

DLP® / Select Series® / Select 3D® /
Select 3D® II / Select CAP
®
Arterial Cannula
Canule artérielle
Arterielle Kanüle
Cánula arterial
Arteriële canule
Cannula per arterie
Arteriekanyle
Valtimokanyyli
Artärkanyl
Αρτηριακή κάνουλα
Arteriekanyle
Kaniula tętnicza
Cânula arterial
Arteriyel Kanül
Arteriální kanyla
Artériás kanül
Артериальная канюля
Instructions for Use • Mode d’emploi • Gebrauchsanweisung • Instrucciones de uso
Gebruiksaanwijzing • Istruzioni per l’uso • Bruksanvisning • Käyttöohjeet
Bruksanvisning • Οδηγίες χρήσης • Brugsanvisning • Instrukcja użytkowania
Instruções de utilização • Kullanım Talimatları • Návod k použití • Használati utasítás
Инструкция по эксплуатации
Caution: Federal law (USA) restricts this device to sale by or on the
order of a physician.


Explanation of symbols on package labeling / Explication des symboles des étiquettes sur
l'emballage / Erläuterung der Symbole auf dem Verpackungsetikett / Explicación de los
símbolos que aparecen en el etiquetado del envase / Verklaring van de symbolen op de
verpakkingslabels / Spiegazione dei simboli sulle etichette della confezione / Forklaring av
symboler på produktet og pakningen / Pakkauksen symbolien selitykset / Förklaring av
symboler på förpackningsetiketten / Επεξήγηση των συμβόλων στην ετικέτα της
συσκευασίας / Forklaring af symboler på emballagens mærkater / Objaśnienie symboli
znajdujących się na etykietach opakowania / Explicação dos símbolos nas etiquetas da
embalagem / Ambalaj etiketindeki sembollerin açıklamaları / Vysvětlení symbolů uvedených
na štítcích balení / A csomagoláson látható szimbólumok jelentése / Объяснение символов
на этикетках упаковки
Refer to the outer package label to see which symbols apply to this product / Se référer à l'étiquette sur l'emballage
extérieur pour savoir quels symboles s'appliquent à ce produit / Welche Symbole für dieses Produkt zutreffen,
entnehmen Sie bitte dem Etikett auf der Verpackung / Consulte la etiqueta del envase exterior para comprobar
qué símbolos son aplicables a este producto / Controleer het label op de buitenverpakking om te zien welke
symbolen op dit product van toepassing zijn / Vedere l'etichetta sulla confezione esterna per sapere quali simboli
si applicano a questo prodotto / Se på etiketten utenpå pakningen for å fastslå hvilke symboler som gjelder for
dette produktet / Katso ulkopakkauksesta, mitkä symbolit koskevat tätä tuotetta. / Se etiketten på
ytterförpackningen för de symboler som gäller denna produkt / Ανατρέξτε στην ετικέτα της εξωτερικής συσκευασίας
για να δείτε ποια σύμβολα αφορούν αυτό το προϊόν / Se mærkaten på den ydre emballage for de symboler, der
gælder for dette produkt / Należy zapoznać się z etykietą na zewnętrznym opakowaniu, aby określić, które symbole
dotyczą niniejszego produktu / Consultar as etiquetas exteriores da embalagem para ver que símbolos se aplicam
a este produto / Hangi sembollerin bu ürün için geçerli olduğunu görmek için ambalaj etiketine başvurun / Podle
štítků na vnější straně balení zjistíte, které symboly se týkají tohoto produktu / A termékre vonatkozó szimbólumok
a külső csomagoláson találhatóak / См. на упаковке, какие символы применимы к данному продукту
Conformité Européenne (European Conformity). This symbol means that the device fully
complies with European Council Directive 93/42/EEC. / Conformité Européenne. Ce
symbole signifie que l'appareil est entièrement conforme à la Directive 93/42/CEE du
Conseil de l'Union Européenne. / Conformité Européenne (Europäische Konformität).
Dieses Symbol besagt, dass das Gerät allen Vorschriften der Richtlinie 93/42/EWG des
Europäischen Rates entspricht. / Conformité Européenne (Conformidad Europea). Este
símbolo indica que el dispositivo cumple totalmente la Directiva del Consejo Europeo
93/42/CEE. / Conformité Européenne (Europese Conformiteit). Dit symbool betekent dat
het apparaat volledig voldoet aan de Europese Richtlijn 93/42/EEG. / Conformité
Européenne (Conformità Europea). Questo simbolo significa che l'apparecchio è conforme
alla Direttiva del Consiglio Europeo 93/42/CEE. / Conformité Européenne (samsvar med
europeisk norm). Dette symbolet betyr at utstyret er fullstendig i samsvar med EU-direktiv
93/42/EØF. / Conformité Européenne (eurooppalainen vaatimustenmukaisuus). Tämä
symboli tarkoittaa, että laite on kokonaan Euroopan unionin neuvoston direktiivin
93/42/ETY mukainen. / Conformité Européenne (EU-standard). Denna symbol betyder att
utrustningen helt följer rådets direktiv 93/42/EEG. / Conformité Européenne (Ευρωπαϊκή
Συμμόρφωση). Το σύμβολο αυτό σημαίνει ότι η συσκευή συμμορφώνεται πλήρως με την
οδηγία του Ευρωπαϊκού Συμβουλίου 93/42/ΕΟΚ. / Conformité Européenne (Europæisk
Standard). Dette symbol betyder, at enheden fuldt ud overholder det Europæiske Råds
Direktiv 93/42/EØF. / Conformité Européenne (Zgodność z normami Unii Europejskiej).
Symbol ten oznacza, że produkt spełnia wszystkie wymogi dyrektywy Unii Europejskiej
93/42/EWG. / Conformité Européenne (Conformidade Europeia). Este símbolo significa
que o dispositivo está em total conformidade com a Directiva do Conselho Europeu
93/42/CEE. / Conformité Européenne (Avrupa Normlarına Uygunluk). Bu sembol, cihazın
Avrupa Konseyi Direktifi 93/42/EEC ile tamamen uyumlu olduğu anlamına gelir. /
Conformité Européenne (Shoda s EU). Tento symbol znamená, že toto zařízení zcela
splňuje požadavky evropského nařízení 93/42/EEC. / Conformité Européenne (Európai
Megfelelőség). Ez a szimbólum azt jelenti, hogy az eszköz teljes mértékben megfelel az
Európai Tanács 93/42/EGK irányelve követelményeinek. / Conformité Européenne
(Европейское соответствие). Этот символ обозначает, что устройство полностью
соответствует требованиям директивы Европейского Совета 93/42/EEC.
Nonpyrogenic / Apyrogène / Nicht pyrogen / Apirógeno / Niet-pyrogeen / Non pirogeno /
Pyrogenfri / Pyrogeeniton / Icke-pyrogen / Μη πυρετογόνο / Non-pyrogen / Produkt
niepirogenny / Apirogénico / Non Pirojenik / Nepyrogenní / Nem pirogén / Апирогенно
1
Sterilized Using Ethylene Oxide / Stérilisation par oxyde d'éthylène / Sterilisiert mittels
Äthylenoxid / Esterilizado mediante óxido de etileno / Gesteriliseerd met ethyleenoxide /
Sterilizzato con ossido di etilene / Sterilisert med etylenoksid / Steriloitu etyleenioksidilla /
Steriliserad med etylenoxid / Αποστειρωμένο χρησιμοποιώντας οξείδιο του αιθυλενίου /
Steriliseret med etylenoxid / Produkt sterylizowany tlenkiem etylenu / Esterilizado com
óxido de etileno / Etilen Oksit ile Sterilize Edilmiştir / Sterilizováno etylenoxidem / Etilénoxiddal sterilizálva / Стерилизовано этиленоксидом
Do Not Reuse / Ne pas réutiliser / Nicht wiederverwenden / No reutilizar / Voor éénmalig
gebruik / Non riutilizzare / Bare for engangsbruk / Kertakäyttöinen / Får inte återanvändas /
Μην επαναχρησιμοποιείτε / Må ikke genbruges / Produkt do jednorazowego zastosowania /
Não reutilizar / Yeniden Kullanmayın / Nepoužívejte opakovaně / Nem újrafelhasználható /
Не использовать повторно
Do Not Resterilize / Ne pas restériliser / Nicht resterilisieren / No reesterilizar / Niet
hersteriliseren / Non risterilizzare / Skal ikke steriliseres på nytt / Ei saa steriloida uudelleen /
Får inte omsteriliseras / Μην επαναποστειρώνετε / Må ikke re-steriliseres / Nie należy
resterylizować / Não reesterilizar / Yeniden Sterilize Etmeyin / Neprovádět resterilizaci /
Nem újrasterilizálható / Не стерилизовать повторно
Use By / À utiliser jusqu'au / Zu verwenden bis einschließlich / No utilizar después de / Te
gebruiken tot en met / Data di scadenza / Siste forbruksdato / Viimeinen käyttöpäivä / Får
användas till och med / Ημερομηνία λήξης / Kan anvendes til og med / Data ważności /
Não utilizar depois de / Son Kullanma Tarihi / Použít do / Lejárat / Использовать до
Lot Number / Numéro de lot / Chargennummer / Número de lote / Partijnummer / Numero
di lotto / Lotnummer / Eränumero / Lotnummer / Αριθμός παρτίδας / Partinummer / Numer
partii / Número de lote / Lot Numarası / Číslo šarže / Sorozatszám / Номер партии
Quantity / Quantité / Anzahl / Cantidad / Aantal / Quantità / Antall / Määrä / Mängd /
Ποσότητα / Antal / Ilość / Quantidade / Miktar / Množství / Mennyiség / Количество
Open Here / Ouvrir ici / Hier öffnen / Abrir aquí / Hier openen / Aprire qui / Åpnes her / Avaa
tästä / Öppna här / Ανοίξτε εδώ / Åbnes her / Otwierać tutaj / Abrir aqui / Buradan Açın /
Zde otevřít / Itt nyílik / Открывать здесь
Caution, Consult Accompanying Documents / Attention, se référer aux documents joints /
Achtung: Begleitdokumentation beachten / Precaución, consulte la documentación que se
incluye / Let op, zie bijgevoegde documentatie / Attenzione, vedere i documenti allegati /
Obs! Se medfølgende dokumenter / Huomio, katso oheiset asiakirjat / OBS! Se
medföljande dokument / Προσοχή, συμβουλευτείτε τα συνοδευτικά έγγραφα / Forsigtig! Se
medfølgende dokumentation / Przestroga: Należy się zapoznać z dołączoną
dokumentacją / Atenção, consulte os documentos anexos / Dikkat, Ürünle Verilen
Belgelere Bakın / Upozornění, viz přiložená dokumentace / Figyelem! Tanulmányozza a
mellékelt dokumentumokat / Внимание! Ознакомьтесь с сопроводительной
документацией
For US Audiences Only / Ne s'applique qu'aux États-Unis / Gilt nur für Leser in den USA /
Sólo aplicable en EE.UU. / Alleen van toepassing voor de VS / Esclusivamente per il
mercato statunitense / Gjelder bare i USA / Koskee vain Yhdysvaltoja / Gäller endast i
USA / Μόνο για πελάτες εντός των Η.Π.Α. / Gælder kun i USA / Dotyczy tylko klientów w
USA / Apenas aplicável aos E.U.A. / Yalnızca ABD'deki Kullanıcılar İçin / Pouze pro
uživatele z USA / Csak egyesült államokbeli felhasználóknak / Только для США
Keep Dry / À conserver au sec / Trocken aufbewahren / Mantener seco / Droog houden /
Conservare in luogo asciutto / Skal holdes tørr / Säilytä kuivassa / Förvaras torrt /
Διατηρήστε στεγνό / Skal opbevares tørt / Chronić przed wilgocią / Manter seco / Kuru
Saklayın / Udržujte v suchu / Szárazon tartandó / Хранить в сухом месте
2

Upper Limit of Temperature / Limite maximale de la température / Obere
Temperaturgrenze / Límite superior de la temperatura / Maximale temperatuur / Limite
superiore di temperatura / Øvre temperaturgrense / Lämpötilan yläraja / Övre
temperaturgräns / Ανώτατο όριο θερμοκρασίας / Højeste tilladte temperatur / Górna granica
dopuszczalnej temperatury / Limite máximo de temperatura / Üst Isı Sınırı / Horní limit
teploty / Legmagasabb tárolási hőmérséklet / Температура не выше
Fragile, Handle with Care / Fragile, à manipuler avec précaution / Vorsicht: zerbrechlich /
Frágil, manipular con cuidado / Breekbaar, voorzichtig hanteren / Fragile, maneggiare con
cura / Skal håndteres med forsiktighet / Helposti särkyvä, käsittele varovasti / Ömtålig,
hanteras varsamt / Εύθραυστο, χειριστείτε με προσοχή / Fragilt, behandles varsomt /
Ostrożnie — produkt delikatny / Frágil, manusear com cuidado / Kırılabilir, Dikkatli Taşıyın /
Křehké, manipulovat opatrně. / Törékeny, óvatosan szállítandó / Хрупкое. При обращении
соблюдайте осторожность.
Catalog Number / Numéro de référence / Katalognummer / Número de catálogo /
Catalogusnummer / Numero di catalogo / Katalognummer / Luettelonumero /
Katalognummer / Αριθμός καταλόγου / Katalognummer / Numer katalogowy / Número de
catálogo / Katalog Numarası / Katalogové číslo / Katalógusszám / Номер по каталогу
Manufacturer / Fabricant / Hersteller / Fabricante / Fabrikant / Produttore / Produsent /
Valmistaja / Tillverkare / Κατασκευαστής / Fabrikant / Producent / Fabricante / İmalatçı /
Výrobce / Gyártó / Производитель
3
3
1
6
13
17
20
DLP
®
70420, 70422, 70424, 71420, 71422, 71424
20
16
Figure 1 / Figure 1 / Abbildung 1 / Figura 1 / Afbeelding 1 / Figura 1 / Figur 1 / Kuva 1 / Figur 1 / Εικόνα 1 / Figur 1 /
3
18
1
4
13
15
19
21
21
16
17
DLP
®
70016, 73016, 74008, 74010, 74012, 74014,
74322, 75008, 75010, 75012, 75014, 75318,
75320, 75322, 75324, 75418, 76020, 76022,
76024, 76118, 76120, 76122, 76124, 76320,
76322, 76324, 76422
5
1
3
14
15
20
20
1211109
16
17
Select Series
®
72120, 72122, 72124, 72220, 72222, 72224, 72320, 72322, 72324, 72420,
72422, 72424, 72520, 72522, 72524, 72620, 72622, 72624, 72720, 72722,
72724, 72820, 72822, 72824, 72920, 72922, 72924, 73420, 73422, 73424,
73520, 73522, 73524, 73620, 73622, 73624, 73720, 73722, 73724, 73820,
73822, 73824, 73920, 73922, 73924
Rysunek 1 / Figura 1 / Şekil 1 / Obrázek 1 / 1. ábra / Рисунок 1
Figure 2 / Figure 2 / Abbildung 2 / Figura 2 / Afbeelding 2 / Figura 2 / Figur 2 / Kuva 2 / Figur 2 / Εικόνα 2 / Figur 2 /
Rysunek 2 / Figura 2 / Şekil 2 / Obrázek 2 / 2. ábra / Рисунок 2
Figure 3 / Figure 3 / Abbildung 3 / Figura 3 / Afbeelding 3 / Figura 3 / Figur 3 / Kuva 3 / Figur 3 / Εικόνα 3 / Figur 3 /
Rysunek 3 / Figura 3 / Şekil 3 / Obrázek 3 / 3. ábra / Рисунок 3
4
13
15
15
DLP
®
81018, 81020, 81022, 81024, 81118, 81120, 81122, 81124, 82018, 82020,
82022, 82024, 82118, 82120, 82122, 82124, 83020, 83022, 83024, 84020,
84022, 84024, 85020, 85022, 85024, 85120, 85122, 85124, 86020, 86022,
86024, 86120, 86122, 86124, 88020, 88022, 88024, 88120, 88122, 88124,
89020, 89022, 89024, 89120, 89122,
89124
DLP
®
87020, 87022, 87024,
87324, 87424, 87920,
87922, 87924
DLP
®
87120, 87122, 87124, 87220, 87222,
87224, 87520, 87522, 87524
19
17
16
18
18
7
8
8
8
8
17
21
20
24
4
15
14
5
2
3
Select 3D
®
78618, 78620, 78622, 78624,
78718, 78720, 78722, 78724
14
17
15
20
16
Figure 4 / Figure 4 / Abbildung 4 / Figura 4 / Afbeelding 4 / Figura 4 / Figur 4 / Kuva 4 / Figur 4 / Εικόνα 4 / Figur 4 /
Rysunek 4 / Figura 4 / Şekil 4 / Obrázek 4 / 4. ábra / Рисунок 4
Figure 5 / Figure 5 / Abbildung 5 / Figura 5 / Afbeelding 5 / Figura 5 / Figur 5 / Kuva 5 / Figur 5 / Εικόνα 5 / Figur 5 /
Rysunek 5 / Figura 5 / Şekil 5 / Obrázek 5 / 5. ábra / Рисунок 5
5

5
2
3
Select 3D® II
78420, 78422, 78424, 78520,
78522, 78524
14
17
15
20
16
Figure 6 / Figure 6 / Abbildung 6 / Figura 6 / Afbeelding 6 / Figura 6 / Figur 6 / Kuva 6 / Figur 6 / Εικόνα 6 / Figur 6 /
5
2
3
Select CAP
®
78818, 78820, 78822, 78824, 78918, 78920, 78922, 78924
14
17
15
20
22
23
16
Rysunek 6 / Figura 6 / Şekil 6 / Obrázek 6 / 6. ábra / Рисунок 6
Figure 7 / Figure 7 / Abbildung 7 / Figura 7 / Afbeelding 7 / Figura 7 / Figur 7 / Kuva 7 / Figur 7 / Εικόνα 7 / Figur 7 /
Rysunek 7 / Figura 7 / Şekil 7 / Obrázek 7 / 7. ábra / Рисунок 7
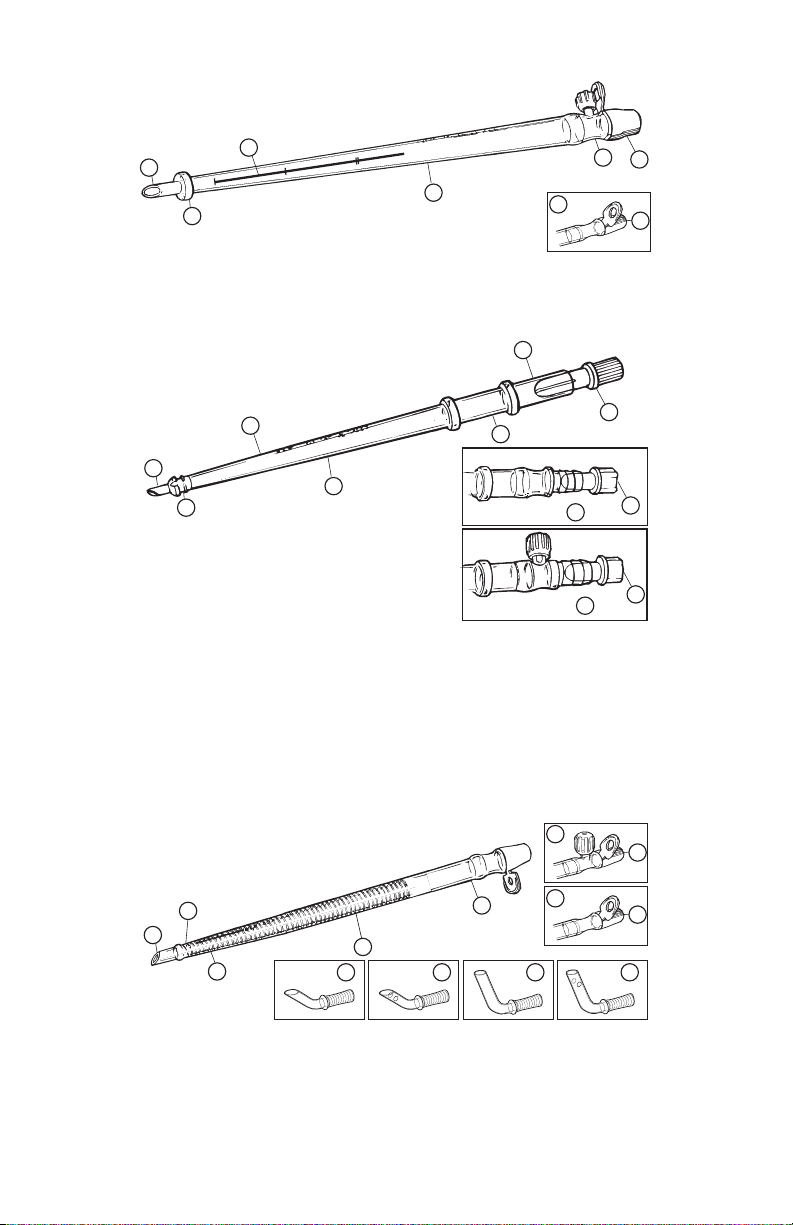
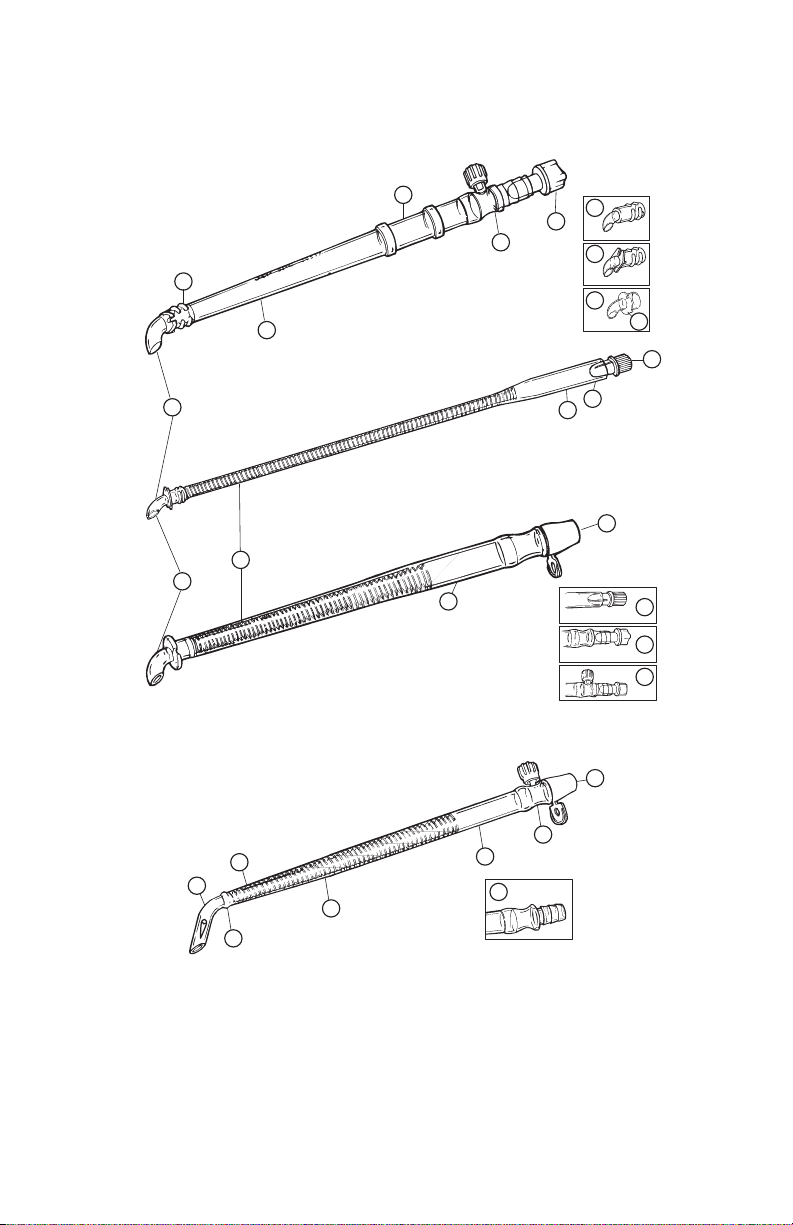
1. Beveled tip / Embout biseauté / Abgeschrägte Spitze / Punta biselada / Afgeschuinde tip /
Punta obliqua / Skrå spiss / Viistokärki / Avsmalnande spets / Λοξοτμημένο άκρο / Skrå spids /
Końcówka ze skośnym ścięciem / Ponta biselada / Eğri uç / Hrot se šikmým úkosem / Ferde
hegy / Скошенный наконечник
2. Angled tip / Embout angulaire / Abgewinkelte Spitze / Punta acodada / Hoekige tip / Punta
angolata / Vinklet spiss / Taivutettu kärki / Vinklad spets / Γωνιωτό άκρο / Vinklet spids /
Końcówka kątowa / Ponta angular / Açılı uç / Úhlová špička / Szögben álló hegy / Угловой
наконечник
3. Tip orientation line / Tubulure d'orientation de l'embout / Orientierungshilfe für die Spitze /
Línea de orientación de la punta / Lijn voor oriëntatie van de tip / Linea per l'orientamento
della punta / Orienteringslinje for spissen / Kärjenohjausviiva / Orienteringslinje för spetsen /
Γραμμή προσανατολισμού άκρου / Spidsorienteringslinje / Wskaźnik orientacji końcówki /
Linha de orientação da ponta / Uç yönlendirme çizgisi / Linie orientace hrotu / A hegy állását
jelző vonal / Линия ориентации наконечника
4. Integral suture rings / Anneaux de suture intégrés / Integrierte Nahtringe / Anillos de sutura
integrados / Integrale hechtingsringen / Anelli per sutura integrali / Integrerte suturringer /
Kiinteät ommelrenkaat / Integrerade suturringar / Ενσωματωμένοι δακτύλιοι ράμματος /
Integrerede sutur-ringe / Zintegrowane oczka na szew / Anéis de sutura integral / Tümleşik
sütür halkaları / Integrované stehové kroužky / Integrált varratgyűrűk / Встроенные кольца
для наложения шва
5. Integral suture bump / Renfort de suture intégré / Integrierte Nahterhöhung / Tope de sutura
integrado / Integrale hechtingsrand / Incurvatura per sutura integrale / Integrert
suturforhøyning / Kiinteä ommelpysäytin / Integrerad suturförhöjning / Ενσωματωμένη
προεξοχή ράμματος / Integreret suturtap / Zintegrowany ogranicznik szwu / Rebordo de
sutura integral / Tümleşik sütür tümseği / Integrální hrbol pro steh / Integrált varratütköző /
Встроенный выступ для наложения шва
6. Adjustable suture collar / Collier de suture réglable / Anpassbarer Nahtring / Collar de sutura
ajustable / Instelbare hechtingsring / Fascetta per sutura regolabile / Justerbar suturring /
Säädettävä ommeltuki / Justerbar suturkrage / Προσαρμοζόμενο κολάρο ράμματος /
6
Indstillelig suturkrave / Regulowany kołnierz szwu / Colar de sutura ajustável / Ayarlanabilir
sütür manşonu / Nastavitelná objímka stehu / Állítható varratrögzítő / Регулируемая
манжета для наложения шва

7. Curved tip without flange / Embout recourbé sans garde / Gebogene Spitze ohne Flansch /
Punta curvada sin reborde / Gebogen tip zonder flens / Punta incurvata senza flangia / Bøyd
spiss uten krage / Kaareva kärki ilman laippaa / Böjd spets utan fläns / Κυρτό άκρο χωρίς
περιαυχένιο / Buet spids uden flange / Zakrzywiona końcówka bez kołnierza / Ponta curvada
sem flange / Kavisli uç (flanşsız) / Zakřivený hrot bez lemu / Hajlított hegy perem nélkül /
Изогнутый наконечник без фланца
8. Curved tip with flange / Embout recourbé avec garde / Gebogene Spitze mit Flansch / Punta
curvada con reborde / Gebogen tip met flens / Punta incurvata con flangia / Bøyd spiss med
krage / Kaareva kärki laipan kanssa / Böjd spets med fläns / Κυρτό άκρο με περιαυχένιο /
Buet spids med flange / Zakrzywiona końcówka z kołnierzem / Ponta curvada com flange /
Kavisli uç (flanşlı) / Zakřivený hrot s lemem / Hajlított hegy peremmel / Изогнутый
наконечник с фланцем
9. 45° Beveled tip / Embout biseauté à 45° / Um 45° abgeschrägte Spitze / Punta biselada 45° /
Afgeschuinde tip van 45° / Punta obliqua 45° / 45° skrå spiss / 45° viistokärki / 45°
avsmalnande spets / Λοξοτμημένο άκρο 45° / 45° skrå spids / Końcówka ze skośnym
ścięciem (45°) / Ponta biselada de 45° / 45° Eğri uç / Hrot se šikmým úkosem 45° / 45°-os
ferde hegy / Наконечник, скошенный под углом 45°
10. 45° Beveled tip with side ports / Embout biseauté à 45° avec ports latéraux / Um 45°
abgeschrägte Spitze mit Seitenanschlüssen / Punta biselada 45° con orificios laterales /
Afgeschuinde tip van 45° met sideports / Punta obliqua 45° con accessi laterali / 45° skrå
spiss med sideåpninger / 45° viistokärki, jossa on sivuportit / 45° avsmalnande spets med
sidoportar / Λοξοτμημένο άκρο 45° με πλευρικές θύρες / 45° skrå spids med sideporte /
Końcówka ze skośnym ścięciem (45°) z bocznymi portami / Ponta biselada de 45° com portas
laterais / 45° Eğri uç (yan portlu) / Hrot se šikmým úkosem 45° s bočními porty / 45°-os ferde
hegy oldalnyílásokkal / Скошенный под углом 45° наконечник с боковыми портами
11. 80° Beveled tip / Embout biseauté à 80° / Um 80° abgeschrägte Spitze / Punta biselada 80° /
Afgeschuinde tip van 80° / Punta obliqua 80° / 80° skrå spiss / 80° viistokärki / 80°
avsmalnande spets / Λοξοτμημένο άκρο 80° / 80° skrå spids / Końcówka ze skośnym
ścięciem (80°) / Ponta biselada de 80° / 80° Eğri uç / Hrot se šikmým úkosem 80° / 80°-os
ferde hegy / Наконечник, скошенный под углом 80°
12. 80° Beveled tip with side ports / Embout biseauté à 80° avec ports latéraux / Um 80°
abgeschrägte Spitze mit Seitenanschlüssen / Punta biselada 80° con orificios laterales /
Afgeschuinde tip van 80° met sideports / Punta obliqua 80° con accessi laterali / 80° skrå
spiss med sideåpninger / 80° viistokärki, jossa on sivuportit / 80° avsmalnande spets med
sidoportar / Λοξοτμημένο άκρο 80° με πλευρικές θύρες / 80° skrå spids med sideporte /
Końcówka ze skośnym ścięciem (80°) z portami bocznymi / Ponta biselada de 80° com portas
laterais / 80° Eğri uç (yan portlu) / Hrot se šikmým úkosem 80° s bočními porty / 80°-os ferde
hegy oldalnyílásokkal / Скошенный под углом 80° наконечник с боковыми портами
13. PVC tapered cannula body / Corps effilé en PVC / Konisch zulaufender PVC-Kanülenkörper /
Cuerpo de PVC transparente / Conisch canulelichaam van pvc / Struttura conica in PVC con
avvolgimento metallico di rinforzo / Konisk PVC-kanyle / Kapeneva kanyylin PVC-runko /
Konisk kanyl av PVC / Κωνικό σώμα κάνουλας από PVC / Konisk PVC-kanylekrop / Zwężany
korpus kaniuli z tworzywa PVC / Cânula cónica em PVC / PVC konik kanül gövdesi /
Zašpičatělé tělo kanyly z PVC / Elvékonyodó testű PVC kanül / Конусовидный корпус
канюли из ПВХ
14. Wirewound cannula body / Corps armé / Drahtverstärkter Kanülenkörper / Cuerpo de cánula
con espiral de alambre / Draadversterkt canulelichaam / Struttura con rinforzo metallico /
Armert kanyle / Lankavahvisteinen kanyylin runko / Armerad kanyl / Σώμα κάνουλας με
περιελιγμένο σύρμα / Trådforstærket kanylekrop / Zbrojony korpus kaniuli / Cânula com guias
em espiral / Telle sarılmış kanül gövdesi / Tělo kanyly s procházejícím drátem /
Drótmerevítésű kanültest / Корпус канюли с проволочной обмоткой
15. Clamp site / Site de clampage / Abklemmstelle / Lugar de conexión / Klemplaats / Punto di
clampaggio / Avklemningssted / Puristimen kohta / Plats för klämma / Σημείο σύσφιξης /
Afklemningssted / Miejsce zacisku / Local do bloqueio / Kelepçe yeri / Místo pro svorku /
Leszorítási hely / Зона зажима
16. Non-vented connector / Connecteur sans purge / Nicht belüftete Öffnung / Conector sin
ventilación / Niet-ontluchte connector / Connettore senza sfiato / Kobling uten hull / Liitin, ei
ilmanpoistoa / Anslutning utan avluftning / Σύνδεσμος χωρίς εξαερισμό / Ikke-ventileret
konnektor / Konektor bez wentu / Conector sem respiradouro / Deliksiz konektör / Konektor
bez ventilu / Légtelenítő nélküli csatlakozó / Соединитель без отвода воздуха
17. Vented connector / Connecteur avec purge / Belüftete Öffnung / Conector con ventilación /
Ontluchte connector / Connettore con sfiato / Kobling med hull / Liitin, jossa ilmanpoisto /
Anslutning med avluftning / Σύνδεσμος με εξαερισμό / Ventileret konnektor / Konektor z
7

wentem / Conector com respiradouro / Delikli konektör / Konektor s ventilem / Légtelenítővel
ellátott csatlakozó / Соединитель с отводом воздуха
18. Connection site / Site de connexion / Anschlussstelle / Lugar de conexión / Aansluiting /
Punto di connessione / Koblingssted / Liitäntäkohta / Anslutningsställe / Σημείο σύνδεσης /
Forbindelsessted / Miejsce połączenia / Local de ligação / Bağlantı bölgesi / Místo pro
připojení / Csatlakozóhely / Зона соединения
19. Vent plug / Bouchon de purge / Entlüftungsstopfen / Tapón de ventilación / Ontluchtingsstop /
Tappo di sfiato / Propp med lufting / Ilmanpoistokorkki / Avluftningsplugg / Βύσμα
εξαερισμού / Udluftningsprop / Zatyczka wentu / Ficha de ventilação / Havalandırma tapası /
Zátka ventilu / Légtelenítő dugó / Вентиляционная пробка
20. Peel cap / Capuchon de purge amovible / Abziehdeckel / Tapón extraíble / Dop / Tappo
rimovibile / Avtagbar propp / Repäisykorkki / Lock / Αποσπώμενο καπάκι / Aftagelig hætte /
Zdejmowana nasadka / Tampa / Soyma kapak / Odtrhovací čepička / Kupak / Съемный
колпачок
21. Porous plug / Bouchon poreux / Poröser Stopfen / Tapón de ventilación poroso / Poreuze
stop / Tappo poroso / Porøs propp / Huokoinen korkki / Porös plugg / Πορώδες βύσμα / Porøs
prop / Porowata zatyczka / Ficha porosa / Gözenekli tapa / Pórovitá zátka / Porózus dugó /
Пористая пробка
22. Pressure monitoring line / Tubulure de contrôle de la pression / Drucküberwachungsleitung /
Vía de monitorización de presión / Drukmetingslijn / Linea di monitoraggio della pressione /
Trykkslange / Paineentarkkailulinja / Tryckövervakningsslang / Γραμμή παρακολούθησης
πίεσης / Trykmonitoreringsslange / Linia monitorowania ciśnienia / Linha de monitorização
da pressão / Basınç izleme hattı / Hadička pro monitorování tlaku / Nyomásmérő szár / Линия
контроля давления
23. Stopcock / Robinet d'arrêt / Absperrhahn / Llave de paso / Driewegkraan / Rubinetto /
Stoppekran / Kolmitiehana / Avstängningskran / Στρόφιγγα / Stophane / Kurek zamykający /
Torneira de passagem / Vana / Uzavírací kohout / Csap / Запорный кран
24. Tip orientation tab / Ailette d'orientation de l'embout / Orientierungshilfe für die Spitze / Patilla
de orientación de la punta / Lipje voor oriëntatie van de tip / Linguetta di orientamento della
punta / Orienteringstapp for spissen / Kärjensuuntauskieleke / Hjälpflik för orientering av
spetsen / Γλωττίδα προσανατολισμού άκρου / Spidsorienteringstap / Wskaźnik orientacji
końcówki / Patilha de orientação da ponta / Uç yönlendirme tırnağı / Poziční úchyt hrotu / A
hegy állását jelző fül / Указатель ориентации наконечника
8

DLP® / Select Series® / Select 3D® / Select 3D® II / Select CAP®
Arterial Cannula
Product Description
The cannula consists of a curved, angled or beveled tip with or without flange that is permanently attached to a
molded, clear, flexible PVC tapered body or wirewound PVC body. The cannula body features a tip orientation line
to indicate direction of the cannula tip during cannulation. The proximal end of the cannula includes a connection
site or a molded 0.95 cm (3/8 in) barbed connector with or without a molded plastic vent plug or peel cap. The vent
plug or peel cap allows air to be vented from the cannula before connection to the perfusion line.
Select CAP® Models: The proximal end features a pressure monitoring line with a 3-way stopcock.
Sterile, nonpyrogenic, single use.
Indications for Use
These cannulae are intended for use in perfusion of the ascending aorta during short-term cardiopulmonary bypass
This product is intended for use up to six hours or less.
Contraindications
This device is not intended for use except as indicated above.
Warnings
In cannulation, extreme caution should be exercised if there is a possibility of tissue dissection of the aorta. Avoid
pointing the cannula tip directly toward the branch arteries of the aortic arch to minimize the possibility of directing
any dislodged emboli into the arteries or causing increased blood pressure in the brain. Avoid directing the tip at
the aortic valve.
Avoid bending or kinking the cannula. Patient and procedure selection is totally a medical responsibility and the
outcome is dependent on many variables, including patient anatomy, pathology, surgical and perfusion procedures
and techniques. This cannula is for short-term, temporary use only.
Precautions
Note: Proper surgical procedures and techniques are the responsibility of the medical professional. The described
procedure is furnished for information purposes only. Surgeons must evaluate the appropriateness of the
procedure based on their own medical training and experience and the type of surgical procedure.
Exercise care during the connection of the cannula and the perfusion line to insure that no air is trapped in the
perfusion line.
Placement location and orientation of the sutures in the aorta is critical to proper positioning of the cannula. Once
the cannula is firmly secured with the sutures, it is difficult to change the position of the cannula.
Do not exceed recommended flow.
Please tighten luer caps before using.
This cannula is designed and intended for single use only. DO NOT REUSE.
Do not exceed maximum recommended flow rates listed below for Select 3D® and Select 3D® II Models:
up to 4 LPM (liters per minute) for an 18 Fr cannula; up to 5 LPM for a 20 Fr cannula; up to 6 LPM for a 22 Fr
cannula; up to 6 LPM for a 24 Fr cannula.
Adverse Effects
This device, as do all extracorporeal blood system devices, has possible side effects which include, but are not
limited to, infections, blood loss, thrombus formation, embolic events, and dislocation. Vessel damage and
complications at the puncture site may occur if the Instructions for Use are not followed.
Instructions for Use
1. Inspect the package and product for damage and expiration date. If undamaged and unexpired, open the
package and transfer the cannula onto the sterile field using an aseptic technique.
2. For models with vent plugs, position the vent plug so the vent slot extends approximately 3 mm beyond the
end of the cannula (connection site models only) or position the porous vent plug snugly into the barbed
connector.
Warning: Do not over insert plugs. Do not moisten the porous vent plug. The plug will become impervious to
air and will minimize priming and venting effectiveness.
3. Place a purse string suture in the anterior aspect of the distal ascending aorta at the desired location. Place a
tourniquet over this purse string. Place a second outer purse string 1–2 mm beyond the initial one and place
a tourniquet over it. Excise the adventitia from within the inner purse string suture.
a. Flexible Arch Models: Position the adjustable suture collar to the desired depth.
Instructions for Use English 9

b. Select CAP® Models: Prime the pressure monitoring lumen of the cannula with heparinized saline and
close the stopcock toward the lumen to retain the heparinized saline in the lumen.
4. After insuring adequate systemic heparinization has been obtained, make an incision in the aorta within the
confines of the inner purse string using a number 11 blade. Place a finger over the incision to control bleeding.
Insert the cannula directly into the aorta through the incision.
Note: Holding the cannula vertically during insertion will aid in prevention of the accumulation of micro-bubbles
on the walls of the cannula.
5. Rotate the cannula so the tip is directed distally and the orientation line on the cannula faces toward the aortic
valve.
6. The tourniquet on the inner purse string is tightened and secured to the cannula by tying a securing ligature
around the cannula and tourniquet at a convenient site.
7. Once all the air has been excluded from the cannula, insert the slotted vent plug completely to seal if applicable.
(DO NOT OVER INSERT.)
8. Prior to attaching the cannula to the arterial line, clamp the cannula body. Remove vent plug or peel cap from
the cannula. Attach the cannula to the arterial line. Inspect the line and remove any entrapped air before
removing the clamp. (Some arterial cannulae have a luer port on the connector which can be used to remove
air from the line or monitor line pressure).
9. Secure the cannula to the skin or retractor with a suture to provide strain relief and prevent inadvertent
movement. Position the cannula and arterial line so that the cannula has a gentle curve and enters the aorta
perpendicularly. Secure the arterial line to the superior drape.
a. Select CAP® Models: Attach a heparinized, saline-filled syringe to the female luer that is perpendicular to
the pressure monitoring line tubing axis. Aspirate the pressure monitoring line until blood appears in the
lumen. Tap the syringe to force any air drawn up during aspiration to the top of the syringe. Inject 2-3 cc
of heparinized saline into the aorta to fill the pressure monitoring line.
b. Attach a pre-primed pressure monitoring line from a pressure monitoring device to the 3-way stopcock.
Make certain the stopcock is open to the pressure monitoring line of the cannula. Balance and zero the
transducer.
10. Remove all clamps from the cannula and lines prior to initiating cardiopulmonary bypass.
11. When the surgical procedure is completed, dispose of the cannula according to hospital policy. DO NOT
REUSE.
The following disclaimer of warranty applies to United States customers only:
Disclaimer of Warranty
ALTHOUGH THE ARTERIAL CANNULA, HEREAFTER REFERRED TO AS “PRODUCT” HAS BEEN
MANUFACTURED UNDER CAREFULLY CONTROLLED CONDITIONS, MEDTRONIC HAS NO CONTROL
OVER THE CONDITIONS UNDER WHICH THIS PRODUCT IS USED. MEDTRONIC, THEREFORE DISCLAIMS
ALL WARRANTIES, BOTH EXPRESS AND IMPLIED, WITH RESPECT TO THE PRODUCT, INCLUDING, BUT
NOT LIMITED TO, ANY IMPLIED WARRANTY OF MERCHANTABILITY OR FITNESS FOR A PARTICULAR
PURPOSE. MEDTRONIC SHALL NOT BE LIABLE TO ANY PERSON OR ENTITY FOR ANY MEDICAL
EXPENSES OR ANY DIRECT, INCIDENTAL OR CONSEQUENTIAL DAMAGES CAUSED BY ANY USE,
DEFECT, FAILURE OR MALFUNCTION OF THE PRODUCT, WHETHER A CLAIM FOR SUCH DAMAGES IS
BASED UPON WARRANTY, CONTRACT, TORT OR OTHERWISE. NO PERSON HAS ANY AUTHORITY TO
BIND MEDTRONIC TO ANY REPRESENTATION OR WARRANTY WITH RESPECT TO THE PRODUCT.
The exclusions and limitations set out above are not intended to, and should not be construed so as to, contravene
mandatory provisions of applicable law. If any part or term of this Disclaimer of Warranty is held to be illegal,
unenforceable or in conflict with applicable law, by a court of competent jurisdiction, the validity of the remaining
portions of this Disclaimer of Warranty shall not be affected, and all rights and obligations shall be construed and
enforced as if this Disclaimer of Warranty did not contain the particular part or term held to be invalid.
The following disclaimer of warranty applies to customers outside the United States:
Disclaimer of Warranty
ALTHOUGH THE ARTERIAL CANNULA, HEREAFTER REFERRED TO AS “PRODUCT” HAS BEEN
CAREFULLY DESIGNED, MANUFACTURED AND TESTED PRIOR TO SALE, THE PRODUCT MAY FAIL TO
PERFORM ITS INTENDED FUNCTION SATISFACTORILY FOR A VARIETY OF REASONS. THE WARNINGS
CONTAINED IN THE PRODUCT LABELING PROVIDE MORE DETAILED INFORMATION AND ARE
CONSIDERED AN INTEGRAL PART OF THIS DISCLAIMER OF WARRANTY. MEDTRONIC, THEREFORE,
DISCLAIMS ALL WARRANTIES, BOTH EXPRESS AND IMPLIED, WITH RESPECT TO THE PRODUCT.
MEDTRONIC SHALL NOT BE LIABLE FOR ANY INCIDENTAL OR CONSEQUENTIAL DAMAGES CAUSED
10 Instructions for Use English

BY ANY USE, DEFECT, OR FAILURE OF THE PRODUCT, WHETHER THE CLAIM IS BASED ON WARRANTY,
CONTRACT, TORT OR OTHERWISE.
The exclusions and limitations set out above are not intended to, and should not be construed so as to, contravene
mandatory provisions of applicable law. If any part or term of this Disclaimer of Warranty is held by any court of
competent jurisdiction to be illegal, unenforceable or in conflict with applicable law, the validity of the remaining
portion of the Disclaimer of Warranty shall not be affected, and all rights and obligations shall be construed and
enforced as if this Disclaimer of Warranty did not contain the particular part or term held to be invalid.
Instructions for Use English 11

DLP® / Select Series® / Select 3D® / Select 3D® II / Select CAP®
Canule artérielle
Description du produit
La canule se compose d'un embout biseauté, angulaire ou recourbé, avec ou sans garde, fixé de manière
permanente à un corps effilé en PVC moulé souple transparent ou à un corps en PVC armé. Le corps de la canule
est pourvu d'une tubulure d'orientation de l'embout qui indique l'orientation de l'extrémité de la canule pendant sa
mise en place. L'extrémité proximale de la canule présente un site de connexion ou un connecteur cranté de
0,95 cm, avec ou sans bouchon/capuchon amovible de purge en plastique moulé. Le bouchon/le capuchon
amovible de purge permet d'évacuer l'air de la canule avant le raccordement à la tubulure de perfusion.
Modèles Select CAP® : L'extrémité proximale est pourvue d'une tubulure de contrôle de la pression dotée d'un
robinet d'arrêt à 3 voies.
Stérile, apyrogène, à usage unique.
Mode d'emploi
Ces canules doivent être utilisées dans les perfusions de l'aorte ascendante lors des interventions de circulation
extracorporelle de courte durée.
Ce produit est conçu pour une utilisation maximale de 6 heures.
Contre-indications
Cet appareil est conçu pour être utilisé exclusivement pour les indications susmentionnées.
Avertissements
Lors de la mise en place de la canule, toutes les précautions doivent être prises en cas de risque de dissection de
l'aorte. Éviter de diriger l'embout de la canule directement vers les artères marginales de la crosse de l'aorte afin
de ne pas diriger dans les artères d'éventuels emboles délogés et de ne pas accroître la pression sanguine dans
le cerveau. Éviter de pointer l'embout de la canule vers la valve aortique.
Éviter de courber ou de plier la canule. La sélection des patients et des procédures appartient uniquement au corps
médical et le résultat dépend de plusieurs variables, dont l'anatomie et la pathologie du patient, le mode opératoire,
les procédures et les techniques de perfusion. Cette canule est uniquement destinée à un usage temporaire et à
court terme.
Précautions
Remarque : L'utilisation de procédures et de techniques chirurgicales appropriées relève de la responsabilité du
médecin. La procédure décrite est uniquement donnée à titre indicatif. Chaque chirurgien doit évaluer l'adéquation
de l'intervention en fonction de sa propre formation et de son expérience médicale ainsi que du mode opératoire.
Prendre les précautions qui s'imposent lors du raccordement de la canule et de la tubulure de perfusion afin d'éviter
la pénétration d'air dans la tubulure.
La pose, l'emplacement et l'orientation des sutures dans l'aorte ont une importance capitale pour le positionnement
de la canule. Une fois la canule fixée par les sutures, sa position est difficile à modifier.
Ne pas dépasser les débits recommandés.
Serrer les capuchons des connecteurs luer avant utilisation.
Cette canule est destinée à un usage unique. NE PAS RÉUTILISER.
Ne pas dépasser les débits maximum recommandés indiqués ci-dessous pour les modèles Select 3D® et Select
3D® II :
Jusqu'à 4 l/min pour une canule 18 Fr ; jusqu'à 5 l/min pour une canule 20 Fr ; jusqu'à 6 l/min pour une canule
22 Fr ; jusqu'à 6 l/min pour une canule 24 Fr.
Effets secondaires
Ce dispositif, comme tous les dispositifs utilisés en circulation extracorporelle, peut provoquer d'éventuels effets
secondaires, notamment : infections, perte de sang, formation d'un thrombus, embolies et luxation. Des lésions et
des complications vasculaires au site d'injection peuvent se produire si le mode d'emploi n'est pas respecté.
Mode d’emploi
1. Inspecter l'emballage afin de détecter tout dommage éventuel et de vérifier la date de péremption. Si
l'emballage n'est pas endommagé et si la date de péremption n'est pas dépassée, ouvrir l'emballage et
transférer la canule sur le champ stérile en recourant à une technique aseptique.
2. Si le modèle utilisé est pourvu d'un bouchon de purge, la fente de purge doit dépasser d'environ 3 mm de
l'extrémité de la canule (modèles avec site de connexion uniquement) ; dans les autres cas, enfoncer
soigneusement le bouchon de purge poreux dans le connecteur cranté.
12 Mode d’emploi Français

Avertissement : Ne pas forcer en enfonçant les bouchons. Ne pas humidifier le bouchon de purge poreux. Il
serait alors imperméable à l'air, ce qui affecterait l'amorçage et l'efficacité de la purge.
3. Poser une suture en bourse au niveau de la face antérieure de l'aorte ascendante distale à l'endroit souhaité.
Placer un tourniquet sur cette suture. Poser une seconde suture en bourse 1 à 2 mm au-dessus de la première
et placer un tourniquet. Exciser la tunique adventice à partir de la première suture en bourse.
a. Modèles à crosse flexible : Positionner le collier de suture réglable à la profondeur souhaitée.
b. Modèles Select CAP® : Amorcer la lumière de contrôle de la pression de la canule à l'aide d'une solution
saline héparinée et fermer le robinet d'arrêt afin de conserver la solution saline héparinée dans la lumière.
4. Après s'être assuré de la bonne héparinisation systémique, inciser l'aorte, dans les limites de la première
suture en bourse, à l'aide d'une lame numéro 11. Placer un doigt au-dessus de l'incision pour contrôler le
saignement. Insérer la canule directement dans l'aorte à travers l'incision.
Remarque : Il est conseillé de maintenir la canule en position verticale pendant l'insertion afin de prévenir
l'accumulation de microbulles sur ses parois.
5. Faire pivoter la canule de telle façon que l'embout soit orienté en position distale et que la tubulure d'orientation
de la canule soit face à la valve aortique.
6. Serrer le tourniquet placé sur la suture en bourse interne avant de le fixer à la canule par une ligature entourant
la canule et le tourniquet au niveau du site approprié.
7. Une fois l'air complètement évacué de la canule, enfoncer le bouchon de purge rainuré au maximum pour fixer
le tout. (NE PAS FORCER EN ENFONÇANT).
8. Avant de raccorder la canule à la tubulure artérielle, clamper le corps de la canule. Enlever le
bouchon/capuchon amovible de purge de la canule. Raccorder la canule à la tubulure artérielle. Inspecter la
tubulure et évacuer éventuellement les bulles d'air avant de retirer le clamp. (Certaines canules artérielles
comportent un port luer sur le connecteur pouvant être utilisé pour évacuer l'air ou contrôler la pression de la
tubulure.)
9. Fixer la canule à la peau ou à l'écarteur au moyen d'une suture pour soulager les contraintes et éviter tout
mouvement inopportun. Positionner la canule et la tubulure artérielle de façon à ce que la canule forme une
légère incurvation et pénètre dans l'aorte perpendiculairement à celle-ci. Fixer la tubulure artérielle au champ
opératoire supérieur.
a. Modèles Select CAP® : Fixer une seringue remplie de solution saline héparinée au connecteur luer femelle
perpendiculaire à l'axe de la tubulure de contrôle de la pression. Appliquer une aspiration sur la tubulure
de contrôle de la pression jusqu'à ce que du sang apparaisse dans la lumière. Tapoter la seringue pour
faire remonter l'air ayant pu être aspiré. Injecter 2 à 3 ml de solution saline héparinée dans l'aorte pour
remplir la tubulure de contrôle de la pression.
b. Fixer une tubulure de contrôle de la pression pré-amorcée reliée à un dispositif de contrôle de la pression
au robinet d'arrêt à 3 voies. Vérifier que le robinet d'arrêt est ouvert côté tubulure de contrôle de la pression.
Rééquilibrer et remettre à zéro le capteur.
10. Retirer l'ensemble des clamps de la canule et des tubulures avant de lancer la circulation extracorporelle.
11. Une fois la procédure chirurgicale terminée, jeter la canule conformément au règlement hospitalier. NE PAS
RÉUTILISER.
Les clients en dehors des États-Unis peuvent avoir recours au présent déni de garantie :
Déni de garantie
BIEN QUE LA CANULE ARTÉRIELLE, CI-APRÈS, LE « PRODUIT », AIT ÉTÉ SOIGNEUSEMENT CONÇUE,
FABRIQUÉE ET TESTÉE AVANT SA COMMERCIALISATION, LE PRODUIT PEUT, POUR DIVERSES
RAISONS, CONNAÎTRE DES DÉFAILLANCES. LES AVERTISSEMENTS DÉCRITS DANS LA
DOCUMENTATION DU PRODUIT CONTIENNENT DES INFORMATIONS PLUS DÉTAILLÉES ET DOIVENT
ÊTRE CONSIDÉRÉS COMME FAISANT PARTIE INTÉGRANTE DU PRÉSENT DÉNI DE GARANTIE. EN
CONSÉQUENCE, MEDTRONIC DÉCLINE TOUTE GARANTIE, EXPLICITE OU IMPLICITE, RELATIVE AU
PRODUIT. MEDTRONIC NE SERA PAS TENU RESPONSABLE DE TOUS DOMMAGES FORTUITS OU
INDIRECTS QUI SERAIENT PROVOQUÉS PAR TOUS USAGES, DÉFECTUOSITÉS OU DÉFAILLANCES DU
PRODUIT, ET CE QUE LA PLAINTE SOIT FONDÉE SUR UNE GARANTIE, UNE RESPONSABILITÉ
CONTRACTUELLE, DÉLICTUEUSE OU AUTRE.
Les exclusions et les limitations de garantie mentionnées ci-dessus ne sont pas, et ne doivent pas, être interprétées
comme contraires aux dispositions obligatoires des lois applicables. Si une partie ou une disposition du présent
déni de garantie devait être considérée illégale, non applicable ou contraire à la loi en vigueur par un tribunal
compétent, la validité des autres dispositions du présent déni de garantie n'en sera pas affectée. Dans ce cas,
tous autres droits et obligations seront interprétés et appliqués, sans tenir compte de la partie ou de la disposition
considérée comme illégale.
Mode d’emploi Français 13

DLP®/Select Series®/Select 3D®/ Select 3D® II/Select CAP®
Arterielle Kanüle
Produktbeschreibung
Die Kanüle besteht aus einer gebogenen, abgewinkelten oder abgeschrägten Spitze mit oder ohne Flansch an
einem transparenten, flexiblen, konisch zulaufenden PVC-Körper bzw. einem drahtverstärkten PVC-Körper
(Formteil). Der Kanülenkörper verfügt über eine Orientierungshilfe für die Spitze, um die Richtung der
Kanülenspitze beim Einführen der Kanüle vorzugeben. Das proximale Kanülenende ist für die 0,95-cm-Konnektion
ausgelegt bzw. mit einem 0,95-cm-Konnektor mit oder ohne Kunststoff-Entlüftungsstopfen oder Abziehdeckel
(Formteil) versehen. Der Entlüftungsstopfen oder Abziehdeckel ermöglicht es, die vorhandene Luft vor dem
Anschluss an die Perfusionsleitung aus der Kanüle entweichen zu lassen.
Select CAP® Modelle: Das proximale Ende verfügt über eine Drucküberwachungsleitung mit einem
Dreiwegehahn.
Steril, nicht pyrogen, zur einmaligen Verwendung.
Indikationen
Diese Kanülen sind für den kurzzeitigen Einsatz bei Operationen mit kardiopulmonalem Bypass bestimmt. Sie
dienen der Perfusion der Aorta ascendens.
Dieses Produkt darf maximal sechs Stunden verwendet werden.
Kontraindikationen
Dieses Produkt ist ausschließlich für den oben genannten Verwendungszweck bestimmt.
Warnhinweise
Beim Einführen der Kanüle ist mit äußerster Vorsicht vorzugehen, wenn die Gefahr einer Dissektion des
Aortengewebes besteht. Vermeiden Sie es, die Kanülenspitze direkt in Richtung der Seitenarterien des
Aortenbogens auszurichten, um die Gefahr zu verringern, dass dislozierte Emboli in die Arterien gelangen oder
es zu einem Blutdruckanstieg im Gehirn kommt. Die Spitze nicht in Richtung der Aortenklappe schieben.
Biegungen und Knicke an der Kanüle vermeiden. Die Frage, welcher Patient für die Behandlung geeignet und
welche Verfahren sinnvoll sind, kann nur vom Arzt beantwortet werden. Der Erfolg der Operation hängt von vielen
Faktoren ab, z. B. vom Krankheitsbild des Patienten und von der angewandten Operations- und
Perfusionsmethode. Diese Kanüle ist nur für den kurzzeitigen und temporären Einsatz bestimmt.
Vorsichtsmaßnahmen
Hinweis: Die Verantwortung für die Anwendung und Einhaltung geeigneter operativer Maßnahmen und Verfahren
obliegt dem Arzt. Die beschriebene Vorgehensweise ist ausschließlich zu Informationszwecken erarbeitet worden.
Chirurgen müssen die Eignung jeglicher Verfahren auf der Basis der eigenen ärztlichen Ausbildung und Erfahrung
sowie der Art des Eingriffs selbst beurteilen.
Beim Anschließen der Kanüle an die Perfusionsleitung darauf achten, dass sich keine Luft in der Perfusionsleitung
befindet.
Die Platzierung, Lage und Ausrichtung der Nähte in der Aorta sind für die korrekte Platzierung der Kanüle von
entscheidender Bedeutung. Die Position der mit Nähten fixierten Kanüle lässt sich nicht ohne weiteres wieder
verändern.
Die empfohlenen Flussraten nicht überschreiten.
Bitte Luer-Abdeckkappen vor Gebrauch festziehen.
Diese Kanüle ist nur für den einmaligen Gebrauch bestimmt. NICHT WIEDERVERWENDEN.
Die unten aufgeführten, empfohlenen maximalen Flussraten für die Modelle Select 3D® und Select 3D® II nicht
überschreiten:
bis zu 4 l/min (Liter pro Minute) für eine Kanüle mit 18 French; bis zu 5 l/min für eine Kanüle mit 20 French; bis zu
6 l/min für eine Kanüle mit 22 French; bis zu 6 l/min für eine Kanüle mit 24 French.
Nebenwirkungen
Wie bei allen Komponenten eines extrakorporalen Blutkreislaufsystems besteht auch bei diesem Produkt die
Gefahr des Auftretens verschiedener Nebenwirkungen wie Infektionen, Blutverlust, Thrombenbildung, embolische
Ereignisse und Dislokation. Bei Missachtung der Gebrauchsanweisung besteht die Gefahr von Gefäßverletzungen
und Komplikationen an der Punktionsstelle.
Gebrauchsanweisung
1. Überprüfen Sie die Verpackung und das Produkt auf Schäden und kontrollieren Sie das
Verwendbarkeitsdatum. Wenn die Verpackung unbeschädigt und das Verwendbarkeitsdatum nicht
14 Gebrauchsanweisung Deutsch

überschritten ist, öffnen Sie die Verpackung und überführen Sie die Kanüle unter Anwendung aseptischer
Verfahren in das sterile Feld.
2. Bei Modellen mit Entlüftungsstopfen diesen so platzieren, dass der Entlüftungsschlitz ca. 3 mm über das
Kanülenende hinausragt (nur bei Modellen für Konnektion) oder den porösen Entlüftungsstopfen fest im
Konnektor platzieren.
Warnung: Stopfen nicht zu weit einführen. Den porösen Entlüftungsstopfen nicht anfeuchten. Dadurch wird
der Stopfen luftundurchlässig und die Wirksamkeit der Vorfüllung und Entlüftung stark beeinträchtigt.
3. An der gewünschten Stelle anterior eine Tabaksbeutelnaht in die distale Aorta ascendens setzen. Ein
Tourniquet über die Tabaksbeutelnaht legen. Eine zweite, äußere Tabaksbeutelnaht 1-2 mm außerhalb der
ersten Naht setzen und ein Tourniquet anlegen. Die Adventitia in dem von der inneren Tabaksbeutelnaht
umschlossenen Bereich entfernen.
a. Modelle mit flexiblem Bogen: Den anpassbaren Nahtring in der gewünschten Tiefe positionieren.
b. Select CAP® Modelle: Das Drucküberwachungslumen der Kanüle mit heparinisierter Kochsalzlösung
befüllen und den Absperrhahn zum Lumen schließen, um die heparinisierte Kochsalzlösung im Lumen zu
behalten.
4. Wenn eine adäquate systemische Heparinisierung gewährleistet ist, mit Klinge Nr. 11 innerhalb des von der
inneren Tabaksbeutelnaht umschlossenen Bereiches eine Inzision in der Aorta vornehmen. Einen Finger auf
die Inzisionsstelle legen, um die Blutung zu kontrollieren. Die Kanüle durch die Inzision direkt in die Aorta
einführen.
Hinweis: Wird die Kanüle bei der Einführung vertikal gehalten, so können sich an den Kanülenwänden weniger
Mikroblasen sammeln.
5. Die Kanüle so drehen, dass die Spitze distal ausgerichtet ist und die Orientierungshilfe auf der Kanüle in
Richtung Aortenklappe zeigt.
6. Tourniquets an der inneren Tabaksbeutelnaht anziehen und mit einer zweiten Naht um Kanüle und Tourniquet
an einer geeigneten Stelle an der Kanüle fixieren.
7. Wenn die Luft vollständig aus der Kanüle entfernt ist, zur Abdichtung den geschlitzten Entlüftungsstopfen
vollständig einführen. (NICHT ZU WEIT EINFÜHREN.)
8. Vor dem Anschließen der Kanüle an die arterielle Leitung, den Kanülenkörper abklemmen. Den
Entlüftungsstopfen oder Abziehdeckel von der Kanüle entfernen. Kanüle an die arterielle Leitung anschließen.
Vor dem Lösen der Klemme, Leitung überprüfen und eventuell vorhandene Luft entweichen lassen. (Einige
arterielle Kanülen verfügen über eine Luer-Öffnung am Konnektor, durch die Luft aus der Leitung entweichen
bzw. der Leitungsdruck überwacht werden kann).
9. Kanüle mit einer Naht an der Haut oder am Retraktor befestigen, um Dehnungsauflösung zu gewährleisten
und unbeabsichtigte Bewegungen zu vermeiden. Kanüle und arterielle Leitung so positionieren, dass die
Kanüle nach einer leichten Biegung senkrecht in die Aorta eintritt. Die arterielle Leitung am oberen Tuch
befestigen.
a. Select CAP® Modelle: Eine heparinisierte, mit Kochsalzlösung gefüllte Spritze am weiblichen Luer-
Anschluss, der senkrecht zur Achse der Drucküberwachungsleitung ist, befestigen. Die
Drucküberwachungsleitung aspirieren, bis im Lumen Blut eintritt. Gegen die Spritze klopfen, um sämtliche
Luft, die sich durch die Aspiration gebildet hat, nach oben in die Spitze zu bewegen. 2-3 ml heparinisierter
Kochsalzlösung zum Befüllen der Drucküberwachungsleitung in die Aorta injizieren.
b. Eine vorbefüllte Drucküberwachungsleitung von einem Drucküberwachungsgerät am Dreiwegehahn
befestigen. Stellen Sie sicher, dass der Absperrhahn zur Drucküberwachungsleitung der Kanüle geöffnet
ist. Abgleich und Nullabgleich des Flussmessumformers.
10. Nehmen Sie vor der Einleitung des kardiopulmonalen Bypasses alle Klemmen von der Kanüle und den
Leitungen ab.
11. Nach Abschluss des Eingriffs muss die Kanüle ordnungsgemäß entsorgt werden. NICHT
WIEDERVERWENDEN.
Der folgende Haftungsausschluss gilt nur für Kunden außerhalb der USA:
Haftungsausschluss
TROTZ SORGFÄLTIGER KONSTRUKTION, HERSTELLUNG UND VOR VERKAUF DURCHGEFÜHRTER
TESTDURCHLÄUFE IST ES MÖGLICH, DASS DIE ARTERIELLE KANÜLE - IM NACHFOLGENDEN ALS
"PRODUKT" BEZEICHNET - AUS VERSCHIEDENSTEN GRÜNDEN NICHT ZUFRIEDENSTELLEND
FUNKTIONIERT. DIE HINWEISE IN DER PRODUKTINFORMATION ENTHALTEN WEITERE DETAILLIERTE
INFORMATIONEN UND SIND ALS BESTANDTEIL DIESES HAFTUNGSAUSSCHLUSSES ANZUSEHEN.
MEDTRONIC SCHLIESST DAHER JEDE AUSDRÜCKLICHE ODER STILLSCHWEIGENDE GARANTIE IN
BEZUG AUF DAS PRODUKT AUS. MEDTRONIC HAFTET WEDER FÜR UNMITTELBARE NOCH
MITTELBARE FOLGESCHÄDEN, DIE DURCH DEN GEBRAUCH, DURCH STÖRUNGEN ODER
FEHLFUNKTIONEN DES PRODUKTES ENTSTEHEN, UNABHÄNGIG DAVON, OB SICH DER ANSPRUCH
Gebrauchsanweisung Deutsch 15

AUF SCHADENERSATZ AUF EINE GARANTIE, EINEN VERTRAG, EINE UNERLAUBTE HANDLUNG ODER
EINE ANDERE ANSPRUCHSGRUNDLAGE STÜTZT.
Die hier aufgeführten Haftungsausschlüsse und -beschränkungen sollen nicht gegen geltendes Recht verstoßen
und sind nicht dahingehend auszulegen. Sollte ein zuständiges Gericht feststellen, dass dieser
Haftungsausschluss ganz oder teilweise unwirksam, nicht durchsetzbar oder im Widerspruch zu zwingendem
Recht ist, berührt dies die Gültigkeit der restlichen Klauseln nicht und alle Rechte und Pflichten aus diesem
Haftungsausschluss sind so auszulegen und durchzusetzen, als sei der für ungültig erklärte Teil oder die ungültige
Vorschrift in dem Haftungsausschluss nicht enthalten.
16 Gebrauchsanweisung Deutsch

DLP® / Select Series® / Select 3D® / Select 3D® II / Select CAP®
Cánula arterial
Descripción del producto
La cánula está formada por una punta biselada, curvada o acodada, con o sin reborde, permanentemente acoplada
a un cuerpo cónico de PVC flexible, transparente y moldeado o a un cuerpo de PVC con espiral de alambre. El
cuerpo de la cánula consta de una línea de orientación de la punta para indicar la dirección de la punta de la cánula
durante la canulación. El extremo proximal de la cánula incluye un lugar de conexión o un conector de 0,95 cm
con o sin tapón de ventilación de plástico moldeado o tapón extraíble. El tapón de ventilación o el tapón extraíble
permite extraer el aire de la cánula antes de la conexión a la vía de perfusión.
Modelos Select CAP®: El extremo proximal dispone de una vía de monitorización de presión con una llave de
3 pasos.
Estéril, apirógeno y válido para un solo uso.
Indicaciones de uso
Estas cánulas se han diseñado para su utilización en la perfusión de la aorta ascendente durante procedimientos
de bypass cardiopulmonar de corta duración.
Este producto está diseñado para utilizarse un máximo de seis horas.
Contraindicaciones
Este dispositivo no está diseñado para utilizaciones distintas de la anteriormente indicada.
Advertencias
Cuando se efectúe canulación, deberá tenerse extremo cuidado si existe posibilidad de rotura del tejido de la
aorta. Evitar dirigir la punta de la cánula directamente hacia las ramas del arco aórtico para reducir al mínimo la
posibilidad de introducir cualquier émbolo desplazado en las arterias o provocar un aumento de la presión
sanguínea en el cerebro. Evitar dirigir la punta a la válvula aórtica.
Evitar doblar o retorcer la cánula. La selección del paciente y del procedimiento es responsabilidad exclusiva del
médico, y el resultado depende de muchas variables tales como la anatomía y enfermedad del paciente, así como
de las técnicas y los procedimientos quirúrgicos y de perfusión empleados. Esta cánula es sólo para uso temporal
de corta duración.
Medidas preventivas
Nota: La utilización de procedimientos y técnicas quirúrgicos apropiados es responsabilidad del profesional
médico. El procedimiento descrito se proporciona exclusivamente con fines informativos. El cirujano debe evaluar
la conveniencia del procedimiento según su propia formación y experiencia médicas y el tipo de procedimiento
quirúrgico.
Extremar la precaución durante la conexión de la cánula a la vía de perfusión para asegurarse de que no quede
aire atrapado en la vía de perfusión.
La colocación, ubicación y orientación de las suturas en el interior de la aorta es de vital importancia para un
posicionamiento adecuado de la cánula. Una vez fijada firmemente la cánula con las suturas, será difícil cambiar
su posición.
No sobrepasar el flujo recomendado.
Apretar los tapones del luer antes de usar.
Esta cánula se ha diseñado y se ha previsto para un solo uso. NO REUTILIZARLA.
No sobrepasar los niveles de flujo máximos recomendados que figuran a continuación para los modelos Select
3D® y Select 3D® II:
Hasta 4 l/min (litros por minuto) para cánulas de 18 Fr; hasta 5 l/min para cánulas de 20 Fr; hasta 6 l/min para
cánulas de 22 Fr; hasta 6 l/min para cánulas de 24 Fr.
Efectos adversos
Este dispositivo, al igual que todos los dispositivos de sistemas de circulación extracorpórea, tienen efectos
secundarios posibles tales como, entre otros, infecciones, pérdida de sangre, formación de trombos, episodios
embólicos y desplazamiento. Pueden producirse lesiones vasculares y complicaciones en el lugar de punción si
no se siguen las instrucciones de uso.
Instrucciones de uso
1. Inspeccionar el envase y el producto en busca de daños y comprobar su fecha de caducidad. Si no presenta
daños ni ha caducado, abrir el envase y transferir la cánula al campo estéril siguiendo una técnica aséptica.
Instrucciones de uso Español 17

2. Cuando se utilicen modelos con tapón de ventilación, colocar éste de modo que las ranuras de ventilación
queden aproximadamente 3 mm más allá del final de la cánula (sólo modelos con conexión) o introducir el
tapón de ventilación poroso dentro del conector.
Advertencia: No insertar los tapones más de la cuenta. No humedecer el tapón de ventilación poroso. El
tapón se haría impermeable al aire y se reduciría al mínimo la eficacia del cebado y de la ventilación.
3. Realizar una sutura de bolsa de tabaco en la aorta ascendente distal en la ubicación deseada. Colocar un
torniquete sobre esta bolsa de tabaco. Realizar una segunda bolsa de tabaco exterior a 1-2 mm de la bolsa
inicial y colocar un torniquete sobre la misma. Efectuar una incisión en la adventicia desde el interior de la
sutura de bolsa de tabaco interna.
a. Modelos flexibles para arco aórtico: Colocar el collar de sutura ajustable a la profundidad deseada.
b. Modelos Select CAP®: Aplicar una solución salina heparinizada a la luz de la línea de monitorización de
presión de la cánula y cerrar la llave de paso en la luz para retener dicha solución.
4. Tras asegurar una adecuada heparinización sistémica, efectuar una incisión en la aorta dentro de los límites
de la bolsa de tabaco interna utilizando un bisturí del n° 11. Colocar un dedo sobre la incisión para controlar
la hemorragia. Insertar la cánula directamente en la aorta a través de la incisión.
Nota: Mantener la cánula vertical durante la inserción ayudará a evitar la acumulación de microburbujas en
las paredes de la cánula.
5. Girar la cánula de modo que la punta quede dirigida distalmente y la línea de orientación de la cánula mire
hacia la válvula aórtica.
6. El torniquete sobre la bolsa de tabaco interna se aprieta y se fija a la cánula atando una ligadura de sujeción
alrededor de la cánula y del torniquete en un punto adecuado.
7. Una vez extraída la totalidad del aire de la cánula, insertar el tapón de ventilación ranurado completamente
para el sellado, si procede (NO APRETAR EN EXCESO).
8. Antes de acoplar la cánula a la vía arterial, pinzar el cuerpo de la cánula. Extraer el tapón de ventilación o el
tapón extraíble de la cánula. Acoplar la cánula a la vía arterial. Examinar la vía y extraer cualquier aire atrapado
antes de quitar la pinza (algunas cánulas arteriales disponen de una conexión luer en el conector que puede
utilizarse para extraer el aire de la vía o para monitorizar la vía de presión).
9. Fijar la cánula a la piel o al retractor con una sutura para liberar la tensión y evitar movimientos inadvertidos.
Colocar la cánula y la vía arterial de modo que la cánula forme una curva suave y entre en la aorta
perpendicularmente. Fijar la vía arterial a la cinta adhesiva superior.
a. Modelos Select CAP®: Acoplar una jeringa con solución salina heparinizada a la conexión luer hembra
perpendicular al eje de los tubos de la vía de monitorización de presión. Aspirar la vía de monitorización
de presión hasta que la sangre acceda a la luz de la vía. Tapar la jeringa para que el aire succionado
durante la aspiración permanezca en su parte superior. Inyectar de 2 a 3 cc de solución salina heparinizada
en la aorta para llenar la vía de monitorización de presión.
b. Conectar una vía de monitorización de presión a la que se haya aplicado previamente una solución
heparinizada desde el dispositivo de monitorización de presión hasta la llave de 3 pasos. Asegurarse de
que la llave de paso está abierta en la vía de monitorización de presión de la cánula. Nivelar y poner a
cero el transductor.
10. Retirar todas las pinzas de la cánula y de las vías antes de iniciar el bypass cardiopulmonar.
11. Una vez concluido el procedimiento quirúrgico, desechar la cánula de acuerdo con la normativa hospitalaria
aplicable. NO REUTILIZARLA.
La siguiente Renuncia de responsabilidad se aplica a clientes de fuera de los Estados Unidos:
Renuncia de responsabilidad
AUNQUE LA CÁNULA ARTERIAL, A LA QUE NOS REFERIREMOS DE AHORA EN ADELANTE COMO
"PRODUCTO", HA SIDO DISEÑADA, FABRICADA Y PROBADA CUIDADOSAMENTE ANTES DE PONERLA
A LA VENTA, EL PRODUCTO PUEDE NO CUMPLIR SUS FUNCIONES SATISFACTORIAMENTE POR
VARIAS RAZONES. LAS ADVERTENCIAS QUE CONTIENE LA DOCUMENTACIÓN DEL PRODUCTO
PROPORCIONAN INFORMACIÓN MÁS DETALLADA Y SE CONSIDERAN COMO PARTE INTEGRANTE DE
ESTA RENUNCIA DE RESPONSABILIDAD. POR TANTO, MEDTRONIC RENUNCIA A CUALQUIER
RESPONSABILIDAD, TANTO EXPRESA COMO IMPLÍCITA, CON RESPECTO AL PRODUCTO. MEDTRONIC
NO RESPONDERÁ POR LOS DAÑOS INDIRECTOS O DIRECTOS CAUSADOS O DERIVADOS DE
CUALQUIER USO, DEFECTO, FALLO O MAL FUNCIONAMIENTO DEL PRODUCTO, AUN CUANDO LA
RECLAMACIÓN SE BASE EN UNA GARANTÍA, CONTRATO, RESPONSABILIDAD EXTRACONTRACTUAL
U OTRAS CAUSAS.
Las exclusiones y limitaciones arriba expresadas no revisten el propósito de contravenir las disposiciones
obligatorias establecidas por la legislación vigente, ni deben interpretarse de dicha forma. En el supuesto de que
cualquier parte o término de la presente Renuncia de Responsabilidad sea declarado por cualquier tribunal
18 Instrucciones de uso Español

competente como ilegal, inaplicable o contrario a la ley, ello no afectará a la validez del resto de la Renuncia de
Responsabilidad, interpretándose y aplicándose cuantos derechos y obligaciones se incluyen en ella como si la
presente Renuncia de Responsabilidad no contuviera la parte o término considerado no válido.
Instrucciones de uso Español 19

DLP® / Select Series® / Select 3D® / Select 3D® II / Select CAP®
Arteriële canule
Productbeschrijving
De canule bestaat uit een gebogen, hoekige of afgeschuinde tip met of zonder flens die permanent is bevestigd
op een gegoten, transparant, flexibel, conisch lichaam van pvc of een draadversterkt lichaam van pvc. Het
canulelichaam bevat een tiporiëntatielijn waarmee de richting van de canuletip tijdens het canuleren kan worden
aangegeven. Het proximale uiteinde van de canule heeft een aansluiting of een gegoten, getande connector van
0,95 cm met of zonder een gegoten kunststof ontluchtingsstop of dop. Door deze stop of dop kan lucht uit de canule
worden verwijderd voordat deze op de perfusielijn wordt aangesloten.
Select CAP®-modellen: Het proximale uiteinde bevat een drukmetingslijn met een driewegkraan.
Steriel, niet-pyrogeen, voor eenmalig gebruik.
Indicaties
Deze canules zijn bedoeld om te worden gebruikt bij perfusie van de aorta ascendens tijdens kortdurende
cardiopulmonale bypassprocedures.
Dit product mag maximaal zes uur worden gebruikt.
Contra-indicaties
Dit apparaat is uitsluitend bedoeld voor gebruik zoals hierboven is aangegeven.
Waarschuwingen
Bij het canuleren dient men uiterst voorzichtig te werk te gaan als er kans bestaat op weefseldissectie van de aorta.
Richt de canuletip niet rechtstreeks op een van de aftakkingen van de aortaboog om zoveel mogelijk te voorkomen
dat losgeraakte emboli in de arteriën terechtkomen of dat de bloeddruk in de hersenen wordt verhoogd. Richt de
tip niet op de aortaklep.
Buig of knik de canule niet. De selectie van patiënt en procedure behoren volledig tot de verantwoordelijkheid van
de arts en de resultaten zijn afhankelijk van verscheidene variabelen, waaronder de anatomie en pathologie van
de patiënt en de gekozen chirurgische en perfusieprocedures. Deze canule mag slechts kortdurend en tijdelijk
worden gebruikt.
Voorzorgsmaatregelen
Opmerking: De juiste chirurgische procedures en technieken vallen onder de verantwoordelijkheid van de arts.
De beschreven procedure wordt slechts ter informatie aangeboden. Een chirurg moet de geschiktheid van de
procedure evalueren op basis van zijn of haar medische opleiding en ervaring, en het soort chirurgische procedure.
Ga bij het aansluiten van de canule en de perfusielijn voorzichtig te werk zodat er geen lucht in de perfusielijn komt.
De plaatsing, locatie en oriëntatie van de hechtingen in de aorta zijn van groot belang voor een juiste positionering
van de canule. Wanneer de canule eenmaal stevig met hechtingen is vastgezet, is het moeilijk de positie van de
canule nog te veranderen.
Overschrijd de aanbevolen infusie niet.
Draai de luerdoppen voor gebruik aan.
Deze canule is uitsluitend ontworpen en bedoeld voor eenmalig gebruik. NIET OPNIEUW GEBRUIKEN.
Overschrijd de maximaal aanbevolen infusiesnelheid niet voor de modellen Select 3D® en Select 3D® II:
tot maximaal 4 LPM (liter per minuut) voor een 18 Fr-canule; tot maximaal 5 LPM voor een 20 Fr-canule; tot
maximaal 6 LPM voor een 22 Fr-canule; tot maximaal 6 LPM voor een 24 Fr-canule.
Bijwerkingen
De mogelijke bijwerkingen van deze en andere extracorporale bypassproducten, zijn onder meer infectie,
bloedverlies, thrombusvorming, embolische complicaties en dislocatie. Als de gebruiksinstructies niet worden
opgevolgd, kan dit leiden tot beschadiging van het bloedvat en complicaties rond de aanprikplaats.
Gebruiksaanwijzing
1. Controleer de verpakking en het product op beschadigingen en controleer de vervaldatum. Als er geen
beschadigingen zijn en de vervaldatum niet is verstreken, opent u de verpakking en brengt u de canule met
een steriele techniek over naar het steriele veld.
2. Plaats bij modellen met een ontluchtingsstop de stop zodanig dat de ontluchtingssleuf zich ongeveer 3 mm
voorbij het uiteinde van de canule bevindt (alleen modellen met een aansluiting) of plaats de poreuze
ontluchtingsstop stevig in de getande connector.
Waarschuwing: Breng stoppen niet te ver in. Voorkom dat de poreuze ontluchtingsstop vochtig wordt. Anders
wordt de stop ondoorlaatbaar voor lucht en zal de effectiviteit van het vullen en ontluchten sterk afnemen.
20 Gebruiksaanwijzing Nederlands

3. Leg op de gewenste locatie in de voorzijde van de distale aorta ascendens een tabakzaknaad aan. Plaats een
tourniquet over deze tabakzaknaad. Leg 1-2 mm voorbij de eerste tabakzaknaad een tweede buitenste
tabakzaknaad aan en plaats er een tourniquet overheen. Excideer de adventitia uit het door de binnenste
tabakzaknaad omsloten gebied.
a. Modellen met flexibele boog: Plaats de instelbare hechtingsring op de gewenste diepte.
b. Select CAP®-modellen: Vul het drukmetingslumen van de canule met een gehepariniseerde
zoutoplossing en sluit de driewegkraan naar het lumen om de gehepariniseerde zoutoplossing in het lumen
te houden.
4. Nadat u zich ervan heeft verzekerd dat adequate systemische heparinisatie is bereikt, maakt u met een mesje
nr. 11 een incisie in de aorta binnen het door de binnenste tabakzaknaad omsloten gebied. Leg een vinger op
de incisie om het bloeden te stoppen. Breng de canule via de incisie rechtstreeks in de aorta in.
Opmerking: Door de canule tijdens het inbrengen verticaal te houden, voorkomt u dat zich microluchtbellen
ophopen op de wanden van de canule.
5. Draai de canule zo dat de tip distaal gericht is en de oriëntatielijn op de canule in de richting van de aortaklep
wijst.
6. Trek de tourniquet op de binnenste tabakzaknaad aan en zet deze aan de canule vast door op een praktische
plaats een bevestigingsligatuur om de canule en tourniquet te binden.
7. Nadat alle lucht uit de canule is verwijderd, steekt u indien van toepassing de stop met ontluchtingssleuf
volledig in de canule om deze af te dichten. (NIET TE VER INBRENGEN.)
8. Voordat u de canule op de arteriële lijn aansluit, klemt u het canulelichaam af. Verwijder de ontluchtingsstop
of dop van de canule. Bevestig de canule op de arteriële lijn. Inspecteer de lijn en verwijder eventueel in de
lijn aanwezige lucht voordat u de klem verwijdert. (Sommige arteriële canules zijn voorzien van een luerpoort
op de connector waarmee lucht uit de lijn kan worden verwijderd of de druk in de lijn kan worden bewaakt.)
9. Zet de canule met een hechting aan de huid of wondspreider vast om voor trekontlasting te zorgen en
onbedoelde bewegingen te voorkomen. Plaats de canule en arteriële lijn zo dat de canule licht gebogen is en
de aorta loodrecht binnengaat. Zet de arteriële lijn vast aan de bovenste doek.
a. Select CAP®-modellen: Bevestig een met gehepariniseerde zoutoplossing gevulde spuit aan het
vrouwelijke luer dat loodrecht staat op de as van de drukmetingslijn. Aspireer de drukmetingslijn totdat er
bloed in het lumen verschijnt. Tik op de spuit om de tijdens de aspiratie opgezogen lucht naar de top van
de spuit te verplaatsen. Injecteer 2-3 cc van de gehepariniseerde zoutoplossing in de aorta om de
drukmetingslijn te vullen.
b. Bevestig een vooraf gevulde drukmetingslijn van een drukmetingsapparaat aan de driewegkraan.
Controleer of de driewegkraan open staat voor de drukmetingslijn van de canule. Kalibreer de transducer
en stel deze op 0 in.
10. Verwijder alle klemmen van de canule en lijnen voordat u de cardiopulmonale bypass start.
11. Nadat de chirurgische ingreep voltooid is, gooit u de canule weg volgens de door het ziekenhuis
voorgeschreven procedure. NIET OPNIEUW GEBRUIKEN.
De hiernavolgende uitsluiting van garantie geldt voor klanten buiten de Verenigde Staten:
Uitsluiting van garantie
HOEWEL DE ARTERIËLE CANULE, HIERNA HET "PRODUCT" GENOEMD, MET VEEL ZORG IS
ONTWORPEN, VERVAARDIGD EN VÓÓR DE VERKOOP GETEST, KUNNEN ER VERSCHILLENDE
REDENEN ZIJN WAAROM HET PRODUCT NIET VOLGENS DE SPECIFICATIES WERKT. DE
WAARSCHUWINGEN IN DE DOCUMENTATIE BIEDEN MEER GEDETAILLEERDE INFORMATIE EN
MOETEN WORDEN BESCHOUWD ALS EEN WEZENLIJK ONDERDEEL VAN DEZE UITSLUITING VAN
GARANTIE. MEDTRONIC VERLEENT DAAROM GEEN ENKELE GARANTIE, NOCH EXPLICIET NOCH
IMPLICIET, MET BETREKKING TOT HET PRODUCT. MEDTRONIC IS NIET AANSPRAKELIJK VOOR ENIGE
INCIDENTELE OF GEVOLGSCHADE, VEROORZAAKT DOOR OM HET EVEN WELK GEBRUIK, DEFECT OF
FALEN VAN HET PRODUCT, ONGEACHT OF DE VORDERING IS GEBASEERD OP EEN GARANTIE,
CONTRACT, ONRECHTMATIGE DAAD OF ANDERSZINS.
De uitsluitingen en beperkingen die hierboven uiteengezet zijn, zijn niet bedoeld, en moeten niet geïnterpreteerd
worden als een inbreuk op dwingende bepalingen van de van toepassing zijnde wet. Indien enig onderdeel of enige
bepaling van deze Uitsluiting van garantie door een daartoe bevoegde rechtbank als onrechtmatig, onuitvoerbaar
of in strijd met de van toepassing zijnde wet beschouwd wordt, zal dit de geldigheid van het overige deel van deze
Uitsluiting van garantie niet aantasten en zullen alle rechten en plichten worden uitgelegd en ten uitvoer worden
gebracht alsof deze Uitsluiting van garantie het desbetreffende ongeldig verklaarde gedeelte niet bevatte.
Gebruiksaanwijzing Nederlands 21

DLP® / Select Series® / Select 3D® / Select 3D® II / Select CAP®
Cannula per arterie
Descrizione del prodotto
La cannula consta di una punta incurvata, angolata od obliqua, con o senza flangia, collegata in modo permanente
ad una struttura conica in PVC flessibile, trasparente e sagomata o ad una struttura in PVC con avvolgimento di
rinforzo in filo metallico. La struttura della cannula presenta una linea per l'orientamento della punta che indica la
direzione della punta della cannula durante la procedura di inserimento della cannula. L'estremità prossimale della
cannula comprende un punto di collegamento o un connettore dentato sagomato da 0,95 cm con o senza tappo
di sfiato/rimovibile in plastica sagomata. Il tappo di sfiato/rimovibile consente lo spurgo dell'aria presente nella
cannula prima del collegamento con la linea di perfusione.
Modelli Select CAP®: l'estremità prossimale presenta una linea di monitoraggio della pressione con un rubinetto
a 3 vie.
Sterile, non pirogeno, esclusivamente monouso.
Indicazioni per l'uso
Queste cannule possono essere utilizzate per la perfusione dell'aorta ascendente durante le procedure chirurgiche
di bypass cardiopolmonare a breve termine.
Il prodotto è concepito per essere utilizzato al massimo per sei ore.
Controindicazioni
Il dispositivo può essere utilizzato unicamente per gli scopi sopra indicati.
Avvertenze
Nell'effettuare l'incannulamento, agire con la massima cautela se esiste la possibilità di dissezione del tessuto
aortico. Evitare di orientare la punta della cannula direttamente verso le diramazioni arteriose dell'arco aortico al
fine di ridurre al minimo la possibilità di orientare in questo senso eventuali emboli spostati nelle arterie o di causare
un aumento della pressione sanguigna nell'encefalo. Evitare di orientare la punta verso la valvola aortica.
Non piegare o incurvare la cannula. La scelta del paziente e della procedura è di esclusiva responsabilità del
medico ed il risultato dipende da una serie di variabili comprese l'anatomia e la patologia del paziente nonché le
procedure di perfusione e chirurgiche. Questa cannula è destinata esclusivamente ad un utilizzo temporaneo, a
breve termine.
Precauzioni
Nota: il personale medico è responsabile dell'adozione delle procedure e delle tecniche chirurgiche corrette. La
descrizione delle procedure viene fornita unicamente a scopo informativo. I chirurghi devono valutare
l'adeguatezza della procedura in base alla propria formazione ed esperienza medica, oltre che al tipo di procedura
chirurgica da eseguire.
Prestare attenzione durante il collegamento della cannula alla linea di perfusione per essere certi di non aver
intrappolato aria nella linea di perfusione.
Il posizionamento, la localizzazione e l'orientamento delle suture nell'aorta sono di importanza essenziale ai fini di
un posizionamento adeguato della cannula. Una volta saldamente fissata la cannula mediante le suture, è difficile
modificarne la posizione.
Non superare il flusso consigliato.
Avvitare con forza i cappucci dei luer prima dell'uso.
La cannula è esclusivamente monouso. NON RIUTILIZZARE.
Non superare le velocità di somministrazione massime consigliate per i modelli Select 3D® e Select 3D® II:
massimo 4 LPM (litri al minuto) per cannula da 18 Fr; massimo 5 LPM per cannula da 20 Fr; massimo 6 LPM per
cannula da 22 Fr; massimo 6 LPM per cannula da 24 Fr.
Effetti indesiderati
Al pari di tutti i sistemi di circolazione sanguigna extracorporea, il presente dispositivo può comportare effetti
collaterali, comprendenti tra l'altro infezioni, perdita di sangue, formazione di trombi, eventi embolici e spostamento.
Se non vengono rispettate le istruzioni per l'uso, possono verificarsi danni e complicanze ai vasi in corrispondenza
del sito di inserzione.
Istruzioni per l’uso
1. Ispezionare la confezione ed il prodotto per verificare la presenza di eventuali danni e per controllare la data
di scadenza. Se non si notano danni e la data di scadenza non è stata superata, aprire la confezione e trasferire
la cannula in campo sterile avvalendosi di tecniche asettiche.
22 Istruzioni per l’uso Italiano

2. Per i modelli provvisti di tappi di sfiato, posizionare il tappo di sfiato in modo che la fessura si estenda di circa
3 mm oltre l'estremità della cannula (solamente nei modelli con punti di collegamento), o posizionare il tappo
di sfiato poroso nel connettore dentato.
Avvertenza: non inserire troppo profondamente i tappi. Non inumidire i tappi di sfiato di tipo poroso. In caso
contrario, diventerebbero impermeabili all'aria riducendo al minimo l'efficacia del riempimento di verifica e dello
sfiato.
3. Eseguire una sutura a borsa di tabacco sulla parte anteriore dell'aorta ascendente distale nel punto desiderato.
Posizionare un tourniquet sopra la sutura a borsa di tabacco. Apporre una seconda sutura a borsa di tabacco
più esternamente (1-2 mm oltre la prima) e posizionarvi sopra un tourniquet. Asportare l'avventizia dall'interno
della sutura a borsa di tabacco più interna.
a. Modelli ad arco flessibile: posizionare la fascetta di sutura regolabile alla profondità desiderata.
b. Modelli Select CAP®: eseguire un prime del lume di monitoraggio della pressione della cannula con
soluzione salina eparinizzata e chiudere il rubinetto verso il lume per mantenere la soluzione salina
eparinizzata all'interno del lume.
4. Dopo avere verificato che è in corso una adeguata eparinizzazione a livello sistemico, praticare un'incisione
nell'aorta, nei confini della sutura a borsa di tabacco più interna, utilizzando una lama numero 11. Porre un
dito sopra l'incisione per tenere sotto controllo il sanguinamento. Inserire la cannula direttamente nell'aorta
attraverso l'incisione.
Nota: il mantenimento della cannula in posizione verticale durante l'inserzione impedisce la formazione di
microbolle d'aria sulle sue pareti.
5. Ruotare la cannula in modo che la punta sia diretta distalmente e la linea di orientamento della cannula sia
rivolta verso la valvola aortica.
6. Il tourniquet sulla sutura di tabacco più interna va serrato e fissato alla cannula apponendo una legatura di
fissaggio intorno alla cannula ed al tourniquet in un punto comodo.
7. Una volta rimossa tutta l'aria dalla cannula, inserire completamente il tappo di sfiato con fessure per sigillare
(EVITARE DI INTRODURRE A UNA PROFONDITÀ ECCESSIVA).
8. Prima di collegare la cannula alla linea arteriosa, applicare un morsetto alla struttura della cannula. Rimuovere
il tappo dalla cannula. Collegare la cannula alla linea arteriosa. Ispezionare la linea ed eliminare eventuale
aria intrappolata al suo interno prima di rimuovere il morsetto (alcune cannule per arterie dispongono di una
porta luer che può essere utilizzata per eliminare l'aria intrappolata nella linea o per il monitoraggio della
pressione nella linea).
9. Fissare la cannula alla cute o al retrattore mediante una sutura in modo da consentire una diminuzione della
tensione ed impedire movimenti accidentali. Posizionare la cannula nella linea arteriosa in modo che si incurvi
delicatamente e si immetta perpendicolarmente nell'aorta. Fissare la linea arteriosa al telo superiore.
a. Modelli Select CAP®: collegare una siringa eparinizzata, riempita con soluzione salina al luer femmina
perpendicolare all'asse dei tubi della linea di monitoraggio della pressione. Aspirare dalla linea di
monitoraggio della pressione finché non compare sangue nel lume. Applicare un tappo alla siringa per
forzare lo spostamento dell'eventuale aria aspirata verso la parte superiore della siringa. Iniettare 2-3 cc
di soluzione salina nell'aorta per riempire la linea di monitoraggio della pressione.
b. Collegare una linea di monitoraggio della pressione già sottoposta a prime da un dispositivo di
monitoraggio della pressione al rubinetto a 3 vie. Assicurarsi che il rubinetto sia aperto verso la linea di
monitoraggio della pressione della cannula. Equilibrare ed azzerare il trasduttore.
10. Rimuovere tutti i morsetti dalla cannula e dalle linee prima di iniziare la procedura di bypass cardiopolmonare.
11. Al termine della procedura chirurgica, smaltire la cannula in conformità alle procedure della propria struttura
ospedaliera. NON RIUTILIZZARE.
La seguente esclusione dalla garanzia è valida solo per i clienti al di fuori degli Stati Uniti:
Esclusione dalla garanzia
SEBBENE LA CANNULA PER ARTERIE, INDICATA QUI DI SEGUITO COME "PRODOTTO", SIA STATA
ACCURATAMENTE PROGETTATA, REALIZZATA E TESTATA PRIMA DI ESSERE COMMERCIALIZZATA,
POTREBBE NON FUNZIONARE IN MODO SODDISFACENTE PER DIVERSE RAGIONI. LE AVVERTENZE
INDICATE NELLA DOCUMENTAZIONE DEL PRODOTTO FORNISCONO INFORMAZIONI PIÙ DETTAGLIATE
A TALE RIGUARDO E SONO DA CONSIDERARSI COME PARTE INTEGRANTE DELLA PRESENTE
ESCLUSIONE DALLA GARANZIA. DI CONSEGUENZA, LA MEDTRONIC NON RILASCIA ALCUNA
GARANZIA, NÉ ESPRESSA NÉ TACITA, IN MERITO AL PRODOTTO. LA MEDTRONIC NON PUÒ IN ALCUN
CASO ESSERE RITENUTA RESPONSABILE, NÉ IN VIA CONTRATTUALE NÉ IN VIA
EXTRACONTRATTUALE, PER DANNI DIRETTI OD INDIRETTI CAUSATI DALL'USO, DAI DIFETTI O DALLE
MANCANZE DEL PRODOTTO, INDIPENDENTEMENTE DAL FATTO CHE LA RICHIESTA DI RISARCIMENTO
DI TALI DANNI SIA BASATA SU GARANZIA, CONTRATTO, FATTO ILLECITO OD ALTRO.
Istruzioni per l’uso Italiano 23

Le esclusioni e le restrizioni di cui sopra non sono intese, né devono essere interpretate in quanto tali, come
contravvenenti a norme ritenute inderogabili dalla legislazione vigente. Nel caso in cui una parte od un termine
della presente Esclusione dalla garanzia venga giudicato illegale, inefficace od in conflitto con il diritto applicabile
da un organo giudiziario, la validità delle rimanenti parti della presente Esclusione dalla garanzia non verrà
compromessa e tutti i diritti e gli obblighi verranno interpretati ed applicati come se la presente Esclusione dalla
garanzia non contenesse la parte od i termini ritenuti non validi.
24 Istruzioni per l’uso Italiano

DLP® / Select Series® / Select 3D® / Select 3D® II / Select CAP®
Arteriekanyle
Beskrivelse av produktet:
Kanylen består av en bøyd, vinklet eller skrå spiss med eller uten krage som er permanent festet til en støpt,
gjennomsiktig, bøyelig PVC-kanyle eller armert PVC-kanyle. Kanylen har en orienteringstapp for spissen som viser
retningen på kanylespissen når den settes inn. Den proksimale enden av kanylen har en 0,95 cm (3/8") kobling
eller en støpt 0,95 cm (3/8") riflet kobling med eller uten en støpt plastpropp med lufting eller avtagbar propp. Med
disse proppene kan luften fjernes fra kanylen før den kobles til perfusjonsslangen.
Select CAP®-modeller: Den proksimale enden har en trykkslange med en treveiskran.
Steril, pyrogenfri, kun for engangsbruk.
Indikasjoner for bruk
Kanylene brukes til perfusjon av aorta ascendens under kortvarig kardiopulmonal bypass.
Dette produktet skal brukes i maksimalt seks timer.
Kontraindikasjoner
Dette produktet skal bare brukes i henhold til indikasjonene.
Advarsler
Ved innsetting av kanylen må det utvises stor forsiktighet hvis det er risiko for å skade aortavev. Unngå å holde
kanylespissen rett mot aortabuens arterieforgreininger for å redusere muligheten for at eventuelle emboli løsner
og føres inn i arteriene eller for å unngå økt intrakranialt blodtrykk. Unngå å holde kanylespissen mot aortaklaffen.
Unngå å bøye eller knekke på kanylen. Valg av pasient og prosedyre er utelukkende et medisinsk ansvar, og
utfallet avhenger av mange variabler, blant annet pasientens anatomi, patologi og operasjons- og
perfusjonsprosedyrer/-teknikker. Kanylen er kun for midlertidig bruk i en kort periode.
Forholdsregler
Merk! Riktige kirurgiske prosedyrer og teknikker er legens ansvar. Prosedyren som beskrives er bare beregnet
for informasjon. Kirurgene må vurdere om prosedyren er hensiktsmessig ut fra egen medisinsk opplæring og
erfaring samt typen operasjon.
Vær forsiktig når kanylen og perfusjonsslangen kobles sammen, slik at det ikke kommer luft inn i slangen.
For å få riktig plassering av kanylen er det svært viktig hvordan og hvor suturene i aorta plasseres. Når kanylen er
festet med suturer, er det vanskelig å endre posisjonen på kanylen.
Anbefalt flow må ikke overskrides.
Sørg for å stramme alle luerpropper før bruk.
Kanylen er kun beregnet for engangsbruk. SKAL IKKE BRUKES FLERE GANGER.
Overskrid ikke følgende maksimale anbefalte flowhastigheter for Select 3D®- og 3D® II-modellene:
opptil 4 l/min for en 18 F kanyle, opptil 5 l/min for en 20 F kanyle, opptil 6 l/min for en 22 F kanyle, opptil 6 l/min
for en 24 F kanyle.
Bivirkninger
Denne enheten har, som alle ekstrakorporelle blodsystemenheter, mulige bivirkninger som omfatter, men ikke er
begrenset til infeksjoner, blodtap, trombedannelse, emboliske hendelser og dislokasjon. Det kan oppstå skader
på kar og komplikasjoner ved punksjonsstedet hvis bruksanvisningen ikke følges.
Bruksanvisning
1. Kontroller at det ikke er skader på pakningen og produktet. Kontroller også siste forbruksdato. Hvis pakningen
ikke er skadet eller gått ut på dato, kan du åpne den og overføre kanylen til det sterile feltet ved hjelp av aseptisk
teknikk.
2. Hvis kanylen har propper med lufting, må du plassere de slik at utluftingshullet stikker ca. 3 mm utenfor enden
av kanylen (gjelder kun kanyler med tilkoblingssted) eller plassere den porøse proppen godt i den riflede
koblingen.
Advarsel! Trykk ikke propper for hardt inn. Fukt ikke den porøse proppen. Proppen blir ugjennomtrengelig for
luft og gjøre priming og lufting mindre effektivt.
3. Fest en tobakkspungsutur på ønsket sted i den anteriore delen av den distale aorta ascendens. Fest en stase
over denne suturen. Fest en ny ytre tobakkspungsutur 1–2 mm utenfor den første suturen og fest en stase
over den. Fjern adventitiavevet fra innsiden av den indre tobakkspungsuturen.
a. Modeller med bøyelige bue: Plasser den justerbare suturringen med ønsket dybde.
Bruksanvisning Norsk 25

b. Select CAP®-modeller: Prime trykklumenet på kanylen med heparinisert saltvann, og steng stoppekranen
mot lumenet for at saltvannet skal bli værende i lumenet.
4. Kontroller at det er tilfredsstillende systemisk heparinisering. Bruk en skalpell nr. 11 og gjør et snitt i aorta
innenfor området som avgrenses av den indre tobakkspungsuturen. Hold en finger over snittet for å kontrollere
blødningen. Sett kanylen rett inn i aorta gjennom snittet.
Merk! Hold kanylen vertikalt under innsettingen for å unngå at det dannes mikrobobler på kanyleveggene.
5. Roter kanylen slik at spissen er orientert distalt og orienteringsmerket på kanylen vender mot aortaklaffen.
6. Stasen på den indre tobakkspungsuturen strammes og sikres til kanylen ved å binde en ligatur rundt kanylen
og stasen på et passende sted.
7. Fjern all luft fra kanylen, og sett inn den riflede proppen for å forsegle om nødvendig. (TRYKK DEN IKKE FOR
HARDT INN.)
8. Klem av kanylen før du fester den til arterieslangen. Fjern proppen med lufting eller den avtagbare proppen
fra kanylen. Fest kanylen til arterieslangen. Kontroller slangen og fjern eventuelle luftbobler før du åpner
klemmen. (Noen arteriekanyler har en lueråpning på koblingsstedet som kan brukes til å fjerne luft fra
slangene).
9. Fest kanylen til huden eller sårhaken med en sutur for strekkavlastning og for å hindre utilsiktet bevegelse.
Plasser kanylen og arterieslangen slik at kanylen har en lett bøyning og går vinkelrett inn i aorta. Fest
arterieslangen til operasjonsduken.
a. Select CAP®-modeller: Fest en sprøyte fylt med heparinisert saltvann til hunn-luerkoblingen som er
vinkelrett på trykkslangens akse. Aspirer trykkslangen til det kommer blod i lumenet. Bank på sprøyten for
å tvinge eventuell luft til å bevege seg mot toppen av sprøyten. Injiser 2–3 ml heparinisert saltvann i aorta
for å fylle trykkslangen.
b. Fest en forhåndsprimet trykkslange fra en trykkenhet til treveiskranen. Kontroller at kranen er åpnet mot
trykkslangen på kanylen. Balanser og nullstill transduseren.
10. Fjern alle klemmene fra kanylen og slangene før du starter kardiopulmonal bypass.
11. Kast kanylen i henhold til sykehusets retningslinjer når operasjonen er fullført. SKAL IKKE BRUKES FLERE
GANGER.
Følgende garantifraskrivelse gjelder for kunder utenfor USA:
Garantifraskrivelse
SELV OM ARTERIEKANYLEN, HERETTER KALT "PRODUKTET", ER OMHYGGELIG KONSTRUERT,
FREMSTILT OG TESTET FØR SALG, KAN DET AV EN REKKE GRUNNER LIKEVEL SKJE AT PRODUKTET
IKKE OPPFYLLER SIN TILTENKTE FUNKSJON. ADVARSLENE SOM FINNES I PRODUKTMERKINGEN,
INNEHOLDER MER DETALJERT INFORMASJON OG SKAL BETRAKTES SOM EN UATSKILLELIG DEL AV
DENNE GARANTIFRASKRIVELSEN. MEDTRONIC FRASIER SEG DERFOR ALT GARANTIANSVAR, BÅDE
DIREKTE OG INDIREKTE, FOR DETTE PRODUKTET. MEDTRONIC PÅTAR SEG IKKE ANSVAR FOR
INDIREKTE SKADER ELLER FØLGESKADER FORÅRSAKET AV BRUK, DEFEKT ELLER FEIL PÅ
PRODUKTET, ENTEN KRAVET ER BASERT PÅ GARANTI, KONTRAKT, ERSTATNINGSKRAV UTENFOR
KONTRAKTSFORHOLD ELLER PÅ NOEN ANNEN MÅTE.
Unntakene og begrensningene som er angitt ovenfor er ikke ment som, og skal ikke tolkes som, brudd på
obligatoriske bestemmelser i gjeldende lov. Hvis en kompetent rettsinstans finner at en del eller en betingelse i
denne garantifraskrivelsen er ulovlig, ikke håndhevbar eller i konflikt med gjeldende lov, skal dette ikke påvirke
gyldigheten til de øvrige deler av garantifraskrivelsen, og alle retter og plikter skal utlegges og håndheves som om
denne garantifraskrivelsen ikke inneholdt den bestemte delen eller betingelsen som ble funnet ugyldig.
26 Bruksanvisning Norsk

DLP® / Select Series® / Select 3D® / Select 3D® II / Select CAP®
Valtimokanyyli
Tuotteen kuvaus
Kanyylissa on kaareva, taivutettu tai viisto laipallinen tai laipaton kärki, joka on pysyvästi kiinnitetty
muotoonpuristettuun, läpinäkyvään, taipuisaan, suippenevaan PVC-runkoon tai lankavahvisteiseen PVC-runkoon.
Kanyylin rungossa on ohjausviiva, joka osoittaa kanyylin kärjen suunnan kanyloinnin aikana. Kanyylin
proksimaalisessa päässä on liitäntäkohta tai muotoonpuristettu 0,95 cm:n väkäsliitin, jota käytetään joko
muotoonpuristetun muovisen ilmanpoistokorkin tai repäisykorkin kanssa tai ilman sitä. Ilmanpoistokorkin tai
repäisykorkin avulla ilma voidaan poistaa kanyylista ennen perfuusiolinjaan liittämistä.
Select CAP® -mallit: Proksimaalisessa päässä on paineentarkkailulinja ja kolmitiehana.
Steriili, pyrogeeniton, kertakäyttöinen.
Käyttöaiheet
Nämä kanyylit on tarkoitettu käytettäviksi nousevan aortan perfuusioon lyhytaikaisen sydän-keuhkokoneen käytön
aikana.
Tuotetta saa käyttää enintään kuuden tunnin ajan.
Vasta-aiheet
Tuotetta ei ole tarkoitettu muuhun kuin edellä kuvattuun käyttöön.
Vaarat
Kanyloinnin aikana on noudatettava erittäin suurta varovaisuutta, jos on olemassa vaara aortan dissekoitumisesta.
Älä suuntaa kanyylin kärkeä suoraan aortan kaaren valtimohaaroihin. Näin voidaan välttää irtonaisten tulppien
kulkeutuminen valtimoihin tai verenpaineen nousu aivoissa. Älä suuntaa kärkeä aorttaläppään.
Älä taivuta tai kierrä kanyyliä. Potilas- ja toimenpidevalinnat ovat täysin lääkärin vastuulla. Lopputulokseen
vaikuttavat erilaiset tekijät, kuten potilaan anatomia, patologia sekä käytetyt leikkaus- ja perfuusiomenetelmät.
Kanyyli on tarkoitettu vain lyhytaikaiseen, tilapäiseen käyttöön.
Varotoimet
Huomautus: Oikeiden kirurgisten toimenpiteiden ja tekniikoiden käyttö on lääkärin vastuulla. Alla kuvattu
menetelmä on tarkoitettu vain ohjeelliseksi. Arvioidessaan käytettävän menettelyn soveltuvuutta kirurgin on
otettava huomioon oma koulutuksensa ja kokemuksensa sekä kirurgisen toimenpiteen tyyppi.
Kanyylin ja perfuusiolinjan liittäminen on tehtävä huolellisesti, jotta perfuusiolinjaan ei jää ilmaa.
Aortan ommelten sijainti ja suunta on erittäin tärkeä kanyylin oikean sijoittamisen kannalta. Kun kanyyli on tukevasti
kiinnitetty ommelten avulla, kanyylin paikkaa on vaikea muuttaa.
Älä ylitä suositeltua virtausta.
Kiristä luerkorkit ennen käyttöä.
Tämä kanyyli on suunniteltu ja tarkoitettu kertakäyttöiseksi. ÄLÄ KÄYTÄ UUDELLEEN.
Älä ylitä seuraavia Select 3D®- ja Select 3D® II -malleille suositeltuja virtausnopeuksia:
18 F:n kanyyli: korkeintaan 4 litraa minuutissa; 20 F:n kanyyli: korkeintaan 5 litraa minuutissa; 22 F:n kanyyli:
korkeintaan 6 litraa minuutissa; 24 F:n kanyyli: korkeintaan 6 litraa minuutissa.
Haittavaikutukset
Tähän laitteeseen, kuten kaikkiin kehonulkoisiin verenkiertojärjestelmiin, liittyy mahdollisia haittavaikutuksia, joita
ovat muun muassa infektiot, verenhukka, trombien muodostuminen, emboliset tapahtumat sekä laitteen
siirtyminen pois paikoiltaan. Jos käyttöohjeita ei noudateta, seurauksena voi olla verisuonivaurioita tai
komplikaatioita punktiokohdassa.
Käyttöohjeet
1. Tarkista pakkaus ja tuote vaurioiden varalta sekä viimeinen käyttöpäivä. Jos pakkaus on ehjä eikä sen
käyttöaika ole umpeutunut, avaa pakkaus ja siirrä kanyyli aseptisesti steriilille alueelle.
2. Jos käytettävässä mallissa on ilmanpoistokorkki, aseta se niin, että ilmanpoistoaukko ulottuu noin 3 mm
kanyylin pään yli (vain mallit, joissa on liitäntäkohta) tai aseta huokoinen ilmanpoistokorkki tiukasti
väkäsliittimeen.
Vaara: Älä työnnä korkkia liian syvälle. Älä kastele huokoista ilmanpoistokorkkia. Korkki ei ehkä enää läpäise
ilmaa, mikä heikentää esitäytön ja ilmanpoiston tehokkuutta.
3. Tee tupakkapussiommel distaalisen nousevan aortan anterioriselle puolelle haluttuun kohtaan. Aseta staasi
tupakkapussiompeleen päälle. Tee toinen tupakkapussiommel 1–2 mm ensimmäisen ompeleen jälkeen ja
aseta sen päälle staasi. Poista adventitia sisemmän tupakkapussiompeleen sisäpuolelta.
Käyttöohjeet Suomi 27

a. Mallit, joissa on taipuisa kaari: Sijoita säädettävä ommeltuki haluttuun syvyyteen.
b. Select CAP® -mallit: Täytä kanyylin paineentarkkailuluumen heparinisoidulla keittosuolaliuoksella ja sulje
kolmitiehana luumenin suuntaan, jotta liuos pysyy luumenissa.
4. Kun systeeminen heparinisointi on riittävä, tee viilto aorttaan sisemmän tupakkapussiompeleen alueelle
veitsellä nro 11. Tyrehdytä verenvuoto painamalla sormi viillon päälle. Vie kanyyli suoraan aorttaan viillon
kautta.
Huomautus: Kanyylin pitäminen pystyasennossa sisäänviennin aikana auttaa estämään mikrokuplien
muodostumisen kanyylin seinämiin.
5. Kierrä kanyylia niin, että kärki on suunnattu distaalisesti ja kanyylin ohjausviiva on kohti aorttaläppää.
6. Sisemmän tupakkapussiompeleen staasi kiristetään ja kiinnitetään kanyyliin sitomalla varmistuslanka kanyylin
ja staasin ympärille sopivaan paikkaan.
7. Kun kanyylissä ei enää ole ilmaa, aseta reiällinen ilmanpoistokorkki (jos sitä käytetään) paikalleen. (ÄLÄ
TYÖNNÄ SITÄ LIIAN SYVÄLLE.)
8. Sulje kanyylin runko puristimella, ennen kuin kiinnität kanyylin valtimolinjaan. Poista ilmanpoistokorkki tai
repäisykorkki kanyylistä. Liitä kanyyli valtimolinjaan. Tarkista linja ja poista siinä mahdollisesti oleva ilma ennen
puristimen irrottamista. (Joidenkin valtimokanyylien liittimissä on luerportti, jonka avulla voidaan poistaa ilma
linjasta tai tarkkailla linjan painetta.)
9. Kiinnitä kanyyli ihoon tai haavahakaseen ompeleella, jotta siihen ei kohdistu vetoa ja se pysyy liikkumatta.
Sijoita kanyyli ja valtimolinja niin, että kanyylissä on loiva kaarre ja se menee aorttaan kohtisuoraan. Kiinnitä
valtimolinja peitteeseen.
a. Select CAP® -mallit: Liitä heparinisoitu, keittosuolaliuoksella täytetty ruisku naaraspuoliseen luer-
liittimeen, joka on kohtisuorassa paineentarkkailulinjan akseliin. Aspiroi paineentarkkailulinjaa, kunnes
luumenissa on verta. Taputtele ruiskua, jotta aspiroinnin aikana mahdollisesti sisään päässyt ilma
kulkeutuu ruiskun yläosaan. Täytä paineentarkkailulinja ruiskuttamalla 2–3 ml heparinisoitua
keittosuolaliuosta aorttaan.
b. Liitä paineentarkkailulaitteesta tuleva esitäytetty paineentarkkailulinja kolmitiehanaan. Varmista, että
kolmitiehana on auki kanyylin paineentarkkailulinjaan. Tasapainota ja nollaa anturi.
10. Irrota kaikki puristimet kanyylista ja letkuista, ennen kuin käynnistät kehonulkoisen verenkierron.
11. Kun kirurginen toimenpide on päättynyt, hävitä kanyyli sairaalan käytännön mukaisesti. ÄLÄ KÄYTÄ
UUDELLEEN.
Seuraava takuuta koskeva vastuuvapauslauseke koskee vain asiakkaita Yhdysvaltojen
ulkopuolella.
Takuuta koskeva vastuuvapauslauseke
HUOLIMATTA SIITÄ, ETTÄ VALTIMOKANYYLI, JÄLJEMPÄNÄ ”TUOTE”, ON SUUNNITELTU,
VALMISTETTU JA TESTATTU HUOLELLISESTI ENNEN MYYNTIÄ, USEISTA ERI SYISTÄ SAATTAA
JOHTUA, ETTÄ TUOTE EI TOIMI TARKOITETULLA TAVALLA. TUOTEPAKKAUKSESSA OLEVAT
VAROITUKSET SISÄLTÄVÄT TARKEMPIA LISÄTIETOJA JA KUULUVAT OLENNAISENA OSANA TÄHÄN
TAKUUTA KOSKEVAAN VASTUUVAPAUSLAUSEKKEESEEN. MEDTRONIC EI SITEN VASTAA MISTÄÄN
SUORASTI TAI EPÄSUORASTI ILMAISTUISTA TAKUISTA, JOTKA LIITTYVÄT TUOTTEESEEN.
MEDTRONIC EI OLE VASTUUSSA MISTÄÄN SATUNNAISESTA TAI VÄLILLISESTÄ VAHINGOSTA, JOKA
ON AIHEUTUNUT TUOTTEEN KÄYTÖSTÄ, TUOTTEESSA OLEVASTA VIASTA TAI TUOTTEEN
VIRHEELLISESTÄ TOIMINNASTA RIIPPUMATTA SIITÄ, PERUSTUUKO VAADE TAKUUSEEN,
SOPIMUKSEEN, OIKEUDENLOUKKAUKSEEN TAI MUUHUN SEIKKAAN.
Yllä mainittuja rajoituksia ei ole tarkoitettu voimassa olevan pakottavan lainsäädännön vastaisiksi, eikä niitä pidä
tällä tavoin tulkita. Mikäli toimivaltainen tuomioistuin katsoo, että jokin tämän takuuta koskevan
vastuuvapauslausekkeen osa tai ehto on laiton, täytäntöönpanokelvoton tai ristiriidassa tapaukseen sovellettavan
lainsäädännön kanssa, takuuta koskeva vastuuvapauslauseke säilyy kuitenkin muilta osin voimassa, ja kaikkia
oikeuksia ja velvollisuuksia on tulkittava ja pantava täytäntöön ikään kuin tämä takuuta koskeva
vastuuvapauslauseke ei sisältäisi sitä erityistä osaa tai ehtoa, joka katsotaan pätemättömäksi.
28 Käyttöohjeet Suomi

DLP® / Select Series® / Select 3D® / Select 3D® II / Select CAP®
Artärkanyl
Produktbeskrivning
Kanylen består av en böjd, vinklad eller avsmalnande spets, med eller utan fläns, som är permanent fäst vid en
gjuten, transparent, flexibel, avsmalnande kanyl av PVC eller en armerad kanyl av PVC. Kanylens huvudstycke
har en orienteringslinje för spetsen för att indikera kanylspetsens riktning vid kanylering. På kanylens proximala
ände finns en anslutningsplats eller en gjuten räfflad anslutning på 0,95 cm (3/8 in) med eller utan en gjuten
avluftningsplugg eller lock av plast. Med avluftningspluggen eller locket kan luft avlägsnas från kanylen innan den
ansluts till perfusionsslangen.
Select CAP®-modeller: På den proximala änden sitter en tryckövervakningsslang med en trevägskran.
Steril, icke-pyrogen, för engångsbruk.
Indikationer
Kanylerna är avsedda för perfusion av aorta ascendens under kortvarig extrakorporeal cirkulation.
Produkten är avsedd för användning i upp till sex timmar.
Kontraindikationer
Produkten är inte avsedd för annat bruk än vad som anges ovan.
Varningar
Under kanylering måste yttersta försiktighet iakttagas om det finns någon risk för vävnadsdissektion av aorta.
Undvik att rikta kanylspetsen direkt mot aortabågens grenartärer för att minimera risken för att eventuella
luftbubblor når artärerna eller att ett förhöjt intrakraniellt blodtryck uppstår. Undvik att rikta spetsen mot aortaklaffen.
Undvik att böja eller vika kanylen. Val av patient och ingrepp sker helt på läkarens ansvar och resultatet påverkas
av många faktorer som till exempel patientens anatomi, patologi, kirurgi- och perfusionsmetod och -tekniker. Denna
kanyl är endast avsedd för kortvarig och tillfällig användning.
Försiktighetsåtgärder
Observera: Läkaren ansvarar för att rätt kirurgiska procedurer och tekniker används. Denna bruksanvisning är
endast avsedd som information. Kirurgen skall med utgångspunkt från sin medicinska utbildning och erfarenhet
samt typen av kirurgiskt ingrepp bedöma om ett förfarande är lämpligt.
Försiktighet måste iakttagas när kanylen och perfusionsslangen kopplas samman, så att ingen luft stängs inne i
perfusionsslangen.
Suturernas placering och orientering i aorta är avgörande för att kanylen skall komma i rätt läge. När kanylen väl
har fästs stadigt med suturer är det svårt att ändra dess läge.
Överskrid ej rekommenderat flöde.
Se till att luerlocken är åtdragna före användning.
Kanylen är konstruerad och avsedd enbart för engångsbruk. FÅR EJ ÅTERANVÄNDAS.
Överskrid ej maximala rekommenderade flödesvärden som anges nedan för modellerna Select 3D® och Select
3D® II:
upp till 4 LPM (liter per minut) för en 18 Fr kanyl; upp till 5 LPM för en 20 Fr kanyl; upp till 6 LPM för en 22 Fr kanyl;
upp till 6 LPM för en 24 Fr kanyl.
Biverkningar
Liksom alla extrakorporeala blodbehandlingssystem kan denna enhet ha biverkningar som innefattar, men inte är
begränsade till, infektioner, blodförlust, trombbildning, emboliska händelser och dislokation. Det kan uppstå
kärlskador och komplikationer vid injektionsstället om bruksanvisningen inte följs.
Bruksanvisning
1. Kontrollera att förpackningen och produkten inte är skadade och att utgångsdatumet inte har passerats. Öppna
förpackningen om den är oskadad och ej utgången. Flytta över kanylen till det sterila området med aseptisk
teknik.
2. Gör följande när en modell med avluftningsplugg används: placera avluftningspluggen så att avluftningsspåret
sträcker sig cirka 3 mm utanför kanylens ände (gäller endast modeller med anslutningsställe), eller sätt i den
porösa avluftningspluggen noggrant i den räfflade anslutningen.
Varning: Tryck inte in pluggarna för hårt. Fukta inte den porösa avluftningspluggen. Pluggen blir
ogenomtränglig för luft, vilket minimerar effektiviteten vid priming och avluftning.
Bruksanvisning Svenska 29

3. Gör en tobakspungssutur på önskat ställe i den främre ytan av distala aorta ascendens. Sätt en tourniquet
över tobakspungen. Gör en andra, yttre tobakspungssutur 1–2 mm utanför den första tobakspungen och sätt
en tourniquet över den. Skär ut adventitian från insidan av den inre tobakspungssuturen.
a. Modeller med flexibel båge: Placera den justerbara suturkragen på önskat djup.
b. Select CAP®-modeller: Prima tryckövervakningslumen på kanylen med hepariniserad koksaltlösning och
stäng kranen mot lumen för att hålla kvar den hepariniserade koksaltlösningen i lumen.
4. Kontrollera att tillräcklig systemisk heparinisering har uppnåtts. Gör ett snitt i aorta inom det område som
avgränsas av den inre tobakspungen med ett skalpellblad nr 11. Sätt ett finger över snittet för att kontrollera
blödningen. För in kanylen direkt i aorta genom snittet.
Observera: Det är till hjälp att förhindra ackumulering av mikrobubblor på kanylväggarna, om man håller
kanylen vertikalt vid inläggningen.
5. Vrid kanylen så att spetsen riktas distalt och orienteringslinjen på kanylen är vänd mot aortaklaffen.
6. Dra åt tourniqueten på den inre tobakspungssuturen och fäst den vid kanylen genom att fästa en ligatur runt
kanylen och tourniqueten på lämplig plats.
7. När kanylen har tömts på all luft, för man in den skårade avluftningspluggen fullständigt, om så är tillämpligt.
(TRYCK INTE IN DEN FÖR LÅNGT.)
8. Stäng kanylen innan den ansluts till artärslangen med en klämma. Ta bort avluftningspluggen eller locket från
kanylen. Anslut kanylen till artärslangen. Granska slangen och avlägsna eventuell instängd luft innan klämman
tas bort. (Vissa artärkanyler har en luerfattning på anslutningen som kan användas för att avlägsna luft från
slangen eller för att mäta slangtrycket.)
9. Fäst kanylen vid huden eller sårhaken med en sutur för att minska belastningen och förhindra att den rubbas
oavsiktligt. Placera kanylen och artärslangen på ett sådant sätt att kanylen är böjd i en mjuk kurva och löper
vinkelrätt in i aorta. Fäst artärslangen vid den övre operationsduken.
a. Select CAP®-modeller: Anslut en spruta fylld med hepariniserad saltlösning till honluerkopplingen som
är lodrät i förhållande till tryckövervakningsslangens axel. Aspirera tryckövervakningsslangen tills blod
syns i lumen. Slå lätt på sprutan för att tvinga ut luft som eventuellt dragits in och upp i sprutan under
aspiration. Injicera 2-3 ml hepariniserad koksaltlösning i aorta för att fylla tryckövervakningsslangen.
b. Anslut en förprimad tryckövervakningsslang från en tryckövervakningsenhet till trevägskranen. Se till att
kranen är öppen mot kanylens tryckövervakningsslang. Balansera och nollställ transducern.
10. Ta bort alla klämmor från kanyl och slangar innan den kardiopulmonella bypassen startas.
11. När det kirurgiska ingreppet är avslutat skall kanylen kasseras enligt sjukhusets gängse rutiner. FÅR EJ
ÅTERANVÄNDAS.
Nedanstående friskrivning från ansvar är tillämplig på kunder utanför USA:
Friskrivning från ansvar
OAKTAT ARTÄRKANYLEN, NEDAN "PRODUKTEN", FÖRE FÖRSÄLJNING BLIVIT NOGGRANT
KONSTRUERAD, TILLVERKAD OCH KONTROLLERAD, KAN DET AV OLIKA SKÄL INTRÄFFA ATT
PRODUKTEN ÄR BEHÄFTAD MED FEL ELLER INTE FUNGERAR TILLFREDSSTÄLLANDE.
VARNINGSTEXTER PÅ PRODUKTETIKETTEN INNEHÅLLER MERA DETALJERADE UPPLYSNINGAR OCH
UTGÖR EN INTEGRERAD DEL AV DENNA FRISKRIVNING FRÅN ANSVAR. MEDTRONIC FRISKRIVER SIG
DÄRFÖR HELT FRÅN ANSVAR FÖR ALLA FEL I PRODUKTEN. INGA GARANTIER LÄMNAS, VARE SIG
UTTRYCKLIGEN ELLER UNDERFÖRSTÅTT. MEDTRONIC SKALL DÄRFÖR INTE VARA SKYLDIGT ATT
ERSÄTTA NÅGON SKADA, VARE SIG DIREKT ELLER INDIREKT, SOM UPPKOMMER MED ANLEDNING
AV PRODUKTENS UTFORMNING ELLER DESS ANVÄNDNING, OAVSETT OM KRAVET GRUNDAR SIG PÅ
PÅSTÅENDE OM GARANTI, AVTALSBROTT, SKADEGÖRANDE HANDLING ELLER ANNAT.
Ovan angiven friskrivning från ansvar är inte avsedd att stå i strid med tvingande regler i tillämplig lag, och den
skall inte heller tolkas så. Skulle denna friskrivning från ansvar till någon del av behörig domstol anses ogiltig,
verkningslös eller stridande mot tillämplig lag, skall friskrivningen från ansvar gälla i övrigt, varvid alla rättigheter
och skyldigheter skall bestå, som om friskrivningen från ansvar inte innehöll den del som underkänts.
30 Bruksanvisning Svenska

DLP® / Select Series® / Select 3D® / Select 3D® II / Select CAP®
Αρτηριακή κάνουλα
Περιγραφή προϊόντος
Η κάνουλα αποτελείται από κυρτό, γωνιωτό ή λοξοτμημένο άκρο, με ή χωρίς περιαυχένιο, που είναι μόνιμα
προσαρτημένο σε ένα χυτευμένο, διάφανο, εύκαμπτο κωνικό σώμα από PVC ή σε σώμα από PVC με περιελιγμένο
σύρμα. Το σώμα της κάνουλας διαθέτει γραμμή προσανατολισμού άκρου για να υποδεικνύει την κατεύθυνση του
άκρου της κάνουλας κατά τη διάρκεια του καθετηριασμού. Το εγγύς άκρο της κάνουλας περιλαμβάνει ένα σημείο
σύνδεσης ή ένα χυτευμένο βαθμιδωτό σύνδεσμο 0,95 cm με ή χωρίς χυτευμένο πλαστικό βύσμα εξαερισμού ή
αποσπώμενο καπάκι. Το βύσμα εξαερισμού ή το αποσπώμενο καπάκι επιτρέπει την αφαίρεση του αέρα από την
κάνουλα πριν από τη σύνδεση στη γραμμή αιμάτωσης.
Μοντέλα Select CAP®: Το εγγύς άκρο διαθέτει γραμμή παρακολούθησης πίεσης με τρίοδη στρόφιγγα.
Στείρα, μη πυρετογόνος, μίας χρήσης.
Ενδείξεις χρήσης
Αυτές οι κάνουλες προορίζονται για χρήση κατά την αιμάτωση της ανιούσας αορτής κατά τη διάρκεια
καρδιοπνευμονικής παράκαμψης βραχείας διάρκειας
Το προϊόν αυτό προορίζεται για χρήση μόνον έως και έξι ώρες ή λιγότερο.
Αντενδείξεις
Η συσκευή αυτή δεν προορίζεται για χρήσεις εκτός από τις ανωτέρω ενδεικνυόμενες.
Προειδοποιήσεις
Κατά τον καθετηριασμό, πρέπει να είστε ιδιαίτερα προσεκτικοί εάν υπάρχει ενδεχόμενο διαχωρισμού ιστού της
αορτής. Αποφύγετε τη στροφή του άκρου της κάνουλας απευθείας προς τους αρτηριακούς κλάδους του αορτικού
τόξου για να ελαχιστοποιήσετε το ενδεχόμενο κατεύθυνσης τυχόν εμβόλων που έχουν εκτοπιστεί εντός των
αρτηριών ή πρόκλησης αυξημένης ενδοκρανιακής πίεσης αίματος. Αποφύγετε την κατεύθυνση του άκρου προς
την αορτική βαλβίδα.
Αποφύγετε την κύρτωση ή στρέβλωση της κάνουλας. Η επιλογή ασθενούς και διαδικασίας αποτελούν αποκλειστική
ιατρική ευθύνη και η έκβαση εξαρτάται από πολλές μεταβλητές, συμπεριλαμβανομένης της ανατομίας του
ασθενούς, της παθολογίας, των χειρουργικών επεμβάσεων και τεχνικών, καθώς και των διαδικασιών και τεχνικών
αιμάτωσης. Αυτή η κάνουλα προορίζεται μόνο για βραχυπρόθεσμη, προσωρινή χρήση.
Προφυλάξεις
Σημείωση: Η χρήση κατάλληλων χειρουργικών επεμβάσεων και τεχνικών αποτελεί ευθύνη του επαγγελματία
υγείας. Η περιγραφόμενη διαδικασία παρέχεται μόνο για σκοπούς πληροφόρησης. Οι χειρουργοί πρέπει να
αξιολογήσουν την καταλληλότητα της διαδικασίας βασιζόμενοι στην προσωπική τους ιατρική εκπαίδευση και
εμπειρία, καθώς και στο είδος της χειρουργικής επέμβασης.
Να είστε προσεκτικοί κατά τη σύνδεση της κάνουλας και της γραμμής αιμάτωσης, ώστε να διασφαλιστεί ότι δεν
έχει παγιδευτεί αέρας στη γραμμή αιμάτωσης.
Το σημείο της τοποθέτησης και ο προσανατολισμός των ραμμάτων στην αορτή είναι ζωτικής σημασίας για τη
σωστή τοποθέτηση της κάνουλας. Μόλις η κάνουλα ασφαλιστεί σταθερά με τα ράμματα, είναι δύσκολο να αλλάξετε
την θέση της κάνουλας.
Μην υπερβαίνετε τη συνιστώμενη ροή.
Συσφίξτε τα καπάκια luer πριν από τη χρήση.
Αυτή η κάνουλα είναι σχεδιασμένη και προορίζεται για μία μόνο χρήση. ΜΗΝ ΕΠΑΝΑΧΡΗΣΙΜΟΠΟΙΕΙΤΕ.
Μην υπερβαίνετε τις μέγιστες συνιστώμενες παροχές που παρατίθενται παρακάτω για τα μοντέλα Select 3D
και Select 3D® II:
έως και 4 LPM (λίτρα ανά λεπτό) για κάνουλα 18 Fr, έως και 5 LPM για κάνουλα 20 Fr, έως και 6 LPM για
κάνουλα 22 Fr, έως και 6 LPM για κάνουλα 24 Fr.
Ανεπιθύμητες ενέργειες
Η συσκευή αυτή, όπως όλες οι συσκευές εξωσωματικής κυκλοφορίας του αίματος, ενδέχεται να προκαλέσει
παρενέργειες, οι οποίες περιλαμβάνουν, μεταξύ άλλων, λοιμώξεις, απώλεια αίματος, σχηματισμό θρόμβου,
εμβολικά επεισόδια και μετατόπιση. Ενδέχεται να προκληθεί αγγειακή βλάβη και επιπλοκές στο σημείο
παρακέντησης εάν δεν ακολουθηθούν οι οδηγίες χρήσης.
Οδηγίες χρήσης
1. Επιθεωρήστε τη συσκευασία και το προϊόν για τυχόν ζημιές και ελέγξτε την ημερομηνία λήξης. Εάν δεν υπάρχει
ζημιά και δεν έχει παρέλθει η ημερομηνία λήξης, ανοίξτε τη συσκευασία και μεταφέρετε την κάνουλα στο στείρο
πεδίο χρησιμοποιώντας άσηπτη τεχνική.
®
Οδηγίες χρήσης Ελληνικά 31

2. Για τα μοντέλα με βύσματα εξαερισμού, τοποθετήστε το βύσμα εξαερισμού ώστε η σχισμή εξαερισμού να
εκτείνεται περίπου 3 mm πέρα από το άκρο της κάνουλας (μόνο στα μοντέλα με σημείο σύνδεσης) ή
τοποθετήστε το πορώδες βύσμα εξαερισμού ώστε να εφαρμόζει άνετα στο βαθμιδωτό σύνδεσμο.
Προειδοποίηση: Μην εισαγάγετε υπερβολικά τα βύσματα. Μην υγραίνετε το πορώδες βύσμα εξαερισμού. Το
βύσμα θα καταστεί μη διαπερατό για τον αέρα και θα μειώσει την αποτελεσματικότητα της αρχικής πλήρωσης
και του εξαερισμού.
3. Τοποθετήστε ράμμα περίπαρσης στην πρόσθια επιφάνεια της άπω ανιούσας αορτής στο επιθυμητό σημείο.
Τοποθετήστε αιμοστατικό επίδεσμο στο ράμμα περίπαρσης. Τοποθετήστε ένα δεύτερο εξωτερικό ράμμα
περίπαρσης 1-2 mm πέρα από το αρχικό και τοποθετήστε έναν αιμοστατικό επίδεσμο πάνω από αυτό.
Εξαιρέστε τον εξωτερικό χιτώνα από το εσωτερικό ράμμα περίπαρσης.
α. Μοντέλα με εύκαμπτο τόξο: Τοποθετήστε το προσαρμοζόμενο κολάρο ράμματος στο επιθυμητό βάθος.
β. Μοντέλα Select CAP®: Πληρώστε τον αυλό παρακολούθησης πίεσης της κάνουλας με ηπαρινισμένο
φυσιολογικό ορό και κλείστε τη στρόφιγγα προς τον αυλό για να συγκρατήσετε τον ηπαρινισμένο
φυσιολογικό ορό εντός του αυλού.
4. Αφότου διασφαλίσετε ότι έχει επιτευχθεί επαρκής συστηματική χορήγηση ηπαρίνης, κάντε μια τομή στην αορτή
εντός των ορίων του εσωτερικού ράμματος περίπαρσης χρησιμοποιώντας λεπίδα αριθμού 11. Τοποθετήστε
το δάκτυλο πάνω από την τομή για να ελέγξετε την αιμορραγία. Εισαγάγετε την κάνουλα απευθείας εντός της
αορτής μέσω της τομής.
Σημείωση: Εάν κρατήσετε κάθετη την κάνουλα κατά τη διάρκεια της εισαγωγής θα βοηθήσετε ώστε να
αποτραπεί η συσσώρευση μικρών φυσαλίδων στα τοιχώματα της κάνουλας.
5. Περιστρέψτε την κάνουλα ώστε το άκρο να κατευθύνεται προς τα άπω και η γραμμή προσανατολισμού της
κάνουλας να είναι στραμμένη προς την αορτική βαλβίδα.
6. Ο αιμοστατικός επίδεσμος στο εσωτερικό ράμμα περίπαρσης συσφίγγεται και ασφαλίζεται στην κάνουλα με
το δέσιμο μιας απολίνωσης ασφάλισης γύρω από την κάνουλα και τον αιμοστατικό επίδεσμο σε βολικό σημείο.
7. Όταν αφαιρεθεί όλος ο αέρας από την κάνουλα, εισαγάγετε πλήρως το βύσμα εξαερισμού με σχισμές ώστε να
τη σφραγίσετε, εάν εφαρμόζεται. (ΜΗΝ ΕΙΣΑΓΑΓΕΤΕ ΥΠΕΡΒΟΛΙΚΑ).
8. Πριν από την προσάρτηση της κάνουλας στην αρτηριακή γραμμή, συσφίξτε το σώμα της κάνουλας. Αφαιρέστε
το βύσμα εξαερισμού ή το αποσπώμενο καπάκι από την κάνουλα. Προσαρτήστε την κάνουλα στην αρτηριακή
γραμμή. Επιθεωρήστε τη γραμμή και αφαιρέστε τυχόν παγιδευμένο αέρα προτού αφαιρέσετε το σφιγκτήρα.
(Ορισμένες αρτηριακές κάνουλες διαθέτουν θύρα luer στο σύνδεσμο η οποία μπορεί να χρησιμοποιηθεί για
την αφαίρεση αέρα από τη γραμμή ή την παρακολούθηση της πίεσης της γραμμής).
9. Ασφαλίστε την κάνουλα στο δέρμα ή σε διαστολέα με ράμμα για να παρέχετε ανακούφιση της τάνυσης και να
αποτρέψετε τυχόν ακούσιες κινήσεις. Τοποθετήστε την κάνουλα και την αρτηριακή γραμμή με τέτοιο τρόπο
ώστε η κάνουλα να αποκτήσει ελαφριά καμπύλη και να εισαχθεί κάθετα στην αορτή. Ασφαλίστε την αρτηριακή
γραμμή στο άνω χειρουργικό πεδίο.
α. Μοντέλα Select CAP®: Προσαρτήστε μια ηπαρινισμένη, πληρωμένη με φυσιολογικό ορό σύριγγα στο
θηλυκό luer που βρίσκεται σε κάθετη θέση ως προς τον άξονα σωλήνωσης της γραμμής παρακολούθησης
πίεσης. Διενεργήστε αναρρόφηση στη γραμμή παρακολούθησης πίεσης έως ότου εμφανιστεί αίμα στον
αυλό. Κτυπήστε ελαφρά τη σύριγγα για να εξωθήσετε τυχόν αέρα που έχει αναρροφηθεί στο πάνω μέρος
της σύριγγας. Εγχύστε 2-3 cc ηπαρινισμένου φυσιολογικού ορού στην αορτή για να πληρώσετε τη γραμμή
παρακολούθησης πίεσης.
β. Προσαρτήστε την προπληρωμένη γραμμή παρακολούθησης πίεσης από μια συσκευή παρακολούθησης
πίεσης στην τρίοδη στρόφιγγα. Βεβαιωθείτε ότι η στρόφιγγα είναι ανοικτή προς τη γραμμή
παρακολούθησης πίεσης της κάνουλας. Ισορροπήστε και μηδενίστε τον μετατροπέα.
10. Αφαιρέστε όλους τους σφιγκτήρες από την κάνουλα και τις γραμμές πριν από την έναρξη της
καρδιοπνευμονικής παράκαμψης.
11. Οταν ολοκληρωθεί η χειρουργική επέμβαση, απορρίψτε την κάνουλα σύμφωνα με την πολιτική του
νοσοκομείου. ΜΗΝ ΕΠΑΝΑΧΡΗΣΙΜΟΠΟΙΕΙΤΕ.
Η παρακάτω αποποίηση εγγύησης εφαρμόζεται σε πελάτες εκτός των Ηνωμένων Πολιτειών:
Αποποίηση εγγύησης
ΑΝ ΚΑΙ Η ΑΡΤΗΡΙΑΚΗ ΚΑΝΟΥΛΑ, ΕΦΕΞΗΣ ΑΝΑΦΕΡΕΤΑΙ ΩΣ "ΠΡΟΪΟΝ" ΕΧΕΙ ΠΡΟΣΕΚΤΙΚΑ ΣΧΕΔΙΑΣΘΕΙ,
ΚΑΤΑΣΚΕΥΑΣΘΕΙ ΚΑΙ ΔΟΚΙΜΑΣΘΕΙ ΠΡΙΝ ΑΠΟ ΤΗΝ ΠΩΛΗΣΗ ΤΗΣ, ΤΟ ΠΡΟΪΟΝ ΜΠΟΡΕΙ ΝΑ ΑΠΟΤΥΧΕΙ
ΣΤΗΝ ΕΚΤΕΛΕΣΗ ΤΗΣ ΠΡΟΤΙΘΕΜΕΝΗΣ ΛΕΙΤΟΥΡΓΙΑΣ ΤΟΥ ΛΟΓΩ ΜΙΑΣ ΠΟΙΚΙΛΙΑΣ ΑΙΤΙΩΝ. ΟΙ
ΠΡΟΕΙΔΟΠΟΙΗΣΕΙΣ ΠΟΥ ΠΕΡΙΕΧΟΝΤΑΙ ΣΤΙΣ ΕΤΙΚΕΤΕΣ ΤΟΥ ΠΡΟΪΟΝΤΟΣ ΠΑΡΕΧΟΥΝ ΠΙΟ ΛΕΠΤΟΜΕΡΕΙΣ
ΠΛΗΡΟΦΟΡΙΕΣ ΚΑΙ ΘΕΩΡΟΥΝΤΑΙ ΑΚΕΡΑΙΟ ΤΜΗΜΑ ΤΗΣ ΠΑΡΟΥΣΑΣ ΑΠΟΠΟΙΗΣΗΣ ΕΓΓΥΗΣΗΣ. Η
MEDTRONIC, ΕΠΟΜΕΝΩΣ, ΑΠΟΠΟΙΕΙΤΑΙ ΟΛΕΣ ΤΙΣ ΕΓΓΥΗΣΕΙΣ, ΤΟΣΟ ΤΙΣ ΡΗΤΕΣ, ΟΣΟ ΚΑΙ ΤΙΣ ΕΜΜΕΣΕΣ,
ΣΕ ΣΧΕΣΗ ΜΕ ΤΟ ΠΡΟΪΟΝ. H MEDTRONIC ΔΕΝ ΘΑ ΕΙΝΑΙ ΥΠΕΥΘΥΝΗ ΓΙΑ ΟΠΟΙΕΣΔΗΠΟΤΕ
ΠΕΡΙΣΤΑΣΙΑΚΕΣ Η ΕΠΑΚΟΛΟΥΘΕΣ ΖΗΜΙΕΣ ΠΡΟΚΑΛΟΥΜΕΝΕΣ ΑΠΟ ΚΑΘΕ ΧΡΗΣΗ, ΕΛΑΤΤΩΜΑ Η
32 Οδηγίες χρήσης Ελληνικά

ΑΣΤΟΧΙΑ ΤΟΥ ΠΡΟΪΟΝΤΟΣ, ΕΙΤΕ Η ΔΙΕΚΔΙΚΗΣΗ ΑΠΟΖΗΜΙΩΣΕΩΝ ΒΑΣΙΖΕΤΑΙ ΣΕ ΕΓΓΥΗΣΗ, ΣΥΜΒΑΣΗ,
ΑΔΙΚΟΠΡΑΞΙΑ ΕΙΤΕ ΣΕ ΟΤΙΔΗΠΟΤΕ ΑΛΛΟ.
Οι εξαιρέσεις και περιορισμοί που αναφέρονται παραπάνω δεν αποσκοπούν, ούτε και πρέπει να εκλαμβάνονται
ως αντιβαίνοντες στις υποχρεωτικές διατάξεις της ισχύουσας νομοθεσίας. Εάν μέρος ή όρος αυτής της αποποίησης
εγγύησης θεωρείται από οποιοδήποτε δικαστήριο αρμόδιας δικαιοδοσίας παράνομο, άκυρο ή συγκρουόμενο με
την ισχύουσα νομοθεσία, η ισχύς του υπολοίπου τμήματος της αποποίησης εγγύησης δεν θα επηρεασθεί και όλα
τα δικαιώματα και υποχρεώσεις θα ερμηνευθούν και θα ισχύσουν σαν να μην περιέχει αυτή η αποποίηση εγγύησης
το ιδιαίτερο τμήμα ή τον όρο που θεωρείται άκυρο.
Οδηγίες χρήσης Ελληνικά 33

DLP® / Select Series® / Select 3D® / Select 3D® II / Select CAP®
Arteriekanyle
Produktbeskrivelse
Kanylen består af en buet, vinklet eller skrå spids med eller uden flange, der sidder fast på en støbt, gennemsigtig,
fleksibel, konisk PVC-krop eller en trådforstærket PVC-krop. Kanylekroppen har en spidsorienteringslinje til
indikation af kanylespidsen under placering af kanylen. Proksimalt ender kanylen i et forbindelsessted eller i en
støbt 0,95 cm konnektor med modhager og med eller uden en udluftningsprop eller hætte støbt i plast.
Udluftningsproppen eller hætten gør det muligt at udlufte kanylen, før denne forbindes til perfusionsslangen.
Select CAP® modeller: Den proksimale ende er udstyret med en trykmonitoreringsslange med en 3-vejs stophane.
Steril, non-pyrogen, må kun bruges én gang.
Brugsanvisning
Disse kanyler er beregnet til perfusion af aorta ascendens under kortvarige indgreb, der indebærer hjertelunge bypass
Dette produkt er beregnet til brug i op til seks timer.
Kontraindikationer
Udstyret er udelukkende beregnet til ovennævnte formål.
Advarsler
Der bør udvises stor forsigtighed under placeringen af kanylen, hvis der er risiko for at beskadige aortavævet. Med
henblik på at formindske risikoen for, at en eventuel emboli rives løs og føres ind i arterierne eller for at undgå
forhøjet intrakranielt tryk, bør kanylespidsen ikke rettes direkte mod aortabuens arterieforgreninger. Undgå at rette
spidsen mod aortaklappen.
Undgå at bøje eller kinke kanylen. Udvælgelse af patienter og valg af procedure er fuldt ud lægens ansvar, og
resultatet afhænger af mange variabler, herunder af patients anatomi og patologi samt procedurer og teknikker for
kirurgi og perfusion. Denne kanyle er kun beregnet til kortvarig midlertidig brug.
Forholdsregler
Bemærk: Korrekte operationsprocedurer og -teknikker er lægens ansvar. Den beskrevne procedure er kun
vejledende. Lægerne må selv vurdere procedurens egnethed på baggrund af egen uddannelse og egne erfaringer
samt ud fra typen af kirurgisk indgreb.
Det er vigtigt at være påpasselig, når kanylen og perfusionsslangen forbindes, og sikre, at luft ikke indesluttes i
perfusionsslangen.
Anbringelse, lokalisering og retning af suturerne i aorta er afgørende for en korrekt placering af kanylen. Når
kanylen først er fastgjort med suturer, er det yderst vanskeligt at ændre dens placering.
Det anbefalede flow må ikke overskrides.
Stram alle luer-hætter før brug.
Denne kanyle er konstrueret og beregnet til kun at bruges én gang. MÅ KUN BRUGES ÉN GANG.
Undgå at overskride de maksimale anbefalede flowhastigheder, der er angivet for Select 3D® og Select 3D® II
model:
op til 4 lpm (liter pr. minut) for en 18 Fr kanyle; op til 5 lpm for en 20 Fr kanyle; op til 6 lpm for en 22 Fr kanyle; op
til 6 lpm for en 24 Fr kanyle.
Bivirkninger
Denne enhed har ligesom andre ekstrakorporale blodsystemenheder mulige bivirkninger, som omfatter - men ikke
er begrænset til - infektioner, blodtab, trombosedannelse, emboli og løsrivelse. Karskader og komplikationer ved
punkturstedet kan forekomme, hvis brugsanvisningen ikke følges.
Brugsanvisning
1. Efterse emballagen og dens indhold for skader, og kontrollér sidste anvendelsesdato. Hvis ubeskadiget, og
anvendelsesdatoen ikke er overskredet, åbnes emballagen, og kanylen overflyttes til det sterile område under
anvendelse af aseptisk teknik.
2. Ved modeller med udluftningspropper skal propperne anbringes således, at udluftningsåbningen stikker ca. 3
mm ud forbi enden af kanylen (kun modeller med forbindelsessted), eller anbring den porøse udluftningsprop
fast i konnektoren med modhager.
Advarsel: Pas på ikke at føre propperne for langt ind. Den porøse udluftningsprop må ikke fugtes. Hvis
proppen bliver fugtig, er den ikke længere luftgennemtrængelig, og opfyldning og udluftning er mindre effektiv.
34 Brugsanvisning Dansk

3. Anbring en tobaksposesutur i det anteriore område af den distale del af aorta ascendens på det ønskede sted.
Anbring en tourniquet over denne tobaksposesutur. Anbring endnu en ydre tobaksposesutur 1–2 mm uden for
den første, og anbring en tourniquet over den. Fjern adventitiavævet inden for den indre tobaksposesutur.
a. Modeller med fleksibel bue: Anbring den indstillelige suturkrave i den ønskede dybde.
b. Select CAP® modeller: Opfyld kanylens trykmonitoreringsåbning med hepariniseret saltvand og luk
stophanen mod åbningen for at holde det hepariniserede saltvand i åbningen.
4. Efter at have kontrolleret, at der er opnået en tilfredsstillende systemisk heparinisering, lægges et snit i aorta
inden for den indre tobaksposesutur ved hjælp af en skalpel nr. 11. Anbring en finger over snittet for at
begrænse blødningen. Indfør kanylen direkte i aorta gennem snittet.
Bemærk: Som hjælp til at forhindre dannelse af mikro-luftbobler på kanylens inderside skal kanylen holdes
lodret under indføringen.
5. Drej kanylen således, at spidsen er rettet distalt, og kanylens orienteringslinje vender mod aortaklappen.
6. Tourniquet'en på den inderste tobaksposesutur strammes og fastgøres på kanylen ved at binde en
fastholdende ligatur rundt om kanylen og tourniquet på et passende sted.
7. Når al luft er fjernet fra kanylen, skubbes den rillede udluftningsprop helt ind for at opnå tætning, hvis dette er
relevant. (FØR IKKE PROPPEN FOR LANGT IND.)
8. Afklem kanylen, før den forbindes til arterieslangen. Fjern udluftningsproppen eller hætten fra kanylen. Forbind
kanylen til arterieslangen. Efterse slangen, og fjern eventuelt indesluttet luft, før klemmen fjernes. (På nogle
arteriekanyler er konnektoren udstyret med en luerport, der kan anvendes til at fjerne luft fra slangen eller til
at monitorere trykket i slangen).
9. Fastgør kanylen til huden eller til en retraktor med en sutur, således at trækket i kanylen mindskes, og den
ikke udsættes for utilsigtede bevægelser. Anbring kanylen og arterieslangen således, at kanylen er let bøjet
og går vinkelret ind i aorta. Gør arterieslangen fast til det øverste afdækningsstykke.
a. Select CAP® modeller: Forbind en hepariniseret saltvandsfyldt sprøjte til den hun-luer, der er vinkelret på
trykmonitoreringsslangens akse. Aspirér trykmonitoreringsslangen, indtil der ses blod i åbningen. Knips
på sprøjten for at tvinge den luft, der eventuelt måtte være trukket op under aspireringen, til sprøjtens top.
Injicér 2-3 ml hepariniseret saltvand i aorta for at fylde trykmonitoreringsslangen.
b. Forbind en i forvejen opfyldt trykmonitoreringsslange fra en trykmonitoreringsenhed til 3-vejs stophanen.
Sørg for, at stophanen er åben mod kanylens trykmonitoreringsslange. Afbalancér og nulstil transduceren.
10. Fjern alle klemmer fra kanyle og slanger, før hjertelunge by-pass’et påbegyndes.
11. Efter afslutning af den kirurgiske procedure skal kanylen kasseres i overensstemmelse med hospitalets regler.
MÅ KUN BRUGES ÉN GANG.
Følgende ansvarsfraskrivelse gælder for kunder uden for USA:
Ansvarsfraskrivelse
SELVOM ARTERIEKANYLEN, I DET FØLGENDE KALDET "PRODUKTET", ER OMHYGGELIGT DESIGNET,
FREMSTILLET OG AFPRØVET FØR SALG, KAN DER AF MANGE GRUNDE VÆRE EN RISIKO FOR, AT
PRODUKTET IKKE FUNGERER TILFREDSSTILLENDE EFTER HENSIGTEN. ADVARSLERNE, SOM
FREMGÅR AF PRODUKTETS MÆRKATER, GIVER MERE DETALJEREDE OPLYSNINGER OG BETRAGTES
SOM EN INTEGRERET DEL AF DENNE ANSVARSFRASKRIVELSE. MEDTRONIC FRASIGER SIG DERFOR
ALLE GARANTIER, UDTRYKKELIGE SÅVEL SOM STILTIENDE, MED HENSYN TIL PRODUKTET.
MEDTRONIC KAN IKKE HOLDES ANSVARLIG FOR TILFÆLDIGE SKADER ELLER FØLGESKADER SOM
FØLGE AF BRUG AF PRODUKTET ELLER DETS DEFEKT ELLER FEJLFUNKTION, UANSET OM KRAVET
BASERES PÅ GARANTI, KONTRAKT, ERSTATNING UDEN FOR KONTRAKT ELLER ANDET.
Ovennævnte undtagelser og begrænsninger har ikke til hensigt at være i modstrid med ufravigelige bestemmelser
i gældende lov, og de må ikke fortolkes således. Hvis nogen del af eller noget vilkår i denne ansvarsfraskrivelse
af en retsinstans i nogen kompetent jurisdiktion anses for ulovligt, uden retskraft eller i konflikt med den relevante
lovgivning, berøres de resterende dele af ansvarsfraskrivelsen ikke, og alle rettigheder og forpligtelser skal tolkes
og håndhæves, som om denne ansvarsfraskrivelse ikke indeholdt det pågældende afsnit eller vilkår, der anses for
ugyldigt.
Brugsanvisning Dansk 35

DLP® / Select® / Select 3D® / Select 3D® II /Select CAP®
Kaniula tętnicza
Opis produktu
Kaniula składa się z zakrzywionej końcówki kątowej lub ze skośnym ścięciem, z kołnierzem lub bez, połączonej
trwale ze zwężanym, przezroczystym i elastycznym korpusem PVC lub zbrojonym korpusem PVC. Korpus kaniuli
zawiera linię orientacji końcówki, która wskazuje kierunek końcówki podczas kaniulacji. Na proksymalnym końcu
kaniuli znajduje się miejsce połączenia lub gwintowany konektor 0,95 cm z lub bez profilowanej plastikowej zatyczki
wentu lub zdejmowanej nasadki. Zatyczka wentu lub zdejmowana nasadka umożliwia odprowadzenie powietrza
z kaniuli przed jej podłączeniem do linii perfuzyjnej.
Modele Select CAP®: Koniec proksymalny kaniuli wyposażony jest w linię monitorowania ciśnienia z trójdrożnym
kurkiem zamykającym.
Produkt jałowy, niepirogenny, jednorazowego użytku.
Wskazania
Kaniule te są przeznaczone do stosowania w perfuzji aorty wstępującej podczas krótkotrwałego krążenia
pozaustrojowego.
Ten produkt może być używany przez okres nie dłuższy niż sześć godzin.
Przeciwwskazania
Niniejszy produkt przeznaczony jest wyłącznie do zastosowań wymienionych powyżej.
Ostrzeżenia
Podczas wprowadzania kaniuli do naczynia należy zachować szczególną ostrożność w przypadku ryzyka
rozwarstwienia ściany aorty. Należy unikać kierowania końcówki kaniuli bezpośrednio w stronę tętnic
odchodzących od łuku aorty w celu zminimalizowania ryzyka embolizacji tętnic lub wzrostu ciśnienia
wewnątrzczaszkowego. Unikać kierowania końcówki w stronę zastawki aorty.
Unikać zginania lub skręcania kaniuli. Za wybór pacjenta i rodzaju zabiegu odpowiada wyłącznie lekarz, a wynik
końcowy zależy od wielu zmiennych, w tym anatomii pacjenta, rodzaju patologii oraz procedur i technik
chirurgicznych i krążenia pozaustrojowego. Kaniula ta jest przeznaczona wyłącznie do czasowego, krótkotrwałego
użytku.
Środki ostrożności
Uwaga: Za stosowanie właściwych zabiegów i technik chirurgicznych odpowiedzialny jest personel medyczny.
Opisana procedura została podana tylko w celach informacyjnych. Celowość i rodzaj zabiegu chirurgicznego
muszą być ocenione przez chirurga w oparciu o jego wiedzę medyczną i doświadczenie.
Należy zachować ostrożność podczas łączenia kaniuli z linią perfuzyjną, aby nie dopuścić do przedostania się
powietrza do linii perfuzyjnej.
Lokalizacja oraz zorientowanie szwów w aorcie mają zasadnicze znaczenie dla prawidłowego ustawienia kaniuli.
Po zamocowaniu kaniuli za pomocą szwów zmiana położenia kaniuli jest bardzo trudna.
Nie przekraczać zalecanych wartości przepływu.
Dokręcić zaślepkę typu Luer przed użyciem.
Kaniula została zaprojektowana i jest przeznaczona wyłącznie do jednorazowego użytku. PRODUKT DO
JEDNORAZOWEGO ZASTOSOWANIA.
Nie przekraczać maksymalnych zalecanych wartości natężenia przepływu w przypadku modeli Select 3D® oraz
Select 3D® II:
maks. 4 l/min w przypadku kaniuli o średnicy 18 Fr, maks. 5 l/min w przypadku kaniuli o średnicy 20 Fr, maks.
6 l/min w przypadku kaniuli o średnicy 22 Fr i maks. 6 l/min. w przypadku kaniuli o średnicy 24 Fr.
Działania niepożądane
Stosowanie tego produktu, tak jak wszystkich systemów pozaustrojowego krążenia krwi, jest obarczone ryzykiem
wystąpienia możliwych objawów ubocznych, takich jak m.in. infekcje, utrata krwi, powstanie skrzepliny, zdarzenia
zatorowe czy przemieszczenie. W przypadku niestosowania się do Instrukcji użytkowania, w miejscu wkłucia może
dojść do uszkodzenia naczynia i powikłań.
Instrukcja użytkowania
1. Sprawdzić opakowanie i produkt pod kątem uszkodzeń i terminu ważności. Jeśli opakowanie nie jest
uszkodzone i nie minął termin ważności, otworzyć opakowanie i z zachowaniem jałowości przenieść kaniulę
na sterylne pole.
36 Instrukcja użytkowania Polski

2. W przypadku modeli z zatyczką wentu należy umieścić zatyczkę w taki sposób, aby otwór wentylacyjny
wystawał o około 3 mm poza koniec kaniuli (dotyczy to tylko modeli z miejscem połączenia) lub dokładnie
wsunąć porowatą zatyczkę w gwintowany konektor.
Ostrzeżenie: Nie wsuwać zatyczek zbyt głęboko. Nie doprowadzać do zamoczenia porowatej zatyczki wentu.
Zatyczka przestanie przepuszczać powietrze, minimalizując skuteczność wypełniania i wentylacji.
3. Założyć szew kapciuchowy w żądanym miejscu na przedniej powierzchni części dystalnej aorty wstępującej.
Na szew kapciuchowy założyć opaskę uciskową. Założyć drugi zewnętrzny szew kapciuchowy w odległości
od 1 do 2 mm od pierwszego i założyć opaskę uciskową. Odciąć przydankę naczyniową w pierwszym szwie
kapciuchowym.
a. Modele elastyczne: Ustawić regulowany kołnierz szwu na żądaną głębokość.
b. Modele Select CAP®: Wypełnić światło kaniuli z linią monitorującą ciśnienie roztworem soli fizjologicznej
z heparyną i zamknąć kurek zamykający w kierunku światła w celu zatrzymania roztworu heparyny w
świetle.
4. Sprawdzić, czy zapewniona została odpowiednia heparynizacja ogólnoustrojowa, a następnie wykonać
nacięcie aorty w obrębie wewnętrznego szwu kapciuchowego ostrzem nr 11. Umieścić palec w nacięciu, aby
zatamować krwawienie. Umieścić kaniulę bezpośrednio w aorcie przez nacięcie.
Uwaga: Aby zapobiec gromadzeniu się mikropęcherzyków powietrza na ścianach kaniuli, podczas jej
umieszczania w świetle aorty należy ją trzymać pionowo.
5. Obracać kaniulę, tak aby końcówka była skierowana ku tyłowi, a wskaźnik orientacji końcówki na kaniuli był
skierowany w stronę zastawki aorty.
6. Opaskę uciskową na wewnętrznym szwie kapciuchowym zaciska się i mocuje do kaniuli za pomocą podwiązki
wokół kaniuli i opaski uciskowej w dogodnym miejscu.
7. Po całkowitym usunięciu powietrza z kaniuli wsunąć do końca rowkowaną zatyczkę wentu w celu uszczelnienia
kaniuli, jeśli jest to wymagane. (NIE WSUWAĆ ZBYT GŁĘBOKO).
8. Przed podłączeniem kaniuli do linii tętniczej zacisnąć korpus kaniuli. Zdjąć zatyczkę wentu lub zdejmowaną
nasadkę z kaniuli. Podłączyć kaniulę do linii tętniczej. Sprawdzić, czy w linii nie znajduje się powietrze i usunąć
je przed zdjęciem zacisku. (Niektóre kaniule tętnicze są wyposażone w port typu luer na konektorze, który
może służyć do usuwania powietrza z linii lub monitorowania ciśnienia w linii).
9. Przymocować kaniulę do skóry lub retraktora za pomocą szwu, aby odciążyć tkanki i zapobiec przypadkowemu
poruszeniu. Ustawić kaniulę i linię tętniczą w taki sposób, aby kaniula była lekko zakrzywiona i wchodziła do
aorty pionowo. Przymocować linię tętniczą do serwet operacyjnych.
a. Modele Select CAP®: Przymocować strzykawkę wypełnioną roztworem soli fizjologicznej z heparyną do
żeńskiej końcówki typu luer, ustawionej prostopadle do osi drenu linii monitorowania ciśnienia.
Zaaspirować do linii monitorowania ciśnienia powietrze, aż w świetle pojawi się krew. Postukać palcem w
strzykawkę, aby spowodować przesunięcie się zaaspirowanych pęcherzyków powietrza w górę
strzykawki. Wprowadzić do aorty 2-3 cc roztworu soli fizjologicznej z heparyną, aby wypełnić linię
monitorowania ciśnienia.
b. Podłączyć wypełnioną wcześniej linię monitorowania ciśnienia z urządzenia monitorującego ciśnienie do
trójdrożnego kurka zamykającego. Upewnić się, że kurek zamykający jest otwarty do linii monitorowania
ciśnienia kaniuli. Zbalansować i wyzerować przetwornik.
10. Zdjąć wszystkie zaciski z kaniuli i linii przed rozpoczęciem krążenia pozaustrojowego.
11. Po zakończeniu zabiegu chirurgicznego usunąć kaniulę zgodnie z procedurą szpitalną. PRODUKT DO
JEDNORAZOWEGO ZASTOSOWANIA.
Poniższe oświadczenie gwarancyjne dotyczy klientów spoza terenu Stanów Zjednoczonych:
Oświadczenie gwarancyjne
NIEZALEŻNIE OD FAKTU, ŻE KANIULA TĘTNICZA, NAZYWANA DALEJ „PRODUKTEM”, ZOSTAŁA PRZED
WPROWADZENIEM DO SPRZEDAŻY ZAPROJEKTOWANA, WYTWORZONA I PRZETESTOWANA Z
NALEŻYTĄ STARANNOŚCIĄ, PRODUKT MOŻE NIE SPEŁNIAĆ W ZADOWALAJĄCY SPOSÓB
ZAMIERZONYCH FUNKCJI Z WIELU POWODÓW. OSTRZEŻENIA PODANE NA ETYKIETACH PRODUKTU
ZAWIERAJĄ BARDZIEJ SZCZEGÓŁOWE INFORMACJE I STANOWIĄ INTEGRALNĄ CZĘŚĆ NINIEJSZEGO
OŚWIADCZENIA GWARANCYJNEGO. FIRMA MEDTRONIC NINIEJSZYM ZRZEKA SIĘ WSZELKICH
GWARANCJI DOTYCZĄCYCH PRODUKTU, ZARÓWNO WYRAŹNYCH, JAK I DOROZUMIANYCH. FIRMA
MEDTRONIC NIE BĘDZIE PONOSIĆ ODPOWIEDZIALNOŚCI ZA JAKIEKOLWIEK SZKODY UBOCZNE LUB
WYNIKOWE BĘDĄCE SKUTKIEM JAKIEGOKOLWIEK ZASTOSOWANIA, USTERKI LUB AWARII
PRODUKTU, NIEZALEŻNIE OD TEGO, CZY ROSZCZENIE WYSUWAME JEST NA PODSTAWIE
GWARANCJI, UMOWY, ODPOWIEDZIALNOŚCI ZA SZKODĘ WYRZĄDZONĄ CZYNEM NIEDOZWOLONYM
CZY INNEJ.
Instrukcja użytkowania Polski 37

Wyżej określone wyłączenia i ograniczenia nie mają na celu naruszania obowiązkowych uregulowań stosownego
prawa i nie należy ich tak interpretować. Jeśli którakolwiek część lub warunek niniejszego oświadczenia
gwarancyjnego zostanie uznany przez właściwy sąd za sprzeczny z prawem, niemożliwy do wyegzekwowania lub
stojący w konflikcie z obowiązującym prawem, fakt ten nie wpłynie na ważność pozostałej części oświadczenia
gwarancyjnego, a wszelkie prawa i zobowiązania będą interpretowane i egzekwowane tak, jak gdyby niniejsze
oświadczenie gwarancyjne nie zawierało danej części lub warunku uznanego za nieważny.
38 Instrukcja użytkowania Polski

DLP® / Select Series® / Select 3D® / Select 3D® II / Select CAP®
Cânula arterial
Descrição do produto
A cânula é constituída por uma ponta curvada, angular ou biselada com ou sem flange que está permanentemente
fixada a um corpo cónico moldado em PVC flexível e transparente ou a um corpo de PVC com guias em espiral.
O corpo da cânula possui uma linha de orientação da ponta para indicar a direcção da ponta da cânula durante
a canulação. A extremidade proximal da cânula inclui um local de ligação ou um conector farpado moldado de
0,95 cm com ou sem uma ficha de ventilação ou tampa em plástico moldado. A ficha de ventilação ou tampa
permite a ventilação de ar da cânula antes da ligação à linha de perfusão.
Selecção dos modelos CAP®: A extremidade proximal possui uma linha de monitorização da pressão com uma
torneira de passagem de 3 vias.
Estéril, não pirogénico, para uma única utilização.
Indicações de utilização
Estas cânulas destinam-se a utilização na perfusão da aorta ascendente durante um bypass cardiopulmonar de
curto-prazo.
Este produto foi concebido para uma utilização de até seis horas ou menos.
Contra-indicações
Este dispositivo só deve ser utilizado conforme indicado acima.
Avisos
Na canulação, deve aplicar-se o máximo cuidado se houver a possibilidade de ocorrer a dissecção do tecido da
aorta. Evite apontar a ponta da cânula directamente na direcção das ramificações das artérias no arco aórtico,
para minimizar a possibilidade de direccionar qualquer êmbolo desencravado para as artérias ou de causar um
aumento na tensão arterial cerebral. Evite direccionar a ponta para a válvula aórtica.
Evite dobrar a cânula. A selecção do doente e do procedimento é da exclusiva responsabilidade do médico e o
resultado depende de muitas variáveis, incluindo a anatomia e patologia do doente e os procedimentos e técnicas
cirúrgicos e de perfusão. Esta cânula foi concebida apenas para uma utilização de curto-prazo, temporária.
Precauções
Nota: As técnicas e procedimentos cirúrgicos adequados são da responsabilidade do profissional médico. O
procedimento descrito é fornecido apenas a título de informação. O cirurgião deve avaliar a adequação do
procedimento, com base na sua formação e experiência médica, bem como no tipo de procedimento cirúrgico.
Tenha cuidado durante a ligação da cânula e da linha de perfusão e assegure-se de que a linha de perfusão não
contém ar.
A colocação e a orientação das suturas na aorta são essenciais para um posicionamento adequado da cânula.
Depois de firmemente fixada com as suturas, é difícil alterar a posição da cânula.
Não ultrapasse o fluxo recomendado.
Apertar as tampas luer antes de usar.
Esta cânula foi concebida e destina-se apenas a uma única utilização. NÃO REUTILIZAR.
Não exceda os débitos máximos recomandados abaixo listados para os modelos Select 3D® e Select 3D® II:
até 4 LPM (litros por minuto) para uma cânula de 18 Fr; até 5 LPM para uma cânula de 20 Fr; até 6 LPM para
uma cânula de 22 Fr; até 6 LPM para uma cânula de 24 Fr.
Efeitos adversos
Este dispositivo, tal como todos os dispositivos extracorpóreos do sistema sanguíneo, pode ter efeitos secundários
que incluem, entre outros, infecções, perda de sangue, formação de trombos, embolia e deslocamento. Em caso
de não observância das Instruções de utilização podem verificar-se lesões no vaso e complicações no local de
punção.
Instruções de utilização
1. Inspeccione a embalagem e o produto, verificando se existem danos e confirmando o prazo de validade. Se
não existirem danos e se o prazo de validade não tiver expirado, abra a embalagem e transfira a cânula para
o campo estéril, utilizando uma técnica asséptica.
2. Para os modelos com fichas de ventilação, posicione a ficha de ventilação de modo a que a ranhura de
ventilação se prolongue cerca de 3 mm para além da extremidade da cânula (apenas modelos com local de
ligação) ou encaixe muito bem a ficha de ventilação porosa no conector farpado.
Instruções de utilização Português 39

Aviso: Não insira excessivamente as fichas. Não humedeça a ficha de ventilação porosa. A ficha tornar-seá estanque ao ar e minimizará a eficácia das funções de purga e ventilação.
3. Coloque uma sutura em bolsa de tabaco na face anterior da aorta ascendente distal, no local pretendido.
Coloque um torniquete sobre esta bolsa de tabaco. Coloque uma segunda bolsa de tabaco externa 1 a 2 mm
à frente da primeira e coloque um torniquete na mesma. Proceda à excisão da adventícia do interior da sutura
em bolsa de tabaco interna.
a. Modelos com arco flexível: Posicione o colar de sutura ajustável à profundidade pretendida.
b. Selecção dos modelos CAP®: Encha o lúmen de monitorização da pressão da cânula com solução salina
heparinizada e feche a torneira de passagem em direcção ao lúmen para manter a solução salina
heparinizada dentro do lúmen.
4. Depois de se assegurar da boa heparinização sistémica, efectue uma incisão na aorta dentro dos limites da
bolsa de tabaco interna, com um bisturi número 11. Coloque um dedo sobre a incisão para controlar a
hemorragia. Introduza a cânula directamente na aorta através da incisão.
Nota: Se mantiver a cânula numa posição vertical durante a inserção estará a ajudar a prevenir a acumulação
de microbolhas nas paredes da cânula.
5. Rode a cânula de modo a que a ponta fique voltada numa direcção distal e que a linha de orientação da cânula
fique voltada para a válvula aórtica.
6. O torniquete da bolsa de tabaco interna é apertado e fixado à cânula atando uma ligadura de fixação em redor
da cânula e torniquete num local adequado.
7. Depois de verificada a total ausência de ar na cânula, insira completamente a ficha de ventilação ranhurada
para vedar, se aplicável. (NÃO INSIRA DEMASIADO)
8. Antes de fixar a cânula à linha arterial, aplique uma pinça no corpo da cânula. Retire a ficha de ventilação ou
tampa da cânula. Fixe a cânula na linha arterial. Inspeccione a linha e retire todo o ar acumulado antes de
retirar a pinça. (Algumas cânulas arteriais possuem uma porta luer no conector que pode ser usada para retirar
o ar da linha ou monitorizar a pressão na linha).
9. Fixe a cânula à pele ou retractor com uma sutura, para aliviar a tensão e evitar movimentos inadvertidos.
Posicione a cânula e linha arterial de modo a que a cânula adquira uma ligeira curvatura e entre na aorta
perpendicularmente. Fixe a linha arterial ao pano superior.
a. Selecção dos modelos CAP®: Fixe uma seringa heparinizada e cheia com solução salina à luer fêmea
perpendicular ao eixo do tubo da linha de monitorização da pressão. Aspire a linha de monitorização da
pressão até surgir sangue no lúmen. Bata levemente na seringa para forçar a deslocação de ar
potencialmente adquirido durante a aspiração para a parte superior da seringa. Injecte 2 a 3 cc de solução
salina heparinizada na aorta para encher a linha de monitorização da pressão.
b. Fixe uma linha de monitorização da pressão previamente enchida a partir de um dispositivo de
monitorização da pressão até à torneira de passagem de 3 vias. Certifique-se de que a torneira de
passagem está aberta para a linha de monitorização da pressão da cânula. Ajuste e coloque o transdutor
a zero.
10. Retire todas as pinças da cânula e das linhas antes de iniciar o bypass cardiopulmonar.
11. No final do procedimento cirúrgico, elimine a cânula segundo as regras do hospital. NÃO REUTILIZAR.
A seguinte renúncia de garantia aplica-se apenas a clientes fora dos Estados Unidos:
Renúncia de garantia
APESAR DA CÂNULA ARTERIAL, A PARTIR DAQUI REFERIDA COMO "PRODUTO", TER SIDO
CUIDADOSAMENTE DESENHADA, FABRICADA E TESTADA ANTES DA COMERCIALIZAÇÃO, O
PRODUTO PODE NÃO DESEMPENHAR SATISFATORIAMENTE A SUA FUNÇÃO DEVIDO A UMA
VARIEDADE DE MOTIVOS. OS AVISOS CONTIDOS NAS ETIQUETAS DO PRODUTO FORNECEM
INFORMAÇÕES MAIS DETALHADAS E SÃO CONSIDERADOS COMO PARTE INTEGRANTE DESTA
RENÚNCIA. ASSIM, A MEDTRONIC RENUNCIA TODAS AS GARANTIAS, EXPRESSAS OU IMPLÍCITAS,
RELATIVAS AO PRODUTO. A MEDTRONIC NÃO SERÁ RESPONSÁVEL POR QUAISQUER DANOS
ACIDENTAIS OU CONSEQUENCIAIS CAUSADOS POR QUALQUER UTILIZAÇÃO, DEFEITO OU FALHA DO
PRODUTO, SE A QUEIXA FOR BASEADA NA GARANTIA, CONTRATO, DANO OU OUTROS.
As exclusões e limitações acima definidas não se destinam a infringir estipulações obrigatórias da lei aplicável, e
não devem ser interpretadas como tal. Se alguma parte ou termo desta renúncia de garantia for considerado ilegal,
não executável ou em conflito com a lei aplicável por parte de um tribunal da jurisdição competente, a validade
da restante renúncia de garantia não será afectada, devendo todos os direitos e obrigações ser interpretados e
executados como se esta renúncia de garantia não contivesse a parte ou termo particular considerado inválido.
40 Instruções de utilização Português

DLP® / Select Series® / Select 3D® / Select 3D® II / Select CAP®
Arteriyel Kanül
Ürün Tanımı
Kanül; kalıplanmış, temiz, esnek bir konik gövdeye veya telle sarılmış PVC gövdeye kalıcı olarak takılan, flanşlı
veya flanşsız, kavisli, açılı veya eğri bir uçtan oluşur. Kanül gövdesi, kanülasyon sırasında kanül ucunun yönünü
gösteren bir uç yönlendirme çizgisine sahiptir. Kanülün proksimal ucunda, kalıplanmış plastik bir havalandırma
tapası veya soyma kapak bulunan ya da bulunmayan, kalıplanmış bir 0,95 cm kancalı konektör ve bir bağlantı
bölgesi vardır. Havalandırma tapası veya soyma kapak, perfüzyon hattına bağlanmadan önce kanüldeki havanın
çıkarılmasını sağlar.
Select CAP® Modelleri: Proksimal uçta, 3 yollu vanalı bir basınç izleme hattı bulunur.
Steril, non pirojenik, tek kullanımlık.
Kullanım Endikasyonları
Bu kanüller, kısa süreli kardiyopulmoner bypass sırasında çıkan aortun perfüzyonunda kullanılmak üzere
tasarlanmıştır.
Bu ürün en çok altı saate kadar kullanılmak üzere tasarlanmıştır.
Kontrendikasyonlar
Bu alet yukarıdakiler dışında bir durum için geliştirilmemiştir.
Uyarılar
Kanülasyon sırasında, aortun doku diseksiyonu olasılığı varsa son derece dikkatli olunmalıdır. Çıkarılan
embolusları arterlerin içine yönlendirme veya beyinde yüksek kan basıncına yol açma olasılığını en aza indirmek
için, kanülün ucunu doğrudan aort yayının arter dallarına yöneltmekten kaçının. Ucu, aortik kapakta
yönlendirmekten kaçının.
Kanülün bükülmemesine veya kıvrılmamasına dikkat edin. Hasta ve prosedür seçimleri tamamen tıbbi bir
sorumluluktur ve sonuç, hasta anatomisi, patolojisi, cerrahi ve perfüzyon prosedürleri ve teknikleri gibi birçok
değişkene bağlıdır. Bu kanül, yalnızca kısa süreli, geçici kullanım içindir.
Önlemler
Not: Uygun cerrahi prosedürlerin ve tekniklerin seçilmesi hekimin sorumluluğundadır. Anlatılan prosedür yalnızca
bilgi amaçlı konulmuştur. Cerrahlar, prosedürün uygunluğunu kendi tıbbi eğitimi ve deneyimine ve cerrahi
prosedürün türüne dayanarak değerlendirmelidir.
Kanül ve perfüzyon hattının bağlanması sırasında dikkatli davranarak, perfüzyon hattında hava kalmadığından
emin olun.
Sütürlerin aort içinde yerleştirildiği konum ve yönü kanülün uygun konumlandırılması açısından kritik öneme
sahiptir. Kanül sütürlerle sıkı bir şekilde sabitlendikten sonra, kanülün konumunu değiştirmek zordur.
Önerilen akışı aşmayın.
Lütfen, luer kapaklarını kullanmadan önce sıkın.
Bu kanül, sadece tek kullanım için tasarlanmış ve üretilmiştir. YENİDEN KULLANMAYIN.
Select 3D® ve Select 3D® II Modelleri için aşağıda listelenen maksimum önerilen akış hızlarını aşmayın:
18 Fr kanül için en fazla 4 LPM (litre/dakika); 20 Fr kanül için en fazla 5 LPM; 22 Fr kanül için en fazla 6 LPM; 24 Fr
kanül için en fazla 6 LPM.
Yan Etkiler
Bu cihaz, tüm ekstrakorporeal kan sistemi cihazlarında olduğu gibi, enfeksiyonlar, kan kaybı, trombüs formasyonu,
embolik olaylar ve yer değiştirme gibi durumları da içeren ancak bunlarla sınırlı olmayan olası advers etkilere
sahiptir. Kullanım Talimatları izlenmezse, damarda hasar ve ponksiyon yerinde komplikasyonlar oluşabilir.
Kullanım Talimatları
1. Ambalajı ve ürünü hasar ve son kullanma tarihi bakımından kontrol edin. Hasarsızsa ve kullanım süresi
içindeyse, ambalajı açın ve aseptik teknik kullanarak kanülü steril bir alana taşıyın.
2. Havalandırma tapaları bulunan modellerde, havalandırma tapasını, havalandırma yuvası kanülün ucundan
yaklaşık 3 mm öteye uzanacak şekilde konumlandırın (yalnızca bağlantı bölgesi modellerinde) veya gözenekli
havalandırma tapasını kancalı konektöre sıkıca yerleştirin.
Uyarı: Tapaları gereğinden fazla ilerletmeyin. Gözenekli havalandırma tapasını nemlendirmeyin. Tapa hava
geçirmez hale gelir ve hazırlama ve havalandırma işlemlerinin etkinliği en aza iner.
Kullanım Talimatları Türkçe 41

3. Distal çıkan aortun anterior açısına, istenen konumda olacak şekilde, bir büzgü sütürü yerleştirin. Bu büzgü
sütürünün üzerine bir turnike yerleştirin. İlkinin 1-2 mm ötesine ikinci bir dış büzgü sütürü yerleştirin ve üzerine
bir turnike yerleştirin. Adventisyayı, iç büzgü sütürünün içinden eksize edin.
a. Esnek Yay Modelleri: Ayarlanabilir sütür manşonunu istenen derinliğe yerleştirin.
b. Select CAP® Modelleri: Kanülün basınç izleme lümenini heparinize salinle doldurun ve heparinize salini
lümende tutmak için vanayı lümene doğru kapatın.
4. Yeterli sistemik heparinizasyonun sağlandığından emin olunduğunda, 11 numaralı bıçağı kullanarak, iç büzgü
sütürünün sınırları içinde aortta bir insizyon yapın. Kanamayı kontrol etmek için, insizyonun üzerine parmak
yerleştirin. Kanülü, bu insizyonun içinden doğrudan aorta sokun.
Not: Giriş sırasında kanülün dikey olarak tutulması, kanülün duvarlarında mikro kabarcıkların birikmesini
önlemeyi kolaylaştırır.
5. Kanülü, ucu distal olarak yönlendirilecek ve kanül üzerinde bulunan yönlendirme çizgisi aortik valfa doğru
olacak şekilde döndürün.
6. Kanül ve turnikenin etrafına uygun bir yerden sabitleme ligatürü bağlanarak, iç büzgü sütürünün üzerindeki
turnike sıkılır ve kanüle sabitlenir.
7. Kanüldeki havanın tamamı dışarı çıkarıldıktan sonra, varsa, yuvalı havalandırma tapasını tam olarak takarak
sızdırmazlık sağlayın. (GEREĞİNDEN FAZLA İLERLETMEYİN.)
8. Kanülü arteriyel hatta takmadan önce, kanül gövdesini kelepçeleyin. Havalandırma tapası veya soyma kapağı
kanülden çıkarın. Kanülü arteriyel hatta takın. Hattı inceleyin ve kelepçeyi sökmeden önce içerideki havayı
çıkarın. (Bazı arteriyel kanüllerinde konektör üzerinde bulunan luer portu, hattaki havayı çıkarmak veya hat
basıncını izlemek için kullanılabilir).
9. Gerilimin azalmasını sağlamak ve yanlış bir hareketi önlemek için, kanülü bir sütürle cilde veya retraktöre
sabitleyin. Kanülü ve arteriyel hattı, kanül hafif eğri olacak ve aorta dikey olarak girecek şekilde konumlandırın.
Arteriyel hattı üst kumaşa sabitleyin.
a. Select CAP® Modelleri: Basınç izleme hattı borusunun eksenine dik olan dişi luere heparinize, salin dolu
bir şırınga takın. Basınç izleme hattını, lümende kan görünene kadar aspire edin. Şırıngaya hafifçe vurarak,
aspirasyon sırasında yukarı çekilen havayı şırınganın üzerine çıkmaya zorlayın. Basınç izleme hattını
doldurmak için, aortun içine 2-3 cc heparinize salin enjekte edin.
b. Bir basınç izleme cihazından 3 yollu vanaya, önceden hazırlanmış bir basınç izleme hattı takın. Kanülün
basınç izleme hattına giden vana yolunun açık olduğundan emin olun. Dönüştürücüyü dengeleyin ve
sıfırlayın.
10. Kardiyopulmoner bypass'a başlamadan önce kanüldeki tüm kelepçeleri ve hatları çıkarın.
11. Cerrahi prosedür tamamlandığında, kanülü hastane politikasına uygun olarak atın. YENİDEN KULLANMAYIN.
Aşağıdaki garanti feragat beyannamesi ABD dışındaki müşteriler için geçerlidir:
Garanti Feragat Beyannamesi
BUNDAN SONRA "ÜRÜN" OLARAK ADI GEÇECEK OLAN ARTERİYEL KANÜL, ÖZENLE TASARLANMIŞ,
ÜRETİLMİŞ VE SATIŞTAN ÖNCE TEST EDİLMİŞ OLSA DA, ÇEŞİTLİ SEBEPLERDEN DOLAYI İŞLEVLERİNİ
TATMİN EDİCİ DÜZEYDE GERÇEKLEŞTİREMEYEBİLİR. ÜRÜN ETİKETİNDEKİ UYARILAR DAHA AYRINTILI
BİLGİLER İÇERMEKTEDİR VE BU GARANTİ FERAGATNAMESİNİN AYRILMAZ BİR PARÇASI OLARAK
DEĞERLENDİRİLMEKTEDİR. MEDTRONIC, BU NEDENLE, ÜRÜNLE İLGİLİ AÇIK VEYA ÖRTÜLÜ TÜM
GARANTİLERDEN FERAGAT EDER. MEDTRONIC ÜRÜNÜN KULLANIMI, KUSUR VEYA BOZUKLUĞU
SEBEBİYLE OLUŞAN HERHANGİ BİR KAZA VEYA DOLAYLI HASARDAN, İDDİA GARANTİ BELGESİ,
SÖZLEŞME VEYA HAKSIZ MUAMELEYE DAYANIYOR OLSA DA SORUMLU DEĞİLDİR.
Yukarıda belirtilenlerin dışındaki istisnalar ve sınırlamalar, ilgili yasanın zorunlu hükümlerini ihlal amacı taşımaz
ve ihlal olarak yorumlanamaz. Bu Garanti Feragat Beyannamesinin bir kısmı veya maddesi herhangi bir yetkili
mahkeme tarafından yasadışı, uygulanamaz bulunursa veya uygulanacak kanunlarla ihtilaf halindeyse, Garanti
Feragat Beyannamesinin geri kalan kısmı bundan etkilenmeyecek, bütün hak ve yükümlülükler, geçersiz bulunan
kısım bu Garanti Feragat Beyannamesinde bulunmuyormuş gibi sayılarak yorumlanacak ve uygulanacaktır.
42 Kullanım Talimatları Türkçe

DLP® / Select Series® / Select 3D® / Select 3D® II / Select CAP®
Arteriální kanyla
Popis produktu
Kanyla se skládá ze zakřiveného, úhlového nebo šikmého hrotu s lemem nebo bez lemu, který je permanentně
připojen k tvarovanému, průhlednému, flexibilnímu zašpičatělému tělu z PVC nebo tělu z PVC s procházejícím
drátem. Tělo kanyly obsahuje linii orientace hrotu pro určení směru kanyly během zavádění kanyly. Proximální
konec kanyly obsahuje místo pro připojení nebo tvarovaný 0,95cm ozubený konektor s tvarovanou plastovou
zátkou ventilu nebo bez ní. Zátka ventilu nebo odtrhovací čepička umožňuje proudění vzduchu z kanyly před
připojením k perfúzní linii.
Modely Select CAP®: Proximální konec obsahuje hadičku pro monitorování tlaku a třícestný ventil.
Sterilní, apyrogenní, jednorázové.
Indikace k použití
Tyto kanyly jsou určeny pro použití při perfúzi vzestupné aorty během krátkodobého mimotělního oběhu.
Tento produkt má být používán maximálně šest hodin nebo méně.
Kontraindikace
Přístroj není určen k jinému použití, než je uvedeno výše.
Výstrahy
Při zavádění kanyly je třeba zvláště dbát na to, aby nedošlo k disekci tkáně aorty. Nesměrujte hrot kanyly přímo
proti větvím oblouku aorty, abyste minimalizovali možnost vniknutí embolu do artérií nebo zvýšení krevního tlaku
v mozku. Nesměrujte hrot do aortální chlopně.
Zamezte zalomení nebo překroucení kanyly. Za výběr pacienta a postupu je zodpovědný výhradně lékař a výsledek
závisí na mnoha faktorech, mimo jiné na anatomii a stavu pacienta, na chirurgické a perfúzní technice. Tato kanyla
je pouze pro krátkodobé, dočasné použití.
Upozornění
Poznámka: Použití správných chirurgických výkonů a technik patří k povinnostem odborných lékařů. Popsaný
postup slouží pouze k informačním účelům. Chirurgové musí samozřejmě vždy vyhodnotit vhodnost postupu a typ
chirurgického zákroku na základě vlastního lékařského vzdělání a zkušeností.
Postupujte obzvlášť opatrně při připojování kanyly a perfúzní linie, abyste se ujistili, že se do perfúzní linie nedostal
žádný vzduch.
Umístění, poloha a orientace stehů v aortě jsou kritickým bodem správného umístění kanyly. Jakmile je kanyla
pevně zafixována stehy, je potom těžké změnit její polohu.
Nepřekračujte doporučený průtok.
Před použitím utáhněte kryty luer.
Tato kanyla je určena pouze k jednorázovému použití. NEPOUŽÍVEJTE OPAKOVANĚ.
Nepřekračujte níže uvedené doporučené rychlosti toku pro modely Select 3D® a Select 3D® II:
do 4 l/min. (litrů za minutu) u kanyly 18 FR; do 5 l/min. u kanyly 20 FR; do 6 l/min. u kanyly 22 FR; do 6 l/min. u
kanyly 24 FR.
Nežádoucí účinky
Tento přístroj, podobně jako všechny ostatní přístroje mimotělních oběhových systémů, může vyvolat případné
nežádoucí účinky, mezi které mj. patří infekce, ztráta krve, tvorba trombu, embolie a dislokace přístroje. Při
nedodržení návodu k použití může dojít k poškození cévy a ke komplikacím v místě vpichu.
Návod k použití
1. Zkontrolujte datum exspirace a zda balení a produkt nejsou poškozeny. Pokud datum exspirace dosud
nevypršelo a kanyla není poškozena, otevřete obal a přeneste kanylu aseptickou technikou do sterilního pole.
2. U modelů se zátkou ventilu umístěte zátku ventilu tak, aby otvor ventilu přesahovat přibližně 3 mm přes konec
kanyly (pouze u modelů s místem pro připojení) nebo umístěte pórovitou zátku ventilu snadno do ozubeného
konektoru.
Varování: Zátky nezasunujte příliš. Nenavlhčujte pórovitou zátku ventilu. Zátka se stane neprostupnou pro
vzduch, a tím sníží účinnost provzdušnění a ventilace.
3. Umístěte tabákový steh v požadovaném místě v přední straně distální vzestupné aorty. Přes tento tabákový
steh umístěte turniket. Druhý vnější tabákový steh umístěte 1 - 2 mm přes počáteční steh a umístěte přes něj
turniket. Z vnitřního tabákového stehu odstraňte přesahující konce.
a. Modely flexibilních oblouků: Umístěte nastavitelnou objímku stehů do požadované hloubky.
Návod k použití Česky 43

b. Modely Select CAP®: Naplňte lumen pro monitorování tlaku heparinizovaným fyziologickým roztokem a
uzavřete kohout směrem k lumenu, aby fyziologický roztok zůstal v lumenu.
4. Po zajištění zahájení odpovídající systemické heparinizace proveďte řez aortou pomocí čepele č. 11 v rámci
hranice vnitřního tabákového stehu. Na řez přiložte prst, aby bylo potlačeno krvácení. Kanylu vsuňte řezem
přímo do aorty.
Poznámka: Kanylu držte během zavádění svisle, předejdete tím akumulaci mikroskopických bublinek na
stěnách kanyly.
5. Otáčejte kanylou tak, aby hrot směřoval distálně a orientační linie na kanyle směřovala proti aortální chlopni.
6. Turniket na vnitřním tabákovém stehu je upevněn a zajištěn na vhodném místě ke kanyle přivázáním
bezpečnostní páskou okolo kanyly a turniketu.
7. Jakmile je všechen vzduch vytěsněn z kanyly, vsuňte drážkovanou zátku ventilu úplně do příslušného těsnění.
(NEZASUNUJTE PŘÍLIŠ.)
8. Před připojením kanyly k arteriální linii připněte tělo kanyly. Odstraňte zátku ventilu nebo odtrhovací čepičku
z kanyly. Kanylu připojte k arteriální linii. Zkontrolujte linii a odstraňte všechen zachycený vzduch odstraněním
svorky. (Některé arteriální kanyly mají na konektoru luer port, který lze použít k odstranění vzduchu z hadičky
nebo z hadičky pro monitorování tlaku).
9. Zajistěte kanylu ke kůži nebo retraktoru stehem, aby se odlehčilo zatížení a zabránilo nechtěnému pohybu.
Umístěte kanylu a arteriální oběh tak, aby kanyla byla jemně prohnutá a vstupovala do aorty kolmo. Připevněte
arteriální oběh k horní roušce.
a. Modely Select CAP®: Připojte heparinizovanou stříkačku naplněnou fyziologickým roztokem k vnitřní
koncovce luer, která je kolmá k ose hadičky pro monitorování tlaku. Nasávejte z hadičky pro monitorování
tlaku, až se objeví krev v lumenu. Poklepejte na stříkačku, aby se všechen nasátý vzduch dostal na vrchol
stříkačky. Vstříkněte 2 - 3 cc heparinizovaného fyziologického roztoku do aorty a naplňte hadičku pro
monitorování tlaku.
b. Připojte předplněnou hadičku pro monitorování tlaku z přístroje pro monitorování tlaku ke třícestnému
ventilu. Kohout musí být otevřený k hadičce pro monitorování tlaku kanyly. Vyrovnejte a vynulujte
převodník.
10. Před zahájením mimotělního oběhu odstraňte všechny svorky z kanyly a hadiček.
11. Po dokončení chirurgického zákroku kanylu zlikvidujte podle předpisů zdravotnického zařízení.
NEPOUŽÍVEJTE OPAKOVANĚ.
Následující odmítnutí záruk se vztahuje na zákazníky mimo USA:
Odmítnutí záruk
AČKOLI JE ARTERIÁLNÍ KANYLE, DÁLE OZNAČOVANÉ JAKO „VÝROBEK“, PŘED PRODEJEM
VĚNOVÁNA PEČLIVÁ POZORNOST VE FÁZI JEHO KONSTRUKCE, VÝROBY I ZKOUŠEK, JE MOŽNÉ, ŽE
U VÝROBKU Z RŮZNÝCH DŮVODŮ SELŽE JEHO ZAMÝŠLENÁ FUNKCE. VÝSTRAHY NA ŠTÍTCÍCH
VÝROBKU POSKYTUJÍ PODROBNĚJŠÍ INFORMACE A JSOU POVAŽOVÁNY ZA NEDÍLNOU SOUČÁST
TOHOTO ODMÍTNUTÍ ZÁRUK. SPOLEČNOST MEDTRONIC PROTO ODMÍTÁ VŠECHNY ZÁRUKY
(VÝSLOVNĚ UVEDENÉ I IMPLICITNĚ PŘEDPOKLÁDANÉ) TÝKAJÍCÍ SE TOHOTO VÝROBKU.
SPOLEČNOST MEDTRONIC NEODPOVÍDÁ ZA JAKÉKOLIV NÁHODNÉ NEBO NÁSLEDNÉ ŠKODY
ZPŮSOBENÉ POUŽITÍM, VADOU NEBO SELHÁNÍM VÝROBKU, NEHLEDĚ K TOMU, VYPLÝVÁ-LI NÁROK
ZE ZÁRUKY, SMLOUVY, OSOBNOSTNÍCH PRÁV, ČI Z JINÉHO DŮVODU.
Výjimky a omezení zde uvedená nejsou zamýšlena a nemají být v rozporu s platným ustanovením rozhodného
práva. Pokud bude kterákoli část nebo podmínka tohoto odmítnutí záruk shledána příslušným soudem jako
protiprávní, nevynutitelná nebo v rozporu s příslušnými právními předpisy, platnost zbývající části tohoto odmítnutí
záruk nebude ovlivněna a všechna práva a závazky budou chápány a uplatněny tak, jako by toto zamítnutí záruk
neobsahovalo tuto konkrétní část nebo podmínku, která byla shledána neplatnou.
44 Návod k použití Česky

DLP® / Select Series® / Select 3D® / Select 3D® II / Select CAP®
Artériás kanül
Termékleírás
A kanül egy hajlított, szögben álló vagy ferde heggyel rendelkezik, amely peremmel is rendelkezhet, és tartósan
rögzítve van egy átlátszó, flexibilis, elvékonyodó PVC testhez vagy egy drótmerevítésű PVC testhez. A kanül testén
lévő vonal segítségével ellenőrizhető a hegy állása kanülálás közben. A kanül proximális végén egy csatlakozóhely
vagy egy 0,95 cm átmérőjű barázdált, öntött csatlakozó van, öntött műanyag légtelenítő dugóval vagy kupakkal,
illetve ezek nélkül. A légtelenítő dugó vagy kupak lehetővé teszi a kanül légtelenítését a perfúziós vezeték
csatlakoztatása előtt.
Select CAP® modellek: A proximális végen egy nyomásmérő szárral rendelkeznek, háromállású csappal.
Az eszközök sterilek, nem pirogének és egyszer használatosak.
Felhasználási javallatok
Ezek a kanülök a felszálló aorta perfundálásához használatosak, rövid ideig tartó kardiopulmonális bypass során.
Az eszköz legfeljebb 6 órán keresztül tartó használatra alkalmas.
Ellenjavallatok
Az eszköz a fentiektől eltérő célra nem használható.
Figyelmeztetések
A kanülálás során különös óvatossággal kell eljárni, ha fennáll az aortadisszekció veszélye. Ne irányítsa a
kanülhegyet közvetlenül az aortaív ágai felé, hogy minimálisra csökkentse egy kimozdult embólus artériákba
jutásának, illetve az agyi vérnyomás megnövekedésének esélyét. Ne irányítsa a hegyet az aortabillentyűre.
Kerülje a kanül elhajlását, megtöretését. A műtétre alkalmas beteg és a megfelelő eljárás kiválasztása teljes
mértékben az orvos felelőssége, a várható eredmény pedig több tényezőtől (például a beteg patológiai
elváltozásaitól, a sebészeti és perfúziós módszerektől) függ. A kanül csak rövid idejű, átmeneti használatra
alkalmas.
Óvintézkedések
Megjegyzés: A megfelelő sebészeti eljárások és módszerek alkalmazása a szakorvos felelőssége. A bemutatott
eljárás csak tájékoztató jellegű. A sebész felelőssége, hogy képzettségének és tapasztalatának, illetve a műtéti
eljárás típusának megfelelően mérlegelje az eszköz alkalmazhatóságát.
A kanül és a perfúziós vezeték csatlakoztatásakor gondoskodjon arról, hogy a perfúziós vezeték teljesen
légtelenítve legyen.
Az aortán lévő öltések megfelelő elhelyezkedése és iránya létfontosságú a kanül helyes pozicionálása
szempontjából. A kanül helyzetének megváltoztatása az öltésekkel való rögzítés után nehezen kivitelezhető.
Az áramlási sebesség ne haladja meg az ajánlott értéket.
Használat előtt ellenőrizze, hogy a luer csatlakozók megfelelően zárnak-e.
A kanül egyszeri használatra készült. TILOS ISMÉTELTEN FELHASZNÁLNI.
Az áramlási sebesség ne haladja meg a következő, Select 3D® és Select 3D® II modellekre vonatkozó maximális
értékeket:
legfeljebb 4 l/perc 18 Fr-es kanül esetén; legfeljebb 5 l/perc 20 Fr-es kanül esetén; legfeljebb 6 l/perc 22 Fr-es
kanül esetén; legfeljebb 6 l/perc 24 Fr-es kanül esetén.
Szövődmények
Ennek a készüléknek az alkalmazása – minden extrakorporális vérkeringtető rendszerhez hasonlóan – járhat
szövődményekkel, amelyek többek között az alábbiak lehetnek: infekció, vérveszteség, vérrögképződés, embóliás
események és diszlokáció. A Használati utasítás figyelmen kívül hagyása esetén a punkciós helyen érkárosodás
és komplikációk következhetnek be.
Használati utasítás
1. Ellenőrizze a csomagoláson és a terméken a lejárati dátumot, és vizsgálja meg a csomagolást, illetve a
terméket, hogy azok nem sérültek-e. Ha nincs sérülés, és nem járt le a szavatossági idő, bontsa fel a csomagot,
és aszeptikus körülmények között helyezze a kanült a steril műtéti területre.
2. Légtelenítő dugóval rendelkező modellek esetén állítsa be úgy a légtelenítő dugó, hogy a légtelenítő nyílás
mintegy 3 mm-rel túlnyúljon a kanül végén (csak csatlakozóhellyel rendelkező modelleknél), vagy szorosan
illessze a porózus légtelenítő dugót a barázdált csatlakozóba.
Használati utasítás Magyar 45

Vigyázat! Ne nyomja be túl mélyen a dugókat. A porózus légtelenítő dugót ne érje nedvesség. Ellenkező
esetben a dugó átjárhatatlanná válik a levegő számára, és ezáltal minimálisra csökken a feltöltés és a
légtelenítés hatékonysága.
3. Helyezzen el egy dohányzacskóöltést a felszálló aorta disztális részének elülső falára, a kívánt helyen. Fogja
le a dohányzacskóöltés fonalát. Helyezzen el egy második, külső dohányzacskóöltést 1–2 mm-rel az elsőn
kívül, és fogja le annak fonalát. Metssze ki az adventitia réteget a belső dohányzacskóöltésen belülről.
a. Flexibilis aortaív-modellek: Pozicionálja az állítható varratrögzítőt a kívánt mélységbe.
b. Select CAP® modellek: Töltse fel a kanül nyomásmérő szárát heparinos sóoldattal, és zárja el a csapot
a szár felé, hogy a sóoldatot benntartsa.
4. A megfelelő szisztémás heparinizáció elérése után egy 11-es pengével ejtsen bemetszést az aortán, a belső
dohányzacskóöltésen belül. A vérzés csillapításához helyezze egyik ujját a bemetszésre. Vezesse a kanült a
bemetszésen keresztül közvetlenül az aortába.
Megjegyzés: A bevezetés során a kanül függőlegesen tartásával megelőzheti a mikrobuborékok
felhalmozódását a kanül falán.
5. Fordítsa úgy a kanült, hogy a hegy disztális irányba álljon, a kanülön lévő vonal pedig az aortabillentyűvel
szemben legyen.
6. A belső dohányzacskóöltésen lévő szorítót rögzítse a kanülhöz egy kanül körüli rögzítőcsomóval, majd
helyezze a szorítást egy megfelelő helyre.
7. Amint az összes levegő eltávozott a kanülből, helyezze be a nyílással rendelkező légtelenítő dugót (ha van
ilyen) teljesen. (NE NYOMJA BE TÚL MÉLYEN.)
8. A kanül artériás vezetékre csatlakoztatása előtt szorítsa le a kanül testét. Távolítsa el a légtelenítő dugót, illetve
a kupakot a kanülről. Csatlakoztassa a kanült az artériás vezetékre. Vizsgálja meg a vezetéket, és szükség
esetén légtelenítsen a leszorítás eltávolítása előtt. (Egyes artériás kanülök a csatlakozón egy luerrel
rendelkeznek, amely légtelenítésre, illetve a vezeték nyomásának monitorizálására használható.)
9. Rögzítse a kanült egy öltéssel a bőrhöz vagy a retraktorhoz, hogy feszülésmentesítést nyújtson, és megelőzze
a véletlen elmozdulást. Állítsa be úgy a kanült és az artériás vezetéket, hogy a kanül enyhén ívelt legyen, és
merőlegesen lépjen be az aortába. Rögzítse az artériás vezetéket a külső letakaráshoz.
a. Select CAP® modellek: Illesszen egy heparinos sóoldattal teli fecskendőt a nyomásmérő száron lévő,
annak tengelyére merőlegesen álló anyaluerre. Végezzen visszaszívást a nyomásmérő száron, amíg vér
nem jelenik meg a vezetékben. Ütögesse meg a fecskendőt, hogy a visszaszívott levegő a fecskendő felső
részébe kerüljön. A nyomásmérő szár feltöltéséhez fecskendezzen be 2–3 ml heparinos sóoldatot az
aortába.
b. Csatlakoztassa a nyomásmérő készülék felől jövő, előzetesen feltöltött vezetéket a háromállású csapra.
Győződjön meg arról, hogy a csap a kanül nyomásmérő szára felé van nyitva. Egyensúlyozza ki és
nullázza a transzducert.
10. A kardiopulmonális bypass elkezdése előtt távolítsa el a kanülről és a vezetékekről a leszorításokat.
11. A műtét befejezése után a kanült a kórházi előírásoknak megfelelően dobja el, illetve ártalmatlanítsa. TILOS
ISMÉTELTEN FELHASZNÁLNI.
Az alábbi garanciafelelősség-kizárás az Egyesült Államok területén kívüli vásárlókra
vonatkozik.
Felelősségkizárás
BÁR AZ ARTÉRIÁS KANÜL (A TOVÁBBIAKBAN „TERMÉK”) TERVEZÉSE, GYÁRTÁSA ÉS ÉRTÉKESÍTÉS
ELŐTTI ELLENŐRZÉSE KÖRÜLTEKINTŐ MÓDON TÖRTÉNT, ELŐFORDULHAT, HOGY A TERMÉK
KÜLÖNBÖZŐ OKOKBÓL ESETLEG NEM LÁTJA EL KIELÉGÍTŐEN AFELADATÁT. A TERMÉKCÍMKÉN
TALÁLHATÓ FIGYELMEZTETÉSEK TOVÁBBI INFORMÁCIÓVAL SZOLGÁLNAK, ÉS A JELEN
SZAVATOSSÁGI NYILATKOZAT SZERVES RÉSZÉT KÉPEZIK. EZÉRT A MEDTRONIC NEM VÁLLAL
SEMMIFÉLE – SEM KÖZVETLEN, SEM KÖZVETETT GARANCIÁT – A TERMÉKKEL KAPCSOLATOSAN. A
MEDTRONIC NEM FELEL A TERMÉK HASZNÁLATÁBÓL, HIBÁJÁBÓL VAGY
MŰKÖDÉSKÉPTELENSÉGÉBŐL EREDŐ SEMMILYEN JÁRULÉKOS VAGY KÖVETKEZMÉNYES KÁRÉRT,
LEGYEN A KÁRIGÉNY ALAPJA SZAVATOSSÁG, SZERZŐDÉS, SZERZŐDÉSEN KÍVÜLI KÁROKOZÁS
VAGY EGYÉB IGÉNY.
A fenti kizárások korlátozások nem szándékoznak a vonatkozó jogszabályok kötelező hatályú rendelkezéseivel
ellentétbe kerülni, és ilyen irányú beállításnak nincs helye. Ha a jelen felelősségkizárás bármely része vagy pontját
illetékes bíróság jogellenesnek és hatálytalannak, vagy a vonatkozó törvényekkel ellentétesnek mondja ki, a
felelősségkizárás fennmaradó részét ez nem érinti, és minden jog és kötelezettség úgy értelmezendő és tartandó
be, mintha a jelen felelősségkizárás nem tartalmazná az érvénytelenített részt vagy pontot.
46 Használati utasítás Magyar

DLP®/Select Series®/Select 3D®/Select 3D® II/Select CAP®
Артериальная канюля
Описание продукта
Канюля состоит из изогнутого, углового или скошенного наконечника с фланцем или без фланца, наглухо
прикрепленного к литому прозрачному и гибкому конусовидному или обвитому проволокой корпусу из ПВХ.
На корпусе канюли имеется линия ориентации наконечника, указывающая его направление во время
канюляции. На проксимальном конце канюли имеется зона соединения или фасонный соединитель 0,95 см
с бородками, с фасонной пластмассовой вентиляционной пробкой или съемным колпачком либо без них.
Вентиляционная пробка и съемный колпачок позволяют выпускать воздух из канюли перед
подсоединением к перфузионной линии.
Модели Select CAP®: Проксимальный конец оснащен линией контроля давления с тройниковым запорным
краном.
Система стерильна, апирогенна и предназначена для однократного использования.
Показания к применению
Эти канюли предназначены для перфузии восходящей аорты в условиях краткосрочного искусственного
кровообращения.
Максимальная продолжительность использования данного продукта – шесть часов.
Противопоказания
Данное устройство может использоваться только, как указано выше.
Предостережения
Во время катетеризации необходимо проявлять крайнюю осторожность, если существует вероятность
рассечения ткани аорты. Чтобы свести к минимуму вероятность эмболизации артерий или повышения
черепно-мозгового кровяного давления, следует избегать направления наконечника канюли в сторону
артериальных ответвлений дуги аорты. Не направляйте наконечник канюли в сторону аортального
клапана.
Запрещается сгибать или перекручивать канюлю. Полную ответственность за подбор пациентов и выбор
процедур несет медицинский персонал. Результат зависит от множества изменяющихся факторов, в том
числе, от анатомических особенностей пациента, характера его патологии, а также вида хирургических
операций и процедур перфузии. Данная канюля предназначена только для краткосрочного временного
применения.
Меры предосторожности
Примечание: Ответственность за правильность применяемых хирургических процедур и методов несет
медицинский персонал. Описанная процедура приведена исключительно для сведения. Целесообразность
данной процедуры должна оцениваться хирургами на основании их профессионального опыта и
медицинской подготовки, а также с учетом типа выполняемой хирургической операции.
При подсоединении канюли и линии перфузии необходимо проследить, чтобы в линию перфузии не попал
воздух.
Правильное расположение канюли зависит от места наложения и ориентации швов на аорте. Положение
прочно закрепленной швами канюли трудно изменить.
Запрещается превышать рекомендуемый поток.
Перед использованием требуется затянуть колпачки Люэра.
Данная канюля разработана и предназначена только для одноразового использования. ЗАПРЕЩАЕТСЯ
ИСПОЛЬЗОВАТЬ ПОВТОРНО.
Запрещается превышать максимальные рекомендуемые скорости потока, перечисленные ниже для
моделей Select 3D® и Select 3D® II:
до 4 л/мин. (литров в минуту) для канюли размером 18 Fr; до 5 л/мин. для канюли размером 20 Fr; до 6 л/мин.
для канюли размером 22 Fr; до 6 л/мин. для канюли размером 24 Fr.
Побочные эффекты
Как и все устройства системы экстракорпорального кровообращения, это устройство может вызывать такие
побочные эффекты, как инфицирование, кровопотеря, образование тромбов, эмболия и дислокация.
Возможны другие побочные эффекты. При несоблюдении данной инструкции по эксплуатации возможны
повреждение сосуда и осложнения в месте выполнения пункции.
Инструкция по эксплуатации На русском языке 47

Инструкция по эксплуатации
1. Осмотрите упаковку и продукт на предмет повреждений и истечения срока годности. Если повреждения
отсутствуют, а срок годности не истек, откройте упаковку и с соблюдением асептических мер
перенесите канюлю в стерильное поле.
2. В случае моделей с вентиляционной пробкой установите пробку таким образом, чтобы прорезь для
отвода воздуха выступала за конец канюли приблизительно на 3 мм (только для моделей с зоной
соединения), или плотно вставьте пористую вентиляционную пробку в соединитель с бородками.
Предупреждение: Запрещается вставлять пробки с избыточной силой. Запрещается увлажнять
пористую вентиляционную пробку. Пробка станет воздухонепроницаемой, и эффективность
наполнения и вентиляции снизится.
3. Наложите кисетный шов в нужном месте на передней части поверхности дистальной восходящей
аорты. Поверх кисетного шва наложите кровоостанавливающий жгут. Наложите второй внешний
кисетный шов на 1-2 мм дальше первого, а поверх него – кровоостанавливающий жгут. Удалите
адвентициальную оболочку изнутри внутреннего кисетного шва.
а. Гибкие дугообразные модели: Установите регулируемую манжету для наложения шва на нужную
глубину.
б. Модели Select CAP®: Наполните полость контроля давления канюли гепаринизированным
физраствором и закройте запорный кран в направлении полости, чтобы гепаринизированный
физраствор оставался в ней.
4. После обеспечения надлежащей гепаринизации всего организма сделайте надрез на аорте лезвием
номер 11 в пределах внутреннего кисетного шва. Остановите кровотечение, зажав разрез пальцем.
Вставьте канюлю через разрез прямо в аорту.
Примечание: Во время введения канюли держите ее вертикально, что поможет предотвратить
накопление микропузырьков на стенках канюли.
5. Поверните канюлю так, чтобы ее наконечник был направлен дистально, а линия ориентации на канюле
была направлена в сторону аортального клапана.
6. Кровоостанавливающий жгут на внутреннем кисетном шве затягивается и крепится к канюле с
помощью фиксирующей лигатуры вокруг канюли и жгута в удобном месте.
7. После вытеснения воздуха из канюли полностью вставьте вентиляционную пробку с прорезью (если
она имеется), чтобы герметизировать канюлю. (ЗАПРЕЩАЕТСЯ ВСТАВЛЯТЬ С ИЗБЫТОЧНОЙ
СИЛОЙ.)
8. Перед подсоединением канюли к артериальной линии пережмите корпус канюли. Удалите
вентиляционную пробку или съемный колпачок с канюли. Прикрепите канюлю к артериальной линии.
Осмотрите линию и удалите из нее весь попавший в нее воздух, прежде чем снимать зажим. (На
соединителях некоторых артериальных канюль имеется люэровский патрубок, с помощью которого
можно удалить воздух из линии или контролировать давление в линии.)
9. Прикрепите канюлю к коже или ранорасширителю с помощью шва, чтобы уменьшить натяжение и
предотвратить непреднамеренные движения. Разместите канюлю и артериальную линию таким
образом, чтобы канюля была слегка изогнута и перпендикулярно входила в аорту. Закрепите
артериальную линию на хирургической простыне.
а. Модели Select CAP®: Вставьте шприц, наполненный гепаринизированным физраствором, в
охватывающий люэровский переходник, который расположен перпендикулярно оси трубки линии
контроля давления. Отсасывайте воздух из линии контроля давления, пока кровь не появится в
полости. Постучите по шприцу, чтобы вытеснить в его верхнюю часть весь воздух, попавший в
шприц во время отсоса. Введите 2-3 куб. см гепаринизированного физраствора в аорту, чтобы
наполнить линию контроля давления.
б. Подсоедините предварительно наполненную линию контроля давления, идущую от устройства
контроля давления, к тройниковому запорному крану. Убедитесь, что запорный кран открыл линию
контроля давления канюли. Отбалансируйте и установите на ноль датчик.
10. Перед началом искусственного кровообращения удалите все зажимы с канюли и линий.
11. По завершении хирургической операции утилизируйте канюлю в соответствии с процедурой,
установленной в медицинском учреждении. ЗАПРЕЩАЕТСЯ ИСПОЛЬЗОВАТЬ ПОВТОРНО.
Настоящий отказ от гарантии распространяется только на клиентов, находящихся за
пределами США.
Отказ от гарантии
ХОТЯ АРТЕРИАЛЬНАЯ КАНЮЛЯ, ДАЛЕЕ ИМЕНУЕМАЯ «ПРОДУКТ», ТЩАТЕЛЬНО
СПРОЕКТИРОВАНА, ПРОИЗВЕДЕНА И ПРОШЛА ПРЕДПРОДАЖНЫЕ ИСПЫТАНИЯ, ТЕМ НЕ МЕНЕЕ,
СУЩЕСТВУЕТ МНОЖЕСТВО ПРИЧИН ВОЗМОЖНОГО СБОЯ В РАБОТЕ ПРОДУКТА. ИМЕЮЩИЕСЯ В
48 Инструкция по эксплуатации На русском языке

ОБОЗНАЧЕНИЯХ ПРОДУКТА ПРЕДОСТЕРЕЖЕНИЯ СОДЕРЖАТ БОЛЕЕ ПОДРОБНЫЕ СВЕДЕНИЯ И
ЯВЛЯЮТСЯ НЕОТЪЕМЛЕМОЙ ЧАСТЬЮ ДАННОГО ОТКАЗА ОТ ГАРАНТИИ. ПОЭТОМУ
КОРПОРАЦИЯ MEDTRONIC ОТКАЗЫВАЕТСЯ ОТ ВСЕХ ГАРАНТИЙНЫХ ОБЯЗАТЕЛЬСТВ, КАК
ПРЯМЫХ, ТАК И ПОДРАЗУМЕВАЕМЫХ, ПО ОТНОШЕНИЮ К ДАННОМУ ПРОДУКТУ. КОРПОРАЦИЯ
MEDTRONIC НЕ НЕСЕТ ОТВЕТСТВЕННОСТИ ЗА ЛЮБЫЕ ПРЯМЫЕ, СЛУЧАЙНЫЕ ИЛИ КОСВЕННЫЕ
ПОВРЕЖДЕНИЯ, ВОЗНИКШИЕ В РЕЗУЛЬТАТЕ ЛЮБОГО ИСПОЛЬЗОВАНИЯ, ДЕФЕКТА ИЛИ
НЕИСПРАВНОСТИ ПРОДУКТА, ВНЕ ЗАВИСИМОСТИ ОТ ТОГО, ОСНОВАНО ЛИ ЗАЯВЛЕНИЕ НА
ГАРАНТИЙНЫХ ОБЯЗАТЕЛЬСТВАХ, КОНТРАКТЕ, ГРАЖДАНСКОМ ПРАВОНАРУШЕНИИ ИЛИ НА
ДРУГИХ ОБСТОЯТЕЛЬСТВАХ.
Вышеизложенные исключения и ограничения не могут пониматься или истолковываться таким образом,
чтобы противоречить обязательным положениям применяемых правовых норм. Если какая-либо часть или
условие данного отказа от гарантии признается судом компетентной юрисдикции незаконным, не имеющим
законной силы или противоречащим действующему законодательству, остальная часть отказа от гарантии
будет считаться имеющей юридическую силу, и все права и обязательства будут толковаться и
принудительно обеспечиваться, как если бы данный отказ от гарантии не содержал отдельных частей или
условий, которые были признаны не имеющими законной силы.
Инструкция по эксплуатации На русском языке 49

Europe
Europe/Africa/Middle East Headquarters
Medtronic International Trading Sàrl
Route du Molliau 31
Case Postale
CH - 1131 Tolochenaz
Switzerland
Internet: www.medtronic.co.uk
Tel. 41-21-802-7000
Fax 41-21-802-7900
Medtronic E.C. Authorized
Representative/Distributed by
Medtronic B.V.
Earl Bakkenstraat 10
6422 PJ Heerlen
The Netherlands
Tel. 31-45-566-8000
Fax 31-45-566-8668
Asia-Pacific
Japan
Medtronic Japan
Comodio Shiodome 5F
2-14-1 Higashi-Shimbashi, Minato-ku
Tokyo 105-0021
Japan
Tel. 81-3-6430-2011
Fax 81-3-6430-7140
Australia
Medtronic Australasia Pty. Ltd.
Business Address:
97 Waterloo Road
North Ryde NSW 2113
Mailing Address:
PO Box 945
North Ryde NSW 1670
Australia
Tel. 61-2-9857-9000
Fax 61-2-9878-5100
Asia
Medtronic International Ltd.
Suite 1602 16/F, Manulife Plaza
The Lee Gardens, 33 Hysan Avenue
Causeway Bay
Hong Kong
Tel. 852-2891-4068
Fax 852-2591-0313
Americas
Latin America
Medtronic Latin America
3750 NW 87th Avenue
Suite 700
Miami, FL 33178
USA
Tel. 305-500-9328
Fax 786-709-4244
Canada
Medtronic of Canada Ltd.
6733 Kitimat Road
Mississauga, Ontario L5N 1W3
Canada
Tel. 905-826-6020
Fax 905-826-6620
Toll-free in Canada:
1-800-268-5346
United States
Manufacturer:
Medtronic, Inc.
710 Medtronic Parkway
Minneapolis, MN 55432-5604
USA
Internet: www.medtronic.com
Tel. 763-514-4000
Fax 763-391-9100
Toll-free in the USA:
1-800-328-2518
(24-hour consultation service)
© Medtronic, Inc. 2008
All Rights Reserved
M932963A001 Rev. 1.0
 Loading...