

Page 1

PATIENT PROGRAMMER
97740
Pain therapy user manual for neurostimulation
system models 37022, 37701, 37702, 37703,
37704, 37711, 37712, 37713, 37714, 97702,
97712, 97713, 97714
! USA
Rx only
2013
Page 2

Medtronic®, AdaptiveStim®, GroupAdjust®, Itrel®,
PrimeAdvanced
RestorePrime
SoftStart/Stop
®
, Restore®, RestoreAdvanced®,
®
, RestoreSensor®, RestoreUltra®,
®
, SureScan®, and TargetMyStim® are
trademarks of Medtronic, Inc., registered in the U.S.
and other countries.
! USA
FCC Information
The following is communications regulation information
on the Model 97740 Patient Programmer.
FCC ID: LF537741
This device complies with Part 15 Rules. Operation is
subject to the following two conditions: (1) this device
may not cause harmful interference and (2) this device
must accept any interference received, including
interference that may cause undesired operation.
IMPORTANT: Changes or modifications to this
product not authorized by Medtronic, Inc., could
void the FCC Certification and negate your
authority to operate this product.
This device complies with Industry Canada licenseexempt RSS standard(s). Operation is subject to the
following two conditions: (1) this device may not cause
interference, and (2) this device must accept any
interference, including interference that my cause
undesired operation of the device.
Page 3

Label Symbols
Explanation of symbols on products and
packaging. Refer to the appropriate product
to see symbols that apply.
Conformité Européenne (European
Conformity). This symbol means that the
device fully complies with AIMD Directive
90/385/EEC (NB 0123) and R&TTE
Directive 1999/5/EC.
Consult instructions for use
Manufacturer
Serial number
EC
-XX °C
-XX °F
REP
XX °C
XXX °F
Authorized Representative in the
European Community
Temperature limitation
Non-ionizing electromagnetic radiation
IEC 60601-1/EN60601-1, Type BF
Equipment
Antenna jack
97740 2015-03-01 English
Label Symbols
3
Page 4

PIN No.
PIN number
Keep dry
Ingress protection rating IP22, pe r
60601-1-11
Label Symbols
MR
Magnetic Resonance (MR) Unsafe
System meets the applicable Canadian
(CAN/CSA-C22.2 No. 60601-1) electrical
safety standard requirements.
Chinese Standard (SJ/T11364-2006)
Logo: Electronic Information Products
Pollution Control Symbol. (The date in this
logo means the environmental protection
use period of the product.)
Do not dispose of this product in the
unsorted municipal waste stream.
Dispose of this product according to local
regulations. See http://
recycling.medtronic.com for instructions
on proper disposal of this product.
For USA audiences only
4
English 97740 2015-03-01
Page 5

Table of contents
Label Symbols 3
Glossary 12
1
Introduction 20
How to use this manual 20
Patient guides 22
Patient identification card 25
2 Important therapy
information 28
Purpose of the device 28
Purpose of the neurostimulation system
(indications) 29
Description of your system 29
Therapies that may not be used with the
neurostimulation system
(contraindications) 34
Risks and benefits 34
Risks of surgery 35
Warnings 35
Precautions 43
Table of contents
97740 2015-03-01 English
5
Page 6

Individualization of Treatment 49
3 Recovery and care after
surgery 52
Recovery from surgery 52
Activities 52
When to call your clinician 54
Care schedule 54
4 Using your patient
programmer 56
How the patient programmer works 56
Patient programmer Therapy screen 58
Status row 59
Group row 61
Parameter row 63
Patient programmer keys 64
Using the Sync key 66
Using the Navigator key 68
Turning your neurostimulator on or
off 70
How to maintain the neurostimulator
batteries 72
Table of contents
6
English 97740 2015-03-01
Page 7

Checking the external neurostimulator
battery 72
Checking the implanted rechargeable
neurostimulator battery 74
Checking the implanted nonrechargeable
neurostimulator battery 79
Changing patient programmer
preferences 81
Using the carrying case and labeling the
patient programmer 89
Using the detachable antenna 91
5 Adjusting your stimulation 96
Introduction 96
Stimulation features 96
Adjusting stimulation settings 99
Increasing or decreasing a parameter
(amplitude, pulse width, or rate) 104
Changing back to clinician settings 108
(Models 37022, 37702, 37712, 37713,
37714, 97702, 97712, 97713,
97714) 108
Viewing and changing a group 111
97740 2015-03-01 English
Table of contents
7
Page 8

(Models 37022, 37701, 37702, 37711,
37712, 37713, 37714, 97702, 97712,
97713, 97714) 111
Displaying group names 114
Using GroupAdjust 116
(Models 37022, 37702, 37712, 37713,
37714, 97702, 97712, 97713,
97714) 116
Viewing Scheduled Therapy 119
(Models 37022, 37701, 37702, 37711,
37712, 37713, 97702, 97712,
97713) 119
Using TargetMyStim 121
(Models 37022, 37702, 37712, 37713,
37714, 97702, 97712, 97713,
97714) 121
Using AdaptiveStim 124
(Models 37714, 97714) 124
AdaptiveStim groups and positions 126
Turning AdaptiveStim on and off 129
Making adjustments to AdaptiveStim 132
6 MRI examinations 136
If you have an MRI appointment 136
Responsibilities of the patient in preparing
Table of contents
8
for the MRI appointment 136
English 97740 2015-03-01
Page 9

At the MRI appointment 137
Placing your neurostimulation system in
MRI mode for the MRI scan 139
Using the Model 97740 patient
programmer to activate MRI mode 140
Activating MRI mode 141
Turning stimulation back on after the MRI
scan 148
For neurostimulators with SureScan MRI
Technology (Models 97702, 97712,
97713, 97714) 152
7 Maintenance 156
Patient programmer batteries 156
Checking the patient programmer
batteries 156
Replacing the patient programmer
batteries 159
Cleaning and care 161
Safety and technical checks 162
Battery and patient programmer
disposal 163
Neurostimulator disposal 163
97740 2015-03-01 English
Table of contents
9
Page 10

Specifications 164
8 Troubleshooting 168
Patient programmer screens 168
Warning screens 168
Information screens 172
Communication screens 181
Possible problems and solutions 181
9 Additional information 190
How stimulation works 190
Controlling your stimulation 195
What your clinician controls 195
What you control 195
Possible adverse effects 196
Changes in therapy 196
Possible system complications 196
10 User assistance 200
User assistance 200
Declaration of Conformity 201
11 Appendix A: Electromagnetic
interference (EMI) 204
Table of contents
10
Contraindication 204
English 97740 2015-03-01
Page 11

Warnings 205
Precautions 216
Notes 220
Index 224
97740 2015-03-01 English
Table of contents
11
Page 12

Glossary
Caution - A statement describing actions that
could result in damage to or improper
functioning of a device.
Clinician - A healthcare professional such as
a doctor or nurse.
Clinician programmer - A device used by a
clinician to send instructions to a
neurostimulator.
Contraindication - A condition or
circumstance when a person should not
have a neurostimulation system.
Glossary
12
English 97740 2015-03-01
Page 13

Diathermy - A medical treatment applied to
the outside of the body that delivers
energy into the body. Three types of
energy that can be used are shortwave,
microwave, and ultrasound. Depending on
the power level used, diathermy devices
may or may not produce heat within the
body. This treatment is typically used to
relieve pain, stiffness and muscle spasms,
reduce joint contractures, reduce swelling
and pain after surgery, and promote
wound healing.
Electrode - A metal piece near the tip of the
lead. Electrodes deliver electrical pulses to
the area where your pain signals will be
blocked.
Electromagnetic interference (EMI) - A
strong field of energy near electrical or
magnetic devices that could prevent the
neurostimulator from functioning properly.
EOS (End of service) - The neurostimulator
has reached the scheduled end of service
and no longer delivers the electrical pulses
that block pain signals.
97740 2015-03-01 English
Glossary
13
Page 14

ERI (Elective replacement indicator) - The
neurostimulator is nearing scheduled end
of service.
Group - Combined programs that provide
stimulation to one or more pain sites. Each
group may be defined for a different
activity, symptom, or time of day.
Indication - The purpose of the
neurostimulation system and the medical
condition for which it may be implanted.
Neurostimulation system - The implanted
and external components of the stimulation
system that delivers electrical pulses to
block pain signals as they move to the
brain.
Glossary
14
English 97740 2015-03-01
Page 15

Neurostimulator - The power source of a
neurostimulation system. It contains the
battery and electronics that control the
stimulation you feel. An external
neurostimulator is carried outside the
body. During test stimulation, it is used to
determine whether or not stimulation is
effective. An implanted neurostimulator is
placed inside the body. If stimulation is
effective during test stimulation, the
neurostimulator is implanted.
OOR (Out of regulation) - The
neurostimulator battery is unable to
produce the levels of energy required for
the current stimulation settings.
Overdischarge - The neurostimulator battery
continues to lose charge even after you
see a low battery screen. Eventually, the
battery loses enough charge to
permanently affect the neurostimulator. If
this occurs, the battery is overdischarged.
Parameter - One of three stimulation settings
that adjust the electrical pulse: amplitude,
pulse width, and rate.
97740 2015-03-01 English
Glossary
15
Page 16

POR (Power on reset) - The neurostimulator
battery has caused the electronic circuitry
in the neurostimulator to be reset.
Precaution - See Caution.
Program - Stimulation directed to a specific
pain site.
Recharger - The component of the
neurostimulation system that is used to
recharge your neurostimulator battery.
SoftStart/Stop - This feature, programmed
by your clinician, starts and stops
stimulation gradually by slowly increasing
or decreasing to the programmed
amplitude or OFF.
Spinal cord - This is your body's information
center. Nerve signals from the entire body
travel to your spinal cord, and then to your
brain.
Glossary
16
English 97740 2015-03-01
Page 17

Stimulation - The delivery of electrical
pulses to the area where pain signals are
blocked as they move to the brain.
Stimulation blocks some pain signals from
reaching the brain.
Stimulation settings - Refers to all the
features assembled to define the
stimulation you feel. The clinician
programs all stimulation. You can adjust
some stimulation settings within cliniciandefined limits.
Test stimulation - The period of time when
an external neurostimulator is used to
determine if stimulation blocks the pain
signals effectively.
Therapy - Treatment of a disease or
condition. When neurostimulation therapy
is prescribed, a neurostimulation system is
used to deliver stimulation to one or more
pain sites.
97740 2015-03-01 English
Glossary
17
Page 18

Therapy impedance measurements -
Impedance and stimulation current
measurements taken at the programmed
settings.
Therapy settings - A specific combination of
amplitude, rate, and pulse width
parameters acting on a specific electrode
set that determines the stimulation pulses
that are delivered.
Warning - A statement describing an action
or situation that could harm the patient.
Glossary
18
English 97740 2015-03-01
Page 19

1 Introduction
Page 20

How to use this manual
Use this manual during test stimulation and
after receiving an implanted neurostimulator.
Ask your clinician to explain anything that is
unclear.
A glossary is included at the beginning of
•
this manual.
Chapter 1 "Introduction" describes the
•
patient documents your clinician should
have provided to you.
Chapter 2 "Important therapy information"
•
describes when you should and should
not use a neurostimulation system, the
neurostimulation system components, and
the risks, benefits, warnings, precautions,
and patient activities related to your
neurostimulation system.
Chapter 3 "Recovery and care after
•
surgery" provides information about
recovering from surgery, activity and care
information, and when to contact your
clinician.
Introduction 1
20
English 97740 2015-03-01
Page 21

Chapter 4 "Using your patient
•
programmer" describes the patient
programmer and how to perform specific
tasks.
Chapter 5 "Adjusting your stimulation"
•
describes how to adjust your stimulation
using your patient programmer.
Chapter 6 "MRI examinations" provides
•
information about what you should do if
you have an MRI examination.
Chapter 7 "Maintenance" describes how
•
to care for your patient programmer,
including how to change the batteries, and
lists the specifications for the patient
programmer and the implanted
neurostimulation system.
Chapter 8 "Troubleshooting" describes
•
patient programmer warning and
information screens and how to solve
possible problems.
Chapter 9 "Additional information"
•
describes how stimulation works, possible
97740 2015-03-01 English
Introduction 1
21
Page 22

adverse effects, changes in therapy, and
possible system complications.
Chapter 10 "User assistance" describes
•
where to find the patient programmer
serial number and who to contact if the
patient programmer is lost or broken.
Chapter 11 "Appendix A: Electromagnetic
•
interference (EMI)" provides more
information about electromagnetic
interference.
Patient guides
Table 1.1 on page 23 describes the
documents you should receive after a
neurostimulator is implanted.
Notes:
If your implantable neurostimulator (INS)
•
has a rechargeable battery, you should
receive documents for the neurostimulator
charging system.
If you have an external neurostimulator
•
you will receive the Medtronic Model
Introduction 1
22
English 97740 2015-03-01
Page 23

37022 External Neurostimulator: Test
Stimulation Patient Guide. This manual
describes the goals, activities,
components, and instructions for test
stimulation.
Table 1.1 Patient guides for an implanted
neurostimulator
Patient guide Rechargeable Non-
Medtronic Model
97740 Patient
Programmer: Pain
Therapy User Manual.
See page 20 for
details.
Medtronic Model
97740 Patient
Programmer: Quick
Reference Guide.
Provides instructions
for common patient
programmer tasks.
97740 2015-03-01 English
XX
XX
rechargeable
Introduction 1
23
Page 24

Table 1.1 Patient guides for an implanted
neurostimulator (continued)
Patient guide Rechargeable Non-
Medtronic Model
37751 Recharger:
Charging System User
Manual. Describes the
charging system and
how to use it with a
rechargeable
neurostimulator.
Medtronic Model
37751 Recharger:
Charging System
Quick Reference
Guide. Provides
instructions for
common recharging
tasks.
Patient Identification
Card. Provides
information about you,
your implanted
neurostimulator, and
your doctor.
X
X
XX
rechargeable
Introduction 1
24
English 97740 2015-03-01
Page 25

Patient identification card
When you leave the hospital, your doctor will
give you a patient identification card. This
card supplies information about you, your
implanted device, and your doctor. Your
identification card may allow you to bypass
security devices. Carry this card with you at
all times and bring this card with you to all
MRI appointments (see Chapter 6 "MRI
examinations").
If you move, change doctors, or lose your
card, contact Medtronic for a replacement
card. Refer to the Medtronic contacts at the
end of this manual.
! USA
A temporary identification card will be
provided at the hospital. After Medtronic
receives your implant registration from the
hospital, you will receive a permanent
identification card.
97740 2015-03-01 English
Introduction 1
25
Page 26

Introduction 1
26
English 97740 2015-03-01
Page 27

2 Important therapy information
Page 28

Purpose of the device
The Medtronic Model 97740 Patient
Programmer is designed to program the
following Medtronic neurostimulators:
Rechargeable
Restore Model 37711
•
RestoreUltra Model 37712
•
RestoreUltra with SureScan MRI
•
Technology Model 97712
RestoreAdvanced Model 37713
•
RestoreAdvanced with SureScan MRI
•
Technology Model 97713
RestoreSensor Model 37714
•
RestoreSensor with SureScan MRI
•
Technology Model 97714
Nonrechargeable
Model 37022 External Neurostimulator
•
RestorePrime Model 37701
•
PrimeAdvanced Model 37702
•
Important therapy information 2
28
English 97740 2015-03-01
Page 29

PrimeAdvanced with SureScan MRI
•
Technology Model 97702
Itrel 4 Models 37703 and 37704
•
Refer to your patient identification card to
determine the model number of your
neurostimulator.
Purpose of the neurostimulation system (indications)
Refer to the indications sheet that is
packaged with the patient programmer for the
purpose of the neurostimulation system and
related information.
Description of your system
A typical neurostimulation system has
implanted parts that deliver the electrical
pulses to the area where your pain signals
are blocked.
Typically the implanted parts of a
neurostimulation system include (Figure 2.1):
97740 2015-03-01 English
Important therapy information 2
29
Page 30

a neurostimulator
•
1 or 2 leads
•
1 or 2 extensions (optional)
•
Neurostimulator
Extensions
Electrodes
Figure 2.1 Implanted parts of a typical
neurostimulation system (spinal cord stimulation
shown).
A typical neurostimulation system also
includes an external patient programmer for
controlling your system. If you have a
rechargeable neurostimulator, your system
also includes a charging system (Figure 2.2).
Important therapy information 2
Leads
30
English 97740 2015-03-01
Page 31

Patient programmer
Detachable
antenna
(optional)
Carrying case
Charging system
(rechargeable
neurostimulator)
Figure 2.2 External parts of a typical
neurostimulation system.
Neurostimulator – The neurostimulator is
the power source (battery) for your
neurostimulation system. It contains
electronics that generate the electrical
pulses. During test stimulation, an external
neurostimulator is used to determine whether
Important therapy information 2
97740 2015-03-01 English
31
Page 32

an implanted neurostimulator is the right
choice for you.
Note: Some implanted neurostimulator
models include a rechargeable battery.
Rechargeable neurostimulators
Restore Model 37711
•
RestoreUltra Model 37712
•
RestoreUltra with SureScan MRI
•
Technology Model 97712
RestoreAdvanced Model 37713
•
RestoreAdvanced with SureScan MRI
•
Technology Model 97713
RestoreSensor Model 37714
•
RestoreSensor with SureScan MRI
•
Technology Model 97714
Non-rechargeable neurostimulators
RestorePrime Model 37701
•
PrimeAdvanced Model 37702
•
Important therapy information 2
32
English 97740 2015-03-01
Page 33

PrimeAdvanced with SureScan MRI
•
Technology Model 97702
Itrel 4 Models 37703 and 37704
•
Lead(s) – A lead is a set of thin wires,
covered with a protective coating. A lead has
small metal electrodes near the tip. The
electrodes transmit electrical pulses to the
area where your pain signals are blocked.
Extension(s) – An extension is a set of thin
wires, covered with a protective coating, that
connects the neurostimulator to a lead. Not
all neurostimulation systems include an
extension.
Patient programmer – A patient
programmer is a hand-held device that you
use to select and adjust your stimulation. A
detachable antenna is also available if you
have difficulty reaching the neurostimulator
implant site (refer to "Using the detachable
antenna" on page 91).
Charging system used with a
rechargeable neurostimulator – The
charging system is used to charge the
97740 2015-03-01 English
Important therapy information 2
33
Page 34

implanted rechargeable neurostimulator
battery.
Therapies that may not be used with the neurostimulation system (contraindications)
Diathermy—Inform anyone treating you that
you CANNOT have any shortwave diathermy,
microwave diathermy or therapeutic
ultrasound diathermy (all now referred to as
diathermy) anywhere on your body because
you have an implanted neurostimulation
system. Energy from diathermy can be
transferred through your implanted system,
and can cause tissue damage, resulting in
severe injury or death.
Risks and benefits
Stimulation has helped thousands of patients
manage their pain and improve their quality
of life. Your neurostimulation system may be
used with other pain treatments. Stimulation
Important therapy information 2
34
English 97740 2015-03-01
Page 35

will not cure your pain. It can, however,
reduce your pain to a tolerable level and
allow you to resume many of your daily
activities.
Risks of surgery
Implanting a neurostimulation system has
risks similar to spinal procedures, including
spinal fluid leak, headaches, swelling,
bruising, bleeding, infection, or paralysis.
If you are on anticoagulation therapy you
might be at greater risk for postoperative
complications such as hematomas that could
result in paralysis.
Warnings
Electromagnetic interference—
Electromagnetic interference (EMI) is a field
of energy generated by equipment found in
the home, work, medical, or public
environments that is strong enough to
interfere with neurostimulator function.
Neurostimulators include features that
provide protection from EMI. Most electrical
Important therapy information 2
97740 2015-03-01 English
35
Page 36

devices and magnets encountered in a
normal day are unlikely to affect the operation
of a neurostimulator. However, sources of
strong EMI can result in the following:
Serious patient injury or death,
•
resulting from heating of the implanted
components of the neurostimulation
system and damage to surrounding
tissue.
System damage, resulting in a loss of or
•
change in symptom control and requiring
additional surgery.
Operational changes to the
•
neurostimulator, that can cause it to turn
on or off (particularly in a neurostimulator
enabled for magnet use) or to reset to
power-on-reset (POR) values, resulting in
loss of neurostimulation, return of
underlying symptoms, and in the case of
POR, requiring your health care provider
to reprogram the neurostimulator.
Unexpected changes in stimulation,
•
causing a momentary increase in
Important therapy information 2
36
English 97740 2015-03-01
Page 37

stimulation or intermittent stimulation,
which some patients have described as a
jolting or shocking sensation. Although the
unexpected change in stimulation may
feel uncomfortable, it does not damage
the device or injure a patient directly. In
rare cases, as a result of the unexpected
change in stimulation, patients have fallen
down and been injured.
Refer to the following table for information
on the effect of EMI on you and your
neurostimulation system. Additional
information and instructions on how to
reduce the risk from EMI are located in
Appendix A of this manual.
97740 2015-03-01 English
Important therapy information 2
37
Page 38

stimulation
Intermittent
increase in
Momentary
stimulation
off/on
Device turns
XXX
Device
damage
injury
patient
Serious
Table 2.1 Potential effects of EMI from devices or procedures
Device or
Important therapy information 2
38
English 97740 2015-03-01
procedure
Bone growth
XX X X
stimulators
CT scans X
Defibrillation/
cardioversion
Dental drills and
ultrasonic probesXDiathermy,
XX X
Electrocautery X X
therapeutic
Electrolysis X X
Page 39

stimulation
Intermittent
increase in
Momentary
stimulation
XXX
off/on
Device turns
(continued)
Device
Serious
Table 2.1 Potential effects of EMI from devices or procedures
Device or
damage
injury
patient
procedure
X
XX X X X
Electromagnetic
field devices
(eg, arc welding,
power stations)
High-output
ultrasonics /
lithotripsy
Household items X X
Laser procedures X
Magnetic
resonance imaging
97740 2015-03-01 English
(MRI)
Important therapy information 2
39
Page 40

stimulation
Intermittent
increase in
Momentary
stimulation
off/on
Device turns
XXX
(continued)
Device
damage
patient
Serious
Table 2.1 Potential effects of EMI from devices or procedures
Device or
Important therapy information 2
40
English 97740 2015-03-01
procedure
XX X X
injury
Psychotherapeutic
procedures
XX X
Radiation therapy X
Radio-frequency
(RF) /
Theft detector or
microwave ablation
security device
Therapeutic
XX X
magnetsXTherapeutic
ultrasound
Page 41

Table 2.1 Potential effects of EMI from devices or procedures
stimulation
Intermittent
increase in
Momentary
stimulation
off/on
Device turns
(continued)
Device
damage
injury
patient
Serious
Device or
procedure
XX
Transcutaneous
electrical nerve
stimulation (TENS)
Important therapy information 2
97740 2015-03-01 English
41
Page 42

Case damage—If the neurostimulator case is
ruptured or pierced due to outside forces,
severe burns could result from exposure to
the battery chemicals.
Neurostimulator interaction with
implanted cardiac devices—When a
neurostimulator and an implanted cardiac
device (eg, pacemaker, defibrillator) are
required, the doctors involved with both
devices (eg, neurologist, neurosurgeon,
cardiologist, cardiac surgeon) should discuss
the possible interactions between the devices
before surgery. To minimize or prevent
device damage or interactions, your doctors
should place the devices on the opposite side
of the body from one another.
Defibrillation therapy from an implanted
•
defibrillator can damage the
neurostimulator.
The electrical pulses from the
•
neurostimulation system could affect the
sensing operation from the cardiac device
and result in inappropriate responses from
Important therapy information 2
the cardiac device. Your doctor should
42
English 97740 2015-03-01
Page 43

program your neurostimulator to a bipolar
configuration and a minimum rate of 60
Hz. The cardiac device should be
programmed to bipolar sensing.
Precautions
System and therapy
Clinician programmer interaction with a
cochlear implant—If you have a cochlear
implant, the external portion of the cochlear
system should be kept as far away as
possible from the clinician programmer or the
cochlear implant should be turned off during
programming to prevent unintended audible
clicks.
Programmer interaction with other active
implanted devices—If you have a
neurostimulator and another active implanted
device:
97740 2015-03-01 English
Important therapy information 2
43
Page 44

the radio-frequency (RF) signal used to
•
program either device can reset or
reprogram the other device
the magnet in a cardiac programmer can
•
activate magnetically controlled functions
in the neurostimulator.
To verify that inadvertent programming did
not occur, clinicians familiar with each device
should check the programmed settings
before you are sent home from the hospital
and after either device is programmed (or as
soon as possible after these times).
Contact your doctor immediately if you notice
symptoms that could be related to either
device or to the medical condition treated by
either device.
Component compatibility—For proper
therapy, use only Medtronic Neuromodulation
components that are prescribed by your
physician.
Patient control devices may affect other
implanted devices—Do not place patient
control devices (eg, patient programmer) over
Important therapy information 2
44
English 97740 2015-03-01
Page 45

another device (eg, pacemaker, defibrillator,
another neurostimulator). The patient control
device could accidently change the operation
of another device.
Patient programmer handling—To avoid
damaging the patient programmer, do not
immerse the device in liquid; do not clean it
with bleach, nail polish remover, mineral oil,
or similar substances; and do not drop it or
handle it in a way that might damage it.
Patient device use—When operating an
external neurostimulator, patient
programmer, or charging system, use special
care near flammable or explosive
atmospheres. An interaction between the
flammable or explosive atmospheres and the
battery in the device could occur. The
consequences of using a battery-powered
device near flammable or explosive
atmospheres are unknown.
Communication interference from EMI—
When using your patient programmer to
communicate with your neurostimulator,
move away from equipment that may
97740 2015-03-01 English
Important therapy information 2
45
Page 46

generate electromagnetic interference (EMI)
or turn off the likely source of EMI. EMI may
disrupt communication between the patient
programmer and neurostimulator. Examples
of EMI sources are computer monitors,
cellular telephones, and motorized
wheelchairs.
Patient programmer modification—Do not
modify this equipment. Modification of this
equipment can result in damage to the
programmer, causing the programmer to
malfunction or become unusable.
Patient activities
Please read the following important
information about activities to avoid.
Activities requiring excessive twisting or
stretching—Avoid activities that may put
undue stress on the implanted components of
your neurostimulation system. Activities that
include sudden, excessive, or repetitive
bending, twisting, bouncing, or stretching can
cause parts of your neurostimulation system
to fracture or migrate. This can result in loss
Important therapy information 2
46
English 97740 2015-03-01
Page 47

of stimulation, intermittent stimulation,
stimulation at the fracture site, and additional
surgery. Spinal cord stimulation patients, in
particular, should avoid excessive bending of
the torso.
Component manipulation (twiddler’s
syndrome)—Do not manipulate or rub your
neurostimulation system through the skin;
this is sometimes called “twiddler's
syndrome.” Manipulation can cause damage
to your system, lead dislodgement, skin
erosion, or stimulation at the implant site. If
you have a rechargeable neurostimulator,
manipulation may also flip your device so that
it cannot be charged.
Scuba diving or hyperbaric chambers—Do
not dive below 10 meters (33 feet) of water or
enter hyperbaric chambers above 2.0
atmospheres absolute (ATA). Pressures
below 10 meters (33 feet) of water (or above
2.0 ATA) can damage the neurostimulation
system. Before diving or using a hyperbaric
chamber, discuss the effects of high pressure
with your doctor.
Important therapy information 2
97740 2015-03-01 English
47
Page 48

Skydiving, skiing, or hiking in the
mountains—High altitudes should not affect
the neurostimulator; however, you should
consider the movements involved in any
planned activity and take precaution to not
put undue stress on your implanted system.
During skydiving, the sudden jerking that
occurs when the parachute opens can
dislodge or fracture the lead, requiring
additional surgery to repair or replace the
lead.
Unexpected changes in stimulation—
Electromagnetic interference, changes in
posture, and other activities can cause a
perceived increase in stimulation, which
some patients have described as
uncomfortable stimulation (a jolting or
shocking sensation). You should reduce your
amplitude to the lowest setting and turn off
your neurostimulator before engaging in
activities that could be unsafe for you or
others if you received an unexpected jolt or
shock (eg, driving, operating power tools).
Discuss these activities with your doctor.
Important therapy information 2
48
English 97740 2015-03-01
Page 49

Individualization of Treatment
Patient management—Best results are
achieved when you are fully informed about
the therapy risks and benefits, surgical
procedure, follow-up requirements, and selfcare responsibilities. Maximum benefits from
the neurostimulation system require longterm postsurgical management.
Patient selection—The neurostimulation
system should not be implanted if:
your symptoms are not of physiological
•
origin,
you are not an appropriate candidate for
•
surgery,
you cannot properly operate the system,
•
or
you do not receive satisfactory results
•
from test stimulation.
Use in specific populations—The safety
and effectiveness of this therapy has not
been established for the following:
97740 2015-03-01 English
Important therapy information 2
49
Page 50

Pregnancy, unborn fetus, or delivery
•
Pediatric use (patients under the age of
•
18)
Important therapy information 2
50
English 97740 2015-03-01
Page 51

3 Recovery and care after surgery
Page 52

Recovery from surgery
It takes several weeks to heal from surgery. It
is normal to feel some discomfort from the
incision(s) and to have some pain at the
implant site for 2 to 6 weeks.
Your doctor may also prescribe physical
therapy or medication to help manage your
pain. Always follow your doctor’s instructions.
Activities
Some movements can cause changes in
stimulation. For example, leaning back may
cause the lead to move closer to your spinal
cord; this can increase the sensation of
stimulation. Other movements may cause the
lead to move further away from your spinal
cord and decrease the stimulation sensation.
Sudden changes in stimulation are most
common during recovery.
Avoid activities where you must bend,
•
stretch, or twist your body; these
movements can move your leads, which
Recovery and care after surgery 3
52
affects your stimulation.
English 97740 2015-03-01
Page 53

Avoid lying on your stomach.
•
Avoid reaching over your head.
•
Avoid turning from side to side.
•
Avoid bending forward, backward, or from
•
side to side.
Avoid lifting more than 2 kilograms
•
(5 pounds).
As you begin to feel better, you should be
able to perform activities such as:
Bathing or showering
•
Sexual activity
•
Working at home or at your business
•
Hobbies or activities, such as walking,
•
gardening, cycling, or swimming
Traveling
•
Remember, returning to your daily activities
should make you feel better, not worse.
Note: As you adjust to life with better pain
management, you may want to try activities
that you could not perform before your
97740 2015-03-01 English
Recovery and care after surgery 3
53
Page 54

surgery. Discuss your activity level with your
doctor.
When to call your clinician
Contact your clinician if any of the following
events occur:
You have pain, redness, or swelling at the
•
incision(s) later than 6 weeks after
surgery.
You feel discomfort or pain during
•
stimulation. Turn your neurostimulator off
and call your clinician.
Your system is not working properly.
•
You cannot turn the neurostimulator on or
•
off.
You cannot adjust stimulation using your
•
patient programmer.
Care schedule
Your clinician will schedule follow-up visits to
make sure you are receiving the most
appropriate therapy.
Recovery and care after surgery 3
54
English 97740 2015-03-01
Page 55

4 Using your patient programmer
Page 56

How the patient programmer
works
The patient programmer communicates with
your neurostimulator by sending signals to
and receiving signals from the
neurostimulator. Your neurostimulator only
accepts communications from the patient
programmer or clinician programmer.
Sending information from the neurostimulator
to the patient programmer is called
"synchronizing."
To synchronize the neurostimulator and the
patient programmer, the antenna of the
patient programmer must be placed directly
over the neurostimulator (Figure 4.1).
Notes:
Keep your patient programmer accessible
•
at all times.
The internal antenna is on the back of the
•
patient programmer.
The patient programmer screen must face
•
Using your patient programmer 4
56
outward.
English 97740 2015-03-01
Page 57

An optional detachable external antenna
•
is available for patients who have difficulty
reaching their neurostimulator (refer to
page 91).
Patient programmer with
internal antenna
Neurostimulator
Figure 4.1 Placing the patient programmer over
the neurostimulator.
Use the patient programmer to:
turn the neurostimulator on or off.
•
check the neurostimulator battery.
•
change stimulation settings.
•
97740 2015-03-01 English
Using your patient programmer 4
57
Page 58

Notes:
The patient programmer can be used with
•
all the neurostimulator models referenced
in this manual; however, the available
functions will be different for each model.
Be sure to note when a specific
neurostimulator model is referenced to
determine if the information is applicable
for your neurostimulator.
Figures in this chapter present information
•
common to rechargeable and nonrechargeable neurostimulators. Some
figures may display battery level icons
that are unique to rechargeable
neurostimulators.
Patient programmer Therapy
screen
The Therapy screen displays icons and
numbers that indicate your neurostimulator
and patient programmer status and your
stimulation settings (Figure 4.2).
Using your patient programmer 4
58
English 97740 2015-03-01
Page 59

Rechargeable Nonrechargeable
Figure 4.2 Therapy screen.
The information that appears on the Therapy
screen may be different for each patient. The
information depends on which
neurostimulator you have and how your
clinician has programmed your
neurostimulator.
Information on the Therapy screen is
arranged in three rows: the Status row, the
Group row, and the Parameter row.
Status row
The Status row is the top row of the Therapy
screen (Figure 4.3).
Using your patient programmer 4
97740 2015-03-01 English
59
Page 60

Status row
Rechargeable Nonrechargeable
Figure 4.3 Status row on Therapy screen.
Icons on the Status row indicate the
neurostimulator on or off status and the
patient programmer battery level status. If
you have a rechargeable neurostimulator, the
Status row also displays the rechargeable
neurostimulator battery charge level status.
Refer to Table 4.1 for a description of the
icons that may appear on the Status row.
Table 4.1 Status row icons
Icon Description
Neurostimulator is off
(Implanted or external neurosti mu lator)
Neurostimulator is on
(Implanted or external neurosti mu lator)
Using your patient programmer 4
60
English 97740 2015-03-01
Page 61

Table 4.1 Status row icons (continued)
Icon Description
Neurostimulator is on and AdaptiveStim is
enabled
Implanted rechargeable neurostimulato r
battery charge level
The implanted rechargeable
neurostimulator battery charge level is low
The implanted nonrechargeable
neurostimulator is near the end of service
External neurostimulator battery level
Patient programmer battery level
Group row
The Group row is the middle row of the
Therapy screen (Figure 4.4). The Group row
will only appear on the Therapy screen if
your neurostimulator supports the Group
feature and your clinician has programmed
the Group setting.
97740 2015-03-01 English
Using your patient programmer 4
61
Page 62

Group row
Rechargeable Nonrechargeable
Figure 4.4 Group row on Therapy screen.
The icons on the Group row indicate the
name of the group and whether or not the
group is active. Refer to Table 4.2 for a
description of the icons that may appear on
the Group row.
Table 4.2 Group row icons
Icon Description
Active
Not active
Group name (can be icons or text)
Scheduled Therapy
AdaptiveStim position (can be this icon or
text)
Using your patient programmer 4
62
English 97740 2015-03-01
Page 63

Parameter row
The Parameter row is the bottom row of the
Therapy screen (Figure 4.5).
Parameter
row
Rechargeable Nonrechargeable
Figure 4.5 Parameter row on Therapy screen.
The icons on the Parameter row indicate the
parameter settings currently in use for your
stimulation and provide information about
specific stimulation settings available for your
neurostimulator. Refer to Table 4.3 for a
description of the icons that may appear on
the Parameter row.
Table 4.3 Parameter row icons
Icon Description
Amplitude
97740 2015-03-01 English
Using your patient programmer 4
63
Page 64

1
Table 4.3 Parameter row icons (continued)
Icon Description
Pulse width
Rate
GroupAdjust
TargetMyStim
AdaptiveStim position
…
Patient programmer keys
IncreaseDecrease
Neurostimulator on
Neurostimulator off
Sync
Navigator
Power /
Backlight
Figure 4.6 Patient programmer keys.
Using your patient programmer 4
64
English 97740 2015-03-01
Page 65
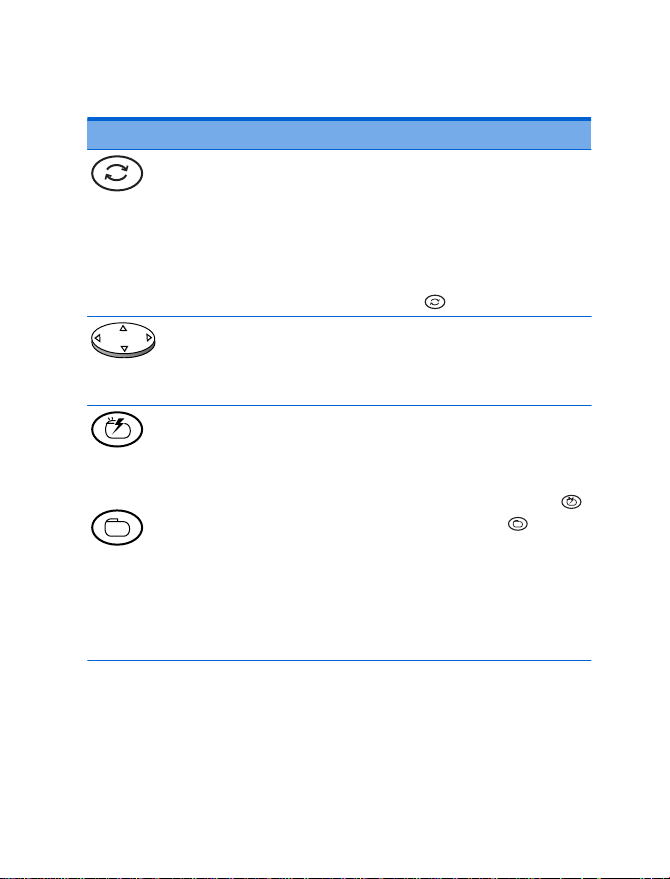
Table 4.4 Patient programmer keys
Key Function
Synchronizes the neurostimulator
•
and patient programmer.
Sync
Navigator
On
Off
Activates a selected group.
•
The patient programmer must be
•
held over the neurostimulator while
pressing the Sync
Moves the selection box on the
•
Therapy screen.
Clears the information screens.
•
Turns the neurostimulator on or off.
•
The patient programmer must be
•
held over the neurostimulator while
pressing the Neurostimulator on
key or Neurostimulator off key.
Pressing either of these keys also
•
automatically synchronizes the
neurostimulator and patient
programmer and displays the
Therapy screen.
key.
97740 2015-03-01 English
Using your patient programmer 4
65
Page 66

Table 4.4 Patient programmer keys (continued)
Key Function
Pressing and releasing this key turns
•
the patient programmer on or off.
Power /
Backlight
Decrease
Increase
Pressing and holding this key turns
•
the backlight on or off permanently.
Normally, the backlight turns on for
eight seconds any time a key is
pressed. The backlight provides
more light to the display.
Decreases or increases a parameter.
•
The patient programmer must be
•
held over the neurostimulator while
pressing the Increase
Decrease
Pressing and holding the key
•
changes the parameter every halfsecond.
To increase a parameter, the
•
neurostimulator must be turned on.
key.
key or
Using the Sync key
Use the Sync key to synchronize your
neurostimulator and patient programmer
(Figure 4.7).
Using your patient programmer 4
66
English 97740 2015-03-01
Page 67

Sync key
Figure 4.7 Sync key.
Synchronizing sends the settings from your
neurostimulator to the patient programmer.
All communication with the neurostimulator
begins with synchronization. After
synchronization, the Therapy screen
appears.
To synchronize your neurostimulator and the
patient programmer, hold the patient
programmer over your neurostimulator and
press the Sync
key.
After synchronization, the Therapy screen
appears.
Using your patient programmer 4
97740 2015-03-01 English
67
Page 68
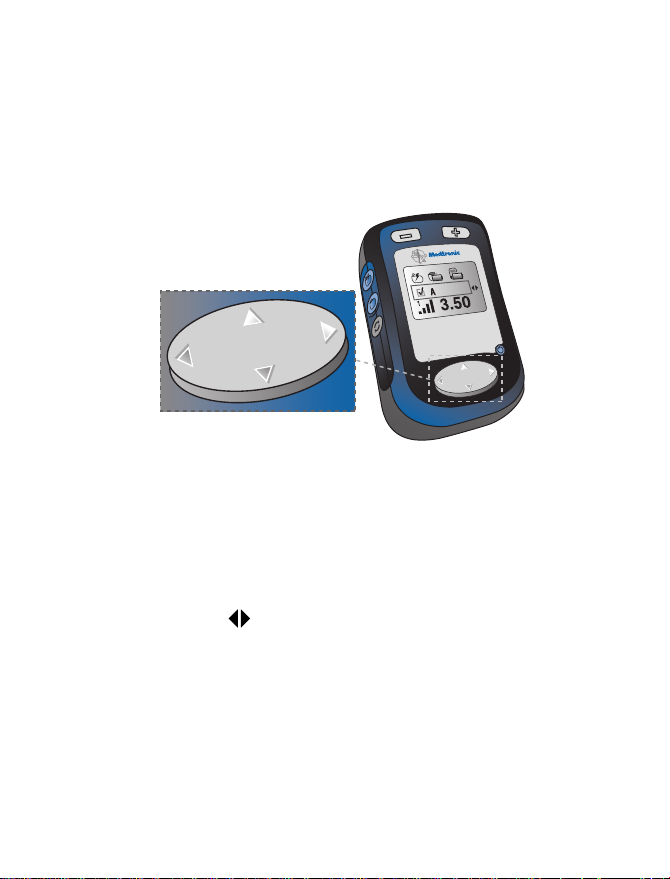
Using the Navigator key
Use the Navigator key (Figure 4.8) to
navigate between and across the rows on the
Therapy screen.
Figure 4.8 Navigator key.
The selection box on the Therapy screen
acts as a cursor to show which row is
selected for programming. If there is more
information on the row than can be displayed,
the Options
selection box (Figure 4.9).
icon will appear next to the
Using your patient programmer 4
68
English 97740 2015-03-01
Page 69
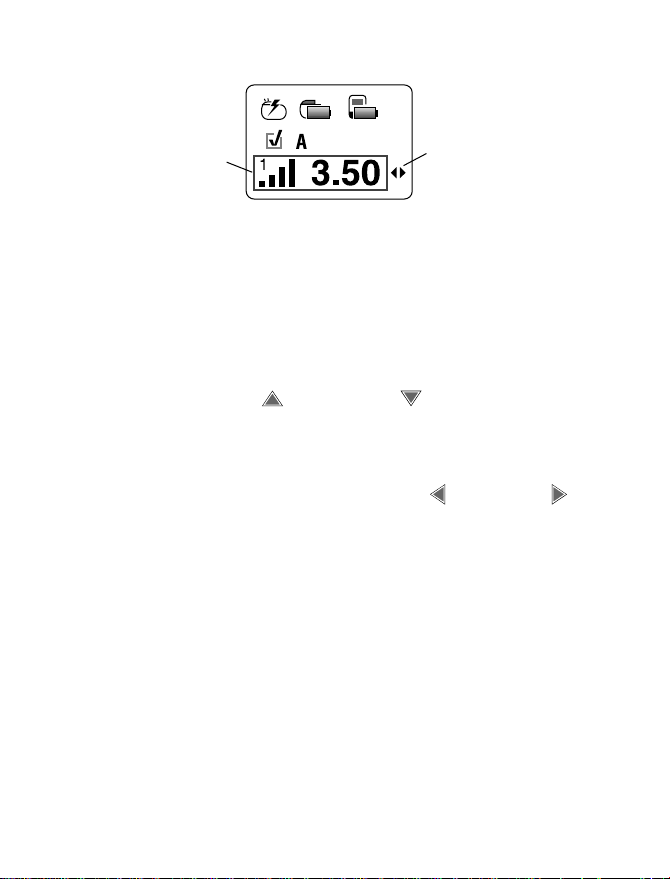
Selection box
Figure 4.9 Options icon and selection box.
Options icon
The Navigator key moves the selection box.
The arrows on the Navigator key indicate the
direction the selection box will move.
To move the selection box between rows,
•
press the up
and down arrows on
the Navigator key.
To move the selection box across a row
•
that continues, press the left
and right
arrows on the Navigator key.
When moving the selection box with the
•
Navigator key, you do not need to hold
the programmer over your
neurostimulator. However, you must hold
the patient programmer over your
neurostimulator when pressing all other
keys except the Power/Backlight key.
Using your patient programmer 4
97740 2015-03-01 English
69
Page 70

Turning your neurostimulator
on or off
Complete the following steps to turn the
neurostimulator on or off.
Note: Turning your neurostimulator on or off
also synchronizes the patient programmer
and neurostimulator.
1. Hold the patient programmer over your
neurostimulator with the patient
programmer screen facing outward and
press the Neurostimulator on
Neurostimulator off
2. Verify that the appropriate On or Off icon
is displayed on the Therapy screen
(Figure 4.10).
key (Figure 4.10).
or
Using your patient programmer 4
70
English 97740 2015-03-01
Page 71
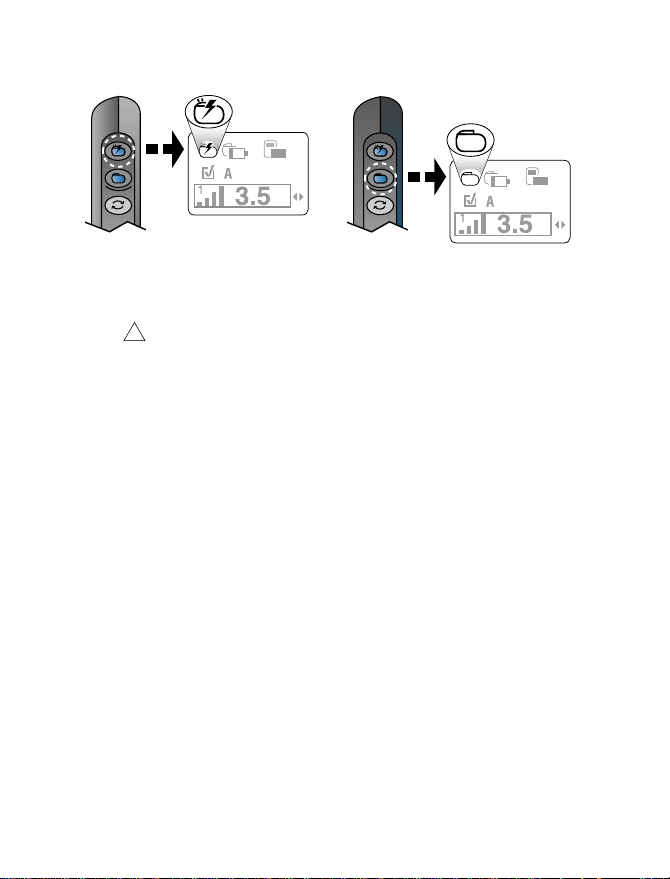
On
Off
Figure 4.10 Turning your neurostimulator on or
off.
Caution: To prevent possible
uncomfortable or unexpected
stimulation (jolting or shocking
sensation) when stimulation is turned
on, decrease all amplitudes to the
lowest setting before adjusting the
pulse width or rate and after turning off
the neurostimulator.
3. If you have turned the neurostimulator off,
decrease the program amplitudes to the
lowest setting. For instructions, see
"Increasing or decreasing a parameter
(amplitude, pulse width, or rate)" on
page 104.
97740 2015-03-01 English
Using your patient programmer 4
71
Page 72

How to maintain the
neurostimulator batteries
It is very important that you maintain your
neurostimulator batteries, whether you have
an external, an implanted rechargeable, or an
implanted non-rechargeable neurostimulator.
Though you will not need to recharge the
external or non-rechargeable
neurostimulators, you should check the
battery status regularly and report any low
battery messages to your clinician.
Checking the external
neurostimulator battery
Check the external neurostimulator battery
level every day.
Complete the following steps to check the
external neurostimulator battery.
1. Synchronize the patient programmer and
neurostimulator.
Using your patient programmer 4
72
English 97740 2015-03-01
Page 73

a. Hold the patient programmer directly
over the neurostimulator with the
screen facing outward.
b. Press the Sync
key. The Therapy
screen appears.
2. Review the external neurostimulator
battery level on the Therapy screen
(Figure 4.11).
Battery level
Replace
batteries
Figure 4.11 External neurostimulator battery
status.
Full
Table 4.5 lists the message screens
associated with the external neurostimulator
batteries.
97740 2015-03-01 English
Using your patient programmer 4
73
Page 74

Table 4.5 External neurostimulator battery
message screens
The external neurostimulator batterie s
are depleted and stimulation is not
available.
Replace the external neurostimulator
batteries now. Refer to the manual
packaged with the extern al
neurostimulator.
The external neurostimulator batterie s
are low and stimulation will not be
available soon.
Replace the external neurostimulator
batteries. Refer to the manual
packaged with the extern al
neurostimulator.
Press any arrow on the Navigator key
to clear this information screen.
Checking the implanted
rechargeable neurostimulator
battery
(Models 37711, 37712, 37713, 37714,
97712, 97713, 97714)
Using your patient programmer 4
74
English 97740 2015-03-01
Page 75

Note: This section applies only to a
neurostimulator with a rechargeable battery.
If your neurostimulator is nonrechargeable,
continue with "Checking the implanted
nonrechargeable neurostimulator battery".
Check the implanted rechargeable
neurostimulator battery charge level every
day.
It is critical that you charge your
neurostimulator battery before the battery is
overdischarged. Refer to the manual
packaged with the charging system for more
information.
Caution: Charge the neurostimulator
when you see a Low battery (
) screen
displayed on the patient programmer or
recharger; this prevents the battery from
overdischarging (see glossary). If the
neurostimulator battery is allowed to
overdischarge, charging is not possible;
however, the clinician may be able to
restore the battery function.
Allowing the neurostimulator battery to
overdischarge will permanently affect the
97740 2015-03-01 English
Using your patient programmer 4
75
Page 76

neurostimulator in one of the following
ways:
Battery function is restored; however,
•
charging sessions may be more
frequent because battery capacity has
been reduced.
Battery function is not restored and the
•
neurostimulator must be surgically
replaced. Battery function is not
restored because:
the neurostimulator battery is
–
permanently damaged.
the neurostimulator battery has
–
been overdischarged and restored
twice before. The third time the
battery is overdischarged, the
neurostimulator will reach end of
service. Surgery is required to
replace the neurostimulator.
Complete the following steps to check the
implanted rechargeable neurostimulator
battery.
Using your patient programmer 4
76
English 97740 2015-03-01
Page 77

1. Synchronize the patient programmer and
neurostimulator.
a. Hold the patient programmer directly
over the neurostimulator with the
screen facing outward.
b. Press the Sync
key. The Therapy
screen appears.
2. Review the implanted rechargeable
battery charge level on the Therapy
screen (Figure 4.12).
Battery charge level
Charge
neurostimulator
Figure 4.12 Implanted neurostimulator charge
level on the Therapy screen.
Full
Table 4.6 on page 78 lists the message
screens associated with the implanted
rechargeable neurostimulator battery charge
level.
Using your patient programmer 4
97740 2015-03-01 English
77
Page 78

When the implanted rechargeable
neurostimulator battery charge level is low,
charge the battery as described in the
manual packaged with the charging system.
Your implanted rechargeable neurostimulator
battery can be charged many times; however,
eventually the implanted rechargeable
neurostimulator will need to be replaced.
Table 4.6 Implanted rechargeable
neurostimulator battery message screens
The implanted rechargeable
neurostimulator battery charge level is
low and stimulation has stopped.
Charge the neurostimulator battery
now. Refer to the manual packaged
with the charging system.
The implanted rechargeable
neurostimulator battery charge level is
low and stimulation will not be available
soon.
Charge the neurostimulator battery.
Refer to the manual packaged with th e
charging system.
Press any arrow on the Navigator key
to clear this information screen.
Using your patient programmer 4
78
English 97740 2015-03-01
Page 79

Checking the implanted
nonrechargeable neurostimulator
battery
(Models 37701, 37702, 37703, 37704,
97702)
Complete the following steps to check the
implanted nonrechargeable neurostimulator
battery.
1. Synchronize the patient programmer and
neurostimulator.
a. Hold the patient programmer directly
over the neurostimulator with the
screen facing outward.
b. Press the Sync
screen appears.
2. Review the battery status on the Therapy
screen.
Table 4.7 lists the message screens
associated with the implanted
nonrechargeable neurostimulator battery.
97740 2015-03-01 English
key. The Therapy
Using your patient programmer 4
79
Page 80
When the battery in an implanted
EOS
nonrechargeable neurostimulator is nearing
depletion, the neurostimulator must be
replaced to continue receiving stimulation.
Surgery is required to replace the implanted
nonrechargeable neurostimulator.
Table 4.7 Implanted nonrechargeable
neurostimulator battery message screens
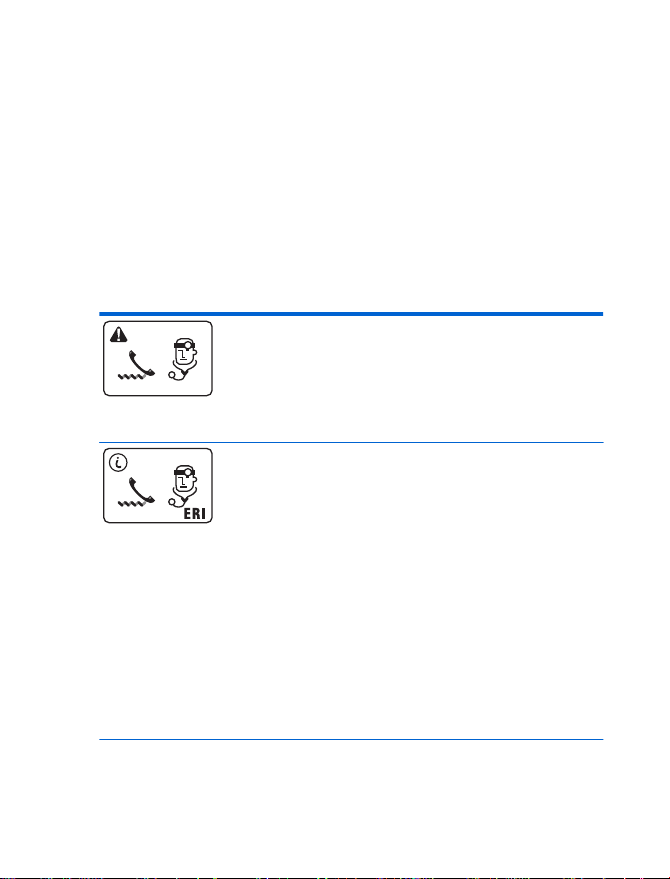
Error code = EOS: The implanted
nonrechargeable neurostimulator has
reached its end of service. Stimulation is
EOS
not available.
Call your clinician.
Error code = ERI: The implanted
nonrechargeable neurostimulator is
nearing end of service. Stimulation will
not be available soon.
Call your clinician to report this
message screen.
Press any arrow on the Navigator key
to clear this information screen.
This screen reappears dail y. After
clearing this screen, a low battery
level icon appears on the Status row
of the Therapy screen.
Using your patient programmer 4
80
English 97740 2015-03-01
Page 81

Changing patient programmer
preferences
Patient programmer preferences affect the
way information displays on the screen or the
way alert tones sound. These patient
programmer preferences include audio,
contrast, time, time/number format, and
group name. Other features can also be
accessed from preference settings. Table 4.8
lists the icons associated with the preference
settings and where to find information on
other features.
Table 4.8 Preference settings icons
Icons Preference
Audio
Contrast
Time
Time and number format
Group name display
97740 2015-03-01 English
Using your patient programmer 4
81
Page 82
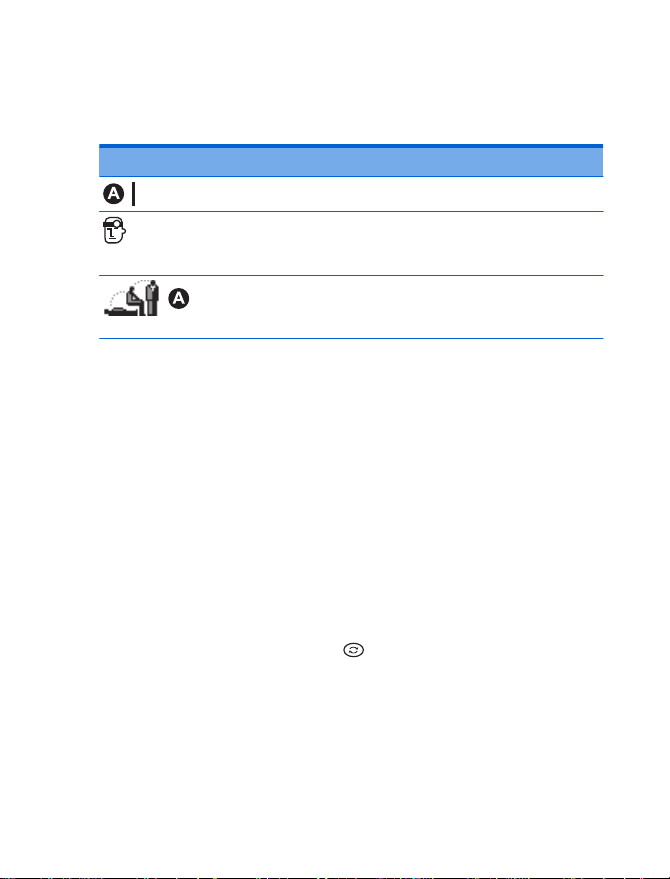
Table 4.8 Preference settings icons
(continued)
Icons Preference
Abc…
a
Changing these preferences will change your
stimulation settings.
AdaptiveStim name display
Return to clinician settings
(see page 108)
AdaptiveStim enabled
(see page 129)
a
a
Complete the following steps to change
patient programmer preferences.
1. Synchronize the patient programmer and
neurostimulator.
a. Hold the patient programmer directly
over the neurostimulator with the
screen facing outward.
b. Press the Sync
screen appears.
Using your patient programmer 4
82
English 97740 2015-03-01
key. The Therapy
Page 83
2. Press the up arrow on the Navigator
key to move the selection box to the
Status row (Figure 4.13).
Status row
Figure 4.13 Accessing preferences from the
Status row.
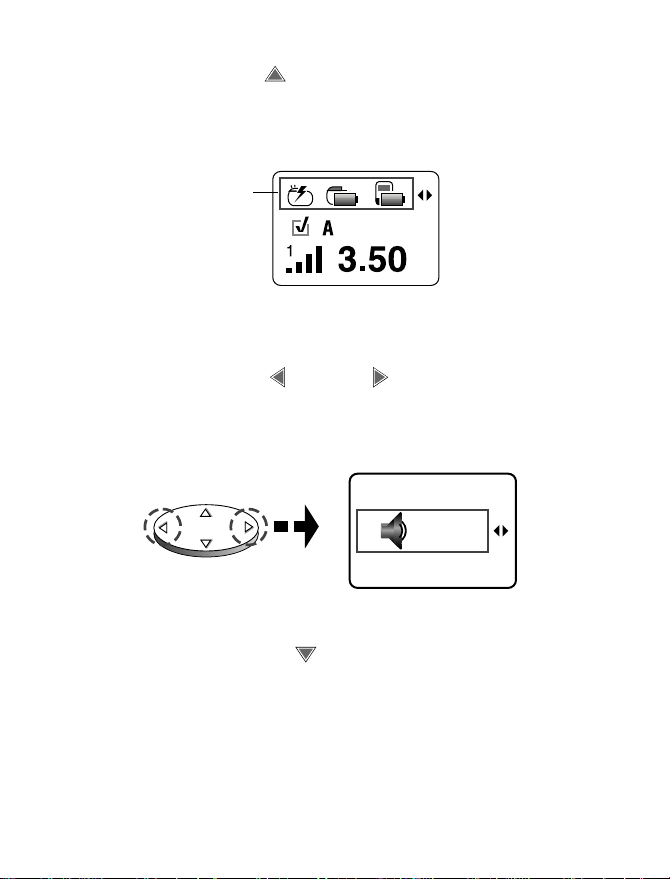
3. Press the left or right arrow on the
Navigator key to move the selection box
to the desired preference (Figure 4.14).
Figure 4.14 Moving to the desired preference.
4. Press the down arrow to move the
selection box to the Change row
(Figure 4.15).
97740 2015-03-01 English
Using your patient programmer 4
83
Page 84
Change row
Figure 4.15 Changing the desired preference
from the change row.
5. Follow the steps in Table 4.9 to change
the selected preference.
Table 4.9 Changing patient programmer
preferences
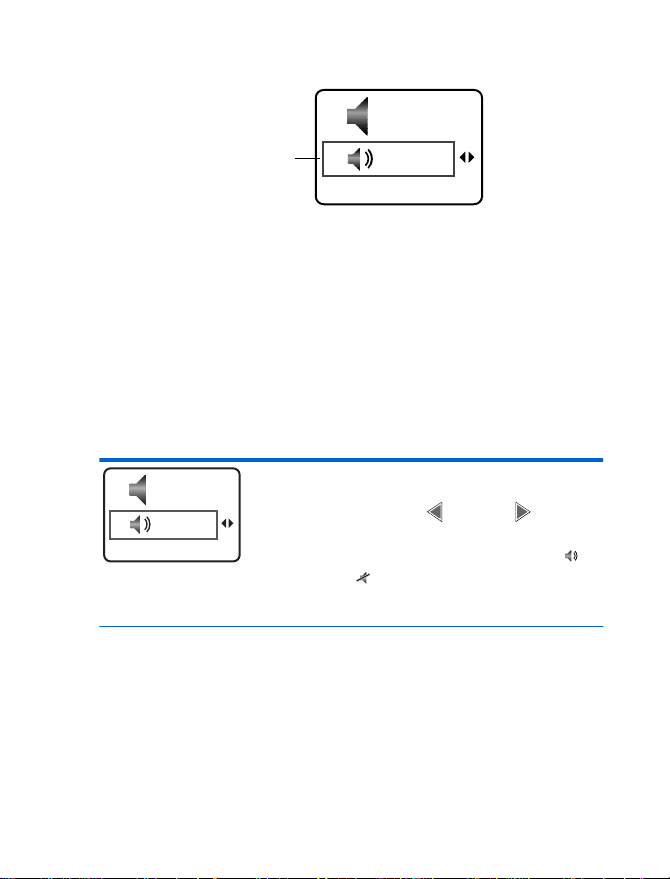
Audio
Using your patient programmer 4
84
English 97740 2015-03-01
1. Press the left
on the Navigator key to move
the selection box to audio on
or off .
2. Go to step 6, page 88.
or right arrow
Page 85
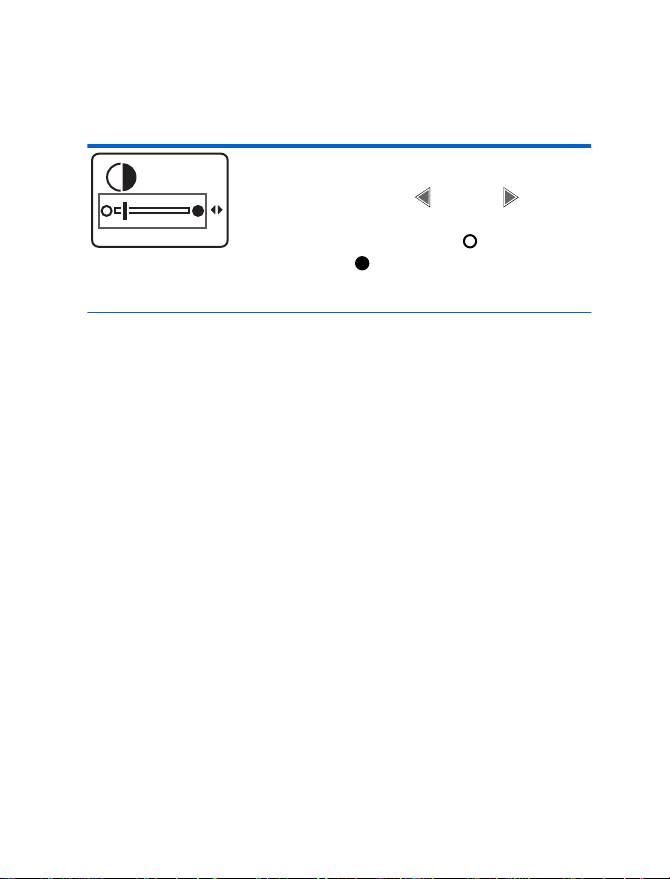
Table 4.9 Changing patient programmer
preferences (continued)
Contrast
1. Press the left
on the Navigator key to make
the contrast lighter
darker
2. Go to step 6, page 88.
.
or right arrow
or
Using your patient programmer 4
97740 2015-03-01 English
85
Page 86
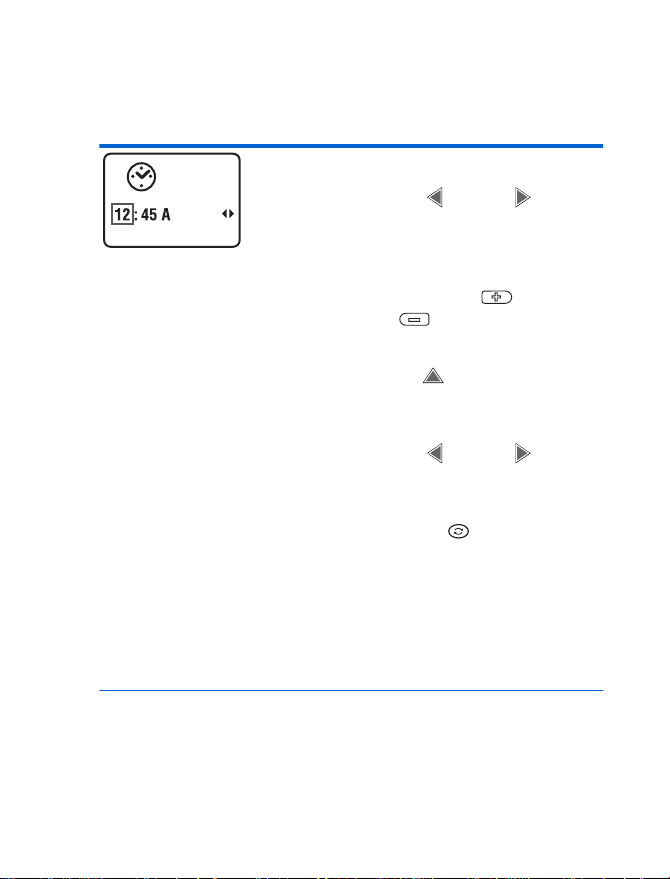
Table 4.9 Changing patient programmer
preferences (continued)
Time
1. Press the left
on the Navigator key to move
the selection box to the hour,
minutes, or time of day (A or P).
2. Press the Increase
Decrease
selection.
3. Press the up
Navigator key to return the
selection box to the Status row.
4. Press the left
on the Navigator key to return to
the Therapy screen.
5. Press the Sync
the change to your
neurostimulator.
6. To verify the time change, repeat
steps 2 and 3 on page 83 to
return to the Time Preference
screen.
Using your patient programmer 4
or right arrow
or
key to change the
arrow on the
or right arrow
key to send
86
English 97740 2015-03-01
Page 87

Table 4.9 Changing patient programmer
preferences (continued)
Time and number format
1. Press the left
on the Navigator key to move
the selection box to a 12-hour
clock and numbers with decimals
or a 24-hour clock and numbers
with commas.
2. Go to step 6, page 88.
Group name display
(Refer to page 114 for more
information about group names.)
1. Press the left
on the Navigator key to move
the selection box to one of the
following:
icons ( ),
–
letters ( ), or
–
text ( ).
–
2. Go to step 6, page 88.
or right arrow
or right arrow
Using your patient programmer 4
97740 2015-03-01 English
87
Page 88
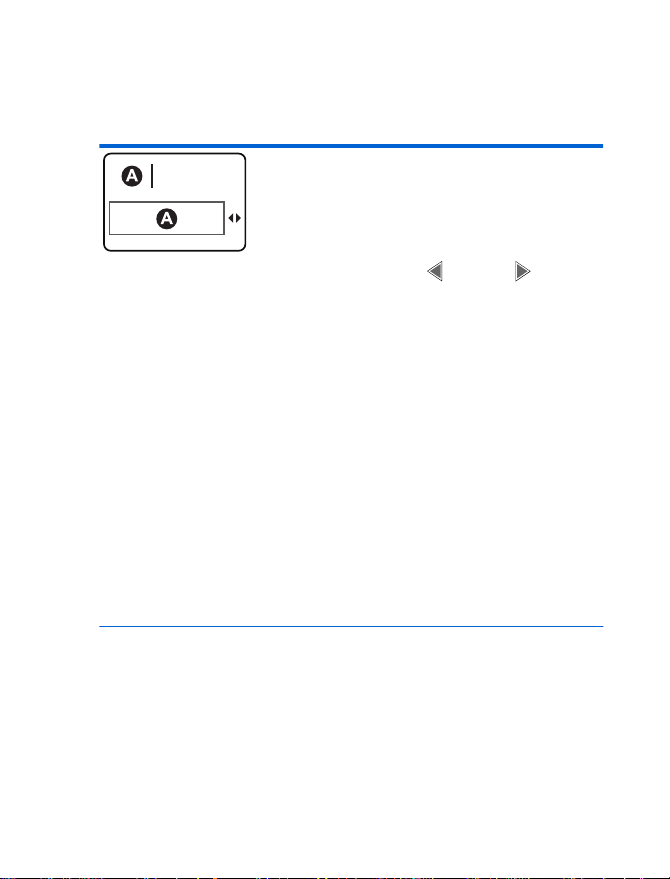
Table 4.9 Changing patient programmer
preferences (continued)
Abc…
AdaptiveStim name display
(Refer to page 126 for more
information about AdaptiveStim
names.)
1. Press the left
on the Navigator key to move
the selection box to one of the
following:
English,
–
French,
–
German,
–
Italian,
–
Spanish, or
–
AdaptiveStim icon only.
–
2. Go to step 6, page 88.
or right arrow
6. When the change is displayed on the
screen, move the selection box to the
Status row.
Using your patient programmer 4
88
English 97740 2015-03-01
Page 89

Note: The preference change is sent to
the neurostimulator at the next
synchronization.
7. Press the left
Navigator key to move to another
preference or return to the Therapy
screen.
or right arrow on the
Using the carrying case and
labeling the patient
programmer
The carrying case has a pouch to hold the
patient programmer and the quick reference
guide (Figure 4.16).
The case also has a loop on the back that
attaches to a belt.
97740 2015-03-01 English
Using your patient programmer 4
89
Page 90

Figure 4.16 Insert the patient programmer into
Place an identification label on the back of
your patient programmer in case the patient
programmer is lost (Figure 4.17).
Figure 4.17 Place the adhesive label on the
Using your patient programmer 4
90
English 97740 2015-03-01
back of the patient programmer.
the case.
ID label
Page 91

Using the detachable antenna
A detachable antenna (Model 37092) is
available if you have difficulty reaching the
neurostimulator. It is also useful for viewing
the patient programmer screen while you are
adjusting stimulation.
Complete the following steps to use the
detachable antenna.
1. Place the antenna over your
neurostimulator (Figure 4.18).
Figure 4.18 Place the antenna over your
neurostimulator.
97740 2015-03-01 English
Using your patient programmer 4
91
Page 92

2. Pull the fabric of your clothing through the
large opening in the antenna. Then,
wedge the fabric in the narrow slit to
secure the antenna in place (Figure 4.19).
ab
Figure 4.19 Pull the fabric through the slit (a)
and wedge in place (b).
3. Push the antenna plug firmly into the
antenna jack (
programmer (Figure 4.20).
) on the patient
Using your patient programmer 4
92
English 97740 2015-03-01
Page 93

Figure 4.20 Insert the antenna plug into the
antenna jack.
4. After the antenna is connected, follow the
instructions for using the patient
programmer.
5. When you have finished using the patient
programmer, grasp the antenna plug and
pull it out.
Using your patient programmer 4
97740 2015-03-01 English
93
Page 94

Caution: Do not pull directly on the
antenna cable to disconnect the cable
from the programmer because this
may damage the antenna cable.
Using your patient programmer 4
94
English 97740 2015-03-01
Page 95

5 Adjusting your stimulation
Page 96

Introduction
Various features are available for adjusting
your stimulation. Each type or model of
neurostimulator provides a unique set of
stimulation features.
Stimulation features
Using the basic neurostimulation features,
you can adjust the rate, amplitude, and pulse
width settings for your stimulation. For
complete information, see "Increasing or
decreasing a parameter (amplitude, pulse
width, or rate)" on page 104.
For information about other stimulation
features and which neurostimulators support
these features, refer to Table 5.1 on
page 97.
Adjusting your stimulation 5
96
English 97740 2015-03-01
Page 97
Adaptive
Stim
Target
MyStim
Group
a
Adjust
models
Scheduled
therapy
b
settings
Table 5.1 Stimulation features available for neurostimulator
Model Groups Clinician
37022 Yes Yes Yes Yes Yes
37701 Yes Yes
37702 Yes Yes Yes Yes Yes
37711 Yes Yes
37712 Yes Yes Yes Yes Yes
37713 Yes Yes Yes Yes Yes
37714 Yes Yes Yes Yes Yes
97702 Yes Yes Yes Yes Yes
97712 Yes Yes Yes Yes Yes
97713 Yes Yes Yes Yes Yes
97714 Yes Yes Yes Yes Yes
97740 2015-03-01 English
Adjusting your stimulation 5
97
Page 98
Adaptive
Stim
Target
MyStim
Group
a
Adjust
models
Scheduled
therapy
b
settings
Table 5.1 Stimulation features available for neurostimulator
Neurostimulator models 37703 and 37704 do not provide the stimulation
features listed in this table.
This feature, "Changing back to clinician settings," allows you to change your
Adjusting your stimulation 5
Model Groups Clinician
a
stimulation settings back to those previously set by your clinician.
b
98
English 97740 2015-03-01
Page 99

Notes:
See "Viewing and changing a group" for
•
more information about Groups and
"Using GroupAdjust" for more information
about GroupAdjust.
See "Using TargetMyStim" for more
•
information about TargetMyStim.
Adjusting stimulation settings
As your activities vary throughout the day,
your therapy needs may change. The patient
programmer allows you to turn stimulation on
and off, switch from one programmed
stimulation option to another, and adjust the
amplitude, pulse width, or rate of the
stimulation. Talk to your clinician about the
settings that apply to your therapy.
Your clinician programs the available
functions and specifies the settings you can
adjust with your patient programmer. Discuss
this with your clinician.
97740 2015-03-01 English
Adjusting your stimulation 5
99
Page 100

There is often more than one way to change
stimulation settings. These instructions
describe the most common ways.
Notes:
Ask your clinician to print a report with
•
your programmed settings.
When a stimulation setting is changed,
•
you will see the change on the Therapy
screen.
If the patient programmer audio is turned
•
on, you will hear 1 tone that means the
change was effective. Three rapid tones
mean there was a problem
communicating with your neurostimulator
and the change may not have occurred.
To receive the most effective therapy, some
days you may need to adjust your stimulation
several times; other days you may not need
to adjust it at all. Your clinician will provide
complete guidelines about when you may
want to adjust your stimulation.
Adjusting your stimulation 5
100
English 97740 2015-03-01
 Loading...