

Page 1

FeatherTouch® Automated Rasp Converter and Suction Rasp Tips
Râpe automatisée FeatherTouch® Adaptateur et embouts de râpe avec aspiration
Raspa automatica FeatherTouch® Punte per convertitore e raspa di aspirazione
FeatherTouch® Automatischer Raspelumrichter und Saug-Raspel-Spitzen
Convertidor de raspador automatizado y puntas de raspador con aspiración FeatherTouch®
FeatherTouch® Automated Rasp Converter en Suction Rasp Tips
FeatherTouch® automatisk konverter til rasp og raspehoveder med sug
FeatherTouch®-automaattikaavin Liitinkappaleen ja imukaapimen ohjeet
FeatherTouch® automatiserad rasp Omkopplare och raspsugspetsar
FeatherTouch® Automated Rasp Adaptador e Pontas de Raspagem e Aspiração
FeatherTouch® Αυτοατοποιηένο Ξέστρο Άκρα Μετατροπέα και Ξέστρου Αναρρόφηση
Zautomatyzowany konwerter skrobaczki FeatherTouch® i końcówki ssące skrobaczki
Automatický měnič pro raspatoria a odsávací škrabací hroty FeatherTouch®
FeatherTouch® automata forgácsoló adapter és szívóval egybeépített forgácsolófej
FeatherTouch® Otomatik Raspa Dönüştürücü ve Saksiyon Raspa Uçları
Product Information & Instructions
FR Informations et instructions concernant le produit IT Informazioni sul prodotto ed istruzioni per l’uso
DE Produktinformation und Gebrauchsanweisung ES Instrucciones e información sobre el producto
NL Productinformatie en instructies DA Produktoplysninger og vejledning FI tuotetta koskevat tiedot
ja käyttöohjeet SV Produktinformation och instruktioner PT-PT Informação do produto e instruções EL
Πληροφορίε προϊόντο και οδηγίε PL Informacje o produkcie i instrukcje CS Údaje o výrobku a pokyny
HU Termék információ és használati utasítás TR Ürün Bilgileri ve Talimatlar NO Produktinformasjon og
instruksjoner
Page 2

EN The following are trademarks or registered trademarks of Medtronic, Inc. in the United States and other countries: FeatherTouch®,
StraightShot®, Magnum®, XPS®. All other trademarks, service marks, registered trademarks or registered service marks are the property
of their respective owners in the United States and other countries. FR Les noms suivants sont des noms commerciaux ou des marques
déposées de Medtronic, Inc aux États-Unis comme dans les autres pays: FeatherTouch®, StraightShot®, Magnum®, XPS®. Tous les autres noms
commerciaux, marques de service, marques déposées ou marques de service enregistrées appartiennent à leurs propriétaires respectifs
aux États-Unis comme dans les autres pays. IT I seguenti marchi sono marchi commerciali o marchi registrati di Medtronic, Inc. negli Stati
Uniti e in altri paesi: FeatherTouch®, StraightShot®, Magnum®, XPS®. Tutti gli altri marchi commerciali, marchi di servizio, marchi registrati o
marchi di servizio registrati appartengono ai rispettivi proprietari negli Stati Uniti e in altri paesi. DE Die folgenden Namen sind in den USA
und anderen Ländern Marken oder eingetragene Marken von Medtronic, Inc.: FeatherTouch®, StraightShot®, Magnum®, XPS®. Alle anderen
Marken, Dienstleistungsmarken, eingetragenen Marken oder eingetragenen Dienstleistungsmarken sind das Eigentum ihrer jeweiligen
Inhaber in den USA und anderen Ländern. ES Las siguientes son marcas comerciales o marcas registradas de Medtronic, Inc. en EE.UU. y
otros países: FeatherTouch®, StraightShot®, Magnum®, XPS®. Todas las demás marcas comerciales, marcas de servicio y marcas registradas
son propiedad de sus respectivos propietarios en EE.UU. y otros países. NL De volgende merken zijn handelsmerken of gedeponeerde
handelsmerken van Medtronic, Inc. in de Verenigde Staten en andere landen: FeatherTouch®, StraightShot®, Magnum®, XPS®. Alle andere
handelsmerken, servicemerken, gedeponeerde handelsmerken of gedeponeerde servicemerken zijn het eigendom van hun respectieve
eigenaren in de Verenigde Staten en andere landen. DA Følgende varemærker eller registrerede varemærker tilhører Medtronic, Inc. i
USA og andre lande: FeatherTouch®, StraightShot®, Magnum®, XPS®. Alle andre varemærker, servicemærker, registrerede varemærker eller
registrerede servicemærker tilhører deres respektive ejere i USA og andre lande. FI Seuraavat tuotemerkit ovat Medtronic, Inc:n tuotemerkkejä
tai rekisteröityjä tuotemerkkejä Yhdysvalloissa ja muissa maissa: FeatherTouch®, StraightShot®, Magnum®, XPS®. Kaikki muut tuotemerkit,
palvelumerkit, rekisteröidyt tuotemerkit tai rekisteröidyt palvelumerkit ovat vastaavien omistajiensa omaisuutta Yhdysvalloissa ja muissa
maissa. SV Följande är varumärken eller registrerade varumärken tillhörande Medtronic, Inc. i USA och i andra länder: FeatherTouch®,
StraightShot®, Magnum®, XPS®. Alla övriga varumärken, servicemärken, registrerade varumärken eller registrerade servicemärken tillhör
respektive ägare i USA och i andra länder. PT-PT As seguintes são marcas comerciais ou marcas comerciais registadas da Medtronic, Inc. nos
Estados Unidos e noutros países: FeatherTouch®, StraightShot®, Magnum®, XPS®. As restantes marcas comerciais, marcas de serviço, marcas
comerciais registadas ou marcas de serviço registadas são propriedade dos respectivos proprietários nos Estados Unidos e noutros países.
EL Οι παρακάτω ονοασίε αποτελούν επορικά σήατα ή κατοχυρωένα επορικά σήατα τη Medtronic, Inc. στι Ηνωένε Πολιτείε
και σε άλλε χώρε: FeatherTouch®, StraightShot®, Magnum®, XPS®. Όλα τα υπόλοιπα επορικά σήατα, σήατα υπηρεσία, κατοχυρωένα
επορικά σήατα ή κατοχυρωένα σήατα υπηρεσία αποτελούν ιδιοκτησία των αντίστοιχων κατόχων του στι Ηνωένε Πολιτείε και σε
άλλε χώρε. PL Poniżej znajdują się znaki towarowe lub zarejestrowane znaki towarowe rmy Medtronic, Inc. w Stanach Zjednoczonych i
innych krajach: FeatherTouch®, StraightShot®, Magnum®, XPS®. Wszystkie inne znaki towarowe, znaki zastrzeżone usług i zarejestrowane znaki
towarowe lub zarejestrowane znaki zastrzeżone usług należą do ich odpowiednich właścicieli w Stanach Zjednoczonych i innych krajach. CS
Dále jsou uvedeny ochranné známky nebo registrované ochranné známky společnosti Medtronic, Inc. v USA a dalších zemích: FeatherTouch®,
StraightShot®, Magnum®, XPS®. Všechny ostatní ochranné známky, servisní značky, registrované ochranné známky nebo registrované
servisní značky jsou vlastnictvím příslušných majitelů v USA a dalších zemích. HU A következők a Medtronic, Inc. védjegyei vagy az Egyesült
Államokban és más országokban bejegyzett védjegyei: FeatherTouch®, StraightShot®, Magnum®, XPS®. Minden más védjegy, szolgáltatásvédjegy, az Egyesült Államokban és más országokban bejegyzett védjegy vagy bejegyzett szolgáltatás-védjegy megfelelő tulajdonosaik
tulajdonát képezi. TR Aşağıdaki markalar, Medtronic, Inc. şirketinin Amerika Birleşik Devletleri ve diğer ülkelerdeki ticari markaları veya tescilli
ticari markalarıdır: FeatherTouch®, StraightShot®, Magnum®, XPS®. Diğer tüm ticari markalar, hizmet markaları, tescilli ticari markalar veya
tescilli hizmet markaları, Amerika Birleşik Devleti ve diğer ülkelerdeki ilgili sahiplerinin mülkiyetidir. NO Følgende er varemerker eller registrerte
varemerker for Medtronic, Inc. i USA og/eller andre land: FeatherTouch®, StraightShot®, Magnum®, XPS®. Alle andre varemerker, tjenestemerker,
registrerte varemerker og registrerte tjenestemerker eies av sine respektive innehavere i USA og/eller andre land.
2
Page 3

EN
EN
SYSTEM COMPONENTS
REF 1922005 - FeatherTouch Automated Rasp Converter
REF 1992208 - FeatherTouch Suc tion Rasp Tip, 8mm, Co arse
REF 1992210 - FeatherTouch Suction Rasp Tip, 8mm, Fi ne
REF 1895524 - FeatherTouch Suction Tubing
REF 1922006 - FeatherTouch Sterilization Tray
DEVICE DESCRIPTION
The Feathe rTouch Automate d Rasp Converter us es the StraightSh ot or StraightSho t Magnum Handpi ece as the power dri ve source
and modies the rotar y action to a forward / reverse action. The FeatherTouch Converter has a collet to hold the FeatherTouch
Rasp Tips .
INTENDED USE / INDICATIONS FOR USE
The Feathe rTouch Convert er is intended for u se as an accessory t o the StraightShot o r StraightShot Ma gnum Handpiece t o operate
rasp tips for cutting an d removal of soft an d hard tissues or bone in o torhinolaryn gology and head an d neck surgery.
Manual surgical instruments are intended for use in various surgical procedures. It is the responsibility of the surgical team to
select the appropriate instruments for each case. Do not use these instrument s for purposes other than which they are intende d.
Instrum ents must be cleane d and sterilized prior to rst use and before e ach reuse.
CONTRAINDICATIONS
None known.
INSTRUCTIONS FOR USE
1. Connect the converter to the handpiece by depressing the spring collet on the handpiece, inserting the converter rmly
and releasing the spring collet on the handpiece. Check for proper connection by tugging slightly on the converter. If the
converter is not securely positioned in the collet, repe at the process.
2
1
1 converter 2 compressed handpiece collet
2. Once the converter is secure in the handpiece collet, prepare the twist collet on the converter for tip installation by twisting
the converter collet counterclockwise until resistance is felt. The collet should now be closest to the open distal end of the
converter.
3. Insert the desired tip into th e collet rmly and rot ate until the groove on the e nd of the shaft drop s into place securely.
3
Page 4

EN
4. Secure the rasp ti p in the collet by turni ng the collet clock wise and tightenin g rmly to secure the t ip. Perform pull te st: while
holding t he handpiece, pull th e rasp away from the hand piece. If the rasp com es out or slips, reinst all, retighten and p erform
the test again.
5. For rasp tip sucti on, attach the Feat herTouch Sucti on Tubing to the t ip as shown, and then con nect standard o perating room
suctio n tubing to the FeatherTouch Tubing. Se cure the operatin g room suction tub ing to the handpiece c able with the white
clamp provided with the FeatherTouch Suction Tubing.
1
2
3
1 suction adapter tubing 2 operating room tubing 3 white clamp
6. Ensure that the handpiece and footswitch cables are properly connected to the Medtronic Xomed XPS Microdebrider
Console. S et the console to “FORWARD” direction, varia ble mode and set maximum spee d between 3,00 0 and 5,000 rpm.
7. Activate the FeatherTouch by depressing the footswitch.
CAUTIONS
• Speeds above 5,000 rpm will cause premature wear of the converter and can void the warranty. Operate the converter in
Forward mode only.
• The Feathe rTouch Converter h as an expected li fe of at least 100 uses. End o f life can be determi ned by checking for lock-up
of the mech anism before each use.
WARNINGS
• Always keep the active tips away from ngers and loose clothing.
• Operate the rasp tip onl y after the approp riate anatomical lan dmarks and the inten ded surgical site have b een conrmed.
• The FeatherTouch Converter is provided non-sterile and must be cleaned and sterilized before the rst use and any reuse.
• Replaceable rasp tips are provided sterile for rst use convenience. Repeated processing has minimal eect on the rasp
tips. End of l ife is normally det ermined by wear dama ge due to use. Discard t he tip and replace wi th a new one when the tip
becomes dull and no longer cuts eectively.
• Suction tubing is prov ided sterile for single use onl y. Discard tubing after each use.
• After each procedure, properly clean all reusable system components.
• Use care in application o f the moving cutting end to only app ropriate anatomica l landmar ks and the intended surgical site
when using XPS accessories. The use of powered reciprocating/rotating instruments may result in vibration-related injury.
Use appropriate precautions.
• Employ visualization when using rotating XPS accessories. Discontinue powered application in the event of lack of
visualiz ation of the surgical site.
• Use methods at the operative site to control bleeding that do not compromise patient safety during at-risk surgery.
• Always insp ect the compon ents before and af ter use for any dama ge. If damage is obse rved, do not use da maged part unti l
it is replaced. Damage d parts may deposi t metal shavings on sur gical site.
• Do not use any p arts other than Medtronic Xom ed, Inc. system components a s damage or substand ard performan ce could
result.
• Remove and discard accessories following local regulations for proper disposal of contaminated materials.
• All service must be p erformed by Medtronic Xome d-qualied pe rsonnel only.
• Do not modify access ories used with the handpiece. Pe rformance could b e diminished with mo died accessories.
• Sterilize immediately after cleaning.
• Sterilize a nd dry reusab le device befo re storing the sy stem. Decrea se likelihood o f cross-contam ination with tim ely cleaning
and sterilization.
• Verify reusable device was cleaned and sterilized prior to use. If not sterilized, do not use.
• Do not change accessory with handpiece running to prevent laceration of user and cross-contamination through
compromised glove.
• Do not use accessory if package is opened or da maged. Broken seal o ers no protecti on against cross-contaminati on.
• Bending o r prying may break th e accessory, causing ha rm to patient or sta.
• Accessories are available for resection of soft tissue and bone for surgical procedures. Use of accessories depends on the
intended application and patient needs. Sharp-cutting powered accessories induce bleeding and removal of signicant
tissue and bone.
4
Page 5

WARNING
Sterilize immediately after cleaning.
REPROCESSING INSTRUCTIONS
EN
Warnings /
Precautions
Limitations End of life i s normally deter mined by wear damag e due to use. See Insp ection and Testing , below.
Point of Us e The conver ter is provided n on-sterile an d must be cleaned a nd sterilized be fore the rst use a nd any reuse.
Containment and
Transportation
Preparation for
Decontamination
Cleaning:
Automated
(Do NOT use
ultrasonic washer)
Cleaning: Manual Suct ion Rasp Tip Cleaning Instructions
Disinfection Do not cold soak in glu taraldehyde, ch lorine, or ammon ium solutions, o r dry heat steril ize, as damage to the
Packaging A standa rd, sterilizat ion wrap may be used . In the US, an FDA approved s urgical wrap is re quired.
Before s terilization , carefully insp ect the convert er and tips. The Feat herTouch Conver ter has an expec ted life
of at least 100 u ses. End of life can b e determined by c hecking for loc k-up of the mechani sm before each use .
Failure to pe rform the recom mended vacuum d rying cycle may r esult in prematur e wear of the converte r.
Do not imme rse the converte r. Soaking in any liqui d solutions will d amage the convert er and void the warr anty.
Dry hea t sterilizatio n will damage the conv erter and void the w arranty.
Promptly a nd thoroughly ri nse instrument s with deionize d water after each u se.
It is recom mended that inst ruments are repr ocessed as soon as i s practical fol lowing use.
Promptly a nd thoroughly ri nse instrument s with deionize d water after each u se. Disassembl e tip from converte r
prior to cleaning. Disassemble converter by unscrewing knurled chuck from the reciprocating collet.
Remove ins truments and eq uipment from any s terilization tr ays before placi ng into washer baske ts. Orient
devices f ollowing recomm endations of wash er/disinfector man ufacturers . Use alkaline or ne utral pH deterge nt
recommended by washer/disinfector or detergent manufacturers.
Auto-Was h Pre-Cleani ng Instructio ns: The rasps and conve rter must be man ually cleaned fo llowing the manua l
cleanin g instructions (C leaning: Manual ) and inspected f or removal of visua l soil prior to plac ement in the
automatic washer/disinfector.
These pr oducts have bee n validated for e ective cleani ng using an automati c washer/disinfecto r cycle
consisti ng of the followin g:
Phase Recirculation Time Water
Pre-Wash 1 3 minutes cold tap water Not applicable
Enzy me Wash 5 minutes hot tap water neutral pH enzymatic detergent
Wash 1 5 minutes 66°C s et point Neutral pH detergent
Rinse 1 3 minutes hot tap water Not applicabl e
Thermal Rinse 1 minute 82°C
Thoroughly examine instruments for residual soil.
Soak in luke warm (less than 43° C), mild (pH 7.0 - 8.5), enzy matic detergent a nd deionized wa ter for a minimum of
2 minutes . For instruments w ith lumens, and in struments equ ipped with clean ing ports, inj ect cleaning so lution
through t he instrument wi th an irrigation sy ringe and allow to s oak for a minimum of 2 mi nutes.
Use a soft i nstrument brus h to scrub instrum ents while subme rged in cleaning s olution to remove or ganic
matter. Rin se with deionize d water, then clean ult rasonically in a l ukewarm (less than 43 °C), mild (pH 7.0 - 8.5),
detergent and deionized water for 10 minutes.
Rinse tho roughly with dei onized water, utili zing a syringe to th oroughly rinse c leaning soluti on from lumens and
cleanin g ports. Clean i n this manner until no v isible soil rema ins on the instrum ent.
Dry wit h compressed air, or wi pe dry with a lint-f ree cloth. Exa mine instrument s for any staining o r deterioratio n;
remove from use as appropriate.
Rasp Converter Cleaning Instructions
Do not imme rse the converte r. Soaking in any liqui d solutions or dr y heat steriliz ation will damag e the converter
and void th e warranty.
Clean the co nverter using a br ush with a mild enz ymatic deterge nt solution and wat er rinse. Debris in side the
converte r may be cleaned usi ng a pipe cleaner, thin w ire, or stylet te.
Rinse tho roughly with dei onized water and w ipe dry with a lint- free towel
Note: Whe n using an ultrason ic cleaner or a spray w ashing machine, f ollow the manufa cturer’s
recommendations, particularly with regard to articulated instruments and positioning of instruments.
instrument nish may occur.
In sets: I nstruments may b e loaded into dedi cated instrume nt trays or genera l purpose steril ization trays. E nsure
that cutting edges are protected. Wrap trays using appropriate method.
Temperature
minimum
Detergent Type
Not applicable
5
Page 6

EN
Sterilization
(Temperatures
are minimum
required, times
are minimum
required)
Maintenance,
Inspection and
Testing
Storage Store instrument s in a clean, dry are a.
Additional
Information
Note: The i nstructio ns provided ab ove have been vali dated by the manuf acturer as be ing CAPABLE of prep aring the produ ct for re-u se. They
are NOT APPLI CABLE to single use de vices or single use a ccessories, whic h must be destroyed a fter use in accorda nce with applicab le local
regulat ions. It remain s the responsib ility of the pr ocessor to ensur e that the reproc essing is per formed using v alidated equi pment to achieve
the desired result. This normally requires validation and routine monitoring of the process.
Some devices have specic assembly instructions. In this case, refer to the assembly insert provided with the device for additional
instructions.
Check the c leanliness and op eration of the ins trument. Clean a gain if debris is pr esent and remove fr om use
any damage d instrument. Cl ose instrument s with catches and r acks on the rst n otch. Arrange the i nstruments
in steril ization contain ers with perf orations on the top a nd bottom, and o n supports such a s those used in
microsur gery. Follow the ap propriate cycl e listed in the tabl e below.
All steam c ycles have been va lidated in the wrap ped congurati on and can be steri lized wrapped o r unwrapped.
Instruments Only Instruments Only or Instruments in
Cycle Gravity Gravity Pre-vac Pre-vac (FR/
Temperature 121°C 132° C 132° C 13 4°C 134° C
Time 30 minutes 10 minutes 4 minutes 18 minutes 3 minutes
Drying 30-40 min utes or until visibl y dry.
100% EtO Sterilization Parameters (Setpoints)
Preconditioning 5 4°C, 6-% relat ive humidity, 60 min utes
Sterilization Temperature 54°C
Relative Humidity 60 ± 5%
Ethylen e oxide
concentration
Gas expo sure time
(full-cycle)
Aeration 54 °C, 8 hours
The Feath erTouch Conver ter has an expec ted life of at least 100 u ses. End of life can b e determined by ch ecking
for lock- up of the mechanism b efore each use. R epeated process ing has minimal ee ct on the rasp tips . End of
life is nor mally determin ed by wear damage due t o use. Discard the ti p and replace with a n ew one when the tip
becomes dull and no longer cuts eectively.
None.
725 ± 25 mg/L
120 minutes
Instrument Trays
WHO)
Pre-va c
(UK)
RETURNS AND/OR REPAIRS
Contact Medtronic Xomed Customer Service at (800-874-5797) to obtain a Return Goods Authorization number (RGA#) prior to
shipping the Product to Medtronic Xomed. Please have the original invoice number or purch ase order number available to assis t
in verifying warranty information. The RGA# should be prominently displayed on the box and included on all paperwork enclosed
with the re turn and/or repair. All Pr oduct retur ned to Medtroni c Xomed should be s afely packed in p rotective wr apping. Custom er
must supply the Purchas e Order number; the correct sh ipping and billing address; and ei ther a completed Re pair Order Form or a
statement of the problem or reason for return.
CUSTOMER SERVICE INFORMATION
For further information regarding the use of this product or to report any problems, please contact Medtronic Xomed using the
appropriate information provided on the blue and white contact information card packaged with each device; or contact your
local distributor.
LIMITED WARRANTY
A. This LIMITED WARRANTY provides assurance for the customer who purchases a FeatherTouch Automated Rasp Converter
and Suction Rasp Tips (hereinaf ter the “Product ”) that should the Product fail to function to Medtronic Xomed’s published
specications during the term of this LIMITED WARRANTY (one year from the date of shipment), Medtronic Xomed will
either replace, repair, or issue a credit (adjusted to reect the age of the Product) for the Product or any portion thereof.
This LIMITED WARRANT Y is extended only to the buyer purchasing the Product directly from Medtronic Xomed or from its
aliate or its authorized distributor or representative.
B. To qualify for this LIMI TED WARRANTY, the following conditions must be m et:
(1) T he Product must be used on or bef ore its “Use By” or “ Use Before” date, if ap plicable.
(2) The Product mu st be used in accord ance with its labe ling and may not be alte red or subject ed to misuse, abuse, a ccident
or improper handling.
(3) M edtronic Xomed must be notied in writing wi thin thirty (30) days following discovery of a d efect.
(4) The Product must be returned to Medtronic Xomed within thirty (30) days of Medtronic Xomed receiving notice as
provide d for in (3) above.
6
Page 7

FR
(5) Upon examination of the Product by Medtronic Xomed, Medtronic Xomed shall have determined that: (i) the Product
was not rep aired or altered by any one other than Med tronic Xomed or its au thorized repre sentative, (ii) the Pro duct was
not operated under conditions other than normal use, and (iii) the prescribed periodic maintenance and services have
been performed on the Product.
C. This LIMITED WARRANTY is limited to its express terms. THIS LIMITED WARRANT Y IS IN LIEU OF ALL OTHER WARRANTIES,
EXPRESSED O R IMPLIED WHETH ER STATUTORY OR OT HERWISE, INCLUDI NG ANY IMPLIED WARRA NTY OF MERCHAN TABILIT Y
OR FITNESS FOR A PARTICULAR PURPOSE. In no event shall Medtronic Xomed be liable for any consequential, incidental,
prospec tive or other simi lar damage resultin g from a defect , failure, or malfu nction of the Prod uct, whether a c laim for such
damage is based upon th e warranty, contrac t, negligence or oth erwise.
D. The exclusions and limitations set out above are not intended to, and should not be construed so as to, contravene
mandatory provisions of applicable law. Users may benet from statutory warranty rights under legislation governing the
sale of consumer goods. If any part or term of this LIMITED WARRANTY is held by any court of competent jurisdiction to be
illegal, unenforceable, or in conict with applicable law, the validity of the remaining portion of the LIMITED WARRANTY
shall not be aected, and all rights and obligations shall be construed and enforced as if this LIMITED WARRANT Y did not
contain the particular part or term held to be i nvalid.
FR
COMPOSANTES DU SYSTÈME
RÉF 1922005 – Adaptateur pour râpe automatis ée FeatherTouch
RÉF 1992208 – Embou t de râpe avec aspiration FeatherTouch, 8mm, grossier
RÉF 1992210 – Embout de râpe avec aspiration FeatherTouch, 8mm, n
RÉF 1895524 – Tubulure d’aspiration FeatherTouch
RÉF 1922006 – Plateau de stérilisation FeatherTouch
DESCRIPTION DU DISPOSITIF
L’adaptateur pour râpe automatisée FeatherTouch utilise une pièce à main StraightShot ou StraightShot Magnum comme source
d’entraînement et transforme le mouvement rotatif en mouvement avant-arrière. L’adaptateur FeatherTouch est muni d’une
bague des tinée à maintenir les e mbouts de râpes FeatherTouch.
USAGE PRÉVU / INDICATIONS
L’adaptateur FeatherTouch est conçu pour être utilisé avec les pièces à main StraightShot ou StraightShot Magnum an de faire
fonctionner diverses râpes pour couper et retirer des tissus mous et durs ou de l’os en oto-rhino-laryngologie et lors d’interventions
chirurgicales au niveau de la tête et du cou.
Les instruments chirurgicaux manuels sont faits pour être utilisés lors de diérentes interventions chirurgicales. Il incombe à
l’équipe chirurgicale de choisir les instruments appropriés pour chaque cas. Ne pas utiliser ces instruments à d’autres ns que
celles pour lesquelles ils ont été conçus. Les instruments doivent être nettoyés et stérilisés avant la première utilisation et toutes
les utilisations ultérieures.
CONTREINDICATIONS
Aucune contre-indication connue.
MODE D’EMPLOI
1. Pour xer l’adaptateur à la pièce à main, appuyer sur la douille de serrage à ressort de la pièce à main et insérer fermement
l’adaptate ur, puis relâcher la do uille de la pièce à mai n. Tirer légère ment sur l’adaptate ur an de vérier si l e raccordement es t
correct. Si l’adaptateur n’est pas solidement xé dans la douille, répéter l’opération ci-dessus.
2
1
1 Adaptateur 2 Douille de serrage comprimée de la pièce à main
7
Page 8

FR
2. Une fois l’adaptateur bien xé dans la douille de la pièce à main, préparer sa bague tournante pour la mise en place de
l’embout en l a faisant tourner d ans le sens contraire de s aiguilles d’une mont re jusqu’à appariti on d’une résistance. L a bague
doit alor s se trouver plus près d e collet l’extrémité distale ou verte de l’adaptate ur.
3. Insérer fermement l’embout de son choix dans la bague et la faire tourner jusqu’à ce que la rainure située à l’extrémité de la
tige s’enfonce en place.
4. Faire tourner la bague dans le sens des aiguilles d’une montre et bien la serrer pour xer l’embout solidement en place.
Eectuer un test de traction : tout en maintenant la pièce à main, tirer sur la râpe. Si elle sort ou glisse, recommencer
l’insta llation, serrer à no uveau et répéter le test.
5. Pour l’aspiration, relier la tubulure d’aspiration FeatherTouch à l’embout comme illustré, puis brancher la tubulure d’aspiration
standar d du bloc opératoi re à la tubulure FeatherTouch. At tacher la tubulure d ’aspirat ion du bloc opérato ire au l de la pièce
à main au moyen du clamp blanc f ourni avec la tubulure d ’aspirati on FeatherTouch.
1
2
3
1 Tubulure d’aspiration de
l’adaptateur
6. S’assurer que les ls de la pièce à main et de la pédale sont correctement branchés sur la console Medtronic Xomed XPS
Microde brider. Régler la co nsole en direc tion vers l’avant (« FORWARD »), en mo de variable et ré gler la vitesse ma ximum entre
3.000 et 5.000 tr/min.
7. Appuyer sur la pédale pour activer l’accessoire FeatherTouch.
ATTENTION
• Toute vitesse supérieure à 5 0 00 tr/min entraînera un e usure prématurée du co nvertisseur et pe ut annuler la garantie. Faire
fonctionner le convertisseur en mode Avant uniquement.
• Le convertisseur FeatherTouch a une durée de vie prévue d’au- moins 100 applicatio ns. On en déterminera le degré d’usure
en examinant le mécanisme de verro uillage avant chaque utilisation .
AVERTISSEMENTS
• Éviter tout contact entre les embouts activés et les doig ts ou des vêtements p eu ajustés.
• N’utiliser la râpe qu’après conrmation des repères anatomiques appropriés et du site chirurgical prévu.
• L’adaptateur FeatherTouch est livré non stérile et doit être nettoyé et stérilisé avant sa première utilisation et avant toute
utilisation ultérieure.
8
2 Tubulure du bloc o pératoire 3 Clamp blanc
Page 9

• Les embou ts râpe amovibl es sont livrés stér iles pour une prem ière utilisatio n aisée. Le retraite ment ne les endom mage pas.
Leur n de vie est habituellement déterminée par l’usure et les dommages liés à l’utilisation Il convient de les jete r et de les
remplace r par des neufs lors qu’ils deviennent émoussés et ne coupent pl us très bien.
• La tubulu re d’aspiration est fournie stérile et est à usa ge unique. Elle doit être jetée apr ès chaque utilisation.
• Après chaque procédure, nettoyer correctement tous les composants réutilisables du système.
• Appliquer très prudemment l’extrémité coupante mobile de l’instrument et uniquement sur les repères anatomiques
appropriés, ainsi que sur le champ chirurgical déni lors de l’utilisation des accessoires XPS. Les vibrations des appareils
rotatifs ou à mouvement alternatif peuvent être à l’origine de blessures. Prendre les précautions appropriées.
• Recourir à une technique de visualisation lors de l’utilisation d’accessoires XPS rotatifs. Cesser l’application mécanique en
cas de défaut de visuali sation du champ opér atoire.
• Utiliser des méthodes de limitation des saignements au niveau du champ opératoire sans compromettre la sécurité du
patient pendant le déroulement des interventions chirurgicales.
• Toujours inspecter méticuleusement les composants avant et après utilisation pour voir s’ils ne sont pas endommagés. En
cas de dommage, ne pas utiliser le système tant que la pièce endommagée n’est pas remplacée. Les pièces endommagées
risquent de déposer des rognures de métal sur le champ opératoire.
• Ne pas utiliser d’autres pièces que les composantes Xomed de Medtronic pour ne pas risquer d’endommager l’appareil ou
de nuire à ses p erformances.
• Retirer et mettre les accessoires au rebut conformément à la réglementation locale sur l’élimination des matières
contaminées.
• Toutes les opérations d’entretien doivent être uniquement eectuées par du personnel Medtronic Xomed qualié.
• Ne pas modier les accessoires utilisés avec la pièce à main. Toute modication d’un accessoire risque d’en altérer les
performances.
• Stériliser et sécher les dispositifs réutilisables avant de ranger le système. Le risque de contamination croisée diminue
lorsque le nettoyage et la stérilisation sont eectués au bon moment.
• Vérier que les dispositifs réutilisables ont été nettoyés et stérilisés avant l’emploi. Ne pas les utiliser s’ils ne sont pas
stérilisés.
• Ne pas changer d’accessoire lors de l’utilisation de la pièce à main pour ne pas blesser l’utilisateur et éviter toute
contamination par le biais de gants endommagés.
• Ne pas utiliser un accessoire si son emballage est ouvert ou en dommagé. En cas de rupture du sceau de sécurité, il n’existe
plus aucune protection contre le risque de contamination.
• Toute tentative d e courbure ou pliu re en force peut prov oquer la cassure d e l’accessoire et bl esser le patient o u le personne l.
• Les accessoires servent à la résection des os et du tissu mou pendant les interventions chirurgicales. L’utilisation de ce
type d’accessoires varie suivant l’application et les besoins du patient. Les accessoires de coupe tranchants peuvent être à
l’origine de saigneme nts et entraîner la résection import ante de tissus et d’os.
AVERTISSEMENT
Stériliser immédiatement après le nettoyage.
FR
INSTRUCTIONS POUR LERETRAITEMENT
Avertissements/
Précautions
Limitations La n de vie u tile est généra lement détermi née par une usure du e à l’utilisation de l ’instrument. Co nsulter la
Utilisation initiale Le co nvertisseur es t livré non stéril e et doit être net toyé et stérilisé p réalablement à s a première utilis ation et à
Conditionnement
et transport
Préparation à la
désinfection
Nettoyage
automatisé
(NE PAS util iser
un nett oyeur à
ultrasons)
Avant stér ilisation, insp ecter soigneu sement le conver tisseur et les râp es. Le convertiss eur FeatherTouch a une
durée de v ie utile supposé e d’au moins 100 utilisat ions. La n de vie ut ile peut être déte rminée en véri ant le
mécani sme de verrouilla ge avant chaque util isation. Le non- respect de l’ap plication du cyc le de séchage à vid e
recomma ndé peut entraîn er une usure prémat urée du convertis seur.
Ne pas imme rger le converti sseur. Un trempage da ns une solution li quide détérior e le convertisseu r et annule la
garantie . Une stérilisati on à la chaleur sèch e détériore le conv ertisseur et an nule la garantie.
section ci-dessous intitulée Inspection et contrôle.
toutes les réutilisations ultérieures.
Après chaque utilisation, rincer rapidement et intégralement les instruments avec de l’eau déionisée.
Il est reco mmandé de procéd er au retraiteme nt des instrumen ts le plus tôt possib le après leur util isation.
Après chaque utilisation, rincer rapidement et intégralement les instruments avec de l’eau déionisée. Avant le
nettoy age, démonter la râ pe du convertiss eur. Démonter le conver tisseur en dév issant le mandrin m oleté de la
bague mobile.
Retirer l es instruments e t accessoires des p lateaux de stéril isation avant de le s placer dans les pan iers de
l’appareil de lavage. Orienter les instruments selon les recommandations du fabricant de l’appareil de lavage/
désinfe ction. Utilis er les détergent s à pH alcalin ou neut re recommandés p ar le fabricant du d ésinfectant o u de
l’appareil de lavage/désinfection.
Instruc tions prélimi naires au nettoy age pour le lavage au tomatique: Les râp es et le convertis seur doivent être
nettoyé s à la main en suivant le s instruction s pour le nettoya ge manuel (Nett oyage: manuel) et i nspectés an de
supprimer tout résidu avant d’être placés dans l’appareil de lavage/désinfection automatique.
Ces produ its ont été validés p our un nettoya ge ecace obtenu en a ppliquant un cyc le automatique de
nettoyage/désinfection tel qu’indiqué ci-dessous:
9
Page 10

FR
Nettoyage
automatisé
(NE PAS util iser
un nett oyeur à
ultrasons)
Nettoyage :
manuel
Nettoyage :
manuel
Désinfection Il n’est pas re commandé de faire t remper les inst ruments dans une s olution de gluta raldéhyde, de chlo re ou
Emballage Une envelopp e de stérilisatio n standard peut ê tre utilisée. Aux É tats-Unis, un e enveloppe chiru rgicale
Stérilisation
(températures et
durées minimales
requises)
Phase Temps de
Prélavage 1 3 minutes E au froide du
Lavage enzymatique 5 minutes Eau chaude
Lavage 1 5 minutes Point de
Rinçag e 1 3 minutes E au chaude
Rinçag e à chaud 1 minute 82 °C
Rechercher soigneusement les éventuelles souillures résiduelles sur les plateaux à instruments.
Consignes de nettoyage de la râpe avec aspiration
Tremper la râp e dans une solutio n tiède (moins de 43 °C ) d’eau déionisée et d e détergent enz ymatique doux
(pH 7,0-8, 5) pendant au moins 2 m inutes. Pour les ins truments équip és de lumières et d ’un port de nett oyage,
inject er la solution net toyante à l’intér ieur de l’instr ument à l’aide d’une se ringue d’irrig ation et faire tre mper
pendant u n minimum de 2 minutes .
Utiliser u ne brosse à instru ments douce pou r frotter les ins truments pend ant l’immersio n dans la solution
nettoy ante et éliminer le s résidus organiq ues. Rincer l’in strument avec de l ’eau déio nisée, puis le net toyer
dans un bai n ultrasonique d ’eau déio nisée tiède (moin s de 43 °C) additionn ée d’un détergent d oux (pH 7,0-8,5)
pendant 10 minutes.
Rincer mi nutieusement ave c de l’eau déionisé e à l’aide d’une sering ue pour éliminer l a solution net toyante des
lumière s et ports de net toyage. Netto yer ainsi jusqu’à la di sparition compl ète des résidus sur l ’instrument.
Sécher à l ’air comprimé ou essu yer à l’aide d’un tissu dé pourvu de pel uches. Examin er les instrumen ts à la
recherc he d’éventuelles ta ches ou signes de dé térioration et l es mettre hors s ervice si néces saire.
Consignes de nettoyage du convertisseur pour râpe
Ne pas immerger le convertisseur. Un trempage dans une solution liquide ou une stérilisation à la chaleur sèche
détério re le convertisse ur et annule la gara ntie.
Nettoyer le convertisseur à l’aide d’une brosse et d’une solution détergente enz ymatique douce, puis rincer à
l’eau. Élimi ner les débris à l’ intérieur du conver tisseur à l’aide d ’un cure -pipe, une tige ne ou un stylet.
Rincer ab ondamment à l’eau dé ionisée et séch er à l’aide d’un tissu dén ué de peluches.
Remarque : En cas d’utilisation d’un nettoyeur à ultrasons ou d’un appareil de lavage à aspersion, suivre les
recommandations du fabricant, en particulier celles applicables aux instruments articulés et à la mise en place
des instruments.
d’ammoniu m, ni de les stérili ser à la chaleur sèc he sous peine de com promettre le n i des surfaces ex ternes.
approuvée par la FDA est nécessaire
Concerna nt les jeux d’ins truments: Les ins truments peuve nt être placés dans d es plateaux d’ins truments
spéciau x ou dans des plateau x de stérilisati on. Vérier que les b ords coupants so nt protégés. Emb aller les
plateaux de façon appropriée.
Vérier la p ropreté et le fonc tionnement de l ’instrument . Répéter le net toyage en cas de déb ris non éliminés e t
mettr e hors service to ut instrument en dommagé. Ferme r les instrument s à taquets et crém aillères au premi er
cran. Ran ger les instrum ents dans des boî tes à stérilisatio n perforées s ur le dessus et le dess ous, et sur des
supports tels ceux utilisés en microchirurgie. Appliquer les cycles appropriés détaillés dans le tableau ci-dessous.
Tous les cycl es de vapeur ont été v alidés avec envelo ppe et la stérilis ation peut être ré alisée avec ou sans
envelopp e. Ces dispositif s n’ont été validés que p our les méthode s de stérilisati on à la vapeur.
Cycle Gravité Gravité Prévide Prévide : (FR /
Température 121°C 132°C 132° C 13 4°C 134 °C
Time 30 minutes 10 minutes 4 minutes 18 minutes 3 minutes
Durée 30-40 minu tes ou jusqu’à un séch age apparent.
recyclage
Instruments Only Instruments Only or Instruments in
Température
de l ’eau
robinet
du robinet
consigne
66 °C
du robinet
minimum
Type de détergent
S/O
Détergent enzymatique à pH neutre
Déterge nt à pH neutre
S/O
S/O
Instrument Trays
OMS)
Prévide :
(GB)
10
Page 11

IT
Stérilisation
(températures et
durées minimales
requises)
Maintenance,
inspection
et contrôle
Stockage Co nserver les ins truments dans un en droit propre et s ec.
Informations
complém-entaires
Remarque : Les instructions ci-dessus ont été conrmées par le fabricant comme étant VALIDES pour préparer le produit en vue d’une
réutilis ation. Néanmoi ns, il incombe à l’étab lissement de s’assu rer que le retraite ment, tel qu’il est e ectivement e xécuté par le per sonnel à
l’aide des équipements et matériels du service de retraitement, permet d’obtenir le résultat souhaité. Celui-ci requiert, normalement, une
validati on et un contrôle pé riodique du pro cessus.
Certains dispositifs sont accompagnés d ’instructions d’assemblage spéciques. Dans ce cas, se référer aux notices d’assemblage fournies
avec le disp ositif pour les in structions co mplémentaire s.
DÉPANNAGES ET RÉPAR ATIONS
Medtronic Xomed, Inc. n’assume aucune responsabilité en cas d’utilisation inappropriée, de réparations non autorisées ou de
défaut de maintenance d e la part de l’utilisateur.
RETOURS
Contact er le service clie nt de Medtronic Xome d pour obtenir un num éro d’autorisation d e retour de produit s (numéro RGA) avant
d’expédier le produit à Medtronic. Le numéro de RGA doit être inscrit de manière bien visible sur l’emballage et mentionné sur
tous les documents joints pour le retour du produit. Tout produit retourné doit avoir été préalablement nettoyé et décontaminé,
et doit êtr e protégé dans un em ballage approp rié. Tenir à dispositio n le numéro de la fac ture ou du bon de co mmande origina l an
de faciliter la vérication des informations relatives à la ga rantie.
Paramètres de stérilisation EtO 100 % (points de consigne)
Préconditionnement 54°C , 60 % d’humidité re lative, 60minutes
Stérilisation Température 54°C
Humidité relative 60 ± 5%
Concentration en
oxyde d’éthylène
Tem ps
d’exposition
au gaz (cycl e
complet)
Aération 54 °C, 8heures
Le conver tisseur FeatherTouch a une du rée de vie utile sup posée d’au moins 100 ut ilisations. La n de vie
utile pe ut être déterminé e en vériant le mé canisme de verrou illage avant chaqu e utilisation. Le s traitements
répétés o nt un eet insigni ant sur les râpes. L a n de vie utile est g énéralement d éterminée par un e usure
due à l’utili sation de l’inst rument. Élimin er la râpe et la rempl acer par un râpe neu ve lorsqu’elle dev ient lisse et
inecace.
Aucune
725 ± 25 mg/L
120 minutes
GARANTIE LIMITÉE
manuals.medtronic.com
IT
COMPONENTI DEL SISTEMA
REF 1922005 – Conver titore per raspa auto matica FeatherTouch
REF 1992208 – Punta per raspa automatica Feath erTouch, 8 mm, grossa
REF 1992210 – Punta per raspa automatica Fe atherTouch, 8 mm, ne
REF 1895524 – Tubo di aspirazio ne FeatherTouch
REF 1922006 – Vassoi o di sterilizzazione FeatherTouch
DESCRIZIONE DEL DISPOSITIVO
Il convertitore per raspa automatica FeatherTouch utilizza il manipolo StraightShot o StraightShot Magnum come motore di
alimentazione e trasforma l’azione rotante in un’azione a stantuo (avanti/indietro). Il convertitore FeatherTouch è munito di un
anello metallico concepito per trattenere le punte della raspa FeatherTouch.
USO PREVISTO / INDICAZIONI PER L’USO
Il convertitore FeatherTouch è concepito per l’uso come accessorio del manipolo StraightShot o StraightShot Magnum e
consente di trattenere le punte della raspa per il taglio o la rimozione di tessuti molli e duri o dell’osso in interventi chirurgici di
otorinolaringoiatria, sulla testa e sul collo.
Gli strumenti chirurgici manuali vengono usati per numerosi interventi. L’équipe medica ha la responsabilità di scegliere gli
strumenti adatti a ciascun caso. N on usare tali strumenti per scop i diversi da quelli previsti. Gli s trumenti vanno puliti e sterili zzati
prima di usarli per la pr ima volta e prima di ogni uso successivo.
11
Page 12

IT
CONTROINDICAZIONI
Non ci sono controindicazioni conosciute.
ISTRUZIONI PER L’USO
1. Collegare il convertitore al manipolo abbassando l’anello metallico a molla sul manipolo, quindi inserire saldamente
il convertitore e rilasciare l’anello metallico a molla sul manipolo. Per vericare che il collegamento sia stato eseguito
correttamente, tirare leggermente il convertitore. In caso contrario, ripetere la procedura.
2
1
1 Convertitore 2 Anello metallico premuto sul manipolo
2. Una volta ssato il convertitore nell’anello del manipolo, predisporre l’anello metallico sul convertitore per l’installazione
della punt a ruotando l’anello in senso antio rario nché non si av verte una certa re sistenza. A questo punto l’anell o metallico
deve trovarsi in prossimità dell’estremità aperta del convertitore.
3. Inserire con fermezza la punta desiderata nell’anello metallico e ruotare nché la scanalatura all’estremità dell’asta non si
innesta s aldamente nella posizione corretta.
4. Fissare la punta nell’anello metallico ruotando l’anello in senso orario e stringendolo con fermezza. Vericare l’installazione:
tirare la raspa tenendo fermo il manipolo. Se la raspa si muove o fuoriesce, ripetere l’installazione, riavvitare ed eseguire
nuovamente la verica.
5. Nel caso di una raspa di aspirazione, collegare il tubo di aspirazione del convertitore alla punta come mostrato, quindi
collegare il tubo di aspirazione standard della sala operatoria. Fissare il tubo di aspirazione della sala operatoria al cavo del
manipol o con l’apposito morse tto bianco in dotaz ione al tubo di aspira zione del convertitore.
1
2
3
12
1 Tubo adattatore di aspira zione 2 Tubo sala operatoria 3 Mor setto bianco
Page 13

6. Vericare che il manipolo e i cavi del comando a pedale siano collegati correttamente alla console Medtronic Xomed
XPS Microdebrider. Regolare la console sulla direzione “FORWARD” (“AVANTI”), modo variabile e su una velocità massima
compresa t ra 3.000 e 5.000 r/min.
7. Attivare il FeatherTouch premendo il comando a pedale.
ATTENZIONE
• Velocità superiori a 5.000 giri/min determinano l’usura prematura del convertitore e possono invalidarne la garanzia. Il
converti tore dovrà essere at tivato esclusivam ente in modalità di avan zamento.
• Il convertitore FeatherTouch ha una durata prevista di almeno 100 applicazioni. Il ne vita può essere determinato
controlla ndo il blocco del mecc anismo prima di ogni applicazi one.
AVVERTENZE
• Le punte in funzione devo no essere sempre mantenute a distanza dalle d ita e da indumenti non a derenti al corpo.
• Attivare la raspa solo dopo aver conf ermato i punti di rifer imento anatomici e il sito chirurgico p revisto.
• Il convertitore FeatherTouch® è fornito non sterile e deve essere pulito e sterilizzato prima di essere usato la prima volta e
prima di ogni successivo riutilizzo.
• Le raspe sostituibili sono fornite sterili per rendere più agevole l’uso la prima volta che vengono adoperate. Successive
steriliz zazioni hanno un impatto minimo sulle raspe. Il ne vita viene generalmente determinato dall’usura derivante
dall’uso. Qu ando la punta si smussa e n on taglia più in modo e cace, eliminarla e sostituirla con una punta nuova.
• Il tubo di aspirazione del convertitore è fornito sterile ed è esclusivamente monouso. Eliminare il tubo dopo ogni singola
applicazione.
• Dopo ogni procedura, pulire opportunamente tutti i componenti riutilizzabili del sistema.
• Prestare attenzione nell’applicare l’estremità tagliente in movimento esclusivamente ai punti anatomici contrassegnati e
ai siti chirurgici di des tinazione durante l ’uso di acces sori XPS®. L’im piego di strument i a moto alternativo/rot anti alimentati
elettricamente può comportare lesioni connesse alle vibrazioni. Attenersi alle opportune precauzioni.
• Durante l ’uso degl i accessori rotanti XP S® ricorrere alla visu alizzazion e. Qualora la visual izzazione d el sito chirurgico no n sia
completa, interrompere la procedura.
• Applicare opportune metodologie di emostasi in corrispondenza del sito operatorio che non compromettano la sicurezza
del paziente durante gli inter venti a rischio.
• Controllare sempre i componenti prima e dopo l’uso per individuare eventuali danni. Qualora si evidenzino eventuali danni,
non utilizzare il componente danneggiato, ma sostituirlo. I componenti danneggiati possono disseminare residui metallici
sul sito chirurgico.
• Non utilizzare componenti diversi da quelli del sistema Medtronic Xomed, Inc.: ciò può provocare danni o compromettere
le prestazioni dell’apparecchiatura.
• Rimuovere ed eliminare gli accessori in conformità con le normative locali per un opportuno smaltimento dei materiali
contaminati.
• Gli interventi di manutenzione devono essere eseguiti esclusivamente da personale qualicato autorizzato da Medtronic
Xomed .
• Non modicare gli accessori utilizzati con il manipolo. L’uso di accessori modicati può compromettere le prestazioni
dell’apparecchiatura.
• Sterilizzare ed asciugare il dispositivo riutilizzabile prima di riporre il sistema. Ridurre la possibilità di contaminazione
incrociata provvedendo tempestivamente alla pulizia e alla sterilizzazione.
• Vericare che i dispositivi riutilizzabili siano stati puliti e sterilizzati prima dell’uso. Se non è stato steriliz zato non utilizzare
il dispositivo.
• Non sostituire l’accessorio mentre il manipolo è in funzione, al ne di prevenire lacerazioni all’utente e contaminazione
incrociata a seguito dell’uso di guanti danneggiati.
• Non utilizzare l’acce ssorio qualora la co nfezione sia aper ta o danneggiata. Qualora l a sigillatura sia dann eggiata, non viene
garantita la protezione da contaminazione incrociata.
• La piegatura o la trazione dell’accessorio po ssono determinarne la rottura, provoca ndo lesioni al paziente o al pers onale.
• Sono disponibili accessori per la resezione di tessuto molle e osseo in interventi chirurgici. L’impiego degli accessori
dipende d all’applicazio ne e dalle necessità d el paziente. Gli acc essori da taglio al ati alimentati ele ttricamente in ducono il
sanguinamento e la rimozione massi ccia di tessuto molle e osseo.
AVVERTENZA
Sterilizzare immediatamente dopo la pulizia.
IT
LINEE GUIDA PER LA STERILIZZAZIONE
Avvertenze/
Precauzioni
Limitazioni L a ne della durat a viene in genere de terminata in bas e ai danni provocati d all’usura. Fare rife rimento alla
Prima del la sterilizza zione, controll are attentame nte il convertitor e e le punte. Per il conver titore
FeatherTouch® è prev ista una durata di a lmeno 100 utilizz i. Per determinar e la ne della durat a, vericare
il blocca ggio del meccan ismo prima di ciasc un utilizzo. La ma ncata esecuzi one del ciclo di asc iugatura ad
aspirazione può determinare un’usura prematura del convertitore.
Non immergere il convertitore in alcun liquido. L’immer sione prolungata in qualsiasi liquido danneggia il
convertitore e rende nulla la garanzia. La sterilizzazione mediante autoclave a secco danneggia il convertitore
e rende nulla la garanzia.
sezion e Manutenzione , ispezione e veri ca, qui di seguit o riportata.
13
Page 14

IT
Punto d’uso Il conve rtitore è forni to non sterile e deve e ssere pulito e ster ilizzato prim a di essere usato la pr ima volta e
Conservazione
etrasp orto
Preparazione alla
decontaminazione
Pulizia - Automatica
(NON utilizzare
lavatr ici ad
ultrasuoni)
Pulizia - Manuale Istruzioni per la pulizia delle punte di aspirazione per raschietto
Disinfezione Non adottare l’immersione a freddo in soluzioni di glutaraldeide, cloro od ammonio, né la sterilizzazione
Confezionamento È consentit o l’uso di materiale di av volgimento pe r la sterilizz azione stand ard.Negli USA , è necessario
prima di og ni successivo riuti lizzo.
Risciacquare tempestivamente ed accuratamente gli strumenti con acqua deionizzata dopo ciascun uso.
Si raccoma nda di procedere a lla rigenerazi one degli strum enti una volta util izzati quanto p rima possibile.
Risciacq uare tempestiv amente ed accurat amente gli strum enti con acqua deion izzata dopo c iascun uso.
Smontar e la punta dal conver titore prima dell a pulizia. Smont are il convertito re svitando il man drino zigrinato
dall’anello a moto alternativo.
Rimuover e gli strumenti e le a pparecchiature d ai vassoi di steri lizzazione p rima di collocar li nei cestelli
della lava trice. Sistemare i d ispositivi in bas e alle raccomanda zioni fornite da i produttori de lla lavatrice/del
disposi tivo di disinfezio ne. Utilizza re un detergente con p H neutro od alcal ino raccomandato d ai produttori
della lavatrice/del dispositivo di disinfezione o del detergente.
Istruz ioni di pre-pu lizia con lavaggio a utomatico: Le raspe e i l convertitore de vono essere pulit i manualmente
seguen do di istruzioni p er la pulizia manu ale (Pulizia: Manu ale) e controllati pe r accertarsi di ave r rimosso
tutto lo sporco visibile prima del posizionamento nella lavadisinfettatrice automatica.
Questi p rodotti sono s tati approvati pe r un’ecace pulizia m ediante ciclo auto matico in lavatrice /dispositivo
di disinfezione costituito dalla procedura seguente:
Fase Tempo di ricircolo Temperatura
Prelavaggio 1 3 minut i Acqua di
Lavaggio enzimatico 5 minuti Acqua di
Lavaggio 1 5 min uti Livell o 66 °C Deterge nte a pH neutro
Risciacquo 1 3 minuti Acqua d i
Risciacquo termico 1 minuti 82°C minimo N/A
Vericar e attentamente ch e i vassoi per stru menti non presen tino tracce di sporc o residuo.
Immerge re in una soluzion e composta da det ergente enzimati co tiepido (meno di 43 ° C) con pH neutro (7,08,5) ed acq ua deionizza ta per almeno 2 min uti. Per gli strume nti che presentan o lumi e gli strumen ti dotati di
porte p er la pulizia, ini ettare la solu zione di pulizia n ello strumento co n una siringa di irro razione e lascia re in
immersi one per almeno 2 mi nuti.
Stronare g li strumenti men tre sono immersi n ella soluzion e detergente util izzando una sp azzola morbi da
per rimuovere eventuali tracce organiche. Risciacquare con acqua deionizzata, quindi eseguire la pulizia ad
ultrasu oni in una soluzio ne tiepida (meno di 43 ° C), neutra (pH 7,0-8 ,5), composta da de tergente e acqua
deioniz zata per 10 minuti .
Risciacquare accuratamente con acqua deionizzata utilizzando una siringa per iniettare la soluzione
deterge nte attraverso i lu mi e le porte di pul izia. Pulire in ques to modo no ad elim inare tutti i resid ui di
sporco visibili sullo strumento.
Asciuga re con aria compress a o con un panno che non l asci pelucchi. Ver icare che gli str umenti non
presentino macchie o segni di deterioramento; se necessario, smaltirli.
Istruzioni per la pulizia del convertitore per raschietto
Non imme rgere il converti tore in alcun liquid o. L’i mmersione prol ungata in qualsias i liquido o la steri lizzazione
mediante autoclave a secco danneggia il convertitore e rende nulla la garanzia.
Pulire il convertitore utilizzando una spazzola imbevuta di una soluzione di detergente enzimatico neutro e
risciacq uare in acqua. I resi dui all’intern o del convertito re possono esse re rimossi utiliz zando uno scovo lino per
pipa, un l o sottile od uno s tiletto.
Risciacquare accuratamente con acqua deionizzata ed asciugare con un panno che non lasci pelucchi.
Nota: se v iene utilizz ato un sistema di p ulizia ad ultr asuoni od una lava trice a spruzz o, attenersi a lle raccomand azioni
del prod uttore, sopr attutto per q uanto riguarda gl i strumenti ar ticolati ed il po sizionamento d egli strumen ti.
mediante autoclave a secco per evitare di danneggiare le niture degli strumenti.
utilizzare materiale di avvolgimento chirurgico approvato dall’FDA.
In set: gli s trumenti poss ono essere ripos ti in contenitori ap positi od in conten itori di steriliz zazione gen erici.
Accertarsi che i bordi taglienti siano protetti. Avvolgere i contenitori adottando il metodo appropriato.
acqua
rubinetto
fredda
rubinetto
calda
rubinetto
calda
Tipo di detergente
N/A
Deterge nte enzimatico a pH n eutro
N/A
14
Page 15

IT
Sterilizzazione
(temperature
minime richieste;
durate minime
richieste)
Manutenzione,
ispezione e verica
Conservazione Conserv are gli strument i in luogo pulito ed a sciutto.
Informazioni
aggiuntive
Nota: le istruzioni qui sopra riportate sono state approvate dal produttore e ritenute IDONEE alla preparazione del prodotto per il riutilizzo.
NON RIGUARDANO i dispositivi e gli accessori monouso, i quali devono essere smaltiti in conformità alle normative locali applicabili una
volta utilizzati. Spetta all’operatore incaricato della rigenerazione il compito di accer tarsi che quest’ultima venga eseguita con l’impiego
di apparecchiature convalidate adibite ad una rigenerazione appropriata. Ciò comporta in genere la necessità di una supervisione ed un
monitoraggio di routine della procedura.
Per alcuni dispositivi vengono fornite speciche istruzioni di montaggio. In tali casi, per ulteriori istruzioni, consultare l’inserto per il
montag gio fornito unita mente al disposit ivo.
Vericar e la pulizia ed il fun zionamento dell o strumento. Pulir e nuovamente gli st rumenti se prese ntano
tracce di sporco ed eliminarli se appaiono danneggiati. Chiudere gli strumenti dotati di fermi e binari
bloccan doli sulla prima t acca. Disporre g li strumenti nei c ontenitori di ster ilizzazio ne con la parte sup eriore ed
inferiore perforate e collocarli su supporti simili a quelli usati in microchirurgia. Utilizzare il ciclo appropriato
indicato nella tabella seguente.
Tutti i cicli a va pore sono stati co nvalidati per la co ngurazione co n materiale di avvo lgimento e consen tono di
adott are la steriliz zazione con o sen za materiale di av volgimento. Que sti dispositiv i sono stati conval idati per
essere so ttoposti escl usivamente a meto di di sterilizz azione a vapor e.
Solo strumenti Solo st rumenti o str umenti in vas soi per
Ciclo: A gravità A gravità Prevuoto Prevuoto
Tem p 121° C 132° C 132° C 13 4°C 134 °C
Durata 30 min . 10 min. 4 min. 18 min . 3 min.
Asciugatura 30-4 0 minuti o no a quand o visibilmente asc iutto
Parametri di sterilizzazione EtO 100% (se t point)
Precondizionamento 54°C, 60% u midità relativ a, 60 minuti
Sterilizzazione Temperatura 54°C
Umidità relativa 60 ± 5%
Concentrazione di
ossido di etilene
Tempo di
esposiz ione al gas
(ciclo completo)
Aerazione 54°C, 8 hour s
Per il conver titore FeatherTouch® è prev ista una durata di a lmeno 100 utilizz i. Per determinar e la ne della
durata, v ericare il blo ccaggio del mecc anismo prima di cias cun utilizzo. L a rigenerazio ne ripetuta pro duce
eett i minimi sulle punte p er raschietto. L a ne della durat a viene in genere de terminata in bas e ai danni da
usura. Eli minare la punta e sos tituirla con una nu ova quando risult a spuntata e non ta glia più in modo ec ace.
Nessuna.
725 ± 25 mg/L
120 minutes
strumenti
(FR/OMS)
Prevuoto
(GB)
INFORMAZIONI PER L’ASSISTENZA CLIENTI
Per ulteriori informazioni relative all’uso di questo prodotto o per riportare eventuali problemi, contattare la Medtronic Xomed
usando le informazioni appropriate riportate sulla scheda informativa blu e bianca fornita con ogni dispositivo o contattare il
distributore locale.
RESI E/O RIPARAZIONI
Prima di pro cedere alla spe dizione del Pro dotto a Medtro nic Xomed, è neces sario contatt are l’Assistenz a clienti (Customer S ervice)
Medtronic Xomed al numero (800-874-5797) per richiedere un numero RGA (Return Goods Authorization, autorizzazione al reso
del materiale). Per consentire una gestione celere della procedura di verica delle informazioni sulla garanzia, si prega di tenere a
disposizione il numero della fat tura originale o il num ero dell’ordine di acquisto. Il numero di autorizzazione al reso del materiale
dovrebbe essere riportato in modo chiaramente visibile sulla confezione e impresso su tutta la documentazione acclusa al reso
e/o alla riparazione. Tutti i Prodotti restituiti a Medtronic Xomed dovranno essere confezionati in modo sicuro all’interno di un
materiale di imballaggio protettivo.
Il cliente do vrà fornire il numer o dell’ordine di acquis to, l’indirizzo esatto di spedizione e f atturazione e un modulo d’ordi ne per la
riparaz ione correttam ente compilato o una dichiarazion e indicante il problema o il motivo de l reso.
GARANZIA LIMITATA
manuals.medtronic.com
15
Page 16

DE
DE
SYSTEMKOMPONENTEN
REF 1922005 – FeatherTouch Automatischer Raspelumrichter
REF 1992208 – FeatherTouch Saug-Raspel-Spitz e, 8mm, grob
REF 1992210 – FeatherTouch Saug-Raspel-Spi tze, 8mm, fein
REF 1895524 – FeatherTouch Saugschlauch
REF 1922006 – FeatherTouch Sterilisiertablett
GERÄTEBESCHREIBUNG
Der automatische Raspelumrichter von FeatherTouch verwendet das StraightShot oder StraightShot Magnum Handstücke als
Motorantriebsquelle und wandelt die Drehbewegung in eine Vorwärts-/ Rückwärtsbewegung um. Der FeatherTouch Umrichter
besitzt eine Spannzange zur Aufnahme der FeatherTouch Raspel-Klingenspitzen.
VERWENDUNGSZWECK / INDIKATIONEN
Der FeatherTouch Umrichter ist als Zubehör für das StraightShot oder StraightShot Magnum Handstück vorgesehen; zum
Betreiben verschiedener Raspel-Klingenspitzen für das Herausschneiden und Entfernen von Weich- und Hartgeweben bzw. von
Knochen bei der Otorhinolaryngologie sowie bei Kopf- und Halsoperationen.
Chirurgische Handinstrumente sind für den Einsatz bei verschiedenen Operationsver fahren geeignet. Das OP-Team ist dafür
verantwortlich, dass für jeden einzelnen Fall die richtigen Instrumente ausgewählt werden. Die Instrumente dürfen nicht für einen
anderen als den angegebenen Verwendungszweck verwendet werden. Die Instrumente müssen vor dem Erstgebrauch und vor
jedem Wiedergebrauch gereinigt und sterilisiert werden.
KONTRAINDIKATIONEN
Es sind keine Kontraindikationen bekannt.
GEBRAUCHSANLEITUNG
1. Zum Anschließen des Umrichters am Handstück die Federspannzange am Handstück herunterdrücken, den Umrichter fest
einsetzen und die Federspannzange am Handstück loslassen. Die ordnungsgemäße Verbindung durch vorsichtiges Ziehen
am Umrichter überprüfen. Falls der Umrichter nicht fest in der Federspannzange sitzt, den Vorgang wiederholen.
2
1
1 Umrichter 2 Zusammengedrückte Spannzange des Handstücks
2. Wenn der Umrichter fest im Handstück sitzt, die Drehspannzange am Umrichter für die Installation der Klingenspitzen
vorbereiten, indem die Spannzange des Umrichters entgegen dem Uhrzeigersinn gedreht wird, bis ein Widerstand spürbar
wird. Die Spannzange sollte nun dem oenen distalen Ende des Umrichters am nächsten sein.
3. Die gewünschte Sp itze fest in die Spannzange einsetzen und drehen, bis die Nut am Ende des Schaf ts sicher einrastet.
16
Page 17

DE
4. Die Spitze in der Spannzange sichern, indem die Spannzange im Uhrzeigersinn gedreht und fest angezogen wird. Ziehtest
durchführen: Das Handstück festhalten und die Raspel vom Handstück wegziehen. Falls die Raspel herausgezogen werden
kann oder verrutscht, erneut installieren, nochmals anziehen und Test wiederholen.
5. Für die Saugwirkung der Raspel-Klingenspitze den FeatherTouch® Saugsschlauch wie abgebildet an die Spitze anschließen.
Danach einen standardmäßigen OP-Saugschlauch an den FeatherTouch® Saugschlauch anschließen. Den OP-Saugschlauch
mit der im Lieferumfang des Umrichter-Saugschlauchs enthaltenen weißen Klemme am Handstückkabel befestigen.
1
2
3
1 Saug-Adapterschlauch 2 OP-Schlauch 3 Weiße Klemme
6. Sicherstellen, dass das Handstück- und das Fußschalterkabel ordnungsgemäß an die Medtronic Xomed XPS® Microdebrider
Konsole angeschlossen sind. Konsole auf „Vorwär ts“, variablen Modus und eine Drehzahl zwischen 3000 und 5000 U/min.
einstellen.
7. Den FeatherTouch® durch Herunterdrücken des Fußschalters aktivieren.
VORSICHT
• Drehzahlen über 5000 U/min. verursachen die vorzeitige Abnutzung des Umrichters und können die Garantie nichtig
machen. Der Umrichter ist nur im Vorwärtsbetrieb einzusetzen.
• Die zu erwartende Lebensdauer des FeatherTouch® Umrichters beträgt mindestens 100 Anwendungen. Ein Ablaufen der
Lebensdauer kann festgestellt werden, indem vor jeder Verwendung das reibungslose Funktionieren des Mechanismus
überprüft wird.
WARNHINWEISE
• Die aktiven Spitzen stets von Fingern und loser Kleidung fernhalten.
• Die Raspel-Klingenspitze erst dann betätigen, wenn die entsprechenden anatomischen Kennzeichen und der beabsichtigte
Operationssitus bestätigt worden sind.
• Der FeatherTouch® Umrichter wird im nicht sterilen Zustand ausgeliefert und muss vor dem ersten Gebrauch und vor jedem
weiteren Gebrauch gereinigt und sterilisiert werden.
• Ersatz-Raspel-Klingenspitzen werden steril geliefert, damit sie sofort einsatzbereit sind Wiederholte Sterilisierungsvorgänge
wirken sich kaum auf Raspel-Spitzen aus. Werden sie unbrauchbar, liegt dies zumeist an Abnutzung oder Beschädigungen
durch die Verwendung. Die Spitze wegwerfen und durch eine neue ersetzen, wenn sie stumpf wird und nicht mehr gut
schneidet.
• Der Saugschlauch des Umrichters wird steril geliefert und darf nur einmal verwendet werden. Umrichterschlauch nach
jedem Gebrauch entsorgen.
• Alle wiederverwendbaren Systemteile müssen nach jedem Eingri sachgemäß gereinigt werden.
• Beim Einsatz von XPS® Instrumenten ist mit äußerster Vorsicht vorzugehen; bewegliche Schnittächen müssen genau am
Eingripunkt angesetzt werden. Der Einsatz strombetriebener, hin - und her beweglicher bzw. drehbarer Instrumente kann
zu durch Vibration verursachten Verletzungen führen. Bitte entsprechende Vorsichtsmaßnahmen treen.
• Beim Einsatz drehbarer XPS® Instrumente sind Visualisierungshilfen zu verwenden. Kann der Eingrisort nicht adäquat
sichtbar gemacht werden, ist der Einsatz strombetriebener Geräte zu unterbrechen.
• Eventuell auftretende Blutungen am Eingrisort müssen ordnungsgemäß kontrolliert werden, so dass die Sicherheit des
Patienten während des chirurgischen Eingris nicht gefährdet wird.
• Alle Instrumente/Komponenten sind vor und nach jedem Einsatz auf Schäden zu inspizieren. Wird ein Schaden festgestellt,
dieses Teil nicht mehr verwenden, bis ein Ersatzteil zur Verfügung steht. Ist ein Instrument beschädigt, kann es zur
Ablagerung von Metallspänen am Eingrisort kommen.
• Bitte verwenden Sie auschließlich Originalkomponenten von Medtronic Xomed, Inc.; ansonsten kann es zu Schäden am
System oder minderwertiger Geräteleistung kommen.
• Zubehörteile müssen laut örtlichen Vorschriften für die Entsorgung verseuchter Stoe ordnungsgemäß entsorgt werden.
• Service und Wartung des Systems sind ausschließlich von Medtronic Xomed-geschultem Fachpersonal auszuführen.
• Mit dem Handstück eingesetzte Zubehörteile dürfen nicht modiziert werden. Derart abgeänderte Zubehörteile können
zu einer Verringerung der Systemleistung führen.
• Sterilisieren und trocknen Sie wiederverwendbare Geräte, bevor sie gelagert werden. Das Risiko einer Kreuzkontamination
durch rechtzeitige Reinigung und Sterilisation verringern.
17
Page 18

DE
• Überprüfen Sie, ob das wiederverwendbare Gerät vor dem Gebrauch gereinigt und sterilisiert wurde. Wenn es nicht
sterilisiert wurde, nicht wiederverwenden.
• Zubehörteile dürfen nicht bei laufendem Handstück ausgetauscht werden. Dies kann zu Schnittverletzungen des Benutzers
und Kreuzkontamination durch verschmutzte Handschuhe führen.
• Ist die Verpackung eines Zubehörteils beschädigt, dar f dieses Teil nicht verwendet werden. Ist die Schutzverpackung
beschädigt, besteht das Risiko einer Kreuzkontamination.
• Verbiegen oder Gewaltanwendung kann zum Bruch eines Zubehörteils führen und Patienten oder Personal gefährden.
• Zubehörteile zur Weichgewebe- und Knochenresektion bei chirurgischen Eingrien sind erhältlich. Der Einsatz von
Zubehörteilen ist jeweils vom Verwendungszweck und den Bedürfnissen des Patienten abhängig. Scharfschneidende,
strombetriebene Instrumente verursachen Blutungen und dienen der Entfernung von Gewebe und Knochen.
WARNUNG
Nach dem Reinigen sofort sterilisieren.
RICHTLINIEN FÜR DIE STERILISATION
Warnhinweise und
Vorsichtsmaßnahmen
Einschränkungen Die Lebensdauer des Geräts wird normalerweise durch den beim Gebrauch auftretenden Verschleiß
Anwendung D er Konverter wir d im nicht sterilen Zu stand ausgelie fert und muss vor d em ersten Gebr auch und vor jedem
Verpackung und
Transport
Vorbereitung der
Reinigung
Reinigung:
Autmatisch
(Verwenden Sie KEINE
Ultraschallreinigung).
Reinigung: Von Hand Reinigungshinweise für die Absaug-Reibspitzen
18
Vor der Sterilisierung müssen die Konverter und Spitzen sorgfältig geprüft werden. Der FeatherTouch®
Konverter hat eine Lebensdauer von mindestens 100 Anwendungen. Prüfen Sie den Mechanismus vor jeder
Verwend ung auf Blockie ren. Wird der empf ohlene Vakuum-Trock nungszyklu s nicht durchgefü hrt, kann es zu
vorzeitigem Verschleiß des Konverters kommen.
Den Konverter nicht untertauchen. Durch Eindringen jeglicher Flüssigkeiten wird der Konverter beschädigt,
und die Garantie erlischt. Trockene Hitzesterilisation beschädigt den Konverter und führt zum Erlöschen der
Garantie.
bestimmt. Siehe „Prüfen und Testen“ weiter unten.
weiteren Gebrauch gereinigt und sterilisiert werden.
Die Instrumente nach jedem Gebrauch sofort und gründlich mit entionisiertem Wasser abspülen.
Die Instrumente nach jedem Gebrauch sofort und gründlich mit entionisiertem Wasser abspülen. Nehmen
Sie die Spitze vor der Reinigung vom Konverter ab. Schrauben Sie dazu das Drehrad vom sich hin- und
herbewegenden Schneideinsatz ab.
Entfernen Sie Instrumente und Zubehör aus den Sterilisationsschalen, bevor Sie sie in die Reinigungskörbe
legen. Richten Sie die Instrumente gemäß den Herstellerempfehlungen des Reinigungs-/Sterilisationsgeräts
aus. Verwenden Sie ein alkalisches oder pH-neutrales Reinigungsmittel, welches vom Gerätehersteller
empfohlen wird.
Vorbereitungsanweisungen für die automatische Reinigung: Die Raspeln und der Konverter sind gemäß der
Reinigungsanleitung manuell zu reinigen (Reinigung: Per Hand) und Prüfung zur Entfernung von sichtbaren
Verunreinigungen vor Reinigung im automatischen Reinigungs-/Desinfektionsgerät.
Diese Produkte wurden für die wirksame Reinigung in einem Zyklus eines automatischen Reinigungs-/
Desinfektionsgeräts validiert, der Folgendes umfasst:
Phase Umwälzzeit Wa sser-
Vorwäsche 1 3 Minuten Kaltes
Enzym-wäsche 5 Minuten Heißes
Wäsche 1 5 Minuten 66 °C (Sollwe rt) pH-neutrales Enz ymreinigungsmittel
Spülung 1 3 Minuten Heißes
Heißspülen 1 Minuten Mindestens
Die Instrumentenschalen gründlich auf etwaige Schmutzreste untersuchen.
Lassen Si e die Instrument e mindestens zwe i Minuten lang in ein er lauwarmen (ma ximal 43 °C) Lösung au s
einem milden (pH-Wert 7,0 –8,5), enzymatischen Reinigungsmittel und entionisiertem Wasser einweichen.
Bei Instrumenten mit Lumina bzw. Reinigungsanschlüssen die Reinigungslösung über eine Spülspritze in das
Instrument injizieren und mindestens zwei Minuten lang einwirken lassen.
Die in Reinigungslösung eingelegten Instrumente mit einer weichen Instrumentenbürste von organischem
Material säubern. Spülen Sie das Instrument mit deionisiertem Wasser ab und reinigen Sie es anschließend
mindest ens 10 Minuten lang mit Ul traschall in eine r lauwarmen (max imal 43 °C) Lösung aus mi ldem (pHWert 7,0–8,5) Reinigungsmittel und deionisiertem Wasser.
Spülen Sie das Instrument unter Verwendung einer Spritze gründlich mit deionisiertem Wasser ab, um
die Reinigungslösung restlos aus den Lumen und Reinigungsanschlüssen zu entfernen. Auf diese Weise
reinige n, bis keine Schmut zreste an dem Ins trument mehr sich tbar sind.
Mit Druc kluft trock nen oder mit eine m fusselfreien Tuch t rocken wischen. D ie Instrumente a uf Flecken oder
Verschleiß überprüfen und gegebenenfalls außer Gebrauch nehmen.
temperatur
Leitungswasser
Leitungswasser
Leitungswasser
82 °C
Art des Reinigungsmittels
--
pH-neutrales Enzymreinigungsmittel
--
--
Page 19

DE
Reinigung: Von Hand Reinigungshinweise für den Reiben-Konverter
Desinfektion Nicht in Glutaraldehyd, Chlor oder Ammoniumlösungen einlegen und keine trockene Heißluft-Sterilisation
Verpackung Bei Sets: Die Instrumente können auf gesonderten Instrumentenablagen oder auf Sterilisationsablagen
Sterilisation
(Temperaturen
und Zeiten sind
Mindestangaben.)
Wartung und Prüfung Der FeatherTouch Konverter hat eine Lebensdauer von mindestens 100 Anwendungen. Prüfen Sie den
Lagerung Instrumente in sauberer, trockener Umgebung aufbewahren.
Zusätzliche
Informationen
Den Konverter nicht untertauchen. Durch Eindringen jeglicher Flüssigkeiten oder durch Hitzesterilisierung
wird der Konverter beschädigt, und die Garantie erlischt.
Reinigen Sie den Konverter mit einer Bürste und einem mildenEnzym-Reinigungsmittel. Anschließend mit
Wasser spülen. Fremdkörper im Innern des Konverters können mit einem Pfeifenreiniger, dünnen Draht o.
ä. entfernt werden.
Die Instrumente gründlich mit destilliertem Wasser spülen und mit einem fusselfreien Tuch trockenwischen.
Hinweis: Bei Verwendung einer Ultraschallreinigungsanlage oder Sprühwaschmaschine den Empfehlungen des
Herstellers folgen, speziell im Hinblick auf Instrumente mit Gelenken und die Positionierung der Instrumente.
durchführen, da dies die Oberächen des Instruments beschädigen kann.
platziert werden. Darauf achten, dass die Schneidkanten geschützt werden. Die Ablagen auf geeignete Weise
einwickeln.
Das Instrument auf Sauberkeit und Funktionstüchtigkeit überprüfen. Bei hartnäckiger Verschmutzung
erneut reinigen und beschädigte Instrumente außer Gebrauch nehmen. Instrumente mit Arretierungen
und Verzahnungen am ersten Zahn arretieren. Die Instrumente in Sterilisationsbehältern mit Perforationen
an der Ober- und Unterseite und auf Trägern, wie sie in der Mikrochirurgie üblich sind, ablegen. Das jeweils
geeignete Sterilisationsprogramm ist der folgenden Tabelle zu entnehmen.
Alle Damp fsterilis ationspr ogramme wu rden mit Umhü llung valid iert, kön nen jedoch w ahlweise mi t oder ohne
Umhüllung verwendet werden. Die hier beschriebenen Geräte wurden nur auf Dampfsterilisationsverfahren
validiert.
Nur Instrumente Nur Instrumente oder Instrumente in
Ciclo A gravità A gravità Prevuoto Prevuoto (FR/
Tem p 121° C 132° C 132 °C 13 4°C 134° C
Durata 30 Minuten 10 Minut en 4 Minute n 18 Mi nute n 3 Min uten
Tro ckne n 30-4 0 Minuten oder bis si chtbar trocken
Parameter für die Sterilisation mit 100 % EtO (Sollwerte)
Vorbehandlung 54° C, 60% relative Lu ftfeuchti gkeit, 60Minuten
Sterilisation Temperatur 54°C
Relative
Luftfeuchtigkeit
EthylenoxidKonzentration
GasEinwirkungszeit
(ganzer Zyklus)
Belüftung 54°C, 8 Stunden
Mechanismus vor jeder Verwendung auf Blockieren. Wiederholte Reinigungsanwendungen haben nur
einen minimalen Eekt auf die Reibspitzen. Die Lebensdauer des Geräts wird normalerweise durch den beim
Gebrauch auftretenden Verschleiß bestimmt. Entsorgen Sie die Spitze und erset zen Sie sie durch eine neue,
sobald d ie Spitze stump f wird und nicht mehr e zient schneid et.
Keine.
60 ± 5%
725 ± 25 mg/L
120 M inuten
Instrumentenschalen
OMS)
Prevuoto
(GB)
Hinweis: Die vorstehend genannten Anweisungen wurden vom Hersteller für die Aufbereitung des Produkts zur Wiederverwendung
als GEEIGNET befunden. Sie GELTEN JEDOCH NICHT für zum einmaligen Gebrauch vorgesehene Geräte oder Zubehörelemente; diese
müssen nach Gebrauch unter Einhaltung der einschlägigen Vorschriften entsorgt werden. Es liegt in der Verantwortung des Anwenders,
sicherzustellen, dass die Aufbereitung unter Verwendung validierter Gerätschaften erfolgt und zum gewünschten Ergebnis führt. Dies
erfordert normalerweise eine Validierung und routinemäßige Überwachung des Prozesses.
Für bestim mte Zubehört eile gelten be sondere Anweis ungen für den Zus ammenbau. B eachten Sie in sol chen Fällen die de m Instrument u nd
dem Zubehörteil beiliegende Zusatzanleitung für den Zusammenbau.
KUNDENDIENSTINFORMATIONEN
Wenn Sie weitere Informationen zur Verwendung dieser Produkte benötigen oder Probleme melden möchten, wenden Sie
sich bitte an Medtronic Xomed. Kontaktinformationen nden Sie auf der den einzelnen Produkten beiliegenden blau-weißen
Kontaktinformationskarte. Alternativ können Sie sich auch an Ihren Lieferanten wenden.
19
Page 20

ES
RÜCKSENDUNGEN UND/ODER REPARATUREN
Setzen Sie sich mit dem Kundendienst von Medtronic Xomed unter der Nummer 800-874-5797 in Verbindung, um eine
Berechtigungsnummer für die Rücksendung (RGA = “Return Goods Authorization number“) zu erhalten, bevor Sie das Produkt
an Medtronic Xomed einsenden. Bitte halten Sie die originale Rechnungs- oder Kaufbelegsnummer bereit, um die Überprüfung
der Gewährleistungsinformationen zu erleichtern. Die Berechtigungsnummer für die Rücksendung (RGA) sollte deutlich auf der
Verpackung sichtbar sein und bei jedem die Rücksendung und/oder Reparatur betreenden Schriftwechsel angegeben werden.
Alle an Med tronic Xomed zurückg esandten Produk te müssen sicher in ein e Schutzhülle verpackt werden.
Der Kunde muss die Kaufbelegsnummer, die richtige Versand- und Rechungsanschrift und entweder ein ausgefülltes Formular für
die Reparatur oder einen Bericht über das Problem oder den Grund für die Rücksendung beilegen.
BESCHRÄNKTE GEWÄHRLEISTUNG
manuals.medtronic.com
ES
COMPONENTES DEL SISTEMA
REF 1922005 – Convertidor de raspador automatizado FeatherTouch
REF 1992208 – Punta de r aspador con aspiración FeatherTouch, 8 mm, g rano grueso
REF 1992210 – Punta de raspador con aspiración FeatherTouch, 8 mm, g rano no
REF 1895524 – Tubo de aspiración FeatherTouch
REF 1922006 – Bandeja de esterilización FeatherTouch
DESCRIPCIÓN DEL DISPOSITIVO
El convertidor de raspador automatizado FeatherTouch utiliza la pieza de mano StraightShot o StraightShot Magnum como
mecanismo de accionamiento y cambia la acción giratoria por una de avance y retroceso. El convertidor FeatherTouch tiene una
boquilla para sujetar puntas de raspador.
FUNCIÓN DEL DISPOSITIVO/INDICACIONES PARA SU USO
El convert idor FeatherTouch es un acceso rio de la pieza d e mano StraightSh ot o StraightShot M agnum cuya func ión es la de utiliz ar
puntas de raspador para cortar y e xtirpar tejidos blandos o duros y huesos en otorrinolaringolog ía y cirugía de cabez a y cuello.
Los instrumentos quirúrgicos manuales están diseñados para utilizarse en diversas intervenciones quirúrgicas. La selección de
los instrumentos adecuados para cada caso es responsabilidad del equipo quirúrgico. No utilice estos instrumentos para otros
propósitos que no sean los propues tos. Los instrumentos deben limp iarse y esteriliz arse antes del prime r uso y antes de cada uso
posterior.
CONTRAINDICACIONES
No se conoce ninguna.
INSTRUCCIONES DE USO
1. Conecte el convertidor a la pieza de mano presionando la boquilla de resorte, insertando el convertidor rmemente y
soltando la boquilla de resorte de la pieza de mano. Compruebe que la conexión es correcta tirando suavemente del
convertidor. Si el convertidor no está bien asegurado en la boquilla, repita el proceso.
2
1
1 Convertidor 2 Boquilla de pieza de mano comprimida
2. Una vez que el conver tidor esté bi en asegurado e n la boquilla de l a pieza de mano , prepare la boq uilla de rosca de l convertido r
para la instalación de la punta girando la boquilla en sentido contrario a las agujas del reloj hasta sentir cier ta resistencia. La
boquilla debe estar ahora más cerca del extremo distal abierto del convertidor.
20
Page 21

ES
3. Inserte la punta deseada en la boquilla y gírela hasta que la muesca del extremo del vástago quede bien asegurada en su
lug ar.
4. Asegure la punt a de raspador en la boquilla giran do ésta en el sentido de las agujas del reloj y apretándola rmemente para
asegura r la punta. Realice la p rueba del tirón: mi entras sujeta la pie za de mano, tire del ra spador para intent ar separarlo de la
pieza de m ano. Si el raspador se s ale o se desliza, vu elva a instalarlo, apriételo y realice la prueba nuevamente.
5. Si la punta de raspador se utiliza para aspiración, acople el tubo de aspiración FeatherTouch a la punta como se muestra y, a
continuación, conecte el tubo de aspiración habitual del quirófano al tubo FeatherTouch. Asegure el tubo de aspiración del
quirófan o al cable de la pieza d e mano con la pinza blanca suminis trada con el tubo de asp iración FeatherTouch.
1
2
3
1 Tubo adaptador de aspiración 2 Tubo del quirófano 3 Pinza blanca
6. Asegúrese de q ue los cables de la pi eza de mano y del p edal interruptor e stén correct amente conect ados a la consola Xome d
XPS Microdebrider. Congure la consola en dirección “FORWARD” (de avance), modo variable, y ajuste la velocidad máxima
entre 300 0 y 5000 rpm.
7. Active el dispositivo FeatherTouch presionando el pedal interruptor.
PRECAUCIÓN
• Las velo cidades de más de 5.0 00 rpm produci rán un desgaste pr ematuro del conver tidor y pueden a nular la garantía . Utilice
el convertidor en modo de avance solamente.
• El convert idor FeatherTouch tiene una v ida útil espera da de un mínimo de 100 usos . El n de la vida útil se p uede determin ar
comproba ndo el bloqueo del mecanismo antes de cada uso.
ADVERTENCIAS
• Mantenga siempre las pu ntas activas lejos de los dedos y d e la ropa suelta.
• Accione la p unta de raspador s olamente despu és de que se hayan con rmado los puntos de r eferencia anató micos y la zona
en la que se va a realizar la intervención quirúrgica.
• El convertidor FeatherTouch® se suministra no estéril y debe limpiarse y esterilizarse antes del primer uso y antes de cada
uso posterior.
• Las puntas de raspador recambiables se suministran estériles para el primer uso. La limpieza y la esterilización repetidas
tienen un e fecto mínimo s obre las puntas de r aspador. Por lo gene ral, el nal de la vi da útil está dete rminado por el de sgaste
y los daños de bidos al uso. Deseche la punta y sus titúyala por una nueva cuando se d esale y deje de cor tar bien.
• El tubo de asp iración se suministra estéril y s irve para un solo us o. Deseche el tubo después de util izarlo.
• Tras cada intervención, limpie bien todos los componentes reutilizables del sistema.
• Al utilizar accesorios XPS®, tenga cuidado para aplicar el extremo cortante móvil solamente a las zonas anatómicas
adecuad as y al lugar de la intervención quir úrgica. El uso de instrumentos eléctricos oscilantes o giratorios pu ede producir
lesiones relacionadas con la vibración. Tome las precauciones adecuadas.
• Emplee visualización al utilizar accesorios XPS® giratorios. Deje de utilizar la aplicación accionada con electricidad si no se
puede visualizar el lugar de la intervención quirúrgica.
21
Page 22

ES
• Durante las intervenciones quirúrgicas arriesgadas, en el lugar de la intervención se deberán utilizar métodos de control de
las hemorragias que no comprometan la seguridad del paciente.
• Inspeccione siempre los componentes antes y después de cada uso para comprobar que no hayan sufrido daños. Si se
observan daños, no utilice la pie za dañada y sustitúyala. Las pi ezas dañadas pueden depositar virutas metálicas en el lugar
de la intervención quirúrgica.
• Utilice únicamente componentes del sistema de Medtronic Xomed, Inc., ya que de lo contrario el sistema podría resultar
dañado o funcionar incorrectamente.
• Retire y deseche los accesorios de acuerdo con la normativa local sobre la eliminación correcta de materiales contaminados.
• El servicio técnico s ólo debe realizarlo perso nal cualicado de Medtronic Xom ed.
• No modique los accesorios utiliz ados con el aplicador. El rendimiento puede resultar perjudicado si se utilizan accesorios
modicados.
• Esteril ice y seque los dispos itivos reutilizab les antes de guardar los. Reduzca el ri esgo de contaminaci ón cruzada reali zando
las tareas de limpieza y esterilización cuando sea oportuno.
• Compruebe que los dispositivos reutilizables se hayan limpiado y esterilizado antes de su uso. Si no se han esterilizado, no
los utilice.
• Para evitar que el usuario sufra laceraciones y se produzca contaminación cruzada por guantes afectados, no cambie el
accesorio mientras el aplicador esté funcionando.
• No utilice el accesorio si el envase está abierto o dañado. Si está roto, el precinto no ofrece ninguna protección contra la
contaminación cruzada.
• Si el accesor io se dobla o se utiliz a para hacer palanca, puede romperse y producir lesi ones al paciente y al pe rsonal.
• Se comerci alizan acceso rios para la res ección de tejid o blando y hueso e n intervenci ones quirúrg icas. El uso de lo s accesorios
depend e de la aplicación p ara la que se vayan a ut ilizar y de las nec esidades del pac iente. Los accesor ios eléctrico s cortantes
alados inducen hemorragias y extirpan cantidades considerables de tejido y hueso.
ADVERTENCIA
Esterilice el dispositivo inmediatamente después de limpiarlo.
PAUTAS PARA LA ESTERILIZACIÓN
Advertencias
y medid as
preventivas
Limitaciones El nal de la vida útil norm almente está determinado por el deteri oro debido al uso. Consulte el apar tado sobre
Uso El convertid or se suministra n o estéril y debe lim piarse y esteril izarse antes del p rimer uso y antes de c ada uso
Embalaje y
transporte
Preparación para
descontaminación
Limpieza:
automática
(NO utilic e un
equipo de lavado
por ultrasonidos)
Antes de la es terilizaci ón, examine d etenidament e el convertid or y las puntas. El co nvertidor Fe atherTouch® tiene
una vida út il prevista de al men os 100 usos . El nal de la vida útil pu ede determinarse comprobando el blo queo
del meca nismo antes de cada u so. Si no se realiza e l ciclo de secado a l vacío recomend ado, podría prod ucirse un
deterioro prematuro del convertidor.
No sumerj a el convertidor. Si se introduce en solucione s líquidas, se dañar á y se anulará la garant ía. Asimismo la
esteril ización con calo r seco dañará el conve rtidor y anular á la garantía.
inspección y pruebas que gura más abajo.
posterior.
Enjuague i nmediatamente y d e forma minucios a los instrument os con agua desioniz ada después de c ada
utilización.
Enjuague inmediatamente y de forma minuciosa los instrumentos con agua desionizada después de cada
utilización. Desmonte la punta del convertidor antes de la limpieza. Desmonte el convertidor desenroscando el
portabrocas estriado del anillo portapieza oscilante.
Extraiga los instrumentos y el equipo de las bandejas de esterilización antes de colocarlos en los contenedores
del equipo de lavado. Oriente los dispositivos conforme a las recomendaciones del fabricante del equipo de
lavado/desinfección. Utilice un detergente con pH alcalino o neutro recomendado por los fabricantes del equipo
o del detergente.
Instrucciones previas a la limpieza mediante lavado automático: Los raspadores y el convertidor se deben
limpiar manualmente según las instrucciones de limpieza manual (Limpieza: manual) e inspeccionar para retirar
los residuos visibles antes de colocarlos en el equipo automático de lavado/desinfección.
Estos pro ductos han sido v alidados para un a limpieza eca z con un ciclo automát ico del equipo de lav ado/
desinfe cción que consiste e n lo siguiente:
Fase Tiempo de
Pre-lavado 1 3 minutos agua corriente fría N /A
Lavado enzimático 5 minutos agua corriente caliente de tergente enzimát ico con pH neutro
Lavado 1 5 minutos 66 °C pu nto de ajuste deterg ente con pH neutro
Aclarado 1 3 minutos agua corriente caliente N/A
Aclarado térmico 1 minu tos 82 °C co mo mínimo N /A
Examine minuciosamente instrumentos de suelo residual.
recirculación
Temperatura del agua Tipo de detergente
22
Page 23

ES
Limpieza: manual Instrucciones para la limpieza de las puntas de aspiración para raspador
Desinfección N o sumerja el instr umental en solu ciones frías de g lutaraldehíd o, cloruro o amoni o ni lo esterilice co n calor seco,
Envasado Puede usarse un envoltorio de esterilización convencional. En los Estados Unidos, se requiere un material de
Esterilización
(las tem peraturas y
los tie mpos son los
valores mínimos
requeridos).
Mantenimiento,
inspección y
pruebas
Almacenamiento Guarde los inst rumentos en un luga r limpio y seco.
Información
adicional
VÁLIDAS para la preparación del producto para su reutiliz ación. NO SON APLICABLES a dispositivos o accesorios de un solo uso, los
cuales deben destruirse después de su uso de acuerdo con la normativa local aplicable. Continúa siendo responsabilidad de la persona
encarga da de este proce so asegurars e de que el reproc esamiento se rea lice con un equip o validado a n de l ograr el result ado deseado. E sto
normalm ente requiere la v alidación y el contr ol sistemático de l proceso.
Sumerja e l instrumental e n una solución tib ia (temperatura in ferior a 43 ºC) de de tergente enzimá tico suave
(pH de 7,0-8 ,5) y agua desioniz ada durante 2 minut os como mínimo. Para in strumental con l úmenes o dotado
de puer tos de limpieza , inyecte solució n de limpieza en su i nterior con una jer inga de irrigaci ón y sumérjalo
durante 2 mi nutos como mínimo.
Utilice un ce pillo de cerdas bla ndas para cepilla r el instrumenta l mientras se encu entra sumergid o en la
solución de limpieza para eliminar la materia orgánica. Aclare con agua desionizada, limpie mediante
ultraso nidos en una soluc ión templada (meno s de 43 ºC) de deterg ente suave (pH 7,0-8, 5) y agua desioniza da
durante al m enos 10 minutos.
Aclare exhaustivamente con agua desionizada, utilizando una jeringa para eliminar por completo la solución de
limpiez a de los lúmenes y lo s puertos de limp ieza. Proceda a l impiar de este mod o hasta que no qued en restos
de sucied ad visible en el ins trumento.
Seque con a ire comprimido o co n un paño que no despr enda pelusa. E xamine el instru mental con el n de
detec tar posibles man chas o signos de dete rioro; retírelo d el servicio si f uese necesari o.
Instrucciones para la limpieza del convertidor para raspador
No sumerj a el convertid or. Si se sumerje en s oluciones lí quidas o se este riliza con ca lor seco, se dañ ará y se anulará
la garantía.
Limpie el convertidor con un cepillo y una solución de detergente enzimático suave y aclare con agua. Los residuos
existentes en el interior del convertidor pueden limpiarse utilizando una escobilla limpiapipas, un hilo no o un ador.
Aclare bie n con agua desioniz ada y seque con un pa ño sin pelusa.
Nota: Cuando utilice un aparato de limpieza por ultrasonidos o una lavadora de pulverización, siga las
recomendaciones del fabricante, especialmente en relación con los instrumentos articulados y su colocación.
ya que ésto p odría dañar su aca bado.
empaquetado quirúrgico aprobado por la FDA.
En conjuntos: El instrumental puede colocarse en bandejas de instrumental especícas o en bandejas de
esterilización de uso general. Compruebe que los bordes cortantes están protegidos. Envuelva las bandejas
usando un método apropiado.
Compruebe que el instrumental esté limpio y funcione correctamente. Límpielo de nuevo si quedan restos;
retire de l servicio el in strumental si es tá dañado. Cierr e el instrumenta l con pasadores y en granaje de cremal lera
en la primera muesca. Disponga el instrumental en recipientes de esterilización perforados en las supercies
superior e inferior, y en soportes como los empleados en microcirugía. Siga el ciclo adecuado indicado en la
tabla siguiente.
Todos los ciclos de vapor se han validado con el instrumento envuelto, que se puede esterilizar envuelto o sin
envolver. Es tos dispositivos s olamente se han va lidado para méto dos de esteriliz ación al vapor.
Solo instrumentos Solo instrumentos o instrumentos
Ciclo Gravedad Gravedad Prevacío P r ev ac í o
Tem p 121° C 132° C 132° C 134 °C 134 °C
Tiempo 30 min 10 mi n 4 min 18 m in 3 m in
Secado 30- 40 minutos o hasta q ue se vea que está se co
Parámetros de esterilización con óxido de etileno al 100 % (puntos de ajuste)
Preacondicionamiento 5 4°C, 60% de hume dad relativa, 60 m inutos
Esterilización Temperatura 54°C
Humedad relativa 60 ± 5%
Concentración de óxido de etileno 7 25 ± 25 mg/L
Tiempo d e exposición al g as (ciclo completo) 120 m inu tos
Aireación 54 °C, 8 ho ras
El convert idor FeatherTouch® tiene u na vida útil previs ta de al menos 100 usos . El nal de la vida úti l puede
determinarse comprobando el bloqueo del mecanismo antes de cada uso. La repetición del proceso tiene
un efec to mínimo sobre las p untas del raspad or. El nal de la vida útil n ormalmente est á determinado p or el
deterio ro debido al uso. De seche la punta y sus titúyala por un a nueva cuando esté d esalada y no cor te bien.
Ninguna
en bandejas para instrumentos
(FR/
OMS)
Prevac ío
(Reino
Unido)
23
Page 24

NL
Algunos dispositivos requieren instrucciones de montaje especícas. En ese caso, consulte el anexo de montaje proporcionado con el
dispositivo para ver instrucciones adicionales.
INFORMACIÓN DEL DEPARTAMENTO DE SERVICIO AL CLIENTE
Para obtener más información en relación con la utilización de este producto o para noticar cualquier problema, póngase en
contacto con Medtronic Xomed utilizando la información correspondiente proporcionada en la tarjeta de información para
contacto azul y blanc a que se adjunta con cada dispositivo, o póngase en contacto co n su distribuidor lo cal.
DEVOLUCIONES Y REPARACIONES
Póngase en contacto con el servicio de atención al cliente de Medtronic Xomed en el teléfono 800 -874-5797 para obtener un
número de autorización de devolución (n.º RGA) antes de enviar el Producto a Medtronic Xomed. Tenga el número de la factura
original o el número de la orden de compra a mano para facilitar la vericación de la información de la garantía. El n.º RGA debe
aparecer en un lugar destacado de la caja, y especicarse en toda la documentación incluida con la devolución o la reparación.
Todos los productos devueltos a Medtronic Xomed deben estar embalados de manera segura en envolturas protectoras.
El cliente debe proporcionar el número de la orden de compra, las direcciones de envío y de facturación correctas, y un formulario
de solicitud de reparación o una descripción del problema o la razón de la devolución.
GARANTÍA LIMITADA
manuals.medtronic.com
NL
YSTEEMCOMPONENTEN
REF 1922005 – FeatherTouch Automatische raspomvormer
REF 1992208 – FeatherTouch suc tierasppunt, 8mm, ruw
REF 1992210 – FeatherTouch suctierasppunt, 8 mm, jn
REF 1895524 – FeatherTouch suctieslang
REF 1922006 – FeatherTouch sterilisatieplateau
BESCHRIJVING VAN HET INSTRUMENT
De FeatherTouch Automatische raspomvormer gebruikt het StraightShot of StraightShot Magnum handstuk als de
krachtaandrijvingsbron en past de draaibeweging aan naar een voorwaartse / achterwaartse beweging. De FeatherTouchomvormer heeft een spanhuls om de FeatherTouch-rasppunten vast te houden.
BEOOGD GEBRUIK / GEBRUIKSAANWIJZING
De FeatherTouch-omvormer is bedoeld voor gebruik als hulpmiddel bij het StraightShot of StraightShot Magnum handstuk voor
het bedienen van rasppunten voor het snijden en verwijderen van zachte en harde weefsels of bot in otorinolaryngologie en
hoofd- e n nekchirurgie.
Chirurgische handinstrumenten zijn bedoeld voor gebruik bij uiteenlopende chirurgische ingrepen. Het is de verantwoordelijkheid
van het chirurgische team om voor elk geval de juiste instrumenten te kiezen. Gebruik deze instrumenten niet voor andere
doeleinden dan waarvoor ze bedoeld zijn. De instrumenten moeten voor elk gebruik worden gereinigd en gesteriliseerd (ook als
ze voor het eerst worden gebruikt).
CONTRAINDICATIES
Geen bekend.
INSTRUCTIES VOOR GEBRUIK
1. Sluit de omvormer aan op het handstuk door op de veerspanhuls op het handstuk te drukken, de omvormer in te zetten en
de veerspanhuls op het handstuk los te laten. Controleer op correcte aansluiting door licht aan de omvormer te trekken.
Wanneer de omvormer niet goed in de spanhuls is geplaatst dient het proces herhaald te worden.
2
1
1 Omvormer 2 Ingeveerde handstukspanhuls
24
Page 25

NL
2. Bereid, zodr a de omvormer go ed op de spanhu ls op het hands tuk zit, de dra aispanhuls op d e omvormer voo r op het instal leren
van de punt d oor de spanhuls van d e omvormer naar link s te draaien tot we erstand wordt o pgemerkt. D e spanhuls moet zi ch
nu het dicht st bij de open dista le kant van de omvormer bevinden .
3. Zet de gewenste pu nt goed in de spanhuls en draai tot de groef aan het ui teinde van de as goed op zijn plaats v alt.
4. Zet de rasppunt goed vast in de spanhuls door de spanhuls naar rechts te draaien en goed vast te draaien om de punt vast
te zetten. Doe de trek test: houd het handstuk vast en trek de rasp weg van het handstuk. Wanneer de rasp loskomt of slipt,
opnieuw inzetten, vastzetten en voer de test opnieuw uit.
5. Voor rasppuntsuctie de FeatherTouch-suctieslang op de getoonde wijze bevestigen en sluit dan de standaard
operatiekamersuctieslang aan op de FeatherTouch-slang. Zet de operatiekamersuctieslang met de witte met de
FeatherTouch-suctieslang meegeleverde klem vast op de kabel van het handstuk.
1
2
3
1 Suctieslangadapter 2 Operatiekamerslang 3 Witte k lem
6. Controleer of de kabels van het handstuk en de voetschakelaar goed zijn aangesloten op de console van de Medtronic
Xomed XPS Microdebrider. Zet de console in de “FORWARD” richting, variabele modus en stel het maximumtoerental in
tussen 3.0 00 en 5.000 omw/min.
7. Activeer de FeatherTouch door de voetschakelaar in te drukken.
OPGELET
• Snelheden van meer dan 5.000 rpm zullen voortijdige slijtage aan de omvormer veroorzaken en kunnen de garantie
ongeldig maken. Gebruik de omvormer uitsluitend in de voorwaarts-modus.
• De FeatherTouch-omvormer heeft een verwachte levensduur van tenminste 100 keer gebruik. Het einde van de levensduur
kan worden bepaald door voorafgaand aan elk gebruik te controleren op vergrendeling van het mechanisme.
WAARSCHUWINGEN
• Houd de actieve punten altijd uit de buurt van vingers en loszittende kleding.
• Gebruik de rasppunt pas nadat de juiste anatomische markeringen en de bedoelde chirurgische plek zijn bevestigd.
• De FeatherTouch-omvormer wordt niet-steriel geleverd en dient voordat u het voor de eerste maal gebruikt en voor ieder
volgend gebruik gereinigd en gesteriliseerd te worden.
25
Page 26

NL
• Vervangende rasppunten worden voor eerste gebruiksgemak steriel geleverd. Herhaald gebruik heeft een minimaal eect
op de rasppunten. Het einde van de levensduur wordt normaal bepaald door slijtage en beschadiging als gevolg van
gebruik . Gooi de punt wanne er deze bot wordt en ni et goed meer snijdt weg en verv ang hem door een nie uwe.
• Suctieslang wordt steriel geleverd voor eenmalig gebruik. Gooi de slang na elk gebruik weg.
• Reinig alle voor hergebruik geschikte systeemonderdelen na elke procedure.
• Pas het bewegende snijgedeelte alleen toe op geschikte anatomische oriëntatiepunten en het beoogde chirurgische
gebied bij gebruik van XPS®-accessoires. Het gebruik van elektrisch aangedreven heen-en-weer bewegende/roterende
instrumenten kan leiden tot letsel als gevolg van vibratie. Gebruik gepaste voorzorgsmaatregelen.
• Pas visuali satie toe bij gebru ik van roterende XPS®-a ccessoires. Staak d e elektrisch aa ngedreven toepa ssing in het geval he t
chirurgische gebied niet gevisualiseerd kan worden.
• Gebruik voor het controleren van bloedingen in het operatiegebied methodes die de veiligheid van de patiënt niet in
gevaar brengen tijdens risicovolle operaties.
• Inspecteer voor en na gebruik altijd de onderdelen op eventuele beschadiging. In geval van beschadiging dient het
beschadigde onderdeel voor gebruik te worden vervangen. Beschadigde onderdelen kunnen metaalsplinters achterlaten
in het operatiegebied.
• Gebruik van andere onderdelen dan de systeemonderdelen van Medtronic Xomed, Inc. kan leiden tot beschadiging of
incorrecte werking.
• Accessoires dienen te worden verwijderd en afgevoerd overeenkomstig de lokale regelgeving voor het correct afvoeren
van verontreinigd materiaal.
• Elk onderhoud dient uitsluitend te worden uitgevoerd door bevoegd personeel van Medtronic Xomed.
• Verander de met het handstuk gebruikte accessoires niet. Gewijzigde accessoires kunnen leiden tot een verminderde
werking.
• Steriliseer en droog het herbruikbare apparaat voordat het wordt opgeslagen. Verklein de kans op kruisbesmetting door
tijdig te reinigen en steriliseren.
• Controleer vóór gebruik of het herbruikbare product is gereinigd en gesteriliseerd. Als dit niet het geval is, het product
niet gebruiken.
• Verander geen accessoires terwijl het handstuk in werking is, teneinde snijwonden bij gebruiker en kruisverontreiniging
door beschadigde handschoen te voorkomen.
• Gebruik geen accessoires waarvan de verpakking is geopend of beschadigd. Een gebroken afsluiting biedt geen
bescherming tegen kruisverontreiniging.
• Accessoires kunnen breken door buigen of wrikken, hetgeen kan leiden tot beschadiging van patiënt of personeel.
• Accessoire s zijn verkrijgb aar voor resec tie van zacht we efsel en bot vo or chirurgische p rocedures. G ebruik van access oires is
afhankelijk van de beoogde toepassing en behoeften van de patiënt. Scherp snijdende elektrisch aangedreven accessoires
veroorzaken bloedingen en verwijdering van signicant weefsel en bot.
WAARSCHUWING
Steriliseer onmiddellijk na het reinigen.
STERILISATIERICHTLIJNEN
Waarschuwingen /
voorzorgsmaatregelen
Beperkingen Het einde van de functionele levensduur wordt doorgaans vastgesteld aan de hand van slijtage door
Gebruik De omvormer wordt niet-steriel geleverd en moet vóór het eerste gebruik en vóór elk volgend gebruik
Verpakking en
transport
Voorbereiding op
ontsmetting
Reiniging: automatisch
(Gebruik GEEN ultrasone
afwasmachine.)
26
Vóór sterilisatie dienen de converter en tips zorgvuldig te worden geïnspecteerd. De FeatherTouch®
converte r heeft een ver wachte levensd uur van ten minste 100 ge bruikscycl i. Controleer vóó r elk gebruik of
het mech anisme niet blok keert. In geva l van blokkerin g is het einde van de f unctionele le vensduur bereik t.
Het niet uitvoeren van de aanbevolen vacuümdroging kan leiden tot voortijdige slijtage van de converter.
Dompel de converter niet onder. Als de converter in vloeistof wordt ondergedompeld, raakt deze
beschad igd en vervalt d e garantie. Bij ster ilisatie door dr oge hitte raak t de converter bes chadigd en verv alt
de garantie.
gebruik. Zie “Onderhoud, inspectie en test” hieronder.
worden gereinigd en gesteriliseerd.
Spoel de i nstrumenten na e lk gebruik direc t en grondig met ge deïoniseerd w ater.
Het wordt a anbevolen om zo sn el mogelijk na geb ruik de hergebr uikinstruc ties uit te voeren.
Spoel de i nstrument en na elk gebr uik direct e n grondig me t gedeïoni seerd wate r. Verwijder vó ór het reinig en
de tip van de converter. Haal de converter uit elkaar door de gekartelde spankop van de reciprocerende
ashals af te draaien.
Haal instrumenten en apparatuur uit de sterilisatiebakjes voordat u ze in afwasmachinemandjes plaatst.
Houd u bij het plaatsen van de instrumenten aan de aanbevelingen van de fabrikant van de afwasmachine/
desinfector. Gebruik een alkalisch of neutraal reinigingsmiddel dat wordt aanbevolen door de fabrikant van
de afwasmachine/desinfector of het reinigingsmiddel.
Voorreinigingsinstructies voor automatisch wassen: De raspen en omvormer moeten in overeenstemming
met de desbetreende instructies (Reiniging: handmatig) handmatig worden gereinigd en gecontroleerd
op de verw ijdering van zi chtbaar vuil voor dat u deze in de automat ische afwasma chine/desinfec tor plaatst.
Deze pro ducten zijn geva lideerd voor e ectieve reinig ing middels een au tomatische af wasmachine-/
desinfe ctorcyclus di e uit het volgende b estaat:
Page 27

NL
Reiniging: automatisch
(Gebruik GEEN ultrasone
afwasmachine.)
Reiniging: handmatig Reinigingsinstruc ties voor rasptip met afzuiging
Desinfectie Koude onderdompeling in glutaaraldehyde, chloor of ammonia, of sterilisatie door droge hitte wordt niet
Verpakking Een standaard sterilisatiedoek kan worden gebruikt. In de VS is een door de FDA goedgekeurde
Sterilisatie
(Verme ld zijn de
minimaal vereiste
temperaturen en
tijd en)
Fase Her-circulatietijd Wat er-
Voor was 1 3 mi nuten koud
Enzymatische
was
Was 1 5 minuten instelpunt
Spoeli ng 1 3 minuten warm
Thermisch
spoelen
Grondig te onderzoeken instrumenten voor de resterende grond.
Dompel h et instrument te n minste 2 minuten on der in een lauww arme (minder dan 43 °C ), milde (pH 7,08,5) opl ossing van een enz ymatisch reini gingsmiddel en g edeïoniseer d water weken. Als ee n instrument is
voorzien van lumina of reinigingsopeningen, injecteert u met een irrigatiespuit reinigingsoplossing door
het instr ument. Dompe l ten minste 2 minuten o nder.
Was de instr umenten met een z achte instrumen tenborstel ter wijl ze in de reini gingsoplossin g
ondergedompeld blijven, om organisch materiaal te verwijderen. Spoel de instrumenten grondig met
gedeïo niseerd water en re inig ze vervolg ens gedurende 10 minu ten ultrasoon in e en lauwwarme (mi nder
dan 43 °C), mil de (pH 7,0-8,5) opl ossing van reinig ingsmiddel en ge deïoniseerd wa ter.
Spoel gr ondig met gedeï oniseerd water m et behulp van een in jectiespuit o m de reinigingso plossing
goed uit d e lumina en reinigi ngspoorten te ve rwijderen. R einig op deze mani er totdat er geen vu il op het
instrum ent meer zichtba ar is.
Droog me t perslucht of ee n schone, pluisv rije doek. Insp ecteer de ins trumenten op vle kken of slijtage;
neem ze zo n odig uit gebruik .
Reinigingsinstructies voor raspconverter
Dompel de converter niet onder. Bij onderdompeling in vloeistof of sterilisatie door droge hitte raakt de
converter beschadigd en vervalt de garantie.
Reinig de c onverter met e en borstel m et een oploss ing van een mild e nzymatis ch reinigings middel en wate r.
Vuil in de conve rter kan worden v erwijderd me t een pijpenrage r, dunne draad of stil et.
Spoel gr ondig met gedeï oniseerd water e n droog af met een pl uisvrije doek .
Opmerking: Volg bij gebruik van ultrasone reinigingsapparatuur of een sproeiwasmachine de
aanbevelingen van de fabrikant op, vooral met betrekking tot scharnierende instrumenten en de plaatsing
van instrumenten.
aanbevolen, omdat hierdoor de buitenkant van de instrumenten kan worden aangetast.
chirurgische doek verplicht
In setjes : Instrumenten ku nnen in daartoe b estemde casse ttes of sterilis atiebakjes vo or algemeen geb ruik
worden geplaatst. Zorg ervoor dat de scherpe randen worden beschermd. Verpak de cassettes of bakjes op
de daarvoor geschikte manier.
Controle er of het instrum ent schoon is en go ed werkt. Rein ig het opnieuw als e r vuil aanwezig is en n eem
een besc hadigd instrum ent uit gebruik . Sluit instrume nten met pallen en b eugels op de eers te uitsparing.
Rangschik de instrumenten in sterilisatiecontainers met perforaties in boven- en onderkant en op steunen
zoals in microchirurgie worden gebruikt. Voer de juiste cyclus uit volgens de onderstaande tabel.
Alle stoo mcycli zijn geva lideerd in de verp akte congura tie en kunnen zowel ve rpakt als niet- verpakt
worden uitgevoerd. Deze instrumenten zijn uitsluitend gevalideerd voor st
Ciclo Gravedad Gravedad Prevacío Prevacío
Tem p 121° C 132 °C 132 °C 134° C 134° C
Tiempo 30 min 10 min 4 m in 18 mi n 3 min
Drogen 30 -40 minuten o f tot zichtbaar droo g
5 minuten warm
1 minutn M inimaal
Alleen instrumenten Alleen instrumenten of instrumenten
temperatuur
leidingwater
leidingwater
66 °C
leidingwater
82 °C
Type reinigingsmiddel
N.v.t .
pH-neutraal enzymatisch
reinigingsmiddel
pH-neutraal reinigingsmiddel
N.v.t .
N.v.t .
in instrumentenschalen
(FR/OMS)
Prevacío
(Reino
Unido)
27
Page 28

DA
Sterilisatie
(Verme ld zijn de
minimaal vereiste
temperaturen en
tijd en)
Onderhoud, inspectie
en test
Opslag Bewaar in strumenten op ee n schone, droge pl aats.
Aanvullende
informatie
Opmerking: De bovenstaande instructies zijn door de fabrikant gevalideerd als zijnde GESCHIKT om het product gereed te maken voor
hergebruik. Deze instruc ties zijn NIET VAN TOEPASSING op instrumenten of toebehoren voor eenmalig gebruik, welke na gebruik moeten
worden vernietigd overeenkomstig de betreende lokale bepalingen. Het blijft echter de verantwoordelijkheid van degene die het product
behandelt, om ervoor te zorgen dat de hergebruikinstructies worden uitgevoerd met gevalideerde apparatuur, zodat het beoogde resultaat
wordt bereikt. Hiervoor is doorgaans validatie en standaardbewaking van het proces vereist.
Op sommige instrumenten zijn specieke montage-instructies van toepassing. Raadpleeg in dat geval de bij het instrument meegeleverde
montagebijlage voor aanvullende instructies.
INFORMATIE KLANTENSERVICE
Als u meer informatie wenst over dit product of problemen wilt melden, neemt u contact op met Medtronic Xomed. Gebruik
hiervo or de blauw-wit te informatiekaart die bij elk apparaat verpakt wor dt of neem contact o p met de distributeu r.
RETOURNERING EN/OF REPARATIES
Neem contact op met Medtronic Xomed Customer Service via tel.nr. (800-874-5797) voor het verkrijgen van een Return
Goods Authorization number (RGA#) (authorisatienummer retournering van goederen) voordat u het Product retourneert aan
Medtronic Xomed. Houd het originele factuurnummer of bestelnummer bij de hand om de controle van de garantie-informatie
te vereenvoudigen. Het RGA# dient duidelijk zichtbaar weergegeven te worden op de doos en vermeld te worden op alle
begeleidende papieren die bijgesloten zijn bij de retournering en/of de reparatie. Alle Producten die geretourneerd worden aan
Medtronic Xomed moeten veilig verpakt worden in beschermend verpakkingsmateriaal.
De klant moet het Bestelnummer, het correcte verzend- en factureringsadres, en ofwel een ingevuld Reparatieformulier of een
beschrijving van het probleem en de reden van terugzending vermelden.
BEPERKTE GARANTIE
manuals.medtronic.com
Parameters voor 100% EtO-sterilisatie (instelpunten)
Voorbereiding 54°C, 6 0% relatieve vocht igheid, 60 minute n.
Sterilisatie Temperatuur 54°C
Relatieve vochtigheid 6 0 ± 5%
Concentratie
ethyleenoxide
Blootstellingstijd van
gas (volle digecyclus)
Ventilatie 54° C, 8 uur
De Feathe rTouc h® converter heef t een verwacht e levensduur van ten m inste 100 gebruik scycli. Contro leer
vóór elk ge bruik of het mech anisme niet blok keert. In geva l van blokkerin g is het einde van de f unctionele
levensduur bereikt. Herhaalde behandeling heeft nauwelijks gevolgen voor de rasptips. Het einde van de
functionele levensduur wordt doorgaans vastgesteld aan de hand van slijtage door gebruik. Gooi de tip
weg en ver vang deze door e en nieuwe wannee r de tip bot wordt en ni et goed meer ras pt.
Geen.
725 ± 25 mg/L
120 m inu ten
DA
SYSTEMETS KOMPONENTER
REF 1922005 – FeatherTouch automatisk konver ter til rasp
REF 1992208 – FeatherTouch rasp ehoved med sug, 8 mm, grov
REF 1992210 – FeatherTouch raspehove d med sug, 8 mm, n
REF 1895524 – FeatherTouch sugeslange
REF 1922006 – FeatherTouch sterilisationsbakke
BESKRIVELSE AF ENHEDEN
FeatherTouch automatisk konverter til raspehoved drives af StraightShot- eller StraightShot Magnum-håndstykket og konverterer
omdrejningsretningen til frem/tilbage. FeatherTouch raspehovederne fastholdes i konverteren ved hjælp af en drejepatron.
ANVENDELSESFORMÅL / INDIKATIONER
FeatherTouch-konverteren er beregnet som tilbehør til et StraightShot- eller StraightShot Magnum-håndstykke og bruges til at
drive rasp ehoveder til resek tion og ernels e af blødt/hårdt væv eller kn ogle i otorhinolar yngologi samt hoved- og ha lskirurgi.
Manuell e kirurgiske instru menter er beregne t til anvendelse i for skellige kirurgis ke procedurer. Det er de t kirurgiske teams ans var
at vælge det rigtige instrument i hvert enkelt tilfælde. Disse instrumenter må ikke bruges til andre formål end dem, de er beregnet
til. Instrumenterne skal rengøres og steriliseres inden første anvendelse og inden hver ny anvendelse.
28
Page 29

KONTRAINDIKATIONER
Ingen kendte.
BRUGSVEJLEDNING
1. Forbind konverteren til således til håndstykket: Tryk håndstykkets ederklemme ned, sæt konverteren helt i og slip
ederklemmen på håndstykket. Træk let i konverteren for at kontrollere, at delene er samlet rigtigt. Hvis konverteren ikke
sidder helt fast under ederklemmen, gentages processen.
2
1
1 Konverter 2 Indtrykket ederklemm på håndstykke
2. Når konverteren sidder helt fast under håndstykkets ederklemme, gøres konverterens drejepatron klar til montering af
raspehovedet ved at dreje den mod uret, til der mærkes modstand. Drejepatronen skal nu være tættest på konverterens
åbne distale ende.
3. Sæt det ønskede r aspehoved godt fa st i drejepatronen o g drej, til rillen i end en af skaftet glid er helt på plads.
DA
4. Spænd raspehovedet fast i drejepatronen ved at dreje den med uret og stramme den, til raspehovedet sidder helt fast. Lav
trækprøve: Hold fast i håndstykket og træk samtidig i raspen, væk fra håndstykket. Hvis raspen glider ud eller ytter sig:
Monter den igen, stra m den til og lav atter træ kprøve.
5. Hvis der skal bruges sug: Sæt FeatherTouch-sugeslangen på raspehovedet som vist og tilslut den så til operationsstuens
standard-sugeudstyr. Sæt operationsstuens sugeslange fast på håndstykkets ledning med den hvide klemme, der følger
med FeatherTouch-sugeslangen.
1
2
3
1 Adapterslange til sug 2 Operationsstuens sugeslange 3 Hvid klemme
29
Page 30

DA
6. Sørg for, at ledningerne til håndstykke og fodkontakt er rigtigt tilsluttet Medtronic Xomed XPS mikrodebrider-konsollen.
Indstil ko nsollen til “FORWARD”, variabel hasti ghed; indstil den til en maks.- hastighed mellem 3.000 og 5.000 o/min.
7. Ak tiver FeatherTouch ved at træde på fodkontakten.
FORSIGTIG
• Hastigheder over 5.000 omdr/min vil betyde, at konverteren nedslides før tiden og kan gøre garantien ugyldig. Konverteren
må kun arbejde i formen fremad.
• FeatherTouch-konverteren har en forventet levetid på mindst 100 anvendelser. Produktlevetiden bestemmes ved at
kontrollere for aåsning af mekanismen inden hver brug.
ADVARSLER
• Lad aldrig raspehoveder komme i nærheden af ngre og løstsiddende tøj, mens de er i bevægelse.
• Start først raspehovedet, når De har sikret Dem, at det bender sig i den pågældende anatomiske struktur og på det
planlagte operationssted.
• FeatherTouch®-konverteren leveres ikke-steril og skal rengøres og steriliseres før ibrugtagning og før eventuel
genanvendelse.
• Udskiftelige raspehoveder leveres sterile til første gangs brug. Gentagne behandlinger påvirker raspehovedet minimalt.
Levetide n bestemmes norm alt af slitage på grun d af brug. Kasser ra spehovedet og er stat det med et ny t, når det bliver mat
og ikke læn gere skærer så god t.
• Sugeslangen leveres steril og er kun til engangsbrug. Kasser altid slangen efter brugen.
• Rengør alle systemets genbrugskomponenter grundigt efter hver procedure.
• Vær omhyggelig med kun at anvende den bevægelige skærende ende på passende anatomiske lokalisationer og det
tilsigtede operationssted, når du bruger XPS®-tilbehør. Brug af elektriske frem/tibageroterende instrumenter kan give
vibrationsrelaterede skader. Anvend passende forsigtighedsregler.
• Anvend visualisering, når du bruger roterende XPS®-tilbehør. Afbryd brug af elektrisk udstyr, hvis operationsstedet ikke
kan visualiseres.
• Brug metoder på operationsstedet til blødningskontrol, der ikke kompromitterer patientens sikkerhed under risikokirurgi.
• Efterse altid komponenterne før og efter brugen for eventuel beskadigelse. Hvis der ses skade, må den skadede del ikke
anvendes, før den er udskiftet. Beskadigede dele kan efterlade metalspåner på operationsstedet.
• Brug ikke andre dele end Medtronic Xomed, Inc. systemets komponenter, da det kan føre til beskadigelse eller nedsat
ydelse.
• Fjern og bortskaf tilbehør ifølge lokale bestemmelser for korrekt bortskaelse af kontaminerede materialer.
• Al service må alene udføres af Medtronic Xomed-autoriseret personale.
• Lav ikke ændringer af tilbehør, der bruges med håndtaget. Ydelsen kan blive forringet med ændret tilbehør.
• Sterilisér og tør udstyr, der kan bruges igen, forud for opbevaring af systemet. Reducér sandsynligheden for
krydskontaminering via korrekt rengøring og sterilisering.
• Kontrollér, at genbrugsudstyret er blevet rengjort og steriliseret før brug. Må ikke bruges, hvis det ikke er steriliseret.Skift
ikke tilbehør med håndtaget kørende for at undgå læsion af bruger og krydskontaminering gennem defekt handske.
• Brug ikke tilbehøret, hvis pakningen er åbnet eller beskadiget. En forsegling, der er brudt, yder ingen beskyttelse mod
krydskontaminering.
• Bøjning eller forsø g på adskillelse k an knække tilbehø ret og være til fare fo r patient eller per sonale.
• Tilbehør fås til resektion af bløddele og knogle ved kirurgiske procedurer. Brug af tilbehøret afhænger af den tilsigtede
anvendelse og patientens behov. Skarpe elektrisk drevne tilbehør fremkalder blødning og ernelse af betydelige mængder
bløddele og knogle.
ADVARSEL
Steriliser straks efter rengøringen.
RETNINGSLINJER FOR STERILISATION
Advarsler/
forholdsregler
Begrænsninger Endt leveti d bestemmes norm alt ved slidskad er opstået ved br ug. Se afsnitt et “Inspekti on og afprøvnin g”
Formål Konverteren leveres usteril og skal rengøres og steriliseres før første anvendelse og eventuelle senere
Embal lage og
transport
Klargøring til
dekontaminering
30
Undersøg nøje omformeren og raspen med sug inden sterilisering. FeatherTouch-omformeren har en
forve ntet levetid på mind st 100 anvendelser. End t levetid kan bes temmes ved før hver anv endelse at
kontroll ere, om låsemek anismen fungere r efter hensig ten. Hvis den anbe falede tørre cyklus med vak uum ikke
udføres, kan omformeren blive slidt for tidligt.
Omform eren må ikke neds ænkes i væske. Hvis om formeren neds ænkes i en væskeop løsning, vil den t age
skade, o g garantien vil bo rtfalde. Ster ilisering med tø r varme vil besk adige omformer en og ugyldigg øre
garantien.
nedenfor.
anvendelser.
Skyl straks efter hver brug instrumenterne omhyggeligt med aoniseret vand.
Det anbefales, at instrumenter genforarbejdes så hurtigt som praktisk muligt efter brug.
Skyl straks efter hver brug instrumenterne omhyggeligt med deioniseret vand. Skil raspen fra omformeren
inden rengøring. Skil omformeren ad ved at skrue den riede borepatron ud af den frem- og tilbagegående
spændepatron.
Page 31

DA
Automatisk
rengøring
(Der må IK KE anvendes
ultralydsvaskemaskine)
Manuel rengøring Rengøringsvejledning til rasp med sug
Manuel rengøring Rengøringsvejledning til omformer
Desinfektion Må ikke lægges i blød i kolde glutaraldehyd-, klorin- eller ammoniumopløsninger eller steriliseres med tør
Emballage Der kan anvendes standard steriliseringsmateriale. I USA er en FDA-godkendt kirurgisk indpakning påkrævet.
Sterilisering
(Kravene
vedrører minimumtempe ratur og
minimums-varighed)
Fjern instrumenter og udstyr fra eventuelle steriliseringsbakker, inden de anbringes i maskinens kurve. Vend
udstyret i forhold til kravene fra opvaske-/desinfektionsmaskinens fabrikant. Brug et rensemiddel med basisk
eller neutral pH-værdi som anbefalet af opvaske-/desinfektionsmaskinens eller rensemidlets fabrikant.
Vejlednin g for automatisk va sk før forrengør ing: Raspe og konve rter skal manue lt rengøres i
overensstemmelse med vejledning i manuel rengøring (Rengøring: Manuel) og efterses for ernelse af synligt
smuds, før de placeres i den automatiske opvaske-/desinfektionsmaskine.
Disse pro dukter er bleve t valideret med h enblik på eek tiv rengøring ve d en cyklus i en auto matisk opvaske -/
desinfektionsmaskine, som bestod af følgende:
Fase Recirkul-eringtid Vandets
Forvask 1 3 min utter ko ldt vand fra
Enzymvask 5 min utter varmt vand fra
Vask 1 5 minut ter 66 °C
Skylning 1 3 minut ter varmt vand fra
Varm skylning 1 minutte r 82 °C minimum -
Grundigt undersøge instrumenter til resten af jorden.
Læg i blø d i lunken (mindre end 43 ° C), mild (pH 7,0-8,5) e nzymsæbe og a oniseret vand i m in. 2 minutter.
På instru menter med lumen o g instrumenter u dstyret med re ngøringspor te skal der indsp røjtes
rengør ingsvæske igenn em instrumente t med en skylles prøjte, og det ska l lægges i blød i min dst 2 minutter.
Brug en bl ød instrumentb ørste til at skru bbe instrument erne, mens de er dy ppet i rengørin gsopløsninge n,
for at ern e organiske stoe r. Skyl med aonis eret vand, og ren s derefter med u ltralyd i aonise ret, lunkent
(mindre end 43 ° C), mildt (pH 7,0-8, 5) vand med rengø ringsmiddel i 10 minu tter.
Skyl grundigt med aoniseret vand og brug dertil en sprøjte til grundigt at skylle rengøringsvæsken fra lumen
og rengø ringsporte. R engør på denne må de, indtil der ikke l ængere er synli g snavs på instrume ntet.
Tør med try kluft, elle r tør af med en fnugf ri klud. Efter se instrumente rne for eventuell e pletter elle r
nedbrydning, tag dem i givne tilfælde ud af brug.
Omform eren må ikke neds ænkes i væske. Hvis o mformeren læg ges i blød i en væske opløsning ell er steriliseres
med tør va rme, vil den tage sk ade og garantie n bortfald e.
Rengør omformeren med en børste med en mild enzymsæbeopløsning, og skyl af med vand. Hvis der sidder
snavs inde n i omformeren, k an det ernes med e n piberenser, en t ynd ståltråd el ler en stilet.
Skyll es grundigt af med d eioniseret va nd og tørres af med e n fnugfri klud.
Bemærk: Ved anvendelse af en ultralydsrenser eller en opvaskemaskine skal producentens anbefalinger følges,
især med h ensyn til ledde lte instrumente r og anbringels e af instrumenter.
varme, da instrumentets overadebehandling kan tage skade.
I sæt: Instrumenter kan sættes på specikke instrumentbakker eller steriliseringsbakker til generel brug. Sørg
for, at de skær ende kanter er bes kyttede . Afdæk bakkerne h ensigtsmæssi gt.
Kontroll ér, at instrumentet e r rent og fungerer k orrekt. Reng ør igen, hvis der n des aejringer, og k assér alle
beskad igede instrum enter. Luk instrumen ter med lås og créma lliere i det førs te hak. Anbring ins trumenterne
i steriliseringsbeholdere med perforeringer i top og bund, og på understøtninger som dem, der bruges i
mikrokirurgi. Følg den passende cyklus i nedenstående tabel.
Alle dampcyklusser skal være validerede i den emballerede konguration og instrumenterne kan steriliseres
emballeret eller ikke emballeret. Disse enheder er kun valideret for dampsteriliseringsmetoder.
Kun instrumenter Kun instrumenter, eller instrumeter i
Cyklus Tyngdekraft Tyngdekraft Forvakuum Forvakuum Forvakuum
Tem p 121° C 132° C 132 °C 134° C 13 4°C
Varighed 30 min 10 mi n 4 min 18 m in 3 min
Tørring 30 -40 minut ter eller indtil s ynligt tør
temperatur
hanen
hanen
referencepunkt
hanen
Rengøringsmiddeltype
-
en enzymrenseopløsning med neutral pH
en rense opløsning med ne utral pH
-
instrumentbakker
(Storbritannien)
31
Page 32

FI
Sterilisering
(Kravene
vedrører minimumtempe ratur og
minimums-varighed)
Huolto, tarkastus
jatest aus
Säilytys Opbevar instr umenter på et rent o g tørt sted.
Lisätietoja Ingen
Bemærk: Vejledningen ovenfor er blevet valideret af fabrikanten som værende I STAND TIL at klargøre produktet til genanvendelse. Den
gælder I KKE for engan gsudstyr el ler engangst ilbehør, der ska l tilintetgøre s efter brug i o verensstemme lse med gælde nde love og regl er. Det
forbliver sterilcentralens ansvar at sikre, at genforarbejdningen udføres med valideret udstyr for at opnå det ønskede resultat. Dette kræver
normalt, at processen valideres og overvåges rutinemæssigt.
For nogle enheder gælder særlige monteringsinstruktioner. Hvis dette er tilfældet, se da monteringsvejledningen, der følger med enheden,
for yderligere anvisninger.
For at få ere oplysninger vedrørende dette produkts anvendelse eller for at rapportere eventuelle problemer, vær venlig at
kontakte Medtronic Xomed med de relevante oplysninger anført på det blå og hvide informationskort til kontakt, som leveres
sammen med hver anordning, eller kontakt den lokale forhandler.
RETURNERING OG/ELLER REPARATIONER
Kontakt Medtronic Xomed Customer Service på (800-874-5797) for at få tilsendt en Return Goods Authorization number
(RGA#, Autorisationsnummer for returgods) før Produktet sendes til Medtronic Xomed. Hav venligt nummeret på den originale
faktura eller ordrenummeret parat som hjælp til kontrol af garantioplysningerne. RGA# skal være synligt på pakken og på alle
dokumenter, der følger med Produktet, der skal returneres eller repareres. Alle Produkter, der returneres til Medtronic Xomed, skal
være forsvarligt indpakket i beskyttende emballage.
Kunden skal opgive ordrenummer, korrekt tilsendelses- og fakturaadresse samt et udfyldt reparationsordreskema eller en
fyldestgørende forklaring af problemet eller grunden til returneringen.
BEGRÆNSET GARANTI
manuals.medtronic.com
100% EtO-steriliseringparametre (indstillede punkter)
Forbehandling 54°C, 6 0% relativ fugti ghed, 60 minut ter
Sterilisering Temperatur 54°C
Relativ luftfugtighed 6 0 ± 5%
Ethylenoxidkoncentration 725 ± 2 5 mg/L
Gaseksponeringstid (fuld
cyklus)
Luftning 54° C, 8 timer
FeatherTouch- omformeren ha r en forventet le vetid på mindst 100 anve ndelser. Endt leve tid kan bestemm es
ved før hver anvendelse at kontrollere, om låsemekanismen fungerer efter hensigten. Gentagen forarbejdning
har minima l eekt på rasp espidserne. End t levetid bestem mes normalt ved sl idskader opst ået ved brug.
Kassér sp idsen, når den bli ver sløv og ikke læ ngere skærer ee ktivt, og s æt en ny på.
120 m inu tte r
FI
JÄRJESTELMÄN OSAT
VIITE 1922005 – FeatherTouch-automaattikaapimen liitinkappale
VIITE 1992208 – Fea therTou ch-imukaapimen kärki, 8 mm, paksu
VIITE 1992210 – FeatherTouch-imukaapime n kärki, 8 mm, ohut
VIITE 1895524 – FeatherTouch-imuletku
VIITE 1922006 – FeatherTouch-sterilointitarjotin
VÄLINEEN KUVAUS
FeatherTouch-automaattikaapimen liitinkappaleessa käytetään virtalähteenä StraightShot- tai StraightShot Magnum
-käsikappaletta ja sen pyörivä liike voidaan suunnata eteen- tai taaksepäin. FeatherTouch-liitinkappaleessa on holkkiosa, johon
FeatherTouch-kaapimen kärjet kiinnitetään.
KÄYTTÖTARKOITUS / KÄYTTÖINDIKAATIOT
FeatherTouch-liitinkappale on tarkoitettu StraightShot- tai StraightShot Magnum -käsikappaleen lisävarusteeksi kaapimen
kärkien käyttöä varten pehmeän ja kovan kudoksen tai luun leikkaamiseksi ja poistamiseksi otorinolaryngologisissa sekä pään
ja niskan leikkauksissa.
Manuaaliset kirurg iset välineet on t arkoitettu käy tettäväksi eri laisissa leikkaustoimenp iteissä. Leikka usryhmän vastuulla on valit a
kussakin tapauksessa sopivat välineet. Älä käytä näitä välineitä muihin kuin niiden käyttätarkoituksen mukaisiin tarkoituksiin.
Välineet on puhdiste ttava ja steriloitava ennen e nsimmäistä käyt töä ja ennen jokaista seuraavaa käyt tökertaa.
KONTRAINDIKAATIOT
Ei tunnettuja kontraindikaatioita
32
Page 33

KÄYTTÖOHJEET
1. Kytke liitinosa käsikappaleeseen painamalla käsikappaleen jousiholkkia ja työntämällä liitinosaa lujasti sisäänpäin, jonka
jälkeen käsikappaleen jousiholkin voi vapauttaa. Tarkista, et tä liitinkappale on kiinnittynyt hy vin paikalleen vetämällä sitä
kevyesti poispäin. Jos liitinkappale ei ole kunnolla paikallaan holkissa, suorita kiinnitys uudestaan.
2
1
1 Liitinkappale 2 Puristettu käsikappaleen holkki
2. Kun liitinosa on tukevasti kiinni käsikappaleen holkissa, valmistele liitinosassa oleva kierreholkki kärjen asennusta varten
kääntämällä sitä vastapäivään, kunnes tunnet vastusta. Holkin tulee tällöin olla lähinnä liitinkappaleen avointa distaalista
päätä.
3. Kiinnitä haluamasi kärk i holkkiin tiukas ti ja pyöritä, kunne s varren päässä oleva ura menee tukevasti paikallee n.
FI
4. Varmista kaapimen kärjen kiinnitys holkkiin kääntämällä holkkia myötäpäivään ja kiristämällä tiukkaan siten, että kärki pysy y
varmasti paikallaan. Vetotesti: pidä kiinni käsikappaleesta ja vedä kaavinta käsikappaleesta poispäin. Jos kaavin ir toaa tai
liukuu, asenna ja kiristä se uudelleen ja tois ta testi.
5. Kiinnitä FeatherTouch-imuletku kärkeen kuvan osoittamalla tavalla kaapimen kärjen imua varten ja liitä sen jälkeen
normaali leikkaussalin imuletku FeatherTouch-letkuun. Varmista leikkaussalin imuletkun kiinnitys käsikappaleen kaapeliin
FeatherTouch-imuletkun mukana toimitetun valkoisen kiinnikkeen avulla.
1
2
3
1 Imuadapteriletku 2 Leikkaussaliletku 3 Valkoinen kiinnike
33
Page 34

FI
6. Tarkista, että käsikappaleen ja jalkakytkimen kaapelit on kytketty kunnolla Medtronic Xomed XPS MicroDebrider-laitteen
ohjauskonsoliin. Aseta konsoli “ETEENPÄIN”-suuntaan, säädettävään tilaan ja aseta maksiminopeus välille 3000 ja 5000
kierrosta minuutissa.
7. Ak tivoi FeatherTouch painamalla jalkakytkintä.
HUOMIO
• Jos nopeus on yli 5000 kierrosta minuutissa, seurauksena voi olla muuntimen ennenaikainen kuluminen, josta takuu ei
vastaa. Käytä muunninta vain eteenpäin-tilassa.
• FeatherTouch-muuntimen arvioitu käyttöikä on vähintään 100 kertaa. Käyttöiän päättymisen voi todeta tarkistamalla
mekanismin lukituksen ennen jokaista käyt tökertaa.
VAROITUKSIA
• Pidä aktivoidut kärjet aina pois sormien ja väljien vaatteiden läheltä.
• Käytä kaavinta vasta sen jälkeen kun asianmukaiset anatomiset rajamerkit ja leikkausalue on varmistettu.
• FeatherTouch-liitinkappale toimitetaan steriloimattomana, ja se on puhdistettava ja steriloitava ennen ensimmäistä ja
seuraavi a käyttökerto ja.
• Vaihdettavat kaapimenterät toimitetaan steriilinä, ja ne ovat tällöin käyttövalmiita. Kaapimen teräkärjet eivät juurikaan kulu
käytöss ä. Normaalis ti niiden käyt töikä määräy tyy käytö ssä synty vän kulumisen pe rusteella. He itä vanha kärk i pois ja vaihda
tilalle uus i, kun kärki on tylsä eikä lei kkaa enää tehokk aasti.
• Imuletku toimitetaa n steriilinä ja se on ker takäyttöinen. Heitä letku pois j okaisen käyt tökerran jälkeen.
• Puhdista kaikki uudelleenkäytettävät laitteiston osat huolellisesti jokaisen toimenpiteen jälkeen.
• Noudata varovaisuutta leikkauspään käytössä, jott a siirrät leikkauspään varmasti vain tarkoitettuihin anatomisiin kohteisiin
ja leikkausalueelle käyttäessäsi XPS-lisävarusteita. Sähkökäyttöisten edestakaisin liikkuvien/pyörivien välineiden käyttö voi
aiheuttaa värähtelyyn liitt yviä vammoja. Noudata asianmukaisia varotoimia.
• Käytä v isualisoint itekniik kaa pyöriv ien XPS-li sävaruste iden käyt ön yhteydess ä. Kytke vir ta pois väli neestä, j os leikkau salueen
visualisointi ei toimi.
• Käytä leikkausalueella sellaisia verenvuodon hallintamenettelyjä, jotka eivät vaaranna potilaan turvallisuutta riskinalaisen
leikkauksen aikana.
• Tarkista aina mahdolliset vauriot osista ennen käyttö ä ja käytön jälkeen. Jos havaits et vaurioita, älä k äytä vahingoit tunutta
osaa enne n kuin se on vaihdet tu uuteen. Vaurioitu neista osista voi ir rota metallilast uja leikkausalu eelle.
• Älä käytä muita kuin Medtronic Xomed, Inc.:n laitteisto-osia, sillä muussa tapauksessa seurauksena voi olla vahinkoja tai
toimintahäiriöitä.
• Irrota ja hävitä lisävarusteet kontaminoituneiden aineiden käsittelyä koskevien paikallisten määräysten mukaisesti.
• Kaikki huoltotyöt on annettava ainoastaan Medtronic Xomedin asiantuntevan henkilöstön tehtäväksi.
• Älä tee muut oksia käsi kappalee n kanssa käy tettävi in lisävarus teisiin. Muu tokset voi vat heikent ää varustei den suoritu skyky ä.
• Steriloi ja kuivaa uudelleenkäytettävä laite ennen järjestelmän varastointia. Vähennä ristikontaminaation todennäköisyyt tä
oikea-aikaisella puhdistuksella ja steriloinnilla.
• Varmista , että uudell eenkäytet tävä laite on puh distettu ja ste riloitu ennen k äyttöä. J os laitetta ei o le steriloitu , älä käytä sitä .
• Lisävarustetta ei saa vaihtaa käsikappaleen toiminnan aikana, jottei käytt äjälle aiheudu haavoja tai ristiinkontaminoitumista
suojakäsineen rikkoutumisen vuoksi.
• Älä käytä lisävarustetta, jos pakkaus on avattu tai vahingoittunut. Jos sinetti on rikki, ristiinkontaminoitumiselle ei ole
suojausta.
• Taivuttaminen tai vääntäminen voi rikkoa lisävarusteen aiheuttaen vahinkoja potilaalle tai henkilöstölle.
• Lisävarusteita on saatavilla pehmeän kudoksen ja luun resekointiin leikkaustoimenpiteissä. Lisävarusteiden käy ttö riippuu
käyttökohteesta ja potilaan asettamista vaatimuksista. Terävät sähkökäyttöiset lisävarusteet aiheuttavat verenvuotoa ja
huomattavan kudoksen ja luun poiston.
VAROITUS
Steriloi heti puhdistuksen jälkeen.
STERILOINTIOHJEET
Varoitukset /
varotoimet
Rajoitukset Käyttöiän päättym inen johtuu tavallisesti käytön aiheuttamasta kulumisesta . Katso kohta Tarkastaminen ja
Hygieniatestaus Konvert teri toimitet aan steriloimat tomana. Se on puh distettava ja s teriloitava enn en ensimmäistä
Suojaus ja kuljetus Instr umentit on hyvä käsitellä mahdollisimman pian käytön jälkeen.
Dekontaminoinnin
valmistelu
34
Tarkasta konvertteri ja kärjet huolellisestiennen sterilointia. FeatherTouch-konvertterin odotettu käyttöikä on
vähintään 100 käyttökertaa. Käyttöiän päätt yminen voidaan havaita tarkastamalla mekanismin lukkiutuminen
ennen jo kaista käyt tökertaa. Jos s uositeltavaa va kuumikuivaust a ei suoriteta, ko nvertteri voi k ulua
ennenaikaisesti.
Älä upota konvertteria nesteeseen. Nesteeseen upot taminen vahingoittaa konvertteria ja mitätöi takuun.
Kuumailmasterilointi vahingoittaa konvertteria ja mitätöi takuun.
testaus.
käyttökertaa ja ennen jokaista seuraavaa käyt tökertaa.
Huuhtele instrumentit huolellisesti deionisoidulla vedellä heti käytön jälkeen.
Huuhtele i nstrumentit hu olellisesti de ionisoidulla ve dellä heti käy tön jälkeen. Irro ta kärki konver tterista enn en
puhdistusta. Pura konvertteri ruuvaamalla karhennettu kiinnit ysistukka irti edestakaisin liikkuvasta renkaasta.
Page 35

FI
Puhdistaminen:
koneellinen
(ÄLÄ käy tä
ultraäänipesuria)
Poista instrumentit ja laitteet sterilointitarjottimilta ennen niiden asettamista pesukoreihin. Noudat a laitteiden
asettelussa pesurin/desinointilaitteen valmistajan antamia suosituksia. Käytä pesurin/desinointilaitteen tai
puhdistusaineen valmistajan suosittelemaa alkalista tai neutraalia puhdistusainet ta.
Automaattisen pesun esipuhdistusohjee t: Raspit ja konvertteri on puhdistet tava manuaalisesti manuaalista
puhdistusta koskevien ohjeiden mukaan (Puhdistaminen: manuaalinen), ja näkyvän lian poistuminen on
tarkastettava ennen asettamista automaattis een pesuriin/desinointilaitteeseen.
Näiden tuotteiden tehokkaaseen puhdistuk seen on validoitu automaattisen pesurin/desinointilaitteen jakso,
joka koo stuu seuraavist a:
Vaihe Kie rtoaika Ve den
Esipesu 1 3 minuuttia ky lmä
Entsyymipe su 5 minuuttia k uuma
Pesu 1 5 minuuttia 66 °C
Huuhtelu 1 3 minuuttia kuuma
Kuumahuuhtelu 1 minuuttia Vähintään
lämpötila
vesijohtovesi
vesijohtovesi
(asetusarvo)
vesijohtovesi
82 °C
Puhdistusainetyyppi
–
pH-neutraali entsymaattinen puhdis tusaine
pH-neutraali puhdistusaine
–
–
Perusteellisesti tutkia välineitä jäljellä maaperän.
Puhdistaminen:
manuaalinen
Imuraspikärkien puhdistusohjeet
Liota ins trumentteja ha aleassa (alle 43 °C) j a miedossa (pH 7,0–8 ,5) entsymaat tisessa puhdi stusaineess a ja
deionisoidussa vedessä vähintään 2 minuuttia. Jos instrumentissa on luumen tai puhdistusaukko, ruiskuta
puhdistusliuosta instrumentin läpi huuhteluruiskulla ja anna sen liota vähintään 2 minuuttia.
Poista orgaaninen aines instrumenteista pehmeällä instrumenttiharjalla niiden ollessa upotettuina
puhdistusliuokseen. Huuhtele deionisoidulla vedellä ja puhdista sen jälkeen ultraäänellä lämpimässä (alle 43
°C) mied on (pH 7,0–8,5) puh distusaineen j a deionisoidun v eden seokse ssa 10 minuutin ajan.
Huuhtele huolellisesti deionisoidulla vedellä . Huuhtele puhdistusliuos huolellisesti luumeneista ja
puhdistusaukoista ruiskun avulla. Jatka puhdistusta näin, kunnes instrumentissa ei ole näkyvää likaa.
Kuivaa paineilmalla tai pyyhi kuivaksi nukkaamattomalla liinalla. Tarkasta, etteivät instrumentit ole syöpyneet
eivätk ä kuluneet. Pois ta ne tarvitt aessa käytös tä.
Raspikonvertterin puhdistusohjeet
Älä upota konvertteria nesteeseen. Nesteeseen upottaminen ja kuumailmasterilointi vahingoittavat
konvertteria ja mitätöivät takuun.
Puhdista konvertteri harjalla käyttäen mietoa entsymaat tista puhdistusainetta ja huuhtele vedellä. Konvertterin
sisällä olevan lian voi poistaa piippurassilla, ohuella vaijerilla tai ohjaimella.
Huuhtele huolellisesti deionisoidulla vedellä ja py yhi kuivaksi nukkaamattomalla liinalla.
Huomautus: Käyttäessäsi ultraääni- tai suihkupesuria noudata pesurin valmistajan suosituksia, etenkin
nivellettyjen instrumenttien sekä instrumenttie n asettelun osalta.
Desinointi Älä liota instrumentteja kylmässä glutaarialdehydi-, kloori- tai ammoniumliuoksessa äläkä käytä
Pakkaus Taval lisia steriloint ipakkauksi a voidaan käyt tää. Yhdysva lloissa on käyte ttävä FDA:n hyvä ksymää kiru rgista
Sterilointi
(Annetut lämpötilat
ja ajat ova t
minimivaatimuksia)
kuumailmasterilointia, sillä nämä menetelmät saattavat vahingoittaa instrumenttien pintaa.
pakkausta.
Instrumenttisarjat: Instrumentit voidaan asettaa niille tarkoitetuille instrumenttitarjot timille tai yleiskäyttöisille
sterilointitarjottimille. Varmista, että leikkaavat reunat on suojattu. Kääri tarjottimet sopivalla tavalla.
Varmista , että instrum entti on puhdas j a toimii. Jos havait set likaa, puhd ista instrume ntti uudestaa n, ja jos
instrum entissa on vauri oita, poista se k äytöstä. Jos i nstrumentiss a on salpa tai kisko, l ukitse se ensim mäiseen
loveen. A seta instrume ntit steriloint iastioihin, jo issa on rei’ity s pohjassa ja kann essa, sekä teli neille, joita
käytetään mikrokirurgiassa. Valitse jokin alla olevan taulukon sykleistä.
Kaikki höyrysterilointisyk lit on validoitu pakatuilla instrumenteilla, ja instrumentit voidaan steriloida
pakattuina tai pakkaamattomina. Höyr ysterilointi on ainoa näille laitteille validoitu sterilointimenetelmä.
Vain instrumentit Vain instrumentit tai Instrumentit
Sykli Painovoima Painovoima Esityhjiö Esity hjiö
instrumenttitarjottimilla
(Ranska/WHO)
Esity hjiö
(Iso-
Britannia)
Lämpötila 121° C 132 °C 132 °C 13 4°C 134 °C
Aika 3 0 min 10 min 4 mi n 18 min 3 min
Kuivaus 30-40
minuuttia, tai kunnes välineet näyttävät kuivilta
35
Page 36

SV
Sterilointi
(Annetut lämpötilat
ja ajat ova t
minimivaatimuksia)
Huolto, tarkastus
jatest aus
Säilytys Säilytä instrumentit puhtaassa ja kuivassa paikassa .
Lisätietoja Ei ole.
Huomautus: Valmistaja on validoinut edellä annetut ohjeet ja todennut, et tä niitä noudattamalla tuote VOIDAAN käsitellä uudelleen
käytet täväksi. Ohj eet EIVÄT KOSKE kertakäy ttöisiä laitte ita tai kertak äyttöisiä lisäv arusteita, jot ka on hävitettäv ä käytön jälkeen s oveltuvien
paikallisten määräysten mukaisesti. Viime kädessä on kuitenkin välinehuollosta vastaavien henkilöiden vastuulla, että huollossa käytetään
validoituja laitteita ja toivottu tulos saavutetaan. Tämä edellyttää tavallisesti prosessin validointia ja rutiininomaista monitorointia.
Joihinkin laitteisiin sisältyy erit yiset kokoamisohjeet. Katso lisäohjeet näiden laitteiden mukana toimitetuista kokoamisohjeista.
ASIAKASPALVELUA KOSKEVAT TIEDOT
Halutessasi lisätietoja tämän tuotteen käytöstä tai ilmoittaaksesi ongelmista, ota yhteyttä Medtronic Xomed:iin jokaisen laitteen
pakkauksessa olevan sinivalkoisen yhteydenottokortin tietojen avulla, tai ota yhteyttä paikalliseen jälleenmyyjään.
PALAUTUKSET JA/TAI HUOLLOT
Pyydä Medtronic Xomedin asiakaspalvelusta (800-874-5797) palautuskoodi ennen tuotteen lähettämistä Medtronic Xomedille.
Pidä alkuperäisen laskun numero tai tilausnumero käsillä, sillä niitä tarvitaan takuutietojen varmistuksessa. Palautuskoodi on
merkittävä näkyvästi laatikkoon sekä kaikkiin palautettavaksi ja/tai korjattavaksi lähetettävän tuotteen mukaan liitettyihin
asiakirjoihin. Kaikki Medtronic Xomedille lähetettävät tuotteet on pakattava turvallisesti suojamateriaaleihin.
Asiakkaan on toimitettava tilausnumero, oikea lähetys- ja laskutusosoite sekä joko täytetty huoltotilauslomake tai lausunto
ongelmasta tai palautussy ystä.
100 % EtO -steriloinnin parametrit (asetusarvot)
Esikäsittely 54°C, 6 -% relative humi dity, 60 minutes
Sterilointi Lämpötila 54°C
Suhteellinen kosteus 6 0 ± 5%
Etyleenioksidipitoisuus 725 ± 25 mg/L
Kaasualtistusaika (täysi
jaks o)
Ilmastus 54°C , 8 tuntia
FeatherTouch-konvertterin odotet tu käyttöikä on vähintään 100 käyttökertaa . Käyttöiän päätt yminen voidaan
havaita tarkastamalla mekanismin lukkiutuminen ennen jokaista käyt tökertaa. Toistuva välinehuolto vaikuttaa
hyvin vähän raspikärkiin. Käyttöiän päätt yminen johtuu tavallisesti käytön aiheuttamasta kulumisesta. Kun
kärki o n tullut tylsäk si eikä leikka a tehokkaasti , hävitä se ja ota kor vaa uudella.
120 minuuttia
RAJOITETTU TAKUU
manuals.medtronic.com
SV
SYSTEMKOMPONENTER
REF 1922005 – FeatherTouch automatiserad raspomkopplare
REF 1992208 – FeatherTouch rasp sugspets, 8mm, grov
REF 1992210 – FeatherTouch raspsugspets, 8mm, n
REF 1895524 – FeatherTouch sugslang
REF 1922006 – FeatherTouch steriliseringsbricka
BESKRIVNING AV UTRUSTNINGEN
FeatherTouch automatiserade raspomkopplare använder handenheten StraightShot eller StraightShot Magnum som elektrisk
drivkälla och bestämmer rotationsriktningen till framåt- eller bakåtriktad. FeatherTouch-omkopplaren har ett fäste som håller
FeatherTouch-raspspetsarna.
AVSEDD ANVÄNDNING / ANVÄNDARANVISNINGAR
FeatherTouch-omkopplaren är avsedd att användas som tillbehör till handenheten StraightShot eller StraightShot Magnum för
att manövrera raspspetsar, som är avsedda för at t skära i och ta bort mjuka och hårda vävnader eller ben vid otorinolaryngologi
samt vid hu vud- och halskirurgi.
Manuella kirurgiska instrument är avsedda att användas vid olika kirurgiska ingrepp. Det åligger läkarlaget att välja lämpliga
instrument i varje enskilt fall. Använd inte dessa instrument för andra ändamål än de avsedda. Instrumenten måste rengöras och
steriliseras före första användningstillfället och före varje återanvändning.
KONTRAINDIKATIONER
Inga kända.
36
Page 37

ANVÄNDARANVISNINGAR
1. Anslut omkopplaren till handenheten genom att trycka ner den ädrande fattningen på handenheten, skjuta in omkopplaren
ordentligt och släppa den ädrande fattningen på handenheten. Kontrollera att de har kopplats ihop ordentligt genom att
dra lätt i omkopplaren. Upprepa proceduren om omkopplaren inte sitter fast ordentligt i fattningen.
2
1
1 Omkopplare 2 Hoptryckt fäste på handenhet
2. När omkopplaren är stadigt fastsatt på handenheten förbereds vridfattningen på omkopplaren för montering av spetsen
genom att vrida omkopplarens fattning moturs tills det tar emot. Fattningen ska nu benna sig närmast den öppna yttre
änden av omkopplaren.
3. För in önskad spe ts ordentligt i fat tningen och vrid tills spåret på s kaftets ände faller på plat s ordentligt.
SV
4. Fäst raspspetsen i fattningen genom att vrida fattningen medurs och dra åt ordentligt för att göra fast spetsen. Gör en
dragtest: håll i hande nheten och dra i raspen i riktnin g från handenheten. Om raspen l ossnar eller glider, montera den då på
nytt, d ra åt igen och upprep a testen.
5. Vid sugning med raspspets ansluts FeatherTouch-sugslangen till spetsen som bilden visar och därefter ansluts
operationssalens standardsugslang till FeatherTouch-slangen. Fäst operationssalens sugslang på handenhetens kabel med
den vita klämman som nns till FeatherTouch-sugslangen.
1
2
3
1 Adaptersugslang 2 Operationssalsslang 3 Vit klämma
37
Page 38

SV
6. Se till att kablarna till handenheten och fotströmbrytaren är ordentligt anslutna till Medtronic Xomed XPS
mikrodebrideringskontrollen. Ställ in kontrollen på riktningen ”FRAMÅT”, variabelt läge och ställ maximal hastighet på
mellan 3 000 och 5 000 rpm.
7. Ak tivera FeatherTouch genom att trycka ner fotströmbrytaren.
FÖRSIKTIGHETSMÅTT
• Hastigh eter över 5000 va rv/minut orsak ar prematurt sl itage på omkopp laren och kan med föra att garan tin förfalle r. Använd
omkopplaren endast i framåtläge.
• FeatherTouch-omkopplaren har en förväntad livslängd på minst 100 användningstillfällen. Genom att kontrollera
låsmekanismen före varje användningstillfälle kan man avgöra när omkopplarens livslängd är slut.
VARNINGAR
• Håll de ak tiva spetsarna b orta från ngra r och lösa kläder.
• Använd rasp spetsarna förs t efter att de rät ta anatomiska rik tmärkena och det avs edda operations området har fastställts .
• FeatherTouch-omkopplaren levereras icke-steril och måste rengöras och steriliseras innan den används första gången och
före varje användningstillfälle.
• Utbytbara raspspetsar levereras sterila för bekväm första användning. Upprepad behandling har mycket liten eekt på
raspspetsarna. Slutet på deras livslängd beror normalt på slitage genom användning. Kassera spetsen och ersätt den med
en ny om spet sen blir slö och inte län gre skär bra.
• Suslangen levereras steril endast för engångsbruk. Kassera slangen efter varje användning.
• Efter varje procedur, rengör noggrant alla återanvändbara systemkomponenter.
• Var noga med att endast föra den skärande änden inom de anatomiska gränsmarkeringarna och det avsedda
kirurgiska området när XPS-tillbehör används. Användning av oscillerande/roterande elektriska instrument kan orsaka
vibrationsrelaterade skador. Vidta lämpliga försiktighetsåtgärder.
• Tillämpa visualisering under användning av roterande XPS-tillbehör. Avbryt förfarandet om visualiseringen av det
kirurgiska området förloras.
• Använd lämplig metod för att reglera blödningen i det kirurgiska området så att inte patientens säkerhet äventyras under
riskfyllda ingrepp.
• Inspektera alltid komponenterna före och efter användning avseende skador. Om en skada upptäcks skall den skadade
delen by tas ut. Skadade de lar kan avsätta me tallpartikla r i det kirurgiska om rådet.
• Använd inga andra delar än systemkomponenter från Medtronic Xomed eftersom skador eller försämrade prestanda
annars kan bli följden.
• Avlägsna och kassera tillbehör enligt de lokala bestämmelserna för hantering av kontaminerat material.
• All service måste ut föras av kvalice rad personal från Medtronic Xomed.
• Modiera inga tillbehör som används med handstycket. Modierade tillbehör kan orsaka försämrade prestanda.
• Sterilisera och torka enheter som ska återanvändas innan systemet förvaras. Minska risken för korskontaminering genom
att rengöra och sterilisera när det behövs.
• Veriera att återanvändningsbara produkter är steriliserade innan de används. Om de inte är steriliserade ska du inte
använda dem.
• Byt inte t illbehör medan ha ndstycket är i gång , detta för att fö rhindra sår på använ daren och korskont aminering via tras iga
handskar.
• Använd inga tillbehör vars förpackning har öppnats eller skadats. Bruten förslutning ger inget skydd mot korskontaminering.
• Böjning eller bändande kan bryta av tillbehöret och skada patienten eller personalen.
• Tillbe hör är tillgängli ga för resekti on av mjuka vävnade r och ben vid kir urgiska ingrep p. Användningen av ti llbehör beror p å
den avsedda tillämpningen och patientens behov. Vassa, eldrivna tillbehör medför blödning och borttagning av signikant
vävnad och ben.
VARNING
Sterilisera omedelbart efter rengöring.
STERILISERINGSANVISNINGAR
Varningar/
försiktighetsåtgärder
Begränsningar Man kan i normala fa ll avgöra om produk ten tjänat ut gen om att granska fö rslitningen. S e Inspektion o ch
Vid användning Omvandlaren levereras icke-steril och måste rengöras och steriliseras innan den används första gången och
Embal lage och
transport
Förberedelse inför
dekontaminering
38
Före sterilisering ska omvandlaren och spetsen inspekteras noggrant. FeatherTouch®-omvandlaren har
en förväntad livslängd på minst 100 användningar. Du kan fastställa om produkten tjänat ut genom
att kontrollera låsmekanismen före varje användning. Underlåtenhet att utföra den rekommenderade
vakuumto rkcykeln kan re sultera i att omvan dlaren slits ut i fö rtid.
Sänk inte ned omvandlaren i vätska. Blötläggning skadar omvandlaren och gör garantin ogiltig. Sterilisering
med torr värme skadar omvandlaren och gör garantin ogiltig.
tester nedan.
före varje efterföljande användningstillfälle.
Skölj inst rumenten noga me d avjoniserat vat ten snarast ef ter varje använd ning.
Instrumenten bör iordningställas så snart som möjligt efter användning.
Skölj inst rumenten noga me d avjoniserat vat ten snarast ef ter varje använd ning. Avlägsna spe tsen från
omvandlaren före rengöring. Montera isär omvandlaren genom att skruva loss den räade chucken från
spännhylsan.
Page 39

SV
Rengöring:
Automatiserad
(Använd I NTE
ultraljudsrengöring)
Rengöring: Manuell Rengöringsanvisningar för sugraspspets
Desinfektion Kall blötläggning i glutaraldehyd-, klor- eller ammoniumlösningar eller torr värmesterilisering
Förpackning Ett vanligt steriliseringsomslag kan användas. I USA krävs FDA-godkänt kirurgiskt omslag.
Sterilisering
(Temperaturer
och tid er avser
minimikrav)
Avlägsna instrument och utrustning från eventuella steriliseringsbrickor innan de placeras i diskmaskinens
korgar. Placera instrumenten enligt rekommendationerna från diskmaskinens/desinfektionsappartens
tillverkare. Använd ett alkaliskt eller neutralt rengöringsmedel som rekommenderas av tvättmaskinens/
desinfektionsapparatens eller rengöringsmedlets tillverkare.
Anvisningar för rengöring före automatisk diskning: Rasparna och omvandlaren måste rengöras manuellt
enligt anvisningarna för manuell rengöring (Rengöring: Manuell) och inspekteras med avseende på
borttagning av synlig smuts innan de placeras i den automatiska diskmaskinen/desinfektorn.
Dessa produkter har validerats för eektiv rengöring genom en automatiserad disk-/desinfektionscykel
bestående av följande:
Fas Åter-cirkulationstid Vatten-
Fördisk 1 3 minuter Kallt
Enzymdisk 5 minu ter Varm t
Disk 1 5 minuter Börvärde
Sköljning 1 3 minuter Varm t
Termisk sköljning 1 minute Mins t 82 °C Används ej
Unders ök instrumenten n oga med avseend e på rester av smuts .
Blötläg g i ljummet (under 43 °C ), milt (pH 7,0–8,5), en zymatiskt re ngöringsmede l och avjonisera t vatten i
minst 2 minu ter. För instrument m ed lumen och inst rument som är förs edda med rengö ringsporta r injiceras
rengör ingslösning gen om instrumentet m ed en spolnings spruta och får dra i m inst 2 minuter.
Använd en mjuk instrumentborste och skrubba instrumenten nedsänkta i rengöringslösning så att organiska
partik lar avlägsnas. Sk ölj med avjoniser at vatten och ren gör sedan med ult raljud i ljummet (un der 43 °C),
avjonise rat vatten med e tt milt (pH 7,0-8, 5) enzymrengö ringsmedel i 10 minut er.
Skölj nog a med avjoniserat v atten. Använd en s pruta och skölj no ga bort rengör ingslösning fr ån lumen och
rengör ingsportar. Ren gör instrument et på detta sät t tills inga synli ga föroreningar nns kvar.
Torka med tr yckluft ell er torka torrt m ed en luddfri duk . Kontrollera ins trumenten med av seende på
missfärgning och försämring. Sortera bort och använd inte sådana instrument.
Rengöringsanvisningar för raspomvandlare
Sänk inte ned omvandlaren i vätska. Blötläggning och sterilisering med torr värme skadar omvandlaren och
gör garantin ogiltig.
Rengör o mvandlaren med e n borste och milt e nzymatisk t rengöringslö sning och skölj med v atten. Skräp i nuti
omvandlaren kan avlägsnas med en piprensare, tunn tråd eller en ledare.
Skölj noggrant med avjoniserat vatten och torka med en luddfri handduk
Obs! Följ tillverkarens rekommendationer om ultraljudsrengöring eller diskmaskin används, i synnerhet när
det gälle r ledade instru ment och placerin g av instrumenten .
rekommenderas inte eftersom instrumentets yta kan skadas.
I set: Instrumenten kan laddas på specialutformade instrumentbrickor eller vanliga steriliseringsbrickor.
Kontrollera att skärande kanter skyddas. Slå in brickor med lämplig metod.
Kontroll era att instrum entet är rent och fu ngerar som det sk a. Rengör igen om d et nns smuts och so rtera
bort sk adade instrum ent så att de inte anvä nds. Stäng instr ument med spärrh akar och kuggst änger i det
första spåret. Placera instrumenten i steriliseringsbehållare med perforeringar överst och nederst samt på
stöd som t ill exempel använ ds vid mikrokir urgi. Följ lämpli g cykel enligt up pgifterna i ne danstående ta bell.
Alla ångc ykler har vali derats med omsl ag och instrumen ten kan sterilise ras med eller uta n omslag. Dessa
enheter har endast validerats för ångsteriliseringsmetoder.
Endast instrument Endast instrument eller instrument i
Cykel Gravitation Gravitation Förvakuum Förvakuum
Tem p 121° C 132 °C 132° C 13 4°C 134 °C
Tid 30 minuter 10 m inute r 4 minuter 18 m inute r 3 mi nuter
Torkning 30- 40 minuter ell er tills det syns at t instrumente t är torrt
temperatur
kranvatten
kranvatten
66 °C
kranvatten
Typ av rengöringsmedel
Används ej
Enzym-rengöringsmedel med neutralt pH
Rengörings-medel med neutralt pH
Används ej
instrumentbrickor
(Frankrike/
WHO)
Förvakuum
(Storbritan-
nien)
39
Page 40

PT-PT
Sterilisering
(Temperaturer
och tid er avser
minimikrav)
Underhåll, inspektion
och testning
Förvaring Förvara instrumenten rent och torrt.
Ytterligare
information
Observera: Tillverkaren har bekräftat att det med ovanstående anvisningar är MÖJLIGT at t förbereda produkter för återanvändning.
Anvisningarna är INTE TILLÄMPLIGA på enheter eller tillbehör för engångsbruk, vilka måste kasseras ef ter användning i enlighet med
tillämpliga lokala föreskrifter. Den person som utför arbetet ansvarar för att förberedelserna utförs med validerad utrustning så att önskade
resultat erhålls. Detta kräver normalt validering och rutinövervakning av processen.
Vissa enheter har speciella monteringsanvisningar. Läs i så fall monteringsbilagan som medföljer enheten för ytterligare anvisningar.
KUNDSERVICEINFORMATION
Om du vill ha m er information om anv ändningen av den här pr odukten eller om n ågot inte fungerar s om det ska, ska du kont akta
Medtronic Xomed (se det blå-vita kontaktinformationskortet som följer med varje produkt) eller den lokala återförsäljaren i det
land du benner dig.
RETUR OCH/ELLER REPARATION
Kontakta Medtronic Xomed kundservice på (800-874-5797) för att få RGA-returnummer (Return Goods Authorization) innan
Produkten skickas till Medtronic Xomed. Numret på originalfakturan eller inköpsordern ska nnas tillgängligt för att underlätta
kontroll av garantiinformation. RGA-returnumret ska vara väl synligt på förpackningen och anges på alla dokument som bifogas
vid retur och/eller reparation. Alla Produkter som returneras till Medtronic Xomed ska vara säkert förpackade i skyddande
emballage.
Kunden måste ange numret på inköpsordern; rätt leverans- och faktureringsadress samt antingen en ifylld beställningsblankett
för reparation eller ett meddelande om problemen eller orsaken till returen.
BEGRÄNSAD GARANTI
manuals.medtronic.com
Parametrar för sterilisering med 10 0 % EO (börvärden)
Förbehandling 54°C , 60 % relativ luf tfuktighe t, 60 minuter.
Sterilisering Temperatur 54°C
Relativ luftfuktighet 60 ± 5%
Etylenoxidkoncentration 725 ± 25 mg /L
Gasexponeringstid (hel
cykel)
Luftning 5 4°C, 8 timmar
FeatherTouch-omvandlaren har en förväntad livslängd på minst 100 användningar. Du kan fastställa om
produkten tjänat ut genom att kontrollera låsmekanismen före varje användning. Upprepad bearbetning
har minima l eekt på rasps petsar. Man kan i nor mala fall avgöra o m produkten tjän at ut genom att gra nska
förslit ningen. Kasse ra spetsen och by t ut den mot en ny när sp etsen blir slö oc h inte lägre skär ee ktivt.
Ingen.
120 m inu ter
PT-PT
COMPONENTES DO SISTEMA
REF 1922005 – Adaptador de Raspagem Automatizada FeatherTouch
REF 1992208 – Ponta de R aspagem e Aspiraç ão FeatherTouch, 8mm, Textura Áspera
REF 1992210 – Ponta de Raspagem e Aspiraç ão FeatherTouch, 8mm, Textura Fin a
REF 1895524 – Tubo de Aspiraçã o FeatherTouch
REF 1922006 – Tabuleiro d e Esterilizaçã o FeatherTouch
DESCRIÇÃO DO DISPOSITIVO
O Adaptador de Raspagem Automatizada FeatherTouch utiliza a Peça de Mão StraightShot ou StraightShot Magnum como
mecanis mo de acção e modic a o movimento rotat ivo para moviment o de avanço e retrocess o. O Adaptador Feat herTo uch possui
uma porca d e aperto para seg urar as pontas de rasp agem FeatherTouch.
UTILIZAÇÃO PRETENDIDA / INDICAÇÕES DE UTILIZAÇÃO
O Adaptad or FeatherTouch é conce bido para s er utiliz ado como um a cessório d a Peça de Mão St raightSh ot ou Straigh tShot Mag num,
para fazer funcionar as pontas de raspagem para o corte e remoção de tecidos moles e rijos ou osso em otorrinolaringologia e
cirurgia d e cabeça e pescoço.
Os instrumentos cirúrgicos manuais destinam-se a vários procedimentos cirúrgicos. Cabe à equipa cirúrgica seleccionar os
instrum entos adequados a c ada caso. Não utili ze estes instrume ntos para outros ns q ue não sejam os indic ados. Os instrum entos
devem ser limpos e ester ilizados antes da primeira utilização e antes de cada reutilizaçã o.
CONTRAINDICAÇÕES
Desconhecidas.
40
Page 41
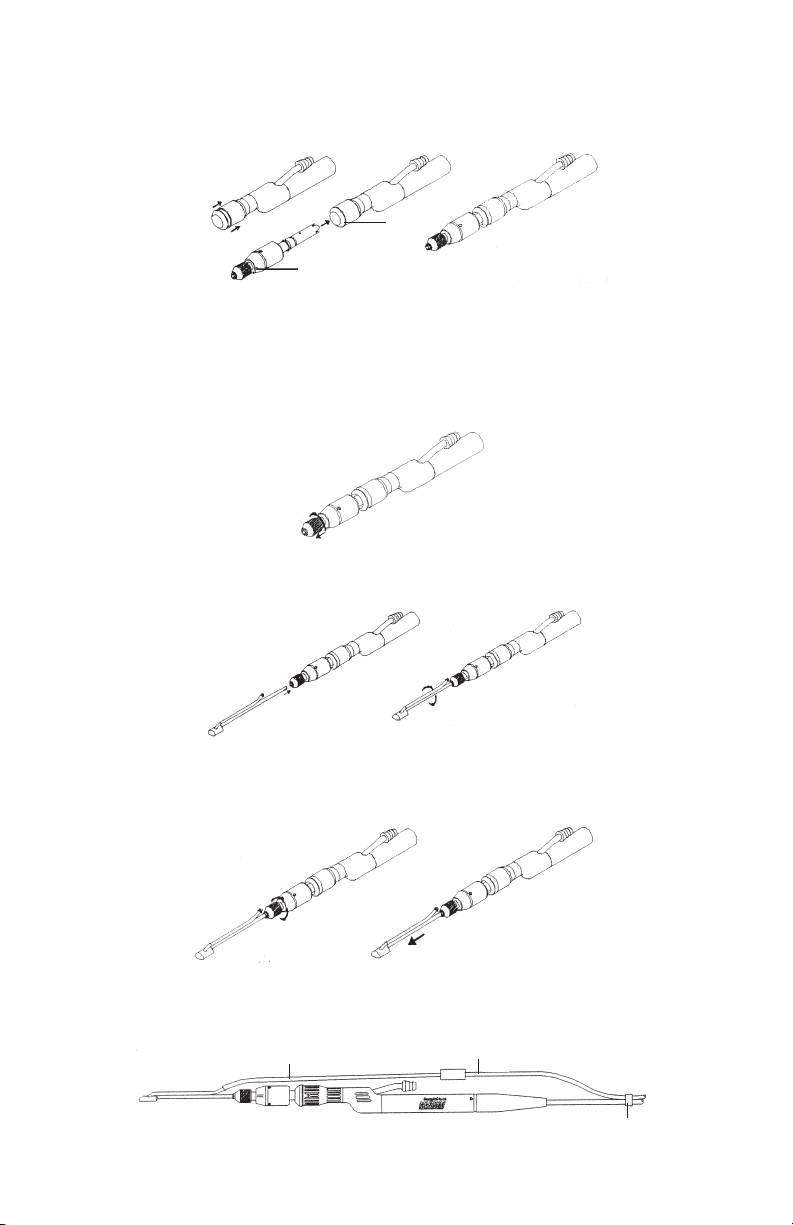
PT-PT
INSTRUÇÕES DE UTILIZAÇÃO
1. Fixe o adapt ador à peça de mão pr emindo a porca de ape rto da peça de mão, i nserindo o adapta dor com rmeza, ao m esmo
tempo que liberta a porca de aperto da peça de mão. Verique se está devidamente encaixado puxando ligeiramente o
adaptador. Se o adaptador não estiver correctamente encaixado na porca de aperto, repita o processo.
2
1
1 Adaptador 2 Porca de Aperto da Peça de Mão Comprimida
2. Logo que o adaptador esteja encaixado na porca de aperto da peça de mão, prepare a chave de porcas do adaptador para
a instalação da ponta, rodando a porca de aperto do adaptador no sentido contrário aos ponteiros do relógio até sentir
resistência. A porca de aperto deve estar, agora, mais perto da extremidade aberta do adaptador.
3. Insira rmemente a ponta desejada na porca de aperto e rode até que a ranhura situada na extremidade da haste encaixe
totalmente.
4. Fixe a ponta de raspagem à porca de aperto rodando a mesma no sentido dos ponteiros do relógio e apertando-a com
força. Verique a instalação: enquanto segura na peça de mão, puxe a ponta de raspagem. Se a ponta de raspagem sair ou
escorregar, volte a reinst alá-la e apert á-la e, em seguida , realize novamente este teste.
5. Para utilizar a ponta para aspiração, encaixe o Tubo de Aspiração FeatherTouch à ponta, como é mostrado na imagem, e, de
seguida , xe o tubo de aspiraç ão standard da sa la de operações ao Tubo Fea therTouch. Pren da o tubo de aspiraç ão da sala de
operaçõ es ao cabo da peça de mão com o grampo b ranco , que é fornecido com o Tubo de Aspir ação FeatherTouch.
1
2
3
1 Tubo adaptador de Aspiração 2 Tubo da Sala de Operações 3 Grampo Branco
41
Page 42

PT-PT
6. Certique-se de que os cabos da peça de mão e do pedal estão correctamente ligados à consola de micro-desbridação
Medtronic Xomed XPS Microdebrider Console. Congure a consola na direcção de “AVANÇO” e modo variável e dena a
velocidade máxima e ntre 3000 e 5000 rp m.
7. Accione o FeatherTouch soltando o pedal.
ATENÇÃO
• As velocidades superiores a 5.000 rpm causam um desgaste prematuro do adaptador e podem anular a garantia. Utilize o
adaptador apenas no modo de Avanço.
• O adaptador FeatherTouch tem uma vida útil prevista de, pelo menos, 100 utilizações. O m da vida útil pode ser
determinado vericando o bloqueio do mecanismo antes de cada utilização.
ADVERTÊNCIAS
• Mantenha sempre as pontas em movimento longe dos dedos e de roupa larga.
• Coloque a ponta de raspagem em funcionamento apenas quando tiver conrmado as fronteiras anatómicas e o local da
cirurgia.
• O Adaptador FeatherTouch é fornecido não estéril e deve ser limpo e esterilizado antes da primeira utilização e antes de
qualquer reutilização.
• As pontas de raspagem de substituição são fornecidas esterilizadas para a primeira utilização. O processamento repetido
surte um efeito mínimo nas pontas de raspagem. O m da vida útil é normalmente determinado pelo desgaste e danos
causados pela utilização. Deite fora a ponta e substitua-a por uma nova, quando a ponta car sem-o e já não cortar de
forma ecaz.
• O tubo de aspiração é for necido estéril e destina-se a uma única utilização. D eite fora o tubo após c ada utilização.
• Depois de cada procedimento, limpe devidamente todos os componentes reutilizáveis do sistema.
• Aplique cuidadosamente a extremidade de corte móvel apenas em marcos anatómicos adequados e no local cirúrgico
pretendido quando utilizar os acessórios XPS. A utilização de instrumentos alternativos/rotativos eléctricos pode resultar
em lesões r elacionadas com a vibração. Ado pte as devidas precauções.
• Adopte métodos de visualização quando utilizar os acessórios XPS rotativos. Interrompa a aplicação em caso de falta de
visualização do local cirúrgico.
• Para controlar a hemorragia no local da operação, utilize métodos que não comprometam a segurança do doente em
cirurgias de risco.
• Inspeccione sempre os componentes antes e após a utilização e certique-se de que não apresentam danos. Se detectar
danos, não u tilize a peça dani cada enquanto não a subs tituir. As peças dani cadas podem dep ositar limalhas de me tal no
local cirúrg ico.
• Não utilize outras peças que não sejam os componentes do sistema da Medtronic Xomed, Inc. dado que podem ocorrer
danos ou uma diminuição do desempenho.
• Retire e elimine os acessórios de acor do com as normas locai s relativas à eliminação correc ta de materiais contaminados.
• As reparações só devem ser efec tuadas por técnicos qualicados da Medtro nic Xomed.
• Não modique os acessórios utilizados com a peça de mão. Pode vericar-se uma diminuição do desempenho com
acessórios modicados.
• Esterilize e seque o dispositivo reutilizável antes de guardar o sistema. Diminua as probabilidades de uma contaminação
cruzad a mediante uma limpeza e esterilização ate mpadas.
• Verique se o d ispositivo reutilizável foi limpo e esterilizado antes da utilização. Se não tive r sido esteriliza do, não o utilize.
• Não mude o ace ssório com a peç a de mão em funcion amento para evit ar lacerações n o utilizador e con taminações cru zadas
devido a lu vas danicadas.
• Não utiliz e o acessório se a emb alagem estive r aberta ou dan icada. Um sel o aberto não ofe rece nenhuma pro tecção contra
uma contaminação cruzada.
• Dobrar ou levantar por meio de uma alavanca pode partir o a cessório, o que pode resultar em ferimentos no doente ou no
pessoal hospitalar.
• Estão disponíveis acessórios para ressecção de tecidos moles e osso em procedimentos cirúrgicos. A utilização dos
acessórios depende da nalidade da aplicação e das necessidades do doente. Os acessórios eléctricos cortantes induzem o
sangram ento e a remoção de uma qu antidade signica tiva de tecido e osso.
ADVERTÊNCIA
Esterilize imediatamente após a limpeza.
DIRECTRIZES DE ESTERILIZAÇÃO
Avisos / Precauções Antes da es terilização, i nspeccione cui dadosamente o conv ersor e as pontas . O conversor Feathe rTouc h tem
Limitações O m de vida é normalm ente determinad o por danos de desga ste provocados p ela utilizaçã o. Consulte a seguir
Ponto de utilização O adapta dor é fornecido n ão estéril e tem de se r limpo e esterili zado antes da prim eira utilizaçã o e de qualquer
42
uma vida út il previsível de p elo menos 100 utiliz ações. O m de vida p ode ser determi nado vericand o o
bloque io do mecanismo an tes de cada utiliz ação. Se não efec tuar o ciclo recom endado de secag em em vácuo
pode ocorrer o desgaste prematuro do conversor.
Não mergu lhe o conversor em lí quidos. A imers ão em soluções líq uidas danicará o c onversor e anulará a
respec tiva garantia. A e sterilizaçã o com calor seco dani cará o converso r e anulará a respec tiva garantia.
a secção M anutenção, inspe cção e teste.
outra reutilização.
Enxagúe r ápida e rigoros amente os instrum entos com água desio nizada após cad a utilização.
Page 43

PT-PT
Acondicionamento
e transporte
Preparação para
descontaminação
Limpeza:
Automática
(NÃO use o apar elho
de ultra-sons)
Limpeza: Manual Instruções de limpeza das pontas do raspador com sucção
Desinfecção Não mergulhe e m soluções frias d e glutaraldeíd o, cloro ou amónia n em esterilize com c alor seco para evi tar
Embalagem É possível utilizar um invólucro de esterilização normal. Nos EUA, é obrigatória a utilização de um invólucro
Recomenda-se que os instrumentos sejam reprocessados logo que possível após a respectiva utilização.
Enxagúe r ápida e rigoros amente os instrum entos com água desio nizada após cad a utilização. De smonte a
ponta do conversor antes de limpar. Desmonte o conversor, desaparafusando o mandril serrilhado da pinça de
vaivém.
Retire os i nstrumentos e e quipamento dos t abuleiros de es terilizaçã o antes de os coloca r nos cestos de lavag em.
Oriente os dispositivos segundo as recomendações do fabricante dos aparelhos de lavagem/desinfecção. Utilize
detergente alcalino ou com pH neutro recomendado pelo fabricante do dispositivo de lavagem/desinfecção ou do
detergente.
Instruções de pré-limpeza com lavagem automática: Os raspadores e o adaptador devem ser manualmente
limpos de a cordo com as instru ções de limpeza m anual (Limpeza: M anual) e inspecci onados quanto à rem oção
da sujidad e visível antes da col ocação no disp ositivo de lavagem /desinf ecção automátic a.
Estes pro dutos foram vali dados quanto a uma lim peza ecaz atr avés do seguinte cic lo automático do
dispositivo de lavagem/desinfecção:
Fase Tempo de
Pré-lavagem 1 3 minut os água fria da
Lavagem
enzimática
Lavagem 1 5 minu tos ponto de
Enxaguamento 1 3 minut os água quente
Enxaguamento
térmico
Examine cuidadosamente os tabuleiros de instrumentos quanto à presença de qualquer sujidade residual.
Mergulh e numa solução tép ida (menos de 43°C) de á gua desionizad a e detergente enzi mático suave (pH
7,0-8,5) du rante um mínimo de 2min utos. Para os instr umentos com lúmens e o s instrumentos e quipados com
port as de limpeza, inj ecte a solução d e limpeza através d o instrumento com u ma seringa de irri gação e deixe
actuar d urante um períod o mínimo de 2 minutos .
Utilize um a escova de cerdas mac ias para esfreg ar os instrumento s enquanto estive rem submersos na s olução
de limpe za de modo a retira r a matéria orgânic a. Enxagúe com água d esionizada e, e m seguida, limpe p or
meio de ult ra-sons numa so lução tépida (men os de 43°C) de água desi onizada e deter gente suave (pH 7,0-8, 5)
durante 10 minu tos.
Enxagúe m uito bem com água des mineralizad a, utilizando um a seringa para lav ar totalmente a solu ção de
limpez a dos lúmens e das por tas de limpez a. Limpe desta fo rma até não restar su jidade visível n o instrumento.
Seque com a r comprimido ou en xugue com um pano qu e não largue pêlos . Examine os inst rumentos,
verica ndo se apresenta m manchas ou deter ioração; retire d o circuito de utiliz ação, se necess ário.
Instruções de limpeza do conversor do raspador
Não mergu lhe o conversor em lí quidos. A imers ão em soluções líq uidas ou a esterili zação com calor s eco
danicará o conversor e anulará a respectiva garantia.
Limpe o conve rsor com uma escova e u ma solução de det ergente enzimát ico suave e enxagúe com á gua. Os
detrito s alojados no inter ior do conversor po dem ser limpos com u m dispositivo de li mpeza de tubag ens, um
o no ou um es tilete.
Enxagúe r igorosamente co m água desioniz ada e seque com uma toa lha que não largue p êlos.
Nota: Ao ut ilizar um disposi tivo de limpeza d e ultra-sons ou um a máquina de lavage m com aspersão, si ga as
recomen dações do fabri cante, em partic ular em relação ao s instrumentos ar ticulados e ao po sicionamento dos
instrumentos.
danos no ac abamento do inst rumento.
cirúrgico aprovado pela FDA.
Em conjuntos: Os instrumentos podem ser colocados em tabuleiros exclusivos para instrumentos ou em
tabuleiros gerais de esterilização. Verique se as arestas cortantes se encontram protegidas. Embrulhe os
tabuleiros segundo um método adequado.
recirculação
5 minutos água que nte
1 minuto 82 °C mín imo N/D
Temperatura
da água
torneira
da torneira
referência de
66 °C
da torneira
Tipo de detergente
N/D
deterge nte enzimático de p H neutro
deterge nte de pH neutro
N/D
43
Page 44

PT-PT
Esterilização
(As tempe raturas
representam os
valores mínimos
necessá rios; os
tempos representam
os perío dos mínimos
necessários)
Esterilização
(As tempe raturas
representam os
valores mínimos
necessá rios; os
tempos representam
os perío dos mínimos
necessários)
Manutenção,
inspecção e teste
Armazenamento Gua rde os instrumen tos numa área limpa e se ca.
Informações
adicionais
Verique a b oa limpeza e o fun cionamento do ins trumento. Limpe n ovamente se encont rar detritos e ret ire
qualque r instrumento dan icado do circui to de utilização. F eche os instrume ntos com trincos e crem alheiras
no prime iro entalhe. Disp onha os instrume ntos em recipiente s de esteriliza ção com perfur ações na parte
superior e inferior e em suportes como aqueles que são utilizados em microcirurgia. Adopte o ciclo adequado
apresentado na tabela seguinte.
Todos os ciclos de vapor foram validados na conguração com invólucro e podem ser esterilizados com
invólucro ou sem invólucro. Estes dispositivos só foram validados para métodos de esterilização por vapor.
Apenas instrumentos Apenas instrumentos ou instrumentos em
Ciclo Gravidade Gravidade Pré-vácuo Pré-vácuo (FR/
Temperatura 121° C 132 °C 132 °C 13 4°C 134° C
Tem po 30 minutos 10 minuto s 4 m inutos 18 min utos 3 minutos
Secagem 30- 40 minutos ou até a sec agem ser eviden te
Parâmetros de esterilização por EtO a 100% EtO (pontos de referência)
Pré-tratamento 54° C, 60% humidade r elativa, 60 minu tos
Esterilização Temp eratura 54°C
Humidade relativa 60 ± 5%
Concentração de
óxido de etileno
Tempo de exp osição
ao gás (ciclo
completo)
Arejamento 54°C, 8 horas
O converso r FeatherTouch tem uma vida út il previsível de pe lo menos 100 utiliz ações. O m de vida p ode ser
determi nado vericand o o bloqueio do me canismo antes de ca da utilização. O s processamento s repetidos
exercem um e feito mínimo sob re as pontas do rasp ador. O m de vida é norm almente determi nado por danos
de desgas te provocados pe la utilização. E limine a ponta e subs titua-a por uma n ova quando a ponta car
romba e de ixar de cortar com e cácia.
Nenhumas
725 ± 25 mg/L
120 m inu tos
bandejas de instrumentos
OMS)
Pré-vácuo
(Reino)
Nota: As instruções facultadas acima foram validadas pelo fabricante como CAPAZES de preparar o produto para uma reutilização. Elas
NÃO SÃO APLICÁVEIS a dispositivos de utiliz ação única ou a acessórios de utilização única, que devem ser destruídos depois de utilizados
de acordo com os regulamentos locais aplicáveis.Continua a ser da responsabilidade do operador assegurar que o reprocessamento é
efectuado utilizando equipamento validado, de forma a alcançar o resultado pretendido. Isto requer normalmente uma validação e uma
monitorização de rotina do processo.
Alguns dispositivos possuem instruções de montagem especícas. Neste caso, consulte o folheto de montagem fornecido com o dispositivo
para obter instruções adicionais.
INFORMAÇÃO DE SERVIÇO AO CLIENTE
Para mais informações sobre a utilização deste produto ou para comunicar qualquer problema, contate a Medtronic Xomed
usando a informação adequada fornecida no cartão azul e branco que contém a informação de contatos e está incluído na
embalagem de cada dispositivo; pode ainda contatar o seu distribuidor local.
DEVOLUÇÕES E/OU REPARAÇÕES
Contacte o Centro de Assistência ao Cliente da Medtronic Xomed através do número (800-874-5797) para obter um número de
autorização para devolução de produtos antes de enviar o Produto à Medtronic Xomed. Tenha à mão o número da factura ou
da nota de encomenda originais a m de facilitar a vericação das informações relativas à garantia. O número de autorização
para devolução de produtos deverá ser apresentado de forma visível na caixa e incluído em toda a documentação relativa à
devolução e/ou reparação. Todos os Produtos devolvidos à Medtronic Xomed deverão ser acondicionados de forma segura numa
embalagem de protecção.
O Cliente deverá fornecer o número da nota de encomenda, o endereço correcto para efeitos de envio e cobrança e um formulário
de requisição de reparação devidamente preenchido ou, então, uma descrição do problema ou do motivo para a devolução.
GARANTIA LIMITADA
manuals.medtronic.com
44
Page 45
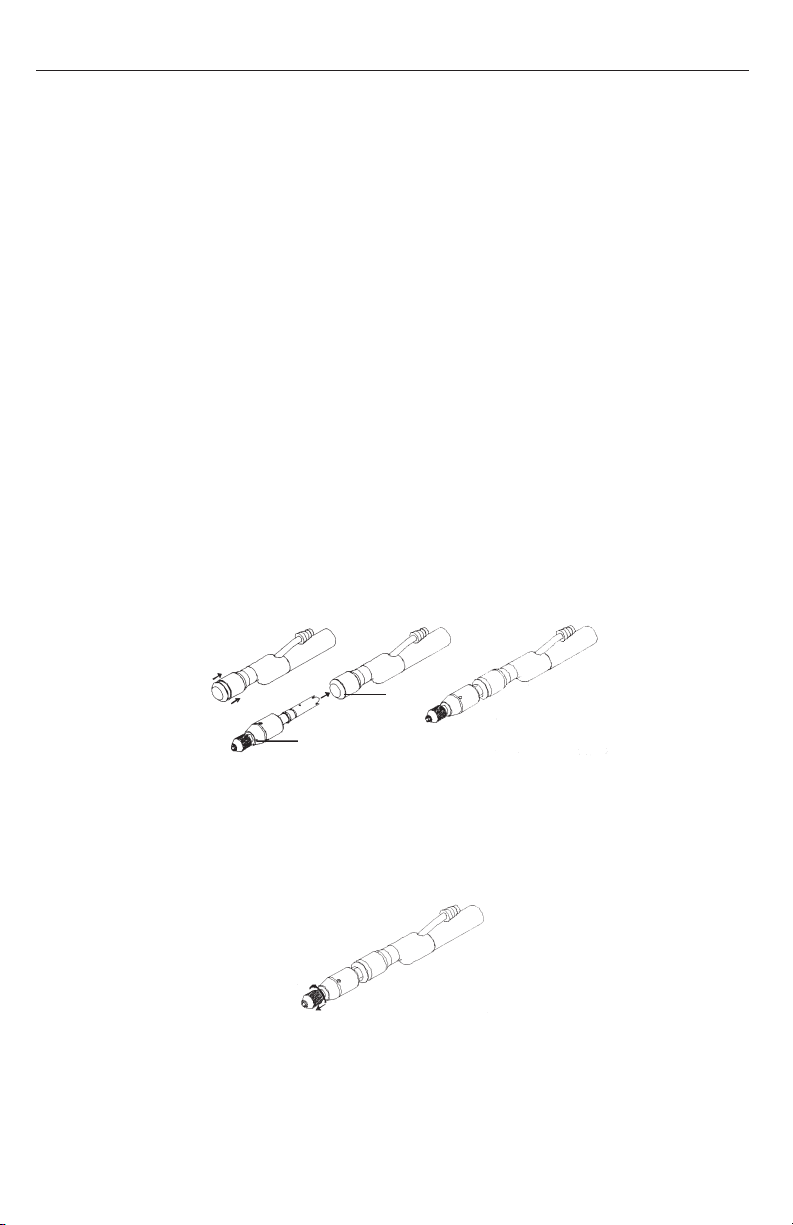
EL
EL
ΕΞΑΡΤΗΜΑΤΑ ΤΟΥ ΣΥΣΤΗΜΑΤΟΣ
ΑΝΑΦ 1922005 – Αυτοατοποιηένο Μετατροπέα Ξέστρ ου FeatherTouch
ΑΝΑΦ 1992208 – Άκρο Ξέσ τρου Αναρρόφηση FeatherTouch , 8mm, Τραχύ
ΑΝΑΦ 1992210 – Άκρο Ξέστρου Αναρρόφηση FeatherTouch , 8mm, Λείο
ΑΝΑΦ 1895524 – Σωλήνωση Αναρρόφηση FeatherTouch
ΑΝΑΦ 1922006 – ίσκο Αποστείρ ωση FeatherTouch
ΠΕΡΙΓΡΑΦΗ ΣΥΣΚΕΥΗΣ
Ο Αυτοατοποιηένο Μετατροπέα Ξέστρου FeatherTouch χρησιοποιεί τη Χειρολαβή StraightShot ή τη StraightShot Magnum
ω πηγή οδηγό ι σχύο και τρο ποποιεί την περισ τροφική ε νέργεια σε πρόσ θια / αντίσ τροφη ενέ ργεια. Ο Μετα τροπέα FeatherTouch
έχει ια σ τεφάνη για τη συγκράτηση των Άκρων του Ξ έστρου FeatherTouch.
ΠΡΟΟΡΙΖΟΜΕΝΗ ΧΡΗΣΗ / ΕΝΕΙΞΕΙΣ ΧΡΗΣΕΣ
Ο Μετατροπέα FeatherTouch προορίζεται για χρήση ω παρελκόενο τη Χειρολαβή StraightShot ή StraightShot Magnum
στη λειτουργία άκρων ξέστρου για την κοπή και αφαίρεση αλακών και σκληρών ιστών ή οστών ωτορινολαρυγγολογία και
χειρουργικ ή επέβαση κεφαλ ή και αυχένα.
Τα χειροκίνητα χειρουργικά όργανα αποσκοπούν σ τη χρήση διαφόρων χειρουργικών διαδικασιών. Είναι ευθύνη τη χειρουργική
οάδα να ε πιλέξει τα κατάλ ληλα όργανα για κάθε πε ρίπτωση. Μη χρησ ιοποιείτε τα όργανα α υτά για άλλου σκο πού εκτό από
εκείνου για του οποίου πρ οορίζονται. Τα χειρουργικά όργανα πρέπει να καθαρίζονται και να αποσ τειρώνονται πριν την πρώτη
χρήση, και ετά από κάθε επαναληπτική χρήση.
ΑΝΤΕΝΕΙΞΕΙΣ
Καία γνωστή.
ΟΗΓΙΕΣ ΧΡΗΣΕΣ
1. Συνδέστε τον ετατροπέα στη χειρολαβή πιέζοντα τη στεφάνη ε το ελατήριο πάνω στη χειρολαβή, εισάγοντα τον
ετατροπέα σταθερά και απελευθερώνοντα τη στεφάνη ε το ελατήριο πάνω στη χειρολαβή. Ελέγξτε για σωστή σύνδεση
τραβώντα ελαφρά τον ετατροπέα. Αν ο ετατροπέα δεν έχει τοποθετηθεί ε ασφάλεια στη στεφάνη, επαναλάβετε τη
διαδικασία.
2
1
1 Μετατροπέα 2 Συπιεσένη Στεφάνη Χειρολαβή
2. Αφού ασφαλίσετε τον ετατροπέα στη στεφάνη τη χειρολαβή, προετοιάστε την σπειροειδή καπύλη πάνω στον
ετατροπέα για εγκατάσταση άκρου περιστρέφοντα τη στεφάνη του ετατροπέα αριστερόστροφα έω ότου αισθανθείτε
αντίσ ταση. Τώρα η στεφάνη πρέπει να βρίσκεται πιο κοντά στο α νοιχτό άπω άκρο του ετατροπέα.
45
Page 46
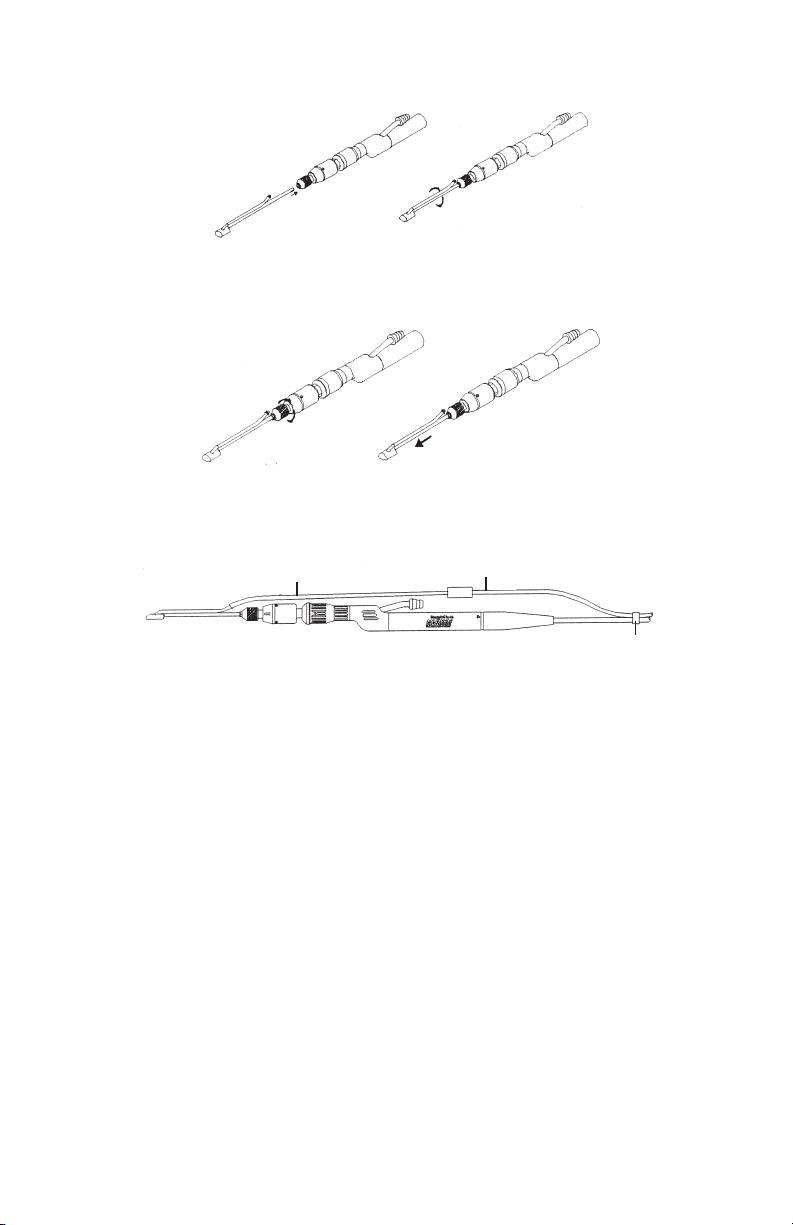
EL
3. Εισάγετε το επιθυητό άκρο στη στεφάνη σ ταθερά και περιστρέψετε έω ότου η αύλακα πάνω στο άκρο του άξονα να
τοποθετ ηθεί ε ασφάλεια σ τη θέση τη.
4. Ασφαλίστε το άκρο του ξέσ τρου στη στεφάνη στρέφοντα τη στεφάνι δεξιόστροφα και σφίγγοντα δυνατά για να το
ασφαλίσετε. Πραγατοποιήστε έλεγχο έλξη: ενώ κρατάτε τη λαβή, τραβήξτε το ξέστρο ακριά από αυτή. Αν το ξέστρο
τραβηχ τεί προ τα έξω ή ολισθήσει , εγκαταστήσ τε το εκ νέου, ξανασφίξ τε το και πραγατοποιήστε τον έλεγχο ξαν ά.
5. Για αναρρόφηση άκρου ξέστρου, προσαρτήστε τη Σωλήνωση Αναρρόφηση FeatherTouch στο άκρο όπω φαίνεται και
κατόπιν συ νδέστε την τυ πική σωλήνωση αν αρρόφηση του χειρου ργικού θαλάου σ τη Σωλήνωση Feathe rTouch. Ασφαλ ίστε
τη σωλήνωσ η αναρρόφηση του χ ειρουργικού θαλά ου στο καλώδιο χει ρολαβή ε τη λευκή έγγενη που παρ έχεται αζί ε
τη Σωλήνωση Αναρρόφηση FeatherTouch.
1
2
3
1 Σωλήνωση Προσαρογέα
Αναρρόφηση
6. Βεβαιωθείτε ότι τα καλώδια χειρολαβή και ποδοδιακόπτη είναι σωστά συνδεδεένα ε την Κονσόλα Μικροκαθαρισ τή τη
Medtro nic Xomed XPS. Ρυθίσ τε την κονσόλα στ ην κατεύθυνση “FO RWARD” (ΠΡΟΣΘΙΑ), τρόπο λειτουργί α διακύανση και
ρυθίσ τε τη έγιστ η ταχύτητα ανάεσα στα 3.0 00 και 5.000 rpm.
7. Ενεργοποιήσ τε το FeatherTouch πατώντα τον ποδοδιακόπτη.
ΠΡΟΣΟΧΗ
• Οι ταχύτητε πέραν των 5.000 rpm προκαλούν πρόωρη φθορά του ετατροπέα και ενδέχεται να ακυρ ώσουν την εγγύηση.
Να λειτουργ είτε το ετατροπέα όνο στη λειτουργία For ward (Επρό).
• Ο ετατροπέα FeatherTouch έχει αναενόενη διάρκεια ζωή τουλάχιστον για 100 χρήσει. Το τέλο ζωή του πορεί να
καθορισ τεί ελέγχον τα για ηχανισό κλειδώατο πριν κάθε χρήσ η.
ΠΡΟΕΙΟΠΟΙΗΣΕΙΣ
• Κρατά τε πάντα τα ενεργά ά κρα ακριά από δάχ τυλα και χαλαρά ενδύ ατα.
• Χειρίζεστε το άκρο ξέστρου όνο αφού έχουν επιβεβαιωθεί τα κατάλ ληλα ανατοικά σηεία και η προοριζόενη θέση
επέβαση.
• Ο Μετατροπέα FeatherTouch παρέχεται η αποστειρωένο και πρέπει να καθαρίζεται και να αποστειρώνεται πριν την
πρώτη χρήσ η και πριν κάθε επαναχρησιοποίηση.
• Τα ανταλλακτικά άκρα ξέστρου παρέχονται αποστειρωένα για ευκολία στην πρώτη χρήση. Η επαναλαβανόενη
διαδικασία έχει ελάχιστο αποτέλεσα στα άκρα ξέσ τρου. Το τέλο ζωή συνήθω καθορίζεται από τη φθορά εξαιτία
χρήση. Α πορρίψτε το άκρο και αν τικαταστήσ τε το ε νέο όταν γίνει αδρανέ και δε ν λειτουργεί πλέον αποτ ελεσατικά.
• Η σωλήνωση α ναρρόφηση παρέ χεται αποσ τειρωένη για ία όνο χρήση. Απορρίψ τε τη σωλήνωση ετά από κάθε χρήση.
• Μετά από κάθ ε διαδικασία, να πλένετε διεξοδικά όλα τα πολλαπλών χρήσεων εξα ρτήατα του συσ τήατο.
• Προσέξτε όταν χρησιοποιείτε τα παρελκόενα του XPS , ώστε η εφαρογή του κινούενου άκρου κοπή να γίνεται όνο
στα σωσ τά ανατοικά ση εία και στην προοριζόενη θέση χ ειρουργική επέβα ση. Η χρήση ηλεκ τρικών παλινδροικών/
περιστρ οφικών οργάνων πορεί να προκαλέσει τραυατισ ό από του κραδασο ύ. Λάβετε τι κατά λληλε προφυλάξει.
• Χρησιοποιείτε ακτινοσκοπική ή άλλη παρακολούθηση όταν εταχειρίζεστε τα παρελκόενα του XPS . ιακόψτε την
ηλεκτρική τροφοδοσία εφόσον δεν χρησιοποιείτε ακ τινοσκοπική ή άλλη παρακολούθηση τη θέση χειρουργική
επέβαση.
46
2 Σωλήνωση Χειρουργικού
Θαλάου
3 Λευκή Μέγγενη
Page 47

• Χρησιοποι ήστε εθόδ ου ελέγχου τ η αιορραγία σ το σηείο τη ε πέβαση που δεν ε κθέτουν σε κί νδυνο την ασφάλ εια
του ασθε νού στη διάρκεια των επικίν δυνων χειρουργικών επεβάσεων.
• Επιθεωρείτε πάντα τα εξαρτήατα πριν και ετά τη χρήση για τυχόν ζηιέ. Αν επισηάνετε κάποια βλάβη, η
χρησιοποιήσετε το εξάρτηα που υπέστη βλάβη έω ότου αντικατασταθεί. Τα έρη που υπέστησαν βλάβη ενδέχεται να
αποθέτουν ετα λλικά ρινίσατα σ τη θέση χειρουργικ ή επέβαση.
• Μη χρησιο ποιείτε άλ λα εξαρτήατα εκ τό από τα εξαρτ ήατα του συσ τήατο M edtronic Xome d, Inc. καθώ θα πορούσε
να προκύψει βλάβη ή υποδεέστερη απόδοση.
• Αφαιρέστε και απορρίψτε τα παρελκόενα ακολουθώντα του τοπικού κανονισού για την ορθή απόρριψη των
ολυσένων υλικών.
• Η συντ ήρηση πρέπει εξ’ ολοκλ ήρου να επιτελεί ται όνο από το εξειδικευένο προσ ωπικό τη Medtronic Xomed.
• Μην κάνετε τροποποιήσει σε παρελκόενα που χρησιοποιούνται ε το εργαλείο χειρό. Η απόδοση πορεί να ειωθεί
από τροποποιηένα παρ ελκόενα.
• Αποστειρώστε και στεγνώστε την επαναχρησιοποιούενη συσκευή πριν την αποθήκευση του συστήατο. Μειώστε την
πιθανότητα διασταυρούενη όλυνση ε έγκαιρο καθαρισό και αποστείρωση.
• Βεβαιωθείτε ότι η επαναχρησιοποιούενη συσκευή έχει καθαρισ τεί και αποστειρωθεί πριν από τη χρήση. Εάν δεν έχει
αποστειρωθεί , ην τη χρησιοποιείτε.
• Μην αλλά ζετε τα παρελκό ενα ε το εργαλε ίο χειρό σε λειτουργ ία ώστε να αποτρέψ ετε τη δηιουργί α πληγών στο χρήσ τη
και επιόλυνση από αλ λοιωένα γάν τια.
• Μη χρησιοποιείτε το παρε λκόενο αν η συσκευασία έχει ανοιχτεί ή παρουσιάζει ζηιά. Σφράγισα που έχει ανοιχθεί δεν
προσφέρει προστασία έναντι επιόλυνση.
• Λύγισα ή άνοιγα ε λοσ τό πορεί να θραύσει το παρελκόενο, προκαλώντα τραυατισό του ασθενού ή του
προσωπικού.
• Τα παρελκόενα διατίθενται για τη χειρουργική αφαίρεση του αλακού ισ τού και οστού σε χειρουργικέ επεβάσει. Η
χρήση των παρ ελκοένων εξ αρτάται από την προ οριζόενη εφαρ ογή και τι ανάγκε το υ ασθενού. Τα αιχ ηρά ηλεκτρικά
παρελκό ενα κοπή είναι ικανά να προκαλέσου ν αιορραγία και να αφα ιρέσουν σηαντική ποσότ ητα ιστό και οστό.
ΠΡΟΕΙΟΠΟΙΗΣΗ
Αποστ ειρώστε αέσω ετά τον καθα ρισό.
ΟΗΓΙΕΣ ΑΠΟΣΤΕΙΡΣΗΣ
Προειδοποιήσει /
Προφυλάξει
Περιορισοί Η λήξη τη διά ρκεια ζωή κανονικά πρ οσδιορίζεται β άσει τη φυσιολογι κή φθορά λόγω χρήσ η. είτε την
Σηείο χρήση Ο ε τατροπέα παρέχ εται η αποστ ειρωένο και πρέ πει να καθαρίζετ αι και να αποστειρ ώνεται πριν από τ ην
Συσκευ ασία και
εταφορά
Προετοιασία για
απολύανση
Καθαρισό:
Αυτόατο
(ΜΗΝ
χρησιοποιείτ ε
συσκευή π λύση ε
υπερήχου )
Πριν την απο στείρωση , επιθεωρήστε πρ οσεκτικά το ε τατροπέα και τα άκρ α. Ο ετατροπέα Fe atherTouch έχει
αναε νόενη διάρκει α ωφέλιη λειτο υργία τουλάχισ τον 100 χρήσεων. Η λήξη τη διάρ κεια ζωή πορεί να
προσδιορ ιστεί έσω ελ έγχου για κλεί δωα του ηχανισ ού πριν από κάθε χρήση. Τυχόν αδυ ναία εκτέλ εση του
προτειν όενου κύκλο υ ξήρανση υπό κε νό πορεί να προκαλέ σει την πρόωρη φθορά τ ου ετατροπέα.
Μην εβαπ τίζετε το ε τατροπέα. Η διαβροχ ή ε υγρά διαλύα τα θα προκαλέσει ζη ιά στο ετατρ οπέα
καθισ τώντα άκυρη την ε γγύηση. Η απο στείρωση ε θ ερό αέρα θα προκαλ έσει ζηιά στο ε τατροπέα
καθισ τώντα άκυρη την ε γγύηση.
ενότητα “Επιθεώρηση και δοκιέ” παρακάτω.
πρώτη χρή ση και πριν από κάθε επα ναχρησιοποίησ η.
Εκπλέ νετε καλά και προσ εκτικά τα εργαλ εία ε απιονισέ νο νερό έπειτα από κάθ ε χρήση.
Συνισ τάται να πραγατ οποιείται η επανε πεξεργασία εργα λείων το συντ οότερο δυνατ ό ακολούθω τη χρήσ η
του.
Ξεπλέ νετε καλά και προσ εκτικά τα εργαλ εία ε απιονισέ νο νερό ετά από κάθε χ ρήση. Αποσυναρ ολογήστε το
άκρο από το ετατροπέα πριν το ν καθαρισό. Αποσυ ναρολογήστε το ετατροπέα ξεβι δώνοντα τον αυλα κωτό
σφιγκ τήρα από την παλι νδροική στεφ άνη.
Αφαιρέσ τε τα εργαλεία και τον ε ξοπλισό από του δίσ κου αποστείρ ωση προτού τα τοποθε τήσετε στ α καλάθια τη
συσκευή π λύση. Προσανα τολίστε τι συ σκευέ ακολουθών τα τι συστά σει των κατασκευα στών συσκευ ών πλύση/
απολύανσ η. Χρησιοποιή στε αλκαλικό ή ο υδέτερου pH απο ρρυπαντικό που σ υνιστάται από τ ου κατασκευασ τέ
συσκευώ ν πλύση/απολύαν ση ή απορρυπαν τικών.
Οδηγίε προ -καθαρισού ε α υτόατο σύσ τηα πλύση: Τα ξέστρ α και ο ετατροπέα πρ έπει να καθαρίζον ται χειροκίνητα
σύφωνα ε τι οδηγίε χειροκί νητου καθαρισού ( Καθαρισό: Χει ροκίνητο) και ν α επιβεβαιώνε ται η αφαίρεση ορα τών
υπολειά των ρύπων πριν τοπο θετηθούν σ τη συσκευή αυτό ατη πλύση/απο λύανση.
Αυτά τα προϊόν τα έχουν επικυρ ωθεί για αποτε λεσατικό καθαρι σό σε αυτόατο κ ύκλο πλύση/απο λύανση ε χρήση τ ων
παρακάτω πα ραέτρων:
Φάση Χρόνο
Πρόπλυση 1 3 λεπτά κρύο νερό βρ ύση /Ε
Ενζυική π λύση 5 λεπτά ζεστό ν ερό βρύση ενζυατικό απορρυπαντικό ουδέτερου pH
Πλύση 1 5 λεπτά σηείο ρύθ ιση
Έκπλυση 1 3 λεπ τά ζεστ ό νερό βρύση /Ε
Θερική έκπλυση 1 λ επτά 82 °C κα τ’
Εξετάζ ετε προσεκτι κά του δίσκου εργα λείων για τυχόν υπολε ίατα ρύπων.
επανακυκλοφορία
Θεροκρασία
νερού
66 °C
ελάχισ τον
Τύπο
απορρυπαντικού
απορρυπαντικό ουδέτερου pH
/Ε
EL
47
Page 48

EL
Καθαρισό: ια
χειρό
Απολύανση Αποφύγετε τη δια βροχή εν ψυχρώ σε δ ιάλυα γλουταρα λδεΰδη, χλωρίο υ ή αωνίου, ή την αποσ τείρωση ε
Συσκευασία Μπορεί να χρησ ιοποιηθεί οποιοδ ήποτε σύνηθε περ ιτύλιγα αποσ τείρωση. Στι Στι Η. Π.Α., απαιτεί ται
Αποστείρωση
(Οι θεροκρασίε
είναι ο ι ελάχιστ ε
απαιτούενε,
οι χρόνο ι είναι
οι ελάχ ιστοι
απαιτούενοι)
Οδηγίε καθαρισού αναρροφητικού άκρου απόξεση
Εβυθίσ τε σε χλιαρό (κάτω από 43 ° C) ήπιο (pH 7,0 - 8,5) ενζυα τικό απορρυπαν τικό και απιονισέ νο νερό για
τουλάχισ τον 2 λεπτά. Για εργαλ εία ε αυλού, καθώ και εργαλεία που δια θέτουν θύρε καθ αρισού, εγχύ ετε το
διάλυα κα θαρισού έσω του ε ργαλείου ε σύρι γγα έκπλυση και το αφήνετε να εποτ ιστεί για τουλάχ ιστον
2 λεπτά .
Χρησιοπο ιήστε αλακ ή βούρτσα, ειδικ ή για εργαλεία, γι α να τρίψετε τα εργαλ εία ενώ είναι εβυ θισένα στο
διάλυα κα θαρισού, ώστ ε να αποακρυνθ εί η οργανική ύλη. Ξε πλύνετε ε απιον ισένο νερό και , στη συνέχει α,
καθαρίσ τε ε υπερήχου σε χλ ιαρό (κάτω από 43 °C), ήπιο ( pH 7, 0 - 8,5) απορρυπαν τικό και απιονισέ νο νερό για
10 λε πτά.
Ξεπλύνε τε καλά ε απιονι σένο νερό χρησι οποιώντα ια σ ύριγγα για έκ πλυση του διαλύα το καθαρισού
από του αυλο ύ και τι θύρε καθαρι σού. Καθαρίστε ε αυτόν τον τρόπο, έω ότ ου να ην υπάρχουν ορατά
υπολείατα ρύπων στο εργαλείο.
Στεγνώ στε ε πεπιεσ ένο αέρα ή σκουπίσ τε ε πανί που δε ν αφήνει χνούδι. Πρ έπει να εξετάζε τε τα εργαλεία γι α
τυχόν κηλί δωση ή απώλεια τη αρχ ική ποιότητα . ιακόψτε τη χρήση τ ου ανάλογα ε την π ερίπτωση.
Οδηγίε καθαρισού ετατροπέα ξέστρου
Μην εβαπ τίζετε το ετατροπέα. Η διαβροχή ε υγρά διαλύατα ή η αποστείρωση ε θερό αέρα θα προκαλέσει
ζηιά σ το ετατροπέα καθ ιστώντα άκ υρη την εγγύησ η.
Καθαρίσ τε το ετατροπέα χρησιοποιών τα βούρτσα ε ήπιο διάλυα ενζυικού απορρυπαντικού και έκπλυση
ε νερό. Τα θραύσατα στο εσωτερικό του ετατροπέα πορείτε να τα καθαρίσε τε χρησιοποιώντα ψήκτρα για
πίπε, λε πτό σύρα ή στ υλεό.
Ξεπλύνε τε καλά ε απιονι σένο νερό και σκου πίστε ε πετσ έτα που δεν αφήνει χ νούδι.
Σηείωσ η: Κατά τη χρήση συσκευή καθαρισ ού ε υπερήχου ή πλυν τηρίου ε σύστηα ψεκασού, ακολουθείτε
τι συσ τάσει του κατασκε υαστή, ιδια ίτερα όσον αφορά τ α αρθρωτά εργαλ εία και την τοποθέτη ση των εργαλείω ν.
θερό αέρ α, καθώ ενδέχε ται να προκληθ εί ζηιά στο φινί ρισα του εργαλεί ου.
χειρουργι κό περιτύλιγα ε γκεκριένο απ ό τον Οργανισό Τροφίων κα ι Φαράκων (FDA).
Σε σετ: Τα εργα λεία πορούν να τοπ οθετηθούν σε ε ιδικού δίσκου εργα λείων ή δίσκου απο στείρωση
γενική χρήση. Βεβαιω θείτε ότι προσ τατεύονται ο ι ακέ που κόβουν. Τυλίξτε του δί σκου εφαρόζον τα την
κατάλληλη έθοδο.
Να ελέ γχετε την καθαρ ιότητα και λειτουργ ία του εργαλείου. Επα ναλάβετε τον κα θαρισό εάν παρα τηρήσετε
θραύσα τα και διακόψτε τη χρ ήση εργαλείων που έ χουν υποστεί ζ ηιά. Σφραγίζε τε τα εργαλεία ε άνδαλα και
σχάρε σ την πρώτη εν τοή. Τακτοποιείσ τε τα εργαλεία σε δ οχεία αποστείρω ση ε οπέ στο άν ω και κάτω έρο
και σε υποσ τηρίγατα, ό πω αυτά που χρησι οποιούνται σ τη ικροχειρουργ ική. Ακολουθήστ ε τον κατάλληλο
κύκλο πο υ αναγράφετα ι στον παρακάτω πί νακα.
Όλοι οι κύκ λοι ατού έχουν αξ ιολογηθεί ε την περι τυλιγένη δια όρφωση και πορο ύν να αποστειρ ωθούν ε ή
χωρί περι τύλιξη. Τα παρόντα προϊό ντα έχουν αξιολογ ηθεί όνο για τι εθ όδου αποστε ίρωση ε ατό.
Μόνο εργαλεία Μόνο εργαλεία ή εργαλεία τοποθετηένα
Κύκλο Βαρύτητα Βαρύτητα Με
σε δίσκου εργαλείων
δηιουργία
κενού
Με δηιουργία
κενού ΓΑΛΛ ΙΑ /
WHO)
Με
δηιουργία
κενού (ΗΒ)
Θερ 121° C 132 °C 132 °C 13 4°C 13 4°C
Χρόνο 3 0
λεπτά 10 λεπτά 4 λεπτά 18 λ επτά 3 λεπτά
Στέγν ωα 30- 40 λεπτά ή έχ ρι να είναι εφανώ στεγνό
Παράετροι αποστείρωση ε αιθυλενοξείδιο 100% (σηεία ρύθιση)
Προσαρογή 54 ° C, σχετική υ γρασία 60%, 60 λε πτά
Αποστείρωση Θεροκρασία 54°C
Σχετική υγρασία 60 ± 5%
Συγκέντρωση
αιθυλενοξειδίου
Χρόνο έκ θεση
σε αέριο (πλή ρη
κύκλο)
725 ± 25 mg/L
120 λ επ τά
Αερισό 54°C, 8 ώρε
Συντ ήρηση,
επιθε ώρηση και
δοκιέ
Ο ετατρ οπέα FeatherTouch έχει αν αενόενη δι άρκεια ωφέλιη λ ειτουργία τουλάχ ιστον 100 χρήσεων. Η λήξη
τη διάρκε ια ζωή πορεί να προσ διοριστεί έσ ω ελέγχου για κ λείδωα του ηχα νισού πριν από κάθε χρή ση.
Η επανει ληένη επεξ εργασία έχει ελά χιστη επίδρα ση στα άκρα από ξεση. Η λήξη τη δι άρκεια ζωή κανονι κά
προσδιορ ίζεται βάσει τη φ υσιολογική φθορ ά λόγω χρήση. Απορρ ίψτε το άκρο και αν τικαταστή στε το ε
καινούρι ο όταν το άκρο στο ώσει και δεν κόβει πλ έον αποτελεσα τικά.
Αποθήκευση Αποθηκε ύστε τα εργαλε ία σε καθαρή και ξηρή περιοχ ή.
Πρόσθετε
πληροφορίε
Καία.
48
Page 49

PL
Σηείωση: Οι οδηγίε που παρέχονται παραπάνω έχουν επικυρωθεί από τον κατασκευαστή ω ΙΚΑΝΕΣ να προετοιάσουν το προϊόν για
επαναχρησιοποίηση. ΕΝ ΙΣΧΥΟΥΝ για προϊόντα ία χρήση ή εξαρτήατα ία χρήση, τα οποία θα πρέπει να καταστρέφον ται ετά
τη χρήση σύφωνα ε του ισχύον τε τοπικού κανονισού. Παραένει ευθύνη του επεξεργαστή να διασφαλίσει ότι η επανεπεξεργασία
πραγατοποιείται ε τη χρήση αξιολογηέν ου εξοπλισού για να επιτευχθεί το επιθυητό αποτέλεσα. Αυτό κανονικά απαιτεί αξιολόγηση
και συστηατική παρακολούθηση τη διαδικασία.
Κάποια προϊό ντα διαθέτ ουν ειδικέ οδηγ ίε συναρολόγη ση. Στην περίπ τωση αυτή, α νατρέξτε σ το ένθετο σ υναρολόγησ η που παρέχετα ι
ε το προϊόν για π ρόσθετε πληρ οφορίε.
ΠΛΗΡΟΦΟΡΙΕΣ ΕΞΥΠΗΡΕΤΗΣΗΣ ΠΕΛΑΤΝ
Για περισσότερε πληροφορίε σχετικά ε τη χρήση αυτού του προϊόντο ή για αναφορά οποιωνδήποτε προβληάτων,
παρακαλείσθε να απευθυνθείτε στην Medtronic Xomed χρησιοποιώντα τι κατάλληλε πληροφορίε που παρέχονται στην
πλε και λευκή κάρτα πληροφοριών επικοινωνία που είναι συσκευασένε ε κάθε συσκευή. ιαφορετικά απευθυνθείτε σ τον
τοπικό σα δια νοέα.
ΕΠΙΣΤΡΟΦΕΣ Η΄/ΚΑΙ ΕΠΙΣΚΕΥΕΣ
Επικοινωνήστε ε την Υπηρεσία Εξυπηρέτηση Πελατών τη Medtronic Xomed στο τηλ. (800-874-5797) για να αποκτήσετε τον
Αριθό Επιστροφή Προϊόντο (RGA#) πριν αποστείλετε το Προϊόν στη Medtronic Xomed. Παρακαλούε, να έχετε πρόχειρο
τον αριθό τιολογίου ή τον αριθό παραγ γελία προ επιβεβαίωση των πληροφοριών τη εγγύηση. Ο αριθό RGA πρέπει να
αναγράφ εται ευκρινώ σ τη συσκευασ ία και να περιλαβά νεται σε όλα τα συνοδ ευτικά έγγρα φα επιστροφή ή/κα ι επισκευή. Όλα
τα Προϊόντ α που επιστρέφον ται στη Medtronic Xomed πρέπει να είναι ασφ αλώ συσκευασ ένα σε προστατ ευτικό περιτύλιγ α.
Ο πελάτη πρέπει να παρέχει τον αριθό παραγγελία, τη σωστή διεύθυνση αποστολή και χρέωση, και είτε το συπληρωένο
Έντυπο Επισκευή ή δήλωση του προβλήατο και του λόγου επισ τροφή.
ΠΕΡΙΟΡΙΣΜΕΝΗ ΕΓΓΥΗΣΗ
manuals.medtronic.com
PL
ELEMENTY SYSTEMU
REF 1922005 – zautomatyzowany konwerter skrobaczki FeatherTouch
REF 1992208 – końcówk a ssąca skrobac zki FeatherTouch, 8 mm, szors tka
REF 1992210 – końcówka ssąca skrobac zki FeatherTouch, 8 mm, gładk a
REF 1895524 – rurka ssąca FeatherTouch
REF 1922006 – taca do sterylizacji FeatherTouch
OPIS URZĄDZENIA
W zautomatyzowanym konwerterze skrobaczki FeatherTouch jako źródło napędu zastosowano rękojeść StraightShot lub
StraightShot Magnum, która przemienia ruch obrotow y na ruch posuwisto -zwrotny. Konwerter FeatherTouch jest wy posażony w
tuleję, w k tórej można mocować ko ńcówki skrobac zki FeatherTouch.
PRZEZNACZENIE / WSKAZANIA
Konwerter FeatherTouch jest przeznaczony do stosowania jako akcesorium rękojeści StraightShot lub StraightShot Magnum
i umożliwia używanie końcówek skrobaczki do cięcia i usuwania tkanki miękkiej i twardej lub kości w otorynolaryngologii i
zabieg ach głowy i szy i.
Ręczne narzędzia chirurgiczne są przeznaczone do stosowania w różnych zabiegach chirurgicznych. Za dobór narzędzi do
konkretnego zabiegu odpowiedzialny jest zespół wykonujący zabieg. Nie należy używać tych narzędzi do celów niezgodnych z
ich przeznaczeniem. Prze d pierwszym i k ażdym następnym użyciem nar zędzia należy oczyś cić i wysteryl izować.
PRZECIWWSKAZANIA
Brak znanych.
INSTRUKCJA UŻYTKOWANIA
1. Konwerte r należy zam ocować, ściskaj ąc tuleję spręż ynującą na rękojeś ci, następnie mo cno wsunąć konwer ter i zwolnić tul eję
na rękojeści. Sprawdzić połączenie, pociągając lekko za konwerter. Jeśli konwer ter nie jest poprawnie ustawiony w tulei,
należy powtórzyć czynności.
2
1
1 Konwerter 2 Ściśnięta tuleja rękojeści
49
Page 50

PL
2. Gdy konwerter zostanie poprawnie zamocowany w tulei rękojeści, przygotować tuleję obrotową na konwerterze do
zamocowania końcówki — w tym celu obracać tuleję konwertera przeciwnie do ruchu wskazówek zegara, aż do wyczucia
oporu. Tuleja powinna teraz znajdować się najbliżej otwartego dystalnego końca konwertera.
3. Zdecydowanym ruchem włożyć odpowiednią końcówkę do tulei i obracać, aż rowek na końcu trzonka zaskoczy na
odpowiednie miejsce.
4. Końcówkę skrobaczki unieruchomić w tulei, obracając tuleję zgodnie z ruchem wskazówek zegara. Sprawdzić poprzez
pociąganie: trzymając rękojeść, wykonać próbę odciągnięcia skrobaczki od rękojeści. Jeśli skrobaczkę uda się w yciągnąć
lub nastąpi jej przesunięcie, należy zamontować ją ponownie, unieruchomić i powtórnie sprawdzić, czy została prawidłowo
przymocowana.
5. Aby możliwe było zasysanie przez końcówkę, należy do niej podłączyć rurkę ssącą FeatherTouch w sposób pokazany na
ilustracji, a następnie do rurki FeatherTouch podłącz yć standardową rurkę ssącą stosowaną na sali operacyjnej. Standardową
rurkę ssąc ą stosowaną na sali o peracyjnej p rzymocowa ć do kabla rękojeś ci za pomocą bia łego zacisku d ostarczone go z rurką
ssącą FeatherTouch.
1
2
3
1 Rurka do przejściówki ssącej 2 Rurka stosowana na sa li operacyjnej 3 Biały zacisk
6. Upewnić się, że kable rękojeści i przełącznika nożnego są prawidłowo podłączone do konsoli mikrodebridera Medtronic
Xomed XPS. Wybrać w konsoli ustawienie „FORWARD” (Do przodu), tryb zmienny i ustawić prędkość mak symalną w
przedziale od 300 0 do 5000 obr./min.
7. Ak tywować urządzenie FeatherTouch, naciskając przełącznik nożny.
PRZESTROGI
• Stosowanie prędkości obrotowych powyżej 5000 obr./min spowoduje przedwczesne zużycie konwertera i może być
przyczyną unieważnienia gwarancji. Konwertera używać wyłącznie w trybie pracy „Forward” (Do przodu).
• Przewidywany czas eksploatacji konwertera FeatherTouch wynosi co najmniej 100 zastosowań. Fakt zakończenia okresu
eksploatacji można ustalić p oprzez sprawdze nie przed każdy m użyciem, czy mechanizm nie został u nieruchomiony.
OSTRZEŻENIA
• Nie należ y zbliżać akt ywnych końcówek do p alców i luźnej odzieży.
• Końcówki skrobaczki należy używać dopiero po zwerykowaniu jej położenia na podstawie odpowiednich
charakterystyc znych elementów anatomii.
50
Page 51

• Dostarczony konwerter FeatherTouch jest niejałowy i musi zostać wyczyszczony oraz wysterylizowany przed pierwszym
oraz każ dym kolejnym użyciem.
• Dostarc zane wym ienne końcówki s krobaczk i są sterylne d la wygody pie rwszego z astosowania. W ielokrotne s terylizowa nie
ma minimalny wpły w na końcówki skrob aczki. Okres e ksploatacji jest zazw yczaj określ any przez stopień z użycia narzędz ia
wynik ającego z jego użytkowania . Jeśli końcówka jes t stępiona i nie tnie sk utecznie, zdjąć ją i z ałożyć nową.
• Dostarc zane rurki ssące są jałowe; pr zeznaczone do j ednorazowego użytku . Rurki wyrzucać po każd ym użyciu.
• Po każdym z abiegu odpowiednio ocz yścić wszystkie częś ci systemu przeznaczone d o ponownego użytku.
• Jeśli stosowane są akcesoria XPS, ruchomą końcówkę tnącą należy stosować wyłącznie w obszarach określonych na
podstawie charakterystycznych cech anatomii. Stosowanie elektronarzędzi z końcówkami obrotowymi/wykonującymi
ruchy tnące może spowodować obraże nia wywołan e wibracjami. Stosować odpowie dnie środki bezp ieczeństwa .
• Podczas korzystania z obrotowych akcesoriów XPS należy korzystać z urządzeń umożliwiających wizualizację pola
operac yjnego. W prz ypadku bra ku widocz ności w polu o peracyj nym nie należ y akty wować urz ądzeń elek trochiru rgicznych.
• W trakcie zabiegów chirurgicznych o zwiększonym ryzyku należy stosować takie metody opanowania krwawienia w
miejscu zabiegu, które nie powodują zagrożenia dla pacjenta.
• Zawsze należy sprawdzić podzespoły urządzenia przed użyciem i po użyciu pod kątem ich uszkodzenia. W razie
zaobserwowania uszkodzenia nie należy uży wać uszkodzonej części, dopóki nie zostanie wymieniona. Uszkodzenia części
mogą być pr zyczyną osa dzania opiłków me talu w polu operac yjnym.
• Nie należy używać części pochodzących od producentów innych niż Medtronic Xomed, Inc., ponieważ mogłoby to
spowodować uszkodzenia lub nieprawidłowe działanie.
• Należ y usuwać i likwidow ać akcesoria zgodni e z lokalnymi prze pisami dotycz ącymi właściw ej utylizacji z anieczyszc zonych
materiałów.
• Wszystkie napraw y może wykonywać wyłącznie wykwali kowany personel r my Medtronic Xomed.
• Nie należy modykować akcesoriów uży wanych z rękojeścią. Działanie systemu ze zmodykowanymi akcesoriami może
być niezadowalające.
• Przed oddaniem systemu do przechowania należy wysterylizować i osuszyć urządzenia wielokrotnego użytku.
Przeprowadzenie c zyszczenia i s terylizacji w o dpowiednim cz asie zmniejsza r yzyko skażenia krzy żowego.
• Przed uż yciem urząd zenia wielokro tnego użyt ku należy spraw dzić, czy zos tało ono wyc zyszczone i w ysteryli zowane. Jeżeli
nie zosta ło wysteryl izowane, nie należ y go używać.
• Nie należ y wymien iać akcesoriów, gd y napęd rękoje ści jest włąc zony. Zapobie gnie to skalec zeniom i ska żeniom krz yżowy m,
do któr ych może dochodzi ć w razie przebicia rękawiczki.
• Nie wolno używać akcesoriów, jeśli opakowanie zostało otwarte lub uszkodzone. Naruszone uszczelnienie nie zapewnia
ochrony pr zed skażeniem k rzyżowym .
• Wyginani e lub podważanie m oże spowodować złamanie akcesorium, a w konsekwencji ur az u pacjenta lub per sonelu.
• Dostępne są akcesoria umożliwiające wycinanie tkanki miękkiej i kości w procedurach chirurgicznych. Wybór akcesoriów
jest uza leżniony od zastosowania i potrzeb pacjenta. Ostre elektronarzędzia tnące mogą wywo ływać krwawienie i usuwać
znaczne ilości tkanek oraz kości.
OSTRZEŻENIE
Sterylizować natychmiast po czyszczeniu.
PL
INSTRUKCJA PRZETWARZANIA
Ostrzeżenia
/ Środk i
ostrożności
Ograniczenia Okres ek sploatacji jes t zazwycz aj określany pr zez stopień zuż ycia narzędz ia. Patrz Kontrol a i testowanie poni żej.
Miejsce
użytkowa nia
Przechowywanie i
transport
Przygotowanie do
odkażania
Czyszczenie:
Automatyczne
(NIE stosować
myjni
ultradźw iękowej)
Przed st erylizacją n ależy dokła dnie sprawdzić kon werter i końcówk i. Przewidyw any czas eksp loatacji
konwert era FeatherTouch wyno si co najmniej 100 zast osowań. Koniec ok resu eksploa tacji można ustal ić
poprzez sprawdzenie przed każdym użyciem, czy mechanizm nie został unieruchomiony. Nieprzeprowadzenie
zalec anego cyklu su szenia próżniow ego spowoduje zb yt szybki e zużycie konwer tera.
Nie zanurzać konwertera. Namoczenie konwertera w jakimkolwiek płynnym roztworze spowoduje jego
uszkodzenie i unieważnienie gwarancji. Sterylizacja wysokotemperaturowa doprowadzi do uszkodzenia
konwertera i unieważnienia gwarancji.
Konwert er jest dostarc zany w stanie nie jałowym i musi zo stać wycz yszczony oraz w ysteryliz owany przed
pierw szym oraz ka żdym kolejnym uż yciem.
Niezwłocznie po każdy m użyciu dokładnie opłukać narzę dzia wodą dejonizowaną.
Zaleca s ię przygotow ywanie prz yrządów do p onownego uży cia jak najszyb ciej po użyciu.
Niezw łocznie po ka żdym użyciu do kładnie opłu kać narzędzia w odą dejonizowan ą. Przed czy szczeniem od łączyć
końcówkę od konwertera. Rozmontować konwerter, odkręcając uchwyt radełkowany od tulei tłokowej.
Wyjąć nar zędzia i wyp osażenie z opakow ań steryliz acyjnych prze d umieszczeni em w koszykach my jni. Ułożyć
urządzenia zgodnie z zaleceniami producentów myjni/dezynfektora. Stosować detergenty alkaliczne albo
o neutralnym pH zalecane przez producentów myjni/dezynfektora lub detergentu.
Instruk cje czyszcz enia wstępneg o przed myciem auto matycznym: Pr zed umieszcz eniem w automaty cznej
myjni/dezynfektorze skrobacz ki i konwerter należy wycz yścić ręcznie zgodnie z instrukcjami czyszczenia
ręczn ego (Czyszc zenie: Ręczne) i s kontrolować pod k ątem obecnośc i widocznych za nieczyszc zeń.
Produk ty te został y sprawdzone pod k ątem skuteczn ego czyszc zenia przy z astosowaniu cy klu automatyc znej
myjni/dezynfektora, w którego skład wchodzą poniżej opisane etapy.
51
Page 52

PL
Czyszczenie:
Automatyczne
(NIE stosować
myjni
ultradźw iękowej)
Czyszczenie:
Ręczne
Czyszczenie:
Ręczne
Dezynfekcja Z uwagi na r yzyko uszko dzenia warst wy wykońc zeniowej przy rządów nie nal eży namacza ć w zimnym roztwo rze
Pakowanie M ożna wykorz ystać standa rdowy materia ł do pakowania do ste rylizacji.W St anach Zjednoc zonych wymagan e
Sterylizacja
(minimalne
wymagania
dotyczące
temperatur
i czasó w
sterylizacji)
Faza Czas recyrkulacji Temperatura
Mycie wstę pne 1 3 min zimna woda z
Mycie
enzymat yczne
Mycie 1 5 m in 66°C set point detergent o obojętnym odczynie pH
Płukanie 1 3 min gorąca woda z
Płukanie
termiczne
Dokła dnie obejrzeć t ace na narzędzi a pod kątem obecn ości jakichkol wiek pozostał ości zaniecz yszczeń.
Instrukcja czyszczenia końcówki ssącej skrobaczki
Namoc zyć w letnim (o tempe raturze niżs zej niż 43°C), łago dnym (pH 7,0–8,5) roz tworze dete rgentu
enzym atycznego w wo dzie dejonizow anej na co najmniej 2 mi nuty. W przypa dku narzędzi z k anałami lub
narzęd zi wyposażo nych w przyłąc za do przepł ukiwania nale ży wstrzyk nąć roztwór c zyszcząc y do narzędzia z a
pomoc ą strzykawk i do przepłuk iwania i pozost awić narzędzie d o namoknięcia n a co najmniej 2 minut y.
W celu usunięcia substancji organicznych należy szorować narzędzia zanurzone w roztworze czyszcząc ym
miękką s zczotką do nar zędzi chirurgi cznych. Przep łukać wodą dejo nizowaną, a nast ępnie przez 10 minut c zyścić
za pomo cą metody wyk orzystujące j ultradźwięk i w letnim (o temper aturze niższe j niż 43°C), łagodny m (pH
7,0–8,5) roztworze detergentu w wodzie dejonizowanej.
Korzy stając ze strz ykawki, prz epłukać nar zędzia dokład nie wodą dejoniz owaną w celu dokła dnego wypł ukania
roztw oru czyszc zącego z kanałó w i przyłącz y do przepłu kiwania. Kont ynuować czy szczenie opis aną metodą aż
do usunię cia wszelkich wi docznych zani eczyszc zeń z narzędzi.
Osusz yć sprężonym powi etrzem lub wy trzeć do sucha ś ciereczką nie pozostawiają cą włókien. Spr awdzić, czy na
narzęd ziach nie ma plam ani w idocznych śla dów zużycia; w raz ie koniecznoś ci wycofać z uży tku.
Instrukcja czyszczenia konwertera skrobaczki
Nie zanu rzać konwerte ra. Namoczen ie w jakimkolwie k płynnym roz tworze lub ste rylizacja
wysokotemperaturowa spowodują uszkodzenie konwertera i unieważnienie gwarancji.
Wyczyścić konwerter za pomocą szczoteczki i roztworu łagodnego detergentu enzymatycznego, a następnie
przep łukać wodą. Zan ieczyszc zenia wewnątrz k onwertera możn a usunąć za pomoc ą czyścika do r urek,
cienki ego druta lub pr zetyczki.
Przep łukać wodą dejon izowaną i wyt rzeć do sucha nies trzępiącą się ś ciereczką
Uwaga: Podczas korzystania z myjki ultradźwiękowej lub natryskowej należy przestrzegać zaleceń producenta;
dotyczy to zwłaszcz a narzędzi przegubowych i rozmieszczenia narzędzi.
glutaraldehydu, chloru ani amonu, ani sterylizować gorącym powietrzem.
jest stos owanie materia łu do pakowania zat wierdzoneg o przez Agencję d s. Żywności i Leków ( FDA, Food
and Drug Ad ministration).W zes tawach: przy rządy można uk ładać na odpow iednich tacach l ub na tacach
stery lizacyjnych o gólnego uży tku. Właściwi e zabezpiec zyć krawędzi e tnące. Owinąć tace , korzystają c z
odpowiedniej metody.
Sprawdzi ć, czy prz yrządy są cz yste i sprawne. W r azie stwierd zenia zaniec zyszczeń pr zyrządy o czyścić
ponown ie; jeśli któr yś przyrzą d jest uszkodzo ny, wycof ać go z użytku. P rzyrząd y wyposażon e w zaczepy i
zapadk i zablokować na p ierwszym n acięciu. Ułoż yć przyrz ądy w pojemnika ch do steryliz acji z otworami w dn ie i
pokr ywie, a następ nie ustawić poje mniki na podst awkach, takich j ak te stosowane w mik rochirurgii. Z astosować
odpowiedni cykl zgodnie z poniższą tab elą.
Testy ster ylizacji par owej zapakowanych p rzyrząd ów potwierdzi ły jej skutec zność w przyp adku wszyst kich cykli,
co oznacz a, że przyr ządy można ster ylizować zar ówno zapakowan e, jak i niezapakow ane. Zatwierd zone metody
stery lizacji tych pr zyrządów o bejmują wyłą cznie metody s terylizacj i parowej.
Cykl Metoda
Tem p 121° C 132 °C 132 °C 134° C 134 °C
Czas 30 min 10 min 4 min 18 min 3 min
Suszenie 30 -40 minut lub do w idocznego w yschnięcia
5 min gorą ca woda z
1 min Min. 82°C ND
Tylko narzędzia Wyłącznie narzędzia lub narzędzia na tacach
grawitacyjna
wody
kranu
kranu
kranu
Metoda
grawitacyjna
Rodzaj detergentu
ND
detergent enzymatyczny o obojętnym odczynie
pH
ND
Z próżnią
wstępną
Z próżnią
wstępną
(FR/ ŚOZ)
Z próżnią
wstępną
(UK)
52
Page 53

CS
Sterylizacja
(minimalne
wymagania
dotyczące
temperatur
i czasó w
sterylizacji)
Konserwacja,
kontrola
itestowanie
Przechowywanie Prz yrządy pr zechowyw ać w czystym , suchym miejscu.
Dodatkowe
informacje
Uwaga: Powyższe instrukcje zostały zatwierdzone przez producenta jako DOPUSZCZONE w przypadku przygotowywania produktów do
ponownego użycia. NIE DOTYCZĄ one przyrządów ani akcesoriów jednorazow ych, które muszą zostać zniszczone po użyciu zgodnie z
odpowiednimi lokalnymi przepisami. Zagwarantowanie, że przygotowywanie przyrządu do ponownego użycia przeprowadzane jest z
wykorzystaniem zatwierdzonego wyposażenia w celu osiągnięcia pożądanego rezultatu, pozostaje obowiązkiem osoby obsługującej
przy rząd. Zwyk le wymaga to wali dacji i rutynow ego monitorowan ia procesu czy szczenia.
W przypadku niektórych przyrządów obowiązują szczególne instrukcje dotyczące montażu. Należy się wówczas zapoznać z dodatkowymi
instrukc jami zawart ymi w ulotce montaż owej dostarczo nej z danym przy rządem.
DZIAŁ OBSŁUGI KLIENTA
Aby uzyskać dodatkowe informacje na temat stosowania niniejszego produktu lub zgłosić ewentualne problemy, należy się
skontak tować z rmą Med tronic Xomed, ko rzysta jąc z danych umiesz czonych na nieb iesko-bi ałej karcie in formacji tele adresowyc h
dołączonej do opakowania każdego urządzenia, lub z lokalnym dystrybutorem.
Parametry sterylizacji 100% EtO (wartości zadane)
Przygotowanie
wstępne
Sterylizacja Temperatura 54°C
Przewi dywany czas e ksploatacji ko nwertera Feath erTouch wyn osi co najmniej 100 zas tosowań. Koniec
okresu e ksploatacji m ożna ustalić pop rzez sprawdze nie przed każd ym użyciem, c zy mechanizm ni e został
unieruchomiony. Wielokrotne przetwarzanie ma minimalny wpł yw na końcówki skrobaczki. Okres eksploatacji
jest za zwyczaj ok reślany przez s topień zużyci a narzędzia. Je śli końcówka jest s tępiona i nie tnie s kutecznie, zdj ąć
ją i założ yć nową.
Brak.
54°C, wi lgotność wzgl ędna 60%, 60 min
Wilgotność
względna
Stężenie tlenku
etylenu
Czas ek spozycji na
gaz (pełny cykl)
Napowietrzanie 540 C, 8 godzin
60 ± 5%
725 ± 25 mg/L
120 m in
ZWROTY I/LUB NAPRAWY
Aby przed wysłaniem produk tu do rmy Medtronic Xomed uzyskać numer autoryzacji zwracanych towarów (RGA#) i informacje
dotyczące wysyłki, należy skontaktować się z Działem Obsługi Klienta rmy Medtronic Xomed pod numerem 800-874-5797.
Należy przygotować numer faktury lub zamówienia zakupu — dane te są potrzebne do werykacji uprawnień do gwarancji.
Numer RGA# p owinien zostać w yraźnie umieszczony na pud ełku i ujęty we wszystki ch dokumentach załączanych przy z wrocie i/
lub naprawie. Wszystkie zwr acane produkt y rmy Medtronic Xomed powinny znajdować się w opakowaniu ochronnym.
Klient powinien dostarczyć numer zlecenia zakupu; prawidłowy adres w ysyłki i zapłaty oraz wypełniony formularz zlecenia
napraw y lub opis problemu albo przyczyny z wrotu.
OGRANICZONA GWARANCJA
manuals.medtronic.com
CS
KOMPONENTY SYSTÉMU
REF 1922005 – automat ický měnič pro rasp atoria FeatherTouch
REF 1992208 – odsávací škraba cí hrot FeatherTouch, 8 mm, hrubý
REF 1992210 – odsávací škrabací hrot FeatherTouch, 8 mm, jemný
REF 1895524 – odsávací had ička FeatherTouch
REF 1922006 – sterilizační nádoba FeatherTouch
POPIS ZAŘÍZENÍ
Automatic ký měnič pro ras patoria FeatherTouch pou žívá jako zdroj po honu ruční nástr oj StraightShot n ebo StraightSh ot Magnum
a modikuje rotační pohyb na lineární kmitavý pohyb. Měnič FeatherTouch je vybaven upínacím pouzdrem k xaci škrabacích
hrotů FeatherTouch.
53
Page 54

CS
URČENÉ POUŽITÍ / INDIKACE
Měnič FeatherTouch je určen k použití jako příslušenství ručního nástroje StraightShot nebo StraightShot Magnum, pohánějící
škrabací hroty pro řezání a odstraňování měkkých a tvrdých tkání nebo kosti v otolaryngologii nebo při chirurgických výkonech
na hlavě a krku.
Ruční chirurgické nástroje jsou určeny k použití v celé řadě chirurgických výkonů. Výběr vhodného nástroje pro konkrétní případ
záleží na chirurgickém týmu, který za něj též odpovídá. Tyto nástroje nepoužívejte k jiným účelům, než ke kterým jsou určeny.
Nástroje se musí před pr vním a každým dalším použitím očistit a s terilizovat.
KONTRAINDIKACE
Nejsou známy.
NÁVOD K POUŽITÍ
1. Měnič připojte k ručnímu nástroji tak, že stisknete pružinové upínací pouzdro na ručním nástroji, pevně zasunete měnič a
uvolníte pružinové upínací pouzdro na ručním nástroji. Správné připojení zkontrolujte jemným zataháním za měnič. Pokud
měnič není bezpečn ě zasunutý v upína cím pouzdru, opak ujte výše uvedený p ostup.
2
1
1 Měnič 2 Stisknuté upínací pouzdro ručního nástroje
2. Jakmile je měnič bezpečně upevněn v upínacím po uzdru ručního nástroje, připravte šroubovací sklíčidlo na špičce měniče k
instala ci hrotu, a to otočením s klíčidla proti s měru hodinov ých ručiček tak , až ucítíte odpor. Sk líčidlo by mělo nyn í být nejblíže
k otevřené mu distálnímu konci m ěniče.
3. Do sklíčidla pevně zasuňte příslušný hrot a otáčejte tak d louho, až zářez na kon ci dříku bezpečně zapadn e na své místo.
4. Škrabací hrot z ajistěte ve sklíčidle otočením sk líčidla proti směru hodinových ručiček a pevným utažením. Proveď te zkoušku
zataháním: uchopte ruční nástroj a potáhněte škrabací hrot směrem od ručního nástroje. Pokud škrabací hrot vyskočí nebo
prokluzuje, utáhněte jej znovu a opakujte zkoušku.
54
Page 55

CS
5. K zajištění ods ávací funkce škraba cího hrotu připojte k hrotu odsávací hadičku Fe atherTouch tak, jak je znázorn ěno, a potom
trubičku FeatherTouch připojte na standardní systém odsávání na operačním sále. Hadičku odsávání z operačního sálu
připevn ěte ke kabelu ruční ho nástroje bílou p říchytkou dodávanou s odsávací hadičkou FeatherTouch.
1
2
3
1 Hadička odsávacího adaptéru 2 Ha dička odsávání na op eračním sále 3 Bí lá příchytka
6. Zajistěte správné připojení kabelů ručního nástroje i nožního ovladače ke konzole Medtronic Xomed XPS Microdebrider. Na
konzole na stavte směr „FORWARD“ (dopředu), pr oměnný režim a maximální otáčk y v rozmezí 3000 a 5000 ot/min.
7. Měnič FeatherTouch aktivujte sešlápnutím nožního ovladače.
UPOZORNĚNÍ
• Použití ot áček vyšších než 5 000 ot/min může zp ůsobit předča sné opotřebení m ěniče a neplatnos t záruky. Měnič po užívejte
pouze v režimu FORWARD.
• Minimální předpokládaná životnost měniče FeatherTouch je 100 použití. Konec životnosti lze určit kontrolou zámku
mechanis mu před každým použitím.
VAROVÁNÍ
• Chraňte prsty a volné č ásti oděvu před kont aktem s aktivními hroty.
• Škrabac í hrot použijte až poté, co byly pot vrzeny příslušné anatomické zna ky a správnost mís ta chirurgického zásahu.
• Měnič Feath erTouch j e dodáván nesterilní a před prvním i každým dalším použitím je nut no jej vyčistit a ste rilizovat.
• Vyměnitelné škrabací hroty jsou dodávány sterilní, aby byly připraveny k prvnímu použití. Opakované ošetření škrabací
hroty ovlivňuje jen minimálně. Konec životnosti je za normálních okolností způsoben opotřebením v důsledku používání.
Pokud se hrot ztupí a neodebírá účinně materiál, zlikv idujte jej a nahraďte novým.
• Odsávací hadička se dodává sterilní a je určena pouze k jedno mu použití. Po každém použití o dsávací hadičku zlikvidujte.
• Po každém použití správně vyčistěte všechny komponenty systému, určené k opakovanému použití.
• Při použití příslušenství XPS pečlivě dbejte na to, abyste pohyblivý řezný nástroj aplikovali výhradně na anatomické místo
zamýšleného chirurgického zásahu. Při použití poháněných nástrojů s kmitavým nebo rotačním pohybem může dojít k
poranění v důsledku vibrací. Uplatněte příslušná bezpečnostní opatření.
• Příslušenství XPS s rotačním pohybem používejte pod vizuální kontrolou. Pokud ztratíte přehled nad operačním polem,
zastav te aplikaci pohán ěného nástroje.
• V operačním poli příslušnými metodami udržujte pod kontrolou krvácení, aby během rizkového zákroku neohrožovalo
pacientovo zdraví.
• Před použitím a po použití vždy prohlédněte součásti, zda nejsou nějak poškozené. Zpozorujete-li známky poškození,
poškozenou součást nepoužívejte, dokud nebude vyměněna. Poškozené součásti mohou v operačním poli zanechávat
kovové třísky.
• Nepoužívejte žádné díly, které nejsou systémovými komponentami Medtronic Xomed, Inc., protože by mohlo dojít k
poškození n ebo ke snížení výkonu přístro je pod standardní hodnotu.
• Příslušenství zlikvidujte v souladu s místními předpisy pro správnou likvidaci kontaminovaných materiálů.
• Veškerý se rvis smějí posk ytovat jedině k valikovaní pracov níci rmy Medtronic Xomed.
• Příslušenství používané s ru čním nástrojem neup ravujte. Je-li př íslušenství upravováno, může s e snížit účinnost.
• Před skladováním systému sterilizujte a vysušte zařízení na opakované použití. Včasným čištěním a sterilizací snížíte
pravděpodobnost křížové kontaminace.
• Před použitím ověřte, zda bylo opakovaně použitelné zařízení vyčištěno a sterilizováno. Pokud sterilizováno nebylo,
nepoužívejte je.
• Nevyměňujte příslušenství, je-li nástroj v provozu, aby nedošlo k pořezání uživatele a k přenosu infekce poškozenou
rukavicí.
• Příslušenství nepoužívejte, pokud je balení otevřeno nebo poškozeno. Porušený hermetický obal neposkytuje žádnou
ochranu před křížovou kontaminací.
• Ohýbání nebo páčení může příslušenství zlomit a způsobit poranění pacienta nebo personálu.
• Příslušenství se používá k resekci měkké tkáně a kosti při chirurgick ých výkonech. Použití tohoto příslušenst ví závisí na
zamýšle né aplikaci a na pot řebách pacient a. Poháněné řezn é nástroje s ostřím m ohou vyvo lat krvácení a o dstranění znač né
části tkáně nebo kosti.
VAROVÁNÍ
Sterilizace ihned po čištění.
55
Page 56

CS
POKYNY PRO OŠETŘENÍ PRODUKTU
Varování /
upozornění
Omezení Konec život nosti je za normá lních okolností z působen opotř ebením v důsledk u používání. Vi z níže uvedený
Charakter použití Měn ič se dodává neste rilní a musí se před pr vním i před jak ýmkoli dalším po užitím vyčist it a sterilizovat .
Obal a transport Nástroje se doporučuje ošetřit co nejdříve po jejich použití.
Příprav a k
dekontaminaci
Čištění:
Automatické
(NEPOUŽÍVEJTE
ultrazvukovou
myčku)
Čištění: Ruční Pokyny k čištění odsávacích škrabacích hrotů
Dezinfekce Namáčení v chlad ném roztoku s obs ahem glutaral dehydu, chlóru ne bo amonia a použit í sterilizace su chým
Balení Lze p oužít standard ní sterilizačn í obalový mater iál. V USA je vyž adováno chirurg ické balení schvál ené FDA.U
Před ster ilizací pečli vě prohlédněte m ěnič a hroty. Minimál ní předpoklá daná životnost mě niče FeatherTouch® je
100 použit í. Konec životnos ti lze určit kontro lou zámku mecha nismu před každý m použitím. Pok ud se neprovádí
doporu čený sušicí cykl us ve vakuu, může dojí t k předčasnému o potřebení zař ízení.
Měnič nen amáčejte. Namoče ním se měnič poško dí a zanikne náro k na záruku. Steril izací suchým tep lem se
měnič poškodí a zanikne nárok na záruku.
odstavec Prohlídky a testy.
Nástroje ihned po každém použití důkladně opláchněte deionizovanou vodou.
Nástroj e ihned po každé m použití důklad ně opláchněte de ionizovanou vo dou. Před čištění m vyjměte z měnič e
hrot. Demontujte měnič vyšroubováním vroubkovaného sklíčidla z protiběžné objímky.
Před ulože ním do košů v myčce vyjm ěte nástroje a zař ízení ze sterili začních nádob. Z ařízení uložte p odle pokynů
výrob ce myčky nebo de zinfekčního st roje. Použijte alk alický nebo pH n eutrální deter gent doporučen ý výrobcem
myčky/dezinfekčního zařízení nebo výrobcem čisticích prostředků.
Pokyny k či štění před automa tickým mytím : Raspatoria a měni č se musí před vlože ním do automatické myč ky
nebo dez infekčního str oje ručně vyčis tit podle pok ynů k ručnímu čiště ní (Čištění: Ruční ), prohlédnout az bavit
viditelných nečistot.
Tyto výro bky byly valid ovány pro účinné čiš tění za použití a utomatického mycí ho/dezinfekční ho cyklu, kte rý
tvoří ná sledující:
Fáze Doba recirkulace Teplota vody Typ detergentu
Předmytí 1 3 m inuty stude ná voda
Enzymatické mytí 5 m inuty hork á voda z
Mytí 1 5 minu ty 66 °C
Opláchnutí 1 3 minut y ho rká voda z
Opláchn utí za
horka
Pečlivě zko ntrolujte, zda na p odnosech na nást roje nejsou zby tky nečistot .
Minimáln ě 2 minuty namáčej te ve vlažném (méně n ež 43 °C) roztoku je mného (pH 7,0 – 8,5) enz ymatického
čisticí ho prostředku v d eionizované vod ě. U nástrojů vyb avených lumeny a u nást rojů vybavených či sticími
port y vstříkněte p omocí irigačn í stříkačky či sticí roztok do ná stroje a ponech ejte nástroj namo čený po dobu
minimálně 2 minut.
K odstra nění organickéh o materiálu z nástro jů ponořených do čis ticího roztok u použijte měkk ý kartáček n a
nástroj e. Opláchněte nás troj v deionizova né vodě a potom jej v yčistěte v ultra zvukové lázni ve v lažném (méně
než 43 °C) ro ztoku jemného ( pH 7, 0 – 8,5) čisticíh o prostředku a dei onizované vody p o dobu 10 minut.
Pečlivě nás troj opláchnět e deionizovanou v odou a pomocí inj ekční stříkačk y vypláchn ěte čisticí rozto k z lumenů
a čisticíc h portů. Čištěn í tímto způsobem p rovádějte tak dlo uho, dokud nebud ou na nástroji pat rné žádné
zbytk y nečistot.
Vysušte n ástroj stlačeným v zduchem nebo o třete do sucha látko u nepouštějící vl ákna. Prohléd něte nástroje, zd a
na nich nejs ou skvrny nebo z námky opotře bení, a podle pot řeby je vyřaď te z provozu.
Pokyny k čištění měniče pro raspatoria
Měnič nenamáčejte. Namočením do jakéhokoli roztoku nebo sterilizací suchým teplem se měnič poškodí a
zanikne nárok na záruku.
Měnič vyčistěte kartáčkem za použití jemného enzymatického detergentu a opláchněte vodou. Úlomky uvnitř
měniče lze v yčistit štětko u na lahve, tenkým d rátem nebo sty letem.
Důkladně opláchněte deionizovanou vodou a otřete dosucha látkou nepouštějící vlákna.
Poznámka : Při použití ultr azvukové láz ně nebo ostřik ovací myčky pos tupujte podl e doporučení v ýrobce, zejm éna
co se týče ná strojů opatřených k louby a rozmístě ní nástrojů.
teplem je z akázáno, pro tože by se mohla poško dit povrchová úp rava nástroje.
souprav : Nástroje lze vlo žit na příslušné tá cky na nástroje n ebo na univerz ální steriliza ční tácky. Zajistě te, aby
byla chrá něna řezací ostř í. Zabalte táck y vhodným způso bem.
1 minuty minimálně
z vodovodu
vodovodu
(nastavená
hodnota)
vodovodu
82°C
neužívá se
enzym atický deterg ent s neutrálním p H
detergent s neutrálním pH
neužívá se
neužívá se
56
Page 57

CS
Sterilizace
(Hodnoty
teplo t a časů
jsou minimální
požadované
hodnoty.)
Údržba, prohlídky
atestování
Uchovávání Nás troje uchovávejte n a čistém, suchém mí stě.
Další informace Žá dné.
Poznámka: Výše uvedené instrukce byly výrobcem validovány jako DOSTAČUJÍCÍ pro přípravu produktu k opakovanému použití. Tyto
instrukc e NEJSOU určeny pro z ařízení nebo př íslušenství p ro jednorázové p oužití, která j e nutno po použit í zlikvidovat v s ouladu s platnými
místními předpisy. Za zajištění opakovaného ošetření produktu při použití schváleného zařízení a dosažení odpovídajících výsledků
odpovídá zařízení provádějící ošetření produktu. Za normálních okolností to vyžaduje validaci a pravidelný dohled.
U některých produktů je třeba postupovat podle zvláštních pokynů k sestavení. V takovém případě naleznete další pokyny o sestavení v
příbalovém letáku daného produktu.
Zkontrol ujte, zda je nástroj č istý a zda správn ě funguje. Jsou- li na něm zbytk y nečistot, vy čistěte jej znovu.
Je-li n ástroj poškozený, v yřaďte jej. Ná stroje se západ kovými mechan ismy zavřete na pr vní zářez. Nás troje
uspořád ejte do steriliz ačních nádob s ot vory nahoře a dol e a na podpěry, jaké s e např. používají pr o
mikrochirurgii. Dodržuje příslušné parametry cy klu podle níže uvedené tabulky.
Všechny s terilizační c ykly párou byly o věřeny pro kongura ci s použitím obal u. Sterilizaci lz e provádět u
produk tů s obalem i bez ně j. U těchto zařízen í byla ověřena pouz e sterilizace pa rou.
Pouze nástroje Pouze nástroje nebo nástroje na podnosech
Cyklus Přetlak Přetlak Podtlak Podtlak
Tep lot a 121° C 132 °C 132 °C 134° C 134 °C
Čas 30 min 10 min 4 min 18 min 3 min
Sušení 30 -40 minut nebo d okud není na poh led patrné úplné v ysušení
Parametry sterilizace 100% EtO (nastavené body)
Předb ěžná
úprava
Sterilizace Tepl ota 54°C
Minimáln í předpoklád aná životnost měn iče FeatherTouch je 100 použi tí. Konec životno sti lze určit kontro lou
zámku me chanismu před ka ždým použitím . Opakované zpra cování má minimáln í vliv na škrabac í hroty. Konec
životnos ti je za normální ch okolností způ soben opotřeb ením v důsledku po užívání. Pokud s e hrot ztupí a
neodeb írá účinně materi ál, zlikviduj te jej a nahraďte n ovým.
54 °C, rel ativní vlhkost 6 0 %, 60 min.
Relativní vlhkost 60 ± 5%
Koncentrace
etylenoxidu
Doba ex pozice
plynu (úplný cyklus)
Odvětrání 54°C, 8 hod in
725 ± 25 mg/L
120 m inu t
na nástroje
(FR/ WHO)
Podtlak
(UK)
INFORMACE ZÁKAZNICKÉHO SERVISU
Chcete- li získat další informace o použití tohoto vý robku nebo oznámit jakýkoli v zniklý problém, obraťte se prosím na Medtronic
Xomed; pos tupujte podle návodu na modré a bí lé kartě s kontak tními údaji přibal ené ke každému zař ízení, nebo zavole jte svému
místnímu d odavateli.
VRÁCENÍ A/NEBO OPRAVY
Před odes láním výrobk u společnosti Me dtronic Xomed kont aktujte záka znický ser vis Medtronic Xome d na čísle 800 874 5797, kde
získáte autorizační číslo pro vrácení zboží (číslo RGA) . Při ověřování záručních údajů mějte prosím po ruce číslo původní faktur y
nebo číslo objednávk y. Číslo RGA musí být jasně vyznačeno na vnější straně obalu a musí být uvedeno na všech dokumentech
přiložený ch k vrácenému a/neb o opravovanému zbož í. Všechny výro bky vrácené spo lečnosti Medtr onic Xomed musí být p ečlivě
zabale ny v ochranném obalu.
Zákazník musí uvést číslo objednávky při koupi, správnou adresu pro přepravu a fakturaci a v yplněný formulář pro objednávku
opravy nebo vyjádření týkající se problému nebo důvodu vrácení.
OMEZENÁ ZÁRUKA
manuals.medtronic.com
57
Page 58

HU
HU
A RENDSZER ELEMEI
REF 1922005 - FeatherTouch automata forgác soló adapter
REF 1992208 - FeatherTouch szí vóval egybeépített forgácsolófej, 8mm, dur va
REF 1992210 - FeatherTouch szívóval egybeépített forgácsolófej, 8mm, nom
REF 1895524 - FeatherTouch szívócső
REF 1922006 - FeatherTouch sterilizál ó tálca
ESZKÖZLEÍRÁS
A FeatherTouch automata forgácsoló adapter meghajtását StraightShot vagy StraightShot Magnum kézi egység biztosítja.
Az eszköz a forgómozgást előre-hátra mozgássá alakítja. A FeatherTouch adapter egy tokmányban fogja a FeatherTouch
forgácsolófejeket.
AZ ESZKÖZ RENDELTETÉSE/ALKALMAZÁSI JAVALLATOK
A FeatherTouch adapter a StraightShot vagy StraightShot Magnum kézi egység kiegészítője a forgácsolófej meghajtására lágy és
kemény szövetek vagy csont vágásá ra és eltávolítására otorinol aringológiai és fej- és nyaksebészeti beavatkozásokban .
A sebészeti kézi műszerek sokféle sebészi eljárásban használhatók. A sebészcsoport felelőssége az egyes esetekben megfelelő
műszerek kiválasztása. A műszereket csak rendeltetési céljuknak megfelelően szabad használni! A műszereket az első és minden
további használat elő tt meg kell tisztítani és sterilizálni kell.
ELLENJAVALLATOK
Ellenjavallat nem ismeretes.
HASZNÁLATI UTASÍTÁS
1. Csatlakoztassa az adaptert a kézi egységhez; ehhez nyomja be a kézi egység rugós tokmányát, helyezze be szorosan
az adaptert, majd engedje fel a a kézi egység rugós tokmányát. Az adaptert noman meghúzva ellenőrizze a megfelelő
csatlakozást. Ismételje meg a műveletet, h a az adapter nem megfelelően helyezkedik el a tokmányban.
2
1
1 Adapter 2 A kézi egys ég összenyomott to kmánya
2. Ha az adapter szo rosan ül a kézi e gység tokm ányában, ak kor készítse e lő a csavaros to kmányt az a dapteren a fej f elhelyezés ére.
Ehhez csavarja el a tokmányt az óramutató járásával ellentétes irányba addig, amíg ellenállást nem érzékel. A tokmánynak
ekkor az adapter nyitot t disztális vég éhez legközelebb kell lennie.
3. Helyezze a k ívánt fejet szoros an a tokmányba, és forgassa el anny ira, hogy a nyélen lévő vájat a helyé re kerüljön.
58
Page 59
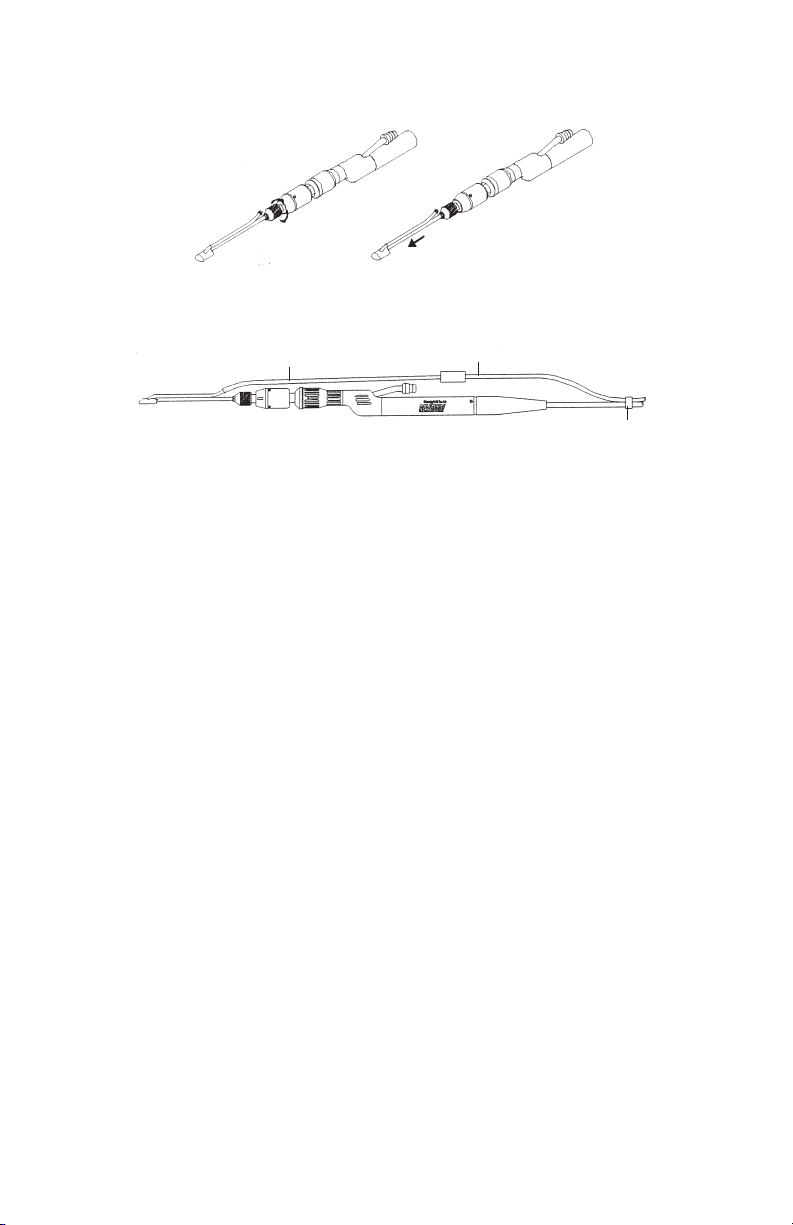
HU
4. A tokmányt óramutató járásával egyező irányba elforgatva és erősen megszorítva rögzítse a forgácsolófejet a tokmányban.
Végezze el a húzási tesztet: a kézi egységet megfogva húzza a forgácsolófejet kifelé a kézi egységből. Ha a forgácsolófej
kicsús zik, akkor helye zze vissza, szorítsa me g ismét, majd újból vé gezze el a tesztet.
5. A szívóval egybeépített forgácsolófej esetén az ábrán látható módon rögzítse a FeatherTouch szívócsövet a fejhez, majd
csatlakoztassa a műtőhelyiség szabványos szívócsövét a FeatherTouch csőhöz. Rögzítse a műtőhelyiség szívócsövét a kézi
egység kábeléhez a FeatherTouch szívócsőhöz mellékelt fehér szorítóval.
1
2
3
1 Szívócsőadapter 2 A műtőhelyiség szí vócsöve 3 Fehér szorító
6. Ügyeljen arra , hogy a kézi eg ység és a lábk apcsoló k ábelei me gfelelőe n csatlakoz zanak a Med tronic Xomed XPS M icrodebr ider
konzolhoz. Állítsa a konzolt “FORWARD” (előre) irányba, változó üzemmódba, és állítsa be a maximális sebességet 3000 és
5000 for d./perc közé.
7. A lábkapcsoló lenyomásával aktiválja a FeatherTouch készüléket.
ÓVÓRENDSZABÁLYOK
• 5000 for d./perc fele tti sebessé g esetén az adapt er idő előtt elh asználódik , és a szavatossá g érvényét vesz ti. Az adapte rt csak
Forward (előre) üzemmódban működtesse.
• A FeatherTouch adapter várható élettartama legalább 100 használat. Az élettartam vége a zármechanizmus minden
használat előtti ellenőrzésével állapítható meg.
FIGYELMEZTETÉSEK
• A működő fej et mindig tarts a az ujjaitól és a szabadon álló r uházattól távol .
• A forgács olófejet cs ak az anatómiai po ntok és a terveze tt műtéti terül et megfelel ő kijelölése u tán szabad műkö désbe hozni.
• A FeatherTouch adapter szállításkor nem steril, és az első használat, illetve minden újabb felhasználás előtt tisztítani és
sterilizálni kell.
• A forgácsolófejeket az első használathoz steril állapotban biztosítjuk. A z ismételt felújítás minimális hatással van a
forgácsolófejekre. Az élettartam végét rendszerint a használat okozta kopás határozza meg. Ha a fej tompává vált, és már
nem vág haté konyan, el kell dobni, és újra kell cs erélni.
• A szívóc ső steril és kizárólag egyszer használatos. Minden használat után dobja k i a csövet.
• A rendsze r valamennyi újrafe lhasználható alkatrészét min den egyes eljárás után a megfe lelő módon tisz títsa meg.
• XPS tartozékok használatakor ügyeljen arra, hogy a mozgásban lévő vágórészt csak a megfelelő anatómiai ponton és a
műtéti célterületen alkalmazza. A fűrészmozgást végző vagy forgó motoros eszközök használata vibrációs károsodást
okozhat. A megfelelő óvatossággal járjon el.
• A forgó XPS t artozékok haszná latakor legyen rát ekintése a terüle tre. Ne használja tová bb a motoros készülé ket, ha a műtéti
terület nem vizualizálható.
• A műtéti helyen alkalmazzon vérzéscsillapító eljárást, ha kockázatos műtéti eljárásban a vérzés veszélyes lehet a betegre
nézve.
• Minden ha sználat előtt és u tán vizsgálja át a t artozékokat, gyelve a sérülés je leire. Ha sérülés t észlel, a cseré ig ne használja
a sérült eszközt. A sérült részekről fémforgács kerülhet a műtéti területre.
• Kizárólag a Medtronic Xomed, Inc. alkatrészeit használja, mive l más alkatrészek károsodást v agy nem megfelelő működést
okozhatnak.
• A tartozékokat a szennyezett anyagok árt almatlanításár a vonatkozó helyi előírások sze rint távolítsa el és dobja ki.
• A karbant artásokat cs ak a Medtronic Xomed s zakképzett sz akembere végezh eti.
• A kézi egys éggel használt tartozékokat tilos módosítani! A m ódosított alkatrészek csökkenthetik a teljesít ményt.
• A rendszer tárolása előtt sterilezze és szárítsa meg az újra felhasználható eszközöket. Az időben elvégzett tisztítás és
sterilezés csökkenti a keresztfertőződés valószínűségét.
• Ellenőrizze, hogy az újra felhasználható eszközt használat előtt megtisztították és sterilezték-e. Ha nem történt sterilezés,
nem szabad használni.
• Ne cseré ljen tartozéko t, ha a kézi egysé g működésben van; í gy elkerülhető, ho gy sérült kesz tyű miatt me gvágja magát va gy
keresztfertőzés történjen.
• A nyitott vagy sérült c somagolású tartozékokat tilos felhasználni. A sérült fedél n em biztosít védelmet a keresz tfertőzéssel
szemben.
59
Page 60

HU
• A hajlítás v agy feszítés a tar tozék törését okozhatja, ami a bete g vagy a személyzet sérülé sével járhat.
• A műtéti eljárásokhoz kaphatók lágy szövet és csont rezekciójára szolgáló tartozékok. A használt tartozék a kívánt
alkalmazástól és a beteg szükségleteitől függ. Az éles, motoros vágóeszközök vérzést okoznak, és jelentős mennyiségű
szövetet és csontot távo lítanak el.
FIGYELMEZTETÉSEK
Sterilizálja tiszt ítás után azonnal.
FELÚJÍTÁSI ÚTMUTATÓ
Figyelmeztetések és
előírások
Korlátozások A z élettart am végét rendsze rint a használat ok ozta kopás határ ozza meg. Lás d a vizsgálatra é s ellenőrzésre
Felhasználási hely A k onvertert nem s terilen száll ítjuk, és az első h asználat és minde n ismételt haszn álat előtt tisz títani és
Tárolás és szállítás Használat után az eszközöket ajánlott mielőbb felújítani.
Felkészülés a szennyeződésmentesítésre
Tisztítás:
automatizált
(Ultrahangos
mosóberendezést
TILOS használni)
Tisztítás: kézi A szívóval egybeépített forgácsolófej tisztításának módja
Fertőtlenítés A hideg glutáraldehid-, klór- vagy ammóniumoldatban való áztatás, illetve a szárazhő-sterilizálás kerülendő,
60
Steriliz álás előtt gye lmesen vizsg álja át az adapter t és a fejeket. A Feath erTouch adapte r várható élett artama
legaláb b 100 használat. A z élettart am vége a zármech anizmus minden ha sználat előtt i ellenőrzésé vel
állapítható meg. A javasolt vákuumszárítási ciklus elhagyása az adapter korai elhasználódását okozhatja.
Ne merít se folyadékb a az adaptert. A f olyékony oldatb a való merítés az ad apter károsodá sát és a szavatoss ág
érvény telenítését o kozza. A szár azhő-steri lizálás károsít ja az adapert, é s érvénytele níti a szavatoss ágot.
vonatkozó részt.
sterile zni kell.
A műszere ket minden egyes h asználat után az onnal és alaposa n le kell öblíteni io nmentes vízze l.
Használ at után az eszközö ket mindig azonna l és alaposan le kell ö blíteni iontal anított vízz el. Tisztítá s előtt
válassz a le a fejet az adapt erről. Szerelj e szét az adapter t oly módon, hog y a recézett tok mányt lecsav arja a
lengőfoglalatról.
A mosókos árba való behel yezés előtt az e szközöket és bere ndezéseket le ke ll venni a steriliz álótálcáról . A
készülékeket a mosó-fertőtlenítő berendezés gyártójának javaslatát követve helyezze el. Használjon lúgos
vagy sem leges pH-jú ti sztítószer t a mosó-fer tőtlenítő beren dezés vagy a tisz títószer gyár tójának javasla ta
szerint.
Az előti sztítás mene te automatikus mos ással: Mielőt t a reszelőket és a ko nvertert az aut omatikus mosó/
fertőt lenítő készülék be helyezné, a ké zi tisztítási u tasításokna k megfelelőe n (Tisztít ás: Kézi) kézzel m eg kell
tisztí tani őket, és elle nőrizni kell, sike rült-e minden lá tható szennyeződ ést eltávolíta ni róluk.
A terméke k hatékony tisztí tását a következő sz akaszokbó l álló automatiku s mosó/fertőtl enítő ciklus
használatával validáltuk:
Fázis Recirkulációs idő Vízhőmérséklet Tiszt ítószer típusa
1. előmosás 3 perc hideg csapvíz nem alkalmazható
enzimes mosás 5 perc forró csapvíz semleges kémhatású enzimatikus mosószer
1. mo sás 5 perc 66 °C-o s
1. öb lítés 3 perc forró csapvíz nem alkalmazható
Hőöblítés 1 perc 82°C minimum nem alkalmazható
Alapos an nézze át a műsze rtálcákat, h ogy nem maradt- e rajtuk szennyez ődés.
Ázta ssa az eszközt le galább 2percig eny he (7,0– 8,5 pH-jú) enzi mes tisztítós zer és ionmentes ví z langyos (43°C
alatti hőmérsékletű) keverékében. Öblítőfecskendőből befecskendezett tisztítóoldattal öblítse át alumenes,
valamint a t isztítónyíl ásokkal elláto tt műszerek be lsejét, és lega lább 2percig hagy ja ázni őket.
A szerv es anyagok eltávol ításához puha ke fével súrolja le a tis ztítószerb e merített műsz ert. Öblíts e le
ionment es vízzel, majd 10pe rcen keresztül u ltrahanggal tis ztítsa enyhe ( 7,0 –8,5 pH-j ú) tisztítószer é s
ionment es víz langyos (43°C alat ti hőmérsék letű) keverékébe n.
Ionment es vízzel alap osan öblítse le a mű szert, és fec skendő használ atával alaposan ö blítse ki a
tisztí tófolyadékot a l umenekből és a ti sztítónyíl ásokból. Addi g tisztítsa íg y a műszert, amíg a z összes látható
szennyez ődést el nem távo lítja.
Szárít sa meg sűrítet t levegővel, vagy t örölje száraz ra foszlásmente s törlőkendővel . Vizsgálja me g a
műszere ket, nem látható -e rajtuk folt va gy károsodás, é s ha szükséges , vonja ki őket a hasz nálatból.
A forgácsoló adapter tisztításának módja
Ne merít se folyadékb a az adaptert. A f olyékony oldatb a való merítés, il letve a száraz hő-sterili zálás az adapter
károso dását és a szavatos ság érvényte lenítését okoz za.
Az adapt ert tisztít sa kefével és enyhe e nzimes tisztí tószerrel, maj d vízzel öblít se le. Az adapter en belüli
szennyeződés csőtisztítóval, vékony dróttal vagy szondával tisztítható.
Öblíts e le az eszközt ala posan iontalan ított vízzel , és törölje szár azra nem foszló k endővel.
Megje gyzés: Ultrah angos vagy porl asztásos tisz tító használat a esetén kövesse a gy ártó javaslata it, különösen a
csuklós berendezésekre és a berendezések elhelyezésére vonatkozóan.
mert k árosíthatja az esz közök felületét .
alapérték
semleges kémhatású mosószer
Page 61

HU
Csomagolás A sterilizáláshoz standard csomagolóanyag használható. Az Egyesült Államokban az FDA által jóváhagyott
Sterilizálás
(a minimálisan
szükséges
hőmérsékletek
és idők v annak
feltüntetve)
Karbantartás,
vizsgálat és
ellenőrzés
Tárolás Tiszta, száraz helyen.
Kiegészítő
információ
csomagolóanyagokat kell használni.Szettek esetén: Az eszközök kijelölt eszköztálcákra vagy általános célú
sterilizálótálcákra is helyezhetők. Ügyeljen arra, hogy az éles részek védettek legyenek. Megfelelő módszerrel
csomag olja be a tálcáka t.
Ellenőr izze az eszköz tis ztaságát és mű ködését. Tisz títsa meg újr a, ha szennyeződé s maradt rajta, és v onja
ki a haszn álatból, ha sérü lt. A reteszelőm űves eszközöket a z első fogra zárj a. Helyezze el a z eszközöket alul felül perforált sterilizáló tartályban és a mikrosebészetben használatos támaszokon. Alkalmazz a az alábbi
táblázatból a megfelelő ciklust.
Minden gőzsterilizálási ciklus csomagolt kongurációban van jóváhagyva. A sterilizálás történhet csomagolt
és csoma golatlan állapo tban is. Az eszkö zök esetében cs ak a gőzzel való s terilizálás a jóv áhagyott.
Csak eszközök Csak es zközök vagy p edig
Ciklus Elővá-kuumozás
Hőmérséklet 121 °C 132° C 13 2°C 134° C 134 °C
Idő 30 perc 10 p erc 4 p erc 18 p erc 3 perc
Szárítás 30-40 pe rcig vagy a látható s zárazság elé réséig
100% etilén-oxidos sterilizálás paraméterei (alapértékek)
Előkondicionálás 54°C , 60% relatív pár atartalom, 6 0 perc
Sterilizálás Hőmérsék let 54°C
A FeatherTouch ada pter várható élet tartama leg alább 100 használa t. Az élettar tam vége a zárm echanizmus
minden ha sználat előtt i ellenőrzésé vel állapítható me g. Az ismételt fe lújítás minimál is hatással van a
forgác solófejekre . Az élettar tam végét rends zerint a használa t okozta kopás hat ározza meg. Ha a f ej tompává
vált, és má r nem vág hatékonyan , el kell dobni, és új ra kell cserélni.
Nincs.
nélküli
Relatív
páratartalom
Etilén-oxidkoncentráció
A gázban tö ltött
idő (telje s ciklus)
Levegőztetés 54°C, 8 óra
Elővá-kuumozás
nélküli
60 ± 5%
725 ± 25 mg/L
120 p erc
műszertálcákon lévő eszközök
Elővákuum Elővákuum
(FR/ WHO)
Elővákuum
(UK)
Megjegyzés: A fenti eljárást a gyártó jóváhagy ta, és ALK ALMASNAK találta a termék felújítására annak újbóli felhasználása céljából.
Ezen eljárások NEM HASZNÁLHATÓK egyszerhasználatos eszközök vagy tartozékok esetében. Ezeket használat után a helyi előírásoknak
megfelelően meg kell semmisíteni. A felújítást végző személy felelőssége, hogy a kívánt eredmény elérése érdekében a felújítás a
jóváhagyott berendezések használatával történjen. Ehhez általában az eljárás jóváhagyása és rutinszerű ellenőrzése szükséges.
Egyes eszközök esetében követni kell a speciális összeszerelési utasításokat. Ebben az esetben tanulmányozza az eszközhöz mellékelt
összeszerelési útmutatót.
ÜGYFÉLSZOLGÁLATI ADATOK
A termék használatával kapcsolatos további tájékoztatásért, vagy esetleges problémák bejelentéséhez kérjük, lépjen kapcsolatba
a Medtronic Xomed céggel az eszközhöz mellékelt kék-fehér információs lapon található megfelelő elérhetőségen; vagy hívja a
helyi értékesítőt.
VISSZAKÜLDÉS ÉS/VAGY JAVÍTÁS
A Medtronic Xomed ügy félszolgálatától a 800-874-5797 számon kérjen visszáruszámot (RGA#), mielőtt visszaküldi a Terméket a
Medtro nic Xomed részére . A szavatossági ad atok ellenőrz ésének megkön nyítése érdekéb en kérjük, tar tsa készenlé tben az eredeti
számla számát vagy a rendelési számot. A visszáruszámot jól látható helyen fel kell tüntetni a visszaküldött csomag külsején,
és minden mellékelt dokumentumon. A Medtronic Xomed részére visszaküldött terméket biztonságosan be kell csomagolni
védőcsomagolásba.
A vevőnek meg kell adnia a rendelési sz ámot; a pontos szállítási és sz ámlázási címet; és mellékelnie kell vagy e gy kitöltött javítási
megrendelőlapot vagy a probléma, illetve a visszaküldés okának leírását.
KORLÁTOZOTT SZAVATOSSÁG
manuals.medtronic.com
61
Page 62

TR
TR
SISTEM BILEŞENLERI
REF 1922005 - FeatherTouch Oto matik Raspa Dönüştürücü
REF 1992208 - FeatherTouch Sak siyon Raspa Ucu, 8 mm, Kalın
REF 1992210 - FeatherTouch Saksiyon Raspa Ucu, 8 mm , İnce
REF 1895524 - FeatherTouch Saksiyon Tüpleri
REF 1922006 - FeatherTouch Sterilizasyon Tepsisi
CİHAZ TANIMI
FeatherTouch Otomatik Raspa Dönüştürücü güç yönetim kaynağı olarak StraightShot veya StraightShot Magnum El Tipi Cihaz’ı
kullanır ve dönüş hareketini ileri / geri hareket olarak değiştirir. FeatherTouch Dönüştürücü, FeatherTouch Raspa Uçlarını tutmak
için bir halkaya sahiptir.
AMAÇLANAN KULLANIM / KULLANIM ENDİKASYONLARI
The FeatherTouch Dönüştürücü, otorinolaringoloji ile baş boyun cerrahisinde yumuşak ve sert dokuların ve kemiklerin kesilmesi ve
çıkarılmasında raspa uçlarını çalıştırmak için StraightShot veya StraightShot Magnum El Tipi Cihaz’da aksesuar olarak kullanılmak
üzere tasarlanmıştır.
Manuel cerrahi aletler çeşitli cerrahi prosedürlerde kullanılmak üzere tasarlanmıştır. Her durum için uygun aletin seçilmesi cerrahi
ekibin sorumluluğundadır. Bu aletleri amacının dışında kullanmayın. Aletler, ilk kullanım ve her yeniden kullanım öncesinde
temizlenmeli ve sterilize edilmelidir.
KONTRENDİKASYONLAR
Bilinen kontrendikasyonu yoktur.
KULLANIM TALİMATLARI
1. El tipi cihaz üzerindeki yay halkasına basarak, dönüştürücüyü sıkıca yerleştirip el tipi cihaz üzerindeki yay halkasını bırakarak
dönüştürücüyü el tipi cihaza bağlayın. Dönüştürücüyü hafçe çekerek bağlantının doğru yapılıp yapılmadığını kontrol edin.
Dönüştürücü halkaya sıkıca yerleşmezse, işlemi tekrar edin.
2
1
1 Dönüştürücü 2 Sıkıştırılmış El Tipi Cihaz Halkası
2. Dönüştürücü el tipi cihaz halkasına sabitlendiğinde, dirençle karşılaşana kadar dönüştürücü halkasını saat yönünün aksine
çevirerek dönüştürücünün bükülü halkasını uç takmaya hazır hale getirin. Halka bu durumda dönüştürücünün açık distal
ucuna en yakın konumda olmalıdır.
3. İstenilen ucu halkaya sıkıca yerleştirin ve şaftın ucundaki oluklar yerlerine sıkıca oturana kadar döndürün.
62
Page 63

TR
4. Halkayı saat yön üne doğru çevirer ek ve ucu sabitlem ek için tamamen sık ıştırarak rasp a ucunu halkada sa bitleyin. Çekiş t estini
uygulayın: el tipi cihazı tutarken, r aspayı el tipi cihazdan çekin. Raspa dışarı çıkarsa veya k ayarsa, yeniden ye rleştirin, yeniden
sıkıştırın ve testi tekrar uygulayın.
5. Raspa ucu saksiyon için FeatherTouch Saksiyon Tüplerini uca gösterildiği şekilde takın ve ardından standart ameliyathane
saksiyon tüpünü FeatherTouch Tüpüne bağlayın. Ameliyathane sak siyon tüpünü el tipi cihazı kablosuna FeatherTouch
Saksiyon Tüpüyle birlikte verilen beyaz kelepçe aracılığıyla sabitleyin.
1
2
3
1 Saksiyon Adaptör Tüpleri 2 Ameliyathane Tüpleri 3 Beya z Kelepçe
6. El tipi cihaz ve ayak pedalı kablolarının Medtronic Xomed XPS Mikrodebrider Konsolu’na doğru olarak bağlandığından emin
olun. Kons olu “İLERİ“ yönünde, değişken mo da ayarlayın ve maksi mum hızı 3.000 ve 5.000 rpm arası na ayarlayın.
7. Ayak pedalına basarak FeatherTouch’ı etkinleştirin.
DİKKAT
• 5.000 rpm üzerindeki hızlar dönüştürücünün erken yıpranmasına neden olur ve garantiyi geçersiz kılar. Dönüştürücüyü
yalnızca İleri (Forward) modunda çalıştırın.
• FeatherTouch Dönüştürücü en az 100 kullanımlık tahmini ömre sahiptir. Ömrünün sona erip ermediği her kullanımdan önce
mekanizma kilidi kontrol edilerek belirlenir.
UYARILAR
• Etkin uçları parmaklardan ve bol giysilerden daima uzak tutun.
• Raspa ucun u yalnızca uygun anato mik yerlerde ve hede f cerrahi bölge tey it edildikten sonra çalıştırın.
• FeatherTouch Dönüştürücü, non steril olarak satışa sunulmuştur; ilk kullanımdan önce ve her yeniden kullanımdan önce
temizlenmeli ve sterilize edilmelidir.
• Değiştirilebilir raspa uçları ilk kullanım kolaylığı açısından steril olarak sunulur. Tekrarlanan işlemin raspa uçları üzerindeki
etkisi minimumdur. Kullanım ömrünün sona erdiği normalde kullanıma bağlı yıpranma hasarıyla anlaşılır. Uç körelirse ve
artık etkin biçimd e kesmezse, ucu atıp ye nisiyle değiştir in.
• Saksiyon tüpü yalnızca tek kullanım için steril olarak sunulur. Her kullanımdan sonra tüpü atın.
• Her prosedürden sonra, tüm yeniden kullanılabilen sistem bileşenlerini doğru şekilde temizleyin.
• XPS aksesuarlarını kullanırken hareketli kesme ucunu yalnızca uygun anatomik işaretlere ve amaçlanan cerrahi bölgeye
uygularken dikkatli olun. Elektrikli ileri geri hareket eden / dönen aletlerin kullanımı, vibrasyona bağlı yaralanmayla
sonuçlanabilir. Uygun önlemleri alın.
• Dönen XPS aksesuarlarını kullanırken görüntülemeyi çalıştırın. Cerrahi bölgenin görüntülenmesi mümkün değilse elektrikli
uygulamayı kesin.
• Riskli ameliyat sırasında kanamayı kontrol etmek için ameliyat bölgesinde hastanın güvenliğini tehdit etmeyen yöntemler
kullanın.
• Her zaman kullanımdan önce ve sonra bileşenlerde hasar olup olmadığını kontrol edin. Hasar görülürse, değiştirilinceye
kadar hasarlı parçayı kullanmayın. Hasarlı parçalar, cerrahi bölgede metal talaşlar bırakabilir.
• Hasar veya standart dışı performans meydana gelebileceği için Medtronic Xomed, Inc. sistem bileşenleri dışında parçalar
kullanmayın.
• Kontamine malzemelerin doğru olarak imha edilmesi için yerel düzenlemelere uygun olarak çıkarıp atın.
• Tüm servis uygulamaları yalnızca Medtronic Xomed belgeli personel tarafından gerçekleştirilmelidir.
• El tipi cihazla kullanılan aksesuarları modiye etmeyin. Değiştirilmiş aksesuarlarla performans azalabilir.
• Sstem saklamadan önce yenden kullanılablen chazı sterlze edn ve kurulayın. Çapraz kontamnasyon olasılığını düzenl
temzlk ve sterlzasyon le azaltın.
• Kullanım önces yenden kullanılablen chazın temzlendğn ve sterlze edldğn doğrulayın. Sterlze edlmedyse
kullanmayın.
• Kullanıcı laserasyonunu ve kompromize eldivenle çapraz kontaminasyonu önlemek için el tipi alet çalışırken aksesuarı
değiştirmeyin.
• Ambalaj açılmış veya zarar görmüşse aksesuarı kullanmayın. Açılmış mühür, çapraz kontaminasyona karşı koruma sağlamaz.
• Bükmek veya zor kullanmak aksesuarı kırıp hastaya veya personele zarar verebilir.
63
Page 64

TR
• Aksesuarlar, cerrahi prosedürler de yumuşak doku ve kemiğin reseksiyonu için kullanılır. Aksesuarların kullanımı amaçlanan
uygulamaya ve hasta ihtiyaçlarına bağlıdır. Elektrikli keskin aksesuarlar, kanamaya ve önemli miktarda doku ve kemik
kaybına neden olur.
UYARI
Temizlikten sonra hemen sterilize.
YENİDEN İŞLEME TALİMATLARI
Uyarılar /
Önlemler
Sınırlamalar Kullan ım ömrünün sona erd iği normalde kul lanıma bağlı yıpr anma hasarıyla a nlaşılır. Aşağıda ki İnceleme ve Test
Kullanım Amacı Dönüş türücü, non steril olarak satışa sunulmuştur; ilk kullanımdan ve her yeniden kullanımdan önce
İçerik ve Nakliye Aletlerin kullanım sonrası ilk fırsatta tekrar işlenmesi tavsiye edilir.
Temizlik için
hazırlanma
Temizleme:
Otomatik
(Ultrasonik yıkayıcı
KULLANMAYIN)
Temizleme:
Manuel
Sterilizasyon öncesinde dönüştürücü ve uçlarıdikkatlice inceleyin. FeatherTouch Dönüştürücü en az 100
kullanımlık tahmini ömre sahiptir. Ömrünün sona erip ermediği her kullanımdan önce mekanizma kilidi
kontrol edilerek belirlenir. Önerilen vakum kurulama döngüsünün uygulanamaması dönüştürücünün erken
yıpranmasına neden olur.
Dönüştürücüyü sıvıya batırmayın. Herhangi bir sıvı solüsyona batırılması dönüştürücüye zarar verir garantiyi
geçersiz kılar. Kuru sıcak hava sterilizasyonudönüştürücüye zarar verir garantiyi geçersiz kılar.
Etme bölümüne bakın.
temizlenmeli ve sterilize edilmelidir.
Cihazları her kullanımdan sonra deiyonize suyla derhal ve iyice yıkayın.
Her kullanımdan sonra aletleri hemen deiyonize suyla iyice durulayın. Temizlemeden önce ucu dönüştürücüden
çıkarın. Dönüştürücüyü resiprokan halkadan dişli mengene vidalarını sökerek çıkarın.
Aletleri ve ekipmanı yıkayıcı bölmelerine yerleştirmeden önce sterilizasyon tepsilerinden çıkarın. Aletlere,
yıkayıc ı / dezenfeksi yon cihazı üretic ilerinin tavsiye lerine göre yön ve rin. Yıkayıcı / dezen feksiyon ciha zı veya
deterjan üreticileri tarafından önerilen alkalin veya nötr pH’lı deterjan kullanın.
Otomatk Yıkama Ön Temzlk Talmatları: Raspalar ve dönüştürücüler el le temzlk talmatları uygulanarak el
le temzlenmel (Temzleme: manuel) ve otomatk yıkama/dezenfeksyon chazına konulmadan önce görünür
krlern gderldğ kontrol edlmeldr.
Bu ürünlern aşağıdak şlemler çeren br otomatk yıkama/dezenfeksyon döngüsü kullanılarak etkn şeklde
temzlendğ onaylanmıştır:
Aşama Devridaim Süresi Su sıcaklığı Deterjan tipi
Ön yıkam a 1 3 dakika soğuk musluk
Enzim Yıkama 5 dakika sıcak musluk
Yıka ma 1 5 dakika 66°C ayar
Durulama 1 3 dakika sıcak musluk
Termal yıkama 1 dakika 82°C
Alet tepsilerini kalıntı olup olmadığını görmek için iyice inceleyin.
Saksyon Raspa Ucu Temzleme Talmatları
En az 2 dakk a boyunca ılık (43°C’de n düşük) sıcaklık tak, yumuş ak (pH 7,0- 8,5), enzmatk de terjan ve deyon ze
su karışım ına daldırın. Lüm ene sahp aletle r çn ve temzlk del klerne sah p aletler çn tem zlk solüsyonun u br
rgasy on şırıngasıyla a letn çne püskü rtün ve en az 2 dakk a boyunca çekm esn bekleyn .
Aletler temzleme solüsyonuna daldırdığınızda organk maddeler çıkarmak üzere ovalamak çn yumuşak br
alet fırç ası kullanın. De yonze suyla yık ayın, daha sonra u ltrasonk olara k ılık (43°C’den daha az), or ta (pH 7,0-8,5),
deterja nlı ve deyonze suy la 10 dakka temzle yn.
Deyonze suyla yce yıkayın, lümenlerden ve temzleme delklernden temzleme solüsyonunu yce yıkamak çn
br şırınga kullanın. Alet üzernde görünür kalıntı kalmayana dek bu şeklde temzleyn.
Sıkıştı rılmış hava le kuru tun veya lf bırak mayan br bezle sl erek kurutun. A letler lekele nme veya bozulmaya
karşı nceleyn, gerekrse kullanımdan kal dırın.
Raspa Dönüştürücü Temizleme Talimatları
Dönüşt ürücüyü sıvıya b atırmayın. Her hangi bir sıvı sol üsyona batırılm ası veya kuru sıcak h ava ile sterilize
edilmesi dönüştürücüye zarar verir garantiyi geçersiz kılar.
Yumuşak enzimatik deterjan solüsyonu ile birliktefırça kullanarak ve suyla durulayarak temizleyin. Dönüştürücü
içindeki kalıntılar, tüp temizleyicisi, ince tel veya stile kullanılarak temizlenebilir.
Deiyoni ze suyla iyice dur ulayın ve hav bırakm ayan bir havluyla k urulayın.
Not: Ultr asonik temizle yici veya püskür tmeli yıkama ma kinesi kullanır ken, özellikle e klemli aletler v e aletlerin
konumlandırılmasına ilişkin üretici tavsiyelerine uyun.
suyu
suyu
noktası
suyu
minimum
YOK
nötral pH enzimatik deterjan
nötral pH deterjan
YOK
YOK
64
Page 65

TR
Dezenfeksiyon Aletin kaplaması zarar göreb ileceğinden glutaraldeid, klorin veya amonyum solüsyonlarına daldırmayın veya
Ambalaj Standart bir sterilizasyon sargısı kullanılabilir. ABD’de FDA onaylı bir cerrahi sargının kullanılması
Sterilizasyon
(Sıcaklıklar
gereken minimum
sıcaklık, süreler
gereken minimum
süreyi gösterir)
Bakım, İnceleme
veTest Etme
Saklama Aletleri temi z ve kuru bir alanda s aklayın.
Ek Bilgi Yo k.
Not: Yukarıda verilen talimatların ürünü yeniden kullanıma HAZIRLAYABİLDİĞİ imalatçı tarafından onaylanmıştır. Bu talimatlar, kullanımdan
sonra ilgili yerel düzenlemelere göre atılması gereken tek kullanımlık cihazlar veya tek kullanımlık aksesuarlar için GEÇERLİ DEĞİLDİR.
Yeniden işlemenin, istenilen sonuca ulaşmak için onaylı ekipman kullanılarak gerçekleştirilmesi işlemeyi yapanın sorumluluğundadır. Bu,
normalde sürecin onaylanmasını ve rutin olarak izlenmesini gerektirir.
kuru sıca k hava ile steriliz e etmeyin.
gerekm ektedirSe tlerde: Aletler b u iş için ayrılmış ale t tepsilerine vey a genel amaçlı ste rilizasyon tep silerine
konabilir. Keskin uçların korunduğundan emin olun. Uygun yöntemi kullanarak tepsileri sarın.
Aletin te miz olup olmadığı nı ve çalışıp çalışma dığını kontrol ed in. Debris vars a tekrar temizle yin ve hasar gören
aletler i kullanımdan ka ldırın. Aletle ri, ilk çentiktek i sürgüler ve askı lar ile kapatın. Al etleri, üstü ve al tı delikli
sterilizasyon kaplarına ve mikrocerrahide kullanılanlar gibi desteklere yerleştirin. Aşağıdaki tablod a gösterilen
uygun döngüyü izleyin.
Buhar döngülerinin tümü sargılı kongürasyonda doğrulanmıştır, sargılı veya sargısız sterilizasyon
gerçekleştirilebilir. Bu aletler yalnızca buhar sterilizasyonu yöntemlerinin kullanılması için onaylanmıştır.
Yalnızca Cihazlar Sadece Aletler veya Alet Tepsisindek i Aletler
Döngü Gravite Gravite Ön vakum Ön vakum (FR/
Sıcaklık 121° C 132° C 132° C 13 4°C 134° C
Süre 30 dk 10 dk 4 dk 18 dk 3 dk
Kurutma 30 -40 dakika veya kuruduğu gözle görülene kadar
%100 EtO Sterilizasyon Parametreleri (ayar noktaları)
Önkoşullama 54° C, 60% bağıl nem, 6 0 dakika
Sterilizasyon Sıcaklık 54°C
Bağıl Nem 60 ± 5%
Etilen ok sit
konsantrasyonu
Gaz maru ziyeti
süresi (tam döngü)
Havalanma 54°C, 8 saat
FeatherTouch Dönüştürücü en az 100 kullanımlık tahmini ömre sahiptir. Ömrünün sona erip ermediği her
kullanımdan önce mekanizma kilidi kontrol edilerek belirlenir. Tekrarlanan işlemin raspa uçları üzerindeki etkisi
minimumdur. Kullanım ömrünün sona erdiği normalde kullanıma bağlı yıpranma hasarıyla anlaşılır. Uç körelirse
ve artık e tkin biçimde kesm ezse, ucu atıp yen isiyle değişti rin.
725 ± 25 mg/L
120 dakika
WHO)
Ön vakum
(BK)
MÜŞTERI HIZMETLERI BILGILERI
Bu ürünün kullanımı ile ilgili daha fazla bilgi almak veya bir sorun bildirmek için, lütfen her cihazın ambalajındaki mavi / beyaz
iletişim b ilgileri kartında yer alan uyg un bilgileri kullanarak Medt ronic Xomed ile iletişim kurun veya yerel dağıtıcınıza baş vurun.
İADELER VE / VEYA TAMİRLER
Ürünü Med tronic Xomed’e göndermeden ön ce bir İade Mallar Yetki numarası (RGA#) almak için (800 -874-5797) numaralı telef onu
arayarak Medtronic Xomed Müşteri Hizmetleriyle temasa geçin. Garanti bilgisini teyit etmek için orijinal fatura numarasını veya
satın alma si pariş numara sını hazır bulu ndurun. RGA n umarası, kutu v e iade ve / veya tami rle birlik te verilen bütü n belgeler ü zerinde
açıkça görünmelidir. Medtronic Xomed’e iade edilen bütün ürünler koruyucu ambalaj içinde güvenli bir biçimde paketlenmelidir.
Müşteri, bir Satın Alma Sipariş numarası; doğru gönderme ve fatura adresi ile birlikte ya tam doldurulmuş bir Tamir Sipariş Formu
ya da sorun un açıklamasını veya iadenin ned enini sunmalıdır.
SINIRLI GARANTİ
manuals.medtronic.com
65
Page 66
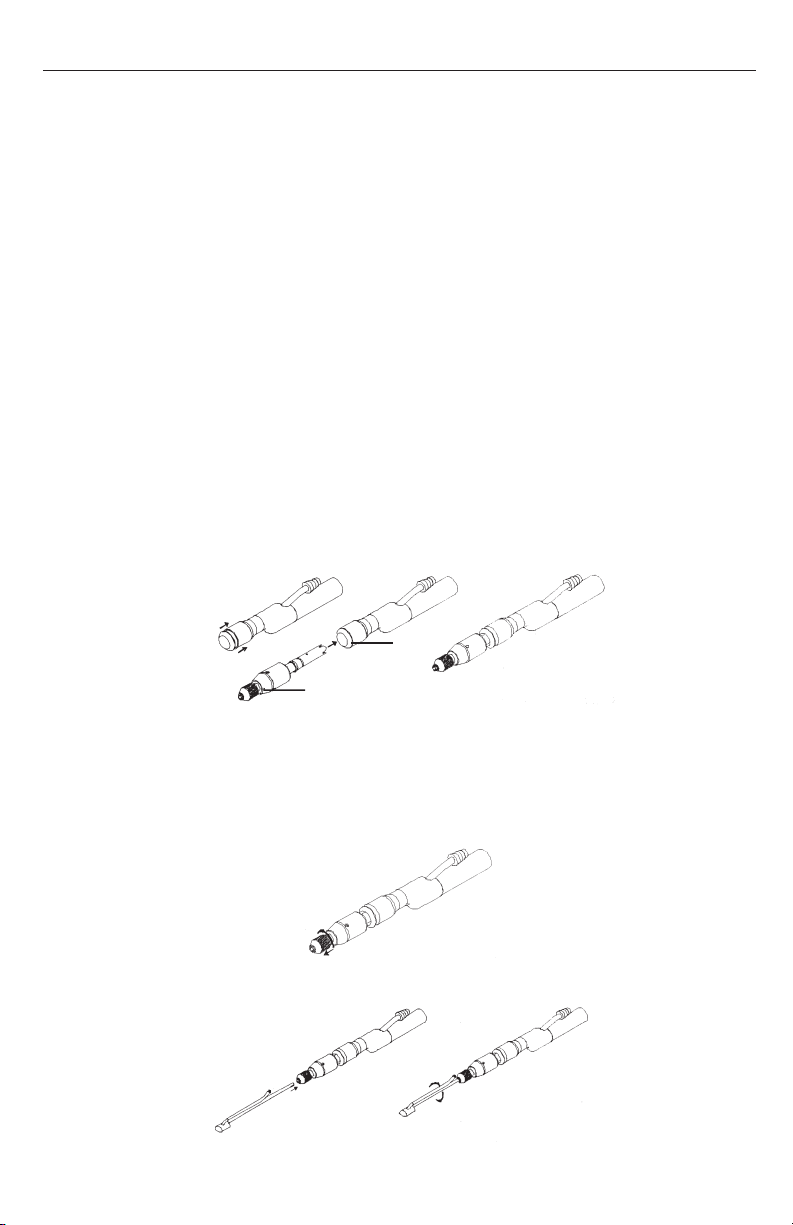
NO
NO
SYSTEMKOMPONENTER
REF 1922005 – FeatherTouch® Automatisert raspeomformer
REF 1992208 – FeatherTouch® Rasp espiss med sug, 8 mm, grov
REF 1992210 – FeatherTouch® Raspespiss m ed sug, 8 mm, n
REF 1895524 – FeatherTouch® Sugeslange
REF 1922006 – FeatherTouch® Steriliseringsbrett
BESKRIVELSE AV UTSTYRET
FeatherTouch® Automatisert raspeomformer benytter StraightShot®- eller StraightShot® Magnum®-håndstykket som elektrisk
drivkilde og endrer rotasjonsretningen til forover/bakover. FeatherTouch®-omformeren har en patron for feste av FeatherTouch®raspespissene.
TILTENKT BRUK / INDIKASJONER FOR BRUK
FeatherTouch®-omformeren er ment som tilbehør for StraightShot®- og StraightShot® Magnum®-håndstykker for betjening av
raspespisser til bortskjæring og erning av bløtt/hardt vev eller ben i forbindelse med otorhinolaryngologi og hode/hals-kirurgi.
Manuell e kirurgiske ins trumenter er m ent for bruk ved ul ike kirurgiske p rosedyrer. De t er det kirurgi ske teamet som har a nsvaret for
å velge rik tige instrumenter for hver prose dyre. Bruk ikke disse instrumentene til andre formål enn de er ment for. Instrumentene
må alltid re ngjøres og steriliseres før bruk, også når de skal br ukes for første gang.
KONTRAINDIKASJONER
Ingen kjente.
BRUK
1. Slik kobler du omformeren til håndstykket: Trykk inn spennpatronen på håndstykket, sett inn omformeren med en fast
bevegelse og slipp spennpatronen. Trekk litt i omformeren for å forsikre deg om at den sitter godt på plass. Hvis omformeren
ikke sitter godt nok på plass i spennpatronen, skal du gjenta prosessen.
2
1
1 Omformer 2 Inntryk t spennpatron på håndstykket
2. Når omformeren er godt festet i spennpatronen på håndstykket, skal du klargjøre patronen for tilkobling av raspespiss på
omformeren ved å vri patronen mot klokken til du føler motstand. Patronen skal nå være nærmest omformerens åpne, distale
ende.
3. Sett den aktuelle raspespissen godt fast i patronen og drei til sporet i enden på skaftet går i inngrep.
66
Page 67
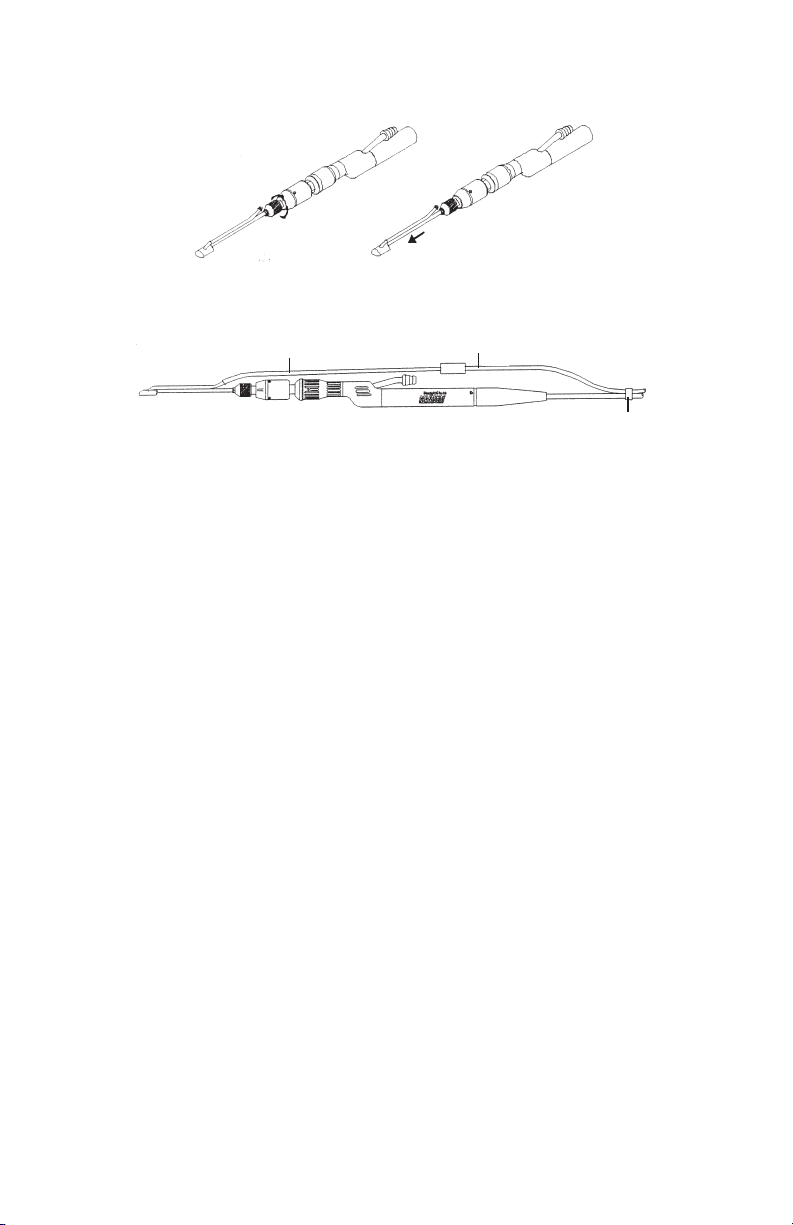
4. Lås raspespissen på plass i patronen ved å vri patronen med klokken og stramme godt til. Test koblingen: Hold fast håndstykket
og trekk raspespissen bort fra håndstykket. Hvis raspespissen slipper taket eller ytter på seg, skal du koble til og stramme på
nytt og så utføre testen igjen.
5. Hvis det skal brukes sug, fester du FeatherTouch®-sugeslangen til raspespissen som vist, og deretter kobler du en standard
sugeslange fra operasjonsstuen til denne slangen. Bruk den hvite klemmen som følger med FeatherTouch®-sugeslangen, til å
feste operasjonsstuens sugeslange til håndstykkets kabel.
1
2
3
1 Adaptersugeslangen 2 Operasjonsstuens sugeslange 3 Hvit klemme
6. Forsikre deg om at kablene til håndstykket og fotkontrollen er riktig tilkoblet Medtronic Xomed XPS®-mikrodebriderkonsollen.
Still inn konsollen på retningen FREMOVER, variabel modus og maksimal hastighet mellom 3000 og 5000 o/min.
7. Aktiver FeatherTouch® ved å trykke på fotkontrollen.
FORHOLDSREGLER
• Hastigheter over 5000 o/min fører til unormalt stor slitasje på omformeren og kan gjøre garantien ugyldig. Omformeren
skal kun br ukes i forovermodus .
• FeatherTouch®-omformeren har en forventet levetid på minst 100 gangers bruk. Du kan nne ut om omformeren har nådd
endt levetid, ved å kontrollere låsemekanismen hver gang omformeren skal brukes.
ADVARSLER
• Hold alltid aktive spisser unna ngre og løstsittende klesplagg.
• Bruk kun raspespissen etter at de relevante anatomiske landemerkene og det tiltenkte operasjonsstedet er bekreftet.
• FeatherTouch®-omformeren leveres usteril og må derfor alltid rengjøres og steriliseres før bruk.
• Utskiftbare raspespisser leveres sterile for første gangs bruk. Gjentatt rengjøring og sterilisering har minimal eekt på
raspespissene. Levetiden bestemmes normalt av slitasje på grunn av bruk. Kast raspespissen og erstatt den med en ny når
spissen blir sløv og ik ke lenger skjærer som den skal.
• Sugeslangen leveres steril og er kun ment for engangsbruk. Kast slangen etter bruk.
• Alle komponenter som skal brukes igjen, må rengjøres tilstrekkelig etter prosedyren.
• Utvis forsiktighet slik at den bevegelige skjæreenden bare brukes innenfor de rette anatomiske landemerkene og det
tiltenkte operasjonsstedet ved bruk av XPS®-tilbehør. Bruken av el-drevne oscillerende/roterende instrumenter kan
resultere i vibrasjonsskade. Følg aktuelle forholdsregler.
• Bruk visualisering når du betjener roterende XPS®-tilbehør. Opphør bruken av el-drevet tilbehør hvis visualiseringen av
operasjonsstedet går tapt.
• Bruk meto der på operasjonsstedet for å kontrollere blødning s om ikke utsetter pasienten fo r fare ved risikofy lt kirurgi.
• Kontroller alltid komponentene før og etter bruk for å avdekke eventuelle skader. Hvis det oppdages en skade, må den
skadede delen ikke brukes før den er skiftet ut. Skadede deler kan etterlate metallpartikler på operasjonsstedet.
• Bruk ikke a ndre deler enn sy stemkomponen tene fra Medtro nic Xomed, Inc., e llers kan det fø re til skade eller r edusert yt else.
• Tilbehør skal ernes og kastes i henhold til lokalt regelverk for deponering av kontaminert materiale.
• Servi ce skal bare utføres av Medtronic Xomed-k valisert pe rsonell.
• Tilbeh ør som brukes med håndstykket, må ikke mo diseres. Modisert tilb ehør kan føre til redusert y telse.
• Steriliser og tørk gjenbrukbare komponenter før systemet settes til oppbevaring. Vær nøye med å rengjøre og sterilisere
komponentene til riktig tid, for å redusere faren for smitteoverføring.
• Veriser at gjenbrukbare komponenter ble rengjort og sterilisert, før bruk. Hvis de ikke er sterilisert, skal de ikke brukes.
• Skift ikke tilbehør mens håndstykket går. Dette er for å unngå rifter på brukeren og smitteoverføring gjennom skadet
hanske.
• Tilbehøret skal ikke brukes hvis forpakningen er åpen eller skadet. Når forseglingen er brutt, er det ingen beskyttelse mot
smitteoverføring.
• Hvis tilbehøret bøyes eller bre kkes, kan det ødel egges og forårs ake skade på pasient e ller personell.
• Tilbehør er tilgjengelig for reseksjon av bløtvev og ben ved kirurgiske prosedyrer. Bruken av tilbehør avhenger av tiltenkt
bruk og pasientens behov. Skarpt el- drevet tilbehør f remkaller blød ning og erning av sign ikante vev og knok ler.
ADVARSEL
Sterilisere umiddelbart etter rengjøring.
NO
67
Page 68

NO
RENGJØRINGSINSTRUKSJONER
Advarsler/
forholdsregler
Begrensninger L evetiden beste mmes normalt av sli tasje på grunn av bru k. Se “Vedlikeho ld, inspeksjo n og testing” ned enfor.
Ved br uk Omformeren leveres usteril og må alltid rengjøres og steriliseres før første gangs bruk og eventuell senere bruk.
Lagring og transport Det anbefa les at instrument ene rengjøres s å raskt som mulig e tter de har vært i b ruk.
Før dekontaminering Vær nøye med å s kylle produk tet grundig me d deionisert v ann etter bruk . Koble spissen fr a omformeren fø r
Rengjøring:
Automatisert
(Bruk IK KE
ultralydvaskemaskin)
Rengjøring: Manuell Rengjøringsinstruksjoner for raspespisser med sug
Desinsering Instrumenten e må ikke legges i glu taraldehyd, kl or eller salmiak kløsninger, og de m å heller ikke tørr steriliseres ,
Forpakning En standard, sterilisert innpaknin g kan brukes. I USA er det påkrevd med FDA-godkjent kirurgiomslag.
Før sterilisering skal du forsiktig undersøke omformeren og raspespissene. FeatherTouch-omformeren har
en forv entet levetid på min st 100 gangers bruk . Du kan nne ut om om formeren har nå dd endt levetid, ve d å
kontrollere låsemekanismen hver gang omformeren skal brukes. Hvis anbefalt vakuumtørkesyklus ikke brukes,
kan det fø re til unormalt st or slitasje på omfo rmeren.
Omform eren skal ikke sen kes ned i væske. Ned senking i enhver fo rm for væske vil sk ade omformeren o g gjøre
garantien ugyldig. Tørrsterilisering vil skade omformeren og gjøre garantien ugyldig.
Vær nøye me d å skylle instru mentene grundi g med avioniser t vann etter hver br uk.
rengjøring. Demonter omformeren ved å skru den riete hylsen av den frem- og tilbakegående patronen.
Fjern instrumenter og utstyr fra steriliseringsbrettene før de plasseres i rengjøringskurvene. Plasser utstyret i
henhol d til anbefaling ene fra produse nten av vaskemaski nen/dekontamina toren. Bruk såpe s om er alkalisk ell er
pH-nøytral, og som anbefales av produsenten av vaskemaskinen/dekontaminatoren eller rengjøringsmiddelet.
Instruk sjoner for ren gjøring før vask i m askin: Raspene o g omformeren må r engjøres manue lt i henhold til
instruk sjonene for man uell rengjøri ng (Rengjøring : Manuell). Sjekk a t synlig smuss er e rnet, før du plass erer
dem i vaskemaskinen/desinseringsmaskinen.
Disse produktene er godkjent for eektiv rengjøring med en automatisk vaske-/desinfeksjonssyklus basert på
følgende instruksjoner:
Fase Resirkuleringstid Vann -
Første forvask 3 minutter
Enzymvask 5 minutter varmt vann
Første vask 5 m inutter 66 °C
Første skylling 3 minu tter varmt vann
Varmeskylling 1 minutter 82 °C
Se til at det i kke sitter igje n skitt på instr umentbrette ne.
La ligge i l unkent (kaldere e nn 43 °C), mildt (pH7,0–8 ,5), enzymatis k rengjøringsm iddel og avionis ert vann i
minst 2 minu tter. På instrume nter med lumen og ins trumenter med r engjøringsk anal kan det sprøy tes inn
rengjø ringsmiddel i ins trumentet med e n sprøyte med sk yllemiddel . La det ligge i mins t 2 minutter.
Bruk en myk i nstrumentbør ste til å skrubbe i nstrumentene m ens de er nedsunket i r engjøringsl øsning, for å
erne or ganisk materiale . Skyll med avio nisert vann, og r engjør med ultr alyd i lunkent (kal dere enn 43 °C), mildt
(pH 7,0–8, 5) rengjøringsm iddel og avionis ert vann i 10 minutt er.
Skyll g rundig med avion isert vann, og b ruk en sprøyte ti l å skylle all reng jøringsløsnin gen ut fra lumene r og
rengjø ringskanaler. Re ngjør på denne må ten til det ikke nne s noen synlige re ster av smuss på instr umentet.
Tørk med tr ykkluft, el ler tørk det tør t med en lofri klu t. Undersøk om ins trumentene har b litt misfarg et eller
defek t, og ta dem om nødv endig ut av bruk.
Rengjøringsinstruksjoner for raspeomformeren
Omform eren skal ikke sen kes ned i væske. Ned senking i enhver fo rm for væske eller t ørrsterilise ring vil skade
omformeren og gjøre garantien ugyldig.
Rengjø r omformeren me d en børste og en mi ld enzymatisk s åpeblanding , og skyll med van n. Urenheter inn e
omform eren kan ernes m ed en piperense r, tynn tr åd eller stilet t.
Skyll g rundig med deio nisert vann, og t ørk med et håndkl e som ikke loer.
Merk: N år det benytte s ultralydrens el ler en vaskemask in, må alltid produ sentens anbefa linger følges, s pesielt
med tanke p å bevegelige de ler og plasseri ngen av instrumen tene.
da det kan o ppstå skade på in strumentover aten.
I sett: I nstrumentene k an legges på bes temte instrumen tbrett eller st eriliseringsb rett for gener ell bruk. Sørg fo r
at skarp e kanter er dekket t il. Pakk inn bret tene ved å bruke rik tig metode.
temperatur
kaldt van n fra
springen
fra springen
(settpunkt)
fra springen
minimum
Rengjørings-middel
I/R
neutral pH enzymatic detergent
Neutral pH detergent
I/R
I/R
68
Page 69

NO
Sterilisering
(Temperaturene
er minimumskrav,
tidsintervallene er
minimumskrav)
Vedlikehold,
inspeksjon og testing
Oppbevaring Oppbevar instrumentene rent og tørt.
Tilleggsinformasjon Ingen.
MERK! Produsenten har godkjent instruksjonene ovenfor som MULIGE metoder for gjenbruk av produktet. De er IKKE gjeldende for
instrumenter eller tilbehør for engangsbruk. De må destrueres etter bruk i henhold til gjeldende retningslinjer. Det er fortsatt brukerstedets
ansvar å sikre at rengjøring utføres med godkjent utstyr for å oppnå ønsket resultat. Dette krever vanligvis at prosessen valideres og
rutinekontrolleres.
Noen ins trumenter har spe sikke instruk sjoner for mont ering. I så fall må du s e i instruksjon ene som fulgte me d instrumentet .
Kontroll er at instrumente t er rent og at det virk er som det skal. Re ngjør på nytt hv is det sitter igj en rester. Ta
defek te instrumenter u t av bruk. Instru menter med hek ter og klemmer sk al festes i det før ste hakket. Leg g
instrumentene i steriliseringsbeholderne med perforeringer øverst og nederst, og på støtter tilsvarende det som
brukes i mikrokirurgi. Følg den gjeldende syklusen som står i tabellen nedenfor.
Alle damps yklusene har b litt godkjen t med innpakked e instrumenter, og in strumentene ka n steriliseres
innpakket eller åpnet. Disse instrumentene er kun godkjent for dampseriliseringsmetoder.
Kun instrumenter Kun instrumenter eller instrumenter i
Syklu s Gravitet Gravitet Pre-vakuum Pre-vakuum
Tem p 121° C 132° C 132 °C 134° C 13 4°C
Tid 30 min 10 min 4 min 18 min 3 min
Tørking 30-40 min utter, eller til de t er synlig tørt
100 % EtO steriliseringsparametere (settpunkter)
Forbehandling 54°C , 60 % relativ luf tfuktighe t, 60 minutter
Sterilisering Temperatur 54° C
Relativ luftfuktighet 60 ± 5%
Etylenoksidkonsentrasjon 7 25 ± 25 mg/L
Gasseksponering (full
syklus)
Lufting 54°C, 8 ti mer
FeatherTouch- omformeren ha r en forventet le vetid på minst 100 gan gers bruk. Du ka n nne ut om omform eren
har nådd en dt levetid, ved å kon trollere låsem ekanismen hver gan g omformeren sk al brukes. Gjent att
rengjø ring og sterilis ering har minimal e ekt på raspes pissene. Leveti den bestemmes no rmalt av slitasje p å
grunn av bru k. Kast raspes pissen og ersta tt den med en ny når sp issen blir sløv og i kke lenger skjæ rer som den
skal.
120 m inu tte r
instrumentbrett
(FR/ WHO)
Pre-vakuum
(UK)
INFORMASJON OM KUNDESERVICE
Hvis du ønske r mer informasjo n om bruken av dett e produktet ell er vil rappor tere probleme r, ber vi deg ta kontak t med Medtro nic
Xomed. Du nner nødvendige opplysninger på det blå og hvite kortet med kontaktinformasjon som fulgte med utst yret. Du kan
også kontakte den lokale distributøren.
RETUR OG/ELLER REPARASJON
Kontakt Medtronic Xomeds kundeservice på (800-874-5797) for å få RGA-nummeret for retur av varer (RGA = Return Goods
Authorization) før Produktet sendes til Medtronic Xomed. Sørg for å ha det originale fakturanummeret eller ordrenummeret
for hånden for lettere å kunne verisere garantiinformasjon. RGA-nummeret skal være lett synlig på emballasjen og på alle
dokumenter som sendes sammen med Produktet. Alle Produkter som returneres til Medtronic Xomed, skal være forsvarlig
innpakket i beskyttende emballasje.
Kunden må oppgi ordrenummeret, riktig leveringsadresse og faktureringsadresse, og enten et utfylt ordreskjema for reparasjon
eller en forklaring av problemet eller grunnen til returen.
BEGRENSET GARANTI
manuals.medtronic.com
69
Page 70

68E3841 C
© 2015 Medtronic, Inc.
2015-01
medtronic.com
manuals.medtronic.com
EC REP
Medtronic Xomed, Inc.
6743 Southpoint Drive North
Jacksonville, Florida USA 32216
+1 800 874 5797
Medtronic B.V.
Earl Bakkenstraat 10
6422 PJ Heerlen
The Netherlands
+31 45 566 8000
 Loading...