

Page 1

User’s Guide
SituateTM
Detection System 200X
Page 2

Page 3

User’s Guide
SituateTM
Detection System 200X
For use with software version 2.X
Part Number: PT00119220
Page 4

Preface
Preface
This guide and the equipment it describes are for use only by qualified medical professionals
trained in the particular technique and surgical procedure to be performed. It is intended as
a guide for using the Medtronic Situate™ detection system 200X only.
Equipment covered in this manual
Situate™ Detection System 200X with software version 2.x.
Conventions Used in this Guide
Warning
Indicates a potentially hazardous situation which, if not avoided, could result in death or serious
injury.
Caution
Indicates a hazardous situation which, if not avoided, may result in minor or moderate injury.
Note: Indicates a hazard which may result in product damage, an operating tip, or a
maintenance suggestion.
ii Situate™ Detection System 200X User's Guide
Page 5

Limited Warranty
Medtronic warrants each covered product listed below to be free from defects in material
and workmanship for normal use and service for the period(s) set forth below. Medtronic’s
obligation under this warranty is limited to the repair or replacement, at its sole option, of
any product, or part thereof, which has been returned to it (or its authorized distributor)
within the applicable time period shown below after delivery of the product to the original
purchaser, and which examination discloses, to Medtronic’s satisfaction, that the product is
defective. This limited warranty does not apply to any product, or part thereof, which has
been repaired or altered in a way so as, in Medtronic’s judgment, to affect its stability or
reliability, or which has been subjected to misuse, neglect, or accident.
The warranty periods for Medtronic products are as follows:
Limited Warranty
SituateTM Detection System 200X
Notwithstanding any other provision herein or in any other document or communication,
Medtronic’s liability with respect to this limited warranty and the products sold hereunder
shall be limited to the aggregate purchase price for the products sold to the customer. This
limited warranty is non-transferable and runs only to the original purchaser of the covered
product(s). There are no warranties which extend beyond the terms hereof. Medtronic
disclaims any liability hereunder or elsewhere in connection with the sale of products and
for any form of indirect, tort, or consequential damages.
This limited warranty and the rights and obligations hereunder shall be construed under and
governed by the laws of the State of Colorado, USA. The sole forum for resolving disputes
arising under or relating in any way to this limited warranty is the District Court of the County
of Boulder, State of Colorado, USA.
Medtronic reserves the right to make changes in covered products built or sold by it at any
time without incurring any obligation to make the same or similar changes to equipment
previously built or sold by it.
THE OBLIGATION TO REPAIR OR REPLACE A DEFECTIVE OR NONPERFORMING PRODUCT IS
THE SOLE REMEDY OF THE CUSTOMER UNDER THIS LIMITED WARRANTY. EXCEPT AS
EXPRESSLY PROVIDED HEREIN, Medtronic DISCLAIMS ALL OTHER WARRANTIES,
WHETHER EXPRESS OR IMPLIED, ORAL OR WRITTEN, WITH RESPECT TO PRODUCTS,
INCLUDING WITHOUT LIMITATION ALL IMPLIED WARRANTIES, WARRANTIES OF
MERCHANTABILITY OR FITNESS FOR A PARTICULAR PURPOSE.
One year from date of shipment
Situate™ Detection System 200X User's Guide iii
Page 6

Software License
Software License
Medtronic llc, (collectively called “Medtronic” herein) own the entire right, title, and interest
in and to all of the computer programs and all portions thereof, and associated
documentation (collectively, the “Software”) provided to Customer as may be installed in the
Products and equipment addressed herein or provided separately, and it has the sole right
to grant licenses hereunder.
The evaluation allowance herein and any ultimate price paid by Customer for the products
incorporating the Software include as a portion of that evaluation allowance, or price, a
license fee granting Customer only the rights set forth in this Software License. Customer
further acknowledges and agrees that the Software is owned exclusively by Medtronic. The
Software is licensed to be used on only one computing device or Product, and a valid license
must be purchased for each computing device on which the Software is installed.
Single User License Grant: Medtronic grants to Customer a limited, nonexclusive, nonsublicensable, nontransferable and revocable license to use the Software, exclusively at
Customer’s location as identified by Customer as the ship-to location of the Product, solely
in machine-readable object code form only on a single central processing unit owned or
leased by Customer or otherwise embedded in equipment provided by Medtronic, and for
the sole purpose of Customer’s internal business purpose in the operation of the Product or
equipment purchased from, other otherwise provided by, Medtronic or its affiliates.
Except to the extent expressly authorized in this Software License or by law, Customer shall
not and shall not cause any third party to: (i) decompile, disassemble, or reverse engineer the
Software; (ii) modify or create any derivative works (including, without limitation,
translations, transformations, adaptations or other recast or altered versions) based on the
Software, or alter the Software in any way; (iii) merge the Software with any other software
or product not supplied by Supplier; (iv) use, copy, sell, sublicense, lease, rent, loan, assign,
convey or otherwise transfer the Software except as expressly authorized by the Agreement;
(v) distribute, disclose or allow use of the Software, in any format, through any timesharing
service, service bureau, network or by any other means, to or by any third parties; (vi) remove
or modify any copyright, confidential and/or proprietary markings, legends or restriction
which are in the Software originally supplied to Customer; or (vii) violate any obligations
with regard to Medtronic’s Confidential Information. To the extent that Customer is expressly
permitted by applicable mandatory law to undertake any of the activities listed in the
preceding sentence, Customer will not exercise those rights until Customer has given
Medtronic thirty (30) days written notice of Customer’s intent to exercise any such rights
unless an order of a government agency of competent jurisdiction will not so allow.
Except for the limited license rights expressly granted in this Software License, Medtronic
reserves all rights in and to the Software and any modifications thereto and derivations
thereof, including, but not limited to, all title, ownership, intellectual property rights and all
other rights and interests. Customer will own only the hardware or physical media on which
the Software is stored or processed, if any.
Customer agrees that the Software, including the specific design and structure of individual
programs, constitute confidential information and trade secrets of Medtronic, whether or
not the programs may be copyrighted or copyrightable, and/or patented or patentable.
Customer agrees not to disclose, provide, or otherwise make available such confidential
information, trade secrets or copyrighted material in any form to any third party. Customer
agrees that it will make the Software available only to employees, contractors, or consultants
iv Situate™ Detection System 200X User's Guide
Page 7

with a need to know, who are obligated to comply with all license restrictions contained in
this Software License Agreement and to maintain the secrecy of the Software and all other
Confidential Information. Customer is responsible for the compliance of all users with these
obligations.
Customer may, from time to time, request that Medtronic incorporate certain features,
enhancements or modifications into the Software. Medtronic may, in its sole discretion,
undertake to incorporate such changes and distribute the Software so modified to all or any
of Medtronic's customers. All such error corrections, bug fixes, patches, updates or other
modifications provided to Medtronic shall be the sole property of Medtronic.
This Software License is effective until terminated. Customer may terminate this License at
any time by destroying all copies of Software including any documentation. This License will
terminate immediately upon notice from Medtronic if Customer fails to comply with any
provision of this License or any supplier agreement. Medtronic may terminate the Software
licenses granted herein and exercise all available rights by giving written notice, effective
immediately, if within ten (10) business days of Customer’s receipt of a reasonably detailed
written request to cure, Customer has not cured all breaches of this License’s limitations or
restrictions. Upon such termination, Customer will immediately pay all undisputed fees
outstanding, cease use of all Software, return or delete, at Medtronic’s request, all copies of
the Software in Customer’s possession, and certify compliance with all of the obligations
herein to Medtronic in writing.
Software License
Limited Warranty: Medtronic represents and warrants to Customer that the Software will
perform substantially as described in Medtronic's then current documentation for such
Software for the longer of (a) the remaining warranty applicable to the product with which
such Software was delivered (not to exceed one year) or (b) ninety (90) days from the date
such Software was shipped or first made available to Customer for electronic download from
Medtronic’s service site. If you notify Medtronic of defects during the warranty period,
Medtronic will replace the Software or, at its option, refund the purchase price. Your remedy
for breach of this limited warranty shall be limited to replacement or refund and shall not
encompass any other damages. No dealer, distributor, agent or employee of Medtronic is
authorized to make any modification or addition to the warranty and remedies stated above.
Notwithstanding these warranty provisions, all of Medtronic's obligations with respect to
such warranties shall be contingent on Customer’s use of the Software in accordance with
this Agreement and in accordance with Medtronic's instructions as provided by Medtronic
in the documentation, as such instructions may be amended, supplemented, or modified by
Medtronic from time to time. Medtronic shall have no warranty obligations with respect to
any failures of the Software which are the result of accident, abuse, misapplication, extreme
power surge or extreme electromagnetic field.
This warranty does not apply to any damages, malfunctions, or non-conformities caused to
or by: (i) Customer’s use of Software in violation of the license granted under the Agreement
or in a manner inconsistent with any provided documentation; (ii) use of non-Medtronic
furnished equipment, software, or facilities with its equipment or Products; (iii) Customer’s
failure to follow Medtronic’s installation, operation, repair or maintenance instructions; (iv)
Customer’s failure to permit Medtronic timely access, remote or otherwise, to Products; (v)
failure to implement all new Updates to Software provided under the Agreement; (vi)
Products or equipment with their original manufacturer’s serial numbers altered, defaced or
deleted; (vii) Products or equipment that have been altered, serviced or modified by a party
Situate™ Detection System 200X User's Guide v
Page 8

Software License
other than Medtronic; or (viii) Software that has been subjected to abnormal physical or
electrical stress, misuse, negligence or accident by Customer or a third party.
DISCLAIMER: EXCEPT AS SPECIFIED IN THIS WARRANTY, ALL EXPRESS OR IMPLIED
CONDITIONS, REPRESENTATIONS, AND WARRANTIES INCLUDING, WITHOUT LIMITATION,
ANY IMPLIED WARRANTY OF MERCHANTABILITY, FITNESS FOR A PARTICULAR PURPOSE, OR
ARISING FROM A COURSE OF DEALING, USAGE, OR TRADE PRACTICE, ARE HEREBY
EXCLUDED TO THE EXTENT ALLOWED BY APPLICABLE LAW.
IN NO EVENT WILL EITHER PARTY BE LIABLE FOR ANY LOST REVENUE, PROFIT, OR DATA, OR
FOR SPECIAL, INDIRECT, CONSEQUENTIAL, INCIDENTAL, OR PUNITIVE DAMAGES HOWEVER
CAUSED AND REGARDLESS OF THE THEORY OF LIABILITY ARISING OUT OF THIS SOFTWARE
LICENSE EVEN IF SUCH PARTY HAS BEEN ADVISED OF THE POSSIBILITY OF SUCH DAMAGES.
IN NO EVENT SHALL ONE PARTY’S LIABILITY TO THE OTHER PARTY, WHETHER IN CONTRACT,
TORT (INCLUDING NEGLIGENCE), OR OTHERWISE, EXCEED THE PRICE PAID OR TO HAVE BEEN
PAID BY CUSTOMER. THE FOREGOING LIMITATIONS SHALL APPLY EVEN IF THE ABOVESTATED WARRANTY FAILS OF ITS ESSENTIAL PURPOSE. SOME STATES DO NOT ALLOW
LIMITATION OR EXCLUSION OF LIABILITY FOR CONSEQUENTIAL OR INCIDENTAL DAMAGES.
U.S. Government Rights. The Software is a “commercial item” developed exclusively at
private expense, consisting of “commercial computer software” and “commercial computer
software documentation” as such terms are defined or used in the applicable U.S. acquisition
regulations. The Software is licensed hereunder (i) only as a commercial item and (ii) with
only those rights as are granted to all other customers pursuant to the terms and conditions
of this License. Customer shall not use, duplicate, or disclose the Software in any way not
specifically permitted by this License. Nothing in this License requires Medtronic to produce
or furnish technical data for or to Customer.
If any provision of this Agreement shall be held by a court of competent jurisdiction to be
illegal, invalid or unenforceable, the remaining provisions shall remain in full force and effect.
This License Agreement contains the entire understanding and agreement between the
parties respecting the Software. This Agreement may not be supplemented, modified,
amended, released or discharged except by an instrument in writing signed by each party's
duly authorized representative. All captions and headings in this Agreement are for
purposes of convenience only and shall not affect the construction or interpretation of any
of its provisions. Any waiver by either party of any default or breach hereunder shall not
constitute a waiver of any provision of this Agreement or of any subsequent default or
breach of the same or a different kind.
The construction and performance of this Agreement will be governed by the laws of the
State of Colorado without reference to its choice of law principles. The parties hereby submit
to the jurisdiction of the courts of the State of Colorado.
vi Situate™ Detection System 200X User's Guide
Page 9

Symbol Glossary
Standards and IEC Classifications
The console meets all pertinent clauses of the IEC 60601-1.
Non-ionizing electromagnetic radiation
Classified with respect to electrical shock, fire, and mechanical hazards
only in accordance with UL standard 60601-1; certified to CSA standard
C22.2 No. 601.1.
Symbol Glossary
Symbols
This device complies with part 18 of the FCC rules
Not made with natural rubber latex
For prescription use only
Consult the instructions for use
Caution
Situate™ Detection System 200X User's Guide vii
Page 10
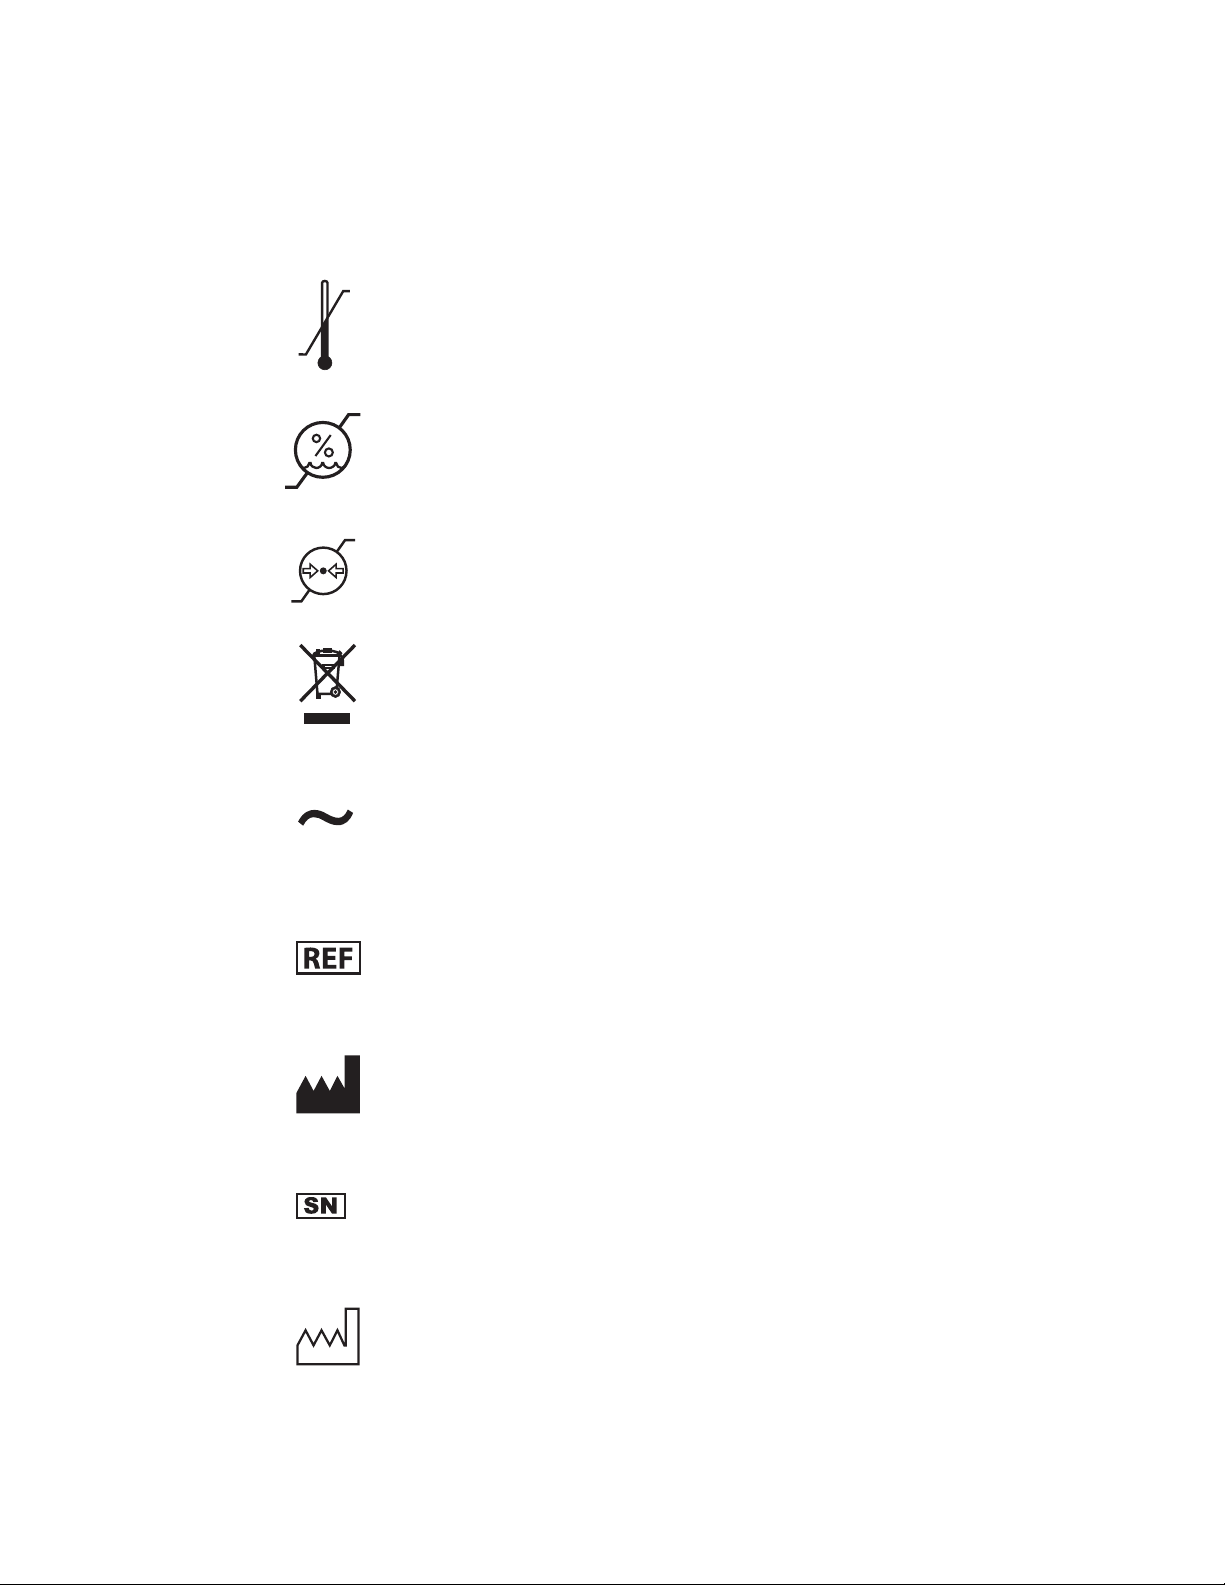
Symbol Glossary
-40°F
-40°C
10%
500hPa
158°F
70°C
90%
1060hPa
Temperature limitations for storage
Humidity limitations for storage
Atmospheric pressure limitations for storage
Product contains waste from electrical and electronic
equipment, and should be separately collected and not
disposed of as unsorted municipal waste
Alternating current
Catalog number
Manufacturer
Serial number
Date of manufacture
viii Situate™ Detection System 200X User's Guide
Page 11

Table of Contents
Preface . . . . . . . . . . . . . . . . . . . . . . . . . . . . . . . . . . . . . . . . . . . . . . . . . . . . . . . . . . . . . . . . ii
Conventions Used in this Guide . . . . . . . . . . . . . . . . . . . . . . . . . . . . . . . . . . . . . . . . ii
Limited Warranty . . . . . . . . . . . . . . . . . . . . . . . . . . . . . . . . . . . . . . . . . . . . . . . . . . . . . iii
Software License. . . . . . . . . . . . . . . . . . . . . . . . . . . . . . . . . . . . . . . . . . . . . . . . . . . . . . iv
Symbol Glossary . . . . . . . . . . . . . . . . . . . . . . . . . . . . . . . . . . . . . . . . . . . . . . . . . . . . . . vii
Standards and IEC Classifications . . . . . . . . . . . . . . . . . . . . . . . . . . . . . . . . vii
Symbols . . . . . . . . . . . . . . . . . . . . . . . . . . . . . . . . . . . . . . . . . . . . . . . . . . . . . . . . vii
Chapter 1. Introduction to the Situate™ Detection System
200X
Introduction . . . . . . . . . . . . . . . . . . . . . . . . . . . . . . . . . . . . . . . . . . . . . . . . . . . . . . . . . 1-1
Indications for Use . . . . . . . . . . . . . . . . . . . . . . . . . . . . . . . . . . . . . . . . . . . . . . . . . . . 1-1
Contraindication. . . . . . . . . . . . . . . . . . . . . . . . . . . . . . . . . . . . . . . . . . . . . . . . . . . . . 1-1
Situate™ 200X System Overview. . . . . . . . . . . . . . . . . . . . . . . . . . . . . . . . . . . . . . 1-2
Console Front Panel. . . . . . . . . . . . . . . . . . . . . . . . . . . . . . . . . . . . . . . . . . . . 1-2
Console Back Panel . . . . . . . . . . . . . . . . . . . . . . . . . . . . . . . . . . . . . . . . . . . . 1-3
Situate™ System Components . . . . . . . . . . . . . . . . . . . . . . . . . . . . . . . . . . 1-4
Chapter 2. Patient and Operating Room Safety
General. . . . . . . . . . . . . . . . . . . . . . . . . . . . . . . . . . . . . . . . . . . . . . . . . . . . . . . . . . . . . . 2-1
Setting Up the System. . . . . . . . . . . . . . . . . . . . . . . . . . . . . . . . . . . . . . . . . . 2-1
Scanning . . . . . . . . . . . . . . . . . . . . . . . . . . . . . . . . . . . . . . . . . . . . . . . . . . . . . . 2-3
Implanted Electronic Devices (IEDs). . . . . . . . . . . . . . . . . . . . . . . . . . . . . 2-5
After Scanning . . . . . . . . . . . . . . . . . . . . . . . . . . . . . . . . . . . . . . . . . . . . . . . . . 2-5
Servicing . . . . . . . . . . . . . . . . . . . . . . . . . . . . . . . . . . . . . . . . . . . . . . . . . . . . . . . . . . . . 2-6
Residual Risk Summary . . . . . . . . . . . . . . . . . . . . . . . . . . . . . . . . . . . . . . . . . 2-6
Chapter 3. Situate™ System Setup
Setup. . . . . . . . . . . . . . . . . . . . . . . . . . . . . . . . . . . . . . . . . . . . . . . . . . . . . . . . . . . . . . . . 3-1
Select a Scanning Device . . . . . . . . . . . . . . . . . . . . . . . . . . . . . . . . . . . . . . . 3-1
Set Up and Turn On the Console . . . . . . . . . . . . . . . . . . . . . . . . . . . . . . . . 3-3
Connect a Scanner to the Console . . . . . . . . . . . . . . . . . . . . . . . . . . . . . 3-10
Chapter 4. Scanning for RF-Tagged Premium Cotton
Scanning with the Situate™ Detection System 200X . . . . . . . . . . . . . . . . . . . 4-1
Set Up Before Surgery . . . . . . . . . . . . . . . . . . . . . . . . . . . . . . . . . . . . . . . . . . 4-2
Starting a Scanning Case . . . . . . . . . . . . . . . . . . . . . . . . . . . . . . . . . . . . . . . 4-3
Scanning with a Body Scanner. . . . . . . . . . . . . . . . . . . . . . . . . . . . . . . . . . 4-4
Scanning with the Situate™ Extremity Scanner . . . . . . . . . . . . . . . . . . 4-7
Scanning with a Situate™ Room Scanner . . . . . . . . . . . . . . . . . . . . . . .4-11
Situate™ Detection System 200X User's Guide ix
Page 12

Viewing Console Case/Scan Records . . . . . . . . . . . . . . . . . . . . . . . . . . .4-15
After a Scanning Session . . . . . . . . . . . . . . . . . . . . . . . . . . . . . . . . . . . . . . . . . . . . 4-15
Disassembly . . . . . . . . . . . . . . . . . . . . . . . . . . . . . . . . . . . . . . . . . . . . . . . . . . 4-15
Periodic Maintenance for Console and Components . . . . . . . . . . .4-16
Storage . . . . . . . . . . . . . . . . . . . . . . . . . . . . . . . . . . . . . . . . . . . . . . . . . . . . . . .4-16
Disposal . . . . . . . . . . . . . . . . . . . . . . . . . . . . . . . . . . . . . . . . . . . . . . . . . . . . . . 4-16
Product Service . . . . . . . . . . . . . . . . . . . . . . . . . . . . . . . . . . . . . . . . . . . . . . . 4-17
Chapter 5. Troubleshooting
Device Notification Screens . . . . . . . . . . . . . . . . . . . . . . . . . . . . . . . . . . . . . . . . . . 5-1
Troubleshooting. . . . . . . . . . . . . . . . . . . . . . . . . . . . . . . . . . . . . . . . . . . . . . . . . . . . . 5-3
Chapter 6. Service & Maintenance
Maintenance . . . . . . . . . . . . . . . . . . . . . . . . . . . . . . . . . . . . . . . . . . . . . . . . . . . . . . . . 6-1
General Safety Guidelines . . . . . . . . . . . . . . . . . . . . . . . . . . . . . . . . . . . . . . 6-2
Biomedical Department Inspection. . . . . . . . . . . . . . . . . . . . . . . . . . . . . . . . . . . 6-2
Set-up Procedure . . . . . . . . . . . . . . . . . . . . . . . . . . . . . . . . . . . . . . . . . . . . . . 6-2
Test Method . . . . . . . . . . . . . . . . . . . . . . . . . . . . . . . . . . . . . . . . . . . . . . . . . . . 6-3
Fuse Replacement . . . . . . . . . . . . . . . . . . . . . . . . . . . . . . . . . . . . . . . . . . . . . . . . . . . 6-4
Chassis Ground . . . . . . . . . . . . . . . . . . . . . . . . . . . . . . . . . . . . . . . . . . . . . . . . . . . . . . 6-5
Software Updates. . . . . . . . . . . . . . . . . . . . . . . . . . . . . . . . . . . . . . . . . . . . . . . . . . . . 6-6
Updating Console Software using Valleylab™ Exchange . . . . . . . . . 6-6
Repairs and Returns. . . . . . . . . . . . . . . . . . . . . . . . . . . . . . . . . . . . . . . . . . . . . . . . . . 6-8
Return for Repair . . . . . . . . . . . . . . . . . . . . . . . . . . . . . . . . . . . . . . . . . . . . . . .6-8
Warranty. . . . . . . . . . . . . . . . . . . . . . . . . . . . . . . . . . . . . . . . . . . . . . . . . . . . . . . 6-8
Periodic Maintenance for Console and Components . . . . . . . . . . . . . . . . . . 6-8
Disposal . . . . . . . . . . . . . . . . . . . . . . . . . . . . . . . . . . . . . . . . . . . . . . . . . . . . . . . . . . . . . 6-9
Chapter 7. Electrical Safety Tests
Electrical Safety Tests 220–240 V . . . . . . . . . . . . . . . . . . . . . . . . . . . . . . . . . . . . . 7-1
Electrical Safety Tests 110–120 V . . . . . . . . . . . . . . . . . . . . . . . . . . . . . . . . . . . . . 7-2
Chapter 8. Technical Specifications
Performance Characteristics. . . . . . . . . . . . . . . . . . . . . . . . . . . . . . . . . . . . . . . . . . 8-1
General . . . . . . . . . . . . . . . . . . . . . . . . . . . . . . . . . . . . . . . . . . . . . . . . . . . . . . . . 8-1
Operating Parameters. . . . . . . . . . . . . . . . . . . . . . . . . . . . . . . . . . . . . . . . . . 8-3
Storage Parameters . . . . . . . . . . . . . . . . . . . . . . . . . . . . . . . . . . . . . . . . . . . . 8-3
Transport Parameters . . . . . . . . . . . . . . . . . . . . . . . . . . . . . . . . . . . . . . . . . . 8-4
Safety Classification . . . . . . . . . . . . . . . . . . . . . . . . . . . . . . . . . . . . . . . . . . . . 8-4
Electromagnetic Compliance (EMC). . . . . . . . . . . . . . . . . . . . . . . . . . . . . 8-4
Accessories . . . . . . . . . . . . . . . . . . . . . . . . . . . . . . . . . . . . . . . . . . . . . . . . . . .8-10
Audio Volume . . . . . . . . . . . . . . . . . . . . . . . . . . . . . . . . . . . . . . . . . . . . . . . .8-10
Audible Tone . . . . . . . . . . . . . . . . . . . . . . . . . . . . . . . . . . . . . . . . . . . . . . . . .8-10
x Situate™ Detection System 200X User's Guide
Page 13

Tone Types . . . . . . . . . . . . . . . . . . . . . . . . . . . . . . . . . . . . . . . . . . . . . . . . . . .8-11
Input Power . . . . . . . . . . . . . . . . . . . . . . . . . . . . . . . . . . . . . . . . . . . . . . . . . .8-11
Power Cord Specification. . . . . . . . . . . . . . . . . . . . . . . . . . . . . . . . . . . . . .8-11
California Proposition 65 Statement . . . . . . . . . . . . . . . . . . . . . . . . . . . 8-12
Situate™ Detection System 200X User's Guide xi
Page 14

Page 15

Chapter 1
Introduction to the Situate™ Detection System 200X
This chapter provides an overview of the features and functions of the Situate™ detection
system 200X.
Caution
Read all warnings, cautions, and instructions provided with this system before use.
Note: Do not use the system as a substitute for recommended practices for sponge counts
prescribed to prevent retained objects. The system is intended as a supplement to standard
counting practices.
Introduction
The Situate™ detection system 200X uses a low-energy radio-frequency (RF) signal to detect
surgical premium cotton (gauze, sponges, and towels) left in or around the patient within
the surgical field. Situate™ scanning devices emit an electronic impulse that, when passed
over an RF-tagged item, resonate a signal back to the scanner.
Indications for Use
The Situate™ system is indicated to detect tagged objects, such as surgical gauze, towels,
and sponges, during a surgical procedure in order to aid surgical staff in the recovery of
those objects before closing. The system is intended for use by trained surgical staff in a
surgical (operating room) setting.
The system is indicated for use as an adjunct device to complement, not replace, established
safety procedures prescribed to prevent retained objects.
Contraindication
None
Situate™ Detection System 200X User's Guide 1-1
Page 16

Situate™ 200X System Overview
Situate™ 200X System Overview
Console Front Panel
Accessory
12
Accessory receptacle
ཱ Body scanner receptacle
Body Scanner
1-2 Situate™ Detection System 200X User's Guide
Page 17
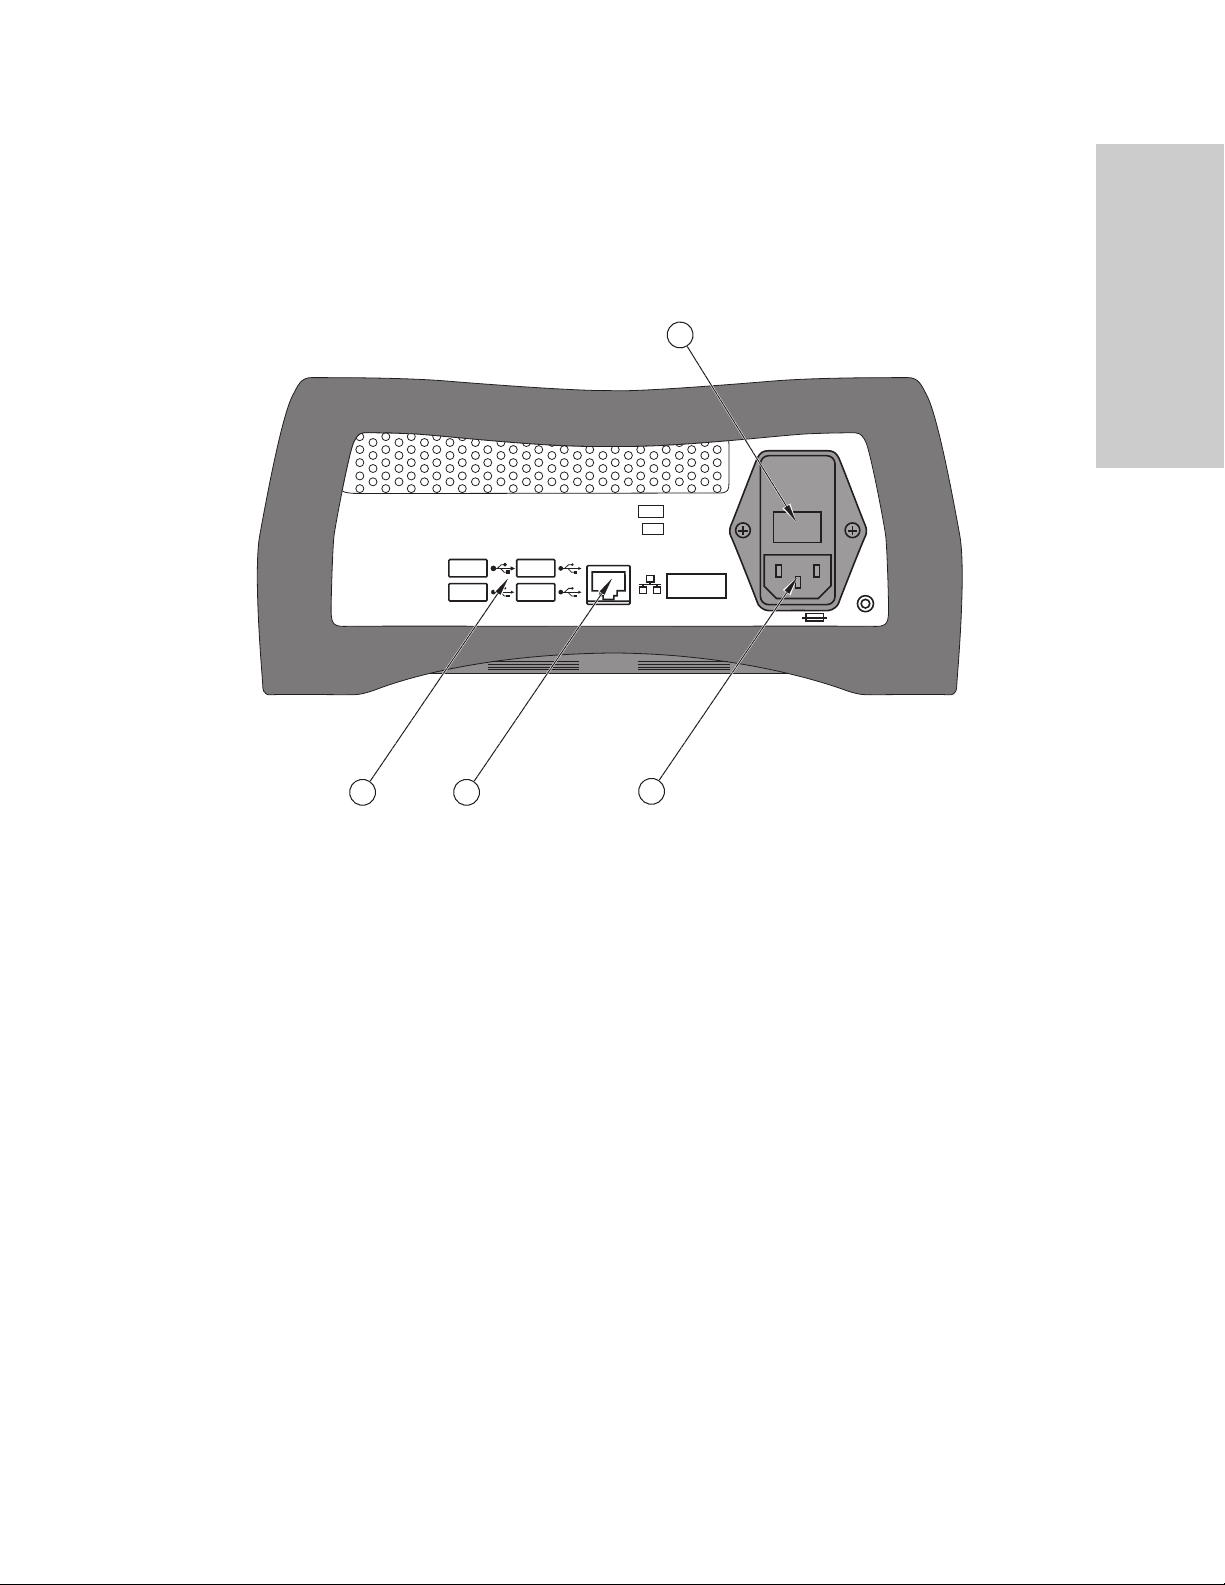
Console Back Panel
Situate™ 200X System Overview
Introduction to the Situate™
Detection System 200X
4
REF
SN
1
USB receptacles (4)
ཱ Ethernet receptacle
ི Power cord receptacle
ཱི Fuse drawer
2
3
Situate™ Detection System 200X User's Guide 1-3
Page 18

Situate™ 200X System Overview
Situate™ System Components
The Situate™ detection system incorporates both single-use and reusable components. It
can include combinations of the components shown below.
2
5
4
1
3
Situate™ detection console 200X
ཱ Situate™ premium cotton
ི Situate™ body scanner/body scanner lite
ཱི Situate™ room scanner
ུ Situate™ extremity scanner
Note: Use sterile drapes (01-0020) if a room scanner is to be used in the sterile field.
Note: Use sterile drapes (01-0037) if an extremity scanner is to be used in the sterile field.
Note: The Situate™ detection console 200X is compatible with the Situate™ delivery stand
(01-0036).
1-4 Situate™ Detection System 200X User's Guide
Page 19

Situate™ Detection Console 200X
Situate™ 200X System Overview
Introduction to the Situate™
Detection System 200X
Accessory
Body Scanner
The console is the central component of the system providing operational instructions and
scanner feedback through a touch screen interface. Data collected from scanning sessions is
stored in the console and can be accessed at any time for evaluation of a specific scan.
Situate™ Detection System 200X User's Guide 1-5
Page 20

Situate™ 200X System Overview
Situate™ Premium Cotton
Situate™ premium cotton are single-use RF-tagged cotton disposables that must be used
with the Situate™ detection system. The disposables have an attached RF tag, which is an
electrically passive inductor-like device. When activated by electromagnetic impulses from
the scanning devices, the tag resonates a signal that allows for the detection of these cotton
disposables.
1-6 Situate™ Detection System 200X User's Guide
Page 21

Situate™ Body Scanner/Body Scanner Lite
Situate™ 200X System Overview
Introduction to the Situate™
Detection System 200X
The body scanner is for detecting RF-tagged premium cotton in the patient’s torso. The
scanner is placed directly on the surgical table’s torso pad, under positioning devices, drapes,
and linens. It contains six radiolucent (X-ray compatible) antennas that transmit
electromagnetic impulses that stimulate RF tags, and receive a resonant signal from the tag
when it is detected.
Body scanners have a detection range of 40.6 cm (16 in.) above the body scanner surface.
Note: Body scanner lite pictured above. Body scanner not pictured.
Situate™ Detection System 200X User's Guide 1-7
Page 22

Situate™ 200X System Overview
Situate™ Room Scanner
The room scanner is a hand held scanning tool for detecting missing or retained sponges in
and around the sterile field (for example, linens, drapes, and trash bins). The scanner
functions as both an antenna to transmit electromagnetic impulses that stimulate the RF tag
on sponges and packing, and as a receiver to detect the resonant signal returning from the
tagged items. The scanner is primarily used for quickly locating a missing sponge in the area
surrounding the patient. It is also used in conjunction with the Situate™ body scanner/body
scanner lite when the surgical site is beyond the effective range of the body scanner.
The room scanner is moved in specific patterns following the contour of the patient’s body
to detect the tag in various orientations. The scanner has a detection range of 40.6 cm
(16 in.).
1-8 Situate™ Detection System 200X User's Guide
Page 23

Situate™ 200X System Overview
Situate™ Extremity Scanner
The extremity scanner is a hand held static scanning tool designed to locate and detect
retained sponges in procedures where in challenges exist in patient positioning.
Introduction to the Situate™
Detection System 200X
The scanner functions as both an antenna and receiver to look for and detect RF-tagged
sponges. The scanner is held motionless while it performs a three-dimensional scan to
capture the tag’s signal regardless of the tag orientation.
The extremity scanner has a detection range of 76 cm (30 in.) wide and 20 cm (8 in.) deep.
Situate™ sterile drapes (01-0037) must cover the extremity scanner when used in the sterile
field.
Catalog number Description (legacy product name)
01-0043 Situate™ detection system 200X (RF assure console model
200X)
01-0044 Situate™ extremity scanner (ArQ sphere)
01-0046 Situate™ room scanner II (Blair Port Wand X)
01-0023
01-0031
Varies Situate™ premium cotton products (RF detect premium)
Situate™ body scanner (RF Assure ConformPlus Antenna
Array body scanner)
Situate™ body scanner lite (RF Assure ConformPlus II
Antenna Array body scanner)
Situate™ Detection System 200X User's Guide 1-9
Page 24

Page 25

Chapter 2
Patient and Operating Room Safety
The safe and effective use of RF-detection technology in surgical procedures depends to a
large degree upon factors solely under the control of the operator. There is no substitute for
a properly trained and vigilant surgical team. It is important that the operating instructions
supplied with this or any equipment be read, understood, and followed.
General
Setting Up the System
Warning
Do not connect wet instruments to the console. Ensure that all instruments are correctly connected
and that no metal is exposed at any connection points.
Fire Hazard Do not use extension cords.
Caution
Read the instructions, warnings, and cautions provided with Situate™ detection system before using.
To avoid risk of electrical shock, connect the power cord to a properly grounded power receptacle.
Position the console so it does not block access to power switch or power plug connection.
Electromagnetic interference caused by MRI, power transformers or other high power sources may
affect the system’s ability to detect tagged objects.
Unfolding gauze sponges can expose woven edges and the radiopaque marker to damage and may
release cotton fibers.
Do not cut any Situate™ premium cotton products (for example, vaginal packing). Cutting may
damage the pouch and separate the RF-detectable tag from the product.
Scanner drapes and surgical cotton disposables are packaged sterile. Sterility is maintained unless the
package or seal has been opened
Follow the hospital procedure for draping non-sterile devices. Cover all portions of the scanner and
cord to avoid contamination and cross-contamination during the procedure.
Situate™ Detection System 200X User's Guide 2-1
Page 26

General
Caution
Ensure the body scanner is placed securely on the surgery table for angled or tilted table. Straps are
provided to fasten the body scanner lite to the operating room table for cases where angular
orientation is utilized to prevent slippage.
The body scanner should cover full length of the torso pad and be positioned under the surgical site.
Remove large metal objects, trays, and Mayo stands from the scan site before scanning. Metallic
objects in the scan area or in close proximity with the tag may interfere with scanning.
Ensure all known tagged objects are more than 91 cm (36 in.) from the scan site to avoid possible false
positive detections.
Remove RFID devices (for example, badges and car keys) away from the scan area to avoid scan
interference.
Limit the use of electrical equipment such as RF-electrosurgery instruments during scanning, and
power down unused electronic devices and instruments. If possible, be sure all electronic equipment
is at least 91cm (36 in.) from the scan site. Concurrent use of some electrical equipment in close
proximity to the surgical scanning site may affect the system’s ability to detect tagged objects.
MRI usage: Follow hospital protocol, device manufacturers’ directions for use, and established clinical
practice by trained staff in the use of MRI. Independent laboratory testing with regard to translational
attraction, migration, and torque as well as MRI-related heating indicates that Situate™ premium
cotton products present no additional risk or hazard to a patient in an MRI environment of up to 3
Tesla. No authoritative testing has been conducted to date on intraoperative MRI use with Situate™
premium cotton products.
Do not stack equipment on top of other operating room devices. This is an unstable configuration.
Note: Inspect the Situate™ detection system 200X components for damage, deterioration,
abrasion, cracks, splits, punctures, and loose components before and after each use. Check
cables for kinks or breaks in insulation and connectors for wear or damage that can prevent
secure attachment. If damaged, do not use.
Note: Connect the power cord to a properly grounded power receptacle having the correct
voltage. Otherwise, product damage may result.
Note: Do not connect unauthorized or unrecognized devices to the console.
Note: In gynecological procedures using a body scanner, ensure the scanner is not covering
the pad’s perineal cutout.
Note: The room scanner can be used in cases where the body scanner cannot be utilized due
to questionable patient stability.
Note: If the home screen fails to appear, check the power connections, then shut off the
system and turn it back on.
Note: The RF tag is contained in a pouch attached to the gauze, towel, or sponge. Damage
to the tag or pouch may affect the system’s ability to detect the tag.
Note: An RF tag in direct contact with metal will reduce the tag signal and impair scanning.
Avoid direct metal contact within 1 mm of the tag. If sponge sticks are used, wrap a layer of
gauze >1 mm between the tag and the instrument.
2-2 Situate™ Detection System 200X User's Guide
Page 27

Note: Do not reuse single-use disposables to avoid the risk of cross-contamination.
Note: The body scanner can be punctured by sharp objects. Replace the body scanner if it is
damaged.
Note: Place console outside of the sterile field.
Note: Do not fill the delivery stand basket with contents weighing more than 1.36 kg (3 lb).
Note: Ensure the body scanner lies flat. If a portion of the body scanner is folded over, it may
result in a scan fault.
Note: The room scanner and extremity scanner cannot be connected at the same time. Use
of the two devices in the same case required disconnecting the active device and
connecting the other to the accessory port. The newly connected device will initially
calibrate. Ensure the new device is selected on the console screen and start the scanning
process.
Note: All scans performed during a session are included in the case record. Records for
scanning cases can be viewed at any time. See Viewing Console Case/Scan Records on page 4-
15.
General
Patient and Operating Room
Safety
Note: The role of the Situate™ detection system is to serve as an adjunct technology. The
system helps validate correct counts and rectify miscounts. The system does not replace
manual counts.
Note: Do not use the system as a substitute for recommended practices for sponges
prescribed to prevent retained objects. The system is intended as a supplement to standard
counting practices.
Note: The body scanner is not a positioning device. Use standard hospital technique to
ensure the patient is secure and stable on the surgical table in all table positions expected to
be used in the surgical case.
Note: Place the body scanner on top of the table pad. Do not place the body scanner under
the pad or directly on the surgical table frame. Metal may interfere with scanning.
Note: Place other devices (such as patient positioning devices, gel pads, and electrocautery
and thermal pads) on top of the body scanner.
Note: Do not handle the body scanner by the cable; damage to the body scanner may occur.
Scanning
Warning
Risk of explosion if used in the presence of flammable anesthetics.
Caution
Do not move the room scanner at a rate faster than 15.2 cm (6 in.) per second. Exceeding this rate may
diminish the system’s ability to detect tagged objects.
Never touch a console interface connection (USB or LAN) and the patient at the same time.
Situate™ Detection System 200X User's Guide 2-3
Page 28

General
Note: All scans performed during a session are included in the case record. Records for
scanning cases can be viewed at any time. See Viewing Console Case/Scan Records on page 4-
15.
Note: An RF tag in direct contact with metal will reduce the tag signal and impair scanning.
Avoid direct metal contact with 1 mm of the tag. If sponge sticks are used, wrap a layer of
gauze >1 mm between the tag and the instrument.
Note: Limit the use of electrical equipment such as electrosurgical consoles while scanning.
Turn off unused electronic devices and instruments, or place devices at least 94 cm (36 in.)
from the scan area.
Note: Additional scanning can be performed any time during the procedure in accordance
with the system’s procedural directions, especially when sponge counts are in question.
Note: Selecting Close Case from a detection scan result screen displays a prompt confirming
to close the case when the last scan resulted in a detection. Selecting Yes from the prompt
displays another screen to confirm or deny the sponge count was reconciled. The case is
then closed.
Note: It is recommended that scan cases be closed only from a clear scan confirmation
number.
Note: If the room scanner is moved within range of a tag while the scan is in progress, a red
detection screen will appear. When the scanner is moved out of range of the tag, the console
screen reverts to displaying the active scan screen.
Note: Each scan pattern will take between 15 and 20 seconds at a rate of at least 3 seconds
per pass.
Note: Scan slowly within 5 cm (2 in.) of the body. Follow the contour of the patient’s body to
ensure thorough scanning for various tag orientations.
Note: Scans must be a minimum of 7 seconds in duration for the system to report a
confirmation number. Scans stopped before 7 seconds will not provide a confirmation
number.
Note: Patient return electrodes that cover a major area of the body scanner (non-skin
contact electrocautery gel pads) can affect the scanner’s detection range and produce fault
indications. Do not use patient return electrodes that may degrade the performance of the
Situate™ detection system.
2-4 Situate™ Detection System 200X User's Guide
Page 29

Implanted Electronic Devices (IEDs)
IEDs include, but are not limited to, pacemakers, neurostimulators, implantable cardioverter
defibrillators (ICDs), ventricular assist devices (VAD), spinal cord stimulators, cochlear
implants, infusion pumps, and bone-growth stimulators.
Warning
Use the device with caution when operating near external or implanted electronic medical devices.
Electromagnetic interference produced by the operation of the Situate™ detection system can
potentially cause a device to temporarily operate in an unsafe mode. Consult the manufacturer of the
external or implanted electronic device or responsible hospital department for further information
when use is planned in close proximity to such medical devices.
Refer to the pacing or defibrillator device manufacturer’s instructions, hospital protocol, and this
guide to ensure optimal operation of these devices. Scanning may affect temporary cardiac pacers in
demand mode settings (DDD). Temporary cardiac pacers should be in non-sensing, asynchronous
mode (VOO or DOO mode) during scanning.
General
Patient and Operating Room
Safety
Do not program pacing or ICD devices while scanning. Visual and audible indicators are present while
scanning is active. Follow the pacing or defibrillator device manufacturer’s instructions to achieve
desired programming settings
Note: Independent laboratory testing and extensive hospital clinical experience
demonstrate that the Situate™ detection system can be compatible with most commonly
used pacing and defibrillator devices when used in accordance with the manufacturers’
directions and hospital protocol.
After Scanning
Note: Disconnect the main power by pulling the plug, not the cord.
Note: Store body scanner flat; otherwise damage to the body scanner may occur.
Note: Thoroughly wipe the scanner and remove all dirt periodically. Dirt may be wiped away
with isopropyl alcohol-based solutions. Follow all applicable label instructions on the
products. Follow the procedures approved by your institution. Avoid excessive exposure to
fluids. Do not submerge. Avoid fluid ingress to any electrical circuitry.
Situate™ Detection System 200X User's Guide 2-5
Page 30

Servicing
Servicing
Caution
Only connect IEC 60601-1 or Medtronic approved devices to the USB interface. The user must ensure
that the interconnected system maintains leakage currents according to IEC 60601-1.
Note: Thoroughly wipe the scanner and remove all dirt periodically. Dirt may be wiped away
with isopropyl alcohol-based solutions. Follow all applicable label instructions on the
products. Follow the procedures approved by your institution. Avoid excessive exposure to
fluids. Do not submerge. Avoid fluid ingress to any electrical circuitry.
Residual Risk Summary
While every attempt has been made to reduce patient and user risks, the use of detection
systems carries some residual risk, even when used by trained physicians. The potential
adverse events associated with the use of detection systems include, but are not limited to,
the following risks:
• Allergic reaction
• Arrhythmia
• Carcinogen exposure
• Cardiac arrest
• Cross patient exposure to body fluids
• Fall
• Foreign body in patient
• Foreign body reaction
• Failure of implant
• Infection
• Respiratory failure
2-6 Situate™ Detection System 200X User's Guide
Page 31

Chapter 3
Situate™ System Setup
This chapter describes how to set up the Situate™ detection system 200X, turn it on, and
prepare for a scanning session.
Caution
Read all warnings, cautions, and instructions provided with this system before use.
Setup
Select a Scanning Device
Select the appropriate Situate™ scanning device for the pending medical procedure.
Note: The role of the Situate™ detection system 200X is to serve as an adjunct technology.
The system helps validate correct counts and rectify miscounts. The system does not replace
manual counts.
Note: Do not use the system as a substitute for recommended practices for sponge counts
prescribed to prevent retained objects. The system is intended as a supplement to standard
counting practices.
The Situate™ detection system can simultaneously accommodate a body scanner and one
hand scanner (extremity or room scanner). Scanning devices can be interchanged during a
scanning case.
Body Scanner/Body Scanner Lite
Application Patient torso
Effective scanning range depth 40.64 cm (16 in.)
Situate™ Detection System 200X User's Guide 3-1
Page 32

Setup
Extremity Scanner
Application Patient
Effective scanning range depth 20.32 cm (8 in.)
Room Scanner
Application Patient and surrounding operating room
Effective scanning range depth 40.64 cm (16 in.)
If the body scanner or body scanner lite is to be used, position the scanner directly on the
surgical table’s torso pad and under positioning devices, drapes, and linens. Ensure the
scanner lies flat on the table.
Straps (01-0040) are provided to secure the body scanner lite to the surgical table. Thread a
strap through the top two slotted tabs at the top of the scanner and another through the
bottom two tabs if needed.
Note: Ensure the body scanner lies flat. If a portion of the body scanner is folded over, it may
result in a scan fault.
Note: In gynecological procedures using a body scanner, ensure the scanner is not covering
the pad’s perineal cutout.
Note: The room scanner can be used in cases where the body scanner cannot be utilized due
to questionable patient stability.
Note: Do not connect unauthorized or unrecognized devices to the console.
3-2 Situate™ Detection System 200X User's Guide
Page 33

Set Up and Turn On the Console
From the Settings section of the Main Menu, the user has the ability to adjust the volume, the
date/time, date format, and the language.
Setting the Volume
Using the (-) and (+) buttons, the user has the ability to lower and raise the audio volume.
Volume Screen
Setup
Setting the Date/Time
By clicking the Date/Time tab, the user has the ability to set the date, adjust the date format,
and set the time.
Date/Time Screen
Situate™ System Setup
Situate™ Detection System 200X User's Guide 3-3
Page 34

Setup
Date Format
This screen allows the user set the date format.
Date Format Screen
Set Date
This screen allows the user to set the date of the Real Time Clock (RTC) that is internal to the
console. The date is used when viewing records and is included in the timestamp for log
entries.
Set Day of the Month Screen
Select the day of the month.
3-4 Situate™ Detection System 200X User's Guide
Page 35

Set Month Screen
Select the month by touching the current month at the top of the screen and selecting the
appropriate month, or by using the left and right arrows.
Set Year Screen
Setup
Select the year by touching the current year at the top of the screen and using the up and
down arrows.
Situate™ System Setup
Situate™ Detection System 200X User's Guide 3-5
Page 36

Setup
Set Time
The following screens allow the user to adjust the hours and the minutes of the current time.
Hours are selected from a 24 hour list accessed by selecting the hours on the screen (there is
no AM/PM designation and no daylight savings).
Set Hours Screen
Minutes are adjusted by selecting the minutes on the screen and choosing the appropriate
minute from the list.
Set Minutes Screen
3-6 Situate™ Detection System 200X User's Guide
Page 37

Setting the Language
Using the up and down arrows, the user has the ability to change the device language. Once
a language is selected, the user must turn off power to the console and then turn on power
to the console in order to change the displayed language.
Set Language Screen
Setup
The user can select from 32 languages that are displayed in the following order:
ar_Arabic hr_Croatian pt_Portuguese
bg_Bulgarian hu_Hungarian ro_Romanian
cs_Czech it_Italian ru_Russian
da_Danish js_Japanese sk_Slovak
de_German ko_Korean sl_Slovenian
el_Greek lt_Lithuanian sr_Serbian
en_English lv_Latvian sv_Swedish
es_Spanish mt_Maltese tr_Turkish
et_Estonian nl_Dutch zh_Simplified Chinese
fi_Finnish no_Norwegian zh-t_Traditional Chinese
fr_French pl_Polish
Situate™ System Setup
Situate™ Detection System 200X User's Guide 3-7
Page 38

Setup
Console Power On
Caution
Ensure all known tagged objects are more than 91 cm (36 in.) from the scan site to avoid possible false
positive detections.
Remove RFID devices (for example, badges and car keys) away from the scan area to avoid scan
interference.
Limit the use of electrical equipment such as RF-electrosurgery instruments during scanning, and
power down unused electronic devices and instruments. If possible, be sure all electronic equipment
is at least 91cm (36 in.) from the scan site. Concurrent use of some electrical equipment in close
proximity to the surgical scanning site may affect the system’s ability to detect tagged objects.
Electromagnetic interference caused by MRI, power transformers, or other high power sources may
affect the system’s ability to detect tagged objects.
Do not reuse single-use disposables to avoid risk of cross-contamination.
Do not cut any Situate™ premium cotton products (for example, vaginal packing). Cutting may
damage the pouch and separate the RF-detectable tag from the product.
Follow the hospital procedure for draping non-sterile devices. Cover all portions of the scanner and
cord to avoid contamination and cross-contamination during the procedure.
Ensure the body scanner is placed securely on the surgery table for an angled or tilted table. Straps
are provided to fasten the body scanner lite to the operating room table for cases where angular
orientation is utilized to prevent slippage.
The body scanner should cover the full length of the torso pad and be positioned under the surgical
site.
To avoid risk of electrical shock, connect the power cord to a properly grounded power receptacle.
Position the console so it does not block access to power switch or power plug connection.
Note: Inspect the Situate™ detection system components for damage, deterioration,
abrasion, cracks, splits, punctures, and loose components before and after each use. Check
cables for kinks or breaks in insulation and connectors for wear or damage that can prevent
secure attachment. If damaged, do not use.
Note: The body scanner is not a positioning device. Use standard hospital technique to
ensure the patient is secure and stable on the surgical table in all table positions expected to
be used in the surgical case.
Note: Place the body scanner on top of the table pad. Do not place the body scanner under
the pad or directly on the surgical table frame. Metal may interfere with scanning.
Note: Place other devices (such as patient positioning devices, gel pads, and electrocautery
and thermal pads) on top of the body scanner.
Note: Do not handle the body scanner by the cable; damage to the body scanner may occur.
3-8 Situate™ Detection System 200X User's Guide
Page 39

1. Place the console on a flat, stable surface such as a table, platform, boom system, or cart.
Thread the retaining strap (01-0056) through the slots in the bottom of the console and
secure the console to the equipment stand if desired. Refer to the procedures for your
local institution or your local codes.
2. Plug the system power cord into the power input connector on the rear panel of the
console.
3. Plug the system power cord into a grounded power outlet.
4. Turn the power switch on the back panel to ON.
The console displays a Medtronic splash screen as it boots up, then changes to the home
screen. If no scanners are attached, the screen appears as shown.
No Scanners Attached Screen
Setup
Note: If the home screen fails to appear, check the power connections, then shut off the
system and turn it back on.
Situate™ System Setup
Situate™ Detection System 200X User's Guide 3-9
Page 40

Setup
Connect a Scanner to the Console
The console has two receptacles on the front panel to attach scanning devices. The right
receptacle, labeled Body Scanner, is used exclusively for body scanners (Situate™ body
scanner or body scanner lite). The left receptacle, labeled Accessory, is used for hand held
scanners (extremity or room scanner).
A single hand held scanner and a body scanner can be attached to the console
simultaneously and used interchangeably during a scanning case. Hand held scanners can
be changed during a case. The results of all scanning devices used during a single case are
stored in the console and can be reviewed at any time. See Viewing Console Case/Scan
Records on page 4-15.
1. Connect the scanner(s) to the console. Align the red dots on the plug and connector and
press to insert. Ensure the connectors are securely fastened.
Extremity or Room Scanner—Connect a hand scanner to the port labeled Accessory.
3-10 Situate™ Detection System 200X User's Guide
Page 41

Body Scanner/Body Scanner Lite—Connect the body scanner cable to the console
port labeled Body Scanner.
Setup
Note: Move all RF-tagged items (used and unused) at least 91 cm (36 in.) from the
scanning area.
2. If an extremity scanner is to be used in the sterile field, drape (01-0037) the device. If a
room scanner is to be used in the sterile field, drape (01-0020) the device.
Situate™ System Setup
Situate™ Detection System 200X User's Guide 3-11
Page 42

Page 43

Chapter 4
Scanning for RF-Tagged Premium Cotton
This chapter includes steps for the Situate™ detection system 200X prior to surgery, during a
scan, and after surgery.
Caution
Read all warnings, cautions, and instructions provided with this system before use.
Scanning with the Situate™ Detection System 200X
The Situate™ console and scanning devices provide accurate detection of sponges, packing,
and towels only when used with Situate™ premium cotton. An embedded RF tag in each
disposable reflects the scanner’s signal, indicating the location of a tagged item.
Surgical packing, gauze, and towels from other manufacturers cannot be detected with the
Situate™ system.
A scanning case is recommended after the final count of RF-tagged sponges, packing, and
towels before the final closure of the surgical site. A case can include multiple scans by
different devices. The results of all scans in a single case are entered into a retrievable record
stored within the console.
Warning
Use the device with caution when operating near external or implanted electronic medical devices.
Electromagnetic interference produced by the operation of the Situate™ detection system can
potentially cause a device to temporarily operate in an unsafe mode. Consult the manufacturer of the
external or implanted electronic device or responsible hospital department for further information
when use is planned in close proximity to such medical devices.
Refer to the pacing or defibrillator device manufacturer’s instructions, hospital protocol, and this
guide to ensure optimal operation of these devices. Scanning may affect temporary cardiac pacers in
demand mode settings (DDD). Temporary cardiac pacers should be in non-sensing, asynchronous
mode (VOO or DOO mode) during scanning.
Do not program pacing or ICD devices while scanning. Visual and audible indicators are present while
scanning is active. Follow the pacing or defibrillator device manufacturer’s instructions to achieve
desired programming settings
Risk of explosion if used in the presence of flammable anesthetics.
Situate™ Detection System 200X User's Guide 4-1
Page 44

Scanning with the Situate™ Detection System 200X
Caution
Never touch a console interface connection (USB or LAN) and the patient at the same time.
Note: Independent laboratory testing and extensive hospital clinical experience
demonstrate that the Situate™ detection system can be compatible with most commonly
used pacing and defibrillator devices when used in accordance with the manufacturers’
directions and hospital protocol.
Note: An RF tag in direct contact with metal will reduce the tag signal and impair scanning.
Avoid direct metal contact within 1 mm of the tag. If sponge sticks are used, wrap a layer of
gauze >1 mm between the tag and instrument.
Note: Limit the use of electrical equipment, such as electrosurgical consoles, while scanning.
Turn off unused electronic devices and instruments, or place devices at least 91 cm (36 in.)
from the scan area.
Note: Do not use the system as a substitute for recommended practices for sponge counts
prescribed to prevent retained objects. The system is intended as a supplement to standard
counting practices.
Set Up Before Surgery
Situate™ premium cotton products are provided sterile. Introduce the required number and
type of tagged premium cotton into the sterile field according to the hospital protocol.
Do not use Situate™ premium cotton with sponges, gauze, or packing from other
manufacturers. Items without the Situate™ RF tag cannot be detected by the Situate™
detection system.
Caution
Unfolding gauze sponges can expose woven edges and radiopaque marker to damage and may
release cotton fibers.
Remove large metal objects, trays and Mayo stands from the scan site before scanning. Metallic
objects in the scan area or in close proximity with the tag may interfere with scanning.
Scanner drapes and surgical cotton disposables are packaged sterile. Sterility is maintained unless
the package or seal has been opened
Note: The RF tag is contained in a pouch attached to the gauze, towel, or sponge. Damage
to the tag or pouch may affect the system’s ability to detect the tag.
4-2 Situate™ Detection System 200X User's Guide
Page 45

Scanning with the Situate™ Detection System 200X
Starting a Scanning Case
The home screen displays the attached scanning devices.
Touching the START button will start a new case and begin scanning.
1 2
Room scanner (extremity scanner if used)
ཱ Body scanner
Note: The room scanner and extremity scanner cannot be connected at the same time. Use
of the two devices in the same case requires disconnecting the active device and connecting
the other to the same peripheral or accessory port. The newly connected device will initially
calibrate. Ensure the new device is selected on the console screen and start the scanning
process.
Note: All scans performed during a session are included in the case record. Records for
scanning cases can be viewed at any time. See Viewing Console Case/Scan Records on page 4-
15.
Scanning for RF-Tagged
Premium Cotton
Situate™ Detection System 200X User's Guide 4-3
Page 46

Scanning with the Situate™ Detection System 200X
Scanning with a Body Scanner
The following directions apply to both the body scanner and body scanner lite.
1. Touch the START Body Scanner button.
The Situate™ system conducts the scanning process without user input. A typical scan
lasts approximately 14–16 seconds. A progress screen displays during the scan, and the
console will emit an audible indicator.
Touch the screen at any time to cancel the body scan.
2. The completed scan results in either a green CLEAR, or in a red DETECTION screen. The
next steps will vary based on the result of the scan. See the instructions for the CLEAR and
DETECTION scan results.
Caution
The body scanner should cover the full length of the torso pad and be positioned under the surgical
site.
Note: Errors and scanning conditions can produce other screens than those shown in the
following work flow. If other screens appear, refer to Chapter 5, Troubleshooting.
Note: Patient return electrodes that cover a major area of the body scanners (non-skin
contact electrocautery gel pads) can affect the scanner’s detection range and produce fault
indications. Do not use patient return electrodes that may degrade the performance of the
Situate™ detection system.
Note: Additional scanning can be performed any time during the procedure in accordance
with the system’s procedural directions, especially when sponge counts are in question.
CLEAR Scan Result
Scanning cases that detect no RF-tagged items display the green CLEAR screen.
1. Touch the screen to continue and view the scan confirmation number.
4-4 Situate™ Detection System 200X User's Guide
Page 47

Scanning with the Situate™ Detection System 200X
To perform another scan on the same patient, touch Resume Case. The screen will return
to the screen displaying attached scanners. Touch the START button to initiate another
scan.
2. If scanning for the case is complete, record the scan confirmation number in the patient
medical record following hospital protocol. A QR code is provided for optional entry of
confirmation code into an electronic medical record (EMR) using a scanner. Then press
Close Case.
3. A prompt appears to confirm the case is to be closed. Select Close Case to close the case
or Resume Case to return to the device selection screen to perform additional scans.
4. If closing the case is confirmed by selecting Close Case, a prompt appears to confirm the
sponge count was reconciled. Select Yes to confirm and end the scanning case.
The case is now closed and the home screen is displayed.
DETECTION Scan Result
Scanning cases that detect RF-tagged items display the red DETECTION screen.
1. Touch the screen to continue. The SCAN SUMMARY window is displayed with the case
confirmation number.
Scanning for RF-Tagged
Premium Cotton
Situate™ Detection System 200X User's Guide 4-5
Page 48

Scanning with the Situate™ Detection System 200X
2. Search for and retrieve missing tagged item(s) following hospital protocol.
3. Touch Resume Case to perform another scan. Repeat the scanning steps in this section
until a clear scan is reported.
Note: Selecting Close Case from a DETECTION scan result screen displays a prompt
confirming to close the case when the last scan resulted in a detection. Selecting Yes from
the prompt displays another screen to confirm or deny the sponge count was reconciled.
The case is then closed.
Note: It is recommended that scan cases be closed only from a clear scan confirmation
number.
4-6 Situate™ Detection System 200X User's Guide
Page 49

Scanning with the Situate™ Detection System 200X
Scanning with the Situate™ Extremity Scanner
1. Inspect the extremity scanner before use. Replace if damaged or deteriorated.
2. For use in the sterile field, the extremity scanner must be covered with a sterile drape.
Follow the hospital procedure for draping non-sterile devices. Ensure all portions of the
extremity scanner are covered to avoid contamination and cross-contamination during
the operative procedure.
3. Position the scanner within 2.54 cm (1 in.) from the area of interest.
Parallel positioning
Scanning for RF-Tagged
Premium Cotton
Situate™ Detection System 200X User's Guide 4-7
Page 50

Scanning with the Situate™ Detection System 200X
Perpendicular positioning
4. Touch the START Extremity Scanner button to initiate the scan.
The Situate™ system conducts the scanning process without user input. A typical scan
lasts approximately 14–16 seconds. A progress screen displays during the scan, and the
console will emit an audible indicator.
5. The completed scan results in either a green CLEAR, or in a red DETECTION screen. The
next steps will vary based on the result of the scan. See the instructions for the CLEAR and
DETECTION scan results.
Note: Additional scanning can be performed any time during the procedure in accordance
with the system’s procedural directions, especially when sponge counts are in question.
4-8 Situate™ Detection System 200X User's Guide
Page 51

Scanning with the Situate™ Detection System 200X
CLEAR Scan Result
Scanning cases that detect no RF-tagged items display the green CLEAR screen.
1. Touch the screen to continue and view the scan confirmation number.
To perform another scan on the same patient, touch Resume Case. The screen will return
to the screen displaying attached scanners. Touch the START button to initiate another
scan.
2. If scanning for the case is complete, record the scan confirmation number in the patient
medical record following hospital protocol. A QR code is provided for optional entry of
confirmation code into an electronic medical record (EMR) using a scanner. Then touch
Close Case.
3. A prompt appears to confirm the case is to be closed. Select Close Case to close the case
or Resume Case to return to the device selection screen to perform additional scans.
4. If closing the case is confirmed by selecting Close Case, a prompt appears to confirm the
sponge count was reconciled. Select Ye s to confirm and end the scanning case.
The case is now closed and the home screen is displayed.
Situate™ Detection System 200X User's Guide 4-9
Premium Cotton
Scanning for RF-Tagged
Page 52

Scanning with the Situate™ Detection System 200X
DETECTION Scan Result
Scanning cases that detect RF-tagged items display the red DETECTION screen.
1. Touch the screen to continue. The SCAN SUMMARY window is displayed with the case
confirmation number.
2. Search for and retrieve missing tagged item(s) following hospital protocol.
3. Touch Resume Case to perform another scan. Repeat the scanning steps in this section
until a clear scan is reported.
Note: Selecting Close Case from a DETECTION scan result screen displays a prompt
confirming to close the case when the last scan resulted in a detection. Selecting Yes from
the prompt displays another screen to confirm or deny the sponge count was reconciled.
The case is then closed.
Note: It is recommended that scan cases be closed only from a clear scan confirmation
number.
4-10 Situate™ Detection System 200X User's Guide
Page 53

Scanning with the Situate™ Detection System 200X
Scanning with a Situate™ Room Scanner
1. Inspect the room scanner before use. Replace if damaged or deteriorated.
2. For use in the sterile field, the room scanner must be covered with a sterile drape (01-
0020). Follow the hospital procedure for draping non-sterile devices. Ensure all portions
of the room scanner are covered to avoid contamination and cross-contamination
during the operative procedure.
Scanning procedure for the room scanner includes a side-to-side scan pattern and a
superior-to-inferior pattern.
3. Touch the green Room Scanner button to initiate the scan.
Side to Side
2
4
6
1
3
1) Position the scanner as close as possible parallel to the side of the body at position 1.
2) With scanner remaining parallel to body, move scanner inferiorly from position 1 to
position 2.
3) Continue scanning through numeric sequence at a rate of at least 3 seconds per pass.
Pass from position 3 to 4 is performed over the front of the body, and pass from 5 to
6 is performed with the scanner positioned on the other side of the torso, and parallel
to the body.
5
Scanning for RF-Tagged
Premium Cotton
Situate™ Detection System 200X User's Guide 4-11
Page 54

Scanning with the Situate™ Detection System 200X
Superior to Inferior
5
3
6
4
1
2
1) Position the scanner as close as possible parallel to the side of the body at position 1.
2) With scanner remaining parallel to body, move scanner to the position 1 to the
inferior position 2.
3) Continue scanning through numeric sequence at a rate of at least 3 seconds per pass.
Pass from position 3 to 4 is performed over the front of the body, and pass from 5 to
6 is performed with the scanner positioned on the other side of the torso and parallel
to the body.
Caution
Do not move the room scanner at a rate faster than 15.2 cm (6 in.) per second. Exceeding this rate may
diminish the system’s ability to detect tagged objects.
Note: If the room scanner is moved within range of a tag while the scan is in progress, a
red detection screen will appear. When the scanner is moved out of range of the tag, the
console screen reverts to displaying the active scan screen.
Note: Each scan pattern will take between 15 and 20 seconds, at a rate of at least three
seconds per pass.
Note: Scan slowly within 5 cm (2 in.) of the body. Follow the contour of the patient’s body
to ensure thorough scanning for various tag orientations.
The screen displays an active scan screen during the scan, and the console emits an
audible indicator sound.
4-12 Situate™ Detection System 200X User's Guide
Page 55

Scanning with the Situate™ Detection System 200X
A feedback screen appears (for example, “Near Metal” or “Scan Obstruction”) when
interference occurs.
The room scanner will continue scanning until stopped by touching the screen. It
requires a minimum of 7 seconds to perform a scan, and ceases scanning after 3 minutes
of inactivity.
Note: The console will not generate a clear code until 7 seconds to ensure inadvertent
start/stop of the room scanner does not produce a confirmation code and maintain
integrity of scan records.
4. The completed scan results in either a green CLEAR, or in a red DETECTION screen. The
next steps will vary based on the result of the scan. See the instructions for the CLEAR and
DETECTION scan results.
CLEAR Scan Result
Scanning cases that detect no RF-tagged items display the green CLEAR screen.
1. Touch the screen to continue and view the scan confirmation number.
Premium Cotton
To perform another scan on the same patient, touch Resume Case. The screen will return
to the home screen. Select the desired scanning device, and touch START to perform
another scan.
2. If scanning for the case is complete, record the scan confirmation number in the patient
medical record following hospital protocol. A QR code is provided for optional entry of
Situate™ Detection System 200X User's Guide 4-13
Scanning for RF-Tagged
Page 56

Scanning with the Situate™ Detection System 200X
confirmation code into an electronic medical record (EMR) using a scanner. Then touch
Close Case.
3. A prompt appears to confirm the case is to be closed. Select Close Case to close the case
or Resume Case to return to the device selection screen to perform additional scans.
4. If closing the case is confirmed by selecting Close Case, a prompt appears to confirm the
sponge count was reconciled. Select Ye s to confirm and end the scanning case.
The case is now closed and the home screen is displayed.
DETECTION Scan Result
Scanning cases that detect RF-tagged items display the red DETECTION screen.
1. Touch the screen to continue and view the scan confirmation number.
2. Search and retrieve the missing tagged item(s) following hospital protocol.
3. Touch Resume Case to perform another scan. Repeat the scanning steps in this section
until a clear scan is reported.
Note: Selecting Close Case from a DETECTION scan result screen displays a prompt
confirming to close the case when the last scan resulted in a detection. Selecting Yes from
the prompt displays another screen to confirm or deny the sponge count was reconciled.
The case is then closed.
Note: It is recommended that scan cases be closed only from a clear scan confirmation
number.
4-14 Situate™ Detection System 200X User's Guide
Page 57

Viewing Console Case/Scan Records
The console stores viewable records of all completed scan records grouped by case.
1. Touch the Menu tab at the top of the console screen to view options.
After a Scanning Session
2. Touch View Records.
A record of the last scan is shown
3. Touch Close to return to the Records tab.
4. The arrows in the header bar allow the user to navigate between cases; the arrows at the
bottom will allow the users to navigate between scans. Touch Close to return to the
Records tab.
After a Scanning Session
Scanning for RF-Tagged
Premium Cotton
Disassembly
After all RF-tagged items have been accounted for, the procedure is complete, and the
patient has been removed from the operating room, disassemble the Situate™ system.
1. Turn console power switch to off.
Situate™ Detection System 200X User's Guide 4-15
Page 58

After a Scanning Session
2. Unplug the console from the wall power outlet.
3. Disconnect the scanner from the console.
4. Remove and discard any draping added to hand-held scanners.
5. If a body scanner was used, retrieve the scanner from the surgical table after it has been
6. Inspect components for damage, deterioration, abrasion, cracks, splits, punctures, and
Periodic Maintenance for Console and Components
Warning
Always turn off and unplug the console before periodic maintenance.
Note: Disconnect the main power by pulling the plug, not the cord.
cleared of all positioning devices, drapes and other coverings.
loose components. Check cables for kinks or breaks in insulation and connectors for wear
or damage that can prevent secure attachment.
Note: Do not clean the console with abrasive cleaning or disinfectant compounds, solvents,
or other materials that could scratch the panels or damage the console.
1. Thoroughly wipe all surfaces of the components, cords, and console with isopropyl
alcohol-based wipes
2. Dry with a lint-free cloth.
Storage
Store console and components in a dry, ventilated area out of direct sunlight. Hanging of the
body scanner lite when not in use is recommended.
Disposal
Dispose of used or opened sterile products (for example, drapes, gauze, and sponges) in
accordance with standard hospital protocol.
Caution
Situate™ premium cotton products and drapes are supplied in sterile packaging. Dispose of used or
opened sterile products (for example, drapes, gauze, and sponges) per standard hospital protocol.
Contact Medtronic technical service for the disposal of the console or system components.
Note: For disposal of the console and scanners, contact the distributor or manufacturer.
4-16 Situate™ Detection System 200X User's Guide
Page 59

After a Scanning Session
Product Service
Medtronic recommends that all Situate™ systems be returned to the manufacturer for all
service requirements. If any service is required without returning the system to the
manufacturer, Medtronic recommends that only qualified personnel service the Situate™
system.
Medtronic defines qualified personnel as a person with equipment repair experience, such
as biomedical personnel, and/or individuals who have taken official Medtronic training
courses.
Caution
Only connect IEC 60601-1 or Medtronic approved devices to the USB interface. The user must ensure
that the interconnected system maintains leakage currents according to IEC 60601-1.
Note: The Situate™ console has no user-serviceable parts and preventative maintenance is
not required. To reduce the risk of electrical shock, do not disassemble unit. Contact
manufacturer if service is required.
Returning the Situate™ Components for Service
Before returning the console, call a Medtronic sales representative for assistance. If the
energy platform is to be sent to Medtronic, do the following:
1. Obtain a return authorization number.
Call the technical service center (page 4-18) to obtain a return authorization number.
Have the following information ready before calling:
• Hospital/clinic name/customer number
• Telephone number
• Department/address, city, state, and zip code
• Model number
• Serial number
• Description of the problem
• Type of repair to be done
2. Perform periodic maintenance.
See Periodic Maintenance for Console and Components on page 4-16.
Scanning for RF-Tagged
Premium Cotton
Situate™ Detection System 200X User's Guide 4-17
Page 60

After a Scanning Session
3. Ship the console.
Medtronic Technical Service
For service, contact Medtronic technical service or your Situate™ sales representative.
Contact a Medtronic technical service representative by telephone, email, or through the
internet:
• USA and Canada: +1 800 255 8522 option 2
• International: +1 303 476 7996
a. Attach a tag to the console that includes the return authorization number and the
information (hospital, phone number, and so forth) listed in step 1.
b. Be sure the console is completely dry before packing it for shipment. Package it in its
original shipping container, if available.
c. Ship Situate™ components prepaid to the Medtronic service center.
• Email: rs.technicalservicevalleylab@medtronic.com
• Internet—http://www.medtronic.com/covidien/support/service-centers
or
http://www.medtronic.com/covidien/support/biomed-connect/electrosurgery
4-18 Situate™ Detection System 200X User's Guide
Page 61

Chapter 5
Troubleshooting
Caution
Read all warnings, cautions, and instructions provided with this system before use.
Device Notification Screens
The Situate™ scanning devices may be affected by electrical interference when a scan is
being performed.
Body Scanner and the Extremity Scanner: If an interference condition occurs during
scanning, the standard scan will complete and an extended scan will begin, lasting up to 20
additional seconds. The scan progress screen will indicate when extended scan mode is
active.
Room Scanner: Brief exposure to interference brings up a feedback screen. Move the
scanner away from the source of interference. Prolonged exposure to interference may
cause the scan to stop, resulting in a fault screen.
If the system is unable to provide a valid scan result, the console will display either a feedback
or notification screen. See the following table.
Situate™ Detection System 200X User's Guide 5-1
Page 62

Device Notification Screens
Notification type Scanning devices Resolution
Scanner near metal Room scanner Move the wand away from the metal
Scan obstruction Room scanner Separate the scanner and the source
or the metal away from the scanning
area. If the console returns to the
scanning progress screen, continue
the scan.
If the metal is not removed when the
scan is stopped, a fault screen
appears.
of interference. If the screen returns
to the scanning progress, continue
the scan.
If the source of interference is not
removed, an interference screen will
appear when the scan is stopped.
Metal fault Body scanner
Body scanner lite
Extremity scanner
Room scanner
Interference fault Body scanner
Body scanner lite
Extremity scanner
Room scanner
Transmit fault Body scanner
Body scanner lite
Extremity scanner
Room scanner
Disconnect fault Body scanner
Body scanner lite
Extremity scanner
Clear the scan area of metal objects.
Scan the patient again.
Signal levels indicate presence of
metal near accessory.
Move keys, badges, and electrical
equipment at least 60 cm (2 ft) away
from the scanning device. Scan the
patient again.
The system cannot detect due to
external interference.
Replace accessory. If error persists,
replace console.
Signal levels extremely low.
Reconnect accessory.
System unexpectedly lost
connection to accessory.
Room scanner
5-2 Situate™ Detection System 200X User's Guide
Page 63

Troubleshooting
The following table identifies possible system issues and provides suggestions for resolving
those issues. If an issue is not resolved after following the suggestion, please contact
Medtronic technical service (page 4-17).
Fault name Description Resolution
Troubleshooting
Troubleshooting
Blank screen The system stays on a
blank white or black
screen.
Boot screen The system stays on
startup screen and the
application fails to load.
System error The console displays the
system error message.
Turn off power to the console and
restart.
Turn off power to the console and
restart.
If the error persists, contact technical
service.
Situate™ Detection System 200X User's Guide 5-3
Page 64

Page 65

Chapter 6
Service & Maintenance
Maintenance
Note: There is no scheduled maintenance for the Situate™ detection system. There are no
calibrations. The Situate™ detection system self-calibrates during use.
Thoroughly wipe the scanner and remove all dirt periodically. Dirt may be wiped away with
isopropyl alcohol-based solutions. Follow all applicable label instructions on the products.
Follow the procedures approved by your institution. Avoid excessive exposure to fluids. Do
not submerge. Avoid fluid ingress to any electrical circuitry.
Medtronic defines qualified personnel as a person with equipment repair experience, such
as biomedical personnel, and/or individuals who have taken official Medtronic training
courses.
Medtronic recommends performing the biomedical department inspection and electrical
safety tests annually.
Warning
Do not connect wet instruments to the console. Ensure that all instruments are correctly connected
and that no metal is exposed at any connection points.
Caution
Only connect IEC 60601-1 or Medtronic approved devices to the USB interface. The user must ensure
that the interconnected system maintains leakage currents according to IEC 60601-1.
Note: The Situate™ console has no user-serviceable parts and preventative maintenance is
not required. To reduce the risk of electrical shock, do not disassemble unit. Contact
manufacturer if service is required.
Situate™ Detection System 200X User's Guide 6-1
Page 66

Biomedical Department Inspection
General Safety Guidelines
• The AC power switch on the rear panel serves as the means of disconnection from supply
mains. This switch also isolates the Situate™ detection system electrically from the supply
mains on both poles simultaneously.
• Using a power cord that does not meet the specifications in this Service and
Maintenance section may present a potential for an electric shock or affect the
performance of the Situate™ detection system.
Environmental Conditions
For storage and transportation information see Chapter 8, Storage Parameters and Transport
Parameters.
Biomedical Department Inspection
Note: The Situate™ detection system performs an internal calibration during use. No
calibration is needed and there are no internal adjustments to the detection console.
This procedure outlines setting up the Situate™ detection system to verify the system ability
to determine the presence and absence of a tagged object.
Refer to Chapter 3, Situate™ System Setup and Chapter 4, Scanning for RF-Tagged Premium
Cotton for detailed information for operating the system.
Set-up Procedure
• Check the Situate™ detection system console case exterior. The case exterior must have
no visible damage (for example, dents, scratches, and peeling paint).
• The touch screen must have no visible foreign material or damage.
• Inspect all external connectors/receptacles for bent pins, foreign objects, a damaged
case and/or improper fit.
• The AC power cord must have no obvious physical defects or damage.
• Place the console on a flat, stable surface such as a table, platform, boom system, or cart.
Thread the retaining strap (01-0056) through the slots in the bottom of the console and
secure the console to the equipment stand if desired. Refer to the procedures for your
local institution or your local codes.
• Plug the system power cord into the power input connector on the rear panel of the
console.
• Plug the system power cord into a grounded power outlet
• Turn the power switch on the back panel to ON.
6-2 Situate™ Detection System 200X User's Guide
Page 67

Biomedical Department Inspection
Test Method
1. Connect the scanner(s) to the console. Align the red dots on the plug and connector and
press to insert. Ensure the connectors are securely fastened.
2. Place a tagged object approximately 15 cm (6 in.) from the scanner.
3. Touch the START button.
The Situate™ system conducts the scanning process without user input.
Touch the screen at any time to cancel the body scan.
4. The completed scan results in a red DETECTION screen.
5. Place a tagged object at least 92 cm (36 in.) from the scanner.
6. Touch the START button.
The Situate™ system conducts the scanning process without user input.
Touch the screen at any time to cancel the body scan.
7. The completed scan results in a green CLEAR screen.
8. Repeat as necessary for each type of scanner.
Service & Maintenance
Situate™ Detection System 200X User's Guide 6-3
Page 68

Fuse Replacement
Fuse Replacement
In the event of a fuse failure, replace the fuses using the following procedure:
Caution
Fuses must be replaced with 2A/250 V fuses. Using other fuses might damage the unit.
1. Disconnect the Situate™ detection system’s AC power cord from the AC power inlet (1).
Fuse Replacement
2. Insert a small blade screwdriver into the small slot located on the top of the holder (2)
and pry forward to open fuse door.
3. Pull the fuse holder drawer (3) out.
4. Replace the fuses (4).
5. Reinsert the fuse holder by pushing it until the holder’s front surface is flush with the
Situate™ console surface and close the fuse door until latch engages.
6-4 Situate™ Detection System 200X User's Guide
Page 69

Chassis Ground
Back Panel Chassis Ground
Chassis Ground
REF
SN
1
Note: The Situate™ console has no user-serviceable parts and preventative maintenance is
not required. To reduce the risk of electrical shock, do not disassemble unit. Contact
manufacturer if service is required.
1. Ground continuity can be checked using the screw located on the back chassis.
If the console is opened, confirm that the chassis ground is marked and intact.
Internal Chassis Ground Terminal
Service & Maintenance
Situate™ Detection System 200X User's Guide 6-5
Page 70

Software Updates
Software Updates
Medtronic recommends that only qualified personnel perform software updates.
Software updates are available directly from Medtronic by using the Valleylab™ Exchange
Remote Software System application.
Go to http://www.medtronic.com/covidien/support/valleylab-exchange to download and
install the latest version of the Valleylab™ Exchange application.
Updating Console Software using Valleylab™ Exchange
Once the Valleylab™ Exchange application has been installed on the computer to be used for
the update, follow these instructions:
Remotely updating software on a Situate™ console:
1. Connect an ethernet cable to the ethernet port on the back of the device.
2. Connect the other end of the LAN connector on the computer hosting the Valleylab™
Exchange application.
3. Plug in the device power cord and turn ON the power switch in the back of the device.
4. Disconnect any scanning instruments connected to the console.
5. Select the Menu option from the home screen.
6. Select the Service option.
7. When the Valleylab™ Exchange application is launched, the device will be automatically
detected.
8. A screen will indicate that the software update is in progress. Do not disconnect the
ethernet or power off the console. The user will be notified to power off the console and
power on to complete the software update.
9. A screen will inform the user of a successful software update. Touch Back to Service, then
touch Close to return to the home screen.
10. If the software update was not successful, a screen will inform the user that the update
failed. Contact Medtronic technical service or your Situate™ sales representative.
Updating software on a Situate™ console using USB:
1. Connect an external USB storage device that contains a software image, which will
initiate a software update. Insertion of an external USB storage device will also initiate a
download of the console logs.
2. Plug in the device power cord and turn on the power switch in the back of the device.
3. Disconnect any scanning instruments connected to the console.
4. Select the Menu option from the home screen.
5. Select the Service option.
6-6 Situate™ Detection System 200X User's Guide
Page 71

6. A screen will indicate that the software update is in progress. Do not disconnect the USB
device or power off the console. The user will be notified to power off the console and
power on to complete the software update.
7. A screen will inform the user of a successful software update. Touch Back to Service, then
touch Close to return to the home screen.
8. If the software update was not successful, a screen will inform the user that the update
failed. Contact Medtronic technical service or your Situate™ sales representative.
Software Updates
Service & Maintenance
Situate™ Detection System 200X User's Guide 6-7
Page 72

Repairs and Returns
Repairs and Returns
For Situate™ detection system repairs or returns, call the Medtronic customer service
department. The Situate™ detection system may be returned to the factory.
Note: The Situate™ console has no user-serviceable parts and preventative maintenance is
not required. To reduce the risk of electrical shock, do not disassemble unit. Contact
manufacturer if service is required.
Return for Repair
For service, contact Medtronic technical service or your Situate™ sales representative.
Contact a Medtronic technical service representative by telephone, email, or through the
internet:
• USA and Canada: +1 800 255 8522 option 2
• International: +1 303 476 7996
• Email: rs.technicalservicevalleylab@medtronic.com
• Internet—http://www.medtronic.com/covidien/support/service-centers
or
http://www.medtronic.com/covidien/support/biomed-connect/electrosurgery
Warranty
For information about the Situate™ detection system warranty and/or to obtain information
about the availability of the Medtronic Extended Warranty, contact Medtronic customer
service.
Opening the Situate™ detection system by anyone other than an authorized Medtronic
technician voids the warranty.
Periodic Maintenance for Console and Components
The Situate™ detection system requires no scheduled maintenance other than periodic
maintenance for external surfaces.
Warning
Always turn off and unplug the console before periodic maintenance.
Note: Thoroughly wipe the scanner and remove all dirt periodically. Dirt may be wiped away
with isopropyl alcohol-based solutions. Follow all applicable label instructions on the
products. Follow the procedures approved by your institution. Avoid excessive exposure to
fluids. Do not submerge. Avoid fluid ingress to any electrical circuitry.
6-8 Situate™ Detection System 200X User's Guide
Page 73

Note: Do not clean the console with abrasive cleaning or disinfectant compounds, solvents,
or other materials that could scratch the panels or damage the console.
1. Thoroughly wipe all surfaces of the components, cords, and console with isopropyl
alcohol-based wipes.
2. Dry with a lint-free cloth.
The Situate™ detection console cannot be sterilized and must not enter a sterile surgical
field.
Disposal
Do not dispose of electrical appliances as unsorted municipal waste. Use separate collection
facilities.
Electrical appliances that are incorrectly disposed in dumps or landfills can leach dangerous
substances causing contamination of soil and groundwater, and damaging the
environment.
Disposal
Service & Maintenance
Contact your local government or point of sale for information regarding the collection of
waste electrical appliances.
Situate™ Detection System 200X User's Guide 6-9
Page 74

Page 75

Chapter 7
Electrical Safety Tests
The Situate™ detection system has been thoroughly tested for isolation, leakage, and
grounding integrity prior to shipment. The product has been tested for compliance with the
IEC 60601-1 standard.
If these tests are necessary, it is mandatory that appropriate test equipment is used, and the
tester has knowledge of the applicable electrical safety standards which pertain to these
tests. Medtronic assumes no responsibility for damage to the unit due to improper
application of the following tests.
If in doubt, consult the Safety Analyzer User’s Manual or Medtronic prior to conducting the
following tests.
Electrical Safety Tests 220–240 V
Warning
Do not touch the equipment during the isolation tests.
1. Set the line voltage to 264 V and set the frequency to 50 Hz. Do not exceed 280 V.
2. Plug the line cord of the Situate™ detection system into the leakage tester for all tests.
3. For the 25 A test, connect the ROD-L leads to the chassis ground lug and to the ground
pin of the power cord.
Electrical Safety Test Limits 240 V
Parameter Conditions Passing
Input voltage Rated line +10% 264 V
Line cord resistance N/A <100 mΩ
25 A chassis-cord GND 10 seconds <100 mΩ
Earth leakage Power Norm, GND open <500 μA
Earth leakage Power Rev, GND open <500 μA
Situate™ Detection System 200X User's Guide 7-1
Page 76

Electrical Safety Tests 110–120 V
Electrical Safety Tests 110–120 V
Warning
Do not touch the equipment during the isolation tests.
1. Use the variable autotransformer and the DVM to set the line voltage to 132 V. Do not
exceed 140 V.
2. Plug the line cord of the Situate™ detection system into the leakage tester for all tests.
3. For the 25 A test, connect the ROD-L leads to the chassis ground lug and to the ground
pin of the power cord.
Electrical Safety Test Limits 120 V
Parameter Conditions Passing
Input voltage Rated line +10% 132 V
Line cord resistance N/A <100 mΩ
25 A chassis-cord GND 10 seconds <100 mΩ
Earth leakage Power Norm, GND open <300 μA
Earth leakage Power Rev, GND open <300 μA
7-2 Situate™ Detection System 200X User's Guide
Page 77

Chapter 8
Technical Specifications
All specifications are nominal and subject to change without notice. A specification referred
to as “typical” is within ± 20% of a stated value at room temperature (25°C/77°F) and a
nominal line input voltage.
Caution
Read all warnings, cautions, and instructions provided with this system before use.
Performance Characteristics
General
Situate™ Detection System 200X
Dimensions (H x W x D) 24.8 cm x 29.8 cm x 11.4 cm
(9.75 in. x 11.75 in. x 4.5 in.)
Console weight 3.2 kg (7 lb)
Console and power cord weight 3.4 kg (7.5 lb)
Power connector type Standard IEC-320 receptacle
System power input 100–240 V ~±10%, 75 VA, 50/60 Hz
Fuses (quantity 2) T 2A, 250 V
Accessory connector type Push-pull lock receptacle
Situate™ Detection System 200X User's Guide 8-1
Page 78

Performance Characteristics
Length 99.06 cm (39 in. ± 0.5 in.)
Width 50.08 cm (20 in. ± 0.5 in.)
Thickness 2.54 cm (1 in. ± 0.25 in.)
Weight 5.65 kg (12.5 lb)
Connector type Push-pull lock receptacle
Cord length 3.66 m (12 ft)
Cord type Shielded
Situate™ Body Scanner
Situate™ Body Scanner Lite
Length 113.67 cm (44.75 in. ± 0.5 in.)
Width 50.93 cm (20.5 in. ± 0.5 in.)
Thickness 2.54 cm (1 in. ± 0.3 in.)
Weight 2.15kg (4.75 lb)
Connector type Push-pull lock receptacle
Cord length 3.2 m (10.5 ft) 3.66 m (12 ft: does not include
connectors)
Cord type Shielded
Situate™ Extremity Scanner
Length 31.5 cm (12.4 in.)
Width 8.89 cm (3.5 in.)
Height 8.38 cm (3.3 in.)
Weight 910 g (2 lb)
8-2 Situate™ Detection System 200X User's Guide
Page 79

Connector type Push-pull lock receptacle
Cord length 3.66 m (12 ft)
Cord type Shielded
Situate™ Room Scanner
Length 48.9 cm (19.35 in.)
Width 37.5 cm (14.74 in.)
Height 1.6 cm (0.625 in.)
Weight 312 g (11 oz)
Performance Characteristics
Connector type Push-pull lock receptacle
Cord length 3.66 m (12 ft)
Cord type Shielded
Operating Parameters
Ambient temperature range 10°C to 40°C (50°F to 104°F)
Relative humidity 20% to 90% non-condensing
Atmospheric pressure 700 hPa to 1060 hPa
Warm-up time If transported or stored at temperatures outside the operating
temperature range, allow one hour for the console to reach room
temperature before use.
Storage Parameters
Technical Specifications
Ambient temperature range -40°C to 70°C (-40°F to 158°F)
Relative humidity 10% to 90% (non-condensing)
Atmospheric pressure 500 hPa to 1060 hPa
Duration of storage If stored over one year, see service manual for instructions or
contact Medtronic service for further information.
Situate™ Detection System 200X User's Guide 8-3
Page 80

Performance Characteristics
Transport Parameters
Ambient temperature range -30°C to 60°C (-22°F to 140°F)
Relative humidity 10% to 90% (non-condensing)
Atmospheric pressure 500 hPa to 1060 hPa
Duration of storage If stored over one year, see service manual for instructions
Safety Classification
or contact Medtronic service for further information.
Mode of operation Continuous operation
External electrical power source Class I equipment
Degree of protection against
electrical shock
Medical electrical equipment safety IEC 60601-1
EMC emissions/immunity - medical
electrical equipment
Type B equipment
IEC 60601-1-2
Note: The Situate™ body scanner/body scanner lite, room scanner, and extremity scanner
emit a 145 kHz low power electromagnetic signal to detect the tag. The level of emitted
radiation is below the prescribed levels per IEC 60601-1-2 and does not pose risk to the
patient or user.
Electromagnetic Compliance (EMC)
CISPR 11:2009 (Amended by A1:2010), Industrial, scientific and medical (ISM) radiofrequency equipment - Electromagnetic disturbance characteristics - Limits and methods of
measurement
IEC 61000-3-2:2009, Electromagnetic compatibility (EMC) - Part 3-2: Limits - Limits for
harmonic current emissions (equipment input current ≤ 16 A per phase)
IEC 61000-3-3:2013, Electromagnetic compatibility (EMC) - Part 3-3: Limits - Limitation of
voltage fluctuations and flicker in low-voltage supply systems for equipment with rated
current ≤ 16 A
IEC 61000-4-2:2008, Electromagnetic compatibility (EMC) - Part 4-2: Testing and
measurement techniques - Electrostatic discharge immunity test
8-4 Situate™ Detection System 200X User's Guide
Page 81

Performance Characteristics
IEC 61000-4-3:2010, Electromagnetic compatibility (EMC) - Part 4-3: Testing and
measurement techniques - Radiated, radio-frequency, electromagnetic field immunity test
IEC 61000-4-4:2012, Electromagnetic compatibility (EMC) - Part 4-4: Testing and
measurement techniques - Electrical fast transient/burst immunity test
IEC 61000-4-5:2005, Electromagnetic compatibility (EMC) - Part 4-5: Testing and
measurement techniques - Surge immunity test
IEC 61000-4-6:2013, Electromagnetic compatibility (EMC) - Part 4-6: Testing and
measurement techniques - Immunity to conducted disturbances, induced by radiofrequency fields
IEC 61000-4-8:2009, Electromagnetic compatibility (EMC) - Part 4-8: Testing and
measurement techniques - Power frequency magnetic field immunity test
IEC 61000-4-11:2004, Electromagnetic compatibility (EMC) - Part 4-11: Testing and
measuring techniques - Voltage dips, short interruptions and voltage variations immunity
tests
Caution
Use of accessories, transducers, and cables other than those specified or provided by the
manufacturer of this equipment could result in increased electromagnetic emissions or decreased
electromagnetic immunity of this equipment and result in improper operation.
Portable RF communications equipment (including peripherals such as antenna cables and external
antennas) should be used no closer than 30 cm (12 in.) to any part of the Situate™ detection system,
including cables specified by the manufacturer. Otherwise, degradation of the performance of this
equipment could result.
Use of this equipment adjacent to or stacked with other equipment should be avoided because it
could result in improper operation. If such use is necessary, this equipment and the other equipment
should be observed to verify that they are operating normally.
Technical Specifications
Situate™ Detection System 200X User's Guide 8-5
Page 82

Performance Characteristics
Electromagnetic Emissions
Guidance and manufacturer’s declaration - electromagnetic emissions
The Situate™ detection system 200X is intended for use in the electromagnetic environment
specified below. The customer or the user of the 200X console should assure that it is used in
such an environment.
Emissions test Compliance Electromagnetic environment - guidance
RF emissions CISPR 11 Group 2 The 200X console must emit electromagnetic energy
RF emissions CISPR 11 Class A The 200X console is suitable for use in all
Harmonic emissions IEC
61000-3-2
Voltage fluctuations /
flicker emissions IEC
61000-3-3
Class A
Complies
in order to perform its intended function. Nearby
electronic equipment may be affected.
establishments other than domestic and those directly
connected to the public low-voltage power supply
network that supplies buildings used for domestic
purposes.
Electromagnetic Immunity
Guidance and manufacturer’s declaration - electromagnetic immunity
The Situate™ detection system is intended for use in the electromagnetic environment
specified below. The customer or the user of the 200X console should ensure that it is used in
such an environment.
Immunity test IEC 60601 test
level
Electrostatic
discharge (ESD)
IEC 61000-4-2
Electrical fast
transient/burst
IEC 61000-4-4
Surge IEC 610004-5
± 8 kV contact
± 15 kV air
± 2 kV for
power supply
lines
± 1 kV for input/
output lines
± 1 kV line(s) to
line(s)
± 2 kV line(s) to
earth
Compliance
level
± 8 kV contact
± 15 kV air
± 2 kV for
power supply
lines
± 2 kV for
input/output
lines
± 1 kV line(s) to
line(s)
± 2 kV line(s) to
earth
Electromagnetic environmentguidance
Floors shall be wood, concrete, or
ceramic tile. If floors are covered with
synthetic material, the relative humidity
should be at least 30%.
Mains power quality should be that of a
typical commercial or hospital
environment. If disruption in power
occurs, it may be necessary to reset the
unit by disconnecting and reconnecting
the accessory.
Mains power quality should be that of a
typical commercial or hospital
environment.
8-6 Situate™ Detection System 200X User's Guide
Page 83

Guidance and manufacturer’s declaration - electromagnetic immunity
Performance Characteristics
Voltage dips,
short
interruptions,
and voltage
variations on
power supply
input lines IEC
61000-4-11
Power frequency
(50/60 Hz)
magnetic field
IEC 61000-4-8
<5% UT (>95%
dip in UT) for
0.5 cycle
40% UT (60%
dip in UT) for 5
cycles
70% UT (30%
dip in UT) for 25
cycles
<5% UT (>95%
dip in UT) for 5 s
0% UT for 1
cycle
30 A/m 30 A/m Power frequency magnetic fields should
<5% UT (>95%
dip in UT) for
0.5 cycle
40% UT (60%
dip in UT) for 5
cycles
70% UT (30%
dip in UT) for
25 cycles
<5% UT (>95%
dip in UT) for
5 s
0% UT for 1
cycle
Mains power quality should be that of a
typical commercial or hospital
environment. If the user of the 200X
console requires continued operation
during power interruptions, it is
recommended that the 200X console be
powered from an uninterruptible power
supply or a battery.
be at levels characteristic of a typical
location in a typical commercial or
hospital environment.
Situate™ Detection System 200X User's Guide 8-7
Technical Specifications
Page 84

Performance Characteristics
Guidance and manufacturer’s declaration - electromagnetic immunity
Conducted RF
IEC 61000-4-6
Radiated RF IEC
61000-4-3
3 V
150 kHz
RMS
to 80 MHz
3 V/m 80 MHz
to 2.7 GHz
3 V
3 V
RMS
RMS
Portable and mobile RF
communications equipment should be
used no closer to any part of the
Situate™ detection system 200X,
including cables, than the
recommended separation distance
calculated from the equation applicable
to the frequency of the transmitter.
Recommended separation distance:
d=1.2 √P
d=1.2 √P 80 MHz to 800 MHz
d=2.3 √P 800 MHz to 2.7 GHz
where P is the maximum output power
rating of the transmitter in watts (W)
according to the transmitter
manufacturer and d is the
recommended separation distance in
meters (m).
Field strengths from fixed RF
transmitters, as determined by an
electromagnetic site survey
less than the compliance level in each
frequency range.
b
a
should be
Interference may occur in the vicinity of
equipment marked with the following
symbol:
Note: UT is the a.c. mains voltage prior to application of the test level.
Note 1: At 80 MHz and 800 MHz, the higher frequency range applies.
Note 2: These guidelines may not apply in all situations. Electromagnetic propagation is affected
by absorption and reflection from structures, objects and people.
a) Field strengths from fixed transmitters, such as base stations for radio (cellular/cordless)
telephones and land mobile radios, amateur radio, AM and FM radio broadcast and TV broadcast
cannot be predicted theoretically with accuracy. To assess the electromagnetic environment due
to fixed RF transmitters, an electromagnetic site survey should be considered. If the measured field
strength in the location in which the RF detection system is used exceeds the applicable RF
compliance level above, the RF detection system should be observed to verify normal operation. If
abnormal performance is observed, additional measures may be necessary, such as re-orienting or
relocating the RF detection system.
b) Over the frequency range 150 kHz to 80 MHz, field strengths should be less than 3 V/m.
8-8 Situate™ Detection System 200X User's Guide
Page 85

Performance Characteristics
Separation Distances
Recommended separation distances between portable and mobile RF communications
equipment and the Situate™ detection system 200X
The Situate™ detection system 200X is intended for use in an electromagnetic environment in
which radiated RF disturbances are controlled. The customer or the user of the Situate™
detection system 200X can help prevent electromagnetic interference by maintaining a
minimum distance between portable and mobile RF communications equipment
(transmitters) and the Situate™ detection system 200X as recommended below, according to
the maximum output power of the communications equipment.
Rated maximum
output power of
transmitter
(W)
0.01 0.1 0.1 0.2
Separation distance according to frequency of transmitter
(m)
150 kHz to 80 MHz
d=1.2 √P
80 MHz to 800 MHz
d=1. 2 √P
800 MHz to 2.7 GHz
d=2.3 √P
0.1 0.4 0.4 0.7
1 1.2 1.2 2.3
10 3.8 3.8 7.3
100 12 12 23
For transmitters rated at a maximum output power not listed above, the recommended separation
distance d in meters (m) can be estimated using the equation applicable to the frequency of the
transmitter, where P is the maximum output power rating of the transmitter in watts (W) according
to the transmitter manufacturer.
Note 1: At 80 MHz and 800 MHz, the separation distance for the higher frequency range applies.
Note 2: These guidelines may not apply in all situations. Electromagnetic propagation is affected by
absorption and reflection from structures, objects and people.
Frequency ranges and text condition on transmitter bands
Bands (MHz) Test frequencies
(MHz)
380 – 390 385 Pulse – 18 Hz 27
430 – 470 450 FM ± 5 kHz Deviation 1
704 – 787 710, 745, 780 Pulse – 217 Hz 9
Modulation Claimed compliance
level (V/m)
28
kHZ sine
Technical Specifications
800 – 969 810, 870, 930 Pulse – 18 Hz 28
1700 – 1990 1720, 1845,1970 Pulse – 217 Hz 28
2400 – 2570 2450 Pulse – 217 Hz 28
Continued
Situate™ Detection System 200X User's Guide 8-9
Page 86

Performance Characteristics
Recommended separation distances between portable and mobile RF communications
5100 – 5800 5240, 5500, 5785 Pulse – 217 Hz 9
Note 1: The minimum dwell time during test is 2 s.
Note 2: A minimum separation distance of 0.3 meters should be maintained between any device
transmitting in this band and the Situate™ detection system. This includes devices such as mobile
phones, PDAs, Wireless LANs, and Bluetooth
Accessories
The following accessories are for use with the Situate™ detection system.
Accessory Cord length
equipment and the Situate™ detection system 200X
TM*.
01-0046 3.6 m (12 ft)
01-0023 3.6 m (12 ft)
01-0031 3.6 m (12 ft)
01-0044 3.6 m (12 ft)
AC power cable 100–240 VAC 3 m (10 ft)
Ethernet cable 3 m (10 ft)
USB flash drive 2.0/3.0 8-32 GB N/A
Audio Volume
The stated audio levels are at a distance of 1 meter.
Audible Tone
The audio levels stated below are for activation tones and alert tones at a distance of 1 meter.
Volume (adjustable) 40 dBa minimum
Frequency (nominal) 3000 Hz
8-10 Situate™ Detection System 200X User's Guide
Page 87

Tone Types
Detection tone 3 kHz, continuous tone until screen is touched: 500ms
minimum.
Fault tone 3 kHz, continuous tone until Mute button, Information
button, or Continue button is pressed: 500 ms minimum.
Active tone 3 kHz, beep tone every 1 s.
Performance Characteristics
Dynamic fault/scan
obstruction tone
System error tone 3 kHz, 3 beep sequence: 0.5 s on, 0.2 s off.
3 kHz, continuous tone until dynamic fault is no longer
active.
Input Power
100 V to 240 V
50 Hz to 60 Hz, 1A
Full regulation range:
90 Vac to 130 Vac
Mains line frequency range (nominal): 50 Hz to 60 Hz
Power plug:
3-prong hospital grade connector
Full Regulation Range:
180 Vac to 264 Vac
Power Cord Specification
This system is factory equipped with a 250 VAC hospital grade NEMA 5-15 power cord.
Should the AC power cord need to be replaced to match another plug configuration, the
replacement plug/cable/receptacle configuration must meet or exceed the following
specifications:
Cable - SJT16/3, IEC color code, maximum length 10 ft. (3.48 m)
Plug - minimum 10 A - 125 VAC
Unit receptacle - IEC female, minimum 10 A - 125 VAC
Technical Specifications
Use only Medtronic provided power cord for this product. For replacement contact your
Medtronic representative.
Note: Contact your local Medtronic representative for alternative internationally approved
power cord options.
Situate™ Detection System 200X User's Guide 8-11
Page 88

Performance Characteristics
California Proposition 65 Statement
For information regarding California Proposition 65, please refer to www.Medtronic.com/
caprop65.
8-12 Situate™ Detection System 200X User's Guide
Page 89

Page 90

Consult
instructions
for use
Caution
Part No. PT00119220
Medtronic and Medtronic logo are trademarks of Medtronic.
™* Third party brands are trademarks of their respective owners.
All other brands are trademarks of a Medtronic company.
May be covered by U.S. Patents: www.medtronic.com/patents
©2020 Medtronic. All rights reserved.
Made in Mexico.
Manufactured for Covidien llc, 15 Hampshire Street,
Mansfield, MA 02048 USA.
www.medtronic.com +1 303 530 2300 [T]
+1 800 255 8522 [T]
REV 03/2020
 Loading...