

REPROCESSING SYSTEMS
LT
User Manual
Automated Endoscope
Leak Tester

Veriscan® is a registered trademark of Minntech Corporation.
Fujinon® is a registered trademark of Fujinon Corporation.
OLYMPUS® is a registered trademark of Olympus Corporation.
PENTAX® is a registered trademark of Pentax Precision Instrument Corporation.
Storz® is a registered trademark of Karl Stroz.
50096-988 Rev A
© 2009, MINNTECH CORPORATION
All rights reserved. This publication is protected by copyright. Copying, disclosure to
others, or the use of this publication is prohibited without the expresswritten consent
of Minntech Corporation.
Minntech reserves the right to make changes in the specications shown herein
without notice or obligation. Contact your Medivators representative or Medivators
customer service for more information.

Table of Contents
Introduction ................................................................... 5
Using this Manual ....................................................... 5
Product Description .................................................... 5
Product Specications ............................................... 6
Safety ..............................................................................7
Intended Use .............................................................. 7
Electrical Compliance ................................................. 7
Operator Safety ......................................................... 7
General Cautions ....................................................... 7
Guidelines .................................................................. 8
Cleaning and Disinfection ..................................... 8
System Components ..................................................... 9
System Features .......................................................... 10
System Setup ............................................................... 11
Performing a Leak Test ................................................14
Performing a Screening test ...................................... 17
Testing a Failed Endoscope ....................................... 19
Daily Quality Assurance Test ..................................... 21
Data Access and Management ....................................22
Main Menu ............................................................... 22
Printing and Quick Reports ...................................... 26
ProV-LT Data Management Software ...................... 28
Maintenance, Handling and Care ............................... 30
Troubleshooting .......................................................... 33
Warranty ....................................................................... 34
USERS MANUAL | 3


Introduction
Using this manual
This manual describes the features of the Medivators Veriscan LT Automated Endoscope Leak Tester, including
system, setup, operation, safety, maintenance and troubleshooting procedures. It is important to follow the provided
instructions to keep the device in proper operating condition, to ensure accurate endoscope leak testing, and to
ensure long product life.
This is not a service manual and does not provide detailed instructions for service beyond general maintenance,
handling and care. Contact the manufacturer’s service representative if you have any questions regarding this
product, its use or operation.
Product Description
Flexible endoscopes are highly vulnerable to damage-causing moisture that enters the endoscope’s sensitive
interior through holes, tears, broken seals, cleaning cap leaks and loose contact pins. Prior to Veriscan LT, leak
detection has always been hampered by testing equipment that lacked precision, and required extraordinary skills
of observation beyond the capabilities of even the most experienced cleaning technician. As a result, undetected
leaks allow moisture to enter the endoscope’s interior through no fault of the technician. These leaks invariably
result in extensive endoscope damage, expensive endoscope repairs, and raise the risk of cross-patient infection
due to pathogens passing into subsequent patients through undetected leaks and moisture invasion.
The Veriscan’s automated endoscope leak testing technology transforms leak testing from a frustrating guessing
game into a simple, highly accurate, repeatable process that can be quickly mastered by cleaning technicians
and nurses. Veriscan’s innovative dry leak testing method accurately detects damage-causing endoscope leaks
without the need of immersing an endoscope in water. The endoscope is dry-leak tested through a process of
pressurizing the endoscope, monitoring the internal pressure level, and identifying if an endoscope leak exists
through a loss of pressure. An endoscope does not have to be placed in a uid-bath and visually observed for air
bubble leaks; the Veriscan’s visual display and printout automatically identify if an endoscope leak is detected.
Carefully review the User Manual to familiarize yourself with Veriscan’s features, operation and testing procedures.
We are condent the Veriscan system will quickly become an invaluable tool for enhancing reprocessing room
efciency, reducing endoscope damage and repair expense due to undetected leaks, and reduce the potential risk
of cross-patient infection.
USERS MANUAL | 5

Product Specications
Power Requirement: Universal Power Supply 100-240VAC, 50/60 Hz, .25 Ampere
Fuse Rating: 250V, 1 Ampere, Type S, 3AG style.
Dimensions: 13.125 H x 8.25 W x 19.25 L inches
(33.3 H x 21 W x 48.9 L cm)
Weight: 15.8 lbs. (7.18 kg)
PSI range: 3.500 - 3.999 PSI (comparable to current manual leak testers)
Display: Liquid Crystal Display (LCD) with LED backlight
ProV-LT Data Management
Connectivity Ports: USB communications port
Operating Temperature Range: +10°C (50°F) to + 40°C (104°F)
Storage Temperature Range: +20°C (68°F) to +45°C (113°F)
Humidity: 20% to 80% non-condensing
Electrical Safety Certications: UL Standard 61010-1
CAN/CSA Standard 61010-1
Environmental Rating: Standard
Designed for Use: Indoor Use Only
Warranty Period: One (1) Year
6 | USERS MANUAL

Safety
Intended Use
The Medivators Veriscan system is intended for endoscope leak testing of exible, immersible endoscopes. The
Medivators Veriscan system has been validated by Medivators for use on Olympus, Pentax, Fujinon, and Storz
exible, immersible endoscopes.
Electrical Compliance
The Medivators Veriscan system was tested to stringent electrical certications and safety standards. This device
complies to UL Standard 61010-1 and CAN/CSA Standard 61010-1.
NOTE: This device must always be plugged into an electrical wall outlet that includes an approved Ground
Fault Interrupter (GFI) prior to operation.
Operator Safety
1) Veriscan is to be operated solely by properly trained and qualied personnel, and only used for its intended use.
2) WARNING: To avoid biological contamination and chemical burns, always wear appropriate personal protective
equipment (PPE) including clothing, gloves, and safety glasses when handling used endoscopes.
General Cautions
1) Veriscan users should be properly trained and instructed on the current procedures used to inspect, prepare,
clean, disinfect, rinse, dry, and store endoscopes. Follow recommended standards as referred by ASTM,
ASGE, SGNA and APIC.
2) The Veriscan system is intended to be used in conjunction with the instructions and labeling provided by the
endoscope manufacturer.
3) This is a dry leak test only - Do not place endoscope in water while testing.
4) Veriscan’s leak test parameter settings are pre-set at the factory for highly accurate endoscope leak test
measurements. Parameter settings should not be changed or adjusted, unless specically recommended by
Medivators. Parameter changes should only be performed by trained and qualied personnel.
5) The Veriscan system must be grounded in accordance with applicable electrical and safety regulations.
6) Read all precaution labels on the device before using.
7) Never use the device in a manner not specied or intended by the manufacturer.
8) The Veriscan system uses coin lithium batteries in the internal electronics for retaining memory settings. The
coin lithium batteries contain perchlorate material and if replaced, special handling may apply.
9) The Veriscan’s Quick Connect Tubings are not autoclavable and can only be decontaminated using low
temperature decontamination methods.
10) Inspect Quick Connect Tubings often and replace if damaged or worn.
11) Lubricate Quick Connect Tubing O-ring weekly with silicon oil to ensure a secure connection.
12) Monitor the condition of the desiccant drying crystals on a regular monthly basis. Replace as needed as
determined by comparing the crystals to the Drying Crystals Color Comparison Chart.
13) Monitor the condition of the coalescent lter for oil and particulates on a regular monthly basis. Replace once
yearly, or more if needed.
For service or service-related questions, contact Medivators Technical Support at 1.800.444.4729 or your
authorized Medivators distributor.
USERS MANUAL | 7

Guidelines
Endoscope Leak Testing and Pre-cleaning
An effective endoscope leak test and pre-cleaning process is an essential step in the reprocessing of an
endoscope. Always follow the endoscope manufacturer’s instructions and established professional guidelines to
properly leak test and clean an endoscope. If an endoscope leak is detected, the endoscope should be immediately
taken out of service and sent in for repair.
Endoscopes should always be dry leak tested before submersion in uid to prevent additional uid invasion and
internal endoscope contamination. Leak testing detects endoscope leaks within the interior and exterior of an
endoscope.
Cleaning and Disinfection
Professional Guidelines
The following organizations have published recommended guidelines for cleaning and disinfecting endoscopes.
Society of Gastroenterology
Nurses and Associates, Inc.
401 North Michigan Ave.
Chicago, Ill. 60611-4267 USA
Tel: 800.245.7462
Fax: 312.527.6658
www.sgna.org
American Society for Gastrointestinal Endoscopy
1520 Kensington Rd. Suite 202
Oak Brook, Ill. 60523-2141 USA
Tel: 630.573.0600
Fax: 630.573.0691
www.asge.org
Association of periOperative Registered Nurses, Inc.
2170 S. Parker Rd., Suite 300
Denver, CO 80231-5711 USA
Tel: 800.755.2676
Fax: 303.750.3462
www.aorn.org
British Society of Gastroenterology
3 St. Andrews Place
Regents Park, London, NW1 4LB England
Tel: +44.020.7387.3534
ww.bsg.org.uk
Association of Professionals in Infection
Control and Epidemiology, Inc.
1275 K. Street NW, Suite 1000
Washington, DC 20005-4006 USA
Tel: 202.789.1890
Fax: 202.789.1899
www.apic.org
American Society for Testing and Materials
100 Barr Harbor Drive
West Conshohocken, PA 19428-2959 USA
Tel: 610.832.9585
Fax: 610.832.9555
www.astm.org
Canadian Society of Gastroenterology
Nurses and Associates
27 Nicholson Dr.
Lakeside, NS B3T 1B3 Canada
Fax: 902.473.4406
www.csgna.com
Societe Francaise d’Hygiene Hospialiere S.F.H.H.
Hopital de la Croix-Rousse
Unite h’Hygiene Hospitaliere-Epidemiologie
93 Grande Rue de la Croix-Rousse
69317 Lyon Cdx04 France
Tel: 04.72.07.19.83
Fax: 0.4.72.07.19.85
www.sfhh.net
8 | USERS MANUAL
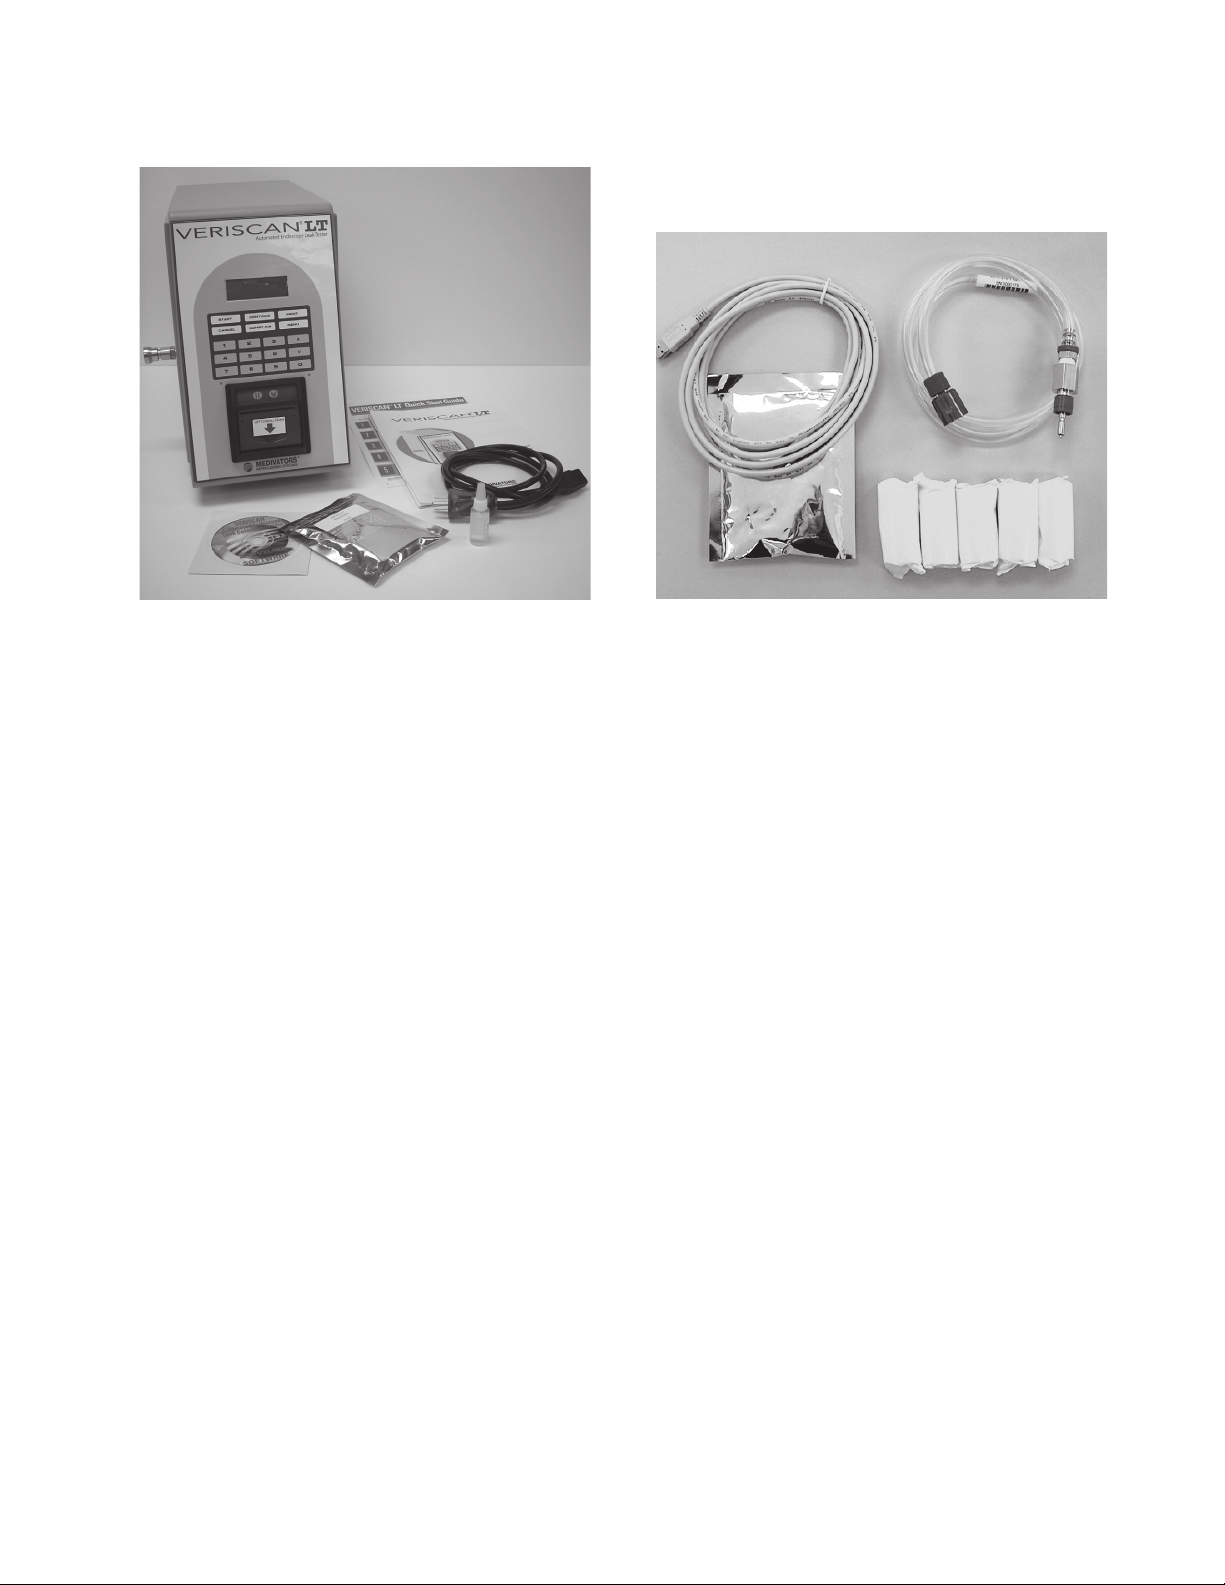
System Components
Veriscan Box
This box contains the following components:
• One (1) Veriscan-LT System
• One (1) Power cord
• One (1) Crystal desiccant bag
• One (1) Silicon Oil
• One (1) ProV-LT Link Database Software
• One (1) Quick Start Guide
• One (1) Veriscan Users Manual
If any of the components are missing, contact Medivators
Customer Support at 1-800-444-4729
or your authorized distributor.
Installation Kit (endoscope specic)
This box contains the following components:
• One (1) Quick connect tubing
• Five (5) printer paper rolls
• One (1) Crystal desiccant bag
• One (1) USB cable
USERS MANUAL | 9
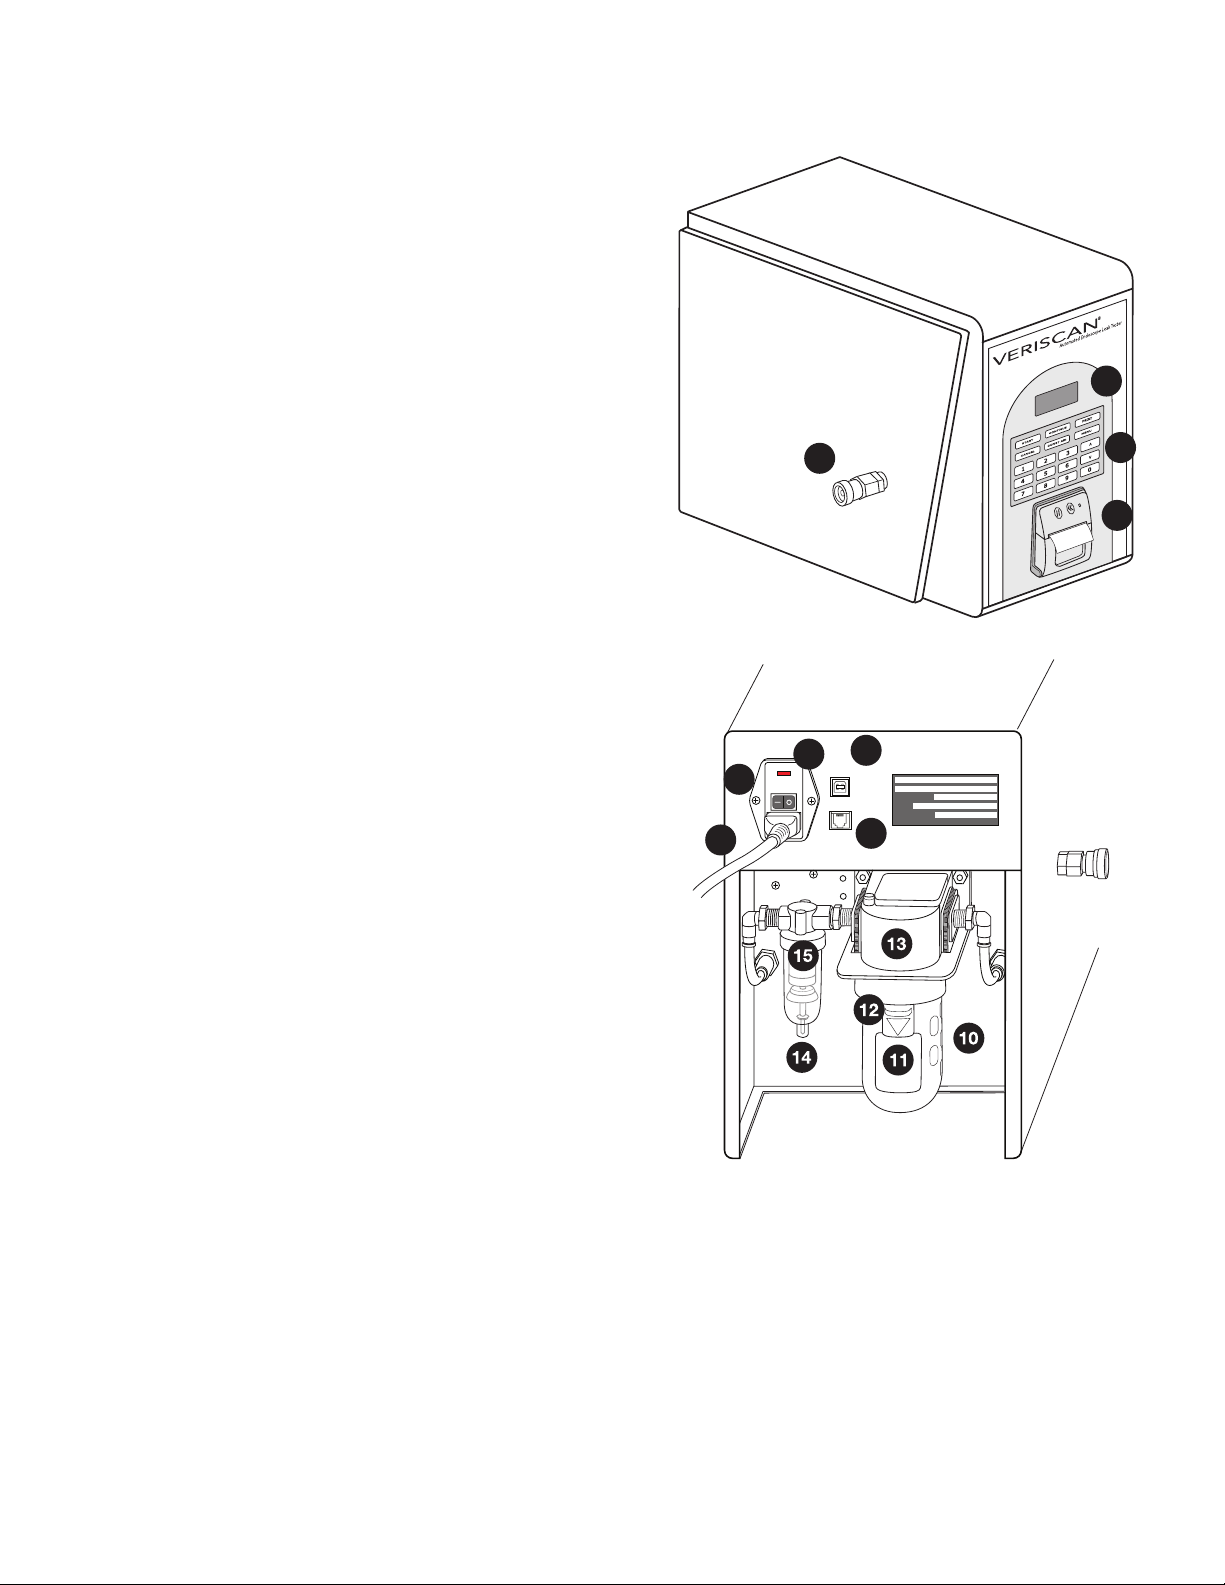
System Features
LT
1. Display Screen
Displays information and test results
2. Control Keypad
Touchpad used to operate Veriscan System
3. Printer
Provides printout of test results
4. Quick Connect Port
Veriscan connector for Quick Connect Tubing
to endoscope
5. Power Switch
Used to turn Veriscan system ON/OFF
6. Power Cord Outlet
Receptacle for AC power cord
7. Power Cord
Provides electrical connection for Veriscan to
AC wall outlet
8. RS232 Port
Not currently used
9. USB Port
Port to connect Veriscan to separate computer
via USB cable
10. Drying Crystals Bulb
Receptacle for desiccant crystals
11. Metal Bulb Receptacle
Removable metal receptacle for securing
drying crystals bulb
12. Receptacle Release Button
Button to release metal bulb receptacle to
provide access to drying crystals bulb
13. Bulb Housing Structure
Housing for securing and linking drying
crystals bulb and metal bulb receptacle to
the device
14. Coalescent Filter Housing
Housing for securing and linking the oil and
particle lter to the device
15. Coalescent Filter
Oil and particle lter removes foreign
substances from air that enters and exits the
endoscope during testing
1
4
9
6
5
7
8
2
3
10 | USERS MANUAL
System Setup
Installation
• Position Veriscan system on a at, level surface and within six (6) feet/
two (2) meters of the electrical AC wall outlet.
• Veriscan’s electrical requirements can be found under the “Introduction,
Product Specications” section.
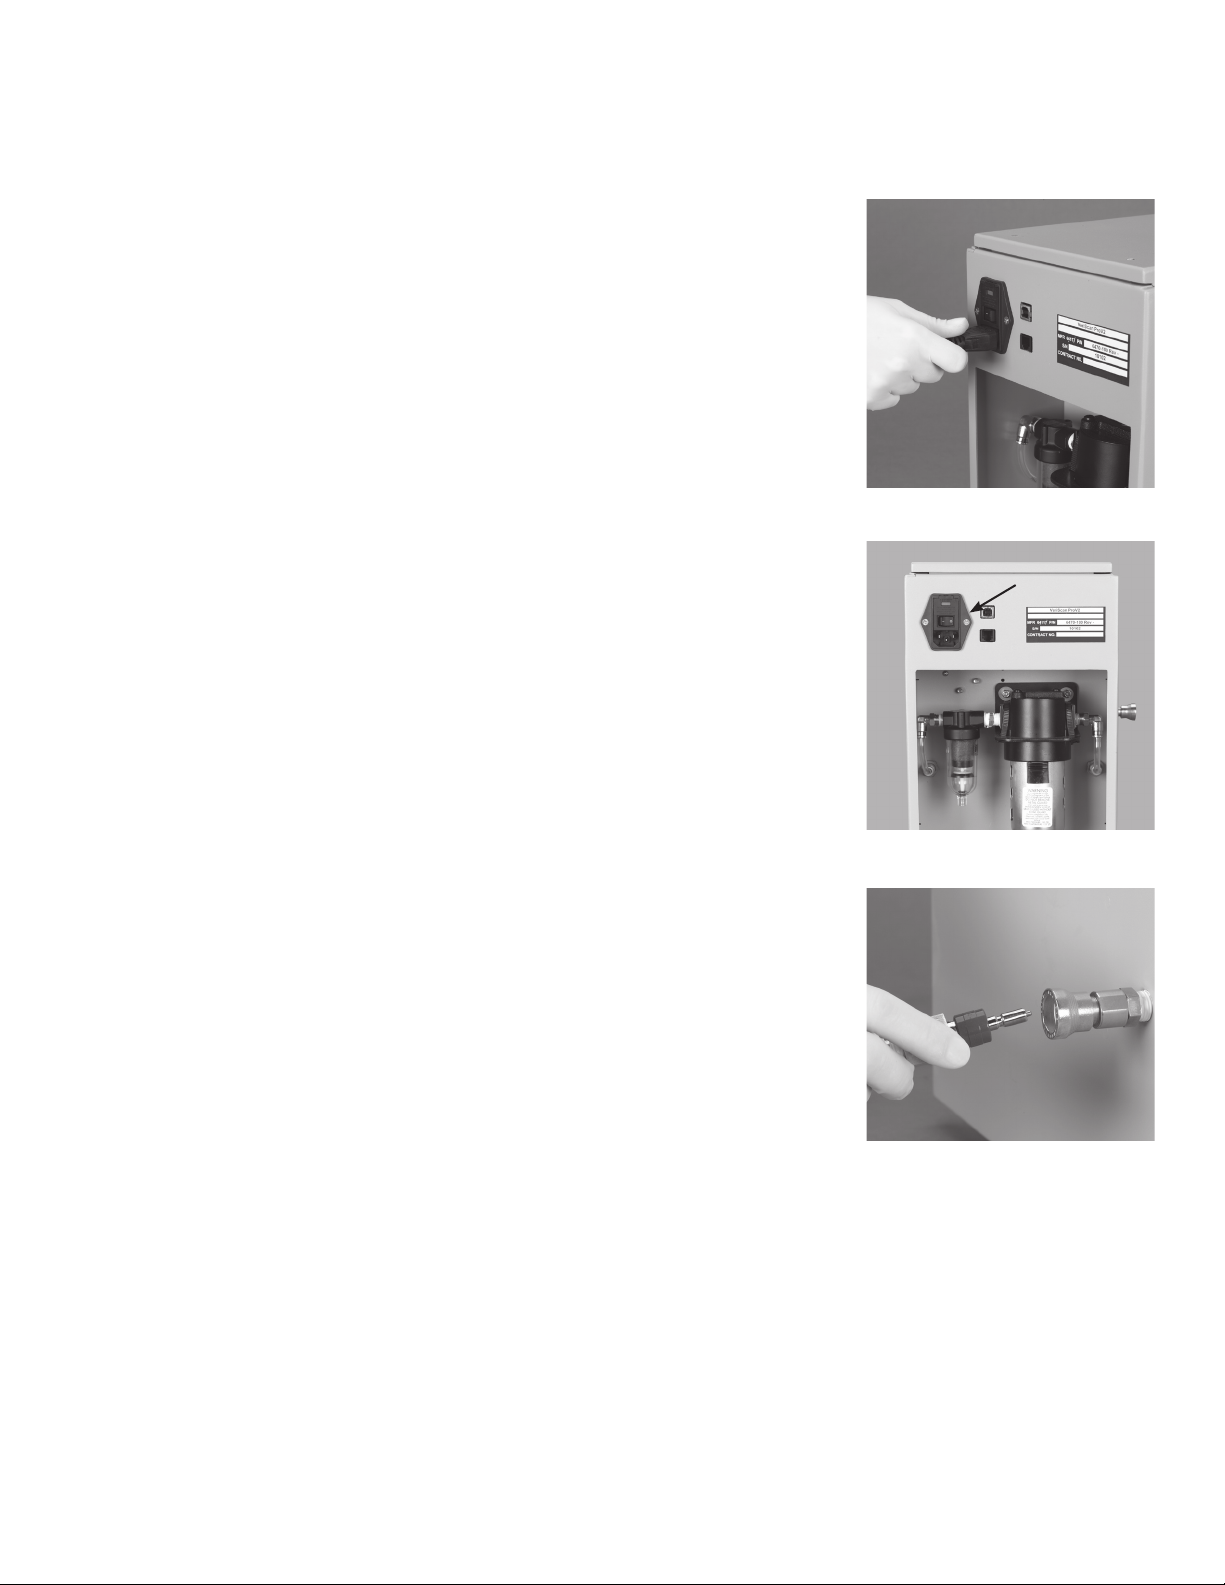
Attaching the Power Cord
• WARNING: Exercise caution when plugging in this electrical
device. Risk of electric shock.
• Connect power cord to power cord outlet located on rear of unit. Gently
push cord in until fully inserted. (see gure 1)
• Plug the other end of the power cord into a standard AC wall outlet.
• NOTE: This device must always be plugged into an electrical wall
outlet that includes an approved Ground Fault Interrupter (GFI)
prior to operation.
Powering the Veriscan System “ON”
• Press the power switch located on the back of the unit to turn system
power ‘on’. (see gure 2)
Figure 1
• When Veriscan is turned on, it will automatically perform an initialization
process which includes a series of diagnostic self-tests. When this
process is complete, the display will indicate that the unit is ready for
testing as displayed below:
mm/dd/yy hh:mm
Connect Scope
Press “Start”
Setting the Time and Date
The Veriscan’s internal clock will record the time of all leak test
procedures. To set the clock:
• Press the MENU button on the display keyboard
• Press the arrow down key until Set Date/Time selection is reached
• Press the CONTINUE key to select the Set Date/Time option
• To enter the month, press CONTINUE and then enter the correct month
in the “month = “ area: 1 = January, 2 = February, etc.. If an incorrect
entry is made, press CANCEL to start the process over. Press
CONTINUE when nished.
• To enter the date, press the down arrow key from the “month” row until
the “date” row is reached. Press CONTINUE to reach the date set
area. Enter the date. For single digit numbers, it is not necessary to
enter a “0” before the number (e.g. enter 3 for the 3
CONTINUE when nished.
rd
). Press
Figure 2
Figure 3
• To enter the year, press the down arrow key from the “date” row until
the “year” row is reached. Press CONTINUE to reach the year set
area. Enter the year as a single digit where 6 = 2006, 70 = 2007, etc.
Press CONTINUE when nished.
USERS MANUAL | 11

System Setup
• To enter the hour, press the down arrow key from the “year” row until
the “hour” row is reached. Press CONTINUE to reach the hour set
area. Using the 24 hour system, enter the hour (e.g. 5 A.M. = 5,
noon = 12, 2 P.M. = 14, midnight = 24, etc.). Press CONTINUE
when nished.
• To enter the minute, press the down arrow key from the “hour” row until
the “minute” row is reached. Press CONTINUE to reach the minute set
area and enter the minute. For single digit numbers it is not necessary
to enter a “0” before the number (e.g. enter 3 for :03). Press
CONTINUE when nished.
• When the date and time are all set, press CANCEL to return to the
MENU area. Press CANCEL again to return to the main display screen.
Attaching the Quick Connect Tubing
• The Veriscan uses Quick Connect Tubing to attach to Olympus®,
Pentax®, Storz® and Fujinon® exible, immersible endoscopes. Verify
the endoscope name labeled on the Quick Connect Tubing to ensure it
matches the specic endoscope brand being leak tested. If
replacement or additional tubings are needed for connecting other
brands of endoscopes, contact Medivators Customer Support at
1-800-444-4729 or your authorized distributor.
NOTE: Inspect Quick Connect Tubings often and replace if damaged
or worn.
NOTE: Lightly Lubricate Quick Connect Tubing O-ring with silicon oil
weekly to ensure a secure connection.
• Insert the Quick Connect Tubing prong into the quick connect port located
on the side of the Veriscan unit and apply inward pressure until the prong
clicks into place (see gure 3). To remove the tubing, gently push inward on
the quick
prong is released.
connect port’s outer metal housing, until the Quick Connect Tubing
Figure 4
Figure 5
Installing or Replacing the Desiccant Drying Crystals
The drying crystals must be installed before leak testing an endoscope. The
drying crystals ensure that only dry air is introduced into the endoscope during
leak testing.
NOTE: Monitor the condition of the drying crystals on a regular basis.
Replace as needed as determined by comparing the crystals to the
Desiccant Drying Crystals Color Comparison Chart.
CAUTION: Disconnect system power before installing or replacing the
drying crystals.
Step 1: Turn off and unplug the Veriscan system before installing
the drying crystals.
Step 2: Locate a new, unopened crystal desiccant bag. (see gure 4)
Step 3: Carefully position the Veriscan system so that the back of the unit can
be easily accessed with a six (6) inch clearance off of the counter surface. The
recommended method for installing or changing the drying crystals is to extend
the last six inches (6”) out over the end of the counter surface.
12 | USERS MANUAL
Figure 6

System Setup
Step 4: Push the metal housing release button down and hold. (see gure 5)
Step 5: While continuing to hold the button, gently pull down on the metal
bulb housing and rotate it to the left, until it releases down and away from the
machine’s bulb housing structure. Gently lower the bulb housing unit away from
the machine. (see gure 6)
Step 6: Remove the drying crystal bulb from the bulb housing structure by placing
one hand on top of the Veriscan, grasping the dry crystal bulb with the other hand
and pulling downward in a twisting motion (either direction) until the bulb can be
removed from the housing structure. (see gures 7 and 8).
Step 7: Empty and discard any used drying crystals from the bulb, and carefully
pour the entire bag of new crystals into the bulb. (see gure 9). Do not allow
crystals to enter the metal tube located in the center of the bulb.
Step 8: Return the bulb to its original housing by placing one hand on the top
of the unit and grasping the glass bulb with other hand, while inserting the glass
bulb vertically up and into the bulb housing structure until the top of the structure
is reached. This is a reverse of the process described in Step 6. Apply careful
upward pressure while turning the bulb (either direction) to help the bulb pass
through the tight gasket seal and seat to the top of the bulb housing structure.
(see gure 7)
Figure 7
Step 9: Return the metal bulb housing unit to the Veriscan by holding down the
bulb receptacle release button and lifting up on the bulb receptacle over the
drying crystal bulb. This is a reverse of the process described in step 5. Align the
release button with the center of the bulb housing structure and lift until resistance
is felt. While holding the button down, turn the receptacle to the left until it
reaches a slot and can be lifted in an upward direction. (see gure 6)
Step 10: Let go of the release button and turn the metal bulb housing unit until
the receptacle button clicks into place. (see gure 5)
WARNING: THE METAL BULB HOUSING STRUCTURE MUST BE IN PLACE
BEFORE OPERATING THE VERISCAN DEVICE. THE GLASS DRYING
CRYSTAL BULB CAN BECOME DISLODGED DURING LEAK TESTING, AND
LEAK TEST RESULTS WILL BE AFFECTED IF THE METAL BULB HOUSING
IS NOT PROPERLY IN PLACE.
Figure 8
Figure 9
USERS MANUAL | 13

Performing a Leak Test
Attaching a exible, immersible endoscope to the Veriscan System
• Ensure the Quick Connect Tube is connected to the Veriscan
system. If not, refer to the System Setup section.
• Check the endoscope cleaning cap to ensure it is securely in place over the
endoscope’s ETO connector. A faulty cleaning cap connection or O-ring seal
onto the endoscope will be detected as an endoscope leak by Veriscan.
• Align Veriscan’s Quick Connect Tubing connector to the pin on the
endoscope’s cleaning cap leak test tting, and then push the connector over
the tting. Rotate the connector until the pin reaches the end of the channel on
the connector. Verify the Quick Connect Tubing connecting the endoscope
to the Veriscan system is not twisted. (see gures 10, 11 and 12)
NOTE: If the connector rotates with difcultly, then verify the o-ring is
properly lubriated.
NOTE: This is a dry leak test only – Do not place or immerse the
endoscope in any type of uid or water while testing.
Performing the Leak Test
The heat of an endoscope can affect leak test measurement accuracy though the
expansion of the soft components of the endoscope. Leak test accuracy is
maximized by identifying if the endoscope was used in a patient procedure
within the last 30 minutes.
If the endoscope was used within the last 30 minutes, then the factory default
“Standard Test” setting should be used.
If the endoscope was not used within the last 30 minutes, then the “Screening
Test” setting should be used. Go to the section labeled “Performing a Screening
Test” for further instructions.
• To begin the leak test, press the START button located on the
Veriscan keypad.
• If optional “OPERATOR ID” screen activated, the following information
will display:
Leak Test Start
Enter Operator ID
Press “Continue”
Enter Operator ID number (maximum 4 digits) and then press CONTINUE.
• If optional “PATIENT ID” screen activated, the following information
will display:
Leak Test Start
Enter Patient ID
Press “Continue”
Enter Patient ID number (maximum 10 digits) and then press CONTINUE.
• The “ENTER SCOPE S/N” screen will now display as:
Leak Test Start
Enter Scope SN
Press “Continue”
Enter last three digits of endoscope’s serial number and then press CONTINUE
(A maximum of 10 digits can be entered).
Figure 10
Figure 11
Figure 12
14 | USERS MANUAL

Performing a Leak Test
• The leak test will now automatically begin when Veriscan is operating in the
factory default “STANDARD TEST” mode, and the following information will
be displayed:
Leak Test Start
Please standby...
• If Veriscan is operating in the “MANUAL” mode, the following information will
display: (The manual mode is used for selecting alternative parameter settings,
other than the factory default “STANDARD TEST” settings.)
Select Test Setting
Standard Test 1
Standard Test 2
Standard Test 3
Use the up/down arrow keys to select the desired test, and then press
“CONTINUE” to begin the leak test.
• After a pre-set period of time, an audible tone will sound. The Veriscan will
display the below listed information which prompts the operator to turn all of
the endoscope’s angulation knobs and to press all of the camera buttons. (see
gures 13, 14 and 15). These endoscope areas are common uid invasion
problem spots which can only be accurately leak tested when all knobs and
buttons are activated.
Leak Test
Oper Knobs & Buttons
“Continue” to Ack
Results in 112 Seconds
NOTE: Turn all endoscope angulation knobs and press all camera buttons
when audible tone is heard.
Figure 13
Figure 14
When all knobs and buttons have been manipulated, press the CONTINUE
button on the display keypad and the test will automatically continue.
• The endoscope leak test continues.
• When the endoscope leak test completes, a humidity test is initiated which
veries the condition of the dry air used during the leak test.
• At the completion of the humidity test, an audible tone is heard and the
Veriscan screen displays the PASS or FAIL, test results.
If a PASS result is displayed, then go to “Printing Results”.
If a FAIL result is displayed, then go to “Testing a Failed Endoscope” section.
Printing Results
• Press the PRINT button to print results, or CONTINUE to start a new
endoscope leak test. Tear the printout off by pulling upwards on the printout
towards the tear bar, and tear from one side to the other across the serrated
edge (see gure 16). For directions on how to load printer paper, see the
“Changing Printer Paper” heading located in the Maintenance, Handling &
Care section.
• For other printing options, (e.g., printing quick reports on daily, weekly
and monthly summary activity,) see the Quick Report Printing heading located
in the Data Access and Management section.
Figure 15
Figure 16
USERS MANUAL | 15

Performing a Leak Test
Disconnecting the Endoscope
• Disconnect the Quick Connect Tubing from the endoscope (see gure 17).
The endoscope is now ready for the next step in the manual cleaning process.
Shut Down and Start Up of the Veriscan system
• Shut Down: The Veriscan system should be turned off
at the end of each day. To turn off the machine, toggle the on/off
switch to the right (see gure 18) and the Veriscan display will go blank.
• Start Up: To start the Veriscan system, toggle the on/off switch to the
left. The system will automatically begin a series of diagnostic self tests during the initializing process. When initialization is complete,
the display will appear as below indicating that the system is ready
to begin testing endoscopes.
mm/dd/yy hh:mm
Connect Scope
Press “Start”
Figure 17
Figure 18
16 | USERS MANUAL

Performing a Screening Test
Veriscan’s “Screening Test” is an extremely accurate, dry endoscope leak test which is
ideal for evaluating “cold” or stable temperature endoscopes.
Use the “Screening Test” to:
1) Evaluate an endoscope that was not used on a patient within the last 30 minutes.
2) Evaluate a facility’s inventory of endoscopes.
Due to Veriscan’s extreme
endoscopes be tested within
time. A facility can also routinely test endoscopes using the “Screening Test” to
ensure ongoing early endoscope leak detection.
NOTE: The screening test is only to be used on stable temperature endoscopes
which have not been used within the last 30 minutes.
Performing the “Screening Test”
• Press the “Menu” button located on the keypad and the following
information will display:
Main Menu
Stored Runs
Quick Reports
Screening Test
Set Test Parameters
• Use the up/down arrow keys to align the curser with the “Screening Test” and then
press “CONTINUE” followed by “START” to begin the leak test.
• If optional “OPERATOR ID” screen activated, the following information
will display:
Screening Test Start
Enter Operator ID
Press “Continue”
Enter Operator ID number (maximum 4 digits) and then press CONTINUE.
• If optional “PATIENT ID” screen activated, the following information
will display:
Screening Test Start
Enter Patient ID
Press “Continue”
Enter Patient ID number (maximum 10 digits) and then press CONTINUE.
• The “ENTER SCOPE S/N” screen will now display as:
Screening Test Start
Enter Scope SN
Press “Continue”
Enter last three digits of endoscope’s serial number and then press CONTINUE (a
maximum of 10 digits can be entered).
• The leak test will now automatically begin when Veriscan is operating in the
factory default “SCREENING TEST” mode, and the following information will
be displayed:
Leak Test Start
Please standby...
leak detection accuracy, it is recommended that all
a facility when a Veriscan unit is received for the rst
USERS MANUAL | 17

• If Veriscan is operating in the “MANUAL” mode, the following information will display:
(The manual mode is used for selecting alternative parameter settings, other than the
factory default “SCREENING TEST” settings.)
Select Test Setting
Screen Test 1
Screen Test 2
Screen Test 3
Use the up/down arrow keys to select the desired test, and then press “CONTINUE” to
begin the leak test.
• After a pre-set period of time, an audible tone will sound. The Veriscan will display
the below listed information which prompts the operator to turn all of the endoscope’s
angulation knobs and to press all of the camera buttons. (see gures 13, 14 and 15).
These endoscope areas are common uid invasion problem spots which can only be
accurately leak tested when all knobs and buttons are activated.
Leak Test
Oper Knobs & Buttons
“Continue” to Ack
Results in 112 Seconds
NOTE: Turn all endoscope angulation knobs and press all camera buttons when
audible tone is heard.
When all knobs and buttons have been manipulated, press the CONTINUE button on the
display keypad and the test will automatically continue.
• The endoscope leak test continues.
• When the endoscope leak test completes, a humidity test is initiated which veries the
condition of the dry air used during the leak test.
• At the completion of the humidity test, an audible tone is heard and the Veriscan screen
displays the PASS or FAIL, test results.
If a PASS result is displayed, then go to “PRINTING RESULTS”.
If a FAIL result is displayed, then go to “Testing a Failed Endoscope” section.
Printing Results
• Press the PRINT button to print results, or CONTINUE to start a new
endoscope leak test. Tear the printout off by pulling upwards on the printout
towards the tear bar, and tear from one side to the other across the serrated
edge (see gure 16).
• For other printing options, (e.g., printing quick reports on daily, weekly
and monthly summary activity,) see the Quick Report Printing header located in
the Data Access and Management section.
18 | USERS MANUAL

Testing a Failed Endoscope
Majority of FAIL leak test results are due to true endoscope leaks. On occasion, a FAIL test
result can be traced to other preventable and correctable issues such as:
• Nicks in the endoscope cleaning cap gasket: If the rubber seal or gasket on the inside
of the endoscope cleaning cap is damaged, a false FAIL leak test result can occur. If the
rubber sealing area is not in perfect condition, replace the cleaning cap with a new one.
• ETO valve loose on endoscope cleaning cap: If the ETO valve on the endoscope
cleaning cap is loose, air can escape and cause a false FAIL leak test results. If the
ETO valve is loose, replace the cleaning cap with a new one.
• Quick Connect Tubing: If the Veriscan’s Quick Connect Tubing is damaged due to a small
hole, or worn due to an O-ring leak, a false FAIL leak test result can occur. Always have a
spare Quick Connect Tubing available to test for a tubing leak.
• Screening Test used to test a warm, unstable temperature endoscope: A false FAIL
leak test result can occur if the “Screening Test” was used to leak test an endoscope used on
a patient within the previous 30 minutes. The screening test should only be used on stable
temperature endoscopes which have not been used within the last 30 minutes. Allow the
endoscopes the recommeneded time to cool, and then re-perform the leak test.
Retesting a Failed Endoscope
In the event of a FAIL test result, the endoscope leak test should be rerun as follows:
Retest Endoscope
Remove the Quick Connect Tubing from the endoscope.
Inspect the tubing for wear, damage or holes.
Inspect the O-ring for rips or tears.
Inspect the O-ring for sufcient silicon oil lubrication. The O-ring can tear if dry or not properly
lubricated.
Replace if worn or damaged.
• Remove the cleaning cap from the endoscope. Inspect the cleaning cap, cleaning cap
O-ring, and ETO valve, and replace if worn or damaged.
• Reattached cleaning cap and Quick Connect Tubing, and initiate a new endoscope leak
test by pressing CONTINUE and the START.
Endoscope Fails Again
If the endoscope fails a second time, then:
• Press the CONST AIR button on the keypad and visually observe the endoscope’s distal
end for ination.
1) Endoscope Distal End Inates:
If the distal end of an endoscope inates, then it can be safely submerged for cleaning before
being sent in for repair. The endoscope must be cleaned with a continuous air ow during
the entire cleaning process. The continuous air ow creates a constant internal endoscope
pressure that prevents uid from invading through the leak. Clean the endoscope as follows:
• Verify the CONS AIR button remains on and the endoscope’s distal tip is inated.
• Submerge the endoscope in uid and look for an air bubble leak.
• Hand clean according to your cleaning room protocol for handling endoscopes
with leaks.
• Remove endoscope from uid and dry. Press CANCEL to stop constant air ow.
• Remove endoscope from service.
• Contact endoscope repair company to arrange for endoscope servicing.
USERS MANUAL | 19

2) Endoscope Distal End Does Not Inate:
Do not submerge the endoscope in uid. This is an indication of a large endoscope leak. Press CANCEL to stop
the constant air ow. The endoscope must be hand cleaned before being sent in for repair by following these
steps:
• Do not submerge the endoscope in any uids or in an automated endoscope reprocessor.
• Hand clean the endoscope according to your cleaning room protocol for handling endoscopes with leaks.
• Remove endoscope from service.
• Contact endoscope repair company to arrange for endoscope servicing.
NOTE: DO NOT SUBMERGE ENDOSCOPE IN FLUID
20 | USERS MANUAL

Daily Quality Assurance Test
To verify the Veriscan device is operating properly, the Daily Quality Assurance Test must be performed prior to the
rst use of the day. This test ensures the internal integrity of the Veriscan unit and its ability to properly sense an
endoscope leak.
Contact Medivators Technical Support or your authorized Medivators distributor if the Daily Quality Assurance
Test fails.
WARNING: Failure to perform the Daily Quality Assurance Test can result in the device not accurately detecting an
endoscope leak.
Performing the Daily Quality Assurance Test
• Plug Veriscan into the appropriate AC wall outlet.
• Press the power switch located on the back of the unit to turn system power “on”.
• Veriscan will automatically perform an initialization process which includes a series of diagnostic self-test.
When this process is complete, the display will indicate that the unit is ready for testing as displayed below:
mm/dd/yy hh:mm
Connect Scope
Press “Start”
• Verify the Veriscan display information is correct.
• Do not connect an endoscope or the Quick Connect Tubing to Veriscan, and then press START.
• Enter endscope serial number “1, 2, 3” and a leak test will now automatically begin.
• After a pre-set period of time, an audible tone will sound and the following screen information will display:
Leak Test
Oper Knobs & Buttons
“Continue” to Ack
• Press the CONTINUE button on the keyboard and the test will automatically resume.
• When the endoscope leak test completes, a humidity test is initiated which veries the condition of the dry air
used during the leak test.
• At the completion of the humidity test, an audible tone is heard and the Veriscan screen displays the PASS or
FAIL, test result.
• If a PASS result is displayed, then press the PRINT button and verify the correct leak test information is
printed. If the printed information is correct, then Veriscan has passed the Daily Quality Assurance Test and
is ready for endoscope use.
• If a FAIL result is displayed or the printed information is incorrect, then the Daily Quality Assurance Test
has failed.
Contact Medivators Technical Support or your authorized Medivators distributor for further assistance.
USERS MANUAL | 21

Data Access and Management
Main Menu
Veriscan can be used as a productive tool for data management, asset tracking,
equipment utilization and infection control. Additional system capabilites are
available through the “MENU” key pad and the ProV-LT data management
software. See “ProV-LT Data Management Software” located in the “Data
Access and Management” section for further details.
Pressing the MENU key displays the following additional system capabilities:
Main Menu
Stored Runs
Quick Reports
Screening Test
Set Test Parameters
Using the up/down arrow keys, allows access to additional system capabilities
including:
Set Date/Time
System Status
Self Test
Pump/Valve Control
Fluid Sensor Cal
Line Frequency
Set Pressure UM
Effective data management begins with the operator entering key identifying
data including endoscope serial number, operator ID and patient ID. The initial
entry of the endoscope serial number allows the Veriscan to link all leak test
results to the specic endoscope tested. This information is used and displayed
in Quick Reports and in the ProV-LT Data Management Software.
1) Enter Scope S/N
• The prompt to enter this information is automatically displayed during the
endoscope leak test, and is displayed as: “Enter Scope SN”.
Figure 19
Figure 20
Enter the last three digits of the endoscope’s serial number and then press
CONTINUE to begin the leak test (a maximum of 10 digits can be entered).
Using MENU button for Operator and Patient ID: The data collected during
an endoscope’s leak test can also include identication of the operator and
patient ID number by following these steps:
2) “Operator ID” prompt activation
• Press the “Menu” key on the keypad
• Use down arrow to toggle to “Set Test Parameters” and press
CONTINUE
• To enable the operator ID function use the down arrow to toggle to
“use oper ID” and press CONTINUE
• Use down arrow to toggle to “Yes” and press CONTINUE
• Press the CANCEL button until the “Connect Scope” language is
displayed is on the screen.
3) “Patient ID” prompt activation
• Press the MENU key on the keypad
• Use down arrow to toggle to “Set Test Parameters” and press
CONTINUE
• To enable the patient ID function use the down arrow to toggle to
“use patient ID” and press CONTINUE
22 | USERS MANUAL

• Use down arrow to toggle to “Yes” and press CONTINUE
• Press the CANCEL button until the “Connect Scope” language is
displayed is on the screen.
Using MENU button for setting Automatic or Manual Test Mode
The Veriscan system is normally used in the Automatic Test Mode which uses factory
default parameter settings for endoscope leak testing. Veriscan always uses “Standard
Test 1” and “Screen Test 1” as the “Automatic” factory default parameter settings. If
special endoscope parameter settings are to be used for a leak test, then the Manual
Test Mode is to be used. The manual mode is only to be used for selecting alternative
endoscope parameter settings, other than the factory default “Standard Test” settings.
Alternative test parameter settings can affect Veriscan accuracy at detecting endoscope
leaks, and should only be performed by qualied and trained personnel. Alternative
parameter settings can be helpful when different settings are required for testing a
unique or specialized endoscope.
Activate the Automatic or Manual Test Mode by:
• Press the “MENU” button located on the keypad and the following information
will display:
Main Menu
Stored Runs
Quick Reports
Screening Test
Set Test Parameters
Use the up/down arrow keys to align the cursor with the “Set Test Parameters” and
then press “CONTINUE”.
• The “Set Test Parameters” screen will now display as:
Settings Mode: Auto or Manual (whichever active)
Use Oper ID: No (whichever active)
Use Pat ID: Yes (whichever active)
Use the up/down arrow keys to align the cursor with the “Setting Mode” and then
press “CONTINUE”.
• The “Select Settings Mode” screen will now display with “automatic” or “manual”
centered in the screen depending on which is active, plus:
Automatic (whichever active)
Automatic
Manual
Use the up/down arrow keys to align the cursor with “automatic” or “manual” mode
and then press “CONTINUE”. The selected mode is now saved.
USERS MANUAL | 23

Manual Test Mode
• If Veriscan is operating in the “manual” mode, the following information will display when performing
either the Standard or Screen leak test:
Standard Test
Select Test Setting
Standard Test 1
Standard Test 2
Standard Test 3
Screening Test
Select Test Setting
Screen Test 1
Screen Test 2
Screen Test 3
Up to three different endoscope parameter settings can be programmed and stored under the “Standard Test”
and also three under the “Screen Test”. Each parameter setting is stored as either 1, 2 or 3. Veriscan always
uses “Standard Test 1” and “Screen Test 1” as the factory default “Automatic” settings and it is not recommended
to change these settings. Any alternative endoscope parameter setting should be programmed and saved under
settings 2 or 3 for the Standard or Screen test. All settings are initially set to factory defaults, unless manually
programmed differently.
Contact Medivators Technical Support for further information.
NOTE: Veriscan’s leak detection accuracy is affected by parameter changes.
NOTE: Parameter changes should only be performed by Medivators trained and qualied personnel.
If the Veriscan is operating in the “Manual” test mode and needs to be changed back to the “Automatic” test
mode, then follow the steps listed under “Activate the Automatic or Manual Test Mode by” to select the
Automatic mode.
Contact Medivators Technical Support or your authorized Medivators distributor if further assistance is required.
24 | USERS MANUAL

Data Access and Management
Managing Leak Test Results Data:
Data can be managed, viewed, downloaded and printed
by using the following features:
Display Screen Data Review - The display screen
features a procedure results review capability that
allows an operator or nurse the ability to scroll through
the past 2500 procedure results to conrm leak testing
protocol compliance, determine reprocessing activity
and review past results. Once 2500 tests have been
accumulated, each successive test replaces the oldest
of the prior 2500 tests. (see gure 20)
Accessing Past Leak Test Results
To access and review past procedure data follow
these steps:
• Press the MENU key on the keypad.
• Press the up/down arrows on the keypad until the
display arrow points to the “Stored Runs” selection.
• Press CONTINUE to select this option
• Press the “select run” option to access past test
data. Press CONTINUE to access stored runs.
• The last leak test run will appear at the top of the
screen (e.g. run 14). Use the up/down arrow keys
to select the desired leak test run. Press
CONTINUE to view leak test result.
• When nished, press CANCEL to return to the list
of stored runs. Press CANCEL again to return to
the MENU.
• Press CANCEL to return to the original
START menu.
Deleting Past Leak Test Results
To delete past procedure results follow these steps:
• Press the MENU key on the keypad.
• Press the up/down arrows on the keypad until the
display arrow points to the “Stored Runs” selection.
• Press CONTINUE to select this option
• Arrow down to select the “delete all” option and to
purge all past test data. To delete all stored runs,
press the CONTINUE button and the program will
begin the deletion process.
• When complete, the display screen will return to
the rst MENU screen.
• Press CANCEL to return to the original
START menu.
Other Menu Options
The MENU key on the keypad provides several types
of program tools:
Programming tools for the operator:
• Set Date/Time: A date/time feature allows the
Veriscan
system to time stamp every leak test.
See the System Setup section for directions on
setting the date/time.
• Stored Runs: The Veriscan system data storage
capability features the ability to store prior test
results. The Veriscan stores the last 2,500
leak tests.
• Quick Reports: The Veriscan system data
storage allows the user to print custom reports that
summarize daily, weekly and month leak testing
results. It also prints a list of all endoscopes that
failed a leak test within the previous 30 days. See the
Quick Report Printing area of the Data Access and
Management section for directions on printing Quick
Report data.
Programming tools for certied Veriscan system
technicians only: These menu items should not be
accessed by any non-Veriscan system technician.
These technician-only settings include:
• System Status
• Self Test
• Sensor Cal
• Line Frequency
• Set Pressure UOM
• Pump/valve Control
NOTE: Accessing these areas of the MENU program
will void the Medivators Reprocessing Systems
Veriscan Warranty. Contact Medivators Technical
Support at 1-800-444-4729 or your authorized
Medivators distributor if you have questions about this
area.
USERS MANUAL | 25

Data Access and Management
Printing and Quick Reports
The Veriscan system features a compact thermal printer that allows the
operator to:
1) Print the leak test results of any test upon completion.
2) Print quick reports summarizing daily, weekly, and monthly results.
3) Print quick reports summarizing all endoscopes that failed a leak test
within the last 30 days.
Post Procedure Printing: After the leak test completes, a printout
summarizing the results is created by pressing the PRINT key. To tear the
printout off, pull the printout upwards toward the tear bar, and tear from
one side to the other across the serrated edge (see gures 21 and 22).
The information on the printout is identical to that contained on the display
screen. When nished printing, the display will revert to the original screen
that begins the leak testing process for a new endoscope.
Quick Report Printing: Quick reports can be generated that summarize
the daily, weekly and monthly leak testing activity. Additionally, a report can
be generated that lists all of the endoscopes that failed a leak test within the
past 30 days. This report is useful for tracking down a specic endoscope
that might be part of an infection outbreak due to cross-patient infection.
Generate quick reports by following these steps:
Figure 21
• Press the MENU key on the keypad.
• Press the up/down arrows on the keypad until the cursor points to
the “Quick Reports” selection.
• Press CONTINUE select this option
• To print a printout of the current day’s procedures, use the up/down arrow
keys to select “Curr Day Results”. When the option is selected, the printer
will automatically print the previous day’s report which includes:
• # of endoscopes tested
• # of scopes that passed
• # of endoscopes that failed the leak test
Press CANCEL to return to the prior screen. Press CANCEL again to reach
the start menu.
• To print a a summary of the previous day’s procedures, use the up/down
arrow keys to select “Prev Day Summary”. When the option is selected, the
printer will automatically print the previous day’s report which includes:
• # of endoscopes tested
• # of scopes that passed
• # of endoscopes that failed the leak test
Figure 22
Press CANCEL to return to the prior screen. Press CANCEL again to reach
the start menu.
26 | USERS MANUAL

Data Access and Management
• To print a summary of the week’s procedures, use the up/down arrow
keys to select “Previous 7 day summary”. When the option is selected,
the printer will automatically print the previous 7 day’s report
which includes:
• # of endoscopes tested
• # of endoscopes that passed
• # of endoscopes that failed the leak test
Press CANCEL to return to the prior screen. Press CANCEL again to reach
the start menu.
• To print a summary of the month’s procedures, use the up/down arrow
keys to select “Previous 30 day summary”. When the option is selected
the printer will automatically print the previous 30 day’s report
which includes:
• # of endoscopes tested
• # of endoscopes that passed
• # of endoscopes that failed the leak test
Press CANCEL to return to the prior screen. Press CANCEL again to reach
the start menu.
Figure 23
• To print a summary of all of the endoscopes that have failed the leak test
in the previous 30 days, use the up/down arrow keys to select “30
Day Failure List”. When the option is selected, the printer will
automatically print the 30 day failure report which includes:
• The list of failed endoscopes from the most current to the least current
• The dates endoscopes failed the test
• The serial number of the failed endoscopes
• The leak test measurements reported on the display screen at the time of the test
Press CANCEL to return to the prior screen. Press CANCEL again to reach
the start menu.
Tearing the Printout Off: To tear the print out off, pull the printout upwards toward the
tear bar, and tear from one side to the other across the serrated edge (see gures 23 and
24). If it is necessary to advance the paper forward, press the Paper Feed Button (vv) on
the printer display. For directions on how to load printer paper, see the “Changing Printer
Paper” heading in the Maintenance, Handle and Care section.
Figure 24
USERS MANUAL | 27

Data Access and Management
ProV-LT Data Management Software
Downloading Past Leak Test Results
The Veriscan system includes a simple-to-use feature for downloading past
leak test results into a spreadsheet format on a PC computer. Downloading
is accomplished by using the ProV-LT software CD which is loaded onto a
separate PC. Veriscan test data is downloaded through the USB port which
is located on the Veriscan’s back panel. The supplied USB cable connects
the Veriscan unit to the PC.
NOTE: For detailed software installation and use instructions, please
refer to the Veriscan ProV-LT Data Management Software Installation
and User Manual.
To download data follow these steps to :
• Load ProV-LT CD software into the CD-rom drive located on a
computer (PC only). The software will automatically load.
• Connect the USB cable to the USB port located on the back of the
Veriscan unit. (see gure 25) Connect the remaining USB cable end to the
corresponding port located on the computer PC.
• Verify the Veriscan system is turned on and displays the
“Connect Scope” screen.
Figure 25
• Open the ProV-LT software and access the ProV-Link le. Select the
spreadsheet where the dowloaded Veriscan data is to be saved. The
Veriscan data can be saved in a new spreadsheet, or it can be added to
an existing spreadsheet.
1) If saving the Veriscan data to a new spreadsheet, then open the ProV
template and save it under a new name, then open the spreadsheet under
the new name.
2) If saving the Veriscan data to an existing spreadsheet, then use the
computer’s browse function to locate the spreadsheet, and then open it.
• Using the dialog box displayed on the computer, select “Download”
to transfer the Veriscan data.
• Veriscan will automatically output all stored runs (oldest to newest) to the
specied Microsoft® Excel™ le. All downloaded data is not automatically
erased from Veriscan. Data les must be erased from Veriscan if
no longer needed. Contact Medivators Technical Support for further
information. The screen will display “downloading data” with an active
progress bar.
• When download is complete, the Veriscan display will return to the original
start screen display.
28 | USERS MANUAL

Data Access and Management
• The transferred data will be housed in a Microsoft Excel spreadsheet
on the computer. The Microsoft Excel spreadsheet format allows data
analysis based upon a variety of user-sort functions depending on the
precise data required. The following data is stored in columns:
Unit Information (this data refers to the type of Veriscan unit in operation)
• data ver
• sfw ver
• model type
• serial number
• cycle
Test Result Data (this data refers to the individual leak test results)
• The Veriscan system’s microprocessor stores a broad range of
individual leak test result data including: operator ID, patient ID, test
date and time, endoscope serial number, pressure test results, and
angulation knobs turned (yes or no).
Test Parameter Settings
This data refers to the technical setting information that a Medivators
Service Technician would access in the event of a service call.
USERS MANUAL | 29

Maintenance, Handling and Care
Veriscan requires a minimal amount of regular maintenance and care to keep
the unit in excellent operating condition.
NOTE: There are no user serviceable parts in Veriscan, and only a
Veriscan certified technician is authorized to replace any internal
components. Removing Veriscan’s outer case will void the product
warranty.
For service or service related questions, contact Medivators Technical
Support at 1-800-444-4729 or your authorized Medivators distributor.
Drying Crystals Color Chart
Fully Activated
Color: Blue
20% Order New Desiccant
Color: Bubblegum Pink
Maintenance Frequency
• Desiccant drying crystals: Monitor Check self-indicating
the condition of the drying crystals on a crystals monthly.
regular monthly basis. Replace as needed
as determined by comparing the crystals to
the Drying Crystals Color Comparison Chart.
• Changing the coalescent lter (oil and Replace once yearly,
particle removal lter). Monitor the condition or more if needed.
of the coalescent lter for oil and particulates
on a regular monthly basis.
• Cleaning the unit As needed
• O-ring lubrication in Quick Connect Tubing: Monitor daily, lubricate
Monitor on a regular basis as used daily. weekly
Ensure a small amount of silicon oil is present
on the O-ring.
1) The Veriscan system uses coin lithium batteries in the internal electronics
for retaining memory settings. The coin lithium batteries contain perchlorate
materials and if replaced, special handling may apply.
NOTE: System uses primary lithium coin cell batteries containing
perchlorate material - special handling may apply.
40% Have New Desiccant
on Hand
Color: Pale Peach
60% Replace Desiccant
Color: Pale Pink
Figure 26
Changing the Desiccant Drying Crystals
The Veriscan system uses self-indicating silica desiccant drying crystals to
remove moisture from the outside air that enters the endoscope during the
pressurization process of the leak test.
Determining When to Change Drying Crystals
The crystals in the drying crystal bulb are blue and white when in an active
state. As the blue crystals become saturated with moisture, they lose their
ability to completely remove moisture from the air and begin to change color.
When the crystals turn a vivid bubble gum pink color, it is recommended to
ensure you have a replacement bag of drying crystals available or on order
from Medivators. As the crystals continue to absorb moisture, their color
continues to change until they reach a pale pink which indicates it is time to
change the crystals. A color-coded comparison chart is located on the metal
housing of the crystal bulb which identies the three color stages (see gure
26). The drying crystals should be checked monthly and compared to the
color-coded chart to determine if the drying crystals require replacement.
30 | USERS MANUAL

Maintenance, Handling and Care
Changing the Drying Crystals
The crystals in the drying crystal bulb are blue and white in their active
state. Once the crystals have turned pale pink, then they must be
replaced. Follow the steps detailed under “Installing or Replacing the
Desiccant Drying Crystals” located in the “System Setup” section for
further instructions.
Changing the Coalescent (Oil & Particulate) Removal Filter
Before pressurizing the endoscope, the incoming air must rst be ltered.
Veriscan lters the air through the coalescent lter which is an oil and
particulate removal lter. This ltration system ensures that only ltered
air enters the endoscope. This lter should be monitored regularly, and
changed once a year. To replace the lter follow these simple steps:
CAUTION: Disconnect all power before performing the lter
installation
Step 1: Turn off and then unplug the Veriscan system before performing
this operation.
Step 2: Unscrew the clear plastic bowl from the lter housing in a
counterclockwise direction until free. Set bowl aside.
(see gures 27 and 28)
Figure 27
Step 3: Remove the lter element from the lter housing by unscrewing
it in a counterclockwise direction until free. Discard the used lter. (see
gure 29)
Step 4: Take new lter element and screw it into the lter housing unit in a
clockwise direction.
Step 5: Replace the clear plastic bowl by screwing it back into the lter
housing unit in a clockwise direction.
Changing the Fuse
In the rare event that the device will not power up, the fuse may need to
be replaced. The Veriscan system uses a Littlefuse PN 31300, which is
a 3AG style fuse. The fuse rating is: 250V, 1 Ampere, Type S. Contact
Medivators Technical Support at 1-800-444-4729 or your authorized
distributor to order a new fuse or for technical assistance.
Performing a System Self Test
The Veriscan system automatically performs a system self test each
time the unit is powered on. In the event that the self-test fails or leak
test performance results yield an unusually high rate of failures, contact
Medivators Technical Support.
Cleaning Care
Gently clean the Veriscan system with a soft cloth soaked in a mild soapy
detergent and water mix solution. Do not allow cleaning solution to enter
the on-off switch on the back of the unit. Do not remove the metal case
for cleaning or any other reason. Do not use alcohol or alcohol-based
products to clean Veriscan.
Figure 28
Figure 29
USERS MANUAL | 31

Maintenance, Handling and Care
Changing Printer Paper
The printer will automatically detect when the thermal paper roll has run
out and report this condition with a ashing light on the LED display.
To replace the printer paper follow these steps:
Step 1: Pull the lever on the front of the printer paper access door upwards
until the lid is released from its locked position (see gure 30). To avoid
damage do not use excessive force.
Step 2: Replacing the paper roll
• With the printer access door open remove the empty paper roll spool.
(see gure 31).
• Locate a new paper roll and reel off approximately one-half inch (1/2”)
of paper. Place the new paper roll in the printer paper compartment
with the leading edge of the paper coming off the top of the paper roll
(see gure 32).
• Close the printer paper access door by applying a small amount of
pressure onto the front of the door, ensuring that the lid clicks into the
locked position (see gure 33). Teat the excess paper off by pulling it in
an upward direction so it tears against the serrated plastic edge.
Figure 30
Figure 31
Storage
To store the Veriscan system: unplug the unit, remove the power cord (see
“Attaching the power cord” directions) and disconnect the quick connect
tubing (see “Attaching the quick connect tubing” ). Store all components
together in a dry, cool environment (see “Product Specications” for proper
storage temperature range).
Transportation
The Veriscan system should always be handled with extreme care when
being moved. To transport the Veriscan: rst unplug the unit, remove the
power cord (see “Attaching the power cord” directions) and disconnect the
quick connect tubing (see “Attaching the quick connect tubing”). Secure
these items. Carefully lift the Veriscan system from the bottom and
securely carry it, or secure it to a transportation device (e.g. a cart). If
shipping the system, remove the accessories as described above and then
separately wrap them and the Veriscan system in thick, padded packaging
materials. Secure in a sturdy, well-sealed container and mark the package
as “FRAGILE HANDLE WITH CARE” .
Figure 32
Figure 33
32 | USERS MANUAL

Troubleshooting
The Veriscan system was designed to deliver consistent and reliable
leak testing performance. Troubleshooting power and display failures is
described below.
Veriscan Does Not Power On (Display screen does not appear)
• Check the power cord to ensure it is securely plugged into the rear of
the Veriscan system and into the properly rated wall outlet.
(see gure 40).
• Turn the Veriscan system off. Wait 15 seconds and then turn it back on.
(see gure 41).
• If the sytem still does not power on, contact your Medivators
service representative.
For all other Veriscan performance inquiries, contact your local
representative or Medivators Technical Support at 1-800-444-4729.
Figure 34
Figure 35
USERS MANUAL | 33

Limited Warranty Information
Limited Warranty
Medivators Reprocessing Systems, a division of Minntech Corporation (the “Company”), warrants that the endoscope
reprocessor and associated equipment it manufactures (collectively, the “Products”) will conform to the Company’s
written specications and will be free from defects in material and workmanship under normal use and service for a
period (the “Warranty Period”) of fteen (15) months from date of shipment from the Company or one (1) year from
the date of installation, whichever occurs rst.
Notwithstanding anything herein to the contrary, the Warranty Period for consumables and accessories supplied
by the Company, including, but not limited to, endoscope hook-ups, lters, printers, printer supplies, test strips, and
accessory bags, is ninety (90) days from the date of installation.
The warranty does not cover, and the Company will have no warranty obligation whatsoever with respect to, any
damage to a Product caused by or associated with: (i) external causes, including without limitation, accident,
vandalism, acts-of-god, power failure or electric power surges, (ii) abuse, misuse or neglect of the Product by the
customer or use of unauthorized third party lters or other consumables and accessories, (iii) usage not in accordance
with product instructions, (iv) the customer’s failure to perform required preventive maintenance, or (v) servicing or
repair not authorized by the Company.
Limitation of Remedy
The warranty obligation of the Company hereunder is limited to the repair or replacement (at its option) of the
defective Products or any parts it deems defective. This will be customer’s exclusive remedy for a covered defect.
In order to recover under the warranty, the customer must notify the Company in the state (if in the USA) or the
country of installation of the defect (describing the problem in reasonable detail) prior to the expiration of the warranty
period and within thirty (30) days of discovery of the defect. Upon receiving the Company’s ofcial “return goods
authorization” (RGA), the customer must promptly return the defective part or Product to the Company (or the service
center indicated on the RGA), freight and insurance prepaid. The Company will not be responsible for any damage
during shipment.
Warranty Disclaimer
THE WARRANTY ABOVE IS THE COMPANY’S ENTIRE WARRANTY OBLIGATION TO THE PURCHASER
OF PRODUCTS. IT IS IN LIEU OF ALL OTHER WARRANTIES OF THE COMPANY, EXPRESS OR IMPLIED,
INCLUDING, WITHOUT LIMITATION, WARRANTY OF MERCHANTABILITY OR FITNESS FOR A PARTICULAR
PURPOSE, AND THE COMPANY DOES NOT REPRESENT OR WARRANT THAT ANY PRODUCT WILL MEET
CUSTOMER’S REQUIREMENTS. THE COMPANY’S RESPONSIBILITY FOR DEFECTS IN A PRODUCT IS
LIMITED SOLELY TO REPAIR AND REPLACEMENT AS SET FORTH IN THIS WARRANTY STATEMENT.
TO THE EXTENT PERMITTED BY LAW, THE COMPANY SHALL NOT, UNDER ANY CIRCUMSTANCES, BE
LIABLE TO CUSTOMER FOR CONSEQUENTIAL, INCIDENTAL, INDIRECT OR SPECIAL DAMAGES OR
LOSSES, INCLUDING WITHOUT LIMITATION, DAMAGES ARISING OUT OF OR IN CONNECTION WITH ANY
MALFUNCTIONS, DELAYS, LOSS OF PROFIT, INTERRUPTION OF SERVICE, OR LOSS OF BUSINESS OR
ANTICIPATORY PROFITS, EVEN IF THE COMPANY HAS BEEN APPRISED OF THE LIKELIHOOD OF SUCH
DAMAGES OCCURRING.
This Warranty gives the customer of Products specic legal rights, and customers may also have other rights which
vary from jurisdiction to jurisdiction.
In no event shall the Company’s liability exceed the original purchase price of the covered Product.
No representative or agent of the Company has any authority to bind the Company to any other representation or
warranty with respect to the Products, and the customer accepts the Products subject to all of the terms above.
34 | USERS MANUAL


© 2009, Minntech Corporation
36 | USERS MANUAL
50096-988 Rev A
Distributed in Canada by:
CARSEN MEDICAL INC.
151 Amber Street
Unit 17 & 18
Markham, ON L3R 3B3
1-866-677-4122
 Loading...