


Part No. WP150
Wi-Net Windowf
v1.20 Addendum to
Operating Instructions
Features:
Wired Equivalent Privacy (WEP)
•
Encryption
Important Note Regarding Battery
•
Installation
Variable Scan Rate and Hidden
•
SSID Connectivity
Feburary 2007

WEP Encryption Setup
The Wi-Net Window now supports
interactive operation with wireless
networks that have 64-bit or 128bit Wired Equivalent Privacy (WEP)
encryption. This is the originally
specied form of wireless encryption
and consequently is supported by most
existing hardware.
On the Wi-Net Window you dene one
WEP key to use when communicating
with encrypted wireless networks.
This key is applied to all networks
that are detected as being encrypted.
To enter the WEP key you need to
specify the key size (64 or 128 bit), the
authentication type (Open System or
Shared Key), the active key position
(1-4) and the hex digits that comprise
the key value. When in doubt as to
the authentication type, choose Open
System to start.
From the Encryption submenu,
press SEL to view and edit the WEP
Encryption setup.
Use the down arrow to scroll through
the Encryption submenus. Press SEL
to view or edit the corresponding WEP
Encryption choices.
1

2
3
Hex digit entry is similar to entering an
IP address on the Wi-Net Window. Use
the right/left arrow keys to position the
cursor beneath the digit you wish to
change. Press the up or down arrow
key to increment or decrement the value
of the corresponding digit. Digit entry
supports rollover so you can increment
from an ‘F’ to a ‘0’ and vice versa.
Your WEP settings are retained while
the Wi-Net Window is off and even
during a battery change.
When entering a 128-bit WEP value
there are 3 “pages” for entering the 26
hex digits. Scrolling right or left off of
one page connects to the next. The
current page number (1-3) is displayed
as a xed number above the WEP
value.
Once the WEP value is entered, press
SEL to always save changes and return
to the next Encryption submenu. Press
the SETUP, SCAN or PING key to exit
WEP editing and start the selected
operation. When exiting in this manner,
if the WEP key value has changed, you
are presented with the option to save
the changes (SEL), discard the changes
(Down Arrow) or cancel and return to
WEP editing (Up Arrow).
You need to know your encryption
parameters whenever you setup a
wireless client or connect with the
Wi-Net Window. For convenience
you should make a note of them so
you don’t need to read them from the
AP each time. It is also good to write
down the Access Point’s IP address
so you can quickly connect with it for
review or to make changes. Many
Access Point manuals have a place
for jotting this information down. Of
course since these are your network’s
security settings, they should be kept in
a protected location.
For more detailed information about how
access points are congured for WEP,
see the Wi-Net Window Application Notes
posted on our web site:
http://www.test-um.com/product_detail.
asp?itemno=WP150.

4
5
SETUP
SETUP
SETUP
SETUP
SETUP
SETUP
SETUP
SETUP
SETUP
Main Setup Menus
Encryption Setup Sup-Menu
SEL
SEL
SEL

6
7
Important Note Regarding
Battery Installation
Variable Scan Rate and Hidden
SSID Connectivity
If your unit does not power on, please
check the batteries to make sure they
are rmly seated in the battery cage and
all contacts are touching.
Occassionally, the initial stiffness in the
battery cage will prevent the battery
terminals from making good contact with
the positive battery terminal.
The Wi-Net Window now supports
three new advanced features based on
customer feedback. These features
include alternate signal strength
measurement units, a variable scan rate
and support for connectivity to access
points with hidden SSIDs. All of these
are controlled via a new Expert Setup
sub-menu. The following sections
describe these additions in detail.
Signal Strength
The Wi-Net Window displays signal
strength as a percentage value. This
value represents an overall signal
quality based on several measured
parameters. This format was selected
because it is widely understood by most
people.

8
9
For more technical users a signal
SETUP
21
4 5 6 7 8 S
CAL
E
strength measurement in dBm is
sometimes preferred. dBm is an
abbreviation for the power ratio in
decibel (dB) of the measured power
referenced to one milliwatt (mW). It is
used in radio, microwave and ber optic
networks as a convenient measure of
absolute power because of its capability
to express both very large and very
small values in a short form. Zero dBm
equals one milliwatt. A 3 dB increase
represents roughly doubling the power,
which means that 3 dBm equals roughly
2 mW. For a 3 dB decrease, the power
is reduced by about one half, making −3
dBm equal to about 0.5 milliwatt.
For these more technical users, an
option to display signal strength in dBm
has been added to the Wi-Net Window.
This is accessed via the Expert Setup
sub-menu (see menu navigation chart in
a later section).
Press the SEL key to cycle between
dBm and percentage (%). When dBm is
selected the CAL icon is shown on the
scan display. The 10 LEDs on the Wi-Net
always indicate the percentage signal
strength.
For wireless networks the signal strength
ranges from around –20 dBm to –90
dBm. When the AP is out-of-range the
signal strength is displayed as –99 dBm.
Scan Rate
The Wi-Net Window actively scans
for existing wireless networks. Active
scanning is much quicker and more
responsive than passive scanning. By
default the Wi-Net scans the current
(i.e. displayed) network once every two
seconds and scans for all networks
once every six seconds. If a hidden
SSID is specied (see section below), it
is scanned every four seconds. Since
active scanning requires more power,
these rates were chosen as a reasonable
balance between functionality and battery
life.

10
11
For some users the two second
SETUP
scan rate is not fast enough for their
application. Consequently an optional
set of scan rates has been added to the
Wi-Net Window. These are accessed
via the Expert Setup sub-menu (see
menu navigation chart in a later section).
Note that the faster scan rates can
potentially decrease battery life.
Press the SEL key to cycle through the
list of rates (in seconds): 0.5, 1.0, 1.5,
2.0, 2.5, 3.0
Service Set Identier (SSID)
A Service Set Identier (SSID) is a
32-character name that, along with a
channel number, identies a wireless
Access Point (AP). The SSID is used
to identify the various wireless networks
available and allows selecting the
one to connect to. Thus when you
turn on your laptop you can choose
to connect to a wireless network
named “Joe’s Coffeehouse” or “Bob’s
Insurance”. The default SSID for an
AP is typically set to the manufacturer’s
name such as “Linksys” or “Belkin”. It
is always a good idea to change the
SSID from the default to a unique one
for your situation. Otherwise you risk
interference with other APs using the
same default SSID. Also it makes
it much easier for you to locate and
connect to your own wireless network.
Hidden SSID
Most Access Points have an option to
not broadcast, or hide, their SSID (see
gure below). By not publicly revealing
its name, the wireless network becomes
“invisible” to casual users. In order to
connect to a hidden AP you need to
already know its SSID.

12
13
The most common reason for hiding an
E
E
SSID is to increase network security.
There is an ongoing debate amongst
security experts as to the viability of SSID
hiding for security. Naturally both sides
feel strongly that their position is the
correct one. It must be acknowledged
that there are several readily available
software packages that can uncover the
SSID of a hidden network.
Ever since the release of version 1.05,
the Wi-Net Window has been able to
detect networks with hidden SSIDs.
Because the SSID is not known, these
networks are represented by a sequence
of 10 asterisks, similar to a hidden
password on a computer.
Since these networks are typically
revealed via passive scanning, the signal
strength update rate can be erratic.
Additionally, the Wi-Net Window is
unable to connect to a hidden network
because its SSID is unknown. Without a
connection, the Wi-Net cannot negotiate
for an IP address or interact with other
systems on the network.
With this latest rmware release
(v1.20), the Wi-Net Window is now
able to connect to a specied hidden
network. This is achieved by entering
a target SSID into the Wi-Net’s setup
parameters. When a target SSID is
specied, the Wi-Net initiates scans for
that network by name. If the hidden
network is located, it is displayed with its
SSID enclosed in parenthesis.
Note that the parentheses are only
shown if a general scan reveals the
same AP (based on MAC addresses)
broadcasting without an SSID.

14
15
Entering an SSID
ID
SETUP
The SSID for a hidden network is
accessed from the Expert Setup submenu via the main Setup Menu (see
menu navigation chart in the following
section).
An underline cursor is initially placed
at the end of the SSID. Scrolling right
and left ( ) moves the cursor under
the character to change. Scrolling up
and down () rotates through all the
characters for that position. Character
entry supports rollover so you can
seamlessly move in either direction
through the character list. The character
list is composed of the alphabet, with
interleaved upper and lower case letters,
followed by symbols and numbers:
Press the SEL key to activate an editing
screen that contains the current SSID, if
any, and displays the ID icon.
AaBbCcDdEeFfGgHhIi
JjKkLlMmNnOoPpQqRr
SsTtUuVvWwXxYyZz
!”#$%&’()*+,-./:=;<>
?@[]\^_{}|~0123456789
Starting with a blank (space) character,
scroll up () to increment through the
alphabet with each letter appearing as
an upper/lower case pair. Otherwise,
scroll down () to decrement through
the digits (9-0) followed by the set of
symbols.

16
17
Hold down an arrow key to initiate
automatic scrolling in the corresponding
direction. The right and left arrow keys
wait a second before starting.
There are several 2-key combinations
that allow for more efcient movement
and editing. To delete to the left, hold
down the right arrow key and press
the left arrow. Continue to hold the left
arrow and it becomes an auto-delete to
the left (after a one second delay). To
move to the end of the SSID, hold down
the left arrow key and press the right
arrow. When auto scrolling with the up
arrow key, press the down arrow to leap
upward by 10 characters. When auto
scrolling with the down arrow key, press
the up arrow to leap downward by 10
characters. For these last two, if you
hold the second key the auto scrolling is
temporarily suspended so you can see
where you are in the character list.
Once an SSID is entered, press SEL to
always save changes and return to the
next Expert sub-menu item. Press the
SETUP, SCAN or PING key to exit SSID
editing and start the selected operation.
When exiting in this manner, if the SSID
has changed, you are presented with
the option to save the changes (SEL),
discard the changes (Down Arrow) or
cancel and return to SSID editing (Up
Arrow).
The SSID name is retained while the
Wi-Net Window is off and even during a
battery change.

18
19
SETUP
Main Setup Menus
SETUP
SETUP
SETUP
SETUP
SETUP
SETUP
ID
Expert Setup Sub-Menu
SEL
SEL
SEL
SEL

+
+
+
+
SEL
Use the left/right arrow
keys to move the underline
cursor. Line 1 wraps down
to second line for 32-
character editing.
Hold the right arrow down
and press the left arrow to
delete to the left.
Hold the left arrow down
and press the right arrow to
jump to the end.
Use the up/down arrows to
increment/decrement the
character list.
Hold the up arrow and
press the down arrow to
jump 10 characters in the
list (hold down both arrows
to suspend the scroll).
Hold the down arrow and
press the up arrow to jump
10 characters in the list
(hold down both arrows to
suspend the scroll)
Save the edit
SCAN
PING
Discard the edit
Hold an arrow key to auto
scroll in that direction. Left
and right arrow keys wait a
second before starting.
20

808 Calle Plano
Camarillo, CA 93012
Phone (805) 383-1500 / Fax (805) 383-1595
www.JDSU.Test-Um.com

Test-Um Inc.
The Intelligent Test Solutions Company
Part No. WP150
Wi-Net Window
Wireless Scanner & Pinger
Operating Instructions
TM


Product Features
Wi-Net Window
Www.
.com
Test-Um
MADE IN USA
TM
SEL
SCAN
SETUP
PING
Select
Scan
Mode
Antenna
Signal
Strength
LED
Navigation
Keys
Setup
Mode
Ping
Mode
Power
Button

LCD Indicators
Signal
Network List
Active
Internet
Qty. Detected
Network Name
(SSID)
Strength
Position
Channel
No.
Encryption
Access
Networks
Wi-Net Window
TM
E
1 2 3 4 5 6 7 8
Briefly press power button to turn backlight on/off.
Hold power button down to turn unit off.
Press up/down arrows to display other networks in area.

Table of Contents
Product Features .................... 1
Battery Installation ................. 2
Instructions For Use ............... 3
Scan Testing Mode .............................. 4
Ping Testing Mode ............................... 8
Pinging Unsuccessful ........................ 10
Main Setup Menus ................ 13
Ping Setup ......................................... 15
DHCP Mode On/Off ........................... 15
Last DHCP ........................................ 16
Target Setup ...................................... 18
Audio Setup ....................................... 19
Advanced Mode Option .................... 20
Shutdown Timeouts ........................... 21
My MAC Address ............................... 21
Status and Error Messages ...... 22
Internet Protocol Denitions .... 28
Specications ....................... 33
Maintenance .......................... 34
Warranty ................................ 35
Returning Equipment ........... 36

Product Features
Wi-Net WindowTM is a wireless network
analyzer that detects and connects
to wireless equipment, reports signal
strength, pings IP addresses, and
identies network components.
Displays signal strength on LED
•
and as a percentage on the LCD
Scans and logs all wireless
•
transmissions in the area
Identies the name and
•
transmission channel of the
equipment detected
Works with IEEE802.11 b and g
•
wireless devices
Displays Internet access capability
•
and encryption status on each
wireless component
Identies the signals as either an
•
access point (infrastructure) or
ad-hoc
Pings IP addresses and checks for
•
a viable link to the Internet
Negotiates with network DHCP to
•
identify components and IP/MAC
addresses
Operates on 4 AA batteries
•
1

Battery Installation
Batteries are not included. A low battery
condition may result in unreliable
operation. A low battery icon indicates
the battery should be replaced as soon
as possible. Replace the battery as
shown below.
1. Using a #1 Phillips screwdriver,
unscrew and remove the battery
cover on the back of the unit.
2. Connect 4 AA size Alkaline batteries
to the battery snaps.
3. Slide the batteries into the cavity.
4. Close the battery cover and replace
the screw. Do not overtighten.
2

Instructions For Use
To turn on the Wi-Net Window press the
Power, SCAN or SETUP key. To turn
the unit off, hold the Power key down
until the display turns off. Briey press
the Power key to toggle the backlight
on/off. The tester will automatically turn
off after 10 minutes of no activity (i.e. no
key press). See Shutdown Timeouts
in the Main Setup Menus section of this
manual for more timeout options.
The Wi-Net Window includes two test
modes, Scan and Ping, which are
designed to detect and connect to
wireless network equipment and verify
Internet access capability. Press their
respective keys to enter these test
modes.
All manually entered parameters, and
administrative options (e.g. audio,
advanced mode, etc.), are saved when
the Wi-Net Window is turned off. To
reset these to their factory-defaults,
press the up arrow key while powering
the unit on.
3
Scan Testing Mode
Wi-Net Window
www. .comTest-Um
MADE IN USA
TM
E
2
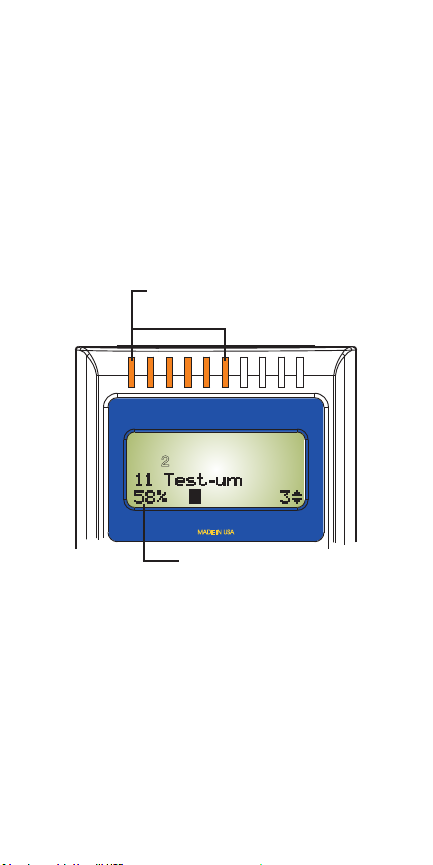
Scan Testing identies wireless network
devices and displays the network name
(SSID) associated with the device. The
signal strength of the wireless LAN
(WLAN) detected displays on the LCD in
percentage format and also on the LED
bar graph at the top of the unit.
LED Light showing
LED Light showing
signal strength
signal strength
Signal strength
Signal strength
shown in percentage
shown in percentage
WLANs detected during scan are
ordered by channel number and network
name (SSID). Use the arrow keys to
scroll up and down the list of detected
WLANs. The WLANs relative position
within the list is depicted by illuminating
one of the xed numbers (1-8) in the
numeric sequence above the SSID.
4

E
2
21
3 4213 4
21
3 4213 4
E
21
3 4
E
21
3 4
During scanning a ping is sent to
the Internet IP every 15 seconds. If
a response is received, an Internet
indicator (i) is displayed.
If an Access Point (AP) is detected that
encrypts its data, the letter “E” displays
on the LCD during scanning. If the
data is encrypted, Ping testing is not
operational.
If two WLANs are using the same SSID
and channel, a twin status (t or twin)
is displayed (they are differentiated by
their MAC addresses). This can indicate
a problematic network conguration or
an attempt to initiate an “evil twin” scam.
5

Additional network status is available
when operating in the Advanced Mode.
See Advanced Mode Option in the
Main Setup Menus section of this
manual for a complete list of status
indicators.
Multiple presses of the SEL button
display the unique IP address assigned
to your Wi-Net Window, the Router’s
IP address, and the Access Point MAC
address.
SELSEL
SELSEL
Each of these displays are shown for up
to 10 seconds. Press SEL to move past
them more quickly.
When operating with DHCP off, editing
is allowed on the My IP and Rtr IP
displays. Once editing starts, the
display remains active until accepted via
the SEL key, or canceled via the SCAN,
PING or SETUP keys.
6

If the router and access point are the
same, it is indicated by the caption “AP
& Router IP.”
Press SEL to display the corresponding
MAC address. Since most wireless
networking hardware has a visible
MAC address label, this allows the
components of the wireless network to
be identied more easily.
A scan for all hosts (AP’s) is initiated
every 6 seconds. If a WLAN is not
detected after 4 scans (24 seconds),
its signal strength is set to 0%. If there
is no activity after an additional 70
seconds, the WLAN is removed from
the scan. It may be removed earlier if a
more active WLAN displaces it.
The currently displayed WLAN is
locked and will not be removed unless
you scroll to a different WLAN or the
unit is turned off. The Wi-Net Window
tracks and identies up to 8 WLANs
simultaneously based on signal
strength.
7

Ping Testing Mode
2
The Ping test is used to verify
connectivity to resources on or off the
network and IP addresses. The Ping
test can be run in DHCP or manual
addressing mode.
During Ping testing, the channel
number, SSID, ping target and count
values for the transmitted and received
ping packets display on the LCD. The
WLAN signal strength displays on the
LCD in percentage format and also on
the light bar at the top of the unit.
Use the left and right arrow keys to view
the ping test results for the IP addresses
associated with the WLAN selected,
including the Router, DNS, target IP
addresses 1-4, and the Internet.
As you scroll through the respective
targets during ping testing, press SEL to
identify the Wi-Net Window’s IP address,
the IP address of the wireless network
device pinged, the length of time it took
for the last ping, as well as the average
ping response time in milliseconds.
8

SELSEL
SELSEL
The Ping Target IPs can be viewed and
edited from this display. The Internet IP
can only be edited from the Target Setup
submenu during Setup mode.
9

Pinging Unsuccessful
TEST
TEST
TEST
When a ping target is selected, the
Wi-Net Window tests the currently
dened network parameters and
displays one of the following messages
if it is unable to to send a ping.
The problems that can prevent a ping
from being successful include a non-
existent target (i.e. no ARP response),
an invalid Router IP (when the target is
not on the local network), or when the
unit’s IP address (My IP) is already in
use on the network.
10

When starting Ping testing, the following
messages may be displayed if a
problem or delay is encountered
Message Description
No WLAN detected
continue to SCAN
DHCP Off
Err IP = 0.0.0.0
Ad-hoc network
no DHCP offered
Waiting on DHCP
for my IP X
DHCP On/Off
Verifying Addr
My IP is in use
on this network
No DHCP located
to assign My IP
No WLAN has been detected via SCAN
so there is nothing to ping.
DHCP is not active and a
Manual IP has not been entered.
Ad-hoc WLANs do not support DHCP.
Waiting for a DHCP assignment; the
number (X) is incremented for each
DHCP request (~every 10 sec).
The Manual, or DHCP assigned, IP is
being checked via ARP to verify that it is
not already in use.
Some other system is already operating
on the network with the Wi-Net Window’s
assigned or Manual IP.
There was no response to multiple DHCP
requests on the network.
If no DHCP response is received, a ping
is attempted every 10 seconds for 2
minutes, then it stops.
To restart the DHCP request cycle,
press the Scan or Ping key. While
scanning, you can also scroll off and
back on the WLAN. If a DHCP assigned
IP is already in use, the Ping test is
retried after a one minute delay.
11

Whenever possible, IP address screens
are augmented with additional error
status messages. For a complete list
of Error and Status messages, see the
Status and Error Messages section in
this manual.
For example, if a specied Router
address does not respond to ARP
requests an error message “Rtr: No
resp.” displays. Also, if a Target IP is not
on the local network, and the router is
unresponsive “Tgtx: No Rtr” displays.
12

Main Setup Menus
Press the center of the Scan/Ping button
to enter SETUP mode. The rst four
setup menus contain options related to
the Ping Test function.
The last four setup menus contain
administrative options, such as display
preferences, audio tones, shutdown
timeouts, and the MAC address
assigned to your Wi-Net Window.
Use the up and down arrow keys to
scroll through the list of Setup Menu
options. Press SEL to view or edit the
information on each submenu.
When you initially press SETUP, the
percentage of remaining charge on the
battery displays briey. A Low Battery
icon indicates the battery should be
replaced as soon as possible. See
the Battery Installation section of this
manual.
13

SETUP
SETUP
SETUP
SETUP
SETUP
SETUP
SETUP
SETUP
Ping
Ping
Setup
Setup
Adminis-
Administrative
trative
Setup
Setup
14

Ping Setup
Ping targets can be selected and edited
during Ping Testing. Press and hold
SETUP to display the Ping Setup menu.
Press SEL to view/edit the Manual IP
or press the down arrow to advance to
the Router IP or Netmask submenus.
When DHCP is off, this manually
entered IP information is used for Ping
testing.
To change the Manual IP, Router IP, or
Network Mask, press SEL and use the
right arrow key to position the cursor
beneath the digit you wish to change.
Press the arrow key again to increment
the value of the respective digit in the IP
address up or down.
Press SEL to save changes and
navigate to the next Ping Setup
submenu. Press the Setup key to
cancel editing without saving changes.
At the bottom of the Ping Setup
submenu, press SEL to return to the
Main Setup Menu.
DHCP Mode On/Off
The Ping test operates in either DHCP
mode On (default) or Manual DHCP
mode (Off). Press the down arrow
key to select the DHCP Mode On/Off
15

submenu, then press SEL to toggle
SETUPSETUP
SETUPSETUP
DHCP off or on. Press the down arrow
to navigate to the next submenu.
Last DHCP
The Last DHCP submenu identies
the DHCP Host information associated
with the currently selected WLAN.
Press SEL to view the IP information
associated with the current DHCP Host,
Router, DNS Server and Network Mask.
SELSEL
Use the up and down arrow keys
to scroll through the Last DHCP
items. Press SEL to view an item’s
MAC address. Since most wireless
networking hardware has a visible
MAC address label, this allows the
components of the wireless network to
be identied more easily.
When a DHCP Host and its identied
router have the same IP, they are shown
on one screen.
16

SETUP
If no information regarding the
SETUP
last DHCP is available a message
conrming this displays briey. Press
the down arrow to move to the next
submenu, view/edit Ping targets.
17

Target Setup
Ping testing includes four custom IP
targets (Tgt1-Tgt4), and an Internet
IP. From the Target Setup submenu,
press SEL to view and edit the target
IP addresses. Target IPs can also be
viewed and edited while Ping testing is
active.
Use the down arrow key to scroll
through the Target submenus. Press
SEL to view or edit the corresponding
target IP. Use the right arrow key to
position the cursor beneath the digit you
wish to change. Press the up or down
arrow key again to increment the value
of the respective digit in the IP address
up or down. Once editing is complete,
press SEL to navigate to the next target
and repeat the same process.
Press SEL to save changes and
navigate to the next Target submenu.
Press the Setup, Scan or Ping buttons
to cancel IP editing without saving
changes. At the bottom of the Target
submenus, press SEL to return to the
Main Setup Menu.
18

SETUPSETUP
SETUPSETUP
SETUPSETUP
SELSEL
SELSEL
Audio Setup
The Audio Setup menu allows you to
toggle audio tones on or off by pressing
SEL. By default, all of the audio tones
are initially enabled, except for the twin
warning.
Message Description
Message Description
New WLAN A single high-low-high tone whenever a
New WLAN A single high-low-high tone whenever a
Twin Warn A longer tone every 7 seconds when
Twin Warn A longer tone every 7 seconds when
Low Batt A low-high tone every 30 seconds when
Low Batt A low-high tone every 30 seconds when
Keypress A short beep when a key is pressed or
Keypress A short beep when a key is pressed or
Start/End A single short beep when the unit is
Start/End A single short beep when the unit is
new network is detected
new network is detected
the displayed WLAN channel and SSID
the displayed WLAN channel and SSID
matches another WLAN.
matches another WLAN.
the battery icon is visible.
the battery icon is visible.
when the Power key is released.
when the Power key is released.
powered on. Two short beeps when the
powered on. Two short beeps when the
unit is powered off.
unit is powered off.
19

Advanced Mode Option
The Advanced Mode (Adv Mode) option
on the Setup Menu toggles on/off
to control the amount of information
displayed on the Scan screen. When
Advanced Mode is active, the Scan
screen identies additional conditions
related to the current WLAN. When the
unit is powered on, an Advanced Mode
indicator (-Adv Mode-) briey displays if
this option is enabled.
Normal Advanced Description
i intr Internet access is avail-
x InUse My IP is already in use
ip My IP assigned by
ap Connected to access
adhoc Ad-hoc network (peer-
t twin 2 WLANs have the
b 802.11b Access Point
g 802.11g Access Point
able
DHCP
point
to-peer)
same SSID and channel
20

Shutdown Timeouts
The Auto-Off menu allows you to select
the number of minutes with no key input
before the unit automatically powers
down. Press SEL to cycle through the
set of possible timeouts (5, 10, 15, and
30 minutes). Press and hold the left
arrow key and press SEL to disable the
automatic shutdown (displays 99m).
When the screen displays the timeout
option you prefer, press the down arrow
to navigate to the next submenu.
My MAC Address
This screen displays the unique MAC
(Media Access Control) identication
number associated with your Wi-Net
Window test instrument.
21

Status and Error Messages
No WLAN detected
continue to SCAN
When entering PING this
message is displayed if no WiFi
networks have been detected.
Goes to SCAN after a 5 second
delay. Press any key, except
SETUP, to immediately go to
SCAN.
DHCP Off
Err IP = 0.0.0.0
When entering PING this
message is displayed if DHCP
is not active (off) and a Manual
IP has not been entered
(defaults to 0.0.0.0). Goes to
SETUP after a 5 second delay.
Press any key, except SCAN, to
immediately go to SETUP.
Ad-hoc network
no DHCP offered
When entering PING this
message is displayed if the
current WiFi network is ad-hoc
(IBSS) and DHCP is on. Ad-hoc
networks do not support DHCP
so the Wi-Net Window cannot
be automatically assigned an
IP address. Turn off DHCP and
22

enter a Manual IP in order to
ping ad-hoc networks. Goes to
SCAN after a 5 second delay.
Press any key, except SETUP,
to immediately go to SCAN.
Waiting on DHCP
for my IP x
When DHCP is on, this
message is displayed whenever
the Wi-Net Window’s IP address
is required before proceeding
(e.g. when entering PING). The
number is incremented for every
DHCP request sent (about once
every 10 seconds) until an IP is
assigned or 12 requests have
been sent. After 12 unanswered
requests the display goes to: No
DHCP located to assign
my IP.
No DHCP located
to assign My IP
This indicates that the current
network has not responded to
12 DHCP requests. This could
be due to the lack of a DHCP
server, or because the WiFi
signal is encrypted. Pressing
PING or SCAN causes the
DHCP request cycle to restart.
23

Waiting for DHCP
to nd Routr IP
This indicates that the WiNet Window is issuing DHCP
requests on the current network
and must complete this step
before the IP address of the
router is known.
No DHCP located
to nd Routr IP
This indicates that the current
network has not responded to
DHCP requests; consequently
the Wi-Net Window is unable to
determine the IP address of the
router.
DHCP On (Off)
Verifying Addr
When entering PING this
message is displayed while the
Wi-Net Window veries that its
IP is valid for use on the current
network (i.e. no other system
responds to an ARP of that IP).
My IP is in use
on this network
This indicates that the IP
assigned to the Wi-Net Window
conicts with another system
on the network. This most
24

often occurs when assigning a
Manual IP, so return to SETUP
and enter a different Manual IP.
Otherwise it could result from
a faulty DHCP host or indicate
that a new system was just
added to the network.
My IP is invalid
When entering PING this
message is displayed if the
Wi-Net Window is unable to
establish a proper IP for use on
the current network.
No DHCP host
was found
This message is displayed when
selecting the Last DHCP option
from the SETUP menu and the
current network is ad-hoc or has
not responded to any DHCP
requests. The display returns
to the SETUP menu after 5
seconds.
No DHCP info
is available
This message is displayed when
selecting the Last DHCP option
from the SETUP menu and
DHCP is off, or DHCP requests
are still being sent to the current
25

network. The display returns
to the SETUP menu after 5
seconds.
Wireless card
not detected
This message is displayed when
the Wi-Net Window starts and
it is unable to communicate
with its wireless hardware. The
display goes to the SETUP
menu after 5 seconds.
DNS is unknown
when DHCP is off
This message is displayed
during PING if information on
the DNS target is requested
by pressing the SEL key. It
indicates that a DNS IP is only
available when communicating
with a DHCP host.
Manual IP cannot
be 0.0.0.0
This message is displayed after
editing the Wi-Net Window’s
Manual IP and pressing SEL.
An IP address of 0.0.0.0 is not
permitted on a network. After
6 seconds the editing display
reappears with the original IP
value (prior to editing).
26

Manual IP cannot
be 224-255.x.x.x
This message is displayed after
editing the Wi-Net Window’s
Manual IP and pressing SEL.
The IP address range of 224.
x.x.x to 255.x.x.x is reserved for
special use on a network. After
6 seconds the editing display
reappears with the original IP
value (prior to editing).
Rtr must be on
MyIP LAN segment
This message is displayed when
editing the Router IP and trying
to change its upper address to
be different from the Manual IP
address. The Router IP must
match the Manual IP wherever
the Netmask bits are set. This
is necessary in order for them
to be operating in the same
network address space.
Rtr: No ARP resp
This message accompanies the
display of a router’s IP address.
It indicates that ARP requests to
the router for its MAC address
have not been returned.
27

Internet Protocol Denitions
AP = Access Point
An access point is a device that
connects wireless devices together
to create a wireless network. An AP
usually connects to a wired network,
and can relay data between wireless
and wired devices. APs operate
on a selected channel (1 to 11) and
broadcast their name (SSID) to allow
connection by wireless devices.
Ad-hoc wireless network
A wireless network between two
wireless capable devices (normally
PCs), where no wireless access point is
involved.
ARP = Address Resolution Protocol
Used to determine Ethernet (MAC)
address when a device starts to
communicate with another. The host
wishing to obtain a physical address
broadcasts an ARP request and the
device responds with its MAC address
so further communication can be
specically addressed between the two.
28

DHCP = Dynamic Host Conguration
Protocol -
Communications protocol where a range
of IP addresses are managed centrally
and assigned automatically to network
devices on demand. A DHCP server is
not required on a WLAN, but if it does
not exist, all the devices on the WLAN
must be manually congured. The Wi-
Net Window reports the following from
the DHCP server:
- an IP address for itself (My IP)
- the IP address of the DHCP server
- the Netmask in use
- the Router’s IP address
- the IP address of the DNS server
DNS = Domain Name Server
Provides translation of URL addresses
(like www.yahoo.com) to IP addresses
DNS servers are found on the Internet,
and thus are of interest to the Wi-Net
Window because accessing (pinging)
the DNS server proves that the Wi-Net
Window can access a device on the
WLAN.
Gateway = Router - see below
IP = Internet Protocol
Actually TCP/IP = Transmission
Control Protocol/Internet Protocol,
but commonly abbreviated to IP.
29

Communications addressing scheme
dened by DARPA (Defense Advanced
Research Projects Agency) to control
the publicly accessed Internet network.
IP Address
Specic number assigned to a single
device to allow it to be uniquely
identied on the network to which it is
connected. On a WLAN, the IP address
must be within the range of addresses
dened for that WLAN by the Network
Mask in use. On the Internet, all IP
addresses must be universally unique
to allow addressing that specic device.
IP addresses consist of 4 hexadecimal
digits that are commonly written in
“dotted decimal” format. 192.168.254.4
is an example. Note that each set of
decimal numbers divided by the periods
must be in the range of 0-255 as they
represent hexadecimal values of 00-FF.
ISP = Internet Service Provider
Commercial supplier of access
mechanisms for public access to the
Internet.
MAC Address = Media Access
Control Address
Hardware serial number that uniquely
identies a device on a WLAN.
30

Netmask = Network Mask = Subnet
Mask
Network Mask = Subnet Mask
IP addressing scheme that divides the
entire IP address network into smaller
sections (Subnets.) The Network mask
is used to identify an IP address as
being located either on the WLAN or on
the Internet.
PING = Packet Internet Groper
A simple communication protocol (ICMP
Echo) used to request an echo back
from an addressed device (target). The
Wi-Net Window uses this to verify IP
connectivity between itself and another
device.
Router = Gateway
Routers are located at gateways, the
places where two or more networks
connect. A wireless router forwards data
packets across the WLAN, typically to
the Internet. A router has an IP address
and MAC address of its own for direct
communications, which differentiates
it from a HUB or SWITCH. A hardware
box sold as a router will usually include
a HUB or SWITCH chip inside, providing
a convenient connection point for
multiple Ethernet devices.
31

SSID - Service Set Identier
A unique network name that identies a
wireless network.
Target
In the Ping protocol, an IP address must
be selected to receive an echo request.
This address is the “target” address for
that Ping. A target IP address may be
selected manually in Setup. This target
can be on the WLAN, or anywhere else
accessible through a router connected
to the WLAN. If the target is not on the
LAN, the router IP address must be
known so the Ping can be sent to the
router which forwards it on toward the
ultimate location.
WLAN = Wireless Local Area Network
A Wireless LAN is a computer network
that connects workstations and
personal computers for the purposing
of communicating with each other and
to share data and devices, such as
laser printers, faxes, and data storage
devices.
32

Specications
Physical Dimensions: (with antenna)
Size: 18.4 x 7.6 x 3.8 cm
7.25 x 3.0 x 1.5 in
Weight: (with antenna and battery)
370 grams (13 oz)
Environmental:
Operating temperature:
0 to 50°C (32 to 122°F)
Storage Temperature:
-20 to 60°C (-4 to 140°F)
Humidity:
10% to 90%, non-condensing
Battery Type: 4 AA Alkaline or NickelMetal Hydride batteries
Battery Life: 4 AA Alkaline batteries
used continuously in one of the following
modes:
Standby: 2.5 years
Testing: 22 hours
33

Maintenance
The Wi-Net Window may be
cleaned with a damp cloth. If heavy
accumulations of dirt are present, a
small amount of liquid soap may be
applied to the cloth to assist in cleaning.
Do not use solvents, scouring powders,
or other abrasive cleaners as they may
damage the polycarbonate lens over the
LCD screen.
34

Warranty
Test-Um Inc. guarantees that its
products will be free of all defects
in material and workmanship. This
warranty extends for a period of 12
months from the date of manufacture or
proof of purchase. All Wi-Net Windows
deemed defective under this warranty
will be repaired or replaced at Test-Um’s
discretion. No further warranties either
implied or expressed will apply, nor will
responsibility for the operation of this
device be assumed by Test-Um Inc.
WEEE Compliant: Prior to disposal
of this product, please contact Test-Um
Inc. for proper disposal options.
35

Returning Equipment
To return a Wi-Net Window, you
must obtain a Return Merchandise
Authorization (RMA) number from
Test-Um’s Customer Service department
by calling (805) 383-1500 or emailing
support@test-um.com. The RMA
number must be marked on the shipping
label or container.
Shipping
1. Ship the equipment with a copy of
the sales receipt, if available.
2. Attach a description of the opera tional problem.
3. Include a contact name, phone num ber, and email address.
4. Pack securely to prevent damage
during shipping.
5. Ship prepaid to:
Test-Um Inc.
Att: RMA XXXX
808 Calle Plano
Camarillo, CA 93012-9396
36


Test-Um Inc.
The Intelligent Test Solutions Company
808 Calle Plano
Camarillo, CA 93012
(805) 383-1500 / FAX (805) 383-1595
www.Test-Um.com
TU9873 (REV A-12/05)
 Loading...