

Page 1

Art. 60050
Ultrabreeze
Intensiv-Luftbefeuchter mit Timer und Vorheizung
Intensive air humidifier with timer and pre-heating
Humidificateur d’air intensif à minuteur et préchauffage
Umidificatore ad alte prestazioni con timer e preriscaldamento
Humidificador intenso con temporizador y precalentamiento
Humidificador intensivo com temporizador e pré-aquecimento
Intensieve luchtbevochtiger met timer en voorverwarming
Tehokas ilmankostutin ajastimella ja esilämmityksellä
Intensiv luftfuktare med timer och förvärme
∂ÓÙ·ÙÈÎfi˜ ˘ÁÚÔÔÈËÙ‹˜ με χρονόμετρο και προθέρμανση
Por favor ler cuidadosamente!
A.u.b. zorgvuldig lezen!
Lue huolellisesti läpi!
Läses noga!
¶·Ъ·О·ПФ‡МВ ‰И·‚¿ЫЩВ ЪФЫВОЩИО¿
Bitte sorgfältig lesen!
Please read carefully!
A lire attentivement s.v.p.!
Da leggere con attenzione!
¡Por favor lea con cuidado!
Gebrauchsanweisung
Manual
Mode d’emploi
Istruzioni per l’uso
Instrucciones de manejo
Manual de instruções
Gebruiksaanwijzing
Käyttöohje
Bruksanvisning
√‰ËÁ›Â˜ ¯Ú‹Û˘
Page 2

D Gebrauchsanweisung
1 Sicherheitshinweise . . . . . . . . . . . . . . . . . . . . . . . . . . . . . . . . . . . . 1
2 Wissenswertes . . . . . . . . . . . . . . . . . . . . . . . . . . . . . . . . . . . . . . . . . . . . . . 2
3 Anwendung . . . . . . . . . . . . . . . . . . . . . . . . . . . . . . . . . . . . . . . . . . . . . . . . . . 2
4 V e r s c h i e d e n e s . . . . . . . . . . . . . . . . . . . . . . . . . . . . . . . . . . . . . . . . . . . . . . 6
5 G a r a n t i e . . . . . . . . . . . . . . . . . . . . . . . . . . . . . . . . . . . . . . . . . . . . . . . . . . . . . . . . . 7
GB Manual
1 Safety Information . . . . . . . . . . . . . . . . . . . . . . . . . . . . . . . . . . . . . . 8
2 Useful Information . . . . . . . . . . . . . . . . . . . . . . . . . . . . . . . . . . . . . . 9
3 Operating . . . . . . . . . . . . . . . . . . . . . . . . . . . . . . . . . . . . . . . . . . . . . . . . . . . . . . 9
4 Miscellaneous . . . . . . . . . . . . . . . . . . . . . . . . . . . . . . . . . . . . . . . . . . . . . . . 13
5 W a r r a n t y . . . . . . . . . . . . . . . . . . . . . . . . . . . . . . . . . . . . . . . . . . . . . . . . . . . . . . . . 1 4
F Mode d’emploi
1 Consignes de sécurité . . . . . . . . . . . . . . . . . . . . . . . . . . . . . . . . 15
2 Informations utiles . . . . . . . . . . . . . . . . . . . . . . . . . . . . . . . . . . . . . . 16
3 Utilisation . . . . . . . . . . . . . . . . . . . . . . . . . . . . . . . . . . . . . . . . . . . . . . . . . . . . . . . 16
4 D i v e r s . . . . . . . . . . . . . . . . . . . . . . . . . . . . . . . . . . . . . . . . . . . . . . . . . . . . . . . . . . . . . . 2 0
5 G a r a n t i e . . . . . . . . . . . . . . . . . . . . . . . . . . . . . . . . . . . . . . . . . . . . . . . . . . . . . . . . . 2 1
I Istruzioni per l’uso
1 N o r m e d i s i c u r e z z a . . . . . . . . . . . . . . . . . . . . . . . . . . . . . . . . . . . . . 2 2
2 Informazioni interessanti . . . . . . . . . . . . . . . . . . . . . . . . . . 23
3 Modalitá d’impiego . . . . . . . . . . . . . . . . . . . . . . . . . . . . . . . . . . . . 23
4 V a r i e . . . . . . . . . . . . . . . . . . . . . . . . . . . . . . . . . . . . . . . . . . . . . . . . . . . . . . . . . . . . . . . . 2 7
5 G a r a n z i a . . . . . . . . . . . . . . . . . . . . . . . . . . . . . . . . . . . . . . . . . . . . . . . . . . . . . . . . . 2 8
E Instrucciones de manejo
1 Indicaciones de seguridad . . . . . . . . . . . . . . . . . . . . . . . 29
2 Informaciones interesantes . . . . . . . . . . . . . . . . . . . . . . 30
3 Aplicación . . . . . . . . . . . . . . . . . . . . . . . . . . . . . . . . . . . . . . . . . . . . . . . . . . . . . . 30
4 Generalidades . . . . . . . . . . . . . . . . . . . . . . . . . . . . . . . . . . . . . . . . . . . . . . 34
5 G a r a n t í a . . . . . . . . . . . . . . . . . . . . . . . . . . . . . . . . . . . . . . . . . . . . . . . . . . . . . . . . . 3 5
Klappen Sie bitte diese Seite auf und lassen Sie
sie zur schnellen Orientierung aufgeklappt.
Please fold out this page and leave it folded out
for quick reference.
Veuillez déplier cette page et la laisser dépliée
afin de vous orienter plus rapidement.
Aprire questa pagina e lasciarla aperta ai fini di
un rapido orientamento.
Por favor, despliegue esta hoja y déjela
desplegada para orientarse rápidamente.
P Manual de instruções
1 Avisos de segurança . . . . . . . . . . . . . . . . . . . . . . . . . . . . . . . . . . . 36
2 I n f o r m a ç õ e s g e r a i s . . . . . . . . . . . . . . . . . . . . . . . . . . . . . . . . . . . . . 3 7
3 Aplicação . . . . . . . . . . . . . . . . . . . . . . . . . . . . . . . . . . . . . . . . . . . . . . . . . . . . . . . 37
4 Generalidades . . . . . . . . . . . . . . . . . . . . . . . . . . . . . . . . . . . . . . . . . . . . . . 41
5 G a r a n t i a . . . . . . . . . . . . . . . . . . . . . . . . . . . . . . . . . . . . . . . . . . . . . . . . . . . . . . . . . 4 2
NL Gebruiksaanwijzing
1 Veiligheidsmaatregelen . . . . . . . . . . . . . . . . . . . . . . . . . . . . . 43
2 Wetenswaardigheden . . . . . . . . . . . . . . . . . . . . . . . . . . . . . . . . 44
3 H e t g e b r u i k . . . . . . . . . . . . . . . . . . . . . . . . . . . . . . . . . . . . . . . . . . . . . . . . . . . 4 4
4 D i v e r s e n . . . . . . . . . . . . . . . . . . . . . . . . . . . . . . . . . . . . . . . . . . . . . . . . . . . . . . . . . 4 8
5 G a r a n t i e . . . . . . . . . . . . . . . . . . . . . . . . . . . . . . . . . . . . . . . . . . . . . . . . . . . . . . . . . 4 9
FIN
Käyttöohje
1 Turvallisuusohjeita . . . . . . . . . . . . . . . . . . . . . . . . . . . . . . . . . . . . . . . 50
2 Tietämisen arvoista . . . . . . . . . . . . . . . . . . . . . . . . . . . . . . . . . . . . . 51
3 Käyttö . . . . . . . . . . . . . . . . . . . . . . . . . . . . . . . . . . . . . . . . . . . . . . . . . . . . . . . . . . . . . 5 1
4 Sekalaista . . . . . . . . . . . . . . . . . . . . . . . . . . . . . . . . . . . . . . . . . . . . . . . . . . . . . . . 55
5 T a k u u . . . . . . . . . . . . . . . . . . . . . . . . . . . . . . . . . . . . . . . . . . . . . . . . . . . . . . . . . . . . . . 5 6
S Bruksanvisning
1 Säkerhetshänvisningar . . . . . . . . . . . . . . . . . . . . . . . . . . . . . . . 57
2 V ä r t a t t v e t a . . . . . . . . . . . . . . . . . . . . . . . . . . . . . . . . . . . . . . . . . . . . . . . . . . 5 8
3 Användning . . . . . . . . . . . . . . . . . . . . . . . . . . . . . . . . . . . . . . . . . . . . . . . . . . 58
4 Ö v r i g t . . . . . . . . . . . . . . . . . . . . . . . . . . . . . . . . . . . . . . . . . . . . . . . . . . . . . . . . . . . . . . 6 2
5 G a r a n t i . . . . . . . . . . . . . . . . . . . . . . . . . . . . . . . . . . . . . . . . . . . . . . . . . . . . . . . . . . . 63
GR
√‰ËÁ›Â˜ ÃÚ‹Û˘
1
√‰ËÁ›Â˜ ÁÈ· ÙËÓ ·ÛÊ¿ÏÂÈ· . . . . . . . . . . . . . . . . . . . . . . . 6 4
2
ГЪ‹ЫИМВ˜ ПЛЪФКФЪ›В˜ . . . . . . . . . . . . . . . . . . . . . . . . . . . 6 5
3
∂Ê·ÚÌÔÁ‹ . . . . . . . . . . . . . . . . . . . . . . . . . . . . . . . . . . . . . . . . . . . . . . . . . . . . . 6 5
4
¢È¿ÊÔÚ· . . . . . . . . . . . . . . . . . . . . . . . . . . . . . . . . . . . . . . . . . . . . . . . . . . . . . . . . 6 9
5
∂ÁÁ‡ËÛË . . . . . . . . . . . . . . . . . . . . . . . . . . . . . . . . . . . . . . . . . . . . . . . . . . . . . . . . 7 0
Por favor, abra esta página e deixe-a aberta
para uma orientação rápida.
Sla deze bladzijde om en laat deze opengeslagen, terwijl u de gebruiksaanwijzing leest.
Käännä tämä sivu auki ja pidä se
aukikäännettynä nopeaa orientaatiota varten.
Vik upp denna sida och låt den vara uppslagen
som hjälp till snabb orientering.
¶·Ъ·О·ПФ‡МВ ·УФ›НЩВ ЩЛ ЫВП›‰· ·˘Щ‹
О·И ·К‹ЫЩВ ЩЛУ ·УФИ¯Щ‹ БИ· БЪ‹БФЪФ
ЪФЫ·У·ЩФПИЫМfi.
Page 3
D
Wassertank
Vernebleraufsatz
LCD-Display
LIGHT-Taste (Lichtfunktionen)
ON/OFF-Taste (Luftbefeuchter ein/aus)
SNOOZE-Taste (Alarm-Wiederholung)
Min-Taste (Minuten-Eingabe)
SET-Taste (Zeit-Einstellungen)
Hour-Taste (Stunden-Eingabe)
Buchse für Netzadapter
GB
Water tank
Nebulizer attachment
LCD display
LIGHT button (Light functions)
ON/OFF button (Air humidifier on/off)
SNOOZE button (Alarm repeat)
Min button (Minutes entry)
SET button (Time settings)
Hour button (Hours entry)
Mains adaptor socket
Page 4

F
Réservoir
Embout de nébulisation
Écran LCD
Touche
LIGHT (fonctions d’éclairage)
Touche
ON/OFF (marche/arrêt
de l’humidificateur d’air)
Touche
SNOOZE (répétition de l’alarme)
Touche
Min (indication des minutes)
Touche
SET (réglages temporels)
Touche
Hour (indication des heures)
Connecteur du bloc d'alimentation
I
Serbatoio dell’acqua
Nebulizzatore esterno
Display LCD
Tasto LIGHT (funzioni d’illuminazione)
Tasto ON/OFF (accensione/spegnimento umidificatore)
Tasto SNOOZE (ripetizione sveglia)
Tasto Min (immissione minuti)
Tasto SET (impostazioni ora)
Tasto Hour (immissione ore)
Presa a spina per adattatore di rete
E
Tanque de agua
Pieza de pulverización
Pantalla LCD
Botón LIGHT (funciones de iluminación)
Botón ON/OFF (humidificador encendido/apagado)
Botón SNOOZE (repetición de la alarma)
Botón Min (introducción de minutos)
Botón SET (ajustes de tiempo)
Botón Hour (introducción de horas)
Zócalo de conexión para el adaptador de red
P
Reservatório de água
Unidade vaporizadora
Mostrador LCD
Botão
LIGHT (funções da luz)
Botão
ON/OFF (ligar/desligar o humidificador)
Botão
SNOOZE (repetir o alarme)
Botão
Min (introdução dos minutos)
Botão
SET (regular a hora)
Botão
Hour (introdução das horas)
Tomada de encaixe para o adaptador de rede
NL
Watertank
Opzetstuk voor de verneveling
LCD-display
LIGHT -toets (Lichtfuncties)
ON/OFF -toets (Luchtbevochtiger aan/uit)
SNOOZE -toets (Herhaling alarm)
Min -toets (Invoer minuten)
SET -toets (Tijdinstellingen)
Hour -toets (Invoer uren)
Aansluiting voor voedingsapparaat
FIN
Vesisäiliö
Sumutinosa
LCD-näyttö
LIGHT -painike (Valotoiminnot)
ON/OFF -painike (Ilmankostutin päälle/pois)
SNOOZE -painike (Hälytyksen toisto)
Min -painike (Minuuttien syöttö)
SET -painike (Aika-asetukset)
Hour -painike (Tuntien syöttö)
Liitinpistoke verkkovirtasovittimelle
S
Vattenbehållare
Dimmunstycke
LCD display
LIGHT -knapp (ljusfunktioner)
ON/OFF -knapp (luftfuktare på/av)
SNOOZE -knapp (alarm upprepning)
Min -knapp (inställning av minuter)
SET -knapp (tidsinställningar)
Hour -knapp (inställning av timmar)
Uttag för nätadapter
GR
¡ÙÂfi˙ÈÙÔ ÓÂÚÔ‡
∂Í¿ÚÙËÌ· ·ÙÌÔ‡
ŒÓ‰ÂÈÍË LCD
¶Ï‹ÎÙÚÔ LIGHT (Λειτουργίες φωτός)
¶Ï‹ÎÙÚÔ ON/OFF (Υγροποιητής
ενεργός/ανενεργός)
¶Ï‹ÎÙÚÔ SNOOZE (Ειδοποίηση/Επανάλειψη)
¶Ï‹ÎÙÚÔ Min (Λεπτά/Καταχώρηση)
¶Ï‹ÎÙÚÔ SET (Χρόνος/Ρυθμίσεις)
¶Ï‹ÎÙÚÔ Hour (Ώρες/Καταχώρηση)
ÀÔ‰Ô¯‹ ÁÈ· ÙÔÓ ·ÓÙ¿ÙÔÚ· ‰ÈÎÙ‡Ô˘
Page 5
1
D
1 Sicherheitshinweise
1.1
Herzlichen Dank
1.2
Wichtig
Vielen Dank für Ihr Vertrauen und herzlichen Glückwunsch!
Mit dem Intensiv-Luftbefeuchter Ultrabreeze haben Sie ein Qualitätsprodukt
von MEDISANA erworben.
Damit Sie den gewünschten Erfolg erzielen und recht lange Freude an Ihrem
MEDISANA Ultrabreeze haben, empfehlen wir Ihnen, die nachstehenden
Hinweise zum Gebrauch und zur Pflege sorgfältig zu lesen.
Lesen Sie die Gebrauchsanweisung, insbesondere die
Sicherheitshinweise, sorgfältig durch, bevor Sie das Gerät
einsetzen und bewahren Sie die Gebrauchsanweisung für die
weitere Nutzung auf. Wenn Sie das Gerät an Dritte weitergeben,
geben Sie unbedingt diese Gebrauchsanweisung mit.
• Bevor Sie das Gerät an Ihre Stromversorgung anschließen, achten Sie darauf,
dass die auf dem Typenschild angegebene Netzspannung mit der Ihres
Stromnetzes übereinstimmt.
• Benutzen Sie das Gerät nur entsprechend seiner Bestimmung laut Gebrauchsanweisung. Das Gerät ist nicht für den kommerziellen Gebrauch bestimmt.
• Betreiben Sie das Gerät nicht in der Nähe von hochfrequenten elektromagnetischen Sendern, da diese die Gerätefunktion stören könnten.
• Lassen Sie das Gerät nicht unbeaufsichtigt in der Reichweite von Kindern.
Elektrische Geräte sind kein Spielzeug.
• Im Falle von Störungen reparieren Sie das Gerät nicht selbst und benutzen Sie
es nicht weiter. Fragen Sie Ihren Fachhändler und lassen Sie Reparaturen nur
von autorisierten Servicestellen durchführen.
• Sie selbst dürfen an dem Gerät nur Reinigungsarbeiten ausführen.
• Benutzen Sie ausschließlich für das Gerät vorgesehene und vom Hersteller mitgelieferte Zubehörteile.
• Entfernen oder Aufsetzen der Zubehörteile nur bei ausgeschaltetem Gerät.
• Bewahren Sie das Gerät in trockener Umgebung auf.
• Betreiben Sie das Gerät nicht, wenn die Verneblungskammer keine oder zu
wenig Flüssigkeit enthält.
• Benutzen Sie das Gerät nicht unter Bettdecken oder Kissen.
• Halten Sie die Belüftungsschlitze auf der Unterseite des Gerätes offen, frei von
Staub und Verunreinigungen.
Beim Betrieb elektrischer Geräte mit Netzteilen beachten Sie besonders:
• Greifen Sie nicht nach einem Gerät, das ins Wasser gefallen ist. Ziehen Sie
sofort den Netzstecker bzw. das Netzteil aus der Steckdose.
• Wenn das Kabel oder das Netzteil beschädigt sind, darf das Gerät nicht weiter
benutzt werden. Aus Sicherheitsgründen dürfen diese Teile nur von einer autorisierten Servicestelle ausgewechselt werden.
• Das Gerät sowie das Kabel und das Netzteil dürfen keinesfalls in Wasser
getaucht oder unter laufendes Wasser gehalten werden.
• Das Kabel darf nicht in der Nähe von Wärmequellen geführt oder über
scharfe Kanten gezogen werden.
• Fassen Sie das Netzteil stets mit trockenen Händen an.
• Tragen, ziehen oder drehen Sie das Netzteil nie am Kabel und klemmen Sie das
Kabel nie ein.
Page 6
2
1 Sicherheitshinweise / 2 Wissenswertes / 3 Anwendung
D
3.1
Inbetriebnahme
2.1
Lieferumfang
und Verpackung
1.2
Wichtig
2.2
Intensiv
Luftbefeuchter
• Ziehen Sie das Netzteil aus der Steckdose, wenn das Gerät ausgeschaltet und
nicht mehr in Gebrauch ist.
• Im Falle einer allergischen Atemwegserkrankung halten Sie vor Anwendung
des Gerätes Rücksprache mit Ihrem Hausarzt.
Bitte prüfen Sie zunächst, ob das Gerät vollständig ist.
Zum Lieferumfang gehören:
• 1 Intensiv Luftbefeuchter Ultrabreeze
mit Wassertank und Vernebleraufsatz
• 1 Netzadapter
• 1 Gebrauchsanweisung
Verpackungen sind wiederverwendbar oder können dem Rohstoffkreislauf
zurückgeführt werden. Bitte entsorgen Sie nicht mehr benötigtes Verpackungsmaterial ordnungsgemäß. Sollten Sie beim Auspacken einen Transportschaden bemerken, setzen Sie sich bitte sofort mit Ihrem Händler in
Verbindung.
WARNUNG
Achten Sie darauf, dass die Verpackungsfolien nicht in die
Hände von Kindern gelangen. Es besteht Erstickungsgefahr!
Gerade in den Wintermonaten erhöht zu trockene Raumluft die Anfälligkeit für
Infektions- und Atemwegserkrankungen und führt zu Müdigkeit und Konzentrationsschwäche. Gesunde Luft sollte eine relative Luftfeuchtigkeit von 40 bis
60% haben.
Die geräuscharme und energiesparende Ultraschall-Technologie des Luftbefeuchters verwandelt Wasser in feinsten Nebel, der den Feuchtigkeitsgrad der
Raumluft erhöht. Das verbessert die Luftqualitat und beugt einer Austrocknung
von Schleimhauten und Haut vor und verbessert somit das Wohlbefinden. Die
Programmierung der Ein- und Ausschaltzeit und eine zuschaltbare Beleuchtung
ermöglichen die Schaffung einer individuellen Atmosphäre. Das Gerät verfügt
über eine Vorheizfunktion zur Abtötung von Keimen und Bakterien.
Das Gerät ist für die Befeuchtung der unmittelbaren Umgebungsluft in Räumen
(bis ca. 15 qm) geeignet.
ACHTUNG
Stellen Sie sicher, dass der MEDISANA Intensiv-Luftbefeuchter
kippsicher auf einer feuchtigkeitsunempfindlichen Oberfläche
betrieben wird.
Insbesondere bei Betrieb mit kalkhaltigem Wasser / Aromaessenz
kann es zu Niederschlägen / Ablagerungen kommen.
Page 7
D
3 Anwendung
3
3.4
Luftbefeuchter
ein- und
ausschalten /
Leistungsstufen
1 und 2
3.2
Befüllen und
Entleeren des
Wassertanks
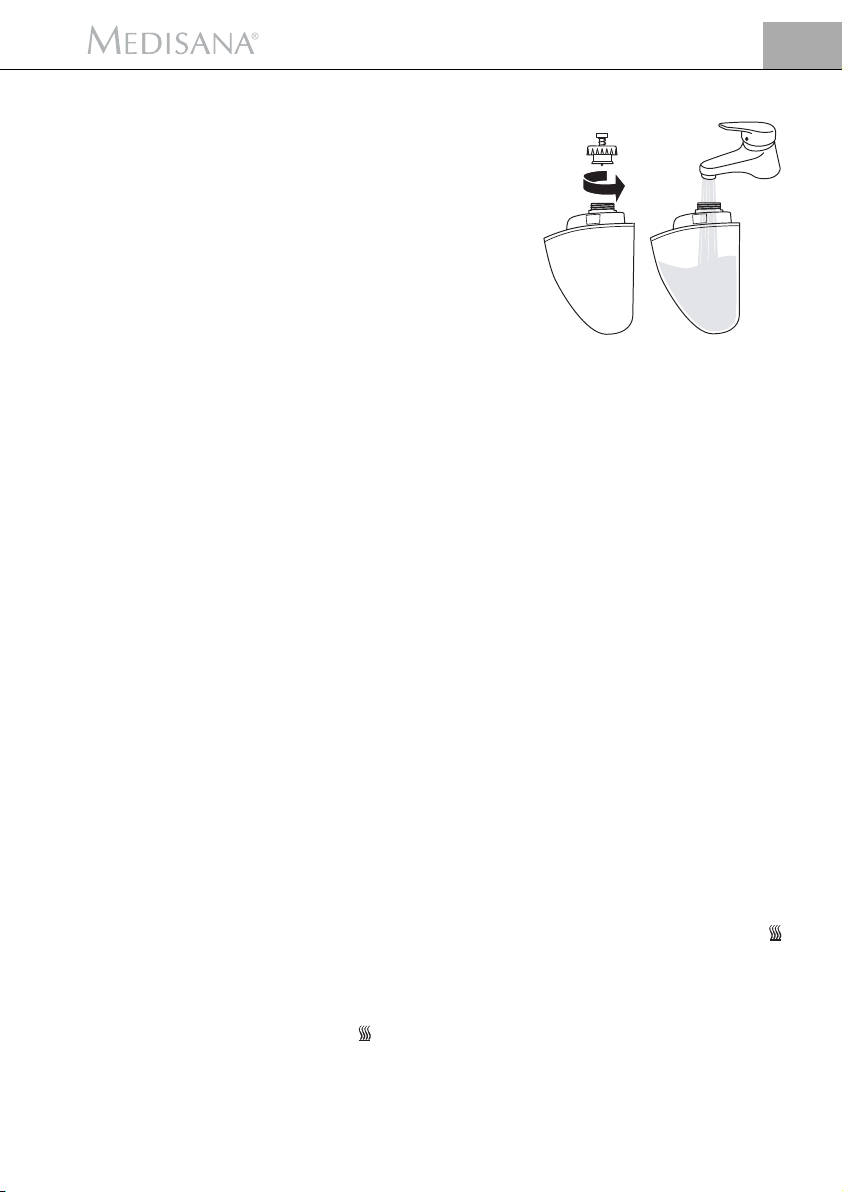
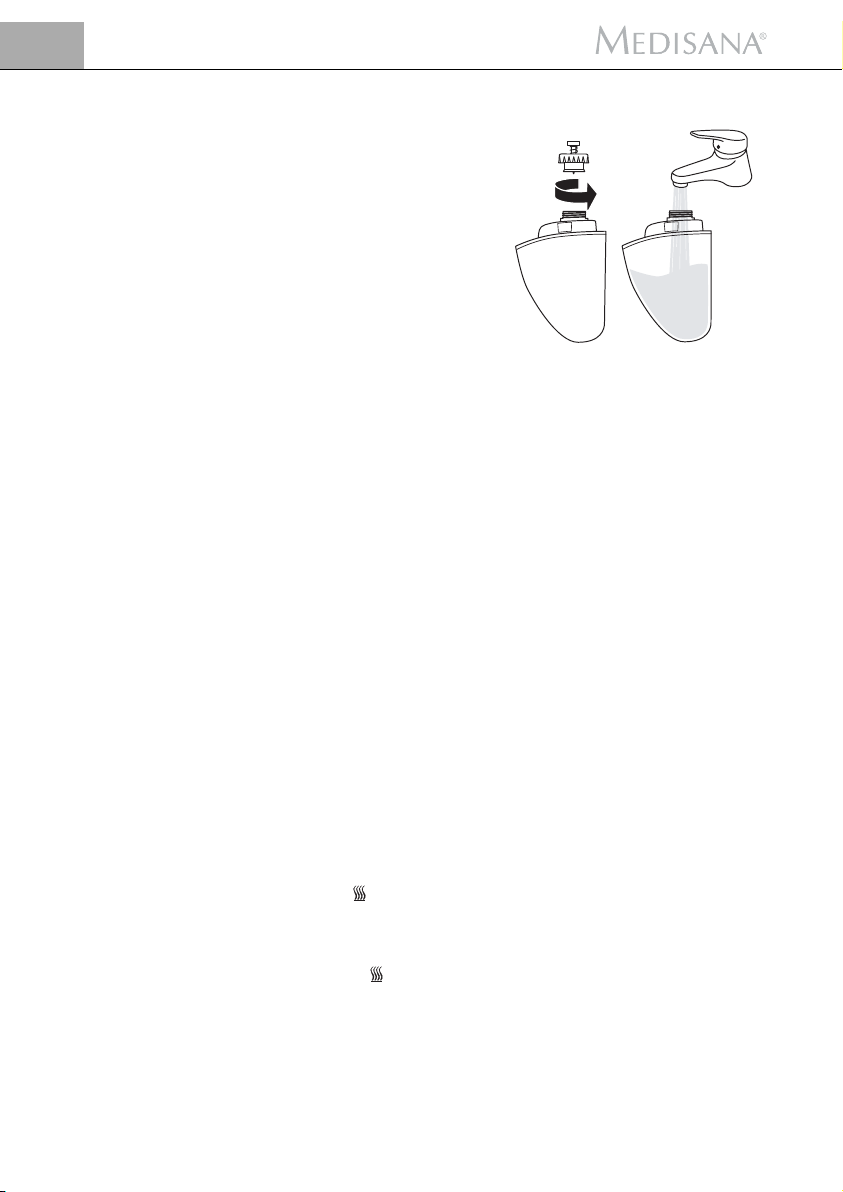
Spülen Sie den Wassertank und den
Vernebleraufsatz vor dem ersten Gebrauch einmal gründlich mit frischem
Trinkwasser. Nehmen Sie den Wassertank vom Gerät, drehen ihn um
und schrauben den Tankverschluss
ab. Befüllen Sie den Tank mit max.
1,3 Liter frischem Trinkwasser oder
demineralisiertem Wasser.
Schrauben Sie den Tankverschluss
wieder fest zu und wischen Sie eventuelle Tropfen vom Tank ab. Achten Sie auf den korrekten Sitz der Deckeldichtung. Setzen Sie den Wassertank mit der nach unten gerichteten Einfüllöffnung auf das Gerät auf.
Transportieren Sie das Gerät nicht mit gefülltem Wassertank. Hierbei kann
durch die schwankenden Bewegungen der Wasserspiegel oberhalb der Verneblermembran ansteigen und dadurch eine Vernebelung verhindert werden.
Bei ausgeschaltetem Gerät kann der Vernebleraufsatz entfernt und das
überschüssige Wasser mittels eines Tuches aufgenommen werden.
Entsorgen Sie das Restwasser nach Gebrauchsende und spülen Sie den Tank
mit frischem Trinkwasser aus. Vor erneutem Gebrauch füllen Sie den Tank mit
frischem Trinkwasser oder demineralisiertem Wasser. Wenn Sie das Gerät
abschalten und längere Zeit nicht benutzen wollen, nehmen Sie den Wassertank vom Gerät ab und entleeren Sie den Tank und das Gerät.
Sie können das Gerät mit einer wasserlöslichen Aromaessenz betreiben. Geben
Sie zu diesem Zweck ca. 10 Tropfen der Essenz in den mit 1,3 Liter gefüllten
Wassertank.
Beachten Sie, dass sich durch die Zugabe der Essenz ein Niederschlag bilden
kann! Sie können die Aromaessenzen mit verschiedenen Duftnoten über
MEDISANA beziehen.
Stecken Sie den Vernebleraufsatz auf das Gerät.
Verbinden Sie das Kabel des Netzteils mit der Buchse und stecken Sie das
Netzteil in die Steckdose.
Nach einem kurzen Druck auf die ON/OFF-Taste beginnt das Gerät mit der
Verneblung des Wassers und das Gebläse setzt mit hoher Intensität (Leistungsstufe 1) ein. Durch die erhöhte Gebläseleistung wird mehr Feuchtigkeit an die
Umgebungsluft abgegeben. Das Betriebszeichen des LuftbefeuchtersXX
erscheint im Display . Sobald der Luftbefeuchter mit der ON/OFF-Taste eingeschaltet wird, setzt auch die Vorheizung zur Abtötung von Keimen und
Bakterien ein. Drücken Sie die ON/OFF-Taste
ein zweites Mal, arbeitet das
Gerät mit reduzierter Intensität (Leistungsstufe 2). Das Betriebszeichen des
Luftbefeuchters blinkt. Bei erneutem Druck auf die ON/OFF-Taste-Taste
wird das Gerät abgeschaltet.
Die Abschaltautomatik im Gerät sorgt dafür, dass die Verneblung und der
Gebläsebetrieb automatisch abgeschaltet werden, wenn das Wasserreservoir
erschöpft ist.
3.3
Hinzufügen von
Aromaessenz
Page 8
4
3 Anwendung
D
3.6
Komfortfunktionen
einstellen
Betriebsdauer:
Leistungsstufe 1 bei Befüllung mit 1,3 Liter Wasser: ca. 20 Std.
Leistungsstufe 2 bei Befüllung mit 1,3 Liter Wasser: ca. 30 Std.
Der Wassertank des MEDISANA Intensiv-Luftbefeuchters Ultrabreeze verfügt
über eine interne Beleuchtungseinheit, die mit einem leichten Druck auf die
LIGHT-Taste eingeschaltet wird. Im Display erscheint das Zeichen für
Beleuchtung . Das Licht erscheint in blauer Farbe. Drücken Sie die Taste
ein zweites Mal, erscheint das Licht in roter Farbe, bei einem dritten Druck
auf die Taste in grüner Farbe. Drücken Sie die LIGHT-Taste ein viertes
Mal, wechseln die drei Farben (blau/rot/grün) in Folge von Intervallen von 10
Sekunden. Beim Wechsel leuchten jeweils zwei Farben gleichzeitig auf. Durch
einen fünften Druck auf die Taste wählen Sie eine bestimmte Farbe für eine
bestimmte Tageszeit aus:
00.00 - 08.00 Uhr - grünes Licht
08.00 - 16.00 Uhr - rotes Licht
16.00 - 24 00 Uhr - blaues Licht
Durch einen sechsten Druck auf die LIGHT-Taste wird die Beleuchtung
abgeschaltet. Das Beleuchtungszeichen erlischt.
Die Beleuchtung kann unabhängig von der Verneblung und vom Gebläse,
zum Beispiel als Nachtbeleuchtung, betrieben werden.
Wenn das Gerät automatisch abschaltet, bleibt die Beleuchtung an. Die
Beleuchtungsintensität nimmt ab, wenn die Verneblung zugeschaltet wird.
Ihr MEDISANA Intensiv-Luftbefeuchter Ultrabreeze verfügt über 3 Komfort
funk-
tionen:
eine Uhrzeitanzeige,
eine
integrierte Zeitschaltuhr und eine Alarmfunktion.
Stellen Sie die aktuelle Uhrzeit ein, um den Ultrabreeze auch als Tischuhr und mit
der Alarmfunktion als
Wecker zu nutzen.
Die integrierte Zeitschaltuhr ermöglicht es Ihnen, Ihren Luftbefeucher zu einem
bestimmten Zeitpunkt automatisch ein- und auszuschalten.
Die Einstellung von Uhrzeit, Zeitschaltuhr und Alarmzeit erfolgt nacheinander
in einem Einstellungsvorgang. Wenn Sie eine Einstellung nicht vornehmen bzw.
überspringen möchten, drücken Sie die SET-Taste so oft, bis Sie in den nächsten Einstellungsmodus gelangen. Der Einstellungsmodus für die Zeitschaltuhr
wird mit “ON” bzw. “OFF” angezeigt, der für den Alarm mit . Wenn Sie
während des Einstellungsvorgangs 10 Sekunden lang keine Taste drücken, wird
der Einstellungsmodus beendet.
Drücken Sie die SET-Taste das erste Mal, befinden Sie sich im Einstellmodus
für die Uhrzeit. Im Display blinkt “00.00”. Drücken Sie die Hour-Taste
so oft,
bis die aktuelle Stundenzahl angezeigt wird . Verfahren Sie in der gleichen Art und
Weise unter Verwendung der Min-Taste
mit der Einstellung der Minuten.
3.5
Beleuchtung
Uhrzeit
einstellen
Page 9

5
D
3 Anwendung
Zeitschaltuhr
einstellen
Alarmzeit
einstellen
Schlummer-
funktion
Drücken Sie die SET-Taste das zweite Mal, befinden Sie sich im Einstellmodus
für die Zeitschaltuhr. Im Display erscheint “ON”. Drücken Sie die Hour-Taste
so oft, bis die Stundenzahl angezeigt wird, zu der sich der Luftbefeuchter einschalten soll. Verfahren Sie mit der Min-Taste wie mit der Hour-Taste .
Sobald die eingestellte Einschaltzeit erreicht wird, startet der Betrieb des Luftbefeuchters.
Drücken Sie die SET-Taste das dritte Mal, erscheint im Display “OFF”. Drücken
Sie die Hour-Taste so oft, bis die Stundenzahl angezeigt wird, zu der sich der
Luftbefeuchter ausschalten. Verfahren Sie mit der Min-Taste wie mit der
Hour-Taste .
Wird die Ausschaltzeit erreicht, wird der Betrieb des Luftbefeuchters gestoppt.
Drücken Sie die SET-Taste das vierte Mal, befinden Sie sich im Einstellmodus
für den Alarm. Im Display blinkt das Alarmzeichen . Drücken Sie die Hour-Taste
so oft, bis die Stundenzahl angezeigt wird, zu der Alarm gegeben werden soll.
Verfahren Sie mit der Min-Taste wie mit der Hour-Taste .
Drücken Sie die SET-Taste das fünfte Mal, können Sie den eingestellten Alarm
aktivieren bzw. deaktivieren. Drücken Sie die Hour-Taste , um die eingestellte
Alarmzeit zu aktivieren; das Alarmzeichen erscheint im Display. Drücken Sie die
Min-Taste , um die eingestellte Alarmzeit zu deaktivieren; das Alarmzeichen I
erlischt.
Wenn der Alarm zu der eingestellten Zeit ertönt, so kann er mit jeder Taste (außer
der SNOOZE-Taste) abgeschaltet werden.
Drücken Sie die SET-Taste das sechste Mal, kehrt das Display zur Anzeige der
aktuellen Tageszeit zurück.
Durch Drücken der SNOOZE-Taste können Sie bei aktivem Alarm die
Schlummerfunktion (SNOOZE) einschalten. In diesem Fall verstummt der Alarmton und schaltet sich nach 10 Minuten automatisch wieder ein.
Page 10
6
4 Verschiedenes
D
• Bevor Sie das Gerät reinigen, vergewissern Sie sich, dass das Gerät ausge-
schaltet und das Netzsteil aus der Steckdose gezogen ist.
• Reinigen Sie das Gerät äußerlich mit einem feuchten, weichen Tuch.
• Benutzen Sie keine aggressiven Substanzen, wie z.B. Scheuermilch oder
andere Mittel, für die Reinigung. Das könnte die Oberfläche angreifen.
• Bei häufigem Betrieb empfehlen wir Ihnen das Gerät mindestens einmal
wöchentlich gründlich zu reinigen. Den Wassertank und den Vernebleraufsatz können Sie mit heißem Wasser ( > 65 °C ) oder einem mindestens
75%igen Alkohol gründlich auszuspülen. Die Verneblerkammer und die
Tankkammer reinigen Sie mittels eines in Alkohol getränkten Tuches und
eines Wattestäbchens. Achten Sie darauf, dass kein Wasser in das Geräteinnere gelangt.
• Wenn Sie das Gerät längere Zeit nicht benutzen, entleeren Sie das restliche
Wasser aus dem Wasser tank und dem Gerät und trocknen das Gerät ab.
• Lagern Sie das Gerät an einem trockenen, kühlen Platz.
Dieses Gerät darf nicht zusammen mit dem Hausmüll entsorgt werden.
Jeder Verbraucher ist verpflichtet, alle elektrischen oder elektronischen
Geräte, egal, ob sie Schadstoffe enthalten oder nicht, bei einer Sammelstelle
seiner Stadt oder im Handel abzugeben, damit sie einer umweltschonenden
Entsorgung zugeführt werden können.
Wenden Sie sich hinsichtlich der Entsorgung an Ihre Kommunalbehörde
oder Ihren Händler.
Name und Modell : MEDISANA Intensiv Luftbefeuchter
Ultrabreeze
Stromversorgung mit Netzadapter
: Input 200-240 V~, 50/60 Hz, 0,8 A
Output 24 V , 1,5 A
Leistungsaufnahme : ca. 36 W
Abmessungen L x B x H : ca. 196 x 135 x 256 mm
Gewicht inkl. Netzteil : ca. 1.100 g
Artikel Nr. : 60050
EAN-Nummer : 40 15588 60050 0
Sonderzubehör je 10 ml Aroma-Essenz
(optional, nicht im Lieferumfang enthalten)
Artikel Nr. : 60005 Eukalyptus
60006 Jasmin
60007 Lavendel
60008 Rose
60009 Lemon
Im Zuge ständiger Produktverbesserungen behalten wir uns
technische und gestalterische Änderungen vor.
4.1
Reinigung und
Pflege
4.2
Hinweis zur
Entsorgung
4.3
Technische
Daten
Page 11

7
D
5 Garantie
5.1
Garantie- und
Reparatur bedingungen
Bitte wenden Sie sich im Garantiefall an Ihr Fachgeschäft oder direkt an die
Servicestelle. Sollten Sie das Gerät einschicken müssen, geben Sie bitte den
Defekt an und legen eine Kopie der Kaufquittung bei.
Es gelten dabei die folgenden Garantiebedingungen:
1. Auf MEDISANA Produkte wird ab Verkaufsdatum eine Garantie für drei
Jahre gewährt. Das Verkaufsdatum ist im Garantiefall durch die Kaufquittung oder Rechnung nachzuweisen.
2. Mängel infolge von Material- oder Fertigungsfehlern werden innerhalb der
Garantiezeit kostenlos beseitigt.
3. Durch eine Garantieleistung tritt keine Verlängerung der Garantiezeit,
weder für das Gerät noch für ausgewechselte Bauteile, ein.
4. Von der Garantie ausgeschlossen sind:
a. alle Schäden, die durch unsachgemäße Behandlung, z.B. durch Nicht-
beachtung der Gebrauchsanleitung, entstanden sind.
b. Schäden, die auf Instandsetzung oder Eingriffe durch den Käufer oder
unbefugte Dritte zurückzuführen sind.
c. Transportschäden, die auf dem Weg vom Hersteller zum Verbraucher
oder bei der Einsendung an den Kundendienst entstanden sind.
d. Zubehörteile, die einer normalen Abnutzung unterliegen.
5. Eine Haftung für mittelbare oder unmittelbare Folgeschäden, die durch das
Gerät verursacht werden, ist auch dann ausgeschlossen, wenn der Schaden
an dem Gerät als ein Garantiefall anerkannt wird.
MEDISANA AG
Itterpark 7-9
40724 Hilden
Deutschland
Tel.: +49 (0) 2103 / 2007-60
Fax: +49 (0) 2103 / 2007-626
eMail: info@medisana.de
Internet: www.medisana.de
Im Servicefall wenden Sie sich
bitte an:
MEDISANA Servicecenter
Feuerbach KG
Corneliusstraße 75
40215 Düsseldorf
Tel.: 0211 - 38 10 07
(Mo-Do: 9-13 Uhr/14-17 Uhr,
Fr: 9-13 Uhr)
Fax: 0211 - 37 04 97
eMail: medisana@t-online.de
Page 12
8
1 Safety Information
GB
1.1
Thank you
very much
Thank you for your confidence in us and congratulations on your purchase!
You have acquired a quality product with your purchase of the MEDISANA
Ultrabreeze intensive air humidifier.
To ensure the best results and long-term satisfaction with your MEDISANA
Ultrabreeze unit, we recommend that you read the following operating and
maintenance instructions carefully.
Read the instruction manual carefully before using this device,
especially the safety instructions, and keep the instruction
manual for future use.
Should you give this device to another person, it is vital that
you also pass on these instructions for use.
• Before connecting the device to your power supply, please ensure that the
supply voltage stated on the rating plate is compatible with your mains supply.
• Only use this unit according to the intended purpose and as directed in the
instructions for use.
The device is not intended for commercial use.
• Do not use the unit in the vicinity of high-frequency electromagnetic transmitters, as this could damage the functions on the device.
• Do not leave the unit unattended within the reach of children. Electrical
appliances are not toys.
• In the case of a fault occurring, stop using the unit and do not attempt to
repair it yourself. Consult your specialist dealer and only have repairs carried
out by authorized service personnel.
• You may only clean the unit yourself.
• Only use the unit with accessories designed for this model and supplied by
the manufacturer.
• Only attach or remove accessories when the unit is switched off.
• Keep the unit in a dry environment.
• Do not use the unit when the nebulizer chamber is empty or contains too
little fluid.
• Do not use the unit beneath cushions or bed covers.
• Keep the ventilation slots on the underside of the unit open, free of dust and
impurities.
Important information when using electrical appliances with a mains
adaptor:
• Never touch an appliance that has fallen into water. Unplug the unit from the
mains outlet immediately.
• You must not continue to use the unit if the lead or the mains adaptor are
damaged. For safety reasons, these parts may only be replaced by authorized
service personnel.
• You must never submerge the unit, the lead or the mains adaptor in water or
hold them under running water.
• Do not lay the cable near sources of heat or pull it over any sharp edges.
• Only handle the mains adaptor when your hands are dry.
• Never carry, pull or turn the unit by the mains lead and do not let the lead
get tangled.
1.2
Important
Page 13
9
GB
1 Safety Information / 2 Useful Information / 3
Operating
3.1
Getting started
2.1
Items supplied
and packaging
1.2
Important
2.2
Intensive
air humidifier
• Only unplug the mains adaptor from the outlet when the unit is switched off
and no longer in use.
• In the event of an allergic respiratory problem, consult your doctor before using
the appliance.
Please check first of all that the unit is complete.
The following parts are included as standard:
• 1 Intensive Humidifier Ultrabreeze unit
with water tank and nebulizer attachment
• 1 Mains adaptor
• 1 Operating instructions
The packaging can be reused or recycled. Please dispose properly of any packaging material no longer required. If you notice any transport damage during
unpacking, please contact your dealer without delay.
WARNING
To avoid risk of suffocation, keep packaging film away
from children!
Especially in the winter months dryness in the atmosphere increases susceptibility to illness and infections of the respiratory tract and causes tiredness and
poor concentration. Healthy air should have a relative atmospheric humidity of
40 to 60 %.
The quiet, energy-saving ultrasound technology of the air humidifier converts
water into a fine mist that increases the moisture level of the air. This improves
the quality of the air and prevents mucous membrane and skin from dehydrating, therefore improving general well-being. Programming the on and off
switch and a lighting switch allow you to create an individual atmosphere. The
device has a pre-heating function for destroying germs and bacteria.
The device is suitable for humidifying the proximate ambient air in rooms of up
to approx. 15 square metres.
CAUTION
Make sure that you use your MEDISANA Intensive Humidifier
on a safe and even surface that is not sensitive to moisture.
There may be some condensation/accumulation of moisture,
especially when using the unit with hard water / aroma essence.
Page 14
10
3
Operating
GB
3.4
Switching the
air humidifier on
and off / power
setting 1 and 2
3.2
Filling and
emptying the
water tank
Rinse the water tank and the nebulizer attachment once thoroughly with
fresh drinking water before using for
the first time. Remove the water tank
from the device, turn it around
and unscrew the tank lid. Fill up the
tank with a maximum of 1.3 litres of
fresh drinking water or demineralised
water.
Screw on the tank lid again tightly and
wipe away any drops on the tank.
Make sure the lid seal is on properly.
Place the water tank on the device with the filler opening facing downwards.
Do not move the unit when the water chamber is full, as the tilting motion can
cause the water level to rise above the nebulizer membrane, preventing it from
working.
When the unit is switched off, you can remove the nebulizer attachment
and use a cloth to remove any excess water.
Dispose of the leftover water after use and rinse out the tank with fresh
drinking water. Before using again, fill the tank with fresh drinking water or
demineralised water.
When you have switched off the unit and do not intend to use it for an extended period of time, remove and empty the water tank and the device.
You can use the device with a water soluble aroma essence. Put about 10
drops of the essence into the 1.3 litre full water tank.
Please note that a film may form through adding the essence! Sie können die
You can obtain aroma essences with a variety of fragrances from MEDISANA.
Fit the nebulizer attachment onto the unit.
Connect the mains adaptor lead to the socket and plug the adaptor into
the mains outlet.
After briefly pressing the ON/OFF switch , the device starts nebulizing the
water and the fan works at a higher intensity (power setting 1). The higher fan
output provides the ambient air with more humidity. The operating symbol for
the air humidifier appears in the display . Once the air humidifier is
switched on with the ON/OFF button, the pre-heating for destroying germs and
bacteria also comes on. Press the ON/OFF button a second time and the
device operates at a reduced intensity (power setting 2). The operating symbol
for the air humidifier flashes. Press the ON/OFF button again to switch
off the device.
The unit’s automatic cut-off feature ensures that the fan and nebulizer are
automatically switched off when the water reservoir is empty.
3.3
Addition of
aroma essence
Page 15

11
GB
3
Operating
3.6
Setting the
convenience
functions
Operating time:
Level 1 when filled with 1,3 litres of water: approx. 20 hours.
Level 2 when filled with 1,3 litres of water: approx. 30 hours.
The water tank in the MEDISANA Intensive Humidifier Ultrabreeze features an
internal illumination unit that can be activated with a simple press of the
LIGHT button . The symbol for lighting appears in the display. A blue
light appears. Press the button a second time and a red light appears, press
the button a third time and a green light appears. Press the LIGHT button
a fourth time and the three colours (blue/red/green) change one after the other
at intervals of 10 seconds. Two colours light up at the same time when they
are changing. Press the button a fifth time to select a colour for a certain
time of day:
Midnight - 8 am - green light
8 am - 4 pm - red light
4 pm - midnight - blue light
Press the LIGHT button a sixth time and the lighting switches off. The
lighting symbol disappears.
The lighting can be used independently from the nebulizer and the fan, such
as for night illumination.
When the unit switches off automatically, the illumination remains on. The
intensity of the light decreases when the nebulizer is activated.
Your MEDISANA intensive air humidifier Ultrabreeze has three convenient
features:
a clock display,
an
integrated clock timer and an alarm function.
Set the current time, to use the Ultrabreeze as a regular clock and as an alarm
clock with the alarm function
.
The integrated clock timer enables you to switch your air humidifier on and off
automatically at a certain time.
Setting the clock and alarm time is done one after the other in one setting procedure. If you do not make any settings or you want to skip them, keep pressing
the SET button until you come to the next setting mode. The setting mode for
the alarm clock is shown by “ON” or “OFF” and for the alarm by . If you do
not press any button for 10 seconds during the setting procedure, the setting
mode ends.
Press the SET button once to get the setting mode for the clock. “00.00”
flashes in the display. Keep pressing the hours button until the current hour
is displayed. Proceed in the same way for the minutes button for setting the
minutes.
3.5
Illumination
Setting
the time
Page 16
12
3
Operating
GB
Press the SET button twice to get the setting mode for the clock timer. “ON”
flashes in the display. Keep pressing the hours button until the time is displayed at which you want the air humidifier to switch on. Proceed in the same
way for the minutes button as for the hours button .
Once the set switch-on time is reached, the air humidifier starts operating.
Press the SET button a third time and “OFF” appears in the display. Keep
pressing the hours button until the time is displayed at which you want the
air humidifier to switch off. Proceed in the same way for the minutes button
as for the hours button .
Once the switch-off time is reached, the air humidifier stops operating.
Press the SET button a fourth time to get the setting mode for the alarm. The
alarm symbol flashes in the display. Keep pressing the hours button until
the time is displayed at which you want the alarm to come on. Proceed in the
same way for the minutes button as for the hours button .
Press the SET button a fifth time to activate or deactivate the set alarm. Press
the hours button , to activate the set alarm time; the alarm symbol appears
in the display. Press the minutes button , to deactivate the set alarm time; the
alarm symbol disappears.
When the alarm tone sounds at the set time, switch it off by touching any
button except the SNOOZE button.
Press the SET button a sixth time to return to the current time on the display.
Press the SNOOZE button to switch on the snooze function while the alarm
is sounding. This mutes the alarm tone and switches it back on automatically
after 10 minutes.
Setting
the alarm
Snooze
function
Setting the
timer switch
Page 17
13
GB
4 Miscellaneous
• Before cleaning the unit, make sure that the unit is switched off and the
mains adaptor is unplugged from the outlet.
• Clean the outside of the unit with a soft, damp cloth.
• Please do not use any aggressive substances for cleaning, such as scouring
cream or other detergents, as these may damage the surfaces.
• With frequent operation we recommend that you clean the unit thoroughly
at least once a week. You can rinse out the water tank and atomiser attachment with hot water (>65 °C) or an alcohol of at least 75% vol. The
atomiser chamber and tank chamber should be cleaned using an alcoholsoaked cloth and cotton bud. Take care to ensure that no water gets inside
the humidifier.
• If you do not intend to use the device for a while, empty the remaining water
from the tank and dry off the unit.
• Store the unit in a cool, dry place.
This product must not be disposed together with the domestic waste.
All users are obliged to hand in all electrical or electronic devices, regardless
of whether or not they contain toxic substances, at a municipal or commercial collection point so that they can be disposed of in an environmentally
acceptable manner.
Consult your municipal authority or your dealer for information about disposal.
Name and model : MEDISANA Intensive Humidifier Ultrabreeze
Current supply with power supply unit
: Input 200-240 V~, 50/60 Hz, 0,8 A
Output 24 V , 1,5 A
Power consumption : approx. 36 W
Dimensions l x w x h : approx. 196 x 135 x 256 mm
Weight with mains adaptor : approx. 1.100 g
Article no. : 60050
EAN-Number : 40 15588 60050 0
Extras 10 ml aroma essences each
(optional, not included in items supplied)
Article no. : 60005 Eucalyptus
60006 Jasmin
60007 Lavender
60008 Rose
60009 Lemon
In accordance with our policy of continual product improvement,
we reserve the right to technical and design changes without notice.
4.1
Cleaning and
maintenance
4.2
Disposal
4.3
Specifications
Page 18

14
5 Warranty
GB
Please contact your dealer or the service centre in case of a claim under the
warranty. If you have to send in the unit, please enclose a copy of your
receipt and state what the defect is.
The following warranty terms apply:
1. The warranty period for MEDISANA products is three years from date of
purchase. In case of a warranty claim, the date of purchase has to be
proven by means of the sales receipt or invoice.
2. Defects in material or workmanship will be removed free of charge
within the warranty period.
3. Repairs under warranty do not extend the warranty period either for the
unit or for the replacement parts.
4. The following is excluded under the warranty:
a. All damage which has arisen due to improper treatment, e.g. non-
observance of the user instructions.
b. All damage which is due to repairs or tampering by the customer or
unauthorised third parties.
c. Damage which has arisen during transport from the manufacturer to
the consumer or during transport to the service centre.
d. Accessories which are subject to normal wear and tear.
5. Liability for direct or indirect consequential losses caused by the unit are
excluded even if the damage to the unit is accepted as a warranty claim.
MEDISANA AG
Itterpark 7-9
40724 Hilden
Germany
Tel.: +49 (0) 2103 / 2007-60
Fax: +49 (0) 2103 / 2007-626
eMail: info@medisana.de
Internet: www.medisana.de
The service centre address is shown on the last page.
5.1
Warranty and
repair terms
Page 19

15
F
1 Consignes de sécurité
1.1
Merci !
Félicitations et merci de votre confiance!
Avec l’humidificateur d’air intensif Ultrabreeze, vous avez acquis un produit
de qualité de la maison MEDISANA. Afin d'obtenir les résultats escomptés
et de profiter longtemps de votre appareil nébulisateur MEDISANA
Ultrabreeze, nous vous recommandons de lire attentivement les instructions
suivantes concernant l'utilisation et l'entretien.
Lisez attentivement le mode d’emploi, et en particulier les
consignes de sécurité, avant d’utiliser l’appareil. Conservez bien
ce mode d’emploi. Vous pourriez en avoir besoin par la suite.
Lorsque vous remettez l’appareil à un tiers, mettez-lui
impérativement ce mode d’emploi à disposition.
• Avant de raccorder l’appareil à l’alimentation électrique, veillez à ce que
la tension indiquée sur la plaque signalétique corresponde à celle de l’alimentation secteur.
• Utilisez l’appareil conformément à sa destination telle que définie dans la notice
d’utilisation.
L'instrument n'est pas destiné à une utilisation commerciale.
•
Ne pas utiliser l’appareil à proximité d’émetteurs électromagnétiques haute
fréquence, ils pourraient perturber le fonctionnement de l’appareil.
•
Ne pas laisser l'appareil sans surveillance si des enfants sont à proximité. Les
appareils électriques ne sont pas des jouets.
•
En cas de pannes, ne réparez pas l'appareil vous-même et ne l'utilisez plus.
Renseignez-vous auprès de votre spécialiste et confiez uniquement les réparations à des ateliers agréés.
•
Vous-même êtes seulement autorisés à nettoyer l'appareil.
•
Veuillez exclusivement utiliser les accessoires conçus pour votre appareil et
fournis par le fabricant.
•
Uniquement démonter ou monter des accessoires lorsque l'appareil est éteint.
•
Rangez l'appareil dans un endroit sec.
•
Ne pas utiliser l'appareil si la chambre de nébulisation est vide ou insuffisamment remplie.
•
Ne pas utiliser l'appareil sous des couvertures ou coussins.
•
Veiller à ce que les fentes d’aération de la face inférieure de l’appareil restent
dégagées et dépourvues de poussières et de saletés.
Observez les instructions suivantes lorsque vous utilisez un appareil
électrique avec bloc d'alimentation:
•
Ne jamais essayer de rattraper un bloc d'alimentation tombé dans l'eau.
Débrancher immédiatement la fiche secteur ou le bloc d'alimentation de la
prise de courant.
•
Ne pas utiliser l'appareil si le câble ou le bloc d'alimentation sont endommagés.
Pour des raisons de sécurité, ces pièces doivent uniquement être remplacées
par un atelier agréé.
•
L'appareil, le câble et le bloc d'alimentation ne doivent en aucun cas être
immergés ou rincés à l'eau courante.
• Le câble ne doit pas se trouver à proximité de sources de chaleur ou être posé
sur des arêtes vives.
• Toujours manipuler le bloc d'alimentation avec les mains sèches.
1.2
Important
Page 20
16
1 Consignes de sécurité / 2 Informations utiles / 3 Utilisation
F
3.1
Mise en service
2.1
Éléments fournis
et emballage
1.2
Important
2.2
Appareil de
nébulisation
intensive
•
Ne pas porter, traîner ou tordre le bloc d'alimentation en tirant sur le cordon
secteur et veiller à ne pas pincer le cordon.
•
Uniquement débrancher le bloc d'alimentation de la prise de courant lorsque
l'appareil est éteint et n'est plus utilisé.
• En cas d’affection des voies respiratoires de nature allergique, consultez
votre médecin avant d’utiliser l’appareil.
Veuillez vérifier si l'appareil est au complet.
La fourniture comprend:
• 1 Appareil de nébulisation intensive Ultrabreeze
avec réservoir d'eau et embout de nébulisation
• 1 Adaptateur secteur/bloc d'alimentation
• 1 Mode d'emploi
Les emballages sont réutilisables ou peuvent être recyclés afin de récupérer les
matières premières. Respectez les règles de protection de l’environnement
lorsque vous jetez les emballages dont vous n’avez plus besoin. Si vous remarquez lors du déballage un dommage survenu durant le transport, contactez
immédiatement votre revendeur.
ATTENTION
Veillez à garder les films d’emballage hors de portée des enfants.
Ils risqueraient de s’étouffer!
Surtout en hiver, l’air trop sec à l’intérieur des locaux accroît le risque d’affections
des voies respiratoires et d’infections et entraîne une fatigue et des troubles
de la concentration. Un air sain doit avoir une humidité relative comprise entre
40 et 60 %.
La technologie à ultrasons silencieuse et peu gourmande en énergie de cet
appareil de nébulisation transforme l’eau en une brume extrêmement fine qui
accroît le degré d’humidité de l’air. Cela améliore la qualité de l’air et empêche
un assèchement des muqueuses et de la peau, et augmente donc le bien-être.
La programmation d’un horaire de mise en marche et d’un horaire d’arrêt ainsi
qu’un éclairage activable en supplément permettent de créer une atmosphère
individuelle. L’appareil dispose d’une fonction de préchauffage pour éliminer
les germes et les bactéries. L’appareil convient pour l’humidification de l’air
ambiant des pièces (jusqu’à 15 m2env.).
ATTENTION
L'appareil nébulisateur MEDISANA doit être installé sûrement
sur une surface insensible à l'humidité.
L'utilisation avec une eau calcaire / essence aromatique peut
former des traces de dépôts/condensation.
Page 21

17
F
3 Utilisation
3.4
Mise en marche
et à l’arrêt de
l’humidificateur
d’air / Niveaux
1 et 2
3.2
Remplir et vider
le réservoir d'eau
Avant la première utilisation, rincez
soigneusement le réservoir d’eau et
l’embout de nébulisation à l’eau
potable. Retirez le réservoir d’eau
de l’appareil, retournez-le et dévissez
le dispositif de fermeture du réservoir.
Remplissez le réservoir avec 1,3 litre
d’eau fraîche potable ou d’eau déminéralisée.
Revissez le dispositif de fermeture du
réservoir et essuyez le réservoir pour
éliminer d’éventuelles gouttes. Vérifiez que le joint du couvercle est correctement placé. Placez le réservoir d’eau sur l’appareil avec l’orifice de remplissage orienté vers le bas.
Ne pas transporter l'appareil si le réservoir d'eau est rempli. Autrement, le
niveau de liquide peut monter au-delà de la membrane du nébulisateur en raison des secousses et ainsi empêcher la nébulisation.
Lorsque l'appareil est éteint, l'embout de nébulisation peut être retiré et
l'eau restante essuyée avec un chiffon.
Après utilisation, vider l’eau résiduelle et rincer le réservoir à l’eau fraîche
potable. Avant toute nouvelle utilisation, remplir le réservoir d’eau fraîche ou
d’eau déminéralisée.
Si vous rangez l'appareil pour une période d'inutilisation prolongée, démontez
le réservoir d'eau et videz le réservoir et l’appareil.
Vous pouvez utiliser l’appareil avec de l’essence aromatique soluble dans l’eau.
Pour ce faire, ajoutez env. 10 gouttes d’essence aromatique dans le réservoir
rempli de 1,3 litre d’eau.
Attention : lorsque vous ajoutez de l’essence, cela peut entraîner un précipité !
Vous pouvez commander des essences aromatiques de différentes senteurs
auprès de MEDISANA.
Insérez l'embout du nébulisateur sur l'appareil.
Connecter le câble du bloc d'alimentation et le connecteur et brancher la
fiche du bloc dans une prise de courant.
Après une brève pression sur la touche ON/OFF , l’appareil commence à
nébuliser l’eau et le ventilateur se met en marche au niveau 1 (forte intensité).
Grâce à la forte puissance du ventilateur, l’humidité émise dans l’air ambiant
est plus élevée. Le symbole de fonctionnement de l’humidificateur d’air
apparaît à l’écran . Dès que l’humidificateur d’air est mis en marche à l’aide
de la touche ON/OFF, le préchauffage permettant l’élimination des germes et
bactéries se met également en marche. Si vous appuyez une deuxième fois sur
la touche ON/OFF , l’appareil fonctionne à intensité réduite (niveau 2). Le
symbole de fonctionnement de l’humidificateur d’air clignote. Une nouvelle
pression sur la touche ON/OFF
permet d’éteindre l’appareil.
L'extinction automatique de l'appareil éteint automatiquement la nébulisation
et le ventilateur lorsque le réservoir d'eau est vide.
3.3
Ajouter de
l’essence
aromatique
Page 22
18
3 Utilisation
F
3.6
Réglage des
fonctions de
confort
Durée d'utilisation :
Niveau de puissance 1 avec 1,3 litre d'eau: env. 20 heures.
Niveau de puissance 2 avec 1,3 litre d'eau: env. 30 heures.
Le réservoir d'eau de l'appareil nébulisateur MEDISANA Ultrabreeze dispose
d'un éclairage interne qui s'allume par une légère pression sur la touche LIGHT
. Le symbole de l’éclairage apparaît à l’écran. La lumière s’allume en
bleu. Si vous appuyez une deuxième fois sur la touche , la lumière devient
rouge, si vous appuyez une troisième fois sur la touche, elle devient verte. Si
vous appuyez une quatrième fois sur la touche LIGHT , les trois couleurs
(bleu/rouge/vert) se succèdent à intervalles de 10 secondes. A chaque changement, deux couleurs s’allument simultanément. Une cinquième pression sur la
touche vous permet de sélectionner une couleur pour une période de la
journée :
00 h 00 - 08 h 00 - lumière verte
08 h 00 - 16 h 00 - lumière rouge
16 h 00 - 24 h 00 - lumière bleue
Une sixième pression sur la touche LIGHT permet d’éteindre l’éclairage. Le
symbole de l’éclairage s’éteint.
Il est possible d’utiliser l’éclairage indépendamment de la nébulisation et du
ventilateur, par exemple comme éclairage de nuit.
Lorsque l'appareil s'éteint automatiquement, l'éclairage reste allumé.
L'intensité d'éclairage diminue lorsque le nébulisateur est activé.
Votre humidificateur d’air intensif Ultrabreeze MEDISANA dispose de 3 fonctions
de confort: un affichage de l’heure,
un
minuteur intégré et une fonction d’alarme.
Réglez l’heure actuelle pour utiliser l’Ultrabreeze comme horloge et comme réveil
avec la fonction d’alarme
.
Le minuteur intégré vous permet d’allumer et d’éteindre automatiquement
votre humidificateur d’air à un horaire déterminé.
Le réglage de l’heure, du minuteur et de l’horaire d’alarme ont lieu l’un après
l’autre dans la procédure de réglage. Si vous ne souhaitez pas procéder à un réglage et que vous souhaitez donc passer au réglage suivant, appuyez sur la touche
SET jusqu’à ce que vous accédiez au mode de réglage suivant. Le mode de
réglage du minuteur est indiqué par “ON” ou “OFF”, celui de l’alarme par .
Si vous n’appuyez sur aucune touche pendant 10 secondes lors de la procédure
de réglage, le mode de réglage est arrêté.
Lorsque vous appuyez pour la première fois sur la touche SET , vous vous
trouvez en mode de réglage de l’heure. “00.00” clignote à l’écran. Appuyez sur
la touche Hour jusqu’à ce que l’heure actuelle s’affiche. Procédez de la même
manière pour régler les minutes en utilisant la touche Min .
3.5
Éclairage
Réglage de
l’heure
Page 23
19
F
3 Utilisation
Réglage du
minuteur
Réglage de
l’horaire
d’alarme
Fonction
répétition
Lorsque vous appuyez pour la deuxième fois sur la touche SET , vous vous
trouvez en mode de réglage du minuteur. “ON” s’affiche à l’écran. Appuyez sur
la touche Hour jusqu’à ce que l’heure à laquelle l’humidificateur d’air doit se
mettre en marche s’affiche. Procédez avec la touche Min comme avec la
touche Hour . Dès que l’horaire de mise en marche réglé est atteint, l’humidificateur d’air commence à fonctionner.
Lorsque vous appuyez pour la troisième fois sur la touche SET , “OFF” apparaît à l’écran. Appuyez sur la touche Hour jusqu’à ce que l’heure à laquelle
l’humidificateur d’air doit s’arrêter s’affiche. Procédez avec la touche Min
comme avec la touche Hour .
Dès que l’horaire d’arrêt réglé est atteint, l’humidificateur d’air cesse de fonctionner.
Lorsque vous appuyez pour la quatrième fois sur la touche SET , vous vous
trouvez en mode de réglage de l’alarme. Le symbole de l’alarme clignote à
l’écran. Appuyez sur la touche Hour jusqu’à ce que l’heure à laquelle l’alarme
doit retentir s’affiche. Procédez avec la touche Min comme avec la touche
Hour .
Lorsque vous appuyez pour la cinquième fois sur la touche SET , vous
pouvez activer ou désactiver l’alarme réglée. Appuyez sur la touche Hour pour
activer l’horaire d’alarme réglé ; le symbole de l’alarme apparaît à l’écran.
Appuyez sur la touche Min pour désactiver l’horaire d’alarme réglé ; le
symbole de l’alarme disparaît de l’écran.
Lorsque l’alarme retentit à l’horaire réglé, toutes les touches (sauf la touche
SNOOZE) permettent de la désactiver.
Lorsque vous appuyez pour la sixième fois sur la touche SET , l’écran revient
à l’affichage de l’heure actuelle.
En appuyant sur la touche SNOOZE , vous pouvez activer la fonction répétition (SNOOZE) lorsque l’alarme est activée. Dans ce cas, l’alarme s’éteint et
se remet automatiquement en marche 10 minutes plus tard.
Page 24

20
4 Divers
F
• Avant de nettoyer l'appareil vérifiez que l'appareil soit éteint et que le bloc
d'alimentation soit débranché de la prise de courant.
• Nettoyez l’extérieur de l’appareil avec un chiffon doux humide.
• N'utilisez pas de produits agressifs, par ex. du lait récurant ou tout autre
détergent pour le nettoyage. Ceci peut endommager la surface.
• En cas d’utilisation fréquente, nous vous recommandons de nettoyer à fond
l’appareil au moins une fois par semaine. Vous pouvez rincer soigneusement le
réservoir d’eau et l’embout de nébulisation à l’eau chaude (> 65 °C) ou avec un
alcool 75 % au moins. La chambre de nébulisation et le réservoir se nettoient
au moyen d’un chiffon imprégné d’alcool et d’un coton-tige. Faites attention à
ce qu’il n’y ait pas d’eau qui pénètre dans l’appareil.
• Si vous n’utilisez pas l’appareil pendant une période prolongée, videz le reste
de l’eau contenue dans le réservoir et dans l’appareil et séchez l’appareil.
• Rangez l'appareil dans un endroit sec et frais.
Cet appareil ne doit pas être placé avec les ordures ménagères.
Chaque consommateur doit ramener les appareils électriques ou électroniques,
qu’ils contiennent des substances nocives ou non, à un point de collecte de sa
commune ou dans le commerce afin de permettre leur élimination écologique.
Pour plus de renseignements sur l’élimination des déchets, veuillez vous
adresser aux services de votre commune ou bien à votre revendeur.
Nom et modèle : MEDISANA Nébulisateur intensif
Ultrabreeze
Alimentation électrique avec adaptateur secteur
: Input 200-240 V~, 50/60 Hz, 0,8 A
Output 24 V , 1,5 A
Puissance : environ 36 W
Dimensions L x l x h : environ 196 x 135 x 256 mm
Poids avec bloc d'alimentation : environ 1.100 g
N° d’article : 60050
EAN-N° : 40 15588 60050 0
Accessoires spéciaux, 10 ml essence aromatique
(en option, ne fait pas partie de la livraison)
N° d’article : 60005 Eucalyptus
60006 Jasmin
60007 Lavande
60008 Rose
60009 Lemon
Dans le cadre du travail continu d’amélioration des produits,
nous nous réservons le droit de procéder à des modifications
techniques et de design.
4.1
Nettoyage
et entretien
4.2
Élimination
de l’appareil
4.3
Caractéristiques
Page 25

21
F
5 Garantie
En cas de recours à la garantie, veuillez vous adresser à votre revendeur
spécialisé ou contactez directement le service clientèle. S’il est nécessaire
d’expédier l’appareil, veuillez indiquer le défaut constaté et joindre une
copie du justificatif d’achat.
Les conditions de garantie sont les suivantes:
1. Une garantie de trois ans à compter de la date d’achat est accordée
sur les produits MEDISANA. En cas d’intervention de la garantie, la
date d’achat doit être prouvée en présentant le justificatif d’achat ou la
facture.
2. Durant la période de garantie, les défauts liés à des erreurs de matériel ou
de fabrication sont éliminés gratuitement.
3. Les services effectués sous garantie n’entraînent pas de prolongation
de la période de garantie, ni pour l’appareil, ni pour les composants remplacés.
4. Sont exclus de la garantie:
a. tous les dommages dus à un usage incorrect, par exemple au non-
respect de la notice d’utilisation.
b. les dommages dus à une remise en état ou des interventions effectuées
par l’acheteur ou par de tierces personnes non autorisées.
c. les dommages survenus durant le transport de l’appareil depuis le site
du fabricant jusque chez l’utilisateur ou lors de l’expédition de l’appareil au service clientèle.
d. les accessoires soumis à une usure normale.
5. Nous déclinons toute responsabilité pour les dommages consécutifs
causés directement ou indirectement par l’appareil, y compris lorsque le
dommage survenu sur l’appareil est couvert par la garantie.
MEDISANA AG
Itterpark 7-9
40724 Hilden
Allemagne
Tel.: +49 (0) 2103 / 2007-60
Fax: +49 (0) 2103 / 2007-626
eMail: info@medisana.de
Internet: www.medisana.de
Vous trouverez l’adresse du service clientèle sur la dernière page.
5.1
Conditions
de garantie et
de réparation
Page 26

22
1 Norme di sicurezza
I
1.1
Grazie!
1.2
Importante
Grazie per la fiducia accordataci e complimenti per la scelta!
Con lo umidificatore Ultrabreeze ad alte prestazioni Lei ha acquistato un prodotto di qualità di MEDISANA.
Per raggiungere i risultati auspicati e per utilizzare al meglio l’umidificatore
MEDISANA Ultrabreeze, raccomandiamo di leggere attentamente le seguenti indicazioni per l’uso e la manutenzione.
Prima di utilizzare l’apparecchio, leggere attentamente le istruzioni
per l’uso, soprattutto le indicazioni di sicurezza, e conservare le
istruzioni per l’uso per gli impieghi successivi.
Se l’apparecchio viene ceduto a terzi, allegare sempre anche
queste istruzioni per l’uso.
• Prima di collegare l'apparecchio all'alimentazione di corrente, accertarsi che
la tensione di rete indicata sulla targhetta corrisponda a quella della rete di
alimentazione.
• Impiegate l’apparecchio solo in conformità alla suo uso di destinazione in base alle
istruzioni per l’uso.
Lo strumento non è destinato all'uso commerciale.
• Non usare l’apparecchio in prossimità di emettitori di onde elettromagnetiche
ad alta frequenza, in quanto potrebbero disturbare il funzionamento dello stesso.
• Non lasciare l’apparecchio incustodito a portata di mano dei bambini. Gli apparecchi elettrici non sono giocattoli.
• In caso di guasti non procedere da soli alla riparazione dell’apparecchio e
sospenderne l’uso. Rivolgersi al proprio rivenditore specializzato e fare eseguire
le riparazioni esclusivamente presso i centri di assistenza tecnica autorizzati.
• Da soli si possono effettuare solo gli interventi di pulizia dell’apparecchio.
• Utilizzare solo gli accessori previsti per l’apparecchio e forniti dal produttore.
• Inserire o rimuovere gli accessori solo ad apparecchio spento.
• Conservare l’apparecchio in un ambiente asciutto.
• Non utilizzare l’apparecchio se la camera di nebulizzazione non contiene
liquido o ne contiene troppo poco.
• Non utilizzare l’apparecchio sotto coperte o cuscini.
• Controllare che la fessura di aerazione posta sulla parte inferiore dell’apparecchio sia aperta e libera da polvere e sporcizia.
Durante l’utilizzo di apparecchi elettrici con alimentatore prestare
particolare attenzione a quanto segue:
• Non toccare un alimentatore caduto in acqua. Togliere immediatamente la
spina ovvero l’alimentatore stesso dalla presa di corrente.
• Se il cavo o l’alimentatore risultano danneggiati, interrompere l’uso dell’apparecchio. Per motivi di sicurezza questi elementi possono essere sostituiti solo
da un centro di assistenza autorizzato.
• L’apparecchio, nonché il cavo e l’alimentatore non devono assolutamente
essere immersi in acqua o tenuti sotto l’acqua corrente.
• Il cavo non deve passare vicino a fonti di calore o su spigoli acuti.
• Afferrare l’alimentatore solo con le mani asciutte.
• Non trasportare, tirare o far ruotare l’apparecchio, tenendolo per il cavo di
alimentazione e non comprimere il cavo stesso.
Page 27

23
I
1 Norme di sicurezza / 2 Inform. interessanti / 3 Modalità d’impiego
3.1
Messa in
funzione
2.1
Materiale in
dotazione e
imballaggio
1.2
Importante
2.2
Umidificatore ad
alte prestazioni
• Togliere l’alimentatore dalla presa di corrente quando l’apparecchio è spento e
non più in uso.
• In caso di bronchite allergica, contattare il proprio medico prima di utilizzare
l'apparecchio.
Verificare in primo luogo che l’apparecchio sia completo.
La fornitura include:
• 1 Umidificatore Ultrabreeze
ad alte prestazioni con serbatoio dell’acqua e nebulizzatore esterno
• 1 Adattatore di rete / alimentatore
• 1 Libretto di istruzioni per l’uso
Le confezioni sono riutilizzabili o possono essere riciclate. Smaltire il materiale
d’imballaggio non più necessario in conformità alle disposizioni vigenti. In caso
di danneggiamenti dovuti al trasporto, mettersi immediatamente in contatto
con il proprio rivenditore.
ATTENZIONE
Assicurarsi che i sacchetti d’imballaggio non siano alla portata
dei bambini. Pericolo di soffocamento!
Soprattutto durante i mesi invernali, l'aria dell'ambiente troppo secca aumenta
la predisposizione alle infezioni e alle malattie respiratorie e causa stanchezza e
difficoltà di concentrazione. L'aria salubre dovrebbe avere un tasso di umidità
relativa compreso fra il 40 e il 60%.
La tecnologia a ultrasuoni dell'umidificatore, silenziosa e a basso consumo
energetico, trasforma l'acqua in nebbia finissima, che aumenta il grado di
umidità dell'aria. Ciò migliora la qualità dell’aria e previene la disidratazione
delle mucose e della pelle, aumentando il benessere. La programmazione
dell’ora di accensione e spegnimento e l’illuminazione programmabile permettono di creare un’atmosfera personalizzata. L’apparecchio dispone di una
funzione di preriscaldamento per l’eliminazione di germi e batteri.
L’apparecchio è adatto all’umidificazione dell’aria immediatamente adiacente
all’interno di ambienti (fino a ca. 15 mq).
ATTENZIONE
Assicurarsi che umidificatore MEDISANA venga utilizzato su una
superficie resistente all’umidità senza rischio che
si rovesci.
In particolare l’uso con acqua calcarea / Essenza
aromatica può
determinare dei depositi / precipitati.
Page 28

24
3
Modalità d’impiego
I
3.4
Accensione e
spegnimento
dell’umidificatore /
livelli di potenza
1 e 2
3.2
Riempimento
e svuotamento
del serbatoio
dell’acqua
Prima del primo utilizzo risciacquare
abbondamente il serbatoio dell’acqua
e il nebulizzatore con acqua potabile
pulita. Rimuovere il serbatoio dell’acqua dall’apparecchio, rovesciarlo e
svitare il tappo. Riempire il serbatoio
con max 1,3 litri di acqua potabile pulita o acqua demineralizzata.
Riavvitare il tappo del serbatoio e
asciugare con un panno le eventuali
gocce presenti sul serbatoio. Verificare
che la guarnizione del coperchio chiuda correttamente. Posizionare il serbatoio
dell’acqua sull’apparecchio con l’apertura di riempimento rivolta verso il
basso.
Non trasportare l’apparecchio con il serbatoio dell’acqua pieno. Le oscillazioni
potrebbero far salire l’acqua oltre la membrana del nebulizzatore col rischio di
ostacolare la nebulizzazione.
Ad apparecchio spento si può togliere il nebulizzatore esterno e asciugare
l’acqua in eccesso con un panno.
Smaltire l'acqua residua dopo l'utilizzo e lavare il serbatoio con acqua potabile
fresca. Prima di un nuovo utilizzo riempire il serbatoio di acqua potabile fresca
o acqua demineralizzata.
Se si spegne l’apparecchio e non lo si intende utilizzare per un lungo periodo,
togliere il serbatoio dell’acqua e svuotare il serbatoio e l’apparecchio.
È possibile far funzionare l’apparecchio con un’essenza aromatica idrosolubile.
Per farlo, versare ca. 10 gocce di essenza nel serbatoio riempito con 1,3 litri
d’acqua.
Ricordare che l'aggiunta dell'essenza può comportare la formazione di
depositi! Tramite MEDISANA è possibile acquistare essenze aromatiche con
varie note profumate.
Infilare sull’apparecchio il pezzo esterno per il gruppo di nebulizzazione.
Collegare il cavo dell’alimentatore alla presa a spina e inserire l’alimentatore
nella presa di corrente.
Premendo brevemente una volta il tasto ON/OFF l’apparecchio inizia a
nebulizzare l’acqua e a soffiarla nell’ambiente con intensità elevata (livello di
potenza 1). Il soffiaggio intenso permette il trasferimento di maggior umidità
all’aria circostante. Il simbolo di esercizio dell’umidificatore appare sul display . Non appena l’umidificatore viene acceso con il tasto ON/OFF, ha
inizio il preriscaldamento per l’eliminazione di germi e batteri. Se si preme una
seconda volta il tasto ON/OFF
l’apparecchio funziona a intensità ridotta
(livello di potenza 2). Il simbolo di esercizio dell’umidificatore lampeggia.
Premendo nuovamente il tasto ON/OFF
l’apparecchio si spegne.
Il dispositivo automatico di spegnimento di cui è dotato l’apparecchio interviene per arrestare automaticamente la nebulizzazione e il funzionamento del
ventilatore, quando il serbatoio dell’acqua è vuoto.
3.3
Aggiunta
dell'essenza
aromatica
Page 29

25
I
3
Modalità d’impiego
3.6
Impostazione
delle funzioni
comfort
Durata di funzionamento:
Livello 1 con un pieno di 1,3 litri d’acqua: ca. 20 ore.
Livello 2 con un pieno di 1,3 litri d’acqua: ca. 30 ore.
Il serbatoio dell’acqua dell umidificatore MEDISANA Ultrabreeze dispone di
un’illuminazione interna che si accende premendo leggermente l’apposito
tasto LIGHT . Sul display appare il simbolo dell’illuminazione . Si accende un’illuminazione blu. Premendo il tasto una seconda volta si accende
un’illuminazione rossa, alla terza pressione un’illuminazione verde. Se si preme
il tasto LIGHT una quarta volta, i tre colori (blu/rosso/verde) si alternano a
intervalli di 10 secondi. Durante il passaggio si accendono due colori contemporaneamente. Premendo per la quinta volta il tasto è possibile scegliere un
determinato colore per una determinata ora del giorno:
00.00 - 08.00 - luce verde
08:00 - 16:00 - luce rossa
16.00 - 24 00 - luce blu
Premendo una sesta volta il tasto LIGHT l’illuminazione viene spenta. Il simbolo di esercizio scompare.
L’illuminazione può essere accesa indipendentemente dalla nebulizzazione e
dal soffiaggio ed essere utilizzata, ad es., come luce notturna.
Se l’apparecchio si spegne automaticamente, l’illuminazione rimane accesa.
L’intensità della luce diminuisce quando si arresta la nebulizzazione.
L’umidificatore intensivo MEDISANA Ultrabreeze dispone di 3 funzioni
comfort:
la
visualizzazione dell’ora,
un
timer integrato e una funzione di sveglia.
Impostare l’ora corrente per utilizzare Ultrabreeze anche come orologio da tavolo
e come
sveglia tramite l’apposita funzione.
Il timer integrato permette di accendere e spegnere automaticamente l’umidificatore a una determinata ora.
L’impostazione dell’ora, del timer e dell’ora di sveglia avviene secondo una
sequenza di impostazione. Se si desidera saltare o non effettuare un’impostazione, premere ripetutamente il tasto SET finché non si giunge alla modalità
di impostazione successiva. La modalità di impostazione del timer viene visualizzata con “ON” o “OFF”, quella della sveglia con . Se durante la procedura di
impostazione non si premono tasti per 10 secondi, la modalità di impostazione
viene interrotta.
Premendo il tasto SET per la prima volta si attiva la modalità d’impostazione
dell’ora. Sul display lampeggia “00.00”. Premere ripetutamente il tasto Hour
fino a quando non appare la cifra delle ore esatta . Per impostare i minuti procedere nello stesso modo utilizzando il tasto Min
.
3.5
Illuminazione
Impostazione
dell’ora
Page 30

26
3
Modalità d’impiego
I
Impostazione
dell’ora
di sveglia
Funzione
Snooze
Impostazione
dell'orologio
programmabile
Premendo il tasto SET per la seconda volta si attiva la modalità d’impostazione dell’orologio programmabile. Sul display lampeggia “ON”. Premere ripetutamente il tasto Hour fino a quando non viene visualizzata la cifra dell’ora
in cui si desidera accendere l’umidificatore. Procedere con il tasto Min nello
stesso modo del tasto Hour .
Una volta raggiunta l’ora di accensione impostata, l’umidificatore entra in funzione.
Premendo il tasto SET per la terza volta, sul display appare “OFF”. Premere
ripetutamente il tasto Hour fino a quando non viene visualizzata la cifra
dell’ora di spegnimento dell’umidificatore. Procedere con il tasto Min nello
stesso modo del tasto Hour .
Quando viene raggiunta l’ora di spegnimento, l’umidificatore cessa di funzionare.
Premendo il tasto SET per la quarta volta si attiva la modalità d’impostazione
della sveglia. Sul display lampeggia il simbolo della sveglia . Premere ripetutamente il tasto Hour fino a quando non viene visualizzata l’ora in cui si
desidera che suoni la sveglia. Procedere con il tasto Min nello stesso modo
del tasto Hour .
Premendo il tasto SET per la quinta volta è possibile attivare o disattivare la
sveglia impostata. Premere il tasto Hour , per attivare l’ora di sveglia impostata; sul display appare il simbolo della sveglia . Premere il tasto Min per disattivare l’ora di sveglia impostata; il simbolo della sveglia scompare.
Quando la sveglia suona all’ora impostata, è possibile spegnerla premendo
qualsiasi tasto (tranne il tasto SNOOZE).
Premendo il tasto tasto SET per la sesta volta, il display torna a visualizzare l’ora
corrente.
Premendo il tasto SNOOZE è possibile attivare la funzione SNOOZE se la
sveglia è attiva. In questo caso il segnale acustico della sveglia cessa e viene
riprodotto nuovamente dopo 10 minuti.
Page 31

27
I
4 Varie
• Prima di pulire l’apparecchio assicurarsi che l’apparecchio stesso sia spento e
che l’alimentatore sia disinserito dalla presa di corrente.
• Pulire esternamente l'apparecchio con un panno umido e morbido.
• Per la pulizia non utilizzare sostanze aggressive come ad es. creme abrasive
o altri detergenti simili, perché potrebbero graffiare la superficie.
• In caso di utilizzo frequente dell'apparecchio, si consiglia di pulirlo a fondo
almeno una volta alla settimana. Il serbatoio dell'acqua e il nebulizzatore
possono essere lavati con acqua calda (>65 °C) o con almeno il 75% di
alcool. La camera di nebulizzazione e la camera del serbatoio devono essere
pulite con un panno imbevuto di alcool e un bastoncino di cotone. Accertarsi
che non penetri acqua all'interno dell'apparecchio.
• Se l’apparecchio non viene utilizzato per un periodo prolungato, togliere
l’acqua rimanente dal serbatoio dell’acqua e dall’apparecchio e asciugarlo.
• Riporre l’apparecchio in un luogo fresco e asciutto.
L'apparecchio non può essere smaltito insieme ai rifiuti domestici.
Ogni utilizzatore ha l'obbligo di gettare tutte le apparecchiature elettroniche
o elettriche, contenenti o prive di sostanze nocive, presso un punto di raccolta
della propria città o di un rivenditore specializzato, in modo che vengano
smaltite nel rispetto dell'ambiente.
Per lo smaltimento rivolgersi alle autorità comunali o al proprio rivenditore.
Nome e modello : MEDISANA
Umidificatore Ultrabreeze
ad alte prestazioni
Alimentazione con adattatore di rete
: Input 200-240 V~, 50/60 Hz, 0,8 A
Output 24 V , 1,5 A
Potenza : circa 36 W
Dimensioni L x L x H : circa 196 x 135 x 256 mm
Peso, incluso alimentatore : circa 1.100 g
N. articolo : 60050
EAN-n° : 40 15588 60050 0
Accessori speciali cad. 10 ml di essenza aromatica
(opzionale, non fornita in dotazione)
N. articolo : 60005 Eucalipto
60006 Gelsomino
60007 Lavanda
60008 Rosa
60009 Limone
Alla luce dei costanti miglioramenti dei prodotti, ci riserviamo
la facoltà di apportare qualsiasi modifica tecnica e strutturale.
4.1
Pulizia e
manutenzione
4.2
Smaltimento
4.3
Dati tecnici
Page 32

28
5 Garanzia
I
In caso di garanzia, contattare il vostro rivenditore di fiducia o direttamente
il centro di assistenza. Se dovesse essere necessario spedire l’apparecchio,
specificare il guasto e allegare una copia della ricevuta di acquisto.
Valgono le seguenti condizioni di garanzia:
1. I prodotti MEDISANA hanno una garanzia di tre anni a partire dalla
data di vendita. La data di acquisto deve essere comprovata in caso di
garanzia dalla ricevuta di acquisto o dalla fattura.
2. Durante il periodo di garanzia, i guasti dovuti a difetti di materiale o di
lavorazione vengono eliminati gratuitamente.
3. Una prestazione di garanzia non da diritto al prolungamento del periodo
di garanzia, né per l’apparecchio né per i componenti sostituiti.
4. La garanzia non include:
a. tutti i danni risultanti da uso improprio, ad esempio dall’inosservanza
delle istruzioni d’uso,
b. i danni riconducibili a manutenzione o ad interventi effettuati dall’ac-
quirente o da terzi non autorizzati,
c. danni di trasporto verificati durante il trasporto dal produttore al
consumatore o durante l’invio al servizio clienti,
d. gli accessori soggetti a normale usura.
5. È altresì esclusa qualsiasi responsabilità per danni secondari diretti o
indiretti causati dall’apparecchio anche se il danno all’apparecchio viene
riconosciuto come caso di garanzia.
MEDISANA AG
Itterpark 7-9
40724 Hilden
Germania
Tel.: +49 (0) 2103 / 2007-60
Fax: +49 (0) 2103 / 2007-626
eMail: info@medisana.de
Internet: www.medisana.de
L'indirizzo del servizio di assistenza è riportato nell'ultima pagina.
5.1
Condizioni
di garanzia e
di riparazione
Page 33

29
E
1 Indicaciones de seguridad
1.1
¡
Muchas gracias!
1.2
Importante
Muchas gracias por su confianza y felicitaciones.
Con el humificador intenso Ultrabreeze ha adquirido un producto de calidad
de MEDISANA. Con el fin de poder alcanzar los resultados deseados y de
disfrutar por mucho tiempo de su humidificador MEDISANA Ultrabreeze
le recomendamos observar detenidamente las siguientes indicaciones en
relación con el uso y el mantenimiento del aparato.
Antes de utilizar el aparato, lea detenidamente las instrucciones
de manejo, especialmente las indicaciones de seguridad; guarde
estas instrucciones para su consulta posterior.
Si cede el aparato a terceras personas, entregue también estas
instrucciones de manejo.
• Antes de conectar el aparato a la red de suministro, compruebe que la
tensión indicada en la placa de características del ventilador se corresponda
con la tensión de su red de suministro.
•
Sólo emplee el aparato para los fines que se señalan en las instrucciones de
uso.
El aparato no está determinado para el uso comercial.
•
No utilice el aparato cerca de emisores electromagnéticos de alta frecuencia
porque estos podrían perturbar el funcionamiento del mismo.
•
No deje el aparato sin vigilancia cerca de los niños. Los aparatos eléctricos no
son ningún juguete.
•
Por favor no intente reparar el aparato usted mismo en caso de avería ni siga
utilizándolo. Consulte con su comercio especializado y deje llevar a cabo reparaciones exclusivamente por estaciones de servicio autorizadas.
•
Los únicos trabajos que debe realizar en el aparato por sí mismo son tareas de
limpieza.
•
Utilice exclusivamente las piezas accesorias previstas para el aparato y suministradas por el fabricante.
•
Instale y desinstale las piezas accesorias sólo cuando el aparato esté apagado.
•
Almacene el aparato en una estancia seca.
•
No utilice el aparato si el líquido en la cámara de pulverización tiene un nivel
bajo o se ha agotado.
•
No utilice el aparato bajo mantas ni cojines.
•
Mantenga las rejillas de ventilación situadas en la parte inferior del aparato
abiertas y libres de polvo y suciedad.
Para la utilización de aparatos eléctricos con bloques de alimentación debe
observar especialmente los siguientes puntos:
• No intente coger un aparato que haya caído al agua. En tal caso desconecte
inmediatamente la clavija de conexión a la red y el bloque de alimentación del
enchufe.
•
No utilice el aparato si el cable o el bloque de alimentación están dañados. Por
razones de seguridad estas piezas deben ser cambiadas exclusivamente por
una estación de servicio autorizada.
•
El aparato, el cable y el bloque de alimentación no deben ser sumergidos en
agua ni mantenidos bajo agua corriente bajo ninguna circunstancia.
• No tienda el cable cerca de fuentes de calor ni lo ponga sobre cantos afilados.
• Coja el bloque de alimentación siempre con las manos secas.
Page 34

30
1 Indicaciones de seguridad / 2 Inform. interesantes / 3 Aplicación
E
3.1
Puesta en
funcionamiento
2.1
Volumen
de suministros
y embalaje
1.2
Importante
2.2
Humidificador
intensivo
•
No transporte, gire o tire del aparato por el bloque de alimentación. No
aplaste el bloque de alimentación.
• Desconecte el bloque de alimentación del enchufe cuando el aparato esté
apagado y no vaya a seguir siendo utilizado.
•
En caso de que padezca de alergia de las vías respiratorias, consulte a su médico
antes de aplicar el aparato.
Compruebe primero si el aparato está completo.
El suministro de serie incluye:
• 1 humidificador intensivo Ultrabreeze
con tanque de agua y pieza de pulverización
• 1 Adaptador de red / bloque de alimentación
• 1 Instrucciones de manejo
El embalaje es reutilizable o puede reciclarse. Deshágase del material de embalaje que no se necesite, siguiendo las normas pertinentes. Si al desembalar
observara algún daño causado durante el transporte, póngase inmediatamente en contacto con el comerciante.
PRECAUCIÓN
¡Asegúrese de que los plásticos de embalaje no caigan en manos
de niños! ¡Existe el peligro de asfixia!
Sobre todo durante los meses de invierno, el aire demasiado seco de las habitaciones puede aumentar la propensión a infecciones y enfermedades de las vías
respiratorias y causar cansancio y deficiencias de concentración.
La humedad
relativa del aire en un ambiente sano debería situarse entre 40 y 60%.
La tecnología silenciosa y económica del humidificador por ultrasonidos
convierte el agua en una niebla muy fina que aumenta el grado de humedad
relativa. Mejora la calidad del aire, evita la resecación de las mucosas y de la
piel y, de este modo, aumenta el bienestar. La programación del tiempo de
conexión y de desconexión y una iluminación que puede variar, permiten crear
un ambiente individual. El aparato dispone de una función de precalentamiento para acabar con gérmenes y bacterias.
El aparato es adecuado para humidificar el aire ambiente en espacios (de hasta
aprox. 15 m2).
ATENCIÓN
Asegúrese de que el humidificador MEDISANA sea instalado
sobre
una superficie resistente a la humedad y asegurado contra
vuelcos. Especialmente si el aparato funciona con agua caliza /
esencia aromática pueden producirse depósitos / condensaciones.
Page 35

31
E
3 Aplicación
3.4
Encender y apagar
el humidificador /
niveles de
potencia 1 y 2
3.2
Llenado y vaciado
del tanque de
agua
Antes de usar por primera vez el aparato, enjuague abundantemente con
agua fresca del grifo el tanque de agua
y la pieza de pulverización. Agarre el
tanque de agua del aparato, déle la
vuelta y desenrosque el tapón. Rellene
el tanque con un máx. de 1,3 litros de
agua fresca del grifo o de agua desmineralizada.
Vuelva a enroscar el tapón del tanque
y seque las gotas que hayan podido
saltar al tanque. Asegúrese de colocar correctamente la junta de la tapa. Sitúe
el tanque de agua en el aparato con la abertura de llenado mirando hacia
abajo.
No trasporte el aparato con el tanque lleno, ya que debido a los movimientos
de oscilación el nivel del agua por encima de la membrana del pulverizador
podría subir impidiendo así la pulverización.
Puede desinstalar la pieza de pulverización y recoger el agua sobrante con
un paño mientras que el aparato está apagado. Vacíe los restos del agua del
tanque al terminar de usar el aparato y lave el tanque con agua fresca del grifo.
Antes de usar de nuevo el aparato, llene el tanque con agua fresca del grifo
o con agua desmineralizada.
Si desconecta el aparato y no desea utilizarlo por un largo período de tiempo
desmonte el tanque de agua del aparato y vacíe el tanque y el aparato.
Puede poner en funcionamiento el aparato con una esencia aromática soluble
en agua. Para ello añada unas 10 gotas de esencia en el tanque de agua
relleno con 1,3 litros.
¡Tenga en cuenta que, a causa de la añadidura de la esencia, se pueden
formar depósitos! Podrá adquirir esencias aromáticas con distintas fragancias
a través de MEDISANA.
Coloque la pieza de pulverización para la unidad de pulverización sobre el
aparato.
Inserte el cable del bloque de alimentación en el zócalo de conexión para el
adaptador de red y seguidamente conecte el bloque de alimentación al
enchufe.
Tras presionar brevemente el botón ON/OFF el aparato comienza a nebulizar el agua y el ventilador se conecta a alta intensidad (nivel de potencia 1).
Gracias a la elevada potencia del ventilador se suministra más humedad al aire
ambiente. La señal que indica el funcionamiento del humidificador aparece
en la pantalla . En cuanto se encienda el humidificador con el botón
ON/OFF, también se conectará el precalentamiento para acabar con gérmenes
y bacterias. Si pulsa por segunda vez el botón ON/OFF
, el aparato funcionará con intensidad reducida (nivel de potencia 2). La señal que indica el
funcionamiento del humidificador parpadea. Si vuelve a pulsar el botón
ON/OFF , el aparato se apaga.
3.3
Añadidura de la
esencia aromática
Page 36

32
3 Aplicación
E
3.6
Ajuste de las
funciones de
confort
La desconexión automática del aparato se ocupa de que la pulverización y la
ventilación sean desconectadas automáticamente si la reserva de agua se ha
agotado.
Duración de servicio:
Nivel de potencia 1 con un llenado de 1,3 litros de agua: aprox. 20 horas.
Nivel de potencia 2 con un llenado de 1,3 litros de agua: aprox. 30 horas.
El tanque de agua del humidificador MEDISANA Ultrabreeze dispone de una
unidad de iluminación interna que es conectada pulsando brevemente el botón
LIGHT . En la pantalla aparece la señal de la iluminación . La luz es de
color azul. Si pulsa por segunda vez el botón , la luz cambiará a color rojo;
si pulsa por tercera vez el botón, la luz cambiará a color verde. Si pulsa por
cuarta vez el botón LIGHT , se iluminarán sucesivamente los tres colores
(azul/rojo/verde) a intervalos de 10 segundos. Durante el cambio se iluminan
dos colores al mismo tiempo. Si se pulsa por quinta vez el botón , podrá
seleccionar un color determinado según la hora del día:
00:00 - 08:00 horas: luz verde
08:00 - 16:00 horas: luz roja
16:00 - 24:00 horas: luz azul
Si pulsa por sexta vez el botón LIGHT , se apaga la iluminación. La señal de
la iluminación se apaga.
La iluminación puede funcionar independientemente de la nebulización y del
ventilador, por ejemplo, como iluminación nocturna.
Si el aparato se apaga automáticamente la iluminación permanece conectada.
La intensidad de iluminación disminuye si es conectada la pulverización.
Su humidificador intenso MEDISANA Ultrabreeze dispone de 3
funciones de
confort:
un reloj,
un
reloj temporizador integrado y una alarma.
Ajuste la hora actual para utilizar el Ultrabreeze como reloj de mesa y, con la
alarma, como
despertador.
El reloj temporizador integrado le permite encender y apagar el humidificador
automáticamente en un momento determinado.
El ajuste del reloj, del reloj temporizador y de la alarma se realiza en un solo paso.
Si no desea efectuar o desea saltar un ajuste, pulse repetidamente el botón SET
hasta llegar al siguiente modo de ajuste. El modo de ajuste del reloj temporizador se indica con “ON” u “OFF” y el de la alarma con . Si en el proceso de
ajuste no pulsa ningún botón durante 10 segundos, finalizará el modo de ajuste.
Si pulsa por primera vez el botón SET , irá hasta el modo de ajuste del reloj.
En la pantalla parpadea “00:00”. Pulse repetidamente el botón Hour , hasta
que se indique la hora actual. Proceda del mismo modo para ajustar los minutos
con el botón Min .
3.5
Iluminación
Ajuste
del reloj
Page 37

33
E
3 Aplicación
Ajuste del reloj
temporizador
Ajustar
la alarma
Función
de repetición
de alarma
Si pulsa por segunda vez el botón SET , irá hasta el modo de ajuste del reloj
temporizador. En la pantalla aparece “ON”. Pulse repetidamente el botón Hour
, hasta que se indique la hora a la que debe encenderse el humidificador.
Proceda del mismo modo con el botón Min que con el botón Hour .
Cuando se alcanza el tiempo de conexión ajustado, se inicia el funcionamiento del
humidificador.
Si pulsa por tercera vez el botón SET , aparece en la pantalla “OFF”. Pulse
repetidamente el botón Hour , hasta que se indique la hora a la que debe
apagarse el humidificador. Proceda del mismo modo con el botón Min que
con el botón Hour .
Cuando se alcanza el tiempo de desconexión, se detiene el funcionamiento del
humidificador.
Si pulsa por cuarta vez el botón SET , irá hasta el modo de ajuste de la
alarma. En la pantalla parpadea la indicación de la alarma . Pulse repetidamente
el botón Hour , hasta que se indique la hora a la que debe activarse la alarma.
Proceda del mismo modo con el botón Min que con el botón Hour .
Si pulsa por cuarta vez el botón SET , podrá activar o desactivar la alarma
ajustada. Pulse el botón Hour , para activar la alarma ajustada; la indicación
de la alarma aparece en la pantalla. Pulse el botón Min , para desactivar la
alarma ajustada; la indicación de la alarma se apaga.
Cuando la alarma suene a la hora ajustada, podrá apagarla con cualquier botón
(excepto con el botón SNOOZE).
Si pulsa por sexta vez el botón SET , la pantalla vuelve a la indicación de la
hora actual.
Si pulsa el botón SNOOZE , podrá conectar la función de repetición de
alarma (SNOOZE) cuando la alarma esté activa. En este caso, se silencia la señal
de alarma y se vuelve a activar automáticamente una vez pasados 10 minutos.
Page 38

34
4 Generalidades
E
• Antes de limpiar el aparato debe asegurarse de que el aparato está apagado
y el bloque de alimentación desconectado del enchufe.
• Limpie el exterior del aparato con un paño suave, ligeramente húmedo.
• Por favor no utilice sustancias agresivas para la limpieza, como por ejemplo
sustancias abrasivas u otros agentes de lavado, ya que de lo contrario se
podrían dañar las superficies.
• Si el aparato se usa con frecuencia, recomendamos limpiarlo con cuidado
por lo menos una vez por semana. Lave el tanque de agua y la pieza de
pulverización, utilizando agua caliente (>65°C) o alcohol del 75% como
mínimo y procediendo con cuidado. La cámara de pulverización y la cámara
del tanque pueden limpiarse con un paño empapado en alcohol o un
bastoncillo de algodón. No permita que agua penetre en el interior del
aparato.
• Cuando el aparato no se utilice durante un periodo de tiempo prolongado,
vacíe el agua restante del tanque de agua y del aparato y seque este último.
• Almacene el aparato en un lugar seco y fresco.
Este aparato no se debe eliminar por medio de la recogida de basuras
doméstica.
Todos los usuarios están obligados a entregar todos los aparatos eléctricos o
electrónicos, independientemente de si contienen substancias dañinas o no, en
un punto de recogida de su ciudad o en el comercio especializado, para que
puedan ser eliminados sin dañar el medio ambiente.
Para más información sobre cómo deshacerse de su aparato, diríjase a su
ayuntamiento o a su establecimiento especializado.
Denominación y modelo : MEDISANA Humificador intensivo
Ultrabreeze
Alimentación eléctrica con adaptador de red
: Input 200-240 V~, 50/60 Hz, 0,8 A
Output 24 V , 1,5 A
Consumo de potencia : aprox. 36 W
Medidad L x A x A : aprox. 196 x 135 x 256 mm
Peso incl. bloque de alimentación : aprox. 1.100 g
N° de articolo : 60050
EAN-N° : 40 15588 60050 0
Accesorios especiales de 10 ml cada uno de esencia aromática
(opcional, no incluido en el suministro)
N.° de artículo : 60005 eucalipto
60006 jazmín
60007 lavanda
60008 rosa
60009 limón
Con vistas a mejoras de la calidad del producto, nos reservamos
el derecho de introducir modificaciones técnicas y de diseño.
4.1
Limpieza y
cuidado
4.2
Indicaciones para
la eliminación
4.3
Datos técnicos
Page 39

35
E
5 Garantía
Le rogamos consulte con su distribuidor especializado o directamente con el
centro de servicio técnico en caso de una reclamación. Si tuviera que remitirnos el dispositivo, le rogamos indique el defecto y adjunte una copia del
recibo de compra.
En este caso, se aplicarán las siguientes condiciones de garantía:
1. Con relación a los productos de MEDISANA, se ofrece una garantía por
un período de tres años a partir de la fecha de compra. En caso de una
reclamación, la fecha de compra debe probarse mediante el recibo de
compra o la factura.
2. Los defectos de material o de fabricación se eliminarán de forma
gratuita dentro del período de garantía.
3. La aplicación de la garantía no conlleva una extensión del período de
garantía, ni con respecto al dispositivo ni con respecto a los componentes sustituidos.
4. Esta garantía no cubre:
a. todos los daños causados por abuso, por ej. por incumplimiento del
manual de uso;
b. los daños debidos a reparaciones o intervenciones por parte del
comprador o terceros no autorizados;
c. los daños de transporte causados durante el transporte del domicilio
del fabricante al consumidor o durante el envío al servicio técnico;
d. accesorios sometidos a un desgaste normal.
5. Se excluye cualquier responsabilidad por los daños directos o indirectos
causados por el dispositivo, aunque el daño en el dispositivo haya sido
considerado como una reclamación justificada.
MEDISANA AG
Itterpark 7-9
40724 Hilden
Alemania
Tel.: +49 (0) 2103 / 2007-60
Fax: +49 (0) 2103 / 2007-626
eMail: info@medisana.de
Internet: www.medisana.de
Para la dirección del servicio técnico, consulte la última página.
5.1
Condiciones
de garantía
y reparación
Page 40

36
1 Avisos de segurança
P
1.1
Muito obrigada
1.2
Importante
Muito obrigado pela sua confiança e muitos parabéns!
Com o humidificador intensivo Ultrabreeze adquiriu um produto de qualidade da MEDISANA.
A fim de poder alcançar o êxito desejado e poder desfrutar durante muito
tempo do seu vaporizador MEDISANA Ultrabreeze, recomendamos que leia
atentamente as indicações de utilização e manutenção.
Antes de utilizar o aparelho, leia atentamente o manual de
instruções, em especial as indicações de segurança e guarde-o
para uma utilização posterior.
Se entregar o aparelho a terceiros, faculte também este manual
de instruções.
• Antes de conectar o aparelho à sua alimentação de corrente, tenha atenção
para que a tensão eléctrica indicada na chapa de identificação corresponda
à da sua rede eléctrica.
• Utilize apenas o instrumento para os fins mencionados nas instruções de
utilização.
O aparelho não se destina ao uso comercial.
• Não utilize o aparelho nas proximidades de emissores electromagnéticos de
alta frequência, pois os mesmos podem perturbar a função do aparelho.
• Não deixe o aparelho sem vigilância ao alcance das crianças. Aparelhos eléctricos não são brinquedos.
• Em caso de avarias não repare o aparelho e não o volte a utilizar. Consulte o
seu vendedor especializado e deixe fazer as reparações apenas por serviços
técnicos autorizados.
• Por si podem ser efectuados apenas trabalhos de limpeza.
• Utilize exclusivamente os acessórios previstos para o aparelho e fornecidos pelo
fabricante.
• Remova ou coloque os acessórios só com o aparelho desligado.
• Guarde o aparelho num ambiente seco.
• Não coloque em funcionamento o aparelho se a câmara vaporizadora não
contiver líquido ou se tiver muito pouco líquido.
• Não utilize o aparelho debaixo de coberturas da cama ou almofadas.
• Mantenha a ranhura de ventilação na parte inferior do aparelho aberta, livre
de pó e impurezas.
No funcionamento de aparelhos eléctricos com adaptador de rede
preste especial atenção ao seguinte:
• Não agarre um adaptador de rede que tenha caído na água. Retire imediatamente da tomada de corrente a ficha de rede ou o adaptador de rede.
• Se o cabo ou o adaptador de rede estiverem danificados, o aparelho não pode
ser utilizado. Por razões de segurança estas peças só podem ser substituídas
por serviços técnicos autorizados.
• O aparelho assim como o cabo e o adaptador de rede nunca podem ser
imergidos em água nem serem mantidos sob água corrente.
• O cabo não pode estar perto de fontes de aquecimento nem puxado por cima
de arestas afiadas.
• Segure no adaptador de rede sempre com mãos secas.
Page 41

37
P
1 Avisos de segurança / 2 Informações gerais /
3 Aplica
ção
3.1
Colocação em
funcionamento
2.1
Material
fornecido e
embalagem
1.2
Importante
2.2
Humidificador
intensivo
• Nunca transporte, puxe ou rode o adaptador de rede no cabo e nunca entale
o cabo.
• Puxe o adaptador de rede da tomada quando o aparelho estiver desligado e já
não estiver a ser utilizado.
• No caso de uma doença alérgica das vias respiratórias, consulte o seu médico
de família antes da utilização.
Por favor, em primeiro lugar, verifique se o aparelho está completo.
O material fornecido é composto por:
•
1 Vaporizador intensivo Ultrabreeze
com reservatório de água e vaporizador
•
1 Adaptador de rede / equipamento de alimentação a partir da rede
•
1 Manual de instruções
As embalagens podem ser reutilizadas ou podem ser eliminadas através da
reciclagem. Por favor, elimine adequadamente o material da embalagem não
necessário. Se, durante o desembalamento, verificar danos devido ao transporte, por favor, entre imediatamente em contacto com o seu revendedor.
AVISO
Tenha atenção para que as películas da embalagem não se
tornem brincadeiras para crianças. Existe perigo de asfixia!
Nos meses de Inverno, o ar ambiente seco aumenta a predisposição de doenças
infecciosas e doenças alérgicas das vias respiratórias e leva ao cansaço e à falta
de concentração. O ar saudável deve possuir uma humidade relativa do ar de
40 até 60 %.
A tecnologia ultra-sónica sem ruídos e económica do humidificador de ar transforma a água em névoa fina que aumenta o grau de humidade do ar. Este processo aumenta a qualidade do ar, previne a secagem das mucosas nasais e da
pele e, deste modo, aumenta o bem estar. A programação da hora de ligar e
desligar e a iluminação que pode ser adicionalmente ligada possibilitam a
criação de uma atmosfera individual. O aparelho possui uma função de préaquecimento para matar germes e bactérias.
O aparelho foi concebido para a humidificação do ar ambiente em divisões
fechadas (até aprox. 15 m2).
ATENÇÃO
Certifique-se de que o vaporizador da MEDISANA funciona sobre
uma superfície não sensível à humidade e que não haja o perigo
de se virar. Sobretudo no funcionamento com água calcária /
essência de aroma podem surgir depósitos / sedimentos.
Page 42

38
3 Aplica
ção
P
3.4
Ligar e desligar o
humidificador /
níveis de potência
1 e 2
3.2
Encher e esvaziar
o reservatório de
água
Antes da primeira utilização, recomendamos que lave o tanque de água e o
aplique do atomizador com água
limpa. Remova o tanque de água
do aparelho, vire-o ao contrário e
desaparafuse o fecho do tanque.
Encha o tanque com, no máx. 1,3
litros de água potável fresca ou água
desmineralizada.
Volte a aparafusar o fecho do tanque
e limpe eventuais pingos de água existentes no tanque. Tenha atenção à posição correcta da junta da tampa.
Coloque o tanque de água com a abertura de enchimento virada para baixo
no aparelho.
Não transporte o aparelho com o reservatório de água cheio. Caso contrário,
através dos movimentos oscilares o nível de água pode subir para além da
membrana vaporizadora impedindo a vaporização.
Com o aparelho desligado pode retirar a unidade vaporizadora e absorver
a água excedente com um pano. Após o fim de utilização, elimine a água
restante e lave o tanque com água potável fresca.
Antes de uma nova utilização, encha o tanque com água potável fresca ou
água desmineralizada. Quando desligar o aparelho e não o quiser voltar a
utilizar durante muito tempo, retire o reservatório de água do aparelho e
esvazie o tanque e o aparelho.
O aparelho pode ser utilizado com uma essência de aroma solúvel em água.
Para isso, coloque aprox. 10 pingos de essência no tanque de água cheio com
1,3 litros.
Tenha em atenção, que, devido à adição da essência, é possível a formação de
precipitação! As essências de aroma com várias fragâncias podem ser adquiridas através da MEDISANA.
Insira a peça para a unidade vaporizadora no aparelho.
Ligue o cabo do adaptador de rede à tomada de encaixe e introduza o
adaptador de rede na tomada de corrente.
Depois de premir o botão ON/OFF , o aparelho inicia a atomização da água
e a ventoinha começa a funcionar com grande intensidade (nível de potência
1). Através da grande potência da ventoinha, o aparelho distribui mais
humidade pelo ar ambiente. O símbolo de funcionamento do humidificador
xxxé exibido no display . Assim que o humidificador é ligado com o botão
ON/OFF, o pré-aquecimento para matar os germes e as bactérias também é
activado. Prima o botão ON/OFF
uma segunda vez para o aparelho funcionar com uma intensidade reduzida (nível de potência 2). O símbolo de funcionamento do humidificador pisca. Se voltar a premir o botão ON/OFF
, o
aparelho é desligado.
O dispositivo automático de desligar no aparelho providencia que a vaporização e a operação do compressor se desliguem automaticamente quando o
reservatório de água estiver vazio.
3.3
Adicionar essência
de aroma
Page 43

39
P
3 Aplica
ção
3.6
Regular
as funções
de conforto
Tempo de funcionamento:
Nível de potência 1 cheio com 1,3 litros de água: aproximadamente 20 horas.
Nível de potência 2 cheio com 1,3 litros de água: aproximadamente 30 horas.
O reservatório de água do vaporizador Ultrabreeze da MEDISANA dispõe de
uma unidade de iluminação interna, a qual é ligada através de uma ligeira
pressão no botão LIGHT . O display exibe o símbolo para a iluminação .
A luz é de cor azul. Prima novamente o botão e a luz é de cor vermelha. A
terceira vez que premir o botão, a luz é de cor verde. Se premir o botão LIGHT
uma quarta vez, a luz comuta na sequência (azul/vermelho/verde) em intervalos de 10 segundos. Durante a mudança, a luz exibe duas cores simultaneamente. Prima o botão uma quinta vez, uma determinada cor é desligada
durante um determinado período de tempo:
00.00 - 08.00 horas - luz verde
08.00 - 16.00 horas - luz vermelha
16.00 - 24 00 horas - luz azul
Se premir seis vezes o botão LIGHT , a iluminação é desligada. O símbolo
da iluminação apaga.
A iluminação pode ser operada independentemente da atomização e da ventoinha, p.ex. como iluminação nocturna.
Quando o aparelho se desliga automaticamente, a luz fica acesa. A intensidade
luminosa diminui quando se liga a vaporização.
O seu humidificador intensivo MEDISANA Ultrabreeze possui 3 funções de
conforto:
uma indicação das horas,
um
temporizador integrado e uma função de
alarme.
Regule as horas actuais para poder utilizar o Ultrabreeze como relógio de mesa e
com a função de alarme como
despertador.
O temporizador integrado possibilita ligar e desligar automaticamente o humidificador a uma determinada hora.
A regulação das horas, do temporizador e da hora de alarme é realizada sequencialmente num processo de regulação. Se não pretender realizar uma regulação, isto é, saltar a mesma, prima o botão SET as vezes necessárias até
chegar ao próximo modo de regulação. O modo de regulação para o temporizador é exibido com “ON” ou “OFF”, o do alarme com . Se, durante o modo
de regulação, não premir um botão durante 10 segundos, o modo de regulação
é terminado.
Prima o botão SET uma vez para chamar o modo de regulação para as horas.
No display pisca “00.00”. Prima o botão Hour
as vezes necessárias até as horas
actuais estarem reguladas. Proceda do mesmo modo com o botão Min
para
acertar os minutos.
3.5
Iluminação
Acertar o
relógio
Page 44

40
3 Aplica
ção
P
Acertar a hora
de alarme
Função
SNOOZE
Acertar o relógio
temporizado
Prima o botão SET uma segunda vez para chamar o modo de regulação para
o temporizador. O display exibe “ON”. Prima o botão Hour as vezes necessárias até a hora estar regulada na qual o humidificador será ligado. Com o botão
Min , proceda como com o botão Hour .
Assim que a hora de activação for alcançada, o humidificador começa a funcionar.
Prima o botão SET uma terceira vez para o display exibir “OFF”. Prima o botão
Hour as vezes necessárias até a hora estar regulada na qual o humidificador
será desligado. Com o botão Min , proceda como com o botão Hour .
Quando a hora de desactivação for alcançada, o funcionamento do humidificador
pára.
Prima o botão SET uma quarta vez para chamar o modo de regulação para o
alarme. No display pisca p símbolo de alarme . Prima o botão Hour as vezes
necessárias até a hora estar regulada na qual o alarme deve ser activado. Com o
botão Min , proceda como com o botão Hour .
Prima o botão SET uma quinta vez para activar ou desactivar o alarme regulado. Prima o botão Hour , para activar o alarme; o símbolo do alarme é
exibido no display. Prima o botão Min , para desactivar o alarme regulado; o
símbolo do alarme apaga.
Quando ouvir o alarme à hora regulada, ele pode ser desligado com qualquer
botão (excepto o botão SNOOZE).
Prima o botão SET uma sexta vez para o display comutar novamente para a
indicação da hora actual.
Se premir o botão SNOOZE , existe a possibilidade de ligar a função
SNOOZE com o alarme activo. Neste caso, o sinal acústico é desligado e volta
a ser activado automaticamente após 10 minutos.
Page 45

41
P
4 Generalidades
• Antes de limpar o aparelho, certifique-se de que o aparelho está desligado e
o adaptador de rede está retirado da tomada de corrente.
•
Limpe o exterior do aparelho com um pano húmido e macio.
•
Por favor, para a limpeza não utilize substâncias agressivas como, por
exemplo, cremes de limpeza ou outros detergentes. Tais produtos podem
corroer a superfície.
• Na utilização frequente, recomendamos que limpe o aparelho, pelo menos,
uma vez por semana. O tanque de água e o aplique do atomizador podem
ser lavados com água quente (>65 °C) ou com álcool de, pelo menos, 75%.
Limpe a câmara do atomizador e a câmara do tanque com um pano
embebido em álcool e um cotonete. Tenha atenção para que a água não
penetre no interior do aparelho.
• Se não utilizar o aparelho durante um período de tempo prolongado, esva-
zie a restante água do tanque de água e do aparelho e seque o aparelho.
•
Guarde o aparelho num local seco e fresco.
Este aparelho não pode ser eliminado em conjunto com o lixo doméstico.
Cada consumidor tem o dever de entregar qualquer aparelho eléctrico ou
electrónico com ou sem substâncias nocivas nos postos de recolha públicos
da sua cidade ou no seu revendedor especializado, para que possam ser eliminados ecologicamente.
Para mais informações sobre as formas de descarte, contacte as autoridades
locais ou o seu revendedor.
Nome e modelo : MEDISANA Humidificador intensivo
Ultrabreeze
Alimentação de corrente com adaptador de rede
: Input 200-240 V~, 50/60 Hz, 0,8 A
Output 24 V , 1,5 A
Consumo : aprox. 36 W
Dimensões C x L x A : aprox. 196 x 135 x 256 mm
Peso incl. equipamento de alimentação
: aprox. 1.100 g
Artigo n.º : 60050
Número EAN : 40 15588 60050 0
Acessórios especiais com 10 ml de essência de aroma
(opcional, não incluído no material fornecido)
Artigo n.º : 60005 Eucalipto
60006 Jasmim
60007 Alfazema
60008 Rosa
60009 Limão
Devido aos constantes melhoramentos do produto, reservamos
o direito a proceder a alterações técnicas e estéticas.
4.1
Limpeza e
manutenção
4.2
Indicações sobre
a eliminação
4.3
Dados técnicos
Page 46

42
5 Garantia
P
Por favor, em caso de garantia, contacte o seu revendedor especializado ou
directamente o centro de assistência. Se for necessário enviar o aparelho,
por favor, envie o aparelho indicando a avaria e acompanhado de uma cópia
do recibo de compra.
Em caso de garantia aplicam-se as seguintes condições:
1. Aos produtos MEDISANA concedemos uma garantia de três anos a
partir da data de compra. Em caso de garantia, a data de compra tem de
ser comprovada através do recibo de compra ou factura.
2. As deficiências devido a erros de material ou de fabricação são eliminadas gratuitamente dentro do prazo de garantia.
3. Após um serviço de garantia, o prazo da garantia não é prolongado, nem
para o aparelho nem para as peças substituídas.
4. A garantia exclui:
a. todos os danos resultantes de manuseamento inadequado como,
p.ex., devido ao não cumprimento do manual de instruções.
b. danos resultantes de reparações ou intervenções pelo comprador ou
por terceiros não autorizados.
c. danos de transporte resultantes do percurso entre o fabricante e
o consumidor ou durante o envio para o serviço de assistência a
clientes.
d. componentes exteriores sujeitos a um desgaste normal.
5. Não nos responsabilizamos por danos consequentes directos ou indi-
rectos que são causados pelo aparelho mesmo quando o dano no
aparelho é reconhecido como um caso de garantia.
MEDISANA AG
Itterpark 7-9
40724 Hilden
Alemanha
Tel.: +49 (0) 2103 / 2007-60
Fax: +49 (0) 2103 / 2007-626
eMail: info@medisana.de
Internet: www.medisana.de
O endereço do serviço de assistência pode ser consultado na última página.
5.1
Garantia e
condições
de reparação
Page 47

43
NL
1 Veiligheidsmaatregelen
1.1
Hartelijk dank
1.2
Belangrijk
Hartelijk dank voor uw vertrouwen en van harte gefeliciteerd!
Met de intensieve luchtbevochtiger Ultrabreeze hebt u een kwaliteitsproduct
van MEDISANA aangeschaft.
Voor een succesvol gebruik en een lange gebruiksduur van uw MEDISANA
luchtbevochtiger Ultrabreeze bevelen wij aan de hieronder beschreven aanwijzingen voor het gebruik en voor het onderhoud zorgvuldig door te lezen.
Lees de gebruiksaanwijzing, in het bijzonder de veiligheidsinstructies, zorvuldig door vooraleer u het apparaat gebruikt
en bewaar de gebruiksaanwijzing voor verder gebruik.
Als u het toestel aan derden doorgeeft, geef dan deze
gebruiksaanwijzing absoluut mee.
• Voor u het apparaat aansluit op uw stroomtoevoer, dient u erop te letten dat
de netspanning, die op het typeaanduidingsplaatje staat aangegeven
overeenkomt met die van uw stroomnet.
• Gebruik het toestel enkel overeenkomstig zijn doel, volgens de handleiding.
Het apparaat is niet voor commercieel gebruik bedoeld.
•
Gebruik het instrument nooit in de buurt van hoogfrequente elektromagnetische zendapparatuur, aangezien deze de functies van het apparaat zou
kunnen verstoren.
•
Laat het instrument nooit zonder toezicht binnen handbereik van kinderen.
Elektrische instrumenten zijn geen speelgoed.
•
Repareer het instrument in het geval van storingen niet zelf en staak het
gebruik. Neem contract op met uw vakhandelaar en laat reparaties alleen door
geautoriseerde servicediensten uitvoeren.
•
U zelf mag alleen reinigingswerkzaamheden aan het instrument verrichten.
•
Gebruik uitsluitend de voor dit instrument bestemde en door de fabrikant meegeleverde reserveonderdelen.
•
Vóór het bevestigen of verwijderen van accessoires moet altijd eerst het
instrument uitgeschakeld worden.
•
Bewaar het instrument op een droge plaats.
•
Gebruik het instrument niet, wanneer de vernevelkamer leeg is of te weinig
vloeistof bevat.
•
Gebruik het instrument nooit onder dekbedden of kussens.
• Hou de ventilatiesleuf aan de onderzijde van het apparaat open, vrij van stof
en verontreinigingen.
Neem voor het gebruik van elektrische instrumenten met behulp van
voedingsapparaten de hieronder beschreven aanwijzingen nauwlettend
in acht:
• Raak nooit een voedingsapparaat aan dat in water is gevallen. Haal onmiddelijk de stekker resp. de voedingsapparaat uit de wandcontactdoos.
•
Wanneer het snoer of het voedingsapparaat beschadigd is, mag het instrument
niet verder gebruikt worden. Om veiligheidsredenen mogen deze onderdelen
alleen door een geautoriseerde servicedienst door nieuwe worden vervangen.
•
Dit instrument, het snoer en het voedingsapparaat mogen nooit in water
ondergedompeld worden of onder stromend water worden gehouden.
• De kabel mag niet in de buurt van warmtebronnen gebracht worden of over
Page 48

44
1 Veiligheidsmaatregelen / 2 Wetenswaardigheden / 3 Het gebruik
NL
3.1
Het eerste
gebruik
2.1
Levering en
verpakking
1.2
Belangrijk
2.2
Intensieve
luchtbevochtiger
scherpe randen heengetrokken.
• Raak het voedingsapparaat uitsluitend met droge handen aan.
•
Transporteer, trek of draai het voedingsapparaat nooit met behulp van het
netsnoer en zorg ervoor dat het netsnoer niet ingeklemd wordt.
• Koppel het voedingsapparaat los van de wandcontactdoos, wanneer het
instrument uitgeschakeld is en als het niet meer wordt gebruikt.
• In geval van een allergische aandoening van de luchtwegen dient u vóór
gebruik van het apparaat ruggespraak te houden met uw huisarts.
Gelieve eerst te controleren of het instrument volledig is.
Bij de levering horen:
• 1 Intensieve luchtbevochtiger Ultrabreeze
met watertank en opzetstuk voor de verneveling
• 1 voedingsapparaat
• 1 gebruiksaanwijzing
Het verpakkingsmateriaal kan opnieuw worden gebruikt of gerecycled. Zorg
ervoor dat het gebruikte verpakkingsmateriaal bij de daarvoor bestemde afvalverwerking terechtkomt. Indien u tijdens het uitpakken transportschade
constateert, neem dan direct contact op met uw leverancier.
WAARSCHUWING
Let er op dat het verpakkingsmateriaal niet in handen komt
van kinderen. Zij kunnen er in stikken!
Juist in de wintermaanden verhoogt te droge kamerlucht de vatbaarheid voor
infecties en aandoeningen van de luchtwegen en leidt tot vermoeidheid en
verminderde concentratie. Gezonde lucht dient een relatieve luchtvochtigheid
van 40 à 60 % te hebben.
De geluidsarme en energiebesparende ultrasone technologie van de luchtbevochtiger verandert water in zeer fijne nevel, die het vochtigheidsgehalte van
de lucht verhoogt. Het verbetert de luchtkwaliteit en voorkomt uitdroging van
de slijmvliezen en de huid en verbetert zodoende het welbevinden. De programmering van de begin- en eindtijd en een extra verlichting maken het
mogelijk een individuele atmosfeer te creëren. Het apparaat beschikt over een
voorverwarmingsfunctie om kiemen en bacteriën te doden.
Het apparaat is geschikt voor de bevochtiging van de onmiddellijke omgevingslucht (tot ca. 15 m2).
OPGELET
Controleer of het MEDISANA luchtbevochtiger kipveilig op een
vochtwerend ondergrond is geplaatst. Vooral het gebruik met
behulp van kalkachtig water / aroma-essence kan leiden tot
neerzetting/neerslag.
Page 49

45
NL
3 Het Gebruik
3.4
Luchtbevochtiger
aan- en
uitschakelen /
prestatieniveau’s
1 en 2
3.2
Bijvullen en
legen van de
watertank
Spoel de watertank en de vernevelingunit voor het eerste gebruik eens grondig met vers water. Neem watertank
van het apparaat, draai hem om en
schroef de tanksluiting eraf. Vul de
tank met max. 1,3 liter drinkwater of
gedemineraliseerd water.
Schroef de tanksluiting opnieuw vast
en veeg eventuele druppels van de
tank af. Let erop dat de dekseldichting
goed zit. Zet watertank met de
naar onder gerichte vulopening op het apparaat.
Transporteer het instrument niet, als de watertank gevuld is. Door schommelende bewegingen kan het waterpeil boven de vernevelkamer stijgen, zodat
een verneveling verhinderd wordt.
Schakel het instrument uit en verwijder het opzetstuk voor de verneveling ,
om het overtollige water met behulp van een doek te verwijderen.
Gooit u het resterende water na gebruik weg en spoelt u de tank met vers
drinkwater uit. Voor hernieuwd gebruik vult u de tank met vers drinkwater of
gedemineraliseerd water. Als het uitgeschakelde instrument voor een langere
periode buiten gebruik zal zijn, verwijder dan de watertank van het instrument
en maak de tank en het apparaat leeg.
U kan het apparaat met een in water oplosbaar aroma gebruiken. Doe daartoe
ca. 10 druppels essence in de met 1,3 liter gevulde watertank.
Bedenk, dat door het toevoegen van de essence zich een neerslag kan vormen!
U kan de aroma’s met verschillende geuren via MEDISANA ontvangen.
Bestig het opzetstuk voor de vernevel-unit op het instrument.
Bevestig het snoer op de aansluiting van het voedingsapparaat en sluit het
voedingsapparaat aan op de wandcontactdoos.
Na een korte druk op ON/OFF-toets begint het apparaat met de verneveling
van het water en het blaastoestel start met hoge intensiteit (prestatieniveau 1).
Door het verhoogd blaasvermogen wordt er meer vocht aan de omgevingslucht afgegeven. Het gebruiksteken van de luchtbevochtigers verschijnt op
het display . Zodra de luchtbevochtiger met de ON/OFF-toets aangeschakeld
is, start ook de voorverwarming om kiemen en bacteriën te doden. Als u
ON/OFF-toets een tweede keer indrukt, werkt het apparaat met een lagere
intensiteit (prestatieniveau 2). Het gebruiksteken van de luchtbevochtigerxxx
knippert. Als u dan nogmaals op ON/OFF-toets drukt, wordt het apparaat
uitgeschakeld.
Het uitschakelmechanisme binnen het instrument zorgt ervoor dat de verneveling en de ventilatie automatisch uitgeschakeld wordt, wanneer het waterreservoir verbruikt is.
3.3
Toevoegen van
aroma-essence
Page 50

46
3 Het Gebruik
NL
3.6
Handige functies
instellen
Gebruiksduur:
Prestatieniveau 1 bij bijvullen met 1,3 Liter water: ca. 20 uren.
Prestatieniveau 2 bij bijvullen met 1,3 Liter water: ca. 30 uren.
De watertank van het MEDISANA luchtbevochtiger Ultrabreeze beschikt over
een interne verlichtingsunit die met behulp van de LIGHT -toets ingeschakeld wordt. Op het display verschijnt het teken voor de verlichting
xxxx. Het licht verschijnt in het blauw. Als u een tweede keer op toets drukt,
verschijnt het licht in het rood en bij een derde druk op de toets in het groen.
Als u LIGHT-toets een vierde keer indrukt, wisselen de drie kleuren
(blauw/rood/groen) elkaar af in intervallen van 10 seconden. Bij het afwisselen
branden er telkens twee kleuren tegelijkertijd. Door een vijfde druk op toets
selecteert u een bepaalde kleur voor een bepaalde tijd:
00.00 - 08.00 uur - groen licht
08.00 - 16.00 uur - rood licht
16.00 - 24.00 uur - blauw licht
Door een zesde druk op LIGHT-toets wordt de verlichting uitgeschakeld.
Het verlichtingsteken gaat uit.
De verlichting kan onafhankelijk van de verneveling en van het blaastoestel
gebruikt worden, bijvoorbeeld als nachtverlichting.
Als het instrument automatisch uitgeschakeld wordt, blijft de verlichting
branden. De verlichtingsintensiteit neemt af, als additioneel de verneveling
ingeschakeld wordt.
Uw MEDISANA Intensieve luchtbevochtiger Ultrabreeze beschikt over 3 comfortfuncties:
een tijdsindicatie,
een
geïntegreerde tjdklok en een alarmfunctie.
Stel de actuele tijd in om de Ultrabreeze ook als tafelklok, of met de alarmfunctie
als
wekker te gebruiken.
De geïntegreerde tijdklok maakt het u mogelijk uw luchtbevochtiger op een
bepaald tijdstip automatisch aan- en uit te schakelen.
De instelling van tijd, tijdklok en alarmtijd gebeurt in een instellingsvolgorde. Als
u een instelling niet wil uitvoeren of wil overslaan, druk dan de SET-toets zo
vaak in tot u in de volgende instelmodus belandt. De instelmodus voor de tijdklok
wordt met “ON” dan wel “OFF” aangegeven, die voor het alarm met . Als u
tijdens het instellen 10 seconden lang geen toets indrukt, wordt de instelmodus
beëindigd.
Als u SET-toets de eerste keer indrukt, bevindt u zich in de instelmodus voor
de tijd. Op het display knippert “00.00”. Druk Hour-toets zo vaak in tot de
juiste uuraanduiding weergegeven wordt. Ga op dezelfde manier met de Mintoets te werk bij de instelling van de minuten.
3.5
Verlichting
Kloktijd
instellen
Page 51

47
NL
3 Het Gebruik
Tijdschakelklok
instellen
Alarmtijd
instellen
Sleep-
functie
Als u SET-toets de tweede keer indrukt, bevindt u zich in de instelmodus voor
de tijdklok. Op het display knippert “ON”. Druk Hour-toets zo vaak in tot het
uur weergegeven wordt waarop de luchtbevochtiger zich moet aanschakelen. Ga
met de Min-toets zoals met de Hour-toets te werk.
Zodra de ingestelde begintijd bereikt is, start de werking van de luchtbevochtiger.
Als u SET-toets een derde keer indrukt, verschijnt er “OFF” op het display.
Druk Hour-toets zo vaak in tot het uur weergegeven wordt waarop de luchtbevochtiger zich moet uitschakelen. Ga met de Min-toets zoals met de Hourtoets te werk.
Als de eindtijd bereikt is, wordt de werking van de luchtbevochtiger gestopt.
Als u SET-toets de vierde keer indrukt, bevindt u zich in de instelmodus voor
het alarm. Op het display knippert het alarmteken . Druk Hour-toets zo
vaak in tot het uur weergegeven wordt waarop de luchtbevochtiger zich dient uit
te schakelen. Ga met de Min-toets zoals met de Hour-toets te werk.
Als u SET-toets een vijfde keer indrukt, kan u het ingestelde alarm activeren of
desactiveren. Druk Hour-toets in om de ingestelde alarmtijd te activeren; het
alarmteken verschijnt op het display. Druk Min-toets in om de ingestelde
alarmtijd te desactiveren; het alarmteken gaat uit.
Als het alarm op het ingestelde tijdstip weerklinkt, kan het met elke toets (behalve de SNOOZE-toets) uitgeschakeld worden.
Als u SET-toets een zesde keer indrukt, keert het display naar de weergave
van de actuele tijd terug.
Door op SNOOZE-toets te drukken kan u bij een actief alarm de sleepfunctie (SNOOZE) aanschakelen. In dit geval stopt de alarm en schakelt zich na
10 minuten automatisch weer aan.
Page 52

48
4 Diversen
NL
• Controleer, of het instrument uitgeschakeld is en het voedingsapparaat uit
de wandcontactdoos is verwijderd, voordat het instrument gereinigd wordt.
• Reinig het apparaat van buiten met een vochtig, zacht doekje.
• Gebruik voor de reiniging geen bijtende of schurende reinigingsmiddelen,
omdat deze het oppervlak aantasten.
• Bij veelvuldig gebruik adviseren wij u om het apparaat minstens een maal per
week grondig te reinigen. De watertank en het vernevelaaropzetstuk kunt u
met heet water (>65 °C) of een alcoholoplossing van ten minste 75%
grondig uitspoelen. De vernevelaarkamer en de tankkamer reinigt u door
middel van een in alcohol gedrenkt doekje en een wattenstaafje. Let u op,
dat er geen water in het inwendige van het apparaat komt.
• Als u het apparaat langere tijd niet gebruikt, giet u het restwater uit de
water tank en het apparaat en droogt u het apparaat af.
• Bewaar het instrument op een droge, koele plaats.
Dit apparaat mag niet samen met het huishoudelijk afval worden aangeboden.
Iedere consument is verplicht, alle elektrische of elektronische
apparaten, ongeacht of die schadelijke stoffen bevatten of niet, bij een
milieudepot in zijn stad of bij de handelaar af te geven, zodat ze op een milieuvriendelijke manier kunnen worden verwijderd.
Wendt u zich betreffende het afvalbeheer tot uw gemeente of handelaar.
Naam en model : MEDISANA Intensieve luchtbevochtiger
Ultrabreeze
Netvoeding met netadapter : Input 200-240 V~, 50/60 Hz, 0,8 A
Output 24 V , 1,5 A
Vermogensopname : ca. 36 W
Afmetingen L x B x H : ca. 196 x 135 x 256 mm
Gewicht incl. voedingsapparaat : ca. 1.100 g
Artikelnr. : 60050
EAN-Nr. : 40 15588 60050 0
Speciaal toebehoren per 10 ml Aroma
(optioneel, niet bij levering inbegrepen)
Artikelnr. : 60005 Eucalyptus
60006 Jasmijn
60007 Lavendel
60008 Roos
60009 Lemon
In het kader van onze voortdurende inspanningen naar
verbeteringen, behouden wij ons het recht voor om qua
vormgeving en op technisch gebied veranderingen aan ons
product door te voeren.
4.1
Reiniging en
onderhoud
4.2
Afvalbeheer
4.3
Technische
Specificaties
Page 53

49
NL
5 Garantie
Wendt u zich voor garantiegevallen altijd tot uw leverancier of tot onze
klantendienst. Moet u het apparaat opsturen, stuur het dan samen met de
klacht en een kopie van de aankoopbon naar onze klantendienst.
Voor garantie gelden de volgende voorwaarden:
1. Voor de producten van MEDISANA geldt een garantietermijn van drie
jaar vanaf de datum van aankoop. Deze kan door middel van de verkoopbon of factuur worden aangetoond.
2. Alle klachten, die het gevolg zijn van materiaal of fabricagefouten
worden binnen de garantietermijn gratis verholpen.
3. Een geval van garantie leidt niet tot automatische verlenging van de
garantietermijn, noch voor het apparaat zelf noch voor de vervangen
onderdelen.
4. Uitgesloten van garantie zijn:
a. Alle schade die ontstaan is door ondeskundige behandeling, b.v. het
niet op de juiste wijze volgen van de gebruiksaanwijzing
b. Beschadigingen, die zijn ontstaan door reparaties door de koper of
een ander onbevoegd persoon.
c. Transportschade, die is ontstaan op weg van de verkoper naar de
verbruiker of tijdens het opsturen naar de klantendienst.
d. Toebehoren, die onderhevig zijn aan slijtage
5. De fabrikant neemt geen verantwoording voor directe of indirecte ver-
volgschade die door het apparaat veroorzaakt wordt. Ook niet als de
schade aan het apparaat als garantiegeval erkend is.
MEDISANA AG
Itterpark 7-9
40724 Hilden
Duitsland
Tel.: +49 (0) 2103 / 2007-60
Fax: +49 (0) 2103 / 2007-626
eMail: info@medisana.de
Internet: www.medisana.de
Het adres van de klantendienst vindt u op de laatste pagina.
5.1
Garantie en
reparatievoorwaarden
Page 54

50
1 Turvallisuusohjeita
FIN
1.1
Sydämellinen
kiitos
1.2
Tärkeää
Kiitoksia luottamuksesta ja sydämelliset onnentoivotukset!
Ostaessasi intensiivisen Ultrabreeze-ilmankostuttimen olet hankkinut
MEDISANA-laatutuotteen.
Jotta saavuttaisit halutun tuloksen ja sinulla olisi pitkään iloa MEDISANA
Ultrabreezestäs, suosittelemme, että luet seuraavat käyttö- ja huolto-ohjeet
huolellisesti läpi.
Lue seuraavat käyttöohjeet huolellisesti kokonaan, erityisesti
turvallisuusohjeet, ennen kuin käytät laitetta ja säilytä ohjeet
mahdollista myöhempää käyttöä varten.
Jos annat laitteen eteenpäin, anna myös aina tämä käyttäohje
mukana.
• Ennen kuin liität laitteen sähköverkkoon, varmista, että laitteen tyyppikilvessä annettu verkkojännite vastaa sähköverkkosi jännitettä.
• Käytä laitetta vain käyttöohjeessa selostetuissa olosuhteissa.
Laitetta ei ole tar-
koitettu kaupalliseen käyttöön.
•
Älä käytä laitetta korkeataajuuksista elektromagneettista säteilyä lähettävien
laitteiden lähellä, koska nämä voivat häiritä laitteen toimintaa.
•
Älä jätä laitetta ilman valvontaa lasten saataville. Sähkölaitteet eivät ole leikkikaluja.
•
Jos laitteeseen tulee häiriö, älä yritä korjata laitetta itse, äläkä käytä sitä enää.
Kysy laitteen myyjältä, missä on laitteen lähin valtuutettu huolto ja jätä laite
sinne korjattavaksi.
•
Laitteen saa itse vain puhdistaa.
•
Käytä ainoastaan laitteeseen tarkoitettuja ja valmistajan toimittamia lisäosia.
•
Irrota tai kiinnitä lisäosat vain laitteen virran ollessa katkaistuna.
•
Säilytä laitetta kuivassa paikassa.
•
Älä käytä, jos sumutussäiliössä ei ole olenkaan tai siinä on vain vähän nestettä.
•
Älä käytä laitetta peittojen tai tyynyjen alla.
• Pidä laitteen alapinnalla olevat tuuletusraot puhtaina pölystä ja liasta.
Verkkolaitteilla varustettuja sähkölaitteita käytettäessä on erityisesti
huomioitava seuraavat asiat:
• Älä koskaan tartu verkkolaitteeseen, joka on pudonnut veteen. Vedä heti
virtapistoke tai verkkolaite irti seinäpistorasiasta.
•
Jos johto tai verkkolaite on vaurioitunut, laitetta ei saa enää käyttää. Turvallisuussyistä nämä osat saa vaihtaa vain valtuutettu huoltoyritys.
• Laitetta, johtoa ja verkkolaite ei saa milloinkaan kastaa veteen tai pitää
juoksevan veden alla.
• Johtoa ei saa ohjata lämpölähteiden lähellä eikä vetää terävien reunojen yli.
• Tartu verkkolaitteeseen aina vain kuivin käsin.
•
Verkkolaitetta ei saa koskaan kantaa, vetää tai kiertää johdosta ja johtoa ei saa
koskaan puristaa tai kiristää.
Page 55

51
FIN
1 Turvallisuusohjeita / 2 Tietämisen arvoista / 3 Käyttö
3.1
Käyttöönotto
2.1
Toimituksen
laajuus ja
pakkaus
2.2
Intensiivinen
ilmankostutin
•
Vedä verkkolaite pistorasiasta vain, kun laitteen virta on katkaistuna eikä se
enää ole käytössä.
•
Jos sairastat allergista hengitysteiden sairautta, neuvottele lääkärisi kanssa
ennen laitteen käyttöä.
Tarkasta ensin, että laite on täydellinen.
Toimituslaajuuteen kuuluu:
• 1 intensiivinen ilmankostutin Ultrabreeze
varustettuna vesisäiliöllä ja sumutinosalla
• 1 verkkovirtasovitin / verkkolaite
• 1 käyttöohje
Pakkauksia voidaan käyttää uudelleen tai ne voidaan kierrättää takaisin raakaainekiertoon. Hävitä tarpeeton pakkausmateriaali asianmukaisella tavalla.
Mikäli pakkausta avatessasi havaitset kuljetusvaurion, ota heti yhteyttä tuotteen myyneeseen liikkeeseen.
VAROITUS
Huolehdi siitä, etteivät pakkausmuovit joudu lasten käsiin.
On olemassa tukehtumisvaara!
Erityisesti talvikuukausina liian kuiva huoneilma lisää altistumista tulehdus- ja
hengityselinsairauksille ja johtaa väsymykseen ja keskittymiskyvyn puutteeseen.
Terveellisen ilman suhteellisen ilmankosteuden tulisi olla välillä 40-60%.
Ilmankostuttimen äänetön ja energiaa säästävä ultraäänitekniikka muuttaa
veden hienoimmaksi sumuksi, joka nostaa ilman kosteusastetta. Se parantaa
ilmanlaatua ja ehkäisee limakalvojen ja ihon kuivumista ja parantaa siten
hyvinvointia. Käynnistys- ja sammutusaikojen ohjelmointi ja kytkettävä valaistus
mahdollistavat yksilöllisen ilmapiirin luomisen. Laitteessa oleva esilämmitystoiminto tappaa itiöt ja bakteerit.
Laite sopii tilojen (noin 15 neliömetriin asti) ympäristöilman kostuttamiseen.
HUOMIO
Varmista, että MEDISANA-ilmankostutinta käytetään vain
tasaisella ja kallistumattomalla alustalla. Alustan pitää olla myös
kosteudenkestävä. Erityisesti kalkkipitoista vettä / tuoksuesanssia
käytettäessä saattaa muodostua sakkaa tai saostumia.
Page 56

52
3 Käyttö
FIN
3.4
Ilmankostuttimen
käynnistys ja
sammutus/
tehoasteet 1 ja 2
3.2
Vesisäiliön
täyttäminen ja
tyhjentäminen
Huuhtele vesisäiliö ja sumutinosa
ennen ensimmäistä käyttöönottoa
huolellisesti puhtaalla juomavedellä.
Ota vesisäiliö laitteesta, käännä se
ja ruuvaa säiliön korkki auki. Täytä
säiliö kork. 1,3 litralla puhdasta juomavettä tai demineralisoitua vettä.
Ruuvaa säiliön korkki uudelleen paikalleen ja pyyhi mahdolliset roiskeet
säiliöstä. Ota huomioon kannen tiivisteen oikea paikka. Aseta vesisäiliö
laitteen päälle alaspäin suunnatulla täyttöaukolla.
Älä siirrä laitetta, kun sen vesisäiliö on täynnä. Kuljetuksen aikana veden pinta
heiluu ja saattaa nousta sumutuskalvon yläpuolelle ja estää siten sumutuksen.
Kun laitteen virta on katkaistuna, sumutinosa voidaan irrottaa ja
ylimääräinen vesi voidaan kuivata kankaalla.
Hävitä jäljelle jäänyt vesi käytön jälkeen ja huuhtele säiliö puhtaalla
juomavedellä. Ennen uutta käyttöä säiliö tulee täyttää puhtaalla juomavedellä
tai demineralisoidulla vedellä. Kun sammutat laitteen etkä käytä sitä pitkään
aikaan, irrota vesisäiliö laitteesta ja tyhjennä säiliö ja laite.
Laitteessa voi käyttää myös vesiliukoista tuoksuesanssia. Laita noin 10 tippaa
esanssia 1,3 litralla täytettyyn vesisäiliöön.
Huomaa, että esanssin käyttö saattaa muodostaa saostumia! Sie können die
Voit tilata eri tuoksuisia esansseja MEDISANA kautta.
Työnnä sumutuslaitteen sumutusosa laitteeseen.
Yhdistä verkkolaitteen johto liitinpistokkeeseen ja työnnä verkkolaite
pistorasiaan.
Kun painat ON/OFF-painiketta lyhyesti, laite aloittaa veden höyrystämisen ja
puhallin käynnistyy suurimmalla teholla (taso 1). Korkea puhallusteho luovuttaa
ympäristöilmaan enemmän kosteutta. Ilmankostuttimen käyttöilmaisin tulee
näytölle . Kun ilmankostutin käynnistetään ON/OFF-painikkeella, käynnistyy
myös itiöiden ja bakteerien tuhoamiseen tarkoitettu esilämmitys. Kun painat
ON/OFF-painiketta toisen kerran, laite toimii alennetulla teholla (teho 2).
Ilmankostuttimen käyttöilmaisin vilkkuu. Kun painat uudelleen ON/OFF-painiketta , laite sammuu.
Laitteen katkaisuautomatiikka pitää huolen siitä, että sumutus ja puhallintoiminto katkeavat automaattisesti, kun vesisäiliö on tyhjentynyt.
Käyttöaika:
Tehotaso 1 täytettynä 1,3 litraa vettä: noin 20 tuntia.
Tehotaso 2 täytettynä 1,3 litraa vettä: noin 30 tuntia.
3.3
Tuoksuesanssin
lisääminen
Page 57

53
FIN
3 Käyttö
3.6
Mukavuustoimintojen
asettaminen
MEDISANA intensiivisen ilmankostuttimen Ultrabreezestäs vesisäiliössä on
sisäänrakennettu valaistus, joka sytytetään painamalla kevyesti LIGHT -painiketta
. Näytölle tulee valaistuksen merkki . Valo tulee esiin sinisenä. Paina
painiketta toisen kerran, esiin tulee valo punaisena, kolmannella painalluksella vihreänä. Kun painat LIGHT-painiketta neljännen kerran, värit
(sininen/punainen/vihreä) vaihtuvat 10 sekunnin välein. Värin vaihtuessa palaa
aina kaksi väriä samaan aikaan. Kun painat painiketta viidennen kerran,
voit valita tietyn värin tiettyä vuorokaudenaikaa vastaavasti:
Kello 00.00–08.00 - vihreä valo
Kello 08.00–16.00 - punainen valo
Kello 16.00–24 00 - sininen valo
Kun LIGHT-painiketta painetaan kuudennen kerran, valaistus sammuu.
Valaistuksen merkki sammuu.
Valaistusta voi käyttää riippumatta sumuttimesta ja puhaltimesta, esimerkiksi
yövalona.
Kun laitteen virta katkeaa automaattisesi, valaistus jää palamaan.
Valaistusvoimakkuus heikkenee, kun sumutus kytketään päälle.
MEDISANA intensiivi-ilmankostuttimessa Ultrabreeze on kolme mukavuus
toimin-
toa:
kellonaika, integroitu ajastnkello ja hälytystoiminto.
Aseta tämänhetkinen kellonaika, niin Ultrabreeze toimii myös pöytäkellona ja
hälytystoiminnolla
herätyskellona.
Integroitu aikakytkentäkello mahdollistaa ilmankostuttimen käynnistyksen ja
sammuttamisen automaattisesti tiettynä ajankohtana.
Kellonajan, aikakytkentäkellon ja hälytysajan asetus tapahtuu asetustoiminnoissa
peräkkäin. Jos et halua asettaa jotain näistä, paina SET-painiketta niin monta
kertaa, että pääset seuraavaan asetustilaan. “ON” tai “OFF” ilmaisee aikakytkentäkellon asetustilan, hälytyksen . Jos ajastuksen aikana et paina mitään
painiketta 10 sekuntiin, asetustila päättyy.
Kun painat SET-painiketta ensimmäisen kerran, pääset kellonajan asetuksiin..
Näytöllä vilkkuu “00.00”. Paina Hour-painiketta niin usein, että tämänhetkisen kellonajan tunnit näkyvät. Aseta minuutit samalla tavalla Min-painikkeella
.
Kun painat SET-painiketta toisen kerran, pääset aikakytkentäkellon asetuksiin..
Näytölle tulee “ON”. Paina Hour-painiketta niin usein, että näet sen kellonajan
tunnit, jolloin ilmankostuttimen tulisi käynnistyä. Aseta minuutit Min-painikkeella
samoin kuin tunnit Hour-painikkeella .
Kun asetettu käynnistysaika on käsillä, ilmankostuttimen toiminta käynnistyy.
3.5
Valaistus
Kellonajan
asettaminen
Aikakytkentäkel-
lon asettaminen
Page 58

54
3 Käyttö
FIN
Kun painat SET-painiketta kolmannen kerran, tulee näytölle “OFF”. Paina
Hour-painiketta niin usein, että näet sen kellonajan tunnit, jolloin ilmankostuttimen tulisi sammua. Aseta minuutit Min-painikkeella samoin kuin tunnit
Hour-painikkeella .
Kun sammutusaika on käsillä, pysähtyy ilmankostuttimen toiminta.
Kun painat SET-painiketta neljännen kerran, pääset hälytyksen asetuksiin..
Näytöllä vilkkuu hälytysmerkki . Paina Hour-painiketta niin usein, että näet
sen kellonajan tunnit, jolloin hälytys tulisi käynnistyä. Aseta minuutit Min-painikkeella samoin kuin tunnit Hour-painikkeella .
Kun painat SET-painiketta viidennen kerran voit aktivoida tai poistaa
hälytyksen. Paina Hour-painiketta , aktivoidaksesiasetetun hälytysajan,
hälytysmerkki tulee näytölle. Paina Min-painiketta , poistaaksesi asetetun
hälytysajan, hälytysmerkki sammuu.
Kun kuulet hälytyksen asettetuna aikana, voit sammuttaa sen jokaisella painikkeella (paitsi SNOOZE).
Kun painat SET-painiketta kuudennen kerran, palaa näyttö tämänhetkiseen
aikaan takaisin.
Painamalla SNOOZE-painiketta voit hälytyksen tullessa käynnistää torkkutoiminnon (SNOOZE). Tässä tapauksessa hälytysääni lakkaa ja alkaa automaattisesti 10 minuutin kuluttua.
Hälytysajan
asetus
Torkkutoiminto
Page 59

55
FIN
4 Sekalaista
• Ennen laitteen puhdistusta on varmistettava, että laitteen virta on katkaistuna
ja verkkolaite on irrotettuna pistorasiasta.
• Puhdista laite ulkoisesti kostealla, pehmeällä liinalla.
• Älä käytä puhdistuksessa voimakkaita aineita, kuten esim. hankaavia
puhdistusaineita tai pesuaineita. Se saattaa vaurioittaa pintaa.
• Usein käytettäessä suosittelemme laitteen puhdistamista perusteellisesti
vähintään kerran viikossa. Vesisäiliö ja sumutusosa voidaan huuhdella
perusteellisesti kuumalla vedellä (>65 °C) tai vähintään 75%-sella alkoholilla.
Sumutuskammio ja säiliökammio voidaan puhdistaa alkoholilla kostutetulla
liinalla ja vanupuikolla. Varmista, ettei laitteen sisälle pääse vettä.
• Jos et käytä laitetta pitkään aikaan, kaada loppuvesi pois vesi säiliöstä ja
kuivaa laite.
• Säilytä laitetta kuivassa, viileässä paikassa.
Tätä laitetta ei saa hävittää talousjätteiden mukana.
Jokainen kuluttaja on velvoitettu luovuttamaan kaikki sähköiset tai elektroniset
laitteet, sisältävätpä ne haitallisia aineita tai eivät, kaupunkinsa tai liikkeen
keräyspisteeseen, jotta laitteet voitaisiin hävittää ympäristöystävällisesti.
Ota yhteyttä paikalliseen viranomaiseen tai myyjäliikkeeseen hävityksen
suorittamiseksi.
Nimi ja malli : MEDISANA intensiivinen ilmankostutin
Ultrabreeze
Sähköverkko verkkolaitteella : Input 200-240 V~, 50/60 Hz, 0,8 A
Output 24 V , 1,5 A
Tehonotto : noin 36 W
Mitat P x L x K : noin 196 x 135 x 256 mm
Paino ml verkkolaite : noin 1.100 g
Tuotenro. : 60050
EAN-numero : 40 15588 60050 0
Lisävarusteena aina 10 ml tuoksuesanssia
(optiona, ei mukana toimituksessa)
Tuotenro : 60005 Eukalyptus
60006 Jasmin
60007 Laventeli
60008 Ruusu
60009 Sitruuna
Jatkuvan tuotekehittelyn myötä pidätämme itsellämme
oikeuden teknisiin ja muotoilullisiin muutoksiin.
4.1
Puhdistus ja hoito
4.2
Hävittämisohjeita
4.3
Tekniset tiedot
Page 60

56
5 Takuu
FIN
Käänny takuutapauksessa alan liikkeen tai suoraan asiakaspalveluhuollon
puoleen. Jos laite tulee lähettää huoltoon, ilmoita vika ja lähetä laitteen
mukana kopio ostokuitista.
Tällöin ovat voimassa seuraavat takuuehdot:
1. MEDISANA-tuotteille myönnetään kolmen vuoden takuu myyntipäiväyksestä. Myyntipäiväys tulee todistaa takuutapauksessa ostokuitilla tai
laskulla.
2. Materiaali- tai valmistusvioista johtuvat puutteet korjataan takuuaikana
maksutta.
3. Takuukorjaus ei pidennä takuuaikaa, ei laitteelle eikä vaihdetulle rakenneosalle.
4. Takuun ulkopuolelle jäävät:
a. kaikki vahingot, jotka syntyvät asiattomasta käsittelystä, esim.
käyttöohjeen noudattamatta jättämisestä.
b. Vahingot, joiden syyksi voidaan jäjittää ostajan tai asiattoman
kolmannen osapuolen suorittama kunnossapito tai toimet.
c. Kuljetusvauriot, jotka ovat syntyneet matkalla valmistajalta kulut-
tajalle tai asiakaspalveluun lähetettäessä.
d. Lisäosat, jotka ovat alttiina normaalille kulutukselle.
5. Vastuu laitteen aiheuttamista välittömistä tai välillisistä seurausvahin-
goista on myös poissuljettu, jos laitteelle aiheutunut vahinko hyväksytään
takuutapaukseksi.
MEDISANA AG
Itterpark 7-9
40724 Hilden
Saksa
Tel.: +49 (0) 2103 / 2007-60
Fax: +49 (0) 2103 / 2007-626
eMail: info@medisana.de
Internet: www.medisana.de
Asiakaspalvelun osoite löytyy viimeiseltä sivulta.
5.1
Takuu- ja
korjausehdot
Page 61

57
S
1 Säkerhetshänvisningar
1.1
Vi tackar
1.2
Viktigt
Tack för Ert förtroende och hjärtliga gratulationer!
Med Intensiv Luftfuktaren Ultrabreeze har du valt en kvalitetsprodukt från
MEDISANA.
För att Ni skall kunna uppnå önskad framgång och ha glädje av Er MEDISANA
luftfuktare Ultrabreeze under så lång tid som möjligt, rekommenderar vi Er att
noga läsa igenom dessa anvisningar gällande användning och vård.
Läs igenom bruksanvisningen, särskilt säkerhetsanvisningarna,
noga innan du använder apparaten och spara bruksanvisningen
för framtida bruk.
Om apparaten lämnas vidare till en annan person måste
bruksanvisningen följa med.
• Innan du ansluter apparaten till strömnätet, måste du kontrollera att
spänningen som är angiven på typskylten stämmer överens med nätspänningen.
• Använd apparaten endast enligt anvisningarna i bruksanvisningen.
Produkten
är inte avsedd för kommersiell användning.
• Apparaten får inte användas i närheten av utrustning som sänder ut högfrekvent elektromagnetisk strålning, det kan störa apparatens funktioner.
• Låt inte apparaten ligga åtkomligt för barn utan att ha den under uppsikt.
Elektrisk utrustning är inte leksaker.
• Försök inte att reparera apparaten själv och fortsätt inte att använda den om
Ni fastställt en störning. Kontakta Er återförsäljare och låt ett auktoriserat
serviceställe genomföra reparationen.
• Användaren får endast genomföra rengöringsarbeten på apparaten.
• Använd uteslutande de tillbehör som rekommenderas av tillverkaren och som
medföljer leverans.
• Ta endast loss och sätt endast på tillbehör när apparaten är avstängd.
• Förvar apparaten i en torr omgivning.
• Använd inte apparaten när dimkammaren innehåller för lite eller ingen vätska
als.
• Använd inte apparaten under täcken eller kuddar.
• Se till att det inte finns damm eller smuts i ventilationsöppningarna på apparatens undersida; ventilationsöppningarna måste vara fria.
Ta särskild hänsyn till följande när Ni använder elektriska apparater som
bedrivs med nätström:
• Försök inte att lyfta ut apparaten om den hamnat i vatten. Dra genast ut
strömkontakten respektive nätadaptern ur vägguttaget.
• Om nätsladden eller strömkontakten är skadad får apparaten inte användas.
Av säkerhetsskäl får dessa delar endast bytas ut av auktoriserade serviceställen.
• Apparaten, nätsladden och strömkontakten får aldrig sänkas ned i vätska eller
hållas under rinnande vatten.
• Kabeln får inte dras intill värmekällor eller över skarpa, vassa kanter.
• Ta endast i strömkontakten med torra händer.
• Bär, dra eller vrid aldrig strömkontakten genom att hålla i kabeln och se till att
kabeln varken kläms eller viks.
Page 62

58
1 Säkerhetshänvisningar / 2 Värt att veta / 3 Användning
S
3.1
Ibruktagning
2.1
Leveransomfång
och förpackning
1.2
Viktigt
2.2
Intensiv
Luftbefuktare
• Dra ut strömkontakten ur vägguttaget när apparaten är avstängd och inte
används längre.
• Om du lider av allergiska problem med andningsvägarna, måste du konsultera
din läkare före användning av apparaten.
Kontrollera först om apparaten är komplett.
I leveransen ingår:
•
1 Intensiv luftfuktare Ultrabreeze
med vattenbehållare och dimmunstycke
•
1 nätadapter / strömkontakt
•
1 bruksanvisning
Förpackningar kan återanvändas eller lämnas till återvinning. Se till att
förpackningsmaterial som inte längre behövs tas omhand på korrekt sätt.
Upptäcks skador när produkten packas upp så kontakta omgående inköpsstället.
VARNING
Se till att förpackningsmaterial i plast hanteras utom räckhåll
för barn. Kvävningsrisk!
Särskilt vintertid gör den torra rumsluften att man lättare får problem med
infektions- och luftvägssjukdomar. Dessutom leder den till trötthet och
koncentrationssvårigheter. Hälsosam luft bör ha en relativ luftfuktighet mellan
40 och 60%. Luftbefuktarens tysta och energisnåla ultraljudsteknologi
omvandlar vatten till en fin dimma som höjer luftfuktigheten. Luftkvaliteten
förbättras vilket minskar risken för torr hy och torra slemhinnor och ger ökat
välbefinnande. Programmerbara påslagnings- och avstängningstider samt
belysning gör det möjligt att skapa olika stämningar i rummet. Apparaten har
en förvärmningsfunktion som dödar bakterier och andra mikroorganismer.
Apparaten är dimensionerad för att fukta den omedelbara omgivningsluften i
upp till ca 15 kvadratmeter stora rum.
OBSERVERA
Se till att MEDISANA luftfuktaren står på ett stabilt underlag, så
att den inte kan tippa. Underlaget måste även vara fuktresistent.
Detta är särskilt viktigt om kalkhaltigt vatten / aromessenz
används, då detta kan orska avlagringar / droppbildning.
Page 63

59
S
3 Användning
3.4
Slå på och av
luftfuktaren /
effektnivå 1 och 2
3.2
Vattenbehållaren
fylls och töms
Skölj vattenbehållaren och spridarinsatsen noga med rent kranvatten före
den första användningen. Ta bort vattentanken från apparaten, vänd
den och skruva av tanklocket. Fyll på
vattentanken med max. 1,3, liter färskt
dricksvatten eller avmineraliserat vatten.
Skruva fast tanklocket igen och torka
bort eventuella vattendroppar från
tanken. Se till att lockets tätning sitter
rätt. Sätt på vattentanken på apparaten med påfyllningsöppningen nedåt.
Transportera inte apparaten med fylld vattenbehållare. I annat fall kan
rörelsen leda till att vattenytan skvalpar och stiger över dimmembranet, vilket
gör att dimbildningen förhindras. När apparaten stängts av kan dimmunstycket
tas loss och kvarvarande vatten torkas upp med hjälp av en duk. Häll ut rest-
vattnet efter avslutad användning och skölj ur tanken med färskt
dricksvatten.
Innan du använder den igen, fyller du den med färskt dricksvatten
eller avmine-
raliserat vatten.
Om Ni inte ämnar använda apparaten en längre tid, ta då loss vat-
tenbehållaren
från apparaten och töm tanken och apparaten.
Det går att använda vattenlösliga aromessenser i apparaten. Tillsätt då ca 10
droppar essens i den fyllda (1,3 liter) vattentanken.
Tänk på att det kan bildas en utfällning när man droppar i essensen. Aromessenser med olika dofter kan beställas från MEDISANA.
Sätt fast munstycket på dimenheten på apparaten.
Sätt i nätsladden i uttaget och strömkontakten i ett vägguttag.
Tryck kort på ON/OFF-knappen ; apparaten börjar vattendimman bildas
och fläkten startar med hög effekt (effektnivå 1). Den höga fläkteffekten gör
att det avges mer fukt till omgivningsluften. Luftfuktarens påslagningssymbol s
visas på displayen . När luftfuktaren slås på med ON/OFf-knappen aktiveras även förvämningsfunktionen som dödar bakterier och andra mikroorganismer. När man trycker på ON/OFF-knappen ännnu en gång börjar apparaten arbeta med sänkt effekt (effektnivå 2). Luftfuktarens påslagningssymbol
blinkar. Apparaten stängs av genom att man trycker en tredje gång på
ON/OFF-knappen .
Apparatens automatiska avstängningsfunktionen säkerställer att dimbildningen samt fläkten stängs av när vattenbehållaren inte innehåller tillräckligt
mycket vatten.
Användingslängd:
Nivå 1 med 1,3 liter vatten: ca. 20 timmar.
Nivå 2 med 1,3 liter vatten: ca. 30 timmar.
3.3
Påfyllning av
aromessens
Page 64

60
3 Användning
S
3.6
Ställa in
komfortfunktionen
MEDISANA Intensiv luftfuktarens Ultrabreeze vattenbehållare har utrustats
med
en intern belysningsenhet. Denna tänds genom ett lätt tryck på LIGHT
-knappen . På displayen visas symbolen för belysning . Belysningen har
blå färg. När knappen trycks för andra gången blir ljuset rött, när den trycks
en tredje gång blir ljuset grönt. Den fjärde gången LIGHT-knappen trycks
lyser de tre färgerna (blått/rött/grönt) omväxlande i 10 sekunders intervall. När
färgerna växlar lyser två färger samtidigt. När knappen trycks för femte
gången kan man välja färg för en bestämd tidpunkt:
kl. 00.00 - 08.00 - grönt ljus
kl. 08.00 - 16.00- rött ljus
kl. 16.00 - 24 00 - blått ljus
Stäng av belysningen genom att trycka en sjätte gång på LIGHT-knappen .
Belysningssymbolen slocknar.
Belysningen kan användas oberoende av spridaren och fläkten, t.ex. som nattlampa.
När apparaten stängs av automatiskt fortsätter belysningen att lysa. Ljusets
intensitet avtar när dimbildningen är aktiverad.
MEDISANA intensiv luftfuktaren Ultrabreeze har 3 komfort
funktioner:
en klocka,
en
inbyggd timer och en alarmfunktion.
För att Ultrabreeze ska kunna användas som klocka eller väckarklocka med alarm
måste klockan först ställas rätt.
Med den inbyggda timern kan luftfuktaren slås på och av automatiskt vid
bestämda tidpunkter.
Inställningarna av klockan, timern och väckarklockan görs efter varandra i ett
inställningsförlopp. Om du vill hoppa över någon av inställningarna, tryck på
SET-knappen tills nästa inställningsläge aktiveras. Inställningsläget för timern
visas med “ON” resp. “OFF”, för alarm visas . Inställningsläget avslutas om
det går 10 sekunder utan att man trycker på någon knapp.
Första gången SET-knappen trycks aktiveras inställningsläget för klockan. På
displayen blinkar “00.00”. Tryck på hour-knappen flera gånger tills aktuellt
timtal visas. Gör på samma sätt med med min-knappen för att ställa in
minuterna.
Andra gången SET-knappen trycks aktiveras inställningsläget för timern. På
displayen visas “ON”. Tryck på hour-knappen flera gånger tills det timtal visas
vid vilket luftfuktaren ska slås på. Gör på samma sätt med min-knappen som
med hour-knappen .
Luftfuktaren slås på vid den inställda påslagningstiden.
3.5
Belysning
Ställa
klockan
Ställa in
tidur
Page 65

61
S
3 Användning
Tredje gången SET-knappen trycks visas "OFF" på displayen. Tryck på hourknappen flera gånger tills det timtal visas vid vilket luftfuktaren ska stängas
av. Gör på samma sätt med min-knappen som med hour-knappen .
Luftfuktaren stängs av vid den inställda avstängningstiden.
Fjärde gången SET-knappen trycks aktiveras inställningsläget för alarmet.
På displayen blinkar alarmsymbolen . Tryck på hour-knappen flera gånger
tills det timtal visas vid vilket alarmet ska aktiveras. Gör på samma sätt med minknappen som med hour-knappen .
När SET-knappen trycks in för femte gången kan man aktivera eller avaktivera det inställda alarmet. Tryck på hour-knappen för att aktivera den inställda
alarmtiden. alarmsymbolen visas på displayen. Tryck på min-knappen för
att avaktivera det inställda alarmet; alarmsymbolen slocknar .
När alarmet ljuder kan det stängas av med valfri knapp (utom SNOOZE-knappen).
Sjätte gången SET-knappen trycks återgår displayen till visning av aktuellt
klockslag.
Med SNOOZE-knappen aktiveras snoozefunktionen när alarmet är aktiverat.
Alarmet avbryts och sätts automatiskt igång igen efter 10 minuter.
Ställa in
väckarklockan
Snoozefunktion
Page 66

62
4 Övrigt
S
•
Se före rengöring till att apparaten är avstängd och nätdelen utdragen ur
vägguttaget.
•
Rengör apparaten utvändigt med en fuktig, mjuk trasa.
•
Använd inga aggressiva substanser vid rengöringen, som exempelvis
skurmedel eller andra diskmedel. Dessa kan angripa ytorna.
•
Om apparaten används ofta, rekommenderar vi att rengöra den grundligt
minst en gång i veckan. Vattentanken och dimtillsatsen kan man skölja
riktigt rena med hett vatten (>65 °C) eller minst 75% alkohol. Dimkammaren
och tankkammaren rengör du med en trasa doppad i alkohol och en
bomullstopp. Se till att inget vatten kommer in i apparatens inre.
• Om apparaten ska stå oanvänd under längre tid: töm ut vattnet ur vatten -
tanken och torka apparaten.
•
Förvara apparaten på en torr, sval plats.
Denna apparat får inte kastas i hushållssoporna.
Varje konsument måste lämna in alla elektriska eller elektroniska apparater
till motsvarande insamlingsställen, oberonde av om apparaterna innehåller
skadliga ämnen eller ej, så att de kan omhändertas på ett miljövänligt sätt.
Kontakta kommunen eller återförsäljaren för att få information om återvinning.
Namn och modell : MEDISANA Intensiv luftbefuktare
Ultrabreeze
Strömförsörjning med nätadapter
: Input 200-240 V~, 50/60 Hz, 0,8 A
Output 24 V , 1,5 A
Effekt : ca 36 W
Mått L x B x H : ca 196 x 135 x 256 mm
Vikt inkl. strömkontakt : ca 1.100 g
Artikelnummer : 60050
EAN-nummer : 40 15588 60050 0
Specialtillbehör vardera 10 ml aromessens
(tillval, ingår inte i leveransen)
Artikelnummer : 60005 eukalyptus
60006 jasmin
60007 lavendel
60008 rose
60009 lemon
Som följd av ständigt pågående produktförbättringar
förbehåller vi oss rätten till tekniska förändringar samt
förändringar i utförande.
4.1
Rengöring
och vård
4.2
Hänvisning
gällande
avfallshantering
4.3
Tekniska Data
Page 67

63
S
5 Garanti
Kontakta inköpsstället vid garantifrågor, eller tag kontakt med kundtjänst
direkt. Måste produkten skickas in så bifoga uppgifter om defekten samt en
kopia av inköpskvittot.
Följande garantiförutsättningar gäller:
1. På MEDISANA produkter lämnas tre års garanti, från inköpsdatum.
Inköpsdatum ska vid garantiförehavanden förevisas med inköpskvitto
eller faktura.
2. Felaktigheter på grund av material- eller tillverkningsfel åtgärdas kostnadsfritt under garantiperioden.
3. Utförande av garantiåtagande leder inte till förlängning av garantiperioden; detta gäller för själva produkten så väl som för utbytta komponenter.
4. Garantin gäller inte för:
a. Alla skador som uppkommer på grund av felaktig hantering, t.ex. vid
icke beaktande av bruksanvisningen.
b. Skador som kan härledas till iordningsställande eller ingrepp utförda
av köparen eller annan, ej auktoriserad, person.
c. Transportskador som uppkommit under transport från tillverkaren till
användaren eller vid insändning till kundtjänst.
d. Tillbehör som utsätts för normalt slitage
5. Ansvar för direkta eller indirekta följdskador som förorsakas av pro-
dukten är uteslutet, även om skadan på produkten godkänns som
garantiåtagande.
MEDISANA AG
Itterpark 7-9
40724 Hilden
Tyskland
Tel.: +49 (0) 2103 / 2007-60
Fax: +49 (0) 2103 / 2007-626
eMail: info@medisana.de
Internet: www.medisana.de
Serviceadressen finns på sista sidan.
5.1
Garanti och
förutsättningar
för reparationer
Page 68

64
1 √‰ËÁ›Â˜ ÁÈ· ÙËÓ ·ÛÊ¿ÏÂÈ·
GR
1.1
™·˜
В˘¯·ЪИЫЩФ‡МВ
1.2
™ËÌ·ÓÙÈÎfi
ФП‡ БИ· ЩЛУ ВМИЫЩФЫ‡УЛ Ы·˜ О·И Ы·˜ В˘¯fiМ·ЫЩВ О·П‹ ВИЩ˘¯›·!
Με τη συσκευή εντατικής ύγρανσης αέρα Ultrabreeze αοκτήσατε
ένα ροόν οιότητας MEDISANA. °È· Ó· ¤¯ÂÙ ÙÔ ÂÈı˘ÌËÙfi
·ФЩ¤ПВЫМ· О·И У· ¯ЪЛЫИМФФИВ›ЩВ ЩЛ Ы˘ЫОВ˘‹ ‡БЪ·УЫЛ˜ ЩФ˘ ·¤Ъ·
MEDISANA Ultrabreeze ÁÈ· ·ÚÎÂÙfi ηÈÚfi, Û·˜ ÚÔÙ›ÓÔ˘Ì ӷ
‰È·‚¿ÛÂÙÂ
ЪФЫВОЩИО¿ ЩИ˜ ВfiМВУВ˜ Ф‰ЛБ›В˜ БИ· ЩЛ ¯Ъ‹ЫЛ О·И КЪФУЩ›‰· ЩЛ˜.
Πριν χρησιμοποιήσετε τη συσκευή μελετήστε προσεκτικά τις
οδηγίες χρήσης και ιδιαίτερα τις οδηγίες ασφαλείας και φυλάξτε
το εγχειρίδιο για μελλοντική χρήση. Όταν δίνετε τη συσκευή
σε άλλα άτομα, δώστε μαζί και αυτό το εγχειρίδιο χρήσης.
•
¡· ЪФЫ¤НВЩВ ЪФЩФ‡ Ы˘У‰¤ЫВЩВ ЩЛ Ы˘ЫОВ˘‹ МВ ЩЛУ ·ЪФ¯‹
ЪВ‡М·ЩФ˜, ·У Л Щ¿ЫЛ ЛПВОЪИОФ‡ ‰ИОЩ‡Ф˘ Ф˘ ·У·БЪ¿КВЩ·И ЫЩЛУ ВЩИО¤Щ·
ЩВ¯УИОТУ ЫЩФИ¯В›ˆУ ЩЛ˜ Ы˘ЫОВ˘‹˜ ·УЩ·ФОЪ›УВЩ·И ЫЩЛУ Щ¿ЫЛ ЩФ˘
ЛПВОЩЪИОФ‡ Ы·˜ ‰ИОЩ‡Ф˘.
• ¡· ¯ЪЛЫИМФФИВ›ЩВ ЩЛ Ы˘ЫОВ˘‹ МfiУФ Ы‡МКˆУ· МВ ЩФУ ЪФФЪИЫМfi ЩЛ˜ Ф˘
·У·К¤ЪВЩ·И ЫЩИ˜ Ф‰ЛБ›В˜ ¯ВИЪИЫМФ‡.
∏ Û˘Û΢‹ ‰ÂÓ ÚÔÔÚ›˙ÂÙ·È ÁÈ·
ÂÌÔÚÈ΋ ¯Ú‹ÛË.
• ªЛ ‚¿˙ВЩВ ЫВ ПВИЩФ˘ЪБ›· ЩЛ Ы˘ЫОВ˘‹ ОФУЩ¿ ЫВ ЛПВОЩЪФМ·БУЛЩИОФ‡˜
ÔÌÔ‡˜ ˘„ËÏ‹˜ Û˘¯ÓfiÙËÙ·˜, επειδή μπορεί να επηρεάσουν τη
λειτουργία της συσκευής.
• ªЛУ ·К‹УВЩВ ЩЛ Ы˘ЫОВ˘‹ ¯ˆЪ›˜ В›‚ПВ„Л ОФУЩ¿ ЫВ ·И‰И¿. √И ЛПВОЩЪИО¤˜
Û˘Û΢¤˜ ‰ÂÓ Â›Ó·È ·È¯Ó›‰È·.
• ™В ВЪ›ЩˆЫЛ ‚П¿‚Л˜ МЛУ ВИ‰ИФЪıТУВЩВ ЩЛ Ы˘ЫОВ˘‹ МfiУФИ Ы·˜ О·И МЛУ
ЩЛ ¯ЪЛЫИМФФИВ›ЩВ. ƒˆЩ‹ЫЩВ ЩФУ ·УЩИЪfiЫˆФ О·И ‰ТЫЩВ ЩЛ Ы˘ЫОВ˘‹ БИ·
ВИЫОВ˘‹ ЫВ ¤У· ВНФ˘ЫИФ‰ФЩЛМ¤УФ Ы˘УВЪБВ›Ф.
• ™·˜ ÂÈÙÚ¤ÂÙ·È ÌfiÓÔ Ó· ηı·Ú›˙ÂÙ ÙË Û˘Û΢‹.
• ГЪЛЫИМФФИ‹ЫЩВ ·ФОПВИЫЩИО¿ Щ· ВН·ЪЩ‹М·Щ· Ф˘ ЪФ‚П¤ФУЩ·И БИ· ЩЛ
Û˘Û΢‹ Î·È Ô˘ ·Ú·‰›‰ÔÓÙ·È ·fi ÙÔÓ Î·Ù·Û΢·ÛÙ‹.
• ∞ÔÌ·ÎÚ‡ÓÂÙ ‹ ÙÔÔıÂÙ›Ù ٷ ÂÍ·ÚÙ‹Ì·Ù· ÌfiÓÔ fiÙ·Ó Ë Û˘Û΢‹ ‰ÂÓ
В›У·И ЫВ ПВИЩФ˘ЪБ›·.
• ∞ФıЛОВ‡ЫЩВ ЩЛ Ы˘ЫОВ˘‹ ЫВ ЫЩВБУfi ¯ТЪФ.
• ªЛ ‚¿˙ВЩВ ЫВ ПВИЩФ˘ЪБ›· ЩЛ Ы˘ЫОВ˘‹ fiЩ·У Ф ı¿П·МФ˜ ·ЩМФ‡ ‰ВУ ВЪИ¤¯ВИ
ηıfiÏÔ˘ ‹ Ï›Á· ˘ÁÚ¿.
• ªЛ ¯ЪЛЫИМФФИВ›ЩВ ЩЛ Ы˘ЫОВ˘‹ О¿Щˆ ·fi ОФ˘‚¤ЪЩВ˜ ‹ М·НИП¿ЪИ·.
• Κρατήστε τις σχισμές αερισμού στο κάτω μέρος της συσκευής
ανοικτές, καθαρές από σκόνη και βρωμιές.
∫·Щ¿ ЩЛ ПВИЩФ˘ЪБ›· ЛПВОЩЪИОТУ Ы˘ЫОВ˘ТУ МВ ЪВ˘М·ЩФП‹ЩЛ ЪФЫ¤НЩВ
И‰И·›ЩВЪ·:
• ªËÓ ÚÔÛ·ı‹ÛÂÙ ӷ È¿ÛÂÙ ̛· Û˘Û΢‹ ‰ÈÎÙ‡Ô˘ Ô˘ ¤ÂÛ ÛÙÔ ÓÂÚfi.
μÁ¿ÏÙ ÙÔ ÚÂ˘Ì·ÙÔÏ‹ÙË ·fi ÙËÓ Ú›˙·.
• ∂¿Ó ÙÔ Î·ÏÒ‰ÈÔ ‹ Ô ÚÂ˘Ì·ÙÔÏ‹Ù˘ ¤¯Ô˘Ó ‚Ï¿‚Ë ··ÁÔÚ‡ÂÙ·È Ó·
¯ЪЛЫИМФФИФ‡УЩ·И. °И· ПfiБФ˘˜ ·ЫК¿ПВИ·˜ Ъ¤ВИ ·˘Щ¿ Щ· ВН·ЪЩ‹М·Щ· У·
·УЩИО·ıИЫЩФ‡УЩ·И ·fi Щ· ВНФ˘ЫИФ‰ФЩЛМ¤У· Ы˘УВЪБВ›·.
• ¢ÂÓ Ú¤ÂÈ Ó· ‚˘ı›˙ÂÙ ÙË Û˘Û΢‹, ÙÔ Î·ÏÒ‰ÈÔ Î·È ÙÔ ÚÂ˘Ì·ÙÔÏ‹ÙË ÛÙÔ
ÓÂÚfi ‹ Ó· Ù· ¤¯ÂÙ οو ·fi ÙÚ¯ԇÌÂÓÔ ÓÂÚfi.
• Το καλώδιο δεν επιτρέπεται να περνάει κοντά από πηγές θερμότητας
ή πάνω από αιχμηρές άκρες.
• ¶И¿УВЩВ ¿УЩ· ЩФ ЪВ˘М·ЩФП‹ЩЛ МВ ЫЩВБУ¿ ¯¤ЪИ·.
Page 69

GR
1 √‰ЛБ›В˜ БИ· ЩЛУ ·ЫК¿ПВИ· / 2 ГЪ‹ЫИМВ˜ ПЛЪФКФЪ›В˜ / 3 ∂Ê·ÚÌÔÁ‹
3.1
§ÂÈÙÔ˘ÚÁ›·
2.1
¶ÂÚȯfiÌÂÓÔ
·Ú¿‰ÔÛ˘ ηÈ
Û˘Û΢·Û›·
1.2
™ËÌ·ÓÙÈÎfi
2.2
™˘Û΢‹ ÂÓÙ·ÙÈ΋˜
‡ÁÚ·ÓÛ˘ ·¤Ú·
• ªË ÌÂٷʤÚÂÙ ÌËÓ ÙÚ·‚¿Ù ‹ ÛÙÚ›‚ÂÙ ÙÔ ÚÂ˘Ì·ÙÔÏ‹ÙË ·fi ÙÔ
О·ПТ‰ИФ О·И МЛ М·ББТУВЩВ ЩФ О·ПТ‰ИФ.
• μÁ¿ÏÙ ÙÔ ÚÂ˘Ì·ÙÔÏ‹ÙË ·fi ÙËÓ Ú›˙· fiÙ·Ó Ë Û˘Î¢‹ ‰ÂÓ Â›Ó·È ÛÂ
ПВИЩФ˘ЪБ›· О·И ‰ВУ ЩЛ ¯ЪЛЫИМФФИВ›ЩВ ¿ППФ.
• ™В ВЪ›ЩˆЫЛ ·ППВЪБ›·˜ ЩˆУ ·У·УВ˘ЫЩИОТУ Ф‰ТУ ·В˘ı˘УıВ›ЩВ ЫЩФУ И·ЩЪfi
Ы·˜ ЪИУ ¯ЪЛЫИМФФИ‹ЫВЩВ ЩЛ Ы˘ЫОВ˘‹.
∂ϤÁÍÙ ·Ú¯Èο ÙËÓ ÏËÚfiÙËÙ· Ù˘ Û˘Û΢‹˜.
ΔÔ ÂÚȯfiÌÂÓÔ ·Ú¿‰ÔÛ˘ ÂÚÈÏ·Ì‚¿ÓÂÈ:
•
1 ™˘Û΢‹ ÂÓÙ·ÙÈ΋˜ ‡ÁÚ·ÓÛ˘ ·¤Ú· Medibreeze PLUS Ì ÓÙÂfi˙ÈÙÔ
ÓÂÚÔ‡ Î·È ÂÍ¿ÚÙËÌ· ·ÙÌÔ‡
•
1 ŒÓ·Ó ·ÓÙ¿ÙÔÚ· ‰ÈÎÙ‡Ô˘ / ˘Ô‰Ô¯‹ ‰ÈÎÙ‡Ô˘
•
1 ΔȘ Ô‰ËÁ›Â˜ ¯Ú‹Û˘
√И Ы˘ЫОВ˘·Ы›В˜ В›У·И В·У·¯ЪЛЫИМФФИ‹ЫИМВ˜ ‹ МФЪФ‡У У·
·У·О˘О-ПˆıФ‡У ЫЩФУ О‡ОПФ ЪТЩˆУ ˘ПТУ. ™·˜ ·Ъ·О·ПФ‡МВ У· ·ФЫ‡ЪВЩВ
ЩФ ˘ПИОfi Ы˘ЫОВ˘·Ы›·˜ Ф˘ ‰ВУ ¯ЪЛЫИМФФИВ›Щ·И П¤ФУ Ы‡МКˆУ· МВ ЩФ˘˜
О·УФУИЫМФ‡˜. ™В ВЪ›ЩˆЫЛ Ф˘ О·Щ¿ ЩЛУ ·К·›ЪВЫЛ ЩЛ˜ Ы˘ЫОВ˘‹˜ ·fi ЩЛ
Ы˘ЫОВ˘·Ы›· ‰И·ИЫЩТЫВЩВ О¿ФИ· ‚П¿‚Л ФКВИПfiМВУЛ ЫЩЛ МВЩ·КФЪ¿, Ы·˜
·Ъ·О·ПФ‡МВ У· ·В˘ı˘УıВ›ЩВ ·М¤Ыˆ˜ ЫЩФУ ¤МФЪfi Ы·˜.
¶ƒ√∂π¢√¶√π∏™∏
¶ÚÔÛ¤¯ÂÙ ÒÛÙ ٷ Ï·ÛÙÈο Û˘Û΢·Û›·˜ Ó· ÌËÓ ÂÚȤÏıÔ˘Ó
Û ·È‰Èο ¯¤ÚÈ·. À¿Ú¯ÂÈ Î›Ó‰˘ÓÔ˜ ·ÛÊ˘Í›·˜!
π‰И·›ЩВЪ· О·Щ¿ ЩФ˘˜ ¯ВИМВЪИУФ‡˜ М‹УВ˜ Ф ФП‡ НЛЪfi˜ ·¤Ъ·˜ ¯ТЪФ˘ ·˘Н¿УВИ
ЩЛУ ЪФ‰И¿ıВЫЛ БИ· МФП˘ЫМ·ЩИО¤˜ УfiЫФ˘˜ О·И ·ППВЪБ›В˜ ЩˆУ
·У·УВ˘ЫЩИОТУ Ф‰ТУ О·И ЪФО·ПВ› ОfiˆЫЛ О·И МВИˆМ¤УЛ ИО·УfiЩЛЩ·
·˘ЩФЫ˘БО¤УЩЪˆЫЛ˜. √ ˘БИ‹˜ ·¤Ъ·˜ ı· Ъ¤ВИ У· ‰И·ı¤ЩВИ М›· Ы¯ВЩИО‹
˘БЪ·Ы›· ·fi 40 ¤ˆ˜ 60 %.
∏ Ы¯В‰fiУ ·ıfiЪ˘‚Л О·И ФИОФУФМИО‹ ˘ВЪЛ¯ЛЩИО‹ ЩВ¯УФПФБ›· ЩЛ˜ Ы˘ЫОВ˘‹˜
‡БЪ·УЫЛ˜ ·¤Ъ· МВЩ·ЩЪ¤ВИ ЩФ УВЪfi ЫВ ·ЩМfi, Ф ФФ›Ф˜ ·˘Н¿УВИ ЩФ ‚·ıМfi
˘БЪ·Ы›·˜ ЩФ˘ ·¤Ъ·. Αυτό βελτιώνει την ποιότητα του αέρα και
προλαμβάνει την αποξήρανση των βλεννογόνων και του δέρματος και
έτσι βελτιώνει το συναίσθημα ευεξίας. Ο προγραμματισμός του
χρόνου ενεργοποίησης και απενεργοποίησης καθώς και ένας
πρόσθετος φωτισμός συνεισφέρουν στη δημιουργία προσωπικής
ατμόσφαιρας. Η συσκευή διαθέτει αυτόματη λειτουργία
προθέρμανσης για την εξόντωση μικροβίων και βακτηρίων. Η συσκευή
προορίζεται για την ύγρανση του άμεσου αέρα περιβάλλοντος σε
χώρους (μέχρι 15 τ.μ.).
ΠΡΟΣΟΧΗ
μВ‚·ИˆıВ›ЩВ fiЩИ Л Ы˘ЫОВ˘‹ ‡БЪ·УЫЛ˜ ЩФ˘ ·¤Ъ· MEDISANA
ПВИЩФ˘ЪБВ› ¿Уˆ ЫВ М›· ЫЩ·ıВЪ‹ ВИК¿УВИ· Ф˘ ‰ВУ В›У·И
В˘·›ЫıЛЩЛ ЫЩЛУ ˘БЪ·Ы›·. π‰И·›ЩВЪ· О·Щ¿ ЩЛ ПВИЩФ˘ЪБ›· МВ
·Ы‚ВЫЩФПИıИОfi УВЪfi / ·fiЫЩ·БМ· ·ЪТМ·ЩФ˜ МФЪВ› У·
‰ЛМИФ˘ЪБЛıФ‡У И˙‹М·Щ· / О·Щ·О¿ıИ·.
65
Page 70

66
3 ∂Ê·ÚÌÔÁ‹
GR
3.4
Ενεργοποίηση και
απενεργοποίηση
του υγροποιητή /
Βαθμίδες ισχύος
1 και 2
3.2
°¤ÌÈÛÌ· ηÈ
¿‰ÂÈ·ÛÌ· ÙÔ˘
ÓÙÂfi˙ÈÙÔ˘ ÙÔ˘
ÓÂÚÔ‡
Πριν από την πρώτη χρήση ξεπλύντε προσεκτικά με καθαρό νερό το
δοχείο νερού και το εξάρτημα
νεφελωτή. Αφαιρέστε το δοχείο
νερού
από τη συσκευή, στρέψτε το ανάποδα και ξεβιδώστε την
τάπα. Γεμίστε το δοχείο με έως 1,3
λίτρα καθαρού πόσιμου νερού ή
απιονισμένου νερού.
Βιδώστε πάλι την τάπα και σκουπίστε τυχόν σταγόνες από το
δοχείο. Προσέξτε τη σωστή εφαρμογή του στεγανοποιητικού παρεμβύσματος στο καπάκι. Βάλτε το
δοχείο νερού πάνω στη συσκευή με το άνοιγμα πλήρωσης προς τα
κάτω.
ªЛ МВЩ·К¤ЪВЩВ ЩЛ Ы˘ЫОВ˘‹ МВ П‹ЪВ˜ УЩВfi˙ИЩФ. ¢И·КФЪВЩИО¿ МФЪВ› МВ
ЩИ˜ Щ·П¿УЩˆЫВИ˜ У· ·У¤‚ВИ Л ЫЩ¿ıМЛ ЩФ˘ УВЪФ‡ ¿Уˆ ·fi ЩЛ МВМ‚Ъ¿УЛ
ЩФ˘ ·ЩМФ‡ ОИ ¤ЩЫИ У· МЛ ‰ЛМИФ˘ЪБВ›Щ·И ·ЩМfi˜.
ŸЩ·У Л Ы˘ЫОВ˘‹ ‰ВУ В›У·И ЫВ ПВИЩФ˘ЪБ›· МФЪВ›ЩВ У· ·ФМ·ОЪ‡УВЩВ
ЩФ ВН¿ЪЩЛМ· ·ЩМФ‡
О·И У· М·˙¤„ВЩВ ЩФ УВЪfi Ф˘ ВЪИЫЫВ‡ВИ М’¤У·
·У›. ∞ФЫ‡ЪВЩВ ЩФ ˘fiПФИФ УВЪfi МВЩ¿ ЩЛ ¯Ъ‹ЫЛ О·И НВП‡УВЩВ ЩФ
УЩВfi˙ИЩФ МВ КЪ¤ЫОФ fiЫИМФ УВЪfi. ¶ЪИУ ЪФ‚В›ЩВ ЫВ У¤· ¯Ъ‹ЫЛ БВМ›ЫЩВ
ЩФ УЩВfi˙ИЩФ МВ КЪ¤ЫОФ fiЫИМФ УВЪfi ή απιονισμένο νερό.
Όταν θέλετε να απενεργοποιήσετε τη συσκευή και να μην τη χρησιμοποιήσετε για αρκετό καιρό, αφαιρέστε το δοχείο νερού από τη
συσκευή και αδειάστε το δοχείο και τη συσκευή.
Μπορείτε να λειτουργήσετε τη συσκευή με ένα υδατοδιαλυτό άρωμα.
Για το σκοπό αυτό προσθέστε 10 σταγόνες αρώματος μέσα στο δοχείο
νερού που είναι γεμάτο με 1,3 λίτρα.
∂¯ÂÙ ˘fi„Ë Û·˜ fiÙÈ Ì ÙËÓ ÚÔÛı‹ÎË ÙÔ˘ ·ÔÛÙ¿ÁÌ·ÙÔ˜ ÌÔÚ› Ó·
‰ËÌÈÔ˘ÚÁËı› ›˙ËÌ·! Μπορείτε να αγοράσετε διάφορα αρώματα από
την MEDISANA.
ΔÔÔıÂÙ‹ÛÙ ÙÔ ÂÍ¿ÚÙËÌ· ÁÈ· ÙË ÌÔÓ¿‰· ·ÙÌÔ‡ ÛÙË Û˘Û΢‹.
™˘Ó‰¤ÛÙ ÙÔ Î·ÏÒ‰ÈÔ ÙÔ˘ ÚÂ˘Ì·ÙÔÏ‹ÙË Ì ÙËÓ ˘Ô‰Ô¯‹ Ù˘ Ú›˙·˜
Î·È ‚¿ÏÙ ÙÔ ÚÂ˘Ì·ÙÔÏ‹ÙË ÛÙËÓ Ú›˙·.
Μετά από σύντομο πάτημα του πλήκτρου ON/OFF
αρχίζει η
συσκευή με τη νεφέλωση του νερού και ο φυσητήρας λειτουργεί με
μεγάλη ένταση (βαθμίδα 1). Χάρη στην αυξημένη ισχύ του φυσητήρα
διοχετεύεται περισσότερη υγρασία στον ατμοσφαιρικό αέρα. Στην
ένδειξη
εμφανίζεται το σύμβολο λειτουργίας του υγροποιητή .
Μόλις ενεργοποιήσετε τον υγροποιητή με το πλήκτρο ON/OFF, ενεργοποιείται επίσης η προθέρμανση για την εξολόθρευση των μικροβίων
και των βακτηρίων. Αν πατήσετε το πλήκτρο ON/OFF για δεύτερη
φορά, η συσκευή λειτουργεί με μειωμένη ένταση (βαθμίδα ισχύος 2).
Το σύμβολο λειτουργίας του υγροποιητή αναβοσβήνει. Αν
πατήσετε πάλι το πλήκτρο ON/OFF , η συσκευή απενεργοποιείται. ∏
·˘ЩfiМ·ЩЛ ·ВУВЪБФФ›ЛЫЛ ЫЩЛ Ы˘ЫОВ˘‹ ЫЩ·М·Щ¿ ЩЛ ПВИЩФ˘ЪБ›· БИ· ЩФУ
·ЩМfi О·И ЩЛ ПВИЩФ˘ЪБ›· ЩФ˘ К˘ЫЛЩ‹Ъ· МfiПИ˜ ЩВПВИТЫВИ ЩФ УВЪfi ЫЩФ
УЩВfi˙ИЩФ.
3.3
¶ÚfiÛıÂÛË
·ÔÛÙ¿ÁÌ·ÙÔ˜
·ÚÒÌ·ÙÔ˜
Page 71

67
GR
3 ∂Ê·ÚÌÔÁ‹
3.6
ƒ‡ıМИЫЛ
ПВИЩФ˘ЪБИТУ
¿УВЫЛ˜
¢И¿ЪОВИ· ПВИЩФ˘ЪБ›·˜
:
™Î¿Ï· ·fi‰ÔÛ˘ 1 Ì 1,3 λίτρα ÓÂÚfi: ÂÚ›Ô˘ 20 ÒÚ˜
™Î¿Ï· ·fi‰ÔÛ˘ 2 Ì 1,3 λίτρα ÓÂÚfi: ÂÚ›Ô˘ 30 ÒÚ˜
ΔÔ ÓÙÂfi˙ÈÙÔ ÓÂÚÔ‡ Ù˘ Û˘Û΢‹˜ ‡ÁÚ·ÓÛ˘ ÙÔ˘ ·¤Ú· Ù˘ MEDISANA
Ultrabreeze ‰И·ı¤ЩВИ М›· ВЫˆЩВЪИО‹ МФУ¿‰· КˆЩИЫМФ‡, Л ФФ›·
ВУВЪБФФИВ›Щ·И ·ЩТУЩ·˜ ВП·КЪ¿ ЩФ П‹ОЩЪФ LIGHT
. Στην οθόνη
εμφανίζεται το σύμβολο του φωτισμού . Το φως ανάβει με μπλε
χρώμα. Αν πατήσετε το πλήκτρο για δεύτερη φορά, εμφανίζεται το
φως κόκκινο, και με ένα τρίτο πάτημα του πλήκτρου το φως γίνεται
πράσινο. Αν πατήσετε το πλήκτρο φωτός (LIGHT) για τέταρτη φορά,
τα τρία χρώματα (μπλε/κόκκινο/πράσινο) εναλλάσσονται ανά 10
δευτερόλεπτα. Κατά την αλλαγή ανάβουν κάθε φορά δύο χρώματα
ταυτόχρονα. Πατώντας το πλήκτρο για πέμπτη φορά, επιλέγετε ένα
ορισμένο χρώμα για κάποιο ορισμένο διάστημα:
00:00 - 08:00 ώρα - πράσινο φως
08:00 - 16:00 ώρα - κόκκινο φως
16:00 - 24:00 ώρα - μπλε φως
Πατώντας για έκτη φορά το πλήκτρο LIGHT ο φωτισμός
απενεργοποιείται. Το σύμβολο φωτισμού σβήνει.
Ο φωτισμός μπορεί να λειτουργήσει ανεξάρτητα από τη νεφέλωση και
το φυσητήρα, για παράδειγμα ως νυχτερινός φωτισμός.
∂¿У Л Ы˘ЫОВ˘‹ ·ВУВЪБФФИВ›Щ·И ·˘ЩfiМ·Щ· Ф КˆЩИЫМfi˜ ·Ъ·М¤УВИ. ∏
¤УЩ·ЫЛ ЩФ˘ КˆЩИЫМФ‡ МВИТУВЩ·И fiЩ·У ВУВЪБФФИЛıВ› Ф ·ЩМfi˜.
Ο εντατικός υγροποιητής Ultrabreeze της MEDISANA διαθέτει 3 βολικές
λειτουργίες: μία ένδειξη ώρας,
έναν
ενσωματωμένο χρονοδιακόπτη και μία
λειτουργία ειδοποίησης.
Ρυθμίστε την ώρα, ώστε να χρησιμοποιείτε τη συσκευή Ultrabreeze ως
επιτραπέζιο ρολόι και με τη λειτουργία ειδοποίησης ως
ξυπνητήρι.
Ο ενσωματωμένος χρονοδιακόπτης σας επιτρέπει να ενεργοποιήσετε
και να απενεργοποιήσετε τον υγροποιητή κάποια συγκεκριμένη
χρονική στιγμή.
Η ρύθμιση της ώρας, του χρονοδιακόπτη και του χρόνου ειδοποίησης
γίνεται διαδοχικά με μία διαδικασία ρύθμισης. Αν δεν θέλετε να κάνετε
κάποια ρύθμιση πιέστε το πλήκτρο SET επανειλημμένα, τόσο μέχρι
να περάσετε στην επόμενη ρύθμιση. Η λειτουργία ρύθμισης για
το χρονοδιακόπτη εμφανίζεται με «ON» ή αντίστοιχα «OFF», για
την ειδοποίηση με . Αν κατά τη διάρκεια της ρύθμισης για 10
δευτερόλεπτα δεν πιέσετε κανένα πλήκτρο, η λειτουργία ρύθμισης
τερματίζεται.
Όταν πατήσετε το πλήκτρο SET για πρώτη φορά, περνάτε στη
λειτουργία ρύθμισης της ώρας. Στην οθόνη αναβοσβήνει η ένδειξη
«00.00». Πατήστε το πλήκτρο ωρών επανειλημμένα, μέχρι να
εμφανιστεί η τρέχουσα ώρα . Ενεργήστε με τον ίδιο τρόπο
χρησιμοποιώντας το πλήκτρο λεπτών ώστε να ρυθμίσετε τα λεπτά.
3.5
ºˆÙÈÛÌfi˜
ƒ‡ıÌÈÛË
ÒÚ·˜
Page 72

68
3 ∂Ê·ÚÌÔÁ‹
GR
Ρύθμιση
του χρόνου
ειδοποίησης
Προσωρινή
απενεργοποίηση
ƒ‡ıÌÈÛË
¯ÚÔÓԉȷÎfiÙË
Όταν πατήσετε το πλήκτρο SET για δεύτερη φορά, περνάτε στη
λειτουργία ρύθμισης του χρονοδιακόπτη. Στην οθόνη εμφανίζεται η
ένδειξη «ON». Πατήστε το πλήκτρο ωρών επανειλημμένα, μέχρι να
εμφανιστεί η ώρα, στην οποία θέλετε να ενεργοποιηθεί η συσκευή.
Ενεργήστε με το πλήκτρο λεπτών όπως και με το πλήκτρο ωρών .
Μόλις φτάσει η ρυθμισμένη ώρα, αρχίζει η λειτουργία του υγροποιητή.
Όταν πατήσετε το πλήκτρο SET για τρίτη φορά, εμφανίζεται η
ένδειξη «OFF». Πατήστε το πλήκτρο ωρών επανειλημμένα, μέχρι να
εμφανιστεί η ώρα, στην οποία θέλετε να απενεργοποιηθεί η συσκευή.
Ενεργήστε με το πλήκτρο λεπτών όπως και με το πλήκτρο ωρών .
Μόλις φτάσει η ρυθμισμένη ώρα απενεργοποίησης, η λειτουργία του
υγροποιητή σταματάει.
Όταν πατήσετε το πλήκτρο SET για τέταρτη φορά, περνάτε στη
λειτουργία ρύθμισης της ειδοποίησης. Στην οθόνη αναβοσβήνει το
σύμβολο ειδοποίησης . Πατήστε το πλήκτρο ωρών επανειλημμένα,
μέχρι να εμφανιστεί η ώρα, στην οποία θέλετε να χτυπήσει το
ξυπνητήρι. Ενεργήστε με το πλήκτρο λεπτών όπως και με το πλήκτρο
ωρών .
Όταν πατήσετε το πλήκτρο SET για πέμπτη φορά, μπορείτε να
ενεργοποιήσετε ή να απενεργοποιήσετε τη ρύθμιση ειδοποίησης.
Πατήστε το πλήκτρο ωρών , ώστε να ενεργοποιήσετε το ρυθμισμένο
χρόνο ειδοποίησης, το σύμβολο ειδοποίησης εμφανίζεται στην οθόνη.
Πατήστε το πλήκτρο λεπτών , ώστε να απενεργοποιήσετε το
ρυθμισμένο χρόνο ειδοποίησης, το σύμβολο ειδοποίησης σβήνει.
Όταν ακούγεται ο ήχος ειδοποίησης τη ρυθμισμένη ώρα, μπορείτε να
τον απενεργοποιήσετε με οποιοδήποτε πλήκτρο (εκτός από το πλήκτρο
SNOOZE).
Όταν πατήσετε το πλήκτρο SET για έκτη φορά, στην οθόνη
εμφανίζεται πάλι η τρέχουσα ώρα.
Όταν πατήσετε το πλήκτρο SNOOZE
μπορείτε να
απενεργοποιήσετε προσωρινά τον ήχο του κουδουνιού (SNOOZE).
Στην περίπτωση αυτή ο ήχος ειδοποίησης σταματά και ξαναρχίζει
αυτόματα μετά από 10 λεπτά.
Page 73

69
GR
4 ¢È¿ÊÔÚ·
•
¶ÚÈÓ Î·ı·Ú›ÛÂÙ ÙË Û˘Û΢‹, ‚‚·Èˆı›Ù fiÙÈ Ë Û˘Û΢‹ ›ӷÈ
·ВУВЪБФФИЛМ¤УЛ О·И ЩФ ЩЪФКФ‰ФЩИОfi ¤¯ВИ ‚БВИ ·fi ЩЛУ ЛПВОЩЪИО‹ Ъ›˙·.
•
∫·ı·Ъ›ЫЩВ ЩЛ Ы˘ЫОВ˘‹ ВНˆЩВЪИО¿ МВ ¤У· Уˆfi О·И М·П·Оfi ·У›.
•
ªЛ ¯ЪЛЫИМФФИВ›ЩВ БИ· ЩФУ О·ı·ЪИЫМfi О·˘ЫЩИО¤˜ Ф˘Ы›В˜, fiˆ˜ .¯.
ОЪ¤М· О·ı·ЪИЫМФ‡ ‹ ¿ПП· ·ФЪЪ˘·УЩИО¿, БИ·Щ› МФЪВ› У·
О·Щ·ЫЩЪ¤„Ф˘У ЩЛУ ВИК¿УВИ·.
•
™В ВЪ›ЩˆЫЛ Ы˘¯У‹˜ ПВИЩФ˘ЪБ›·˜ ЩЛ˜ Ы˘ЫОВ˘‹˜ Ы·˜ ЪФЩВ›УФ˘МВ У·
ЩЛУ О·ı·Ъ›˙ВЩВ О·П¿ ЩФ˘П¿¯ИЫЩФУ М›· КФЪ¿ ЩЛУ В‚‰ФМ¿‰·. ΔФ
УЩВfi˙ИЩФ УВЪФ‡ О·И ЩФ ВН¿ЪЩЛМ· ·ЩМФ‡ МФЪВ›ЩВ У· Щ· НВП¤УВЩВ О·П¿
МВ ˘¤ЪıВЪМФ УВЪfi (>65 ЖC) ‹ МВ ·ПОФfiПЛ ВЪИВОЩИОfiЩЛЩ·˜
ЩФ˘П¿¯ИЫЩФУ 75%. √ ı¿П·МФ˜ ·ЩМФ‡ О·И Ф ı¿П·МФ˜ УЩВfi˙ИЩФ˘
МФЪФ‡У У· О·ı·Ъ›˙ФУЩ·И МВ ·У› Ф˘ ¤¯ВИ ‰И·‚ЪВ¯ЩВ› МВ ·ПОФfiПЛ О·И
М·ЩФУ¤ЩВ˜ ‚·М‚·ОИФ‡. ∫·Щ¿ ЩФ О·ı¿ЪИЫМ· ЪФЫ¤¯ВЩВ ТЫЩВ У· МЛУ
‰ИВИЫ‰‡ЫВИ УВЪfi ЫЩФ ВЫˆЩВЪИОfi ЩЛ˜ Ы˘ЫОВ˘‹˜.
• Εάν δεν πρόκειται να χρησιμοποιήσετε τη συσκευή για μεγάλο
χρονικό διάστημα, αδειάστε το υπόλοιπο νερό από το δοχείο νερού
και απο τη συσκευή και σκουπίστε τη συσκευή.
•
∞ФıЛОВ‡ЫЩВ ЩЛ Ы˘ЫОВ˘‹ Ы’¤У· ЫЩВБУfi О·И ‰ЪФЫВЪfi ¯ТЪФ.
Η συσκευή αυτή δεν ειτρέεται να αοσύρεται µαζί µε τα οικιακά
αορρίµµατα.
Κάθε καταναλωτής είναι υοχρεωµένος να αραδίνει όλες τις
ηλεκτρικές ή ηλεκτρονικές συσκευές, ανεξάρτητα αν εµεριέχουν
βλαβερές ύλες, σε υηρεσία συλλογής του δήµου του ή στο ειδικό
εµόριο, ώστε νε είναι εφικτή η οικολογική αόσυρση των συσκευών
αυτών.
∞У·КФЪИО¿ МВ ЩЛУ ·ФОФМИ‰‹, ·В˘ı˘УıВ›ЩВ ЫЩИ˜ ЩФИО¤˜ ·Ъ¯¤˜ ‹
ÛÙÔÓ ·ÚÌfi‰ÈÔ ¤ÌÔÚÔ.
ŸÓÔÌ· Î·È ÌÔÓÙ¤ÏÔ : MEDISANA ™˘Û΢‹ ÂÓÙ·ÙÈ΋˜
‡ÁÚ·ÓÛ˘ ·¤Ú· Ultrabreeze
∏ПВОЩЪИО‹ ЩЪФКФ‰ФЫ›· με προσαρμογέα ρεύματος
: Input 200-240 V~, 50/60 Hz, 0,8 A
Output 24 V , 1,5 A
∞ФЪЪФКФ‡МВУЛ ИЫ¯‡˜ : ÂÚ. 36 W
¢È·ÛÙ¿ÛÂȘ Μ x Π x Υ : ÂÚ. 196 x 135 x 256 mm
μ¿ÚÔ˜
ÌÂ ÙËÓ
˘Ô‰Ô¯‹ ‰ÈÎÙ‡Ô˘ : ÂÚ. 1.100 g
∫ˆ‰ÈÎfi˜ ÚÔ˚fiÓÙÔ˜ : 60050
∞ÚÈıÌ. ∂∞¡ : : 40 15588 60050 0
Πρόσθετα εξαρτήματα, ανά 10 ml άρωμα
(κατά παραγγελία, δεν περιλαμβάνεται στη συσκευασία)
∫ˆ‰ÈÎfi˜ ÚÔ˚fiÓÙÔ˜ : 60005 Ευκάλυπτος
60006 Γιασεμί
60007 Λεβάντα
60008 Τριαντάφυλλο
60009 Λεμόνι
™Щ· П·›ЫИ· Ы˘УВ¯ТУ ‚ВПЩИТЫВˆУ ЩˆУ ЪФ˚fiУЩˆУ ‰И·ЩЛЪФ‡МВ
ЩФ ‰ИО·›ˆМ· ЩВ¯УИОТУ ‹ Ы¯ЛМ·ЩИОТУ ЩЪФФФИ‹ЫВˆУ.
4.1
∫·ı¿ÚÈÛÌ· ηÈ
Û˘ÓÙ‹ÚËÛË
4.2
√‰ËÁ›Â˜ ÁÈ·
ÙË ‰È¿ıÂÛË
4.3
Δ¯ÓÈο ÛÙÔȯ›·
Page 74

70
5 ∂ÁÁ‡ËÛË
GR
5.1
∂ÁÁ‡ËÛË Î·È
fiÚÔÈ ÂÈÛ΢ÒÓ
™В ВЪ›ЩˆЫЛ ВББ˘ЛЩИО‹˜ ·Н›ˆЫЛ˜ Ы·˜ ·Ъ·О·ПФ‡МВ У· ·В˘ı˘УıВ›ЩВ
ЫЩФ ВИ‰ИОfi О·Щ¿ЫЩЛМ· Ф˘ ·БФЪ¿Ы·ЩВ ЩЛ Ы˘ЫОВ˘‹ ‹ О·ЩВ˘ıВ›·У ЫЩФ
∫¤УЩЪФ ™¤Ъ‚И˜. ™В ВЪ›ЩˆЫЛ fiМˆ˜ Ф˘ В›У·И ··Ъ·›ЩЛЩЛ Л ·ФЫЩФП‹
ЩЛ˜ Ы˘ЫОВ˘‹˜, Ы·˜ ·Ъ·О·ПФ‡МВ У· ЩЛУ ЫЩВ›ПВЩВ МВ ·У·КФЪ¿ ЩФ˘
ВП·ЩЩТМ·ЩФ˜, ВИЫ˘У¿ЩФУЩ·˜ О·И ¤У· ·УЩ›БЪ·КФ ЩЛ˜ ·fi‰ВИНЛ˜ ·БФЪ¿˜.
°È· ÙËÓ ÂÁÁ˘ËÙÈ΋ ·Í›ˆÛË ÈÛ¯‡Ô˘Ó ÔÈ ·ÎfiÏÔ˘ıÔÈ fiÚÔÈ ÂÁÁ‡ËÛ˘:
1. °È· Ù· ÚÔ˚fiÓÙ· MEDISANA ·Ъ¤¯ВЩ·И ВББ‡ЛЫЛ ЩЪИТУ ВЩТУ ·fi ЩЛУ
ЛМВЪФМЛУ›· ·БФЪ¿˜. ™В ВЪ›ЩˆЫЛ ВББ˘ЛЩИО‹˜ ·Н›ˆЫЛ˜ Л ЛМВЪФМЛУ›·
·БФЪ¿˜ ı· Ъ¤ВИ У· ·Ф‰ВИОУ‡ВЩ·И М¤Ыˆ ·fi‰ВИНЛ˜ ‹ ЩИМФПФБ›Ф˘
·ÁÔÚ¿˜.
2. ∂П·ЩЩТМ·Щ· ФКВИПfiМВУ· ЫВ ЫК¿ПМ·Щ· ˘ПИОФ‡ ‹ О·Щ·ЫОВ˘‹˜
ВИ‰ИФЪıТУФУЩ·И ‰ˆЪВ¿У ВУЩfi˜ ЩФ˘ ¯ЪfiУФ˘ ВББ‡ЛЫЛ˜.
3. ™Â ÂÚ›ÙˆÛË ·ÚÔ¯‹˜ ÂÁÁ‡ËÛ˘ ‰ÂÓ ·Ú·Ù›ÓÂÙ·È Ô ¯ÚfiÓÔ˜
ÂÁÁ‡ËÛ˘, Ô‡Ù ÁÈ· ÙË Û˘Û΢‹ Ô‡Ù ÁÈ· ÂÍ·ÚÙ‹Ì·Ù· Ô˘
·ÓÙÈηٷÛÙ¿ıËηÓ.
4. ∞fi ÙËÓ ÂÁÁ‡ËÛË ·ÔÎÏ›ÔÓÙ·È:
·. fiПВ˜ ФИ ‚П¿‚В˜, ФИ ФФ›В˜ ФКВ›ПФУЩ·И ЫВ ·О·Щ¿ППЛПФ ¯ВИЪИЫМfi,
.¯. ·fi ·Ъ¿ПВИ„Л Щ‹ЪЛЫЛ˜ ЩˆУ Ф‰ЛБИТУ ¯Ъ‹ЫЛ˜.
‚. ‚Ï¿‚˜, ÔÈ Ôԛ˜ ÔÊ›ÏÔÓÙ·È Û ÂÈÛ΢¤˜ ‹ ÂÂÌ‚¿ÛÂȘ ÙÔ˘
·ÁÔÚ·ÛÙ‹ ‹ ·Ó·ÚÌfi‰ÈˆÓ ÙÚ›ÙˆÓ.
Á. ‚Ï¿‚˜ ÌÂÙ·ÊÔÚ¿˜, ÔÈ Ôԛ˜ ÚԤ΢„·Ó ηٿ ÙË ÌÂÙ·ÊÔÚ¿ ·fi
ЩФУ О·Щ·ЫОВ˘·ЫЩ‹ ЪФ˜ ЩФУ О·Щ·У·ПˆЩ‹ ‹ О·Щ¿ ЩЛУ ·ФЫЩФП‹
ЫЩФ ∫¤УЩЪФ ™¤Ъ‚И˜.
‰. ·УЩ·ПП·ОЩИО¿, Щ· ФФ›· ˘fiОВИУЩ·И ЫВ К˘ЫИФПФБИО‹ КıФЪ¿.
5. ∏ В˘ı‡УЛ БИ· ¿МВЫВ˜ ‹ ¤ММВЫВ˜ В·ОfiПФ˘ıВ˜ ˙ЛМИ¤˜, ФИ ФФ›В˜
ЪФО·ПФ‡УЩ·И ·fi ЩЛ Ы˘ЫОВ˘‹, ·ФОПВ›ВЩ·И ·ОfiМ· О·И ЫВ ВЪ›ЩˆЫЛ
Ф˘ Л ˙ЛМИ¿ ЫЩЛ Ы˘ЫОВ˘‹ ·У·БУˆЪИЫЩВ› ˆ˜ ВББ˘ЛЩИО‹ ·Н›ˆЫЛ.
™Â ÂÚ›ÙˆÛË Ô˘ ¤¯ÂÙ ÂÚˆÙ‹ÛÂȘ Û¯ÂÙÈο Ì ·˘Ùfi ‹ ¿ÏÏ· ÚÔ˚fiÓÙ·,
›̷ÛÙ ÛÙË ‰È¿ıÂÛ‹ Û·˜ Ó· Û·˜ ··ÓÙ‹ÛÔ˘Ì ÙȘ ÂÚˆÙ‹ÛÂȘ Û·˜ ·˘Ù¤˜.
MEDISANA AG
Itterpark 7-9
D-40724 Hilden
°ÂÚÌ·Ó›·
ΔËÏ.: +49 (0) 2103 / 2007-60
º·Í: +49 (0) 2103 / 2007-626
eMail: info@medisana.de
Internet: www.medisana.de
ΔË ‰È‡ı˘ÓÛË ™¤Ú‚Ș ı· ÙËÓ ‚Ú›Ù ÛÙËÓ ÙÂÏÂ˘Ù·›· ÛÂÏ›‰·.
Page 75

Page 76

Page 77

Adressen
D
MEDISANA AG
Itterpark 7-9
40724 Hilden
Tel.: 0 21 03 - 20 07-60
Fax: 0 21 03 - 20 07-626
eMail: info@medisana.de
Internet: www.medisana.de
Im Servicefall wenden Sie sich bitte an:
MEDISANA Servicecenter
Feuerbach KG
Corneliusstraße 75
40215 Düsseldorf
Tel.: 0211 - 38 10 07
(Mo-Do: 9-13 Uhr/14-17 Uhr,
Fr: 9-13 Uhr)
Fax: 0211 - 37 04 97
eMail: medisana@t-online.de
GB
MEDISANA HEALTHCARE UK LTD.
City Business Centre 41 St.
Olav’s Court Surrey Quays
London SE16 2XB
Tel.: + 44 / 207 - 237 88 99
Fax: + 44 / 207 - 252 22 99
eMail: info@medisana.co.uk
Internet: www.medisana.co.uk
F / NL / B / L
MEDISANA Benelux NV
Euregiopark 18
6467 JE Kerkrade
Nederland
Tel.: + 31 / 45 - 5 28 03 89
Fax : + 31 / 45 - 5 23 35 18
eMail: info@medisana.nl
I
SANICO S.R.L.
Via G. Ferraris 31
20090 Cusago (MI)
Tel.: + 39 / 02 - 90 39 00 38
Fax: + 39 / 02 - 90 39 02 79
eMail: info@sanicare.it
Internet: www.sanicare.it
E
MEDISANA HEALTHCARE, S.L.
Plaza Josep Freixa i Argemí, no 8
08224 Terrassa (Barcelona)
Tel.: + 34 / 93 - 73 36 70 7
Fax: + 34 / 93 - 78 88 65 5
eMail: info@medisana.es
Internet: www.medisana.es
P
GRUPO RP
Avda. D.Miguel, 330 -Zona Industrial
4435-678 Baguim do Monte
Tel.: +35 / 12 - 29 75 69 64
Fax: +35 / 12 - 29 75 60 15
eMail: rickiparodi@mail.telepac.pt
Internet: www.medisana.pt
FIN
D&L Marketing Oy
Juvan teollisuuskatu 23
02920 Espoo
Tel.: + 358 / 9 - 85 53 08 0
Fax: + 358 / 9 - 85 53 08 30
eMail: jan.lindfors@dlmarketing.fi
Internet: www.dlmarketing.fi
S
ALERE Electronics AB
Stormbyvägen 2-4
163 29 SPÅNGA
Phone: +46 8 761 24 31
Fax: +46 8 795 42 05
Internet: www.alere.se
GR
MEDISANA Hellas
Kosma Etolou & Kazantzaki 10
141 21 N. Iraklion
Tel.: + 30 / 210 - 2 75 09 32
Fax: + 30 / 210 - 2 75 00 19
eMail: info@medisana.gr
Internet: www.medisana.gr
Page 78

MEDISANA AG
Itterpark 7-9
40724 Hilden
Deutschland
Tel.: +49 (0) 2103 / 2007-60
Fax: +49 (0) 2103 / 2007-626
eMail: info@medisana.de
Internet: www.medisana.de
60050 01/2008
 Loading...