

Page 1
DDEE Lichtwecker SAC
GGBB Sunrise Alarm Clock SAC
FFRR Réveil lumineux SAC
IITT Luce sveglia SAC
EESS Despertador de luz SAC
PPTT Despertador luminoso SAC
NNLL Lichtwekker SAC
FFII Valoherätyskello SAC
SSEE Väckaklocka med lampa SAC
GGRR Ξυπνητήρι φωτισμού SAC
Art. 45100
Gebrauchsanweisung
Manual
Mode d’emploi
Istruzioni per l’uso
Instrucciones de manejo
Bitte sorgfältig lesen!
Please read carefully!
A lire attentivement s.v.p.!
Da leggere con attenzione!
¡Por favor lea con cuidado!
Manual de instruções
Gebruiksaanwijzing
Käyttöohje
Bruksanvisning
√‰ËÁ›Â˜ ¯Ú‹Û˘
Por favor ler cuidadosamente!
A.u.b. zorgvuldig lezen!
Lue huolellisesti läpi!
Läses noga!
¶·Ъ·О·ПФ‡МВ ‰И·‚¿ЫЩВ ЪФЫВОЩИО¿
Page 2

DE Gebrauchsanweisung
1 Sicherheitshinweise . . . . . . . . . . . . . . . . . . . . . . . . . . . . . . . . . . . . 1
2 B e t r i e b . . . . . . . . . . . . . . . . . . . . . . . . . . . . . . . . . . . . . . . . . . . . . . . . . . . . . . . . . . . .2
3 V e r s c h i e d e n e s . . . . . . . . . . . . . . . . . . . . . . . . . . . . . . . . . . . . . . . . . . . . . . 7
4 G a r a n t i e . . . . . . . . . . . . . . . . . . . . . . . . . . . . . . . . . . . . . . . . . . . . . . . . . . . . . . . . . 8
PT Manual de instruções
1 Avisos de segurança . . . . . . . . . . . . . . . . . . . . . . . . . . . . . . . . . . . 41
2 Opera
3 Generalidades . . . . . . . . . . . . . . . . . . . . . . . . . . . . . . . . . . . . . . . . . . . . . . 47
4 G a r a n t i a . . . . . . . . . . . . . . . . . . . . . . . . . . . . . . . . . . . . . . . . . . . . . . . . . . . . . . . . . 4 8
ção
. . . . . . . . . . . . . . . . . . . . . . . . . . . . . . . . . . . . . . . . . . . . . . . . . . . . . . . 4 2
GB Manual
1 Safety Information . . . . . . . . . . . . . . . . . . . . . . . . . . . . . . . . . . . . . . 9
2 Operation . . . . . . . . . . . . . . . . . . . . . . . . . . . . . . . . . . . . . . . . . . . . . . . . . . . . . . 10
3 Miscellaneous . . . . . . . . . . . . . . . . . . . . . . . . . . . . . . . . . . . . . . . . . . . . . . . 15
4 W a r r a n t y . . . . . . . . . . . . . . . . . . . . . . . . . . . . . . . . . . . . . . . . . . . . . . . . . . . . . . . . 1 6
FR Mode d’emploi
1 Consignes de sécurité . . . . . . . . . . . . . . . . . . . . . . . . . . . . . . . . 17
2 Fonctionnement . . . . . . . . . . . . . . . . . . . . . . . . . . . . . . . . . . . . . . . . . . 18
3 D i v e r s . . . . . . . . . . . . . . . . . . . . . . . . . . . . . . . . . . . . . . . . . . . . . . . . . . . . . . . . . . . . . . 2 3
4 G a r a n t i e . . . . . . . . . . . . . . . . . . . . . . . . . . . . . . . . . . . . . . . . . . . . . . . . . . . . . . . . . 2 4
IT Istruzioni per l’uso
1 N o r m e d i s i c u r e z z a . . . . . . . . . . . . . . . . . . . . . . . . . . . . . . . . . . . . . 2 5
2 Funzionamento . . . . . . . . . . . . . . . . . . . . . . . . . . . . . . . . . . . . . . . . . . . . 26
3 V a r i e . . . . . . . . . . . . . . . . . . . . . . . . . . . . . . . . . . . . . . . . . . . . . . . . . . . . . . . . . . . . . . . . 3 1
4 G a r a n z i a . . . . . . . . . . . . . . . . . . . . . . . . . . . . . . . . . . . . . . . . . . . . . . . . . . . . . . . . . 3 2
ES Instrucciones de manejo
1 Indicaciones de seguridad . . . . . . . . . . . . . . . . . . . . . . . 33
2 Funcionamiento . . . . . . . . . . . . . . . . . . . . . . . . . . . . . . . . . . . . . . . . . . . 34
3 Generalidades . . . . . . . . . . . . . . . . . . . . . . . . . . . . . . . . . . . . . . . . . . . . . . 39
4 G a r a n t í a . . . . . . . . . . . . . . . . . . . . . . . . . . . . . . . . . . . . . . . . . . . . . . . . . . . . . . . . . 4 0
NL Gebruiksaanwijzing
1 Veiligheidsmaatregelen . . . . . . . . . . . . . . . . . . . . . . . . . . . . . 49
2 G e b r u i k . . . . . . . . . . . . . . . . . . . . . . . . . . . . . . . . . . . . . . . . . . . . . . . . . . . . . . . . . . 5 0
3 D i v e r s e n . . . . . . . . . . . . . . . . . . . . . . . . . . . . . . . . . . . . . . . . . . . . . . . . . . . . . . . . . 5 5
4 G a r a n t i e . . . . . . . . . . . . . . . . . . . . . . . . . . . . . . . . . . . . . . . . . . . . . . . . . . . . . . . . . 5 6
FI
Käyttöohje
1 Turvallisuusohjeita . . . . . . . . . . . . . . . . . . . . . . . . . . . . . . . . . . . . . . . 57
2 Käyttö . . . . . . . . . . . . . . . . . . . . . . . . . . . . . . . . . . . . . . . . . . . . . . . . . . . . . . . . . . . . . 5 8
3 Sekalaista . . . . . . . . . . . . . . . . . . . . . . . . . . . . . . . . . . . . . . . . . . . . . . . . . . . . . . . 63
4 T a k u u . . . . . . . . . . . . . . . . . . . . . . . . . . . . . . . . . . . . . . . . . . . . . . . . . . . . . . . . . . . . . . 6 4
SE Bruksanvisning
1 Säkerhetshänvisningar . . . . . . . . . . . . . . . . . . . . . . . . . . . . . . . 65
2 D r i f t . . . . . . . . . . . . . . . . . . . . . . . . . . . . . . . . . . . . . . . . . . . . . . . . . . . . . . . . . . . . . . . . . 6 6
3 Ö v r i g t . . . . . . . . . . . . . . . . . . . . . . . . . . . . . . . . . . . . . . . . . . . . . . . . . . . . . . . . . . . . . . 7 1
4 G a r a n t i . . . . . . . . . . . . . . . . . . . . . . . . . . . . . . . . . . . . . . . . . . . . . . . . . . . . . . . . . . . 72
GR
√‰ËÁ›Â˜ ÃÚ‹Û˘
1 √‰ËÁ›Â˜ ÁÈ· ÙËÓ ·ÛÊ¿ÏÂÈ· . . . . . . . . . . . . . . . . . . . 7 3
2 §ÂÈÙÔ˘ÚÁ›· . . . . . . . . . . . . . . . . . . . . . . . . . . . . . . . . . . . . . . . . . . . . . . . . . . . . 7 4
3 ¢È¿ÊÔÚ· . . . . . . . . . . . . . . . . . . . . . . . . . . . . . . . . . . . . . . . . . . . . . . . . . . . . . . . 7 9
4 ∂ÁÁ‡ËÛË . . . . . . . . . . . . . . . . . . . . . . . . . . . . . . . . . . . . . . . . . . . . . . . . . . . . . . . 8 0
Klappen Sie bitte diese Seite auf und lassen Sie
sie zur schnellen Orientierung aufgeklappt.
Please fold out this page and leave it folded out
for quick reference.
Veuillez déplier cette page et la laisser dépliée
afin de vous orienter plus rapidement.
Aprire questa pagina e lasciarla aperta ai fini di
un rapido orientamento.
Por favor, despliegue esta hoja y déjela
desplegada para orientarse rápidamente.
Por favor, abra esta página e deixe-a aberta
para uma orientação rápida.
Sla deze bladzijde om en laat deze opengeslagen, terwijl u de gebruiksaanwijzing leest.
Käännä tämä sivu auki ja pidä se
aukikäännettynä nopeaa orientaatiota varten.
Vik upp denna sida och låt den vara uppslagen
som hjälp till snabb orientering.
¶·Ъ·О·ПФ‡МВ ·УФ›НЩВ ЩЛ ЫВП›‰· ·˘Щ‹
О·И ·К‹ЫЩВ ЩЛУ ·УФИ¯Щ‹ БИ· БЪ‹БФЪФ
ЪФЫ·У·ЩФПИЫМfi.
Page 3
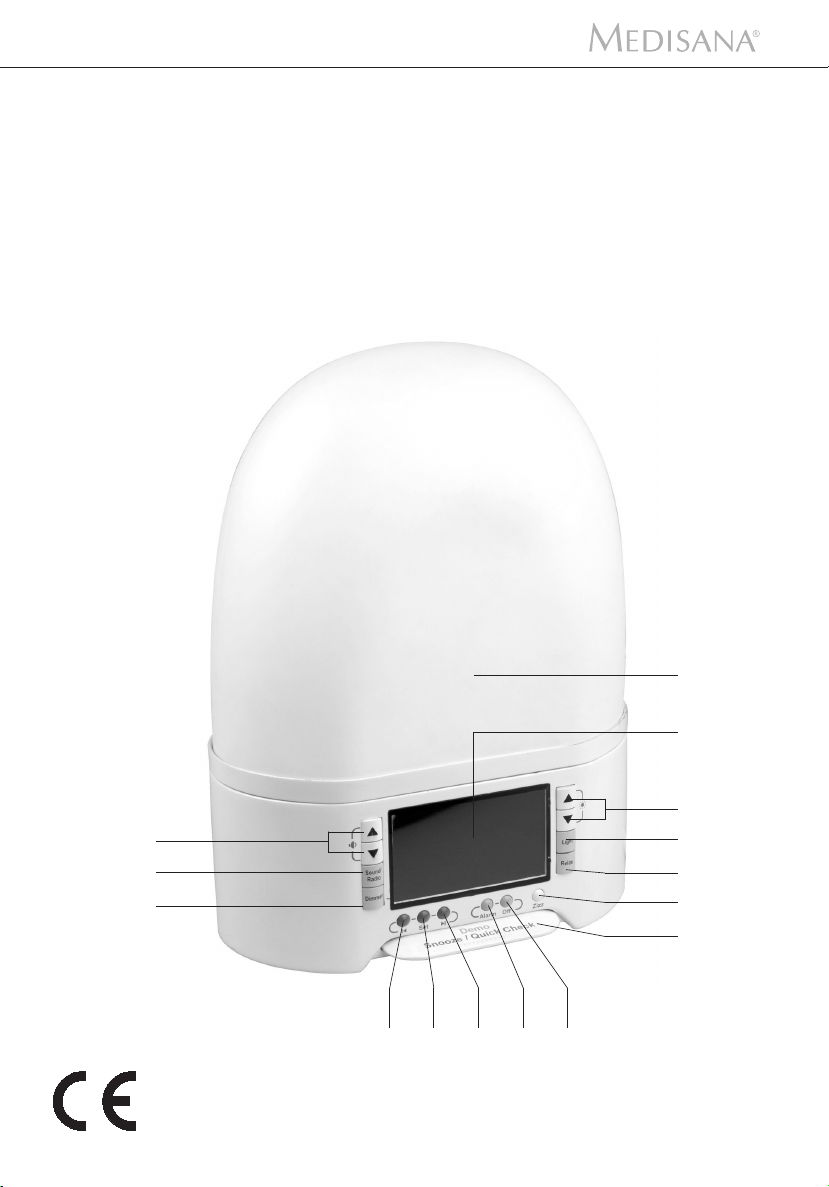
Gerät und Bedienelemente
Device and controls
Appareil et éléments de commande
Apparecchio ed elementi per la regolazione
Dispositivo y elementos de control
Aparelho e elementos de comando
Toestel en bedieningselementen
Laite ja käyttölaitteet
Apparaten och komponenter
Συσκευή και στοιχεία χειρισμού
Page 4
DE
Leuchtkörper
Display
Helligkeitsgrad einstellen
Light-Taste (Licht ein/aus)
Relax-Taste (Lichtfarbe einstellen)
Zizz-Taste (Kurzzeit-Alarm)
Demo/Snooze/Quick Check-Taste
Off-Taste (Alarm deaktivieren)
Alarm-Taste (Alarm aktivieren)
-Taste (Einstellungen vorwärts)
Set-Taste
(Einstellungen vornehmen/bestätigen)
-Taste (Einstellungen rückwärts)
Dimmer-Taste
(Display-Beleuchtung einstellen)
Sound/Radio-Taste
(Radio-Sender/Naturgeräusche einstellen)
Lautstärke einstellen
FR
Elément lumineux
Affichage
Réglage du degré de luminosité
Touche Light (lumière activée/désactivée)
Touche Relax (réglage de la couleur de la lumière)
Touche Zizz (alarme brève)
Touche Demo/Snooze/Quick Check
Touche Off (désactivation de l’alarme)
Touche Alarm (activation de l’alarme)
Touche (avancer dans les réglages)
Touche Set
(effectuer/confirmer des réglages)
Touche (reculer dans les réglages)
Touche Dimmer
(réglage de l’éclairage de l’affichage)
Touche Sound/Radio (réglage de la station
radio/des bruits de la nature)
Réglage du volume sonore
GB
Luminous element
Display
Set brightness
Light button (light on/off)
Relax button (set light colour)
Zizz button (short time alarm)
Demo/Snooze/Quick Check button
Off button (deactivate alarm)
Alarm button (activate alarm)
button (settings forward)
Set button
(make/confirm settings)
button (settings backwards)
Dimmer button
(set display illumination)
Sound/Radio button
(set radio station/sounds of nature)
Set volume
IT
Corpo luminoso
Display
Impostazione dell’intensità
Tasto della luce (luce on/off)
Tasto Relax (impostazione del colore della luce)
Tasto Zizz (allarme breve)
Tasto Demo/Snooze/Quick Check
Tasto Off (disattiva allarme)
Tasto Allarme (attiva allarme)
Tasto (avanti)
Tasto Set
(effettua/conferma le impostazioni)
Tasto (indietro)
Tasto Dimmer
(impostazione dell’illuminazione del display)
Tasto Sound/Radio (impostazione dell’emittente
radiofonico/rumori naturali)
Regolazione del volume
Page 5
ES
Lámpara
Display
Regulación de la intensidad de luz
Botón Light (encender/apagar la luz)
Botón Relax (ajustar el color de la luz)
Botón Zizz (alarma inmediata)
Botón Demo/Snooze/Quick Check
Botón Off (desactivar la alarma)
Botón Alarm (activar la alarma)
Botón (continuar las configuraciones)
Botón Set
(realizar/confirmar configuraciones)
Botón (retroceder en las configuraciones)
Botón Dimmer
(ajustar la iluminación del display)
Botón Sound/Radio (ajustar emisora de
radio/sonidos de la naturaleza)
Ajustar el volumen
NL
Lamp
Display
Helderheidsgraad instellen
Light-toets (licht aan/uit)
Relax-toets (lichtkleur instellen)
Zizz-toets (snel alarm)
Demo/Snooze/Quick Check-toets
Off-toets (alarm deactiveren)
Alarm-toets (alarm activeren)
-toets (instellingen vooruit)
Set-toets
(Instellingen uitvoeren/bevestigen)
-toets (instellingen achteruit)
Dimmer-toets
(displayverlichting instellen)
Sound/radio-toets
(radiozenders/natuurgeluiden instellen)
Volume instellen
PT
Corpo luminoso
Display
Ajustar a luminosidade
Botão Light (ligar/desligar a luz)
Botão Relax (configurar a cor da luz)
Botão Zizz (alarme breve)
Botão Demo/Snooze/Quick Check
Botão Off (desactivar o alarme)
Botão Alarm (activar o alarme)
Botão (ajustes para a frente)
Botão Set
(realizar/confirmar os ajustes)
Botão (ajustes para trás)
Botão Dimmer
(ajustar a luminosidade do display)
Botão Sound/Radio
(sintonizar a estação de rádio/sons naturais)
Ajustar o volume
FI
Lamppu
Näyttö
Kirkkauden säätö
Valo-painike (valo päälle/pois)
Relax-painike (valon värin säätö)
Zizz-painike (lyhytaikainen hälytys)
Demo/Snooze/Quick Check-painike
Off-painike (hälytyksen deaktivointi)
Hälytys-painike (hälytyksen aktivointi)
-painike (säätö eteenpäin)
Set-painike
(säätöjen tekeminen/vahvistaminen)
-painike (säätö taaksepäin)
Dimmer-painike
(näytön valaistuksen säätö)
Sound/Radio-painike
(radiolähettimen/luontoäänien säätö)
Äänenvoimakkuuden säätö
Page 6
SE
Ljuskälla
Display
Inställning av ljusstyrka
Light-knapp (lampa på/av)
Relax-knapp (inställning av lampans färg)
Zizz-knapp (korttidsalarm)
Demo/Snooze/Quick Check-knapp
Off-knapp (stänga av alarm)
Alarm-knapp (aktivera alarm)
-knapp (inställning framåt)
Set-knapp
(genomföra/bekräfta inställningar)
-knapp (inställning bakåt)
Dimmer-knapp
(inställning av display-belysning)
Sound/Radio-knapp
(inställning av radiosändare/naturljud)
Inställning av volym
GR
Λυχνία φωτισμού
Οθόνη
Ρύθμιση βαθμού έντασης φωτεινότητας
Πλήκτρο φωτός (Light)
(ανάβει/σβήνει φως)
Πλήκτρο χαλάρωσης (Relax)
(Ρύθμιση χρώματος φωτισμού)
Πλήκτρο-Zizz
(συναγερμός μικρής διάρκειας)
Πλήκτρο επίδειξης (DEMO) / επανάληψης
(Snooze) / Πλήκτρο ταχέους ελέγχου
(Quick Check)
Πλήκτρο διακοπής λειτουργίας (Off)
(Απενεργοποίηση συναγερμού)
Πλήκτρο συναγερμού (Συναγερμός)
(Ενεργοποίηση συναγερμού)
Πλήκτρο
(Ρυθμίσεις προχωρόντας μπροστά)
Πλήκτρο ρύθμισης (Set)
(Επιλογή/επιβεβαίωση ρυθμίσεων)
Πλήκτρο (Ρυθμίσεις οπισθοδρομόντας)
Πλήκτρο- Dimmer
(Ρύθμιση φωτισμού οθόνης)
Πλήκτρο ήχου/ραδιοφώνου (Ρύθμιση
σταθμού ραδιοφώνου/φυσικών ήχων)
Ρύθμιση έντασης ήχου
Page 7
1 Sicherheitshinweise
DE
Herzlichen Dank
für Ihr Vertrauen und herzlichen Glückwunsch!
Mit dem dem Lichtwecker SAC haben Sie ein Qualitätsprodukt von
MEDISANA erworben.
Damit Sie den gewünschten Erfolg erzielen und recht lange Freude an Ihrem
MEDISANA Lichtwecker SAC haben, empfehlen wir Ihnen die nachstehenden
Hinweise zum Gebrauch und zur Pflege sorgfältig zu lesen.
WICHTIGE HINWEISE !
UNBEDINGT AUFBEWAHREN!
Lesen Sie die Gebrauchsanweisung, insbesondere die
Sicherheitshinweise, sorgfältig durch, bevor Sie das Gerät
einsetzen und bewahren Sie die Gebrauchsanweisung für
die weitere Nutzung auf.
Wenn Sie das Gerät an Dritte weitergeben, geben Sie
unbedingt diese Gebrauchsanweisung mit.
Folgende Symbole finden Sie in der Bedienungsanlei
Diese Gebrauchsanweisung gehört zu diesem Gerät.
Sie enthält wichtige Informationen zur Inbetriebnahme und Handhabung. Lesen Sie diese Gebrauchsanweisung vollständig. Die Nichtbeachtung dieser
Anweisung kann zu schweren Verletzungen oder
Schäden am Gerät führen.
tung wieder
WARNUNG
Diese Warnhinweise müssen eingehalten werden, um
mögliche Verletzungen des Benutzers zu verhindern.
ACHTUNG
Diese Hinweise müssen eingehalten werden, um
mögliche Beschädigungen am Gerät zu verhindern.
HINWEIS
Diese Hinweise geben Ihnen nützliche Zusatz-
informationen zur Installation oder zum Betrieb.
1
Page 8

DE
1 Sicherheitshinweise / 2 Betrieb
1.1
Sicherheitshinweise
• Bevor Sie das Gerät an Ihre Stromversorgung anschließen, achten Sie darauf,
dass die auf dem Typenschild angegebene Netzspannung mit der Ihres Stromnetzes übereinstimmt.
• Benutzen Sie das Gerät nur entsprechend seiner Bestimmung laut Gebrauchsanweisung.
• Bei Zweckentfremdung erlischt der Garantieanspruch.
• Das Gerät ist nur für den Gebrauch im privaten Haushalt bestimmt.
• Benutzen Sie das Gerät nicht, wenn es nicht einwandfrei funktioniert, wenn es
herunter- oder ins Wasser gefallen ist oder beschädigt wurde.
• Greifen Sie nicht nach einem Gerät, das ins Wasser gefallen ist. Ziehen Sie sofort
den Netzstecker bzw. das Netzteil aus der Steckdose.
• Wenn das Kabel oder das Netzteil beschädigt sind, darf das Gerät nicht weiter
benutzt werden.
• Betreiben Sie das Gerät nicht in der Nähe von hochfrequenten elektromagnetischen Sendern, da diese die Gerätefunktion stören könnten.
• Setzen Sie das Gerät nicht der direkten Sonnenstrahlung aus.
• Schützen Sie das Gerät vor Feuchtigkeit.
• Das Gerät sowie das Kabel und das Netzteil dürfen keinesfalls in Wasser
getaucht oder unter laufendes Wasser gehalten werden.
• Fassen Sie das Netzteil stets mit trockenen Händen an.
• Das Kabel darf nicht in der Nähe von Wärmequellen geführt oder über
scharfe Kanten gezogen werden.
• Tragen, ziehen oder drehen Sie das Netzteil nie am Kabel und klemmen Sie das
Kabel nie ein.
• Schützen Sie das Gerät vor Stößen und Erschütterungen.
• Reparieren Sie im Falle einer Störung das Gerät nicht selbst. Eine Reparatur
darf nur von einem autorisierten Fachhändler oder einer entsprechend qualifizierten Person durchgeführt werden.
• Stellen Sie das Gerät zum Gebrauch auf eine feste und ebene Fläche, so dass es
nicht kippen oder herunterfallen kann.
2 Betrieb
2.1
Lieferumfang
und Verpackung
2
Bitte prüfen Sie zunächst, ob das Gerät vollständig ist und keinerlei Beschädigung aufweist. Im Zweifelsfalle nehmen Sie das Gerät nicht in Betrieb und
senden Sie es an eine Servicestelle.
Zum Lieferumfang gehören:
• 1 MEDISANA Lichtwecker SAC
• 1 Gebrauchsanweisung
Verpackungen sind wiederverwendbar oder können dem Rohstoffkreislauf
zurückgeführt werden. Bitte entsorgen Sie nicht mehr benötigtes Verpackungsmaterial ordnungsgemäß. Sollten Sie beim Auspacken einen Transportschaden
bemerken, setzen Sie sich bitte sofort mit Ihrem Händler in Verbindung.
Page 9
2.2
Aufstellen und
Einrichten
2 Betrieb
WARNUNG
Achten Sie darauf, dass die Verpackungsfolien nicht in die
Hände von Kindern gelangen! Es besteht Erstickungsgefahr!
1.
Stellen Sie das Gerät zum Gebrauch auf eine feste und ebene Fläche, so dass
es nicht kippen oder herunterfallen kann.
2. Stellen Sie das Gerät in einer Entfernung von ca. 40 – 50 cm von Ihrem Kopf
entfernt auf, z. B. auf einem Nachttisch.
3. Stecken Sie das Netzteil in die Netzsteckdose.
HINWEISE
Ihr MEDISANA Lichtwecker SAC ist mit R.D.S. (Radio Data System)
ausgestattet. Das Gerät erhält seine Zeit-Information über das R.D.S.Signal. Ist kein R.D.S.-Signal verfügbar, so wird die Zeit nicht automatisch
eingestellt.
Die Kurzbezeichnung des Radiosenders wird in Buchstaben angezeigt.
Wenn der Radiosender keine Signatur sendet, wird nur die digitale
Frequenz der Radiostation angezeigt.
Die Uhrzeit (12:00) im Display beginnt zu blinken, das R.D.S-Symbol und
der Schriftzug TIME SETTING erscheinen im Display, um die automatische
Zeiteinstellung zu starten. Nach einigen Minuten wird die aktuelle Zeit übernommen und im Display angezeigt. Am unteren Rand des Displays läuft der
Schriftzug SET SUCCESS. Wenn das Funksignal des R.D.S-Senders nicht
empfangen wird, erlischt das R.D.S.-Symbol nach ca. 60 Sekunden, und es
erscheint der Schriftzug SET FAIL. In diesem Fall stellen Sie die Uhrzeit
manuell mit der Set-Taste und den Tasten
bzw.
ein.
DE
2.3
TastenFunktionen
Manuelle Einstellung der Uhrzeit und der Alarme
Drücken Sie die Set-Taste ca. 3 Sekunden lang, die Uhrzeit im Display
blinkt im 0,5 Sekunden-Takt. Sie können nun die Uhrzeit manuell einstellen.
Drücken Sie die Tasten
zweites Mal, um die Zeit zu bestätigen und gleichzeitig in das Einstellungsmenü
für den Alarm 1 (AL1) / Alarm 2 (AL2) / Zizz (Kurzzeit-Alarm) zu gelangen.
Wählen Sie mit den Tasten
und bestätigen die Wahl mit der Set-Taste (wählen Sie z.B. AL1). Stellen
Sie die Alarmzeit durch Drücken der Tasten
der Einstellung des Alarms blinkt das AL1-Symbol und die Alarmzeit im 0,5Sekunden-Takt. Bestätigen Sie die eingestellte Alarmzeit mit der Set-Taste
Im Anschluss daran gelangen Sie direkt in das Auswahlmenü für den gewählten Alarm. Im Display erscheint das Radio (FM)- oder Sound-Symbol.
bzw.
. Drücken Sie die Set-Taste ein
bzw.
den gewünschten Alarm aus
bzw.
ein. Während
.
3
Page 10
DE
2 Betrieb
Wählen Sie mit den Tasten
und bestätigen Sie die Wahl wieder mit der Set-Taste .
Wenn Sie Radio (FM) gewählt haben, können Sie mit den Tasten
eine Radiostation wählen, mit der Sie geweckt werden möchten. Be-
stätigen Sie Ihre Auswahl wieder mit der Set-Taste .
Wenn Sie die Naturgeräusche gewählt haben, können Sie über die Tasten
bzw.
Geräusch bei der Anwahl kurz ertönt und ein Piktogramm im Display angezeigt
wird. Bestätigen Sie Ihre Wahl wieder mit der Set-Taste .
Anschließend gelangen Sie zur Einstellung der Lautstärke. Im Display geben
die Ziffern unter dem -Symbol die eingestellte Lautstärke wieder. Stellen Sie
mit den Tasten
die Set-Taste erneut, um Ihre Eingabe zu bestätigen. Sie gelangen zur Einstellung der Helligkeit. Im Display geben die Ziffern unter dem -Symbol die
eingestellte Helligkeit wieder. Stellen Sie mit den Tasten
gewünschte Helligkeit ein. Bestätigen Sie Ihre Eingabe wieder mit der Set-Taste
. Wenn Sie nur die Licht- oder nur die Sound/Radio-Funktion nutzen möch-
ten, setzen Sie die andere bei der Einstellung auf Position 0.
Wenn Sie während der Einstellung 10 Sekunden lang keine Taste drücken,
schaltet sich das Einstellungsmenü automatisch aus.
Nachdem Sie Ihre Auswahl getroffen und bestätigt haben, müssen Sie, wenn Sie
die Funktion nutzen möchten, die Alarm- bzw. Zizz-Taste drücken.
Zur Einstellung des Alarm 2 (AL2) bzw. Kurzzeit-Alarms (Zizz) verfahren Sie in
der gleichen Art und Weise.
Wenn ein Alarm aktiviert ist, sind die Tasten für Radio , Licht und Relax
gesperrt.
Sound/Radio-Taste
Wenn Sie die Sound/Radio-Taste einmal drücken, erscheint das SoundSymbol, und das Übertragungs-Signal blinkt. Wählen Sie mit den Tasten
bzw. das gewünschte Geräusch aus. Mit den -Tasten ▼ bzw. ▲
stellen Sie die gewünschte Lautstärke ein.
Wenn Sie die Sound/Radio-Taste ein zweites Mal drücken, erscheint das
Radio (FM)-Symbol, und das Übertragungs-Signal blinkt. Wählen Sie mit den
Tasten
den -Tasten ▼ bzw. ▲ stellen Sie die gewünschte Lautstärke ein. Wenn
Sie die Sound/Radio-Taste ein drittes Mal oder die Off-Taste drücken,
verlassen Sie das Menü.
acht verschiedene Naturgeräusche wählen, wobei jeweils das
bzw.
bzw.
bzw.
zwischen Radio (FM) oder Sound
die gewünschte Lautstärke ein. Drücken Sie
bzw.
den von Ihnen gewünschten Radiosender aus. Mit
bzw.
die
Dimmer-Taste
Wenn Sie die Dimmer-Taste drücken, schaltet sich die Displaybeleuchtung
ein und wechselt nacheinander von hoher Leuchtstärke (grün) zu niedriger
Leuchtstärke (grün), hoher Leuchtstärke (gelb), niedriger Leuchtstärke (gelb) und
Beleuchtung ausgeschaltet. Drücken Sie die Dimmer-Taste bei der von
Ihnen gewünschten Leuchtstärke und Lichtfarbe, um Ihre Auswahl zu treffen.
Relax-Taste
Durch Drücken der Relax-Taste haben Sie die Möglichkeit, unter verschiedenen Licht-Einstellungen zu wählen. Wenn Sie die Relax-Taste
drücken, gelangen Sie in Position Relax A, in der ca. alle 8 Sekunden
einmal
4
Page 11
2 Betrieb
ein Wechsel der Lichtfarbe vorgenommen wird. Nacheinander werden Rot, Blau,
Grün und deren Mischfarben angezeigt (Relax 1 - 7).
Wenn Sie die Relax-Taste ein zweites Mal drücken, gelangen Sie in Position
Relax C, in der die Lichtfarbe zu bestimmten Tageszeiten automatisch wechselt:
0:00 - 4:00 Uhr -> wie Relax 5 = blau-grün
4:00 - 8:00 Uhr -> wie Relax 1 = nur rot
8:00 -12:00 Uhr -> wie Relax 4 = rot-blau
12:00 -16:00 Uhr -> wie Relax 2 = nur blau
16:00 -20:00 Uhr -> wie Relax 6 = grün-rot
20:00 -24:00 Uhr -> wie Relax 3 = nur grün
Durch wiederholtes Drücken der Relax-Taste gelangen Sie in die weiteren
Positionen zur Auswahl der Lichtfarbe: Position Relax 1 = nur rot, Position
Relax 2 = nur blau, Position Relax 3 = nur grün, Position Relax 4 = rot-blau,
Position Relax 5 = blau-grün, Position Relax 6 = grün-rot, Position Relax 7 =
rot-blau-grün. Wenn Sie die Relax-Taste zum zehnten Mal drücken, verlassen Sie das Einstellungmenü der Relax-Funktion. Durch Drücken der Off-
Taste können Sie das Menü jederzeit verlassen.
DE
Light- Taste
Durch Drücken der Light- Taste schalten Sie den Leuchtkörper ein, im
Display erscheint das -Symbol. Anstelle der Uhrzeit erscheinen Ziffern, die
den Grad (0 - 20) der Helligkeit angeben. Der Helligkeitsgrad steigt schrittweise
von 0 bis 20 an. Drücken Sie die -Tasten ▼ bzw. ▲, um den Grad der
Helligkeit nach Ihren Wünschen zu ändern.
Wenn Sie die Light- Taste ein zweites Mal drücken, verringert sich die Helligkeit schrittweise von der eingestellten Helligkeitsstufe rückwärts bis 0 und das
-Symbol erlischt. Zum Lesen wird Helligkeitsstufe 20 empfohlen. Durch
Drücken der Off-Taste können Sie das Menü jederzeit verlassen.
Alarm-Taste
Mit der Alarm-Taste aktivieren Sie Alarm1 und/oder Alarm 2. Wenn Sie die
Alarm-Taste einmal drücken, erscheint das AL1-Symbol und AL1 ist aktiviert.
Wenn Sie die Taste ein zweites Mal drücken, erscheint das AL2-Symbol und
AL2 ist aktiviert. Wenn Sie die Alarm-Taste ein drittes Mal drücken, erscheinen beide Symbole, AL1 und AL2 und beide Alarme sind aktiviert. Die Alarmzeit
wird angezeigt. Wenn AL1 und AL2 aktiviert wurden, wird im Uhrzeit-Display
die Alarmzeit angezeigt, die der aktuellen Zeit am nächsten liegt. Wenn Sie die
Taste ein viertes Mal drücken, wird die Alarm-Funktion ausgeschaltet.
Beim Einstellen der Alarmzeit haben Sie auch einen Radiosender oder ein Naturgeräusch, eine Helligkeitsstufe der Beleuchtung und eine Lautstärke ausgewählt.
Innerhalb der letzten 30 Minuten vor dem Start eines aktivierten Alarms gleicht
sich die Helligkeit langsam der für die Alarmzeit eingestellten Helligkeitsstufe an.
Die für die Alarmzeit gewählte Lautstärke erhöht sich vom Beginn eines Alarms
(Erreichen der Alarmzeit) innerhalb 60 Sekunden auf den eingestellten Wert. Der
reguläre Alarm wird nur aktiviert, wenn zwischen dem Zeitpunkt, zu dem der
Alarm eingestellt wird, und dem Zeitpunkt, zu dem der Alarm ausgelöst werden
soll, mehr als 30 Minuten liegen. Wenn zwischen dem Zeitpunkt, zu dem der
Alarm eingestellt wird, und dem Zeitpunkt, zu dem der Alarm ausgelöst werden
soll, weniger als 30 Minuten liegen, schaltet sich die Alarm-Funktion 60 Sekunden vor der Alarmzeit ein.
5
Page 12

DE
2 Betrieb
Off-Taste
Wenn Sie einen Alarm aktiviert haben, jedoch schon vor der Alarmzeit aufwachen, können Sie durch Drücken der Off-Taste die Alarm-Funktion ausschalten. Die Einstellungen der Alarmfunktion bleiben für den nächsten Tag
erhalten. Wenn Sie die Off-Taste nicht drücken, z. B. vor der Alarmzeit
aufwachen und vergessen, die Off-Taste zu drücken, schaltet sich die AlarmFunktion nach 30 Min. automatisch ab. Durch Drücken der Off-Taste
können Sie auch jede andere aktive Menü-Funktion verlassen.
Zizz-Taste
Wenn Sie eine kurze Ruhepause einlegen oder ein Mittagsschläfchen machen
möchten, können Sie einen Kurzzeit-Alarm einstellen. Drücken Sie die Zizz-
Taste , im Display erscheint das Zizz-Symbol.
Einmaliges Drücken der Zizz-Taste stellt einen Weckalarm nach Ablauf von
15 Minuten ein. Jedes weitere Drücken verlängert die Zeit bis zum Alarm um 15
Minuten. Die maximal einstellbare Alarmzeit für einen Kurzzeit-Alarm beträgt
90 Minuten. Durch Drücken der Set-Taste bestätigen Sie Ihre Eingabe und
starten gleichzeitig den eingestellten Zeitablauf bis zum Alarm.
In der Ziss-Funktion ist der Alarm-Sound voreingestellt. Mit der Set-Taste
können Sie die Einstellung ändern (siehe “Manuelle Einstellung der Uhrzeit
und der Alarme”, Seite 3-4).
Demo/Snooze/Quick Check-Taste
Wenn die Alarmfunktion nicht genutzt wird, d.h. kein Alarm mit der Alarm-
Taste aktiviert wurde, kann die Taste für die Demo-Funktion genutzt
werden. Drücken Sie die Demo-Taste . Das Licht wird schrittweise in 5Sekunden-Intervallen heller (angezeigte Helligkeitsstufen 0 – 20). Anschließend
beginnt die Vorstellung von vier Naturgeräuschen. Der gesamte Vorgang der
Demo-Funktion dauert circa eine Minute.
Wenn Sie einen Alarm eingestellt und gewählt haben, der Alarm jedoch noch
nicht aktiv ist, können Sie mit der Taste zum Abruf der Einstellungen die
Alarm-Funktionen prüfen. Drücken Sie die Quick Check-Taste , und die eingegebenen Werte erscheinen im Display. Drücken Sie die Taste erneut, um
die Quick Check-Funktion zu beenden.
Wenn Sie eine Alarmzeit aktiviert haben, der Count-down hierfür bereits läuft,
die maximale Helligkeitsstufe jedoch noch nicht erreicht ist, können Sie die Taste
gestellten Alarmzeit die Snooze-Taste , stoppt die Weckfunktion (Helligkeit
und Lautstärke) bis zur eingestellten Alarmzeit. Helligkeit und Lautstärke benötigen dann nur 1 Minute bis zur Alarmzeit, um sich den eingestellten Stärken
anzugleichen. Drücken Sie innerhalb 30 Min. nach der Alarmzeit die Snooze-
Taste , verlängert sich die Alarmzeit um 5 Minuten. Jedes weitere Drücken
der Snooze-Taste
können dIe Alarmzeit um maximal 30 Minuten verlängern.
für die Snooze-Funktion nutzen. Drücken Sie innerhalb 30 Min. vor der ein-
verzögert den Weckalarm um weitere 5 Minuten. Sie
2.4
NeustartFunktion (Reset)
6
Wenn das Gerät nicht korrekt funktioniert, ziehen Sie das Netzteil aus der
Netzsteckdose, warten Sie 10 Sekunden und stecken Sie anschließend das Netzteil wieder in die Netzsteckdose. Stellen Sie die Uhrzeit und die anderen Funktionen neu ein, wie in Abschnitt „Manuelle Einstellung der Uhrzeit und der
Alarme“, Seite 3-4 beschrieben.
Page 13
3 Verschiedenes
HINWEIS
Das Gerät enthält keine Speicherbatterien. Wenn der Netzstecker
gezogen und wieder eingesteckt wurde, befindet sich das Gerät in
Ausgangsstellung. Alle Einstellungen, außer Alarm- und Zizz-Funktion,
müssen erneut vorgenommen werden.
Wenn das Funksignal des R.D.S-Senders nicht empfangen werden
kann, muss die Uhrzeit manuell eingestellt werden. Bei manueller
Zeiteinstellung kann die Zeitangabe um ± 6 Sekunden/Tag abweichen.
DE
3.1
Reinigung
und Pflege
3.2
Hinweis zur
Entsorgung
3.3
Technische
Daten
• Entstauben Sie das Gerät regelmäßig mit einem antistatischen Tuch. Sie
können auch ein leicht angefeuchtetes Tuch verwenden.
• Verwenden Sie keine aggressiven Reinigungs- oder Scheuermittel.
Dieses Gerät darf nicht zusammen mit dem Hausmüll entsorgt werden.
Jeder Verbraucher ist verpflichtet, alle elektrischen oder elektronischen
Geräte, egal, ob sie Schadstoffe enthalten oder nicht, bei einer Sammelstelle
seiner Stadt oder im Handel abzugeben, damit sie einer umweltschonenden
Entsorgung zugeführt werden können.
Wenden Sie sich hinsichtlich der Entsorgung an Ihre Kommunalbehörde oder
Ihren Händler.
Name und Modell :
Stromversorgung : 230 V~ 50 Hz
Leistung : max. 10 W
Zeitgenauigkeit : ± 6 Sekunden/Tag
Helligkeit : 300 Lumen (40 cm vom Gerät entfernt)
Betriebsbedingungen :
Abmessungen : ca. 19 (L) x 13 (T) X 25,5 (H) cm
Gewicht : ca. 770 g
Länge Netzkabel
Artikel Nr. : 45100
EAN Code : 40 15588 45100 3
MEDISANA
(wenn R.D.S. nicht verfügbar)
nur in trockenen Räumen laut Gebrauchsanweisung
benutzen
: ca. 1,95 m
Lichtwecker SAC
Im Zuge ständiger Produktverbesserungen behalten wir uns
technische und gestalterische Änderungen vor.
7
Page 14

DE
4 Garantie
4.1
Garantie- und
Reparatur bedingungen
Bitte wenden Sie sich im Garantiefall an Ihr Fachgeschäft oder direkt an die
Servicestelle. Sollten Sie das Gerät einschicken müssen, geben Sie bitte den
Defekt an und legen eine Kopie der Kaufquittung bei.
Es gelten dabei die folgenden Garantiebedingungen:
1. Auf MEDISANA Produkte wird ab Verkaufsdatum eine Garantie für drei
Jahre gewährt. Das Verkaufsdatum ist im Garantiefall durch die Kauf-
quittung oder Rechnung nachzuweisen.
2. Mängel infolge von Material- oder Fertigungsfehlern werden innerhalb der
Garantiezeit kostenlos beseitigt.
3. Durch eine Garantieleistung tritt keine Verlängerung der Garantiezeit,
weder für das Gerät noch für ausgewechselte Bauteile, ein.
4. Von der Garantie ausgeschlossen sind:
a. alle Schäden, die durch unsachgemäße Behandlung, z.B. durch Nicht-
beachtung der Gebrauchsanleitung, entstanden sind.
b. Schäden, die auf Instandsetzung oder Eingriffe durch den Käufer oder
unbefugte Dritte zurückzuführen sind.
c. Transportschäden, die auf dem Weg vom Hersteller zum Verbraucher
oder bei der Einsendung an den Kundendienst entstanden sind.
d. Zubehörteile, die einer normalen Abnutzung unterliegen.
5. Eine Haftung für mittelbare oder unmittelbare Folgeschäden, die durch das
Gerät verursacht werden, ist auch dann ausgeschlossen, wenn der Schaden
an dem Gerät als ein Garantiefall anerkannt wird.
Im Servicefall wenden Sie sich
bitte an:
MEDISANA AG
Itterpark 7-9
40724 Hilden
Deutschland
Tel.: +49 (0) 2103 / 2007-60
Fax: +49 (0) 2103 / 2007-626
eMail: info@medisana.de
Internet: www.medisana.de
MEDISANA Servicecenter
Feuerbach KG
Corneliusstraße 75
40215 Düsseldorf
Tel.: 0211 - 38 10 07
(Mo-Do: 9-13/14-17 Uhr,
Fr: 9-13 Uhr)
Fax: 0211 - 37 04 97
eMail: medisana@t-online.de
Internet: www.medisana-service.de
8
Page 15
1 Safety Information
GB
Thank you
very much
Thank you for your confidence in us and congratulations!
By purchasing the SAC sunrise alarm clock, you have acquired a high-quality
product by MEDISANA.
To derive the most success and to enjoy your device for a very long time, we
recommend that you read the following information on the use and care of the
device carefully.
IMPORTANT INFORMATION!
RETAIN FOR FUTURE USE!
Read the instruction manual carefully before using this
device, especially the safety instructions, and keep the
instruction manual for future use.
Should you give this device to another person, it is vital
that you also pass on these instructions for use.
You will find the following symbols in the operating manual:
This instruction manual belongs to this device.
It contains important information about starting up
and operation.
Read the instruction manual thoroughly.
Non-observance of these instructions can result in
serious injury or damage to the device.
WARNING
These warning notes must be observed to prevent
any injury to the user.
CAUTION
These notes must be observed to prevent any
damage to the device.
NOTE
These notes give you useful additional information
on the installation or operation.
9
Page 16
GB
1.1
Safety
Information
1 Safety Information / 2 Operation
•
Before connecting the device to your power supply, please ensure that the
supply voltage stated on the rating plate is compatible with your mains supply.
• Only use this unit according to the intended purpose and as directed in the
instructions for use.
• If misused, all guarantee rights shall become null and void.
• The device is designed for use in private households only.
•
Do not use the device if it is not working correctly, if it has been dropped or
has fallen into water or has been damaged.
•
Never touch an appliance that has fallen into water. Unplug the unit from the
mains outlet immediately.
•
You must not continue to use the unit if the lead or the mains adaptor are
damaged.
•
Do not use the unit in the vicinity of high-frequency electromagnetic transmitters, as this could damage the functions on the device.
• Do not expose the device to direct sunlight.
•
Protect the device from moisture.
•
You must never submerge the unit, the lead or the mains adaptor in water or
hold them under running water.
•
Only handle the mains adaptor when your hands are dry.
•
Do not lay the cable near sources of heat or pull it over any sharp edges.
•
Never carry, pull or turn the unit by the mains lead and do not let the lead
get tangled.
• Protect the device from impact and shocks.
• If a fault occurs, do not attempt to repair the unit yourself. Repairs must only
be carried out by an authorized specialist dealer or other suitably qualified
personnel.
• Place the device on a solid and flat surface for use, to ensure that it cannot tip
over or fall down.
2 Operation
2.1
Items supplied
and packaging
10
Please check first of all that the unit is complete and is not damaged in any way.
If in doubt, do not use the appliance. Send it to a service point.
The following parts are included as standard:
• 1 MEDISANA sunrise alarm clock SAC
• 1 Instructions for use
The packaging can be reused or recycled. Please dispose properly of any
packaging material no longer required.
If you notice any transport damage during unpacking, please contact your
dealer without delay.
Page 17

2 Operation
WARNING
Please ensure that polybag packing is kept away from reach
of children! Risk of suffocation!
GB
2.2
Positioning
and setup
2.3
Button functions
1. Place the device on a solid and flat surface for use to ensure that it cannot
tip over or fall down.
2. Position the device about 40 - 50 cm away from your head, for example, on
a bedside table.
3. Connect the power supply to the power point.
NOTES
Your MEDISANA Sunrise Alarm Clock SAC is equipped with R.D.S. (Radio
Data System). The device receives its time information via the R.D.S. signal.
If no R.D.S. signal is available, the time is not set automatically.
The abbreviation of the radio station is displayed in letters. If the radio
station does not send a signature, only the digital frequency of the radio
station is displayed.
The time (12:00) in the display starts blinking, the R.D.S icon and the writ-
ing TIME SETTING appear on the display to the automatic time setting. After a
few minutes, the current time is accepted and displayed on the display. The
text SET SUCCESS runs through the bottom of the display. If the radio signal
of the R.D.S. sender is not received, the R.D.S. icon disappears after about 60
seconds and the text SET FAIL appears. In this case you set the time manually
using the
Setting the time and the alarms manually
Press the Set button for about 3 seconds; the time on the display
flashes every 0.5 seconds. You can now set the time manually.
Press the buttons
the time and get to your settings for alarm 1 (AL1) / alarm 2 (AL2) / Zizz (shorttime alarm).
Use the buttons
your selection with the Set button (take AL1 for example). Set the alarm
time by pressing the buttons
the AL1 icon and alarm time flash every 0.5 seconds. Confirm the set alarm
time with the Set button
immediately afterwards. The radio (FM) or sound icon appears on the display.
Set button and the buttons
or
or
. Press the Set button again to confirm
to choose the desired alarm and confirm
or
. The selection menu for the chosen alarm appears
and
.
. Whilst you are setting the alarm,
11
Page 18
GB
2 Operation
Use the buttons
confirm your choice by pressing the Set button again.
If you have selected radio (FM) you can use the buttons
choose a radio station with which you would like to be woken up. Again,
confirm your selection with the Set button .
If you have selected sounds of nature, you can use the buttons
to choose between eight different sounds of nature whereby you hear the
sound briefly and a pictogram appears on the display. Again, confirm your
selection with the Set button .
The setting for the volume follows. On the display the digits under the
icon reflect the set volume. Use the buttons
volume. Press the Set button again to confirm your entry. You can now
set the brightness here. On the display the digits under the icon reflect the
set brightness. Use the buttons
Confirm your selection with the Set button again. If you need only light or
sound function, set the other at 0.
If you did not press buttons for 10s during setting, it will quit all setting automatically.
After setting to record your choose, you still need to use Alarm button and
Zizz button to activate the function.
Proceed in the same way to set up alarm 2 (AL2) or Zizz (shot-Time alarm).
If an alarm is activated, the buttons for radio , light and relax are
not available.
Sound/Radio button
If you press the Sound/Radio button once, the Sound icon appears, the
broadcast signal blinks also. Use
choice. Use the buttons ▼ or ▲ to set the desired volume.
If you press the Sound/Radio button a second time, the Radio (FM) icon
appears, the broadcast signal blinks also. Use the buttons
choose a radio station. Use the buttons ▼ or ▲ to set the desired
volume. To press the Sound/Radio button the third time or Off button
to quit.
or
to choose between radio (FM) or sound and
or
or
to set the desired brightness.
or
to select the sound of your
to set the desired
or
or
or
to
to
12
Dimmer button
If you press the Dimmer button the display lights up and changes from
High green – Low green – High yellow – Low yellow - off. Press the Dimmer
button at your brightness and light colour of choice to make your selection.
Page 19
2 Operation
GB
Relax button
Pressing the Relax button allows you to choose from different light settings.
If you press the Relax button once you get to option A (relax A), in which
the colour of the light changes about every 8 seconds. Red, blue, green and
mixtures thereof are displayed in sequence (relax 1 - 7).
If you press the Relax button a second time you get to option C (relax C),
in which the light color changes automatically according to certain time of day:
0:00 - 4:00 am -> relax 5 = blue-green
4:00 - 8:00 am -> relax 1 = red only
8:00 -12:00 am -> relax 4 = red-blue
12:00 -16:00 pm -> relax 2 = blue only
16:00 -20:00 pm -> relax 6 = green-red
20:00 -24:00 pm -> relax 3 = green only
By pressing the Relax button several times, you get to the other positions
for selecting the colour of the light: Option 1 (relax 1) = only red, option 2
(relax 2) = blue only, option 3 (relax 3) = green only, option 4 (relax 4) = red-
blue, option 5 (relax 5) = blue-green, option 6 (relax 6) = green-red, option 7
(relax 7) = red-blue-green. If you press the Relax button a 10th time you
quit settings of relax function. You can press Off button any time to quit.
Light button
By pressing the Light button you activate the luminous element , the
icon appears on the display . Instead of the time, numbers appear reflecting
the level (0 - 20) of brightness. The level of brightness increases in increments
from 0 to 20. Press the buttons ▼ or ▲ to adjust the brightness as
desired.
If you press the Light button a second time, the light dark down gradually
from setting number to 0, and the icon disappears. For reading, we recommend brightness level 20. You can press Off button any time to quit.
Alarm button
With the Alarm button you activate alarm 1 and/or alarm 2. If you press
the Alarm button once, the AL1 icon appears, and AL1 is activated. If you
press the button a second time, the AL2 icon appears, and AL2 is activated.
If you press the Alarm button a third time, both icons AL1 and AL2 appear,
and both alarms are activated. The alarm time is displayed. If AL1 and AL2 were
set down and have been activated, the time display will show the alarm time
which is most close to present time. If you press the button a fourth time,
the alarm function is turned off.
In setting the alarm time, you have also selected a radio station or sound of
nature, a level of brightness for the illumination and a volume. In the last 30
minutes before an activated alarm starts, the brightness slowly adjusts to the
brightness set for the alarm time. The volume selected for the alarm time,
increases from the start of the alarm (when the alarm time is reached) to the set
value within 60 seconds. The regular alarm is only activated, if there are more
than 30 minutes between the time when the alarm is set and the time at which
the alarm is supposed to be triggered. If there is less than 30 minutes between
the time when the alarm is set and the time at which the alarm is supposed to
be triggered, the alarm function will start 60 seconds before the setting time.
13
Page 20

GB
2 Operation
Off button
If you have activated an alarm but wake up before the set time, you can press
the Off button to turn off the alarm function. The settings of the alarm function are kept for the next day. If you do not press the Off button e.g. if you
wake up before the alarm time and forget to press the Off button the alarm
function is turned off automatically after about 30 minutes.
You can use Off button to close any activated function.
Zizz button
If you are taking a short break or what to take a little nap, you can set a short-
time alarm. Press the Zizz button , on the display the Zizz icon appears.
Pressing the Zizz button once sets an alarm to go off in 15 minutes. Every
time you press the button, the time until the alarm is extended by 15 minutes.
The maximum alarm time that can be set for a short-time alarm is 90 minutes.
By pressing the Set button you confirm your entry and start the countdown
to the alarm at the same time.
In the Zizz function, the setting for sound is preset. If you need to change the
sound, use Set button to change the setting (see “Setting the time and
alarms manually“ section, page 11-12).
Demo/Snooze/Quick Check button
If you are not using the alarm function, that is, if no alarm was activated by
Alarm button , the button can be used for the demo function. Press
the Demo button . The light gets brighter in 5 second intervals (displayed
levels of brightness 0 – 20). Following that, four sounds of nature are introduced. The entire demo process takes about one minute.
If an alarm has been set but the alarm is not active, you can use the button
to check the settings of the alarm function. Press the Quick Check button ,
and the entered values appear on the display. Press the button again, to end
the Quick Check function.
If you have activated an alarm time, the countdown for it has already started but
the maximum level of brightness has not been reached, you can use the button
before setting time, the wake up function (including light and sound) will stop
until the setting time. Then it takes only 1 minute for light and sound to reach
the setting degree. If you press the Snooze button within 30 minutes after
the setting time, the unit will wake up after 5 minutes, and repeat operation
works within 30 minutes. Every time pressing the Snooze button
wake up function for further 5 minutes. The maximum to extend the alarm time
is 30 minutes.
for the snooze function. Press the Snooze button during 30 minutes and
stops the
2.4
Reset function
14
If the device is not working correctly, pull the plug from the power point, wait
10 seconds and then plug it in again. Set the time and the other functions again
as described in the “Setting the time and alarms manually“ section, page
11-12.
Page 21
3 Miscellaneous
NOTE
The device does not have storage batteries. Once the plug has been
pulled and plugged in again, the device has been reset to its original
state. All settings except the alarm and zizz function must be made
again.
If the radio signal of the R.D.S. sender cannot be received, the time
must be set manually. If you are setting the time manually, the time
information can deviate by ± 6 seconds/day.
GB
3.1
Cleaning and
maintenance
3.2
Disposal
3.3
Specifications
• Dust the device regularly using an antistatic cloth. You can also used a
slightly damp cloth.
• Do not use any aggressive detergents or abrasives.
This product must not be disposed together with the domestic waste.
All users are obliged to hand in all electrical or electronic devices, regardless
of whether or not they contain toxic substances, at a municipal or commercial collection point so that they can be disposed of in an environmentally
acceptable manner.
Consult your municipal authority or your dealer for information about disposal.
Name and model :
Power supply : 230 V~ 50 Hz
Power : max. 10 W
Precision : ± 6 seconds/day
Brightness : 300 lumen (40 cm away from device)
Operating conditions:Only use in dry rooms as described in the operating
Dimensions
Weight
Mains lead length
Article No. : 45100
EAN Code : 40 15588 45100 3
MEDISANA
(if R.D.S. is not available)
instructions
: approx. 19 (l) x 13 (w) X 25,5 (h) cm
: approx. 770 g
: approx. 1,95 m
Sunrise Alarm Clock SAC
In accordance with our policy of continual product improvement,
we reserve the right for technical and design changes without notice.
15
Page 22

GB
4 Warranty
4.1
Warranty and
repair terms
Please contact your dealer or the service centre in case of a claim under the
warranty. If you have to return the unit, please enclose a copy of your
receipt and state what the defect is.
The following warranty terms apply:
1. The warranty period for MEDISANA products is three years from date of
purchase. In case of a warranty claim, the date of purchase has to be
proven by means of the sales receipt or invoice.
2. Defects in material or workmanship will be removed free of charge
within the warranty period.
3. Repairs under warranty do not extend the warranty period either for the
unit or for the replacement parts.
4. The following is excluded under the warranty:
a. All damage which has arisen due to improper treatment, e.g. non-
observance of the user instructions.
b. All damage which is due to repairs or tampering by the customer or
unauthorised third parties.
c. Damage which has arisen during transport from the manufacturer to
the consumer or during transport to the service centre.
d. Accessories which are subject to normal wear and tear.
5. Liability for direct or indirect consequential losses caused by the unit are
excluded even if the damage to the unit is accepted as a warranty claim.
16
MEDISANA AG
Itterpark 7-9
40724 Hilden
Germany
Tel.: +49 (0) 2103 / 2007-60
Fax: +49 (0) 2103 / 2007-626
eMail: info@medisana.de
Internet: www.medisana.de
The service centre address is shown on the last page.
Page 23
1 Consignes de sécurité
FR
Merci !
Félicitations et merci de votre confiance!
Vous venez d’acquérir un réveil lumineux SAC, produit de qualité MEDISANA.
Afin d’obtenir les résultats souhaités et de pouvoir profiter longtemps des
avantages de votre réveil lumineux MEDISANA SAC, nous vous recommandons de lire attentivement les conseils d’utilisation et d’entretien suivants.
REMARQUE IMPORTANTE!
TOUJOURS CONSERVER!
Lisez attentivement le mode d’emploi, et en particulier
les consignes de sécurité, avant d’utiliser l’appareil.
Conservez bien ce mode d’emploi. Vous pourriez en
avoir besoin par la suite.
Lorsque vous remettez l’appareil à un tiers, mettez-lui
impérativement ce mode d’emploi à disposition.
Les symboles suivants se trouvent dans le mode d’emploi :
Ce mode d’emploi fait partie du contenu de l’appareil. Elle
contient des informations importantes concernant sa mise
en service et sa manipulation. Lisez l’intégralité de ce mode
d’emploi. Le non respect de cette notice peut provoquer de
graves blessures ou des dommages de l’appareil.
AVERTISSEMENT
Ces avertissements doivent être respectés afin d’éviter
d’éventuelles blessures de l’utilisateur.
ATTENTION
Ces remarques doivent être respectées afin d’éviter
d’éventuels dommages de l’appareil.
REMARQUE
Ces remarques vous donnent des informations
supplémentaires utiles pour l’installation ou l’utilisation.
17
Page 24

FR
1.1
Consignes
de sécurité
1 Consignes de sécurité / 2 Fonctionnement
•
Avant de raccorder l’appareil à l’alimentation électrique, veillez à ce que
la tension indiquée sur la plaque signalétique corresponde à celle de l’alimentation secteur.
• Uniquement utiliser cet appareil conformément au but d'utilisation décrit dans
ce mode d'emploi.
• Tout emploi non conforme annule les droits de garantie.
• Cet appareil est uniquement destiné à une utilisation privée.
•
N’utilisez pas l’appareil s’il ne fonctionne pas correctement, s’il est tombé par
terre ou dans l’eau ou bien s’il a été endommagé.
• Ne jamais essayer de rattraper un bloc d'alimentation tombé dans l'eau.
Débrancher immédiatement la fiche secteur ou le bloc d'alimentation de la
prise de courant.
• Ne pas utiliser l'appareil si le câble ou le bloc d'alimentation sont endommagés.
• Ne pas utiliser l’appareil à proximité d’émetteurs électromagnétiques haute
fréquence, ils pourraient perturber le fonctionnement de l’appareil.
• N’exposez pas l’appareil au rayonnement solaire direct.
•
Conservez l’appareil à l’abri de l’humidité.
• L'appareil, le câble et le bloc d'alimentation ne doivent en aucun cas être
immergés ou rincés à l'eau courante.
• Toujours manipuler le bloc d'alimentation avec les mains sèches.
• Le câble ne doit pas se trouver à proximité de sources de chaleur ou être posé
sur des arêtes vives.
• Ne pas porter, traîner ou tordre le bloc d'alimentation en tirant sur le cordon
secteur et veiller à ne pas pincer le cordon.
• Protégez l’appareil des coups et des chocs.
• En cas de dysfonctionnement, ne réparez pas l’appareil vous-même. Uniquement confier les réparation à des revendeurs agréés ou des techniciens
qualifiés.
• Pour utiliser l’appareil, posez-le sur une surface dure et plate de façon à ce qu’il
ne puisse pas basculer ou tomber.
2 Fonctionnement
2.1
Éléments fournis
et emballage
18
Veuillez vérifier si l'appareil est au complet et ne présente aucun dommage.
En cas de doute, ne faites pas fonctionner l'appareil et renvoyez-le à un point de
service après-vente.
La fourniture comprend:
• 1 réveil lumineux MEDISANA SAC
• 1 mode d'emploi
Les emballages sont réutilisables ou peuvent être recyclés afin de récupérer les
matières premières. Respectez les règles de protection de l’environnement
lorsque vous jetez les emballages dont vous n’avez plus besoin. Si vous remarquez lors du déballage un dommage survenu durant le transport, contactez
immédiatement votre revendeur.
Page 25
2.2
Installation et
réglages
2 Fonctionnement
AVERTISSEMENT
Veillez à garder les films d’emballage hors de portée des enfants !
Ils risqueraient de s’étouffer !
1.
Pour utiliser l’appareil, posez-le sur une surface dure et plate de façon à ce
qu’il ne puisse pas basculer ou tomber.
2. Posez l’appareil à une distance d’env. 40 – 50 cm de votre tête, p. ex. sur
une table de chevet.
3. Branchez le bloc d’alimentation dans une prise.
REMARQUES
Votre réveil lumineux MEDISANA SAC est équipé d’un système R.D.S.
(Radio Data System). L’appareil reçoit ses informations horaires d’un
signal R.D.S.. Si aucun signal R.D.S. n’est disponible, le réglage de
l’heure n’a pas lieu automatiquement.
L’abréviation de la station radio s’affiche en toutes lettres. Si la station
radio n’émet pas de signature, la fréquence de la station s’affiche en
chiffres.
L’heure (12:00) de l’affichage commence à clignoter, le symbole R.D.S
et l’inscription défilante TIME SETTING apparaissent à l’affichage afin de
démarrer le réglage automatique de l’heure. Au bout de quelques minutes,
l’heure actuelle est reprise et affichée à l’écran. L’inscription SET SUCCESS
défile en bas de l’affichage. Si le signal radio de l’émetteur R.D.S. n’est pas
reçu, le symbole R.D.S. disparaît au bout d’env. 60 secondes, et l’inscription
SET FAIL défile sur l’affichage. Dans ce cas, réglez l’heure manuellement à
l’aide de la touche Setet des touches
et .
FR
2.3
Fonctions des
touches
Réglage manuel de l’heure et de l’alarme
Appuyez sur la touche Setpendant env. 3 secondes, l’heure clignote sur
l’affichage à intervalles de 0,5 secondes. Vous pouvez maintenant régler
l’heure manuellement. Appuyez sur les touches
une deuxième fois sur la touche Set pour confirmer l’horaire et accéder
simultanément au menu de réglage pour l’alarme 1 (AL1) / alarme 2 (AL2) / Zizz
(alarme brève).
A l’aide des touches
la sélection en appuyant sur la touche Set (sélectionnez p.ex. AL1). Réglez
l’horaire d’alarme en appuyant sur les touches
réglage de l’alarme, le symbole AL1 et l’horaire d’alarme clignotent à intervalles
de 0,5 secondes. Confirmez l’horaire d’alarme réglé avec la touche Set.
Vous accédez ensuite directement au menu de sélection pour l’alarme
sélectionnée. Le symbole radio (FM) ou Sound apparaît à l’affichage.
ou
, sélectionnez l’alarme et confirmez
ou
ou
. Appuyez
. Durant le
19
Page 26
FR
2 Fonctionnement
A l’aide des touches
confirmez la sélection en appuyant sur la touche Set .
Si vous avez sélectionné Radio (FM), vous pouvez sélectionner la station de radio
par laquelle vous souhaitez être réveillé avec les touches
Confirmez de nouveau votre sélection en appuyant sur la touche Set .
Si vous avez choisi les bruits de la nature, vous pouvez, à l’aide des touches
ou
retentit brièvement et un pictogramme s’affiche. Confirmez de nouveau votre
sélection en appuyant sur la touche Set.
Vous accédez ensuite au réglage du niveau sonore. A l’affichage , les chiffres
sous le symbole indiquent le volume sonore réglé. A l’aide des touches
ou
touche Set pour confirmer votre saisie. Vous accédez au réglage de la
luminosité. A l’affichage, les chiffres sous le symbole indiquent la luminosité réglée. A l’aide des touches
Confirmez de nouveau votre saisie en appuyant sur la touche Set . Si vous
souhaitez utiliser uniquement la fonction lumière ou uniquement la fonction
Sound/Radio, placez l’autre sur la position 0 lors du réglage.
Si vous n’appuyez sur aucune touche pendant 10 secondes lors du réglage, le
menu de réglage s’éteint automatiquement.
Après avoir effectué et confirmé votre sélection, vous devez appuyez sur la
touche Alarmou Zizzsi vous souhaitez utiliser la fonction.
Procédez de la même manière pour régler l’alarme 2 (AL2) ou l’alarme brève
(Zizz).
Lorsqu’une alarme est activée, les touches pour la radio , la lumière et
Relax sont bloquées.
Touche Sound/Radio
Si vous appuyez une fois sur la touche Sound/Radio, le symbole Sound
apparaît et le signal de transmission clignote. Sélectionnez le bruit souhaité à
l’aide des touches
lez le volume sonore souhaité.
Si vous appuyez une deuxième fois sur la touche Sound/Radio, le symbole
Radio (FM) apparaît et le signal de transmission clignote. A l’aide des touches
Si vous appuyez une troisième fois sur la touche Sound/Radioou la touche
Off, vous quittez le menu.
, sélectionner huit bruits de la nature. Lors de la sélection le bruit
, réglez le volume sonore souhaité. Appuyez de nouveau sur la
ou
▼ ou ▲, réglez le volume sonore souhaité.
, sélectionnez la station radio souhaitée. A l’aide des touches
ou
ou
sélectionnez Radio (FM) ou Sound et
ou
. A l’aide des touches ▼ ou ▲, rég-
, réglez la luminosité souhaitée.
ou
.
20
Touche Dimmer
Lorsque vous appuyez sur la touche Dimmer, l’éclairage de l’affichage est
activé et passe d’une forte luminosité (verte) à une faible luminosité (verte), à
une forte luminosité (jaune), à une faible luminosité (jaune) et à l’extinction de
l’éclairage. Appuyez sur la touche Dimmerpour sélectionner la luminosité
et la couleur actuelles.
Touche Relax
En appuyant sur la touche Relax, vous pouvez sélectionner différents
réglages lumineux. Si vous appuyez une fois sur la touche Relax
vez en position Relax A, où la couleur de la lumière change toutes les secondes
, vous arri-
Page 27

2 Fonctionnement
environ. Les couleurs rouge, bleu, vert et les couleurs secondaires sont activées
(Relax 1 - 7). Si vous appuyez une deuxième fois sur la touche Relax, vous
arrivez en position Relax C, où la couleur de la lumière change automatiquement à certains horaires de la journée :
0 h 00 - 4 h 00 -> comme Relax 5 = bleu-vert
4 h 00 - 8 h 00 -> comme Relax 1 = rouge seul
8 h 00 - 12 h 00 -> comme Relax 4 = rouge-bleu
12 h 00 - 16 h 00 -> comme Relax 2 = bleu seul
16 h 00 - 20 h 00 -> comme Relax 6 = vert-rouge
20 h 00 - 24 h 00 -> comme Relax 3 = vert seul
En appuyant sur la touche Relaxà plusieurs reprises, vous accédez aux positions suivantes permettant de sélectionner la couleur de la lumière : position
Relax 1 = rouge seul, position Relax 2 = bleu seul, position Relax 3 = vert seul,
position Relax 4 = rouge-bleu, position Relax 5 = bleu-vert, position Relax 6 =
vert-rouge, position Relax 7 = rouge-bleu-vert. Lorsque vous appuyez sur la
touche Relaxpour la dixième fois, vous quittez le menu de réglage de la
fonction Relax. ous pouvez quitter à tout moment le menu en appuyant sur la
touche Off.
FR
Touche Light
En appuyant sur la touche Light, vous activez l’élément lumineux , le
symbole apparaît à l’affichage . A la place de l’heure apparaissent des
chiffres qui indiquent le degré de luminosité (0 - 20). Le degré de luminosité
augmente progressivement de 0 à 20. Appuyez sur les touches
pour modifier le degré de luminosité selon vos souhaits.
Si vous appuyez une deuxième fois sur la touche Light, la luminosité diminue progressivement du niveau de luminosité réglé jusqu’à 0 et le symbole
s’éteint. Le niveau de luminosité 20 est conseillé pour la lecture. Vous pouvez
quitter à tout moment le menu en appuyant sur la touche Off.
Touche Alarm
La touche Alarmvous permet d’activer l’alarme 1 et/ou l’alarme 2. Si vous
appuyez une fois sur la touche Alarm, le symbole AL1 apparaît et AL1 est
activée. Si vous appuyez une deuxième fois sur la touche , le symbole AL2
apparaît et AL2 est activée. Si vous appuyez une troisième fois sur la touche
Alarm, les deux symboles AL1 et AL2 apparaissent et les deux alarmes sont
activées. L’horaire d’alarme s’affiche. Si AL1 et AL2 ont été activées, l’horaire
d’alarme le plus proche de l’horaire actuel s’affiche. Si vous appuyez une quatrième fois sur la touche , la fonction d’alarme est désactivée.
Lors du réglage de l’horaire d’alarme, vous avez également sélectionné une
station radio ou un bruit de la nature, un niveau de luminosité de l’éclairage et
un niveau sonore. Lors des 30 dernières minutes avant le départ d’une alarme
activée, la luminosité s’adapte lentement au niveau de luminosité réglé pour
l’horaire d’alarme. Le volume sonore sélectionné pour l’horaire d’alarme augmente au début d’une alarme (horaire d’alarme atteint) pour atteindre la valeur
réglée dans un délai de 60 secondes. L’alarme normale est activée uniquement
si plus de 30 minutes séparent le moment où l’alarme est réglée du moment où
l’alarme doit être déclenchée. Si moins de 30 minutes séparent le moment où
l’alarme est réglée du moment où l’alarme doit être déclenchée, la fonction
d’alarme s’active 60 secondes avant l’horaire de l’alarme.
▼ ou ▲
21
Page 28

FR
2 Fonctionnement
2.4
Fonction de
réinitialisation
(reset)
22
Touche Off
Si vous avez activé une alarme, mais que vous vous réveillez avant l’horaire
d’alarme, vous pouvez désactiver la fonction d’alarme en appuyant sur la touche
Off. Les réglages de la fonction d’alarme restent valables pour le jour
suivant. Si vous n’appuyez pas sur la touche Off, p. ex. si vous vous réveillez
avant l’horaire d’alarme et oubliez d’appuyer sur la touche Off, la fonction
d’alarme s’éteint automatiquement au bout de 30 minutes. Vous pouvez quitter à tout moment toute autre fonction active du menu en appuyant sur la
touche Off.
Touche Zizz
Si vous souhaitez vous reposer un peu ou faire une sieste, vous pouvez régler
une alarme brève. Appuyez sur la touche Zizz-Taste , le symbole Zizz
s’affiche. En appuyant une fois sur la touche Zizz, vous réglez l’alarme pour
qu’elle vous réveille au bout de 15 minutes. Tout appui supplémentaire sur la
touche prolonge le temps jusqu’à l’alarme de 15 minutes. Le temps d’alarme
maximal réglable pour une alarme brève est de 90 minutes. En appuyant sur
la touche Set, vous confirmez votre saisie et démarrez en même temps
le temps réglé jusqu’à l’alarme. Le son de l’alarme est préréglé pour la fonction Ziss. Vous pouvez modifier le réglage à l’aide de la touche Set(voir
« Réglage manuel de l’heure et de l’alarme », page 19-20).
Touche Demo/Snooze/Quick Check
Lorsque la fonction d’alarme n’est pas utilisée, c’est-à-dire qu’aucune alarme n’a
été activée par la touche Alarm, la touche peut être utilisée pour la
fonction démo. Appuyez sur la touche Demo. La lumière devient progressivement plus claire, à intervalles de 5 secondes (niveaux de luminosité activés 0
à 20). Quatre bruits de la nature sont ensuite présentés. L’ensemble de la procédure de la fonction démo dure environ une minute.
Si vous avez réglé et sélectionné une alarme, mais que l’alarme n’est pas encore activée, vous pouvez vérifier les fonctions d’alarme en appuyant sur la touche
valeurs saisies apparaissent à l’affichage. Appuyez à nouveau sur la touche
pour désactiver la fonction Check.
Si vous avez activé un horaire d’alarme et que le compte à rebours de cette
alarme est déjà commencé, mais que le niveau de luminosité maximal n’est
pas encore atteint, vous pouvez utiliser la touche pour la fonction Snooze.
Si vous appuyez sur la touche Snoozedans un délai de 30 minutes avant
l’horaire d’alarme réglé, la fonction réveil (niveau de luminosité et volume
sonore) sera interrompue jusqu’à l’horaire d’alarme réglé. Le niveau de luminosité et le volume sonore ne prennent alors qu’une minute jusqu’à l’horaire
d’alarme réglé pour s’ajuster à l’intensité réglée. Si vous appuyez sur la touche
Snoozedans un délai de 30 minutes après l’horaire d’alarme réglé,
l’horaire d’alarme sera retardé de 5 minutes. Tout appui supplémentaire sur
la touche Snooze
pouvez retarder l’horaire d’alarme de 30 minutes maximum.
Si l’appareil ne fonctionne par correctement, retirez la fiche de la prise, attendez
10 secondes et rebranchez la fiche dans la prise. Réglez de nouveau l’heure et
les autres fonctions comme décrit au chapitre « Réglage manuel de l’heure
et de l’alarme », page 19-20.
afin de consulter les réglages. Appuyez sur la touche Quick Check, les
retarde l’alarme de 5 minutes supplémentaires. Vous
Page 29

3 Divers
REMARQUE
L’appareil ne contient aucune pile permettant l’enregistrement. Si la
fiche est retirée de la prise et de nouveau branchée, l’appareil se
retrouve à l’état d’origine. Tous les réglages, sauf la fonction Alarm et
Zizz, doivent être effectués de nouveau.
Si le signal radio de l’émetteur R.D.S. ne peut pas être reçu, l’heure
doit être réglée manuellement. En cas de réglage manuel de l’heure,
l’indication temporelle peut varier de ± 6 secondes/jours.
FR
3.1
Nettoyage et
entretien
3.2
Élimination
de l’appareil
3.3
Caractéristique
• Dépoussiérez régulièrement l’appareil avec un chiffon antistatique. Vous
pouvez également utiliser un chiffon légèrement humide.
• Ne pas utiliser de produit agressif ou détergent.
Cet appareil ne doit pas être placé avec les ordures ménagères.
Chaque consommateur doit ramener les appareils électriques ou électroniques,
qu’ils contiennent des substances nocives ou non, à un point de collecte de sa
commune ou dans le commerce afin de permettre leur élimination écologique.
Pour plus de renseignements sur l’élimination des déchets, veuillez vous
adresser aux services de votre commune ou bien à votre revendeur.
Nom et modèle
Alimentation électrique
Puissance : max. 10 W
Exactitude temporelle : ± 6 secondes/jour
Luminosité : 300 Lumen (à 40 cm de l’appareil)
Conditions d'utilisation:uniquement utiliser dans des pièces sèches
Dimensions
Poids
Cordon d'alimentation:environ longueur du
Numéro d’article
Numéro EAN
:
Réveil lumineux MEDISANA
: 230 V~ 50 Hz
(si R.D.S. n’est pas disponible)
conformément au mode d'emploi
:
environ
19 (L) x 13 (I) X 25,5 (h) cm
:
environ
770 g
1,95 m
: 45100
: 40 15588 45100 3
SAC
Dans le cadre du travail continu d’amélioration des produits,
nous nous réservons le droit de procéder à des modifications
techniques et de design.
23
Page 30

FR
4 Garantie
4.1
Conditions
de garantie et
de réparation
En cas de recours à la garantie, veuillez vous adresser à votre revendeur
spécialisé ou contactez directement le service clientèle. S’il est nécessaire
d’expédier l’appareil, veuillez indiquer le défaut constaté et joindre une
copie du justificatif d’achat.
Les conditions de garantie sont les suivantes:
1. Une garantie de trois ans à compter de la date d’achat est accordée
sur les produits MEDISANA. En cas d’intervention de la garantie, la
date d’achat doit être prouvée en présentant le justificatif d’achat ou la
facture.
2. Durant la période de garantie, les défauts liés à des erreurs de matériel ou
de fabrication sont éliminés gratuitement.
3. Les services effectués sous garantie n’entraînent pas de prolongation
de la période de garantie, ni pour l’appareil, ni pour les composants remplacés.
4. Sont exclus de la garantie:
a. tous les dommages dus à un usage incorrect, par exemple au non-
respect de la notice d’utilisation.
b. les dommages dus à une remise en état ou des interventions effectuées
par l’acheteur ou par de tierces personnes non autorisées.
c. les dommages survenus durant le transport de l’appareil depuis le site
du fabricant jusque chez l’utilisateur ou lors de l’expédition de l’appareil au service clientèle.
d. les accessoires soumis à une usure normale.
5. Nous déclinons toute responsabilité pour les dommages consécutifs
causés directement ou indirectement par l’appareil, y compris lorsque le
dommage survenu sur l’appareil est couvert par la garantie.
24
MEDISANA AG
Itterpark 7-9
40724 Hilden
Allemagne
Tel.: +49 (0) 2103 / 2007-60
Fax: +49 (0) 2103 / 2007-626
eMail: info@medisana.de
Internet: www.medisana.de
Vous trouverez l’adresse du service clientèle sur la dernière page.
Page 31

1 Norme di sicurezza
IT
Grazie!
Grazie per la fiducia accordataci e complimenti per la scelta!
Con la luce sveglia SAC avete acquistato un prodotto di qualità MEDISANA.
Per ottenere il successo desiderato e poter godere a lungo della vostra luce
sveglia SAC MEDISANA, si consiglia di leggere attentamente le indicazioni
seguenti sull’uso e la manutenzione.
NOTE IMPORTANTI !
UCONSERVARE IN MANIERA
SCRUPOLOSA!
Prima di utilizzare l’apparecchio, leggere attentamente le
istruzioni per l’uso, soprattutto le indicazioni di sicurezza,
e conservare le istruzioni per l’uso per gli impieghi
successivi.
Se l’apparecchio viene ceduto a terzi, allegare sempre
anche queste istruzioni per l’uso.
All’interno delle istruzioni per l’uso vengono usati i seguenti simboli:
Queste istruzioni per l’uso si riferiscono a questo
apparecchio. Contengono informazioni importanti per la
messa in funzione e l’uso. Leggere interamente queste
istruzioni per l’uso. L’inosservanza delle presenti istruzioni
può causare ferite gravi o danni all’apparecchio.
AVVERTENZA
Attenersi a queste indicazioni di avvertimento per
evitare che l’utente si ferisca.
ATTENZIONE
Attenersi a queste indicazioni per evitare danni
all’apparecchio.
NOTA
Queste note forniscono ulteriori informazioni utili
relative all’istallazione o al funzionamento.
25
Page 32

IT
1.1
Norme di
sicurezza
1 Norme di sicurezza / 2 Funzionamento
•
Prima di collegare l'apparecchio all'alimentazione di corrente, accertarsi che
la tensione di rete indicata sulla targhetta corrisponda a quella della rete di
alimentazione.
• Utilizzare l’apparecchio esclusivamente secondo le modalità riportate nelle
istruzioni per l’uso. In caso di uso diverso.
• Si estingue qualsiasi diritto di garanzia.
• L’apparecchio è destinato solo all’uso privato.
•
Non utilizzare l'apparecchio quando non funziona correttamente o quando è
caduto a terra o in acqua o se è danneggiato.
• Non toccare un alimentatore caduto in acqua. Togliere immediatamente la
spina ovvero l’alimentatore stesso dalla presa di corrente.
• Se il cavo o l’alimentatore risultano danneggiati, interrompere l’uso dell’apparecchio.
• Non usare l’apparecchio in prossimità di emettitori di onde elettromagnetiche
ad alta frequenza, in quanto potrebbero disturbare il funzionamento dello stesso.
• Non esporre l’apparecchio ai raggi diretti del sole.
•
Proteggere l’apparecchio dall’umidità.
• L’apparecchio, nonché il cavo e l’alimentatore non devono assolutamente
essere immersi in acqua o tenuti sotto l’acqua corrente.
• Afferrare l’alimentatore solo con le mani asciutte.
• Il cavo non deve passare vicino a fonti di calore o su spigoli acuti.
• Non trasportare, tirare o far ruotare l’apparecchio, tenendolo per il cavo di
alimentazione e non comprimere il cavo stesso.
• Proteggere l’apparecchio da possibili colpi o scossoni.
• In caso di anomalie, non riparare mai l’apparecchio da soli. Le riparazioni
devono essere eseguite esclusivamente da un rivenditore specializzato autorizzato o da una persona qualificata.
• Durante il funzionamento posizionare l’apparecchio su una superficie piana e
resistente, affinché non si rovesci o cada.
2 Funzionamento
2.1
Materiale in
dotazione e
imballaggio
26
Verificare in primo luogo che l’apparecchio sia completo e che non vi siano
segni di danni. In caso di dubbi non mettere in funzione l'apparecchio e inviarlo
al centro di assistenza.
Il materiale consegnato consta di:
• 1 Luce sveglia SAC MEDISANA
• 1 opuscolo d’istruzioni per l’uso
Le confezioni sono riutilizzabili o possono essere riciclate. Smaltire il materiale
d’imballaggio non più necessario in conformità alle disposizioni vigenti. In caso
di danneggiamenti dovuti al trasporto, mettersi immediatamente in contatto
con il proprio rivenditore.
Page 33

2.2
Montaggio e
impostazione
2 Funzionamento
AVVERTIMENTO
Assicurarsi che i sacchetti d’imballaggio non siano alla portata
dei bambini. Pericolo di soffocamento!
1.
Durante il funzionamento posizionare l’apparecchio su una superficie piana e
resistente, affinché non si rovesci o cada.
2. Posizionare l’apparecchio a una distanza di circa 40 – 50 cm dalla testa, p.
es. su un comodino.
3. Collegare l’alimentatore alla presa.
NOTE
La luce sveglia SAC MEDISANA è provvista del sistema R.D.S. (Radio
Data System). L’apparecchio riceve quindi le informazioni relative all’ora
mediante il segnale R.D.S. Se non è disponibile tale segnale, l’ora non
viene impostata automaticamente.
La sigla dell’emittente radio viene visualizzata con delle lettere. Se
l’emittente radio non invia il numero di collocazione, viene visualizzata
solo la frequenza digitale della stazione radio.
L’ora (12:00) sul display comincia a lampeggiare, il simbolo R.D.S e la
scritta TIME SETTING appaiono sul display, per cominciare l’impostazione
oraria automatica. Dopo pochi minuti l’orario attuale viene acquisito e
visualizzato sul display. Sul bordo inferiore del display appare la scritta scorrevole SET SUCCESS. Se è impossibile ricevere il segnale radio dell’emittente R.D.S, il simbolo R.D.S. si spegne dopo ca. 60 secondi e appare la scritta
SET FAIL. In questo caso impostare manualmente l’ora con il tasto Set
e i tasti
e
.
IT
2.3
Funzioni dei tasti
Impostazione manuale dell’orario e dell’allarme
Premere il tasto Setper ca. 3 secondi, l’orario sul display lampeggia a
intervalli di 0,5 secondi. Ora è possibile impostare manualmente l’orario. Premere i tasti
confermare l’ora e per accedere contemporaneamente al menu Impostazione
per l’allarme 1 (AL1) / allarme 2 (AL2) / Zizz (allarme breve).
Selezionare l’allarme desiderato con i tasti
la selezione con il tasto Set (selezionare p.es. AL1). Impostare l’ora di
sveglia premendo i tasti
lampeggia il simbolo AL1 e l’ora di sveglia a intervalli di 0,5 secondi. Confemare
l’ora di sveglia impostata con il tasto Set
menu di selezione per l’allarme desiderato. Sul display appare il simbolo
Radio (FM) o Sound.
o
. Premere una seconda volta il tasto Set, per
o
o
. Durante l’impostazione dell’allarme,
. Infine si accede direttamente al
e confermare
27
Page 34

IT
2 Funzionamento
Selezionare con il tasto
zione con il tasto Set .
Se è stata selezionata la modalità Radio (FM), è possibile selezionare una stazione radiofonica con i tasti
gliati. Confermare di nuovo la scelta con il tasto Set .
Se sono stati selezionati i rumori naturali, premendo i tasti
possibile scegliere tra otto rumori naturali diversi. Al momento della selezione,
viene emesso brevemente il rumore selezionato e viene visualizzato un simbolo sul display. Confermare di nuovo la scelta con il tasto Set.
Infine si accede al menu di regolazione del volume. Nel display i numeri al di
sotto del simbolo si riferiscono al volume impostato. Regolare con i tasti
o
l’immissione. Si accede al menu di impostazione della luminosità. Nel display,
i numeri al di sotto del simbolo si riferiscono alla luminosità impostata.
Regolare con i tasti
l’immissione con il tasto Set . Se si desidera utilizzare solo una delle due
funzioni (luce o Sound/Radio), impostare quella non desiderata sulla posizione
0.
Se, nel corso dell’impostazione, non viene premuto nessun tasto per 10
secondi, il menu Impostazione si spegne automaticamente.
Dopo aver effettuato e confermato la selezione, se si desidera utilizzare la
funzione, premere il tasto Allarmeo Zizz.
Per impostare l’Allarme 2 (AL2) o l’Allarme breve (Zizz) procedere nello stesso
modo.
Quando viene attivato un allarme, i tasti Radio , Luce e Relax sono
bloccati.
Tasto Sound/Radio
Se si preme una volta il tasto Sound/Radio, appare il simbolo Sound e il
segnale di trasferimento lampeggia. Selezionare con il tasto
rumore desiderato. Con il tasto ▼ o ▲ , regolare il volume desiderato.
Se si preme una seconda volta il tasto Sound/Radio, appare il simbolo
Radio (FM) e il segnale di trasferimento lampeggia. Selezionare con i tasti
o
lare il volume desiderato.
Premendo una terza volta il tasto Sound/Radioo il tasto Off, si esce
dal menu.
il volume desiderato. Premere il tasto Set, per confermare
la stazione radiofonica desiderata. Con il tasto ▼ o ▲ , rego-
o
o
Radio (FM) o Sound e confermare la sele-
o
la luminosità desiderata. Confermare di nuovo
con la quale si desidera venire sve-
o
o
è
il
28
Tasto Dimmer
Se si preme il tasto Dimmer, l’illuminazione del display si accende e passa
in sequenza dall’intensità luminosa forte (verde) a quella più debole (verde),
dall’intensità luminosa forte (giallo) a quella più debole (giallo) per poi spegnersi. Premere il tasto Dimmer
della luce desiderato.
Tasto Relax
Premendo il tasto Relaxè possibile selezionare diverse impostazioni di luce.
Se si preme una volta il tasto Relax
quale ogni ca. 8 secondi cambia il colore della luce. La luce cambia dai colori
per selezionare l’intensità luminosa e il colore
, si accede alla posizione Relax A, nella
Page 35

2 Funzionamento
rosso, blu, verde passando per le sfumature intermedie (Relax 1 - 7).
Se si preme una seconda volta il tasto Relax, si accede alla posizione Relax
C, nella quale il colore della luce muta a seconda del momento della giornata:
ore 0:00 - 4:00 -> come Relax 5 = blu-verde
ore 4:00 - 8:00 -> come Relax 1 = solo rosso
ore 8:00 - 12:00 -> come Relax 4 = rosso-blu
ore 12:00 - 16:00 -> come Relax 2 = solo blu
ore 16:00 - 20:00 -> come Relax 6 = verde-rosso
ore 20:00 - 24:00 -> come Relax 3 = solo verde
Premendo più volte il tasto Relaxsi accede a ulteriori posizioni per la
selezione del colore della luce: posizione Relax 1 = solo rosso, posizione Relax
2 = solo blu, posizione Relax 3 = solo verde, posizione Relax 4 = rosso-blu,
posizione Relax 5 = blu-verde, posizione Relax 6 = verde-rosso, posizione
Relax 7 = rosso-blu-verde. Se si preme il tasto Relaxper la decima volta, si
esce dal menu Impostazione della funzione Relax. È sempre possibile uscire dal
menu premendo il tasto Off.
IT
Tasto Luce
Premendo il tasto Lucesi accende il corpo luminoso , sul display si
illumina il simbolo . Invece dell’orario vengonono visualizzate delle cifre che
indicano il grado (0 - 20) di luminosità che aumenta gradualmente da 0 a 20.
Premere il tasto
proprie esigenze.
Se viene premuto il tasto Luceuna seconda volta, la luminosità diminuisce
gradualmente dal livello di luminosità desiderato fino a 0 e il simbolo si
spegne. Per la lettura, si consiglia un livello di luminosità 20. È sempre possibile
uscire dal menu premendo il tasto Off.
Tasto Allarme
Con il tasto Allarmesi attiva l’Allarme1 e/o l’Allarme 2. Se si preme il tasto
Allarmeuna volta, appare il simbolo AL1 e AL1 è attivato. Se viene pre-
muto una seconda volta , appare il simbolo AL2 e AL2 è attivato. Premendo
il tasto Allarmeuna terza volta, appaiono i due simboli AL1 e AL2 e i due
allarmi sono attivati. Viene visualizzato l’orario di sveglia. Se AL1 e AL2 vengono attivati, sul display Orario viene visualizzato l’orario di sveglia più prossimo
rispetto all’orario attuale. Premendo il tasto una quarta volta, la funzione di
allarme viene spenta.
Nel corso dell’impostazione dell’orario di sveglia sono stati selezionati anche una
stazione radiofonica o un rumore naturale, un livello di luminosità e un volume.
30 minuti prima dell’avvio di un allarme, la luminosità si adatta lentamente al
livello di luminosità impostato per il momento della sveglia. Il volume selezionato per il momento della sveglia viene emesso in crescendo (raggiungimento
dell’orario di sveglia) per 60 secondi fino a raggiungere il valore impostato.
L’allarme viene attivato solamente se tra il momento in cui l’allarme è stato
impostato e il momento in cui l’allarme scatta sono passati più di 30 minuti. Se
tra il momento in cui l’allarme è stato impostato è il momento in cui l’allarme
scatta sono trascorsi meno di 30 minuti, la funzione di allarme si attiva 60 secondi prima che l’allarme scatti.
▼ o ▲, per modificare il grado di luminosità in base alla
29
Page 36

IT
2 Funzionamento
Tasto Off
Se è stato attivato un allarme, ma ci si sveglia prima che esso scatti, è possibile
spegnere la funzione di allarme premendo il tasto Off. Le impostazioni della
funzione di allarme rimangono impostate per il giorno seguente. Se non viene
premuto il tasto Off(p.es. ci si sveglia prima che l’allarme scatti e si dimentica di premere il tasto Off), la funzione di allarme si disattiva automaticamente dopo 30 min.. Premendo il tasto Off, è possibile abbandonare
qualunque altra funzione di menu attiva.
Tasto Zizz
Se si desidera concedersi una breve pausa di relax o un sonnellino, è possibile
impostare l’allarme breve. Premere il tasto Zizz, sul display appare il
simbolo Zizz.
Se si preme una volta il tasto Zizz, viene impostato un allarme dopo 15
minuti. Ogni volta che si preme nuovamente il tasto, si ritarda il tempo dell’allarme di 15 minuti. Il tempo di allarme massimo impostabile per un allarme
breve è di 90 minuti. Premendo il tasto Set, si conferma la propria immissione e si avvia contemporaneamente il timer impostato fino all’allarme.
Nella funzione Zizz, l’allarme Sound è preimpostato. Con il tasto Setè
possibile modificare l’impostazione (vedi “Impostazione manuale dell’orario
e dell’allarme”, pagina 27-28).
Tasto Demo/Snooze/Quick Check
Se la funzione di allarme non viene utilizzata, ovvero se con il tasto Allarm
non è stato attivato l’allarme, è possibile utilizzare il tasto per la funzione
demo. Premere il tasto Demo. La luce diventa più forte, a intervalli di 5
secondi (livelli di luminosità visualizzati 0 – 20). Infine vengono presentati i
quattro rumori naturali. La presentazione della funzione demo dura circa un
minuto.
Se è stato selezionato e impostato un allarme che non è ancora stato attivato,
con il tastoè possibile richiamare le impostazioni della funzione di allarme.
Premere il tasto Quick Check, e i valori memorizzati appaiono sul display.
Premere di nuovo il tasto per concludere la funzione Quick Check.
Se è stato attivato un orario di sveglia, il count-down è già funzionante, il livello di luminosità massimo non è ancora stato raggiunto, è possibile usare il tasto
dell’orario di sveglia impostato, la funzione di sveglia (luminosità e volume) viene
bloccata fino all’orario di sveglia impostato. È necessario solamente 1 minuto
fino all’orario di sveglia impostato affinché la luminosità e il volume si regolino
sui valori impostati. Premendo il tasto Snoozeentro 30 minuti dopo l’orario
di sveglia impostato, l’orario di sveglia viene posticipato di 5 minuti. Ogni volta
che si preme il tasto Snooze
possibile ritardare l’orario di sveglia al massimo di 30 minuti.
per la funzione Snooze. Premendo il tasto Snoozeentro 30 minuti prima
, l’allarme viene ritardato di altri 5 minuti. È
2.4
Funzione riavvio
(Reset)
30
Se l’apparecchio non funziona correttamente, estrarre l’alimentatore dalla presa,
attendere 10 secondi e ricollegare l’alimentatore alla presa. Impostare nuovamente l’orario e le altre funzioni, come descritto al paragrafo “Impostazione
manuale dell’orario de degli allarmi“, a pagina 27-28.
Page 37

3 Varie
NOTA
L’apparecchio non contiene alcuna batteria secondaria. Se la spina di
alimentazione viene estratta e poi reinserita, l’apparecchio si trova allo
stato di consegna. Tutte le impostazioni, ad eccezione delle funzioni
di allarme e Zizz, devono essere eseguite nuovamente.
Se il segnale radio dell’emittente R.D.S non viene ricevuto, inserire
l’orario manualmente. In questo caso, l’indicazione dell’ora può
differire di ± 6 secondi/giorno.
IT
3.1
Pulizia e
manutenzione
3.2
Smaltimento
3.3
Dati Tecnici
• Pulire il dispositivo dalla polvere con un panno antistatico. È possibile utilizzare un panno leggermente umido.
• Non utilizzare detergenti aggressivi o sostanze abrasive.
L'apparecchio non può essere smaltito insieme ai rifiuti domestici.
Ogni utilizzatore ha l'obbligo di gettare tutte le apparecchiature elettroniche
o elettriche, contenenti o prive di sostanze nocive, presso un punto di raccolta
della propria città o di un rivenditore specializzato, in modo che vengano
smaltite nel rispetto dell'ambiente.
Per lo smaltimento rivolgersi alle autorità comunali o al proprio rivenditore.
Nome e modello
Alimentazione
Potenza : max. 10 W
Precisione di temporizzazione
Luminosità : 300 lumen (40 cm di distanza dall’apparecchio)
Condizioni di funzionamento
Dimensioni
Peso
Lunghezza cavo
Numero di articolo
Codice EAN
:
Luce sveglia SAC MEDISANA
: 230 V~ 50 Hz
: ± 6 secondi/giorno (se R.D.S. non è disponibile)
:
utilizzare solo in ambienti asciutti come
riportato nelle istruzioni per l’uso
: ca. 19 (L) x 13 (L) X 25,5 (H) cm
: ca. 770 g
: ca. 1,95 m
: 45100
: 40 15588 45100 3
Alla luce dei costanti miglioramenti dei prodotti, ci riserviamo
la facoltà di apportare qualsiasi modifica tecnica e strutturale.
31
Page 38

IT
4 Garanzia
4.1
Condizioni
di garanzia e
di riparazione
In caso di garanzia, contattare il vostro rivenditore di fiducia o direttamente
il centro di assistenza. Se dovesse essere necessario spedire l’apparecchio,
specificare il guasto e allegare una copia della ricevuta di acquisto.
Valgono le seguenti condizioni di garanzia:
1. I prodotti MEDISANA hanno una garanzia di tre anni a partire dalla
data di vendita. La data di acquisto deve essere comprovata in caso di
garanzia dalla ricevuta di acquisto o dalla fattura.
2. Durante il periodo di garanzia, i guasti dovuti a difetti di materiale o di
lavorazione vengono eliminati gratuitamente.
3. Una prestazione di garanzia non da diritto al prolungamento del periodo
di garanzia, né per l’apparecchio né per i componenti sostituiti.
4. La garanzia non include:
a. tutti i danni risultanti da uso improprio, ad esempio dall’inosservanza
delle istruzioni d’uso,
b. i danni riconducibili a manutenzione o ad interventi effettuati dall’ac-
quirente o da terzi non autorizzati,
c. danni di trasporto verificati durante il trasporto dal produttore al
consumatore o durante l’invio al servizio clienti,
d. gli accessori soggetti a normale usura.
5. È altresì esclusa qualsiasi responsabilità per danni secondari diretti o
indiretti causati dall’apparecchio anche se il danno all’apparecchio viene
riconosciuto come caso di garanzia.
32
MEDISANA AG
Itterpark 7-9
40724 Hilden
Germania
Tel.: +49 (0) 2103 / 2007-60
Fax: +49 (0) 2103 / 2007-626
eMail: info@medisana.de
Internet: www.medisana.de
L'indirizzo del servizio di assistenza è riportato nell'ultima pagina.
Page 39

1 Indicaciones de seguridad
ES
¡
Muchas gracias!
Muchas gracias por su confianza y felicitaciones.
Con el despertador de luz SAC ha adquirido un producto de calidad de
MEDISANA. Para que se cumplan sus expectativas sobre el producto y disfrute durante mucho tiempo del despertador de luz SAC de MEDISANA, le
recomendamos que lea detenidamente las siguientes instrucciones para el uso
y el mantenimiento.
¡NOTAS IMPORTANTES!
¡CONSERVAR SIN FALTA!
Antes de utilizar el aparato, lea detenidamente las
instrucciones de manejo, especialmente las indicaciones
de seguridad; guarde estas instrucciones para su consulta
posterior.
Si cede el aparato a terceras personas, entregue también
estas instrucciones de manejo.
En el manual de uso encontrará los siguientes símbolos:
Estas instrucciones forman parte de este aparato.
Contienen información importante relativa a la puesta
en funcionamiento y manejo. Lea estas instrucciones
en su totalidad. Si no se respetan estas instrucciones se
pueden producir graves lesiones o daños en el aparato.
ADVERTENCIA
Las indicaciones de advertencia se deben respetar para
evitar la posibilidad de que el usuario sufra lesiones.
ATENCIÓN
Estas indicaciones se deben respetar para evitar posibles
daños en el aparato.
NOTA
Estas indicaciones le ofrecen información adicional que le
resultará útil para la instalación y para el funcionamiento.
33
Page 40

ES
1.1
Indicaciones
de seguridad
1 Indicaciones de seguridad / 2 Funcionamiento
•
Antes de conectar el aparato a la red de suministro, compruebe que la
tensión indicada en la placa de características del ventilador se corresponda
con la tensión de su red de suministro.
• Utilice el aparato exclusivamente según su uso previsto descrito en las instrucciones de manejo.
• En caso de utilizarlo para fines distintos, ya no será aplicable la garantía.
• El aparato sólo es adecuado para un uso doméstico.
•
No utilice el aparato si no funciona perfectamente, se ha caído al suelo o al
agua o se ha dañado.
• No intente coger un aparato que haya caído al agua. En tal caso desconecte
inmediatamente la clavija de conexión a la red y el bloque de alimentación del
enchufe.
• No utilice el aparato si el cable o el bloque de alimentación están dañados.
• No utilice el aparato cerca de emisores electromagnéticos de alta frecuencia
porque estos podrían perturbar el funcionamiento del mismo.
• No exponga el aparato a la radiación directa del sol.
•
Proteja el aparato contra la humedad.
• El aparato, el cable y el bloque de alimentación no deben ser sumergidos en
agua ni mantenidos bajo agua corriente bajo ninguna circunstancia.
• Coja el bloque de alimentación siempre con las manos secas.
• No tienda el cable cerca de fuentes de calor ni lo ponga sobre cantos afilados.
• No transporte, gire o tire del aparato por el bloque de alimentación. No
aplaste el bloque de alimentación.
• Proteja el aparato frente a golpes y sacudidas.
• Si el aparato sufre una avería, no lo intente reparar usted mismo. Deje llevar
a cabo las reparaciones exclusivamente por comercios especializados autorizados o por una persona debidamente cualificada para ello.
• Para utilizar el aparato, colóquelo sobre una superficie firme y llana, de forma
que no se pueda volcar ni caer.
2 Funcionamiento
2.1
Volumen
de suministros
y embalaje
34
Compruebe primero si el aparato está completo y si no presenta daño alguno.
En caso de dudas, no ponga el aparato en funcionamiento y envíelo a un punto
de atención al cliente.
El volumen de entrega comprende:
• 1 Despertador de luz SAC de MEDISANA
• 1 instrucciones de manejo
El embalaje es reutilizable o puede reciclarse. Deshágase del material de embalaje que no se necesite, siguiendo las normas pertinentes. Si al desembalar
observara algún daño causado durante el transporte, póngase inmediatamente en contacto con el comerciante.
Page 41

2.2
Instalación y
configuración
2 Funcionamiento
ADVERTENCIA
¡Asegúrese de que los plásticos de embalaje no caigan en manos
de niños! ¡Existe el peligro de asfixia!
1.
Para utilizar el aparato, colóquelo sobre una superficie firme y llana, de forma
que no se pueda volcar ni caer.
2. Coloque el despertador a una distancia de aprox. 40 – 50 cm respecto a su
cabeza, por ejemplo, en la mesilla de noche.
3. Enchufe la fuente de alimentación a una toma de corriente.
NOTAS
Su despertador de luz SAC de MEDISANA está provisto de un sistema
RDS (Radio Data System). El despertador recibe la información horaria a
través de la señal RDS. Si no se dispone de esta señal, la hora no se
ajusta automáticamente.
Aparece la denominación abreviada de la emisora. Si la emisora no
emite su identificación, aparece sólo la frecuencia digital.
La hora (12:00) del display empieza a parpadear y en el display aparecen el símbolo RDS y el texto TIME SETTING para iniciar el ajuste automático de la hora. Tras unos minutos se adopta la hora actual y se visualiza en
el display. En el margen inferior del display aparece el texto SET SUCCESS.
Si no se recibe señal de radio de la emisora RDS, el símbolo RDS se apaga
tras aprox. 60 segundos y aparece el texto SET FAIL. En este caso, ajuste la
hora manualmente con el botón Sety con
o
.
ES
2.3
Funciones de
los botones
Ajuste manual de la hora y de las alarmas
Pulse el botón Setdurante aprox. 3 segundos: la hora parpadea en el
display a intervalos de 0,5 segundos. Ahora puede ajustar manualmente
la hora. Pulse los botones
confirmar la hora y para, al mismo tiempo, acceder al menú de configuración
para alarma 1 (AL1) / alarma 2 (AL2) / Zizz (alarma inmediata).
Con los botones
AL1) y confirme su elección con el botón Set . Ajuste la hora de la alarma
con los botones
el símbolo AL1 y la hora de alarma a intervalos de 0,5 segundos. Confirme la
hora de alarma ajustada con el botón Set. A continuación accede directamente al menú de selección para la alarma elegida. En el display aparece el
símbolo de radio (FM) o el de sonido (Sound).
o
o
o
. Pulse el botón Setotra vez para
seleccione la alarma que desee (por ejemplo,
. Mientras está ajustando la alarma, parpadea
35
Page 42

ES
2 Funcionamiento
Con los botones
elección con el botón Set .
Si ha seleccionado Radio (FM), puede entonces elegir con los botones
o
confirmar su elección con el botón Set .
Si ha seleccionado sonidos de la naturaleza, puede elegir con las teclas
o
mente al ser seleccionado, al tiempo que en el display aparece un pictograma.
Vuelva a confirmar su elección con el botón Set.
Seguidamente accede al ajuste de volumen. En el display , las cifras situadas
debajo del símbolo representan el volumen ajustado. Con las teclas
o
la entrada. Ahora accede al ajuste de intensidad de luz. En el display, las
cifras situadas debajo del símbolo representan la intensidad ajustada. Con
los botones
entrada con el botón Set . Si sólo desea utilizar la función de luz o sólo la
de sonido/radio, ajuste la que no desee a la posición 0.
Si durante el ajuste no pulsa ningún botón por un espacio de 10 segundos, el
menú de configuración se desactiva automáticamente.
Una vez realizada y confirmada la selección, para utilizar la función deberá
pulsar el botón Alarmo el botón Zizz.
Para ajustar la alarma 2 (AL2) o la alarma inmediata (Zizz), proceda del mismo
modo.
Si está activada una alarma, los botones para Radio , Luz y Relax están
bloqueados.
Botón Sound/Radio
Si pulsa una vez el botón Sound/Radio, aparece el símbolo de sonido y
parpadea la señal de transmisión. Con los botones
el sonido que desee. Con los botones ▼ o ▲ ajuste el volumen que
desee.
Si pulsa otra vez el botón Sound/Radio, aparece el símbolo de radio (FM)
y parpadea la señal de transmisión. Con los botones
la emisora de radio que desee. Con los botones ▼ o ▲ ajuste el volumen que desee.
Si pulsa el botón Sound/Radiopor tercera vez o el botón Off, saldrá del
menú.
o
la emisora de radio con la que desea ser despertado. Vuelva a
entre 8 sonidos diferentes, cada uno de los cuales suena breve-
ajuste el volumen que desee. Pulse el botón Setpara confirmar
o
elija entre Radio (FM) o Sound, y confirme su
ajuste la intensidad que desee. Vuelva a confirmar la
o
seleccione
o
sintonice
36
Botón Dimmer
Si pulsa el botón Dimmer, se activa la iluminación del display y cambia de
una alta intensidad luminosa (verde) a una baja (verde), seguidamente a una alta
intensidad (amarilla) para a continuación pasar a una baja (amarilla) y finalmente se apaga. Pulse el botón Dimmeren la intensidad y color de luz que desee
para así realizar su selección.
Page 43

2 Funcionamiento
ES
Botón Relax
Pulsando el botón Relax, tiene la posibilidad de elegir entre distintos ajustes
de luz. Si pulsa una vez el botón Relax, accede a la posición Relax A, en la
que el color de la luz cambia cada 8 segundos. Se visualizan sucesivamente los
colores rojo, azul, verde y las mezclas resultantes de los mismos (Relax 1 - 7).
Si pulsa otra vez el botón Relax, accede a la posición Relax C, en la que el
color de la luz cambia automáticamente según las horas del día:
Pulsando repetidamente el botón Relaxaccede a las otras posiciones para
elegir el color de luz: posición Relax 1 = sólo rojo, posición Relax 2 = sólo azul,
posición Relax 3 = sólo verde, posición Relax 4 = rojo-azul, posición Relax 5 =
azul-verde, posición Relax 6 = verde-rojo, posición Relax 7 = rojo-azul-verde.
Si pulsa el botón Relaxdiez veces, sale del menú para configurar la función
de Relax. Pulsando el botón Offpodrá salir en cualquier momento del menú.
Botón Light
Pulsando el botón Lightse enciende la lámpara y en el display
aparece el símbolo . En lugar de la hora aparecen cifras que indican el grado
(0 - 20) de intensidad de la luz. Dicho grado aumenta progresivamente de 0 a
20. Pulse los botones ▼ o ▲ para modificar a su gusto la intensidad.
Pulsando por segunda vez el botón Light, disminuye progresivamente la
intensidad desde el nivel ajustado hasta llegar a 0 y se apaga el símbolo . Para
leer se recomienda el nivel de intensidad 20. Pulsando el botón Off podrá
salir en cualquier momento del menú.
0:00 - 4:00 h -> como Relax 5 = azul-verde
4:00 - 8:00 h -> como Relax 1 = sólo rojo
8:00 - 12:00 h -> como Relax 4 = rojo-azul
12:00 - 16:00 h -> como Relax 2 = sólo azul
16:00 - 20:00 h -> como Relax 6 = verde-rojo
20:00 - 24:00 h -> como Relax 3 = sólo verde
Botón Alarm
Con el botón Alarmactive Alarm1 y/o Alarm 2. Pulsando una vez el botón
Alarm, aparece el símbolo AL1, indicando que AL1 está entonces activada.
Pulsando el botón por segunda vez, aparece el símbolo AL2 indicando
que AL2 está entonces activada. Pulsando el botón Alarmpor tercera vez,
aparecen los dos símbolos AL1 y AL2 y las dos alarmas están entonces activadas. Se visualiza la hora a la que está fijada la alarma. Si se han activado AL1 y
AL2, en el display de la hora se indica la hora de alarma más próxima a la hora
actual. Pulsando el botón por cuarta vez, se desactiva la función de alarma.
Al ajustar la hora de alarma también ha seleccionado una emisora de radio o un
sonido de la naturaleza, un grado de intensidad de luz y un nivel de volumen.
En los últimos 30 minutos antes de que se inicie la alarma activada, la intensidad de luz se va aproximando al grado de intensidad ajustado para la hora de
alarma. El volumen seleccionado para la hora de alarma aumenta desde el
comienzo de la alarma (al llegar la hora de alarma) durante 60 segundos
hasta alcanzar el valor ajustado. La alarma regular sólo se activa si entre el
momento de programarla y el momento en el que se tiene disparar transcurren
más de 30 minutos. Si entre el momento de programar la alarma y el momento en el que se tiene que disparar transcurren menos de 30 minutos, la función
de alarma se activa automáticamente 60 segundos antes de la hora de la
alarma.
37
Page 44

ES
2 Funcionamiento
Botón Off
Si ha activado una alarma pero se despierta antes de la hora, puede desactivar
la función de alarma pulsando el botón Off. Los ajustes de la función de
alarma se mantienen para el día siguiente. Si no pulsa el botón Off, si por
ejemplo se despierta antes de la hora de alarma y olvida pulsar el botón Off,
la función se desactiva automáticamente tras 30 minutos. Pulsando el botón Off
Botón Zizz
Si desea descansar un rato o echar una cabezada, puede programar una alarma
inmediata. Pulse el botón Zizz: en el display aparece el símbolo Zizz.
Pulsando una vez el botón Zizzse dispara una alarma 15 minutos más tarde.
Con cada nueva pulsación del botón, la hora de la alarma se retrasa 15 minutos. El tiempo máximo al que se puede ajustar una alarma inmediata es de 90
minutos a partir del momento en que se ajuste. Pulsando el botón Setse
confirma la entrada realizada y se inicia la cuenta atrás hasta el momento
ajustado para la alarma.
En la función Ziss, está preajustado el sonido de alarma. Con el botón Set
se puede modificar el ajuste (véase “Ajuste manual de la hora y de las
alarmas”, páginas 35-36).
Botón Demo/Snooze/Quick Check
Si no se utiliza la función de alarma, es decir, si no se ha activado ninguna alarma con el botón Alarm, se puede utilizar el botón para la función Demo.
Pulse el botón Demo. La luz va aumentando su intensidad a intervalos de
5 segundos (grados de intensidad indicados 0 – 20). Seguidamente comienza la
presentación de cuatro sonidos de la naturaleza. Toda la función Demo dura
aproximadamente un minuto.
Si ha ajustado y seleccionado una alarma, pero ésta todavía no está activa,
puede comprobar las funciones de la alarma mirando los ajustes con el botón
nuevamente el botón para finalizar la función Quick Check.
Si ha activado un tiempo de alarma y ya ha empezado la cuenta atrás pero
todavía no se ha alcanzado el grado máximo de intensidad, puede utilizar el
botón para la función Snooze. Si en los 30 minutos anteriores al tiempo
de alarma ajustado pulsa el botón Snooze, la función de despertador se
detiene (brillo y volumen) hasta el tiempo de alarma ajustado. El brillo y el
volumen sólo necesitan 1 minuto hasta el tiempo de alarma para ajustarse a las
intensidades predefinidas. Si en los 30 minutos posteriores al tiempo de alarma
pulsa el botón Snooze, se prolonga el tiempo de alarma 5 minutos. Cada
vez que se vuelva a pulsar el botón Snooze, el tiempo de alarma se retrasa
5 minutos. Puede retrasarla un máximo de 30 minutos.
podrá salir de cualquier otra función del menú activa.
. Pulse el botón Quick Checkpara ver los valores en el display. Pulse
2.4
Función de
reinicio (Reset)
38
Si el despertador no funciona correctamente, extraiga la fuente de alimentación
de la toma de corriente, espere 10 segundos y finalmente vuelva a enchufar la
fuente de alimentación. Vuelva a ajustar la hora y otras funciones tal y como se
describe en el apartado “Ajuste manual de la hora y de las alarmas”, pág.
35-36.
Page 45

3 Generalidades
NOTA
El despertador no tiene baterías de memoria. Si el conector de red se
desenchufa y se vuelve a enchufar, el despertador queda en el estado
inicial. Todas las configuraciones excepto las funciones Alarm y Zizz
deben volver a llevarse a cabo.
Si no se puede recibir señal de radio de la emisora RDS, se deberá
ajustar manualmente la hora. Con el ajuste manual de la hora, la
indicación de hora puede diferir ± 6 segundos/día.
ES
3.1
Limpieza y
cuidado
3.2
Indicaciones para
la eliminación
3.3
Datos Tècnicos
• Elimine regularmente el polvo del aparato con un paño antiestático o un paño
ligeramente húmedo.
• No utilice productos de limpieza agresivos ni abrasivos.
Este aparato no se debe eliminar por medio de la recogida de basuras
doméstica.
Todos los usuarios están obligados a entregar todos los aparatos eléctricos o
electrónicos, independientemente de si contienen substancias dañinas o no, en
un punto de recogida de su ciudad o en el comercio especializado, para que
puedan ser eliminados sin dañar el medio ambiente.
Para más información sobre cómo deshacerse de su aparato, diríjase a su
ayuntamiento o a su establecimiento especializado.
Denominación y modelo
Alimentación eléctrica
Potencia : máx. 10 W
Precisión : ± 6 segundos/día
Flujo luminoso : 300 lúmenes
Condiciones de servicio
Medidad
Peso
Longitud del cable de red:aprox
N° de articolo
Código EAN
: Despertador de luz SAC de
: 230 V~ 50 Hz
(si no se dispone de sistema RDS)
(a una distancia de 40 cm del aparato)
:
utilización sólo en recintos secos, según las
instrucciones de manejo
:
aprox
. 19 (L) x 13 (L) X 25,5 (A) cm
:
aprox
. 770 g
. 1,95 m
: 45100
: 40 15588 45100 3
MEDISANA
Con vistas a mejoras de la calidad del producto, nos reservamos
el derecho de introducir modificaciones técnicas y de diseño.
39
Page 46

ES
4 Garantía
4.1
Condiciones
de garantía
y reparación
Le rogamos consulte con su distribuidor especializado o directamente con el
centro de servicio técnico en caso de una reclamación. Si tuviera que remitirnos el dispositivo, le rogamos indique el defecto y adjunte una copia del
recibo de compra.
En este caso, se aplicarán las siguientes condiciones de garantía:
1. Con relación a los productos de MEDISANA, se ofrece una garantía por
un período de tres años a partir de la fecha de compra. En caso de una
reclamación, la fecha de compra debe probarse mediante el recibo de
compra o la factura.
2. Los defectos de material o de fabricación se eliminarán de forma
gratuita dentro del período de garantía.
3. La aplicación de la garantía no conlleva una extensión del período de
garantía, ni con respecto al dispositivo ni con respecto a los componentes sustituidos.
4. Esta garantía no cubre:
a. todos los daños causados por abuso, por ej. por incumplimiento del
manual de uso;
b. los daños debidos a reparaciones o intervenciones por parte del
comprador o terceros no autorizados;
c. los daños de transporte causados durante el transporte del domicilio
del fabricante al consumidor o durante el envío al servicio técnico;
d. accesorios sometidos a un desgaste normal.
5. Se excluye cualquier responsabilidad por los daños directos o indirectos
causados por el dispositivo, aunque el daño en el dispositivo haya sido
considerado como una reclamación justificada.
40
MEDISANA AG
Itterpark 7-9
40724 Hilden
Alemania
Tel.: +49 (0) 2103 / 2007-60
Fax: +49 (0) 2103 / 2007-626
eMail: info@medisana.de
Internet: www.medisana.de
Para la dirección del servicio técnico, consulte la última página.
Page 47

1 Avisos de segurança
PT
Muito obrigada
Obrigado pela sua confiança e parabéns!
Com o despertador luminoso SAC adquiriu um produto de qualidade da
MEDISANA.
Para obter os resultados desejados e desfrutar do seu despertador luminoso
SAC MEDISANA durante muito tempo, aconselhamos a leitura atenta das
seguintes instruções de uso e conservação.
NOTAS IMPORTANTES!
GUARDAR SEM FALTA!
Antes de utilizar o aparelho, leia atentamente o manual
de instruções, em especial as indicações de segurança e
guarde-o para uma utilização posterior.
Se entregar o aparelho a terceiros, faculte também este
manual de instruções.
Os seguintes símbolos são apresentados nas instruções de operação:
Este manual de instruções pertence a este aparelho.
Ele contém informações importantes para a colocação em
funcionamento e a operação. Leia completamente este
manual de instruções. O incumprimento destas instruções
pode causar lesões graves ou danos no aparelho.
AVISO
Estas indicações de aviso têm de ser cumpridas para
evitar possíveis lesões do utilizador.
ATENÇÃO
Estas indicações têm de ser cumpridas para evitar
possíveis danos no aparelho.
NOTA
Estas notas fornecem informações adicionais úteis para
a instalação ou a operação.
41
Page 48

PT
1.1
Avisos de
segurança
1 Avisos de segurança / 2 Operação
•
Antes de conectar o aparelho à sua alimentação de corrente, tenha atenção
para que a tensão eléctrica indicada na chapa de identificação corresponda à
da sua rede eléctrica.
• Utilize o aparelho apenas de acordo com as prescrições das instruções de
utilização.
• Em caso de utilização não adequada, o direito à garantia perde a sua validade.
• O aparelho destina-se apenas ao uso doméstico privado.
•
Não utilize o aparelho se este apresentar defeitos de funcionamento, se tiver
caído à água, entrado em contacto com água ou tiver sido danificado de
outra forma.
• Não agarre um adaptador de rede que tenha caído na água. Retire imediatamente da tomada de corrente a ficha de rede ou o adaptador de rede.
• Se o cabo ou o adaptador de rede estiver danificado, o aparelho não pode ser
utilizado.
• Não utilize o aparelho nas proximidades de emissores electromagnéticos de alta
frequência, pois os mesmos podem perturbar a função do aparelho.
• Não exponha o aparelho à radiação solar directa.
•
Proteja o aparelho da humidade.
• O aparelho, assim como o cabo e o adaptador de rede, nunca podem ser
imergidos em água nem ser mantidos sob água corrente.
• Segure no adaptador de rede sempre com mãos secas.
• O cabo não pode estar perto de fontes de aquecimento nem ser puxado por
cima de arestas afiadas.
• Nunca transporte, puxe ou rode o adaptador de rede no cabo e nunca entale o
cabo.
• Proteja o aparelho de embates e vibrações.
• Em caso de falha, não tente reparar o aparelho. Uma reparação só pode ser
efectuada por um vendedor autorizado ou uma pessoa qualificada.
• Para a utilização do aparelho, coloque-o sobre uma superfície firme e lisa para
que não possa tombar ou cair.
2
Operação
2.1
Material fornecido
e embalagem
42
Por favor, em primeiro lugar, verifique se o aparelho está completo e não
apresenta qualquer dano. Em caso de dúvida, não coloque o aparelho em
funcionamento e envie-o para um centro de assistência.
Do volume de fornecimento fazem parte:
• 1 despertador luminoso SAC MEDISANA
• 1 instruções de uso
As embalagens podem ser reutilizadas ou podem ser eliminadas através da
reciclagem. Por favor, elimine adequadamente o material da embalagem não
necessário. Se, durante o desembalamento, verificar danos devido ao transporte, por favor, entre imediatamente em contacto com o seu revendedor.
Page 49

2.2
Instalar e ajustar
2
Operação
ADVERTÊNCIA
Tenha atenção para que as películas da embalagem não se
tornem brincadeiras para crianças! Existe perigo de asfixia!
1.
Para a utilização do aparelho, coloque-o sobre uma superfície firme e lisa para
que não possa tombar ou cair.
2. Instale o aparelho a uma distância de aprox. 40 –50 cm da sua cabeça,
p.ex., numa mesa de cabeceira.
3. Insira a fonte de alimentação na tomada eléctrica.
NOTAS
O seu despertador luminoso SAC MEDISANA está equipado com R.D.S.
(Radio Data System). O aparelho recebe a sua informação horária através
do sinal R.D.S. Se não estiver disponível um sinal R.D.S., a hora não é
ajustada automaticamente.
A designação breve da estação de rádio é exibida em letras. Quando
a estação de rádio não emitir uma designação, apenas é exibida a
frequência digital da estação de rádio.
As horas (12:00) no display começam a piscar, o símbolo R.D.S. e o
texto corrido TIME SETTING são exibidos no display para iniciar a regulação
automática da hora. Após alguns minutos, a hora actual é aceite e exibida
no display. Na margem inferior do display passa o texto corrido SET
SUCCESS. Quando o sinal rádio da estação emissora R.D.S. não for recebido, o símbolo R.D.S. apaga após aprox. 60 segundos e é exibido o texto
corrido SET FAIL. Neste caso, regule manualmente as horas com o botão
Sete os botões
ou
.
PT
2.3
Funções dos
botões
Regulação manual das horas e dos alarmes
Prima o botão Setdurante aprox. 3 segundos, no display , as horas
piscam em ciclos de 0,5 segundos. Agora, poderá ajustar manualmente as
horas. Prima os botões
vez para confirmar a hora e aceder em simultâneo ao menu de ajuste para o
alarme 1 (AL1) / alarme 2 (AL2) / Zizz (alarme breve).
Com os botões
selecção com o botão Set (seleccione, p.ex., AL1). Ajuste a hora de alarme,
premindo os botões
AL1 e a hora de alarme piscam em ciclos de 0,5 segundos. Confirme a hora de
alarme ajustada com o botão Set
mente o menu de selecção para o alarme seleccionado. O display exibe o símbolo de rádio (FM) ou Sound.
ou
ou
ou
. Prima o botão Setuma segunda
, seleccione o alarme pretendido e confirme a
. Durante o ajuste do alarme, o símbolo
. Em seguida, o display exibe directa-
43
Page 50

PT
2
Operação
Com os botões
confirmar a sua selecção com o botão Set .
Se tiver optado por rádio (FM), poderá escolher uma estação de rádio com os
botões
selecção com o botão Set .
Se tiver seleccionado sons naturais, com os botões
seleccionar oito sons naturais diferentes, no entanto, na selecção de cada som
é emitido durante breves instantes o respectivo som e exibido um pictograma
no display. Volte a confirmar a sua selecção com o botão Set.
Em seguida, o aparelho solicita o ajuste do volume. No display , os dígitos sob
o símbolo representam o volume ajustado. Com os botões
configure o volume pretendido. Volte a premir o botão Set para confirmar
a sua introdução. O aparelho solicita o ajuste da luminosidade. No display, os
dígitos sob o símbolo representam a luminosidade ajustada. Com os botões
introdução com o botão Set . Se pretender utilizar apenas a função de luz
ou apenas a função Sound/Radio, coloque a outra na posição 0 durante a
regulação.
Se, durante o ajuste não premir um botão durante 10 segundos, o menu de
ajuste é desligado automaticamente.
Depois de ter realizado e confirmado a sua selecção, se pretender utilizar a
função terá de premir o botão Alarm- ou Zizz.
Para ajustar o alarme 2 (AL2) ou o alarme breve (Zizz), proceda do mesmo
modo.
Se estiver activado um alarme, os botões estão bloqueados para rádio , luz
e relax .
Botão Sound/Radio
Quando o botão Sound/Radiofor premido uma vez, é exibido o símbolo
Sound e o sinal de transmissão pisca. Com os botões
cione o som pretendido. Com os botões ▼ ou ▲, regule o volume pretendido.
Quando o botão Sound/Radiofor premido uma segunda vez, é exibido o
símbolo de rádio (FM) e o sinal de transmissão pisca. Com os botões
▼ ou ▲, ajuste o volume pretendido.
Se premir o botão Sound/Radiouma terceira vez ou o botão Off, o
menu é abandonado.
ou
ou
, seleccione a sua estação de rádio pretendida. Com os botões
ou
, escolha entre rádio (FM) ou Sound e volte a
com a qual pretende acordar. Volte a confirmar a sua
ou
ou
poderá
, configure a luminosidade pretendida. Volte a confirmar a sua
ou
, selec-
ou
,
44
Botão Dimmer
Se premir o botão Dimmer, a luminosidade do display é ligada e altera alternadamente de intensidade luminosa alta (verde) para intensidade luminosa
baixa (verde), intensidade luminosa alta (amarelo), intensidade luminosa baixa
(amarelo) e iluminação. Prima o botão Dimmerpara realizar a sua selecção
da intensidade luminosa e a cor da luz por si pretendidas.
Botão Relax
Premindo, o botão Relaxtem a possibilidade de seleccionar entre diversas
configurações de luz. Se premir uma vez o botão Relax
Relax A na qual após aprox. a cada 8 segundos é realizada uma mudança da
, acede à posição
Page 51

2
Operação
cor da luz. Sucessivamente são exibidas vermelho, azul, verde e as suas cores de
mistura (Relax 1 - 7).
Se premir uma segunda vez o botão Relax, acede à posição Relax C, na
qual a cor da luz altera automaticamente em determinadas horas do dia:
0:00 - 4:00 horas -> como Relax 5 = azul-verde
4:00 - 8:00 horas -> como Relax 1 = apenas vermelho
8:00 - 12:00 horas -> como Relax 4 = vermelho-azul
12:00 - 16:00 horas -> como Relax 2 = apenas azul
16:00 - 20:00 horas -> como Relax 6 = verde-vermelho
20:00 - 24:00 horas -> como Relax 3 = apenas verde
Premindo novamente, o botão Relaxacede às outras posições para a
selecção da cor da luz: posição Relax 1 = apenas vermelho, posição Relax 2 =
apenas azul, posição Relax 3 = apenas verde, posição Relax 4 = vermelho-azul,
posição Relax 5 = azul-verde, posição Relax 6 = verde-vermelho, posição
Relax 7 = vermelho-azul-verde. Se premir o botão Relaxpela décima vez,
abandona o menu de ajuste da função Relax. Se premir o botão Offpode
abandonar o menu a qualquer altura.
PT
Botão Light
Premindo o botão Light, o corpo luminoso é ligado, no display é
exibido o símbolo . Em vez das horas, são exibidos os dígitos que indicam a
intensidade (0 - 20) da luminosidade. A intensidade da luminosidade sobe
gradualmente de 0 até 20. Prima os botões
sidade da luminosidade de acordo com as suas necessidades.
Se premir uma segunda vez o botão Light, a luminosidade é reduzida
gradualmente até 0 do nível de luminosidade ajustado e o símbolo apaga.
Para a leitura, recomenda-se o nível de luminosidade 20. Se premir o botão Off
Botão Alarm
Com o botão Alarm, activa o Alarm 1 e/ou o Alarm 2. Se premir uma vez o
botão Alarm, o símbolo AL1 é exibido e AL1 está activado. Se premir uma
segunda vez o botão , o símbolo AL2 é exibido e AL2 está activado. Se
premir uma terceira vez o botão Alarm, ambos os símbolos AL1 e AL2 são
exibidos e os dois alarmes estão activados. É exibida a hora de alarme. Se AL1 e
AL2 tiverem sido activados, o display das horas exibe a hora de alarme que está
mais próxima da hora actual. Se premir uma quarta vez o botão , a função
de alarme é desligada.
Ao ajustar a hora de alarme também seleccionou uma estação de rádio ou um
som natural, um nível de luminosidade e um volume. Dentro dos últimos 30
minutos antes do início de um alarme activado, a luminosidade adapta-se
lentamente ao nível de luminosidade ajustado para a hora de alarme. O
volume seleccionado para a hora de alarme é aumentado desde o início de um
alarme (quando a hora de alarme é alcançada) dentro de 60 segundos para o
valor ajustado. O alarme regular apenas é activado quando existem mais de 30
minutos entre o momento para o qual o alarme é ajustado e o momento para
o qual o alarme deve ser activado. Quando existir entre o momento para o qual
o alarme é ajustado e o momento para o qual o alarme deve ser activado menos
de 30 minutos, a função de alarme liga-se 60 segundos antes da hora do
alarme.
pode abandonar o menu a qualquer altura.
▼ ou ▲ para alterar a inten-
45
Page 52

PT
2
Operação
Botão Off
Se tiver activado um alarme, contudo acordar antes da hora de alarme, poderá
desligar a função de alarme premindo o botão Off. Os ajustes da função de
alarme permanecem para o próximo dia. Se não premir o botão Off, p.ex.,
se acordar antes da hora de alarme e se esquecer de premir o botão Off, a
função alarme é desligada automaticamente após 30 minutos. Ao premir o
botão Offtambém pode abandonar qualquer outra função do menu activa.
Botão Zizz
Poderá configurar o alarme breve, p.ex., se pretender descansar um pouco ou
dormir a sesta. Prima o botão Zizz, no display é exibido o símbolo Zizz.
Se premir uma vez o botão Zizz, é configurado um alarme de despertar para
após 15 minutos. Cada vez que premir este botão, o alarme é prolongado em
15 minutos. A hora de alarme máxima ajustável de um alarme breve é de 90
minutos. Premindo o botão Set, confirma a sua introdução e inicia em simultâneo o tempo até à activação do alarme ajustado.
Na função Ziss está pré-ajustado o alarme com Sound. Com o botão Set,
poderá alterar a configuração (ver “Regulação manual das horas e dos alar-
mes” na página 43-44).
Botão Demo/Snooze/Quick Check
Se não tiver utilizada a função de alarme, isto é, se não tiver activado um alarme com o botão Alarm, é possível utilizar o botão para a função de
demonstração. Prima o botão Demo. A luz torna-se gradualmente mais
clara em intervalos de 5 segundos (níveis de luminosidade exibidos 0 – 20). Em
seguida, é iniciada a apresentação de até quatro sons naturais. O processo total
da função de demonstração tem uma duração de aprox. um minuto.
Se tiver configurado um alarme, contudo se o alarme ainda não estiver activado, poderá verificar as funções de alarme consultando os ajustes com o botão
display. Volte a premir o botão para terminar a função Quick Check.
Se tiver activado a hora de alarme, a contagem decrescente já estiver em curso,
o nível de luminosidade máximo ainda não estiver alcançado, poderá utilizar o
botão para a função Snooze. Se, dentro de 30 minutos da hora de alarme
ajustada, premir o botão Snooze, a função de despertar (luminosidade e
volume) pára até à hora de alarme ajustada. Depois, a luminosidade e o volume
necessitam de apenas 1 minuto até à hora de alarme para adaptar-se às intensidades ajustadas. Se, dentro de 30 minutos após a hora de alarme, premir o
botão Snooze, a hora de alarme é prolongada por mais 5 minutos. Cada
vez que premir o botão Snooze, o alarme de despertar é retardado em mais
5 minutos. Poderá prolongar a hora de alarme, no máximo, em 30 minutos.
. Prima o botão Quick Checke os valores introduzidos são exibidos no
2.4
Função de
reinicialização
(Reset)
46
Se o aparelho não funcionar de modo correcto, retire a fonte de alimentação da
tomada eléctrica, aguarde 10 segundos e, em seguida, volte a inserir a fonte de
alimentação na tomada eléctrica. Ajuste de novo as horas e as outras funções
como descrito no parágrafo “Regulação manual das horas e dos alarmes”
na página 43-44.
Page 53

3 Generalidades
NOTA
O aparelho não contém quaisquer pilhas recarregáveis. Se a ficha de
rede tiver sido retirada e novamente inserida, o aparelho encontra-se
na posição de partida. Todos os ajustes, excepto a função de alarme
e a função Zizz têm de ser realizados de novo.
Quando o sinal rádio da estação emissora R.D.S. não for recebido, as
horas têm de ser reguladas manualmente. Em caso de uma configuração
manual da hora, a indicação da hora pode desviar em ± 6 segundos/dia.
PT
3.1
Limpeza e
conservação
3.2
Indicações sobre
a eliminação
3.3
Dados técnicos
• Limpe regularmente o pó do aparelho com um pano antiestático. Também
poderá utilizar um pano ligeiramente humedecido.
• Não utilize agentes de limpeza agressivos ou abrasivos.
Este aparelho não pode ser eliminado em conjunto com o lixo doméstico.
Cada consumidor tem o dever de entregar qualquer aparelho eléctrico ou
electrónico com ou sem substâncias nocivas nos postos de recolha públicos
da sua cidade ou no seu revendedor especializado, para que possam ser eliminados ecologicamente.
Para mais informações sobre as formas de eliminação, contacte as autoridades
locais ou o seu revendedor.
Denominação e modelo
Alimentação de corrente
Potência : máx. 10 W
Precisão horária : ± 6 segundos/dia
Luminosidade : 300 Lumen (40 cm afastado do aparelho)
Condições funcionamento:utilizar só em locais secos conforme
Dimensões
Peso
Comprimento cabo
Número de artigo
Número EAN
:
despertador luminoso SAC MEDISANA
: 230 V~ 50 Hz
(quando R.D.S. não disponível)
manual de instruções
:
aprox
. 19 (C) x 13 (L) X 25,5 (A) cm
:
aprox
. 770 g
:
aprox
. 1,95 m
: 45100
: 40 15588 45100 3
Devido aos constantes melhoramentos do produto, reservamos
o direito a proceder a alterações técnicas e estéticas.
47
Page 54

PT
4 Garantia
4.1
Garantia e
condições
de reparação
Por favor, em caso de garantia, contacte o seu revendedor especializado ou
directamente o centro de assistência. Se for necessário enviar o aparelho,
por favor, envie o aparelho indicando a avaria e acompanhado de uma cópia
do recibo de compra.
Em caso de garantia aplicam-se as seguintes condições:
1. Aos produtos MEDISANA concedemos uma garantia de três anos a
partir da data de compra. Em caso de garantia, a data de compra tem de
ser comprovada através do recibo de compra ou factura.
2. As deficiências devido a erros de material ou de fabricação são elimi-
nadas gratuitamente dentro do prazo de garantia.
3. Após um serviço de garantia, o prazo da garantia não é prolongado, nem
para o aparelho nem para as peças substituídas.
4. A garantia exclui:
a. todos os danos resultantes de manuseamento inadequado como,
p.ex., devido ao não cumprimento do manual de instruções.
b. danos resultantes de reparações ou intervenções pelo comprador ou
por terceiros não autorizados.
c. danos de transporte resultantes do percurso entre o fabricante e
o consumidor ou durante o envio para o serviço de assistência a
clientes.
d. componentes exteriores sujeitos a um desgaste normal.
5. Não nos responsabilizamos por danos consequentes, directos ou in-
directos, causados pelo aparelho mesmo quando o dano no aparelho
é reconhecido como um caso de garantia.
48
MEDISANA AG
Itterpark 7-9
40724 Hilden
Alemanha
Tel.: +49 (0) 2103 / 2007-60
Fax: +49 (0) 2103 / 2007-626
eMail: info@medisana.de
Internet: www.medisana.de
O endereço do serviço de assistência pode ser consultado na última página.
Page 55

1 Veiligheidsmaatregelen
NL
Hartelijk dank
Hartelijk dank voor uw vertrouwen en van harte gelukgewenst!
Met de lichtwekker SAC bent u in het bezit van een kwaliteitsproduct van
MEDISANA.
Opdat u het gewenste succes zou bereiken en lang plezier aan uw
MEDISANA lichtwekker SAC zou beleven, raden we u aan om de volgende
aanwijzingen over het gebruik en het onderhoud zorgvuldig te lezen.
BELANGRIJKE AANWIJZINGEN!
ABSOLUUT BEWAREN!
Lees de gebruiksaanwijzing, in het bijzonder de
veiligheidsinstructies, zorvuldig door vooraleer u het
apparaat gebruikt en bewaar de gebruiksaanwijzing
voor verder gebruik.
Als u het toestel aan derden doorgeeft, geef dan deze
gebruiksaanwijzing absoluut mee.
De volgende symbolen vindt u in de bedieningshandleiding terug:
Deze gebruiksaanwijzing behoort bij dit toestel. Ze bevat
belangrijke informatie over de ingebruikneming en het
gebruik. Lees deze gebruiksaanwijzing helemaal. Het niet
naleven van deze instructie kan zware verwondingen of
schade aan het toestel veroorzaken.
WAARSCHUWING
Deze waarschuwingen moeten in acht genomen worden
om mogelijk letsel van de gebruiker te verhinderen.
OPGELET
Deze aanwijzingen moeten in acht genomen worden
om mogelijke schade aan het toestel te verhinderen.
AANWIJZING
Deze aanwijzingen geven u nuttige bijkomende
informatie bij de installatie of het gebruik.
49
Page 56

NL
1.1
Veiligheidsmaatregelen
1 Veiligheidsmaatregelen / 2 Gebruik
•
Voor u het apparaat aansluit op uw stroomtoevoer, dient u erop te letten dat
de netspanning, die op het typeaanduidingsplaatje staat aangegeven overeenkomt met die van uw stroomnet.
• Gebruik het apparaat alleen voor doeleinden zoals gesteld in de gebruiksaanwijzing.
• In alle andere gevallen vervalt de garantie.
• Het toestel is alleen voor privé-gebruik bestemd.
•
Gebruikt u het apparaat niet, als het niet storingvrij functioneert, als het op
de grond of in het water gevallen is of beschadigd is.
• Raak nooit een voedingsapparaat aan dat in water is gevallen. Haal onmiddelijk de stekker resp. de voedingsapparaat uit de wandcontactdoos.
• Wanneer het snoer of het voedingsapparaat beschadigd is, mag het instrument
niet verder gebruikt worden.
• Gebruik het instrument nooit in de buurt van hoogfrequente elektromagnetische zendapparatuur, aangezien deze de functies van het apparaat zou
kunnen verstoren.
• Stel het toestel niet bloot aan direct zonlicht.
•
Bescherm het apparaat tegen vocht.
• Dit instrument, het snoer en het voedingsapparaat mogen nooit in water
ondergedompeld worden of onder stromend water worden gehouden.
• Raak het voedingsapparaat uitsluitend met droge handen aan.
• De kabel mag niet in de buurt van warmtebronnen gebracht worden of
over scherpe randen heengetrokken.
• Transporteer, trek of draai het voedingsapparaat nooit met behulp van het
netsnoer en zorg ervoor dat het netsnoer niet ingeklemd wordt.
• Bescherm het toestel tegen stoten en schokken.
• Repareer het toestel in het geval van een storing niet zelf. Een reparatie
mag alleen door een geautoriseerde vakhandelaar of een dergelijk gekwalificeerde persoon worden doorgevoerd.
• Plaats het toestel bij het gebruik op een vast en effen vlak, zodat het niet kan
kantelen.
2 Gebruik
2.1
Levering en
verpakking
50
Gelieve eerst te controleren of het instrument volledig is en volledig vrij van
beschadigingen is. In geval van twijfel neemt u het apparaat niet in gebruik en
zendt u het naar een servicepunt.
Bij de levering horen:
• 1 MEDISANA lichtwekker SAC
• 1 gebruiksaanwijzing
Het verpakkingsmateriaal kan opnieuw worden gebruikt of gerecycled. Zorg
ervoor dat het gebruikte verpakkingsmateriaal bij de daarvoor bestemde
afvalverwerking terechtkomt. Indien u tijdens het uitpakken transportschade
constateert, neem dan direct contact op met uw leverancier.
Page 57

2 Gebruik
WAARSCHUWING
Let er op dat het verpakkingsmateriaal niet in handen komt
van kinderen! Zij kunnen er in stikken!
NL
2.2
Opstellen en
instellen
2.3
Toetsfuncties
Opstellen en instellen
1.
Plaats het toestel voor gebruik op een vast en effen vlak, zodat het niet kan
kantelen of vallen.
2. Plaats het toestel op een afstand van ca. 40-50 cm van uw hoofd, bijv. op
een nachttafel.
3. Steek de voeding in het stopcontact.
INSTRUCTIES
Uw MEDISANA lichtwekker SAC is met RDS (Radio Data System) uitgerust. Het toestel krijgt zijn tijdsinformatie via het RDS-signaal. Is er
geen RDS-signaal beschikbaar, dan wordt de tijd niet automatisch ingesteld.
De afkorting van de radiozender wordt in letters weergegeven. Als
de radiozender geen handtekening zendt, wordt alleen de digitale
frequentie van het radiostation weergegeven.
De tijd (12:00) op het display begint te knipperen, het RDS-symbool en
de tekst TIME SETTING verschijnen op het display om de automatische tijdsinstelling te starten. Na enkele minuten wordt de actuele tijd overgenomen
en op het display weergegeven. Aan de onderste rand van het display loopt
de tekst SET SUCCESS. Als het radiosignaal van de RDS-zender niet ontvangen wordt, verdwijnt het RDS-symbool na ca. 60 seconden en de tekst
SET FAIL verschijnt. In dit geval stelt u de tijd handmatig met de Set-toets
en de toetsen
Handmatige instelling van de tijd en van de alarmen
Druk ca. 3 seconden op de Set-toets , de tijd op het display knippert
om de 0,5 seconden. U kunt nu de tijd handmatig instellen. Druk op de toetsen
te bevestigen en tegelijk om naar het instellingsmenu voor het alarm 1 (AL1) /
alarm 2 (AL2) / Zizz (snel alarm) te gaan.
Kies met de toetsen
met de Set-toets (kies bijv. AL1). Stel de alarmtijd door het indrukken van
de toetsen
AL1-symbool en de alarmtijd om de 0,5 seconden. Bevestig de ingestelde
alarmtijd met de Set-toets . Daarna gaat u direct naar het keuzemenu
voor het gekozen alarm. Op het display verschijnt het radio (FM)- of soundsymbool.
resp.
resp.
of
. Druk een tweede keer op de Set-toets om de tijd
resp.
in. Tijdens het instellen van het alarm knippert het
in.
het gewenste alarm en bevestig de keuze
51
Page 58

NL
2 Gebruik
Kies met de toetsen
de keuze opnieuw met de Set-toets .
Als u radio (FM) gekozen hebt, kunt u met de toetsen
radiostation kiezen waarmee u gewekt wil worden. Bevestig uw keuze
opnieuw met de Set-toets .
Als u de natuurgeluiden gekozen hebt, kunt u met de toetsen
acht verschillende natuurgeluiden kiezen, waarbij telkens het geluid bij de
keuze kort weerklinkt en een pictogram op het display weergegeven wordt.
Bevestig uw keuze opnieuw met de Set-toets .
Daarna gaat u naar de instelling van het volume. Op het display geven de
cijfers onder het -symbool het ingestelde volume weer. Stel met de toetsen
resp.
om uw invoer te bevestigen. U bereikt de instelling van de helderheid. Op het
display geven de cijfers onder het -symbool de ingestelde helderheid weer.
Stel met de toetsen
invoer opnieuw met de Set-toets . Als u alleen de licht- of alleen de
sound/radiofunctie wilt gebruiken, stel de andere functie bij de instelling dan
op de positie 0 in.
Als u tijdens de instelling 10 seconden lang op geen enkele toets drukt, schakelt
het instellingsmenu automatisch uit.
Als u uw keuze gemaakt en bevestigd hebt, moet u, als u de functie wilt gebruiken, de Alarm- resp. Zizz-toets indrukken.
Voor de instelling van het alarm 2 (AL2) resp. het snelle alarm (Zizz) gaat u op
dezelfde manier te werk.
Als een alarm geactiveerd is, zijn de toetsen voor radio , licht en relax
geblokkeerd.
Sound/radio-toets
Als u de Sound/radio-toets een keer indrukt, verschijnt het soundsymbool
en het transmissiesymbool knippert. Kies met de toetsen
het gewenste geluid. Met de -toetsen ▼ resp. ▲ stelt u het gewenste
volume in.
Als u de Sound/radio-toets een tweede keer indrukt, verschijnt het radio
(FM)-symbool en het transmissiesymbool knippert. Kies met de toetsen
resp.
▲ stelt u het gewenste volume in.
Als u de Sound/radio-toets een derde keer of de Off-toets indrukt, verlaat u het menu.
het gewenste volume in. Druk opnieuw op de Set-toets
de door u gewenste radiozender. Met de -toetsen ▼ resp.
resp.
resp.
tussen radio (FM) of sound en bevestig
resp.
de gewenste helderheid in. Bevestig uw
resp.
resp.
een
52
Dimmer-toets
Als u de Dimmer-toets indrukt, schakelt de displayverlichting in en wisselt
het display na elkaar van hoge lichtsterkte (groen) naar lage lichtsterkte (groen),
hoge lichtsterkte (geel), lage lichtsterkte (geel) en verlichting uitgeschakeld. Druk
op de Dimmer-toets bij de door u gewenste lichtsterkte en lichtkleur om uw
keuze te maken.
Relax-toets
Door op de Relax-toets te drukken, hebt u de mogelijkheid om uit verschillende lichtinstellingen te kiezen. Als u een keer op de Relax-toets
drukt, gaat u naar de positie Relax A, waarin ca. om de 8 seconden van licht-
Page 59

2 Gebruik
kleur gewisseld wordt. Na elkaar worden rood, blauw, groen en de mengkleuren ervan weergegeven (Relax 1 - 7).
Als u een tweede keer op de Relax-toets drukt, gaat u naar de positie
Relax C waarin de lichtkleur op bepaalde tijdstippen automatisch wisselt:
0:00 - 4:00 uur -> zoals Relax 5 = blauw-groen
4:00 - 8:00 uur -> zoals Relax 1 = alleen rood
8:00 - 12:00 uur -> zoals Relax 4 = rood-blauw
12:00 - 16:00 uur -> zoals Relax 2 = alleen blauw
16:00 - 20:00 uur -> zoals Relax 6 = groen-rood
20:00 - 24:00 uur -> zoals Relax 3 = alleen groen
Door het meermaals indrukken van de relax-toets gaat u naar de andere
posities voor het kiezen van de lichtkleur: Positie Relax 1 = alleen rood, positie
Relax 2 = alleen blauw, positie Relax 3 = alleen groen, positie Relax 4 =
rood-blauw, positie Relax 5 = blauw-groen, positie Relax 6 = groen-rood,
positie Relax 7 = rood-blauw-groen. Als u voor de tiende keer op de Relaxtoets drukt, verlaat u het instellingsmenu van de relaxfuncties. Door op de
Off-toets te drukken, kunt u het menu altijd verlaten.
NL
Light-toets
Door het indrukken van de Light-toets schakelt u de lamp in, op het
display verschijnt het -symbool. In de plaats van de tijd verschijnen cijfers
die de graad (0 - 20) van de helderheid aangeven. De helderheidsgraad stijgt
stapsgewijs van 0 tot 20. Druk op de -toetsen ▼ resp. ▲, om de graad
van de helderheid volgens uw wensen te wijzigen.
Als u de Light-toets een tweede keer indrukt, vermindert de helderheid
stapsgewijs van de ingestelde helderheidsstand achteruit tot 0 en het -symbool verdwijnt. Om te lezen wordt helderheidsstand 20 aanbevolen. Door op de
Off-toets te drukken, kunt u het menu altijd verlaten.
Alarm-toets
Met de Alarm-toets activeert u alarm 1 en/of alarm 2. Als u een keer op de
Alarm-toets drukt, verschijnt het AL1-symbool en AL1 is geactiveerd. Als u
een tweede keer op de toets drukt, verschijnt het AL2-symbool en AL2 is
geactiveerd. Als u een derde keer op de Alarm-toets drukt, verschijnen
beide symbolen AL1 en AL2 en beide alarmen zijn geactiveerd. De alarmtijd
wordt weergegeven. Als AL1 en AL2 geactiveerd werden, wordt in het tijddisplay de alarmtijd weergegeven die het dichtst bij de actuele tijd ligt. Als u
een vierde keer op de toets drukt, wordt de alarmfunctie uitgeschakeld.
Bij het instellen van de alarmtijd hebt u ook een radiozender of een natuurgeluid, een helderheidsstand van de verlichting en een volume geselecteerd.
Binnen de laatste 30 minuten voor het starten van een geactiveerd alarm past
de helderheid zich langzaam aan de voor de alarmtijd ingestelde helderheidsstand aan. Het voor de alarmtijd gekozen volume verhoogt vanaf het begin van
een alarm (bereiken van de alarmtijd) binnen 60 seconden tot de ingestelde
waarde. Het reguliere alarm wordt alleen geactiveerd als tussen het tijdstip
waarop het alarm ingesteld wordt en het tijdstip waarop het alarm geactiveerd
moet worden, meer dan 30 minuten liggen. Als tussen het tijdstip waarop het
alarm ingesteld wordt en het tijdstip waarop het alarm geactiveerd moet worden, minder dan 30 minuten liggen, schakelt de alarmfunctie 60 seconden voor
de alarmtijd in.
53
Page 60

NL
2 Gebruik
Off-toets
Als u een alarm geactiveerd hebt, maar al voor de alarmtijd wakker wordt, kunt
u door het indrukken van de Off-toets de alarmfunctie uitschakelen. De
instellingen van de alarmfunctie blijven voor de volgende dag behouden. Als u
niet op de Off-toets drukt, als u dus bijv. voor de alarmtijd wakker wordt en
vergeet om op de Off-toets te drukken, schakelt de alarmfunctie na 30
minuten automatisch uit. Door op de Off-toets te drukken, kunt u ook elke
andere menufunctie verlaten.
Zizz-toets
Als u een korte rustpauze inlast of een middagdutje wilt doen, kunt u een snel
alarm instellen. Druk op de Zizz-toets , op het display verschijnt het Zizzsymbool.
Het eenmalig indrukken van de Zizz-toets stelt een wekalarm na het verstrijken van 15 minuten in. Elk bijkomend indrukken verlengt de tijd tot aan het
alarm met 15 minuten. De maximaal instelbare alarmtijd voor een snel alarm
bedraagt 90 minuten. Door het indrukken van de Set-toets bevestigt u uw
invoer en start u tegelijk het ingestelde tijdsverloop tot aan het alarm.
In de zizz-functie is de alarmsound vooraf ingesteld. Met de Set-toets kunt
u de instelling wijzigen (zie “Handmatige instelling van de tijd en van de
alarmen“, pagina 51-52).
Demo/snooze/quick check-toets
Als de alarmfunctie niet gebruikt wordt, d.w.z. als geen alarm met de Alarm-
toets geactiveerd werd, kan de toets voor de demofunctie gebruikt worden. Druk op de Demo-toets . Het licht wordt stapsgewijs in intervallen van
5 seconden helderder (weergegeven helderheidsstanden 0 - 20). Daarna begint
de voorstelling van vier natuurgeluiden. De volledige procedure van de demofunctie duurt ongeveer een minuut.
Als u een alarm ingesteld en gekozen hebt, maar het alarm nog niet actief is,
kunt u met de toets voor het oproepen van de instellingen de alarmfuncties
controleren. Druk op de Quick Check-toets en de ingevoerde waarden
verschijnen op het display. Druk opnieuw op de toets om de Quick Checkfunctie te beëindigen.
Als u een alarmtijd geactiveerd hebt, en de countdown hiervoor al loopt, maar
de maximale helderheidsstand nog niet bereikt is, kunt u de toets voor de
snoozefunctie gebruiken. Drukt u binnen 30 minuten voor de ingestelde alarmtijd op de Snooze-toets , stopt de wekfunctie (helderheid en volume) tot aan
de ingestelde alarmtijd. Helderheid en volume hebben dan slechts 1 minuut tot
aan de alarmtijd nodig om zich aan de ingestelde waarden aan te passen. Drukt
u binnen 30 min. na de alarmtijd op de Snooze-toets , verlengt de alarmtijd met 5 minuten. Elk bijkomend indrukken van de Snooze-toets
het wekalarm met nog eens 5 minuten. U kunt de alarmtijd met maximaal
30 minuten verlengen.
vertraagt
2.4
Herstartfunctie
(reset)
54
Als het toestel niet correct functioneert, trekt u de voeding uit het stopcontact,
wacht u 10 seconden en steekt u daarna de voeding opnieuw in het stopcontact. Stel de tijd en de andere functies opnieuw in, zoals in het hoofdstuk
“Handmatige instelling van de tijd en van de alarmen“, pagina 51-52
beschreven.
Page 61

3 Diversen
AANWIJZING
Het toestel bevat geen geheugenbatterijen. Als de stekker uit het stop
contact getrokken en er opnieuw ingestoken wordt, bevindt het toestel
zich in de uitgangspositie. Alle instellingen, behalve alarm- en zizzfunctie, moeten opnieuw uitgevoerd worden.
Als het radiosignaal van de RDS-zender niet ontvangen kan worden,
moet de tijd handmatig ingesteld worden. Bij handmatige tijdinstelling
kan de tijdsopgave ± 6 seconden/dag afwijken.
NL
3.1
Reiniging en
onderhoud
3.2
Afvalbeheer
3.3
Technische
Specificaties
• Ontstof het toestel regelmatig met een antistatische doek. U kunt ook een
licht bevochtigde doek gebruiken.
• Gebruik geen agressieve reinigings- of schuurmiddelen.
Dit apparaat mag niet samen met het huishoudelijk afval worden aangeboden.
Iedere consument is verplicht, alle elektrische of elektronische
apparaten, ongeacht of die schadelijke stoffen bevatten of niet, bij een
milieudepot in zijn stad of bij de handelaar af te geven, zodat ze op een milieuvriendelijke manier kunnen worden verwijderd.
Wendt u zich betreffende het afvalbeheer tot uw gemeente of handelaar.
Naam en model
Netvoeding
Vermogen : max. 10 W
Tijdsprecisie : ± 6 seconden/dag
Helderheid : 300 lumen (40 cm van het toestel verwijderd)
Bedrijfsvoorwaarden:alleen in droge ruimtes overeenkomstig de
Afmetingen
Gewicht : ca. 770 g
Lengte netsnoer
Artikelnummer
EAN Code : 40 15588 45100 3
:
MEDISANA
: 230 V~ 50 Hz
(indien RDS niet beschikbaar)
gebruiksaanwijzing gebruiken
: ca. 19 (L) x 13 (B) X 25,5 (H) cm
: ca. 1,95 m
: 45100
lichtwekker SAC
In het kader van onze voortdurende inspanningen naar
verbeteringen, behouden wij ons het recht voor om qua
vormgeving en op technisch gebied veranderingen aan ons
product door te voeren.
55
Page 62

NL
4 Garantie
4.1
Garantie en
reparatievoorwaarden
Wendt u zich voor garantiegevallen altijd tot uw leverancier of tot onze
klantendienst. Moet u het apparaat opsturen, stuur het dan samen met de
klacht en een kopie van de aankoopbon naar onze klantendienst.
Voor garantie gelden de volgende voorwaarden:
1. Voor de producten van MEDISANA geldt een garantietermijn van drie
jaar vanaf de datum van aankoop. Deze kan door middel van de verkoopbon of factuur worden aangetoond.
2. Alle klachten, die het gevolg zijn van materiaal of fabricagefouten
worden binnen de garantietermijn gratis verholpen.
3. Een geval van garantie leidt niet tot automatische verlenging van de
garantietermijn, noch voor het apparaat zelf noch voor de vervangen
onderdelen.
4. Uitgesloten van garantie zijn:
a. Alle schade die ontstaan is door ondeskundige behandeling, b.v. het
niet op de juiste wijze volgen van de gebruiksaanwijzing
b. Beschadigingen, die zijn ontstaan door reparaties door de koper of
een ander onbevoegd persoon.
c. Transportschade, die is ontstaan op weg van de verkoper naar de
verbruiker of tijdens het opsturen naar de klantendienst.
d. Toebehoren, die onderhevig zijn aan slijtage
5. De fabrikant neemt geen verantwoording voor directe of indirecte ver-
volgschade die door het apparaat veroorzaakt wordt. Ook niet als de
schade aan het apparaat als garantiegeval erkend is.
56
MEDISANA AG
Itterpark 7-9
40724 Hilden
Duitsland
Tel.: +49 (0) 2103 / 2007-60
Fax: +49 (0) 2103 / 2007-626
eMail: info@medisana.de
Internet: www.medisana.de
Het adres van de klantendienst vindt u op de laatste pagina.
Page 63

1 Turvallisuusohjeita
FI
Sydämellinen
kiitos
Kiitoksia luottamuksesta ja sydämelliset onnentoivotukset!
Hankkimasi valoherätyskello SAC on MEDISANA-laatutuote.
Lue seuraavat käyttöä ja huoltoa koskevat ohjeet huolellisesti, jotta
MEDISANA valoherätyskello SAC toimii asianmukaisesti ja siitä on Sinulle
pitkään iloa.
TÄRKEITÄ TIETOJA!
SÄILYTÄ NÄMÄ OHJEET!
Lue seuraavat käyttöohjeet huolellisesti kokonaan,
erityisesti turvallisuusohjeet, ennen kuin käytät laitetta
ja säilytä ohjeet mahdollista myöhempää käyttöä varten.
Jos annat laitteen eteenpäin, anna myös aina tämä
käyttäohje mukana.
Löydät seuraavat symbolit käyttöohjeesta:
Tämä käyttöohje kuuluu tähän laitteeseen.
Siinä on tärkeitä tietoja käyttöönottoa ja käsittelyä koskien.
Lue tämä käyttöohje kokonaan.
Näiden ohjeiden noudattamatta jättäminen voi aiheuttaa
loukkaantumisen tai laitteen vaurioitumisen.
VAROITUS
Noudata näitä varoitusohjeita niin voit estää käyttäjän
mahdollisen loukkaantumisen.
HUOMIO
Noudata näitä ohjeita niin voit estää laitteen mahdollisen
vaurioitumisen.
OHJE
Näistä ohjeista saat hyödyllistä tietoa asennusta ja
käyttöä koskien.
57
Page 64

FI
1 Turvallisuusohjeita / 2 Käyttö
1.1
Turvallisuusohjeita
•
Ennen kuin liität laitteen sähköverkkoon, varmista, että laitteen tyyppikilvessä annettu verkkojännite vastaa sähköverkkosi jännitettä.
• Käytä laitetta ainoastaan sen tarkoituksen mukaan käyttöohjetta noudattaen.
• Takuuvaatimukset raukeavat, jos laitetta käytetään väärin.
• Laite on tarkoitettu käytettäväksi ainoastaan yksityistaloudessa.
•
Älä käytä laitetta, jos laite ei toimi moitteettomasti, jos laite on pudonnut
lattialle tai veteen tai on vaurioitunut
• Älä koskaan tartu verkkolaitteeseen, joka on pudonnut veteen. Vedä heti
virtapistoke tai verkkolaite irti seinäpistorasiasta.
• Jos johto tai verkkolaite on vaurioitunut, laitetta ei saa enää käyttää.
• Älä käytä laitetta korkeataajuuksista elektromagneettista säteilyä lähettävien
laitteiden lähellä, koska nämä voivat häiritä laitteen toimintaa.
• Älä aseta laitetta alttiiksi suoralle auringonpaisteelle.
•
Suojaa laitetta kosteudelta.
• Laitetta, johtoa ja verkkolaite ei saa milloinkaan kastaa veteen tai pitää
juoksevan veden alla.
• Tartu verkkolaitteeseen aina vain kuivin käsin.
• Johtoa ei saa ohjata lämpölähteiden lähellä eikä vetää terävien reunojen yli.
• Verkkolaitetta ei saa koskaan kantaa, vetää tai kiertää johdosta ja johtoa ei saa
koskaan puristaa tai kiristää.
• Suojaa laite tönäisyiltä ja tärinältä.
• Älä korjaa laitetta häiriötapauksessa itse. Korjauksen saa tehdä vain
valtuutettu erikoisliike tai vastaavasti koulutettu henkilö.
• Aseta laite käyttöä varten tukevalle ja tasaiselle alustalle niin, että se ei voi kaatua tai pudota.
2 Käyttö
2.1
Pakkauksen
sisältö ja pakkaus
58
Tarkasta ensin, että laite on täydellinen eikä siinä ole mitään vaurioita.
Jos sinulla on epäilyksiä, älä ota laitetta käyttöön vaan lähetä se huoltoon.
Pakkauksesta pitää löytyä:
• 1 MEDISANA valoherätyskello SAC
• 1 käyttöohje
Pakkauksia voidaan käyttää uudelleen tai ne voidaan kierrättää takaisin raakaainekiertoon. Hävitä tarpeeton pakkausmateriaali asianmukaisella tavalla.
Mikäli pakkausta avatessasi havaitset kuljetusvaurion, ota heti yhteyttä tuotteen myyneeseen liikkeeseen.
Page 65

2.2
Sijoittaminen ja
valmistelu
2 Käyttö
VAROITUS
Huolehdi siitä, etteivät pakkausmuovit joudu lasten käsiin!
On olemassa tukehtumisvaara!
1.
Aseta laite käyttöä varten tukevalle ja tasaiselle alustalle niin, että se ei voi
kaatua tai pudota.
2. Aseta laite noin 40–50 cm:n päähän päästäsi, esimerkiksi yöpöydälle.
3. Työnnä verkkolaite verkkopistorasiaan.
OHJEITA
MEDISANA valoherätyskellossa SAC on varusteena R.D.S. (Radio Data
System). Laite ottaa aikatietonsa R.D.S.-signaalista. Jos R.D.S.-signaalia
ei ole saatavissa, aika ei säädy automaattisesti.
Radiolähettimen lyhyttunnus näytetään kirjaimilla. Jos radiolähetin ei
lähetä tunnustaan, ainoastaan radioaseman digitaalinen taajuus
näytetään.
Kellonaika (12:00) näytössä alkaa vilkkua, R.D.S-symboli ja teksti
TIME SETTING ilmestyvät näyttöön automaattisen aikasäädön aloittamista
varten. Joidenkin minuuttien kuluttua nykyinen aika otetaan vastaan ja
näytetään näytössä. Näytön alareunassa juoksee teksti SET SUCCESS.
Jos R.D.S-lähettimen radiosignaalia ei oteta vastaan, R.D.S.-symboli sammuu n. 60 sekunnin kuluttua ja näkyviin ilmestyy teksti SET FAIL. Tässä
tapauksessa aseta kellonaika manuaalisesti Set-painikkeella japainikkeilla
tai
.
FI
2.3
Painiketoiminnot
Kellonajan ja hälytysten manuaalinen säätö
Paina Set-painiketta n. 3 sekunnin ajan, kellonaika näytössä vilkkuu
0,5 sekunnin tahdissa. Voit asettaa kellonajan nyt manuaalisesti. Paina painikkeita
ajan ja samalla päästäksesi asetusvalikkoon hälytykselle 1 (AL1) / hälytykselle 2
(AL2) / Zizz (lyhytaikaherätys).
Valitse painikkeilla
painikkeella (valitse esim. AL1). Aseta hälytysaika painamalla painikkeita
vilkkuvat 0,5 sekunnin tahdissa. Vahvista asettamasi hälytysaika Set-painik-
keella .Tämän jälkeen pääset suoraan valitun hälytyksen valintavalikkoon.
Näyttöön ilmestyy radio (FM)- tai äänisymboli.
ja
ja
. Paina Set-painiketta toisen kerran vahvistaaksesi
ja
haluamasi hälytys ja vahvista valinta Set-
. Hälytyksen asettamisen aikana AL1-symboli ja hälytysaika
59
Page 66

FI
2 Käyttö
Valitse painikkeilla
jälleen Set-painikkeella .
Jos valitset radion (FM), voit valita painikkeilla
jonka haluat herättävän itsesi. Vahvista valintasi jälleen Set-painikkeella .
Jos valitsit käyttöön luontoäänet, voit valita painikkeilla
kahdeksan erilaista luontoääntä, jolloin jokainen äänistä kuuluu valinnan
aikana hetken ja näytössä näytetään kuvake. Vahvista valintasi jälleen Set-
painikkeella .
Tämän jälkeen pääset äänenvoimakkuuden säätöön. Näytössä säädetty
äänenvoimakkuus osoitetaan numeroilla -symbolin alla. Aseta haluamasi
äänenvoimakkuus painikkeilla
vahvistaaksesi syöttösi. Pääset kirkkauden säätöön. Näytössä 2 säädetty kirkkaus
osoitetaan numeroilla -symbolin alla. Aseta haluamasi kirkkaus painikkeilla
ja
vain valo- tai vain ääni/radio-toimintoa, aseta toinen säädön aikana 0:ksi.
Jos et paina säädön aikana 10 sekuntiin mitään painiketta, säätövalikko
kytkeytyy automaattisesti pois päältä.
Sen jälkeen kun olet tehnyt ja vahvistanut valintasi, Sinun täytyy, sikäli kuin
haluat käyttää toimintoa, painaa hälytys- tai Zizz-painiketta .
Toimi samalla tavalla säätääksesi hälytyksen 2 (AL2) tai lyhytaikaisen hälytyksen
(Zizz).
Kun hälytys on aktivoitu, painikkeiden radio , valo ja Relax käyttö on
estetty.
Ääni/radio-painike
Kun painat ääni/radio-painiketta kerran, näkyviin ilmestyy äänisymboli ja
siirtosignaali vilkkuu. Valitse painikkeilla
äänenvoimakkuus säädetään painikkeilla ▼ ja ▲.
Kun painat ääni/radio-painiketta toisen kerran, näkyviin ilmestyy radio (FM)
-symboli ja siirtosignaali vilkkuu. Valitse painikkeilla
radiolähetin. Haluttu äänenvoimakkuus säädetään painikkeilla ▼ ja ▲.
Kun painat ääni/radio-painiketta kolmannen kerran tai Off-painiketta ,
poistut valikosta.
. Vahvista syöttösi jälleen Set-painikkeella . Jos haluat käyttää
ja
joko radio (FM) tai ääni ja vahvista valinta
ja
sen radioaseman,
ja
. Paina Set-painiketta uudelleen
ja
haluamasi ääni. Haluttu
ja
ja
haluamasi
60
Dimmer-painike
Kun painat Dimmer-painiketta , näytön valaistus syttyy ja vaihtuu vuoronperään suuresta valovoimasta (vihreä) matalaan valovoimaan (vihreä), suureen
valovoimaan (keltainen), matalaan valovoimaan (keltainen) ja valaistus pois
päältä -asetukseen. Paina Dimmer-painiketta haluamasi valovoiman ja
valovärin kohdalla tehdäksesi valintasi.
Page 67

2 Käyttö
FI
Relax-painike
Relax-painikkeen painaminen antaa käyttöösi mahdollisuuden valita erilaisia
valosäätöjä. Kun painat Relax-painiketta kerran, pääset kohtaan Relax A,
jossa valon väriä vaihdetaan n. joka 8. sekunti. Peräkkäin näytetään punainen,
sininen, vihreä ja näiden sekoitusvärit (Relax 1–7).
Kun painat Relax-painiketta toisen kerran, pääset kohtaan Relax C, jossa
valon väri vaihtuu automaattisesti tiettyinä vuorokaudenaikoina:
Painamalla toistuvasti Relax-painiketta pääset muihin valon värin valintakohtiin: Kohta Relax 1 = vain punainen, kohta Relax 2 = vain sininen, kohta
Relax 3 = vain vihreä, kohta Relax 4 = punainen-sininen, kohta Relax 5 =
sininen-vihreä, kohta Relax 6 = vihreä-punainen, kohta Relax 7 = punainensininen-vihreä. Kun painat Relax-painiketta kymmenennen kerran, poistut
Relax-toiminnon säätövalikosta. Voit poistua valikosta aina painamalla Off-
painiketta .
Light-painike
Painamalla valo-painiketta kytket lampun päälle, näyttöön ilmestyy
symboli. Kellonajan sijaan näkyviin ilmestyvät numerot, jotka ilmaisevat
-
kirkkausasteen (0–20) Kirkkausaste nousee askeleittain 0:sta 20:een asti. Paina
-painikkeita
Jos painat valo-painiketta toisen kerran, vähennät kirkkautta askeleittain
säädetystä kirkkaustasosta taaksepäin 0:aan asti ja -symboli sammuu.
Lukemiseen suositellaan kirkkaustasoa 20. Voit poistua valikosta aina painamalla Off-painiketta .
Kello 0:00– 4:00 -> kuten Relax 5 = sininen-vihreä
Kello 4:00– 8:00 -> kuten Relax 1 = vain punainen
Kello 8:00–12:00 -> kuten Relax 4 = punainen-sininen
Kello 12:00–16:00 -> kuten Relax 2 = vain sininen
Kello 16:00–20:00 -> kuten Relax 6 = vihreä-punainen
Kello 20:00–24:00 -> kuten Relax 3 = vain vihreä
▼ ja ▲ säätääksesi kirkkauden haluamallasi tavalla.
Hälytys-painike
Hälytys-painikkeella aktivoit hälytys 1:n ja/tai hälytys 2:n. Jos painat
hälytys-painiketta kerran, näkyviin ilmestyy AL1-symboli ja AL1 on
aktivoitu. Kun painat painiketta toisen kerran, näkyviin ilmestyy AL2symboli ja AL2 on aktivoitu. Kun painat hälytys-painiketta kolmannen
kerran, näkyvin ilmestyvät molemmat symbolit AL1 ja AL2 ja molemmat
hälytykset on aktivoitu. Hälytysaika näytetään. Jos AL1 ja AL2 on molemmat
aktivoitu, kellonaikanäytössä näytetään se hälytysaika, joka on lähinnä kulloistakin kellonaikaa. Kun painat painiketta
to kytketään pois päältä.
Säätäessäsi hälytysaikaa olet myös valinnut radiolähettimen tai luontoäänen,
valaistuksen kirkkaustason ja äänenvoimakkuuden. Aktivoidun hälytyksen
alkamista edeltävien 30 minuutin aikana kirkkaus muuttuu hitaasti hälytysajaksi
asetetulle kirkkaustasolle. Hälytysajaksi valittu äänenvoimakkuus kasvaa
hälytyksen alusta (hälytysajan saavuttamisesta) 60 sekunnin sisällä säädettyyn
arvoon. Tavallinen hälytys aktivoidaan vain, jos sen hetken, jolloin hälytys asetetaan, ja sen hetken, jolloin hälytyksen on tarkoitus alkaa, välissä on yli 30
minuuttia. Jos hälytyksen asettamisajan ja hälytyksen toiminta-ajan välissä on
alle 30 minuuttia, käynnistyy hälytystoiminto 60 sekuntia ennen hälytysaikaa.
neljännen kerran, hälytystoimin-
61
Page 68

FI
2 Käyttö
Off-painike
Jos olet aktivoinut hälytyksen, mutta heräät jo ennen hälytysaikaa, voit kytkeä
hälytystoiminnon pois päältä Off-painiketta painamalla. Hälytystoiminnon
säädöt säilyvät seuraavaa päivää varten. Jos et paina Off-painiketta ,
esim. heräät ennen hälytysaikaa ja unohdat painaa Off-painiketta ,
hälytystoiminto kytkeytyy 30 minuutin kuluttua automaattisesti pois päältä.
Painamalla Off-painiketta voit poistua muista aktiivista valikkotoiminnoista.
Zizz-painike
Jos haluat pitää pienen lepotauon tai nukkua päiväunet, voit asettaa käyttöön
lyhytaikaisen hälytyksen. Paina Zizz-painiketta , näyttöön ilmestyy
Zizz-symboli.
Zizz-painikkeen kytkee herätyshälytyksen alkamaan 15 minuutin kuluttua.
Jokainen lisäpainallus pidentää aikaa hälytykseen 15 minuutilla. Lyhytaikaisen
hälytyksen säädettävissä oleva maksimiaika on 90 minuuttia. Painamalla Set-
painiketta vahvistat syöttösi ja käynnistät samalla aikajakson, joka johtaa
hälytykseen.
Ziss-toiminnossa on esisäädettynä hälytysääni. Voit muuttaa säätöä Set-painik-
keella (katso “Kellonajan ja hälytysten manuaalinen säätö”, sivu
59–60).
Demo/Snooze/Quick Check-painike
Jos hälytystoimintoa ei ei käytetä, eli jos hälytystä ei aktivoitu Alarm-painikkeella , voi painiketta käyttää Demo-toimintoon. Paina Demo-painiketta
. Valo muuttuu askeleittain kirkkaammaksi 5 sekunnin välein (näytettävät
kirkkaustasot 0–20). Sen jälkeen alkaa luontoäänien esittely. Demo-toiminnon
koko tapahtuma kestää noin minuutin.
Jos olet asettanut hälytyksen ja valinnut sen, mutta hälytys ei kuitenkaan ole
aktivoitu, voit tarkastaa painikkeella hälytystoimintojen asetukset. Paina
Quick Check-painiketta ja syötetyt arvot ilmestyvät näyttöön. Paina
painiketta uudelleen Quick Check-toiminnon lopettamiseksi.
Jos olet aktivoinut hälytysajan ja sen Count-down on jo käynnissä, mutta
maksimikirkkaustasoa ei ole kuitenkaan vielä saavutettu, voit käyttää painiketta
aikana ennen asetettua hälytysaikaa, hälytystoiminto loppuu (kirkkaus ja äänenvoimakkuus) säädettyyn hälytysaikaan. Kirkkaus ja äänenvoimakkuus tarvitsevat
ainoastaan 1 minuutin herätysaikaan sopeutuakseen säädettyyn voimakkuuteen.
Joa painat 30 minuutin aikana hälytysajan jälkeen Snooze-painiketta ,
hälytysaika pitenee 5 minuuttia. Jokainen Snooze-painikkeen lisäpainallus
viivästää herätyshälytystä 5 minuuttia lisää. Voit siirtää hälytysaikaa korkeintaan
30 minuuttia.
Snooze-torkkutoimintoon. Jos painat Snooze-painiketta 30 minuutin
2.4
Uudelleenkäynnistystoiminto
(reset)
62
Jos laite ei toimi oikein, vedä verkkolaite pois verkkopistorasiasta, odota 10
sekuntia ja työnnä sitten verkkolaite takaisin verkkopistorasiaan. Säädä kellonaika ja muut toiminnot uudelleen kuten kappaleessa „Kellonajan ja
hälytysten manuaalinen säätö“ sivulla 59–60 kuvataan.
Page 69

3 Sekalaista
OHJE
Laitteessa ei ole muistiparistoja. Jos verkkopistoke vedetään irti ja
liitetään takaisin, laite on alkutilassaan. Kaikki asetukset, paitsi hälytysja Zizz-toiminto, tulee tehdä uudelleen.
Jos R.D.S-lähettimen radiosignaalia ei voida ottaa vastaan, kellonaika
täytyy asettaa manuaalisesti. Manuaalisessa aikasäädössä aikatieto voi
poiketa ± 6 sekuntia/päivä.
FI
3.1
Puhdistus ja hoito
3.2
Hävittämisohjeita
3.3
Tekniset Tiedot
• Pyyhi pölyt laitteesta säännöllisesti antistaattisella liinalla. Voit käyttää myös
hieman kostutettua liinaa.
• Voimakkaiden ja hankaavien puhdistusaineiden käyttö on kielletty.
Tätä laitetta ei saa hävittää talousjätteiden mukana.
Jokainen kuluttaja on velvoitettu luovuttamaan kaikki sähköiset tai elektroniset
laitteet, sisältävätpä ne haitallisia aineita tai eivät, kaupunkinsa tai liikkeen
keräyspisteeseen, jotta laitteet voitaisiin hävittää ympäristöystävällisesti.
Ota yhteyttä paikalliseen viranomaiseen tai myyjäliikkeeseen hävityksen
suorittamiseksi.
Nimi ja malli
Sähköverkko
Teho : maks. 10 W
Ajan täsmällisyys : ± 6 sekuntia/päivä
Kirkkaus : 300 lumenia (40 cm päässä laitteesta)
Käyttöedellytykset
Mitat
Paino
Verkkojohdon pituus:noin
Tuotenumero
EAN koodi : 40 15588 45100 3
:
MEDISANA
: 230 V~ 50 Hz
(jos R.D.S. ei ole käytettävissä)
:
käytetään vain kuivissa tiloissa käyttöohjeen
mukaan
:
noin
:
noin
: 45100
Valoherätyskello SAC
19 (P) x 13 (L) X 25,5 (K) cm
770 g
1,95 m
Jatkuvan tuotekehittelyn myötä pidätämme itsellämme
oikeuden teknisiin ja muotoilullisiin muutoksiin.
63
Page 70

FI
Inbetriebnahme
4.1
Takuu- ja
korjausehdot
Käänny takuutapauksessa alan liikkeen tai suoraan asiakaspalveluhuollon
puoleen. Jos laite tulee lähettää huoltoon, ilmoita vika ja lähetä laitteen
mukana kopio ostokuitista.
Tällöin ovat voimassa seuraavat takuuehdot:
1. MEDISANA-tuotteille myönnetään kolmen vuoden takuu myyntipäiväyk-
sestä. Myyntipäiväys tulee todistaa takuutapauksessa ostokuitilla tai
laskulla.
2. Materiaali- tai valmistusvioista johtuvat puutteet korjataan takuuaikana
maksutta.
3. Takuukorjaus ei pidennä takuuaikaa, ei laitteelle eikä vaihdetulle raken-
neosalle.
4. Takuun ulkopuolelle jäävät:
a. kaikki vahingot, jotka syntyvät asiattomasta käsittelystä, esim.
käyttöohjeen noudattamatta jättämisestä.
b. Vahingot, joiden syyksi voidaan jäjittää ostajan tai asiattoman
kolmannen osapuolen suorittama kunnossapito tai toimet.
c. Kuljetusvauriot, jotka ovat syntyneet matkalla valmistajalta kulut-
tajalle tai asiakaspalveluun lähetettäessä.
d. Lisäosat, jotka ovat alttiina normaalille kulutukselle.
5. Vastuu laitteen aiheuttamista välittömistä tai välillisistä seurausvahin-
goista on myös poissuljettu, jos laitteelle aiheutunut vahinko hyväksytään
takuutapaukseksi.
64
MEDISANA AG
Itterpark 7-9
40724 Hilden
Saksa
Tel.: +49 (0) 2103 / 2007-60
Fax: +49 (0) 2103 / 2007-626
eMail: info@medisana.de
Internet: www.medisana.de
Asiakaspalvelun osoite löytyy viimeiseltä sivulta.
Page 71

1 Säkerhetshänvisningar
SE
Vi tackar
Tack för Ert förtroende och hjärtliga gratulationer!
Väckaklockan med lampa SAC är en kvalitetsprodukt från MEDISANA.
För att användningen ska ge önskat resultat, och för att du ska kunna
använda MEDISANA väckaklocka med lampa SAC så länge som möjligt,
rekommenderar vi att du läser nedanstående anvisningar om användning och
skötsel noga.
OBSERVERA!
SPARA!
Läs igenom bruksanvisningen, särskilt säkerhetsanvisningarna, noga innan du använder apparaten och
spara bruksanvisningen för framtida bruk.
Om apparaten lämnas vidare till en annan person måste
bruksanvisningen följa med.
I den här bruksanvisningen används följande symboler:
Bruksanvisningen hör till apparaten.
Den innehåller viktig information om igångsättning och
användning. Läs igenom hela bruksanvisningen.
Om anvisningarna i bruksanvisningen inte följs kan det
leda till svåra personskador eller skador på apparaten.
VARNING
Varningstexterna måste beaktas, annars kan det finnas
risk för personskador.
OBSERVERA
De här anvisningarna måste beaktas, annars kan det
finnas risk för skador på apparaten.
ANVISNING
De här texterna innehåller praktisk information om
installation eller användning.
65
Page 72

SE
1.1
Säkerhetshänvisningar
1 Säkerhetshänvisningar / 2 Drift
•
Innan du ansluter apparaten till strömnätet, måste du kontrollera att
spänningen som är angiven på typskylten stämmer överens med nätspänningen.
• Använd endast apparaten för avsett ändamål och på det sätt som beskrivs i
bruksanvisningen.
• Garantin upphör att gälla om den används för andra ändamål än de som
anges här.
• Apparaten är endast avsedd för privat bruk.
• Älä koskaan kanna, vedä tai käännä laitetta verkkojohdosta äläkä purista
johtoa mihinkään.
• Försök inte att lyfta ut apparaten om den hamnat i vatten. Dra genast ut
strömkontakten respektive nätadaptern ur vägguttaget.
• Om nätsladden eller strömkontakten är skadad får apparaten inte användas.
• Apparaten får inte användas i närheten av utrustning som sänder ut högfrekvent elektromagnetisk strålning, det kan störa apparatens funktioner.
• Utsätt inte apparaten för direkt solljus.
•
Skydda apparaten mot fuktighet.
•
Doppa inte apparaten i vatten eller andra vätskor.
• Apparaten, nätsladden och strömkontakten får aldrig sänkas ned i vätska eller
hållas under rinnande vatten.
• Ta endast i strömkontakten med torra händer.
• Kabeln får inte dras intill värmekällor eller över skarpa, vassa kanter.
• Bär, dra eller vrid aldrig strömkontakten genom att hålla i kabeln och se till att
kabeln varken kläms eller viks.
• Skydda apparaten mot stötar och vibrationer.
• Reparera inte apparaten själv om den är defekt. Reparationer får endast
genoföras av auktoriserade återförsäljare eller personer med motsvarande
kvalifikationer.
• Ställ apparaten på en jämn och stabil yta så att den inte kan välta eller falla ner
på golvet.
2 Drift
2.1
Leveransomfång
och förpackning
66
Kontrollera först om apparaten är komplett och att den inte uppvisar några
skador. I tveksamma fall ska apparaten inte tas i bruk utan skickas in till ett
serviceställe.
Följande delar skall medfölja vid leverans:
• 1 MEDISANA Väckaklocka med lampa SAC
• 1 bruksanvisning
Förpackningar kan återanvändas eller lämnas till återvinning. Se till att förpackningsmaterial som inte längre behövs tas omhand på korrekt sätt. Upptäcks skador när produkten packas upp så kontakta omgående inköpsstället.
Page 73

2.2
Uppställning och
installation
2 Drift
VARNING
Se till att förpackningsmaterial i plast hanteras utom räckhåll
för barn! Kvävningsrisk!
1.
Ställ apparaten på en jämn och stabil yta så att den inte kan välta eller falla
ner på golvet.
2. Ställ apparaten cirka 40 – 50 cm från ditt huvud, t.ex. på ett nattduksbord.
3. Anslut nätkontakten till ett eluttag.
OBSERVERA
Din MEDISANA väckaklocka med lampa SAC är utrustad med R.D.S.
(Radio Data System). Apparaten hämtar tidsinformation via en R.D.S.signal. Om ingen R.D.S.-signal finns tillgänglig ställs tiden inte in
automatiskt.
Radiosändarens förkortning visas med bokstäver. Om inte radiosändaren
skickar någon signatur, visas bara radiostationens digitala frekvens.
Klockan (12:00) på displayen börjar blinka, R.D.S-symbolen och texten
TIME SETTING visas på displayen för att starta den automatiska tidsinställningen. Efter ett par minuter överförs den aktuella tiden och visas på
displayen. På den nedre delen av displayen visas texten SET SUCCESS.
Om R.D.S-sändarens radiosignal inte kan tas emot, slocknar R.D.S.-symbolen efter ca. 60 sekunder och texten SET FAIL visas. Ställ i så fall in tiden
manuellt med Set-knappen och knappen
resp.
.
SE
2.3
Knappfunktioner
Manuell inställning av tid och alarm
Tryck på Set-knappen ca. 3 sekunder, klockan på displayen blinkar i
0,5 sekunders takt. Nu kan du ställa in klockan manuellt. Tryck på knapparna
resp.
tiden och samtidigt komma till inställningsmenyn för alarm 1 (AL1) / alarm 2
(AL2) / Zizz (korttidsalarm).
Välj önskat alarm med knapparna
Set-knappen (välj t.ex. AL1). Ställ in alarmtiden genom att trycka på knapparna
och alarmtiden i 0,5 sekunders takt. Bekräfta den inställda alarmtiden med
Set-knappen
alarmet. I displayen visas radio (FM)- eller ljud-symbolen.
. Tryck på Set-knappen en andra gång för att bekräfta
resp.
resp.
. Under inställningen av alarmet blinkar AL1-symbolen
. Därefter kommer du direkt till valmenyn för det valda
och bekräfta valet med
67
Page 74

SE
2 Drift
Välj med knapparna
ditt val med Set-knappen .
Om du har valt radio (FM) kan du välja en radiostation med knapparna
resp.
med Set-knappen .
Om du har valt naturljud, kan du välja mellan åtta olika ljud med knapparna
resp.
displayen. Bekräfta ditt val igen med Set-knappen .
Därefter kommer du till volyminställningen. I displayen visar siffrorna under
-symbolen den inställda volymen. Ställ in önskad volym med knapparna
resp.
kommer du till inställningen av ljusstyrka. I displayen visar siffrorna under symbolen den inställda ljusstyrkan. Ställ in önskad ljusstyrka med knapparna
resp.
vill använda lampan eller bara ljud/radiofunktionerna, ställer du in de andra på
position 0.
Om du inte trycker på någon knapp under 10 sekunder under inställningen,
avslutas inställningsmenyn automatiskt.
När du är klar med inställningen och har bekräftat dina val, måste du, om du vill
använda dig av funktionerna, trycka på Alarm- resp. Zizz-knappen .
För att ställa in alarm 2 (AL2) resp. korttidsalarm (Zizz) går du tillväga på samma
sätt.
Om ett alarm är aktiverat, är knapparna för radio , lampan och Relax
spärrade.
Sound/Radio-knapp
Om du trycker på Sound/Radio-knappen en gång visas ljud-symbolen
och en överföringssignal blinkar. Välj det önskade ljudet med knapparna
resp.
volymen.
Om du trycker på Sound/Radio-knappen två gånger visas radio (FM)symbolen och en överföringssignal blinkar. Ställ in önskad radiosändare med
knapparna
den önskade volymen.
Om du trycker på Sound/Radio-knappen en tredje gång, eller Off-knappen
lämnar du menyn.
, alarmet startar nu med denna radiostation. Bekräfta ditt val igen
, för varje ljud spelas ett kort test upp och ett piktogram visas på
. Tryck på Set-knappen igen för att bekräfta inställningen. Nu
. Bekräfta inmatningen med Set-knappen . Om du bara
. Med -knapparna ▼ resp. ▲ ställer du in den önskade
resp.
resp.
mellan radio (FM) eller ljud och bekräfta
. Med -knapparna ▼ resp. ▲ ställer du in
68
Dimmer-knapp
Om du trycker på Dimmer-knappen , slås displaybelysningen på och växlar
därefter från hög ljusstyrka (grön) till låg ljusstyrka (grön), hög ljusstyrka (gul),
låg ljusstyrka (gul) och därefter stängs belysningen av. Tryck på Dimmer-knap-
pen när din önskade ljusstyrka och färg visas för att bekräfta ditt val.
Page 75

2 Drift
SE
Relax-knapp
Om du trycker på Relax-knappen har du möjlighet att välja mellan olika
ljusinställningar. Om du trycker på Relax-knappen en gång kommer du till
positionen Relax A, i den positionen växlar ljuset färg cirka var 8:e sekund. Röd,
blå, grön och deras blandade färger visas efter varandra (Relax 1 - 7).
Om du trycker på Relax-knappen en gång till kommer du till positionen
Relax C, i den positionen växlar ljuset automatiskt efter bestämda tider på
dagen.
Klockan 0.00 - 4.00 -> Relax 5 = blå-grön
Om du trycker flera gånger på Relax-knappen kommer du till positionen
där du kan välja färg: Position Relax 1 = bara röd, position Relax 2 = bara blå,
position Relax 3 = bara grön, position Relax 4 = röd-blå, position Relax 5 =
blå-grön, position Relax 6 = grön-röd, position Relax 7 = röd-blå-grön. När du
trycker på Relax-knappen den tionde gången stänger du inställningsmenyn
för Relax-funktionen. Du kan alltid lämna menyn genom att trycka på Off-
knappen .
Light-knapp
Om du trycker på Light-knappen slår du på lampan , på displayen
visas -symbolen. Istället för klockan visas siffror, de anger ljusstyrkan
(0 - 20). Ljusstyrkan kan ställas in i steg från 0 till 20. Tryck på -knappen
▼ resp. ▲, för att ändra till önskad ljusstyrka.
Om du trycker på Light-knappen en gång till minskar ljusstyrkan stegvis,
från den inställda ljusstyrkan till 0 och -symbolen slocknar. För läsning rekommenderas ljusstyrka 20. Du kan alltid lämna menyn genom att trycka på Off-
knappen .
4.00 - 8.00 -> Relax 1 = bara röd
8.00 - 12.00 -> Relax 4 = röd-blå
12.00 - 16.00 -> Relax 2 = bara blå
16.00 - 20.00 -> Relax 6 = grön-röd
20.00 - 24.00 -> Relax 3 = bara grön
Alarm-knapp
Med Alarm-knappen aktiverar du alarm1 och/eller alarm 2. Om du trycker
på Alarm-knappen en gång, visas AL1-symbolen och AL1 är aktiverat. Om
du trycker på knappen en gång till, visas AL2-symbolen och AL2 är aktiverat. Om du trycker på Alarm-knappen en tredje gång visas båda symbolerna, AL1 och AL2, och båda alarmen är aktiverade. Alarmtiden visas. Om du
har aktiverat AL1 och AL2, visas den alarmtid som ligger närmast den aktuella
tiden på displayen. Om du trycker in knappen
funktionen av.
När du har ställt in alarmtiden har du också valt en radiosändare eller ett naturljud, en ljusstyrka på lampan och inställning av volymen. De sista 30 minuterna
innan alarmet aktiveras, ökar ljusstyrkan successivt till den inställda ljusstyrkan
när alarmet aktiveras. När alarmet ljuder ökar den inställda volymen och når det
inställda värdet efter 60 sekunder. Det ordinarie alarmet aktiveras endast om det
är mer än 30 minuter mellan den tidpunkt vid vilken alarmet ställs in, och den
tid då det ska utlösas. Om det är mindre än 30 minuter mellan den tidpunkt som
larmet ställs in och den tidpunkt då det ska utlösas kopplas larmfunktionen till
60 sekunder före alarmtiden.
en fjärde gång, stängs alarm-
69
Page 76

SE
2 Drift
Off-knapp
Om du har aktiverat ett alarm, innan den inställda alarmtiden, kan du stänga av
alarmfunktionen genom att trycka på Off-knappen . Alarmfunktionens
inställningar behålls till nästa dag. Om du inte trycker på Off-knappen , t.ex.
innan alarmtiden och glömmer bort att trycka på Off-knappen , stängs
alarmet av automatiskt efter 30 minuter. Du kan även lämna alla andra aktiva
menyfunktioner genom att trycka på Off-knappen .
Zizz-knapp
Om du vill ta en vilopaus eller sova middag, kan du ställa in ett korttidsalarm.
Tryck på Zizz-knappen , på displayen visas Zizz-symbolen.
Om du trycker en gång på Zizz-knappen ställs alarmet in på 15 minuter. För
varje gång du trycker på knappen ökar tiden till alarmet med 15 minuter. Den
max inställbara tiden för korttidsalarmet är 90 minuter. När du trycker på Set-
knappen bekräftar du din inmatning och startar samtidigt den inställda
tiden.
I Ziss-funktionen är alarmljudet förinställt. Du kan ändra inställningen med Set-
knappen (se ”Manuell inställning av tid och alarm”, sida 67-68).
Demo/Snooze/Quick Check-knapp
Om alarmfunktionen inte används, dvs. inget alarm har aktiverats med Alarm-
knappen , kan knappen användas för demofunktionen. Tryck på Demo-
knappen . Ljusstyrkan ökar stegvis i 5-sekunders intervaller (ljusstyrka 0 - 20).
Därefter presenteras de fyra naturljuden. Hela demonstrationen varar cirka 1
minut.
Om du har ställt in en alarmtid kan du kontrollera alarmfunktionens inställningar med knappen , innan alarmet är aktiverat. Tryck på Quick Check-knappen , de inställda värdena visas på displayen. Tryck på knappen igen för
att stänga av Quick Check-funktionen.
Om du har aktiverat en alarmtid och nedräkningen har påbörjats, men max
ljusstyrka har ännu inte uppnåtts, kan du trycka på knappen för att aktivera
Snooze-funktionen. Om du trycker på Snooze-knappen inom 30 minuter
före den inställda alarmtiden, upphör väckningsfunktionen (ljus och ljud) fram
till den inställda alarmtiden. Ljus och ljud når då den inställda styrkan på bara
en minut. Om du trycker på Snooze-knappen inom 30 minuter efter alarmtiden, förlängs alarmtiden 5 minuter. För varje gång du trycker på Snooze-
knappen förlängs alarmtiden med ytterligare 5 minuter. Du kan förlänga
alarmtidem med max 30 minuter.
2.4
Återställningsfunktion (reset)
70
Om inte apparaten fungerar korrekt, dra ut kontakten ur nätuttaget, vänta tio
sekunder och stick sedan in kontakten igen. Ställ in klockan och de andra funktionerna igen, enligt beskrivningarna i avsnitt ”Manuell inställning av tid och
alarm”, sida 67-68.
Page 77

3 Övrigt
ANVISNING
Apparaten innehåller inga batterier för minne. Om du drar ut och sticker
in kontakten återställer du apparaten till standardinställningen.
Alla inställningar, utom alarm och Zizz-funktionen, måste göras om.
Om inte R.D.S-sändarens radiosignal kan tas emot, måste klockan ställas
in manuellt. Vid manuell tidsinställning kan tidsangivelsen variera med
± 6 sekunder/dag.
SE
3.1
Rengöring
och vård
3.2
Hänvisning
gällande
avfallshantering
3.3
Tekniska data
• Damma av apparaten regelbundet med en antistatisk dammtrasa. Du kan
också använda en mjuk, lätt fuktad trasa.
• Använd aldrig aggressiva rengöringsmedel eller skurmedel.
Denna apparat får inte kastas i hushållssoporna.
Varje konsument måste lämna in alla elektriska eller elektroniska apparater
till motsvarande insamlingsställen, oberonde av om apparaterna innehåller
skadliga ämnen eller ej, så att de kan omhändertas på ett miljövänligt sätt.
Kontakta kommunen eller återförsäljaren för att få information om återvinning.
Namn och modell
Strömförsörjning
Effekt : max. 10 W
Klockans noggrannhet : ± 6 sekunder/dag
Ljusstyrka : 300 lumen (40 cm från apparaten)
Användningsmiljö
Yttermått
Vigt
Längd nätsladd
Artikelnummer
EAN
kod
:
MEDISANA
: 230 V~ 50 Hz
(om ingen R.D.S.-signal finns)
:
används endast i torra utrymmen enligt
bruksanvisningen
: ca 19 (L) x 13 (B) X 25,5 (H) cm
: ca 770 g
: ca 1,95 m
: 45100
: 40 15588 45100 3
Väckaklocka med lampa SAC
Som följd av ständigt pågående produktförbättringar förbehåller vi
oss rätten till tekniska förändringar samt förändringar i utförande.
71
Page 78

SE
4 Garanti
4.1
Garanti och
förutsättningar
för reparationer
Kontakta inköpsstället vid garantifrågor, eller tag kontakt med kundtjänst
direkt. Måste produkten skickas in så bifoga uppgifter om defekten samt en
kopia av inköpskvittot.
Följande garantiförutsättningar gäller:
1. På MEDISANA produkter lämnas tre års garanti, från inköpsdatum.
Inköpsdatum ska vid garantiförehavanden förevisas med inköpskvitto
eller faktura.
2. Felaktigheter på grund av material- eller tillverkningsfel åtgärdas kost-
nadsfritt under garantiperioden.
3. Utförande av garantiåtagande leder inte till förlängning av garanti-
perioden; detta gäller för själva produkten så väl som för utbytta komponenter.
4. Garantin gäller inte för:
a. Alla skador som uppkommer på grund av felaktig hantering, t.ex. vid
icke beaktande av bruksanvisningen.
b. Skador som kan härledas till iordningsställande eller ingrepp utförda
av köparen eller annan, ej auktoriserad, person.
c. Transportskador som uppkommit under transport från tillverkaren till
användaren eller vid insändning till kundtjänst.
d. Tillbehör som utsätts för normalt slitage
5. Ansvar för direkta eller indirekta följdskador som förorsakas av pro-
dukten är uteslutet, även om skadan på produkten godkänns som
garantiåtagande.
72
MEDISANA AG
Itterpark 7-9
40724 Hilden
Tyskland
Tel.: +49 (0) 2103 / 2007-60
Fax: +49 (0) 2103 / 2007-626
eMail: info@medisana.de
Internet: www.medisana.de
Serviceadressen finns på sista sidan.
Page 79

1 √‰ËÁ›Â˜ ÁÈ· ÙËÓ ·ÛÊ¿ÏÂÈ·
GR
™·˜
В˘¯·ЪИЫЩФ‡МВ
ФП‡ БИ· ЩЛУ ВМИЫЩФЫ‡УЛ Ы·˜ О·И Ы·˜ В˘¯fiМ·ЫЩВ О·П‹ ВИЩ˘¯›·!
Με το Ξυπνητήρι Φωτισμού SAC αποκτήσατε ένα προϊόν ποιότητας
της MEDISANA. Για να επιτύχετε το ποθητό αποτέλεσμα και για να
νοιώθετε για μακρύ χρονικό διάστημα χαρά με το Ξυπνητήρι σας
Φωτισμού MEDISANA SAC, σας συνιστούμε να διαβάσετε προσεκτικά
τις ακόλουθες υποδείξεις χρήσης και περιποίησης.
ΣΗΜΑΝΤΙΚΕΣ ΥΠΟΔΕΙΞΕΙΣ!
ΦΥΛΑΞΤΕ ΤΙΣ
ΟΠΩ ΣΔΗΠΟΤΕ!
Πριν χρησιμοποιήσετε τη συσκευή μελετήστε προσεκτικά
τις οδηγίες χρήσης και ιδιαίτερα τις οδηγίες ασφαλείας
και φυλάξτε το εγχειρίδιο για μελλοντική χρήση.
Όταν δίνετε τη συσκευή σε άλλα άτομα, δώστε μαζί και
αυτό το εγχειρίδιο χρήσης.
Στο εγχειρίδιο οδηγιών λειτουργίας θα βρείτε επίσης τα
παρακάτω σύμβολα:
Αυτό το εγχειρίδιο οδηγιών ανήκει σε αυτήν τη συσκευή.
Περιλαμβάνει σημαντικές πληροφορίες για την έναρξη της
λειτουργίας και τη μεταχείριση. Μελετήστε ολόκληρο το
εγχειρίδιο οδηγιών. Αν δεν τηρηθούν οι οδηγίες αυτού του
εγχειριδίου, μπορούν να προκληθούν σοβαροί τραυματισμοί
ή και ζημιές στη συσκευή.
ΠΡΟΕΙΔΟΠΟΙΗΣΗ
Αυτές οι προειδοποιητικές υποδείξεις πρέπει να τηρηθούν
ώστε να αποφευχθούν οι πιθανοί τραυματισμοί του χρήστη.
ΠΡΟΣΟΧΗ
Αυτές οι υποδείξεις πρέπει να τηρηθούν ώστε να
αποφευχθούν οι πιθανές ζημιές στη συσκευή.
ΥΠΟΔΕΙΞΗ
Αυτές οι υποδείξεις σας δίνουν πρόσθετες χρήσιμες
πληροφορίες για την εγκατάσταση και τη λειτουργία.
73
Page 80

GR
1.1
√‰ËÁ›Â˜ ÁÈ·
ÙËÓ ·ÛÊ¿ÏÂÈ·
1 √‰ËÁ›Â˜ ÁÈ· ÙËÓ ·ÛÊ¿ÏÂÈ· / 2 §ÂÈÙÔ˘ÚÁ›·
•
¡· ЪФЫ¤НВЩВ ЪФЩФ‡ Ы˘У‰¤ЫВЩВ ЩЛ Ы˘ЫОВ˘‹ МВ ЩЛУ ·ЪФ¯‹
ЪВ‡М·ЩФ˜, ·У Л Щ¿ЫЛ ЛПВОЪИОФ‡ ‰ИОЩ‡Ф˘ Ф˘ ·У·БЪ¿КВЩ·И ЫЩЛУ ВЩИО¤Щ·
ЩВ¯УИОТУ ЫЩФИ¯В›ˆУ ЩЛ˜ Ы˘ЫОВ˘‹˜ ·УЩ·ФОЪ›УВЩ·И ЫЩЛУ Щ¿ЫЛ ЩФ˘
ЛПВОЩЪИОФ‡ Ы·˜ ‰ИОЩ‡Ф˘.
• Χρησιµοοιείτε τη συσκευή µόνο σύµφωνα µε τις οδηγίες χρήσης.
• Ηααίτηση για εγγύηση καταργείται όταν η συσκευή
χρησιµοοιείται για άλλο σκοόαό τον ροβλεόµενο.
•
Η συσκευή προορίζεται μόνο για χρησιμοποίηση μέσα σε ιδιωτικά
νοικοκυριά.
•
ªЛ ¯ЪЛЫИМФФИВ›ЩВ ЩЛ Ы˘ЫОВ˘‹ ЫВ ВЪ›ЩˆЫЛ Ф˘ Л Ы˘ЫОВ˘‹ ‰ВУ
ПВИЩФ˘ЪБВ› ¿„ФБ·, ·У ¤ВЫВ О¿Щˆ ‹ М¤Ы· ЫВ УВЪfi ‹ ·У ·ЪФ˘ЫИ¿˙ВИ
‚П¿‚Л.
• ªËÓ ÚÔÛ·ı‹ÛÂÙ ӷ È¿ÛÂÙ ̛· Û˘Û΢‹ ‰ÈÎÙ‡Ô˘ Ô˘ ¤ÂÛ ÛÙÔ ÓÂÚfi.
μÁ¿ÏÙ ÙÔ ÚÂ˘Ì·ÙÔÏ‹ÙË ·fi ÙËÓ Ú›˙·.
• ∂¿У ЩФ О·ПТ‰ИФ ‹ Ф ЪВ˘М·ЩФП‹ЩЛ˜ ¤¯Ф˘У ‚П¿‚Л ··БФЪВ‡ВЩ·И У·
¯ЪЛЫИМФФИФ‡УЩ·И.
• ªЛ ‚¿˙ВЩВ ЫВ ПВИЩФ˘ЪБ›· ЩЛ Ы˘ЫОВ˘‹ ОФУЩ¿ ЫВ ЛПВОЩЪФМ·БУЛЩИОФ‡˜
ФМФ‡˜ ˘„ЛП‹˜ Ы˘¯УfiЩЛЩ·˜, επειδή μπορεί να επηρεάσουν τη
λειτουργία της συσκευής.
• Μην εκτίθετε την συσκευή άμεσα στις ακτίνες του ηλίου.
•
¶ÚÔÛٷهÂÙ ÙË Û˘Û΢‹ ·fi ˘ÁÚ·Û›·.
• ¢ÂÓ Ú¤ÂÈ Ó· ‚˘ı›˙ÂÙ ÙË Û˘Û΢‹, ÙÔ Î·ÏÒ‰ÈÔ Î·È ÙÔ ÚÂ˘Ì·ÙÔÏ‹ÙË ÛÙÔ
ÓÂÚfi ‹ Ó· Ù· ¤¯ÂÙ οو ·fi ÙÚ¯ԇÌÂÓÔ ÓÂÚfi.
• ¶И¿УВЩВ ¿УЩ· ЩФ ЪВ˘М·ЩФП‹ЩЛ МВ ЫЩВБУ¿ ¯¤ЪИ·.
• Το καλώδιο δεν επιτρέπεται να περνάει κοντά από πηγές θερμότητας
ή πάνω από αιχμηρές άκρες.
• ªЛ МВЩ·К¤ЪВЩВ МЛУ ЩЪ·‚¿ЩВ ‹ ЫЩЪ›‚ВЩВ ЩФ ЪВ˘М·ЩФП‹ЩЛ ·fi ЩФ
О·ПТ‰ИФ О·И МЛ М·ББТУВЩВ ЩФ О·ПТ‰ИФ.
• Προστατεύστε την συσκευή από κτυπήματα και δονήσεις.
• Μη επισκευάσετε μόνοι σας την συσκευή στην περίπτωση κάποιας
βλάβης.
ВНФ˘ЫИФ‰ФЩЛМ¤УФ О·Щ¿ЫЩЛМ· ‹ ·У¿ПФБ· ВО·И‰В˘М¤УФ О·Щ¿ППЛПФ
ЪfiЫˆФ.
• Τοποθετείστε την συσκευή κατά την χρήση της σε στερεή και επίπεδη
επιφάνεια, έτσι ώστε να μην μπορεί να αναποδογυρίσει ή να πέσει
κάτω.
∏ ÂÈÛ΢‹ ÂÈÙÚ¤ÂÙ·È Ó· Ú·ÁÌ·ÙÔÔÈÂ›Ù·È ÌfiÓÔ ·fi
2
§ÂÈÙÔ˘ÚÁ›·
2.1
¶ÂÚȯfiÌÂÓÔ
·Ú¿‰ÔÛ˘ ηÈ
Û˘Û΢·Û›·
74
∂ϤÁÍÙ ·Ú¯Èο ÙËÓ ÏËÚfiÙËÙ· Ù˘ Û˘Û΢‹˜
ζημιά. Σε περίπτωση αμφιβολίας μη θέτετε τη συσκευή σε λειτουργία και
στείλτε τη στο τμήμα σέρβις για επισκευή.
ΔÔ ÂÚȯfiÌÂÓÔ ·Ú¿‰ÔÛ˘ Û˘ÌÂÚÈÏ·Ì‚¿ÓÂÈ:
• 1 MEDISANA Ξυπνητήρι φωτισμού SAC
• 1 Ô‰ËÁ›· ¯Ú‹Û˘
√И Ы˘ЫОВ˘·Ы›В˜ В›У·И В·У·¯ЪЛЫИМФФИ‹ЫИМВ˜ ‹ МФЪФ‡У У· ·У·О˘ОПˆıФ‡У ЫЩФУ О‡ОПФ ЪТЩˆУ ˘ПТУ. ™·˜ ·Ъ·О·ПФ‡МВ У· ·ФЫ‡ЪВЩВ ЩФ
˘ПИОfi Ы˘ЫОВ˘·Ы›·˜ Ф˘ ‰ВУ ¯ЪЛЫИМФФИВ›Щ·И П¤ФУ Ы‡МКˆУ· МВ ЩФ˘˜
О·УФУИЫМФ‡˜. ™В ВЪ›ЩˆЫЛ Ф˘ О·Щ¿ ЩЛУ ·К·›ЪВЫЛ ЩЛ˜ Ы˘ЫОВ˘‹˜ ·fi ЩЛ
Ы˘ЫОВ˘·Ы›· ‰И·ИЫЩТЫВЩВ О¿ФИ· ‚П¿‚Л ФКВИПfiМВУЛ ЫЩЛ МВЩ·КФЪ¿, Ы·˜
·Ъ·О·ПФ‡МВ У· ·В˘ı˘УıВ›ЩВ ·М¤Ыˆ˜ ЫЩФУ ¤МФЪfi Ы·˜.
και δεν παρουσιάζει καμία
Page 81

2.2
Τοποθέτηση και
Ρύθμιση
2
§ÂÈÙÔ˘ÚÁ›·
¶ƒ√∂π¢√¶√π∏™∏
¶ÚÔÛ¤¯ÂÙ ÒÛÙ ٷ Ï·ÛÙÈο Û˘Û΢·Û›·˜ Ó· ÌËÓ ÂÚȤÏıÔ˘Ó
Û ·È‰Èο ¯¤ÚÈ·! À¿Ú¯ÂÈ Î›Ó‰˘ÓÔ˜ ·ÛÊ˘Í›·˜!
1.
Τοποθετείστε την συσκευή κατά την χρήση της σε στερεή και
επίπεδη επιφάνεια, έτσι ώστε να μην μπορεί να αναποδογυρίσει ή να
πέσει κάτω.
2. Τοποθετείστε την συσκευή σε μία απόσταση περίπου 40 –50 εκ. από
το κεφάλι σας, π. χ. σε ένα κομοδίνο.
3. Συνδέστε το καλώδιο ρεύματος με την πρίζα.
ΥΠΟΔΕΙΞΕΙΣ
Το Ξυπνητήρι σας Φωτισμού MEDISANA SAC είναι εφοδιασμένο
με σύστημα R.D.S. (Data System = Σύστημα Στοιχείων
Ραδιόφωνου). Η συσκευή λαμβάνει την πληροφορία τής ώρας
διαμέσου του σήματος του συστήματος R.D.S. ΄Οταν δεν είναι
διαθέσιμο το σήμα του R.D.S, τότε δεν ρυθμίζεται αυτόματα ή
ώρα. Η σύντομη περιγραφή του ονόματος του σταθμού
εμφανίζεται με γράμματα στην οθόνη. ΄Οταν ο σταθμός δεν
εκπέμπει τα χαρακτηριστικά τού ονόματος του, επιδεικνύεται
μόνον η ψηφιακή συχνότητα του ραδιοφωνικού σταθμού.
Η ώρα (12:00) αρχίζει να αναβοσβήνει στην οθόνη , το σύμβολο
R.D.S. και η επιγραφή TIME SETTING εμφανίζονται στην οθόνη, για
να αρχίσει η αυτόματη ρύθμιση της ώρας. Μετά από λίγα λεπτά
μεταβιβάζεται η επίκαιρη ώρα και επιδεικνύεται στην οθόνη. Στο
κάτω άκρο της οθόνης εμφανίζεται η επιγραφή SET SUCCESS
(επιτυχία ρύθμισης). ΄Οταν δεν δέχεσθε το σήμα του σταθμού διά
του συστήματος R.D.S., σβήνει το σύμβολο R.D.S. μετά από
περίπου 60 δευτερόλεπτα, και εμφανίζεται η επιγραφή SET FAIL
(αποτυχία ρύθμισης). Σε αυτήν την περίπτωση ρυθμίστε την ώρα με
το πλήκτρο ρύθμισης
και με τα πλήκτρα
ή
.
GR
2.3
Λειτουργίες των
πλήκτρων
Ρύθμιση της ώρας και των συναγερμών διά της χειρός
Πιέστε το πλήκτρο ρύθμισης Setπερίπου για 3 δευτερόλεπτα, η
ώρα στην οθόνη
Τώρα μπορείτε να ρυθμίσετε την ώρα με το χέρι. Πιέστε τα πλήκτρα
ή
να επιβεβαιώσετε την ώρα και ταυτόχρονα να περάσετε στο μενού
ρύθμισης για τους συναγερμούς 1 (AL1) / 2 (AL2) / Zizz (σύντομη
ειδοποίηση). Επιλέξτε με τα πλήκτρα
επιθυμείτε και επιβεβαιώστε την επιλογή αυτή με το πλήκτρο
ρύθμισης Set (επιλέξτε π.χ. AL1). Ρυθμίστε την ώρα του
συναγερμού διά της πιέσεως των πλήκτρων
διάρκεια της ρύθμισης των συναγερ μών αναβοσβήνει το σύμβολο
AL1 και η ώρα συναγερμού σε ρυθμό ανά 0,5 δευτερόλεπτα.
Επιβεβαιώστε την ρυθμισθείσα ώρα συναγερμού με το πλήκτρο
ρύθμισης Set. Εν συνεχεία φθάνετε μετά από αυτό κατευθείαν
στο μενού επιλογής για τον επιλεχθέντα συναγερμό. Στην οθόνη
εμφανίζεται τό σύμβολο του ραδιοφώνου (FM) ή του ήχου.
. Πιέστε το πλήκτρο ρύθμισηςμια δεύτερη φορά, ώστε
αναβοσβήνει σε ρυθμό ανά 0,5 δευτερόλεπτα.
ή
τον συναγερμό που
ή
. Κατά την
75
Page 82

GR
2
§ÂÈÙÔ˘ÚÁ›·
Επιλέξτε με τα πλήκτρα
και επιβεβαιώστε την επιλογή πάλι με το πλήκτρο ρύθμισης (Set) .
΄Οταν επιλέξατε Ραδιόφωνο (FM), μπορείτε να επιλέξετε με τα πλήκτρα
ή
ξυπνήσετε. Επιβεβαιώστε την επιλογή σας πάλι με το πλήκτρο ρύθμισης
.
(Set)
΄Οταν επιλέξατε τους φυσικούς ήχους, μπορείτε να διαλέξετε με τα
πλήκτρα
φορά ακούγεται σύντομα ο ήχος της επιλογής και εμφανίζεται ενα
πικτογράφημα στην οθόνη. Επιβεβαιώστε την επιλογή σας πάλι με το
πλήκτρο ρύθμισης (Set)
Εν συνεχεία φθάνετε στην ρύθμιση της έντασης ήχου. Στην οθόνη
τα ψηφία κάτω από το σύμβολο δείχνουν την ένταση ήχου που έχει
ρυθμισθεί. Ρυθμίστε με τα πλήκτρα
επιθυμείτε. Πιέστε το πλήκτρο ρύθμισης (Set) , για να επιβεβαιώσετε
την επιλογή σας. Μετά φθάνετε στην ρύθμιση της φωτεινότητας. Στην
οθόνητα ψηφία κάτω από το σύμβολο δείχνουν την ένταση την
ένταση φωτεινότητας που έχει ρυθμισθεί. Ρυθμίστε με τα πλήκτρα
ή την ένταση φωτεινότητας. Επιβεβαιώστε την επιλογή σας πάλι
με το πλήκτρο ρύθμισης (Set) . Οταν θέλετε να χρησιμοποιήσετε
μόνο την λειτουργία φωτισμού ή μόνο τη λειτουργία ήχου/ραδιοφώνου,
βάλτε την άλλη κατά την ρύθμιση στη θέση 0.
΄Οταν κατά την διάρκεια της ρύθμισης δεν πιέσετε για 10 δευτερόλεπτα
κανένα πλήκτρο, απενεργοποιείται αυτόματα το μενού ρύθμισης.
Αφού έχετε κάνει την επιλογή σας και την έχετε επιβεβαιώσει, πρέπει να
πιέσετε, εάν θέλετε να χρησιμοποιήσετε την λειτουργία, το πλήκτρο
συναγερμού
Για την ρύθμιση του συναγερμού 2 (AL2) ή του συναγερμού μικρής
διάρκειας (Zizz) ακολουθείτε ακριβώς την ίδια διαδικασία.
΄Οταν έχει ενεργοποιηθεί ένας συναγερμός, τα πλήκτρα
ραδιόφωνο (Radio),
είναι ακινητοποιημένα.
Πλήκτρο
΄Οταν πιέσετε μία φορά το πλήκτρο
εμφανίζεται το σύμβολο του ήχου, και το σήμα μετάδοσης αναβοσβήνει.
Επιλέξτε με τα πλήκτρα
πλήκτρα ▼ και ▲ ρυθμίζετε τον ένταση ήχου που επιθυμείτε.
Οταν πιέσετε μία φορά το πλήκτρο
σύμβολο του Ραδιόφωνου (FM), και το σήμα μετάδοσης αναβοσβήνει.
Επιλέξτε με τα πλήκτρα
επιθυμείτε. Με τα πλήκτρα ▼ ή ▲ ρυθμίζετε την ένταση ήχου που
επιθυμείτε. Αν πιέσετε το πλήκτρο Sound/Radio
πιέσετε το πλήκτρο Off
Πλήκτρο
΄Οταν πιέσετε το πλήκτρο
της οθόνης και εναλλάσσεται συνεχώς μεταξύ υψηλής έντασης
φωτεινότητας (πράσινο) και χαμηλής έντασης φωτεινότητας (πράσινο),
υψηλής έντασης φωτεινότητας (κίτρινο) και χαμηλής έντασης
φωτεινότητας (κίτρινο), και ο φωτισμός διακόπτεται. Πιέστε το πλήκτρο
(Dimmer) μόλις φθάσετε την ένταση φωτεινότητας και το χρώμα
φωτισμού που επιθυμείτε, για να επιτύχετε την επιλογή σας.
έναν ραδιοφωνικό σταθμό, με τον οποίο θέλετε να
ή
ή το πλήκτρο συναγερμού μικρής διάρκειας (Zizz) .
ήχου/ραδιοφώνου (Sound/Radio)
(Dimmer)
ή
μεταξύ οκτώ διαφορετικών φυσικών ήχων, ενώ κάθε
.
για φωτισμό (Light) και για χαλάρωση (Relax)
, φεύγετε από το μενού.
(Dimmer), αρχίζει να λειτουργεί ο φωτισμός
μεταξύ ραδιόφωνου (FM) ή ήχου
ή
την ένταση ήχου που
ήχου/ραδιόφωνου (Sound/Radio),
ή
τον ήχο που επιθυμείτε. Με τα
για δεύτερη φορά, εμφανιζεται το
ή
τον ραδιοφωνικό σταθμό που
μια τρίτη φορά ή αν
για το
76
Πλήκτρο (Relax)
Πιέζοντας το πλήκτρο
μεταξύ διαφόρων ρυθμίσεων φωτός. Πιέζοντας το πλήκτρο
φορά, φθάνετε στη θέση
(Relax) έχετε τη δυνατότητα να διαλέξετε
Relax A
, στην οποία κάθε 8 δευτερόλεπτα
(Relax) μία
Page 83

2
§ÂÈÙÔ˘ÚÁ›·
GR
διενεργείται αλλαγή του χρώματος του φωτός. Διαδοχικά δείχνονται
κόκκινα, γαλάζια, πράσινα και άλλα μικτά χρώματα (
Πιέζοντας το πλήκτρο
Relax C
, στην οποία εναλάσσσεται αυτόματα το χρώμα του φωτός σε
ορισμένες ώρες της ημέρας:
0:00 - 4:00 -> όπως
4:00 - 8:00 -> όπως
8:00 - 12:00 -> όπως
12:00 - 16:00 -> όπως
16:00 - 20:00 -> όπως
20:00 - 24:00 -> όπως
Πιέζοντας το πλήκτρο
θέσεις επιλογής του χρώματος του φωτός: θέση
Relax 2
θέση
= κόκκινο-γαλάζιο, θέση Relax 5 = γαλάζιο-πράσινο, θέση
πράσινο-κόκκινο, θέση
πλήκτρο
της λειτουργίας χαλάρωσης (Relax). Πιέζοντας το πλήκτρο
μπορείτε να φύγετε από το μενού οποιαδήποτε στιγμή.
Πλήκτρο φωτός
Πιέζοντας το πλήκτρο φωτός
στην οθόνη
ψηφία, που αναφέρονται στον βαθμό έντασης (0 - 20) της φωτεινότητας.
Ο βαθμός φωτεινότητας σταδιακά αυξάνεται από 0 έως 20. Πιέστε τα
πλήκτρα
σύμφωνα με τις επιθυμίες σας.
Πιέζοντας το πλήκτρο φωτός (Light)
σταδιακά η φωτεινότητα από την ρυθμισθείσα βαθμίδα φωτεινότητας
οπισθοχωρόντας μέχρι το 0 και το σύμβολο σβήνει. Για να διαβάζετε
συνιστάται η βαθμίδα φωτεινότητας 20. Πιέζοντας το πλήκτρο
μπορείτε να φύγετε από το μενού οποιαδήποτε στιγμή.
Πλήκτρο Συναγερμού
Με το Πλήκτρο Συναγερμού
Συναγερμό 2. ΄Οταν πιέσετε μία φορά το Πλήκτρο Συναγερμού
εμφανίζεται το σύμβολο AL1 και ο AL1 είναι ενεργοποιημένος. ΄Οταν
πιέσετε το Πλήκτρο Συναγερμού
σύμβολο AL2 και ο AL2 είναι ενεργοποιημένος. ΄Οταν πιέσετε το Πλήκτρο
Συναγερμού
AL2 και τότε είναι και οι δύο συναγερμοί ενεργοποιημένοι. Η ώρα του
συναγερμού επιδεικνύεται. ΄Οταν έχουν ενεργοποιηθεί οι συναγερμοί AL1
και AL2, επιδεικνύεται στην οθόνη η ώρα του συναγερμού, που βρίσκεται
πιο κοντα στην τρέχουσα ώρα. ΄Οταν πιέσετε το Πλήκτρο Συναγερμού
για τέταρτη φορά, απενεργοποιείται η λειτουργία του συναγερμού.
Κατά την ρύθμιση ττης ώρας συναγερμού έχετε επιλέξει επίσης έναν
ραδιοφωνικό σταθμό ή ένα φυσικό ήχο, μία βαθμίδα φωτεινότητας
του φωτισμού και μία ορισμένη ένταση ήχου. Κατά την διάρκεια των
τελευταίων 30 λεπτών πριν από την ενεργοποίηση του συναγερμού
προσαρμόζεται σιγά-σιγά η φωτεινότητα στον βαθμό φωτεινότητας
που έχει ήδη ρυθυμισθεί για την ώρα του συναγερμού. Η επιλεχθείσα
ένταση ήχου για την ώρα του συναγερμού αυξάνεται από την αρχή
του συναγερμού (μόλις φθάσει η ώρα του συναγερμού) εντός 60
δευτερολέπτων μέχρις ότου φθάσει τον βαθμό έντασης που έχετε
ρυθμίσει. Ο κανονικός συναγερμός ενεργοποιείται μόνο όταν ανάμεσα
στη χρονική στιγμή που ρυθμίστηκε και στη χρονική στιγμή που θα πρέπει
να ενεργοποιηθεί, μεσολαβούν πάνω από 30 λεπτά. Αν ανάμεσα στη
χρονική στιγμή που ρυθμίστηκε ο συναγερμός και στη χρονική στιγμή
που θα πρέπει να ενεργοποιηθεί, μεσολαβούν λιγότερο από 30 λεπτά, η
λειτουργία συναγερμού ενεργοποιείται 60 δευτερόλεπτα πριν από τη
στιγμή συναγερμού.
= μόνο γαλάζιο, θέση
(Relax) για δέκατη φορά, βγαίνετε από το μενού ρύθυμισης
εμφανίζεται το σύμβολο . Αντί της ώρας εμφανίζονται
▼ ή ▲, για να αλλάξετε τον βαθμό φωτεινότητας
για τρίτη φορά, εμφανίζονται και τα δύο σύμβολα AL1 και
(Relax) για δεύτερη φορά, φθάνετε στη θέση
Relax 5
Relax 1
Relax 4
Relax 2
Relax 6
Relax 3
(Relax) επανειλημμένα, φθάνετε σε περιατέρω
Relax 7
(Light )
(Alarm)
= γαλάζιο-πράσινο
= μόνο κόκκινο
= κόκκινο-γαλάζιο
= μόνο γαλάζιο
= πράσινο-κόκκινο
= μόνο πράσινο
Relax 3
= κόκκινο-γαλάζιο-πράσινο. Πιέζοντας το
(Light) ανάβετε την λυχνία φωτισμού ,
για δεύτερη φορά, μειώνεται
ενεργοποιείτε τον Συναγερμό 1 και/ή τον
για δεύτερη φορά, εμφανίζεται το
Relax 1 - 7
Relax 1
= μόνο πράσινο, θέση
).
= μόνο κόκκινο,
Relax 6
Relax 4
Off
Off
77
=
,
Page 84

GR
2
§ÂÈÙÔ˘ÚÁ›·
Πλήκτρο Διακοπής (Off)
΄Οταν έχετε ενεργοποιήσει τον συναγερμό, αλλά ξυπνήσατε ήδη πριν από
την ώρα του συναγερμού, μπορείτε να απενεργοποιήσετε την λειτουργία
του συναγερμού πιέζοντας το Πλήκτρο Διακοπής
την λειτουργία συναγερμού διατηρούνται και ισχύουν για την επόμενη
ημέρα. Εάν δεν πιέσετε το Πλήκτρο Διακοπής
ξυπνήσατε πριν από την ώρα του συναγερμού και ξεχάσατε να πιέσετε το
Πλήκτρο Διακοπής
συναγερμού μετά από 30 λεπτά. Πιέζοντας το πλήκτρο Off
κλείνετε επίσης κάθε ενεργή λειτουργία μενού.
(Off), απενεργοποιείται αυτόματα η λειτουργία του
(Off). Οι ρυθμίσεις για
(Off), π.χ. όταν
μπορείτε να
78
Πλήκτρο
΄Οταν θέλετε να κάνετε ένα μικρό διάλειμμα ανάπαυσης ή να κοιμηθείτε
για λίγο το μεσημέρι, μπορείτε να ρυθμίσετε έναν συναγερμό μικρής
διάρκειας. Πιέστε το Πλήκτρο
σύμβολο Zizz. Πιέζοντας μία μοναδική φορά το Πλήκτρο
ρυθμίζεται ένας συναγερμός αφύπνισης μετά από 15 λεπτά. Με κάθε
περαιτέρω πίεση του πλήκτρου αυτού παρατείνεται το χρονικό διάστημα
μέχρι τον συναγερμό κατά 15 λεπτά. Η κατά ανώτατο όριο ώρα
συναγερμού που μπορεί να ρυθμισθεί για ένα συναγερμό μικρής
διάρκειας ανέρχεται σε 90 λεπτά. Πιέζοντας το πλήκτρο
επιβεβαιώνετε την επιλογή σας και ξεκινάτε ταυτόχρονα τον χρόνο που
ρυθμίσατε μέχρις ότου ενεργοποιηθεί ο συναγερμός. Στην λειτουργία
«Ziss» ο ήχος του συναγερμού έχει ήδη επιλεχθεί. Με το πλήκτρο
μπορείτε να αλλάξετε αυτήν την ρύθμιση (συγκρίνατε και την “Ρύθμιση
της ώρας και των συναγερμών διά της χειρός”, σελίδα 75 - 76).
Πλήκτρο επίδειξης
Αν δεν χρησιμοποιείτε τη λειτουργία συναγερμού, δηλαδή με το
πλήκτρο Alarm
χρησιμοποιήσετε το πλήκτρο για τη λειτουργία επίδειξης (Demo).
Πιέστε το πλήκτρο
φωτεινότερο μέσα σε χρονικά διαστήματα που διαρκούν ανά 5
δευτερόλεπτα (δείχνονται βαθμίδες φωτεινότητας από 0 έως 20). Εν
συνεχεία αρχίζει η παράσταση των τεσσάρων φυσικών ήχων. Η όλη
διαδικασία της επίδειξης διαρκεί περίπου 1 λεπτό.
΄Οταν έχετε ρυθμίσει και επιλέξει έναν συναγερμό, χωρίς να είναι
ενεργοποιημένος ο συναγερμός, μπορείτε πιέζοντας το Πλήκτρο
ζητήσετε την επίδεξη των ρυθμίσεων συναγερμού και να να ελέγξετε τις
λειτουργίες του συναγερμού. Πιέστε το Πλήκτρο
(Quick Check), και εμφανίζονται στην οθόνη ότι έχετε ρυθμίσει.
Ξαναπιέστε το Πλήκτρο
ταχέους ελέγχου (Quick Check).
΄Οταν έχετε ενεργοποιήσει μία ώρα συναγερμού, και τρέχει ήδη η
αντίστροφη μέτρηση για τον συναγερμό αυτόν, χωρίς να έχει επιτευχθεί
όμως ακόμη η πιο υψηλή βαθμίδα φωτεινότητας, μπορείτε να
χρησιμοποιήστε με το Πλήκτρο
πλήκτρο ύπνου
χρόνο, σταματάει η λειτουργία αφύπνισης (φωτεινότητα και ένταση)
μέχρι τον ρυθμισμένο χρόνο ειδοποίησης. Η φωτεινότητα και η ένταση
ήχου χρειάζονται μόνο 1 λεπτό μέχρι το χρόνο ειδοποίησης ώστε να
προσαρμοστούν στις ρυθμισμένες τιμές. Αν πιέσετε το πλήκτρο ύπνου
(Snooze) μέσα σε 30 λεπτά μετά από το χρόνο ειδοποίησης, ο χρόνος
ειδοποίησης παρατείνεται για 5 λεπτά.
Πλήκτρου
άλλα 5 λεπτά. Μπορείτε να επιβραδύνετε την ώρα συναγερμού το πολύ
για 30 λεπτά.
(Zizz)
(Zizz) και στην οθόνη εμφανίζεται το
(Demo)/(Snooze)/ταχέους ελέγχου (Quick Check)
δεν ρυθμίστε κανένας συναγερμός, μπορείτε να
για την επίδειξη. Το φως γίνεται σταδιακά
ταχέους ελέγχου
για να τερματίσετε την λειτουργία του
την λειτουργία Snooze. Αν πιέσετε το
(Snooze) μέσα σε 30 λεπτά πριν από το ρυθμισμένο
(Snooze) επιβραδύνει τον συναγερμό αφύπνησης κατά
Κάθε περαιτέρω πίεση του
(Zizz)
(Set)
(Set)
να
Page 85

3 ¢È¿ÊÔÚ·
GR
2.4
Νέα εκκίνηση
λειτουργίας
(Reset)
3.1
∫·ı¿ÚÈÛÌ· ηÈ
Û˘ÓÙ‹ÚËÛË
3.2
√‰ËÁ›Â˜ ÁÈ· ÙË
‰È¿ıÂÛË
΄Οταν δεν λειτουργεί σωστά η συσκευή, βγάλτε το καλώδιο ρεύματος από
την πρίζα, περιμένετε 10 δευτερόλεπτα και βάλτε μετά ξανά το καλώδιο
στην πρίζα του ρεύματος. Ρυθμίστε εκ νέου την ώρα και τις άλλες
λειτουργίες, όπως περιγράφεται στην παράγραφο „Ρύθμιση της ώρας
και των συναγερμών διά της χειρός“, σελίδα 75 - 76.
ΥΠΟΔΕΙΞΗ
Η συσκευή δεν περιέχει μπαταρίες αποθήκευσης. ΄Οταν
βγάλετε ττο καλώδιο ρεύματοςς από την πρίζα και το
ξαναβάλετε η συσκευή βρίσκεται στην εντελώς αρχική της
κατάσταση. Όλες οι ρυθμίσεις, εκτός από τα «Alarm» και «Zizz»,
πρέπει να γίνουν πάλι. ΄Οταν δεν μπορείτε να λάβετε το σήμα
του συστήματος εκπομπής R.D.S., η ώρα πρέπει να ρυθμισθεί
με το χέρι. ΄Οταν γίνει ρύθμιση της ώρας με το χέρι μπορεί να
υπάρξει απόκλιση της ρύθμισης της ώρας από τον σωστό
καθορισμό της ώρας κατά ± 6 δευτερόλεπτα την ημέρα.
• Ξεσκονίζετε τακτικά τη συσκευή με ένα αντιστατικό πανάκι.
Μπορείτε να χρησιμοποιήσετε και ένα ελαφρά υγρό πανάκι.
• Μην χρησιμοποιείτε επιθετικά μέσα καθαρισμού και τριψίματος.
Η συσκευή αυτή δεν ειτρέεται να αοσύρεται µαζί µε τα οικιακά
αορρίµµατα.
Κάθε καταναλωτής είναι υοχρεωµένος να αραδίνει όλες τις
ηλεκτρικές ή ηλεκτρονικές συσκευές, ανεξάρτητα αν εµεριέχουν
βλαβερές ύλες, σε υηρεσία συλλογής του δήµου του ή στο ειδικό
εµόριο, ώστε νε είναι εφικτή η οικολογική αόσυρση των
συσκευών αυτών.
∞У·КФЪИО¿ МВ ЩЛУ ·ФОФМИ‰‹, ·В˘ı˘УıВ›ЩВ ЫЩИ˜ ЩФИО¤˜ ·Ъ¯¤˜ ‹ ЫЩФУ
·ÚÌfi‰ÈÔ ¤ÌÔÚÔ.
3.3
Δ¯ÓÈο
ÛÙÔȯ›·
ŸУФМ· О·И МФУЩ¤ПФ
∏ПВОЩЪИО‹ ЩЪФКФ‰ФЫ›·
Απόδοση ενεργίας : το πολύ 10 W
Ακρίβεια της ώρας : ± 6 δευτερόλεπτα/ημέρα (όταν δεν
Φωτεινότητα : 300 Lumen (σε απόσταση 40 εκ. από
™˘Уı‹ОВ˜ ПВИЩФ˘ЪБ›·˜
¢И·ЫЩ¿ЫВИ˜
μ¿ЪФ˜
ª‹ОФ˜ О·Пˆ‰›Ф˘ ЩЪФКФ‰ФЫ›·˜l:ВЪ
∞ЪИıМfi˜ В›‰Ф˘˜
∞ЪИıМfi˜ EAN
™Щ· П·›ЫИ· Ы˘УВ¯ТУ ‚ВПЩИТЫВˆУ ЩˆУ ЪФ˚fiУЩˆУ ‰И·ЩЛЪФ‡МВ
ЩФ ‰ИО·›ˆМ· ЩВ¯УИОТУ ‹ Ы¯ЛМ·ЩИОТУ ЩЪФФФИ‹ЫВˆУ.
:
MEDISANA Ξυπνητήρι φωτισμού SAC
: 230 V~ 50 Hz
έναι διαθέσιμο το σύστημα R.D.S.)
την συσκευή)
:
ГЪ‹ЫЛ МfiУФ ЫВ ЫЩВБУФ‡˜ ¯ТЪФ˘˜
Ы‡МКˆУ· МВ ЩИ˜ Ф‰ЛБ›В˜ ¯Ъ‹ЫЛ˜
:
ÂÚ
. 19 (Μ) x 13 (Π) X 25,5 (Υ) cm
:
ÂÚ
. 770 g
. 1,95 m
: 45100
: 40 15588 45100 3
79
Page 86

GR
4 ∂ÁÁ‡ËÛË
4.1
∂ÁÁ‡ËÛË Î·È
fiÚÔÈ ÂÈÛ΢ÒÓ
™В ВЪ›ЩˆЫЛ ВББ˘ЛЩИО‹˜ ·Н›ˆЫЛ˜ Ы·˜ ·Ъ·О·ПФ‡МВ У· ·В˘ı˘УıВ›ЩВ
ЫЩФ ВИ‰ИОfi О·Щ¿ЫЩЛМ· Ф˘ ·БФЪ¿Ы·ЩВ ЩЛ Ы˘ЫОВ˘‹ ‹ О·ЩВ˘ıВ›·У ЫЩФ
∫¤УЩЪФ ™¤Ъ‚И˜. ™В ВЪ›ЩˆЫЛ fiМˆ˜ Ф˘ В›У·И ··Ъ·›ЩЛЩЛ Л ·ФЫЩФП‹
ЩЛ˜ Ы˘ЫОВ˘‹˜, Ы·˜ ·Ъ·О·ПФ‡МВ У· ЩЛУ ЫЩВ›ПВЩВ МВ ·У·КФЪ¿ ЩФ˘
ВП·ЩЩТМ·ЩФ˜, ВИЫ˘У¿ЩФУЩ·˜ О·И ¤У· ·УЩ›БЪ·КФ ЩЛ˜ ·fi‰ВИНЛ˜
·ÁÔÚ¿˜.
°È· ÙËÓ ÂÁÁ˘ËÙÈ΋ ·Í›ˆÛË ÈÛ¯‡Ô˘Ó ÔÈ ·ÎfiÏÔ˘ıÔÈ fiÚÔÈ ÂÁÁ‡ËÛ˘:
1. °È· Ù· ÚÔ˚fiÓÙ· MEDISANA ·Ъ¤¯ВЩ·И ВББ‡ЛЫЛ ЩЪИТУ ВЩТУ ·fi ЩЛУ
ЛМВЪФМЛУ›· ·БФЪ¿˜. ™В ВЪ›ЩˆЫЛ ВББ˘ЛЩИО‹˜ ·Н›ˆЫЛ˜ Л
ЛМВЪФМЛУ›· ·БФЪ¿˜ ı· Ъ¤ВИ У· ·Ф‰ВИОУ‡ВЩ·И М¤Ыˆ ·fi‰ВИНЛ˜
‹ ЩИМФПФБ›Ф˘ ·БФЪ¿˜.
2. ∂П·ЩЩТМ·Щ· ФКВИПfiМВУ· ЫВ ЫК¿ПМ·Щ· ˘ПИОФ‡ ‹ О·Щ·ЫОВ˘‹˜
ВИ‰ИФЪıТУФУЩ·И ‰ˆЪВ¿У ВУЩfi˜ ЩФ˘ ¯ЪfiУФ˘ ВББ‡ЛЫЛ˜.
3. ™Â ÂÚ›ÙˆÛË ·ÚÔ¯‹˜ ÂÁÁ‡ËÛ˘ ‰ÂÓ ·Ú·Ù›ÓÂÙ·È Ô ¯ÚfiÓÔ˜
ÂÁÁ‡ËÛ˘, Ô‡Ù ÁÈ· ÙË Û˘Û΢‹ Ô‡Ù ÁÈ· ÂÍ·ÚÙ‹Ì·Ù· Ô˘
·ÓÙÈηٷÛÙ¿ıËηÓ.
4. ∞fi ÙËÓ ÂÁÁ‡ËÛË ·ÔÎÏ›ÔÓÙ·È:
·. fiПВ˜ ФИ ‚П¿‚В˜, ФИ ФФ›В˜ ФКВ›ПФУЩ·И ЫВ ·О·Щ¿ППЛПФ ¯ВИЪИЫМfi,
.¯. ·fi ·Ъ¿ПВИ„Л Щ‹ЪЛЫЛ˜ ЩˆУ Ф‰ЛБИТУ ¯Ъ‹ЫЛ˜.
‚. ‚Ï¿‚˜, ÔÈ Ôԛ˜ ÔÊ›ÏÔÓÙ·È Û ÂÈÛ΢¤˜ ‹ ÂÂÌ‚¿ÛÂȘ ÙÔ˘
·ÁÔÚ·ÛÙ‹ ‹ ·Ó·ÚÌfi‰ÈˆÓ ÙÚ›ÙˆÓ.
Á. ‚Ï¿‚˜ ÌÂÙ·ÊÔÚ¿˜, ÔÈ Ôԛ˜ ÚԤ΢„·Ó ηٿ ÙË ÌÂÙ·ÊÔÚ¿
·fi ÙÔÓ Î·Ù·Û΢·ÛÙ‹ ÚÔ˜ ÙÔÓ Î·Ù·Ó·ÏˆÙ‹ ‹ ηٿ ÙËÓ
·ФЫЩФП‹ ЫЩФ ∫¤УЩЪФ ™¤Ъ‚И˜.
‰. ·УЩ·ПП·ОЩИО¿, Щ· ФФ›· ˘fiОВИУЩ·И ЫВ К˘ЫИФПФБИО‹ КıФЪ¿.
5. ∏ В˘ı‡УЛ БИ· ¿МВЫВ˜ ‹ ¤ММВЫВ˜ В·ОfiПФ˘ıВ˜ ˙ЛМИ¤˜, ФИ ФФ›В˜
ЪФО·ПФ‡УЩ·И ·fi ЩЛ Ы˘ЫОВ˘‹, ·ФОПВ›ВЩ·И ·ОfiМ· О·И ЫВ
ВЪ›ЩˆЫЛ Ф˘ Л ˙ЛМИ¿ ЫЩЛ Ы˘ЫОВ˘‹ ·У·БУˆЪИЫЩВ› ˆ˜ ВББ˘ЛЩИО‹
·Í›ˆÛË.
80
MEDISANA AG
Itterpark 7-9
40724 Hilden
°ÂÚÌ·Ó›·
ΔËÏ.: +49 (0) 2103 / 2007-60
º·Í: +49 (0) 2103 / 2007-626
eMail: info@medisana.de
¢È·‰›ÎÙ˘Ô:www.medisana.de
ΔË ‰È‡ı˘ÓÛË ™¤Ú‚Ș ı· ÙËÓ ‚Ú›Ù ÛÙËÓ ÙÂÏÂ˘Ù·›· ÛÂÏ›‰·.
Page 87

Page 88

Page 89

DE
DE
MEDISANA AG
Itterpark 7-9
40724 Hilden
Tel.: 0 21 03 - 20 07-60
Fax: 0 21 03 - 20 07-626
eMail: info@medisana.de
Internet: www.medisana.de
Im Servicefall wenden Sie sich bitte an:
MEDISANA Servicecenter
Feuerbach KG
Corneliusstraße 75
40215 Düsseldorf
Tel.: 0211 - 38 10 07
(Mo-Do: 9-13 Uhr/14-17 Uhr,
Fr: 9-13 Uhr)
Fax: 0211 - 37 04 97
eMail: medisana@t-online.de
Internet: www.medisana-service.de
GB
MEDHEALTH SUPPLIES LTD.
City Business Centre 41 St.
Olav’s Court Surrey Quays
London SE16 2XB
Tel.: + 44 / 207 - 237 88 99
Fax: + 44 / 207 - 252 22 99
eMail: info@medisana.co.uk
Internet: www.medisana.co.uk
BE / FR / IT / LU / NL
MEDISANA Benelux N.V.
Euregiopark 30
6467 JE Kerkrade
Nederland
Tel.: 0031 / 45 547 0860
Fax : 0031 / 45 547 0879
eMail: info@medisana.nl
ES
MEDISANA HEALTHCARE, S.L.
Plaza Josep Freixa i Argemí, no 8
08224 Terrassa (Barcelona)
Tel.: + 34 / 93 - 73 36 70 7
Fax: + 34 / 93 - 78 88 65 5
eMail: info@medisana.es
Internet: www.medisana.es
PT
GRUPO RP
Avda. D.Miguel, 330 -Zona Industrial
4435-678 Baguim do Monte
Tel.: +35 / 12 - 29 75 69 64
Fax: +35 / 12 - 29 75 60 15
eMail: rickiparodi@mail.telepac.pt
Internet: www.medisana.pt
FI
D&L Marketing Oy
Juvan teollisuuskatu 23
02920 Espoo
Tel.: + 358 / 9 - 85 53 08 0
Fax: + 358 / 9 - 85 53 08 30
eMail: jan.lindfors@dlmarketing.fi
Internet: www.dlmarketing.fi
SE
ALERE Electronics AB
Stormbyvägen 2-4
163 29 SPÅNGA
Phone: +46 8 761 24 31
Fax: +46 8 761 24 35
Internet: www.alere.se
GR
MEDISANA Hellas
Kosma Etolou & Kazantzaki 10
141 21 N. Iraklion
ΔËÏ.
: + 30 / 210 - 2 75 09 32
º·Í
: + 30 / 210 - 2 75 00 19
eMail: info@medisana.gr
¢È·‰›ÎÙ˘Ô
: www.medisana.gr
Page 90

DE
MEDISANA AG
Itterpark 7-9
40724 Hilden
Deutschland
Tel.: +49 (0) 2103 / 2007-60
Fax: +49 (0) 2103 / 2007-626
eMail: info@medisana.de
Internet: www.medisana.de
45100 10/2008
 Loading...