

Page 1
DE Oberarm-Blutdruck-Messgerät MTD
GB Upper arm blood pressure monitor MTD
FR Tensiomètre brassard MTD
I
T Sfigmomanometro da braccio MTD
E
S Esfigmomanómetro de brazo MTD
P
T Medidor da tensão arterial para o braço superior MTD
N
L Bloeddrukmeter voor de bovenarm MTD
F
I Olkavarren verenpainemittari MTD
S
E Blodtrycksmätare för överarm MTD
G
R ™˘ЫОВ˘‹ М¤ЩЪЛЫЛ˜ ·ЪЩЛЪИ·О‹˜ ›ВЫЛ˜ МЪ¿ЩЫФ˘ MTD
Art. 51145
Gebrauchsanweisung
Instruction Manual
Mode d’emploi
Istruzioni per l’uso
Instrucciones de manejo
Bitte sorgfältig lesen!
Please read carefully!
A lire attentivement s.v.p.!
Da leggere con attenzione!
¡Por favor lea con cuidado!
Manual de instruções
Gebruiksaanwijzing
Käyttöohje
Bruksanvisning
√‰ËÁ›Â˜ ¯Ú‹Û˘
Por favor ler cuidadosamente!
A.u.b. zorgvuldig lezen!
Lue huolellisesti läpi!
Läses noga!
¶·Ъ·О·ПФ‡МВ ‰И·‚¿ЫЩВ ЪФЫВОЩИО¿
Page 2

DE Gebrauchsanweisung
1 S i c h e r h e i t s h i n w e i s e . . . . . . . . . . . . . . . . . . . . . . . . . . . . . . . . . . . . . 1
2 Wissenswertes zum Blutdruck . . . . . . . . . . . . . . . . . 3
3 I n b e t r i e b n a h m e . . . . . . . . . . . . . . . . . . . . . . . . . . . . . . . . . . . . . . . . . . . . . 5
4 A n w e n d u n g . . . . . . . . . . . . . . . . . . . . . . . . . . . . . . . . . . . . . . . . . . . . . . . . . . . 8
5 S p e i c h e r . . . . . . . . . . . . . . . . . . . . . . . . . . . . . . . . . . . . . . . . . . . . . . . . . . . . . . . . . . .9
6 V e r s c h i e d e n e s . . . . . . . . . . . . . . . . . . . . . . . . . . . . . . . . . . . . . . . . . . . . . . . . 1 0
7 G a r a n t i e . . . . . . . . . . . . . . . . . . . . . . . . . . . . . . . . . . . . . . . . . . . . . . . . . . . . . . . . . . 1 3
PT Manual de instruções
1 A v i s o s d e s e g u r a n ç a . . . . . . . . . . . . . . . . . . . . . . . . . . . . . . . . . . . . . 6 6
2 I n f o r m a ç õ e s g e r a i s . . . . . . . . . . . . . . . . . . . . . . . . . . . . . . . . . . . . . . . 6 8
3 P ô r e m f u n c i o n a m e n t o . . . . . . . . . . . . . . . . . . . . . . . . . . . . . . . 7 0
4 A p l i c a ç ã o . . . . . . . . . . . . . . . . . . . . . . . . . . . . . . . . . . . . . . . . . . . . . . . . . . . . . . . . 7 3
5 M e m ó r i a . . . . . . . . . . . . . . . . . . . . . . . . . . . . . . . . . . . . . . . . . . . . . . . . . . . . . . . . . . 7 4
6 G e n e r a l i d a d e s . . . . . . . . . . . . . . . . . . . . . . . . . . . . . . . . . . . . . . . . . . . . . . . . 7 5
7 G a r a n t i a . . . . . . . . . . . . . . . . . . . . . . . . . . . . . . . . . . . . . . . . . . . . . . . . . . . . . . . . . . 78
GB Instruction Manual
1 S a f e t y I n f o r m a t i o n . . . . . . . . . . . . . . . . . . . . . . . . . . . . . . . . . . . . . . . 1 4
2 U s e f u l I n f o r m a t i o n . . . . . . . . . . . . . . . . . . . . . . . . . . . . . . . . . . . . . . . 1 6
3 G e t t i n g s t a r t e d . . . . . . . . . . . . . . . . . . . . . . . . . . . . . . . . . . . . . . . . . . . . . . 1 8
4 O p e r a t i n g . . . . . . . . . . . . . . . . . . . . . . . . . . . . . . . . . . . . . . . . . . . . . . . . . . . . . . . . 2 1
5 M e m o r y . . . . . . . . . . . . . . . . . . . . . . . . . . . . . . . . . . . . . . . . . . . . . . . . . . . . . . . . . . . 2 2
6 M i s c e l l a n e o u s . . . . . . . . . . . . . . . . . . . . . . . . . . . . . . . . . . . . . . . . . . . . . . . . 2 3
7 W a r r a n t y . . . . . . . . . . . . . . . . . . . . . . . . . . . . . . . . . . . . . . . . . . . . . . . . . . . . . . . . . 2 6
FR Mode d’emploi
1 C o n s i g n e s d e s é c u r i t é . . . . . . . . . . . . . . . . . . . . . . . . . . . . . . . . . 2 7
2 I n f o r m a t i o n s u t i l e s . . . . . . . . . . . . . . . . . . . . . . . . . . . . . . . . . . . . . . . 2 9
3 M i s e e n s e r v i c e . . . . . . . . . . . . . . . . . . . . . . . . . . . . . . . . . . . . . . . . . . . . . . 3 1
4 A p p l i c a t i o n . . . . . . . . . . . . . . . . . . . . . . . . . . . . . . . . . . . . . . . . . . . . . . . . . . . . . 3 4
5 M é m o i r e . . . . . . . . . . . . . . . . . . . . . . . . . . . . . . . . . . . . . . . . . . . . . . . . . . . . . . . . . . 3 5
6 D i v e r s . . . . . . . . . . . . . . . . . . . . . . . . . . . . . . . . . . . . . . . . . . . . . . . . . . . . . . . . . . . . . . . 3 6
7 G a r a n t i e . . . . . . . . . . . . . . . . . . . . . . . . . . . . . . . . . . . . . . . . . . . . . . . . . . . . . . . . . . 3 9
IT Istruzioni per l’uso
1 N o r m e d i s i c u r e z z a . . . . . . . . . . . . . . . . . . . . . . . . . . . . . . . . . . . . . . 4 0
2 I n f o r m a z i o n i i n t e r e s s a n t i . . . . . . . . . . . . . . . . . . . . . . . . . . . . 4 2
3 M e s s a i n f u n z i o n e . . . . . . . . . . . . . . . . . . . . . . . . . . . . . . . . . . . . . . . . 4 4
4 M o d a l i t à d ’ i m p i e g o . . . . . . . . . . . . . . . . . . . . . . . . . . . . . . . . . . . . . 4 7
5 M e m o r i a . . . . . . . . . . . . . . . . . . . . . . . . . . . . . . . . . . . . . . . . . . . . . . . . . . . . . . . . . . . 4 8
6 V a r i e . . . . . . . . . . . . . . . . . . . . . . . . . . . . . . . . . . . . . . . . . . . . . . . . . . . . . . . . . . . . . . . . . 4 9
7 G a r a n z i a . . . . . . . . . . . . . . . . . . . . . . . . . . . . . . . . . . . . . . . . . . . . . . . . . . . . . . . . . . 5 2
ES Instrucciones de manejo
1 Indicaciones de seguridad . . . . . . . . . . . . . . . . . . . . . . . . 53
2 Informaciones interesantes . . . . . . . . . . . . . . . . . . . . . . . 55
3 P u e s t a e n f u n c i o n a m i e n t o . . . . . . . . . . . . . . . . . . . . . . . . . 5 7
4 A p l i c a c i ó n . . . . . . . . . . . . . . . . . . . . . . . . . . . . . . . . . . . . . . . . . . . . . . . . . . . . . . . 6 0
5 M e m o r i a . . . . . . . . . . . . . . . . . . . . . . . . . . . . . . . . . . . . . . . . . . . . . . . . . . . . . . . . . . 6 1
6 G e n e r a l i d a d e s . . . . . . . . . . . . . . . . . . . . . . . . . . . . . . . . . . . . . . . . . . . . . . . . 6 2
7 G a r a n t í a . . . . . . . . . . . . . . . . . . . . . . . . . . . . . . . . . . . . . . . . . . . . . . . . . . . . . . . . . . 6 5
NL Gebruiksaanwijzing
1 V e i l i g h e i d s m a a t r e g e l e n . . . . . . . . . . . . . . . . . . . . . . . . . . . . . . 7 9
2 W e t e n s w a a r d i g h e d e n . . . . . . . . . . . . . . . . . . . . . . . . . . . . . . . . . 8 1
3 V o o r h e t G e b r u i k . . . . . . . . . . . . . . . . . . . . . . . . . . . . . . . . . . . . . . . . . 8 3
4 H e t G e b r u i k . . . . . . . . . . . . . . . . . . . . . . . . . . . . . . . . . . . . . . . . . . . . . . . . . . . . 8 6
5 G e h e u g e n . . . . . . . . . . . . . . . . . . . . . . . . . . . . . . . . . . . . . . . . . . . . . . . . . . . . . . . 8 7
6 D i v e r s e n . . . . . . . . . . . . . . . . . . . . . . . . . . . . . . . . . . . . . . . . . . . . . . . . . . . . . . . . . . . 88
7 G a r a n t i e . . . . . . . . . . . . . . . . . . . . . . . . . . . . . . . . . . . . . . . . . . . . . . . . . . . . . . . . . . 91
FI Käyttöohje
1 T u r v a l l i s u u s o h j e i t a . . . . . . . . . . . . . . . . . . . . . . . . . . . . . . . . . . . . . . . . 9 2
2 T i e t ä m i s e n a r v o i s t a . . . . . . . . . . . . . . . . . . . . . . . . . . . . . . . . . . . . . . 9 4
3 K ä y t t ö ö n o t t o . . . . . . . . . . . . . . . . . . . . . . . . . . . . . . . . . . . . . . . . . . . . . . . . . 9 6
4 K ä y t t ö . . . . . . . . . . . . . . . . . . . . . . . . . . . . . . . . . . . . . . . . . . . . . . . . . . . . . . . . . . . . . . 9 9
5 M u i s t i . . . . . . . . . . . . . . . . . . . . . . . . . . . . . . . . . . . . . . . . . . . . . . . . . . . . . . . . . . . . . . . 1 0 0
6 S e k a l a i s t a . . . . . . . . . . . . . . . . . . . . . . . . . . . . . . . . . . . . . . . . . . . . . . . . . . . . . . . . 1 0 1
7 T a k u u . . . . . . . . . . . . . . . . . . . . . . . . . . . . . . . . . . . . . . . . . . . . . . . . . . . . . . . . . . . . . . . 1 0 4
SE Bruksanvisning
1 S ä k e r h e t s h ä n v i s n i n g a r . . . . . . . . . . . . . . . . . . . . . . . . . . . . . . . 1 0 5
2 V ä r t a t t v e t a . . . . . . . . . . . . . . . . . . . . . . . . . . . . . . . . . . . . . . . . . . . . . . . . . . . 1 0 7
3 I b r u k t a g n i n g . . . . . . . . . . . . . . . . . . . . . . . . . . . . . . . . . . . . . . . . . . . . . . . . . . 1 0 9
4 A n v ä n d n i n g . . . . . . . . . . . . . . . . . . . . . . . . . . . . . . . . . . . . . . . . . . . . . . . . . . . . 1 1 2
5 M i n n e . . . . . . . . . . . . . . . . . . . . . . . . . . . . . . . . . . . . . . . . . . . . . . . . . . . . . . . . . . . . . . . 1 1 3
6 Ö v r i g t . . . . . . . . . . . . . . . . . . . . . . . . . . . . . . . . . . . . . . . . . . . . . . . . . . . . . . . . . . . . . . . 1 1 4
7 G a r a n t i . . . . . . . . . . . . . . . . . . . . . . . . . . . . . . . . . . . . . . . . . . . . . . . . . . . . . . . . . . . . . 1 1 7
GR √‰ËÁ›Â˜ ¯Ú‹Û˘
1 √‰ËÁ›Â˜ ÁÈ· ÙËÓ ·ÛÊ¿ÏÂÈ· . . . . . . . . . . . . . . . . . . . . . . . . . . . 1 1 8
2 ГЪ‹ЫИМВ˜ ПЛЪФКФЪ›В˜ . . . . . . . . . . . . . . . . . . . . . . . . . . . . . . . . . 1 2 0
3 §ÂÈÙÔ˘ÚÁ›· . . . . . . . . . . . . . . . . . . . . . . . . . . . . . . . . . . . . . . . . . . . . . . . . . . . . . . . 1 2 2
4 ∂Ê·ÚÌÔÁ‹ . . . . . . . . . . . . . . . . . . . . . . . . . . . . . . . . . . . . . . . . . . . . . . . . . . . . . . . . 1 2 5
5 ªÓ‹ÌË . . . . . . . . . . . . . . . . . . . . . . . . . . . . . . . . . . . . . . . . . . . . . . . . . . . . . . . . . . . . . . . 1 26
6 ¢È¿ÊÔÚ· . . . . . . . . . . . . . . . . . . . . . . . . . . . . . . . . . . . . . . . . . . . . . . . . . . . . . . . . . . . 1 2 7
7 ∂ÁÁ‡ËÛË . . . . . . . . . . . . . . . . . . . . . . . . . . . . . . . . . . . . . . . . . . . . . . . . . . . . . . . . . . . 1 3 0
Klappen Sie bitte diese Seite auf und lassen Sie sie zur
schnellen Orientierung aufgeklappt.
Please fold out this page and leave it folded out for quick
reference.
Veuillez déplier cette page et la laisser dépliée afin de
vous orienter plus rapidement.
Aprire questa pagina e lasciarla aperta ai fini di un rapido
orientamento.
Por favor, despliegue esta hoja y déjela desplegada para
orientarse rápidamente.
Por favor, abra esta página e deixe-a aberta para uma
orientação rápida.
Sla deze bladzijde om en laat deze opengeslagen,
terwijl u de gebruiksaanwijzing leest.
Käännä tämä sivu auki ja pidä se aukikäännettynä
nopeaa orientaatiota varten.
Vik upp denna sida och låt den vara uppslagen som hjälp
till snabb orientering.
¶·Ú·Î·Ïԇ̠·ÓÔ›ÍÙ ÙË ÛÂÏ›‰· ·˘Ù‹ Î·È ·Ê‹ÛÙ ÙËÓ
·УФИ¯Щ‹ БИ· БЪ‹БФЪФ ЪФЫ·У·ЩФПИЫМfi.
Page 3
Gerät und Bedienelemente
Device and controls
Appareil et éléments de commande
Apparecchio ed elementi per la regolazione
Dispositivo y elementos de control
Aparelho e elementos de comando
Toestel en bedieningselementen
Laite ja käyttölaitteet
Apparaten och komponenter
Συσκευή και στοιχεία χειρισμού
MEM
SYS
mmHg
START
DIA
PUL
/min
mmHg
Page 4

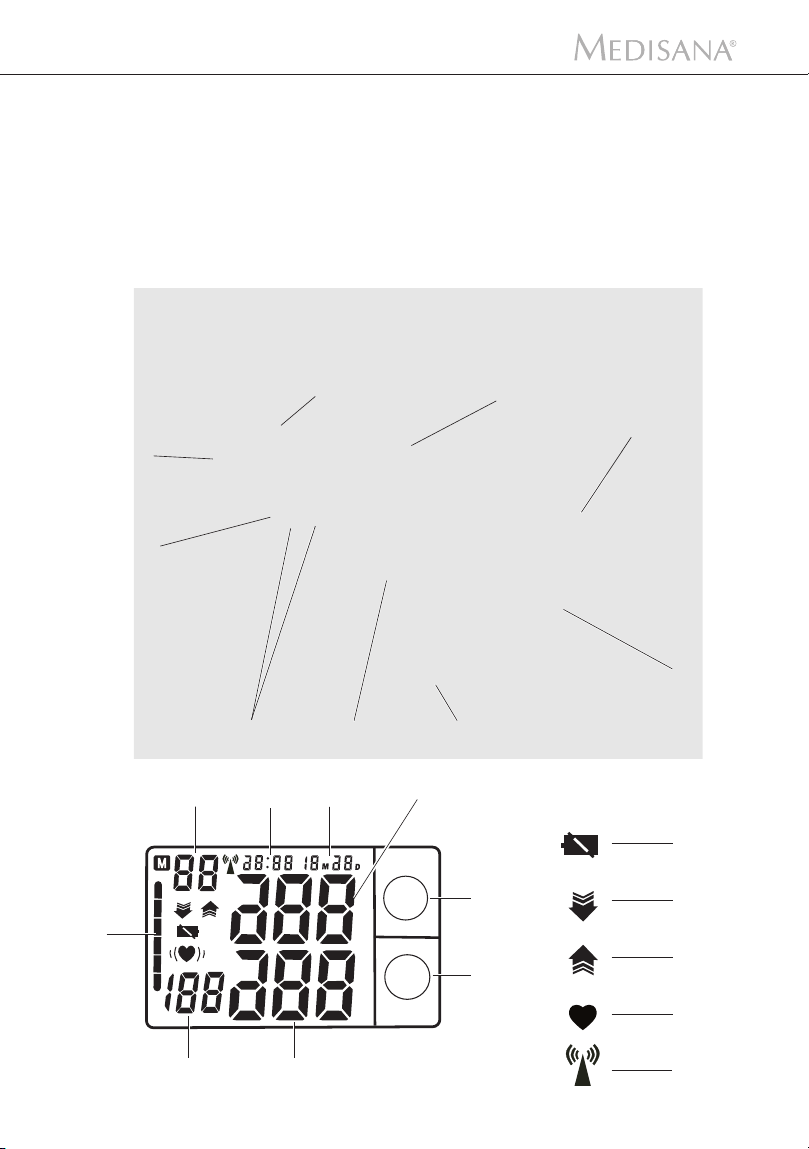
DE
Anschluss für Netzteil
Touch screen-Taste MEM (grün)
Touch screen-Taste START (rot)
EIN/AUS Schalter
Display
Blutdruck-Indikator
Anschluss für Luftschlauch
Luftschlauch
Oberarmmanschette
Batterie schwach
Luftablass-Symbol
Aufpump-Symbol
Puls-Symbol
Funkuhr-Symbol
Anzeige des Systolischen Drucks
Anzeige des Diastolischen Drucks
Anzeige der Pulsfrequenz
Speicherplatz-Nummer
Uhrzeit
Datum
FR
Connecteur pour le bloc d'alimentation
Touche à effleurement MEM (verte)
Touche à effleurement START (rouge)
Commutateur MARCHE/ARRET
Affichage
Indicateur de la tension
Connecteur pour le tuyau d'air du brassard
Tuyau d’air
Brassard
Les piles sont faibles
Symbole du dégonflage
Symbole du gonflage
Symbole du pouls
Symbole de la montre
Affichage de la pression systolique
Affichage de la pression diastolique
Affichage du pouls
Numéro de la position occupée dans la mémoire
Heure
Date
GB
Socket for mains adaptor
Touch screen button MEM (green)
Touch screen button START (red)
ON/OFF switch
Display
Blood pressure indicator
Connector for the hose
Air hose
Upper arm cuff
Batteries low
Deflate to measure symbol
Inflate to measure symbol
Pulse symbol
Radio clock symbol
Display of systolic pressure
Display of diastolic pressure
Display of pulse rate
Memory location number
Time
Date
IT
Presa di connessione per alimentatore
Tasto schermo a sfioramento MEM (verde)
Tasto schermo a sfioramento START (rosso)
Interruttore ON/OFF
Display
Indicatore di pressione arteriosa
Presa di connessione per tubo flessibile
Tubo flessibile dell’aria
Manicotto
Batteria scarica
Simbolo di fuoriuscita dell'aria
Simbolo di gonfiamento
Simbolo del battito
Simbolo dell’orologio radiocontrollato
Visualizzazione della pressione sistolica
Visualizzazione della pressione diastolica
Visualizzazione della frequenza cardiaca
Numero della posizione di memoria
Ora
Data
Page 5

ES
Zócalo de con. para el bloque de alimentación
Botón de la pantalla táctil MEM (verde)
Botón de la pantalla táctil INICIO (rojo)
Interruptor ENCENDIDO/APAGADO
Display
Indicador de presi
Zócalo de conexión para el tubo de aire
Tubo de aire
Manguito
Pilas vacías
Símbolo de salida de aire
Símbolo de inflado
Símbolo de pulso
Símbolo de reloj radiocontrolado
Indicación de la presión sistólica
Indicación de la presión diastólica
Indicación de la frecuencia cardíaca
Posición de memoria
Hora
Fecha
ón arterial
NL
Aansluiting voor voedingsapparaat
Touchscreen-knop MEM (groen)
Touchscreen-knop START (rood)
AAN/UIT-schakelaar
Display
Bloeddrukindicator
Aansluiting voor luchtslang
Luchtslang
Bovenarm-manchet
Batterij zwak
Symbool voor het laten ontsnappen van lucht
Oppomp-symbool
Polsslag-symbool
Symbool radiobestuurde klok
Aanduiding van de systolische druk
Aanduiding van de diastolische druk
Aanduiding van de polsslag
Geheugenplaats-nummer
Tijd
Datum
PT
Conexão para adaptador de rede
Botão no ecrã de toque MEM (verde)
Botão no ecrã de toque START (vermelho)
Interruptor de LIGAR/DESLIGAR
Ecrã
Indicador da tensão arterial
Conexão para tubo de ar da braçadeira
Tubo de ar
Braçadeira
Pilhas fracas
Símbolo da saída de ar
Símbolo de bombagem
Símbolo do pulso
Símbolo do relógio controlado por rádio
Indicação da pressão sistólica
Indicação da pressão diastólica
Indicação da frequência do pulso
Número da posição de memória
Horas
Data
FI
Liitäntä verkko-osalle
Touch screen -painike MEM (vihreä)
Kosketuspainike START (punainen)
ON/OFF-kytkin
Näyttö
Verenpaineen merkkivalo
Liitäntä olkavarsimansetin ilmaletkulle
Ilmaletku
Olkavarsimansetti
Paristo vähissä
Ilmanpoisto-symboli
Pumppaus-symboli
Pulssi-symboli
Radiokellosymboli
Systolisen paineen näyttö
Diastolisen paineen näyttö
Pulssitaajuuden näyttö
Muistipaikan numero
Kellonaika
Päivämäärä
Page 6

SE
Uttag för anslutning till vanligt strömuttag
Touch screen-knapp MEM (grön)
Touch screen-knapp START (röd)
PÅ/AV-knapp
Display
Blodtrycksindikator
Anslutning för luftslang till manschetten
Luftslang
Överarmsmanschett
Batteri svagt
Symbol för lufttömning
Symbol för uppumpning
Symbol för puls
Symbol för radioklocka
Indikering av systoliskt tryck
Indikering av diastoliskt tryck
Indikering av pulsfrekvens
Minnesplats nummer
Klocka
Datum
GR
™‡У‰ВЫЛ ЩЪФКФ‰ФЩИОФ‡
Πλήκτρο MEM οθόνης αφής (πράσινο)
Πλήκτρο START οθόνης αφής (κόκκινο)
Γενικός διακόπτης
ŒÓ‰ÂÈÍË
Ενδείκτης ίεσης αίµατος
™‡Ó‰ÂÛË ÁÈ· ÙÔÓ ÂÏ·ÛÙÈÎfi ۈϋӷ ·¤Ú·
Ελαστικός σωλήνας αέρα
Μανσέτα βραχίονα
Αδύνατη µαταρία
Σύµβολο εξαγωγής αέρα
Σύµβολο εισαγωγής αέρα
Σύµβολο αλµών
Σύμβολο ρολογιού
Ενδειξη της συστολικής ίεσης
Ενδειξη της διαστολικής ίεσης
Ενδειξη της συχνότητας αλµών
Αριθµός θέσης µνήµης
Ώρα
Ημερομηνία
Page 7
1 Sicherheitshinweise
WICHTIGE HINWEISE !
UNBEDINGT AUFBEWAHREN!
Lesen Sie die Gebrauchsanweisung, insbesondere die Sicherheitshinweise,
sorgfältig durch, bevor Sie das Gerät einsetzen und bewahren Sie die
Gebrauchsanweisung für die weitere Nutzung auf. Wenn Sie das Gerät an Dritte
weitergeben, geben Sie unbedingt diese Gebrauchsanweisung mit.
Zeichenerklärung
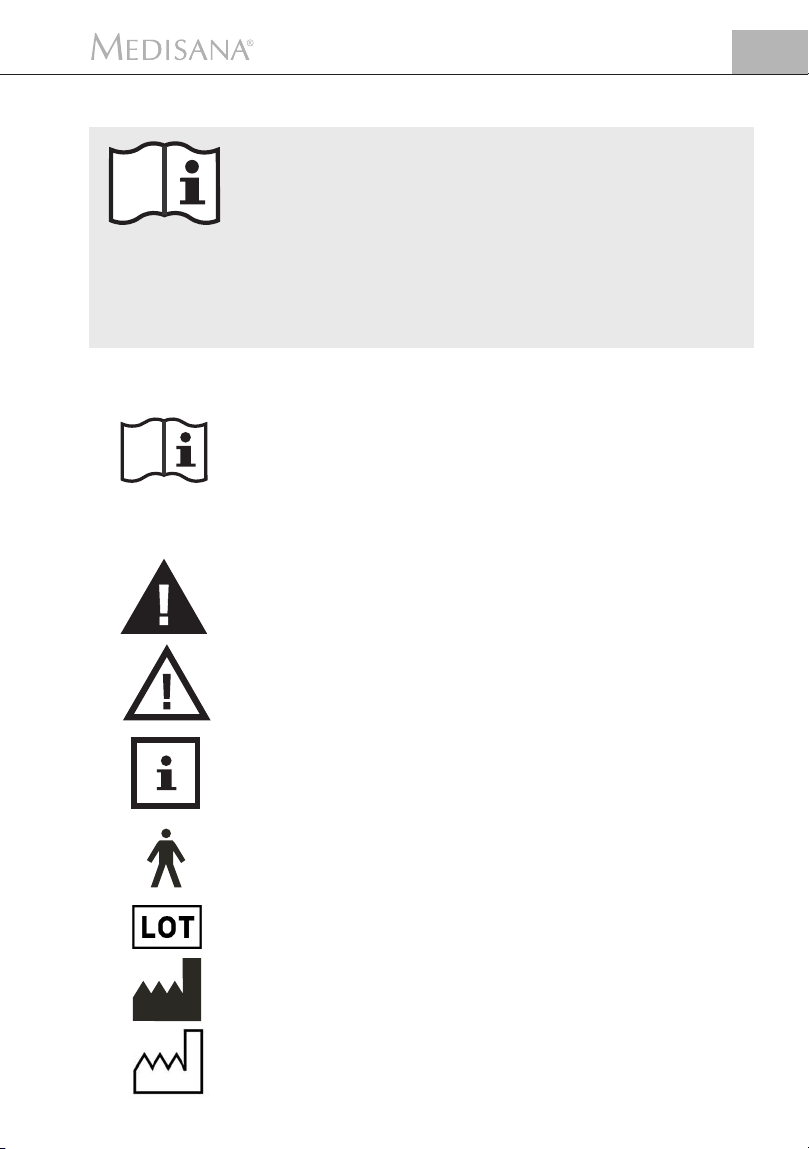
Diese Gebrauchsanweisung gehört zu diesem Gerät.
Sie enthält wichtige Informationen zur Inbetriebnahme und Handhabung. Lesen Sie diese Gebrauchsanweisung vollständig. Die Nichtbeachtung dieser
Anweisung kann zu schweren Verletzungen oder
Schäden am Gerät führen.
WARNUNG
Diese Warnhinweise müssen eingehalten werden, um
mögliche Verletzungen des Benutzers zu verhindern.
DE
ACHTUNG
Diese Hinweise müssen eingehalten werden, um
mögliche Beschädigungen am Gerät zu verhindern.
HINWEIS
Diese Hinweise geben Ihnen nützliche Zusatzinformationen zur Installation oder zum Betrieb.
Geräteklassifikation: IIa, Typ B
LOT-Nummer
Hersteller
Herstellungsdatum
1
Page 8
DE
Sicherheitshinweise
1 Sicherheitshinweise
WARNUNG
Treffen Sie aufgrund einer Selbstmessung keine therapeutischen
Maßnahmen. Ändern Sie niemals die Dosierung eines vom Arzt
verordneten Medikaments!
1.1
Hinweise für Ihr
Wohl be finden
1.2
Was Sie unbedingt
beachten sollten
2
• Herzrhythmusstörungen bzw. Arrhy th mien verursachen einen unregelmäßigen Puls. Dies kann bei Mess ungen mit oszillometrischen Blut druck mess ge räten zu Schwierig keiten bei der Er fas sung des korrekten Messwertes führen.
• Wenn Sie an Krank heiten leiden, wie z.B. arterieller Ver schluss krank heit,
halten Sie bitte vor der Anwendung des Gerätes Rück sprache mit Ihrem Arzt.
• Das Gerät kann nicht zur Kontrolle der Herz frequenz eines Schritt machers
verwendet werden.
• Schwangere sollten die notwendigen Vorsichtsmaßnahmen und ihre individuelle Belastbarkeit beachten, halten Sie ggf. Rücksprache mit Ihrem Arzt.
• Sollten während einer Messung Un an nehmlichkeiten wie z.B. Schmerz am
Ober arm oder andere Be schwerden auftreten, ergreifen Sie folgende Gegen maß nahmen: Be tä tigen Sie die START-Taste
lüftung der Man schette zu er reichen. Lösen Sie die Manschette und nehmen
Sie diese vom Ober arm ab. Bitte nehmen Sie Kon takt mit Ihrem Fachhändler
auf oder in for mieren Sie uns direkt.
• Menschen mit flacher Pulswelle sollten den Arm anheben und die Hand
ca. 10 mal öffnen und schliessen und dann erst messen. Durch diese Übung
wird erreicht, dass die Pulswelle und der Mess vorgang optimiert werden.
• Benutzen Sie das Gerät nur entsprechend seiner Bestimmung laut Gebrauchsanweisung.
• Bei Zweck ent fremdung erlischt der Garantie anspruch.
• Das Gerät ist nur für den Gebrauch im Haushalt bestimmt.
• Sollte es in seltenen Fällen durch eine Fehl funktion passieren, dass die
Man schette während der Mes sung dauerhaft auf gepumpt bleibt, muss sie
sofort geöffnet werden.
• Das Gerät darf nicht im Umfeld von Geräten betrieben werden, die starke
elektrische Strahlung aussenden, wie zum Beispiel Radiosender. Dadurch
kann die Funktion beeinträchtigt werden.
• Dieses Gerät ist nicht dafür bestimmt, durch Personen (einschließlich Kinder)
mit eingeschränkten physischen, sensorischen oder geistigen Fähigkeiten,
mangelnder Erfahrung und/oder mangelndem Wissen benutzt zu werden, es
sei denn, sie werden durch eine für ihre Sicherheit zuständige Person beaufsichtigt und erhielten von ihr Anweisungen, wie das Gerät zu benutzen ist.
• Kinder müssen beaufsichtigt werden, um sicherzustellen, dass sie nicht mit
dem Gerät spielen.
• Im Falle von Störungen reparieren Sie das Gerät bitte nicht selbst, da dadurch
je glicher Garantie an spruch erlischt. Lassen Sie Repa ra turen nur von autorisierten Service stellen durch führen.
• Schützen Sie das Gerät vor Feuch tigkeit. Sollte dennoch einmal Flüssigkeit in
das Gerät eindringen, müssen die Batterien sofort entfernt und weitere
Anwen dun gen vermieden werden. Setzen Sie sich in diesem Fall mit Ihrem
Fach händler in Verbindung oder informieren Sie uns direkt. Wie Sie uns erreichen können, steht auf der Adress seite.
, um eine sofortige Ent-
Page 9
2 Wissenswertes
DE
Herzlichen Dank
2.1
Lieferumfang
und Verpackung
2.2
Was ist
Blutdruck?
Vielen Dank für Ihr Vertrauen und herzlichen Glückwunsch!
Mit dem Blutdruckmessgerät MTD haben Sie ein Qualitätsprodukt von
MEDISANA erworben.
Damit Sie den gewünschten Erfolg erzielen und recht lange Freude an Ihrem
MEDISANA Blutdruckmessgerät MTD haben, empfehlen wir Ihnen, die nachstehenden Hinweise zum Ge brauch und zur Pflege sorgfältig zu lesen.
Bitte prüfen Sie zunächst, ob das Gerät vollständig ist und keinerlei Beschädigung aufweist. Im Zweifelsfalle nehmen Sie das Gerät nicht in Betrieb und
wenden Sie sich an Ihren Händler oder an Ihre Servicestelle.
Zum Lieferumfang gehören:
• 1 MEDISANA Blutdruckmessgerät MTD
• 1 Manschette mit Luftschlauch
• 4 Batterien (Typ AA, LR 6) 1,5V
• 1 Aufbewahrungstasche
• 1 Halter mit Klebekissen
• 1 Gebrauchsanweisung
Verpackungen sind wiederverwendbar oder können dem Rohstoffkreislauf
zurückgeführt werden. Bitte entsorgen Sie nicht mehr benötigtes Verpackungsmaterial ordnungsgemäß. Sollten Sie beim Auspacken einen Transportschaden bemerken, setzen Sie sich bitte sofort mit Ihrem Händler in
Verbindung.
WARNUNG
Achten Sie darauf, dass die Verpackungsfolien nicht in die
Hände von Kindern gelangen. Es besteht Erstickungsgefahr!
Blutdruck ist der Druck, der bei jedem Herzschlag in den Gefäßen entsteht.
Wenn sich das Herz zusammenzieht (= Systole) und Blut in die Arterien pumpt,
führt das zu einem Druck anstieg. Dessen höchster Wert wird als systolischer
Druck bezeichnet und bei einer Blutdruck messung als erster Wert gemessen.
Wenn der Herzmuskel erschlafft, um neues Blut aufzunehmen, sinkt auch der
Druck in den Arterien. Sind die Gefäße entspannt, wird der zweite Wert – der
diastolische Druck – gemessen.
2.3
Wie funktioniert
die Messung?
2.4
Warum ist es
sinnvoll, den
Blut druck zu
Hause zu messen?
Das MTD ist ein Blut druckmessgerät, das für die Blutdruck messung am Oberarm bestimmt ist. Die Messung erfolgt hier durch einen Mikro prozessor, der
über einen Drucksensor die Schwingungen auswertet, die beim Aufpumpen
und Ablassen der Blutdruckmanschette über die Arterie entstehen.
MEDISANA verfügt über mehrjährige Erfahrung auf dem Gebiet der Blut druck messung. Die hohe Ge nau ig keit des Messprinzips der MEDISANA-
Geräte wird von klinischen Studien, die nach internationalen Standards durchgeführt werden, belegt. Ein wichtiges Argu ment für die Blutdruckmessung zu
Hause, ist die Tatsache, dass die Messung in der gewohnten Umge bung und
unter ausgeruhten Bedin gungen durchgeführt werden. Beson ders aussage-
3
Page 10

DE
2 Wissenswertes
kräftig ist der sogenannte „Basis wert“, der morgens direkt nach dem Aufstehen vor dem Frühstück gemessen wird.
Grundsätzlich sollten Sie möglichst immer zur gleichen Zeit und unter gleichen
Bedingungen Ihren Blut druck messen. Denn dann ist die Vergleich barkeit der
Ergebnisse ge währleistet und eine beginnende Bluthoch druck erkrankung kann
frühzeitig erkannt werden. Bleibt Blut hochdruck lange unentdeckt, steigt das
Risiko für weitere Herz-Kreislauf-Erkrankungen.
DESHALB UNSER TIPP:
Messen Sie Ihren Blutdruck täglich und regelmäßig, auch dann,
wenn Sie keine Beschwerden haben.
2.5
Blutdruckklassifikation
2.6
Blutdruckschwankungen
In der nachfolgenden Tabelle werden die Richtwerte für hohen und niedrigen
Blutdruck ohne Berücksichtigung des Alters angegeben. Diese Blutdruckbewertungsskala entspricht den Richtlinien der Weltgesund heits organisation
(WHO).
Niedriger Blutdruck Normaler Blutdruck
systolisch <100 systolisch 100 – 139
diastolisch <60 diastolisch 60 – 89
Formen des Bluthochdrucks
leichter Bluthochdruck mittlerer Bluthochdruck starker Bluthochdruck
(gelber (orange (roter
Anzeigebereich
systolisch 140 – 159 systolisch 160 – 179 systolisch>_180
diastolisch 90 – 99 diastolisch 100 – 109 diastolisch>_110
Zu niedriger Blutdruck stellt ebenso ein Gesundheitsrisiko dar
wie Bluthochdruck! Schwindelanfälle können zu gefährlichen
Situationen führen (z.B. auf Treppen oder im Straßenverkehr)!
Es gibt viele Faktoren, die den Blutdruck beeinflussen können. So wirken sich
schwere körperliche Arbeit, Angst, Stress oder die Tageszeit der Messung sehr
stark auf die gemessenen Werte aus. Die persönlichen Blutdruckwerte unterliegen während des Tages und des Jahres großen Schwan kungen. Bei Hoch druck patienten sind diese Schwan kun gen besonders stark ausgeprägt. Nor ma l erweise ist der Blutdruck während körperlicher Anstrengung am höchsten und
während der Nacht im Schlaf am niedrigsten.
WARNUNG
(grüner Anzeigebereich
) Anzeigebereich) Anzeigebereich )
)
2.7
Beeinflussung
und Auswertung
der Messungen
4
• Messen Sie Ihren Blutdruck mehrfach, speichern Sie die Ergebnisse und vergleichen Sie diese dann miteinander. Ziehen Sie keine Rück schlüsse aus
einem einzigen Ergebnis.
• Ihre Blutdruckwerte sollten immer von einem Arzt beurteilt werden, der auch
mit Ihrer medizinischen Vor geschichte vertraut ist. Wenn Sie das Gerät regelmäßig benutzen und die Werte für Ihren Arzt aufzeichnen, sollten Sie auch
Page 11
• von Zeit zu Zeit Ihren Arzt über den Verlauf informieren.
• Bedenken Sie bei den Blut druck messungen, dass die täglichen Werte von
vielen Faktoren abhängen. So beeinflussen Rau chen, Alko hol genuss, Medi ka mente und kör per liche Arbeit die Messwerte in unterschiedlicher Weise.
• Messen Sie Ihren Blutdruck vor den Mahlzeiten.
• Bevor Sie Ihren Blutdruck messen, sollten Sie sich mindestens 5 Minuten ausruhen.
• Wenn Ihnen der systolische oder der diastolische Wert der Messung trotz
korrekter Hand habung des Gerätes ungewöhnlich erscheinen (zu hoch oder
zu niedrig) und sich dies mehrmals wiederholt, dann informieren Sie Ihren
Arzt. Dies gilt auch, wenn in seltenen Fällen ein unregelmäßiger oder sehr
schwacher Puls keine Messungen ermöglicht.
3 Inbetriebnahme
2 Wissenswertes / 3 Inbetriebnahme
DE
3.1
Batterien einlegen/
entnehmen
Einlegen: Öffnen Sie das Batterie fach an der Geräteunterseite mit einem
leichten Druck gegen den Riegel, und legen Sie die vier mitgelieferten Batterien (Alkaline-Bat terien, Typ AA LR 6) ein. Ach ten Sie auf die Liegerichtung
der Batterien (Ab bil dung im Batterie fach). Setzen Sie den Batteriefachdeckel
wieder auf und drüc ken Sie ihn an, so dass er hörbar einrastet.
Entnehmen: Erscheint das Batterie symbol auf dem Display, setzen Sie
neue Bat te rien ein. Nach dem Einlegen der Batterien zeigt das Display Datum
und Zeit (voreingestellt) an. Stellen Sie nun Datum und Uhrzeit ein, wie unter
3.3 / 3.4 beschrieben. Beachten Sie bitte, dass Sie nach jedem neuen Einsetzen
der Batterien Datum und Uhrzeit neu einstellen müssen. Die bisherigen Messer gebnisse bleiben gespeichert.
WARNUNG
BATTERIE-SICHERHEITSHINWEISE
• Batterien nicht auseinandernehmen!
• Erschöpfte Batterien umgehend aus dem Gerät entfernen!
• Erhöhte Auslaufgefahr, Kontakt mit Haut, Augen und Schleimhäuten vermeiden! Bei Kontakt mit Batteriesäure die betroffenen
Stellen sofort mit reichlich klarem Wasser spülen und umgehend
einen Arzt aufsuchen!
• Sollte eine Batterie verschluckt worden sein, ist sofort ein Arzt
aufzusuchen!
• Immer alle Batterien gleichzeitig austauschen!
• Nur Batterien des gleichen Typs einsetzen, keine unterschiedlichen Typen oder gebrauchte und neue Batterien miteinander
verwenden!
• Legen Sie Batterien korrekt ein, beachten Sie die Polarität!
• Batterien bei längerer Nichtverwendung aus dem Gerät
entfernen!
• Batterien von Kindern fernhalten!
• Batterien nicht wiederaufladen! Es besteht Explosionsgefahr!
-
>
5
Page 12

DE
3 Inbetriebnahme
WARNUNG BATTERIE-SICHERHEITSHINWEISE
(Fortsetzung)
• Nicht kurzschließen! Es besteht Explosionsgefahr!
• Nicht ins Feuer werfen! Es besteht Explosionsgefahr!
• Werfen Sie verbrauchte Batterien und Akkus nicht in den Haus
müll, sondern in den Sondermüll oder in eine Batterie-Sammelstation im Fachhandel!
3.2
Verwendung
eines Netzteils
3.3
Empfang des
Zeitsignals (RCC)
einstellen
(RCC =
Radio Controlled
Clock)
Alternativ können Sie das Gerät auch mit einem speziellen Netzteil betreiben
(MEDISANA Art.–Nr. 51125), das Sie an den dafür vorgesehenen Anschluss
an der rechten Geräteseite einstecken. Dabei verbleiben die Batterien im
Gerät.
Durch das Einstecken des Steckers
gerätes werden die Batterien mechanisch abgeschaltet. Es ist daher erforderlich,
zunächst das Netzteil in die Steckdose zu stecken und dann mit dem Blutdruckmessgerät zu verbinden. Wird das Blutdruckmessgerät nicht mehr genutzt, muss
zunächst der Stecker aus dem Blutdruckmessgerät und dann das Netzteil aus der
Steckdose gezogen werden. Dadurch verhindern Sie , dass Sie Datum und Uhrzeit
jedesmal neu eingeben müssen.
a. Erst-Einstellung:
Sobald Sie die Batterien eingesetzt haben, schaltet das Gerät automatisch in
den Funkuhr-Modus. Während der Suche nach dem Zeitsignal blinkt das
Funkuhr-Symbol. Sobald die Uhr ein für die Einstellung ausreichendes Signal
erhält, werden Uhrzeit und Datum automatisch eingestellt. Das Gerät wechselt
am Ende des Einstellungsvorgangs in den Standby-Modus, in dem Uhrzeit und
Datum permanent angezeigt werden. Wird kein Signal empfangen, geht das
Gerät direkt in den Standby-Modus, ohne die voreingestellten Werte für Uhrzeit und Datum zu ändern.
Während der Erst-Einstellung kann durch Drücken der START-Taste die
Suche nach dem Zeitsignal abgebrochen werden. Das Gerät geht direkt in den
Standby-Modus, ohne die voreingestellten Werte für Uhrzeit und Datum zu
ändern.
b. Schnell-Einstellung der Funkuhr
Wenn sich das Gerät im Standby-Modus befindet und Sie für ca. 1 Sekunde
gleichzeitig die START-
Schnell-Einstellungs-Modus der Funkuhr. Das Funkuhr-Symbol blinkt. Wenn
das Zeitsignal empfangen wird, werden Uhrzeit und Datum automatisch eingestellt. Wenn kein Signal empfangen wird, wechselt das Gerät in den manuellen Zeiteinstellungs-Modus.
Die Schnell-Einstellung kann abgebrochen werden, indem die START-Taste
gedrückt wird. Dann wechselt das Gerät in den manuellen ZeiteinstellungsModus.
und MEM-Taste drücken, gelangen Sie in den
an der rechten Seite
des Blutdruckmess-
6
Page 13

3 Inbetriebnahme
c. regelmäßiger Signal-Empfang
Das Gerät erhält automatisch zweimal täglich, um 2:05 Uhr und 14:05 Uhr, das
Funksignal zur Aktualisierung der Zeiteinstellung.
Durch Drücken der START-Taste lässt sich der regelmäßige Empfang des
Zeitsignals ausschalten.
DE
3.4
Datum und
Uhrzeit einstellen
3.5
Sprachfunktion
einstellen
Normalerweise werden Uhrzeit und Datum per Funk mit dem Zeitsignal automatisch eingestellt. Wenn das Zeitsignal nicht oder nur schwach empfangen
wird, lässt sich die Uhr auch manuell einstellen.
1. Das Gerät befindet sich im Standby-Modus. Drücken Sie die START- und
MEM-Taste
uhr zu gelangen. Drücken Sie nun die START-Taste
den manuellen Zeiteinstellungs-Modus.
2. Zunächst blinkt die Stelle für die Eingabe des Monats. Durch fortgesetztes
Drücken der START-Taste
die Stunde und die Minute. Während die jeweilige Eingabestelle blinkt,
betätigen Sie die MEM-Taste , um die entsprechende Zahl einzugeben.
Durch Halten der MEM-Taste lässt sich der Einstellungsvorgang beschleunigen.
3. Den Zeiteinstellungs-Modus verlassen Sie, indem Sie die START-Taste
drücken, während die Minuten-Stelle blinkt. Sie gelangen in den StandbyModus.
Nach einem Batteriewechsel muss die Uhr neu eingestellt werden, automatisch
durch Funksignal oder manuell durch den Zeiteinstellungs-Modus.
Die Sprachfunktion können Sie einstellen, wenn das Gerät eingeschaltet ist
( EIN/AUS Schalter in Position I ), d.h. nur Datum und Uhrzeit anzeigt.
Drücken und halten Sie die MEM-Taste , bis die Anzeige der eingestellten
Sprache (z.B. L1) im Display erscheint.
L0 = Sprachfunktion ausgeschaltet L4 = Niederländisch
L1 = Deutsch L5 = Französisch
L2 = Englisch L6 = Italienisch
L3 = Spanisch L7 = Portugiesisch
Das Gerät sagt die eingestellte Sprache an und wechselt, wenn Sie die MEM-
Taste gedrückt halten, in Anzeige und Ansage zur nächstfolgenden
Sprache. Sie können die eingestellte Sprache ändern, indem Sie die MEM-Taste
loslassen, sobald die von Ihnen gewünschte Sprache angezeigt bzw. ange-
sagt wird. Die eingestellte Lautstärke, angezeigt durch den blinkenden Balken,
lässt sich ändern, indem Sie die MEM-Taste erneut drücken und gedrückt
halten, bis die gewünschte Lautstärke angezeigt wird - je höher der Balken,
desto höher die Lautstärke. Lassen Sie die MEM-Taste los, um Ihre Auswahl
zu bestätigen. Der Balken hört auf zu blinken, und das Display wechselt wieder
in die Zeitanzeige.
gleichzeitig, um in den Schnell-Einstellungs-Modus der Funk-
blinken nacheinander die Stellen für den Tag,
, und Sie gelangen in
7
Page 14
DE
3 Inbetriebnahme / 4 Anwendung
3.6
Halter
3.7
EIN/AUS
Schalter I/0
4 Anwendung
4.1
Anlegen der
Druck man schette
b
1-2 cm
a
c
Mit Hilfe des im Lieferumfang enthaltenen Halters lassen sich Manschette und
Schlauch am Gerät aufbewahren. Befestigen Sie zunächst das doppelseitige
Klebekissen an der Rückseite des Gerätes und drücken Sie dann den Halter
darauf fest.
Ihr Gerät ist mit einem Touch screen-Display ausgestattet. Achten Sie deshalb
darauf, dass der EIN/AUS Schalter sich immer in Position 0 befindet, wenn
das Gerät nicht in Gebrauch ist, damit durch versehentlichen Druck auf das
Display keine unbeabsichtigten Einstellungen vorgenommen werden können.
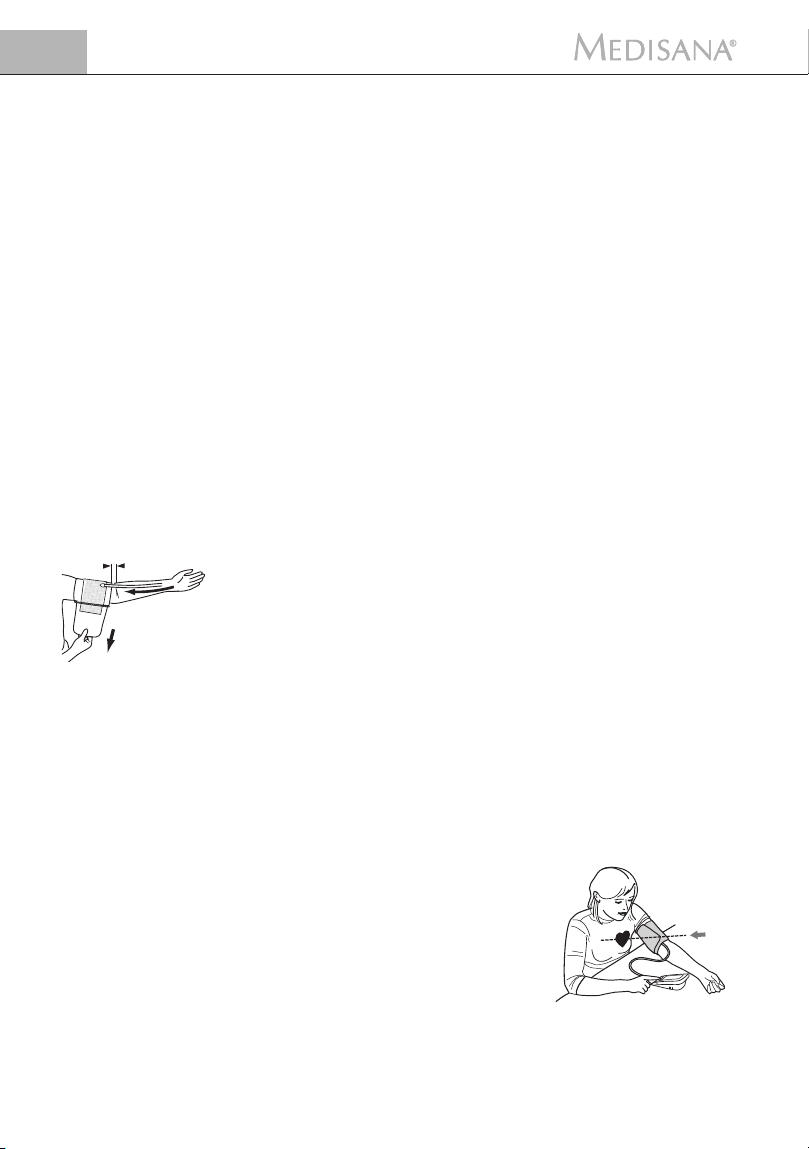
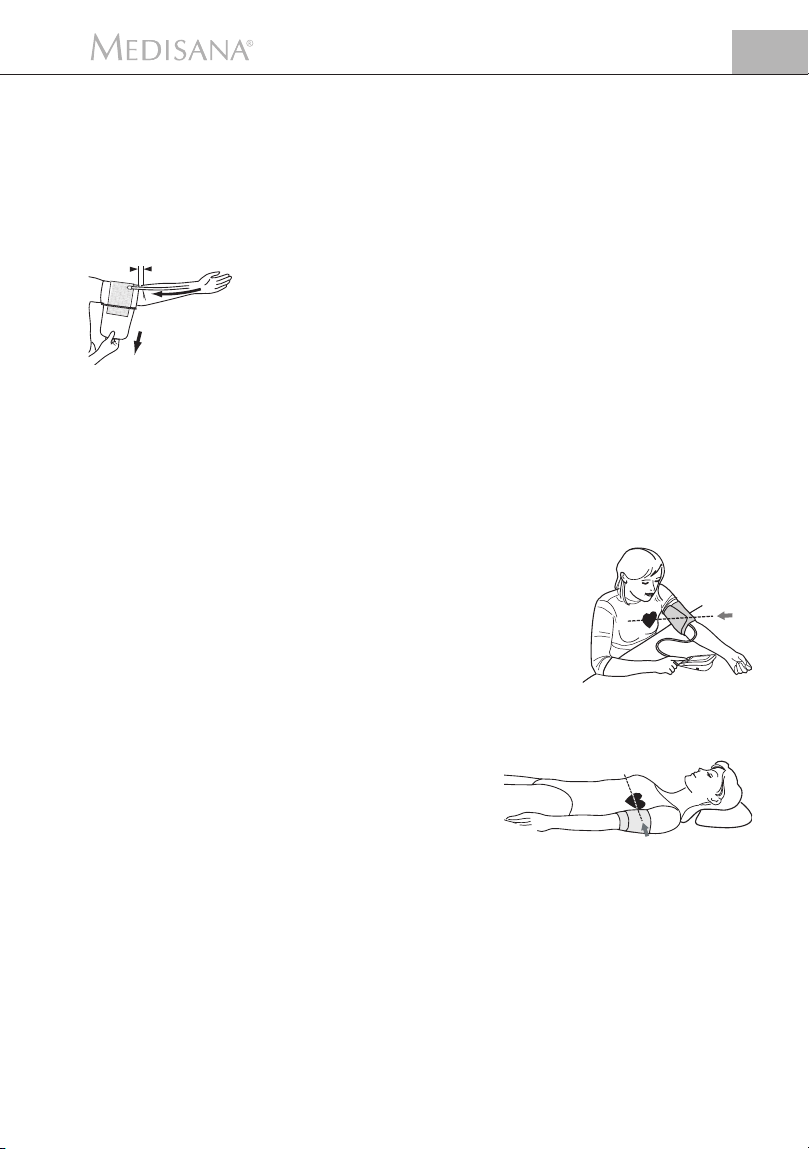
1. Stecken Sie vor Gebrauch das Endstück des Luftschlauches in die Öffnung
des Gerätes
gen aufweist und fest sitzt. Das Blutdruckmessgerät wird als Tischgerät
genutzt.
2. Schieben Sie die offene Seite der Manschette so durch den Metallbügel,
dass der Klettverschluss sich an der Außenseite befindet.
3. Öffnen Sie die Manschette so, dass eine zylindrische Form entsteht.
4. Schieben Sie die Manschette über Ihren linken Oberarm. Platzieren Sie den
Luftschlauch
5. Legen Sie den Arm mit der Handinnenfläche nach oben auf den Tisch. Die
Unterkante der Manschette sollte dabei 1 - 2 cm oberhalb der Ellenbeuge
liegen (b). Ziehen Sie die Manschette straff (c) und schließen Sie die Klettverbindung.
6. Vermeiden Sie einen Hohlraum zwischen Arm und Manschette. Er kann das
Messergebnis verfälschen.
7. Messen Sie am nackten Oberarm. Achten Sie darauf, dass der Arm bei eng
anliegender Oberarmbekleidung durch das Hochkrempeln des Ärmels nicht
abgeschnürt wird.
8. Nur wenn die Manschette nicht am linken Arm angelegt werden kann,
legen Sie sie am rechten Arm an. Messungen sind stets am selben Arm
durchzuführen.
. Achten Sie darauf, dass der Schlauch keine Beschädigun-
auf der Armmitte in Verlängerung des Mittelfingers (a).
4.2
Die richtige
Messposition
8
Die richtige Position beim Messen im Sitzen
• Führen Sie die Messung im Sitzen durch.
• Entspannen Sie Ihren Arm und legen Sie ihn
locker auf, z.B. auf einem Tisch.
• Achten Sie darauf, dass die Manschette sich in
Höhe des Herzens befindet.
• Verhalten Sie sich während der Messung ruhig:
Bewegen Sie sich nicht und sprechen Sie nicht,
da sich sonst die Messergebnisse verändern
können.
Page 15
4 Anwendung / 5 Speicher
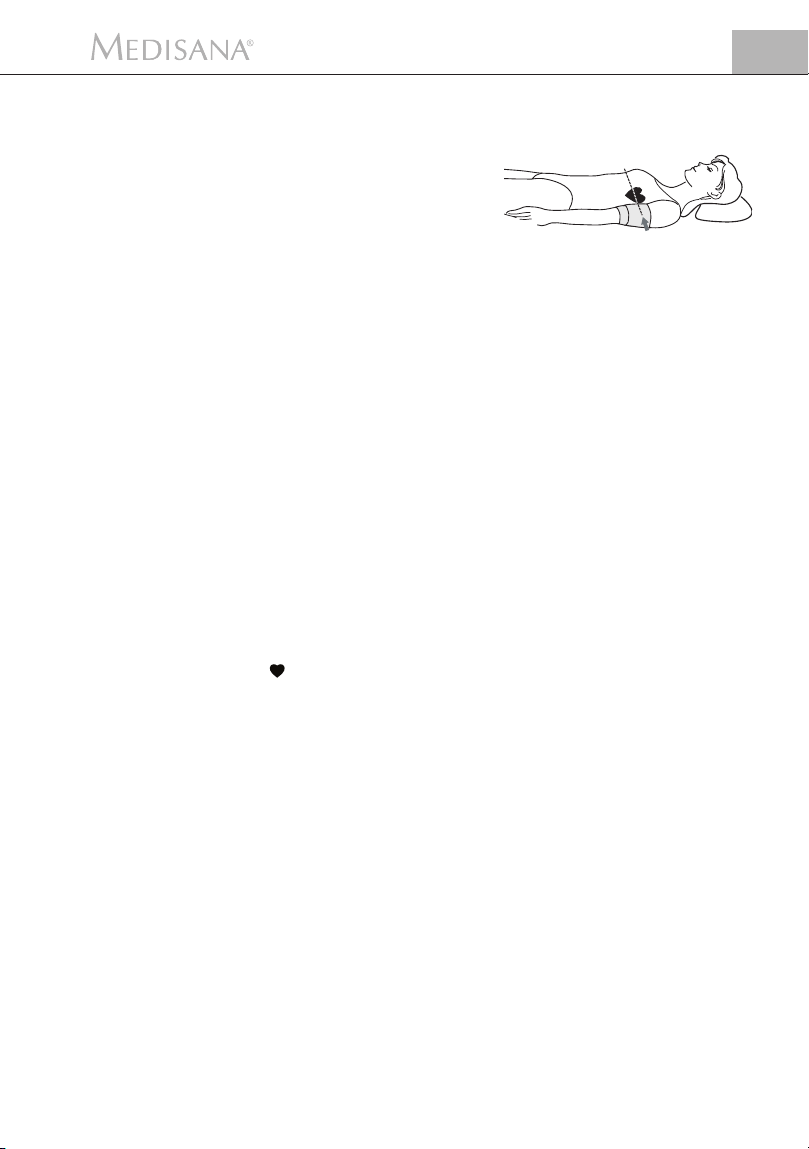
Die richtige Position beim Messen im Liegen
• In besonderen Fällen kann die Messung auch im Liegen vorgenommen
werden.
• Entspannen Sie sich auf dem Rücken
liegend mindestens 5 Minuten und
legen Sie Ihren Arm locker auf.
• Achten Sie darauf, dass die Manschette sich in Höhe des Herzens befindet.
Von einander abweichende Höhen beeinflussen die Genauigkeit der Messung.
• Verhalten Sie sich während der Messung ruhig: Bewegen Sie sich nicht und
sprechen Sie nicht, da sich sonst die Messergebnisse verändern können.
DE
4.3
Den Blutdruck
messen
4.4
Abschalten
des Gerätes
5 Speicher
1. Schalten Sie das Gerät mit dem EIN/AUS Schalter
drücken Sie die START-Taste
2. Wird die START-Taste
Zeichen erscheinen im Display. Durch diesen Test wird die Vollständigkeit
der Anzeige überprüft. Das Display zeigt die Werte der letzten Messung.
Wenn die Sprachfunktion eingeschaltet ist, werden die Angaben in der eingestellten Sprache gemacht. Wurde noch keine Messung vorgenommen,
erscheinen neben Uhrzeit und Datum nur Nullen.
3. Das Gerät ist messbereit, es erscheint die Ziffer 0, bei eingestellter Sprach-
funktion wird der Beginn der Messung angesagt. Automatisch pumpt es
die Manschette langsam auf, um Ihren Blutdruck zu messen. Während des
Aufpumpens ändert sich die Druckanzeige fortwährend.
4. Das Gerät pumpt die Manschette solange auf, bis ein für die Messung aus-
reichender Druck erreicht ist. Anschließend lässt das Gerät langsam die Luft
aus der Manschette ab und führt die Messung durch.
5. Ist die Messung beendet, wird die Manschette entlüftet. Der systolische
und der diastolische Blutdruck sowie der Puls-Wert mit dem Puls-Symbol
erscheinen im Display . Entsprechend der Blutdruckklassifikation
nach der WHO (siehe S. 4) blinkt der Blutdruck-Indikator
dazugehörigen farbigen Balken. Bei eingestellter Sprachfunktion werden
die Messergebnisse in der eingestellten Sprache angesagt.
6. Die gemessenen Werte werden automatisch gespeichert. Im Speicher
können bis zu 60 Messwerte mit Uhrzeit und Datum gespeichert werden.
Das Gerät verfügt über eine automatische Abschaltung. Wird keine Taste mehr
gedrückt, schaltet sich das Gerät nach einer Minute automatisch ab. Das Gerät
kann auch mit der START-Taste
nicht in Gebrauch ist, schalten Sie den EIN/AUS Schalter
Die Uhrzeit und das Datum werden kontinuierlich im Display angezeigt.
.
gedrückt, ist ein Piepton zu hören und alle
ausgeschaltet werden. Wenn das Gerät
ein ( Position I ) und
neben den
auf Position 0.
5.1
Anzeigen der
gespeicherten
Werte
Sie können im Speicher Ihres Blutdruckmessgerätes bis zu 60 Messungen
(Blutdruck und Puls mit Uhrzeit und Datum) speichern. Die Messwerte werden
automatisch gespeichert. Zum Abrufen der gespeicherten Messwerte drücken
Sie die MEM-Taste
Zunächst erscheint die Anzahl der belegten Speicherplätze. Dann werden die
Werte der zuletzt gespeicherten Messung einschließlich des blinkenden Blutdruck-Indikators
. Die gespeicherten Daten erscheinen in der Anzeige.
angezeigt.
9
Page 16

DE
5 Speicher / 6 Verschiedenes
Wenn die Sprachfunktion aktiviert ist, sagt das Gerät die SpeicherplatzNummer an, zusammen mit den gespeicherten Blutdruck- und Pulswerten und
der Bewertung des Blutdrucks entsprechend der Skala der Richtlinien der
Weltgesund heits organisation (siehe S. 4).
Weiteres Drücken der MEM-Taste
Wenn Sie beim ältesten Eintrag angelangt sind, schaltet sich das Gerät aus.
Im Speicherabruf-Modus schaltet sich das Gerät nach ca. 120 Sekunden automatisch aus, wenn keine Taste mehr betätigt wird. Durch Drücken der STARTTaste
Gerät gleichzeitig ausschalten.
Sind alle 60 Speicherplätze belegt, wird ein neu gemessener Wert gespeichert,
indem der älteste Wert gelöscht wird.
können Sie den Speicherabruf-Modus jederzeit verlassen und das
zeigt die jeweils vorherigen Messwerte.
5.2
Löschen
des Speichers
Wenn Sie sich im Speicherabruf-Modus befinden, drücken und halten Sie die
MEM-Taste
speicherten Messwerte automatisch gelöscht. Im Display werden anstelle der
Messwerte nur Nullen angezeigt.
6 Verschiedenes
6.1
Fehler und
Behebung
10
Im Display erscheint das Batteriewechsel-Symbol
• Die Batterien sind zu schwach oder leer. Ersetzen Sie alle vier Batterien durch
Es werden außergewöhnliche Messwerte angezeigt
• Die Manschette ist falsch angelegt oder nicht richtig festgezogen. Legen Sie
• Sie haben sich oder das Gerät während der Messung bewegt. Halten Sie sich
• Sie haben unregelmäßigen Puls. Bei nur leichtem unregelmäßigem Puls wie-
• Sie haben während der Messung gesprochen, sind nervös oder aufgeregt.
• Sie haben nicht die korrekte Sitz- oder Liegeposition eingenommen. Nehmen
• Die Verbindung zum Luftschlauch ist unterbrochen oder die Schlauchverbin-
Im Display erscheint “EE”
• Das Gerät hat nicht genügend aufgepumpt. Wiederholen Sie die Messung.
• Beim Aufpumpen oder während des Messvorgangs ist eine Störung aufge-
Die Anzeige zeigt nichts an oder bleibt stehen
• Es sind keine Batterien eingelegt oder sie sind verkehrt eingelegt oder sie sind
• Es handelt sich um eine Fehlfunktion oder Betriebsstörung. Entnehmen Sie
Falls die Fehlermeldung bei erneuter Messung wieder auftritt, setzen
Sie sich bitte mit dem Servicecenter in Verbindung.
für ca. 8 Sekunden. Nach einem Signalton werden alle ge-
neue 1,5 V Alkali-Batterien des Typs AA.
die Manschette richtig an und ziehen Sie sie fest.
ruhig, bewegen Sie Ihren Arm und das Gerät nicht.
derholen Sie die Messung. Für Patienten mit starkem unregelmäßigem Puls
ist das Gerät nicht geeignet.
Sprechen Sie nicht und atmen Sie zwei- bis dreimal tief durch, um sich zu
entspannen.
Sie die richtige Position zum Messen ein.
dung ist nicht dicht. Überprüfen Sie den Anschluss zwischen Oberarmmanschette und Gerät und, ob der Luftschlauch dicht ist. Wiederholen Sie die
Messung.
treten. Wiederholen Sie die Messung.
völlig leer. Legen Sie Batterien ein, prüfen Sie die Lage der Batterien oder
ersetzen Sie sie durch neue.
für eine Weile die Batterien und setzen Sie sie wieder ein.
Page 17
6 Verschiedenes
DE
6.2
Reinigung
und Pflege
6.3
Hinweis zur
Entsorgung
• Entfernen Sie die Batterien, bevor Sie das Gerät reinigen.
• Verwenden Sie nie aggressive Reini gungsmittel oder starke Bür sten.
• Reinigen Sie das Gerät mit einem weichen Tuch, das Sie mit einer milden
Seifenlauge leicht befeuchten. Verwenden Sie keinesfalls scharfe Reinigungsmittel oder Alkohol.
• In das Gerät darf kein Wasser eindringen. Benutzen Sie das Gerät erst
wieder, wenn es völlig trocken ist.
• Nehmen Sie die Batterien aus dem Gerät, wenn Sie es längere Zeit nicht
benutzen möchten. Es besteht sonst die Gefahr, dass die Batterien auslaufen.
• Setzen Sie das Gerät nicht der direkten Sonneneinstrahlung aus, schützen Sie
es vor Schmutz und Feuchtigkeit.
• Pumpen Sie nur dann Luft in die Man schette, wenn sie um den Ober arm
gelegt ist.
• Verstauen Sie das Gerät am besten in der beim Kauf erworbenen Aufbewahrungstasche, und bewahren Sie es an einem sauberen und trockenen
Platz auf.
• Messtechnische Kontrolle (gilt für die gewerbliche Nutzung):
Das Gerät ist vom Hersteller für die Dauer von zwei Jahren kalibriert. Die
messtechnische Kontrolle muss bei gewerblicher Nutzung spätestens alle
zwei Jahre erfolgen. Die Kontrolle ist kostenpflichtig und kann durch eine
zuständige Behörde oder durch autorisierte War tungs dienste – entsprechend
der „Medi zin produkte-Betreiber Veror dnung“ – erfolgen.
Dieses Gerät darf nicht zusammen mit dem Hausmüll entsorgt werden.
Jeder Verbraucher ist verpflichtet, alle elektrischen oder elektronischen
Geräte, egal, ob sie Schadstoffe enthalten oder nicht, bei einer Sammelstelle
seiner Stadt oder im Handel abzugeben, damit sie einer umweltschonenden
Entsorgung zugeführt werden können.
Entnehmen Sie die Batterien, bevor Sie das Gerät entsorgen. Werfen Sie verbrauchte Batterien nicht in den Hausmüll, sondern in den Sondermüll oder in
eine Batterie-Sammelstation im Fachhandel.
Wenden Sie sich hinsichtlich der Entsorgung an Ihre Kommunalbehörde
oder Ihren Händler.
6.4
Richtlinien /
Normen
Dieses Blutdruckmessgerät entspricht den Vorgaben der EU-Norm für nichtinvasive Blutdruckmessgeräte. Es ist nach EG-Richtlinien zertifiziert und mit
dem CE-Zeichen (Konformitätszeichen) „CE 0297“ versehen. Das BlutdruckMessgerät entspricht den europäischen Vorschriften EN 1060-1 und EN
1060-3+A1. Die Vorgaben der EU-Richtlinie “93/42/EWG des Rates vom
14. Juni 1993 über Medizinprodukte” sind erfüllt, ebenso die EU-Richtlinie
89/336/EWG.
Elektromagnetische Verträglichkeit:
Das Gerät entspricht den Forderungen der Norm EN 60601-1-2 für die Elektromagnetische Verträglichkeit. Einzelheiten zu diesen Messdaten können über
MEDISANA erfragt werden.
11
Page 18
DE
6 Verschiedenes
Anwenderkreis:
Das Gerät ist für nichtinvasive Blut druck messungen bei Erwachsenen geeignet
(das heißt, es ist für die äußere Anwendung geeignet).
6.5
Technische
Daten
Name und Modell : MEDISANA Blutdruckmessgerät MTD
Anzeigesystem : Digitale Anzeige
Speicherplätze : 60
Messmethode : Oszillometrisch
Spannungsversorgung : 6 V= , 4 x 1,5 V Mignon AA LR 6, Alkaline
Messbereich Blutdruck : 0 – 300 mmHg
Messbereich Puls : 30 – 180 Schläge / Min.
Maximale Messabweichung
des statischen Drucks : ± 3 mmHg
Maximale Messabweichung
der Pulswerte : ± 5 % des Wertes
Druckerzeugung : Automatisch mit Pumpe
Luftablass : Automatisch
Autom. Abschaltung : Nach ca. 1 Min.
Betriebsbedingungen : + 5 °C bis + 40 °C,
<
85 % Luftfeuchte
Lagerbedingungen : – 20 °C bis + 55 °C
<
95 % Luftfeuchte
Abmessungen : ca. 142 mm x 98 mm x 52 mm
Manschette: : 22 – 30 cm für Erwachsene mit
durchschnittlichem Oberarmumfang
Gewicht : ca. 310 g ohne Batterien
Artikel-Nummer : 51145
EAN-Nummer : 40 15588 51145 5
Sonderzubehör : Netzadapter
Art.-Nr. 51125
EAN-Nr. 40 15588 51125 7
Manschette groß 30 - 42 cm für
Erwachsene mit kräftigem Oberarmumfang
Art.-Nr. 51126
EAN-Nr. 40 15588 51126 4
12
Im Zuge ständiger Produktverbesserungen behalten wir uns
technische und gestalterische Änderungen vor.
Page 19

7 Garantie
DE
Garantie- und
Reparaturbedingungen
Bitte wenden Sie sich im Garantiefall an Ihr Fachgeschäft oder direkt an die
Servicestelle. Sollten Sie das Gerät einschicken müssen, geben Sie bitte den
Defekt an und legen eine Kopie der Kaufquittung bei.
Es gelten dabei die folgenden Garantiebedingungen:
1. Auf MEDISANA Produkte wird ab Verkaufsdatum eine Garantie für drei
Jahre gewährt. Das Verkaufsdatum ist im Garantiefall durch die Kaufquittung oder Rechnung nachzuweisen.
2. Mängel infolge von Material- oder Fertigungsfehlern werden innerhalb der
Garantiezeit kostenlos beseitigt.
3. Durch eine Garantieleistung tritt keine Verlängerung der Garantiezeit,
weder für das Gerät noch für ausgewechselte Bauteile, ein.
4. Von der Garantie ausgeschlossen sind:
a. alle Schäden, die durch unsachgemäße Behandlung, z.B. durch Nicht-
beachtung der Gebrauchsanleitung, entstanden sind.
b. Schäden, die auf Instandsetzung oder Eingriffe durch den Käufer oder
unbefugte Dritte zurückzuführen sind.
c. Transportschäden, die auf dem Weg vom Hersteller zum Verbraucher
oder bei der Einsendung an den Kundendienst entstanden sind.
d. Zubehörteile, die einer normalen Abnutzung unterliegen, wie Man-
schette, Batterien usw..
5. Eine Haftung für mittelbare oder unmittelbare Folgeschäden, die durch das
Gerät verursacht werden, ist auch dann ausgeschlossen, wenn der Schaden
an dem Gerät als ein Garantiefall anerkannt wird.
Im Servicefall wenden Sie sich bitte
MEDISANA AG
Itterpark 7-9
40724 Hilden
Deutschland
Tel.: 0 21 03 - 20 07-60
Fax: 0 21 03 - 20 07-626
eMail: info@medisana.de
Internet: www.medisana.de
an:
MEDISANA Service-Center
Feuerbach KG
Corneliusstraße 75
40215 Düsseldorf
Tel.: 0211 - 38 10 07
(Mo-Do: 9-13 Uhr/14-17 Uhr,
Fr: 9-13 Uhr)
Fax: 0211 - 37 04 97
eMail: medisana@t-online.de
Internet: www.medisana-service.de
13
Page 20
GB
1 Safety Information
IMPORTANT INFORMATION!
RETAIN FOR FUTURE USE!
Read the instruction manual carefully before using this device, especially the
safety instructions, and keep the instruction manual for future use.
Should you give this device to another person, it is vital that you also pass on
these instructions for use.
Explanation of symbols
This instruction manual belongs to this device.
It contains important information about starting up
and operation. Read the instruction manual thoroughly.
Non-observance of these instructions can result in
serious injury or damage to the device.
WARNING
These warning notes must be observed to prevent
any injury to the user.
14
CAUTION
These notes must be observed to prevent any
damage to the device.
NOTE
These notes give you useful additional information
on the installation or operation.
Classification: IIa, type B applied part
Lot number
Manufacturer
Date of manufacture
Page 21
Safety
Information
1 Safety Information
WARNING
Do not take any therapeutic measures based on your own
measurements! Never change the quantity of medication
prescribed by your doctor!
GB
1.1
Tips for your
well being
1.2
Important
considerations
• Irregularity of pulse or arrhythmia can lead to difficulties in recording a
correct reading when measurements are taken using oscillometric blood
pressure devices.
• If you should suffer from conditions such as arterial occlusive disease, please
consult your doctor before using the unit.
• The unit may not be used to check the heart rate of patients with a
pacemaker.
• Pregnant patients should take their own personal state of health into
consideration and take all necessary precautions before using the unit. If in
doubt, consult your doctor.
• Should you experience discomfort or other complaints during measurement,
for example pain in the upper arm, please take the following action: Press the
START button
remove it from your arm. Please contact either your dealer or MEDISANA
directly.
• Patients with a weak pulse wave should raise their arm and open and close
their hand around 10 times before taking a reading. This exercise optimizes
the pulse wave and the measuring process.
• The unit is only to be used for the specific purpose described in this
instruction manual.
• Any misuse will void the warranty.
• The unit is intended for domestic use only.
• On the rare occasion of a fault causing the cuff to remain fully inflated
during measurement, open the cuff immediately.
• Do not use the unit near to equipment emitting a strong electric or
magnetic field, such as radios. This may impair the correct functioning of
the unit.
• This device is not designed to be used by persons (including children) with
limited physical, sensory or mental abilities, or by persons with insufficient
experience and/or knowledge, unless under observation by a person responsible for their safety, or unless they have been instructed in the use of the
device.
• Children must be supervised to ensure that they do not play with the device.
• If a fault occurs, do not try to repair the unit yourself. Attempts to do so will
void the warranty. Refer all servicing to authorized service personnel.
• Protect the unit from moisture. Should moisture enter the unit, remove the
batteries and stop using it immediately. In this case, please contact either
your dealer or MEDISANA directly. You can find details of how to contact
us on the address page.
to deflate the cuff immediately. Loosen the cuff and
15
Page 22
GB
2 Useful Information
Thank you
very much
2.1
Items supplied
and packaging
2.2
What is blood
pressure?
Thank you for your confidence in us and congratulations on your purchase!
With the MTD upper arm blood pressure monitor you have purchased a
MEDISANA quality product. To ensure the best results and long-term satisfaction with your MEDISANA MTD blood pressure monitor, we recommend
that you read the following operating and maintenance instructions carefully.
Please check first of all that the device is complete and is not damaged in any
way. In case of doubt, do not use the appliance and contact your dealer or your
service centre. The following parts are included:
• 1 MEDISANA Blood pressure monitor MTD
• 1 Cuff with air hose
• 4 Batteries (AA type, LR 6) 1,5V
• 1 Storage bag
• 1 Holder with adhesive pad
• 1 Instruction manual
The packaging can be reused or recycled. Please dispose properly of any packaging material no longer required. If you notice any transport damage during
unpacking, please contact your dealer without delay.
WARNING
Please ensure that the polythene packing is kept away from the
reach of children! Risk of suffocation!
Blood pressure is the pressure created in the blood vessels by each heart beat.
When the heart contracts (= systole) and pumps blood into the arteries, it
brings about a rise in pressure. The highest value is known as the systolic pressure and is the first value to be measured. When the cardiac muscle relaxes to
take in fresh blood, the pressure in the arteries also falls. Once the arteries are
relaxed, a second reading is taken – the diastolic pressure.
2.3
How is blood
pressure
measured?
2.4
Why should
you take your
blood pressure
at home?
16
The MTD is a blood pressure unit which is used to measure blood pressure at
the upper arm. The measurement is carried out by a microprocessor, which, via
a pressure sensor, measures the vibrations resulting from the inflation and
deflation of the cuff over the artery.
MEDISANA has had many years of experience in the field of blood pressure
measurement. The high precision of MEDISANA devices has been confirmed
by clinical tests, carried out according to international standards. One strong
argument in favour of taking blood pressure at home is the fact that the
readings are taken in familiar surroundings under relaxed conditions. The most
important reading is the socalled „baseline value“, the one taken before
breakfast, directly after getting up in the morning. As far as it is possible, you
should always try to take your blood pressure at the same time and under the
same conditions each day.
Page 23
2 Useful Information
This ensures comparable results and helps in detecting the first signs of high
blood pressure. If high blood pressure remains undetected, it increases the risk
of further cardiovascular diseases.
THEREFORE WE RECOMMEND:
Take a blood pressure reading daily and on a regular basis,
even if you are experiencing no apparent complaints.
GB
2.5
Blood
pressure
classification
2.6
Fluctuations in
blood pressure
The following table shows the classification of high and low blood pressure,
without taking age into consideration. This blood pressure assessment scale
corresponds to the guidelines of the World Health Organisation (WHO).
Low blood pressure Normal blood pressure
systolic below <100 systolic 100 – 139
diastolic below <60 diastolic 60 – 89
Types of high blood pressure
mild hypertension medium hypertension serious hypertension
(yellow (orange (red
display area
systolic 140 – 159 systolic 160 – 179 systolic>_180
diastolic 90 – 99 diastolic 100 – 109 diastolic>_110
There are many factors that can influence blood pressure. Readings can be
affected seriously by stress, fear, heavy physical exertion or the time of day at
which the measurements are taken. Your personal blood pressure values are
subject to considerable fluctuation during the course of the day and the year.
These fluctuations are particularly pronounced in the case of patients suffering
from hypertension. Blood pressure is usually at its highest during physical
exertion and at its lowest at night when you are asleep.
WARNING
Blood pressure that is too low represents just as great a health
risk as blood pressure that is too high! Fits of dizziness may lead
to dangerous situations arising (e.g. on stairs or in traffic)!
(green display area
) display area) display area)
)
2.7
Influencing
and evaluating
readings
• Measure your blood pressure several times, then record and compare the
results. Do not draw any conclusions from a single reading.
• Your blood pressure readings should always be evaluated by a doctor who is
also familiar with your personal medical history. When using the unit
regularly and recording the values for your doctor, you should visit the
doctor from time to time to keep him updated.
• When taking readings, remember that the daily values are influenced by
several factors. Smoking, consumption of alcohol, drugs and physical
exertion influence the measured values in various ways.
17
Page 24
GB
2 Useful Information / 3 Getting Started
3 Getting Started
• Measure your blood pressure before meals.
• Before taking readings, allow yourself at least five minutes rest.
• If the systolic and diastolic readings seem unusual (too high or too low) on
several occasions, despite correct use of the unit, please inform your doctor.
This also applies to the rare occasions when an irregular or very weak pulse
prevents you from taking readings.
3.1
Inserting /
removing batteries
Insertion: Open the battery compartment on the underside of the unit by
exerting gentle pressure, and insert the four batteries included with the unit
(alkaline batteries, AA type, LR 6). Remember to insert the batteries as indicated in the diagram in the battery compartment. Replace the lid, pressing it
until it snaps into place.
Removal: When the battery symbol appears in the display, please re-
place the batteries with new ones. After batteries be inserted, the display will
display the defaulted date & time. Set the date and time as described in 3.3 /
3.4. Please note that the date and time will have to be reset each time new bat-
teries are inserted. The previous measuring results are saved.
WARNING BATTERY SAFETY INFORMATION
•
Do not disassemble batteries!
• Remove discharged batteries from the device immediately!
• Increased risk of leakage, avoid contact with skin, eyes and
mucous membranes! If battery acid comes in contact with any
of these parts, rinse the affected area with copious amounts of
fresh water and seek medical attention immediately!
• If a battery has been swallowed seek medical attention
immediately!
• Replace all of the batteries simultaneously!
• Only replace with batteries of the same type, never use different
types of batteries together or used batteries with new ones!
• Insert the batteries correctly, observing the polarity!
• Remove the batteries from the device if it is not going to be
used for an extended period!
• Keep batteries out of children's reach!
• Do not attempt to recharge these batteries! There is a danger of
explosion!
• Do not short circuit! There is a danger of explosion!
• Do not throw into a fire! There is a danger of explosion!
• Do not throw used batteries into the household refuse; put
them in a hazardous waste container or take them to a battery
collection point, at the shop where they were purchased!
18
Page 25

3 Getting Started
GB
3.2
Using a mains
adaptor
3.3
Setting the
reception for the
time signal (RCC)
(RCC = Radio
Controlled Clock)
Alternatively, the unit may also be operated with a special power adapter
(MEDISANA item no. 51125), which is plugged into the connector provided
on the right-hand side of the unit. In this case the batteries remain in the unit.
The batteries are disconnected mechanically when the connector is inserted on
the right-hand side of the blood pressure monitor. It is necessary, therefore, to
plug the mains adaptor into the mains socket first of all and then to connect it
to the blood pressure monitor. If the blood pressure monitor is no longer being
used, first remove the connector from the blood pressure monitor and then pull
the mains adaptor out of the mains socket. Doing this means that the date and
time will not have to be reset each time.
a. Initial setting:
As soon as you have inserted the batteries, the device automatically switched to
the radio clock mode. While searching for the time signal, the radio clock signal
flashes. As soon as the clock receives an adequate signal for setting, the time and
date are set automatically. When the setting process is finished, the device
switches to stand-by mode, in which time and date are displayed permanently.
If no signal is received, the device goes directly to stand-by mode without
changing the preset time and date.
By pressing the Start button
can be switched off. The device goes directly to stand-by mode without changing
the preset time and date.
b. Quick radio clock setting
When the device is in stand-by mode and you press the START button and
MEM button
setting mode for the radio clock. The radio clock symbol flashes. When the time
signal is received, the time and date are set automatically. If no signal is received,
the device switches to the manual time setting mode.
The quick setting can be cancelled by pressing the START button
then switched to the manual time settimg mode.
simultaneously for approx. 1 second, you will go to the quick
the initial setting reception of the time signal
. The device
c. regular signal reception
The device automatically receives the radio signal to update the time setting
twice a day, at 2.05 a.m. and 2.05 p.m.
By pressing the START button
be switched off.
the regular reception of the time signal can
19
Page 26

GB
3 Getting Started
3.4
Setting the date
and time
3.5
Adjusting the
voice function
The time and date are normally set automatically by radio along with the time
signal. When no time signal is received, or it is too weak, the clock can also be
set manually.
1. The device is in stand-by mode. Press the START button
simultaneously to go to the quick setting mode for the radio clock. Now
press the START button to go to the manual time setting mode.
2. The digit for entering the month flashes first. By pressing the START button
repeatedly, the digits for the day, hour and minute will flash in succession.
While each input position is flashing, press the MEM button to enter the
corresponding digit. By holding the MEM button the setting process can
be speeded up.
3. Exit the time setting mode by pressing the START button while the minute
position is flashing. It will switch to stand-by mode.
After changing the batteries the clock will need to be reset, either automatically
by radio signal or manually by time setting mode.
The voice function can be adjusted with the device switched on ( ON/OFF
switch
hold down the MEM button until the selected language appears on the display (e.g. L1).
The device speaks the language setting, and changes the display and the announcement to the next language if the MEM button
selected language can be changed by releasing the MEM button
as the language that you require is displayed or spoken. The selected volume,
which is indicated by flashing bars, can be modified by pressing the MEM
button again and holding it down until the required volume is indicated –
the higher the bar, the louder the volume. Release the MEM button
confirm your selection. The bar stops flashing and the display switches back to
the time display.
in I position ), i.e. with just the date and time displayed. Press and
L0 = Language function switched off L4 = Dutch
L1 = German L5 = French
L2 = English L6 = Italian
L3 = Spanish L7 = Portuguese
and MEM button
is held down. The
as soon
to
3.6
Holder
3.7
ON/OFF switch
I/0
20
Using the holder included with the unit you will store the arm cuff and the air
hose together with the device. First attach the adhesive pad to the rear side of
the unit, then fix the holder on it firmly.
Your device has a touch screen as an equipment. Be careful not to touch the
display by mistake. Keep the ON/OFF switch in 0 position when the device
is not in use to avoid unintentional adjustments.
Page 27
4 Operating
GB
4.1
Fitting the cuff
b
1-2 cm
a
c
4.2
Correct position
for taking
readings
1. Push the end piece of the air tube into the hole on the unit prior to
use. Ensure that the hose is not damaged and is securely attached. The
blood pressure monitor is intended for use as a table-top unit.
2. Slide the open end of the cuff through the metal bracket so that the
Velcro fastener is on the outside.
3. Open the cuff so as to create a cylindrical shape.
4. Slide the cuff over your left upper arm. Position the air hose in the
middle of your arm in line with your middle finger (a).
5. Place your arm on the table with the palm uppermost. The lower edge of
the cuff should be 1 - 2 cm above the crease of the elbow (b). Pull the cuff
tight (c) and close the Velcro fastener.
6. Avoid creating a space between arm and cuff. It may falsify the measured
result.
7. Measure the pulse on your bare arm. If wearing tight clothing, ensure that
the circulation in the arm is not impaired when rolling up the sleeve.
8. Only position the cuff on the right arm if it cannot be used on the left arm.
Always carry out measurements on the same arm.
The Correct Measuring Position when sitting
• Carry out the measurement whilst seated.
• Relax your arm and place it comfortably, on a
table for instance.
• Ensure that the cuff is at heart height.
• Keep still during the measurement: do not move
and do not talk as this may alter the measurements.
Correct position for taking measurements lying down
• In special cases the measurement
can also be taken lying down.
• Lie on your back and relax for at
least 5 minutes and also relax your
arm.
• Ensure that the cuff is at heart height. Differing heights affect the accuracy
of the measurement.
• Keep still during the measurement: do not move and do not talk as this may
alter the measurements.
21
Page 28

GB
4 Operating / 5 Memory
4.3
Taking blood
pressure readings
4.4
Switching off
the unit
1. Switch the unit on by using first the ON/OFF switch ( I position) and
then pressing the START button .
2. If the START button is pressed, a beep is heard and all display
characters are shown (display test). This test can be used to check that the
display is indicating properly and in full. The display shows the values from
the previous measurement. Information will be given in the language set if
the language function is switched on. If no measurement has been taken,
zeroes will appear next to the date and time.
3. The unit is ready for measurement, the number 0 is displayed, the start of
measurement will be announced if the language function is switched on.
It automatically inflates the cuff slowly in order to measure your blood pressure. The pressure on the display changes continuously during the time it
continues to inflate.
4. The unit inflates the cuff until sufficient pressure has built up for a measurement. Then the unit slowly releases air from the cuff and carries out the
measurement.
5. When the measurement is finished, the cuff is deflated completely. The
systolic and diastolic blood pressure and the pulse value with the pulse
symbol appear on the display . The blood pressure indicator
flashes next to the relevant coloured bar depending on the WHO blood
pressure classification (see page 17). The measured results will be announced in the language set if the language function is switched on.
6. The measured values are stored automatically. Up to 60 measured values
with date and time may be stored in the memory.
The unit has an automatic switch-off function. The unit switches off automatically after a minute if no buttons are pressed. The unit may also be switched
off using the START button . When the device is not in use switch the
ON/OFF switch in 0 position.
The time and the date are constantly shown in the display.
5 Memory
5.1
Displaying
stored results
22
The memory of your blood pressure monitor will hold up to 60 measurements
(blood pressure and pulse with time and date). Press the MEM button to
call up the saved measured values. The saved data will appear on the display.
Initially the number of memory locations occupied will appear then the values
of the most recently saved measurement including the flashing blood pressure
indicator
If the voice function has been activated, the device speaks the memory
location number, together with the saved blood pressure and pulse values and
the blood pressure assessment as per the scale in the World Health Organisation guidelines (see pg. 17).
will be displayed.
Page 29

5 Memory / 6 Miscellaneous
Repeatedly pressing the MEM button displays the respective values
measured previously. The unit will switch off if the oldest memory has been
reached.
In memory recall mode, the unit will switch off automatically after approx. 120
seconds if no button is pressed. Memory recall mode can be exited at any time
by pressing the START button , which will also switch the unit off.
If all 60 memory locations in the memory are occupied, a new measured value
is saved whilst the oldest value is deleted.
GB
5.2
Deleting memory
6 Miscellaneous
6.1
Troubleshooting
If you are in memory recall mode, press and hold the MEM button for
approximately 8 seconds. All measured data stored will be deleted automatically after three beeps. Only noughts will be shown on the display instead of
the measured values.
The battery change symbol appears in the display
• The batteries are too low or empty. Replace all four batteries with new 1.5 V
alkali AA batteries.
Erratic measurements being displayed
• Cuff incorrectly fitted or not tight enough. Fit cuff correctly and tighten.
• You have changed position or the cuff has moved during the measurement.
Keep still and do not move your arm or the cuff.
• You have an irregular heartbeat. Even if your heartbeat is only slightly
irregular, repeat the measurement. The unit is not suitable for people with
an extremely irregular heartbeat.
• You have spoken during the measurement, you are nervous or you are
excited. Do not speak and breathe deeply two or three times in order to
relax.
• You are not in the corrected seated or lying position. Please assume the
correct position when taking the measurement.
• The air hose is not connected or leaking. Check the connection between the
upper arm cuff and the unit and check the air hose for leaks. Repeat the
measurement.
“EE” appears in the display
• The unit has not been inflated enough. Repeat the measurement
• A problem occurred during inflation or during the measurement. Repeat the
measurement.
No display or display locked
• No batteries have been inserted, batteries wrongly inserted or batteries are
completely empty. Insert batteries, check battery position or replace with
new batteries.
• A malfunction or fault has occurred. Briefly remove the batteries and then
replace them.
Please contact the service centre if the error message appears again
when the measurement is repeated.
23
Page 30
GB
6 Miscellaneous
6.2
Care and
maintenance
6.3
Disposal
• Remove the batteries before cleaning the unit.
• Never use strong detergents or hard brushes.
• Clean the unit using a soft cloth lightly moistened with a mild soapy
solution. Never use abrasive cleaning agents or alcohol.
• Do not allow any water to get into the unit. Do not use the unit again until
it is completely dry.
• Remove the batteries from the unit if you do not wish to use it for an
extended period of time, otherwise there is a risk of battery leakage.
• Do not expose the unit to direct sunlight, and protect it from dust and
moisture.
• Only inflate the cuff when it is in position around the upper arm.
• The unit is best kept in the storage pouch included in your purchase and
should preferably be stored in a clean dry place.
• Servicing and calibration (applies to commercial use):
The unit has been calibrated by the manufacturer for a period of two years’
use. In the case of commercial use, the unit must be serviced and recali-
brated at least once every two years. This calibration will be charged for and
can be carried out by an appropriate authority or an authorised service
centre - in accordance with the regulations for users of medical equipment.
This product must not be disposed of together with domestic waste.
All users are obliged to hand in all electrical or electronic devices, regardless
of whether or not they contain toxic substances, at a municipal or commercial collection point so that they can be disposed of in an environmentally
acceptable manner.
Please remove the batteries before disposing of the device / unit. Do not
dispose of old batteries with your household waste, but at a battery collection
station at a recycling site or in a shop.
Consult your municipal authority or your dealer for information about disposal.
6.4
Directives /
norms
24
This blood pressure monitor meets the requirements of the EU standard for
non-invasive blood pressure monitors. It is certified in accordance with EC
Guidelines and carries the CE symbol (conformity symbol) “CE 0297”. The
blood pressure monitor corresponds to European standards EN 1060-1 and
EN 1060-3+A1. The specifications of EU Guideline “93/42/EEC of the Council
Directive dated 14 June 1993 concerning medical devices” are met and likewise those of EU Guideline 89/336/EEC.
Intended use:
This unit is suitable for non-invasive blood pressure measurement in adults
(i.e., suitable for external use).
Electromagnetic compatibility:
The device complies with the EN 60601-1-2 standard for electromagnetic
compatibility. Inquire at MEDISANA for details on this measurement data.
Page 31

6 Miscellaneous
GB
6.5
Technical
specifications
Name and model : MEDISANA blood pressure monitor MTD
Display system : Digital display
Memory slots : 60
Measuring technique : Oscillometric
Power supply : 6 V= , 4 x 1,5 V Mignon AA LR 6, Alkaline
Blood pressure measuring
range : 0 – 300 mmHg
Pulse measuring range : 30 – 180 beats / Min.
Maximum error tolerance
for static pressure : ± 3 mmHg
Maximum error tolerance
for pulse rate : ± 5 % of the reading
Pressure generation : Automatic, using pump
Deflation : Automatic
Automatic switch-off : After approx. 1 minute
Operating conditions : + 5 °C to + 40 °C,
<
85 % humidity
Storage conditions : – 20 °C to + 55 °C
<
95 % humidity
Dimensions : approx. 142 mm x 98 mm x 52 mm
Cuff size : 22 – 30 cm Adult cuff for average
upper arm circumference
Weight : approx. 310 g without batteries
Article number : 51145
EAN number : 40 15588 51145 5
Accessories : Mains adapter
Art.-No. 51125
EAN-No. 40 15588 51125 7
Cuff, large 30 - 42 cm for
adults with upper arm of large circumference
Art.-No. 51126
EAN-Nr. 40 15588 51126 4
In accordance with our policy of continual product improvement,
we reserve the right to make technical and optical changes
without notice.
25
Page 32

GB
7 Warranty
Warranty and
repair terms
Please contact your dealer or the service centre in case of a claim under the
warranty. If you have to return the unit, please enclose a copy of your
receipt and state what the defect is.
The following warranty terms apply:
1. The warranty period for MEDISANA products is three years from date of
purchase. In case of a warranty claim, the date of purchase has to be
proven by means of the sales receipt or invoice.
2. Defects in material or workmanship will be removed free of charge
within the warranty period.
3. Repairs under warranty do not extend the warranty period either for the
unit or for the replacement parts.
4. The following is excluded under the warranty:
a. All damage which has arisen due to improper treatment, e.g. non-
observance of the user instructions.
b. All damage which is due to repairs or tampering by the customer or
unauthorised third parties.
c. Damage which has arisen during transport from the manufacturer to
the consumer or during transport to the service centre.
d. Accessories which are subject to normal wear and tear (cuff, batteries
etc.).
5. Liability for direct or indirect consequential losses caused by the unit are
excluded even if the damage to the unit is accepted as a warranty claim.
MEDISANA AG
Itterpark 7-9
40724 Hilden
Germany
Tel.: +49 (0) 2103 / 2007-60
Fax: +49 (0) 2103 / 2007-626
eMail: info@medisana.de
Internet: www.medisana.de
The service centre address is shown on the last page.
26
Page 33

1 Consignes de sécurité
REMARQUE IMPORTANTE!
TOUJOURS CONSERVER!
Lisez attentivement le mode d’emploi, et en particulier les consignes de sécurité,
avant d’utiliser l’appareil. Conservez bien ce mode d’emploi. Vous pourriez en
avoir besoin par la suite. Lorsque vous remettez l’appareil à un tiers, mettez-lui
impérativement ce mode d’emploi à disposition.
Légende
Ce mode d’emploi fait partie du contenu de l’appareil.
Elle contient des informations importantes concernant
sa mise en service et sa manipulation. Lisez l’intégralité
de ce mode d’emploi. Le non respect de cette notice
peut provoquer de graves blessures ou des dommages
de l’appareil.
AVERTISSEMENT
Ces avertissements doivent être respectés afin d’éviter
d’éventuelles blessures de l’utilisateur.
FR
ATTENTION
Ces remarques doivent être respectées afin d’éviter
d’éventuels dommages de l’appareil.
REMARQUE
Ces remarques vous donnent des informations
supplémentaires utiles pour l’installation ou l’utilisation.
Classification de l’appareil: IIa, type B
N° de lot
Fabricant
Date de fabrication
27
Page 34

FR
Consignes
de sécurité
1 Consignes de sécurité
AVERTISSEMENT
Ne prenez pas de mesures thérapeutiques sur la base de
mesures effectuées par vous-même! Ne modifiez jamais les
doses de médicament prescrites par votre médecin!
1.1
Conseils pour
votre bien être
1.2
Ce qu'il faut
absolument
respecter
28
• Les troubles du rythme cardiaque ou arythmies entraînent un pouls irrégulier.
Ceci peut causer des difficultés pour déterminer la tension correcte en cas de
mesure avec un tensio-mètre oscillométrique.
• Si vous souffrez d'autres maladies, par exemple d'obturation artérielle,
renseignezvous auprès de votre médecin avant d'utiliser cet appareil.
• Cet appareil ne peut pas être utilisé pour contrôler la fréquence cardiaque
d'un stimulateur.
• Les femmes enceintes doivent tenir compte des mesures de précautions
nécessaires, de leur condition physique et le cas échéant, consulter leur
médecin.
• Si vous remarquez des sensations désagréables durant la mesure, par ex. des
douleurs du bras ou d'autres maux, prenez les contremesures suivantes:
Actionnez la touche START
Desserrez le brassard et ôtez-le du bras. Veuillez contacter votre commerçant
spécialisé ou nous informer directement.
• Les personnes avec une onde de pouls plate doivent lever le bras, ouvrir et
fermer 10 fois le poing avant d'effectuer la mesure. Cet exercice permet
d'optimiser l'onde du pouls et l'opération de mesure.
• Utilisez uniquement cet appareil conformément au but d'utilisation décrit
dans ce mode d'emploi.
• Tout emploi non conforme annule les droits de garantie.
• Cet appareil est réservé à l’usage domestique uniquement.
• Dans les cas rares de pannes où le brassard reste gonflé durant la mesure, il
faut immédiatement le desserrer.
• L'appareil ne doit pas être utilisé à proximité d'appareils émettant un fort
rayonnement électrique, tels que des émetteurs radio. Ceci peut déranger le
bon fonctionnement.
• Cet appareil n’est pas destiné aux personnes (y compris les enfants) à
capacités physiques, sensorielles ou mentales réduites ou dépourvues d’expérience et/ou de connaissances, sauf si elles sont surveillées par une personne responsable de leur sécurité ou ont été instruites de l’utilisation de
l’appareil.
• Les enfants doivent être surveillés en s’assurant qu’ils ne jouent pas avec
l’appareil.
• En cas de panne, ne réparez pas l'appareil vousmême, ceci supprime tous vos
droits de garantie. Confiez les réparations à des techniciens agréés.
• Protégez l'appareil contre l'humidité. Si toutefois des liquides s'infiltrent dans
l'appareil, vous devez immédiatement retirer les piles et éviter toute autre utilisation. Veuillez dans ce cas contacter votre commerçant spécialisé ou nous
informer directement. Nos coordonnées sont indiquées à la page adresse.
pour dégonfler immédiatement le brassard.
Page 35

2 Informations utiles
FR
Merci !
2.1
Éléments fournis
et emballage
2.2
La tension
qu’est-ce que
c’est?
Félicitations et merci de votre confiance!
Avec le tensiomètre MTD, vous avez acquis un produit de qualité de la maison
MEDISANA.
Afin d'obtenir les résultats escomptés et de profiter longtemps de votre tensiomètre MTD MEDISANA, nous vous recommandons de lire attentivement
les instructions suivantes concernant l'utilisation, la sécurité et l'entretien.
Veuillez vérifier si l'appareil est au complet et ne présente aucun dommage.
cas de doute, ne faites pas fonctionner l’appareil et adressez-vous à votre revendeur ou à un point de service après-vente. La fourniture comprend:
• 1 tensiomètre MTD MEDISANA
• 1 brassard avec tuyau à air
• 4 piles (type AA, LR 6) 1,5V
• 1 pochette de rangement
• 1 support avec coussin adhésif
• 1 mode d'emploi
Les emballages sont réutilisables ou peuvent être recyclés afin de récupérer les
matières premières. Respectez les règles de protection de l’environnement
lorsque vous jetez les emballages dont vous n’avez plus besoin. Si vous remarquez lors du déballage un dommage survenu durant le transport, contactez
immédiatement votre revendeur.
AVERTISSEMENT
Veillez à garder les films d’emballage hors de portée des enfants.
Ils risqueraient de s’étouffer!
La tension désigne la pression formée dans les vaisseaux à chaque battement
du coeur. Lorsque le coeur se contracte ( = systole ) et pompe le sang dans
les artères la pression vasculaire augmente. La valeur maximale est appelée
pression systolique, cette valeur est la première qui est prise lors d’une mesure.
Lorsque le coeur se rétracte pour se remplir de sang, la pression diminue
également dans les artères. Lorsque les vaisseaux se relâchent, la deuxième
valeur, la pression diastolique, est mesurée.
En
2.3
Comment
fonctionne
la mesure?
2.4
Quelle est l'utilité
de mesurer la
tension à la
maison?
Le MTD est un tensiomètre destiné à mesurer la tension au niveau du bras. La
mesure est ici réalisée par un microprocesseur qui, au moyen d'un capteur de
pression, analyse les variations générées dans les artères par le gonflage et
dégonflage du brassard.
MEDISANA dispose d'une longue expérience dans le domaine de la mesure de
la tension. La haute précision du principe de mesure des appareils MEDISANA
est vérifiée par d’études cliniques effectuées confor mément à des standards
internationaux. Un argument de poids pour mesurer la tension à la maison est
le fait que la mesure est effectuée dans un environnement familier et en étant
reposé. La « valeur de base », qui est mesurée le matin directement au lever
29
Page 36

FR
2 Informations utiles
avant le petit déjeuner est la plus significative. Par principe, il convient de toujours effectuer la mesure à la même heure et dans des conditions identiques.
C’est le seul moyen d'obtenir des résultats comparables et ainsi de détecter à
temps tout début d'hypertension. Une hypertension restant longtemps inconnue augmente le risque d'autres maladies cardiovasculaires.
VOICI DONC NOTRE CONSEIL:
Mesurez votre tension quotidiennement et régulièrement,
même si vous vous sentez bien.
2.5
Classification
des tensions
2.6
Variations
de tension
Le tableau ci-dessous présente des valeurs indicatives de tension élevée et
faible sans considération de l'âge. Cette échelle de classification est conforme
aux directives de l’Organisation mondiale de la santé (OMS).
Tension faible Tension normale
systolique <100 systolique 100 – 139
diastolique i<60 diastolique 60 – 89
Formes de tension
légère hypertension hypertension modérée sévère hypertension
(plage jaune) plage orange) plage rouge)
systolique 140 – 159 systolique 160–179 systolique >_180
diastolique 90 – 99 diastolique 100 – 109 diastolique >_110
AVERTISSEMENT
Une pression sanguine trop basse est aussi dangereuse pour la
santé qu’une pression trop élevée. Les vertiges peuvent entraîner
des situations dangereuses (par ex. dans les escaliers ou en
voiture) !
La tension est influencée par de nombreux facteurs, ainsi, un travail
physiquement éprouvant, l'anxiété, le stress, mais aussi l'heure de la journée
peuvent fortement modifier les valeurs mesurées. Les valeurs de tension
personnelles varient également durant la journée et l'année. Les sujets
hypertendus sont particulièrement exposés à ces variations. Normalement, la
tension atteint sa valeur maximale durant des activités physiques intenses et sa
valeur minimale la nuit durant le sommeil.
(plage verte
)
2.7
Influence et
évaluation
des mesures
30
• Effectuez plusieurs mesures de votre tension, mémorisez les résultats et
comparez-les ensuite. Ne tirez jamais de conclusions à partir d'un seul
résultat.
• Les valeurs de votre pression sanguine doivent toujours être évaluées par un
médecin informé de vos antécédents médicaux. Si vous utilisez l'appareil
Page 37

• régulièrement et enregistrez les valeurs pour votre médecin, il faut aussi de
• Lorsque vous mesurez votre tension, tenez compte que les valeurs
• Mesurez votre tension avant les repas.
• Avant de mesurer votre tension, reposez-vous au moins 5 minutes.
• Si la valeur systolique ou diastolique mesurée semble anormale (trop forte ou
3 Mise en service
2 Informations utiles / 3 Mise en service
temps en temps informer votre médecin du déroulement.
quotidiennes dépendent de nombreux facteurs. Ainsi, la consommation de
tabac, d'alcool, la prise de médicaments et les activités physiques influencent
les valeurs de mesure de manière différente.
trop faible) malgré une manipulation correcte de l'appareil et que ceci se
reproduit plusieurs fois, veuillez informer votre médecin. Il en est de même
si parfois un pouls irrégulier ou trop faible ne permet pas d'effectuer la
mesure.
FR
3.1
Insérer / changer
les piles
Insérer: ouvrez le compartiment à pile sur la face inférieure de l'appareil en
appuyant légèrement contre le cran et insérez les quatre piles fournies (piles
alcalines, type AA LR 6). Vérifiez la polarité des piles (représentée au fond du
compartiment). Replacez le couvercle et poussez-le jusqu'au déclic.
Changer: lorsque le symbole des piles est affiché sur l'écran, vous devez
changer les piles. Après la mise en place des piles, l’écran indique la date et
l’heure (préconfigurés). Réglez alors la date et l’heure, tel que décrit sous 3.3 /
3.4. Attention : La date et l’heure doivent être réglées à chaque nouvelle installation des piles. Les mesures effectuées jusqu’alors restent enregistrées.
AVERTISSEMENT
INSTRUCTIONS DE SECURITE RELATIVES AUX PILES
• Ne désassemblez pas les piles !
• Retirez immédiatement les piles usagées de l'appareil !
• Danger accru de fuite ! Evitez tout contact avec la peau, les
yeux et les muqueuses ! En cas de contact avec l'électrolyte,
rincez tout de suite les endroits concernés à l'eau claire en
abondance et consultez immédiatement un médecin !
• En cas d'ingestion d'une pile, consultez immédiatement un
médecin !
• Remplacez toujours toutes les piles à la fois !
• N'utilisez que des piles de type identique! N'utilisez pas
simultanément des piles différentes ou des piles ayant déjà été
utilisées et des piles neuves !
• Introduisez correctement les piles en faisant attention à la
polarité !
• Retirez-les de l'appareil lors d'une non-utilisation prolongée !
• Conservez les piles hors de portée des enfants !
• Ne rechargez pas les piles ! Risque d'explosion !
-
>
31
Page 38

FR
3 Mise en service
AVERTISSEMENT
INSTRUCTIONS DE SECURITE RELATIVES AUX PILES
( suite )
• Ne pas les court-circuiter ! Risque d'explosion !
• Ne pas les jeter au feu ! Risque d'explosion !
• Ne jetez pas les piles et batteries usées dans les ordures
ménagères ! Jetez-les dans un conteneur prévu à cet effet ou
dans un point de collecte des batteries, dans un commerce
spécialisé !
3.2
Utilisation
d’un bloc
d’alimentation
3.3
Réglage de la
réception du
signal horaire
(RCC)
(RCC = Radio
Controlled Clock)
Il est également possible d’utiliser l’appareil avec un bloc d’alimentation
spécial (MEDISANA N° d’art. 51125) qui doit être branché au connecteur
prévu à cet effet sur le côté droit de l’appareil. Les piles doivent rester dans
l’appareil. Le branchement du connecteur sur le côté droit du tensiomètre
désactive automatiquement les piles. C’est pourquoi il est nécessaire de
raccorder le bloc d’alimentation d’abord au secteur et ensuite à l’appareil.
Après l’utilisation du tensiomètre, il faut d’abord tirer le connecteur de
l’appareil et ensuite débrancher le bloc d’alimentation du secteur. Cela vous
évitera de régler la date et l’heure à chaque mise sous tension.
a. Premier réglage :
Dès que vous avez inséré les piles, l’appareil passe automatiquement en mode
montre. Pendant la recherche du signal horaire, le symbole de la montre clignote.
Dès que la montre reçoit un signal suffisant pour le réglage, le réglage de l’heure
et de la date s’effectue automatiquement. A la fin de la procédure de réglage,
l’appareil passe en mode veille, dans lequel l’heure et la date sont affichés en
permanence. Si aucun signal n’est reçu, l’appareil passe directement en mode
veille, sans modifier les valeurs préréglées de la date et de l’heure.
Durant le premier réglage, il est possible d’interrompre la recherche du signal
temporel en appuyant sur la touche START
en mode veille, sans modifier les valeurs préréglées de la date et de l’heure.
b. Réglage rapide de la montre
Quand l’appareil se trouve en mode veille et que vous appuyez simultanément
sur les touches START
mode de réglage rapide de la montre. Le symbole de la montre clignote. Dès que
la montre reçoit un signal horaire, le réglage de l’heure et de la date s’effectue
automatiquement. Si aucun signal n’est reçu, l’appareil passe en mode de
réglage manuel de l’horaire.
Il est possible d’interrompre le réglage rapide en appuyant sur la touche START
. L’appareil passe alors en mode de réglage manuel de l’horaire.
et MEMpendant 1 seconde, vous accédez au
. L’appareil passe directement
32
Page 39

3 Mise en service
c. Réception régulière du signal
L’appareil reçoit automatiquement, deux fois par jour, à 2h05 et 14h05, le signal
radio permettant d’actualiser le réglage horaire.
Il est possible de désactiver la réception régulière du signal horaire en appuyant
sur la touche START.
FR
3.4
Réglage
de la date et
de l’heure
3.5
Régler la fonction
langue
Normalement, le réglage de la date et de l’heure s’effectue automatiquement
par radio, avec le signal horaire. Si le signal horaire n’est pas ou mal reçu, il est
également possible de régler l’heure manuellement.
1. L’appareil se trouve en mode veille. Appuyez simultanément sur les touches
STARTet MEMpour accéder au mode de réglage rapide de la montre.
Appuyez ensuite sur la touche STARTpour accéder au mode de réglage
manuel de l’horaire.
2. L’emplacement de saisie du mois clignote en premier. Si vous continuez
d’appuyer sur la touche START
des minutes clignotent les uns après les autres. Tandis que l’emplacement de
saisie clignote, actionnez la touche MEMpour saisir le chiffre
correspondant. Le fait de maintenir la touche MEMpermet d’accélérer la
procédure de réglage.
3. Pour quitter le mode de réglage de l’horaire, appuyez sur la touche START
tandis que l’emplacement des minutes clignote. Vous accédez au mode veille.
Après avoir changé les piles, vous devez régler de nouveau l’heure, soit
automatiquement par signal radio, soit manuellement grâce au mode de réglage
de l’horaire.
Vous pouvez régler la fonction langage lorsque l’appareil est allumé (commutateur MARCHE/ARRÊTen position I ), c’est-à-dire qu’il affiche uniquement la date et l’heure. Appuyez sur la touche MEMet maintenez-la enfoncée jusqu’à ce que la langue souhaitée (par ex. L 1) s’affiche.
L0 = fonction langue inactive L4 = néerlandais
L1 = allemand L5 = français
L2 = anglais L6 = italien
L3 = espagnol L7 = portuguais
, les emplacements du jour, des heures et
L’appareil annonce la langue réglée. Vous pouvez passer à la langue suivante,
au niveau de l’affichage et de l’annonce, en appuyant sur la touche MEM
Vous pouvez changer la langue réglée en appuyant sur la touche MEMet
en la relâchant dès que la langue souhaitée s’affiche ou est annoncée. L’intensité du volume est indiquée par des barres et peut être modifiée en appuyant
33
.
Page 40

FR
3 Mise en service / 4 Application
en la relâchant dès que la langue souhaitée s’affiche ou est annoncée. L’intensité du volume est indiquée par des barres et peut être modifiée en appuyant
sur la touche MEM
souhaitée. Plus le nombre de barres est important plus le volume est élevé.
Relâchez la touche MEM
clignoter et l’écran indique à nouveau l’heure.
et en la maintenant enfoncée jusqu’à obtenir l’intensité
pour confirmer votre choix. La barre cesse de
3.6
Support
3.7
Commutateur
MARCHE/ARRÊT
I/0
4 Application
4.1
Placer le brassard
b
1-2 cm
a
c
A l’aide du support contenu dans la livraison, vous pouvez conserver le
brassard et le flexible sur l’appareil. Dans un premier temps, fixez le coussin
adhésif double face au dos de l’appareil et appuyez ensuite le support dessus.
L’appareil est équipé d’un écran à effleurement. Vous devez donc veiller à ce
que le commutateur MARCHE/ARRÊTse trouve toujours en position 0
lorsque l’appareil n’est pas utilisé, afin qu’aucun réglage ne soit effectué par
inadvertance en raison d’une pression involontaire sur l’écran.
1. Insérez l’extrémité du tuyau dans l’orifice
que le tuyau est en parfait état et correctement emboîté. Le tensiomètre
peut être utilisé, posé sur la table.
2. Faites glisser le côté libre du brassard à travers l’anneau en métal de
manière à ce que la bande velcro se trouve sur la face extérieure.
3. Ouvrez le brassard de manière à former un cylindre.
4. Placez le brassard sur votre bras gauche. Positionnez le tuyau au le
milieu du bras, dans le prolongement du majeur (a).
5. Posez votre bras sur la table de manière à ce que la paume de la main soit
dirigée vers le haut. Le bord inférieur du brassard doit être placé à 1 – 2 cm
au dessus du coude (b). Serrez le brassard (c) et fermez-le à l’aide à la
bande velcro.
6. Veillez à ne pas laisser d’espace entre le bras et le brassard. Cela pourrait
fausser la mesure.
7. Pour la mesure, le brassard doit être en contact immédiat avec le bras.
Veillez à ce le bras ne soit pas compressé si vous avez remonté la manche
de votre vêtement.
8. Posez le brassard sur le bras droit uniquement si ce n’est pas possible sur
le bras gauche. Effectuez les mesures toujours sur le même bras.
du tensiomètre. Vérifiez bien
4.2
La bonne position
de mesure
34
Position assise correcte
• Effectuer la mesure en position assise.
• Décontractez le bras et posez-le par exemple sur
une table.
• Veillez à ce que le brassard se trouve à la même
hauteur que le cœur.
• Restez tranquille durant la mesure: ne bougez
pas et ne parlez pas, ceci pouvant fausser les
résultats de la mesure.
Page 41

4 Application / 5 Mémoire
Position allongée correcte
• Dans certains cas, il est possible
d’effectuer la mesure en position
allongée.
• Allongez-vous sur le dos et décontractez-vous pendant au moins 5 minutes et posez vos bras relâché sur le sol.
• Veillez à ce que le brassard se trouve à la même hauteur que le cœur. Une
différence de niveau peut avoir des répercussions sur l’exactitude de la
mesure.
• Restez calme et immobile pendant la mesure : le fait de parler ou de bouger
peut fausser la mesure.
FR
4.3
Mesurer
la tension
4.4
Éteindre
l'appareil
5 Mémoire
1. Allumez l’appareil à l’aide du commutateur MARCHE/ARRÊT
I ) et appuyez sur la touche START
2. Lorsque vous appuyez sur la touche START
et tous les signes apparaissent à l’écran. Ce test permet de vérifier le bon
fonctionnement de l’affichage. Les valeurs de la dernière mesure s’affichent à l’écran. Lorsque la fonction langue est activée, les valeurs sont
données dans la langue réglée. Si aucune mesure n’a encore été effectuée,
des zéros s’affichent à côté de l’heure et de la date.
3. Lorsque l’appareil est prêt à la mesure, le chiffre 0, apparaît ; lorsque la
fonction langue est activée, le début de la mesure est annoncé. Le brassard
se gonfle lentement et automatiquement pour prendre la tension.
L’affichage change constamment pendant le gonflage.
4. L’appareil gonfle le brassard jusqu’à ce que la pression nécessaire à la
mesure soit atteinte. Ensuite, l’appareil laisse le brassard se dégonfler
progressivement et effectue la mesure.
5. Lorsque la mesure est terminée, le brassard se dégonfle totalement. Les
tensions systolique et diastolique de même que le pouls, symbolisé par
le signe , s’affichent à l’écran
à côté des barres colorées conformément à l’échelle de classification des
tensions définie par l’OMS (voir p. 30). Lorsque la fonction langue est
activée, les résultats sont annoncés dans la langue sélectionnée.
6. Les valeurs mesurées sont enregistrées automatiquement. La mémoire per-
met d’enregistrer jusqu’à 60 valeurs avec l’heure et la date.
L’appareil dispose d’une fonction de mise à l’arrêt automatique. Si aucune
touche n’est actionnée pendant 1 minute, l’appareil s’arrête automatiquement.
La touche START
pas l’appareil, réglez le commutateur MARCHE/ARRÊT
L’heure et la date restent affichées en permanence.
permet également d’éteindre l’appareil. Si vous n’utilisez
.
. L’indicateur de la tension clignote
, un signal sonore retentit
( position
sur la position 0.
5.1
Affichage
des valeurs
en mémoire
Vous pouvez enregistrer jusqu’à 60 mesures dans la mémoire de votre tensiomètre (la tension ainsi que le pouls avec l’heure et la date). Les valeurs
mesurées sont enregistrées automatiquement. Pour consulter les valeurs enregistrées, appuyez sur la touche MEM
à l’écran. Le nombre de valeurs enregistrées apparaît en premier. Ensuite, les
valeurs de la dernière mesure enregistrée s’affichent et l’indicateur de la tension
clignote.
. Les valeurs enregistrées s’affichent
35
Page 42

FR
5 Mémoire / 6 Divers
Si la fonction langue est activée, l’appareil annonce la position occupée dans la
mémoire, les valeurs de la tension et le pouls ainsi que la catégorie de la
tension conformément à l’échelle de classification définie par les directives de
l’Organisation mondiale de la santé (voir p. 30).
Une pression supplémentaire sur la touche MEM
valeurs mesurées précédentes. Lorsque vous êtes parvenu à l’enregistrement le
plus ancien, l’appareil s’éteint. En mode de consultation de la mémoire, l’appareil s’éteint automatiquement au bout de 120 secondes environ si aucune
touche n’est actionnée. Vous pouvez quitter le mode de consultation de la
mémoire et en même temps éteindre l’appareil en appuyant sur la touche
START
velle valeur est enregistrée, la valeur la plus ancienne est effacée.
. Si les 60 positions de la mémoire sont occupées et qu’une nou-
permet d’afficher les
5.2
Effacer
la mémoire
6 Divers
6.1
Problémes et
dépannage
36
Si vous vous trouvez en mode de consultation de la mémoire, appuyez sur
la touche MEM
Trois signaux sonores retentissent et toutes les valeurs mesurées sont automatiquement effacées. Les valeurs mesurées sont remplacées par une série
de zéros à l’écran.
Le symbole de la pile apparaît à l’écran.
• Les piles sont trop faibles ou déchargées. Remplacez les quatre piles par de
nouvelles piles alcalines de 1,5 V, du type AA.
Les valeurs affichées n’ont aucun de sens
• Le brassard est mal posé ou mal serré. Posez le brassard correctement et serrez-le bien.
• Vous avez bougé ou déplacé l’appareil pendant la mesure. Veillez à rester
immobile, sans bouger ni votre bras ni l’appareil.
• Votre pouls est irrégulier. Si le pouls n’est que légèrement irrégulier, reprenez la tension. L’appareil ne convient pas aux patients dont le pouls est
très irrégulier.
• Vous avez parlé pendant la mesure, vous êtes nerveux ou agité. Ne parlez
pas et respirez deux ou trois fois profondément pour vous décontracter.
• La position assise ou allongée que vous avez adoptée n’est pas correcte.
Prenez la position adéquate à la mesure.
• La connexion avec le tuyau est interrompue ou le raccord n’est pas hermétique. Vérifiez le raccord entre le brassard et l’appareil et si le tuyau est
étanche. Reprenez la tension.
Les lettres « EE » s’affichent à l’écran
• Le gonflage n’est pas suffisant. Reprenez la tension.
• Une perturbation a eu lieu pendant le gonflage ou la mesure. Reprenez la
tension.
L’écran est vide ou reste bloqué
• Soit les piles n’ont pas été installées, soit elles sont en mauvaise position, soit
elles sont complètement déchargées. Insérez les piles, vérifiez leur position ou
remplacez-les par des piles neuves.
• Il s’agit d’un dysfonctionnement ou d’une panne. Retirez les piles pendant un
instant et replacez-les dans leur compartiment.
Si le message d’erreur réapparaît lors de la nouvelle mesure, veuillez
contacter le service après-vente.
et maintenez-la enfoncée pendant 8 secondes environ.
Page 43

6 Divers
FR
6.2
Nettoyage et
Entretien
6.3
Élimination
de l’appareil
• Enlever les piles avant de nettoyer l'appareil.
• Ne jamais utiliser de détergents agressifs, ni de brosses dures.
• Nettoyer l'appareil avec un chiffon doux légèrement imbibé d'une solution
savonneuse neutre. Ne jamais utiliser de produits nettoyants corrosifs ou d’alcool.
• L'eau ne doit pas s'infiltrer dans le boîtier. Ne réutilisez l'appareil que lorsqu'il
est parfaitement sec.
• Si l'appareil reste longtemps inutilisé, retirer les piles du compartiment à piles.
Autrement, cellesci risquent de couler.
• Ne pas exposer l'appareil directement aux rayons solaires et le protéger
contre les poussières et l'humidité.
• Le brassard ne doit être gonflé qu'après avoir été placé autour du bras.
• L’appareil doit être rangé de préférence dans la pochette de rangement
fournie et conservé dans un lieu propre et sec.
• Contrôle métrologique (en cas d’utilisation professionnelle):
Cet appareil a été calibré par le fabricant pour une durée de deux ans. En cas
d'utilisation professionnelle, le contrôle métrologique doit être effectué
au plus tard tous les deux ans. Ce contrôle est payant et ne peut être effec-
tué que par un service compétent ou des centres de maintenance autorisés
– conformément aux directives sur la sécurité des produits médicaux.
Cet appareil ne doit pas être placé avec les ordures ménagères.
Chaque consommateur doit ramener les appareils électriques ou électroniques,
qu’ils contiennent des substances nocives ou non, à un point de collecte de sa
commune ou dans le commerce afin de permettre leur élimination écologique.
Retirez les piles avant de jeter l’appareil. Ne mettez pas les piles usagées à la
poubelle, placez-les avec les déchets spéciaux ou déposez-les dans un point
de collecte des piles usagées dans les commerces spécialisés.
Pour plus de renseignements sur l’élimination des déchets, veuillez vous
adresser aux services de votre commune ou bien à votre revendeur.
6.4
Directives /
normes
Ce tensiomètre satisfait aux directives de la norme européenne relative aux tensiomètres non invasifs. Il est homologué conformément aux directives de la
Communauté européenne et porte le sigle CE (sigle de conformité) CE 0297.
Ce tensiomètre est conforme aux directives européennes EN 1060-1 et
EN 1060-3+A1. Il satisfait à la directive européenne « 93/42/CEE du Conseil du
14 juin 1993 relative aux dispositifs médicaux » et également à la directive
européenne 89/336/CEE.
Utilisation:
Cet appareil est conçu pour la mesure de tension non invasive chez des
adultes ( cela signifie qu'il est approprié pour l'application externe ).
Compatibilité électromagnétique :
L’appareil correspond aux exigences de la norme EN 60601-1-2 pour la compatibilité électromagnétique. Pour connaître les détails de ces données de mesure,
contactez MEDISANA.
37
Page 44

FR
6 Divers
6.5
Caractéristique
Nom et modèle : Tensiomètre MTD de MEDISANA
Système d'affichage : Affichage numérique
Blocs mémoire : 60
Méthode de mesure : Oscillométrique
Alimentation électrique : 6 V= , 4 x 1,5 V Mignon AA LR 6, alcaline
Plage de mesure de la tension : 0 – 300 mmHg
Pulse measuring range : 30 – 180 battements / min
Tolérance maximale de
la pression statique : ± 3 mmHg
Tolérance maximale des
valeurs du pouls : ± 5 % de la valeur
Gonflage : Automatique par pompe
Décompression : Automatique
Extinction autom. : Au bout d'environ 1 minute
Conditions d'utilisation : + 5 °C à + 40 °C,
Humidité de l'air
Conditions de stockage : - 20 °C à + 55 °C
Humidité de l'air
Dimensions : environ 142 mm x 98 mm x 52 mm
Brassard: : 22 - 30 cm brassard pour adultes
avec tour de bras moyen
Poids : environ 310 g sans piles
Numéro d’article : 51145
Numéro EAN : 40 15588 51145 5
Accessoires spéciaux : Adaptateur secteur,
réf. 51125
Numéro EAN 40 15588 51125 7
Grand brassard 30 – 42 cm
pour adultes aux bras très forts,
réf. 51126
Numéro EAN 40 15588 51126 4
<
<
85%
95%
38
Dans le cadre du travail continu d’amélioration des produits,
nous nous réservons le droit de procéder à des modifications
techniques et de design.
Page 45

7 Garantie
FR
Conditions
de garantie et
de réparation
En cas de recours à la garantie, veuillez vous adresser à votre revendeur
spécialisé ou contactez directement le service clientèle. S’il est nécessaire
d’expédier l’appareil, veuillez indiquer le défaut constaté et joindre une
copie du justificatif d’achat.
Les conditions de garantie sont les suivantes:
1.
Une garantie de trois ans à compter de la date d’achat est accordée
sur les produits MEDISANA. En cas d’intervention de la garantie, la
date d’achat doit être prouvée en présentant le justificatif d’achat ou la
facture.
2. Durant la période de garantie, les défauts liés à des erreurs de matériel ou
de fabrication sont éliminés gratuitement.
3. Les services effectués sous garantie n’entraînent pas de prolongation
de la période de garantie, ni pour l’appareil, ni pour les composants remplacés.
4. Sont exclus de la garantie:
a. tous les dommages dus à un usage incorrect, par exemple au non-
respect de la notice d’utilisation.
b. les dommages dus à une remise en état ou des interventions effectuées
par l’acheteur ou par de tierces personnes non autorisées.
c. les dommages survenus durant le transport de l’appareil depuis le site
du fabricant jusque chez l’utilisateur ou lors de l’expédition de l’appareil au service clientèle.
d. les accessoires soumis à une usure normale (brassard, batteries, piles,
etc.).
5. Nous déclinons toute responsabilité pour les dommages consécutifs
causés directement ou indirectement par l’appareil, y compris lorsque le
dommage survenu sur l’appareil est couvert par la garantie.
MEDISANA AG
Itterpark 7-9
40724 Hilden
Allemagne
Tel.: +49 (0) 2103 / 2007-60
Fax: +49 (0) 2103 / 2007-626
eMail: info@medisana.de
Internet: www.medisana.de
Vous trouverez l’adresse du service clientèle sur la dernière page.
39
Page 46

IT
1 Norme di sicurezza
NOTE IMPORTANTI !
CONSERVARE IN MANIERA
SCRUPOLOSA!
Prima di utilizzare l’apparecchio, leggere attentamente leistruzioni per l’uso,
soprattutto le indicazioni di sicurezza, e conservare le istruzioni per l’uso per gli
impieghi successivi. Se l’apparecchio viene ceduto a terzi, allegare sempre anche
queste istruzioni per l’uso.
Spiegazione dei simboli
Queste istruzioni per l’uso si riferiscono a questo apparecchio. Contengono informazioni importanti per la
messa in funzione e l’uso. Leggere interamente queste
istruzioni per l’uso. L’inosservanza delle presenti istruzioni può causare ferite gravi o danni all’apparecchio.
AVVERTENZA
Attenersi a queste indicazioni di avvertimento per
evitare che l’utente si ferisca.
40
ATTENZIONE
Attenersi a queste indicazioni per evitare danni
all’apparecchio.
NOTA
Queste note forniscono ulteriori informazioni utili
relative all’istallazione o al funzionamento.
Classificazione dell’apparecchio: IIa, tipo B
Numero LOT
Produttore
Data di produzione
Page 47

Norme di
sicurezza
1 Norme di sicurezza
AVVERTENZA
Non intraprendere azioni terapeutiche in base
all'automisurazione! Non modificare mai il dosaggio di un
farmaco prescritto dal medico!
IT
1.1
Suggerimenti
per il vostro
benessere
1.2
Precauzioni
di assoluta
importanza
• I disturbi del ritmo cardiaco, ovvero le aritmie determinano un polso irregolare.
Ciò può causare delle difficoltà nel rilevamento del valore corretto, se si
effettuano misurazioni con apparecchi oscillometrici.
• Qualora si soffra di malattie quali, ad esempio, l’occlusione arteriosa, prima
di utilizzare l’apparecchio è opportuno chiedere il parere del medico curante.
• L’apparecchio non può essere utilizzato per il controllo della frequenza
cardiaca di un pacemaker.
• Le donne incinte dovrebbero attenersi alle precauzioni necessarie e rispettare la
propria resistenza personale. Si consiglia di rivolgersi al proprio medico curante.
• Se si verificassero dei disagi nel corso di una misurazione, ad esempio dolore
alla parte alta del braccio o altri disturbi, consigliamo di adottare le seguenti
contromisure: Azionare il tasto START per sgonfiare velocemente il
manicotto pneumatico. Allentare il manicotto e sfilarlo dal braccio. Rivolgersi quindi al proprio rivenditore di fiducia o direttamente a noi.
• Le persone con battito cardiaco debole dovrebbero sollevare il braccio e aprire
e chiudere la mano ca. 10 volte prima di effettuare la misurazione. Questo
esercizio consente di ottimizzare il battito cardiaco e il processo di misurazione.
• Utilizzare l’apparecchio esclusivamente per gli scopi previsti e secondo le
modalità riportate nelle istruzioni per l’uso.
• In caso di uso improprio decade il diritto alla garanzia.
• L’apparecchio è concepito esclusivamente per uso domestico.
• In rari casi, per un difetto di fabbricazione, può capitare che il manicotto
pneumatico rimanga costantemente gonfio nel corso della misurazione, in
questi casi è opportuno aprirlo subito.
• L’apparecchio non deve essere utilizzato in prossimità di altri apparecchi che
emettano forti radiazioni elettromagnetiche, ad esempio una radio. La
funzionalità può risultarne disturbata.
• Questo apparecchio non deve essere mai maneggiato da bambini, né
utilizzato da persone con discapacità fisiche, sensoriali o intellettive o con
esperienza insufficiente e/o carenza di competenze sempre che, per la loro
incolumità, non vengano assistiti da una persona competente o non vengano adeguatamente istruiti su come impiegare l’apparecchio.
• Assicurarsi e controllare che i bambini non giochino con l’apparecchio.
• In caso di guasti non procedere da soli alla riparazione dell’apparecchio, perché
ciò comporterebbe la decadenza di ogni diritto di garanzia. Fare eseguire le
riparazioni esclusivamente presso i centri di assistenza tecnica autorizzati.
• Proteggere l’apparecchio dall’umidità. Nel caso dovesse penetrarvi dell’acqua
è necessario togliere immediatamente le batterie e sospendere l’utilizzo
dell’apparecchio stesso. In questo caso rivolgersi al proprio rivenditore
specializzato oppure direttamente a noi. Per contattarci, consultate la pagina
degli indirizzi.
41
Page 48

IT
2 Informazioni interessanti
Grazie!
2.1
Materiale in
dotazione e
imballaggio
2.2
Che cos’è
la pressione
sanguigna?
Grazie per la fiducia accordataci e complimenti per la scelta!
Con lo sfigmomanometro MTD Lei ha acquistato un prodotto di qualità di
MEDISANA. Per raggiungere i risultati auspicati e per utilizzare al meglio il
Suo sfigmomanometro MTD MEDISANA, raccomandiamo di leggere attentamente le seguenti indicazioni per l’uso e la manutenzione.
Verificare in primo luogo che l’apparecchio sia completo e che non vi siano
segni di danni.
gersi al proprio rivenditore o al proprio centro di assistenza.
Il materiale consegnato consta di:
• 1 Sfigmomanometro Medisana MTD
• 1 manicotto con tubo flessibile per l’aria
• 4 batterie (tipo AA LR6) 1,5V
• 1 borsa di custodia
• 1 supporto con cuscino adesivo
• 1 opuscolo d’istruzioni per l’uso
Le confezioni sono riutilizzabili o possono essere riciclate. Smaltire il materiale
d’imballaggio non più necessario in conformità alle disposizioni vigenti. In caso
di danneggiamenti dovuti al trasporto, mettersi immediatamente in contatto
con il proprio rivenditore.
Assicurarsi che i sacchetti d’imballaggio non siano alla portata
dei bambini. Pericolo di soffocamento!
La pressione sanguigna è la pressione presente nei vasi sanguigni a ogni
battito cardiaco. Quando il cuore si contrae (= sistole) e pompa il sangue nelle
arterie, si ha un innalzamento di pressione, il cui valore massimo è definito
pressione sistolica ed è il primo ad essere rilevato nel corso della misurazione
della pressione sanguigna. Quando il muscolo cardiaco si allenta per ricevere
nuovo sangue, scende anche la pressione nelle arterie. Ed è proprio nel
momento in cui i vasi sanguigni sono rilassati che si misura il secondo valore,
ovvero la pressione diastolica.
In caso di dubbi non mettere in funzione l’apparecchio e rivol-
AVVERTENZA
2.3
Come avviene
la misurazione?
2.4
Perché è utile
misurare
la pressione
sanguigna a
casa?
42
MTD è uno sfigmomanometro destinato alla misurazione della pressione arte-
riosa sul braccio.
a un sensore di pressione è in grado di valutare le oscillazioni della pressione
che si verificano nelle arterie e che vengono rilevate gonfiando e sgonfiando il
manicotto pneumatico.
MEDISANA vanta un’esperienza pluriennale nel campo della misurazione della
pressione sanguigna. L’elevata precisione del principio di misurazione degli
apparecchi MEDISANA è provata da studi clinici, condotti sulla base di
standard internazionali. Un valido argomento a favore della misurazione della
pressione sanguigna a casa propria è dato dal fatto che le misurazioni sono
effettuate in un ambiente familiare e in condizioni di relax. Particolarmente
importante è il cosiddetto “valore base”, cioè quello rilevato al mattino appena
La misurazione avviene tramite un microprocessore che grazie
Page 49

2 Informazioni interessanti
svegli, prima della colazione. Sarebbe fondamentale misurare la propria
pressione sanguigna possibilmente sempre alla stessa ora e nelle stesse condizioni. Ciò, infatti, consentirebbe di confrontare i risultati e di riconoscere per
tempo disturbi iniziali dell’alta pressione. Se per molto tempo non ci si accorge di
soffrire di alta pressione, aumenta il rischio di ulteriori malattie cardiovascolari.
IL NOSTRO CONSIGLIO:
Consigliamo dunque di misurare la pressione sanguigna
quotidianamente e con regolarità, anche nel caso in cui non
siano presenti particolari disturbi.
IT
2.5
Classificazione
della pressione
sanguigna
2.6
Oscillazioni
della pressione
sanguigna
2.7
Influenzabilità
e valutazione
delle misurazioni
Nello schema che segue sono riportati i valori indicativi relativi all’alta e alla
bassa pressione senza tener conto dell’età. Questa scala di classificazione della
pressione arteriosa è conforme alle direttive impartite dall'Organizzazione
Mondiale della Sanità (OMS).
Ipotensione Pressione normale
(pressione bassa) (Area di visualizzazione verde
Sistolica <100 Sistolica 100 – 139
Diastolica <60 Diastolica 60 – 89
Tipi di ipertensione (pressione alta)
Leggera ipertensione Media ipertensione Forte ipertensione
(Area di visualizzazione (Area di visualizzazione (Area di visualizzazione
gialla
Sistolica 140 – 159 Sistolica 160 – 179 Sistolica >_180
Diastolica 90 – 99 Diastolica 100 – 109 Diastolica >_110
Molti sono i fattori che possono influire sulla pressione sanguigna. Un’attività
fisica pesante, la paura, lo stress o una determinata fascia oraria possono avere
ripercussioni molto rilevanti sui valori misurati. La pressione sanguigna
individuale è soggetta a forti oscillazioni sia durante la giornata che nel corso
dell’anno. In pazienti affetti da alta pressione tali oscillazioni risultano
particolarmente marcate. Di solito la pressione sanguigna raggiunge i massimi
livelli sotto sforzo fisico, mentre è al minimo di notte, durante il sonno.
• Misurare più volte la pressione sanguigna, memorizzando i risultati ottenuti e
• I valori della pressione sanguigna dovrebbero sempre essere valutati da un
) arancione) rossa)
AVVERTENZA
Una pressione troppo bassa rappresenta un rischio per la salute
tanto quanto l'ipertensione! I capogiri possono causare situazioni
pericolose (per es., sulle scale o nel traffico)!
confrontandoli poi fra di loro. Evitare di trarre conclusioni partendo da un
singolo risultato.
medico che sia anche a conoscenza dell’anamnesi del soggetto. Se si utilizza
regolarmente l’apparecchio e si prende nota dei valori rilevati per comunicarli
al proprio medico curante, occorrerebbe anche informarlo periodicamente
sull’andamento della situazione.
)
43
Page 50

IT
2 Informazioni interessanti / 3 Messa in funzione
3 Messa in funzione
• Nel misurare la pressione sanguigna tenere presente che i valori rilevati
quotidianamente dipendono da diversi fattori. Il fumo, l’alcol, i farmaci e
l’attività fisica influiscono in modo diverso sui valori rilevati.
• Misurare la pressione sanguigna prima dei pasti.
• Prima di misurare la pressione sanguigna è consigliabile rimanere a riposo
almeno 5 minuti.
• Se il valore sistolico o diastolico rilevato nel corso nella misurazione non
sembra normale (troppo alto o troppo basso), nonostante il corretto utilizzo
dell’apparecchio, e se ciò si ripete diverse volte, è opportuno rivolgersi al
proprio medico curante. Lo stesso vale anche nei rari casi in cui un polso
irregolare o troppo debole non renda possibile la misurazione.
3.1
Inserire / estrarre
le batterie
Per inserire le batterie: Aprire il vano batterie situato sulla parte inferiore
dell’apparecchio, esercitando una leggera pressione sulla chiusura , e inserire le
quattro batterie incluse nella confezione (pile alcaline, tipo AA LR 6). Prestare
attenzione a disporre le batterie nel senso giusto (schema nel vano batterie).
Appoggiare di nuovo il coperchio di chiusura e spingerlo fino a quando si incastra perfettamente con uno scatto.
Per estrarre le batterie: Quando sul display appare il simbolo della batteria
sbarrato , occorre inserire delle nuove pile. Dopo aver inserito le batterie sul
display vengono visualizzate la data e l’ora (preimpostate). Impostare la data e
l'ora, come descritto al punto 3.3 / 3.4. Si ricordi che ogni volta che si inseriscono le batterie, è necessario impostare nuovamente la data e l'ora. I risultati
della misurazione effettuata rimangono memorizzati.
AVVERTENZA
INDICAZIONI DI SICUREZZA PER LA BATTERIA
• Non smontare le batterie!
• Rimuovere immediatamente le batterie esaurite dal dispositivo!
• Elevato rischio di fuoriuscita di liquidi, evitare il contatto con la
pelle, gli occhi e le mucose! In caso di contatto con gli acidi delle
batterie risciacquare subito i punti interessati con abbondante
acqua pulita e consultare subito un medico!
• In caso di ingerimento di una batteria chiamare immediatamente
un medico!
• Sostituire sempre tutte le batterie contemporaneamente!
• Impiegare unicamente batterie dello stesso tipo, non utilizzare
tipologie diverse oppure batterie usate e nuove insieme!
• Inserire correttamente le batterie, prestare attenzione alla polarità!
• In caso di lungo periodo di inutilizzo, rimuovere le batterie dal
dispositivo!
• Tenere le batterie lontano dalla portata dei bambini!
• Non ricaricare le batterie! Pericolo di esplosione!
• Non cortocircuitare! Pericolo di esplosione!
-
>
44
Page 51

3 Messa in funzione
IT
3.2
Utilizzo
dell'alimentatore
3.3
Impostazione
della ricezione
del segnale
orario (RCC)
(RCC = Radio
Controlled Clock)
AVVERTENZA
(Continuazione)
• Non gettare nel fuoco! Pericolo di esplosione!
• Non gettare le batterie usate insieme ai rifiuti domestici,
smaltirle separatamente oppure consegnarle a un punto di
raccolta batterie presso il rivenditore!
In alternativa è possibile utilizzare l'apparecchio anche con un alimentatore
speciale (MEDISANA n. art. 51125) da inserire nell'apposita presa
destro dell'apparecchio. Le batterie restano nell'apparecchio. Inserendo la spina
sul lato destro dello sfigmomanometro, le batterie vengono disinserite meccanicamente. Pertanto è necessario inserire prima l'alimentatore nella presa e successivamente collegare lo sfigmomanometro. Se lo sfigmomanometro non viene più
utilizzato, la presa deve essere prima scollegata dallo sfigmomanometro, quindi
deve essere estratto l'alimentatore dalla presa. In questo modo si evita di dovere
immettere nuovamente la data e l'ora ogni volta.
a. Impostazione iniziale:
Non appena sono state inserite le batterie, l’apparecchio si attiva automaticamente nella modalità dell’orologio radiocontrollato. Durante la ricerca del
segnale orario, il simbolo dell’orologio radiocontrollato lampeggia. L’ora e la
data vengono impostate automaticamente non appena l’orologio ha ricevuto
un segnale sufficiente per effettuare l’impostazione. Alla fine dell’operazione di
impostazione, l’apparecchio passa alla modalità stand-by, nella quale l’ora e la
data vengono visualizzate permanentemente. Se non viene ricevuto alcun
segnale, l’apparecchio passa direttamente alla modalità stand-by, senza
modificare i valori preimpostati per l’ora e la data.
Durante la prima impostazione, premendo il tasto START
l’interruzione della ricerca del segnale orario. L’apparecchio passa direttamente
alla modalità stand-by, senza modificare i valori preimpostati per l’ora e la data.
INDICAZIONI DI SICUREZZA PER LA BATTERIA
sul lato
, può verificarsi
b. Impostazione rapida dell’orologio radiocontrollato
Quando l’apparecchio si trova nella modalità stand-by e premendo per ca. 1
secondo il tasto STARTe il tasto MEM, si passa alla modalità di
impostazione rapida dell’orologio radiocontrollato. Il simbolo dell’orologio
radiocontrollato lampeggia. L’ora e la data vengono impostate automaticamente
non appena l’apparecchio riceve il segnale orario. Se l’apparecchio non riceve
alcun segnale orario, passa automaticamente alla modalità di impostazione
manuale dell’ora. È possibile interrompere l’impostazione rapida premendo il
tasto START. A questo punto l’apparecchio passa alla modalità di impostazione manuale dell’ora.
c. Ricezione regolare del segnale
L’apparecchio riceve automaticamente due volte al giorno (alle 2:05 e alle 14:05)
il segnale radio per l’aggiornamento dell’impostazione dell’ora. Premendo il tasto
STARTsi disattiva la ricezione regolare del segnale orario.
45
Page 52

IT
3 Messa in funzione
3.4
Impostazione
della data e
dell’ora
3.5
Impostazione
della funzione
vocale
Normalmente l’ora e la data vengono impostate automaticamente con il segnale
orario proveniente dalla radio. Se il segnale orario è debole o se non viene
ricevuto, è possibile impostare l’ora anche manualmente.
1. L’apparecchio si trova nella modalità stand-by. Per accedere alla modalità di
impostazione rapida dell’orologio radiocontrollato, premere contemporaneamente il tasto STARTe il tasto MEM. Per accedere alla modalità
di impostazione manuale dell’ora, premere il tasto START.
2. Prima lampeggia lo spazio per l’immissione del mese. Premendo
ripetutamente il tasto START, lampeggiano in sequenza gli spazi per
l’immissione del giorno, dell’ora e dei minuti. Mentre il rispettivo spazio di
immissione lampeggia, premere il tasto MEM
corrispondente. Tenendo premuto il tasto MEM
sequenza di impostazione.
3. Per uscire dalla modalità di impostazione dell’ora, premere il tasto START
mentre lo spazio dei minuti lampeggia. In questo modo si accede alla modalità
stand-by.
Dopo la sostituzione della batteria, è necessario impostare nuovamente l’ora,
automaticamente grazie al segnale radio oppure manualmente con la modalità
di impostazione dell’ora.
Quando l’apparecchio è acceso è possibile impostare la funzione lingua
(interruttore ON/OFFnella posizione I ), questo significa solamente quando viene visualizzata la data e l’ora. Premere e tenere premuto il tasto MEM
fino a quando sul display viene visualizzato l’indicatore della lingua impostata
(ad es. L1).
L0 = funzione vocale disattivata L4 = olandese
L1 = tedesco L5 = francese
L2 = inglese L6 = italiano
L3 = spagnolo L7 = portoghese
per inserire il numero
è possibile accelerare la
3.6
Supporto
46
L’apparecchio segnala la lingua impostata e tenendo premuto il tasto MEM
passa alla visualizzazione e segnalazione vocale della lingua successiva. È possibile modificare la lingua impostata rilasciando il tasto MEM
viene visualizzata e/o pronunciata la lingua desiderata. Il volume impostato,
indicato dalla barra lampeggiante, può essere modificato tenendo di nuovo
premuto il tasto MEMfino alla visualizzazione del volume desiderato: più
aumenta l’altezza della barra, più alto è il volume. Lasciare il tasto MEM
confermare la selezione. La barra smette di lampeggiare e il display passa di
nuovo alla visualizzazione dell’ora.
Grazie ai supporti inclusi nella fornitura è possibile conservare il manicotto e il
tubo flessibile sull’apparecchio. Fissare prima il cuscino adesivo a due strati alla
parte posteriore dell’apparecchio e premere il supporto fino a farlo bloccare.
non appena
per
Page 53

3 Messa in funzione / 4 Modalità d’impiego
IT
3.7
ON/OFF
Interruttore I/0
L’apparecchio è dotato di un display a sfioramento. Fare attenzione che l’interruttore ON/OFFsi trovi sempre nella posizione 0 quando l’apparecchio non
viene utilizzato, in modo da evitare che vengano effettuate involontariamente
delle impostazioni premendo inavvertitamente il display.
4 Modalità d’impiego
4.1
Applicazione
del manicotto
pneumatico
b
1-2 cm
c
1. Prima dell’uso, inserire l'estremità del tubo flessibile dell'aria nell'apertura
dell'apparecchio
inserito correttamente. Lo sfigmomanometro viene impiegato come apparecchio da tavolo.
2. Spingere il lato aperto del manicotto nell'asta di metallo, in modo che la
chiusura a strappo si trovi sul lato esterno.
3. Aprire il manicotto in modo che questo assuma una forma cilindrica.
4. Spingere il manicotto sul braccio sinistro. Posizionare il tubo flessibile
a
dell’aria al centro del braccio prolungando la linea del dito medio (a).
5. Appoggiare il braccio sul tavolo con il palmo della mano rivolto verso
l’alto. Il bordo inferiore del manicotto deve essere 1-2 cm al di sopra
dell’incavo del braccio (b). Tendere il manicotto (c) e chiudere la chiusura a
strappo.
6. Evitare spazi tra il braccio e il manicotto. Eventuali spazi potrebbero com-
promettere i risultati della misurazione.
7. Eseguire la misurazione sul braccio nudo. Accertarsi che, in caso di indu-
menti aderenti, il braccio non venga stretto eccessivamente a causa
dell'arrotolamento delle maniche.
8. Solo se non è possibile posizionare il manicotto sul braccio sinistro, utiliz-
zare quello destro. Le misurazioni devono essere effettuate sempre sullo
stesso braccio.
. Assicurarsi che il tubo non sia danneggiato e venga
4.2
Posizione corretta
per la misurazione
Posizione corretta durante la misurazione da seduti
• Effettuare la misurazione da seduti.
• Rilassare il braccio e appoggiarlo ad esempio su
un tavolo, senza irrigidirlo.
• Accertarsi che il manicotto si trovi all'altezza del
cuore.
• Durante la misurazione non agitarsi, non
muoversi e non parlare, altrimenti i dati pot
rebbero alterarsi.
Posizione corretta durante la misurazione da distesi
• In casi particolari, la misurazione può
essere effettuata anche da distesi.
• Distendersi sulla schiena per almeno
5 minuti e appoggiare il braccio
senza contrazioni per almeno 5
minuti.
47
Page 54

IT
4 Modalità d’impiego / 5 Memoria
• Accertarsi che il manicotto si trovi all'altezza del cuore. Altezze divergenti
l'una dall'altra influiscono sulla precisione della misurazione.
• Restare calmi durante la misurazione. Non muoversi e non parlare, altrimenti i risultati della misurazione potrebbero subire variazioni.
4.3
Misurazione
della pressione
arteriosa
4.4
Spegnimento
dell’apparecchio
1. Accendere l’apparecchio con l’interruttore ON/OFF(posizione I ) e
premere il tasto START.
2. Se si preme il tasto START, viene emesso un segnale acustico e tutti i
simboli vengono visualizzati sul display. Con questo test viene
completezza della visualizzazione. Il display visualizza i valori dell'ultima
misurazione. Una volta attivata la funzione vocale, le informazioni vengono visualizzate nella lingua impostata. Se non è stata effettuata ancora
alcuna misurazione, oltre all'ora e alla data vengono visualizzati solo gli
zeri.
3. L’apparecchio è pronto per la misurazione, viene visualizzata la cifra 0 e, a
funzione vocale impostata, viene segnalato l’inizio della misurazione. Il
manicotto si gonfia automaticamente per misurare la pressione arteriosa.
Durante il gonfiamento, l’indicazione della pressione varia progressivamente.
4. L’apparecchio pompa il manicotto fino a raggiungere una pressione suf-
ficiente per la misurazione. Successivamente l’apparecchio fa uscire
lentamente l’aria dal manicotto ed esegue la misurazione.
5. Al termine della misurazione, il manicotto si sgonfia completamente. Sul
display vengono visualizzati la pressione arteriosa sistolica e diastolica,
nonché il valore del battito con il rispettivo simbolo . A seconda della
classificazione della pressione arteriosa secondo l'OMS (si veda pag. 43),
l'indicatore di pressione arteriosa lampeggia accanto alla relativa
barra colorata. Se la funzione vocale è stata impostata, i risultati della
misurazione vengono pronunciati nella lingua selezionata.
6. I valori misurati vengono memorizzati automaticamente. Nella memoria è
possibile memorizzare fino a 60 valori misurati con ora e data.
L’apparecchio dispone di una funzione di disattivazione automatica. Se non
viene premuto alcun tasto, l’apparecchio si spegne automaticamente dopo un
minuto. È possibile spegnere l’apparecchio anche con il tasto START
do l’apparecchio non viene utilizzato, regolare l’interruttore ON/OFF
posizione 0. L'ora e la data vengono continuamente visualizzate sul display.
verificata la
. Quan-
sulla
5 Memoria
5.1
Lettura dei dati
registrati
48
È possibile memorizzare nella memoria dello sfigmomanometro fino a 60
misurazioni (pressione arteriosa e polso con ora e data). I valori misurati
vengono memorizzati automaticamente. Per selezionare i valori misurati
memorizzati, premere il tasto MEM. I dati memorizzati vengono visualizzati sul display. Inoltre viene visualizzato il numero delle posizioni di memoria
occupate. Successivamente vengono visualizzati i valori dell'ultima misurazione
memorizzata, inclusi quelli dell'indicatore di pressione lampeggiante .
Se la funzione vocale è stata attivata, l’apparecchio pronuncia il numero della
posizione di memoria, insieme ai valori memorizzati della pressione arteriosa e
Page 55

5 Memoria / 6 Varie
del battito e alla valutazione della pressione in base alla scala delle direttiva
dell’OMS (si veda pag. 43).
Premendo di nuovo il tasto MEM
precedentemente. Quando è stata visualizzata la voce più vecchia, l’apparecchio si spegne. Nella modalità di richiamo della memoria, se non viene
premuto alcun tasto l’apparecchio si spegne automaticamente dopo ca. 120
secondi. Premendo il tasto START
dalla modalità di selezione memoria e spegnere contemporaneamente l'apparecchio. Se tutte le 60 posizioni di memoria sono occupate, i nuovi valori
misurati vengono memorizzati cancellando il valore più vecchio.
vengono visualizzati i valori misurati
è possibile uscire in qualsiasi momento
IT
5.2
Cancellazione
della memoria
6 Varie
6.1
Problemi e
soluzioni
Se ci si trova nella modalità di selezione memoria, premere e tenere premuto il
tasto MEM
automaticamente tutti i valori misurati. Sul display vengono visualizzati solo
alcuni zero al posto dei valori di misurazione.
Il display visualizza il simbolo della sostituzione delle batterie
• Le batterie sono quasi o del tutto scariche. Sostituire tutte e quattro le
batterie con batterie alcaline nuove da 1,5 V tipo AA.
Vengono visualizzati valori di misura anomali
• Il manicotto è stato posizionato in modo sbagliato o non è stato stretto
correttamente. Posizionare correttamente il manicotto e stringerlo adeguatamente.
• Il paziente o l'apparecchio si è mosso durante la misurazione. Rimanere fermi
e non muovere né il braccio né l'apparecchio.
• Il battito è irregolare. Ripetere la misurazione in caso di battito leggermente
irregolare. L'apparecchio non è adatto ai pazienti con battito molto irregolare.
• Durante la misurazione il paziente ha parlato, è nervoso o agitato. Non
parlare e fare due o tre respiri profondi per rilassarsi.
• Il paziente non è seduto o disteso correttamente. Assumere la posizione
corretta per la misurazione.
• Il collegamento con il tubo dell'aria si è interrotto o il collegamento del
tubo non è a tenuta. Controllare il collegamento tra manicotto da braccio
e apparecchio e verificare che il tubo dell'aria sia ermetico. Ripetere la
misurazione.
Il display visualizza “EE”
• L’apparecchio non ha gonfiato il manicotto a sufficienza. Ripetere la misurazione.
• Durante il gonfiamento o la misurazione si è verificata un'anomalia. Ripetere
la misurazione.
Il display non visualizza nulla o resta fermo
• Mancano le batterie, sono state invertite o sono completamente scariche.
Inserire le batterie, controllare la loro posizione o sostituirle.
• Si tratta di un malfunzionamento o di un'anomalia di funzionamento.
Rimuovere le batterie per breve tempo e riposizionarle.
Se il messaggio di errore viene visualizzato di nuovo, contattare il
Servicecenter.
per ca. 8 secondi. Dopo tre segnali acustici vengono cancellati
49
Page 56

IT
6 Varie
6.2
Pulizia e
manutenzione
6.3
Smaltimento
• Prima di pulire l’apparecchio togliere le batterie.
• Non utilizzare detergenti aggressivi o spazzole dure.
• Pulire l’apparecchio con un panno morbido leggermente inumidito con un
detergente delicato. Non utilizzare in alcun caso detergenti aggressivi o
alcool.
• L’acqua non deve penetrare nell’apparecchio. Utilizzare di nuovo l’apparecchio solo quando sia perfettamente asciutto.
• Togliere le batterie dall’apparecchio nel caso in cui non si intenda usarlo per
molto tempo. Altrimenti si corre il pericolo che le batterie si scarichino.
• Non esporre l’apparecchio direttamente ai raggi del sole, proteggerlo dalla
polvere e dall’umidità.
• Pompare aria nel manicotto pneumatico solo una volta che questo sia stato
sistemato intorno al braccio.
• Consigliamo di conservare lo strumento nella custodia ricevuta al momento
dell’acquisto e in un luogo pulito e asciutto.
• Controlli metrologici (vale per l’uso commerciale):
L’apparecchio è stato calibrato dal produttore per una durata di due anni.
In caso di uso commerciale, i controlli metrologici devono ripetersi come
minimo ogni due anni. Il controllo è a pagamento e può essere effettuato
da un ente competente o da centri di manutenzione autorizzati, conformemente alle norme in materia.
L'apparecchio non può essere smaltito insieme ai rifiuti domestici.
Ogni utilizzatore ha l'obbligo di gettare tutte le apparecchiature elettroniche
o elettriche, contenenti o prive di sostanze nocive, presso un punto di raccolta
della propria città o di un rivenditore specializzato, in modo che vengano
smaltite nel rispetto dell'ambiente.
Togliere le pile prima di smaltire lo strumento. Non gettare le pile esaurite nei
rifiuti domestici, ma nei rifiuti speciali o in una stazione di raccolta pile presso i
rivenditori specializzati.
Per lo smaltimento rivolgersi alle autorità comunali o al proprio rivenditore.
6.4
Direttive /
norme
50
Questo sfigmomanometro soddisfa i requisiti della norma UE in materia di
sfigmomanometri non invasivi. È stato certificato secondo le direttive CE ed
è provvisto del marchio CE (marchio di conformità) “CE 0297”. Lo sfigmomanometro è conforme alle norme europee EN 1060-1 e EN 1060-3+A1.
L’apparecchio soddisfa i requisiti della direttiva Ue “93/42/CEE del Consiglio
del 14 giugno 1993 sui dispositivi medici”, oltre a quelli della direttiva Ue
89/336/CEE.
Destinazione:
l’apparecchio è indicato per la misurazione non invasiva della pressione
sanguigna dei soggetti adulti (è quindi destinato all’uso esterno).
Compatibilità elettromagnetica:
l’apparecchio soddisfa i requisiti della norma EN 60601-1-2 per la compatibilità
elettromagnetica. Per in-formazioni dettagliate di questi dati di misurazione è
possibile rivolgersi a MEDISANA.
Page 57

6 Varie
IT
6.5
Dati tecnici
Nome e modello : Sfigmomanometro MEDISANA MTD
Sistema di visualizzazione : Display digitale
Spazi di memoria : 60
Metodo di misurazione : oscillometrico
Alimentazione : 6 V= , 4 x 1,5 V mignon AA LR 6, alcaline
Campo di misurazione del
la pressione : 0 – 300 mmHg
Campo di misurazione del
polso : 30 – 180 battiti / min
Deviazione massima di misurazione dell apressione statica : ± 3 mmHg
Deviazione massima di misurazione dei valori del polso : ± 5 % del valore
Produzione di pressione : automatica con pompa
Rilascio dell’aria : automatico
Spegnimento automatico : dopo ca. 1 minuto
Condizioni di funzionamento : da + 5 °C a + 40 °C,
<
85 % umidità relativa
Condizioni di conservazione : da – 20 °C a + 55 °C
<
95 % umidità relativa
Dimensioni : ca. 142 mm x 98 mm x 52 mm
Manicotto: : 22 – 30 cm Manicotto per adulti con cir-
conferenza della parte alta del braccio media
Peso : ca. 310 g senza le batterie
Numero di articolo : 51145
Codice EAN : 40 15588 51145 5
Accessori speciali : Adattatore
N. art. 51125
Codice EAN 40 15588 51125 7
Manicotto di grandezza 30 - 42 cm per
adulti con circonferenza del braccio robusta
N. art. 51126
Codice EAN 40 15588 51126 4
Alla luce dei costanti miglioramenti dei prodotti, ci riserviamo
la facoltà di apportare qualsiasi modifica tecnica e strutturale.
51
Page 58

IT
7 Garanzia
Condizioni
di garanzia e
di riparazione
In caso di garanzia, contattare il vostro rivenditore di fiducia o direttamente
il centro di assistenza. Se dovesse essere necessario spedire l’apparecchio,
specificare il guasto e allegare una copia della ricevuta di acquisto.
Valgono le seguenti condizioni di garanzia:
1.
I prodotti MEDISANA hanno una garanzia di tre anni a partire dalla
data di vendita. La data di acquisto deve essere comprovata in caso di
garanzia dalla ricevuta di acquisto o dalla fattura.
2. Durante il periodo di garanzia, i guasti dovuti a difetti di materiale o di
lavorazione vengono eliminati gratuitamente.
3. Una prestazione di garanzia non da diritto al prolungamento del periodo
di garanzia, né per l’apparecchio né per i componenti sostituiti.
4. La garanzia non include:
a. tutti i danni risultanti da uso improprio, ad esempio dall’inosservanza
delle istruzioni d’uso,
b. i danni riconducibili a manutenzione o ad interventi effettuati dall’ac-
quirente o da terzi non autorizzati,
c. danni di trasporto verificati durante il trasporto dal produttore al
consumatore o durante l’invio al servizio clienti,
d. gli accessori soggetti a normale usura (manicotto, batterie ecc.).
5. È altresì esclusa qualsiasi responsabilità per danni secondari diretti o
indiretti causati dall’apparecchio anche se il danno all’apparecchio viene
riconosciuto come caso di garanzia.
MEDISANA AG
Itterpark 7-9
40724 Hilden
Germania
Tel.: +49 (0) 2103 / 2007-60
Fax: +49 (0) 2103 / 2007-626
eMail: info@medisana.de
Internet: www.medisana.de
L'indirizzo del servizio di assistenza è riportato nell'ultima pagina.
52
Page 59

1 Indicaciones de seguridad
¡NOTAS IMPORTANTES!
¡CONSERVAR SIN FALTA!
Antes de utilizar el aparato, lea detenidamente las instrucciones de manejo,
especialmente las indicaciones de seguridad; guarde estas instrucciones para su
consulta posterior. Si cede el aparato a terceras personas, entregue también
estas instrucciones de manejo.
Leyenda
Estas instrucciones forman parte de este aparato.
Contienen información importante relativa a la puesta
en funcionamiento y manejo. Lea estas instrucciones
en su totalidad. Si no se respetan estas instrucciones
se pueden producir graves lesiones o daños en el
aparato.
ADVERTENCIA
Las indicaciones de advertencia se deben respetar para
evitar la posibilidad de que el usuario sufra lesiones.
ES
ATENCIÓN
Estas indicaciones se deben respetar para evitar
posibles daños en el aparato.
NOTA
Estas indicaciones le ofrecen información adicional que
le resultará útil para la instalación y para el funcionamiento.
Clasificación del aparato: IIa, tipo B
Número de LOTE
Fabricante
Fecha de fabricación
53
Page 60

ES
Indicaciones
de seguridad
1 Indicaciones de seguridad
ADVERTENCIA
No tome ninguna medida terapeútica a causa de una medición
realizada por usted mismo. No modifique nunca la dosificación
de un medicamento que le haya prescrito su médico.
1.1
Indicaciones para
su bienestar
1.2
Lo que debería
observar
explícitamente
54
• Las arritmias provocan un pulso irregular. Esto puede originar dificultades
para determinar los valores de medición correctos con tensiómetros
oscilométricos.
• Si padece otras enfermedades como por ejemplo obstrucción de arterias
consulte con su médico antes de utilizar el aparato.
• El aparato no puede ser utilizado para controlar la frecuencia cardiaca de un
marcapasos.
• La mujeres embarazadas deben observar las medidas de precaución
necesarias y su capacidad de resistencia individual, si se da el caso consulte
con su médico.
• Si durante la medición sufre algún tipo de molestia como por ejemplo
dolores en el brazo tome las siguientes medidas:
Pulse la tecla START
brazalete y retírelo delbrazo. Por favor póngase en contacto con su comercio
especializado o infórmenos directamente.
• Las personas con pulso débil deben levantar el brazo y abrir y cerrar la mano
aprox. 10 veces antes de realizar la medición. A través de este ejercicio se
alcanza una optimización del pulso y del proceso de medición.
• Utilice el aparato exclusivamente según su uso previsto descrito en las
instrucciones de manejo.
• El derecho de garantía se extingue por uso indebido.
• El aparato solamente está destinado para el uso doméstico.
• Si muy raramente se diera el caso de que debido a un fallo en el funcionamiento el brazalete se mantuviera inflado de forma constante durante la
medición debe abrirlo inmediatamente.
• El aparato no debe ser utilizado cerca de aparatos con una irradiación
eléctrica fuerte como por ejemplo emisoras de radio, ya que de lo contrario
la funcionalidad del aparato podría verse influida.
• Este aparato no está concebido para ser utilizado por personas (niños incluidos) con capacidad física, sensorial o psíquica disminuida o que no tengan la
experiencia ni los conocimientos necesarios para usarlo, a no ser que sean
vigilados por una persona responsable de su seguridad que les dé instrucciones de cómo manejarlo.
• Los niños deben estar vigilados para asegurarse de que no utilicen el aparato como juguete.
• Por favor no repare el aparato usted mismo en caso de avería, ya que de lo
contrario se extinguirían todos los derechos de garantía. El aparato debe ser
reparado exclusivamente por estaciones de servicio autorizadas.
• Proteja el aparato contra la humedad. Si a pesar de ello penetra agua en el
aparato desinstale inmediatamente las pilas y no lo utilice. En tal caso
póngase en contacto con su comercio especializado o infórmenos
directamente. Puede encontrar la dirección de contacto en la página de
direcciones.
para desinflar el brazalete inmediatamente. Abra el
Page 61

2 Informaciones interesantes
ES
¡
Muchas gracias!
2.1
Volumen
de suministros
y embalaje
2.2
¿Qué es la tensión
arterial?
Muchas gracias por su confianza y felicitaciones.
Con el tensiómetro MTD ha adquirido un producto de calidad de MEDISANA.
Para obtener los resultados deseados y disfrutar durante mucho tiempo de su
tensiómetro MTD de MEDISANA, le recomendamos leer atentamente las
siguientes instrucciones de uso y cuidado.
Compruebe primero si el aparato está completo y si no presenta daño alguno.
En caso de dudas, no ponga el aparato en funcionamiento y diríjase a su proveedor o punto de atención al cliente.
El volumen de entrega comprende:
• 1 tensiómetro MTD de MEDISANA
• 1 brazalete con tubo de aire
• 4 pilas (Tipo AA, LR 6) 1,5V
• 1 bolsa para guardar el dispositivo
• 1 soporte con almohadillas adhesivas
• 1 instrucciones de manejo
El embalaje es reutilizable o puede reciclarse. Deshágase del material de embalaje que no se necesite, siguiendo las normas pertinentes. Si al desembalar
observara algún daño causado durante el transporte, póngase inmediatamente en contacto con el comerciante.
ADVERTENCIA
¡Asegúrese de que los plásticos de embalaje no caigan en manos
de niños! ¡Existe el peligro de asfixia!
Tensión arterial es la presión que se produce en las arterias con cada latido del
corazón. Cuando el músculo del corazón se contrae (sístole) bombeando
sangre a las arterias se produce un aumento de la presión. Su valor máximo es
denominado presión sistólica y es medido en primer lugar.
Cuando el músculo del corazón se dilata para recoger sangre disminuye
consecuentemente la presión en las arterias. El segundo valor – presión diastólica – es medido cuando las arterias están en estado de relajación.
2.3
¿Cómo funciona
la medición?
2.4
¿Porqué es
razonable medir
la tensión arterial
en casa?
El MTD es un tensiómetro que se ha diseñado para realizar mediciones de
la tensión arterial en el brazo. La medición se produce mediante un microprocesador que evalúa las oscilaciones de presión que se producen al inflar y desinflar el brazalete sobre la arteria mediante un sensor de presión.
MEDISANA dispone de muchos años de experiencia en el campo de la medición
de la tensión arterial. La gran exactitud del principio de medición de los aparatos
MEDISANA está documentada por estudios clínicos realizados según los estándares internacionales. Uno de los argumentos más importantes a favor de la
medición de la tensión arterial en casa es el hecho de que la medición pueda ser
realizada en un ambiente h abitual bajo un estado de relajación. El valor más
importante es el denominado „valor base“ que es medido por la mañana directamente después de haberse levantado y antes del desayuno. Principalmente y
55
Page 62

ES
2 Informaciones interesantes
siempre que sea posible se recomienda medir la tensión arterial a la misma hora
del día y bajo las mismas condiciones, ya que de este modo queda garantizada
la comparatibilidad de los resultados y es posible prediagnosticar un problema de
hipertensión. El riesgo de sufrir enfermedades cardiovasculares aumenta si
existe una hipertensión no detectada durante un largo período de tiempo.
POR ESTA RAZÓN RECOMENDAMOS:
Medir su tensión arterial diaria y regularmente también incluso
si no sufre ninguna molestia.
2.5
Clasificación de
la tensión arterial
2.6
Oscilaciones de
la tensión arterial
En la siguiente tabla se representan los valores indicativos para la tensión
arterial alta y baja sin tener en cuenta la edad. Esta escala sobre la tensión
arterial cumple las directivas de la Organización Mundial de la Salud (OMS).
Tensión arterial baja Tensión arterial normal
Sístole <100 Sístole 100 – 139
Diástole <60 Diástole 60 – 89
Formas de tensión alta
Tensión arterial Tensión arterial Tensión arterial
ligeramente alta medio alta muy alta
(zona de indicación (zona de indicación (zona de indicación
amarilla
Sístole 140 – 159 Sístole 160 – 179 Sístole>_180
Diástole 90 – 99 Diástole 100 – 109 Diástole>_110
Existen diversos factores que pueden influir en nuestra tensión arterial y en los
valores de la medición como por ejemplo, un gran esfuerzo físico, ansiedad,
estrés, la hora del día etc. Los valores de la tensión arterial personal están
sujetos a grandes oscilaciones a lo largo del día y del año. Estas oscilaciones son
especialmente notorias en pacientes hipertensos. Normalmente la tensión
arterial alcanza su valor más alto durante el esfuerzo físico y su valor más bajo
en la noche durante el sueño.
) naranja) roja)
ADVERTENCIA
Una tensión arterial demasiado baja también representa un
riesgo para la salud igual que la tensión arterial elevada.
Los mareos pueden provocar situaciones peligrosas (por ej. en
escaleras o en la circulación vial).
(zona de indicación verde
)
2.7
Influencias y
valoración de
las mediciones
56
• Mida su tensión arterial varias veces, memorice los resultados y compáre los
unos con otros. No saque conclusiones de una sola medición.
• Los resultados de la medición de la tensión arterial deberían ser evaluados
siempre por un médico que esté también familiarizado con su historial
médico. Si utiliza el aparato regularmente y registra los resultados para su
médico debería también de vez en cuando informarle sobre el desarrollo de
las mediciones.
Page 63

2 Informaciones interesantes / 3 Puesta en funcionamento
• Tenga en cuenta durante las mediciones de la tensión arterial que los valores
diarios obtenidos dependen de muchos factores. El tabaco, el alcohol, los
medicamentos y los esfuerzos físicos influyen en estos valores de diferente
modo.
• La tensión arterial debe ser medida antes de las comidas.
• Antes de medir su tensión arterial debería descansar durante como mínimo
5 minutos.
• Si a pesar de haberse cerciorado de que el aparato ha sido manejado
correctamente tiene la impresión de que el valor diastólico o sistólico son
anormales (demasiado altos o demasiado bajos) y esto se produce
repetidamente debe consultar con su médico. Esto también es válido si en raras
ocasiones no fuera posible medir la tensión arterial debido a un pulso muy bajo.
3 Puesta en funcionamento
ES
3.1
Instalación /
desinstalación
de las pilas
Instalación: Abra la cámara para las pilas situada en la parte inferior del
aparato presionando levemente el pasador e instale las cuatro pilas que se
incluyen en el volumen de entrega (pilas alcalinas, tipo AA LR 6). Observe la
dirección en la que instala las pilas (figura en la cámara para las pilas). Vuelva
a colocar la tapa de la cámara para pilas y presiónela hasta que quede engatillada audiblemente.
Desinstalación:
instale pilas nuevas. Una vez colocadas las pilas, la pantalla muestra la
fecha y la hora (preajustadas). Ajuste la fecha y la hora tal como se describe en
3.3 / 3.4. tenga en cuenta que después de cambiar las pilas siempre tendrá que
ajustar de nuevo la fecha y la hora. Los resultados de medición realizados hasta
ahora se conservarán.
•
¡No desmonte las baterías!
• ¡Retire inmediatamente las baterías descargadas!
• ¡Peligro elevado de fuga del líquido; evite el contacto con la piel,
los ojos y las mucosas! ¡En caso de contacto con el ácido de las
baterías, lave inmediatamente las zonas afectadas con agua
limpia y abundante y vaya de inmediato al médico!
• ¡En el caso de que alguien se tragara una batería, habría que ir
inmediatamente al médico!
• ¡Cambie siempre todas las baterías al mismo tiempo!
• ¡Utilice solo baterías del mismo tipo, no use tipos diferentes o
mezcle baterías viejas y nuevas!
• ¡Coloque las baterías de forma correcta teniendo en cuenta la
polaridad!
• ¡Retire las baterías del aparato, si no lo va a utilizar durante un
tiempo!
Si en el display aparece representado el símbolo de las pilas
ADVERTENCIA
ADVERTENCIAS DE SEGURIDAD SOBRE LAS PILAS
-
>
57
Page 64

ES
3 Puesta en funcionamento
ADVERTENCIA
ADVERTENCIAS DE SEGURIDAD SOBRE LAS PILAS
(Continuación)
• ¡Mantenga las baterías fuera del alcance de los niños!
• ¡No vuelva a cargar las baterías! ¡Peligro de explosión!
• ¡No las ponga en cortocircuito! ¡Peligro de explosión!
• ¡No las tire al fuego! ¡Peligro de explosión!
• ¡No tire las baterías usadas ni los acus en la basura doméstica
sino en la basura especial o en el recogedor de baterías de los
comercios especializados!
3.2
Uso de un bloque
de alimentación
3.3
Ajustar
recepción de la
señal horaria
(RCC)
(RCC = Radio
Controlled Clock)
Como método alternativo, también puede utilizar el aparato con una fuente
de alimentación especial (nº de art. MEDISANA: 51125), que se inserta en la
conexión prevista para ello
las pilas permanecen en el aparato. Al insertar el conector en el lado derecho
del tensiómetro las pilas se desconectan mecánicamente. Sin embargo, es
necesario insertar primero el bloque de alimentación en la toma de corriente
y luego conectarlo con el tensiómetro. Si no se utiliza más el tensiómetro, se
tendrá que extraer primero el enchufe del tensiómetro y luego el bloque de
alimentación de la toma de corriente. De este modo se evita que la fecha y la
hora se tengan que introducir de nuevo cada vez.
a. Primer ajuste:
Tan pronto como se hayan colocado las pilas, el aparato pasa automáticamente
al modo reloj radiocontrolado. Durante la búsqueda de la señal horaria parpadea
el símbolo de reloj radiocontrolado. Tan pronto como el reloj recibe una señal
suficiente, se ajustan automáticamente hora y fecha. Una vez finalizado el ajuste,
el aparato pasa al modo stand-by, donde se visualizan permantemente la hora
y fecha. Si no se recibe ninguna señal, el aparato pasa directamente al modo
stand-by sin modificar los valores predefinidos para hora y fecha.
Durante el primer ajuste puede interrumpirse la búsqueda de la señal horaria
pulsando la tecla START
modificar los valores predefinidos para hora y fecha.
b. Ajuste rápido del reloj radiocontrolado
Si el aparato se encuentra en el modo stand-by y se pulsan al mismo tiempo,
durante 1 segundo, la tecla START
de ajuste rápido del reloj radiocontrolado. El símbolo de reloj radiocontrolado
parpadea. Si se recibe la señal horaria se ajustan automáticamente la hora y
fecha. Si no se recibe ninguna señal, el aparato pasa al modo de ajuste manual
de la hora.
El ajuste rápido se puede cancelar pulsando la tecla START. Ahora el aparato
pasa al modo de ajuste manual de la hora.
en el lado derecho del aparato. En este caso,
. El aparato pasa directamente al modo stand-by sin
y la tecla MEM, se accede al modo
58
Page 65

3 Puesta en funcionamento
c. Recepción de la señal con regularidad
El aparato recibe automáticamente dos veces al día -a las 2:05 h y a las 14:05
h- la señal de radio para actualizar el ajuste de la hora.
Pulsando la tecla STARTse puede desconectar la recepción regular de la
señal horaria.
ES
3.4
Ajuste de fecha
y hora
3.5
Ajuste de la
función de voz
Normalmente la hora y fecha se ajustan automáticamente por radio con la señal
horaria. Si esta señal no se recibe o se recibe débilmente, el reloj también se
puede ajustar manualmente.
1. El aparato se encuentra en el modo stand-by. Pulse al mismo tiempo las teclas
START
radiocontrolado. Pulse ahora la tecla START
ajuste manual de la hora.
2. Primero parpadea la posición para introducir el mes. Pulsando repetidamente
la tecla START
minutos. Mientras parpadea la correspondiente posición de introducción,
pulse la tecla MEMpara introducir la cifra que corresponda. Manteniendo
pulsada la tecla MEMse puede acelerar el proceso de ajuste.
3. Para salir del modo de ajuste de la hora, pulse la tecla STARTmientras
parpadea la posición de los minutos. Así se accede al modo stand-by.
Cuando se cambian las pilas se debe ajustar nuevamente la hora. Esto se puede
hacer bien de forma automática a través de la señal de radio o bien de forma
manual a través del modo de ajuste de la hora.
Puede ajustar la función del idioma cuando el aparato está encendido
(interruptor ENCENDIDO/APAGADOen posición I, es decir, sólo se indican la fecha y la hora. Mantenga pulsada la tecla MEM
cación del idioma ajustado (p. ej. L1) aparezca en la pantalla.
L0 = Función de idioma desconectada L4 = Holandés
L1 = Alemán L5 = Francés
L2 = Inglés L6 = Italiano
L3 = Español L7 = Portugués
y MEMpara acceder al modo de ajuste rápido del reloj
parpadean sucesivamente las posiciones para día, horas y
para acceder al modo de
hasta que la indi-
El aparato pronuncia en el idioma ajustado y, si mantiene pulsada la tecla MEM
, tanto las indicaciones como la pronunciación pasan al siguiente idioma. Se
puede cambiar el idioma ajustado soltando la tecla MEM
muestra o se pronuncia el idioma deseado. El volumen ajustado, mostrado por
la barra parpadeante, se puede modificar, volviendo a pulsar la tecla MEM
y manteniéndola pulsada, hasta que se muestra el volumen deseado. Cuanto
más alta esté la barra, mayor será el volumen. Suelte la tecla MEMpara
confirmar su selección. La barra deja de parpadear y la pantalla vuelve a
mostrar la hora.
en cuanto se
59
Page 66

ES
3 Puesta en funcionamento / 4 Aplicación
3.6
Soporte
3.7
Interruptor
ENCENDIDO/
APAGADO I/0
4 Aplicación
4.1
Colocación
del brazalete
b
1-2 cm
a
c
El brazalete y el tubo del aparato se almacenan con la ayuda del soporte incluido en el volumen de suministro. Coloque las almohadillas adhesivas por ambos
lados en la parte trasera del aparato y presione el soporte para que quede fijo.
El aparato está equipado con una pantalla táctil. Por ello, procure que el interruptor ENCENDIDO/APAGADOsiempre esté en posición 0 cuando no utilice el aparato para evitar que se realicen ajustes no deseados al presionar accidentalmente la pantalla.
1. Inserte el extremo del tubo flexible de aire en la apertura del aparato
antes de usarlo. Observe que el tubo de goma no presente daños y se
asiente con firmeza. El tensiómetro se utiliza como aparato de mesa.
2. Pase la parte abierta del manguito por el estribo de metal de modo que el
velcro se encuentre en la parte exterior.
3. Abra el manguito de tal modo que adopte una forma circular.
4. Pase el manguito por encima del brazo izquierdo. Coloque el tubo de aire
en el centro del brazo como prolongación del dedo medio (a).
5. Coloque el brazo con la palma de las manos hacia arriba sobre la mesa. El
canto inferior del manguito debería hallarse entre 1 - 2 cm encima del codo
(b). Alise el manguito (c) y cierre el velcro.
6. Evite unvacío entre el brazo y el manguito. El resultado de medición podría
verse falseado.
7. Efectúe la medición en el brazo remangado. El brazo no debe ser estran-
gulado por la ropa remangada.
8. Sólo cuando el manguito no se puede colocar en el brazo izquierdo, coló-
quelo entonces en el brazo derecho. Las mediciones deberán llevarse a
cabo siempre en el mismo brazo.
4.2
Posición correcta
para la medición
60
Posición correcta en la medición al sentarse
• Efectúe la medición en la posición sentada.
• Relaje su brazo y estírelo, por ejemplo sobre una
mesa.
• El manguito debe mantenerse a la altura del
corazón.
• Mantenga la calma durante la medición: No se
mueva ni hable, ya que los resultados podrían verse afectados.
Posición correcta en la medición al tumbarse
• En algunos casos, la medición tam-
bién se puede efectuar estando
tumbado.
• Túmbese de espaldas al menos
durante 5 minutos y relaje su brazo.
Page 67

4 Aplicación / 5 Memoria
• Observe que el manguito se encuentre a la altura del corazón. En caso de que
no esté alineado, la exactitud de la medición puede verse afectada.
• Mantenga la calma durante la medición: No se mueva ni hable, ya que los
resultados podrían verse afectados.
ES
4.3
Medición de la
tensión arterial
4.4
Desconexión
del aparato
1. Encienda el aparato con el interruptor ENCENDIDO/APAGADO(posi-
ción I ) y pulse la tecla de START.
2. Si se pulsa la tecla de START, se oirá un pitido y todos los símbolos
aparecerán en la pantalla. Mediante este test, se puede comprobar que la
indicación esté completa. La pantalla muestra los valores de la última
medición. Si la función de voz está activada, las indicaciones se realizarán
en el idioma ajustado. Si todavía no se ha realizado ninguna medición,
aparecerán además de la hora y la fecha, sólo ceros.
3. El aparato está listo para usarse, aparece el número 0, con la función de
voz se anuncia el inicio de la medición. El manguito se infla automáticamente para medir la presión arterial. Durante el inflado la indicación de la
presión cambia de manera constante.
4. El aparato va bombeando el manguito hasta alcanzar una presión sufi-
ciente. A continuación, el aparato deja salir el aire lentamente y lleva a
cabo una medición.
5. Una vez finalizada la medición, se desinfla el manguito. La presión sistólica
y diastólica, así como la frecuencia cardíaca con el símbolo de pulso
aparecen en la pantalla . Conforme a la clasificación de la presión
arterial de la OMS (véase pág. 56), parpadeará el indicador de presión
arterial
voz ajustada los resultados de medición se anuncian en el idioma ajustado.
6. Los valores medidos se guardan automáticamente. En la memoria se
pueden guardar hasta 60 valores medidos con hora y fecha.
El aparato dispone de una desconexión automática. Si no se pulsa ninguna
tecla más, el aparato se desconecta de manera automática tras un minuto. El
aparato también se puede desconectar con la tecla de START. Cuando no
utilice el aparato, cambie el interruptor ENCENDIDO/APAGADOa la posición 0. La hora y la fecha se muestran de forma permanente en la pantalla.
junto a las correspondientes barras de color. Con la función de
5 Memoria
5.1
Llamar los valores
memorizados
Puede guardar en la memoria de su tensiómetro hasta 60 mediciones (presión
arterial y pulso con hora y fecha). Los valores de medición se guardan automáticamente. Para consultar los valores medidos guardados, pulse la tecla
MEM
número de posiciones de memoria ocupado, luego se muestran los valores de
la última medición guardada incluido el indicador de presión arterial parpadeante .
. Los datos guardados aparecerán en la indicación. Primero aparece el
61
Page 68

ES
5 Memoria / 6 Generalidades
Si la función de voz está activada, el aparato pronuncia el número de memoria, junto con los valores guardados de presión arterial y pulso, así como
la evaluación de la presión conforme a la escala de las directrices de la
Organización Mundial de la Salud (véase la pág. 56).
Si se vuelve a pulsar la tecla MEM
anteriores. Cuando llegue a la entrada más antigua, el aparato se apaga.
En el modo de consulta de memoria, el aparato se apaga automáticamente
transcurridos unos 120 segundos si no se pulsa ninguna tecla. Si pulsa la tecla
START
desconectar el aparato al mismo tiempo.
Si en una memoria todas las 60 posiciones de memorización están ocupadas,
un nuevo valor medido se sobreescribirá en el valor más antiguo.
podrá salir en cualquier momento del modo de memorización y
se mostrarán los valores de medición
5.2
Borrar la memoria
6 Generalidades
6.1
Averias y solucion
62
Si se encuentra en el modo de memorización, pulse y sostenga la tecla MEM
durante unos 8 segundos. Después de tres pitidos se borrarán de manera
automática todos los valores de medición guardados. En la pantalla se
muestran sólo ceros en lugar de los valores de medición.
En la pantalla aparece el símbolo de cambio de pilas
• Las pilas están casi o completamente gastadas. Sustituya las cuatro pilas por
pilas alcalinas nuevas de 1,5 V del tipo AA.
Se muestran valores de medición fuera de lo normal
• El manguito no se ha colocado correctamente o está mal apretado. Coloque
correctamente el manguito y apriételo.
• Usted o el aparato se han movido durante la medición. No se mueva, no
mueva el brazo ni el aparato.
• Tiene un pulso irregular. Si su pulso es ligeramente irregular, repita la
medición. El aparato no es apropiado para pacientes con un pulso marcadamente irregular.
• Ha hablado durante la medición, está nervioso o impaciente. No hable y
respire profundamente de dos a tres veces para relajarse.
• No ha adoptado la posición correcta al sentarse o tumbarse. Adopte la
posición correcta para efectuar la medición.
• La unión al tubo de aire está interrumpida o la unión del tubo no es estanca.
Compruebe si el tubo es estanco en la conexión entre el manguito y el
aparato. Repita la medición.
En la pantalla aparece "EE"
• El aparato no se ha insuflado lo suficiente. Repita la medición.
• Al insuflarse o durante el proceso de medición se ha producido un error.
Repita la medición.
La indicación no muestra nada o permanece inmóvil
• No se han introducido pilas, están mal colocadas o están completamente
vacías. Inserte pilas, compruebe que estén bien colocadas o sustitúyalas por
nuevas.
• Se trata de un funcionamiento erróneo o de una avería en el funcionamiento. Extraiga las pilas durante un momento y vuélvalas a insertar.
En caso de que el mensaje de error vuelva a aparecer durante una
nueva medición, póngase en contacto con el centro de servicio.
Page 69

6 Generalidades
ES
6.2
Limpieza y
cuidado
6.3
Indicaciones para
la eliminación
• Desinstale las pilas antes de limpiar el aparato.
• No utilice nunca soluciones de limpieza abrasivas ni cepillos duros.
• Limpie el aparato con un paño suave humedecido ligeramente con agua y
jabón. No utilice en ningún caso productos de limpieza agresivos o alcohol.
• No debe penetrar agua en el aparato. Vuelva a utilizar el aparato una vez esté
completamente seco.
• Desinstale las pilas del aparato si no va a utilizarlo por un período de tiempo
largo. De lo contrario existe el peligro de que las pilas se descarguen.
• No exponga el aparato a la radiación solar directa y protéjalo contra el polvo
y la humedad.
• Infle el brazalete exclusivamente cuando éste haya sido colocado sobre el
brazo.
• Guarde el aparato preferiblemente en el embalaje de compra en un lugar
limpio y seco.
• Control técnico de medición (sirve para el uso profesional):
El aparato ha sido calibrado por el fabricante para un período de tiempo de
dos años. El control técnico de medición debe ser llevado a cabo nuevamente
cada dos años si se utiliza el aparato profesionalmente. Este control
está sujeto a costes y puede ser llevado a cabo por la autoridad competente
o por los centros de servicios de mantenimiento autorizados, conforme al
“reglamento alemán para explotadores de productos médicos”.
Este aparato no se debe eliminar por medio de la recogida de basuras
doméstica.
Todos los usuarios están obligados a entregar todos los aparatos eléctricos o
electrónicos, independientemente de si contienen substancias dañinas o no, en
un punto de recogida de su ciudad o en el comercio especializado, para que
puedan ser eliminados sin dañar el medio ambiente.
Retire las pilas antes de deshacerse del aparato. No arroje las pilas usadas a la
basura sino al contenedor de residuos especiales, o deposítelas en los recolectores de pilas de los comercios especializados.
Para más información sobre cómo deshacerse de su aparato, diríjase a su
ayuntamiento o a su establecimiento especializado.
6.4
Directrices /
normas
Este tensiómetro cumple las especificaciones de las normativas comunitarias
para mediciones de la tensión arterial no intensivas. Está certificado según las
directivas comunitarias y provisto del símbolo CE (símbolo de certificación)
m"CE 0297". El tensiómetro cumple las especificaciones europeas EN 1060-1
y EN 1060-3+A1. Se cumplen las especificaciones de la directiva comunitaria
"93/42/CEE del Consejo de 14 de junio de 1993 sobre productos médicos",
igual que la directiva comunitaria 89/336/CEE.
Zona de aplicación:
El aparato ha sido diseñado para realizar mediciones de la tensión arterial no
invasivas en adultos (esto es, ha sido diseñado para su uso externo).
63
Page 70

ES
6 Generalidades
Compatibilidad electromagnética:
El aparato cumple las exigencias de la norma EN 60601-1-2 de compatibilidad
electromagnética. Puede consultar a MEDISANA los detalles de estos datos
medidos.
6.5
Datos tècnicos
Denominación y modelo : Tensiómetro MTD de MEDISANA
Sistema de indicación : Indicador digital (display)
Espacios de memoria : 60
Método de medición : Oscilométrico
Alimentación de corriente : 6 V= , 4 x 1,5 V miñón AA LR 6, alcalina
Intervalo de medición de
la tensión arterial : 0 – 300 mmHg
Intervalo de medición del pulso : 30 – 180 battiti/ min
Divergencia de medición
máxima de la presión estática : ± 3 mmHg
Divergencia de medición
máxima de los valores del pulso : ± 5 % del valore
Generación de presión : Automática por bomba
Desinflado : Automático
Desconexión automática : Tras aprox. 1 minuto
Condiciones de servicio : De + 5 °C a + 40 °C,
<
85 % % humedad relativa del aire
Condiciones de almacenaje : De – 20 °C a + 55 °C
<
95 % % humedad relativa del aire
Medidas : aprox. 142 mm x 98 mm x 52 mm
Brazalet : 22 – 30 cm brazalete para adultos con
una circunferencia de brazo normal
Peso : aprox. 310 g sin las pilas
Artículo n° : 51145
N° EAN : 40 15588 51145 5
Accesorios especiales : Adaptador de red,
art. N° 51125
N° EAN 40 15588 51125 7
Brazalete grande de 30 y 42 cm para adultos
con una gran circunferencia de brazo,
art. N° 51126
N° EAN 40 15588 51126 4
64
Debido a la constante mejora del producto nos reservamos
el derecho a introducir modificaciones técnicas y de diseño.
Page 71

7 Garantía
ES
Condiciones
de garantía
y reparación
Le rogamos consulte con su distribuidor especializado o directamente con el
centro de servicio técnico en caso de una reclamación. Si tuviera que remitirnos el dispositivo, le rogamos indique el defecto y adjunte una copia del
recibo de compra.
En este caso, se aplicarán las siguientes condiciones de garantía:
1. Con relación a los productos de MEDISANA, se ofrece una garantía por
un período de tres años a partir de la fecha de compra. En caso de una
reclamación, la fecha de compra debe probarse mediante el recibo de
compra o la factura.
2. Los defectos de material o de fabricación se eliminarán de forma
gratuita dentro del período de garantía.
3. La aplicación de la garantía no conlleva una extensión del período de
garantía, ni con respecto al dispositivo ni con respecto a los componentes sustituidos.
4. Esta garantía no cubre:
a. todos los daños causados por abuso, por ej. por incumplimiento del
manual de uso;
b. los daños debidos a reparaciones o intervenciones por parte del
comprador o terceros no autorizados;
c. los daños de transporte causados durante el transporte del domicilio
del fabricante al consumidor o durante el envío al servicio técnico;
d. accesorios sometidos a un desgaste normal (manguito, pilas, etc.).
5. Se excluye cualquier responsabilidad por los daños directos o indirectos
causados por el dispositivo, aunque el daño en el dispositivo haya sido
considerado como una reclamación justificada.
MEDISANA AG
Itterpark 7-9
40724 Hilden
Alemania
Tel.: +49 (0) 2103 / 2007-60
Fax: +49 (0) 2103 / 2007-626
eMail: info@medisana.de
Internet: www.medisana.de
Para la dirección del servicio técnico, consulte la última página.
65
Page 72

PT
1 Avisos de segurança
NOTAS IMPORTANTES!
GUARDAR SEM FALTA!
Antes de utilizar o aparelho, leia atentamente o manual de instruções, em
especial as indicações de segurança e guarde-o para uma utilização posterior.
Se entregar o aparelho a terceiros, faculte também este manual de instruções.
Descrição dos símbolos
Este manual de instruções pertence a este aparelho.
Ele contém informações importantes para a colocação
em funcionamento e a operação. Leia completamente
este manual de instruções. O incumprimento destas
instruções pode causar lesões graves ou danos no
aparelho.
AVISO
Estas indicações de aviso têm de ser cumpridas para
evitar possíveis lesões do utilizador.
66
ATENÇÃO
Estas indicações têm de ser cumpridas para evitar
possíveis danos no aparelho.
NOTA
Estas notas fornecem informações adicionais úteis
para a instalação ou a operação.
Classificação do aparelho: IIa, tipo B
Número de lote
Fabricante
Data de produção
Page 73

AVISO
1 Avisos de segurança
PT
Avisos de
segurança
1.1
Indicações para
o seu bemestar
1.2
O que deverá
fazer sem falta
Não proceda a medidas terapêuticas com base nas medições
de tensão realizadas por si! Nunca altere a dosagem de um
medicamento prescrito pelo médico!
• Perturbações do ritmo cardíaco ou arritmias provocam um pulso irregular. Tal
pode causar em medições da tensão arterial com aparelhos oscilométricos
problemas na avaliação do valor correcto de medição.
• Se sofrer de doenças como, por exemplo, oclusão arterial, antes de utilizar o
aparelho consulte por favor o seu médico.
• O aparelho não pode ser utilizado para controlo da frequência cardíaca de
um pacemaker.
• Grávidas devem tomar atenção às medidas de precaução necessárias e à sua
própria capacidade de sobrecarga, caso necessário consulte o seu médico.
• Se durante uma medição surgirem transtornos como, por exemplo, dores na
parte superior do braço ou outras queixas, tome a seguinte contra-medida:
Accione o botão START
insuflada. Desaperte a braçadeira e retire-a da parte superior do braço. Por
favor entre em contacto com o seu vendedor especializado ou informenos
directamente.
• Pessoas com a veia do pulso pouco saliente deverão levantar o braço e abrir
e fechar a mão aproximadamente 10 vezes e só depois medir. Através deste
exercício consegue-se que a veia do pulso e o processo de medição sejam
optimizados.
• Utilize o aparelho só de acordo com a sua finalidade conforme as instruções
de uso.
• Se utilizar o aparelho para outros fins perde o direito à garantia.
• O aparelho destina-se apenas ao uso doméstico.
• Se, em casos raros, através de uma função errada acontecer que a braçadeira
durante a medição fique permanentemente insuflada, terá de a abrir imediatamente.
• O aparelho não pode ser utilizado perto de aparelhos com forte radiação
eléctrica como, por exemplo, transmissor de rádio. A função pode ser
prejudicada através disso.
• Este aparelho não é adequado para ser utilizado por pessoas (incluindo
crianças) com capacidades físicas, sensoriais ou psíquicas limitadas ou falta
de experiência e/ou conhecimentos, a não ser que sejam vigiadas por uma
pessoa responsável pela sua segurança ou que tenham recebido instruções
como utilizar a máquina.
• As crianças devem ser vigiadas para garantir que não brincam com o aparelho.
• Em caso de avarias não repare o aparelho, visto perder todos os direitos à
garantia. Deixe fazer as reparações apenas por serviços técnicos autorizados.
• Proteja o aparelho da humidade. Se, contudo, alguma vez houver infiltração
de líquidos no aparelho, retire imediatamente as pilhas e não deixe o aparelho
ser novamente utilizado. Neste caso entre em contacto com o seu vendedor
especializado ou informenos directamente. Para saber como nos contactar,
consulte a página dos endereços.
, a fim de a braçadeira ser imediatamente des-
67
Page 74

PT
2 Informações gerais
Muito obrigada
2.1
Material fornecido
e embalagem
2.2
O que é a
tensão arterial?
Muito obrigado pela sua confiança e muitos parabéns!
Com o medidor de tensão arterial MTD adquiriu um produto de qualidade da
MEDISANA. Para poder obter os resultados desejados e desfrutar do seu
medidor de tensão arterial MTD da MEDISANA durante muito tempo, aconselhamos a leitura das seguintes instruções de uso e conservação com muita
atenção.
Por favor, em primeiro lugar, verifique se o aparelho está completo e não
apresenta qualquer dano.
funcionamento e consulte o seu revendedor ou o seu centro de assistência.
Do volume de fornecimento fazem parte:
• 1 medidor de tensão arterial MTD MEDISANA
• 1 braçadeira com tubo de ar
• 4 pilhas (tipo AA, LR 6) 1,5V
• 1 bolsa
• 1 suporte com almofada adesiva
• 1 instruções de uso
As embalagens podem ser reutilizadas ou podem ser eliminadas através da
reciclagem. Por favor, elimine adequadamente o material da embalagem não
necessário. Se, durante o desembalamento, verificar danos devido ao transporte, por favor, entre imediatamente em contacto com o seu revendedor.
AVISO
Tenha atenção para que as películas da embalagem não se
tornem brincadeiras para crianças. Existe perigo de asfixia!
Tensão arterial é a pressão exercida nas artérias principais em cada batimento
cardíaco. Quando o coração se contrai (sístole) e bombeia sangue para as
artérias, tal causa um aumento de pressão. O seu valor máximo é designado
pressão sistólica e numa medição da tensão arterial medido como primeiro
valor. Quando o músculo do coração relaxa, a fim de receber novo sangue,
desce também a pressão nas artérias. Quando as artérias estão relaxadas mede
– se o segundo valor – a pressão diastólica.
Em caso de dúvida, não coloque o aparelho em
2.3
Como funciona
a medição?
2.4
¿Porqué es
razonable medir
la tensión arterial
en casa?
68
O MTD é um medidor de tensão arterial concebido para medir a tensão arterial na parte superior do braço. A medição é feita através dum microprocessador que, através de um sensor de pressão, avalia as oscilações de pressão surgidas nas artérias durante a insuflação e desinsuflação da braçadeira.
MEDISANA dispõe de experiência de muitos anos na área da medição da
tensão arterial. A elevada exactidão do princípio de medição dos aparelhos
MEDISANA é comprovada por estudos clínicos efectuados segundo standards
internacionais. Um argumento importante para a medição da tensão arterial é
o facto de as medições serem efectuadas no ambiente habitual e sobre condições de repouso. Muito informativo é o chamado “valor básico”, o qual é
medido directamente a seguir ao levantar e antes do pequeno-almoço. Funda-
Page 75

2 Informações gerais
mentalmente deve medir a sua tensão arterial sempre à mesma hora e sob as
mesmas condições.
Assim garante-se a comparabilidade dos resultados podendo-se detectar a
tempo uma doença de hipertensão arterial ainda no início.
Se a hipertensão arterial permanecer desconhecida durante muito tempo,
aumenta o risco de outras doenças cardiovasculares.
POR ISSO O NOSSO CONSELHO:
Meça a sua tensão arterial todos os dias e regularmente
mesmo que não tenha quaisquer queixas.
PT
2.5
Classificação da
tensão arterial
2.6
Oscilações
da tensão
Na tabela seguinte encontram-se os valores de referência para tensão alta e
baixa sem consideração da idade. Esta escala de medição da tensão arterial
corresponde às directivas da Organização Mundial de Saúde (OMS).
Tensão baixa Tensão normal
sistólica <100 sistólica 100 – 139
diastólica <60 diastólica 60 – 89
Formas da hipertensão
hipertensão leve hipertensão média hipertensão forte
(área de indicação (área de indicação (área de indicação
amarela
sistólica 140 – 159 sistólica 160 – 179 sistólica >_180
diastólica 90 – 99 diastólica 100 – 199 diastólica >_110
Existem muitos factores que podem influenciar a tensão arterial. Assim, por
exemplo, os trabalhos físicos duros, a ansiedade, o stress ou, simplesmente, a
hora da medição podem ter grandes efeitos nos valores medidos. A tensão de
cada pessoa é capaz de oscilar fortemente durante o dia e ao longo do ano.
No caso de pacientes de hipertensão, estas oscilações são particularmente
acentuadas. Em geral, a tensão arterial costuma atingir valores máximos após
esforços físicos e, mínimos, durante a noite, quando se está a dormir.
) laranja) vermelha)
ADVERTÊNCIA
Uma tensão arterial demasiado baixa representa um risco de
saúde, tal como a tensão arterial elevada! As tonturas poderão
resultar em situações perigosas (p.ex. em escadas ou no trânsito)!
(área de indicação verde
)
2.7
Manipulações
e análises
das medições
• Meça a sua tensão várias vezes, guarde os resultados e compare-os depois.
Não tire conclusões de um único resultado!
• Os seus valores de tensão deveriam ser sempre analisados por um médico
que conhece o seu historial clínico. Se utilizar o aparelho regularmente e
registar os valores para o seu médico, informe o seu médico de vez em
quando sobre a tendência que observa.
69
Page 76

PT
2 Informações gerais / 3 Pôr em funcionamento
• Não se esqueça que os valores de medição da tensão diários dependem de
muitos factores. Por exemplo, fumar, o consumo de álcool, medicamentos e
trabalho físico influenciam as medições de diferente maneira.
• Meça a tensão antes das refeições.
• Antes de medir a tensão deveria descansar, no mínimo, 5 minutos.
• Se achar a sua tensão sistólica ou diastólica pouco normal (demasiado alta ou
baixa), apesar de ter manuseado o aparelho correctamente, e verificar que
isto acontece com frequência, deveria consultar o seu médico. Consulte o
médico também quando um pulso irregular ou muito baixo não permite
fazer medições.
3 Põr em funcionamento
3.1
Colocar / retirar
as pilhas
Colocar: Abra o compartimento das pilhas na parte de baixo do aparelho
carregando levemente no fecho e coloque as quatro pilhas fornecidas
juntamente com o aparelho (pilhas alcalinas, tipo AA LR 6). Preste atenção
ao posicionamento correcto das pilhas (figura no compartimento das pilhas).
Volte a colocar a tampa do compartimento das pilhas e pressioneo até o ouvir
engrenar.
Retirar: Se no ecrã aparecer o símbolo da pilha , coloque por favor pilhas
novas. Após a colocação das pilhas, o display indica a data e as horas (predefinidas). Acerte a data e a hora, como descrito em 3.3 / 3.4. Por favor, tenha
em atenção que, após cada mudança de pilhas, a data e as horas têm de ser
acertadas de novo. Os resultados de medição anteriores permanecem memorizados.
AVISO
INDICAÇÕES DE SEGURANÇA SOBRE AS PILHAS
• Não abra as pilhas!
• Remova imediatamente as pilhas gastas do aparelho!
• Elevado perigo de pilhas babadas, evite o contacto com a pele,
olhos e mucosas! No caso de contacto com ácido das pilhas, lave
o local com água potável abundante e consulte imediatamente
um médico!
• Se a pilha foi engolida, consulte imediatamente um médico!
• Troque todas as pilhas em conjunto!
• Utilize pilhas do mesmo tipo, não utilize pilhas de diferentes
tipos ou pilhas novas e gastas umas com as outras!
• Coloque correctamente as pilhas, atenção à polaridade!
• No caso de não utilização prolongada, remova as pilhas do
aparelho!
• Mantenha as pilhas afastadas das crianças!
• Não volte a carregar as pilhas! Existe perigo de explosão!
• Não conecte as pilhas em curto-circuito! Existe perigo de
explosão!
-
>
70
Page 77

3 Pôr em funcionamento
AVISO
INDICAÇÕES DE SEGURANÇA SOBRE AS PILHAS
(Continuação)
• Não coloque as pilhas no fogo! Existe perigo de explosão!
• Não elimine as pilhas ou as pilhas recarregáveis vazias através
do lixo doméstico, mas entregue-as nos postos de recolha
especiais para pilhas ou coloque-as no pilhão!
PT
3.2
Utilização de
uma fonte de
alimentação
3.3
Regular a
recepção do
sinal horário
(RCC)
(RCC = Radio
Controlled Clock)
Como alternativa, o aparelho também pode ser operado com uma fonte de
alimentação especial (MEDISANA n.º de art. 51125) que é conectada na
respectiva tomada
pilhas permanecem no aparelho. Inserindo a ficha na tomada do lado direito
do medidor da tensão arterial, as pilhas são desligadas mecanicamente. Por
isso, é necessário inserir primeiro a fonte de alimentação na tomada e, depois,
conectá-la ao medidor de tensão arterial. Se o medidor de tensão arterial já não
for utilizado, é preciso remover primeiro a ficha do medidor de tensão arterial
e, depois, a fonte de alimentação da tomada. Assim, deixa de ser necessário
introduzir constantemente a data e as horas.
a. Primeira regulação:
Assim que tiver inserido as pilhas, o aparelho comuta automaticamente para o
modo do relógio comandado por rádio. Durante a busca pelo sinal horário pisca
o símbolo do relógio comandado por rádio. Assim que o relógio receber um
sinal suficiente para a regulação, as horas e a data são reguladas
automaticamente. No final do processo de regulação, o aparelho comuta para
o modo standby, no qual são exibidas permanentemente as horas e a data. Se
não for recebido um sinal, o aparelho comuta automaticamente para o modo
standby sem alterar os valores previamente regulados para as horas e a data.
Durante a primeira regulação é possível interromper a busca pelo sinal horário
ao premir a tecla START
modo standby sem alterar os valores previamente regulados para as horas e a
data.
b. Regulação rápida do relógio controlado por rádio
Se o aparelho se encontrar no modo standby e se premir o botão START
e o botão MEMem simultâneo, acede ao modo de regulações rápidas do
relógio controlado por rádio. O símbolo do relógio controlado por rádio pisca.
Quando o sinal horário for recebido, as horas e a data são automaticamente
reguladas. Se não for recebido um sinal, o aparelho comuta para o modo da
regulação manual das horas.
A regulação rápida pode ser cancelada, premindo o botão START
o aparelho comuta para o modo da regulação da hora.
localizada na parte direita do aparelho. Neste caso, as
. O aparelho comuta automaticamente para o
. Depois,
71
Page 78

PT
3 Põr em funcionamento
c. Sinal de regulação regular
O aparelho obtém automaticamente duas vezes diariamente, às 2:05 h e às
14:05 h, o sinal rádio para a actualização da regulação das horas.
Premindo o botão START, é possível desligar a recepção regular o sinal
horário.
3.4
Regular a data
e as horas
3.5
Ajustar a função
de voz
Normalmente, as horas e a data são reguladas automaticamente via rádio com
o sinal horário. Quando o sinal horário não for recebido ou for recebido apenas
de modo fraco, as horas também podem ser reguladas manualmente.
1. O aparelho tem de se encontrar no modo standby. Prima o botão START
e o botão MEMem simultâneo para aceder ao modo de regulação rápida
do relógio controlado por rádio. Prima agora o botão START
modo da regulação manual das horas.
2. Primeiro, pisca o local da introdução do mês. Premindo continuamente o
botão START
outros. Enquanto o respectivo local de introdução pisca, accione o botão
MEMpara introduzir p respectivo número. Segurando o botão MEM,
é possível acelerar o processo de regulação.
3. Abandona o modo da regulação das horas, premindo o botão START
enquanto pisca o local para os minutos. Acede o modo standby.
Após uma troca de pilhas, é necessário regular o relógio de novo, automaticamente via sinal rádio ou manualmente através do modo da regulação das
horas.
A função de voz pode ser ajustada quando o aparelho está ligado, (interruptor
de LIGAR/DESLIGAR
exibidadas. Prima o botão MEM
a indicação da língua ajustada (p.ex. L1).
L0 = função de voz desligada L4 = holandês
L1 = alemão L5 = francês
L2 = inglês L6 = italiano
L3 = espanhol L7 = português
, piscam os locais para o dia, a hora e o minuto uns após os
na posição I), isto é, apenas a data e as horas são
e mantenha premido até o display exibir
e acede ao
72
O aparelho anuncia a língua ajustada e comuta para a indicação e o anúncio
da próxima língua se mantiver o botão MEMpremido. A língua ajustada
pode ser alterada libertando o botão MEM
for indicada e anunciada. O volume ajustado que é indicado através das barras
a piscar pode ser alterado se voltar a premir o botão MEMe mantiver
premido até à indicação do volume pretendido, quanto maior a barra, mais
alto o volume. Liberte o botão MEMpara conformar a sua selecção. A barra
pára de piscar e o display volta a comutar para a indicação da hora.
assim que a língua pretendida
Page 79

3 Pôr em funcionamento / 4 Utilização
PT
3.6
Suporte
3.7
Interruptor de
LIGAR/DESLIGAR
I/0
4 Utilização
4.1
Colocar a
braçadeira
b
1-2 cm
a
c
Com a ajuda do suporte fornecido, a braçadeira e o tubo podem ser guardados no aparelho. Em primeiro lugar, fixe a almofada adesiva de ambos os lados
na parte traseira do aparelho e, depois, pressione o suporte sobre a mesma.
O seu aparelho está equipado com um ecrã de toque. Por isso, tenha atenção
para que o interruptor de LIGAR/DESLIGAR
quando o aparelho não está em funcionamento para que um accionamento
acidental sobre o ecrã não realize ajustes involuntários.
1. Antes da utilização, insira a peça final do tubo de ar na abertura do apa-
relho
. Tenha atenção para que o tubo não seja danificado e esteja bem
apertado. O medidor de tensão arterial é utilizado como aparelho de mesa.
2. Desloque o lado aberto da braçadeira através do aro em metal de modo a
que o fecho de Velcro se encontre no lado exterior.
3. Abra a braçadeira
4. Desloque a braçadeira através da parte superior do seu braço esquerdo.
Posicione o tubo de ar
médio (a).
5. Coloque o braço, com a palma da mão virada para cima, sobre a mesa.
Para tal, a margem inferior da braçadeira deve encontrar-se 1 - 2 cm acima
da curva do cotovelo (b). Estique a braçadeira (c) e feche o fecho de Velcro.
6. Evite um espaço vazio entre o braço e a braçadeira. Este pode falsificar o
valor de medição.
7. Meça na parte superior do braço despido. No caso de vestuário justo na
parte superior do braço, tenha atenção para que o braço não seja estrangulado através das dobras da manga.
8. Só quando a braçadeira não pode ser colocada no braço esquerdo é que
ela deve ser colocada no braço direito. As medições devem ser sempre
realizadas no mesmo braço.
de modo a que seja formada uma forma cilíndrica.
no centro do braço no prolongamento do dedo
esteja sempre na posição 0
4.2
A posição correcta
a medição
A posição correcta durante a medição quando sentado
• Proceda à medição sentado.
• Relaxe o braço e coloque-o descontraído, por
exemplo, em cima de uma mesa.
• Tenha atenção para que a braçadeira se encontre à altura do coração.
• Durante a medição permaneça sossegado: não
se mexa nem fale, caso contrário poderá alterar
os resultados da medição.
A posição correcta durante a medição quando deitado
• Em casos especiais, a medição também pode ser realizada na posição
deitada.
• Relaxe na posição deitada sobre as
costas, pelo menos, durante 5 minutos e posicione o braço de forma
descontraída.
73
Page 80

PT
4 Utilização / 5 Memória
• Tenha atenção para que a braçadeira se encontre à altura do coração. Uma
altura diferente influencia a precisão da medição.
• Durante a medição, mantenha-se quieta(o): Não se mexa e não fale, caso
contrário, os resultados de medição podem ser alterados.
4.3
Medir a
tensão arterial
4.4
Desligar o
aparelho
1. Ligue o aparelho com o interruptor de LIGAR/DESLIGAR
pressione o botão START
2. Se premir o botão START, ouve-se um sinal acústico (bip) e todos os
símbolos são exibidos no display. Através deste teste, verifica-se se a indicação está completa. O display exibe os valores da última medição. Se a
função de voz estiver ligada, as informações são anunciadas na língua
ajustada. Se ainda não foi realizada qualquer medição, ao lado da hora e
da data são apenas exibidos zeros.
3. O aparelho está pronto para a medição, o display exibe o número 0 e, com
a função de voz ajustada, o início da medição é anunciado. O aparelho
bombeia automaticamente a braçadeira de modo lento para medir a sua
tensão arterial. Durante a bombagem, a indicação da tensão altera-se continuamente.
4. O aparelho bombeia a braçadeira o tempo necessário até alcançar uma
pressão suficiente para a medição. Em seguida, o aparelho esvazia lentamente o ar da braçadeira e efectua a medição.
5. Quando a medição estiver concluída, o ar da braçadeira é esvaziado. A
pressão sistólica e diastólica, bem como o valor do pulso com o símbolo do
pulso são exibidos pelo display
tensão arterial da WHO (ver pág. 69), o indicado da tensão arterial
ao lado da respectiva barra colorida. Com a função de voz ajustada, os
resultados da medição são anunciados na língua ajustada.
6. Os valores medidos são memorizados automaticamente. A memória tem
uma capacidade para guardar até 60 valores de medição com a hora e
data.
O aparelho dispõe de uma desactivação automática. Quando nenhum dos
botões é premido, o aparelho desliga-se automaticamente após um minuto.
O aparelho também pode ser desligado com o botão START
lho não estiver a ser utilizado, comute o interruptor de LIGAR/DESLIGAR
para a posição 0. A hora e a data são exibidas continuamente pelo display.
.
. De acordo com a classificação da
(posição I) e
. Se o apare-
pisca
5 Memória
5.1
Indicação
dos valores
memorizados
74
A memória do seu medidor da tensão arterial possui a capacidade de memorizar até 60 medições (pressão arterial e pulso com hora e data). Os valores de
medição são memorizados automaticamente. Para consultar os valores de
medição guardados, prima o botão MEM
dos no display. Em primeiro lugar, o display exibe a quantidade de posições de
memória ocupadas. Depois, o display exibe os valores da última medição
guardada com o indicador da tensão arterial a piscar.
Se a função de voz estiver activada, o aparelho anuncia o número da posição
de memória em conjunto com os valores da tensão arterial e do pulso guar-
. Os dados guardados são exibi-
Page 81

5 Memória / 6 Generalidades
dados e a avaliação da tensão arterial de acordo com a escala das directivas
da Organização Mundial de Saúde (ver pág. 69). Se voltar a premir o botão
MEM, o display exibe os respectivos valores de medição anteriores. Quan-
do chegar ao registo mais antigo, o aparelho desliga-se. No modo consulta da
memória, o aparelho desliga-se automaticamente após aprox. 120 segundos,
caso não seja pressionada nenhuma tecla. Premindo o botão START, existe
a possibilidade de abandonar a qualquer altura o modo de consulta da
memória e de desligar simultaneamente o aparelho.
Se todas as 60 posições de memória estiverem ocupadas, o novo valor medido
é gravado enquanto o valor mais antigo é apagado.
PT
5.2
Apagar a
memória
6 Generalidades
6.1
Erros e solução
Se estiver no modo de consulta da memória, prima e mantenha o botão MEM
premido durante aprox. 8 segundos. Após três sinais acústicos, todos os
valores de medição guardados são automaticamente apagados. O display exibe
apenas zeros em vez dos valores de medição.
No mostrador é exibido o símbolo da substituição das pilhas
• As pilhas estão com pouca carga ou vazias. Substitua todas as quatro pilhas
por pilhas alcalinas novas 1,5 V do tipo AA.
São indicados valores de medição invulgares
• A braçadeira não está colocada correctamente ou não está bem apertada.
Coloque a braçadeira correctamente e aperte-a.
• Durante a medição mexeu-se ou movimentou o aparelho. Mantenha-se
quieta(o), não mova o seu braço e o aparelho.
• Tem um pulso irregular. Repita a medição apenas com um pulso ligeiramente irregular. O aparelho não é adequado para pacientes com um pulso
fortemente irregular.
• Durante a medição falou, está nervosa(o) ou agitada(o). Não fale e inspire
profundamente duas a três vezes para descontrair.
• Não adoptou a posição sentada ou deitada correcta. Adopte a posição
sentada correcta durante a medição.
• É possível que a conexão ao tubo de ar esteja interrompida ou que a conexão
do tubo não esteja vedada. Verifique a conexão entre a braçadeira para a
parte superior do braço e o aparelho e se o tubo de ar está vedado. Repita a
medição.
O display exibe "EE"
• O aparelho não bombeou ar suficiente. Repita a medição.
• Ocorreu uma falha na bombagem ou durante o procedimento de medição.
Repita a medição.
A indicação não exibe nada ou fica parada
• As pilhas não estão inseridas, as pilhas estão mal inseridas ou estão completamente vazias. Insira as pilhas, verifique a posição das pilhas ou substitua-as por novas.
• Trata-se de uma função errada ou falha de funcionamento. Retire as pilhas
durante algum tempo e volte a inseri-las.
Se a mensagem de erro voltar a ser exibida durante a nova medição,
por favor, contacte o centro de assistência.
75
Page 82

PT
6 Generalidades
6.2
Limpeza e
manutenção
6.3
Indicações sobre
a eliminação
• Retire as pilhas antes de limpar o aparelho.
• Não utilize detergentes agressivos nem escovas fortes.
• Limpe o aparelho com um pano macio humedecido com uma barrela de
sabão suave. Nunca utilize agentes de limpeza agressivos ou álcool.
• Não pode entrar água para dentro do aparelho. Só volte a utilizar o aparelho
quando este estiver completamente seco.
• Retire as pilhas do aparelho se não o quiser utilizar durante longo tempo.
Caso contrário há o risco de as pilhas derramarem.
• Não exponha o aparelho à luz directa do sol, proteja-o de sujidade e
humidade.
• Só bombeie ar para a braçadeira quando esta estiver colocada na parte
superior do braço.
• A melhor maneira de proteger o aparelho é colocá-lo dentro da bolsa ad-
quirida e guardá-lo num local limpo e seco.
• Controlo técnico de medição (válido para a utilização comercial):
O aparelho está calibrado pelo fabricante por um período de dois anos.
O controlo técnico de medição tem, em caso de utilização industrial, de
ser feito o mais tardar de dois em dois anos. O controlo está sujeito a custos
e pode ser efectuado por uma entidade pública competente ou por um
serviço de manutenção autorizado de acordo com a directiva sobre produtos
médicos.
Este aparelho não pode ser eliminado em conjunto com o lixo doméstico.
Cada consumidor tem o dever de entregar qualquer aparelho eléctrico ou
electrónico com ou sem substâncias nocivas nos postos de recolha públicos
da sua cidade ou no seu revendedor especializado, para que possam ser eliminados ecologicamente.
Antes de eliminar o aparelho, remova as pilhas. Não elimine as pilhas vazias
através do lixo doméstico, mas entregue-as nos postos de recolha especiais
para pilhas ou coloque-as no pilhão.
Para mais informações sobre as formas de descarte, contacte as autoridades
locais ou o seu revendedor.
6.4
Directivas /
norms
76
Este medidor de tensão arterial corresponde às prescrições da norma UE para
medidores de tensão arterial não invasivos. O aparelho está certificado em
conformidade com as directivas CE e está provido do símbolo CE (símbolo de
conformidade) “CE 0297”. O medidor de tensão arterial corresponde às
prescrições europeias EN 1060-1 e EN 1060-3+A1. As prescrições da directiva
UE “93/42/CEE do Conselho de 14 de Junho de 1993 relativas a produtos
médicos” estão cumpridas, bem como as da directiva UE 89/336/CEE.
Círculo de utilizadores:
O aparelho é apropriado para medições da tensão arterial não-invasivo em
adultos (quer dizer, é apropriado para a aplicação exterior).
Page 83

6 Generalidades
Compatibilidade electromagnética:
O aparelho corresponde às exigências da norma EN 60601-1-2 para a compatibilidade electromagnética. Detalhes sobre estes dados de medição podem ser
solicitados junto da MEDISANA.
PT
6.5
Dados técnicos
Nome e modelo : Medidor de tensão arterial MTD MEDISANA
Sistema de indicação : Indicação digital
Posições de memória : 60
Método de medição : Oscilométrico
Abastecimento de tensão : 6 V= , 4 x 1,5 V Mignon AA LR 6, Alcalina
Alcance pressão arterial : 0 – 300 mmHg
Alcance medição pulso : 30 – 180 pulsações / min
Deriva máxima da pressão
estática : ± 3 mmHg
Deriva máxima dos valores
do pulso : ± 5 % do valor
Formação de pressão : Automática com bomba
Desinsuflação do ar : Automática
Desligar automático : Após ca. de 1 min
Ambiente de funcionamento : + 5 °C a + 40 °C
<
85 % humidade relativa
Condições armazenamento : - 20 °C a + 55 °C
<
95 % humidade relativa
Dimensões : aprox. 142 mm x 98 mm x 52 mm
Braçadeira : 22 – 30 cm braçadeira para adultos com
volume médio da parte superior do braço
Peso : aprox. de 310 g sem pilhas
Número de artigo : 51145
Número EAN : 40 15588 51145 5
Acessórios : Fonte de alimentação
art. n.º 51125
Número EAN 40 15588 51125 7
Braçadeira grande 30 - 42 cm
para adultos com volume grande
da parte superior do braço
art. n.º 51126
Número EAN 40 15588 51126 4
Devido aos constantes melhoramentos do produto,
reservamos o direito a proceder a alterações técnicas e estéticas.
77
Page 84

PT
7 Garantia
Garantia e
condições
de reparação
Por favor, em caso de garantia, contacte o seu revendedor especializado ou
directamente o centro de assistência. Se for necessário enviar o aparelho,
por favor, envie o aparelho indicando a avaria e acompanhado de uma cópia
do recibo de compra.
Em caso de garantia aplicam-se as seguintes condições:
1. Aos produtos MEDISANA concedemos uma garantia de três anos a
partir da data de compra. Em caso de garantia, a data de compra tem de
ser comprovada através do recibo de compra ou factura.
2. As deficiências devido a erros de material ou de fabricação são elimi-
nadas gratuitamente dentro do prazo de garantia.
3. Após um serviço de garantia, o prazo da garantia não é prolongado, nem
para o aparelho nem para as peças substituídas.
4. A garantia exclui:
a. todos os danos resultantes de manuseamento inadequado como,
p.ex., devido ao não cumprimento do manual de instruções.
b. danos resultantes de reparações ou intervenções pelo comprador ou
por terceiros não autorizados.
c. danos de transporte resultantes do percurso entre o fabricante e
o consumidor ou durante o envio para o serviço de assistência a
clientes.
d. componentes exteriores sujeitos a um desgaste normal (braçadeira,
pilhas etc.).
5. Não nos responsabilizamos por danos consequentes directos ou indirectos que são causados pelo aparelho mesmo quando o dano no
aparelho é reconhecido como um caso de garantia.
MEDISANA AG
Itterpark 7-9
40724 Hilden
Alemanha
Tel.: +49 (0) 2103 / 2007-60
Fax: +49 (0) 2103 / 2007-626
eMail: info@medisana.de
Internet: www.medisana.de
O endereço do serviço de assistência pode ser consultado na última página.
78
Page 85

1 Veiligheidsmaatregelen
BELANGRIJKE AANWIJZINGEN!
ABSOLUUT BEWAREN!
Lees de gebruiksaanwijzing, in het bijzonder de veiligheidsinstructies, zorvuldig
door vooraleer u het apparaat gebruikt en bewaar de gebruiksaanwijzing
voor verder gebruik. Als u het toestel aan derden doorgeeft, geef dan deze
gebruiksaanwijzing absoluut mee.
Verklaring van de symbolen
Deze gebruiksaanwijzing behoort bij dit toestel.
Ze bevat belangrijke informatie over de ingebruikneming en het gebruik. Lees deze gebruiksaanwijzing helemaal. Het niet naleven van deze
instructie kan zware verwondingen of schade aan
het toestel veroorzaken.
WAARSCHUWING
Deze waarschuwingen moeten in acht genomen
worden om mogelijk letsel van de gebruiker te
verhinderen.
NL
OPGELET
Deze aanwijzingen moeten in acht genomen worden
om mogelijke schade aan het toestel te verhinderen.
AANWIJZING
Deze aanwijzingen geven u nuttige bijkomende
informatie bij de installatie of het gebruik.
IIa, B-veiligheidsklasse
LOT-nummer
Producent
Productiedatum
79
Page 86

NL
Veiligheidsmaatregelen
1 Veiligheidsmaatregelen
WAARSCHUWING
Neem op grond van zelfmeting van de bloeddruk geen
therapeutische maatregelen! Wijzig nimmer de dosering van
de door een arts voorgeschreven medicijnen!
1.1
Aanwijzingen
voor uw welzijn
1.2
Waarop u moet
letten
80
• Hartritmestoringen resp. aritmieën veroorzaken een onregelmatige pols.
Normaal brengt dit moeilijkheden met zich mee bij het vaststellen van de
correcte meetwaarde met behulp van oscillometrische bloeddruk-computers.
• Als u aan ziektes lijdt, bijvoorbeeld aderverkalking, neem voor gebruik van dit
instrument contact op met uw arts.
• Het instrument kan niet worden gebruikt voor de controle van de hartfrequentie van een pacemaker.
• Zwangeren dienen de nodige veiligheidsmaatregelen in acht te nemen en
rekening te houden met hun individuele belastbaarheid; neemt u zo nodig
contact op met uw arts.
• Indien tijdens de meting ongemakken optreden zoals pijn in de bovenarm
of andere kwalen, ga dan als volgt te werk: Druk op de START-toets om
het manchet onmiddellijk te ontluchten. Koppel het manchet los en ver-
wijder het van de bovenarm. Neem contact op met uw vakhandel of infor-
meer ons direct.
• Mensen met een lage polsgolf kunnen het beste hun arm omhoog tillen en de
hand ca. 10 maal openen en sluiten voordat er gemeten wordt. Als gevolg van
deze oefening worden de polsgolf en de meetprocedure geoptimaliseerd.
• Het instrument mag alleen voor de in deze gebruiksaanwijzing beschreven
toepassing worden gebruikt.
• Anders vervalt de garantieclaim.
• Het apparaat is alleen bestemd voor huishoudelijk gebruik.
• Indien het manchet door een zeldzame functiestoring tijdens de meting
voortdurend opgeblazen blijft, open het manchet onmiddellijk.
• Het instrument mag niet in de buurt van instrumenten worden gebruikt die
een sterke elektrische straling uitzenden zoals zend-ontvangstapparatuur.
Anders kan het goede functioneren worden belemmerd.
• Dit toestel is niet bestemd om door personen (inclusief kinderen) met beperkte fysieke, sensorische of geestelijke capaciteiten of een gebrek aan ervaring
en/of kennis gebruikt te worden, tenzij ze door een voor hun veiligheid
bevoegde persoon gecontroleerd worden of tenzij ze van deze persoon
instructies kregen hoe het toestel gebruikt moet worden.
• Kinderen moeten in het oog gehouden worden om er zeker van te zijn dat
ze niet met het toestel spelen.
• Repareer het instrument in geval van storingen niet zelf. Anders vervalt de
garantieclaim. Reparaties mogen alleen door geautoriseerde servicediensten
worden verricht.
• Stel het instrument niet bloot aan vocht. Indien per ongeluk vocht in het
instrument is binnengedrongen, verwijder dan onmiddellijk de batterijen en
staak het gebruik het instrument. Neem in dit geval contact op met uw
vakhandel of informeer ons direct. Op de adrespagina is aangegeven hoe u
ons kunt bereiken.
Page 87

2 Wetenswaardigheden
NL
Hartelijk dank
2.1
Levering en
verpakking
2.2
Wat betekent
bloeddruk?
Hartelijk dank voor uw vertrouwen en van harte gelukgewenst!
Met de bloeddrukmeter MTD heeft u een kwaliteitsproduct van MEDISANA
aangeschaft.
Voor een succesvol gebruik en een lange gebruiksduur van uw MEDISANA
bloeddrukmeter MTD bevelen wij aan de hieronder beschreven aanwijzingen
voor het gebruik en voor het onderhoud zorgvuldig door te lezen.
Gelieve eerst te controleren of het instrument volledig is en volledig vrij van
beschadigingen is.
neemt u contact op met uw handelaar of uw servicepunt.
Bij de levering horen:
• 1 MEDISANA Bloeddrukmeter MTD
• 1 manchet met luchtslang
• 4 batterijen (type AA, LR 6) 1,5V
• 1 opbergtasje
• 1 houder met plakkussen
• 1 gebruiksaanwijzing
Het verpakkingsmateriaal kan opnieuw worden gebruikt of gerecycled. Zorg
ervoor dat het gebruikte verpakkingsmateriaal bij de daarvoor bestemde afvalverwerking terechtkomt. Indien u tijdens het uitpakken transportschade
constateert, neem dan direct contact op met uw leverancier.
Let er op dat het verpakkingsmateriaal niet in handen komt
van kinderen. Zij kunnen er in stikken!
Bloeddruk is de druk die door elke hartslag in de vaten ontstaat. Wanneer het
hart samentrekt (= systole) en bloed naar de arteriën pompt, leidt dit tot het
stijgen van de druk. De hoogste waarde van deze druk wordt systolische druk
genoemd en gedurende een bloeddrukmeting als eerste waarde gemeten.
Wanneer de hartspier verslapt om nieuw bloed op te nemen, neemt ook de
druk af in de arteriën. Wanneer de vaten ontspannen zijn, wordt de tweede
waarde - de diastolische ´druk gemeten.
In geval van twijfel neemt u het toestel niet in bedrijf en
WAARSCHUWING
2.3
Hoe werkt
de meting?
2.4
Waarom is het
zinvol om de
bloeddruk thuis
te meten?
De MTD is een bloeddrukmeter, die de bloeddruk van de bovenarm meet. De
meting wordt door een microprocessor bestuurt die met behulp van een druksensor de drukschommelingen analyseert die via de arterie ontstaan door het
opblazen en aflaten van de bloeddrukmanchet.
MEDISANA beschikt over meerjarige ervaringen op het gebied van de
bloeddrukmeting. De hoge nauwkeurigheid van het meetprincipe van het
MEDISANA–instrument blijkt uit klinische onderzoeken die volgens internationale standaards zijn doorgevoerd. Een belangrijk argument voor de bloeddrukmeting thuis is het feit dat de meting in de bekende omgeving en onder
ontspannen omstandigheden wordt verricht. Bijzonder veelzeggend is de
zogenoemde 'basiswaarde' die 's morgens direct na het opstaan en vóór het
81
Page 88

NL
2 Wetenswaardigheden
ontbijt wordt gemeten. De bloeddruk kan het beste altijd op dezelfde tijdstip
en onder dezelfde omstandigheden worden gemeten.
Hierdoor wordt de vergelijkbaarheid van de resultaten gewaarborgd en een
aanvankelijke bloeddrukziekte kan tijdig worden vastgesteld.
Indien een verhoogde bloeddruk over een langere periode niet wordt ontdekt,
stijgt de kans op een aantal hart-bloedsomloopziektes.
VANDAAR ONZE TIP
Meet uw bloeddruk dagelijks en regelmatig, zelfs als uw geen
ongemakken heeft.
2.5
Bloeddrukclassificatie
2.6
Bloeddrukschommelingen
In de tabel hieronder zijn de richtwaarden aangegeven voor hoge en lage
bloeddruk zonder inachtneming van de leeftijd. Deze beoordelingsschaal voor
de bloeddruk voldoet aan de richtlijnen van de Wereldgezondheidsorganisatie
(WHO).
Lage bloeddruk Normale bloeddruk
systolisch <100 systolisch 100 – 139
diastolisch <60 diastolisch 60 – 89
Vormen van verhoogde bloeddruk
gering verhoogde gemiddeld verhoogde sterk verhoogde
bloeddruk bloeddruk bloeddruk
(gele (oranje (rode
displaygebied
systolisch 140 – 159 systolisch 160 – 179 systolisch >_180
diastolisch 90 – 99 diastolisch 100 – 109 diastolisch >_110
Te lage bloeddruk betekent net zo’n gezondheidsrisico als hoge
bloeddruk! Aanvallen van duizeligheid kunnen leiden tot
gevaarlijke situaties (b.v. op trappen of in het verkeer)!
Er zijn vele factoren die de bloeddruk kunnen beïnvloeden. De waarden
worden met nadruk beïnvloedt door zwaar lichamelijk werk, angst, stress of de
tijdstip van de meting. De persoonlijke bloeddrukwaarden zijn over een dag en
over een jaar gerekend aan sterke schommelingen onderhevig. Bij patiënten
met verhoogde bloeddruk zijn deze schommelingen bijzonder ontwikkeld.
Normaal wordt de bloeddruk tijdens lichamelijke inspanningen het meest
verhoogd en 's nachts tijdens het slapen het meest verlaagd.
) displaygebied) displaygebied)
WAARSCHUWING
(groene displaygebied
)
2.7
Beïnvloeding
en analyse van
de metingen
82
• Meet meermalen uw bloeddruk, sla de resultaten op en vergelijk de deze
vervolgens onder elkaar. Trek geen conclusie opgrond van een enkel
resultaat.
• Uw bloeddrukwaarden dienen altijd door een arts te worden beoordeeld die
vertrouwd is met uw medische voorgeschiedenis. Als u het instrument
regelmatig gebruikt en de waarden registreert voor uw arts, informeer dan
Page 89

2 Wetenswaardigheden / 3 Voor het Gebruik
• uw arts regelmatig over het verloop.
• Houd tijdens bloeddrukmetingen rekening ermee dat de dagelijkse waarden
van vele factoren afhankelijk zijn. Factoren zoals roken, alcohol, medicijnen
en lichamelijk werk beïnvloeden de meetwaarden op verschillende manier.
• Meet uw bloeddruk voor de maaltijden.
• Rust minstens 5 minuten voordat u uw bloeddruk meet.
• Neem, als u een buitengewone (te hoge of te lage) systolische of diastolische
waarde van de meting constateert, hoewel het instrument op de juiste
manier is gebruikt, contact op met uw arts, indien deze waarde ook na een
aantal metingen blijft verschijnen. Dit geldt ook voor de zeldzame gevallen
dat door een onregelmatige of zeer zwakke pols de meting wordt
verhinderd.
3 Voor het Gebruik
NL
3.1
Het inleggen /
verwijderen van
de batterijen
Inleggen: Schuif de sluiting aan de onderzijde van het instrument , om het
batterijvak te openen en plaats hierin de vier meegeleverde batterijen (alkalische
batterijen, type AA LR 6). Controleer of de batterijen in de juiste richting zijn
geplaatst (zie de afbeelding in de batterijruimte). Zet het batterijdeksel weer op
het instrument en druk dit in positie totdat het hoorbaar vastklikt.
Verwijderen: Vervang, wanneer het batterijsymbool op het display ver-
schijnt, de batterijen door nieuwe. Na het plaatsen van de batterijen geeft het
display de datum en tijd (vooraf ingesteld) aan. Stelt u nu datum en tijd in, zoals
onder 3.3 / 3.4 is beschreven. Denkt u er s.v.p. om, dat u iedere keer als u er
nieuwe batterijen heeft ingezet de datum en tijd opnieuw moet instellen. De
meetresultaten van tot dusver blijven opgeslagen.
WAARSCHUWING
VEILIGHEIDSAANWIJZINGEN T.A.V. DE BATTERIJ
•
Batterien niet uit elkaar halen!
• Lege batterijen onmiddellijk uit het toestel verwijderen!
• Verhoogd uitloopgevaar, contact met huid, ogen en slijmhuid
vermijden! Bij contact met accuzuur de betreffende plaatsen
onmiddellijk met overvloedig helder water spoelen en onmiddellijk een arts opzoeken!
• Mocht er een batterij ingeslikt zijn, dan moet onmiddellijk een
arts opgezocht worden!
• Altijd alle batterijen tegelijk vervangen!
• Alleen batterijen van hetzelfde type gebruiken, geen verschillende types of gebruikte en nieuwe batterijen door elkaar
gebruiken!
• Plaats de batterijen correct, neem de polariteit in acht!
• Batterijen bij langer niet-gebruik uit het toestel verwijderen!
• Batterijen uit de buurt van kinderen houden!
-
>
83
Page 90

NL
3 Voor het Gebruik
WAARSCHUWING
VEILIGHEIDSAANWIJZINGEN T.A.V. DE BATTERIJ
(het vervolg)
• Batterijen niet heropladen! Er bestaat explosiegevaar!
• Niet kortsluiten! Er bestaat explosiegevaar!
• Niet in het vuur werpen! Er bestaat explosiegevaar!
• Geef verbruikte batterijen en accu's niet met het gewone
huisvuil mee, maar met het speciale afval of in een batterijverzamelstation in de vakhandel!
3.2
Gebruik van
een adapter
3.3
Ontvangst van
het tijdsignaal
(RCC) instellen
(RCC = Radio
Controlled Clock)
Als alternatief kunt u het apparaat ook met een speciale adapter gebruiken
(MEDISANA art.–nr. 51125), die u er bij de daarvoor bedoelde aansluiting
aan de rechterkant van het apparaat insteekt. Daarbij blijven de batterijen in
het apparaat. Door het erin steken van de stekker aan de rechterkant van de
bloeddrukmeter worden de batterijen mechanisch uitgeschakeld. Het is dus
nodig, eerst de adapter in de contactdoos te steken en dan met de bloeddrukmeter te verbinden. Als de bloeddrukmeter niet meer wordt gebruikt, moet
eerst de stekker uit de bloeddrukmeter en dan de adapter uit de contactdoos
worden getrokken. Daardoor voorkomt u dat u datum en tijd iedere keer
opnieuw moet invoeren.
a. Eerste instelling:
Zodra u de batterijen geplaatst hebt, schakelt het toestel automatisch in de
modus radiobestuurde klok. Tijdens het zoeken na het tijdsignaal knippert het
symbool radiobestuurde klok. Zodra de tijd een voor de instelling voldoende
signaal ontvangt, worden tijd en datum automatisch ingesteld. Het toestel
wisselt aan het einde van de instellingsprocedure in de stand-bymodus, waarin
tijd en datum permanent weergegeven worden. Wordt er geen signaal
ontvangen, dan gaat het toestel direct in de stand-bymodus zonder de
vooringestelde waarden voor tijd en datum te wijzigen.
Tijdens de eerste instelling kan door het indrukken van de START-toets
zoeken naar het tijdsignaal afgebroken worden. Het toestel gaat direct in de
stand-bymodus zonder de vooringestelde waarden voor tijd en datum te
wijzigen.
b. Snelinstelling van de radiobestuurde klok
Als het toestel zich in de stand-bymodus bevindt en u gedurende ca. 1 seconde
tegelijk de START- en MEM-toets indrukt, gaat u naar de snelinstellingsmodus van de radiobestuurde klok. Het symbool voor de radiobestuurde
klok knippert. Als het tijdsignaal ontvangen wordt, worden tijd en datum
automatisch ingesteld. Als er geen signaal ontvangen wordt, wisselt het toestel
in de handmatige tijdinstellingsmodus.
De snelinstelling kan afgebroken worden door op de START-toets te
drukken. Dan wisselt het toestel in de handmatige tijdinstellingsmodus.
het
84
Page 91

3 Voor het Gebruik
c. Regelmatige signaalontvangst
Het toestel ontvangt automatisch twee keer dagelijks om 2.05 uur en 14.05 uur
het radiosignaal voor de actualisering van de tijdinstelling.
Door het indrukken van de START-toets kan de regelmatige ontvangst van
het tijdsignaal uitgeschakeld worden.
NL
3.4
Datum en tijd
instellen
3.5
Taalfunctie
instellen
Normaal gezien worden tijd en datum radiobestuurd met het tijdsignaal
automatisch ingesteld. Als het tijdsignaal niet of slechts zwak ontvangen wordt,
kan de klok ook handmatig ingesteld worden.
1. Het toestel bevindt zich in de stand-bymodus. Druk tegelijk op de START-
en MEM-toets om naar de snelinstellingsmodus van de radiobestuurde
klok te gaan. Druk op de START-toets
tijdinstellingsmodus.
2. Eerst knippert de positie voor het invoeren van de maand. Door het
permanent indrukken van de START-toets
voor de dag, het uur en de minuut. Terwijl de betreffende invoerpositie
knippert, drukt u op de MEM-toets om het betreffende getal in te voeren.
Door het ingedrukt houden van de MEM-toets kan de instellingsprocedure
versneld worden.
3. De tijdinstellingsmodus verlaat u door op de START-toets te drukken
terwijl de minutenpositie knippert. U bereikt de stand-bymodus.
Na een batterijwissel moet de klok opnieuw ingesteld worden, automatisch door
radiosignaal of handmatig met de tijdinstellingsmodus.
De taalfunctie kunt u instellen, als het toestel is ingeschakeld (AAN/UIT-
schakelaar op positie I ), d.w.z. alleen datum en tijd worden aangegeven.
Druk op de MEM-toets , en houdt u die vast tot de aanduiding van de ingestelde taal (b.v. L1) in het display verschijnt.
L0 = taalfunctie uitgeschakeld L4 = Nederlands
L1 = Duits L5 = Frans
L2 = Engels L6 = Italiaans
L3 = Spaans L7 = Portugees
en u gaat naar de handmatige
knipperen na elkaar de posities
Het apparaat kondigt de ingestelde taal aan en springt, wanneer u de MEM-
toets
gende taal. U kunt de ingestelde taal wijzigen door de MEM-toets los te
laten, zodra de door u gewenste taal wordt aangegeven c.q. aangekondigd.
De ingestelde geluidssterkte, aangegeven door de knipperende balk, is te
wijzigen, door opnieuw op de MEM-toets te drukken en die ingedrukt te
houden, tot de gewenste geluidssterkte aangegeven wordt - hoe hoger de
balk, hoe hoger de geluidssterkte. Laat de MEM-toets los om uw keuze te
bevestigen. De balk houdt op te knipperen, en het display springt weer in de
tijdsaanduiding.
ingedrukt houdt, in aanduiding en aankondiging naar de eerstvol-
85
Page 92

NL
3 Voor het Gebruik / 4 Het Gebruik
3.6
Houder
3.7
AAN/UITschakelaar I/0
4 Het Gebruik
4.1
Het bevestigen
van de
drukmanchet
b
1-2 cm
a
c
Met behulp van de meegeleverde houder kunnen manchet en slang op het
toestel worden bewaard. Bevestig eerst het dubbelzijdige plakkussen aan de
achterzijde van het toestel en druk vervolgens de houder er vast op.
Uw toestel is voor zien van een touchscreen. Let er daarom op, dat de
AAN/UIT-schakelaar altijd in positie 0 staat, als het toestel niet in gebruik
is, zodat er niet onbedoeld instellingen worden uitgevoerd als er per ongeluk
op het scherm wordt gedrukt.
1. Steekt u voor gebruik het eindstuk van de luchtslang in de opening van het
apparaat . Let u erop dat de slang geen beschadigingen vertoont en vast
zit. De bloeddrukmeter wordt gebruikt als tafelapparaat.
2. Schuif de open kant van de manchet zo door de metalen beugel, dat de
klittenbandsluiting zich aan de buitenkant bevindt.
3. Open de manchet zo, dat er een cilindrische vorm ontstaat.
4. Schuif de manchet over uw linker bovenarm. Plaats de luchtslang
midden van de arm in het verlengde van de middelvinger (a).
5. Leg uw arm met de handpalm naar boven op tafel. De onderkant van de
manchet dient daarbij 1 - 2 cm boven de binnenkant van de elleboog te
liggen (b). Trek de manchet strak (c) en sluit de klittenbandverbinding.
6. Vermijd een holle ruimte tussen arm en manchet. Hij kan het meetresultaat
vervalsen.
7. Meet op de ontblote bovenarm. Let erop dat uw arm bij nauw aan-
sluitende bovenarmkleding door het oprollen van uw mouw niet wordt
afgebonden.
8. Alleen als de manchet niet op de linker arm kan werden aangelegd, legt
u die op de rechter arm aan. Metingen dienen altijd verricht te worden
aan de zelfde arm.
op het
4.2
De correcte
meetpositie
86
De juiste houding bij zittend meten
• Neemt u tijdens de meting ergens plaats.
• Ontspan uw arm en steun deze losjes bijv. op
een tafel.
• Let erop dat de manchet zich ter hoogte van het
hart bevindt.
• Blijf rustig tijdens de meting: beweeg en spreek
niet, omdat hierdoor de meetresultaten worden beïnvloed.
De juiste houding bij liggend meten
• In speciale gevallen kan de meting
ook worden verricht terwijl u ligt.
• Ontspant u zich op uw rug liggend
minstens 5 minuten en leg uw arm
losjes neer.
Page 93

4 Het Gebruik / 5 Geheugen
• Let erop, dat de manchet zich ter hoogte van het hart bevindt. Van elkaar
afwijkende hoogten hebben invloed op de nauwkeurigheid van de meting.
• Blijf rustig tijdens de meting: Beweeg niet en spreek niet, omdat anders de
meetresultaten kunnen veranderen.
NL
4.3
Het meten van
de bloeddruk
4.4
Het uitschakelen
van het
instrument
1. Schakel het toestel in met de AAN/UIT-schakelaar (positie I ) en druk
op de START-knop .
2. Als er op de START-toets wordt gedrukt, is er een pieptoon te horen
en alle tekens verschijnen in het display. Door deze test wordt de volledigheid van de meldingen getest. Het display toont de waarden van de
laatste meting. Als de taalfunctie is ingeschakeld, worden de meldingen in
de ingestelde taal gedaan. Als er nog geen meting is verricht, verschijnen
er naast tijd en datum alleen maar nullen.
3. Het apparaat is klaar voor de meting, er verschijnt het cijfer 0, als de
taalfunctie is ingesteld wordt het begin van de meting aangekondigd.
Automatisch pompt het de manchet langzaam op, om uw bloeddruk te
meten. Tijdens het oppompen verandert de drukaanduiding voortdurend.
4. Het apparaat pompt de manchet net zo lang op tot er een druk is bereikt
die voldoende is voor de meting. Daarna laat het apparaat langzaam de
lucht uit de manchet ontsnappen en voert het de meting uit.
5. Als de meting beëindigd is, wordt de manchet ontlucht. De systolische
en de diastolische bloeddruk evenals de polsslagwaarde met het polssymbool verschijnen in het display . Overeenkomstig de bloeddrukclassificatie volgens de WHO (zie p. 82) knippert de bloeddrukindicator
naast de bijbehorende gekleurde balk. Als de taalfunctie ingesteld is
worden de meetresultaten in de ingestelde taal aangekondigd.
6. De gemeten waarden worden automatisch opgeslagen. In het geheugen
kunnen maximaal 60 meetwaarden met tijd en datum worden opgeslagen.
Het apparaat beschikt over een automatische uitschakeling. Als er niet meer op
een toets wordt gedrukt, schakelt het apparaat na een minuut automatisch uit.
Het apparaat kan ook met de START-toets worden uitgeschakeld. Als het
toestel niet wordt gebruikt, schakel dan de AAN/UIT-schakelaar op positie
0. De tijd en de datum worden voortdurend in het display aangeduid.
5 Geheugen
5.1
Het weergeven
van de opgeslagen
waarden
U kunt in het geheugen van uw bloeddrukmeter maximaal 60 metingen
(bloeddruk en pols met tijd en datum) opslaan. De meetwaarden worden automatisch opgeslagen. Voor het oproepen van de opgeslagen meetwaarden
drukt u op de MEM-toets
display. Eerst verschijnt het aantal bezette geheugenplaatsen. Dan worden
de waarden van de laatst opgeslagen meting inclusief de knipperende bloeddrukindicator aangegeven.
. De opgeslagen gegevens verschijnen in het
87
Page 94

NL
5 Geheugen / 6 Diversen
Als de taalfunctie is geactiveerd, kondigt het apparaat het geheugenplaatsnummer aan, samen met de opgeslagen bloeddruk- en polsslagwaarden en de
beoordeling van de bloeddruk volgens de schaal van de richtlijnen van de
Wereld Gezondheids Organisatie (zie p. 82).
Verder drukken op de MEM-toets
Als u bij de oudste ingang gekomen bent, schakelt het toestel uit. In de geheugenafroepmodus schakelt het toestel na ca. 120 seconden automatisch uit als
er geen toets meer ingedrukt wordt. Door te drukken op de START-toets
kunt u de geheugenoproepmodus te allen tijde verlaten en het apparaat
tegelijk uitschakelen. Als alle 60 de geheugenplaatsen bezet zijn, wordt er een
nieuw gemeten waarde opgeslagen, terwijl de oudste waarde gewist wordt.
geeft de meetwaarden van daarvoor aan.
5.2
Wissen van het
geheugen
6 Diversen
6.1
Problemen en
oplossingen
88
Als u zich in de geheugenoproepmodus bevindt, drukt u ca. 8 seconden op de
MEM-toets
meetwaarden automatisch gewist. In het display worden in plaats van de meetwaarden alleen nullen aangegeven.
In het display verschijnt het symbool voor batterijen vervangen
• De batterijen zijn te zwak of leeg. Vervangt u alle vier de batterijen door
nieuwe 1,5 V alkalibatterijen van type AA.
Er worden ongewone meetwaarden aangegeven
• De manchet is verkeerd aangelegd of niet goed aangetrokken. Legt u de
manchet goed aan en trekt u hem vast.
• U heeft uzelf of het apparaat tijdens de meting bewogen. Houdt u zich
rustig, beweegt u uw arm en het apparaat niet.
• U heeft een onregelmatige pols. Bij een slechts licht onregelmatige pols
herhaalt u de meting. Voor patiënten met een sterk onregelmatige pols is het
apparaat niet geschikt.
• U hebt tijdens de meting gesproken, bent nerveus of opgewonden. Spreekt
u niet en ademt u twee- à drie maal diep in en uit, om u te ontspannen.
• U heeft niet de correcte zit- of lighouding ingenomen. Neemt u de juiste
houding in voor het meten.
• De verbinding met de luchtslang is onderbroken of de slangverbinding is niet
dicht. Controleert u de aansluiting tussen bovenarmmanchet en apparaat en
of de luchtslang dicht is. Herhaalt u de meting.
In het display verschijnt “EE”
• Het apparaat heeft niet voldoende opgepompt. Herhaalt u de meting.
• Bij het oppompen of tijdens het meten heeft zich een storing voorgedaan.
Herhaalt u de meting.
Het display laat niets zien of blijft staan
• Er zijn geen batterijen ingelegd of ze zijn er verkeerd ingelegd of ze zijn
helemaal leeg. Legt u er batterijen in, controleert u de positie van de batterijen of vervangt u ze door nieuwe.
• Het gaat om een defect of een bedrijfsstoring. Haalt u een poosje de batte-
rijen er uit en zet u ze er weer in.
Als de foutmelding zich bij opnieuw meten weer voordoet, kunt
u zich met het servicecenter in verbinding stellen.
en houdt u die vast. Na drie pieptonen worden alle opgeslagen
Page 95

6 Diversen
NL
6.2
Reiniging en
onderhoud
6.3
Afvalbeheer
• Verwijder altijd eerst de batterijen voordat u het instrument reinigt.
• Gebruik geen agressieve reinigingsmiddelen of sterke borstels.
• Reinig het instrument met een zachte met neutraal reinigingsmiddel
bevochtigde doek. Gebruikt u in geen geval scherpe reinigingsmiddelen of
alcohol.
• In het instrument mag geen water binnendringen. Gebruik het instrument
pas nadat het volledig droog is.
• Verwijder de batterijen uit het instrument, als het over een langere periode
niet wordt gebruikt. Anders kunnen de batterijen leeglopen.
• Stel het instrument niet bloot aan direct zonlicht, beveilig het tegen vuil en
vochtigheid.
• Het manchet mag alleen opgeblazen worden als het op de bovenarm is
bevestigd.
• Bergt u het apparaat bij voorkeur op in de bewaartas die bij de aankoop heeft
gekregen, en bewaart u het op een schone en droge plaats.
• Meettechnische controle (geldt voor bedrijfsmatig gebruik):
Het instrument is door de fabrikant gekalibreerd voor een gebruiksduur van
twee jaar. De meettechnische controle is bij industrieel gebruik uiterlijk
alle twee jaar vereist. De controle kan tegen betaling en overeenkomstig
de Duitse “Medizinprodukte-Betreiber Verordnung” (voorschriften voor ex-
ploitanten van medische producten) door een daartoe bevoegd persoon of
een geautoriseerde verpleeginstelling worden uitgevoerd.
Dit apparaat mag niet samen met het huishoudelijk afval worden aangeboden.
Iedere consument is verplicht, alle elektrische of elektronische
apparaten, ongeacht of die schadelijke stoffen bevatten of niet, bij een
milieudepot in zijn stad of bij de handelaar af te geven, zodat ze op een milieuvriendelijke manier kunnen worden verwijderd.
Haal de batterijen uit het apparaat voordat u het apparaat verwijdert. Gooi
gebruikte batterijen niet bij het huisvuil, maar breng deze naar de daarvoor
bestemde afvalverwerking of lever deze in bij een speciaal daarvoor bestemd
inzamelstation bij de supermarkt of elektrawinkelier.
Wendt u zich betreffende het afvalbeheer tot uw gemeente of handelaar.
6.4
Richtlijnen /
normen
Deze bloeddrukmeter voldoet aan de eisen van de EU-norm voor nietinvasieve bloeddrukmeters. Hij is volgens EG-richtlijnen gecertificeerd en van
het CE-teken (conformiteitsteken) „CE 0297“ voorzien. De bloeddrukmeter
voldoet aan de Europese voorschriften EN 1060-1 en EN 1060-3+A1. Aan de
eisen van de EU-richtlijn “93/42/EEG van de Raad van 14 juni 1993 over
geneeskundige producten” is voldaan, evenzo aan de EU-richtlijn 89/336/EEG.
Toepassing:
Het instrument is geschikt voor de niet-infusieve bloeddrukmeting bij volwassenen (dit betekent dat het voor uitwendig gebruik is bestemd).
89
Page 96

NL
6 Diversen
Elektromagnetische verdraagbaarheid:
het apparaat voldoet aan de eisen van norm EN 60601-1-2 voor de elektromagnetische verdraagbaarheid. Details over deze meetgegevens kan u aanvragen
via MEDISANA.
6.5
Technische
specificaties
Naam en model : MEDISANA Bloeddrukmeter MTD
Displaysysteem : Digitaal display
Geheugenplaatsen : 60
Meetmethode : Oscillometrisch
Spanning : 6 V= , 4 x 1,5 V mignon AA LR 6, alkaline
Meetbereik bloeddruk : 0 – 300 mmHg
Meetbereik pols : 30 – 180 slagen / min
Maximale meetafwijking
van de statische druk : ± 3 mmHg
Maximale meetafwijking
van de polswaarden : ± 5 % van de waarde
Drukopbouw : Automatisch met pomp
Ontluchting : Automatisch
Autom. uitschakeling : Na ca. 1 min.
Bedrijfsvoorwaarden : + 5 °C t/m + 40 °C,
<
85 % luchtvochtigheid
Opbergvoorwaarden : - 20 °C t/m + 55 °C
<
95 % luchtvochtigheid
Afmetingen : ca. 142 mm x 98 mm x 52 mm
Manchet : 22 – 30 cm manchet voor volwassenen
met normale bovenarmomvang
Gewicht : ca. 310 g zonder batterijen
Artikelnummer : 51145
EAN-nummer : 40 15588 51145 5
Speciaal onderdeel : Netadapter
Art.-nr. 51125
EAN-nummer 40 15588 51125 7
30 - 42 cm manchet voor volwassenen met
een grote bovenarmomvang
Art.-Nr. 51126
EAN-nummer 40 15588 51126 4
90
In het kader van onze voortdurende inspanningen naar
verbeteringen, behouden wij ons het recht voor om qua
vormgeving en op technisch gebied veranderingen aan ons
product door te voeren.
Page 97

7 Garantie
NL
Garantie en
reparatievoorwaarden
Wendt u zich voor garantiegevallen altijd tot uw leverancier of tot onze
klantendienst. Moet u het apparaat opsturen, stuur het dan samen met de
klacht en een kopie van de aankoopbon naar onze klantendienst.
Voor garantie gelden de volgende voorwaarden:
1.
Voor de producten van MEDISANA geldt een garantietermijn van drie
jaar vanaf de datum van aankoop. Deze kan door middel van de verkoopbon of factuur worden aangetoond.
2. Alle klachten, die het gevolg zijn van materiaal en/of fabricagefouten
worden binnen de garantietermijn kosteloos verholpen.
3. Een geval van garantie leidt niet tot automatische verlenging van de
garantietermijn, noch voor het apparaat zelf noch voor de vervangbare
onderdelen.
4. Uitgesloten van garantie zijn:
a. Alle schade die ontstaan is door ondeskundige behandeling, b.v. het
niet op de juiste wijze volgen van de gebruiksaanwijzing
b. Beschadigingen, die zijn ontstaan door reparaties door de koper of
een ander onbevoegd persoon.
c. Transportschade, die is ontstaan op weg van de verkoper naar de
verbruiker of tijdens het opsturen naar de klantendienst.
d. Toebehoren, die onderhevig zijn aan slijtage (manchet, batterijen
enz.).
5. De fabrikant neemt geen verantwoording voor directe of indirecte vervolgschade die door het apparaat veroorzaakt wordt. Ook niet als de
schade aan het apparaat als garantiegeval erkend is.
MEDISANA AG
Itterpark 7-9
40724 Hilden
Duitsland
Tel.: +49 (0) 2103 / 2007-60
Fax: +49 (0) 2103 / 2007-626
eMail: info@medisana.de
Internet: www.medisana.de
Het adres van de klantendienst vindt u op de laatste pagina.
91
Page 98

FI
1 Turvallisuusohjeita
TÄRKEITÄ TIETOJA!
SÄILYTÄ NÄMÄ OHJEET!
Lue seuraavat käyttöohjeet huolellisesti kokonaan, erityisesti turvallisuusohjeet,
ennen kuin käytät laitetta ja säilytä ohjeet mahdollista myöhempää käyttöä
varten. Jos annat laitteen eteenpäin, anna myös aina tämä käyttäohje mukana.
Kuvan selitys
Tämä käyttöohje kuuluu tähän laitteeseen.
Siinä on tärkeitä tietoja käyttöönottoa ja käsittelyä
koskien. Lue tämä käyttöohje kokonaan.
Näiden ohjeiden noudattamatta jättäminen voi
aiheuttaa loukkaantumisen tai laitteen vaurioitumisen.
VAROITUS
Noudata näitä varoitusohjeita niin voit estää käyttäjän
mahdollisen loukkaantumisen.
92
HUOMIO
Noudata näitä ohjeita niin voit estää laitteen
mahdollisen vaurioitumisen.
OHJE
Näistä ohjeista saat hyödyllistä tietoa asennusta ja
käyttöä koskien.
Laiteluokitus: IIa, Tyyppi B
LOT-numero
Laatija
Valmistuspäivämäärä
Page 99

Turvallisuusohjeita
1 Turvallisuusohjeita
VAROITUS
Älkää koskaan ryhtykö terapeuttisiin toimenpiteisiin
itsemittauksen perusteella! Älkää koskaan muuttako lääkärin
määräämän lääkkeen annostelua!
FI
1.1
Hyvinvointia
edistäviä ohjeita
1.2
Mihin pitää
ehdottomasti
kiinnittää
huomiota
• Sydämen rytmihäiriöt eli arytmiat aiheuttavat epäsäännöllisen pulssin. Tämä
saattaa aiheuttaa sen, että oskillometrisillä mittareilla on vaikeaa saada
oikeaa mittausarvoa.
• Jos sinulla on jokin muu sairaus esim. valtimotukoksia, on ennen
verenpainemittarin käyttöä keskusteltava lääkärin kanssa.
• Tätä laitetta ei voida käyttää kontrolloimaan sydämen tahdistimen
syketaajuutta.
• Raskaana olevien naisten on noudatettava tarvittavaa varovaisuutta ja otettava
huomioon oma rasituskykynsä. Tarpeen mukaan otetaan yhteys hoitavaan
lääkäriin.
• Jos mittauksen aikana esiintyy epämiellyttäviä oireita, esim. kipua olkavarressa
tai muita oireita, toimi seuraavasti: Tyhjennä mansetti välittömästi painamalla
START-painiketta . Avaa mansetti ja ota se pois olkavarresta. Ota yhteys
laitteen myyjään tai suoraan Medisanan edustajaan.
• Jos pulssi on erityisen vaimea, kohota käsivarsi ylös ja sulje ja avaa nyrkkiä
noin 10 kertaa ja mittaa verenpaine vasta sitten. Tämän harjoitteen avulla
voidaan optimoida pulssiaalto ja mittaustoimenpide.
• Käytä laitetta ainoastaan sille määritettyyn tarkoitukseen ja käyttöohjeessa
annettujen ohjeiden mukaan.
• Jos laitetta käytetään muuhun kuin sille määritettyyn käyttöön, sen takuu
raukeaa.
• Laite on tarkoitettu ainoastaan kotitalouksissa käytettäväksi.
• Joskus harvoin saattaa tapahtua, että laitteeseen tulee toimintahäiriö ja
mansetti jää pysyvästi täyteen pumpatuksi. Tässä tapauksessa mansetti on
avattava välittömästi.
• Laitetta ei saa käyttää sellaisten laitteiden läheisyydessä, jotka muodostavat
voimakasta sähköistä säteilyä, kuten esimerkiksi radiolähettimet. Ne saattavat
häiritä mittarin toimintaa.
• Tätä laitetta ei ole tarkoitus antaa sellaisten henkilöiden käyttöön (mukaan
lukien lapset), joilla on fyysisiä, hermollisia tai psyykkisiä ongelmia tai joiden
kokemus ja/tai tieto ei riitä laitteen käyttöön, ellei heitä valvo heidän
turvallisuudestaan vastaava henkilö tai tämä henkilö kertoo heille laitteen
käytöstä.
• Lapsia tulisi pitää silmällä sen varmistamiseksi, että nämä eivät leiki laitteella.
• Häiriötapauksissa laitetta ei saa korjata itse, koska silloin kaikki takuut
raukeavat. Korjaukset on teetettävä valtuutetussa huoltoyrityksessä.
• Suojaa laite kosteudelta. Jos laitteeseen kaikesta huolimatta pääsee vettä, on
paristot irrotettava välittömästi eikä laitetta saa enää käyttää. Ota yhteys
laitteen myyjään tai soita suoraan Medisanan numeroon. Yhteystiedot
löytyvät tämän käyttöohjeen osoitesivulta.
93
Page 100

FI
2 Tietämisen arvoista
Sydämellinen
kiitos
2.1
Toimituksen
laajuus ja
pakkaus
2.2
Mikä
verenpaine on?
Kiitoksia luottamuksesta ja sydämelliset onnentoivotukset!
Ostaessasi MTD-verenpainemittarin olet hankkinut MEDISANA-laatutuotteen.
Jotta saavuttaisit halutun tuloksen ja sinulla olisi pitkään iloa MEDISANA MTDverenpainemittaristasi, suosittelemme, että luet seuraavat käyttö- ja huoltoohjeet huolellisesti läpi.
Tarkasta ensin, että laite on täydellinen eikä siinä ole mitään vaurioita.
Jos sinulla on kysymyksiä, älä ota laitetta käyttöön, vaan käänny kauppiaasi tai
huoltoliikkeen puoleen. Pakkauksesta pitää löytyä:
• 1 MEDISANA verenpainemittari MTD
• 1 ilmaletkulla varustettu mansetti
• 4 paristoa (tyyppiä AA, LR 6) 1,5V
• 1 säilytyspussi
• 1 pidike tarratyynyllä
• 1 käyttöohje
Pakkauksia voidaan käyttää uudelleen tai ne voidaan kierrättää takaisin raaka-
ainekiertoon. Hävitä tarpeeton pakkausmateriaali asianmukaisella tavalla.
Mikäli pakkausta avatessasi havaitset kuljetusvaurion, ota heti yhteyttä tuotteen myyneeseen liikkeeseen.
VAROITUS
Huolehdi siitä, etteivät pakkausmuovit joudu lasten käsiin.
On olemassa tukehtumisvaara!
Verenpaine on paine, joka muodostuu jokaisen sydämenlyönnin aikana
verisuonissa. Kun sydän supistuu (= Systole) ja pumppaa verta valtimoihin, ja
paine nousee. Paineen korkeinta arvoa kutsutaan systoliseksi paineeksi ja se on
verenpaineen mittauksessa ensimmäinen arvo.
Kun sydänlihas lepää ottaakseen lisää verta, paine valtimoissa laskee. Kun
verisuonet ovat lepotilassa, mitataan toinen arvo - diastolinen paine.
2.3
Kuinka mittaus
tapahtuu?
2.4
Miksi on
järkevää mitata
verenpainetta
kotona?
94
MTD on verenpainemittari, joka on tarkoitettu verenpaineen mittaukseen
olkavarresta. Mittauksen suorittaa mikroprosessori, joka arvioi painesensorin
avulla valtimon yläpuolelle muodostuvaa värähtelyä, kun verenpainemansettiin
pumpataan ilmaa tai lasketaan ilmaa ulos.
MEDISANAlla on useiden vuosien kokemus verenpaineen mittauksesta.
MEDISANA–laitteiden mittausperiaatteen suuri tarkkuus vahvistetaan laajoissa
vaativien kansainvälisten standardien mukaan tehdyissä kliinisissä tutkimuksissa. Tärkeä peruste kotona tapahtuville verenpaineen mittauksille
on se tosiasia, että mittaukset tehdään tutussa ympäristössä ja levollisissa
olosuhteissa. Erityisen merkittävä on niin sanottu „perusarvo“, joka mitataan
aamuisin heti heräämisen jälkeen ennen aamiaista. Periaatteessa verenpaine
tulisi mitata aina samaan aikaan ja samoissa olosuhteissa.
Silloin tulokset ovat keskenään vertailukelpoisia ja alkava verenpainetauti
voidaan havaita ajoissa. Jos verenpainetauti on kauan havaitsematta, muiden
sydän-verisuonitautien riski kasvaa.
 Loading...