

Page 1
DE Luftbefeuchter Minibreeze
GB Humidifier Minibreeze
FR
Humidificateur d’air Minibreeze
IT
Umidificatore Minibreeze
ES
Humidificador Minibreeze
PT
Humidificador Minibreeze
NL
Luchtbevochtiger Minibreeze
FI
Ilmankostutin Minibreeze
SE
Luftfuktare Minibreeze
GR Υγραντ‹ρα˜Minibreeze
Gebrauchsanweisung
Instruction Manual
Mode d’emploi
Istruzioni per l’uso
Instrucciones de manejo
Manual de instruções
Gebruiksaanwijzing
Käyttöohje
Bruksanvisning
√‰ËÁ›Â˜ ¯Ú‹Û˘
Bitte sorgfältig lesen!
Please read carefully!
A lire attentivement s.v.p.!
Da leggere con attenzione!
¡Por favor lea con cuidado!
Por favor ler cuidadosamente!
A.u.b. zorgvuldig lezen!
Lue huolellisesti läpi!
Läses noga!
¶·Ъ·О·ПФ‡МВ ‰И·‚¿ЫЩВ ЪФЫВОЩИО¿!
Art. 60075
Page 2

DE Gebrauchsanweisung
1 Sicherheitshinweise . . . . . . . . . . . . . . . . . . . . . 1
2 Wissenswertes . . . . . . . . . . . . . . . . . . . . . . . . . . . . . . . . 4
3 Anwendung . . . . . . . . . . . . . . . . . . . . . . . . . . . . . . . . . . . . 5
4 V e r s c h i ed e n e s . . . . . . . . . . . . . . . . . . . . . . . . . . . . . . . . 7
5 G a r a n t i e . . . . . . . . . . . . . . . . . . . . . . . . . . . . . . . . . . . . . . . . . . . 1 0
PT Manual de instruções
1 Avisos de segurança . . . . . . . . . . . . . . . . . . . 51
2 I n f o r m a çõ e s g e ra i s . . . . . . . . . . . . . . . . . . . . . . . 5 4
3 U t i l i z ç ão . . . . . . . . . . . . . . . . . . . . . . . . . . . . . . . . . . . . . . . . . . . 5 5
4 Generalidades . . . . . . . . . . . . . . . . . . . . . . . . . . . . . . . . 57
5 G a r a n t i a . . . . . . . . . . . . . . . . . . . . . . . . . . . . . . . . . . . . . . . . . . . 6 0
GB Instruction Manual
1 Safety Information . . . . . . . . . . . . . . . . . . . . . . . 11
2 Useful Information . . . . . . . . . . . . . . . . . . . . . . . . 14
3 Operation . . . . . . . . . . . . . . . . . . . . . . . . . . . . . . . . . . . . . . . . 15
4 Miscellaneous . . . . . . . . . . . . . . . . . . . . . . . . . . . . . . . . . 17
5 W a r r a n t y . . . . . . . . . . . . . . . . . . . . . . . . . . . . . . . . . . . . . . . . . . 2 0
FR Mode d’emploi
1 Consignes de sécurité . . . . . . . . . . . . . . . . 21
2 Informations utiles . . . . . . . . . . . . . . . . . . . . . . . . 24
3 Application . . . . . . . . . . . . . . . . . . . . . . . . . . . . . . . . . . . . . . 25
4 D i v e r s . . . . . . . . . . . . . . . . . . . . . . . . . . . . . . . . . . . . . . . . . . . . . . . . 2 7
5 G a r a n t i e . . . . . . . . . . . . . . . . . . . . . . . . . . . . . . . . . . . . . . . . . . . 3 0
IT Istruzioni per l‘uso
1 N o r m e d i s i c u r e z z a . . . . . . . . . . . . . . . . . . . . . . 3 1
2 Informazioni Iinteressanti . . . . . . . . . . . 34
3 Modalità d’impiego . . . . . . . . . . . . . . . . . . . . . . 35
4 V a r i e . . . . . . . . . . . . . . . . . . . . . . . . . . . . . . . . . . . . . . . . . . . . . . . . . . 3 7
5 G a r a n z i a . . . . . . . . . . . . . . . . . . . . . . . . . . . . . . . . . . . . . . . . . . . 4 0
ES Instrucciones de uso
1 Indicaciones de seguridad . . . . . . . . . 41
2 Informaciones interesantes . . . . . . . . 44
3 Aplicación . . . . . . . . . . . . . . . . . . . . . . . . . . . . . . . . . . . . . . . . 45
4 Generalidades . . . . . . . . . . . . . . . . . . . . . . . . . . . . . . . . 47
5 G a r a n t í a . . . . . . . . . . . . . . . . . . . . . . . . . . . . . . . . . . . . . . . . . . . 5 0
NL Gebruiksaanwijzing
1 Veiligheidsmaatregelen . . . . . . . . . . . . . . 61
2 Wetenswaardigheden . . . . . . . . . . . . . . . . . . 64
3 H e t G e b r u i k . . . . . . . . . . . . . . . . . . . . . . . . . . . . . . . . . . . . 6 5
4 D i v e r s e n . . . . . . . . . . . . . . . . . . . . . . . . . . . . . . . . . . . . . . . . . . . 6 7
5 G a r a n t i e . . . . . . . . . . . . . . . . . . . . . . . . . . . . . . . . . . . . . . . . . . . 7 0
FI Käyttöohje
1 Turvallisuusohjeita . . . . . . . . . . . . . . . . . . . . . . . 71
2 Tietämisen arvoista . . . . . . . . . . . . . . . . . . . . . . . 74
3 Käyttö . . . . . . . . . . . . . . . . . . . . . . . . . . . . . . . . . . . . . . . . . . . . . . . 75
4 Sekalaista . . . . . . . . . . . . . . . . . . . . . . . . . . . . . . . . . . . . . . . . . 77
5 T a k u u . . . . . . . . . . . . . . . . . . . . . . . . . . . . . . . . . . . . . . . . . . . . . . . . 8 0
SE Bruksanvisning
1 Säkerhetshänvisningar . . . . . . . . . . . . . . . 81
2 V ä r t a t t v e t a . . . . . . . . . . . . . . . . . . . . . . . . . . . . . . . . . . . . 8 4
3 Användning . . . . . . . . . . . . . . . . . . . . . . . . . . . . . . . . . . . . 85
4 Ö v r i g t . . . . . . . . . . . . . . . . . . . . . . . . . . . . . . . . . . . . . . . . . . . . . . . . 8 7
5 G a r a n t i . . . . . . . . . . . . . . . . . . . . . . . . . . . . . . . . . . . . . . . . . . . . . 9 0
GR √‰ËÁ›Â˜ ¯Ú‹Û˘
1 √‰ËÁ›Â˜ ÁÈ· ÙËÓ ·ÛÊ¿ÏÂÈ· . . . . 9 1
2 ГЪ‹ЫИМВ˜ ПЛЪФКФЪ›В˜ . . . . . . . . . . . 9 4
3 ∂Ê·ÚÌÔÁ‹ . . . . . . . . . . . . . . . . . . . . . . . . . . . . . . . . . . . . . . 9 5
4 ¢È¿ÊÔÚ· . . . . . . . . . . . . . . . . . . . . . . . . . . . . . . . . . . . . . . . . . 9 7
5 ∂ÁÁ‡ËÛË . . . . . . . . . . . . . . . . . . . . . . . . . . . . . . . . . . . . . . . . . 1 0 0
Page 3
Gerät und Bedienelemente
Device and controls
Appareil et éléments de commande
Apparecchio ed elementi per la regolazione
Dispositivo y elementos de control
Aparelho e elementos de comando
Toestel en bedieningselementen
Laite ja käyttölaitteet
Apparaten och komponenter
Συσκευή και στοιχεία χειρισμού
Page 4

DE
FR
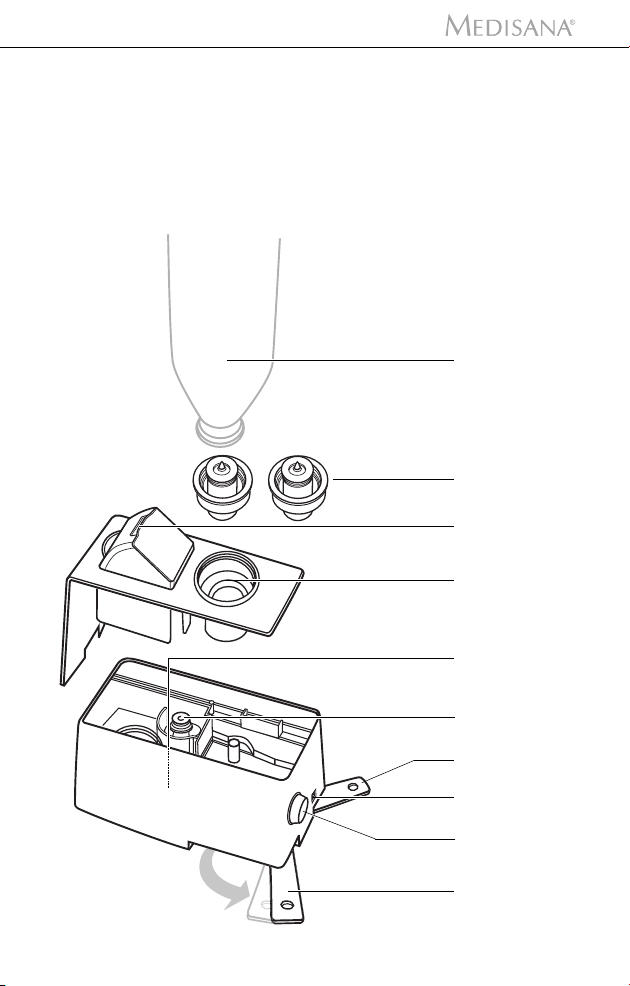
Tankflasche (im Lieferumfang
nicht enthalten)
2 unterschiedliche Flaschen-
aufsätze (Verschlusskappen)
Nebel-Auslass
Flascheneinsatz
Beleuchtung
Vernebler
Standfüsse (schwenkbar)
Einsteckbuchse für Netzadapter
EIN/AUS-Drehschalter mit
Einstellung der Nebelintensität
(niedrig/hoch)
GB
Bottle tank ( not included )
2 different bottle bases
( bottle caps )
Mist outlet
Bottle base
Light
Nebulizer
Fold-out stands
Mains adaptor socket
ON/OFF rotary control switch
with mist intensity setting
(low/high)
Bouteille de réservoir (non
comprise dans la livraison)
2 adaptateurs de bouteille
différents (bouchons)
Sortie de brouillard
Insert de bouteille
Eclairage
Atomiseur
Pieds (orientables)
Connecteur du bloc
d'alimentation
Commutateur rotatif
MARCHE/ARRET avec réglage
de l’intensité de brouillard
(faible/élevée)
IT
Bottiglia per rifornimento
(non inclusa nella fornitura)
2 diversi tappi di chiusura
per la bottiglia
Erogatore nebbia
Inserto per bottiglia
Luce
Nebulizzatore
Basi (girevoli)
Presa a spina per adattatore
di rete
Commutatore rotante ON/OFF
con impostazione dell’intensità
della nebbia (bassa/alta)
Page 5

ES
NL
Botella (no incluida en el
material adjunto)
2 cierres diferentes de la botella
(tapones)
Salida de niebla
Alojamiento de la botella
Iluminación
Nebulizador
Pies de apoyo (pueden girarse)
Zócalo de conexión para el
adaptador de red
Interruptor giratorio ON/OFF
con regulación de intensidad
de la niebla (baja/alta)
PT
Garrafa do depósito (não
incluído no material fornecido)
2 adaptadores de garrafa
diferentes (tampas de fecho)
Saída de névoa
Adaptador da garrafa
Iluminação
Nebulizador
Pés (basculáveis)
Tomada de encaixe para
o adaptador de rede
Interruptor LIG/DES com
configuração da intensidade
de névoa (baixo/elevado)
Tankfles (niet inbegrepen in
de leveringsomvang)
2 verschillende flesopzetstukken
(afsluitdoppen)
Neveluitlaat
Flesinzetdeel
Verlichting
Vernevelaar
Standvoeten (zwenkbaar)
Aansluiting voor
voedingsapparaat
AAN/UIT-draaischakelaar met
instelling van de
nevelintensiteit (laag/hoog)
FI
Säiliöpullo (ei kuulu
toimituskokonaisuuteen)
2 erilaista pullon kantta
(sulkukorkit)
Sumuaukko
Pullon paikka
Valaistus
Sumutin
Jalat (käännettävät)
Liitinpistoke
verkkovirtasovittimelle
PÄÄLLE/POIS-kierrekytkin
sumuintensiteetin asetuksella
(matala/korkea)
Page 6

SE
Tankflaska (ingår inte i
leveransomfattningen)
2 olika flaskadaptrar (korkar)
Fuktutsläpp
Flaskfäste
Belysning
Dimapparat
Fötter (vikbara)
Uttag för nätadapter
PÅ/AV-vridknapp med inställning
för dimintensitet (låg/hög)
GR
Φιάλη νερού (δεν
περιλαμβάνεται στη
συσκευασία παράδοσης)
2 διαφορετικές κεφαλές
φιαλών (καπάκια ασφαλείας)
Στόμιο νέφους
Θήκη φιάλης
Φωτισμός
Νεφελοποιητής
Πόδια στήριξης
(περιστρεφόμενα)
ÀÔ‰Ô¯‹ ÁÈ· ÙÔÓ ·ÓÙ¿ÙÔÚ·
‰ÈÎÙ‡Ô˘
Περιστροφικός διακόπτης
ON/OFF με ρύθμιση της
έντασης νέφους
(χαμηλή/υψηλή ένταση)
Page 7

1 Sicherheitshinweise
WICHTIGE HINWEISE !
UNBEDINGT AUFBEWAHREN!
Lesen Sie die Gebrauchsanweisung, insbesondere die Sicherheitshinweise, sorgfältig durch, bevor Sie das Gerät einsetzen
und bewahren Sie die Gebrauchsanweisung für die weitere
Nutzung auf. Wenn Sie das Gerät an Dritte weitergeben,
geben Sie unbedingt diese Gebrauchsanweisung mit.
Zeichenerklärung
Diese Gebrauchsanweisung gehört zu diesem
Gerät. Sie enthält wichtige Informationen zur
Inbetriebnahme und Handhabung. Lesen Sie
diese Gebrauchsanweisung vollständig. Die Nichtbeachtung dieser Anweisung kann zu schweren
Verletzungen oder Schäden am Gerät führen.
WARNUNG
Diese Warnhinweise müssen eingehalten werden,
um mögliche Verletzungen des Benutzers zu verhindern.
ACHTUNG
Diese Hinweise müssen eingehalten werden, um
mögliche Beschädigungen am Gerät zu verhindern.
DE
HINWEIS
Diese Hinweise geben Ihnen nützliche Zusatzinformationen zur Installation oder zum Betrieb.
LOT-Nummer
Hersteller
1
Page 8
DE
1 Sicherheitshinweise
Sicherheitshinweise
zur Stromversorgung
• Bevor Sie das Gerät an Ihre Stromversorgung anschließen, achten Sie darauf,
dass die auf dem Typenschild angegebene Netzspannung mit der Ihres Stromnetzes übereinstimmt.
• Stecken Sie den Netzstecker nur in die Steckdose, wenn das Gerät ausgeschaltet ist.
• Tragen, ziehen oder drehen Sie das Gerät nie am Netzkabel und klemmen Sie
das Kabel nicht ein.
• Positionieren Sie das Netzkabel so, dass keine Sturzgefahr besteht.
• Fassen Sie den Netzstecker nicht an, wenn Sie im Wasser stehen und fassen Sie
den Stecker stets mit trockenen Händen an.
für besondere Personen
• Dieses Gerät ist nicht dafür bestimmt, durch Personen (einschließlich Kinder) mit
eingeschränkten physischen, sensorischen oder geistigen Fähigkeiten oder mangelnder Erfahrung und/oder mangelndem Wissen benutzt zu werden, es sei
denn, sie werden durch eine für ihre Sicherheit zuständige Person beaufsichtigt
oder erhielten von ihr Anweisungen, wie das Gerät zu benutzen ist.
• Kinder müssen beaufsichtigt werden, um sicherzustellen, dass sie nicht mit dem
Gerät spielen.
• Im Falle einer allergischen Atemwegserkrankung halten Sie vor Anwendung des
Gerätes Rücksprache mit Ihrem Hausarzt.
• Sprechen Sie mit Ihrem Arzt, wenn bei Gebrauch gesundheitliche Beschwerden
auftreten sollten. Stellen Sie in diesem Fall sofort die Benutzung des Gerätes ein.
für den Betrieb des Gerätes
Bestimmungsgemäßer Gebrauch
Der Luftbefeuchter dient dazu, die Luftfeuchtigkeit in einem
Raum durch Wasserdampf zu erhöhen.
Das Gerät ist nur für den Gebrauch im
gewerbliche Zwecke
Sollten Sie gesundheitliche Bedenken haben, sprechen
Sie vor dem Gebrauch des Luftbefeuchters mit Ihrem Arzt!
• Das Gerät ist nicht für den kommerziellen Gebrauch bestimmt.
• Benutzen Sie das Gerät nur entsprechend seiner Bestimmung laut Gebrauchsanweisung. Bei Zweckentfremdung erlischt der Garantieanspruch.
• Benutzen Sie das Gerät nicht, wenn das Gerät oder das Zuleitungskabel beschädigt ist, wenn es nicht einwandfrei funktioniert, wenn es herunter oder ins
Wasser gefallen war.
• Benutzen Sie ausschließlich für das Gerät vorgesehene und vom Hersteller mitgelieferte Zubehörteile.
oder den medizinischen Bereich
Haushalt und nicht für
bestimmt!
2
Page 9

1 Sicherheitshinweise
• Entfernen oder Aufsetzen der Zubehörteile nur bei ausgeschaltetem Gerät.
• Benutzen Sie das Gerät nicht unter Bettdecken oder Kissen.
• Betreiben Sie das Gerät nicht in der Nähe von hochfrequenten elektromagnetischen Sendern.
• Stellen Sie das Gerät zum Gebrauch auf eine feste und ebene Fläche, so dass es
nicht kippen kann.
Um beste Ergebnisse zu erzielen, sollte der Luftbefeuchter mit einem Mindestab-
•
stand von 10 cm vor einer Wand aufgestellt werden.
•
Richten Sie keinesfalls den Nebel direkt auf eine Wand.
•
Stellen Sie den Luftbefeuchter in einer Höhe von mindestens 60 cm über dem
Boden auf.
• Halten Sie das Gerät einschließlich des Netzkabels von heißen Oberflächen fern.
Wenn das Kabel oder das Netzteil beschädigt sind, darf das Gerät nicht weiter
•
benutzt werden. Aus Sicherheitsgründen dürfen diese Teile nur von einer autorisierten Servicestelle ausgewechselt werden.
•
Das Kabel darf nicht in der Nähe von einer Wärmequellen aufbewahrt oder über
scharfe Kanten gezogen werden.
•
Befüllen Sie den Luftbefeuchter nicht, bevor Sie den Netzadapter vom Stromnetz
getrennt haben.
•
Kippen, bewegen oder entleeren Sie das Gerät niemals, wenn es eingeschaltet ist.
•
Schalten Sie das Gerät aus und trennen Sie es vom Stromnetz, bevor Sie den
Wassertank entfernen und die Position des Gerätes verändern.
•
Greifen Sie nicht nach einem Gerät, das ins Wasser gefallen ist. Ziehen Sie sofort
den Netzstecker bzw. das Netzteil aus der Steckdose.
• Betreiben Sie das Gerät nicht, wenn der Wassertank keine oder zu wenig
Flüssigkeit enthält.
• Verwenden Sie keine ätherischen Öle (z.B. Eukalyptus oder Menthol), diese
können das Gerät beschädigen.
• Halten Sie die Belüftungsschlitze auf der Unterseite des Gerätes frei von Staub
und Verunreinigungen.
Fassen Sie das Netzteil stets mit trockenen Händen an.
•
•
Übermäßige Raumfeuchtigkeit kann zu Kondensation an Fenstern und Möbeln
führen. Sobald dieses eintritt, schalten Sie den Luftbefeuchter aus.
•
Ziehen Sie das Netzteil aus der Steckdose, wenn das Gerät ausgeschaltet und
nicht mehr in Gebrauch ist.
DE
für Wartung und Reinigung
• Sie selbst dürfen an dem Gerät nur Reinigungsarbeiten ausführen. Im Falle von
Störungen reparieren Sie das Gerät nicht selbst und benutzen Sie es nicht
weiter. Fragen Sie Ihren Fachhändler und lassen Sie Reparaturen nur von autorisierten Servicestellen durchführen.
Das Gerät sowie das Kabel und das Netzteil dürfen keinesfalls in Wasser getaucht
•
oder unter laufendes Wasser gehalten werden.
• Sollte dennoch einmal Flüssigkeit in das Gerät gelangen, ziehen Sie sofort den
Netzstecker.
Verwenden Sie zur Reinigung der Teile des Luftbefeuchtrs niemals Scheuermittel,
•
Benzin, Glasreiniger, Möbelpolitur, Farbverdünner oder andere aggressive Haushaltsreiniger. Das könnte die Oberfläche angreifen.
• Bewahren Sie das Gerät in trockener Umgebung auf.
3
Page 10
DE
2 Wissenswertes
Herzlichen Dank
Vielen Dank für Ihr Vertrauen und herzlichen Glückwunsch!
Mit dem Luftbefeuchter Minibreeze haben Sie ein Qualitätsprodukt von
MEDISANA erworben. Damit Sie den gewünschten Erfolg erzielen und recht
lange Freude an Ihrem MEDISANA Minibreeze haben, empfehlen wir Ihnen, die
nachstehenden Hinweise zum Gebrauch und zur Pflege sorgfältig zu lesen.
2.1 Lieferumfang und Verpackung
Bitte prüfen Sie zunächst, ob das Gerät vollständig ist und keinerlei Beschädigung
aufweist. Im Zweifelsfalle nehmen Sie das Gerät nicht in Betrieb und wenden Sie
sich an Ihren Händler oder an Ihre Servicestelle.
Zum Lieferumfang gehören:
• 1 Luftbefeuchter Minibreeze
inkl. 2 unterschiedliche Flaschenaufsätze (Verschlusskappen)
• 1 Netzadapter/Netzteil
• 1 Reinigungsbürste
• 1 Aufbewahrungsbeutel
• 1 Gebrauchsanweisung
Verpackungen sind wiederverwendbar oder können dem Rohstoffkreislauf zurückgeführt werden. Bitte entsorgen Sie nicht mehr benötigtes Verpackungsmaterial
ordnungsgemäß. Sollten Sie beim Auspacken einen Transportschaden bemerken,
setzen Sie sich bitte sofort mit Ihrem Händler in Verbindung.
WARNUNG
Achten Sie darauf, dass die Verpackungsfolien nicht
in die Hände von Kindern gelangen.
Es besteht Erstickungsgefahr!
2.2 Ultraschall-Technologie
Zu trockene Raumluft erhöht die Anfälligkeit für Infektions- und Atemwegserkrankungen und führt zu Müdigkeit und Konzentrationsschwäche. Gesunde Luft sollte
eine relative Luftfeuchtigkeit von 40 bis 55 % haben.
Die geräuscharme und energiesparende Ultraschalltechnologie des Luftbefeuchters
verwandelt Wasser durch Schwingungen in feinsten Nebel, der den Feuchtigkeitsgrad der Luft erhöht. Dies verbessert die Luftqualität und beugt einer Austrocknung
der Schleimhäute und der Haut vor.
Die Kapazität des Gerätes ist für einen Raum von max. 15 m
Mit dem Drehregler für die Nebelintensität
tung mit der Größe des Raumes ab.
Befolgen Sie unbedingt die Reinigungs- und Pflegehinweise.
stimmen Sie den Grad der Befeuch-
2
Fläche ausgelegt.
4
Page 11
2 Wissenswertes / 3 Anwendung
ACHTUNG
Ein zu intensiver Betrieb kann zu einer Übersättigung der
Raumluft mit Feuchtigkeit führen, die sich an Wänden,
Fenstern und Gegenständen im Raum niederschlagen kann.
Überprüfen Sie deshalb regelmäßig mittels eines
Hygrometers, dass der Wert der relativen Luftfeuchtigkeit
55 % nicht übersteigt.
3 Anwendung
ACHTUNG
Stellen Sie sicher, dass der Luftbefeuchter kippsicher auf
einer feuchtigkeitsunempfindlichen Oberfläche betrieben
wird. Insbesondere bei Betrieb mit mineralstoffhaltigem
Wasser / Aromaessenz kann es zu Niederschlägen /
Ablagerungen kommen.
Achten Sie darauf, dass der austretende Nebel nicht auf
andere elektrische Geräte, Möbel oder Wände gerichtet ist.
3.1 Befüllen und Entleeren der Tankflasche
Als Tankflasche können Sie jede haushaltsübliche Halbliterflasche mit Drehverschluss (z.B. von einem Fruchtsaft- oder Erfrischungsgetränk) verwenden.
Nehmen Sie die Tankflasche
die Verschlusskappe
anschließend mit max. 500 ml Trinkwasser. Verschließen Sie die Tankflasche wieder
durch Eindrehen der Verschlusskappe. Drehen Sie die Tankflasche um und setzen
Sie sie zurück auf das Gerät. Transportieren Sie das Gerät nicht mit gefüllter Tankflasche. Entsorgen Sie das Restwasser nach Gebrauchsende und spülen Sie die
Tankflasche mit frischem Trinkwasser aus. Vor erneutem Gebrauch füllen Sie die
Tankflasche mit frischem Trinkwasser. Wenn Sie das Gerät abschalten und längere
Zeit nicht benutzen wollen, nehmen Sie die Tankflasche vom Gerät ab und entleeren Sie diese.
vom Gerät ab und drehen Sie diese um. Drehen Sie
heraus. Spülen Sie die Tankflasche aus und befüllen Sie sie
DE
ACHTUNG
Verwenden Sie für den Betrieb des Gerätes nur frisches
Trinkwasser. Bei hartem kalkhaltigen Wasser haben Sie
auch die Möglichkeit, demineralisiertes Wasser zu nutzen.
Reinigen Sie das Gerät regelmäßig und befreien es von
Kalk und anderen Ablagerungen, um seine Funktionsfähigkeit zu erhalten.
5
Page 12

DE
3 Anwendung
3.2 Ein- und Ausschalten
Stellen Sie das Gerät zum Gebrauch auf eine feste und ebene Fläche, so dass es
nicht kippen kann. Schwenken Sie die Standhfüsse
zusätzliche Stabilität zu geben.
Stecken Sie die gefüllte Tankflasche
Flascheneinsatz
Verbinden Sie das Kabel des Netzteils mit der Einsteckbuchse
das Netzteil in die Steckdose.
Klappen Sie den Nebelauslass
hat das Gerät keine Funktion.
Schalten Sie den Luftbefeuchter ein, indem Sie den EIN/AUS-Schalter und Drehregler für die Nebelintensität
Kontrolllampe (LED)/Beleuchtung
leerer Tankflasche geht die Beleuchtung aus und das Gerät schaltet sich automatisch aus.
Stellen Sie das Gerät im Anschluss, je nach den räumlichen Erfordernissen, stufenlos von der Position L (= niedrigste Gebläseintensität) bis zur Maximal-Position H
(= höchste Gebläseintensität) ein. Nach wenigen Sekunden wird der austretende
Nebel über dem Auslass
Vernebler-Kapazität
minimale Einstellung ( L ) : ca. 50 ml/h
maximale Einstellung ( H ) : ca. 100 ml/h
Schalten Sie das Gerät bei Gebrauchsende oder, wenn fast kein Wasser mehr im
Tank ist (die Kontrolllampe/Beleuchtung
Schalter und Drehregler für Nebelintensität
Das Gerät schaltet die Vernebelung bei leerer Tankflasche automatisch ab.
Die blaue Beleuchtung
.
sichtbar.
erlischt.
mit eingedrehter Verschlusskappe in den
nach oben auf. Bei geschlossenem Nebelauslass
zunächst von OFF auf ON drehen. Die integrierte
in der Vernebelungskammer leuchtet blau. Bei
erlischt), aus, indem Sie den EIN/AUS-
auf OFF stellen.
heraus, um dem Gerät
und stecken Sie
6
Page 13

4.1 Fehler und Behebung
4 Verschiedenes
DE
Fehler
Der Luftbefeuchter
arbeitet nicht und die
LED leuchtet nicht.
Der Sprühnebel
wird von einem
unangenehmen
Geruch begleitet.
Der Luftbefeuchter
arbeitet nicht,obwohl
die LED leuchtet.
Es wird zu wenig
Nebel erzeugt.
Ungewöhnliches
Geräusch
Der Flaschenaufsatz
sitzt fest.
Mögliche Ursache
Der Netzadapter ist
nicht angeschlossen
oder das Gerät ist nicht
eingeschaltet.
Kein Wasser in der
Tankflasche
Der Nebelauslass ist
geschlossen.
Neues Gerät
Das Wasser ist verun-
reinigt oder Wasser
hat zu lange in der
Flasche gestanden.
Zuviel Wasser in der
Vernebelungskammer
Der Vernebler ist
verunreinigt.
Das Wasser ist verun-
reinigt oder Wasser
hat zu lange in der
Flasche gestanden.
In der Tankflasche
entsteht eine Resonanz,
wenn Sie zu wenig
Wasser enthält.
Das Gerät steht auf
keinem stabilen Fläche.
Zu stark
festgeschraubt
Lösung
Stecken Sie den
Netzadapter ein
und schalten Sie das
Gerät ein.
Befüllen Sie die Tank-
flasche mit Wasser.
Klappen Sie den Nebel-
auslass nach oben auf.
Öffnen Sie die Tank-
flasche und lassen Sie
diese für 12 Stunden
an einem dunklen und
kühlen Platz auslüften.
Reinigen Sie die
Tankflasche und
befüllen Sie diese mit
frischem Wasser.
Gießen Sie etwas
Wasser aus der Ver-
nebelungskammer ab.
Reinigen Sie den
Vernebler mit einer
weichen Bürste.
Reinigen Sie die
Tankflasche und
befüllen Sie diese mit
frischem Wasser.
Füllen Sie die
Tankflasche auf.
Stellen Sie das Gerät auf
eine stabile Fläche.
Verwenden Sie
Flüssigseife, um die
Verschlussdichtung
leichter zu öffnen.
7
Page 14
DE
4 Verschiedenes
4.2 Reinigung und Pflege
• Bei häufigem Betrieb empfehlen wir Ihnen, das Gerät mindestens einmal
wöchentlich gründlich zu reinigen. Reinigen Sie das Gerät äußerlich mit einem
feuchten, weichen Tuch. Die Tankflasche können Sie mit heißem Wasser
( > 65 °C ) oder einem mindestens 75%igen Alkohol gründlich ausspülen.
• Entfernen Sie die Geräteabdeckung, indem Sie den Deckel am vorderen Ende
mit einem Daumennagel anheben und dann vorsichtig abheben.
• Die Verneblerkammer und die Tankkammer reinigen Sie mittels eines in Alkohol
getränkten Tuches und eines Wattestäbchens. Achten Sie darauf, dass kein
Wasser in das Geräteinnere gelangt.
• Bevor Sie das Gerät reinigen, vergewissern Sie sich, dass das Gerät ausgeschaltet und das Netzsteil aus der Steckdose gezogen ist.
• Nehmen Sie die Tankflasche vom Gerät ab und entleeren Sie diese.
• Benutzen Sie keine aggressiven Substanzen, wie z.B. Scheuermilch oder andere
Mittel, für die Reinigung. Das könnte die Oberfläche angreifen und die Vernebelung verringern.
ACHTUNG
In das Geräteinnere darf kein Wasser gelangen!
• Der Ultraschall-Geber ist das empfindlichste Bauteil des Gerätes. Es ist wichtig,
dass er sauber ist und pfleglich behandelt wird. Verwenden Sie die die mitgelieferte Bürste, um die Auslässe von Ablagerungen und Schmutzpartikeln
zu befreien. Verwenden Sie zur Reinigung des Ultraschall-Gebers keinesfalls
metallische Hilfsmittel.
• Wenn Sie das Gerät längere Zeit nicht benutzen, entleeren Sie das restliche
Wasser aus der Tankflasche und trocknen das Gerät ab.
• Kalkrückstände lassen sich mittels eines milden Entkalkungsmittels, z.B.
Zitronensäure, entfernen. Lösen Sie das Mittel nach Herstellervorschrift in
Wasser auf, füllen es in die Tankflasche und lassen es dort für mehrere Stunden
einwirken. Anschließend spülen Sie mit frischem Wasser aus.
• Lagern Sie das Gerät an einem trockenen, kühlen Platz, am besten in der
Originalverpackung.
• Bewahren Sie den Flaschenaufsatz
auf, um ein Verkleben oder Festhaften der Dichtungsmanschette zu vermeiden.
von der Unterseite der Tankflasche lose
4.3 Hinweise zur Entsorgung
Dieses Gerät darf nicht zusammen mit dem Hausmüll entsorgt
werden.
Jeder Verbraucher ist verpflichtet, alle elektrischen oder elektronischen Geräte, egal, ob sie Schadstoffe enthalten oder nicht, bei einer
Sammelstelle seiner Stadt oder im Handel abzugeben, damit sie einer
umweltschonenden Entsorgung zugeführt werden können.
Wenden Sie sich hinsichtlich der Entsorgung an Ihre Kommunalbehörde oder Ihren Händler.
8
Page 15
4 Verschiedenes
4.4 Technische Daten
Name und Modell : MEDISANA Luftbefeuchter Minibreeze
Stromversorgung / Netzteil : 100-240 V~ 50/60 Hz 0,8 A
Sekundär: 24 V= 0,5 A
Leistung : 12 W
Tankflaschen-Inhalt : 0,5 l empfohlen
Vernebler-Kapazität : maximal ca. 100 ml/h
Lagerbedingungen : sauber und trocken
Abmessungen B x T x H : ca. 125 mm x 72 mm x 88,2 mm
Gewicht ohne Netzteil : ca. 300 g
Artikel-Nummer : 60075
EAN-Nummer : 40 15588 60075 3
Im Zuge ständiger Produktverbesserungen behalten wir uns
technische und gestalterische Änderungen vor.
DE
9
Page 16
DE
5 Garantie
Garantie- und Reparaturbedingungen
Bitte wenden Sie sich im Garantiefall an Ihr Fachgeschäft oder direkt an die
Servicestelle. Sollten Sie das Gerät einschicken müssen, geben Sie bitte den Defekt
an und legen eine Kopie der Kaufquittung bei.
Es gelten dabei die folgenden Garantiebedingungen:
1. Auf MEDISANA Produkte wird ab Verkaufsdatum eine Garantie für drei Jahre
gewährt. Das Verkaufsdatum ist im Garantiefall durch die Kaufquittung oder
Rechnung nachzuweisen.
2. Mängel infolge von Material- oder Fertigungsfehlern werden innerhalb der
Garantiezeit kostenlos beseitigt.
3. Durch eine Garantieleistung tritt keine Verlängerung der Garantiezeit, weder
für das Gerät noch für ausgewechselte Bauteile, ein.
4. Von der Garantie ausgeschlossen sind:
a. alle Schäden, die durch unsachgemäße Behandlung, z.B. durch Nichtbeach-
tung der Gebrauchsanweisung, entstanden sind.
b. Schäden, die auf Instandsetzung oder Eingriffe durch den Käufer oder unbe-
fugte Dritte zurückzuführen sind.
c. Transportschäden, die auf dem Weg vom Hersteller zum Verbraucher oder
bei der Einsendung an die Servicestelle entstanden sind.
d. Zubehörteile, die einer normalen Abnutzung unterliegen, wie Batterien usw..
5. Eine Haftung für mittelbare oder unmittelbare Folgeschäden, die durch das
Gerät verursacht werden, ist auch dann ausgeschlossen, wenn der Schaden an
dem Gerät als ein Garantiefall anerkannt wird.
MEDISANA AG
Jagenbergstraße 19
41468 NEUSS
DEUTSCHLAND
E-Mail: info@medisana.de
Internet: www.medisana.de
Die Service-Adresse finden Sie auf dem separaten Beilegeblatt.
10
Page 17
1 Safety Information
IMPORTANT INFORMATION!
RETAIN FOR FUTURE USE!
Read the instruction manual carefully before using this device,
especially the safety instructions, and keep the instruction
manual for future use.
Should you give this device to another person, it is vital that
you also pass on these instructions for use.
Explanation of symbols
This instruction manual belongs to this device.
It contains important information about starting
up and operation.
Read the instruction manual thoroughly.
Non-observance of these instructions can result in
serious injury or damage to the device.
WARNING
These warning notes must be observed to prevent
any injury to the user.
CAUTION
These notes must be observed to prevent any
damage to the device.
GB
NOTE
These notes give you useful additional
information on the installation or operation.
Lot number
Manufacturer
11
Page 18
GB
1 Safety Information
Safety Information
Power supply
• Before connecting the device to your power supply, please ensure that the
supply voltage stated on the rating plate is compatible with your mains supply.
• Only connect the mains plug to the wall socket when the device is switched off.
• Never carry, pull or turn the device by the electricity cable and do not squeeze
the cable.
• Position the mains cable so as to avoid the danger of falling.
• Do not touch the mains plug when you are standing in water and always take
hold of the plug with dry hands.
For special people
• This device is not designed to be used by persons (including children) with
limited physical, sensory or mental abilities, or by persons with insufficient
experience and/or knowledge, unless under observation by a person responsible
for their safety, or unless they have been instructed in the use of the device.
• Children must be supervised to ensure that they do not play with the device.
• In the event of an allergic respiratory problem, consult your doctor before using
the appliance.
• Should you experience medical complaints during use talk to your doctor.
Should this be the case, stop using the device immediately.
Operating the device
Proper use
The humidifier is designed to increase moisture level in a
room by converting water into fine mist.
This device intended only for private use and not
for commercial purposes or for medical applications!
If you have any medical concerns, please discuss using the
humdifier with your doctor before using it!
• The device is not determined for commercial use.
• Only use the device for its intended use as in the instruction manual. If misused,
all guarantee rights shall become null and void.
• Do not use the device if it or the power supply cable is damaged, if it does not
work properly or if it has been dropped or fallen into water.
• Only use the unit with accessories designed for this model and supplied by the
manufacturer.
• Only attach or remove accessories when the unit is switched off.
• Do not use the unit beneath cushions or bed covers.
12
Page 19

1 Safety Information
• Do not use the unit in the vicinity of high-frequency electromagnetic transmitters.
• Place the device on a firm floor area when in use so that it cannot tip over.
The humidifier should be at least 10 cm away from the wall for best results.
•
•
Never direct the mist directly towards a wall.
•
Always place the humidifier at least 60 cm away from the floor.
• Keep the device and its power cable away from hot surfaces.
• You must not continue to use the unit if the lead or the mains adaptor are
damaged. For safety reasons, these parts may only be replaced by authorized
service personnel.
• Do not store the lead near a heat source or drag it over sharp edges.
Do not attempt to refill humidifier without first unplugging the unit from it’s
•
electrical outlet.
•
Never tilt, move, or attempt to empty unit while it is switched on.
•
Shut off and unplug before removing the water tank and moving the unit.
• Never touch an appliance that has fallen into water. Unplug the unit from the
mains outlet immediately.
• Do not use the device if the water tank is empty or does not contain enough
liquid.
• Do not use distilled oils (e.g. eucalyptus or menthol), since these could damage
the device.
• Keep the ventilation slits on the underside of the unit free of dust and impurities.
• Only handle the mains adaptor when your hands are dry.
Excessive humidity in a room can cause water condensation on windows and
•
some furniture. If this happens, turn the humidifier OFF.
• Only unplug the mains adaptor from the outlet when the unit is switched off
and no longer in use.
Maintenance and cleaning
• You may only clean the device yourself. In the case of a fault occurring, stop
using the unit and do not attempt to repair it yourself. Consult your specialist
dealer and only have repairs carried out by authorized service personnel.
• You must never submerge the unit, the lead or the mains adaptor in water or
hold them under running water.
• If, nonetheless, liquid should penetrate the device, unplug the mains cable
immediately.
Never use detergents, gasoline, glass cleaner, furniture polish, and paint thinner,
•
or other household solvents to clean any part of the humidifier. These may
damage the surfaces.
• Store the unit in a dry place.
GB
13
Page 20
GB
2 Useful Information
Thank you very much
Thank you for your confidence in us and congratulations on your purchase!
You have acquired a quality product with your purchase of the MEDISANA
Minibreeze personal humidifier. To ensure the best results and long-term
satisfaction with your MEDISANA Minibreeze unit, we recommend that you read
the following operating and maintenance instructions carefully.
2.1 Items supplied and packaging
Please check first of all that the device is complete and is not damaged in any way.
In case of doubt, do not use it and contact your dealer or your service centre.
Send it to a service point.
The following parts are included:
• 1 Humidifier Minibreeze
incl. 2 different bottle bases (bottle caps)
• 1 Mains adaptor
• 1 Cleaning brush
• 1 Storage bag
• 1 Instruction manual
The packaging can be reused or recycled. Please dispose properly of any packaging
material no longer required. If you notice any transport damage during unpacking,
please contact your dealer without delay.
WARNING
Please ensure that the polythene packing is kept
away from the reach of children! Risk of suffocation!
2.2 Ultrasound technology
Very dry air increases susceptibility to infection and respiratory diseases and leads to
fatigue and lack of concentration. Healthy air should have a relative atmospheric
humidity of 40 to 55 %.
The quiet, energy-saving ultrasound technology of the personal humidifier uses
oscillation to convert water into a fine mist that increases the moisture level of the
air. This improves the air quality and prevents the mucous membranes and skin from
drying out.
The capacity of the device is suitable for a room with a maximum area of 15 m
can adjust the level of humidity to the size of the room using the knob for the mist
intensity
Pay special attention to the notes on cleaning and care.
.
2
. You
14
Page 21
2 Useful Information / 3 Operation
CAUTION
Over-intensive operation can result in saturating the
room with moisture, which can affect the walls, windows
and objects in the room. Therefore, use a hygrometer
at regular intervals to check that the level of relative air
humidity does not exceed 55%.
3 Operation
CAUTION
Make sure that the MEDISANA air humidifier is operated
on a surface which is resistant to water, and that it
cannot tip over. In particular, when operated with
mineralised water / aromatic essences, condensation /
residues may be produced.
Make sure that the mist being issued is not directed
towards electronic appliances, furniture or walls.
3.1 Filling and emptying the water tank
Any standard half-litre bottle with a screw top (e.g. a fruit juice or soft drink bottle)
can be used as a bottle tank.
Detach the bottle tank
Rinse out the bottle tank and then fill it up with a maximum of 500 ml drinking
water. Seal the bottle tank again by screwing the cap back in. Turn the bottle tank
over again and place it back in the device. Do not move the unit when the bottle
tank is full. Dispose of the leftover water after use and rinse out the bottle tank with
fresh drinking water. Before using again, fill the bottle tank with fresh drinking
water. When you have switched off the unit and do not intend to use it for an
extended period of time, remove and empty the bottle tank.
from the device and turn it over. Unscrew the cap.
GB
CAUTION
Only use fresh drinking water in the device. You can also
use demineralised water, if the water is very hard and
calciferous.
Clean the device at regular intervals and remove lime
and other deposits, to maintain its efficiency.
15
Page 22

GB
3 Operation
3.2 Switching the unit on and off
Place the unit on a solid and flat surface for use, so that it cannot tip over. Swivel
the fold-out stands
outwards to make the unit more stable.
Insert the filled bottle tank
bottle base
Connect the mains adaptor lead to the socket
mains outlet.
Open the mist outlet
unit is not functionable.
Switch on the personal humidifier by turning the ON/OFF switch and the knob for
the mist intensity
nebulizer. When the bottle tank is empty, the light turns off and the unit turns off
automatically.
Then set the device depending on the room requirements at a position from the
lowest ( L ) to the highest ( H ) blower intensity. After a few seconds the mist from
the outlet
Blower intensity
lowest level ( L ) : approx. 50 ml/h
highest level ( H ) : approx. 100 ml/h
Switch the device off after use or when the water in the bottle tank has almost
been used up (the LED turns off) by moving the ON/OFF switch and the rotary mist
intensity knob
The device switches itself off automatically when the bottle tank is empty.
The blue illumination turns off.
.
will be visible.
to OFF.
from OFF to ON. The built-in LEDlights up next to the
with the bottle cap screwed in place into the
and plug the adaptor into the
by folding it upwards. When the mist outlet is closed, the
16
Page 23
4.1 Troubleshooting
4 Miscellaneous
GB
Trouble
Humidifier does not
operate and the LED
does not light up.
The water mist produces
an unpleasant smell.
The power light is on,
but the humidifier
doesn’t work.
The output volume of
the mist is low.
Abnormal noise
Very tight tank cap
Probable cause
Mains adaptor not
plugged in
or the unit is
not switched on.
No water in
bottle tank
The mist outlet
is closed.
New machine
Dirty water or the
water is left in the
bottle tank for
too long.
Too much water in
the water flume
The transducer is
dirty.
Water is too dirty
or water kept too long
in the bottle tank.
Resonant in bottle
tank when water is
too less.
Unit is on an unstable
surface.
Over tightened
Solution
Plug in mains adaptor
and switch unit on.
Fill bottle tank
with water.
Open the mist outlet by
folding it upwards.
Open the bottle tank
and leave it for
12 hours at shady
and cool place.
Clean the bottle
tank and change
the water.
Pour away some
water from the
water flume.
Clean transducer
by a soft brush.
Clean bottle tank and
change the water.
Fill water into bottle
tank.
Move the unit to a
stable flat surface.
Add liquid soap to
cap gasket for ease
opening
17
Page 24
GB
4 Miscellaneous
4.2 Cleaning and maintenance
• With frequent operation we recommend that you clean the unit thoroughly at
least once a week. Clean the outside of the unit with a soft, damp cloth. You
can rinse out the bottle tank with hot water (>65 °C) or an alcohol of at least
75% vol.
• Remove the housing of the device by lifting the front end of the cover with your
thumbnail and then carefully lifting it.
• The atomiser chamber and the bottle compartment should be cleaned using an
alcoholsoaked cloth and cotton bud. Take care to ensure that no water gets
inside the humidifier.
• Before cleaning the unit, make sure that the unit is switched off and the mains
adaptor is unplugged from the outlet.
• Remove the bottle tank from the device and empty it.
• Please do not use any aggressive substances for cleaning, such as scouring
cream or other detergents, as these may damage the surfaces and reduce the
atomisation effect.
CAUTION
Do not allow water to penetrate the device.
• The ultrasound generator is the most sensitive component in the device. It is
important for it to be kept clean and handled with care. Please use the provided
brush to remove deposits and dirt particles from the outlets. Never clean the
ultrasound generator using metal objects.
• If you do not intend to use the unit for an extended period of time, empty any
remaining water from the bottle tank and dry off the unit.
• Limescale can be removed using a mild descaling agent such as citric acid.
Dissolve the substance in water according to the manufacturer’s instructions,
pour it into the bottle tank and leave it to take effect for several hours. Then
rinse with fresh water.
• Store the unit in a cool, dry place, preferably in its original packaging.
• Remove cap
prevent sleeve gasket from sticking.
from underside of the bottle tank and store separately to
4.3 Disposal
18
This product must not be disposed of together with domestic waste.
All users are obliged to hand in all electrical or electronic devices,
regardless of whether or not they contain toxic substances, at a
municipal or commercial collection point so that they can be disposed of in an environmentally acceptable manner.
Consult your municipal authority or your dealer for information
about disposal.
Page 25
4 Miscellaneous
4.4 Technical specifications
Name and model : MEDISANA humidifier Minibreeze
Current supply / Mains adaptor : 100-240 V~ 50/60 Hz 0,8 A
secondary 24 V= 0,5 A
Output : approx. 12 W
Bottle tank contents : 0,5 l recommended
Atomizer capacity : maximum approx. 100 ml/h
Storage conditions : clean and dry
Dimensions l x w x h : approx. 125 mm x 72 mm x 88.2 mm
Weight without mains adaptor : approx. 300 g
Item number : 60075
EAN number : 40 15588 60075 3
In accordance with our policy of continual product improvement,
we reserve the right to make technical and optical changes without
notice.
GB
19
Page 26

GB
5 Warranty
Warranty and repair terms
Please contact your dealer or the service centre in case of a claim under the
warranty. If you have to return the unit, please enclose a copy of your receipt and
state what the defect is.
The following warranty terms apply:
1. The warranty period for MEDISANA products is three years from date of
purchase. In case of a warranty claim, the date of purchase has to be proven by
means of the sales receipt or invoice.
2. Defects in material or workmanship will be removed free of charge within the
warranty period.
3. Repairs under warranty do not extend the warranty period either for the unit or
for the replacement parts.
4. The following is excluded under the warranty:
a. All damage which has arisen due to improper treatment, e.g. non-
observance of the user instructions.
b. All damage which is due to repairs or tampering by the customer or un-
authorised third parties.
Damage which has arisen during transport from the manufacturer
c.
consumer or during transport to the service centre.
d. Accessories which are subject to normal wear and tear as batteries etc..
5. Liability for direct or indirect consequential losses caused by the unit are
excluded even if the damage to the unit is accepted as a warranty claim.
to the
MEDISANA AG
Jagenbergstraße 19
41468 NEUSS
GERMANY
E-Mail: info@medisana.de
Internet: www.medisana.de
The service centre address is shown on the attached leaflet
20
.
Page 27
1 Consignes de sécurité
REMARQUE IMPORTANTE!
TOUJOURS CONSERVER!
Lisez attentivement le mode d’emploi, et en particulier les
consignes de sécurité, avant d’utiliser l’appareil. Conservez
bien ce mode d’emploi. Vous pourriez en avoir besoin par la
suite. Lorsque vous remettez l’appareil à un tiers, mettez-lui
impérativement ce mode d’emploi à disposition.
Légende
Ce mode d’emploi fait partie du contenu de
l’appareil. Elle contient des informations
importantes concernant sa mise en service et sa
manipulation. Lisez l’intégralité de ce mode
d’emploi. Le non respect de cette notice
peut provoquer de graves blessures ou des
dommages de l’appareil.
AVERTISSEMENT
Ces avertissements doivent être respectés afin
d’éviter d’éventuelles blessures de l’utilisateur.
ATTENTION
Ces remarques doivent être respectées afin d’éviter
d’éventuels dommages de l’appareil.
FR
REMARQUE
Ces remarques vous donnent des informations
supplémentaires utiles pour l’installation ou
l’utilisation.
N° de lot
Fabricant
21
Page 28
FR
1 Consignes de sécurité
Consignes de sécurité
Alimentation en courant
• Avant de raccorder l’appareil à l’alimentation électrique, veillez à ce que la
tension indiquée sur la plaque signalétique corresponde à celle de l’alimentation secteur.
• Vérifier que l'appareil est éteint avant d'insérer la fiche secteur dans une prise
de courant.
• Ne pas porter, traîner ou tordre l'appareil en tirant sur le cordon secteur et
veiller à ne pas pincer le cordon.
• Positionner le câble secteur de manière à éviter tout trébuchement.
• Ne touchez pas la fiche secteur si vous avez les pieds dans l'eau et veillez
toujours à manipuler la prise de la fiche avec les mains sèches.
Pour certaines personnes
• Cet appareil n’est pas destiné aux personnes (y compris les enfants) à capacités
physiques, sensorielles ou mentales réduites ou dépourvues d’expérience et/ou
de connaissances, sauf si elles sont surveillées par une personne responsable de
leur sécurité ou ont été instruites de l’utilisation de l’appareil.
• Les enfants doivent être surveillés en s’assurant qu’ils ne jouent pas avec
l’appareil.
• En cas d’affection des voies respiratoires de nature allergique, consultez votre
médecin avant d’utiliser l’appareil.
• Si l’utilisation provoque des problèmes de santé, interrompez immédiatement
l’utilisation et consultez votre médecin.
Fonctionnement de l’appareil
Utilisation conforme
L’humidificateur d’air permet d’augmenter l’humidité de l’air
dans une pièce grâce à la vapeur d’eau.
L’appareil est destiné exclusivement à un cadre domestique et
non à un usage professionnel ou médical!
Si vous avez des doutes concernant votre santé, parlez-en à
votre médecin avant d’utiliser l’humidificateur d’air.
• L’appareil n’est pas prévu pour une utilisation professionnelle.
• Uniquement utiliser cet appareil conformément au but d'utilisation décrit dans
ce mode d'emploi. Tout emploi non conforme annule les droits de garantie.
• Ne pas utiliser l'appareil si celui-ci ou son cordon secteur est endommagé, s'il
ne fonctionne pas correctement ou s'il est tombé dans l'eau.
• Veuillez exclusivement utiliser les accessoires conçus pour votre appareil et
fournis par le fabricant.
• Uniquement démonter ou monter des accessoires lorsque l'appareil est éteint.
• Ne pas utiliser l'appareil sous des couvertures ou coussins.
22
Page 29

1 Consignes de sécurité
• Ne pas utiliser l'appareil à proximité d'émetteurs électromagnétiques haute
fréquence.
• Installer l'appareil par terre sur une surface plane de manière à ce qu'il ne
bascule pas.
Pour obtenir de meilleurs résultats, l’humidificateur d’air doit être installé au
•
moins 10 cm devant un mur.
•
N’orienter en aucun cas le brouillard directement sur un mur.
•
Installer l’humidificateur d’air à une hauteur d’au moins 60 cm du sol.
• Tenir l'appareil, câble secteur compris, à l'écart des surfaces chaudes.
Ne pas utiliser l'appareil si le câble ou le bloc d'alimentation sont endommagés.
•
Pour des raisons de sécurité, ces pièces doivent uniquement être remplacées par
un atelier agréé.
•
Le câble ne doit pas être conservé à proximité de sources de chaleur ni tiré sur
des arêtes coupantes.
•
Ne pas remplir l’humidificateur d’air avant d’avoir débranché l’adaptateur du secteur.
•
Ne jamais basculer, déplacer ou vider l’appareil lorsqu’il est allumé.
•
Eteindre et débrancher l’appareil du secteur avant de retirer le réservoir d’eau et
de modifier la position de l’appareil.
•
Ne jamais essayer de rattraper un appareil tombé dans l'eau. Retirer la fiche
secteur immédiatement.
•
N’utilisez pas l’appareil si le réservoir d’eau ne contient pas ou pas assez de
liquide.
•
N’utilisez pas d’huiles essentielles (par exemple eucalyptus ou menthol), car
cela pourrait endommager l’appareil.
•
Veiller à ce que les fentes d'aération de la face inférieure de l'appareil restent
libres et propres.
• Toujours manipuler le bloc d'alimentation avec les mains sèches.
Une humidité excessive de la pièce peut entraîner de la condensation au niveau
•
des fenêtres et des meubles. Dès que cela se produit, éteindre l’humidificateur
d’air.
• Uniquement débrancher le bloc d'alimentation de la prise de courant lorsque
l'appareil est éteint et n'est plus utilisé.
FR
Entretien et nettoyage
• Vous-même êtes seulement autorisés à nettoyer l'appareil. En cas de pannes, ne
réparez pas l'appareil vous-même et ne l'utilisez plus. Renseignez-vous auprès
de votre spécialiste et confiez uniquement les réparations à des ateliers agréés.
L'appareil, le câble et le bloc d'alimentation ne doivent en aucun cas être im-
•
mergés ou rincés à l'eau courante.
• Si des liquides s’infiltrent dans l’appareil, débranchez immédiatement la fiche
secteur.
Pour nettoyer les pièces de l’humidificateur d’air, n’utilisez jamais de produit
•
détergent, d’essence, de produit de nettoyage pour les vitres, de produit du lustrage pour les meubles, de diluant pour peintures ou d’autres produits ménagers
agressifs. Ceci peut endommager la surface.
• Conservez l’appareil dans un endroit sec.
23
Page 30
FR
2 Informations utiles
Merci !
Félicitations et merci de votre confiance!
Avec l’humidificateur d’air Minibreeze, vous avez acquis un produit de qualité de
la maison MEDISANA. Afin d'obtenir les résultats escomptéset de profiter
longtemps de votre appareil nébulisateur MEDISANA Minibreeze, nous vous
recommandons de lire attentivement les instructions suivantes concernant l'utilisation et l'entretien.
2.1 Éléments fournis et emballage
Veuillez vérifier si l'appareil est au complet et ne présente aucun dommage. En cas
de doute, ne faites pas fonctionner l’appareil et adressez-vous à votre revendeur
ou à un point de service après-vente.
La fourniture comprend:
• 1 Humidificateur d’air Minibreeze
avec 2 adaptateurs de bouteille différentes (bouchons)
• 1 Adaptateur secteur/bloc d'alimentation
• 1 Brosse de nettoyage
• 1 sac de stockage
• 1 Notice d’utilisation
Les emballages sont réutilisables ou peuvent être recyclés afin de récupérer les
matières premières. Respectez les règles de protection de l’environnement lorsque
vous jetez les emballages dont vous n’avez plus besoin. Si vous remarquez lors du
déballage un dommage survenu durant le transport, contactez immédiatement
votre revendeur.
AVERTISSEMENT
Veillez à garder les films d’emballage hors de portée
des enfants. Ils risqueraient de s’étouffer!
2.2 Technologie à ultrasons
Une atmosphère trop sèche augmente les risques de maladies infectieuses ou des
voies respiratoires et entraîne fatigue et difficulté de concentration. Un air sain doit
avoir une humidité relative comprise entre 40 et 55 %. La technologie à ultrasons
silencieuse et peu gourmande en énergie de cet appareil de nébulisation transforme par vibrations l’eau en une brume extrêmement fine qui accroît le degré
d’humidité de l’air. Cela améliore la qualité de l’air et prévient un desséchement
des muqueuses et de la peau.
La capacité de l’appareil est conçue pour une pièce de 30 m
Le régulateur rotatif de l’intensité du brouillard
d’humidification avec la dimension de l’espace. Respecter impérativement les consignes de maintenance et d’entretien.
permet d’harmoniser le niveau
2
au plus de surface.
24
Page 31

2 Informations utiles / 3 Utilisation
ATTENTION
Une utilisation intensive risque d’entraîner la
sursaturation de l’air ambiant en humidité, qui peut alors
apparaître sur les murs, fenêtres et objets de la pièce.
Pour cette raison, à l’aide d’un hygromètre, vérifier que
la valeur de l’humidité relative de l’air ne dépasse pas
55%.
3 Utilisation
ATTENTION
Assurez-vous que l’humidificateur d’air MEDISANA est
utilisé sur une surface résistant à l’humidité et qu’il ne
peut pas se renverser. L’utilisation avec de l’eau
minéralisée / des essences aromatiques peut en
particulier entraîner des retombées / dépôts.
Faites attention à ce que la brume qui s’échappe de
l’appareil ne soit pas dirigée vers d’autres appareils
électriques, des meubles ou des murs.
3.1 Remplissage et vidage de la bouteille de réservoir
Vous pouvez utiliser comme bouteille de réservoir toutes les bouteilles usuelles d’un
demi-litre avec capsule à vis (jus de fruit ou boisson rafraîchissante par exemple).
Retirez la bouteille de réservoir
. Rincez la bouteille de réservoir puis remplissez-la avec au max. 500 ml d’eau
potable. Refermez la bouteille de réservoir en vissant à nouveau le bouchon.
Retournez la bouteille de réservoir et replacez-la sur l’appareil. Ne transportez pas
l’appareil avec la bouteille de réservoir pleine. Eliminez l’eau résiduelle après utilisation
et rincez la bouteille de réservoir avec de l’eau fraîche. Avant toute nouvelle
utilisation, remplissez la bouteille de réservoir avec de l’eau potable fraîche. Si vous
éteignez l’appareil et que vous ne souhaitez pas l’utiliser de manière prolongée,
retirez la bouteille de réservoir de l’appareil et videz-la.
de l’appareil et retournez-la. Dévissez le bouchon
FR
ATTENTION
Utiliser uniquement de l’eau potable fraîche pour faire
fonctionner l’appareil. Si l’eau présente une forte teneur
en calcaire, il est également possible d’utiliser de l’eau
déminéralisée. Nettoyez l’appareil régulièrement et
éliminez le calcaire et les autres dépôts, afin de préserver
son bon fonctionnement.
25
Page 32

FR
3 Utilisation
3.2 Mise en marche et arrêt de l’appareil
Installer l'appareil par terre sur une surface plane de manière à ce qu'il ne
bascule pas. Pivoter les pieds
pareil.
Insérer la bouteille de réservoir pleine
bouteille
Connecter le câble du bloc d'alimentation et le connecteur
du bloc dans une prise de courant.
Ouvrir la sortie de brouillard
sortie de brouillard est fermée.
Activer l’humidificateur d’air en tournant l’interrupteur MARCHE/ARRET ainsi que
le régulateur de l’intensité de brouillard
de contrôle intégré (DEL)/l’éclairage
s’allume en bleu. Lorsque la bouteille de réservoir est vide, l’éclairage s’éteint et
l’appareil s’éteint automatiquement.
Brancher l’appareil, selon les contraintes du lieu d’exploitation, progressivement
de la position L (= intensité la plus basse du ventilateur) jusqu’à la position maximale
H (= intensité la plus forte du ventilateur). Au bout de quelques secondes, le
brouillard est visible au niveau de la sortie
Capacité de l’atomiseur
Réglage minimal ( L ) : env. 50 ml/h
Réglage maximal ( H ) : env. 100 ml/h
Après utilisation ou lorsqu’il n’y a presque plus d’eau dans le réservoir (le témoin de
contrôle/l’éclairage
CHE/ARRÊT et le bouton tournant de réglage de l’intensité de nébulisation
OFF (ARRÊT).
L’appareil stoppe automatiquement l’atomisation lorsque la bouteille de réservoir est
vide.
L’éclairage bleu
.
s’éteint), éteignez l’appareil en amenant l’interrupteur MAR-
s’éteint.
vers l’extérieur pour améliorer la stabilité de l’ap-
avec le bouchon vissédans l’insert pour
et brancher la fiche
vers le haut. L’appareil ne fonctionne pas lorsque la
tout d’abord de OFF sur ON. Le témoin
dans le compartiment de vaporisation
.
sur
26
Page 33

4.1 Erreurs et comment y remédier
4 Divers
FR
Erreur
L’humidificateur d’air
ne fonctionne pas et la
DEL ne s’allume pas.
Le brouillard de
pulvérisation est
accompagné d’une
odeur désagréable.
L’humidificateur ne
fonctionne pas, bien que
la DEL s’allume.
La quantité de
brouillard générée
est insuffisante.
Bruit inhabituel
L’adaptateur de la
bouteille est bloqué.
Cause possible
L’adaptateur secteur
n’est pas branché ou
l’appareil n’est pas
allumé.
Pas d’eau dans la
bouteille de réservoir
La sortie de brouillard
est fermée.
Appareil neuf
L’eau est contaminée
ou est restée trop
longtemps dans la
bouteille.
Trop d’eau dans le
compartiment de
vaporisation
L’atomiseur est
encrassé.
L’eau est contaminée
ou est restée trop
longtemps dans la
bouteille.
Une résonance se
produit dans la bouteille
de réservoir lorsqu’elle
ne contient pas
suffisamment d’eau.
L’appareil ne se trouve
pas sur une surface
stable.
Vissage excessif
Solution
Branchez l’adaptateur
secteur et allumez
l’appareil.
Remplissez la bouteille
de réservoir d’eau.
Ouvrez la sortie de
brouillard vers le haut.
Ouvrez la sortie de
réservoir et aérez-la
pendant 12 heures
dans un endroit sombre
et frais.
Nettoyez la bouteille
de réservoir et
remplissez-la d’eau
fraîche.
Versez un peu d’eau
hors du compartiment
de vaporisation.
Nettoyez l’atomiseur
avec une brosse douce.
Nettoyez la bouteille
de réservoir et
remplissez-la d’eau
fraîche.
Remplissez la bouteille
réservoir.
Installez l’appareil sur
une surface stable.
Utilisez du savon
liquide pour ouvrir plus
facilement le joint
de fermeture.
27
Page 34

FR
4 Divers
4.2 Nettoyage et entretien
• En cas d’utilisation fréquente, nous vous recommandons de nettoyer à fond
l’appareil au moins une fois par semaine. Nettoyez l’extérieur de l’appareil avec
un chiffon doux humide. Vous pouvez rincer soigneusement la bouteille de
réservoir avec de l’eau chaude (> 65 °C) ou de l’alcool à 75 % minimum.
• Retirez le cache de l’appareil en soulevant le couvercle à l’avant avec l’ongle du
pouce puis enlevez-le prudemment.
• La chambre de nébulisation et le réservoir se nettoient au moyen d’un chiffon
imprégné d’alcool et d’un coton-tige. Faites attention à ce qu’il n’y ait pas d’eau
qui pénètre dans l’appareil.
• Avant de nettoyer l'appareil vérifiez que l'appareil soit éteint et que le bloc
d'alimentation soit débranché de la prise de courant.
• Retirez la bouteille de réservoir de l’appareil et videz-la.
• N'utilisez pas de produits agressifs, par exemple de la crème à récurer ou tout
autre détergent pour le nettoyage. Ceci peut endommager la surface et réduire
la nébulisation.
ATTENTION
Veillez à ce que l’eau ne s’infiltre pas à l’intérieur de l’appareil !
• L’émetteur d’ultrasons est la partie la plus sensible de l’appareil. Il est important
qu’il soit propre et bien entretenu. Utilisez la brosse fournie pour éliminer les
dépôts et les particules de saletés au niveau des orifices. N’utilisez en aucun
cas de produits métalliques pour nettoyer l’émetteur d’ultrasons.
• Si vous n’utilisez pas l’appareil pendant une durée prolongée, videz l’eau
résiduelle de la bouteille de réservoir et séchez l’appareil.
• Les dépôts calcaires peuvent être éliminés avec un produit de détartrage non
agressif, par exemple de l’acide citrique. Diluez le produit dans l’eau en respectant les indications du fabricant, versez-le dans la bouteille du réservoir et
laissez-le agir plusieurs heures. Rincez ensuite avec de l’eau fraîche.
• Entreposez l’appareil dans un endroit frais et sec, de préférence dans l’emballage original.
• Conservez l’adaptateur de la bouteille
la bouteille de réservoir afin d’éviter l’adhérence ou le blocage de la manchette
d’étanchéité.
séparément de la partie inférieure de
4.3 Élimination de l’appareil
Cet appareil ne doit pas être placé avec les ordures ménagères.
Chaque consommateur doit ramener les appareils électriques ou
électroniques, qu’ils contiennent des substances nocives ou non, à
un point de collecte de sa commune ou dans le commerce afin de
permettre leur élimination écologique.
Pour plus de renseignements sur l’élimination des déchets, veuillez
vous adresser aux services de votre commune ou bien à votre revendeur.
28
Page 35

4 Divers
4.4 Caractéristiques
Nom et modèle : MEDISANA humidificateur d’air Minibreeze
Alimentation électrique /
Bloc d'alimentation : 100-240 V~ 50/60 Hz 0,8 A
secondaire: 24 V= 0,5 A
Puissance : 12 W
Contenu de la bouteille
de réservoir : 0,5 l recommandé
Capacité nébulisateur : maximal environ 100 ml/h
Conditions de rangement : propre et sec
Dimensions l x h x p : environ 125 mm x 72 mm x 88,2 mm
Poids sans bloc d’alimentation : environ 300 g
Numéro d’article : 60075
Numéro EAN : 40 15588 60075 3
Dans le cadre du travail continu d’amélioration des produits,
nous nous réservons le droit de procéder à des modifications
techniques et de design.
FR
29
Page 36

FR
5 Garantie
Conditions de garantie et de réparation
En cas de recours à la garantie, veuillez vous adresser à votre revendeur spécialisé
ou contactez directement le service clientèle. S’il est nécessaire d’expédier
l’appareil, veuillez indiquer le défaut constaté et joindre une copie du justificatif
d’achat.
Les conditions de garantie sont les suivantes:
1. Une garantie de trois ans à compter de la date d’achat est accordée sur les
produits MEDISANA. En cas d’intervention de la garantie, la date d’achat doit
être prouvée en présentant le justificatif d’achat ou la facture.
2. Durant la période de garantie, les défauts liés à des erreurs de matériel ou de
fabrication sont éliminés gratuitement.
3. Les services effectués sous garantie n’entraînent pas de prolongation de la
période de garantie, ni pour l’appareil, ni pour les composants remplacés.
4. Sont exclus de la garantie:
a. tous les dommages dus à un usage incorrect, par exemple au nonrespect
de la notice d’utilisation.
b. les dommages dus à une remise en état ou des interventions effectuées par
l’acheteur ou par de tierces personnes non autorisées.
c. les dommages survenus durant le transport de l’appareil depuis le site du
fabricant jusque chez l’utilisateur ou lors de l’expédition de l’appareil au
service clientèle.
d. les accessoires soumis à une usure normale (batteries, piles, etc.).
5. Nous déclinons toute responsabilité pour les dommages consécutifs causés
directement ou indirectement par l’appareil, y compris lorsque le dommage
survenu sur l’appareil est couvert par la garantie.
MEDISANA AG
Jagenbergstraße 19
41468 NEUSS
ALLEMAGNE
E-Mail: info@medisana.de
Internet: www.medisana.de
Vous trouverez l'adresse du SAV sur la fiche jointe séparément.
30
Page 37

1 Norme di sicurezza
NOTE IMPORTANTI!
CONSERVARE IN MANIERA
SCRUPOLOSA!
Prima di utilizzare l’apparecchio, leggere attentamente
leistruzioni per l’uso, soprattutto le indicazioni di sicurezza, e
conservare le istruzioni per l’uso per gli impieghi successivi.
Se l’apparecchio viene ceduto a terzi, allegare sempre anche
queste istruzioni per l’uso.
Spiegazione dei simboli
Queste istruzioni per l’uso si riferiscono a questo
apparecchio. Contengono informazioni importanti
per la messa in funzione e l’uso. Leggere
interamente queste istruzioni per l’uso.
L’inosservanza delle presenti istruzioni può causare
ferite gravi o danni all’apparecchio.
AVVERTENZA
Attenersi a queste indicazioni di avvertimento per
evitare che l’utente si ferisca.
ATTENZIONE
Attenersi a queste indicazioni per evitare danni
all’apparecchio.
IT
NOTA
Queste note forniscono ulteriori informazioni utili
relative all’istallazione o al funzionamento.
Numero LOT
Produttore
31
Page 38

IT
1 Norme di sicurezza
Norme di sicurezza
Informazioni sull’alimentazione di corrente
• Prima di collegare l'apparecchio all'alimentazione di corrente, accertarsi che la
tensione di rete indicata sulla targhetta corrisponda a quella della rete di
alimentazione.
• Inserire la spina di rete nella presa solo ad apparecchio spento.
• Non portare, tirare o ruotare mai l’apparecchio utilizzando il cavo di alimenta-
zione e non bloccare il cavo.
• Posizionare il cavo di alimentazione in modo che non intralci il passaggio.
• Non afferrare la spina di rete quando si è in acqua e afferrare sempre la presa
con le mani asciutte.
Per persone con esigenze particolari
• Questo apparecchio non deve essere mai maneggiato da bambini, né utilizzato
da persone con discapacità fisiche, sensoriali o intellettive o con esperienza
insufficiente e/o carenza di competenze sempre che, per la loro incolumità, non
vengano assistiti da una persona competente o non vengano adeguatamente
istruiti su come impiegare l’apparecchio.
• Assicurarsi e controllare che i bambini non giochino con l’apparecchio.
• In caso di bronchite allergica, contattare il proprio medico prima di utilizzare
l'apparecchio.
• Nel caso dovessero comparire dei disturbi fisici durante l’utilizzo, rivolgersi al
proprio medico. In questo caso sospendere immediatamente l’uso dell’apparecchio.
Informazioni sul funzionamento dell’apparecchio
Impiego conforme alla destinazione
L’umidificatore serve ad aumentare l’umidità in un ambiente
tramite erogazione di vapore acqueo.
L'apparecchio è concepito esclusivamente per uso domestico e
non per scopi commerciali o per il settore medico!
Se pensate che possa nuocere alla vostra salute, consultate il
vostro medico prima di usare l’umidificatore.
• L’apparecchio non è destinato all’uso commerciale.
• Utilizzare l’apparecchio esclusivamente secondo le modalità riportate nelle istru-
zioni per l’uso. In caso di uso diverso, si estingue qualsiasi diritto di garanzia.
• Non utilizzare l'apparecchio quando l'apparecchio o il cavo di alimentazione è
danneggiato, non funziona correttamente, quando è caduto a terra o in acqua.
• Utilizzare solo gli accessori previsti per l’apparecchio e forniti dal produttore.
• Inserire o rimuovere gli accessori solo ad apparecchio spento.
• Non utilizzare l’apparecchio sotto coperte o cuscini.
32
Page 39

1 Norme di sicurezza
• Non usare l’apparecchio in prossimità di emettitori di onde elettromagnetiche
ad alta frequenza.
• Per utilizzare l’apparecchio, collocarlo su una superficie stabile, in modo che non
si possa rovesciare.
Per ottenere risultati ottimali l’umidificatore dovrebbe essere posto ad una dis-
•
tanza minima di 10 cm dalla parete.
•
Non indirizzare la nebbia direttamente verso una parete.
•
Disporre l’umidificatore ad una altezza minima di 60 cm dal pavimento.
• Tenere lontano l'apparecchio e il cavo di alimentazione da superfici calde.
Se il cavo o l’alimentatore risultano danneggiati, interrompere l’uso dell’appa-
•
recchio. Per motivi di sicurezza questi elementi possono essere sostituiti solo da
un centro di assistenza autorizzato.
•
Il cavo non deve essere custodito vicino a fonti di calore né fatto passare sopra a
spigoli vivi.
•
Non riempire l’umidificatore prima di aver separato l’adattatore di rete dalla rete
elettrica.
•
Non rovesciare, non muovere o non svuotare l’apparecchio finché è acceso.
•
Spegnere l’apparecchio e staccarlo dalla rete elettrica prima di rimuovere il serbatoio dell’acqua e di cambiare la posizione dell’apparecchio.
•
Non afferrare mai un apparecchio caduto in acqua. Estrarre immediatamente la
spina di rete.
•
Non mettere in funzione l'apparecchio, se il serbatoio non contiene acqua o se la
quantità di acqua è insufficiente.
•
Non utilizzare oli essenziali (ad esempio eucalipto o mentolo), che possono
danneggiare l'apparecchio.
•
Controllare che la fessura di aerazione posta sulla parte inferiore dell’apparecchio
sia libera da polvere e sporcizia.
•
Afferrare l’alimentatore solo con le mani asciutte.
•
Un’eccessiva umidità dell’ambiente può causare la formazione di acqua di condensa su finestre e mobili. Spegnere l’umidificatore non appena si verifica ciò.
•
Togliere l’alimentatore dalla presa di corrente quando l’apparecchio è spento e
non più in uso.
IT
Informazioni sulla manutenzione e la pulizia
• L'utilizzatore può effettuare solo interventi di pulizia sull'apparecchio. In caso di
guasti non procedere da soli alla riparazione dell’apparecchio e sospenderne
l’uso. Rivolgersi al proprio rivenditore specializzato e fare eseguire le riparazioni
esclusivamente presso i centri di assistenza tecnica autorizzati.
L’apparecchio, nonché il cavo e l’alimentatore non devono assolutamente essere
•
immersi in acqua o tenuti sotto l’acqua corrente.
• Qualora nell’apparecchio entrasse dell’acqua, disinserire immediatamente la
spina dalla presa di alimentazione elettrica.
Per pulire i componenti dell’umidificatore non utilizzare mai sostanze abrasive,
•
benzina, detergenti per vetri, lucidanti per mobili, diluenti per vernici o altri detergenti domestici aggressivi, perché potrebbero graffiare la superficie.
• Conservare l’apparecchio in un luogo asciutto.
33
Page 40

IT
2 Informazioni interessanti
Grazie!
Grazie per la fiducia accordataci e complimenti per la scelta!
Con lo umidificatore Minibreeze Lei ha acquistato un prodotto di qualità di
MEDISANA. Per raggiungere i risultati auspicati e per utilizzare al meglio l’umidificatore Minibreeze di MEDISANA, raccomandiamo di leggere attentamente le
seguenti indicazioni per l’uso e la manutenzione.
2.1 Materiale in dotazione e imballaggio
Verificare in primo luogo che l’apparecchio sia completo e che non vi siano segni
di danni. In caso di dubbi non mettere in funzione l’apparecchio e rivolgersi al
proprio rivenditore o al proprio centro di assistenza.
Il materiale consegnato consta di:
• 1 Umidificatore Minibreeze
incl. 2 diversi tappi di chiusura per la bottiglia
• 1 Adattatore di rete / alimentatore
• 1 Spazzola per la pulizia
• 1 busta per la conservazione
• 1 Manuale d’uso
Le confezioni sono riutilizzabili o possono essere riciclate. Smaltire il materiale
d’imballaggio non più necessario in conformità alle disposizioni vigenti. In caso
di danneggiamenti dovuti al trasporto, mettersi immediatamente in contatto con
il proprio rivenditore.
AVVERTENZA
Assicurarsi che i sacchetti d’imballaggio non siano alla
portata dei bambini. Pericolo di soffocamento!
2.2 Tecnologia a ultrasuoni
Se l’aria dell’ambiente è troppo secca si è più soggetti a malattiee infettive o delle vie
respiratorie portando a stanchezza e incapacità di concentrazione. L'aria salubre
dovrebbe avere un tasso di umidità relativa compreso fra il 40 e il 55 %.
La tecnologia a ultrasuoni dell'umidificatore, silenziosa e a basso consumo energetico, trasforma l'acqua in vapore finissimo attraverso vibrazioni, aumentando il grado
di umidità dell'aria. In questo modo si migliora la qualità dell'aria e si previene la
disidratazione delle mucose e della pelle.
La capacità dell'apparecchio è progettata per un ambiente di max. 30 m
ficie. Con il regolatore rotativo per regolare l’intensità della nebbia
il grado di umidificazione con la grandezza dell’ambiente.
È di fondamentale importanza osservare le indicazioni per la pulizia e per la cura.
2
si seleziona
di super-
34
Page 41

2 Informazioni interessanti / 3 Modalità d’impiego
ATTENZIONE
Un esercizio troppo intenso può portare a una
saturazione di umidità nell’aria dell’ambiente, che si
deposita sulle pareti, le finestre egli oggetti nell’ambiente.
Controllare quindi regolarmente con un igrometro che il
valore dell’umidità relativa nell’aria non è superiore al
55 %.
3 Modalità d’impiego
ATTENZIONE
Assicurarsi che umidificatore MEDISANA venga utilizzato
su una superficie resistente all’umidità senza rischio che
si rovesci. In particolare l’uso con acqua contenente
sostanze minerali / essenza aromatica può determinare
dei depositi / precipitati.
Accertarsi che il vapore in uscita non sia rivolto verso
altre apparecchiature elettriche, mobili o pareti.
3.1 Riempire e svuotare la bottiglia per rifornimento
Come bottiglia per rifornimento potete utilizzare una qualsiasi bottiglia da mezzo
litro per uso domestico con tappo girevole (per es. di un succo di frutta o bevanda
rinfrescante).
Togliere la bottiglia per rifornimento
di chiusura
500 ml di acqua potabile. Richiudere la bottiglia per rifornimento avvitando il tappo
di chiusura. Girare la bottiglia per rifornimento e rimetterla al suo posto
nell’apparecchio. Non trasportare l’apparecchio se la bottiglia per rifornimento non
è vuota. A fine utilizzo svuotare la bottiglia dall’acqua restante e sciacquare la bottiglia
per rifornimento con acqua potabile pulita. Prima del riutilizzo riempire la bottiglia per
rifornimento con acqua potabile pulita. Se spegnete l’apparecchio e non volete
utilizzarlo per lungo tempo, togliere la bottiglia per rifornimento dall’apparecchio e
svuotarla.
. Sciacquare la bottiglia per rifornimento e riempirla quindi con max
dall’apparecchio e giratela. Togliere il tappo
IT
ATTENZIONE
Per l’esercizio dell’apparecchio, utilizzare solo acqua
ossigenata pulita. Se si ha a disposizione acqua calcarea
dura, è possibile utilizzare acqua demineralizzata. Pulire
l’apparecchio regolarmente e rimuovere calcare o altri
depositi, per preservare la sua capacità di funzionamento.
35
Page 42

IT
3 Modalità d’impiego
3.2 Accensione e spegnimento dell’apparecchio
Per utilizzare l’apparecchio, collocarlo su una superficie stabile, in modo che non
si possa rovesciare. Estrarre (con rotazione) le basi
più stabile.
Infilare la bottiglia per rifornimento piena
nell’inserto per bottiglia .
Collegare il cavo dell’alimentatore alla presa a spina
nella presa di corrente.
Aprire verso l’alto
recchio non si attiva.
Accendere l’umidificatore ruotando il commutatore ON/OFF e il regolatore rotativo
per regolare l’intensità della nebbia
trollo integrata (LED)/luce
la bottiglia per rifornimento è vuota la luce si spegne e l’apparecchio si spegne
automaticamente.
Infine impostare l’apparecchio, a seconda dell’ambiente, sull’erogazione continua
dalla posizione L (= intensità minima) fino alla posizione massima H (= massima
intensità). Dopo pochi secondi la nebbia erogata dallo scarico
Capacità del nebulizzatore
impostazione minima ( L ) : ca. 50 ml/h
impostazione massima ( H ) : ca. 100 ml/h
Spegnere l'apparecchio al termine dell'utilizzo o quando l'acqua nel
serbatoio sta per finire (la spia di controllo/luce
ruttore ON/OFF e la manopola per l'intensità del vapore
Quando la bottiglia per rifornimento è vuota l’apparecchio si spegne automaticamente.
La luce blu
l’erogatore nebbia. Se l’erogatore nebbia è chiuso l’appa-
blu nella camera di nebulizzazione è accesa. Quando
si spegne.
d’apprima da OFF su ON. La spia di con-
per rendere l’apparecchio
con tappo di chiusura avvitato
e inserire l’alimentatore
è visibile.
si spegne), posizionando l'inter-
su OFF.
36
Page 43

4.1 Malfunzionamento e soluzione
4 Varie
IT
Errore
L’umidificatore non è
in funzione e il LED
non è acceso.
La nebbia erogata a
spruzzo emana un odore
sgradevole.
L’umidificatore non è
in funzione nonostante
il LED sia acceso.
Viene prodotta troppo
poca nebbia.
Rumore insolito
Il tappo di chiusura della
bottiglia è bloccato.
Possibile causa
L’adattatore di rete
non è allacciato oppure
l’apparecchio non è
acceso.
Non c’è acqua nella
bottiglia per rifornimento
L’erogatore nebbia è
chiuso.
Nuovo apparecchio
L’acqua è sporca oppure
è rimasta troppo a
lungo nella bottiglia.
Troppa acqua nella
camera di nebulizzazione
Il nebulizzatore è
sporco.
L’acqua è sporca oppure
è rimasta troppo a
lungo nella bottiglia.
Nella bottiglia per
rifornimento si genera
una risonanza quando
questa contiene troppo
poca acqua.
L’apparecchio non si
trova su una superficie
stabile.
Avvitatamento troppo
stretto
Soluzione
Inserire l’adattatore di
rete e accendere
l’apparecchio.
Riempire la bottiglia per
rifornimento con acqua.
Aprire verso l’alto
l’erogatore nebbia.
Aprire la bottiglia per
rifornimento e farla
aerare per 12 ore in
luogo buio e fresco.
Pulire la bottiglia per
rifornimento e riempirla
con acqua fresca.
Versare un po’ d’acqua
dalla camera di
nebulizzazione.
Pulire il nebulizzatore
con una spazzola
morbida.
Pulire la bottiglia per
rifornimento e riempirla
con acqua fresca.
Riempire la bottiglia
per rifornimento.
Porre l’apparecchio su
una superficie stabile.
Utilizzare sapone
liquido per aprire più
facilmente la guarnizione
di chiusura.
37
Page 44

IT
4 Varie
4.2 Pulizia e cura
• In caso di utilizzo frequente dell'apparecchio, si consiglia di pulirlo a fondo
almeno una volta alla settimana. Pulire esternamente l'apparecchio con un
panno umido e morbido. Potete sciacquare a fondo la bottiglia per rifornimento con acqua calda ( > 65 °C ) oppure con una soluzione con concentrazione
minima di alcool al 75%.
• Togliere la copertura dell’apparecchio sollevando un poco il coperchio all’estremità anteriore con un’unghia del pollice e poi rimuovendolo con prudenza.
• La camera di nebulizzazione e la camera del serbatoio devono essere pulite con
un panno imbevuto di alcool e un bastoncino di cotone. Accertarsi che non
penetri acqua all'interno dell'apparecchio.
• Prima di pulire l’apparecchio assicurarsi che l’apparecchio stesso sia spento e che
l’alimentatore sia disinserito dalla presa di corrente.
• Togliere la bottiglia per rifornimento dall’apparecchio e svuotarla.
• Per la pulizia non utilizzare sostanze aggressive come ad es. creme abrasive o
altri detergenti simili, perché potrebbero graffiare la superficie e diminuire la
vaporizzazione.
ATTENZIONE
Non deve penetrare acqua all’interno dell’apparecchio!
• Il trasmettitore a ultrasuoni è il componente più delicato dell'apparecchio. È
importante che venga tenuto pulito e trattato con cura. Utilizzare la spazzola
fornita in dotazione per rimuovere depositi e particelle di sporco dalle uscite.
Per la pulizia del trasmettitore a ultrasuono non utilizzare in alcun caso strumenti
metallici.
• Se l’apparecchio non verrà utilizzato per lungo tempo svuotare la bottiglia per
rifornimento dall’acqua restante e asciugare l’apparecchio.
• I residui di calcare possono essere rimossi utilizzando un decalcificante delicato,
come ad esempio l'acido citrico. Disciogliere la sostanza nell’acqua secondo le
disposizioni del produttore, versarla nella bottiglia per rifornimento e lasciarla
agire per diverse ore. In seguito sciacquare con acqua fresca.
• Posizionare l’apparecchio in un luogo asciutto e fresco, possibilmente nell’imballo originale.
• Conservare il tappo di chiusura della bottiglia allentato
della bottiglia per rifornimento per evitare che il manicotto di tenuta si attacchi
o aderisca troppo.
dalla parte inferiore
38
Page 45

4 Varie
4.3 Smaltimento
L'apparecchio non può essere smaltito insieme ai rifiuti domestici.
Ogni utilizzatore ha l'obbligo di gettare tutte le apparecchiature
elettroniche o elettriche, contenenti o prive di sostanze nocive,
presso un punto di raccolta della propria città o di un rivenditore
specializzato, in modo che vengano smaltite nel rispetto dell'ambiente.
Per lo smaltimento rivolgersi alle autorità comunali o al proprio
rivenditore.
4.4 Dati tecnici
Nome e modello : MEDISANA umidificatore Minibreeze
Alimentazione / Alimentatore : 100-240 V~ 50 /60 Hz 0,8 A
secondario: 24 V= 0,5 A
Potenza : 12 W
Capacità della bottiglia
per rifornimento : preferibilmente 0,5 l
Capacità di vaporizzazione : massimo circa 100 ml/h
Condizioni di magazzinaggio : pulito e asciutto
Dimensioni B x A x P : circa 125 mm x 72 mm x 88,2 mm
Peso senza alimentatore : circa 300 g
Numero articolo : 60075
Codice EAN : 40 15588 60075 3
IT
Alla luce dei costanti miglioramenti dei prodotti, ci riserviamo
la facoltà di apportare qualsiasi modifica tecnica e strutturale.
39
Page 46

IT
5 Garanzia
Condizioni di garanzia e di riparazione
In caso di garanzia, contattare il vostro rivenditore di fiducia o direttamente il
centro di assistenza. Se dovesse essere necessario spedire l’apparecchio, specificare il guasto e allegare una copia della ricevuta di acquisto.
Valgono le seguenti condizioni di garanzia:
1. I prodotti MEDISANA hanno una garanzia di tre anni a partire dalla data di
vendita. La data di acquisto deve essere comprovata in caso di garanzia dalla
ricevuta di acquisto o dalla fattura.
2. Durante il periodo di garanzia, i guasti dovuti a difetti di materiale o di lavo-
razione vengono eliminati gratuitamente.
3. Una prestazione di garanzia non da diritto al prolungamento del periodo di
garanzia, né per l’apparecchio né per i componenti sostituiti.
4. La garanzia non include:
a. tutti i danni risultanti da uso improprio, ad esempio dall’inosservanza delle
istruzioni d’uso,
b. i danni riconducibili a manutenzione o ad interventi effettuati dall’ac-
quirente o da terzi non autorizzati,
c. danni di trasporto verificati durante il trasporto dal produttore al consu-
matore o durante l’invio al servizio clienti,
d. gli accessori soggetti a normale usura (batterie ecc.).
5. È altresì esclusa qualsiasi responsabilità per danni secondari diretti o indiretti
causati dall’apparecchio anche se il danno all’apparecchio viene riconosciuto
come caso di garanzia.
MEDISANA AG
Jagenbergstraße 19
41468 NEUSS
GERMANIA
E-Mail: info@medisana.de
Internet: www.medisana.de
L'indirizzo del servizio di assistenza è riportato nel foglio allegato separato.
40
Page 47

1 Indicaciones de seguridad
ES
¡NOTAS
IMPORTANTES
!
¡CONSERVAR SIN FALTA!
Antes de utilizar el aparato, lea detenidamente las instrucciones
de manejo, especialmente las indicaciones de seguridad; guarde
estas instrucciones para su consulta posterior.
Si cede el aparato a terceras personas, entregue también
estas instrucciones de manejo.
Leyenda
Estas instrucciones forman parte de este aparato.
Contienen información importante relativa a la
puesta en funcionamiento y manejo. Lea estas
instrucciones en su totalidad. Si no se respetan
estas instrucciones se pueden producir graves
lesiones o daños en el aparato.
ADVERTENCIA
Las indicaciones de advertencia se deben respetar
para evitar la posibilidad de que el usuario sufra
lesiones.
ATENCIÓN
Estas indicaciones se deben respetar para evitar
posibles daños en el aparato.
NOTA
Estas indicaciones le ofrecen información adicional
que le resultará útil para la instalación y para el
funcionamiento.
Número de LOTE
Fabricante
41
Page 48

ES
1 Indicaciones de seguridad
Indicaciones de seguridad
fuente de alimentación
• Antes de conectar el aparato a la red de suministro, compruebe que la tensión
indicada en la placa de características se corresponda con la tensión de su red
de suministro.
• Conecte el enchufe a una toma de corriente sólo cuando el aparato está
apagado.
• No sujete, tire o gire el aparato mediante el cable de alimentación y no apriete
el cable.
• Coloque el cable de alimentación de tal manera que no haya ningún riesgo de
caídas.
• No toque el enchufe, si está con el pies en el agua; toque el enchufe siempre
con las manos secas.
personas con necesidades especiales
• Este aparato no está concebido para ser utilizado por personas (niños incluidos)
con capacidad física, sensorial o psíquica disminuida o que no tengan la experiencia ni los conocimientos necesarios para usarlo, a no ser que sean
vigilados por una persona responsable de su seguridad que les dé instrucciones
de cómo manejarlo.
• Los niños deben estar vigilados para asegurarse de que no utilicen el aparato
como juguete.
• En caso de sufrir de una enfermedad alérgica de las vías respiratorias, consulte
con su médico antes de utilizar el aparato.
• Consulte con su médico si tiene molestias durante la utilización del aparato. En
tal caso apáguelo inmediatamente.
funcionamiento del dispositivo
Uso de acuerdo con las disposiciones
Este humidificador sirve para elevar con vapor de agua la
humedad del aire de una estancia.
¡El aparato está destinado exclusivamente para el uso en el
ámbito doméstico y no para fines industriales o médicos!
Si tuviera dudas respecto a la salud, consulte a su médico
antes de usar el humidificador.
• Este aparato no ha sido destinado para un uso comercial.
• Utilice el aparato exclusivamente según su uso previsto descrito en las instruc-
ciones de manejo. En caso de utilizarlo para fines distintos, ya no será aplicable
la garantía.
• No utilice el aparato si el aparato o el cable de alimentación están defectuosos,
si el aparato no funciona perfectamente, si se ha caído al suelo o al agua.
• Utilice exclusivamente las piezas accesorias previstas para el aparato y sumi-
nistradas por el fabricante.
• Instale y desinstale las piezas accesorias sólo cuando el aparato esté apagado.
42
Page 49

1 Indicaciones de seguridad
• No utilice el aparato bajo mantas ni cojines.
• No utilice el aparato cerca de emisores electromagnéticos de alta frecuencia.
• Coloque el aparato sobre una superficie de suelo estable de tal manera que no
pueda volcar.
Para obtener resultados óptimos, el humidificador debe colocarse a una distancia
•
mínima de 10 cm de la pared.
•
No oriente nunca la niebla directamente hacia una pared.
•
Instale el humidificador a una altura mínima de 60 cm por encima del suelo.
• Mantenga el aparato y el cable de red alejados de superficies calientes.
No utilice el aparato si el cable o el bloque de alimentación están dañados. Por
•
razones de seguridad estas piezas deben ser cambiadas exclusivamente por una
estación de servicio autorizada.
•
El cable no debe guardarse cerca de fuentes de calor ni colocarse sobre bordes
punzantes.
•
No llene el humidificador antes de haber desenchufado el adaptador de red de la
red eléctrica.
•
No vuelque, mueva o vacíe el aparato mientras esté encendido.
•
Apague el aparato y desenchúfelo de la red eléctrica antes de retirar el depósito
de agua y modificar la posición del aparato.
•
No trate de agarrar un aparato que haya caído al agua. Desconecte de inmediato
el enchufe de la red.
•
No haga funcionar el aparato sin líquido o con un nivel de líquido insuficiente en
el tanque de agua.
•
No utilice aceites etéreos (por ej. eucalipto o mentol), puesto que podrían dañar
el aparato.
•
Mantenga las rejillas de ventilación situadas en la parte inferior del aparato libres
de polvo y suciedad.
• Coja el bloque de alimentación siempre con las manos secas.
Una humedad excesiva del ambiente puede producir condensación en ventanas
•
y muebles. Cuando esto se produzca, apague el humidificador.
•
Desconecte el bloque de alimentación del enchufe cuando el aparato esté
apagado y no vaya a seguir siendo utilizado.
ES
mantenimiento y limpieza
• Usted únicamente podrá realizar los trabajos de limpieza del aparato. Por favor
no intente reparar el aparato usted mismo en caso de avería ni siga utilizándolo. Consulte con su comercio especializado y deje llevar a cabo reparaciones
exclusivamente por estaciones de servicio autorizadas.
El aparato, el cable y el bloque de alimentación no deben ser sumergidos en agua
•
ni mantenidos bajo agua corriente bajo ninguna circunstancia.
• Si a pesar de ello penetrara alguna sustancia líquida en el aparato desconecte
inmediatamente el cable de red.
Para limpiar las piezas del humidificador no utilice nunca sustancias abrasivas,
•
gasolina, limpiacristales, abrillantador de muebles, disolventes de pinturas u otros
limpiadores domésticos agresivos, ya que de lo contrario se podrían dañar las
superficies.
• Guarde el aparato en un entorno seco.
43
Page 50

ES
2 Informaciones interesantes
¡Muchas gracias!
Muchas gracias por su confianza y felicitaciones.
Con el humificador Minibreeze intenso ha adquirido un producto de calidad de
MEDISANA. Con el fin de poder alcanzar los resultados deseados y de disfrutar
por mucho tiempo de su humidificador Minibreeze de MEDISANA le recomendamos observar detenidamente las siguientes indicaciones en relación con el uso
y el mantenimiento del aparato.
2.1 Volumen de suministros y embalaje
Compruebe primero si el aparato está completo y si no presenta daño alguno.
En caso de dudas, no ponga el aparato en funcionamiento y diríjase a su proveedor o punto de atención al cliente.
El volumen de entrega comprende:
• 1 Humidificador Minibreeze
incl. 2 cierres distintos de la botella (tapones)
• 1 Adaptador de red / bloque de alimentación
• 1 Cepillo de limpieza
• 1 bolsa para guardar el aparato
• 1 Instrucciones de uso
El embalaje es reutilizable o puede reciclarse. Deshágase del material de embalaje
que no se necesite, siguiendo las normas pertinentes. Si al desembalar observara
algún daño causado durante el transporte, póngase inmediatamente en contacto
con el comerciante.
ADVERTENCIA
¡Asegúrese de que los plásticos de embalaje no caigan en
manos de niños! ¡Existe el peligro de asfixia!
2.2 Tecnología ultrasónica
El aire ambiente demasiado seco aumenta la probabilidad de sufrir enfermedades
infecciosas y respiratorias, y provoca cansancio y una disminución de la concentración. La humedad relativa del aire en un ambiente sano debería situarse entre 40 y
55 %. La tecnología silenciosa y económica del humidificador por ultrasonidos convierte mediante oscilaciones el agua en una niebla muy fina que aumenta el grado
de humedad relativa. Así se mejora la calidad del aire, lo que previene la desecación
de las mucosas y de la piel.
La capacidad del aparato está diseñada para una habitación con una superficie
máxima de 30 m
adapta el nivel de humidificación a las dimensiones de la sala.
Siga sin falta las indicaciones de limpieza y cuidado.
2
. Con el regulador giratorio para la intensidad de la niebla
44
Page 51

2 Informaciones interesantes / 3 Aplicación
ATENCIÓN
Un funcionamiento demasiado intenso puede provocar
una sobresaturación de humedad en el aire ambiente;
esta humedad podría condensarse en las paredes,
ventanas y objetos situados en la sala. Por ello,
compruebe regularmente mediante un higrómetro que el
valor de la humedad relativa del aire no supere el 55 %.
3 Aplicación
ATENCIÓN
Asegúrese de que el humidificador MEDISANA sea
instalado sobre una superficie resistente a la humedad y
asegurado contra vuelcos. Especialmente si el aparato
funciona con agua mineral / esencia aromática pueden
producirse depósitos / condensaciones.
Asegúrese de que la niebla que sale no esté dirigida hacia
otros aparatos eléctricos, muebles o paredes.
3.1 Llenar y vaciar la botella
Como botella puede utilizar cualquier botella doméstica de medio litro con tapón
roscado (por ej., de un zumo o una bebida refrescante).
Tome la botella
la botella y, a continuación, rellénela con un máx. de 500 ml de agua del grifo. Cierre
la botella enroscando de nuevo el tapón. Dé la vuelta a la botella y vuelva a colocarla
en el aparato. No transporte el aparato con la botella llena. Cuando termine de
utilizar el aparato, vacíe el agua restante y enjuague la botella con agua del grifo.
Antes de volver a utilizarlo, llene la botella con agua del grifo. Cuando apague el
aparato y no vaya a utilizarlo durante un tiempo prolongado, retire la botella del
aparato y vacíela.
del aparato y dele la vuelta. Desenrosque el tapón. Enjuague
ES
ATENCIÓN
Para poner en marcha el aparato, utilice únicamente agua
fresca del grifo. Si el agua posee un alto contenido en cal,
también podrá utilizar agua desmineralizada. Limpie el
aparato con regularidad y elimine la cal u otros depósitos
para así conservar su capacidad de funcionamiento.
45
Page 52

ES
3 Aplicación
3.2 Encendido y apagado del aparato
Coloque el aparato sobre una superficie de suelo estable de tal manera que no
pueda volcar. Gire hacia fuera los pies de apoyo
aparato.
Inserte la botella llena
Inserte el cable del bloque de alimentación en el zócalo de conexión para el adaptador de red
Abra la salida de niebla
el aparato no funciona.
Encienda el humidificador girando el botón de ENCENDIDO/APAGADO y, a continuación, el regulador giratorio de la intensidad de la niebla
luz de control integrada (LED)/iluminación
ilumina en azul. Si la botella está vacía, la iluminación se apaga y el aparato se
apaga también automáticamente.
A continuación, ajuste el aparato de forma continua, dependiendo de las necesidades del espacio, desde la posición L (= intensidad de nebulización baja) hasta la
posición máxima H (= intensidad de nebulización máxima). Pasados unos segundos
verá la niebla saliendo por el orificio de salida
Capacidad del nebulizador
mínima ( L ) : aprox. 50 ml/h
máxima ( H ) : aprox. 100 ml/h
Apague el aparato al finalizar su uso, o cuando hay apenas agua en el tanque
(la luz de control/iluminación
APAGADO y regulador giratorio para la intensidad de la niebla
OFF (apagado).
El aparato apaga automáticamente la nebulización si la botella está vacía.
La luz azul
se apaga.
con el tapón enroscado en su alojamiento .
y seguidamente conecte el bloque de alimentación al enchufe.
girándola hacia arriba. Si la salida de niebla está cerrada,
se apaga), poniendo el botón de ENCENDIDO/
para aumentar la estabilidad del
de OFF a ON. La
de la cámara de nebulización se
.
en la posición
46
Page 53

4.1 Problemas y su solución
4 Generalidades
ES
Errores
El humidificador no
trabaja y el LED no
está encendido.
La niebla desprende
un olor desagradable.
El humidificador no
trabaja pero el LED está
encendido.
Se genera demasiado
poca niebla.
Ruido extraño
La botella está bien
cerrada.
Causa posible
El adaptador de red
no está conectado o
el aparato no está
encendido.
No hay agua en la
botella.
La salida de niebla está
cerrada.
Nuevo aparato
El agua está sucia o el
agua ha permanecido
demasiado tiempo en
la botella.
Demasiada agua
en la cámara de
nebulización
El nebulizador está
sucio.
El agua está sucia o el
agua ha permanecido
demasiado tiempo en
la botella.
En la botella se produce
una resonancia cuando
contiene demasiado
poca agua.
El aparato no está sobre
una superficie estable.
Enroscado demasiado
fuerte
Solución
Enchufe el adaptador
de red y encienda el
aparato.
Llene la botella de
agua.
Abra la salida de niebla
girándola hacia arriba.
Abra la botella y déjela
que se ventile en un
lugar oscuro y fresco
durante 12 horas.
Limpie la botella y
llénela de agua fresca.
Extraiga un poco de
agua de la cámara de
nebulización.
Limpie el nebulizador
con un cepillo blando.
Limpie la botella y
llénela de agua fresca.
Llene la botella.
Instale el aparato sobre
una superficie estable.
Utilice jabón líquido
para que la junta del
tapón se abra más
fácilmente.
47
Page 54

ES
4 Generalidades
4.2 Limpieza y mantenimiento
• Si el aparato se usa con frecuencia, recomendamos limpiarlo con cuidado por lo
menos una vez por semana. Limpie el exterior del aparato con un paño suave,
ligeramente húmedo. Puede enjuagar a fondo la botella con agua muy caliente
( > 65 °C ) o con alcohol de al menos el 75%.
• Retire la tapa del aparato levantándola por el extremo delantero con la uña del
pulgar y quitándola a continuación con cuidado.
• La cámara de pulverización y la cámara del tanque pueden limpiarse con un
paño empapado en alcohol o un bastoncillo de algodón. No permita que agua
penetre en el interior del aparato.
• Antes de limpiar el aparato debe asegurarse de que el aparato está apagado y
el bloque de alimentación desconectado del enchufe.
• Extraiga la botella del aparato y vacíela.
• Por favor no utilice sustancias agresivas para la limpieza, como por ejemplo
sustancias abrasivas u otros agentes de lavado, ya que de lo contrario se podrían
dañar las superficies y disminuir la generación de niebla.
ATENCIÓN
¡No debe entrar agua en el interior del aparato!
• El transmisor ultrasónico es el componente más sensible del aparato. Es
importante mantenerlo limpio y manejarlo con cuidado. Utilice el cepillo
suministrado para retirar depósitos y suciedad de los orificios. No utilice nunca
dispositivos metálicos para limpiar el transmisor ultrasónico.
• Cuando no vaya a utilizar el aparato durante un tiempo prolongado, vacíe el
agua que quede en la botella y seque el aparato.
• Los restos de cal pueden eliminarse utilizando un descalcificador suave, por
ej. ácido cítrico. Disuelva el producto en agua siguiendo las instrucciones del
fabricante, viértalo en la botella y deje que el producto actúe durante varias
horas. A continuación, enjuague con agua fresca.
• Guarde el aparato en un lugar seco y frío; si es posible, en su embalaje original.
• Guarde el cierre
manguito de sellado pueda quedarse pegado.
de la parte inferior de la botella suelto para evitar que el
4.3 Indicaciones para la eliminación
Este aparato no se debe eliminar por medio de la recogida de
basuras doméstica.
Todos los usuarios están obligados a entregar todos los aparatos
eléctricos o electrónicos, independientemente de si contienen
substancias dañinas o no, en un punto de recogida de su ciudad
o en el comercio especializado, para que puedan ser eliminados
sin dañar el medio ambiente.
Para más información sobre cómo deshacerse de su aparato, diríjase
a su ayuntamiento o a su establecimiento especializado.
48
Page 55

4 Generalidades
4.4 Datos técnicos
Nombre y modelo : MEDISANA humidificador Minibreeze
Alimentación eléctrica /
Bloque de alimentación : 100-240 V~ 50/60 Hz 0,8 A
secundario: 24 V= 0,5 A
Potencia : 12 W
Contenido de la botella : 0,5 l (recomendado)
Capacidad del generador
de niebla : como máximo aprox. 100 ml/h
Condiciones de almacenaje : en un lugar limpio y seco
Dimensiones A x H x P : aprox. 125 mm x 72 mm x 88,2 mm
Peso sin bloque de alimentación : aprox. 300 g
Número de artículo : 60075
Número EAN : 40 15588 60075 3
Con vistas a mejoras de la calidad del producto, nos reservamos
el derecho de introducir modificaciones técnicas y de diseño.
ES
49
Page 56

ES
5 Garantía
Condiciones de garantía y reparación
Le rogamos consulte con su distribuidor especializado o directamente con el
centro de servicio técnico en caso de una reclamación. Si tuviera que remitirnos
el dispositivo, le rogamos indique el defecto y adjunte una copia del recibo de
compra.
En este caso, se aplicarán las siguientes condiciones de garantía:
1. Con relación a los productos de MEDISANA, se ofrece una garantía por un
período de tres años a partir de la fecha de compra. En caso de una reclamación, la fecha de compra debe probarse mediante el recibo de compra o
la factura.
2. Los defectos de material o de fabricación se eliminarán de forma gratuita
dentro del período de garantía.
3. La aplicación de la garantía no conlleva una extensión del período de garantía,
ni con respecto al dispositivo ni con respecto a los componentes sustituidos.
4. Esta garantía no cubre:
a. todos los daños causados por abuso, por ej. por incumplimiento del manual
de uso;
b. los daños debidos a reparaciones o intervenciones por parte del comprador
o terceros no autorizados;
c. los daños de transporte causados durante el transporte del domicilio del
fabricante al consumidor o durante el envío al servicio técnico;
d. accesorios sometidos a un desgaste normal (pilas, etc.).
5. Se excluye cualquier responsabilidad por los daños directos o indirectos
causados por el dispositivo, aunque el daño en el dispositivo haya sido considerado como una reclamación justificada.
MEDISANA AG
Jagenbergstraße 19
41468 NEUSS
ALEMANIA
E-Mail: info@medisana.de
Internet: www.medisana.de
Encontrará la dirección de nuestra asistencia técnica en la hoja anexa.
50
Page 57

1 Avisos de segurança
NOTAS IMPORTANTES!
GUARDAR SEM FALTA!
Antes de utilizar o aparelho, leia atentamente o manual de
instruções, em especial as indicações de segurança e guarde-o
para uma utilização posterior.
Se entregar o aparelho a terceiros, faculte também este
manual de instruções.
Descrição dos símbolos
Este manual de instruções pertence a este
aparelho. Ele contém informações importantes
para a colocação em funcionamento e a operação.
Leia completamente este manual de instruções.
O incumprimento destas instruções pode causar
lesões graves ou danos no aparelho.
AVISO
Estas indicações de aviso têm de ser cumpridas
para evitar possíveis lesões do utilizador.
ATENÇÃO
Estas indicações têm de ser cumpridas para evitar
possíveis danos no aparelho.
PT
NOTA
Estas notas fornecem informações adicionais úteis
para a instalação ou a operação.
Número de lote
Fabricante
51
Page 58

PT
1 Avisos de segurança
Avisos de segurança
para a alimentação de corrente
• Antes de conectar o aparelho à sua alimentação de corrente, tenha atenção
para que a tensão eléctrica indicada na chapa de identificação corresponda à
da sua rede eléctrica.
• Insira apenas a ficha de rede na tomada quando o aparelho estiver desligado.
• Não transporte, puxe ou rode o aparelho através do cabo de alimentação e não
entale o cabo.
• Posicione o cabo de rede de modo a que não exista um perigo de queda.
• Não toque na ficha de rede quando se encontrar na água e toque-o sempre
com as mãos secas.
para pessoas especiais
• Este aparelho não é adequado para ser utilizado por pessoas (incluindo crianças)
com capacidades físicas, sensoriais ou psíquicas limitadas ou falta de experiência e/ou conhecimentos, a não ser que sejam vigiadas por uma pessoa
responsável pela sua segurança ou que tenham recebido instruções como
utilizar a máquina.
• As crianças devem ser vigiadas para garantir que não brincam com o aparelho.
• No caso de uma doença alérgica das vias respiratórias, consulte o seu médico
de família antes da utilização.
• Consulte o seu médico se, durante a utilização, ocorrerem queixas a nível da
saúde. Nesse caso, deixe imediatamente de utilizar o aparelho.
antes da utilização do aparelho
Utilização adequada
O humidificador serve para aumentar a humidade do ar num
compartimento através de vapor de água.
O aparelho destina-se exclusivamente à utilização doméstica e
não para fins comerciais ou para a utilização na área medicinal!
Se tiver questões a nível da saúde, consulte o seu médico antes
da utilização do humidificador!
• O aparelho não se destina ao uso comercial.
• Utilize o aparelho apenas de acordo com as prescrições das instruções de uti-
lização. Em caso de utilização não adequada, o direito à garantia perde a sua
validade.
• Não utilize o aparelho quando o mesmo ou o cabo de alimentação apresentar
danos, quando não funcionar correctamente e quando caiu no chão ou na
água.
• Utilize exclusivamente os acessórios previstos para o aparelho e fornecidos pelo
fabricante.
• Remova ou coloque os acessórios só com o aparelho desligado.
• Não utilize o aparelho debaixo de coberturas da cama ou almofadas.
52
Page 59

1 Avisos de segurança
• Não utilize o aparelho nas proximidades de emissores electromagnéticos de alta
frequência.
• Antes da utilização, coloque o aparelho sobre uma superfície sólida e plana de
modo a não poder tombar.
Para alcançar os melhores resultados, o humidificador deve ser instalado com uma
•
distância mínima de 10 cm para a parede.
•
Nunca direccione a névoa directamente para uma parede.
•
Instale o humidificador a uma altura de no mínimo 60 cm acima do solo
• Mantenha o aparelho afastado das superfícies quentes.
Se o cabo ou o adaptador de rede estiverem danificados, o aparelho não pode
•
ser utilizado. Por razões de segurança estas peças só podem ser substituídas por
serviços técnicos autorizados.
•
O cabo não pode ser guardado na proximidade de uma fonte de aquecimento
nem ser puxado por arestas afiadas.
•
Não ateste o humidificador antes de desligar o adaptador de corrente da corrente.
•
Nunca incline, mova ou esvazie o aparelho se este estiver ligado!
•
Desligue o aparelho e desligue-o da corrente antes de retirar o depósito de água
ou alterar a posição do aparelho.
•
Não tente agarrar um aparelho que caiu para dentro da água. Retire imediatamente a ficha de rede da tomada.
•
Não utilize o aparelho quando o tanque de água não conter líquido ou conter
pouco líquido.
•
Não utilize óleos etéreos (p.ex. eucalipto ou mentol), estes podem danificar o
aparelho.
•
Mantenha a ranhura de ventilação na parte inferior do aparelho livre de pó e
impurezas.
• Segure no adaptador de rede sempre com mãos secas.
Uma humidade excessiva na sala pode provocar condensação nas janelas e no
•
mobiliário. Assim que esta se manifesta, desligue o humidificador.
• Puxe o adaptador de rede da tomada quando o aparelho estiver desligado e
já não estiver a ser utilizado.
PT
para a manutenção e limpeza
• Você apenas deve realizar trabalhos de limpeza no aparelho. Em caso de
avarias não repare o aparelho e não o volte a utilizar. Consulte o seu vendedor
especializado e deixe fazer as reparações apenas por serviços técnicos autorizados.
• O aparelho assim como o cabo e o adaptador de rede nunca podem ser
imergidos em água nem serem mantidos sob água corrente.
• Se alguma vez penetrar água no aparelho, retire imediatamente a ficha de rede
da tomada.
Para proceder à limpeza dos componentes do humidificador, nunca utilizar agen-
•
tes abrasivos, gasolina, produtos para limpeza dos vidros, agentes de polimento
para móveis, diluentes ou outros agentes de limpeza domésticos agressivos. Tais
produtos podem corroer a superfície.
• Guarde o aparelho num local seco.
53
Page 60

PT
2 Informações gerais
Muito obrigada
Muito obrigado pela sua confiança e muitos parabéns!
Com o humidificador Minibreeze adquiriu um produto de qualidade da
MEDISANA. A fim de poder alcançar o êxito desejado e poder desfrutar durante
muito tempo do seu vaporizador Minibreeze da MEDISANA, recomendamos
que leia atentamente as indicações de utilização e manutenção.
2.1 Material fornecido e embalagem
Por favor, em primeiro lugar, verifique se o aparelho está completo e não apresenta qualquer dano. Em caso de dúvida, não coloque o aparelho em funcionamento
e consulte o seu revendedor ou o seu centro de assistência.
Do volume de fornecimento fazem parte:
• 1 humidificador Minibreeze
incl. 2 adaptadores de garrafa diferentes (tampas de fecho)
• 1 adaptador de rede / equipamento de alimentação a partir da rede
• 1 escova de limpeza
• 1 bolsa
• 1 manual de utilização
As embalagens podem ser reutilizadas ou podem ser eliminadas através da reciclagem. Por favor, elimine adequadamente o material da embalagem não necessário.
Se, durante o desembalamento, verificar danos devido ao transporte, por favor,
entre imediatamente em contacto com o seu revendedor.
AVISO
Tenha atenção para que as películas da embalagem não
se tornem brincadeiras para crianças.
Existe perigo de asfixia!
2.2 Tecnologia ultra-sónica
O ar ambiente demasiado seco aumenta a vulnerabilidade a infecções e doenças
do foro respiratório, causa cansaço e a diminuição da concentração. O ar saudável
deve possuir uma humidade relativa do ar de 40 até 55 %.
Graças às vibrações, a tecnologia ultra-sónica sem ruídos e económica do humidificador de ar transforma a água em névoa fina que aumenta o grau de humidade
do ar. Esse processo aumenta a qualidade do ar e previne a secagem das mucosas
nasais e da pele.
A capacidade do aparelho está concebida para uma divisão com uma área máx. de
2
. Com o regulador rotativo para a intensidade da névoa , adapte o grau de
30 m
humidade ao tamanho da sala.
Cumpra obrigatoriamente as indicações de limpeza e de conservação.
54
Page 61

2 Informações gerais / 3 Aplicação
ATENÇÃO
Um funcionamento demasiado intensivo pode causar uma
saturação do ar ambiente com humidade que, por sua
vez, pode formar condensação nas paredes, janelas e
objectos na sala. Por isso, verifique regularmente através
de um higrómetro que o valor da humidade relativa do
ar não exceda os 55 %.
3 Aplicação
ATENÇÃO
Certifique-se de que o humidificador MEDISANA é colocado
em funcionamento em cima de uma superfície estável e
insensível à humidade. Sobretudo no funcionamento com
água com teor de sais minerais / essências aromáticas pode
dar-se origem à formação de condensação / sedimentos.
Tenha atenção para que a névoa que sai do aparelho não
esteja direccionada para outros aparelhos eléctricos,
móveis ou paredes.
3.1 Enchimento e esvaziamento da garrafa do depósito
Pode ser utilizada como garrafa do depósito qualquer garrafa de meio litro disponível
em casa que tenha tampa de rosca (p.ex. uma garrafa de sumo de fruta ou de um
refrigerante).
Retire a garrafa do depósito
de rosca
500 ml de água potável. Feche novamente a tampa do depósito enroscando a tampa.
Vire a garrafa do depósito ao contrário e volte a colocá-la no aparelho. Não
transporte o aparelho com a garrafa do depósito cheia. Elimine a água residual
após a utilização e lave a garrafa do depósito com água potável limpa. Antes de uma
nova utilização, lave a garrafa do depósito com água potável limpa. Caso pretenda
desligar o aparelho e o mesmo não seja utilizado durante um período de tempo mais
prolongado, retire a garrafa do depósito do aparelho e esvazie-a.
. Lave a garrafa do depósito e, em seguida, encha-a com, no máx.,
do aparelho e vire-a ao contrário. Desenrosce a tampa
PT
ATENÇÃO
Para a utilização do aparelho utilize apenas água potável
limpa. No caso de água com elevado teor calcário, também
tem a possibilidade de utilizar água desmineralizada.
Limpe regularmente o aparelho e remova o calcário e
outras sedimentações, para este manter a sua capacidade
de funcionamento.
55
Page 62

PT
3 Aplicação
3.2 Ligar e desligar
Antes da utilização, coloque o aparelho sobre uma superfície sólida e plana de
modo a não poder tombar. Bascule os pés
dade ao aparelho.
Coloque a garrafa do depósito atestada
adaptador da garrafa
Ligue o cabo do adaptador de rede à tomada de encaixe
dor de rede na tomada de corrente.
Abra a tampa da saída de névoa
aparelho não funciona.
Ligue o humidificador rodando, primeiro, o interruptor LIG/DESL e o regulador
rotativo para a intensidade da névoa
integrada (LED)/iluminação
garrafa do depósito vazia a luz apaga e o aparelho desliga automaticamente.
Em seguida, regule o aparelho dependendo das necessidades da sala, progressivamente da posição L (= intensidade de ventilação mínima) até à posição máxima H
(= intensidade de ventilação máxima). Após poucos segundos, poderá observar a
saída de névoa através da saída
Capacidade do nebulizador
Regulação mínima ( L ) : aprox. 50 ml/h
Regulação máxima ( H ) : aprox. 100 ml/h
Desligue o aparelho no fim de utilização ou quando o tanque estiver quase sem
água (a luz de controlo/iluminação
LIGAR/DESLIGAR e o regulador rotativo para a intensidade de névoa
O aparelho desliga automaticamente a nebulização com a garrafa do depósito vazia.
A iluminação azul
.
apaga.
acende a azul na câmara de nebulização. Com a
.
, por forma a conferir maior estabili-
com a tampa de rosca enroscada no
e introduza o adapta-
para cima. Com a saída de névia fechada, o
de OFF para ON. A luz de controlo
apaga), colocando o interruptor de
em OFF.
56
Page 63

4.1
Erros e eliminação
4 Generalidades
PT
Erro
O humidificador não
funciona e o LED não
acende.
O nevoeiro é
acompanhado de um
odor desagradável.
O humidificador não
funciona, apesar do
LED estar aceso.
É produzida uma
quantidade de
nevoeiro muito
reduzida.
Ruído estranho
O adaptador da
garrafa está preso.
Possível causa
O adaptador de
corrente não está ligado
ou o aparelho não está
ligado.
Garrafa do depósito
sem água
A saída de névoa
está fechada.
Aparelho novo
A água está suja ou
esteve demasiado
tempo dentro da
garrafa.
Demasiada água
na câmara de
nebulização
O nebulizador está
sujo.
A água está suja
ou esteve demasiado
tempo dentro da
garrafa.
Na garrafa do
depósito surge uma
ressonância, quando
tem pouca água.
O aparelho encontra-se
em cima de uma
superfície estável.
Fechado com
demasiada pressão
Solução
Insira o adaptador
de rede e ligue o
aparelho.
Encha a garrafa do
depósito com água.
Abra a tampa da saída
de névoa para cima.
Abra a garrafa
do depósito e deixe
esta arejar durante
12 horas num local
escuro e seco.
Limpe a garrafa do
depósito e encha a
mesma com água
limpa.
Verta um pouco de
água da câmara de
nebulização.
Limpe o nebulizador
com uma escova macia.
Limpe a garrafa
do depósito e encha
a mesma com água
limpa.
Encha a garrafa do
depósito.
Coloque o aparelho
numa superfície estável.
Utilize sabão líquido
para abrir a vedação
de fecho de forma
mais fácil.
57
Page 64

PT
4 Generalidades
4.2 Limpeza e manutenção
• Na utilização frequente, recomendamos que limpe o aparelho, pelo menos,
uma vez por semana. Limpe o exterior do aparelho com um pano húmido e
macio. Pode lavar a garrafa do depósito com água quente ( > 65 °C ) ou com
álcool com, no mínimo, 75%.
• Remova a cobertura do aparelho elevando cuidadosamente a parte da frente da
tampa com a unha do polegar.
• Limpe a câmara do atomizador e a câmara do tanque com um pano embebido
em álcool e um cotonete. Tenha atenção para que a água não penetre no interior do aparelho.
• Antes de limpar o aparelho, certifique-se de que o aparelho está desligado e o
adaptador de rede está retirado da tomada de corrente.
• Retire a garrafa do depósito do aparelho e esvazie o mesmo.
• Por favor, para a limpeza não utilize substâncias agressivas como, por exemplo,
cremes de limpeza ou outros detergentes. Tais produtos podem corroer a superfície e diminuir a nebulização.
ATENÇÃO
Não pode entrar água no interior do aparelho!
• O sensor por ultra-sons é o componente mais sensível do aparelho. É muito
importante que ele seja utilizado de modo limpo e conservado. Utilize a escova
fornecida para libertar as sedimentações e partículas de sujidade das saídas.
Para limpar o sensor de ultra-sons, não utilize meios auxiliares metálicos.
• Se não utilizar o aparelho durante muito tempo, retire o resto da água da
garrafa do depósito e seque o aparelho.
• Os resíduos de calcário podem ser limpos através de um agente de descalcificação suave, p.ex. ácido cítrico. Dissolva o agente em água conforme as
prescrições do fabricante, verta-o na garrafa do depósito e, aí, deixe-o actuar
durante várias horas. De seguida lave com água limpa.
• Guarde o aparelho num local seco e fresco. A melhor maneira é na embalagem
original.
• Guarde o adaptador da garrafa
forma solta, para evitar uma colagem ou aderência da braçadeira de vedação.
da parte debaixo da garrafa do depósito de
4.3 Indicações sobre a eliminação
Este aparelho não pode ser eliminado em conjunto com o lixo
doméstico.
Cada consumidor tem o dever de entregar qualquer aparelho
eléctrico ou electrónico com ou sem substâncias nocivas nos postos
de recolha públicos da sua cidade ou no seu revendedor especializado, para que possam ser eliminados ecologicamente.
Para mais informações sobre as formas de descarte, contacte as
autoridades locais ou o seu revendedor.
58
Page 65

4 Generalidades
4.4 Dados técnicos
Nome e modelo : MEDISANA humidificador Minibreeze
Alimentação de corrente /
Fonte de alimentação : 100-240 V~ 50/60 Hz 0,8 A
secundário: 24 V= 0,5 A
Potência : 12 W
Conteúdo da garrafa
do depósito : 0,5 l recomendado
Capacidade do nebulizador : máximo aprox. 100 ml/h
Condições de armazenamento : local limpo e seco
Dimensões L x A x P : aprox. 125 mm x 72 mm x 88,2 mm
Peso sem fonte de alimentação : aprox. 300 g
Número de artigo : 60075
Número EAN : 40 15588 60075 3
Devido aos constantes melhoramentos do produto, reservamos
o direito a proceder a alterações técnicas e estéticas.
PT
59
Page 66

PT
5 Garantia
Garantia e condições de reparação
Por favor, em caso de garantia, contacte o seu revendedor especializado ou
directamente o centro de assistência. Se for necessário enviar o aparelho, por
favor, envie o aparelho indicando a avaria e acompanhado de uma cópia do
recibo de compra.
Em caso de garantia aplicam-se as seguintes condições:
1. Aos produtos MEDISANA concedemos uma garantia de três anos a partir
da data de compra. Em caso de garantia, a data de compra tem de ser comprovada através do recibo de compra ou factura.
2. As deficiências devido a erros de material ou de fabricação são eliminadas
gratuitamente dentro do prazo de garantia.
3. Após um serviço de garantia, o prazo da garantia não é prolongado, nem
para o aparelho nem para as peças substituídas.
4. A garantia exclui:
a. todos os danos resultantes de manuseamento inadequado como, p.ex.,
devido ao não cumprimento do manual de instruções.
b. danos resultantes de reparações ou intervenções pelo comprador ou por
terceiros não autorizados.
c. danos de transporte resultantes do percurso entre o fabricante e o consu-
midor ou durante o envio para o serviço de assistência a clientes.
d. componentes exteriores sujeitos a um desgaste normal (pilhas etc.).
5. Não nos responsabilizamos por danos consequentes directos ou indirectos
que são causados pelo aparelho mesmo quando o dano no aparelho é reconhecido como um caso de garantia.
MEDISANA AG
Jagenbergstraße 19
41468 NEUSS
ALEMANHA
E-Mail: info@medisana.de
Internet: www.medisana.de
Encontra o endereço da assistência técnica na folha em anexo.
60
Page 67

1 Veiligheidsmaatregelen
BELANGRIJKE
AANWIJZINGEN!
ABSOLUUT BEWAREN!
Lees de gebruiksaanwijzing, in het bijzonder de veiligheidsinstructies, zorvuldig door vooraleer u het apparaat gebruikt
en bewaar de gebruiksaanwijzing voor verder gebruik.
Als u het toestel aan derden doorgeeft, geef dan deze
gebruiksaanwijzing absoluut mee.
Verklaring van de symbolen
Deze gebruiksaanwijzing behoort bij dit toestel.
Ze bevat belangrijke informatie over de
ingebruikneming en het gebruik. Lees deze
gebruiksaanwijzing helemaal. Het niet naleven
van deze instructie kan zware verwondingen of
schade aan het toestel veroorzaken.
WAARSCHUWING
Deze waarschuwingen moeten in acht genomen
worden om mogelijk letsel van de gebruiker te
verhinderen.
NL
OPGELET
Deze aanwijzingen moeten in acht genomen
worden om mogelijke schade aan het toestel te
verhinderen.
AANWIJZING
Deze aanwijzingen geven u nuttige bijkomende
informatie bij de installatie of het gebruik.
LOT-nummer
Producent
61
Page 68

NL
1 Veiligheidsmaatregelen
Veiligheidsmaatregelen
over de stroomvoorziening
• Voor u het apparaat aansluit op uw stroomtoevoer, dient u erop te letten dat
de netspanning, die op het typeaanduidingsplaatje staat aangegeven overeenkomt met die van uw stroomnet.
• Steek de stekker alleen in het stopcontact, als het apparaat uitgeschakeld is.
• Draag, trek of draai het apparaat nooit aan het snoer en knel het snoer niet af.
• Positioneer het snoer zo dat er geen struikelgevaar ontstaat.
• Raak de stekker nooit aan als u in het water staat en raak de stekker altijd
met droge handen aan.
voor bijzondere personen
• Dit toestel is niet bestemd om door personen (inclusief kinderen) met beperkte
fysieke, sensorische of geestelijke capaciteiten of een gebrek aan ervaring
en/of kennis gebruikt te worden, tenzij ze door een voor hun veiligheid bevoegde persoon gecontroleerd worden of tenzij ze van deze persoon instructies
kregen hoe het toestel gebruikt moet worden.
• Kinderen moeten in het oog gehouden worden om er zeker van te zijn dat ze
niet met het toestel spelen.
• In geval van een allergische aandoening van de luchtwegen dient u vóór gebruik
van het apparaat ruggespraak te houden met uw huisarts.
• Neem contact op met uw arts, wanneer er zich tijdens gebruik gezondheid-
sproblemen voordoen. Staak in dat geval onmiddellijk het gebruik van het
instrument.
bij gebruik van het apparaat
Reglementair gebruik
De luchtbevochtiger dient om de luchtvochtigheid in een ruimte
door waterdamp te verhogen.
Het apparaat is alleen voor het gebruik thuis en niet voor
industriële doeleinden of medisch gebruik bestemd!
Als u twijfels hebt wat de gezondheid betreft, gelieve dan voor
het gebruik van de luchtbevochtiger met uw arts te spreken!
• Het instrument is niet voor commercieel gebruik bestemd.
• Gebruik het apparaat alleen voor doeleinden zoals gesteld in de gebruiksaan-
wijzing. In alle andere gevallen vervalt de garantie.
• Gebruik het apparaat niet als het apparaat of het snoer beschadigd is, als het
niet overtuigend functioneert, als het naar beneden of in het water gevallen is.
• Gebruik uitsluitend de voor dit instrument bestemde en door de fabrikant
meegeleverde reserveonderdelen.
• Vóór het bevestigen of verwijderen van accessoires moet altijd eerst het instru-
ment uitgeschakeld worden.
• Gebruik het instrument nooit onder dekbedden of kussens.
62
Page 69

1 Veiligheidsmaatregelen
• Gebruik het instrument nooit in de buurt van hoogfrequente elektromagnetische zendapparatuur.
• Zet het apparaat voor het gebruik op een stabiele ondergrond zodat het niet
kan omvallen.
Om de beste resultaten te bereiken, moet de luchtbevochtiger op een minimum-
•
afstand van 10 voor een muur opgesteld worden.
•
Richt de nevel in geen geval direct op een muur.
•
Stel de luchtbevochtiger op een hoogte van minstens 60 cm boven de grond op.
• Houdt het apparaat en het snoer zover mogelijk uit de buurt van hete oppervlakten.
Wanneer het snoer of het voedingsapparaat beschadigd is, mag het instrument
•
niet verder gebruikt worden. Om veiligheidsredenen mogen deze onderdelen
alleen door een geautoriseerde servicedienst door nieuwe worden vervangen.
•
Het snoer mag niet in de buurt van een warmtebron bewaard worden of over
scherpe randen getrokken worden.
•
Vul de luchtbevochtiger niet voor u de netadapter van het stroomnet losgekoppeld hebt.
•
Kantel, beweeg of leeg het toestel nooit als het ingeschakeld is.
•
Schakel het toestel uit en koppel het van het stroomnet los voor u de watertank
verwijdert en de positie van het toestel verandert.
•
Raakt nooit een apparaat aan dat in het water gevallen is. Trek meteen de
stekker uit het stopcontact.
•
Gebruik het apparaat niet, wanneer de watertank geen of te weinig vloeistof
bevat.
•
Gebruik geen etherische olies (bijv. eucalyptus of menthol) deze kunnen het apparaat beschadigen.
•
Zorg ervoor dat de ventielatieopeningen aan de onderzijde van het instrument
niet verstopt raken door pluis en verontreinigingen.
• Raak het voedingsapparaat uitsluitend met droge handen aan.
Overmatige vochtigheid in de ruimte kan tot condensatie aan vensters en meu-
•
bels leiden. Zodra dit optreedt, dient u de luchtbevochtiger uit te schakelen.
• Koppel het voedingsapparaat los van de wandcontactdoos, wanneer het instrument uitgeschakeld is en als het niet meer wordt gebruikt.
NL
voor onderhoud en reiniging
• U mag aan het apparaat enkel reinigingswerkzaamheden uitvoeren. Repareer
het instrument in het geval van storingen niet zelf en staak het gebruik. Neem
contract op met uw vakhandelaar en laat reparaties alleen door geautoriseerde
servicediensten uitvoeren.
• Dit instrument, het snoer en het voedingsapparaat mogen nooit in water
ondergedompeld worden of onder stromend water worden gehouden.
• Indien er toch per ongeluk vocht in het instrument is binnengedrongen, koppel
dan onmiddellijk het netsnoer los van de wandcontactdoos.
Gebruik voor de reiniging van de onderdelen van de luchtbevochtiger nooit
•
schuurmiddelen, benzine, glasreiniger, meubelpolitoer, verfverdunner of andere
agressieve huishoudreinigers, omdat deze het oppervlak aantasten.
• Bewaart u het apparaat in een droge omgeving.
63
Page 70

NL
2 Wetenswaardigheden
Hartelijk dank
Hartelijk dank voor uw vertrouwen en van harte gelukgewenst!
Met de Minibreeze luchtbevochtiger heeft u een kwaliteitsproduct van
MEDISANA aangeschaft. Voor een succesvol gebruik en een lange gebruiksduur
van uw MEDISANA luchtbevochtiger Minibreeze bevelen wij aan de hieronder
beschreven aanwijzingen voor het gebruik en voor het onderhoud zorgvuldig door
te lezen.
2.1 Levering en verpakking
Gelieve eerst te controleren of het instrument volledig is en volledig vrij van beschadigingen is. In geval van twijfel neemt u het toestel niet in bedrijf en neemt
u contact op met uw handelaar of uw servicepunt.
Bij de levering horen:
• 1 luchtbevochtiger Minibreeze
incl. 2 verschillende flesopzetstukken (afsluitdoppen)
• 1 voedingsapparat
• 1 reinigingsborstel
• 1 bewaarzakje
• 1 handleiding
Het verpakkingsmateriaal kan opnieuw worden gebruikt of gerecycled. Zorg
ervoor dat het gebruikte verpakkingsmateriaal bij de daarvoor bestemde afvalverwerking terechtkomt. Indien u tijdens het uitpakken transportschade constateert, neem dan direct contact op met uw leverancier.
WAARSCHUWING
Let er op dat het verpakkingsmateriaal niet in handen
komt van kinderen. Zij kunnen er in stikken!
2.2 Ultrasone technologie
Een te droge lucht in de ruimte verhoogt de vatbaarheid voor infecties en aandoeningen aan de ademwegen en leidt tot vermoeidheid en concentratiemoeilijkheden. Gezonde lucht dient een relatieve luchtvochtigheid van 40 à 55 % te
hebben. De geluidsarme en energiebesparende ultrasone technologie van de luchtbevochtiger verandert door trillingen water in zeer fijne nevel, die het vochtigheidsgehalte van de lucht verhoogt. Dit verbetert de luchtkwaliteit en voorkomt het
uitdrogen van de slijmvliezen en de huid.
De capaciteit van het apparaat is berekend op een ruimte met een oppervlakte van
max. 30 m
bevochtiging aan de grootte van de ruimte aan.
Houd u beslist aan de reinigings- en onderhoudsaanwijzingen.
2
. Met de draairegelaar voor de nevelintensiteit past u de mate van
64
Page 71

2 Wetenswaardigheden / 3 Het Gebruik
OPGELET
Een te intensief gebruik kan tot oververzadiging van de
ruimtelucht met vochtigheid leiden, die op de wanden,
ramen en voorwerpen in de ruimte kan neerslaan.
Controleer daarom regelmatig met een hygrometer, dat
de waarde van de relatieve luchtvochtigheid niet hoger
stijgt dan 55 %.
3 Het Gebruik
OPGELET
Zorg ervoor dat de MEDISANA luchtbevochtiger op een
voor vocht ongevoelig oppervlak gebruikt wordt en dat
de bevochtiger niet kan omvallen. Vooral bij het gebruik
met mineraalhoudend water / aroma-essence kan het tot
afzettingen komen.
Let erop, dat de eruit komende damp niet op andere
elektrische apparaten, meubels of wanden is gericht.
3.1 Vullen en legen van de tankfles
Als tankfles kunt u elke courante halfliterfles met draaisluiting (bijv. van vruchtensap
of frisdrank) gebruiken.
Haal de tankfles
Spoel de tankfles uit en vul deze vervolgens met max. 500 ml drinkwater. Sluit de
tankfles opnieuw door het indraaien van de afsluitdop. Draai de tankfles om en plaats
deze opnieuw op het toestel. Transporteer het toestel niet met een gevulde tankfles.
Voer het restwater na het gebruik af en spoel de tankfles met vers drinkwater uit.
Voor hergebruik vult u de tankfles met vers drinkwater. Als u het toestel uitschakelt
en langere tijd niet wenst te gebruiken, haalt u de tankfles van het toestel en leegt
u deze.
van het toestel en draai deze om. Draai de afsluitdoperuit.
NL
OPGELET
Gebruik voor het toestel alleen vers drinkwater. Bij hard
kalkhoudend water is het ook mogelijk gedemineraliseerd
water te gebruiken. Reinig het apparaat regelmatig en
verwijder kalk en andere aanslag om zijn functie te
behouden.
65
Page 72

NL
3 Het Gebruik
3.2 In- en uitschakelen
Zet het apparaat voor het gebruik op een stabiele ondergrond zodat het niet kan
omvallen. Zwenk de standvoeten
geven.
Steek de gevulde tankfles
Bevestig het snoer op de aansluiting van het voedingsapparaat
voedingsapparaat aan op de wandcontactdoos.
Klap de neveluitlaat
geen functie.
Schakel de luchtbevochtiger in, door de AAN/UITschakelaar en de draairegelaar
voor de nevelintensiteit
controlelampje (LED)/de verlichting
een lege tankfles gaat de verlichting uit en het toestel schakelt automatisch uit.
Stel vervolgens het toestel in, afhankelijk van de behoefte in de ruimte, traploos van
de positie L (= laagste ventilatorintensiteit) tot de maximale positie H (= hoogste
ventilatorintensiteit). Na enkele seconden wordt de uitstromende nevel via de uit-
zichtbaar.
laat
Capaciteit vernevelaar
Minimale instelling ( L ) : ca. 50 ml/h
Maximale instelling ( H ) : ca. 100 ml/h
Schakel het apparaat, wanneer u het niet meer wilt gebruiken of wanneer er bijna
geen water meer in de tank is (het controlelampje/de verlichting
door de AAN/UITschakelaar en draairegelaar voor vernevelintensiteit
(UIT) te zetten.
Het toestel schakelt de verneveling bij een lege tankfles automatisch uit.
De blauwe verlichting
naar boven open. Bij gesloten neveluitlaat heeft het toestel
eerst van OFF op ON te draaien. Het geïntegreerde
gaat uit.
uit om het toestel bijkomende stabiliteit te
met ingedraaide afsluitdop in het flesinzetdeel .
en sluit het
in de vernevelingskamer licht blauw op. Bij
gaat uit), uit,
op OFF
66
Page 73

4.1 Fouten en het opheffen ervan
4 Diversen
NL
Fout
De luchtbevochtiger
werkt niet en de LED
brandt niet.
De sproeinevel wordt
door een onaangename
geur begeleid.
De luchtbevochtiger
werkt niet hoewel
de LED brandt.
Er wordt te weinig
nevel gemaakt.
Ongewoon geluid
Het flesopzetstuk
zit vast.
Mogelijke oorzaak
De netadapter is niet
aangesloten of het
toestel is niet
ingeschakeld.
Geen water in de
tankfles
De neveluitlaat is
gesloten.
Nieuw toestel
Het water is
verontreinigd of water
heeft te lang in de
fles gestaan.
Teveel water in de
vernevelingskamer
De vernevelaar is
verontreinigd.
Het water is
verontreinigd of water
heeft te lang in de
fles gestaan.
In de tankfles ontstaat
een resonantie als ze te
weinig water bevat.
Het toestel staat niet
op een stabiel
oppervlak.
Te sterk
vastgeschroefd
Oplossing
Sluit de netadapter
aan en schakel het
toestel in.
Vul de tankfles met
water.
Klep de neveluitlaat
naar boven open.
Open de tankfles en
laat deze gedurende
12 uur op een donkere
en koele plaats luchten.
Reinig de tankfles en vul
deze met vers water.
Giet een beetje
water uit de
vernevelingskamer af.
Reinig de vernevelaar
met een zachte borstel.
Reinig de tankfles en vul
deze met vers water.
Vul de tankfles.
Plaats het toestel op
een stabiel oppervlak.
Gebruik vloeibare
zeep om de
afsluitafdichting
makkelijker te openen.
67
Page 74

NL
4 Diversen
4.2 Reiniging en onderhoud
• Bij veelvuldig gebruik adviseren wij u om het apparaat minstens een maal per
week grondig te reinigen. Reinig het apparaat van buiten met een vochtig,
zacht doekje. De tankfles kunt u met heet water ( > 65°C) of met alcohol van
minstens 75% grondig uitspoelen.
• Verwijder de toestelafdekking door het deksel aan het voorste einde met een
duimnagel op te tillen en dan voorzichtig te verwijderen.
• De vernevelaarkamer en de tankkamer reinigt u door middel van een in alcohol
gedrenkt doekje en een wattenstaafje. Let u op, dat er geen water in het inwendige van het apparaat komt.
• Controleer, of het instrument uitgeschakeld is en het voedingsapparaat uit de
wandcontactdoos is verwijderd, voordat het instrument gereinigd wordt.
• Haal de tankfles van het toestel en leeg deze.
• Gebruik voor de reiniging geen bijtende of schurende reinigingsmiddelen,
omdat deze het oppervlak aantasten en de verneveling verminderen.
OPGELET
Er mag geen water in het toestel dringen!
• De ultrasoondetector is het meest kwetsbare onderdeel van het apparaat. Het
is belangrijk, dat hij schoon is en met zorg wordt behandeld. Gebruik de erbij
geleverde borstel om de afvoeren van aanslag en smerige delen te ontdoen.
Gebruik voor het reinigen van de ultrasoondetector beslist geen metalen hulpmiddelen.
• Als u het toestel langere tijd niet gebruikt, verwijder dan het resterende water
uit de tankfles en droog het toestel af.
• Kalkresten kunnen door middel van een zacht ontkalkingsmiddel, bijv. citroenzuur, worden verwijderd. Los het middel volgens de voorschriften van de fabrikant in water op, vul het in de tankfles en laat het daar enkele uren inwerken.
Daarna spoelt u met vers water uit.
• Bewaar het apparaat op een droge, koele plaats, het beste in de originele
verpakking.
• Bewaar het flesopzetstuk
vastplakken van de afdichtdingsmanchet te vermijden.
van de onderkant van de tankfles los om het
4.3 Afvalbeheer
Dit apparaat mag niet samen met het huishoudelijk afval worden
aangeboden.
Iedere consument is verplicht, alle elektrische of elektronische
apparaten, ongeacht of die schadelijke stoffen bevatten of niet, bij
een milieudepot in zijn stad of bij de handelaar af te geven, zodat
ze op een milieuvriendelijke manier kunnen worden verwijderd.
Wendt u zich betreffende het afvalbeheer tot uw gemeente of
handelaar.
68
Page 75

4 Diversen
4.4 Technische specificaties
Benaming en model : MEDISANA luchtbevochtiger Minibreeze
Stroomverzorging /
Voedingsapparat : 100-240 V~ 50/60 Hz 0,8 A
secundair: 24 V= 0,5 A
Vermogen : 12 W
Inhoud tankfles : 0,5 l aanbevolen
Capaciteit van de vernevelaar : maximaal ca. 100 ml/h
Opbergcondities : schoon en droog
Afmetingen B x H x D : ca. 125 mm x 72 mm x 88,2 mm
Gewicht zonder adapter : ca. 300 g
Artikel-nummer : 60075
EAN-nummer : 40 15588 60075 3
In het kader van onze voortdurende inspanningen naar
verbeteringen, behouden wij ons het recht voor om qua
vormgeving en op technisch gebied veranderingen aan ons
product door te voeren.
NL
69
Page 76

NL
5 Garantie
Garantie en reparatievoorwaarden
Wendt u zich voor garantiegevallen altijd tot uw leverancier of tot onze klantendienst. Moet u het apparaat opsturen, stuur het dan samen met de klacht en
een kopie van de aankoopbon naar onze klantendienst.
Voor garantie gelden de volgende voorwaarden:
1. Voor de producten van MEDISANA geldt een garantietermijn van drie jaar
vanaf de datum van aankoop. Deze kan door middel van de verkoopbon of
factuur worden aangetoond.
2. Alle klachten, die het gevolg zijn van materiaal en/of fabricagefouten worden
binnen de garantietermijn kosteloos verholpen.
3. Een geval van garantie leidt niet tot automatische verlenging van de garantie-
termijn, noch voor het apparaat zelf noch voor de vervangbare onderdelen.
4. Uitgesloten van garantie zijn:
a. Alle schade die ontstaan is door ondeskundige behandeling, b.v. het niet
op de juiste wijze volgen van de gebruiksaanwijzing.
b. Beschadigingen, die zijn ontstaan door reparaties door de koper of een ander
onbevoegd persoon.
c. Transportschade, die is ontstaan op weg van de verkoper naar de verbruiker
of tijdens het opsturen naar de klantendienst.
d. Toebehoren, die onderhevig zijn aan slijtage (batterijen enz.).
5. De fabrikant neemt geen verantwoording voor directe of indirecte vervolg-
schade die door het apparaat veroorzaakt wordt. Ook niet als de schade aan
het apparaat als garantiegeval erkend is.
MEDISANA AG
Jagenbergstraße 19
41468 NEUSS
DUITSLAND
E-Mail: info@medisana.de
Internet: www.medisana.de
Het serviceadres vindt u op het afzonderlijk bijgevoegde blad.
70
Page 77

1 Turvallisuusohjeita
TÄRKEITÄ TIETOJA!
SÄILYTÄ NÄMÄ OHJEET!
Lue seuraavat käyttöohjeet huolellisesti kokonaan, erityisesti
turvallisuusohjeet, ennen kuin käytät laitetta ja säilytä ohjeet
mahdollista myöhempää käyttöä varten. Jos annat laitteen
eteenpäin, anna myös aina tämä käyttäohje mukana.
Kuvan selitys
Tämä käyttöohje kuuluu tähän laitteeseen.
Siinä on tärkeitä tietoja käyttöönottoa ja käsittelyä
koskien. Lue tämä käyttöohje kokonaan.
Näiden ohjeiden noudattamatta jättäminen
voi aiheuttaa loukkaantumisen tai laitteen
vaurioitumisen.
VAROITUS
Noudata näitä varoitusohjeita niin voit estää
käyttäjän mahdollisen loukkaantumisen.
HUOMIO
Noudata näitä ohjeita niin voit estää laitteen
mahdollisen vaurioitumisen.
FI
OHJE
Näistä ohjeista saat hyödyllistä tietoa asennusta ja
käyttöä koskien.
LOT-numero
Laatija
71
Page 78

FI
1 Turvallisuusohjeita
Turvallisuusohjeita
Virransyöttö
• Ota huomioon, että tyyppikilvessä mainittu sähköjännite vastaa verkkovirtaasi,
ennen kuin liität laitteen virransyöttöön.
• Työnnä verkkopistoke pistorasiaan vain, kun laite on kytkettynä pois päältä.
• Älä kanna, vedä tai käännä laitetta koskaan verkkojohdosta äläkä aseta johtoa
puristuksiin.
• Aseta verkkojohto siten, että se ei aiheuta kompastumisvaaraa.
• Älä kosketa verkkopistoketta, jos seisot vedessä ja kosketa sitä aina ainoastaan
kuvin käsin.
Erityishenkilöt
• Tätä laitetta ei ole tarkoitus antaa sellaisten henkilöiden käyttöön (mukaan
lukien lapset), joilla on fyysisiä, hermollisia tai psyykkisiä ongelmia tai joiden
kokemus ja/tai tieto ei riitä laitteen käyttöön, ellei heitä valvo heidän turvallisuudestaan vastaava henkilö tai tämä henkilö kertoo heille laitteen käytöstä.
• Lapsia tulisi pitää silmällä sen varmistamiseksi, että nämä eivät leiki laitteella.
• Jos kärsit allergisesta hengitystiesairaudesta, käänny kotilääkärisi puoleen ennen
laitteen käyttämistä.
• Käänny lääkärisi puoleen, jos käytöstä aiheutuu terveydellisiä vaivoja. Lopeta
tällaisessa tapauksessa laitteen käyttö välittömästi.
Laitteen käyttö
Määräysten mukainen käyttö
Ilmankostuttimen tarkoitus on nostaa huoneen ilmankosteutta
vesihöyryn avulla.
Laite on tarkoitettu käytettäväksi ainoastaan kotona, sitä ei
tule käyttää ammattitarkoituksiin tai lääketieteen alalla!
Jos sinulla on terveyteen liittyviä kysymyksiä, keskustele
lääkärisi kanssa ennen ilmankostuttimen käyttöä.
• Laitetta ei ole tarkoitettu kaupalliseen käyttöön.
• Käytä laitetta ainoastaan sen tarkoituksen mukaan käyttöohjetta noudattaen.
Takuuvaatimukset raukeavat, jos laitetta käytetään väärin.
• Älä käytä laitetta, jos laite tai sen syöttöjohto ei ole moitteettomassa kunnossa,
jos laite ei toimi moitteettomasti tai jos se on pudonnut tai joutunut veteen.
• Käytä ainoastaan laitteeseen tarkoitettuja ja valmistajan toimittamia lisäosia.
• Irrota tai kiinnitä lisäosat vain laitteen virran ollessa katkaistuna.
• Älä käytä laitetta peittojen tai tyynyjen alla.
72
Page 79

1 Turvallisuusohjeita
• Älä käytä laitetta korkeataajuuksista elektromagneettista säteilyä lähettävien
laitteiden lähellä.
• Aseta laite käyttöä varten tukevalle ja tasaiselle alustalle niin, että se ei voi
kaatua.
Saat parhaat tulokset, kun asetat ilmankostuttimen vähintään 10 cm:n päähän
•
seinästä.
•
Älä suuntaa sumua koskaan suoraan seinää kohti.
•
Aseta ilmankostutin vähintään 60 cm:n korkeudelle lattiasta.
• Pidä laite ja sen verkkojohto kaukana kuumista pinnoista.
Jos johto tai verkkolaite on vaurioitunut, laitetta ei saa enää käyttää. Turvallisuus-
•
syistä nämä osat saa vaihtaa vain valtuutettu huoltoyritys.
•
Johtoa ei saa säilyttää lämpölähteiden lähettyvillä tai vetää terävien reunojen yli.
•
Älä täytä ilmankostutinta, ennen kuin olet irrottanut verkkolaitteen verkkovirrasta.
•
Laitetta ei saa kallistaa, liikuttaa tai tyhjentää kun se on kytkettynä päälle.
•
Kytke laite pois päältä ja irrota se verkkovirrasta, ennen kuin irrotat vesisäiliön ja
muutat laitteen paikkaa.
•
Älä tartu laitteeseen, joka on pudonnut veteen. Irrota heti verkkopistoke.
•
Älä käytä laitetta, jos vesisäiliössä ei ole vettä tai vettä on liian vähän.
•
Älä käytä eteerisiä öljyjä (esim. eukalyptus tai menthol), koska ne voivat vaurioittaa laitetta.
•
Pidä laitteen alapinnalla olevat tuuletusraot puhtaina pölystä ja liasta.
• Tartu verkkolaitteeseen aina vain kuivin käsin.
Huoneen liiallinen kosteus voi aiheuttaa ikkunoiden ja huonekalujen kondensa-
•
atiota. Jos näin käy, kytke ilmankostutin pois päältä.
• Vedä verkkolaite pistorasiasta vain, kun laitteen virta on katkaistuna eikä se enää
ole käytössä.
Huolto ja puhdistus
• Saat itse ainoastaan puhdistaa laitteen. Jos laitteeseen tulee häiriö, älä yritä
korjata laitetta itse, äläkä käytä sitä enää. Kysy laitteen myyjältä, missä on
laitteen lähin valtuutettu huolto ja jätä laite sinne korjattavaksi.
Laitetta, johtoa ja verkkolaite ei saa milloinkaan kastaa veteen tai pitää juoksevan
•
veden alla.
• Jos laitteeseen kuitenkin joutuu nestettä, irrota verkkopistoke välittömästi.
Ilmankostuttimen osien puhdistamiseen ei saa koskaan käyttää hankausaineita,
•
bensiiniä, lasinpuhdistusainetta, huonekalujen kiillotusainetta, värin ohenninta tai
muita voimakkaita talouspuhdistusaineita. Se saattaa vaurioittaa pintaa.
• Säilytä laite kuivassa ympäristössä.
FI
73
Page 80

FI
2 Tietämisen arvoista
Sydämellinen kiitos
Kiitoksia luottamuksesta ja sydämelliset onnentoivotukset!
Ostaessasi Minibreeze ilmankostuttimen olet hankkinut MEDISANA-laatutuotteen. Jotta saavuttaisit halutun tuloksen ja sinulla olisi pitkään iloa MEDISANA,
suosittelemme, että luet seuraavat käyttö- ja huolto-ohjeet huolellisesti läpi.
2.1 Toimituksen laajuus ja pakkaus
Tarkasta ensin, että laite on täydellinen eikä siinä ole mitään vaurioita. Jos sinulla
on kysymyksiä, älä ota laitetta käyttöön, vaan käänny kauppiaasi tai huoltoliikkeen
puoleen.
Pakkauksesta pitää löytyä:
• 1 ilmankostutin Minibreeze
sis. 2 erilaista pullon kantta (sulkukorkkia)
• 1 Verkkovirtasovitin / verkkolaite
• 1 puhdistusharja
• 1 säilytyspussi
• 1 käyttöohje
Pakkauksia voidaan käyttää uudelleen tai ne voidaan kierrättää takaisin raakaainekiertoon. Hävitä tarpeeton pakkausmateriaali asianmukaisella tavalla.
Mikäli pakkausta avatessasi havaitset kuljetusvaurion, ota heti yhteyttä tuotteen
myyneeseen liikkeeseen.
VAROITUS
Huolehdi siitä, etteivät pakkausmuovit joudu lasten
käsiin. On olemassa tukehtumisvaara!
2.2 Ultraääniteknologia
Liian kuiva sisäilma lisää infektio- ja hengityselinsairauksien vaaraa ja aiheuttaa
väsymystä sekä keskittymisvaikeuksia. Terveellisen ilman suhteellisen kosteuden
tulisi olla 40 - 55 %.
Ilmankostuttimen äänetön ja energiaa säästävä teknologia muuttaa vettä
värähtelyjen avulla mitä hienoimmaksi sumuksi, joka lisää ilman kosteutta. Tämä
parantaa ilman laatua ja estää sekä limakalvojen että ihon kuivumista.
Laitteen kapasiteetti on suunniteltu silmällä pitäen tilaa, jonka pintaala on maks.
2
. Sumuintensiteetin kiertosäätimellä voit sovittaa kostutuksen tason tilan
30 m
koon mukaan.
Noudata aina puhdistus- ja huolto-ohjeita.
74
Page 81

2 Tietämisen arvoista / 3 Käyttö
HUOMIO
Liian intensiivinen käyttö voi johtaa huoneen
liikakosteuteen, joka taas voi vaikuttaa seiniin, ikkunoihin
ja huoneen esineisiin.
Tarkasta sen vuoksi kosteusmittarilla säännöllisesti, ettei
suhteellinen ilmankosteus ylitä 55 %.
3 Käyttö
HUOMIO
Varmista, että MEDISANAn -ilmankostutinta käytetään
kosteudenkestävällä alustalla siten, että laite ei pääse
kaatumaan. Erityisesti mineraalipitoista vettä /
tuoksuesanssia käytettäessä saattaa muodostua sakkaa /
saostumia.
Huolehdi siitä, että laitteesta tulevaa sumua ei suunnattu
muihin sähköisiin laitteisiin, huonekaluihin tai seiniin päin.
3.1 Säiliöpullon täyttäminen ja tyhjääminen
Säiliöpullona voit käyttää mitä tahansa tavallista puolen litran pulloa, jossa on
kierrekorkki (esim. mehu- tai virvoitusjuomapullo).
Ota säiliöpullo
säiliöpullo ja täytä siihen lopuksi korkeintaan 500 ml juomavettä. Sulje säiliöpullo
uudelleen kiertämällä sulkukorkki kiinni. Käännä säiliöpullo ja aseta se takaisin
laitteeseen. Älä kuljeta laitetta, kun sen säiliöpullo on täytettynä. Hävitä loppuvesi
käytön jälkeen ja huuhtele säiliöpullo puhtaalla juomavedellä. Täytä säiliöpullo ennen
uutta käyttöä puhtaalla juomavedellä. Jos kytket laitteen pois päältä ja poistat sen
käytöstä pidemmäksi aikaa, ota säiliöpullo pois laitteesta ja tyhjennä se.
laitteesta ja käännä pullo. Kierrä sulkukorkki auki. Huuhtele
FI
HUOMIO
Käytä laitteessa ainoastaan raikasta juomavettä. Jos vesi
on kovin kalkkipitoista, voit käyttää myös demineralisoitua
vettä. Puhdista laite säännöllisesti ja poista siitä kalkki sekä
muut kerrostumat, jotta laitteen toimintakunto säilyy.
75
Page 82

FI
3 Käyttö
3.2 Laitteen päälle ja pois kytkeminen
Aseta laite käyttöä varten tukevalle ja tasaiselle alustalle niin, että se ei voi
kaatua. Käännä jalat
Työnnä täytetty säiliöpullo
Yhdistä verkkolaitteen johto liitinpistokkeeseen
rasiaan.
Taita sumuaukko
Kytke ilmankostutin päälle käntämällä PÄÄLLE-/POISkytkintä ja sumuintensiteetin
kiertosäädintä
(LED)/valaistus
sammuu ja laite kytkeytyy automaattisesti pois.
Säädä laite lopuksi, huoneen vaatimusten mukaan, portaattomasti asennosta L
(= matalin puhallusteho) maksimiasentoon H (= suurin puhallusteho). Muutaman
sekunnin kuluttua laitteesta tuleva sumu alkaa näkyä aukon
Sumuttimen kapasiteetti
minimiasetus (L ) : noin 50 ml/h
maksimiasetus (H ) : noin 100 ml/h
Kytke laite pois käytön loputtua tai kun säiliö on lähes tyhjä (merkkivalo/valaistus
sammuu). Paina tätä varten PÄÄLLE/POIS-kytkintä ja aseta sumuintensiteetin
kiertosäädin
Laite lopettaa sumutuksen automaattisesti säiliöpullon tyhjentyessä.
Sininen valaistus
auki antaaksesi laitteella lisävakautta.
ja kiinnitetty sulkukorkki pullon paikkaan .
ja työnnä verkkolaite pisto-
ylöspäin auki. Laite ei toimi, jos sumuaukko on suljettu.
ensin asennosta OFF asentoon ON. Kiinteä merkkivalo
sumutinkammiossa palaa sinisenä. Kun säiliöpullo on tyhjä, valo
päällä.
asentoon OFF.
.
76
Page 83

4.1 Viat ja niiden poisto
4 Sekalaista
FI
Virhe
Ilmankostutin ei toimi
eikä LED pala.
Suihkun mukana
tulee epämiellyttävää
hajua.
Ilmankostutin ei toimi,
vaikka LED palaa.
Sumua muodostuu
liian vähän.
Epätavallinen meteli
Mahdollinen syy
Verkkolaitetta ei ole
liitetty tai laitetta ei
ole kytketty päälle.
Säiliöpullossa ei ole
vettä
Sumuaukko on
suljettu.
Uusi laite
Vesi on likaantunut
tai seissyt pullossa
liian kauan.
Sumutinkammiossa
on liikaa vettä
Sumutin on
likaantunut.
Vesi on likaantunut
tai seissyt pullossa
liian kauan.
Säiliöpullossa syntyy
resonanssia, jos siinä
on liian vähän vettä.
Ratkaisu
Liitä verkkolaite ja
käynnistä laite.
Lisää säiliöpulloon
vettä.
Taita sumuaukko
ylöspäin auki.
Avaa säiliöpullo ja
anna sen tuulettua
12 tunnin ajan
pimeässä ja viileässä
paikassa.
Puhdista säiliöpullo
ja lisää siihen
puhdasta vettä.
Kaada
sumutinkammiosta
hieman vettä pois.
Puhdista sumutin
pehmeällä harjalla.
Puhdista säiliöpullo
ja lisää siihen
puhdasta vettä.
Täytä säiliöpullo.
Pullon kansi on
jumissa.
Laite ei ole vakaalla
pinnalla.
Kierretty kiinni liian
voimakkaasti
Aseta laite vakaalla
alustalle.
Käytä nestemäistä
saippuaa saadaksesi
tiivisteen helpommin
auki.
77
Page 84

FI
4 Sekalaista
4.2 Puhdistus ja hoito
• Usein käytettäessä suosittelemme laitteen puhdistamista perusteellisesti
vähintään kerran viikossa. Puhdista laite ulkoisesti kostealla, pehmeällä liinalla.
Voit huuhdella säiliöpullon perusteellisesti kuumalla vedellä ( > 65 °C ) tai
ainakin 75-prosenttisella alkoholilla.
• Poista laitteen kate nostamalla peukalon kynnellä kantta etureunasta ja
nostamalla sen varovasti ylös.
• Sumutuskammio ja säiliökammio voidaan puhdistaa alkoholilla kostutetulla
liinalla ja vanupuikolla. Varmista, ettei laitteen sisälle pääse vettä.
• Ennen laitteen puhdistusta on varmistettava, että laitteen virta on katkaistuna
ja verkkolaite on irrotettuna pistorasiasta.
• Ota säiliöpullo irti laitteesta ja tyhjennä se.
• Älä käytä laitteen puhdistamiseen mitään voimakasvaikutteisia aineita kuten
esim. hankausnestettä tai muita vastaavia aineita. Se saattaa vahingoittaa
laitteen pintaa ja heikentää sumunsynnytystehoa.
HUOMIO
Laitteen sisään ei saa päästä vettä!
• Ultraäänianturi on laitteen herkin rakenneosa. On tärkeää, että sitä käsitellään
puhtaasti ja huolellisesti. Käytä mukana toimitettua harjaa ulostuloaukkojen
puhdistamiseen kerrostumista ja likahiukkasista. Älä missään tapauksessa käytä
ultraäänianturin puhdistamiseen metallista valmistettuja apuvälineitä.
• Jos et käytä laitetta pitkään aikaan, kaada loppuvesi pois säiliöpullosta ja kuivaa
laite.
• Kalkkijäämät voidaan poistaa miedolla kalkinpoistoaineella, esim. sitruunahapolla. Luota aine valmistajan ohjeiden mukaan veteen, lisää sitä säiliöpulloon
ja anna sen vaikuttaa useamman tunnin ajan. Huuhtele se lopuksi puhtaalla
vedellä.
• Säilytä laitetta kuivassa, viileässä paikassa, mieluiten sen alkuperäisessä
pakkauksessa.
• Pidä pullon kantta
jumitu.
säiliöpullon alapuolella löysästi auki, ettei tiivisterengas
4.3 Hävittämisohjeita
Tätä laitetta ei saa hävittää talousjätteiden mukana.
Jokainen kuluttaja on velvoitettu luovuttamaan kaikki sähköiset
tai elektroniset laitteet, sisältävätpä ne haitallisia aineita tai eivät,
kaupunkinsa tai liikkeen keräyspisteeseen, jotta laitteet voitaisiin
hävittää ympäristöystävällisesti.
Ota yhteyttä paikalliseen viranomaiseen tai myyjäliikkeeseen
hävityksen suorittamiseksi.
78
Page 85

4 Sekalaista
4.4 Tekniset tiedot
Nimi ja malli : MEDISANA -ilmankostutin Minibreeze
Virtalähde / Verkkolaite : 100-240 V~ 50/60 Hz 0,8 A
sekundäärinen: 24 V= 0,5 A
Teho : 12 W
Säiliöpullon sisältö : 0,5 l suositeltu
Sumuttimen kapasiteetti : korkeintaan n. 100 ml/h
Säilytysolosuhteet : puhdas ja kuiva
Mitat L x K x S : n. 125 mm x 72 mm x 88,2 mm
Paino ilman verkkolaitetta : n. 300 g
Tuotenumero : 60075
EAN-numero : 40 15588 60075 3
Jatkuvan tuotekehittelyn myötä pidätämme itsellämme
oikeuden teknisiin ja muotoilullisiin muutoksiin.
FI
79
Page 86

FI
5 Takuu
Takuu- ja korjausehdot
Käänny takuutapauksessa alan liikkeen tai suoraan asiakaspalveluhuollon puoleen.
Jos laite tulee lähettää huoltoon, ilmoita vika ja lähetä laitteen mukana kopio
ostokuitista.
Tällöin ovat voimassa seuraavat takuuehdot:
1. MEDISANA-tuotteille myönnetään kolmen vuoden takuu myyntipäiväyksestä.
Myyntipäiväys tulee todistaa takuutapauksessa ostokuitilla tai laskulla.
2. Materiaali- tai valmistusvioista johtuvat puutteet korjataan takuuaikana
maksutta.
3. Takuukorjaus ei pidennä takuuaikaa, ei laitteelle eikä vaihdetulle rakenneosalle.
4. Takuun ulkopuolelle jäävät:
a. kaikki vahingot, jotka syntyvät asiattomasta käsittelystä, esim. käyttöohjeen
noudattamatta jättämisestä.
b. Vahingot, joiden syyksi voidaan jäjittää ostajan tai asiattoman kolmannen
osapuolen suorittama kunnossapito tai toimet.
c. Kuljetusvauriot, jotka ovat syntyneet matkalla valmistajalta kuluttajalle tai
asiakaspalveluun lähetettäessä.
d. Lisäosat, jotka ovat alttiina normaalille kulutukselle (paristot jne.).
5. Vastuu laitteen aiheuttamista välittömistä tai välillisistä seurausvahingoista
on myös poissuljettu, jos laitteelle aiheutunut vahinko hyväksytään takuutapaukseksi.
MEDISANA AG
Jagenbergstraße 19
41468 NEUSS
SAKSA
E-Mail: info@medisana.de
Internet: www.medisana.de
Huolto-osoite löytyy erillisestä liitelehtisestä.
80
Page 87

1 Säkerhetshänvisningar
OBSERVERA!
SPARA!
Läs igenom bruksanvisningen, särskilt säkerhetsanvisningarna,
noga innan du använder apparaten och spara bruksanvisningen
för framtida bruk.
Om apparaten lämnas vidare till en annan person måste
bruksanvisningen följa med.
Teckenförklaring
Bruksanvisningen hör till apparaten.
Den innehåller viktig information om igångsättning
och användning.
Läs igenom hela bruksanvisningen.
Om anvisningarna i bruksanvisningen inte följs kan
det leda till svåra personskador eller skador på
apparaten.
VARNING
Varningstexterna måste beaktas, annars kan det
finnas risk för personskador.
OBSERVERA
De här anvisningarna måste beaktas, annars kan
det finnas risk för skador på apparaten.
SE
ANVISNING
De här texterna innehåller praktisk information
om installation eller användning.
LOT-nummer
Tillverkare
81
Page 88

SE
1 Säkerhetshänvisningar
Säkerhetshänvisningar
Strömförsörjning
• Kontrollera att elspänningen som anges på typskylten stämmer överens med
elspänningen på plats innan apparaten ansluts.
• Anslut endast nätkontakten till eluttaget när apparaten är avstängd.
• Bär, dra eller vrid inte apparaten genom att dra i kabeln, kläm inte fast kabeln.
• Lägg kabeln så att man inte kan snubbla på den.
• Vidrör aldrig kontakten med våta eller fuktiga händer, eller om du står med
fötterna i vatten/på vått underlag.
Särskilda grupper
• Den här apparaten får inte användas av personer med nedsatt fysisk, sensorisk
eller mental förmåga och/eller av personer som har för lite kännedom om
apparaten om de inte står under uppsikt och instrueras av en annan ansvarig
person. Detta gäller även för barn.
• Små barn måste hållas under uppsikt, så att de inte leker med apparaten.
• Om du lider av någon allergisk luftvägssjukdom: fråga din läkare innan du
använder apparaten.
• Rådgör med din läkare om du upplever besvär i samband med användningen.
Använd inte apparaten i sådana fall.
Om användningen
Ändamålsenlig användning
Luftfuktaren höjer luftfuktigheten i ett rum med hjälp av
vattenånga.
Produkten är endast avsedd för privat bruk i hemmet. Den är
ej avsedd för kommersiella eller medicinska ändamål!
Rådgör med din läkare före användningen av luftfuktaren om
du är osäker på grund av hälsomässiga skäl!
• Apparaten är inte avsedd för kommersiellt bruk.
• Använd endast apparaten för avsett ändamål och på det sätt som beskrivs i
bruksanvisningen. Garantin upphör att gälla om den används för andra ändamål
än de som anges här.
• Använd inte apparaten om apparaten eller strömkabeln uppvisar skador eller
om apparaten inte fungerar riktigt längre efter det att den ramlat ned på golvet
eller i vattnet.
• Använd uteslutande de tillbehör som rekommenderas av tillverkaren och som
medföljer leverans.
• Ta endast loss och sätt endast på tillbehör när apparaten är avstängd.
• Använd inte apparaten under täcken eller kuddar.
82
Page 89

1 Säkerhetshänvisningar
• Apparaten får inte användas i närheten av utrustning som sänder ut högfrekvent
elektromagnetisk strålning.
• Ställ apparaten på en jämn och stabil yta så att den inte kan välta.
För bästa resultat bör luftfuktaren ställas upp minst 10 cm från en vägg.
•
•
Rikta inte dimman direkt mot väggen.
•
Ställ luftfuktaren minst 60 cm ovanför golvet.
• Skydda apparaten och nätkabeln mot värme, ställ den inte när heta ytor.
Om nätsladden eller strömkontakten är skadad får apparaten inte användas. Av
•
säkerhetsskäl får dessa delar endast bytas ut av auktoriserade serviceställen.
•
Kabeln får inte förvaras i närheten av värmekällor eller dras över vassa kanter.
•
Fyll inte på luftfuktaren innan du har dragit ut nätadaptern ur uttaget.
•
Vält, rör eller töm aldrig apparaten när den är påslagen.
•
Stäng av apparaten och koppla bort den från elnätet innan du tar bort vattentanken och ändrar apparatens placering.
•
Ta inte upp apparaten om den faller ned i vattnet. Dra genast ut nätkontakten.
•
Använd inte apparaten om det inte finns någon vätska, eller för lite vätska i
vattentanken.
•
Använd inga eteriska oljor (t.ex. eukalyptus eller mentol), de kan skada apparaten.
•
Se till att det inte finns damm eller smuts i ventilationsöppniningarna på apparatens undersida.
• Ta endast i strömkontakten med torra händer.
För hög fuktighet kan leda till kondensering på fönster och möbler. Skulle detta
•
ske ska du stänga av luftfuktaren.
• Dra ut strömkontakten ur vägguttaget när apparaten är avstängd och inte
används längre.
Underhåll och rengöring
• Du får endast rengöra apparaten själv. Försök inte att reparera apparaten
själv och fortsätt inte att använda den om Ni fastställt en störning. Kontakta Er
återförsäljare och låt ett auktoriserat serviceställe genomföra reparationen.
Apparaten, nätsladden och strömkontakten får aldrig sänkas ned i vätska eller
•
hållas under rinnande vatten.
• Dra genast ut kontakten om det skulle komma in vätska i apparaten.
Använd aldrig skurmedel, bensin, glasrengöring, möbelpolityr, färgförtunning
•
eller andra aggressiva rengöringsmedel för att rengöra luftfuktaren. Dessa kan
angripa ytorna.
• Förvar apparaten i ett torrt utrymme.
SE
83
Page 90

SE
2 Värt att veta
Vi tackar
Tack för Ert förtroende och hjärtliga gratulationer!
Med Minibreeze luftfuktaren har du köpt en kvalitetsprodukt från MEDISANA.
För att Ni skall kunna uppnå önskad framgång och ha glädje av Er MEDISANA
luftfuktare Minibreeze under så lång tid som möjligt, rekommenderar vi Er att
noga läsa igenom dessa anvisningar gällande användning och vård.
2.1 Leveransomfång och förpackning
Kontrollera först om apparaten är komplett och att den inte uppvisar några skador.
I tveksamma fall ska apparaten inte tas i bruk utan skickas in till återförsäljaren
eller ett serviceställe.
Följande delar skall medfölja vid leverans:
• 1 Luftfuktare Minibreeze
inkl. 2 olika flaskadaptrar (korkar)
• 1 Nätadapter / Strömkontakt
• 1 Rengöringsborste
• 1 förvaringsväska
• 1 Bruksanvisning
Förpackningar kan återanvändas eller lämnas till återvinning. Se till att förpackningsmaterial som inte längre behövs tas omhand på korrekt sätt. Upptäcks
skador när produkten packas upp så kontakta omgående inköpsstället.
VARNING
Se till att förpackningsmaterial i plast hanteras utom
räckhåll för barn.
Kvävningsrisk!
2.2 Ultraljudsteknik
Alltför torr rumsluft leder till ökad risk för infektions- och luftvägssjukdomar och
förorsakar trötthet och koncentrationssvårigheter. Hälsosam luft har en relativ luftfuktighet på 40 till 55 %.
Med den tystgående och energisparande ultraljudstekniken förvandlas vattnet till fin
dimma av vibrationerna; denna dimma höjer luftfuktigheten. Luftkvaliteten förbättras vilket minskar risken för torr hy och torra slemhinnor.
Apparatens kapacitet är dimensionerad för ett rum på max. 30 m
effektläget
Observera rengörings- och skötselanvisningarna.
anpassas luftfuktningen till rummets storlek.
2
. Med ratten för
84
Page 91

2 Värt att veta / 3 Användning
OBSERVERA
Om luftfuktaren används för intensivt kan det leda till att
rumsluften blir mättad vilket i sin tur leder till att fukten
avsätts på föremål, väggar och fönster i rummet.
Använd därför en hygrometer (fuktmätare) för att
regelbundet kontrollera att den relativa luftfuktigheten
inte blir högre än 55%.
3 Användning
OBSERVERA
Se till att MEDISANA luftfuktaren alltid står stabilt på en
säker, fukttålig yta. Särskilt vid användning av
mineralhaltigt vatten / mineralhaltiga aromaessenser kan
det förekomma avsättning / avlagringar. Se till att den
fuktiga dimman som kommer ut ur apparaten inte riktas
mot andra elektriska apparater, möbler eller väggar.
3.1 Fylla på och tömma tankflaskan
Man kan använda alla vanliga halvlitersflaskor med gängad kork som tankflaska
(t.ex. saftflaskor eller läskedrycksflaskor).
Ta tankflaskan
Skölj ur tankflaskan och fyll den sedan med max. 500 ml dricksvatten. Stäng
tankflaskan igen genom att skruva fast korken. Rikta öppningen neråt och sätt fast
flaskan på apparaten. Transportera inte apparaten med fylld tankflaska. Töm ut
vattnet efter användningen och skölj tankflaskan med färskt dricksvatten. Fyll på
tankflaskan med färskt dricksvatten före nästa användning. Ta ut tankflaskan och
töm den om apparaten inte ska användas under längre tid.
från apparaten och rikta öppningen uppåt. Skruva loss korken.
SE
OBSERVERA
Använd endast färskt dricksvatten för apparaten. Om
vattnet är mycket kalkhaltigt kan avmineraliserat vatten
användas. Rengör apparaten regelbundet och ta bort kalk
och andra avlagringar; på så sätt säkerställer man
apparatens funktionsduglighet.
85
Page 92

SE
3 Användning
3.2 Påslagning och avstängning av apparaten
Ställ apparaten på en jämn och stabil yta så att den inte kan välta. Vrid ut
fötterna
Skjut in den fyllda tankflaskan
Sätt i nätsladden i uttaget
Fäll upp fuktutsläppet
Slå på luftfuktaren genom att ställa om PÅ/AV-knappen och ratten för effektläget
dimkammaren lyser blått. Om tankflaskan är tom släcks belysningen och apparaten
stängs av automatiskt.
Ställ sedan in effektläget beroende på förhållandena i rummet. Effektläget ställs
in steglöst från läget L (= lägsta fläkteffekt) till max-läget H (= högsta fläkteffekt).
Efter några sekunder syns det att dimman kommer ut ur öppningen
Fuktkapacitet
min. inställning ( L ) : ca 50 ml/tim
max. inställning ( H ) : ca 100 ml/tim
Stäng av apparaten om den inte behövs längre, eller om vattnet börjar ta slut i
tanken (kontrollampan/belysningen
ratten för effektläget
När tankflaskan är tom stängs luftfuktaren av automatiskt.
Den blå belysningen
så att apparaten blir stabilare.
med påskruvad kork i flaskfästet .
och strömkontakten i ett vägguttag.
. Om fuktutsläppet är stängt fungerar inte apparaten.
från OFF till ON. Den integrerade kontrollampan (LED)/belysningi
.
slocknar). Ställ då in PÅ/AV-knappen och
på OFF.
slocknar.
86
Page 93

4.1 Fel och åtgärder
4 Övrigt
SE
Fel
Luftfuktaren fungerar
inte och belysningen
lyser inte.
Dimman luktar dåligt.
Luftfuktaren fungerar
inte trots att
belysningen lyser.
För lite dimma skapas.
Konstigt ljud.
Möjlig orsak
Nätadaptern är inte
ansluten eller apparaten
är inte påslagen.
Inget vatten i
vattentanken.
Fuktutsläppet är
stängt.
Ny apparat
Vattnet är smutsigt
eller så har det stått
för länge i flaskan.
För mycket vatten
i dimkammaren.
Luftfuktaren är
smutsig.
Vattnet är smutsigt
eller så har det stått
för länge i flaskan.
Det bildas resonans
i tankflaskan när
den innehåller för
lite vatten.
Lösning
Sätt fast nätadaptern
och slå på apparaten.
Fyll på tankflaskan
med vatten.
Fäll upp
fuktutsläppet.
Öppna tankflaskan
och lufta ur den på
en kall och mörk
plats i 12 timmar.
Rengör tankflaskan
och fyll på med
färskt vatten.
Fyll på lite vatten
i dimkammaren.
Rengör luftfuktaren
med en mjuk borste.
Rengör tankflaskan
och fyll på med
färskt vatten.
Fyll på tankflaskan.
Flaskadaptern
sitter fast.
Apparaten står inte på
ett stabilt underlag.
För starkt fastskruvad.
Ställ apparaten på ett
stabilt underlag.
Använd flytande tvål
för att kunna öppna
fästet lättare.
87
Page 94

SE
4 Övrigt
4.2 Rengöring och skötsel
• Om apparaten används ofta, rekommenderar vi att rengöra den grundligt
minst en gång i veckan. Rengör apparaten utvändigt med en fuktig, mjuk trasa.
Använd varmt vatten ( > 65 °C ) eller minst 75-procentig sprit för att skölja
tankflaskan.
• Ta bort apparatens kåpa genom att lyfta locket försiktigt i den främre kanten
med en tumnagel och sedan lyfta kåpan försiktigt.
• Dimkammaren och tankkammaren rengör du med en trasa doppad i alkohol
och en bomullstopp. Se till att inget vatten kommer in i apparatens inre.
• Se före rengöring till att apparaten är avstängd och nätdelen utdragen ur
vägguttaget.
• Ta bort tankflaskan från apparaten och töm den.
• Använd inte skurmedel eller andra aggressiva rengöringsmedel. Det kan skada
apparatens yta och leda till reducerad fukteffekt.
OBSERVERA
Det får inte komma in vatten i apparaten!
• Ultraljudsgivaren är apparatens känsligaste del. Det är viktigt att den alltid är
ren. Använd den medföljande borsten för att ta bort avlagringar och smuts
från öppningarna. Använd aldrig metallföremål för att rengöra ultraljudsgivaren.
• Ta ut tankflaskan, töm den och torka av apparaten om den inte ska användas
under längre tid.
• Kalkavlagringar kan tas bort med ett milt avkalkningsmedel, t.ex. citronsyra.
Blanda medlet med vatten enligt tillverkarens anvisningar, fyll på lösningen i
tankflaskan och låt den verka några timmar. Spola sedan med färskt vatten.
• Förvara apparaten på en torr och sval plats, helst i originalförpackningen.
• Förvara flaskadaptern
separat så att tätningen inte klibbar fast.
4.3 Hänvisning gällande avfallshantering
Denna apparat får inte kastas i hushållssoporna.
Varje konsument måste lämna in alla elektriska eller elektroniska
apparater till motsvarande insamlingsställen, oberonde av om
apparaterna innehåller skadliga ämnen eller ej, så att de kan omhändertas på ett miljövänligt sätt.
Kontakta kommunen eller återförsäljaren för att få information om
återvinning.
88
Page 95

4 Övrigt
4.4 Teknisk Data
Namn och modell : MEDISANA luftfuktare Minibreeze
Strömförsörjning / Strömkontakt : 100-240 V~ 50/60 Hz 0,8 A
sekundär: 24 V= 0,5 A
Effekt : 12 W
Innehåll tankflaska : 0,5 l rekommenderas
Fukt kapacitet : max. ca 100 ml/h
Förvaring : rent och torrt
Mått B x H x D : ca 125 mm x 72 mm x 88,2 mm
Vikt utan nätdel : ca 300 g
Artikelnummer : 60075
EAN-nummer : 40 15588 60075 3
Som följd av ständigt pågående produktförbättringar
förbehåller vi oss rätten till tekniska förändringar samt
förändringar i utförande.
SE
89
Page 96

SE
5 Garanti
Garanti och förutsättningar för reparationer
Kontakta inköpsstället vid garantifrågor, eller tag kontakt med kundtjänst direkt.
Måste produkten skickas in så bifoga uppgifter om defekten samt en kopia av
inköpskvittot.
Följande garantiförutsättningar gäller:
1. På MEDISANA produkter lämnas tre års garanti, från inköpsdatum. Inköps-
datum ska vid garantiförehavanden förevisas med inköpskvitto eller faktura.
2. Felaktigheter på grund av material- eller tillverkningsfel åtgärdas kostnadsfritt
under garantiperioden.
3. Utförande av garantiåtagande leder inte till förlängning av garantiperioden;
detta gäller för själva produkten så väl som för utbytta komponenter.
4. Garantin gäller inte för:
a. Alla skador som uppkommer på grund av felaktig hantering, t.ex. vid icke
beaktande av bruksanvisningen.
b. Skador som kan härledas till iordningsställande eller ingrepp utförda av
köparen eller annan, ej auktoriserad, person.
c. Transportskador som uppkommit under transport från tillverkaren till an-
vändaren eller vid insändning till kundtjänst.
d. Tillbehör som utsätts för normalt slitag (batterier o.s.v.).
5. Ansvar för direkta eller indirekta följdskador som förorsakas av produkten är
uteslutet, även om skadan på produkten godkänns som garantiåtagande.
MEDISANA AG
Jagenbergstraße 19
41468 NEUSS
TYSKLAND
E-Mail: info@medisana.de
Internet: www.medisana.de
Service-adresserna finns på en separat bilaga.
90
Page 97

1 √‰ËÁ›Â˜ ÁÈ· ÙËÓ ·ÛÊ¿ÏÂÈ·
ΣΗΜΑΝΤΙΚΕΣ ΥΠΟΔΕΙΞΕΙΣ!
ΦΥΛΑΞΤΕ ΤΙΣ
ΟΠΩΣΔΗΠΟΤΕ!
Πριν χρησιμοποιήσετε τη συσκευή μελετήστε προσεκτικά τις
οδηγίες χρήσης και ιδιαίτερα τις οδηγίες ασφαλείας και φυλάξτε
το εγχειρίδιο για μελλοντική χρήση. Όταν δίνετε τη συσκευή σε
άλλα άτομα, δώστε μαζί και αυτό το εγχειρίδιο χρήσης.
Επεξήγηση συμβόλων
Αυτό το εγχειρίδιο οδηγιών ανήκει σε αυτήν τη
συσκευή. Περιλαμβάνει σημαντικές πληροφορίες
για την έναρξη της λειτουργίας και τη μεταχείριση.
Μελετήστε ολόκληρο το εγχειρίδιο οδηγιών.
Αν δεν τηρηθούν οι οδηγίες αυτού του εγχειριδίου,
μπορούν να προκληθούν σοβαροί τραυματισμοί ή
και ζημιές στη συσκευή.
ΠΡΟΕΙΔΟΠΟΙΗΣΗ
Αυτές οι προειδοποιητικές υποδείξεις πρέπει να
τηρηθούν ώστε να αποφευχθούν οι πιθανοί
τραυματισμοί του χρήστη.
ΠΡΟΣΟΧΗ
Αυτές οι υποδείξεις πρέπει να τηρηθούν ώστε να
αποφευχθούν οι πιθανές ζημιές στη συσκευή.
GR
ΥΠΟΔΕΙΞΗ
Αυτές οι υποδείξεις σας δίνουν πρόσθετες χρήσιμες
πληροφορίες για την εγκατάσταση και τη λειτουργία.
Αριθμός LOT
¶·Ú·ÁˆÁόÛ
91
Page 98

GR
1 √‰ËÁ›Â˜ ÁÈ· ÙËÓ ·ÛÊ¿ÏÂÈ·
√‰ËÁ›Â˜ ÁÈ· ÙËÓ ·ÛÊ¿ÏÂÈ·
Ηλεκτρική τροφοδοσία
• Πριν συνδέσετε τη συσκευή στην παροχή ρεύματος, σιγουρευτείτε ότι η
τάση ηλεκτρικού δικτύου που αναγράφεται στην ετικέτα συμφωνεί με αυτήν
του ηλεκτρικού δικτύου Σας.
• Συνδέστε το βύσμα στην πρίζα τότε μόνο, όταν η συσκευή είναι
απενεργοποιημένη.
• Μην φέρετε, τραβάτε ή περιστρέφετε την συσκευή από το καλώδιο και μην
μαγκώνετε το καλώδιο.
• Τοποθετήστε το καλώδιο με τέτοιο τρόπο, έτσι ώστε να μην υπάρχει
κίνδυνος να σκοντάψει κανείς.
• Μην ακουμπάτε το βύσμα όταν βρίσκεστε κοντά σε νερό και να πιάνετε το
καλώδιο μόνο με στεγνά χέρια.
Για ιδιαίτερες ομάδες ατόμων
• Απαγορεύεται η χρήση της συσκευής από άτομα (συμπεριλαμβανομένων
παιδιών) με περιορισμένες φυσικές ή πνευματικές ικανότητες, έλλειψη
αισθήσεων, εμπειρίας και/ή γνώσης, εάν δεν επιτηρούνται για την ασφάλειά
τους από κάποιο αρμόδιο άτομο που θα τους δίνει οδηγίες για τη χρήση της
συσκευής.
• Θα πρέπει να παρακολουθείτε τα παιδιά ώστε να βεβαιώνεστε πως δεν
παίζουν με τη συσκευή.
• Σε περίπτωση που αντιμετωπίζετε αλλεργικά αναπνευστικά νοσήματα,
συμβουλευθείτε τον οικογενειακό Σας γιατρό πριν την χρησιμοποίηση της
συσκευής.
• Σε περίπτωση που παρουσιαστούν προβλήματα υγείας κατά τη χρήση,
συμβουλευθείτε τον γιατρό Σας. Σε αυτήν την περίπτωση σταματήστε
αμέσως τη χρήση της συσκευής.
Λειτουργία της συσκευής
Προβλεπ όμενη χρήση
Ο υγροποιητής χρησιμοποιείται για την αύξηση της υγρασίας αέρα
σε ένα δωμάτιο μέσω της δημιουργίας ενός λεπτού νέφους.
Η συσκευή
σκο
που μπορεί να έχει η συσκευή στην υγεία σας, τότε πριν από τη χρήση του
υγροποιητή συμβουλευτείτε τον γιατρό σας!
• Η συσκευή δεν προορίζεται για εμπορική χρήση.
• Χρησιμοποιείτε τη συσκευή μόνο σύμφωνα με τις οδηγίες χρήσης. Η
απαίτηση για εγγύηση καταργείται όταν η συσκευή χρησιμοποιείται για άλλο
σκοπό από τον προβλεπόμενο.
• Μην χρησιμοποιείτε τη συσκευή σε περίπτωση που η συσκευή ή το καλώδιο
τροφοδοσίας έχει φθορές, όταν δεν λειτουργεί ομαλά, όταν έχει πέσει κάτω
από ή μέσα σε νερό.
π
ροορίζεται μόνο για οικιακή χρήση και όχι για επαγγελματικούς
π
ούς ούτε για τον ιατρικό τομέα! Αν δεν είστε σίγουροι για τις επιπτώσεις
92
Page 99

1 √‰ËÁ›Â˜ ÁÈ· ÙËÓ ·ÛÊ¿ÏÂÈ·
• ГЪЛЫИМФФИ‹ЫЩВ ·ФОПВИЫЩИО¿ Щ· ВН·ЪЩ‹М·Щ· Ф˘ ЪФ‚П¤ФУЩ·И БИ· ЩЛ Ы˘ЫОВ˘‹
Î·È Ô˘ ·Ú·‰›‰ÔÓÙ·È ·fi ÙÔÓ Î·Ù·Û΢·ÛÙ‹.
• ∞ÔÌ·ÎÚ‡ÓÂÙ ‹ ÙÔÔıÂÙ›Ù ٷ ÂÍ·ÚÙ‹Ì·Ù· ÌfiÓÔ fiÙ·Ó Ë Û˘Û΢‹ ‰ÂÓ Â›Ó·È ÛÂ
ПВИЩФ˘ЪБ›·.
• ªЛ ¯ЪЛЫИМФФИВ›ЩВ ЩЛ Ы˘ЫОВ˘‹ О¿Щˆ ·fi ОФ˘‚¤ЪЩВ˜ ‹ М·НИП¿ЪИ·.
• ªЛ ‚¿˙ВЩВ ЫВ ПВИЩФ˘ЪБ›· ЩЛ Ы˘ЫОВ˘‹ ОФУЩ¿ ЫВ ЛПВОЩЪФМ·БУЛЩИОФ‡˜ ФМФ‡˜
˘„ËÏ‹˜ Û˘¯ÓfiÙËÙ·˜
• Τοποθετήστε τη συσκευή προς χρήση πάνω σε μία σταθερή και επίπεδη
επιφάνεια, ώστε να μην μπορεί να γείρει.
•
Για την επίτευξη των βέλτιστων αποτελεσμάτων, ο υγροποιητής θα πρέπει να
τοποθετηθεί σε απόσταση τουλάχιστον 10 cm από τον τοίχο.
•
Το νέφος απαγορεύεται να κατευθύνεται προς τον τοίχο.
•
Τοποθετήστε τον υγροποιητή σε ύψος τουλάχιστον 60 cm πάνω από το έδαφος.
• Κρατήστε τη συσκευή, συμπεριλαμβανομένου και του καλωδίου, μακριά
από καυτές επιφάνειες.
∂¿Ó ÙÔ Î·ÏÒ‰ÈÔ ‹ Ô ÚÂ˘Ì·ÙÔÏ‹Ù˘ ¤¯Ô˘Ó ‚Ï¿‚Ë ··ÁÔÚ‡ÂÙ·È
•
У·¯ЪЛЫИМФФИФ‡УЩ·И. °И· П
·ÓÙÈηıÈÛÙÔ‡ÓÙ·È ·
•
ΔÔ Î·ÏÒ‰ÈÔ ‰ÂÓ ÂÈÙÚ¤ÂÙ·È Ó· ‚Ú›ÛÎÂÙ·È ÏËÛ›ÔÓ ËÁÒÓ ıÂÚÌfiÙËÙ·˜ Ô‡Ù ӷ
ÙÚ·‚È¤Ù·È ¿Óˆ ·
•
Μην γεμίζετε τον υγροποιητή, προτού αποσυνδέσετε τον ρευματολήπτη από
την πρίζα.
•
Το γέρσιμο, η μετακίνηση ή το άδειασμα της συσκευής απαγορεύεται όταν η
συσκευή είναι ενεργοποιημένη.
•
Προτού αφαιρέσετε το δοχείο νερού και αλλάξετε τη θέση της συσκευής,
απενεργοποιήστε τη συσκευή και αποσυνδέστε την από το ηλεκτρικό ρεύμα.
•
Μην πιάνετε τη συσκευή που έχει πέσει σε νερό. Αποσυνδέστε αμέσως το
ρευματολήπτη.
•
Μην θέτετε σε λειτουργία τη συσκευή, όταν το δοχείο νερού δεν περιέχει
καθόλου ή περιέχει πολύ λίγο υγρό.
•
Μην χρησιμοποιείτε αιθέρια έλαια (π.χ. ευκάλυπτος ή μενθόλη), καθώς αυτά
μπορούν να βλάψουν τη συσκευή.
•
Κρατήστε τις σχισμές αερισμού στο κάτω μέρος της συσκευής καθαρές από
σκόνη και βρωμιές.
• ¶И¿УВЩВ ¿УЩ· ЩФ ЪВ˘М·ЩФП‹ЩЛ МВ ЫЩВБУ¿ ¯¤ЪИ·.
•
Η υπερβολική υγρασία στο χώρο μπορεί να προκαλέσει σχηματισμό σταγόνων
στα παράθυρα και στα έπιπλα. Αν συμβεί κάτι τέτοιο απενεργοποιήστε τον
υγροποιητή.
•
BБ¿ПЩВ ЩФ ЪВ˘М·ЩФП‹ЩЛ ·fiЩЛУ Ъ›˙· fiЩ·У Л Ы˘ОВ˘‹ ‰ВУ В›У·И ЫВ ПВИЩФ˘ЪБ›·
О·И ‰ВУ ЩЛ ¯ЪЛЫИМФФИВ›ЩВ ¿ППФ.
Συντήρηση και καθαρισμός
• Εσείς οι ίδιοι επιτρέπεται να κάνετε μόνο εργασίες καθαρισμού στη
συσκευή. ™В ВЪ›ЩˆЫЛ ‚П¿‚Л˜ МЛУ ВИ‰ИФЪıТУВЩВ ЩЛ Ы˘ЫОВ˘‹ МffiУФИ Ы·˜
О·И МЛУ ЩЛ ¯ЪЛЫИМФФИВ›ЩВ. ƒˆЩ‹ЫЩВ ЩФУ ·УЩИЪfiЫˆФ О·И ‰ТЫЩВ ЩЛ Ы˘ЫОВ˘‹
БИ· ВИЫОВ˘‹ ЫВ ¤У· ВНФ˘ЫИФ‰ФЩЛМ¤УФ Ы˘УВЪБВ›Ф.
• Εάν παρ' όλα αυτά εισχωρήσει υγρό μία φορά στη συσκευή, αφαιρέστε
αμέσως το ρευματολήπτη.
•
Για τον καθαρισμό των εξαρτημάτων του υγροποιητή απαγορεύεται να
χρησιμοποιείτε αιχμηρά μέσα καθαρισμού, βενζίνη, καθαριστικά τζαμιών,
γυαλιστικά επίπλων, διαλυτικά χρωμάτων ή άλλα καυστικά οικιακά
καθαριστικά, ÁÈ·Ù› ÌÔÚ› Ó· ηٷÛÙÚ¤„Ô˘Ó ÙËÓ ÂÈÊ¿ÓÂÈ·.
• Διατηρείτε τη συσκευή σε στεγνό περιβάλλον.
fi
ÁÔ˘˜ ·ÛÊ¿ÏÂÈ·˜ Ú¤ÂÈ ·˘Ù¿ Ù· ÂÍ·ÚÙ‹Ì·Ù· Ó·
fi
Щ· ВНФ˘ЫИФ‰ФЩЛМ¤У· Ы˘УВЪБВ›·.
fi
ОФКЩВЪ¤˜ ¿ОЪВ˜.
93
GR
Page 100

GR
2 ГЪ‹ЫИМВ˜ ПЛЪФКФЪ›В˜
™·˜ В˘¯·ЪИЫЩФ‡МВ
Σας ευχαριστούμε ολύ για την εμ ιστοσύνη σας και σας συγχαίρουμε για
την α όφασή σας! Με την αγορά της συσκευής ύγρανσης του αέρα
Minibreeze α οκτήσατε ένα ρο όν υψηλής οιότητας MEDISANA. °И· У·
¤¯ВЩВ ЩФ ВИı˘МЛЩfi ·ФЩ¤ПВЫМ· О·И У· ¯ЪЛЫИМФФИВ›ЩВ ЩЛ Ы˘ЫОВ˘‹
‡БЪ·УЫЛ˜ ЩФ˘ ·¤Ъ· MEDISANA Minibreeze БИ· ·ЪОВЩfi О·ИЪfi, Ы·˜
ЪФЩВ›УФ˘МВ У· ‰И·‚¿ЫВЩВ ЪФЫВОЩИО¿ ЩИ˜ ВfiМВУВ˜ Ф‰ЛБ›В˜ БИ· ЩЛ ¯Ъ‹ЫЛ
О·И КЪФУЩ›‰· ЩЛ˜.
2.1 ¶ÂÚȯfiÌÂÓÔ ·Ú¿‰ÔÛ˘ Î·È Û˘Û΢·Û›·
∂ϤÁÍÙ ·Ú¯Èο ÙËÓ ÏËÚfiÙËÙ· Ù˘ Û˘Û΢‹˜ και δεν παρουσιάζει καμία
ζημιά. Εάν έχετε απορίες μη θέτετε τη συσκευή σε λειτουργία και
απευθυνθείτε στο κατάστημα αγοράς ή στο τμήμα σέρβις.
TÔ ÂÚȯfiÌÂÓÔ ·Ú¿‰ÔÛ˘ Û˘ÌÂÚÈÏ·Ì‚¿ÓÂÈ:
Υγραντ‹ρα˜Minibreeze
• 1
μαζί με 2 διαφορετικές κεφαλές φιαλών (καπάκια ασφαλείας)
• 1 ŒÓ·Ó ·ÓÙ¿ÙÔÚ· ‰ÈÎÙ‡Ô˘ / ˘Ô‰Ô¯‹ ‰ÈÎÙ‡Ô˘
• 1 Βούρτσα καθαρισμού
• 1 τσαντάκι φύλαξης
• 1 Ô‰ËÁ›Â˜ ¯Ú‹Û˘
√И Ы˘ЫОВ˘·Ы›В˜ В›У·И В·У·¯ЪЛЫИМФФИ‹ЫИМВ˜ ‹ МФЪФ‡У У· ·У·О˘ОП ˆıФ‡У
ЫЩФУ О‡ОПФ ЪТЩˆУ ˘ПТУ. ™·˜ ·Ъ·О·ПФ‡МВ У· ·ФЫ‡ЪВЩВ ЩФ ˘ПИОfi
Ы˘ЫОВ˘·Ы›·˜ Ф˘ ‰ВУ ¯ЪЛЫИМФФИВ›Щ·И П¤ФУ Ы‡МКˆУ· МВ ЩФ˘˜
О·УФУИЫМФ‡˜. ™В ВЪ›ЩˆЫЛ Ф˘ О·Щ¿ ЩЛУ ·К·›ЪВЫЛ ЩЛ˜ Ы˘ЫОВ˘‹˜ ·fi ЩЛ
Ы˘ЫОВ˘·Ы›· ‰И·ИЫЩТЫВЩВ О¿ФИ· ‚П¿‚Л ФКВИПfiМВУЛ ЫЩЛ МВЩ·КФЪ¿, Ы·˜
·Ъ·О·ПФ‡МВ У· ·В˘ı˘УıВ›ЩВ ·М¤Ыˆ˜ ЫЩФУ ¤МФЪfi Ы·˜.
¶ƒ√∂π¢√¶√πH™H
¶ÚÔÛ¤¯ÂÙ ÒÛÙ ٷ Ï·ÛÙÈο Û˘Û΢·Û›·˜ Ó· ÌËÓ
ÂÚȤÏıÔ˘Ó Û ·È‰Èο ¯¤ÚÈ·. À¿Ú¯ÂÈ Î›Ó‰˘ÓÔ˜ ·ÛÊ˘Í›·˜!
2.2 Τεχνολογία υπέρηχων
Η ευαισθησία για μολύνσεις και αναπνευστικά νοσήματα αυξάνεται όταν
ο αέρας του χώρου είναι πολύ ξηρός με αποτέλεσμα την κόπωση και την
αδυναμία συγκέντρωσης. Ο υγιής αέρας πρέπει να εμπεριέχει μία σχετική
υγρασία από 40 έως 55 %. Η χαμηλού θορύβου και η οικονομική σε
ενέργεια τεχνολογία υπέρηχων του υγροποιητή μετατρέπει το νερό μέσω
ταλαντώσεων σε λεπτό νέφος, το οποίο αυξάνει το βαθμό υγρασίας στην
ατμόσφαιρα. Αυτό βελτιώνει την ποιότητα του αέρα και προλαμβάνει την
αποξήρανση των βλεννογόνων καιτου δέρματος.
Η χωρητικότητα της συσκευής έχει σχεδιαστεί για ένα χώρο μέγιστης
επιφάνειας 30 m
νεφελώματος
χώρου. Τηρείτε οπωσδήποτε τις υποδείξεις καθαρισμού και φροντίδας.
2
. Με τον περιστροφικό ρυθμιστή για την ένταση
εναρμονίστε το βαθμό της ύγρανσης με το μέγεθος του
94
 Loading...