

Page 1
Blutdruck-Messgerät HGD
Blood pressure measuring device HGD
Appareil de mesure de la tension HGD
Misuratore di pressione HGD
Tensiómetro HGD
Medidor da pressão arterial HGD
Bloeddrukmeetapparaat HGD
Verenpainemittari HGD
Blodtrycksmätare HGD
¶¶ÈÈÂÂÛÛfifiÌÌÂÂÙÙÚÚÔÔ ··››ÌÌ··ÙÙÔÔ˜˜ HHGGDD
Art. 51422
Gebrauchsanweisung
Manual
Mode d’emploi
Istruzioni per l’uso
Instrucciones de manejo
Bitte sorgfältig lesen!
Please read carefully!
A lire attentivement s.v.p.!
Da leggere con attenzione!
¡Por favor lea con cuidado!
Manual de instruções
Gebruiksaanwijzing
Käyttöohje
Bruksanvising
√√‰‰ËËÁÁ››Â˜˜ ¯¯ÚÚ‹‹ÛÛˢ˜
Por favor ler cuidadosamente!
A.u.b. zorgvuldig lezen!
Lue huolellisesti läpi!
Läses noga!
¶·Ъ·О·ПФ‡МВ ‰И·‚¿ЫЩВ ЪФЫВОЩИО¿
Page 2

D
Gebrauchsanweisung
1 Sicherheitshinweise . . . . . . . . . . . . . . . . . . . . . . . . . . . . . . . . . . . . . 1
2 Wissenswertes . . . . . . . . . . . . . . . . . . . . . . . . . . . . . . . . . . . . . . . . . . . . . . . 2
3 Inbetriebnahme . . . . . . . . . . . . . . . . . . . . . . . . . . . . . . . . . . . . . . . . . . . . . 4
4 Anwendung . . . . . . . . . . . . . . . . . . . . . . . . . . . . . . . . . . . . . . . . . . . . . . . . . . . 6
5 Verschiedenes . . . . . . . . . . . . . . . . . . . . . . . . . . . . . . . . . . . . . . . . . . . . . . . . 8
6 Garantie . . . . . . . . . . . . . . . . . . . . . . . . . . . . . . . . . . . . . . . . . . . . . . . . . . . . . . . . . . 10
P
Manual de instruções
1 Avisos de Segurança . . . . . . . . . . . . . . . . . . . . . . . . . . . . . . . . . . . 51
2 Informações gerais . . . . . . . . . . . . . . . . . . . . . . . . . . . . . . . . . . . . . . . 52
3 Põr em Funcionamento . . . . . . . . . . . . . . . . . . . . . . . . . . . . . . 54
4 Utilização . . . . . . . . . . . . . . . . . . . . . . . . . . . . . . . . . . . . . . . . . . . . . . . . . . . . . . . . 56
5 Generalidades . . . . . . . . . . . . . . . . . . . . . . . . . . . . . . . . . . . . . . . . . . . . . . . . 58
6 Garantia . . . . . . . . . . . . . . . . . . . . . . . . . . . . . . . . . . . . . . . . . . . . . . . . . . . . . . . . . . 60
GB
Manual instruction
1 Safety Information . . . . . . . . . . . . . . . . . . . . . . . . . . . . . . . . . . . . . . . 11
2 Useful Information . . . . . . . . . . . . . . . . . . . . . . . . . . . . . . . . . . . . . . . 12
3 Getting started . . . . . . . . . . . . . . . . . . . . . . . . . . . . . . . . . . . . . . . . . . . . . . 14
4 Use . . . . . . . . . . . . . . . . . . . . . . . . . . . . . . . . . . . . . . . . . . . . . . . . . . . . . . . . . . . . . . . . . . 1 6
5 Miscellaneous . . . . . . . . . . . . . . . . . . . . . . . . . . . . . . . . . . . . . . . . . . . . . . . . 18
6 W a r r a n t y . . . . . . . . . . . . . . . . . . . . . . . . . . . . . . . . . . . . . . . . . . . . . . . . . . . . . . . . . 2 0
F
Mode d’emploi
1 Consignes de sécurité . . . . . . . . . . . . . . . . . . . . . . . . . . . . . . . . . 21
2 Informations utiles . . . . . . . . . . . . . . . . . . . . . . . . . . . . . . . . . . . . . . . 22
3 Mise en service . . . . . . . . . . . . . . . . . . . . . . . . . . . . . . . . . . . . . . . . . . . . . . 24
4 Application . . . . . . . . . . . . . . . . . . . . . . . . . . . . . . . . . . . . . . . . . . . . . . . . . . . . . 26
5 Divers . . . . . . . . . . . . . . . . . . . . . . . . . . . . . . . . . . . . . . . . . . . . . . . . . . . . . . . . . . . . . . . 2 8
6 Garantie . . . . . . . . . . . . . . . . . . . . . . . . . . . . . . . . . . . . . . . . . . . . . . . . . . . . . . . . . . 30
I
Istruzioni per l’uso
1 Norme di Sicurezza . . . . . . . . . . . . . . . . . . . . . . . . . . . . . . . . . . . . . . 31
2 Informazoni importanti . . . . . . . . . . . . . . . . . . . . . . . . . . . . . . 32
3 Messa in Funzione . . . . . . . . . . . . . . . . . . . . . . . . . . . . . . . . . . . . . . . 34
4 Utilizzo . . . . . . . . . . . . . . . . . . . . . . . . . . . . . . . . . . . . . . . . . . . . . . . . . . . . . . . . . . . . . 3 6
5 Varie . . . . . . . . . . . . . . . . . . . . . . . . . . . . . . . . . . . . . . . . . . . . . . . . . . . . . . . . . . . . . . . . . 3 8
6 Garanzia . . . . . . . . . . . . . . . . . . . . . . . . . . . . . . . . . . . . . . . . . . . . . . . . . . . . . . . . . . 40
E
Instrucciones de manejo
1 Indicaciones de Seguridad . . . . . . . . . . . . . . . . . . . . . . . . . 41
2 Informaciones interesantes . . . . . . . . . . . . . . . . . . . . . . . 42
3 Puesta en Funcionamiento . . . . . . . . . . . . . . . . . . . . . . . . 44
4 Uso . . . . . . . . . . . . . . . . . . . . . . . . . . . . . . . . . . . . . . . . . . . . . . . . . . . . . . . . . . . . . . . . . . 4 6
5 Generalidades . . . . . . . . . . . . . . . . . . . . . . . . . . . . . . . . . . . . . . . . . . . . . . . . 48
6 Garantía . . . . . . . . . . . . . . . . . . . . . . . . . . . . . . . . . . . . . . . . . . . . . . . . . . . . . . . . . . 50
NL
Gebruiksaanwijzing
1 Veiligheidsmaatregelen . . . . . . . . . . . . . . . . . . . . . . . . . . . . . . 61
2 Wetenswaardigheden . . . . . . . . . . . . . . . . . . . . . . . . . . . . . . . . . 62
3 Voor het Gebruik . . . . . . . . . . . . . . . . . . . . . . . . . . . . . . . . . . . . . . . . . 64
4 Toepassing . . . . . . . . . . . . . . . . . . . . . . . . . . . . . . . . . . . . . . . . . . . . . . . . . . . . . . 66
5 Diversen . . . . . . . . . . . . . . . . . . . . . . . . . . . . . . . . . . . . . . . . . . . . . . . . . . . . . . . . . . .68
6 Garantie . . . . . . . . . . . . . . . . . . . . . . . . . . . . . . . . . . . . . . . . . . . . . . . . . . . . . . . . . . 70
FIN
Käyttöohje
1 Turvallisuusohjeita . . . . . . . . . . . . . . . . . . . . . . . . . . . . . . . . . . . . . . . . 71
2 Tietämisen arvoista . . . . . . . . . . . . . . . . . . . . . . . . . . . . . . . . . . . . . . 72
3 Käyttöönotto . . . . . . . . . . . . . . . . . . . . . . . . . . . . . . . . . . . . . . . . . . . . . . . . . 74
4 K ä y t t ö . . . . . . . . . . . . . . . . . . . . . . . . . . . . . . . . . . . . . . . . . . . . . . . . . . . . . . . . . . . . . . 7 6
5 Sekalaista . . . . . . . . . . . . . . . . . . . . . . . . . . . . . . . . . . . . . . . . . . . . . . . . . . . . . . . . 78
6 Takuu . . . . . . . . . . . . . . . . . . . . . . . . . . . . . . . . . . . . . . . . . . . . . . . . . . . . . . . . . . . . . . . 8 0
S
Bruksanvising
1 Säkerhetshänvisningar . . . . . . . . . . . . . . . . . . . . . . . . . . . . . . . . 81
2 V ä r t a t t v e t a . . . . . . . . . . . . . . . . . . . . . . . . . . . . . . . . . . . . . . . . . . . . . . . . . . . 8 2
3 Ibruktagning . . . . . . . . . . . . . . . . . . . . . . . . . . . . . . . . . . . . . . . . . . . . . . . . . . 84
4 Användning . . . . . . . . . . . . . . . . . . . . . . . . . . . . . . . . . . . . . . . . . . . . . . . . . . . . 86
5 Övrigt . . . . . . . . . . . . . . . . . . . . . . . . . . . . . . . . . . . . . . . . . . . . . . . . . . . . . . . . . . . . . . . 8 8
6 Garantii . . . . . . . . . . . . . . . . . . . . . . . . . . . . . . . . . . . . . . . . . . . . . . . . . . . . . . . . . . . . 8 0
GR
√√‰‰ËËÁÁ››Â˜˜ ¯¯ÚÚ‹‹ÛÛˢ˜
1 √‰ËÁ›Â˜ ÁÈ· ÙËÓ ·ÛÊ¿ÏÂÈ· . . . . . . . . . . . . . . . . . . . . . . . . . . . 9 1
2 ГЪ‹ЫИМВ˜ ПЛЪФКФЪ›В˜ . . . . . . . . . . . . . . . . . . . . . . . . . . . . . . . . 9 2
3 §ÂÈÙÔ˘ÚÁ›· . . . . . . . . . . . . . . . . . . . . . . . . . . . . . . . . . . . . . . . . . . . . . . . . . . . . . . . 9 4
4 ∂Ê·ÚÌÔÁ‹ . . . . . . . . . . . . . . . . . . . . . . . . . . . . . . . . . . . . . . . . . . . . . . . . . . . . . . . . 9 6
5 ¢È¿ÊÔÚ· . . . . . . . . . . . . . . . . . . . . . . . . . . . . . . . . . . . . . . . . . . . . . . . . . . . . . . . . . . . 9 8
6 ∂ÁÁ‡ËÛË . . . . . . . . . . . . . . . . . . . . . . . . . . . . . . . . . . . . . . . . . . . . . . . . . . . . . . . . . . . 1 0 0
Klappen Sie bitte diese Seite auf und lassen Sie sie zur
schnellen Orientierung aufgeklappt.
Please fold out this page and leave it folded out for quick
reference.
Veuillez déplier cette page et la laisser dépliée afin de
vous orienter plus rapidement.
Aprire questa pagina e lasciarla aperta ai fini di un rapido
orientamento.
Por favor, despliegue esta hoja y déjela desplegada para
orientarse rápidamente.
Por favor, abra esta página e deixe-a aberta para uma
orientação rápida.
Sla deze bladzijde om en laat deze opengeslagen,
terwijl u de gebruiksaanwijzing leest.
Kääntäkää tämä sivu auki ja pitäkää se aukikäännettynä
nopeaa orientaatiota varten.
Vik upp denna sida och låt den vara uppslagen som hjälp
till snabb orientering.
¶·Ú·Î·Ïԇ̠·ÓÔ›ÍÙ ÙË ÛÂÏ›‰· ·˘Ù‹ Î·È ·Ê‹ÛÙ ÙËÓ
·УФИ¯Щ‹ БИ· БЪ‹БФЪФ ЪФЫ·У·ЩФПИЫМfi.
Page 3
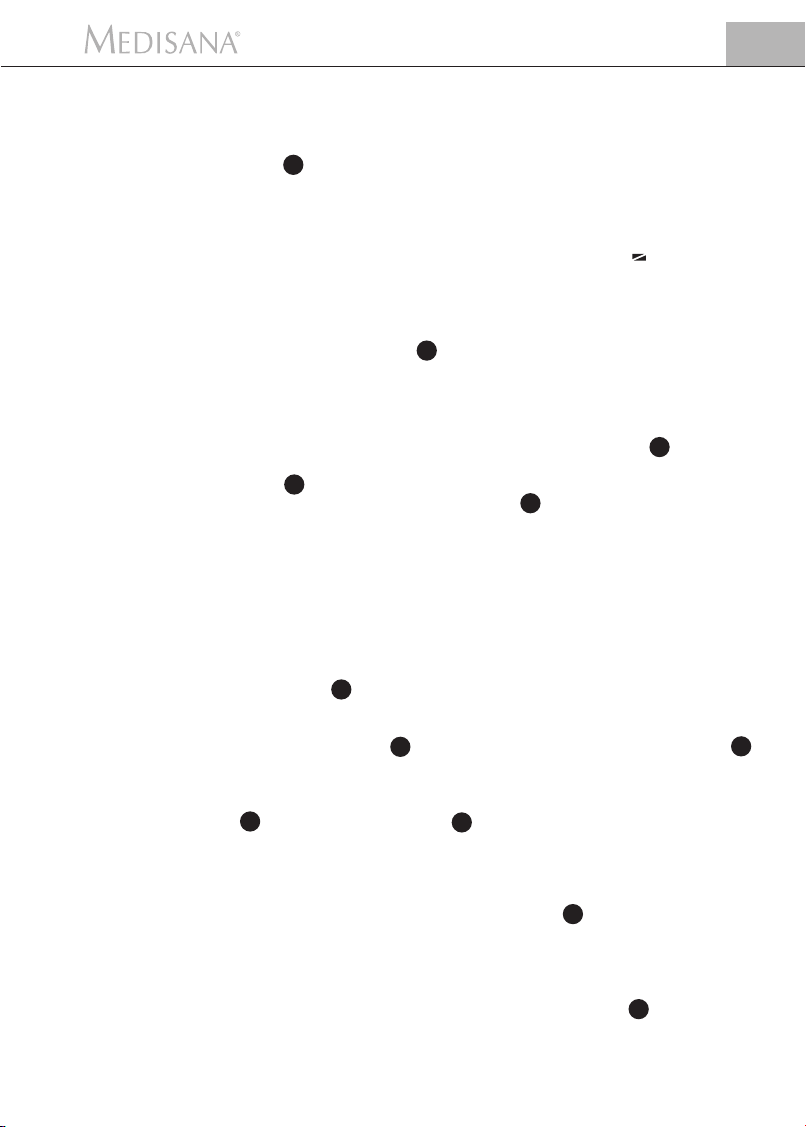
Blutdruckmessgerät HGD
e
d
1
2
1
3
4
7
a
c
6
b
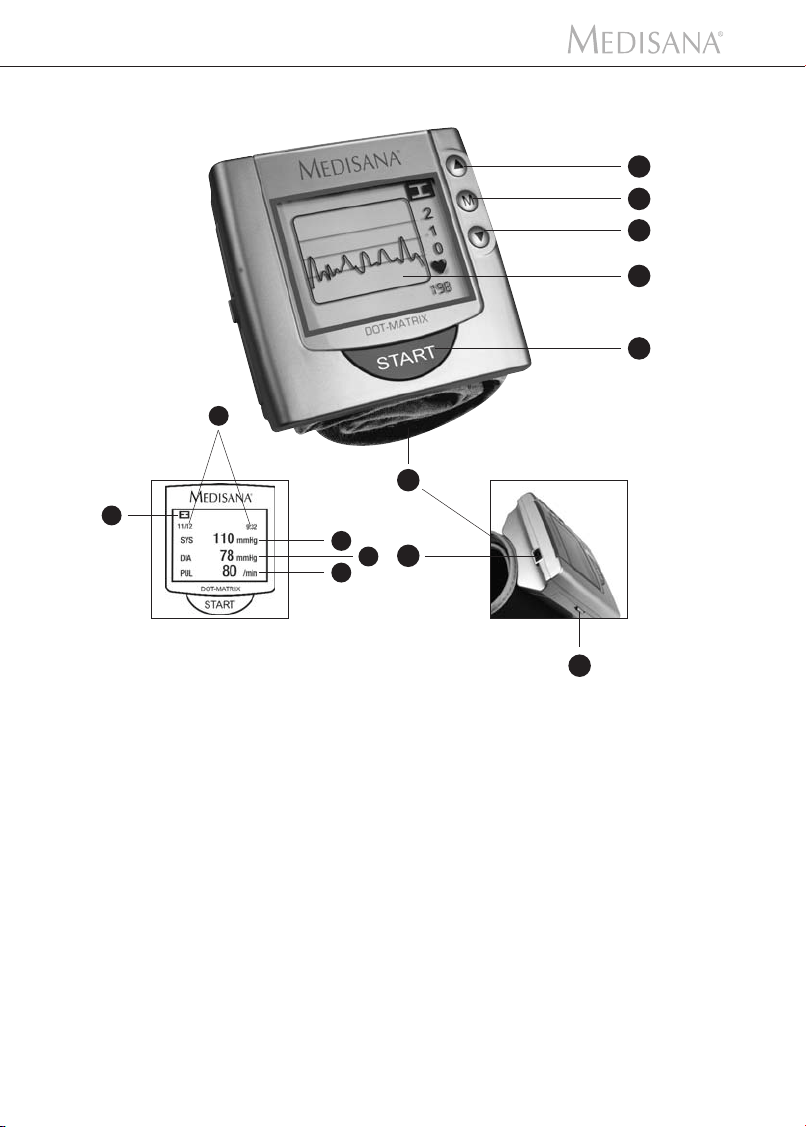
D ➊ AUSWAHL-Tasten
➋ MENÜ-Taste Symbole auf dem Anzeigenfeld
➌ Anzeige (Punktmatrix Display) ● Systolischer Wert in mmHg
➍ START-Taste ● Diastolischer Wert in mmHg
➎ Batteriefach ● Puls pro Minute
➏ USB-Schnittstelle ● Benutzer
➐ Handgelenk-Manschette ● Datum und Uhrzeit
a
b
c
d
e
GB ➊ SELECT buttons
➋ MENU button Display symbols
➌ Display (dot matrix) ● Systolic reading in mmHg
➍ START button ● Diastolic reading in mmHg
➎ Battery compartment ● Pulse per minute
➏ USB-Interface ● User
➐ Wrist cuff ● Date and time
a
b
c
d
e
F ➊ Touches de SELECTION
➋ Touche MENU Symboles de l'écran
➌ Affichage (écran de matrice à point) ● Valeur systolique en mmHg
➍ Touche START ● Valeur diastolique en mmHg
➎ Compartiment à piles ● Pouls par minute
➏ Interface USB ● Utilisateur
➐ Brassard de poignet ● Date et heure
a
b
c
d
e
5
Page 4

Blutdruckmessgerät HGD
I ➊ Tasti di SELEZIONE
➋ Tasto MENU Simboli sul quadrante del display
➌ Display (matrix a punti) ● Valore sistolico in mmHg
➍ Tasto START ● Valore diastolico in mmHg
➎ Vano batterie ● Battiti al minuto
➏ Interfacia USB ● Utente
➐ Manicotto per polso ● Data e ora
E ➊ Teclas de SELECCIÓN
➋ Tecla de MENÚ Símbolos en el display
➌ Display (Display Punto Matrix) ● Valor sistólico en mmHg
➍ Tecla START ● Valor diastólico en mmHg
➎ Compartimento para las pilas ● Pulso por minuto
➏ Interface USB ● Usuario
➐ Brazalete para la muñeca ● Fecha y hora
P ➊ Teclas de SELECÇÃO
➋ Tecla MENU Símbolos no ecrã
➌ Display (Display de matriz de pontos) ● Valor sistólico em mmHg
➍ Tecla START ● Valor diastólico em mmHg
➎ Compartimento das pilhas ● Pulso por minuto
➏ Interface USB ● Utilizador
➐ Braçadeira de pulso ● Data e hora
NL ➊ KEUZE-toetsen
➋ MENU-toets Symbolen op het display
➌ Display (punt-matrix display) ● Systolische waarde in mmHg
➍ START-toets ● Diastolische waarde in mmHg
➎ Batterijvak ● Pols per minuut
➏ USB interface ● Gebruiker
➐ Pols-manchet ● Datum en tijd
a
b
c
d
e
a
b
c
d
e
a
b
c
d
e
a
b
c
d
e
FIN ➊ VALINTA-painikkeet
➋ MENU-painike Näyttökentän symbolit
➌ Näyttö (Pistematriisinäyttö) ● Systolinen arvo mmHg
➍ START-painike ● Diastolinen arvo mmHg
➎ Paristokotelo ● Syke lyöntiä/min
➏ USB-liitäntä ● Käyttäjä
➐ Rannemansetti ● Päivämäärä ja kellonaika
a
b
c
d
e
S ➊ INSTÄLLNINGS-knappar
➋ MENU-knapp Symboler som visas i displayen
➌ Punkt matrix display ● Systoliskt värde i mmHg
➍ START-knapp ● Diastolikt värde i mmHg
➎ Batterifack ● Puls per minut
➏ USB-gränssnitt ● Användare
➐ Handledsmanschett ● Datum och tid
GR ➊ ¶Ï‹ÎÙÚ·
∂∂¶¶ππ§§√√°°∏∏™™
➋ ¶Ï‹ÎÙÚÔ MENU
➌ ŒÓ‰ÂÈÍË (Point- Matrix-Display) ● ÙÈÌ‹ Û˘ÛÙÔÏ‹˜ Û mmHg
➍ ¶Ï‹ÎÙÚÔ START ● ÙÈÌ‹ ‰È·ÛÙÔÏ‹˜ Û mmHg
➎ £‹ÎË ÁÈ· ÙË Ì·Ù·Ú›· ● ·ÏÌfi˜ ·Ó¿ ÏÂÙfi
➏ ÀÔ‰Ô¯‹ Û‡Ó‰ÂÛ˘ USB ● ¯Ú‹ÛÙ˘
➐ ª·ÓÛ¤Ù· ÁÈ· ÙÔÓ Î·Úfi ● ЛМВЪФМЛУ›· О·И ТЪ·
a
b
c
d
e
™‡Ì‚ÔÏ· ÛÙÔ Â‰›Ô ¤Ó‰ÂÈ͢
a
b
c
d
e
Page 5
1 Sicherheitshinweise
D
1.1
Herzlichen Dank
1.2
Hinweise für Ihr
Wohlbefinden
Vielen Dank für Ihr Vertrauen! Sie haben ein Qualitätsprodukt von MEDISANA
erworben, einem der weltweit führenden Unternehmen im Gesundheitsmarkt.
Damit Sie den gewünschten Erfolg erzielen und recht lange Freude an Ihrem
MEDISANA Blutdruckmessgerät HGD haben, empfehlen wir Ihnen, die nachstehenden Hinweise zum Gebrauch und zur Pflege sorgfältig zu lesen.
WARNUNG
Treffen Sie aufgrund einer Selbstmessung keine therapeutischen
Maßnahmen. Ändern Sie niemals die Dosierung eines vom Arzt
verordneten Medikaments.
• Herzrhythmusstörungen verursachen einen unregelmäßigen Puls, so dass Sie
auf Messungen mit oszillometrischen Geräten (Handgelenkgeräte, Oberarmgeräte) verzichten sollten. In diesen Fällen lassen Sie bitte durch Ihren Arzt
die Blutdruckmessung durch die herkömmliche Stethoskop-Methode vornehmen.
• Auch wenn Sie an anderen Krankheiten leiden, z.B. arterieller Verschlusskrankheit, halten Sie vor der Anwendung des Gerätes Rücksprache mit Ihrem
Arzt.
• Das Gerät kann nicht zur Kontrolle der Herzfrequenz eines Schrittmachers
verwendet werden.
• Schwangere sollten die notwendigen Vorsichtsmaßnahmen und ihre individuelle Belastbarkeit beachten, halten Sie ggf. Rücksprache mit Ihrem Arzt.
• Sollten während einer Messung Unannehmlichkeiten wie z.B. Schmerz am
Handgelenk oder andere Beschwerden auftreten, ergreifen Sie folgende
Gegenmaßnahmen: Betätigen Sie die START-Taste 4 , um eine sofortige
Entlüftung der Manschette zu erreichen. Lösen Sie die Manschette und
nehmen Sie diese vom Handgelenk ab. Bitte nehmen Sie Kontakt mit Ihrem
Fachhändler auf oder informieren Sie uns direkt.
1.3
Was Sie unbedingt
beachten sollten
• Benutzen Sie das Gerät nur entsprechend seiner Bestimmung laut Gebrauchsanweisung. Bei Zweckentfremdung erlischt der Garantieanspruch.
• Sollte es in seltenen Fällen durch eine Fehlfunktion passieren, dass die
Manschette während der Messung dauerhaft aufgepumpt bleibt, muss sie
sofort geöffnet werden.
• Das Gerät darf nicht im Umfeld von Geräten betrieben werden, die starke
elektrische Strahlung aussenden, wie zum Beispiel Radiosender. Dadurch
kann die Funktion beeinträchtigt werden.
• Kinder dürfen das Gerät nicht verwenden. Medizinprodukte sind kein
Spielzeug!
• Im Falle von Störungen reparieren Sie das Gerät bitte nicht selbst, da dadurch
jeglicher Garantieanspruch erlischt. Lassen Sie Reparaturen nur von autorisierten Servicestellen durchführen.
• Schützen Sie das Gerät vor Feuchtigkeit. Sollte dennoch einmal Flüssigkeit in
das Gerät eindringen, müssen die Batterien sofort entfernt und weitere
Anwendungen vermieden werden. Setzen Sie sich in diesem Fall mit Ihrem
Fachhändler in Verbindung oder informieren Sie uns direkt. Wie Sie uns
erreichen können, steht auf der Adressseite.
1
Page 6
D
1 Sicherheitshinweise / 2 Wissenswertes
1.4
Lieferumfang und
Verpackung
2.1
Was ist
Blutdruck?
2.2
Wie funktioniert
die Messung?
Bitte prüfen Sie zunächst, ob das Gerät vollständig ist.
Zum Lieferumfang gehören:
• 1 MEDISANA Blutdruckmessgerät HGD • 1 Software CD
• 2 Batterien (Typ AAA, LR03) • 1 Aufbewahrungsbox
• 1 USB-Kabel • 1 Gebrauchsanweisung
Verpackungen sind wiederverwendbar oder können dem Rohstoffkreislauf
zurückgeführt werden. Bitte entsorgen Sie nicht mehr benötigtes Verpackungsmaterial ordnungsgemäß. Sollten Sie beim Auspacken einen
Transportschaden bemerken, setzen Sie sich bitte sofort mit Ihrem Händler in
Verbindung.
WARNUNG
Achten Sie darauf, dass die Verpackungsfolien nicht in die
Hände von Kindern gelangen. Es besteht Erstickungsgefahr!
Blutdruck ist der Druck, der bei jedem Herzschlag in den Gefäßen entsteht.
Wenn sich das Herz zusammenzieht (=Systole) und Blut in die Arterien pumpt,
führt das zu einem Druckanstieg. Dessen höchster Wert wird als systolischer
Druck bezeichnet und bei einer Blutdruckmessung als erster Wert gemessen.
Wenn der Herzmuskel erschlafft, um neues Blut aufzunehmen, sinkt auch der
Druck in den Arterien. Sind die Gefäße entspannt, wird der zweite Wert – der
diastolische Druck – gemessen.
Das HGD ist ein Blutdruckmessgerät, das für die Blutdruckmessung am Handgelenk bestimmt ist. Die Messung erfolgt hier durch einen Mikroprozessor, der
über einen Drucksensor die Schwingungen auswertet, die beim Aufpumpen
und Ablassen der Blutdruckmanschette über die Arterie entstehen.
2.3
Warum ist es
sinnvoll, den
Blutdruck zu
Hause zu messen?
2
MEDISANA verfügt über mehrjährige Erfahrung auf dem Gebiet der Blutduck-
messung. Die hohe Genauigkeit des Messprinzips der MEDISANA-Geräte wird
von umfangreichen klinischen Studien, die nach strengen internationalen
Standards durchgeführt werden, belegt. Ein wichtiges Argument für die Blutdruckmessung zu Hause ist die Tatsache, dass die Messung in der gewohnten
Umgebung und unter ausgeruhten Bedingungen durchgeführt wird. Besonders
aussagekräftig ist der sogenannte „Basiswert“, der morgens direkt nach dem
Aufstehen vor dem Frühstück gemessen wird.
Grundsätzlich sollten Sie möglichst immer zur gleichen Zeit und unter gleichen
Bedingungen Ihren Blutdruck messen. Denn dann ist die Vergleichbarkeit der
Ergebnisse gewährleistet und eine beginnende Bluthochdruckerkrankung kann
frühzeitig erkannt werden.
Bleibt Bluthochdruck lange unentdeckt, steigt das Risiko für weitere HerzKreislauf-Erkrankungen.
Page 7

2 Wissenswertes
DESHALB UNSER TIPP:
Messen Sie Ihren Blutdruck täglich und regelmäßig, auch dann,
wenn Sie keine Beschwerden haben.
D
2.4
Blutdruckklassifikation
nach der WHO
2.5
Blutdruckschwankungen
2.6
Beeinflussung
und Auswertung
der Messungen
In der nachfolgenden Tabelle werden die Richtwerte für hohen und niedrigen
Blutdruck ohne Berücksichtigung des Alters angegeben. Diese Werte wurden
von der Weltgesundheitsorganisation (WHO) festgelegt.
Niedriger Blutdruck Normaler Blutdruck
systolisch unter 100 systolisch 100–140
diastolisch unter 60 diastolisch 60–90
Formen des Bluthochdrucks
Stadium 1 Stadium 2 Stadium 3
leichter Bluthochdruck mittelstarker Bluthochdruck starker Bluthochdruck
systolisch 140–159 systolisch 160–179 systolisch über 180
diastolisch über 90 diastolisch über 95 diastolisch über 110
Es gibt viele Faktoren, die den Blutdruck beeinflussen können. So wirken sich
schwere körperliche Arbeit, Angst, Stress oder die Tageszeit der Messung sehr
stark auf die gemessenen Werte aus. Die persönlichen Blutdruckwerte unterliegen während des Tages und des Jahres großen Schwankungen. Bei Hochdruckpatienten sind diese Schwankungen besonders stark ausgeprägt. Normalerweise ist der Blutdruck während körperlicher Anstrengung am höchsten
und während der Nacht im Schlaf am niedrigsten.
• Messen Sie Ihren Blutdruck mehrfach, speichern Sie die Ergebnisse und vergleichen Sie diese dann miteinander. Ziehen Sie keine Rückschlüsse aus einem
einzigen Ergebnis.
• Ihre Blutdruckwerte sollten immer von einem Arzt beurteilt werden, der auch
mit Ihrer medizinischen Vorgeschichte vertraut ist. Wenn Sie das Gerät regelmäßig benutzen und die Werte für Ihren Arzt aufzeichnen, sollten Sie auch
von Zeit zu Zeit Ihren Arzt über den Verlauf informieren.
• Bedenken Sie bei den Blutdruckmessungen, dass die täglichen Werte von
vielen Faktoren abhängen. So beeinflussen Rauchen, Alkoholgenuss, Medikamente und körperliche Arbeit die Messwerte in unterschiedlicher Weise.
• Messen Sie Ihren Blutdruck vor den Mahlzeiten.
• Bevor Sie Ihren Blutdruck messen, sollten Sie sich mindestens 5 Minuten
ausruhen.
• Wenn Ihnen der systolische oder der diastolische Wert der Messung trotz korrekter Handhabung des Gerätes ungewöhnlich erscheinen (zu hoch oder zu
niedrig) und sich dies mehrmals wiederholt, dann informieren Sie Ihren Arzt.
Dies gilt auch, wenn in seltenen Fällen ein unregelmäßiger oder sehr
schwacher Puls keine Messungen ermöglicht.
3
Page 8

D
3 Inbetriebnahme
3.1
Batterien
einlegen /
entnehmen
3.2
Auswahl der
Einstellungen
Einlegen: Drücken Sie kräftig mit dem Daumen auf den Verschluss des Batte-
riefachs 5 an der Außenseite des Gerätes. Heben Sie den Deckel ab und legen
Sie die zwei mitgelieferten Batterien (Alkaline-Batterien, Typ AAA) ein. Achten
Sie auf die Liegerichtung der Batterien (Abbildung im Batteriefach). Setzen Sie
den Batteriedeckel wieder auf und drücken Sie ihn an, so dass er hörbar einrastet.
Entnehmen: Die Batterieanzeige erscheint auf dem Display, sobald die Batterien zu schwach werden. Das Gerät beginnt nach Drücken der START-Taste
4 nicht mehr mit der Blutdruckmessung. Setzen Sie bitte neue Batterien ein.
Entnehmen Sie die verbrauchten Batterien, indem Sie an der Haltelasche im
Batteriefach ziehen und setzen Sie die neuen Batterien ein. Beachten Sie bitte,
dass nach dem Einsetzen neuer Batterien die Einstellungen nicht gespeichert
bleiben.
BATTERIE-SICHERHEITSHINWEISE
• Von Kindern fernhalten! • Nicht wiederaufladbar!
• Nicht kurzschließen! • Nicht ins Feuer werfen!
• Werfen Sie verbrauchte Batterien und Akkus nicht in den
Hausmüll, sondern in den Sondemüll oder in eine BatterieSammelstation im Fachhandel.
Das MEDISANA HGD bietet nach einmaligen Drücken der MENUE-Taste 2
eine Auswahl verschiedener Einstellungen für den individuellen Gebrauch an.
Bei der ersten Inbetriebnahme erscheinen nach dem Drücken der MENUE-
Taste
2 folgende Menü-Bereiche in englischer Sprache:
MEASURING MODE => MESS-MODUS
USER => BENUTZER
CLEAR MEMORY => WERTE LÖSCHEN
TIME / ALARM => ZEIT / ALARM
LANGUAGE => SPRACHE
CONTRAST => KONTRAST
PC-LINK => PC-VERBINDUNG
Die einzelnen Menü-Bereiche können mit den AUSWAHL-Tasten ▲▼ ange-
steuert und mit einem Druck auf die MENUE-Taste 2 aufgerufen werden.
Durch einen kurzen Druck auf die START-Taste 4 verlassen Sie den jeweiligen
Menü-Bereich, im Anzeigenfeld werden wieder Datum/Uhrzeit und Benutzer
angezeigt.
3.2.1
Messmodus
einstellen
4
Im Menü-Bereich Messmodus „MEASURING MODE“ können Sie zwischen
dem Standard-Messverfahren (1) und dem 3/MAM-Messverfahren (3 Measurement Average Mode) wählen.
Im Standard-Messverfahren (1) wird eine einmalige Blutdruckmessung vorgenommen und abgespeichert. Durch einen Druck auf die Pfeiltaste ▲ gelangen
Sie zum 3/MAM Verfahren.
Das 3/MAM-Verfahren empfiehlt sich, wenn Sie unter schwankendem Blutdruck leiden. Durch die 3 im Abstand von 15 Sekunden aufeinanderfolgenden
Messungen werden stark abweichende Werte eleminiert. Bei gravierenden
Page 9
3 Inbetriebnahme
Abweichungen kann unter Umständen eine 4. Messung erfolgen. Nach
Abschluss der Messung wird intern ein gewichteter Mittelwert errechnet und
angezeigt. Dadurch wird das Risiko einer Falschmessung deutlich minimiert.
Den eingestellten Messmodus, zu erkennen am schwarzen Balken unter dem
Symbol für das ausgewählte Messverfahren, bestätigen Sie durch einmaliges
Drücken auf die MENUE-Taste 2 .
Danach erscheinen Datum, Uhrzeit, Benutzerangabe im Anzeigenfeld.
D
3.2.2
Benutzer
auswählen und
kennzeichnen
3.2.3
Werte löschen
Das MEDISANA HGD bietet die Möglichkeit, zwischen zwei fest definierten
Benutzern ( I oder II ) auszuwählen oder eine Messung ohne Benutzer-Zuordnung ( ) durchzuführen. Für die beiden definierten Benutzer ( I oder II )
stehen jeweils 30 Speicherplätze für Messergebnisse zur Verfügung. Eine
Messung ohne Benutzer-Zuordnung wird nur bis zur nächsten Messung
gespeichert. Durch Drücken auf die AUSWAHL-Tasten ▲▼ können Sie den
gewünschten Benutzer auswählen, zu erkennen am schwarzen Balken unter
den Symbolen. Bestätigen Sie Ihre Auswahl durch einmaliges Drücken auf die
MENUE-Taste 2 .
Im Anschluss können dem Benutzer I oder II eine 6-stellige Buchstaben- oder
Ziffernkombination zugeordnet werden. Durch Drücken der AUSWAHL-Tasten
▲▼ gelangen Sie zum gewünschten Buchstaben bzw. zur gewünschten Ziffer.
Wenn Sie ohne Unterbrechung auf die AUSWAHL-Tasten ▲▼ drücken,
springt die Anzeige jeweils um einen Buchstaben/eine Ziffer weiter, bis der
gewünschte Buchstabe/die Ziffer auf dem Anzeigenfeld erscheint. Dann loslassen und mit der MENUE-Taste 2 bestätigen. Ist die Benutzer-Bezeichnung
abgeschlossen, verlassen Sie den Menü-Bereich durch Drücken auf die MENUE-
Taste 2 . Sie können auch direkt nach Festlegung des Benutzers das AuswahlMenü verlassen, indem Sie einmal kurz auf die START-Taste 4 drücken.
Danach erscheinen Datum, Uhrzeit, Benutzerangaben im Anzeigenfeld.
In diesem Menü-Bereich können Sie bis zu 30 gespeicherte Werte für Benutzer
I oder II aufrufen sowie auf Wunsch löschen. Legen Sie zuvor den Benutzer,
wie im Punkt 3.2.2 beschrieben, fest.
Mit den AUSWAHL-Tasten ▲▼ können Sie wählen, ob Sie ein Messergebnis
(SINGLE) oder alle Messergebnisse (ALL) löschen wollen. Die vorgenommene
Einstellung können Sie am schwarzen Balken unter der Anzeige erkennen.
Wenn Sie nur ein Messergebnis löschen wollen (SINGLE-Modus), erscheinen
nach einmaligem Druck auf die MENUE-Taste 2 alle für den Benutzer gespeicherten Messwerte. Mit den AUSWAHL-Tasten ▲▼ wählen Sie den zu
löschenden Messwert aus. Im oberen Bereich des Anzeigenfeldes wird aufgeführt, zu welchem Zeitpunkt dieser Wert ermittelt wurde. Bestätigen Sie das
Löschen des Wertes mit der MENUE-Taste 2 oder verlassen Sie durch einmaliges Drücken der START-Taste 4 den MENUE-Modus ohne Löschen.
Sollen alle gespeicherten Messwerte gelöscht werden, wählen Sie den
ALL-Modus aus. Durch einen kurzen Druck auf die MENUE-Taste 2 bestätigen Sie das Löschen der Werte oder verlassen Sie den Menü-Bereich ohne
Löschen durch Druck auf die START-Taste
4 .
3.2.4
Zeit / Alarm
einstellen
In diesem Menü-Bereich können Sie Datum, Uhrzeit und Alarm einstellen. Als
erstes blinkt die Jahreszahl in der Anzeige auf. Durch Drücken der AUSWAHL-
Tasten ▲▼ wird die gewünschte Jahreszahl eingestellt und mit MENUE-Taste
2 bestätigt.
5
Page 10
D
3 Inbetriebnahme / 4 Anwendung
Im Anschluss können nacheinander die Monats- / Tages- / Stunden- und
Sekundenbereiche im gleichen Verfahren eingestellt werden. Nach Eingabe
dieser Daten können Sie einen Zeitpunkt für einen 1. und 2. Alarm festlegen.
Wenn Sie keine Alarmzeit festlegen wollen, wählen Sie mit den AUSWAHL-
Tasten ▲▼ das Symbol mit der durchgestrichenen Glocke nach Bestätigung
der Alarmzeit. Wenn dieses Symbol blinkt, bestätigen Sie Ihre Auswahl mit der
MENUE-Taste 2 . Dann ist der Alarm ausgeschaltet.
Abschließend können Sie festlegen, ob Datum, Uhrzeit und Benutzer immer im
Anzeigenfeld erscheinen sollen oder nicht. Mit den AUSWAHL-Tasten ▲▼
wählen Sie zwischen Anzeige EIN oder AUS. Der jeweils eingestellte Modus
blinkt auf und wird durch einen Druck auf die MENUE-Taste 2 bestätigt.
3.2.5
Sprache
auswählen
3.2.6
Kontrast
einstellen
3.3
PC-Link
4.1
Anlegen der
Druckmanschette
Im Menü-Bereich „Language“ können Sie auswählen, in welcher Sprache die
Menüführung erfolgen soll. Die Angaben im Anzeigenfeld können in 5 verschiedenen Sprachen dargestellt werden.
• ENGLISH • DEUTSCH • FRANCAIS • ESPANOL • ITALIANO
Wählen Sie eine Sprache mit den AUSWAHL-Tasten ▲▼ und bestätigen Sie
Ihre Wahl mit einem kurzen Druck auf die MENUE-Taste 2 . Nach der Bestätigung erscheint die Zeit- und Benutzeranzeige im Anzeigenfeld.
Im Menü-Bereich „Contrast“ kann graduell der Kontrast im Anzeigenfeld mit
den AUSWAHL-Tasten ▲▼ abgestuft werden. Ist der gewünschte Kontrast
eingestellt, bestätigen Sie bitte Ihre Auswahl mit der MENUE-Taste 2 .
Dem Gerät sind eine Software CD und ein USB-Kabel beigefügt, mit denen Sie
die Daten aus dem MEDISANA Blutdruckmessgerät HGD über die USBSchnittstelle auf Ihren Computer übertragen können. Verbinden Sie das USBKabel mit der USB-Schnittstelle 6 an Ihrem Gerät auf der einen Seite und der
USB-Eingangsbuchse Ihres Computers auf der anderen Seite. Über die MENUE-
Taste 2 und die AUSWAHL-Tasten ▲▼ wählen Sie den Menüpunkt PC-Link
und bestätigen die Wahl mit einem erneuten Tastendruck auf die MENUE-
Taste 2 . Auf dem Display des HGD erscheinen Wellenlinien, die Verbindung
zum Computer symbolisieren. Legen Sie die CD in Ihren Computer ein und
führen Sie den Installationsvorgang durch. Die Software ist selbsterklärend. Bei
eingelegter CD startet die Installationsroutine automatisch. Folgen Sie einfach
den Anweisungen auf Ihrem Computer-Bildschirm. Im Fall von Problemen
bietet die Software umfangreiche Hilfedateien.
Die Auswertesoftware bietet die Möglichkeit, die gemessenen Werte grafisch
oder tabellarisch anzuzeigen.
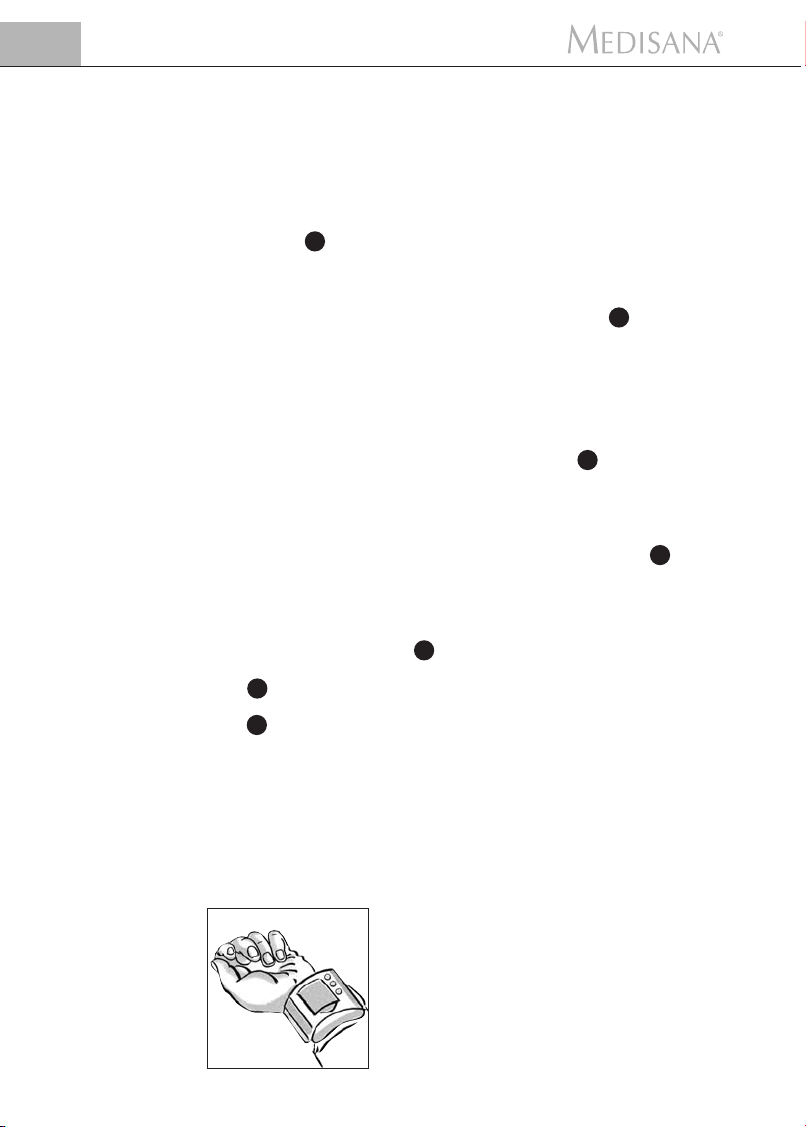
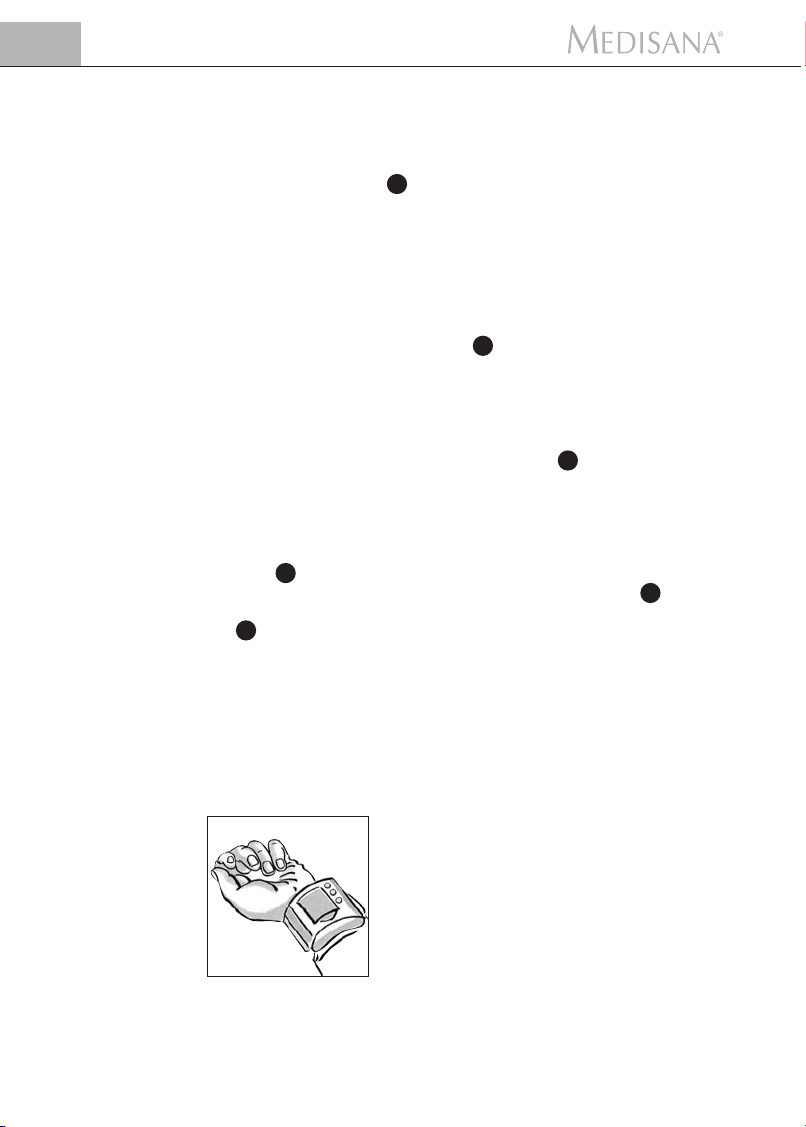
a. Legen Sie die Druckmanschette um Ihr linkes
Handgelenk. Achten Sie darauf, dass
• sich das Anzeigenfeld auf der Innenseite des
Handgelenks befindet.
• das Handgelenk frei sein muss von Schmuck,
Uhren o.ä.. Das Gerät muss direkt auf der Haut
aufliegen, da es nicht durch Textilien hindurch
messen kann.
6
Page 11
4 Anwendung
b. Schließen Sie die Druckmanschette so, dass sie eng anliegt, aber nicht ein-
schnürt. Die Manschette darf in keiner Weise verdreht werden.
D
4.2
Die richtige
Messposition
4.3
Den Blutdruck
messen
4.4
Ergebnisse
speichern
• Führen Sie die Messung im Sitzen durch.
• Entspannen Sie Ihren Arm und stützen Sie ihn locker auf, z.B. auf einem
Tisch.
• Heben Sie das Handgelenk so, dass sich die Druckmanschette in Herzhöhe
befindet.
• Verhalten Sie sich während der Messung ruhig: Bewegen Sie sich nicht und
sprechen Sie nicht, da sich sonst die Messergebnisse verändern können.
a. Drücken Sie die START-Taste 4 .
• Im Anzeigenfeld erscheint das Messsymbol mit dem Schriftzug „READY“.
• Anschließend pumpt sich die Manschette auf. Dabei wird der steigende
Druck symbolisch angezeigt und abwechselnd die Anzeige „BE QUIET“ und
„PLEASE RELAX“ eingeblendet.
• Wird die START-Taste 4 während des Aufpumpens gedrückt, unterbrechen Sie den Aufpumpvorgang. Das Gerät schaltet sich aus und die Luft
entweicht aus der Manschette.
b. Wenn das Aufpumpen beendet ist, wird der Messvorgang automatisch
gestartet, indem der aufgebaute Druck in der Manschette langsam wieder
abgelassen wird. Gleichzeitig wird im Anzeigenfeld eine Kurve für die Pulstätigkeit angezeigt. Abwechselnd erscheinen die Anzeigen „DO NOT
MOVE“ und „DO NOT TALK“, die Sie darauf hinweisen, dass Sie sich
während der Messung nicht bewegen und nicht sprechen sollen.
c. Die Entlüftung erfolgt zunächst mit konstanter Geschwindigkeit.
Wenn der Puls zum ersten Mal ermittelt werden kann, wird die Entlüftung
mit dem Herzschlag synchronisiert, bis die Messung beendet ist. Dabei blinkt
das Herz-Symbol . Die Messung ist beendet, sobald die Manschette
schlagartig entlüftet wird und neben den Bezeichnungen SYS, DIA und PUL
Werte angezeigt werden.
Das Gerät verfügt über je 30 Speicherplätze für 2 mögliche Benutzer. Das letzte
Messergebnis wird automatisch dem ausgewählten Benutzer zugeordnet
und auf dem entsprechendem freien Speicherplatz mit der nächst höheren
Speichernummer abgespeichert.
Die gespeicherten Werte können bei ausgeschaltetem Gerät durch Drücken der
AUSWAHL-Tasten ▲▼ abgefragt werden. Mit den entsprechenden AUSWAHL-Tasten ▲▼ können Sie in der Wertetabelle nach oben oder unten
wandern. Durch Drücken der MENUE-Taste 2 werden Ihnen die gespeicherten Werte des aktuellen Speichers tabellarisch angezeigt. Durch ein weiteres
Drücken der MENUE-Taste 2 werden Ihnen Ihre Werte grafisch angezeigt.
4.5
Abschalten
des Gerätes
Das Gerät schaltet sich nach kurzer Zeit selbst ab, wenn keine weitere Taste
gedrückt wurde, oder kann mit der START-Taste 4 ausgeschaltet werden. Die
Anzeige mit Datum, Uhrzeit und Benutzer bleibt im Anzeigenfeld sichtbar,
wenn im Menü-Bereich ZEIT/ALARM die Option ANZEIGE EIN ausgewählt
und bestätigt wurde.
7
Page 12

D
5 Verschiedenes
5.1
Fehler und
Behebungen
5.2
Reinigung
und Pflege
Erscheint in der Anzeige eine der folgenden Fehlermeldungen, konnte das
Gerät nicht einwandfrei den Wert des Blutdruckes ermitteln.
Fehlermeldung - Mögliche Gründe und Lösungen
ERR 1 - Es konnte kein Puls festgestellt werden. Stellen Sie sicher, dass die
Manschette korrekt sitzt und dass Sie Ihr Handgelenk in Herzhöhe halten.
ERR 2 - Unphysiologische Druckimpulse wurden festgestellt und beeinflussten
den Messwert. Ursache: Der Arm wurde während der Messung bewegt.
Wiederholen Sie die Messung bei ruhiger Armhaltung und sprechen Sie nicht
während der Messung.
ERR 3 - Der Druckaufbau in der Manschette dauert zu lange. Die Ursache
könnte eine undichte Schlauchverbindung oder eine nicht korrekt platzierte
Manschette sein.
ERR 4 - Der Unterschied zwischen systolischem und diastolischem Druck ist
überhöht. Messen Sie den Blutdruck erneut genau entsprechend den Anweisungen und unter ruhigen Bedingungen. Falls die Fehlermeldung bei erneuter
Messung wieder auftritt, setzen Sie sich mit MEDISANA in Verbindung.
ERR 5 - Aufgrund unstabiler Bedingungen während der Messungen konnte
kein Mittelwert berechnet werden. Wiederholen Sie die Messung bei ruhiger
Armhaltung und sprechen Sie nicht während der Messung.
• Entfernen Sie die Batterien, bevor Sie das Gerät reinigen.
• Verwenden Sie nie aggressive Reinigungsmittel oder starke Bürsten.
• Reinigen Sie das Gerät mit einem weichen Tuch, das Sie mit einer milden
Seifenlauge leicht befeuchten. In das Gerät darf kein Wasser eindringen.
Benutzen Sie das Gerät erst wieder, wenn es völlig trocken ist.
• Nehmen Sie die Batterien aus dem Gerät, wenn Sie es längere Zeit nicht
benutzen möchten. Es besteht sonst die Gefahr, dass die Batterien auslaufen.
• Setzen Sie das Gerät nicht der direkten Sonneneinstrahlung aus, schützen Sie
es vor Schmutz und Feuchtigkeit.
• Pumpen Sie nur dann Luft in die Manschette, wenn sie um das Handgelenk
gelegt ist.
• Messtechnische Kontrolle (gilt für die gewerbliche Nutzung) :
Das Gerät ist vom Hersteller für die Dauer von zwei Jahren kalibriert. Die
messtechnische Kontrolle muss spätestens alle zwei Jahre erfolgen. Die Kontrolle ist kostenpflichtig und kann entweder durch eine zuständige Behörde
oder durch autorisierte Wartungsdienste - entsprechend der „Medizinprodukte - Betreiber Verordnung“ - erfolgen.
5.3
Entsorgung
8
Entsorgen Sie Ihr Elektroaltgerät nach dessen Lebensdauerende umweltgerecht!
Verpackungen sind wiederverwendbar bzw. können in den Rohstoffkreislauf
zurückgeführt werden, Metallteile der Altmetallverwertung, Kunststoffe, elektrische und elektronische Bauteile müssen als Elektroschrott entsorgt werden.
Entnehmen Sie die Batterien, bevor Sie das Gerät entsorgen. Werfen Sie verbrauchte Batterien nicht in den Hausmüll, sondern in den Sondermüll oder in
eine Batterie-Sammelstation im Fachhandel.
Wenden Sie sich für Ratschläge bezüglich des Recyclings an Ihre Kommunalbehörde oder Ihren Händler.
Page 13
5 Verschiedenes
D
5.4
Richtlinien /
Normen
5.5
Technische Daten
Das Blutdruckmessgerät entspricht den europäischen Vorschriften EN 1060 Teil
1 / 1995 und EN 1060 Teil 3 / 1997.
Das Gerät entspricht den Anforderungen der europäischen Standardnorm
EN 60601-1-2.
Die Anforderungen der EU-Richtlinien 93 / 42 / EWG für Medizinische Produkte
Klasse II a wurden erfüllt.
Die CE-Kennzeichnung des Gerätes bezieht sich auf die EU-Richtlinie 93 / 42
EWG.
Geräteklassifikation: Typ BF
Benutzerkreis:
Das Gerät ist für nichtinvasive Blutdruckmessungen bei Erwachsenen geeignet
(das heißt, es ist für die äußere Anwendung geeignet).
Name und Modell : MEDISANA Blutdruckmessgerät HGD
Anzeigesystem : Digitale Anzeige im Punkt-Matrix-Display
Messmethode : Oszillometrisch
Spannungsversorgung : 3 V=, 2 x 1,5 V Mignon AAA Alkaline
Messbereich Blutdruck : 30 – 280 mmHg
Messbereich Puls : 40 – 200 Schläge / Min.
Maximale Messabweichung
der statischen Messwerte : ± 3 mmHg
Maximale Messabweichung
der Pulswerte : ± 5 % des Wertes
Druckerzeugung : Automatisch mit Mikropumpe
Luftablass : Automatisch
Autom. Abschaltung : Nach ca. 30 Sekunden
Betriebsbedingungen : + 10 °C bis + 40 °C, 15 - 85 % Luftfeuchte
Lagerbedingungen : - 5 °C bis + 50 °C
Abmessungen : 70 x 67 x 80 mm inkl. Manschette
Gewicht : ca. 140 g inkl. Batterien
Artikel-Nummer : 51422
EAN-Nummer : 4015588514227
Im Zuge ständiger Produktverbesserungen behalten wir uns
technische und gestalterische Änderungen vor.
9
Page 14

D
5 Verschiedenes / 6 Garantie
5.6
Zu guter Letzt
6.1
Garantie- und
Reparaturbedingungen
Wir wünschen Ihnen viel Spaß und Erfolg bei der Anwendung des
MEDISANA Blutdruckmessgerätes HGD und sind sicher, dass Sie recht
lange Freude daran haben werden.
Probieren Sie zum Wohle Ihrer Gesundheit auch unsere anderen Qualitätsprodukte, denn als eines der weltweit führenden Unternehmen im Home
Health Care - Bereich bieten wir Ihnen eine große Produktpalette in den
Bereichen Gesundheitskontrolle, Therapie zu Hause, alternative Schmerztherapie und qualifizierte Körperpflege.
Bitte wenden Sie sich im Garantiefall an Ihr Fachgeschäft oder direkt an die
Servicestelle. Sollten Sie das Gerät einschicken müssen, geben Sie bitte den
Defekt an und legen eine Kopie der Kaufquittung bei.
Es gelten dabei die folgenden Garantiebedingungen:
1. Auf MEDISANA Produkte wird ab Verkaufsdatum eine Garantie für drei
Jahre gewährt. Das Verkaufsdatum ist im Garantiefall durch die Kaufquittung oder Rechnung nachzuweisen.
2. Mängel infolge von Material- oder Fertigungsfehlern werden innerhalb
der Garantiezeit kostenlos beseitigt.
3. Durch eine Garantieleistung tritt keine Verlängerung der Garantiezeit,
weder für das Gerät noch für ausgewechselte Bauteile, ein.
4. Von der Garantie ausgeschlossen sind:
a. alle Schäden, die durch unsachgemäße Behandlung, z.B. durch Nicht-
beachtung der Gebrauchsanleitung, entstanden sind.
b. Schäden, die auf Instandsetzung oder Eingriffe durch den Käufer oder
unbefugte Dritte zurückzuführen sind.
c. Transportschäden, die auf dem Weg vom Hersteller zum Verbraucher
oder bei der Einsendung an den Kundendienst entstanden sind.
d. Zubehörteile, die einer normalen Abnutzung unterliegen.
5. Eine Haftung für mittelbare oder unmittelbare Folgeschäden, die durch
das Gerät verursacht werden, ist auch dann ausgeschlossen, wenn der
Schaden an dem Gerät als ein Garantiefall anerkannt wird.
Sollten Sie Fragen zu diesem oder anderen Produkten haben, beantworten
wir diese sehr gerne.
10
MEDISANA AG
Itterpark 7-9
D-40724 Hilden
Tel.: +49 (0) 2103 / 2007-60
Fax: +49 (0) 2103 / 2007-626
eMail: info@medisana.de
Internet: www.medisana.de
Im Servicefall wenden Sie sich
bitte an:
MEDISANA Servicecenter
Feuerbach KG
Corneliusstraße 75
D-40215 Düsseldorf
Tel.: 0211 - 38 10 07
(Mo-Do: 9-13 Uhr/14-17 Uhr,
Fr: 9-13 Uhr)
Fax: 0211 - 37 04 97
eMail: medisana@t-online.de
Page 15
1 Safety Information
GB
1.1
Thank you
very much
1.2
Tips for your
well being
Thank you for your confidence! You have purchased a quality product by
MEDISANA , one of the world’s leading producers of health care products. To
ensure the best results and long-term satisfaction with your MEDISANA HGD
Blood Pressure Monitor, we recommend that you read the following operating
and maintenance instructions carefully.
WARNING
Do not take any therapeutic measures based on your own
measurements. Never change the quantity of medication
prescribed by your doctor.
• Patients suffering from arrhythmia have an irregular pulse and should
therefore avoid using oscillometric measuring devices (wrist and upper arm
devices). In this case, please let your doctor measure your blood pressure
using the traditional stethoscope method.
• Patients suffering from other complaints, e.g. arterial occlusive disease,
should also consult their doctor before using the unit.
• The unit may not be used to check the heart rate of patients with a pacemaker.
• Pregnant patients should take their own personal state of health into
consideration and take all necessary precautions before using the unit. If in
doubt, consult your doctor.
• Should you experience discomfort or other complaints during measurement,
for example pain in the wrist, please take the following action: Press the
START button 4 to deflate the cuff immediately. Loosen the cuff and remove it from your arm. Please contact either your dealer or MEDISANA
directly.
1.3
Important
considerations
• The unit is only to be used for the specific purpose described in these
operating instructions. Any misuse will void the warranty.
• On the rare occasion of a fault causing the cuff to remain fully inflated during
measurement, open the cuff immediately.
• Do not use the unit near to equipment emitting a strong electric or
magnetic field, such as radios. This may impair the correct functioning of the
unit.
• Do not let children operate the unit. Medical products are not toys!
• If a fault occurs, do not try to repair the unit yourself. Attempts to do so will
void the warranty. Refer all servicing to authorized service personnel.
• Protect the unit from moisture. Should moisture enter the unit, remove the
batteries and stop using it immediately. In this case, please contact either
your dealer or MEDISANA directly. You can find details of how to contact us
on the address page.
11
Page 16

GB
1 Safety Information / 2 Useful Information
1.4
Items supplied
and packaging
2.1
What is blood
pressure?
2.2
How is blood
pressure
measured?
Please ensure that the package contents are complete.
These are as follows:
• 1 MEDISANA Blood pressure monitor HGD • 1 Software CD
• 2 Batteries (AAA type LR03) • 1 storage box
• 1 USB cable • 1 Operating instructions
The packaging can be reused or recycled. Please dispose properly of any packaging material no longer required. If you notice any transport damage during
unpacking, please contact your dealer without delay.
WARNING
To avoid risk of suffocation, keep packaging film away
from children.
Blood pressure is the pressure created in the blood vessels by each heart beat.
When the heart contracts (= systole) and pumps blood into the arteries, it
brings about a rise in pressure. The highest value is known as the systolic
pressure and is the first value to be measured. When the cardiac muscle relaxes to take in fresh blood, the pressure in the arteries also falls. Once the
arteries are relaxed, a second reading is taken – the diastolic pressure.
The HGD is a blood pressure computer which is used to measure blood pressure at the wrist. The measurement is carried out by a microprocessor, which,
via a pressure sensor, measures vibrations resulting from the inflation and
deflation of the cuff over the artery.
2.3
Why should
you take your
blood pressure
at home?
12
MEDISANA has had many years of experience in the field of blood pressure
measurement. The high precision of MEDISANA devices has been confirmed
by extensive clinical tests, carried out according to strict international
standards. One strong argument in favour of taking blood pressure at home is
the fact that the readings are taken in familiar surroundings under relaxed
conditions. The most important reading is the so-called “baseline value”, the
one taken before breakfast, directly after getting up in the morning.
As far as it is possible, you should always try to take your blood pressure at the
same time and under the same conditions each day. This ensures comparable
results and helps in detecting the first signs of high blood pressure. If high
blood pressure remains undetected, it increases the risk of further cardiovascular diseases.
Page 17
2 Useful Information
THEREFORE WE RECOMMEND:
Take a blood pressure reading daily and on a regular basis,
even if you are experiencing no apparent complaints.
GB
2.4
WHO blood
pressure
classification
2.5
Fluctuations in
blood pressure
2.6
Influencing
and evaluating
readings
The following table shows the classification of high and low blood pressure,
without taking age into consideration. These values were determined by the
World Health Organization (WHO).
Low blood pressure Normal blood pressure
systolic below 100 systolic 100–140
diastolic below 60 diastolic 60–90
Types of high blood pressure
Stage 1 Stage 2 Stage 3
mild hypertension medium hypertension serious hypertension
systolic 140–159 systolic 160–179 systolic above 180
diastolic above 90 diastolic above 95 diastolic above 110
There are many factors that can influence blood pressure. Readings can be
affected by stress, fear, heavy physical exertion or the time of day at which they
are taken. Your personal blood pressure values are subject to considerable
fluctuation during the course of the day and the year. These fluctuations are
particularly pronounced in the case of patients suffering from hypertension.
Blood pressure is usually at its highest during physical exertion and at its lowest
at night when asleep.
• Measure your blood pressure several times, then record and compare the
results. Do not draw any conclusions from a single reading.
• Your blood pressure readings should always be evaluated by a doctor who is
also familiar with your personal medical history. When using the unit
regularly and recording the values for your doctor, you should visit the
doctor from time to time to keep him updated.
• When taking readings, remember that the daily values are influenced by
several factors. Smoking, consumption of alcohol, drugs and physical
exertion influence the measured values in various ways.
• Measure your blood pressure before meals.
• Before taking readings, allow yourself at least five minutes rest.
• If the systolic and diastolic readings seem unusual (too high or too low) on
several occasions, despite correct use of the unit, please inform your doctor.
This also applies to the rare occasions when an irregular or very weak pulse
prevents you from taking readings.
13
Page 18
GB
3 Getting Started
3.1
Inserting /
removing
batteries
3.2
Setting up
the unit
Insertion: Press firmly with your thumb to open the lid of the battery
compartment 5 on the exterior of the unit. Remove the lid and insert the two
batteries included with the unit (alkaline batteries, AAA type). Remember to
insert the batteries as indicated in the diagram in the battery compartment.
Replace the lid, pressing it until it snaps into place.
Removal: The battery indicator is displayed when the batteries are low. When
the START button 4 is pressed, the unit does not start to measure the blood
pressure. Insert new batteries. Pull on the tab in the battery compartment to
remove the old batteries and then insert the new batteries. Note that the
settings are lost when new batteries are inserted.
BATTERY SAFETY INFORMATION:
• Keep away from children. • Do not recharge.
• Do not short-circuit. • Do not throw into fire.
• Do not dispose of old batteries with your household waste,
but dispose of them at a battery collection station at a
recycling site or in a shop.
With just one press of the MENU button 2 ,the MEDISANA HGD offers you
a se-lection of various settings for individual use. When the unit is switched on
for the first time, pressing the MENU button 2 causes the following menu
options to appear in English:
MEASURING MODE
USER
CLEAR MEMORY
TIME / ALARM
LANGUAGE
CONTRAST
PC-LINK
The individual menu options can be highlighted using the SELECT buttons
▲▼ and selected with a press of the MENU button 2 . With a short press of
the START button 4 , you will leave the selected menu option, and the display will once again show the time/date and the user.
3.2.1
Setting the
measuring mode
14
Under the menu option „MEASURING MODE“, you can choose between the
standard measuring mode (1) and the 3/MAM mode (3 Measurement Average
Mode).
With the standard mode (1), a single blood pressure reading is taken and
stored. A press of the button ▲ will switch to the 3/MAM mode.
The 3/MAM mode is to be recommended if you suffer from fluctuating blood
pressure. Three successive readings are taken at 15 second intervals, thus
eliminating widely varying readings. In the case of serious deviations, a 4th
reading may be taken. Once measurement is completed, the unit will calculate
and display a weighted average value, thus greatly minimizing the risk of an
incorrect reading.
Page 19
3 Getting Started
You confirm the selection of the measuring mode, indicated by a black bar
under the symbol for the selected measuring mode, by pressing the MENU
button 2 once.
The display will then show the date, time and user.
GB
3.2.2
Selecting and
defining users
3.2.3
Clear memory /
deleting readings
The MEDISANA HGD allows you to select between two specified users ( I or
II ), or to take a reading without assigning it to either user ( ). There are 30
memory slots available for each of the two specified users ( I or II ) for their
readings. An unassigned reading is only stored until the next reading is taken.
Using the SELECT buttons ▲▼, you can select the required user. The selection
is indicated by a black bar under the symbols. Confirm your selection by
pressing the MENU button 2 once.
After doing this, you can give user I or II a name with up to 6 characters,
either letters or numbers.
number you require. If you hold down one of the SELECT buttons ▲▼, you
can scroll through the letters/numbers until the one you require appears on the
display, then let go and confirm by pressing the MENU button 2 . Once you
have defined the user, you can leave this menu option by pressing the MENU
button 2 . You can also leave the selection menu directly after defining the
user with a short press of the START button 4 . The date, time and user details
will appear in the display.
In this sub-menu you can call up or, if desired, delete the stored readings for
user I or II (up to 30 each). First select a user, as described in section 3.2.2.
Using the SELECT buttons ▲▼, you can choose between deleting just one
reading (SINGLE) or all of the readings (ALL). Your selection is indicated by the
black bar at the bottom of the display.
If you have chosen to delete just one reading (SINGLE-mode), pressing the
MENU button 2 once will display all the stored readings for the selected user.
Using the SELECT buttons ▲▼ select the reading you wish to delete. At the
top of the display you can see at what time this reading was taken. Confirm
with the MENU button 2 to delete the reading or press the START button 4
to leave the MENU-mode without deleting the reading.
If you wish to delete all stored readings select the ALL-mode. Either confirm
that you want to delete the readings with a short press of the MENU button
2 , or press the START button 4 to leave the menu without deleting.
Use the
SELECT buttons ▲▼ to get to the letter or
3.2.4
Time / alarm
With this menu option you can set the date, time and alarm. First of all the year
will start to flash in the display. Use the SELECT buttons ▲▼ to set the year
and confirm the selection with the MENU button 2 .
After this, the month/day/hour and seconds can by set in the same way. After
entering this data, you can set a time for a 1st and 2nd alarm. If you do not
wish to set the alarm, use the SELECT buttons ▲▼ to highlight the symbol of
the crossed-out bell after confirming the alarm time. Once the symbol starts to
flash, confirm the selection by pressing the MENU button 2 . The alarm is
now deactivated.
15
Page 20
GB
3 Getting Started / 4 Use
Finally, you can choose whether or not the date, time and user should be
permanently displayed by using the SELECT buttons ▲▼ to choose between
Display ON or OFF. The selected mode will flash and you can confirm with a
press of the MENU button 2 .
3.2.5
Selecting
language
3.2.6
Setting contrast
3.3
PC-Link
4.1
Fitting the cuff
With the menu option „Language“, you can choose the language to be used
in the menus. The information can be displayed in one of 5 languages.
• ENGLISH • DEUTSCH • FRANCAIS • ESPANOL • ITALIANO
Use the SELECT buttons ▲▼ to choose a language and confirm your selection
with a short press of the MENU button 2 . After confirmation, the time and
user will be displayed.
With the menu option „Contrast“, the contrast level of the display can be set
in stages using the SELECT buttons ▲▼. Once the desired contrast is set,
please confirm your selection with the MENU button 2 .
The unit is supplied with a software CD and a USB cable which you can use to
transfer the data from the MEDISANA HGD blood pressure monitor via the
USB interface to your computer. Connect one end of the USB cable to the USB
interface 6 on the unit and the other end to the USB input socket of your
computer. Select the menu option PC-Link using MENU button 2 and the
SELECT buttons ▲▼, and confirm your selection by pressing the MENU button 2 again. The display of the HGD shows wavy lines which symbolise the
connection to the computer. Insert the CD into your computer and carry out
the installation process. The software guides you through the process. Once
you have inserted the CD, the installation routine starts automatically. Simply
follow the instructions on your computer monitor. The software has extensive
help files in case of problems.
The evaluation software makes it possible to display the measurements graphically or as a table.
a. Fit the pressure cuff around your left wrist.
Make sure that
• the display panel is positioned on the inside of
the wrist.
• the wrist is free of jewellery, watches etc. The
unit must rest directly on the skin, as a reading
cannot be taken through clothing.
16
b. Fasten the cuff in such a way that it fits tightly but
does not constrict the arm. The cuff must not be
twisted in any way.
Page 21
4 Use
GB
4.2
The correct
position for
taking readings
4.3
Measuring
blood pressure
4.4
Storing results
• Take readings while in a seated position.
• Relax your arm and rest it lightly on a surface such as a table.
• Raise your wrist so that the pressure cuff is on the same level as the heart.
• Relax during the measuring process: do not move or talk, as this can affect
the results.
a. Press the START button 4 .
• The display will show the “measuring” symbol with the text „READY“.
• The cuff will then inflate. The increasing pressure will be displayed symbolically while the messages „BE QUIET“ and „PLEASE RELAX“ are displayed
alternately.
• Pressing the START button 4 during inflation will stop the inflation pro-
cess. The unit switches off and the cuff deflates.
b. The measuring process begins automatically when inflation is complete by
slowly releasing the pressure built up in the cuff. At the same time, a pulse
curve is shown in the display. The messages „DO NOT MOVE“ and „DO
NOT TALK“, are displayed alternately, reminding you not to do so while the
reading is being taken.
c. Initially, deflation occurs at a constant speed.
As soon as the pulse can be determined, deflation is synchronised with the
beating of the heart until the measurement ends. During this time the heart
symbol will flash. The measurement is complete when the cuff suddenly
deflates and readings appear on the display under SYS, DIA and PUL.
The unit has 30 memory slots each for 2 potential users. The latest reading will
automatically be stored under the name of the currently selected user in the next
available memory slot.
When the unit is switched off, the stored values can be displayed by pressing
the SELECT buttons ▲▼ . You can then move through the list using the
SELECT buttons ▲▼ .
The values stored in the current memory location are shown in table form
when MENU button 2 is pressed. When MENU button 2 is pressed again,
the values are displayed graphically.
4.5
Switching off
the unit
The unit switches off automatically after a short time if no further buttons are
pressed, or can be switched off using the START button 4 . The display
showing the date, time and user will remain visible if the menu option
DISPLAY ON was selected and confirmed in the TIME/ALARM menu.
17
Page 22

GB
5 Miscellaneous
5.1
Troubleshooting
5.2
Care and
maintenance
If the display shows one of the following error messages, this means that the
unit was unable to accurately determine blood pressure.
Error messages - Possible causes and solutions
ERR 1 - No pulse could be detected. Make sure that the cuff is correctly fitted
and that you are holding your wrist at the level of the heart.
ERR 2 - Non-physiological pressure has been detected and has influenced the
reading. Cause: the arm was moved during the measurement. Take another
reading, keeping your arm still and not speaking.
ERR 3 - The cuff takes too long to inflate.
The cause may be that the cuff is incorrectly positioned or that the connection
with the hose is not airtight.
ERR 4 - The difference between systolic and diastolic pressure is abnormally
high. Repeat the measurement under relaxed conditions, following the
instructions exactly. If the same error occurs repeatedly, please contact
MEDISANA.
ERR 5 - An average value could not be calculated due to unstable conditions
while the readings were being taken. Repeat the measuring process, keeping
your arm still and not speaking.
• Remove the batteries before cleaning the unit.
• Never use strong detergents or hard brushes.
• Clean the unit with a soft cloth, moistened with mild soapy water. Do not
let water enter the unit. After cleaning, only use the unit when completely
dry.
• Remove the batteries from the unit if you do not wish to use it for an
extended period of time, otherwise there is a risk of battery leakage.
• Do not expose the unit to direct sunlight, and protect it from dust and
moisture.
• Only inflate the cuff when it is in position around the wrist.
• Servicing and calibration (only applies in the case of commercial use) :
The unit has been calibrated by the manufacturer for a period of two years’
use. The unit must be inspected and, if necessary, re-calibrated at least once
every two years. The inspection, which is subject to a charge, may only be
carried out by an appropriate authority or authorized service personnel as
laid down in the medical product suppliers’ regulations.
5.3
Disposal
18
Dispose of your old electrical unit in an environmentally acceptable manner
when it has reached the end of its service life!
Packaging is re-usable or may be re-cycled; metal parts must be disposed of
as scrap metal; plastics, electrical and electronic components must be disposed
of as electro-scrap.
Please remove the batteries before disposing of the equipment. Do not dispose of old batteries with your household waste, but dispose of them at a
battery collection station at a recycling site or in a shop.
Consult your local council or your dealer for recycling information.
Page 23
5 Miscellaneous
GB
5.4
Directives /
Norms
5.5
Specifications
This blood pressure computer conforms to the European regulations EN 1060
part 1 / 1995 and EN 1060 part 3 / 1997.
The unit conforms to the requirements of the European Norm standard
EN 60601-1-2.
The requirements of the EEC Directives 93 / 42 / EEC for Class II a medical
products have been fulfilled.
The CE-mark of this device refers to the EC-Directive 93 / 42 EEC.
Device classification: Class BF
Intended use:
This unit is suitable for non-invasive blood pressure measurement in adults (i.e.,
suitable for external use). We reserve the right to modify technical specifications without notice, in order to improve and further develop the product.
Name and model : MEDISANA Blood pressure monitor HGD
Display system : Digital dot matrix display
Measuring technique : Oscillometric
Power supply : 3 V=, 2 x 1,5 V Mignon AAA Alkaline
Blood pressure measuring
range : 30 – 280 mmHg
Pulse measuring range : 40 – 200 beats / min.
Maximum error tolerance
for static values : ± 3 mmHg
Maximum error tolerance
for pulse rate : ± 5 % of the reading
Pressure generation : Automatic, using micro pump
Deflation : Automatic
Automatic cut-off : After approx. 30 seconds
Operating conditions : + 10 °C to + 40 °C, 15 - 85 % humidity
Storage conditions : - 5 °C to + 5 °C
Dimensions : incl. cuff 70 x 67 x 80 mm
Weight Approx. : 140 g incl. batteries
Article number : 51422
EAN number : 4015588514227
In accordance with our policy of continual product improvement, we
reserve the right to technical and design changes without notice.
19
Page 24

GB
5 Miscellaneous / 6 Warranty
5.6
Finally
6.1
Warranty and
repair terms
We wish you success in using your MEDISANA HGD blood pressure computer and are certain that you will enjoy using it for a long time.
For the benefit of your health, we invite you to sample our other quality
products. As one of the world’s leading companies in the Home Health Care
sector, we offer a wide range of products in the areas of health
examination, home therapy, alternative pain therapy and professional body
care.
Please contact your dealer or the service centre in case of a claim under the
warranty. If you have to send in the unit, please enclose a copy of your receipt and state what the defect is.
The following warranty terms apply:
1. The warranty period for MEDISANA products is three years from date of
purchase. In case of a warranty claim, the date of purchase has to be
proven by means of the sales receipt or invoice.
2. Defects in material or workmanship will be removed free of charge
within the warranty period.
3. Repairs under warranty do not extend the warranty period either for the
unit or for the replacement parts.
4. The following is excluded under the warranty:
a. All damage which has arisen due to improper treatment, e.g. non-
observance of the user instructions.
b. All damage which is due to repairs or tampering by the customer or
unauthorised third parties.
c. Damage which has arisen during transport from the manufacturer to
the consumer or during transport to the service centre.
d. Accessories which are subject to normal wear and tear.
5. Liability for direct or indirect consequential losses caused by the unit are
excluded even if the damage to the unit is accepted as a warranty claim.
20
Please do not hesitate to contact us if you have questions about this or any
other product.
MEDISANA AG
Itterpark 7-9
D-40724 Hilden
Tel.: +49 (0) 2103 / 2007-60
Fax: +49 (0) 2103 / 2007-626
eMail: info@medisana.de
Internet: www.medisana.de
The service centre address is shown on the last page.
Page 25
1 Consignes de sécurité
F
1.1
Merci
1.2
Conseils pour
votre bien être
Félicitations et merci de votre confiance! Vous avez choisi un produit de
qualité MEDISANA, l'un des leaders mondiaux sur le marché de la santé. Afin
d'obtenir les résultats escomptés et de profiter longtemps de votre
tensiomètre HGD MEDISANA, nous vous recommandons de lire attentivement
les instructions suivantes concernant l'utilisation et l'entretien.
AVERTISSEMENT
Ne prenez pas de mesures thérapeutiques sur la base de
mesures effectuées par vous-même. Ne modifiez jamais les
doses de médicament prescrites par votre médecin.
• Les troubles du rythme cardiaque ont pour conséquence un pouls irrégulier,
nous vous recommandons dans ce cas de ne pas effectuer de mesures avec
des appareils oscillométriques (portés au poignet ou sur le bras). Veuillez alors
confier la mesure de la tension à votre médecin avec la méthode
traditionnelle au stéthoscope.
• De même, si vous souffrez d'autres maladies, par exemple d'obturation
artérielle, renseignez-vous auprès de votre médecin avant d'utiliser cet
appareil.
• Cet appareil ne peut pas être utilisé pour contrôler la fréquence cardiaque
d'un stimulateur.
• Les femmes enceintes doivent tenir compte des mesures de précautions
nécessaires, de leur condition physique et le cas échéant, consulter leur
médecin.
• Si vous remarquez des sensations désagréables durant la mesure, par ex. des
douleurs du poignet ou d'autres maux, prenez les contre-mesures suivantes:
actionnez la touche START 4 pour dégonfler immédiatement le brassard.
Desserrez le brassard et ôtez-le du poignet. Veuillez contacter votre commerçant spécialisé ou nous informer directement.
1.3
Ce qu'il faut
absolument
respecter
• Utilisez uniquement cet appareil conformément au but d'utilisation décrit dans
ce mode d'emploi. Tout emploi non conforme annule les droits de garantie.
• Dans les cas rares de pannes où le brassard reste gonflé durant la mesure, il
faut immédiatement le desserrer.
• L'appareil ne doit pas être utilisé à proximité d'appareils émettant un fort
rayonnement électrique, tels que des émetteurs radio. Ceci peut déranger le
bon fonctionnement.
• Cet appareil ne doit pas être utilisé par des enfants. Les équipements
médicaux ne sont pas des jouets !
• En cas de panne, ne réparez pas l'appareil vous-même, ceci supprime tous
vos droits de garantie. Confiez les réparations à des techniciens agréés.
• Protégez l'appareil contre l'humidité. Si toutefois des liquides s'infiltrent dans
l'appareil, vous devez immédiatement retirer les piles et éviter toute autre
utilisation. Veuillez dans ce cas contacter votre commerçant spécialisé ou
nous informer directement. Nos coordonnées sont indiquées à la page
adresse.
21
Page 26
F
1 Consignes de sécurité / 2 Informations utiles
1.4
Éléments fournis
et emballages
2.1
La tension
qu’est-ce que
c’est?
2.2
Comment
fonctionne
la mesure?
Veuillez vérifier si l'appareil est au complet. La fourniture comprend:
• 1 tensiomètre HGD MEDISANA • 1 CD avec le logiciel
• 2 piles (type AAA, LR03) • 1 boîte de rangement
• 1 câble USB • 1 mode d'emploi
Les emballages sont réutilisables ou peuvent être recyclés afin de récupérer les
matières premières. Respectez les règles de protection de l’environnement
lorsque vous jetez les emballages dont vous n’avez plus besoin. Si vous remarquez lors du déballage un dommage survenu durant le transport, contactez immédiatement votre revendeur.
ATTENTION
Veillez à garder les films d’emballage hors de portée des enfants.
Ils risqueraient de s’étouffer!
La tension désigne la pression formée dans les vaisseaux à chaque battement
du coeur. Lorsque le coeur se contracte (= systole) et pompe le sang dans les
artères la pression vasculaire augmente. La valeur maximale est appelée
pression systolique, cette valeur est la première qui est prise lors d’une mesure.
Lorsque le coeur se rétracte pour se remplir de sang, la pression diminue
également dans les artères. Lorsque les vaisseaux se relâchent, la deuxième
valeur, la pression diastolique, est mesurée.
L’HGD est un tensiomètre destiné à mesurer la tension au niveau du poignet.
La mesure s'effectue au moyen d'un microprocesseur qui analyse par un capteur les différences de pression sanguine des artères lors du gonflage et dégonflage du brassard.
2.3
Quelle est
l'utilité de
mesurer la
tension à la
maison?
22
MEDISANA dispose d'une longue expérience dans le domaine de la mesure
de la tension. La haute précision du principe de mesure des appareils
MEDISANA est vérifiée par de nombreuses études cliniques effectuées conformément à des standards internationaux stricts. Un argument de poids
pour mesurer la tension à la maison est le fait que la mesure est effectuée dans
un environnement familier et en étant reposé. La « valeur de base », qui est
mesurée le matin directement au lever avant le petit déjeuner est la plus
significative. Par principe, il convient de toujours effectuer la mesure à la même
heure et dans des conditions identiques.
C’est le seul moyen d'obtenir des résultats comparables et ainsi de détecter à
temps tout début d'hypertension. Une hypertension restant longtemps
inconnue augmente le risque d'autres maladies cardiovasculaires.
Page 27

2 Informations utiles
VOICI DONC NOTRE CONSEIL:
Mesurez votre tension quotidiennement et régulièrement,
même si vous vous sentez bien.
F
2.4
Classification
des tensions
selon l'OMS
2.5
Variations de
tension
2.6
Influence et
évaluation des
mesures
Le tableau ci-dessous présente des valeurs indicatives de tension élevée et
faible sans considération de l'âge. Ces valeurs ont été déterminées par
l'Organisation Mondiale de la Santé (OMS).
Tension faible Tension normale
systolique inférieure à 100 systolique 100–140
diastolique inférieure à 60 diastolique 60–90
Formes de tension
Grade 1 Grade 2 Grade 3
légère hypertension hypertension modérée sévère hypertension
systolique 140–159 systolique 160–179 systolique supérieure à 180
diastolique sup. à 90 diastolique sup. à 95 diastolique supérieure à 110
La tension est influencée par de nombreux facteurs, ainsi, un travail
physiquement éprouvant, l'anxiété, le stress, mais aussi l'heure de la journée
peuvent fortement modifier les valeurs mesurées. Les valeurs de tension
personnelles varient également durant la journée et l'année. Les sujets
hypertendus sont particulièrement exposés à ces variations. Normalement, la
tension atteint sa valeur maximale durant des activités physiques intenses et
sa valeur minimale la nuit durant le sommeil.
• Effectuez plusieurs mesures de votre tension, mémorisez les résultats et
comparez-les ensuite. Ne tirez jamais de conclusions à partir d'un seul
résultat.
• Les valeurs de votre pression sanguine doivent toujours être évaluées par un
médecin informé de vos antécédents médicaux. Si vous utilisez l'appareil
régulièrement et enregistrez les valeurs pour votre médecin, il faut aussi de
temps en temps informer votre médecin du déroulement.
• Lorsque vous mesurez votre tension, tenez compte que les valeurs
quotidiennes dépendent de nombreux facteurs. Ainsi, la consommation de
tabac, d'alcool, la prise de médicaments et les activités physiques influencent
les valeurs de mesure de manière différente.
• Mesurez votre tension avant les repas.
• Avant de mesurer votre tension, reposez-vous au moins 5 minutes.
• Si la valeur systolique ou diastolique mesurée semble anormale (trop forte ou
trop faible) malgré une manipulation correcte de l'appareil et que ceci se
reproduit plusieurs fois, veuillez informer votre médecin. Il en est de même si
parfois un pouls irrégulier ou trop faible ne permet pas d'effectuer la
mesure.
23
Page 28
F
3 Mise en service
3.1
Insérer / changer
les piles
3.2
Sélection des
réglages
Insérer: Appuyer fermement sur le couvercle du compartiment à pile 5 sur
le côté de l'appareil. Soulever le couvercle et insérer les deux piles fournies avec
l'appareil (piles alcalines, type AAA). Vérifiez la polarité des piles (représentée
au fond du compartiment). Replacez le couvercle et poussez-le jusqu'au déclic.
Retrait: Le symbole des piles apparaît à l’écran dès que les piles faiblissent.
L’appareil ne procède plus à la mesure de la tension lorsque vous appuyez sur
la touche START 4 . Dans ce cas, veuillez insérer des piles neuves. Retirez les
piles usagées en tirant la languette de fixation dans le compartiment à piles et
insérez les piles neuves. Attention: les réglages ne restent pas en mémoire
lorsque vous changez de piles.
INSTRUCTIONS DE SECURITE RELATIVES AUX PILES:
• Tenir à l’écart des enfants! • Piles non rechargeables!
• Ne pas court-circuiter! • Ne pas jeter au feu!
• Ne mettez pas les piles et les accus usagés à la poubelle,
placez-les avec les déchets spéciaux ou déposez-les dans un
point de collecte des piles usagées dans les commerces
spécialisés.
Appuyer une fois sur la touche MENU 2 du MEDISANA HGD pour afficher
les différents réglages permettant de personnaliser l'application. À la première
mise en service, après pression sur la touche MENU 2 , les menus suivants
sont affichés en anglais :
MEASURING MODE => MODE DE MESURE
USER => UTILISATEUR
CLEAR MEMORY => EFFACER LA MÉMOIRE
TIME / ALARM => HEURE/ALARME
LANGUAGE => LANGUE
CONTRAST => CONTRASTE
PC-LINK => CONNEXION PC
Pour sélectionner les différents menus, utiliser les touches de SÉLECTION ▲▼
et appuyer sur la touche MENU 2 . Appuyer brièvement sur la touche START
4 pour quitter les menus, l'écran affiche de nouveau la date, l'heure et l'uti-
lisateur.
3.2.1
Régler le mode
de mesure
24
Le menu Mode de mesure „MEASURING MODE“ permet de sélectionner le
mode de mesure Standard (1) et le mode de mesure 3/MAM (3 Measurement
Average Mode).
Le mode de mesure Standard (1) effectue une mesure de tension et mémorise
le résultat. Appuyer sur la touche fléchée ▲ pour sélectionner le mode 3/MAM.
La mesure 3/MAM est recommandée si vous souffrez de variations de tension.
Les 3 mesures effectuées à 15 secondes d'intervalle permettent d'éliminer les
valeurs aberrantes. Si les écarts sont fortement accusés, une 4ème mesure peut
être exécutée. Lorsque les mesures sont terminées, la valeur moyenne est
calculée et affichée.
Page 29
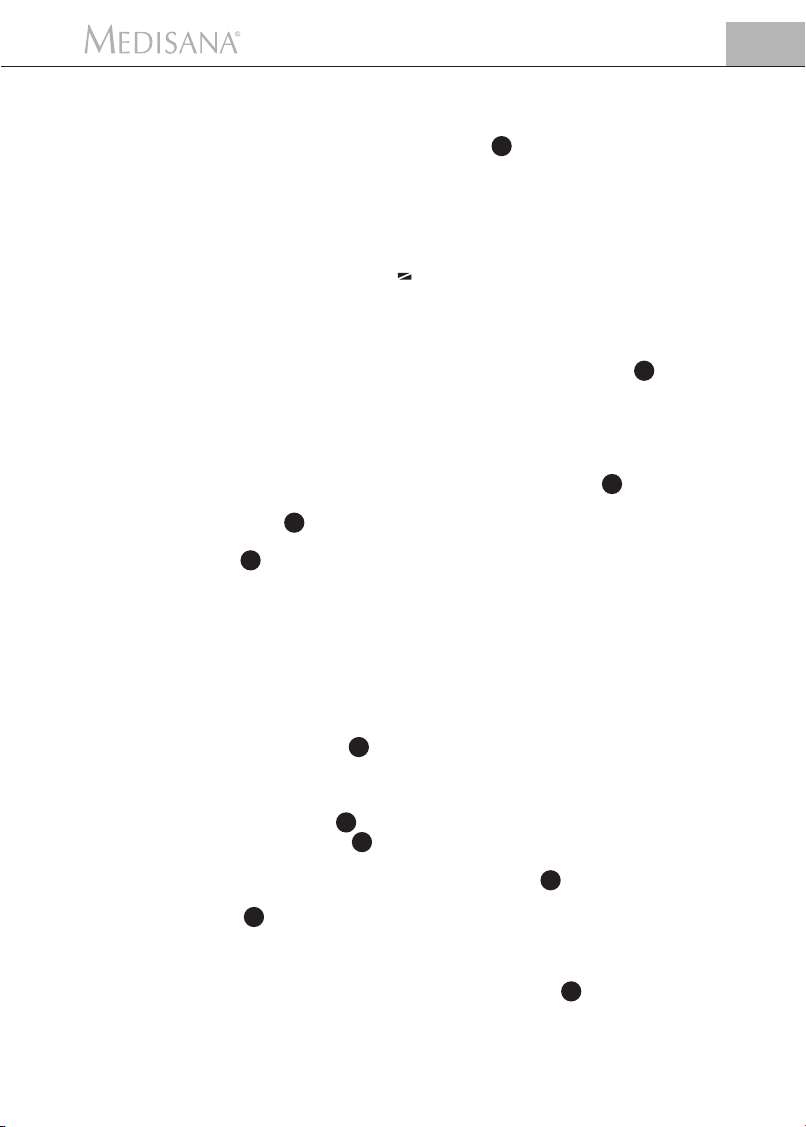
3 Mise en service
Ceci réduit considérablement les risques de mesure erronée.
Appuyer une fois sur la touche MENU 2 pour confirmer le mode de mesure
sélectionné, reconnaissable au trait noir sous son symbole.
L'écran affiche ensuite de nouveau la date, l'heure et l'utilisateur.
F
3.2.2
Sélectionner
un utilisateur
et le désigner
3.2.3
Effacer
les valeurs
Le tensiomètre MEDISANA HGD permet de sélectionner parmi deux
utilisateurs prédéfinis ( I ou II ) et aussi d'effectuer une mesure sans
affectation d'utilisateur ( ). Les deux utilisateur prédéfinis ( I ou II ) disposent
chacun de 30 emplacements en mémoire pour les résultats de mesure. Si la
mesure est effectuée sans affectation d'utilisateur, le résultat est mémorisé
jusqu'à la prochaine mesure. Appuyer sur les touches de SÉLECTION ▲▼ pour
sélectionner l'utilisateur désiré, reconnaissable au trait noir sous son symbole.
Confirmer la sélection par une pression sur la touche MENU 2 .
Vous pouvez ensuite désigner l'utilisateur ( I ou II ) en lui affectant une
combinaison de lettres ou de chiffres composée de 6 caractères.
les touches de
Lorsque vous maintenez une touche de SÉLECTION ▲▼ enfoncée, l'affichage
passe à la lettre ou au chiffre suivant jusqu'au caractère désiré. Relâcher la
touche de sélection et confirmer avec la touche MENU 2 . Lorsque la désignation de l'utilisateur est terminée, quitter le menu en appuyant sur la touche
MENU 2 . Vous pouvez aussi quitter le menu de sélection directement après
la désignation de l'utilisateur en appuyant brièvement sur la touche START
4 . L'écran affiche ensuite la date, l'heure et l'utilisateur.
Ce sous-menu vous permet de consulter jusqu'à 30 valeurs mémorisées pour
l'utilisateur I ou II et au besoin de les effacer. Sélectionner l'utilisateur comme
décrit au paragraphe 3.2.2.
À l'aide des touches de SÉLECTION ▲▼,sélectionner l'effacement d'un résultat de mesure (SINGLE) ou de tous les résultats (ALL). Les réglages sélectionnés
sont reconnaissables au trait noir sous leur symbole.
Pour effacer un seul résultat de mesure (mode SINGLE), appuyer une fois sur
la touche MENU 2 pour afficher toutes les valeurs de mesure mémorisées de
l'utilisateur sélectionné. À l'aide des touches de SÉLECTION ▲▼ sélectionner
le résultat de mesure devant être effacé. Le haut de l'écran indique la date et
l'heure de la mesure. Confirmer l'effacement du résultat de mesure avec la
touche MENU 2 ou quitter le menu sans effacer en appuyant une fois sur
la touche START 4 .
Si vous désirez effacer tous les résultats de mesure mémorisés, sélectionnez
ALL. Appuyer brièvement sur la touche MENU 2 pour confirmer l'effacement
des valeurs ou quitter le menu sans effacer en appuyant sur la touche START
4 .
SÉLECTION ▲▼ pour accéder à la lettre ou au chiffre désiré.
Appuyer sur
3.2.4
Régler l'heure /
alarme
Ce menu vous permet de régler la date, l'heure et l'alarme. Le premier chiffre
clignotant sur l'écran est l'année. À l'aide des touches de SÉLECTION ▲▼,
régler l'année et confirmer avec la touche MENU
Procéder ensuite de manière identique pour régler mois/jours/heures et
secondes. Après avoir entré ces données, vous pouvez définir une heure pour
une 1ère et 2ème alarme. Si vous ne désirez pas régler l'alarme, sélectionnez le
symbole de la cloche barrée après confirmation de l'heure d'alarme à l'aide des
2 .
25
Page 30
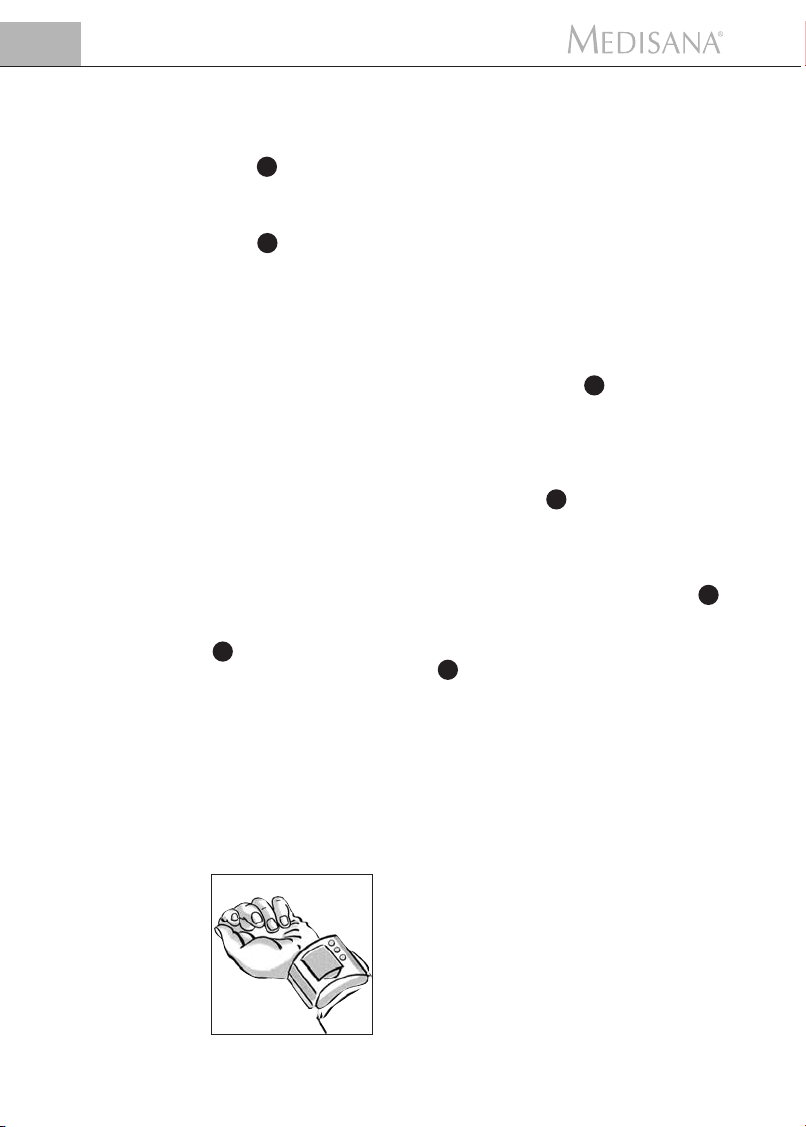
F
3 Mise en service / 4 Application
touches de SÉLECTION ▲▼.
Lorsque ce symbole clignote, confirmer la sélection par pression sur la touche
MENU 2 . L'alarme est alors désactivée. Vous pouvez ensuite déterminer si la
date, l'heure et l'utilisateur doivent toujours être affichés sur l'écran ou non. À
l'aide des touches de SÉLECTION ▲▼, activer ou désactiver l'affichage de ces
données. Le mode sélectionné clignote et il suffit d'appuyer sur la touche
MENU 2 pour confirmer.
3.2.5
Sélectionner
la langue
3.2.6
Régler
le contraste
3.3
Connexion
avec le PC
4.1
Placement
du brassard
26
Le menu „Language“ vous permet de sélectionner la langue des menus. Les
données affichées sur l'écran sont disponibles dans cinq langues.
• ENGLISH • DEUTSCH • FRANCAIS • ESPANOL • ITALIANO
Sélectionner une langue avec les touches de SÉLECTION ▲▼ et confirmer la
langue choisie par une brève pression sur la touche MENU 2 . Après avoir confirmé la langue, l'heure et l'utilisateur sont affichés sur l'écran.
Le menu „Contrast“ permet de régler le niveau de contraste de l'écran à
l'aide des touches de SÉLECTION ▲▼ Lorsque le contraste est réglé au niveau
désiré, confirmer la sélection avec la touche MENU 2 .
L’appareil est fourni avec un logiciel sur CD et un câble USB permettant de
transférer sur votre ordinateur par l’interface USB les données qui se trouvent
sur le tensiomètre HGD MEDISANA. Reliez le câble USB à l’interface USB 6
de l’appareil d’un côté et à la prise USB de votre ordinateur de l’autre. Sélectionnez l’élément de menu PC-Link (Connexion PC) à l’aide de la touche MENU
2 et des touches de SÉLECTION ▲▼ et confirmez votre choix en appuyant
de nouveau sur la touche MENU 2 . Vous voyez apparaître sur l’écran de
l’HGD des lignes ondulées symbolisant la connexion avec l’ordinateur. Insérez
le CD dans votre ordinateur et procédez à l’installation. Tout est expliqué dans
le programme. Lorsque vous insérez le CD, l’installation démarre automatiquement. Il vous suffit de suivre les instructions qui s’affichent sur l’écran de votre
ordinateur. En cas de problème, vous trouverez dans le logiciel des fichiers
d’aide complets.
Le logiciel d’exploitation des résultats vous permet d’afficher les valeurs
mesurées sous forme de graphique ou de tableau.
a. Placer le brassard autour du poignet gauche.
• Veiller à ce que l'écran soit du côté interne du
poignet.
• Ôter auparavant les bijoux, montres, etc. portés au poignet. Placer l'appareil directement
sur la peau nue, la mesure à travers des textiles
étant impossible.
b. Serrez le brassard de manière à ce qu'il soit
cintré, mais sans étrangler. Le brassard ne doit
aucunement être tordu.
Page 31
4 Application
F
4.2
La bonne position
de mesure
4.3
Mesurer
la tension
4.4
Mémoriser
les résultats
• Effectuer la mesure en position assise.
• Décontractez le bras et posez-le par exemple sur une table.
• Placer le poignet de manière à ce que le brassard soit à hauteur du coeur.
• Restez tranquille durant la mesure: ne bougez pas et ne parlez pas, ceci
pouvant fausser les résultats de la mesure.
a. Appuyer sur la touche START 4 .
• L'écran affiche le symbole de mesure et le message „READY“.
• Le brassard commence à se gonfler. L'augmentation de la pression est
affichée par un symbole tandis que les messages „BE QUIET“ et „PLEASE
RELAX“ sont affichés alternativement.
• Une pression sur la touche START 4 durant le gonflage arrête la procédure
de gonflage. L'appareil s'éteint et le brassard se dégonfle.
b. Lorsque le gonflage est fini, la mesure démarre automatiquement en
diminuant lentement la pression du brassard. Simultanément, l'écran affiche
une courbe montrant le pouls. L'affichage alterné des messages „DO NOT
MOVE“ et „DO NOT TALK“ vous rappelle de ne pas bouger et de ne pas
parler durant la mesure.
c. Le dégonflage s'effectue d'abord à une vitesse constante. Lorsque le pouls
peut être déterminé pour la première fois, le dégonflage est synchronisé avec
le battement du cœur jusqu'à ce que la mesure soit terminée. Le symbole du
coeur clignote. La mesure est terminée dès que le brassard se dégonfle
rapidement et que des valeurs sont affichées à côté de SYS, DIA et PUL.
L'appareil dispose de 30 emplacements en mémoire pour chacun des 2
utilisateurs. Le dernier résultat de mesure est automatiquement affecté à
l'utilisateur sélectionné et mémorisé sur l'emplacement libre portant le premier
numéro disponible.
Lorsque l’appareil est éteint, les valeurs en mémoire peuvent être consultées en
appuyant sur les touches de SÉLECTION ▲▼. Les touches de SÉLECTION ▲▼
vous permettent de vous déplacer vers le haut et vers le bas dans la table des
valeurs.
Lorsque vous appuyez sur la touche MENU 2 , les valeurs en mémoire dans
le bloc mémoire actuel s’affichent sous forme de tableau. Appuyez de nouveau
sur la touche MENU 2 pour afficher les valeurs sous forme graphique.
4.5
Éteindre l'appareil
L'appareil s'éteint automatiquement au bout quelques minutes d'inutilisation
ou peut être éteint en appuyant sur la touche START 4 . Si vous avez
sélectionné l'option AFFICHAGE dans le menu HEURE/ALARME l'écran
affiche la date, l'heure et l'utilisateur.
27
Page 32

F
5 Divers
5.1
Problèmes et
dépannage
5.2
Nettoyage et
entretien
Lorsqu'un des messages d'erreur suivants est affiché, l'appareil n'a pas pu
déterminer correctement la tension.
Message d'erreur - Cause et remèdes
ERR 1 - Impossible de détecter le pouls. Contrôler le placement correct du
brassard et que le poignet soit à hauteur du coeur.
ERR 2 - Détection de battements non physiologiques et influençant la mesure.
Cause : mouvement du bras durant la mesure. Répétez la mesure en tenant le
bras immobile et ne pas parler durant la mesure.
ERR 3 - Si le gonflage du brassard dure trop longtemps, c'est qu'il est mal placé
ou que le raccord du tuyau a une fuite.
ERR 4 - La différence entre la tension systolique et diastolique est
anormalement élevée. Répétez la mesure conformément aux instructions et
dans des conditions calmes. Si le message d'erreur s'affiche de nouveau à la
mesure suivante, veuillez contacter MEDISANA.
ERR 5 - Impossible de calculer une valeur moyenne pour cause d'instabilité
durant les mesures. Répéter la mesure en gardant le bras immobile et ne pas
parler durant la mesure.
• Enlever les piles avant de nettoyer l'appareil.
• Ne jamais utiliser de détergents agressifs, ni de brosses dures.
• Nettoyer l'appareil avec un chiffon doux légèrement imbibé d'une solution
savonneuse neutre. L'eau ne doit pas s'infiltrer dans le boîtier. Ne réutilisez
l'appareil que lorsqu'il est parfaitement sec.
• Si l'appareil reste longtemps inutilisé, retirer les piles du compartiment à piles.
Autrement, celles-ci risquent de couler.
• Ne pas exposer l'appareil directement aux rayons solaires et le protéger
contre les poussières et l'humidité.
• Le brassard ne doit être gonflé qu'après avoir été placé autour du poignet.
• Contrôle métrologique (uniquement pour utilisation professionnelle) :
Cet appareil a été calibré par le fabricant pour une durée de deux ans. Le
contrôle métrologique doit être effectué au plus tard tous les deux ans. Le
contrôle est payant et peut être effectué par les autorités responsables ou un
atelier agréé, conformément à la réglementation "Équipements médicaux Exploitant".
5.3
Élimination
de l’appareil
28
Éliminez votre ancien appareil électrique de manière respectueuse de l’environnement à l’issue de sa durée de vie !
Les emballages sont réutilisables ou peuvent être recyclés afin de récupérer les
matières premières, les pièces métalliques doivent être déposées dans une
borne de récupération des vieux métaux, les plastiques, les composants électriques et électroniques doivent être placés avec les déchets électriques.
Retirez les piles avant de jeter l’appareil. Ne mettez pas les piles usagées à la
poubelle, placez-les avec les déchets spéciaux ou déposez-les dans un point
de collecte des piles usagées dans les commerces spécialisés.
Pour plus de conseils relativement au recyclage, adressez-vous aux services de
votre commune ou à votre revendeur.
Page 33

5 Divers
F
5.4
Directives /
Normes
5.5
Caractéristiques
Ce tensiomètre est conforme aux directives européennes EN 1060 1ère
partie / 1995 et EN 1060 3ème partie / 1997.
Cet appareil est conforme à la norme européenne standard EN 60601-1-2.
Les spécifications des directives UE 93 / 42 / CEE concernant les équipements
médicaux de la classe II a ont été remplies.
La certification CE de l'appareil se réfère à la directive UE 93 / 42 CEE.
Classification de l'appareil: Type BF
Utilisation:
Cet appareil est conçu pour la mesure de tension non invasive chez des
adultes (cela signifie qu'il est approprié pour l'application externe).
Nom et modèle : tensiomètre HGD MEDISANA
Système d'affichage : affichage numérique dans l'écran de
matrice à point
Méthode de mesure : oscillométrique
Alimentation électrique : 3 V=, 2 x 1,5 V Mignon AAA alcaline
Plage de mesure de
la tension : 30 – 280 mmHg
Plage de mesure du pouls : 40 – 200 battements/min
Tolérance maximale de
la pression statique : ± 3 mmHg
Tolérance maximale des
valeurs du pouls : ± 5 % de la valeur
Gonflage : automatique par micro pompe
Décompression : automatique
Extinction autom. : au bout d'environ 30 secondes
Conditions d'utilisation : + 10 °C à + 40 °C,
Humidité de l’air 15 - 85 %
Conditions de stockage : - 5 °C à + 5 °C
Dimensions : brassard incl. 70 x 67 x 80 mm
Poids : appr. 140 g piles incl.
Numéro d’article : 51422
Numéro EAN : 4015588514227
Dans le cadre du travail continu d’amélioration des produits,
nous nous réservons le droit de procéder à des modifications
techniques et de design.
29
Page 34

F
5 Divers / 6 Garantie
5.6
Pour terminer
6.1
Conditions
de garantie et
de réparation
Nous vous souhaitons beaucoup de plaisir et de réussite en utilisant votre
tensiomètre HGD MEDISANA et nous sommes certains que vous en profi-
terez longtemps.
Pour votre bien-être, essayez aussi nos autres produits de qualité. En effet,
en notre qualité d'un des plus grands fabricants mondiaux du secteur de la
santé, nous disposons d'une gamme complète pour le contrôle, la thérapie
à la maison, les traitements d'appoint analgésiques et les soins corporels
spécialisés.
En cas de recours à la garantie, veuillez vous adresser à votre revendeur
spécialisé ou contactez directement le service clientèle. S’il est nécessaire
d’expédier l’appareil, veuillez indiquer le défaut constaté et joindre une
copie du justificatif d’achat.
Les conditions de garantie sont les suivantes:
1. Une garantie de trois ans à compter de la date d’achat est accordée
sur les produits MEDISANA. En cas d’intervention de la garantie, la
date d’achat doit être prouvée en présentant le justificatif d’achat ou la
facture.
2. Durant la période de garantie, les défauts liés à des erreurs de matériel ou
de fabrication sont éliminés gratuitement.
3. Les services effectués sous garantie n’entraînent pas de prolongation
de la période de garantie, ni pour l’appareil, ni pour les composants remplacés.
4. Sont exclus de la garantie:
a. tous les dommages dus à un usage incorrect, par exemple au non-
respect de la notice d’utilisation.
b. les dommages dus à une remise en état ou des interventions effectuées
par l’acheteur ou par de tierces personnes non autorisées.
c. les dommages survenus durant le transport de l’appareil depuis le site
du fabricant jusque chez l’utilisateur ou lors de l’expédition de l’appareil au service clientèle.
d. les accessoires soumis à une usure normale.
5. Nous déclinons toute responsabilité pour les dommages consécutifs
causés directement ou indirectement par l’appareil, y compris lorsque le
dommage survenu sur l’appareil est couvert par la garantie.
30
Si vous avez des questions concernant ce produit ou d’autres articles, nous
y répondrons très volontiers.
MEDISANA AG
Itterpark 7-9
D-40724 Hilden
Tel.: +49 (0) 2103 / 2007-60
Fax: +49 (0) 2103 / 2007-626
eMail: info@medisana.de
Internet: www.medisana.de
Vous trouverez l’adresse du service clientèle sur la dernière page.
Page 35

1 Norme di Sicurezza
I
1.1
Grazie!
1.2
Suggerimenti
per il vostro
benessere
Grazie per la fiducia accordataci! Avete acquistato un prodotto di qualità del
marchio MEDISANA, un’azienda leader a livello mondiale nel mercato dei
prodotti sanitari. Per raggiungere i risultati auspicati e per utilizzare al meglio il
computer per la misurazione della pressione sanguigna HGD MEDISANA,
raccomandiamo di leggere attentamente le seguenti indicazioni per l’uso e
per la manutenzione.
ATTENZIONE
Non intraprendere azioni terapeutiche in base
all'automisurazione. Non modificare mai il dosaggio di un
farmaco prescritto dal medico.
• I disturbi del ritmo cardiaco determinano un polso irregolare, si sconsiglia
quindi la misurazione con apparecchi oscillometrici (apparecchi per i polso o la
parte alta del braccio). In questi casi consigliamo di provvedere alla misurazione
della pressione sanguigna con l’aiuto del proprio medico curante, utilizzando
il tradizionale metodo dello stetoscopio.
• Anche qualora si soffra di altre malattie, ad esempio di occlusione arteriosa,
prima di utilizzare l’apparecchio è opportuno chiedere il parere del medico
curante.
• L’apparecchio non può essere utilizzato per il controllo della frequenza
cardiaca di un pacemaker.
• Le donne incinte dovrebbero attenersi alle precauzioni necessarie e rispettare la
propria resistenza personale. Si consiglia di rivolgersi al proprio medico curante.
• Se nel corso di una misurazione si verificassero dei disagi, ad esempio dolore
al polso o altri disturbi, consigliamo di adottare le seguenti contromisure:
Azionare il tasto START 4 per sgonfiare velocemente il manicotto pneumatico. Allentare il manicotto e sfilarlo dal polso. Rivolgersi quindi al proprio
rivenditore di fiducia o direttamente a noi.
1.3
Precauzioni
di assoluta
importanza
• Utilizzare l’apparecchio esclusivamente per gli scopi previsti e secondo le
modalità riportate nelle istruzioni per l’uso. In caso di uso improprio decade
il diritto alla garanzia.
• In rari casi, per un difetto di fabbricazione, può capitare che il manicotto
pneumatico rimanga costantemente gonfio nel corso della misurazione, in
questi casi è opportuno aprirlo subito.
• L’apparecchio non deve essere utilizzato in prossimità di altri apparecchi che
emettano forti radiazioni elettromagnetiche, ad esempio una radio. La
funzionalità può risultarne disturbata.
• I bambini non possono utilizzare l’apparecchio. I prodotti sanitari non sono
giocattoli!
• In caso di guasti non procedere da soli alla riparazione dell’apparecchio, perché
ciò comporterebbe la decadenza di ogni diritto di garanzia. Fare eseguire le
riparazioni esclusivamente presso i centri di assistenza tecnica autorizzati.
• Proteggere l’apparecchio dall’umidità. Nel caso dovesse penetrarvi dell’acqua è
necessario togliere immediatamente le batterie e sospendere l’utilizzo dell’apparecchio stesso. In questo caso rivolgersi al proprio rivenditore specializzato
oppure direttamente a noi. Per contattarci, consultate la pagina degli indirizzi.
31
Page 36

I
1 Norme di Sicurezza / 2 Informazoni importanti
1.4
Materiale in
dotazione e
imballaggio
2.1
Che cos’è
la pressione
sanguigna?
2.2
Come funziona
la misurazione?
Innanzitutto controllare che l’apparecchio sia completo.
Il materiale consegnato consta di:
• 1 Sfigmomanometro MEDISANA HGD • 1 CD con il software
• 2 batterie (tipo AAA LR03) • 1 Custodia
• 1 Cavo USB • 1opuscolo d’istruzioni per l’uso
Le confezioni sono riutilizzabili o possono essere riciclate. Smaltire il materiale
d’imballaggio non più necessario in conformità alle disposizioni vigenti. In caso
di danneggiamenti dovuti al trasporto, mettersi immediatamente in contatto
con il proprio rivenditore.
ATTENZIONE
Assicurarsi che i sacchetti d’imballaggio non siano alla portata
dei bambini. Pericolo di soffocamento!
La pressione sanguigna è la pressione presente nei vasi sanguigni a ogni battito
cardiaco. Quando il cuore si contrae (= sistole) e pompa il sangue nelle arterie,
si ha un innalzamento di pressione, il cui valore massimo è definito pressione
sistolica ed è il primo ad essere rilevato nel corso della misurazione della pressione
sanguigna. Quando il muscolo cardiaco si allenta per ricevere nuovo sangue,
scende anche la pressione nelle arterie. Ed è proprio nel momento in cui i vasi
sanguigni sono rilassati che si misura il secondo valore, ovvero la pressione
diastolica.
HGD è uno sfigmomanometro destinato alla misurazione della pressione arteriosa sul polso. La misurazione avviene tramite un microprocessore che grazie
ad un sensore di pressione è in grado di valutare le oscillazioni che si verificano nelle arterie e che vengono rilevate gonfiando e sgonfiando il manicotto
pneumatico.
2.3
Perché è utile
misurare
la pressione
sanguigna
a casa?
32
MEDISANA vanta un’esperienza pluriennale nel campo della misurazione della
pressione sanguigna. L’elevata precisione del principio di misurazione degli
apparecchi MEDISANA è provata da numerosi studi clinici, condotti sulla base
di severi standard internazionali. Un valido argomento a favore della
misurazione della pressione sanguigna a casa propria è dato dal fatto che le
misurazioni sono effettuate in un ambiente familiare e in condizioni di relax.
Particolarmente importante è il cosiddetto “valore base”, cioè quello rilevato al
mattino appena svegli, prima della colazione. Sarebbe fondamentale misurare
la propria pressione sanguigna possibilmente sempre alla stessa ora e nelle
stesse condizioni.
Ciò, infatti, consentirebbe di confrontare i risultati e di riconoscere per tempo i
disturbi iniziali dell’alta pressione. Se per molto tempo non ci si accorge di
soffrire di alta pressione, aumenta il rischio di ulteriori malattie cardiovascolari.
Page 37

2 Informazoni importanti
IL NOSTRO CONSIGLIO:
Consigliamo dunque di misurare la pressione sanguigna
quotidianamente e con regolarità, anche nel caso in cui non
siano presenti particolari disturbi.
I
2.4
Classificazione
della pressione
sanguigna
secondo l’OMS
2.5
Oscillazioni
della pressione
sanguigna
2.6
Influenzabilità
e valutazione
delle misurazioni
Nello schema che segue sono riportati i valori indicativi relativi all’alta e alla
bassa pressione senza tener conto dell’età. Tali valori sono stati stabiliti dall’Organizzazione Mondiale della Sanità (OMS).
Ipotensione (pressione bassa) Pressione normale
Sistolica inferiore a 100 Sistolica 100–140
Diastolica inferiore a 60 Diastolica 60–90
Tipi di ipertensione (pressione alta)
Stadio 1 Stadio 2 Stadio 3
Leggera ipertensione Media ipertensione Forte ipertensione
Sistolica 140–159 Sistolica 160–179 Sistolica superiore a 180
Diastolica superiore a 90 Diastolica superiore a 95 Diastolica superiore a 110
Molti sono i fattori che possono influire sulla pressione sanguigna. Un’attività
fisica pesante, la paura, lo stress o una determinata fascia oraria possono avere
ripercussioni molto rilevanti sui valori misurati. La pressione sanguigna
individuale è soggetta a forti oscillazioni sia durante la giornata che nel corso
dell’anno. In pazienti affetti da alta pressione tali oscillazioni risultano
particolarmente marcate. Di solito la pressione sanguigna raggiunge i massimi
livelli sotto sforzo fisico, mentre è al minimo di notte, durante il sonno.
• Misurare più volte la pressione sanguigna, memorizzando i risultati ottenuti e
confrontandoli poi fra di loro. Evitare di trarre conclusioni partendo da un
singolo risultato.
• I valori della pressione sanguigna dovrebbero sempre essere valutati da un
medico che sia anche a conoscenza dell’anamnesi del soggetto. Se si utilizza
regolarmente l’apparecchio e si prende nota dei valori rilevati per comunicarli
al proprio medico curante, occorrerebbe anche informarlo periodicamente
sull’andamento della situazione.
• Nel misurare la pressione sanguigna tenere presente che i valori rilevati
quotidianamente dipendono da diversi fattori. Il fumo, l’alcol, i farmaci e
l’attività fisica influiscono in modo diverso sui valori rilevati.
• Misurare la pressione sanguigna prima dei pasti.
• Prima di misurare la pressione sanguigna è consigliabile rimanere a riposo
almeno 5 minuti.
• Se il valore sistolico o diastolico rilevato nel corso nella misurazione non
sembra normale (troppo alto o troppo basso), nonostante il corretto utilizzo
dell’apparecchio, e se ciò si ripete diverse volte, è opportuno rivolgersi al
proprio medico curante. Lo stesso vale anche nei rari casi in cui un polso
irregolare o troppo debole non renda possibile la misurazione.
33
Page 38

I
3 Messa in Funzione
3.1
Inserire ed
estrarre
le batterie
3.2
Selezione delle
impostazioni
Per inserire le batterie: Premere energicamente con il pollice la chiusura del
vano batterie 5 posta sulla parte esterna dell’apparecchio. Sollevare il
coperchio e inserire le due batterie fornite con l’apparecchio (pile alcaline, tipo
AAA). Prestare attenzione a disporre le batterie nel senso giusto (schema nel
vano batterie). Appoggiare di nuovo il coperchio di chiusura e spingerlo fino a
quando si incastra perfettamente con uno scatto.
Per estrarre le batterie: Sul display viene visualizzato il simbolo della batteria non
appena le batterie sono scariche. Se premendo il pulsante START 4 l'apparec-
chio non inizia la misurazione della pressione sanguigna, inserire delle batterie
nuove. Togliere le batterie esaurite, tirando l’apposita linguetta presente nel vano
batterie e sostituirle con quelle nuove. Occorre ricordare che, dopo l’inserimento
di batterie nuove, le impostazioni non rimangono in memoria.
INDICAZIONI DI SICUREZZA PER LA BATTERIA
• Tenere la batteria lontano dalla portata dei bambini!
• Non ricaricarla! • Non cortocircuitarla! • Non gettarla nel fuoco!
• Non gettare la batteria esaurita e gli accumulatori nei rifiuti
domestici, ma nei rifiuti speciali o in una stazione di raccolta pile
nel commercio specializzato.
L’HGD MEDISANA offre, premendo una volta il tasto MENU 2 , una sele-
zione d’impostazioni varie per le diverse esigenze individuali. Alla prima messa
in funzione, dopo aver premuto il tasto MENU 2 , appaiono le seguenti voci
del menu in inglese:
MEASURING MODE => MODALITÀ MISURAZIONE
USER => UTENTE
CLEAR MEMORY => CANCELLA DATI
TIME / ALARM => TEMPO/ALLARME
LANGUAGE => LINGUA
CONTRAST => CONTRASTO
PC-LINK => COLLEGAMENTO PC
Le singole voci del menu si possono evidenziare con i tasti di SELEZIONE ▲▼
e richiamare premendo il tasto MENU 2 . Premendo brevemente il tasto
START 4 si esce dalla voce del menu attiva in quel momento e sul display
ricompaiono di nuovo data/ora e utente.
3.2.1
Impostazione
della modalità
di misurazione
34
La voce del menu „MEASURING MODE“ (modalità di misurazione) consente
di scegliere tra la procedura di misurazione standard (1) e la procedura di
misurazione 3 MAM (3 Measurement Average Mode).
Nella procedura standard (1) si effettua e si memorizza una sola misurazione
della pressione sanguigna. Premendo la freccia si seleziona la procedura 3
MAM, consigliata qualora si soffra di pressione instabile. Le 3 misurazioni,
effettuate una dopo l’altra ogni 15 secondi, eliminano valori molto divergenti
tra loro. In presenza di differenze rilevanti si procede eventualmente a un
quarto rilevamento.
Page 39

3 Messa in Funzione
A misurazione avvenuta, l’apparecchio calcola internamente un valore medio
ponderato e lo visualizza. In questo modo si riduce al minimo il rischio di un
rilevamento errato.
Per confermare la modalità di misurazione impostata, riconoscibile dal trattino
nero sotto al simbolo dalla procedura selezionata, premere una volta il tasto
MENU 2 . A questo punto, sul display appaiono le indicazioni della data,
dell’ora e dell’utente.
I
3.2.2
Selezione e
definizione
dell’utente
3.2.3
Cancellazione
dati
L’HGD MEDISANA offre la possibilità di selezionare due utenti distinti ( I o II )
oppure di effettuare una misurazione senza alcuna associazione ad un utente
( ) Per ognuno dei due utenti definiti ( I o II ) sono disponibili 30 spazi di
memoria per i dati rilevati. Una misurazione senza associazione ad un utente
rimane in memoria fino alla misurazione successiva. Premendo i tasti di
SELEZIONE ▲▼ si può evidenziare l’utente desiderato, riconoscibile dal trattino nero sotto ai simboli. Per confermare la propria scelta, premere una volta il
tasto MENU 2 .
A seguire si può associare all’utente I o II una combinazione di 6 lettere o cifre.
Premendo i tasti di
endo premuti i tasti di SELEZIONE ▲▼ sul display scorrono le lettere/cifre, fino
a quando appare quella desiderata. A quel punto lasciare il pulsante e confermare con il tasto MENU 2 . Quando la definizione dell’utente è terminata,
uscire dalla voce del menu, premendo il tasto MENU 2 . Si può uscire dal
menu anche subito dopo la scelta dell’utente, in questo caso premere una volta,
brevemente, il tasto START 4 . A questo punto, sul display appaiono le indicazioni della data, dell’ora e dell’utente.
In questa sezione del menu è possibile selezionare oppure eliminare fino a 30
valori memorizzati per utente I o II. Innanzitutto occorre definire l’utente come
descritto al punto 3.2.2.
Con i tasti di SELEZIONE ▲▼ si può scegliere se cancellare un solo dato di
misurazione (SINGLE) o tutti i dati in memoria (ALL). Si può riconoscere
l’impostazione effettuata dal trattino nero sotto all’indicazione.
Se si vuole cancellare un solo dato di misurazione (modalità SINGLE),
premendo una volta il tasto MENU 2 appariranno tutti i risultati memorizzati
relativi all’utente selezionato. Con i tasti di SELEZIONE ▲▼ scegliere il dato da
cancellare. Nella parte superiore del display è indicato il momento in cui il dato
è stato rilevato. Confermare la cancellazione del dato con il tasto MENU
oppure uscire dal menu, senza cancellare, premendo una volta il tasto START
4 . Se si vogliono cancellare tutti i dati memorizzati, selezionare la modalità
ALL. Confermare la cancellazione dei dati premendo brevemente il tasto
MENU 2 , oppure uscire dal menu, senza cancellare, premendo il tasto START
4 .
SELEZIONE ▲▼ si ottiene la lettera o la cifra desiderata. Ten-
2
3.2.4
Impostazione
tempo / allarme
Questa voce consente d’impostare data, ora e allarme. Il primo a lampeggiare
sul display è il numero indicante l’anno. Premendo i tasti di SELEZIONE ▲▼
s’imposta l’anno desiderato e si conferma con il tasto MENU 2 .
A seguire si possono impostare, in successione, le sezioni relative a mese /
giorno / ora e secondi, applicando la stessa procedura. Dopo aver inserito
questi dati, si può fissare un momento preciso per il primo e per il secondo
allarme.
35
Page 40

I
3 Messa in Funzione / 4 Utilizzo
Se non si vuole stabilire un’ora di allarme, evidenziare con i tasti di SELEZIONE
▲▼ il simbolo con la campana cancellata dopo aver confermato l’ora di allarme. Quando il simbolo lampeggia, confermare la propria scelta con il tasto
MENU 2 . A questo punto, l’allarme è disinserito. Infine, si può stabilire se
data, ora e utente devono sempre essere visualizzati o no. Con i tasti di
SELEZIONE ▲▼ scegliere tra display ON oppure OFF. La modalità impostata
di volta in volta lampeggia e la si conferma premendo il tasto MENU 2 .
3.2.5
Selezione
della lingua
3.2.6
Impostazione
del contrasto
3.3
Collegamento
al PC
4.1
Applicazione
del manicotto
pneumatico
36
La voce del menu „Language“ (lingua) consente di scegliere in che lingua
visualizzare il menu. Le indicazioni sul display possono essere in 5 lingue
diverse.
• ENGLISH • DEUTSCH • FRANCAIS • ESPANOL • ITALIANO
Selezionare una lingua con i tasti di SELEZIONE ▲▼ e confermare la propria
scelta premendo il tasto MENU 2 . A conferma avvenuta, sul display appaiono l’ora e l’indicazione dell’utente.
La voce del menu „Contrast“ consente di sfumare gradualmente il contrasto
sul display, utilizzando i tasti di SELEZIONE ▲▼. Quando il contrasto desiderato è impostato, confermare la propria scelta con il tasto MENU 2 .
Insieme all'apparecchio vengono forniti un CD di software e un cavo USB con
i quali è possibile trasferire i dati dallo sfigmomanometro MEDISANA HGD al
PC mediante l'interfaccia USB. Collegare il cavo USB con l'interfaccia corrispondente 6 sull'apparecchiatura da un lato e la presa di ingresso USB del
computer dall'altro lato. Mediante il pulsante MENU 2 e i pulsanti di
SELEZIONE ▲▼ selezionare la voce di menu "PC-Link" e confermare la selezione premendo nuovamente il pulsante MENU 2 . Sul display dell'HGD
vengono visualizzate linee ondulate che simboleggiano il collegamento con il
PC. Inserire il CD nell'unità del PC e eseguire il processo di installazione. Il software è autoesplicativo. Appena viene inserito il CD la routine di installazione si
avvia automaticamente. Seguire le istruzioni visualizzate sulla schermata del
PC. In caso di problemi, il software offre numerosi file di guida. Il software di
valutazione consente di visualizzare i valori misurati in forma di grafici o tabelle.
a. Porre il manicotto pneumatico attorno al polso
sinistro.
Verificare che
• il display si trovi sulla parte interna del polso;
• il polso sia libero da gioielli, orologi od oggetti
analoghi. L’apparecchio deve poggiare direttamente sulla pelle, perché non può effettuare
misurazioni attraverso i tessuti.
b. Chiudere il manicotto in modo tale che sia ade-
rente, ma non stretto. Non storcere il manicotto
in alcun modo.
Page 41

4 Utilizzo
I
4.2
Posizione corretta
per la misurazione
4.3
Misurazione
della pressione
arteriosa
4.4
Memorizzazione
dei risultati
• Effettuare la misurazione da seduti.
• Rilassare il braccio e appoggiarlo ad esempio su un tavolo, senza irrigidirlo.
• Sollevare il polso in modo che il manicotto pneumatico si trovi all’altezza del
cuore.
• Rilassare il braccio e tenerlo appoggiato senza tensioni. Durante la
misurazione non agitarsi, non muoversi e non parlare, altrimenti i dati
potrebbero alterarsi.
a. Premere il tasto START 4 .
• Sul display appare il simbolo della misurazione con la scritta „READY“.
• Subito dopo il manicotto si gonfia. La pressione in aumento è indicata simbolicamente e si alternano le scritte „BE QUIET“ e „PLEASE RELAX“.
• Se si preme il tasto START 4 mentre il manicotto si sta gonfiando, si interrompe il processo. L’apparecchio si spegne e il manicotto si sgonfia.
b. Il processo di misurazione inizia automaticamente dopo che il manicotto si
è gonfiato, grazie al fatto che la pressione creatasi in esso viene nuovamente rilasciata. Al tempo stesso sul display appare una curva che riproduce il
battito cardiaco. In alternanza si leggono le scritte „DO NOT MOVE“ e
„DO NOT TALK“ a sottolineare che durante la misurazione non ci si deve
muovere e non si deve parlare.
c. Il rilascio dell’aria avviene in un primo momento ad una velocità costante.
Quando il polso può essere valutato per la prima volta, la velocità di rilascio
dell’aria è sincronizzata con il battito cardiaco, fino alla fine della misurazione.
Contemporaneamente inizia a lampeggiare il simbolo del cuore . La
misurazione si conclude quando il manicotto si è completamente sgonfiato
e accanto alle definizioni SYS, DIA e PUL appaiono dei valori.
L’apparecchio dispone di 30 spazi di memoria per 2 eventuali utenti. Il risultato
dell’ultima misurazione viene automaticamente associato all’utente selezionato e
memorizzato nel primo spazio di memoria libero con il numero immediatamente
successivo in ordine crescente.
I valori memorizzati possono essere selezionati ad apparecchio spento premendo i pulsanti di SELEZIONE ▲▼. Con i pulsanti di SELEZIONE corrispondenti
▲▼ è possibile spostarsi verso l'alto o verso il basso all'interno della tabella di
valori.
Premendo il pulsante MENU 2 vengono visualizzati, sotto forma di tabella, i
valori memorizzati della memoria aggiornata. Premendo nuovamente il pulsante MENU 2 , i valori vengono visualizzati sotto forma di grafico.
4.5
Spegnimento
dell’apparecchio
Se non si preme alcun tasto, l’apparecchio si spegne da solo dopo poco tempo,
oppure lo si può spegnere azionando il tasto START
ora e utente rimangono sul display, se alla voce del menu TEMPO/ALLARME
si è selezionata e confermata l’opzione DISPLAY ON.
4 . Le indicazioni di data,
37
Page 42
I
5 Varie
5.1
Problemi e
Soluzioni
5.2
Pulizia e
Manutenzione
Quando sul display appare uno dei seguenti messaggi di errore, significa che
l’apparecchio non è riuscito a valutare perfettamente il valore della pressione
sanguigna.
Messaggi di errore - Possibili cause e soluzioni
ERR 1 - Non si è potuto individuare il battito cardiaco.
Controllare che il manicotto sia applicato correttamente e che il polso si trovi
all’altezza del cuore.
ERR 2 - Si sono individuati impulsi di pressione non fisiologici che hanno
influenzato il valore rilevato.
Causa: è stato mosso il braccio durante la misurazione. Ripetere il rilevamento
con il braccio rilassato e non parlare durante il rilevamento stesso.
ERR 3 - La pressione impiega troppo tempo a salire nel manicotto.
La causa potrebbe essere un collegamento del tubo flessibile non a tenuta
d’aria oppure un’applicazione non corretta del manicotto.
ERR 4 - La differenza tra pressione sistolica e diastolica è eccessiva.
Misurare di nuovo la pressione sanguigna seguendo con precisione le istruzioni
per l’uso e in condizioni di relax. Se, ripetendo la misurazione, appare nuovamente il messaggio di errore, contattare la MEDISANA.
ERR 5 - A causa di condizioni instabili durante le misurazioni, non si è potuto
calcolare un valore medio.Ripetere il rilevamento con il braccio rilassato e non
parlare durante il rilevamento stesso.
• Prima di pulire l’apparecchio togliere le batterie.
• Non utilizzare detergenti aggressivi o spazzole dure.
• Pulire l’apparecchio con un panno morbido leggermente inumidito con un
detergente delicato. L’acqua non deve penetrare nell’apparecchio. Utilizzare
di nuovo l’apparecchio solo quando sia perfettamente asciutto.
• Togliere le batterie dall’apparecchio nel caso in cui non si intenda usarlo per
molto tempo. Altrimenti si corre il pericolo che le batterie si scarichino.
• Non esporre l’apparecchio direttamente ai raggi del sole, proteggerlo dalla
polvere e dall’umidità.
• Pompare aria nel manicotto pneumatico solo una volta che questo sia stato
sistemato intorno al polso.
• Controlli metrologici (solo nel caso di uso commerciale) :
L’apparecchio è stato calibrato dal produttore per una durata di due anni. I
controlli metrologici devono ripetersi come minimo ogni due anni. Il controllo
è a pagamento e può essere effettuato presso un presidio competente o
presso i centri di assistenza autorizzati – in conformità con “Prodotti sanitari - Disposizione esercenti”.
5.3
Smaltimento
38
Al termine della durata utile, smaltire l'apparecchio elettrico vecchio nel
rispetto dell'ambiente.
Gli imballaggi sono riutilizzabili o riciclabili. Le parti metalliche devono essere
smaltite come metallo vecchio, le materie plastiche e i componenti elettrici
elettronici come rifiuti elettrici.
Togliere las pilas prima di smaltire lo strumento. Non gettare le pile esaurite nei
rifiuti domestici, ma nei rifiuti speciali o in una stazione di raccolta pile presso i
rivenditori specializzati.
Per qualsiasi consiglio sul riciclaggio, rivolgersi alle autorità comunali o al
proprio rivenditore.
Page 43
5 Varie
I
5.4
Direttive /
Norme
5.5
Dati Tecnici
Il misuratore di pressione sanguina è conforme alle norme europee EN 1060
parte 1 / 1995 ed EN 1060 parte 3 / 1997. L’apparecchio è conforme alle
convenzioni dello standard europeo EN 60601-1-2.
L’apparecchio è conforme ai requisiti della direttiva europea 93 / 42 / CEE per
dispositivi medici di classe II a. L’indicazione CE dell’apparecchio fa riferimento
alla norma europea 93 / 42 / CEE.
Classificazione dell’apparecchio: Tipo BF
Destinazione:
l’apparecchio è indicato per la misurazione non invasiva della pressione
sanguigna dei soggetti adulti (è quindi destinato all’uso esterno).
Nome e modello : Sfigmomanometro MEDISANA HGD
Sistema di visualizzazione : Display digitale con matrix a punti
Metodo di misurazione : Oscillometrico
Alimentazione : 6 V=, 4 x 1,5 V mignon AAA alcaline
Campo di misurazione
della pressione : 30 – 280 mmHg
Campo di misurazione del polso : 40 – 200 battiti/min
Deviazione massima di
misurazione della pressione statica : ± 3 mmHg
Deviazione massima di
misurazione dei valori del polso : ± 5 % valore
Produzione di pressione : Automatica con micropompa
Rilascio dell’aria : Automatico
Spegnimento automatico : Dopo ca. 30 secondi
Condizioni di funzionamento : Da +10 °C a + 40 °C,
15 – 85 % umidità relativa
Condizioni di conservazione : Da – 5 °C a + 50 °C
Dimensioni : compreso manicotto 70 x 67 x 80 mm
Peso : Ca.140 g comprese le batterie
Numero di articolo : 51422
Codice EAN : 4015588514227
Alla luce dei costanti miglioramenti dei prodotti, ci riserviamo
la facoltà di apportare qualsiasi modifica tecnica e strutturale.
39
Page 44

I
5 Varie / 6 Garanzia
5.6
E per finire
6.1
Condizioni
di garanzia e
di riparazione
Vi auguriamo buon divertimento nell'utilizzo dello sfigmomanometro
MEDISANA HGD e siamo certi che sarete soddisfatti a lungo termine delle
prestazioni dell'apparecchio.
Per la propria salute fisica consigliamo di provare anche altri tra i nostri
prodotti di qualità, infatti, essendo un’azienda leader a livello mondiale nel
settore dell’Home Health Care, proponiamo un’ampia gamma di articoli per
il controllo della salute, per la fisioterapia in casa, per le terapie antidolorifiche alternative e per la cura del corpo qualificata.
In caso di garanzia, contattare il vostro rivenditore di fiducia o direttamente
il centro di assistenza. Se dovesse essere necessario spedire l’apparecchio,
specificare il guasto e allegare una copia della ricevuta di acquisto.
Valgono le seguenti condizioni di garanzia:
1. I prodotti MEDISANA hanno una garanzia di tre anni a partire dalla
data di vendita. La data di acquisto deve essere comprovata in caso di
garanzia dalla ricevuta di acquisto o dalla fattura.
2. Durante il periodo di garanzia, i guasti dovuti a difetti di materiale o di
lavorazione vengono eliminati gratuitamente.
3. Una prestazione di garanzia non da diritto al prolungamento del periodo
di garanzia, né per l’apparecchio né per i componenti sostituiti.
4. La garanzia non include:
a. tutti i danni risultanti da uso improprio, ad esempio dall’inosservanza
delle istruzioni d’uso,
b. i danni riconducibili a manutenzione o ad interventi effettuati dall’ac-
quirente o da terzi non autorizzati,
c. danni di trasporto verificati durante il trasporto dal produttore al con-
sumatore o durante l’invio al servizio clienti,
d. gli accessori soggetti a normale usura.
5. È altresì esclusa qualsiasi responsabilità per danni secondari diretti o
indiretti causati dall’apparecchio anche se il danno all’apparecchio viene
riconosciuto come caso di garanzia.
40
Restiamo a completa disposizione per rispondere a domande su questo o
altri prodotti.
MEDISANA AG
Itterpark 7-9
D-40724 Hilden
Tel.: +49 (0) 2103 / 2007-60
Fax: +49 (0) 2103 / 2007-626
eMail: info@medisana.de
Internet: www.medisana.de
L'indirizzo del servizio di assistenza è riportato nell'ultima pagina.
Page 45

1 Indicaciones de Seguridad
E
1.1
Muchas gracias
1.2
Indicaciones para
su bienestar
1.3
Lo que debería
observar
explícitamente
¡Muchas gracias por su confianza! Usted ha adquirido un producto de calidad
MEDISANA, una de las empresas líderes a nivel mundial en el ámbito de la
salud. Con el fin de poder alcanzar los resultados deseados y de disfrutar por
mucho tiempo de su tensiómetro digital HGD MEDISANA le recomendamos
leer atentamente las siguientes indicaciones para el uso y cuidado del aparato.
PRECAUCIÓN
No tome ninguna medida terapeútica a causa de una medición
realizada por usted mismo! No modifique nunca la dosificación
de un medicamento que le haya prescrito su médico!
• Las arritmias provocan un pulso irregular, por esta razón se descarta la
posibilidad de realizar mediciones con aparatos oscilométricos (aparatos de
medición en la muñeca o en el brazo). En estos casos es el médico el que
debe tomar la tensión arterial a través del método del estetoscopio usual.
• Si padece otras enfermedades como por ejemplo obstrucción de arterias
consulte con su médico antes de utilizar el aparato.
• El aparato no puede ser utilizado para controlar la frecuencia cardiaca de un
marcapasos.
• La mujeres embarazadas deben observar las medidas de precaución
necesarias y su capacidad de resistencia individual, si se da el caso consulte
con su médico.
• Si durante la medición sufre algún tipo de molestia como por ejemplo
dolores en la muñeca tome las siguientes medidas: Pulse la tecla START 4
para desinflar el brazalete inmediatamente. Abra el brazalete y retírelo de la
muñeca. Por favor póngase en contacto con su comercio especializado o
infórmenos directamente.
• Utilice el aparato exclusivamente según su uso previsto descrito en las
instrucciones de manejo. El derecho de garantía se extingue por uso
indebido.
• En muy raras ocasiones existe la posibilidad de que debido a un fallo en el
funcionamiento el brazalete se mantenga inflado de forma constante
durante la medición, en tal caso abra el brazalete inmediatamente.
• El aparato no debe ser utilizado cerca de aparatos con una irradiación
eléctrica fuerte como por ejemplo emisoras de radio, ya que de lo contrario
la funcionalidad del aparato podría verse influida.
• El aparato no debe ser utilizado por niños. ¡Los productos médicos no son
ningún juguete!
• Por favor no repare el aparato usted mismo en caso de avería, ya que de lo
contrario se extinguirían todos los derechos de garantía. El aparato debe ser
reparado exclusivamente por estaciones de servicio autorizadas.
• Proteja el aparato contra la humedad. Si a pesar de ello penetra agua en el
aparato desinstale inmediatamente las pilas y no lo utilice. En tal caso
póngase en contacto con su comercio especializado o infórmenos
directamente. Puede encontrar la dirección de contacto en la página de
direcciones.
41
Page 46
E
2 Informaciones interesantes
1.4
Volumen
de suministros
y embalaje
2.1
¿Qué es la
tensión arterial?
2.2
¿Cómo funciona
el HGD?
Primeramente compruebe por favor que el aparato esté completo.
El volumen de entrega comprende:
• 1 tensiómetro HGD de MEDISANA • 1 CD con software
• 2 pilas (Tipo AAA LR03) • 1 caja para guardar el dispositivo
• 1 cable USB • 1 instrucciones de manejo
El embalaje es reutilizable o puede reciclarse. Deshágase del material de embalaje que no se necesite, siguiendo las normas pertinentes. Si al desembalar
observara algún daño causado durante el transporte, póngase inmediatamente en contacto con el comerciante.
PRECAUCIÓN
¡Asegúrese de que los plásticos de embalaje no caigan en manos
de niños! ¡Existe el peligro de asfixia!
La tensión arterial es la presión que se produce en las arterias con cada latido
del corazón. Cuando el músculo del corazón se contrae (sístole) bombeando
sangre a las arterias se produce un aumento de la presión. Su valor máximo es
denominado presión sistólica y es medido en primer lugar.
Cuando el músculo del corazón se dilata para recoger sangre disminuye consecuentemente la presión en las arterias. El segundo valor – presión diastólica
– es medido cuando las arterias están en estado de relajación.
El HGD es un tensiómetro con el que se ha diseñado para realizar mediciones
de la tensión arterial en la muñeca. La medición se produce mediante un microprocesador que evalúa las oscilaciones que se producen al inflar y desinflar el
brazalete sobre la arteria, mediante un sensor de presión.
2.3
¿Porqué es
razonable medir
la tensión
arterial en casa?
42
MEDISANA dispone de muchos años de experiencia en el campo de la
medición de la tensión arterial. La gran exactitud del principio de medición de
los aparatos MEDISANA está documentada por amplios estudios clínicos
realizados según los más estrictos estándares internacionales. Uno de los
argumentos más importantes a favor de la medición de la tensión arterial en
casa es el hecho de que la medición pueda ser realizada en un ambiente
habitual bajo un estado de relajación. El valor más importante es el denom
inado „valor base“ que es medido por la mañana directamente después de
haberse levantado y antes del desayuno. Principalmente y siempre que sea
posible se recomienda medir la tensión arterial a la misma hora del día y bajo
las mismas condiciones, ya que de este modo queda garantizada la
comparatibilidad de los resultados y es posible prediagnosticar un problema de
tensión. El riesgo de sufrir enfermedades cardiovasculares aumenta si existe
una hipertensión no detectada durante un largo período de tiempo.
Page 47

2 Informaciones interesantes
POR ESTA RAZÓN RECOMENDAMOS:
Medir su tensión arterial diaria y regularmente también incluso
si no sufre ninguna molestia.
E
2.4
Clasificación de
la tensión arterial
según la OMS
2.5
Oscilaciones de
la tensión arterial
2.6
Influencias y
valoración de
las mediciones
En la siguiente tabla se representan los valores indicativos para la tensión
arterial alta y baja sin tener en cuenta la edad. Estos valores han sido determinados por la Organización Mundial de la Salud (OMS).
Tensión arterial baja Tensión arterial normal
Sístole inferior a 100 Sístole 100–140
Diástole inferior a 60 Diástole 60–90
Formas de tensión alta
Estado 1 Estado 2 Estado 3
Tensión arterial Tensión arterial Tensión arterial
ligeramente alta medio alta muy alta
Sístole 140–159 Sístole 160–179 Sístole superior a 180
Diástole superior a 90 Diástole superior a 95 Diástole superior a 110
Existen diversos factores que pueden influir en nuestra tensión arterial y en los
valores de la medición como por ejemplo, un gran esfuerzo físico, ansiedad,
estrés, la hora del día etc. Los valores de la tensión arterial personal están
sujetos a grandes oscilaciones a lo largo del día y del año. Estas oscilaciones son
especialmente notorias en pacientes hipertensos. Normalmente la tensión
arterial alcanza su valor más alto durante el esfuerzo físico y su valor más bajo
en la noche durante el sueño.
• Mida su tensión arterial varias veces, memorice los resultados y compárelos
unos con otros. No saque conclusiones de una sola medición.
• Los resultados de la medición de la tensión arterial deberían ser evaluados
siempre por un médico que esté también familiarizado con su historial
médico. Si utiliza el aparato regularmente y registra los resultados para su
médico debería también de vez en cuando informarle sobre el desarrollo de
las mediciones.
• Tenga en cuenta durante las mediciones de la tensión arterial que los valores
diarios obtenidos dependen de muchos factores. El tabaco, el alcohol, los
medicamentos y los esfuerzos físicos influyen en estos valores de diferente
modo.
• La tensión arterial debe ser medida antes de las comidas.
• Antes de medir su tensión arterial debería descansar durante como mínimo
5 minutos.
• Si a pesar de haberse cerciorado de que el aparato ha sido manejado
correctamente tiene la impresión de que el valor diastólico o sistólico son
anormales (demasiado altos o demasiado bajos) y esto se produce repetidamente debe consultar con su médico. Esto también es válido si en raras
ocasiones no fuera posible medir la tensión arterial debido a un pulso muy
bajo.
43
Page 48

E
3 Puesta en Funcionamiento
3.1
Instalación /
desinstalación
de las pilas
3.2
Selección
de ajustes
Instalación: Presione firmemente con el pulgar la lengüeta del compartimento
para las pilas 5 situado en la parte exterior del aparato. Levante la tapa e
instale las dos pilas incluidas en el volumen de entrega (pilas alcalinas del tipo
AAA). Observe la dirección en la que instala las pilas (figura en la cámara para
pilas). Vuelva a colocar la tapa de la cámara para pilas y presiónela hasta que
quede engatillada audiblemente.
Retirar las pilas: En cuanto que las pilas estén demasiado bajas, aparecerá el símbolo de pilas en la pantalla. El aparato ya no empieza a medir la tensión arterial
tras pulsar la tecla de arranque START 4 . Por favor, coloque pilas nuevas. Retire las pilas usadas tirando de la lengüeta de sujeción del compartimiento de pilas
y coloque las pilas nuevas. Por favor, tenga en cuenta que los ajustes no permanecen almacenados al colocar las pilas nuevas.
ADVERTENCIAS DE SEGURIDAD SOBRE LAS PILAS
• ¡Mantenerlas fuera del alcance de los niños!
• ¡No recargar! • ¡No cortocircuitar! • ¡No arrojar al fuego!
• No arroje las pilas y acumuladores usados a la basura sino al
contenedor de residuos especiales, o deposítelas en los
recolectores de pilas de los comercios especializados.
El HGD MEDISANA ofrece una selección de diferentes ajustes para la
utilización individual a la que puede acceder pulsando una vez la tecla MENÚ
2 . En la primera puesta en funcionamiento y tras haber pulsado la tecla
MENÚ 2 aparecerán los siguientes menús en inglés:
MEASURING MODE => MODO DE MEDICIÓN
USER => USUARIO
CLEAR MEMORY => BORRAR RESULTADOS
TIME / ALARM => HORARIO/ALARMA
LANGUAGE => IDIOMA
CONTRAST => CONTRASTE
PC-LINK => CONEXIÓN PC
Puede dirigirse hacia los menús individuales mediante las teclas de SELECCIÓN
▲▼ y seleccionarlos pulsando la tecla MENÚ 2 . Pulsando brevemente la
tecla START 4 abandonará el menú respectivamente, en el display serán indicados la fecha/hora y el usuario.
3.2.1
Ajuste del modo
de medición
44
Dentro del menú „MEASURING MODE“ (modo de medición) puede elegir
entre el modo de medición estándar (1) y el modo de medición 3/MAM
(3 Measurement Average Mode).
En el modo de medición estándar (1) es realizada y memorizada una sola
medición. Pulsando una vez la tecla de flecha accede al modo de medición
3/MAM. Si su tensión arterial sufre grandes oscilaciones se recomienda
seleccionar el modo de medición 3/MAM. A través de las tres mediciones
realizadas en intervalos seguidos de 15 segundos son eliminados en gran
medida los valores divergentes. Si se producen divergencias es posible que
Page 49

3 Puesta en Funcionamiento
bajo circunstancias determinadas sea llevada a cabo una cuarta medición. Tras
haber finalizado la medición será calculado internamente e indicado un valor
medio ponderado. De este modo el riesgo de que se produzca una medición
errónea es mínimo. Para confirmar el modo de medición seleccionado, reconocible
mediante la barra negra situada bajo el símbolo para el modo de medición
seleccionado, pulse una vez la tecla MENÚ 2 .Seguidamente aparecerán representados en el display la fecha, la hora y los datos de usuario.
E
3.2.2
Selección y
definición
del usuario
3.2.3
Borrar
los resultados
de la medición
El HGD MEDISANA ofrece la posibilidad de definir dos usuarios ( I ó II ) o de
realizar una medición sin asignación a un usuario concreto ( ). Cada usuario
definido ( I ó II ) dispone de 30 espacios de memoria para memorizar los
resultados de las mediciones. La medición para un usuario no definido será
memorizada sólo hasta que sea realizada la próxima medición. Pulsando las
teclas de SELECCIÓN ▲▼ puede seleccionar el usuario deseado, reconocible
mediante la barra negra situada por debajo de los símbolos. Confirme su
selección pulsando una vez la tecla MENÚ 2 .
Finalmente puede ser asignada una combinación de cifras y letras de 6 dígitos
al usuario I ó II Pulsando las teclas de SELECCIÓN ▲▼ podrá acceder a las
letras o a las cifras deseadas. Si mantiene pulsada las teclas de SELECCIÓN ▲▼
el display saltará a la cifra/letra siguiente continuamente hasta que aparezca
la cifra/letra deseada. Seguidamente suelte las teclas de selección y confirme pulsando la tecla MENÚ 2 . Tras haber definido el usuario abandone el
menú pulsando la tecla MENÚ 2 . También puede abandonar el menú de
selección directamente después de haber definido el usuario pulsando una vez
la tecla START 4 . Seguidamente aparecerán representados en el display la
fecha, la hora y los datos de usuario.
En este menú puede acceder a hasta 30 valores almacenados para el usuario I
o II o borrarlos si lo desea. Primeramente defina el usuario según se ha descrito en el punto 3.2.2. Mediante las teclas de SELECCIÓN ▲▼ puede seleccionar si desea borrar un resultado de medición individual (SINGLE) o todos los
resultados de medición (ALL). Puede reconocer los ajustes realizados en la
barra negra situada bajo el display. Si desea borrar un resultado (modo
SINGLE), pulse una vez la tecla MENÚ 2 y seguidamente aparecerán todos
los resultados de medición memorizados para el usuario. Seleccione el resultado que desea borrar mediante las teclas de SELECCIÓN ▲▼. En la parte
superior del display será indicada la fecha y la hora en la que ha sido determinado este resultado. Confirme la eliminación del resultado pulsando la tecla
MENÚ 2 o abandone el menú sin haber borrado ningún resultado pulsando
una vez la tecla START 4 . Si desea borrar todos los resultados de medición
memorizados seleccione el modo ALL. Confirme la eliminación de los resultados pulsando la tecla MENÚ
resultado pulsando una vez la tecla START
2 o abandone el menú sin haber borrado ningún
4 .
3.2.4
Ajuste del
horario / alarma
Mediante este menú puede ajustar la fecha, la hora y la alarma. Primeramente
parpadea la cifra para el año en el display. Pulsando las teclas de SELECCIÓN
▲▼ puede ajustar el año deseado y confirmarlo con la tecla MENÚ
damente puede ajustar el mes, el día, las horas, y los segundos uno tras otro
siguiendo el mismo procedimiento.
2 . Segui-
45
Page 50

E
3 Puesta en Funcionamiento / 4 Uso
Tras haber introducido estos datos puede ajustar un horario/fecha para una
primera y segunda alarma. Si no desea ajustar ninguna fecha y hora para la
alarma seleccione el símbolo con la campana tachada a través de las teclas de
SELECCIÓN ▲▼ tras haber confirmado el tiempo de alarma. Una vez que este
símbolo comience a parpadear confirme la selección con la tecla MENÚ 2 .
Seguidamente será desconectada la alarma. Finalmente puede determinar si la
fecha, la hora y el usuario deben aparecer representados en el display siempre
o no. Seleccione Display ON o display OFF mediante las teclas de SELECCIÓN
▲▼ . El modo que ha sido ajustado comienza a parpadear, confírmelo pulsando la tecla MENÚ 2 .
3.2.5
Selección
del idioma
3.2.6
Ajuste
del contraste
3.3
Enlace
de ordenador
4.1
Colocación
del brazalete
de presión
46
Dentro del menú „Language“ puede seleccionar en qué idioma desea que sea
representado el menú en el display. Los datos en el display pueden ser
representados en 5 idiomas diferentes.
• INGLÉS • ALEMÁN • FRANCÉS • ESPAÑOL • ITALIANO
Seleccione un idioma a través de las teclas de SELECCIÓN ▲▼ y confirme su
selección pulsando brevemente la tecla MENÚ 2 . Tras la confirmación en el
display aparecerá representada la hora y el usuario.
Mediante el menú „Contrast“ puede ser regulado el contraste gradualmente en
el display a través de las teclas de SELECCIÓN ▲▼. Una vez que haya sido seleccionado el contraste deseado confirme la selección pulsando la tecla MENÚ
2 .
El aparato viene suministrado con un CD de software y un cable USB con el que
puede transmitir los datos del tensiómetro HGD de MEDISANA a su ordenador mediante un interfaz USB. Conecte el cable USB al interfaz USB 6 de su
aparato y al enchufe USB de su ordenador. Mediante la tecla MENÚ 2 y las
teclas de SELECCIÓN ▲▼ st puede seleccionar el menú "enlace de ordenador" y confirmar la selección pulsando la tecla MENÚ 2 otra vez. En la pantalla del HGD aparecen unas líneas onduladas que simbolizan la conexión con
el ordenador. Introduzca el CD en su ordenador e instálelo. El software es de
instalación automática. Una vez el CD está puesto en su lugar, la rutina de
instalación empieza automáticamente. Siga simplemente las instrucciones indicadas en la pantalla de su ordenador. Si surgieran problemas, el software
ofrece amplios ficheros de ayuda.
El software de evaluación ofrece la posibilidad de indicar los valores medidos
en forma de un gráfico o de una tabla.
a. Coloque el brazalete sobre su muñeca izquierda.
Observe que
• El display debe indicar hacia la parte interior de la
muñeca.
• Debe retirar todos los adornos de la muñeca
como son pulseras, relojes etc... El aparato debe
estar en contacto directo con la piel, ya que no
puede realizar la medición a través de tejidos.
Page 51

4 Uso
b. Cierre el brazalete de tal manera que quede ajustado pero no estrangule la
muñeca. El brazalete no debe ser torcido de ningún modo.
E
4.2
La posición de
medición correcta
4.3
Medición de la
tensión arterial
4.4
Almacenamiento
de valores
• Lleve a cabo la medición sentado.
• Relaje el brazo y apóyelo por ejemplo sobre una mesa.
• Levante la muñeca de tal manera que el brazalete se encuentre a la altura
del corazón.
• Permanezca tranquilo durante la medición. No se mueva ni hable, ya que de
lo contrario podría alterar los resultados de la medición.
a. Pulse la tecla START 4 .
• En el display parecerá representado el símbolo de medición con el carácter
gráfico „READY“.
• Seguidamente se infla el brazalete. Al mismo tiempo es indicada la presión
en aumento de forma simbólica y alternativamente son indicados los
mensajes „BE QUIET“ y „PLEASE RELAX“.
• Si pulsa la tecla START 4 mientras que el brazalete se está inflando
detiene el proceso de inflado. El aparato se desconecta y el brazalete se
desinfla.
b. Una vez que el brazalete se haya inflado se inicia el proceso de medición
automáticamente dejando salir despacio la presión establecida en el brazalete. Al mismo tiempo en el display aparece representada una curva para el
pulso. Alternativamente aparecerán también los mensajes „DO NOT
MOVE“ y „DO NOT TALK“, que le indicarán que no debe moverse ni
hablar durante la medición.
c. La salida del aire del brazalete se produce primeramente a una velocidad
constante. Cuando el pulso es registrado por primera vez la salida de aire es
sincronizada con el latido del corazón hasta que la medición finaliza. El
símbolo del corazón parpadea . La medición finaliza cuando el brazalete se desinfla de golpe totalmente y al lado de las impresiones SYS, DIA y
PUL son indicados los valores correspondientes.
El aparato dispone de 30 espacios de memoria para dos posibles usuarios
respectivamente. El último valor de medición le es asignado automáticamente al
usuario seleccionado y es memorizado en el espacio de memoria libre bajo el
número de memoria mayor próximo.
Los datos almacenados pueden invocarse con el aparato apagado pulsando las
teclas de SELECCIÓN ▲▼. Presionando las teclas de SELECCIÓN ▲▼ corres-
pondientes, también puede moverse hacia arriba o abajo en la tabla de valores.
Pulsando la tecla MENÚ 2 , se visualizan los valores almacenados de la memoria actual en forma de una tabla. Pulsando la tecla MENÚ 2 otra vez, los
datos se visualizan en forma de un gráfico.
4.5
Desconexión
del aparato
El aparato se autodesconecta si tras haber transcurrido un período de tiempo
corto no ha sido pulsada ninguna tecla o también puede ser desconectado
pulsando la tecla START 4 . Las indicaciones de la fecha, hora y el usuario
permanecen visibles en el display si en el menú HORARIO/ALARMA ha sido
seleccionada y confirmada la opción DISPLAY ON.
47
Page 52

E
5 Generalidades
5.1
Errores y
solución
5.2
Limpieza y
cuidado
Si en el display aparece representado alguno de los siguientes avisos de error no
es posible determinar unos valores de medición de la tensión arterial correctos.
Aviso de error - Causas posibles y soluciones
ERR 1 - No ha podido ser registrado el pulso. Asegúrese de que el brazalete
haya sido colocado correctamente y de que mantiene su muñeca a la altura del
corazón.
ERR 2 - Han sido registrados impulsos no fisiológicos que influyen en el valor
medido. Causa: El brazo ha sido movido durante la medición. Vuelva a medir
la tensión manteniendo el brazo quieto y no hablando durante la medición.
ERR 3 - El establecimiento de presión en el brazalete dura demasiado tiempo.
La causa puede ser una conexión de tubos con fugas o un brazalete colocado
de forma errónea.
ERR 4 - La diferencia entre la tensión sistólica y diastólica es demasiado grande.
Vuelva a medir la tensión exactamente según las instrucciones y bajo condiciones
de tranquilidad. En caso de que el aviso de error siga siendo indicado durante
una nueva medición póngase por favor en contacto con MEDISANA.
ERR 5 - Debido a condiciones inestables durante las mediciones no ha podido
ser calculado ningún valor medio. Vuelva a medir la tensión manteniendo el
brazo quieto y no hablando durante la medición.
• Desinstale las pilas antes de limpiar el aparato.
• No utilice nunca soluciones de limpieza abrasivas ni cepillos duros.
• Limpie el aparato con un paño suave humedecido ligeramente en una
solución jabonosa suave. Evite la penetración de agua en el aparato. Utilice
el aparato sólo si está completamente seco.
• Desinstale las pilas del aparato si no va a utilizarlo por un período de tiempo
largo. De lo contrario existe el peligro de que las pilas se descarguen.
• No exponga el aparato a la radiación solar directa y protéjalo contra el polvo
y la humedad.
• Infle el brazalete exclusivamente cuando éste haya sido colocado sobre la
muñeca.
• Control técnico de medición (válido para su uso profesional) :
El aparato ha sido calibrado por el fabricante para un período de tiempo de
dos años. El control técnico de medición debe ser llevado a cabo nuevamente
cada dos años. Este control está sujeto a costes y puede ser llevado a cabo
por una institución competente o por una estación de servicio autorizada
según el „Reglamento del usuario para productos médicos“.
5.3
Eliminación
48
Elimine su aparato eléctrico tras su vida útil conforme a la normativa de
protección del medio ambiente.
Los embalajes se pueden volver a utilizar o aprovecharse como materia prima,
las piezas de metal deben llevarse al chatarrero, los plásticos, los componentes
eléctricos y electrónicos deben eliminarse como chatarra eléctrica.
Retire las pilas antes de deshacerse del aparato. No arroje las pilas usadas a la
basura sino al contenedor de residuos especiales, o deposítelas en los recolectores de pilas de los comercios especializados.
Para informarse sobre el reciclado, diríjase a las autoridades locales o a su
distribuidor.
Page 53

5 Generalidades
E
5.4
Directrices /
Normas
5.5
Datos técnicos
El aparato cumple con las exigencias de la norma estándar europea EN 1060
parte 1 / 1995 y EN 1060 parte 3 / 1997. El aparato cumple con las exigencias
de la norma estándar europea EN 60601-1-2.
Este aparato cumple con las exigencias de las directrices UE 93 / 42 / CEE para
productos médicos de la clase II.
La marca CE del aparato se refiere a la directiva UE 93 / 42 / CEE.
Clasificación del aparato: Tipo BF
Usuarios:
El aparato ha sido diseñado para realizar mediciones de la tensión arterial no invasivas en adultos (esto es, ha sido diseñado para su uso externo).
Denominación y modelo : MEDISANA Tensiómetro HGD
Sistema de indicación Display : digital en Display Punto Matrix
Método de medición : Oscilométrico
Alimentación de corriente : 3 V=, 2 x 1,5 V Miñón AAA Alcalina
Intervalo de
medición de la tensión arterial : 30 – 280 mmHg
Intervalo de medición del pulso : 40 – 200 pulsaciones /min.
Divergencia de medición máxima de
los valores de medición estadísticos : ± 3 mmHg
Divergencia de medición máxima
de los valores del pulso : ± 5 % del valor
Generación de presión : Automática por microbomba
Desinflado : Automático
Desconexión automática : Tras 30 segundos
Condiciones de servicio : De + 10 °C a + 40 °C,
15 - 85 % Humedad relativa del aire
Condiciones de almacenaje : De - 5 °C a + 50 °C
Medidas : incluyendo el brazalete
70 x 67 x 80 mm
Peso : Aprox. 140 g incluyendo las pilas
Artículo n° : 51422
N° EAN : 4015588514227
Con vistas a mejoras de la calidad del producto, nos reservamos
el derecho de introducir modificaciones técnicas y de diseño.
49
Page 54

E
5 Generalidades / 6 Garantía
5.6
Por último
6.1
Condiciones
de garantía
y reparación
Le deseamos que se divierta y tenga éxito al usar su tensiómetro HGD de
MEDISANA, y confiamos en que podrá disfrutar durante mucho tiempo de
su aparato.
Pruebe también otros de nuestros productos de alta calidad por el bien de
su salud. Como una de las empresas líder a nivel mundial en el sector de
Home Health Care le ofrecemos una amplia gama de productos en los
sectores de control de la salud, fisioterapia en casa, terapia alternativa
contra el dolor y cuidado corporal cualificado.
Le rogamos consulte con su distribuidor especializado o directamente con el
centro de servicio técnico en caso de una reclamación. Si tuviera que remitirnos el dispositivo, le rogamos indique el defecto y adjunte una copia del
recibo de compra.
En este caso, se aplicarán las siguientes condiciones de garantía:
1. Con relación a los productos de MEDISANA, se ofrece una garantía por
un período de tres años a partir de la fecha de compra. En caso de una
reclamación, la fecha de compra debe probarse mediante el recibo de
compra o la factura.
2. Los defectos de material o de fabricación se eliminarán de forma
gratuita dentro del período de garantía.
3. La aplicación de la garantía no conlleva una extensión del período de
garantía, ni con respecto al dispositivo ni con respecto a los componentes sustituidos.
4. Esta garantía no cubre:
a. todos los daños causados por abuso, por ej. por incumplimiento del
manual de uso;
b. los daños debidos a reparaciones o intervenciones por parte del
comprador o terceros no autorizados;
c. los daños de transporte causados durante el transporte del domicilio
del fabricante al consumidor o durante el envío al servicio técnico;
d. accesorios sometidos a un desgaste normal.
5. Se excluye cualquier responsabilidad por los daños directos o indirectos
causados por el dispositivo, aunque el daño en el dispositivo haya sido
considerado como una reclamación justificada.
50
Si tuviera dudas o preguntas con respecto a este u otros productos, le responderemos con mucho gusto.
MEDISANA AG
Itterpark 7-9
D-40724 Hilden
Tel.: +49 (0) 2103 / 2007-60
Fax: +49 (0) 2103 / 2007-626
eMail: info@medisana.de
Internet: www.medisana.de
Para la dirección del servicio técnico, consulte la última página.
Page 55

1 Avisos de Segurança
P
1.1
Muito obrigada
1.2
Indicações para
o seu bem-estar
Muito obrigado pela confiança no nosso produto! Acaba de adquirir um
produto de qualidade da MEDISANA, uma das empresas líder, a nível mundial, no mercado da saúde. Para poder obter os resultados desejados e desfrutar
do seu medidor de tensão MEDISANA HGD durante muito tempo, aconselhamos-lhe ler as seguintes instruções de uso e manutenção com muita atenção.
AVISO
Não proceda a medidas terapêuticas com base nas medições
de tensão realizadas por si. Nunca altere a dosagem de um
medicamento prescrito pelo médico.
• Falhas do ritmo cardíaco provocam um pulso irregular pelo que deveria
evitar medições com aparelhos oscilométricos (aparelhos de medição no
pulso da mão ou no braço). Nestes casos, deixe efectuar as medições da
tensão pelo seu médico com o método estetoscópico convencional.
• Mas consulte o seu médico também se padecer de outras doenças, por
exemplo, de congestão arterial, antes de usar o aparelho.
• O aparelho não pode ser usado para controlar a frequência de batimentos de
um pacemaker.
• Mulheres grávidas deveriam tomar as precauções necessárias e ter em conta
a sua capacidade de esforço individual. Consulte eventualmente o seu
médico.
• Se durante uma medição aparecerem incómodos como, por exemplo, dores
no pulso ou outros achaques, tome as seguintes medidas: Carregue na tecla
START 4 para esvaziar imediatamente a braçadeira de medição. Solte a
braçadeira e tire-a imediatamente do pulso. Entre em contacto com o seu
vendedor ou informe-nos directamente.
1.3
Alguns avisos
importantes
• Utilize o aparelho para os fins previstos nas instruções de uso. Em caso de
uma utilização não conforme os fins previstos perde-se o direito à garantia.
• Se, em raras ocasiões, acontecer por causa de uma falha de funcionamento,
que a braçadeira de medição é continuamente insuflada durante uma
medição, abra a braçadeira imediatamente.
• O aparelho não deve ser usado nas imediações de aparelhos que emitem
fortes radiações eléctricas como, por exemplo, transmissores de rádio. Isto
pode prejudicar o seu funcionamento.
• As crianças não devem usar o aparelho. Produtos médicos não são
brinquedos!
• Em caso de uma avaria não intente reparar o aparelho, porque isso implica a
perda da garantia. Deixe efectuar as reparações pelos pontos de assistência
técnica autorizados.
• Proteja o aparelho da humidade. Se, apesar de tudo, entrarem líquidos no
aparelho, retire imediatamente as pilhas e não utilize mais o aparelho. Nestes
casos, entre em contacto com o seu vendedor ou informe-nos directamente.
Os nossos contactos constam da página dos endereços.
51
Page 56

P
1 Avisos de Segurança / 2 Informações gerais
1.4
Material fornecido
e embalagem
2.1
O quê é a
tensão arterial?
2.2
Como funciona
a medição?
Antes de começar, verifique, por favor, se o aparelho foi fornecido
completamente. Os seguintes itens fazem parte do escopo de fornecimento:
• 1 medidor de tensão arterial HGD MEDISANA
• 2 pilhas (do tipo AAA LR03) • 1 caixa
• 1 cabo USB • 1 instruções de uso
• 1 CD de software
As embalagens podem ser reutilizadas ou podem ser eliminadas através da
reciclagem. Por favor, elimine adequadamente o material da embalagem não
necessário. Se, durante o desembalamento, verificar danos devido ao transporte, por favor, entre imediatamente em contacto com o seu revendedor.
AVISO
Tenha atenção para que as películas da embalagem não se
tornem brincadeiras para crianças. Existe perigo de asfixia!
A tensão arterial é a pressão que surge nos vasos sanguíneos após cada
batimento do coração. Quando o coração contrai (=sístole) e bombeia sangue
nas artérias, isto provoca um aumento da tensão. O valor mais alto desta
tensão é designado por tensão sistólica, que é medida primeiro durante uma
medição. Quando o músculo do coração relaxa para absorver sangue nova,
também desce a pressão nas artérias. Quando os vasos estão afrouxados
mede-se o segundo valor - a tensão diastólica.
O HGD é um medidor de tensão arterial concebido para medir a tensão arteri-
al no pulso. A medição efectua-se mediante um microprocessador que analisa
através de um sensor de pressão as oscilações que surgem durante o encher e
o esvaziar da braçadeira de medição acima da artéria.
2.3
Porquê faz sentido
medir a tensão
arterial em casa?
52
A MEDISANA conta com muitos anos de experiência na área da medição da
tensão. A alta precisão do sistema de medição dos aparelhos MEDISANA é
comprovada por estudos clínicos, realizados em conformidade com rigorosas
normas internacionais. Um argumento importante para medir a tensão arterial
em casa é o facto de que a medição é efectuada sempre no ambiente
habitual e em estado relaxado. Especialmente representativo é o chamado
“valor base”, medido de manhã depois de acordar, antes de tomar o
pequeno-almoço. Por princípio deveria medir a tensão sempre à mesma hora
e sob as mesmas condições.
Porque assim é possível comparar os resultados e uma patologia relacionada
com a tensão arterial pode ser detectada atempadamente. Se uma hipertensão
não é detectada durante um longo período de tempo, isto faz aumentar o risco
de contrair outras doenças cardiovasculares.
Page 57

2 Informações gerais
POR ISSO O NOSSO CONSELHO:
Meça a sua tensão arterial diária e regularmente, e também
quando não sentir nenhum problema de saúde.
P
2.4
Classificação da
tensão arterial
segundo a OMS
2.5
Oscilações
da tensão
2.6
Manipulações
e análises
das medições
Na tabela seguinte encontram-se os valores de referência para tensão alta e
baixa sem consideração da idade. Estes valores foram estabelecidos pela
Organização Mundial da Saúde (OMS).
Tensão baixa Tensão normal
sistólica inferior a 100 sistólica 100–140
diastólica inferior a 60 diastólica 60–90
Formas da hipertensão
Grau 1 Grau 2 Grau 3
hipertensão leve hipertensão média hipertensão forte
sistólica 140–159 sistólica 160–179 sistólica superior a 180
diastólica superior a 90 diastólica superior a 95 diastólica superior a 110
Existem muitos factores que podem influenciar a tensão arterial. Assim, por
exemplo, os trabalhos físicos duros, a ansiedade, o stress ou, simplesmente, a
hora da medição podem ter grandes efeitos nos valores medidos. A tensão de
cada pessoa é capaz de oscilar fortemente durante o dia e ao longo do ano.
No caso de pacientes de hipertensão, estas oscilações são particularmente
acentuadas. Em geral, a tensão arterial costuma atingir valores máximos após
esforços físicos e, mínimos, durante a noite, quando se está a dormir.
• Meça a sua tensão várias vezes, guarde os resultados e compare-os depois.
Não tire conclusões de um único resultado!
• Os seus valores de tensão deveriam ser sempre analisados por um médico
que conhece o seu historial clínico. Se utilizar o aparelho regularmente e
registar os valores para o seu médico, informe o seu médico de vez em
quando sobre a tendência que observa.
• Não se esqueça que os valores de medição da tensão diários dependem de
muitos factores. Por exemplo, fumar, o consumo de álcool, medicamentos e
trabalho físico influenciam as medições de diferente maneira.
• Meça a tensão antes das refeições.
• Antes de medir a tensão deveria descansar, no mínimo, 5 minutos.
• Se achar a sua tensão sistólica ou diastólica pouco normal (demasiado alta ou
baixa), apesar de ter manuseado o aparelho correctamente, e verificar que
isto acontece com frequência, deveria consultar o seu médico. Consulte o
médico também quando um pulso irregular ou muito baixo não permite
fazer medições.
53
Page 58
P
3 Colocação em Funcionamento
3.1
Colocar / retirar
as pilhas
3.2
Selecção
dos ajustes
Colocar: Prima com o dedo grande fortemente contra a tampa do comparti-
mento das pilhas 5 na parte exterior do aparelho. Levante a tampa e insira as
duas pilhas juntamente fornecidas (pilhas alcalinas do tipo AAA). Preste atenção à
posição correcta das pilhas (gráfico no compartimento das pilhas). Coloque a
tampa das pilhas novamente e pressione-a até engatar de forma audível.
Retirar: A indicação da pilha é exibida no display assim que as pilhas tiverem
pouca carga. Se, depois de premir o botão START 4 , o aparelho não iniciar
a medição da tensão arterial, por favor, insira pilhas novas. Remova as pilhas
gastas puxando a fita de fixação existente no compartimento das pilhas e
insira pilhas novas. Por favor, tenha em consideração que depois de inserir as
pilhas novas, os ajustes não permanecem memorizados.
INDICAÇÕES DE SEGURANÇA SOBRE AS PILHAS
• Mantenha as pilhas afastadas das crianças!
• Não recarregue as pilhas!
• Não conecte as pilhas em curto-circuito!
• Não coloque as pilhas no fogo!
• Não elimine as pilhas ou as baterias vazias através do lixo
doméstico, mas entregue-as nos postos de recolha especiais
para pilhas ou coloque-as no pilhão.
Depois de premir uma vez a tecla MENU 2 , o MEDISANA HGD oferece
uma série de ajustes para configurar uma utilização individualizada. Durante a
primeira colocação em funcionamento aparecem, depois de premir a tecla
MENU 2 , os seguintes pontos de menu em língua inglesa:
MEASURING MODE => MODO DE MEDIÇÃO
USER => UTILIZADOR
CLEAR MEMORY => APAGAR VALORES GUARDADOS
TIME / ALARM => TEMPO/ALARME
LANGUAGE => LÍNGUA
CONTRAST => CONTRASTE
PC-LINK => LIGAÇÃO AO PC
Os diversos pontos de menu podem ser seleccionadas com as teclas de SELECÇÃO
▲▼ e activados mediante pressão na tecla MENU 2 . Mediante pressão
breve na tecla START 4 consegue sair do respectivo ponto de menu. No
display volta a ser indicado a data/hora e o nome do utilizador.
3.2.1
Ajustar o modo
de medição
54
No ponto de menu „MEASURING MODE“, modo de medição, pode escolher
entre o método de medição padrão (1) e o método de medição 3/MAM
(“3 Measurement Average Mode” - Média de 3 medições).
No método de medição padrão (1) efectua-se e guarda-se uma medição
individual da tensão. Se premir na tecla ▲ chega ao método 3/MAM.
O método 3/MAM é aconselhável quando tiver oscilações da tensão.
Mediante 3 medições, efectuadas numa sequência de 15 segundos, se
eliminam os valores mais díspares. No caso de diferenças muito grandes
eventualmente pode ser efectuada uma 4. medição.
Page 59
3 Põr em Funcionamento
Depois de concluir as medições é calculado internamente e visualizado no
display uma média ponderada. Desta forma consegue-se minimizar de forma
significativa uma medição errada. Para confirmar o modo de medição escolhido, salientado por uma barra preta debaixo do símbolo do método de medição
seleccionado, prima uma vez na tecla MENU 2 . A seguir aparecem a data,
a hora e a indicação do utilizador no display.
P
3.2.2
Seleccionar e
identificar
utilizador
3.2.3
Apagar valores
O MEDISANA HGD oferece a possibilidade de seleccionar um de dois
utilizadores predefinidos ( I ou II ) ou efectuar uma medição sem atribuição a
uma dos utilizadores ( ) Para os dois utilizadores definidos ( I ou II ) existem
30 entradas de memória, cada, para guardar os resultados das medições. Uma
medição sem atribuição a um utilizador somente fica guardada até à medição
seguinte. Se premir nas teclas de
desejado, salientado pela barra preta debaixo do respectivo símbolo. Confirme
a sua selecção premindo uma vez na tecla MENU 2 .
A seguir pode ser atribuído ao utilizador I ou II uma combinação de 6 letras
ou números.
desejado. Ao premir sem interrupção nas teclas de
continua a saltar de letra em letra, e de número em número, até aparecer a
letra/ o número desejada no display. Soltar então a tecla e confirmar a selecção
com a tecla MENU 2 . Quando tiver concluída a designação do utilizador,
prima a tecla MENU 2 para sair deste menu. Também pode abandonar o
menu de selecção directamente depois de definir o utilizador, premindo brevemente na tecla START 4 . A seguir aparecem a data, a hora e as informações
do utilizador no display.
Nesta área de menu, existe a possibilidade de chamar até 30 valores guardados para o utilizador I ou II, bem como apagar os mesmos a pedido. Defin
a antes o utilizador conforme descrito na secção 3.2.2. Com as teclas de
SELECÇÃO
isolado (SINGLE) ou todos os resultados (ALL). A selecção efectuada é indicada pela barra preta debaixo da indicação. Se desejar apagar apenas um resultado de medição (modo SINGLE), aparecem, depois de premir uma vez na
tecla MENU 2 , todos os resultados de medição guardados para o utilizador.
Seleccione com as teclas de
eliminar. Na área superior do display é indicado o momento de realização da
medição. Confirme a eliminação do resultado com a tecla MENU 2 ou prime
uma vez na tecla START 4 para sair do modo de menu sem apagar o valor.
Se desejar eliminar todos os resultados de medição guardados seleccione o
modo ALL. Confirme a eliminação de todos os resultados com a tecla MENU
2 ou prime uma vez na tecla START 4 para sair do modo de menu sem
apagar os valores.
Se premir nas teclas de
▲▼ pode seleccionar se deseja eliminar um resultado de medição
SELECÇÃO
SELECÇÃO
SELECÇÃO
▲▼ pode seleccionar o utilizador
▲▼ chega à letra/ ao número
SELECÇÃO
▲▼ o valor de medição que deseja
▲▼, a indicação
3.2.4
Ajustar hora /
alarme
Neste ponto de menu pode ajustar a data, a hora e alarmes. Primeiro começa
a piscar o número do ano no display. Para ajustar o número de ano desejado
prima nas teclas de
2 . Mês, dia, hora e segundos são definidos sucessivamente da mesma
maneira. Depois de ajustar esses dados pode definir o momento para o 1. e 2.
alarme.
SELECÇÃO▲▼e confirma a definição com a tecla MENU
55
Page 60
P
3 Põr em Funcionamento / 4 Utilização
Se não deseja definir nenhum tempo de alarme, seleccione com as teclas de
SELECÇÃO
me. Quando este símbolo começa a piscar, confirme a sua selecção com a tecla
MENU 2 . O alarme então fica desactivado. A seguir pode definir se a data,
a hora e o utilizador devem ser visualizados sempre no display ou não. Seleccione com as teclas de
gada AUS. O modo seleccionado começa a piscar e é confirmado premindo
na tecla MENU 2 .
▲▼ o símbolo do sino riscado depois de confirmar a hora do alar-
SELECÇÃO
▲▼ entre visualização ligada EIN ou desli-
3.2.5
Seleccionar
a língua
3.2.6
Ajustar o
contraste
3.3
Ligação ao PC
4.1
Colocar a
braçadeira
56
No ponto de menu „Language“ (língua) pode seleccionar a língua do menu.
As informações do display podem ser visualizadas em 5 línguas diferentes.
• INGLÊS • DEUTSCH • FRANCÊS • ESPANHOL • ITALIANO
Seleccione uma das línguas com as teclas de
selecção premindo brevemente na tecla MENU 2 . Depois da confirmação
aparece a indicação da data e do utilizador no display.
No ponto de menu „Contrast“ (contraste) é possível ajustar gradualmente,
mediante as teclas de
o contraste desejado, confirma a sua selecção com a tecla MENU 2 .
O aparelho é fornecido com um CD de software e um cabo USB com os quais
poderá transmitir os dados registados pelo medidor de tensão arterial HGD
MEDISANA para o computador através da interface USB. Conecte uma extremidade do cabo USB à interface USB 6 do seu aparelho e a outra extremidade à tomada de entrada USB do seu computador. Através do botão de MENU
2 e dos botões de
PC e confirme a selecção premindo novamente o botão de MENU 2 . O display do HGD exibe linhas onduladas que simbolizam a ligação ao computador.
Insira o CD no seu computador e execute o programa de instalação. O software
contém explicações para a sua execução. Com o CD inserido, a rotina de
instalação é executada automaticamente. Basta seguir as indicações exibidas
no ecrã do seu computador. Em caso de problemas, o software disponibiliza
vários ficheiros de ajuda. O software de avaliação permite a indicação dos
valores medidos de modo gráfico ou em tabela.
SELECÇÃO
SELECÇÃO
▲▼ o contraste do display. Depois de ajustar
▲▼, seleccione o tópico de menu da ligação
a. Coloque a braçadeira no pulso da sua mão
esquerda.
Tenha atenção para que
• o display fique na parte interior da articulação da
mão.
• o pulso da mão esteja livre de pulseiras, relógios
ou objectos similares. A braçadeira deve ter
contacto directo com a pele porque não é possível medir através de têxteis.
b. Feche a braçadeira de maneira que fique bem
assente no pulso, mas sem estrangulá-lo. A
braçadeira nunca deve ficar torcida.
SELECÇÃO
▲▼ e confirme a sua
Page 61
4 Utilização
P
4.2
A posição correcta
para efectuar a
medição
4.3
Medir a tensão
• Faça a medição sentado.
• Relaxe o seu braço e pouse-o levemente em cima de, por exemplo, uma
mesa.
• Levante o pulso da mão até a braçadeira se encontrar à altura do coração.
• Mantenha-se calmo durante a medição: Não se mexa e não fale, porque isto
pode repercutir nos resultados da medição.
a. Prima a tecla START 4 .
• No display aparece o símbolo de medição com a indicação „READY“.
• A seguir começa a insuflação da braçadeira. Durante o processo de insuflar,
a pressão crescente é indicada de forma simbólica, e no display aparecem,
alternadamente, as mensagens „BE QUIET“ (mantenha-se calmo) e
„PLEASE RELAX“ (relaxe por favor).
• Se premir na tecla START 4 durante a insuflação da braçadeira, interrompe o processo de insuflar. O aparelho desliga-se e o ar sai da braçadeira.
b. Quando a braçadeira estiver totalmente insuflada, começa automatica-
mente o processo de medição através da saída, pouco a pouco, da pressão
acumulada da braçadeira. Simultaneamente aparece no display um gráfico
que reflecte o número de batimentos do coração. As mensagens „DO NOT
MOVE“ (não se mexa) e „DO NOT TALK“, (não fale) aparecem alternada-
mente no display para lembrar que não se deve mexer e falar durante a
medição.
c. A vazão do ar começa, no início, a uma velocidade constante. No momen-
to em que é possível determinar o pulso pela primeira vez, a vazão do ar é
sincronizada com o batimento do coração até à conclusão da medição.
Durante este tempo o símbolo do coração pisca no display. A medição
está concluída quando a braçadeira é esvaziada repentinamente, encontrando-se os valores então visualizados no display, ao lado das designações
SYS, DIA e PUL.
4.4
Guardar os
resultados
4.5
Desligar o
aparelho
O aparelho dispõe de 30 entradas de memória, cada, para 2 possíveis
utilizadores. O último resultado de medição é automaticamente atribuído ao
utilizador seleccionado e guardado no número de memória seguinte que ainda
está livre.
ligado premindo os botões de
de
dos valores.
Premindo o botão MENU 2 , os valores memorizado da memória actual são
exibidos em forma de tabela. Se voltar a premir o botão MENU 2 , os valores são exibidos de forma gráfica.
O aparelho desliga-se automaticamente após um curto período de tempo se
entretanto não é premida nenhuma tecla. Também é possível desligá-lo
através da tecla START 4 . A indicação da data, da hora e do utilizador
permanece visível no display, quando foi seleccionada a opção INDICAÇÃO
LIGADA no ponto de menu HORA/ALARME.
Os valores guardados podem ser consultados com o aparelho des-
SELECÇÃO
▲▼ existe a possibilidade de subir e descer o cursor na tabela
SELECÇÃO
▲▼. Com os respectivos botões
57
Page 62

P
5 Generalidades
5.1
Falhas e a sua
correcção
5.2
Limpeza e
conservação
Quando aparecer uma das a seguir descritas mensagens de erro no display, o
aparelho não foi capaz de medir correctamente a tensão.
Mensagem de erro - Possíveis causas e medidas de correcção
ERR 1 - Não foi possível detectar o pulso. Assegure que a braçadeira assenta
de forma correcta e que o pulso da mão fica à altura do coração durante a
medição.
ERR 2 - Impulsos de pressão não fisiológicos foram detectados e manipulam o
resultado de medição.
Causa: O braço foi mexido durante a medição. Repita a medição mantendo o
braço tranquilo e não fale durante a medição.
ERR 3 - O processo de insuflação da braçadeira é demasiado demorado. A
causa pode ser uma mangueira não estanque ou uma braçadeira não
correctamente colocada.
ERR 4 - A diferença entre a tensão sistólica e diastólica é exageradamente alta.
Meça a tensão arterial novamente, seguindo exactamente as instruções e em
condições calmas. Se a mensagem de erro voltar a aparecer, entre em
contacto com a MEDISANA.
ERR 5 - Por causa de condições não estáveis durante as medições não foi
possível apurar uma média. Repita a medição mantendo o braço tranquilo e
não fale durantea medição.
• Retire as pilhas antes de limpar o aparelho.
• Nunca utilize detergentes agressivos ou escovas duras para fazer a limpeza.
• Limpe o aparelho com um pano macio ligeiramente humedecido em água
com sabão. Não deve entrar água no aparelho. Volte a usar o aparelho
somente quando este estiver outra vez totalmente seco.
• Tire as pilhas do aparelho se não tenciona usá-lo durante um período de
tempo prolongado. Caso contrário existe o perigo de fuga de líquido das pilhas.
• Não exponha o aparelho directamente à luz solar e proteja-o de sujidade e
humidade.
• Encha a braçadeira somente com ar quando se encontra colocada no braço.
• Controlo de calibração (apenas para utilização profissional) :
O fabricante calibrou o aparelho para um período de 2 anos. Em caso de uma
utilização profissional uma nova calibragem deve ser efectuada, ao mais
tardar, cada 2 anos. A inspecção da calibragem está sujeita a custos e pode
ser efectuada pela uma entidade pública competente ou por um serviço de
manutenção autorizado de acordo com a directiva sobre produtos médicos.
5.3
Eliminação
58
Após o fim da vida útil do aparelho eléctrico, eliminá-lo de forma a não
prejudicar o meio ambiente!
Embalagens podem ser reutilizadas ou recicladas, peças metálicas que podem
ser reaproveitadas, plásticos, componentes eléctricos ou electrónicos devem
ser descartados como resíduos eléctricos e electrónicos.
Antes de eliminar o aparelho, remova as pilhas. Não elimine as pilhas vazias
através do lixo doméstico, mas entregue-as nos postos de recolha especiais
para pilhas ou coloque-as no pilhão.
Se necessitar de conselhos em relação à reciclagem, por favor, contacte as
autoridades locais ou o seu revendedor especializado.
Page 63
5 Generalidades
P
5.4
Directivas /
Normas
5.5
Dados Técnicos
O medidor digital da tensão arterial está em conformidade com as normas
europeias EN 1060 parte 1 / 1995 e EN 1060 parte 3 / 1997.
O aparelho cumpre os requisitos da norma europeia por defeito EN 60601-1-2.
Os requisitos da Directiva CE 93 / 42 / CEE para produtos médicos classe II a
foram cumpridos.
A marca CE no aparelho se refere à Directiva CE 93 / 42 / CEE.
Classificação do aparelho: Tipo BF
Destinatários:
O aparelho é apto para a medição não invasiva da tensão arterial de adultos
(ou seja, só para aplicação exterior).
Nome e modelo : medidor de tensão arterial HGD MEDISANA
Sistema de indicação : Indicação digital em display de matriz de pontos
Método de medição : Oscilométrico
Tensão de alimentação : 3 V=, 2 x 1,5 V Mignon AAA, Alcalina
Margem de medição
tensão arterial : 30 – 280 mmHg
Margem de medição pulso : 40 – 200 batimentos /minuto
Desvio de medição máx. dos
valores de medição estáticos : ± 3 mmHg
Desvio de medição máx.
do pulso : ± 5 % do valor
Geração de pressão : Automática, com micro-bomba
Saída do ar : Automático
Desactivação automática : Após aprox. 30 segundos
Ambiente de funcionamento : + 10 °C a + 40 °C,
15 - 85 % humidade relativa
Condições de
armazenamento : - 5 °C a + 5 °C
Dimensões : 70 x 67 x 80 mm incl. braçadeira
Peso : Aprox. 140 g incl. pilhas
Número de artigo : 51422
Número EAN : 4015588514227
Devido aos constantes melhoramentos do produto,
reservamos o direito a proceder a alterações técnicas e estéticas.
59
Page 64

P
5 Generalidades / 6 Garantia
5.6
Algumas palavras
no fim
6.1
Garantia e
condições
de reparação
Queremos desejar muito sucesso e prazer durante a utilização do medidor
de tensão arterial HGD MEDISANA e temos a certeza de que irá desfrutar
do aparelho durante muito tempo.
Para o bem da sua saúde, experimente também outros dos nossos produtos
de qualidade, porque como empresa líder, a nível mundial, no sector dos
cuidados médicos em casa, dispomos de uma ampla gama de produtos para
controlo da saúde, terapia doméstica, terapia de dores alternativa e
cuidados corporais qualificados.
Por favor, em caso de garantia, contacte o seu revendedor especializado ou
directamente o centro de assistência. Se for necessário enviar o aparelho,
por favor, envie o aparelho indicando a avaria e acompanhado de uma cópia
do recibo de compra.
Em caso de garantia aplicam-se as seguintes condições:
1. Aos produtos MEDISANA concedemos uma garantia de três anos a
partir da data de compra. Em caso de garantia, a data de compra tem de
ser comprovada através do recibo de compra ou factura.
2. As deficiências devido a erros de material ou de fabricação são elimi-
nadas gratuitamente dentro do prazo de garantia.
3. Após um serviço de garantia, o prazo da garantia não é prolongado, nem
para o aparelho nem para as peças substituídas.
4. A garantia exclui:
a. todos os danos resultantes de manuseamento inadequado como,
p.ex., devido ao não cumprimento do manual de instruções.
b. danos resultantes de reparações ou intervenções pelo comprador ou
por terceiros não autorizados.
c. danos de transporte resultantes do percurso entre o fabricante e
o consumidor ou durante o envio para o serviço de assistência a
clientes.
d. componentes exteriores sujeitos a um desgaste normal.
5. Não nos responsabilizamos por danos consequentes directos ou indi-
rectos que são causados pelo aparelho mesmo quando o dano no
aparelho é reconhecido como um caso de garantia.
60
Se tiver perguntas relativas a este ou a outros aparelhos, teremos muito
gosto em responder às mesmas.
MEDISANA AG
Itterpark 7-9
D-40724 Hilden
Tel.: +49 (0) 2103 / 2007-60
Fax: +49 (0) 2103 / 2007-626
eMail: info@medisana.de
Internet: www.medisana.de
O endereço do serviço de assistência pode ser consultado na última página.
Page 65

1 Veiligheidsmaatregelen
NL
1.1
Hartelijk dank
1.2
Aanwijzingen
voor uw welzijn
Dank u wel voor uw vertrouwen!U heeft een kwaliteitsproduct aangeschaft van
MEDISANA, één van de wereldwijd leidende ondernemingen op de gezondheidsmarkt. Voor een succesvol gebruik en een lange gebruiksduur van uw
MEDISANA bloeddrukmeter HGD bevelen wij aan de hieronder beschreven aanwijzingen voor het gebruik en voor het onderhoud zorgvuldig door te lezen.
WAARSCHUWING
Neem op grond van zelfmeting van de bloeddruk geen
therapeutische maatregelen. Wijzig nimmer de dosering van
de door een arts voorgeschreven medicijnen.
• Hartritmestoringen veroorzaken een onregelmatige pols zodat u metingen
met behulp van oscillometrische instrumenten (instrumenten voor het handgewricht of de bovenarm) moet vermijden. Laat de bloeddruk in deze
gevallen door uw arts meten met behulp van de gebruikelijke stethoscoopmethode.
• Ook als u aan andere ziektes lijdt, bijvoorbeeld aderverkalking, neem voor
gebruik van dit instrument contact op met uw arts.
• Het instrument kan niet worden gebruikt voor de controle van de hartfrequentie van een pacemaker.
• Zwangeren dienen de nodige veiligheidsmaatregelen in acht te nemen en
rekening te houden met hun individuele belastbaarheid; neemt u zo nodig
contact op met uw arts.
• Indien tijdens de meting ongemakken optreden zoals pijn in de pols of andere
kwalen, ga dan als volgt te werk: Druk op de START-toets 4 om het manchet
onmiddellijk te ontluchten. Koppel het manchet los en vervwijder het van de
pols. Neem contact op met uw vakhandel of informeer ons direct.
1.3
Waarop u moet
letten
• Het instrument mag alleen voor de in deze gebruiksaanwijzing beschreven
toepassing worden gebruikt. Anders vervalt de garantieclaim.
• Indien het manchet door een zeldzame functiestoring tijdens de meting
voortdurend opgeblazen blijft, open het manchet onmiddellijk.
• Het instrument mag niet in de buurt van instrumenten worden gebruikt die
een sterke elektrische straling uitzenden zoals zend-ontvangstapparatuur.
Anders kan het goede functioneren worden belemmerd.
• Kinderen mogen het instrument niet gebruiken. Medische producten zijn
geen speelgoed!
• Repareer het instrument in geval van storingen niet zelf. Anders vervalt de
garantieclaim. Reparaties mogen alleen door geautoriseerde servicediensten
worden verricht.
• Stel het instrument niet bloot an vocht. Indien per ongeluk vocht in het
instrument is binnengedrongen, verwijder dan onmiddellijk de batterijen en
staak het gebruik het instrument. Neem in dit geval contact op met uw
vakhandel of informeer ons direct. Op de adrespagina is aangegeven hoe u
ons kunt bereiken.
61
Page 66

NL
2 Wetenswaardigheden
1.4
Levering en
verpakking
2.1
Wat betekent
bloeddruk?
2.2
Hoe werkt
de meting?
Vergelijk de verpakkingsinhoud met de hieronder beschreven onderdelen.
• 1 MEDISANA bloeddrukmeter HGD • 1 Software CD
• 2 batterijen (type AAA LR03) • 1 Opbergdoos
• 1 USB kabel • 1 gebruiksaanwijzing
Het verpakkingsmateriaal kan opnieuw worden gebruikt of gerecycled. Zorg
ervoor dat het gebruikte verpakkingsmateriaal bij de daarvoor bestemde
afvalverwerking terechtkomt. Indien u tijdens het uitpakken transportschade
constateert, neem dan direct contact op met uw leverancier.
WAARSCHUWING
Let er op dat het verpakkingsmateriaal niet in handen komt
van kinderen. Zij kunnen er in stikken!
Bloeddruk is de druk die door elke hartslag in de vaten ontstaat. Wanneer het
hart samentrekt (=systole) en bloed naar de arteriën pompt, leidt dit tot het
stijgen van de druk. De hoogste waarde van deze druk wordt systolische druk
genoemd en gedurende een bloeddrukmeting als eerste waarde gemeten.
Wanneer de hartspier verslapt om nieuw bloed op te nemen, neemt ook de
druk af in de arteriën. Wanneer de vaten ontspannen zijn, wordt de tweede
waarde - de diastolische druk - gemeten.
De HGD is een bloeddrukmeter, die de bloeddruk van de pols meet. De meting
wordt door een microprocessor bestuurt die met behulp van een druksensor de
schommelingen analyseert die via de arterie ontstaan door het opblazen en
aflaten van de bloedrukmanchet.
2.3
Waarom is het
zinvol om de
bloeddruk thuis
te meten?
62
MEDISANA beschikt over meerjarige ervaringen op het gebied van de
bloeddrukmeting. De hoge nauwkeurigheid van het meetprincipe van het
MEDISANA-instrument blijkt uit omvangrijke klinische onderzoeken die
volgens strikte internationale standards zijn doorgevoerd. Een belangrijk
argument voor de bloeddrukmeting thuis is het feit dat de meting in de
bekende omgeving en onder ontspannen omstandigheden wordt verricht.
Bijzonder veelzeggend is de zogenoemde 'basiswaarde' die 's morgens direct
na het opstaan en vóór het ontbijt wordt gemeten. De bloeddruk kan het beste
altijd op dezelfde tijdstip en onder dezelfde omstandigheden worden gemeten.
Hierdoor wordt de vergelijkbaarheid van van de resultaten gewaarborgd en
een aanvankelijke bloeddrukziekte kan tijdig worden vastgesteld. Indien een
verhoogde bloeddruk over een langere periode niet wordt ontdekt, stijgt de
kans op een aantal hart-circulatie-ziektes.
Page 67

2 Wetenswaardigheden
VANDAAR ONZE TIP:
Meet uw bloeddruk dagelijks en regelmatig, zelfs als uw geen
ongemakken heeft.
NL
2.4
Bloeddrukclassificatie
volgens de WHO
2.5
Bloeddrukschommelingen
2.6
Beïnvloeding
en analyse van
de metingen
In de tabel hieronder zijn de richtwaarden aangegeven voor hoge en lage
bloeddruk zonder inachtneming van de leeftijd. Deze waarden zijn door de
wereldgezondheitsorganisatie (WHO) vastgelegd.
Lage bloeddruk Normale bloeddruk
systolisch beneden 100 systolisch 100–140
diastolisch beneden 60 diastolisch 60–90
Vormen van verhoogde bloeddruk
Stadium 1 Stadium 2 Stadium 3
gering verhoogde gemiddeld verhoogde sterk verhoogde
bloeddruk bloeddruk bloeddruk
systolisch 140–159 systolisch 160–179 systolisch boven180
diastolisch boven 90 diastolisch boven 95 diastolisch boven 110
Er zijn vele factoren die de bloeddruk kunnen beïnvloeden. De waarden
worden met nadruk beïnvloedt door zwaar lichaamlijk werk, angst, stress of de
de tijdstip van de meting. De persoonlijke bloeddrukwaarden zijn over een dag
en over een jaar gerekend aan sterke schommelingen onderhevig. Bij patiënten
met verhoogde bloeddruk zijn deze schommelingen bijzonder ontwikkeld.
Normaal wordt de bloeddruk tijdens lichaamlijke inspanningen het meest
verhoogd en 's nachts tijdens het slapen het meest verlaagd.
• Meet meermalen uw bloeddruk, sla de resultaten op en vergelijk de deze
vervolgens onder elkaar. Trek geen conclusie opgrond van een enkel
resultaat.
• Uw bloeddrukwaarden dienen altijd door een arts te worden beoordeeld die
vertrouwd is met uw medische voorgeschiedenis. Als u het instrument
regelmatig gebruikt en de waarden registreert voor uw arts, informeer dan
uw arts regelmatig over het verloop.
• Houd tijdens bloeddrukmetingen rekening ermee dat de dagelijkse waarden
van vele factoren afhankelijk zijn. Factoren zoals roken, alcohol, medicijnen
en lichaamlijk werk beïnvloeden de meetwaarden op verschillende manier.
• Meet uw bloeddruk voor de maaltijden.
• Rust minstens 5 minuten voordat u uw bloeddruk meet.
• Neem, als u een buitengewone (te hoge of te lage) systolische of diastolische
waarde van de meting constateert, hoewel het instrument op de juiste
manier is gebruikt, contact op met uw arts, indien deze waarde ook na een
aantal metingen blijft verschijnen. Dit geldt ook voor de zeldzame gevallen
dat door een onregelmatige of zeer zwakke pols de meting wordt
verhinderd.
63
Page 68

NL
3 Voor het Gebruik
3.1
Het inleggen /
uitnemen van
de batterijen
3.2
Selecteren van
de instellingen
Inleggen: Druk met uw duim stevig op de sluiting van het batterijvak 5 aan de
buitenkant van het instrument. Verwijder het deksel en plaats in het batterijvak de
twee meegeleverde batterijen (alcaliebatterijen, type AAA). Let op dat de
batterijen in de juiste richting ingelegd worden (zie de afbeelding in de
batterijruimte). Zet het batterijdeksel weer op het instrument en druk dit in
positie totdat het hoorbaar vastklikt.
Uitnemen: In de display verschijnt de batterijaanwijzing zodra de batterijen te
zwak geworden zijn. Het apparaat begint dan niet meer met de bloeddrukmeting nadat de START-toets 4 wordt ingedrukt. Vernieuw in dat geval de
batterijen. Terwijl u aan de houder trekt, neemt u de lege batterijen er uit en
vervangt u deze door nieuwe exemplaren. Hou er rekening mee dat door het
vervangen van de batterijen de eerder ingevoerde gegevens verloren gaan!
VEILIGHEIDSAANWIJZINGEN T.A.V. DE BATTERIJ
• Uit de buurt van kinderen houden! • Niet kortsluiten!
• Niet oplaadbaar! • Niet in het vuur gooien!
• Gooi gebruikte batterijen en accu’s niet bij het huisvuil,
maar breng deze naar de daarvoor bestemde afvalverwerking
of naar uw elektrawinkelier.
De MEDISANA HGD biedt, nadat u eenmaal op de MENU-toets 2 heeft
gedrukt, een selectie van verschillende instellingen voor het individuele
gebruik. Bij het eerste gebruik verschijnen na het indrukken van de MENU-
toets 2 de hieronder beschreven menu's in het Engels:
MEASURING MODE => MEET-MODUS
USER => GEBRUIKER
CLEAR MEMORY => WAARDEN VERWIJDEREN
TIME / ALARM => TIJD/ALARM
LANGUAGE => TAAL
CONTRAST => CONTRAST
PC-LINK => PC-VERBINDING
De aparte menu's kunnen worden aangestuurd met behulp van de KEUZE-
toetsen ▲▼ en deze worden opgeroepen door eenmaal op de MENU-toets
2 te drukken. Druk even op de START-toets 4 om het betreffende menu te
verlaten, op het display verschijnen nu weer datum/tijd en gebruiker.
3.2.1
Het instellen van
de meetmodus
64
In het menu meetmodus „MEASURING MODE“ kunt u de standaard-meting
(1) of de 3/MAM-meting (3 Measurement Average Mode) selecteren.
Bij de standaard-meting (1) wordt een eenmalige bloedrukmeting doorgevoerd
en opgeslagen. Druk eenmaal op de pijltoets ▲ om de 3/MAM-meting te
selecteren.
De 3/MAM-meting wordt aanbevolen als u onder bloeddrukschommelingen
lijdt. Als gevolg van de 3 over een periode van 15 seconden opeenvolgende
metingen worden sterk afwijkende waarden geëlimineerd. Bij bijzonder sterke
afwijkingen kan mogelijkerwijs een 4de meting worden doorgevoerd.
Page 69

3 Voor het Gebruik
Nadat de meting is voltooid wordt intern een gewogen gemiddelde waarde
berekend en weergegeven. Hierdoor wordt het risico voor een incorrecte
meting duidelijk geminimaliseerd.
Bevestig de ingestelde meetmodus die door een zwarte balk onder het symbool
aangegeven wordt door eenmaal op de MENU-toets 2 te drukken.
Hierna verschjnen datum, tijd en gebruiker op het display.
NL
3.2.2
Gebruiker
selecteren en
vastleggen
3.2.3
Waarden
verwijderen
De MEDISANA HGD maakt het mogelijk tussen twee vastgelegde gebruikers
( I of II ) te selecteren of een meting zonder gebruiker-bepaling ( ) door te
voeren. Voor de twee vastgelegde gebruikers ( I of II ) staan per gebruiker 30
geheugenplaatsen ter beschikking. Een meting zonder gebruiker-bepaling
wordt alleen tot de volgende meting opgeslagen. Druk op de KEUZE-
▲▼
om de gewenste gebruiker te selecteren, zichtbaar als zwarte balk bene-
den de symbolen. Druk eenmaal op de MENU-toets 2 om uw selectie te bevestigen. Vervolgens kan aan de gebruiker I of II een letter- of cijfercombinatie
van max. 6 tekens worden toegewezen. Druk op de KEUZE-
de gewenste letters resp. cijfers te selecteren. Als u de KEUZE-
ingedrukt houdt, verspringen de weergegeven letters/cijfers achtereenvolgend
totdat de gewenste letter/cijfer op het display verschijnt. Laat de keuzetoets los
en bevestig de geselecteerde letter/cijfer met de MENU-toets 2 . Druk, nadat
de gebruikergegevens vastgelegd zijn, op de MENU-toets 2 om het menu te
verlaten. U kunt ook direct na het vastleggen het keuze-menu verlaten door
eenmaal kort op de START-toets 4 te drukken. Vervolgens verschijnen de
datum, de tijd en de gebruikergegevens op het display.
In dit menu kunt u t/m 30 opgeslagen waarden voor gebruiker I of II oproepen
alsmede desgewenst verwijderen. Leg eerst de gebruiker vast, zoals hierboven
in paragraaf 3.2.2 is beschreven. Selecteer met behulp van de KEUZE-
▲▼
of één meetresultaat (SINGLE) of alle meetresultaten (ALL) moeten wor-
den verwijderd. De geselecteerde instelling wordt door de zwarte balk onder de
betreffende selectie weergegeven. Als u maar één meetresultat wilt gaan verwijderen (SINGLE-Modus), verschijnen na eenmalig indrukken van de MENU-
toets 2 alle voor de gebruiker opgeslagen meetwaarden. Met behulp van de
KEUZE-
toetsen ▲▼
In het bovenste gedeelte van het display wordt weergegeven, wanneer deze
waarde is vastgesteld. Bevestig het verwijderen van de waarde met de MENU-
toets 2 of druk eenmaal op de START-toets 4 , om dit af te breken en de
menu-modus zonder verwijderen te verlaten. Wanneer alle opgeslagen meetwaarden moeten worden verwijderd, selecteert u de ALL-modus. Druk eenmaal op de MENU-toets 2 , om u het verwijderen van de waarden te bevestigen, of drukt u op de START-toets 4 om dit menu zonder verwijderen te
verlaten.
selecteert u de meetwaarde die verwijderd moet worden.
toetsen
toetsen ▲▼
toetsen ▲▼
toetsen
om
3.2.4
Tijd / alarm
instellen
In dit menu kunt u datum, tijd en alarm instellen. Op het display gaat eerst het
jaartal flikkeren. Druk op de KEUZE-
stellen en bevestig dit vervolgens met de MENU-toets 2 . Hierna kunnen
achtereenvolgend de maand-/dag-/uur- en secondengegevens op de hierboven
beschreven manier worden ingesteld. Nadat deze gegevens zijn ingevoerd kunt
u een tijdstip vastleggen voor een 1de en een 2de alarm.
toetsen ▲▼
om het gewenste jaartal in te
65
Page 70

NL
3 Voor het Gebruik / 4 Toepassing
3.2.5
Taal selecteren
3.2.6
Het instellen van
het contrast
3.3
Aansluiting
op de PC
Selecteer, als u geen alarmtijd wilt instellen, met behulp van de KEUZE-
▲▼
het symbool met de doorgestreepte klok na bevestiging van de alarmtijd.
Bevestig, als dit symbool flikkert, uw selectie met de MENU-toets 2 .
Nu is de alarm uitgeschakeld. Afsluitend kunt u vastleggen, of datum, tijd en
gebruiker altijd in het display moeten worden weergeven of niet. Selecteert u
met de KEUZE-
en wordt door indrukken van de MENU-toets 2 bevestigd.
In het menu „Language“ kunt u een taal voor de bediening van het menu
selecteren. De gegevens op het display kunnen in 5 verschillende talen worden
weergegeven.
• ENGLISH • DEUTSCH • FRANCAIS • ESPANOL • ITALIANO
Selecteer een taal met behulp van de keuzetoetsen ▲▼ en bevestig dit met de
MENU-toets 2 . Na de bevestiging verschijnt de tijd en de gebruiker op het
display.
In het menu „Contrast“ kan met behulp van de KEUZE-
contrast in stappen worden ingesteld. Wanneer het gewenste contrast is
ingesteld, bevestig dit met de MENU-toets 2 .
Bij het apparaat is een software CD en een USB kabel meegeleverd, waarmee
u de gegevens van uw MEDISANA bloeddrukmeter HGD via de USB aansluiting op uw computer kunt invoeren. Verbindt de USB-aansluiting 6 van het
apparaat middels de USB kabel met de USB poort van uw computer.
In het MENU-toets 2 en de KEUZE-
bevestig daarna uw keuze door opnieuw op MENU-toets 2 te drukken. Op
de display van de HDG verschijnen golflijnen die de verbinding met de computer aanduiden. Plaats de CD in de Cd-speler van uw computer en volg de
instructies van het installatieprogramma. Als u de CD in de Cd-speler legt,
wordt het installatieprogramma automatisch gestart. Volg eenvoudig de aanwijzingen op die op uw beeldscherm verschijnen. In het geval er problemen zijn
heeft de software de beschikking over een uitgebreid helpprogramma. De
gebruikte software biedt de mogelijkheid om de gemeten waarden grafisch of
in tabelvorm aan te geven.
toetsen ▲▼
IN of UIT. De geselecteerde modus gaat flikkeren
toetsen ▲▼
toetsen ▲▼
kiest u het menu PC-Link en
toetsen
het
4.1
Het bevestigen
van het
drukmanchet
66
a. Plaats het drukmanchet rond uw linker pols.
Let op dat
• het display naar de binnenkant van uw pols wijst.
• aan de pols geen sieraden, klokken of dergelijke
zijn bevestigd. Het instrument moet direct op de
huid zijn geplaatst, omdat het niet door kleding
heen kan meten.
b. Sluit het drukmanchet zodanig dat dit nauw,
zit maar niet afsnoert. Het manchet mag niet
worden verdraaid.
Page 71

4 Toepassing
NL
4.2
De juiste
meetpositie
4.3
Het meten van
de bloeddruk
4.4
Resultaten
opslaan
• Neemt u tijdens de meting ergens plaats.
• Ontspan uw arm en steun deze losjes bijv. op een tafel.
• Til de pols totdat zich het drukmanchet op de hoogte van het hart bevindt.
• Blijf rustig tijdens de meting: beweeg en spreek niet, omdat hierdoor de
meetresultaten worden beïnvloed.
a. Druk op de START-toets 4 .
• In het display verschijnt het meetsymbool „READY“.
• Vervolgens wordt het manchet opgeblazen. Hierbij wordt de stijgende druk
symbolisch weergegeven en er verschijnt afwisselend „BE QUIET“ en
„PLEASE RELAX“.
• Als u tijden het opblazen op de START-toets 4 drukt, wordt de opblaasprocedure gestopt. Het instrument wordt uitgeschakeld en de lucht in
het manchet wordt uitgelaten.
b. Wanneer het opblazen is voltooid, wordt de meting automatisch gestart
terwijl de lucht binnen het manchet langzaam uitgelaten wordt. Tevens
verschijnt er een curve voor de polsactiviteit. Afwisselend verschijnen er
„DO NOT MOVE“ en „DO NOT TALK“, d.w. z. aanwijzingen dat u tijdens
de meting niet mag bewegen of spreken.
c. De ontluchting vindt aanvankelijk met een constante snelheid plaats.
Wanneer de pols de eerste keer kan worden vastgesteld, wordt de
ontluchting met de hartslag synchroniseerd totdat de meting is voltooid.
Hierbij gaat het hart-symbool flikkeren. De meting is voltooid zodra het
manchet ineens wordt ontlucht en de indicatoren SYS, DIA en PUL
waarden aangegeven.
Het instrument beschikt over 30 geheugenplaatsen voor max. 2 gebruiker. Het
laatste meetresultaat wordt automatisch aan de de geselecteerde gebruiker
toegewezen en op de betreffende vrije geheugenplaats onder het navolgende
hogere geheugenummer opgeslagen.
uitgeschakeld apparaat worden opgevraagd door op de KEUZE-
drukken. Met de juiste KEUZE-
slagen waarden naar boven of naar beneden gaan.
Door op de MENU-toets 2 te drukken worden de ingevoerde actuele waarden in tabelvorm aangegeven. Door nog een keer op de MENU-toets 2 te
drukken worden de waarden grafisch weergegeven.
De opgeslagen waarden kunnen bij een
toetsen ▲▼
kunt u in de tabel met de opge-
toetsen ▲▼
te
4.5
Het instrument
uitschakelen
Het instrument wordt na korte tijd automatisch uitgeschakeld, als er geen toets
meer is ingedrukt, of het kan met behulp van START-toets 4 uitgeschakeld
worden. Datum, tijd en gebruiker blijven op het display zichtbaar, als in het
menu TIJD/ALARM de optie WEERGAVE IN is geselecteerd en bevestigd.
67
Page 72

NL
5 Diversen
5.1
Problemen en
oplossingen
5.2
Reiniging en
onderhoud
Wanneer op het display één van de hieronder beschreven foutmeldingen
verschijnt, kon het instrument niet soepel en correct de waarde van de bloeddruk vaststellen.
Foutmelding - Mogelijke oorzaken en oplossingen
ERR 1 - Er is geen pols vastgesteld.
Controleer of het manchet correct is bevestigd en of u uw pols op de hoogte
van het hart hebt getild.
ERR 2 - Niet-fysiologische drukimpulsen zijn vastgesteld die de meetwaarde
hebben beïnvloed. Oorzaak: Armbewegingen tijdens de meting. Herhaal de
meting bij een rustige armhouding en spreek niet tijdens de meting.
ERR 3 - Het opblazen van het manchet duurde te lang.
De oorzaak ervan kan mogelijkerwijs een lekke slangverbinding zijn of een niet
correct geplaatst manchet.
ERR 4 - Het verschil tussen de systolische en de diastolische druk is te groot.
Meet de bloeddruk nog een keer onder ontspannen omstandigheden en houdt
u hierbij nauwlettend aan de aanwijzingen. Indien de foutmelding na de
meeting opnieuw verschijnt, neem dan contact op met MEDISANA.
ERR 5 - Wegens onstabiele condities tijdens de meting is er geen gemiddelde
berekend. Herhaal de meting bij een rustige armhouding en spreek niet tijdens
de meting.
• Verwijder altijd eerst de batterijen voordat u het instrument reinigt.
• Gebruik geen aggressieve reinigingsmiddelen of sterke borstels.
• Reinig het instrument met een zachte met neutraal reinigingsmiddel
bevochtigde doek. In het instrument mag geen water binnendringen.
Gebruik het instrument pas nadat het volledig droog is.
• Verwijder de batterijen uit het instrument, als het over een langere periode
niet wordt gebruikt. Anders kunnen de batterijen leeglopen.
• Stel het instrument niet bloot aan direct zonlicht, beveilig het tegen vuil en
vochtigheid.
• Het manchet mag alleen opgeblazen worden als het op de pols is bevestigd.
• Meettechnische controle (alleen voor industrieel gebruik) :
Het instrument is door de fabrikant gekalibreerd voor een gebruiksduur van
twee jaar. De meettechnische controle is uiterlijk alle twee jaar vereist. De
controle is met verplichte betaling van de kosten en deze mag worden verricht
door een bevoegde instantie of een geautoriseerde servicedient - volgens de
„Medische producten - houder voorschrift".
5.3
Verwijderen
68
Ontdoet u zich van uw afgedankte elektrische apparaat op een milieuvriendelijke manier. Verpakkingen kunnen opnieuw worden gebruikt of in de grondstofkringloop gebracht, metalen onderdelen horen thuis bij de verzamelplaats
voor de recycling van oud ijzer, kunststoffen, elektrische en elektronische componenten dienen als elektrisch afval te worden verwijderd. Haal de batterijen
uit het apparaat voordat u het apparaat verwijdert. Gooi gebruikte batterijen
niet bij het huisvuil, maar breng deze naar de daarvoor bestemde afvalverwerking of lever deze in bij een speciaal daarvoor bestemd inzamelstation bij de
supermarkt of elektrawinkelier. Informatie hier-over is verkrijgbaar bij het afvalstation in uw buurt of bij uw leverancier.
Page 73

5 Diversen
NL
5.4
Richtlinjnen /
Normen
5.5
Technische
specificaties
Het bloeddrukmeetinstrument voldoet aan de Europese voorschriften EN 1060
deel 1 / 1995 en EN 1060 deel 3 / 1997. Het instrument voldoet aan de eisen
van de Europese standaardnorm EN 60601-1-2
Dit instrument voldoet aan de eisen van de EU-richtlijnen 93 / 42 / EEG voor
medische producten, klasse II a.
CE-keurmerk van het instrument volgens de EU-richtlijn 93 / 42 EWG.
BF-veiligheidsklasse: Typ BF
Gebruikers:
Het instrument is geschikt voor de niet-infusieve bloeddrukmeting bij volwassenen (dit betekent dat het voor uitwendig gebruik is bestemd).
Naam en model : MEDISANA bloeddrukmeter HGD
Displaysysteem : Digitale weergave in het
punt-matrix display
Meetmethode : Oscillometrisch
Spanning : 3 V=, 2 x 1,5 V Mignon AAA Alkaline
Meetbereik bloeddruk : 30 – 280 mmHg
Meetbereik pols : 40 – 200 slagen/min
Maximale meetafwijking van
de statische meetwaarden : ± 3 mmHg
Maximale meetafwijking van
de polswaarden : ± 5 % van de waarde
Drukopbouw : Automatisch met micropomp
Ontluchting : Automatisch
Autom. uitschakelen : Na ca. 30 seconden
Bedrijfsvoorwaarden : + 10 °C t/m + 40 °C,
15 - 85 % luchtvochtigheid
Opbergvoorwaarden : - 5 °C t/m + 50 °C
Afmetingen : 70 x 67 x 80 mm incl. manchet
Gewicht : ca. 140 g incl. Batterien
Artikelnummer : 51422
EAN-nummer : 4015588514227
In het kader van onze voortdurende inspanningen naar
verbeteringen, behouden wij ons het recht voor om qua
vormgeving en op technisch gebied veranderingen aan ons
product door te voeren.
69
Page 74

NL
5 Diversen / 6 Garantie
5.6
Tenslotte
6.1
Garantie en
reparatievoorwaarden
Wij wensen u veel plezier en succes bij het gebruik van de MEDISANA
bloeddrukmeter HDG en zijn er van overtuigd, dat u er gedurende lange tijd
vreugde aan zult beleven.
Probeert u ook eens voor uw welzijn de overige kwaliteitsproducten: als één
van de wereldwijd leidende ondernemingen op het Home Health Care gebied bieden wij u een uitgebreid sortiment aan op het gebied van
gezondheidscontrole, therapie thuis, alternatieve pijnstillende therapieën en
gekwalificeerde lichaamsverzorging.
Wendt u zich voor garantiegevallen altijd tot uw leverancier of tot onze
klantendienst.
Moet u het apparaat opsturen, stuur het dan samen met de klacht en een
kopie van de aankoopbon naar onze klantendienst.
Voor garantie gelden de volgende voorwaarden:
1. Voor de producten van MEDISANA geldt een garantietermijn van drie
jaar vanaf de datum van aankoop. Deze kan door middel van de verkoopbon of factuur worden aangetoond.
2. Alle klachten, die het gevolg zijn van materiaal of fabricagefouten
worden binnen de garantietermijn gratis verholpen.
3. Een geval van garantie leidt niet tot automatische verlenging van de
garantietermijn, noch voor het apparaat zelf noch voor de vervangen
onderdelen.
4. Uitgesloten van garantie zijn:
a. Alle schade die ontstaan is door ondeskundige behandeling, b.v. het
niet op de juiste wijze volgen van de gebruiksaanwijzing
b. Beschadigingen, die zijn ontstaan door reparaties door de koper of
een ander onbevoegd persoon.
c. Transportschade, die is ontstaan op weg van de verkoper naar de
verbruiker of tijdens het opsturen naar de klantendienst.
d. Toebehoren, die onderhevig zijn aan slijtage
5. De fabrikant neemt geen verantwoording voor directe of indirecte ver-
volgschade die door het apparaat veroorzaakt wordt. Ook niet als de
schade aan het apparaat als garantiegeval erkend is.
70
Mocht u vragen over deze of andere producten hebben, dan zullen wij deze
gaarne beantwoorden.
MEDISANA AG
Itterpark 7-9
D-40724 Hilden
Tel.: +49 (0) 2103 / 2007-60
Fax: +49 (0) 2103 / 2007-626
eMail: info@medisana.de
Internet: www.medisana.de
Het adres van de klantendienst vindt u op de laatste pagina.
Page 75
1 Turvallisuusohjeita
FIN
1.1
Sydämellinen
kiitos
1.2
Hyvinvointia
edistäviä ohjeita
Kiitoksia luottamuksesta! Olet ostanut MEDISANA laatutuotteen. Medisana
on yksi maailman johtavista terveydenhoitotuotteita valmistavista yrityksistä.
Jotta saat haluamasi tuloksen ja voit käyttää MEDISANA HGD verenpainemittaria
mahdollisimman pitkän aikaa, on hyvä lukea seuraavat käyttö- ja hoito-ohjeet
mahdollisimman huolellisesti ja myös noudattaa niitä.
VAROITUS
Älkää koskaan ryhtykö terapeuttisiin toimenpiteisiin
itsemittauksen perusteella. Älkää koskaan muuttako lääkärin
määräämän lääkkeen annostelua.
• Sydämen rytmihäiriöt aiheuttavat epäsäännöllisen pulssin, jolloin mittaus
oskillometrisillä mittareilla (rannemittari, olkavarsimittari) ei onnistu. Näissä
tapauksissa on annettava lääkärin mitata verenpaine perinteisellä
verenpainemittarilla ja stetoskoopilla.
• Jos sinulla on jokin muu sairaus esim. valtimotukoksia, on ennen
verenpainemittarin käyttöä keskusteltava lääkärin kanssa.
• Tätä laitetta ei voida käyttää kontrolloimaan sydämen tahdistimen
syketaajuutta.
• Raskaana olevien naisten on noudatettava tarvittavaa varovaisuutta ja
otettava huomioon oma rasituskykynsä. Tarpeen mukaan otetaan yhteys
hoitavaan lääkäriin.
• Jos mittauksen aikana esiintyy epämiellyttäviä oireita, esim. kipua ranteessa
tai muita oireita, toimi seuraavasti: tyhjennä mansetti välittömästi painamalla
START-painike 4 . Avaa mansetti ja ota se pois ranteesta. Ota yhteys
laitteen myyjään tai suoraan Medisanan edustajaan.
1.3
Mihin pitää
ehdottomasti
kiinnittää
huomiota
• Käytä laitetta ainoastaan sille määritettyyn tarkoitukseen ja käyttöohjeessa
annettujen ohjeiden mukaan. Jos laitetta käytetään muuhun kuin sille
määritettyyn käyttöön, sen takuu raukeaa.
• Joskus harvoin saattaa tapahtua, että laitteeseen tulee toimintahäiriö ja
mansetti jää pysyvästi täyteen pumpatuksi. Tässä tapauksessa mansetti on
avattava välittömästi.
• Laitetta ei saa käyttää sellaisten laitteiden läheisyydessä, jotka muodostavat
voimakasta sähköistä säteilyä, kuten esimerkiksi radiolähettimet. Ne saattavat
häiritä mittarin toimintaa.
• Lapset eivät saa käyttää laitetta. Lääkintätuotteet eivät ole leikkikaluja!
• Häiriötapauksissa laitetta ei saa korjata itse, koska silloin kaikki takuut
raukeavat. Korjaukset on teetettävä valtuutetussa huoltoyrityksessä.
• Suojaa laite kosteudelta. Jos laitteeseen kaikesta huolimatta pääsee vettä, on
paristot irrotettava välittömästi eikä laitetta saa enää käyttää. Ota yhteys
laitteen myyjään tai soita suoraan Medisanan numeroon. Yhteystiedot
löytyvät tämän käyttöohjeen osoitesivulta.
71
Page 76

FIN
1 Turvallisuusohjeita / 2 Tietämisen arvoista
1.4
Toimituksen
laajuus ja
pakkaus
2.1
Mikä
verenpaine on?
2.2
Kuinka mittaus
tapahtuu?
Tarkasta, että laitteessa ei ole vikaa.
Pakkauksesta pitää löytyä:
• 1 MEDISANA verenpainemittari HGD • 1 ohjelmisto-CD
• 2 paristoa (tyyppiä AAA, LR 03) 1,5V • 1 säilytyslaatikko
• 1 USB-kaapeli • 1 käyttöohje
Pakkauksia voidaan käyttää uudelleen tai ne voidaan kierrättää takaisin raakaainekiertoon. Hävitä tarpeeton pakkausmateriaali asianmukaisella tavalla.
Mikäli pakkausta avatessasi havaitset kuljetusvaurion, ota heti yhteyttä tuotteen myyneeseen liikkeeseen.
VAROITUS
Huolehdi siitä, etteivät pakkausmuovit joudu lasten käsiin.
On olemassa tukehtumisvaara!
Verenpaine on paine, joka muodostuu jokaisen sydämenlyönnin aikana
verisuonissa. Kun sydän supistuu
(= Systole) ja pumppaa verta valtimoihin, ja paine nousee. Paineen korkeinta
arvoa kutsutaan systoliseksi paineeksi ja se on verenpaineen mittauksessa
ensimmäinen arvo.
Kun sydänlihas lepää ottaakseen lisää verta, paine valtimoissa laskee. Kun
verisuonet ovat lepotilassa, mitataan toinen arvo - diastolinen paine.
HGD on verenpainemittari, joka on tarkoitettu verenpaineen mittaukseen
ranteesta. Mittauksen suorittaa mikroprosessori, joka arvioi painesensorin
avulla valtimon yläpuolelle muodostuvaa värähtelyä, kun verenpainemansettiin
pumpataan ilmaa tai siitä lasketaan ilmaa ulos.
2.3
Miksi on
järkevää mitata
verenpainetta
kotona?
72
MEDISANA on useiden vuosien kokemus verenpaineen mittauksesta.
MEDISANA -laitteiden mittausperiaatteen suuri tarkkuus vahvistetaan
laajoissa vaativien kansainvälisten standardien mukaan tehdyissä kliinisissä
tutkimuksissa. Tärkeä peruste kotona tapahtuville verenpaineen mittauksille
on se tosiasia, että mittaukset tehdään tutussa ympäristössä ja levollisissa
olosuhteissa. Erityisen merkittävä on niin sanottu „perusarvo“, joka mitataan
aamuisin heti heräämisen jälkeen ennen aamiaista.
Periaatteessa verenpaine tulisi mitata aina samaan aikaan ja samoissa
olosuhteissa. Silloin tulokset ovat keskenään vertailukelpoisia ja alkava
verenpainetauti voidaan havaita ajoissa. Jos verenpainetauti on kauan
havaitsematta, muiden sydän-verisuonitautien riski kasvaa.
Page 77

2 Tietämisen arvoista
TÄSSÄ OHJEEMME:
Mittaa verenpaineesi päivittäin ja säännöllisesti myös silloin,
kun sinulla ei ole oireita.
FIN
2.4
Verenpaineluokitus WHO:n
mukaan
2.5
Verenpaineen
vaihtelut
2.6
Mittauksiin
vaikuttaminen
ja mittausten
arvioiminen
Seuraavassa taulukossa ovat ohjearvot korkeille ja matalille verenpainearvoille
ilman, että ikä otetaan huomioon. Nämä arvot on määrittänyt Maailman
terveysjärjestö (WHO).
Matala verenpaine Normaali verenpaine
systolinen alle 100 systolinen 100–140
diastolinen alle60 diastolinen 60–90
Verenpainetaudin muotoja
Vaihe 1 Vaihe 2 Vaihe 3
lievästi kohonnut kohtalaisesti kohonnut huomattavan kohonnut
verenpaine verenpaine verenpaine
systolinen 140–159 systolinen 160–179 systolinen yli 180
diastolinen yli 90 diastolinen yli 95 diastolinen yli 110
Verenpaineeseen saattavat vaikuttaa monet eri tekijät. Voimakas ruumiillinen
rasitus, pelko, stressi tai vuorokauden aika, jolloin mittaus suoritetaan
vaikuttavat kaikki voimakkaasti mitattuihin tuloksiin. Yksilölliset
verenpainearvot vaihtelevat päivän mittaan ja eri vuodenaikoina erittäin paljon.
Korkeasta verenpaineesta kärsivillä nämä vaihtelut ovat erityisen suuria.
Tavallisesti verenpaine on korkeimmillaan ruumiillisessa rasituksessa ja alim
millaan yöllä unen aikana.
• Mittaa verenpaine useampaan kertaan ja tallenna tulokset ja vertaa tuloksia
sitten keskenään. Älä tee johtopäätöksiä yksittäisen mittaustuloksen
perusteella.
• Anna sellaisen lääkärin arvioida verenpainearvosi, joka tuntee aikaisemman
terveydentilasi ja sairautesi. Kun käytät laitetta säännöllisesti ja kirjoitat arvot
muistiin lääkäriä varten, on hyvä kertoa lääkärille tuloksista silloin tällöin.
• Muista verenpainetta mitatessasi, että päivittäisiin arvoihin vaikuttavat monet
eri tekijät. Tupakointi, alkoholin käyttö, lääkkeet ja ruumiillinen työ
vaikuttavat mittaustuloksiin eri tavoin.
• Mittaa verenpaine ennen ruokailua.
• Ennen verenpainemittausta on levättävä vähintään 5 minuuttia.
• Jos systolinen tai diastolinen mittausarvo vaikuttaa epätavalliselta (liian
korkealta tai liian matalalta), vaikka mittaus on suoritettu oikein, ja tämä
toistuu useammalla mittauskerralla, on syytä ottaa yhteys lääkäriin. Joskus on
myös mahdollista, että mittaus ei onnistu siksi, että pulssi on epäsäännöllinen
tai heikko. Silloin on myös syytä ottaa yhteys lääkäriin.
73
Page 78
FIN
3 Käyttöönotto
3.1
Paristojen
asentaminen /
poistaminen
3.2
Säätöjen Valinta
Asentaminen: Paina voimakkaasti peukalolla paristokotelon 5 suljinta lait-
teen ulkopuolella. Nosta kansi pois ja laita laitteen mukana toimitetut 2
paristoa (Alkaliparisto, tyyppi AAA) paristokoteloon. Huomioi paristojen oikea
suunta (kuva paristokotelossa). Laita paristokotelon kansi paikalleen ja paina
sitä niin, että kuulet sen naksahtavan paikalleen.
Irrottaminen: Paristonäyttö ilmestyy näyttöön paristojen muuttuessa liian
heikoiksi. Laite ei aloita verenpaineen mittausta START-painike 4 painal-
luksen jälkeen, vaihda paristot uusiin. Poista käytetyt paristot vetämällä
paristokotelon läpästä, ja aseta uudet paristot paikoilleen. Huomaa, etteivät
asetukset säily muistissa paristonvaihdon jälkeen.
PARISTO-TURVAOHJEITA
• Pidettävä poissa lasten ulottuvilta! • Ei saa ladata uudelleen!
• Ei saa oikosulkea! • Ei saa heittää tuleen!
• Älä heitä käytettyjä paristoja tai akkuja kotitalousjätteisiin,
vaan ongelmajätteisiin tai toimita ne alan liikkeen
paristonkeräyspisteeseen.
MEDISANA HGD mittarilla voidaan valita erilaisia säätöjä henkilökohtaisten
tarpeiden mukaan painamalla vain kerran MENU-painike 2 . Ensimmäisellä
käyttökerralla MENU-painike 2 painettaessa näkyvät valikko-osassa seuraavat
tiedot englanninkielisinä:
MEASURING MODE => MITTAUS MOODI
USER => KÄYTTÄJÄ
CLEAR MEMORY => TYHJENNÄ MUISTI
TIME / ALARM => AIKA/HÄLYTYS
LANGUAGE => KIELI
CONTRAST => KONTRASTI
PC-LINK => PC-LINKKI
Yksittäisiä valikkoalueita voidaan ohjata VALINTA-painikkeet ▲▼ ja ne
saadaan näkyviin painamalla MENU-painike 2 . Kulloiseltakin valikkoalueelta
poistutaan painamalla START-painike 4 lyhyesti, ja näyttökenttään tulevat
jälleen näkyviin päivämäärä/kellonaika ja käyttäjä.
3.2.1
Mittausmoodin
määrittäminen
74
Valikkoalueella mittausmoodissa „MEASURING MODE“ voit valita joko
standardimittauksen ( 1 ) tai 3/MAM-mittauksen ( 3 Measurement Average
Mode ).
3/MAM-menetelmä on suositeltavampi, jos verenpaine vaihtelee paljon. Kun
verenpaine mitataan 3 kertaa 15 sekunnein välein, eliminoidaan voimakkaasti
poikkeavat arvot. Jos poikkeamat ovat erittäin suuret, voidaan joskus mitata
vielä 4. arvo. Kun kaikki arvot on mitattu laite laskee painotetun keskiarvon,
joka näkyy näytöllä. Tällä tavalla minimoidaan väärien mittausten vaara.
Page 79
3 Käyttöönotto
Määritetty mittausmoodi, jonka voi tunnistaa valitun mittausmenetelmän
symbolin alla näkyvästä mustasta palkista, vahvistetaan painamalla kerran
MENU-painike 2 .
Sen jälkeen tulevat näytöllä näkyviin päivämäärä, kellonaika ja käyttäjätiedot.
FIN
3.2.2
Käyttäjän valinta
ja tunnistaminen
3.2.3
Arvojen
poistaminen
MEDISANA HGD mittarille voidaan valita kaksi määritettyä käyttäjää ( I tai II )
tai mittaus voidaan suorittaa ilman käyttäjävarausta ( ) Molemmilla
määritetyillä käyttäjillä ( I tai II ) on käytössään 30 tallennuspaikkaa mittaustuloksia varten. Ilman käyttäjävarausta tallennettu mittaustulos tallennetaan vain
seuraavaan mittaukseen asti.
VALINTA-painikkeet ▲▼ voit valita halutun käyttäjän, jonka voi tunnistaa
symbolien alapuolella näkyvästä mustasta palkista. Valinta vahvistetaan
painamalla MENU-painike 2 kerran.
Lisäksi käyttäjälle ( I tai II ) voidaan varata 6-numeroinen tai -kirjaiminen
tunnisteyhdistelmä. VALINTA-painikkeet ▲▼ painamalla voidaan päästä
haluttuun kirjaimeen tai haluttuun merkkiin. Jos valintanäppäimiä painetaan
tauotta, näyttö saadaan hyppäämään aina seuraavan merkin eteenpäin,
kunnes näyttökentässä näkyy haluttu merkki. Nyt voit päästää painikkeen ja
vahvistaa valinnan MENU-painike 2 painamalla.
Kun käyttäjän määritys on valmis, valikosta voidaan poistua MENU-painike 2
painamalla. Voit myös poistua suoraan valintavalikosta käyttäjän määrittämisen
jälkeen painamalla lyhyesti START-painike 4 . Näytöllä näkyvät sen jälkeen
päivämäärä, kellonaika ja käyttäjätiedot.
Tässä valikossa voit kutsua esiin käyttäjälle I tai II jopa 30 tallennettua arvoa
sekä poistaa nämä halutessasi. Sitä ennen on määritettävä käyttäjä kohdassa
3.2.2 annettujen ohjeiden mukaan..
VALINTA-painikkeet ▲▼ voit valita, haluatko pyyhkiä pois yhden mittaustu-
loksen (SINGLE) vai kaikki mittaustulokset (ALL). Tehdyt asetukset voit tunnistaa näytön alapuolella näkyvästä mustasta palkista.
Jos haluat pyyhkiä pois vain yhden mittaustuloksen (SINGLE-Modus), näkyvät
näytöllä MENU-painike 2 painamisen jälkeen kaikki käyttäjälle tallennetut mittaustulokset. Voit valita poistettavan mittaustuloksen VALINTA-painikkeet
▲▼ Näyttökentän yläosassa näkyy, milloin tämä arvo on mitattu. Arvon
poistamisen vahvistat painamalla MENU-painike 2 , ja jos et halua poistaa
mitään tietoa, poistu valikkomoodista painamalla kerran START-painike 4 .
Jos haluat poistaa kaikki tallennetut mittaustulokset, valitse ALL-moodi. Vahvista arvojen poistaminen painamalla MENU-painike 2 kerran lyhyesti, ja jos et
halua poistaa mitään tietoa, poistu valikosta painamalla START-painike 4 .
3.2.4
Ajan / hälytyksen
määrittäminen
Tässä valikossa voit määrittää päivämäärän, kellonajan ja hälytyksen.
Ensimmäisenä vilkkuu näytöllä vuosiluku. Painamalla VALINTA-painikkeet ▲▼
voit määrittää haluamasi vuosiluvun, jonka vahvistat MENU-painike
malla.
Sen jälkeen voit samalla tavoin määrittää kuukauden / päivän / tunnin ja
sekunnin. Kun kaikki nämä tiedot on syötetty, voit määrittää ajankohdan 1. ja
2. hälytykselle.
2 paina-
75
Page 80

FIN
3 Käyttöönotto / 4 Käyttö
Jos et halua määrittää hälytysaikaa, valitse VALINTA-painikkeet ▲▼ hälytysajan
vahvistamisen jälkeen yliviivattua kelloa esittävä symboli. Kun tämä symboli
vilkkuu, vahvista valinta painamalla MENU-painike 2 . Silloin hälytys on
kytketty pois käytöstä. Sen jälkeen voit valita, näkyvätkö päivämäärä,
kellonaika ja käyttäjä aina näyttökentässä. VALINTA-painikkeet ▲▼ valitset
näyttö PÄÄLLÄ tai POIS. Kulloinkin määritetty moodi vilkkuu ja sen määritys
vahvistetaan MENU-painike 2 painamalla.
3.2.5
Kielen
valitseminen
3.2.6
Kontrastin
säätäminen
3.3
PC-linkki
4.1
Verenpainemansetin
kiinnittäminen
Valikosta „Language“ voit valita, millä kielellä valikkoa ohjataan. Tiedot
näyttökentässä voidaan esittää 5 eri kielellä.
• ENGLISH • DEUTSCH • FRANCAIS • ESPANOL • ITALIANO
Valitse kieli VALINTA-painikkeet ▲▼ ja vahvista valinta painamalla lyhyesti
MENU-painike 2 . Vahvistamisen jälkeen tulee näytölle näkyviin aika ja käyttäjä.
Valikossa voidaan „Contrast“ muuttaa asteittaan VALINTA-painikkeet ▲▼
Kun haluttu kontrasti on määritetty, vahvista valinta MENU-painike 2 .
Laitteen mukana tulee ohjelmisto-CD sekä USB-kaapeli, joiden avulla voit
siirtää tietoja MEDISANA HGD -verenpainemittarista USB-liitännän avulla
tietokoneellesi. Liitä USB-kaapeli laitteesi sivulla olevaan USB-rajapintaan 6 ja
tietokoneesi USB-tuloholkkiin. MENU-painike 2 ja VALINTA-painikkeet ▲▼
avulla valitset valikkokohdan ”PC-Link” ja vahvistat valinnan painamalla
MENU-painike 2 uudelleen. HGD:n näyttöön ilmestyy aaltoviivoja, jotka
symbolisoivat yhteyttä tietokoneeseen. Aseta CD tietokoneeseesi ja suorita
sen asennus. Ohjelmisto on itseselitteinen. CD:n ollessa levyasemassa asennusrutiini käynnistyy automaattisesti. Seuraa yksinkertaisesti tietokoneesi
näytölle ilmestyviä ohjeita. Ongelmatapauksessa ohjelmisto tarjoaa laajoja
aputiedostoja.
Tulkintaohjelmisto tarjoaa mahdollisuuden mitattujen arvojen esittämiseen
graafisesti tai taulukkomuodossa.
a. Kiinnitä verenpainemansetti vasempaan
ranteeseen.
Pidä huoli, että
• näyttökenttä on ranteen sisäpuolella.
• ettei ranteessa ole koruja, kelloa tms. Laitteen
on oltava suoraan iholla, koska se ei kykene
mittaamaan kankaan läpi.
b. Kiinnitä painemansetti niin, että se on tiukasti
paikallaan, mutta ei kiristä. Mansetti ei saa olla
millään tavalla kiertyneenä.
76
Page 81

4 Käyttö
FIN
4.2
Oikea
mittausasento
4.3
Verenpaineen
mittaaminen
4.4
Tulosten
tallentaminen
• Mittaa verenpaine istuen.
• Rentouta käsivarsi ja laske se kevyesti esimerkiksi pöydälle.
• Nosta ranne niin korkealle, että painemansetti on sydämen korkeudella.
• Pysy mittauksen aikana hiljaa paikallasi: älä liiku äläkä puhu, koska se
saattaa muuttaa mittausarvoja.
a. Paina START-painike 4 .
• Näyttökentässä näkyy mittaussymboli, jossa lukee „READY“.
• Sen jälkeen mansetti täyttyy. Samalla nouseva paine näkyy symbolisesti ja
näytöllä näkyy vuorotellen teksti „BE QUIET“ ja „PLEASE RELAX“.
• Jos START-painike 4 painetaan täytön aikana, täyttö keskeytyy. Laitteen
virta katkeaa ja mansetti tyhjenee.
b. Kun täyttö on valmis, mittaus alkaa automaattisesti niin, että täytetty
mansetti tyhjenee hitaasti. Samanaikaisesti näkyy näyttökentässä sykkeen
käyrä. Vuorotellen näytölle tulevat näkyviin tekstit „DO NOT MOVE“ ja
„DO NOT TALK“, jotka muistuttavat, ettei mittauksen aikana saa liikkua tai
puhua.
c. Ilma tyhjenee aluksi tasaisella nopeudella.
Kun sydämen lyönnit välittyvät ensi kerran, tyhjennys synkronisoidaan
sydämen tahtiin, kunnes mittaus on valmis. Samalla näytöllä vilkkuu
sydänsymboli . Mittaus on valmis, kun mansetti tyhjenee äkillisesti ja
merkintöjen SYS, DIA ja PUL viereen tulevat näkyviin arvot.
Laitteessa on yli 30 tallennuspaikkaa 2 eri käyttäjälle. Viimeisin mittaustulos
tallentuu automaattisesti vapaaseen tallennuspaikkaan, jolla on järjestyksessä
seuraava tallennusnumero.
Laitteen ollessa pois päältä voidaan tallennetut arvot kutsua esiin painamalla
VALINTA-näppäimiä ▲▼. Vastaavilla VALINTA-näppäimillä ▲▼ voidaan
arvotaulukossa siirtyä ylös- tai alaspäin.
MENU-painike 2 painamalla näytetään ajankohtaisen muistin tallennetut
arvot taulukkomuodossa. Painamalla MENU-painike 2 uudelleen näytetään
arvot graafisesti.
4.5
Laitteen
sulkeminen
Laite sulkeutuu automaattisesti hetken kuluttua, jos mitään painiketta ei
paineta. Vaihtoehtoisesti laite voidaan sulkea painamalla START-painike 4 .
Näytölle jäävät näkyviin näyttökenttään päivämäärä, kellonaika ja käyttäjä, jos
valikkokohdassa (AIKA/HÄLYTYS) ZEIT/ALARM valittiin vaihtoehto (NÄYTTÖ
PÄÄLLÄ) ANZEIGE EIN ja valinta vahvistettiin.
77
Page 82

FIN
5 Sekalaista
5.1
Viat ja niiden
Korjaaminen
5.2
Puhdistus ja Hoito
Jos näytöllä näkyy jokin seuraavista vikailmoituksista, laite ei kyennyt
välittämään verenpainearvoa moitteettomasti.
Vikailmoitus - Mahdollisia syitä ja ratkaisuja
ERR 1 - Sydämen sykettä ei voitu havaita. Varmista, että mansetti on oikein
paikallaan ja pidä rannetta sydämen korkeudella.
ERR 2 - Todettiin epäfysiologisia paineimpulsseja, jotka vaikuttivat mitattavaan
arvoon. Syy: Käsivartta liikutettiin mittauksen aikana. Toista mittaus ja pidä
käsivarsi paikallaan älä puhu mittauksen aikana.
ERR 3 - Paineen saaminen mansettiin kestää liian kauan.
Syynä voi olla se, että letkuliitos ei ole tiivis tai mansetti ei ole oikein paikallaan.
ERR 4 - Systolisen ja diastolisen paineen välinen ero on liian suuri. Mittaa
verenpaine uudelleen tarkalleen käyttöohjeiden mukaan ja pidä käsivarsi hiljaa
paikallaan. Jos uudelleenmittauksessa tulee sama virheilmoitus, ota yhteys
MEDISANAn edustajaan.
ERR 5 - Mittauksen aikana vallinneiden epästabiilien olosuhteiden takia
keskiarvoa ei voitu laskea. Mittaa verenpaine uudelleen ja pidä käsivarsi hiljaa
paikallaan äläkä puhu mittauksen aikana.
• Poista paristot ennen laitteen puhdistamista.
• Älä koskaan käytä voimakkaita puhdistusaineita tai karkeita harjoja.
• Puhdista mittari miedossa saippualiuoksessa nihkeäksi kostutetulla pehmeällä
kankaalla. Laitteeseen ei saa päästää vettä. Laitetta ei saa käyttää ennen kuin
se on kokonaan kuiva.
• Ota paristot pois laitteen sisältä, jos laite on pitkään käyttämättä. Paristot
saattavat muuten vuotaa laitteen sisään.
• Suojaa laite suoralta auringonvalolta, lialta ja kosteudelta.
• Mansettiin saa täyttää ilmaa vain, kun se on kiedottuna ranteen ympäri.
• Mittaustekninen kontrolli (koskee vain ammatillista käyttöä) :
Valmistaja on kalibroinut laitteen kahdeksi vuodeksi. Mittaustekninen
kontrolli on suoritettava viimeistään kahden vuoden kuluttua, ja sen saa
suorittaa vain ammattitaitoinen henkilö. Kontrolli on maksullinen, ja sen voi
suorittaa joko vastuullinen viranomainen tai valtuutettu huoltopalvelu „Lääkintälaitteiden käyttöä koskevien säännösten" mukaan.
5.3
Hävittäminen
78
Kun sähkölaitetta ei enää käytetä, huolehdi sen hävittämisestä ympäristöystävällisesti!
Pakkaukset voidaan käyttää uudestaan tai ne voidaan kierrättää. Kierrätyskelpoiset metalliosat, muovit, sähköiset ja elektroniset osat on hävitettävä
sähköromuna.
Poista paristo ennen laitteen hävittämistä. Älä heitä käytettyjä paristoja ja
akkuja kotitalousjätteisiin, vaan ongelmajätteisiin tai toimita ne alan liikkeessä
olevaan keräyspisteeseen.
Ota yhteyttä paikalliseen viranomaiseen tai myyjäliikkeeseen hävityksen
suorittamiseksi.
Page 83

5 Sekalaista
FIN
5.4
Direktiivit /
Normit
5.5
Tekniset tiedot
Verenpainemittari vastaa eurooppalaisia määräyksiä EN 1060 osa 1 / 1995 ja
EN 1060 osa 3 / 1997.
Laite vastaa eurooppalaisen standardinormin EN 60601-1-2 vaatimuksia.
Laite täyttää EY-direktiivin 93 / 42 / ETY luokan II a lääkintälaitteille asetetut
vaatimukset.
Laitteen CE-merkintä viittaa EY-direktiiviin 93 / 42 ETY
Laiteluokitus: Tyyppi BF
Käyttäjäkunta:
Laite soveltuu aikuisten ei-invasiiviseen verenpainemittaukseen (mikä
tarkoittaa, että se soveltuu ulkoiseen käyttöön).
Nimi ja malli : MEDISANA verenpainemittarin HGD
Näyttöjärjestelmä : Digitaalinen näyttö pistematriisinäytöllä
Mittausmenetelmä : Oskillometrinen
Jännitelähde : 3 V=, 2 x 1,5 V Mignon AAA Alkaline
Verenpaineen mittausalue : 30 – 280 mmHg
Sykkeen mittausalue : 40 – 200 lyöntiä / min
Staattisen paineen
mittauspoikkeama : ± 3 mmHg
Sykearvojen maksimaalinen
mittauspoikkeama : ± 5 % des arvosta
Paineenmuodostus : Automaattisesti mikropumpulla
Ilmanpäästö : Automaattinen
Autom. sammutus : Noin 30 sekunnin kuluttua
Käyttöedellytykset : Välillä + 10 °C ja + 40 °C,
ilmankosteus 15 - 85 %
Säilytysedellytykset : Välillä - 5 °C ja + 50 °C
Mitat : 70 x 67 x 80 mm sis. mansetin
Paino : Noin 140 g sis. paristot
Tuotenumero : 51422
EAN-numero : 4015588514227
Jatkuvan tuotekehittelyn myötä pidätämme itsellämme
oikeuden teknisiin ja muotoilullisiin muutoksiin.
79
Page 84

FIN
5 Sekalaista / 6 Takuu
5.6
Lopuksi
6.1
Takuu- ja
korjausehdot
Toivotamme sinulle paljon iloa ja menestystä MEDISANA HGD -verenpainemittarin käytössä, ja olemme varmoja siitä, että siitä on sinulle iloa
todella pitkään.
Kokeile oman hyvinvointisi vuoksi myös muita laatutuotteitamme, sillä
kaikkialla maailmassa johtaviin yrityksiin Home Health Care (kodin
terveydenhuolto) alalla kuuluvana yrityksenä tarjoamme laajan
tuotevalikoiman sellaisilla aloilla kuin terveystarkastukset, fysioterapia
kotona, vaihtoehtoinen kivun hoito ja laadukkaat hygieniatuotteet.
Käänny takuutapauksessa alan liikkeen tai suoraan asiakaspalveluhuollon
puoleen. Jos laite tulee lähettää huoltoon, ilmoita vika ja lähetä laitteen
mukana kopio ostokuitista.
Tällöin ovat voimassa seuraavat takuuehdot:
1. MEDISANA-tuotteille myönnetään kolmen vuoden takuu myyntipäiväyk-
sestä. Myyntipäiväys tulee todistaa takuutapauksessa ostokuitilla tai
laskulla.
2. Materiaali- tai valmistusvioista johtuvat puutteet korjataan takuuaikana
maksutta.
3. Takuukorjaus ei pidennä takuuaikaa, ei laitteelle eikä vaihdetulle raken-
neosalle.
4. Takuun ulkopuolelle jäävät:
a. kaikki vahingot, jotka syntyvät asiattomasta käsittelystä, esim.
käyttöohjeen noudattamatta jättämisestä.
b. Vahingot, joiden syyksi voidaan jäjittää ostajan tai asiattoman
kolmannen osapuolen suorittama kunnossapito tai toimet.
c. Kuljetusvauriot, jotka ovat syntyneet matkalla valmistajalta kulut-
tajalle tai asiakaspalveluun lähetettäessä.
d. Lisäosat, jotka ovat alttiina normaalille kulutukselle.
5. Vastuu laitteen aiheuttamista välittömistä tai välillisistä seurausvahin-
goista on myös poissuljettu, jos laitteelle aiheutunut vahinko hyväksytään
takuutapaukseksi.
80
Jos sinulla on kysyttävää tästä tai muista tuotteista, vastaamme kysymyksiisi
erittäin mielellämme.
MEDISANA AG
Itterpark 7-9
D-40724 Hilden
Tel.: +49 (0) 2103 / 2007-60
Fax: +49 (0) 2103 / 2007-626
eMail: info@medisana.de
Internet: www.medisana.de
Asiakaspalvelun osoite löytyy viimeiseltä sivulta.
Page 85

1 Säkerhetshänvisningar
S
1.1
Vi tackar
1.2
Hänvisningar
för Ert
välbefinnande
Tack för Ert förtroende och hjärtliga gratulationer! Ni har valt en kvalitetsprodukt från MEDISANA, ett av världens ledande företag i hälsobranschen.
För att Ni skall kunna uppnå önskad framgång och ha glädje av Er MEDISANA
blodtrycksmätare HGD under så lång tid som möjligt, rekommenderar vi Er att
noga läsa igenom dessa anvisningar gällande användning och vård.
VARNING
Genomför inga medicinska åtgärder baserade på egen
mätning. Ändra aldrig dosering av medicin som skrivits ut
av läkare.
• Hjärtfrekvensstörningar orsakar en oregelbunden puls. I dessa fall är den
oscillometriska mättekniken olämplig (handleds- och överarmsmätare). Låt
istället en läkare genomföra blodtrycksmätningen med den traditionella
stetoskop metoden.
• Ni bör även samråda med er läkare om Ni lider av andra sjukdomar, t.ex.
arteriella slutningssjukdomar, innan Ni använder apparaten
• Apparaten lämpar sig inte för att kontrollera frekvensen på en pacemaker.
• Gravida bör vidtaga nödvändiga försiktighetsåtgärder och ta hänsyn till sin
individuella belastningsförmåga. Tala vid behov med Er läkare.
• Om Ni skulle känna obehag under pågående mätning, t.ex. smärta i
handleden eller andra besvär, agera då enligt följande. Tryck in START-
knappen 4 för att släppa ut luften ur manschetten. Lossa manschetten och
tag av den från handleden. Vänligen kontakta Er återförsäljare eller
informera oss direkt.
1.3
Detta måste
ovillkorligen
beaktas
• Tänk alltid på följande Använd endast apparaten för de syften som beskrivs
i denna bruksanvisning och enligt anvisningarna som ges i den. Om den
används för andra syften förfaller garantin.
• Om manschetten, till följd av någon sällsynt felfunktion, förblir uppblåst
under mätningen måste den omedelbart öppnas.
• Apparaten får inte användas i närheten av utrustning som sänder ut stark
elektrisk strålning, som exempelvis radiosändare. I annat fall kan dess
funktion påverkas negativt.
• Apparaten får inte användas av barn. Medicinsk utrustning är inte leksaker!
• Försök inte att reparera utrustningen själv vid funktionsstörningar, eftersom
garantin förfaller i sådana fall. Låt endast auktoriserade serviceställen
genomföra reparationer.
• Skydda apparaten mot fukt. Om vätska trots allt skulle komma in i
apparaten, måste batterierna omedelbart tas ut och fortsatt användning
ställas in. Vänligen kontakta Er återförsäljare eller informera oss direkt. På
adressidan finns uppgifter om hur ni kan kontakta oss.
81
Page 86

S
1 Säkerhetshänvisningar / 2 Värt att veta
1.4
Leveransomfång
och förpackning
2.1
Vad är blodtryck?
2.2
Hur fungerar
mätningen?
Vänligen börja med att kontrollera att utrustningen är komplett. Följande delar
skall medfölja vid leverans:
• 1 MEDISANA Blodtrycksmätare HGD • 1 CD mjukvara
• 2 Batterier (typ AAA LR03) • 1 Förvaringsbox
• 1 USB-kabel • 1 Bruksanvisning
Förpackningar kan återanvändas eller lämnas till återvinning. Se till att förpackningsmaterial som inte längre behövs tas omhand på korrekt sätt. Upptäcks skador när produkten packas upp så kontakta omgående inköpsstället.
VARNING
Se till att förpackningsmaterial i plast hanteras utom räckhåll
för barn. Kvävningsrisk!
Blodtryck är det tryck som uppstår i kärlen vid varje hjärtslag. När hjärtat dras
samman (=systol) och blod pumpas ut i artärerna, stiger blodtrycket. Det
högsta värdet kallas för det systoliska trycket. Detta är det första värdet som
mäts vid blodtrycksmätningar.
När hjärtmuskulaturen slappnar av för att släppa in nytt blod, sjunker trycket i
artärerna. När kärlen är avslappnade mäts det andra värdet – det diastoliska
trycket.
HGD är en blodtrycksmätare, avsedd för mätning på handleden. Mätningen
utförs av en mikroprocessor som utvärderar variationerna som en trycksensor
mäter när blodtrycksmanschetten pumpas upp och töms kring artären.
2.3
Varför är det
bra att mäta
blodtrycket
hemma?
82
MEDISANA har mångårig erfarenhet av allt som har med blodtrycksmätning
att göra. Mätprincipen som används av MEDISANA-utrustning har hög
noggrannhet. En rad omfångsrika kliniska studier, som genomförts enligt
sträng internationell standard, belägger detta. Ett viktigt argument för
blodtrycksmätning i hemmet är att mätningen genomförs i en välkänd miljö
och i avslappnat tillstånd. Det viktigaste blodtrycksvärdet är det så kallade
„basvärdet“, som mäts på morgonen efter att Ni stigit upp och före frukosten.
En grundregel är att blodtrycket i största möjliga mån alltid bör mätas vid
samma tid och under liknande förutsättningar. Detta gör att värdena är
jämförbara, vilket gör att Ni har betydligt större chans att upptäcka ett höjt
blodtryck i ett tidigt stadium. Om en blodtryckshöjning inte upptäcks i tid
stiger risken för hjärt- och kärlsjukdomar.
Page 87

2 Värt att veta
DÄRFÖR REKOMMENDERAR VI:
Mät Ert blodtryck dagligen och regelbundet, även när Ni inte
har några besvär.
S
2.4
Blodtrycksklassificering
enligt WHO
2.5
Variationer i
blodtrycket
2.6
Påverkan och
utvärdering av
mätresultat
Nedan visas riktvärden för högt och lågt blodtryck utan hänsyn till åldern. Dessa
värden har definierats av Världshälsoorganisationen (WHO).
Lågt blodtryck Normalt blodtryck
systolikt under 100 systolikt 100–140
diastoliskt under 60 diastoliskt 60–90
Former av högt blodtryck
Stadium 1 Stadium 2 Stadium 3
högt blodtryck: lätt högt blodtryck: medel starkt högt blodtryck: starkt
systolikt 140–159 systolikt 160–179 systolikt över 180
diastoliskt över 90 diastoliskt över 95 diastoliskt över 110
Blodtrycket kan påverkas av en rad faktorer. Exempelvis har tungt
kroppsarbete, rädsla, stress eller tidpunkten på dygnet när mätningen
genomförs avsevärd inverkan på mätresultatet. Värdena för det personliga
blodtrycket varierar mycket under dagens och årets lopp. Hos patienter med
högt blodtryck är variationerna speciellt markanta. I vanliga fall är blodtrycket
högst när kroppen ansträngs och lägst på natten när man sover.
• Mät blodtrycket ett flertal gånger och spara värdena i datorns minne. Jämför
dessa värden med varandra. Dra inga slutsatser från ett enstaka mätresultat.
• Blodtrycksvärdena bör alltid bedömas av en läkare som är förtrodd med Er
tidigare hälsoutveckling. Om Ni använder apparaten regelbundet och
antecknar värdena, bör Ni emellanåt informera läkaren om förloppet.
• När Ni genomför blodtrycksmätning, tänk då på att många faktorer kan
påverka mätresultatet. Exempelvis påverkar rökning, alkohol, mediciner och
kroppsarbete värdena på olika sätt.
• Mät blodtrycket före måltider.
• Innan Ni mäter blodtrycket bör Ni ha vilat i minst 5 minuter.
• Om Ni upprepade gånger uppmätt ett ovanligt (för högt eller för lågt)
systoliskt eller diastoliskt värde, trots att utrustningen används på korrekt
sätt, bör Ni informera Er läkare. Detta gäller även i de sällsynta fall, när
mätningen inte kan genomföras p.g.a. en oregelbunden eller mycket svag
puls.
83
Page 88
S
3 Ibruktagning
3.1
Sätta i /
ta ur batterier
3.2
Inställningar
Insättning: Tryck in batterifackets lock 5 på apparatens utsida hårt med hjälp
av tummen. Lyft locket och lägg i den två batterierna som medföljde leveransen (alkaline- batterier, typ AA). Var noga med batteriets polaritet (figur i
batterifacket). Sätt på batterilocket igen och tryck fast det så att Ni hör att låset
stängs.
Urtagning: Batterisymbolen visas i displayen så snart batterierna blir för svaga.
Apparaten påbörjar inte längre blodtrycksmätning när START-knappen
tryckts in. Sätt i nya batterier. Tag ur de förbrukade batterierna genom att dra
i bandet i batterifacket och lägg i nya batterier. Tänk på att inställningarna inte
förblir sparade efter isättning av nya batterier.
SÄKERHETSANVISNINGAR FÖR BATTERI
• Förvaras utom räckhåll för barn! • Ej uppladdningsbart!
• Får ej kortslutas! • Får ej kastas i öppen eld!
• Kasta inte förbrukade batterier, engångs eller
uppladdningsbara, i hushållssoporna utan lämna dessa till
batteriinsamling vid återvinningsstation eller till insamling
i fackhandeln.
Om MENU-knappen 2 trycks in en gång kan Ni ställa in MEDISANA HGD för
Era individuella behov. När apparaten tas i bruk första gången visas följande
text meny på engelska om MENU-knappen 2 trycks in:
MEASURING MODE => MÄT-MODUS
USER => ANVÄNDARE
CLEAR MEMORY => TÖM MINNET
TIME / ALARM => TID/ALARM
LANGUAGE => SPRÅK
CONTRAST => KONTRAST
PC-LINK => PC-ANSLUTNING
Respektive undermeny kan markeras med hjälp av INSTÄLLNINGS-knapparna
▲▼ och tas fram med ett tryck på MENU-knappen 2 . Genom ett kort tryck
på START-knappen 4 kan Ni lämna respektive meny. I displayen visas då
datum/tid och användare.
4
3.2.1
Ställ in mätmodus
84
I undermenyn mätmodus „MEASURING MODE“ kan Ni välja mellan standard
mätmetoden (1) och 3/MAM mätmetoden (3 Measurement Average Mode).
Med standard mätmetoden (1) mäts blodtrycket en gång och värdet sparas.
Genom att trycka på piltangenten kommer Ni till 3/MAM mätmetoden.
3/MAM metoden lämpar sig särskilt om Ni lider av blodtrycksvariationer. Tack
vare 3 mätningar med 15 sekunders mellanrum kan starka avvikelser
elimineras. Vid stora avvikelser kan en 4 mätning genomföras. Efter avslutad
mätning beräknas ett avvägt medelvärde som visas.
Page 89

3 Ibruktagning
På detta sätt minimeras risken för felaktiga mätresultat avsevärt.
Vald mätmodus kännetecknas genom att en svart balk visas under dess
symbol. Bekräfta valet genom att trycka in MENU-knappen 2 en gång.
Därefter visas datum, tid och användare i displayen.
S
3.2.2
Välj och namnge
användare
3.2.3
Töm minnet
Med MEDISANA HGD kan mätningar genomföras för två fast definierade
användare ( I och II ) eller som enstaka mätning utan fastlagd användare ( )
durchzuführen. För varje definierad användare ( I och II ) kan 30 mätresultat
sparas. Resultatet från enstaka mätningar sparas endast till dess att nästa
mätning genomförs.
Med hjälp av INSTÄLLNINGS-knapparna ▲▼ kan önskad användare väljas. Ett
svart streck under respektive symbol visar vilken användare som valts ut.
Bekräfta valet genom att trycka på MENU-knappen 2 en gång.
Därefter kan Ni namnge användare I eller II med hjälp av en bokstavs- eller
sifferkombination om 6 tecken. Genom att trycka in INSTÄLLNINGS-knap-
parna ▲▼ erhålls den önskade bokstaven respektive siffran.
Om INSTÄLLNINGS-knapparna ▲▼ trycks in kontinuerligt hoppar bokstaven/siffran ett steg vidare. Håll knappen intryckt till dess att önskad bokstav/
siffra visas. Släpp inställningsknappen och bekräfta valet med MENU-knappen
2 . När använ daren namngivits kan Ni lämna undermenyn genom att trycka
på MENU-knappen 2 . Med hjälp av ett kort tryck på START-knappen 4 kan
Ni även lämna undermenyn direkt efter att Ni valt användare.
Därefter visas datum, tid och vald användare i displayen.
I denna meny kan upp till 30 sparade värden för användare I eller II aktiveras
och även raderas om så önskas. Välj användare enligt punkt 3.2.2.
Med hjälp av INSTÄLLNINGS-knapparna ▲▼ kaN Ni välja om Ni vill ta bort ett
enstaka mätvärde (SINGLE) eller samtliga mätvärden (ALL). Vilken inställning
som valts markeras av en svart balk under respektive text.
Om ett enstaka mätresultat skall tas bort (SINGLE-modus), visas samtliga
sparade mätvärden när MENU-knappen 2 trycks in en gång. Markera värdet
som skall tas bort med hjälp av INSTÄLLNINGS-knapparna ▲▼ övre delen av
displayen anges när detta värde uppmättes. Bekräfta valet av värdet som skall
tas bort genom att trycka in MENU-knappen 2 , eller lämna undermenyn utan
att ta bort något värde genom att trycka på START-knappen 4 en gång. Om
samtliga sparade värden skall tas bort, välj då ALL-modus. Bekräfta valet
genom att trycka in MENU-knappen 2 , eller lämna undermenyn utan att ta
bort något värde genom att trycka på START-knappen 4 .
3.2.4
Ställ in tid /
alarm
Med hjälp av denna undermeny kan Ni ställa in datum, tid och alarm. Först
visas årtalet i displayen. Med hjälp av INSTÄLLNINGS-knapparna ▲▼ väljs
önskat årtal. Inställningen bekräftas med MENU-knappen 2 .
Därefter kan månad/dag/timme/minuter och sekunder ställas in på
motsvarande sätt. När detta gjorts kan tidpunkten för alarm 1 och 2 ställas in.
Om Ni inte vill ställa in något alarm, välj då symbolen med den genomstrukna
klockan med hjälp av INSTÄLLNINGS-knapparna ▲▼ efter att alarmtiden
bekräftats.
85
Page 90

S
3 Ibruktagning / 4 Användning
Bekräfta ert val med MENU-knappen 2 när denna symbol blinkar. Då är
larmet avstängt. Slutligen kan Ni välja om datum, tid och användare alltid
skall visas i displayen eller inte. Välj mellan display PÅ eller AV med hjälp av
INSTÄLLNINGS-knapparna ▲▼ Vald modus blinkar och bekräftas med ett
tryck på MENU-knappen 2 .
3.2.5
Välj språk
3.2.6
Ställ in kontrast
3.3
PC-anslutning
4.1
Tryckmanschetten
tas på
I undermenyn „Language“ kan Ni välja på vilket språk menyerna skall visas.
Texterna i displayen kan visas på 5 olika språk.
• ENGLISH • DEUTSCH • FRANCAIS • ESPANOL • ITALIANO
Välj önskat språk med hjälp av INSTÄLLNINGS-knapparna ▲▼ och bekräfta
valet med ett kort tryck på MENU-knappen 2 . Därefter visas tiden och vald
användare i displayen.
I undermenyn „Contrast“ kan kontrasten i displayen ställas in gradvis med
hjälp av INSTÄLLNINGS-knapparna ▲▼ När önskad kontrast valt, bekräftas
inställningen med MENU-knappen 2 .
En CD innehållande mjukvara samt en USB kabel följer med produkten. Med
hjälp av dessa kan data från MEDISANA blodtrycksmätare HGD överföras till
din dator via USB gränssnittet. Anslut USB kabeln till USB gränssnitt 6 på
blodtrycksmätarens ena sida och till USB uttaget på datorn på den andra sidan.
Välj PC anslutning i menyn med MENU-knappen 2 och INSTÄLLNINGSknapparna ▲▼ och bekräfta valet genom att återigen trycka på MENU-knappen 2 . I HGD displayen syns våglinjer vilka visar anslutningen till datorn. Lägg
i CD skivan i datorn och genomför installeringsförloppet. Mjukvaran är
självförklarande. Med ilagd CD startar installeringen automatiskt. Följ anvisningarna på datorns bildskärm. CD skivan innehåller omfattande data för hjälp
vid eventuella problem. Mjukvaran för utvärdering gör det möjligt att visa
uppmätta värden grafiskt eller i tabellform.
a. Lägg tryckmanschetten kring Er vänstra handled.
Se till att
• displayen befinner sig på handledens insida.
• handleden är helt bar, inga smycken, klockor
eller dylikt rör vid apparaten. Utrustningen måste
ligga an direkt mot huden eftersom det inte kan
mäta igenom textilier.
b. Tillslut tryckmanschetten så att den ligger tätt
emot huden utan den hindrar blodflödet.
Manschetten får inte vara vriden på något vis.
86
Page 91

4 Användning
S
4.2
Rätt ställning
vid mätningen
4.3
Mätning av
blodtrycket
4.4
Mätvärden
sparas
• Genomför mätningen sittande.
• Låt armen slappna av och stöd den löst, t.ex. genom att lägga den på ett
bord.
• Lyft handleden så att tryckmanschetten befinner sig i höjd med hjärtat.
• Försök att slappna av under mätningen: Rör Er inte och tala inte, annars kan
mätresultatet påverkas.
a. Tryck in START-knappen 4 .
• displayen visas mätsymbolen med texten „READY“.
• Därefter pumpas manschetten upp. Det stigande trycket anges i displayen
och växelvis visas texten „BE QUIET“ och „PLEASE RELAX“.
• Om START-knappen 4 trycks in medan manschetten pumpas upp, stängs
pumpen av. Apparaten stängs av och luften släpps ut ur manschetten.
b. När manschetten pumpats upp tillräckligt, startas mätningen automatiskt
genom att trycket släpps ut långsamt. I displayen visas en kurva med
pulsen. Växelvis visas texten „DO NOT MOVE“ och „DO NOT TALK“ för
att påminna Er om att inte röra Er eller tala under pågående mätning.
c. Till att börja med släpps luften ut med konstant hastighet. När pulsen kan
mätas för första gången, synkroniseras utsläppet med hjärtfrekvensen till
dess att mätningen avslutats. Under denna tid blinkar hjärt-symbolen .
Mätningen är avslutat när luften släpps ut ur manschetten med en gång och
värden visas bredvid texterna SYS, DIA and PUL.
Apparaten kan spara 30 värden för 2 olika användare. Det senaste mätresultatet
sparas automatiskt under den valda användarens nästa högre lediga resultatnummer.
Genom att trycka på INSTÄLLNINGS-knapparna ▲▼ kan sparade värden
hämtas när apparaten är avstängd. Med motsvarande INSTÄLLNINGS-knap-
par ▲▼ kan man bläddra uppåt och neråt i värdetabellen.
När MENU-knappen 2 trycks in visas aktuell moduls sparade värden i tabellform. Trycks MENU-knappen 2 in på nytt visas dessa värden grafiskt.
4.5
Apparaten
stängs av
Apparaten stängs automatiskt av efter en liten stund, om inga knappar trycks
in. Den kan även stängas av med hjälp av START-knappen 4 . Datum, tid och
användare visas i displayen om optionen DISPLAY PÅ valts i menyn TID/LARM.
87
Page 92

S
5 Övrigt
5.1
Fel och åtgärder
5.2
Rengöring och
Vård
Om en av följande felsignaler visas i displayen kunde apparaten inte mäta
blodtrycksvärdena ordentligt.
Felsignal - Möjlig orsak och åtgärd
ERR 1 - Ingen puls kunde mätas. Vänligen kontrollera att manschetten
placerats korrekt samt att Ni håller handleden i höjd med hjärtat.
ERR 2 - Icke-fysiologiska tryckimpulser fastställdes och påverkade mätningen.
Orsak: armen rördes under mätningen. Upprepa mätningen medan Ni håller
armen stilla. Tala inte under pågående mätning.
ERR 3 - Det tog för lång tid att höja trycket i manschetten. Orsaken kan vara
ett läckage i slangen eller att manschetten inte placerats korrekt.
ERR 4 - Skillnaden mellan det systoliska och diastoliska trycket är för stor.
Mät blodtrycket på nytt i lugn och ro enligt anvisningarna. Vänligen kontakta
MEDISANA om felsignalen upprepas vid den upprepade mätningen.
ERR 5 - På grund av störningar under mätningen kunde inget korrekt
medelvärde beräknas. Upprepa mätningen medan Ni håller armen stilla. Tala
inte under pågående mätning.
• Ta ut batterierna innan Ni rengör apparaten.
• Använd aldrig aggressiva rengöringsmedel eller hårda borstar.
• Rengör utrustningen med en mjuk duk som fuktats med en mild tvållösning.
Ingen vätska får tränga in i apparaten. Använd utrustningen först när den är
helt torr igen.
• Ta ut batterierna ur apparaten om Ni inte ämnar att använda den under en
längre tid. I annat fall föreligger risken att batterierna börjar läcka.
• Utsett inte apparaten för direkt solljus, skydda den mot smuts och fukt.
• Pumpa endast upp manschetten med luft när den sitter fast kring handleden.
• Mätteknisk kontroll (gäller vid yrkesmässig användning) :
Apparaten har kalibrerats av tillverkaren för två år. Den mättekniska kontrollen
måste minst genomföras vartannat år. Kontrollen är avgiftsbelagd och kan
antingen genomföras av den ansvariga myndigheten eller en auktoriserad
underhållstjänst enligt MPBtreibV ("medicinska produkter - förordningen för
brukare"; i Tyskland) eller motsvarande.
5.3
Återvinning
88
Förbrukade elektroapparater ska omhändertas enligt gällande miljöbestämmelser!
Förpackningarna kan återanvändas eller återvinnas, metalldelarna ska läggas i
metallåtervinningen, plast, elektriska och elektroniska komponenter måste
omhändertas som elavfall.
Tag ur batteriet innan blodtrycksmätaren kasseras. Kasta inte förbrukade batterier i hushållssoporna utan lämna dem till återvinningsstation eller till batteriinsamling i fackhandeln.
Kontakta kommunen eller inköpsstället vid frågor beträffande återvinning.
Page 93
5 Övrigt
S
5.4
Riktlinjer /
Normer
5.5
Teknisk Data
Blodtrycksmätutrustningen uppfyller de europeiska kraven enligt EN 1060 del
1 / 1995 och EN 1060 del 3 / 1997.
Utrustningen uppfyller kraven enligt den europeiska standardnormen EN
60601-1-2
Kraven i EU- EU-riktlinje 93 / 42 / EWG för medicinska produkter klass II a
uppfylls.
CE-tecknet på apparaten referera till EU-riktlinje 93 / 42 EWG
Utrustningen har klassats som: typ BF
Användarkrets:
Apparaten lämpar sig för icke-invasiv blodtrycksmätning hos vuxna (det
betyder att den lämpar sig för yttre användning).
Namn och model : MEDISANA Blodtrycksmätare HGD
Display : Digital punkt-matrix-display
Mätmetod : Oscillometrisk
Spänningsförsörjning : 3 V=, 2 x 1,5 V Mignon AAA Alkaline
Mätområde blodtryck : 30 – 280 mmHg
Mätområde puls : 40 – 200 slag/min
Maximal mätavvikelse statiska mätvärden : ± 3 mmHg
Maximal mätavvikelse
pulsvärdet : ± 5 % av värdet
Tryck alstring : Automatisk med mikropump
Luftutsläpp : Automatisk
Autom. avstängning : Efter ca. 30 sekunder
Driftsmiljö : + 10 °C till + 40 °C 15 – 85 % luftfuktighet
Förvaringsmiljö : - 5 °C till + 50 °C
Yttermått : 70 x 67 x 80 mm inkl. Manschett
Vikt : Ca. 140 g inkl. batterier
Artikelnummer : 51422
EAN-nummer : 4015588514227
Som följd av ständigt pågående produktförbättringar förbehåller
vi oss rätten till tekniska förändringar samt förändringar i
utförande.
89
Page 94

S
5 Övrigt / 6 Garanti
5.6
Slutligen
6.1
Garanti och
förutsättningar
för reparationer
Vi önskar mycket nöje och framgång vid användning av MEDISANA
Blodtrycksmätare HGD och vi är säkra på att blodtrycksmätaren kommer
att kunna användas under lång tid.
Prova även andra kvalitetsprodukter ur vårt sortiment för Er hälsa. Som ett
av världens ledande företag i Home Health Care-området erbjuder vi Er en
bred produktpalett för hälsokontroll, terapi i hemmet, alternativ smärtterapi och kvalificerad kroppsvård.
Kontakta inköpsstället vid garantifrågor, eller tag kontakt med kundtjänst
direkt. Måste produkten skickas in så bifoga uppgifter om defekten samt en
kopia av inköpskvittot.
Följande garantiförutsättningar gäller:
1. På MEDISANA produkter lämnas tre års garanti, från inköpsdatum.
Inköpsdatum ska vid garantiförehavanden förevisas med inköpskvitto
eller faktura.
2. Felaktigheter på grund av material- eller tillverkningsfel åtgärdas kost
nadsfritt under garantiperioden.
3. Utförande av garantiåtagande leder inte till förlängning av garanti-
perioden; detta gäller för produkten själv så väl som för utbytta komponenter.
4. Garantin gäller inte för:
a. Alla skador som uppkommer på grund av felaktig hantering, ex. vid
icke beaktande av bruksanvisningen.
b. Skador som kan härledas till iordningsställande eller ingrepp utförda
av köparen eller annan, ej auktoriserad, person.
c. Transportskador som uppkommit under transport från tillverkaren till
användaren eller vid insändning till kundtjänst.
d. Tillbehör som utsätts för normalt slitage
5. Ansvar för direkta eller indirekta följdskador som förorsakas av pro-
dukten är uteslutet, även om skadan på produkten godkänns som
garantiåtagande.
90
Vid frågor beträffande denna eller andra produkter står vi gärna till tjänst.
MEDISANA AG
Itterpark 7-9
D-40724 Hilden
Tel.: +49 (0) 2103 / 2007-60
Fax: +49 (0) 2103 / 2007-626
eMail: info@medisana.de
Internet: www.medisana.de
Serviceadressen finns på sista sidan.
Page 95
11 √√‰‰ËËÁÁ››Â˜˜ ÁÁÈÈ·· ÙÙËËÓÓ ··ÛÛÊÊ¿¿ÏÏÂÂÈÈ··
GR
11..11
™™··˜˜ ¢˘¯¯··ÚÚÈÈÛÛÙÙÔÔ‡‡ÌÌÂÂ
ÁÁÈÈ·· ÙÙËËÓÓ
ÂÂÌÌÈÈÛÛÙÙÔÔÛÛ‡‡ÓÓËË ÛÛ··˜˜!!
1.2
√√‰‰ËËÁÁ››Â˜˜ ÁÁÈÈ·· ÙÙËËÓÓ
˘˘ÁÁ››·· ÛÛ··˜˜
™·˜ В˘¯·ЪИЫЩФ‡МВ БИ· ЩЛУ ВМИЫЩФЫ‡УЛ Ы·˜! ∞БФЪ¿Ы·ЩВ ¤У· ЪФ˚fiУ
ФИfiЩЛЩ·˜ ·fi ЩЛ
ЫЩФУ ЩФМ¤· И·ЩЪИОТУ ЪФ˚fiУЩˆУ. °И· У· ¤¯ВЩВ ЩФ ВИı˘МЛЩfi ·ФЩ¤ПВЫМ·
О·И У· ¯ЪЛЫИМФФИВ›ЩВ ЩФ ИВЫfiМВЩЪФ ИВЫfiМВЩЪФ
·ЪОВЩfi О·ИЪfi, Ы·˜ ЪФЩВ›УФ˘МВ У· ‰И·‚¿ЫВЩВ ЪФЫВОЩИО¿ ЩИ˜ ВfiМВУВ˜
Ф‰ЛБ›В˜ БИ· ЩЛ ¯Ъ‹ЫЛ О·И КЪФУЩ›‰· ЩФ˘.
ªªËËÓÓ ··››ÚÚÓÓÂÂÙÙ ııÂÂÚÚ··Â¢˘ÙÙÈÈÎο¿ Ì̤¤ÙÙÚÚ·· Îη·ÙÙfifiÈÈÓÓ ··˘˘ÙÙÔÔÌ̤¤ÙÙÚÚËËÛÛˢ˜..
ªªËËÓÓ ··ÏÏÏÏ¿¿˙˙ÂÂÙÙ ÔÔÙÙ¤¤ ÙÙËË ‰‰ÔÔÛÛÔÔÏÏÔÔÁÁ››·· ÂÂÓÓfifi˜˜ ÊÊ··ÚÚÌÌ¿¿ÎÎÔÔ˘˘ ÔÔ˘˘ ÛÛ··˜˜
¯¯ÔÔÚÚ‹‹ÁÁËËÛÛ ÔÔ ÈÈ··ÙÙÚÚfifi˜˜ ÛÛ··˜˜..
ñ √È Î·Ú‰È·Î¤˜ ·ÚÚ˘ı̛˜ ‰ËÌÈÔ˘ÚÁÔ‡Ó ¤Ó·Ó ·ÓÒÌ·ÏÔ ·ÏÌfi, ÁÈ’·˘Ùfi
‰ВУ ı· ¤ЪВВ У· МВЩЪ¿ЩВ ЩЛУ ›ВЫ‹ Ы·˜ МВ Щ·П·УЩˆЫИМВЩЪИО¤˜
Ы˘ЫОВ˘¤˜ (Ы˘ЫОВ˘¤˜ БИ· ЩФУ О·Ъfi, ЩФ ‚Ъ·¯›ФУ·). ™В Щ¤ЩФИВ˜
ВЪИЩТЫВИ˜ Ъ¤ВИ У· ‰ИВН¿БВИ ЩЛ М¤ЩЪЛЫЛ Ф БИ·ЩЪfi˜ Ы·˜ МВ ЩЛУ
ОП·ЫИО‹ М¤ıФ‰Ф ЩФ˘ ЫЩЛıФЫОФ›Ф˘.
с ∂›ЫЛ˜ В¿У ¤¯ВЩВ О¿ФИ· ¿ППЛ ·Ыı¤УВИ· .¯. ·ФКЪ·ОЩИО‹ ·ЪЩЛЪИФ-
¿ıÂÈ·, ÌÈÏ‹ÛÙ ÚÈÓ ÙË ¯Ú‹ÛË Ù˘ Û˘Û΢‹˜ Ì ÙÔÓ ÁÈ·ÙÚfi Û·˜.
с∏ Ы˘ЫОВ˘‹ ‰ВУ МФЪВ› У· ¯ЪЛЫИМФФИЛıВ› БИ· ЩФУ ¤ПВБ¯Ф ЩЛ˜
ηډȷ΋˜ Û˘¯ÓfiÙËÙ·˜ ÂÓfi˜ ‚ËÌ·ÙÔ‰fiÙË.
ñ√È ¤ÁÎ˘Â˜ Á˘Ó·›Î˜ Ú¤ÂÈ Ó· ÚÔÛ¤ÍÔ˘Ó Ù· ·Ó·Áη›· ̤ÙÚ·
ÚÔÛÙ·Û›·˜ ηıÒ˜ Î·È ÙËÓ ÚÔÛˆÈ΋ ÙÔ˘˜ ·ÓÙÔ¯‹, Û˘Ì‚Ô˘Ï¢Ù›ÙÂ
ÙÔÓ ÁÈ·ÙÚfi Û·˜.
с ∂¿У О·Щ¿ ЩЛ ‰И¿ЪОВИ· МИ·˜ М¤ЩЪЛЫЛ˜ ·ЪФ˘ЫИ·ЫЩФ‡У ‰˘ЫОФП›В˜ fiˆ˜
.¯. fiУФ˜ ЫЩФУ О·Ъfi ‹ ¿ППФИ fiУФИ, ВУВЪБ‹ЫЩВ ˆ˜ ВН‹˜: ·Щ‹ЫЩВ ЩФ
П‹ОЩЪФ
ТЫЩВ ЩЛ М·УЫ¤Щ· О·И ·ФМ·ОЪ‡УЩВ ЩЛУ ·fi ЩФУ О·Ъfi. ∂ИОФИУˆУ‹ЫЩВ
МВ ЩФУ ·УЩИЪfiЫˆФ ‹ ·В˘ıВ›·˜ МВ М·˜.
MMEEDDIISSAANNAA
¶¶ƒƒ√√∂∂ππ¢¢√√¶¶√√ππ∏∏™™∏∏
SSTTAARRTT
4 БИ· У· НВКФ˘ЫОТЫВИ ·М¤Ыˆ˜ Л М·УЫ¤Щ·. Г·П·Ъ-
, ÌÈ· ·fi ÙȘ ÚÒÙ˜ ÂÙ·ÈÚ›˜ ÛÙÔÓ ÎfiÛÌÔ
MMEEDDIISSAANNAA HHGGDD
ÁÈ·
1.3
ΔΔÈÈ ÚÚ¤¤ÂÂÈÈ ÓÓ··
ÚÚÔÔÛÛ¤¤ÍÍÂÂÙÙÂÂ
с ГЪЛЫИМФФИ‹ЫЩВ ЩЛ Ы˘ЫОВ˘‹ МfiУФ БИ· ЩФ ЫОФfi Ф˘ ВЪИБЪ¿КВЩ·И ЫЩИ˜
Ф‰ЛБ›В˜ ¯Ъ‹ЫЛ˜. ∂¿У ЩЛ ¯ЪЛЫИМФФИ‹ЫВЩВ БИ· ¿ППФ˘˜ ·ОФФ‡˜ ‰ВУ
ИЫ¯‡ВИ Л ВББ‡ЛЫЛ.
с™В Ы¿УИВ˜ ВЪИЩТЫВИ˜ В¿У Л М·УЫ¤Щ· ПfiБˆ ‰˘ЫПВИЩФ˘ЪБ›·˜
·Ъ·МВ›УВИ О·Щ¿ ЩЛ ‰И¿ЪОВИ· ЩЛ˜ М¤ЩЪЛЫЛ˜ КФ˘ЫОˆМ¤УЛ Ъ¤ВИ У· ЩЛУ
·ÓÔ›ÍÂÙ ·Ì¤Ûˆ˜.
с ∏ Ы˘ЫОВ˘‹ ‰ВУ ВИЩЪ¤ВЩ·И У· ПВИЩФ˘ЪБВ› ОФУЩ¿ ЫВ Ы˘ЫОВ˘¤˜ Ф˘
ВО¤МФ˘У ИЫ¯˘Ъ‹ ЛПВОЩЪИО‹ ·ОЩИУФ‚ФП›·, fiˆ˜ .¯. Ъ·‰ИФФМfi˜.
ŒЩЫИ МФЪВ› У· ВЛЪВ·ЫЩВ› ·ЪУЛЩИО¿ Л ПВИЩФ˘ЪБ›·.
с Δ· ·И‰И¿ ··БФЪВ‡ВЩ·И У· ¯ЪЛЫИМФФИФ‡У ЩЛ Ы˘ЫОВ˘‹. Δ· И·ЩЪИО¿
ÚÔ˚fiÓÙ· ‰ÂÓ Â›Ó·È ·È¯Ó›‰È·!
ñ ∂¿Ó ˘¿Ú¯Ô˘Ó ‚Ï¿‚˜ ÌËÓ ÂÈÛ΢¿˙ÂÙ ÙË Û˘Û΢‹ ÌfiÓÔÈ Û·˜, ÁÈ·Ù›
¤ЩЫИ ·‡ВИ У· ИЫ¯‡ВИ Л ВББ‡ЛЫЛ. ∏ ВИЫОВ˘‹ Ъ¤ВИ У· Б›УВЩ·И МfiУФ ЫВ
ВНФ˘ЫИФ‰ФЩЛМ¤У· Ы˘УВЪБВ›·.
ñ¶ÚÔÊ˘Ï¿ÍÙ ÙË Û˘Û΢‹ ·fi ÙËÓ ˘ÁÚ·Û›·. ∂¿Ó ·Ú’fiÏ· ·˘Ù¿
ВИЫ¯ˆЪ‹ЫВИ ˘БЪfi ЫЩЛ Ы˘ЫОВ˘‹ Ъ¤ВИ У· ‚Б¿ПВЩВ ·М¤Ыˆ˜ ЩИ˜ М·Щ·Ъ›В˜ О·И У· ·ФК‡БВЩВ ЩЛУ ВЪ·ИЩ¤Ъˆ ¯Ъ‹ЫЛ ЩЛ˜. ™В МИ· Щ¤ЩФИ· ВЪ›ЩˆЫЛ ВИОФИУˆУ‹ЫЩВ МВ ЩФУ ·УЩИЪfiЫˆФ ‹ ·В˘ıВ›·˜ МВ М·˜. °И· ЩФ Т˜
ı· ВИОФИУˆУ‹ЫВЩВ М·˙› М·˜ ·У·ЩЪ¤НЩВ ЫЩЛ ЫВП›‰· МВ ЩИ˜ ‰ИВ˘ı‡УЫВИ˜.
91
Page 96

GR
22 ÃÃÚÚ‹‹ÛÛÈÈÌ̘˜ ÏÏËËÚÚÔÔÊÊÔÔÚÚ››Â˜˜
11..44
¶¶ÂÂÚÚÈȯ¯fifiÌÌÂÂÓÓÔÔ
··ÚÚ¿¿‰‰ÔÔÛÛˢ˜ Îη·ÈÈ
ÛÛ˘˘ÛÛÎ΢˘··ÛÛ››··
22..11
ΔΔÈÈ Â››ÓÓ··ÈÈ ››ÂÂÛÛËË??
22..22..
¶¶ÒÒ˜˜ ÏÏÂÂÈÈÙÙÔÔ˘˘ÚÚÁÁ›› ËË
Ì̤¤ÙÙÚÚËËÛÛËË??
¶·Ú·Î·Ïԇ̠ÂϤÁÍÙ ·Ú¯Èο ·Ó Ë Û˘Û΢‹ Â›Ó·È Ï‹Ú˘. ΔÔ
ÂÚȯfiÌÂÓÔ ·Ú¿‰ÔÛ˘ Û˘ÌÂÚÈÏ·Ì‚¿ÓÂÈ::
с 1 ¶ИВЫfiМВЩЪФ
с 2 М·Щ·Ъ›В˜ (Щ‡Ф˘ AAA LR03) ñ 1 £‹ÎË ·Ôı‹Î¢Û˘
ñ 1 ∫·ÏÒ‰ÈÔ USB ñ 1 1 Ô‰ËÁ›· ¯Ú‹Û˘
√И Ы˘ЫОВ˘·Ы›В˜ В›У·И В·У·¯ЪЛЫИМФФИ‹ЫИМВ˜ ‹ МФЪФ‡У У·
·Ó·Î˘ÎψıÔ‡Ó ÛÙÔÓ Î‡ÎÏÔ ÚÒÙˆÓ ˘ÏÒÓ. ™·˜ ·Ú·Î·Ïԇ̠ӷ
·ФЫ‡ЪВЩВ ЩФ ˘ПИОfi Ы˘ЫОВ˘·Ы›·˜ Ф˘ ‰ВУ ¯ЪЛЫИМФФИВ›Щ·И П¤ФУ
Ы‡МКˆУ· МВ ЩФ˘˜ О·УФУИЫМФ‡˜. ™В ВЪ›ЩˆЫЛ Ф˘ О·Щ¿ ЩЛУ ·К·›ЪВЫЛ
ЩЛ˜ Ы˘ЫОВ˘‹˜ ·fi ЩЛ Ы˘ЫОВ˘·Ы›· ‰И·ИЫЩТЫВЩВ О¿ФИ· ‚П¿‚Л
ФКВИПfiМВУЛ ЫЩЛ МВЩ·КФЪ¿, Ы·˜ ·Ъ·О·ПФ‡МВ У· ·В˘ı˘УıВ›ЩВ ·М¤Ыˆ˜
ЫЩФУ ¤МФЪfi Ы·˜.
¶¶ÚÚÔÔÛÛ¤¤¯¯ÂÂÙÙ ÒÒÛÛÙÙ ÙÙ·· ÏÏ··ÛÛÙÙÈÈÎο¿ ÛÛ˘˘ÛÛÎ΢˘··ÛÛ››··˜˜ ÓÓ·· ÌÌËËÓÓ ÂÂÚÚÈȤ¤ÏÏııÔÔ˘˘ÓÓ
ÛÛ ··Èȉ‰È
∏ ›ВЫЛ ЩФ˘ ·›М·ЩФ˜ В›У·И Л ›ВЫЛ Ф˘ ‰ЛМИФ˘ЪБВ›Щ·И ЫЩ· ·ББВ›· ЫВ О¿ıВ
¯Щ‡Ф ЩЛ˜ О·Ъ‰И¿˜. ŸЩ·У Л О·Ъ‰И¿ Ы˘ЫЩ¤ППВЩ·И (Ы˘ЫЩФП‹) О·И ¯ФЪЛБВ›
·›М· ЫЩИ˜ ·ЪЩЛЪ›В˜ ЪФО·ПВ›Щ·И ·‡НЛЫЛ ЩЛ˜ ›ВЫЛ˜. ∏ МВБ·П‡ЩВЪЛ ЩИМ‹
ЩЛ˜ П¤БВЩ·И ›ВЫЛ ЩЛ˜ Ы˘ЫЩФП‹˜ О·И В›У·И Л ЪТЩЛ Ф˘ МВЩЪИ¤Щ·И О·Щ¿ ЩЛ
М¤ЩЪЛЫЛ ›ВЫЛ˜.
ŸЩ·У Ф О·Ъ‰И·Оfi˜ М˘˜ ¯·П·ЪТУВИ БИ· У· ¿ЪВИ О·ИУФ‡ЪБИФ ·›М· Л ›ВЫЛ
ЫЩИ˜ ·ЪЩЛЪ›В˜ МВИТУВЩ·И. ∂¿У Щ· ·ББВ›· В›У·И ¯·П·Ъ¿ МВЩЪИ¤Щ·И Л ‰В‡ЩВЪЛ
ЩИМ‹ - Л ›ВЫЛ ЩЛ˜ ‰И·ЫЩФП‹˜.
∏ Ы˘ЫОВ˘‹
М¤ЩЪЛЫЛ ЩЛ˜ ›ВЫЛ˜ ·›М·ЩФ˜ ЫЩФУ О·Ъfi ЩФ˘ ¯ВЪИФ‡. ∏ М¤ЩЪЛЫЛ Б›УВЩ·И
М’¤У·У МИОЪФВВНВЪБ·ЫЩ‹, Ф ФФ›Ф˜ М¤Ыˆ ВУfi˜ Ы¤УЫФЪ· ›ВЫЛ˜
ВВНВЪБ¿˙ВЩ·И ЩИ˜ ‰ФУ‹ЫВИ˜ Ф˘ ‰ЛМИФ˘ЪБФ‡УЩ·И О·Щ¿ ЩФ КФ‡ЫОˆМ· О·И
НВКФ‡ЫОˆМ· ЩЛ˜ М·УЫ¤Щ·˜ ›ВЫЛ˜ ¿Уˆ ·fi ЩЛУ ·ЪЩЛЪ›·.
MMEEDDIISSAANNAA HHGGDD
¶¶ƒƒ√√∂∂ππ¢¢√√¶¶√√ππ∏∏™™∏∏
ÈÎο¿ ¯¯¤¤ÚÚÈÈ··.. ÀÀ¿¿ÚÚ¯¯ÂÂÈÈ ÎΛ›ÓÓ‰‰˘˘ÓÓÔÔ˜˜ ··ÛÛÊÊ˘˘ÍÍ››··˜˜!!
HHGGDD
В›У·И ¤У· ИВЫfiМВЩЪФ, ЩФ ФФ›Ф ЪФФЪ›˙ВЩ·И БИ· ЩЛ
с 1 CD ПФБИЫМИОФ‡
2.3
°°ÈÈ··ÙÙ›› ››ÓÓ··ÈÈ Îη·ÏÏfifi
ÓÓ·· ÌÌÂÂÙÙÚÚÈȤ¤ÙÙ··ÈÈ ËË
››ÂÂÛÛËË ÛÛÙÙÔÔ ÛÛ››ÙÙÈÈ??
92
MMEEDDIISSAANNAA
∏
¶ФПП¤˜ ВМВЪИЫЩ·ЩˆМ¤УВ˜ ОПИУИО¤˜ МВП¤ЩВ˜ ˘fi ‰ИВıУ‹ ·˘ЫЩЛЪ¿
ЫЩ¿УЩ·Ъ ·Ф‰ВИОУ‡Ф˘У ЩЛ МВБ¿ПЛ ·ОЪ›‚ВИ· ЩЛ˜ МВıfi‰Ф˘ М¤ЩЪЛЫЛ˜ ЩˆУ
Ы˘ЫОВ˘ТУ
ЩЛ˜ ›ВЫЛ˜ ЫЩФ Ы›ЩИ В›У·И ЩФ БВБФУfi˜ fiЩИ Л М¤ЩЪЛЫЛ Б›УВЩ·И ЫЩФ
Ы˘УЛıИЫМ¤УФ ВЪИ‚¿ППФУ О·И ЫВ ¯·П·Ъ¤˜ Ы˘Уı‹ОВ˜. π‰И·›ЩВЪ· ЫЛМ·УЩИО‹
В›У·И Л ПВБfiМВУЛ «‚·ЫИО‹ ЩИМ‹», Л ФФ›· МВЩЪИ¤Щ·И ЩФ Ъˆ› ·М¤Ыˆ˜ МВЩ¿
ЩФ Н‡УЛМ· О·И ЪИУ ЩФ ЪˆИУfi. μ·ЫИО¿ Ъ¤ВИ У· МВЩЪ¿ЩВ ЩЛУ ›ВЫ‹ Ы·˜
¿УЩ· ЩЛУ ›‰И· ТЪ· О·И О¿Щˆ ·fi ЩИ˜ ›‰ИВ˜ Ы˘Уı‹ОВ˜.
°И·Щ› МfiУФ ЩfiЩВ В›У·И ‰˘У·Щ‹ Л Ы‡БОЪИЫЛ ЩˆУ ·ФЩВПВЫМ¿ЩˆУ О·ıТ˜ О·И Л
¤БО·ИЪЛ ‰И¿БУˆЫЛ ЩЛ˜ ¿ıЛЫЛ˜ ЩЛ˜ ˘„ЛП‹˜ ›ВЫЛ˜. ∂¿У Л ˘„ЛП‹ ›ВЫЛ
‰ВУ ‰И·БУˆЫıВ› ВБО·›Ъˆ˜, Ф О›У‰˘УФ˜ БИ· ¿ППВ˜ О·Ъ‰И·О¤˜ ·ı‹ЫВИ˜ О·И
·ı‹ЫВИ˜ ЩФ˘ О˘ОПФКФЪИОФ‡ ·˘Н¿УВЩ·И.
¤¯ВИ ФП‡¯ЪФУЛ В›Ъ· ЫЩФУ ЩФМ¤· М¤ЩЪЛЫЛ˜ ЩЛ˜ ›ВЫЛ˜.
MMEEDDIISSAANNAA
. ŒУ· ЫЛМ·УЩИОfi ВИ¯В›ЪЛМ· ˘¤Ъ ЩЛ˜ М¤ЩЪЛЫЛ˜
Page 97

22 ÃÃÚÚ‹‹ÛÛÈÈÌ̘˜ ÏÏËËÚÚÔÔÊÊÔÔÚÚ››Â˜˜
°°ÈÈ’’··˘˘ÙÙfifi ËË ÛÛ˘˘ÌÌ‚‚ÔÔ˘˘ÏÏ‹‹ ÌÌ··˜˜::
ªªÂÂÙÙÚÚ¿¿ÙÙ ÙÙËËÓÓ ››ÂÂÛÛ‹‹ ÛÛ··˜˜ Îη·ııËËÌÌÂÂÚÚÈÈÓÓ¿¿ ÛÛ ÙÙ··ÎÎÙÙ¿¿ ¯¯ÚÚÔÔÓÓÈÈÎο¿
‰‰ÈÈ··ÛÛÙÙ‹‹ÌÌ··ÙÙ·· ··ÎÎfifiÌÌËË ÎÎÈÈ ··ÓÓ ‰‰ÂÂÓÓ ¤¤¯¯ÂÂÙÙ Îο¿ÔÔÈȘ˜ ÂÂÓÓÔÔ¯¯ÏÏ‹‹ÛÛÂÂÈȘ˜..
GR
2.4
ΔΔ··ÍÍÈÈÓÓfifiÌÌËËÛÛËË ÙÙˢ˜
››ÂÂÛÛˢ˜ ÛÛ‡‡ÌÌÊʈˆÓÓ··
ÌÌ ÙÙÔÔ ¢¢ÈÈÂÂııÓÓ‹‹
√√ÚÚÁÁ··ÓÓÈÈÛÛÌÌfifi
ÀÀÁÁ››··˜˜ WWHHOO
2.5
¢¢ÈÈ··‚‚··ııÌÌ››ÛÛÂÂÈȘ˜
ÛÛÙÙËËÓÓ ››ÂÂÛÛËË
2.6
∂∂ËËÚÚ··ÛÛÌÌfifi˜˜ Îη·ÈÈ
ÂÂÂÂÍÍÂÂÚÚÁÁ··ÛÛ››·· ÙÙˆˆÓÓ
ÌÌÂÂÙÙÚÚ‹‹ÛÛˆˆÓÓ
™ÙÔÓ ÂfiÌÂÓÔ ›Ó·Î· ‰›ÓÔÓÙ·È ÔÈ Î·Ù¢ı˘ÓÙ‹ÚȘ ÙÈ̤˜ ÁÈ· ˘„ËÏ‹ ηÈ
¯·ÌËÏ‹ ›ÂÛË ·ÓÂÍ¿ÚÙËÙˆ˜ ËÏÈΛ·˜. ∞˘Ù¤˜ ÔÈ ÙÈ̤˜ ηıÔÚ›ÛÙËÎ·Ó ·fi ÙÔ
¢ÈÂıÓ‹ √ÚÁ·ÓÈÛÌfi ÀÁ›·˜ (WHO).
Ã÷·ÌÌËËÏÏ‹‹ ››ÂÂÛÛËË ºº˘˘ÛÛÈÈÔÔÏÏÔÔÁÁÈÈÎ΋‹ ››ÂÂÛÛËË
Û˘ÛÙÔÏ‹ οو ·fi 100 Û˘ÛÙÔÏ‹100–140
‰È·ÛÙÔÏ‹ οو ·fi 60 ‰È·ÛÙÔÏ‹ 60–90
∂∂››‰‰ËË ˘˘„„ËËÏÏ‹‹˜˜ ››ÂÂÛÛˢ˜
™™ÙÙ¿¿‰‰ÈÈÔÔ 11 ™™ÙÙ¿¿‰‰ÈÈÔÔ 11 ™™ÙÙ¿¿‰‰ÈÈÔÔ 33
ÂÏ·ÊÚ¿ ˘„ËÏ‹ ›ÂÛË Ì¤ÙÚÈ· ˘„ËÏ‹ ›ÂÛË Ôχ ˘„ËÏ‹ ›ÂÛË
Û˘ÛÙÔÏ‹ 140–159 Û˘ÛÙÔÏ‹ 160–179 Û˘ÛÙÔÏ‹ ¿Óˆ ·fi 180
‰È·ÛÙÔÏ‹ ¿Óˆ ·fi 90 ‰È·ÛÙÔÏ‹ ¿Óˆ ·fi 95 ‰È·ÛÙÔÏ‹ ¿Óˆ ·fi 110
А¿Ъ¯Ф˘У ФППФ› ·Ъ¿БФУЩВ˜ Ф˘ МФЪФ‡У У· ВЛЪВ¿ЫФ˘У ЩЛУ ›ВЫЛ. ∏
‚·ЪИ¿ ЫˆМ·ЩИО‹ ВЪБ·Ы›·, Кfi‚Ф˜, ¿Б¯Ф˜ ‹ Л ТЪ· ЩЛ˜ М¤ЩЪЛЫЛ˜
ВЛЪВ¿˙Ф˘У ¿Ъ· ФП‡ ЩИ˜ МВЩЪЛМ¤УВ˜ ЩИМ¤˜. √И ЪФЫˆИО¤˜ ЩИМ¤˜
›ВЫЛ˜ ˘fiОВИУЩ·И ЫВ МВБ¿ПВ˜ ‰И·‚·ıМ›ЫВИ˜ О·Щ¿ ЩЛ ‰И¿ЪОВИ· ЩЛ˜ ЛМ¤Ъ·˜
О·И ЩФ˘ ¯ЪfiУФ˘. ™В ·ЫıВУВ›˜ МВ ˘„ЛП‹ ›ВЫЛ ·˘Щ¤˜ ФИ ‰И·‚·ıМ›ЫВИ˜ В›У·И
И‰И·›ЩВЪ· ¤УЩФУВ˜. ∫·УФУИО¿ Л ›ВЫЛ В›У·И ФП‡ ˘„ЛП‹ О·Щ¿ ЩЛ ЫˆМ·ЩИО‹
ОfiˆЫЛ О·И ФП‡ ¯·МЛП‹ ЩЛ У‡¯Щ· О·Щ¿ ЩЛ ‰И¿ЪОВИ· ЩФ˘ ‡УФ˘.
ñªÂÙÚ‹ÛÙ ÙËÓ ›ÂÛ‹ Û·˜ ÔÏϤ˜ ÊÔÚ¤˜, ·ÔıË·ÛÙ ٷ
·ÔÙÂϤÛÌ·Ù· Î·È Û˘ÁÎÚ›ÓÂÙ¤ Ù· ÌÂٷ͇ ÙÔ˘˜. ªËÓ ‚Á¿˙ÂÙÂ
Û˘ÌÂÚ¿ÛÌ·Ù· ·fi ¤Ó· Î·È ÌfiÓÔ ·ÔÙ¤ÏÂÛÌ·.
с ŒУ·˜ БИ·ЩЪfi˜ Ф˘ БУˆЪ›˙ВИ О·И ЩФ ИЫЩФЪИОfi Ы·˜ Ъ¤ВИ У· ОЪ›УВИ ЩИ˜
ЩИМ¤˜ ›ВЫЛ˜. ∂¿У ¯ЪЛЫИМФФИВ›ЩВ ЩЛ Ы˘ЫОВ˘‹ Щ·ОЩИО¿ О·И ЫЛМВИТУВЩВ
ЩИ˜ ЩИМ¤˜ БИ· ЩФУ БИ·ЩЪfi Ы·˜ Ъ¤ВИ У· ЩФУ ВУЛМВЪТУВЩВ БИ· ЩЛУ ВН¤ПИНЛ.
с ∫·Щ¿ ЩИ˜ МВЩЪ‹ЫВИ˜ ЩЛ˜ ›ВЫЛ˜ П¿‚ВЩВ ˘fi„Л Ы·˜ fiЩИ ФИ О·ıЛМВЪИУ¤˜
ЩИМ¤˜ ВНВЪЩТУЩ·И ·fi ФППФ‡˜ ·Ъ¿БФУЩВ˜. ΔФ О¿УИЫМ·, ЩФ ·ПОФfiП, Щ·
К¿ЪМ·О· О·И Л ЫˆМ·ЩИО‹ ВЪБ·Ы›· ВЛЪВ¿˙Ф˘У ЩИ˜ ЩИМ¤˜ ‰И·КФЪВЩИО¿.
с ªВЩЪ‹ЫЩВ ЩЛУ ›ВЫ‹ Ы·˜ ЪИУ ЩФ К·БЛЩfi.
с ¶ЪИУ МВЩЪ‹ЫВЩВ ЩЛУ ›ВЫЛ Ъ¤ВИ У· НВОФ˘Ъ·ЫЩВ›ЩВ БИ· ЩФ˘П¿¯ИЫЩФУ 5
ПВЩ¿.
с ∂¿У ФИ ЩИМ¤˜ Ы˘ЫЩФП‹˜ ‹ ‰И·ЫЩФП‹˜ ЩЛ˜ М¤ЩЪЛЫЛ˜ Ы·˜ К·›УФУЩ·И
·Û˘Ó‹ıÈÛÙ˜ (Ôχ ˘„ËϤ˜ ‹ Ôχ ¯·ÌËϤ˜) ·Ú’fiÏÔ Ô˘
¯ЪЛЫИМФФИ‹Ы·ЩВ ЫˆЫЩ¿ ЩЛ Ы˘ЫОВ˘‹ О·И ·У ·˘Щfi Ы˘М‚В›
В·УВИПЛММ¤У·, ВИ‰ФФИ‹ЫЩВ ·М¤Ыˆ˜ ЩФУ БИ·ЩЪfi Ы·˜. ΔФ ›‰ИФ ИЫ¯‡ВИ О·И
fiЩ·У ЫВ Ы¿УИВ˜ ВЪИЩТЫВИ˜ ¤У·˜ ·УТМ·ПФ˜ ‹ ФП‡ ·‰‡У·МФ˜ ·ПМfi˜
‰ВУ ВИЩЪ¤ВИ ЩЛ М¤ЩЪЛЫЛ.
93
Page 98

GR
33 §§ÂÂÈÈÙÙÔÔ˘˘ÚÚÁÁ››··
3.1
ΔΔÔÔÔÔıı¤¤ÙÙËËÛÛËË //
∞∞ÊÊ··››ÚÚÂÂÛÛËË ÙÙˆˆÓÓ
ÌÌ··ÙÙ··ÚÚÈÈÒÒÓÓ
3.2
∂∂ÈÈÏÏÔÔÁÁ‹‹
ÚÚ ˘˘ııÌÌ››ÛÛ ÂˆˆÓÓ
ΔΔÔÔÔÔıı¤¤ÙÙËËÛÛËË::
Ì·Ù·ÚÈÔı‹Î˘ 5 ЫЩЛУ ВНˆЩВЪИО‹ ПВ˘Ъ¿ ЩЛ˜ Ы˘ЫОВ˘‹˜. ™ЛОТЫЩВ ЩФ
О·¿ОИ О·И ‚¿ПЩВ ЩИ˜ ‰˘Ф М·Щ·Ъ›В˜ Ф˘ П¿‚·ЩВ О·Щ¿ ЩЛУ ·Ъ¿‰ФЫЛ
(М·Щ·Ъ›В˜ Alkaline, Щ‡Ф˘ AAA). ¶ЪФЫ¤НЩВ ЫВ ФИ· О·ЩВ‡ı˘УЫЛ Ъ¤ВИ
У· МФ˘У ФИ М·Щ·Ъ›В˜ (·ВИОfiУИЫЛ ЫЩЛ М·Щ·ЪИФı‹ОЛ). ΔФФıВЩ‹ЫЩВ
Н·У¿ ЩФ О·¿ОИ О·И И¤ЫЩВ ЩФ М¤¯ЪИ У· ·ОФ˘ЫЩВ› ЩФ ОПВ›ЫИМФ.
∞∞ÊÊ··››ÚÚÂÂÛÛËË::
М·Щ·Ъ›·˜ ВН·ЫıВУ›ЫФ˘У ФП‡. ªВЩ¿ ЩФ ¿ЩЛМ· ЩФ˘ П‹ОЩЪФ˘
Л Ы˘ЫОВ˘‹ ‰ВУ ·Ъ¯›˙ВИ МВ ЩЛ М¤ЩЪЛЫЛ ›ВЫЛ˜ ·›М·ЩФ˜. ¶·Ъ·О·ПФ‡МВ
ЩФФıВЩ‹ЫЩВ У¤В˜ М·Щ·Ъ›В˜. ΔИ˜ МВЩ·¯ВИЪИЫМ¤УВ˜ М·Щ·Ъ›В˜ МФЪВ›ЩВ
У· ЩИ˜ ·К·ИЪ¤ЫВЩВ ЩЪ‚ТУЩ·˜ ЩЛ ПˆЪ›‰· ЫЩЛ М·Щ·ЪИФı‹ОЛ О·И МВЩ¿
ЩФФıВЩ‹ЫЩВ ЩИ˜ У¤В˜ М·Щ·Ъ›В˜. ∂¯ВЩВ ˘fi„Л Ы·˜ fiЩИ МВЩ¿ ЩЛУ
ЩФФı¤ЩЛЫЛ У¤ˆУ М·Щ·ЪИТУ ФИ Ъ˘ıМ›ЫВИ˜ ‰ВУ ·Ъ·М¤УФ˘У
·ÔıËÎÂ˘Ì¤Ó˜ ÛÙË ÌÓ‹ÌË.
ññ ªª··ÎÎÚÚÈÈ¿¿ ··fifi ··Èȉ‰ÈÈ¿¿!! ññ ¢¢ÂÂÓÓ Â··ÓÓ··ÊÊÔÔÚÚÙÙ››˙˙ÔÔÓÓÙÙ··ÈÈ!!
ññ ªªËËÓÓ ‚‚ÚÚ··¯¯˘˘Î΢˘ÎÎÏÏÒÒÓÓÂÂÙÙÂÂ!! ññ ªªËËÓÓ ÂÂÙÙ¿¿ÙÙ ÛÛÙÙËË ÊʈˆÙÙÈÈ¿¿!!
ññ ªªËËÓÓ ÂÂÙÙ¿¿ÙÙ ÌÌÂÂÙÙ··¯¯ÂÂÈÈÚÚÈÈÛÛÌ̤¤ÓÓ˜˜ ÌÌ··ÙÙ··ÚÚ››Â˜˜ Îη·ÈÈ ÛÛ˘˘ÛÛÛÛˆˆÚÚ¢˘ÙÙ¤¤˜˜
ÛÛÙÙ·· ÔÔÈÈÎÎÈÈ··Îο¿ ··ÔÔÚÚÚÚ››ÌÌÌÌ··ÙÙ··,, ··ÏÏÏÏ¿¿ ÛÛÙÙ·· ÂÂÈȉ‰ÈÈÎο¿ ··ÔÔÚÚÚÚ››ÌÌÌÌ··ÙÙ·· ‹‹
ÛÛ ¤¤ÓÓ·· ÛÛÙÙ··ııÌÌfifi ÛÛ˘˘ÏÏÏÏÔÔÁÁ‹‹˜˜ ÌÌ··ÙÙ··ÚÚÈÈÒÒÓÓ ÙÙÔÔ˘˘ ÂÂÈȉ‰ÈÈÎÎÔÔ‡‡ ÂÂÌÌÔÔÚÚ››ÔÔ˘˘..
MMEEDDIISSAANNAA HHGGDD
ΔФ
ЩЛУ ЪФЫˆИО‹ ¯Ъ‹ЫЛ ·КФ‡ ·Щ‹ЫВЩВ М›· КФЪ¿ ЩФ П‹ОЩЪФ
∫·Щ¿ ЩЛУ ЪТЩЛ ВУВЪБФФ›ЛЫЛ ·ЩТУЩ·˜ ЩФ П‹ОЩЪФ
ВМК·У›˙ФУЩ·И ФИ ВН‹˜ ЩФМВ›˜ МВУФ‡ ЫЩ· ·ББПИО¿ :
MEASURING MODE => ∫∞Δ∞™Δ∞™∏ ª∂Δƒ∏™∏™
USER => Ã∏™Δ∏™
CLEAR MEMORY => ™μ∏™πª√ Δø¡ Δπªø¡
TIME/ALARM => øƒ∞/ALARM
LANGUAGE => °§ø™™∞
CONTRAST => ∞¡Δπ£∂™∏
PC-LINK => ™А¡¢∂™∏ ∏/А
∫¿ıВ ЩФМ¤· МВУФ‡ МФЪВ›ЩВ У· ЩФУ ¯ВИЪИЫЩВ›ЩВ МВ Щ· П‹ОЩЪ·
▲▼ О·И У· ЩФУ О·П¤ЫВЩВ ·ЩТУЩ·˜ ЩФ П‹ОЩЪФ
П›БФ ЩФ П‹ОЩЪФ
В‰›Ф ¤У‰ВИНЛ˜ ВМК·У›˙ФУЩ·И ¿ПИ ЛМВЪФМЛУ›·/ТЪ· О·И Ф ¯Ъ‹ЫЩЛ˜.
¶·Ù‹ÛÙ ‰˘Ó·Ù¿ Ì ÙÔÓ ·ÓÙ›¯ÂÈÚ· ÙÔ Î¿·ÎÈ Ù˘
∏ ¤Ó‰ÂÈÍË Ì·Ù·Ú›·˜ ÂÌÊ·Ó›˙ÂÙ·È ÛÙËÓ ÔÙÈ΋ ¤Ó‰ÂÈÍË ÌfiÏȘ ÔÈ
ÀÀ¶¶√√¢¢∂∂ππ••∂∂ππ™™ ∞∞™™ºº∞∞§§∂∂ππ∞∞™™ ªª¶¶∞∞ΔΔ∞∞ƒƒππøø¡¡
ЪФЫК¤ЪВИ М›· ВИПФБ‹ ‰И·КФЪВЩИОТУ Ъ˘ıМ›ЫВˆУ БИ·
SSTTAARRTT
4 ·К‹УВЩВ ЩФУ ВО¿ЫЩФЩВ ЩФМ¤· МВУФ‡ О·И ЫЩФ
MMEENNUU
SSTTAARRTT
MMEENNUU
MMEENNUU
∂∂¶¶ππ§§√√°°∏∏™™
2 . ¶·ÙÒÓÙ·˜ ÁÈ·
4
2 .
2
3.2.1
ƒƒ‡‡ııÌÌÈÈÛÛËË ÙÙˢ˜
Îη·ÙÙ¿¿ÛÛÙÙ··ÛÛˢ˜
Ì̤¤ÙÙÚÚËËÛÛˢ˜
94
™ЩФУ ЩФМ¤· МВУФ‡ ЩЛ˜ О·Щ¿ЫЩ·ЫЛ˜ М¤ЩЪЛЫЛ˜ «
МФЪВ›ЩВ У· ВИП¤НВЩВ ·У¿МВЫ· ЫЩЛ ЫЩ¿УЩ·Ъ ‰И·‰ИО·Ы›· М¤ЩЪЛЫЛ˜ (1) О·И
ЫЩЛ ‰И·‰ИО·Ы›· М¤ЩЪЛЫЛ˜ 3/MAM (3 Measurement Average Mode).
™ЩЛ ЫЩ¿УЩ·Ъ ‰И·‰ИО·Ы›· М¤ЩЪЛЫЛ˜(1) Б›УВЩ·И М›· КФЪ¿ Л М¤ЩЪЛЫЛ ЩЛ˜
›ВЫЛ˜ О·И ·ФıЛОВ‡Щ·И. ¶·ЩТУЩ·˜ ЩФ П‹ОЩЪФ ‚¤ПФ˜ ▲ ЛБ·›УВЩВ ЫЩЛ
‰И·‰ИО·Ы›· 3/MAM. ™·˜ ЪФЩВ›УФ˘МВ ЩЛ ‰И·‰ИО·Ы›· 3/MAM В¿У Л ›ВЫЛ
Ы·˜ ·ЪФ˘ЫИ¿˙ВИ ‰И·‚·ıМ›ЫВИ˜. √И 3 Ы˘УВ¯fiМВУВ˜ МВЩЪ‹ЫВИ˜ Ф˘ Б›УФУЩ·И
О¿ıВ 15 ‰В˘ЩВЪfiПВЩ· ВН·ПВ›КФ˘У ЩИ˜ МВБ¿ПВ˜ ·ФОП›ЫВИ˜ ЫЩИ˜ ЩИМ¤˜. ∂¿У
ФИ ЩИМ¤˜ ·ФОП›УФ˘У ˘ВЪ‚ФПИО¿ МФЪВ› У· Б›УВИ О·И Щ¤Щ·ЪЩЛ М¤ЩЪЛЫЛ.
∞КФ‡ ЩВПВИТЫФ˘У ФИ МВЩЪ‹ЫВИ˜ ˘ФПФБ›˙ВЩ·И ВЫˆЩВЪИО¿ ¤У·˜
ЫЩ·ıМИЫМ¤УФ˜ М¤ЫФ˜ fiЪФ˜ О·И МВЩ¿ ВМК·У›˙ВЩ·И. ŒЩЫИ Ф О›У‰˘УФ˜ МИ·˜
Measuring Mode
»
Page 99

3.2.2
∂∂ÈÈÏÏÔÔÁÁ‹‹ Îη·ÈÈ
¯¯··ÚÚ··ÎÎÙÙËËÚÚÈÈÛÛÌÌfifi˜˜
ÙÙÔÔ˘˘ ¯¯ÚÚ‹‹ÛÛÙÙËË
33 §§ÂÂÈÈÙÙÔÔ˘˘ÚÚÁÁ››··
М¤ЫФ˜ fiЪФ˜ О·И МВЩ¿ ВМК·У›˙ВЩ·И. ŒЩЫИ Ф О›У‰˘УФ˜ МИ·˜ П·Уı·ЫМ¤УЛ˜
М¤ЩЪЛЫЛ˜ МВИТУВЩ·И ЫЩФ ВП¿¯ИЫЩФ. ¶·ЩТУЩ·˜ М›· КФЪ¿ ЩФ П‹ОЩЪФ
MMEENNUU
2 ВИ‚В‚·ИТУВЩВ ЩЛ Ъ˘ıМИЫМ¤УЛ О·Щ¿ЫЩ·ЫЛ М¤ЩЪЛЫЛ˜, К·›УВЩ·И
ЫЩЛ М·‡ЪЛ М¿Ъ· О¿Щˆ ·fi ЩФ Ы‡М‚ФПФ БИ· ЩЛУ ВИПВБМ¤УЛ ‰И·‰ИО·Ы›·
М¤ЩЪЛЫЛ˜. ŒВИЩ· ЫЩФ В‰›Ф ¤У‰ВИНЛ˜ ВМК·У›˙ВЩ·И ЛМВЪФМЛУ›·, ТЪ· О·И
Щ· ЫЩФИ¯В›· ЩФ˘ ¯Ъ‹ЫЩЛ.
MMEEDDIISSAANNAA HHGGDD
ΔФ
ЫЩ·ıВЪТУ ¯ЪЛЫЩТУ (ππ‹
¯Ъ‹ЫЩЛ (). √И ‰‡Ф О·ıФЪИЫМ¤УФИ ¯Ъ‹ЫЩВ˜ (ππ‹
30 ı¤ЫВИ˜ ·Фı‹ОВ˘ЫЛ˜ Ф О·ı¤У·˜. ª›· М¤ЩЪЛЫЛ ¯ˆЪ›˜ О·Щ·¯ТЪИЫЛ
¯Ъ‹ЫЩЛ ·ФıЛОВ‡ВЩ·И МfiУФ М¤¯ЪИ ЩЛУ ВfiМВУЛ М¤ЩЪЛЫЛ ¶·ЩТУЩ·˜ Щ·
П‹ОЩЪ·
ВИı˘МВ›ЩВ, ЩФ ‚П¤ВЩВ ЫЩЛ М·‡ЪЛ М¿Ъ· О¿Щˆ ·fi Щ· Ы‡М‚ФП·.
∂И‚В‚·ИТЫЩВ ЩЛУ ВИПФБ‹ Ы·˜ ·ЩТУЩ·˜ М›· КФЪ¿ ЩФ П‹ОЩЪФ
™ЩФ Щ¤ПФ˜ МФЪВ› У· О·Щ·¯ˆЪИıВ› ЫЩФ ¯Ъ‹ЫЩЛ ππ‹
Û˘Ó‰˘·ÛÌfi˜ ÁÚ·ÌÌ¿ÙˆÓ ‹ ·ÚÈıÌÒÓ. ¶·ÙÒÓÙ·˜ Ù· Ï‹ÎÙÚ·
▲▼ ËÁ·›ÓÂÙ ÛÙÔ ÂÈı˘ÌËÙfi ÁÚ¿ÌÌ· ‹ ·ÚÈıÌfi. ∂¿Ó ·Ù¿Ù ٷ Ï‹ÎÙÚ·
∂∂¶¶ππ§§√√°°∏∏™™
БЪ¿ММ· ‹ ·ЪИıМfi М¤¯ЪИ У· ВМК·УИЫЩВ› ЫЩФ В‰›Ф ¤У‰ВИНЛ˜ ЩФ ВИı˘МЛЩfi
БЪ¿ММ· ‹ Ф ·ЪИıМfi˜. ªВЩ¿ ·К‹ЫЩВ Щ· О·И ВИ‚В‚·ИТЫЩВ МВ ЩФ П‹ОЩЪФ
MMEENNUU
ЩФМ¤· МВУФ‡ ·ЩТУЩ·˜ ЩФ П‹ОЩЪФ
ЩФ ¯·Ъ·ОЩЛЪИЫМfi ЩФ˘ ¯Ъ‹ЫЩЛ У· ‚БВ›ЩВ ·fi ЩФ МВУФ‡ ВИПФБ‹˜ ·ЩТУЩ·˜
М›· КФЪ¿ ЩФ П‹ОЩЪФ
ЛМВЪФМЛУ›·, ТЪ· О·И Щ· ЫЩФИ¯В›· ЩФ˘ ¯Ъ‹ЫЩЛ.
∂∂¶¶ππ§§√√°°∏∏™™
▲▼ ¯ˆÚ›˜ ‰È·ÎÔ‹ Ë ¤Ó‰ÂÈÍË ËÁ·›ÓÂÈ ·Ú·Î¿Ùˆ ηٿ ¤Ó·
2 . ∂¿У ФПФОПЛЪТıЛОВ Ф ¯·Ъ·ОЩЛЪИЫМfi˜ ¯Ъ‹ЫЩЛ ‚БВ›ЩВ ·fi ЩФУ
Û·˜ ÚÔÛʤÚÂÈ ÙË ‰˘Ó·ÙfiÙËÙ· ÂÈÏÔÁ‹˜ ÌÂٷ͇ ‰‡Ô
ππππ
) ‹ У· ‰ИВН¿БВЩВ М›· М¤ЩЪЛЫЛ ¯ˆЪ›˜ О·Щ·¯ТЪИЫЛ
▲▼ ÌÔÚ›Ù ӷ ÂÈϤÍÂÙ ÙÔÓ ¯Ú‹ÛÙË Ô˘
MMEENNUU
SSTTAARRTT
4 . ŒÂÈÙ· ÛÙÔ Â‰›Ô ¤Ó‰ÂÈ͢ ÂÌÊ·Ó›˙ÂÙ·È
ππππ
) ¤¯Ô˘Ó ÛÙË ‰È¿ıÂÛ‹ ÙÔ˘˜
MMEENNUU
ππππ
¤Ó·˜ ÂÍ·ÌÂÏ‹˜
2 . ªÔÚ›ÙÂ Î·È ¿ÌÂÛ· ÌÂÙ¿
2 .
∂∂¶¶ππ§§√√°°∏∏™™
GR
3.2.3
™™‚‚‹‹ÛÛÈÈÌÌÔÔ ÙÙˆˆÓÓ
ÙÙÈÈÌÌÒÒÓÓ
3.2.4
ƒƒ‡‡ııÌÌÈÈÛÛËË ÒÒÚÚ··˜˜
Îη·ÈÈ ÛÛ˘˘ÓÓ··ÁÁÂÂÚÚÌÌÔÔ‡‡
™В ·˘Щfi ЩФ ЫЛМВ›Ф МВУФ‡ МФЪВ›ЩВ У· О·П¤ЫВЩВ ¤ˆ˜ О·И 30 ВЪ·ЫМ¤УВ˜
ЫЩЛ МУ‹МЛ ЩИМ¤˜ БИ· ЩФ˘˜ ¯Ъ‹ЫЩВ˜ π ‹ ππ ‹ О·И У· ‰И·БЪ¿„ВЩВ ЩИМ¤˜ ·У ЩФ
ВИı˘МВ›ЩВ. ¶ЪИУ О·ıФЪ›ЫЩВ ЩФ ¯Ъ‹ЫЩЛ fiˆ˜ ВЪИБЪ¿КВЩ·И ЫЩЛУ
·Ъ¿БЪ·КФ 3.2.2. ªВ Щ· П‹ОЩЪ·
·У ı¤ПВЩВ У· У· Ы‚‹ЫВЩВ ¤У· ·ФЩ¤ПВЫМ· М¤ЩЪЛЫЛ˜ (SINGLE) ‹ fiП· Щ·
·ÔÙÂϤÛÌ·Ù· (ALL). ΔȘ Ú˘ıÌ›ÛÂȘ Ô˘ οӷÙ ÌÔÚ›Ù ӷ ÙȘ ‰Â›Ù ÛÙË
Ì·‡ÚË Ì¿Ú· οو ·fi ÙËÓ ¤Ó‰ÂÈÍË. ∂¿Ó ı¤ÏÂÙ ӷ Û‚‹ÛÂÙ ÌfiÓÔ ¤Ó·
·ФЩ¤ПВЫМ· М¤ЩЪЛЫЛ˜ (SINGLE-Mode), ·ЩТУЩ·˜ ЩФ П‹ОЩЪФ
ВМК·У›˙ФУЩ·И fiП· Щ· ·ФЩВП¤ЫМ·Щ· Ф˘ ¤¯Ф˘У ·ФıЛОВ˘ЩВ› БИ· ЩФ
¯Ъ‹ЫЩЛ. ªВ Щ· П‹ОЩЪ·
·ФЩ¤ПВЫМ· Ф˘ ı· Ы‚ЛЫЩВ›. ™ЩФ В¿Уˆ М¤ЪФ˜ ЩФ˘ В‰›Ф˘ ¤У‰ВИНЛ˜
ВМК·У›˙ВЩ·И Ф ¯ЪfiУФ˜ Ф˘ ˘ФПФБ›ЫЩЛОВ ·˘Щ‹ Л ЩИМ‹. ∂И‚В‚·ИТЫЩВ ЩФ
Ы‚‹ЫИМФ ЩЛ˜ ЩИМ‹˜ МВ ЩФ П‹ОЩЪФ
МВУФ‡ ¯ˆЪ›˜ У· Ы‚‹ЫВЩВ ·ЩТУЩ·˜ М›· КФЪ¿ ЩФ П‹ОЩЪФ
ı¤ПВЩВ У· Ы‚ЛЫЩФ‡У fiПВ˜ ФИ ЩИМ¤˜ М¤ЩЪЛЫЛ˜ ВИП¤НЩВ ЩЛУ О·Щ¿ЫЩ·ЫЛ ALL.
¶·ЩТУЩ·˜ БИ· П›БФ ЩФ П‹ОЩЪФ
ЩИМТУ ‹ ‚БВ›ЩВ ·fi ЩФУ ЩФМ¤· МВУФ‡ ¯ˆЪ›˜ У· Ы‚‹ЫВЩВ ·ЩТУЩ·˜ ЩФ
П‹ОЩЪФ
™В ·˘ЩfiУ ЩФУ ЩФМ¤· МВУФ‡ МФЪВ›ЩВ У· Ъ˘ıМ›ЫВЩВ ЛМВЪФМЛУ›· ТЪ· О·И
Ы˘У·БВЪМfi. ∞Ъ¯ИО¿ ·У·‚ФЫ‚‹УВИ ЫЩЛУ ¤У‰ВИНЛ ЩФ ¤ЩФ˜. ¶·ЩТУЩ·˜ Щ·
П‹ОЩЪ·
ЩФ ВИ‚В‚·ИТЫВЩВ МВ ЩФ П‹ОЩЪФ
SSTTAARRTT
∂∂¶¶ππ§§√√°°∏∏™™
4 .
▲▼ ÌÔÚ›Ù ӷ Ú˘ıÌ›ÛÂÙ ÙÔ ÂÈı˘ÌËÙfi ¤ÙÔ˜ Î·È Ó·
∂∂¶¶ππ§§√√°°∏∏™™
∂∂¶¶ππ§§√√°°∏∏™™
MMEENNUU
MMEENNUU
MMEENNUU
▲▼ ÌÔÚ›Ù ӷ ÂÈϤÍÂÙÂ
MMEENNUU
▲▼ ÌÔÚ›Ù ӷ ÂÈϤÍÂÙ ÙÔ
2 ‹ ‚Á›Ù ·fi ÙËÓ Î·Ù¿ÛÙ·ÛË
2 ВИ‚В‚·ИТУВЩВ ЩФ Ы‚‹ЫИМФ ЩˆУ
2 .
SSTTAARRTT
4 . ∂¿Ó
95
2
Page 100

GR
33 §§ÂÂÈÈÙÙÔÔ˘˘ÚÚÁÁ››·· // 44 ∂∂ÊÊ··ÚÚÌÌÔÔÁÁ‹‹
™ЩЛ Ы˘У¤¯ВИ· МФЪВ›ЩВ У· Ъ˘ıМ›ЫВЩВ МВ ЩФУ ›‰ИФ ЩЪfiФ ЩФ˘˜ ЩФМВ›˜
М‹У·/М¤Ъ·˜/ ТЪ·˜ О·И ‰В˘ЩВЪФП¤ЩФ˘. ªВЩ¿ ЩЛУ О·Щ·¯ТЪИЫЛ ·˘ЩТУ ЩˆУ
ЫЩФИ¯В›ˆУ МФЪВ›ЩВ У· О·ıФЪ›ЫВЩВ ЩФ ¯ЪfiУФ БИ· ЩФУ ЪТЩФ О·И ‰В‡ЩВЪФ
Ы˘У·БВЪМfi. ∂¿У ‰ВУ ı¤ПВЩВ У· О·ıФЪ›ЫВЩВ ¯ЪfiУФ Ы˘У·БВЪМФ‡ ВИП¤НЩВ
МВ Щ· П‹ОЩЪ·
·КФ‡ ВИ‚В‚·ИТЫВЩВ ЩФ ¯ЪfiУФ Ы˘У·БВЪМФ‡. ∂¿У ·˘Щfi ЩФ Ы‡М‚ФПФ
·У·‚ФЫ‚‹УВИ ВИ‚В‚·ИТЫЩВ ЩЛУ ВИПФБ‹ МВ ЩФ П‹ОЩЪФ
Ы˘У·БВЪМfi˜ В›У·И ·ВУВЪБФФИЛМ¤УФ˜. ™ЩФ Щ¤ПФ˜ МФЪВ›ЩВ У·
О·ıФЪ›ЫВЩВ В¿У Л ЛМВЪФМЛУ›·/ТЪ· О·И ¯Ъ‹ЫЩЛ˜ ı¤ПВЩВ У· ВМК·У›˙ФУЩ·И
¿УЩ· ЫЩФ В‰›Ф ¤У‰ВИНЛ˜ ‹ fi¯И. ªВ Щ· П‹ОЩЪ·
У· ВИП¤НВЩВ МВЩ·Н‡ ЩЛ˜ ¤У‰ВИНЛ˜ √¡ О·И √FF. ∏ ВО¿ЫЩФЩВ ВИПВБМ¤УЛ
О·Щ¿ЫЩ·ЫЛ ·У‚ФЫ‚‹УВИ О·И ВИ‚В‚·ИТУВЩ·И ·ЩТУЩ·˜ ЩФ П‹ОЩЪФ
2 .
∂∂¶¶ππ§§√√°°∏∏™™
▲▼ ÙÔ Û‡Ì‚ÔÏÔ Ì ÙË ‰È·ÁÚ·Ì̤ÓË Î·Ì¿Ó·
MMEENNUU
2 . ŒÙÛÈ Ô
∂∂¶¶ππ§§√√°°∏∏™™
▲▼ ÌÔÚ›ÙÂ
MMEENNUU
3.2.5
∂∂ÈÈÏÏÔÔÁÁ‹‹
ÁÁÏÏÒÒÛÛÛÛ··˜˜
3.2.6
ƒƒ‡‡ııÌÌÈÈÛÛËË ÙÙˢ˜
··ÓÓÙÙ››ııÂÂÛÛˢ˜
33..33
™™‡‡ÓÓ‰‰ÂÂÛÛËË ∏∏//ÀÀ
((PPCC--LLiinnkk))
™ÙÔÓ ÙÔ̤· ÌÂÓÔ‡ «Language» МФЪВ›ЩВ У· ВИП¤НВЩВ ЫВ ФИ· БПТЫЫ·
ı¤ПВЩВ У· ¯ВИЪ›˙ВЫЩВ ЩФ МВУФ‡. Δ· ЫЩФИ¯В›· ЫЩФ В‰›Ф ¤У‰ВИНЛ˜ МФЪФ‡У
У· ВМК·УИЫЩФ‡У ЫВ 5 ‰И·КФВЪЩИО¤˜ БПТЫЫВ˜.
ñ ENGLISH ñ DEUTSCH ñ FRANCAIS ñ ESPANOL ñ ITALIANO
∂ИП¤НЩВ М›· БПТЫЫ· МВ Щ· П‹ОЩЪ·
ВИПФБ‹ Ы·˜ ·ЩТУЩ·˜ БИ· П›БФ ЩФ П‹ОЩЪФ
ВИ‚В‚·›ˆЫЛ ВМК·У›˙ВЩ·И ЫЩФ В‰›Ф ¤У‰ВИНЛ˜ Ф ¯ЪfiУФ˜ О·И Ф ¯Ъ‹ЫЩЛ˜.
™ЩФУ ЩФМ¤· МВУФ‡ «
Ъ˘ıМИЫЩВ› ‚·ıМИ·›· МВ Щ· П‹ОЩЪ·
ВИı˘МЛЩ‹ ·УЩ›ıВЫЛ ВИ‚В‚·ИТЫЩВ ЩЛУ ВИПФБ‹ Ы·˜ МВ ЩФ П‹ОЩЪФ
2 .
™ЩЛ Ы˘ЫОВ˘·Ы›· ЩЛ˜ Ы˘ЫОВ˘‹˜ ˘¿Ъ¯ВИ ¤У· CD ПФБИЫМИОФ‡ О·И ¤У·
О·ПТ‰ИФ USB, МВ Щ· ФФ›· МФЪВ›ЩВ У· МВЩ·‚И‚¿ЫВЩВ Щ· ‰В‰ФМ¤У· ·fi ЩФ
ИВЫfiМВЩЪФ
Ы·˜. ™˘У‰¤ЫЩВ ЩФ О·ПТ‰ИФ USB МВ ЩЛ ‰ИВ·К‹ USB 66Ù˘ Û˘Û΢‹˜ Û·˜
·fi ЩЛ М›· ПВ˘Ъ¿ О·И ·fi ЩЛУ ¿ППЛ ПВ˘Ъ¿ МВ ЩЛУ ˘Ф‰Ф¯‹ ВИЫfi‰Ф˘
USB ЩФ˘ ˘ФПФБИЫЩ‹ Ы·˜. ª¤Ыˆ ЩФ˘ П‹ОЩЪФ
∂∂¶¶ππ§§√√°°∏∏™™
О·И ВИ‚В‚·ИТЫЩВ ЩЛУ ВИПФБ‹ МВ У¤Ф ¿ЩЛМ· ЩФ˘ П‹ОЩЪФ
™ЩЛУ ФЩИО‹ ¤У‰ВИНЛ ЩЛ˜ Ы˘ЫОВ˘‹˜
БЪ·ММ¤˜, Л ФФ›В˜ Ы˘М‚ФП›˙Ф˘У ЩЛ Ы‡У‰ВЫЛ МВ ЩФУ ˘ФПФБИЫЩ‹. ∂ИЫ¿БВЩВ
ЩФ CD ЫЩФУ ˘ФПФБИЫЩ‹ Ы·˜ О·И ВОЩВП¤ЫЩВ ЩЛ ‰И·‰ИО·Ы›· ВБО·Щ¿ЫЩ·ЫЛ˜.
ΔФ ПФБИЫМИОfi ‰И·ı¤ЩВИ Ы‡ЫЩЛМ· ·˘ЩФВВН‹БЛЫЛ˜. ªВЩ¿ ЩЛУ ВИЫ·БˆБ‹ ЩФ˘
CD Б›УВЩ·И ·˘ЩfiМ·ЩЛ ¤У·ЪНЛ ЩЛ˜ ‰И·‰ИО·Ы›·˜ ВБО·Щ¿ЫЩ·ЫЛ˜.
∞ОФПФ˘ı‹ЫЩВ ·П¿ ЩИ˜ Ф‰ЛБ›В˜ Ф˘ ВМК·У›˙ФУЩ·И ЫЩЛУ ФıfiУЛ ЩФ˘
˘ФПФБИЫЩ‹ Ы·˜. ™В ВЪ›ЩˆЫЛ ЪФ‚ПЛМ¿ЩˆУ ЩФ ПФБИЫМИОfi Ы·˜
ЪФЫК¤ЪВИ ВОЩВУ‹ ·Ъ¯В›· ‚ФЛıВИТУ. ΔФ ПФБИЫМИОfi ·ФЩ›МЛЫЛ˜ ЪФЫК¤ЪВИ
ЩЛ ‰˘У·ЩfiЩЛЩ· БЪ·КИО‹˜ ·Ъ¿ЫЩ·ЫЛ˜ ‹ ·Ъ¿ЫЩ·ЫЛ˜ ˘fi МФЪК‹ ›У·О·
ЩˆУ ЩИМТУ Ф˘ ¤¯Ф˘У МВЩЪЛıВ›.
▲▼ ВИП¤НЩВ ЩФ ЫЛМВ›Ф МВУФ‡ Ы‡У‰ВЫЛ ˘ФПФБИЫЩ‹ (PC-Link)
Contrast
MMEEDDIISSAANNAA HHGGDD
∂∂¶¶ππ§§√√°°∏∏™™
» ÛÙÔ Â‰›Ô ¤Ó‰ÂÈ͢ ÌÔÚ› Ë ·ÓÙ›ıÂÛË Ó·
∂∂¶¶ππ§§√√°°∏∏™™
М¤Ыˆ ЩЛ˜ ‰ИВ·К‹˜ USB ЫЩФУ ˘ФПФБИЫЩ‹
▲▼ О·И ВИ‚В‚·ИТЫЩВ ЩЛУ
MMEENNUU
▲▼. ∂¿У Ъ˘ıМ›ЫЩЛОВ Л
MMEENNUU
HHGGDD
ÂÌÊ·Ó›˙ÔÓÙ·È Î˘Ì·ÙÔÂȉ›˜
2 . ªÂÙ¿ ÙËÓ
2 Î·È ÙˆÓ Ï‹ÎÙÚ·
MMEENNUU
MMEENNUU
2 .
4.1
ΔΔÔÔÔÔıı¤¤ÙÙËËÛÛËË ÙÙˢ˜
ÌÌ··ÓÓÛÛ¤¤ÙÙ··˜˜ ››ÂÂÛÛˢ˜
96
aa..
μ¿ПЩВ ЩЛ М·УЫ¤Щ· ›ВЫЛ˜ Б‡Ъˆ ·fi ЩФУ ·ЪИЫЩВЪfi Ы·˜ О·Ъfi.
¶ЪФЫ¤НЩВ
с ТЫЩВ ЩФ В‰›Ф ¤У‰ВИНЛ˜ У· ‚Ъ›ЫОВЩ·И ЫЩФ ВЫˆЩВЪИОfi ЩФ˘ О·ЪФ‡.
 Loading...