

Page 1

Art. 77050
Infrarot-Thermometer FTD
Infrared thermometer FTD
Instrucciones de manejo
Manual de instruções
Käyttöohje
Bruksanvisning
√‰ËÁ›Â˜ ¯Ú‹Û˘
¡Por favor lea con cuidado!
Por favor ler cuidadosamente!
Lue huolellisesti läpi!
Läses noga!
¶·Ъ·О·ПФ‡МВ ‰И·‚¿ЫЩВ ЪФЫВОЩИО¿
Gebrauchsanweisung
Manual
Mode d’emploi
Gebruiksaanwijzing
Istruzioni per l’uso
Bitte sorgfältig lesen!
Please read carefully!
A lire attentivement s.v.p.!
A.u.b. zorgvuldig lezen!
Da leggere con attenzione!
Thermomètre infrarouge FTD
Infrarood-thermometer FTD
Termometro a infrarossi FTD
Termómetro de infrarrojos FTD
Termómetro a infra-vermelhos FTD
Infrapunakuumemittari FTD
Infraröd termometer FTD
£ВЪМfiМВЩЪФ ˘ЪВЩФ‡ МВ
˘¤Ъ˘ıЪВ˜ FTD
Page 2

2
D Gebrauchsanweisung
1 Einführung . . . . . . . . . . . . . . . . . . . . . . . . . . . . . . . . . . . . . . . . . . . . 5
2 Inbetriebnahme . . . . . . . . . . . . . . . . . . . . . . . . . . . . . . . . . . . 6
3 Messmethode . . . . . . . . . . . . . . . . . . . . . . . . . . . . . . . . . . . . . . . 8
4 V e r s c h i e d e n e s . . . . . . . . . . . . . . . . . . . . . . . . . . . . . . . . . . . . . . 1 0
5 G a r a n t i e . . . . . . . . . . . . . . . . . . . . . . . . . . . . . . . . . . . . . . . . . . . . . . . . . 1 2
GB Instructions Manual
1 Introduction . . . . . . . . . . . . . . . . . . . . . . . . . . . . . . . . . . . . . . . . . . 14
2 S t a r t u p . . . . . . . . . . . . . . . . . . . . . . . . . . . . . . . . . . . . . . . . . . . . . . . . . . 1 5
3 Measuring procedure . . . . . . . . . . . . . . . . . . . . . . . . . 17
4 Miscellaneous . . . . . . . . . . . . . . . . . . . . . . . . . . . . . . . . . . . . . . . 19
5 W a r r a n t y . . . . . . . . . . . . . . . . . . . . . . . . . . . . . . . . . . . . . . . . . . . . . . . . 2 1
F Mode d’emploi
1 Introduction . . . . . . . . . . . . . . . . . . . . . . . . . . . . . . . . . . . . . . . . . . 23
2 Mise en marche . . . . . . . . . . . . . . . . . . . . . . . . . . . . . . . . . . . 24
3 Méthode de mesure . . . . . . . . . . . . . . . . . . . . . . . . . . . 26
4 D i v e r s . . . . . . . . . . . . . . . . . . . . . . . . . . . . . . . . . . . . . . . . . . . . . . . . . . . . . . 2 8
5 G a r a n t i e . . . . . . . . . . . . . . . . . . . . . . . . . . . . . . . . . . . . . . . . . . . . . . . . . 3 0
NL Gebruiksaanwijzing
1 Inleiding . . . . . . . . . . . . . . . . . . . . . . . . . . . . . . . . . . . . . . . . . . . . . . . . . 32
2 Inbedrijfstelling . . . . . . . . . . . . . . . . . . . . . . . . . . . . . . . . . . . . 33
3 M e e t m e h t o d e . . . . . . . . . . . . . . . . . . . . . . . . . . . . . . . . . . . . . . 3 5
4 A l g e m e e n . . . . . . . . . . . . . . . . . . . . . . . . . . . . . . . . . . . . . . . . . . . . . . 3 7
5 G a r a n t i e . . . . . . . . . . . . . . . . . . . . . . . . . . . . . . . . . . . . . . . . . . . . . . . . . 3 9
I Istruzioni per l‘uso
1 Introduzione . . . . . . . . . . . . . . . . . . . . . . . . . . . . . . . . . . . . . . . . . 41
2 Messa infuzione . . . . . . . . . . . . . . . . . . . . . . . . . . . . . . . . . . . 42
3 Metodo dimisurazione . . . . . . . . . . . . . . . . . . . . . . . 44
4 V a r i e . . . . . . . . . . . . . . . . . . . . . . . . . . . . . . . . . . . . . . . . . . . . . . . . . . . . . . . 4 6
5 G a r a n z i a . . . . . . . . . . . . . . . . . . . . . . . . . . . . . . . . . . . . . . . . . . . . . . . . . 4 8
E Instrucciones de uso
1 Introducción . . . . . . . . . . . . . . . . . . . . . . . . . . . . . . . . . . . . . . . . . . 50
2 P u e s t a e n s e r v i c i o . . . . . . . . . . . . . . . . . . . . . . . . . . . . . . . . 5 1
3 Método de medición . . . . . . . . . . . . . . . . . . . . . . . . . 53
4 Varios . . . . . . . . . . . . . . . . . . . . . . . . . . . . . . . . . . . . . . . . . . . . . . . . . . . . . . 55
5 G a r a n t í a . . . . . . . . . . . . . . . . . . . . . . . . . . . . . . . . . . . . . . . . . . . . . . . . . 5 7
P Manual de instruções
1 Introdução . . . . . . . . . . . . . . . . . . . . . . . . . . . . . . . . . . . . . . . . . . . . . 59
2 Colocação em funcionamento . . . . . . . . 60
3 Método de medição . . . . . . . . . . . . . . . . . . . . . . . . . . . 62
4 Generalidades . . . . . . . . . . . . . . . . . . . . . . . . . . . . . . . . . . . . . . 64
5 G a r a n t i e . . . . . . . . . . . . . . . . . . . . . . . . . . . . . . . . . . . . . . . . . . . . . . . . . 6 6
FIN Käyttöohje
1 Johdatus . . . . . . . . . . . . . . . . . . . . . . . . . . . . . . . . . . . . . . . . . . . . . . . . . 68
2 Käyttöönotto . . . . . . . . . . . . . . . . . . . . . . . . . . . . . . . . . . . . . . . . 69
3 M i t t a u s t a v a t . . . . . . . . . . . . . . . . . . . . . . . . . . . . . . . . . . . . . . . . . . 7 1
4 Sekalaista . . . . . . . . . . . . . . . . . . . . . . . . . . . . . . . . . . . . . . . . . . . . . . . 73
5 T a k u u . . . . . . . . . . . . . . . . . . . . . . . . . . . . . . . . . . . . . . . . . . . . . . . . . . . . . . 7 5
S Bruksanvisning
1 Instruktion . . . . . . . . . . . . . . . . . . . . . . . . . . . . . . . . . . . . . . . . . . . . . 77
2 Använding . . . . . . . . . . . . . . . . . . . . . . . . . . . . . . . . . . . . . . . . . . . . . 78
3 M ä t m e t o d . . . . . . . . . . . . . . . . . . . . . . . . . . . . . . . . . . . . . . . . . . . . . 8 0
4 Övright . . . . . . . . . . . . . . . . . . . . . . . . . . . . . . . . . . . . . . . . . . . . . . . . . . . 82
5 G a r a n t i . . . . . . . . . . . . . . . . . . . . . . . . . . . . . . . . . . . . . . . . . . . . . . . . . . . 8 4
GR √‰ËÁ›Â˜ ¯Ú‹Û˘
1 ∂ÈÛ·ÁˆÁ‹ . . . . . . . . . . . . . . . . . . . . . . . . . . . . . . . . . . . . . . . . . . . . . . . 8 6
2
£¤ЫЛ ЫВ ПВИЩФ˘ЪБ›· . . . . . . . . . . . . . . . . . . . . . . . . . . . . 8 7
3
ª¤ıФ‰Ф˜ М¤ЩЪЛЫЛ˜ . . . . . . . . . . . . . . . . . . . . . . . . . . . . . 8 9
4
¢È¿ÊÔÚ· . . . . . . . . . . . . . . . . . . . . . . . . . . . . . . . . . . . . . . . . . . . . . . . . . . 9 1
5
∂ÁÁ‡ËÛË . . . . . . . . . . . . . . . . . . . . . . . . . . . . . . . . . . . . . . . . . . . . . . . . . 9 3
Klappen Sie bitte diese Seite auf und lassen Sie sie zur schnellen Orientierung aufgeklappt.
Please fold out this page and leave it folded out for quick reference.
Veuillez déplier cette page et la laisser dépliée afin de vous orienter plus rapidement.
Sla deze bladzijde om en laat deze opengeslagen, terwijl u de gebruiksaanwijzing leest.
Aprire questa pagina e lasciarla aperta ai fini di un rapido orientamento.
Por favor, despliegue esta hoja y déjela desplegada para orientarse rápidamente.
Por favor, abra esta página e deixe-a aberta para uma orientação rápida.
Kääntäkää tämä sivu auki ja pitäkää se aukikäännettynä nopeaa orientaatiota varten.
Vik upp denna sida och låt den vara uppslagen som hjälp till snabb orientering.
¶·Ъ·О·ПФ‡МВ ·УФ›НЩВ ЩЛ ЫВП›‰· ·˘Щ‹ О·И ·К‹ЫЩВ ЩЛУ ·УФИ¯Щ‹ БИ· БЪ‹БФЪФ ЪФЫ·У·ЩФПИЫМfi.
Page 3
3
FTD Thermometer
1
2
3
4
5
16 15 14 13 12 11 10
8
7
9
6
Page 4
Lesen Sie die folgende Gebrauchsanweisung
sorgfältig durch, bevor Sie das FTD Thermometer
benutzen und bewahren Sie sie auf.
4
FTD Thermometer
D
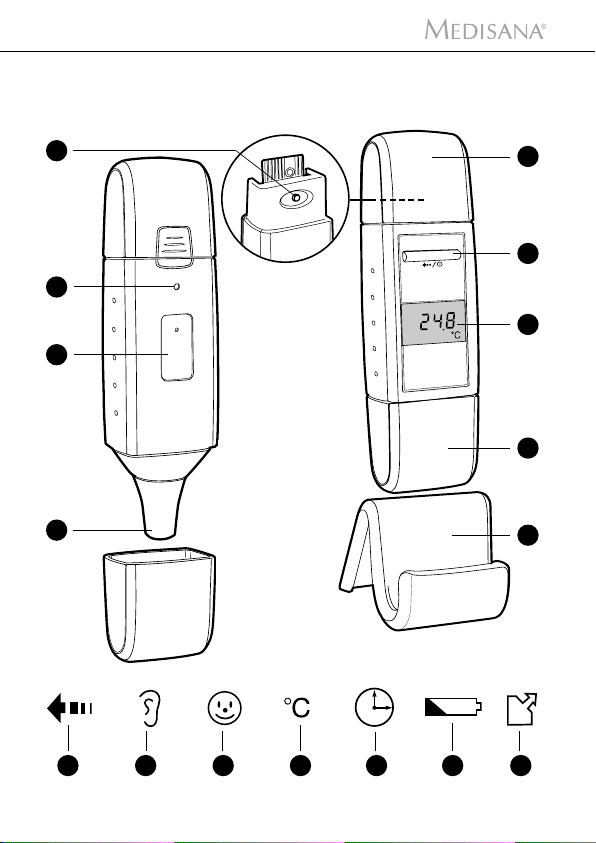
1
Batteriefach-Abdeckung
Einschalt- / Scan-Taste
Display
Sensor-Abdeckung
Ständer
Sensor
Typenschild
Knopf zum Öffnen des Batteriefachs
Einstelltaste für die Uhrzeit
Speicher-Symbol
- für die zuletzt gespeicherte Temperatur
Batterie-Symbol
- für die Anzeige niedriger Batteriestand
Uhrzeit-Symbol
- für die Anzeige der Uhrzeit
Celsius-Symbol
- für die Körpertemperatur
- für die Umgebungstemperatur
Symbol für die Temperaturermittlung an der Stirn
Symbol für die Temperaturermittlung im Ohr
Symbol für laufende Temperaturmessung
Teile des Gerätes
Displaysymbole
2
3
4
5
6
7
8
9
10
11
12
13
14
15
16
Page 5
5
D
1 Einführung
Vielen Dank für Ihr Vertrauen und herzlichen Glückwunsch! Wir freuen uns, dass Sie mit dem FTD Thermometer ein Qualitätsprodukt von
MEDISANA erworben haben.
Damit Sie den gewünschten Erfolg erzielen und recht lange Freude an
Ihrem MEDISANA FTD Thermometer haben, empfehlen wir Ihnen,
die nachstehende Gebrauchsanleitung sorgfältig zu lesen und aufzubewahren.
Das FTD Thermometer ermöglicht Ihnen, die Temperatur im Ohr und
auf der Stirn zu messen. Zusätzlich ermittelt es die Umgebungstemperatur und zeigt die aktuelle Uhrzeit an.
Bitte prüfen Sie zunächst, ob die Lieferung vollständig ist.
Verpackungen sind wiederverwendbar oder können dem Rohstoffkreislauf zurückgeführt werden. Bitte entsorgen Sie nicht mehr
benötigtes Verpackungsmaterial ordnungsgemäß. Sollten Sie beim
Auspacken einen Transportschaden bemerken, setzen Sie sich bitte
sofort mit Ihrem Händler in Verbindung.
WARNUNG
Achten Sie darauf, dass die Verpackungsfolien nicht in die
Hände von Kindern gelangen. Es besteht Erstickungsgefahr!
• Benutzen Sie das Gerät nur entsprechend seiner Bestimmung laut
Gebrauchsanweisung. Bei Zweckentfremdung erlischt der Garantieanspruch.
• Das Gerät ist nicht für den kommerziellen Gebrauch bestimmt.
• Kinder dürfen das Gerät nicht verwenden. Medizinprodukte sind
kein Spielzeug!
• Im Falle von Störungen oder Beschädigungen reparieren Sie das
Gerät nicht selbst, da dadurch jeglicher Garantieanspruch erlischt.
Fragen Sie Ihren Fachhändler und lassen Sie Reparaturen nur von
autorisierten Servicestellen durchführen.
• Legen Sie das Thermometer nicht ins Wasser oder in eine andere
Flüssigkeit. Sollte dennoch einmal Feuchtigkeit in das Gerät eindringen, entfernen Sie die Batterie und nehmen Sie keine weiteren
Messungen mit dem Thermometer vor. Vor der weiteren Benutzung des Gerätes setzen Sie sich mit Ihrem Fachhändler oder
MEDISANA in Verbindung.
• Schütteln und klopfen Sie das Thermometer nicht.
• Setzen Sie das Thermometer nicht über längere Zeit extremen
Temperaturen aus, z.B. in einem von der Sonne direkt bestrahlten
Fahrzeug.
1.1
Herzlichen
Dank
1.2
Lieferumfang
1 MEDISANA
FTD
Thermometer
inkl. Batterie
1 Ständer
1 Gebrauchs-
anweisung
1.3
Allgemeine
Hinweise
Page 6
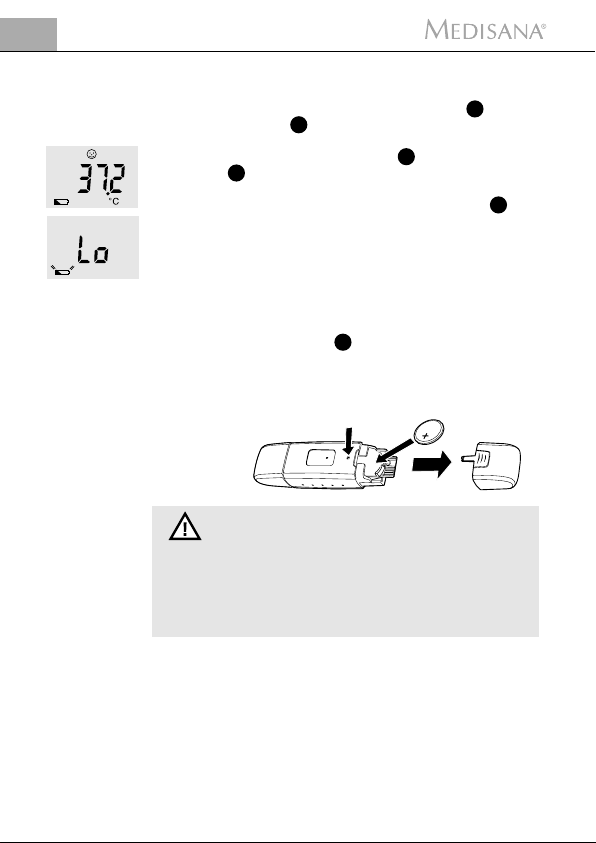
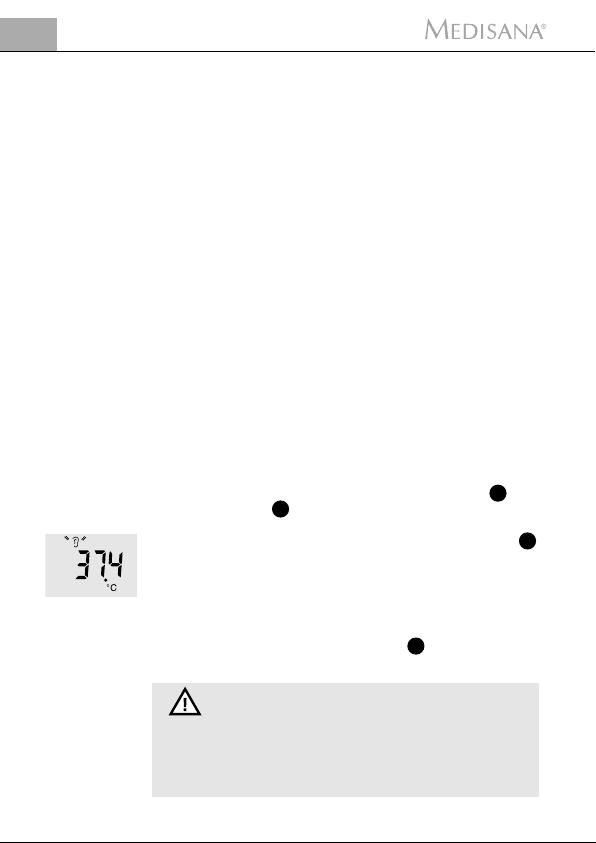
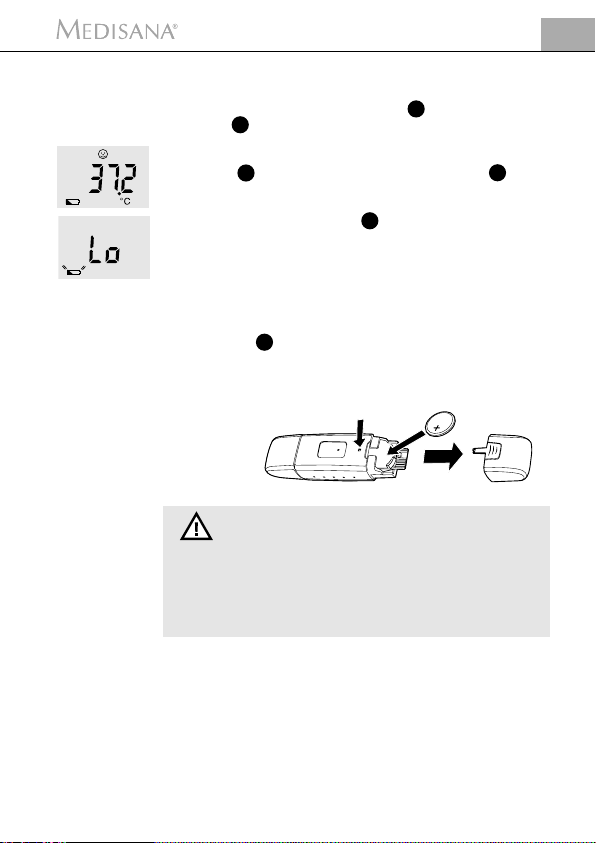
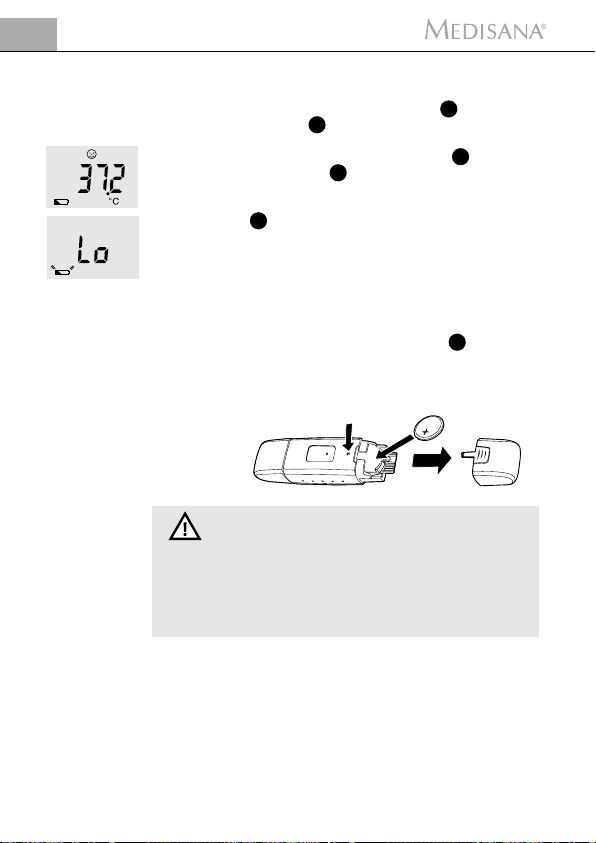
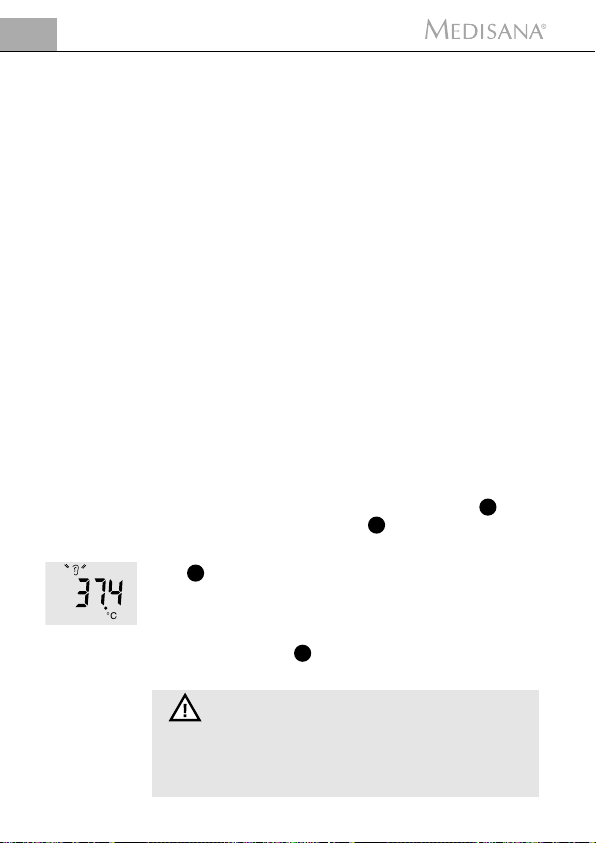
Im Lieferumfang ist eine Lithium Batterie (3 V CR2032) enthalten. Ein
niedriger Batteriestand wird durch das Batterie-Symbol im unteren Bereich des Displays angezeigt. Sie sollten die Batterie so bald
wie möglich wechseln. Ist die Batteriekapazität erschöpft, erscheint
zusätzlich zum blinkenden Batterie-Symbol der Hinweis “Lo” auf
dem Display und ein Signalton ertönt (siehe Abb.). Eine weitere
Benutzung des Thermometers ist nun vor dem Wechseln der Batterie
nicht mehr möglich. Drücken Sie die Einschalt-/Scan-Taste , um
das Gerät auszuschalten.
Dieses Thermometer ist mit einem Sicherheitsverschluss ausgestattet,
um die Batterie von Kindern fernzuhalten. Drücken Sie den Knopf
zum Öffnen des Batteriefachs mit einem spitzen Gegenstand
nach innen und entnehmen Sie die Batterie (siehe Abb.). Für dieses
Thermometer benötigen Sie eine 3 V CR2032 Lithium Batterie. Wenn
Sie die Batterie einsetzen, muss der Pluspol (+) nach oben zeigen.
BATTERIE-SICHERHEITSHINWEISE
• Von Kindern fernhalten! • Nicht wiederaufladbar!
• Nicht kurzschließen! • Nicht ins Feuer werfen!
• Werfen Sie verbrauchte Batterien und Akkus nicht in den
Hausmüll, sondern in den Sondemüll oder in eine BatterieSammelstation im Fachhandel.
Wenn Sie das Thermometer zum ersten Mal in Betrieb nehmen oder
nach einem Batteriewechsel müssen Sie zunächst die Uhrzeit einstellen. Danach wird automatisch der Modus zur Messung der Umgebungstemperatur aktiviert.
6
2 Inbetriebnahme
D
2.1
Batterieanzeige
2.2
Batteriewechsel
2.3
Uhrzeit und
Umgebungstemperatur
Knopf zum Öffnen des Batteriefachs
11
2
8
11
3
3
Page 7
7
D
2 Inbetriebnahme
2.5
Hinweise
vor dem
Gebrauch
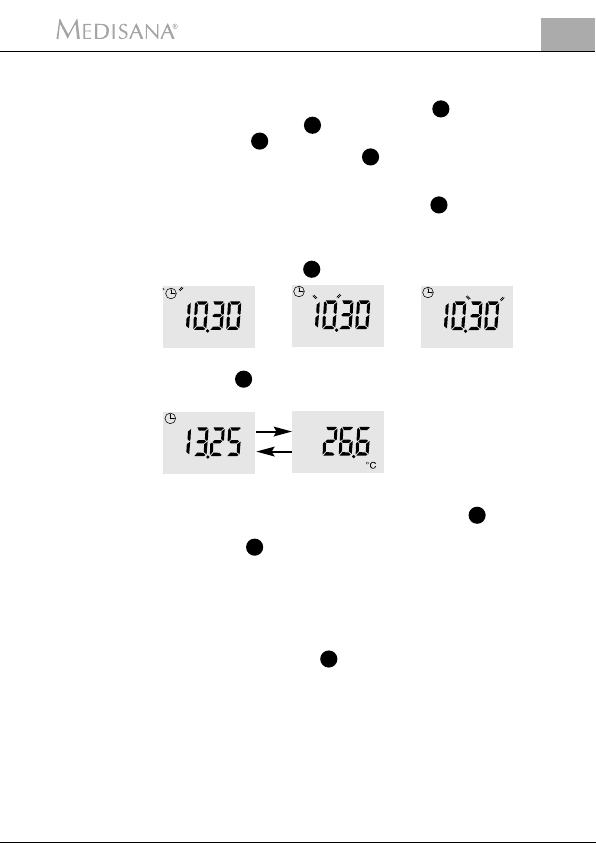
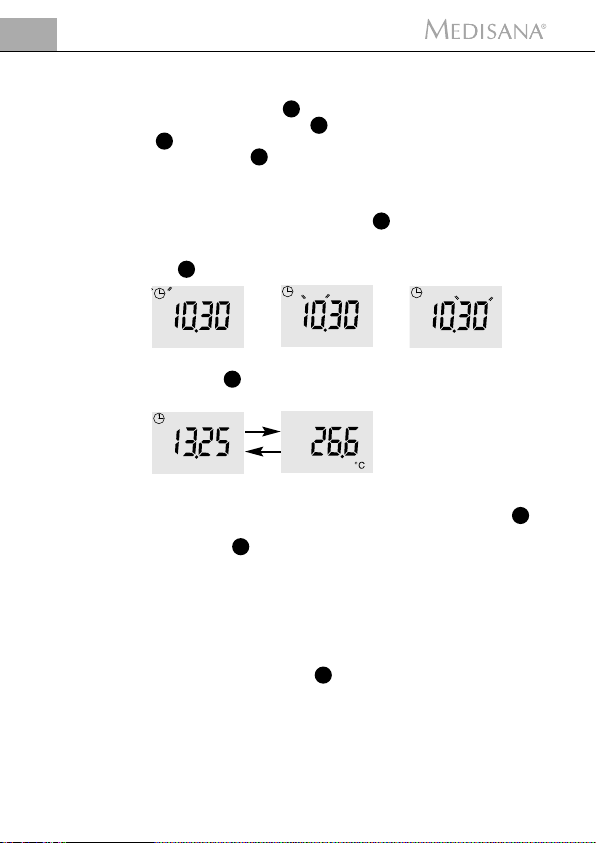
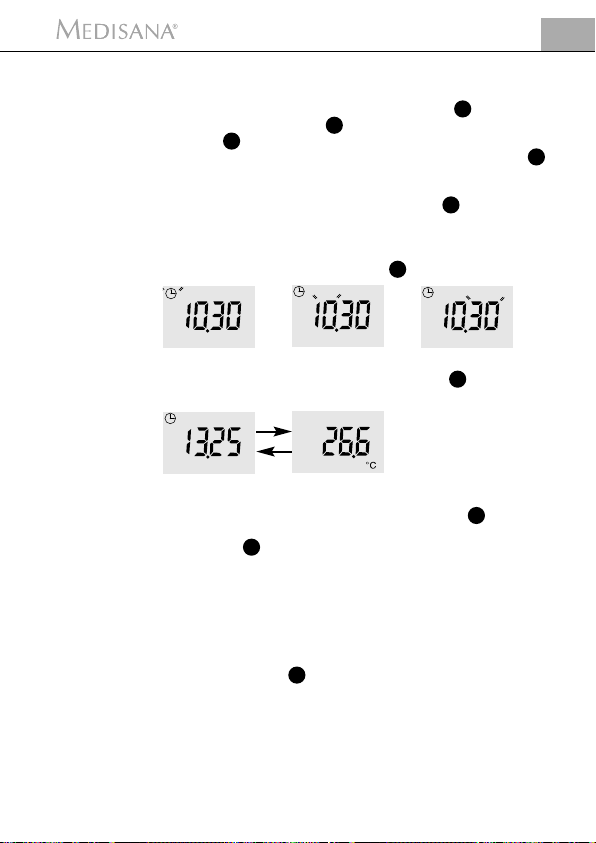
Öffnen Sie das Batteriefach, indem Sie mit einem spitzen Gegenstand
auf den Knopf zum Öffnen des Batteriefachs drücken und die
Batteriefach-Abdeckung abziehen. Drücken Sie die Einstelltaste
für die Uhrzeit , bis die Stundenanzeige blinkt. Die Stunden werden mit der Einschalt-/Scan-Taste durch mehrmaliges Drücken,
bis die gewünschte Stunde erreicht ist, eingestellt (siehe Abb.).
Durch Drücken der Einstelltaste für die Uhrzeit wechseln Sie von
der Stundeneinstellung in die Minuteneinstellung. Die Minutenanzeige blinkt. Verfahren Sie wie bei der Stundeneinstellung. Wenn Sie die
Uhrzeit eingestellt haben, drücken Sie zur Bestätigung einmal die Einstelltaste für die Uhrzeit (siehe Abb.).
Das Display des Gerätes zeigt dann im Wechsel die Uhrzeit und
die Umgebungstemperatur an (siehe Abb.).
• Das Thermometer ist mit einem gekapselten Sensor ausgestattet. Sensorschutzkappen sind nicht erforderlich.
• Der Sensor des Thermometers muss stets sauber und intakt
sein, um genaue Messwerte zu garantieren.
• Ohrenschmalz beeinflusst die Messgenauigkeit. Reinigen Sie bei
Bedarf das Ohr und die Sensorspitze des Thermometers vor der
Messung, um eventuelle Fehlmessungen zu vermeiden.
• Überschreitet die Umgebungstemperatur während der Ermittlung
der Umgebungstemperatur den ausgelegten Rahmen von 16
0
C –
40
0
C , zeigt das Display „Err“.
2.4
Einstellen
der Uhrzeit
1
6
9
2
6
9
9
8
3
3
Page 8
8
3 Messmethode
D
3.3
Messen der
Körpertemperatur
• Messen Sie Ihre Temperatur nicht direkt nach dem Essen, Sporttraining oder Baden. Warten Sie eine halbe Stunde.
• Nehmen Sie aufeinander folgende Messungen nur in Abständen
von mindestens 1 Minute vor. Falls Sie Ihre Temperatur über einen
kurzen Zeitraum häufiger ermitteln müssen, können die Messergebnisse geringfügig schwanken.
• Die menschliche Körpertemperatur bewegt sich innerhalb eines
natürlichen Spielraums. Es gibt keine Standard-Körpertemperatur.
• Messen und notieren Sie Ihre Körpertemperatur an ganz normalen
Tagen. So können Sie eventuelles Fieber besser erkennen.
• Für eine genaue Messung im Ohr ist es sehr wichtig, dass der
Sensor auf das Trommelfell ausgerichtet ist und sich tief genug im
Gehörgang befindet.
• Es gibt Personen, die unterschiedliche Messwerte am linken und
rechten Ohr haben. Um Temperaturveränderungen zu erfassen,
messen Sie bei derselben Person immer am selben Ohr.
• Die Schlafposition kann die Messergebnisse beeinflussen. Wenn
eine Person eine geraume Zeit auf einem Ohr geschlafen hat, ist
die Temperatur in diesem Ohr höher als normal. Messen Sie in
diesem Fall am anderen Ohr oder warten Sie ein paar Minuten mit
der Messung.
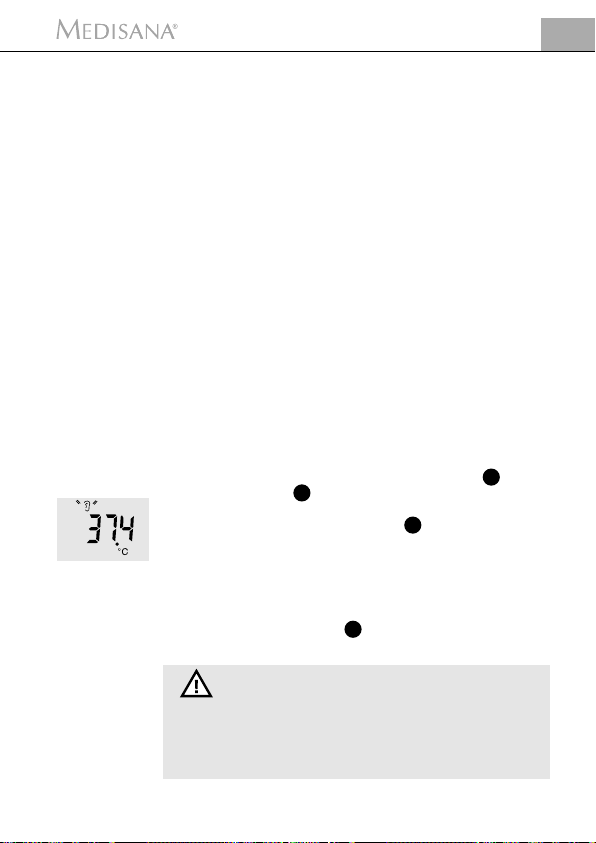
Dieses Thermometer optimiert während der Temperaturmessung die
Bedingungen automatisch. Falls das Messsystem für eine Messung
noch nicht bereit ist, leuchtet entweder das Ohrtemperatur- oder
das Stirntemperatur- Symbol auf (siehe Abb.). Gleichzeitig sind
kurze, schnell aufeinanderfolgende Signaltöne zu hören. In diesem
fall stoppen Sie die Messung, indem Sie die Einschalt-/Scan-Taste
drücken. Fahren Sie mit der Temperaturermittlung erst fort, wenn das
Symbol erloschen ist und der Signalton verstummt ist.
Um von der Messung an der Stirn zur Messung im Ohr zu wechseln,
entfernen Sie einfach die Sensor-Abdeckung . Um wieder an der
Stirne zu messen, stecken Sie sie wieder auf.
ACHTUNG
Die Temperaturermittlung an der Stirn sollte nur zur
Kontrolle durchgeführt werden, da die Hauttemperatur an
der Stirn durch äußere Einflüsse leicht beeinflusst und somit
das Messergebnis verfälscht werden kann.
3.2
Die besten
Voraussetzungen
3.1
Hinweise zur
Temperaturermittlung
2
14
15
4
Page 9
9
D
3 Messmethode
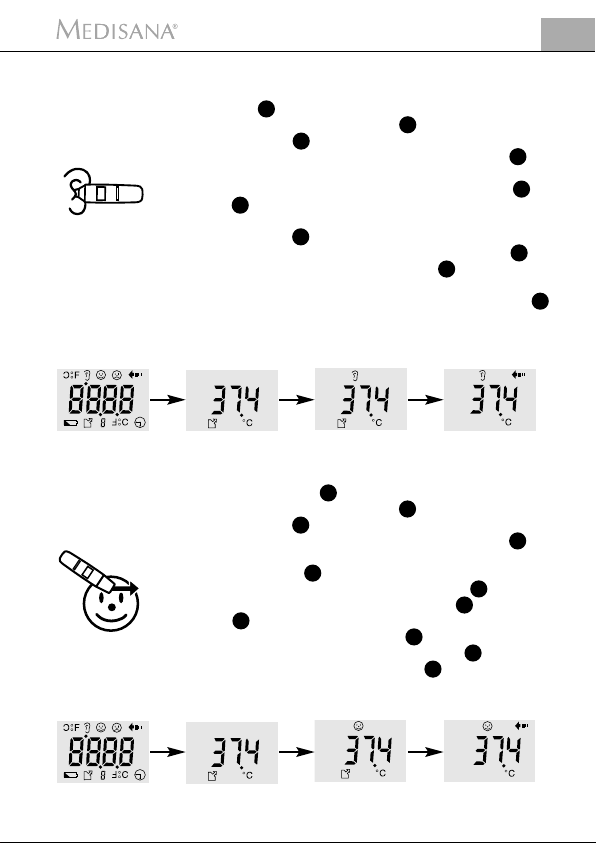
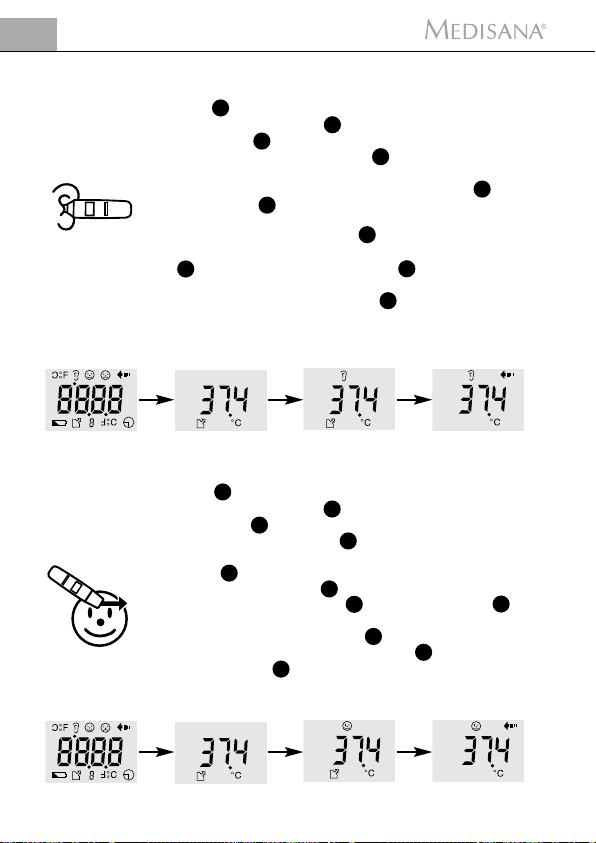
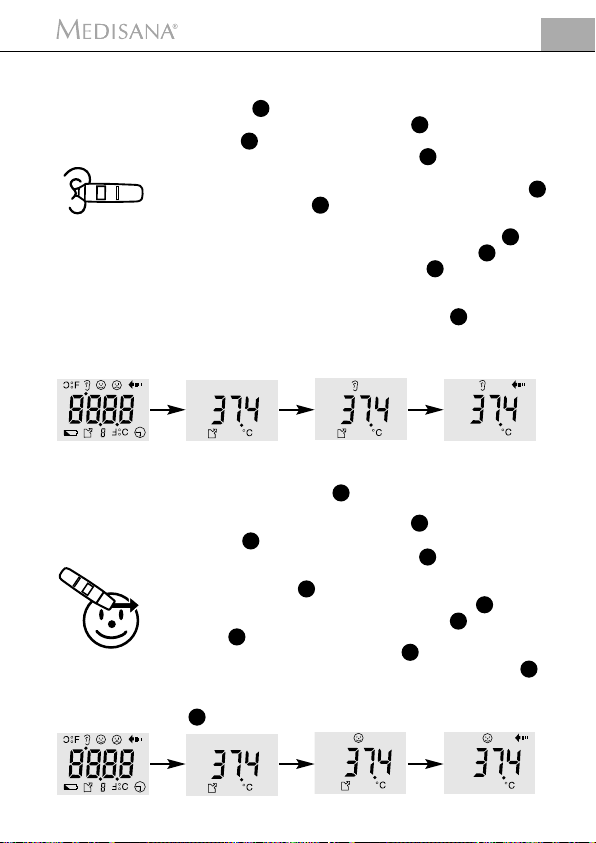
Zur Temperaturermittlung im Ohr entfernen Sie die SensorAbdeckung .
Drücken Sie die Einschalt-/Scan-Taste .
Wenn das Display die Uhrzeit oder die Umgebungstemperatur anzeigt, drücken Sie erneut die Einschalt-/Scan-Taste . Es
erscheint die zuletzt ermittelte Temperatur (siehe Abb.).
Wenn das Symbol für die Temperaturermittlung im Ohr im
Display erscheint, ertönen zwei kurze Signaltöne und das Gerät ist einsatzbereit (siehe Abb.). Drücken Sie noch einmal die Einschalt-/Scan-Taste .
Sobald das Symbol zur laufenden Temperaturmessung erscheint (siehe Abb.), stecken Sie den Sensor ins Ohr. Halten
Sie das Gerät während des Messvorgangs ruhig. Nach nur wenigen Sekunden ertönt ein kurzer Signalton und das Display I
zeigt die ermittelte Körpertemperatur.
Nach der Temperaturermittlung wechselt das Gerät automatisch
in den Modus der Uhrzeit und Umgebungstemperatur.
Um die Körpertemperatur an der Stirn ermitteln zu können, muss
die Sensor-Abdeckung aufgesteckt sein.
Drücken Sie die Einschalt-/Scan-Taste .
Wenn das Display die Uhrzeit oder die Umgebungstemperatur anzeigt, drücken Sie erneut die Einschalt-/Scan-Taste . Es
ertönen zwei Signaltöne und die zuletzt ermittelte Temperatur
erscheint im Display (siehe Abb.).
Drücken Sie noch einmal die Einschalt-/Scan-Taste . Das Symbol für die Temperaturermittlung an der Stirn erscheint im
Display (siehe Abb.). Das Gerät ist einsatzbereit.
Halten Sie das Gerät mit dem Sensor an die Stirnmitte und
drücken Sie gleichzeitig die Einschalt-/Scan-Taste . Ziehen Sie
nun bei gedrückter Einschalt-/Scan-Taste das Thermometer
von der Stirnmitte zur Seite bis über die Schläfe.Lassen Sie die
Taste los, wenn diese Position erreicht ist.
3.4
Messen der
Temperatur
im Ohr
3.5
Messen der
Temperatur
an der Stirn
4
16
2
3
1.
2.
3.
4.
5.
6.
1.
2.
3.
4.
5.
3
3
3
6
2
2
15
2
2
3
4
6
14
2
2
3
2
Ziehen Sie etwas am
Ohr, damit der
Gehörgang gerade
wird. Führen Sie den
Sensor vorsichtig in
den Gehörgang ein.
Page 10
10
3 Messmethode / 4 Verschiedenes
D
• Das wichtigste und empfindlichste Teil des Thermometers ist der
Sensor . Um genaue Temperaturermittlungen zu garantieren,
muss sie immer sauber und intakt sein.
• Der Sensor ist wasserdicht und kann deshalb durch direktes
Eintauchen in Alkohol oder durch Säubern mit in einem in Alkohol
getränkten Wattepad gereinigt werden.
• Zur Desinfektion des Sensors eignen sich handelsübliche alkoholische Desinfektionsmittel. Beachten Sie die Hinweise der jeweiligen Hersteller.
• Das Gehäuse und das Display des Thermometers sind nicht
wasserdicht. Tauchen Sie sie nicht in Flüssigkeiten.
• Reinigen Sie sie mit einem trockenen, sauberen Tuch. Verwenden
Sie keine aggressiven Reinigungsmittel.
• Verstauen Sie das Thermometer am besten in der beim Kauf erworbenen Originalverpackung und bewahren Sie es an einem
sauberen und trockenen Platz auf. Schützen Sie es vor direkter
Sonneneinstrahlung.
• Die Aufbewahrungstemperatur soll im Bereich von -20,0
0
C bis
+50,0
0
C liegen.
• Das Gerät ist werkseitig kalibriert. Bei ordnungsgemäßer Handhabung ist ein Nachkalibrieren nicht erforderlich.
Entsorgen Sie Ihr Altgerät nach dessen Lebensdauerende umweltgerecht! Verpackungen sind wiederverwendbar bzw. können in den
Rohstoffkreislauf zurückgeführt werden, Metallteile der Altmetallverwertung, Kunststoffe, elek trische und elektronische Bauteile müssen
als Elektroschrott entsorgt werden.
Entnehmen Sie die Batterie, bevor Sie das Gerät entsorgen. Werfen
Sie verbrauchte Batterien nicht in den Hausmüll, sondern in den
Sondermüll oder in eine Batterie-Sammelstation im Fachhandel.
Wenden Sie sich hinsichtlich der Entsorgung an Ihre Kommunalbehörde oder Ihren Händler.
4.1
Pflegen und
Aufbewahren
4.2
Entsorgen
3
6
6
6
Nach vollendeter Temperaturermittlung hören Sie einen Signalton und die Körpertemperatur wird im Display angezeigt.
Danach wechselt das Gerät automatisch in den Modus der Uhrzeit und Umgebungstemperatur.
Wenn die gemessene Temperatur außerhalb des zulässigen
Bereichs liegt, erfolgt die Anzeige “Lo” “Hi”.
6.
7.
8.
3
Page 11
Modell : MEDISANA FTD Thermometer
Angezeigter
Temperaturbereich : 10
0
C – 50 0C
Messgenauigkeit : bei weniger als 35,5
0
C oder
mehr als 42,0
0
C ±0,3 0C ,
von 35,5
0
C bis 42,0 0C ±0,2 0C
Klinische
Wiederholpräzision : ±0,1 °C
Auflösung des Displays : 0,1
0
C
Betriebstemperatur : 16,0
0
C bis 40,0 0C
bei 95 % max. relativer Luftfeuchtigkeit
Lagertemperatur : -20,0
0
C bis +50,0 0C
bei 95 % max. relativer Luftfeuchtigkeit
Batterie: 1 x 3 V CR2032 Lithium Batterie
Batterie-Lebensdauer : ca. 500 Messungen
Schutzklasse : BF
Abmessungen : ca. 109 mm x 30 mm x 22 mm
Gewicht : ca. 45 g inkl. Batterie
Artikel Nr. : 77050
EAN-Nummer : 4015588770500
Dieses Gerät entspricht den Bestimmungen der EWG-Richtlinie 93/42
für Medizinprodukte.
Im Zuge ständiger Produktverbesserungen behalten wir uns
technische und gestalterische Änderungen vor.
11
D
4 Verschiedenes
4.3
Technische
Daten
Page 12

12
5 Garantie
D
Bitte wenden Sie sich im Garantiefall an Ihr Fachgeschäft oder direkt
an die Servicestelle. Sollten Sie das Gerät einschicken müssen, geben
Sie bitte den Defekt an und legen eine Kopie der Kaufquittung bei.
Es gelten dabei die folgenden Garantiebedingungen:
1. Auf MEDISANA Produkte wird ab Verkaufsdatum eine Garantie
für drei Jahre gewährt. Das Verkaufsdatum ist im Garantiefall
durch die Kaufquittung oder Rechnung nachzuweisen.
2. Mängel infolge von Material- oder Fertigungsfehlern werden
innerhalb der Garantiezeit kostenlos beseitigt.
3. Durch eine Garantieleistung tritt keine Verlängerung der Garantie-
zeit, weder für das Gerät noch für ausgewechselte Bauteile, ein.
4. Von der Garantie ausgeschlossen sind:
a. alle Schäden, die durch unsachgemäße Behandlung, z.B. durch
Nichtbeachtung der Gebrauchsanweisung, entstanden sind.
b. Schäden, die auf Instandsetzung oder Eingriffe durch den Käu-
fer oder unbefugte Dritte zurückzuführen sind.
c. Transportschäden, die auf dem Weg vom Hersteller zum Ver-
braucher oder bei der Einsendung an die Servicestelle entstanden sind.
d. Zubehörteile, die einer normalen Abnutzung unterliegen (Man-
schetten, Batterien usw.).
5. Eine Haftung für mittelbare oder unmittelbare Folgeschäden, die
durch das Gerät verursacht werden, ist auch dann ausgeschlossen,
wenn der Schaden an dem Gerät als ein Garantiefall anerkannt
wird.
Sollten Sie Fragen zu diesem oder anderen Produkten haben, beantworten wir diese sehr gerne.
MEDISANA
AG
Itterpark 7-9
D-40724 Hilden
Fon: +49 (0) 2103 / 2007-60
Fax: +49 (0) 2103 / 2007-626
eMail: info@medisana.de
Internet: www.medisana.de
5.1
Garantie- und
Reparaturbedingungen
Im Servicefall wenden Sie
sich bitte an:
MEDISANA Servicecenter
Feuerbach KG
Corneliusstraße 75
D-40215 Düsseldorf
Tel.: 0211 - 38 10 07
(Mo-Do: 9-13 Uhr/14-17 Uhr,
Fr: 9-13 Uhr)
Fax: 0211 - 37 04 97
eMail: medisana@t-online.de
Page 13
13
GB
FTD Thermometer
Please read the following usage instructions
carefully before using the FTD thermometer,
and keep them in a safe place.
1
Battery compartment cover
On / Scan button
Display
Sensor cover
Stand
Sensor
Name plate
Knob for opening battery compartment
Time setting button
Memory symbol
- for last stored temperature
Battery symbol
- for indicating low battery charge
Clock symbol
- for displaying the time
Celsius symbol
- for body temperature
- for ambient temperature
Symbol for measuring temperature at forehead
Symbol for measuring temperature in the ear
Symbol for continuous temperature measurement
Device
components
Display symbols
2
3
4
5
6
7
8
9
10
11
12
13
14
15
16
Page 14
14
1 Introduction
GB
Thank you for buying our product, and congratulations! You are now
the owner of the FTD thermometer, which is a quality product made
by MEDISANA. In order to successfully use the product and ensure
that your MEDISANA FTD thermometer has a long service life, we
recommend that you read these usage instructions carefully and keep
them in a safe place.
The FTD thermometer can be used to take ear or forehead temperature measurements. The device also measures the ambient temperature and displays the time.
Please first check whether the delivery is complete.
The packaging is reusable or can be recycled. Packaging that is not
longer required must be disposed of properly. If you discover any
transport damage when unpacking, please contact your dealer immediately.
WARNING
Please keep the packaging film away from children.
Risk of suffocation!
• Only use the device for its correct purpose of use, as described in
the usage instructions. Using the device for any other purpose will
invalidate the warranty.
• The device is not intended for commercial use.
• Do not allow children to use the device. Medical products are not
toys!
• In the event of faults or damage do not repair the device yourself,
since this will invalidate all warranty claims. Contact your specialist
dealer and always have repairs carried out by authorised service
workshops.
• Do not immerse the thermometer in water or any other liquid. If
the device is penetrated by moisture, remove the battery and do
not carry out any further measurements with the thermometer.
Contact your specialist dealer or MEDISANA before using the
device again.
• Do not shake or knock the thermometer.
• Do not expose the thermometer to extreme temperatures for long
periods, e.g. in a vehicle standing in direct sunlight.
1.1
Thank you
1.2
Scope of
delivery
1 MEDISANA
FTD
thermometer,
incl. battery
1Stand
1 Set of usage
instructions
1.3
General
instructions
Page 15
15
GB
2 Start-up
The scope of delivery includes a battery (3 V CR2032). A low battery
charge is indicated by the battery symbol in the lower area of
the display .
In this case the battery should be replaced as soon as possible. When
the battery capacity has been used up, the symbol “Lo” appears in
the display as well as the flashing battery symbol and a
beep is heard (see fig.).
The thermometer can no longer be used without changing the
battery. Press the On/Scan button to switch off the device.
This thermometer is equipped with a safety catch in order to keep the
battery away from children. Push in the knob for opening the battery
compartment with a pointed object and remove the battery
(Fig.). A 3 V CR2032 lithium battery is required for this thermometer.
The battery must be inserted with the positive terminal (+) on top.
BATTERY SAFETY INSTRUCTIONS
• Keep away from children! • Do not recharge!
• Do not short-circuit! • Do not throw in the fire!
• Do not throw used batteries away with the domestic
rubbish. Please put them in the special rubbish or a battery
collecting station in a specialist dealer’s shop.
When the thermometer is used for the first time or after a battery
change, the time must first be set. Then the ambient temperature
measuring mode is automatically activated.
2.1
Battery
display
2.2
Battery
change
2.3
Time and
ambient
temperature
Knob for opening battery compartment
11
2
8
11
3
3
Page 16
16
2 Start-up
GB
2.5
Before you
start to use
the device…
Open the battery compartment by pressing the knob for opening the
battery compartment with a pointed object and removing the
battery compartment cover . Press the button for setting the time
until the hour display flashes. The hours are set by pressing the
On/Scan button several times until the required hour setting is
reached (see Fig.).
You can now switch from the hour setting to the minute setting by
pressing the time setting button again . The minute display flashes. Adjust the minute setting in the same way that you adjusted the
hour setting. When you have set the time, press the time setting button again as confirmation (see Fig.).
The display of the device now alternates between the time and
the ambient temperature (see Fig.).
• The thermometer is equipped with an encapsulated sensor .
Special protection caps are not required.
• The sensor of the thermometer must be kept clean and intact
at all times in order to guarantee that the measurements are accurate.
• Ear wax affects the measuring accuracy. If necessary, clean your ear
and the sensor tip of the thermometer before measuring in order
to avoid erroneous measurements.
• If the ambient temperature exceeds the designated range of 16 °C
to 40 °C when the ambient temperature is being measured, "Err"
will appear in the display .
2.4
Setting
the time
1
6
9
2
6
9
9
8
3
3
Page 17
17
GB
3 Measuring procedure
3.3
Taking body
temperature
measurements
• Do not measure your temperature immediately after eating,
training or bathing. Wait for half an hour.
• Do not take successive measurements at intervals of less than one
minute. If you have to take your temperature at shorter intervals,
the results may fluctuate slightly.
• The human body temperature fluctuates within a natural range.
There is no such thing as a standard body temperature.
• Measure and record your body temperature on normal days. This
will allow you to detect a fever more easily.
• In order to make an accurate measurement in the ear, the sensor
must be directed at the eardrum and be inserted far enough into
the ear canal.
• Some people will have different readings for the right and left ears.
Always measure the same person in the same ear when measuring
temperature changes.
• The measurements can also be influenced by your sleeping position.
If someone has slept on a particular ear for a considerable period,
the temperature will be higher than normal in this ear. In this case,
measure in the other ear or wait for a few minutes before
measuring.
This thermometer optimises the conditions automatically during the
temperature measurement. If the measuring system is still not ready
to take a measurement, either the ear temperature or the
forehead temperature symbol illuminates (see Fig.). At the same
time, rapid, brief successive beeps can be heard. In this case, stop
measuring by pressing the On/Scan button . Do not continue with
the temperature measurement until the symbol goes dark and the
beeping stops.
In order to change from forehead measurement to ear measurement,
simply remove the sensor cover . When you wish to change back
again, replace the cover.
ATTENTION
Forehead temperatures should only be taken for checking
purposes, since the skin temperature at the forehead is
easily affected by outside influences, meaning that the
measurement can be falsified.
3.2
The best
prerequisites
3.1
Notes on
temperature
measurement
2
14
15
4
Page 18
18
3 Measuring procedure
GB
To measure the temperature in your ear, first remove the sensor
cover .
Press the On/Scan button .
If the display is showing the time or the ambient temperature, press the On/Scan button again . The last temperature that
was measured is displayed (see Fig.).
If the symbol for temperature measurement in the ear appears
in the display , two short beeps will be heard and the device
is ready for use (see Fig.).
Press the On/Scan button again .
As soon as the symbol for continuous temperature measurement
appears (see Fig.), insert the sensor in your ear. Keep the
device still whilst measuring. After just a few seconds a short
beep will be heard and the display will show the measured
body temperature.
After the temperature has been measured, the device automatically switches to the time and ambient temperature display mode.
To measure the body temperature at your forehead, the sensor
cover must be attached.
Press the On/Scan button .
If the display is showing the time or the ambient temperature, press the On/Scan button again. Two beeps will be heard,
and the last temperature that was measured will appear on the
display (see Fig.).
Press the On/Scan button again. The symbol for temperature
measurement at the forehead appears on the display (see
Fig.). The device is ready for use.
Hold the device with the sensor against the centre of your
forehead and press the On/Scan button . Hold down the
On/Scan button and drag the thermometer from the centre
of your forehead to the side, as far as your temple. When you
reach this position, release the button.
3.4
Measuring the
temperature in
your ear
3.5
Measuring the
temperature
at your
forehead
4
16
2
3
1.
2.
3.
4.
5.
6.
1.
2.
3.
4.
5.
3
3
3
6
2
2
15
2
2
3
4
6
14
2
2
3
2
Stretch your ear
canal by pulling
your ear backwards
and upwards and
carefully insert the
sensor into the ear.
Page 19
19
GB
3 Meas. procedure / 4 Miscellaneous
• The most important and sensitive part of the thermometer is
the sensor . Accurate temperature measurements can only be
guaranteed if the probe is clean and intact.
• The sensor is waterproof and can therefore be cleaned by
directly immersing it in alcohol or using a ball of cotton wool
soaked in alcohol.
• Normal commercial alcohol-based disinfectant is suitable for disinfecting the sensor . Please follow the respective manufacturer’s instructions.
• The housing and the display of the thermometer are not
waterproof. Do not immerse them in liquids.
• Clean them with a dry, clean cloth. Do not use aggressive cleaners.
• It is advisable to keep the thermometer in the original packing that
it was in when it was purchased, and keep it in a clean, dry place.
Do not expose the thermometer to direct sunlight.
• The storage temperature should be between -20.0°C to +50.0°C.
• The device is calibrated in the factory. Recalibration is not required
for normal use.
Dispose of your old electrical unit in an environmentally acceptable
manner when it has reached the end of its service life! Packaging is
re-usable or may be recycled; metal parts must be disposed of as scrap
metal; plastics,
electrical and electronic components must be disposed
of as electro
scrap.
Remove the battery before disposing of the device. Do not throw
batteries away in the domestic rubbish: put them in the special wast
or a specialist dealer's battery collection station.
Consult your municipal authority or your dealer for information about
disposal.
4.1
Care and
storage
4.2
Disposal
3
6
6
6
When temperature measurement is complete, you will hear a
beep and the body temperature will appear in the display .
The device will then automatically go into time and ambient temperature mode.
If the measured temperature is outside the permitted range, “Lo”
or Hi” will be displayed.
6.
7.
8.
3
Page 20
20
4 Miscellaneous
GB
Model : MEDISANA FTD thermometer
Displayed
Temperature range : 10
0
C – 50 0C
Measuring accuracy : ±0.3 °C at less than 35.5 °C
or above 42.0 °C,
±0.2 °C between 35.5 °C and 42.0 °C
Clinical repeatability : ±0,1 °C
Display resolution : 0,1
0
C
Operating temperature : 16.0 °C to 40.0 °C
at 95 % max. relative humidity
Storage temperature : -20.0 °C to +50.0 °C
at 95 % max. relative humidity
Battery 1 x 3 V CR2032 lithium battery
Battery service life : approx. 500 measurements
Protection class : BF
Dimensions : approx. 109 mm x 30 mm x 22 mm
Weight : approx. 45 g including battery
Article No. : 77050
EAN Code : 4015588770500
This device complies with the regulations of EEC directive 93/42 for
medical products.
Right reserved to make technical and design changes during the
course of continuous product improvement.
4.3
Technical
data
Page 21

21
GB
5 Warranty
Please contact your dealer or the service centre in case of a claim
under the warranty. If you have to send in the unit, please enclose a
copy of your receipt and state what the defect is.
The following warranty terms apply:
1. The warranty period for MEDISANA products is three years from
date of purchase. In case of a warranty claim, the date of purchase
has to be proven by means of the sales receipt or invoice.
2. Defects in material or workmanship will be removed free of charge
within the warranty period.
3. Repairs under warranty do not extend the warranty period either
for the unit or for the replacement parts.
4. The following is excluded under the warranty:
a. All damage which has arisen due to improper treatment, e.g.
nonobservance of the user instructions.
b. All damage which is due to repairs or tampering by the customer
or unauthorised third parties.
c.
Damage which has arisen during transport from the manufacturer
to the consumer or during transport to the service centre.
d. Accessories which are subject to normal wear and tear.
5. Liability for direct or indirect consequential losses caused by the
unit are excluded even if the damage to the unit is accepted as a
warranty claim.
Please do not hesitate to contact us if you have questions about this
or any other product.
MEDISANA
AG
Itterpark 7-9
D-40724 Hilden
Tel.: +49 (0) 2103 / 2007-60
Fax: +49 (0) 2103 / 2007-626
eMail: info@medisana.de
Internet: www.medisana.de
The service centre address is shown on the last page.
5.1
Warranty and
repair terms
Page 22
22
Thermomètre FTD
F
Veuillez lire attentivement le mode d'emploi
suivant avant d'utiliser le thermomètre FTD.
Conservez le mode d'emploi.
1
Couvercle du compartiment à pile
Touche Démarrage / Scan
Écran
Protection du capteur
Socle
Capteur
Plaque signalétique
Bouton pour ouvrir le compartiment à pile.
Touche de réglage de l'heure
Symbole "Mémoire"
- affiche la dernière température mémorisée
Symbole "Pile"
- affiche un état faible de la pile
Symbole "Heure"
- affiche l'heure
Symbole "Température Celsius"
- affiche la température corporelle
- affiche la température ambiante
Symbole "Prise de la température par le front"
Symbole "Prise de la température par l'oreille"
Symbole "Prise de température active"
Éléments de
l'instrument
Symboles
affichés
2
3
4
5
6
7
8
9
10
11
12
13
14
15
16
Page 23

23
F
1 Introduction
Nous vous remercions de votre confiance et nous vous félicitons de
votre achat! En achetant le thermomètre FTD, vous avez acquis un
produit de qualité de la maison MEDISANA.
Afin d'obtenir les résultats désirés et de profiter longtemps du
thermomètre FTD MEDISANA, nous vous recommandons de lire
attentivement le mode d'emploi suivant et de bien le conserver.
Le thermomètre FTD vous permet de mesurer la température par l'oreille et par le front. Il mesure également la température ambiante et
indique l'heure actuelle.
Veuillez tout d'abord vérifier si le contenu de l'emballage est complet.
Les matériaux d'emballage sont recyclables. Ils peuvent être jetés avec
les déchets recyclables. Veuillez jeter les matériaux d'emballage inutilisés
conformément aux règles de protection de l'environnement.
Si, en défaisant l'emballage, vous constatez des détériorations
causées par le transport, veuillez contacter immédiatement le revendeur.
AVERTISSEMENT
Veillez à ce que les poches plastiques d'emballage ne soient
pas à portée de main des enfants! Risques d'étouffement!
• Utilisez uniquement l'instrument conformément à son emploi
prévu et selon le mode d'emploi. Dans le cas contraire, la garantie
est annulée.
• L'instrument n'est pas destiné à une utilisation commerciale.
• Ne laissez pas les enfants utiliser cet instrument. Les produits
médicaux ne sont pas des jouets!
• En cas de perturbations ou de détériorations, ne réparez pas vousmême l'instrument. Dans le cas contraire, tout droit de garantie est
annulé. Veuillez consulter votre revendeur spécialisé et faites
uniquement réparer l'instrument par des services après-vente
autorisés.
• N'immergez pas le thermomètre dans de l'eau ou dans un autre
liquide. Si toutefois l'instrument a été exposé à l'humidité, retirez
la pile et n'utilisez plus le thermomètre. Avant tout nouvel emploi,
consultez votre revendeur ou MEDISANA.
• Ne faites pas subir de secousses ou de chocs au thermomètre.
• N'exposez pas de façon prolongée le thermomètre à des
températures extrêmes, comme par exemple dans un véhicule
placé en plein soleil.
1.1
Tous nos
remerciements
1.2
Contenu de
l'emballage
1 thermomètre
FTD
MEDISANA,
pile comprise
1 socle
1 mode d'emploi
1.3
Remarques
générales
Page 24
24
2 Mise en marche
F
Une pile lithium (3 V CR2032) est comprise dans la livraison. Un état
faible de la pile est indiqué par le symbole "Pile" affiché sur la
partie inférieure de l'écran . Il faut alors remplacer la pile le plus
rapidement possible.
Si la pile n'a plus de capacité, il apparaît sur l'écran l'indication
"Lo" en plus du symbole "Pile" clignotant et un signal sonore est
émis (voir illustration). À partir de là, il n'est plus possible d'utiliser le
thermomètre sans avoir remplacer la pile. Appuyez sur la touche
Démarrage/Scan afin d'éteindre l'instrument.
Ce thermomètre est muni d'une fermeture de sécurité afin que les
enfants ne puissent pas accéder à la pile. Appuyez sur le bouton avec
un objet pointu pour ouvrir le compartiment à pile et retirez la
pile (voir illustration). Vous avez besoin d'une pile lithium 3 V CR 2032
pour ce thermomètre. En insérant la pile, placez le pôle positif (+) vers
le haut.
CONSEILS DE SÉCURITÉ CONCERNANT LA PILE
• Mettre hors de portée des enfants! • Non rechargeable!
• Ne pas court-circuiter! • Ne pas jeter au feu!
• Ne pas jeter les piles usées et les accus dans les ordures
ménagères. Jetez-les dans un dépôt spécial ou au poste
de ramassage de piles usées placé chez un revendeur.
Vous devez d'abord ajuster l'heure lors de la première mise en
marche du thermomètre ou à chaque changement de pile.
Ensuite, le mode de mesure de la température ambiante est automatiquement activé.
2.1
Indicateur
de pile
2.2
Remplacer
la pile
2.3
Heure et
température
ambiante
Bouton pour ouvrir le compartiment à pile
11
2
8
11
3
3
Page 25
25
F
2 Mise en marche
2.5
Remarques
à lire avant
l'utilisation
Ouvrez le compartiment à pile. Pour ceci, appuyez avec un objet pointu
sur le bouton qui sert à ouvrir le compartiment et retirez le
couvercle du compartiment . Appuyez sur la touche de réglage
de l'heure jusqu'à ce que l'affichage des heures clignote. On ajuste
l'heure en appuyant plusieurs fois sur la touche Démarrage/Scan
jusqu'à ce que l'heure souhaitée apparaisse. (voir illustration).
En appuyant sur la touche de réglage de l'heure , on bascule de
l'ajustage des heures à l'ajustage des minutes. L'affichage des minutes
clignote. Procédez de la même manière que pour l'ajustage des
heures. Pour la validation, après l'ajustage de l'heure, appuyez une
fois sur la touche de réglage de l'heure (voir illustration)
L'instrument affiche alternativement sur l'écran l'heure et la
température ambiante (voir illustration).
• Le thermomètre est muni d’un capteur encapsulé . Des embouts de protection spéciaux ne sont pas nécessaires.
• Le capteur du thermomètre doit toujours être propre et intact
pour garantir des mesures exactes.
• La présence de cérumen a un impact sur l'exactitude de la mesure.
Nettoyez au besoin l'oreille et la pointe du palpeur du thermomètre
avant de prendre la température afin d'éviter des erreurs de
mesure éventuelles.
• Si, pendant la prise de température, la température ambiante
dépasse la plage définie comprise entre 16 °C – 40 °C , „Err“ est
affiché sur l 'écran .
2.4
Ajustage
de l'heure
1
6
9
2
6
9
9
8
3
3
Page 26
26
3 Méthode de mesure
F
3.3
Prise de la
température
du corps
• Ne prenez pas votre température immédiatement après le repas, le
sport ou la nage. Attendez une demi-heure.
• Pour prendre la température plusieurs fois de suite, laissez un écart
d'au moins une minute entre deux prises. Si vous devez prendre
votre température de façon répétée en un laps de temps réduit, les
résultats de mesure peuvent alors varier de façon minime.
• La température du corps humain varie selon une marge naturelle.
Il n'existe pas de température corporelle de norme.
• Prenez et notez aussi votre température à des jours normaux. Vous
pouvez ainsi mieux détecter une éventuelle montée de fièvre.
• Pour prendre la température par l'oreille de façon exacte, il est
important que le palpeur soit placé vers le tympan et introduit
assez profondément dans le conduit auditif.
• Il existe des personnes qui ont une température différente à l'oreille
gauche et à l'oreille droite. Pour saisir les changements de
température, prenez la température de la même personne toujours
à la même oreille.
• La position durant le sommeil peut influencer les résultats de mesure.
Si une personne a dormi un certain temps sur une oreille, la
température à cette oreille est alors plus élevée que la normale.
Dans ce cas, prenez la température à l'autre oreille et attendez
quelques minutes avant la prise.
Ce thermomètre optimise automatiquement les conditions de prise
de température. Au cas où le système de mesure n'est pas encore
prêt à l'emploi, soit le symbole "Température par l'oreille" soit le
symbole "Température par le front" (voir illustration) s'allume.
En même temps. des signaux sonores brefs et rapides sont émis. Dans
ce cas interrompez la mesure en appuyant sur la touche Démarrage/
Scan . Continuez avec la prise de température uniquement lorsque le symbole a disparu et quand le signal s'est arrêté.
Pour passer de la mesure par le front à la mesure par l’oreille, retirez
la protection du capteur . Pour repasser à la mesure par le front,
remettez la protection.
ATTENTION
La prise de température par le front doit seulement servir de
contrôle car la température cutanée du front est facilement
soumise à des facteurs externes, ce qui peut fausser le résultat
de la mesure.
3.2
Les meilleures
conditions
de prise de
température
3.1
Remarques
concernant
la prise de
température
2
14
15
4
Page 27
27
F
3 Méthode de mesure
Pour déterminer la température par l’oreille, retirez la protection
du capteur .
Appuyez sur la touche Démarrage/Scan .
Si l'écran affiche l'heure ou la température ambiante, appuyez
à nouveau sur la touche Démarrage/Scan .
La dernière température prise est alors affichée (voir illustration).
Lorsque le symbole pour la prise de température par l'oreille
est affiché sur l'écran , deux signaux sonores brefs sont émis
qui signalisent que l'instrument est prêt à l'emploi (voir illustration).
Appuyez une fois encore sur la touche Démarrage/Scan .
Dès que le symbole "Prise de température active" apparaît
(voir illustration), introduisez le capteur dans l'oreille. Ne
bougez pas le thermomètre durant la prise de température. Au
bout de quelques secondes, un bref signal sonore est émis et la
température corporelle est affichée sur l'écran .
Après la prise de température, l'instrument bascule automatiquement au mode d'indication de l'heure et de la température ambiante.
La protection du capteur doit être en place pour mesurer la
température corporelle par le front.
Appuyez sur la touche Démarrage/Scan .
Si l'écran affiche l'heure ou la température ambiante, appuyez
à nouveau sur la touche Démarrage/Scan . Deux brefs signaux
sonores retentissent et la dernière température prise est alors
affichée sur l'écran (voir illustration).
Appuyez à nouveau sur la touche Démarrage/Scan . Le symbole pour la prise de température par le front est affiché sur
l'écran (voir illustration). L'instrument est prêt à l'emploi.
Maintenez l’appareil avec le capteur au milieu du front et
appuyez en même temps sur la touche Démarrage/Scan .
Déplacez maintenant le thermomètre en partant du milieu du front
jusqu'à la tempe tout en appuyant sur la touche Démarrage/Scan
.Relâchez la touche quand vous avez atteint cette position.
3.4
Prise de la
température
par l'oreille
3.5
Prise de la
température
par le front
4
16
2
3
1.
2.
3.
4.
5.
6.
1.
2.
3.
4.
5.
3
3
3
6
2
2
15
2
2
3
4
6
14
2
2
3
2
Étirez le conduit
auditif en tirant
l’oreille vers le haut
et vers l’arrière
et introduisez
prudemment le
capteur dans
l’oreille.
Page 28
28
3 Méthode de mesure / 4 Divers
F
• Le capteur est la partie la plus importante et la plus sensible du
thermomètre. Il doit rester toujours propre et intact afin de garantir une prise de température exacte.)
• Le capteur est étanche et peut donc être nettoyé en le
plongeant directement dans l’alcool ou en le nettoyant avec un
tampon d’ouate imprégné d’alcool.
• Pour désinfecter le capteur , utilisez des désinfectants alcoolisés
en vente dans le commerce. Veuillez respecter les indications du
fabricant respectif.
• Le boîtier et l'écran du thermomètre ne sont pas étanches. Ne
les immergez pas dans des liquides.
• Nettoyez le boîtier et l'écran avec un chiffon sec et propre.
N'utilisez pas de produits nettoyants agressifs.
• Rangez de préférence le thermomètre dans l'emballage d'origine
reçu à l'achat et conservez-le dans un endroit propre et sec. Ne
l'exposez pas directement au soleil.
• La température de conservation doit être comprise entre -20,0 °C
et +50,0 °C.
• L'instrument a été calibré à l'usine. Un calibrage ultérieur n'est pas
nécessaire dans le cas d'une utilisation conforme.
Éliminez votre ancien appareil électrique de manière respectueuse de
l’environnement à l’issue de sa durée de vie ! Les emballages sont
réutilisables ou peuvent être recyclés afin de récu-pérer les matières
premières, les pièces métalliques doivent être déposées dans une borne
de récupération des vieux métaux, les plastiques, les composants électriques et
él
ectroniques doivent être placés avec les déchets électriques.
Retirez la pile avant de jeter l'instrument aux déchets. Ne jetez pas les
piles usées dans les ordures ménagères. Jetez-les dans un dépôt
spécial ou au poste de ramassage de piles usées placé chez un
revendeur.
Pour plus de renseignements sur l’élimination des déchets, veuillez vous
adresser aux services de votre commune ou bien à votre revendeur.
4.1
Entretien et
conservation
4.2
Mise aux
déchets
3
6
6
6
Lorsque la prise de température est terminée, un signal sonore est
émis et la température corporelle est affichée sur l'écran .
Après, l'instrument bascule automatiquement sur le mode
d'indication de l'heure et de la température ambiante.
Si la température mesurée se trouve au-delà de la plage de
mesure admissible, “Lo” “Hi” sont alors affichés.
6.
7.
8.
3
Page 29
29
F
4 Divers
Modèle : MEDISANA Thermomètre FTD
Gamme de mesure
affichée : 10
0
C – 50 0C
Tolérance : au-dessous de 35,5 °C ou
au-dessus de 42,0 °C: ±0,3 °C ,
entre 35,5 °C et 42,0 °C: ±0,2 °C
Précision de
répétabilité clinique : ±0,1 °C
Graduation : 0,1
0
C
Température
de fonctionnement : de 16,0 °C à 40,0 °C
à une humidité relative de 95 % max.
Température
de conservation : de -20,0 °C à +50,0 °C
à une humidité relative de 95 % max.
Pile : 1 pile lithium 3 V CR2032
Durée de la pile : environ 500 prises de température
Classe de protection : BF
Dimensions : environ 109 mm x 30 mm x 22 mm
Poids : environ 45 g avec pile
Numéro d'article : 77050
Code EAN : 4015588770500
Cet instrument est conforme à la directive CEE 93/42 relative aux
produits médicaux.
Dans le cadre de l'amélioration constante de nos produits, nous
nous réservons le droit d'apporter des changements concernant
la technique et à la forme.
4.3
Données
techniques
Page 30

30
5 Garantie
F
5.1
Conditions
de garantie et
de réparation
En cas de recours à la garantie, veuillez vous adresser à votre
revendeur spécialisé ou contactez directement le service clientèle.
S’il est nécessaire d’expédier l’appareil, veuillez indiquer le défaut
constaté et joindre une copie du justificatif d’achat.
Les conditions de garantie sont les suivantes:
1.
Une garantie de trois ans à compter de la date d’achat est accordée
sur les produits MEDISANA. En cas d’intervention de la garantie,
la date d’achat doit être prouvée en présentant le justificatif
d’achat ou la facture.
2.
Durant la période de garantie, les défauts liés à des erreurs de
matériel ou de fabrication sont éliminés gratuitement.
3.
Les services effectués sous garantie n’entraînent pas de prolongation
de la période de garantie, ni pour l’appareil, ni pour les composants
remplacés.
4.
Sont exclus de la garantie:
a.
tous les dommages dus à un usage incorrect, par exemple au
nonrespect de la notice d’utilisation.
b.
les dommages dus à une remise en état ou des interventions
effectuées par l’acheteur ou par de tierces personnes non
autorisées.
c.
les dommages survenus durant le transport de l’appareil depuis
le site du fabricant jusque chez l’utilisateur ou lors de l’expédition
de l’appareil au service clientèle.
d.
les accessoires soumis à une usure normale.
5.
Nous déclinons toute responsabilité pour les dommages consécutifs
causés directement ou indirectement par l’appareil, y compris
lorsque le dommage survenu sur l’appareil est couvert par la
garantie.
Si vous avez des questions concernant ce produit ou d’autres articles,
nous y répondrons très volontiers.
MEDISANA
AG
Itterpark 7-9
D-40724 Hilden
Tel.: +49 (0) 2103 / 2007-60
Fax: +49 (0) 2103 / 2007-626
eMail: info@medisana.de
Internet: www.medisana.de
Vous trouverez l’adresse du service clientèle sur la dernière page.
Page 31

31
NL
FTD Thermometer
Lees de volgende gebruiksaanwijzing zorgvuldig
door, voor u de FTD thermometer gebruikt en
bewaar hem goed.
1
Afsluiting batterijvak
Inschakel- / Scan-toets
Display
Sensorafdekking
Standaard
Sensor
Typeplaat
Knop voor het openen van het batterijvak
Insteltoets voor de tijd
Opslagsymbool
- voor de laatst opgeslagen temperatuur
Batterijsymbool
- voor de aanduiding van een laag niveau van de batterij
Tijdsymbool
- voor de aanduiding van de tijd
Celsiussymbool
- voor de lichaamstemperatuur
- voor de omgevingstemperatuur
Symbool voor de temperatuurbepaling op het voorhoofd
Symbool voor de temperatuurbepaling in het oor
Symbool voor actuele temperatuurmeting
Onderdelen van
het apparaat
Displaysymbolen
2
3
4
5
6
7
8
9
10
11
12
13
14
15
16
Page 32

32
1 Inleiding
NL
Hartelijk dank voor uw vertrouwen en proficiat met uw aankoop van
de FTD thermometer, een kwaliteitsproduct van MEDISANA.
Om veel plezier van uw MEDISANA FTD thermometer te hebben, en
ook omdat hij dan aan uw verwachtingen voldoet, raden wij u aan de
volgende gebruiksaanwijzing zorgvuldig te lezen en te bewaren.
Met de FTD thermometer kunt u de temperatuur in het oor en op
het voorhoofd meten. Bovendien kunt u de omgevingstemperatuur
bepalen en geeft hij de actuele tijd aan.
We verzoeken u eerst te controleren of de levering compleet is.
De verpakking kunt u opnieuw gebruiken of hij kan via het afval van
grondstoffen gerecycled worden. Verwijder het niet meer nodige
verpakkingsmateriaal netjes als afval. Neem, u als u merkt bij het
uitpakken dat er transportschade is, contact op met de leverancier.
WAARSCHUWING
Let erop dat de verpakkingsfolie niet in handen van kinderen
komt. Er bestaat gevaar voor verstikking!
• Gebruik het apparaat alleen, waarvoor het volgens de gebruiksa
anwijzing bedoeld is. Bij onjuist gebruik vervalt de aanspraak op
garantie.
• Het apparaat is niet voor commercieel gebruik bedoeld.
• Kinderen mogen het apparaat niet gebruiken. Medische producten
zijn geen speelgoed!
• Bij storingen of beschadigingen moet u het apparaat niet zelf
repareren, omdat daardoor elke aanspraak op garantie vervalt.
Informeer bij uw leverancier en laat reparaties alleen door
geautoriseerde servicepunten uitvoeren.
• Leg de thermometer niet in het water of in een andere vloeistof.
Mocht er toch nog vocht in het apparaat komen, moet u de
batterij verwijderen en moet u met het apparaat niet meer gaan
meten. Voor het verdere gebruik moet u met uw leverancier of
MEDISANA contact opnemen.
• De thermometer niet schudden of ergens tegen aan kloppen.
• Stel de thermometer niet gedurende langere tijd aan extreme
temperaturen bloot, bijv. in een direct door de zon beschenen
voertuig.
1.1
Hartelijk dank
1.2
Leveringsomvang
1 MEDISANA
FTD
thermometer
incl. batterij
1 standaard
1 gebruiks-
aanwijzing
1.3
Algemene
aanwijzingen
Page 33

33
NL
2 Inbedrijfstelling
Tot de leveringsomvang behoort een lithium batterij (3 V CR2032).
Een laag batterijniveau wordt door het batterijsymbool onder in
de display aangegeven . U moet de batterij zo spoedig mogelijk
vervangen. Is de batterijcapaciteit te gering, dan verschijnt ook nog
behalve het knipperende batterijsymbool de indicatie “Lo” op de
display en een signaal klinkt (zie afb.) Het verder gebruiken van
de thermometer is vóór het vervangen van de batterij niet meer
mogelijk. Druk op de inschakel-/scan-toets om het apparaat uit
te schakelen.
Deze thermometer is van een veiligheidssluiting voorzien, om de
batterij bij kinderen uit de buurt te houden. Druk op de knop om het
batterijvak te openen met een scherp voorwerp naar binnen en
haal de batterij eruit (zie afb.) Voor deze thermometer hebt u een 3
V CR2032 lithium batterij nodig. Wanneer u de batterij vervangt,
moet de pluspool (+) naar boven wijzen.
BATTERIJ VEILIGHEIDSINSTRUCTIES
• Uit de buurt van kinderen houden! • Niet oplaadbaar!
• Niet kortsluiten! • Niet in het vuur gooien!
• Gooi gebruikte batterijen en accu’s niet in het huisvuil, maar bij
het speciaal afval of breng ze naar een batterijverzamelplaats
van de leverancier.
Wanneer u de thermometer voor de eerste keer gebruikt, of na
vervanging van de batterij, moet u eerst de tijd instellen. Daarna
wordt automatisch voor de meting de omgevingstemperatuur
geactiveerd.
2.1
Batterijindicatie
2.2
Vervanging
van de
batterij
2.3
Tijd en
omgevingstemperatuur
Knop voor het openen van het batterijvak
11
2
8
11
3
3
Page 34

34
2 Inbedrijfstelling
NL
2.5
Aanwijzingen
voor het
gebruik
Open het batterijvak, door met een scherp voorwerp op de knop voor
het openen van het batterijvak te drukken en de bedekking van
het batterijvak eraf te trekken. Druk op de insteltoets voor de tijd
, tot de uuraanduiding knippert. De uren worden met de inschakel-/scan-toets door meer keer drukken, tot het gewenste uur
is bereikt, ingesteld (zie afb.)
Door het indrukken van de insteltoets voor de tijd gaat u van de
ureninstelling naar de minuteninstelling. De minutenaanduiding
knippert. Handel zoals bij de ureninstelling. Wanneer u de tijd hebt
ingesteld, drukt u voor de bevestiging eenmaal op de insteltoets voor
de urentijd (zie afb.)
Het display van het apparaat geeft dan afwisselend de tijd en de
omgevingstemperatuur aan (zie afb.)
• De thermometer is voorzien van een ingekapselde sensor .
Extra beschermende kapjes zijn niet nodig.
• De sensor van de thermometer dient steeds schoon en intact
te zijn om exacte meetwaarden te garanderen.
• Oorsmeer beïnvloedt de meetnauwkeurigheid. Reinig indien nodig
het oor en de sensorpunt van de thermometer vóór het meten, om
eventuele foutieve metingen te vermijden.
• Overschrijdt de omgevingstemperatuur gedurende de vaststelling
van de omgevingstemperatuur de ingestelde waarde van 16 ºC –
40 ºC , dan geeft het display „Err“aan.
2.4
Instellen
van de tijd
1
6
9
2
6
9
9
8
3
3
Page 35

35
NL
3 Meetmethode
3.3
Meten van
de lichaamstemperatuur
• Meet uw temperatuur niet direct na het eten, sporttraining of
baden. Wacht een half uur.
• Voer opeenvolgende metingen slechts met tussenpozen van
tenminste 1 minuut uit. Indien u uw temperatuur gedurende een
korte periode vaker moet bepalen, kunnen de meetresultaten een
beetje variëren.
• De lichaamstemperatuur van een mens beweegt zich binnen een
natuurlijke marge. Er is geen standaard lichaamstemperatuur.
• Meet en noteer uw lichaamstemperatuur op geheel normale
dagen. Op die manier kunt u koorts beter herkennen.
• Voor een nauwkeurige meting in het oor is het zeer belangrijk, dat
de sensor op het trommelvlies gericht is en diep genoeg in de
gehoorgang is.
• Er zijn personen die verschillende meetwaarden in het linker en
rechter oor hebben. Om temperatuurveranderingen te bepalen
meet u bij dezelfde persoon altijd in hetzelfde oor.
• De slaappositie kan de meetresultaten beïnvloeden. Wanneer een
persoon gedurende geruime tijd op één oor heeft geslapen, is de
temperatuur in dit oor hoger dan normaal. Meet in dit geval in het
andere oor of wacht een paar minuten met de meting.
Deze thermometer optimaliseert gedurende de temperatuurmeting
de voorwaarden automatisch. Indien het meetsysteem nog niet klaar
is voor een meting, geeft òf het oortemperatuur- òf het voorhoofdtemperatuursymbool dit aan. (zie afb.) Tegelijkertijd zijn
kort, snel opeenvolgende signaaltonen te horen. In dit geval stopt u
de meting door de inschakel-/scan-toets in te drukken. Ga met
de temperatuurbepaling pas verder, wanneer het symbool niet meer
te zien en de signaaltoon niet meer te horen is.
Om over te gaan van de meting op het voorhoofd naar de meting in
het oor verwijdert u gewoonweg de sensorafdekking .
Om weer aan het voorhoofd te meten, zet u hem er weer op.
ATTENTIE
De temperatuur van het voorhoofd moet alleen voor controle
worden uitgevoerd, omdat de huidtemperatuur aan het
voorhoofd door uitwendige invloeden makkelijk kan worden
beïnvloed en daardoor het meetresultaat verkeerd kan worden
weergeven.
3.2
De beste
voorwaarden
3.1
Aanwijzingen
m.b.t. de
bepaling
van de
temperatuur
2
14
15
4
Page 36

36
3 Meetmethode
NL
Om de temperatuur in het oor te bepalen verwijdert u de sensorafdekking .
Druk op de inschakel-/scan-toets .
Wanneer het display de tijd of de omgevingstemperatuur dit
aangeeft, drukt u nog eens op de inschakel-/scan-toets .
De laatst bepaalde temperatuur verschijnt (zie afb.)
Wanneer het symbool voor de temperatuurbepaling in het
oor in het display verschijnt, klinken twee korte signaaltonen
en het apparaat is klaar voor gebruik. (zie afb.). Druk nog eens op
de inschakel-/scan-toets .
Zodra het symbool bij de lopende temperatuurmeting verschijnt (zie fig.), steekt u de sensor het oor in. Beweeg het
apparaat gedurende de meting niet. Na slechts een paar seconden klinkt een korte signaaltoon en het display geeft de bepaalde lichaamstemperatuur aan.
Na de temperatuurbepaling gaat het apparaat automatisch in de
modus tijd en omgevingstemperatuur.
Teneinde de lichaamstemperatuur op het voorhoofd te kunnen
bepalen moet de sensorafdekking opgestoken zijn.
Druk op de inschakel-/scan-toets .
Wanneer het display de tijd of de omgevingstemperatuur
aangeeft, drukt u nog een keer op de inschakel-/scan-toets .
Er klinken twee signaaltonen en de laatst bepaalde temperatuur
verschijnt in de display (zie afb.)
Druk nog een keer op de inschakel-/scan-toets . Het symbool
voor de temperatuurbepaling op het voorhoofd verschijnt in
het display (zie afb.). Het apparaat is klaar voor gebruik.
Houd het apparaat met de sensor in het midden tegen het
voorhoofd en druk tegelijkertijd op de inschakel-/scanknop .
Trek nu, wanneer de inschakel-/scan-toets ingedrukt is, de
thermometer van het midden van het voorhoofd naar de zijkant
tot over de slapen. Laat de toets los, wanneer deze positie is
bereikt.
3.4
Meten van de
temperatuur in
het oor
3.5
Meten van de
temperatuur
op het
voorhoofd
4
16
2
3
1.
2.
3.
4.
5.
6.
1.
2.
3.
4.
5.
3
3
3
6
2
2
15
2
2
3
4
6
14
2
2
3
2
Rek de gehoorgang
door het oor naar
achteren omhoog
te trekken en schuif
dan de sensor
voorzichtig het oor
in.
Page 37

37
NL
3
Meetmethode
/ 4 Algemeen
• De belangrijkste en gevoeligste component van de thermometer is
de sensor . Om nauwkeurige temperatuurbepalingen te garanderen moet die altijd schoon en intact zijn.
• De sensor is waterdicht en kan daarom worden gereinigd door
hem rechtstreeks in alcohol te dompelen of door hem schoon te
maken m.b.v. een met alcohol geïmpregneerd wattenschijfje.
• Voor het desinfecteren van de sensor zijn in de handel verkrijgbare alcoholische desinfecteermiddelen geschikt. Let op de
aanwijzingen van de betreffende fabrikant.
• Het huis en het display van de thermometer zijn niet waterdicht. Dompel die niet in vloeistoffen.
• Reinig ze met een droge, schone doek. Gebruik geen agressieve
reinigingsmiddelen.
• U kunt het beste de thermometer opbergen in de originele
verpakking die u bij de aankoop hebt gekregen en die op een
schone en droge plaats bewaren. Bescherm hem tegen directe
instraling van het zonlicht.
• De bewaartemperatuur moet tussen de -20,0
0
C en +50,0 0C liggen.
• Het apparaat is in de fabriek gekalibreerd. Bij een juist gebruik is
nakalibreren niet noodzakelijk.
Ontdoet u zich van uw afgedankte elektrische apparaat op een milieuvriendelijke manier. Verpakkingen kunnen opnieuw worden gebruikt
of in de grondstofkringloop gebracht, metalen onderdelen horen thuis
bij de verzamelplaats voor
de recycling van oud ijzer, kunststoffen,
elektrische en elektronische
componenten dienen als elektrisch afval te
worden verwijderd.
Haal de batterij eruit vóór u het apparaat als afval verwijdert. Gooi
oude batterijen niet bij het huisvuil, maar doe ze bij het speciale
huisvuil of breng ze naar een batterijverzamelplaats van de leverancier.
Wendt u zich betreffende het afvalbeheer tot uw gemeente of
handelaar.
4.1
Onderhouden
en bewaren
4.2
Verwijderen
als afval
3
6
6
6
Wanneer de temperatuurbepaling klaar is, hoort u een signaaltoon
en de lichaamstemperatuur wordt in het display aangegeven.
Daarna gaat het apparaat automatisch naar de modus tijd en
omgevingstemperatuur.
Wanneer de gemeten temperatuur buiten het toegestane bereik
ligt, wordt de aanduiding “Lo” “Hi” gegeven.
6.
7.
8.
3
Page 38

38
4
Algemeen
NL
Model : MEDISANA FTD thermometer
Aangegeven
temperatuurniveau : 10 °C – 50 °C
Meetnauwkeurigheid : bij minder dan 35,5 ºC of
meer dan 42,0 ºC ±0,3 ºC,
van 35,5 ºC tot 42,0 ºC ±0,2 ºC
Klinische
herhalingsprecisie : ±0,1 °C
Resolutie van het
display : 0,1 °C
Bedrijfstemperatuur : 16,0 °C tot 40,0 °C
bij 95 % max. relatieve luchtvochtigheid
Bewaartemperatuur : -20,0
0
C tot +50,0 0C
bij 95 % max. relatieve luchtvochtigheid
Batterij : 1 x 3 V CR2032 lithium batterij
Batterij-levensduur : ca. 500 metingen
Beschermklasse : BF
Afmetingen : ca. 109 mm x 30 mm x 22 mm
Gewicht : ca. 45 g inclusief batterij
Artikelnr. : 77050
EAN Code : 4015588770500
Dit apparaat komt overeen met de bepalingen van de EG-richtlijn
93/42 voor medische producten.
Vanwege voortdurende productverbeteringen behouden wij
ons technische en creatieve wijzingen voor.
4.3
Technische
gegevens
Page 39

39
NL
5 Garantie
Wendt u zich voor garantiegevallen altijd tot uw leverancier of tot
onze klantendienst. Moet u het apparaat opsturen, stuur het dan
samen met de klacht en een kopie van de aankoopbon naar onze
klantendienst.
Voor garantie gelden de volgende voorwaarden:
1. Voor de producten van MEDISANA geldt een garantietermijn van
drie jaar vanaf de datum van aankoop. Deze kan door middel van
de verkoopbon of factuur worden aangetoond.
2. Alle klachten, die het gevolg zijn van materiaal of fabricagefouten
worden binnen de garantietermijn gratis verholpen.
3. Een geval van garantie leidt niet tot automatische verlenging
van de garantietermijn, noch voor het apparaat zelf noch voor de
vervangen onderdelen.
4. Uitgesloten van garantie zijn:
a. Alle schaden die ontstaan zijn door ondeskundige behandeling,
b.v. het niet op de juiste wijze volgen van de gebruiksaanwijzing.
b. Beschadigingen, die zijn ontstaan door reparaties door de koper
of een ander onbevoegd persoon.
c. Transportschade, die is ontstaan op weg van de verkoper naar
de verbruiker of tijdens het opsturen naar de klantendienst.
d. Toebehoren, die onderhevig zijn aan slijtage.
5. De fabrikant neemt geen verantwoording voor directe of indirecte
vervolgschade die door het apparaat veroorzaakt wordt. Ook niet
als de schade aan het apparaat als garantiegeval erkend is.
Mocht u vragen over deze of andere producten hebben, dan zullen
wij deze gaarne beantwoorden.
MEDISANA
AG
Itterpark 7-9
D-40724 Hilden
Tel.: +49 (0) 2103 / 2007-60
Fax: +49 (0) 2103 / 2007-626
eMail: info@medisana.de
Internet: www.medisana.de
Het adres van de klantendienst vindt u op de laatste pagina.
5.1
Garantie en
reparatievoorwaarden
Page 40

40
Termometro FTD
I
Leggere attentamente le seguenti istruzioni per
l’uso prima di utilizzare il termometro FTD e
conservarle per consultazioni future.
1
Coperchio del vano batteria
Tasto di accensione / scansione
Display
Cappuccio del sensore
Sensore
Sonda di misurazione
Targhetta di identificazione
Pulsante di apertura del vano batteria
Tasto di regolazione dell'ora
Simbolo memoria
- per l'ultima temperatura memorizzata
Simbolo batteria
- per la visualizzazione del basso livello della batteria
Simbolo ora
- per la visualizzazione dell'ora
Simbolo Celsius
- per la temperatura corporea
- per la temperatura ambiente
Simbolo per il rilevamento della temperatura sulla fronte
Simbolo per il rilevamento della temperatura nell'orecchio
Simbolo per la misurazione della temperatura attuale
Parti dello
strumento
Simboli del
display
2
3
4
5
6
7
8
9
10
11
12
13
14
15
16
Page 41

41
I
1 Introduzione
La ringraziamo per la fiducia dimostrata e ci congratuliamo con Lei!
Con il termometro FTD Lei ha acquistato un prodotto di qualità di
MEDISANA.
Per ottenere il successo desiderato e poter utilizzare a lungo il Suo
termometro FTD MEDISANA, Le consigliamo di leggere accuratamente e conservare le seguenti istruzioni per l'uso.
Il termometro FTD Le consente di misurare la temperatura nell'orecchio e sulla fronte. Inoltre rileva la temperatura ambiente e mostra
l'ora attuale.
Verificare in primo luogo che la confezione sia completa. Le
confezioni sono riutilizzabili o possono essere riciclate. Smaltire il
materiale d’imballaggio non più necessario in conformità alle
disposizioni vigenti. In caso di danneggiamenti dovuti al trasporto,
mettersi immediatamente in contatto con il proprio rivenditore.
ATTENZIONE
Assicurarsi che i sacchetti d’imballaggio non siano alla portata
dei bambini. Pericolo di soffocamento!
• Utilizzare il prodotto esclusivamente per l’impiego previsto come
da istruzioni. In caso di uso diverso, si estingue qualsiasi diritto di
garanzia.
• Lo strumento non è destinato all'uso commerciale.
• Lo strumento non deve essere utilizzato dai bambini. I prodotti
medici non sono giocattoli!
• In caso di anomalie o danni, non riparare lo strumento personalmente, pena l'estinzione di qualsiasi diritto di garanzia. Consultare
il proprio rivenditore specializzato e fare eseguire le riparazioni
esclusivamente a cura di centri di assistenza autorizzati.
• Non immergere il termometro nell'acqua o in altri liquidi. Se
tuttavia dovesse penetrare del liquido nello strumento, rimuovere
la batteria e non effettuare altre misurazioni con il termometro.
Prima dell'utilizzo dello strumento, contattare il proprio rivenditore
specializzato o MEDISANA.
• Non scuotere o sbattere il termometro.
• Non esporre il termometro a temperature estreme per un tempo
prolungato, per es., in un veicolo al sole.
1.1
Grazie!
1.2
Materiale in
dotazione
1 Termometro
FTD
MEDISANA,
batteria inclusa
1 Supporto
1 Manuale
di istruzioni
per l’uso
1.3
Indicazioni
generali
Page 42

42
2 Messa in funzione
I
Il materiale in dotazione prevede una batteria al litio (3 V CR2032). Il
livello basso della batteria viene indicato dal simbolo della batteria
sul lato inferiore del display . La batteria deve essere sostituita
appena possibile. Se la capacità della batteria è esaurita, oltre al
simbolo della batteria lampeggiante compare l'indicazione "Lo"
sul display e viene emesso un segnale acustico (si veda fig.). Un
ulteriore utilizzo del termometro non è più possibile prima della sostituzione della batteria. Premere il tasto di accensione / scansione
per spegnere lo strumento.
Questo termometro è dotato di una chiusura di sicurezza per tenere
lontano la batteria lontano dalla portata dei bambini. Premere verso
l'interno il pulsante di apertura del vano batteria con un oggetto
appuntito e rimuovere la batteria (si veda fig.). Per questo termometro è necessaria una batteria al litio 3 V CR2032. Se viene utilizzata
la batteria, il polo positivo (+) deve essere rivolto verso l'alto.
INDICAZIONI DI SICUREZZA PER LA BATTERIA
• Tenere la batteria lontano dalla portata dei bambini!
• Non ricaricarla!
• Non cortocircuitarla! • Non gettarla nel fuoco!
• Non gettare la batteria esaurita e gli accumulatori nei rifiuti
domestici, ma nei rifiuti speciali o in una stazione di raccolta
pile nel commercio specializzato.
Se si mette in funzione il termometro per la prima volta o dopo una
sostituzione della batteria, deve essere prima impostata l'ora.
Successivamente viene attivata in automatico la modalità di
misurazione della temperatura ambiente.
2.1
Visualizzazione della
batteria
2.2
Sostituzione
della batteria
2.3
Ora e
temperatura
ambiente
Pulsante di apertura del vano batteria
11
2
8
11
3
3
Page 43

43
I
2 Messa in funzione
2.5
Istruzioni
prima
dell'uso
Aprire il vano batteria premendo sul pulsante di apertura del vano
batteria con un oggetto appuntito ed estrarre il coperchio del vano
batteria . Premere il tasto di impostazione dell'ora , fino a
quando non lampeggia l'indicatore dell'ora. Le ore vengono impostate
con il tasto di accensione / scansione premendo più volte, fino a
raggiungere l'ora desiderata (si veda fig.).
Premendo il tasto di impostazione dell'ora si passa dall'impostazione dell'ora all'impostazione dei minuti. L'indicatore dei minuti
lampeggia. Procedere come nell'impostazione dell'ora. Una volta
impostata l'ora , premere una volta il tasto di impostazione dell'ora
per confermare (si veda fig.).
Il display dello strumento visualizza l'ora e la temperatura ambiente in alternanza (si veda fig.).
• Il termometro è dotato di un sensore incapsulato . Non sono
necessarie capsule di protezione supplementari.
• Il sensore del termometro deve essere sempre pulito e intatto
per garantire valori di misurazione esatti.
• Il cerume compromette la precisione di misurazione. All'occorrenza
pulire l'orecchio e la punta del sensore del termometro prima della
misurazione per evitare eventuali misurazioni errate.
• Se la temperatura ambiente supera in eccesso il range impostato di
16° C – 40° C durante il rilevamento della temperatura ambiente,
il display indica "Err".
2.4
Impostazione
dell'ora
1
6
9
2
6
9
9
8
3
3
Page 44

44
3 Metodo di misurazione
I
3.3
Misurazione
della
temperatura
corporea
• Non misurare la temperatura direttamente dopo i pasti,
l'allenamento sportivo o il bagno. Attendere circa 30 minuti.
• Effettuare misurazioni consecutive solo a intervalli di almeno 1
minuto. Se risulta necessario rilevare la temperatura frequentemente in un breve lasso di tempo, i risultati della misurazione
possono presentare oscillazioni minime.
• La temperatura corporea oscilla all'interno di un margine naturale.
Non esiste una temperatura corporea standard.
• Misurare e annotare la propria temperatura corporea in giornate
normali. In questo modo è possibile individuare meglio la presenza
di febbre.
• Per una misurazione accurata nell'orecchio è importantissimo che
il sensore sia rivolto verso il timpano e si trovi nel condotto uditivo
a una profondità sufficiente.
• Alcune persone presentano valori di misurazione diversi
all'orecchio sinistro e destro. Per rilevare variazioni di temperatura,
con la stessa persona misurare sempre nello stesso orecchio.
• La posizione di sonno può compromettere i risultati della
misurazione. Se una persona ha dormito a lungo su un orecchio, la
temperatura su quest'orecchio è più elevata del normale. In tal
caso, misurare nell'altro orecchio o attendere un paio di minuti
prima della misurazione.
Questo termometro ottimizza automaticamente le condizioni durante la
misurazione della temperatura. Se il sistema di misurazione non è ancora
pronto per il rilevamento, il simbolo della temperatura dell'orecchio
o della temperatura della fronte si accende (si veda fig.). Contemporaneamente vengono emessi brevi segnali acustici in sequenza rapida.
In questo caso, interrompere la misurazione premendo il tasto di accensione/scansione . Riprendere il rilevamento della temperatura solo
dopo che il simbolo e il segnale acustico si sono spenti.
Per passare dalla misurazione sulla fronte a quella nell'orecchio,
rimuovere semplicemente il cappuccio del sensore . Per misurare
nuovamente sulla fronte, inserirlo nuovamente.
ATTENZIONE
Il rilevamento della temperatura sulla fronte dovrebbe essere
eseguito solo come controllo, in quanto la temperatura della pelle
sulla fronte può essere leggermente compromessa da fattori esterni
e, di conseguenza, il risultato della misurazione può essere falsato.
3.2
Condizioni
ottimali
3.1
istruzioni per
il rilevamento
della
temperatura
2
14
15
4
Page 45

45
I
3 Metodo di misurazione
Ai fini del rilevamento della temperatura nell'orecchio rimuovere
il cappuccio del sensore .
Premere il tasto di accensione / scansione .
Quando il display visualizza l'ora o la temperatura ambiente,
premere nuovamente il tasto di accensione / scansione . Viene
visualizzata la temperatura rilevata per ultima (si veda fig.).
Se il display visualizza il simbolo per il rilevamento della
temperatura nell'orecchio , vengono emessi due brevi segnali
acustici e lo strumento è pronto per l'uso (si veda fig.). Premere
ancora una volta il tasto di accensione / scansione .
Non appena viene visualizzato il simbolo per la misurazione della
temperatura attuale (si veda fig.), inserire il sensore
nell'orecchio. Tenere fermo lo strumento durante la misurazione.
Dopo solo alcuni secondi viene emesso un breve segnale acustico
e il display visualizza la temperatura corporea rilevata.
Dopo il rilevamento della temperatura, lo strumento passa automaticamente nella modalità dell'ora e della temperatura ambiente.
Per potere rilevare la temperatura corporea sulla fronte, il cappuccio del sensore deve essere applicato.
Premere il tasto di accensione / scansione .
Quando il display visualizza l'ora o la temperatura ambiente,
premere nuovamente il tasto di accensione / scansione .
Vengono emessi due segnali acustici e il display visualizza
l'ultima temperatura rilevata (si veda fig.).
Premere ancora una volta il tasto di accensione / scansione . Il
display visualizza il simbolo del rilevamento della temperatura
sulla fronte (si veda fig.). Lo strumento è pronto per l'uso.
Tenere lo strumento con il sensore al centro della fronte e
premere contemporaneamente il tasto di accensione/scansione
. Tenendo premuto il tasto di accensione/scansione , trascinare il termometro dal centro della fronte al lato fino alla
tempia. Una volta raggiunta la posizione, rilasciare il tasto.
3.4
Misurazione
della
temperatura
nell'orecchio
3.5
Misurazione
della
temperatura
sulla fronte
4
16
2
3
1.
2.
3.
4.
5.
6.
1.
2.
3.
4.
5.
3
3
3
6
2
2
15
2
2
3
4
6
14
2
2
3
2
Distendere il
condotto auricolare,
tirando l'orecchio
indietro e verso
l'alto e introdurre
il sensore delicatamente nell'orecchio.
Page 46

46
3 Metodo di misurazione / 4 Varie
I
• La parte più importante e più sensibile del termometro è il sensore
. Per garantire rilevamenti precisi della temperatura, la sonda
deve essere sempre pulita e intatta.
• Il sensore è impermeabile; pertanto, può essere pulito immer-
gendolo direttamente nell'alcool o con un batuffolo di cotone imbevuto di alcool.
• Per disinfettare il sensore possono essere utilizzati i comuni disin-
fettanti alcolici. Rispettare le istruzioni dei rispettivi produttori.
• Il corpo e il display del termometro non sono impermeabili. Non
immergerli nei liquidi.
• Pulirli con un panno asciutto e pulito. Non utilizzare detergenti
aggressivi.
• Consigliamo di conservare il termometro nella confezione originale
ricevuta al momento dell’acquisto e in un luogo pulito e asciutto.
Proteggerlo dai raggi diretti del sole.
•
La temperatura di conservazione deve essere compresa fra -20,0 °C
e +50,0 °C.
• Lo strumento è calibrato in fabbrica. Se utilizzato correttamente,
non necessita di un'ulteriore calibratura.
Al termine della durata utile, smaltire l'apparecchio
elettrico vecchio
nel rispetto dell'ambiente. Gli imballaggi
sono riutilizzabili o riciclabili.
Le parti metalliche devono
essere smaltite come metallo vecchio, le
materie plastiche
e i componenti elettrici elettronici come rifiuti
elettrici.
Togliere la pila prima di smaltire lo strumento. Non gettare le pile
esaurite nei rifiuti domestici, ma nei rifiuti speciali o in una stazione di
raccolta pile nel commercio specializzato.
Per lo
smaltimento rivolgersi alle autorità comunali o al proprio riven-
ditore.
4.1
Manutenzione
e
conservazione
4.2
Smaltimento
3
6
6
6
Dopo aver completato il rilevamento della temperatura, viene
emesso un segnale acustico e il display visualizza la temperatura corporea.
Lo strumento passa automaticamente nella modalità dell'ora e
della temperatura ambiente.
Se la temperatura misurata non rientra nel range consentito,
viene visualizzato "Lo" "Hi".
6.
7.
8.
3
Page 47

47
I
4 Varie
Modello : Termometro FTD MEDISANA
Range di
temperatura visualizzato : 10
0
C – 50 0C
Precisione di
misurazione : a meno di 35,5 °C o
più di 42,0 °C ±0,3 °C,
da 35,5 °C a 42,0° C ±0,2 °C
Precisione di
ripetibilità clinica : ±0,1 °C
Risoluzione del display : 0,1
0
C
Temperatura d’esercizio : da 16,0 °C a 40,0 °C
con il 95 % di umidità relativa massima
Temperatura di
stoccaggio : da -20,0 °C a +50,0 °C con il 95 %
di umidità relativa massima
Batteria : 1 x 3 V CR2032 batteria al litio
Durata della batteria : circa 500 misurazioni
Classe di protezione : BF
Dimensioni : circa 109 mm x 30 mm x 22 mm
Peso : circa 45 g compresa la batteria
Codice articolo : 77050
Codice a barre europeo : 4015588770500
Lo strumento è conforme alle disposizioni della direttiva CEE 93/42
sui dispositivi medici.
Alla luce dei costanti miglioramenti dei prodotti, ci riserviamo la
facoltà di apportare qualsiasi modifica tecnica e strutturale.
4.3
Dati tecnici
Page 48

48
5 Garanzia
I
In caso di garanzia, contattare il vostro rivenditore di fiducia o
direttamente il centro di assistenza. Se dovesse essere necessario
spedire l’apparecchio, specificare il guasto e allegare una copia della
ricevuta di acquisto.
Valgono le seguenti condizioni di garanzia:
1. I prodotti MEDISANA hanno una garanzia di tre anni a partire
dalla data di vendita. La data di acquisto deve essere comprovata
in caso di garanzia dalla ricevuta di acquisto o dalla fattura.
2. Durante il periodo di garanzia, i guasti dovuti a errori di materiale
o di lavorazione vengono eliminati immediatamente.
3. Una prestazione di garanzia non dà diritto al prolungamento del
periodo di garanzia, né per l’apparecchio né per i componenti
sostituiti.
4. La garanzia non include:
a. tutti i danni risultanti da uso improprio, ad esempio dall’inosservanza
delle istruzioni d’uso,
b. i danni riconducibili a manutenzione o a interventi effettuati
dall’acquirente o da terzi non autorizzati,
c. danni di trasporto verificati durante il trasporto dal produttore al
consumatore o durante l’invio al servizio clienti,
d. gli accessori soggetti a normale usura.
5. È altresì esclusa qualsiasi responsabilità per danni secondari diretti
o indiretti causati dall’apparecchio quando il danno all’apparecchio
viene riconosciuto come caso di garanzia.
Restiamo a completa disposizione per rispondere a domande su
questo o altri prodotti.
MEDISANA
AG
Itterpark 7-9
D-40724 Hilden
Tel.: +49 (0) 2103 / 2007-60
Fax: +49 (0) 2103 / 2007-626
eMail: info@medisana.de
Internet: www.medisana.de
L'indirizzo del servizio di assistenza è riportato nell'ultima pagina.
5.1
Condizioni di
garanzia e di
riparazione
Page 49

49
E
Termómetro FTD
Lea con detenimiento las siguientes instrucciones
de uso antes de usar el termómetro FTD y
consérvelas.
1
Tapa del compartimento de la batería
Tecla de conexión / escaneado
Pantalla
Tapa del sensor
Soporte
Sensor
Placa de características
Botón para abrir el compartimento de la batería
Tecla de ajuste para la hora
Símbolo de memoria
- para la última temperatura memorizada
Símbolo de la batería
- para indicar el estado bajo de la batería
Símbolo de la hora
- para indicar la hora
Símbolo de grados centígrados
- para la temperatura del cuerpo
- para la temperatura ambiente
Símbolo para determinar la temperatura en la frente
Símbolo para determinar la temperatura en el oído
Símbolo para la medición actual de temperatura
Piezas del
termómetro
Símbolos de
la pantalla
2
3
4
5
6
7
8
9
10
11
12
13
14
15
16
Page 50

50
1 Introducción
E
Muchas gracias por su confianza y felicidades. Nos alegramos de que
se haya decidido por un producto de calidad MEDISANA como el
termómetro FTD. Para que obtenga los resultados deseados y disfrute
durante mucho tiempo de su termómetro FTD de MEDISANA, le
recomendamos que lea detenidamente las siguientes instrucciones de
uso y que las conserve.
El termómetro FTD permite medir la temperatura en el oído y en la
frente. Además, también registra la temperatura ambiente e indica la
hora actual.
Compruebe primero si el suministro de serie está completo. Los
embalajes se pueden reutilizar o se pueden aprovechar como materia
prima. Elimine el material de embalaje que ya no necesite según la
normativa. En caso de que aprecie daños ocasionados por el transporte al desempaquetar el termómetro, póngase inmediatamente en
contacto con el comercio especializado.
ADVERTENCIA
Vigile que las láminas del embalaje no vayan a parar a las
manos de niños. Existe peligro de asfixia.
• Utilice el termómetro únicamente para el fin para el que fue previsto
según las instrucciones de uso. En caso de utilizarlo para otro fin
distinto al previsto se extinguirá el derecho de garantía.
• El termómetro no está determinado para el uso comercial.
• Los niños no deben utilizar el termómetro. Los productos
medicinales no son un juguete.
• En caso de errores o daños no repare usted mismo el termómetro,
ya que se extinguiría el derecho de garantía.
Pregunte en su comercio especializado y encargue únicamente las
reparaciones a servicios técnicos autorizados.
• No sumerja el termómetro en agua u otros líquidos. Sin embargo,
en caso de que entrara humedad en el termómetro, retire la
batería y no efectúe más mediciones con el termómetro. Antes de
seguir usando el termómetro, póngase en contacto con su
comercio especializado o con MEDISANA.
• No agite ni sacuda el termómetro.
• No exponga el termómetro a temperaturas extremas durante un
largo período de tiempo, por ejemplo a la radiación directa del sol
en el interior de un vehículo.
1.1
Muchas
gracias
1.2
Suministro
de serie
1 Termómetro
MEDISANA
FTD
con batería
incluida
1 Soporte
1 Instrucciones
de uso
1.3
Indicaciones
generales
Page 51

51
E
2 Puesta en servio
En el suministro de serie se incluye una batería de litio (3 V CR2032).
Si el estado de la batería es bajo. ésto se indicará mediante el símbolo
de batería en la parte inferior de la pantalla . La batería
debería cambiarse lo antes posible. Si se ha agotado la capacidad de
la batería, además de un símbolo de batería parpadeando parpadeando, aparecerá la indicación “Lo” en la pantalla y sonará
una señal acústica (vea la fig.). No será posible seguir utilizando el
termómetro si no se cambia la batería. Pulse la tecla de conexión /
escaneado para desconectar el termómetro.
Este termómetro está dotado de un cierre de seguridad para mantener
alejada de los niños la batería. Pulse el botón para abrir el compartimento de la batería con un objeto puntiagudo hacia dentro y
extráigala (vea la fig.). Necesitará una batería de litio 3 V CR2032 para
este termómetro. Al insertar la batería, el polo positivo (+) debe estar
hacia arriba.
INDICACIONES DE SEGURIDAD DE LA BATERÍA
• Mantener alejado de los niños • No recargable
• No cortocircuitar • No arrojar al fuego
• No tirar las baterías ni las pilas usadas a la basura
doméstica, sino a la basura especial o llévelas al punto de
recogida de pilas usadas de su comercio especializado.
Al poner el termómetro la primera vez en servicio o tras un cambio de
la batería, primero tendrá que ajustar la hora. A continuación, se
activará automáticamente el modo de temperatura ambiente.
2.1
Indicación
de la batería
2.2
Cambio de la
batería
2.3
Hora y
temperatura
ambiente
Boton para abrir el compartimento de la batería
11
2
8
11
3
3
Page 52

52
2 Puesta en servicio
E
2.5
Indicaciones
antes
del uso
Abra el compartimento de la batería con un objeto puntiagudo sobre
el botón para abrir el compartimento de la batería y retirar la tapa
del compartimento . Pulse el botón de ajuste para la hora ,
hasta que parpadee la indicación de las horas. Las horas se ajustan
con la tecla de conexión / escaneado pulsando varias veces, hasta
que se haya ajustado la hora deseada (vea fig.).
Al pulsar la tecla de ajuste para la hora pasará del ajuste de horas
al ajuste de minutos. El indicador de minutos parpadea. Proceda igual
que con el ajuste de las horas. Una vez ajustada la hora, pulse una
vez la tecla de ajuste para confirmarla (vea fig.).
La pantalla del termómetro indica entonces alternadamente la
hora y la temperatura ambiente (vea fig.).
• El termómetro dispone de un sensor encapsulado . Las tapas de
protección especiales no son necesarias.
• El sensor del termómetro debe mantenerse siempre limpio e intacto para asegurar mediciones exactas.
• El cerumen de los oídos puede influir en la exactitud de la
medición. Limpie en caso de necesidad el oído y la punta del
sensor del termómetro antes de efectuar la medición para evitar
falsear los resultados.
• Si la temperatura ambiente sobrepasa el margen establecido de 16 ºC
– 40 ºC , en la pantalla aparecerá "Err“.
2.4
Ajuste de
la hora
1
6
9
2
6
9
9
8
3
3
Page 53

53
E
3 Método de medición
3.3
Medición
de la
temperatura
corporal
• No mida su temperatura inmediatamente después de comer, hacer
deporte o bañarse. Espere una media hora.
• Lleve a cabo sucesivamente las siguientes mediciones a intervalos
de al menos 1 minuto. En caso de que deba tomar su temperatura
con frecuencia por intervalos breves de tiempo, los resultados
pueden oscilar mínimamente.
• La temperatura corporal se mueve dentro de un margen natural.
No existe ninguna temperatura corporal estándar.
• Mida y anote su temperatura corporal en días totalmente normales.
De este modo podrá detectar mejor si tiene fiebre.
• Para una medición exacta en el oído es muy importante que el
sensor esté alineado dentro del oído a suficiente profundidad.
• Puede haber personas que arrojen distintos valores de medición
según sea el oído izquierdo o derecho. Para registrar cambios en la
temperatura, mida la temperatura en una persona siempre en el
mismo oído.
• La posición al dormir puede influir en los resultados de medición.
Si una persona ha dormido apoyada en un lado durante un período
de tiempo prolongado, la temperatura en el oído de ese lado
puede ser mayor que la normal. Mida en ese caso también en el
otro oído o espere un par de minutos para proceder con la medición.
Este termómetro optimiza durante la medición de la temperatura las
condiciones de manera automática. En caso de que el sistema para una
medición todavía no esté listo, se enciende el símbolo de temperatura
del oído o el símbolo de temperatura de la frente ) (vea fig.).
Se oirán simultáneamente tonos breves y rápidos de manera consecutiva. En este caso, detenga la medición pulsando la tecla de conexión/
escaneado . Prosiga con el registro de la temperatura una vez se
haya apagado el símbolo y haya desaparecido la señal acústica.
Para cambiar de una medición en la frente a una medición en la oreja,
simplemente retire la tapa del sensor . Para volver a medir en la
frente, vuelva a insertarla.
ATENCION
La temperatura en la frente sólo debería tomarse a modo de
control, ya que la temperatura de la piel en la frente puede
influirse con facilidad externamente y, por tanto, falsear el
resultado de la medición.
3.2
Las mejores
condiciones
3.1
Indicaciones
para
determinar la
temperatura
2
14
15
4
Page 54

54
3 Método de medición
E
Para medir la temperatura en la oreja, retire la tapa del sensor
.
Pulse la tecla de conexión / escaneado .
Cuando la pantalla muestre la hora o la temperatura
ambiente, vuelva a pulsar la tecla de conexión / escaneado .
Aparecerá la última temperatura registrada (vea fig.).
Si el símbolo para determinar la temperatura en el oído
aparece en la pantalla , sonarán dos señales acústicas breves
y el termómetro estará listo para ser usado (vea fig.). Vuelva a
pulsar la tecla de conexión / escaneado .
En cuanto que aparezca el símbolo de la medición de temperatura
(ver ilustr.), inserte el sensor en la oreja. Mantenga quieto
el termómetro durante el proceso de medición. Tras pocos
segundos sonará una breve señal acústica y en la pantalla
aparecerá la temperatura corporal registrada.
Tras determinar la temperatura, el termómetro pasará automáticamente al modo de hora y temperatura ambiente.
Para determinar la temperatura corporal en la zona de la frente,
la tapa del sensor debe estar puesta.
Pulse la tecla de conexión / escaneado .
Cuando la pantalla muestre la hora o la temperatura ambiente,
vuelva a pulsar la tecla de conexión / escaneado . Sonarán dos
señales acústicas y se mostrará en la pantalla la última temperatura registrada (vea fig.).
Vuelva a pulsar la tecla de conexión / escaneado . El símbolo
para determinar la temperatura en la frente aparecerá en la
pantalla (vea fig.). El termómetro está listo para usarse.
Acerque el aparato con el sensor al centro de la frente y
pulse simultáneamente la tecla de conexión / escaneado .
Arrastre el termómetro con la tecla de conexión / escaneado
pulsada desde el centro de la frente a un lado hasta la sien.
Suelte la tecla una vez alcanzada la posición.
3.4
Medición
de la
temperatura
en el oído
3.5
Medición
de la
temperatura
en la frente
4
16
2
3
1.
2.
3.
4.
5.
6.
1.
2.
3.
4.
5.
3
3
3
6
2
2
15
2
2
3
4
6
14
2
2
3
2
Enderece el canal
auditivo tirando
ligeramente de la
oreja hacia atrás y
arriba e inserte el
sensor en la oreja
procediendo con
cuidado.
Page 55

55
E
3 Método de medición / 4 Varios
•
La parte más importante y delicada del termómetro es el sensor
. Para garantizar un registro exacto de la temperatura, siempre
debe estar limpia e intacta.
• El sensor es resistente al agua, por lo que puede sumergirse
en alcohol o limpiarse con un tapón de algodón empapado en
alcohol.
• Los desinfectantes alcohólicos usuales son aptos para desinfectar el
sensor . Observe las indicaciones del fabricante.
• La carcasa y la pantalla del termómetro no son impermeables.
No las sumerja en líquidos.
•
Límpielas con un paño seco y limpio. No utilice productos de limpieza
agresivos.
• Guarde el termómetro preferiblemente en su embalaje de compra
original y guárdelo en un lugar limpio y seco. No lo exponga a la
radiación solar directa.
• La temperatura de conservación debe hallarse entre -20,0
0
C y
+50,0 ºC.
• El termómetro está calibrado de fábrica. En caso de un manejo
adecuado no será necesaria una recalibración.
Elimine su aparato eléctrico tras su vida útil conforme a la normativa
de protección del medio ambiente. Los embalajes se pueden volver a
utilizar o aprovecharse como materia prima, las piezas de metal
deben llevarse al chatarrero, los plásticos, los componentes eléctricos
y electrónicos deben eliminarse como chatarra eléctrica.
Retire la batería antes de eliminar el termómetro. No tirar las baterías
ni las pilas usadas a la basura doméstica, sino a la basura especial o
llévelas al punto de recogida de pilas de su comercio especializado.
Para más información sobre cómo deshacerse de su aparato, diríjase
a su ayuntamiento o a su establecimiento especializado.
4.1
Cuidados y
conservación
4.2
Eliminación
3
6
6
6
Una vez determinada la temperatura se oirá una señal acústica y
se mostrará la temperatura corporal en la pantalla .
A continuación, el termómetro pasará automáticamente al modo
hora y temperatura ambiente.
Si la temperatura registrada se encuentra fuera del margen
establecido, aparecerá la siguiente indicación “Lo” “Hi”.
6.
7.
8.
3
Page 56

56
4 Varios
E
Modelo : termómetro MEDISANA FTD
Mostrado margen
de temperatura : 10 ºC – 50 ºC
Exactitud de medición : con menos de 35,5 ºC o
más de 42,0 ºC ±0,3 ºC,
desde 35,5 ºC hasta 42,0 ºC ±0,2 ºC
Precisión de
repetición clínica
: ±0,1 °C
Resolución de
la pantalla : 0,1 ºC
Temperatura de servicio : 16,0 ºC hasta 40,0 ºC
con 95 % de humedad relativa máxima
Temperatura de
almacenamiento : -20,0 ºC hasta +50,0 ºC
con 95 % de humedad relativa máxima
Batería : 1 batería de litio 3 V CR2032
Vida útil de la batería : aprox. 500 mediciones
Clase de protección: : BF
Tamaño
: aprox. 109 mm x 30 mm x 22 mm
Peso
: aprox. 45 g
incluyendo la pila
N.º de artículo : 77050
EAN Code : 4015588770500
Este termómetro cumple las especificaciones de la directriz comunitaria
CEE 93/42 para productos medicinales.
Debido a la constante evolución técnica del producto nos
reservamos el derecho a introducir modificaciones técnicas
y de diseño.
4.3
Datos
técnicos
Page 57

57
E
5 Garantía
Le rogamos consulte con su distribuidor especializado o directamente
con el centro de servicio técnico en caso de una reclamación. Si
tuviera que remitirnos el dispositivo, le rogamos indique el defecto y
adjunte una copia del recibo de compra.
En este caso, se aplicarán las siguientes condiciones de garantía:
1.
Con relación a los productos de MEDISANA, se ofrece una
garantía por un período de tres años a partir de la fecha de
compra. En caso de una reclamación, la fecha de compra debe
probarse mediante el recibo de compra o la factura.
2.
Los defectos de material o de fabricación se eliminarán de forma
gratuita dentro del período de garantía.
3.
La aplicación de la garantía no conlleva una extensión del período
de garantía, ni con respecto al dispositivo ni con respecto a los
componentes sustituidos.
4.
Esta garantía no cubre:
a.
todos los daños causados por abuso, por ej. por incumplimiento
del manual de uso;
b.
los daños debidos a reparaciones o intervenciones por parte del
comprador o terceros no autorizados;
c.
los daños de transporte causados durante el transporte del
domicilio del fabricante al consumidor o durante el envío al
servicio técnico;
d.
accesorios sometidos a un desgaste normal.
5.
Se excluye cualquier responsabilidad por los daños directos o
indirectos causados por el dispositivo, aunque el daño en el dispositivo haya sido considerado como una reclamación justificada.
Si tuviera dudas o preguntas con respecto a este u otros productos,
le responderemos con mucho gusto.
MEDISANA AG
Itterpark 7-9
D-40724 Hilden
Tel.: +49 (0) 2103 / 2007-60
Fax: +49 (0) 2103 / 2007-626
eMail: info@medisana.de
Internet: www.medisana.de
Para la dirección del servicio técnico, consulte la última página.
5.1
Condiciones
de garantía
y reparación
Page 58

58
Termómetro FTD
P
Antes de utilizar o termómetro FTD, leia cuida
dosamente as seguintes instruções de utilização
e guarde-as num local seguro.
1
Cobertura do compartimento da pilha
Botão de ligar/scan
Display
Cobertura do sensor
Suporte
Sensor
Chapa de identificação
Botão para abrir o compartimento da pilha
Botão de ajuste para a hora
Símbolo de memória
- para a última temperatura memorizada
Símbolo da pilha
- para a indicação de pouca carga
Símbolo das horas
- para a indicação das horas
Símbolo Celsius
- para a temperatura do corpo
- para a temperatura ambiente
Símbolo para determinar a temperatura na testa
Símbolo para determinar a temperatura no ouvido
Símbolo para a medição da temperatura a decorrer
Peças do
aparelho
Símbolos
no display
2
3
4
5
6
7
8
9
10
11
12
13
14
15
16
Page 59

59
P
1 Introdução
Muito obrigada pela sua confiança e muitos parabéns! Ao decidir-se
pelo termómetro FTD, adquiriu um produto de qualidade da
MEDISANA.
Para que possa obter o resultado pretendido e desfrute durante muito
tempo do seu termómetro FTD da MEDISANA, recomendamos que
leia cuidadosamente o manual de instruções e guarde o mesmo num
local seguro. O termómetro FTD possibilita a medição da temperatura
no ouvido ou na testa. Adicionalmente, ele determina a temperatura
ambiente e indica as horas actuais.
Por favor, em primeiro lugar, verifique se o material fornecido está
completo. As embalagens podem ser reutilizadas ou podem ser
eliminadas através da reciclagem. Por favor, elimine adequadamente o
material da embalagem não necessário. Se, durante o desembalamento,
verificar danos devido ao transporte, por favor, entre imediatamente
em contacto com o seu revendedor.
AVISO
Tenha atenção para que as películas da embalagem não se
tornem brincadeiras para crianças. Existe perigo de asfixia!
• Utilize o aparelho apenas de acordo com as prescrições das
instruções de utilização. Em caso de utilização não adequada, o
direito à garantia perde a sua validade.
• O aparelho não se destina ao uso comercial.
• As crianças não podem utilizar o aparelho. Os produtos medicinais
não são brinquedos!
• Em caso de falhas ou danos, não tente reparar o aparelho, pois,
caso contrário, qualquer direito à garantia perde a sua validade.
Consulte o seu revendedor especializado e deixe reparar o aparelho
por serviços de assistência autorizados.
• Não coloque o termómetro dentro de água ou de outro líquido
qualquer. No entanto, se penetrar humidade no aparelho, remova
a pilha e não torne a realizar medições com o termómetro. Antes
da próxima utilização do aparelho, entre em contacto com o seu
revendedor especializado ou com a MEDISANA.
• Não chocalhe ou bate com o termómetro.
• Não exponha o termómetro durante muito tempo a temperaturas
extremas como, p.ex. num veículo estacionado directamente ao
sol.
1.1
Muito
obrigada
1.2
Material
fornecido
1 termómetro
FTD
MEDISANA
incl. pilha
1 suporte
1 instruções de
utilização
1.3
Indicações
gerais
Page 60

60
2 Colocação em funcionamento
P
O material fornecido inclui uma pilha de lítio (3 V CR2032). Quando
a pilha possui pouca carga, este estado é indicado pelo símbolo da
pilha localizado na área inferior do display . A pilha deve ser
substituída o mais rápido possível. Quando a pilha não possuir mais
carga, para além do símbolo da pilha , o display também
exibe a indicação “Lo” e ouve-se um sinal acústico (ver fig.). Agora,
já não poderá utilizar o termómetro antes de substituir a pilha. Prima
o botão de ligar/scan para desligar o aparelho.
Este termómetro está equipado com um fecho de segurança para
manter a pilha afastada das crianças. Com um objecto pontiagudo,
prima o botão apara abrir o compartimento da pilha para dentro
e remova a pilha (ver fig.). Este termómetro utiliza uma pilha de lítio
de 3 V CR2032. Quando inserir a pilha, o pólo positivo (+) tem de
indicar para cima.
INDICAÇÕES DE SEGURANÇA SOBRE A PILHA
• Mantenha a pilha afastada das crianças!
• Não recarregue a pilha!
• Não conecte a pilha em curto-circuito!
• Não coloque a pilha no fogo!
• Não elimine a pilha ou a bateria vazia através do lixo
doméstico, mas entregue-a nos postos de recolha
especiais para pilhas ou coloque-a no pilhão.
Quando colocar o termómetro pela primeira vez em funcionamento
ou após uma substituição da pilha, em primeiro lugar, terá de ajustar
as horas. Depois, o aparelho activa automaticamente o modo para a
medição da temperatura ambiente.
2.1
Indicação
da pilha
2.2
Substituição
da pilha
2.3
Horas e
temperatura
ambiente
Botão para abrir o compartimento da pilha
11
2
8
11
3
3
Page 61

61
P
2 Colocação em funcionamento
2.5
Indicação
antes da
utilização
Com um objecto pontiagudo, abra o compartimento da pilha
pressionando o botão para abrir o compartimento da pilha e
removendo a cobertura do compartimento da pilha . Pressione o
botão de ajuste para as horas até a indicação das horas piscar.
As horas são ajustadas premindo várias vezes o botão de ligar/scan
até alcançar a hora pretendida (ver fig.).
Premindo o botão de ajuste para as horas , o ajuste das horas
comuta para o ajuste dos minutos. A indicação dos minutos pisca.
Proceda como na regulação das horas. Quando as horas estiverem
reguladas, prima uma vez o botão de ajuste das horas para confirmar a regulação (ver fig.).
O display do aparelho exibe alternadamente as horas e a temperatura ambiente (ver fig.).
• O termómetro está equipado com um sensor blindado. Por
isso, não são necessárias tampas de protecção especiais.
• O sensor do termómetro tem de estar sempre limpo e intacto
para garantir valores de medição exactos.
• A cera nos ouvidos influencia a precisão da medição. Se necessário,
limpe o ouvido e a ponta do sensor do termómetro antes da
medição para evitar eventuais medições erradas.
• Se, durante a determinação da temperatura ambiente, esta
exceder o âmbito determinado de 16 ºC – 40 ºC, o display
exibe “Err”.
2.4
Regular
a hora
1
6
9
2
6
9
9
8
3
3
Page 62

62
3 Método de medição
P
3.3
Medir a
temperatura
corporal
• Não meça a temperatura imediatamente após a refeição, actividade
desportiva ou banho. Aguarde trinta minutos.
• As medições sucessivas devem ser realizadas em intervalos de, pelo
menos, 1 minuto. Se necessitar de determinar a sua temperatura
em curtos espaços de tempo, os resultados das medições podem
oscilar ligeiramente.
• A temperatura corporal humana oscila dentro de uma margem
natural. Não existe uma temperatura corporal padrão.
• Meça e anote a sua temperatura corporal em dias normais. Assim,
poderá reconhecer melhor uma eventual febre.
• Para uma medição exacta no ouvido, é muito importante que o
sensor esteja alinhado sobre o tímpano e se encontre
suficientemente dentro do canal auditivo.
• Existem pessoas que têm valores de medição diferentes no ouvido
esquerdo e direito. Para registar as alterações de temperatura,
realize a medição sempre no mesmo ouvido.
• A posição de dormir pode influenciar os resultados da medição. Se
uma pessoa esteve a dormir durante algum tempo sobre uma
orelha, a temperatura nesse ouvido é mais alta que o normal.
Neste caso, realize a medição no outro ouvido ou aguarde alguns
minutos até realizar a medição.
Este termómetro optimiza automaticamente as condições durante a
medição da temperatura. Se o sistema de medição ainda não estiver
pronto para uma medição, o display exibe o símbolo da temperatura
do ouvido ou da temperatura da testa (ver fig.).
Simultaneamente, ouve-se dois sinais acústicos curtos, rápidos e
sucessivos. Neste caso, pare a medição premindo o botão de
ligar/scan . Prossiga com a medição da temperatura apenas quando
o símbolo apagar e já não ouvir o sinal acústico.
Para comutar da medição na testa para a medição no ouvido, remova
simplesmente a cobertura do sensor . Para voltar a medir na
testa, volte a colocar a cobertura das sondas de medição.
ATEN²AO
A determinação da temperatura na testa deve ser realizada
apenas para controlo, pois a temperatura da pele na testa
pode ser ligeiramente influenciada por condições externas e,
deste modo, falsificar o resultado da medição.
3.2
As melhores
condições
3.1
Indicações
para
determinar a
temperatura
2
14
15
4
Page 63

63
P
3 Método de medição
Para determinar a temperatura no ouvido, remova a cobertura do
sensor .
Prima o botão de ligar/scan .
Se o display exibir as horas ou a temperatura ambiente, volte
a premir o botão de ligar/scan . O display exibe a última temperatura determinada (ver fig.).
Quando o display exibir o símbolo para determinar a temperatura no ouvido , ouve-se dois sinais acústicos breves e o
aparelho está operacional (ver fig.). Prima outra vez o botão de
ligar/scan .
Assim que o display exibir o símbolo para a medição da temperatura (ver Fig.), insira o sensor no ouvido. Durante a
medição, mantenha o aparelho quieto. Após apenas alguns
segundos, ouve-se um sinal acústico breve e o display exibe
a temperatura corporal determinada.
Após a medição da temperatura, o aparelho comuta automaticamente para o modo das horas e da temperatura ambiente.
Para poder medir a temperatura corporal na testa, a cobertura do
sensor tem de estar colocada.
Prima o botão de ligar/scan .
Se o display exibir as horas ou a temperatura ambiente, volte
a premir o botão de ligar/scan . Ouve-se dois sinais acústicos
e o display exibe a última temperatura determinada (ver fig.).
Volte a premir o botão de ligar/scan . O display exibe o
símbolo para determinar a temperatura na testa (ver fig.). O
aparelho está operacional.
Segure o aparelho com o sensor no centro da testa e pressione simultaneamente o botão de ligar/scan . Agora, com
o botão de ligar/scan premido, desloque o termómetro do
centro da testa para o lado até às fontes. Liberte o botão
quando alcançar esta posição.
3.4
Medir a
temperatura
no ouvido
3.5
Medir a
temperatura
na testa
4
16
2
3
1.
2.
3.
4.
5.
6.
1.
2.
3.
4.
5.
3
3
3
6
2
2
15
2
2
3
4
6
14
2
2
3
2
Aumente o canal
auditivo puxando a
orelha para trás e
para cima e insira
cuidadosamente o
sensor no ouvido.
Page 64

64
4 Generalidades
P
•
A parte mais importante e sensível do termómetro é o sensor
. Para garantir medições exactas da temperatura, a sonda tem
de estar sempre limpa e intacta.
• O sensor é à prova de água e, por isso, pode ser limpo através
da imersão em álcool ou através de um disco de algodão embebido em álcool.
• Para a desinfecção do sensor pode-se utilizar agentes de desinfecção normais à base de álcool. Por favor, respeite as indicações
do respectivo fabricante.
• A caixa e o display do termómetro não são à prova de água.
Não os coloque dentro de líquidos.
• Limpe a caixa e o display com um pano seco e limpo. Não utilize
agentes de limpeza agressivos.
• A melhor maneira de proteger o termómetro é colocá-lo dentro da
embalagem original adquirida na compra e guardá-lo num local
limpo e seco. Proteja o termómetro contra raios solares directos.
• A temperatura de armazenamento deve situar-se entre os -20,0ºC
e +50,0ºC.
• O aparelho está calibrado de fábrica. Em caso de manuseio
adequado, não será necessário realizar uma calibração posterior.
Após o fim da vida útil do aparelho eléctrico, eliminá-lo de forma a
não prejudicar o meio ambiente! Embalagens podem ser reutilizadas
ou recicladas, peças metálicas que podem ser reaproveitadas, plásticos, componentes eléctricos ou electrónicos devem ser descartados
como resíduos eléctricos e electrónicos.
Antes de eliminar o aparelho, remova a pilha. Não elimine a pilha
vazia através do lixo doméstico, mas entregue-a nos postos de recolha especiais para pilhas ou coloque-a no pilhão.
Para mais informações sobre as formas de descarte, contacte as autoridades locais ou o seu revendedor.
4.1
Conservação
e armazen
amento
4.2
Eliminação
3
6
6
6
Após a medição da temperatura, ouve-se um sinal acústico e a
temperatura do corpo é exibida no .
Em seguida, o aparelho comuta automaticamente para o modo
das horas e da temperatura ambiente.
Se a temperatura medida se situar fora do âmbito permitido, o
display exibe a indicação “Lo” “Hi”.
6.
7.
8.
3
Page 65

65
P
4 Generalidades
Modelo : MEDISANA Termómetro FTD
Âmbito de
temperatura indicado : 10 °C – 50 °C
Precisão de medição : inferior a 35,5 ºC
ou superior a 42,0 ºC ±0,3 ºC,
de 35,5 ºC a 42,0 ºC ±0,2 ºC
Precisão de
repetição clínica
: ±0,1 °C
Resolução do display : 0,1
0
C
Temperatura de
funcionamento : 16,0 ºC a 40,0 ºC
a 95 % de humidade relativa do ar máx.
Temperatura de
armazenagem : -20,0 ºC a +50,0 ºC
a 95 % de humidade relativa do ar máx.
Pilha: 1 pilha de lítio 3 V CR2032
Vida útil da pilha : aprox. 500 medições
Classe de protecção : BF
Dimensões
: aprox. 109 mm x 30 mm x 22 mm
Peso : aprox. 45 g
incluindo pilha
N.º de artigo : 77050
EAN Code : 4015588770500
Este aparelho corresponde às prescrições da directiva CEE 93/42 para
produtos medicinais.
Devido aos constantes melhoramentos do produto, reservamos
o direito a proceder a alterações técnicas e estéticas.
4.3
Dados
técnicos
Page 66

66
5 Garantia
P
Por favor, em caso de garantia, contacte o seu revendedor especializado ou directamente o centro de assistência. Se for necessário
enviar o aparelho, por favor, envie o aparelho indicando a avaria e
acompanhado de uma cópia do recibo de compra.
Em caso de garantia aplicam-se as seguintes condições:
1.
Aos produtos MEDISANA concedemos uma garantia de três anos
a partir da data de compra. Em caso de garantia, a data de
compra tem de ser comprovada através do recibo de compra ou
factura.
2.
As deficiências devido a erros de material ou de fabricação são
eliminadas gratuitamente dentro do prazo de garantia.
3.
Após um serviço de garantia, o prazo da garantia não é prolongado, nem para o aparelho nem para as peças substituídas.
4.
A garantia exclui:
a.
todos os danos resultantes de manuseamento inadequado como,
p.ex., devido ao não cumprimento do manual de instruções.
b.
danos resultantes de reparações ou intervenções pelo comprador
ou por terceiros não autorizados.
c.
danos de transporte resultantes do percurso entre o fabricante
e o consumidor ou durante o envio para o serviço de assistência
a clientes.
d.
componentes exteriores sujeitos a um desgaste normal.
5.
Não nos responsabilizamos por danos consequentes directos ou
indirectos que são causados pelo aparelho mesmo quando o dano
no aparelho é reconhecido como um caso de garantia.
Se tiver perguntas relativas a este ou a outros aparelhos, teremos
muito gosto em responder às mesmas.
MEDISANA AG
Itterpark 7-9
D-40724 Hilden
Tel.: +49 (0) 2103 / 2007-60
Fax: +49 (0) 2103 / 2007-626
eMail: info@medisana.de
Internet: www.medisana.de
O endereço do serviço de assistência pode ser consultado na última
página.
5.1
Garantia e
condições de
reparação
Page 67

67
FIN
FTD kuumemittari
Lukekaa seuraava käyttöohje huolellisesti
läpi ennen FTD-kuumemittarin käyttöä
ja säilyttäkää se.
1
Paristolokeron kansi
Käynnistys-/skannausnäppäin
Näyttö
Sensorin suojus
Teline
Sensori
Tyyppikilpi
Nappi paristolokeron avaamiseen
Kellonajan asetusnäppäin
Tallennus-symboli
- viimeksi tallennettua lämpötilaa varten
Paristo-symboli
- alhaisen paristotason näyttöä varten
Kellonaika-symboli
- kellonajan näyttöä varten
Celsius-symboli
- kehon lämpötilaa varten
- ympäristön lämpötilaa varten
Symboli lämpötilan mittaamiseen otsalta
Symboli lämpötilan mittaamiseen korvasta
Symboli suoritettavalle lämpötilan mittaukselle
Laitteen osat
Näytön symbolit
2
3
4
5
6
7
8
9
10
11
12
13
14
15
16
Page 68

68
1 Johdatus
FIN
Paljon kiitoksia luottamuksestanne ja sydämellinen onnittelumme!
Mukavaa, että olette hankkineet MEDISANA-laatutuotteen FTD-
kuumemittarin ostamalla.
Jotta pääsisitte haluttuun tulokseen ja voisitte nauttia MEDISANA
FTD-kuumemittaristanne mahdollisimman kauan, suosittelemme,
että luette seuraavan käyttöohjeen huolellisesti ja säilytätte sen.
FTD-kuumemittari mahdollistaa lämpötilan mittauksen korvasta ja
otsalta. Lisäksi se mittaa ympäristön lämpötilan ja näyttää
ajankohtaisen kellonajan.
Tarkastakaa aluksi, että toimitus on täydellinen. Pakkauksia voidaan
käyttää uudelleen tai ne voidaan kierrättää takaisin raakaainekiertoon. Hävittäkää tarpeeton pakkausmateriaali
asianmukaisella tavalla. Mikäli pakkausta avatessanne havaitsette
kuljetusvaurion, ottakaa heti yhteyttä tuotteen myyneeseen
liikkeeseen.
VAROITUS
Huolehtikaa siitä, etteivät pakkausmuovit joudu lasten käsiin.
On olemassa tukehtumisvaara!
• Käyttäkää laitetta ainoastaan sen käyttöohjeessa ilmoitetun
tarkoituksen mukaisesti. Tarkoituksenvastainen käyttö aiheuttaa
takuun raukeamisen.
• Laitetta ei ole tarkoitettu kaupalliseen käyttöön.
• Lapset eivät saa käyttää laitetta. Lääkinnälliset tuotteet eivät ole
leikkikaluja!
• Häiriöiden tai vaurioiden tapauksessa älkää korjatko laitetta itse,
sillä silloin kaikki takuut raukeavat. Kysykää alan liikkeestä, ja
antakaa korjaukset ainoastaan valtuutettujen huoltokorjaamojen
tehtäväksi.
• Älkää asettako kuumemittaria veteen tai muuhun nesteeseen.
Mikäli laitteeseen tästä huolimatta sattuisi pääsemään vettä,
poistakaa paristo älkääkä mitatko kuumemittarilla enää mitään.
Ennen kuumemittarin jatkokäyttöä ottakaa yhteyttä alan
liikkeeseen tai MEDISANAan.
• Älkää ravistako tai kolauttako kuumemittaria.
• Älkää altistako kuumemittaria pidemmäksi aikaa äärimmäisille
lämpötiloille, esim. suoraan auringon kuumentamassa ajoneuvossa.
1.1
Sydämellinen
kiitos
1.2
Toimituksen
laajuus
1 MEDISANA
FTD
-kuumemittari
sis. pariston
1 teline
1 käyttöohje
1.3
Yleisiä ohjeita
Page 69

69
FIN
2 Käyttöönotto
Toimituslaajuuteen sisältyy yksi litiumparisto (3 V CR2032). Pariston
alhainen virtataso esitetään paristosymbolin avulla näytön
alaosassa. Paristot tulee vaihtaa mahdollisimman nopeasti uuteen.
Mikäli pariston virta on loppu, ilmestyy näyttöön vilkkuvan
paristo-symbolin lisäksi maininta ”Lo” ja kuuluu äänimerkki
(katso kuva). Kuumemittarin käyttö ei ole enää mahdollista ennen
pariston vaihtoa. Painakaa käynnistys-/skannausnäppäintä
sammuttaaksenne laitteen.
Tämä kuumemittari on varustettu turvalukituksella, jotta lapset eivät
pääsisi käsiksi paristoihin. Painakaa paristolokeron avaamiseen
tarkoitettu nappi sisään terävän esineen avulla ja irrottakaa
paristo (katso kuva). Tähän kuumemittariin tarvitaan yksi 3 V CR2032
litiumparisto. Kun asetatte pariston sisään, plusnavan (+) tulee
osoittaa ylöspäin.
PARISTO-TURVAOHJEITA
• Pitäkää poissa lasten ulottuvilta! • Ei saa ladata uudelleen!
• Ei saa oikosulkea! • Ei saa heittää tuleen!
• Älkää heittäkö käytettyjä paristoja tai akkuja
kotitalousjätteisiin, vaan ongelmajätteisiin tai viekää ne alan
liikkeen paristonkeräyspisteeseen.
Ottaessanne kuumemittarin käyttöön ensimmäistä kertaa tai
paristonvaihdon jälkeen tulee teidän ensimmäiseksi asettaa
kellonaika. Sen jälkeen ympäristön lämpötilan mittaustila aktivoidaan
automaattisesti.
2.1
Paristonäyttö
2.2
Paristonvaihto
2.3
Kellonaika ja
ympäristön
lämpötila
Nappi paristolokeron avaamiseen
11
2
8
11
3
3
Page 70

70
2 Käyttöönotto
FIN
2.5
Ohjeita
ennen
käyttöä
Avatkaa paristolokero painamalla paristolokeron avaamiseen
tarkoitettua nappia terävällä esineellä ja irrottakaa paristolokeron
kansi . Painakaa kellonajan asetusnäppäintä , kunnes
tuntinäyttö vilkkuu. Tunnit asetetaan painamalla käynnistys/skannausnäppäintä useampaan kertaan, kunnes haluttu tunti
on saavutettu (katso kuva).
Kellonajan asetusnäppäintä painamalla vaihdetaan tuntien
asetuksesta minuuttien asetukseen. Minuuttinäyttö vilkkuu. Toimikaa
kuten tunteja asettaessanne. Kun kellonaika on asetettu, painakaa
vahvistukseksi kerran kellonajan asetusnäppäintä (katso kuva).
Laitteen näyttö näyttää sitten vuorotellen kellonaikaa ja ympäristön
lämpötilaa (katso kuva).
• Kuumemittari on varustettu kapseloidulla sensorilla . Erityisiä
suojuksia ei tarvita.
• Kuumemittarin sensorin tulee olla aina puhdas ja kunnossa,
jotta tarkat mittausarvot voitaisiin taata.
• Korvavaha vaikuttaa mittaustarkkuuteen. Puhdistakaa tarvittaessa
korva ja kuumemittarin anturikärki ennen mittausta mahdollisen
virhemittauksen välttämiseksi.
• Mikäli ympäristön lämpötila ylittää ympäristön lämpötilaa
mitattaessa annetut +16 °C ... +40 °C:n puitteet, ilmestyy näyttöön
”Err”.
2.4
Kellonajan
asettaminen
1
6
9
2
6
9
9
8
3
3
Page 71

71
FIN
3 Mittaustavat
3.3
Kehon
lämpötilan
mittaaminen
• Älkää mitatko lämpötilaanne heti ruokailun, urheilusuorituksen tai
kylvyn jälkeen. Odottakaa puoli tuntia.
• Suorittakaa toisiaan seuraavat mittaukset ainoastaan vähintään 1
minuutin väliajoin. Mikäli teidän on mitattava lämpötilaanne usein
lyhyen ajan sisällä, mittaustulokset saattavat poiketa toisistaan
vähäisessä määrin.
• Ihmisen kehon lämpötila vaihtelee luonnollisen marginaalin sisällä.
Ei ole olemassa mitään standardilämpötilaa.
• Mitatkaa ja merkitkää kehonne lämpötila ylös aivan tavallisina
päivinä. Näin voitte tunnistaa paremmin mahdollisen kuumeen.
• Tarkkaa korvasta tapahtuvaa mittausta varten on tärkeää, että
sensori on suunnattu rumpukalvoa kohti ja että se sijaitsee riittävän
syvällä korvakäytävässä.
• On olemassa henkilöitä, joiden mittaustulokset vaihtelevat oikean
ja vasemman korvan välillä. Voidaksenne havaita
lämpötilanmuutoksia, mitatkaa saman henkilön lämpötila aina
saman puolen korvasta.
• Nukkumisasento saattaa vaikuttaa mittaustulokseen. Jos henkilö
on nukkunut pidemmän aikaa yhdellä korvalla, on tämän korvan
lämpötila tavanomaista korkeampi. Mitatkaa tässä tapauksessa
toisesta korvasta tai odottakaa muutama minuutti ennen mittausta.
Tämä kuumemittari optimoi olosuhteet lämpötilamittauksen aikana
automaattisesti. Mikäli mittausjärjestelmä ei ole vielä valmis
mittaukseen, palaa joko korvalämpötila- tai otsalämpötilasymboli
(katso kuva). Samalla kuullaan lyhyitä, nopeasti toisiaan seuraavia
signaaliääniä. Tässä tapauksessa tulee mittaus lopettaa painamalla
käynnistys-/skannausnäppäintä . Jatkakaa lämpötilan mittausta
vasta, kun symboli on sammunut eikä signaaliääntä enää kuulu.
Vaihtaaksenne otsamittauksesta korvamittaukseen poistakaa yksinkertaisesti sensorin suojus . Mitataksenne jälleen otsalta tulee
suojus asettaa taas paikoilleen.
HUOMIO
Lämpötilamittaus otsalta tulisi suorittaa ainoastaan
tarkastusmielessä, sillä otsan ihon lämpötila on herkkä
vaikutteille ja siksi mittaustulos saattaa olla virheellinen.
3.2
Parhaat
edellytykset
3.1
Ohjeita
lämpötilan
mittaukseen
2
14
15
4
Page 72

72
3 Mittaustavat
FIN
Mitataksenne lämpötilaa korvasta tulee sensorin suojus
poistaa.
Painakaa käynnistys-/skannausnäppäintä .
Kun näytössä näkyy kellonaika tai ympäristön lämpötila,
painakaa uudelleen käynnistys-/skannausnäppäintä .
Näytössä näkyy viimeksi mitattu lämpötila (katso kuva).
Kun näyttöön ilmestyy korvan lämpötilamittauksen symboli
, kuuluu kaksi lyhyttä signaaliääntä ja laite on käyttövalmis
(katso kuva). Painakaa käynnistys-/skannausnäppäintä vielä
kerran.
Heti kun suoritettavan lämpötilamittauksen symboli ilmestyy
(katso kuva), työntäkää sensori korvaan. Pitäkää laite mittaustapahtuman aikana rauhallisena. Muutaman sekunnin
jälkeen kuuluu lyhyt signaaliääni ja näytössä näytetään
mitattu kehon lämpötila.
Lämpötilamittauksen jälkeen laite vaihtaa automaattisesti
kellonaikaa ja ympäristön lämpötilaa osoittavaan tilaan.
Voidaksenne mitata lämpötilaa otsasta, tulee sensorin suojuksen
olla paikoillaan.
Painakaa käynnistys-/skannausnäppäintä .
Kun näytössä näkyy kellonaika tai ympäristön lämpötila,
painakaa uudelleen käynnistys-/skannausnäppäintä . Kuulette
kaksi signaaliääntä ja näyttöön ilmestyy viimeksi mitattu
lämpötila (katso kuva).
Painakaa uudelleen käynnistys-/skannausnäppäintä . Näyttöön
ilmestyy otsan lämpötilamittauksen symboli (katso kuva).
Laite on käyttövalmis.
Pitäkää laitetta sensori keskellä otsaa ja painakaa samalla
käynnistys-/skannausnäppäintä . Pitäkä käynnistys/skannausnäppäintä painettuna ja vetäkää kuumemittaria otsan
keskeltä sivulle aina ohimolle saakka. Päästäkää näppäin irti, kun
olette päässeet ohimolle.
3.4
Lämpötilan
mittaaminen
korvasta
3.5
Lämpötilan
mittaaminen
otsasta
4
16
2
3
1.
2.
3.
4.
5.
6.
1.
2.
3.
4.
5.
3
3
3
6
2
2
15
2
2
3
4
6
14
2
2
3
2
Venyttäkää
korvakäytävää
vetämällä korvaa
taakse ylös ja
viekää sensori
varovasti korvaan.
Page 73

73
FIN
3
Mittaustavat
/ 4 Sekalaista
• Kuumemittarin tärkein ja herkin osa on sensori . Jotta tarkka
lämpötilan mittaus voitaisiin taata, sen tulee olla aina puhdas ja
ehjä.
• Sensori on vedenpitävä, ja se voidaan siksi puhdistaa kastamalla
se suoraan alkoholiin tai pyyhkimällä alkoholilla kostutetulla
vanulla.
• Sensorin desinfiointiin soveltuvat tavalliset alkoholia
sisältävät desinfiointiaineet. Noudattakaa kulloisenkin valmistajan
antamia ohjeita.
• Kuumemittarin kotelo ja näyttö eivät ole vedenpitäviä. Älkää
siksi upottako niitä nesteisiin.
• Puhdistakaa kuumemittari kuivalla, puhtaalla liinalla. Älkää
käyttäkö voimakkaita puhdistusaineita.
• Säilyttäkää kuumemittari parhaiten ostaessa saadussa
alkuperäispakkauksessa, puhtaassa ja kuivassa paikassa. Suojatkaa
sitä suoralta auringonvalolta.
• Säilytyslämpötilan tulee olla -20,0 °C ... +50 °C.
• Laite on kalibroitu tehtaalla. Laitetta asianmukaisesti käsiteltäessä
ei uudelleenkalibrointi ole tarpeen.
Kun sähkölaitetta ei enää käytetä, huolehdi sen hävittämisestä
ympäristöystävällisesti! Pakkaukset voidaan käyttää uudestaan tai ne
voidaan kierrättää. Kierrätyskelpoiset metalliosat, muovit, sähköiset ja
elektroniset osat on vietävä sähköromuihin.
Poistakaa paristo ennen laitteen hävittämistä. Älkää heittäkö
käytettyjä paristoja kotitalousjätteisiin, vaan ongelmajätteisiin tai alan
liikkeen käytettyjen paristojen keräyspisteeseen.
Ota yhteyttä paikalliseen
viranomaiseen tai myyjäliikkeeseen hävityksen
suorittamiseksi.
4.1
Huolto ja
säilytys
4.2
Hävittäminen
3
6
6
6
Lämpötilan mittauksen päätyttyä kuulette signaaliäänen ja kehon
lämpötila näytetään näytössä .
Sen jälkeen laite vaihtaa automaattisesti kellonaikaa ja
ympäristön lämpötilaa osoittavaan tilaan.
Jos mitattu lämpötila on sallitun alueen ulkopuolella, ilmoitetaan
"Lo" "Hi".
6.
7.
8.
3
Page 74

74
4 Sekalaista
FIN
Malli : MEDISANA FTD-kuumemittari
Näytetty
lämpötila-alue : +10 °C ... +50 °C
Mittaustarkkuus : alle 35,5 °C:ssa
tai yli 42,0 °C:ssa ±0,3 °C,
35,5 °C ... 42 °C ±0,2 °C
Kliininen
toistotarkkuus
: ±0,1 °C
Näytön tarkkuus : 0,1 °C
Käyttölämpötila : 16,0 °C ... 40,0 °C
95 % maks. suhteellisella ilmankosteudella
Varastointilämpötila : -20,0 °C ... +50,0 °C
95 % maks. suhteellisella ilmankosteudella
Paristo: 1 x 3 V CR2032 litiumparisto
Pariston käyttöikä : n. 500 mittausta
Suojaluokka : BF
Mitat
: n. 109 mm x 30 mm x 22 mm
Paino
: n. 45 g
sisältäen pariston
Tuote-nro. : 77050
EAN koodi : 4015588770500
Tämä laite vastaa lääkinnällisistä tuotteista annettua ETY-standardia
93/42.
Jatkuvan tuotekehittelyn myötä pidätämme itsellämme
oikeuden teknisiin ja muotoilullisiin muutoksiin.
4.3
Tekniset
tiedot
Page 75

75
FIN
5 Takuu
Käänny takuutapauksessa alan liikkeen tai suoraan asiakaspalveluhuollon puoleen. Jos laite tulee lähettää huoltoon, ilmoita vika ja
lähetä laitteen mukana kopio ostokuitista.
Tällöin ovat voimassa seuraavat takuuehdot:
1.
MEDISANA-tuotteille myönnetään kolmen vuoden takuu
myyntipäiväyksestä. Myyntipäiväys tulee todistaa takuutapauksessa ostokuitilla tai laskulla.
2.
Materiaali- tai valmistusvioista johtuvat puutteet korjataan
takuuaikana maksutta.
3.
Takuukorjaus ei pidennä takuuaikaa, ei laitteelle eikä vaihdetulle
raken-neosalle.
4.
Takuun ulkopuolelle jäävät:
a.
kaikki vahingot, jotka syntyvät asiattomasta käsittelystä, esim.
käyttöohjeen noudattamatta jättämisestä.
b.
Vahingot, joiden syyksi voidaan jäjittää ostajan tai asiattoman
kolmannen osapuolen suorittama kunnossapito tai toimet.
c.
Kuljetusvauriot, jotka ovat syntyneet matkalla valmistajalta
kuluttajalle tai asiakaspalveluun lähetettäessä.
d.
Lisäosat, jotka ovat alttiina normaalille kulutukselle.
5.
Vastuu laitteen aiheuttamista välittömistä tai välillisistä
seurausvahingoista on myös poissuljettu, jos laitteelle aiheutunut
vahinko hyväksytään takuutapaukseksi.
Jos sinulla on kysyttävää tästä tai muista tuotteista, vastaamme
kysymyksiisi erittäin mielellämme.
MEDISANA AG
Itterpark 7-9
D-40724 Hilden
Tel.: +49 (0) 2103 / 2007-60
Fax: +49 (0) 2103 / 2007-626
eMail: info@medisana.de
Internet: www.medisana.de
Asiakaspalvelun osoite löytyy viimeiseltä sivulta.
5.1
Takuu- ja
korjausehdot
Page 76

76
FTD Termometer
S
Läs denna bruksanvisning noga innan FTD
termometern används och spara den för
senare bruk.
1
Skydd över batterifack
Start/Scan knapp
Display
Sensorkydd
Hållare
Sensor
Typskylt
Knapp för öppning av batterifack
Startknapp för tidsangivelse
Lagringssymbol
- visar senast sparade temperatur
Batterisymbol
- visar låg batterinivå
Tidssymbol
- visar aktuell tid
Celsius symbol
- visar kroppstempertur
- visar omgivande temperatur
Symbol för temperaturmätning på pannan
Symbol för temperaturmätning i örat
Symbol för pågående temperaturmätning
Termometerns
olika delar
Symboler i
displayen
2
3
4
5
6
7
8
9
10
11
12
13
14
15
16
Page 77

77
S
1 Instruktion
Tack för visat intresse och gratulationer! Det glädjer oss att du valt vår
FTD termometer som är en kvalitetsprodukt från MEDISANA.
För att nå önskade resultat och ha glädje av din MEDISANA FTD
termometer under lång tid rekommenderar vi att du läser denna
bruksanvisning noga samt förvarar den för framtida behov.
FTD termometern gör det möjligt att mäta temperturen i örat och på
pannan. Dessutom mäter den temperaturen i omgivningen samt visar
vad klockan är.
Kontrollera först att förpackningen är komplett.
Förpackningar kan åternvändas eller lämnas till återvinning. Sörj för
att förpackningsmaterialet tas omhand på korrekt sätt. Upptäcks
skador när produkten packas upp så kontakta omgående
inköpsstället.
VARNING
Förpackningsdetaljer i plast är ej lämpliga för barn.
Kvävningsrisk!
• Använd produkten endast enligt anvisning i bruksanvisningen. Vid
ej korrekt användning förfaller alla garantianspråk.
• Produkten är inte avsedd för kommersiell användning.
• Produkten är ej avsedd att användas av barn. Medicinska
produkter är inga leksaker!
• Reparera inte produkten själv vid störningar eller skador då detta
leder till att samtliga grantianspråk förfaller. Kontakta inköpsstället
och låt endast auktoriserad kundservice utföra reparationer.
• Lägg inte termometern i vatten eller annan vätska. Skulle fukt ändå
tränga in i termometern så tag ur batteriet och utför inga fler
mätningar med termometern. Kontakta inköpsstället eller
MEDISANA innan termometern tas ibruk.
• Skaka, och slå, inte på termometern.
• Utsätt inte termometern för extrema temperaturer under längre
perioder, ex. i fordon parkerat i solsken.
1.1
Tack
1.2
Innehåll
1 MEDISANA
FTD
termometer
inkl. batteri
1 hållre
1
bruksanvisning
1.3
Allmänna
anvisningar
Page 78

78
2 Användning
S
Med termometern levereras ett Lithium batteri (3 V CR2032).
Låg batterinivå visas med batterisymbolen i nedre delen av
displayen . Batteriet bör bytas ut så snart som möjligt. Är batteriets
kapacitet uttömd visas, förutom den blinkande battersymbolen ,
hänvisningen ”Lo” i displayen och en signalton ljuder (se bild).
Termometern kan nu inte användas innan batteriet bytts. Tryck på
Start/Scan knappen för att stänga av produkten.
Termometern är utrustad med ett säkerhetslås så att barn inte kan få
tag på batteriet. Tryck knappen inåt med ett spetsigt föremål för att
öppna batterifacket och tag ur batteriet (se bild). För denna
termometer behövs ett 3 V CR 2032 Lithium batteri. När batteriet
läggs i måste pluspolen (+) riktas uppåt.
SÄKERHETSANVISNINGAR FÖR BATTERI
• Förvaras utom räckhåll för barn! • Ej uppladdningsbart!
• Får ej kortslutas! • Får ej kastas i öppen eld!
• Kasta inte förbrukade batterier, engångs eller uppladdningsbara, i hushållssoporna utan lämna dessa till batterinsamling
vid återvinningsstation eller till insamling i fackhandeln.
När termometern tas ibruk första gången, eller efter batteribyte,
måste klockan först ställas in. Däreftter aktiveras modus för temperaturmätning i omgivningen automatiskt.
2.1
Batteridisplay
2.2
Batteribyte
2.3
Tid och
temperatur
i omgivning
Knapp för att öppna batterifacket
11
2
8
11
3
3
Page 79

79
S
2 Användning
2.5
Anvisningar
före
användning
Öppna batterfacket genom att trycka med ett spetsigt föremål på
knappen för batterifacke och drag bort skyddet . Tryck på
knappen för inställning av tid , tills timangivelsen blinkar. Timmarna
ställs in med Start/Scan knappen vilken trycks in flera gånger,
tills önskad tidsangivelse uppnåtts (se bild).
Genom att trycka på inställningsknappen för tid växlar man från
inställning av timme till inställning av minuter. Minutangivelsen
blinkar. Gör på samma sätt som vid inställning av timme. När tiden
ställts in trycks inställningsknappen för tid ner en gång som
bekräftelse (se bild).
Termometerns display visar då växelvis tid och omgivande temperatur (se bild).
• Termometern är utrustad med en kapslad sensor . Extra
skyddshättor behövs inte.
• Termometerns sensor måste alltid vara ren och intakt för att
exakta värden användning ska kunna garanteras.
• Öronvax påverkar exaktheten i mätningen. Före mätning rengörs
örat vid behov och sensorspetsen på termometern för att undvika
eventuella felmätningar.
• Överskrider den omgivande temperaturen vid mätning den mellan
16 °C - 40 °C fastlagda ramen visar displayen ”Err”.
2.4
Ställa
klockan
1
6
9
2
6
9
9
8
3
3
Page 80

80
3 Mätmetod
S
3.3
Mäta
kroppstemperatur
• Mät inte temperaturen direkt efter maten eller i direkt anslutning
till sportaktivitet eller bad. Vänta en halvtimme.
• Genomför endast upprepade mätningar med minst en minuts
mellanrum. Måste man mäta temperaturen med tätare intervaller
under en kortare period kan mätresultaten variera något.
• Den mänskliga kroppstemperaturen rör sig inom en naturlig
avgränsning. Det finns igen standardtemperatur.
• Mät och notera kroppstemperaturen under normala dagar. På
detta sätt kan eventuell feber lättare upptäckas.
• För exakt mätning i örat är det mycket viktigt att termometerns
sensor är riktad mot trumhinnan och befinner sig tillräckligt djupt
in i hörselgången.
• Det finns personer som har olika mätresultat i vänster och höger
öra. Mät alltid i samma öra på peronen i fråga för att registrera
temperaturförändringar.
• Sovställningen kan påverka mätresultaten. När en person har sovit
en längre period på ett öra är temperaturen i detta öra högre än
normalt. Mät då i det andra örat eller vänta några minuter med
mätningen.
Denna termometer förbättrar förutsättningarna automatiskt under
mätningen. Om mätsystemet ännu inte är klart för mätning tänds
antingen symbolen för örats temperatur eller symbolen för pannans
temperatur (se bild). Samtidigt hörs korta, snabba, på varandra
följande signaltoner. I detta fall avbryter man mätningen genom att
trycka in Start/Scan knappen . Påbörja inte ny mätning innan
symbolen slocknat och signaltonen tystnat.
För att byta från mätning på pannan till mätning i örat tas sensorkydd
bort. Ska mätning åter ske på pannan sätts den tillbaka.
OBSERVERA
Temperaturmätning på pannan bör endast göras som kontroll
då hudens tempertur i pannan lätt påverkas av yttre influenser
vilket kan ge ett felaktigt mätresultat.
3.2
Bäst förutsättningar
3.1
Anvisningar
för
temperaturmätning
2
14
15
4
Page 81

81
S
3 Mätmetod
För temperaturmätning i örat tas sensorskyddet bort.
Tryck in Start/Scan knappen .
När displayen visar tid eller omgivande tempertur trycks
Start/Scan knappen in på nytt. Sist uppmätt temperatur visas
(se bild).
När symbolen för temperaturmätning i örat syns i displayen
hörs två korta signaltoner och termometern är klar att
använda (se bild).
Tryck återigen på Start/Scan knappen .
Så snart symbolen för pågående temperaturmätning visas
(se bild) sticks sensorn in i örat. Håll termometern stilla under
mätningen. Redan efter några sekunder hörs en kort signalton
och displayen visar uppmätt kroppstemperatur.
Efter temperaturmätningen växlar termometern automatiskt till
att visa tid och omgivande tempertur.
För att kroppstemperaturen ska kunna mätas på pannan måste
sensorskyddet vara påsatt.
Tryck in Start/Scan knappen .
När displayen visar tid eller omgivande tempertur trycks
Start/Scan knappen in på nytt. Två signaltoner hörs och sist
uppmätt temperatur visas i displayen (se bild).
Tryck återigen på Start/Scan knappen . Symbolen för temperaturmätning på pannan visas i displayen (se bild).
Termometern är klar att använda.
Håll termometerns sensor i mitten på pannan och tryck
samtidigt på Start/Scan knappen . Drag sedan termometern,
med Start/Scan knappen intryckt, från mitten av pannan och
åt sidan, ända förbi tinningen. Släpp knappen när denna position
nåtts.
3.4
Mäta
temperatur
i örat
3.5
Mäta
temperatur
på pannan
4
16
2
3
1.
2.
3.
4.
5.
6.
1.
2.
3.
4.
5.
3
3
3
6
2
2
15
2
2
3
4
6
14
2
2
3
2
Sträck
hörselgången
genom att dra
örat bakåt,
uppåt och stick
försiktigt in
sensorn i örat.
Page 82

82
3 Mätmetod / 4 Övrigt
S
• Den viktigaste och känsligaste delen på termometern är dess
sensor . För att garantera exakta temperaturmätningar måste
den alltid vara ren och intakt.
• Sensorn är vattentät och kan därför doppas i alkohol för
rengöring, eller förvaring torkas av med bomullstuss indränkt i
alkohol.
• I handeln förekommande alkoholbaserade desinfektionsmedel kan
användas för desinficering av sensorn . Beakta respektive tillverkares anvisningar.
• Termometerns hölje och display är inte vattentäta. Doppa inte
dessa i vätskor.
• Rengör dessa delar med en torr, ren lapp. Använd inga aggresiva
rengöringsmedel.
• Förvara helst termometern i den originalförpackning som följer
med vid köpet och placera den på ren och torr plats. Utsätt den
inte för direkt sol.
• Förvaringstemperaturen bör ligga mellan -20°C och +50°C.
• Termometern har kalibrerats av tillverkaren. Vid korrekt hantering
krävs ingen ny kalibrering.
Förbrukade elektroapparater ska omhändertas enligt gällande miljöbestämmelser! Förpackningarna kan återanvändas eller återvinnas,
metalldelarna ska läggas i metallåtervinningen, plast, elektriska och
elektroniska
komponenter måste omhändertas som elavfall.
Tag ur batteriet innan termometern kasseras. Kasta inte det förbrukade batteriet i hushållssoporna utan lämna det till återvinningsstation eller till batteriinsamling i fackhandeln.
Kontakta kommunen
eller återförsäljaren för att få information om
återvinning.
4.1
Skötsel och
förvaring
4.2
Återvinning
3
6
6
6
Efter genomförd tempersturmätning hörs en signalton och
kroppstemperturen visas i displayen .
Därefter växlar termometern automatiskt till modus för tid och
omgivande tempertur.
Ligger uppmätt temperatur utanför det tillåtna området visas
”Lo” ”Hi”.
6.
7.
8.
3
Page 83

83
S
4 Övrigt
Modell : MEDISANA FTD termometer
Visat
temperaturområde : 10
0
C – 50 °C
Exakthet vid mätning : under 35,5 °C eller
mer än 42,0 °C ±0,3 °C,
från 35,5 °C till 42,0°C ±0,3 °C
Klinisk
repeterbarhet
: ±0,1 °C
Displayens upplösning : 0,1 °C
Brukstemperatur : 16,0 °C till 40,0 °C
vid maximalt 95 % relativ luftfuktighet
Förvaringstemperatur : -20 °C till +50 °C
vid maximalt 95 % relativ luftfuktighet
Batteri : 1 x 3 V CR2032 Lithium batteri
Batteriets livslängd : ca. 500 mätningar
Skyddsklass : BF
Yttermått
: ca. 109 mm x 30 mm x 22 mm
Vikt
: ca. 45 g
inklusive batteri
Artikel nr : 77050
EAN Code : 4015588770500
Denna produkt motsvarar riktlinjerna i EWG-direktivet 93/42 för
medicinska produkter.
Som följd av ständigt pågående produktförbättringar förbehåller
vi oss rätten till tekniska förändringar samt förändringar i
utförande.
4.3
Tekniska
data
Page 84

84
5 Garanti
S
Kontakta inköpsstället vid garantifrågor, eller tag kontakt med
kundtjänst direkt. Måste produkten skickas in så bifoga uppgifter om
defekten samt en kopia av inköpskvittot.
Följande garantiförutsättningar gäller:
1.
På MEDISANA produkter lämnas tre års garanti, från inköps-
datum. Inköpsdatum ska vid garantiförehavanden förevisas med
inköpskvitto eller faktura.
2.
Felaktigheter på grund av material- eller tillverkningsfel åtgärdas
kost nadsfritt under garantiperioden.
3.
Utförande av garantiåtagande leder inte till förlängning av garantiperioden; detta gäller för produkten själv så väl som för utbytta
komponenter.
4.
Garantin gäller inte för:
a.
Alla skador som uppkommer på grund av felaktig hantering, ex.
vid icke beaktande av bruksanvisningen.
b.
Skador som kan härledas till iordningsställande eller ingrepp
utförda av köparen eller annan, ej auktoriserad, person.
c.
Transportskador som uppkommit under transport från tillverkaren till användaren eller vid insändning till kundtjänst.
d.
Tillbehör som utsätts för normalt slitage.
5.
Ansvar för direkta eller indirekta följdskador som förorsakas av
produkten är uteslutet, även om skadan på produkten godkänns
som garantiåtagande.
Vid frågor beträffande denna eller andra produkter står vi gärna till
tjänst.
MEDISANA AG
Itterpark 7-9
D-40724 Hilden
Tel.: +49 (0) 2103 / 2007-60
Fax: +49 (0) 2103 / 2007-626
eMail: info@medisana.de
Internet: www.medisana.de
Serviceadressen finns på sista sidan.
5.1
Garanti och
förutsättningar för
reparationer
Page 85

85
GR
£ВЪМfiМВЩЪФ FTD
¶·Ъ·О·ПФ‡МВ У· ‰И·‚¿ЫВЩВ ·˘Щ¤˜ ЩИ˜ Ф‰ЛБ›В˜
¯Ъ‹ЫЛ˜ ЪФЫВОЩИО¿, ЪФЩФ‡ ¯ЪЛЫИМФФИ‹ЫВЩВ
ЩФ £ВЪМfiМВЩЪФ FTD Î·È Ó· ÙȘ Ê˘Ï¿ÍÂÙÂ.
1
∫·¿ÎÈ Ù˘ ı‹Î˘ Ì·Ù·ÚÈÒÓ
¶П‹ОЩЪФ EУВЪБФФ›ЛЫЛ˜ / Scan
√ıfiÓË
∫¿П˘ММ· ·ИЫıЛЩ‹Ъ· М¤ЩЪЛЫЛ˜
√ÚıÔÛÙ¿Ù˘
∞ИЫıЛЩ‹Ъ·˜ М¤ЩЪЛЫЛ˜
∂ИБЪ·К‹ ЩВ¯УИОТУ ПЛЪФКФЪИТУ
∫Ô˘Ì› ·ÓÔ›ÁÌ·ÙÔ˜ Ù˘ ı‹Î˘ Ì·Ù·Ú›·˜
¶Ï‹ÎÙÚÔ Ú‡ıÌÈÛ˘ ÙÔ˘ ¯ÚfiÓÔ˘
™‡Ì‚ÔÏÔ ·Ôı‹Î¢Û˘
- БИ· ЩЛУ ıВЪМФОЪ·Ы›· Ф˘ ¤¯ВИ ·ФıЛОВ˘ıВ›
ÙÂÏÂ˘Ù·›·
™‡Ì‚ÔÏÔ Ì·Ù·Ú›·˜
- ÁÈ· ÙËÓ ¤Ó‰ÂÈÍË ¯·ÌËÏ‹˜ ÛÙ¿ıÌ˘ ÈÛ¯‡Ô˜ Ù˘
Ì·Ù·Ú›·˜
™‡Ì‚ÔÏÔ ¯ÚfiÓÔ˘
- ÁÈ· ÙËÓ ¤Ó‰ÂÈÍË ÙÔ˘ ¯ÚfiÓÔ˘
™‡Ì‚ÔÏÔ ∫ÂÏÛ›Ô˘
- БИ· ЩЛ ıВЪМФОЪ·Ы›· ЫТМ·ЩФ˜
- БИ· ЩЛ ıВЪМФОЪ·Ы›· ВЪИ‚¿ППФУЩФ˜
™‡М‚ФПФ БИ· ЩЛ М¤ЩЪЛЫЛ ıВЪМФОЪ·Ы›·˜ ЫЩФ М¤ЩˆФ
™‡М‚ФПФ БИ· ЩЛ М¤ЩЪЛЫЛ ıВЪМФОЪ·Ы›·˜ ЫЩФ ·˘Щ›
™‡М‚ФПФ БИ· ЩЪ¤¯Ф˘Ы· М¤ЩЪЛЫЛ ıВЪМФОЪ·Ы›·˜
ΔÌ‹Ì·Ù· Ù˘
Û˘Û΢‹˜
™‡Ì‚ÔÏ· ÔıfiÓ˘
2
3
4
5
6
7
8
9
10
11
12
13
14
15
16
Page 86

86
1 ∂ÈÛ·ÁˆÁ‹
GR
∂˘¯·ЪИЫЩФ‡МВ ФП‡ БИ· ЩЛУ ВМИЫЩФЫ‡УЛ Ы·˜ О·И Ы˘Б¯·ЪЛЩ‹ЪИ·!
Г·ИЪfiМ·ЫЩВ И‰И·›ЩВЪ· Ф˘ ·ФОЩ‹Ы·ЩВ МВ ЩФ £ВЪМfiМВЩЪФ FTD ¤Ó·
ФИФЩИОfi ЪФ˚fiУ ЩЛ˜ MEDISANA. °И· ЩЛУ В›ЩВ˘НЛ ЩЛ˜ ВИı˘МЛЩ‹˜
ВИЩ˘¯›·˜ О·И БИ· У· ·ФП·‡ЫЩВ БИ· ФП‡ ¯ЪФУИОfi ‰И¿ЫЩЛМ· ЩФ ‰ИОfi
Ы·˜ MEDISANA £ВЪМfiМВЩЪФ FTD, ı· Ы·˜ Ы˘УИЫЩФ‡Ы·МВ У·
‰И·‚¿ЫВЩВ ЩИ˜ ·Ъ·О¿Щˆ Ф‰ЛБ›В˜ ¯Ъ‹ЫЛ˜ МВ ЪФЫВОЩИОfi ЩЪfiФ О·И
У· ЩИ˜ К˘П¿НВЩВ. ΔФ £ВЪМfiМВЩЪФ FTD Ы·˜ ·Ъ¤¯ВИ ЩЛ ‰˘У·ЩfiЩЛЩ·
У· МВЩЪ‹ЫВЩВ ЩЛ ıВЪМФОЪ·Ы›· ЩfiЫФ ЫЩФ ·˘Щ›, fiЫФ О·И ЫЩФ М¤ЩˆФ.
∂ИЪfiЫıВЩ· В›У·И ЫВ ı¤ЫЛ У· МВЩЪ‹ЫВИ ЩЛ ıВЪМФОЪ·Ы›· ЩФ˘
ВЪИ‚¿ППФУЩФ˜ О·И У· ‰В›¯УВИ ЩЛУ ·ОЪИ‚‹ ТЪ·.
¶·Ъ·О·ПФ‡МВ У· ВП¤БНВЩВ ЪТЩ·, В¿У Л ЪФМ‹ıВ˘ЫЛ В›У·И
П‹ЪЛ˜. √И Ы˘ЫОВ˘·Ы›В˜ МФЪФ‡У У· В·У·¯ЪЛЫИМФФИЛıФ‡У ‹
МФЪФ‡У У· ‰И·ЩВıФ‡У ЫЩЛУ ·У·О‡ОПˆЫЛ ЪТЩˆУ ˘ПТУ.
¶·Ъ·О·ПФ‡МВ У· ‰И·ı¤ЩВЩВ Щ· ˘ПИО¿ Ы˘ЫОВ˘·Ы›·˜, Щ· ФФ›· ‰ВУ
¯ЪВИ¿˙ВЫıВ П¤ФУ, МВ ЩФУ О·Щ¿ППЛПФ ЩЪfiФ. ™В ВЪ›ЩˆЫЛ Ф˘
‰И·ИЫЩТЫВЩВ О·Щ¿ ЩФ ¿УФИБМ· О¿ФИВ˜ ˙ЛМ›В˜ МВЩ·КФЪ¿˜, У·
ВИОФИУˆУ‹ЫВЩВ ·М¤Ыˆ˜ МВ ЩФУ ˘В‡ı˘УФ ¤МФЪФ.
¶ƒ√∂π¢√¶√π∏™∏
¡· МВЪИМУ‹ЫВЩВ, Ф‡Щˆ˜ ТЫЩВ ФИ МВМ‚Ъ¿УВ˜ Ы˘ЫОВ˘·Ы›·˜ У·
МЛУ ВЪИ¤ПıФ˘У ЫВ ¯¤ЪИ· ·И‰ИТУ. АК›ЫЩ·Щ·И О›У‰˘УФ˜ ·ЫК˘Н›·˜!
• ¡· ¯ЪЛЫИМФФИВ›ЩВ ЩЛ Ы˘ЫОВ˘‹ Ы‡МКˆУ· МВ ЩЛУ И‰ИfiЩЛЩ¿ ЩЛ˜,
fiˆ˜ ВЪИБЪ¿КВЩ·И ЫЩИ˜ Ф‰ЛБ›В˜ ¯Ъ‹ЫЛ˜. ™В ВЪ›ЩˆЫЛ
·О·Щ¿ППЛПЛ˜ ¯Ъ‹ЫЛ˜ ВО›ЩВИ ЩФ ‰ИО·›ˆМ· БИ· ВББ‡ЛЫЛ.
• ∏ Û˘Û΢‹ ‰ÂÓ ÚÔÔÚ›˙ÂÙ·È ÁÈ· ÂÌÔÚÈ΋ ¯Ú‹ÛË.
• Δ· ·И‰И¿ ‰ВУ Ъ¤ВИ У· ¯ЪЛЫИМФФИФ‡У ЩЛ Ы˘ЫОВ˘‹. Δ·
ÚÔ˚fiÓÙ· π·ÙÚÈ΋˜ ‰ÂÓ Â›Ó·È ·È¯Ó›‰È·!
• ¡· МЛУ ВИЫОВ˘¿˙ВЩВ ЫВ ВЪ›ЩˆЫЛ ‰˘ЫПВИЩФ˘ЪБИТУ ‹ ˙ЛМИТУ
ЩЛ Ы˘ЫОВ˘‹ МfiУФИ Ы·˜, ‰ИfiЩИ Мг·˘Щfi ЩФУ ЩЪfiФ ВО›ЩФ˘У fiП· Щ·
‰ИО·ИТМ·Щ· ВББ‡ЛЫЛ˜. ∂ИОФИУˆУ‹ЫЩВ МВ ЩФУ ˘В‡ı˘УФ ВИ‰ИОfi
¤МФЪФ О·И ·К‹ЫЩВ У· ‰ИВУВЪБЛıФ‡У ФИ ВЪБ·Ы›В˜ ВИЫОВ˘‹˜
МfiУФ ·fi ВНФ˘ЫИФ‰ФЩЛМ¤У· Ы˘УВЪБВ›· ВН˘ЛЪ¤ЩЛЫЛ˜.
• ¡· МЛ ЩФФıВЩВ›ЩВ ЩФ £ВЪМfiМВЩЪФ ЫВ УВЪfi ‹ ЫВ О¿ФИФ ¿ППФ
˘БЪfi. ™В ВЪ›ЩˆЫЛ Ф˘ ‰ИВИЫ‰‡ЫВИ О¿ФИ· КФЪ¿ ˘БЪ·Ы›· ЫЩЛ
Ы˘ЫОВ˘‹, У· ·К·ИЪ¤ЫВЩВ ЩЛУ М·Щ·Ъ›· О·И У· МЛ ‰ИВУВЪБ‹ЫВЩВ
¿ППВ˜ МВЩЪ‹ЫВИ˜ МВ ЩФ £ВЪМfiМВЩЪФ. ∂ИОФИУˆУ‹ЫЩВ МВ ЩФУ
ВИ‰ИОfi ¤МФЪФ ‹ МВ ЩЛУ MEDISANA, ЪФЩФ‡ ¯ЪЛЫИМФФИ‹ЫВЩВ
ВО У¤Ф˘ ЩЛ Ы˘ЫОВ˘‹.
• ªЛУ ·У·ОИУВ›ЩВ О·И У· МЛУ ¯Щ˘¿ЩВ ЩФ £ВЪМfiМВЩЪФ.
• ¡· МЛУ ВОЩ›ıВЩ·И ЩФ £ВЪМfiМВЩЪФ БИ· ФП‡ ТЪ· ЫВ ˘ВЪ‚ФПИО‹
1.1
∂˘¯·ЪИЫЩФ‡М
В ФП‡
1.2
¶ÂÚȯfiÌÂÓÔ
·Ú¿‰ÔÛ˘
1 MEDISANA
FTD
£ВЪМfiМВЩЪФ
ÌÂ Ì·Ù·Ú›·
1 ÔÚıÔÛÙ¿Ù˘
1 ¤ÓÙ˘Ô
Ф‰ЛБИТУ
¯Ú‹Û˘
1.3
°ВУИО¤˜
ПЛЪФКФЪ›В˜
Page 87

87
GR
2 £¤ЫЛ ЫВ ПВИЩФ˘ЪБ›·
ıВЪМФОЪ·Ы›·, .¯. М¤Ы· ЫВ ·˘ЩФО›УЛЩФ, ЩФ ФФ›Ф ‰¤¯ВЩ·И
¿МВЫЛ ЛПИ·О‹ ·ОЩИУФ‚ФП›·.
™ÙÔ ÂÚȯfiÌÂÓÔ ·Ú¿‰ÔÛ˘ Û˘ÌÂÚÈÏ·Ì‚¿ÓÂÙ·È ÌÈ· Ì·Ù·Ú›·
Lithium (3 V CR2032). ∏ ¯·ÌËÏ‹ ÛÙ¿ıÌË ÈÛ¯‡Ô˜ Ù˘ Ì·Ù·Ú›·˜
ÂÓ‰ÂÈÎÓ‡ÂÙ·È Ì¤Ûˆ ÙÔ˘ Û˘Ì‚fiÏÔ˘ Ì·Ù·Ú›·˜ ÛÙÔ Î¿Ùˆ ÙÌ‹Ì·
Ù˘ ÔıfiÓ˘ . ™Â Ù¤ÙÔÈ· ÂÚ›ÙˆÛË ı· Ú¤ÂÈ Ó·
·УЩИО·Щ·ЫЩ‹ЫВЩВ ЩЛ М·Щ·Ъ›· fiЫФ ЩФ ‰˘У·ЩfiУ ИФ Ы‡УЩФМ·. ™В
ВЪ›ЩˆЫЛ Ф˘ ·ФКФЪЩИЫıВ› ВУЩВПТ˜ Л М·Щ·Ъ›·, ЩfiЩВ
ВМК·У›˙ВЩ·И ЫЩЛУ ФıfiУЛ ÂÎÙfi˜ ÙÔ˘ Û˘Ì‚fiÏÔ˘ Ì·Ù·Ú›·˜ Ô˘
·Ó·‚ÔÛ‚‹ÓÂÈ О·И Л ¤У‰ВИНЛ “Lo” О·И Л¯В› ¤У· Л¯ЛЩИОfi Ы‹М· (
‚П¤В ·ВИОfiУИЫЛ ). ∏ ВЪ·ИЩ¤Ъˆ ¯Ъ‹ЫЛ ЩЛ˜ М·Щ·Ъ›·˜ В›У·И
П¤ФУ МfiУФ МВЩ¿ ЩЛУ ·УЩИО·Щ¿ЫЩ·ЫЛ ЩЛ˜ М·Щ·Ъ›·˜ ‰˘У·Щ‹.
¶·Щ‹ЫЩВ ЩФ П‹ОЩЪФ ∂УВЪБФФ›ЛЫЛ/Scan , ÁÈ· Ó·
·ВУВЪБФФИ‹ЫВЩВ ЩЛ Ы˘ЫОВ˘‹.
∞˘Щfi ЩФ £ВЪМfiМВЩЪФ В›У·И ВНФПИЫМ¤УФ МВ ‰И¿Щ·НЛ ·ЫК¿ПИЫЛ˜, БИ·
У· МЛУ ВЪИ¤Ъ¯ВЩ·И ЫВ ¯¤ЪИ· ·И‰ИТУ Л М·Щ·Ъ›·. ¶·Щ‹ЫЩВ Мг¤У·
·И¯МЛЪfi ·УЩИОВ›МВУФ ЩФ ОФ˘М› ЪФ˜ Щ· М¤Ы· БИ· Уг·УФ›НВИ Л ı‹ОЛ
М·Щ·Ъ›·˜ О·И ·К·ИЪ¤ЫЩВ ЩЛУ М·Щ·Ъ›· ( ‚П¤В ·ВИОfiУИЫЛ ).
°Иг·˘Щfi ЩФ £ВЪМfiМВЩЪФ ¯ЪВИ¿˙ВЫıВ МИ· М·Щ·Ъ›· 3 V CR2032 Lithium. ∫·Щ¿ ЩЛУ ЩФФı¤ЩЛЫЛ ЩЛ˜ М·Щ·Ъ›·˜, Ф ıВЩИОfi˜ fiПФ˜ (+)
ı· Ъ¤ВИ У· ‰В›¯УВИ ЪФ˜ Щ· В¿Уˆ.
À¶√¢∂π•∂π™ ∞™º∞§∂π∞™ ™Ã∂Δπ∫∞ ª∂ Δ∏¡ ª¶∞Δ∞ƒπ∞
• ¡· Ê˘Ï¿ÛÛÂÙ·È Ì·ÎÚÈ¿ ·fi ·È‰È¿! • ¢ÂÓ Â·Ó·ÊÔÚÙ›˙ÂÙ·È!
• ¡· МЛ ‚Ъ·¯˘О˘ОПТУВЩ·И! •
¡· ÌË Ú›ÙÂÙ·È ÛÙË ÊˆÙÈ¿!
• ¡· МЛ Ъ›ЩФУЩ·И ФИ МВЩ·¯ВИЪИЫМ¤УВ˜ М·Щ·Ъ›В˜ О·И ФИ
Ы˘ЫЫˆЪВ˘Щ¤˜ ЫЩ· ·ФЪЪ›М·Щ· УФИОФО˘ЪИФ‡, ·ПП¿ ЫЩ· ВИ‰ИО¿
·ÔÚÚ›ÌÌ·Ù· ‹ Û ÂȉÈÎfi ¯ÒÚÔ Û˘ÏÏÔÁ‹˜ ÛÙ· ÂȉÈο
ηٷÛÙ‹Ì·Ù·.
ŸЩ·У ЩФ £ВЪМfiМВЩЪФ Щ›ıВЩ·И БИ· ЪТЩЛ КФЪ¿ ЫВ ПВИЩФ˘ЪБ›· ‹ МВЩ¿
ЩЛУ ·УЩИО·Щ¿ЫЩ·ЫЛ М·Щ·Ъ›·˜ ı· Ъ¤ВИ У· Ъ˘ıМ›˙ВЩ·И О·Щг·Ъ¯‹У
Л ТЪ·. ŒВИЩ· ВУВЪБФФИ‹Щ·И ·˘ЩФМ¿Щˆ˜ Л ПВИЩФ˘ЪБ›· БИ· ЩЛУ
М¤ЩЪЛЫЛ ЩЛ˜ ıВЪМФОЪ·Ы›·˜ ВЪИ‚¿ППФУЩФ˜.
2.1
ŒÓ‰ÂÈÍË
Ì·Ù·Ú›·˜
2.2
∞ÓÙÈηٿÛÙ·ÛË
Ì·Ù·Ú›·˜
2.3
flЪ· О·И
ıВЪМФОЪ·Ы›·
ВЪИ‚¿ППФУЩФ˜
∫Ф˘М› БИ· ЩФ ¿УФИБМ· ЩЛ˜ ı‹ОЛ˜
М·Щ·Ъ›·˜
11
2
8
11
3
3
Page 88

88
2 £¤ЫЛ ЫВ ПВИЩФ˘ЪБ›·
GR
2.5
Àԉ›ÍÂȘ
ÚÔÙÔ‡ ÙË
¯Ú‹ÛË
∞УФ›НЩВ ЩЛ ı‹ОЛ М·Щ·Ъ›·˜, ·ЩТУЩ·˜ Мг¤У· ·И¯МЛЪfi ·УЩИОВ›МВУФ
ЩФ ОФ˘М› ·УФ›БМ·ЩФ˜ ЩЛ˜ ı‹ОЛ˜ М·Щ·Ъ›·˜ О·И ·К·ИЪТУЩ·˜
ЩФ О¿П˘ММ· Ù˘ ı‹Î˘ Ì·Ù·Ú›·˜. ¶·Ù‹ÛÙ ÙÔ Ï‹ÎÙÚÔ
Ú‡ıÌÈÛ˘ ÙÔ˘ ¯ÚfiÓÔ˘ , М¤¯ЪИ У· ·У·‚ФЫ‚‹ЫВИ Л ¤У‰ВИНЛ БИ·
ЩИ˜ ТЪВ˜. √И ТЪВ˜ Ъ˘ıМ›˙ФУЩ·И М¤Ыˆ В·УВПВИММ¤УˆУ ·ЩЛМ¿ЩˆУ
ЩФ˘ П‹ОЩЪФ˘ ∂УВЪБФФ›ЛЫЛ-/Scan , ̤¯ÚÈ Ó· ÂÌÊ·ÓÈÛı› Ë
ÂÈı˘ÌËÙ‹ ÒÚ· ( ‚Ϥ ·ÂÈÎfiÓÈÛË ).
¶·ÙÒÓÙ·˜ ÙÔ Ï‹ÎÙÚÔ Ú‡ıÌÈÛ˘ ÙÔ˘ ¯ÚfiÓÔ˘ ÌÂÙ·‚·›ÓÂÙ ·fi
ÙË Ú‡ıÌÈÛË ÙˆÓ ˆÚÒÓ ÛÙË Ú‡ıÌÈÛË ÙˆÓ ÏÂÙÒÓ. ∏ ¤Ó‰ÂÈÍË
ÏÂÙÒÓ ·Ó·‚ÔÛ‚‹ÓÂÈ. ∂ÓÂÚÁ‹ÛÙ fiˆ˜ Î·È ÛÙË Ú‡ıÌÈÛË ÙˆÓ
ˆÚÒÓ. ªfiÏȘ Ú˘ıÌ›ÛÂÙ ÙÔ ¯ÚfiÓÔ, Ó· ·Ù‹ÛÂÙ ÚÔ˜
ÂȂ‚·›ˆÛË ÌÈ· ÊÔÚ¿ ÙÔ Ï‹ÎÙÚÔ Ú‡ıÌÈÛ˘ ¯ÚfiÓÔ˘ ( ‚ϤÂ
·ÂÈÎfiÓÈÛË ).
™ÙËÓ ÔıfiÓË ЩЛ˜ Ы˘ЫОВ˘‹˜ ВУ‰ВИОУ‡ВЩ·И ·М¤Ыˆ˜ МВЩ¿ МВ
ВУ·ПП·ОЩИОfi ЩЪfiФ Л ТЪ· О·И Л ıВЪМФОЪ·Ы›· ВЪИ‚¿ППФУЩФ˜
( ‚П¤В ·ВИОfiУИЫЛ ).
• ΔФ £ВЪМfiМВЩЪФ В›У·И ВНФПИЫМ¤УФ МВ ¤У·У ЪФЫЩ·ЩВ˘fiМВУФ
·ИЫıЛЩ‹Ъ· М¤ЩЪЛЫЛ˜ . ¢ÂÓ Â›Ó·È ·Ó·Áη›· Ù· ÂȉÈο
ÚÔÛٷ٢ÙÈο ηχÌÌ·Ù·.
• √ ·ИЫıЛЩ‹Ъ·˜ М¤ЩЪЛЫЛ˜ ЩФ˘ £ВЪМФМ¤ЩЪФ˘ ı· Ъ¤ВИ У·
В›У·И ¿УЩФЩВ О·ı·Ъfi˜ О·И ·У¤·КФ˜, БИ· У· ВББ˘¿Щ·И ·ОЪИ‚‹
·ФЩВП¤ЫМ·Щ· М¤ЩЪЛЫЛ˜.
• ∏ О˘„ВП›‰· ЩˆУ ·˘ЩИТУ ВЛЪВ¿˙ВИ ЩЛУ ·ОЪ›‚ВИ· М¤ЩЪЛЫЛ˜. ¡·
О·ı·Ъ›˙ВЩВ Щ· ·˘ЩИ¿ О·И ЩЛУ ·И¯М‹ ЩФ˘ ·ИЫıЛЩ‹Ъ· ЩФ˘
£ВЪМФМ¤ЩЪФ˘ ЪФЩФ‡ ЩЛУ М¤ЩЪЛЫЛ, БИ· У· ·ФК‡БВЩВ Щ˘¯fiУ
П·Уı·ЫМ¤УВ˜ МВЩЪ‹ЫВИ˜.
• ™В ВЪ›ЩˆЫЛ Ф˘ О·Щ¿ ЩЛ М¤ЩЪЛЫЛ ЩЛ˜ ıВЪМФОЪ·Ы›·˜
ВЪИ‚¿ППФУЩФ˜ ·˘Щ‹ ˘ВЪ‚В› ЩФ ЪФО·ıФЪИЫМ¤УФ П·›ЫИФ ЩˆУ
16
0
C – 40 0C, ÙfiÙ ÂÌÊ·Ó›˙ÂÙ·È ÛÙËÓ ÔıfiÓË Ë ¤Ó‰ÂÈÍË
“Err“.
2.4
ƒ‡ıÌÈÛË
ÙÔ˘ ¯ÚfiÓÔ˘
1
6
9
2
6
9
9
8
3
3
Page 89

89
GR
3 ª¤ıФ‰Ф˜ М¤ЩЪЛЫЛ˜
3.3
ª¤ЩЪЛЫЛ ЩЛ˜
ıВЪМФОЪ·Ы›·
˜ ЫТМ·ЩФ˜
• ªЛ МВЩЪ¿ЩВ ЩЛ ıВЪМФОЪ·Ы›· ·М¤Ыˆ˜ МВЩ¿ ЩФ К·БЛЩfi, ЩЛУ
·ıПЛЩИО‹ ЪФfiУЛЫЛ, ‹ ЩФ М¿УИФ. ¶ВЪИМ¤УВЩВ МИЫ‹ ТЪ·.
• ¡· ‰ИВУВЪБВ›ЩВ ‰И·‰Ф¯ИО¤˜ МВЩЪ‹ЫВИ˜ МВ ВУ‰И¿МВЫ· ‰И·ПВ›ММ·Щ·
ЩФ˘П¿¯ИЫЩФУ 1 ПВЩФ‡. ™В ВЪ›ЩˆЫЛ О·Щ¿ ЩЛУ ФФ›· ı· Ъ¤ВИ
У· МВЩЪ¿ЩВ БИ· ¤У· Ы‡УЩФМФ ¯ЪФУИОfi ‰И¿ЫЩЛМ· Ы˘¯УfiЩВЪ· ЩЛ
ıВЪМФОЪ·Ы›·, ЩfiЩВ МФЪФ‡У У· ˘¿ЪНФ˘У ВП·КЪ¤˜
‰И·О˘М¿УЫВИ˜ ЫЩ· ·ФЩВП¤ЫМ·Щ· М¤ЩЪЛЫЛ˜.
• ∏ ıВЪМФОЪ·Ы›Ф˘ ЩФ˘ ·УıЪˆ›УФ˘ ЫТМ·ЩФ˜ О˘М·›УВЩ·И ЫВ
П·›ЫИ· Ф˘ О·ıФЪ›˙ФУЩ·И ·fi ЩЛ К‡ЫЛ. ¢ВУ ˘¿Ъ¯ВИ
Щ˘ФФИЛМ¤УЛ ıВЪМФОЪ·Ы›· ·УıЪˆ›УФ˘ ЫТМ·ЩФ˜.
• ¡· МВЩЪ¿ЩВ О·И У· ЫЛМВИТУВЩВ ЩЛ ıВЪМФОЪ·Ы›· ЩФ˘ ЫТМ·Щfi˜
Ы·˜ ЫВ ВУЩВПТ˜ К˘ЫИФПФБИО¤˜ ЛМ¤ЪВ˜. ªг·˘Щfi ЩФУ ЩЪfiФ
МФЪВ›ЩВ У· ВУЩФ›ЫВЩВ О·П‡ЩВЪ· Щ˘¯fiУ ˘ЪВЩfi.
• °И· ЩЛУ ·ОЪИ‚‹ М¤ЩЪЛЫЛ ЫЩФ ·˘Щ› В›У·И И‰И·›ЩВЪ· ЫЛМ·УЩИОfi, Ф
·ÈÛıËÙ‹Ú·˜ Ó· Â›Ó·È ÛÙÚ·Ì̤ÓÔ˜ ÚÔ˜ ÙÔÓ Ù˘Ì·ÓÈÎfi ˘Ì¤Ó·
Î·È Ó· ‚Ú›ÛÎÂÙ·È ·ÚÎÂÙ¿ ‚·ıÈ¿ ÛÙÔÓ ¤Íˆ ·ÎÔ˘ÛÙÈÎfi fiÚÔ.
• А¿Ъ¯Ф˘У ¿УıЪˆФИ, ФИ ФФ›ФИ ¤¯Ф˘У ‰И·КФЪВЩИО¿
·ФЩВП¤ЫМ·Щ· М¤ЩЪЛЫЛ˜ ЫЩФ ·ЪИЫЩВЪfi О·И ЫЩФ ‰ВН› ·˘Щ›. °И·
У· ВУЩФИЫıФ‡У ФИ ·ПП·Б¤˜ ıВЪМФОЪ·Ы›·˜, ı· Ъ¤ВИ У·
МВЩЪ¿ЩВ ЫВ О¿ФИФ ¿ЩФМФ ¿УЩ· ЫЩФ ›‰ИФ ЩФ˘ ·˘Щ›.
• ∏ ÛÙ¿ÛË ‡ÓÔ˘ ÌÔÚ› Ó· ÂËÚ¿ÛÂÈ Ù· ·ÔÙÂϤÛÌ·Ù·
М¤ЩЪЛЫЛ˜. ™В ВЪ›ЩˆЫЛ Ф˘ ¤У· ¿ЩФМФ ¤¯ВИ ОФИМЛıВ› БИ·
·ЪОВЩ‹ ТЪ· ЫЩФ ¤У· ·˘Щ›, ЩfiЩВ Л ıВЪМФОЪ·Ы›· Ыг·˘Щfi ЩФ ·˘Щ›
¤ИУ·И ˘„ЛПТЩВЪЛ ·fi ЩЛУ О·УФУИО‹. ™В Щ¤ЩФИ· ВЪ›ЩˆЫЛ У·
МВЩЪ‹ЫВЩВ ЫЩФ ¿ППФ ·˘Щ› ‹ У· ВЪИМ¤УВЩВ МВЪИО¿ ПВЩ¿
ЪФЩФ‡ МВЩЪ‹ЫВЩВ.
∞˘Щfi ЩФ ıВЪМfiМВЩЪФ ‚ВПЩИЫЩФФИВ› ЩИ˜ Ы˘Уı‹ОВ˜ ·˘ЩФМ¿Щˆ˜ О·Щ¿
ЩЛУ М¤ЩЪЛЫЛ ЩЛ˜ ıВЪМФОЪ·Ы›·˜. ™В ВЪ›ЩˆЫЛ Ф˘ ЩФ Ы‡ЫЩЛМ·
М¤ЩЪЛЫЛ˜ ‰ВУ В›У·И ¤ЩФИМФ БИ· М¤ЩЪЛЫЛ, ЩfiЩВ ·У¿‚ВИ ‹ ЩФ Ы‡М‚ФПФ
ıВЪМФОЪ·Ы›·˜ ·˘ЩИФ‡ , ‹ ЩФ Ы‡М‚ФПФ ıВЪМФОЪ·Ы›·˜ МВЩТФ˘
( ‚П¤В ·ВИОfiУИЫЛ ). ™˘Б¯ЪfiУˆ˜ ·ОФ‡БФУЩ·И Ы‡УЩФМ·,
‰И·‰Ф¯ИО¿ Л¯ЛЩИО¿ Ы‹М·Щ·. ™г·˘Щ‹ ЩЛУ ВЪ›ЩˆЫЛ У· ЫЩ·М·Щ‹ЫВЩВ
ЩЛУ М¤ЩЪЛЫЛ, ·ЩТУЩ·˜ ЩФ П‹ОЩЪФ ∂УВЪБФФ›ЛЫЛ/Scan . ¡·
Ы˘УВ¯›ЫВЩВ ЩЛ М¤ЩЪЛЫЛ ıВЪМФОЪ·Ы›·˜ ·КФ‡ ЪТЩ· Ы‚‹ЫВИ ЩФ
Ы‡М‚ФПФ О·И ·КФ‡ ¤¯ВИ ЫЩ·М·Щ‹ЫВИ ЩФ Л¯ЛЩИОfi Ы‹М·.
°И· У· МВЩ·‚В›ЩВ ·fi ЩЛУ М¤ЩЪЛЫЛ ЫЩФ М¤ЩˆФ ЫЩЛ М¤ЩЪЛЫЛ ЫЩФ
·˘Ù›, ı· Ú¤ÂÈ ·Ï¿ Ó· ‚Á¿ÏÂÙ ÙÔ Î¿Ï˘ÌÌ· ЩФ˘ ·ИЫıЛЩ‹Ъ·
М¤ЩЪЛЫЛ˜. ΔФФıВЩ‹ЫЩВ ЩФ ВО У¤Ф˘, ·У ı¤ПВЩВ У· МВЩЪ‹ЫВЩВ ¿ПИ
ЫЩФ М¤ЩˆФ.
¶ÚÔÛÔ¯‹
М¤ЩЪЛЫЛ ЫЩФ М¤ЩˆФ ı· Ъ¤ВИ У· ‰ИВУВЪБВ›Щ·И МfiУФ БИ· ПfiБФ˘˜
ВП¤Б¯Ф˘, ‰ИfiЩИ Л ıВЪМФОЪ·Ы›· ЩЛ˜ ВИ‰ВЪМ›‰·˜ ЫЩФ М¤ЩˆФ
ВЛЪВ¿˙ВЩ·И В‡ОФП· ·fi ВНˆЩВЪИОФ‡˜ ·Ъ¿БФУЩВ˜, О·И ¤ЩЫИ
МФЪФ‡У У· ЪФО‡„Ф˘У П·Уı·ЫМ¤У· ·ФЩВП¤ЫМ·Щ· М¤ЩЪЛЫЛ˜.
3.2
√È
ηχÙÂÚ˜
Û˘Óı‹Î˜
3.1
¶ПЛЪФКФЪ›В˜
Ы¯ВЩИО¿ МВ
ЩЛУ М¤ЩЪЛЫЛ
ıВЪМФОЪ·Ы›·˜
2
14
15
4
Page 90

90
3 ª¤ıФ‰Ф˜ М¤ЩЪЛЫЛ˜
GR
°И· У· МВЩЪ‹ЫВЩВ ЩЛ ıВЪМФОЪ·Ы›· ЫЩФ ·˘Щ›, ı· Ъ¤ВИ У·
‚Б¿ПВЩВ ЩФ О¿П˘ММ· ЩФ˘ ·ИЫıЛЩ‹Ъ· М¤ЩЪЛЫЛ˜.
¶·Щ‹ЫЩВ ЩФ П‹ОЩЪФ ∂УВЪБФФ›ЛЫЛ/Scan .
ªfiÏȘ ÂÓ‰ÂÈÎÓ‡ÂÙ·È ÛÙËÓ ÔıfiÓË Л ТЪ· ‹ Л ıВЪМФОЪ·Ы›·
ВЪИ‚¿ППФУЩФ˜, У· ·Щ‹ЫВЩВ ВО У¤Ф˘ ЩФ П‹ОЩЪФ
∂УВЪБФФ›ЛЫЛ/Scan . ∂МК·У›˙ВЩ·И Л ıВЪМФОЪ·Ы›·, Л ФФ›·
¤¯ВИ МВЩЪЛıВ› ЩВПВ˘Щ·›· ( ‚П¤В ·ВИОfiУИЫЛ ).
ªfiПИ˜ ВМК·УИЫıВ› ЫЩЛУ ФıfiУЛ ЩФ Ы‡М‚ФПФ БИ· ЩЛ М¤ЩЪЛЫЛ
ıВЪМФОЪ·Ы›·˜ ЫЩФ ·˘Щ› , ЩfiЩВ Л¯Ф‡У ‰‡Ф Ы‡УЩФМ· Л¯ЛЩИО¿
Ы‹М·Щ· О·И Л Ы˘ЫОВ˘‹ В›У·И ¤ЩФИМЛ БИ· ПВИЩФ˘ЪБ›· ( ‚П¤В
·ВИОfiУИЫЛ ). ¶·Щ‹ЫЩВ ¿ППЛ МИ· КФЪ¿ ЩФ П‹ОЩЪФ
∂УВЪБФФ›ЛЫЛ/Scan .
ªfiПИ˜ ВМК·УИЫıВ› ЩФ Ы‡М‚ФПФ БИ· ЩЛУ ЩЪ¤¯Ф˘Ы· М¤ЩЪЛЫЛ
ıВЪМФОЪ·Ы›·˜ ( ‚Ϥ ·ÂÈÎfiÓÈÛË), Ó· ÙÔÔıÂÙ‹ÛÂÙ ÙÔÓ
·ИЫıЛЩ‹Ъ· М¤ЩЪЛЫЛ˜ М¤Ы· ЫЩФ ·˘Щ›. ∫Ъ·Щ‹ЫЩВ ЩЛ Ы˘ЫОВ˘‹
О·Щ¿ ЩЛ ‰И¿ЪОВИ· ЩЛ˜ М¤ЩЪЛЫЛ˜ ·О›УЛЩЛ. ªВЩ¿ ·fi П›Б·
‰В˘ЩВЪfiПВЩ· Л¯В› ¤У· Ы‡УЩФМФ Л¯ЛЩИОfi Ы‹М· О·И ЫЩЛУ
ФıfiУЛ ВУ‰ВИОУ‡ВЩ·И Л МВЩЪЛМ¤УЛ ıВЪМФОЪ·Ы›·.
∏ Ы˘ЫОВ˘‹ МВЩ·‚·›УВИ МВЩ¿ ·fi ЩЛУ М¤ЩЪЛЫЛ ıВЪМФОЪ·Ы›·˜
·˘ЩФМ¿Щˆ˜ ЫЩЛ ПВИЩФ˘ЪБ›· ЩФ˘ ¯ЪfiУФ˘ О·И ЩЛ˜ ıВЪМФОЪ·Ы›·˜
ВЪИ‚¿ППФУЩФ˜.
°И· У· МВЩЪЛıВ› Л ıВЪМФОЪ·Ы›· ЫЩФ М¤ЩˆФ, ı· Ъ¤ВИ У· ¤¯ВИ
ЩФФıВЩЛıВ› ЩФ О¿П˘ММ· ¿Уˆ ЫЩФУ ·ИЫıЛЩ‹Ъ· М¤ЩЪЛЫЛ˜.
¶·Щ‹ЫЩВ ЩФ П‹ОЩЪФ ∂УВЪБФФ›ЛЫЛ/Scan .
ªfiÏȘ ÂÓ‰ÂÈÎÓ‡ÂÙ·È ÛÙËÓ ÔıfiÓË Л ТЪ· ‹ Л ıВЪМФОЪ·Ы›·
ВЪИ‚¿ППФУЩФ˜, У· ·Щ‹ЫВЩВ ВО У¤Ф˘ ЩФ П‹ОЩЪФ
∂УВЪБФФ›ЛЫЛ/Scan . ∏¯Ф‡У ‰‡Ф Л¯ЛЩИО¿ Ы‹М·Щ· О·И
ВМК·У›˙ВЩ·И Л ıВЪМФОЪ·Ы›·, Л ФФ›· ¤¯ВИ МВЩЪЛıВ› ЩВПВ˘Щ·›·
( ‚П¤В ·ВИОfiУИЫЛ ).
¶·Щ‹ЫЩВ ¿ППЛ МИ· КФЪ¿ ЩФ П‹ОЩЪФ ∂УВЪБФФ›ЛЫЛ/Scan .
™ÙËÓ ÔıfiÓË ВМК·У›˙ВЩ·И ЩФ Ы‡М‚ФПФ БИ· ЩЛ М¤ЩЪЛЫЛ
ıВЪМФОЪ·Ы›·˜ ЫЩФ М¤ЩˆФ ( ‚П¤В ·ВИОfiУИЫЛ ). ∏
Ы˘ЫОВ˘‹ В›У·И ¤ЩФИМЛ БИ· ПВИЩФ˘ЪБ›·.
∫Ъ·Щ‹ЫЩВ ЩЛ Ы˘ЫОВ˘‹ МВ ЩФУ ·ИЫıЛЩ‹Ъ· М¤ЩЪЛЫЛ˜ ЫЩЛ
М¤ЫЛ ЩФ˘ МВЩТФ˘ О·И ·Щ‹ЫЩВ Ы˘Б¯ЪfiУˆ˜ ЩФ П‹ОЩЪФ
∂УВЪБФФ›ЛЫЛ/Scan .ΔЪ·‚‹НЩВ ЩФ £ВЪМfiМВЩЪФ МВ ‰И·ЪОТ˜
·ЩЛМ¤УФ ЩФ П‹ОЩЪФ ∂УВЪБФФ›ЛЫЛ/Scan ·fi ÙË Ì¤ÛË ÙÔ˘
ÌÂÙÒÔ˘ ÚÔ˜ ÙËÓ ¿ÎÚË, ̤¯ÚÈ ¤Ú· ·fi ÙÔÓ ÎÚfiÙ·ÊÔ. ∞Ê‹ÛÙÂ
ÙÔ Ï‹ÎÙÚÔ, ÌfiÏȘ ¤¯ÂÙ Êı¿ÛÂÈ Ûã·˘Ùfi ÙÔ ÛËÌ›Ô.
3.4
ª¤ЩЪЛЫЛ ЩЛ˜
ıВЪМФОЪ·Ы›·˜
ЫЩФ ·˘Щ›
3.5
ª¤ЩЪЛЫЛ ЩЛ˜
ıВЪМФОЪ·Ы›·˜
ЫЩФ М¤ЩˆФ
4
16
2
3
1.
2.
3.
4.
5.
6.
1.
2.
3.
4.
5.
3
3
3
6
2
2
15
2
2
3
4
6
14
2
2
3
2
EВОЩВ›УВЩВ ЩФУ
¤Нˆ ·ОФ˘ЫЩИОfi
fiЪФ ЩЪ·‚ТУЩ·˜
ЩФ ·˘Щ› ЪФ˜ Щ·
›Ыˆ О·И ЪФ˜ Щ·
¿Уˆ О·И ВИЫ¿БВЩВ
ЪФЫВОЩИО¿ ЩФУ
·ÈÛıËÙ‹Ú· ÛÙÔ
·˘Ù›.
Page 91

91
GR
3 ª¤ıФ‰Ф˜ М¤ЩЪЛЫЛ˜ /4 ¢È¿ÊÔÚ·
• Ф ИФ ЫЛМ·УЩИОfi О·И ИФ В˘·›ЫıЛЩФ ЩМ‹М· ЩФ˘ £ВЪМФМ¤ЩЪФ˘
В›У·И Ф ·ИЫıЛЩ‹Ъ·˜ М¤ЩЪЛЫЛ˜ . £· Ъ¤ВИ У· В›У·И ¿УЩФЩВ
О·ı·Ъfi˜ О·И ·У¤·КФ˜, БИ· У· ВББ˘¿Щ·И ·ОЪИ‚‹ ·ФЩВП¤ЫМ·Щ·
М¤ЩЪЛЫЛ˜.
• √ ·ИЫıЛЩ‹Ъ·˜ М¤ЩЪЛЫЛ˜ В›У·И ˘‰·ЩФЫЩВБ‹˜ О·И Ы˘УВТ˜
ÌÔÚ› Ó· ηı·ÚÈÛı› ̤ۈ ·Â˘ı›·˜ ÂÌ‚‡ıÈÛ˘ ÛÂ
ÔÈÓfiÓÂ˘Ì·, ‹ Ó· ηı·ÚÈÛı› Ì ‚·Ì‚¿ÎÈ, ÙÔ ÔÔ›Ô ¤¯ÂÈ
ÂÌ‚˘ıÈÛı› Û ÔÈÓfiÓÂ˘Ì·.
• Δ· Û˘Ó‹ıË ÂÌÔÚÈο ÔÈÓÔÓÂ˘Ì·ÙÒ‰Ë Ì¤Û· ·Ôχ̷ÓÛ˘
В›У·И О·Щ¿ППЛП· БИ· ЩЛУ ·ФП‡М·УЫЛ ЩФ˘ ·ИЫıЛЩ‹Ъ·
М¤ЩЪЛЫЛ˜ . ¶·Ъ·О·ПВ›ЫıВ У· ЪФЫ¤¯ВЩВ ЩИ˜ Ф‰ЛБ›В˜ ЩˆУ
ВО¿ЫЩФЩВ О·Щ·ЫОВ˘·ЫЩТУ.
• ΔÔ ÂÚ›‚ÏËÌ· Î·È Ë ÔıfiÓË ЩФ˘ £ВЪМФМ¤ЩЪФ˘ ‰ВУ В›У·И
˘‰·ЩФЫЩВБ‹. ¡· МЛУ ВМ‚˘ı›˙ФУЩ·И ЫВ ˘БЪ¿.
• ¡· О·ı·Ъ›˙ФУЩ·И МВ ¤У· ЫЩВБУfi О·И О·ı·Ъfi ·У›. ¡· МЛ
¯ЪЛЫИМФФИФ‡УЩ·И И‰И·›ЩВЪ· ‰Ъ·ЫЩИО¿ М¤Ы· О·ı·ЪИЫМФ‡.
• ¡· К˘П¿ЫЫВЩВ ЫВ И‰·УИО‹ ВЪ›ЩˆЫЛ ЩФ £ВЪМfiМВЩЪФ ЫЩЛУ
БУ‹ЫИ· Ы˘ЫОВ˘·Ы›· ЩФ˘, О·И М¿ПИЫЩ· ЫВ М¤ЪФ˜ О·ı·Ъfi О·И
ЫЩВБУfi. ¡· ЩФ ЪФК˘П¿ЫЫВЩВ ·fi ЩЛУ ¿МВЫЛ ЛПИ·О‹
·ОЩИУФ‚ФП›·.
• ∏ ıВЪМФОЪ·Ы›· ЩФ˘ ¯ТЪФ˘ К‡П·НЛ˜ ı· Ъ¤ВИ У· О˘М·›УВЩ·И
ÌÂٷ͇ -20,0
0
C Î·È +50,0 0C.
• ∏ Ы˘ЫОВ˘‹ В›У·И О·ПИМЪ·ЪИЫМ¤УЛ ·fi ЩФ ВЪБФЫЩ¿ЫИФ
О·Щ·ЫОВ˘‹˜. ™В ВЪ›ЩˆЫЛ О·Щ¿ППЛПЛ˜ ¯Ъ‹ЫЛ˜ ‰ВУ ı·
¯ЪВИ·ЫıВ› У· ЩЛУ О·ПИМЪ¿ЪВЩВ ВО У¤Ф˘.
ªВЩ¿ ЩФ Щ¤ПФ˜ ЩЛ˜ ‰И¿ЪОВИ·˜ ˙ˆ‹˜ ЩФ˘˜, ФИ ·ПИ¤˜ ЛПВОЩЪИО¤˜
Ы˘ЫОВ˘¤˜ ı· Ъ¤ВИ У· ·ФЪЪ›ЩФУЩ·И Ы‡МКˆУ· МВ ЩФ˘˜
ВЪИ‚·ППФУЩИОФ‡˜ О·УfiУВ˜! √И Ы˘ЫОВ˘·Ы›В˜ МФЪФ‡У У·
В·У·¯ЪЛЫИМФФИЛıФ‡У ‹ У· ВИЫЩЪ·КФ‡У ЫЩФ Ы‡ЫЩЛМ· ЪТЩˆУ
˘ПТУ, Щ· МВЩ·ППИО¿ ЩМ‹М· ЫЩЛУ ·У·О‡ОПˆЫЛ ·П·ИТУ МВЩ¿ППˆУ,
ВУТ Щ· П·ЫЩИО¿, Щ· ЛПВОЩЪИО¿ О·И Щ· ЛПВОЩЪФУИО¿ ВН·ЪЩ‹М·Щ·
Ъ¤ВИ У· ·ФЪЪ›ЩФУЩ·И ˆ˜ ·ФЪЪ›ММ·Щ· ЛПВОЩЪИОТУ ˘ПИОТУ. ¡·
·К·ИЪВ›ЩВ ЩЛ М·Щ·Ъ›·, ЪФЩФ‡ ‰И·ı¤ЫВЩВ ЩЛ Ы˘ЫОВ˘‹. ¡· МЛУ
ВЩ¿ЩВ ЩИ˜ МВЩ·¯ВИЪИЫМ¤УВ˜ М·Щ·Ъ›В˜ ЫЩ· ·ФЪЪ›ММ·Щ·
УФИОФО˘ЪИФ‡, ·ПП¿ ЫЩ· ВИ‰ИО¿ ·ФЪЪ›ММ·Щ· ‹ ЫВ ¯ТЪФ Ы˘ППФБ‹˜
М·Щ·ЪИТУ ЫЩ· ВИ‰ИОВ˘М¤У· О·Щ·ЫЩ‹М·Щ·. ∞У·КФЪИО¿ МВ ЩЛУ
·ФОФМИ‰‹, ·В˘ı˘УıВ›ЩВ ЫЩИ˜ ЩФИО¤˜ ·Ъ¯¤˜ ‹ ЫЩФУ ·ЪМfi‰ИФ
¤МФЪФ
.
4.1
ºÚÔÓÙ›‰· ηÈ
ʇϷÍË
4.2
¢È¿ıÂÛË
·ФЪЪИММ¿ЩˆУ
3
6
6
6
∞КФ‡ ·ФВЪ·ЩˆıВ› Л М¤ЩЪЛЫЛ ıВЪМФОЪ·Ы›·˜, ı· ·ОФ‡ЫВЩВ
¤У· Л¯ЛЩИОfi Ы‹М· О·И ı· ВМК·УИЫıВ› Л ıВЪМФОЪ·Ы›· ЩФ˘
ЫТМ·ЩФ˜ ЫЩЛУ ФıfiУЛ .
ŒВИЩ· Л Ы˘ЫОВ˘‹ ı· МВЩ·‚В› ·˘ЩФМ¿Щˆ˜ ЫЩЛ ПВИЩФ˘ЪБ›· ЩЛ˜
ТЪ·˜ О·И ЩЛ˜ ıВЪМФОЪ·Ы›·˜ ВЪИ‚¿ППФУЩФ˜.
™В ВЪ›ЩˆЫЛ Ф˘ Л МВЩЪЛМ¤УЛ ıВЪМФОЪ·Ы›· ‚Ъ›ЫОВЩ·И ВОЩfi˜
ЩˆУ ВИЩЪВfiМВУˆУ ФЪ›ˆУ, ı· ВМК·УИЫıВ› Л ¤У‰ВИНЛ “Lo” “Hi”.
6.
7.
8.
3
Page 92

92
4 ¢È¿ÊÔÚ·
GR
MÔÓÙ¤ÏÔ : MEDISANA £ВЪМfiМВЩЪФ FTD
∂У‰ВИОУ˘fiМВУ·
fiЪИ· ıВЪМФОЪ·Ы›·˜ : 10
0
C – 50 0C
∞ОЪ›‚ВИ· М¤ЩЪЛЫЛ˜ : οو ÙˆÓ 35,5
0
C ‹
¿Óˆ ÙˆÓ 42,0
0
C ±0,3 0C ,
ÌÂٷ͇ 35,5
0
C Î·È 42,0 0C ±0,2 0C
∫ПИУИО‹ ·ОЪ›‚ВИ·
В·У·ПЛ„ИМfiЩЛЩ·˜
: ±0,1 0C
∂˘ÎÚ›ÓÂÈ· ÔıfiÓ˘: 0,1
0
C
£ВЪМФОЪ·Ы›·
ПВИЩФ˘ЪБ›·˜: 16,0
0
C ¤ˆ˜ 40,0 0C
ЫВ М¤БИЫЩЛ Ы¯ВЩИО‹ ˘БЪ·Ы›· ·¤ЪФ˜ 95 %
£ВЪМФОЪ·Ы›·
К‡П·НЛ˜ : -20,0
0
C ¤ˆ˜ +50,0 0C
ЫВ М¤БИЫЩЛ Ы¯ВЩИО‹ ˘БЪ·Ы›· ·¤ЪФ˜ 95 %
ª·Ù·Ú›· : 1 x 3 V CR2032 Lithium
¢È¿ÚÎÂÈ· Ì·Ù·Ú›·˜ : ÂÚ. 500 ÌÂÙÚ‹ÛÂȘ
∫Ï¿ÛË ÚÔÛÙ·Û›·˜ : BF
¢È·ÛÙ¿ÛÂȘ
: ÂÚ. 109 mm x 30 mm x 22 mm
μ¿ÚÔ˜
: ÂÚ. 45 g
Ì·˙› ÌÂ ÙËÓ Ì·Ù·Ú›·
∫ˆ‰ÈÎfi˜ ÚÔ˚fiÓÙÔ˜ : 77050
EAN Code : 4015588770500
∞˘Щ‹ Л Ы˘ЫОВ˘‹ ·УЩ·ФОЪ›УВЩ·И ЫЩИ˜ ‰И·Щ¿НВИ˜ ЩЛ˜ √‰ЛБ›·˜
93/42/∂√∫ ¤ЪИ ЩˆУ И·ЩЪФЩВ¯УФПФБИОТУ ЪФ˚fiУЩˆУ.
ÈÊ˘Ï·ÛÛfiÌ·ÛÙ ÛÙ· Ï·›ÛÈ· Ù˘ Û˘Ó¯ԇ˜ ‚ÂÏÙ›ˆÛ˘ ÙˆÓ
ÚÔ˚fiÓÙˆÓ Ù¯ÓÈΤ˜ Î·È ‰È·ÌÔÚʈÙÈΤ˜ ÙÚÔÔÔÈ‹ÛÂȘ.
4.3
TВ¯УИО¿
¯·Ъ·ОЩЛЪИЫЩИО
¿
Page 93

93
GR
5
∂ÁÁ‡ËÛË
™Â ÂÚ›ÙˆÛË ÂÁÁ˘ËÙÈ΋˜ ·Í›ˆÛ˘ Û·˜ ·Ú·Î·Ïԇ̠ӷ
·Â˘ı˘Óı›Ù ÛÙÔ ÂȉÈÎfi ηٿÛÙËÌ· Ô˘ ·ÁÔÚ¿Û·Ù ÙË Û˘Û΢‹
‹ ηÙ¢ı›·Ó ÛÙÔ ∫¤ÓÙÚÔ ™¤Ú‚Ș. ™Â ÂÚ›ÙˆÛË fï˜ Ô˘ ›ӷÈ
··Ъ·›ЩЛЩЛ Л ·ФЫЩФП‹ ЩЛ˜ Ы˘ЫОВ˘‹˜, Ы·˜ ·Ъ·О·ПФ‡МВ У·
ЩЛУ ЫЩВ›ПВЩВ МВ ·У·КФЪ¿ ЩФ˘ ВП·ЩЩТМ·ЩФ˜, ВИЫ˘У¿ЩФУЩ·˜ О·И
¤У· ·УЩ›БЪ·КФ ЩЛ˜ ·fi‰ВИНЛ˜ ·БФЪ¿˜.
°И· ЩЛУ ВББ˘ЛЩИО‹ ·Н›ˆЫЛ ИЫ¯‡Ф˘У ФИ ·ОfiПФ˘ıФИ fiЪФИ ВББ‡ЛЫЛ˜:
1. °È· Ù· ÚÔ˚fiÓÙ· MEDISANA ·Ъ¤¯ВЩ·И ВББ‡ЛЫЛ ЩЪИТУ ВЩТУ
·fi ЩЛУ ЛМВЪФМЛУ›· ·БФЪ¿˜. ™В ВЪ›ЩˆЫЛ ВББ˘ЛЩИО‹˜
·Н›ˆЫЛ˜ Л ЛМВЪФМЛУ›· ·БФЪ¿˜ ı· Ъ¤ВИ У· ·Ф‰ВИОУ‡ВЩ·И
М¤Ыˆ ·fi‰ВИНЛ˜ ‹ ЩИМФПФБ›Ф˘ ·БФЪ¿˜.
2. ∂П·ЩЩТМ·Щ· ФКВИПfiМВУ· ЫВ ЫК¿ПМ·Щ· ˘ПИОФ‡ ‹ О·Щ·ЫОВ˘‹˜
ВИ‰ИФЪıТУФУЩ·И ‰ˆЪВ¿У ВУЩfi˜ ЩФ˘ ¯ЪfiУФ˘ ВББ‡ЛЫЛ˜.
3. ™Â ÂÚ›ÙˆÛË ·ÚÔ¯‹˜ ÂÁÁ‡ËÛ˘ ‰ÂÓ ·Ú·Ù›ÓÂÙ·È Ô ¯ÚfiÓÔ˜
ÂÁÁ‡ËÛ˘, Ô‡Ù ÁÈ· ÙË Û˘Û΢‹ Ô‡Ù ÁÈ· ÂÍ·ÚÙ‹Ì·Ù· Ô˘
·ÓÙÈηٷÛÙ¿ıËηÓ.
4. ∞fi ÙËÓ ÂÁÁ‡ËÛË ·ÔÎÏ›ÔÓÙ·È:
·. fiПВ˜ ФИ ‚П¿‚В˜, ФИ ФФ›В˜ ФКВ›ПФУЩ·И ЫВ ·О·Щ¿ППЛПФ
¯ВИЪИЫМfi, .¯. ·fi ·Ъ¿ПВИ„Л Щ‹ЪЛЫЛ˜ ЩˆУ Ф‰ЛБИТУ
¯Ъ‹ЫЛ˜.
‚. ‚Ï¿‚˜, ÔÈ Ôԛ˜ ÔÊ›ÏÔÓÙ·È Û ÂÈÛ΢¤˜ ‹ ÂÂÌ‚¿ÛÂȘ
ÙÔ˘ ·ÁÔÚ·ÛÙ‹ ‹ ·Ó·ÚÌfi‰ÈˆÓ ÙÚ›ÙˆÓ.
Á. ‚Ï¿‚˜ ÌÂÙ·ÊÔÚ¿˜, ÔÈ Ôԛ˜ ÚԤ΢„·Ó ηٿ ÙË
МВЩ·КФЪ¿ ·fi ЩФУ О·Щ·ЫОВ˘·ЫЩ‹ ЪФ˜ ЩФУ О·Щ·У·ПˆЩ‹ ‹
О·Щ¿ ЩЛУ ·ФЫЩФП‹ ЫЩФ ∫¤УЩЪФ ™¤Ъ‚И˜.
‰. ·УЩ·ПП·ОЩИО¿, Щ· ФФ›· ˘fiОВИУЩ·И ЫВ К˘ЫИФПФБИО‹ КıФЪ¿.
5. ∏ В˘ı‡УЛ БИ· ¿МВЫВ˜ ‹ ¤ММВЫВ˜ В·ОfiПФ˘ıВ˜ ˙ЛМИ¤˜, ФИ
ФФ›В˜ ЪФО·ПФ‡УЩ·И ·fi ЩЛ Ы˘ЫОВ˘‹, ·ФОПВ›ВЩ·И ·ОfiМ· О·И
ЫВ ВЪ›ЩˆЫЛ Ф˘ Л ˙ЛМИ¿ ЫЩЛ Ы˘ЫОВ˘‹ ·У·БУˆЪИЫЩВ› ˆ˜
ВББ˘ЛЩИО‹ ·Н›ˆЫЛ.
™Â ÂÚ›ÙˆÛË Ô˘ ¤¯ÂÙ ÂÚˆÙ‹ÛÂȘ Û¯ÂÙÈο Ì ·˘Ùfi ‹ ¿ÏÏ·
ÚÔ˚fiÓÙ·, ›̷ÛÙ ÛÙË ‰È¿ıÂÛ‹ Û·˜ Ó· Û·˜ ··ÓÙ‹ÛÔ˘Ì ÙȘ
ÂÚˆÙ‹ÛÂȘ Û·˜ ·˘Ù¤˜.
MEDISANA AG
Itterpark 7-9
D-40724 Hilden
Tel.: +49 (0) 2103 / 2007-60
Fax: +49 (0) 2103 / 2007-626
eMail: info@medisana.de
Internet: www.medisana.de
ΔË ‰È‡ı˘ÓÛË ™¤Ú‚Ș ı· ÙËÓ ‚Ú›Ù ÛÙËÓ ÙÂÏÂ˘Ù·›· ÛÂÏ›‰·.
5.1
∂ÁÁ‡ËÛË Î·È
fiÚÔÈ
ÂÈÛ΢ÒÓ
Page 94

Page 95

Page 96

Page 97

D
Medisana AG
Itterpark 7-9
D-40724 Hilden
Tel.: 0 21 03-20 07-60
Fax: 0 21 03-20 07-626
eMail: info@medisana.de
Internet: www.medisana.de
Im Servicefall wenden Sie sich bitte an:
Medisana Servicecenter
Feuerbach KG
Corneliusstraße 75
D-40215 Düsseldorf
Tel.: 0211-38 10 07
(Mo-Do: 9-13 Uhr/14-17 Uhr,
Fr: 9-13 Uhr)
Fax: 0211-37 04 97
eMail:
medisana@t-online.de
GB
MEDISANA HEALTHCARE UK LTD.
City Business Centre 41 St.
Olav’s Court Surrey Quays
London SE16 2XB
Tel.: + 44/207-237 88 99
Fax: + 44/207-252 22 99
eMail: info@medisana.co.uk
Internet: www.medisana.co.uk
F / NL / B / L
Medisana Benelux NV
Euregiopark 18
6467 JE Kerkrade
Tel.: + 31/45-5 28 03 89
Fax : + 31/45-5 23 35 18
eMail: info@medisana.nl
I
SANICO S.R.L.
Via G. Ferraris 31
20090 Cusago (MI)
Tel.: + 39/02-90 39 00 38
Fax: + 39/02-90 39 02 79
eMail: info@sanicare.it
Internet: www.sanicare.it
E
MEDISANA HEALTHCARE, S.L.
Plaza Josep Freixa i Argemí, no 8
08224 Terrassa (Barcelona)
Tel.: + 34/93-73 36 70 7
Fax: + 34/93-78 88 65 5
eMail: info@medisana.es
Internet: www.medisana.es
P
GRUPO RP
Avda. D.Miguel,
330 -Zona Industrial
4435-678 Baguim do Monte
Tel.: +35/12-29 75 69 64
Fax: +35/12-29 75 60 15
eMail: rickiparodi@mail.telepac.pt
Internet: www.medisana.pt
FIN
D&L Marketing Oy
Juvan teollisuuskatu 23
02920 Espoo
Tel.: + 358/9-85 53 08 0
Fax: + 358/9-85 53 08 30
eMail: jan.lindfors@dlmarketing.fi
Internet: www.dlmarketing.fi
S
ALERE Electronics AB
Stormbyvägen 2-4
163 29 SPÅNGA
Phone: +46 8 761 24 31
Fax: +46 8 795 42 05
Internet: www.alere.se
GR
Medisana Hellas
Kosma Etolou & Kazantzaki 10
141 21 N. Iraklion
Tel.: +30/210-2 75 09 32
Fax: +30/210-2 75 00 19
eMail: info@medisana.gr
Internet: www.medisana.gr
Adressen
Page 98

MEDISANA AG
Itterpark 7-9
D-40724 Hilden
Tel.: +49 (0) 2103 / 2007-60
Fax: +49 (0) 2103 / 2007-626
eMail: info@medisana.de
Internet: www.medisana.de
12/2005
 Loading...