


Smart Baby Monitor
Art. 52345
!
® ® ®
Für iPhone , iPad , iPod touch , PC oder MAC
® ® ®
For iPhone , iPad , iPod touch , PC or MAC
DE
GB
iPhone®, iPad®, iPod touch®, PC veya MAC için
TR
Gebrauchsanweisung
Instruction Manual
Kullanım kılavuzu
Bitte sorgfältig lesen!
Please read carefully!
Lütfen dikkatli okuyun!

II
1 Safety Information
2 Useful Information
3 Getting Started
4 Operation with Apple device
5 Operation with PC
6 Operation with MAC
7 The web-interface
8 Operation via internet (WAN)
9 Reset to factory default settings
10 Miscellaneous
11 Warranty
1 Sicherheitshinweise
2 Wissenswertes
3 Inbetriebnahme
4 Betrieb mit Apple Gerät
5 Betrieb mit PC
6 Betrieb mit MAC
7 Das Web-Interface
8 Betrieb über Internet (WAN)
9 Zurücksetzen auf Werkseinstellung
10 Verschiedenes
11 Garantie
.............................
......................................
.....................................
.......................
.......................................
....................................
................................
...............
..
......................................
..................................................
1 DE
4 DE
5 DE
6 DE
13 DE
14 DE
DE
15
DE28
DE29
30
DE
DE
32
Gebrauchsanweisung
DE
Instruction manual
GB
................................
................................
......................................
...............
................................
.............................
.................................
.............
........
.......................................
..................................................
1 GB
4 GB
5 GB
6 GB
13 GB
14 GB
GB
15
GB28
GB29
30
GB
GB
32
Kullanım kılavuzu
TR
1 Güvenlik Bilgisi
2 Yararlı Bilgiler
3 Başlarken
4 Apple cihazı ile çalışma
5 PC ile Çalışma
6 MAC ile Çalışma
7 Web Arayüzü
8 İnternet üzerinden işlem (WAN)
9 Fabrika varsayılan ayarlarına Sıfırla
10 Çeşitli
.....................................
........................................
..............................................
......................
.....................................
..................................
.........................................
........
.....................................................
1 TR
4 TR
5 TR
6 TR
13 TR
14 TR
TR
15
TR28
TR29
30
TR

III
Smart Baby Monitor auf einen Blick
Smart Baby Monitor at a glance
Bir bakışta Akıllı Bebek Monitörü

IV
Kameralinse
Linsenfokussierrädchen
Infrarot-LED (insgesamt sind 10 Stück vorhanden und um die Linse herum angeordnet)
Status Indikator
Anzeige des Gerätebetriebsstatus:
LED blinkt langsam (ca. 2 Sekunden Intervall) =
Das Gerät sucht nach einer Netzwerkverbindung
LED blinkt normal (ca. 1 Sekunde Intervall) =
Das Gerät ist über ein Netzwerkkabel verbunden
LED blinkt schnell (ca. 2-3 mal je Sekunde) =
Das Gerät ist per drahtloser Netzwerkverbindung verbunden
Integriertes Mikrofon
Antenne für Drahtlos-Netzwerkverbindung (W
ireless LAN)
Netzteilanschluss (Stromversorgung) 5V, 1.5A
Antennenanschlussbuchse
RJ45-Buchse für Ethernet-Netzwerkkabel (LAN Schnittstelle 10/100M)
Anschlussbuchse Audioausgang,
z.B. für Lautsprecher etc.
Kunststofffuß
Reset-Knopf (auf der Unterseite, 10 Sekunden gedrückt halten für Reset)
Netzteil
Ethernet-Netzwerkkabel
Gewindebuchse für die Befestigung des Kunststofffußes
Camera lens
Lens focussing wheel
Infrared LED (totally 10 pcs., arranged around the camera lens)
Status Indicator
Indicates the camera operating status:
LED flashes slowly (appr. once every 2 seconds)
=
The device is searching for a network connection
LED flashes normally (appr. once per second) =
The device is connected via cable network
LED flashes quickly (appr. 2-3 times per second) =
The device is connected via wireless network
Integrated microphone
Antenna for wireless LAN connection
Adaptor connection (power input) 5V, 1.5A
Jack for antenna
RJ45-jack for ethernet cable (LAN ethernet socket self-adjust 10/100M)
Audio output socket, e.g. for speakers etc.
Plastic stand
Reset button
(on the underside, press & hold for 10 seconds to initiate a reset)
Power adaptor
Ethernet cable
Tapped bushing for fixation of plastic stand
DE
GB

V
TR
Kamera merceği
Mercek odaklama tekerleği
Kızılötesi LED (toplam 10 adet., Kamera lensi etrafında düzenlenir)
Durum Göstergesi
Kamera çalışma durumunu gösterir:
LED = (her 2 saniyede bir yaklaşık) yavaş yavaş yanıp söner
Cihazın ağ bağlantısı arıyor
LED = (saniyede bir kez yaklaşık) normal yanıp söner
Cihaz kablolu ağ üzerinden bağlı
Hızlı LED yanıp söner (saniyede yak. 2-3 kez) =
Cihaz kablosuz ağ üzerinden bağlı
Mikrofon
Kablosuz LAN bağlantısı için Anten
Adaptör bağlantısı (güç girişi) 5V, 1.5A
Anten bağlantı konnektörü
Ethernet kab
losu için RJ45 jak (LAN ethernet soket 10/100M)
Ses çıkış soketi,
örneğin hoparlör vs
Plastik stant
Reset düğmesi (altındadır, basın ve sıfırlamak için 10 saniye basılı tutun –Bütün
Değerler Silinir!-)
Güç adaptörü
Ethernet kablosu
Duvara tespit için Plastik stant

VI

1
DE
Lesen Sie die Gebrauchsanweisung, insbesondere die Sicherheitshinweise,
sorgfältig durch, bevor Sie das Gerät einsetzen und bewahren Sie die
Gebrauchsanweisung für die weitere Nutzung auf. Wenn Sie das Gerät an
Dritte weitergeben, geben Sie unbedingt diese Gebrauchsanweisung mit.
WICHTIGE HINWEISE !
UNBEDINGT AUFBEWAHREN!
Diese Gebrauchsanweisung gehört zu diesem Gerät.
Sie enthält wichtige Informationen zur Inbetriebnahme und Handhabung. Lesen Sie diese Gebrauchsanweisung vollständig. Die Nichtbeachtung dieser
Anweisung kann zu schweren Verletzungen oder
Schäden am Gerät führen.
WARNUNG
Diese Warnhinweise müssen eingehalten werden, um
mögliche Verletzungen des Benutzers zu verhindern.
ACHTUNG
Diese Hinweise müssen eingehalten werden, um
mögliche Beschädigungen am Gerät zu verhindern.
HINWEIS
Diese Hinweise geben Ihnen nützliche Zusatz-
informationen zur Installation oder zum Betrieb.
LOT-Nummer
Hersteller
Zeichenerklärung
1 Sicherheitshinweise
DE

Bevor Sie das Gerät an Ihre Stromversorgung anschließen,
achten Sie darauf, dass die auf dem Typenschild angegebene
Netzspannung mit der Ihres Stromnetzes übereinstimmt. G
Benutzen Sie das Gerät nur entsprechend seiner Bestimmung
laut Gebrauchsanweisung. G
Bei Zweckentfremdung erlischt der Garantieanspruch. G
Dieses Gerät ist für den Betrieb in Innenräumen vorgesehen. Ein
Betrieb im Außenbereich kann zu Defekten und Stromschlag
führen. Verletzungsgefahr! G
Dieses Produkt ist nicht dafür bestimmt, durch Personen (einschließlich Kinder) mit eingeschränkten physischen, sensorischen
oder geistigen Fähigkeiten oder mangels Erfahrung und/oder
mangels Wissen benutzt zu werden, es sei denn, sie werden durch
eine für ihre Sicherheit zuständige Person beaufsichtigt oder erhielten von ihr Anweisungen, wie das Gerät zu benutzen ist. G
Kinder müssen beaufsichtigt werden, um sicherzustellen, dass
sie nicht mit dem Gerät spielen. G
Benutzen Sie das Gerät nicht, wenn es nicht einwandfrei funktioniert, wenn es herunter- oder ins Wasser gefallen ist oder beschädigt wurde.
G
Der Aufstellort sollte so gewählt werden, dass dort weder extreme
Temperaturen noch extreme Luftfeuchtigkeit auftreten. G
Stellen Sie das Produkt so, dass keine direkte Sonneneinstrahlung
auf den Bildaufnehmer (Linse) des Gerätes fallen kann. G
GHalten Sie das Gerät von Feuchtigkeit fern!
Vermeiden Sie folgende widrige Umgebungsbedingungen beim
Betrieb des Gerätes:
G
• Extreme Kälte oder Hitze G
• Nässe oder zu hohe Luftfeuchtigkeit G
• Direkte Sonneneinstrahlung G
• Staub oder brennbare Gase, Dämpfe oder Lösungsmittel G
• Starke Vibrationen G
• Starke Magnetfelder, wie z. B. in der Nähe von Maschinen oder
Lautsprechern G
Die Kamera darf nicht auf unbeständigen Flächen, sondern nur
auf ebenem und rutschfestem Untergrund platziert werden. G
Führen Sie keine Gegenstände durch die Öffnungen in das
Geräteinnere. G
Vermeiden Sie Schläge und Erschütterungen des Gerätes. Durch
den Fall aus bereits geringer Höhe kann das Produkt beschädigt
werden. G
Versuchen Sie nicht, das Gerät zu zerlegen, andernfalls erlischt
die Garantie. Dieses Gerät enthält keine Teile, die vom Benutzer
gewartet werden können. G
Reparieren Sie das Gerät bei Störungen nicht selbst, da dadurch
jeglicher Garantieanspruch erlischt. Lassen Sie Reparaturen nur
von autorisierten Servicestellen durchführen.
G
Reinigen Sie das Gerät nach dem Gebrauch mit einem leicht angefeuchteten Tuch. Verwenden Sie keine Scheuermittel und
tauchen Sie das Gerät nicht in Wasser. G
Benutzen Sie ausschließlich für das Gerät vorgesehene und vom
Hersteller mitgelieferte Zubehörteile.
Schließen Sie keine inkompa-
tiblen Produkte an.
Sicherheitshinweise
•
•
•
•
•
•
•
•
•
•
•
•
•
•
•
•
•
•
2
DE
1 Sicherheitshinweise
DE

•
•
•
Beachten Sie beim Betrieb elektrischer Geräte mit Netzteilen im
Besonderen:
Bitte beachten Sie die Sicherheitshinweise und Bedienungsanleitungen der übrigen, angeschlossenen Geräte. G
Überprüfen Sie vor Inbetriebnahme das Gerät auf Beschädigungen.
Benutzen Sie das Gerät nicht, wenn Sie Zweifel an der Unversehrtheit des Gerätes haben. Kontaktieren Sie eine Servicestelle.
Dieses Gerät ersetzt auf keinen Fall die Aufsicht durch erwachsene Personen. G
•
•
Greifen Sie nicht nach einem Gerät, welches ins Wasser gefallen
ist. G
Ziehen Sie sofort den Netzstecker bzw. das Netzteil aus der
Steckdose, wenn das Gerät mit Flüssigkeiten in Berührung gekommen ist. G
Wenn das Kabel oder das Netzteil beschädigt ist, darf das Gerät
nicht weiterbenutzt werden. Aus Sicherheitsgründen dürfen diese
Teile nur von einer autorisierten Servicestelle ausgewechselt
werden. G
Das Gerät sowie das Kabel und das Netzteil dürfen keinesfalls in
Wasser getaucht oder unter laufendes Wasser gehalten werden.G
Das Kabel darf nicht in der Nähe von Wärmequellen aufbewahrt
oder über scharfe Kanten gezogen werden. G
Fassen Sie das Netzteil stets mit trockenen Händen an. G
Tragen, ziehen oder drehen Sie das Netzteil nie am Kabel und
klemmen Sie das Kabel nie ein. G
Ziehen Sie das Netzteil aus der Steckdose, wenn das Gerät
ausgeschaltet und nicht mehr in Gebrauch ist.
G
•
•
•
•
•
3
DE
HINWEISE zur Software
• Stellen Sie sicher, dass Ihr Apple Gerät mit dem neuesten Betriebssystem arbeitet.
Hinweise zu Software-Updates finden Sie in Ihrer Apple Geräte-Gebrauchsanweisung.
• Stellen Sie sicher, dass Ihre Smart Baby Monitor App regelmäßig aktualisiert wird.
Hinweise zu Updates von Apps finden Sie in Ihrer Apple Geräte-Gebrauchsanweisung.
• Zur korrekten Funktion ist es erforderlich, dass das Apple Gerät ausreichend geladen
ist. Nutzer sollten ein Netzteil bzw. eine Lademöglichkeit zur Verfügung haben.
1 Sicherheitshinweise
DE
•

4
DE
2 Wissenswertes
DE
Herunterladen der Software
Zum Auffinden des Smart Baby Monitors im Netzwerk laden Sie das aktuelle
®
und kostenlose Programm für PC oder Mac von unserer Homepage im Bereich
Software herunter. (http://www.medisana.de/sbm)
Vielen Dank für Ihr Vertrauen und herzlichen Glückwunsch! G
Mit dem Smart Baby Monitor (im Folgenden SBM genannt) haben Sie ein Qualitätspro-
® ® ®
dukt von MEDISANA erworben. In Verbindung mit Ihrem iPhone , iPod touch , iPad , PC
oder MAC haben Sie Ihr Baby in einem festgelegten, überwachten Bereich jederzeit und
von überall im Blick - egal ob zu Hause oder wenn Sie unterwegs sind. Der SBM kann aus
der Ferne in Neigung und Drehung verstellt werden. Damit Sie den gewünschten Erfolg erzielen und recht lange Freude an Ihrem SBM von MEDISANA haben, empfehlen wir Ihnen,
die nachstehenden Hinweise zum Gebrauch und zur Pflege sorgfältig zu lesen.
Herzlichen Dank!
WARNUNG
Achten Sie darauf, dass die Verpackungsfolien nicht in die Hände von
Kindern gelangen. Es besteht Erstickungsgefahr!
2.1 Lieferumfang und Verpackung
Bitte prüfen Sie zunächst, ob der Lieferumfang vollständig ist und der Artikel keinerlei
Beschädigungen aufweist. Im Zweifelsfall nehmen Sie das Gerät nicht in Betrieb und
wenden Sie sich an Ihren Händler oder an Ihre Servicestelle. G
Zum Lieferumfang gehören: E
1 MEDISANA SBM
1 Kurzanleitung
1 Netzteil 5V
1 Kunststofffuß
1 Netzwerkkabel
1 Antenne
2 Befestigungsschrauben
2 Dübel
Verpackungen sind wiederverwendbar oder können dem Rohstoffkreislauf zurückgeführt werden. Bitte entsorgen Sie nicht mehr benötigtes Verpackungsmaterial
ordnungsgemäß. Sollten Sie beim Auspacken einen Transportschaden bemerken,
setzen Sie sich bitte sofort mit Ihrem Händler in Verbindung. G
2.2 Verbindungsmöglichkeiten
Je nach gewünschter Konnektivität können Sie den SBM mit Ihrem iOS-Gerät oder
dem PC oder dem MAC verbinden. Es ist aber auch möglich, z. B. über iOS-Gerät und
PC auf den SBM zuzugreifen. Dies richtet sich nach den bei Ihnen verfügbaren
Geräten und wie Sie diese einbinden möchten. Für jedes der Geräte (iOS-Gerät,
PC und MAC) werden in den folgenden Kapiteln die Schritte beschrieben, wie eine
Verbindung herzustellen ist. Je nachdem, ob Sie alle Geräte oder nur eines mit dem
SBM verbinden möchten, müssen Sie die entsprechenden Kapitel befolgen: G
SBM-Verbindung mit einem iOS-Gerät: Kapitel 3 und 4 befolgen G
SBM-Verbindung mit einem PC: Abschnitt 3.1 und Kapitel 5 befolgen G
SBM-Verbindung mit einem MAC: Abschnitt 3.1 und Kapitel 6 befolgen G

5
DE
3 Inbetriebnahme
DE
3.2 Installieren der kostenlosen Smart Baby Monitor App
HINWEISE
Ihr Apple Gerät muss für die korrekte Funktion der App mindestens die
iOS-Version 5.0 oder später besitzen. Für den Download der Software
benötigen Sie eine Apple-ID mit E-Mail-Adresse und Kennwort sowie eine
aktive Internetverbindung. Durch das Herunterladen und Nutzen der
Software können bei Ihrem Telefonanbieter ggf. Gebühren anfallen.
Starten Sie auf Ihrem Apple-Gerät den Apple App Store, suchen Sie nach „medisana“
und installieren Sie die Smart Baby Monitor App. Alternativ können Sie den folgenden
QR-Code scannen, um direkt zur App zu gelangen: G
Nach der Installation erscheint das entsprechende App Symbol auf der Anzeige Ihres
Apple-Gerätes:
3.3 Starten der App G
® ® ®
Stellen Sie sicher, dass sich Ihr iPhone , iPad oder iPod touch im selben Netzwerk
(WLAN) befindet wie Ihr SBM. Starten Sie die App und befolgen Sie die Anweisungen
(Einrichtung des WLAN-Netzwerkes siehe Kapitel 4.2 Erster Start der App). G
3.4 Trennen des Netzwerkkabels G
Nach Einrichtung der kabellosen Verbindung (WLAN) können Sie das Netzwerkkabel
vom SBM trennen. Der SBM kann nun kabellos genutzt werden.
3.1 Anschließen des SBM an Ihren Router
1. Schrauben Sie die Antenne an die Antennenbuchse des SBM.
2. Verbinden Sie das Netzwerkkabel mit Ihrem Router und dem SBM (Router nicht im
Lieferumfang).
3. Schließen Sie das mitgelieferte Netzteil an.
® ®
iPod touch iPhone
®
iPad
®
PC oder Mac
1. Antenne
3. Netzteil
2. Netzwerkkabel
Internet
Modem
Router
Netzwerkkabel

6
DE
DE
4 Betrieb mit Apple-Gerät
4.2 Erster Start der App
Nach dem Start der App werden Sie aufgefordert,
die Verbindung zum SBM zu kontrollieren. G
Diese Anzeige kommt bei jedem Neustart der
App - dieses können Sie durch Setzen eines
Häkchens (Kästchen anklicken) bei "Nicht mehr
anzeigen" unterbinden.
Drücken Sie auf "Weiter".
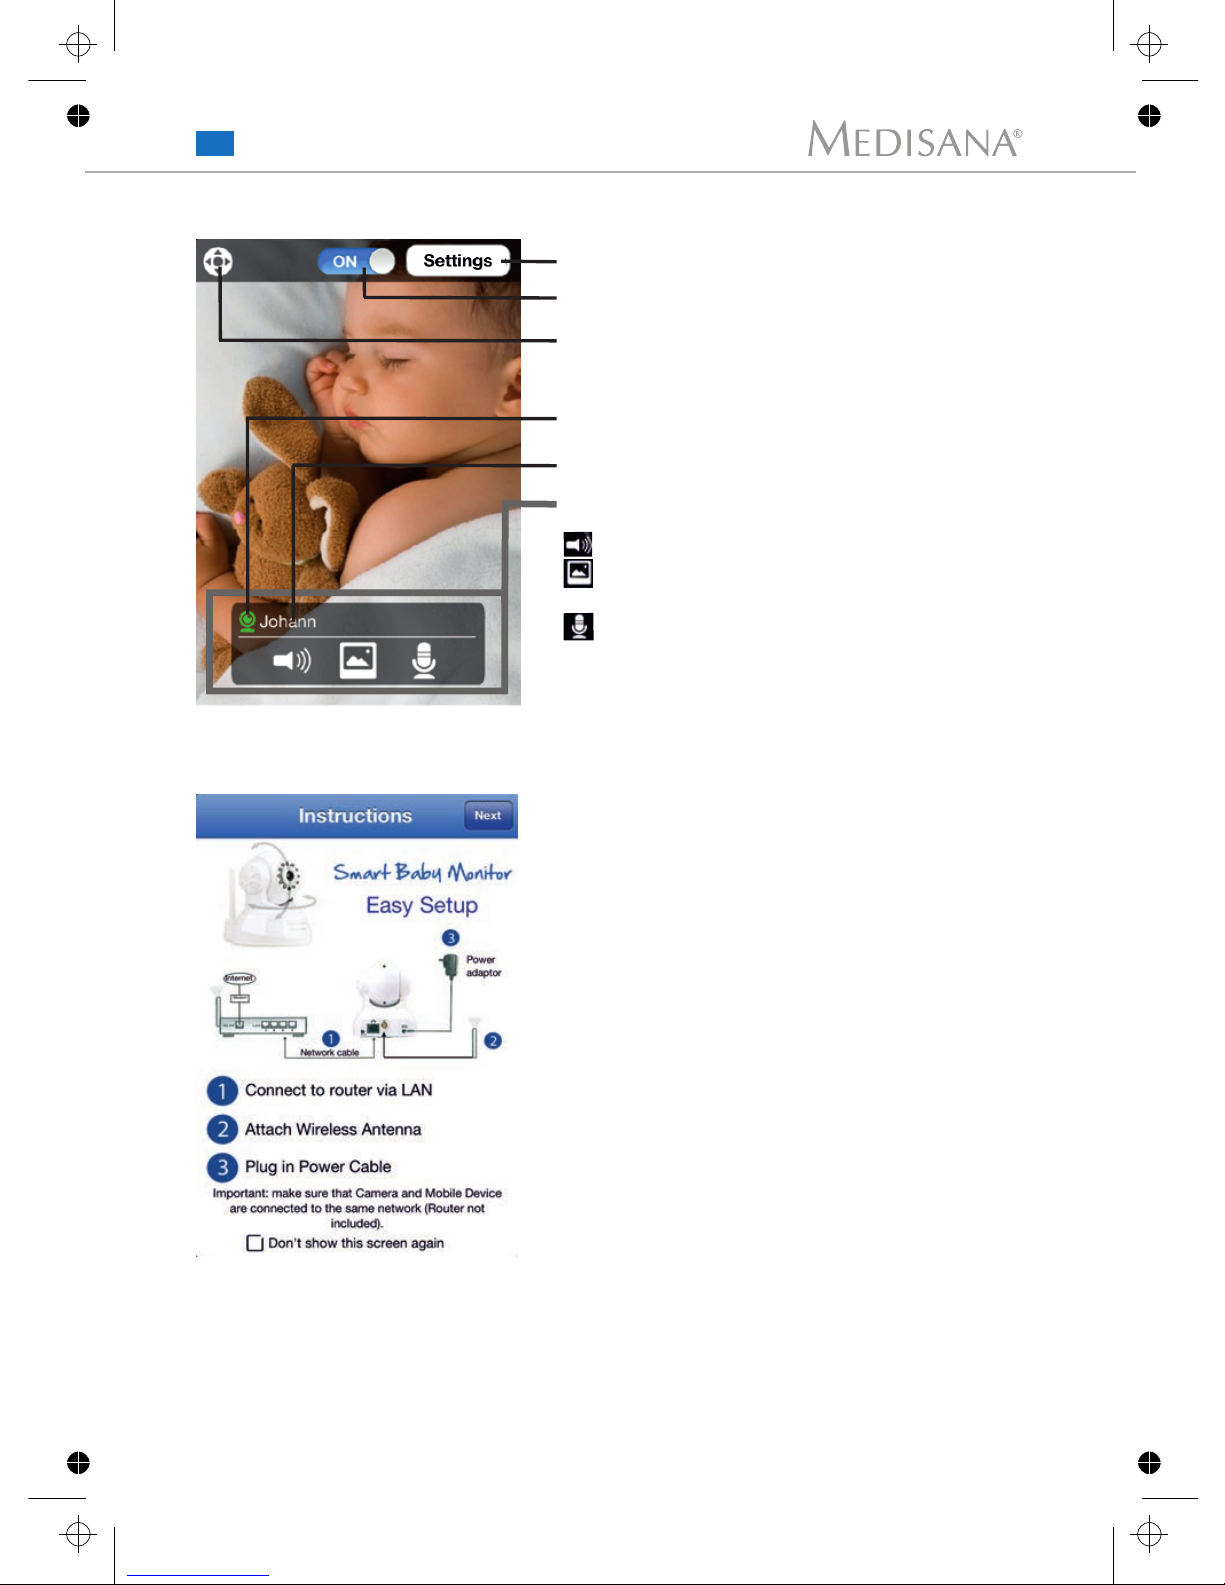
4.1 App auf einen Blick
Einstellungen des SBM
Aktivieren und Deaktivieren des SBM
Umschalten zwischen Gestensteuerung
und Pfeilsteuerung (siehe Kapitel 4.5 App-
Steuerung)
Aktivitätsanzeige
(grün = verbunden; rot = nicht verbunden)
Name des SBM
Steuerung (ausblendbar; siehe Kapitel
4.5 App-Steuerung)
Audioüberwachung aktivieren / deaktivieren
Schnappschuss: Schnappschüsse werden
in der Fotos-App gespeichert
Gegensprechfunktion: Sind Lautsprecher am
Audioausgang angeschlossen, können
Sie mit Ihrem iOS-Gerät bei gedrückter Taste
Ihr Baby mit Ihrer Stimme beruhigen.

7
DE
4 Betrieb mit Apple-Gerät
DE
Bei Erststart der App (Kapitel 4.2):
Wählen Sie bei Ihrem WLAN "Verbinden"
4.3 Einstellen des WLAN
WLAN später einstellen:
Folgen Sie dem Navigationspfad:
Einstellungen -> Kameras -> "Meine Kamera" ->
WLAN-Einrichtung
Aktivieren Sie das WLAN des SBM mit dem
Schiebeschalter und lassen Sie den SBM nach
verfügbaren Netzwerken suchen, indem Sie auf
"Suchen" tippen.
Nachdem Sie auf "Weiter" gedrückt haben, wird
automatisch nach vorhandenen SBMs gesucht.
Wurde ein SBM erfolgreich gefunden, so wird
automatisch nach verfügbaren WLAN-Netzwerken in Ihrer Umgebung gesucht. G
Folgen Sie nun Kapitel 4.3 Einstellen des WLAN.

4 Betrieb mit Apple-Gerät
DE
8
DE
Zum Verbinden des SBM zu Ihrem WLAN ist ein
Neustart des SBM erforderlich. Dieser wird automatisch ausgeführt. G
Entfernen Sie das Netzwerkkabel vom SBM. Nach
dem Neustart kontrollieren Sie die Verbindung
des SBM mit Hilfe des Status Indikators : G
LED blinkt schnell (ca. 2-3 mal je Sekunde) = das
Gerät ist per drahtloser Netzwerkverbindung verbunden. G
HINWEIS
Wird das Blinken des Indikators unterbrochen, kann die Verbindung zum
WLAN nicht hergestellt werden.
Häufigster Fall ist die fehlerhafte Eingabe des Passwortes. Schließen Sie
das Netzwerkkabel wieder an den SBM
an und folgen Sie den Anweisungen in
Kapitel 4.2 Erster Start der App.
Geben Sie Ihren Netzwerkschlüssel ein.
HINWEIS
Schauen Sie dazu auf die Unterseite
Ihres Routers, in dessen Handbuch
oder Ihren Unterlagen, wo Sie Passwörter aufbewahren, nach.

4 Betrieb mit Apple-Gerät
DE
9
DE
Folgen Sie dem Navigationspfad:
Einstellungen -> Ansicht
4.4 App-Ansicht
Spiegeln
Das angezeigte Videobild wird gespiegelt
Flip
Das angezeigte Videobild wird um 180° gedreht
Auflösung
Auswahl zwischen 3 weboptimierten Auflösungen: 160 x 120 / 320 x 240 / 640 x 480
FPS
Anzahl der zu übertragenden Bilder (Standardeinstellung: Maximum = 30 fps)
Modus
Bildwiederholrate des SBM
LED
Status Indikator an- oder ausschalten
Helligkeit
Einstellbar von 0 (dunkel) bis 15 (extrem hell)
Kontrast
Einstellbar von 0 (gering) bis 6 (sehr hoch)
Nach dem Neustart des Gerätes wird sich die
App automatisch mit dem Gerät verbinden.

4 Betrieb mit Apple-Gerät
DE
10
DE
Gestensteuerung
Die Gestensteuerung funktioniert wie in Ihrer
Fotos-App, wenn Sie ein Bild betrachten
möchten:
• Auf das Bild tippen und nach unten ziehen
-> Kamera schwenkt nach oben.
• Auf das Bild tippen und nach oben ziehen
-> Kamera schwenkt nach unten.
• Auf das Bild tippen und nach links ziehen
-> Kamera dreht nach rechts.
• Auf das Bild tippen und nach rechts ziehen
-> Kamera dreht nach links.
Pfeilsteuerung
Benutzen Sie die Pfeiltasten, um die Kameraausrichtung zu steuern.
4.5 App-Steuerung
Folgen Sie dem Navigationspfad:
Einstellungen -> Steuerung
Ausblenden
Einstellen der Ausblendzeit der Steuerung
Ausblendzeit
Talk-Back
Ausblenden der Talk-Back-Funktion.
Für die Nutzung der Talk-Back-Funktion
müssen externe Lautsprecher am Audioausgang angeschlossen sein
Vollbild
Vollbild-Anzeige ein- oder ausschalten

4 Betrieb mit Apple-Gerät
DE
11
DE
Folgen Sie dem Navigationspfad:
Einstellungen -> Kameras -> Kamera hinzufügen...
4.6.2 Manuelles Hinzufügen weiterer SBMs
Geben Sie der Kamera einen Namen und stellen
Sie die IP-Adresse der Kamera ein. G
Vergewissern Sie sich, dass Port, Benutzer und
Passwort stimmen. G
HINWEIS
Die Standardeinstellungen für
Benutzername und Passwort befinden
sich auf der Unterseite des SBM,
z. B. "user name: admin, password:
medisana".
Tippen Sie auf „Hinzufügen“. Sie werden automatisch auf das SBM-Bild geleitet und eine Verbindung zum SBM wird hergestellt. Für eine sofortige Konfiguration des WLAN gehen Sie auf
"WLAN-Einrichtung". Folgen Sie dem Kapitel 4.3
Einstellen des WLAN. Nach dem Neustart der
Kamera tippen Sie auf die Schaltflächen „Kamera
Setup“ und „Hinzufügen“. G
Für eine nachträgliche Konfiguration des WLAN
folgen Sie bitte Kapitel 4.3 Einstellen des WLAN.
4.6.3 Entfernen von SBMs
Zum Entfernen eines SBM tippen Sie im Navigationspfad Einstellungen -> Kameras auf
die Zeile mit der zu entfernenden Kamera. "Wischen" Sie nach links oder rechts, um die
Schaltfläche "Löschen" sichtbar zu machen. Um die Kamera zu entfernen, tippen Sie auf
die Schaltfläche "Löschen".
4.6.1 Automatisches Hinzufügen weiterer SBMs
Folgen Sie dem Navigationspfad:
Einstellungen -> Kamera finden
Ihnen wird eine Liste der verfügbaren SBMs angezeigt. Sollte dieses nicht der Fall sein, überprüfen Sie die korrekte Inbetriebnahme des
SBM (Kapitel 3) und drücken Sie auf „Suchen“.
Wählen Sie beim entsprechenden SBM „Hinzufügen“. Sie werden automatisch auf die WLANEinrichtung weitergeleitet. Folgen Sie nun Kapitel
4.3 Einstellen des WLAN.

4 Betrieb mit Apple-Gerät
DE
12
DE
4.6.4 Alarm-Einstellungen
Folgen Sie dem Navigationspfad: G
Ei n stellungen G
Standardmäßig sind Bewegungs- und Geräuschalarm aktiviert. Bei beiden Alarmmeldungen ist die
Sensitivität auf 7 voreingestellt (1 = träge reagierend, 10 = schnell reagierend).
Anzeige bei Bewegunsalarm (Beispiel):
Anzeige bei Geräuschalarm (Beispiel):
Anzeige bei unterbrochener Verbindung:

DE
13
DE
5 Betrieb mit PC
Die IP-Adresse (3) sollte automatisch durch das DHCP bezogen werden und sollte
gleich der unter "Local PC information" zu sehenden Adresse sein, mit Ausnahme
der oben eingekreisten Ziffern. Wenn dies nicht der Fall ist, fahren Sie mit Punkt 3
fort, ansonsten mit Punkt 4. G
Geben Sie die Authentifizierungsdaten ein (4). Die Werkseinstellung für "Account for
watching" lautet "admin" und für "Password for watching" = "medisana". Klicken Sie
auf "Update (F5)" (5). G
Klicken Sie auf "Browse (F4)" (6). Das unten dargestellte Pop-up-Fenster erscheint.
Geben Sie die Werte für "User name" (Werkseinstellung = "admin") und "Password"
(Werkseinstellung = "medisana") ein, um Zugriff auf die Netzwerkkamera zu erlangen. G
2.
3.
4.
1
2
auswählen
3
4
5
6
admin
******
Klicken Sie auf "Search (F3)" (1) und klicken Sie dann auf die erscheinende Kamera
in der Liste (2).
1.
Herunterladen der Software
Zum Auffinden des Smart Baby Monitors im Netzwerk laden Sie das aktuelle
und kostenlose Programm für PC von unserer Homepage im Bereich Software herunter.
(http://www.medisana.de/sbm)
admin
medisana
Werte der
Werkseinstellung
Beispiel für die Anzeige nach dem Klick
auf eine gefundene Kamera (Punkt 1 unten)

6 Betrieb mit MAC
DE
14
DE
Herunterladen der Software
Zum Auffinden des Smart Baby Monitors im Netzwerk laden Sie das aktuelle und
®
kostenlose Programm für Mac von unserer Homepage im Bereich Software herunter.
(http://www.medisana.de/sbm)
Sollten Sie keine IP-Adresse sehen, ist Ihr
Router nicht für den DHCP-Service konfiguriert oder er arbeitet nicht korrekt. G
Starten Sie die Kamera neu oder vergeben
Sie manuell eine IP-Adresse durch Doppelklick auf den Kameraeintrag. G
In diesem Fenster können Sie manuell
eine IP, Subnet, Gateway, DNS Server und
den HTTP port zuweisen. G
Geben Sie die Werte für "User" (Werkseinstellung = "admin") und "Password"
(Werkseinstellung = "medisana") ein, um
Zugriff auf die Netzwerkkamera zu erlangen.
Nach kurzer Zeit erscheint die Kamera mit
einer IP-Adresse in der Liste. Doppelklicken
Sie auf den Eintrag. G
Ihr S tan dar dbrow ser wird geöff net.
Fahren Sie fort wie unter "7 Das Web-
Interface" beschrieben. G
HINWEIS
Bei Nutzung von Mac OSX 10.8 „Mountain Lion“ oder höher gehen Sie
unter:
Systemeinstellungen -> Sicherheit -> Programme aus folgenden Quellen
erlauben:
und wählen Sie die Option „Keine Einschränkungen“ aus.

15
DE
DE
7 Das Web-Interface
7.1 Steuerung der Kamera über Internetbrowser
Auf dem Willkommensbildschirm können Sie zwischen 3 verschiedenen Zugriffsarten
wählen: G
- über Internet Explorer
- über einen anderen Browser (z.B. FireFox oder Safari)
- über einen Browser für mobile Endgeräte
(Smartphones)
Wir empfehlen die Verwendung des Internet Explorers, da so alle Funktionalitäten optimal genutzt werden können. Vor dem ersten Zugang mit dem Internet Explorer muss
eine Videoabspiel-Software installiert werden. Sollte auf Ihrem Computer noch keine
Software installiert sein, werden Sie automatisch nach der Installation gefragt. G
Zur Installation der Software klicken Sie auf "download and install player (first use)". Es
erscheint ein Pop-Up Fenster ähnlich dem folgenden:
Klicken Sie auf "RUN" bzw. "AUSFÜHREN". Es beginnt der automatische Download
und die Installation. Bitte beachten Sie, dass Sie ggf. Ihre Browser- und Virenprogrammeinstellungen für eine vollständige Installation modifizieren müssen. Lässt der Browser
keine Fortsetzung der Installation zu, öffnen Sie die Sicherheitseinstellungen und reduzieren Sie die Sicherheitsstufe oder wenden Sie sich an den IT- oder Netzwerk-Administrator.
Nach der Installation der Videoabspiel-Software klicken Sie im Willkommensbildschirm
auf "Ansicht - Modus 1 (Für Internet Explorer)", um mit dem Internet Explorer Browser
auf die Kamera zuzugreifen. Ggf. muss der Internet Explorer nach der Installation der
Videoabspiel-Software geschlossen und neu gestartet werden, damit ein Kamerabild
zu sehen ist.

7 Das Web-Interface
DE
16
DE
Bewegen der
Kamera
7.2 Aktuelle Ansicht
Kapitel 7.2 Aktuelle Ansicht
Kapitel 7.3 LAN
Kapitel 7.4 WLAN
Kapitel 7.5 DDNS
Kapitel 7.6 Alarm Einstellungen
Kapitel 7.7 E-Mail Einstellungen
Kapitel 7.8 Benutzereinstellungen
Kapitel 7.9 Andere Einstellungen
Kapitel 7.10 Geräte-Information
Kapitel 7.11 Benutzername
Kapitel 7.12 Datum & Zeit Einstellungen
Kapitel 7.13 Firmware aktualisieren
Kapitel 7.14 Auslieferungszustand
Kapitel 7.15 Log
Zurück zur
Ansichtsund Sprachauswahl
Vertikales u.
horizontales
Patroullieren
der Kamera

7 Das Web-Interface
DE
17
DE
7.3 Netzwerk - LAN
Standardmäßig bezieht der SBM seine IP-Adresse automatisch vom DHCP-Server im
Router. Möchten Sie eine eigene Adresse vergeben, so entfernen Sie das Häkchen
und geben Sie Ihre eigene IP-Adresse an.
HINWEIS
Kann Ihr Browser keine Verbindung zum SBM herstellen, wiederholen Sie bitte
die Schritte in Kapitel 5 (Betrieb mit PC) bzw. Kapitel 6 (Betrieb mit MAC).
Klicken Sie auf „übernehmen“, um die Einstellungen zu speichern.

7 Das Web-Interface
DE
18
DE
7.4 Netzwerk - WLAN
Klicken Sie auf „Scan“. G
Nach Abschluss der Suche werden die verfügbaren WLAN-Netzwerke in der Liste aufgeführt. Wählen Sie Ihr Netzwerk aus, geben Sie im Eingabefeld „Schlüssel“ Ihren
Netzwerkschlüssel ein und bestätigen Sie die Eingabe mit „übernehmen“. G
Zum Verbinden des SBM zu Ihrem WLAN ist ein Neustart des SBM erforderlich und
wird automatisch ausgeführt. Entfernen Sie das Netzwerkkabel vom SBM. Nach dem
Neustart kontrollieren Sie die Verbindung des SBM mit Hilfe des Status Indikators :
LED blinkt schnell (ca. 2-3 mal je Sekunde) = Das Gerät ist per drahtloser Netzwerkverbindung verbunden. G
G
Klicken Sie auf „übernehmen“, um die Einstellungen zu speichern.
HINWEIS
Wird das Blinken des Indikators unterbrochen, kann die Verbindung zum
WLAN nicht hergestellt werden. Häufigster Fall ist die fehlerhafte Eingabe
des Passwortes. Schließen Sie das Netzwerkkabel wieder an den SBM an
und folgen Sie dem Kapitel 3 und 5 bzw. 6.

7 Das Web-Interface
DE
19
DE
7.5 Netzwerk - DDNS
Hersteller Domain G
Sie können Ihr SBM auch aus dem Internet (WAN, siehe Kapitel 8) erreichen, indem
Sie einen dynamischen Domain-Name-System-Eintrag (DDNS) einrichten. Ab Werk
ist bereits eine DDNS eingerichtet. Die Adresse finden Sie unter Hersteller-Domain
im Webinterface und bei Geräten ab LOT R1210CC79 auch auf der Unterseite des
SBM. G
Drittanbieter G
Sie können auch einen DDNS-Service eines Drittanbieters auswählen. Benutzen
Sie dazu das Auswahlmenü unter „DDNS Service“, tragen Sie Ihren Benutzernamen
und Passwort sowie die Adresse ein.
G
Klicken Sie auf „übernehmen“, um die Einstellungen zu speichern.
WARNUNG
Aus Sicherheitsgründen empfehlen wir Ihnen, bei einer WAN Konfiguration (Kaptiel 8), dass Sie das Passwort und ggf. den Namen des SBM
Benutzers („admin“) ändern. Des Weiteren sollten Sie bei einer
Weitergabe der DDNS, z. B. an Verwandte, weitere Benutzer für den Zugriff
konfigurieren und die Rechte auf „Gast“ limitieren.
Dazu folgen Sie bitte Kapitel 7.8 Erweitert - Benutzereinstellungen.

7 Das Web-Interface
DE
20
DE
7.6 Alarm - Alarm Einstellungen
Standardmäßig sind Bewegungs- und Geräuschalarm aktiviert. Bei beiden Alarmmeldungen ist die Sensitivität auf 7 voreingestellt (1 = träge reagierend, 10 = schnell
reagierend). Wenn Sie die Alarmoption "E-Mail verschicken" aktivieren, müssen Sie
die E-Mail Einstellungen vornehmen. Schauen Sie dazu in Kapitel 7.7 Alarm - E-Mail-
Einstellungen.
Klicken Sie auf „übernehmen“, um die Einstellungen zu speichern.
Anzeige bei Bewegungsalarm (Beispiel):
Anzeige bei Geräuschalarm (Beispiel):
Anzeige bei unterbrochener Verbindung:

7 Das Web-Interface
DE
21
DE
7.7 Alarm - E-Mail Einstellungen
Haben Sie aus Kapitel 7.6 Alarm - Alarm Einstellungen die Alarmoption „Email verschicken“ gewählt, so müssen Sie folgende Einstellungen setzen, um eine Email mit
fünf Bildern bei Alarm zu erhalten: G
Sender G
Absendername, der bei Eintreffen der Mail angezeigt wird (z.B. SBM Louisa) G
Empfänger G
Sie können bei Alarmauslösung eine Mail an bis zu vier E-Mail-Adressen verschicken
lassen. G
Geben Sie die Adresse des Postausgangsservers (SMTP Server) der absendenden Mailadresse an (z. B. smtp.t-online.de) G
Geben Sie den zu verwendenden Port des Postausgangsservers an (Standard: 25)
Wählen Sie das Sicherheitsprotokoll zum Übertragen der Mail aus und ändern Sie
ggf. den Port.
G
Sollte eine Authentifizierung am Postausgangsserver nötig sein, aktivieren Sie die
Option und geben Sie Ihren Benutzernamen und das Passwort ein. Ihre Einstellungen können Sie mit dem Knopf „Test“ überprüfen.
G
Aktivieren Sie "externe IP Adresse per Email mitteilen", wenn die externe IP Adresse
in der Mail übermittelt werden soll. G
Klicken Sie auf „übernehmen“, um die Einstellungen zu speichern.

7 Das Web-Interface
DE
22
DE
7.8 Erweitert - Benutzereinstellungen
Für den Zugriff auf Ihren SBM können Sie bis zu acht Benutzer mit Passwort anlegen. Jeder Benutzer muss einer Benutzergruppe zugeordnet sein. Es gibt drei
Benutzergruppen mit unterschiedlichen Rechten beim Zugriff. G
Benutzergruppen: G
Administrator G
Vollzugriff: Ein Administrator darf Einstellungen jeglicher Art vornehmen. (z. B.
WLAN, Benutzereinstellungen) G
Benutzer G
Steuerzugriff: Ein Benutzer darf KEINE Einstellungen am SBM vornehmen, kann
den SBM aber mit Pfeil- oder Gestensteuerung vertikal und horizontal drehen /
schwenken.
G
Gast
G
Betrachtungszugriff: Ein Gast darf KEINE Einstellungen am SBM vornehmen und
den SBM auch NICHT drehen / schwenken. Er kann eine Video- und Audioübertragung vom SBM empfangen.
Klicken Sie auf „übernehmen“, um die Einstellungen zu speichern.
HINWEISE
- Haben Sie die Einstellungen für den Benutzer "admin" geändert, werden
Sie nach dem Klicken auf "übernehmen" aufgefordert, die neuen Daten
einzugeben.
- Haben Sie die Einstellungen geändert und bekommen Sie nach dem
Klick auf "übernehmen" keinen Zugriff mehr (ggf. durch Tippfehler),
können Sie den SBM zurücksetzen - siehe Kapitel 9 Zurücksetzen auf
Werkseinstellung.

7 Das Web-Interface
DE
23
DE
7.9 Erweitert - Andere Einstellungen
Status LED
Ein- und Ausschalten der Status Indikator LED .
PTZ* Zentrieren beim Start
Zentriert die Kamera beim Start
Horizontale / Vertikale Runden
Anzahl der Dreh- / Schwenkrunden beim Start des SBM.
PTZ* Geschwindigkeit
Geschwindigkeit der Dreh- / Schwenkbewegung bei Gesten-/Pfeilsteuerung
(0 = schnell, 10 = langsam)
Auto. horizon. / vertik. Geschwindigkeit
Geschwindigkeit der Dreh- / Schwenkbewegung bei Runden zum Start des SBM,
Zentrieren des SBM und Patroullieren.
(0 = schnell, 10 = langsam)
Klicken Sie auf „übernehmen“, um die Einstellungen zu speichern.
* PTZ = Pan-Tilt-Zoom (Schwenken-Neigen-Vergrößern)

7 Das Web-Interface
DE
24
DE
7.10 Wartung - Geräte Information
Zeigt aktuelle Informationen zum Gerätestatus.
Ändern Sie den Namen des SBMs und klicken Sie auf „übernehmen“, um die Einstellungen zu speichern.
7.11 Wartung - Benutzername

7 Das Web-Interface
DE
25
DE
7.12 Wartung - Datum & Zeit Einstellungen
Zeit mit PC synchronisieren
Wählen Sie die Option „Mit PC Zeit synchronisieren“ und klicken Sie auf „übernehmen“,
um die Einstellung zu speichern.
Zeit mit Network-Time-Protocol Server (NTP Server) synchronisieren
Wählen Sie die Option „Mit NTP Server synchronisieren“ und wählen Sie einen
Server aus, mit dem die Zeit synchronisieren werden soll. Klicken Sie auf „übernehmen“, um die Einstellung zu speichern.

7 Das Web-Interface
DE
26
DE
7.13 Wartung - Firmware aktualisieren
Aktuelle Versionen der Firmware und der Benutzeroberfläche (Web-Interface) finden
Sie im Bereich Software unter http://www.medisana.de/sbm. G
Speichern Sie die Datei auf Ihrem Desktop. G
Wählen Sie die entsprechende Datei mittels der Schaltfläche „Durchsuchen“ aus
und klicken Sie auf „übernehmen“.
WARNUNG
Trennen Sie den SBM während des Updates nicht vom Stromnetz.
Nach dem Update startet der SBM neu, ggf. müssen Sie die Schritte in Kapitel
5 bzw. 6 erneut durchführen, um eine Verbindung zum SBM wieder herzustellen.
Sobald Sie die Herstellung des Auslieferungszustandes bestätigen, wird ein Reset
des SBM durchgeführt. Dies ist vergleichbar mit einem 10-sekündigen Drücken des
Resetknopfes .
7.14 Wartung - Auslieferungszustand wiederherstellen

7 Das Web-Interface
DE
27
DE
7.15 Wartung - Log
Über den Log können Sie die Zugriffe und Alarmmeldungen über die Zeit hinweg
verfolgen.

8 Betrieb über Internet (WAN)
DE
28
DE
Betrieb über Internet (WAN)
Aus Sicherheitsgründen blockt in der Regel die NAT-Firewall Ihres Routers den Zugriff
auf Ihren SBM vom Internet (WAN). Möchten Sie den Zugriff vom Internet auf Ihren
SBM ermöglichen, so müssen Sie diesen in der Firewall zulassen. G
Auf Grund der Vielzahl verschiedenster Router auf dem Markt nehmen Sie für das weitere Vorgehen Ihr Router-Benutzerhandbuch zur Hilfe. Die benötigte Funktion Ihres
Routers heißt Portforwarding, Portweiterleitung oder oft auch Virtual Server. G
Für das weitere Vorgehen suchen Sie nach diesen Begriffen im Router-Benutzerhandbuch und folgen den dort gegebenen Anweisungen. G
Wir zeigen Ihnen folgend ein Beispiel an einem Router des Herstellers FritzBox: G
1. Nachdem Sie sich an Ihrem
Router angemeldet haben,
wählen Sie die Funktion
„Internet“.
2. Wählen Sie „Freigeben“.
3. Klicken Sie daraufhin den
"Neue Portfreigabe" Button rechts unten.
4. Wählen Sie in der Drop
down box unter "Portfrei-
gabe aktiv für" die Ein stellung "Andere Anwen-
dungen". In dem Feld
"Bezeichnung" tragen Sie
den Namen Ihres SBMs
(z.B. Smart Baby Monitor
3G) ein.
5. Wählen Sie mit Hilfe der
Drop down box das "TCP" Protokoll. Tragen Sie in die
Felder "von Port", "bis
Port" und "an Port" jeweils
die Port Nummer 80 ein.
Beim Feld "an Computer"
wählen Sie per Drop down
box "manuelle Eingabe
der IP-Adresse". Tragen
Sie die IP-Adresse Ihres
SBM (z. B. 192.168.1.75) in das Feld "IP-Adresse" ein. Diese finden Sie unter dem
Navigationspfad in der App: Einstellungen -> Kameras -> „Mein SBM“ -> Adresse.
Bestätigen Sie Ihre Eingaben durch Klick auf den "OK"-Button.
Die Einrichtung Ihres Routers zur Nutzung der 3G Verbindung ist damit
abgeschlossen.

DE
29
DE
9 Zurücksetzen auf Werkseinstellung
Greifen Sie entsprechend der Anweisungen in Kapitel 5 bzw. 6 auf das Web-Interface zu.
Folgen Sie dem Navigationspfad: Wartung -> Auslieferungszustand wiederherstellen
(siehe Kapital 7.14 Wartung). Bestätigen Sie das Wiederherstellen und warten Sie den
Neustart des SBM ab.
9.1 Zurückstellen mittels Reset-Knopf :
Stellen Sie sicher, dass der SBM an das Stromnetz angeschlossen ist. Verwenden
Sie einen Kugelschreiber oder Ähnliches und führen diesen durch die Öffnung auf den
Reset-Knopf auf der Unterseite des Gerätes (siehe Seite III, Punkt ).
Drücken Sie den Reset-Knopf länger als 10 Sekunden. Der Status-Indikator erlischt. Lassen Sie den Knopf nun los und der SBM startet neu. G
Sie haben den SBM somit erfolgreich auf die Werkseinstellung zurückgesetzt.
9.2 Zurückstellen mittels Web-Interface:

DE
30
DE
10 Verschiedenes
10.1 Häufige Fragen
Die Interaktion mit der Kamera bzw. die Steuerung funktionieren nur sehr langsam - woran liegt das? G
Die Geschwindigkeit ist abhängig von der verfügbaren Netzwerkbandbreite. Die Bandbreiten für Videos in der Größe 640x480@10 fps sollte zwischen 4 und 5 Mbits und für
Videos in der Größe 320x240@30 fps zwischen 1.2 und 1.6 Mbits liegen. Ist die verfügbare Bandbreite geringer, verringert sich die Geschwindigkeit merklich. G
Nach dem Entsperren meines Apple Gerätes lädt das Kamerabild nicht mehr
korrekt, obwohl ich vor der automatischen Sperre einen guten Empfang hatte.
Was soll ich tun? G
Setzen Sie die Zeit bis zur automatischen Sperre in den allgemeinen Einstellungen
Ihres Apple Gerätes auf "NIE", wenn Sie eine dauerhafte Beobachtung planen. Alternativ können Sie nach einer Beobachtung die App beenden und für einen erneuten Blick
wieder starten. G
Eine Kamera wurde von der Software gefunden, kann aber nicht angesteuert
werden. Woran liegt das? G
Wenn die IP Adresse der Kamera und des PCs nicht im selben Netzwerkabschnitt
liegen, müssen Sie diese anpassen. Der Netzwerkabschnitt wird durch die ersten 3
Nummernblöcke der IP Adresse beschrieben. Ist die IP Adresse des PC beispielsweise
192.168.0.100, so kann die Kamera nur im Bereich 192.168.0.1 bis 192.168.0.255
ordnungsgemäß funktionieren. G
Die Kamera kann über eine öffentliche IP Adresse angesteuert werden, nicht
aber über die Hersteller-Domain. G
Stellen Sie sicher, dass die DNS Einstellungen von Kamera und PC übereinstimmen.
Siehe Beispiel unten: Die DNS muss identisch sein.
G
HINWEIS
Weitere, aktualisierte Fragen und Antworten finden Sie auch unter
www.medisana.de/SBM unter dem Reiter "FAQ - Fragen und Antworten"!

10 Verschiedenes
DE
31
DE
Bildaufnehmer: 300k CMOS Sensor, Mindestbeleuchtung 0 LUX (Auto IR)
Objektiv: f=3,6mm, F=2.0
Schwenkradius: 0 - 270°
Kippwinkel: 0 - 120 °
Beleuchtungsassistent: 10 x 850nm Infrarot LEDs, 5m Auto-Control
Videoauflösung: 640x480 (VGA), 320x240 (QVGA), 160x120 (QQVGA)
Kompressionsmethode: MJPEG
Bildwiederholrate: 30 fps
Bitrate: 128kbps - 5 Mbps
Bildrotation: Spiegel / Flip
Audiokompression: ADPCM
Netzwerkprotokolle: TCP/IP, UDP/IP, HTTP, SMTP, FTP, DHCP, DDNS, UPNP, NTP,
PPPOE
W-LAN: 802.11 b/g
Nutzerlevel: 3 Berechtigungsstufen
Alarmmeldung: E-Mail / LPN (Local Push Notification)
Upgrade: über Netzwerk
Netzwerkanschluss: RJ-45 Ethernet 10Base-T/100Base-TX
Audioeingang: Integriertes Mikrofon x 1
Audioausgang: 1 x 3,5 mm Klinke
Sofware für iPod Touch, iPhone und iPad: iOS 5.0 oder später, kostenlose App
Unterstützte Betriebssysteme (PC/Laptop): Microsoft Windows 98 oder höher
Spannungsversorgung: 5 VDC
Stromverbrauch: max. 7,5W
Gewicht: ca. 245 g
Maße: ca. L 100 x B 99 x H 118 mm
Betriebstemperatur: 0°C - 40°C, Luftfeuchtigkeit: 10 % - 80 %
Artikel-Nr.: 52345
EAN-Nr.: 40 15588 52345 8
10.2 Technische Daten
Im Zuge ständiger Produktverbesserungen behalten wir uns
technische und gestalterische Änderungen vor.
!

DE
32
DE
11 Garantie
Bitte wenden Sie sich im Garantiefall an Ihr Fachgeschäft oder direkt an die Servicestelle.
Sollten Sie das Gerät einschicken müssen, geben Sie bitte den Defekt an und legen eine
Kopie der Kaufquittung bei.
Es gelten dabei die folgenden Garantiebedingungen:
1.
Auf MEDISANA Produkte wird ab Verkaufsdatum eine Garantie für 3 Jahre gewährt.
Das Verkaufsdatum ist im Garantiefall durch Kaufquittung oder Rechnung nachzu weisen.
2. Mängel infolge von Material- oder Fertigungsfehlern werden innerhalb der Garantiezeit
kostenlos beseitigt.
3. Durch eine Garantieleistung tritt keine Verlängerung der Garantiezeit, weder für das
Gerät noch für ausgewechselte Bauteile, ein.
4. Von der Garantie ausgeschlossen sind:
a. alle Schäden, die durch unsachgemäße Behandlung, z.B. durch Nichtbeachtung der
Gebrauchsanweisung, entstanden sind.
b.
Schäden, die auf Instandsetzung oder Eingriffe durch den Käufer oder unbefugte
Dritte zurückzuführen sind.
c. Transportschäden, die auf dem Weg vom Hersteller zum Verbraucher oder bei der
Einsendung an die Servicestelle entstanden sind.
d. Zubehörteile, die einer normalen Abnutzung unterliegen.
5. Eine Haftung für mittelbare oder unmittelbare Folgeschäden, die durch das Gerät ver ursacht werden, ist auch dann ausgeschlossen, wenn der Schaden an dem Gerät als
ein Garantiefall anerkannt wird.
MEDISANA AG
Jagenbergstraße 19
41468 NEUSS
Deutschland
eMail: info@medisana.de
Internet: www.medisana.de
11.1 Garantie- und Reparaturbedingungen

11 Garantie
DE
33
DE
Im Servicefall wenden Sie sich bitte an:
DEUTSCHLAND
MEDISANA Servicecenter
c/o GSL mbH
Am Weimarer Berg 6
99510 Apolda
Service-Hotline:
E-Mail: vitadock-info@medisana.de
(für allgemeine Informationen)
14 ct /Minute aus dem deutschen Festnetz
Mobilfunk Höchstpreis 42 ct /Minute
ÖSTERREICH
ZMUGG Elektronik
Service & Vertriebs G.m.b.H
Fabriksgasse 27
8020 Graz
Tel.: 0043-316-772120
Fax:
eMail: zmuggelektronik@utanet.at
Internet: www.zmuggelektronik.at
SCHWEIZ
BLUEPOINT Service Sagl
Via Cantonale 14
6917 Barbengo
Tel.: 0041 091 980 49 72
Fax: 0041 091 605 37 55
eMail: info@bluepoint-service.ch
Internet: www.bluepoint-service.ch
01805 45 40 15
0043-316-77212010
Medisana Service Consommateur
c/o Opaya, 8 Rue Petit
F-92110 Clichy
Service Hotline : 0811 560 952
o
N Azur du lundi au vendredi de 9h à 18h
Prix appel local
eMail: info@medisana.fr
FRANKREICH


Read the instruction manual carefully before using this device, especially the
safety instructions, and keep the instruction manual for future use. Should
you give this device to another person, it is vital that you also pass on these
instructions for use.
IMPORTANT INFORMATION!
RETAIN FOR FUTURE USE!
WARNING
These warning notes must be observed to prevent
Explanation of Symbols
This instruction manual belongs to this device.
It contains important information about starting up
and operation. Read the instruction manual thoroughly.
Non-observance of these instructions can result in
serious injury or damage to the device.
any injury to the user.
CAUTION
These notes must be observed to prevent any
damage to the device.
NOTE
These notes give you useful additional information
on the installation or operation.
LOT number
Manufacturer
1
GB
1 Safety Information
GB

Safety
Information
Before connecting the device to your power supply, please ensure
that the supply voltage stated on the rating plate is compatible with
your mains supply. G
Use the device only according to its intended purpose as specified
in the instruction manual. G
The warranty will be invalidated if the device is used for purposes
other than those for which it is intended. G
This device is intended for use in interiors. An exterior usage may
lead to defects or electric shocks. Risk of injury! G
This device is not designed to be used by persons (including
children) with limited physical, sensory or mental abilities, or by
persons with insufficient experience and/or knowledge, unless
under observation by a person responsible for their safety, or unless they have been instructed in the use of the device. G
Children must be supervised to ensure that they do not play with
the device.
G
Do not use the device if it is not working correctly, if it has been
dropped or has fallen into water or has been damaged. G
Do not use the device in a location where extremely high temperatures or humidity may occur.
G
Do not expose the device (especially the lens) to direct sunlight! G
GProtect the unit against moisture.
Keep the device away from adverse surrounding conditions like: G
• Extreme coldness or heat G
• Moisture or too high humidity G
• Direct sunlight G
• Dust or flammable gases, fumes or solvents G
• Strong convulsions
G
• Strong magnetic fields, e.g. close to machines or speakers G
Never place the camera on unstable places. Only place the camer
a
on even and non-slippery underground. G
Never insert objects through the openings into the inside of the
device. G
The device must not be subjected to impacts or vibration. Already
by falling from a low height, the device may be damaged. G
Do not attempt to dismantle the unit, otherwise the warranty will
be invalidated. The unit does not contain any parts that need to
be maintained by the user. G
Do not attempt to repair the device yourself in the event of a malfunction since this will invalidate the warranty Repairs should only .
be carried out by authorised service centres.
G
Clean the unit after use with a damp cloth. Do not use scouring
agent and never submerge the unit in water. G
Only use the unit with accessories designed for this model and
supplied by the manufacturer. Never connect any incompatible
products. G
Please observe the safety hints and instruction manuals of other,
connected devices.
G
•
•
•
•
•
•
•
•
•
•
•
•
•
•
•
•
•
•
•
1 Safety Information
GB
2
GB

•
•
•
Important information when using electrical appliances with a
mains adaptor:
Carefully check the device before each use. Do not use the device
if there is any doubt about the integrity of the unit. Contact the
service point. G
GThis item by no means substitutes adult supervision.
•
Never touch an appliance that has fallen into water. G
Unplug the unit from the mains outlet immediately, if the device
has come in contact with liquids. G
You must not continue to use the unit if the lead or the mains
adaptor are damaged. For safety reasons, these parts may only
be replaced by authorized service personnel. G
You must never submerge the unit, the lead or the mains adaptor
in water or hold them under running water. G
Do not store the lead near a heat source or drag it over sharp
edges. G
Only handle the mains adaptor when your hands are dry. G
Never carry, pull or turn the unit by the mains lead and do not let
the lead get tangled. G
Unplug the mains adaptor from the outlet when the unit is switched off and no longer in use. G
•
•
•
•
•
NOTES regarding the software
• Make sure that your Apple device is running on the latest operating system. For
information about software updates, see the instructions for your Apple device.
• Make sure that your Smart Baby Monitor App is updated at regular intervals. For
information about App updates, see the instructions for your Apple device.
• For the unit to function correctly, the Apple device has to be sufficiently charged.
Users should have a power supply unit or a charging device to hand.
•
3
GB
1 Safety Information
GB

2 Useful Information
GB
4
GB
Downloading the software
To discover the Smart Baby Monitor in your network download the latest version of the
®
free software for PC or Mac from the software section of our homepage.
(http://www.medisana.com/sbm).
Thank you for your confidence in us and congratulations! G
With this Smart Baby Monitor (called SBM in the following) you have acquired a quality
® ® ®
product from MEDISANA. In collaboration with your iPhone , iPod touch , iPad , PC or
MAC you can keep an eye on your child at any time in any place - regardless of whether
you are at home or away. The SBM features a pan/tilt function, which can be adjusted
from afar. To ensure that your MEDISANA SBM provides successful results for a long
time, we recommend that you read carefully through the following notes on its use and
care.
Thank you!
WARNING
Please ensure that the polythene packing is kept away from the reach of
children! Risk of suffocation!
2.1 Items supplied and packaging
Please check first of all that the unit is complete and is not damaged in any way. If in
doubt, do not use the appliance. Send it to a service point. E
The following parts are included: E
1 MEDISANA SBM
1 Quick Start Guide
1 Power Adaptor 5V
1 Plastic stand
1 Network cable
1 Antenna
2 Screws
2 Screw Anchors
The packaging can be reused or recycled. Please dispose properly of any packaging
material no longer required. If you notice any transport damage during unpacking,
please contact your retailer without delay. G
2.2 Range of connections
Depending on the preferrend connectivity you may connect your SBM with your iOSdevice or with your PC or MAC. It is also possible, to access the SBM via iOS-device
AND PC or MAC. This depends on the availability and the preferred way of usage on
your side. The following chapters describe the way of connection for each device
(iOS-device, PC, MAC) separately. Depending on the preferred connectivity you need
to follow the corresponding chapters: G
G
SBM-connection with an iOS-device: Follow chapters 3 and 4 G
SBM-connection with a PC: Follow chapters 3.1 and 5 G
SBM-connection with a MAC: Follow chapters 3.1 and 6

5
GB
3 Getting Started
GB
NOTES
Your Apple device needs to have iOS version 5.0 or later installed for
proper installation. To download the software, you need an Apple ID with
an e-Mail address and a password, as well as an active internet connection. Downloading the software may be subject to charges from your
provider.
3.2 Install the free Smart Baby Monitor app
3.1 Connecting the SBM to your router
1. Connect antenna to the antenna jack and tighten it.
2. Connect the network cable to your router and the SBM (router not included).
3. Connect the included power adaptor .
® ®
iPod touch iPhone
®
iPad
®
PC or Mac
1. Antenna
3. Power adaptor
2. Network cable
Internet
Modem
Router
Network cable
Launch the Apple App Store on your Apple device and search for "medisana" and install
the Smart Baby Monitor app. Alternatively, you may scan this QR code to directly
access the app:
After installation, the corresponding app symbol will be shown on the display of your
Apple device:
3.3 Launching the app G
® ® ®
Ensure that your iPhone , iPad or iPod touch is connected to the same (wireless)
network as your SBM. Start the app and follow the instructions (please check chapter
4.2 First start of the app regarding the installation of the WiFi-network). G
3.4 Disconnecting the network cable G
After setting up the wireless connection (Wi-Fi) you can detach the network cable. You
can now use your SBM with your wireless network.
GB
6
GB
4 Operation with Apple device
4.2 First start of the app
After the start of the app you will be prompted to
check the connection of the SBM. G
This display will appear automatically with every
new start of the app - you may prevent this by
clicking the checkbox "Don't show this screen
again". G
Tap "Next".
4.1 App at a glance
Settings of the SBM
Activate / Deactivate SBM
Switch between gesture control and
arrow control (see chapter 4.5 App
control)
Activity display
(green = connected; red = not connected)
Name of the SBM
Control dialogue (hideable; see chapter
4.5 App control)
Activate / Deactivate audio surveillance
Snapshot: Snapshots will be saved
in the photo app
Intercom function: If speakers are connected
to the audio output socket , you may
soothe your child with your voice via your
iOS-device (with button pressed).

4 Operation with Apple device
GB
7
GB
At first start of the app (chapter 4.2):
Select "Connect" for your wireless network
4.3 Setting up the wireless network
Setting up the wireless network later:
Navigate to:
Setup -> Cameras -> "My Camera" ->
Wireless Setup
After tapping "Next" the app will automatically
search for existing SBM devices. If a device has
been detected, the app will scan for available
wireless networks in the surrounding. G
Follow the steps in chapter 4.3 Setting up the
wireless network.
Activate the wireless network with the switch
and let the SBM search for available networks
by tapping "Find".

4 Operation with Apple device
GB
8
GB
To properly connect the SBM to your wireless network, a reboot of the SBM is necessary. This will
happen automatically. Remove the network cable.
After the restart, check the connection of the SBM
with the status indicator : G
If the LED flashes quickly (approx. 2 to 3 times per
second), the SBM is properly connected to your
wireless network. G
NOTE
If the flashing of the status indicator
stops, the network connection could
not be established. The most common
reason for this is a wrongly entered
password / network key. Re-connect
the network cable and follow the steps
in chapter 4.2 First start of the app.
Enter the network key (Share key).
NOTE
If you don't know your network key,
take a look at the bottom side of your
router, in its instruction manual or
in your records, where you keep
passwords.

4 Operation with Apple device
GB
9
GB
Navigate to:
Settings -> View
4.4 App view
Mirror
Shows a mirror view of the video
Flip
Turns the video view by 180°
Resolution
Select one out of 3 web-optimised resolutions:
160 x 120 / 320 x 240 or 640 x 480
FPS
Frames per second (factory setting =
maximum = 30 fps)
Mode
Image refresh rate of the SBM
LED
Switch status indicator on or off
Brightness
Adjustable from 0 (dark) up to 15 (very bright)
Contrast
Adjustable from 0 (low) up to 6 (very high)
After the reboot of the device, the app automatically will connect to the SBM.

10
GB
4 Operation with Apple device
GB
Gesture control
The gesture control is the same as in your
photos app. Do the following while you watch
a photo:
• Tap on the picture and pull downwards
-> Camera pivots upwards.
• Tap on the picture and pull upwards
-> Camera pivots downwards.
• Tap on the picture and pull to the left
-> Camera turns to the right.
• Tap on the picture and pull to the right
-> Camera turns to the left.
Arrow control
Use the arrow buttons to control the camera
movements.
4.5 App control
Navigate to:
Settings -> Controls
Fade Out
Adjust the fade out time of the control dialogue
fade out
Talk-Back
Switch Talk-Back function on or off.
In order to use the Talk-Back function, external
speakers need to be connected to the Audio
output .
Full screen
Switch full screen display on or off

4 Operation with Apple device
GB
11
GB
Navigate to:
Settings -> Cameras -> Camera Setup...
4.6.2 Manual adding of further SBM devices
Enter the name (Camera Alias) and the IP address of the camera. G
Make sure, that port, user and password are
correct.
NOTE
The default settings for user name and
password are printed onto the bottom
of the SBM, e. g. "user name: admin,
password: medisana".
Tap on "Add". You will automatically be forwarded
to the SBM picture (a connection to the SBM will
be established). For an instant configuration of
the wireless network, tap on "Network Configuration". Follow chapter 4.3 Setting up the wireless
network. After rebooting of the device, tap on
"Camera Setup" and "Add". G
For a subsequent configuration of the network,
follow chapter 4.3 Setting up the wireless
network.
4.6.3 Remove SBM devices
To remove a SBM device, navigate to Settings -> Cameras and tap on the line with the
camera to remove. "Wipe" to the left or to the right to display the button "Delete" and
then tap on "Delete".
4.6.1 Automatically add further SBM devices
Navigate to:
Settings -> Find Camera
A list with available SBM devices will be displayed. If this is not the case, check the correct
start-up of the device (chapter 3) and tap on
"Find". G
Tap on "Add" at the the device to be added you will automatically be forwarded to the
set-up of the wireless network. Follow chapter
4.3 Setting up the wireless network.

12
GB
4 Operation with Apple device
GB
4.6.4 Alarm settings
Navigate to: G
Settings G
The motion and sound alarms are activated by
default. The sensivity is set by default to level 7.
Level 1 means the alarms react sluggish, level
10 means the alarms react very sensitive.
Display of motion alarm (Example):
Display of sound alarm (Example):
Display when connection is lost:
Johann: Motion alarm
Johann: Sound alarm
Johann: Not connected

GB
13
GB
1
2
select
3
4
5
6
admin
******
Downloading the software: G
To discover the Smart Baby Monitor in your network download the latest version of
the free software for PC from the software section of our homepage. G
(http://www.medisana.com/sbm)
Click "Search (F3)" (1) and click on the found device in the list (2). G
The IP address (3) should be given automatically by DHCP and should be the same
as under "Local PC information", except the circled area above. If this is not the
case, proceed with step 3, otherwise with step 4. G
Enter the authentication information (4). The factory default setting for "Account for
watching" is "admin" and for "Password for watching" it is "medisana". Click "Update
(F5)" (5). G
Now click "Browse (F4)" (6). The below shown pop-up window will appear. Enter your
user name (default: "admin") and password (default: "medisana") to access the
network camera.
1.
2.
3.
4.
admin
medisana
Factory default
settings
Example display after click on a found
device (point 1 below)
5 Operation with PC

6 Operation with MAC
GB
14
GB
If you do not see an IP address, your router
is not configured to DHCP-service or is not
working correctly. Restart the camera or
set your IP manually by double-clicking on
the device. G
In this window you may input an IP, subnet,
gateway, DNS Server manually and assign
the HTTP port. G
Enter the authentication information (user
and password) and click "OK". G
After a while the camera with an IP address
will appear in the list. Click twice on the
found device. Your standard browser will
open. Please proceed as described under
"7 The web interface". G
NOTE
The factory default setting for
"User" is "admin" and for "Password" it is "medisana".
Downloading the software: G
To discover the Smart Baby Monitor in your network download the latest version of
®
the free software for Mac from the software section of our homepage. G
(http://www.medisana.com/sbm)
NOTE
When using MacOSX 10.8 „Mountain Lion“ go to:
System Preferences -> Security & Privacy -> Allow applications downloaded
from:
and select the option „Anywhere“.

GB
15
GB
7 The web-interface
7.1 Camera control through internet browser
The welcome screen allows you to choose between 3 different access variants: G
- via Internet Explorer
- via other browser (e.g. FireFox or Safari)
- via browser for mobile devices (Smartphones)
We recommend to use the Internet Explorer, as this provides the full functionality of the
programme. Before first access with Internet Explorer, the provided video player software needs to be installed. If no software is installed on your computer, you will automatically be prompted for installation. To install the software, click "download and install
player (first use)". A pop-up window like this will appear:
Click "RUN". The automatic download and installation procedure will begin. Please pay
attention, that it may be necessary to adjust your browser- and virus-programme settings
for a complete installation. If your browser blocks the installation, open the security settings and lower the safety level or contact your IT- resp. network administrator. G
After the installation of the video player software, click "Mode 1 to view" in the welcome
screen to access your camera with the Internet Explorer browser. It may be necessary
to restart Internet Explorer after the installation in order to see a picture from the camera.

7 The web-interface
GB
16
GB
Camera
movement
control
7.2 Actual view
Chapter 7.2 Actual view
Chapter 7.3 LAN
Chapter 7.4 Wi-Fi
Chapter 7.5 DDNS
Chapter 7.6 Alarm Settings
Chapter 7.7 E-Mail Settings
Chapter 7.8 User Settings
Chapter 7.9 Other Settings
Chapter 7.10 Device Info
Chapter 7.11 Alias Settings
Chapter 7.12 Date & Time Settings
Chapter 7.13 Upgrade Firmware
Chapter 7.14 Factory Settings
Chapter 7.15 Log
Back to
display and
language
selection
Vertical and
horizontal
observation

GB
7 The web-interface
17
GB
7.3 Network - LAN
By default, the SBM obtains its IP address automatically from the DHCP-Server in the
router. If you want to assign an individual IP, remove the tick and enter the desired IP
address.
NOTE
If your browser cannot connect to the SBM, please repeat the steps in
chapter 5 (Operation with PC) resp. chapter 6 (Operation with MAC).
Click „Submit“ to save the settings.

7 The web-interface
GB
18
GB
7.4 Network - Wireless (Wi-Fi)
Click „Scan“. G
After the scan process, the available wireless networks are displayed in the list. Select
your network and enter the network key (share key) in the field "Share Key". Confirm
your input with "Submit". The SBM device needs to reboot in order to properly connect
to the selected network - this happens automatically. Remove the network cable from
the SBM. After the restart, check the connection of the SBM with the status indicator
: If the LED flashes quickly (approx. 2 to 3 times per second), the SBM is properly
connected to your wireless network. G
G
Click „Submit“ to save the settings.
NOTE
If the flashing of the status indicator stops, the network connection could
not be established. The most common reason for this is a wrongly
entered password / network key. Re-connect the network cable and follow
the steps in chapter 3 and 5 resp. 6.

GB
7 The web-interface
19
GB
7.5 Network - DDNS
Manufacturer's Domain G
You may reach your SBM also through internet (WAN, see chapter 8). Therefore,
a DDNS (Domain-Name-System-Entry) needs to be established. The default DDNS
(which is already established for your convenience) can be found under "Manufacturer's Domain) in the web-interface. SBM devices beginning with LOT R1210CC79
bear this information also on the bottom side of the device itself. G
Third party DDNS G
You may also choose the DDNS service from a third party provider. Therefore, you
need to enter your user name and password (informed by the third party provider)
under "DDNS Service".
G
Click „Submit“ to save the settings.
WARNING
For safety reasons we recommend, to change the user name and password if you configure a WAN access (according to chapter 8) to your
SBM. Furthermore, if you hand over your DDNS to other people, you
should configure other users as "guests" (with limited rights).
More information can be found in chapter 7.8 Advanced - User Settings.

7 The web-interface
GB
20
GB
Display of motion alarm (Example):
Display of sound alarm (Example):
Display when connection is lost:
Johann: Motion alarm
Johann: Sound alarm
Johann: Not connected
7.6 Alarm - Alarm Settings
The motion and sound alarms are activated by default. The sensivity is set by default
to level 7. Level 1 means the alarms react sluggish, level 10 means the alarms react
very sensitive. If you activate the option "Send Mail on Alarm", you need to adjust the
E-Mail setting - check chapter 7.7 Alarm - E-Mail Settings.
Click „Submit“ to save the settings.

GB
7 The web-interface
21
GB
7.7 Alarm - E-Mail Settings
Is the option "Send Mail on Alarm" (see chapter 7.6 Alarm - Alarm Settings) activated,
you need to enter the following information. Only then you can receive an E-Mail with
5 photos in case of an alarm: G
Sender G
Name of sender to be shown upon receipt of the E-Mail (e.g. SBM Louisa). G
Receiver G
In case of alarm, you have the option to let the program send E-Mails to max. 4 receivers. Enter the E-Mail-addresses in the fields. G
Enter the address of the Outgoing Mail Server (SMTP Server) of the sending EMail-Address (e.g. smtp.t-online.de). G
Enter the respective Port of the Outgoing Mail Server (default: 25) G
Select the safety protocol for the transfer of the E-Mail; if necessary change the port
accordingly. G
If the Outgoing Mail Server needs authentification, activate this option and enter your
user name and password. You may check your values by clicking "Test". G
Activate "Report Internet IP by Mail", if the external IP address should be informed
in the E-Mail.
G
Click „Submit“ to save the settings.

7 The web-interface
GB
22
GB
7.8 Advanced - User Settings
You may set up a maximum of 8 users with password, which can access your SBM
device. Each user needs to be grouped to a specific user group - there a three
different user groups with different access rights. G
User groups: G
Administrator G
Complete access: The admin can set-up or adjust every possible value (e.g. WiFisettings, user settings etc.)
G
User G
Operational access: A user CANNOT amend the set-up or installation information,
but he can operate the SBM via gesture or arrow control (e.g. vertical and horizontal turns / pivots).
G
Guest G
Observational access: A guest CANNOT amend the set-up or installation information and CANNOT operate the SBM via gesture or arrow control. A guest can
only watch a video- or audiobroadcast from the SBM.
Click „Submit“ to save the settings.
NOTES
- If you have changed the settings for "admin", you will be prompted to
enter the new data after clicking "Submit".
- If you have changed settings and you cannot get access anymore after
clicking "Submit", you can reset the SBM device. Please follow chapter
"9 Reset to factory default settings" if you want to reset the SBM.

GB
7 The web-interface
23
GB
7.9 Advanced - Other Settings
Status LED Mode
Switch the status indicator on or off.
PTZ* Center on Start
Centers the camera at the start.
Horizon / Vertical Patrol Rounds
Number of turns / pivots at the start of the SBM.
Manual PTZ* Rate
Speed of the turn- / pivot-movements with gesture or arrow control
(0 = quick, 10 = slow)
Auto Horizon / Vertical Rate
Speed of the turn- / pivot-movements with rounds at the start of the SBM,
upon centering and patrolling.
(0 = quick, 10 = slow)
Click „Submit“ to save the settings.
* PTZ = Pan-Tilt-Zoom

7 The web-interface
GB
24
GB
7.10 Maintain - Device Info
Shows actual information of the device status.
Change the name of the SBM and click "Submit" to save the settings.
7.11 Maintain - Alias Settings

GB
7 The web-interface
25
GB
7.12 Maintain - Date & Time Settings
Synchronise time with PC
Select the option „Sync with PC Time“ and click "Submit" to save the setting.
Synchronise time with Network-Time-Protocol Server (NTP Server)
Select the option „Sync with NTP Server“ and select a server to synchronise with.
Click "Submit" to save the setting.

7 The web-interface
GB
26
GB
7.13 Maintain - Upgrade Firmware
You can find actual versions of firmware and web-interface software on the website
http://www.medisana.com/sbm in the software section. G
Save the new file to your desktop. G
Select the respective file through the button "Browse" and click "Submit".
WARNING
Do not unplug the SBM from the mains supply during the update process.
After the update, the SBM reboots automatically, it may be necessary to
follow the instructions in chapter 5 resp. 6 again, to properly reconnect the
SBM.
After you have confirmed the reset to factory settings, the reset will be executed.
This is similar to the press and hold (for approx. 10 seconds) of the reset button .
7.14 Maintain - Factory Settings
Browse
Browse

GB
7 The web-interface
27
GB
7.15 Maintain - Log
Via the log you may follow the access processes and alarm messages over time.

8 Operation via Internet (WAN)
GB
28
GB
Operation via Internet (WAN)
For safety reasons the NAT-firewall normally blocks the access to your SBM from the
internet (WAN). If you want to allow the access to your SBM via internet, you need to
adjust your firewall accordingly. G
As there are many different kinds of routers available on the market, we recommend to
consult your router instruction manual to learn how you can set-up a port forwarding
(or virtual server as it is called sometimes). Check out the router manual for these terms
and follow the instructions given. The below example refers to a router of the brand
"Fritz!Box" (Model 7390):
1. After you logged in to your
router, choose „Internet“.
2. Select „Enable“.
3. Now click the button
"New Portforwarding" in the lower right area.
4. In the drop-down box se lect "Other applications"
under "Activate portfor-
warding for". Enter the
name of your SBM in the
field "Description" (e.g.
"Smart Baby Monitor 3G").
5. In the drop-down box select
"TCP"-protocol. Enter the
port no. 80 in the fields
"from port", "to port" and
"at port". In the field "at
computer" you should
select (via drop-box) "ma-
nual input of IP-address".
Enter the IP-address of
your SBM device (e.g.
192.168.1.75) in the field
"IP-address". Navigate to
Settings -> Cameras -> "my SBM" -> address in the app to see the IP-address.
Confirm the settings by pressing "OK". The router setup for using the 3G connec-
tion is now complete.

GB
29
GB
9 Reset to factory default settings
Access the web-interface as descibed in chapter 5 resp. 6. Navigate to Maintain -> Factory Settings (see chapter 7.14 Maintain - Factory Settings). Confirm the reset and wait
for the SBM to reboot.
9.1 Resetting the device with the reset button :
Make sure, that the SBM is connected to the mains. Use a ball-pen or similar and
guide it through the opening of the reset-button on the bottom side of the device
(see page III, point ). Press and hold the button for more than 10 seconds. G
The status indicator goes off. When you release the button, the SBM will reboot.
You have successfully reset the SBM to the factory default settings.
9.2 Resetting the device via web-interface:

GB
30
GB
10 Miscellaneous
The interaction with the camera resp. the camera control are working very slowly
only - what is the problem? G
The network bandwith is important for the possible connection speed. The bandwith for
videos of size 640x480@10 fps should be at least between 4 and 5 Mbits and for videos
of size 320x240@30 fps between 1.2 and 1.6 Mbits. Does your network provide lower
bandwith rates, the working speed will decrease remarkably. G
After unlocking my Apple device, the camera view cannot be loaded correctly,
although I had a good connection before automatic lock was activated. G
What should I do? G
Set the time for Auto-Lock in the general settings of your Apple device to "NEVER", if
you plan a constant surveillance. Alternatively you may close the app after your view.
For a new view, restart the app. G
The camera has been found by the software, but I cannot access the device.
What could be the cause for this?
G
In case the IP address of the camera and the PC are not within the same range in the
network, you need to adapt it. The range of the network is identified by the first 3 number sets of the IP address. E.g. if the IP address of the PC is 192.168.0.100, the camera
can only be accessed within the range of 192.168.0.1 to 192.168.0.255 properly.
G
The camera can be accessed through a public IP address, but not through the
manufacturer's domain. G
Make sure, the DNS settings of the camera and the PC are consistent. Please observe
the example below - the DNS needs to be identical. G
10.1 FAQ
NOTE
More, actual FAQ (Frequently Asked Questions) can be found in the
Internet: www.medisana.com/SBM, tab "FAQ".

GB
10 Miscellaneous
31
GB
Image acquisition system: 300k CMOS sensor, minimum illumination 0 LUX (Auto IR)
Lens: f=3,6mm, F=2.0
Pan coverage: 0 - 270°
Tilt coverage: 0 - 120 °
Lighting assistant: 10 x 850nm IR LEDs, 5m Auto-Control
Video resolution: 640x480 (VGA), 320x240 (QVGA), 160x120 (QQVGA)
Compression method: MJPEG
Frame rate: 30 fps
Bitrate: 128kbps - 5 Mbps
Image rotation: Mirror / Flip
Audio compression: ADPCM
Network protocols: TCP/IP, UDP/IP, HTTP, SMTP, FTP, DHCP, DDNS, UPNP, NTP,
PPPOE
W-LAN: 802.11 b/g
User level: 3 levels
Alarm methods: E-Mail / LPN (Local Push Notification)
Upgrade: via network
Network connection: RJ-45 Ethernet 10Base-T/100Base-TX
Audio input: Integrated microphone x 1
Audio output: 1 x 3.5mm jack
Sofware for iPod Touch, iPhone and iPad: iOS 5.0 or newer, free app
Supported operating systems (PC/Laptop): Microsoft Windows 98 or higher
Power supply: 5 VDC
Power consumption: max. 7.5 W
Weight: approx. 245 g
Measurements: approx. L 100 x W 99 x H 118 mm
Operating temperature: 0°C - 40°C, relative humidity: 10 % - 80 %
Article no.: 52345
EAN Code: 40 15588 52345 8
In accordance with our policy of continual product improvement, we reserve
the right to make technical and optical changes without notice.
!
10.2 Technical specifications

32
GB
11 Warranty
GB
Please contact your dealer or the service centre in case of a claim under the warranty.
If you have to return the unit, please enclose a copy of your receipt and state what the
defect is.
The following warranty terms apply:
1. The warranty period for MEDISANA products is three years from date of purchase.
In case of a warranty claim, the date of purchase has to be proven by means of the
sales receipt or invoice.
2. Defects in material or workmanship will be removed free of charge within the warranty
period.
3. Repairs under warranty do not extend the warranty period either for the unit or for the
replacement parts.
4. The following is excluded under the warranty:
a. All damage which has arisen due to improper treatment, e.g. nonobservance of the
user instructions.
b. All damage which is due to repairs or tampering by the customer or unauthorised
third parties.
c. Damage which has arisen during transport from the manufacturer to the consumer or
during transport to the service centre.
d. Accessories which are subject to normal wear and tear.
5. Liability for direct or indirect consequential losses caused by the unit are excluded even
if the damage to the unit is accepted as a warranty claim.
MEDISANA AG
Jagenbergstraße 19
41468 NEUSS
Germany
eMail: info@medisana.de
Internet: www.medisana.com
11.1 Warranty and repair terms

GB
11 Warranty
33
GB
For service, accessories and spare parts, please contact:
Medisana Healthcare UK Limited,
Emery House,
Greatbridge Road,
Romsey,
Hampshire, SO51 0AD
United Kingdom
Tel.: (+44) 0844 888 20 32
email: customerservice@medisana.co.uk
web: www.medisana.co.uk


1
TR
bu cihazı kullanmadan önce kullanım kılavuzunu dikkatle okuyun,
ve ileride kullanmak için kullanım kılavuzunu saklayın.
Eğer bu cihazı başka bir kişiye verecekseniz, bu kullanım kılavuzunu da verin.
GELECEKTE KULLANILA-
BİLECEK ÖNEMLİ BİLGİLER!
Bu kullanım kılavuzu Bu cihaz aittir. Bu kılavuz,
çalışmadan önce yapılması gereken işlemler hakkında
önemli bilgiler içerir. Kılavuzunu dikkatlice okuyun.
Bu talimatlara uyulmaması ciddi yaralanmalara neden
olabilir veya cihaza zarar verebilir.
UYARI
Bu uyarı notları kullanıcıya herhangi bir yaralanma
önlemek için uyulması gerekir.
DİKKAT
Bu notlar, cihaza zarar gelmesini önlemek içindir.
NOT
Bu notlar kurulumda veya çalışmada ek yararlı bilgiler
verir.
LOT numarası
Üretici
Semboller açıklaması:
1 Güvenlik Bilgisi
TR

Kullanım kılavuzunda belirtildiği gibi sadece amacına göre aygıtı
kullanın.
Cihaz amacı dışında kullanılırsa garanti geçersiz olacaktır.
Bu cihaz bina içi kullanım için tasarlanmıştır. Bina dışı kullanım
yaralanmalara, elektrik çarpmalarına yol açabilir.Yaralanma
tehlikesi!
Bu cihaz, gözetim altında olmadıkça kendi güvenliklerinden sorumlu
olmayan kişiler tarafından, sınırlı fiziksel, duyusal veya zihinsel
yetenekleri olan kişiler (çocukla dahil) tarafından ya da yetersiz deneyim
ve / veya bilgiye sahip kişiler tarafından kullanılmak üzere tasarlanmış
DEĞİLDİR.
Çocukları bu cihazla oynaması yasaktır,
Eğer cihaz düzgün çalışmıyorsa, onu kullanmayınız, eğer suya düşmüşse yada zarar görmüşse onu kullanmayınız
Bu cihazı yüksek sıcaklıkta yada yüksek nemde kullamayınız,
Doğrudan güneş ışığına cihaz (özellikle objektif) maruz bırakmayın!
Cihazı neme karşı koruyunuz,
Cihazı aşağıdaki koşullardan KORUYUNUZ:
* Aşırı soğukluk veya ısı
* Nem ya da çok yüksek nem
* Doğrudan güneş ışığı,
* Toz veya yanıcı gaz, duman veya solvent,
* Güçlü manyetik alanlar, örneğin makinelere veya hoparlörlere yakın
Dengesiz yerlerde cihazı kesinlikle çalıştırmayın, sadece düz ve kaygan
olmayan zeminlere kamerayı yerleştirin,
Cihazın içine deliklerden nesne sokmayınız,
Cihaz titreşime maruz bırakılmamalıdır,
Cihazı düşürmeyiniz, zarar görebilir,
Birim sökmeye çalışmayın, aksi takdirde garanti geçersiz olacaktır.
Ünite kullanıcı tarafından bakımının yapılması gereken herhangi bir
parça bulunmamaktadır.
Bir arıza durumunda cihazı kendiniz tamir etmeye çalışmayın. Bu
garantiyi geçersiz kılar,
Tamir işlemleri sadece yetkili servis merkezleri tarafından yapılmalıdır,
Nemli bir bezle kullanımdan sonra üniteyi temizleyin, kesinlikle suya
batırmayın,
Sadece bu model için tasarlanmış aksesuar ile birimi kullanın, herhangi
bir uyumsuz ürünü bağlamayın,
Bu, güvenlik ipuçları ve kullanım kılavuzunu dikkatle saklayınız,
Güvenlik Bilgisi
•
•
•
•
•
•
•
•
•
•
•
•
•
•
•
•
2
TR
1 Güvenlik Bilgisi
TR
•
•
•
•
•

•
•
•
Elektrikli ev aletlerinin adaptörle kullanımında önemli bilgiler:
Dikkatlice her kullanımdan önce cihazı kontrol edin.Ünitenin bütünlüğü
hakkında herhangi bir şüphe varsa cihazı kullanmayın. Servis noktasına
başvurun.
•
Suya düşmüş bir cihaz asla dokunmayın.
Cihaz sıvıya düşerse, hemen elektrik prizinden adaptörü çıkarınız,
Eğer addaptör zarar görmüşse bu birim kullanmaya devam etmemelidir.
Güvenlik nedeniyle, bu parçalar, yetkili servis personeli tarafından
değiştirilmelidir.
Adaptör, kesinlikle suya batırılmamalı, suda yıkanmamalıdır.
Isıtıcının üzerine koymayın, keskin köşelerden saklayın,
Adaptöre, kuru elle dokunun,
Adaptörün fişinden tutup taşımayın,
Uzun süre kullanmayacaksanız, adaptörü fişten çekin.
•
•
•
•
•
NOTLAR (Yazılım ile ilgili):
• Apple cihazınızın en son işletim sistemi üzerinde çalıştığından emin olun. Yazılım
güncellemeleri hakkında bilgi için, Apple cihaz için talimatlara bakın.
• Akıllı Bebek Monitörü Uygulaması düzenli aralıklarla güncel olduğundan emin olun.
Uygulama güncelleştirmeleri hakkında bilgi için, Apple cihaz için talimatlara bakın.
• Cihazın doğru çalışması için Apple cihazı bataryasının yeterince dolu olması gerekir.
3
TR
1 Güvenlik Bilgisi
TR

4
TR
2 Yararlı Bilgiler
Yazılım indirme
Akıllı Bebek Monitörünü keşfetmek için bizim ana sayfamıza bağlanıp, yazılım bölümün-
®
den PC veya Mac için bedava yazılımın en son sürümü indiriniz.
(http://www.medisana.com/sbm).
Bize olan güveniniz için teşekkür ederiz ve tebrikler!Bu Akıllı Bebek Monitörü (aşağıda
®
SBM 'de denir) MEDISANA ile gelen kaliteli bir ürün elde etmiş oldunuz. iPhone , iPod
® ® ®
Teşekkürler!
! UYARI !
Polietilen ambalajı çocukların ulaşamayacağı yerde tutunuz!
Boğulma tehlikesi!
2.1 Paket İçindekiler:
Her şeyden önce paket içeriğini kontrol edin. Eğer eksik görürseniz, cihazı kullanmayın. Bir servis noktasına gönderin.
Aşağıdaki parçalar dahildir: E
1 MEDISANA SBM
1 Hızlı Başlangıç Kılavuzu
1 Güç Adaptörü 5V
1 Plastik Ayak
1 Ağ kablosu
1 Anten
2 Vidalar
2 Plastik Vida Yerleri (dübel)
Ambalaj yeniden kullanılabilir veya geri dönüştürülebilir. Artık gerekmeyen her türlü
ambalaj malzemesini lütfen çöpe atınız. Siz, açma sırasında herhangi bir nakliye
hasarı fark ederseniz, gecikmeden bayiye başvurunuz.
2.2 Bağlantıların aralığı:
Tercihinize göre SBM'ye iOS cihazı, PC'niz veya MAC ile bağlanabilirsiniz. Bu tamamen
sizin isteğinize kalmış bir yöntemdir. Ayrıca SBM'ye iOS cihazı ile VE PC veya MAC ile
de bağlanmak mümkündür. Kullanım tercihi size kalmıştır. İzleyen bölümlerde ayrı ayrı
her bir cihaz için bağlantı şekli (iOS cihaz, PC, MAC) açıklanmıştır:
SBM - iOS bağlantısı: Bölüm 3 ve 4
SBM - PC bağlantısı: Bölüm 3.1 ve 5
SBM - MAC bağlantısı: Bölüm 3.1 ve 6
TR
touch , iPad , PC veya MAC işbirliği ile, siz, herhangi bir yerde ve herhangi bir zamanda
çocuğunuzun gözü kulağı olabilirsiniz - nerede olursanız olsun. SBM ayarlanabilir özellik
leri kameranın sağa- sola ve yukarı aşağı hareket etmesini sağlar, bu özellikleri uzaktan
kontrol edilebilir (mobil cihazınızla kontrol edebilirsiniz) MEDISANA SBM ile uzun süre
başarılı sonuçlar almak istiyorsanız, size kullanımı ve bakımı ile ilgili aşağıdaki uyarılar
dikkatle okumanızı öneririz.

5
TR
3 Başlarken
NOTLAR
Yükleme tamamlandıktan sonra, aşağıdaki uygulama simgesi Apple cihazınızın
ekranında görülmeli:
3.3 Uygulamayı başlatma G
® ® ®
3.4 Ağ kablosunu çıkarma G
Kablosuz bağlantı (Wi-Fi) kurduktan sonra ağ kablosu çıkartabilirsiniz.
Artık SBM'yi kablosuz ağ ile kullanabilirsiniz.
3.1 SBM'ye Router'ınızdan Bağlanmak
1. Anteni , anten girişine bağlayın ve sıkın.
2. Network kablosunu router'ınıza veya modeminizin boş bir portuna takın, diğer ucunu
SBM'ni network girişine bağlayın,
3. Verilen güç adaptörünü bağlayın,
® ®
iPod touch iPhone
®
iPad
®
PC / MAC
1. Anten
3. Adaptörü
2. Ağ kablosu
Internet
Módem
Router
Ağ kablosu
TR
3.2 Ücretsiz Akıllı Bebek Monitörü uygulamasını yükleyin
IPhone , iPad veya iPod touch cihazının SBM ile aynı (kablosuz) ağa bağlı olduğundan emin olun.
Uygulamayı başlatın ve talimatları izleyin (şu bölümleri kontrol ediniz: 1- WiFi ağ
kurulumu, 2- İlk Başlangıç).
Apple cihazın iOS sürümü 5.0 veya daha yüksek versiyonda olması
gerekir. Yazılımı indirmek için, bir e-posta adresi, şifre ve de etkin bir
internet bağlantısı olan bir Apple kimliği gerekir. Yazılım indirilmesi ücrete
tabi olabilir.
Apple cihazınızda, App Store'ye girin ve "MEDISANA" için arama başlatın ve bulduğunuz Akıllı Bebek Monitörü uygulamasını yükleyin. Alternatif olarak, doğrudan bu
uygulamaya erişmek için aşağıdaki
QR kodu taramasını da yapabilirsiniz.
G

6
TR
4 Apple cihazı ile çalışma
4.2 Uygulamanın ilk kullanımı
Uygulama ilk kez başladığı zaman sizden SBM
bağlantısını kontrol etmeniz istenir.
"İleri" düğmesine dokunun.
4.1 Bir bakışta Uygulama:
Faaliyet Göstergesi
(yeşil = bağlı; kırmızı = bağlı değil)
SBM adı
Kontrol diyalogu (gizlenebilir; bölümüne bakın
4.5 App kontrolü)
Sesi Etkinleştirme / Devre dışı bırakma
EkranResmi: Anlık fotoğraf olarak kaydedilir
Interkom fonksiyonu: ses çıkış soketine ,
hoparlörler bağlıysa şunları yapabilirsiniz:
sesinizi (düğmeye basarak) bebeğinize
iletebilir onu yatıştırabilirsiniz.
TR
“Settings": SBM ayarlarını
etkinleştirme / devre dışı bırakmaGereç
kontrol ve yön kontrol arasında geçiş
anahtarı (bölüm 4.5 uygulamasına bakın)
Bu fonksiyon, uygulama her açıldığında
otomatik olarak görünür, siz "Bu ekranı bir
daha gösterme" onay kutusunu tıklayarak bu
ekranı engelleyebilirsiniz.

4 Apple cihazı ile çalışma
7
TR
Uygulamayı ilk kez başlatırken (Bölüm 4.2):
Kablosuz ağ için "Bağlan" ı seçin
4.3 Kablosuz ağ kurma
Bölüm 4.3 kablosuz ağ kurma adımları izleyin.
TR
"İleri" düğmesine dokunduktan sonra uygulama
otomatik olarak mevcut SBM cihazlarını
yakınındaki kablosuz ağları tarar.arayacaktır. Eğer
bir cihaz bulunursa uyarı olarak ekrana gelecektir,
Daha sonra kablosuz ağ kurulumu için şu
yolu takip ediniz:
Setup -> Cameras -> "My Camera" ->
Wireless Setup
Düğmeye basıp kablosuz ağı etkinleştiriniz ve
"Bul" ("Find") düğmesine dokunarak kullanılabilir ağları bulunuz; için SBM arama sağlar.
Burada kendi kullandığınız (evinizin ya da
işyerinizin) internet ismi ve şifresini girerek
kendi Apple cihazınızı aynı ağa bağlamalısınız.

8
TR
NOT
adımları izleyin.
Ağ anahtarını giriniz.
NOT
4 Apple cihazı ile çalışma
TR
Eğer ağ anahtarını bilmiyorsanız,
modeminizin kendi kullanma kılavuzundan, kendi kaydettiğiniz yerden,
yada modemin altına yazılmış olabilir,
buralara bakın;
Eğer hala bulamadıysanız, modeminizi
"fabrika ayarlarına" almanız gereklidir.
Bu sorunu modeminizin markasını ve
modelini bir kağıda yazdıktan sonra,
modeminizin teknik servisini arayarak
çözebilirsiniz.
Kablosuz ağınıza düzgün bağlanmak için, SBM'yi
yeniden başlatınız. Bu otomatik olacaktır.
Ağ kablosunu çıkarın.
Yeniden başlatma sonrasında, durum göstergesi
ile SBM bağlantısını kontrol edin :
Eğer, hızla LED yanıp sönüyorsa (yaklaşık
saniyede 2 ila 3 kez), SBM düzgün şekilde
kablosuz ağa bağlıdır. G
Eğer yanıp sönme durursa, ağ
bağlantısı kurulamadı demektir.
Bunun en yaygın nedeni bir yanlış
girilen parola ya da ağ anahtarıdır.
Ağ kablosunu yeniden takın ve App
bölüm 4.2 İlk başlangıç

9
TR
Uygulama içinde (Settings -> View / Ayarlar ->
Görünüm yapınız). Şu ayarlar mevcuttur:
4.4 Uygulama Görünümü:
Mirror (Ayna)
Videoyu,ayna görünümünde gösterir
Flip (Döndür)
Videoyu 180 derece döndürür
Resolution (Çözünürlük)
3 web optimize ekranından birini seçin:
160 x 120, 320 x 240 veya 640 x 480
Mode (Mod)
SBM Görüntü yenileme hızı
LED
Açık veya kapalı durum göstergesi ile geçiş
Brightness (Parlaklik)
0 (koyu), 15(çok parlak) arasında ayarlanabilir
Contrast (Kontrast)
0 (düşük), 6(çok yüksek) arasında ayarlanabilir
Cihazı yeniden başlattığınızda, uygulama
kendiliğinden SBM'ye bağlanacaktır.
4 Apple cihazı ile çalışma
TR
FPS : Saniyedeki resim hızı
(fabrika ayarı, saniyede 30 çerçeve)

10
Hareket kontrolü
Hareket kontrolü fotoğraflarınızı uygulamasıyla
aynıdır. Bir fotoğraf izlerken aşağıdakileri yapın:
4.5 Uygulama kontrol
Gidiniz:
Settings -> Controls (Ayarlar -> Kontroller)
Fade out (Kararma)
Kontrol diyalogu ile karartma süresini ayarlayın.
Kararma
Talk-Back
Basarak, Talk-Back fonksiyonunu, açın veya kapayın.
Bu fonksiyonu, kullanmak için ses çıkışına hoparlörlerin bağlı olması gerekir.
Full screen (Tam ekran)
Basarak, tam ekran geçişi, açın veya kapayın
TR
4 Apple cihazı ile çalışma
TR
• Resme dokunun ve aşağı doğru
çekin- Yukarı> Kamera döner.
• resme dokunun ve yukarı doğru çekin
-> Kamera döner aşağı doğru.
• resmi dokunun ve sola çekin
-> Kamera sağa döner.
• resmi dokunun ve sağa çekin
-> Kamera sola döner.
Ok kontrolü
Kamera hareketlerini kontrol etmek için
ilgili yönlere ok tuşlarını kullanın.

11
Gidiniz:
Settings -> Cameras -> Camera Setup...
4.6.2 Elle SBM cihazlarını ekleme
Kamera adını (Kamera Alias ) ve kameranın IP
adresini girin. Port için kullanıcı ve şifre doğru
olduğundan emin olun.
NOT
Kullanıcı adı ve parola için SBM
varsayılan ayarları"kullanıcı adı:
admin, şifre: MEDISANA" dır. Bu
bilgi kameranın altındaki etikette
vardır.
"Ekle" (Add) üzerine dokunun. Otomatik olarak
SBM'ye (SBM bağlantı kurulacak) iletilir. Kablosuz
ağ hızlı yapılandırması için, "Ağ Yapılandırması"
üzerine dokunun. g
Kablosuz ağ ayarını (Bölüm 4.3) izleyin. Cihazın
yeniden başlattıktan sonra, "Kamera Ayarı"
dokunun ve "Ekle" seçin. Ağın bir sonraki yapılandırma ayarları için, kablosuz ağ Bölüm 4.3 Ayar
izleyin.
Bir SBM aygıtı kaldırmak için, Ayarlar-> Kameralar ve kaldırmak istediğiniz kameraya
satırına dokunun. "Sil" Düğmesini görüntülemek için sola veya sağa ekranı kaydırın
ve "Sil" üzerine dokunun.
4.6.1 Otomatik olarak daha SBM cihazlar ekleyin
Gidiniz:
Settings -> Find Camera (Ayarlar -> Kamera bul)
Kullanılabilir SBM cihazlarla bir liste görüntülenir.
Bu durumda değilse, doğru cihazla başlayıp
başlamadığınızı (bölüm 3) kontrol edin ve "Bul"
üzerine dokunun. g
Eklenecek cihazda "Ekle"ye dokunun - otomatik
olarak kurulum kablosuz ağa iletilir. "Bölüm 4.3
Kablosuz ağ kurma"yı izleyin.
TR
4 Apple cihazı ile çalışma
TR
4.6.3 SBM Cihazları Kaldırmak

12
TR
4.6.4 Alarm Ayarları
Gidiniz: G
Settings (Ayarlar) G
Hareket ve ses alarm varsayılan olarak aktif hale
gelir.
Duyarlılık seviyesi 7, varsayılan olarak ayarlanır.
Seviye 1 alarm yavaş tepki anlamına gelir seviyesi
10 alarmları çok hassas tepki anlamına gelir.
Hareket alarmı (Örnek) gösterimi:
Sesli alarm (Örnek) gösterimi:
Bağlantı kaybolduğunda Ekran:
Johann: Motion alarm
Johann: Sound alarm
Johann: Not connected
4 Apple cihazı ile çalışma
TR

13
TR
5 PC ile Çalışma
1
2
seleccionar
3
4
5
6
admin
******
1.
2.
3.
4.
admin
medisana
Yazılım indirme:
TR
Aşağıdaki 1. şart sağlandıktan sonraki ekran çıktısı
Ağınıza Akıllı Bebek Monitörünü (SBM) eklemek için (http://www.medisana.com/sbm)
sayfasına gidiniz. Buradaki yazılım sekmesinden PCiçin ücretsiz yazılımın en son
sürümünü indiriniz.
Arama "Search(F3)" (1) tıklayın ve (2) listesin'de bulunan cihaza tıklayın.
IP adresini çok dikkatli bir şekilde ve sabit vermelisiniz. Bunun için resmi dikkatli
inceleyiniz. Kamera, sizin ADSL modemin IP aralığında olmalıdır. Aksi takdirde görüntü
alamazsınız. ilk olarak "Set IP automatically" check düğmesi önündeki seçili işareti
kaldırın; daha sonra altındaki tüm alanlar sizin girişiniz için açılacaktır. Buraya yazacağınız rakamlar solda gördüğünüz PC nizin rakamlarıyla aynı olmalıdır. Sadece kırmızı
yuvarlak içindeki rakam farklı olmalıdır. Lütfen bu rakamı özenle bir yere yazınız. Bu IP,
sizin kameranıza dışarıdan erişmeniz için gerekli olacak "iç IP"dir.
Kimlik doğrulama bilgilerini (4) girin. varsayılan fabrika ayarı kullanıcı adı "admin" ve
parola "medisana" dır. "Güncelleme (F5)" (5) tıklayın.
Şimdi "(F4) Browse" (6) düğmesine tıklayın. Aşağıda gösterilen açılır pencere görünür.
Ve kullanıcı adı ("admin" varsayılan) şifre (varsayılan: "medisana") ağınızdan
kameraya erişmek için girin, OK'e basın

14
TR
6 MAC ile Çalışma
Yandaki pencerede elle giriş için IP, alt ağ, ağ
geçidi, DNS Sunucusu ve HTTP bağlantı
noktası rakamları örnek olarak gösterilmiştir.
Kimlik doğrulama bilgilerini (kullanıcı ve şifre)
girin ve "Tamam" butonuna tıklayınız.
Bir süre sonra bir IP adresi ile kamera listede
gözükecektir. Bulunan cihaz üzerinde iki kez
tıklayın. Sizin standart tarayıcı açılacaktır.
"7 web arayüzü" bölümünde anlatıldığı gibi
devam edin..
NOT
MacOSX 10.8 kullanırken "Mountain Lion" gidin:
Sistem Tercihleri -> Güvenlik ve Gizlilik -> indirilebilir uygulamalar izin ver:
ve "Anywhere" seçeneğini seçin.
Yazılım indirme:
Ağınıza Akıllı Bebek Monitörü (bundan sonra SBM) keşfetmek için
®
TR
NOT
"Kullanıcı" için varsayılan
fabrika ayarı "admin" ve "Parola"
için "MEDISANA" dir.
(http://www.medisana.com/sbm) sayfasına bağlanın yazılım bölümünden Mac için
ücretsiz yazılımın en son sürümü indirin.
Bir IP adresi göremiyorsanız, yönlendirici
DHCP-hizmeti için yapılandırılmamış veya
düzgün çalışmıyor demektir. Kameranızı
yeniden başlatın veya cihaz üzerinde çift
tıklayarak elle IP ayarlayın.

15
TR
7 Web Arayüzü
7.1 İnternet tarayıcısı üzerinden Kamera kontrol
Bu açılış ekranı için 3 farklı erişim seçeneğiniz vardır:
- Internet Explorer ile
- Firefox, Chrome veya Safari ile
- Mobil cihazlar için tarayıcı (akıllı telefonlar) ile
Biz tam işlevsellik için Internet Explorer kullanmanızı öneririz.
Internet Explorer ile ilk erişimden önce verilen video oynatıcı yazılımların yüklü olması
gerekmektedir. Eğer hiçbir yazılım bilgisayarınızda yüklü değil ise, otomatik olarak
kurulmak istenir. Yazılımı yüklemek için, "download and install player (first use)" butonuna tıklayınız.
Böyle bir açılır pencere görünecektir:
TR
"RUN" a tıklayın. Otomatik indirme ve yükleme işlemi başlayacaktır. Lütfen dikkat: Tam
bir kurulum için tarayıcı ve virüs programı ayarlarını yapmak için gerekli olabilir. Eğer
tarayıcınız kurulumu engellerse, güvenlik ayarlarını açın ve güvenlik düzeyi daha düşük
seviyeye ayarlayın ya da ağ yöneticinize başvurun.
g
Video oynatıcı yazılım yüklendikten sonra, Internet Explorer tarayıcısı ile kamera erişmek
için karşılama ekranında görülen "Mode 1 to view" satırına tıklayınız. Bu kameradan
bir resim görmek için kurulumdan sonra Internet Explorer'ı yeniden başlatmanız
gerekebilir.

16
TR
7 Web Arayüzü
kamera yön
kontrol
7.2 Gerçek görünümü
Bölüm 7.2 Gerçek görünümü
Bölüm 7.3 LAN
Bölüm 7.4 Wi-Fi
Bölüm 7.5 DDNS
Bölüm 7.6 Alarm Ayarları
Bölüm 7.7 E-Posta Ayarları
Bölüm 7.8 Kullanıcı Ayarları
Bölüm 7.9 Diğer Ayarlar
Bölüm 7.10 Aygıt Bilgisi
Bölüm 7.11 Alias Ayarları
Bölüm 7.12 Tarih ve Saat Ayarları
Bölüm 7.13 Cihaz Güncelleme
Bölüm 7.14 Fabrika Ayarları
Bölüm 7.15 Rapor
görüntülemek
ve dil
seçimine geri
dönmek
dikey ve
yatay gözlem
TR

17
TR
7.3 Ağ (Lan)
Varsayılan olarak, SBM yönlendirici, DHCP-Server IP adresini otomatik olarak alır.
Eğer elle bir IP atamak isterseniz, tik (seçim) işaretini siliniz ve istediğiniz IP
adresini giriniz.
NOT
Tarayıcınız SBM'ye bağlanamıyorsa, 5. bölümdeki adımları (PC ile Çalışma)
tekrarlayınız. MAC için Bölüm 6 (MAC ile Çalışma).
Ayarları kaydetmek için "Submit" (Gönder) butonuna tıklayınız.
7 Web Arayüzü
TR

18
TR
7.4 Ağ - Kablosuz
"Scan" e basınız. g
Değişiklileri "Submit" düğmesine basarak saklayın.
NOT
Durum göstergesinde yanıp sönme durursa, ağ bağlantısı kurulamadı
demektir. Bunun en yaygın nedeni yanlış girilen parola / ağ anahtarıdır.
Ağ kablosunu yeniden takın ve bölüm 3 ve 5 bölümündeki adımları
izleyin.
7 Web Arayüzü
TR
Tarama işleminden sonra, mevcut kablosuz ağlar listesinde görüntülenir. Kendi ağınızı
seçin ve şifrenizi yazın "Submit" (Gönder) tıklayın, SBM cihazı yeniden başlayacak ve
otomatik olarak ağınıza bağlanacaktır. SBM'den ağ kablosunu çıkarın. Yeniden başlatma
sonrasında, durum göstergesi ile SBM bağlantısını kontrol edin : Eğer LED yanıp
sönüyorsa (yaklaşık saniyede 2 ila 3 kez), SBM düzgün olarak kablosuz ağa bağlıdır.

19
TR
7.5 Ağ - DDNS
Üçüncü taraf DDNS (Third party DDNS)
Ayrıca bir üçüncü parti sağlayıcıdan DDNS hizmeti seçebilirsiniz. Bu nedenle,
"DDNS Service" altında kullanıcı adı ve parola (üçüncü taraf sağlayıcı tarafından
haberdar) girmeniz gerekir.
G
Değişiklikleri saklamak için "Submit"i tıklayınız.
UYARI
Güvenlik nedeniyle size SBM'nin kullanıcı adı ve şifresini değiştirmenizi
öneririz. (bölüm 8 göre). Eğer diğer kullanıcılar için DDNS üzerinden
erişim vermeniz gerekirse bu kişilere "misafir" (sınırlı haklara sahip)
kullanıcı özelliği vermelisiniz. Daha fazla bilgi bölüm 7.8 Gelişmiş
Kullanıcı Ayarları bulunabilir.
7 Web Arayüzü
TR
Üretici Domain'i (Manufacturer's Domain)
SBM' ye internet üzerinden de ulaşabilirsiniz.Bu nedenle, DDNS (Alan-Adı SistemiGiriş) oluşturulması gerekmektedir. Varsayılan DDNS (ki zaten kolaylaştırmak
amacıyla kuruldu; Web arayüzünde "Manufacturer's Domain" sekmesi altında
bulunabilir. LOT R1210CC79 ile başlayan SBM cihazları bu özelliği içerir ve altındaki
etiketten bu bilgiye ulaşabilirsiniz.

20
TR
7.6 Alarm Ayarları:
Hareket ve ses alarm varsayılan olarak aktif halde gelir. Duyarlılık varsayılan olarak
7 seviye ayarlanır. Seviye 1 alarm yavaş tepki anlamına gelir. seviye 10 alarmları
çok hassas tepki anlamına gelir.
Eğer "Send Mail on Alarm"ı etkinleştirirseniz E-posta ayarını ayarlamanız gerekir.
(Bakınız: Bölüm 7.7 Alarm kontrol - E-Posta Ayarları seçeneği)
Değişiklikleri saklamak için "Submit"i tıklayınız.
Hareket alarmı (Örnek) gösterimi:
Sesli alarm (Örnek) gösterimi:
Bağlantı kaybolduğunda Ekran:
Johann: Motion alarm
Johann: Sound alarm
Johann: Not connected
7 Web Arayüzü
TR

21
TR
7.7 Alarm, E-posta Ayarları
Eğer "Send Mail on Alarm" seçeneğini seçip, (bölüm 7.6'daki) aktif hale getirdiyseniz,
aşağıdaki bilgileri girmelisiniz. Ancak o zaman bir alarm durumunda 5 fotoğraftan
oluşan bir e-posta alabilirsiniz: G
Alıcı
Alarm durumunda, program maksimum 4 e-mail alıcısına posta gönderebilir.
Bu alanlara geçerli e-posta adreslerini giriniz.
Giden Posta Sunucusu (SMTP Sunucusu) adresini girin.
(örneğin smtp.t-online.de). Giden Posta Sunucusu ve ilgili port( varsayılan:25) girin
E-posta devri için güvenlik protokolünü seçin; gerekliyse portu değiştirin,
Giden Posta Sunucusu doğrulama ihtiyacı varsa, bu seçeneği etkinleştirin ve
kullanıcı adınızı, şifrenizi girin.
Sonra "Test"i tıklayarak değerleri kontrol edebilirsiniz.
Dış IP adresi e-posta olarak bildirilecektir gerekiyorsa, "Posta Raporu İnternet IP"
etkinleştirin.
Kendi IP adresinizi rapor etmek isterseniz, "Report Internet IP by Mail" seçili olmalıdır.
Bu seçenek sizin IP adresinizi e-posta ile gönderecektir.
7 Web Arayüzü
TR
Gönderen
Gönderenin adı E-postada (örneğin SBM Bade) gösterilecektir.
Ayarları kaydetmek için "Submit" butonuna tıklayınız.

22
TR
7.8 Gelişmiş Kullanıcı Ayarları
Kullanıcı grupları: G
Yönetici: G
Tam erişim: Admin her türlü değeri (örneğin WiFi settings, set-up ya da kullanıcı
ayarlarına erişebilir) G
Ayarları kaydetmek için "Submit" butonuna tıklayınız.
NOTLAR
- Eğer "admin" ayarlarını değiştirdiyseniz, sizeden "Gönder"i tıkladıktan
sonra yeni bilgi istenir.
- Eğer ayarları değiştirdiyseniz ve panele tekrar giremiyorsanız, SBM
cihazı sıfırlayabilirsiniz. Lütfen Bölüm 9 "fabrika ayarlarına Sıfırla"
bölümüne takip edin.
7 Web Arayüzü
TR
En fazla 8 kullanıcı SBM cihazınıza şifre ile erişebilir. Her kullanıcı özel kullanıcı
gruplarından birisi ile sınıflandırılmalıdır. Burada çeşitli erişim haklarına sahip, 3
değişik kullanıcı grubu vardır: g
Kullanıcı: G
Operasyonel erişim: Bir kullanıcı, kurulum veya yükleme bilgilerini değiştiremez.
Fakat kamerayı kontrol edebilir (örneğin dikey ve yatay). G
Misafir: G
Gözlemsel erişim: Bu konuk kurulum veya yükleme bilgileri değiştiremez, kamera
kontrolü yapamaz. Bu konuk sadece bir videoyu izleyebilir.

23
TR
7.9 Gelişmiş - Diğer Ayarlar
Başlat PTZ* Merkezi
Kamera ilk başlangıcında ortalanır.
Yatay / Dikey Tur Sayısı
(Horizon / Vertical Patrol Rounds) SBM başladığında yatay / dikey tur sayısı.
Elle PTZ* Oranı (Manuel PTZ* Rate)
Hareketin hızı, (0 = hızlı, yavaş = 10).
Otomatik Ufuk / Dikey Oranı (Auto Horizon / Vertical Rate)
SBM başladığında pivot hareketlerinin hızı, merkezleme ve devriye üzerine.
(0 = hızlı, yavaş = 10)
Ayarları kaydetmek için "Submit" (Gönder) butonuna tıklayınız.
* PTZ = Pan-Tilt-Zoom (Döndür, Yatır, Yaklaştır)
7 Web Arayüzü
TR
Durum LED Modu
Durum göstergesi LEDini açık veya kapalı yapabilirsiniz

24
TR
7.10 Aygıt Bilgisi
Aygıt durumunun gerçek bilgilerini gösterir.
SBM adını değiştirin ve ayarları kaydetmek için "Gönder" butonuna tıklayınız.
7.11 Bakım Ayarları
7 Web Arayüzü
TR

25
TR
7.12 Bakım - Tarih ve Saat Ayarları
PC ile senkronize etme
Bunun için "Sync with PC Time"ı seçiniz ve bu değişikliği saklamak için "Submit"i
tıklayınız
Ağ-Zaman-Protokolü Sunucusu (NTP Sunucusu) ile senkronize zaman
Seçeneği "NTP Server ile Sync" seçin ve senkronize bir sunucu seçin.
Ayarı kaydetmek için "Submit" butonuna tıklayınız.
7 Web Arayüzü
TR

26
TR
7.13 Bakım - Ürün Yazılımı Yükseltme
Yazılımın bölümünde web http://www.medisana.com/sbm üzerinde yazılım ve web
arayüz yazılımı gerçek sürümlerini bulabilirsiniz.
Bu yazılımı Masaüstünüze yeni dosyayı kaydedin.
!DİKKAT UYARI!
Eğer fabrika ayarlarına dönmek isterseniz Reset (sıfırlama) düğmesine basın
(yaklaşık. 10 saniye) kadar.
7.14 Bakım - Fabrika Ayarları
Browse
Browse
7 Web Arayüzü
TR
"Gözat" ile ilgili dosyayı seçin ve "Gönder" butonuna tıklayınız.
Güncelleme işlemi sırasında beslemeyi kesmeyiniz.
Güncelleme sonrasında, SBM otomatik olarak yeniden başlayacaktır.
Yeniden bağlanabilmek için bölüm 5 ve 6 daki yönergeleri izlemeniz gerekli
olabilir.
DİKKAT!
Bu işlem yaptığınız ve eklediğiniz tüm bilgileri silecek, kamerayı satın aldığınız
gündeki konumuna döndürecektir.
 Loading...