

Page 1
User Guide
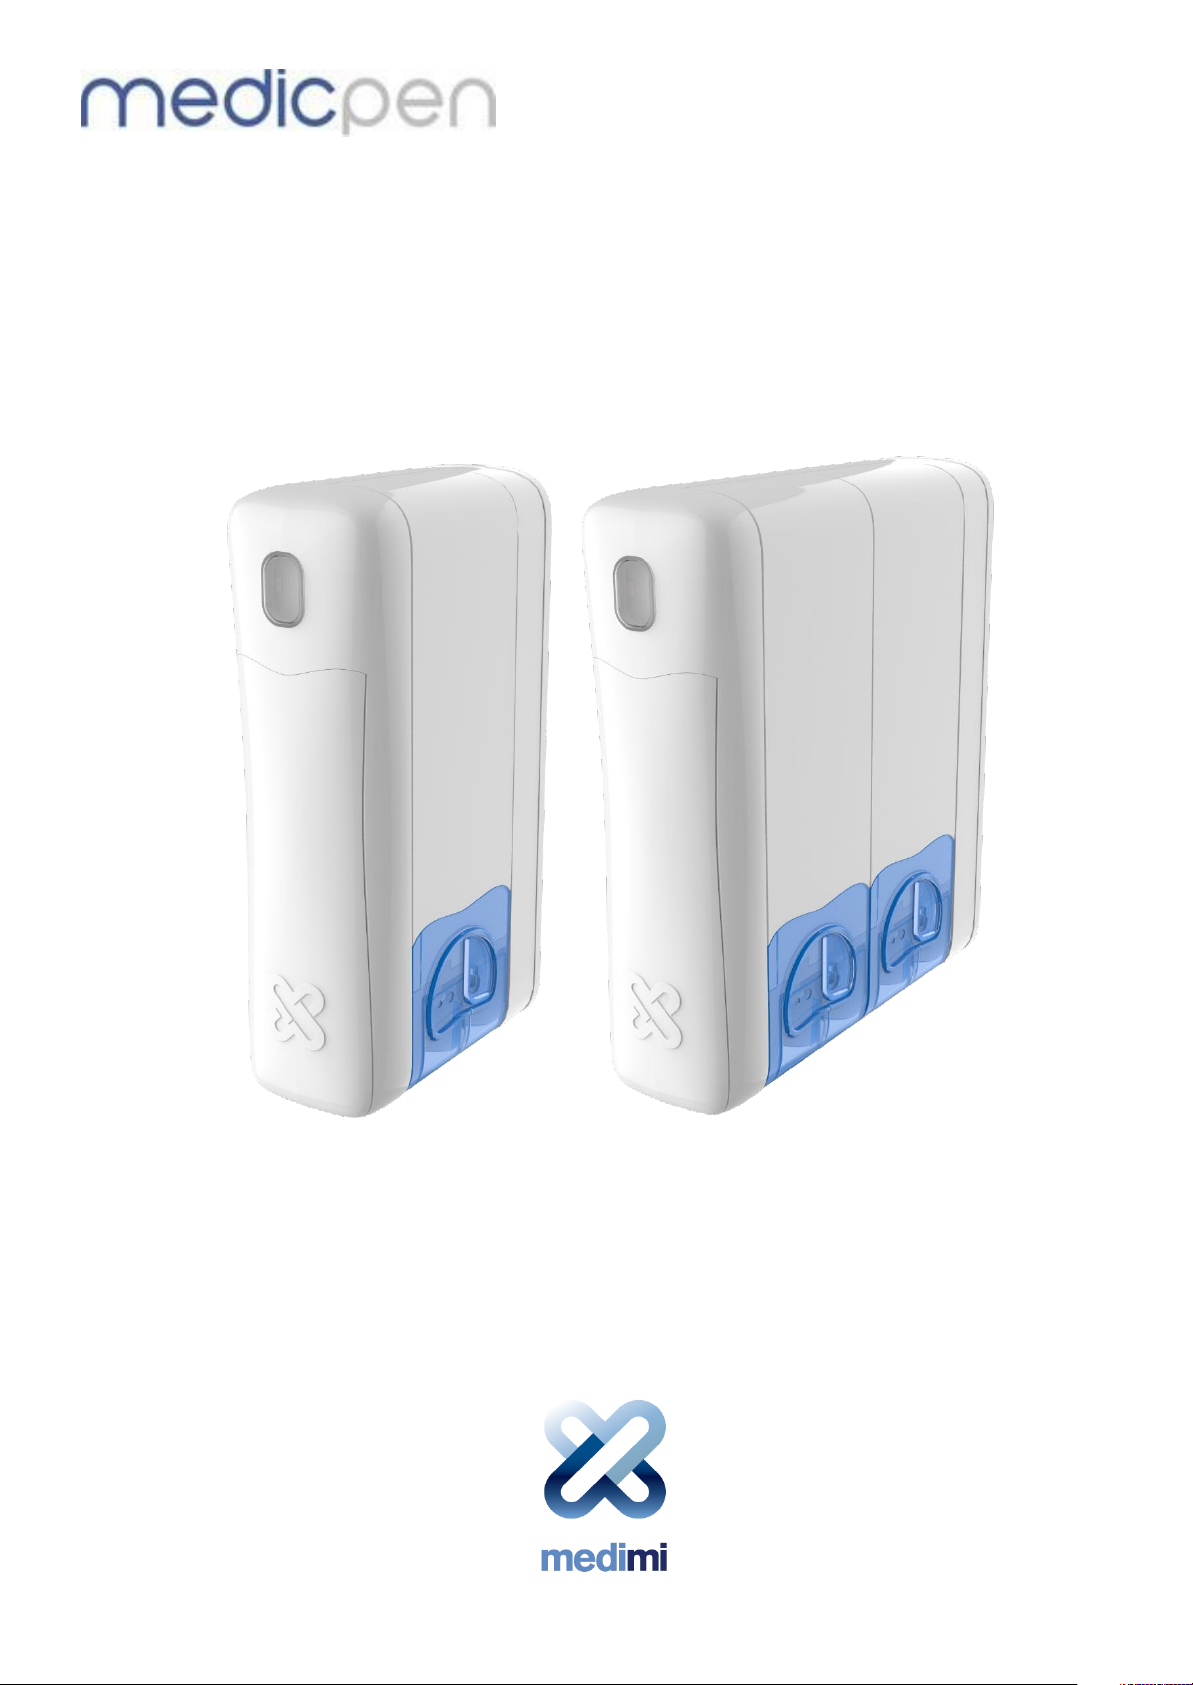
Medimi™ Pro 2/4 CDMA
Portable Automatic Pill Dispenser
Wireless, CDMA - Sprint
Sweden, June 2016
Page 2

Thank you for choosing Medimi™
Please read this User Guide before using Medimi
SE-211 16 Limhamn
www.medicpen.com
nuf
Ma
acture
d
By
MedicPen AB
Gustavsgatan 24
Sweden
+46 40 100
800
____________________________________________________________________________________
Page 2 (28) www.medicpen.com Phone +46 40 100 800
Page 3

FCC labeling
Medimi™ is tested and approved according to FCC 47 CFR part 15B.
Patents
Patent: US 12/595514, AU 2007351001, JP 2010-502421, EP 07724156.0 (CH, GE, ES, FR, UK, NL, SE)
Patent pending: CN 200780053066.5, IN 2090/MUMNP/2009
FDA
MedicPen AB is registered with the FDA as the manufacturer of Medimi, with registration number 3008467487.
Trademarks
Medimi™ is a trademark belonging to MedicPen AB, Malmö, Sweden.
Disclaimer
The information in this document is subject to change without notice. While the information contained is accurate
to the best of our knowledge, MedicPen AB assumes no liability or responsibility for omissions or errors.
____________________________________________________________________________________
Phone +46 40 100 800 www.medicpen.com Page 3 (28)
Page 4

Contents
FCC labeling ............................................................................................................................... 3
Patents ...................................................................................................................................... 3
FDA ............................................................................................................................................ 3
Trademarks ................................................................................................................................ 3
Disclaimer .................................................................................................................................. 3
1. General Warnings and Precautions ................................................................................. 6
2. Purpose and Functions .................................................................................................... 7
3. Package content ................................................................................................................ 8
4. Presentation of Medimi ..................................................................................................... 8
4.1 Medimi Overview .......................................................................................................... 8
4.2 User Interface ................................................................................................................ 8
4.3 Menu ............................................................................................................................. 9
4.3.1 Menu system .............................................................................................................10
4.3.2 Take dose ...................................................................................................................10
4.3.3 Tools ..........................................................................................................................10
4.3.4 Schedule ....................................................................................................................10
4.3.5 Info .............................................................................................................................10
4.4 Cartridge ...................................................................................................................... 11
5. Getting started ................................................................................................................. 12
5.1 Entering numbers ........................................................................................................ 12
5.2 Entering text and SMS (phone) number ....................................................................... 12
5.3 Preparing cartridges ..................................................................................................... 13
5.4 Inserting Batteries........................................................................................................ 14
5.5 Basic settings (Quick Start-Up) ..................................................................................... 14
5.6 Medication schedule setup wizard ............................................................................... 15
5.7 Wireless/CDMA setup .................................................................................................. 16
5.7.1 Activating CDMA ........................................................................................................16
5.7.2 Flight mode ................................................................................................................16
5.7.3 Trigger Alarm .............................................................................................................16
5.7.4 SMS Nbr (phone no) ..................................................................................................16
5.7.5 MEID ..........................................................................................................................16
5.8 Taking your medication ................................................................................................ 17
5.9 Refilling medications .................................................................................................... 18
6. Cleaning ........................................................................................................................... 18
____________________________________________________________________________________
Page 4 (28) www.medicpen.com Phone +46 40 100 800
Page 5

7. Maintenance ..................................................................................................................... 19
7.1 Changing Batteries ....................................................................................................... 19
7.2 Cartridge ...................................................................................................................... 19
8. Troubleshooting .............................................................................................................. 19
8.1 Alarms / Error messages .............................................................................................. 20
9. Operating your Medimi ................................................................................................... 21
9.1 Entering numbers ........................................................................................................ 21
9.2 Entering text and SMS (phone) number ....................................................................... 21
9.3 Customization, fine tuning ........................................................................................... 21
9.3.1 Language ....................................................................................................................21
9.3.2 Time & date ...............................................................................................................22
9.3.3 Time format ...............................................................................................................22
9.3.4 Ring tone ....................................................................................................................22
9.3.5 Vibration mode ..........................................................................................................22
9.3.6 Confirm dialog ...........................................................................................................22
9.4 Medication schedules .................................................................................................. 22
9.4.1 View all ......................................................................................................................22
9.4.2 Edit medication name................................................................................................22
9.4.3 Edit date ....................................................................................................................23
9.4.4 Edit window ...............................................................................................................23
9.4.5 Add dose ....................................................................................................................23
9.4.6 Edit dose ....................................................................................................................23
9.4.7 Delete dose ................................................................................................................23
9.4.8 Delete all ....................................................................................................................23
9.5 Helpful features ........................................................................................................... 24
9.5.1 Time offset .................................................................................................................24
9.5.2 Manually dispense doses ...........................................................................................24
9.6 Options ........................................................................................................................ 25
9.6.1 Number of cartridges ................................................................................................25
9.6.2 Operating mode ........................................................................................................25
9.6.3 Link cartridges ...........................................................................................................25
9.6.4 Cartridge admin .........................................................................................................25
10. Technical data ...................................................................................................................... 26
11. Federal Communication Commission Interference Statement .................................... 27
12. Radiation Exposure Statement .......................................................................................... 27
____________________________________________________________________________________
Phone +46 40 100 800 www.medicpen.com Page 5 (28)
Page 6
1. General Warnings and Precautions
Warning
Check that your medication is suitable for use with the dosage
device before loading tablets/capsules into your Medimi.
Warning
Follow these Instructions for Use in order to prevent personal
injury or damage to the device.
Warning
Ensure that the medication schedule is entered correctly.
Warning
Ensure that the cartridge is loaded and labeled with the correct
medication.
Warning
Ensure that the cartridge is inserted in the correct position.
____________________________________________________________________________________
Page 6 (28) www.medicpen.com Phone +46 40 100 800
Page 7

2. Purpose and Functions
Medimi is intended to aid dosing of medication in tablet or capsule form and to remind the user when to take
medication. Medimi comes in two sizes, for two (2) or four (4) medication cartridges to meet different needs.
In addition to choosing your required size of Medimi you can enter one extra schedule. If you use medication
that is not suitable for storage in Medimi, it is possible to enter one additional schedule for this medication.
Medimi alerts you in the same manner as if the medication were loaded in one of the cartridges.
Medimi is available in two versions, Medimi and Medimi Pro. The Pro version can be programmed
with advanced medication schedules and includes the option of logging events.
When starting the Medimi for the first time a setup wizard will take you through the steps necessary to
prepare Medimi for use. You will enter basic settings, medication schedules and load tablets and capsules
into the device.
After you have entered your medication schedules and loaded Medimi with your medication, it will:
•
Alert you when it is time for medication with a flashing light, sounds or vibrations.
•
Dispense medication based on the schedules you have entered.
•
Check that there is enough medication for the next dosage.
•
Alert you with a red flashing light, when you need to refill a cartridge before the next scheduled dosage.
•
Provide information on the display about which cartridge needs to be refilled.
•
Log all events for you to review on the display.
•
Alert you when you have missed a dose.
•
Alert you when batteries are low and need to be changed.
•
Send alarms as a SMS (Text message).
____________________________________________________________________________________
Phone +46 40 100 800 www.medicpen.com Page 7 (28)
Page 8
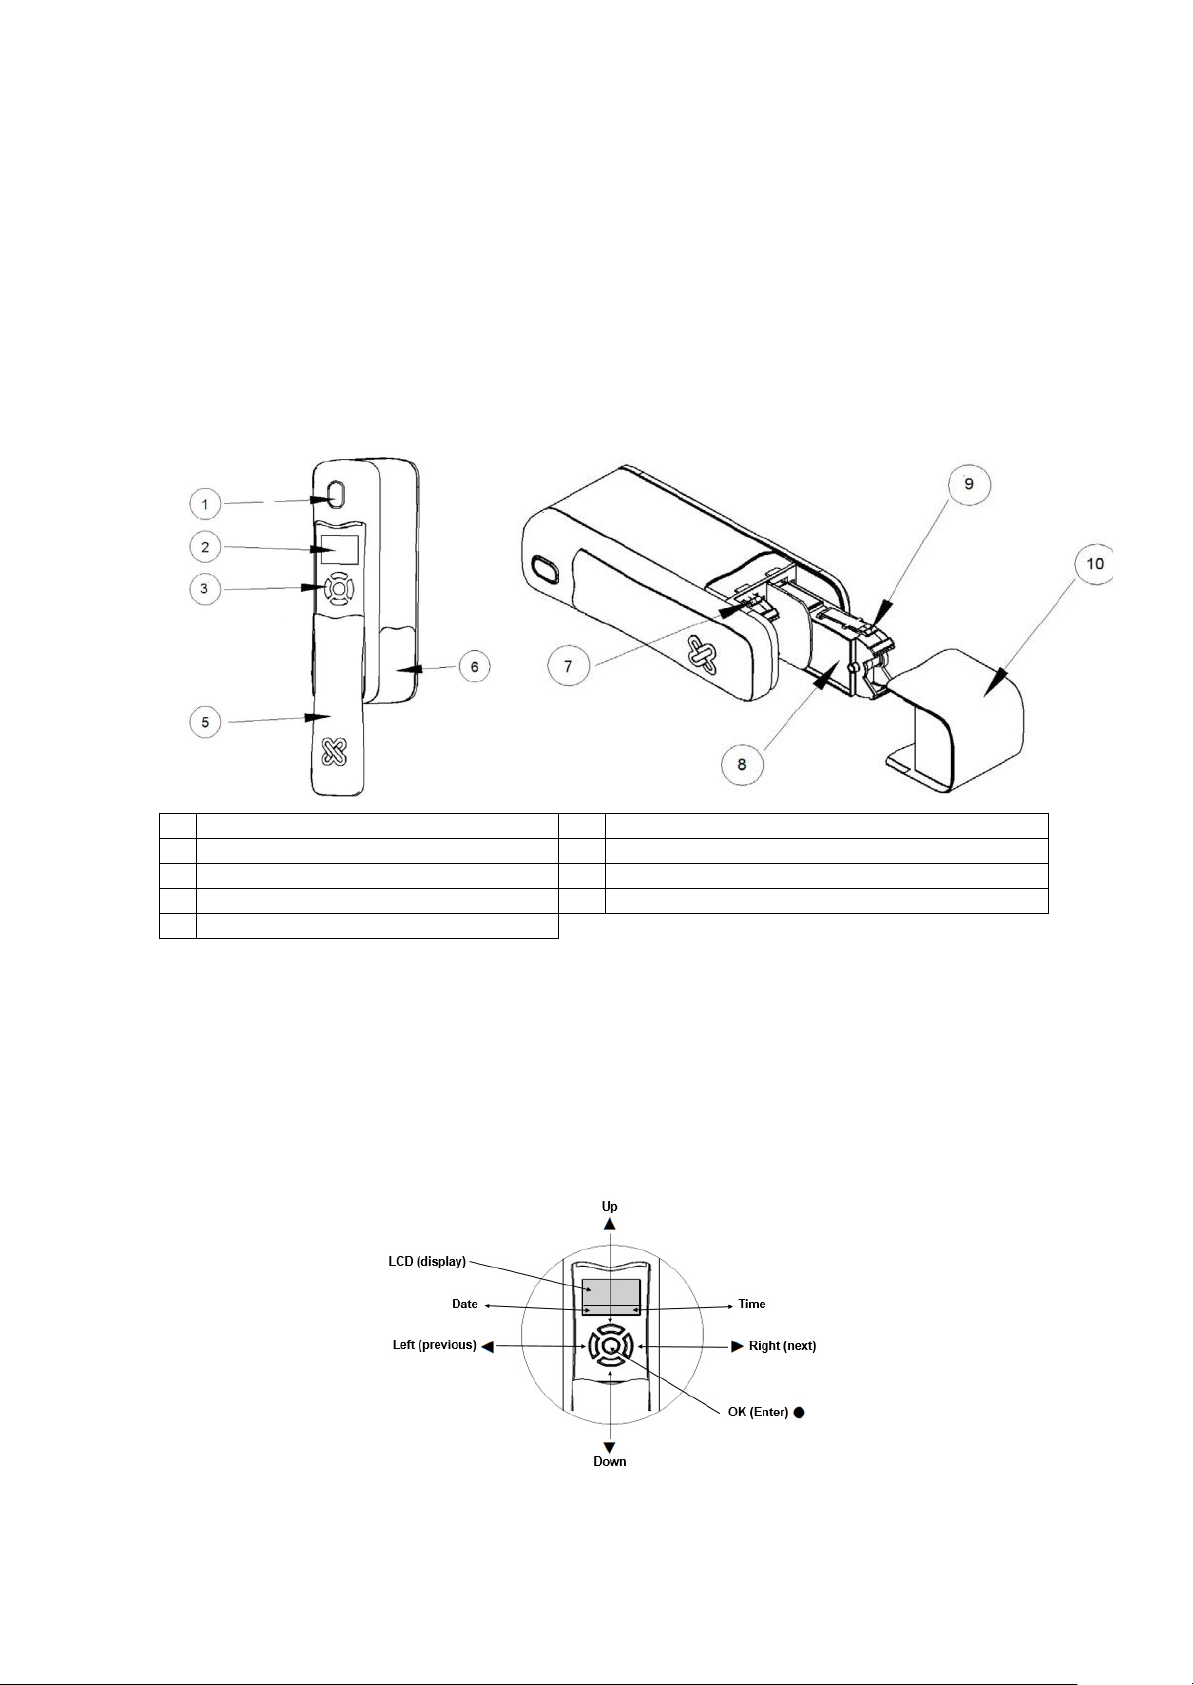
3. Package content
1.
Eject button and light indicator
7.
Inserted cartridge
2.
Display (LCD)
8.
Cartridge entering Medimi
3.
Navigation keys
9.
Cartridge release lever
5.
Sliding cover
10.
Medication collection cup removed from Medimi
6.
Medication collection cup
Medimi Pro (C200W2x) CDMA – Portable Automatic Pill Dispenser See.
Two Alkaline batteries type AA (LR6)
User Guide (this guide)
Quick Start-up guide
Two or Four Pill Cartridge depending on model (Cartridges are available in two sizes:
One with room for 7 larges tablets/pills and one with room for 15 smaller tablets/pills)
4. Presentation of Medimi
4.1 Medimi Overview
4.2 User Interface
Medimi is operated via the display, 5 navigation keys and one dispensing button. The Display and the navigation
keys are located under a sliding cover on the front side of Medimi. During regular use Medimi is operated using
the dispensing button
Normally Medimi is in standby mode, with the display and the navigation keys hidden under the sliding
cover and the display inactivated in order to extend the lifetime of the batteries. To activate the display, press
any navigation key
The 5 navigation keys are used to navigate and select items displayed. By using the outer navigation keys as
arrows you can navigate to the left ◄ (select the key on the left side), right ► (select the key on the right side), up
▲ (select the upper key) and down ▼ (select the lower key). You can use these keys to highlight a menu or a
menu item. Confirm your choice by pressing the ● button (located in the center of the navigation keys).
____________________________________________________________________________________
Page 8 (28) www.medicpen.com Phone +46 40 100 800
Page 9
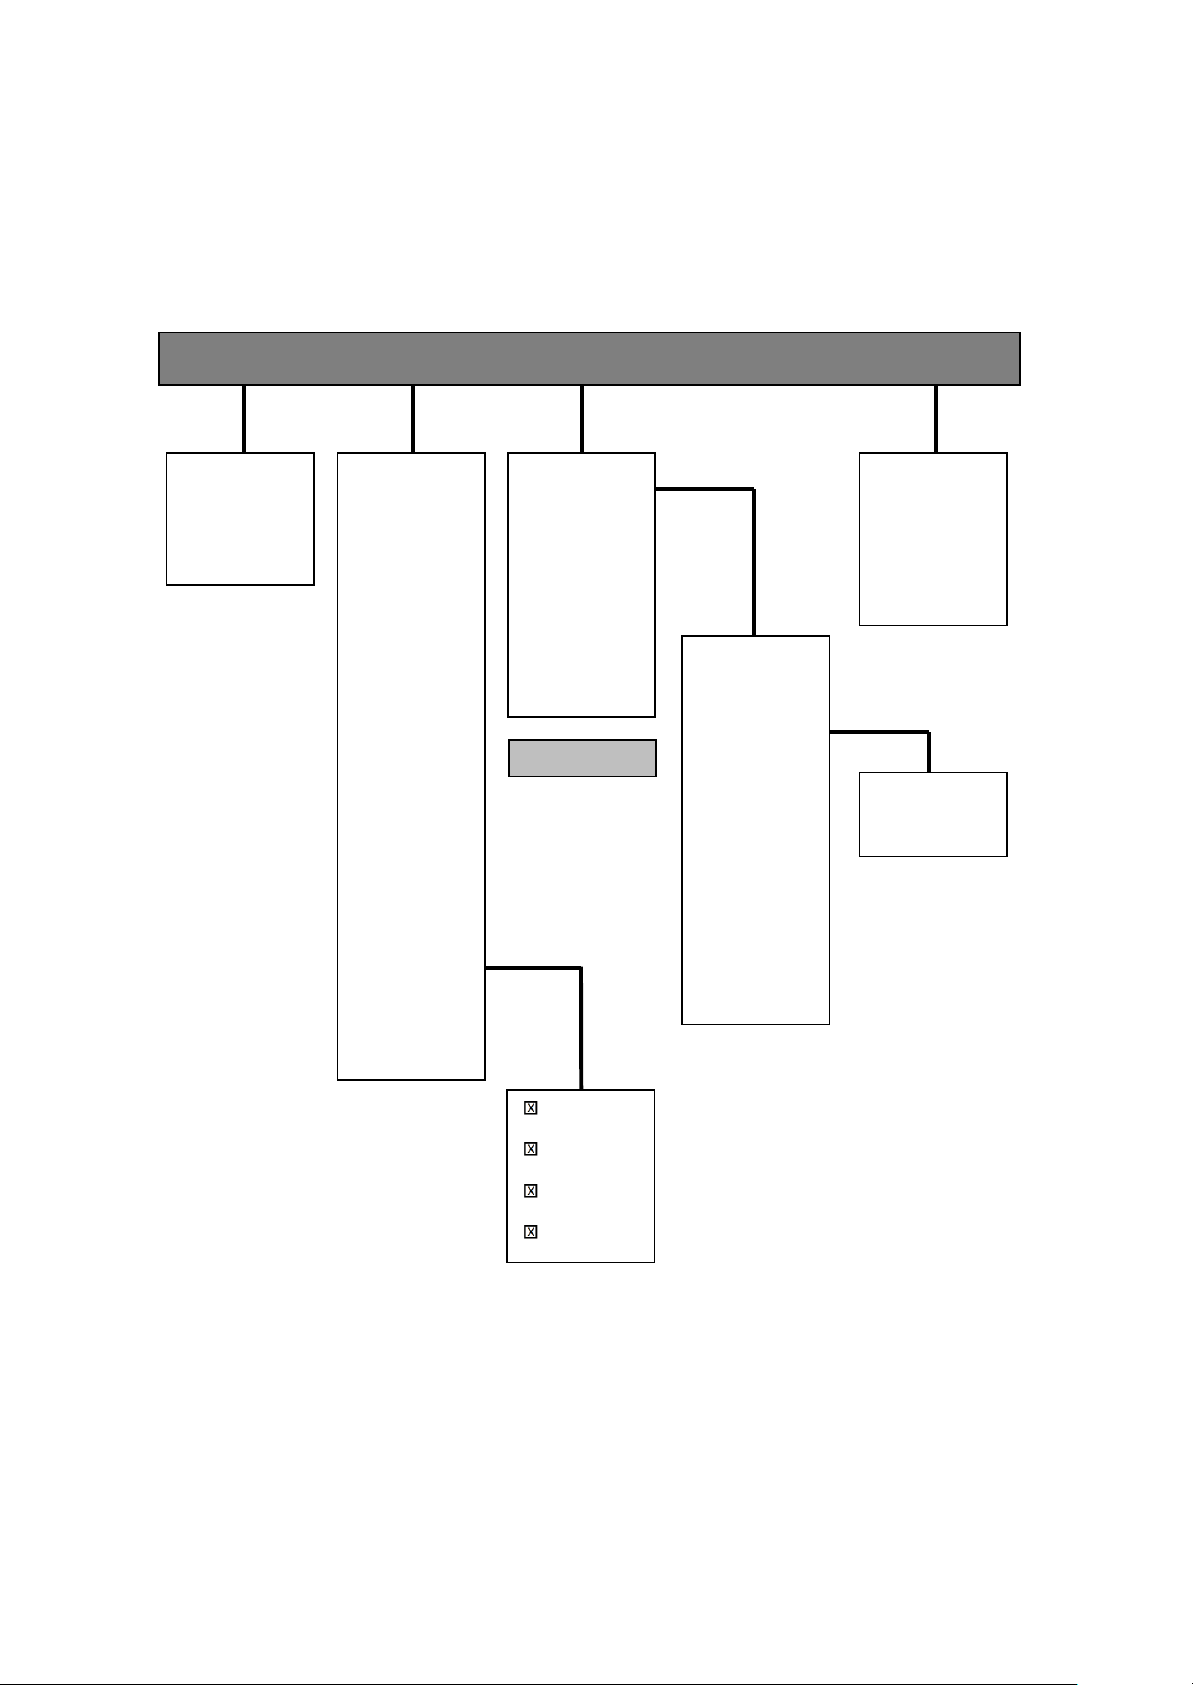
4.3 Menu
Take dose Tools Schedule Info
Current dose
Next dose
Extra pill
Flight mode
Cartridge admin
Schedule g
uide
Language
Time & D
ate
Time for
mat
Ring ton
e
Vibr
atio
n
Time offs
et
M
ode
Confirm
dialog
# of
cartri
dges
Trigger A
larm
SMS Nbr
MEID
#1 <N
ame>
#2 <N
ame>
::
::
#n <N
ame>
#0 <N
ame>
View
all
Edit n
ame
Edit d
ate
Edit window
Add dos
e
Edit dos
e
Delete dos
e
Delete all
Link
cartridge
Missed dose
Dose taken
Low battery
Missing pills
View log
View cartridge
View next 24h
Version
n=2, 4 or 6
Start schedule
End schedule
Medimi functions are displayed in four menus. Navigate between the different menus with the ◄ ►
navigation keys. Select a menu by pressing the ● button.
Move up and down within a menu by using the ▲ ▼ navigation keys. Select items by pressing the ● button.
Press the ◄ navigation key to leave a menu or a menu item.
4.3.1 Menu system
____________________________________________________________________________________
Phone +46 40 100 800 www.medicpen.com Page 9 (28)
Page 10

4.3.2 Take dose
“Take dose” gives you three dosing options. Use these options together with your medication schedule for
increased flexibility.
You can dispense the Current Dose before Medimi alerts you if you are within the permitted medication
time window. This may be of use if your medication is taken before breakfast and your breakfast time varies.
You can dispense the Next Dose in advance. This function may be used when you don’t want to bring Medimi
with you but need to take your medication. When the Next Dose function is used, you will not be reminded of
the next dose(s) if you have already dispensed that dose.
You can dispense an extra tablet/capsule by using the function Extra Pill. This function may be of use if you
should drop or lose a tablet or capsule.
Medimi logs all events, to help you remember everything. You find this under the Info menu.
4.3.3 Tools
The “Tools” menu is used to enter and change settings. When you use Medimi for the first time you will
follow a setup wizard to enter some basic data such as your preferred language and the current time and date.
The default setting for Trigger Alarm is Missed dose, Dose taken, Low battery and Missing pills.
The settings can be changed in the menu Trigger Alarm.
A number of settings are default settings and you don’t need to change them to get started.
Wireless setup is located under Tools.
4.3.4 Schedule
This menu is used to enter or change your medication schedules. A maximum of 16 doses can be entered for a
24-hour period. You may have different schedules for each cartridge.
Medimi will save each medication schedule that you enter and alert you based on these schedules.
If you use medication that is not suitable for storage in Medimi, it is possible to have an additional schedule
for this medication. Medimi alerts you in the same manner as if the medication were loaded in one of the
cartridges.
Each schedule can have a fixed start and end date.
4.3.5 Info
This menu is used to show information stored in Medimi.
You can get information on all events that have occurred (View log).
How much medication is left in each cartridge and what doses are scheduled for the next 24 hours.
The menu Version shows what version the Medimi software is.
____________________________________________________________________________________
Page 10 (28) www.medicpen.com Phone +46 40 100 800
Page 11
4.4 Cartridge
Cartridges are available in two sizes. One cartridge for 15 pills/tablets/capsules with a maximum size of 3/8" x
3/8" x 3/8" (10 x 10 x 10 mm) and one cartridge for a maximum of 7 pills/tablets/capsules with a maximum
size of 3/4" x 3/8" x 3/8" (20 x 10 x 10 mm)
Medimi will keep track of the number of tablets/capsules in the cartridge based on the size of the cartridge, the
number entered when the cartridge is inserted and the number of tablets/capsules dispensed based on the
medication schedule.
When you insert a cartridge, Medimi assumes it is completely filled if it was empty on ejection. If the
cartridge is not empty when ejected, Medimi assumes that the number of tablets/capsules remaining has
not changed.
You must enter the applicable number of tablets/capsules:
when you do not fill an empty cartridge completely or
when you change the number of tablets/capsules in a cartridge that is not empty.
The cartridges are designed so that you are only able to insert them in the correct position.
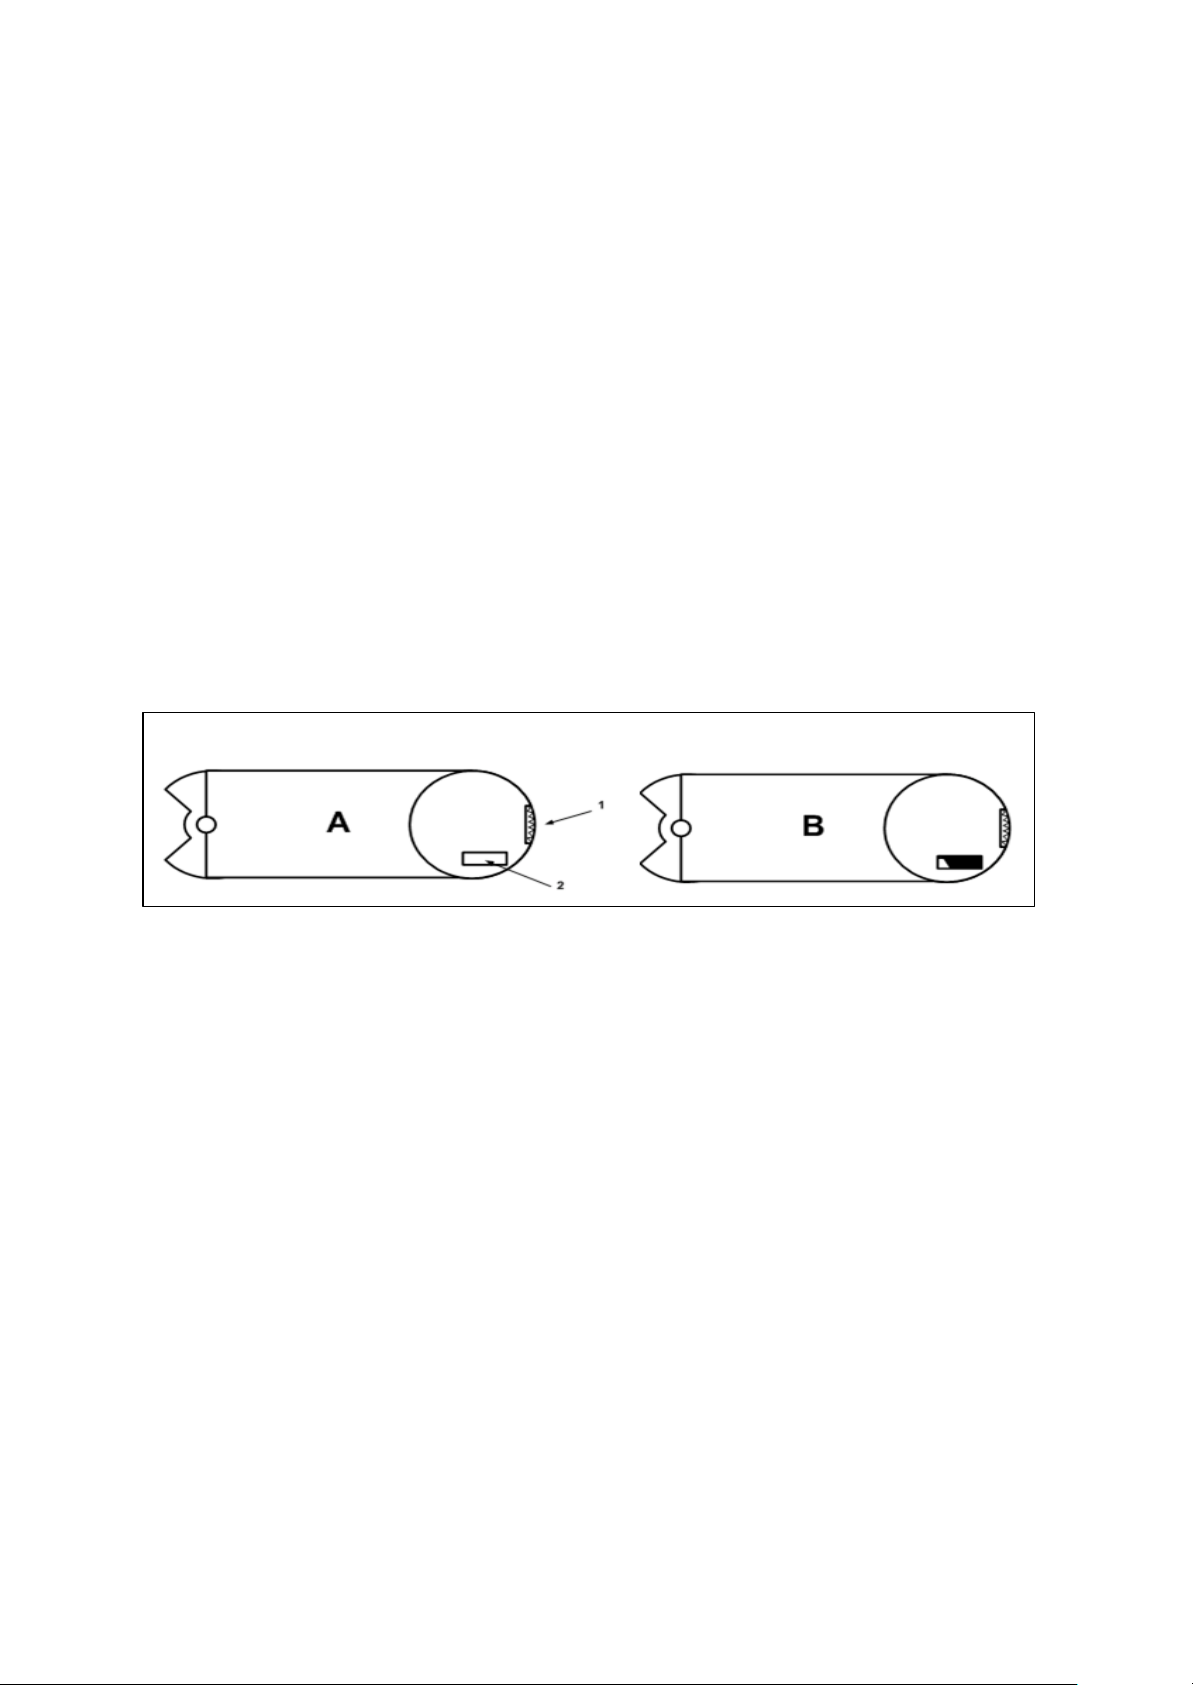
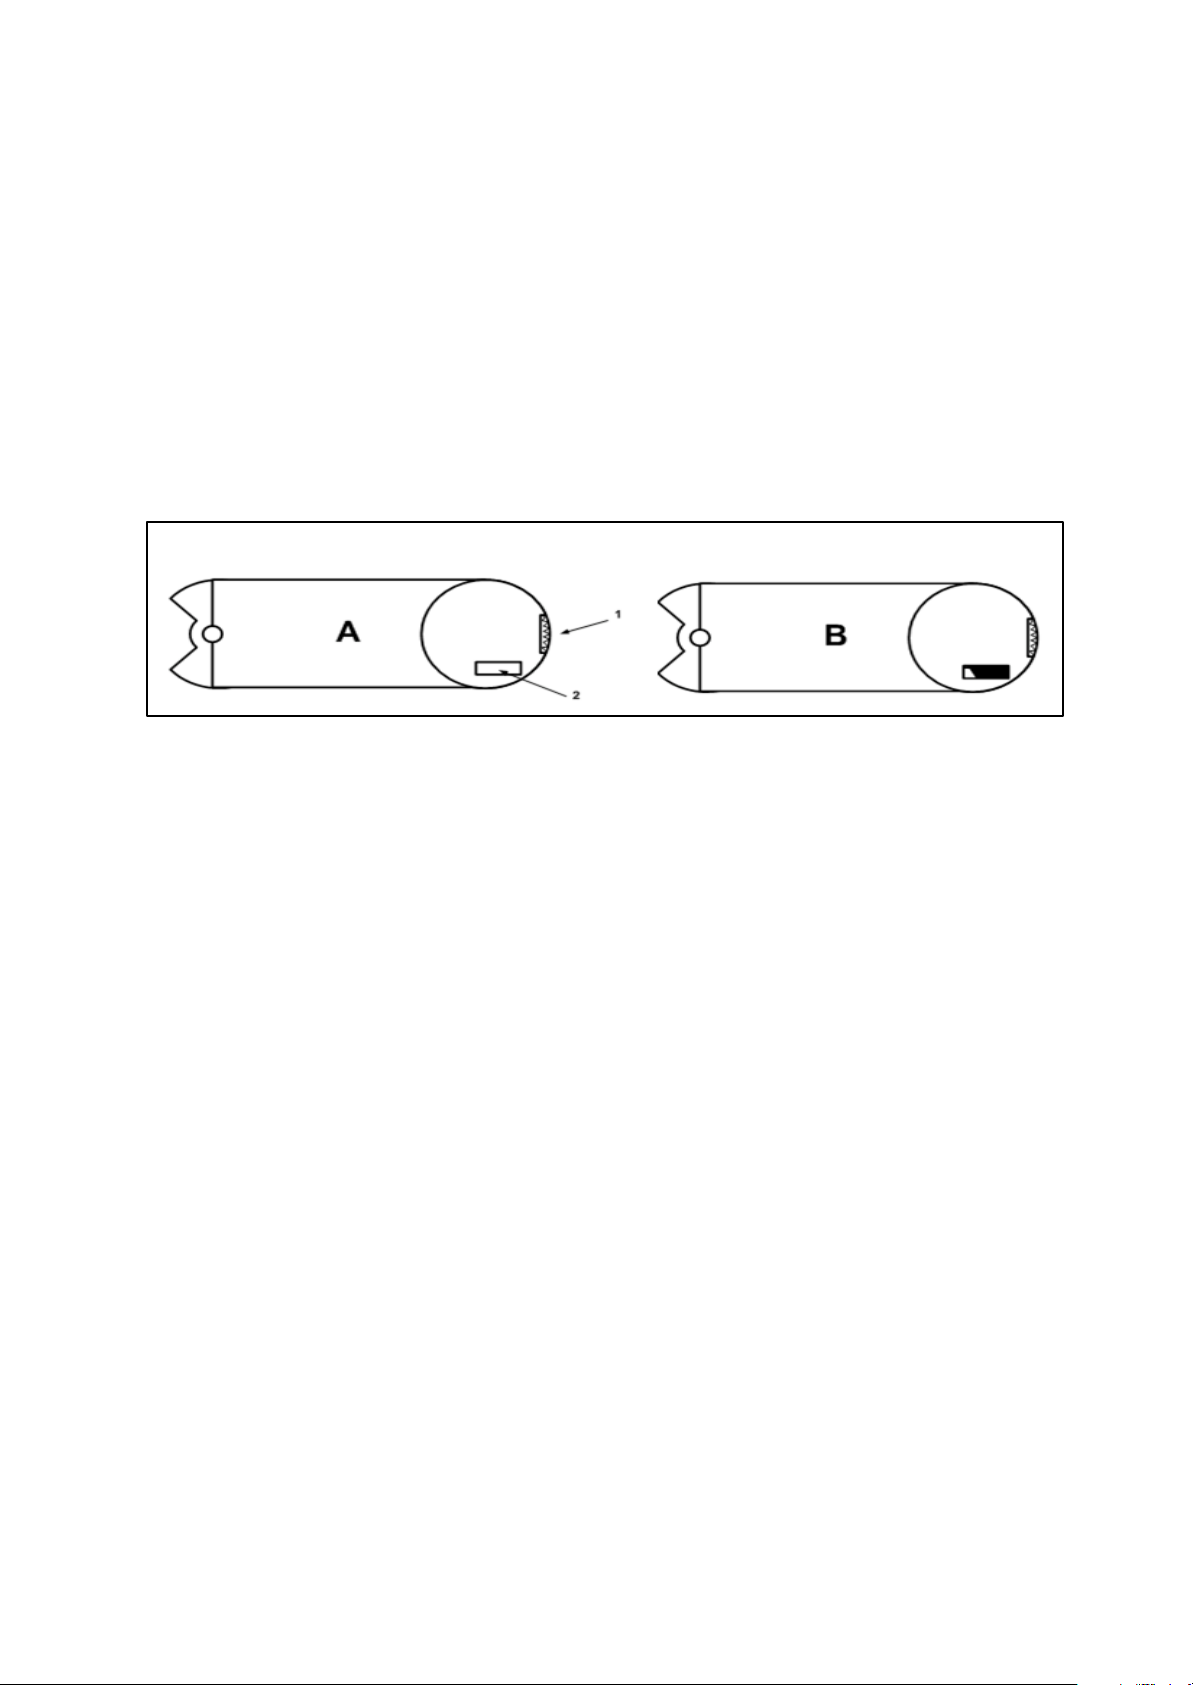
If the cartridge dispensing mechanism for some reason ends up in the wrong position (B), you will receive
an error message and will be asked to remove the cartridge and correct the error (A). An incorrectly
positioned dispensing mechanism is corrected by rotating the dispensing wheel until the window for position
detection is white.
Cartridges seen from the reverse side.
Dispensing wheel in correct position Dispensing wheel in wrong position
1. Dispensing wheel
2. Window for position detection
When the cartridge is inserted in the correct position (A) Medimi will make a sound. If any fault is detected
Medimi will alert you with a red flashing light.
____________________________________________________________________________________
Phone +46 40 100 800 www.medicpen.com Page 11 (28)
Page 12

5. Getting started
A BC D EF G H IJ K LM N
O PQ R ST U V W X Y Z
Aa
ß _
C _
C
OK
0 1 2 3 4 5 6 7 8 9
+
ß
+_
OK
OK
When you startup Medimi the first time you will be asked to fill in some basic information needed to setup
Medimi correctly. Follow the instructions carefully.
5.1 Entering numbers
When you need to enter numbers the Medimi will display you a number as a starting point.
If you want to increase the given number, use ▲ navigation key and press it repeatedly until the number you
require is displayed. Choose the number by pressing the ● button.
If you want to decrease the given number, use ▼ navigation key and confirm it by pressing the ● button.
Use ◄ to delete a chosen number.
5.2 Entering text and SMS (phone) number
All letters and numbers are shown in the information window.
Move to the letter, number or function you require by highlighting it with the ▲ ▼ ◄ ► navigation keys.
Select a letter, number or function by pressing the ● button. The letter or number you have selected will be
displayed at the bottom of the window. If you need to delete a letter or number, move to ß and then press the ●
button.
Change between upper and lower case by moving to Aa and then pressing the ● button.
Insert a space by highlighting _ and then press the ● button.
When you have finished writing, move to and press the ● button. This will take you back to the menu.
____________________________________________________________________________________
Page 12 (28) www.medicpen.com Phone +46 40 100 800
Page 13
5.3 Preparing cartridges
Warning
Handle only one medication and one cartridge at the same time. Write the
slot number and medication name on the label of each cartridge to prevent
mix-ups.
Warning
You can only have one tablet/capsule per compartment and only one
medication per cartridge to ensure correct medication dosage.
Warning
Ensure your medication is suitable for use in Medimi. Ask your
pharmacist if you are uncertain.
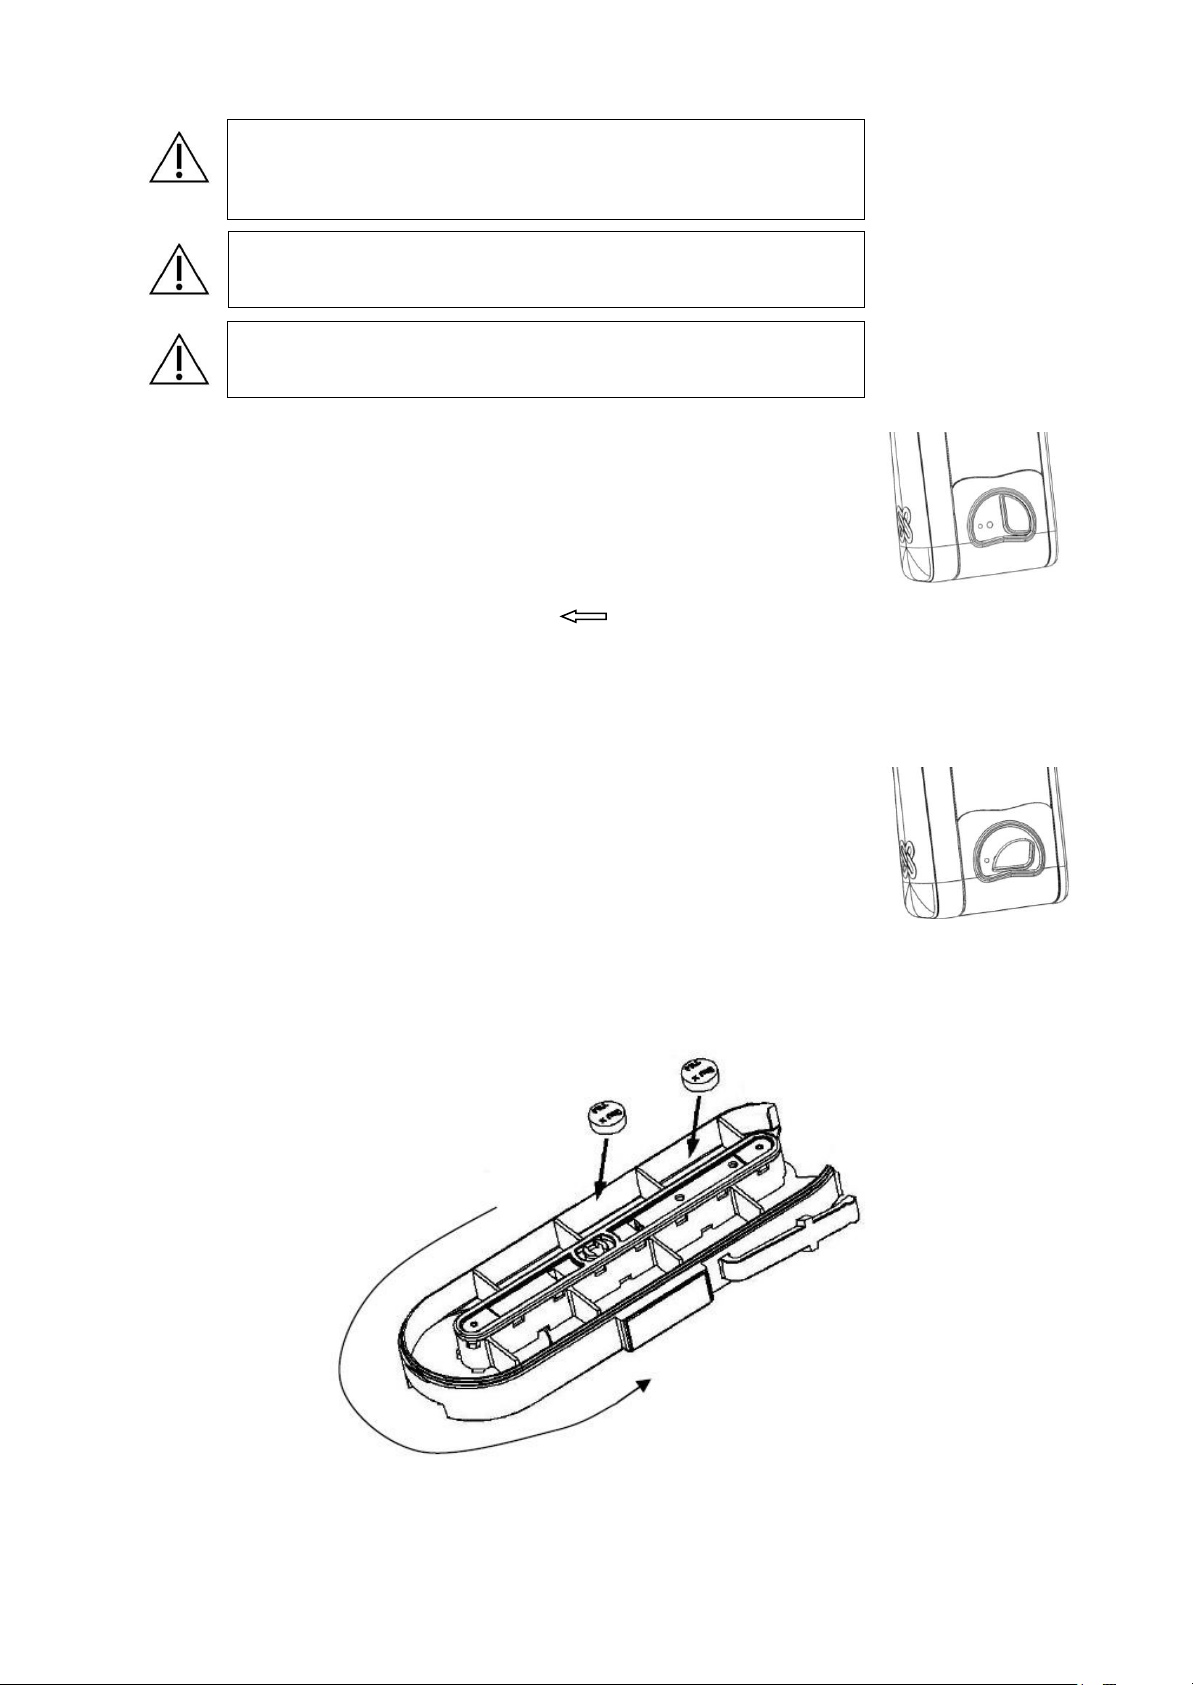
Medication cup lever
in locked position
Turn the lever anti-clockwise to
remove the medication cup
1. Have your prescriptions available. You will need the times and dosages
for each medication to enter correct medication schedules.
2. Have your medications available for loading into the cartridges.
3. Remove the medication collection cup by sliding it down from
Medimi. When you feel resistance, simply apply a little more force.
4. Remove all cartridges from Medimi.
5. Remove the cartridge lid. The lid is marked “ OPEN HERE”
to show where to open it.
6. Check that the tablets/capsules fit into the cartridge compartments.
Fill compartments with pills, tablets or capsules as shown below.
Fill the compartments in an anti-clockwise direction.
Note: Do not force tablets or capsules into the compartments.
Note: Only fill the compartment with pills, tablets or capsules.
Note: Only one pill, tablet or capsule per compartment and one
medication per cartridge.
7. The compartment at the open end of the cartridge should remain empty.
8. Replace the cartridge lid and make sure it snaps into place.
Write the number of the slot where you are going to put the cartridge
and the medication name on the label on the back of the cartridge.
9. Repeat steps 5 – 8 for each cartridge.
Fill the cartridge with medication in an anti-clockwise direction
____________________________________________________________________________________
Phone +46 40 100 800 www.medicpen.com Page 13 (28)
Page 14
5.4 Inserting Batteries
Warning
Ensure that the time and date are set correctly, to prevent medication errors.
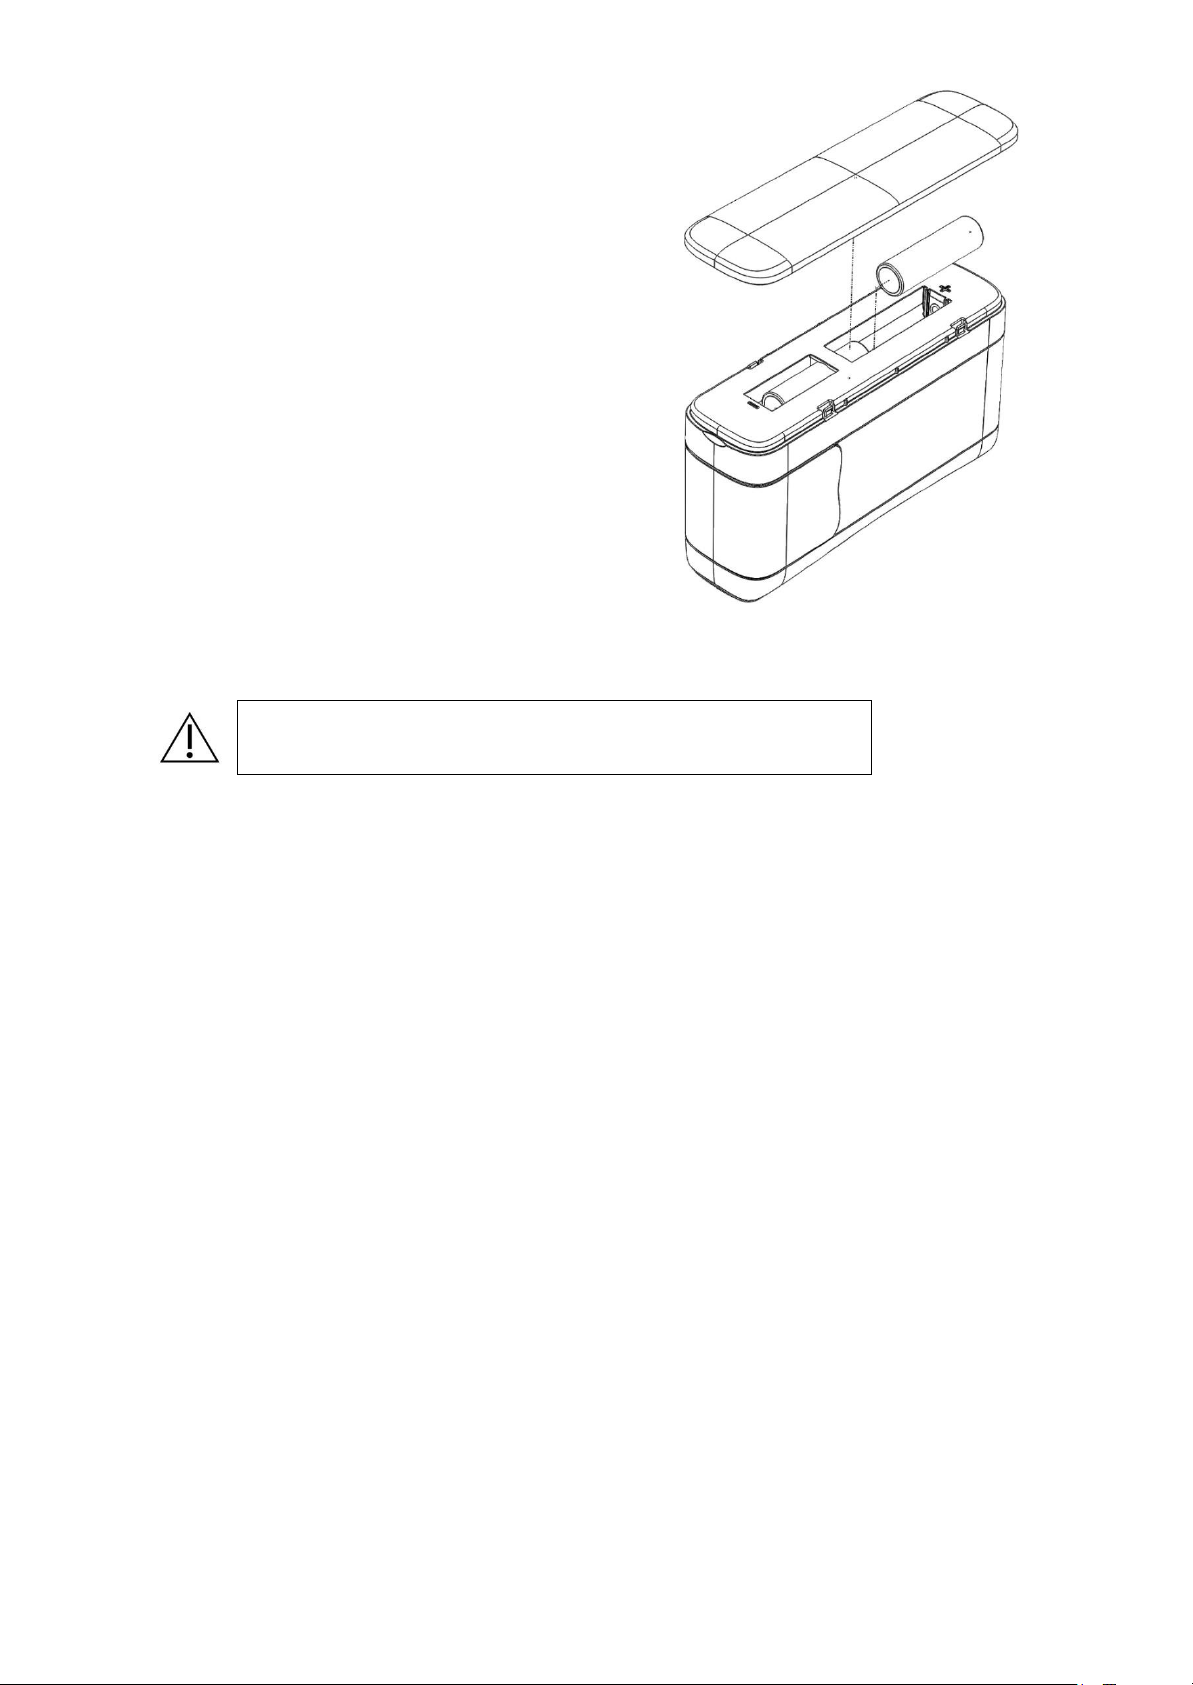
1. Remove the cover to expose the battery.
2. Insert the supplied batteries.
Two 1,5 V AA (LR6) Alkaline batteries
3. Make sure the batteries are inserted
in the same position as shown.
4. When the batteries are inserted Medimi
will prompt you to adjust a number of settings.
5.5 Basic settings (Quick Start-Up)
1. Battery: Remove the sliding cover completely to expose the battery compartment. Slide it away from the
dispensing button.
2. Insert the supplied batteries, see above picture.
3. Ensure that the batteries are inserted in the same position as shown at the bottom of the battery
compartment.
4. When the batteries are inserted Medimi will prompt you to adjust a number of settings.
5. Perform these steps using the navigation keys, as prompted on the display.
6. Language: Select the language by scrolling with the ▲ ▼ navigation keys. Press the ● button to confirm.
7. Time format: Select the time format, 12-hour clock or 24-hour clock. Scroll with the ▲ ▼ navigation
keys. Press the ● button to confirm.
8. Date format: Select the date format. Scroll with the ▲ ▼ navigation keys. Press the ● button to confirm.
9. Set the current time: Set the hours by pressing the ▲ ▼ navigation keys. Press the ● button to confirm
and then set the minutes in the same way. Confirm by pressing the ● button.
10. Set the current date. Set the date by pressing the ▲ ▼ navigation keys. Confirm by pressing the ●
button.
11. Schedule guide: You will now be asked whether you want to proceed to a schedule guide to set up your
medication schedules. If you choose not to, it is possible to do so later from the “Tool menu – Schedule
guide”.
12. Wireless communication: The Medimi must have been activated (using the MEDIN) at the operator to
work on the Sprint network.
If the wireless communications (CDMA) is going to be used, a Phone (mobile) number need to be entered
in the Medimi under the menu “Tools – SMS Nbr”.
Note: After entering the phone number, the Medimi will send a test SMS/Text message to
verify communication. The message is sent when Medimi goes into sleep mode, after approx. 60
seconds after last activity
____________________________________________________________________________________
Page 14 (28) www.medicpen.com Phone +46 40 100 800
Page 15

5.6 Medication schedule setup wizard
Warning
Ensure that you enter all medication schedules correctly. An incorrectly
entered medication schedule may result in inaccurate dosage of medication.
Warning
Be sure to match the cartridge name and number with the correct position
in Medimi. Mistakes may lead to incorrect dosage of medication.
If you press the ◄ navigation key during setup, the wizard will abort the process. You can restart the wizard by
selecting “Tools-Schedule guide” on the Medimi.
1. Start the wizard by selecting Yes and press the ● button.
2. Select “Erase previous schedules”. Highlight Yes and press the ● button. This will erase all your previously
entered schedules.
3. Confirm by pressing the ● button.
Default setting when the Schedule guide is used are:
Start date (Start schedule) today’s date and the End date (End schedule) to 31rd of December 2099
The window is set to +/- 60min
4. Medimi will start with the cartridge number one (1). Enter the name of the medication for the cartridge
number one (1).
5. Enter the number of doses. i.e. the number of times the medication will be dispensed each day. Confirm by
pressing the ● button.
6. Enter the dosage time for the medication. Start with the earliest time. Confirm by pressing the ● button.
7. Enter the number of tablets/capsules to be taken at that time. Confirm by pressing the ● button.
8. Steps 6 – 7 will be repeated the number of times you have entered in 5.
9. Add another medication? Highlight Yes and press the ● button for the next cartridge and repeat
steps 4 – 8 for each cartridge.
10. Once all medication schedules have been entered into Medimi, you will be prompted to insert the cartridges.
Wait to press ● until all cartridges have been inserted into Medimi.
11. Insert cartridge number one (1) in the position closest to the button and display side. Insert the cartridge with
the rounded side end first.
Note: Ensure that the cartridge is correctly inserted and locks into place with a click.
12. Continue with cartridge number 2, and so on.
13. When all cartridges have been inserted into Medimi, press the ● button.
14. The Medimi will now check each cartridge and ask for the number of tablets/capsules in the cartridge and
show the name of the medication in the cartridge. The number of tablets/capsules in the cartridge may be
adjusted by pressing the ▲ ▼ navigation keys.
15. If you have made any mistakes, you can change the settings under “Schedule”.
16. Slide the cover in place over the navigation keys and the display.
17. Put the medication collection cup into position and lock it.
18. The schedule setup is now complete.
____________________________________________________________________________________
Phone +46 40 100 800 www.medicpen.com Page 15 (28)
Page 16

5.7 Wireless/CDMA setup
If your Medimi is equipped with wireless communication, CDMA, this must be activated and configured.
Select "Tools - Flight mode" in the menu to check that wireless is turned on. If not activate by selecting "Wireless
on"
5.7.1 Activating CDMA
Before the Medimi CDMA can use the wireless communication the Medimi need to be activated at SPRINT by
the operator or by the selling company, using the MEID.
5.7.2 Flight mode
Select “Tools – Flight mode”
Use to switch on or off the wireless mode
Wireless off
Wireless on
The default setting is Wireless on.
Toggle on/off with the ● button. Leave the menu with the ◄ navigation key (left arrow).
Then flight mode is activated (wireless off) the symbol will be visible in the LCD.
Note: In flight mode (wireless off), will they functions ”Trigger Alarm” (see 5.7.3) , “SMS Nbr” (see 5.7.3) and
“MEID” (see 5.7.5) not be visible in the menu Tools.
5.7.3 Trigger Alarm
Select “Tools – Trigger Alarm”
Are used to select what kind of alarms that will be send by SMS/text message
Missed dose
Dose taken
Low battery
Missing pills
The default setting for Trigger Alarm is Missed dose, Dose taken, Low battery and Missing pills.
Toggle on/off with the ● button. Leave the menu with the ◄ navigation key (left arrow).
Alarms (SMS/text message) will be sent when Medimi goes into sleep mode after an event.
5.7.4 SMS Nbr (phone no)
Select “Tools – SMS Nbr” (phone no)
Enter the phone number where the SMS/Text message is going to be send on alarms. After entering the phone
number, the Medimi will send a test SMS/Text message to verify communication. The message is sent when
Medimi goes into sleep mode, after approx. 60 seconds after last activity.
5.7.5 MEID
Select “Tools – MEID”
Shows what MEID the Medimi has
Leave the menu with the ● button key.
____________________________________________________________________________________
Page 16 (28) www.medicpen.com Phone +46 40 100 800
Page 17
5.8 Taking your medication
Warning
You may continue to skip dispensing your medication by pressing the
dispensing button once, opening the cover and answering No to the
question asked. However, this will eventually result in missing the dosage
time window and the dosage will be registered as a missed dose. Your
Medimi will then cease to provide you with an alarm for this dose. This
can result in inaccurate dosing.
When it is time to take your medication Medimi will alert you with a light, sound alarm and vibration.
To silence the alarm, press the dispensing button once. Medimi will continue to alert you once a minute until
you have dispensed the dose.
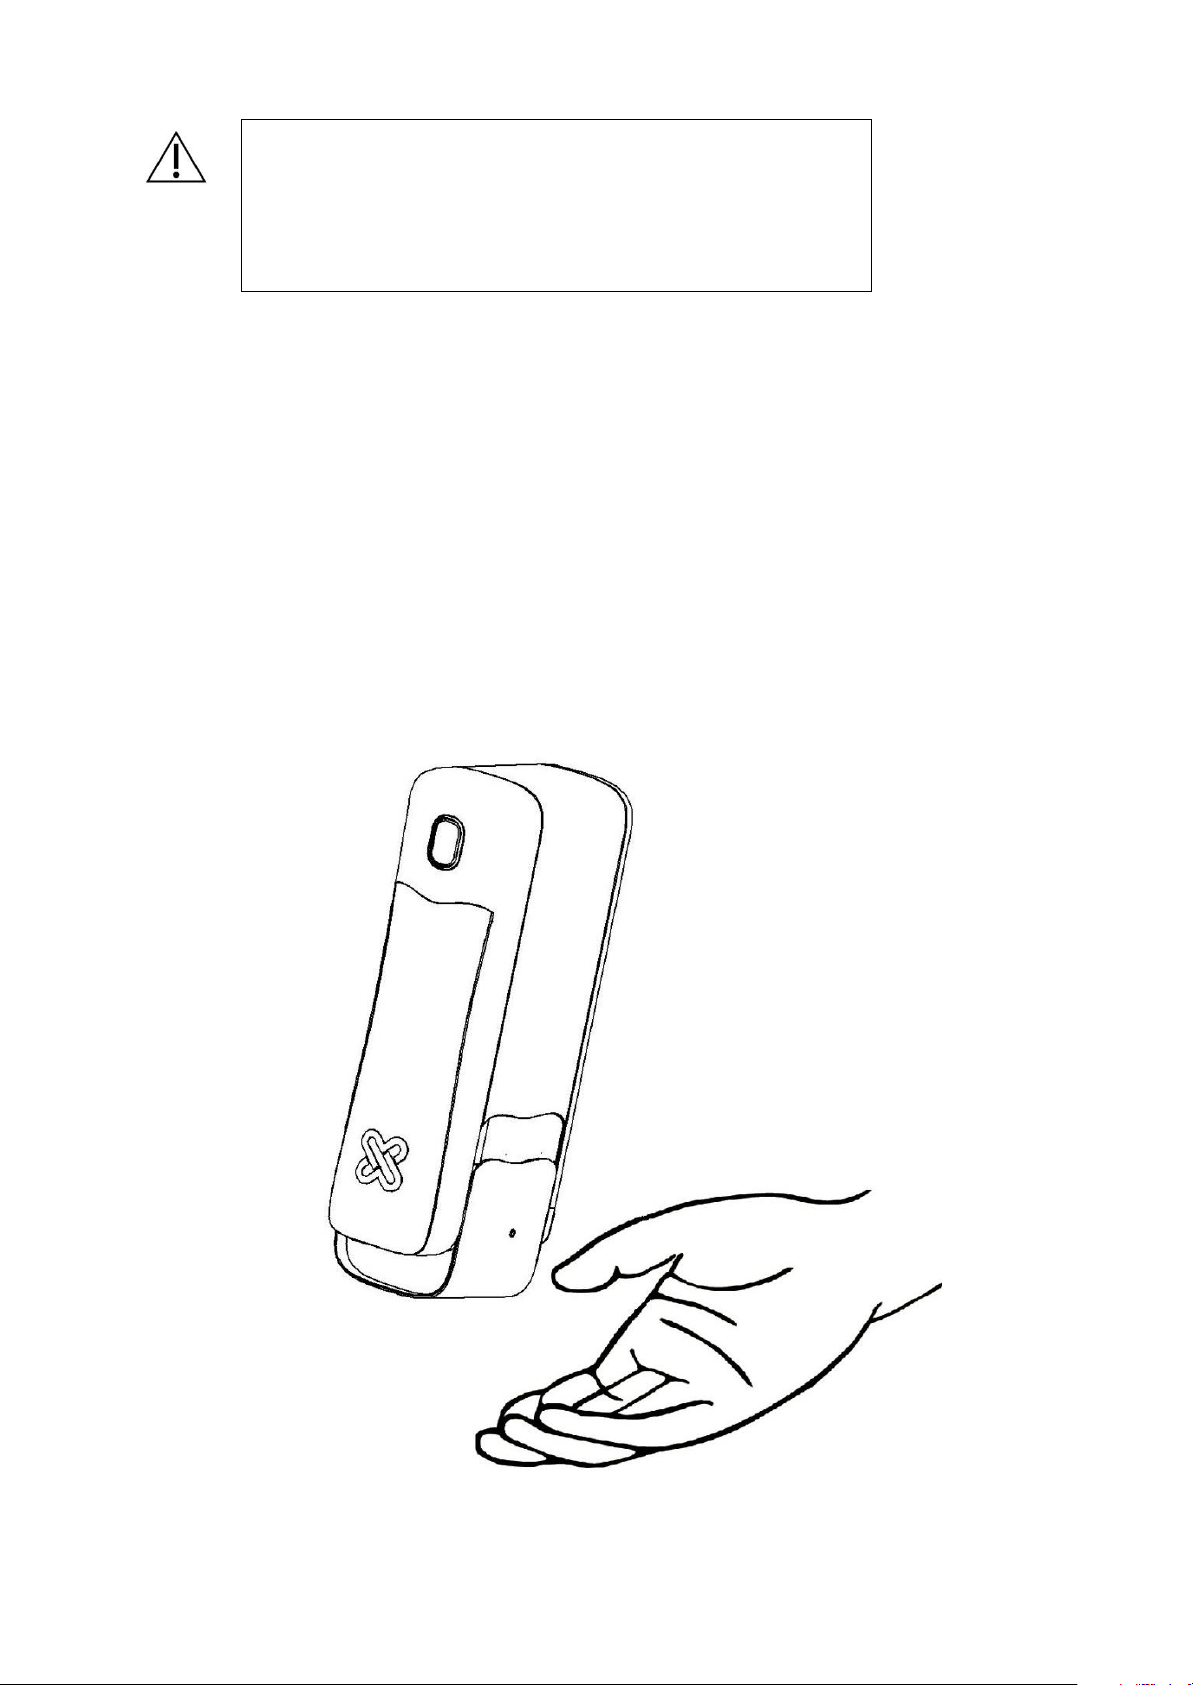
To eject the medication, press the flashing dispensing button a second time. Keep Medimi upright when
dispensing the medication.
Medication is ejected into the cup. Check that the dose is correct. To take the medication, hold your hand under
the cup, pull the cup down one notch and tilt Medimi until the medication falls into your hand. To remove the
cup completely you need to move it beyond the notch.
If Medimi alerts you that it is out of medication, open the sliding cover. The display gives you information
about which cartridge needs to be refilled. To avoid incorrect medication, refill medication immediately.
If for any reason you do not want to take your medication, you can open the sliding cover and answer no to the
question displayed.
____________________________________________________________________________________
Phone +46 40 100 800 www.medicpen.com Page 17 (28)
Page 18
5.9 Refilling medications
Warning
Ensure that you refill the cartridge with the correct medication. Loading
with incorrect tablets/capsules will lead to medication errors
Warning
Ensure that you enter the correct number of tablets/capsules loaded in the
cartridge. An incorrect amount will lead to medication errors.
Warning
Follow the cleaning instructions to prevent damage to your Medimi.
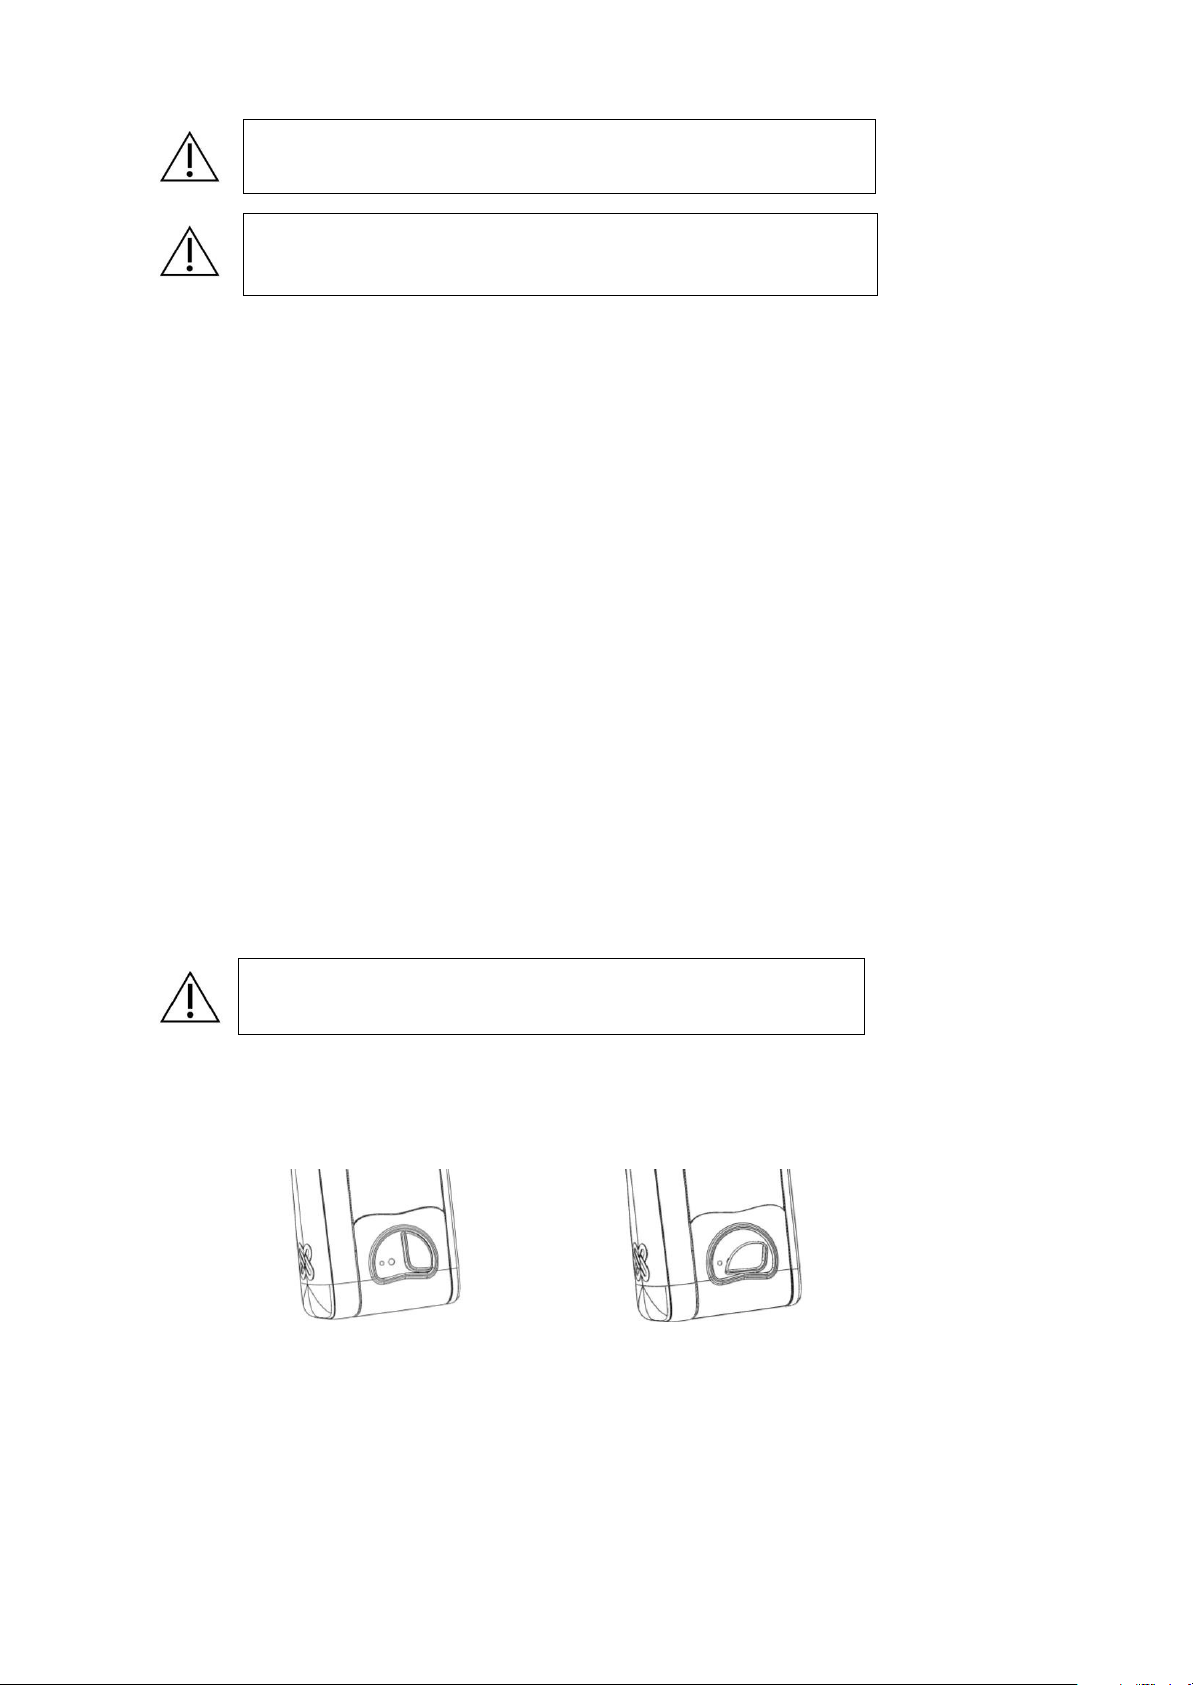
Medication cup lever
in locked position
Turn the lever anti-clockwise to
remove the medication cup
1. Remove the medication collection cup.
2. Remove the cartridge to be filled. If more than one cartridge needs refilling, handle each of them
separately to avoid mix-ups.
3. Refill the cartridge in an anti-clockwise direction (see section 5.3, Preparing cartridges). Ensure
that you put one tablet/capsule in each compartment.
4. When the cartridge is reinserted into your Medimi, a text message will confirm which cartridge
was entered and which medication Medimi expects has been loaded.
5. Ensure that the information is correct.
6. Medimi will ask you how many tablets/capsules are in the cartridge. If the cartridge was empty when
it was removed, the number tablets/capsules contained in a full cartridge will be suggested.
7. If the cartridge contained tablets/capsules when it was removed, the suggestion will be the same
amount as when the cartridge was removed.
8. Change the number if necessary using the ▲ ▼ navigation keys.
9. Press the ● button to confirm.
10. If more than one cartridge needs to be refilled, repeat steps 2 – 9 for each cartridge.
11. Replace the medication collection cup in position.
12. The refill has now been completed.
6. Cleaning
Use either water and a mild detergent or clean water only. Clean your Medimi using a damp cloth.
The medication collection cup can be removed from Medimi and hand washed. Clean your Medimi
medication collection cup once a month or when you change to a new medication.
____________________________________________________________________________________
Page 18 (28) www.medicpen.com Phone +46 40 100 800
Page 19

7. Maintenance
Warning
Using the wrong type of batteries can result in loss of function and may
damage your Medimi.
Warning
Change your batteries promptly when alerted, to prevent Medimi from
ceasing to function.
7.1 Changing Batteries
Your Medimi is powered by two 1.5 V AA (LR6) Alkaline batteries.
A low battery level is indicated by a battery symbol on the display. Replace the batteries as soon as
possible when the symbol appears.
Battery symbol:
A backup system in your Medimi will maintain timer functions during the battery replacement procedure.
This function will only work if the display is inactivated during the replacement.
Please do not touch any of the buttons during battery replacement as this would activate the display.
All settings and other data are securely stored in Medimi even without batteries.
To change batteries:
1. Remove the sliding cover completely.
2. Remove the used batteries.
3. Insert new batteries in the same position as shown at the bottom of the battery compartment.
4. Replace the sliding cover.
7.2 Cartridge
Cartridges must only be used for one type of medication. Use a new cartridge if you want to dispense another
type of medication. The expected lifetime of a cartridge is one year.
8. Troubleshooting
If your Medimi is not working properly.
Check the display for any error message.
Check that the correct battery type has been inserted and that the batteries are inserted correctly.
See 5.4 and 10
Check that the cartridges are inserted correctly.
See 8.1.2, 8.1.3, 5.3 and 5.9
Check that the parameter settings (date, time and time format) and medication schedules are correct.
See 9.3.2, 9.3.3 and 9.4.1.
Check the MEDI and Phone Nbr is correct and Flight mode is set wireless on if the wireless
communications not work
See 5.7.2, 5.7.4 and 5.7.4
____________________________________________________________________________________
Phone +46 40 100 800 www.medicpen.com Page 19 (28)
Page 20
8.1 Alarms / Error messages
8.1.1 Missed Dose Alarm
A dose is considered missed if you have not dispensed it within the stated dosage time window.
Medimi will alert you with a red flashing light and an audible signal if this occurs. The alarm is triggered
when the time window has passed, and continues until the next dose.
Missed doses are displayed until you confirm them. Medimi will also log this information, which can be seen
on the Info menu.
8.1.2 Position error
If the cartridge dispensing mechanism is in the wrong position (B) you will see an error message and will be
asked to remove the cartridge and correct the error. An incorrectly positioned dispensing mechanism is corrected
by rotating the dispensing wheel until the window for position detection is white (A).
Cartridges seen from the reverse side.
Dispensing wheel in correct position Dispensing wheel in wrong position
1. Dispensing wheel
2. Window for position detection
8.1.3 Eject error Missing # pills of medicine
Dispensing error due to either running out of medication in the cartridge or the cartridge not moving.
Please eject the cartridge and open the lid.
If empty, refill.
If not empty, remove any jammed tablets/capsules.
Check that the rubber belt is moving.
Check that the cartridge was filled in an anti-clockwise direction and replace the lid.
If necessary, turn the dispensing wheel to the correct position.
____________________________________________________________________________________
Page 20 (28) www.medicpen.com Phone +46 40 100 800
Page 21
9. Operating your Medimi
A BC D EF G H IJ K LM N
O PQ R ST U V W X Y Z
Aa
ß _
C _
C
OK
Warning
Ensure that the date and time are set correctly to prevent improper dosing.
0 1 2 3 4 5 6 7 8 9
+
ß
+_
OK
OK
9.1 Entering numbers
When entering numbers Medimi will display a number as a starting point.
If you want to increase the given number use the ▲ navigation key repeatedly until the number you require is
displayed and confirm it by pressing the ● button.
If you want to decrease the given number use the ▼ navigation key and confirm by pressing the ● button.
Use the ◄ navigation key to delete a selected number.
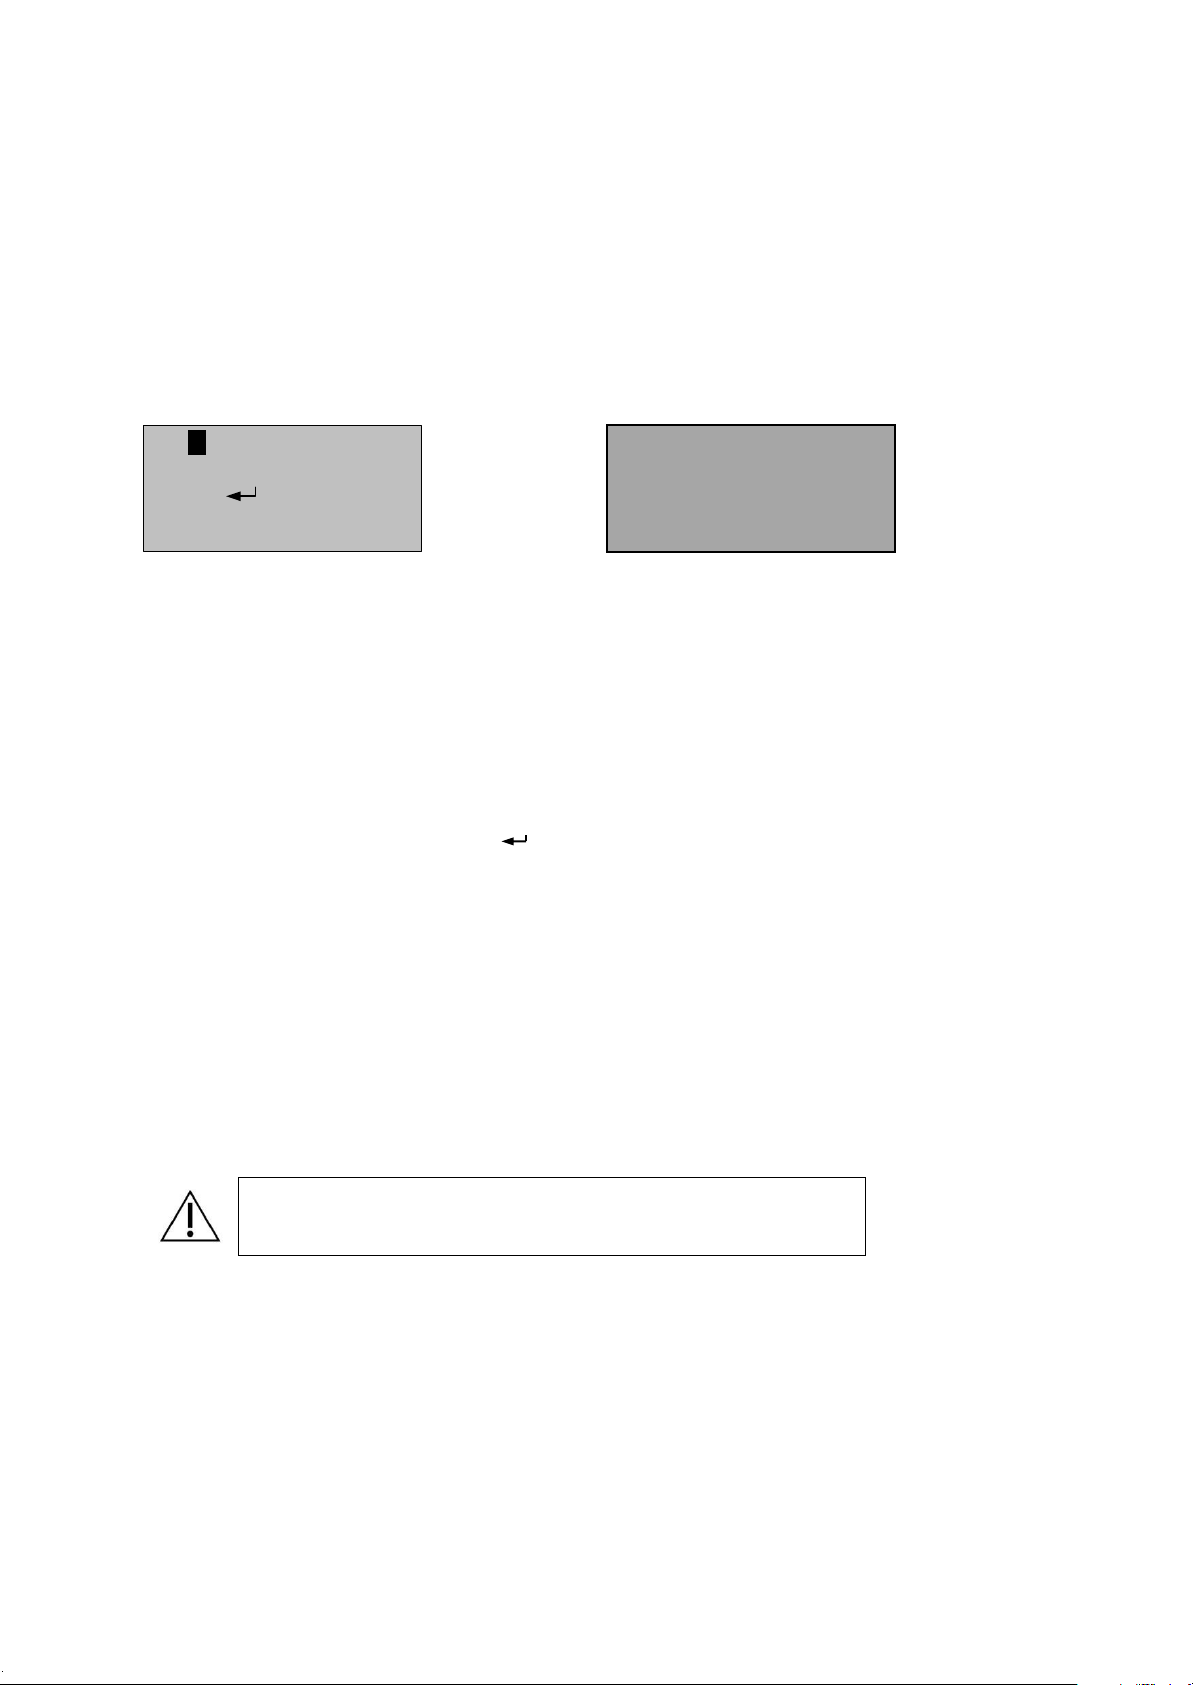
9.2 Entering text and SMS (phone) number
All letters and numbers are shown in the information window.
Move to the letter, number or function you require by highlighting it with the ▲ ▼ ◄ ► navigation keys.
Select a letter, number or function by pressing the ● button. The letter or number you have selected will be
displayed at the bottom of the window. If you need to delete a letter or number, move to ß and then press the ●
button.
Change between upper and lower case by moving to Aa and then pressing the ● button.
Insert a space by highlighting _ and then press the ● button.
When you have finished writing, move to and press the ● button. This will take you back to the menu.
9.3 Customization, fine tuning
Find these settings listed under” Tools” in the main menu.
9.3.1 Language
Available languages are displayed on the list. Highlight your selection and confirm with the ● button.
9.3.2 Time & date
Set the hours by pressing the ▲ ▼ navigation keys. Press the ● button to select the minute item and then set the
minutes. Confirm by pressing the ● button. Set the date and confirm by pressing the ● button.
____________________________________________________________________________________
Phone +46 40 100 800 www.medicpen.com Page 21 (28)
Page 22
9.3.3 Time format
Warning
Ensure that the medication schedule is correct after any changes are made
by reviewing the information in “View all”.
Both the time and date format are set here. Select 12 or 24-hour clock from the list and confirm with the ● button.
Select date format, available date formats are YYMMDD, DD.MM.YY and MM/DD/YY, and confirm with the ●
button.
YY = Year
MM = Month
DD = Day
9.3.4 Ring tone
You may select silent mode or one of five different ringtone signals. Highlight your selection and press the ●
button to confirm.
When activating silent mode, a warning symbol will appear on the display.
9.3.5 Vibration mode
Select the vibration mode on/off function and select on or off, then confirm with the ● button.
The default setting is on.
9.3.6 Confirm dialog
You may choose to manually confirm dialogs by selecting “Must confirm”. The default setting is “Use default”
which means no manual confirmations are needed.
9.4 Medication schedules
You will find these settings under “Schedule”.
If you use medication that is not suitable for storage in Medimi, it is possible to have an additional schedule for
this medication. Medimi alerts you in the same manner as if the medication was loaded in one of the cartridges.
The schedule for medication outside Medimi is always number zero (0).
Select the schedule you want to change by pressing the ● button. A list of the available options appears in
the display.
The information about the schedule is displayed in the following order Start date, end date, dosage time
window, dosage times and the number of tablets/capsules.
9.4.1 View all
View the set schedule per each cartridge on the display.
9.4.2 Edit medication name
Enter the name of your medication. A maximum of 20 characters may be used. The name is then displayed
on the list and is used to identify the medication cartridge.
____________________________________________________________________________________
Page 22 (28) www.medicpen.com Phone +46 40 100 800
Page 23

9.4.3 Edit date
Enter the start date (Start schedule) and end date (End schedule) for the medication schedule.
9.4.4 Edit window
The dosage time window is the time interval before and after the set time, when it is possible to take the
medication. The time window is entered in minutes and may be a maximum of +/- 240 minutes. The time
can be adjusted in steps of 5min.
9.4.5 Add dose
Enter the dosage time and the number of pills/tablets/capsules. A maximum of 16 dosage can
be entered and schedule per day.
9.4.6 Edit dose
A list of all dosage times appears. Select the dosage time that is to be altered. Adjust the dosage time and/or the
number of pills/tablets/capsules.
9.4.7 Delete dose
A list of all of the dosage times appears. Select the dose to be deleted.
9.4.8 Delete all
This function deletes all of the parameters set for the schedule selected, name, dosage times, start and end
dates and time windows.
____________________________________________________________________________________
Phone +46 40 100 800 www.medicpen.com Page 23 (28)
Page 24
9.5 Helpful features
Warning
Using time offset may result in missed doses that closely follow each
other.
Warning
When dispensing in advance you must ensure that the dosage schedule
is followed for the doses that have been dispensed. It is not possible to
cancel doses that have been dispensed in advance. No alarm is
triggered for dispensed doses.
Warning
Extra tablets/capsules are not included in the normal dosage
schedule. Incorrect use can lead to overdose.
9.5.1 Time offset
This setting is located under “Tools – Time offset”.
The medication schedule can be altered to an earlier or later time. An hourglass indicates that the Time offset
function is activated.
This function is useful if you wish to move your dose times temporarily, during weekends or vacations,
without changing your saved medication schedules.
Select one:
• As scheduled – cancels Time offset and is the default setting.
• Doses later – delays your dosage with the selected minutes. You can delay the doses from 10 minutes to 120
minutes. Confirm by pressing the ● button.
• Doses earlier – brings forward your doses from 10 minutes to 120 minutes. Confirm by pressing the ●
button.
9.5.2 Manually dispense doses
These settings are located under “Take Dose”.
Your Medimi handles dosages and reminders based on the saved medication schedules. The medication
schedule states the times when different medications should be taken.
If for any reason you do not wish to take your dosage when you are alerted, it is possible to manually
dispense your medication.
9.5.2.1 Current dose
This function may be used to dispense your Current Dose before Medimi alerts you. It can only be used within
the time window for the current dosage. The time window default is two hours, with the set time in the middle
9.5.2.2 Next dose
The Next Dose function may be used to dispense doses in advance. This can be used if you are not able to bring
your Medimi with you but still need to take your medication.
Medimi will display the time for the next dose and will ask if you would like to dispense it. If you answer YES,
this dose will be dispensed and the next dosage time will be displayed.
This procedure is repeated until you answer NO to the prompt.
9.5.2.3 Extra tablets/capsules
The function Extra Pill is used to dispense medication that is not included in the medication schedule. This
function can be used if you drop or lose a tablet/capsule, or if you need extra medication.
____________________________________________________________________________________
Page 24 (28) www.medicpen.com Phone +46 40 100 800
Page 25

9.6 Options
9.6.1 Number of cartridges
You will find these settings under “Tools - # of cartridges”.
This menu states how many cartridges your Medimi can be equipped with. When installing additional
cartridge modules you must enter the new cartridge number before the added cartridge can be used.
9.6.2 Operating mode
You will find these settings under “Tools – Mode”.
Medimi can operate in two different ways. The medication schedule is linked either to a fixed position in
Medimi or to the medication name saved on the cartridge.
Position
Medication schedules are linked to the cartridge position in Medimi. The user is responsible for ensuring that
cartridges with the correct medication are inserted into the correct cartridge holders.
Medication
The name of the medication is stored on the cartridge and linked by the name to the schedule. Medimi reads the
name of the medication from the cartridge and the cartridge may be inserted into any
position. It is important that the cartridge contains the correct medication.
Enter the name of the medication using the ‘Cartridge Admin’ option under the Tools menu.
Please note that the medication and dosage schedule must be entered before this option can be selected.
9.6.3 Link cartridges
You will find this setting under “Schedule – Link cartridge”.
This function can only be used when the medication schedule is linked to the position. With this function
you can use more than one cartridge for the same medication schedule.
When the medication in one linked cartridge is consumed, your Medimi checks if there are other
cartridges available. When another cartridge is linked to the same schedule, the dosages continue from this
cartridge.
To set this up, go to Schedule. Select the medication you want to link to another cartridge. Go to Link cartridge.
Select the schedule you want to use for the linked cartridge.
9.6.4 Cartridge admin
You will find this setting under “Tools – Cartridge admin”.
A list of cartridges appears on the display. Select cartridge by pressing the ● button.
If it is in medication mode, you can assign a cartridge to a schedule.
You can change the number of tablets/capsules in a cartridge.
You can also lock a cartridge to a specific Medimi. When this is activated, a cartridge can only be used with a
specific Medimi. A locked cartridge can only be unlocked by manufacturer.
____________________________________________________________________________________
Phone +46 40 100 800 www.medicpen.com Page 25 (28)
Page 26
10. Technical data
Medimi Size
2 Cartridges 6.1" x 1.82" x 3.44" (155 x 46.2 x 87.5 mm)
4 Cartridges 6.1" x 1.82" x 5,33" (155 x 46.2 x 135.4 mm)
6 Cartridges 6.1" x 1.82" x 7,22" (155 x 46.2 x 183.3 mm)
Weight
0.55 lb (250 g) without batteries and medication
Batteries (2pcs)
1,5V AA (LR6) Alkaline batteries. NOTE: Not NiMH or NiCd
Cartridges and
pill/tablets/capsules size
Size 7, type M201/7:
7 pills/tablets/capsules with a maximum size of
3/4" x 3/8" x 3/8" (20 x 10 x 10 mm)
Size 15, type M201/15:
15 Pills/tablets/capsules with a maximum size of
3/8" x 3/8" x 3/8" (10 x 10 x 10 mm)
Storage temperature
-22°F to 185°F (–30º C- +85º C)
Operating temperature
41 °F to 131 °F (+5 °C to +55 °C)
FCC approval
According to FCC 47 CFR part 15B
Patents
US 12/595514, AU 2007351001, JP 2010-502421, EP 07724156.0 (CH,
GE, ES, FR, UK, NL, SE)
Patent pending
CN 200780053066.5, IN 2090/MUMNP/2009
FDA
Registration number 3008467487
____________________________________________________________________________________
Page 26 (28) www.medicpen.com Phone +46 40 100 800
Page 27

11. Federal Communication Commission Interference Statement
This equipment has been tested and found to comply with the limits for a Class B digital device,
pursuant to Part 15 of the FCC Rules. These limits are designed to provide reasonable protection
against harmful interference in a residential installation. This equipment generates, uses and can
radiate radio frequency energy and, if not installed and used in accordance with the instructions,
may cause harmful interference to radio communications. However, there is no guarantee that
interference will not occur in a particular installation. If this equipment does cause harmful
interference to radio or television reception, which can be determined by turning the equipment off
and on, the user is encouraged to try to correct the interference by one of the fo llowing measures:
Reorient or relocate the receiving antenna.
Increase the separation between the equipment and receiver.
Connect the equipment into an outlet on a circuit different from that to which the receiver is
connected.
Consult the dealer or an experienced radio or television technician for help.
FCC Caution: Any changes or modifications not expressly approved by the party responsible for
compliance could void the user's authority to operate this equipment.
This device complies with Part 15 of the FCC Rules. Operation is subject to the following two
conditions: (1) This device may not cause harmful interference, and (2) this device must accept any
interference received, including interference that may cause undesired operation.
including interference that may cause undesired operation.
12. Radiation Exposure Statement
This equipment complies with FCC radiation exposure limits set forth for an uncontrolled
environment. End users must follow the specific operating instructions for satisfyi ng RF exposure
compliance.
To maintain compliance with FCC RF exposure compliance requirements, please follow operation
instruction as documented in this guide. This transmitter must not be co -located or operating in
conjunction with any other antenna or transmitter, except the transmitters built-in with this device.
____________________________________________________________________________________
Phone +46 40 100 800 www.medicpen.com Page 27 (28)
Page 28

The World’s First Digital Pill Dispenser
____________________________________________________________________________________
Page 28 (28) www.medicpen.com Phone +46 40 100 800
 Loading...