

Page 1
Overview of the appliance
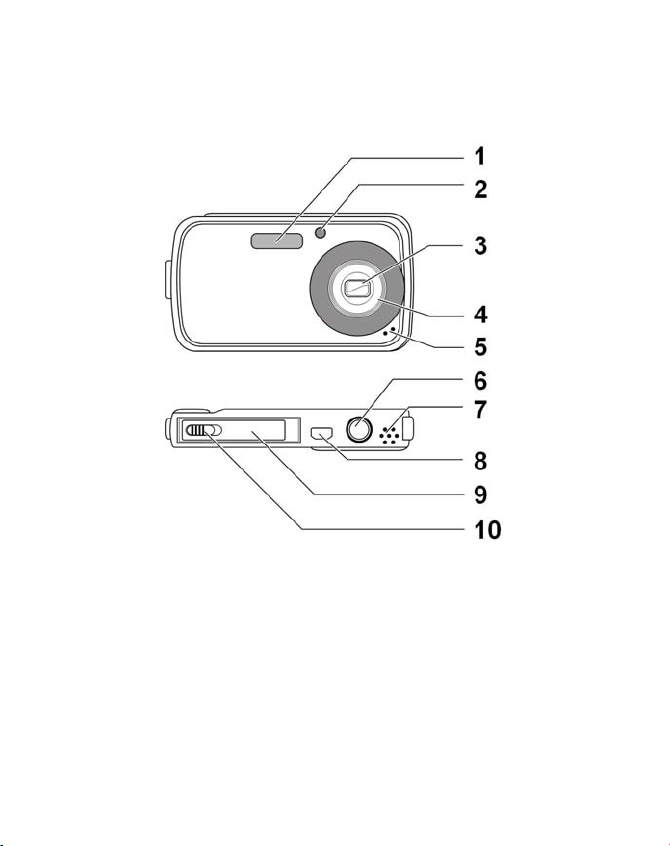
Front and underside
1. Flash
2. Display for automatic
release/autofocus light
flashing: Automatic
release switched on
3. Camera lens
4. Lens barrel
5. Microphone
6. Tripod socket
7. Loudspeaker
8. USB connection for USB
and AV cables supplied
9. Battery compartment
10. Catch for battery
compartment
3
Page 2
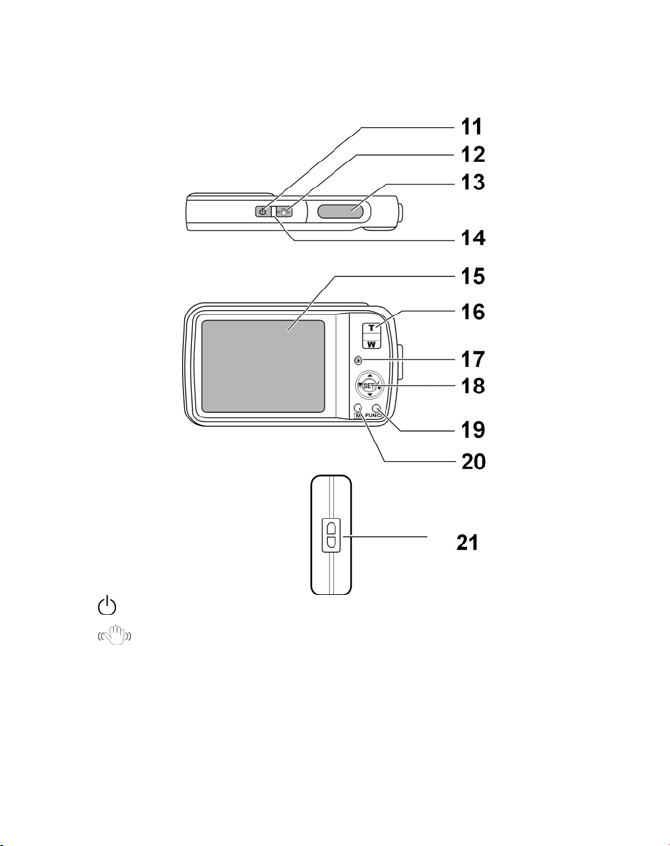
Rear and top
Camera on/off switch
11.
12.
13. Briefly press
14. ON indicator, lights up yellow or green depending on
15. Display
Briefly press image stabiliser: Switch image stabiliser on
release button: Set focus range
operating mode
4
Page 3
16. T / W: Zoom keys; enlarge or reduce selection
17. : Press: Switch back and forward between shooting and
playback mode
18. SET button: Confirm selection
Scroll up in menus/submenus
Scroll down in menus/submenus
In shooting mode: Choose flash type
In playback mode: Show next shot
Video playback: Switch fast forward on or off
In the menu Open submenu or select
setting
In shooting mode: Turn on macro for close-ups
In playback mode: Show previous shot
Video playback: Switch fast rewind on or off
In the menu Quit submenu or select
setting
19. FUNC/: Function/trash can
In playback mode: Open setting options
M: Menu button: Open the menu
20.
21. Eye for strap
5
Page 4

Contents
Overview of the appliance ................................. 3
Rear and top ................................................................... 4
Contents ....................................................... 6
Safety instructions .......................................... 9
Start of operation ......................................... 14
Contents of package ..................................................... 14
Charging batteries in the battery charger ...................... 14
Inserting the battery ...................................................... 16
Inserting and removing SD cards .................................. 17
Fitting the strap ............................................................. 18
First Steps ................................................... 19
Switching on the camera .............................................. 19
Switching off the camera .............................................. 19
Setting the language, date and time ............................. 20
Shooting and playback mode ....................................... 21
Displays ...................................................... 22
Displays for shooting .................................................... 22
Displays for playback .................................................... 24
Displays for video playback ........................................... 25
Displays for sound playback .......................................... 27
Switching the displays on and off .................................. 29
Taking your first shoots .................................. 31
6
Page 5

Setting shooting mode.................................................. 31
Tips for good shots ....................................................... 31
Taking photos ............................................................... 32
Setting the focus mode ................................................. 34
Recording video clips .................................................... 35
Recording audio clips .................................................... 35
Using the Functions menu ............................................ 37
Using the recording menu ............................................ 43
Watching and listening to recordings ................ 44
Individual playback of recordings .................................. 44
Playing back images as thumbnails ............................... 45
Zooming within photos ................................................ 46
Playing back video/audio clips and voice messages ....... 47
Deleting photos ............................................................ 48
The Menus .................................................. 49
Navigating in the menus ............................................... 49
The Recording menu ..................................................... 50
Shooting mode ............................................................. 53
The settings menu ........................................................ 58
The playback menu ....................................................... 61
Connection to TV and PC ................................. 72
Displaying shots on a television set ............................... 72
Printing shots on a printer ............................................. 73
Transferring data to a computer .................................... 74
Using a USB cable ......................................................... 74
7
Page 6

DCF memory standard .................................................. 75
Card drive ..................................................................... 75
Directory structure in the memory ................................ 76
Installing the software ................................................... 77
Storage capacity ........................................................... 78
Troubleshooting ........................................... 79
Maintenance and care ................................... 81
Disposal ..................................................... 82
Technical specifications .................................. 83
8
Page 7

Safety instructions
About these instructions
Read the safety instructions carefully before use. Note the warnings
on the appliance and in the operating instructions
Always keep the operating instructions close to hand. If you sell the
equipment or give it away, make sure you also hand over these
instructions and the guarantee card.
Proper use
The camera is intended for taking pictures in digital format.
Do not operate the camera either in extreme heat or extreme cold.
The camera is not suited to operation in extreme conditions.
Warning
To avoid injury please note the following warnings when using this
product.
Make sure you are not too close to people when using the flash.
Otherwise you could damage people’s eyes.
Keep a distance of at least one metre from children when
working with the flash function.
Do not open up or dismantle the device.
Dismantling the device could lead to an electric shock. Tests on
internal components, modifications and repairs should be
carried out by specialists only. Please take the product to an
authorised service centre for checks.
Disconnect the battery charger from the mains when it is not in
use.
The socket must be close to the device and within easy reach.
If you are not going to use the camera for some time, remove
the batteries to prevent leakage.
9
Page 8

The camera and the mains adapter must not be exposed to
water in drip or spray form. Do not place any objects filled with
liquids (e.g., vases) on the camera.
Instructions for batteries
Your camera may be operated by the li-ion batteries supplied.
Charge the battery only in the battery charger supplied.
Please heed the following general instructions on handling
batteries:
Keep children away from the rechargeable batteries. Seek
medical attention immediately if a battery is swallowed.
CAUTION! Never try to recharge non-rechargeable batteries.
Danger of explosion!
CAUTION! There is a risk of explosion if batteries are incorrectly
replaced. Replace the battery with the same or equivalent type
only.
Before inserting the batteries, check that the contacts in the
device and on the batteries are clean, and clean them if
necessary.
You must insert only the battery supplied.
Note the polarity (+/-) when inserting the battery.
Store the battery in a cool, dry place. Direct intense heat can
damage the battery. Do not expose the device to any sources of
intense heat.
Avoid contact with skin, eyes and mucous membranes. If these
areas come into contact with battery acid, rinse them
immediately with plenty of clean water and contact a doctor
immediately.
Do not throw the battery into a fire, short-circuit it or dismantle
it.
10
Page 9

Never expose the battery to excessive heat, such as from
sunshine, fire or similar.
If the camera is not going to be used for some time, remove the
battery.
If the battery is leaking, remove it from the camera immediately.
Clean the contacts before inserting a new battery. There is a risk
of skin irritation from battery acid!
Also remove a flat battery from the camera.
Precautionary measures
Please note the following precautionary measures to avoid damage
to your camera and to keep it in good condition.
Store in a dry place
This camera is not watertight and will not function properly if it
is immersed in water or if liquids penetrate to the inner
workings.
Keep away from damp, salt and dust
Wipe off salt and dust with a light, damp cloth if you have been
using the camera on the beach or at the seaside. Carefully dry
the camera afterwards.
Keep it away from strong magnetic fields
Never place the camera too close to appliances which generate
strong electromagnetic fields, such as electric motors. Strong
electromagnetic fields may result in camera malfunctions or
disturb the data recording.
Avoid excessive heat
Do not use or store the camera in sunlight or at high
temperatures. This can cause the battery to leak or the case to
become misshapen.
Avoid high variations in temperature
If you suddenly take the camera out of a cold environment into a
warm one or vice versa, drops of water can form outside and
11
Page 10

inside it, possibly resulting in malfunctions and damage to the
camera. Wait until the camera temperature has adjusted to the
ambient temperature before starting to use the camera. You can
provide some protection against varying temperatures by using
a bag or a plastic case.
Do not drop the camera
Jarring or vibrations resulting from a fall can cause malfunctions.
Loop the strap round your wrist when you carry the camera.
Do not remove battery when data are being processed
When image data are being recorded to memory cards or
deleted, switching off the power supply can result in data loss or
damage the internal circuit or the memory.
Treat lens and all moving parts carefully
Do not touch the lens or the lens barrel. Take care when
handling the memory card and the battery. These parts are not
designed for high levels of stress.
Batteries
At low temperatures, there can be a sharp drop in battery
capacity. If you take photographs at cold temperatures, keep a
warm replacement battery in reserve.
If the contacts on the battery are dirty, clean them with a dry,
clean cloth or use an eraser to remove residues.
Memory cards
Switch the power supply off before you insert or remove the
memory card. Otherwise the memory card may become
unstable. Memory cards may become hot during use. Always
remove the memory cards carefully from the camera.
12
Page 11
At low temperatures the capacity of the battery can
drop significantly due to the reduced speed of the
chemical reactions. When recording in cold weather
keep a second battery pack in reserve in a warm place
(e.g. trouser pocket).
This symbol on your camera certifies that the device
complies with EU guidelines on electromagnetic
interference. CE stands for Conformité Européene
[European Conformity].
The device is intended for private use only and are not
designed to be used in a heavy industrial business.
13
Page 12

Start of operation
Contents of package
Please check your purchase to ensure all items are included and
contact us within 14 days of purchase if any of the following
components are missing:
The following items are supplied with the product:
Camera
2 li-ion batteries
2 GB SD memory card
Battery charger with mains cable
USB cable
AV cable
Carrying strap
Carrying case
Software on CD-ROM
Charging batteries in the battery charger
The battery charger supplied may only be used to charge the
lithium-ion battery supplied with the camera.
CAUTION! Never try to recharge non-rechargeable batteries.
Danger of explosion!
Use only the battery charger supplied to charge the battery.
Avoid covering the battery charger with items such as
newspapers, tablecloths, curtains, etc. to prevent heat build-up.
Do not place naked flames, such as lit candles, on or near the
unit.
14
Page 13
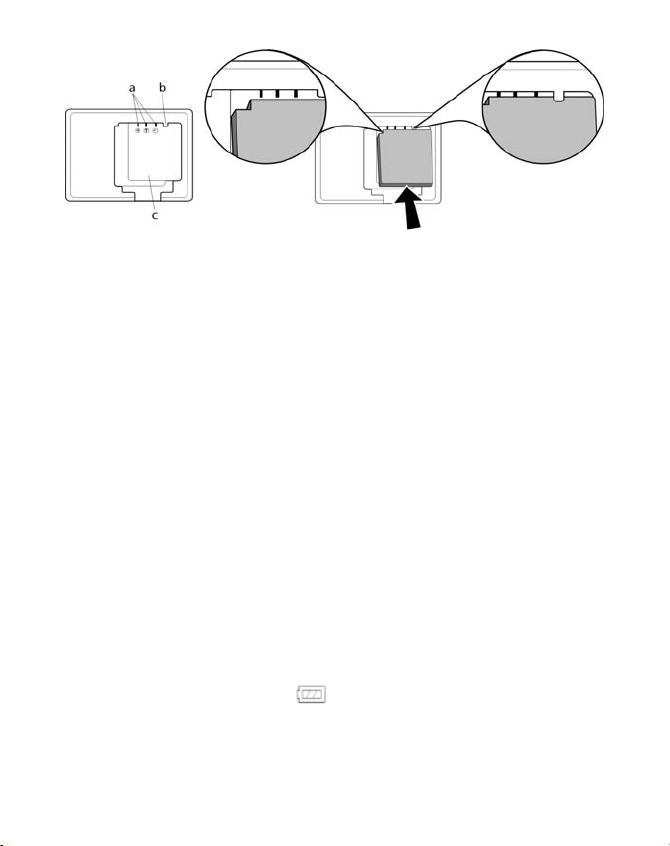
1. Insert the battery in the tray
corner on the left. The battery contacts must be flush with the
contacts on the charger.
2. Push the battery forwards against the spring contacts
Ensure that the battery is positioned properly below the guide
[b] in the tray.
edge
3. Now press the battery down. The battery must be in contact
with the base of the tray
4. Attach the supplied power cable to the battery charger and
connect it to a 230 V ~ 50 Hz power source. The orange LED
indicator will light up.
5. The charging time is approx. 2 hours. The green LED indicator
will light up when the battery is fully charged.
6. Unplug the power cable from the mains.
The charger is set up to prevent overcharging. Nonetheless,
unplug the charger from the mains to avoid unnecessary
power consumption.
7. Insert the battery in the camera, as described below.
[c], positioning the indented
[a].
[c].
This battery charge indicator
charging status. Charge the battery as soon as it becomes flat.
on the display shows you the
15
Page 14
Instructions on using the battery
The battery capacity is reduced in cold conditions (-10°C or
below). Warm up the battery (e.g. in your pocket) before using
it in cold conditions.
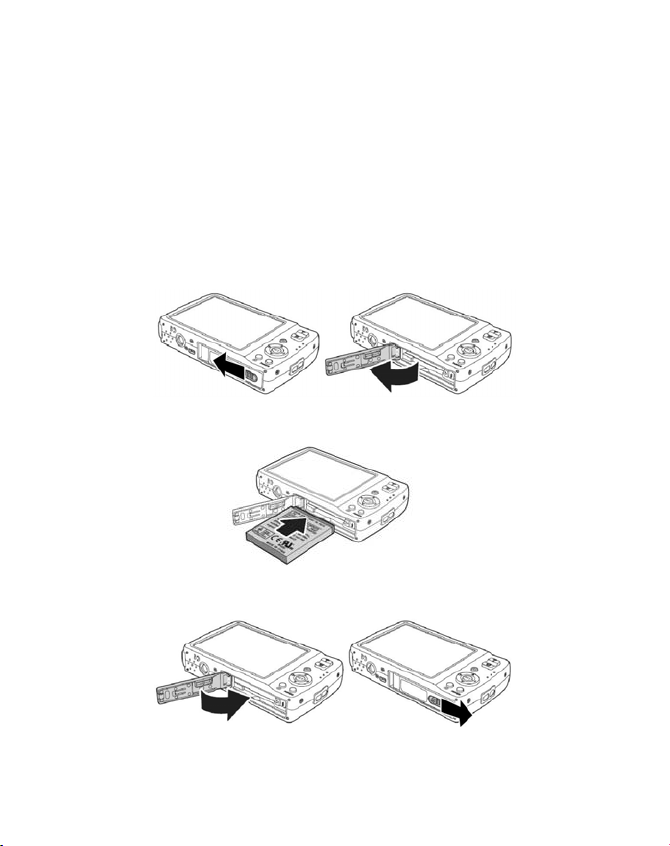
Inserting the battery
The li-ion battery supplied is required for operating the camera.
1. Switch the camera off.
2. Move the battery compartment catch in the direction shown
by the arrow. The battery compartment opens.
3. Insert the battery in the compartment so that the battery
contacts are touching the contacts in the compartment.
4. Close the compartment and move the catch back to its original
position.
16
Page 15
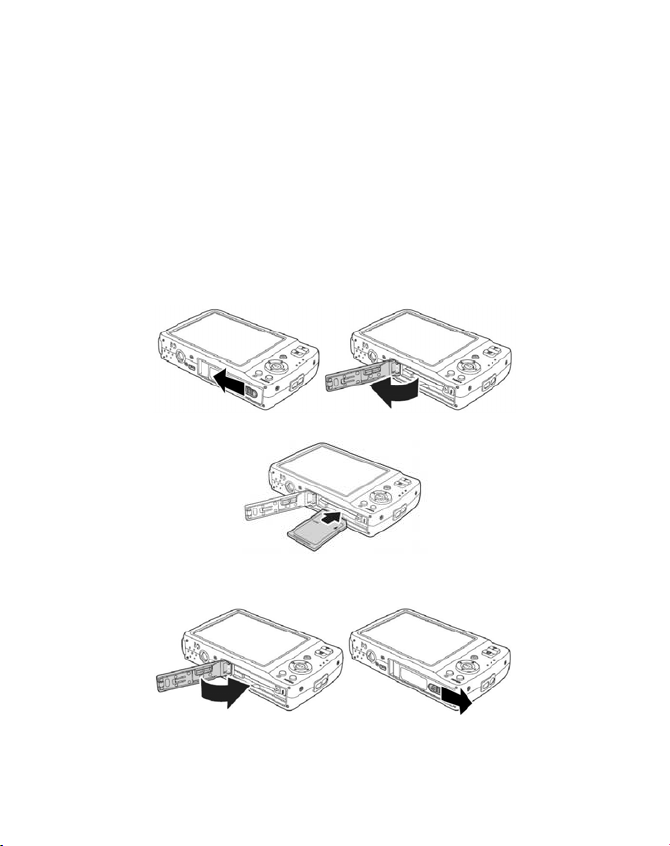
Inserting and removing SD cards
If no memory card is inserted, photos will be stored in the internal
memory. Please note that the capacity of the internal memory is
limited.
Use an SD memory card to increase the memory capacity. If a
memory card is inserted, your photos will be stored on the card.
Insert card
1. Switch the camera off.
2. To open the battery compartment, push the compartment
cover outwards.
3. Insert the card in the slot with the contacts facing down.
4. Close the compartment and move the catch back to its original
position.
To remove the card, press it down briefly to release it. The card will
then protrude slightly and may be removed.
17
Page 16
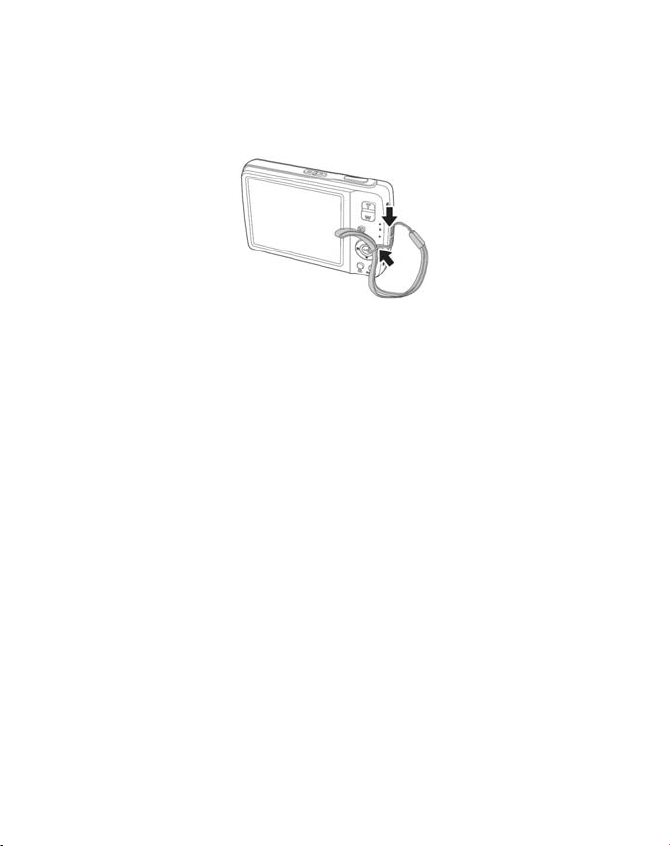
Fitting the strap
For ease of handling and increased security attach the strap to the
camera.
1. Feed the strap through the eye, as shown in the diagram.
2. Pull the other end of the carrying strap through the thin loop
of the strap and pull tight.
If you carry the camera by the carrying strap ensure that the
camera does not bang into anything.
While you are attaching the carrying strap place the camera on
a stable surface so it cannot fall down and get broken.
18
Page 17

First Steps
Switching on the camera
1. Press the ON/OFF button (1) for 1 to 2 seconds to turn the
camera on.
The lens comes out, the green light appears on the operating
display and the display is switched on. The camera is in
shooting mode.
If the camera does not switch on, check whether the battery
has been inserted properly and whether it is charged.
Switching off the camera
Hold the ON/OFF button down for a little longer to switch the
camera off.
Energy-saving function
If the camera has not been used for 60 seconds, it will switch off
automatically. You can also set the automatic switch-off period to
three or five minutes; see page 2.
The energy-saving function is not enabled in the following
circumstances:
While recording audio and video clips;
During playback of images, video clips or audio recordings;
While the camera is connected to another device via the USB
socket.
19
Page 18
Setting the language, date and time
Before using the camera for the first time, select your preferred
language from the menu and set the current date and time. Both
settings are performed in the Settings menu:
1. With the camera switched on, press the
menus.
2. Use the left and right arrow keys to select the Settings
menu
Setting the language
1. Use the up and down arrow keys
(English Language) in the “Settings” menu and press
language selection menu opens.
2. Select the preferred language using the up and down arrow
keys
Setting the date and time
1. Use the up and down arrow keys
the “Settings” menu and press
As well as the date and time, you can also set the date format. You
have the following options:
YY/MM/DD (year/month/day);
MM/DD/YY (month/day/year);
DD/MM/YY (day/month/year)
2. Use the left and right arrow keys to choose the entry
which you would like to change.
3. Use the up and down arrow keys
Hold down the keys to fast forward through the digits
.
and press SET.
SET. The Settings menu opens.
M button to open the
to select "LANGUAGE"
SET. The
5 6 to select "DATE/TIME" in
to select the entry.
20
Page 19

4. When the required entry has been selected, use the right arrow
key to take you to the next entry, e.g. month, etc.
5. Finally, press
The camera can only display the date and time in playback mode.
This information cannot be printed.
The time setting is saved by the internal battery. It is lost, however,
if the battery is removed from the camera for more than 48 hours.
SET to confirm the settings.
Shooting and playback mode
The shooting mode is enabled after the camera has been switched
on therefore you may take photos directly. You can also take audio
and video clips.
In playback mode, you can play, edit and delete photos, audio clips
and video clips.
1. To set playback mode, press this button:
appears in the top left of the display. The last picture taken is
displayed.
2. To go back to shooting mode, press this key again:
. The playback icon
.
21
Page 20
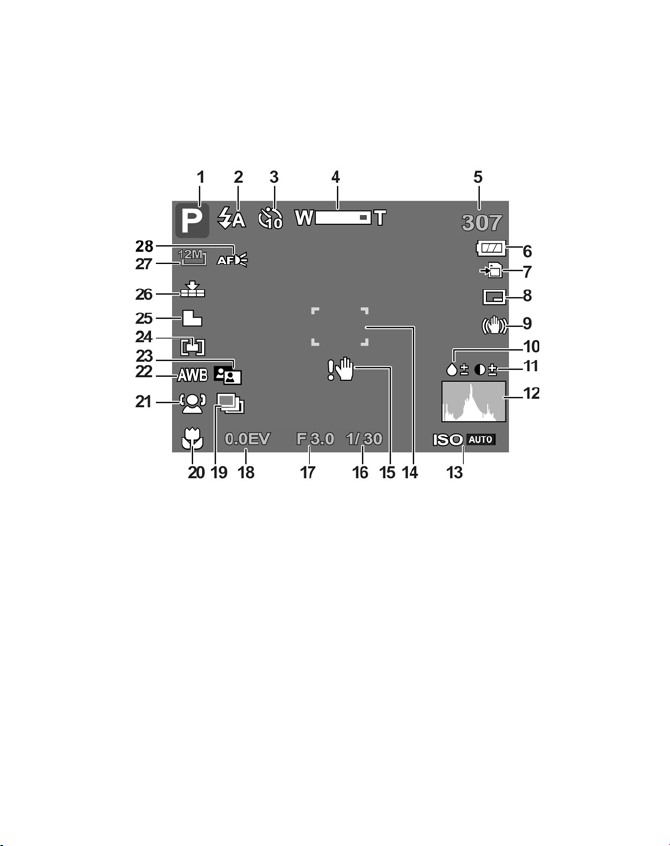
Displays
Displays for shooting
The following displays are possible in shooting mode:
1. You may set various types of recording (
current type of recording is displayed here.
2. Flash setting
3. Self-timer/burst
4. Zoom setting
5. Shots still available (at current resolution)
6. Battery status
7. Memory location (IN internal memory or card)
8. Date stamp
9. Image stabiliser switched on
22
FUNC button); the
Page 21

10. Saturation display
11. Contrast display
12. Histogram for the selected ISO settings
13. Setting
14. Focus range
15. Warning: Risk of blurring!
16. Shutter speed display
17. Aperture setting
18. Exposure setting
19. Automatic exposure
20. Macro setting
21. Face recognition
22. Automatic white balance
23. Exposure correction
24. AF range (autofocus range (portrait, distance and centre)
25. Definition
26. Quality
27. Resolution
28. Autofocus light switched on
23
Page 22
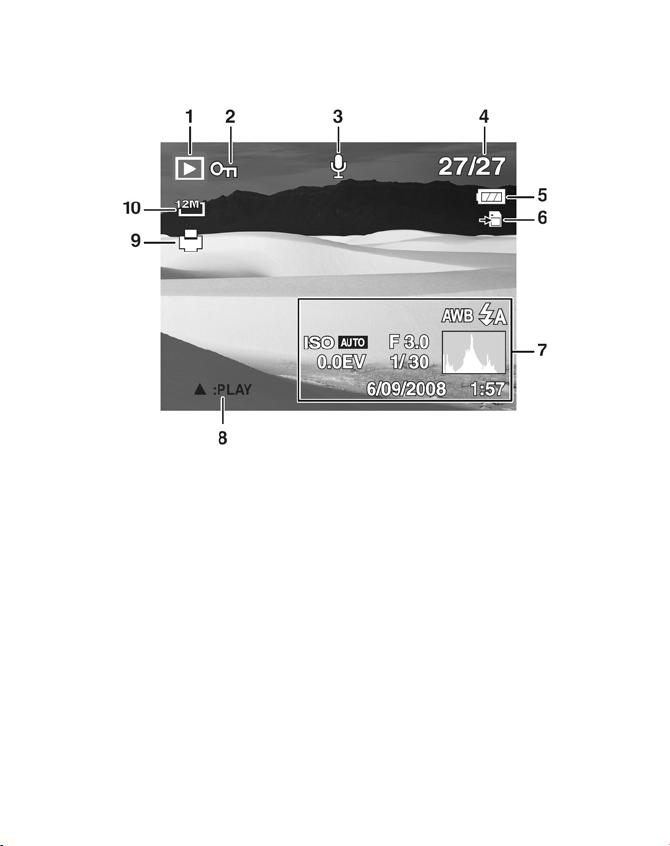
Displays for playback
The following displays are possible in playback mode:
1. Mode display (shooting or playback)
2. Image is protected
3. Sound recording
4. Current recording/total number of recordings
5. Battery status
6. Memory location (“IN” internal memory or card)
7. Recording information
8. Recording control
9. DPOF enabled
10. Resolution of image currently displayed
24
Page 23
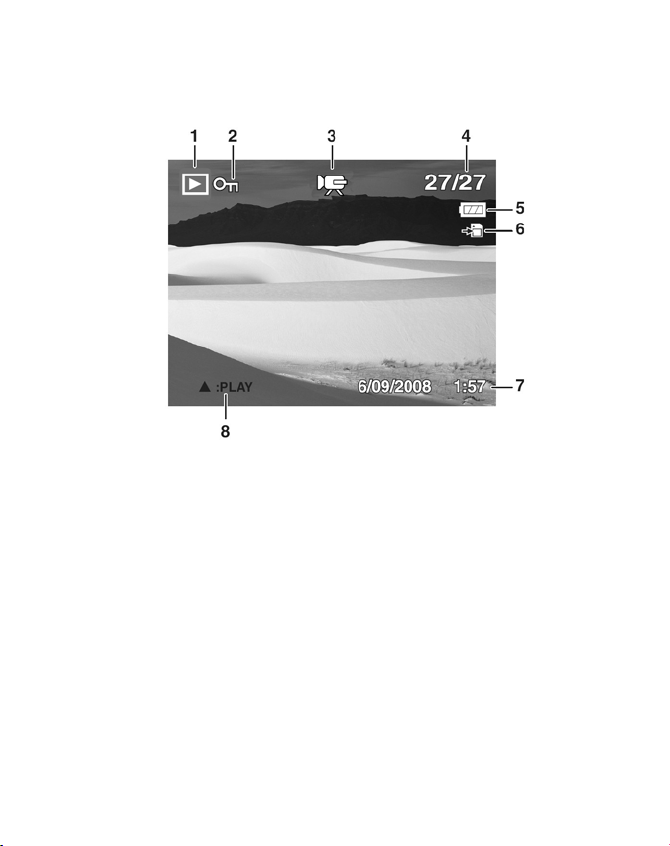
Displays for video playback
The following displays for video clips are possible in playback
mode:
1. Mode display (shooting or playback)
2. Picture is protected
3. Recording videos
4. Current recording/total number of recordings
5. Battery status
6. Memory location (“IN” internal memory or card)
7. Recording information
8. Recording control
25
Page 24
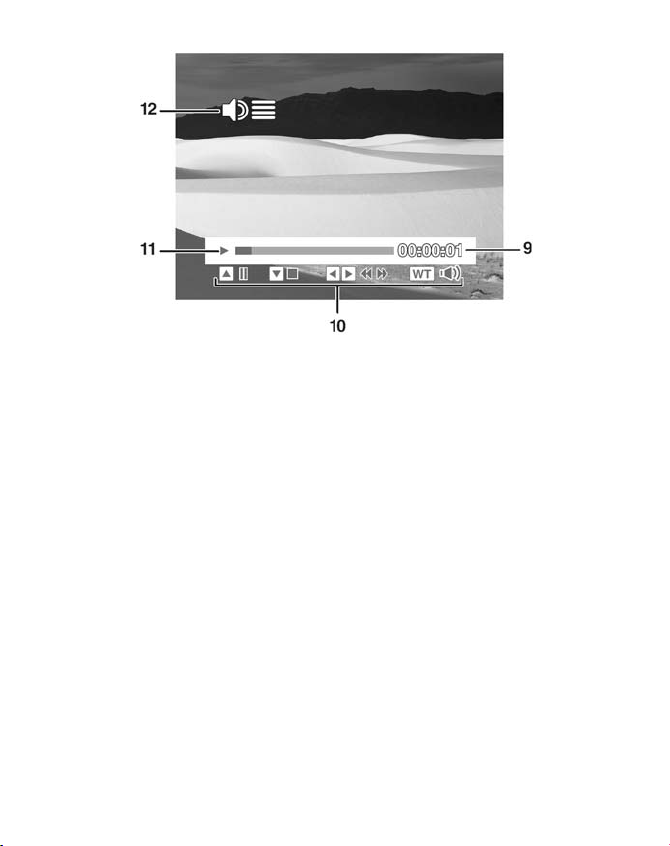
9. Playback time
10. Button display:
Tells you which button has to be pressed to execute the
required playback function.
11. Indicates the playback status (playback/pause/stop)
12. Volume setting
26
Page 25
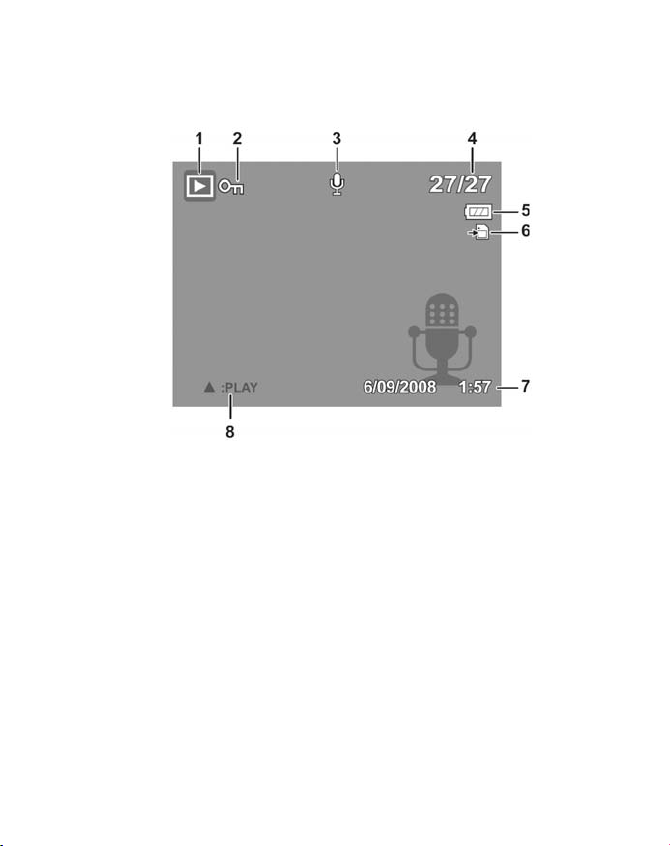
Displays for sound playback
The following displays for sound recordings are possible in
playback mode:
1. Mode display (shooting or playback)
2. Picture is protected
3. Sound recording
4. Current recording/total number of recordings
5. Battery status
6. Memory location (“IN” internal memory or card)
7. Recording information (date and time)
8. Recording control
27
Page 26

9. Playback time
10. Button display:
Tells you which button has to be pressed to execute the
required playback function.
11. Indicates the playback status (playback/pause/stop)
12. Volume setting
28
Page 27

Switching the displays on and off
Press the SET button repeatedly to turn the displays on and off and
change them.
In shooting mode
With the most important
displays
With dividing lines to divide the
image more easily
With all the displays
With no displays
The screen displays may vary with the shooting mode.
29
Page 28

In playback mode
With the most
important displays
The displays cannot be changed in the following circumstances:
While recording and playing back audio and video clips;
During a slideshow or thumbnail display;
While a photo is being cropped (in editing mode).
With all the displays
With no displays
30
Page 29

Taking your first shoots
Setting shooting mode
When the camera is switched on, it automatically switches into
shooting mode.
to indicate automatic shooting mode. You can find out more
status
about shooting modes and the icons on page 60.
If playback mode is enabled instead of shooting mode, press this
button
Tips for good shots
Move the camera slowly so that the photos do not become
fuzzy. The camera should not move when pressing the shutter
release. Do not move the camera directly after pressing the
shutter release.
View the subject on the display before you press the shutter
release.
Check the angle if the subject is lit from behind. Change your
position to reduce the background lighting.
In order to create good video clips, move the camera round
slowly. If you pan too quickly, the video pictures will be fuzzy
and blurred.
Auto appears in the top left of the display in basic
to select shooting mode.
31
Page 30

Taking photos
1. When you can see the image in the viewer, press the shutter
release down slightly.
The green image section markers turn red and the power light
flashes if the autofocus cannot operate.
The display features the shutter speed values, the aperture and
the ISO value, providing that an ISO value is set.
2. Press the shutter release down fully to take the picture. A bleep
indicates that the photo has been taken.
The photos are saved as JPEG files.
If there is a risk that the shot will be blurred, this icon also
appears:
use a tripod.
Use the Functions menu to vary the shooting settings (see page
41).
Using the image stabiliser
The stabiliser enables you to take better shots in poor lighting
conditions. Select faster shutter speeds to avoid pictures that are
blurred or too dark.
Press this button on the top of the camera:
switches on and an icon appears in the display.
The function remains enabled until you switch off the stabiliser by
pressing the button again.
This function is only available if the ISO setting is in automatic
mode.
. In this case, you should hold the camera still or
. The function
32
Page 31

Using the flash
If the light is insufficient to taking a photo the integrated flash will
provide the required extra light.
Press the flash button
settings:
AUTO: The flash is automatically enabled if shooting
conditions require additional lighting.
Flash is triggered before the actual flash; used to
prevent “red-eye” effect. The camera detects the
brightness and only flashes if necessary.
Permanent flash
“Slow Sync”: The flash is synchronised with slow
shutter speed.
Permanent flash
The flash only works in single shot and self-timer mode. It cannot
be used for bursts and video recordings.
Using the flash increases battery usage. If the battery is almost flat,
the flash requires a longer time for charging.
repeatedly to select the following flash
Do not use the flash to take close-ups of people and animals.
Maintain a distance of at least one metre from the subject.
Zoom function – enlarging or reducing
The camera has an optical and a digital zoom. Use the lens to set
the optical zoom and use the Settings menu to enable the digital
zoom.
Press the
setting: .
W – T button. The bar appears which indicates the zoom
W: The image is zoomed out (wide angle); you can capture a
larger section.
33
Page 32

T: The image is zoomed in (“telephoto”); you can capture a
smaller section.
If the left side of the bar is filled in, the optical
zoom is in use.
If you press
off automatically. You can continue to zoom in
in four stages.
T again, the digital zoom will switch
To do this, the digital zoom must be switched
on in the Settings menu!
The digital zoom is not available for video recordings.
With the digital zoom, the image section is enlarged by
interpolation; the image quality may suffer somewhat as a
result.
Setting the focus mode
You can use this function to define the focus type when taking a
photo or recording a video.
Press the macro button
required focus mode is displayed in the bottom left LCD.
Your camera has four different focus modes, as follows:
Normal
With normal focus, the focus range starts at 40 cm. If the camera is
set to normal mode, no icon is displayed.
Macro
This mode is ideal for close-ups. In this mode, you can capture
details by means of a fixed focus and sharpen the image even at a
short distance.
PF Multifocus
If the multifocus is enabled, the camera sharpens every subject.
repeatedly until the icon for the
34
Page 33

INF Infinity
When the Infinity setting is enabled, the camera can focus on
subjects which are very far away.
Recording video clips
1. Under the shooting mode setting in the Recording menu,
select the Video menu item.
2. Press the shutter release to start
recording. The recording bar
appears in the display.
3. You can change the image section
by zooming in and out using the
button.
W
4. Press the up arrow key if you wish to stop the recording.
5. Press the shutter release again to stop recording.
Note:
T –
The digital zoom is not available for recording video clips.
While the zoom button is held down, no sound is recorded.
During the video recording, the microphone is simultaneously
enabled and the sound is also recorded.
The video recordings are saved with the sound as an AVI file.
Recording audio clips
The microphone is on the front left of the camera underneath the
lens. Take care not to touch the microphone during the recording.
1. Under the shooting mode setting in the Recording menu,
select the speech recording
menu item.
35
Page 34

2. Press the shutter release to start
recording. The recording bar appears
in the display.
3. Press the shutter release again to
stop recording.
Note:
The speech recordings are saved as WAV files.
36
Page 35

Using the Functions menu
The Functions menu allows you to perform the essential settings for
recording.
In the menu bar on the left, the functions available for setting the
camera are displayed. The lower bar displays the possible settings
for the particular function .
Press the FUNC/ button to open the menu. The Functions
menu appears on the display.
Use the up and down arrow keys to select the function you
would like to change.
Use the
such as resolution 12M.
Press the SET key to save this setting.
or button (or) to select the required setting,
37
Page 36

My Mode
The last six shooting modes used are listed here.
Each shooting mode has other setting options. If you change the
shooting mode using the
options change accordingly.
Resolution - photos
The resolution basically determines the image quality. The higher
the resolution, the more memory a shot requires. The highest
resolutions are generally recommended for large prints (larger than
A4).
Setting Size in pixels
12 M 4000 x 3000
3:2 4000 x 2672
8 M 3264 x 2448
5 M 2592 x 1944
3 M 2048 x 1536
16:9 HD 1920 x 1080
VGA* 640 x 480
The VGA setting is recommended for sending images by email for
example.
or (or) button, the setting
38
Page 37

Quality
The quality determines the compression required for the recorded
data. The higher the quality, the more memory space the images
require.
Setting Explanation
Exposure correction(EV)
By correcting the exposure values (EV, exposure value) you can
adjust pictures that are too dark or too light.
You can set the value in nine stages between +2.0 EV and -2.0 EV.
The following bar chart appears on the display:
Superfine Highest quality.
Fine Medium quality.
Normal Normal quality.
Use a positive value when light conditions are poor and a negative
value in strong light.
Do not use the exposure correction when the subject is in a very
bright or very dark area or if you are using the flash. In that case,
use the automatic setting.
39
Page 38

White balance
The white balance can correct certain light conditions.
Setting Explanation
AWB
Auto
Daylight
Cloudy
Tungsten
Fluorescent_1.
Flourescent_2.
White balance is automatically
adapted.
Suitable for shots in bright
daylight.
Suitable for shots under cloudy
skies, at dusk or in the shade.
For shots taken in electric light.
Suitable for shots in fluorescent
light. Corrects the green cast from
fluorescent lamp light and can
save the flash in this case.
For more precise adjustment or if
the light source cannot be
categorised.
In order to find the correct
Custom
setting, point the camera at a
sheet of white paper or a
similar item under the lighting
conditions for which you wish
to set a white balance, and take
a trial shot.
40
Page 39

ISO (light sensitivity)
This setting changes the light sensitivity according to the brightness
of the subject. A higher value reduces the image sharpness. A lower
value results in clearer images in good lighting conditions.
Setting Explanation
Automatic Automatic ISO value.
ISO 50 Sets the sensitivity to ISO 50.
ISO 100 Sets the sensitivity to ISO 100.
ISO 200 Sets the sensitivity to ISO 200.
ISO 400 Sets the sensitivity to ISO 400.
ISO 800 Sets the sensitivity to ISO 800.
ISO 1600 Sets the sensitivity to ISO 1600.
ISO 3200 Sets the sensitivity to auf ISO 3200
(3M resolution only)
41
Page 40

Measurement– light measurement procedure
This function allows you to determine the range for measuring light
for the photos or video recordings.
Setting Explanation
Selects an exposure on the basis
MULTIPLE
CENTER
SPOT
Colour-effect
You can use the photo effects in the shooting and playback modes
in order to lend various tones or aesthetic effects to images.
Setting Explanation
Normal No photo effect set.
Vivid The image is produced with higher contrast and
higher saturation to emphasise the bright colours.
Sepia The image is produced in nostalgic brown tones.
Black/white The image is produced in black and white.
Vivid Red The image takes on a red tone.
Vivid Green The image takes on a green tone.
Vivid Blue The image takes on a blue tone.
of the measurements in
several places within the shooting
range.
The light for the entire shooting
range is measured
but there is higher weighting for
the values near the center.
Selects an exposure on the basis
of one single measurement in the
centre of the image
42
Page 41

Video size (resolution - videos)
The video size setting is only available for recording video clips.
Setting Resolution Picture quality
848 x 480 HDTV
640 x 480 High quality
320 x 240 Normal
640 x 480 Web quality
Quality for internet display
In the
internet display.
Since the file size is restricted on the internet, the camera switches
off automatically when the file reaches 100 MB.
The files are saved in the “101UTUBE” directory in DCF standard).
setting, the video clip recording is optimised for
Using the recording menu
You can also select the settings for the recordings via the Recording
menu.
You can find more detailed information on navigating through the
menus and on the various settings of the section entitled
“Recording menu”.
.
43
Page 42

Watching and listening to recordings
Individual playback of recordings
You can play back your most recent recordings in sequence in
display mode.
1. Press the
The most recent recording appears on the display and the
following display modes are possible, depending on the type:
button to enable this playback mode.
Photo Video Voice record
2. Press the
recording or the next one.
44
or button (or) in order to see the previous
Page 43

Playing back images as thumbnails
1. In playback mode, press the W zoom button for a thumbnail
display of up to nine small preview images.
2. You may select any desired file, using the
).
3. Press the SET button in order to display the image in full size.
4. You can also use the T zoom button to return to full size view.
Some thumbnails contain icons which specify the file type.
Icon File type Explanation
Voice
message
Video Displays a video clip.
Protected
file
Voice
recording
Defective file Indicates a defective file.
The photo has been recorded
with a voice message.
The start-up picture is shown on
the display
The file is protected.
It cannot be deleted or edited.
Indicates a voice recording.
or (or
45
Page 44

Zooming within photos
With photographic shots you can look at individual image sections.
1. Press the T button
repeatedly in full size view
to enlarge the image
section up to 12 times.
2. The four arrows at the
edges indicate that the
image section is enlarged.
3. Use the to
change the image section
within the image.
4. Press the SET button to return to the full size image.
46
Page 45

Playing back video/audio clips and voice
messages
1. Select the required recording.
2. Press the , to start playback.
3. When playing back video
clips, press the or
button (or), to fast
forward or rewind.
4. Press the
increase the volume.
5. Press the
reduce the volume.
6. If you wish to pause playback, press the up arrow key .
7. Press the button
8. If you wish to end playback, press the.
Making a screenshot of a video clip
While replaying a video clip, press the up arrow button
the replay.
Press the shutter release to save the image as a screenshot. The
shutter release symbol is displayed on the screen
The camera terminates the playback automatically and switches to
display mode.
This function is only available if there is sufficient memory.
Otherwise the shutter release function does not appear.
T button to
W button to
again to continue the playback.
5 to pause
.
47
Page 46

Deleting photos
You may delete shots in playback mode or via the playback menu
(see page 35).
1. Select the shot in playback mode and press the button
.
2. The “DELETE” query appears on the screen. Select YES
using.
3. Press SET to confirm the query.
To cancel the function, select “CANCEL” and confirm again by
pressing
4. The next shot is shown on the display.
Protected data cannot be deleted. In this case, the “File
protected” message appears on the display.
SET.
48
Page 47

The Menus
Navigating in the menus
If you would like to open the playback menu, press this button:
.
Press the M button to open the menus.
Use the
recording/playback or setting.
Use the up and down arrow keys to select the setting you
would like to change.
Press SET and the relevant submenu will open.
Use the up and down arrow keys to select the required
option and confirm by pressing SET.
Press M to return to the previous level every time.
or button (or) to select the required menu,
49
Page 48

The Recording menu
Setting Explanation
RECORD MODE Here you can select 20 different
recording modes.
DRIVE MODE Here you can adjust the automatic
release or select the burst.
10 SEC - The image is recorded 10
seconds after pressing the shutter release
2 SEC - The image is recorded 2 seconds
after pressing the shutter release
2 SHOTS - Two shots are taken. The first
and second shots are taken 10 seconds
and 12 seconds respectively after the
shutter release has been pressed
BURST - With this setting three photos
are taken one after the other after shutter
release: one correctly exposed, one
underexposed and one overexposed
OFF - Recording without automatic
shutter release or burst
AEB
AF AREA
50
Here you can switch the automatic
exposure function on or off.
Here you can select the autofocus range
(AF).
FACE TRACKING - The camera
automatically detects the position of a
face and puts it in focus
WIDE - A wide area is put in focus
CENTRE - The centre is put in focus
Page 49

Setting Explanation
AF LAMP The autofocus light is located on the
front of the camera. If the shutter release
is pressed halfway it emits a red light
making it easier to focus.
AUTOM. - Helps the camera to focus in
the dark.
OFF - Switched off
SHARPNESS
SATURATION
CONTRAST
Here you can make the details of an
image appear sharper or softer.
HIGH - Sharpens the image
NORMAL - Normal image sharpness
LOW - Softens the image
Here you can select the colour
saturation.
Select the high saturation level for strong
colours and the low level for more
natural tones.
HIGH - Strong colours
NORMAL
LOW - Natural colour tones
Here you can select the contrast.
HIGH - Increases the contrast
NORMAL - Normal contrast
LOW - Reduces the contrast
51
Page 50

Setting Explanation
DIGITAL ZOOM
DATE STAMP Here you can choose the date and time
AUTO-REVIEW
ACTIVE ZLIGHTING
Here you can select the digital zoom for
some operating modes.
INTELLIG. ZOOM - Enlarges the image
digitally and optimises it
STANDARD ZOOM - Enlarges all sizes up
to 12 times but produces poorer image
quality
OFF - Use the optical zoom only
stamp for the pictures.
DATE
DATE & TIME
OFF
After the shot, the photo is displayed for
a few seconds. You may switch this
function on or off
AUTOM.: The exposure is automatically
adapted to the shooting conditions. This
function is only available for photos
Exposure correction
52
Page 51

Shooting mode
For certain shooting situations or subjects, you can use the preset
shooting modes. This eliminates the necessity for manual setting.
After you have made your selection, the selected mode (with the
exception of voice recording mode) is added in the top position on
“My Mode” in the Functions menu.
The following shooting modes are available:
Symbol Setting Explanation
For inexperienced photographers.
Auto
P
Auto
Program
All the settings are automatically
selected by the camera.
The camera automatically selects the
right shooting settings for exposure
time and shutter f-stop value.
Aperture
Av
Priority
Shutter
Tv
Priority
Manual
M
Exposure
For the following special types of shot, certain settings cannot
be changed (e.g. flash and macro) as they are preset for the
type of shot.
The camera automatically adjusts the
shutter f-stop value to the
brightness.
The camera sets the shutter exposure
automatically.
You can adjust the shutter f-stop
value and the shutter time manually.
53
Page 52

Symbol Setting Explanation
Intelligent
Scene
Portrait Reduces background focus and
Landscape Suitable for wide landscape views.
Sunset Emphasises the colour red when
Backlight Adjusts the “Measurement” setting
Smile capture Utilises the face recognition function
Kids Suitable for capturing people in
Night scene Achieves the effect of night in the
Firework Reduces the shutter speed for
Snow Suitable for beach and snow shots.
The camera analyses the shot
conditions and automatically
switches to the right scene mode.
focuses on the centre.
taking sunsets.
to the backlight.
to take a sequence of six images and
thus capture a smile.
motion.
background.
capturing fireworks.
54
Sport Suitable for creating images with fast
movements.
Page 53

Symbol Setting Explanation
Party Suitable for indoor shots and parties.
Candlelight Creates shots in warm light
Night Portrait Suitable for portrait shots with a dark
Soft Skin Creates images with soft transition
Soft Flowing
Water
Food Increases the colour saturation.
Building Emphasises the border (outline) of
Text Emphasises the black & white
Auction Optimises the images for internet
background.
areas and delicate colours.
Creates a delicate effect with fast
movements.
the subject more.
contrast
playback (auctions), e.g. VGA
resolution.
The images are automatically saved
to the “_AUCT” directory (see page
55).
Blink
Detection
The camera detects whether the
subject's eyes were closed and asks if
you wish to save the picture.
55
Page 54

Symbol Setting Explanation
Movie Recording a video clip.
Voice Rec Recording an audio clip.
56
Page 55

Using the "Smile capture" mode
The “Smile capture” mode automatically takes photos as soon as it
detects a smile. When you press the shutter release, the camera
takes photos continuously as soon as it detects a smile. This
function is particularly helpful when shooting from different angles
and when trying to capture a smile on moving subjects.
How to enable the “Smile capture” mode
1. Select this function:
2. Focus the camera on the subject.
3. Then press the shutter release to start the detection process.
The
first picture.
Symbol
As soon as the camera
The camera continues to take pictures as long as a smile is
detected.
4. You can interrupt the shots by pressing the shutter release
again. The
icon then flashes, the camera operates and takes the
icon then stops flashing.
in shooting mode.
detects a smile an icon
is shown on the screen.
When several faces are being photographed, the face detection
function initially requires more time to detect the faces.
57
Page 56

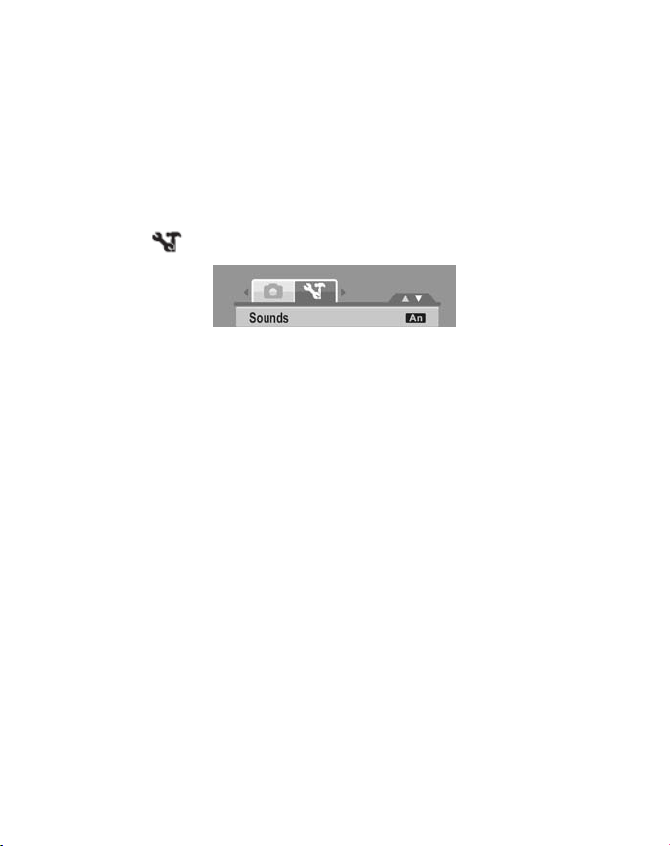
The settings menu
Setting Explanation
SOUNDS
POWER SAVE
DATE & TIME
LANGUAGE
Here you can switch the start tone off or
choose from three tones, switch on the
beep and the shutter-released tone, and
you can also set the volume for all the
tones.
Save power
To save the battery charge, the camera
switches off automatically after the
selected period. Select
1 min, 3 min or 5 min.
The energy-saving function is not enabled
in the following circumstances:
While recording audio and video clips;
During playback of images, video clips
or audio recordings;
While the camera is connected to
another device via the USB socket.
Here you can select the date, time and
display format .
Here you can select the language for the
menu.
58
Page 57

Setting Explanation
FILE
NUMBERING
TV OUT Using the TV cable supplied, you can
LCD
BRIGHTNESS
LCD SAVE
File numbering
Here you can set the numbering for the
files.
SERIES: The files are numbered from 0001.
RESET: Resets the numbering to 0001.
This function is advisable, for example,
after the memory card has been changed.
transfer the images to your television set.
Choose the image format for your area.
NTSC: For America, Japan, Taiwan, etc.
PAL: For Europe, Australia, etc.
Here you can set the display brightness.
BRIGHT: Display is brightened
NORMAL: Standard brightness
When you set this function to ON, the
display is darkened after a short period out
of use.
59
Page 58

Setting Explanation
MEMORY KIT
RESET ALL
Here you can organise the data in the
internal memory.
FORMATTING: Formats the current
memory, i.e. memory card or internal
memory.
This deletes all the shots.
COPYING ONTO CARD: Copies shots from
the internal memory onto an inserted
memory card.
Select YES with the up and down arrow
keys 56 and press SET if you would like to
execute the selected function.
Here you can reset all the individual
settings to the factory settings. In this case,
answer the query with Yes. The following
settings are not reset:
Date & Time
Language
TV system
60
Page 59

The playback menu
Setting Explanation
SLIDESHOW You can run the shots (photos only) as a
slideshow.
DELETE
PROTECT
RED-EYE
CORRECTION
This function can be used to delete files no
longer required on the internal memory or
the memory card.
The following options are available:
SINGLE: Delete one shot
MULTI: Delete multiple shots selected in
the thumbnail view.
ALL: Delete all the shots
This function can be used to protect shots
from accidental deletion.
The following options are available:
SINGLE: Protect one shot
MULTI: Protect multiple shots selected in
the thumbnail view.
LOCK ALL: Protect all the shots
UNLOCK ALL: Remove protection for all
the shots.
Here you can correct shots which were not
taken using the pre-flash function.
You can either save the corrected file under
a new name or you can overwrite the
original file.
61
Page 60

Setting Explanation
VOICE MEMO You can save a voice message for each
photo taken.
The maximum length of voice message is
30 seconds. The time remaining is shown
on the display.
If there is already a voice message for the
selected photo, it is overwritten.
PHOTO EDIT
Z-LIGHTING
ROTATE With this function you can rotate photos.
TRIM
In completed shots you can also create
colour or aesthetic effects at a later stage
Exposure correction
If shots were taken in poor lighting
conditions, you can adapt the photos
manually here (see page 60).
The edited image is saved as a new file
The rotated photo will be saved with a
new name.
This function can be used to choose an
image section and crop the image to this
size. The border not visible on the display
is deleted (see page 61).
You can either save the corrected file under
a new name or you can overwrite the
original file.
62
Page 61

Setting Explanation
RESIZE You can reduce the resolution of photos
and thus reduce the file size.
You can either save the corrected file under
a new name or you can overwrite the
original file.
The resolution of photos in VGA cannot be
changed.
STARTUP IMAGE You can select a start screen that appears
on the screen after the camera has been
switched on.
You can choose between the following:
SYSTEM: The standard system screen is
displayed.
MY PHOTO: The selected photo is
displayed.
OFF: No photo is displayed.
Use the up and down arrow keys 56 to
select MY PHOTO.
Use the left and right arrow keys
make your selection.
34 to
63
Page 62

Setting Explanation
DPOF
DPOF stands for “Digital Print Order
Format”.
Here you can specify print settings if you
wish to have pictures published by a photo
studio or a DPOF-compatible printer. With
a DPOF-compatible printer you can print
the pictures directly without transferring
them to the computer beforehand.
You can print all the photos or just one, or
reset the DPOF settings.
Use the up and down arrow keys
to set the number of prints for each
photo .
Use the
date stamp on or off.
With the DPOF function you can specify
up to 99 copies. If you select 0 copies,
the DPOF setting is automatically
disabled for this image.
PICT-BRIDGE
If you wish to publish photos directly on a
printer, you must switch on this function.
button to switch the
64
Page 63

Show slideshow
You can run the photos and video clips (Start screen) as a
slideshow.
1. Select Slideshow in the Playback menu. The “Slideshow” menu
opens.
The following settings are available:
Choose the interval in which the pictures are to be displayed (1
to 10 seconds).
Choose the effect with which the shots are to be displayed:
HORIZONTAL, SHRINK, FADE, VERTICAL, RANDOM.
Choose whether the burst should be constantly repeated
(“YES”) or whether it should end after the last image (“NO“).
2. When all the settings are made, select START and press
start the slideshow.
3. During playback you can pause and resume the show by
pressing
Protecting / unblocking or deleting an individual file
1. Select SINGLE in the submenu to have the images shown
individually on the display.
2. Use the left and right arrows to select an image.
3. Choose Protect / Unblock or Delete as soon as the required file
is shown on the screen.
4. Press SET to protect / unblock or delete the file and return to
Playback mode.
SET.
SET to
Protecting / unlocking or deleting several files
1. Select MULTI in the submenu to have the images shown as
thumbnails on the display.
2. Use the left and right arrows
to select an image.
65
Page 64

3. Press SET as soon as the required file appears. This highlights
the file or removes the highlighting.
4. Repeat Step 3 until all the pictures which you would like to
protect or delete are highlighted.
5. Press the M button. A confirmation prompt appears.
6. Choose YES and press
camera returns to Playback mode.
Protecting/unlocking or deleting all files
1. In the submenu select LOCK ALL/UNLOCK ALL? or DELETE ALL.
A confirmation prompt appears.
2. Choose YES. Press
files.
Correcting red-eye effect
This function is used for reducing red-eye effect on photos. This
function is only available for photos. The red-eye effect can be used
several times with one picture, but the picture quality can also
gradually deteriorate as a result.
How to enable RED-EYE CORRECTION:
1. Select the image in Playback mode.
2. Open the RED-EYE CORRECTION submenu in the Playback
menu.
The image preview and the input menu appear on the display.
3. Choose the entry and press the button to start the correction
process.
4. A menu selection appears after termination of the function.
OVERWRITE: The new file is saved by overwriting the old one.
CANCEL: The function is cancelled.
5. Press
SET to save / cancel the changes.
SET to protect or delete the files. The
SET to protect / unblock or delete all the
66
Page 65

Recording voice messages
1. Select the required photo in Playback mode. If the photo
already contains a voice message, the voice message icon will
appear.
2. Open the VOICE MEMO submenu in the Playback menu. The
image preview and a selection menu will appear on the
display.
3. Choose START and press
microphone is located underneath the lens.
4. The recording is cancelled automatically after 30 seconds. If
you wish to terminate the recording before then, press the
button again.
SET to start recording. The
SET
You can only add voice messages to photos, not to video clips.
You cannot add voice messages to protected images. You can
only delete a voice message along with the photo, not
separately.
67
Page 66

Editing photos
The following fields are available:
Symbol Setting Explanation
Normal No photo effects are added.
Sepia The image is produced in nostalgic
Black/white The image is produced in black &
Negative The image is produced as a negative.
Mosaik The image is produced as a mosaic.
Vivid Red The image takes on a red tone.
Vivid Green The image takes on a green tone.
Vivid Blue The image takes on a blue tone.
1. Select the required photo in Playback mode.
2. In the Playback menu, open the PHOTO EDIT submenu and
the menu will open.
brown tones.
white.
68
Page 67

3. Use the or button to select the required effect. The
selected effect is applied to the image preview and displayed
accordingly.
4. Press
Applying Z-Wave Lighting (exposure correction)
1. Select the image in Playback mode.
2. Open the Z-LIGHTING submenu in the Playback menu.
3. Use the
4. Press
Rotating photos
1. Select the required photo in Playback mode.
2. Open the ROTATE submenu in the Playback menu. The image
3. Choose Yes and press the
4. To terminate the function, choose END and press the
Protected images cannot be rotated.
SET to save the new file.
The image preview and the input menu appear on the display.
or key to reduce or increase the value. The
exposure correction is applied to the image preview and
displayed accordingly.
SET to save the new file.
preview and the selection menu appear on the display.
SET button. The image is rotated
clockwise through 90°. Every time you press the
the image rotates clockwise through 90°.
SET button,
SET
button.
69
Page 68

Cropping photos
1. Choose the required photo in Playback mode.
2. Open the TRIM submenu in the Playback menu. The editing
window appears on the display.
Enlarged picture
Direction
Current size
Full view of the
picture
3. Press the
can detect the position of the image section in the grey
rectangle on the left.
4. During the enlargement process you can use the direction
buttons to change the image section.
5. Use
6. A menu selection appears after termination of the function.
Choose between:
OVERWRITE: The new file is saved by overwriting the old one.
SAVE UNDER: The new file is saved under another name
without replacing the old file.
CANCEL: The function is cancelled.
7. Press the
T zoom button in order to enlarge the image. You
T to further enlarge the image or W to reduce it again.
SET button to save / cancel the changes.
70
Page 69

Changing the size
1. Choose the required photo in Playback mode.
2. Open the RESIZE submenu in the Playback menu. The Selection
menu appears on the display.
3. Choose one of the following resolutions and press the
button:
8 M, 5 M, 3 M or VGA.
SET
The available resolutions may vary according to the original
size of the image. Settings which are not available are greyed
out.
4. A menu selection appears after termination of the function.
Choose between:
OVERWRITE: The new file is saved by overwriting the old one.
SAVE UNDER: The new file is saved under another name
without replacing the old file.
CANCEL: The function is cancelled.
5. Press the
SET button to save / cancel the changes.
71
Page 70

Connection to TV and PC
Displaying shots on a television set
You can play back the camera shots on a television set.
1. Switch off the camera and television set.
2. Connect the TV cable supplied
to the USB socket on the
camera and the yellow video
socket and white audio socket
on the television set.
3. Switch the camera and
television set on.
4. Switch the camera to Playback
mode (
as required.
5. If the television set does not
detect the camera image by
itself, switch on the video input on the television set (usually
by means of the AV button).
6. You may have to choose between PAL and NTSC in the camera
menu settings, TV output menu selection.
) and begin playback
72
Page 71

Printing shots on a printer
Using PictBridge, you can print your shots directly on a PictBridgecompatible photo printer.
1. Switch the camera and the photo printer on.
2. Press the [Playback] button and switch to Playback mode
3. Press
4. Use the up and down arrow keys
5. Connect the camera to your photo printer using the USB cable.
M to open the Playback menu.
to select the
PICTBRIDGE option.
You have the following options:
SINGLE - Prints one shot
ALL - Prints all the shots
PRINT INDEX - Prints the thumbnails of the pictures taken.
73
Page 72

Transferring data to a computer
You can copy the shots to a computer.
Supported operating systems:
Windows XP
Windows Vista
Using a USB cable
1. Switch the camera off.
2. With the computer switched
on, connect the USB cable
supplied to the USB socket on
the camera and a USB socket
on the PC.
3. Switch the camera on.
“Connect” appears in the
camera's display.
The camera is detected by the
computer as a mass storage
device (removable storage
medium).
In Windows XP and Windows Vista you can immediately access the
content of the camera memory.
In other Windows versions, open Windows Explorer or double-click
on the "Desktop" (in Vista: on “Computer”).
4. Double-click on the media icon for the camera.
5. Navigate to the “DCIM” directory and, where applicable, to the
relevant subdirectories in order to display the files (*.jpg =
photos; *.avi = sound recordings; *.wav = video recordings).
See also the directory structure in the memory.
74
Page 73

6. Press down the left mouse button and drag the relevant files to
the directory provided on the computer, e.g. in the folder "My
Files". You can also highlight the files and use the Windows
commands "Copy" and "Paste".
The files are transferred to the computer and stored there. You can
display and process the files with a suitable application software.
DCF memory standard
The recordings on your camera are managed (saved, named, etc.)
as specified by the DCF standard (DCF = Design Rule for Camera
File System). Shots on memory cards for other DCF cameras can be
played back on your camera.
Card drive
If your PC has a card drive or is connected to a card reader and you
have saved the shots on the memory card, you can copy the shots
onto the PC.
The card reader is also
detected as a removable data
medium on the Windows
desktop (or in “ Computer” if
using Vista.
75
Page 74

Directory structure in the memory
The camera saves the pictures, videos and audio files in three
different directories in the internal memory or on the memory card.
The following directories are created
automatically:
DICAM.: All the pictures, videos and
audio files are saved to this folder, with
the exception of files which are recorded
in auction or internet quality mode.
_AUC.: Pictures taken in auction mode
are saved to this folder.
_UTUBE: Pictures taken in internet
quality mode are saved to this folder.
Normal shots are located in the
“100DICAM” folder and automatically
named with “DSCI” and a four-digit
number.
When the highest number has been
reached - “DSCI9999” - the next folder
“101DICAM” is created for the remaining
shots.
A maximum of 999 folders can be
created. If another recording is made, an
error message will appear (“Directory
cannot be created”). In this case, proceed as follows:
1. Insert a new memory card.
2. Reset the file numbers in the “Settings” menu, “File reset”
menu item. The file count begins at 0001 again in the
DSCI1000 folder.
Do not try to change the folders and files in the camera's own
directory structure (renaming, etc.). You might destroy the files by
doing so.
76
Page 75

Installing the software
On the CD supplied, you will find “Media Impression”, a program
for editing your pictures.
1. Insert the CD in the CD-ROM drive of your computer.
2. Usually, the CD is automatically recognised and displayed. If
not, select the CD drive in Windows Explorer > My Computer
and double-click on the drive name to start the CD.
3. On the start page, you will see the contents of the CD.
4. To install the software, highlight the latter and click INSTALL.
5. Follow the other on-screen instructions.
77
Page 76

Storage capacity
Size of memory card
64
MB
12 M 16 33 66 133 260 520
3:2 21 43 86 173 338 677
8 M 25 50 100 200 390 781
5 M 40 80 160 320 625 1250
3 M 66 133 266 533 1041 2083
Resolution
VGA 305 611 1223 2466 4778 9557
The table specifies the number of images which you can save at a
chosen resolution (e.g. 5 M) on a memory card with a specified size
(e.g. 128 MB).
The actual number of photos which can be saved may vary (by up
to 30%) depending on the resolution and the number of colours.
128
MB
256
MB
512
MB
1 GB 2 GB
78
Page 77

Troubleshooting
Use the following checklist if the camera does not function
correctly. If the problem persists, consult MEDION Service.
The camera will not switch on.
The battery is not inserted correctly.
The battery is flat. Recharge it.
The battery compartment door is not closed properly.
The camera will not take photos
The flash is still charging.
The memory is full.
The SD card is not correctly formatted or is defective.
The maximum number of files has been exceeded. Reset the file
numbering function.
Not enough light. Change the angle of the camera to pick up
more light or use the flash.
The flash does not go off
The camera was moved during the shot.
The flash is switched off.
The image is blurred
The camera was moved during the shot.
The subject was outside the camera’s range. Use the Macro
mode for close-up pictures if necessary.
The image is not shown on the display
An SD card has been inserted which took pictures in non-DCF
mode on another camera. The camera cannot display that type
of image.
79
Page 78

The period of time between shots is longer when taking
pictures in the dark
The shutter usually works slower under weak light conditions.
Change the angel of the camera, or improve the light conditions.
The camera switches itselfs off.
After a preset period, the camera switches itself off to save the
battery charge. Restart the camera.
The shot has not been saved.
The camera was switched off before the shot could be saved.
Shots on other memory cards are not displayed.
The shots on memory cards of other cameras are displayed if the
other camera also uses the DCF memory system.
The shots cannot be transferred to the PC via the USB
cable.
The camera is not switched on.
When the camera is connected to the computer for the
first time, no new hardware is found
The USB connection of the computer is deactivated in the BIOS.
Enable the port in the computer’s BIOS. Refer to the PC manual
if necessary.
80
Page 79

Maintenance and care
Clean the housing, lens and the display as follows:
Clean the camera housing using a soft, dry cloth.
Do not use thinners or cleaning solutions that contain oil.
Use a lens brush to remove the dust before cleaning the lens or the
display. Then wipe them with a soft cloth. Do not apply pressure to
the display and do not use hard objects to clean it.
Do not use strong cleaning solutions for the housing and lens
(contact your dealer if dirt cannot be removed).
When cleaning the lens ring, take care with the crystal ring.
It is only stuck on and can fall off if handled carelessly.
81
Page 80

Disposal
Packaging
Your camera is packaged to protect it from transportation
damage. Packaging is raw material and can be reused or
added to the recycling system.
Appliance
At the end of its life, the appliance should not be disposed
of with the household rubbish. Dispose of it in an
environmentally friendly manner via a local collection
point for old devices. Ask your local authority for the
location of the collection points.
Batteries
Used batteries do not belong with household rubbish.
Batteries must be taken to a collection point for used
batteries.
82
Page 81

Technical specifications
Pixel: 12 Mega Pixel CCD
Sensor: 1 / 2.3 inch
Aperture: F = 3,1 ~ 5,6
Shutter speed: 1/2000 ~ 15 s
Focal distance: f = 6.3mm ~ 18.9 mm
Optical zoom: 3 times
Digital zoom: 5 times
LCD Monitor: 3.0 " LC - display
File format: JPEG (EXIF 2.2), DPOF, AVI, WAV
Max. resolution: Camera mode:
4000 x 3000
Video mode:
848 x 480 pixels
Picture memory: Internal: 32 MB flash memory for the
operating software
Residual memory of approx. 9 MB free
External: SD/SDHC card
Port: Mini-USB 2.0 connection
Dimensions: 9,7 x 5,7 x 1,9 cm (B x H x T)
83
 Loading...