


Contents
Safety and Maintenance .....................................................1
Safety Instructions............................................................. 1
Data Security.................................................................. 2
Operating Environment..................................................... 2
Repair............................................................................ 2
Ambient temperature .......................................................3
Electromagnetic Compatibility ...........................................3
Connection ....................................................................... 4
Maintenance...................................................................... 6
Care of the Display............................................................. 6
Transport.......................................................................... 7
Notes on these Operating Instructions .................................. 8
Quality........................................................................... 8
Service ..........................................................................8
Supplied Items ..................................................................9
Views ............................................................................... 10
Front Components ........................................................... 10
Back Components ............................................................ 11
Bottom Components......................................................... 11
Top Components.............................................................. 12
Left Components ............................................................. 12
Right Components ........................................................... 13
Initial Set-up....................................................................14
I. Power Supply ............................................................... 14
Car Adapter .................................................................. 14
AC Adapter (optional)..................................................... 14
Battery operation .......................................................... 15
II. Turning on/turn off the Device....................................... 16
III. Installing the Navigation Software................................. 17

General Operating Instructions ........................................ 18
Working with Memory Cards.............................................. 18
Inserting Memory Cards ................................................. 18
Removing Memory Cards ................................................ 18
Accessing Memory Cards ................................................ 19
Data exchange via card reader ........................................ 19
Resetting the Navigation System (Reset)............................. 20
Navigation........................................................................ 21
Safety Instructions for Navigation ...................................... 21
Tips for Navigation......................................................... 21
Notes for Use in a Vehicle ............................................... 22
Additional Notes for Use on a Bicycle or a motorcycle......... 22
Aerial Orientation............................................................. 22
I. Mounting the Car Holder ................................................ 23
II. Fixing the Suction Plate ................................................ 24
III. Attaching the Navigation System .................................. 25
IV. Connecting the Car Adapter.......................................... 26
V. Starting the Navigation Software.................................... 27
FAQ .................................................................................. 28
Customer Service .............................................................29
First-Aid in the Event of Malfunction ................................... 29
General guidance........................................................... 29
Check Connections and Cables ........................................ 29
Faults and Possible Causes................................................ 30
Additional Support ........................................................... 31
Appendix .......................................................................... 32
Special CleanUp Function (Program management in English) . 32
Synchronisation with the PC .............................................. 34
I. Installing Microsoft® ActiveSync®.................................. 34
II. Connecting with the PC .............................................. 35
III. Working with Microsoft® ActiveSync®.......................... 35
GPS (Global Positioning System) ........................................ 36
External GPS antenna .................................................... 37
ii

TMC (Traffic Message Channel) .......................................... 38
Installing the External TMC Receiver................................. 39
Additional Card Material.................................................... 40
Transfer of card material to a memory card....................... 40
Mounting the Navigation Set on a Bicycle ............................ 41
Specifications...................................................................42
Warranty .......................................................................... 43
Liability limitations ........................................................... 44
Copying this manual......................................................... 44
Index ...............................................................................45
iii
Device
At the end of its life, the appliance must not be disposed of in household
rubbish. Enquire about the options for environmentally-friendly disposal
Batteries
Do not dispose of used batteries in the household rubbish! They must be
deposited at a collection point for used batteries.
Copyright © 2006, All rights reserved. Microsoft
trademarks of Microsoft Corporation in the U.S. and other countries. Pentium
trademark of Intel Corporation. The names of actual companies and products mentioned
herein may be the trademarks of their respective owners. Information in this document is
subject to change without notice
®
, MS-DOS®, and Windows are registered
®
is a registered
iv

Safety and Maintenance
Safety Instructions
Please read this section carefully and follow all the instructions
given. This will help ensure reliable operation and extend the service life for your appliance.
Keep the packaging and the user instructions for future reference
or inquiries at a later date. If you pass the article on to another
person, you must pass on these instructions.
• Never open up the housing of the appliance or the power
adapter. These contain no user-serviceable parts. If the
housing is opened there is a danger to life from electric
shock.
• Do not place any objects on the appliance and do not exert
any pressure on the display. Otherwise there is a danger
that the screen will break.
• Do not touch the display with sharp-edged objects, in
order to avoid damage. Use a blunt stylus. An operation
can be also carried out by means of a finger in many cases.
• There is a risk of injury if the display breaks. If this should
occur, use protective gloves to pack the broken parts and
contact customer support to arrange for disposal. Then
wash your hands with soap, since there is a possibility that
chemicals may have escaped.
• Never allow children to play with electrical equipment
unsupervised. Children may not always correctly recognize
possible danger.
AFETY AND MAINTENANCE
S
1

Remove the power adapter from the outlet, switch the appliance
off immediately, or do not actually switch it on, and contact Customer Service...
... if the power adapter (optional) or the attached plug become
scorched or damaged.
... if the housing of the appliance or the power pack becomes
damaged or fluids leak into it. Components must be checked
by Customer Service in order to avoid damage!
Data Security
• Every time you update your data make backup copies on
an external storage medium. The supplier does not assume
liability for data loss or damage to data storage units, and
no claims can be accepted for damages resulting from the
loss of data or for consequential damages.
Operating Environment
Failure to follow these instructions may lead to damage to your appliance. The guarantee will be excluded in such cases.
• Keep your navigation System and all connected devices
away from moisture and avoid dust, heat and direct sunlight, especially in the car.
• Make sure you protect your appliance from getting wet,
e.g. from rain and hail, at all times. Please pay attention
that moisture can even build up in a protective pouch because of condensation.
• Avoid heavy vibrations and shaking, such as can arise, for
example, in the case of transverse field intrusions.
• Avoid the device from releasing itself from its holder, for
example when braking. Install the device as vertically as
possible.
Repair
• Please contact our Service Center if you encounter technical problems with your appliance.
• In the event repair becomes necessary, please use only our
authorized Service Partners. You will find the address on
the back of your guarantee card.
2
NGLISH
E

Ambient temperature
• The appliance is most reliably operated at an ambient temperature of between 41°F and 104°F (5°C and 40°C) and
at a relative humidity of between 10% and 90% (noncondensing).
• In the powered down state the appliance can be stored at
between 32°F and 140°F (0°C and 60°C).
• Store the appliance in a safe location to avoid high temperatures (e.g. when parking or from direct sunlight).
Electromagnetic Compatibility
• When connecting additional or other components the “Electromagnetic Compatibility Directive” (EMC) must be adhered to. Please also note that only screened cable (maximum 10ft) should be used with this appliance.
• For optimal performance, maintain a distance of at least 10
ft. from sources of high-frequency and magnetic interference (televisions, loudspeaker systems, mobile telephones
and so on. This will help avoid malfunctions and loss of data.
• Electronic devices emit electromagnetic waves during operation.
These emissions are harmless, but can interfere with other
devices operated in close proximity.
While our devices are tested and optimized for electromagnetic compliance in our laboratories, interference during
operation may still occur in the device itself and with other
devices in its proximity.
Should such interference occur, try to eliminate it by adjusting the positions of and the distances between the devices.
Before driving a car, please ensure that the electronic systems of the car are working properly.
AFETY AND MAINTENANCE
S
3

Connection
When connecting your appliance be sure to correctly observe the
following instructions:
Power supply through Car Adapter
• The car adapter should only be connected to the lighter socket of a car (car battery = DC 12V , truck battery = DC
24V !). If you are in any doubt about the power source in
your car, contact your car manufacturer.
Power supply through AC adapter
• The outlet must be in the vicinity of the appliance and must
be easily accessible.
• Only use the mains adapter on sockets at
110 – 240 V~ AC, 50/60 Hz (5V DC/2A). If you are
unsure about the power supply to the place of use, ask the
relevant energy supplier.
• Use only the power adapter provided with your appliance.
• For additional safety, we recommend the use of a surge
protector in order to protect your appliance from damage
from spikes or lighting strikes on the power network.
Power supply by means of batteries
Your device can also be operated with ordinary or rechargeable
batteries.
Battery Handling
Batteries may contain combustible materials. Misusing them may
cause battery leakage, heat, explosion or ignition, bringing about injury or damage to the product or YOU. Please observe strictly the following:
KEEP CHILDREN AWAY from batteries.
If by any chance, batteries are swallowed, consult a medical
doctor immediately.
DO NOT CHARGE batteries (except rechargeable
batteries).
4
NGLISH
E

DO NOT FORCIBLY DISCHARGE batteries.
DO NOT SHORT-CIRCUIT batteries.
DO NOT HEAT or DISPOSE OF IN FIRE.
DO NOT DISASSEMBLE or DEFORM batteries. Your hands and
fingers may be injured, or the liquid of the battery may get into
your eyes or adhere to your skin. If this happens, rinse with a
large quantity of water immediately and consult a medical doctor.
DO NOT expose batteries to strong impacts by dropping or
throwing the batteries.
DO NOT reverse the positive (+) and negative (-) terminals to
avoid short-circuit.
REMOVE PROMPTLY any used battery from the device.
REPLACE THE BATTERY with a new battery of the same type.
INSULATE THE TERMINAL parts with tape or the like when stor-
ing or at disposal of the batteries.
DO NOT throw drained batteries in with the domestic rubbish! Respect the environment and dispose of them in the specific containers for separate collection. If necessary, turn to your
reseller or to our service centre. Thank you!
Cabling
• Arrange cables so that no-one can tread on them or trip
over them.
• Do not place any items on the cable.
AFETY AND MAINTENANCE
S
5

Maintenance
!
Warning: There are no user-serviceable or clean-
able parts inside the housing of the appliance.
You can prolong the life of the appliance by taking the following
simple steps:
• Always remove the power plug and all connecting ca-
bles before cleaning.
• Clean the appliance only with a damp, lint-free cloth.
• Do not use solvents, caustic or gaseous cleaners .
• The device and its packaging are recyclable.
Care of the Display
• Avoid scratching the display surface as this is easily dam-
aged. It is strongly recommended to use a display protection mylar to avoid scratches. Please ask your nearest
dealer for this accessory.
The foil on the display at delivery is purely for protection
during transportation!
• Ensure that no traces of water remain on the screen. Wa-
ter can cause irreversible discoloration.
• Use only a soft, lint-free cloth to clean the screen.
• Do not expose the screen to either strong sunlight or ul-
traviolet radiation.
6
NGLISH
E

Transport
If you wish to transport the appliance follow the instructions below:
• Following transport of the appliance wait until the unit has
acclimatized before using it.
• In the case of wide fluctuations in temperature or humidity
condensation or moisture may form inside the appliance
and this can cause an electrical short-circuit.
• In order to protect the appliance from dirt, knocks and
scratching, use either the protective case.
• Before travelling ensure that you are aware of the power
and communications provision at your destination. Before
travelling obtain any power or communications adapters
(modem, LAN, etc.) that may be needed.
• When shipping your appliance use only the original pack-
aging and advise the carrier accordingly.
• When passing through the hand luggage control at air-
ports, it is recommended that you pass the appliance and
all magnetic storage media (external hard drives) through
the X-ray system (the machine on which you place your
bags). Avoid the magnetic detector (the structure through
which you yourself pass) or the magnetic wand (the hand
device that the security staff use), since this may corrupt
your data.
AFETY AND MAINTENANCE
S
7

Notes on these Operating Instructions
We have structured these Operating Instructions for the installation so that you will be able to look up the necessary subjectrelated information by means of the Contents List at any time.
i
Note: You will find comprehensive Operating Instruc-
tions for navigation on the relevant CDs/DVDs and at
the online help of the device.
Read the section "Frequently Asked Questions" to obtain answers
to questions that are often addressed to our customer service.
The purpose of this manual is to help you with installing your
appliance using instruction, that are easy to understand.
Quality
In selecting the components we have aimed for a high level of
functionality, simple handling, safety and reliability. A wellbalanced hardware and software design allows us to offer you a
technologically advanced navigation system that will give great
satisfaction in both work and leisure use.
Service
Our individual customer care is there to support you when you
have questions or problems. Please get in touch – we look forward
to helping you. This manual contains a special section on Customer Service starting on page 29.
8
NGLISH
E

Supplied Items
Please check the integrity and completeness of the supplied items
and, in the case this is not complete, forward us any possible
claims within 14 days from the purchase date. The purchase package includes:
• Navigation system
• Power cable for cigarette lighter (Atech ATPI 68HT0501)
• Car holder
• CDs/DVDs with navigation software
• Support CD
• Instruction manual and warranty card
Optional
• AC adapter (Phihong PSC05R-050)
• Pre-installed memory card MMC/SD
• USB-cable
• External GPS antenna
• External TMC receiver
• Bicycle fixture
• Protective case / storage pocket
AFETY AND MAINTENANCE
S
9

Views
Front Components
n
o
Ref Component Description
Touch Screen Displays the output of your appliance. Tap on
n
the screen with your finger, a stylus or a
"blunt" tipped pen to select menu commands
or enter data.
Power indicator
o
A green light will shine if the device is connected to and external source of electricity.
This display will shine orange in the case of
a low battery status.
The display will shine orange continu-
ously if the battery status is critically low.
10
NGLISH
E
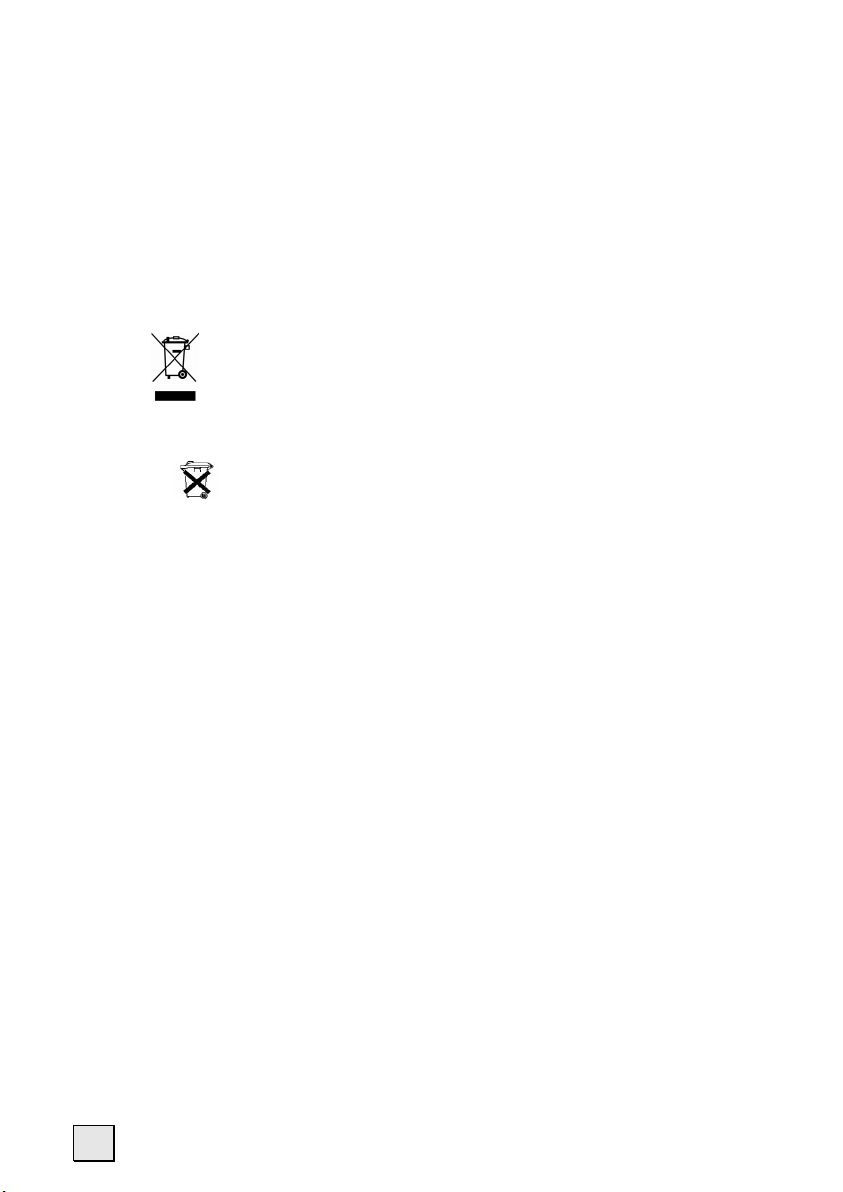
Back Components
n
o
Ref Component Description
Battery compart-
n
ment cover
o
Security bar Press the security bar to remove the bat-
Covers the battery compartment.
tery compartment cover.
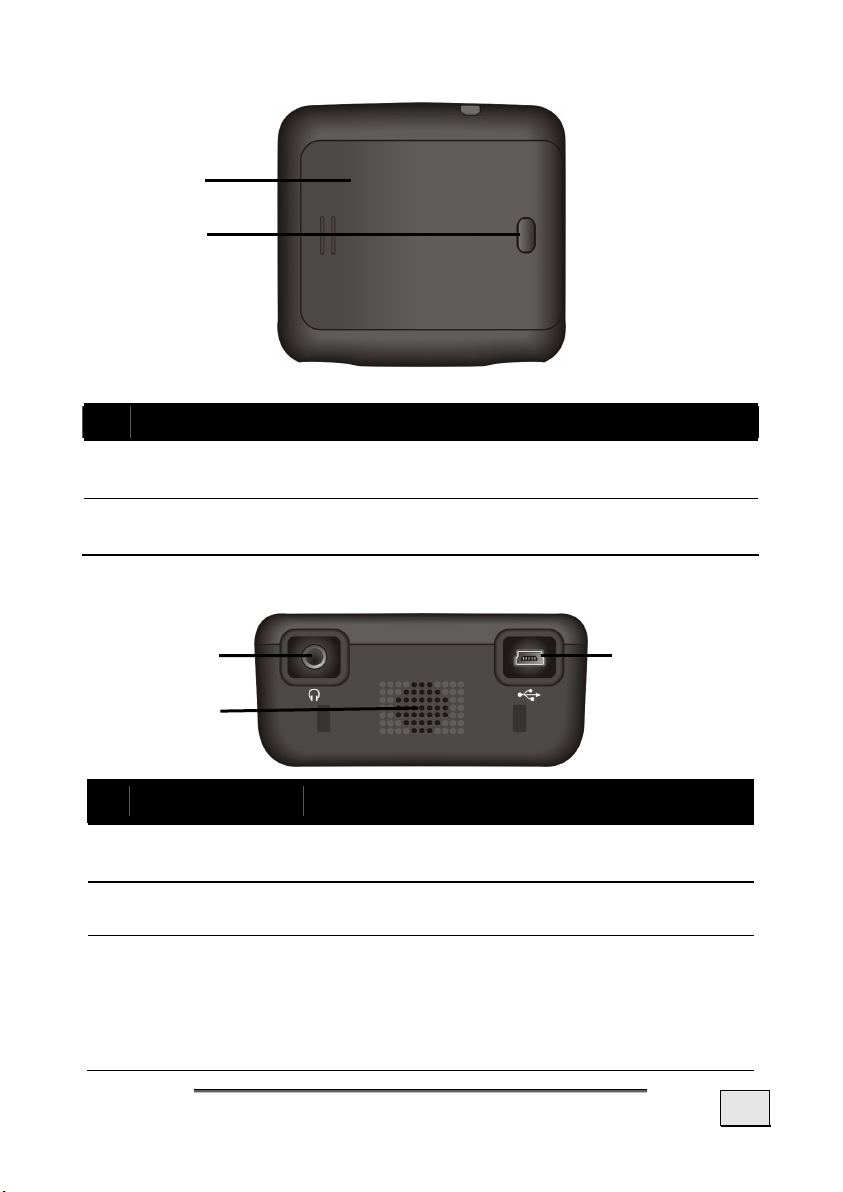
Bottom Components
n
o
Ref Component Description
n
Earphone
connector
o
Loudspeaker
p
Mini-USBConnector
Connects to a pair of stereo headphones
(3,5 mm).
Plays back language statements and
warnings.
Connection for connecting to a PC by means
of the USB cable (for data matching) as well
as connection to external power supply.
Here you also have the possibility (optional)
to connect a TMC receiver.
p
IEWS
V
11

Top Components
n
o
Ref Component Description
n
External
aerial
connection
o
Installed GPS
aerial
Connection for an optional second GPS
aerial.
The installed GPS aerial is located in the
centre of the upper side of the device.
Left Components
n
o
Ref Component Description
n
On-/Off button
Reset Opening
o
12
Press briefly to turn the appliance on or off.
Restarts your appliance (Reset, see page 20).
E
NGLISH

Right Components
n
Ref Component Description
SD/MMC Slot Accepts an optional SD (Secure Digital) or
n
MMC (MultiMediaCard) card for removable
storage
.
IEWS
V
13

Initial Set-up
The following guides you step by step through the initial Set-up of
the navigation system.
Firstly, remove the foil for protecting the device during transportation from the display.
I. Power Supply
Car Adapter
(similar picture)
AC Adapter (optional)
Adapter plug
(similar picture)
14
NGLISH
E

1. Push the adapter connector into the guide on the back of
the AC adapter. Press the push button at the same time, so
that the adapter plug can engage.
2. Push the AC adapter (o) into a power point that is easily
accessible.
Plug the cable of the mains adapter (n) into the mini-USB
3.
connection on the lower side of the navigation system
.
Battery operation
Electricity is supplied by means of 4 AA
type 1.5 V miniature batteries.
1. Open the battery compartment by
pressing the security bar and pushing
the battery compartment cover to the
right.
2. Insert each battery into the battery
compartment, paying attention to the
correct polarity.
3. Close the battery compartment by
replacing the cover and pushing it
carefully back to the starting
position.
We recommend the use of alkali batteries
for practical purposes. Operation with
high capacity rechargeable NIMH
batteries is also possible. Use a suitable
charging device to recharge batteries. Batteries of this type cannot be recharged in the navigation system.
The energy display may report a low energy status earlier, because a rechargeable battery displays a lower voltage than a
normal battery.
Note: Please read the information concerning the
i
safe handling of batteries from Page 2.
NITIAL SET-UP
I
15

II. Turning on/off the Device
1. Press the on/off button on the left side of the device for
approx. 4 seconds, until the operating device briefly shines
orange, when you switch the device on for the first time.
The Navigation System will start the initial installation automatically. The brand logo will appear and your device will display the
application screen after a few seconds. Follow the onscreen instructions.
Note: Brief pressure on the on/off button will be
i
enough to switch the device on or off, provided that
your navigation system is connected to an external
source of electricity or is running in battery operation.
The device will have to be switched on again by long
pressure on the on/off button, in the case of only a
short interruption to the electricity supply. No data will
be lost during this because of the storage of data in the
internal memory. The starting process will only last
slightly longer
.
Note: Your device will be delivered in a status in which
i
it will not switch off independently.
You can adjust the period of operation to suit your
needs using the Settings button on the main screen of
your device
.
Your navigation system will use a low amount of electricity and
the batteries will be discharged, even when it has been turned off.
It is possible for the battery to loose so much energy that an initial installation will be necessary once again, if you do not use the
navigation system for a longer period.
16
NGLISH
E

III. Installing the Navigation Software
The final installation of the navigation software will take place
automatically from the internal memory, during the initial setting
up, if your device has already been equipped with the basic data
of the navigation software at the factory. Follow the instructions
on the screen.
Alternative installation of the navigation software from a
memory card
Please proceed as follows in that case:
1. Carefully take the memory card out of its packing. Take
care not to touch or dirty the contacts.
2. Push the memory card carefully into the SD-/MMC card bay
until it slightly lock in place.
The memory card must always be inserted in the device while the
navigation system is being used. It will be necessary to carry out
a Reset to restart the navigation system if the memory card has
been removed, only for a short time, while the system was being
used (see page 20).
The main screen, through which you will be able to make the
navigation settings, will appear after all the data has been copied
to your navigation system.
Please also read the chapter Navigation starting on page 21.
NITIAL SET-UP
I
17

General Operating Instructions
Working with Memory Cards
Your navigation system supports MMC and SD memory cards.
Inserting Memory Cards
1. Carefully take the optional
memory card out of its packing (if
included). Take care not to touch
or dirty the contacts.
2. Insert the memory card carefully
into the card bay with contacts
pointing forward. The printed side of the memory card
must face upwards. The card must lock easily.
Removing Memory Cards
Note: Only remove the memory card if the naviga-
i
tion software has been closed and the device has
been switched off by means of the On/Off button beforehand. Otherwise you will risk a loss of data.
1. To remove the card press lightly onto the upper edge until
it ejects.
2. Pull the card out without touching the contacts.
3. Store the memory card in the packing or in another safe
location.
i
Note: Memory cards are very fragile. Take care not
to dirty the contacts and not to force the card.
18
NGLISH
E

Accessing Memory Cards
• The appliance only supports memory cards in the FAT16/32
file format. If you insert a card prepared with a different format (e.g. in cameras, MP3 players), your navigation system
may not recognize it and will ask you to format it again.
Warning: Formatting the memory card irretrievably
!
wipes out all data.
• Likewise you cannot just copy files onto the memory card.
In some cases they must be converted by the Microsoft
ActiveSync
®
Sync
®
program das Programm Microsoft® Active-
konvertiert werden.
®
Data exchange via card reader
However, if you wish to copy large quantities of data (MP3 files,
navigation maps) to the memory card, these can also be stored
directly to the memory card.
Many computers already have memory card devices. Insert the
card in this and copy the data directly to the card.
Because of the direct access you can achieve a much higher
transfer rate compared to using ActiveSync
®
.
ENERAL OPERATING INSTRUCTIONS
G
19

Resetting the Navigation System (Reset)
You will have the possibility of resetting your navigation system if
it is no longer reacting or working properly.
This option restarts the navigation system, without reinstallation
being necessary. A reset is often used in order to reorganize the
memory. In doing so all programs that are running are interrupted and the working memory is reinitialized.
Choose this option if your navigation system is not responding or
working properly.
Perform the reset as follows:
Insert a pointy object (e.g. a paper clip, which has been bent
open) with slight pressure into the reset opening.
20
NGLISH
E

Navigation
Safety Instructions for Navigation
The bundled product CD/DVD contains a comprehensive instruction
manual.
Tips for Navigation
• Do not manipulate the navigation system while driving
to protect yourself and others from accidents!
• In the event that you do not understand the voice instruc-
tion or if you are in any doubt about what to do at the next
intersection, then the map or arrow display will provide you
with a quick orientation. Only look at the display when
you are in a safe driving situation!
!
Attention: The road layout and driving rules take
precedence over the instructions of the navigation
system. Only follow the instructions when circumstances and driving rules permit it! The navigation
system will guide you to your destination even when
you have to deviate from your planned route.
• The direction statements of the navigation system given do
not release the driver of the vehicle from his or her duty of
care or personal responsibility.
• Plan routes before you leave. If you want to plan a new
route whilst on the road stop driving.
• In order to receive the GPS signal correctly, metal objects
may not hinder reception. Attach the navigation system
onto the inside of the windscreen or near the windscreen
with the sucker. Try out different positions in your vehicle
in order to find the best reception.
AVIGATION
N
21

Notes for Use in a Vehicle
• Take care that the holder does not present any risk to safe-
ty, even in the case of an accident, when installing it.
• Take care that the cable does not impede any safety com-
ponents.
• The display of your navigation system may show “light re-
flexions”. Please take care of not being “blinded” during
operation.
• Take care that the cable does not impede any safety com-
ponents.
• Do not mount the components within the operating range
of any airbags.
• Check the secure adherence of the suction cup at regular
intervals.
• The power plug will consume power, even if no device is
connected. Remove it when not in use to avoid draining the
battery.
• Check all safety equipment in your car after installation.
Additional Notes for Use on a Bicycle or a
motorcycle
• Pay attention during installation that the ability to steer is
not impaired.
• Do not cover any instruments during installation.
Aerial Orientation
The aerial must have unrestricted access to the sky to receive
GPS satellite signals. Orient the aerial as horizontally as possible
for this reason. Try out aerial and installation possibilities in the
vehicle in the case of inadequate reception. It can be necessary to
install an external GPS antenna (see page 37) under certain circumstances.
22
NGLISH
E

I. Mounting the Car Holder
Attention! Only fix the holder for the navigation
!
system to the windscreen, if it does not impede the
view. Should this not be possible, then mount the
holder with the suction plate in any way that will
allow peril-free and safe operation.
Suction plate
(optional)
Snap-in lever
(similar picture)
Note: If you want to fix the holder to the wind
i
screen, then you can skip steps 1 and 2.
AVIGATION
N
23

1. Remove the protective foil from the sticky side of the suction plate.
2. Fix the suction plate to a suitable location on the
dashboard. Take care, that the surface of the dashboard is
clean and press the suction plate strongly onto the surface.
Note: To obtain a strong and secure hold the suction
i
plate should not be used for 24 hours.
3. Connect the cradle to the car mounting. Pay attention to
the inscription on the car mounting. The connection closes
with a noticeable clicking sound (fig. see the next page).
II. Fixing the Suction Plate
Note: Clean the disk thoroughly with a glass cleaner.
i
Warm the disk and the nipple slightly at temperatures below 15° C.
Place the holder with the suction head onto the suction plate (or
directly onto the wind screen) and press the lever on the suction
head downwards. The sucker will attach itself to the background
firmly.
24
NGLISH
E

III. Attaching the Navigation System
1. Connect the car adapter (see page 14) and, if necessary,
the external GPS aerial, to your navigation system and insert the memory card.
2. Position the support on the attachment holes on the back of
the device.
3. After you have put the device on the support, push the
navigation system downwards until it locks into place audibly.
4. Now you will be able to place the complete unit on the
cleaned windscreen or the suction plate.
AVIGATION
N
25

IV. Connecting the Car Adapter
o
n
(similar picture)
1. Plug the jack (n) of the connection cable into the corresponding receptor at the bottom of your navigation system
(p. 11).
2. Insert the power adapter (o) now into the cigarette lighter
socket and ensure, that it will not lose contact while driving. This could cause a malfunction.
26
i
Note: Remove the power adapter from the cigarette
lighter socket when ending a trip or when parking the
car for a extended period of time. Otherwise the car
battery could be drained. In this case use the power
switch to turn off the navigation system.
NGLISH
E

V. Starting the Navigation Software
i
Note: Your memory card will always have to be in-
serted into the device during the use of the navigation system, if the card contains (additional) mapping
material. It will be necessary to carry out a reset to
restart the navigation system if the memory card has
been removed, only for a short time, while the system was being used (see page 20). This Reset will
take place automatically, according to the navigation
system.
1. Switch on your navigation system.
2. The Navigation software will start automatically or after
tapping on the navigation control button on the main
screen, according to the version.
3. Tap on Navigation on the screen for entering the destination and enter the address of your navigation destination.
Confirm your entry by clicking the
navigation. You will receive the route information on the
screen, augmented by language statements, after a short
time, if the satellite reception is adequate.
Further information regarding the navigation software can be
found in the comprehensive manual on your navigation
CD(s)/DVD(s). This is a pdf-file you can read and print with the
any Acrobat Reader.
9 symbol to start the
Note: The GPS-receiver will require some minutes
i
for initialization when deployed for the first time.
Even when GPS signal reception is indicated the
navigation could be imprecise. In all future instances
it will take about 30-60 seconds until a correct GPSsignal is available, sufficient “sight” of the satellite is a
prerequisite.
AVIGATION
N
27

FAQ
Where can I find more informationen on the navigation
system?
What do I need the accompanied CDs/DVDs for?
Detailed operating instructions for navigation can be
found on the corresponding CDs/DVDs, which accompany
your navigation system.
Also use the additional Help functions that are available
with a single touch of a button (usually F1 on the PC), or
by selecting the Help option, as additional assistance.
These aids will be provided to you while you are using the
computer or the device.
The Support-CD contains:
Contents of the navigation-CD(s)/DVD(s):
the ActiveSync® program for balancing data be-
•
tween the navigation system and the PC
• Additional programs (optional).
• This User manual in digital form.
.
• digital maps
• Data for rapidly resetting the contents of the
memory card
• Manual of the navigation software
Depending on the configuration one or more CDs/DVDs
may be included in the package.
28
The navigation system is no longer responding. What should I do?
Carry out a reset (see page 20).
How can I adjust the lighting?
Under Settings Ö Lightning.
NGLISH
E

Customer Service
First-Aid in the Event of Malfunction
Error functions can sometimes have trivial causes; however, they
can also sometimes be complex in nature and require costly
analysis.
General guidance
Note: The regular running of the Windows® pro-
i
grams “Defrag” and “Scandisk” on the PC can remove
sources of error and raise system performance.
Check Connections and Cables
Start with a careful visual check of all cable links. If the LCD’s are
not working, make sure that the power is reaching the computer
and all peripherals.
Note: Switch off the computer and check all cable
i
links. If the computer is connected to peripherals,
check also the plug connections of all cables. Do not
arbitrarily swap the cables between various units,
even if they appear to be precisely the same. The pin
assignments of the cables are likely to be different.
Once you have ascertained that the power supply is
not at fault and all connections are intact, switch on the
computer again.
USTOMER SERVICE
C
29

Faults and Possible Causes
The navigation system no longer reacts or is behaving
atypically.
Carry out a reset (see page 20).
•
The navigation system is recognized only as a guest by
ActiveSync
• See informationen on page 35.
I am receiving error messages from a maintenance program after installing ActiveSync
• The program places the WCESCOMM.LOG file in a tempo-
The GPS receiver cannot be initialized or found.
If a GPS signal continues not to be reported on the screen, in spite of
the correct installation of the system, this can be caused by the following factors:
• Sufficient satellite reception is not possible.
No language statements can be heard.
• Check the volume setting.
®
.
®
.
rary directory defined by the system, which cannot be deleted. A respective error message will appear, if another
program attempts to do so.
Solution:
Change the position of your navigation system and ensure
that unrestricted “sight” of the aerial is not impaired.
30
NGLISH
E

Additional Support
If the suggestions in the above section have not solved your problem, please contact our customer service hotline. However, before
you contact your Technology Center, please have the following information available:
However, before you contact your Technology Center, please have
the following information available:
• How is your computer configured?
• What additional peripherals do you use?
• What messages, if any, appear on your screen?
• What software were you using when the error occurred?
• What steps have you already undertaken to solve the
problem?
• Have you upgraded or removed drivers or hardware?
• Can you manually repeat the problem?
• If you have been given a customer number previously,
please give this number to the technician.
USTOMER SERVICE
C
31

Appendix
Special CleanUp Function
(Program management in English)
The CleanUp function serves the targeted deletion of data, without using a PC.
IMPORTANT: Please use this function very care-
i
fully, because it is possible for data to be deleted
that will only need to be entered again manually afterwards.
The CleanUp function will be activated if the ‘o’ is pressed in the
Gopal lettering of the Main Menu briefly, immediately after the
start tone following a soft reset
The CleanUp function offers 5 options:
Remove Installation Only
Removing the software installed from the permanent memory
(\My Flash Disk\Navigation)
Remove MAP Only
Removing the digital maps from the permanent memory (\My
Flash Disk\MapRegions)
Remove Preload Only
Removing the data required for the installation of the navigation
software from the permanent memory (\My Flash Disk\Install).
Remove All
Removing all data from the permanent memory
Exit
Leaving the
CleanUp function and restarting the device (like reset)
.
32
NGLISH
E

The deletion of the data must be confirmed before the action actually takes place. To do this, press on YES. There will be corresponding report if the data to be deleted are meanwhile (no
longer) available.
Example
Reinstallation of the software (similar to the status at delivery).
Proceed as follows:
1. Remove Installation Only
2. Exit
The device will restart and reinstall the software.
PPENDIX
A
33

Synchronisation with the PC
I. Installing Microsoft® ActiveSync®
In order to transfer your data between your PC and your navigation system you need the Microsoft
The cost of the navigation system includes a license for this program which can be found on the Support CD.
Attention: Important files can be overwritten or
!
changed during the installation of software. You
should create a hard disk backup, in order to be able
to have access to the original files in the case of possible problems following the installation.
®
ActiveSync® program.
You must have administrator rights to install the software under
Windows
!
®
2000 or XP.
Attention: You should not connect the navigation
system to your computer yet.
1. Insert the Support CD and wait until the program starts
automatically.
Note: The Auto Run function is probably deactivated
i
if it does not function. The Setup program on the CD
must be started, to start installation manually.
2. Choose the language, click then Install ActiveSync® and
follow the instructions on the screen.
34
NGLISH
E

II. Connecting with the PC
1. Press the On/Off button to start your navigation system.
2. Connect the USB cable to your navigation system.
3. Push the USB connector into a free USB port on your computer.
4. The hardware installation assistant recognizes now a new
appliance and installs a suitable driver which can take some
minutes. Repeat the die connection search if it fails the first
time.
5. Follow the instructions on the screen. The program will now
set up a partnership between your PC and the device.
III. Working with Microsoft® ActiveSync®
ActiveSync® will be started automatically if you connect your
navigation system to the PC. The program will check whether the
device is one with which a partnership has been entered. If this is
the case, the changes that have taken place on the PC and on the
navigation system since the last synchronisation will be compared
and adjusted to each other. You will be able to define exactly
which data will have priority during the synchronisation in the
settings of the ActiveSync
gram (with the F1 Button), in order to become familiar with the
effects of the respective settings. A restricted Guest Access, with
which you will be able to exchange data, for example, will become
active automatically if the navigation system has not been recognised as a partner. If this is the case, although the process concerns the registered partner device, separate your navigation system from the PC and switch it off and on again. Now connect your
navigation system to the PC, to restart the recognition process.
Repeat the process and, restart your PC in addition, if your device
continues to be recognised as a guest.
Note: Make sure that you always connect your navigation system
to your PC with the same USB connection, otherwise your PC will
allocate an additional ID and reinstall the device.
®
Program. Call up the Help of the Pro-
PPENDIX
A
35

GPS (Global Positioning System)
GPS is a satellite-backed system for determining your position.
With the help of 24 satellites revolving around the earth, it is possible to determine your position on earth with the accuracy of a
few meters. The satellite signals are received by the antenna of
the built-in GPS receiver, which must have a "line of sight" to at
least 4 of these.
Note: By limited line of sight (e.g. in tunnels, be-
i
tween houses, in woods or also in vehicles with
metal-coated windows) it is not possible to determine
the position. The satellite reception however automatically picks up again as soon as the obstacle has
been passed and there line of sight is re-established
again. Moving slowly (e.g. slow walking) also limits
the accuracy of the navigation.
The GPS receiver consumes additional power. This is especially of
concern, when running on batteries. To conserve power do not
turn on the GPS receiver unnecessarily. Also terminate the Navigation Software, if it is not needed or satellite reception is not
possible for a longer period, for this reason. However, you can
also switch the device off by means of the On/Off switch in the
case of a shorter interruption to your journey. Pressing the same
switch again will activate a restart. The GPS receiver will also be
reactivated at the same time, if navigation software is still active.
Here, it can take a short time for the position to be updated
again, according to the reception situation.
36
Note: Please note, that your appliance is preset to
i
not shut down automatically after a few minutes
without activity. You can change this preset in the Settings mode. If the GPS receiver has not been active
for some hours, it must orientate itself again. This
process may take a while.
NGLISH
E

External GPS antenna
This second optional GPS antenna (only for Model A) makes it
possible to receive the signals of satellites better (e. g. in the case
of vehicles with a metallized windscreen).
1. The antenna should be pointing upwards.
2. Push the plug of the external GPS antenna into the opening
provided for it at the top of your device (see page 12).
PPENDIX
A
37

TMC (Traffic Message Channel)
The Traffic Message Channel (TMC) is a digital radio data service that functions in a similar way to RDS and is used to transmit
disruptions to traffic to a suitable reception device.
The traffic information is continuously transmitted across FM.
The user is less dependent on the half-hourly broadcast traffic
information, because the signal is continuously transmitted. Apart
from this, important information, as in the case of people driving
on the wrong side of the road for example, can be passed on immediately.
The transmission is planned for the whole of Europe and is already offered by radio transmitters in many countries. The precision of the TMC messages can deviate greatly according to the
country.
The evaluation of TMC messages is not supported by every type
of navigation software. Enquire whether your system supports
TMC before the possible purchase of a TMC receiver.
38
NGLISH
E

Installing the External TMC Receiver
Please proceed as follows to connect your TMC receiver to your
navigation system.
1. Connect the mini-USB plug to the mini-USB connection of
your device.
2. Connect the projecting antenna to the TMC receiver and attach that antenna with the aid of the suckers, at the edge
of your windscreen, for example.
(similar picture)
3. Connect the TMC receiver to the car adapter cable after you
have attached the TMC receiver to your navigation system.
Your navigation system will now be able to receive traffic information through the TMC receiver and thus to avoid potential disruptions to traffic.
PPENDIX
A
39

Additional Card Material
Your navigation system is already equipped with a digitalized map
of your country in the internal memory at the factory.
There is an already digitalized card for your country on the
the memory card. Depending on the configuration, additional
maps may be included on your navigation CDs/DVDs. You will be
able to transfer these cards to a memory card immediately. Here,
it is recommended to use an external card reader (see also page 19).
Depending on the amount of map data on the CDs/DVDs, memory
cards with capacities of 256 MB, 512 MB, 1.024 MB or more may
be required.
You will obtain additional memory cards (MMC or SD cards) in
specialist stores.
Transfer of card material to a memory card
The transfer of additional card material to a memory card will
preferably take place through the Explorer of your PCs. Proceed
as follows:
1. Insert the CD/DVD with the card material required.
2. Start your workstation and select your CD/DVD Drive.
3. Copy the file with the .map ending out of the Directory of
the region that you require to the MapRegions Directory
on your memory card, from the CD/DVD.
You can transfer several files with map material to your memory
card, depending on the capacity of the memory card. There must
be sufficient space on your memory card.
If you have copied digitized maps of several countries or country
groups onto your memory card, you will be required to select the
desired map in the navigation application of your device.
40
NGLISH
E

Mounting the Navigation Set on a Bicycle
You can attach your navigation system to a bicycle as an
optional additional feature. A special holder is needed to do this.
The installation is explained in the following.
Screws
Hexagon key
Clamp
Holding plate
(similar picture)
1. Release both the screws connecting the clamp to the holding plate with the hexagon key.
2. Remove the rubber ring and wind it
around the handlebars.
3. Position the clamp on your bicycle
handlebars, by pulling it across the
handlebars from below.
4. Put the holding plate back onto the clamp and retighten
both the screws.
5. Seat the holder for the navigation system on the holder
plate until it locks into place audibly. Please pay attention to
the fact that the holder must only be seated in one direc-
tion.
6. Now place the device on the holder. You must pay attention
to firm positioning.
i
Note: Your navigation system could also be equipped
with a different bicycle mounting, where the attachment of mountings can vary slightly, according to the
version.
PPENDIX
A
41

Specifications
Parameter Information
Power supply
with mains adapter or a power
supply cable for a cigarette
lighter
Battery operation
Earphones
Internal Flash memory 256 MB (220 MB usable)
Memory card type
Connector type of the external
GPS receiver
USB interface
Dimensions
Weight approx. 116 g
Temperatures
Humidity
(without condensation)
Phihong PSC05R-050
Atech ATPI-68HT0501
4 miniature batteries
(AA type, preferably alkaline)
Stereo earphones (3.5 mm)
MMC and SD
MMCX
USB 1.1
7.7 mm x 8.5 mm x 3.8 mm
(without packaging/batteries)
Operating
Storage
10 – 90%
+ 41 °F – +104° F
(+5° C - +40° C)
+32 °F – +140 °F
-0° C - +60° C
42
NGLISH
E

Warranty
The receipt serves as proof of first purchase and should be kept in
a safe place. Your legal rights are not limited
ditions. It is required should you need to make use of the guarantee.
We guarantee that this equipment is in perfect working order.
Upon production of the receipt, the remaining period of guarantee
shall pass on from the original parts to the respective replacement
parts. If you hand in this equipment to make use of the guarantee, you must remove all programs, data and removable storage
media. Products which are sent without accessories will be replaced without accessories. The warranty obligation does not apply in the case of the problem being caused by an accident, a catastrophe, vandalism, misuse, incorrect use, ignoring the safety
and maintenance regulations, changes by software, viruses or
another piece of equipment or accessories or by other modifications not approved by ourselves. This limited guarantee declaration replaces all other guarantees of express or implied nature.
This includes the guarantee of saleability or the suitability for a
certain purpose but is not limited to this. In some countries the
exclusion of implied guarantees is not permissible upon principle.
In this case the validity of all express and implied guarantees is
limited to the guarantee period. Once this period has expired, all
guarantees become invalid. In some countries limiting the period
of validity for implied guarantees is not permitted, so that the
above limitation does not come into force. If you have any questions with regard to these guarantee conditions, please contact us.
by these warranty con-
ARRANTY
W
43

Liability limitations
The contents of this manual are subject to unannounced changes
caused by technical progress. Manufacturer and sales shall not be
responsible for any damages which have been caused as a result
of omissions or errors in the information provided in this manual.
Under no circumstances shall we be liable for any of the following:
1. Claims made against you by third parties based on loss or
damage.
2. Loss or damage to your blanks, recordings or data.
3. Economic follow-on damage (including lost profit or savings)
or associated damage even in the case that we have been
informed of the possibilities of this type of damage.
In some countries the exclusion or limitation of accompanying or
follow-on damage is not legally accepted so that the above limitations do not come into force.
Copying this manual
This document contains legally protected information. All rights
reserved. Copying in mechanical, electronic and any other form
without the written approval of the manufacturer is prohibited.
44
NGLISH
E

Index
A
AACC AAddaapptteerr....................................................1144
AAcccceessssiinngg MMeemmoorryy CCaarrddss..............1199
AAddddiittiioonnaall ccaarrdd mmaatteerriiaall..................4400
AAeerriiaall OOrriieennttaattiioonn..................................2222
AAmmbbiieenntt tteemmppeerraattuurree..........................33
AAttttaacchh NNaavviiggaattiioonn SSyysstteemm............2255
AAuuttoo rruunn..........................................................3344
AAuuttoo ssttaarrtt........................................................3344
C
CCaabblliinngg................................................................55
CCaarr AAddaapptteerr..................................................1144
CCaarrdd rreeaaddeerr..................................................1199
CCaarree ooff tthhee DDiissppllaayy................................66
CClleeaannUUpp ffuunncc..............................................3322
CCoonnnneeccttiinngg tthhee ccaarr aaddaapptteerr........2266
CCoonntteennttss..............................................................ii
CCooppyyiinngg tthhiiss mmaannuuaall..........................4444
CCooppyyrriigghhtt..........................................................iivv
CCuussttoommeerr SSeerrvviiccee..................................2299
D
DDaattaa eexxcchhaannggee..........................................1199
DDaattaa SSeeccuurriittyy................................................22
DDeeffrraaggmmeennttaattiioonn....................................2299
E
EEaarrpphhoonneess......................................................1111
EElleeccttrroommaaggnneettiicc CCoommppaattiibbiilliittyy..33
EEMMCC........................................................................33
EExxtteerrnnaall aaeerriiaall ccoonnnneeccttiioonn............1122
EExxtteerrnnaall GGPPSS aanntteennnnaa......................3377
F
FFAAQQ........................................................................2288
FFaauullttss aanndd PPoossssiibbllee CCaauusseess........3300
FFiirrsstt--AAiidd............................................................2299
FFiixxiinngg tthhee ssuuccttiioonn ppllaattee..................2244
G
GGPPSS......................................................................3366
External GPS antenna........ 37
H
HHoottlliinnee..............................................................3311
I
IInniittiiaall sseett--uupp
Battery operation.............. 15
Installing the navigation
software ....................... 17
Power supply.................... 14
Switching on the
navigation system.......... 16
IInnssttaalllleedd GGPPSS aaeerriiaall............................1122
IInnttrroodduuccttiioonn....................................................88
L
LLiiaabbiilliittyy lliimmiittaattiioonnss..............................4444
M
MMaaiinntteennaannccee....................................................66
MMaallffuunnccttiioonn..................................................2299
MMeemmoorryy ccaarrddss............................................1188
MMiiccrroossoofft
®
®
t
AAccttiivveeSSyynnc
®
®
c
..................3344
MMiinnii--UUSSBB--CCoonnnneeccttoorr..........................1111
MMoouunnttiinngg tthhee ccaarr hhoollddeerr................2233
MMoouunnttiinngg tthhee NNaavviiggaattiioonn SSeett
oonn aa BBiiccyyccllee..........................................4411
N
NNaavviiggaattiioonn
Attaching the navigation
system ......................... 25
Connecting the car adapter 26
Fixing the suction plate...... 24
Mounting the car holder ..... 23
Safety instructions ............ 21
NDEX
I
45

Starting the navigation
software .......................27
O
OOnn--//OOffff bbuuttttoonn..........................................1122
OOppeerraattiinngg EEnnvviirroonnmmeenntt....................22
P
PPoowweerr iinnddiiccaattoorr........................................1100
Q
QQuuaalliittyy..................................................................88
R
RReeppaaiirr..................................................................22
RReeppaarraattuurr..........................................................22
RReesseett OOppeenniinngg..........................................1122
RReesseettttiinngg tthhee nnaavviiggaattiioonn
ssyysstteemm ((RReesseett))..................................2200
S
SSaaffeettyy aanndd MMaaiinntteennaannccee..................11
SSaaffeettyy iinnssttrruuccttiioonnss
Batteries ........................... 4
Navigation........................21
Connection ........................ 4
Data security ..................... 2
Operating environment ....... 2
Repair .............................. 2
Power supply ..................... 4
Cabling ............................. 5
Maintenance ...................... 6
Care of the display .............. 6
Transport...........................7
SSccaannddiisskk..........................................................2299
SSDD//MMMMCC SSlloott..............................................1133
SSeerrvviiccee..................................................................88
SSppeecciiaall CClleeaannUUpp ffuunnccttiioonn..............3322
SSppeecciiffiiccaattiioonnss............................................4422
SSttaarrttiinngg tthhee nnaavviiggaattiioonn
ssooffttwwaarree....................................................2277
SSuupppplliieedd IItteemmss............................................99
SSyynncchhrroonniissaattiioonn wwiitthh tthhee PPCC....3344
T
TTMMCC......................................................................3388
Installing the external TMC
receiver........................ 39
TToouucchh SSccrreeeenn............................................1100
TTrraannssffeerr ooff ccaarrdd mmaatteerriiaall ttoo
aa mmeemmoorryy ccaarrdd..................................4400
TTrraannssppoorrtt............................................................77
V
VViieewwss
Back components.............. 11
Bottom components .......... 11
Front components ............. 10
Left components ............... 12
Right components ............. 13
Top components ............... 12
W
WWaarrrraannttyy........................................................4433
46
NGLISH
E
 Loading...