

Page 1
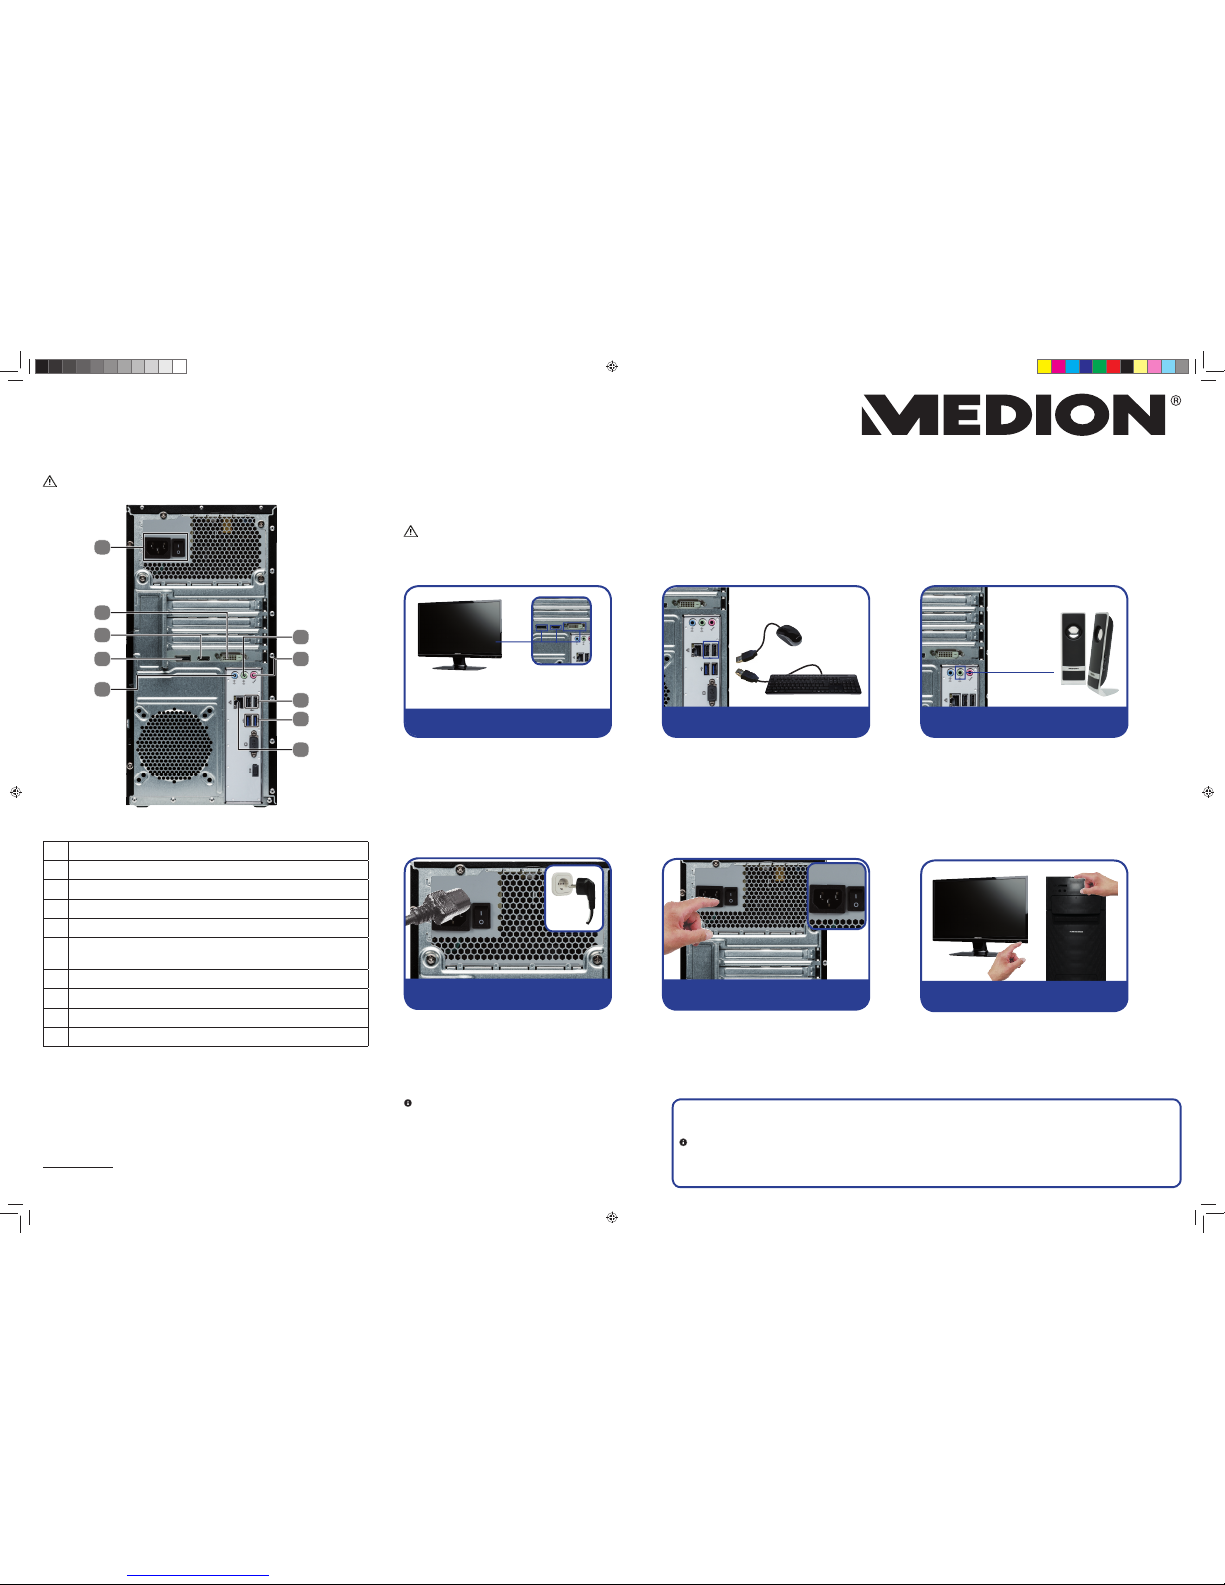
11
9
15
16
27
5
21
14
23
24
Kurzanleitung
MULTIMEDIA PCSYSTEM MEDION® AKOYA® P5360 E MD 8881)
Lesen Sie das Kapitel Sicherheit in der Bedienungsanleitung bevor Sie beginnen und beachten Sie die ausführlichen Hinweise zum Aufbau und Anschluss.
Komponenten aufstellen
Peripheriegeräte anschließen
Beachten Sie bei der Aufstellung Ihres PCs, dass Sie die Kabel so verlegen, dass niemand darauf treten oder darüber stolpern kann.
Positionieren Sie Ihren PC und die Peripheriegeräte so, dass Sie bequem an die Anschlüsse kommen.
Hinweis! Es darf sich keine bootfähige Disc im op-
tischen Laufwerk befinden, da sonst das Betriebssystem nicht von der Festplatte geladen werden kann.
7. Folgen Sie nach Erscheinen des Windowsbegrüßungsbildschirms den Anweisungen zur Ersteinrichtung. Die einzelnen Dialoge erklären die
durchzuführenden Schritte.
1. Schließen Sie das Signalkabel Ihres Monitors entweder an den DVI-Anschluss, den
DisplayPort oder an den HDMI-Anschluss
Ihres PCs an. (Bitte lesen Sie auch die Bedienungsanleitung Ihres Monitors.)
2. Schließen Sie die Tastatur und die Maus an
einen freien USB 2.0-Anschluss an.
3. Schließen Sie die Lautsprecher an den grünen Audio Ausgang an.
Auf Ihrem PC ist eine Antiviren Software installier t. Bei der Verbindung des PCs mit dem Internet wird die Softw are automatisch registriert. Mit der kostenlosen Registri erung erhalten Sie für die Dauer von 30 Tagen kostenlose Updates.
Hinweis! Installieren Sie keine weitere Antiviren Software, da da durch die Leistung des PCs beeinträchtigt werden kann.
Mit der ersten Onlineverbindung werden das Betriebssystem und die Anti viren Software automatisch aktualisiert. Diese Vorgänge
dauern erfahrungsgemäß einige Minuten. In dieser Zeit k ann es zu Beeinträchtigungen in der Arbeitsgeschwindigkeit des Computers
kommen, diese sind nur bei der Erstinbetriebnahme spürbar.
4. Verbinden Sie das Netzanschlusskabel mit
dem Netzanschluss Ihres PCs und stecken
Sie es anschließend in eine Steckdose. Diese
muss sich in der Nähe des PCs befinden und
leicht erreichbar sein.
5. Ihr PC-Netzteil hat einen Netzschalter
worüber Sie den PC mit Strom versorgen.
Stellen Sie den Schalter auf die Stellung I.
(Stellen Sie den Schalter auf O, wird die
Stromzufuhr unterbrochen.)
6. Schalten Sie den PC über den Ein-/Ausschalter an der Oberseite durch kurzes Drücken
ein. Ihr PC startet und durchläuft nun verschiedene Phasen.
Stromversorgung anschließen Starten
Antiviren Software aktivieren
Geräteteile
5 Stromversorgung (Netzkabelanschluss & Netzschalter)
9 USB 3.0-Anschlüsse
11 USB 2.0-Anschlüsse
14 Audioeingang / Lautsprecher RS (rear out)*
15 Kopfhöreranschluss / Lautsprecher FS (front out)*
16
Mikrofonanschluss / Lautsprecher CS/SS
(cente r/subwoof er out)*
21 Monitoranschluss DVI-D
23 DisplayPort
24 HDMI-Anschluss
27 Netzwerk LAN (RJ-45)
* Anschlüsse mit Dop pelbelegun g - Konfiguratio n über Softw are
2 Tastatur und Maus anschließen
4 Netzkabel anschließen
5 Netzschalter einschalten
6 Monitor und PC einschalten
Lautsprecher
(nicht i m
Lieferumfang)
3 Lautsprecher anschließen
Monitor
(nicht im Lieferumfang)
1 Monitor anschließen
MSN 2006 2976
8881 DE_EN ALDI QSG MSN 2006 2976 final.indd 18881 DE_EN ALDI QSG MSN 2006 2976 final.indd 1 05.08.2016 09:35:0905.08.2016 09:35:09
Page 2
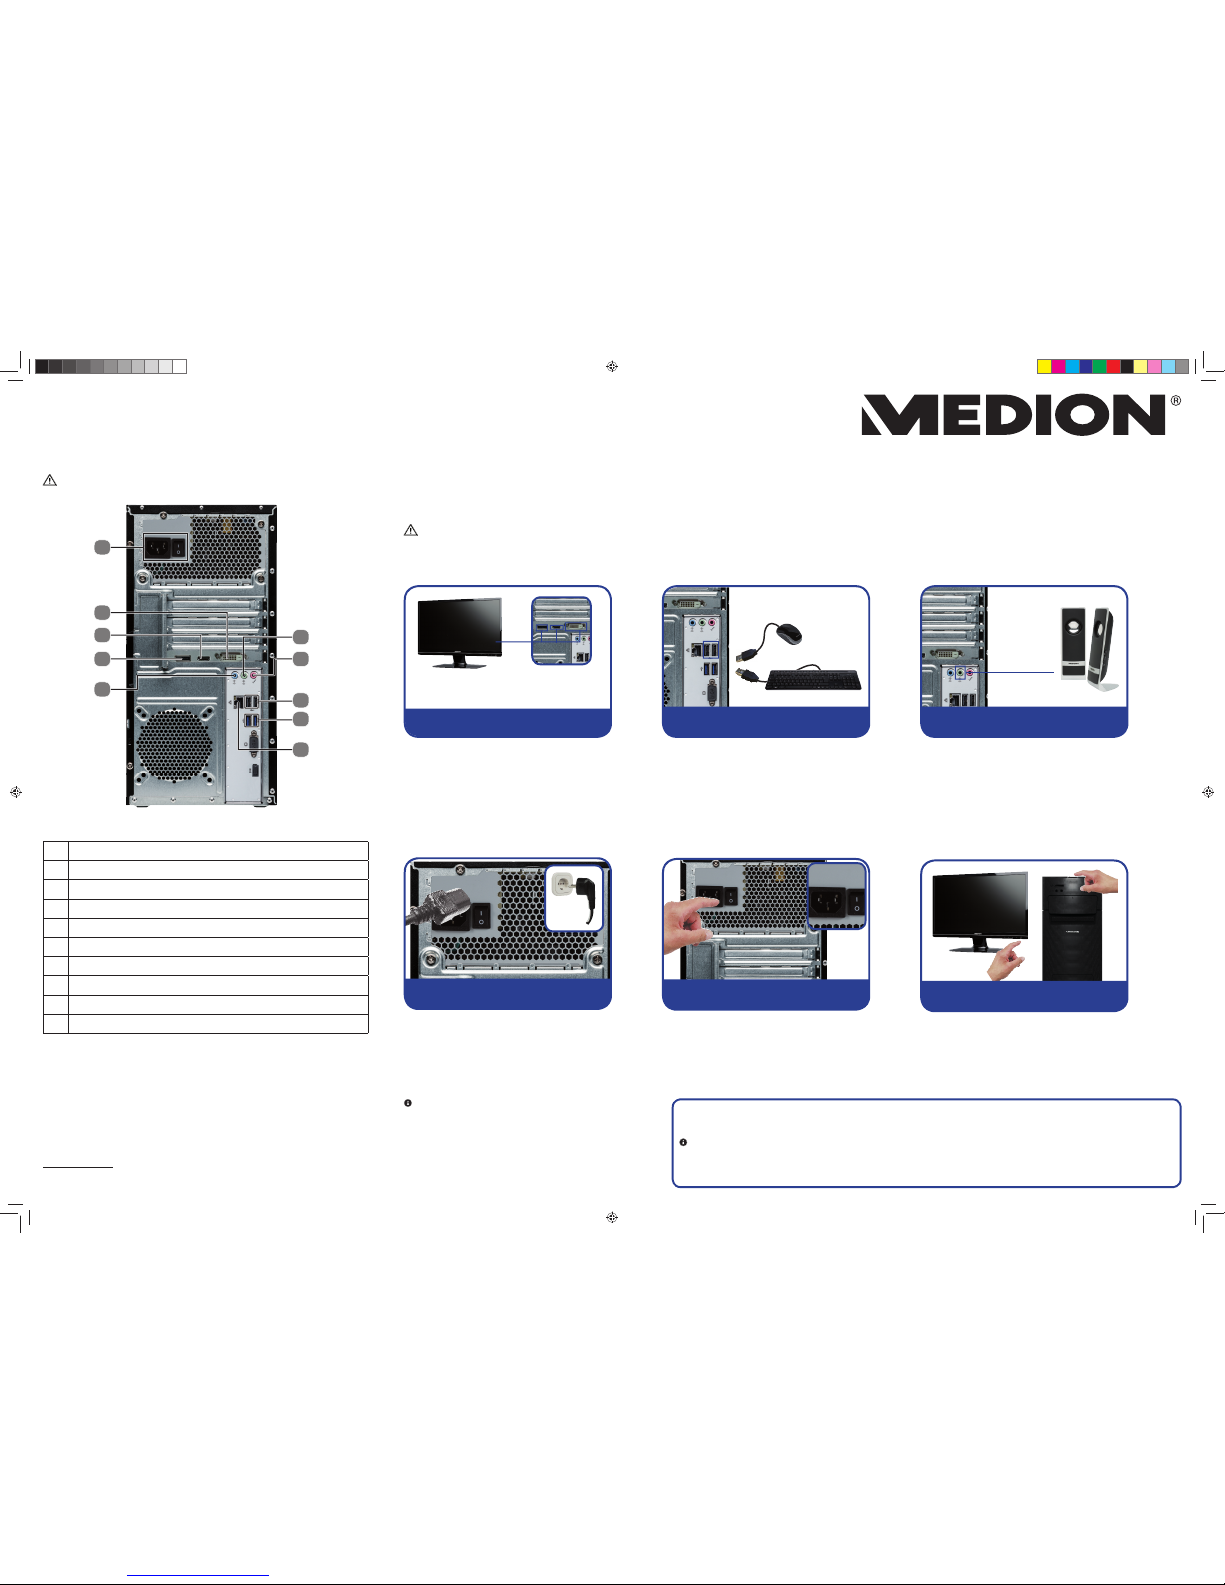
11
9
15
16
27
5
21
14
23
24
Quick guide
MULTIMEDIA PC SYSTEM MEDION® AKOYA® P5360E MD 8881)
Read the Safety chapter in the operating instructions before you begin, and pay attention to the detailed notes on set-up and connection.
Setting up components
Connecting peripherals
When setting up your PC, arrange the cables so that nobody can step on them or trip over them.
Position your PC and peripherals in such a way that the connections are easily accessible.
Notice! There should be no bootable disk in the
optical drive as this will prevent the operating system from being loaded from the hard drive.
7. Follow the initial set-up instructions once the Windows welcome screen has appeared. Step-by-step
instructions will guide you through the process to
be followed.
1. Connect your monitor's signal cable to the
DVI connection, the DisplayPort or HDMI
connection on your PC. (Please read the operating manual for your monitor.)
2. Connect the keyboard and the mouse to a
free USB 2.0 connection.
3. Connect the speakers to the green audio
output.
Anti-virus software is installe d on your PC. The software will automatically be regis tered when the PC connects to the Internet. With the
free registration you will receive free updates for 30 days.
Notice! Do not install any additional anti-virus soft ware, as this could impair the performance of your PC.
When you connect to the Internet for the fir st time, the operating system and anti-virus soft ware are updated automatically. This process usually takes several minutes to complete. During this period it can adverse ly affect the operating speed of the computer but this
only occurs on first use.
4. Connect the power cord to the mains connection on your PC, and then plug it into a
socket. The socket must be near to the PC
and easily accessible.
5. Your PC power supply unit has a mains
switch to provide the PC with power. Set
the switch to position I. (If you set it to O the
power supply will be interrupted.)
6. Switch on the PC by briefly pressing the on/
off switch on the top. Your PC will now start
and run through various steps.
Connecting power supply Start-up
Activating anti-virus software
Parts of the device
5 Power supply (power cord and mains switch)
9 USB 3.0 connections
11 USB 2.0 connections
14 Audio input (line-in) / speakers (rear line out)*
15 Audio output / speakers (front out)
16 Microphone connection (mic) / speakers (centre/subwoofer out)*
21 Monitor connection, DVI-D
23 DisplayPort
24 HDMI connection
27 Gigabit LAN network
* Connections wit h double assignm ents – configur ation via soft ware
2 Connect keyboard and mouse
4 Connect power cord
5 Switch on mains switch
6 Switch on monitor and PC
Speakers
(not sup plied)
3 Connect speakers
Monitor
(not sup plied)
1 Connect monitor
MSN 2006 2976
8881 DE_EN ALDI QSG MSN 2006 2976 final.indd 28881 DE_EN ALDI QSG MSN 2006 2976 final.indd 2 05.08.2016 09:35:1705.08.2016 09:35:17
 Loading...