

Page 1
AFTER SALES SUPPORT
www.medionusa.com866-633-4660
USA
USA
Model: MD 833 2 · Product Code: 93 606
Promotion period:
06/2016
Quick start guide
MULTIMEDIA PC P2125 D
Read the Safety chapter in the operating instructions before you begin, and
pay attention to the detailed notes on set-up and connection.
Setting up components
Connecting peripherals
When setting up your PC, arrange the cables so that nobody can step on them or trip over them. Position your PC and
peripherals in such a way that the connections are easily accessible.
7. Follow the initial set-up instructions
once the Windows welcome screen has
appeared. Step-by-step instruc tions will
guide you through the process to be
followed.
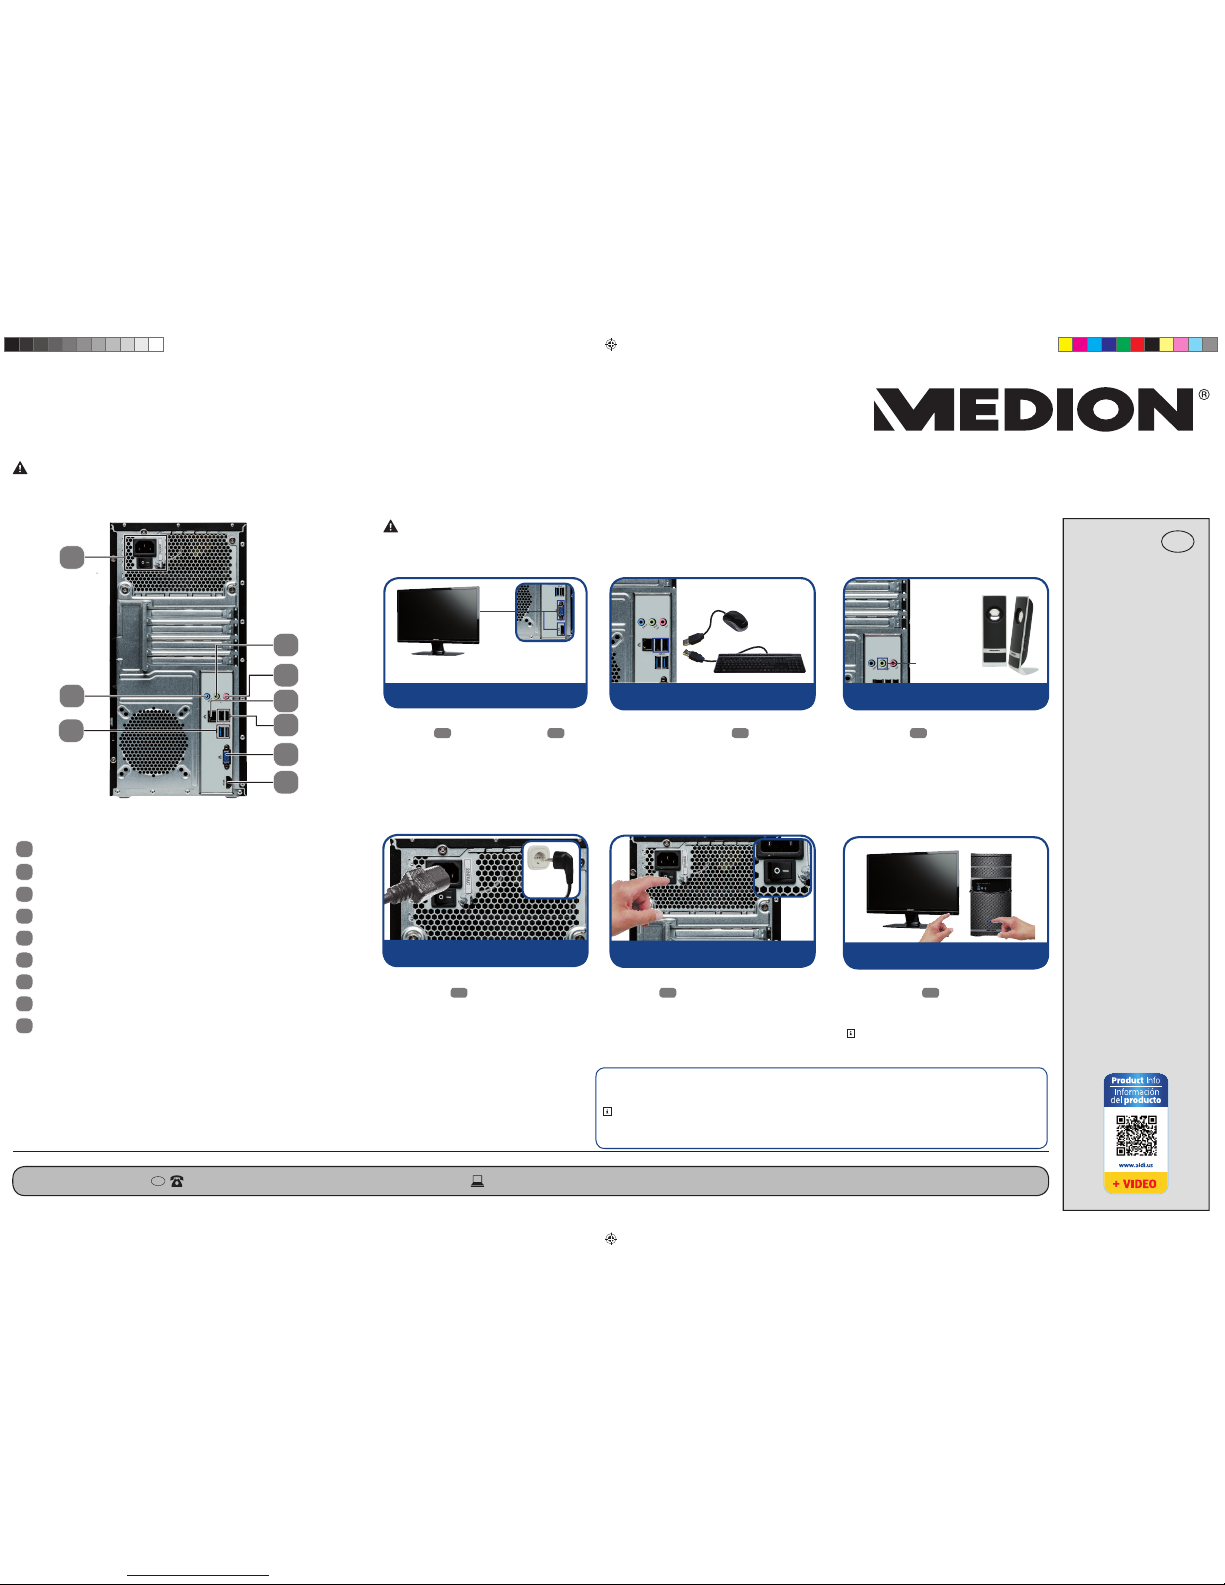
1. Connect your monitor’s signal cable to
the VGA
20
or HDMI connection 24
on your PC. (Please read the operating
manual for your monitor.)
2. Connect the keyboard and the mouse to
a free USB connection 11.
3. Connect the speakers to the green audio output 15.
Anti-virus software is installed on your PC. The software will automatically be registered when the PC connects
to the internet. With the free registration you will receive free updates for 30 days.
Notice! Do not install any additional anti-virus software, as this could impair the performance of your PC.
When you connect to the Internet for the fi rst time, the operating system and anti-virus software are updated automatically. This process usually
takes several minutes to complete. During this period it can adversely affect the operating speed of the computer but this only occurs on fi rst
use.
4. Connec t the power cord to the mains
connection 5 on your PC, and then
plug it into a socket. This must be near
to the PC and easily accessible.
5. Your PC power supply unit has a mains
switch 5 to provide the PC with power. Set the switch to position I. (If you
set it to O the power supply will be
interrup ted.)
6. Switch on the PC by brief ly pressing the
on/off switch 1 on the top. Your PC
will now start and run through various
steps.
Notice! There should be no bo otable disk in the opti -
cal drive as this w ill prevent the opera ting system from
being loaded fr om the hard drive.
Connecting power supply Start-up
Activating anti-virus software
Parts of the device
5
Power supply (power cord and mains switch)
9
USB 3.0 connections
11
USB 2.0 connections
14
Audio input (line-in) / speakers (rear line out)*
15
Audio output / speakers (front out)
16
Microphone connection (mic) / speakers (centre/subwoofer out)*
20
Monitor connection, VGA
24
HDMI connection
27
Gigabit LAN network
* Connectio ns with doub le assignm ents – conf iguratio n via soft ware
5
11
15
16
27
20
24
14
9
Keyboard
Mouse
2 Connect keyboard and mouse
4 Connect power cord
5 Switch on mains switch
6 Switch on monitor and PC
Speakers
(not sup plied)
Speaker
connection
3 Connect speakers
Monitor
(not sup plied)
Monitor connection (VGA or HDM I)
1 Connect monitor
MSN 2006 2 107
8332 EN-ES ALDI USA QSG MSN 2006 2107 final.indd 18332 EN-ES ALDI USA QSG MSN 2006 2107 final.indd 1 09.02.2016 13:14:3609.02.2016 13:14:36
Page 2
Instrucciones breves
SERVICIO POSTVENTA
www.medionusa.com866-633-4660
USA
USA
MSN 2006 2 107
PC MULTIMEDIA P2125 D
Lea el capítulo Seguridad del manual de instrucciones antes de comenzar, y observe las detalladas indicaciones sobre el montaje y la conexión.
Instalación de componentes
Conexión de los periféricos
Al instalar su computadora, tienda los cables de forma que nadie pueda pisarlos ni tropezar con ellos.
Posicione el computadora y los periféricos para poder llegar cómodamente a las conexiones.
7. Cuando aparezca la pantalla de bienvenida de Windows, siga las indicaciones
para la configuración inicial. Los distintos
diálogos le irán indicando los pasos que
debe realizar.
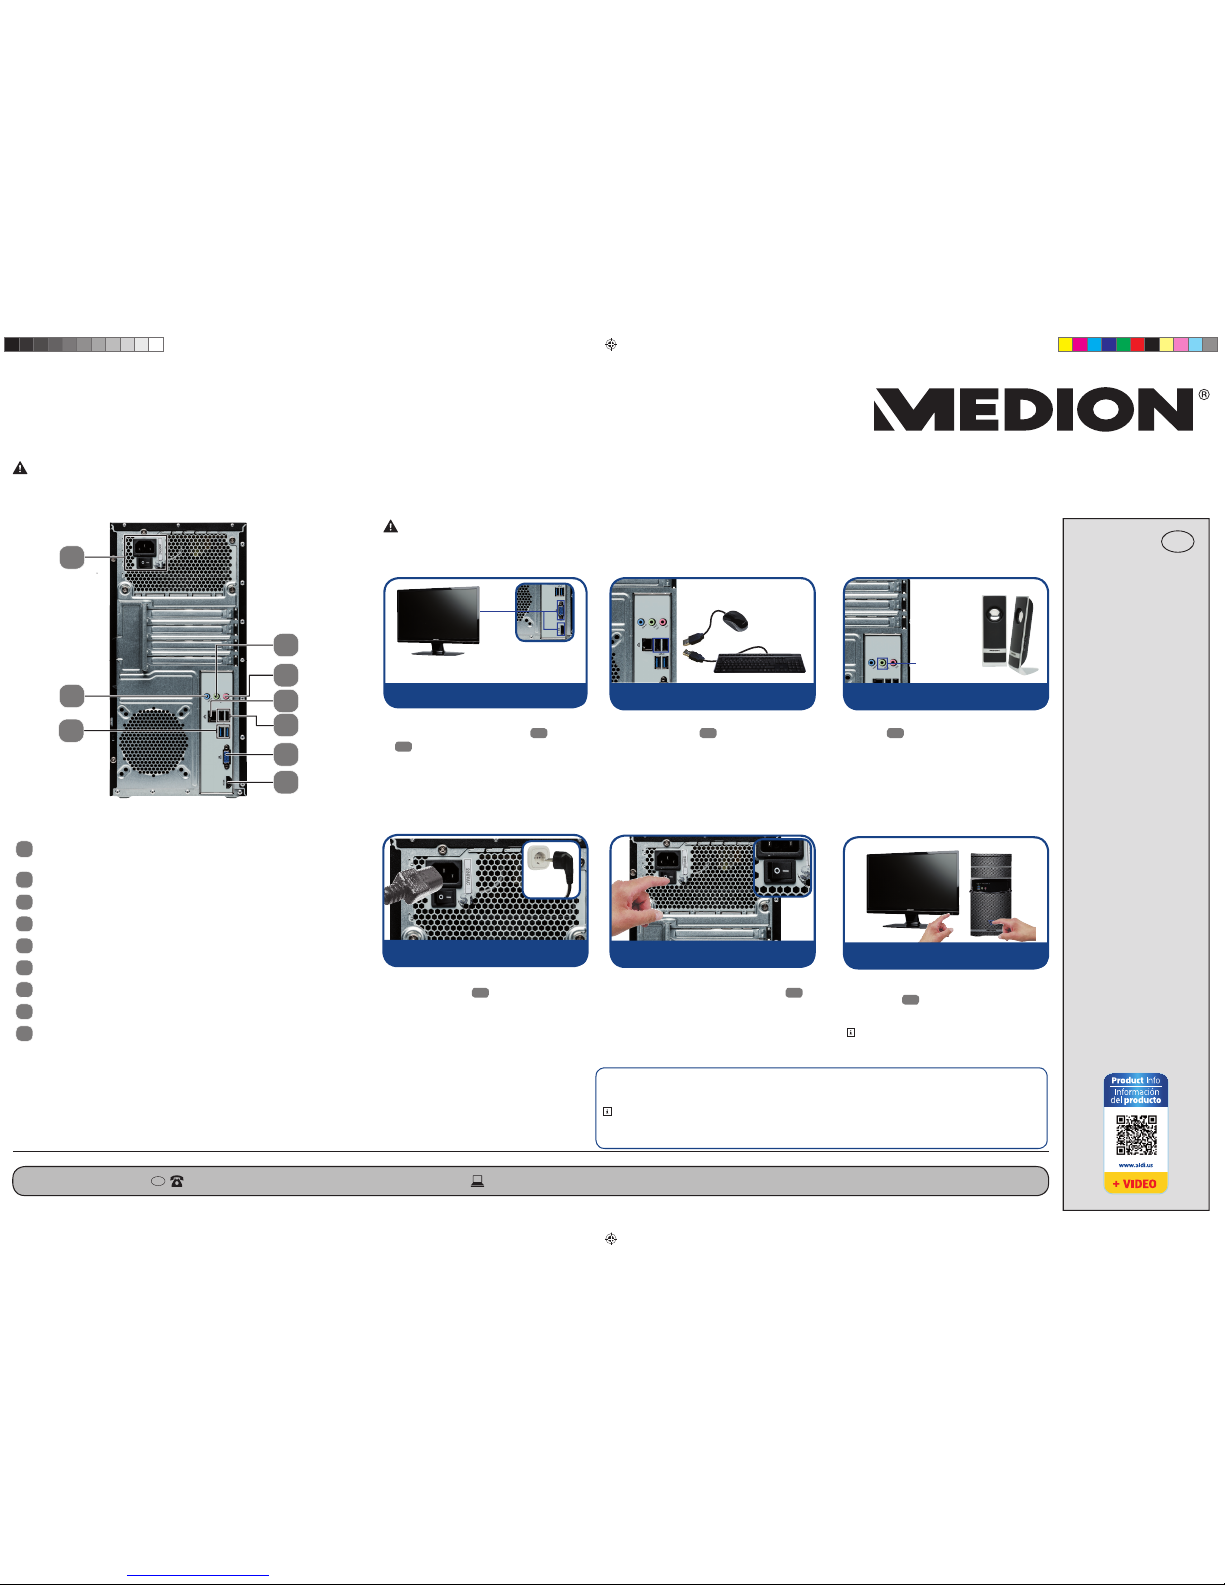
1. Puede conect ar el cable de señales de
su monitor a la conexión VGA
20
o HDMI
24
del computadora. (Lea también el
manual de instrucciones del monitor.)
2. Conecte el teclado y el ratón a uno de los
conectores USB 11 libres.
3. Conecte los altavoces a la salida de audio
verde 15.
Su computadora lleva instalado un software antivirus. Cuando el computadora se conecte a Internet, el software
se registrará automáticamente. El registro es gratuito y tendrá las actualizaciones gratuitas durante 30 días.
¡Nota! No instale otros antivirus, porque podría afectar al rendimiento del computadora.
Con la primera conexión en línea se actualiza automáticamente el sistema operativo y el software antivirus. El proceso dura normalmente unos
minutos. Durante ese tiempo, la velocidad de trabajo del ordenador se puede resentir, pero solo se notará en la primera puesta en funcionamiento.
4. Conecte el cable de conexión de red a la
conexión de red 5 del computadora
y luego a una toma de corriente. Dicha
toma de corriente debe estar cerca del
computadora y ser fácilmente accesible.
5. La fuente de alimentación de su computadora tiene un interruptor de red 5
con el que se suministra electricidad al
computadora. Coloque el interruptor en
la posición I. (En la posición O, se interrumpe la alimentación de corriente.)
6. Enc ienda el computadora pulsando brevemente el interruptor de encendido/
apagado
1
de la parte superior. Su
computadora se iniciará y pasará por di ferentes fase s.
¡Nota! En la unidad óptic a no debe haber ning ún disco
arrancable , ya que, de lo contra rio, el sistema oper ativo
no se cargará de sde el disco duro.
Conexión de la alimentación Puesta en marcha
Activación del software antivirus
Piezas del aparato*
5
Alimentación eléctrica
(conexión cable de red & interruptor de red)
9
Puertos USB 3.0
11
Puertos USB 2.0
14
Entrada de audio / Altavoz RS (rear out)*
15
Conexión auriculares / Altavoz FS (front out)*
16
Conexión micrófono / Altavoz CC/SS (center/subwoofer out)*
20
Conexión pantalla VGA
24
Puerto HDMI
27
Red LAN (RJ45)
* Conexiones c on doble asig nación (con figurac ión por sof tware)
5
11
15
16
27
20
24
14
9
Tecl ado
Ratón
2 Conectar teclado y ratón
4 Conectar cable de red
5 Encender interruptor de red
6 Encender monitor y PC
Altavoces
(no en el
volumen de
suministro)
Conexión a
los altavoces
3 Conectar altavoces
Monitor (no en el volumen de suministro)
Conexión al monitor (VGA o HDMI )
1 Conectar monitor
Modelo: MD 83 32 · Número del art ículo: 93606
Periodo de promoción:
06/2016
8332 EN-ES ALDI USA QSG MSN 2006 2107 final.indd 28332 EN-ES ALDI USA QSG MSN 2006 2107 final.indd 2 09.02.2016 13:14:4409.02.2016 13:14:44
 Loading...