

Page 1

Introduction 1
Congratulations on choosing to buy a Tevion® product. By doing so you now have
the assurance and peace of mind that comes with purchasing a product made by
one of Europe’s leading manufacturers.
All products brought to you by Tevion® are manufactured to the highest
standards of performance and safety, and, as part of our philosophy of customer
service and satisfaction, are backed by our comprehensive 3 Year Warranty.
Please fill in and return the Warranty Card to the address provided.
We hope you will enjoy using your purchase for many years to come.
Helpline No. UK/ North Ireland 0871 37 61 020 Rep. Ireland 1-800-992 508
Web Support www.medion.co.uk
Model Number: MD 30275
3
Page 2
Overview 2
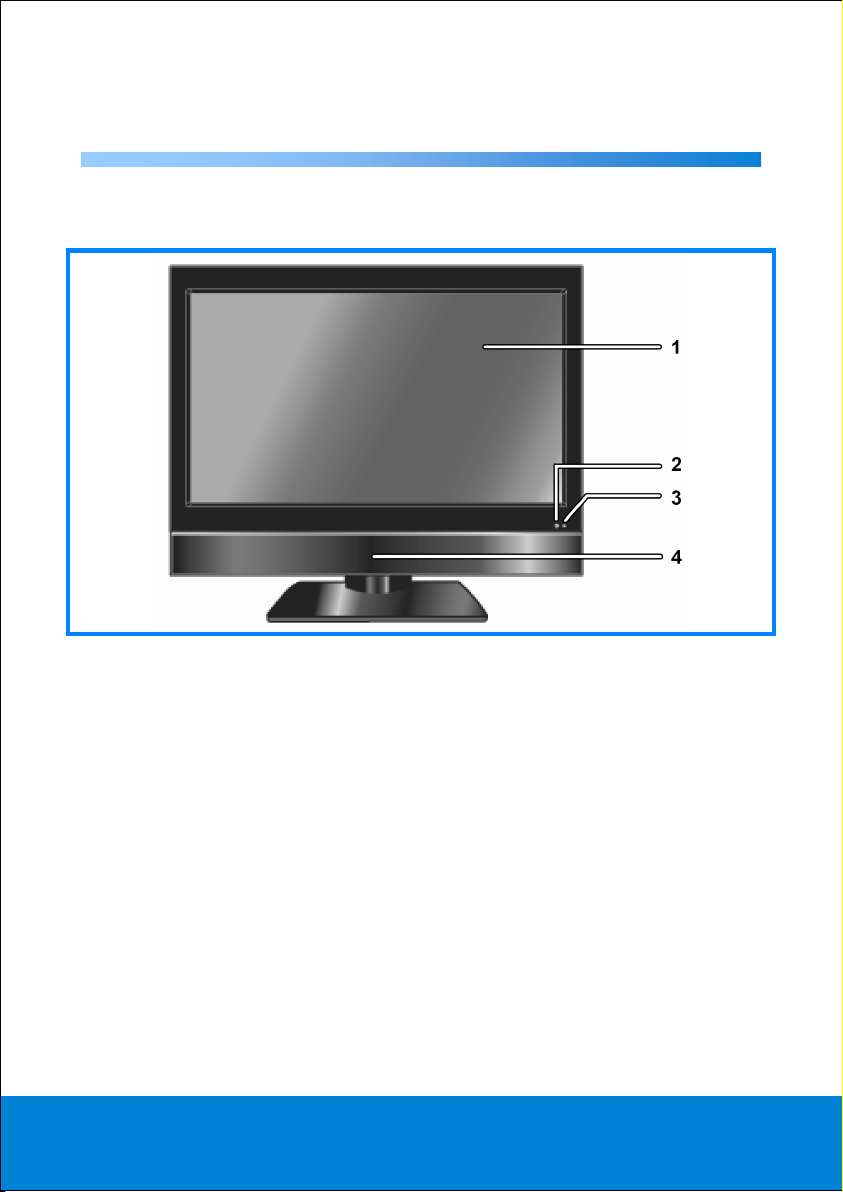
Front
1. Screen
2. Infra-red sensor: receiving area for infra-red signals from the remote control
3. On/off light: the red light will come on when the device is in stand-by mode.
It will turn blue when the device is switched on.
4. Loudspeakers
Helpline No. UK/ North Ireland 0871 37 61 020 Rep. Ireland 1-800-992 508
Web Support www.medion.co.uk
Model Number: MD 30275
4
Page 3
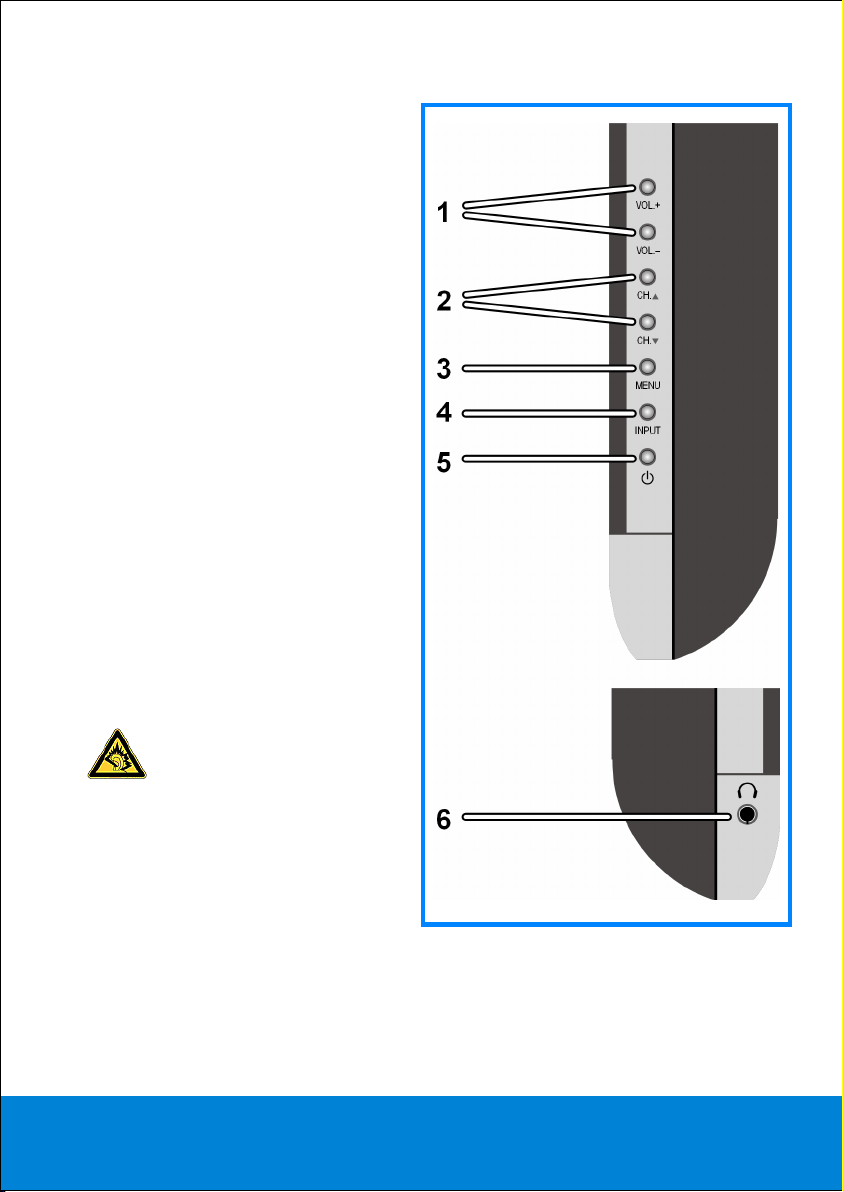
Sides
1.
VOL+/–
volume of your equipment with
these keys.
2.
CH
channel using these keys.
3.
MENU
display the screen menu to make
adjustments to your equipment.
4.
INPUT
DTV, TV (antennae), AV, SVideo, YPbPr, SCART, HDMI,
VGA.
5. STANDBY: to switch the LCD-TV off
temporarily.
6. Connect headphones or earphones
here with a 3.5 mm TRS stereo
connector to be able to hear the
sound from your device via this
connection. The main loudspeaker
will turn off.
: you can regulate the
: you can switch TV
: with this key you can
: to select the input signal:
Using this appliance at full
volume for extended periods
of time may cause damage
to the hearing capacity of
the listener.
Helpline No. UK/ North Ireland 0871 37 61 020 Rep. Ireland 1-800-992 508
Web Support www.medion.co.uk
Model Number: MD 30275
5
Page 4
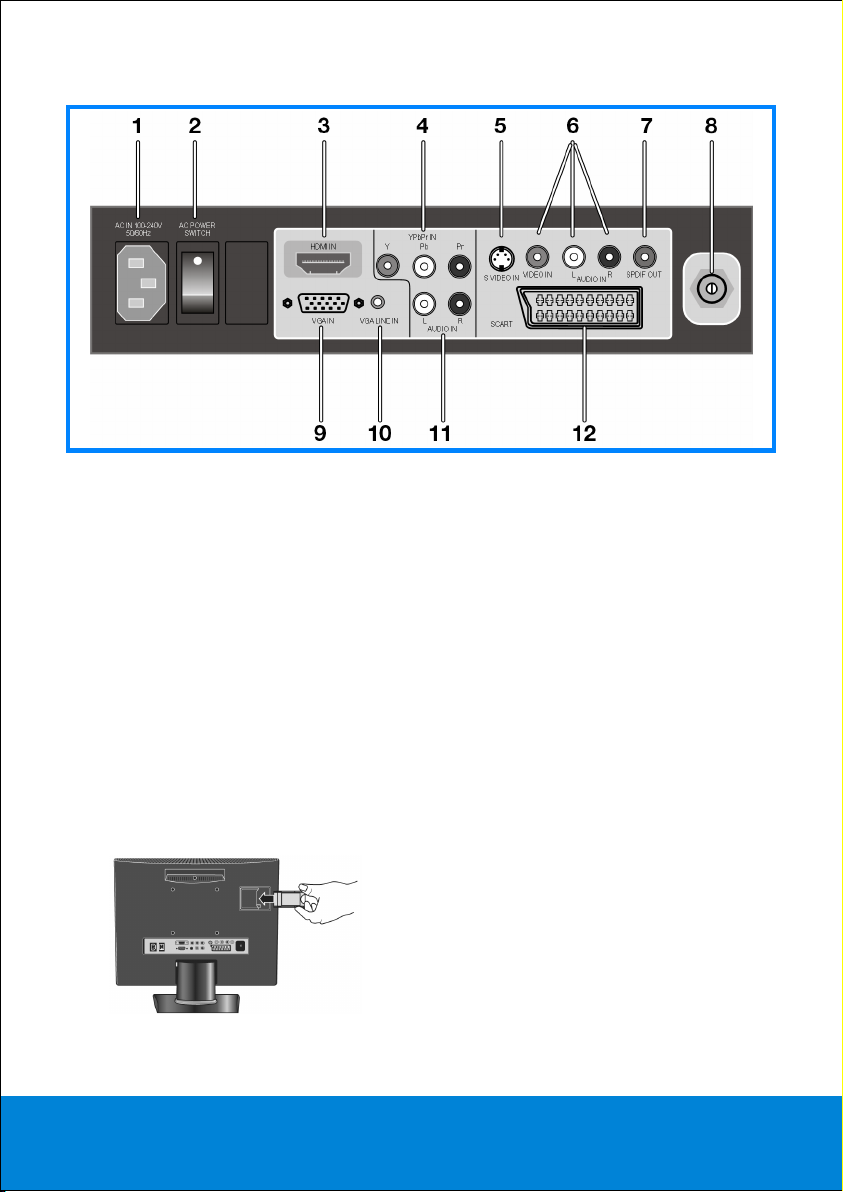
Rear
1.
AC IN
: to connect the supplied power cable.
2.
AC POWER SWITCH
again.
HDMI IN
3.
4.
Y - Pb – Pr IN
5. S-VIDEO IN: to connect a device using an S-VHS cable.
6. VIDEO IN/L–R AUDIO IN: VIDEO-input (yellow) and AUDIO-inputs (red/white):
to connect a device using an RCA cable.
7.
COAXIAL
8. Aerial: connection for co-axial aerial
VGA-INPUT
9.
10.
VGA LINE IN
L – R AUDIO IN
11.
SCART
12.
: to connect a device with a HDMI output.
: Component inputs: to connect devices with Component output.
: digital audio output (optical) to connect devices with optical audio input.
: to connect a PC.
: to connect an audio cable to the PC.
: SCART connection
For a detailed description of the connections, also see 43.
: to put the device into stand-by mode and switch it off
: Audio input: to connect devices with Audio output
Common Interface card slot. See page 25.
Helpline No. UK/ North Ireland 0871 37 61 020 Rep. Ireland 1-800-992 508
Web Support www.medion.co.uk
Model Number: MD 30275
6
Page 5
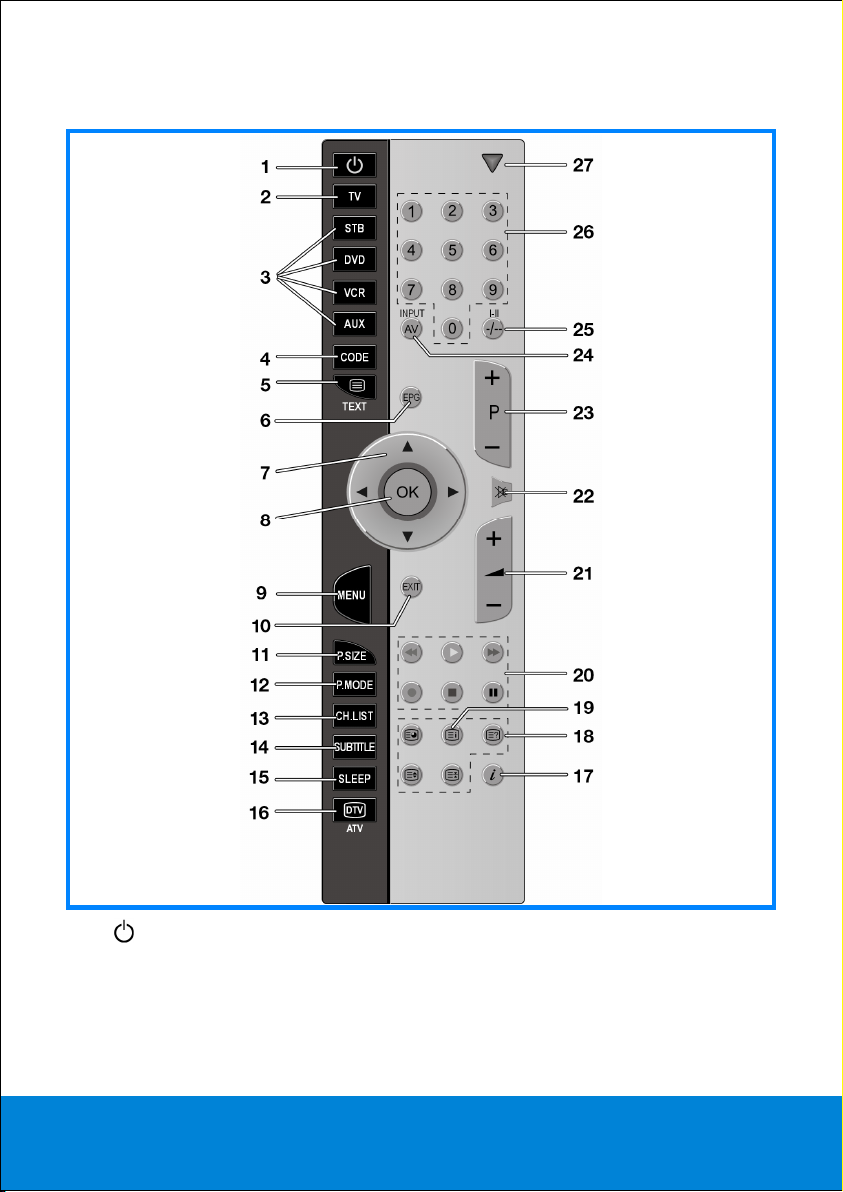
Remote control
1. (Standby): switch the LCD-TV off temporarily
2.
TV
: operate the LCD-TV MD 30275
STB, DVD, VCR, AUX
3.
function; see page 53)
: operate other devices (universal remote control
Helpline No. UK/ North Ireland 0871 37 61 020 Rep. Ireland 1-800-992 508
Web Support www.medion.co.uk
Model Number: MD 30275
7
Page 6

4.
CODE
page 53)
5.
EPG
6.
: directional keys
7.
8.
OK
MENU
9.
10.
EXIT
P.SIZE
11.
P.MODE
12.
13.
CH
SUBTITLE
14.
15.
SLEEP
DTV/ATV
16.
17.
i
18. Videotext function:
19. Show list of favourites; create favourites in the menu (see page 30)
:
20.
Coloured keys
Programme Edit
playback functions for playback devices (universal remote control function)
21.
22.
P+/–
23.
Select the following (+) or the previous (-) channel in TV mode.
Select the following (+) or the previous (-) page in videotext mode.
24.
I-II
-/--: enter channel number with two digits (universal remote control function; see
page 53)
INPUT/AV
25.
26. Digit keys in the TV mode: channel selection; in videotext mode: page selection
27. blue LED – confirms key press
: enter the code for other devices (universal remote control function; see
TEXT
: switch videotext on, transparent videotext; switch videotext off
: call up Electronic Programme Guide
: confirm channel selection or selection in certain menus; open channel list
: open and close menu
: close menu.
: select picture size setting
: select picture mode
.LIST
: open channel list (both analogue and digital channels)
: display subtitles or subtitle options
: press repeatedly to select a sleep time option
: select digital mode (DTV) or analogue mode (ATV)
(INFO): to display information, such as current channel number and name
: display time; open a sub-page (if availabe)
: call up index page
: hidden text
: double size
: stop page
: confirm a selection when the matching colour is offered (in
menu and videotext);
+/–
: to increase (+) or decrease (–) volume.
(Mute): Switch volume off
: Channel selection keys:
: select the sound mode
: select input signal from connected devices
Helpline No. UK/ North Ireland 0871 37 61 020 Rep. Ireland 1-800-992 508
Web Support www.medion.co.uk
Model Number: MD 30275
8
Page 7

General Information 3
Read these instructions carefully under all circumstance and follow all
the instructions listed. You will guarantee the reliable operation and a
long life expectancy of your LCD TV in this way. Always keep these
instructions at hand, close to your LCD TV. In the event that you
transfer ownership of this LCD TV, please provide these instructions to
the new owner.
Purpose of use
• This device serves to receive and transmit television channels. The different
connection possibilities will enable an additional expansion of the sources of
reception and transmission (Receiver, DVD-Player, DVD-Recorder, Video
Recorder etc.).
• This device is only suitable for using in dry, internal rooms.
• This device is not suitable as a data screen for office use.
• This device is intended for personal use only. It not intended for commercial
use in a heavy industry environment. Use under extreme environmental
conditions can result in damage to your device.
HD ready
Your LCD-TV is equipped with the 'HD ready' feature. This means that it can
display high resolution television programmes (HDTV) in principle.
It is the prerequisite that an HDTV signal is sent to the LCD TV by an external settop box (HD-STB).
Included in the box
Check that nothing is missing from the packaging and inform us of any missing
parts within 14 days after purchase. The delivery of the LCD-TV you have
purchased includes:
1. LCD-TV
2. Connection cable
3. Remote control incl. 2 batteries type R03 (AAA) 1,5V
4. Documentation
Helpline No. UK/ North Ireland 0871 37 61 020 Rep. Ireland 1-800-992 508
Web Support www.medion.co.uk
Model Number: MD 30275
9
Page 8

Safety 4
General
• Do not allow children to play unattended on electrical equipment. Children
may not always correctly recognize danger.
• Keep the packing materials, such as foil away from children. The danger of
suffocation could arise in the case of misuse.
• Never open the housing of the TFT display (electric shock, short-circuit and
the danger of fire)!
• Do not insert any objects through the slots and openings into the inside of the
TFT (electrical shock, short-circuit and the danger of fire)!
• The remote control has a class 1 infrared diode. Do not examine the LED with
optical instruments!
• Slots and openings in the TFT display are for ventilation purpose. Do not cover
these openings, as otherwise this may lead to overheating (overheating,
danger of fire)!
• Never exert pressure on the display. This could damage the display.
• An injury hazard exists when the display breaks. Wear protective gloves to
pack the broken parts and send them into your service center for proper
disposal. Then wash your hands with soap, because it is possible for chemicals
to escape.
• Do not touch the display with your fingers or with sharp objects to avoid
damage.
• Please proceed as outlined in the service center section:
– if the AC cable overheats or is damaged
– if liquid has gotten into the display
– if the device does not work properly
– if the device is dropped or the housing damaged
Helpline No. UK/ North Ireland 0871 37 61 020 Rep. Ireland 1-800-992 508
Web Support www.medion.co.uk
Model Number: MD 30275
10
Page 9

Point of use
• In the first hours of operation, new devices may emit a typical, unavoidable
but completely harmless smell, which will decline increasingly in the course of
time.
• We recommend you to ventilate the room regularly, in order to counteract the
formation of the smell.
• Keep your LCD TV and all units connected to it away from moisture and avoid
dust, heat and direct sunlight. Failure to observe these instructions can lead to
malfunctions or damage to the LCD TV.
• Do not operate your device in the open air, because external influences, such
as rain, snow, etc. could damage the device.
• Do not subject the device to drops or splashes of water and do not place any
vessels filled with water, such as vases, on the device. Water penetrating the
device can impair its electrical safety.
• Do not place any open sources of fire (candles or similar objects) on the
device.
• Leave sufficiently large clearances to allow for ventilation, particularly when
mounting in a cupboard or alcove. Maintain a minimum clearance of 10 cm
around the device for sufficient ventilation.
• Place and operate all units on a stable, level and vibration-free surface in order
to avoid the LCD TV from falling.
• Avoid dazzle, reflections, extreme light/dark contrast in order to save your
eyes and ensure a pleasant viewing experience.
• The optimum viewing distance is 5 times the screen diagonal.
Repair
• Leave all repairs of your LCD TV to authorized and qualified personnel only.
• Should a repair be necessary, please contact one of our authorized service
center.
Helpline No. UK/ North Ireland 0871 37 61 020 Rep. Ireland 1-800-992 508
Web Support www.medion.co.uk
Model Number: MD 30275
11
Page 10

Intended Environment
• The device can be operated at an ambient temperature of between 5 °C to 35
°C and at a relative humidity between 20 % and 85 % (without condensation).
• When switched off, the LCD-TV can be stored most reliably between -20 °C -
+60 °C).
• Provide an interval of at least one meter from high-frequency and magnetic
sources of interference (television sets, loudspeakers, mobile telephones, etc.)
in order to avoid malfunctions.
• After transporting your LCD TV please wait until it has assumed the ambient
temperature before connecting and switching it on.
• Large variations in temperature and humidity can cause condensation to
occur inside the LCD-TV, which may cause an electrical short circuit.
• Disconnect the power plug from the power socket and the aerial from the
aerial connection during storms or if the device is not being used for a long
time.
Power Supply
Please pay attention: Parts of the device are still live, even if the
mains switch is switched off. Pull the mains plug out of the
socket, to interrupt the power supply to your LCD TV completely.
• Operate your TFT display mains (power supply) only on grounded sockets
with 230 V ~ 50 Hz. If you have doubts about the power supply in the location
where the LCD-TV is installed, consult your energy supplier.
• For additional safety we recommend use of an excessive voltage protection
device to protect your LCD TV from damage resulting from voltage surges or
lightning.
• The power socket must be in the vicinity of your LCD TV and within reach of
the power cables.
• If you use an extension cable, please ensure that it complies with the VDE
requirements. If necessary consult your electrical equipment supplier.
• You should lay the TFT Display cables in a manner that no one can trip or step
on it.
• To avoid damage of cable do not place any objects or furniture on the cable.
Helpline No. UK/ North Ireland 0871 37 61 020 Rep. Ireland 1-800-992 508
Web Support www.medion.co.uk
Model Number: MD 30275
12
Page 11

Standards/electro-magnetic compatibility
Your display fulfils the requirements for electro-magnetic compatibility and
electrical safety specified in the following standards:
Standards/electro-magnetic compatibility
EN 55013 Limit values and measuring methods for radio interference
by radios and television receivers and accessories
EN 55020 Electromagnetic immunity of broadcast receivers and
associated equipment
EN 60065 Audio, video and similar electronic apparatus—Safety
requirements
EN 61000-3-2 Electromagnetic compatibility (EMC)—Part 3-2:Limits—
Limits for harmonic current emissions (equipment input
current up to and including 16 A per phase)
EN 61000-3-3 Electromagnetic compatibility (EMC)—Part 3-3:Limits—
Limitation of voltage changes, voltage fluctuations and
flicker in public low-voltage supply systems, for
equipment with rated current <= 16 A per phase and not
subject to conditional connection
Helpline No. UK/ North Ireland 0871 37 61 020 Rep. Ireland 1-800-992 508
Web Support www.medion.co.uk
Model Number: MD 30275
13
Page 12

Batteries and Proper Treatment
Batteries may contain combustible materials. By misuse, this may cause battery
leakage, heat, explosion or ignition, bringing about injury or damage to the
device.
Please observe strictly the following matters:
• Keep children away from batteries. If by any chance, the batteries are
swallowed, consult a doctor immediately.
• Do not charge batteries (except rechargeable batteries).
• Do not forcibly discharge batteries.
• Do not short-circuit batteries.
• Do not heat or dispose off in fire.
• Do not disassemble or deform batteries. Your hands and fingers may be
injured, or the liquid of the battery may get into your eyes or adhere to your
skin. If this happens, rinse with a large quantity of water immediately and
consult a doctor.
• Do not expose batteries to strong impact by dropping or throwing the
batteries.
• Do not reverse the positive (+) and negative (-) terminals to avoid short-circuit.
• Do not mix used and new or different types of batteries together.
• Remove promptly the used batteries from the device.
• Remove the batteries from your device if it is not to be used for a longer
period.
• Clean the battery and device contacts, if necessary, before inserting batteries.
• Replace all batteries with new batteries of the same type at the same time.
Helpline No. UK/ North Ireland 0871 37 61 020 Rep. Ireland 1-800-992 508
Web Support www.medion.co.uk
Model Number: MD 30275
14
Page 13

Setting up the LCD-TV 5
NOTE:
Read the Safety Information Chapter under all circumstances before
bringing the device into operation.
Unpacking
1. Have someone help you when unpacking the equipment.
2. Do not carry the equipment alone, otherwise it could fall or cause personal
injury.
3. Open the box very carefully to prevent the equipment from being damaged.
Damage can occur if a knife with a long blade is used to open the box.
4. There are various small parts in the packaging (batteries, screws, etc.). Keep
these out of the reach of children. There is a risk of swallowing the parts.
5. Please keep the packaging material well and use it exclusively to transport
the television.
How to install the stand
1. Cover an even stable surface with a soft cloth. Place the LCD TV unit facedown on the cloth. Fit the stand onto the bottom of the LCD TV unit as
shown.
2. Then push until stand into the LCD TV’s stand socket.
Helpline No. UK/ North Ireland 0871 37 61 020 Rep. Ireland 1-800-992 508
Web Support www.medion.co.uk
Model Number: MD 30275
15
Page 14
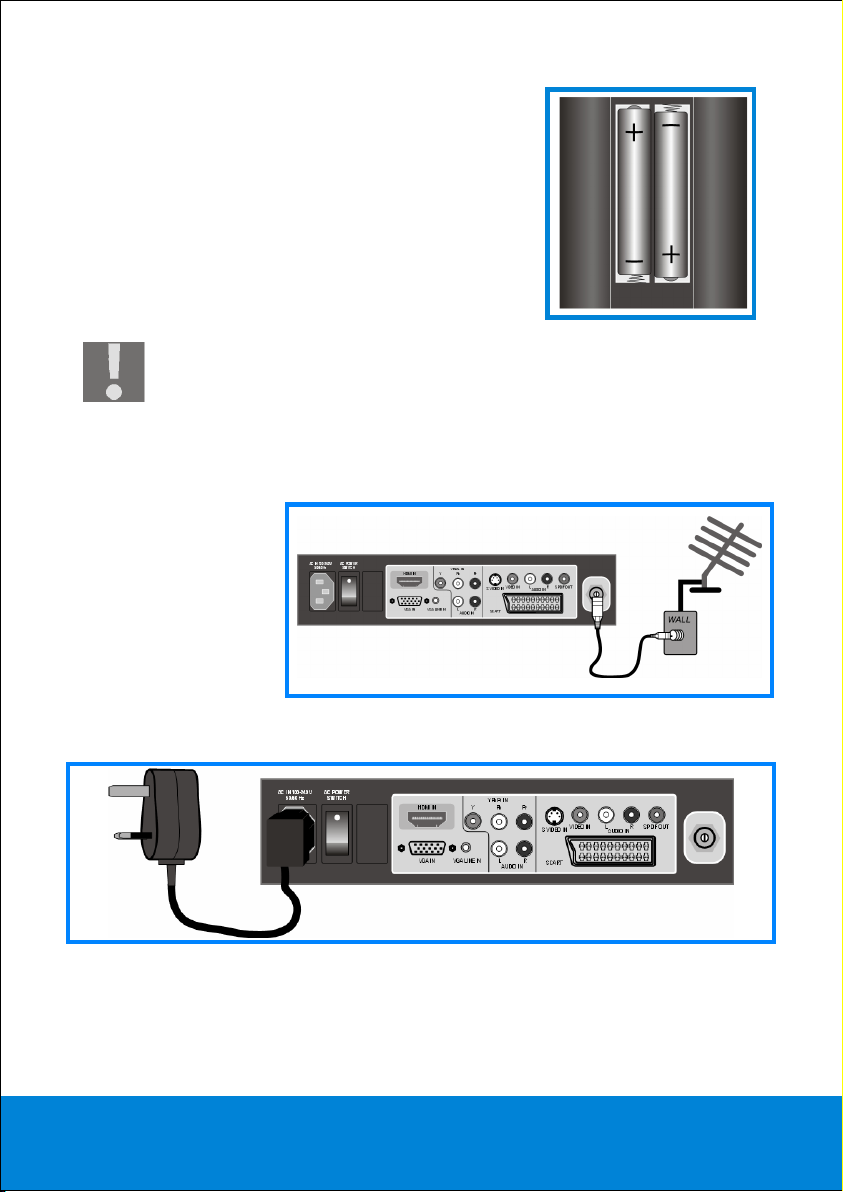
Putting the batteries into the remote control
1. Remove the small cover on the battery
compartment on the back of the remote control.
2. Install two AAA size, type R03 batteries according
to the correct polarity (marked in the battery
compartment).
3. Close the battery compartment.
ATTENTION!
Remove the batteries from the remote if the device will not be used for
a longer period. The remote could be damaged by leaking batteries.
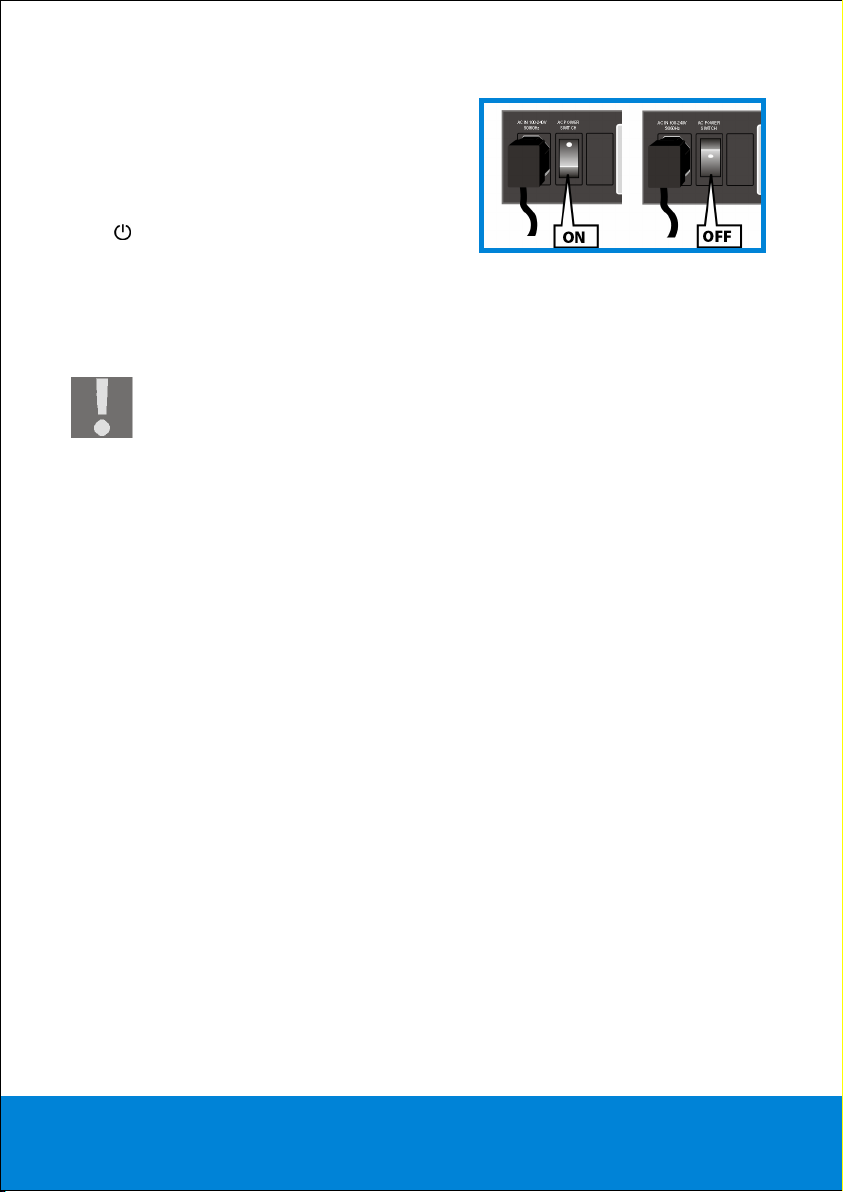
Connecting an antenna
Connect the aerial
connection and the
LCD-TV by means of a
double screened aerial
cable (not supplied)
when connecting the
device to the room
aerial or cable system.
Connecting the power supply
Insert the plug of the supplied power cable into the connecting bush
(220-240 V ~ 50 Hz) on the device and insert the other end into an easily
accessible 230 V ~ 50 Hz power socket.
Helpline No. UK/ North Ireland 0871 37 61 020 Rep. Ireland 1-800-992 508
Web Support www.medion.co.uk
Model Number: MD 30275
16
Page 15
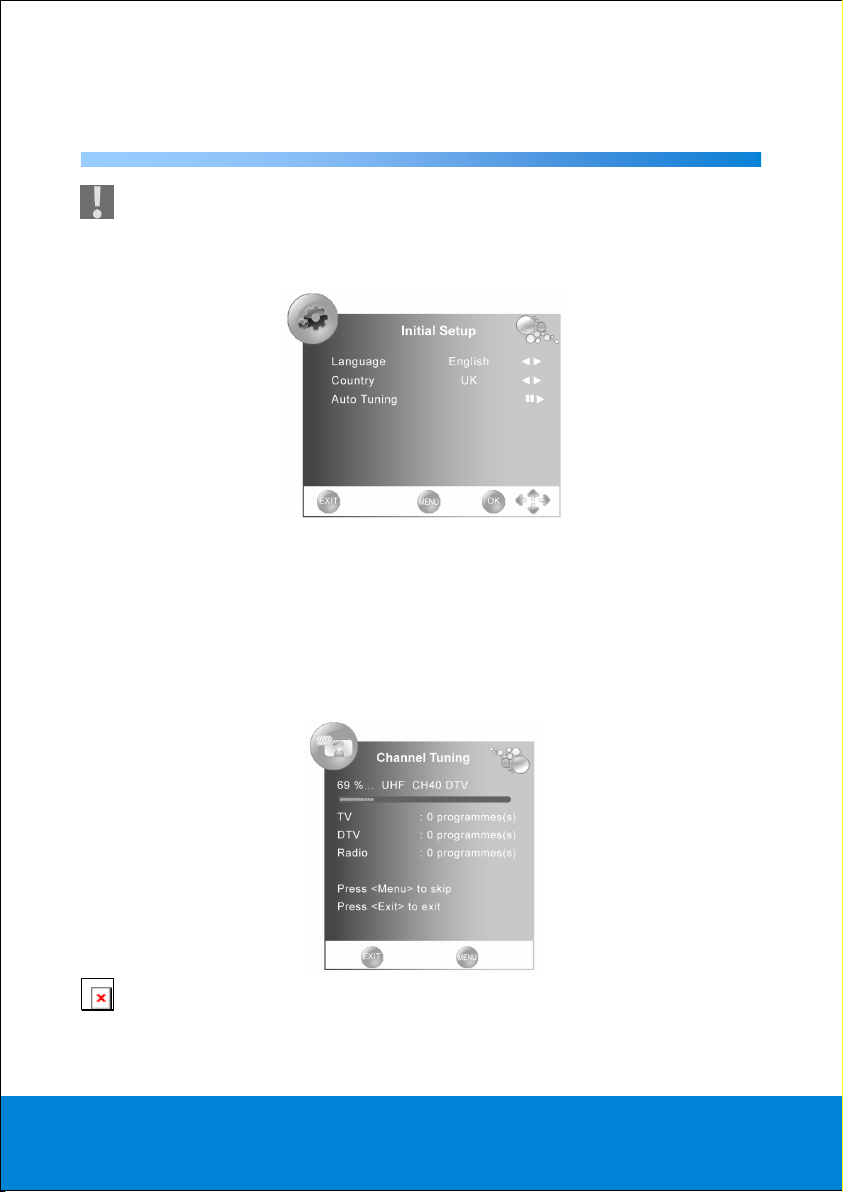
Turning the LCD TV on and off
1. Press the on/off switch on the back of the
device. The stand-by mode will be
activated and a red light on the front will
come on.
2. You can switch on the device by pressing
on the remote or on the device itself.
The light on the front will turn blue.
3. You can put the device back into stand-by mode with the same keys.
4. Press the on/off switch on the back of the device again to switch the device
off completely.
ATTENTION!
To completely disconnect the main voltage, please remove the power
plug from the socket.
Helpline No. UK/ North Ireland 0871 37 61 020 Rep. Ireland 1-800-992 508
Web Support www.medion.co.uk
Model Number: MD 30275
17
Page 16
First Time Installation 6
If the universal remote control should seem not to work, press the TV key
to make sure you operate your LCD-TV MD 30275.
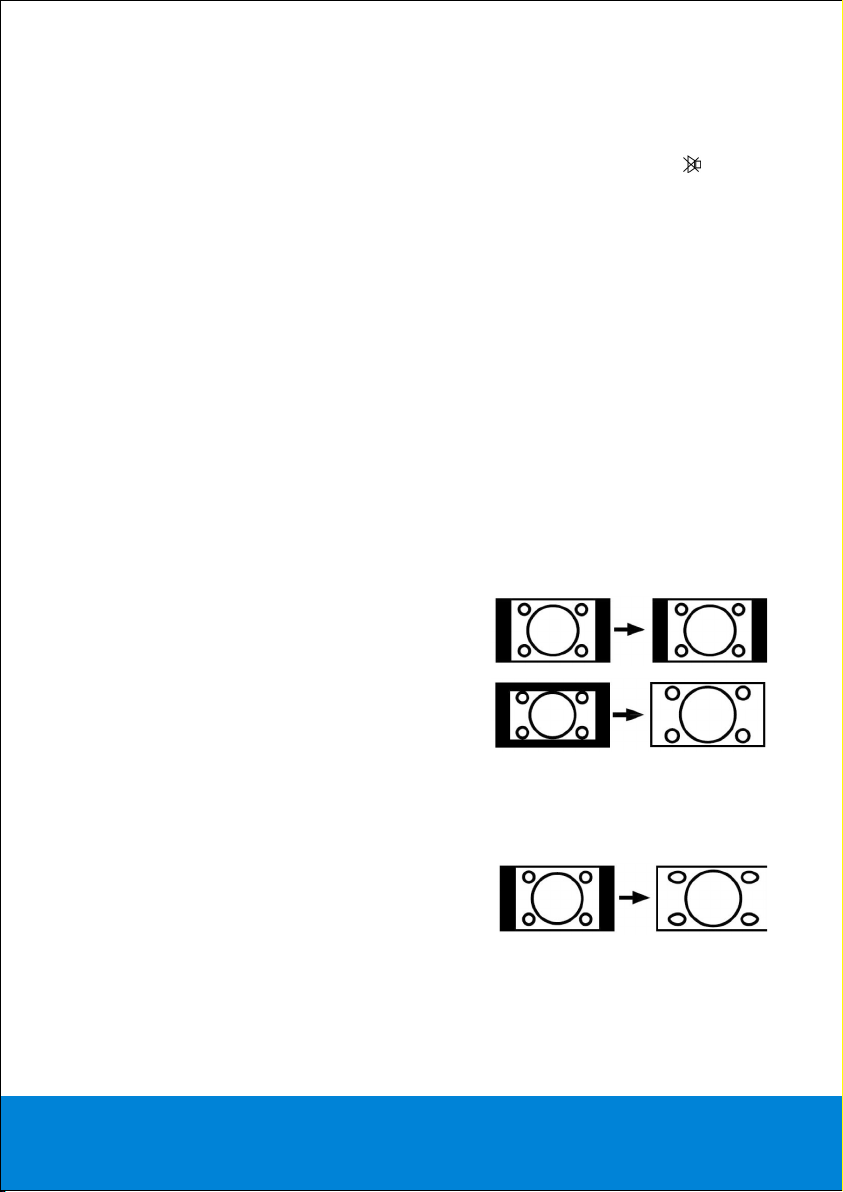
The
Initial Setup Menu will appear when you switch your device on for the
first time. You will be requested to select the language and country required.
You will be able to move upwards or downwards in the Menu by means of
the
directional keys.
Select the language of the OSD with the
Select the country in which you will operate the TV with the
Auto Tuning and press
Select
In the following menu, select
OK
to start the channel search and create a list of receivable channels.
OK
YES with the _` directional keys and confirm with
_` directional keys.
_` directional keys.
or the ` directional key to start the process.
Do not press any key during the process. If you want to interrupt the
memorization process, press
Helpline No. UK/ North Ireland 0871 37 61 020 Rep. Ireland 1-800-992 508
Web Support www.medion.co.uk
Model Number: MD 30275
EXIT
.
18
Page 17

Basic Functions 7
Switching between DVBT and analogue reception /
Select external device
You will be able to switch between terrestrial digital reception and analogue
reception at any time, while a television programme is being displayed, by the
DTV/ATV
Press
directional keys.
•
•
•
•
•
•
•
•
Channel Search
You can select a channel by pressing the
the device or by selecting the channel directly using a digit key.
key.
INPUT AV
DTV
: TV function (aerial signal) – digital repeption
TV
: TV function (aerial signal) – analogue reception
Video 1(AV)
Video 2 (S-Video)
Video 3 (YpbPr)
Video 4 (SCART)
Video 5 (HDMI)
Computer (VGA)
to open the Input Source Menu and select a source with the
: device on yellow/white/red RCA inputs
: device on S-Video connection
: device on Component video and audio inputs
: device on SCART input
: device on HDMI input
: computer on PC input
CH+/–
key on the remote control or on
Channel list
Open the channel list by pressing the
and the analogue channels (
open the list.
You can select a channel with
Press
EXIT
to close the channel list.
Helpline No. UK/ North Ireland 0871 37 61 020 Rep. Ireland 1-800-992 508
Web Support www.medion.co.uk
Model Number: MD 30275
TV
and
CH.LIST
) will be displayed, no matter in which mode you
key. The digital channels (DTV)
OK
.
19
Page 18
Sound Settings
You can increase or decrease the volume with the volume keys
remote control or on the device.
You can switch off the sound completely and switch it on again with the
(mute).
You can choose the loudspeakers (left or right) with the
I-II
broadcast supports the DUAL mode (e.g. with bilingual broadcasts), you can also
choose the. Audio Language.
+/–
on the
key
key. If the current
Picture Settings
With the
Dynamic.
The function is identical with the sub-menu
menu. The setting “User” can be defined in menu; see page 32.
Picture Mode
Press on the
Auto
4:3
4:3-format.
P.MODE
key, you can select the picture mode: Standard, Mild, User,
P.SIZE
key to switch between the following picture formats.
: for undistorted display of the picture in
Picture Mode in the PICTURE
The transmitted format is
automatically set to the input
signal.
• 16:9: a picture in 16:9-format will be
expanded to full screen size.
• Zoom 1
Enlarged picture
•
Zoom 2
Twice enlarged picture
•
Panorama: the picture is stretched on
the left and right sides to fill up the
screen. In this case the upper and/or
lower edges are somewhat cut off.
The function is identical with the sub-menu Aspect Ratio in the PICTURE
menu.
Helpline No. UK/ North Ireland 0871 37 61 020 Rep. Ireland 1-800-992 508
Web Support www.medion.co.uk
Model Number: MD 30275
20
Page 19

Having information displayed
Press the i (INFO) key. The information box will inform you about:
• The channel number
• Analogue or digital reception (TV / DTV)
• The channel name
• In the case of analogue reception (TV): Colour system (e. g. PAL), sound system
(e. g. BG), sound setting (stereo, mono)
• In the case of digital reception (DTV): Information about the programme
showing.
i
Press the
You will obtain the same information when switching to a different programme.
To display the time TV mode, press
(INFO) key again to close the information display.
.
Electronic Programme Guide
In DTV mode (digital reception), the LCD TV offers an electronic programme
guide.
Press the
You will find a table with tuned in stations on the left side and current
programmes on the right side. You can browse through the table with the
directional keys
To get more Information on one programme, select it and press
To highlight the current date, press the
another day’s programme.
To close the table, press
If you press
EPG
key to open the programme guide.
.
i
(INFO).
yellow
EXIT
.
OK
, you will move back to the station column on the left.
Please note that the contents of the table and of the info boxes depend on
the broadcasting stations.
key. You can now switch to
Sleep Timer
Press
SLEEP
automatically: 10, 20, 30, 60, 90, 120, 180 or 240 minutes. In the last minute, a
count down menu will appear.
Select
The function is identical with the sub-menu
Helpline No. UK/ North Ireland 0871 37 61 020 Rep. Ireland 1-800-992 508
Web Support www.medion.co.uk
Model Number: MD 30275
repeatedly to select a time after which the LCD TV will turn off
Off
to switch the function off.
Sleep Timer in the TIME menu.
21
Page 20

SUBTITLE
During digital reception (DTV mode), press
offering subtitle languages (if available).
The presetting of the subtitle language is set in the sub-menu
Language in the OPTION menu.
During analogue reception (ATV), press
current programme if available.
Please note that the availability of subtitles depends on the broadcasting
stations.
SUBTITLE
SUBTITLE
to open a subtitle menu
Subtitle
to show the subtitles to the
Helpline No. UK/ North Ireland 0871 37 61 020 Rep. Ireland 1-800-992 508
Web Support www.medion.co.uk
Model Number: MD 30275
22
Page 21
Videotext 8
Videotext is a free service that is broadcast by the majority of television stations
and offers current information in relation to news, the weather, television
programmes, share prices, subtitles and other subjects..
Switch videotext on and off
Select a TV station on which videotext is being transmitted.
Press the
Press the
in the background).
By pressing the
Select videotext pages
Number keys
Enter the videotext page required directly as three-digit number with the number
keys.
The page number selected will be displayed in the upper left corner of the screen.
The videotext counter will search until the page number selected has been found.
Channel selection keys
You can scroll forwards and backwards through the videotext pages with the
channel selection keys.
key to display the basic/index page of the videotext.
key again to display videotext transparently (the TV picture is visible
key again, you will switch over again to TV mode.
Index key
Page 100 is usually the entrance page for the TV station videotext (index page).
Press the index key
contents.
to select the index page that displays the list of Teletext
Colour keys
If text is displayed in colour at the bottom of the screen, you can select the
associated content immediately by pressing the matching
blue
or
green
key.
Helpline No. UK/ North Ireland 0871 37 61 020 Rep. Ireland 1-800-992 508
Web Support www.medion.co.uk
Model Number: MD 30275
red
,
yellow
,
23
Page 22
More functions
Double the size of the page
This function displays the videotext information doubled in size.
Press the
Press the
Pressing the
Sub-pages
Some video text pages contain sub-pages. For example, 1/3 will be displayed on
the screen. The sub-pages will be faded in successively at intervals of approx. 30
seconds.
You will also be able to call up the sub-pages yourself by pressing the
four-digit entry field, into which you will be able to enter the number of a subpage (e.g. 0002), will appear. You can scroll through the sub-pages with the
directional keys
STOP
The videotext page that you have selected may contain more information than
will fit on the screen. In this case the information will be sub-divided across
several sub-pages. The sub-pages will be scrolled through with regular pauses in
between.
Press the
STOP symbol will be displayed in the top left corner of the screen and the
automatic switching over of pages will be interrupted.
Press the
key to enlarge the upper half of the page.
key again to display the lower half of the page enlarged.
key again will return the videotext to its normal size.
.
STOP
key to prevent pages from changing automatically. The
STOP
key again to resume automatic changing of pages.
key. A
Display hidden text
You can display hidden information, such as solutions to riddles, puzzles or
quizzes, by pressing the
If you press the
Helpline No. UK/ North Ireland 0871 37 61 020 Rep. Ireland 1-800-992 508
Web Support www.medion.co.uk
Model Number: MD 30275
key again, the answers will be hidden again.
key once.
24
Page 23
Common interface 9
You will have to register with a corresponding provider in advance if you wish to
view channels with a fee.
You will receive a Conditional Access Module (CAM Module) and a special card
from your provider after the registration.
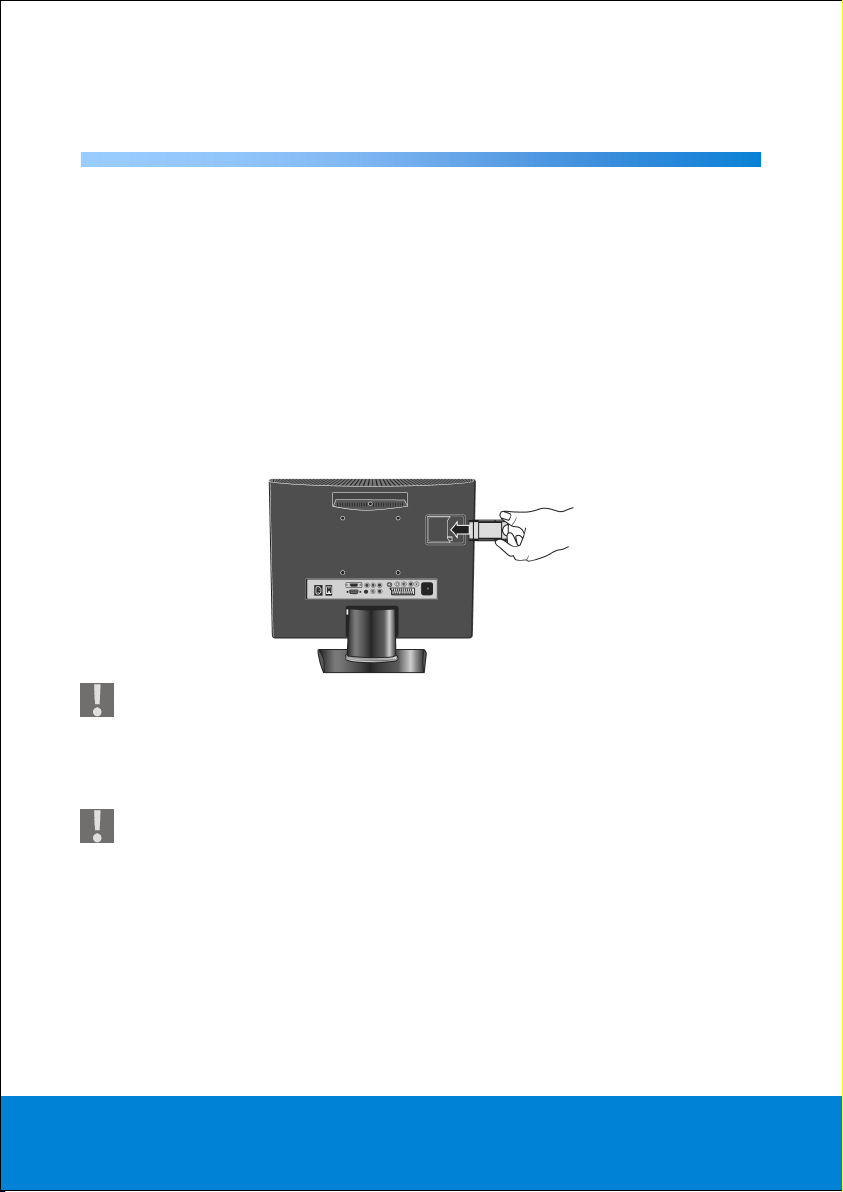
How to install the CAM Module and the card
Install the CAM Module and the card in your television device in the following
way:
Switch the television device off and pull out the mains plug.
First, insert the CAM Module into the socket behind the connection cover on the
left of the television device (observed from the front). Then, insert the card.
The CAM Module must be inserted correctly the right way up; it cannot be
pushed in the wrong way up. The CAM Module or the television device can
be damaged if you attempt to push in the CAM Module with force.
Connect the television device to the power supply, switch it on and wait for a
moment, until the card is recognized.
Pay attention to the fact that you must only insert or remove the CI Module
if the device is in the STANDBY Mode or is SWITCHED OFF.
To remove the card, simply pull it out of the slot.
Helpline No. UK/ North Ireland 0871 37 61 020 Rep. Ireland 1-800-992 508
Web Support www.medion.co.uk
Model Number: MD 30275
25
Page 24
The OSD Menu 10
You can set certain parameters on the LCD-TV using the OSD menu (On Screen
Display).
Navigating within the Menu
1. Press the
2. Select the a menu from the main menu with the directional keys
3. Select the options from a menu with the directional keys
4. When
5. A sub-menu is available when
6. Go back to the menu above with the menu key
7. Set the required value or enter another selection with directional keys
8. Close the menu with the menu key
selection at the same time.
MENU
key to activate the OSD.
.
.
appears, select an option with the directional keys.
appears. Open it with OK or .
MENU
.
.
MENU
The menu will close automatically after approx. 10, 15, 30 or 60 seconds if
no key is pressed (setting
ATTENTION:
The menus described here may vary from the menus on your screen
because of possible technical modifications.
OSD Time Out in menu OPTION).
or with
EXIT
and confirm the
Helpline No. UK/ North Ireland 0871 37 61 020 Rep. Ireland 1-800-992 508
Web Support www.medion.co.uk
Model Number: MD 30275
26
Page 25
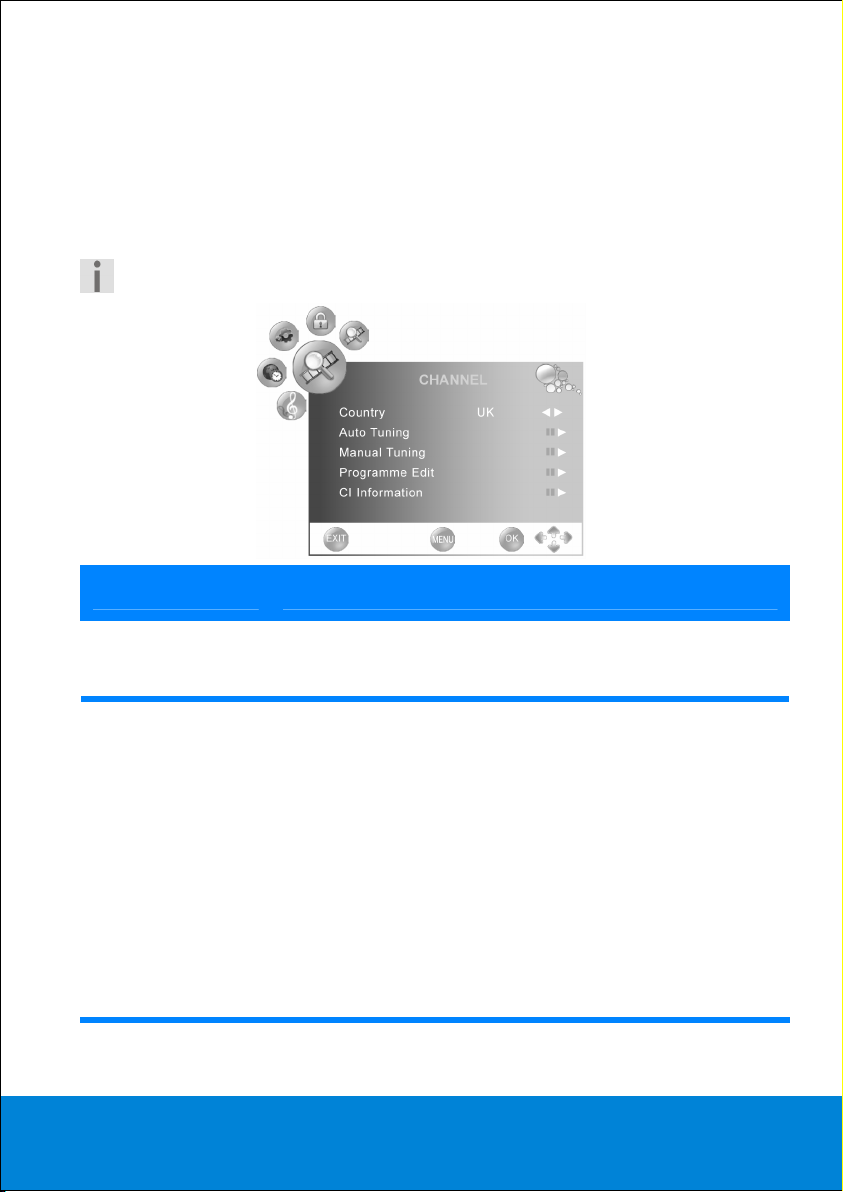
Menu CHANNEL
Under normal circumstances, the automatic channel seek function looks for the
available channels and these are automatically stored on the channel locations in
the order they are found. You can reorder the channel locations in the channel.
The
CHANNEL menu allows you to search for individual channels manually and
to store them as well as to adjust the picture to the optimum setting.
If the
Lock System in the LOCK menu is set to On, you will have to
enter the password to enter the menu or its sub-menus.
Menu point Settings
Country
Select the country in which you will operate the TV with the
_` directional keys.
Auto Tuning
Helpline No. UK/ North Ireland 0871 37 61 020 Rep. Ireland 1-800-992 508
Web Support www.medion.co.uk
Model Number: MD 30275
Press OK or the ` directional key to open a sub-menu.
Select the group of channels you want to find:
DTV: Digital channels;
ATV: Analogue channels;
DTV+ATV: Both channel groups.
Auto Tuning and press
Select
OK
or `, and confirm Yes
in the following menu to start the channel search and
create a list of receivable channels. The message “All of
service-information will be updated” informs you that the
channels received so far will be deleted.
In case the
Lock System is set to On, you will also have
to enter the password (see page 39).
27
Page 26

Menu point Settings
Manual Tuning
Here you can search channels manually.
Open the sub-menu with
OK
or .
You will see information about the current channel and at
the same time will be able to change the settings. There are
two different menus depending on the type of channel you
search:
TV (analogue) or
DTV
(digital).
• See the following sections for the sub-menus TV and
DTV
.
Programme
Edit
CI Information
Open the channel list in the sub-menu Channel List.
Information about the connected Common Interface
module (see page 25).
Save video recorder manually
The manual search function can, for example, be used to set a video recorder on
the LCD-TV.
Once the LCD-TV and the video recorder are connected via the aerial, you should
tune your video recorder to the test signal.
• Perform the manual search action on the LCD-TV.
Once the test signal has been found, store the test signal under one channel
number.
• Remember not to store a TV channel on this channel location.
Helpline No. UK/ North Ireland 0871 37 61 020 Rep. Ireland 1-800-992 508
Web Support www.medion.co.uk
Model Number: MD 30275
28
Page 27
Sub-menu MANUAL TUNING, setting TV
Menu point Settings
Current CH
System
Search
Fine-Tune
Store
Frequency
The current channel number. You can assign another
location to the channel.. Remember that when you save a
channel under a different number that location will be
written over.
The TV system: The country specific TV system (video
standard):
DK (countries in Eastern Europe).
BG (West Europe), I (Great Britain), L (France) or
Although this TV system really is a sound system, choosing
an incorrect standard can also result in an incorrect picture.
Start a search up or down with the directional keys .
The search will be interrupted with every programme that
is found. .
To further adjust the channel frequency.
Store the channel by pressing the OK key. OK will then be
displayed.
The current MHz value of the channel.
Helpline No. UK/ North Ireland 0871 37 61 020 Rep. Ireland 1-800-992 508
Web Support www.medion.co.uk
Model Number: MD 30275
29
Page 28

Sub-menu MANUAL TUNING, setting DTV
Menu point Settings
UHF CH
DTV
Select the entry UHF CH with , then select a channel
with
, then press
selected channel.
DTV will search through the UHF channels 21 to 68 and for
terrestrial digital TV channels automatically.
The number of found stations will be displayed.
Bad – Normal – Good: Reception quality..
OK
to start the search on the
Sub-menu PROGRAMME EDIT
The list of digital channels (DTV) and analogue channels (TV) currently received.
You can edit the list here.
Menu point Settings
Delete
Rename
Press the
second time to delete it. The following channels will be
renumbered.
Only possible for analogue channels (mode TV).
Press the
The first letter of the current channel name will be
highlighted.
Select a different sign (letter, symbol or number) with the
red key
green key
one time to select the channel and a
to start the renaming process.
keys.
Move to the next letter with
At the end, press the
renaming process.
green key
` and proceed as described.
again to finish the
Helpline No. UK/ North Ireland 0871 37 61 020 Rep. Ireland 1-800-992 508
Web Support www.medion.co.uk
Model Number: MD 30275
30
Page 29
Menu point Settings
Move
Skip
Fav
Press the
yellow key
one time to select the channel.
Then move the channel to another place with the
directional keys
.
Press the yellow key again to finish.
The following channels will be renumbered.
Press the
blue key
one time to select the channel for
being skipped. A “SKIP” sign appears after the channel
name.
The channel will be skipped when using the channel keys.
However, it can be opened using the digit keys.
Create Favourites. Press the to select a channel for the
list of favourite channels. A heart symbol appears after the
channel name.
Press the key again to delete the channel from the list.
When this menu is closed, you can open the
by pressing the key.
List
Favorite
Helpline No. UK/ North Ireland 0871 37 61 020 Rep. Ireland 1-800-992 508
Web Support www.medion.co.uk
Model Number: MD 30275
31
Page 30
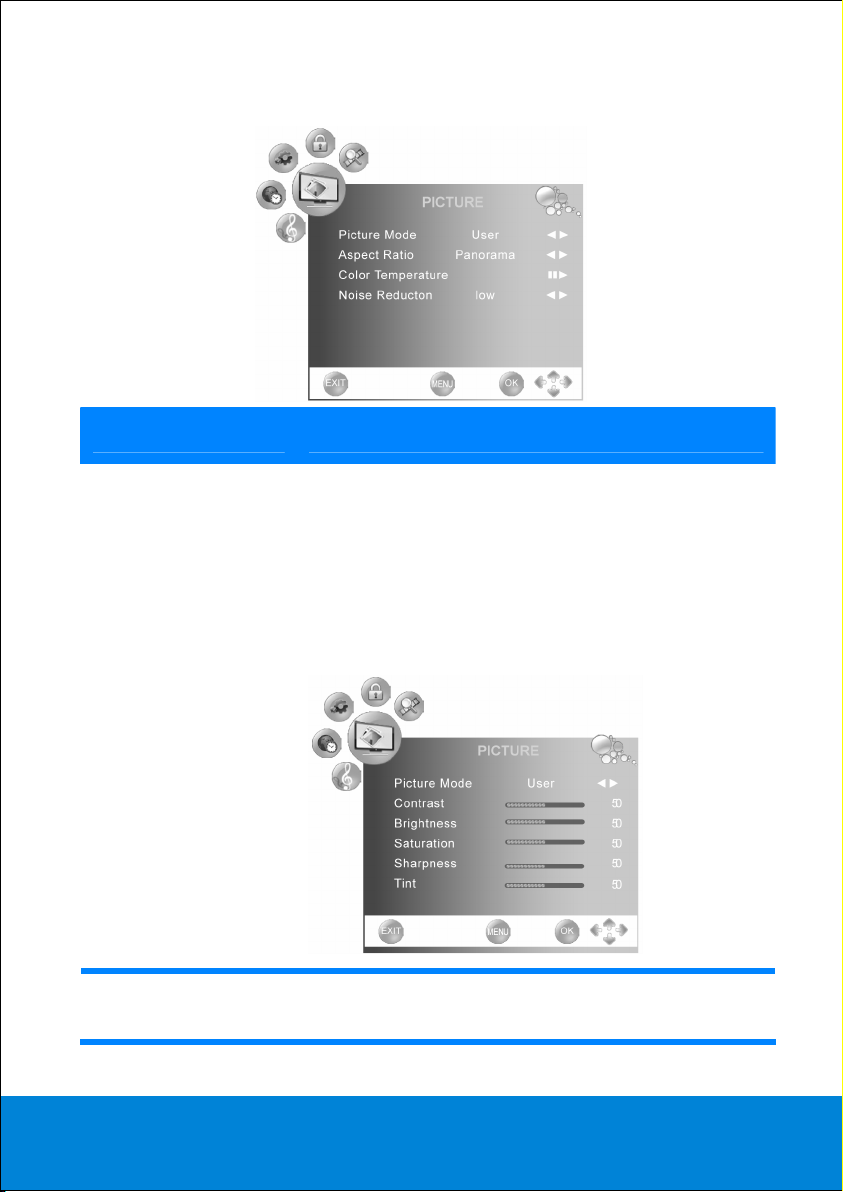
Menu PICTURE
Menu point Settings
Picture Mode
Aspect Ratio
Select image mode: Standard, Mild, User,
Dynamic. This function corresponds to the operation
of the
P.MODE key.
With each selection, you see the settings of
Contrast, Brightness, Saturation, Sharpness
Tint.
and
With the selection
User, the settings are at “50” and
you can adjust the setting between 0 and 100.
Set the standard zoom here to Auto, 4:3, 16:9,
Zoom 1, Zoom2 or Panomara (also see page 20).
Helpline No. UK/ North Ireland 0871 37 61 020 Rep. Ireland 1-800-992 508
Web Support www.medion.co.uk
Model Number: MD 30275
32
Page 31

Menu point Settings
Color
Temperature
Noise Reduction
Open sub-menu Color Temperature.
Select hue:
With each selection, you see the settings of
Green and Blue.
With the selection
Cool, Nature, Warm or User.
Red,
User, the settings are at “50” and
you can adjust the setting between 0 and 100.
You can reduce noise in the image with this function
and improve the image quality if the signal is weak.
Select
Onor Off.
Helpline No. UK/ North Ireland 0871 37 61 020 Rep. Ireland 1-800-992 508
Web Support www.medion.co.uk
Model Number: MD 30275
33
Page 32

Menu SOUND
Menu point Settings
Sound Mode
Balance
Select the sound mode: Standard, Music, Rock, Live,
Surround and User.
With each selection, you see the settings of
Bass.
With the selection
User, the settings are at “50” and you
Treble and
can adjust the setting between 0 and 100.
Balance between left and right loudspeaker
(range L50 – R50).
Helpline No. UK/ North Ireland 0871 37 61 020 Rep. Ireland 1-800-992 508
Web Support www.medion.co.uk
Model Number: MD 30275
34
Page 33

Menu TIME
Menu point Settings
Clock
Off Time
In the sub-menu, you set the Date, Month, Year,
Hour and Minute.
Confirm
Close with
OK
to save the setting.
Select the time at which the device will turn off
automatically.
In the sub-menu, you can choose the frequency of
repetition (
Monday – Saturday, Saturday – Sunday,
Sunday) or Off to set no Off Time.
Once, Every day, Monday – Friday,
Then you set the Hour and Minute.
Confirm
Close with
OK
to save the setting.
Helpline No. UK/ North Ireland 0871 37 61 020 Rep. Ireland 1-800-992 508
Web Support www.medion.co.uk
Model Number: MD 30275
35
Page 34

On Time
Sleep Timer
Auto Sleep
Time Zone
Select the time at which the device will turn on
automatically.
In the sub-menu, you can choose the frequency of
repetition (
Monday – Saturday, Saturday – Sunday,
Sunday) or Off to set no On Time.
Once, Every day, Monday – Friday,
You also have to select a volume level (standard: 32)
and the source.
Confirm
Close with
OK
to save the setting.
Select the time after which the device is automatically
turned to standby mode. You can set 10, 20, 30, 60, 90,
120, 180 and 240 minutes. The time for the Sleep Timer
will start to run as soon as you have set the sleep time.
Select
Off to switch off this function.
With the setting On, the TV will automatically turn off in
case it receives no signal.
Select the time zone of the region the TV is operated in.
Helpline No. UK/ North Ireland 0871 37 61 020 Rep. Ireland 1-800-992 508
Web Support www.medion.co.uk
Model Number: MD 30275
36
Page 35

Menu OPTION
Menu point Settings
Language
Audio
Language
Subtitle
Language
SCART Input
Choose the language for the OSD menu. This will
change immediately.
Several sound channels in different languages can be
transmitted at the same time in the case of terrestrial,
digital television channels. You will select which sound
channel (which language) should be transmitted with
this function, if you have switched to channels that
have several audio tracks.
Subtitles for those with damaged hearing can be faded
onto the screen in the case of many terrestrial, digital
television channels. You will select the required subtitle
language and activate the automatic display of subtitles
with this function, provided that they are transmitted.
Select the SCART signal input: AV+RGB or SV+RGB.
If the connected device supports the superiour S-Video
mode, select
supports the standard Fbas mode, select
SV+RGB. If the connected device only
AV+RGB.
Helpline No. UK/ North Ireland 0871 37 61 020 Rep. Ireland 1-800-992 508
Web Support www.medion.co.uk
Model Number: MD 30275
37
Page 36

OSD Time Out
Restore To
Default
Here you can set the time after which the OSD menu
will automatically close: 15, 30 or 60 seconds.
menu will not close automatically. Close it with
Off: The
MENU
Restores factory settings.
Exception: The password.
.
Helpline No. UK/ North Ireland 0871 37 61 020 Rep. Ireland 1-800-992 508
Web Support www.medion.co.uk
Model Number: MD 30275
38
Page 37

Menu LOCK
To access the menu, you have to enter the password. The factory password is:
0000. This can be changed (see below “
Menu point Settings
Set Password”).
Lock System
Functions like a new programme search can now only
be carried out after entering the password.
Set Password
A dialogue window will open when you select this
point. Enter a four-digit password with the digit keys of
the remote control and repeat this password in the line
Confirm. The password will be valid immediately.
Please note that the new password will NOT
change back to the factory password when a reset
to factory settings is carried out.
Therefore make sure to note down the password.
Block
Programme
Press OK to open the channel list. Select a channel
which you want to block with the directional keys
. Press the
green key
(“
LOCK
”) to confirm.
A lock symbol will appear behind the blocked
programme.
Now the channel can only be viewed after entering the
password.
To unlock the channel, open the menu
Block
Helpline No. UK/ North Ireland 0871 37 61 020 Rep. Ireland 1-800-992 508
Web Support www.medion.co.uk
Model Number: MD 30275
39
Page 38

Menu point Settings
Parental
Guidance
Programme again and press the
yellow key
once
more. The lock symbols disappears.
You will be able to change the age here (4 to 18).
Programmes which are classified for a certain age group
will only be shown if the age is below the selected age.
If, e. g., you want to block movies graded „12“, select
„12“ or higher.
Please note that this function depends on the signal
being sent from the broadcasting stations. With most
Free-to-Air-Programmes, the age classifications are not
sent.
Helpline No. UK/ North Ireland 0871 37 61 020 Rep. Ireland 1-800-992 508
Web Support www.medion.co.uk
Model Number: MD 30275
40
Page 39

Menu in PC mode
The OSD menu has the following option in PC mode:
Menu point Settings
Contrast
Brightness
Aspect Ratio
Color Temperatur
Adjust the contrast between 0 and 100.
Adjust the brightness between 0 and 100.
Set the standard zoom here to, 4:3 or 16:9.
Open sub-menu Color Temperature.
Select hue:
With each selection, you see the settings of
Green and Blue.
With the selection
Cool, Nature, Warm or User.
Red,
User, the settings are at “50” and
you can adjust the setting between 0 and 100.
Helpline No. UK/ North Ireland 0871 37 61 020 Rep. Ireland 1-800-992 508
Web Support www.medion.co.uk
Model Number: MD 30275
41
Page 40

Auto
If the picture has shifted, you can select Auto
(Autoposition) and press
middle of the screen. This function has to be
performed with a full picture, otherwise the settings
will not match..
OK to move it back to the
Screen
Open sub-menu Screen.
Sub-menu SCREEN
Menu point Settings
Horizontal Pos.
Vertical Pos.
Here you can change the horizontal position of the
picture with the use of
Here you can change the vertical position of the
picture with the use of
.
.
Size
Phase
Helpline No. UK/ North Ireland 0871 37 61 020 Rep. Ireland 1-800-992 508
Web Support www.medion.co.uk
Model Number: MD 30275
Controls the width of the picture based on the VGA
mode.
If the PC picture does not display clearly, you can
align the picture signal here with the pixels on the
LCD-TV with the use of
picture sharper and more even.
. This makes the
42
Page 41

Connections and Examples of Connections 11
The connections are on the rear of the device.
Connection Name of source
Examples of connections
(INPUT key)
VIDEO 5
(HDMI)
VIDEO 3
(YPbPr)
Digital connection: to connect an
device with an HDMI output. For this
you need an HDMI cable.
Component inputs to connect devices
to Component output, such as
camcorders, DVD players, decoders
1
HDMI
2
YPbPR
(e.g. satellite receivers), etc. You will
need a green/blue/red Component
cable for this connection for the video
link.
AUDIO IN
L–R
AUDIO input L - R (left - right):
to connect the audio line of devices
connected to the Component inputs.
You will need a red/white RCA cable for
the audio link
Helpline No. UK/ North Ireland 0871 37 61 020 Rep. Ireland 1-800-992 508
Web Support www.medion.co.uk
Model Number: MD 30275
43
Page 42

Connection Name of source
(INPUT key)
Examples of connections
3
4
5
6
S-VIDEO IN
VIDEO IN;
AUDIO IN
L – R
COAXIAL
VIDEO 2
(S-Video)
VIDEO 1
(AV)
TV, DTV
S-VIDEO input to connect a device to
an S-VIDEO output (e. g. camcorder).
You will need an S-Video cable for this
connection.
VIDEO input (yellow):
Connect devices such as camcorders,
DVD players, decoders (e.g. satellite
receivers), etc.
AUDIO inputs L-R (red/white):
Connect the left and right audio
channels of the source here, if you
want to reproduce the sound through
the LCD-TV (e.g. camcorder).
You will need RCA cables for these
connections.
Digital audio output socket (optical):
for the connection of an amplifier or a
receiver with a digital input socket. Use
a suitable optical cable for this.
Aerial Socket:
connection for co-axial aerial
7
8
VGA IN
VGA LINE IN
Computer
(VGA)
VGA connection. Connect your PC or
notebook here. For this you need a
VGA cable.
Audio connection to the PC connected
at the VGA input. Use an audio cable to
connect the PC’s audio output jacks to
the LCD TV’s
Helpline No. UK/ North Ireland 0871 37 61 020 Rep. Ireland 1-800-992 508
Web Support www.medion.co.uk
Model Number: MD 30275
44
Page 43

Connection Name of source
(INPUT key)
Examples of connections
9
SCART
VIDEO 4
(SCART)
SCART input to connect devices such
as video recorders, DVD players, games
consoles, decoders (e.g. satellite
receivers), etc.
You will need a SCART cable for this
connection.
Headphones
Connect the headphones to the headphone connection at the side
of the LCD TV. The main loudspeakers will turn off when the
headphones are connected. Regulate the volume level of the
headphones by means of the volume keys.
WARNING!
In the first instance set the volume to a value at the lowest end of the
scale before you put on the headphones. Then select a comfortable
volume. Excessive volume can damage your hearing
Using this appliance at full volume for extended periods of time may
cause damage to the hearing capacity of the listener.
Helpline No. UK/ North Ireland 0871 37 61 020 Rep. Ireland 1-800-992 508
Web Support www.medion.co.uk
Model Number: MD 30275
45
Page 44

DVD player
Connect a DVD player with a SCART cable to the SCART connection.
If the DVD player has YUV outputs (Y Pb Pr), it is advisable to connect these using
a Component cables (green/blue/red RCA) to the
inputs on the LCD-TV.
Instead of the SCART cable or the Component cables you can also use RCA cables:
• Connect (red-white) audio RCA cables to the audio inputs on the LCD-TV and
the audio outputs on the external device.
• Connect a (yellow) video RCA cable to the video input on the LCD-TV and the
audio output on the external device.
• Instead of using a video RCA cable you can also connect an S-Video video
cable to the S-Video input on the LCD-TV and the S-Video output on the
external device.
Y-Pb-Pr and L-R Component
Video recorder
Connect an aerial cable to the aerial socket of the LCD TV and the aerial output of
the video recorder, if you want to connect a video recorder to the LCD TV.
Connect another aerial cable to the aerial input of the video recorder and the
aerial socket on the wall.
In addition, you can connect an LCD-TV and a video recorder with each other
using a SCART cable.
Helpline No. UK/ North Ireland 0871 37 61 020 Rep. Ireland 1-800-992 508
Web Support www.medion.co.uk
Model Number: MD 30275
46
Page 45

If you want to transmit stereo sound you will need a SCART connection.
DVD recorder
You can connect a DVD recorder to the SCART connection on the LCD-TV using a
SCART cable.
In addition, connect the aerial cable in the manner described in the "Video
Recorder" section (see above.)
Helpline No. UK/ North Ireland 0871 37 61 020 Rep. Ireland 1-800-992 508
Web Support www.medion.co.uk
Model Number: MD 30275
47
Page 46

Receiver (SAT, DVB-T, decoder, etc.)
Connect a device that is intended to be used as a receiver for the LCD TV (e. g. SAT
receiver, DVB-T receiver, decoder, set-top box) or a DVD recorder to the SCART
socket, with a SCART cable.
Instead of the SCART cable you can also use RCA cables:
• Connect (red-white) audio RCA cables to the audio inputs on the LCD-TV and
the audio outputs on the external device.
• Connect a (yellow) video RCA cable to the video input on the LCD-TV and the
audio output on the external device.
• Instead of using a video RCA cable you can also connect an S-Video video
cable to the S-Video input on the LCD-TV and the S-Video output on the
external device.
Helpline No. UK/ North Ireland 0871 37 61 020 Rep. Ireland 1-800-992 508
Web Support www.medion.co.uk
Model Number: MD 30275
48
Page 47

DVD or video recorder and SAT-receiver
If you want to connect a DVD or video recorder and a satellite receiver at the
same time, you can use the following connection method:
Helpline No. UK/ North Ireland 0871 37 61 020 Rep. Ireland 1-800-992 508
Web Support www.medion.co.uk
Model Number: MD 30275
49
Page 48

Camcorder
You can reproduce the sound and pictures of a camcorder on your LCD-TV by
connecting the camcorder to the AUDIO-IN connections and the VIDEO-IN
connection on the LCD-TV.
Apart from using a (yellow) video RCA cable you can also connect an S-Video
video cable to the S-Video input on the LCD-TV and the S-Video output on the
camcorder.
Helpline No. UK/ North Ireland 0871 37 61 020 Rep. Ireland 1-800-992 508
Web Support www.medion.co.uk
Model Number: MD 30275
50
Page 49

Device with HDMI or DVI output
HDMI ("High Definition Multimedia Interface") is the only interface in the
entertainment electronics sector with which one can transmit audio and video
data digitally at the same time. HDMI can process all picture and sound systems
known at this time, including HDTV (High Definition Television), so that it can
reproduce a resolution of 1080 i without loss of quality.
Many devices from the entertainment electronics sector, such as DVD players, are
equipped these days with HDMI or DVI outputs.
External device with HDMI output
1. Connect an HDMI cable (not supplied) to the HDMI input on the LCD-TV and
the HDMI output on the external device.
2. Once you have connected the HDMI device, then switch on the LCD-TV.
3. Then switch on the external HDMI reproduction device.
External device with DVI output
If the external device has a DVI output, you can also connect it to the HDMI input
(HDMI is backwards compatible with DVI - "Digital Visual Interface"). For this you
need an HDMI-to-DVI adapter.
Given that no sound can be transmitted via the DVI output, you also need to
connect an audio cable with a TRS stereo connector.
Helpline No. UK/ North Ireland 0871 37 61 020 Rep. Ireland 1-800-992 508
Web Support www.medion.co.uk
Model Number: MD 30275
51
Page 50

If you want to reproduce the sound through the LCD-TV, connect audio RCA
cables (red-white) to the component audio inputs (position 2 on page 43) on the
LCD-TV.
PC
The LCD-TV can be connected as a screen or additional monitor to your PC or
notebook. The image on your PC or notebook will then be displayed on the LCDTV.
Connect the LCD-TV as follows:
1. Switch off both devices.
2. Connect a VGA cable (screen cable; not supplied) to the VGA input on the
LCD-TV and to the output for the video card on the PC or the notebook.
3. Tighten the screws on the screen cable with your fingers so that the plug
makes a good connection.
4. If you also want sound, connect an audio cable to the connection
LINE IN
5. Switch on the LCD-TV first.
6. Only then switch on the PC or notebook.
7. Press the
(VGA)
with the
If you use the LCD-TV as a second screen with your PC, then it may sometimes be
necessary to adjust the screen settings in the operating system. You will find
further information about matters you need to pay attention to when using more
than one screen in the user manual for your PC or notebook.
.
INPUT
. The PC image will appear on the LCD-TV. You can return to TV mode
TV key.
key on the remote control in order to select Computer
VGA
Helpline No. UK/ North Ireland 0871 37 61 020 Rep. Ireland 1-800-992 508
Web Support www.medion.co.uk
Model Number: MD 30275
52
Page 51

Universal Remote Control 12
Safety advises
• Do not attempt to repair the remote control yourself.
• The universal remote control has a class 1 infrared diode. Do not examine the
laser with optical instruments!
• Do not subject your remote control to dust, strong sunlight, moisture, high
temperatures or strong vibrations.
• Do not use any corrosive or aggressive cleaning products.
URC-related keys on the remote control
Use
This universal remote can operate the following types of device:
TV
LCD-TV MD 30275
STB/DVD/VCR/AUX
DVD recorder, videorecorder, amplifier, pay-TV-decoder. The labels on the source
keys only serve clarity.
Helpline No. UK/ North Ireland 0871 37 61 020 Rep. Ireland 1-800-992 508
Web Support www.medion.co.uk
Model Number: MD 30275
Other devices, such as satellite receiver, DVD player or
53
Page 52

Programming the device code
General
Please note down the codes which you used for the programming. This
helps to programme the URC again in case the code got lost after changing
the batteries.
You cannot programme the URC in the TV mode.
You will have to programme a four-digit device on the source keys (
VCR, AUX
The labels on the keys only serve as an aid here. You can assign any key to any
device, with exception of the TV key which can only be assigned to a TV.
VCR’s: The code search for VCR's must be done while a tape is inserted.
) for each device that you wish to operate with the universal remote.
Pre-programming
The remote control has been pre-programmed for several devices produced by
Medion. Because of this you can use certain basic functions for Medion devices
directly and without having to programme in the device code.
Entering a device code according to the code list
The codes of the respective devices must be taken from the code list
accompanying these instructions for use. Proceed as follows:
1. Switch the relevant device on manually.
2. Briefly press the desired source key (
3. Hold the
remains permanently lit.
4. Enter the four-digit code from the code list.
The blue LED will go out briefly to confirm each press of a key.
The blue LED will go out after the last digit has been entered, if the code entry
was valid. The blue LED will flash for three seconds before going out, if an invalid
code was entered.
If the device does not respond as expected, repeat the programming, or try a
different code. Please try all the codes specified for your brand. Select the code
that causes all the available commands of your remote control to respond
correctly.
If this is not successful either, then try using the search method described in the
chapter "Automatic Search"..
CODE
key pressed down for approx. 3 seconds, until the blue LED
STB, DVD, VCR, AUX
STB, DVD,
).
Helpline No. UK/ North Ireland 0871 37 61 020 Rep. Ireland 1-800-992 508
Web Support www.medion.co.uk
Model Number: MD 30275
54
Page 53

Manual code search
Carry out a manual search as follows:
1. Switch the relevant device on manually.
2. Briefly press the desired source key (
3. Hold the
remains permanently lit.
4. Press the
until the device that is intended to be controlled changes the channel or
reacts accordingly. The code search will start at the currently stored fourdigit number.
5. Press
Up to 350 different codes are pre-programmed per device type, because of the
extensive number of different code numbers. It is possible in individual cases that
only the most common main functions are available. The mode of procedure
described cannot lead to success in the case of some special device models.
CODE
OK
briefly in order to store the code.
key pressed down for approx. 3 seconds, until the blue LED
, P+ or
P–
key successively several times (up to 350 times),
STB, DVD, VCR, AUX
).
Automatic code search
If your device does not respond to the remote control even though you have
tried all of the codes listed for your device type and the relevant brand, then try
using the automatic search. This will enable you to find codes for brands that
were not listed in the device Code List.
1. Switch the relevant device on manually.
2. Briefly press the desired source key (
3. Hold the
remains permanently lit.
4. Point the remote at the device and press the
Press
The remote will start the code search after 6 seconds and will transmit all the
codes successively at intervals of a second (see also the next section). The
blue LED will flash up for each transmission.
5. As soon as the device responds to the remote control, press
missed pressing
device responded by using the
Press
EXIT
CODE
key, instead of
to cancel the search.
key pressed down for approx. 3 seconds, until the blue LED
P/CH+,
OK
in time, you can go back in steps to the code which the
STB, DVD, VCR, AUX
P/CH+
if the device has no programme function.
P/CH–
key.
key once briefly.
).
OK
. – If you
Helpline No. UK/ North Ireland 0871 37 61 020 Rep. Ireland 1-800-992 508
Web Support www.medion.co.uk
Model Number: MD 30275
55
Page 54

1 second or 3 second intervals
If you want the remote control to transmit a new code every 3 seconds instead of
every second, proceed as follows::
1. Press
P/CH+
code every 3 seconds. This gives you more time, but the procedure will also
take longer.
(or ) twice. The remote control will now only transmit a new
Code searching by brand name
This function offers you the option of searching by brand name. You can find the
brand name in the Code List under “Code Search by Brand Name”. This is done as
follows:
1. Switch the relevant device on manually.
2. Briefly press the desired source key (
3. Hold the
remains permanently lit.
Enter the one-digit code according
to the following list in the attached
Code List. Some brands are:
Key 1 Medion, Tevion
Key 2 Philips
Key 3 Sony, Panasonic, Sharp
4. Continue pressing the
until the device responds accordingly. Proceed quickly otherwise the
automatic code search will start.
5. Save the code by pressing
The blue LED will flash for approx. 3 seconds when all codes have been searched
through.
CODE
key pressed down for approx. 3 seconds, until the blue LED
P/CH+
OK
STB, DVD, VCR, AUX
Key 4 Thomson
Key 5 Telefunken, Saba
Key 6 Grundig, Blaupunkt
Key 7 Nokia
Key 0 All brands
key (or for video recorders or PLAY ),
.
).
Code identification
Code identification gives you the opportunity to determine codes that have
already been entered and stored in the remote control.. Proceed as follows:
1. Switch the relevant device on manually.
2. Briefly press the desired source key (
3. Hold the
remains permanently lit.
4. Press the
Helpline No. UK/ North Ireland 0871 37 61 020 Rep. Ireland 1-800-992 508
Web Support www.medion.co.uk
Model Number: MD 30275
CODE
CODE
key pressed down for approx. 3 seconds, until the blue LED
key briefly again. The blue LED will flash again.
STB, DVD, VCR, AUX
).
56
Page 55

5. To find the first number, press the number keys from 0 to 9. If the source key
extinguishes briefly, then it is the first stored number.
6. To determine the second number, press the number keys again from 0 to 9.
Repeat the procedure for the third number.
7. The source key will extinguish as soon as the button for the third number has
been pressed.
Code identification has now been completed.
Normal operation
Operating individual devices
After you have finished programming your remote control for your audio/video
devices, the remote control will work in the common main functions just like the
original remote control of the respective device.
Point your remote control at the desired device and press the relevant source key.
The key will light up briefly but will not remain lit.
Activate the functions by pressing the corresponding function key of your
universal remote control. The source key will light up briefly each time the key is
pressed.
Please note:
• In certain circumstances, not every function of your original remote control
may be directly available on the universal remote control.
• Especially for newer devices, it might be possible that the functions are stored
to different keys than expected or may not even be available at all.
Special functions
All off function
You can switch off all the pre-programmed devices at the same time. Proceed as
follows:
• Press the
pressed down for 3 seconds. Now all pre-programmed devices will be
switched off consecutively.
Some devices can be switched on and off with the
such a way will be switched back on after carrying out the ALL OFF function
Helpline No. UK/ North Ireland 0871 37 61 020 Rep. Ireland 1-800-992 508
Web Support www.medion.co.uk
Model Number: MD 30275
key briefly once. Immediately press the key again and keep it
key. Devices switched off in
57
Page 56

EPG – Electronic Programme Guide
The
EPG
key (EPG = Electronic Programme Guide) has various functions,
depending on which code has been used:
For TV and satellite codes (e.g. SAT-TV or DVB-T) the button calls up the electronic
programme guide.
For DVD codes the button opens the title menu.
For VCR codes you can use the button for programming, if your video recorder
has a Showview / Videoplus function.
Universal functions (“Punch Through”)
The universal functions (also called “Punch Through” functions) enable you to
carry out certain functions on a different device type than the programmed one.
These are the volume, mute and playback functions.
• If the remote control is in VCR, DVD, SAT or CBL mode, the volume and mute
keys control the TV set (provided the other devices do not have their own
volume control);
• if the remote control is in TV mode or in another mode without playback
function, the PLAY, STOP, PAUSE, FAST FORWARD/BACK, SKIP keys and
perhaps RECORD will actuate a connected video recorder, DVD player or DVD
recorder. The last selected device is actuated.
Programming the volume/mute universal functions to another
device type
In its delivered state, the universal remote control is programmed in such a way
that the volume and mute functions automatically control the TV set if a source
key for a device with image transmission (DVD, video recorder) is pressed.
You can programme the universal remote control so that the universal functions
volume and mute will actuate another device type than the TV set.
1. Hold the
remains permanently lit
2. Press the
3. Press a source key for the device to which the volume and mute functions
should be transferred to. The light for this source key will remain lit.
4. Press the
its own volume control, the blue LED will flash.
CODE
MUTE
MUTE
key pressed down for approx. 3 seconds, until the blue LED
key.
key. If you accidentally selected a device that does not have
Helpline No. UK/ North Ireland 0871 37 61 020 Rep. Ireland 1-800-992 508
Web Support www.medion.co.uk
Model Number: MD 30275
58
Page 57

Programming the volume/mute universal functions to a particular
device
You can programme the universal remote control in such a way that it will use
only that particular device’s own volume and mute functions. The universal
function for this mode or device type is therefore switched off.
1. Hold the
remains permanently lit.
2. Press the
3. Press the source key for the device that is only to have its own volume and
mute functions.
4. Press the desired volume key. The blue LED remains lit.
5. Press the
CODE
MUTE
MUTE
key pressed down for approx. 3 seconds, until the blue LED
key.
key, and the blue LED will extinguish.
Restoring the universal volume/mute functions
If you have changed the universal volume and mute functions as described in the
previous two sections, you can reset the functions back to the factory settings
and thus restore the “Punch Through” effect.
Keep the
remains permanently lit.
Keep the
Press
mute functions are now restored to their factory defaults.
CODE
key pressed down for approx. 3 seconds until the blue LED
MUTE
MUTE
key pressed down until the blue LED extinguishes briefly.
again. The blue LED will extinguish completely. The volume and
Helpline No. UK/ North Ireland 0871 37 61 020 Rep. Ireland 1-800-992 508
Web Support www.medion.co.uk
Model Number: MD 30275
59
Page 58

Troubleshooting 13
Many times, problems have simple causes. We would like to give you some tips to
solve some common problems. Should these tips not help, please call us!
There is no picture or sound.
• Check whether the mains cable has been connected to the socket and the
mains adapter correctly.
• Check whether the signal reception has been set to ATV or DTV.
• Check whether the mains switch of the device on the rear of the device has
been switched on.
There is no picture. There is no picture from the INPUT SOURCE.
• Make sure the Contrast/Brightness is properly adjusted.
• Make sure all external devices are connected properly.
• Check whether the correct Input Source has been selected (
There is no sound.
• Make sure the volume is not set to minimum.
• Make sure the sound is not set to mute.
There is no picture or sound, just noise.
• The reception may be weak. Make sure the aerial is not disconnected.
The picture is not clear.
• The reception may be weak.
• Make sure the aerial is not disconnected.
The picture is too bright or too dark.
• Check the contrast and brightness settings.
The remote control does not work.
• Press the source key
• Check whether the batteries in the remote are operational and have been
inserted correctly.
• Make sure the remote sensor window is not under strong lighting.
• Switch the device off and on again with the mains switch at the rear.
TV
for operation of your LCD-TV MD 30275.
INPUT/AV
key)..
Helpline No. UK/ North Ireland 0871 37 61 020 Rep. Ireland 1-800-992 508
Web Support www.medion.co.uk
Model Number: MD 30275
60
Page 59

The picture is not sharp.
• The reception may be weak.
• Make sure the aerial is not disconnected.
• Check the sharpness and noise suppression settings in the
A double or triple image will be displayed.
• Check if the aerial is correctly oriented.
• The signal may be reflected off hills or buildings.
The picture is spotted.
• There may be interference from automobiles, trains, high voltage lines, neon
light, etc.
• There may be interference between the antenna cable and power cable. Try
moving them further apart.
There are stripes on the screen or colours fade.
• Is the unit receiving interference from other devices?
• Transmission antennas of radio broadcasting station and transmission
antennas of amateur radio and cellular phones may also cause interference.
• Place the unit as far apart as possible from device that may cause possible
interference.
Some functions in the menu do not work.
• The system lock may have been activated.
PICTURE menu.
Do you require additional Support?
If the suggestions in the above section have not solved your problem, please
contact the hotline. We will try and help you over the telephone. However, before
you contact your Service Center, please keep the following information available:
• What external devices have been connected?
• What messages appear on your display?
• During which operating step has the problem arisen?
• When a PC has been connected to the device:
– What is the system configuration?
– Which software were you using when the problem arose?
• What steps have you already undertaken to solve the problem?
• If you have already been given a customer number, please keep this available.
Helpline No. UK/ North Ireland 0871 37 61 020 Rep. Ireland 1-800-992 508
Web Support www.medion.co.uk
Model Number: MD 30275
61
Page 60

Specifications 14
Input voltage: 110-240 V ~ 50 Hz
Power consumption: max 48 W
Power consumption standby: < 1 W
Visible display size: 15,4 inch (39 cm) TFT; 16:10-display
TV system: PAL, DK/BG/I, SECAM, L/L'
Tuner: Aerial, DVB-T
Channels: VHF/UHF Hyperband
CABLE-TV (S1-S20)/(S21-S41)
No. Of channel positions Aerial: 100
No. Of channel positions DVB-T: 200
Antenna interface: 75 Ohm
Audio: Stereo
Response Time: 8 ms (grey to grey), typ.
Contrast ratio: 400:1 (typ.)
Brightness. 200 cd/m²
Physical resolution: 1280 x 800
Picture improvement: via 2D comb filter
Connections: 1 x HDMI with HDCP encoding, 1 x SCART,
composite VIDEO (cinch), component
YPbPr in (cinch), S-video (mini din), 2 x
stereo audio in (cinch), headphone (3.5
mm jack), COAXIAL, VGA (15 pin d-sub),
1 x VGA line in, 1 x CI Slot
Dimensions W x H x D, incl. stand: 385 x 340 x 150 mm
Dimensions W x H x D without stand: 385 x 305 x 60 mm
Weight (incl. stand): approx. 3,2 kg
Helpline No. UK/ North Ireland 0871 37 61 020 Rep. Ireland 1-800-992 508
Web Support www.medion.co.uk
Model Number: MD 30275
62
Page 61

Further DVB-T features:
EPG (Electronic Program Guide)
Automatic channel programming
Programme lock via password
Timer
Copyright © 2008
All rights reserved.
This manual is protected by copyright. All rights reserved. Copying mechanically, electronically and
any other way is prohibited unless written permission from the manufacturer is obtained.
The company MEDION® owns the copyright.
Subject to technical and optical changes as well as printing errors.
Helpline No. UK/ North Ireland 0871 37 61 020 Rep. Ireland 1-800-992 508
Web Support www.medion.co.uk
Model Number: MD 30275
63
Page 62

Maintenance 15
The lifespan of the LCD-TV can be extended by the following means:
1. Before cleaning, always remove the power adapter plug and all connecting
cables.
2. Do not use any solvents, corrosive or gaseous cleaning agents.
3. Clean the display with a soft, lint-free cloth.
4. Ensure that no water droplets remain on the screen. Water can cause
permanent discoloration.
5. Do not expose the screen to bright sunlight.
6. Please keep the packaging material well and use it exclusively to transport
the device.
ATTENTION!
There are no user-serviceable or user-cleanable parts inside the device.
Helpline No. UK/ North Ireland 0871 37 61 020 Rep. Ireland 1-800-992 508
Web Support www.medion.co.uk
Model Number: MD 30275
64
Page 63

Recycling 16
Packaging
Your device is packaged to protect it against damage during
transportation. The packaging is manufactured from materials that can
be sent to a specialist recycling facility and disposed of in an
environmentally-friendly way.
Device
At the end of its life, the appliance must not be disposed of in household
rubbish. Enquire about the options for environmentally-friendly disposal.
Batteries
Do not dispose of used batteries in the household rubbish! They must be
deposited at a collection point for used batteries.
Helpline No. UK/ North Ireland 0871 37 61 020 Rep. Ireland 1-800-992 508
Web Support www.medion.co.uk
Model Number: MD 30275
65
Page 64

Pixel Errors with LCD TVs 17
Individual pixels or groups of them can fail in
rare cases, in spite of the most up-to-date
manufacture, because of the highly complex
technology.
Active matrix LCDs (TFT) with a resolution of
1280 x 800 pixel, which are in turn composed
of three sub-pixels each (red, green, blue),
contain about 3.1 million addressable
transistors. Because of this very high number
of transistors and their extremely complex
production process occasionally defective or
incorrectly addressed pixels or sub-pixels may
occur.
Description Accepted Number
Bright sub-pixels
Distance Minimum distance between light and
Dark sub-pixels
Distance Minium distance between light and dark
Total number of bright and dark sub-pixels
The Table describes the maximum number of pixel faults that are permitted to
arise on the screen, without involving a guaran-tee case. Under certain
circumstances, a guarantee case will be present if the number of faults given
above is exceeded in one category.
Helpline No. UK/ North Ireland 0871 37 61 020 Rep. Ireland 1-800-992 508
Web Support www.medion.co.uk
Model Number: MD 30275
1 sub-pixel Max. 2
Two lying next to each other
(horizontally/vertically)
dark sub-pixels
Individual Max. 4
Two lying next to each other Max. 2
sub-pixels
0
Min. 10 mm
Min. 10 mm
Max. 5
66
Page 65

Code List
TV
A
ACME 0011
ADA 0018
ADC 0006 0007
ADMIRAL 0019 0108 0002 0001 0047 0000
ADYSON 0003
AGAZI 0002
AGB 0123
AIKO 0003 0009 0004
AIWA 0184 0248 0291
AKAI 0011 0086 0009 0068 0004 0006 0008 0051
0061 0088 0169 0200 0133 0141 0069
AKIBA 0011
AKURA 0169 0074 0002 0009 0011 0071
ALBA 0028 0027 0009 0011 0003 0068 0083 0169
0047 0245 0248 0162 0062
ALBIRAL 0037
ALKOS 0164
ALLORGAN 0157 0026
ALLSTAR 0051
ALTUS 0042
AMPLIVISION 0003
AMSTRAD 0011 0009 0068 0074 0002 0108 0071 0069
0030 0123 0013
ANAM 0009 0065 0109
ANGLO 0009
ANITECH 0009 0002 0043 0109
ANSONIC 0009 0014
ARC EN CIEL 0126 0045 0139
ARCAM 0003
ARISTONA 0169 0051
ARTHUR MARTIN 0158
ASA 0017 0110 0016 0018 0000 0021
ASBERG 0051 0043
ASTRA 0009
ASUKA 0011 0002 0003
ATLANTIC 0169 0003 0051 0157
ATORI 0009
AUDIOSONIC 0009 0003 0169 0011 0051 0139 0157 0090
1062
AUDIOTON 0003
Helpline No. UK/ North Ireland 0871 37 61 020 Rep. Ireland 1-800-992 508
Web Support www.medion.co.uk
Model Number: MD 30275
67
Page 66

AUSIND 0043
AUTOVOX 0003 0002 0101 0157 0000 0125 0043
B
BAIRD 0111 0139 0245
BANG & OLUFSON 0199 0000
BARCO 0112
BASIC LINE 0009 0011 0051 0245
BASTIDE 0003
BAUR 0169 0118 0076 0141 0132
BEKO 0042 0083 0034 1064 0007 0095
BEON 0169 0051
BEST 0113
BESTAR 0051 0245
BINATONE 0003
BLACK DIAMOND 0171
BLACK PANTHER LINE 0245
BLACK STAR 0129
BLAUPUNKT 0117 0202 0135 0008 0022 0100
BLUE SKY 0011
BLUE STAR 0120
BONDSTEC 0129
BOOTS 0003
BPL 0120
BRANDT 0127 0045 0022 0036 0126 0139 0046
BRION VEGA 0051 0169 0000
BRITANNIA 0003
BROKSONIC 0920
BRUNS 0000 0007
BSR 0131 0026
BTC 0011
BUSH 0028 0027 0032 0009 0011 0019 0205 0039
0051 0068 0169 0107 0115 0131 0139 0167
0245 0248 0024 0132 0120 0062
C
CAPSONIC 0002
CARREFOUR 0027
CASCADE 0009
CATHAY 0051 0169
CENTRUM 0168 0205
CENTURION 0051 0169
CENTURY 0000
CGE 0129 0047 0131 0043
CIMLINE 0009 0028
CITY 0009
CLARIVOX 0169 0037
CLATRONIC 0009 0011 0051 0002 0083 0003 0129 0030
0043
Helpline No. UK/ North Ireland 0871 37 61 020 Rep. Ireland 1-800-992 508
Web Support www.medion.co.uk
Model Number: MD 30275
68
Page 67

COMBITECH 0248
CONCORDE 0009
CONDOR 0198 0051 0083 0003 0245
CONTEC 0003 0009 0027 0030 0029
CONTINENTAL EDISON 0022 0111 0036 0045 0126 0139 0046
COSMEL 0009
CROSLEY 0129 0131 0000 0043
CROWN 0009 0169 0083 0047 0051 0245 0121 0043
CS ELECTRONICS 0011 0129 0003
CTC 0129
CTC CLATRONIC 0014
CYBERCOM 0177 0038 0171 0002 0009 0206 0205 0207
0208 0210 0169 0042 0044 0127 0047 0061
0063 0067 0068 0103 0107 0115 0154 0168
0185 0228 0209 0343 0924 0933 0248 0291
CYBERMAXX 0177 0038 0171 0002 0009 0206 0200 0205
0207 0208 0210 0211 0169 0015 0042 0044
0047 0048 0049 0061 0063 0067 0068 0087
0103 0107 0115 0127 0154 0155 0168 0170
0185 0228 0229 0209 0218 1005 0894 0343
0924 0933 0248 0291
CYBERTRON 0011
CYTRON 0177 0038 0171 0002 0009 0206 0200 0205
0207 0208 0210 0211 0169 0015 0042 0044
0047 0048 0049 0061 0063 0067 0068 0087
0103 0107 0115 0127 0154 0155 0168 0170
0185 0228 0229 0209 0218 1005 0894 0343
0924 0933 0248 0291
D
DAEWOO 0094 0009 0191 0003 0051 0115 0245
DAINICHI 0011
DANSAI 0002 0169 0051
DANTAX 0171 0161 0169 0088 0034 0113
DATSURA 0121
DAYTON 0009
DAYTRON 0245
DE GRAAF 0019 0006 0033
DECCA 0003 0169 0004 0051 0123 0030
DECCACOLOR 0015
DCE 0205 0042
DELL 0025
DESMET 0051 0169
DIGITOR 0227 0228
DISNEY 0148
DIXI 0009 0169 0051
DTS 0009
DUAL 0177 0038 0171 0002 0009 0206 0207 0208
0169 0042 0044 0127 0047 0061 0063 0067
0068 0003 0103 0107 0115 0126 0131 0139
0154 0160 0168 0210 0228 0343 0924 0933
0248 0291 0125 0089
Helpline No. UK/ North Ireland 0871 37 61 020 Rep. Ireland 1-800-992 508
Web Support www.medion.co.uk
Model Number: MD 30275
69
Page 68

DUAL-TEC 0009 0131 0003
DUMONT 0003 0014 0017 0018 0000
DURABRAND 0228 1006 1007 1008 1009 0933 1085 1086
1087 1088
DUX 0169
DYNATRON 0051 0169
E
ELBE 0108 0157 0037
ELCIT 0000
ELECTRO TECH 0009
ELEKTA 0120
ELIN 0051 0003 0169 0016 0018
ELITE 0011 0051
ELMAN 0014 0131
ELTA 0009
EMERSON 0141 0127 0000
ERAE 1003
ERRES 0169 0051
ESC 0245
ETRON 0009
EURO-FEEL 0002
EUROLINE 0149 0169 0088
EUROMANN 0002 0051 0003
EUROPHON 0003 0051 0051 0131 0123
EXPERT 0157
F
FENNER 0009 0115
FERGUSON 0127 0166 0035 0169 0036 0050 0052 0111
0163 0037
FIDELITY 0003 0019 0068 0074 0096
FINLANDIA 0019 0006 0110 0128
FINLUX 0061 0087 0063 0003 0004 0016 0167 0110
0131 0157 0169 0051 0017 0018 0014 0000
0123 0043 0042
FIRSTLINE 0003 0129 0009 0051 0062 0026
FISHER 0006 0003 0018 0083 0131 0000 0027 0029
0040
FLINT 0051 0113
FORMENTI 0001 0169 0003 0131 0133 0000 0043 0125
FORTRESS 0001 0000
FRONTECH 0019 0002 0009 0068 0118 0129 0120 0021
FUJITSU 0116 0004 0157
FUNAI 0002 0026
G
GALAXY 0047 0083
GBC 0009 0027 0131
Helpline No. UK/ North Ireland 0871 37 61 020 Rep. Ireland 1-800-992 508
Web Support www.medion.co.uk
Model Number: MD 30275
70
Page 69

GEC 0169 0003 0004 0041 0051 0141 0123 0132
GELOSO 0019 0009 0131
GENERAL TECHNIC 0009 0248
GENEXXA 0011 0051 0021
GERICOM 1064 0049 1022 1023
GOLDSTAR 0084 0129 0003 0009 0019 0051 0131 0169
0171 0261 0012 0093
GOODMANS 0009 0111 0002 0004 0027 0169 0028 0051
0068 0115 0127 0171 0245 0283 0093
GORENJE 0083
GPM 0011
GRAETZ 0141 0142 0021
GRANADA 0127 0019 0003 0006 0169 027 0031
0051 0054 0004 0064 0133 0138 0128 0040
0043 0123
GRANDIN 0009 0169 0011 0245 0120
GRUNDIG 0117 0091 0114 0101 0135 0008 0017 0136
0043
H
H & B 0343 0228
HB 1003 0168 0095 0015 0042 1011
HAAZ 0228
HALIFAX 0002 0003
HAMPTON 0003
HANSEATIC 0009 0003 0027 0169 0051 0083 0118 0131
0141 0007 0026
HANTAREX 0009 0123
HARWOOD 0171
HCM 0002 0003 0009 0074 0120
HIFIVOX 0139
HINARI 0171 0009 0011 0027 0051 0006 0169 0248
0043 0137
HISAWA 0011 0113 0120
HISENSE 0156
HITACHI 0027 0019 0085 0134 0153 0213 0140 0144
0003 0118 0004 0016 0023 0041 0045 0047
0131 0133 0138 0139 0141 1013 0021 0046
0033 0123 0142
HORNYPHON 0051
HOSHAI 0011
HUANYU 0003 0115
HYGASHI 0003
HYPER 0003 0009 0129 0131
HYPSON 0002 0003 0051 0169 0120
HYUNDAI 1010
I
ICE 0009 0002 0003 0011 0051 0068
IMPERIAL 0047 0051 0083 0129 0131 0021 0043
Helpline No. UK/ North Ireland 0871 37 61 020 Rep. Ireland 1-800-992 508
Web Support www.medion.co.uk
Model Number: MD 30275
71
Page 70

INDESIT 0024 0101
INDIANA 0051 0169
INGELEN 0021
INGERSOL 0009
INNO HIT 0009 0011 0003 0004 0051 0169 0245 0093
0123
INNOVATION 0171 0111 0002 0009 0169 0061 0067 0068
0103 0107 0115 0154 0168 0177 0248 0291
INTERBUY 0009 0129 0109
INTERFUNK 0051 0129 0169 0139 0141 0000 0021
INTERTRONIC 0894
INTERVISION 0002 0003 0014 0109
IRRADIO 0009 0011 0051 0169 0068
ISUKAI 0011
ITC 0003 0131
ITS 0011 0051 0068 0120
ITT 0061 0009 0143 0031 0133 0141 0021 0142
0132
ITT/NOKIA 0133 0142 0021
ITV 0169 0171 0009 0088 0245
J
JEC 0164
JVC 0051 0053 0027 0068
K
KAISUI 0009 0011 0003 0120
KAMOSONIC 0003
KAMP 0003
KAPSCH 0157 0021
KARCHER 0169 0003 0009 0016 0037
KENDO 0019 0014 0028 0108 0245
KENNEDY 0131 0157
KINGSLEY 0003
KING TV 0015
KNEISSEL 0174
KOLSTER 0051
KONKA 0047 0068 0229 0011
KORPEL 0051 0169
KORTING 0000
KOYODA 0009
KTV 0003
KURO 0121
KYOTO 0037
L
LENCO 0009 0245
LENOIR 0003 0009
LESA 0129
Helpline No. UK/ North Ireland 0871 37 61 020 Rep. Ireland 1-800-992 508
Web Support www.medion.co.uk
Model Number: MD 30275
72
Page 71

LEYCO 0169 0002 0004 0051 0026
LG 0084 0119 0129 0149 0019 0003 0051 0088
0131 0169 0171 0009 0261 0093
LIESENK 0169
LIFE 0002 0009 0061 0067 0068 0103 0107 0111
0115 0154 0168 0169 0171 0177 0205 2910
LIFETEC 0177 0038 0171 0002 0009 0206 0205 0207
0208 0210 0211 0169 0015 0042 0044 0047
0048 0049 0061 0063 0067 0068 0087 0103
0107 0115 0127 0154 0155 0168 0170 0185
0228 0229 0209 0218 1005 0894 0343 0924
0933 0248 0291
LOEWE 0097 0098 0051 0169 0000
LOGIK 0030
LUMA 0019 0169 0141 0157
LUMATRON 0002 0171 0019 0088 0051 0074 0169 0107
0141 0157 0245
LUX MAY 0051
LUXOR 0141 0019 0047 0003 0077 0138 0093 0132
M
M+P 0133
MAGNADYNE 0014 0129 0131 0169 0000 0123
MAGNAFON 0003 0014 0043 0123
MAGNUM 0002 0111 0009 0169 0171 0061 0067 0068
0103 0107 0115 0154 0168 0177 0200 0291
MANDOR 0002
MANESTH 0002 0169 0003 0028 0051
MARANTZ 0051 0169
MARELLI 0000
MARK 0051 0169
MATSUI 0173 0099 0091 0027 0180 0028 0147 0003
0004 0009 0019 0051 0068 0101 0164 0169
0248 0113 0123 0013 0062 0026 0030
MATSUSHITA 0065
MCMICHAEL 0041
MEDIATOR 0051 0169
MEDION 0177 0038 0171 0002 0009 0206 1015 0200
0205 0207 0208 0210 0211 0169 0015 0042
0044 0047 0048 0049 0061 0063 0067 0068
0087 0103 0107 0115 0127 0148 0154 0155
0168 0170 0185 0228 0229 0209 0218 1005
0894 0343 0924 0933 0248 0291 1014
MELECTRONIC 0009 0016 0169 0018 0003 0036 0051 0068
0110 0115 0139 0021 0109
MEMOREX 0009 0920
MEMPHIS 0004 0009
METZ 0201 0135 0151 0152 0000 0075
MICROMAXX 0177 0038 0171 0002 0009 0206 0200 0205
0207 0208 0210 0211 0169 0015 0042 0044
0047 0048 0049 0061 0063 0067 0068 0087
0103 0107 0115 0127 0154 0155 0168 0170
0185 0228 0229 0209 0218 1005 0894 0343
0924 0933 0248 0291
Helpline No. UK/ North Ireland 0871 37 61 020 Rep. Ireland 1-800-992 508
Web Support www.medion.co.uk
Model Number: MD 30275
73
Page 72

MICROSTAR 0177 0038 0171 0002 0009 0206 0200 0205
0207 0208 0210 0211 0169 0015 0042 0044
0047 0048 0049 0061 0063 0067 0068 0087
0103 0107 0115 0127 0154 0155 0168 0170
0185 0228 0229 0209 0218 1005 0894 0343
0924 0933 0248 0291
MINERVA 0017 0101 0135
MINOKA 0051
MITSUBISHI 0000 0027 0030 0051 0054 0057 0060 0098
0101 0135 0205
MIVAR 0055 0083 0003 0093 0123 0043
MOTION 0043
MT LOGIC 0090 1062
MTC 0132
MULTI SYSTEM 0169
MULTITECH 0003 0009 0014 0019 0169 0027 0045 0129
0131 0043
MURPHY 0003 0133 0018
N
NAD 0141
NAIKO 0099
NAONIS 0019 0108
NATIONAL 0064 0101
NEC 0185 0027 0056
NECKERMANN 0003 0169 0008 0019 0022 0051 0083 0118
0132 0000
NEI 0051 0068 0169 0113
NESCO 0129
NEW WORLD 0011
NEWTECH 0009 0051
NICAMAGIC 0003
NIKKAI 0002 0003 0164 0004 0011 0051 0169
NOBLIKO 0003 0014 0043
NOGAMATIC 0139
NOKIA 0061 0143 0063 0141 0077 0133 0031 0021
0132 0142
NORDMENDE 0111 0127 0036 0045 0051 0126 0139 0046
0000 0021 0024
NORDVISION 0169
O
OCEANIC 0141 1011 0142 0021 1089
OKANO 0083
ONCEAS 0003
ONWA 0069
ORBIT 0051
ORION 0099 0147 0159 0009 0212 0028 0051 0154
0169 0171 0920 0248 0283 0123 0142 0030
0013 0062
0075 0026
Helpline No. UK/ North Ireland 0871 37 61 020 Rep. Ireland 1-800-992 508
Web Support www.medion.co.uk
Model Number: MD 30275
74
Page 73

ORMOND 0205
OSAKI 0011 0002 0003 0004 0074
OSO 0011
OSUME 0004 0029
OTTO VERSAND 0003 0169 0008 0001 0027 0051 0076 0111
0118 0131 0139 0141 0120 0121 0132
P
PACKARD BELL 0204 0203
PAEL 0003
PALLADIUM 0003 0083 0012
PANAMA 0002 0003 0009
PANASONIC 0065 0067 0064 0197 0072 0186 0101 0141
0021 0151 0142 0124 0152
PATHE CINEMA 0003 0083 0131 0037
PATHE MARCONI 0022 0045 0126 0139 0037 0046
PAUSA 0009
PERDIO 0004
PHILCO 0047 0129 0131 0000 0043
PHILHARMONIC 0003
PHILIPS 0200 0088 0217 0202 0020 0169 0003 0041
0181 0339 0051 0083 0111 0115 0131 0141
0154 0000 0043 0089
PHOCUS 0042 0095 1064
PHOENIX 0051 0169 0000
PHONOLA 0051 0169 0000
PIONEER 0010 0145 0036 0051 0139 0169 0021
PLANTRON 0002 0051
POPPY 0009
PORTLAND 0245
PRANDONI-PRINCE 0019 0141 0123
PRECISION 0003
PRIMA 0009 0021
PRINZ 0047
PRO2 0177 0038 0171 0002 0009 0206 0200 0205
0207 0208 0210 0211 0169 0015 0042 0044
0047 0048 0049 0061 0063 0067 0068 0087
0103 0107 0115 0127 0154 0155 0168 0170
0185 0228 0229 0209 0218 1005 0894 0343
0924 0933 0248 0291
PROFEX 0009 0141 0043
PROFILO 0171
PROFI-TRONIC 0051
PROLINE 0004 0051 0062
PROSONIC 0161 0169 0003 0015 0042 0088 0107 0200
0068 0245
PROTECH 0002 0003 0009 0169 0014 0051 0129 0131
0132 0113
PROVISION 0169 0171 0015
PYE 0169 0051 0068
PYMI 0009
Helpline No. UK/ North Ireland 0871 37 61 020 Rep. Ireland 1-800-992 508
Web Support www.medion.co.uk
Model Number: MD 30275
75
Page 74

Q
QUASAR 0129
QUELLE 0169 0205 0002 0003 0016 0022 0051 0129
0131 0135 0141 0017 0018 0026 0030
QUESTA 0027
R
RADIOLA 0051 0169
RADIOMARELLI 0129 0000 0123
RADIONETTE 0016 0018
RADIOTONE 0051 0007
RANK 0017 0027
RBM 0017
RCA 0031
REDIFFUSION 0141
REVOX 0051 0169
REX 0019 0002 0108 0157 0021
RFT 0000 0007
R-LINE 0051 0169
ROADSTAR 0002 0009 0011 0245
ROBOTRON 0000
RTF 0000
S
SABA 0127 0111 0126 0036 0045 0139 0141 0245
0142 0046 0000 0123 0021
SACCS 0037
SAISHO 0028 0002 0003 0009 0248 0030 0123 0013
SALORA 0019 0031 0047 0061 0107 0108 0118 0131
0138 0141 0093 0121 0128 0132 0021
SAMBERS 0014 0169 0043 0123
SAMSUNG 0090 0104 0009 0051 0172 0083 0002 0160
0003 0004 0312 0030 0105 0093
SANDRA 0003 0009
SANSUI 0051 0920
SANYO 0004 0006 0031 0003 0027 0016 0018 0083
0127 0160 0131 0029 0030 0040 0043
SAVILLE 0248
SBR 0041 0169
SCHAUB LORENZ 0141 0021 0142 0205 1003 0168 0095 0015
0042 1011
SCHNEIDER 0177 0003 0169 0011 0051 0068 0131 0139
0160 0245 0264 0071 0125
SCHWAIGER 1024
SEG 0171 0002 0205 0003 0169 0009 0014 0027
0088 0129 0131 1014 0043 0168
SEI-SINUDYNE 0014 0013 0021 0026 0075 0123 0000
SELECO 0019 0027 0131 0108 0157 0021
SENCORA 0009
SENTRA 0164
Helpline No. UK/ North Ireland 0871 37 61 020 Rep. Ireland 1-800-992 508
Web Support www.medion.co.uk
Model Number: MD 30275
76
Page 75

SHARP 0001 0059 0005 0027 0187 0188 0029
SHORAI 0026
SIAREM 0014 0131 0000 0123
SICATEL 0037
SIEMENS 0008 0022 0200 0135 0029
SIERRA 0051
SIESTA 0160
SILVER 0027
SINGER 0014 0131 0129 0228 0000
SINUDYNE 0014 0131 0169 0028 0000 0075 0013 0026
0015
SKANTIC 0138 0021
SKYMASTER 0016
SKYWORTH 0228
SOLAVOX 0092 0021
SONITRON 0006 0031
SONOKO 0009 0002 0169 0003 0051 0245
SONOLOR 0006 0021
SONTEC 0051 0169 0160
SONY 0165 0130 0183 0106 0076 0027 0127 0009
0004 0182 0029 0030
SOUND & VISION 0011 0014
SOUNDWAVE 0051 0169
STANDARD 0003 0009 0011 0051 0245
STARLIGHT 0169
STENWAY 0120
STERN 0019 0157 0021
SUNKAI 0009 0026 0062
SUNWOOD 0009 0051
SUPERLA 0003
SUPERTECH 0118
SUPRA 0009
SUSUMU 0011
SUTRON 0009
SYDNEY 0003
SYSLINE 0169
T
TANDBERG 0157 0026
TANDY 0001 0003 0004 0011 0133 0021
TARGA 0185 1018 1003 1004
TASHIKO 0003 0019 0027 0041 0056 0128
TATUNG 0051 0003 0004 0169 0123
TCM 0177 0038 0171 0002 0009 0206 1015 1017
1119 0205 0207 0208 0210 0169 0042 0044
0047 0061 0063 0067 0068 0103 0107 0115
0127 0154 0168 0185 0211 0228 0209 1005
0343 0924 0933 0248 0291
TEC 0003 0009 0129 0131 0133
TECHNICS 0065
Helpline No. UK/ North Ireland 0871 37 61 020 Rep. Ireland 1-800-992 508
Web Support www.medion.co.uk
Model Number: MD 30275
77
Page 76

TECHNISAT 0154
TECHNISSON 0042
TELEAVIA 0022 0036 0045 0111 0126 0139
TELEFUNKEN 0166 0111 0127 0190 0022 0035 0163 0101
0102 0036 0050 0051 0052 0078 0108 0126
0139 0079
TELETECH 0169 0009 0088 0129 0113
TELETON 0003 0157 0118 0132
TENSAI 0011 0168 0018 0051 0026
TESMET 0051
TEVION 0177 0038 0171 0002 0009 0206 1015 0200
0205 0207 0208 0210 0211 0169 0015 0042
0044 0047 0048 0049 0061 0063 0067 0068
0087 0103 0107 0115 0127 0154 0155 0168
0170 0185 0228 0229 0209 0214 0218 1005
1016 0894 0343 0924 0933 0248 0291 1064
TEXET 0003
THOMSON 0166 0127 0111 0003 0022 0036 0045 0176
0101 0102 0050 0051 0052 0126 0139 0163
0185 0245 0046
THORN 0004 0018 0169 0035 0054 0111 0127 0141
0164 0037
TOKAI 0004 0051
TOKYO 0003
TOMASHI 0120
TOSHIBA 0117 0164 0189 0027 0146 0017 0920 0082
TOWADA 0131 0021
TRIUMPH 0013 0123 0082
U
UHER 0051 0157 0021 0043
ULTRAVOX 0003 0014 0129 0131 0133 0000
UNITED 0088 0169
UNITED QUICK STAR 0245
UNIVERSUM 0102 0002 0016 0018 0051 0061 0169 0083
0110 0122 0129 0131 0143
UNIVOX 0037
V
VESTEL 0019 0051 0169 0171 0083 0092 0103 0107
0118 0129 0131 0138 0168 0195 0205 0021
1014
VEXA 0169 0009
VICTOR 0027 0051 0065
VIDEO SYSTEM 0051
VIDEOLOGIQUE 0011 0003
VIDEON 0248
VIDEOSAT 0129
VISIOLA 0003
VISION 0051
VISOREX 0096
Helpline No. UK/ North Ireland 0871 37 61 020 Rep. Ireland 1-800-992 508
Web Support www.medion.co.uk
Model Number: MD 30275
78
Page 77

VISTAR 0133
VORTEC 0051 0169
VOXSON 0019 0051 0108 0021 0043
W
WALTHAM 0003 0133 0138 0037
WATSON 0051 0169
WATT RADIO 0003 0014 0131 0037
WEGA 0000 0027
WELLTECH 0042
WELTBLICK 0051 0169
WESTON 0131
WHARFEDALE 0099
WHITE WESTINGHOUSE 0169 0003 0014 0043
WORLD OF VISION 1021
Y
YAKUMO 1012
YOKO 0009 0011 0051 0169 0002 0003
YORX 0011
Z
ZANUSSI 0019 0157 0108
VCR
A
AIWA 0230 0233 0256 0293 0231 0248 0291
AKAI 0300 0329 0307 0237 0236 0238 0239 0293
AKIBA 0275
AKURA 0275 0244 0293
ALBA 0275 0233 0250 0245 0248 0246 0247
ALLORGAN 0311
AMBASSADOR 0250
AMSTRAD 0253 0231 0254
ANITECH 0275
APEX 0949
ASA 0257 0256
ASUKA 0275 0257 0231 0256
B
BAIRD 0259 0231 0258 0245 0237 0293
BASIC LINE 0275 0233 0250 0245
BAUR 0263 0257
BESTAR 0250 0245
BLACK PANTHER LINE 0245
Helpline No. UK/ North Ireland 0871 37 61 020 Rep. Ireland 1-800-992 508
Web Support www.medion.co.uk
Model Number: MD 30275
79
Page 78

BLAUPUNKT 0263 0257 0262 0260 0309 0325 0271
BONDSTEC 0250
BRANDT 0303 0305
BROKSONIC 0277 0967
BUSH 0275 0233 0245 0248 0246 0247 0288
C
CATRON 0250
CGE 0231 0293
CIMLINE 0275 0233
CINEVISION 0256
CLATRONIC 0250
COMBITECH 0248
CONDOR 0250 0245
CROWN 0275 0250 0245
CYBERCOM 0233 0311 0262 0269 0319 0256 0248 0291
0338 0905 0906
CYBERMAXX 0233 0311 0262 0269 0319 0256 0248 0291
0338 0905 0906
CYTRON 0233 0311 0262 0269 0319 0256 0248 0291
0338 0905 0906
D
DAEWOO 0274 0250 0265 0319 0245 0971
DANSAI 0275
DANTAX 0233
DAYTRON 0245
DE GRAAF 0266 0257
DECCA 0257 0231 0293
DUAL 0233 0256 0257 0311 0262 0319 0293 0248
0291 0338 0905 0906
DUMONT 0266 0257 0231 0258
E
ELTA 0275
EMERSON 0231 0256 0301 0339
ESC 0245
ETZUKO 0275
F
FERGUSON 0294 0259 0271 0278 0293 0281 0305
FIDELITY 0311 0231
FINLANDIA 0266 0257 0258
FINLUX 0266 0298 0257 0231 0258 0293 0237
FIRSTLINE 0266 0275 0233 0265 0298 0256
FISHER 0258 0279
FLINT 0233
FORMENTI-PHEONIX 0257
Helpline No. UK/ North Ireland 0871 37 61 020 Rep. Ireland 1-800-992 508
Web Support www.medion.co.uk
Model Number: MD 30275
80
Page 79

FRONTECH 0250
FUJITSU 0231
FUNAI 0231 0339
G
GALAXY 0231
GBC 0275 0250
GEC 0257
GELOSO 0275
GENERAL 0250
GENERAL TECHNIC 0262 0233 0311 0248
GOLDHAND 0275
GOLDSTAR 0231 0256
GOODMANS 0275 0250 0259 0256 0231 0245 0283 0282
GO-VIDEO 0338 0367 0971
GRAETZ 0258 0293
GRANADA 0257 0266 0240 0258 0271
GRANDIN 0275 0250 0256 0231 0245
GRUNDIG 0273 0270 0263 0235 0243 0257 0260 0272
0275 0286 0287 0290 0315 0271 0288
H
HAAZ 0233
HANSEATIC 0257 0256
HCM 0275 0288
HINARI 0275 0233 0248 0288 0301
HISAWA 0233
HITACHI 0266 0257 0268 0231 0293 0387
HYPSON 0233 0275
I
IMPEGO 0250
IMPERIAL 0231
INNO HIT 0250 0257 0275 0245
INNOVATION 0233 0311 0262 0248 0291
INTERBUY 0256
INTERFUNK 0257 0258
INTERVISION 0231
IRRADIO 0275 0256
ITT 0237 0293 0258 0292
ITV 0256 0245
J
JVC 0294 0295 0293 0400
Helpline No. UK/ North Ireland 0871 37 61 020 Rep. Ireland 1-800-992 508
Web Support www.medion.co.uk
Model Number: MD 30275
81
Page 80

K
KAISUI 0275
KARCHER 0257
KENDO 0233 0250 0265 0300 0245 0236 0237
KENWOOD 0293
KORPEL 0275
L
LENCO 0245
LEYCO 0275
LG 0231 0256 0261 0907
LIFE 0291 0256
LIFETEC 0233 0311 0262 0269 0319 0256 0248 0291
0338 0905 0906
LOEWE 0267 0325 0262 0257 0256 0271
LOGIK 0275
LUMATRON 0274 0245
LUXOR 0298 0258 0237 0281
M
MAGNASONIC 0258
MAGNAVOX 0914 0285
MAGNUM 0291
MANESTH 0275 0265
MARANTZ 0257 0271 0281 0299
MATSUI 0233 0256 0248 0301
MEDIATOR 0257
MEDION 0233 0311 0262 0269 0319 0256 0248 0291
0338 0905 0906
MELECTRONIC 0231
MEMOREX 0240 0256 0231 0258 0279
MEMPHIS 0275
METZ 0262 0263 0267 0273 0325 0271
MICROMAXX 0233 0311 0262 0269 0319 0256 0248 0291
0338 0905 0906
MICROSTAR 0233 0311 0262 0269 0319 0256 0248 0291
0338 0905 0906
MIGROS 0231
MINERVA 0263 0271
MITSUBISHI 0298 0257 0289 0294 0231
MULTITECH 0275 0250 0257 0231
MURPHY 0231
N
NATIONAL 0262 0260
NEC 0294 0293 0299
NECKERMANN 0257 0293 0301
Helpline No. UK/ North Ireland 0871 37 61 020 Rep. Ireland 1-800-992 508
Web Support www.medion.co.uk
Model Number: MD 30275
82
Page 81

NEI 0257
NESCO 0275
NIKKAI 0250 0302
NOKIA 0240 0300 0307 0258 0237 0292 0293
NORDMENDE 0294 0293 0303 0305
O
OCEANIC 0240 0231 0293
OKANO 0233 0300
ORION 0234 0233 0304 0248 0283 0301 0246
ORSON 0231
OSAKI 0275 0231 0256
OTTO VERSAND 0257
P
PALLADIUM 0275 0300 0256 0271 0293
PANASONIC 0262 0267 0260 0314 0321 0325 0970
PATHE CINEMA 0301
PATHE MARCONI 0293
PENTAX 0266
PERDIO 0231
PHILCO 0299
PHILIPS 0235 0257 0290 0315 0327 0286 0285 0242
0271 0293 0969
PHONOLA 0257
PIONEER 0294 0257 1084
POLAROID 0949
PORTLAND 0250 0245
PRINZ 0231
PRO2 0233 0311 0262 0269 0319 0256 0248 0291
0338 0905 0906
PROFEX 0275
PROLINE 0231 0288
PROSONIC 0233 0245
PYE 0257
Q
QUARTZ 0258
QUELLE 0257 0263 0258 0231 0271 0301
R
RADIOLA 0257
REX 0293
RFT 0250 0257
ROADSTAR 0275 0256 0245
Helpline No. UK/ North Ireland 0871 37 61 020 Rep. Ireland 1-800-992 508
Web Support www.medion.co.uk
Model Number: MD 30275
83
Page 82

S
SABA 0324 0245 0281 0293 0303 0305
SAISHO 0275 0233 0248 0301
SALORA 0298 0258 0237 0292
SAMSUNG 0311 0312 0338 0963
SAMURAI 0250
SANSUI 0294 0244 0293 0920
SANYO 0284 0258 0279
SAVILLE 0248
SBR 0257
SCHAUB LORENZ 0258 0237 0231 0293
SCHNEIDER 0275 0233 0265 0250 0257 0256 0231 0264
0245
SEG 0275 0319
SEI-SINUDYNE 0257
SELECO 0293
SENTRA 0250
SENTRON 0275
SHARP 0240 0241 0328 0281
SHINTOM 0275 0258
SHIVAKI 0256
SIEMENS 0263 0256 0258 0271
SILVA 0256
SILVERCREST 0256
SINUDYNE 0257
SOLAVOX 0250
SONOKO 0245
SONOLOR 0240
SONTEC 0256
SONY 0232 0308 0309 0310 0313 0249 0251 0255
0402
STANDARD 0245
STRONG 0244
SUNKAI 0233
SUNSTAR 0231
SUNTRONIC 0231
SUNWOOD 0275
SYLVANIA 0339 0231
T
TAISHO 0233
TANDBERG 0263
TARGA 0256 0907
TASHIKO 0240 0231
TATUNG 0257 0231 0293
TCM 0233 0256 0311 0262 0269 0319 0375 0248
0291 0338 0905 0906
TEC 0250
TECHNICS 0262 0260
Helpline No. UK/ North Ireland 0871 37 61 020 Rep. Ireland 1-800-992 508
Web Support www.medion.co.uk
Model Number: MD 30275
84
Page 83

TELEAVIA 0293
TELEFUNKEN 0306 0294 0324 0295 0323 0280 0293 0303
0305
TENOSAL 0275
TENSAI 0275 0231 0256
TEVION 0233 0311 0262 0269 0319 0256 0248 0291
0338 0905 0906
THOMSON 0294 0324 0295 0323 0326 0245 0242 0293
0305
THORN 0258 0293 0301
TIVO 0242
TOKAI 0275 0256
TONSAI 0275
TOSHIBA 0320 0257 0265 0298 0319 0362 0293
TOWADA 0275
TOWIKA 0275
TRIUMPH 0301
TVA 0250
U
UHER 0256
UNITED QUICK STAR 0245
UNIVERSUM 0290 0235 0263 0257 0315 0256 0231 0237
0239 0253 0271
V
VICTOR 0294 0295
VIDEON 0233 0262 0311 0248
W
WELTBLICK 0256
Y
YAMISHI 0275
YOKAN 0275
YOKO 0275 0250 0256
Z
ZENITH 0256
Helpline No. UK/ North Ireland 0871 37 61 020 Rep. Ireland 1-800-992 508
Web Support www.medion.co.uk
Model Number: MD 30275
85
Page 84

DVD
A
ACCOUSTIC SOLUTIONS 0383 0350
AEG 0894 0333
AFREEY 0386
AIRIS 0357
AIWA 0383 0377
AKAI 0369 0333 0382 0350 0894
AKASHI 0346
ALBA 0384 0350 0381 0357 0370 0351
ALL-TEL 0333
AMES 0383
AMSTRAD 0350
AMW 1053 1054
ANABA 0961
ANSONIC 0356
APEX 0921 0384 0357 0911 0390 0913 1083 0949
ARENA 0923
ASPIRE 0952
A-TREND 0347
AUDIOSONIC 0382 1062
AUDIOVOX 0942
AXION 0942
B
B & K 0978
BAIER 0349
BAZE 0357
BEKO 1064
BLACK DIAMOND 0350
BLAUPUNKT 0384
BLUE NOVA INTERNATIONAL 1051
BLUE SKY 0373 0357 0350
BOMAN 0894 0351
BRANDT 0373 0360 0362
BROKSONIC 0920 0967
BUSH 0384 0382 0350 0381 0356
C
CAMBRIDGE 0376
CELESTIAL 0357
CENTREX 0357
CENTRIOS 0932 0951 0954 0955
CENTRON 0932
CENTRUM 0346 0926 0928 0350 0927
Helpline No. UK/ North Ireland 0871 37 61 020 Rep. Ireland 1-800-992 508
Web Support www.medion.co.uk
Model Number: MD 30275
86
Page 85

CINETEC 0350
CINEVISION 0375
CLASSIC 0383
CLATRONIC 0357 0894
CMI 0923
COBY 0332 0916 0946 0947 0357 1051 0948
CONTEL 0894
CRITERION 0344
CROWN 0373 0382
C-TECH 0341
CURTIS 0950 0948
CYBERCOM 0356 0930 0932 0330 0335 0339 0340 0341
0342 0345 0352 0358 0371 0923 0375 0343
0924 0933 0338 0334 0344 0664 0372 0373
CYBERHOME 0347 0912 0985 1075
CYBERLINK 1101
CYBERMAXX 0356 0930 0373 0932 0330 0335 0339 0340
0341 0342 0345 0352 0358 0371 0895 0896
0897 0898 0899 0900 0901 0902 0903 0904
0923 0893 0959 1069 1070 1071 1067 1066
1068 1117 1118 0905 0343 0924 0933 0375
0906 0338 0372 0334 0344 0664 0894
CYTRON 0356 0930 0373 0932 0330 0335 0339 0340
0341 0342 0345 0352 0358 0371 0380 0895
0896 0897 0898 0899 0900 0901 0902 0903
0904 0923 0893 0959 1069 1070 1071 1067
1066 1068 1117 1118 0905 0343 0924 0933
0375 0906 0338 0372 0334 0344 0664 0894
D
DAEWOO 0353 0354 0965 0355 0347 0380 0925 0971
DANSAI 0351
DAYTRON 0925
DCE 0356
DENON 0364 0389
DENVER 0381 1051 0894
DENZEL 0392
DESAY 0958
DIAMOND 0373 0341
DIGIFRAME 0930
DIGIHOME 0350
DIGITOR 0382
DIGITREX 0357
DIGITRON 0386
DIGIX 0962
DIK 0356
DISNEY 0339 0902
DiViDo 0380
DIVX 0375 0932
DK DIGITAL 0356
DMTECH 0351 0333
DRAGON SYSTEMS 0356
Helpline No. UK/ North Ireland 0871 37 61 020 Rep. Ireland 1-800-992 508
Web Support www.medion.co.uk
Model Number: MD 30275
87
Page 86

DUAL 0350 0356 0984 0383 0956 0373 0330 0335
0337 0340 0392 0341 0342 0345 0352 0358
0371 0923 0351 0333 0343 0338 0372 0334
0344 0664 0375 0924 0933
DURABRAND 0333 0375 0356 0933 1085 1086 1087 1088
DVD 1024 0929
E
E-BENCH 0341
ELTA 0365 0382 0894 0333
ELTAX 1051
EMERSON 0380 1057 0339 0375
ENCORE 0386
ENZER 0392
ESA 0956
EUROLINE 0894
F
FARENHEIT 0960
FERGUSON 0373
FINLUX 0375 0357 0351
FINTEC 0350
FIRSTLINE 0373
FISHER 0378
FUNAI 0339
G
GE 0384
GERICOM 1064
GOLDEN SPHERE 0341
GOLDSTAR 0375 0907 0972
GOODMANS 0373 0382 0350 0333 0351
GO-VIDEO 0383 1059 1061 0338 0367 0971 0351
GPX 0910
GRADIENTE 0373
GRAETZ 0392
GRAN PRIX 0356
GRANDIN 0357
GRUNDIG 0385 0370 0380 0373 0378 0376 0350 0333
H
H & B 0350 0343
HB 1089
HAAZ 0341 0342
HANSEATIC 0375 0351 0333
HARMON/KARDON 0395
HCM 0894
HE 0383
Helpline No. UK/ North Ireland 0871 37 61 020 Rep. Ireland 1-800-992 508
Web Support www.medion.co.uk
Model Number: MD 30275
88
Page 87

HITACHI 0367 0368 0392 0387 0350
HITEKER 0357
HOHER 0356
HOME ELECTRONICS 0383
HOMITA 0934 0935 0936 0937 0938
HOYO 0392
HYUNDAI 0351
I
ILO 0959
INITIAL 0384
INTEGRA 0374
INTERTRONIC 0893 0933 0894
J
JATON 0392
JBL 0395
JDB 0383
JVC 0361 1058 0362 0400 0964 0662 1072
JWIN 1076 1083
K
KARCHER 0351
KAWASHI 0333
KENDO 0356 0923 0350
KENNEX 0350
KENWOOD 0393 0364
KISS 0392
KLH 0384
KONKA 0908 0909
KOSS 0358 0373
L
LASONIC 0341
LAWSON 0341 0380
LECSON 0376
LENCO 0373 0350 0356
LENOXX 0931 0346 0382
LG 0375 0907 0972
LIFE 0372 0373 1117 1118
LIFETEC 0356 0930 0373 0932 0330 0335 0339 0340
0341 0342 0345 0352 0358 0371 0895 0896
0897 0898 0899 0900 0901 0902 0903 0904
0923 0893 0959 1069 1070 1071 1067 1066
1068 1117 1118 0905 0343 0924 0933 0375
0906 0338 0372 0334 0344 0664 0894
LIMIT 0341
LINN 0336
LITEON 0982 1056 1059 0959
LODOS 0350
Helpline No. UK/ North Ireland 0871 37 61 020 Rep. Ireland 1-800-992 508
Web Support www.medion.co.uk
Model Number: MD 30275
89
Page 88

LOEWE 0370 0375
LOGIX 0351 0380
LUMATRON 0332 0342 1051 0350 0383 0380
LUXMAN 0367
LUXOR 0350 0383
M
MAGNAVOX 0362 0379 0979 0980 0981 0370 0350 0914
MANHATTAN 0350 0380
MARANTZ 1079 0370 0379 0981 0375 0362
MARK 0350
MASTEC 0335
MATSUI 0373 0357 0350
MAXDORF 0894
MAXIM 0331 0350
MBO 0396 0383 0382
MEDION 0356 0930 0373 0932 0330 0335 0339 0340
0341 0342 0345 0352 0358 0371 0351
0895 0896 0897 0898 0899 0900 0901 0902
0903 0904 0923 0893 0959 1069 1070 1071
1067 1066 1068 1115 1116 1117 1118 0905
0343 0924 0933 0375 0906 0338 0372 0334
0344 0664 0894
MEMOREX 0356 0339 0920
MERIDIAN 0362
METZ 0368 0350 0922
MICROMAXX 0356 0893 0930 0373 0932 0330 0335 0339
0340 0341 0342 0345 0352 0358 0371 0895
0896 0897 0898 0899 0900 0901 0902
0903 0904 0923 0959 1069 1070 1071 1067
1066 1068 1117 1118 0905 0343 0924 0933
0375 0906 0338 0372 0334 0344 0664 0894
MICROMEGA 0370
MICROSOFT 0399
MICROSTAR 0356 0930 0373 0932 0330 0335 0339 0340
0341 0342 0345 0352 0358 0371 0895 0896
0897 0898 0899 0900 0901 0902 0903 0904
0923 0893 0959 1069 1070 1071 1067 1066
1068 1117 1118 0905 0343 0924 0933 0375
0906 0338 0372 0334 0344 0664 0894
MINATO 0349
MINERVA 0380
MINTEK 0384
MIRROR 0349
MITSUBISHI 0350 0366
MONYKA 0392
MT LOGIC 1062
MUSTEK 0383
MxONDA 0373
MYSTRAL 0356
Helpline No. UK/ North Ireland 0871 37 61 020 Rep. Ireland 1-800-992 508
Web Support www.medion.co.uk
Model Number: MD 30275
90
Page 89

N
NAD 0375 0394
NAKAMICHI 0398
NEC 0375
NEOTEK 0386
NEUFUNK 0392
NEVIR 0356
NEXXTECH 0932 0954 0955 0956
NORCENT 0332 0982 0944 0945 0948
NORDMENDE 0356
NORIKO 0349
O
OCEANIC 1089
OKANO 0349 0362
OMNI 0382
ONIX 0346
ONKYO 0374 0975
OPTIMUS 0368 0922
ORION 0920 0335
ORITRON 0373
P
PACIFIC 0356 0350 0333
PACKARD BELL 0939 0940 1101 1052
PALSONIC 0357
PANASONIC 0401 0364 0403 0970 0974
PANDA 0351
PHILIPS 0370 0379 0979 0980 0981 0362 1080 1123
1128 0969 0339
PHOCUS 1063 1064
PHONOTREND 0916
PIONEER 0368 0977 0922 0968 0976 1084
POLAROID 0957 0949
PORTLAND 0382
PRINZ 0356
PRISM 0335
PRO2 0356 0930 0373 0932 0330 0335 0339 0340
0341 0342 0345 0352 0358 0371 0895 0896
0897 0898 0899 0900 0901 0902 0903 0904
0923 0893 0959 1069 1070 1071 1067 1066
1068 0905 0343 0924 0933 0375 0906 0338
0372 0334 0344 0664 0894
PROCASTER 0905
PROLINE 0373 0357 0333 0376 0397
PROSCAN 0399
PROSON 0350
PROSONIC 0332 0341 0349
PROVISION 0381 1051
Helpline No. UK/ North Ireland 0871 37 61 020 Rep. Ireland 1-800-992 508
Web Support www.medion.co.uk
Model Number: MD 30275
91
Page 90

Q
QUARTEK 1077
R
RADIONETTE 0375
RAITE 0392
RCA 0399 0384
REDSTAR 0894
RELISYS 0923 0895
REOC 0341
REX 0346
ROADSTAR 0350 0383 0382
RONIN 0397
ROTEL 0361
ROWA 0384 0922
RTL 0923
S
SABA 0373 0915 0360
SAIVOD 0356
SALORA 0375
SAMPO 0341 0386 0923 0895 1051
SAMSUNG 0367 1050 0338 0963 0919
SANSUI 0341 0920
SANYO 0350 0333 1060 0378
SCAN 0380
SCHAUB LORENZ 0894 1089
SCHWAIGER 0349
SCIENTIFIC LABS 0341
SCOTT 0373 0357
SEG 0350 0341 0392
SHARP 0371 0394 1055 0350
SHERWOOD 0391
SHINCO 0384
SHINSONIC 0384
SILVA 0894
SILVA SCHNEIDER 0356
SILVERCREST 0341 1093 1090 1091 1092
SINGER 0341 0382
SKYMASTER 0382 0383
SM ELECTRONIC 0382 0383 0341
SMART 0350 0380
SONY 0363 0987 0988 0989 0402 0986
SOUNDMASTER 0341
SOUNDMAX 0341
SOUNDSTORM 0330
SOUNDWAVE 0351
STANDARD 0373
Helpline No. UK/ North Ireland 0871 37 61 020 Rep. Ireland 1-800-992 508
Web Support www.medion.co.uk
Model Number: MD 30275
92
Page 91

STRONG 0350
SUNGALE 0953
SUPERVISION 0382 0383
SVA 0349
SYLVANIA 0339
SYNN 0341
T
TANDBERG 0350
TANGENT 1051
TARGA 0375 1115 0959 0891 1117 0972 1094 1121
1041 0907
TCM 0356 0930 0373 0932 0330 0335 0339 0340
0333 0341 0342 0345 0352 0358 0371 0923
1119 0343 0924 0933 0338 0372 0334 0344
0664
TEAC 0368 0333 0341 0384 0375
TECHNICS 0364 0399
TECHNIKA 0356
TECHWOOD 0394 0350 0370
TECO 0923 0895
TEDELEX 0382
TELEDEVICE 1051
TELEFUNKEN 0894 0333
TELETECH 0350
TENSAI 0373 0382
TERAPIN 0943
TEVION 0356 0930 0373 0932 0330 0335 0337 0339
0340 0341 0342 0345 0352 0358 0371 0891
0892 0895 0896 0897 0898 0899 0900 0901
0902 0903 0904 0923 0966 0893 0959 1065
1068 1069 1070 1071 1067 1066 1117 1118
0890 0905 0343 0924 0933 0375 0906 338
0917 0918 0372 0334 0344 0664 0894 1064
THETA DIGITAL 0368
THOMSON 0360 0359 0399 1078
TINY 1051
TOKAI 0894 0392
TOKIWA 0380
TOSHIBA 0973 1110 1120 0362 0983 0920 1111
TRANS-CONTINENTS 0356 1051
TRANSONIC 0357
TREDEX 0941
TRUTECH 1075
U
UMAX 0382
UNITED 0333 0348 0357 0894
UNIVERSUM 0350 0375 0333
Helpline No. UK/ North Ireland 0871 37 61 020 Rep. Ireland 1-800-992 508
Web Support www.medion.co.uk
Model Number: MD 30275
93
Page 92

V
VENTURER 0333
VESTEL 0350
VIETA 0380
VOXSON 0383 0356 0382
W
WALKVISION 0384
WELKIN 0356
WESTAR 0350
WHARFEDALE 0376 0349 0341 0386
WILSON 0356
X
X-BOX 0399
XENIUS 0373 0358
XLOGIC 0341
XMS 0894
Y
YAKUMO 0357 1083 0905
YAMAHA 0364 0388 0979 0980 0370
YAMAKAWA 0397 0392 0382
YUKAI 0383
Z
ZENITH 0375 0907
CD
A
ADCOM 0848
AIWA 0849 0850 0851 0751
AKAI 0853 0854 0855
ALBA 0856
ARCAM 0732
B
BESTAR 0859
BSR 0860
BUSH 0661
C
CARRERA 0663
Helpline No. UK/ North Ireland 0871 37 61 020 Rep. Ireland 1-800-992 508
Web Support www.medion.co.uk
Model Number: MD 30275
94
Page 93

CLASSIC 0807
CONDOR 0860
CYBERCOM 0843 0664 0668 0674 0675 0694 0730 0742
0743 0744 0745 0746 0747 0801 0802 0803
0807 0809 0818 0819
CYBERMAXX 0843 0664 0668 0674 0675 0694 0730 0742
0743 0744 0745 0746 0747 0801 0802 0803
0807 0809 0818 0819
CYTRON 0843 0664 0668 0674 0675 0694 0730 0742
0743 0744 0745 0746 0747 0801 0802 0803
0807 0809 0818 0819
D
DENON 0665 0666
DUAL 0843 0848 0664 0668 0675 0694 0730 0742
0743 0744 0745 0746 0747 0798 0801 0802
0803
E
E-BENCH 0811
ELTA 0667 0668 0693 0694 0745
EMERSON 0848 0859
F
FISHER 0669
G
GENEXXA 0859 0671 0672 0673 0675 0676 0677
GOLDSTAR 0663
GOODMANS 0678 0679
GRUNDIG 0680 0697 0698 0732
H
HARMON/KARDON 0683
HITACHI 0848 0685 0686
I
INNOVATION 0730 0742 0743 0744 0745 0746 0747
J
JVC 0662 0687
K
KENWOOD 0669 0688 0689 0690 0762
Helpline No. UK/ North Ireland 0871 37 61 020 Rep. Ireland 1-800-992 508
Web Support www.medion.co.uk
Model Number: MD 30275
95
Page 94

L
LIFETEC 0843 0664 0668 0674 0675 0694 0730 0742
0743 0744 0745 0746 0747 0801 0802 0803
0807 0809 0818 0819
LG 0663
LINN 0732
LUXMAN 0691
M
MAGNUM 0730 0742 0743 0744 0745 0746 0747
MARANTZ 0695 0732
MATSUI 0696 0732
MEDION 0843 0664 0668 0674 0675 0694 0730 0742
0743 0744 0745 0746 0747 0801 0802 0803
0807 0809 0818 0819
MEMOREX 0848 0859 0677
MERIDIAN 0732
MICROMAXX 0843 0664 0668 0674 0675 0694 0730 0742
0743 0744 0745 0746 0747 0801 0802 0803
0807 0809 0818 0819
MICROMEGA 0732
MICROSTAR 0843 0664 0668 0674 0675 0694 0730 0742
0743 0744 0745 0746 0747 0801 0802 0803
0807 0809 0818 0819
MISSION 0732
N
NAD 0671 0733 0735 0736 0737 0800
NAIM 0732
NAKAMICHI 0699 0700
NUVO 0866
O
ONKYO 0840 0701 0702 0703 0785 0792
P
PANASONIC 0661 0705
PHILIPS 0847 0706 0732
PHILIPS CD-V 0840
PIONEER 0673 0677 0753
PRO2 0843 0664 0668 0674 0675 0694 0730 0742
0743 0744 0745 0746 0747 0801 0802 0803
0807 0809 0818 0819
PROTON 0732
Q
QUAD 0732
Helpline No. UK/ North Ireland 0871 37 61 020 Rep. Ireland 1-800-992 508
Web Support www.medion.co.uk
Model Number: MD 30275
96
Page 95

R
REALISTIC 0848 0859 0675
ROADSTAR 0706 0708
ROTEL 0732
S
SABA 0848
SAE 0732
SAMSUNG 0768
SANSUI 0847 0709 0710 0711 0732
SCHNEIDER 0860 0732
SCOTT 0859
SHARP 0672 0712 0713 0714
SHERWOOD 0782
SILVERCREST 0811
SINGER 0803
SKYMASTER 0778
SONY 0671 0716 0717 0718 0741 0748 0749 0750
T
TANDBERG 0732
TCM 0843 0664 0668 0674 0675 0694 0730 0742
0743 0744 0745 0746 0747 0801 0802 0803
0807 0809 0823 0824 0825
TEAC 0795
TECHNICS 0705 0721 0763 0787
TELEFUNKEN 0848
TEVION 0843 0664 0668 0674 0675 0694 0730 0742
0743 0744 0745 0746 0747 0801 0802 0803
0807 0809 0813 0814 0816 0818 0819 0821
0822
THEORIE & ANWENDING 0804
THOMSON 0842 0848
TOSHIBA 0722 0723
U
UNIVERSUM 0732
V
VECTOR RESEARCH 0663
VICTOR 0687
W
WELLTECH 0675 0694 0744 0811 0827 0828
Y
YAMAHA 0712 0720 0725 0771
Helpline No. UK/ North Ireland 0871 37 61 020 Rep. Ireland 1-800-992 508
Web Support www.medion.co.uk
Model Number: MD 30275
97
Page 96

YORX 0708
SAT
A
AKAI 0552
ALBA 0508 0562 0405 0407
ALDES 0408 0409
ALLSAT 0462 0410 0552
ALLSONIC 0408 0428
AMPERE 0422
AMSTRAD 0584 0555 0541 0415 0416 0417 0419
ANKARO 0408 0428 0424
ANTTRON 0405 0407
APOLLO 0405
ARCON 0415 0422 1155 1144 1153 0424 0463 1154
ARMSTRONG 0419
ASAT 0552
AST 0435
ASTON 0594 0406
ASTRA 0429 0419 0431 0432 0502
ASTRO 0428 0439 0569 0407 0409
AUDIOTON 0462 0407
AURORA 0602
AUSTAR 0602 0643 0642
AXIS 0428 0415 0432 0456
B
BARCOM 0424
BEST 0428 0424
BLAUPUNKT 0439
BOCA 0419 0502
BRAIN WAVE 0444 1131
BRANDT 0565 0566 0567 0574
BSKYB 0584 0555
BT SATELLITE 0574
BUSH 0508 0562 0410
C
CANAL SATELLITE 0569 0599
CANAL+ 0569 0599
CHAPARRAL 0507
CHESS 0547 0586
CITYCOM 0508 0640 0459
CLATRONIC 0444
CLEMENS KAMPHUS 0491
CNT 0409
Helpline No. UK/ North Ireland 0871 37 61 020 Rep. Ireland 1-800-992 508
Web Support www.medion.co.uk
Model Number: MD 30275
98
Page 97

COLUMBUS 0477
COMAG 0471
COMMLINK 0408
COMTECH 0456
CONDOR 0428 0640
CONNEXIONS 0438 0454
CONRAD 0640 1156
CONTEC 0456 0459
COSAT 0462
CROWN 0419
CYBERCOM 0412 0413 0423 0428 0442 0493 0504 0511
0514 0546 0566 0583 0586 0587 0618 0619
CYBERMAXX 0412 0413 0423 0428 0442 0466 0478 0484
0493 0504 0511 0514 0535 0546 0566 0583
0586 0587 0618 0619 0644 0650 0652 0653
1130 1138 1137
CYTRON 0412 0413 0423 0428 0442 0466 0478 0484
0493 0504 0511 0514 0535 0546 0566 0583
0586 0587 0618 0619 0644 0650 0652 0653
1130 1138 1137
D
DAERYUNG 0438
DANSAT 0410
D-BOX 0564 0604
DECCA 0460
DEW 0456
DIAMOND 0461
DIGIALITY 0640
DISKXPRESS 0424 0454
DITRISTRAD 0462
DMT 0412
DNT 0438 0552
DRAKE 0557 0463
DREAMBOX 0658
DStv 0602
DUAL 0412 0413 0423 0428 0493 0504 0511 0566
0583 0586 0587 0618 0514
E
ECHOSTAR 0640 0581 0586 0425 0481 0578 0579 0580
0657 0659 0464 0465 0467
EINHELL 0408 0417 0405 0419
ELEKTA 0409
ELTA 0428 0462 0405 0552
EMANON 0405
EMME ESSE 0428 0508 0491
EMTECH 1162
EP SAT 0508 0491
E-TEK 1140
Helpline No. UK/ North Ireland 0871 37 61 020 Rep. Ireland 1-800-992 508
Web Support www.medion.co.uk
Model Number: MD 30275
99
Page 98

EUROPHON 0640
EUROSAT 0419
EUROSKY 0428 0640 1156 0419
EUROSPACE 0468
EUROSTAR 0438 0419
EVA 0588 0589
EXATOR 0405 0407
F
FERGUSON 0508 0472 0603 0410 0473
FIDELITY 0415 0417
FINLANDIA 0508
FINLUX 0508 0429 0608 0475 0480 0487
FINNSAT 0603 0456
FORCE 0577 0553 0535
FORTEC STAR 0470
FOXTEL 0602 0643 0584
FRACARRO 0562
FRANCE SATELLITE/TV 0477
FREECOM 0405 0489
FTE 0422 0496
FUBA 0548 0439 0428 0438 0405 0424 0431 0477
0480 0552
FUNTACH 0587
G
GALAXIS 0428 0408 0462 0478 0484 0535 0582 0583
0602 0619 0432 0456
GALAXY 0424
GLOBECAST 1141
GLOBO 1156
GMI 0419
GOLDSTAR 0489
GOODING 0483
GOODMANS 0508
GRANADA 0429
GROTHUSEN 0405 0489
GRUNDIG 0439 0436 0483 0495 0508 0544 0469 0602
0584 0407 0550
H
HANDAN 0547 1167
HANSEATIC 0504
HANTOR 0444 0405
HANURI 0409
HB 1162 0413
HELIOCOM 0422
HIRSCHMANN 0439 0522 0547 0548 1156 1165 1174 0487
0488 0491 0558
Helpline No. UK/ North Ireland 0871 37 61 020 Rep. Ireland 1-800-992 508
Web Support www.medion.co.uk
Model Number: MD 30275
100
Page 99

HISAWA 0444
HITACHI 0508 0537
HOUSTON 0462
HUMAX 0485 0517 0582
HUTH 0408 0411 0444 0462 0419 0491
HYUNDAI 0486
I
IMPERIAL 0562
INNOVATION 0428 0493 0504 0511 0583 0586 0587 0618
INTERTRONIC 0419
INTERVISION 0462
IRDETO 0602
ITT/NOKIA 0429 0508 0548 0454 0487 0537
J
JOHANSSON 0444
JSR 0462
JVC 0483
K
KATHREIN 0549 0617 0631 0607 0635 0439 0459 0496
0507 0552
KOSMOS 0489 0491 0496
KR 0407
KREISELMEYER 0439
KYOSTAR 0405
L
LASAT 0428 0565 0566 0567 1156 1157 0409 0502
LENCO 0405 0489 0503
LENG 0444
LENNOX 0462
LENSON 0479
LG 0489
LIFE 0583
LIFESAT 0412 0413 0423 0428 0442 0493 0504 0511
0514 0546 0566 0583 0586 0587 0618 0619
LIFETEC 0412 0413 0423 0428 0442 0466 0478 0484
0493 0504 0511 0514 0535 0546 0566 0583
0586 0587 0618 0619 0644 0650 0652 0653
1130 1138 1137
LION 0468
LORENTZEN 1156
LORRAINE 0489
LUPUS 0428
LUXOR 0417 0429 0548 0537
Helpline No. UK/ North Ireland 0871 37 61 020 Rep. Ireland 1-800-992 508
Web Support www.medion.co.uk
Model Number: MD 30275
101
Page 100

M
MACAB 0603
MANHATTAN 0462 0508 0557 0633 0421 0409
MARANTZ 0552
MARMITEK 0641
MARMITEK OCTOPUS 0655
MASCOM 0409
MASPRO 0483 0508 0507 0558
MATSUI 0483 0574
MB 0504
MBOX 0442
MEDIABOX 0569
MEDIAMARKT 0419
MEDIASAT 0569 0432
MEDION 0412 0413 0423 0428 0442 0466 0478 0484
0493 0504 0511 0514 0535 0546 0566 0583
0586 0587 0618 0619 0644 0650 0652 0653
1130 1139 1138 1137 1181
MEGA 0552
METRONIC 0408 0575 0612 0613 0614 0615 0632 0409
0424 0405
0407
METZ 0439
MICRO TECHNOLOGY 0468
MICROMAXX 0412 0413 0423 0428 0442 0466 0478 0484
0493 0504 0511 0514 0535 0546 0566 0583
0586 0587 0618 0619 0644 0650 0652 0653
1130 1139 1138 1137
MICROSTAR 0412 0413 0423 0428 0442 0466 0478 0484
0493 0504 0511 0514 0535 0546 0566 0583
0586 0587 0618 0619 0644 0650 0652 0653
1130 1138 1137
MINERVA 0483 0439
MITSUBISHI 0508 0439 0574
MITSUMI 0502
MORETV 0644 0423 1130 1181
MORGAN SYDNEY 0611
MORGANS 0611 0419 0502 0552
MULTICHOICE 0602
MULTISTAR 0496
MULTITEC 0586 0587
MURATTO 0437 0489
N
NAVEX 0444
NEC 0509 0510
NEUHAUS 0462 0479 0432
NEXTWAVE 0414 0585
NIKKO 0419
NOKIA 0530 0564 0425 0429 0508 0548 0563 0531
0454 0487 0604
Helpline No. UK/ North Ireland 0871 37 61 020 Rep. Ireland 1-800-992 508
Web Support www.medion.co.uk
Model Number: MD 30275
102
 Loading...