

Page 1

Table of contents:
SAFETY CAUTIONS .................................................................. 1
Data Backup ........................................................................... 1
Safe Usage Guidelines.............................................................. 2
Power supply ....................................................................... 3
Electromagnetic Compatibility ................................................ 3
Cleaning.............................................................................. 3
Recycling............................................................................. 4
Battery Handling .................................................................. 4
Legal caution: ......................................................................... 4
Audio formats ......................................................................... 5
Page 2

OPERATION ........................................................................... 16
Switching On/Off ................................................................... 16
Selecting Menu Language .................................................... 16
Start Menu ........................................................................... 16
Button Locking ...................................................................... 17
Volume Control ..................................................................... 18
Connecting Earphones/Amplifier.............................................. 18
Playback .............................................................................. 19
Playback ........................................................................... 19
Pause ............................................................................... 19
Select Title(s) .................................................................... 19
Page 3

CONNECTING TO A COMPUTER .............................................. 25
I. Installation of the Driver ..................................................... 25
II. Installation of the Jukebox Service Plug-In .............................. 25
III. Installation of Music Match ................................................ 26
IV. Connection to the Computer .............................................. 26
V. PC/Jukebox Data Exchange................................................. 27
EXTENDED FUNCTIONS OF THE JUKEBOX .............................. 29
Use as an External Hard Drive ................................................ 29
File Management ................................................................ 29
Using the Card Bay for MMC/SD Cards .................................. 30
Support of USB-OTG Devices ............................................... 31
Page 4

Page 5

S
S
AAFFEETTYY
C
C
AAUUTTIIOONNS
S
We recommend that the user reads the present chapter completely
and with care and follows the instructions contained. In this way, the
correct functioning and the long duration of the Jukebox is guaranteed. Please keep the present instructions and preserve them in
order to eventually be able to deliver them to the new owner of the
device in case of sale. In case of any problems, address exclusively
to an authorized assistance centre.
DATA BACKUP
You must guard against the loss of your important data by making backup copies. You can
Page 6

SAFE USAGE GUIDELINES
Keep the product away from damp, protect it from jolts, dust
and heat and do not expose it to direct sunlight, in order to
avoid any operational problems.
Do not open the product casing: this would cause the forfeit of the
guarantee and the eventual damage/destruction of the product.
Attention: The jukebox has an installed hard drive. Do not drop the
device and avoid vibrations, in order to avoid damage.
There is a risk of injury if the display breaks. If this should occur,
use protective gloves to pack the broken parts and contact customer
support to arrange for disposal. Then wash your hands with soap,
since there is a possibility that chemicals may have escaped.
Do not allow children to play with electrical products without the supervision
Page 7

POWER SUPPLY
The outlet must be in the vicinity of the appliance and must be easily
accessible.
Only use the mains adapter on grounded sockets at 100 – 240 V~ AC,
50/60 Hz. If you are unsure about the power supply to the place of
use, ask the relevant energy supplier.
Use only the power adapter provided with your appliance.
For additional safety, we recommend the use of a surge protector in
order to protect your appliance from damage from spikes or lighting
strikes on the power network.
ELECTROMAGNETIC COMPATIBILITY
When you use the product, follow the directives on electromagnetic com-
Page 8

RECYCLING
The device and its packaging are recyclable.
BATTERY HANDLING
Batteries may contain combustible materials. Misusing them may cause battery
leakage, heat, explosion or ignition, bringing about injury or damage to the
product or YOU. Please observe strictly the following:
KEEP CHILDREN AWAY from batteries.
If by any chance, batteries are swallowed, consult a medical doctor
immediately.
DO NOT SHORT-CIRCUIT batteries.
DO NOT HEAT or DISPOSE OF IN FIRE.
DO NOT DISASSEMBLE or DEFORM batteries. Your hands and fingers
Page 9

Any user who violates these rights is prosecutable according to the
laws and/or subject to claims from the holder of the rights.
AUDIO FORMATS
Your Jukebox can handle MP3, WAV and WMA-files.
When using the Windows
®
Mediaplayer® you can select if you want to
protect your files converted from your own discs:
Page 10

Page 11

W
W
HHAAT
T
’
’
SS IINN TTHHEE
B
B
OOX
X
??
Please check the below listed parts and accessories are in the box
when you first unpack your product. In the case of any missing
item(s) please contact your local service centre accordingly. Any
claim for missing parts will only be accepted within 7 days from date
of purchase. Included in your product box is the following:
Jukebox
USB computer connection cable
Short USB- connection cable for USB-OTG devices*
Page 12

S
S
YYSSTTEEMM RREEQQUUIIRREEMMEENNTTS
S
Connection USB-Socket (USB 1.1/2.0)
CD-ROM (for installation)
Operating
System
Microsoft Windows
®
98SE / ME
Microsoft Windows
®
2000 / XP
Driver
Only required for Windows
®
98SE
Page 13

O
O
VVEERRVVIIEEW
W
Front
4
6
5
Page 14

Ref. Description Page
1
Menu Button [
]
- Switches the device ON/OFF
- Switches to the previous Menu.
16
2 Scroll Area
Use this area, which is sensitive to the touch, to shift
upwards/downwards on the display or to adjust the
volume during playback. Move your finger or thumb up
or down in the groove, to control your selection.
-
3 Back [] to the previous Title/Point/Directory
19
4 Display (Screen)
-
Page 15
2
1
3
Left Side Right Side
Page 16

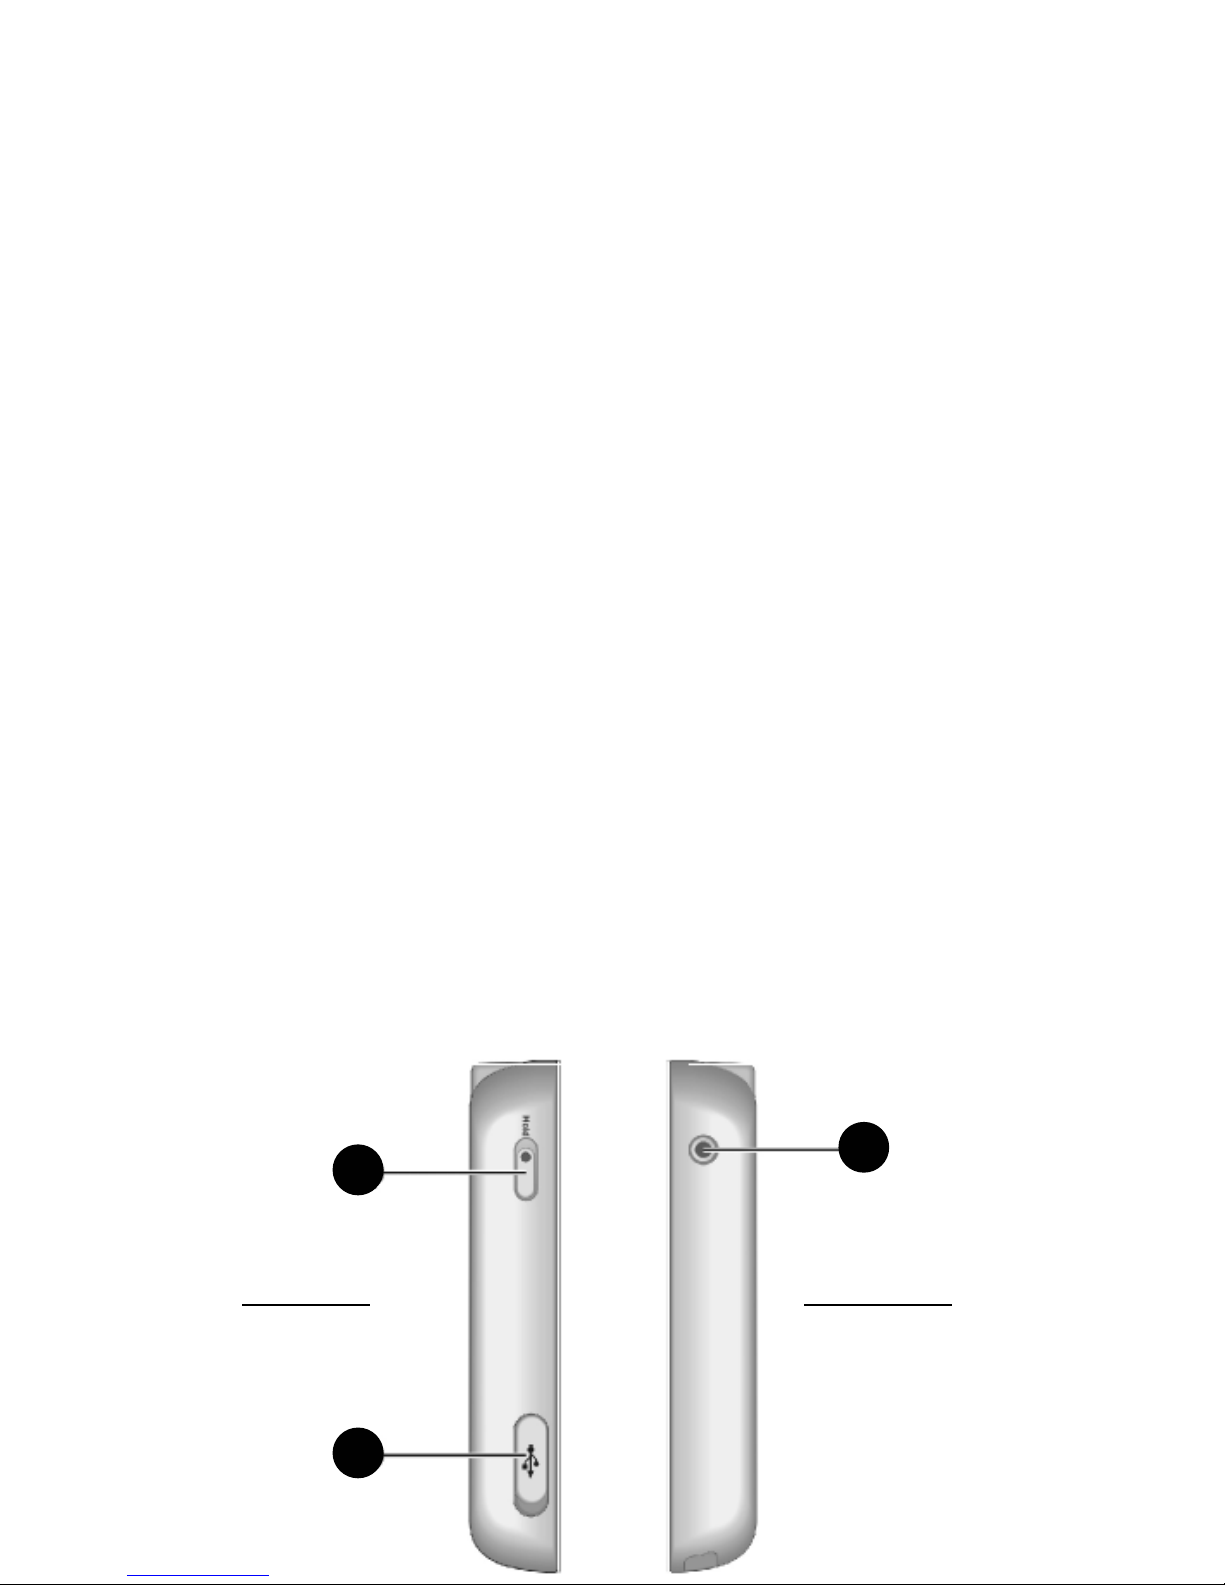
Ref. Description Page
1 Button Locking to protect against unintentional con-
trol
17
2 Record Button to start recording sound through the
installed microphone.
21
3 USB 1.1/2.0 Connection for connection to the PC or
another USB device.
25
4 Microphone
21
5 Memory bay for SD/MMC cards
30
Page 17

I
I
NNIITTIIAALL
S
S
EETTUUP
P
The battery must be inserted and charged completely before you can
use the Jukebox. Use the network adapter provided exclusively to do
this.
INSERT/REPLACE BATTERY
Insert the accumulator pack supplied:
Page 18
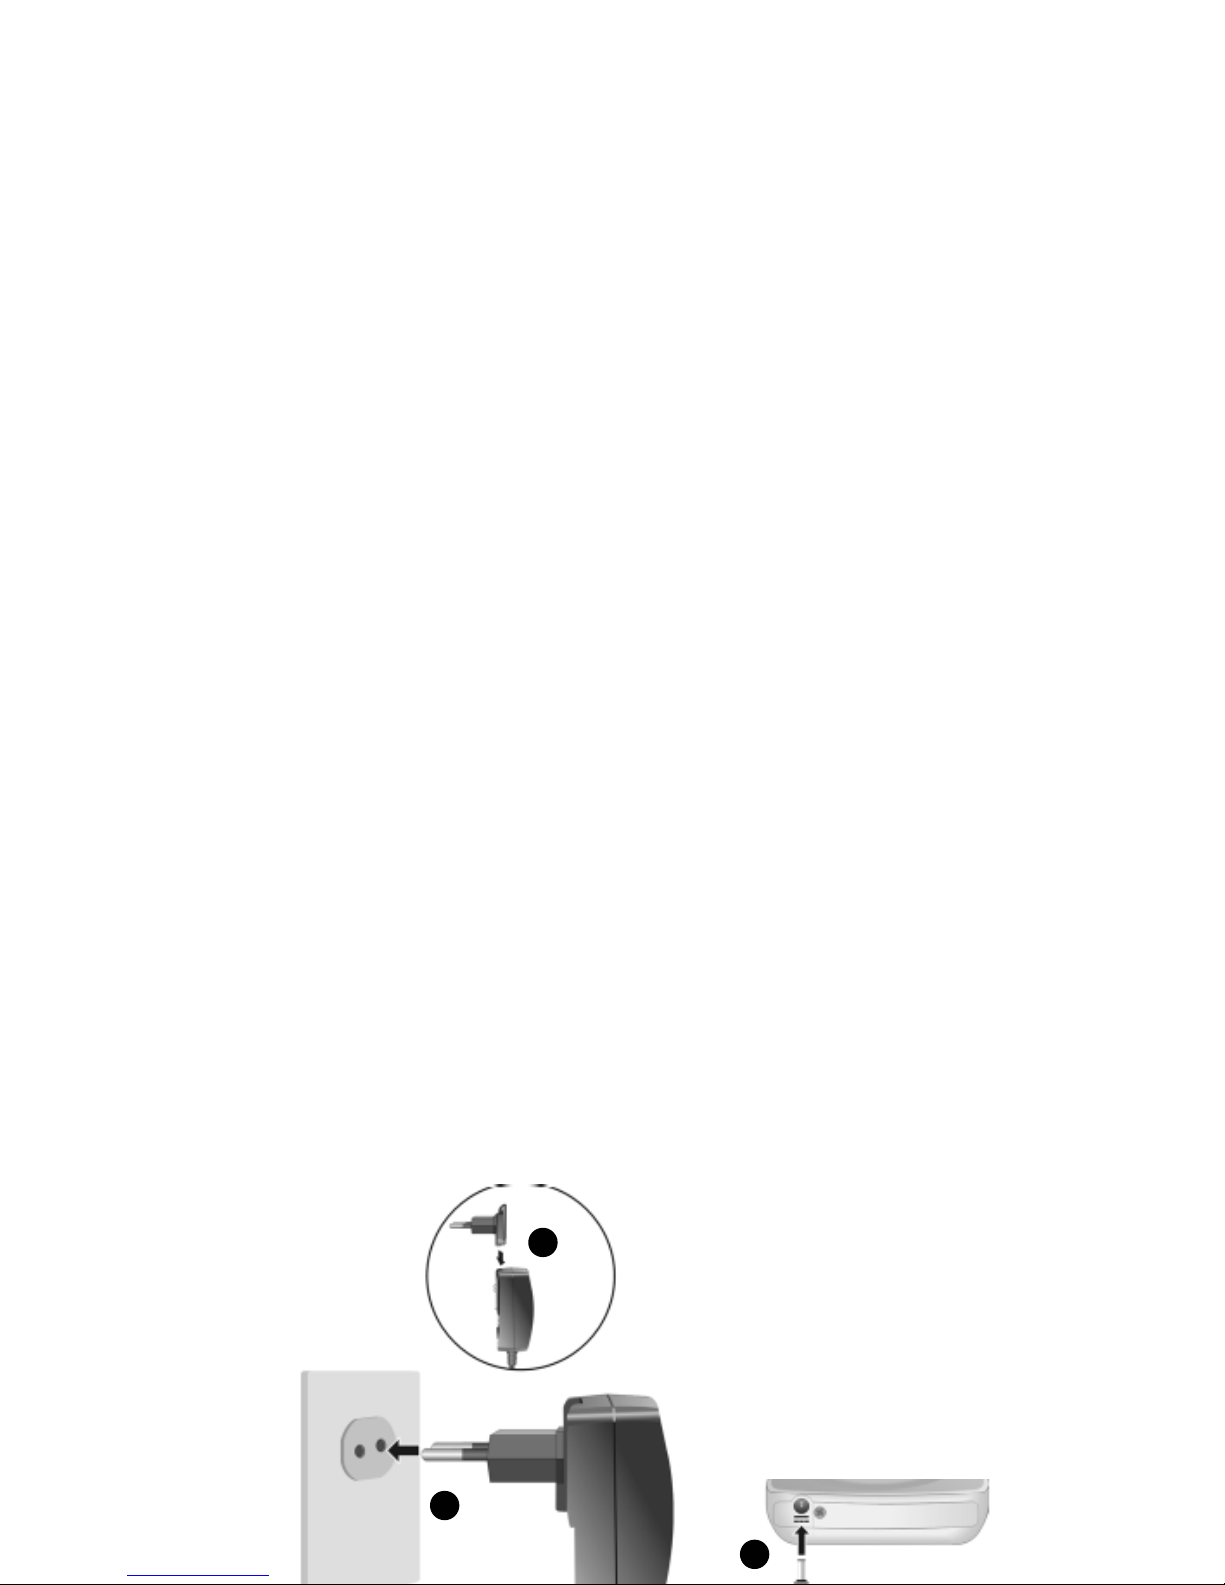
CONNECT NETWORK ADAPTER /CHARGE BATTERY
Connect the network adapter as illustrated:
2
1
3
Page 19

The battery symbol in the display will indicate the charging status. If
the display flashes, the battery is being charged. As soon as the display no longer flashes, the battery is full. The charging process will
take approx. 3 hours when the battery is empty. The battery will be
approx 80 % charged in 2 hours.
Display Remark
The battery is charged.
The battery is almost empty and
should now be recharged.
Page 20

O
O
PPEERRAATTIIOON
N
SWITCHING ON/OFF
Press the Menu Button [] for two seconds, to switch on the Jukebox
and to load the operator interface (Menu).
Press the Menu Button [
] again for four seconds, to switch the Juke-
box off again. The device will also switch itself off if you stop the playback and the set stand-by time is overridden. Then, the device will
switch itself off automatically.
SELECTING MENU LANGUAGE
Page 21

The Menu will be faded out when you start playback. Proceed as follows
to display the Menu during playback:
1. Press the Menu Button
briefly, to reach the Menu mode. The
Menu will be faded out if you do not make any further selection
for more than eight seconds.
2. Move your finger/thumb up or down in the groove of the Scroll
Area, to select a menu point.
3. Confirm the selection by pressing the Selection Button (ENTER).
4. Press the Menu Button to reach a Sub-Menu. You will reach the
higher level of the Menu in this way.
BUTTON LOCKING
Page 22

VOLUME CONTROL
Regulate the volume during playback by touching the Scroll Area.
Move your finger up, to increase the volume. Move your finger down,
to reduce the volume.
CONNECTING EARPHONES/AMPLIFIER
The device is supplied with stereo earphones.
Plug the jack plug (3.5 mm) of the earphones into the earphones
connection. You can also connect a cable (optional) to this connection
for a connection to your stereo equipment.
* Attention: Using earphones at a high volume can lead to last-
ing hearing damage. Set the volume to the lowest level before
playback. Start the playback and increase the volume to the ex-
Page 23

PLAYBACK
Read how you transfer data to your Jukebox from Page 27.
PLAYBACK
Press the Play/Pause Button [] briefly, to play a title if the Jukebox is
switched on.
PAUSE
Press the [] Button briefly, to pause playback at the position that
has just been played. Press the button again to continue playback.
SELECT TITLE(S)
You can have your titles displayed in a structured way in the Main
Page 24

MyRecorded You will find your sound recordings here.
* Important Note: The titles will only be correctly sorted if
they are available with a so-called ID3 tag.
Titles that are incorrectly categorized will be displayed in All
Songs. For this reason, adjust your titles with the Medion
Music Manager Program or another processing program,
before
you transfer data.
1. Press the Selection Button (ENTER) briefly, to select a title,
album, category, etc. Your selection will then be played back.
Then the following title from this selection category will be
played back; the previous selection list will no longer be
available.
* Note: Hold down the Selection Button (ENTER) for two sec-
Page 25

SORTING ORDER
This menu is designed to change the sorting order of your Jukebox.
Your tracks can be listed by Title, Tracknumer (helpful for Audiobooks, Classical or Concept albums) or Artist.
RECORDING
You can make a recording with the installed microphone with this
function:
1. Align the microphone on the upper side of the Jukebox to the
source of the sound to be recorded and press the Record Button
(or select Record in the Main Menu).
2. Press the Button again, to start the recording.
3. Press the Button once more to stop the recording.
Page 26

RESETTING THE JUKEBOX (RESET)
It can happen that it is no longer possible to operate the Jukebox
because of unpredicted operating combinations or incorrect data
exchange. In that case, proceed as follows.
1. Remove memory cards inserted, if necessary.
2. Insert a thin object (e.g. a bent paperclip) into the opening provided, until you feel resistance. Now, the Jukebox will restart.
Page 27

MENU STRUCTURE
MAIN MENU Main Menu
My Favorite Selected favourites
Browse Display of the titles on the Jukebox according to …
By Artists Interpreter
By Albums Album name
By Genres Musical genre
By Composers Composer
Setting Settings
Main Menu Adjustment of the Main Menu
EQ Setting Equalizer setting (frequency response equalization)
Shuffle Playback options (random playback, etc.)
Page 28
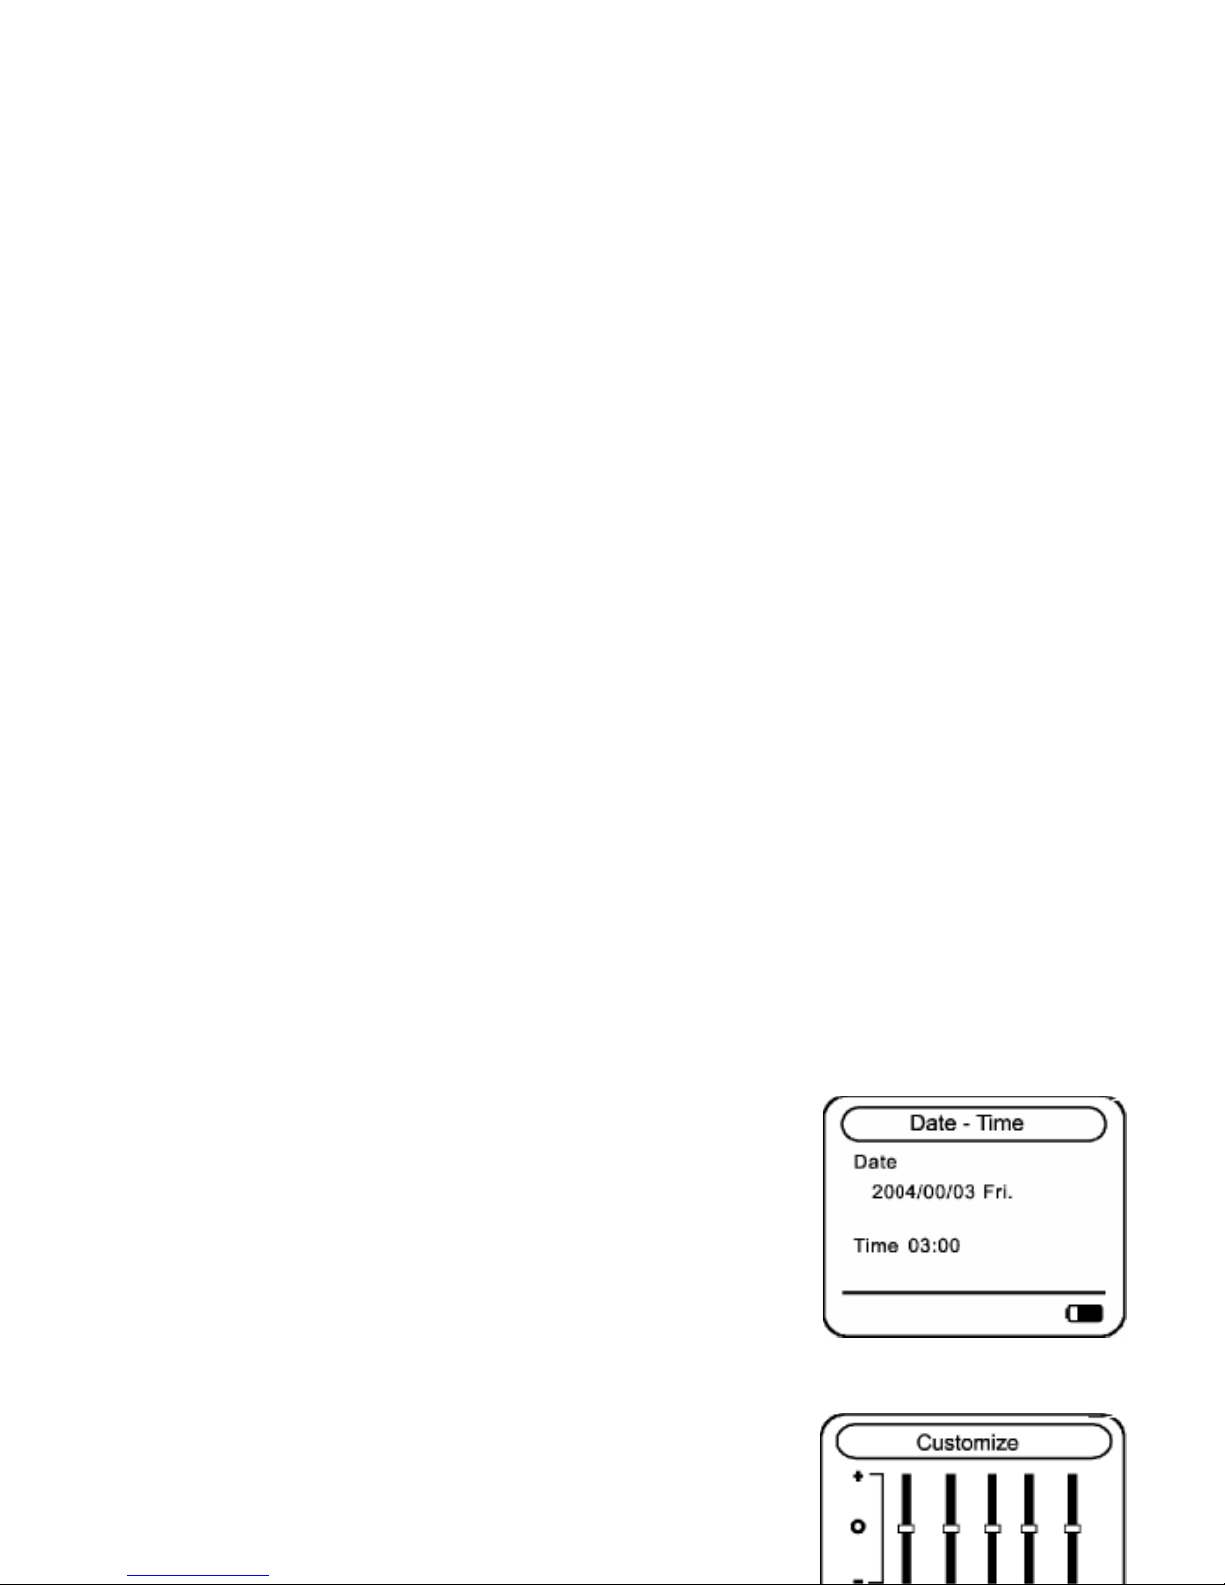
SET TIME /DATE
1. Select the Settings entry in the Main
Menu.
2. Then, open the Date-Time Menu Point.
3. Now you will be able to adjust the information with the Scroll Area. Change the
processing fields with the Back [] and
Forward [] buttons.
EQUALIZER
You can adjust the frequency response of your
Jukebox to your personal requirements. You
can select predefined adjustments and carry
Page 29

C
C
OONNNNEECCTTIINNGG TTOO AA
C
C
OOMMPPUUTTEER
R
* Caution! During the installation of the software it is possible that
some important files are overwritten or modified. To have access
to the original files in case of problems that arise after installation, it is advisable to create a back-up of the hard disk contents.
I. INSTALLATION OF THE DRIVER
(ONLY Windows 98SE – Windows ME/2000/XP does not need any
additional driver)
1. Insert the supplied CDROM until the installation screen appears.
2. Choose the option „Driver for Windows 98 SE“.
Page 30

III. INSTALLATION OF MUSIC MATCH
Music Match will manage your music files and creates the secure
data transfer between your computer and the Jukebox.
You will install the Medion Music Manager in this way:
1. Insert the CD supplied and wait until the program starts automatically.
2. Select the Install Music Match Option.
* Now follow the screen instructions.
IV. CONNECTION TO THE COMPUTER
Page 31

2. Plug the end of the long USB cable supplied into the Jukebox with
the small connector.
3. Connect the other end of the USB cable to a free USB socket on
your computer, after
you have carried out Steps I to III. Now,
the display of the Jukebox will show the connection to the PC.
4. Then press the Menu Button
for two seconds. The computer will
now recognize that a new device has been connected.
* Note: remove the USB connection to your PC, to use the Juke-
box for playing back music again.
V. PC/JUKEBOX DATA EXCHANGE
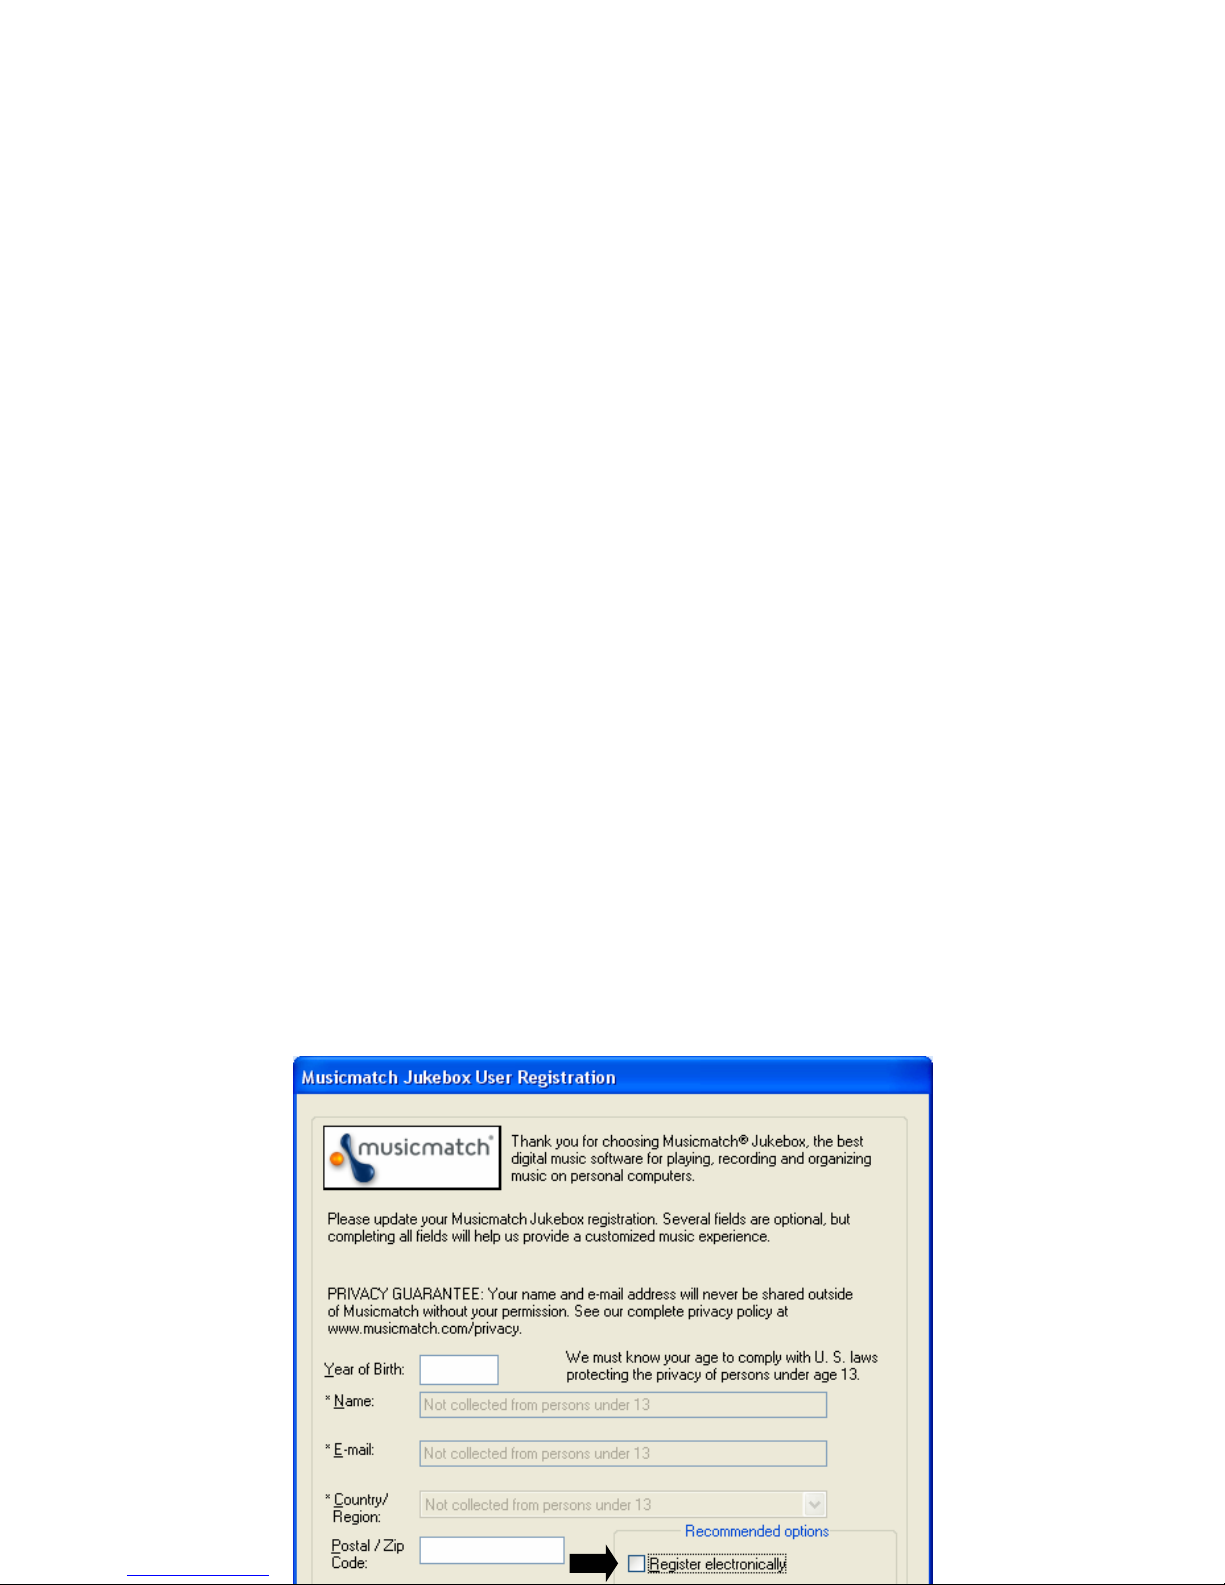
You need the Musicmatch software for the data exchange between
the computer and the Jukebox.
Page 32
Page 33

E
E
XXTTEENNDDEEDD
F
F
UUNNCCTTIIOONNSS OOFF TTHHEE
J
J
UUKKEEBBOOX
X
USE AS AN EXTERNAL HARD DRIVE
It is possible to transfer other files to your Jukebox, in order to use it
as a portable data medium. However, the Jukebox can only playback
MP3, WMA and WAV files.
The operation as an external storage medium functions as in the case
of a usual removable disk.
You can copy, move or delete files through the File Manager Menu
Option.
Page 34

Copy (Copy) or Delete (delete) file operations. Confirm your selection with the Selection Button (ENTER). You will end the process
with the
Menu Button.
4. Attention: Your selection will be deleted without checking
if
you select Delete!
5. If you have selected Copy or Move, you will now have to enter the
target device and directory into which the files should be copied or
moved. You will recognize directories from the arrow on the right
edge of the screen pointing to the right.
6. Press the Selection Button (ENTER) down for two seconds, to
start the process. Now a window showing you the file operation will
appear.
The titles must be located in the \MyJukeBox\MUSIC directory or
Page 35

SUPPORT OF USB-OTG DEVICES
You can connect devices that support this technology by means of the
adapter supplied. You will be able to access these devices and carry
out file operations (see File Management, Page 22) through the File
Management Entry in the Main Menu, if such a device is connected.
Page 36

C
C
UUSSTTOOMMEERR
S
S
EERRVVIICCEE
SOLUTIONS FOR COMMON PROBLEMS
The computer does not recognise the Jukebox:
¾ Check the installation (page 25 and following. Windows 98
SE: is the driver installed?)
¾ Is the battery loaded?
¾ Check the cable connections.
¾ Is the Jukebox turned on?
¾ In Windows Control Panel, check if the Jukebox is installed
correctly. Try installing the USB controller again. Remove
Page 37

The titles are not shown in the correct sequence:
¾ Check that the playback mode is set correctly.
¾ Reset the Jukebox (page 22).
¾ Chose the option Refresh Tracks in the Jukebox’ menu.
¾ Are this Tracks in the folder \MyJukeBox\MUSIC?
Files are not copied in the proper directory
¾ Check your installation (Driver etc.).
IS FURTHER ASSISTANCE NECESSARY?
If the suggestions listed above are not enough to resolve the problem, then contact us. The following information will help us to help
you resolve your problem:
Page 38

DRIVER SUPPORT
This Jukebox has been extensively tested in our laboratories with a
large number of compatible devices. It fulfils all required standards
and complies with the standard “Designed for Windows”, which certifies utmost compatibility.
However, often the software drivers for individual components are
updated from time to time. This is a regular process provided by the
manufactured to mend possible compatibility problems that may
occur with components (e.g., programs or hardware) that were not
tested at the time of your Jukebox’s manufacture. Driver updates and
the latest information on your product are available on the Internet.
Visit Medion on the Web at
Page 39

WARRANTY
PLEASE READ THIS LIMITED WARRANTY CAREFULLY TO UNDERSTAND YOUR RIGHTS
AND OBLIGATIONS.
The sales receipt is considered valid proof of purchase and should be kept in a safe
place. This receipt will be required for receiving any warranty service. This warranty
is transferable. When transferring ownership to a third party, please provide the
receipt and warranty information. Our company warrants to the end user that each
product, including related software, accessories, media and supplies, shall be free
from defects in materials and workmanship for thirty six months from date of purchase. This warranty covers only those defects that arise as a result of normal use of
the product. This warranty does not cover any other problems, including problems
that arise as a result of improper maintenance or modification; software, accessories,
media or supplies not provided or supported by the supplier; or operation outside the
manufacturer’s specifications.
Any part of this device repaired or exchanged by a valid service representative will be
covered under the original warranty period. Back up all programs and data before
Page 40

LIMITS OF LIABILITY
To the extent allowed by local law, except for the obligations specifically set forth in
this warranty statement, in no event shall the company or its third party suppliers be
liable for direct, indirect, special, incidental, or consequential damage, whether based
on contract or any other legal theory and whether advised of the possibility of such
damages. This includes loss or damage of personal data on your computer.
LOCAL LAW
This warranty statement gives you legal rights. You may also have other rights that vary
from jurisdiction to jurisdiction. To the extent this warranty statement is inconsistent with
local law, certain disclaimers and limitations of this statement may not apply to the customer.
MAKING COPIES OF THIS MANUAL
This manual contains information protected by law. All rights are reserved. Copyright
 Loading...