

Page 1

Table of Contents:
Safety and Maintenance...........................3
Working in comfort .................................... 5
Declaration of Conformity.......................... 6
About the Laser ......................................... 6
Battery Handling........................................ 7
Recycling ................................................. 8
What’s in the Box?................................... 9
System requirements ............................. 10
Technical Data ....................................... 11
Mouse Components ............................... 12
Getting started ....................................... 14
1. Installing the software.......................... 14
De-installation of the software ............. 18
2. Inserting batteries................................ 19
3. Switching the mouse on........................... 20
Energy-saving function ........................ 20
4. Connecting the receiver....................... 21
5. Adjusting the frequency....................... 22
6. Configuration of the mouse functions . 23
Customer service ................................... 24
Technical Support ................................... 25
If you need further help ….................... 26
Page 2

© 2007 Medion®. All rights reserved. Microsoft®, MS-
®
DOS
Microsoft Corporation in the U.S. and other countries.
Pentium
The names of actual companies and products mentioned
herein may be the trademarks of their respective owners.
Information in this document is subject to change without
, and Windows are registered trademarks of
®
is a registered trademark of Intel Corporation.
notice.
2
/
UUKK/
RREEPP.
.
NN.
IIRREELLAANND
.
IIRREELLAANND
D
HHEELLPPLLIINNE
D
HHEELLPPLLIINNE
E
0088770
E
11--880000--99992255008
0
77227700337700
8
Page 3

Safety and
Maintenance
Keep these instructions with your wireless
mouse set at all times. The proper set up, use
and care can help extend the life of your
product. In the event that you transfer
ownership of this device, please provide
these instructions to the new owner.
• Whenever you edit your data, it is
advisable to make backup copies on an
external data medium (disks, CD). We are
not liable for any loss of data and
consequential damages.
• This product is designed to run on a
PC/AT (IBM-compatible) computer with
USB port.
• Follow the safety instructions for the
computer to which you are connecting
the devices.
/
.
UUKK/
RREEPP.
NN.
IIRREELLAANND
.
IIRREELLAANND
D
HHEELLPPLLIINNE
D
HHEELLPPLLIINNE
E
0088770
E
11--880000--99992255008
0
77227700337700
8
3
Page 4

• Never open up the component
housings. This might lead to a short
circuit or even to a fire.
• Never allow children to use electronic
devices unsupervised. Children may not
always correctly identify potential
hazards.
• This device should only be repaired by
an authorised service centre. Please
contact customer care if you have any
technical problems.
• Keep devices away from moisture and
avoid dust, heat and direct sunlight.
Ensure an ambient temperature that is
suitable for office equipment.
• Before cleaning the devices, remove the
cable connection with the computer.
Clean the devices and other
components with a damp cloth. Do not
use any solvents, corrosives or gaseous
detergents.
• Position and operate these devices only
on a stable, even and vibration-free
surface.
4
/
UUKK/
RREEPP.
.
NN.
IIRREELLAANND
.
IIRREELLAANND
D
HHEELLPPLLIINNE
D
HHEELLPPLLIINNE
E
0088770
E
11--880000--99992255008
0
77227700337700
8
Page 5

• Allow a clearance of at least 50 cm (19.7”)
from sources of high-frequency and
magnetic interference (TV, mobile
telephone, infrared devices, loudspeaker
cabinets, etc), in order to avoid
malfunctions and loss of data. The distance
between the transmitter and the receiver
should be greater than 50 cm (19.7”).
• These devices are not intended for use
in a heavy industrial environment.
Contact customer care:
• if the connections are cut or otherwise
damaged;
• if liquid has entered the device housing;
• if a device does not operate correctly;
• if a device is dropped or the housing
damaged.
Working in comfort
Medical studies have shown that certain
physical ailments and injuries are linked to
prolonged and repetitive movements in an
unsuitable working environment and to unsafe
working habits. Take frequent breaks when
/
.
UUKK/
RREEPP.
NN.
IIRREELLAANND
.
IIRREELLAANND
D
HHEELLPPLLIINNE
D
HHEELLPPLLIINNE
E
0088770
E
11--880000--99992255008
0
77227700337700
8
5
Page 6
using a computer. If you experience pain,
numbness or tingling in your arms, wrists,
hands or fingers, consult a medical doctor.
Declaration of Conformity
Hereby, Medion AG, declares that this device
is in compliance with. the essential
requirements and other relevant provisions of
Directive 1999/5/EC.
0560
About the Laser
:
In this product laser devices of Laser
Class 1 may be used according to DIN
EN 60825-1. Repairs to the mouse
must be performed only by the
manufacturer. Do not look into the
laser beam, even with specialist optical
instruments.
6
/
UUKK/
RREEPP.
.
NN.
IIRREELLAANND
.
IIRREELLAANND
D
HHEELLPPLLIINNE
D
HHEELLPPLLIINNE
E
0088770
E
11--880000--99992255008
0
77227700337700
8
Page 7

Battery Handling
Batteries may contain combustible materials.
Misusing them may cause battery leakage, heat,
explosion or ignition, bringing about injury or
damage to the product or YOU. Please observe
strictly the following:
KEEP CHILDREN AWAY from batteries.
If by any chance, batteries are swallowed,
consult a medical doctor immediately.
DO NOT CHARGE batteries (except
rechargeable
batteries).
DO NOT FORCIBLY DISCHARGE
batteries.
DO NOT SHORT-CIRCUIT batteries.
DO NOT HEAT or DISPOSE OF IN FIRE.
DO NOT DISASSEMBLE or DEFORM
batteries. Your hands and fingers may be
injured, or the liquid of the battery may get
into your eyes or adhere to your skin. If this
happens, rinse with a large quantity of
water immediately and consult a medical
doctor.
/
.
UUKK/
RREEPP.
NN.
IIRREELLAANND
.
IIRREELLAANND
D
HHEELLPPLLIINNE
D
HHEELLPPLLIINNE
E
0088770
E
11--880000--99992255008
0
77227700337700
8
7
Page 8

DO NOT expose batteries to strong
impacts by dropping or throwing the
batteries.
DO NOT reverse the positive (+) and
negative (-) terminals to avoid short-circuit.
REMOVE PROMPTLY any used battery
from the device.
REPLACE THE BATTERY with a new
battery of the same type.
INSULATE THE TERMINAL parts with tape
or the like when storing or at disposal of
the batteries.
DO NOT throw drained batteries in with the
domestic rubbish! Respect the
environment and dispose of them in the
specific containers for separate collection.
If necessary, turn to you local refuse
authority for advice. Thank you!
Recycling
Device
8
/
UUKK/
RREEPP.
.
NN.
IIRREELLAANND
.
IIRREELLAANND
D
HHEELLPPLLIINNE
D
HHEELLPPLLIINNE
E
0088770
E
11--880000--99992255008
0
77227700337700
8
Page 9
At the end of its life, the appliance must not
be disposed of in household rubbish. Enquire
about the options for environmentally-friendly
disposal with your retailer.
Batteries
Do not dispose of used batteries in the
household rubbish! They must be deposited
at a collection point for used batteries.
Packaging
All packaging and packaging materials that
are no longer required can and should be
recycled.
What’s in the
Box?
Please check that the following parts and
accessories are in the box. If an item is
missing please contact your local service
centre. Any claim for (Page 10) missing parts
/
.
UUKK/
RREEPP.
NN.
IIRREELLAANND
.
IIRREELLAANND
D
HHEELLPPLLIINNE
D
HHEELLPPLLIINNE
E
0088770
E
11--880000--99992255008
0
77227700337700
8
9
Page 10

will only be accepted within 7 days from date
of purchase.
Wireless receiver
Wireless mouse
Batteries (AAA / LR03, 1.5 V) x2
Installation software on disc
User manual
System
requirements
• PC/AT-compatible computer Pentium
500 MHz or higher
®
•
Operating system Windows
®
Vista
• Free USB port
connection
XP /
10
/
UUKK/
RREEPP.
.
NN.
IIRREELLAANND
.
IIRREELLAANND
D
HHEELLPPLLIINNE
D
HHEELLPPLLIINNE
E
0088770
E
11--880000--99992255008
0
77227700337700
8
Page 11

Technical Data
Mouse
• Connection technology Wireless
• Technology Laser
• Sensor scanning rate 800, 1600 dpi
• Buttons 3
• Battery operation 2 x 1.5V
(AAA/LR03)
Receiver
• Transmission frequency 2.4 GHz
• Operating voltage Through USB
port
• Interface USB Type A
/
.
UUKK/
RREEPP.
NN.
IIRREELLAANND
.
IIRREELLAANND
D
HHEELLPPLLIINNE
D
HHEELLPPLLIINNE
E
0088770
E
11--880000--99992255008
0
77227700337700
8
11
Page 12
Mouse
Components
A
B
C
D
F
I
E
G
H
(subject to change without notice)
12
/
UUKK/
RREEPP.
.
NN.
IIRREELLAANND
.
IIRREELLAANND
D
HHEELLPPLLIINNE
D
HHEELLPPLLIINNE
E
0088770
E
11--880000--99992255008
0
77227700337700
8
Page 13

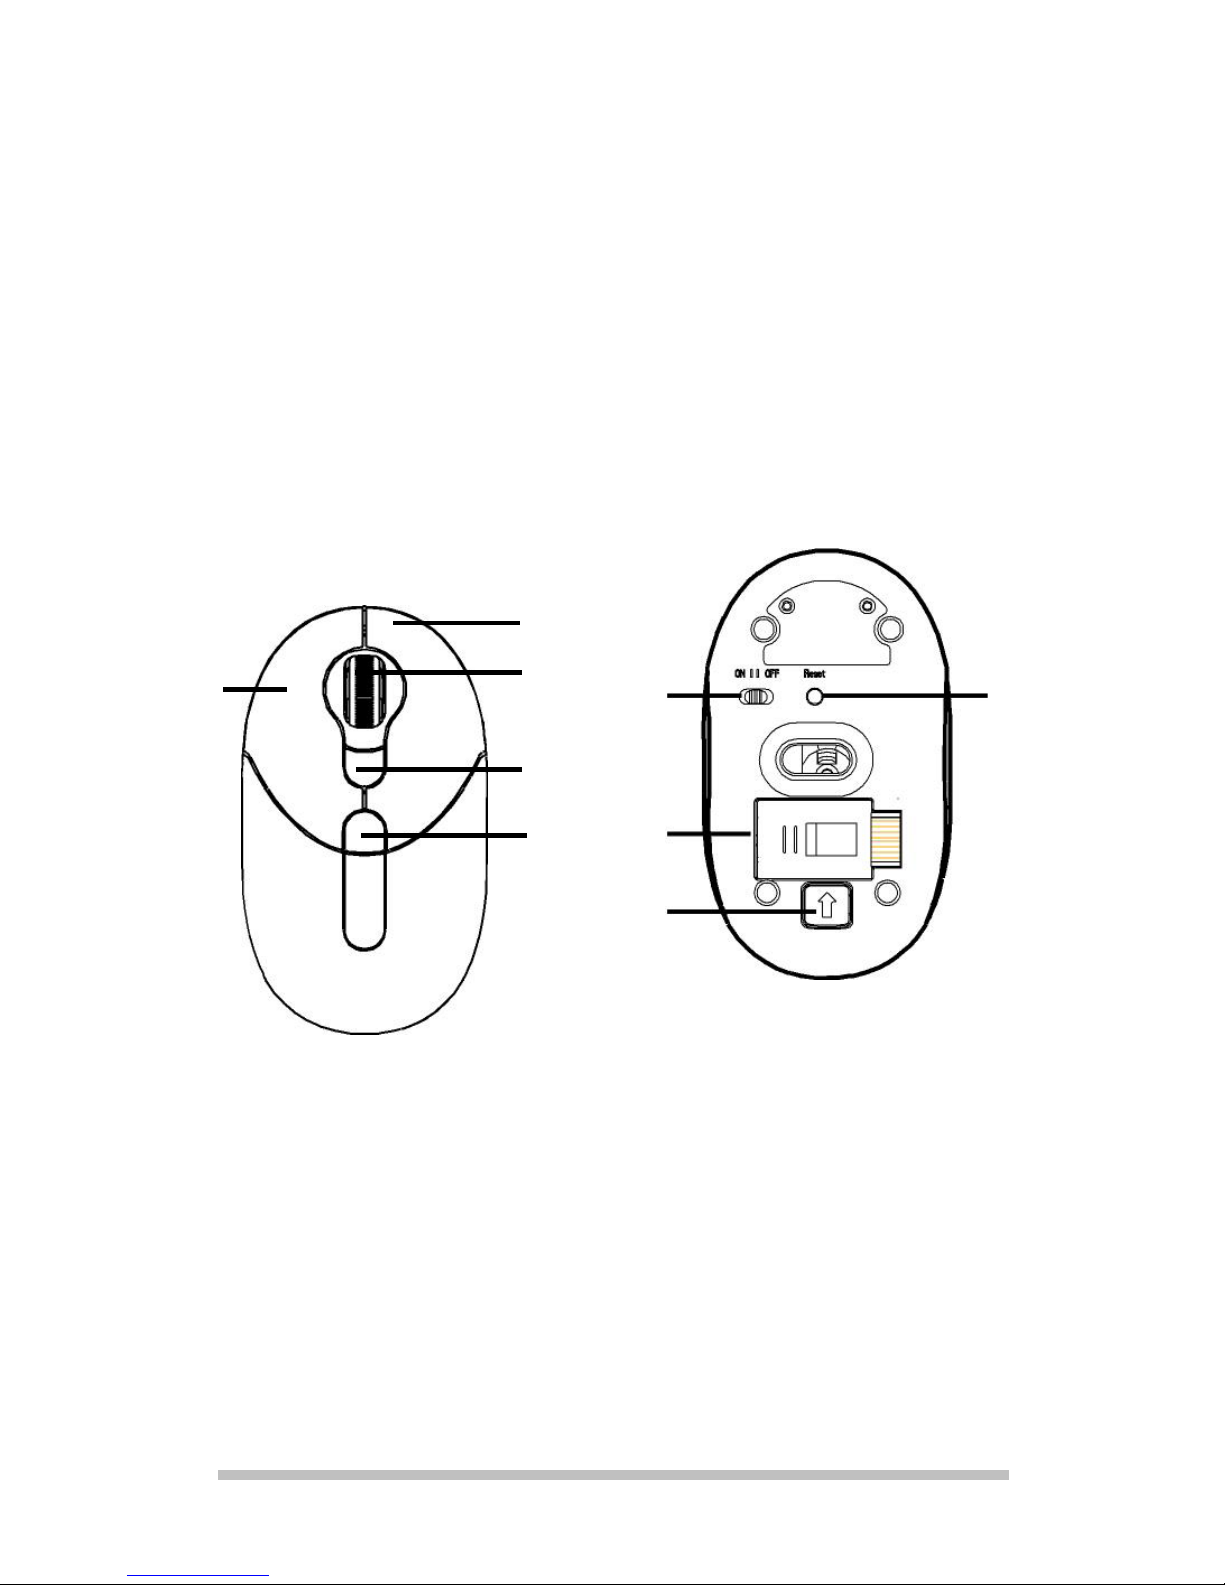
A Left mouse button.
B Right mouse button.
C Four-way button wheel with LED status
display. Pressing the wheel to the left or
the right will enable a horizontal
sequence of images.
D Button for setting the sensor scanning
rate.
E Battery cover release button.
F On-off switch.
G USB-Receiver
H USB-Receiver release button.
I Mouse frequency adjustment button.
/
.
UUKK/
RREEPP.
NN.
IIRREELLAANND
.
IIRREELLAANND
D
HHEELLPPLLIINNE
D
HHEELLPPLLIINNE
E
0088770
E
11--880000--99992255008
0
77227700337700
8
13
Page 14

Getting started
Please connect the mouse to your computer
before installing the software.
You will be able to use the basic functions of
the mouse without installing the software. In
order to use the extended functions the
software must be installed.
1. Installing the software
Information
A corresponding dialog box, which
can be worded differently,
independently of the operating
system, will appear if your
operating system has been set so
that drivers can only be installed if
this has been signed off (released
by Microsoft).
14
/
UUKK/
RREEPP.
.
NN.
IIRREELLAANND
.
IIRREELLAANND
D
HHEELLPPLLIINNE
D
HHEELLPPLLIINNE
E
0088770
E
11--880000--99992255008
0
77227700337700
8
Page 15

Please confirm that you
nevertheless want to install the
software.
Mouse driver
You will need a mouse driver to use or adjust
the special functions of the mouse. This
driver is included and installed with the
software.
Important files can be
overwritten or changed
during the installation of
programs or drivers. You
should make a safeguard
for the content of your hard
drive before the installation,
in order to be able to
access the original files in
the case of potential
problems after the
installation.
/
.
UUKK/
RREEPP.
NN.
IIRREELLAANND
.
IIRREELLAANND
D
HHEELLPPLLIINNE
D
HHEELLPPLLIINNE
E
0088770
E
11--880000--99992255008
0
77227700337700
8
15
Page 16

Install your software as
follows:
The installation menu will be started
automatically if you insert the CD.
Information
The Autorun function will probably
have been deactivated if the
automatic Start does not function.
Change this setting under
Windows®, in your Device
Manager, if necessary, by dealing
with the CD-DVD-ROM entry and
activating the Automatic
notification in the case of a
change feature.
Continue with Point 4, if the installation starts
automatically. Manual installation without the
Autorun function starts with Point 1:
1. Click on START
and select the
EXECUTE entry.
2. Now, enter the drive letter of the CDROM, followed by a colon and the
16
/
UUKK/
RREEPP.
.
NN.
IIRREELLAANND
.
IIRREELLAANND
D
HHEELLPPLLIINNE
D
HHEELLPPLLIINNE
E
0088770
E
11--880000--99992255008
0
77227700337700
8
Page 17
program name INSTALL, into the OPEN
field. The drive letter can vary according
to the configuration.
3. Confirm your entry with a click on OK.
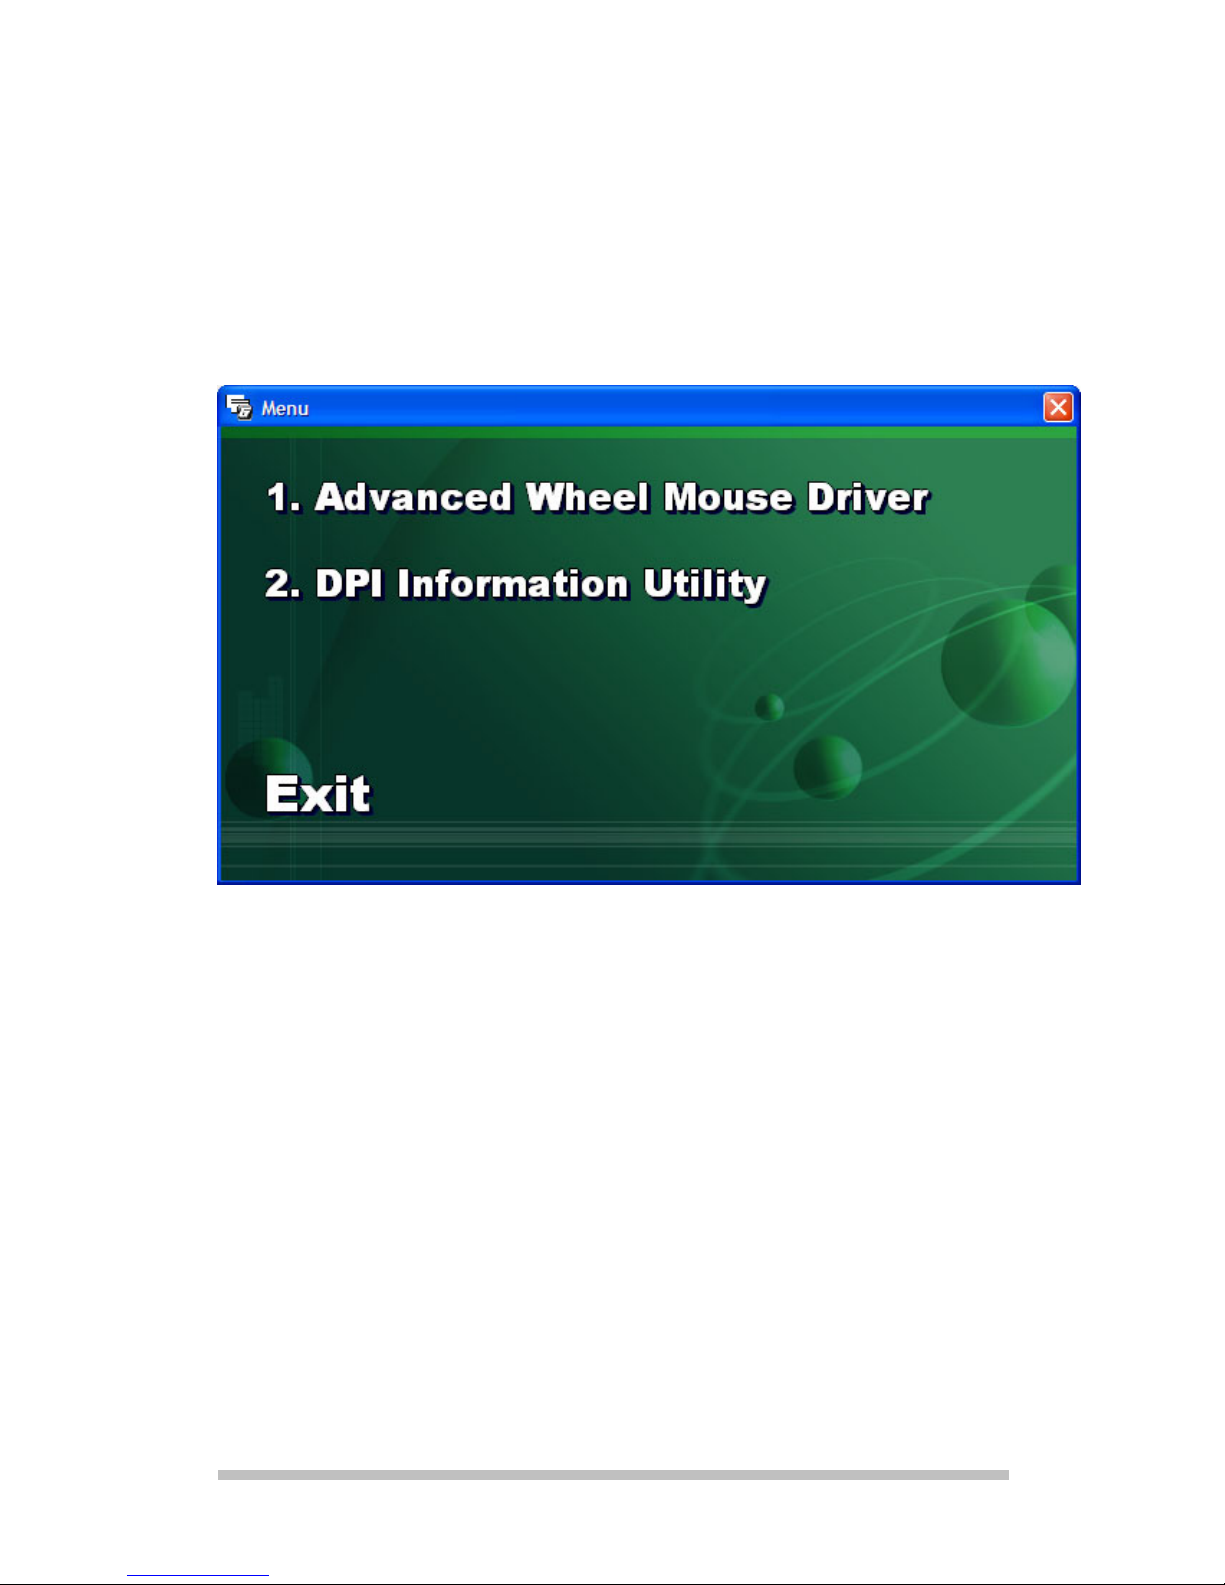
4. Select the installation option and follow the
instructions.
1.: This selection installs the driver
for the
extended functions.
2.: This program installs a symbol, in
which the sensor scanning rate of
the mouse will be displayed, in the
right section of the Task Strip. The
/
.
UUKK/
RREEPP.
NN.
IIRREELLAANND
.
IIRREELLAANND
D
HHEELLPPLLIINNE
D
HHEELLPPLLIINNE
E
0088770
E
11--880000--99992255008
0
77227700337700
8
17
Page 18

dpi rate will be selected by pressing
the [D] button.
Exit: Finishes the installation
program.
5. Restart the PC after the conclusion of
the installation, in order to conclude the
installation successfully.
De-installation of the
software
Tje software can be un-installed from your
PC as follows:
1. Click on START Ö SETTINGS Ö
SYSTEM CONTROL.
2. Double click on the software entry in the
Window that opens.
Select the program concerned (e.g. Presenter
Mouse), start the de-installation and follow
the instructions on your screen.
18
/
UUKK/
RREEPP.
.
NN.
IIRREELLAANND
.
IIRREELLAANND
D
HHEELLPPLLIINNE
D
HHEELLPPLLIINNE
E
0088770
E
11--880000--99992255008
0
77227700337700
8
Page 19
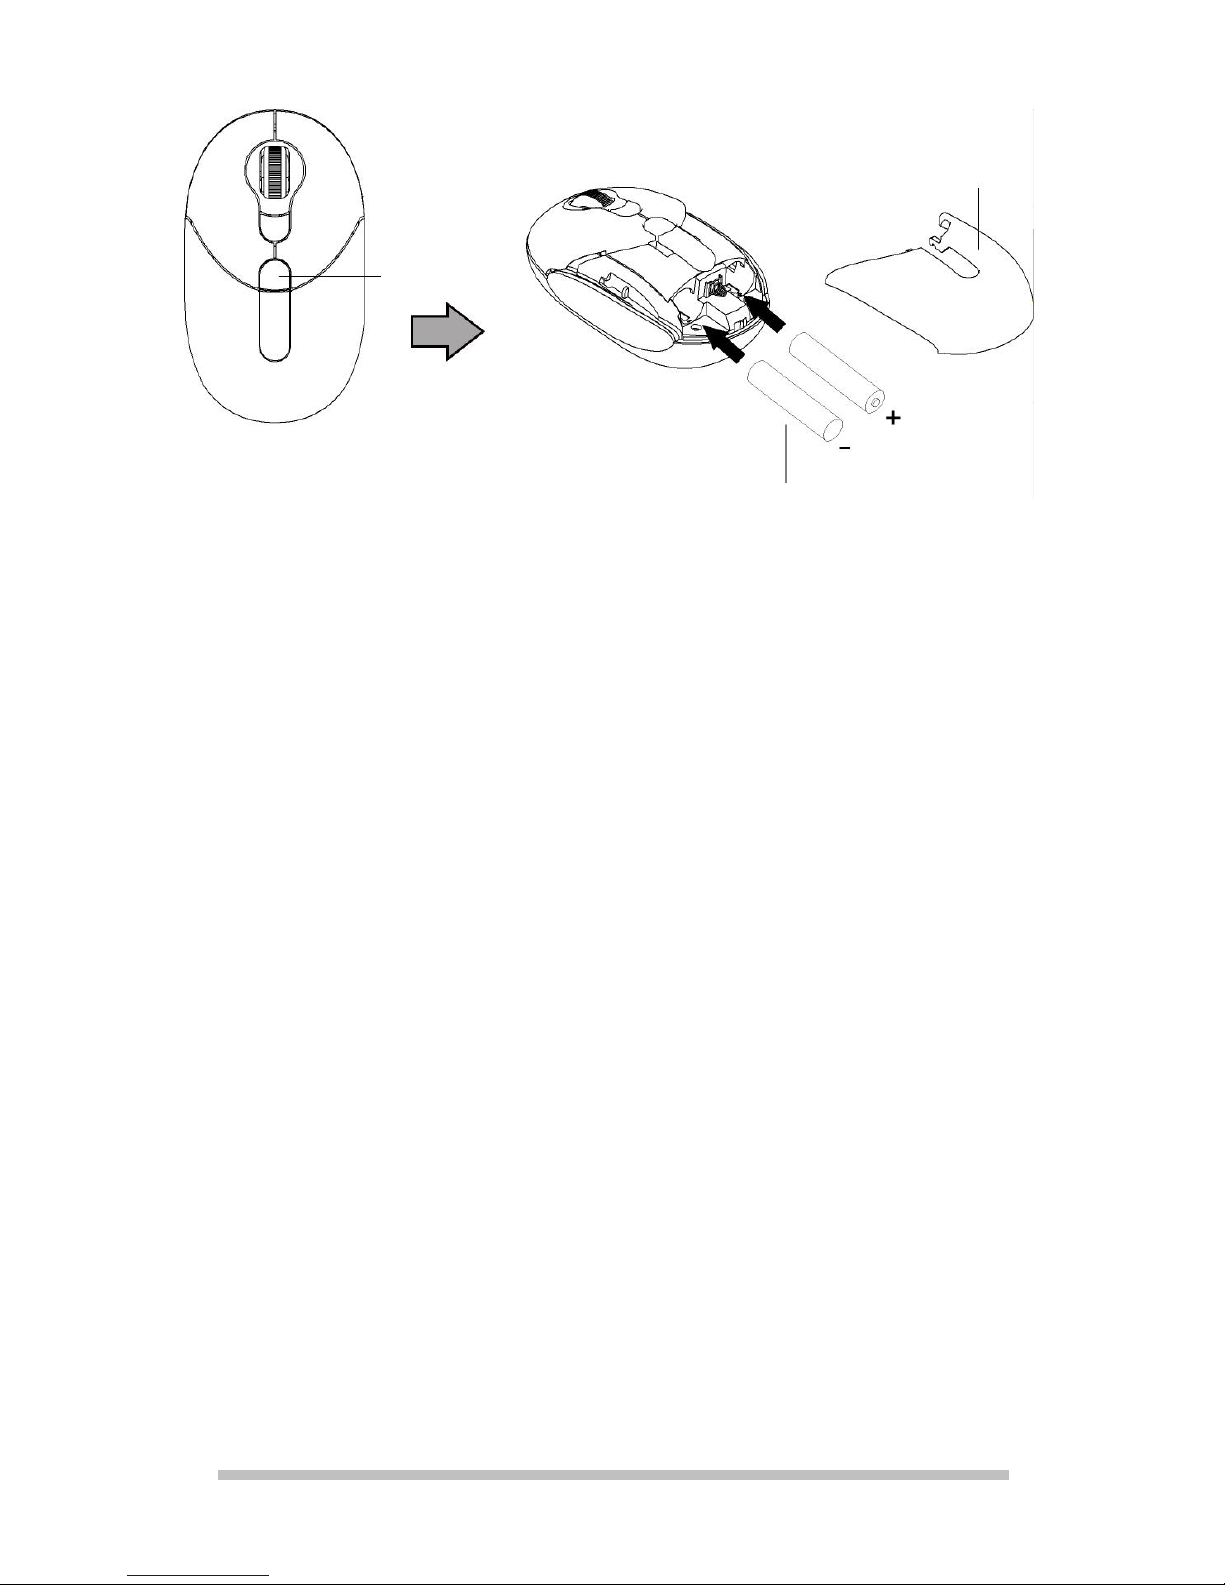
Battery
compartment
cover
E
2 x type AAA/LR03
2. Inserting batteries
1. Remove the battery compartment cover
by pressing the button [E] for unlocking
the battery compartment cover.
2. Place the batteries supplied with the
mouse (2 x type AAA) into the battery
compartment of the mouse. Pay
attention that the polarity of the batteries
corresponds to the + and – symbols.
3. Push the battery compartment cover on
again until it clicks in.
/
.
UUKK/
RREEPP.
NN.
IIRREELLAANND
.
IIRREELLAANND
D
HHEELLPPLLIINNE
D
HHEELLPPLLIINNE
E
0088770
E
11--880000--99992255008
0
77227700337700
8
19
Page 20

3. Switching the mouse on
1. Position the on / off switch [F] to the ON
position. Position to OFF, if you will not
be using the mouse for a long period of
time.
Energy-saving function
The mouse will switch itself off if you do not
use it for a long period of time. This serves to
minimize the battery consumption. Click on
one of the mouse buttons to switch off the
energy-saving function and begin using the
mouse again.
20
/
UUKK/
RREEPP.
.
NN.
IIRREELLAANND
.
IIRREELLAANND
D
HHEELLPPLLIINNE
D
HHEELLPPLLIINNE
E
0088770
E
11--880000--99992255008
0
77227700337700
8
Page 21
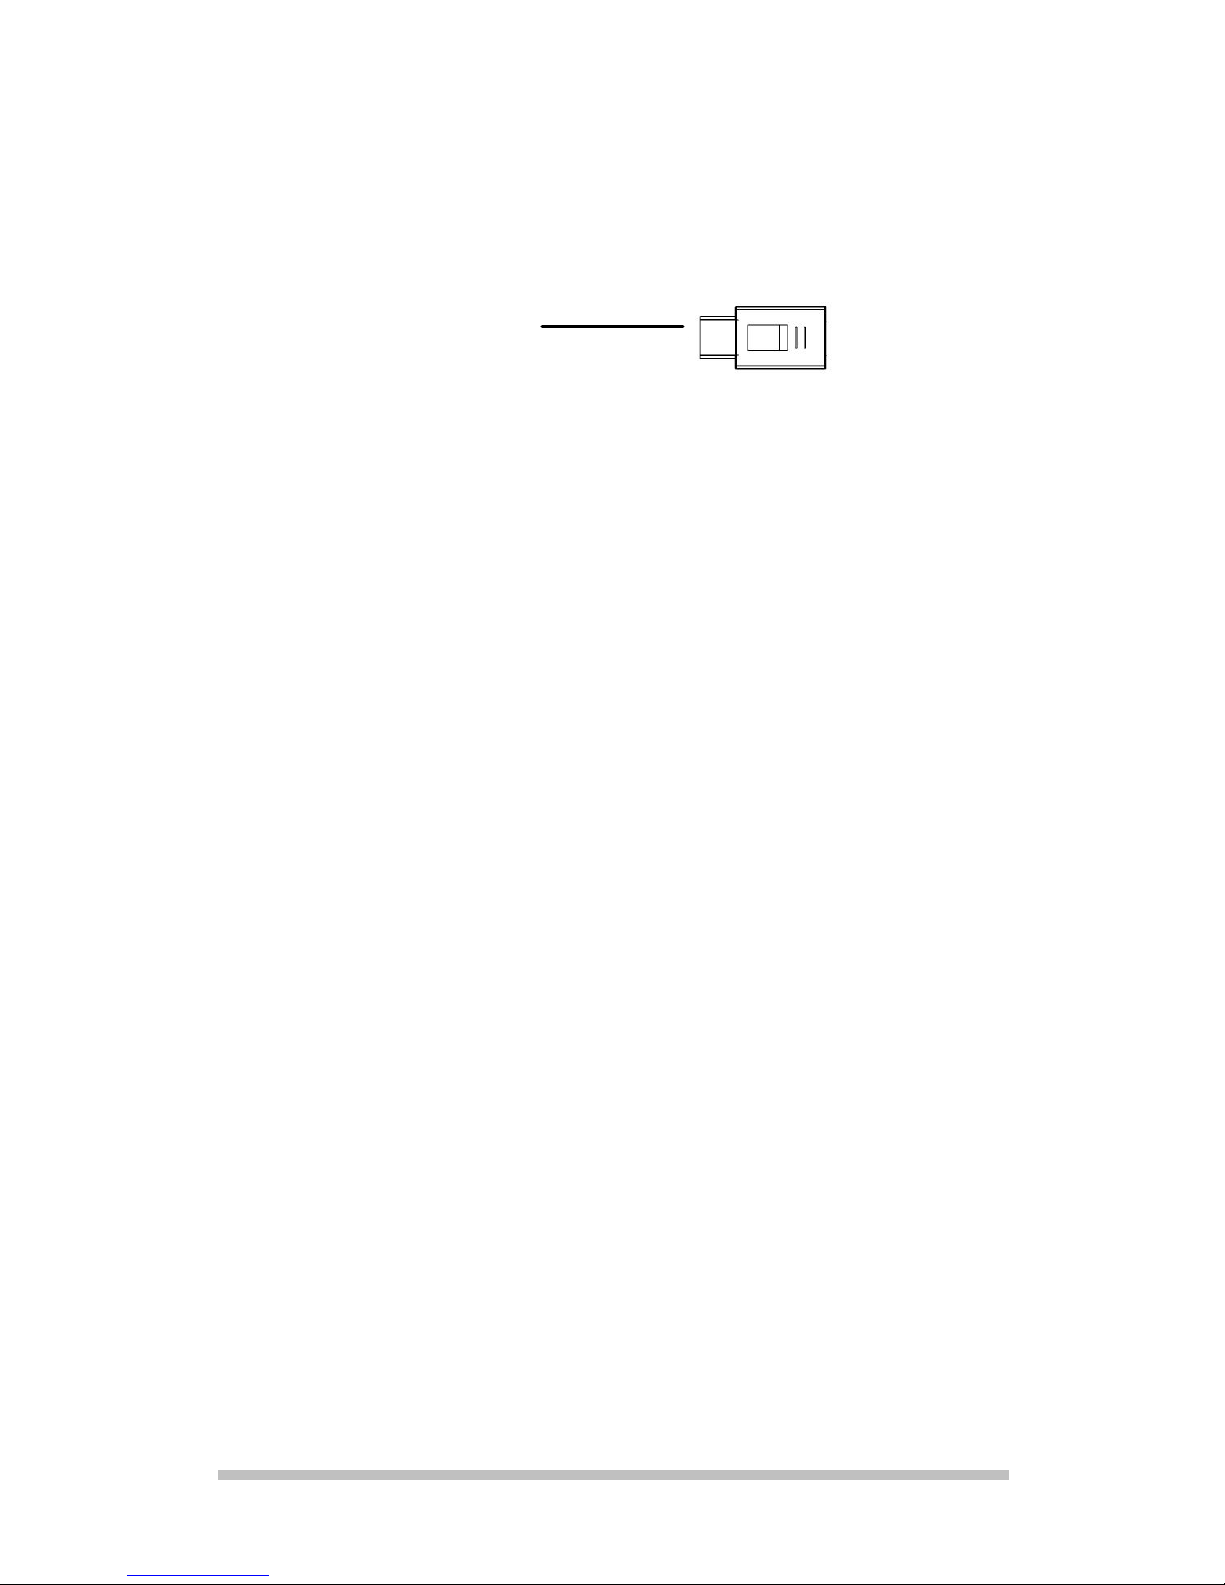
4. Connecting the
receiver
USB receiver
1. Pay attention to the information in the
Safety and Maintenance Chapter
(Pages 3 ff.).
2. Switch on the computer and all the
peripheral devices connected (monitor,
printer, etc.) and wait until the operating
system has started completely.
3. Locate the USB connection of your
computer.
4. Plug the receiver into a free USB
connection socket on your computer.
®
5. Windows
will now establish that new
hardware has been connected. This will
start the hardware recognition process.
You have now installed your receiver
successfully.
/
.
UUKK/
RREEPP.
NN.
IIRREELLAANND
.
IIRREELLAANND
D
HHEELLPPLLIINNE
D
HHEELLPPLLIINNE
E
0088770
E
11--880000--99992255008
0
77227700337700
8
21
Page 22
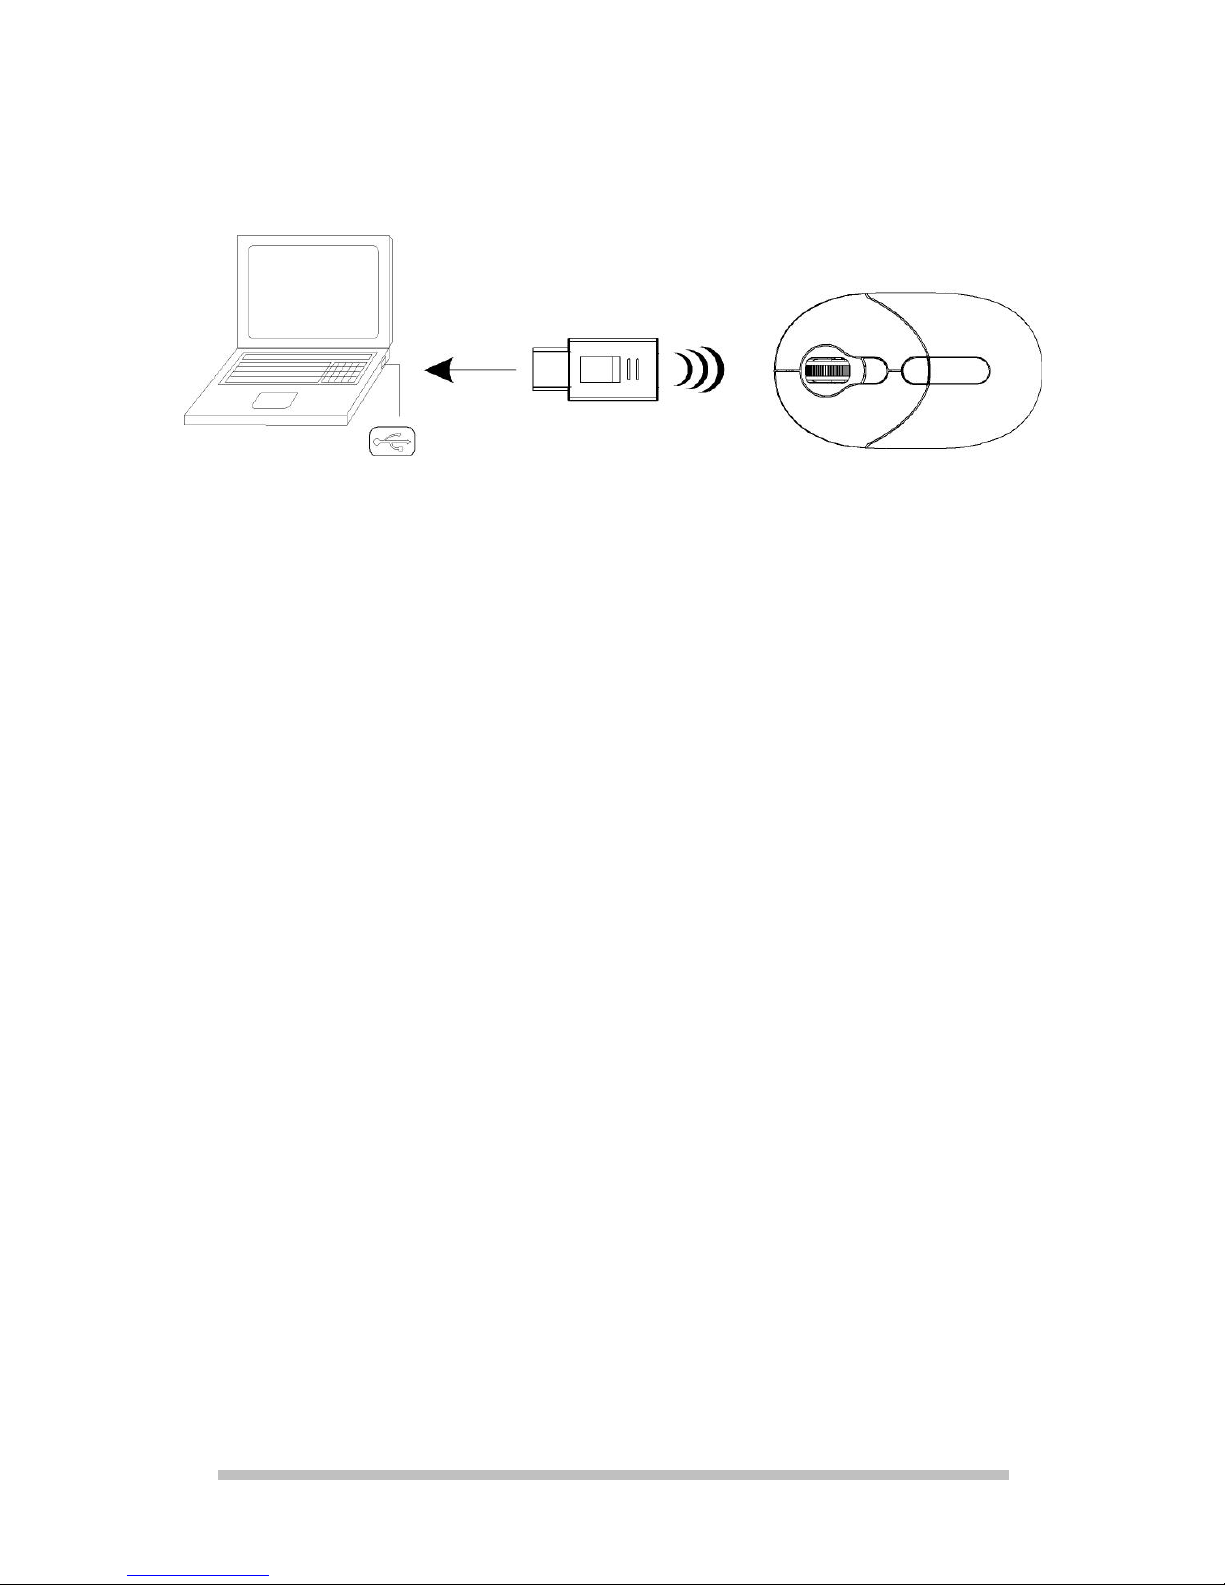
5. Adjusting the
frequency
A connection will already have been set at
the factory so no adjustment will be
necessary. However, at any stage in the
future if the mouse does not react an
adjustment will be necessary. To adjust the
frequencies of the mouse and receiver:
1. Bring the mouse close (approx. 50 cm
away) to the receiver.
2. Now press the frequency adjustment
button [I] on the base of the mouse.
3. The automatic setting will function
immediately, if a fault should arise
repeat the process. A new frequency
combination will be selected
automatically.
22
/
UUKK/
RREEPP.
.
NN.
IIRREELLAANND
.
IIRREELLAANND
D
HHEELLPPLLIINNE
D
HHEELLPPLLIINNE
E
0088770
E
11--880000--99992255008
0
77227700337700
8
Page 23

6. Configuration of the
mouse functions
You will be able to set the mouse functions to
your requirements in the System Control of
®
Windows
Advanced Wheel Mouse Driver a
corresponding entry will have been made in
the directly under “All programs”.
. If you have installed the
/
.
UUKK/
RREEPP.
NN.
IIRREELLAANND
.
IIRREELLAANND
D
HHEELLPPLLIINNE
D
HHEELLPPLLIINNE
E
0088770
E
11--880000--99992255008
0
77227700337700
8
23
Page 24

Customer service
Malfunctions can sometimes have very trivial
causes, but at times can also be of quite a
complex nature and call for an in-depth analysis.
Basic hints
• The regular running of the Windows®
programs “Defrag” and “Scandisk” can
remove sources of error and increase
system performance.
Error handling and tips
Start with a careful visual check of all cable
links. If the LCD’s are not working, make sure
that the power is reaching the computer and
all peripherals.
• Check that the USB ports are active and
correctly configured and that there are
no resource conflicts with other devices.
Please refer to your PC user manual on
this point.
24
/
UUKK/
RREEPP.
.
NN.
IIRREELLAANND
.
IIRREELLAANND
D
HHEELLPPLLIINNE
D
HHEELLPPLLIINNE
E
0088770
E
11--880000--99992255008
0
77227700337700
8
Page 25

• Have the batteries been inserted
incorrectly or are they dead? Check the
polarity (+/-) and exchange them for
new ones as necessary.
• If you are working on a metal surface,
use a mouse mat. Position the receiver
(by using a different USB port) in such a
way that a good radio connection is
ensured.
If the mouse does not function properly,
try the following:
• Check that the distance is within the
working range of 5 meters.
• Make sure the mouse is switched on.
Technical Support
This program has been extensively and
successfully tested in our test laboratory with
a number of different devices. It is
nevertheless quite normal for the drivers to
be updated from time to time. This means,
therefore, that problems of compatibility with
other, as yet untested, components
(programs, devices) may arise.
/
.
UUKK/
RREEPP.
NN.
IIRREELLAANND
.
IIRREELLAANND
D
HHEELLPPLLIINNE
D
HHEELLPPLLIINNE
E
0088770
E
11--880000--99992255008
0
77227700337700
8
25
Page 26

Driver updates and the most up-to-date
information on this product can be found at
the following Internet address:
Internet: www.medion.co.uk
If you need further help …
If the suggestions in the above sections have
not helped to solve your problem, please
contact us. It will help us to help you if you
can have the following information available:
• What is your computer configuration?
• What additional peripherals are you
using?
• What messages are appearing on the
screen?
• What software was running when the
fault occurred?
• What steps have you already taken to
solve the problem?
• If you already have a customer number,
please state this.
26
/
UUKK/
RREEPP.
.
NN.
IIRREELLAANND
.
IIRREELLAANND
D
HHEELLPPLLIINNE
D
HHEELLPPLLIINNE
E
0088770
E
11--880000--99992255008
0
77227700337700
8
 Loading...