

Page 1

Índice
Recomendaciones de Seguridad........................5
Uso conforme a las especificaciones ..................9
¿Qué es la tensión arterial?.............................10
Valor sistólico y diastólico .......................................10
Margen de medición...............................................11
¿Cómo funciona la medición de la tensión arterial? 12
Indicaciones para la medición.................................12
Colocación de las pilas.....................................15
Esquema del aparato.......................................16
Puesta en funcionamiento ..............................18
Ajustar la fecha y la hora ......................................... 18
Ajustar el idioma / el volumen de voz .....................19
Colocar la muñequera.....................................20
Medición correcta ...........................................21
Medir la presión arterial .................................22
Medición automática ..............................................23
Detección de arritmias ............................................ 24
Visualizar valores medidos..............................24
Borrar la memoria ..........................................25
Transmisión de datos al ordenador.................26
Requisitos del sistema .............................................26
Instalar el software.................................................. 27
ES
EN
DE
PT
PL
DK
3
Page 2

Desinstalar el software ............................................28
El software del tensiómetro ............................29
Transferir datos al "BP Manager" ............................. 31
Indicaciones de error ..............................................32
Limpieza y cuidado..........................................33
Indicaciones para el mantenimiento .......................33
Limpieza/almacenamiento......................................33
Reciclado y eliminación de desechos ...............34
Indicaciones de error ......................................35
Especificaciones técnicas.................................37
4
Page 3

Recomendaciones de
Seguridad
• Este aparato no está destinado para personas
(incluidos niños) con limitaciones en sus
capacidades físicas, sensoriales o mentales o sin
experiencia o con poco conocimiento sobre su
utilización, excepto si son controladas por una
persona responsable de su seguridad o si reciben
instrucciones sobre el uso del aparato. Los niños
deben ser vigilados para asegurar que no jueguen
con el aparato.
• Para estar seguro de que los niños no juegan con el
aparato, vigílelos.
• Guarde el aparato y sus accesorios en un lugar
inaccesible para los niños.
• Mantenga también los embalajes alejados de los
niños. ¡Existe peligro de asfixia!
• El aparato es apto para adultos sanos. Utilice el
aparato para mediciones comparativas,
especialmente en caso de actividades deportivas.
NO utilice el aparato para un diagnóstico médico.
No puede sustituir medidas médicas.
• Inicie el proceso de bombeo (con la tecla
solamente cuando el aparato se encuentre bien
ajustado.
)
ES
EN
DE
PT
PL
DK
5
Page 4

• No deje caer el aparato y no ponga ningún objeto
pesado encima.
• ¡No sumerja nunca el aparato en agua! ¡No
exponga el aparato a salpicaduras de agua!
• ¡No utilice el aparato a temperaturas exteriores
extremas!
• ¡No doble la parte rígida de la muñequera!
Indicaciones de seguridad baterias
Las pilas pueden contener sustancias inflamables. El
manejo inadecuado puede descargar las pilas,
sobrecalentarlas, inflamarlas o incluso hacerlas explotar,
lo que podría ocasionar daños al aparato o perjudicar su
salud. Por favor, siga atentamente las siguientes
indicaciones:
• Mantenga las pilas fuera del alcance de los niños.
• En caso de que se tragaran las pilas por descuido,
avise inmediatamente al médico.
• Nunca cargue las pilas (a no ser que lo indique
expresamente).
• Nunca descargue las pilas con una potencia de
salida elevada.
• Nunca ponga las pilas en cortocircuito.
• Evite el calor y no arroje las pilas al fuego.
• No desmonte o deforme las pilas.
6
Page 5

• Podría herirse en las manos o en los dedos, o el
líquido de las pilas podría derramarse y entrar en
contacto con los ojos o con la piel. Si esto ocurriese,
enjuague bien las zonas afectadas con abundante
agua clara e informe inmediatamente al médico.
• Evite fuertes golpes y sacudidas.
• Jamás confunda la polaridad.
• Asegúrese de que los polos Más (+) y Menos (-)
están bien colocados, de esta forma evitará
cortocircuitos.
• Nunca mezcle pilas nuevas y usadas, ni pilas de
diferente tipo.
• Esto podría ocasionar averías en el funcionamiento
del aparato.
• Saque inmediatamente las pilas descargadas del
aparato!
• Saque las pilas del aparato si éste no va a ser
utilizado durante un largo periodo de tiempo.
• Sustituya al mismo tiempo todas las pilas
descargadas del aparato por otras nuevas del
mismo tipo.
ES
EN
DE
PT
PL
DK
7
Page 6

Reparación
• Rogamos se dirija a nuestro servicio de reparación
Medion en caso de problemas técnicos con su
aparato.
• No intente en ningún caso abrir o arreglar Usted
mismo el aparato. Con el fin de evitar accidentes,
en caso de mal funcionamiento del aparato diríjase
a nuestro servicio de reparación Medion o a otro
taller especializado.
8
Page 7

Uso conforme a las
ES
especificaciones
El aparato está diseñado para la medición de la presión
arterial en la muñeca y puede almacenar hasta 60
mediciones. Es apto para las mediciones comparativas
en personas sanas – especialmente en caso de
actividades deportivas.
El aparato está diseñado solamente para su utilización
en interiores secos. Este aparato está diseñado para
uso privado y no para uso industrial o comercial. El uso
bajo condiciones ambientales extremas puede causar
daños en su aparato.
En caso de que sobre la base de los valores medidos con
este aparato surjan dudas relativas a su salud, consulte
siempre un médico. ¡No cambie o modifique en ningún
caso su terapia o su medicación por causa de las
mediciones realizadas sin consultar antes a su médico!
EN
DE
PT
PL
DK
9
Page 8

¿Qué es la tensión arterial?
La tensión arterial es una medida para la fuerza que el
corazón debe realizar para bombear la sangre a través
del sistema circulatorio y los órganos vitales del cuerpo.
Cuánto más alta es la presión, más esfuerzo debe
realizar el corazón.
Valor sistólico y diastólico
La tensión arterial oscila con cada latido del corazón
entre un valor máximo (valor sistólico) cuando el
corazón se contrae bombeando sangre (sístole), y un
valor mínimo (valor diastólico) cuando el corazón se
vuelve a llenar de sangre (diástole). El valor medio
corresponde a la tensión media.
Si partes del sistema circulatorio de la sangre están
oprimidas, enfermas o en un estado de alguna manera
anormal, la tensión arterial puede ser más alta de lo
normal. Una tensión arterial alta puede causar daños en
órganos vitales, incluidos el cerebro y el corazón.
10
Page 9
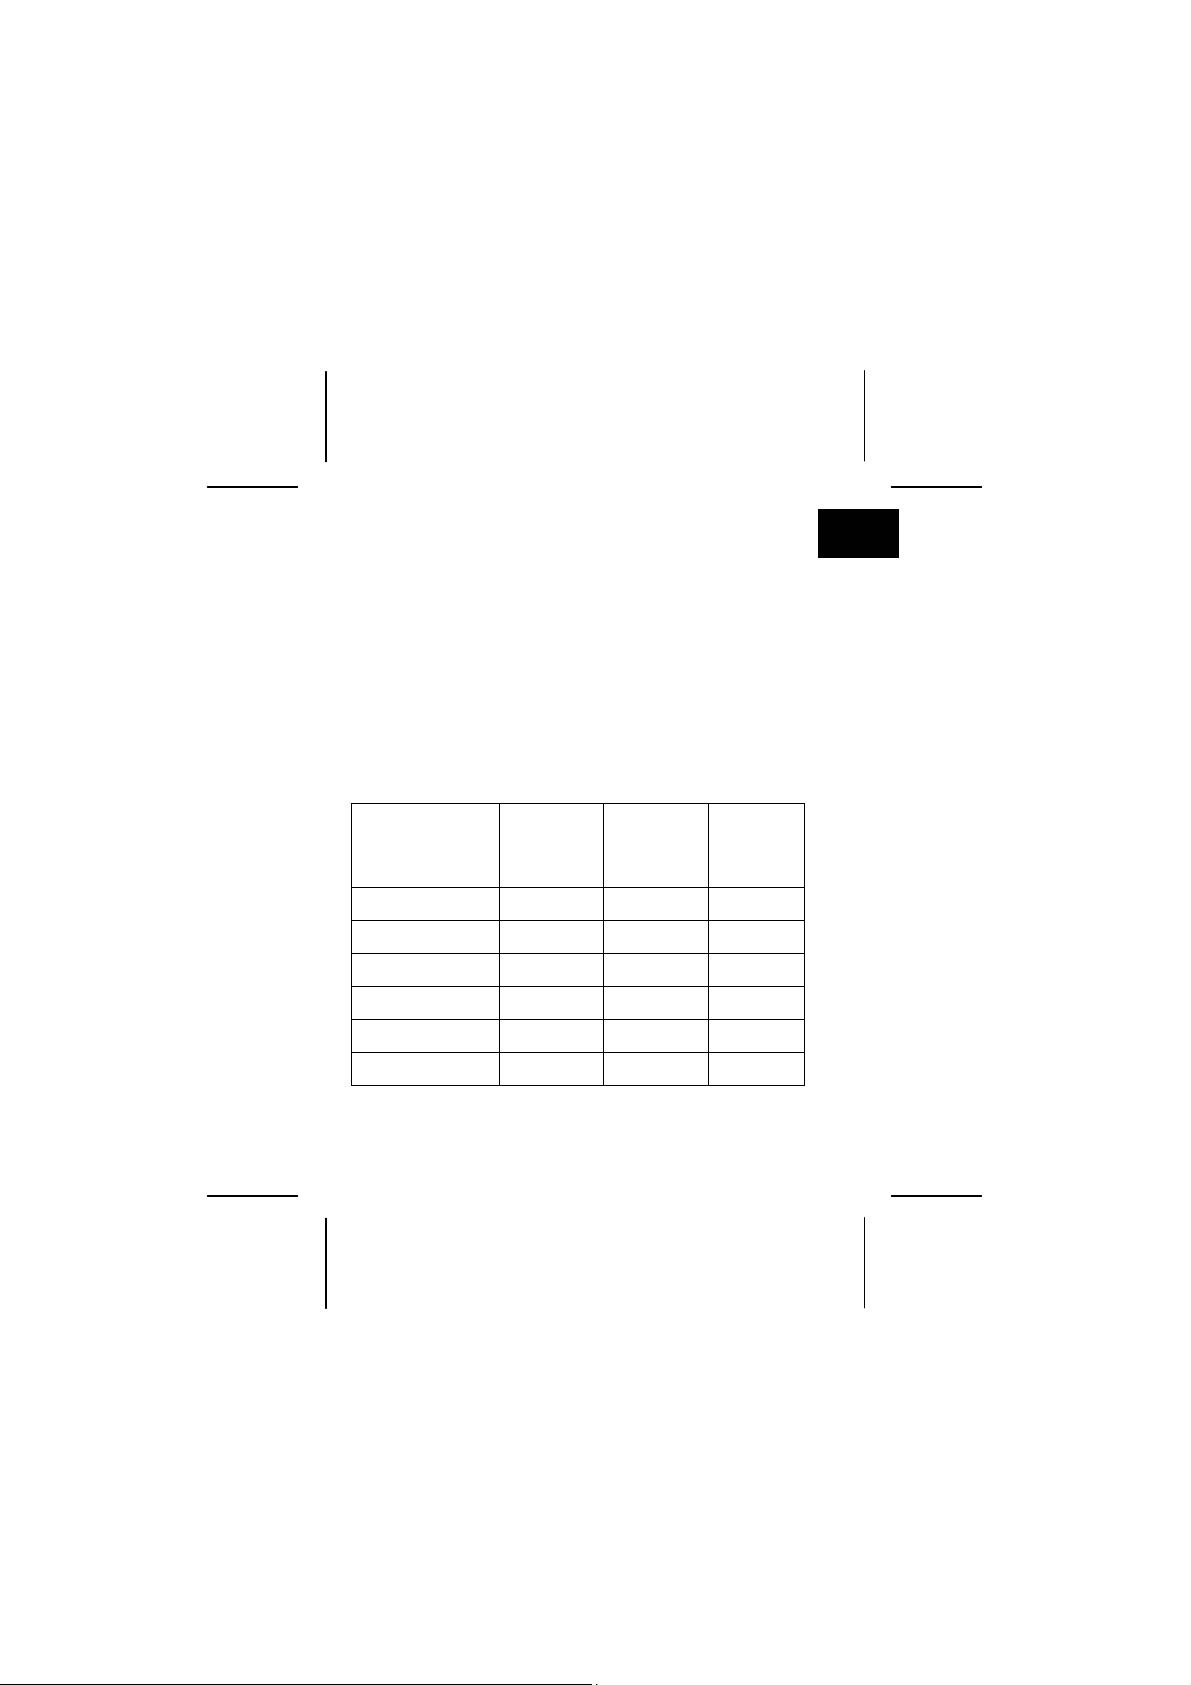
Margen de medición
La clasificación de los valores de tensión arterial se basa
en una definición y clasificación de la OMS
(Organización Mundial de la Salud) de 1999. Siguiendo
estos márgenes de la OMS se habla de tensión alta
cuando los valores sobrepasan los 140 mmHg (valor
sistólico) y 90 mmHg (valor diastólico).
Su tensiómetro está equipado de un indicador por
colores que le facilitará la interpretación de los valores
medidos.
Sección Sistólico
mmHg
Tensión baja < 90 < 50 verde
Tensión normal 91 – 129 51 - 84 verde
Valores límite 130 -139 85 – 89 verde
Tensión alta I 140 – 159 90 – 99 amarillo
Tensión alta II 160 – 179 100 – 109 naranja
Tensión alta III > 180 > 110 rojo
Diastólico
mmHg
Indicaci
ón por
colores
ES
EN
DE
PT
PL
DK
11
Page 10

¿Cómo funciona la medición de la
tensión arterial?
Su tensiómetro contiene componentes tecnológicos de
alta calidad para medir la presión y visualizar en la
pantalla los valores medidos. Además, el tensiómetro
también mide e indica la frecuencia del pulso.
El aparato mide la presión arterial de forma indirecta
mediante una muñequera colocada alrededor de la
muñeca. Bombeando aire en la muñequera se oprime la
arteria de tal forma que la sangre no puede circular por
la misma. Cuando la presión se reduce dentro de la
muñequera, se establece una relación entre la presión
del manguito y la presión arterial. El aparato dispone de
válvulas de paso electrónicas que durante la medición
reconocen hasta las más mínimas oscilaciones y las
pueden compensar con ayuda de la presión de la
muñequera.
Indicaciones para la medición
Con ayuda de su aparato puede hacerse una idea clara
acerca de su presión arterial si realiza las mediciones de
forma regular y anota los resultados siempre de forma
exacta. La presión arterial de cada ser humano cambia
continuamente.
La causa de estos cambios pueden ser factores mentales
y físicos (p.ej., ansiedad, esfuerzo, tabaco, cafeína y
12
Page 11

estrés). Pero también la hora del día, la época del año y
las temperaturas pueden influir en la presión arterial.
Además, arritmias pueden causar resultados incorrectos
o poco exactos. En este caso consulte con su médico si
es recomendable que utilice este aparato.
Para que los valores le proporcionen una idea realista
acerca de su presión arterial, tenga en cuenta lo
siguiente:
• Mida su tensión arterial siempre a la misma hora.
• Mídala estando relajado. Antes de realizar la
medición, procure descansar durante un cuarto de
hora. Después de una comida principal debería
esperar una hora antes de medir la presión arterial.
• No fume y no beba alcohol antes de medir la
presión arterial.
• Antes de medir la presión no debería realizar
ningún trabajo físico durante una hora.
• No mida su presión arterial si está bajo estrés o si
está tenso.
• Mida su presión arterial con una temperatura
corporal normal; no cuando tenga frío o calor.
• Espere aprox. 5 minutos si desea volver a medir la
presión arterial.
¡Trate siempre de medir la tensión arterial bajo las
mismas condiciones exteriores! Mediciones en
condiciones diversas pueden llevar a factores de
ES
EN
DE
PT
PL
DK
13
Page 12

medición diferentes y por consiguiente a valores muy
dispares.
Si en una medición obtiene valores muy diferentes a los
valores usuales, en todo caso realice una segunda
medición pasado un cierto tiempo, para poder excluir
que se haya producido alguno de los factores
mencionados que causan valores dispares.
14
Page 13
Colocación de las pilas
ES
Retire la tapa del compartimento de las pilas tirando
en el sentido de la flecha.
Introduzca dos pilas 1,5-V R03/LR03 AAA (alcalinas).
Tenga en cuenta la polaridad correcta (el polo
negativo conectado con el muelle).
Vuelva a cerrar el compartimento de pilas.
Cambie las pilas siempre que
• en pantalla aparezca el símbolo de la pila,
• después de pulsar la tecla
permanezca negra.
¡Cambie siempre ambas pilas al mismo
tiempo! ¡No utilice nunca pilas gastadas en
combinación con pilas nuevas ni tampoco
pilas de diferentes tipos!
El aparato no está diseñado para el
funcionamiento con pilas recargables
(baterías).
la pantalla
15
EN
DE
PT
PL
DK
Page 14
Esquema del aparato
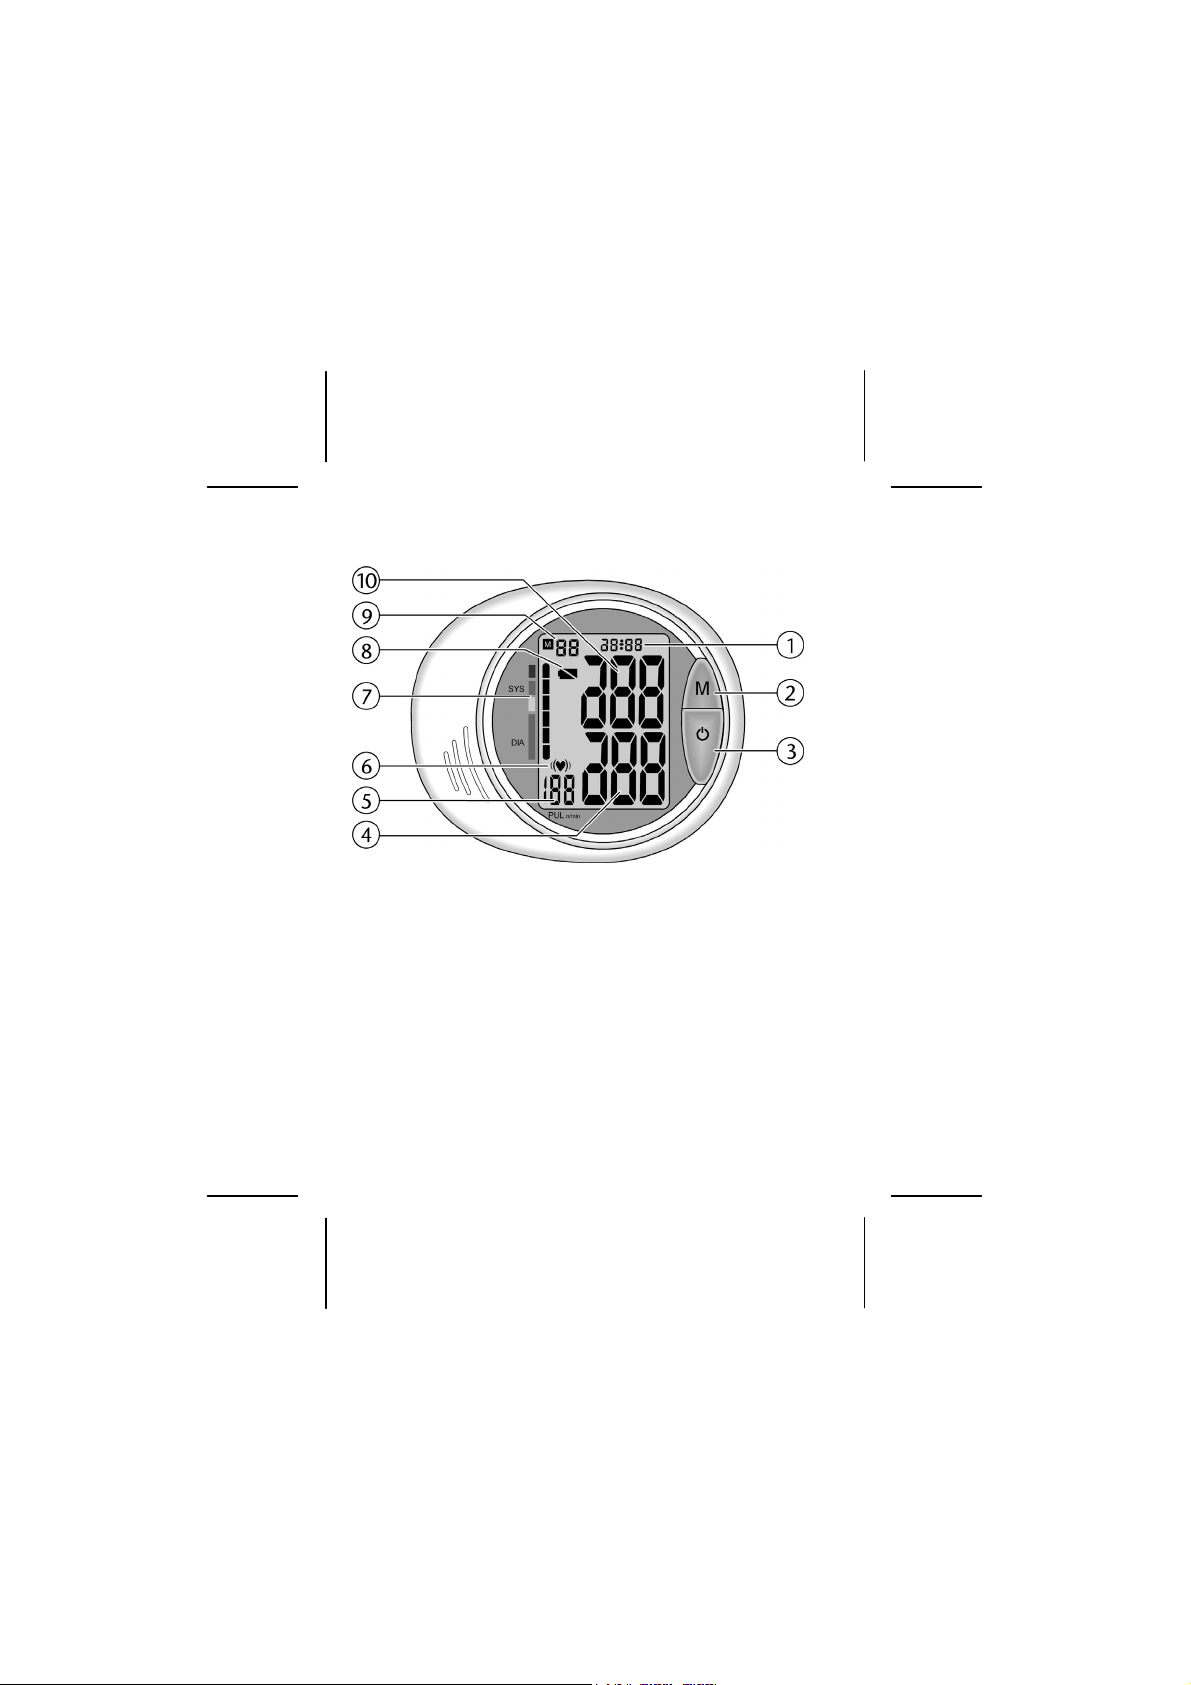
1 Indicación de la hora / fecha
2 Tecla M: Visualizar valores almacenados, ajustar
idioma, volumen de voz, fecha y hora
3 Activa la medición de la tensión arterial, confirma
los ajustes de fecha y hora
4 Presión arterial diastólica medida
5 Frecuencia cardiaca medida
6 Símbolo de corazón: Indicación de la frecuencia
cardiaca
16
Page 15

Símbolo del corazón entre paréntesis: indicación de
arritmia
7 Indicación por colores
8 Indicador de las pilas: aparece cuando las pilas
están gastadas
9 Posiciones de memoria 01 – 30; 01 medición más
reciente; 02, 03,... mediciones anteriores
10 Presión arterial sistólica medida
ES
EN
DE
PT
PL
DK
17
Page 16

Puesta en funcionamiento
Ajustar la fecha y la hora
Pulse las teclas y M simultáneamente. La
indicación del año parpadea. Pulse la tecla M
repetidas veces para ajustar el año actual.
Pulse la tecla
Pulse la tecla M repetidas veces para ajustar el mes
actual.
Pulse la tecla
Pulse la tecla M repetidas veces para ajustar el día
actual.
Pulse la tecla
parpadea. Pulse la tecla M repetidas veces para
ajustar la hora actual.
Pulse la tecla
parpadea. Pulse la tecla M repetidas veces para
ajustar los minutos.
Están ajustadas la fecha y la hora. El aparato sale del
modo de ajustes automáticamente pasado un minuto.
Alternativamente, puede dejar el modo de ajustes
pulsando la tecla
18
. La indicación del mes parpadea.
. La indicación del día parpadea.
. La indicación de las horas
. La indicación de los minutos
.
Page 17

Ajustar el idioma / el volumen de voz
El aparato dispone de información por voz en varios
idiomas. Para ajustar el idioma deseado siga los
siguientes pasos:
Mantenga la tecla M pulsada hasta que se escuchen
las indicaciones en el idioma deseado. En pantalla
aparecerá el idioma seleccionado actualmente en
forma de L0, L1, L2 etc. L0 significa en este caso
"sin indicación por voz".
Después de finalizar la selección del idioma suelte la
tecla por un instante. Se escuchará un tono de
confirmación.
A continuación, mantenga pulsada de nuevo la
tecla M hasta que haya ajustado el volumen de voz
deseado. Para determinar el volumen, se escuchará
una señal acústica en cada uno de los niveles de
volumen y en la parte izquierda de la pantalla se
mostrará una barra que indica el volumen
correspondiente.
La indicación por voz y el volumen están ajustados,
y el aparato vuelve al modo de hora.
ES
EN
DE
PT
PL
DK
19
Page 18
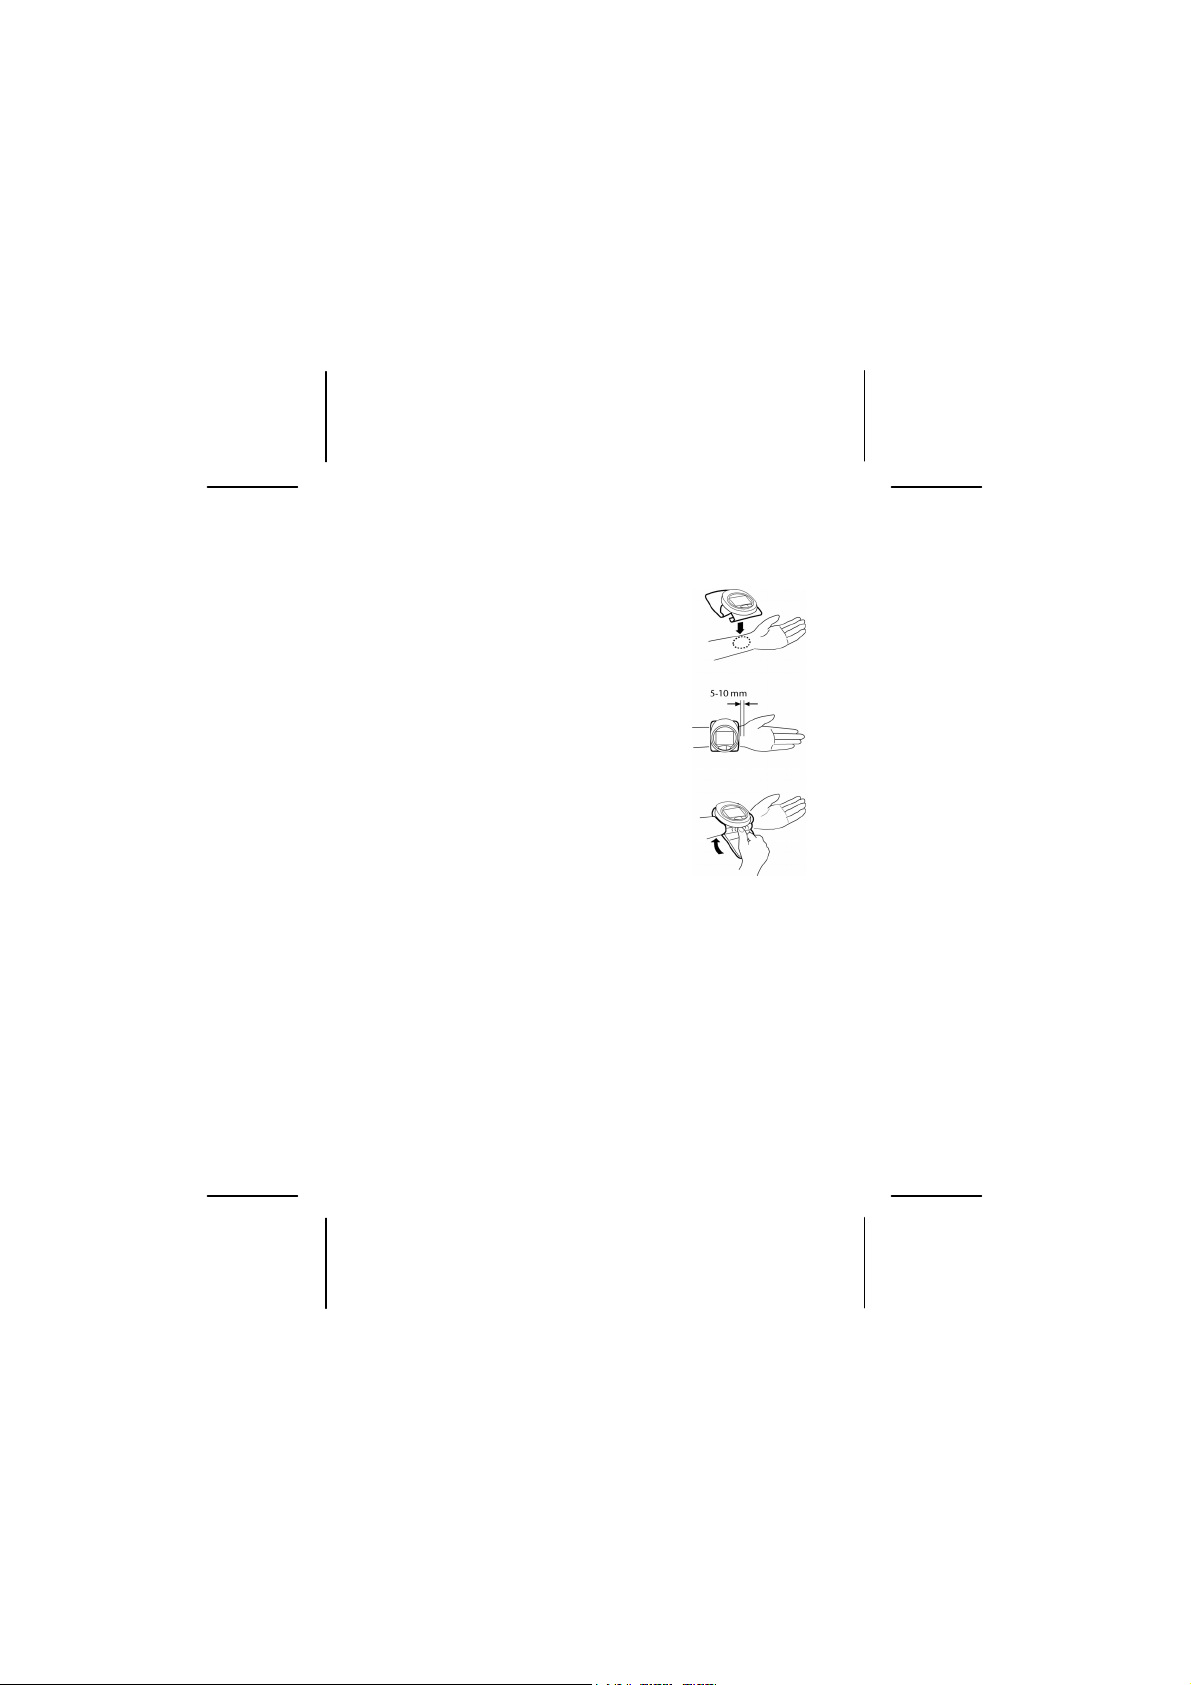
Colocar la muñequera
Coloque la muñequera de tal forma
que se encuentre a una distancia de
aprox. 5-10 mm de la muñeca de la
mano izquierda (véase figura a la
derecha). Asegúrese de que no
queda ninguna prenda de ropa
bajo la muñequera.
Mantenga la parte inferior de la
muñequera según se muestra en la
figura. Apriétela con fuerza y
enróllela hacia arriba para que no
queden huecos entre la muñequera
y la muñeca.
Al cerrarla hacia arriba, sujete con el
pulgar la cubierta de la muñequera.
Cierre la muñequera según la forma de su muñeca.
Si la muñequera no queda lo suficientemente tensa,
la presión aumentará y la muñeca quedará
insensible. En este caso no será posible una
medición correcta.
Si no se puede colocar la muñequera alrededor de la
muñeca izquierda y no se puede realizar la medición en
la muñeca izquierda, realice la medición en la muñeca
derecha.
20
Page 19
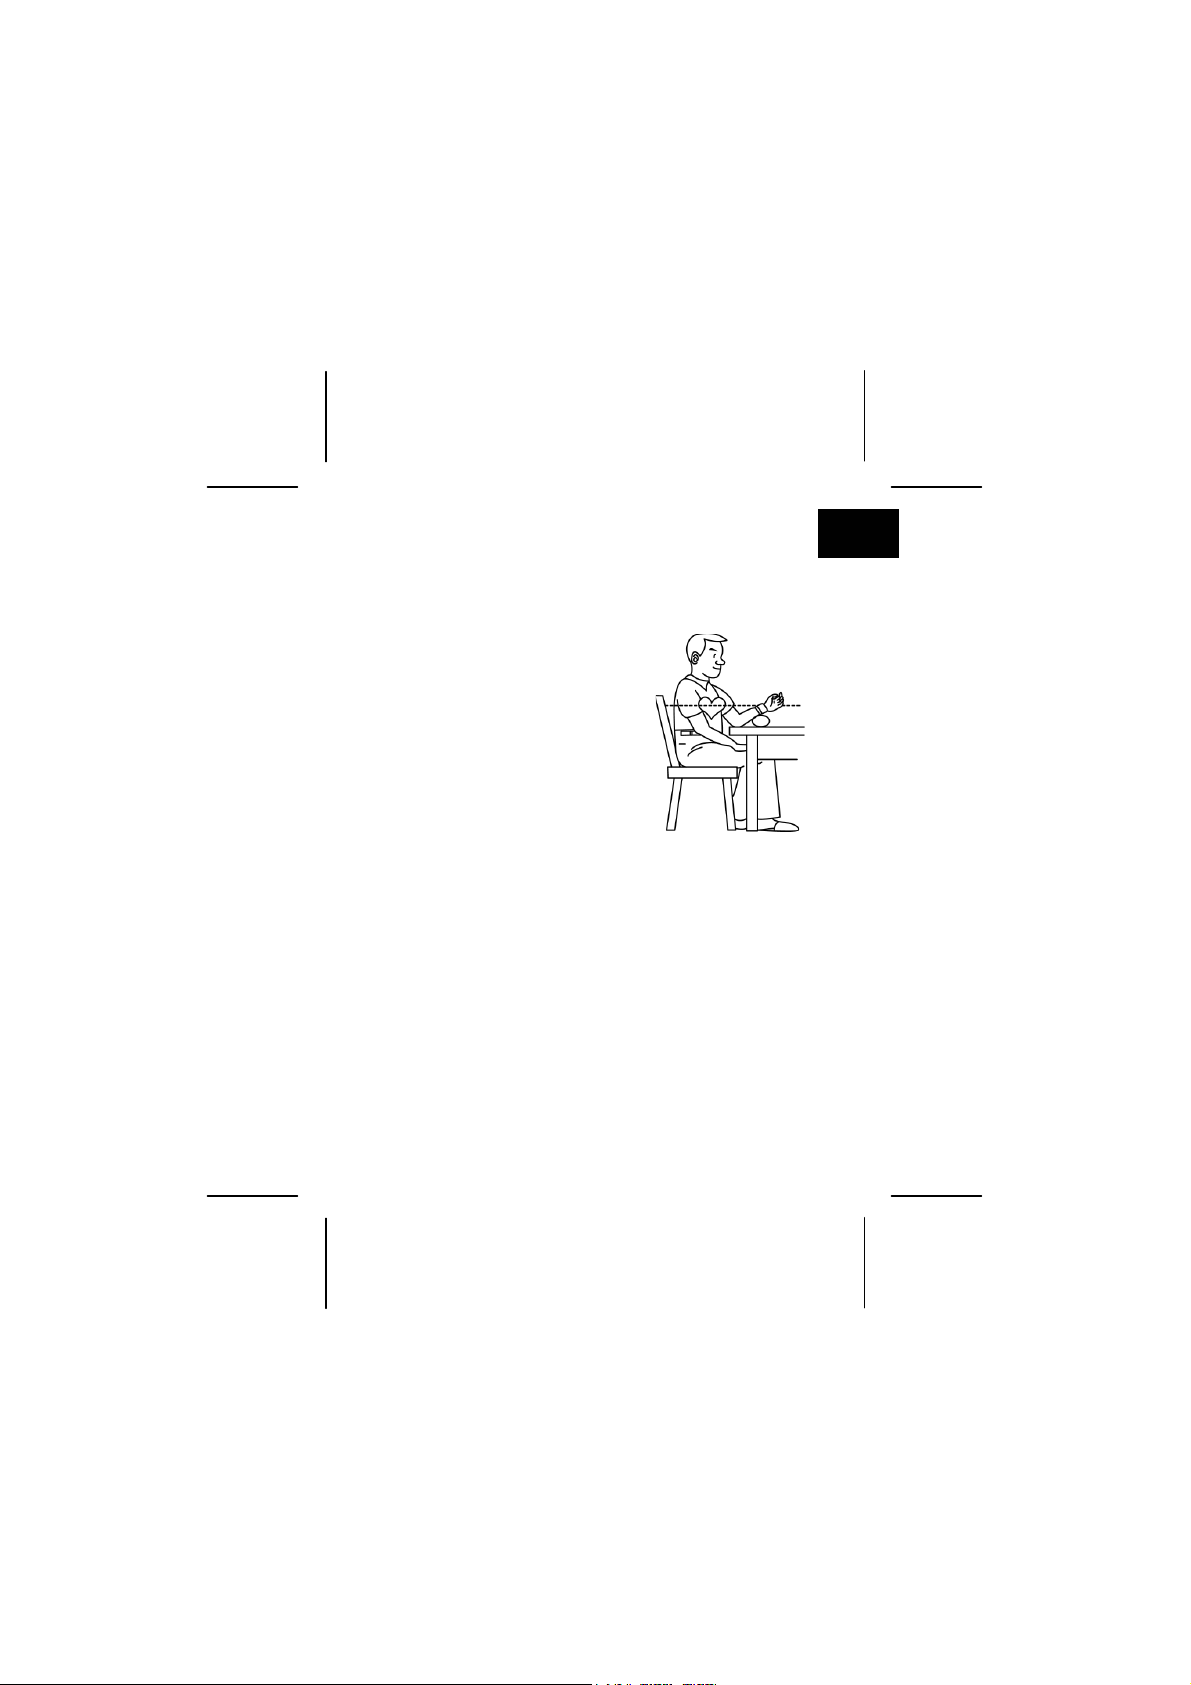
Medición correcta
Para medir la presión arterial, siéntese
cómodamente en una silla, respire profundamente
5 ó 6 veces y relájese.
Coloque el codo sobre la mesa
o una superficie y mantenga el
brazo de forma que la
muñequera se encuentre a la
altura de su corazón. Para este
fin, apoye su antebrazo p.ej.
sobre el estuche o una toalla
doblada.
Mida la tensión arterial cada
día a la misa hora.
Para medir de forma correcta los niveles de tensión
que cambian a lo largo del día, es de suma
importancia, medir la presión arterial siempre en
casa y cada día a la misma hora.
Debería informar a su médico sobre los valores
medidos, para que éste le pueda aconsejar las
medidas sanitarias oportunas.
La presión arterial medida en la muñeca puede ser
diferente a la presión medida en el brazo. Como la
posición de medición y el grosor de los vasos
sanguíneos en la muñeca y en el brazo son
diferentes, también los valores pueden variar
ES
EN
DE
PT
PL
DK
21
Page 20

ligeramente. En muchos casos la diferencia puede
oscilar alrededor de ±-10 mmHg de la presión
arterial sistólica y diastólica, tratándose de personas
sanas.
En el caso del siguiente tipo de personas se
recomienda prestar especial atención: personas con
una tensión arterial alta, diabetes, enfermedades
hepáticas, arterias endurecidas, debilidad
circulatoria, etc. En este caso consulte a su médico
antes de utilizar el aparato para controlar su tensión
arterial.
Medir la presión arterial
Coloque la muñequera alrededor de su muñeca
según se describe en el capítulo "Colocar la
muñequera".
Pulse la tecla
pocos segundos todas las indicaciones a la vez. A
continuación, aparecerá brevemente el último valor
medido para cambiar luego a las indicaciones de
medición.
Si ha activado la función de indicación por voz, siga
las órdenes acústicas.
Durante la medición no mueva la muñequera ni los
músculos del brazo o de la mano. Pasados unos
pocos segundos, el aparato bombea aire inflando la
muñequera. Cuando la presión de la muñequera
22
. En pantalla aparecerán por unos
Page 21

sea estable, el aparato procederá automáticamente
a la medición.
Si desea interrumpir el proceso de medición,
pulse la tecla
desea repetir una medición, debería dejar
pasar al menos cinco minutos entre ambas
mediciones. La muñequera tiene que estar
completamente desinflada.
. La muñequera se desinfla. Si
Medición automática
Cuando se haya alcanzado la presión óptima en la
muñequera, comienza el proceso de medición. Durante
la medición, el aparato también mide su frecuencia
cardiaca. El valor indicado irá reduciéndose a lo largo de
la medición.
Si la presión de la muñequera es demasiado
baja, el aparato interrumpe la medición y
sigue inflando la muñequera hasta que se
haya alcanzado una presión de la muñequera
suficiente para la medición.
Cuando la medición haya terminado, la muñequera se
desinfla. En pantalla aparecen la presión arterial sistólica
y diastólica así como el pulso con el símbolo de pulso.
Si está activada la función de indicación por voz, el valor
23
ES
EN
DE
PT
PL
DK
Page 22

medido se reproducirá además de forma acústica y se le
informará si la tensión arterial medida se encuentra a un
nivel normal o más bien elevado.
Detección de arritmias
Normalmente el pulso es regular (rítmico). Si el aparato
detecta irregularidades en el pulso, en pantalla
aparecerá el símbolo .
En este caso, repita la medición.
Irregularidades de la frecuencia cardiaca pueden tener
causas muy variadas. Si su pulso es constantemente
arrítmico, rogamos consulte un médico.
Visualizar valores medidos
El aparato puede almacenar hasta 60 mediciones. Para
visualizar los valores almacenados proceda de la
siguiente forma:
El aparato no debe encontrarse en el modo de
medición. Si fuera necesario, apáguelo.
Pulse la tecla M para acceder a la memoria. En
pantalla aparecerá el símbolo de memoria M y el
número de mediciones almacenadas hasta el
momento.
24
Page 23

Pulse la tecla M para visualizar los valores
almacenados con la fecha y la hora
correspondiente.
Cada vez que pulse la tecla, aparecerá la posición
de memoria siguiente contando a partir de la última
medición.
Pulse la tecla
para apagar el aparato. Los valores memorizados
seguirán almacenados.
para salir del modo de memoria y
Borrar la memoria
Pulse la tecla M para acceder a la memoria. En
pantalla aparecerá el símbolo de memoria M y el
número de mediciones almacenadas hasta el
momento.
Mantenga pulsada la tecla M durante un par de
segundos para borrar la memoria.
Se escuchará una señal acústica y en pantalla
aparecerán dos líneas. Los datos de la memoria
seleccionada quedan borrados.
ES
EN
DE
PT
PL
DK
25
Page 24

Transmisión de datos al
ordenador
En el CD incluido en el suministro, se encuentra un
programa para la transmisión de datos. Mediante este
programa puede transferir los datos almacenados en su
tensiómetro a un ordenador para evaluarlos allí.
Requisitos del sistema
Para que se pueda instalar el software, su ordenador
deberá cumplir los siguientes requisitos:
Hardware:
• Ordenador compatible PC/AT,
• Procesador Intel® Pentium® o comparable,
• Puerto USB
• Unidad de CD-ROM
• Sistema operativo: Microsoft Windows® XP Home
Edition/Vista
26
Page 25

Instalar el software
Como el software se puede utilizar con diversas
versiones de Windows®, es posible que los pasos a
realizar diverjan ligeramente de la siguiente descripción.
Proceda de la siguiente forma:
Introduzca el CD para que la instalación se inicie
automáticamente.
Se activa el asistente de instalación. Al principio de
la instalación llegará a la ventana de la licencia.
Seleccione "Acepto los términos de licencia" y a
continuación pulse en „NEXT“ para poder instalar
el software.
A continuación siga las indicaciones en pantalla y
confirme cada paso con un clic en „CONTINUE“.
Cuando la instalación esté completada, en su menú de
programas aparecerá un enlace con el nombre
„BPMcomm“.
En caso de que no funcione la inicialización
automática, puede activar la instalación del
programa directamente desde el CD (doble clic en
la unidad de CD en el Explorer). Allí ejecute el
archivo „Setup.exe“.
ES
EN
DE
PT
PL
DK
27
Page 26

Desinstalar el software
Para eliminar el software instalado en su PC proceda de
la siguiente forma:
Pulse en INICIO.
Active el PANEL DE CONTROL.
A continuación, seleccione SOFTWARE y elija el
programa „BPMcomm“. Active la desinstalación y
siga las indicaciones que aparezcan en pantalla.
En caso de que utilice el software en
combinación con Windows XP,
adicionalmente deberá desinstalar el
controlador USB „PL-2303 USB-to-Serial“.
28
Page 27

El software del tensiómetro
ES
Inicie el programa con un doble clic en el símbolo
BPMcomm en su escritorio o con un clic en el
enlace correspondiente en el menú de inicio.
Cuando haya iniciado el programa por primera vez,
seleccione el idioma en el que el programa deberá
iniciarse en el futuro. Confirme con “OK”.
Se abre la ventana principal. En las líneas superiores
del menú encontrará los botones principales del
software; entre ellos el diálogo con los cuatro
apartados „User“, „Database“, „Diagram“ y
„Histogram“ para la introducción de sus datos y
sus evaluaciones.
Las funciones principales del software
• Botones en gris: Los botones que aparezcan en
gris, no están activos en el modo actual (es decir
que la función no está disponible en ese
momento).
• System (S): Aquí puede borrar todos los datos o
parte de los datos, así como reestablecer todas las
indicaciones que ya no desea ver por defecto.
• Help (H): Aquí puede acceder a la ayuda online. Los
textos de ayuda le guiarán informándole sobre
todos los detalles de las diversas funciones del
software. Lea estas informaciones detenidamente,
29
EN
DE
PT
PL
DK
Page 28

para poder aprovechar las funcionalidades del
programa de forma óptima.
• Add user: Con este botón podrá crear un nuevo
archivo de datos de paciente. Deberá ejecutar esta
función primero, antes de poder iniciar otras
funciones.
• Cancel new user: Pulsando en este botón
cancelará la introducción de datos.
• Save user: Pulsando en este botón almacenará los
datos de paciente. Rogamos tenga en cuenta que
los datos nuevos no se almacenan
automáticamente.
• User list: Con este botón iniciará la búsqueda de
datos de paciente.
• Delete user: Con este botón borrará los datos del
paciente seleccionado.
• Print: Imprimir los valores almacenados o los
diagramas de una base de datos.
• Download data: Con este botón establecerá la
conexión con el aparato (véase el capítulo
siguiente).
30
Page 29

Transferir datos al "BP Manager"
El programa transfiere al software TODOS los datos
almacenados en el tensiómetro.
Antes de transmitir los datos, asegúrese de que hay
datos en la memoria del aparato que desea transferir a
su ordenador.
Proceda de la siguiente forma:
Active el programa BPMcomm y cree en el diálogo
"User" el paciente, cuyos datos se encuentran en el
tensiómetro y se deberán transferir al ordenador.
En caso de que ya se hayan creado varios pacientes,
seleccione el paciente en cuestión mediante los
botones adjuntos.
Conecte la toma USB del cable incluido en el
suministro a un puerto USB libre en su ordenador.
Conecte el otro enchufe del cable a la toma en el
tensiómetro.
Si el aparato está apagado, enciéndalo pulsando la
tecla M.
Si está activada la función de indicación por voz,
espere a que haya terminado el mensaje.
No encienda el aparato pulsando el interruptor de
conexión/desconexión, si no quiere medir la tensión
arterial y si el aparato no está colocado debidamente en
la muñeca (la función de bombeo se activa
inmediatamente).
31
ES
EN
DE
PT
PL
DK
Page 30

En el programa BP Manager, haga clic en el botón
„Download data“.
Si la conexión funciona, aparecerá un mensaje
„Connecting...“ y „Downloading...“. Los datos
serán transmitidos al ordenador e incorporados a la
base de datos.
Los datos son almacenados en la tabla de la pestaña
„Database“. Tan pronto como los datos estén
almacenados en la base de datos, las pestañas
„Diagram“ y „Histogram“ se activan para su
evaluación.
Indicaciones de error
• Si la conexión no funciona correctamente, aparece
la indicación „Device not found“. En este caso
controle todas las conexiones y eventualmente
encienda el aparato pulsando la tecla M.
Si el aparato está encendido y aún así no puede ser
detectado, posiblemente el controlador para la
transmisión de los datos esté dañado o falte. En este
caso deberá volver a instalar el controlador:
Abra la carpeta Programas\BPMcomm en el
escritorio,
y con un doble clic en el programa „USB to 232
Driver Installer.exe“ se instalará el controlador.
32
Page 31

• Si la memoria del aparato está vacía, aparecerá el
mensaje “No data found“. En este caso realice
mediciones primero. Para medir la tensión arterial,
desconecte antes el cable de datos del aparato.
Limpieza y cuidado
Indicaciones para el mantenimiento
Se recomienda comprobar la precisión de medición
cada 3 años.
Limpieza/almacenamiento
• Para limpiar el aparato, emplee siempre un paño
seco y suave. Evite emplear disolventes y productos
de limpieza químicos, puesto que podrían dañar la
superficie y/o las inscripciones del aparato.
• Para guardarlo o para transportarlo guarde el
aparato en el estuche correspondiente incluido en
el suministro.
• No doble hacia fuera la muñequera preformada. La
muñequera no debe lavarse ni limpiarse
químicamente.
• Si no va a utilizar el aparato durante mucho tiempo,
extraiga las pilas.
ES
EN
DE
PT
PL
DK
33
Page 32

Reciclado y eliminación de
desechos
34
Embalage
Los materiales y accesorios de embalaje son
reciclables y deben ser depositados en un
contenedor para reciclaje cuando ya no sean
necesarios.
Aparato
No tire bajo ningún concepto el aparato al
final de su vida útil a la basura doméstica
normal. Infórmese sobre las posibilidades de
las que dispone para eliminarlo de forma
respetuosa con el medio ambiente.
Pilas
¡No tire las pilas usadas a la basura
doméstica! Deben ser depositadas en un
punto de recogida para pilas usadas!
Page 33

Indicaciones de error
Error Posible causa Solución
Er 0
Er 1
Er 2
Er 3
Er 4
Las pilas están
gastadas.
El nivel de presión es
inestable durante la
medición.
No se ha podido medir
la presión sistólica.
No se ha podido medir
la presión diastólica.
El sistema de presión
está bloqueado o la
muñequera está
demasiado apretada.
El sistema de presión
tiene algún escape o la
muñequera está
demasiado floja.
Sustituya las dos
pilas por dos pilas
nuevas de 1,5 V,
LR03/AAA
(alcalinas).
Vuelva a realizar la
medición.
No se mueva y no
hable mientras se
está llevando a
cabo la medición.
Vuelva a colocar la
muñequera
correctamente y
vuelva a medir.
ES
EN
DE
PT
PL
DK
35
Page 34

Error Posible causa Solución
Er 5
Er 6
Er 7
Er 8
Er 9
Er A
En caso de que se produzcan indicaciones erróneas en
pantalla o mediciones erróneas, retire las pilas y vuelva a
colocarlas pasado un minuto.
Presión de la
muñequera superior a
300 mm Hg
La presión de la
muñequera sigue
superior a 15 mm Hg
durante más de 3
minutos.
Error EEPROM
Error durante el
control de
plausibilidad
Error interno de
funcionamiento
Error en el margen de
medición
Vuelva a repetir la
medición pasados
unos 5 minutos.
Si la indicación de
error persiste,
póngase en
contacto con
nuestro servicio
de atención al
cliente.
36
Page 35

Especificaciones técnicas
Método de medición oscilométrico
Margen de medición Tensión arterial: 30 ~ 250
mmHg, Pulso: 40 ~ 180
pulsaciones/min.
Alimentación eléctrica 2 pilas de 1,5V LR03/AAA
(alcalinas)
Pantalla LCD
Espacios de memoria 60 resultados de medición
Generación de la presión Generación automática de la
presión mediante bomba
Salida de aire Vaciado automático por una
válvula antiretorno
Precisión de medición +/- 3mmHg Indicación de la
presión
Temperatura de
funcionamiento +5 ~ +40 °C con
una humedad < 80 %
Temperatura de
almacenamiento -20 ~ +55 °C,
con una humedad < 95 %
Circunferencia de la
muñequera 14 ~ 19,5 cm
ES
EN
DE
PT
PL
DK
37
Page 36

Las especificaciones técnicas están sujetas a
cambios sin previo aviso.
El producto cumple los requisitos de la Directiva
93/42/CEE acerca de productos médicos
Este aparato cumple los requisitos de las normas para
tensiómetros no invasivos EN 1060 1: 1995 y EN 1060
3: 1997.
Tipo B
0197
El aparato fue fabricado en el año 2008
El número de serie del aparato se encuentra en el
interior del compartimento de pilas.
Encontrará información más detallada sobre emisiones
electromagnéticas y resistencia a interferencias
electromagnéticas en el apéndice incluido en el CD:
Acceda al escritorio con un doble clic:
Seleccione con un doble clic la unidad en la que se
encuentra el CD de software.
Abra en el CD la carpeta "Appendix" con un doble
clic.
El archivo „Appendix Spanish“ contiene el
apéndice. Este se abrirá también con un doble clic.
38
Page 37

Content
Safety Instructions ............................................5
Purpose of use...................................................8
What is blood pressure? ....................................9
Systolic and diastolic value .......................................9
Measuring range ....................................................10
How does the measurement work?......................... 11
Inserting the batteries ....................................14
Overview ......................................................... 15
Starting the unit .............................................17
Setting the date and time........................................17
Setting the language / volume................................18
Attaching the wrist sleeve...............................19
Correct measurement .....................................20
Carrying out measurements............................21
Automatic Measurement ........................................22
Indication of an irregular heartbeat (arrhythmia) ....23
Memory unit ...................................................23
Deleting memory ............................................24
Transferring data to a computer.....................25
System requirements ..............................................25
Installing the software ............................................26
Removing the software ...........................................27
ES
EN
DE
PT
PL
DK
3
Page 38

The blood pressure monitor software .............28
Transfer data to “BP Manager” ...............................30
Error messages........................................................31
Cleaning and maintenance .............................32
Notes on maintenance............................................32
Cleaning/Storage.................................................... 32
Disposal...........................................................33
Error messages................................................34
Technical Data ................................................36
4
Page 39

Safety Instructions
• This device is not intended to be used by
individuals with limited physical, sensory or
intellectual abilities or limited experience, and/or a
lack of knowledge (including children), unless they
are being supervised by an individual responsible
for their safety or receive instructions from them
concerning how the device must be used.
• Children should be supervised in order to ensure
that they do not play with the device.
• Keep the device and its accessories out of reach of
small children.
• Keep the packing materials, such as foil away from
children. The danger of suffocation could arise in
the case of misuse.
• The device is suitable for healthy adults. Use the
unit for comparative measurements, particularly
during sporting activities. Do NOT use the unit for
medical diagnosis. It can not replace medical
intervention.
• Only start the air supply (
is attached correctly.
• Do not drop the unit and do not place objects on
top of it.
button) once the unit
ES
EN
DE
PT
PL
DK
5
Page 40

• Never immerse the unit in water. Do not expose it
to water or moisture!
• Do not use the device under extreme temperature
conditions!
• Do not bend the fixed part of the sleeve!
Batteries and Proper Treatment
Batteries may contain combustible materials. By misuse,
this may cause battery leakage, heat, explosion or
ignition, bringing about injury or damage to the device.
Please observe strictly the following matters:
• Clean the battery and device contacts, if necessary,
before inserting batteries.
• Clean the battery and device contacts, if necessary,
before inserting batteries.
• Do not charge batteries (except rechargeable
batteries).
• Do not short-circuit batteries.
• Do not disassemble or deform batteries. Your hands
and fingers may be injured, or the liquid of the
battery may get into your eyes or adhere to your
skin. If this happens, rinse with a large quantity of
water immediately and consult a doctor.
• Do not expose batteries to strong impact by
dropping or throwing the batteries.
6
Page 41

• Do not reverse the positive (+) and negative (-)
terminals to avoid short-circuit.
• Remove the used batteries promptly from the
device.
• Remove the batteries from your device if it is not to
be used for a long period.
• Replace all batteries with new batteries of the same
type at the same time.
Repair
• Leave all repairs of your device to authorized and
qualified personnel only.
• Never try to open and/or repair the unit yourself.
Repairs may only be undertaken by our Service
Centre or other appropriate specialist workshop, in
order to avoid damage.
ES
EN
DE
PT
PL
DK
7
Page 42

Purpose of use
The memories are stored in two units, and each unit can
store 60 memories at most. It is suitable for healthy
people and can be used to make comparative
measurements – especially during sporting activities.
This device is only suitable for using in dry, internal
rooms. This device is intended for personal use only. It is
not intended to commercial use in a heavy industry
environment. Use under extreme environmental
conditions can result in damage to your device.
If the values obtained give you cause to be concerned
about your health, take medical advice. Do not change
your treatment/dosage of medication as a result of the
values unless you have discussed this with your doctor!
8
Page 43

What is blood pressure?
ES
Blood pressure is a measurement of the force that the
heart expends to pump the blood through the
circulatory system and vital organs in the body. The
higher the pressure, the harder the heart has to work.
Systolic and diastolic value
Every time the heart beats the blood pressure fluctuates
between a maximum value (systole), where the heart
pumps the blood into the circulatory system (systolic
value), and a minimum value (diastolic value), were the
heart fills up with blood (diastole). The average value is
the average blood pressure.
Blood pressure can be higher than usual if parts of the
circulatory system are restricted, diseased or abnormal
in other ways. High blood pressure can cause damage
to vital organs including the brain and heart.
EN
DE
PT
PL
DK
9
Page 44

Measuring range
The classification of blood pressure values is based on a
definition and classification by the WORLD HEALTH
ORGANISATION from 1999. The WHO defines high
blood pressure as values above 140 mmHg (systolic
value) and 90 mmHg (diastolic value).
Your blood pressure measuring device is equipped with
a colour-coded indicator which makes it easier to read
the result.
Blood pressure
classification
Low < 90 < 50 Green
Normal 91 - 129 51 - 84 Green
High-Normal 130 -139 85 - 89 Green
Hypertension
stage I
Hypertension
stage II
Hypertension
stage III
systolic
mmHg
140 – 159 90 – 99 Yellow
160 – 179 100 –
> 180 > 110 Red
diastoli
c
mmHg
109
Colour
indica
tor
Orange
10
Page 45

How does the measurement work?
Your blood pressure device contains highly technical
components which measure your blood pressure and
display the results on the screen. The unit also measures
and displays your pulse frequency.
The unit measures blood pressure indirectly using a
sleeve around the wrist. Inflating the sleeve presses the
arteries together so that no more blood can flow
through them. If the pressure in the sleeve is then
reduced, this creates a relation between the sleeve
pressure and the blood pressure.
The unit has electronic step valves that can detect even
slight changes during the measurement, which can be
evened out using the sleeve pressure. By reducing the
pressure step-by-step, fluctuations in the sleeve are
recorded by the unit and included in the assessment. If
no fluctuations are recorded for a step, the air pressure
is reduced. Existing fluctuations are assessed at the
corresponding step level until they can be determined
precisely.
ES
EN
DE
PT
PL
DK
11
Page 46

Advice on measuring your blood
pressure
Using your unit regularly to measure your blood
pressure will give you a clear overview of your blood
pressure. Everybody's blood pressure changes
constantly.
Fluctuations may be caused by mental and physical
factors (such as fear, exertion, smoking, caffeine and
stress). Blood pressure can also be affected by the time
of day, time of year and temperature.
Arrhythmia can also produce an imprecise result. If you
suffer from arrhythmia please consult your doctor to
find out if you should be using this device.
Note the following points so that the values give a
realistic image of your blood pressure:
• Always measure your blood pressure at the same
time.
• Measure your pressure when you are relaxed. Try to
rest for fifteen minutes before measuring your
blood pressure. You should wait an hour after a
large meal before measuring your blood pressure.
• Do not smoke or drink alcohol before measuring
your blood pressure.
• Do not undertake any physical activity an hour
before measuring your blood pressure.
12
Page 47

• Do not measure your blood pressure if you are
under stress or are tense.
• Measure your blood pressure at normal body
temperature, but not if you are too hot or cold.
• Wait for approx. 5 minutes if you want to measure
your blood pressure again.
Make sure you always measure your blood pressure
under the same conditions! Different measuring
conditions could result in different results, thereby
producing grossly deviating results.
If, after measuring your blood pressure, the result is very
different to your normal result, make sure to measure
your blood pressure again after a short time so that the
factors listed above, which may have affected your test
results, can be excluded.
ES
EN
DE
PT
PL
DK
13
Page 48

Inserting the batteries
Remove the cover of the battery compartment in
the direction of the arrow.
Insert two 1.5V batteries size AAA/LR03 (alkaline).
Pay attention to the polarity (the negative terminal
faces the spring).
Close the battery compartment.
Replace the batteries
• if the battery icon appears on the display,
• if the display remains blank after pressing the
button.
14
Replace all batteries with new batteries of the
same type at the same time. Do not mix used
and new or different types of batteries together.
Rechargeable batteries are not suitable for the
operation of this device.
Page 49

Overview
1. Date
and time display
2. M-button: Access saved values; language / speech
volume, set date and time
3. Starts the blood pressure measurement, confirms
date and time settings
4. Diastolic blood pressure value
5. Measured pulse
ES
EN
DE
PT
PL
DK
15
Page 50

6. Heart symbol: pulse display Heart symbol in
brackets: arrhythmic display
7. Colour-coded indicator
8. Battery indicator: appears when the battery power
is too low
9. Memory space 01 – 30. 01 is the last measurement;
02, 03 are older measurements
10. Systolic blood pressure value
16
Page 51

Starting the unit
ES
Setting the date and time
Press the buttons and M at the same time. The
year flashes. Press the M button repeatedly to set
the current year.
Press the button
button repeatedly to set the current month.
Press the button
button repeatedly to set the day.
Press the button . The hour flashes. Press the M
button repeatedly to set the hour.
Press the button
button repeatedly to set the minutes.
The date and time are now set. The device closes the
setting mode automatically after one minute. You can
also exit by pressing the
. The month flashes. Press the M
. The day flashes. Press the M
. The minutes flash. Press the M
button.
EN
DE
PT
PL
DK
17
Page 52

Setting the language / volume
The unit has a speech function in several languages. To
set your language, proceed as follows:
Hold the M button pressed until the voice
announces the required language. While doing this
the display shows the current language with L0, L1,
L2, etc. L0 here stands for “no language set”.
Release the button after you have selected your
language. You will hear a confirmation tone.
Now press and hold the M button again until the
volume you want is selected. After the volume
increases by a level you will hear a signal tone and
the left-hand side of the display will show a volume
bar, the size of which will indicate the volume level.
The language and volume have now been set, the
unit returns to the time-set mode.
18
Page 53

Attaching the wrist sleeve
ES
Attach the wrist sleeve in such a
way that it is approx. 5 – 10 mm
away from the palm of your left
hand (siehe fig.). Ensure that no
articles of clothing are trapped in
the sleeve.
Hold the lower part of the sleeve
as shown. Pull down and wrap it
around and upwards, so that
there is no gap between the
sleeve and your wrist.
Use your thumb to hold the
sleeve cover while you wrap it
upwards.
Wrap the sleeve according to the
shape of your wrist. If the sleeve is not firmly
attached the pressure will increase and the wrist will
become numb. Correct measurement is then no
longer possible.
If the sleeve cannot be attached to your left arm and if it
is not possible to measure your left arm, use your right
one.
19
EN
DE
PT
PL
DK
Page 54

Correct measurement
To measure your blood pressure, sit comfortably on
a chair, take 5 or 6 deep breaths and relax.
Place your elbow on the table
or other supporting surface,
and hold your arm so that the
wrist sleeve is at heart height.
In doing so, support your
lower arm on the storage box
or on a folded towel or similar.
Always measure your blood
pressure at the same time each
day!
It is important to measure your blood pressure at
home and at the same time each day so that the
blood pressure, which can change over the course
of a day, is recorded properly.
Inform your doctor of the values measured so that
he can give you medical advice.
Blood pressure measured at the wrist can vary from
that measured at the upper arm. The values may be
slightly different because of the different
measurement positions and the strength of the
blood vessels in the wrist and upper arm. In many
cases, the difference for healthy people can be ±10
mmHg of the systolic and diastolic blood pressure.
20
Page 55

Attention is advised for the following types of
person: People with high blood pressure, diabetes,
liver disease, hardened arteries, poor circulation.
Always consult a doctor before using the unit to
measure your blood pressure.
Carrying out measurements
Attach the wrist sleeve to your wrist as described in the
chapter “Attaching the wrist sleeve“.
Press the button . All indicators are displayed for a
few seconds on the screen. The last measurement
will be displayed. The screen will then return to the
measurement display.
If the speaking option is switched on, follow the
acoustic instructions.
During measurement do not move the sleeve or
your arm or hand muscles. A few seconds later the
monitor starts searching the zero point. When the
air pressure is stable the monitor begins to measure
automatically.
If you want to stop the measurement, press
the button. The sleeve deflates. If you want
to repeat a measurement you should wait at
least five minutes. The air must be completely
removed from the sleeve.
ES
EN
DE
PT
PL
DK
21
Page 56

Automatic Measurement
Measurement starts when the correct sleeve pressure
has been reached. The device also measures your pulse.
The value displayed will fall during measurement.
If the sleeve pressure is too low the device
pauses and pumps up the sleeve again until it
reaches a sleeve pressure that is appropriate
for the measurement.
The sleeve deflates when the measurement is complete.
The systolic and diastolic blood pressure and the pulse
with the pulse icon appear in the display. If the speaking
option is activated, the measurement results will also be
spoken and you will be informed if your blood pressure
is in the normal or high ranges.
22
Page 57

Indication of an irregular heartbeat
(arrhythmia)
The pulse normally beats evenly (rhythmically). The
symbol
perceives irregularities in the rhythm of the pulse.
Repeat the measurement in this case.
There can be different causes of irregularities in the
rhythm of the pulse. Please consult your doctor if your
pulse is arrhythmic in the long term.
will appear in the display if the device
Memory unit
Up to 60 measurements can be saved in the unit. To
access the saved values proceed as follows:
The device should not be in measure mode. Switch
it off if necessary.
Press the button M, to enter the memory mode. On
the display appear the memory sign, the memory
unit and the number of measurements, which have
been stored.
Press the button M, to display the stored values.
The measured values are displayed in reverse order.
Press the button
values remain saved when the device is switched
off.
to exit the memory. The saved
ES
EN
DE
PT
PL
DK
23
Page 58

Deleting memory
Press the button M, to enter the memory mode. The
memory symbol M will appear on the display along
with the number of previously saved measurement
results.
Press the button M for more than 2 seconds to
delete the memory.
A control tone signalizes the deletion. On the display
appear two bars. The values of the selected memory
unit are deleted.
24
Page 59

Transferring data to a
ES
computer
The accompanying CD contains a program for
transferring the data to a computer. This CD can be
used to transfer the data saved in your unit to a
computer, where the data can then be processed.
System requirements
Your computer must comply with the following before
you can install the software:
Hardware:
• PC/AT-compatible computer
• Intel® Pentium® or similar processor
• USB interface
• CD-ROM drive
• Operating system: Microsoft Windows® XP Home
Edition/Vista
EN
DE
PT
PL
DK
25
Page 60

Installing the software
Because the software can be installed on various
versions of Windows®, the instructions may vary slightly
depending on your system.
Proceed as follows:
Place the CD in the drive. The installation menu will
start automatically.
The installation wizard will start. A list of queries will
appear at the start of the installation. Click on the “I
accept the terms of the license agreement” box and
then click “NEXT” to install the software.
Now follow the instructions on the screen and
confirm each step with “NEXT”.
After successful installation, your program menu will
contain a link with the name “BPMcomm”.
If installation does not start automatically, start
the installation straight from the CD (doubleclick the CD-ROM drive in the Windows
Explorer window). Run the “Setup.exe” file.
26
Page 61

Removing the software
Proceed as follows to uninstall the software from your
PC:
Click “START”.
Open the CONTROL PANEL.
Select SOFTWARE from the list and then select the
program “BPMcomm”. Start the de-installation and
follow the instructions that appear on the screen.
If you are running the software on Windows
XP you will also have to uninstall the USB
driver “PL-2303 USB-to-Serial”.
ES
EN
DE
PT
PL
DK
27
Page 62

The blood pressure monitor
software
Start the program by double-clicking on the
BPMcomm symbol on the desktop or simply click
on the corresponding link in the start menu.
If you are starting the program for the first time, you
will be asked to select the operating language. The
program will use this language from here on in.
Confirm with “OK”.
The main screen opens. The main software buttons
are on the top menu bar; below these you will see
the four tabs “User”, “Database”, “Diagram” and
“Histogram” where you can input your entries and
evaluations.
The main software buttons
• Grey buttons: Buttons which appear grey are not
active in the current mode (you cannot select the
functions).
• System (S): Here you can delete all or individual
data records or restore any information which will
not generally be displayed.
• Help (H): This starts the online help. The help texts
will take you through the various software
28
Page 63

functions. Read the help information carefully to
help you get the most from the software.
• Add user: This is used to add a new user record.
You have to do this before you can start any of the
functions.
• Cancel new user: You can cancel the operation
using this button.
• Save user: This button saves the patient’s data.
Please remember that new entries are not saved
automatically.
• User list: Use this button to search for patient data.
• Delete user: This is used to delete data associated
with a selected patient.
• Print: Print the saved values or diagram in the
database.
• Download data: This button establishes a
connection with the unit (see following section).
ES
EN
DE
PT
PL
DK
29
Page 64

Transfer data to “BP Manager”
The program transfers ALL data saved in the blood
pressure monitor to the software.
Before transferring the data, make sure that the monitor
contains data that you want to transfer to your
computer.
Proceed as follows:
Start the program BPMcomm and in the “User”
dialogue enter the patient whose data are saved in
the blood pressure monitor and which you want to
transfer to the computer.
If several patients are already set up, select the
required patient by pressing the adjacent button.
Insert the USB connection on the supplied cable
into an empty USB port on your computer.
Insert the other end of the cable into the socket on
the blood pressure unit.
Is the unit is switched off, switch it on by pressing
the M button.
If the speaking function is activated, wait until the
command has finished.
Do not use the on/off switch to turn the device on/off if
you are not planning to measure your blood pressure
and the device is not attached to your wrist (otherwise
the inflation pump will start working).
30
Page 65

In the BP manager click on the Download data
button.
If there is a connection, the messages
“Connecting...” and “Downloading...” will appear.
The data will be transferred to your PC and will then
appear in the database.
The data are saved in the table under the “Database”
tab. The tabs “Diagram” and “Histogram”, which are
used to evaluate the data, become active as soon as data
is downloaded.
Error messages
• If there is a problem with the connection, you will
see the error message “Device not found”. Check
the connection and press the M button to switch off
the unit.
If the unit is switched on but cannot be located, the
driver for transferring the data may be damaged or
missing. In this case you will need to re-install the
driver:
Open the program BPMcomm via My
Computer.
Double-click on the program “USB 20 232
Driver Installer.exe” to install the driver.
ES
EN
DE
PT
PL
DK
31
Page 66

• If the monitor memory is empty the message “No
data found” will appear. You will have to measure
your blood pressure before continuing. First
remove the data cable from the unit before you
perform the measurement.
Cleaning and maintenance
Notes on maintenance
It is recommended that you check the usability of the
unit every three years.
Cleaning/Storage
• Clean the device with a soft, lint-free cloth. Do not
use chemical solutions and cleaning products
because these may damage the unit's surface
and/or inscriptions.
• Store and transport the device in the storage box
supplied.
• Do not bend the preshaped sleeve outwards. The
sleeve should neither be washed nor dry cleaned.
• If the appliance is not going to be used for long
periods, remove the batteries.
32
Page 67

Disposal
ES
Packaging
Your device is packaged to protect it against
damage during transportation. The
packaging is manufactured from materials
that can be sent to a specialist recycling
facility and disposed of in an
environmentally-friendly way.
Appliance
At the end of its life, the appliance must not
be disposed of in household rubbish. Enquire
about the options for environmentallyfriendly disposal.
Batteries
Do not dispose of used batteries in the
household rubbish! They must be deposited
at a collection point for used batteries.
EN
DE
PT
PL
DK
33
Page 68

Error messages
Defect Possible cause Solution
The batteries are dead. Replace both
Er 0
Er 1
Er 2
Er 3
Er 4
34
Pressure system is
unstable before
measurement.
Systolic pressure
detect fail.
Diastolic pressure
detect fail.
Pneumatic system
blocked or cuff is too
tight during inflation.
Pneumatic system
leakage or cuff is too
loose during inflation.
batteries with 2
new 1.5V, LR03/
AAA batteries.
Take the
measurement
again.
Don’t move and
don’t speak
during the
measurement.
Place the cuff
correctly and try
again.
Page 69

Defect Possible cause Solution
Er 5
Er 6
Er 7
Er 8
Er 9
Er A
If you detect failures on the display or wrong
measurements, remove the batteries and replace them
after 1 minute.
Inflation above 30
mmHg
Over 3 Minutes while
pressure above 15
mmHg
EEPROM accessing
error
Device parameter
check error
MCU self-verity error
Span error
Take the
measurement
again after a 5
minute break.
Contact the
service centre if
the error is
indicated
repeatedly over a
long period of
time.
ES
EN
DE
PT
PL
DK
35
Page 70

Technical Data
Measurement method oscillometric
Measuring range Blood pressure: 30 ~ 250
mmHg, Pulse: 40 ~ 180
beats/min.
Power supply 2 x 1,5V batteries LR03/AAA
(alkaline)
Display LCD
Memory space 60 measurements results
Pressure built up automatically by pump
Air release automatically via one-way
valve
Measuring accuracy +/- 3mmHg pressure
indicator
Operating temperature +5 ~ +40 °C bei
air humidity < 80 %
Storage temperature -20 ~ +55 °C,
air humidity < 95 %
Sleeve size 14 ~ 19,5 cm
Subject to technical changes.
36
Page 71

The product meets the requirements of the guideline
93/42/EWG for medical devices.
The device corresponds with standards EN 1060-1: 1995
and EN 1060-3: 1997 for non-invasive blood pressure
measuring devices.
Type B
0197
The device was manufactured in 2008.
The serial number is arranged inside the battery
compartment.
For more information on electromagnetic applications
and stability please refer to the appendix on the CD:
Double-click on My Computer to open.
Double-click on the drive which contains the CD-
ROM.
Open the “Appendix” folder on the CD by double-
clicking.
The file “Appendix English” contains the appendix.
Double-click to open.
ES
EN
DE
PT
PL
DK
37
Page 72

38
Page 73

Inhalt
Sicherheitshinweise ..........................................5
Bestimmungsgemäßer Gebrauch...................... 8
Was ist der Blutdruck? ......................................9
Systolischer und diastolischer Wert ...........................9
Messbereich............................................................10
Wie funktioniert die Blutdruckmessung?.................11
Batterien einsetzen.........................................14
Geräteübersicht ..............................................15
Inbetriebnahme..............................................16
Datum und Uhrzeit einstellen .................................16
Sprache / Sprachlautstärke einstellen......................18
Manschette anlegen........................................19
Richtiges Messen .............................................20
Blutdruck messen............................................21
Automatische Messung...........................................22
Arrhythmie Erkennung............................................23
Werte aufrufen ...............................................23
Speicher löschen .............................................24
Datenübertragung an den Computer .............25
Systemvoraussetzungen .........................................25
Die Software installieren .........................................26
Die Software deinstallieren .....................................27
ES
EN
DE
PT
PL
DK
3
Page 74

Die Blutdruckmessgerät-Software ..................28
Daten auf den „BP Manager“ übertragen ...............30
Fehlermeldungen ...................................................31
Reinigung und Pflege .....................................33
Hinweise zur Wartung ............................................33
Reinigung/Aufbewahrung ......................................33
Entsorgung .....................................................34
Fehleranzeigen................................................35
Technische Daten............................................37
4
Page 75

Sicherheitshinweise
• Dieses Gerät ist nicht dafür bestimmt, durch Perso-
nen (einschließlich Kinder) mit eingeschränkten
physischen, sensorischen oder geistigen Fähigkeiten
oder mangels Erfahrung und/oder mangels Wissen
benutzt zu werden, es sei denn, sie werden durch
eine für Ihre Sicherheit zuständige Person beaufsichtigt oder erhielten von Ihnen Anweisungen, wie das
Gerät zu benutzen ist.
• Kinder sollen beaufsichtigt werden um sicherzustel-
len, dass sie nicht mit dem Gerät spielen.
• Bewahren Sie das Gerät und das Zubehör an einem
für Kinder unerreichbaren Platz auf.
• Halten Sie auch die Verpackungsfolien von Kindern
fern. Es besteht Erstickungsgefahr!
• Das Gerät ist geeignet für gesunde, erwachsene
Personen. Nutzen Sie das Gerät zur vergleichenden
Messung, insbesondere bei sportlichen Aktivitäten.
Nutzen Sie das Gerät NICHT für eine medizinische
Diagnostik. Es kann keine ärztlichen Maßnahmen
ersetzen.
• Starten Sie die Luftzufuhr (mit der Taste
dann, wenn das Gerät richtig angelegt ist.
• Lassen Sie das Gerät nicht fallen und beschweren
Sie es nicht mit Gegenständen.
) nur
ES
EN
DE
PT
PL
DK
5
Page 76

• Halten Sie das Gerät niemals unter Wasser. Setzen
Sie es nicht Tropf- und Spritzwasser aus!
• Benutzen Sie das Gerät nicht unter extremen Tem-
peraturbedingungen!
• Verbiegen Sie den festen Teil der Manschette nicht!
Sicherer Umgang mit Batterien
Batterien können brennbare Stoffe enthalten. Bei unsachgemäßer Behandlung können Batterien auslaufen,
sich stark erhitzen, entzünden oder gar explodieren, was
Schäden für Ihr Gerät und ihre Gesundheit zur Folge
haben kann. Bitte befolgen Sie unbedingt folgende
Hinweise:
• Halten Sie Kinder von Batterien fern. Sollten verse-
hentlich Batterien verschluckt worden sein, melden
Sie dies sofort Ihrem Arzt.
• Prüfen Sie vor dem Einlegen der Batterien, ob die
Kontakte im Gerät und an den Batterien sauber
sind, und reinigen Sie diese gegebenenfalls.
• Laden Sie niemals Batterien (es sei denn, dies ist
ausdrücklich angegeben). Explosionsgefahr!
• Schließen Sie die Batterien niemals kurz.
• Zerlegen oder verformen Sie Batterien nicht. Ihre
Hände oder Finger könnten verletzt werden oder
Batterieflüssigkeit könnte in Ihre Augen oder auf Ihre Haut gelangen. Sollte dies passieren, spülen Sie
6
Page 77

die entsprechenden Stellen mit einer großen Menge klaren Wassers und informieren Sie umgehend
Ihren Arzt.
• Setzen Sie Batterien niemals übermäßiger Wärme
(wie Sonnenschein, Feuer oder dergleichen) aus.
• Vertauschen Sie niemals die Polarität. Achten Sie
darauf, dass die Pole Plus (+) und Minus (-) korrekt
eingesetzt sind, um Kurzschlüsse zu vermeiden.
• Entfernen Sie verbrauchte Batterien sofort aus dem
Gerät.
• Entfernen Sie Batterien aus Ihrem Gerät, wenn die-
ses über einen längeren Zeitraum nicht benutzt
wird.
• Ersetzen Sie alle verbrauchten Batterien in einem
Gerät gleichzeitig mit neuen Batterien des gleichen
Typs.
Reparatur
• Bitte wenden Sie sich an das Medion Service Center
wenn Sie technische Probleme mit Ihrem Gerät haben.
• Versuchen Sie auf keinen Fall, das Gerät selber zu
öffnen oder zu reparieren. Wenden Sie sich im Fall
einer Störung an das Medion Service Center oder
eine andere geeignete Fachwerkstatt, um Gefährdungen zu vermeiden.
ES
EN
DE
PT
PL
DK
7
Page 78

Bestimmungsgemäßer
Gebrauch
Das Gerät dient der Messung des Blutdrucks am Handgelenk und kann 60 Messwerte speichern. Es ist für
gesunde Personen zur vergleichenden Messung – insbesondere bei sportlichen Aktivitäten – geeignet.
Dieses Gerät ist nur für den Gebrauch in trockenen Innenräumen geeignet. Dieses Gerät ist für den Privatgebrauch gedacht und nicht für industrielle oder kommerzielle Nutzung vorgesehen. Die Nutzung unter
extremen Umgebungsbedingungen kann die Beschädigung Ihres Gerätes zur Folge haben.
Sollten die gemessenen Werte für Sie Fragen zu Ihrer
Gesundheit aufwerfen, ziehen Sie unbedingt einen Arzt
zu Rate. Nehmen Sie aufgrund der gemessenen Werte
ohne Rücksprache mit dem Arzt keine Änderungen der
Therapie/Medikamentdosierung vor!
8
Page 79

Was ist der Blutdruck?
ES
Der Blutdruck ist ein Maß für die Kraft, die das Herz
aufwenden muss, um das Blut durch das Kreislaufsystem und die lebenswichtigen Organe des Körpers zu
pumpen. Je höher der Druck, desto mehr Arbeit muss
das Herz leisten.
Systolischer und diastolischer Wert
Der Blutdruck schwankt bei jedem Herzschlag zwischen
einem Maximalwert (Systole), wenn das Herz Blut in
den Blutkreislauf pumpt (systolischer Wert) und einem
Minimalwert (diastolischer Wert), wenn sich das Herz
wieder mit Blut füllt (Diastole). Der Mittelwert ist der
mittlere Blutdruck.
Wenn Teile des blutleitenden Systems eingeengt, krank
oder in irgendeiner Weise nicht normal sind, kann der
Blutdruck höher als normal sein. Hoher Blutdruck kann
Schäden an lebenswichtigen Organen, einschließlich
Gehirn und Herz verursachen.
EN
DE
PT
PL
DK
9
Page 80

Messbereich
Die Einteilung der Blutdruckwerte basiert auf einer Definition und Klassifikation der WHO (World Health Organisation) von 1999. Bei Werten höher 140 mmHg (systolischer Wert) und 90 mmHg (diastolischer Wert) spricht
man nach der WHO von hohem Blutdruck.
Ihr Blutdruckmessgerät ist mit einem Farbindikator ausgestattet, der Ihnen die Beurteilung des gemessenen
Wertes erleichtert.
Bereich
Niedriger Blutdruck
Normaler Blutdruck
Grenzbereich 130 -139 85 - 89 Grün
Bluthochdruck I 140 – 159 90 – 99 Gelb
Bluthochdruck II 160 – 179 100 –
Bluthochdruck III > 180 > 110 Rot
Systolisch
mmHg
< 90 < 50 Grün
91 - 129 51 - 84 Grün
Diastolisch
mmHg
109
Farbindikator
Orange
10
Page 81

Wie funktioniert die Blutdruckmessung?
Ihr Blutdruckmessgerät enthält technisch hochwertige
Komponenten, um den Druck zu messen und die Werte
auf dem Display darzustellen. Darüber hinaus misst es
auch die Pulsfrequenz und zeigt sie an.
Das Gerät misst den Blutdruck indirekt mit einer um das
Handgelenk gelegten Manschette, indem durch Aufpumpen der Manschette die Arterie so zusammengedrückt wird, dass kein Blut mehr durch sie fließen kann.
Wenn dann der Druck in der Manschette reduziert wird,
wird ein Zusammenhang zwischen dem Manschettendruck und dem Blutdruck hergestellt.
Das Gerät verfügt über elektronische Schrittventile, die
selbst geringe Schwankungen während der Messung
erkennbar machen und diese mit Hilfe des Manschettendruckes ausgleichen können. Durch die schrittweise
Verringerung des Drucks werden Schwankungen in der
Manschette vom Gerät erfasst und in die Auswertung
einbezogen. Werden bei einem Schritt keine Schwankungen erkannt, erfolgt eine Verminderung des Luftdrucks. Bestehende Schwankungen werden auf der
entsprechenden Schrittstufe ausgewertet, bis deren
Genauigkeit ermittelt wurde.
ES
EN
DE
PT
PL
DK
11
Page 82

Hinweise zum Messen
Mithilfe Ihres Geräts können Sie sich durch regelmäßiges Messen und saubere Aufzeichnungen einen klaren
Überblick über Ihren Blutdruck verschaffen. Der Blutdruck eines jeden Menschen ändert sich laufend.
Schwankungen können durch geistige und körperliche
Faktoren (z. B. Angst, Anstrengung, Rauchen, Koffein
und Stress) verursacht werden. Aber auch die Tageszeit,
Jahreszeit und die Temperaturen können den Blutdruck
beeinflussen.
Des Weiteren können Arrhythmien (Herzrhythmusstörungen) zu einem ungenauen Ergebnis führen. Besprechen Sie in diesem Fall unbedingt mit einem Arzt, ob Sie
dieses Gerät benutzen sollten.
Damit die Werte ein realistisches Bild Ihres Blutdruckverhaltens geben, beachten Sie bitte Folgendes:
• Messen Sie Ihren Blutdruck immer zur gleichen
Tageszeit.
• Messen Sie in entspanntem Zustand. Versuchen Sie,
vor der Messung eine Viertelstunde zu ruhen. Nach
einer größeren Mahlzeit sollten Sie eine Stunde bis
zur Blutdruckmessung warten.
• Rauchen Sie nicht und trinken Sie keinen Alkohol,
bevor Sie den Blutdruck messen.
• Vor der Messung sollten Sie für eine Stunde keine
körperlichen Arbeiten verrichten.
12
Page 83

• Messen Sie Ihren Blutdruck nicht, wenn Sie unter
Stress stehen oder angespannt sind.
• Messen Sie Ihren Blutdruck bei normaler Körper-
temperatur; nicht, wenn es Ihnen zu kalt oder zu
warm ist.
• Warten Sie ca. 5 Minuten, wenn Sie den Blutdruck
erneut messen wollen.
Achten Sie darauf, den Blutdruck immer unter den gleichen Bedingungen zu messen! Unterschiedliche Messbedingungen können zu unterschiedlichen Messfaktoren und somit zu stark abweichenden Werten führen.
Sollten Sie nach einer Messung einen Messwert erhalten, der stark von Ihren üblichen Werten abweicht,
führen Sie in jedem Fall nach einiger Zeit eine weitere
Messung durch, um die oben aufgeführten Faktoren,
die zu einem abweichenden Wert führen können, auszuschließen.
ES
EN
DE
PT
PL
DK
13
Page 84

Batterien einsetzen
Ziehen Sie den Batteriefach-Deckel in Pfeilrichtung
ab.
Legen Sie zwei 1,5 V-Batterien LR03 / AAA (Alkaline)
ein. Beachten Sie dabei die Polaritätsangabe im Batteriefach (der Minus-Pol liegt an der Feder an).
Schließen Sie den Batteriefach-Deckel wieder.
Wechseln Sie die Batterien, wenn
• im Display das Batteriesymbol erscheint,
• nach dem Drücken der Taste
bleibt.
das Display dunkel
14
Wechseln Sie immer beide Batterien aus!
Verwenden Sie niemals alte und neue Batterien zusammen oder Batterien unterschiedlichen Typs!
Wiederaufladbare Batterien (Akkus) sind für
den Betrieb dieses Gerätes nicht geeignet.
Page 85

Geräteübersicht
1 Uhrzeit-/
Datumsanzeige
2 M-Taste: Gespeicherte Werte abrufen; Sprache /
Sprachlautstärke, Datum und Uhrzeit einstellen
3 Startet die Blutdruckmessung, bestätigt Datums-
und Uhrzeit-Einstellung
4 Diastolischer Blutdruckwert
5 Gemessener Puls
ES
EN
DE
PT
PL
DK
15
Page 86

6 Herzsymbol: Pulsanzeige Herzsymbol in Klammern:
Arrhythmieanzeige
7 Farbindikator
8 Batterieanzeige: erscheint, wenn Batterieleistung
schwach ist
9 Speicherplatz 01 – 30; 01 zuletzt durchgeführte
Messung; 02, 03,... ältere Messungen
10 Systolischer Blutdruckwert
Inbetriebnahme
Datum und Uhrzeit einstellen
Drücken Sie die Tasten und M gleichzeitig. Die
Jahresanzeige blinkt. Drücken Sie die Taste M wiederholt, um das aktuelle Jahr einzustellen.
Drücken Sie die Taste . Die Monatsanzeige blinkt.
Drücken Sie die Taste M wiederholt, um den aktuellen Monat einzustellen.
Drücken Sie die Taste . Die Taganzeige blinkt.
Drücken Sie die Taste M wiederholt, um den Tag
einzustellen.
Drücken Sie die Taste
Drücken Sie die Taste M wiederholt, um die Stunden einzustellen.
16
. Die Stundenanzeige blinkt.
Page 87

Drücken Sie die Taste . Die Minutenanzeige blinkt.
Drücken Sie die Taste M wiederholt, um die Minuten einzustellen.
Datum und Uhrzeit sind jetzt eingestellt Das Gerät verlässt die Einstellung automatisch nach einer Minute. Sie
können diese aber auch durch Drücken der Taste
verlassen.
ES
EN
DE
PT
PL
DK
17
Page 88

Sprache / Sprachlautstärke einstellen
Das Gerät verfügt über eine Tonausgabe in mehreren
Sprachen. Um die gewünschte Sprache einzustellen,
gehen Sie wie folgt vor:
Halten Sie die Taste M so lange gedrückt, bis die
gewünschte Sprache akustisch angesagt wird. Das
Display zeigt dabei die aktuell ausgewählte Sprache
mit L0, L1, L2 etc. an. L0 steht hierbei für „keine
Sprachausgabe“.
Lassen Sie nach Beendigung der Sprachauswahl die
Taste kurz los. Ein Bestätigungston ist zu hören.
Halten Sie nun die Taste M erneut so lange ge-
drückt, bis die gewünschte Tonlautstärke ausgewählt ist. Dazu hören Sie bei jeder Lautstärkenstufe
einen Signalton und auf der linken Seite im Display
wird ein Balken mit der Höhe der Lautstärke angezeigt.
Die Sprachausgabe und die Lautstärke sind einge-
stellt, das Gerät schaltet zurück in den Uhrzeitmodus.
18
Page 89

Manschette anlegen
ES
Legen Sie die Handgelenkman-
schette so an, dass sie ca. 5-10
mm vom Handgelenk der linken
Hand entfernt ist (siehe Abbildung rechts). Stellen Sie sicher,
dass kein Kleidungsstück eingeklemmt ist.
Halten Sie den unteren Teil der
Handgelenkmanschette wie in der
Abbildung gezeigt. Ziehen Sie fest
an und wickeln Sie es nach oben,
so dass keine Lücke zwischen
Manschette und Handgelenk
bleibt.
Während des Wickelns nach oben
hält der Daumen die Manschettenabdeckung.
Wickeln Sie die Manschette nach der Form des
Handgelenks. Wenn die Manschette nicht fest genug angelegt ist, wird der Druck größer, das Handgelenk wird empfindungslos. Eine korrekte Messung ist so nicht möglich.
Wenn die Manschette nicht am linken Handgelenk angelegt werden kann und das Messen am linken Handge-
19
EN
DE
PT
PL
DK
Page 90

lenk nicht möglich ist, messen Sie am rechten Handgelenk.
Richtiges Messen
Setzen Sie sich zum Blutdruckmessen bequem auf
einen Stuhl, machen Sie 5 oder 6 tiefe Atemzüge
und entspannen Sie sich.
Legen Sie Ihren Ellenbogen auf
den Tisch oder eine Unterlage
und halten Sie den Arm so,
dass die Handgelenkmanschette sich auf der Höhe Ihres Herzens befindet. Legen Sie dabei
Ihren Unterarm
z. B. auf die Aufbewahrungsbox oder ein gefaltetes Handtuch.
Messen Sie den Blutdruck jeden Tag zur selben Zeit!
Um die Werte des sich im Laufe des Tages ändern-
den Blutdrucks richtig zu erfassen, ist es wichtig,
den Blutdruck täglich zu Hause und zur gleichen
Zeit zu messen.
Die erfassten Messwerte sollten Sie Ihrem Arzt zur
Auswertung überlassen, damit er Sie bei gesundheitlichen Maßnahmen beraten kann.
Der am Handgelenk gemessene Blutdruck kann sich
von dem am Oberarm gemessenen unterscheiden.
20
Page 91

Weil sich die Position der Messung und die Stärke
der Blutgefäße von Handgelenk und Oberarm unterscheiden, können die Werte auch leicht voneinander abweichen. In vielen Fällen kann der Unterschied bei gesunden Personen +/-10 mmHg des
systolischen und diastolischen Blutdrucks betragen.
Bei folgenden Personen ist Aufmerksamkeit ange-
zeigt: bei Personen mit Bluthochdruck, Diabetes, Erkrankungen der Leber, verhärteten Arterien oder
Kreislaufschwächen. Konsultieren Sie in diesem Fall
Ihren Arzt, bevor Sie das Gerät zur Überwachung Ihres Blutdrucks verwenden.
Blutdruck messen
Legen Sie die Handgelenkmanschette wie im Kapitel
„Manschette anlegen“ beschrieben um Ihr Handgelenk.
Drücken Sie die Taste
wenige Sekunden alle Displayanzeigen gleichzeitig.
Anschließend wird der letzte Messwert kurz angezeigt. Danach wechselt das Bild zur Messanzeige.
Wenn Sie die Sprachausgabe eingeschaltet haben,
folgen Sie den akustischen Anweisungen.
Bewegen Sie während der Messung weder die Man-
schette noch Ihre Arm- oder Handmuskeln. Nach
wenigen Sekunden pumpt das Gerät die Manschet-
. Im Display erscheinen für
ES
EN
DE
PT
PL
DK
21
Page 92

te auf. Wenn der Manschettendruck stabil ist, beginnt das Gerät automatisch mit der Messung.
Wollen Sie die Messung unterbrechen, drücken
Sie die Taste
Möchten Sie eine Messung wiederholen, sollten
Sie mindestens fünf Minuten warten. Die Manschette muss völlig entlüftet sein.
. Die Manschette wird entlüftet.
Automatische Messung
Wenn der richtige Manschettendruck erreicht ist, beginnt der Messvorgang. Während der Messung ermittelt
das Gerät auch Ihre Pulsfrequenz. Der angezeigte Wert
fällt während der Messung.
Ist der Manschettendruck zu niedrig, unterbricht
das Gerät und pumpt die Manschette höher auf,
bis ein für die Messung ausreichender Manschettendruck erreicht ist.
Ist die Messung beendet, wird die Manschette entlüftet.
Der systolische und diastolische Blutdruck sowie der
Puls mit dem Pulssymbol erscheinen im Display. Bei
aktivierter Sprachausgabe, wird zusätzlich der gemessene Wert akustisch wiedergegeben und Sie werden darüber informiert, ob sich Ihr gemessener Blutdruck im
normalen oder erhöhten Bereich befindet.
22
Page 93

Arrhythmie Erkennung
Normalerweise schlägt der Puls gleichmäßig (rhythmisch). Wenn das Gerät Störungen im Pulsrhythmus
erkennt, erscheint im Display das Symbol
In diesem Fall wiederholen Sie die Messung.
Pulsrhythmusstörungen können verschiedene Ursachen
haben. Sollte der Puls dauerhaft arrhythmisch sein,
konsultieren Sie bitte Ihren Arzt.
.
Werte aufrufen
Das Gerät kann bis zu 60 Messungen speichern. Gehen
Sie zum Abrufen der gespeicherten Werte wie folgt vor:
Das Gerät darf sich nicht im Messbetrieb befinden.
Schalten Sie es gegebenenfalls aus.
Drücken Sie die Taste M, um den Speicher aufzuru-
fen. Auf dem Display erscheint das Speichersymbol
M und die Anzahl der bisher gespeicherten Messungen.
Drücken Sie die Taste M, um die gespeicherten
Werte mit Datum und Uhrzeit anzeigen zu lassen.
Mit jedem Tastendruck wird Ihnen der nächste
Speicherplatz, von der letzten Messung an, angezeigt.
ES
EN
DE
PT
PL
DK
23
Page 94

Drücken Sie die Taste
lassen und das Gerät auszuschalten. Die gespeicherten Werte bleiben gespeichert.
, um den Speicher zu ver-
Speicher löschen
Drücken Sie die Taste M, um den Speicher aufzuru-
fen. Auf dem Display erscheint das Speichersymbol
M und die Anzahl der bisher gespeicherten Messungen.
Halten Sie die Taste M für einige Sekunden ge-
drückt, um den Speicher zu löschen.
Es ertönt ein Signal, auf dem Display erscheinen zwei
Striche. Die Daten des gewählten Speichers sind gelöscht.
24
Page 95

Datenübertragung an den
ES
Computer
Auf der mitgelieferten CD befindet sich ein Programm
zur Datenübertragung. Mithilfe dieses Programms können Sie die gespeicherten Daten Ihres Blutdruckmessgerätes an einen Computer übertragen und dort auswerten.
Systemvoraussetzungen
Um die Software installieren zu können, muss Ihr Computer folgende Voraussetzungen erfüllen:
Hardware:
• PC/AT-kompatibler Computer,
• Intel® Pentium® oder vergleichbarer Prozessor,
• USB-Schnittstelle
• CD-ROM-Laufwerk
• Betriebssystem: Microsoft Windows® XP Home
Edition/Vista
25
EN
DE
PT
PL
DK
Page 96

Die Software installieren
Da die Software mit verschiedenen Windows® Versionen
benutzt werden kann, sind leichte Abweichungen von
der nachfolgenden Beschreibung möglich.
So gehen Sie vor:
Legen Sie die CD ein, um das Installationsmenü
automatisch zu starten.
Der Installationsassistent startet. Zu Beginn der
Installation erfolgt eine Lizenzabfrage. Wählen Sie „I
accept the terms of the license agreement“ aus und
klicken Sie dann „NEXT“, um die Software installie-
ren zu können.
Folgen Sie dann den Anweisungen auf dem Bild-
schirm und bestätigen Sie jeden Schritt durch Klick
auf „WEITER“.
Ist die Installation abgeschlossen, wird in Ihrem Programmmenü eine Verknüpfung mit dem Namen
„BPMcomm“ abgelegt.
Sollte der hier beschriebene automatische Start
nicht funktionieren, starten Sie dann die Programminstallation direkt von der CD (Doppelklick auf das CD-Laufwerk im Explorer). Führen
Sie dort die Datei „Setup.exe“ aus.
26
Page 97

Die Software deinstallieren
Um die installierte Software von Ihrem PC zu entfernen,
gehen Sie so vor:
Klicken Sie auf START.
Starten Sie die SYSTEMSTEUERUNG.
Wählen Sie anschließend das Programm SOFT-
WARE und wählen Sie das Programm „BPMcomm“
aus. Starten Sie die Deinstallation und folgen Sie
den Anweisungen auf Ihrem Bildschirm.
Sollten Sie die Software mit Windows XP nutzen, ist es außerdem notwendig, den USBTreiber
„PL-2303 USB-to-Serial“ zu deinstallieren.
ES
EN
DE
PT
PL
DK
27
Page 98

Die BlutdruckmessgerätSoftware
Starten Sie das Programm durch einen Doppelklick
auf das Symbol BPMcomm auf ihrem Desktop oder
durch einen einfachen Klick auf die entsprechende
Verknüpfung im Startmenü.
Nachdem das Programm zum ersten Mal gestartet
wurde, wählen Sie die gewünschte Sprache aus, in
der das Programm gestartet werden soll. Bestätigen
Sie mit „OK“.
Der Hauptbildschirm öffnet. Sie finden in den obe-
ren Menüzeilen die Hauptschaltflächen der Software; darunter den Dialog mit den vier Registern
„Benutzer“, „Datenbank“, „Diagramm“ und
„Histogramm“ für Ihre Eingaben und Auswertungen.
Die Hauptschaltflächen der Software
• Graue Schaltflächen: Schaltflächen, die grau er-
scheinen, sind im aktuellen Modus nicht aktiv (die
Funktion kann zurzeit nicht angewählt werden).
• System (S): Hier können Sie alle oder einzelne
Datensätze löschen sowie alle Hinweise, die standardmäßig nicht mehr angezeigt werden sollen,
wiederherstellen.
28
Page 99

• Hilfe (H): Hier starten Sie die Online-Hilfe. Die Hilfe-
texte führen Sie detailliert durch die diversen Funktionen der Software. Lesen Sie sich die Hilfe aufmerksam durch, um die volle Funktionalität des
Programms ausschöpfen zu können.
• Benutzer anlegen: Über diese Schaltfläche legen
Sie einen neuen Patienten-Datensatz an. Diese
Funktion muss zunächst ausgeführt werden, bevor
Sie eine andere Funktion starten können.
• Bearbeitung abbrechen: Über diese Schaltfläche
brechen Sie die Eingaben ab.
• Benutzer speichern: Über diese Schaltfläche spei-
chern Sie die Patientendaten. Bitte beachten Sie,
dass neue Einträge nicht automatisch gespeichert
werden.
• Benutzerliste: Über diese Schaltfläche starten Sie
eine Suche nach Patientendaten.
• Benutzer löschen: Mit dieser Schaltfläche löschen
Sie die Daten des ausgewählten Patienten.
• Drucken: Ausdrucken der gespeicherten Werte
oder eines Diagramms in der Datenbank.
• Daten herunterladen: Über diese Schaltfläche stel-
len Sie die Verbindung zum Gerät her (siehe folgenden Abschnitt).
ES
EN
DE
PT
PL
DK
29
Page 100

Daten auf den „BP Manager“ übertragen
Das Programm überträgt ALLE Daten, die im Blutdruckmessgerät gespeichert sind, in die Software.
Bevor Sie die Daten übertragen, vergewissern Sie sich,
dass Daten im Gerätespeicher sind, die Sie auf den
Computer übertragen möchten.
So gehen Sie vor:
Starten Sie das Programm BPMcomm und legen Sie
im Dialog „Benutzer“ einen Patienten an, dessen
Daten im Blutdruckmessgerät gespeichert sind und
die auf den Computer übertragen werden sollen.
Wenn bereits mehrere Patienten angelegt sind,
wählen Sie den gewünschten über die nebenstehenden Schaltflächen aus.
Stecken Sie den USB-Stecker des mitgelieferten
Kabels in eine freie USB-Schnittstelle Ihres Computers.
Stecken Sie den anderen Stecker des Kabels in die
Buchse am Blutdruckmessgerät. Achten Sie darauf,
dass während der Datenübertragung das Gerät
nicht am Handgelenk angelegt ist.
Falls das Gerät ausgeschaltet ist, schalten Sie es über
die Taste M an.
Falls die Sprachfunktion aktiviert ist, warten Sie bis
die Ansage beendet ist.
30
 Loading...