

Page 1

ES
Contenido
Recomendaciones de seguridad ......................................................................... 2
Uso previsto ......................................................................................................... 2
Seguridad de funcionamiento .............................................................................. 2
La manipulación segura de las pilas .................................................................... 4
Reparaciones ....................................................................................................... 4
Paquete de entrega ............................................................................................... 5
Vista general del aparato ..................................................................................... 6
Parte delantera ..................................................................................................... 6
Parte superior ....................................................................................................... 7
Lateral derecho .................................................................................................... 7
Lateral izquierdo................................................................................................... 8
Parte inferior ......................................................................................................... 8
Puesta en marcha ................................................................................................. 9
Creación de conexión de corriente ...................................................................... 9
Batería de recambio ............................................................................................. 9
Ajuste del reloj ...................................................................................................... 9
Utilización ............................................................................................................ 10
Encendido y apagado ........................................................................................ 10
Selección de modo de funcionamiento .............................................................. 10
Modificación del volumen ................................................................................... 10
Indicativo de pantalla ......................................................................................... 10
Conectar a un aparato de sonido externo ......................................................... 10
Dirección de la antena de recepción ................................................................. 10
Funcionamiento de radio ................................................................................... 11
Funcionamiento del CD ...................................................................................... 11
Modo despertador ............................................................................................... 13
Servicio de atención al cliente ........................................................................... 14
Ayuda inicial en caso de fallos en el funcionamiento ........................................ 14
¿Necesita más ayuda? ...................................................................................... 14
Limpieza y cuidado ............................................................................................ 14
Eliminación .......................................................................................................... 15
Datos técnicos ..................................................................................................... 15
Copyright © 2010
Todos los derechos reservados.
Los derechos de autor de este manual están protegidos.
El copyright pertenece a la empresa Medion®.
Marcas:
Las marcas mencionadas son propiedad de sus respectivos propietarios.
Modificaciones técnicas y ópticas y errores de impresión reservados.
EN
PL
1
Page 2

Recomendaciones de seguridad
Antes de utilizar el aparato por primera vez, lea este manual de
utilización con atención y, sobre todo, siga los consejos de
seguridad.
Todas las acciones realizadas en y con este aparato, deben
acometerse tal y como se explica en estas instrucciones de
utilización.
Guarde estas instrucciones de utilización para su consulta
frecuente. Si cede el aparato a otra persona, asegúrese de ceder
también estas instrucciones de utilización.
Uso previsto
El aparato no está destinado a personas (incluidos niños) con limitaciones físicas,
sensoriales, mentales o falta de experiencia o consciencia limitada a menos que
estén supervisados por una persona responsable o que reciban instrucciones
sobre cómo utilizar el aparato. Los niños deben ser supervisados para asegurarse
de que no jueguen con el aparato.
Guarde el aparato y los accesorios fuera del alcance de los niños.
Mantenga también la película de embalaje fuera del alcance de los niños. Existe
peligro de asfixia.
Seguridad de funcionamiento
No ponga ningún recipiente lleno de líquidos, como jarrones, sobre el aparato o en
su cercanía y proteja todas las piezas de gotas o salpicaduras. El recipiente puede
volcar y el líquido puede afectar la seguridad eléctrica.
En caso de daños, retire inmediatamente de la conexión eléctrica el enchufe.
El aparato sólo está previsto para el uso doméstico y no para ser utilizado en
empresas de la industria pesada.
Si se lleva el aparato de un lugar frío a una caliente, puede formarse humedad por
la condensación en el aparato. Espere algunas horas antes de poner el aparato en
funcionamiento.
2
Page 3

Alimentación de corriente
Conecte el aparato sólo a un enchufe fácilmente accesible
AC 230 V ~ 50 Hz que esté cerca del lugar de trabajo. Permita el libre acceso al
enchufe para poder retirarlo con comodidad.
La placa indicativa del tipo se encuentra en la parte inferior del aparato.
Tras cada uso y antes de limpiarlo, desconecte el enchufe del aparato de la toma
de red.
Desconecte el cable de red de enchufe sin tirar de él.
En caso de que el enchufe, el cable de red o el aparato estén dañados o si entran
líquidos y objetos extraños en el aparato, desconecte inmediatamente el enchufe
de la toma de red.
El interruptor de encendido y apagado no retira completamente el aparato de la
alimentación de corriente. Además, el aparato necesita alimentación de corriente
incluso cuando está apagado. Para retirar completamente el aparato de la
corriente, retira el enchufe de la toma.
Lugar y entorno
Los aparatos nuevos pueden generar en su primer funcionamiento un olor típico,
inevitable pero totalmente inofensivo que disminuye con el tiempo. Para
contrarrestar el olor, le recomendamos airear con frecuencia el lugar. En el
desarrollo de este producto, hemos tenido en cuenta de estar bien por debajo de
los límites actuales.
Coloque y utilice todos los componentes en una superficie estable, plana y libre de
vibraciones para evitar choques del dispositivo.
Evite una acumulación de polvo excesiva
No tape las ranuras de ventilación para que esté siempre garantizada una
ventilación suficiente. La aireación no puede ser impedida tapando el aparato con
objetos, como revistas, manteles, cortinas, etc. Mantenga una distancia mínima de
5 cm alrededor del aparato para garantizar una aireación suficiente.
Preste atención y cuide de que el aparato no entre en contacto con fuentes
directas de calor (como calentadores) y los rayos solares directos
No puede ponerse fuentes de fuego abierto (como por ejemplo velas encendidas)
encima o cerca del aparato.
No coloque ningún objeto sobre el cable porque puede dañarlo.
Utilice el aparato únicamente en espacios domésticos o similares.
ES
EN
PL
Compatibilidad electromagnética
Mantenga al menos una distancia de un metro respecto a las fuentes de alta
frecuencia y electromagnéticas (televisores, altavoces, teléfonos móviles o sin
cables, etc.) para evitar los errores de funcionamiento.
Utilice únicamente los accesorios adjuntos.
3
Page 4

La manipulación segura de las pilas
Las baterías pueden contener sustancias inflamables. En caso de una utilización
incorrecta, las baterías pueden tener fugas, calentarse, encenderse o explotar,
causando daños tanto al aparato como a su propia salud. Siga sin falta las
siguientes recomendaciones:
Mantenga las baterías fuera del alcance de los niños. En caso de ingestión
accidental de las pilas, consulte inmediatamente a su médico.
Verifique antes de la introducción de pilas si los contactos en el aparato y en las
pilas están limpios y límpielos como sea necesario.
No recargue nunca las baterías (a menos que así se exija expresamente). Existe
peligro de explosión.
No cierre nunca las baterías brevemente ni las tire al fuego. Existe peligro de
explosión.
No desmonte ni deforme las baterías. Puede dañarse los dedos o las manos o el
líquido de la batería puede entrar en contacto con los ojos o piel. En ese caso,
enjuague el lugar correspondiente con una gran cantidad de agua clara e informe
inmediatamente a su médico.
No exponga nunca las baterías a un calor excesivo (como rayos solares, fuego o
similares).
No intercambie nunca la polaridad. Tenga cuidado de que los polos Más (+) y
Menos (-) estén correctamente colocados para evitar cortocircuitos.
Retire inmediatamente las baterías desgastadas del aparato.
Retire las baterías del aparato si no va a utilizar éste durante un largo periodo de
tiempo.
Sustituya las pilas gastadas por otras nuevas del mismo tipo.
Reparaciones
Diríjase a nuestro servicio técnico si tiene problemas con su aparato.
No trate en ningún caso de abrir o reparar usted mismo el aparato. Diríjase en
caso de disfuncionamiento al servicio técnico de Medion o a un establecimiento
especializado similar para evitar riesgos.
Si las conexiones del aparato estuvieran dañadas, deben ser reparadas por el
fabricante, su servicio técnico o una personal cualificada para evitar riesgos.
4
Page 5

Paquete de entrega
Verifique la integridad del paquete de entrega y avísenos en un plazo máximo
de 14 días a partir de la fecha de compra si el paquete de entrega no está
completo. Con la radio despertador, deberá haber recibido:
CD radio reloj
Manual de instrucciones y documento de garantía
ES
EN
PL
5
Page 6
Vista general del aparato
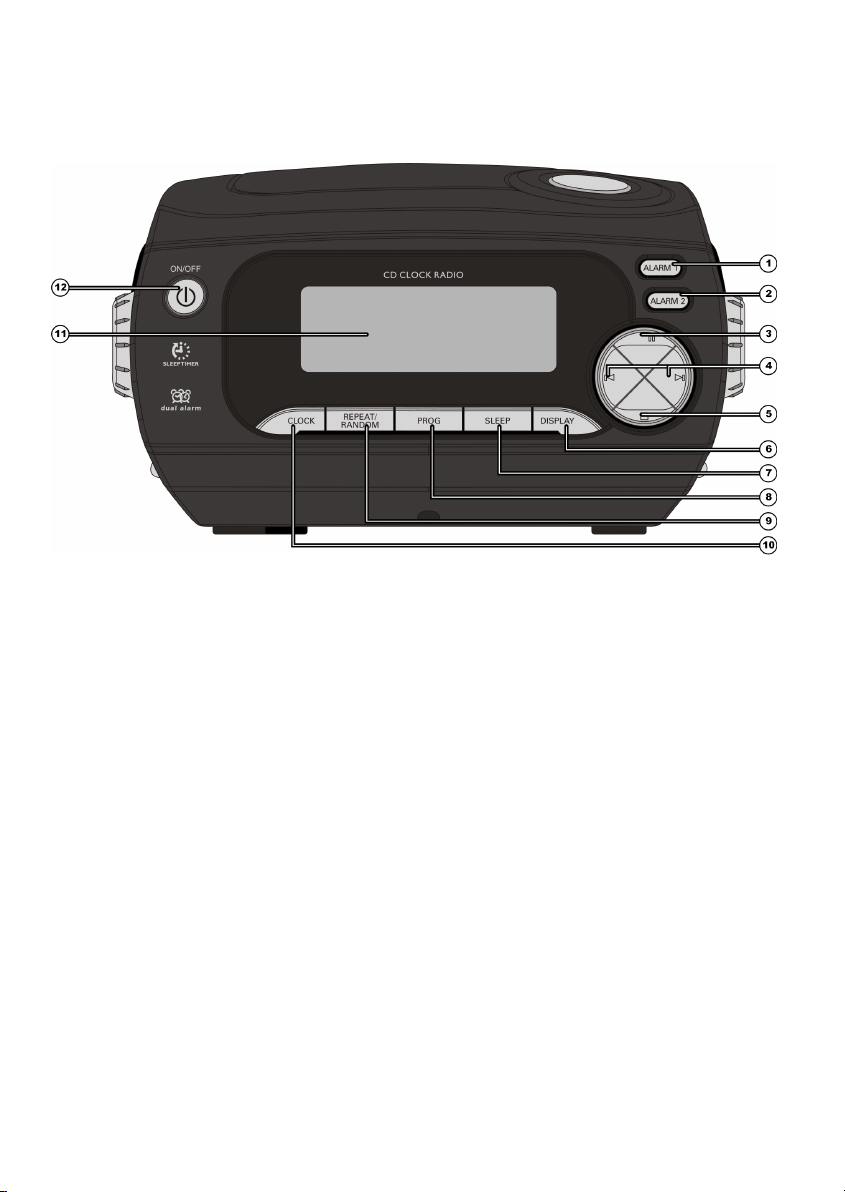
Parte delantera
1 ALARM 1: Alarma 1 – encendido y apagado; ajuste
2 ALARM 2: Alarma 2 - – encendido y apagado; ajuste
3 PLAY/PAUSE: Inicio de la reproducción; pausa
4 SKIP: Título anterior/posterior; búsqueda de título hacia delante y hacia atrás;
ajuste de hora y alarma
5 STOP: Detener la reproducción
6 DISPLAY: Cambio entre radio/CD e indicativo de hora
7 SLEEP: Ajuste de función de dormir
8 PROG: Ajuste de orden de reproducción de títulos
9 REPEAT/RANDOM: Ajuste de la función de repetición y reproducción en
orden aleatorio
10 CLOCK: Ajuste del reloj
11 Pantalla
12 ON/OFF: Activación del modo Standby
6
Page 7
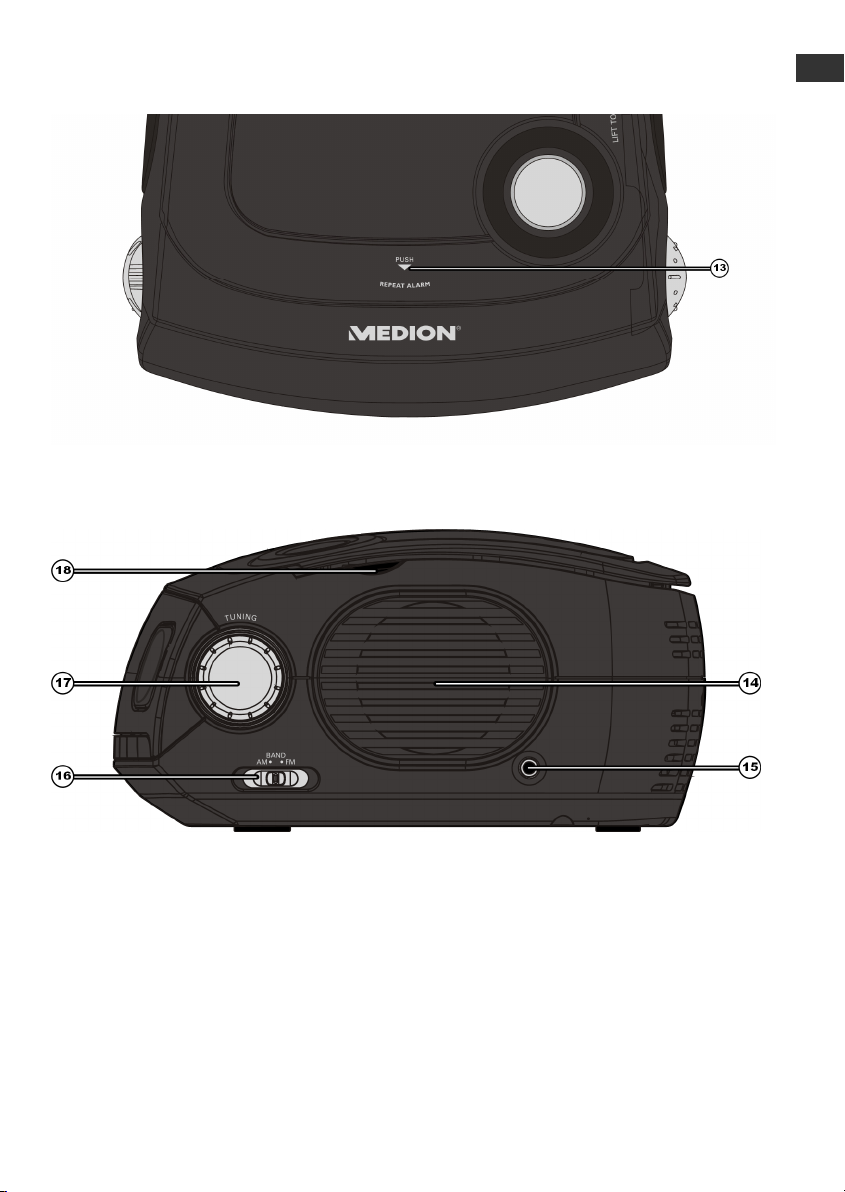
Parte superior
ES
EN
PL
13 REPEAT ALARM: Encendido y apagado de la función de dormir
Lateral derecho
14 Altavoz derecho
15 AUX IN: Conexión de 3,5 mm para la conexión de un aparato de audio
externo
16 BAND: Ajuste de la frecuencia de banda
17 TUNING: Ajuste de la frecuencia de radio
18 Pestaña para levantar la tapa del compartimento de CD
7
Page 8
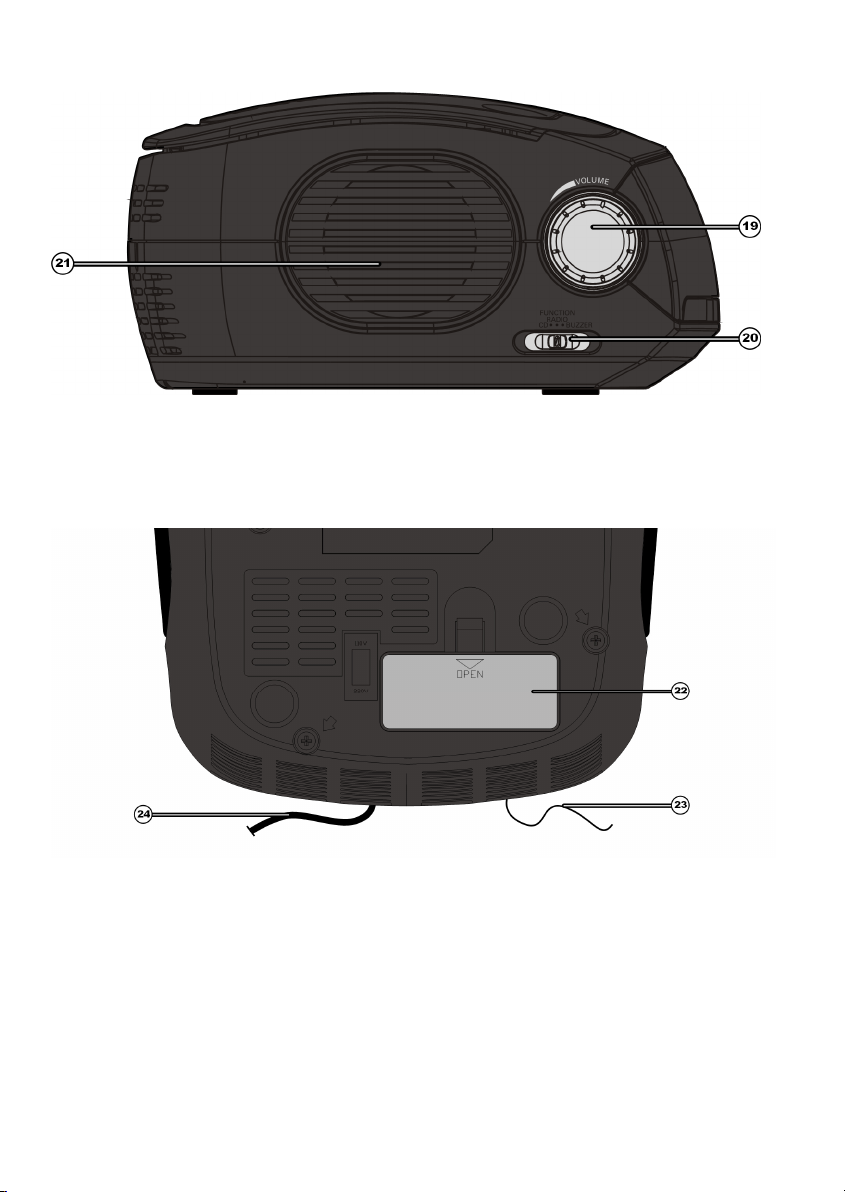
Lateral izquierdo
19 VOLUME: Ajuste del volumen
20 FUNCTION: Ajuste de la radio, CD o sonido del despertador
21 Altavoz izquierdo
Parte inferior
22 Compartimento de batería
23 Antena FM
24 Cable de red
8
Page 9
Puesta en marcha
ES
EN
Creación de conexión de corriente
Conecte el enchufe del cable de red con la toma eléctrica
AC 230 V ~ 50 Hz.
La hora se mostrará en la pantalla. Si no hay ninguna batería de recambio, se
mostrará la hora
0:00.
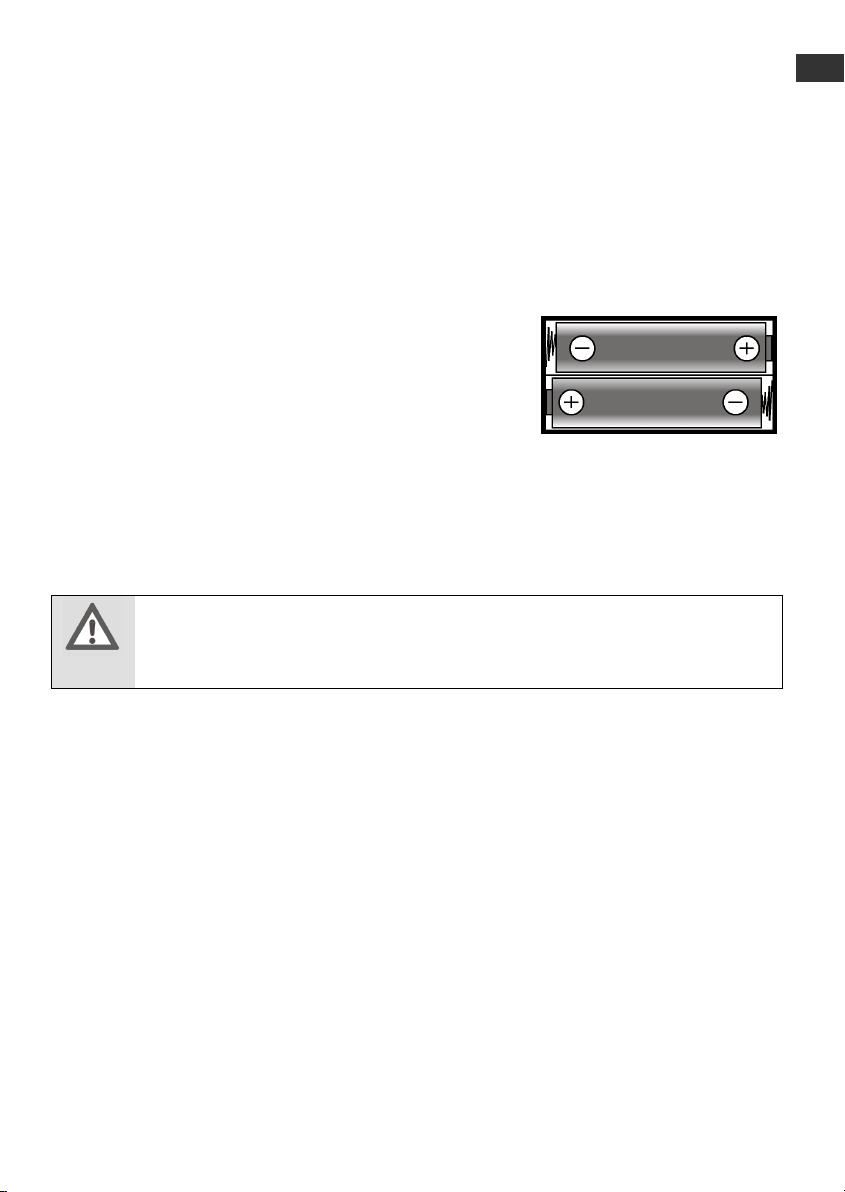
Batería de recambio
Para que la hora siga en el fondo cuando
desconecte el aparato de la red, puede introducir
dos baterías (tipo LR03/R03/AAA; no incluido en el
paquete de entrega).
Desconecte el enchufe.
Retire la tapa del compartimento de batería en la
parte inferior del aparato.
Introduzca las baterías. Cuide de que la polaridad sea correcta (+/-).
Cierre el compartimento de batería y conecte de nuevo el enchufe con la toma de
red AC 230 V ~ 50 Hz.
Ajuste el reloj, una vez introducida la batería, para mantener la hora en caso de
interrupción de la alimentación de corriente.
¡ATENCIÓN!
Peligro de explosión en caso de sustitución incorrecta de las baterías.
Cambie las baterías únicamente por otras del mismo tipo o de tipo
similar.
Ajuste del reloj
Mantenga pulsada la tecla CLOCK. El indicativo de la hora parpadeará.
Ajuste con las teclas SKIP o la hora deseada.
Pulse CLOCK. El indicativo de los minutos parpadeará.
Ajuste con SKIP o los minutos deseados.
Tras haber ajustado la hora, vuelva a encender el aparato unos segundos en el
modo Hora.
PL
9
Page 10

Utilización
Encendido y apagado
Pulse la tecla ON/OFF en el aparato. La iluminación de la pantalla será más clara.
Pulse la tecla ON/OFF de nuevo para volver a encender el aparato en el modo
Standby. La iluminación de la pantalla se atenuará.
Selección de modo de funcionamiento
Con el interruptor FUNCTION, seleccione la forma de funcionamiento CD, RADIO
o BUZZER (sonido del despertador).
Modificación del volumen
Con VOLUME puede aumentar o disminuir el volumen en cualquier modo de
utilización.
Indicativo de pantalla
Pulse la tecla DISPLAY para cambiar entre el indicativo de funcionamiento o el
indicativo de hora.
Conectar a un aparato de sonido externo
Puede conectar la salida de sonido de un aparato externo (por ejemplo, un
reproductor MP3) con el conector AUX IN en la parte derecha del aparato para
poder reproducir el sonido en la radio reloj CD.
En cuanto el conector 3,5 mm de un cable de sonido esté conectado con el
conector AUX IN, se enciende el sonido de la radio o del CD y aparece en
indicativo
sonido externo en la radio reloj CD.
Si se ajusta la alarma del despertador y hay un aparato de sonido externo
conectado, se enciende la hora del despertador ajustada en lugar del sonido de la
radio o del CD.
AU en la pantalla. Ahora puede ajustar el volumen para el aparato de
Dirección de la antena de recepción
La antena de recepción para la recepción de radio FM se encuentra en la parte
posterior del aparato. Extiéndala al máximo para garantizar la mejor recepción
posible.
10
Page 11

ES
Funcionamiento de radio
Extienda al máximo la antena de recepción para la recepción de FM.
Ajuste el interruptor FUNCTION en la posición RADIO.
Ajuste el interruptor BAND en la posición FM (UKW) o AM (MW).
Ajuste con el regulador TUNING la frecuencia de recepción deseada. La
frecuencia se mostrará en la pantalla.
Funcionamiento del CD
Abra el compartimento de CD utilizando la pestaña para tal efecto.
Introduzca un CD con la parte etiquetada hacia arriba en el compartimento
correspondiente y asegúrese de que esté bien inserto.
Ajuste el interruptor FUNCTION en la posición CD.
El CD será leído y en pantalla aparecerá „
brevemente el número total del título y después la hora.
Reproducción/Pausa/Parada
Con la tecla PLAY/PAUSE
interrumpir la reproducción, pulse de nuevo la tecla. Si pulsa una vez más,
continuará la reproducción.
Con la tecla STOP hará una pausa a la reproducción. El CD dejará de girar.
Selección de título, avance rápido hacia delante y hacia atrás
Pulse la tecla SKIP o para cargar el título anterior o posterior.
Mantenga pulsada la tecla SKIP o para realizar una búsqueda hacia delante
o hacia atrás de un título.
se inicia la reproducción de los títulos. Para
--“. A continuación, aparecerá
EN
PL
11
Page 12

Repetición del título/CD
Pulse durante la reproducción varias veces la tecla REPEAT para ajustar las
siguientes opciones de repetición o reproducción aleatoria:
RANDOM: Reproducción aleatoria de todos los títulos a todos
los títulos
REP.: Repetición del título actual
REP. ALL: Repetición de todo el CD
RANDOM REP. ALL: Repetición de todos los títulos en orden aleatorio.
Reproducción programada
Puede programar la reproducción en orden de hasta 20 títulos, que serán
reproducidos uno después de otro.
Pulse en el modo Stopp la tecla PROG para realizar la programación. En la
pantalla, aparecerá „
Seleccione con SKIP o el título deseado y pulse PROG para guardar el
título.
Repita este paso si desea programar varios títulos.
Para iniciar la reproducción programada, pulse la tecla PLAY/PAUSE
La lista programada se borrará en cuanto pulse la tecla STOP.
1“ para el primer puesto y parpadeará el número de título 01.
.
12
Page 13

Modo despertador
El aparato ofrece dos horas de despertador que pueden activarse
independientemente una de otra.
Ajuste del despertador
Para ajustar el despertador, siga los pasos siguientes:
Ajuste el interruptor FUNCTION en la posición CD, RADIO o BUZZER,
dependiendo de si desea despertarse con un CD, la radio o el sonido del
despertador.
Mantenga pulsada la tecla ALARM1 para la alarma 1 o ALARM2 para la alarma 2.
El indicativo de hora parpadeará.
Ajuste con SKIP o la hora del despertador y pulse después ALARM1 o
ALARM2. El indicativo de los minutos parpadeará.
Ajuste con SKIP o los minutos del despertador y pulse después ALARM1 o
ALARM2.
Una vez ajustado el modo CD para el despertador, aparecerá en pantalla el
indicativo del título. Ajuste con la tecla SKIP o el título en el CD que desea
escuchar en el momento de ser despertado.
Pulse de nuevo ALARM1 o ALARM2 para guardar el ajuste.
Activar y desactivar la hora del despertador
Tras haber ajustado la hora del despertador como se describe arriba, encienda la
alarma 1 ó 2 como sigue:
Pulse la tecla ALARM1 para activar la Alarma 1 o ALARM2 para la Alarma 2. En la
pantalla, aparece el correspondiente indicativo ALARM1 o ALARM2.
Pulse de nuevo una tecla para desactivar la alarma.
ES
EN
PL
Apagar la alarma, repetición del despertador
Cuando suene el sonido de la alarma o la música de la radio o del CD, tiene
varias posibilidades para apagar la alarma:
Pulse la tecla STANDBY, ALARM1 o ALARM2 para apagar la alarma durante 24
horas. El símbolo del despertador permanece en pantalla y la alarma vuelva a
sonar el día siguiente.
Pulse la tecla REPEAT ALARM para apagar la alarma durante nueve minutos. La
alarma vuelva a sonar. Este proceso puede repetirse durante 60 minutos.
Temporizador - SLEEP
Con la función „SLEEP“, el aparato se pone en modo radio o CD y se apaga una
vez transcurrido un periodo de tiempo predeterminado de 90, 80, 70, 60, 50, 40,
30, 20 y 10 minutos.
Inicie el modo radio o CD como se describe.
Pulse varias veces la tecla SLEEP. En la pantalla, parpadeará el indicativo „
valor indicado corresponde a los minutos tras los cuales se enciende en el modo
Standby.
90“. El
13
Page 14

Para ajustar un tiempo inferior, pulse varias veces la tecla SLEEP.
Para interrumpir la función SLEEP, pulse varias veces SNOOZE hasta que
aparezca en pantalla el modo actual.
Servicio de atención al cliente
Ayuda inicial en caso de fallos en el funcionamiento
Los fallos en el funcionamiento pueden tener causas banales pero también
pueden deberse a causas de naturaleza compleja que exijan un análisis
profundo.
Sin tono
El altavoz está ajustado demasiado bajo. El conector de red no está bien
conectado al enchufe.
Aumente el volumen. Conecte bien el enchufe.
El aparato no reaccione a las órdenes de funcionamiento.
Carga electrostática.
Ajuste el aparato retirando las baterías de recambio y desconectando el enchufe
de la toma de red. Introduzca las pilas, conecte el enchufe y vuelva a encender el
aparato.
Mala recepción de radio
Señal de radio insuficiente. Distorsiones causadas por otros aparatos eléctricos,
como televisores, grabadoras de vídeo, ordenadores, etc.
Extienda al máximo la antena o modifique su posición y dirección.
¿Necesita más ayuda?
Si lo que se ha propuesto en la sección anterior no resuelve su problema,
póngase en contacto con nosotros. Nos será muy útil recibir la siguiente
información:
¿Qué indicativos se ven?
¿Qué pasos ya ha seguido para resolver los problemas?
Si ya tiene un número de cliente, indíquenoslo.
Limpieza y cuidado
¡ATENCIÓN!
Antes de limpiar el aparato, retírelo sin falta de la conexión eléctrica.
Utilice para la limpieza sólo un paño seco y suave. No utilice ningún producto de
limpieza químico porque podría dañar la superficie o las etiquetas del aparato.
14
Page 15

Eliminación
Aparato
Al finalizar su vida operativa, no tire el aparato dentro de los
desechos domésticos. Infórmese de las posibilidades de reciclaje.
Baterías
Las baterías gastadas no pueden tirarse con los desechos domésticos.
Debe deshacerse de ellas en un punto de recogida de baterías.
Embalaje
El aparato tiene un embalaje protector de los daños causados en el
transporte. Los embalajes son fabricados con materiales reciclables y
deben ser llevados al punto de reciclaje o recogida correspondiente.
Datos técnicos
Alimentación de corriente AC 230 V ~ 50 Hz
Potencia: 9 W
AUX IN: Conector de 3,5 mm
Entrada de sonido
Batería de repuesto 2 x 1,5V AAA/R03/LR03
Radio
Banda FM: 87,5 – 108 MHz
Bando AM: 522 – 1620 kHz
ES
EN
PL
Reproductor de CD, discos soportados
Prestación láser: Láser clase 1
Discos soportados: Audio-CD, CD-Rs, CD-RWs
Si reproduce CD de sonido, utilice únicamente CD
que tengan la marca:
Tenga cuidado de que:
Hoy en día existen muchos procesos de copia de CD no estandarizados y
procedimientos de protección de copia así como diferentes CD-R y CD-RW.
En determinados casos, pueden darse fallos o retrasos en la lectura.
Éstos no suponen un fallo del aparato.
Modificaciones técnicas reservadas.
15
Page 16

16
Page 17

ES
Spis treści
Wskazówki bezpieczeństwa ................................................................................. 2
Użycie zgodne z przeznaczeniem ....................................................................... 2
Bezpieczeństwo pracy ......................................................................................... 2
Bezpieczne postępowanie z bateriami ................................................................ 4
Naprawa ............................................................................................................... 4
Zawartość opakowania ......................................................................................... 5
Przegląd urządzenia .............................................................................................. 6
Przód .................................................................................................................... 6
Góra urządzenia................................................................................................... 7
Prawa strona ........................................................................................................ 7
Lewa strona .......................................................................................................... 8
Spód urządzenia .................................................................................................. 8
Uruchomienie ........................................................................................................ 9
Podłączenie do prądu .......................................................................................... 9
Bateria podtrzymująca ......................................................................................... 9
Ustawianie zegara ............................................................................................... 9
Obsługa ................................................................................................................ 10
Włączanie/wyłączanie ........................................................................................ 10
Wybór trybu pracy .............................................................................................. 10
Zmiana głośności ............................................................................................... 10
Informacje na wyświetlaczu ............................................................................... 10
Podłączanie zewnętrznego urządzenia audio ................................................... 10
Ustawianie anteny zewnętrznej ......................................................................... 10
Tryb pracy radia .................................................................................................. 11
Tryb odtwarzacza CD .......................................................................................... 11
Tryb budzenia ...................................................................................................... 13
Serwis ................................................................................................................... 14
Pierwsza pomoc w przypadku zakłóceń w pracy urządzenia ............................ 14
Czy jest potrzebna dalsza pomoc? .................................................................... 15
Czyszczenie i pielęgnacja .................................................................................. 15
Utylizacja .............................................................................................................. 15
Dane techniczne .................................................................................................. 16
EN
PL
Copyright © 2010
Wszelkie prawa zastrzeżone.
Niniejszy podręcznik jest chroniony prawem autorskim.
Posiadaczem praw autorskich jest firma Medion®.
Znaki towarowe:
Użyte znaki towarowe są własnością ich właścicieli.
Zastrzegamy sobie prawo do zmian technicznych i optycznych oraz błędów drukarskich.
1
Page 18

Wskazówki bezpieczeństwa
Przed pierwszym uruchomieniem należy dokładnie przeczytać
niniejszą instrukcję obsługi i stosować się przede wszystkim do
zawartych w niej wskazówek bezpieczeństwa!
Wszystkie czynności wykonywane przy tym urządzeniu oraz przy
jego pomocy wolno przeprowadzać wyłącznie zgodnie z opisem
zawartym w instrukcji obsługi.
Zachować niniejszą instrukcję do dalszego użycia. W przypadku
dalszego przekazania urządzenia należy dołączyć do niego także
niniejszą instrukcję.
Użycie zgodne z przeznaczeniem
Urządzenie nie jest przeznaczone do używania przez osoby (także dzieci) z
ograniczonymi zdolnościami fizycznymi, sensorycznymi lub psychicznymi
lub nieposiadające wystarczającego doświadczenia i/lub wiedzy na temat jego
obsługi; chyba, że są one nadzorowane dla ich bezpieczeństwa przez
odpowiedzialne osoby lub też otrzymały od nich wskazówki dotyczące
prawidłowego korzystania z urządzenia. Dzieci należy kontrolować, aby upewnić
się, że nie bawią się one urządzeniem.
Przechowywać urządzenie i jego wyposażenie w miejscu niedostępnym dla dzieci.
Przed dziećmi należy także schować folie użyte do opakowania urządzenia.
Ryzyko udławienia.
Bezpieczeństwo pracy
Nie stawiać na urządzeniu lub w jego otoczeniu naczyń napełnionych cieczą, np.
wazonów, i chronić wszystkie części przed wodą. Naczynie może przewrócić się i
ciecz może pogorszyć bezpieczeństwo elektryczne.
Bezzwłocznie wyciągnąć wtyczkę z gniazdka sieciowego w przypadku zauważenia
uszkodzeń na samej wtyczce, na przewodzie sieciowym lub w urządzeniu.
Urządzenie jest przeznaczone wyłącznie do użytku prywatnego i nie jest
przeznaczone do użytkowania w firmie z branży przemysłu ciężkiego.
Po przyniesieniu urządzenia z zimnego do ciepłego miejsca może dojść do
gromadzenia się wilgoci w jego wnętrzu. Przed uruchomieniem urządzenia
odczekać kilka godzin.
2
Page 19

Zasilanie prądowe
Urządzenie należy podłączać wyłącznie do dobrze dostępnego gniazdka
sieciowego AC 230 V ~ 50 Hz, które znajduje się w pobliżu miejsca pracy
urządzenia. Gniazdko sieciowe powinno być łatwo dostępne, aby w razie potrzeby
można było bez problemu wyciągnąć wtyczkę.
Tabliczka znamionowa znajduje się pod spodem urządzenia.
Wtyczkę należy wyciągać z gniazdka po każdym użyciu urządzenia oraz przed
każdym czyszczeniem.
Kabel sieciowy należy zawsze wyciągać przy pomocy wtyczki, nigdy nie ciągnąć za
sam kabel.
W przypadku uszkodzenia wtyczki, przewodu zasilającego lub samego urządzenia,
lub też, kiedy do wnętrza urządzenia dostały się płyny lub cia
ła obce, należy
natychmiast wyciągnąć wtyczkę z gniazdka.
Użycie przełącznika Wł./Wył. nie powoduje całkowitego odłączenia urządzenia od
zasilania. Ponadto urządzenie pobiera prąd również wtedy, gdy jest wyłączone.
Aby całkowicie odłączyć urządzenie od zasilania, należy wyjąć wtyczkę z gniazdka.
Miejsce ustawienia/otoczenie
Nowe urządzenia mogą w ciągu pierwszych godzin pracy wydzielać typowy i nie
do uniknięcia, ale zupełnie bezpieczny, zapach, który w miarę upływu czasu będzie
zanikał. Aby zapobiec gromadzeniu się przykrego zapachu, pomieszczenie należy
regularnie wietrzyć. Przy projektowaniu tego produktu staraliśmy się, aby wartości
uzyskiwane przez urządzenie leżały wyraźnie poniżej obowią
zujących limitów.
Aby urządzenie nie spadło, należy je ustawić na stabilnym, równym i nienarażonym
na drgania podłożu.
Przy ustawianiu urządzenia należy pamiętać o zachowaniu odstępu 5 cm z każdej
strony, co zapewni mu wystarczającą wentylację.
Nie wolno ograniczać wentylacji zakrywając urządzenie różnymi przedmiotami, np.
gazetami, obrusami, zasłonami, itd. Nie dopuszczać do nagromadzenia się
nadmiernej ilości kurzu.
Nie wystawiać urządzenia na bezpośrednie działanie źródeł ciepła (np.
ogrzewania) ani światła słonecznego.
Pamiętać o tym, aby urządzenie nie stało w pobliżu bezpośrednich źródeł
ciepła
(np. ogrzewanie).
Nie stawiać otwartych źródeł ognia (np. palące się świece) na urządzeniu lub w
jego pobliżu.
Nie ustawiać żadnych przedmiotów na kablach, ponieważ można je uszkodzić.
Urządzenie należy używać wyłącznie w pomieszczeniach mieszkalnych lub
podobnych.
ES
EN
PL
3
Page 20

Tolerancja elektromagnetyczna
Należy zachować minimalny odstęp 1 metra od wysoko-częstotliwościowych i
magnetycznych źródeł zakłóceń (odbiornik telewizyjny, inne głośniki, telefony
komórkowe i bezprzewodowe, itd.), dzięki czemu uniknie się zakłóceń w działaniu
urządzenia.
Używać wyłącznie dostarczonego z urządzeniem wyposażenia.
Bezpieczne postępowanie z bateriami
Baterie mogą zawierać substancje palne. W przypadku nieprawidłowego
obchodzenia się z bateriami może z nich wypłynąć kwas. Mogą one silnie się
nagrzewać, zapalić lub nawet wybuchnąć, co może prowadzić do uszkodzenia
urządzenia oraz obrażeń u znajdujących się w pobliżu osób. Bezwzględnie
stosować się do następujących wskazówek:
Trzymać baterie z dala od dzieci. W przypadku omyłkowego połknięcia baterii
zgłosić się natychmiast do lekarza.
Przed włożeniem baterii sprawdzić, czy styki w urządzeniu oraz na bateriach są
czyste i w razie potrzeby przeczyścić je.
W żadnym wypadku nie wolno ładować baterii (chyba, że jest to wyraźnie podane).
Ryzyko wybuchu!
Nie zwierać biegunów baterii i nie wrzucać ich do ognia. Ryzyko wybuchu!
Baterii nie wolno rozbierać ani deformować. Ryzyko odniesienia obrażeń dłoni lub
palców. Ciecz z baterii może dostać się do oczu oraz na skórę. Jeżeli dojdzie do
takiej sytuacji, to skażone miejsca należy przemyć dużą ilością czystej wody i
zgłosić się do lekarza.
Nie wystawiać baterii na działanie nadmiernego ciepła (np. słońce, ogień, itp.).
Nie zamieniać biegunów. Nie wolno zamieniać biegunów przy wkładaniu baterii.
Biegun plus (+) i minus (-) należy prawidłowo podłączyć, co zapobiegnie zwarciom.
Zużyte baterie należy natychmiast wyciągnąć z urządzenia.
Wyciągać baterie z urządzenia w przypadku niekorzystania z niego przez d
Zużyte baterie należy wymieniać na nowe baterie tego samego typu.
łuższy czas.
Naprawa
W przypadku problemów technicznych z urządzeniem należy kontaktować się z
naszym centrum serwisowym.
W żadnym wypadku nie wolno samodzielnie otwierać i/lub naprawiać urządzenia.
W przypadku awarii należy zwrócić się do centrum serwisowego Medion lub do
innego wyspecjalizowanego serwisu. To pozwoli na uniknięcie zagrożeń.
4
Page 21

W przypadku uszkodzenia przewodu sieciowego urządzenia należy zlecić jego
wymianę producentowi lub jego serwisowi lub też podobnie wykwalifikowanej
osobie. W ten sposób uniknie się ewentualnych zagrożeń.
Zawartość opakowania
Zawartość opakowania należy sprawdzić. W razie jeśli zawartość opakowania nie
była kompletna, należy nas poinformować w ciągu 14 dni od daty zakupu.
Do zakupionego radiobudzika z odtwarzaczem CD dołączono nastepujące
elementy:
Instrukcja obsługi
Karta gwarancyjna
ES
EN
PL
5
Page 22

Przegląd urządzenia
Przód
1 ALARM 1: włączanie i wyłączanie Alarmu 1; ustawianie
2 ALARM 2: włączanie i wyłączanie Alarmu 2; ustawianie
3 PLAY/PAUSE: start odtwarzania; zatrzymanie
4 SKIP: poprzedni/następny tytuł; wyszukiwanie tytułu do tyłu/do przodu;
ustawianie godziny i alarmu
5 STOP: zatrzymanie odtwarzania
6 DISPLAY: zmiana między wyświetlaniem radia/CD i zegarem
7 SLEEP: ustawianie funkcji wyłączania
8 PROG: ustawianie kolejności utworów
9 REPEAT/RANDOM: ustawianie funkcji powtarzania i odtwarzania losowego
10 CLOCK: ustawianie godziny
11 Wyświetlacz
12 ON/OFF: włączanie/przełączanie do trybu standby
6
Page 23

Góra urządzenia
13 REPEAT ALARM: włączanie i wyłączanie funkcji drzemki
Prawa strona
ES
EN
PL
14 Prawy głośnik
15 AUX IN: gniazdo 3,5 mm do podłączenia zewnętrznego urządzenia audio
16 BAND: ustawianie zakresu częstotliwości
17 TUNING: ustawianie częstotliwości radiowej
18 Wgłębienie do podnoszenia pokrywy napędu CD
7
Page 24

Lewa strona
19 VOLUME: ustawianie głośności
20 FUNCTION: ustawianie radia, odtwarzacza CD lub dźwięku budzenia
21 Lewy głośnik
Spód urządzenia
22 Pojemnik na baterie
23 Antena kablowa FM
24 Kabel sieciowy
8
Page 25

Uruchomienie
Podłączenie do prądu
Podłączyć wtyczkę kabla sieciowego do gniazdka sieciowego
AC 230 V ~ 50 Hz.
Na wyświetlaczu pojawia się czas. Jeżeli nie ma włożonej baterii podtrzymującej,
to na wyświetlaczu pojawia się
Bateria podtrzymująca
Aby zegar pracował dalej po odłączeniu urządzenia
od sieci, należy włożyć do niego dwie baterie (typ
LR03/R03/AAA; niedołączone do urządzenia).
Wyciągnąć wtyczkę z gniazdka.
Zdjąć pokrywę z pojemnika na baterię na spodzie
urządzenia.
Włożyć baterie. Pamiętać o prawidłowym podłączeniu biegunów (+/-).
Zamknąć pojemnik na baterie i włożyć wtyczkę do gniazdka AC 230 V ~ 50 Hz.
Ustawić zegar po włożeniu baterii, to ustawienie zostanie zachowane w pamięci
po odłączeniu urządzenia od zasilania sieciowego.
UWAGA!
0:00.
ES
EN
PL
Ryzyko wybuchu w przypadku nieprawidłowej wymiany baterii. Baterie
należy wymieniać na identyczne lub tego samego typu.
Ustawianie zegara
Przytrzymać wciśnięty przycisk CLOCK. Migają godziny.
Ustawić wybraną godzinę przyciskami SKIP lub .
Nacisnąć przycisk CLOCK. Migają minuty.
Ustawić wybrane minuty przyciskami SKIP lub .
Po ustawieniu czasu urządzenie powraca po kilku sekundach do trybu
wyświetlania czasu.
9
Page 26

Obsługa
Włączanie/wyłączanie
W tym celu nacisnąć przycisk ON/OFF na urządzeniu. Wyświetlacz świeci
mocniej.
Nacisnąć ponownie przycisk ON/OFF, aby ponownie włączyć urządzenie w
tryb standby. Wyświetlacz świeci słabiej.
Wybór trybu pracy
Przełącznikiem FUNCTION wybrać jeden z trybów pracy: CD, RADIO lub
BUZZER (dźwięk budzenia).
Zmiana głośności
Przy pomocy VOLUME można we wszystkich trybach pracy zmniejszać lub
zwiększać poziom głośności.
Informacje na wyświetlaczu
Nacisnąć przycisk DISPLAY, aby przejść pomiędzy wyświetlaniem trybu pracy, a
wyświetlaniem czasu.
Podłączanie zewnętrznego urządzenia audio
Wyjście audio urządzenia zewnętrznego (np. odtwarzacz MP3) można
połączyć z gniazdem AUX IN umieszczonym po prawej stronie urządzenia, po
podłączeniu dźwięk będzie odtwarzany przez radio.
Po włożeniu wtyczki typu jack 3,5 mm kabla audio do gniazda AUX IN wyłącza
się dźwięk z radia lub odtwarzacza CD i na wyświetlaczu pojawia się napis
Teraz przy pomocy radia można ustawić głośność zewnętrznego urządzenia
audio.
Jeżeli został ustawiony alarm budzenia i jest podłączone zewnętrzne
urządzenie audio, to o ustawionym czasie zamiast dźwięku z radia lub płyty CD
włącza się dźwięk budzenia.
AU.
Ustawianie anteny zewnętrznej
Antena zewnętrzna przeznaczona do odbioru fal FM znajduje się z tyłu
urządzenia. Aby zagwarantować najbardziej optymalny odbiór, antenę należy
całkowicie rozwinąć.
10
Page 27

Tryb pracy radia
Całkowicie rozwinąć podłączoną antenę zewnętrzną do odbioru stacji UKW.
Ustawić przełącznik FUNCTION w pozycji RADIO.
Ustawić przełącznik BAND w pozycji FM (UKW) lub AM (MW).
Ustawić pokrętłem TUNING wybraną częstotliwość odbiorczą. Na wyświetlaczu
pojawia się wybrana częstotliwość.
Tryb odtwarzacza CD
Otworzyć pokrywę napędu CD chwytając za wgłębienie.
Włożyć płytę CD opisaną stroną do przodu do napędu i upewnić się, czy płyta
leży prawidłowo.
Ustawić przełącznik FUNCTION w pozycji CD.
Następuje wczytanie zawartości płyty CD i na wyświetlaczu pojawia się „
Następnie na chwilę pojawia się liczba utworów i potem czas.
Odtwarzanie/Przerwa/Stop
Przyciskiem PLAY/PAUSE
odtwarzanie, nacisnąć ponownie przycisk. Kolejne naciśnięcie na przycisk
uruchamia ponownie odtwarzanie.
Przyciskiem STOP zatrzymać całkowicie odtwarzanie. Płyta CD nie obraca się.
Wybór utworu, szybkie przewijanie do tyłu/do przodu
Nacisnąć przycisk SKIP lub , aby przejść do poprzedniego/następnego tytułu.
Przytrzymać wciśnięty przycisk SKIP lub , aby przeszukać dany utwór do
tyłu/do przodu.
uruchamia się odtwarzanie utworów. Aby przerwać
--”.
ES
EN
PL
11
Page 28

Powtarzanie utworu/płyty CD
Nacisnąć podczas odtwarzania kilkakrotnie przycisk REPEAT, aby ustawić
następujący tryb powtarzania lub odtwarzania losowego:
RANDOM: Losowe odtwarzanie wszystkich utworów do
momentu odtworzenia wszystkich utworów
REP.: Aktualny tytuł jest powtarzany
REP. ALL: Jest powtarzana cała płyta CD
RANDOM REP. ALL: Wszystkie utwory są powtarzane w losowym
odtwarzaniu.
Zaprogramowane odtwarzanie
Można zaprogramować do 20 tytułów w dowolnej kolejności odtwarzania.
Aby wejść do trybu programowania, należy nacisnąć w trybie stop przycisk
PROG. Na wyświetlaczu pojawia się „
numeru utworu
Przyciskiem SKIP lub wybrać żądany utwór i nacisnąć przycisk PROG,
aby go zapisać w pamięci.
Powtórzyć te kroki, kiedy ma być zaprogramowanych kilka utworów.
Aby uruchomić zaprogramowane odtwarzanie, należy nacisnąć przycisk
PLAY/PAUSE
Zaprogramowana lista ulega wykasowaniu po naciśnięciu przycisku STOP.
01 miga.
.
1” dla pierwszego miejsca w pamięci i
12
Page 29

Tryb budzenia
Urządzenie oferuje dwa czasy budzenia, które można aktywować niezależnie od
siebie.
Ustawianie czasu budzenia
W celu ustawienia czasów budzenia należy wykonać następujące czynności:
Ustawić przełącznik FUNCTION w pozycji CD, RADIO lub BUZZER, zależnie
od tego, czy budzenie ma być wykonane przy użyciu płyty CD, radia lub
dźwięku budzenia.
Przytrzymać wciśnięty przycisk ALARM1 dla Alarmu 1 lub ALARM2 dla Alarmu
2. Migają godziny.
Przyciskiem SKIP lub ustawić godzinę budzenia i nacisnąć następnie
ALARM1 lub ALARM2. Migają minuty.
Przyciskiem SKIP lub ustawić minuty budzenia i nacisnąć następnie
ALARM1 lub ALARM2.
W przypadku ustawienia trybu odtwarzania płyty CD do budzenia na
wyświetlaczu pojawia się numer utworu. Przyciskami SKIP lub wybrać
utwór na płycie CD, który ma by
Następnie nacisnąć ponownie ALARM1 lub ALARM2, aby zapisać w pamięci
wybrane ustawienia.
Aktywowanie/dezaktywowanie czasu budzenia
Po ustawieniu czasu budzenia w opisany powyżej sposób należy włączyć Alarm 1
lub 2 w następujący sposób:
ć odtwarzany podczas budzenia.
ES
EN
PL
Nacisnąć przycisk ALARM1, aby aktywować Alarm 1 lub ALARM2 dla Alarmu
2. Na wyświetlaczu pojawia się odpowiednia informacja ALARM1 lub ALARM2.
Ponownie nacisnąć jeden z przycisków, aby na stałe dezaktywować dany
alarm.
Wyłączanie alarmu, powtarzanie budzenia
W momencie włączenia się dźwięku alarmu lub muzyki z radia lub z płyty CD
istnieje kilka możliwości wyłączenia alarmu:
Nacisnąć przycisk STANDBY, ALARM1 lub ALARM2, aby wyłączyć alarm na 24
godziny. Symbol budzenia nie znika z wyświetlacza i kolejnego dnia alarm
ponownie uruchamia się.
Nacisnąć przycisk REPEAT ALARM, aby wyłączyć alarm na 9 minut. Alarm
aktywuje się ponownie po 9 minutach. Tą czynność można powtarzać
minut.
przez 60
13
Page 30

Timer wyłączający - SLEEP
Po aktywowaniu funkcji „SLEEP” urządzenie pracuje najpierw w trybie radia lub
odtwarzacza CD i wyłącza się po wybraniu odpowiedniego czasu (90, 80, 70, 60,
50, 40, 30, 20 i 10 minut).
Włączyć radio lub odtwarzacz w opisany powyżej sposób.
Nacisnąć kilkakrotnie przycisk SLEEP. Na wyświetlaczu pojawia się informacja
„
90”. Pokazana wartość odpowiada minutom, po upłynięciu których urządzenie
przechodzi do trybu standby.
Aby ustawić krótszy czas, należy kilkakrotnie nacisnąć przycisk SLEEP .
Aby funkcję SLEEP przerwać szybciej, należy nacisnąć kilkakrotnie przycisk
SNOOZE, aż na wyświetlaczu pojawi się ponownie aktualny tryb pracy.
Serwis
Pierwsza pomoc w przypadku zakłóceń w pracy
urządzenia
Nieprawidłowe działanie urządzenia może mieć niekiedy błahe przyczyny, ale
może to być także bardziej złożony problem wymagający wnikliwej analizy.
Brak dźwięku
Głośność ustawiona na zbyt małą wartość. Wtyczka nie jest prawidłowo
połączona z gniazdkiem sieciowym.
Zwiększyć głośność; włożyć prawidłowo wtyczkę do gniazdka.
Urządzenie nie reaguje na polecenia obsługi.
Rozładowanie elektrostatyczne.
Zresetować urządzenie wyciągając baterie podtrzymujące oraz wtyczkę
sieciową z gniazdka. Ponownie włożyć baterie oraz umie
gniazdku i włączyć urządzenie.
Słaby odbiór radia
Niewystarczający sygnał radiowy. Zakłócenia spowodowane obecnością innych
urządzeń elektrycznych, np. odbiornik telewizyjny, magnetowid, komputer, itd.
Całkowicie rozwinąć antenę zewnętrzną urządzenia lub zmienic jej położenie i
kierunek.
14
ścić wtyczkę w
Page 31

Czy jest potrzebna dalsza pomoc?
Jeżeli podane powyżej propozycje nie pomogły w usunięciu problemu, należy
skontaktować się z nami. Pomocne byłyby dla nas następujące informacje:
Jakie informacje są widoczne na wyświetlaczu?
Jakie kroki podjęto w celu rozwiązania problemu?
Jeżeli został już przydzielony numer klienta, należy nam go podać.
Czyszczenie i pielęgnacja
UWAGA!
Przed przystąpieniem do czyszczenia urządzenia należy zawsze
wyciągnąć wtyczkę z gniazdka sieciowego.
Do czyszczenia używać wyłącznie suchej i miękkiej szmatki. Unikać stosowania
chemicznych rozpuszczalników i środków czyszczących, ponieważ mogą one
uszkodzić powierzchnię i/lub napisy na urządzeniu.
Utylizacja
Urządzenie
W żadnym wypadku nie wolno wyrzucać urządzenia po jego zużyciu
do normalnych odpadów domowych. Zasięgnąć informacji o
możliwościach przyjaznej dla środowiska utylizacji.
ES
EN
PL
Baterie
Nie wolno wyrzucać zużytych baterii do domowych odpadów! Baterie
należy oddać do punktu zajmującego się zbieraniem starych baterii.
Opakowanie
Zakupione urządzenie znajduje się w opakowaniu chroniącym je przed
uszkodzeniami podczas transportu. Opakowania są wykonane z
materiałów, które można utylizować i poddawać recyklingowi w sposób
przyjazny dla środowiska.
15
Page 32

Dane techniczne
Zasilanie sieciowe: AC 230 V ~ 50 Hz
Moc: 9 W
AUX IN: Wtyczka typu jack 3,5 mm
wejście audio
Baterie podtrzymujące 2 x 1,5V AAA/R03/LR03
Radio
Zakres UKW: 87,5 – 108 MHz
Zakres fal średnich: 522 – 1620 kHz
Odtwarzacz CD, odtwarzane płyty
Moc lasera: Klasa lasera 1
Obsługiwane płyty: Płyty audio CD, CD-R, CD-RW.
W przypadku odtwarzania płyt audio-CD należy używać wyłącznie płyt CD, które
są następująco oznaczone:
Uwaga:
Obecnie jest dostępnych dużo, po części niestandardowych metod nagrywania
CD i metod zabezpieczenia przed kopiowaniem, oraz różnych nienagranych płyt
CD-R i CD-RW.
Dlatego w pojedynczych przypadkach może dojść do wystąpienia błędów
podczas odczytu lub opóźnień podczas odtwarzania.
Nie jest to uszkodzenie urządzenia.
Zastrzegamy sobie prawo do zmian technicznych!
16
Page 33

Contents
Safety Notes .......................................................................................................... 2
Use in accordance with regulations ..................................................................... 2
Safety during operation ........................................................................................ 2
Handling batteries safely ...................................................................................... 4
Repair ................................................................................................................... 4
Scope of the delivery ............................................................................................ 5
Overview of the device ......................................................................................... 6
Front ..................................................................................................................... 6
Upper side ............................................................................................................ 7
Right side ............................................................................................................. 7
Left side ................................................................................................................ 8
Bottom .................................................................................................................. 8
Bringing the device into operation ...................................................................... 9
Making the electrical connection .......................................................................... 9
Back-up battery .................................................................................................... 9
Set the time .......................................................................................................... 9
Operation ............................................................................................................. 10
Switching the device on or off ............................................................................ 10
Selecting the type of operation .......................................................................... 10
Changing the volume ......................................................................................... 10
Display ............................................................................................................... 10
Connecting an external audio device ................................................................. 10
Aligning the wire aerial ....................................................................................... 10
Radio operation ................................................................................................... 11
CD operation ........................................................................................................ 11
Alarm operation ................................................................................................... 13
Customer service ................................................................................................ 14
Initial help in the case of malfunctions ............................................................... 14
Do you need additional support? ....................................................................... 14
Cleaning and care .............................................................................................. 14
Disposal ............................................................................................................... 15
Technical Data ..................................................................................................... 15
Copyright © 2010
All rights reserved.
This Handbook is protected by copyright.
The copyright is possessed by the Medion® Company.
Trademarks:
The trademarks used are the property of their respective owner.
Technical and optical changes, and print errors, reserved.
EN
EN
PL
1
Page 34

Safety Notes
Read these Operating Instructions through thoroughly before bringing the device into operation for the first time and follow the Safety
Notes above all.
All activities on and with this device must only be carried out in so
far as they are described in these Operating Instructions.
Keep these Operating Instructions for further use. Please hand
over these Operating Instructions as well, if you pass on the device.
Use in accordance with regulations
The device is not intended to be used by individuals with limited physical, sensory
or intellectual abilities, or lacking experience and/or knowledge (including children),
unless they are supervised by an individual responsible for their safety or have received instructions from this individual how the device must be used. Children
should be supervised, to ensure that they do not play with the device
Keep the device and its accessories at a place inaccessible to a child.
Keep the packaging foil away from children as well. There is a danger of suffoca-
tion.
Safety during operation
Do not put any containers filled with liquid, such as vases, on the device or in its
near surroundings and protect all parts of the device against drops of water and
spray. The device could tip over and liquid could diminish electrical safety.
Pull the plug out of the socket in the case of damage to the plug, the service cable
or the device.
The device has only been conceived for private use, not for operation in a business
or in heavy industry.
Condensation can arise in the device if it has been brought from a cold to a warm
place. Wait several hours before operating the device.
2
Page 35

Power supply
Connect the device only to a well accessible AC 230 V ~ 50 Hz domestic socket
close to the place of use. Keep the socket freely accessible, so that plug can be
pulled out unimpeded.
The nameplate is located on the base of the device.
Pull the plug out of the socket in principle after every use and before each cleaning.
Always pull the mains cable out of the socket at the plug; do not pull on the cable
itself.
Pull the plug out of the socket immediately in the case of damage to the plug, the
service cable or the device, of if liquid or a foreign body has reached the interior of
the device.
This device’s ON/OFF switch does not cut it off completely from the mains. Further
more the device still consumpts power when switched off. To completely cut the
device from the mains, unplug the mains socket.
Setting up location / environment
New devices can emit a typical, unavoidable but completely harmless odour, which
will decline in the course of time, in the first hours of operation. We recommend you
to ventilate the room regularly, in order to counter the smell. We have taken care
that the applicable limits are clearly fallen below during the development of this
product.
Place and operate all components on a stable, level, vibration-free base, in order to
avoid accidents to the device.
Avoid extreme dust accumulations. Do not cover the ventilation slots to ensure
adequate ventilation. The ventilation should not be obstructed by placing objects,
such as newspapers, table cloths, curtains, etc. on the vents. Maintain a minimum
distance to walls and furniture of approx. 10 cm to the top and rear and approx. 5
cm to the other sides.
Pay attention that the device is not subjected to any direct sources of heat (such as
heating systems). Do not place the unit in direct sunlight.
No open sources of fire (such as lit candles) may stand on or close to the device.
Do not place any objects on the cable, because it could be damaged if you do so.
Use the device exclusively in the living room or in similar rooms.
EN
EN
PL
Electro-magnetic compatibility
Maintain a minimum distance of one metre from high-frequency and magnetic
sources of interference (a television device, other loudspeakers, mobile and cordless telephones, etc.), in order to avoid malfunctions.
Use only the accessories supplied with the device.
3
Page 36

Handling batteries safely
Batteries can contain flammable materials. Batteries can leak, heat up severely,
catch fire or even explode, which could result in damage to the device and to your
health, in the case of improper treatment. Please follow the notes below under all
circumstances:
Keep children away from batteries. Notify your doctor immediately if batteries have
been swallowed accidentally.
Check that the contacts in the device and on the batteries are clean and clean them
if necessary, before inserting the batteries.
Never charge batteries, unless this is expressly stated. Danger of explosion!
Do not take batteries to pieces or deform them. Your hands or fingers could be
injured or battery liquid could penetrate your eyes or your skin. Rinse the places affected with a large quantity of clear water and inform your doctor immediately if this
has happened.
Never subject batteries to excess heat (such as sunshine, fire or similar).
Never reverse the polarity. Pay attention that the plus (+) and minus (-) poles are
positioned correctly, in order to avoid short-circuiting.
Remove used batteries from the device immediately.
Remove the batteries from your device if it will not be used for a longer period.
Replace used batteries by new batteries of the same type.
Repair
Please contact our Service Center if you have technical problems with your device.
Do not attempt to open or repair the device yourself under any circumstances.
Contact the Medion Service Center or another suitable specialist workshop, in the
case of a malfunction, in order to avoid danger.
The service cable of the device must be replaced by the manufacturer, its customer
service, or a similarly qualified individual, if it has been damaged.
4
Page 37

Scope of the delivery
Please check the completeness of the delivery and inform us within 14 days
after purchase, if the delivery is not complete. You will have received the follow-
ing items with the CD clock radio acquired by you:
CD Clock Radio
Operating Instructions and guarantee documents
EN
EN
PL
5
Page 38

Overview of the device
Front
1 ALARM 1: Switch Alarm 1 on or off: set Alarm 1
2 ALARM 2: Switch Alarm 2 on or off: set Alarm 2
3 PLAY/PAUSE: Start: stop replay
4 SKIP: Previous/next title: backwards/forwards title search: set time and alarm
5 STOP: Stop replay
6 DISPLAY: Change between Radio/CD and time display
7 SLEEP: Set the Sleep function
8 PROG: Set the title sequence
9 REPEAT/RANDOM: Set the Repeat function and the random replay
10 CLOCK: Set the time
11 Display
12 ON/OFF: Switch on/switch to the Standby mode
6
Page 39

Upper side
EN
EN
PL
13 REPEAT ALARM: Switch the Slumber function on or off
Right side
14 Right loudspeaker
15 AUX IN: 3.5 mm socket for the connection of an external audio device
16 BAND: Set the frequency band
17 TUNING: Set the radio frequency
18 Hollow to lift the cover of the CD compartment
7
Page 40

Left side
19 VOLUME: Set the volume
20 FUNCTION: Set the radio, CD or alarm sound
21 Left loudspeaker
Bottom
22 Battery compartment
23 FM wire aerial
24 Mains cable
8
Page 41

Bringing the device into operation
Making the electrical connection
Connect the plug of the mains cable with an AC 230 V ~ 50 Hz socket.
The time will be shown in the display. The time will be shown as
up battery has been inserted.
0:00 if no back-
Back-up battery
You can insert two batteries (type LR03/R03/AAA;
not included in the scope of the delivery), if you have
detached the device from the mains, so that the time
will continue to run in the background.
Pull out the mains plug.
Remove the cover of the battery compartment on
the bottom of the device.
Insert the batteries. Pay attention to the polarity (+/-) here.
Close the battery compartments and connect the mains plug with an
AC 230 V ~ 50 Hz mains socket again.
Set the time if the battery has already been inserted, in order to keep the time in
the memory in the case of an interruption of the mains operation.
ATTENTION!
A danger of explosion in the case of an improper replacement of the
batteries. Replacement only by the same or an equivalent type.
Set the time
Hold the CLOCK button pressed down. The hour display will flash.
Set the required hour with the or SKIP buttons.
Press CLOCK. The minute display will flash.
Set the required minutes with the or SKIP buttons.
The device will switch back to the Time mode after a few seconds, after you have
set the time.
EN
EN
PL
9
Page 42

Operation
Switching the device on or off
Press the ON/OFF button on the device to do this. The display illumination will
become brighter.
Press the ON/OFF button again, in order to switch the device on again from the
Standby mode. The display illumination will be dimmed.
Selecting the type of operation
You will select between the CD, RADIO or BUZZER (alarm tone) types of op-
eration with the FUNCTION switch.
Changing the volume
You can reduce or increase the volume in all types of operation with VOLUME.
Display
Press the DISPLAY button, to change between the operating display and the time
display.
Connecting an external audio device
You can connect the audio output of an external device (of an MP3 player, for
example) to the AUX IN on the right side of the device, in order to output the
sound through the CD Clock Radio.
The Radio or CD sound will switch off and AU will appear in the display, as
soon as the 3.5 mm phono connector of an audio cable has been connected to
the AUX IN socket. Now you will be able to set the volume for the external au-
dio device on the CD Clock Radio.
The alarm tone will switch on, instead of the radio or CD sound, at the waking
time set, if an alarm has been set and an external audio device has been con-
nected.
Aligning the wire aerial
The wire aerial for FM reception is located on the back of the device. Unwind it
completely, in order to guarantee the best possible reception.
10
Page 43

Radio operation
Unwind the connected wire aerial for UKW reception completely.
Set the FUNCTION switch to the RADIO position.
Set the BAND switch to the FM (UKW) or AM (MW) position.
Set the required reception frequency with the TUNING control. The frequency
will be shown in the display.
EN
EN
CD operation
Open the cover of the CD compartment by touching it at the hollow.
Place a CD on the holder with the labelled side upward and make sure that it is
sitting securely.
Set FUNCTION switch to the CD position.
The CD will be read in and ‘—‘ will be shown on the display. Then the total list of
titles will be shown briefly and afterwards the time will appear.
Replay/Pause/Stop
The replay of titles will start with the PLAY/PAUSE
again to interrupt the replay. The replay will recommence if the button is pressed
again.
You will stop the replay finally with the STOP button. The CD will no longer rotate.
Title selection, faster backwards/forwards
Press the or SKIP button, in order to reach the previous/next title.
Hold the or SKIP button pressed down, in order to carry out a back-
wards/forwards search within a title.
button. Press the button
PL
11
Page 44

Repeat title/CD
Press the REPEAT button several times during the replay, in order to set the
following repeat or random replay possibilities:
RANDOM: Random replay of all titles until all titles have
been replayed
REP.: The current title will be repeated
REP. ALL: The whole CD will be repeated
RANDOM REP. ALL: All titles will be repeated in random replay.
Programmed replay
You can program up to twenty titles in any sequence: they will then be played
through successively.
Press the PROG button in the Stop mode, in order to carry out the program-
ming. ‘1’ will appear for the first program position and the title number
flash in the display.
Select the required title with the or SKIP button and press PROG, in order
to store the title.
Repeat these steps if you want to program several titles.
Press the PLAY/PAUSE
The programmed list will be deleted as soon as you press the STOP button.
button, in order to start the programmed replay.
01 will
12
Page 45

Alarm operation
The device offers 2 alarm times, which can be activated independently of each
other.
Setting the alarm time
Proceed as follows to set the alarm times:
Set the FUNCTION switch to the CD, RADIO or BUZZER position, according to
whether you want to be woken by a CD, Radio or an alarm tone.
Hold the ALARM1 button for Alarm 1, or the ALARM2 button for Alarm 2,
pressed down. The hour display will flash.
Set the hour of the alarm time with the or SKIP button and then press
ALARM1 or ALARM2. The minute display will flash.
Set the alarm time with the or SKIP button and then press ALARM1 or
ALARM2.
The display of titles will appear in the display if you have set the CD operation
as the alarm. Set the title on the CD that should be played at waking with the
or SKIP buttons.
In conclusion, press ALARM1 or ALARM2 again, in order to store the settings.
Activate/deactivate the waking time
You will switch on Alarm 1 or Alarm 2 as follows, after the waking time has been
set as described above:
Press the ALARM1 button, to activate Alarm 1, or ALARM2 for Alarm 2. The
corresponding ALARM1 or ALARM2 notice will appear in the display.
Press one of the buttons again, in order to deactivate the alarm again with
lasting effect.
EN
EN
PL
Switching off the alarm, repeating the alarm
You will have several possibilities of switching off the alarm if the alarm tone is
sounding or music can be heard from the radio or a CD:
Press the STANDBY, ALARM1 or ALARM2 button, in order to switch off the alarm
for 24 hours. The alarm symbol will remain in the display and the alarm will sound
again on the following day.
Press the REPEAT ALARM button, in order to switch off the alarm for 9 minutes.
The alarm will then sound again. You can repeat this process for 60 minutes.
Sleep timer - SLEEP
The device will initially operate in Radio or CD operation and will then switch off
after 90, 80, 70, 60, 50, 30, 20 or 10 minutes, in accordance with a time selected
in steps.
Start Radio or CD operation as described.
13
Page 46

Press the SLEEP button several times. The ‘90’ notice will flash in the display.
The value displayed will correspond to the minutes after which the device will
switch to Standby mode.
Press the SLEEP button several times, in order to set a shorter time.
Press SNOOZE several times, until the current type of operations appears in
the display again, in order to cut the SLEEP function short prematurely.
Customer service
Initial help in the case of malfunctions
Malfunctions can sometimes have commonplace causes, but at times they can
also be really complex and require an extensive analysis.
No sound
The volume has been set too low or the mains plug has not been correctly connected to the mains socket.
Increase the volume; insert the mains plug correctly.
The device does not react to operating commands
Electrostatic discharge.
Re-boot the device, by removing the back-up batteries and pulling the mains
plug from the socket. Then, re-insert the batteries, plug the mains plug into
socket and switch the device on again.
Poor radio reception
An inadequate radio signal. Interference from other electrical devices, such as TV
devices, video recorders, computers, etc.
Lay the wire aerial to its complete length or change its position and alignment.
Do you need additional support?
Please contact us if the suggestions above have not solved your problem. You
will help us very much if you make the following information available to us:
What displays can be seen?
What steps have you taken to solve the problem?
Inform us if you have already received a customer number.
Cleaning and care
ATTENTION!
Always pull the plug out under all circumstances before cleaning the
device.
Only use a clean, soft cloth to clean the device. Do not use any chemical solutions or cleaning materials because they can damage the surface of and/or the
labels on the device.
14
Page 47

Disposal
Device
Do not throw the device into the normal domestic waste at the end of
its useful life under any circumstances. Find out about the possibilities
of disposal harmless to the environment.
Batteries
Used batteries should not be put into the domestic waste! They must
be handed in at a collection point for used batteries.
Packaging
Your device is in packaging to protect it against damage in transport.
Packaging is made of materials that can be disposed of in an envi-
ronmentally friendly way and can be taken to correct recycling.
EN
EN
PL
Technical Data
Power supply AC 230 V ~ 50 Hz
Power consumption: 9 W
AUX IN: 3.5 mm phono connector
Audio input
Back-up batteries 2 x 1.5V AAA/R03/LR03
Radio
UKW band: 87.5 – 108 MHz
Medium wave band: 522 – 1620 kHz
CD player, discs supported
Laser performance: Laser Class 1
Discs supported: Audio-CD, CD-R, CD-RW
Use CDs as they have been labelled below exclusively,
if you play audio CDs:
Please pay attention to the following:
Today, there are many partly unstandardized CD recording processes and processes protecting copyright, and varying CD-R and CD-RW unwritten discs. Reading errors or delays can arise in individual cases because of this.
This is not a defect in the device.
Technical changes reserved!
15
Page 48

16
Page 49

Inhalt
Sicherheitshinweise .............................................................................................. 2
Bestimmungsgemäßer Gebrauch ........................................................................ 2
Betriebssicherheit................................................................................................. 2
Der sichere Umgang mit Batterien ....................................................................... 5
Reparatur ............................................................................................................. 5
Lieferumfang ......................................................................................................... 6
Geräteübersicht ..................................................................................................... 7
Vorderseite ........................................................................................................... 7
Oberseite .............................................................................................................. 8
Rechte Seite ......................................................................................................... 8
Linke Seite ........................................................................................................... 9
Unterseite ............................................................................................................. 9
Inbetriebnahme ................................................................................................... 10
Stromverbindung herstellen ............................................................................... 10
Backup-Batterie.................................................................................................. 10
Uhr stellen .......................................................................................................... 10
Bedienung ............................................................................................................ 11
Ein-/Ausschalten ................................................................................................ 11
Betriebsart wählen ............................................................................................. 11
Lautstärke ändern .............................................................................................. 11
Displayanzeige ................................................................................................... 11
Externes Audiogerät anschließen ...................................................................... 11
Wurfantenne ausrichten ..................................................................................... 11
Radiobetrieb ........................................................................................................ 12
CD-Betrieb ........................................................................................................... 12
Weckbetrieb ......................................................................................................... 14
Kundendienst ...................................................................................................... 15
Erste Hilfe bei Fehlfunktionen ............................................................................ 15
Benötigen Sie weitere Unterstützung? .............................................................. 15
Reinigung und Pflege ......................................................................................... 15
Entsorgung .......................................................................................................... 16
Technische Daten ............................................................................................... 16
Copyright © 2010
Alle Rechte vorbehalten.
Dieses Handbuch ist urheberrechtlich geschützt.
Das Copyright liegt bei der Firma Medion®.
Warenzeichen:
Angewendete Warenzeichen sind Eigentum ihrer jeweiligen Besitzer.
Technische und optische Änderungen sowie Druckfehler vorbehalten.
DE
EN
PL
1
Page 50

Sicherheitshinweise
Lesen Sie vor der ersten Inbetriebnahme diese Bedienungsanleitung gründlich durch und befolgen Sie vor allen Dingen die Sicherheitshinweise!
Alle Tätigkeiten an und mit diesem Gerät dürfen nur soweit ausgeführt werden, wie sie in dieser Bedienungsanleitung beschrieben
sind.
Bewahren Sie diese Bedienungsanleitung für den weiteren Gebrauch auf. Falls Sie das Gerät weitergeben, händigen Sie bitte
auch diese Bedienungsanleitung aus.
Bestimmungsgemäßer Gebrauch
Das Gerät ist nicht dafür bestimmt, durch Personen (einschließlich Kinder) mit
eingeschränkten physischen, sensorischen oder geistigen Fähigkeiten
oder mangels Erfahrung und/oder mangels Wissen benutzt zu werden, es sei
denn, sie werden durch eine für ihre Sicherheit zuständige Person beaufsichtigt
oder erhielten von ihr Anweisungen, wie das Gerät zu benutzen ist. Kinder sollten
beaufsichtigt werden, um sicherzustellen, dass sie nicht mit dem Gerät spielen.
Bewahren Sie das Gerät und das Zubehör an einem für Kinder unerreichbaren
Platz auf.
Halten Sie auch die Verpackungsfolien von Kindern fern. Es besteht Erstickungs-
gefahr.
Betriebssicherheit
Stellen Sie keine mit Flüssigkeit gefüllten Gefäße, wie z.B. Vasen, auf das Gerät
oder in die nähere Umgebung und schützen Sie alle Teile vor Tropf- und Spritzwasser. Das Gefäß kann umkippen und die Flüssigkeit kann die elektrische Sicherheit beeinträchtigen.
Ziehen Sie bei Beschädigungen des Steckers, der Anschlussleitung oder des Ge-
rätes sofort den Stecker aus der Steckdose.
Das Gerät ist nur für den privaten Gebrauch und nicht für den Betrieb in einem
Unternehmen der Schwerindustrie konzipiert.
Wird das Gerät von einem kalten an einen warmen Ort gebracht, kann
Kondensfeuchtigkeit im Gerät entstehen. Warten Sie einige Stunden, bevor Sie
das Gerät in Betrieb nehmen.
2
Page 51

Stromversorgung
Schließen Sie das Gerät nur an eine gut erreichbare Haushaltssteckdose
AC 230 V ~ 50 Hz an, die sich in der Nähe des Arbeitsortes befindet. Lassen Sie
die Steckdose frei zugänglich, damit der Stecker ungehindert abgezogen werden
kann.
Das Typenschild befindet sich auf der Unterseite des Geräts.
Ziehen Sie nach jedem Gebrauch und vor jeder Reinigung grundsätzlich den Ste-
cker des Gerätes aus der Steckdose.
Ziehen Sie das Netzkabel stets am Stecker aus der Steckdose, ziehen Sie nicht
am Kabel.
Ziehen Sie bei Beschädigung des Steckers, der Anschlussleitung oder des Gerätes
oder, wenn Flüssigkeiten oder Fremdkörper ins Innere des Gerätes gelangt sind,
sofort den Stecker aus der Steckdose.
Der Ein-/Ausschalter trennt das Gerät nicht vollständig vom Stromnetz. Außerdem
verbraucht das Gerät auch im ausgeschalteten Zustand Strom. Um das Gerät
ganz vom Stromnetz zu trennen, ziehen Sie den Netzstecker aus der Steckdose.
Aufstellungsort / Umgebung
Neue Geräte können in den ersten Betriebsstunden einen typischen, unvermeidli-
chen aber völlig ungefährlichen Geruch abgeben, der im Laufe der Zeit abnimmt.
Um der Geruchsbildung entgegenzuwirken, empfehlen wir Ihnen, den Raum regelmäßig zu lüften. Wir haben bei der Entwicklung dieses Produktes Sorge dafür
getragen, dass geltende Grenzwerte deutlich unterschritten werden.
Stellen und betreiben Sie alle Komponenten auf einer stabilen, ebenen und vibrati-
onsfreien Unterlage, um Stürze des Gerätes zu vermeiden.
Vermeiden Sie extreme Staubansammlung. Verdecken Sie die Lüftungsschlitze
nicht, damit immer eine ausreichende Belüftung gewährleistet ist. Die Belüftung
darf nicht durch Bedecken der Lüftungsöffnungen mit Gegenständen (wie Zeitschriften, Decken, Vorhängen usw.) behindert werden. Bewahren Sie einen Mindestabstand zu Wänden oder Möbeln von ca. 10 cm nach oben und hinten und ca.
5 cm zu den anderen Seiten.
Achten Sie darauf, dass keine direkten Wärmequellen (z. B. Heizungen) auf das
Gerät wirken und kein direktes Sonnenlicht auf das Gerät trifft.
Es dürfen keine offenen Brandquellen (z. B. brennende Kerzen) auf oder in der
Nähe des Geräts stehen.
Stellen Sie keine Gegenstände auf die Kabel, da diese sonst beschädigt werden
könnten.
Verwenden Sie das Gerät ausschließlich in Wohn- oder ähnlichen Räumen.
DE
EN
PL
Elektromagnetische Verträglichkeit
Wahren Sie mindestens einen Meter Abstand von hochfrequenten und magneti-
schen Störquellen (Fernsehgerät, anderen Lautsprecherboxen, Mobil- und schnurlose Telefone usw.), um Funktionsstörungen zu vermeiden.
3
Page 52

Verwenden Sie nur das mitgelieferte Zubehör.
4
Page 53

Der sichere Umgang mit Batterien
Batterien können brennbare Stoffe enthalten. Bei unsachgemäßer Behandlung
können Batterien auslaufen, sich stark erhitzen, entzünden oder gar explodieren,
was Schäden für Ihr Gerät und ihre Gesundheit zur Folge haben kann. Bitte befolgen Sie unbedingt folgende Hinweise:
Halten Sie Kinder von Batterien fern. Sollten versehentlich Batterien verschluckt
worden sein, melden Sie dies sofort Ihrem Arzt.
Prüfen Sie vor dem Einlegen der Batterien, ob die Kontakte im Gerät und an den
Batterien sauber sind, und reinigen Sie sie gegebenenfalls.
Laden Sie niemals Batterien (es sei denn, dies ist ausdrücklich angegeben). Explo-
sionsgefahr!
Schließen Sie die Batterien niemals kurz und werfen sie diese nicht ins Feuer.
Explosionsgefahr!
Zerlegen oder verformen Sie Batterien nicht. Ihre Hände oder Finger könnten ver-
letzt werden oder Batterieflüssigkeit könnte in Ihre Augen oder auf Ihre Haut gelangen. Sollte dies passieren, spülen Sie die entsprechenden Stellen mit einer großen
Menge klaren Wassers und informieren Sie umgehend Ihren Arzt.
Setzen Sie Batterien niemals übermäßiger Wärme (wie Sonnenschein, Feuer oder
dergleichen) aus.
Vertauschen Sie niemals die Polarität. Achten Sie darauf, dass die Pole Plus (+)
und Minus (-) korrekt eingesetzt sind, um Kurzschlüsse zu vermeiden.
Entfernen Sie verbrauchte Batterien sofort aus dem Gerät.
Entfernen Sie Batterien aus Ihrem Gerät, wenn dieses über einen längeren Zeit-
raum nicht benutzt wird.
Ersetzen Sie die verbrauchte Batterie durch eine neue Batterie gleichen Typs.
DE
EN
PL
Reparatur
Bitte wenden Sie sich an unser Service Center wenn Sie technische Probleme mit
Ihrem Gerät haben.
Versuchen Sie auf keinen Fall, das Gerät selber zu öffnen oder zu reparieren.
Wenden Sie sich im Fall einer Störung an das Medion Service Center oder eine
andere geeignete Fachwerkstatt, um Gefährdungen zu vermeiden.
Wenn die Anschlussleitung des Gerätes beschädigt wird, muss sie durch den Her-
steller oder seinen Kundendienst oder eine ähnlich qualifizierte Person ersetzt werden, um Gefährdungen zu vermeiden.
5
Page 54

Lieferumfang
Bitte überprüfen Sie die Vollständigkeit der Lieferung und benachrichtigen Sie uns
bitte innerhalb von 14 Tagen nach dem Kauf, falls die Lieferung nicht komplett
ist. Mit dem von Ihnen erworbenen CD Uhrenradio haben Sie erhalten:
CD Uhrenradio
Bedienungsanleitung und Garantieunterlagen
6
Page 55

Geräteübersicht
Vorderseite
DE
EN
PL
1 ALARM 1: Alarm 1 ein- und ausschalten; einstellen
2 ALARM 2: Alarm 2 ein- und ausschalten; einstellen
3 PLAY/PAUSE: Wiedergabe starten; anhalten
4 SKIP: vorheriger/nächster Titel; Titelsuche rückwärts/vorwärts;
Uhrzeit und Alarm einstellen
5 STOP: Wiedergabe anhalten
6 DISPLAY: Zwischen Radio/CD und Uhrzeitanzeige wechseln
7 SLEEP: Einschlaffunktion einstellen
8 PROG: Titelreihenfolge einstellen
9 REPEAT/RANDOM: Wiederholfunktion und Zufallswiedergabe einstellen
10 CLOCK: Uhrzeit einstellen
11 Display
12 ON/OFF: Einschalten/in den Standby Modus schalten
7
Page 56

Oberseite
13 REPEAT ALARM: Schlummerfunktion ein- und ausschalten
Rechte Seite
14 Rechter Lautsprecher
15 AUX IN: 3,5 mm Buchse zum Anschluss eines externen Audiogeräts
16 BAND: Frequenzband einstellen
17 TUNING: Radiofrequenz einstellen
18 Griffmulde zum Anheben des CD-Fach Deckels
8
Page 57

Linke Seite
19 VOLUME: Lautstärke einstellen
20 FUNCTION: Radio-, CD- oder Weckton einstellen
21 Linker Lautsprecher
Unterseite
DE
EN
PL
22 Batteriefach
23 FM-Wurfantenne
24 Netzkabel
9
Page 58

Inbetriebnahme
Stromverbindung herstellen
Verbinden Sie den Stecker des Netzkabels mit einer Steckdose
AC 230 V ~ 50 Hz.
Die Uhrzeit wird im Display angezeigt. Ist keine Backup-Batterie eingesetzt, wird
die Uhrzeit
Backup-Batterie
Damit die Uhr im Hintergrund weiterläuft, wenn Sie
das Gerät vom Netz nehmen, können Sie zwei Batterien (Typ Micro LR03/R03/AAA; nicht im Lieferumfang enthalten) einlegen.
Ziehen Sie den Netzstecker heraus.
Nehmen Sie den Deckel des Batteriefachs auf der
Geräteunterseite ab.
Legen Sie die Batterien ein. Achten Sie dabei auf die Polarität (+/-).
Schließen Sie das Batteriefach und verbinden Sie den Netzstecker wieder mit
einer Netzsteckdose AC 230 V ~ 50 Hz.
Stellen Sie die Uhr, wenn die Batterie bereits eingelegt ist, um die Uhrzeit bei
Unterbrechung des Netzbetriebs im Speicher zu behalten.
Uhr stellen
Halten Sie die Taste CLOCK gedrückt. Die Stundenanzeige blinkt.
Stellen Sie mit den Tasten SKIP bzw. die gewünschte Stunde ein.
Drücken Sie CLOCK. Die Minutenanzeige blinkt.
Stellen Sie mit SKIP bzw. die gewünschten Minuten ein.
Nachdem Sie die Uhrzeit eingestellt haben, schaltet das Gerät nach einigen Sekunden zurück in den Uhrzeitmodus.
0:00 angezeigt.
ACHTUNG!
Explosionsgefahr bei unsachgemäßem Auswechseln der Batterien.
Ersatz nur durch denselben oder einen gleichwertigen Typ.
10
Page 59

Bedienung
Ein-/Ausschalten
Drücken Sie die Taste ON/OFF am Gerät, um das Gerät einzuschalten. Die Dis-
playbeleuchtung wird heller.
Drücken Sie die Taste ON/OFF erneut, um das Gerät in den Standby-Modus zu
schalten. Die Displaybeleuchtung wird gedimmt.
Betriebsart wählen
Mit dem Schalter FUNCTION wählen Sie die Betriebsarten CD, RADIO oder
BUZZER (Weckton) aus.
Lautstärke ändern
Mit VOLUME können Sie in allen Betriebsarten die Lautstärke verringern bzw.
erhöhen.
Displayanzeige
Drücken Sie die Taste DISPLAY, um zwischen der Betriebsanzeige und der Uhrzeitanzeige zu wechseln.
Externes Audiogerät anschließen
Sie können den Audioausgang eines externen Geräts (z. B. ein MP3-Player) mit
der Buchse AUX IN an der rechten Geräteseite verbinden, um den Ton über das
CD Uhrenradio auszugeben.
Sobald ein 3,5 mm Klinkenstecker eines Audiokabels mit der Buchse AUX IN
verbunden ist, schaltet sich der Radio- oder CD-Ton ab und erscheint die Anzeige
AU im Display. Sie können nun die Lautstärke für das externe Audiogerät am CD
Uhrenradio einstellen.
Wurde ein Weckalarm eingestellt und ein externes Audiogerät ist angeschlossen,
so schaltet sich zur eingestellten Weckzeit statt des Radio- oder CD-Tons der
Weckton ein.
DE
EN
PL
Wurfantenne ausrichten
Die Wurfantenne für den FM-Empfang befindet sich auf der Rückseite des Gerätes. Wickeln Sie sie vollständig ab, um den bestmöglichen Empfang zu gewährleisten.
11
Page 60

Radiobetrieb
Wickeln Sie die angeschlossene Wurfantenne für den UKW-Empfang ganz ab.
Stellen Sie den Schalter FUNCTION auf die Position RADIO.
Stellen Sie den Schalter BAND auf die Position FM (UKW) oder AM (MW).
Stellen Sie mit dem Regler TUNING die gewünschte Empfangsfrequenz ein. Die
Frequenz wird im Display angezeigt.
CD-Betrieb
Öffnen Sie den CD-Fachdeckel, indem Sie ihn an der Griffmulde anfassen.
Legen Sie eine CD mit der beschrifteten Seite nach oben auf die Halterung und
vergewissern Sie sich, dass sie fest sitzt.
Stellen Sie den Schalter FUNCTION auf die Position CD.
Die CD wird eingelesen und im Display wird „
die Gesamtzahl der Titel und dann die Uhrzeit.
Wiedergabe/Pause/Stopp
Mit der Taste PLAY/PAUSE
gabe zu unterbrechen, drücken Sie die Taste erneut. Ein weiterer Druck auf die
Taste setzt die Wiedergabe fort.
Mit der Taste STOP halten Sie die Wiedergabe endgültig an. Die CD rotiert nicht
mehr.
Titelwahl, Schneller Rück-/Vorlauf
Drücken Sie die Taste SKIP bzw. , um zum vorherigen/nächsten Titel zu ge-
langen.
Halten Sie die die Taste SKIP bzw. gedrückt, um einen Suchlauf rück-
wärts/vorwärts innerhalb eines Titels durchzuführen.
startet die Wiedergabe von Titeln. Um die Wieder-
--“angezeigt. Danach erscheint kurz
12
Page 61

Titel/CD wiederholen
Drücken Sie während der Wiedergabe mehrmals die Taste REPEAT um folgende
Wiederhol- bzw. Zufallswiedergaben einzustellen:
RANDOM: Zufällige Wiedergabe aller Titel bis alle Titel
wiedergegeben wurden
REP.: Der aktuelle Titel wird wiederholt
REP. ALL: Die gesamte CD wird wiederholt
RANDOM REP. ALL: Alle Titel werden in zufälliger Wiedergabe
wiederholt.
Programmierte Wiedergabe
Sie können bis zu 20 Titel in einer beliebigen Reihenfolge programmieren, die
dann nacheinander abgespielt werden.
Drücken Sie im Stopp-Modus die Taste PROG, um die Programmierung vorzu-
nehmen. Im Display erscheint „
mer
01 blinkt.
Wählen Sie mit SKIP oder den gewünschten Titel und drücken Sie PROG,
um den Titel zu speichern.
Wiederholen Sie diese Schritte wenn Sie mehrere Titel programmieren möchten.
Um die programmierte Wiedergabe zu starten, drücken Sie die Taste
PLAY/PAUSE
Die programmierte Liste wird gelöscht, sobald Sie die Taste STOP drücken.
.
1“ für den ersten Programmplatz und die Titelnum-
DE
EN
PL
13
Page 62

Weckbetrieb
Das Gerät bietet 2 Weckzeiten, die unabhängig voneinander aktiviert werden können.
Weckzeit einstellen
Um die Weckzeiten einzustellen, gehen Sie wie folgt vor:
Stellen Sie den Schalter FUNCTION auf die Position CD, RADIO oder BUZZER, je
nachdem, ob Sie von CD, Radio oder Weckton geweckt worden wollen.
Halten Sie die Taste ALARM1 für Alarm 1 bzw. ALARM2 für Alarm 2 gedrückt. Die
Stundenanzeige blinkt.
Stellen Sie mit SKIP bzw. die Stunde der Weckzeit ein und drücken dann
ALARM1 bzw. ALARM2. Die Minutenanzeige blinkt.
Stellen Sie mit SKIP bzw. die Minuten der Weckzeit ein und drücken dann
ALARM1 bzw. ALARM2.
Wenn Sie den CD-Betrieb zum Wecken eingestellt haben, erscheint im Display die
Titelanzeige. Stellen Sie mit den Tasten SKIP bzw. den Titel auf der CD ein,
der beim Wecken wiedergegeben werden soll.
Drücken Sie abschließend erneut ALARM1 bzw. ALARM2, um die Einstellungen
zu speichern.
Weckzeit aktivieren/deaktivieren
Nachdem wie oben beschrieben die Weckzeit eingestellt ist, schalten Sie Alarm 1
oder 2 wie folgt ein:
Drücken Sie die Taste ALARM1, um Alarm 1 zu aktivieren bzw. ALARM2 für Alarm
2. Im Display erscheint die entsprechende Anzeige ALARM1 oder ALARM2.
Drücken Sie eine der Tasten erneut, um den Alarm wieder dauerhaft zu deaktivie-
ren.
Alarm abschalten, Weckwiederholung
Wenn der Alarmton ertönt bzw. Musik aus Radio oder CD zu hören ist, haben Sie
mehrere Möglichkeiten, den Alarm auszuschalten:
Drücken Sie die Taste STANDBY, ALARM1 oder ALARM2, um den Alarm für 24
Stunden auszuschalten. Das Wecksymbol verbleibt im Display und der Alarm ertönt am nächsten Tag erneut.
Drücken Sie die Taste REPEAT ALARM, um den Alarm für 9 Minuten abzuschal-
ten. Der Alarm ertönt dann erneut. Diesen Vorgang können Sie 60 Minuten lang
wiederholen.
Einschlaftimer - SLEEP
Mit der „SLEEP“-Funktion arbeitet das Gerät zunächst im Radio- oder CD-Betrieb
und schaltet dann nach einer stufenweise gewählten Zeit nach 90, 80, 70, 60, 50,
40, 30, 20 und 10 Minuten ab.
Starten Sie wie beschrieben den Radio oder CD-Betrieb.
14
Page 63

Drücken Sie mehrmals die Taste SLEEP. Im Display blinkt die Anzeige „
angezeigte Wert entspricht den Minuten, nach der das Gerät in den Standby-
Modus schaltet.
Um eine kürzere Zeit einzustellen, drücken Sie die Taste SLEEP mehrmals.
Um die SLEEP-Funktion vorzeitig abzubrechen, drücken Sie SNOOZE mehrmals,
bis im Display wieder die aktuelle Betriebsart erscheint.
90“. Der
Kundendienst
Erste Hilfe bei Fehlfunktionen
Fehlfunktionen können manchmal banale Ursachen haben, zuweilen aber auch
von recht komplexer Natur sein und eine aufwendige Analyse erfordern.
Kein Ton
Die Lautstärke ist zu gering eingestellt. Der Netzstecker ist nicht korrekt mit der
Netzsteckdose verbunden.
Erhöhen Sie die Lautstärke; Stecken Sie den Netzstecker richtig ein.
Das Gerät reagiert nicht auf Bedienungskommandos.
Elektrostatische Entladung.
Setzen Sie das Gerät zurück, indem Sie die Backup-Batterien entfernen und den
Netzstecker aus der Steckdose ziehen. Legen Sie die Batterien danach wieder ein,
stecken Sie den Netzstecker in die Steckdose und schalten Sie das Gerät wieder
ein.
Schlechter Radioempfang
Ungenügendes Radiosignal. Störeinflüsse von anderen elektrischen Geräten wie
z. B. TV-Geräte, Videorecorder, Computer etc.
Verlegen Sie die Wurfantenne in voller Länge oder verändern Sie die Position und
Richtung.
Benötigen Sie weitere Unterstützung?
Wenn die Vorschläge in den vorangegangenen Abschnitten Ihr Problem nicht
behoben haben, nehmen Sie bitte Kontakt mit uns auf. Sie würden uns sehr helfen, wenn Sie uns folgende Informationen zur Verfügung stellen:
Welche Anzeigen sind zu sehen?
Welche Schritte haben Sie zur Lösung des Problems bereits unternommen?
Wenn Sie bereits eine Kundennummer erhalten haben, teilen Sie uns diese mit.
Reinigung und Pflege
ACHTUNG!
Bevor Sie das Gerät reinigen, ziehen Sie unbedingt immer zuerst den
Netzstecker.
Verwenden Sie für die Reinigung nur ein trockenes, weiches Tuch. Benutzen Sie
keine chemischen Lösungs- und Reinigungsmittel, weil diese die Oberfläche
und/oder die Beschriftungen des Geräts beschädigen können.
DE
EN
PL
15
Page 64

Entsorgung
Gerät
Werfen Sie das Gerät am Ende seiner Lebenszeit keinesfalls in den
normalen Hausmüll. Erkundigen Sie sich nach Möglichkeiten einer
umweltgerechten Entsorgung.
Batterien
Verbrauchte Batterien gehören nicht in den Hausmüll! Sie müssen bei
einer Sammelstelle für Altbatterien abgegeben werden.
Verpackung
Ihr Gerät befindet sich zum Schutz vor Transportschäden in einer Verpa-
ckung. Verpackungen sind aus Materialien hergestellt, die umweltschonend
entsorgt und einem fachgerechten Recycling zugeführt werden können.
Technische Daten
Stromversorgung AC 230 V ~ 50 Hz
Leistungsaufnahme: 9 W
AUX IN: 3,5 mm Klinkenstecker
Audioeingang
Backup Batterien 2 x 1,5V Micro Batterien
AAA/R03/LR03
Radio
UKW-Band: 87,5 – 108 MHz
Mittelwelle-Band: 522 – 1620 kHz
CD-Spieler, unterstützte Disks
Laserleistung: Laser Klasse 1
Unterstützte Disks: Audio-CD, CD-Rs, CD-RWs
Wenn Sie Audio-CDs abspielen, verwenden Sie ausschließlich
CDs, die wie nebenstehend gekennzeichnet sind:
Bitte beachten Sie:
Es gibt heute viele, zum Teil nicht standardisierte CD-Aufnahmeverfahren und
Kopierschutzverfahren, sowie unterschiedliche CD-R- und CD-RW-Rohlinge.
Darum kann es in Einzelfällen zu Einlesefehlern oder -Verzögerungen kommen.
Dies ist kein Defekt des Geräts.
Technische Änderungen vorbehalten!
16
 Loading...