

Page 1
Bedienungsanleitung
User Manual
Mode d‘emploi
Handleiding
Betjeningsvejledning
10/2015
Micro-Audio-System mit Bluetooth-Funktion und DAB+
Micro audio system with Bluetooth technology and DAB+
Micro chaîne audio avec fonction Bluetooth et DAB+
Micro-audiosysteem met Bluetooth en DAB+
Micro-audiosystem med Bluetooth-funktion og DAB+
MEDION
®
LIFE
®
P64262 (MD 84597)
Page 2

Inhaltsverzeichnis
1. Zu dieser Anleitung ..................................................................................... 3
1.1. In dieser Anleitung verwendete Warnsymbole und Signalwörter .......3
2. Bestimmungsgemäßer Gebrauch .............................................................. 4
3. Konformitätsinformation ............................................................................ 4
4. Sicherheitshinweise ..................................................................................... 5
4.1. Betriebssicherheit ...................................................................................................5
4.2. Aufstellungsort ....................................................................................................... 5
4.3. Reparatur ...................................................................................................................6
4.4. Umgebungstemperatur ...................................................................................... 7
4.5. Stromversorgung ....................................................................................................7
4.6. CD-Spieler ..................................................................................................................8
4.7. Batterien .....................................................................................................................9
5. Lieferumfang .............................................................................................. 10
6. Geräteübersicht ......................................................................................... 11
6.1. Vorderseite ..............................................................................................................11
6.2. Rückseite ..................................................................................................................12
6.3. Display ......................................................................................................................13
6.4. Fernbedienung ......................................................................................................14
7. Vorbereitung .............................................................................................. 16
7.1. Batterien in die Fernbedienung einlegen ....................................................16
7.2. Gerät aufstellen .....................................................................................................16
8. Anschlüsse .................................................................................................. 16
8.1. Lautsprecher anschließen .................................................................................16
8.2. Kopfhörer anschließen........................................................................................17
8.3. Antennenanschluss ..............................................................................................17
8.4. Externes Gerät am Anschluss AUDIO IN anschließen ..............................18
8.5. Externes Gerät am Anschluss LINE IN anschließen ...................................18
8.6. Netzanschluss ........................................................................................................19
9. USB-Speicherstick anschließen ................................................................ 19
10. Allgemeine Bedienfunktionen ................................................................. 20
10.1. Tonfunktionen .......................................................................................................20
10.2. Uhrzeit ......................................................................................................................21
10.3. Timer..........................................................................................................................21
10.4. Sleeptimer verwenden .......................................................................................23
10.5. Betriebsart wählen ...............................................................................................23
DE
EN
FR
NL
DK
1
Page 3

11. Radio ........................................................................................................... 24
11.1. Sender einstellen ..................................................................................................24
11.2. Sendersuchlauf ......................................................................................................24
11.3. Sender speichern und aufrufen .......................................................................24
11.4. Stereo-/Monoempfang (nur FM-Radio) ........................................................24
11.5. Senderinformationen ..........................................................................................25
11.6. Scan-Funktion ........................................................................................................25
11.7. Intro-Funktion (nur DAB)....................................................................................25
12. CDs und USB-Speicher wiedergeben ....................................................... 25
12.1. Hinweise zu den Medien ....................................................................................25
12.2. Disk einlegen ..........................................................................................................26
12.3. Wiedergabe starten/anhalten ..........................................................................26
12.4. Titelwahl, Schneller Rück-/Vorlauf ..................................................................26
12.5. Direkte Titelanwahl ..............................................................................................26
12.6. Ordneranwahl ........................................................................................................27
12.7. Abspielreihenfolge programmieren ..............................................................27
12.8. Wiederholfunktion/Zufallswiedergabe ........................................................28
12.9. Titelinformationen anzeigen ............................................................................28
13. Bluetooth-Modus ....................................................................................... 29
13.1. Bluetooth-Geräte koppeln ................................................................................29
13.2. Steuerung via Fernbedienung (Bereich Bluetooth) .................................29
14. Wiedergabe am Anschluss LINE IN und AUDIO IN ................................... 29
15. Wenn Störungen auftreten ....................................................................... 30
16. Reinigung ................................................................................................... 31
17. Entsorgung ................................................................................................. 31
18. Technische Daten ....................................................................................... 32
19. Impressum .................................................................................................. 33
2
Page 4
1. Zu dieser Anleitung
Lesen Sie vor Inbetriebnahme die Sicherheitshinweise aufmerksam
durch. Beachten Sie die Warnungen auf dem Gerät und in der Bedienungsanleitung.
Bewahren Sie die Bedienungsanleitung immer in Reichweite auf. Wenn
Sie das Gerät verkaufen oder weitergeben, händigen Sie unbedingt
auch diese Anleitung aus.
DE
EN
FR
NL
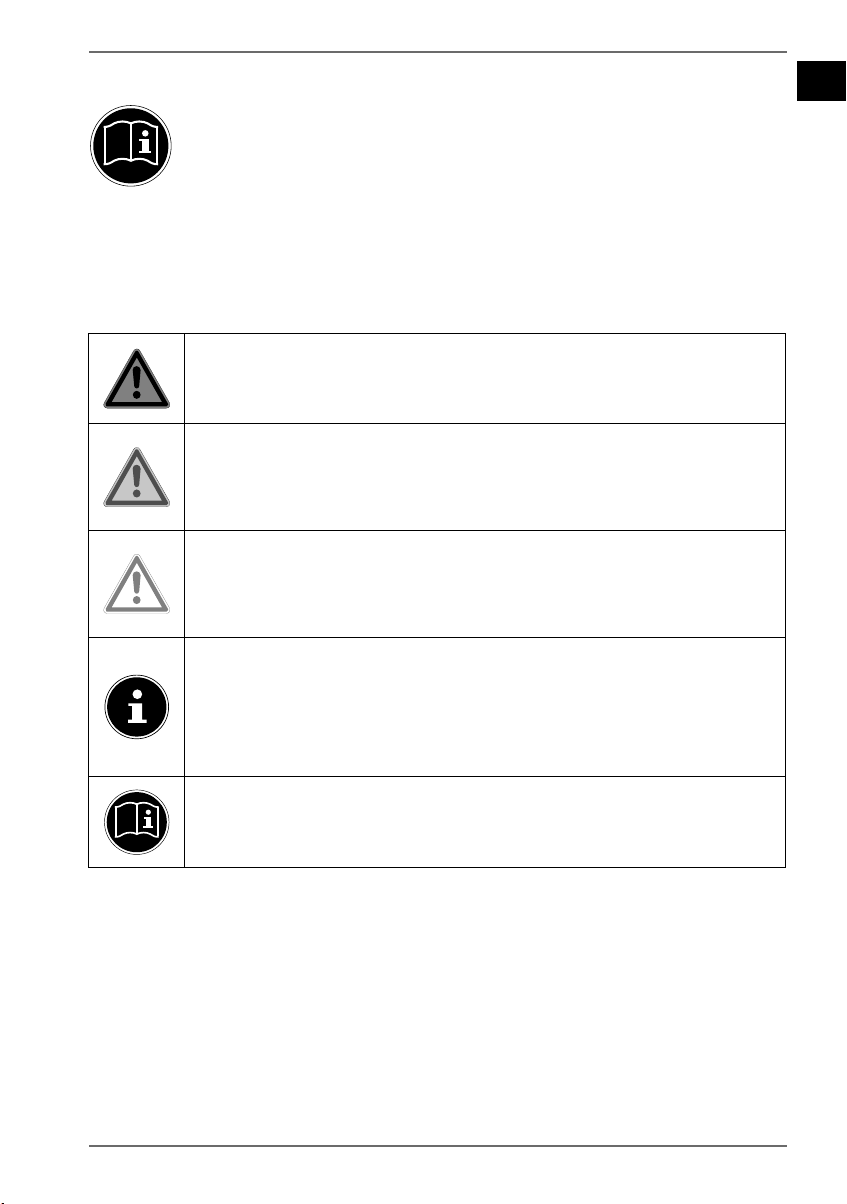
1.1. In dieser Anleitung verwendete Warnsymbole
und Signalwörter
GEFAHR!
Warnung vor unmittelbarer Lebensgefahr!
WARNUNG!
Warnung vor möglicher Lebensgefahr und/oder
schweren irreversiblen Verletzungen!
VORSICHT!
Warnung vor möglichen mittleren und oder leichten
Verletzungen!
HINWEIS!
Hinweise beachten, um Sachschaden zu vermeiden!
Weiterführende Informationen für den Gebrauch des
Gerätes!
HINWEIS!
Hinweise in der Bedienungsanleitung beachten!
DK
3
Page 5

2. Bestimmungsgemäßer Gebrauch
Ihr Gerät bietet Ihnen vielfältige Möglichkeiten der Nutzung:
Das Gerät dient zum Abspielen von Tonmedien (CDs, MP3-Datenträger, USB-Geräte)
sowie zum Radioempfang. Darüber hinaus können Sie externe Geräte zur Wiedergabe von Audiodaten per Bluetooth drahtlos verbinden.
Das Gerät ist nur für den privaten und nicht für den industriellen/kommerziellen Gebrauch bestimmt.
Bitte beachten Sie, dass im Falle des nicht bestimmungsgemäßen Gebrauchs die
Haftung erlischt:
• Bauen Sie das Gerät nicht ohne unsere Zustimmung um und verwenden Sie keine nicht von uns genehmigten oder gelieferten Zusatzgeräte.
• Verwenden Sie nur von uns gelieferte oder genehmigte Ersatz- und Zubehörteile.
• Beachten Sie alle Informationen in dieser Bedienungsanleitung, insbesondere
die Sicherheitshinweise. Jede andere Bedienung gilt als nicht bestimmungsgemäß und kann zu Personen- oder Sachschäden führen.
• Nutzen Sie das Gerät nicht unter extremen Umgebungsbedingungen.
Das Gerät ist nicht dafür bestimmt, durch Personen (einschließlich Kinder) mit eingeschränkten physischen, sensorischen oder geistigen Fähigkeiten oder mangels
Erfahrung und/oder mangels Wissen benutzt zu werden, es sei denn, sie werden
durch eine für ihre Sicherheit zuständige Person beaufsichtigt oder erhielten von ihr
Anweisungen, wie das Gerät zu benutzen ist. Kinder sollten beaufsichtigt werden,
um sicherzustellen, dass sie nicht mit dem Gerät spielen.
3. Konformitätsinformation
Hiermit erklärt die Medion AG, dass das Produkt mit den folgenden europäischen
Anforderungen übereinstimmt:
• EMV-Richtlinie 2004/108/EG
• Niederspannungsrichtlinie 2006/95/EG
• RoHS-Richtlinie 2011/65/EU.
• Öko-Design Richtlinie 2009/125/EG (Verordnung 1275/2008)
4
Page 6
4. Sicherheitshinweise
DE
4.1. Betriebssicherheit
• Das Gerät ist nicht dafür bestimmt, durch Personen (ein-
schließlich Kinder) mit eingeschränkten physischen, sensorischen oder geistigen Fähigkeiten oder mangels Erfahrung
und/oder mangels Wissen benutzt zu werden, es sei denn, sie
werden durch eine für ihre Sicherheit zuständige Person beaufsichtigt oder erhielten von ihr Anweisungen, wie das Gerät
zu benutzen ist. Kinder sollten beaufsichtigt werden, um sicherzustellen, dass sie nicht mit dem Gerät spielen.
GEFAHR!
Erstickungsgefahr!
Verpackungsfolien können verschluckt oder unsachgemäß benutzt werden, daher besteht Erstickungsgefahr!
Halten Sie das Verpackungsmaterial, wie z.B. Folien
oder Plastikbeutel von Kindern fern.
4.2. Aufstellungsort
• Halten Sie Ihr Gerät und alle angeschlosse nen Komponenten
von Feuchtigkeit fern und ver meiden Sie Staub, Hitze, direkte Sonneneinstrahlung und offene Brandquellen (Kerzen oder
ähnliches). Das Nichtbeachten dieser Hinweise kann zu Störungen oder zur Beschädigung des Bildschirms führen.
• Betreiben Sie Ihr Gerät nicht im Freien, da äußere Einflüsse,
wie Regen, Schnee etc. das Gerät beschädigen könnten.
• Setzen Sie das Gerät und das Netzteil nicht Tropf- oder Spritz-
wasser aus und stellen Sie keine mit Flüssigkeit gefüllten Gefäße (Vasen oder ähnliches) auf oder neben das Gerät und das
Netzteil. Eindringende Flüssigkeit kann die elektrische Sicherheit beeinträchtigen.
• Schlitze und Öffnungen des Gerätes dienen der Belüftung.
Decken Sie diese Öffnungen nicht ab (Überhitzung, Brandgefahr)!
EN
FR
NL
DK
5
Page 7

• Verlegen Sie die Kabel so, dass niemand darauf treten, oder
darüber stolpern kann.
• Achten Sie auf genügend große Abstände in der Schrankwand. Halten Sie einen Mindestabstand von 10 cm rund um
das Gerät zur ausreichenden Belüftung ein.
• Stellen und betreiben Sie alle Komponenten auf einer stabilen, ebenen und vibrations freien Unterlage, um ein Herunterfallen des Gerätes zu ver meiden.
4.3. Reparatur
• Wenden Sie sich an den Kundendienst, wenn:
− das Netzkabel angeschmort oder beschädigt ist
− Flüssigkeit in das Gerät eingedrungen ist
− das Gerät nicht ordnungsgemäß funktioniert
− das Gerät heruntergefallen, oder das Gehäuse beschädigt
ist.
• Überlassen Sie die Reparatur Ihres Gerätes ausschließlich qualifiziertem Fachpersonal.
• Im Falle einer notwendigen Reparatur wenden Sie sich bitte
ausschließlich an unsere autorisierten Servicepartner.
6
Page 8
4.4. Umgebungstemperatur
• Das Gerät kann bei einer Umgebungstempera tur von 0 °C bis
+35 °C und bei einer relati ven Luftfeuchtigkeit von < 80 %
(nicht kondensierend) betrieben werden.
• Im ausgeschalteten Zustand kann das Gerät bei -20 °C bis +60
°C gelagert werden.
GEFAHR!
Stromschlaggefahr!
Bei großen Temperatur- oder Feuchtigkeitsschwankungen kann es durch Kondensation zur Feuchtigkeitsbildung inner halb des Gerätes kommen, die einen elektrischen Kurzschluss verursachen kann.
Warten Sie nach einem Transport des Gerätes so-
lange mit der Inbetriebnahme, bis es die Umgebungstemperatur angenommen hat.
4.5. Stromversorgung
GEFAHR!
Stromschlaggefahr!
Auch bei ausgeschaltetem Netzschalter sind Teile des
Gerätes unter Spannung.
Um die Stromversorgung zu Ihres Gerätes zu un-
terbrechen, oder es gänzlich von Spannung freizuschalten, ziehen Sie den Netzstecker aus der Steckdose.
• Betreiben Sie das Gerät nur an einer leicht erreichbaren und
in der Nähe befindlichen Schutzkontakt-Steckdose mit 100 240 V~, 50/60 Hz.
DE
EN
FR
NL
DK
7
Page 9
• Um die Stromversorgung zu Ihr Gerät zu unterbrechen, ziehen Sie den Netzstecker aus der Steckdose.
GEFAHR!
Stromschlaggefahr!
Im Inneren des Gerätes befinden sich stromführende
Teile. Bei diesen besteht durch unabsichtlichen Kurzschluss die Gefahr eines elektrischen Schlages oder eines Brandes.
Öffnen Sie niemals das Gehäuse und führen Sie kei-
ne Gegenstände durch die Schlitze und Öffnun gen
ins Innere des Gerätes!
• Stellen Sie keine Gegenstände auf die Kabel, da diese sonst
beschädigt werden könnten.
• Halten Sie mindestens einen Meter Abstand von hochfrequenten und magnetischen Störquellen (Fernsehgerät,
Lautsprecherbo xen, Mobiltelefon usw.), um Funktionsstörungen und Datenverlust zu vermeiden.
4.6. CD-Spieler
Der CD-Spieler ist ein Laserprodukt der Klasse 1.
Das Gerät ist mit einem Sicherheitssystem ausgerüstet, das das Austreten von gefährlichen Laserstrahlen während des normalen Gebrauchs verhindert. Um Augenverletzungen zu vermeiden,
manipulieren oder beschädigen Sie niemals das
Sicherheitssystem des Geräts.
8
Page 10

4.7. Batterien
Die Fernbedienung wird mit Batterien betrieben. Beachten Sie
hierzu folgende Hinweise:
• Halten Sie Batterien von Kindern fern. Falls eine Batterie ver-
schluckt wurde, suchen Sie umgehend einen Arzt auf.
• Prüfen Sie vor dem Einlegen der Batterien, ob die Kontakte im
Gerät und an den Batterien sauber sind, und reinigen Sie diese gegebenenfalls.
• Legen Sie grundsätzlich nur neue Batterien gleichen Typs ein.
Benutzen Sie nie alte und neue Batterien zusammen.
• Achten Sie beim Einlegen der Batterien auf die Polarität (+/–).
• Bei unsachgemäßem Auswechseln der Batterien besteht Ex-
plosionsgefahr! Ersetzen Sie die Batterien nur durch denselben oder einen gleichwertigen Typ.
• Versuchen Sie niemals, Batterien wieder aufzuladen. Es be-
steht Explosionsgefahr!
• Setzen Sie Batterien niemals übermäßiger Wärme (wie Son-
nenschein, Feuer oder dergleichen) aus.
• Lagern Sie Batterien an einem kühlen, trockenen Ort. Direkte
starke Wärme kann die Batterien beschädigen. Setzen Sie das
Gerät daher keinen starken Hitzequellen aus.
• Schließen Sie Batterien nicht kurz.
• Werfen Sie Batterien nicht in Feuer.
• Nehmen Sie ausgelaufene Batterien sofort aus dem Gerät.
Reinigen Sie die Kontakte, bevor Sie neue Batterien einlegen.
Es besteht Verätzungsgefahr durch Batteriesäure!
• Entfernen Sie auch leere Batterien aus dem Gerät.
• Wenn Sie das Gerät für längere Zeit nicht benutzen, nehmen
Sie die Batterien heraus.
DE
EN
FR
NL
DK
9
Page 11
5. Lieferumfang
Bitte überprüfen Sie die Vollständigkeit der Lieferung und benachrichtigen Sie uns
bitte innerhalb von 14 Tagen nach dem Kauf, falls die Lieferung nicht komplett ist.
Mit dem von Ihnen erworbenen Bildschirm haben Sie erhalten:
• Micro-Audio-System
• Fernbedienung inkl. Batterien (2x 1,5 V-Batterie R03/LR03/AAA/Micro)
• UKW-Wurfantenne
• Audiokabel (3,5mm Klinkenstecker auf 2x Cinch)
• Netzanschlusskabel
• Dokumentation
GEFAHR!
Erstickungsgefahr!
Verpackungsfolien können verschluckt oder unsachgemäß benutzt werden, daher besteht Erstickungsgefahr!
Halten Sie das Verpackungsmaterial, wie z.B. Folien
oder Plastikbeutel von Kindern fern.
10
Page 12
6. Geräteübersicht
DE
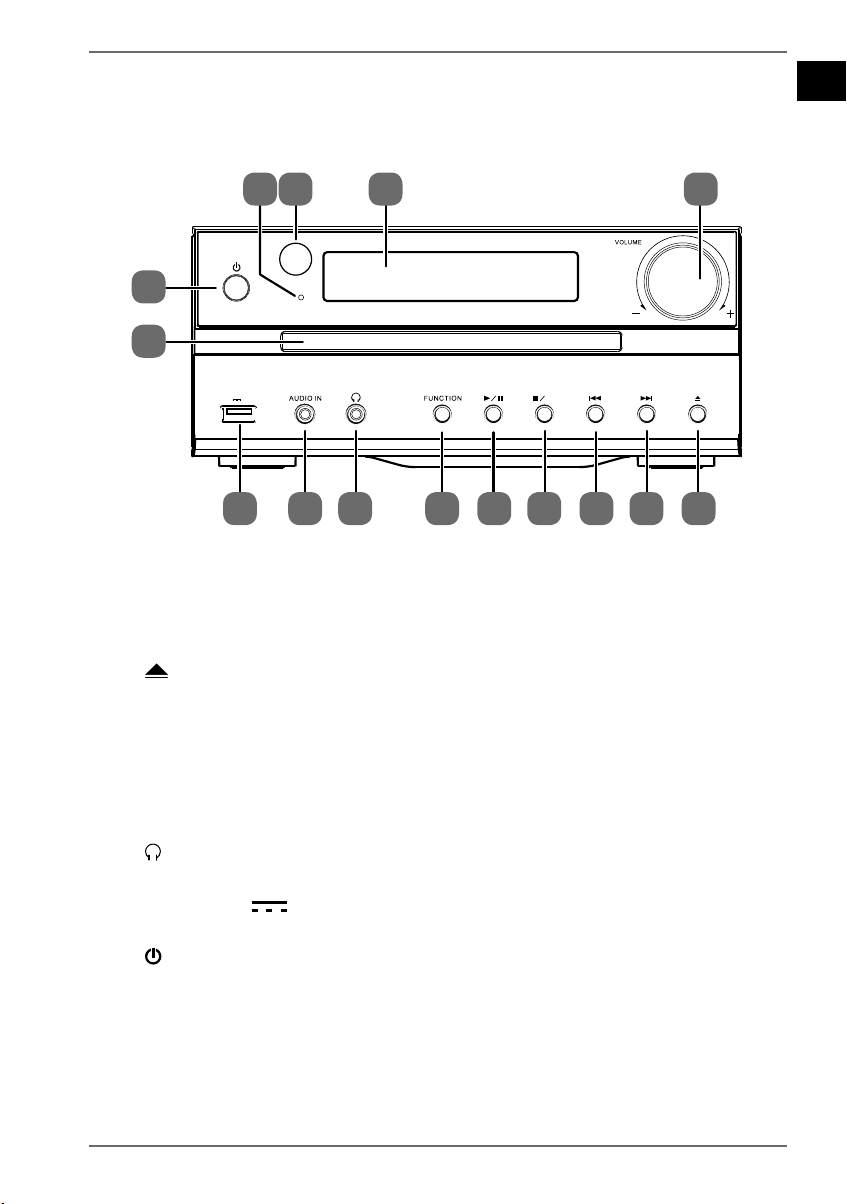
6.1. Vorderseite
1 2
15
14
USB
5V 1.5A
1) Anzeige für Timer
2) IR-Sensor für Fernbedienung
3) Display
4) Lautstärkeregler
5)
6) – CD/USB: Nächster Titel, Radio: Sendersuchlauf vorwärts
7) – CD/USB: Vorheriger Titel, Radio: Sendersuchlauf rückwärts
8) /PAIR – CD/USB: Wiedergabe stoppen; Bluetooth: Kopplungsmodus ak-
9) /– CD/USB: Wiedergabe starten/unterbrechen
10) FUNCTION – Betriebsart wählen
11)
12) AUDIO IN – Audio-Eingang
13) USB 5V
14) Disklade
15)
– Diskfach öffnen/schließen
tivieren
– Kopfhöreranschluss 3,5 mm Klinke
1.5A – USB-Anschluss
– Gerät einschalten/ausschalten
3 4
PAIR
5678910111213
EN
FR
NL
DK
11
Page 13
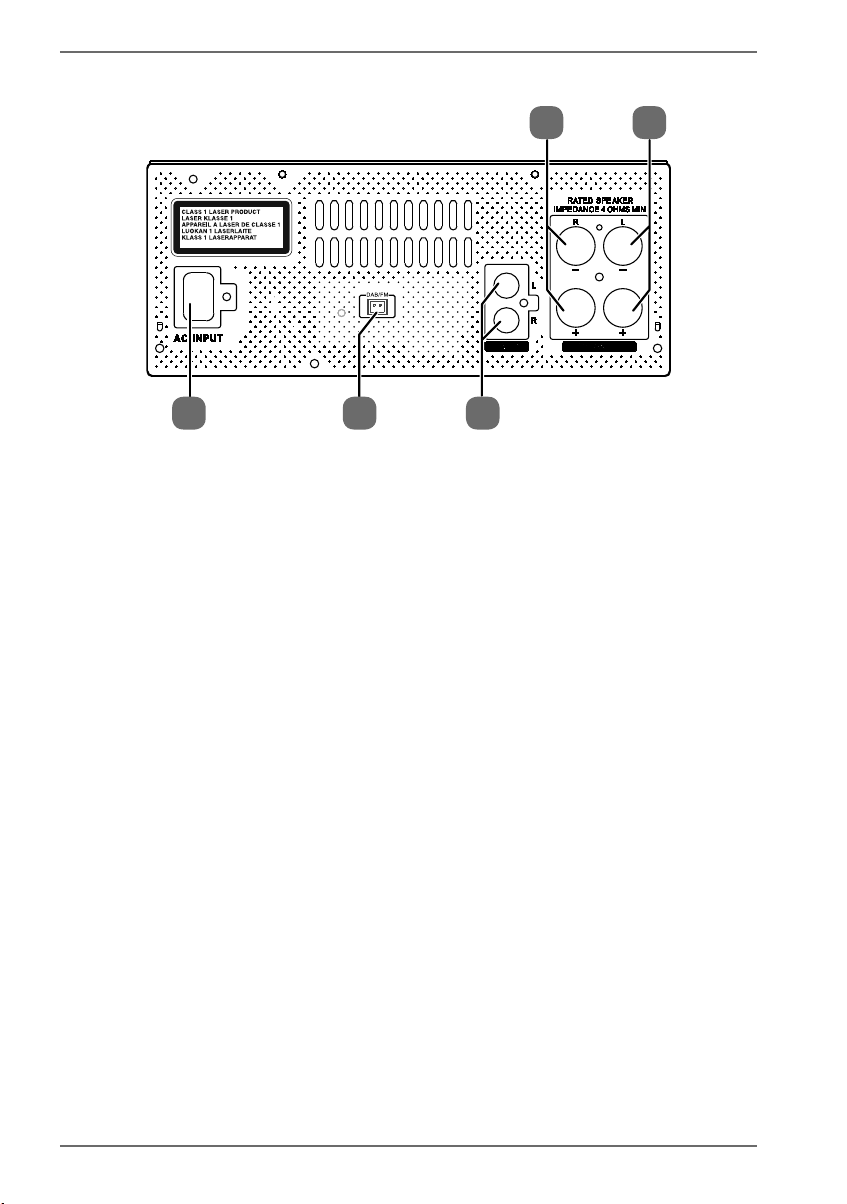
6.2. Rückseite
1
345
1) SPEAKER R – Anschlüsse für den rechten Lautsprecher
2) SPEAKER L – Anschlüsse für den linken Lautsprecher
3) LINE IN – Audioeingänge Cinch L/R
4) DAB/FM – Antennenanschluss 75 Ω
5) AC INPUT – Netzanschluss
2
12
Page 14
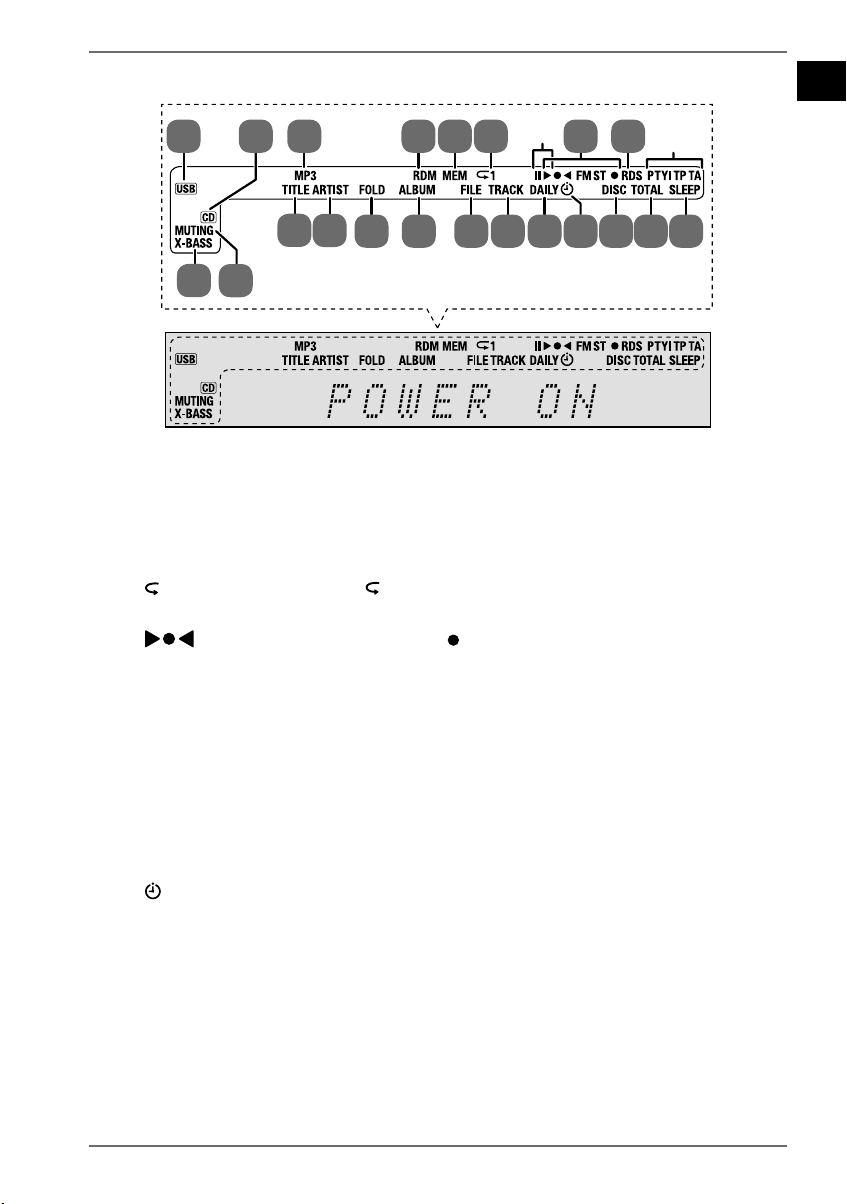
6.3. Display
DE
1 2 3
1819
4 5
6 7 8
91011121314151617
1819
1) USB – Betriebsart USB
2) CD – Betriebsart CD
3) MP3 – Betriebsart MP3
4) RDM – Zufallswiedergabe aktiviert
5) MEM – Gespeicherte Wiedergabe aktiviert
6) – Alle Titel wiederholen; 1: aktuellen Titel wiederholen
7) – Wiedergabe angehalten/gestartet
8) Radiosender eingestellt;
empfangen
9) RDS – Anzeige eines RDS Radiosenders
10) PTYI – wird angezeigt, wenn ein Sender eine Genre-Kennung sendet;
TP – wird angezeigt, wenn ein Sender Verkehrsmeldungen anbietet;
TA – wird angezeigt, wenn ein Sender aktuell eine Verkehrsmeldung aus-
strahlt
11) SLEEP – Sleeptimer aktiviert
12) TOTAL – Anzeige der Gesamtdauer eines Datenträgers
13) DISC– Anzeige einer eingelegten Disk
14)
15) DAILY – Eingestellter Timer ist auf „täglich“ gesetzt
16) TRACK – Anzeige der Titelnummer
17) FILE – Anzeige des Dateinamens
18) ALBUM– Anzeige des Albums eines Musikstücks
19) FOLD – Anzeige des Ordners
20) ARTIST – Anzeige des Künstlers eines Musikstücks
21) TITLE – Anzeige des Titels eines Musikstücks
22) MUTING – Stummschaltung aktiviert
23) X-BASS – X-Bass aktiviert
– Timer ist eingestellt
FM ST
Stereosignal des Radiosenders wird
EN
FR
NL
DK
13
Page 15
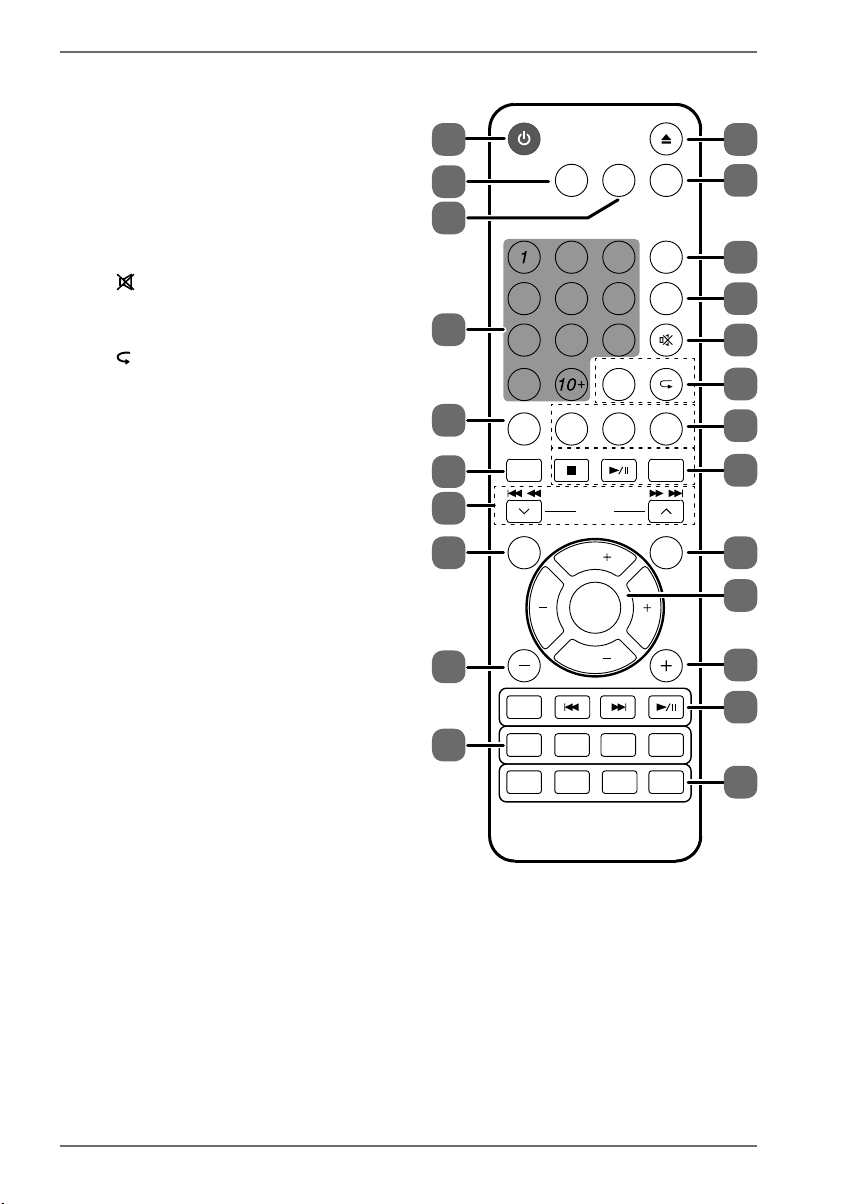
6.4. Fernbedienung
1) OPEN/CLOSE – Diskfach
öffnen und schließen
2) AUDIO IN – Eingangsmodus
wählen
3) MEMORY – Speichertaste
4) DIMMER – Displayhelligkeit ein-
22
21
stellen
5)
– Stummschaltung
6) RANDOM – Zufallswiedergabe
einstellen
20
/ REPEAT – Wiederholfunktion
einstellen
7) EQ
X-BASS – X-Bass aktivieren/de-
19
aktivieren
BASS/TREBLE – Bass/Höhen
einstellen
18
17
8) /PAIR – CD/USB: Wiedergabe
stoppen; Bluetooth: Kopplungsmo-
16
dus aktivieren
/ – CD/USB: Wiedergabe starten und unterbrechen
MP3 INFO – CD/USB: Titelinformationen anzeigen
15
9) BACK – im Menü zurückkehren
10) ENTER – Auswahl bestätigen
VOL-/+ – Lautstärke verringern/
14
erhöhen
PRESET -/+ – Radio: voriger/
nächster gespeicherter Sender
11) FOLDER + – CD/USB: nächs-
ter Ordner
12) BLUETOOTH – Bluetooth aktivieren
– Bluetooth: voriger Titel
– Bluetooth: nächster Titel
/ – Bluetooth: Wiedergabe starten/unterbrechen
13) TUNER – Betriebsart FM-Radio wählen
SCAN – FM-Radio: Automatisches Suchen und Speichern von Sendern
starten
ST./MONO – FM-Radio: Stereo/Mono-Ton einstellen
INFO – FM-Radio: Zwischen dem Sendernamen, Programmtyp, Radiotext
und Frequenz schalten
ON/STAND-BY
TIMER/
SLEEP AUDIO IN
CLOCK
3
2
5
4
7
6
89
RANDOM
0
USB EQ X-BASS BASS/TREBLE
PAI R
CD MP3 INFO
SCAN
TUNING
VOL
ENTER
VOL
ST./
MONO
MENU BACK
PRESET
FOLDER FOLDER
FOLDER FOLDER
BT
DAB INTROSCAN
FM
OPEN/CLOSE
MEMORY
DIMMER
REPEAT
PRESET
INFO
INFO
123
2
3
4
5
6
7
8
9
10
11
12
13
14
Page 16

14) DAB – DAB-Radio: Betriebsart DAB-Radio wählen
SCAN – DAB-Radio: Automatisches Suchen und Speichern von Sendern
starten
INTRO – CD: Titel für 10 Sekunden anspielen
INFO – DAB-Radio: Zwischen dem Sendernamen, Programmtyp, Radiotext
und Frequenz schalten
15) FOLDER - – CD/USB: vorheriger Ordner
16) MENU –
17) / – CD/USB: Schnelllauf rückwärts/vorwärts
/ – CD/USB: voriger/nächster Titel
TUNING / – Radio: Sendersuchlauf rückwärts/vorwärts
18) CD – in den Betriebsmodus CD wechseln
19) USB – in den Betriebsmodus USB wechseln
20) Zifferntasten
21) SLEEP – Sleeptimer stellen
22) TIMER/CLOCK – Uhr/Timer stellen
23)
/ STAND-BY – Gerät vom Standby-Modus einschalten und wieder in
den Standby-Modus schalten
DE
EN
FR
NL
DK
15
Page 17
7. Vorbereitung
7.1. Batterien in die Fernbedienung einlegen
Legen Sie die beiden 1,5 V-Batterien R03/LR03/AAA/Micro in die Fernbedienung ein.
Öffnen Sie den Batteriefachdeckel.
Legen Sie die Batterie so ein, dass der Minuspol der Batterien an den Federn an-
liegt.
Setzen Sie den Batteriefachdeckel wieder auf.
7.2. Gerät aufstellen
• Stellen Sie die Geräte auf eine ebene, feste Oberfläche. Einige aggressive Möbellacke können die Gummifüße der Geräte angreifen. Stellen Sie das Gerät ggf. auf
eine Unterlage.
HINWEIS!
Wenn Sie Anschlüsse an ein externes Gerät vornehmen,
ziehen Sie vorher die Netzstecker des Gerätes ab!
8. Anschlüsse
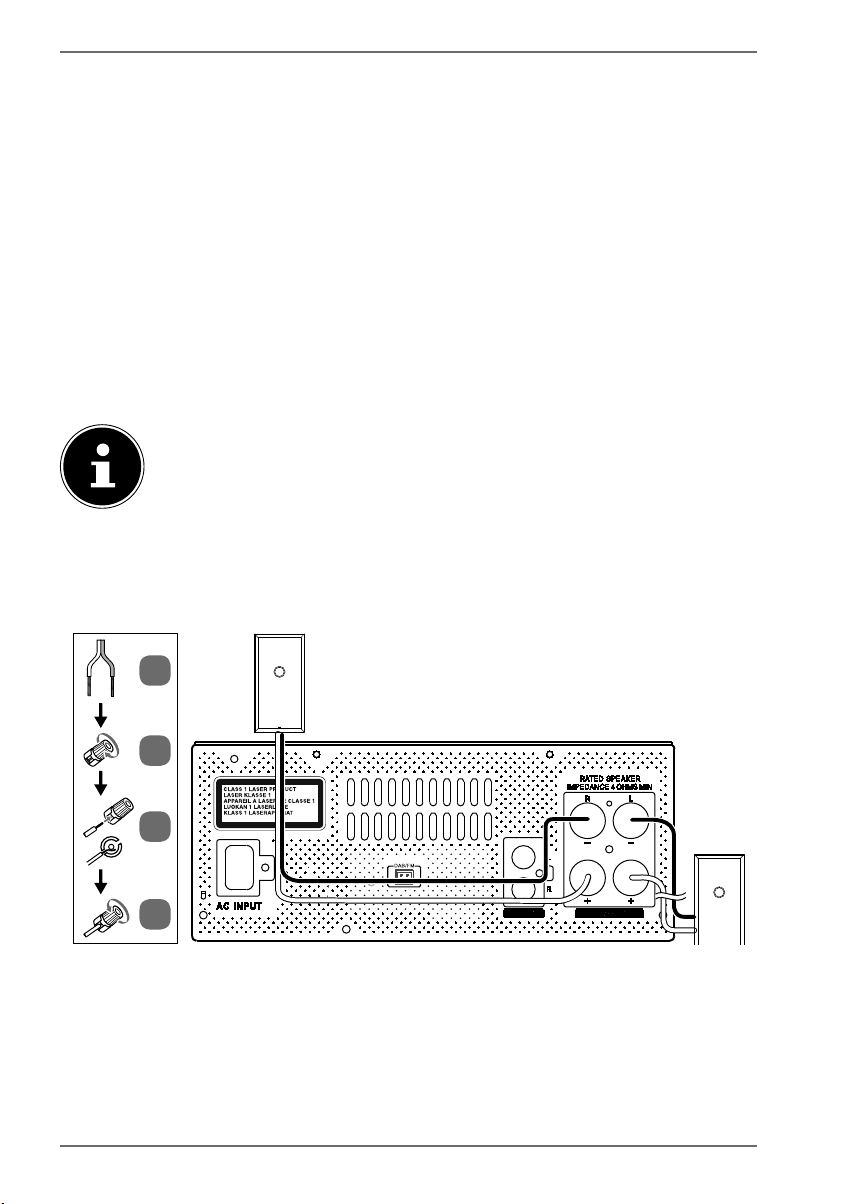
8.1. Lautsprecher anschließen
1
2
3
4
Verbinden Sie die blanken Enden der Lautsprecherkabel mit den farblich ent-
sprechend gekennzeichneten Buchsen. SPEAKERS R (rechts) ist für das Kabelpaar des rechten Lautsprechers. SPEAKERS L (links) ist für das Kabelpaar
des linken Lautsprechers.
Schließen Sie die Kabel wie in der Abbildung dargestellt an.
16
Page 18
8.2. Kopfhörer anschließen
Auf der Vorderseite des Gerätes befindet sich ein 3,5 mm Kopfhöreranschluss.
Stecken Sie einen Kopfhörer mit einem 3,5 mm Klinkenstecker in den Kopfhörer-
anschluss.
Ist ein Kopfhörer angeschlossen, werden die Lautsprecher abgeschaltet. Die Lautstärkeregelung ist weiterhin möglich, um die Lautstärke des Kopfhörers zu verändern.
DE
EN
FR
NL
WARNUNG!
Gefahr von Hörschäden!
Wenn ein Gerät längere Zeit mit erhöhter Lautstärke
über einen Kopfhörer betrieben wird, kann das Schäden am Hörvermögen des Zuhörers verursachen
Stellen Sie die Lautstärke vor der Wiedergabe auf
den niedrigsten Wert ein.
Starten Sie die Wiedergabe und erhöhen Sie die
Lautstärke auf den Pegel, der für Sie angenehm ist.
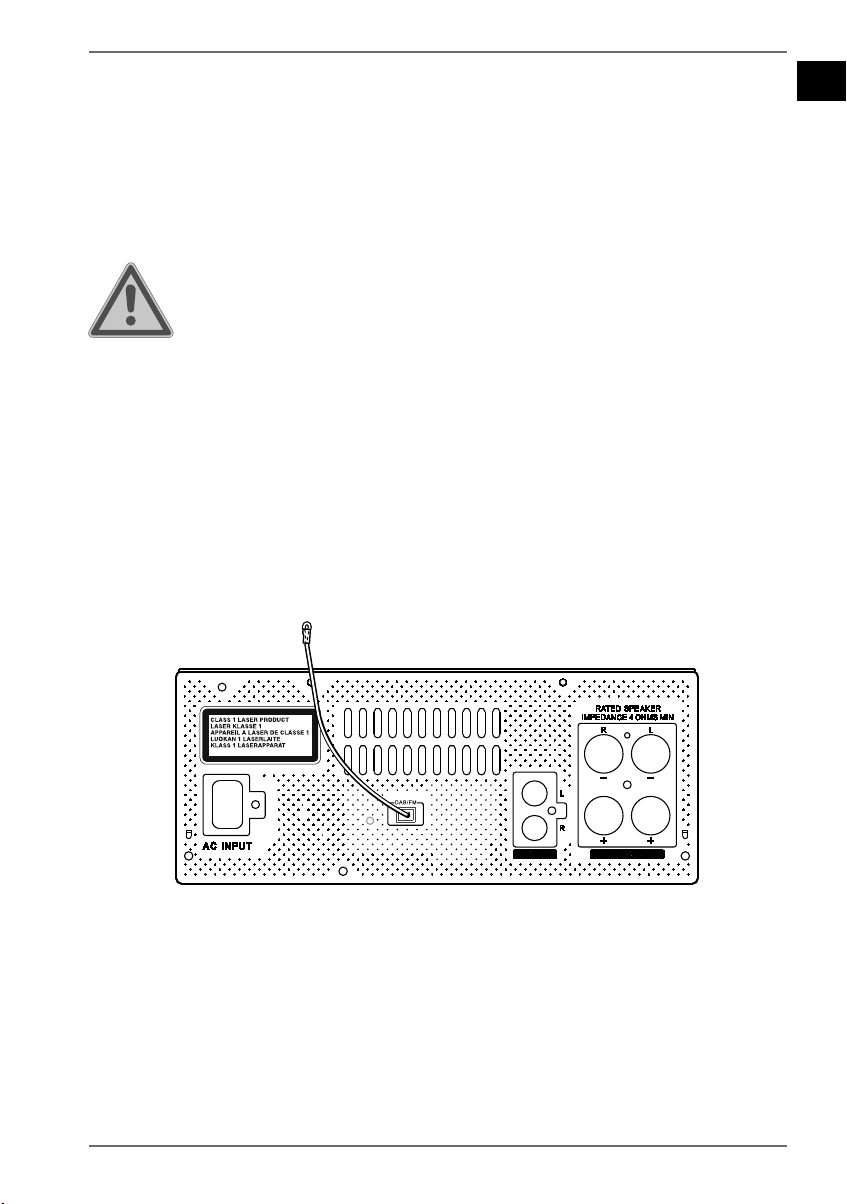
8.3. Antennenanschluss
DK
Für den Radioempfang verbinden Sie ein Antennenkabel mit dem Antennenanschluss DAB/FM am Gerät.
• Eine Wurfantenne ist mitgeliefert. Schließen Sie die Wurfantenne an und richten
Sie sie für den besten Empfang aus.
• Alternativ können Sie ein Wandantennenkabel verwenden, das Sie mit dem ent-
sprechenden Anschluss in der Wand verbinden.
17
Page 19
8.4. Externes Gerät am Anschluss AUDIO IN
anschließen
Auf der Vorderseite des Gerätes befindet sich ein 3,5 mm Anschluss mit der Beschriftung AUDIO IN.
Stecken Sie das Anschlusskabel mit einem 3,5 mm Klinkenstecker in den An-
schluss.
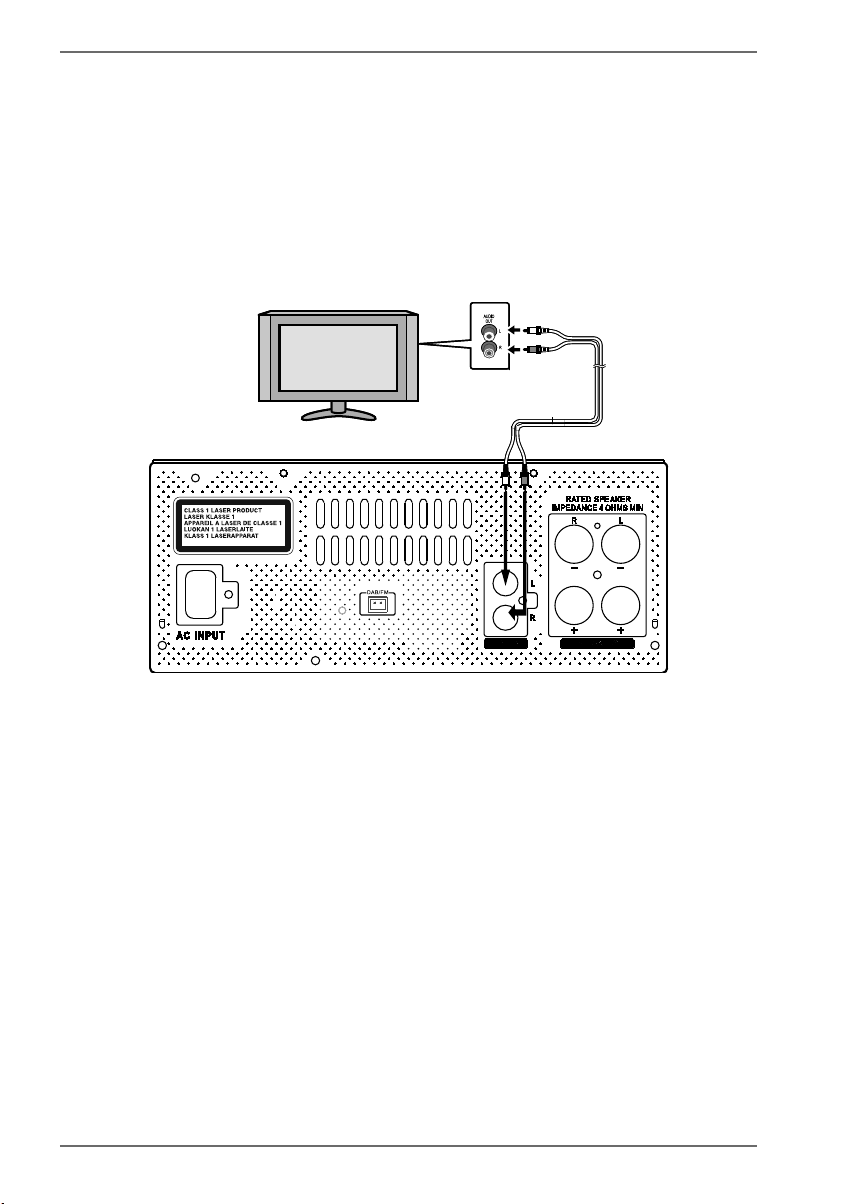
8.5. Externes Gerät am Anschluss LINE IN anschließen
TV
Sie können ein externes Gerät (z. B. ein Fernsehgerät) zur Tonübertragung am Microsystem anschließen. Dazu benötigen Sie ein Audio Cinch-Verbindungskabel.
Schließen Sie ein Ende der Cinch-Stecker an den Anschlüssen LINE IN links
und rechts an.
Schließen Sie das andere Ende der Cinch-Stecker am Audio-Ausgang des exter-
nen Gerätes an. Achten Sie dabei auf die farbige Kennzeichnung der Stecker.
18
Page 20
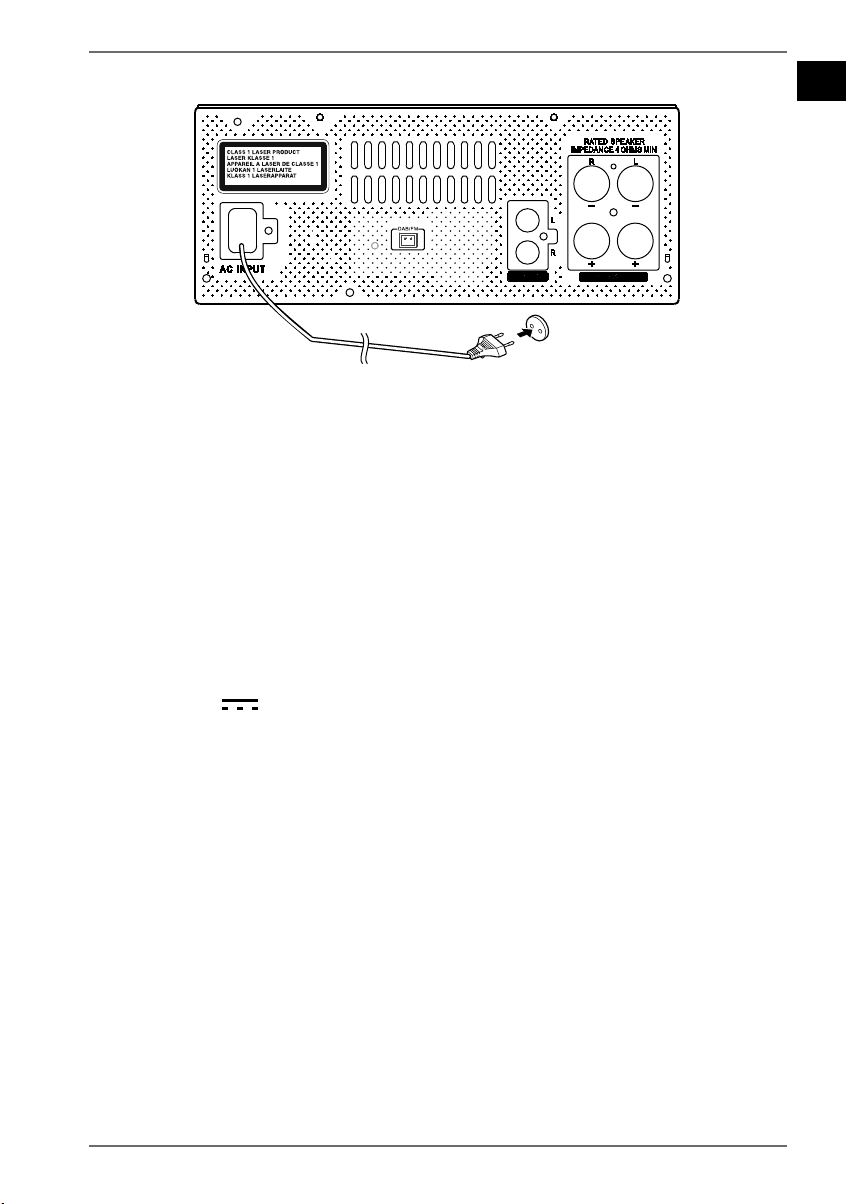
8.6. Netzanschluss
Nachdem alle anderen Komponenten angeschlossen sind, nehmen Sie den Anschluss des Netzkabels vor.
Stecken Sie dazu das flache Ende in den Anschluss AC INPUT und das an-
dere Ende des Kabels in eine ordnungsgemäß installierte und jederzeit frei zugängliche 220V-240V ~ 50/60Hz Schutzkontaktsteckdose.
9. USB-Speicherstick anschließen
Am USB-Anschluss können Sie USB-Speichersticks anschließen. Damit können Musikstücke von einem USB-Speicherstick wiedergegeben werden. Der USB-Anschluss
unterstützt keine Video-Wiedergabe.
Schließen Sie den USB-Speicherstick am USB-Anschluss
USB 5V 1.5A an.
DE
EN
FR
NL
DK
19
Page 21

10. Allgemeine Bedienfunktionen
10.1. Tonfunktionen
HINWEIS!
Die Beschreibung gilt für die Tonausgabe an angeschlossenen Lautsprechern. Sind Geräte mit eigenen Lautsprechern angeschlossen, können
Sie natürlich auch an diesen Geräten den Ton einstellen.
10.1.1. Lautstärke
Drücken Sie die Taste VOL+ an der Fernbedienung oder drehen Sie den Laut-
stärkeregler am Gerät im Uhrzeigersinn, um die Lautstärke anzuheben.
Drücken Sie die Taste VOL– an der Fernbedienung oder drehen Sie den Laut-
stärkeregler am Gerät gegen den Uhrzeigersinn, um die Lautstärke zu senken.
10.1.2. Stummschaltung – MUTE
Drücken Sie die Taste an der Fernbedienung, um den Ton ganz abzuschalten.
Im Display erscheint MUTING.
Drücken Sie die Taste an der Fernbedienung, um den Ton wieder einzuschal-
ten. Die Anzeige MUTING erlischt im Display.
10.1.3. Bass/Treble
Drücken Sie die Taste BASS/TREBLE ein- oder mehrmals, bis im Display die
gewünschte Funktion BASS oder TREBLE erscheint.
Stellen Sie mit VOL -/+ die gewünschte Bass- bzw. Treble-Einstellung ein.
Ist die Funktion X-Bass aktiviert, werden die Einstellungen zu Bass/Treble ignoriert.
10.1.4. X-Bass
Mit X-Bass können Sie mit der Fernbedienung eine Bassverstärkung ein- oder ausschalten.
Drücken Sie die Taste X-BASS auf der Fernbedienung. Im Display erscheint
die Anzeige X-BASS. Die Funktion ist aktiviert.
Drücken Sie die Taste erneut, um X-Bass wieder auszuschalten. Die Anzeige
X-BASS im Display erlischt.
Ist die Funktion X-Bass aktiviert, werden die Einstellungen zu Bass/Treble ignoriert.
10.1.5. Equalizer
Drücken Sie die Taste EQ ein- oder mehrmals, um die verschiedenen Klangmuster
FLAT, CLASSIC, ROCK und POP abzurufen.
20
Page 22

10.2. Uhrzeit
DE
10.2.1. Uhrzeit anzeigen
Die Uhrzeit wird kann sowohl im eingeschalteten Zustand des Gerätes als auch im
Stand-By-Modus angezeigt werden.
Drücken Sie die Taste TIMER/CLOCK. Die Uhrzeit wird für mehrere Sekun-
den angezeigt.
10.2.2. Uhrzeit einstellen
Die Uhrzeit wird automatisch durch das DAB-Radio eingestellt. Sie können die Uhr
jedoch auch manuell einstellen:
Drücken Sie im eingeschalteten Zustand des Gerätes die Taste
TIMER/CLOCK auf der Fernbedienung.
Bestätigen Sie innerhalb von 10 Sekunden mit der ENTER Taste.
Um den Tag einzustellen, drücken Sie oder und bestätigen die Aus-
wahl mit ENTER. Die Tage werden im englischen Format angezeigt:
− MON = Montag − FRI = Freitag
− TUE = Dienstag − SAT = Samstag
− WED = Mittwoch − SUN = Sonntag.
− THU = Donnerstag
Wählen Sie nun mit oder das 12- (12:00 AM) oder 24-Stunden Zeitfor-
mat (00:00) und bestätigen mit ENTER.
Wählen Sie mit oder die gewünschte Stunde und bestätigen mit
ENTER.
Stellen Sie mit oder die gewünschten Minuten ein. Bestätigen Sie mit
ENTER.
Drücken Sie abschließend die Taste TIMER/CLOCK erneut, um die Einstel-
lung zu speichern.
EN
FR
NL
DK
10.3. Timer
Mit dem Timer können Sie das Gerät zu einer bestimmten Uhrzeit in einem bestimmten Modus (z. B. DAB, CD) starten lassen.
Das Gerät bietet zwei Arten von Timern:
• Der einmalige Timer wird im Display mit 1 dargestellt und startet das Gerät
nur einmalig zur eingestellten Zeit für eine bestimmte Dauer.
• Der tägliche Timer wird im Display mit DAILY dargestellt und startet das
Gerät täglich zur gleichen Zeit für eine bestimmte Dauer.
Sie können beide Timer unabhängig voneinander einstellen. Zwischen den gewählten Zeiten muss mindestens 1 Minute Abstand gehalten werden.
Um die Timerfunktion zu verwenden, muss die Uhrzeit wie oben beschrieben, eingestellt sein.
21
Page 23

10.3.1. Timer einstellen
Wenn Sie einen Timer in der Betriebsart TUNER oder DAB starten möchten, stellen Sie zuvor den gewünschten Radiosender ein, damit das Gerät mit dem richtigen
Sender einschaltet.
Halten Sie im eingeschalteten Zustand des Gerätes die Taste
TIMER/CLOCK für 2 Sekunden gedrückt.
Wählen Sie innerhalb von 10 Sekunden mit den Tasten oder
− einen täglichen (DAILY) oder
− oder einmaligen (ONCE) Timer
Bestätigen Sie die Eingabe mit ENTER.
Wählen Sie mit den Tasten oder den Eintrag TIMER SET aus und be-
stätigen mit ENTER.
Stellen Sie nun ein, welche Quelle verwendet werden soll. Drücken Sie oder
um eine der folgenden Betriebsarten auszuwählen:
− CD = CD-Player − USB = USB-Anschluss
− TUNER = FM-Radio − AUDIO IN = Audio IN-Anschluss
− DAB = Digitalradio DAB − LINE IN = LINE IN-Anschluss
Bestätigen danach mit ENTER.
Drücken Sie oder , um den Tag zu wählen. Die Tage werden im engli-
schen Format angezeigt:
− MON = Montag − FRI = Freitag
− TUE = Dienstag − SAT = Samstag
WED = Mittwoch − SUN = Sonntag.
−
− THU = Donnerstag
Bestätigen Sie mit ENTER. Im Display erscheint ON 00:00 und die Stun-
denanzeige blinkt.
Drücken Sie oder , um die Stunde einzustellen, zu der das Gerät einge-
schaltet werden soll und bestätigen erneut mit ENTER.
Die Minutenanzeige blinkt. Wählen Sie mit oder die Minute zu der das
Gerät eingeschaltet werden soll und drücken ENTER.
Im Display erscheint OFF 00:00 und die Stundenanzeige blinkt. Wiederho-
len Sie die letzten beiden Schritte und geben jetzt an, zu welcher Stunde und
Minute das Gerät wieder abgeschaltet werden soll. Bestätigen Sie jeden Schritt
mit ENTER.
Im Display erscheint TIMER VOL und die Zahl des Lautstärkepegels blinkt.
Wählen Sie mit VOL-/+ die gewünschte Lautstärke und bestätigen abschließend mit ENTER.
Schalten Sie das Gerät mit ON/STAND-BY in den Stand-By-Zustand. Es
leuchtet die LED für den Timer.
Wenn die eingestellte Zeit erreicht ist, schaltet das Gerät in der gewünschten Be-
22
Page 24

triebsart ein und schaltet zur eingestellten Zeit wieder ab. Während ein Timer ausgeführt wird, blinkt
im Display.
10.3.2. Eingestellten Timer aktivieren/löschen
Sie können einen zuvor eingestellten Timer aktivieren oder deaktivieren.
Halten Sie im eingeschalteten Zustand des Gerätes die TasteTIMER/CLOCK
für 2 Sekunden gedrückt.
Wählen Sie innerhalb von 10 Sekunden mit oder den Eintrag ONCE
(einmaliger Timer) oder DAILY (täglicher Timer), abhängig davon, welchen Ti-
mer sie aktivieren/deaktivieren möchten.
Drücken Sie nun innerhalb von 10 Sekunden den Eintrag TIMER ON (aktivie-
ren) oder TIMER DEL (löschen) im Display und bestätigen mit ENTER.
Der eingestellte Timer ein- oder ausgeschaltet.
10.4. Sleeptimer verwenden
Mit dem Sleeptimer schaltet sich das eingeschaltete Gerät nach einer definierten
Zeit automatisch ab.
Drücken Sie im laufenden Betrieb die Taste SLEEP.
Wählen Sie innerhalb von 5 Sekunden mit den Zifferntasten die gewünschte
Dauer in Minuten, bis das Gerät ausschalten soll. Im Display erscheint SLEEP.
Das Gerät schaltet nun nach Ablauf der eingestellten Dauer ab.
Wenn ein Sleeptimer aktiviert ist, können Sie jederzeit die noch ablaufende Dauer
abfragen:
Drücken Sie SLEEP. Die verbleibende Zeit wird angezeigt.
Wenn Sie den Sleeptimer abbrechen möchten, gehen Sie wie folgt vor:
Drücken Sie SLEEP.
Drücken Sie innerhalb von 5 Sekunden die Taste 0 zweimal, bis im Display
SLEEP 00 erscheint. Die Anzeige SLEEP im Display erlischt und der Sleepti-
mer ist abgeschaltet.
DE
EN
FR
NL
DK
10.5. Betriebsart wählen
Wählen Sie mit den folgenden Tasten auf der Fernbedienung oder der Taste
FUNCTION am Gerät die Betriebsart:
− TUNER: Radio
− USB: Wiedergabe von einem USB-Datenträger oder eines Tablets
− BLUETOOTH: Wiedergabe von einem externen Gerät via Bluetooth
− AUDIO IN: Wiedergabe von Audiosignalen eines externen Gerätes am
Anschluss AUDIO IN.
− LINE IN: Wiedergabe von Audiosignalen eines externen Gerätes am An-
schluss LINE IN.
− CD: Wiedergabe von CDs
23
Page 25

11. Radio
Sie können mit diesem Gerät sowohl das analoge FM-Radio, als auch das digitale
DAB-Radio empfangen
Drücken Sie die Taste FUNCTION am Gerät ein- oder mehrmals, bis im Dis-
play bis im Display FM oder DAB angezeigt wird.
alternativ
Drücken Sie die Taste FM oder DAB auf der Fernbedienung.
Wenn Sie die Wurfantenne angeschlossen haben, richten Sie die Antenne für
den optimalen Empfang aus.
HINWEIS
Das Display zeigt immer den RDS-Sendernamen an und kehrt nach einem Senderwechsel zu dieser Anzeige zurück. Um den Status beim
Speichern eines Senders oder beim Eingeben einer Radiofrequenz zu
sehen, drücken Sie mehrmals die Taste INFO im FM-Bereich auf der
Fernbedienung bis die Radiofrequenz im Display erscheint.
11.1. Sender einstellen
Drücken Sie die Tasten TUNING bzw. TUNING , um einen Sender
manuell einzustellen.
11.2. Sendersuchlauf
Halten Sie eine der Tasten TUNING bzw. TUNING länger gedrückt,
um eine automatische Sendersuche vorwärts/rückwärts durchzuführen.
11.3. Sender speichern und aufrufen
Das Radio verfügt über 40 Speicherplätze, auf denen Sie Sender ablegen können.
Um einen eingestellten Sender zu speichern, drücken Sie die Taste MEMORY
Drücken Sie die Taste TUNING bzw. TUNING und wählen Sie den
gewünschten Programmplatz aus.
Um das Speichern abzuschließen, drücken Sie die Taste ENTER.
Sie können den Sender aufrufen, indem Sie die Taste PRESET- bzw.
PRESET+ drücken und damit den gewünschten Speicherplatz auswählen.
11.4. Stereo-/Monoempfang (nur FM-Radio)
Falls der Stereoempfang schwach ist, können Sie u.U. mit der Monoeinstellung einen störungsfreieren Empfang erzielen.
Drücken Sie TUNER, um zwischen Stereo- und Monoempfang umzuschalten. Im
ST
Display erscheint bzw. verschwindet die Anzeige
24
.
Page 26

11.5. Senderinformationen
Bei einigen Sendern stehen weitere Informationen zur Verfügung. Dabei können
Senderinformationen, die Frequenz, Angaben zum aktuell laufenden Titel/Interpreten und die Empfangsstärke angezeigt werden
Drücken Sie ein- oder mehrmals die Taste INFO im FM- bzw. DAB-Bereich auf
der Fernbedienung, um weitere Informationen im Display anzuzeigen:
11.6. Scan-Funktion
Mit der Taste SCAN im Bereich FM bzw. DAB können Sie jeweils den nächsten
Sender suchen lassen. Drücken Sie die Taste erneut, um einen weiteren Sender vorzuspringen.
11.7. Intro-Funktion (nur DAB)
Drücken Sie INTRO, um einen Radiosender nur ca. 10 Sekunden abzuspielen und
dann zum nächsten Sender zu wechseln.
12. CDs und USB-Speicher wiedergeben
Drücken Sie die Taste FUNCTION am Gerät ein- oder mehrmals, bis im Dis-
play bis im Display je nach gewünschter Betriebsart
− USB oder
− CD angezeigt wird.
alternativ
Drücken Sie die Taste USB bzw. CD auf der Fernbedienung.
DE
EN
FR
NL
DK
12.1. Hinweise zu den Medien
Am USB-Anschluss USB 5V 1.5A können Sie USB-Speichersticks anschließen.
Beachten Sie folgendes:
• Aufgrund der zahlreichen verschiedenen Dateisysteme und Dateiformate kann
die Funktion von angeschlossenen Speichern nicht garantiert werden.
• Je nach Größe des Datenträgers kann es länger dauern, bis das System erkannt
wird.
• Unterstützte Dateisysteme sind FAT16 und FAT32; das unterstützte Dateiformat
ist MP3.
• Wenn der richtige Dateityp nicht vom Gerät erkannt wird, erscheint NOT
SUPPORTED im Display.
• Je nach eingelegtem Medium werden verschiedene Funktionen nicht unter-
stützt so können bei einer Audio-CD keine Ordner und keine Titelinformationen
angewählt werden.
• Externe Festplatten werden nicht unterstützt.
25
Page 27

12.2. Disk einlegen
Achten Sie darauf, dass vor dem Gerät ca. 15 cm Platz ist, damit das Diskfach beim
Ausfahren nicht behindert wird.
Drücken Sie bei eingeschaltetem Gerät die Taste
OPEN /CLOSE an der Fernbedienung.
Legen Sie eine Disk mit der beschrifteten Seite nach oben in das Diskfach ein.
Achten Sie darauf, dass die Disk mittig in der Diskvertiefung liegt, damit sie beim
Schließen nicht verklemmt.
Drücken Sie die Taste . Das Diskfach schließt sich.
Nach einigen Sekunden beginnt automatisch die Wiedergabe der Disk. Eventuell
müssen Sie / drücken, um die Wiedergabe zu starten.
oder
12.3. Wiedergabe starten/anhalten
Mit der Taste am Gerät oder im Bereich USB bzw. CD an der Fernbedie-
nung starten Sie die Wiedergabe von Titeln. Um die Wiedergabe zu unterbrechen, drücken Sie die Taste erneut. Ein weiterer Druck auf die Taste setzt die Wiedergabe fort.
12.4. Titelwahl, Schneller Rück-/Vorlauf
Drücken Sie die Taste , um zum Anfang des eines wiedergegebenen Titels
zurück zu kehren. Drücken Sie die Taste noch einmal, um zum vorigen Titel zu
springen. Mit der Taste springen Sie direkt zum nächsten Titel.
Halten Sie die Taste gedrückt, um einen schnellen Rücklauf innerhalb eines
Titels durchzuführen; mit geschieht dies vorwärts.
12.5. Direkte Titelanwahl
Drücken Sie die Tasten 0-9 auf der Fernbedienung, um einen Titel direkt anzu-
wählen. Sollte es sich bei der Titelnummer um eine mehrstellige Titelnummer
handeln, drücken Sie die Taste +10 ein- bzw. mehrmals und geben dann die Titelnummer ein.
26
Page 28

12.6. Ordneranwahl
Wenn Sie MP3-Dateien wiedergeben, können diese in verschiedenen Ordnern gespeichert sein, um einen besseren Überblick zu behalten. Sie können diese Ordner
einzeln am Gerät anwählen, um die richtigen Titel abzuspielen. Hierbei kann es sich
um Ordner und weitere Unterordner handeln. Die Ordner werden vom Gerät automatisch nummeriert.
Um einen Ordner auszuwählen, versetzen Sie das Gerät zunächst in den Ordnermodus.
Drücken Sie die Taste FOLDER-/+ auf der Fernbedienung. Im Display er-
scheint FOLD und der aktuell ausgewählte Ordner.
Wählen Sie mit FOLDER-/+ den gewünschten Ordner.
Mit den Tasten oder und können Sie nun wie beschrieben die Ti-
tel auswählen und abspielen.
12.7. Abspielreihenfolge programmieren
Mit der Programm-Funktion können Sie Ihr eigenes Musikprogramm zusammenstellen, indem Sie nur bestimmte Titel zur Wiedergabe auswählen. Die Reihenfolge,
in der die Kapitel wiedergegeben werden, können Sie dabei selbst bestimmen. Gehen Sie wie folgt vor:
Drücken Sie die Taste MEMORY.
Wählen Sie mit FOLDER-/+den gewünschten Ordner aus, in dem sich der
Titel befindet.
Drücken Sie oder und wählen Sie den gewünschten Titel.
Speichern Sie den Titel mit MEMORY.
Wiederholen Sie diese Schritte, bis alle Titel programmiert sind.
Eine programmierte Wiedergabe wird im Display mit MEM angezeigt.
Starten Sie eine programmierte Wiedergabe mit .
Sie können eine programmierte Wiedergabe wieder löschen, indem Sie drü-
cken. MEMORY CLEAR wird angezeigt und der Speicher ist gelöscht
DE
EN
FR
NL
DK
27
Page 29

12.8. Wiederholfunktion/Zufallswiedergabe
Drücken Sie die Taste REPEAT ein- oder mehrmals um die Wiederholungsmo-
di durchzuschalten. Es werden verschiedene Modi unterstützt:
− Einzelnen Titel wiederholen (REPEAT ONE/
− den aktuellen Ordner wiederholen (REPEAT FOLDER/ 1FOLD er-
scheinen im Display)
− alle Titel wiederholen (REPEAT ALL/
Ist eine Abspielreihenfolge programmiert (siehe voriges Kapitel), erscheint bei Aktivierung der Wiederholungsfunktion nur REPEAT ALL.
Drücken sie die Taste REPEAT erneut, um die Wiederholungsfunktion auszu-
schalten. Das Symbol im Display erlischt.
Drücken Sie die Taste RANDOM, um die Zufallswiedergabe ein-/auszuschal-
ten.
erscheinen im Display).
1 erscheint im Display),
12.9. Titelinformationen anzeigen
Mit der Taste MP3 INFO auf der Fernbedienung können Sie Titelinformationen
zu jedem Titel anzeigen lassen. Nacheinander werden dann Dateiname, Ordner, Titel, Künstler, Album und Titelnummer angezeigt.
28
Page 30

13. Bluetooth-Modus
Sie können mittels Bluetooth schnurlos Titel von externen Geräten (z. B. MP3 Player
oder Mobiltelefon mit Bluetooth) auf diesem Gerät wiedergeben.
Drücken Sie die Taste FUNCTION am Gerät ein- oder mehrmals, bis im Dis-
play bis im Display BLUETOOTH angezeigt wird. Alternativ drücken Sie die
Taste BT auf der Fernbedienung.
13.1. Bluetooth-Geräte koppeln
Drücken Sie die Taste /PAIR, um den Kopplungmodus zu aktivieren. Akti-
vieren Sie ebenso die Bluetooth-Funktion auf ihrem externen Gerät und führen
die einen Kopplungsvorgang durch. Lesen Sie dazu die Anleitung ihres Gerätes.
Der Name des Audio-Systems ist „MD84597“.
Sollte eine Passwortabfrage im Display des externen Gerätes erscheinen, geben
Sie als Kennziffer „8888“ ein.
Die Kopplung ist abgeschlossen und das externe Gerät kann am Audio-System
genutzt werden.
Die Wiedergabe der Titel sowie die Lautstärke und Sonderfunktionen können so-
wohl an ihrem externen Gerät als auch am Audio-System gesteuert werden. Welche
Funktionen verfügbar sind, liegt von Ihrem externen Geräte und der Software, die
Sie verwenden, ab.
Wenn Sie die Bluetooth-Übertragung beenden möchten, schalten Sie Bluetooth
am externen Gerät aus oder wechseln am Audio-System die Quelle.
13.2. Steuerung via Fernbedienung (Bereich
Bluetooth)
Möchten Sie die Titel mittels der Fernbedienung des Audio-Systems steuern, haben
Sie folgende Möglichkeiten:
• Drücken Sie die Taste VOL-/+ um die Lautstärke zu erhöhen oder zu verrin-
gern.
• Mit der Taste im Bereich BT auf der Fernbedienung starten Sie die Wieder-
gabe bzw. halten sie an.
• Mit den Tasten oder wechseln sie zum vorigen bzw. nächsten Titel
Beachten Sie, dass nicht jede Funktion mit jedem externen Endgerät verfügbar ist.
Einige Funktionen werden ggf. im Display des externen Endgerätes angezeigt.
DE
EN
FR
NL
DK
14. Wiedergabe am Anschluss LINE IN und
AUDIO IN
Schließen Sie das externe Geräte wie im Kapitel „8.5. Externes Gerät am Anschluss
LINE IN anschließen“ auf Seite 18 und „8.4. Externes Gerät am Anschluss AUDIO IN
anschließen“ auf Seite 18 an. Die Steuerung erfolgt über die externen Geräte.
29
Page 31

15. Wenn Störungen auftreten
Sollten Störungen auftreten, prüfen Sie bitte zunächst, ob Sie das Problem selbst
beheben können. Die folgende Übersicht kann Ihnen dabei helfen.
ACHTUNG!
Versuchen Sie auf keinen Fall, das Gerät selbst zu reparieren. Wenn eine Reparatur notwendig ist, wenden Sie sich
bitte an unser Service-Center oder eine andere geeignete
Fachwerkstatt.
STÖRUNG MÖGLICHE URSACHE / MASSNAHME
Keine Funktion • Falls das Gerät durch ein Gewitter, eine statische Aufla-
dung oder einen anderen externen Faktor gestört ist,
versuchen Sie folgendes Vorgehen: Ziehen Sie das Netzkabel und stecken es wieder ein.
Die Disk läuft
nicht an, obwohl
/ gedrückt ist,
oder stoppt sofort
wieder
Das Gerät reagiert
nicht auf die Fernbedienung
Kein Ton
,
• Ist die Disk mit der beschrifteten Seite nach oben eingelegt?
• Prüfen Sie, ob die Disk beschädigt ist, indem Sie eine andere Disk einlegen. Falls die Disk verschmutzt ist, wischen Sie sie mit einem weichen, trockenen Tuch von
der Mitte zum Rand vorsichtig ab.
• Es hat sich Kondenswasser gebildet; geben Sie dem Gerät ein bis zwei Stunden Zeit zum Trocknen.
• Prüfen Sie, ob die Batterien nicht verbraucht und richtig eingelegt sind. Entfernen Sie eventuelle Hindernisse
zwischen dem Infrarotsender, der Fernbedienung und
dem Sensor am Gerät.
• Sind Sie eventuell zu weit vom Gerät entfernt?
Ist eventuell die Stummschaltung MUTING eingeschal-
tet?
30
Page 32

16. Reinigung
Bevor Sie das Gerät reinigen, ziehen Sie unbedingt immer zuerst den Netzstecker.
Verwenden Sie für die Reinigung nur ein trockenes, weiches Tuch. Benutzen Sie kei-
ne chemischen Lösungs- und Reinigungsmittel, weil diese die Oberfläche und/oder
die Beschriftungen des Gerätes beschädigen können.
DE
EN
FR
17. Entsorgung
Verpackung
Ihr Gerät befindet sich zum Schutz vor Transportschäden in einer Verpackung. Verpackungen sind Rohstoffe und somit wiederverwendungsfähig oder können dem Rohstoffkreislauf zurückgeführt werden.
Gerät
Werfen Sie das Gerät am Ende seiner Lebenszeit keinesfalls in den normalen Hausmüll. Erkundigen Sie sich in Ihrer Stadt- oder Gemeindeverwaltung nach Möglichkeiten einer umwelt- und sachgerechten Entsorgung.
Batterien
Verbrauchte Batterien gehören nicht in den Hausmüll. Die Batterien
müssen bei einer Sammelstelle für Altbatterien abgegeben werden.
NL
DK
31
Page 33

18. Technische Daten
Spannung AC 220 - 240V ~ 50/60Hz
Leistungsaufnahme im Betrieb 30W
Ausgangsleistung 2 x 15W RMS
Batterien Fernbedienung 2 x 1,5V R03/LR03/AAA/Micro
UKW-Radio
Senderspeicher 20
UKW-Band 87,5 – 108MHz
DAB-Radio
Senderspeicher 20
DAB+ Frequenz 174 – 240MHz (Band III)
Bluetooth
Version 3.0
Profile A2DP v1.2, AVRCP v1.4
Klasse 2, bis zu 10 Meter Radius
Betriebsfrequenz 2.4GHz
Anschlüsse
FM-Antenne 75 Ohm
Kopfhöreranschluss (Front) 3,5-mm-Klinkenstecker
Kopfhörerausgangsspannung max. 150mV
AUDIO IN (Front) 3,5-mm-Klinkenstecker
USB-Eingang (Front) Version 2.0
USB-Ausgangsspannung DC 5V
LINE IN L/R (Rückseite) Audioeingang Cinch
Lautsprecher Impedanz 4 Ohm
1,5A
CD-Spieler
Laserleistung Laser Klasse 1
Unterstützte Formate CD-R, CD-RW, Audio-CD, MP3-CD
Bitte beachten Sie: Es gibt heute viele, zum Teil nicht standardisierte CD-Aufnahme-
verfahren und Kopierschutzverfahren, sowie unterschiedliche CD-R- und CD-RWRohlinge. Darum kann es in Einzelfällen zu Einlesefehlern oder Verzögerungen kommen. Dies ist kein Defekt des Geräts.
.
32
Page 34

19. Impressum
Copyright © 2015
Alle Rechte vorbehalten.
Diese Bedienungsanleitung ist urheberrechtlich geschützt.
Vervielfältigung in mechanischer, elektronischer und jeder an-
deren Form ohne die schriftliche Genehmigung des Herstellers
ist verboten
Das Copyright liegt bei der Firma:
Medion AG
Am Zehnthof 77
45307 Essen
Deutschland
Die Anleitung kann über die Service Hotline nachbestellt werden und steht über
das Serviceportal www.medionservice.de zum Download zur Verfügung.
Sie können auch den oben stehenden QR Code scannen und die Anleitung über das
Serviceportal auf Ihr mobiles Endgerät laden.
DE
EN
FR
NL
DK
33
Page 35

34
Page 36

Inhaltsverzeichnis
1. À propos de ce mode d'emploi ................................................................... 3
1.1. Symboles et avertissements utilisés dans ce mode d'emploi ................3
2. Utilisation conforme .................................................................................... 4
3. Informations relatives à la conformité ....................................................... 4
4. Consignes de sécurité .................................................................................. 5
4.1. Sécurité de fonctionnement ...............................................................................5
4.2. Lieu d'installation ...................................................................................................5
4.3. Réparation ................................................................................................................. 6
4.4. Température ambiante ......................................................................................... 7
4.5. Alimentation électrique ....................................................................................... 7
4.6. Lecteur CD .................................................................................................................8
4.7. Piles ..............................................................................................................................9
5. Contenu de l'emballage ............................................................................ 10
6. Vue d'ensemble de l'appareil .................................................................... 11
6.1. Vue avant .................................................................................................................11
6.2. Vue arrière ...............................................................................................................12
6.3. Écran ..........................................................................................................................13
6.4. Télécommande ......................................................................................................14
7. Préparation ................................................................................................ 16
7.1. Insertion des piles dans la télécommande ..................................................16
7.2. Installation de l'appareil .....................................................................................16
8. Raccordements .......................................................................................... 16
8.1. Raccordement des haut-parleurs....................................................................16
8.2. Raccordement d'un casque...............................................................................17
8.3. Raccordement de l'antenne ..............................................................................17
8.4. Raccordement d'un appareil externe à la prise AUDIO IN .....................18
8.5. Raccordement d'un appareil externe à la prise LINE IN ..........................18
8.6. Raccordement au secteur ..................................................................................19
9. Raccordement d'une clé USB .................................................................... 19
10. Fonctions de commande générales ......................................................... 20
10.1. Fonctions pour le son ..........................................................................................20
10.2. Heure .........................................................................................................................21
10.3. Minuterie .................................................................................................................21
10.4. Utilisation de la minuterie de sommeil .........................................................23
10.5. Sélection du mode ...............................................................................................23
DE
EN
FR
NL
DK
35
Page 37

11. Radio ........................................................................................................... 24
11.1. Réglage des stations ............................................................................................24
11.2. Recherche automatique des stations ............................................................24
11.3. Mémorisation et écoute des stations ............................................................24
11.4. Réception stéréo/mono (uniquement radio FM) ......................................24
11.5. Informations sur les stations .............................................................................25
11.6. Fonction Scan .........................................................................................................25
11.7. Fonction Intro (uniquement DAB) ..................................................................25
12. Lecture de CD et de supports USB ............................................................ 25
12.1. Remarques concernant les supports de stockage ....................................25
12.2. Insertion d'un CD ..................................................................................................26
12.3. Lancement/interruption de la lecture ...........................................................26
12.4. Sélection d'un titre, avance/retour rapide ...................................................26
12.5. Sélection directe d'un titre ................................................................................26
12.6. Sélection d'un dossier .........................................................................................26
12.7. Programmation d'un ordre de lecture ..........................................................27
12.8. Fonction de répétition/lecture aléatoire ......................................................27
12.9. Affichage d'informations sur le titre ..............................................................27
13. Mode Bluetooth ......................................................................................... 28
13.1. Couplage d'appareils Bluetooth ......................................................................28
13.2. Commande avec la télécommande (niveau Bluetooth) .........................28
14. Lecture sur la prise LINE IN et AUDIO IN .................................................. 28
15. En cas de dysfonctionnements ................................................................. 29
16. Nettoyage ................................................................................................... 30
17. Élimination ................................................................................................. 30
18. Caractéristiques techniques ..................................................................... 31
19. Mentions légales ........................................................................................ 32
36
Page 38

1. À propos de ce mode d'emploi
Lisez attentivement les consignes de sécurité avant de mettre l'appareil
en service. Tenez compte des avertissements figurant sur l'appareil et
dans le mode d'emploi.
Gardez toujours ce mode d'emploi à portée de main. Si vous vendez ou
donnez l'appareil, remettez impérativement aussi ce mode d'emploi au
nouveau propriétaire.
DE
EN
FR
NL
1.1. Symboles et avertissements utilisés dans ce
mode d'emploi
DANGER !
Avertissement d'un risque vital immédiat !
AVERTISSEMENT !
Avertissement d'un risque vital possible et/ou de
blessures graves irréversibles !
PRUDENCE !
Avertissement d'un risque possible de blessures
moyennes à légères !
REMARQUE!
Respecter les consignes pour éviter tout dommage
matériel !
Informations supplémentaires pour l'utilisation de
l'appareil !
REMARQUE!
Respecter les consignes du mode d'emploi !
DK
37
Page 39

2. Utilisation conforme
Cet appareil vous offre des possibilités d'utilisation variées :
Il vous permet d'écouter des supports audio (CD, supports de données MP3, appa-
reils USB) et de capter la radio. Vous pouvez en plus y connecter sans fil des appareils externes pour lire des données audio via Bluetooth.
L'appareil est destiné exclusivement à un usage privé et non à une utilisation industrielle/commerciale.
Veuillez noter qu'en cas d'utilisation non conforme, la garantie est annulée :
• Ne transformez pas l'appareil sans notre accord et n'utilisez pas d'appareils supplémentaires autres que ceux que nous avons nous-mêmes autorisés ou livrés.
• Utilisez uniquement des pièces de rechange et accessoires que nous avons livrés
ou autorisés.
• Tenez compte de toutes les informations contenues dans le présent mode d'emploi, en particulier des consignes de sécurité. Toute autre utilisation est considérée comme non conforme et peut entraîner des dommages corporels ou matériels.
• N'utilisez pas l'appareil dans des conditions ambiantes extrêmes.
Cet appareil n'est pas destiné à être utilisé par des personnes (y compris les enfants) dont les capacités physiques, sensorielles ou mentales sont limitées ou qui
manquent d'expérience et/ou de connaissances, sauf si elles sont surveillées par
une personne responsable de leur sécurité ou ont reçu de cette personne les instructions pour utiliser l'appareil. Surveillez les enfants afin de garantir qu'ils ne
jouent pas avec l'appareil.
3. Informations relatives à la conformité
Par la présente, la société Medion AG déclare que le produit est conforme aux exigences européennes suivantes :
• Directive CEM 2004/108/CE
• Directive «Basse tension» 2006/95/CE
• Directive RoHS 2011/65/UE
• Directive sur l'écoconception 2009/125/CE (Règlement n° 1275/2008)
38
Page 40

4. Consignes de sécurité
DE
4.1. Sécurité de fonctionnement
• Cet appareil n'est pas destiné à être utilisé par des personnes
(y compris les enfants) dont les capacités physiques, sensorielles ou mentales sont limitées ou qui manquent d'expérience et/ou de connaissances, sauf si elles sont surveillées
par une personne responsable de leur sécurité ou ont reçu de
cette personne les instructions pour utiliser l'appareil. Surveillez les enfants afin de garantir qu'ils ne jouent pas avec l'appareil.
DANGER!
Risque de suffocation!
Les films d'emballage peuvent être avalés ou utilisés
dans un autre but que celui prévu et présentent donc
un risque de suffocation !
Conserver les emballages tels que les films ou
sachets en plastique hors de la portée des enfants.
4.2. Lieu d'installation
• Gardez toujours l'appareil et tous les composants raccordés à
l'abri de l'humidité et évitez toute exposition à la poussière, la
chaleur, le rayonnement direct du soleil et les sources de feu
nues (bougies allumées ou similaire). Le non-respect de ces
consignes peut entraîner des dysfonctionnements ou un endommagement de l'appareil.
• N'utilisez jamais l'appareil en plein air, des facteurs externes
(pluie, neige, etc.) pourraient l'endommager.
• N'exposez pas l'appareil et le cordon d'alimentation à des
gouttes d'eau ou éclaboussures et ne posez aucun récipient
rempli de liquide (vase ou similaire) sur ou à proximité de l'appareil et du cordon d'alimentation. Du liquide pénétrant à
l'intérieur de l'appareil peut porter atteinte à la sécurité électrique.
EN
FR
NL
DK
39
Page 41

• Les fentes et ouvertures de l'appareil servent à son aération.
Ne recouvrez pas ces ouvertures (risque de surchauffe et d'incendie)!
• Disposez les câbles de manière à ce que personne ne puisse
marcher ou trébucher dessus.
• Si vous installez l'appareil dans un élément mural, veillez à
laisser des écarts assez grands: prévoyez une distance minimum de 10 cm tout autour de l'appareil afin de garantir une
aération suffisante.
• Placez et utilisez tous les composants sur un support stable,
plan et exempt de vibrations afin d'éviter que l'appareil ne
tombe.
4.3. Réparation
• Adressez-vous au service après-vente si:
− le cordon d'alimentation a fondu ou est endommagé,
− du liquide s'est infiltré dans l'appareil,
− l'appareil ne fonctionne pas correctement,
− l'appareil est tombé ou le boîtier, endommagé.
• Faites réparer l'appareil uniquement par un personnel qualifié.
• Si une réparation est nécessaire, adressez-vous uniquement à
l'un de nos partenaires agréés pour le SAV.
40
Page 42

4.4. Température ambiante
• Cet appareil peut être utilisé à une température ambiante de
0 à +35° C et avec une humidité relative de l'air inférieure à
80% (sans condensation).
• Lorsqu'il est éteint, l'appareil peut être stocké à une tempéra-
ture de -20° C à +60° C.
DANGER!
Risque d'électrocution!
En cas de fortes variations de température ou d'humidité, il est possible que, par condensation, de l'humidité
se forme à l'intérieur de l'appareil, pouvant provoquer
un court-circuit.
Après tout transport de l'appareil, attendez qu'il
soit à température ambiante avant de le mettre en
service.
4.5. Alimentation électrique
DANGER!
Risque d'électrocution!
Certaines pièces restent sous tension même si l'appareil
est éteint.
Pour couper votre appareil de l'alimentation en
courant et le mettre totalement hors tension, débranchez la fiche d'alimentation de la prise de courant.
• Branchez l'appareil uniquement sur une prise de terre de 100-
240 V ~ 50/60 Hz facilement accessible et située à proximité
du lieu d'installation.
DE
EN
FR
NL
DK
41
Page 43

• Pour couper l'alimentation en courant de votre appareil, débranchez la fiche d'alimentation de la prise de courant.
DANGER!
Risque d'électrocution!
Des pièces conductrices de courant se trouvent à l'intérieur de l'appareil. Ces pièces présentent un risque
d'électrocution ou d'incendie en cas de court-circuitage
accidentel.
N'ouvrez jamais le boîtier et n'introduisez aucun
objet à l'intérieur de l'appareil par les fentes et ouvertures !
• Ne posez pas d'objets sur le cordon d'alimentation, il pourrait
être endommagé.
• Prévoyez au moins un mètre de distance entre l'appareil et
les sources de brouillage hautes fréquences et magnétiques
éventuelles (téléviseur, haut-parleurs, téléphone portable,
etc.) afin d'éviter tout dysfonctionnement.
4.6. Lecteur CD
42
Le lecteur CD est un produit laser de classe 1.
L'appareil est équipé d'un système de sécurité
qui empêche la sortie de rayons laser dangereux
lors d'une utilisation normale. Pour prévenir tout
risque de blessure des yeux, prenez garde de ne
jamais manipuler ni abîmer le système de sécurité de l'appareil.
Page 44

4.7. Piles
La télécommande fonctionne avec des piles. Respectez les
consignes suivantespour une manipulation sûre des piles :
• Conservez les piles hors de la portée des enfants. En cas d'in-
gestion d'une pile, faites immédiatement appel à un médecin.
• Avant d'insérer les piles, vérifiez que les contacts de la télé-
commande et des piles sont bien propres et nettoyez-les si
nécessaire.
• Par principe, insérez uniquement des piles neuves de même
type. N'utilisez jamais simultanément une pile usée et une
pile neuve.
• Lorsque vous insérez les piles, veillez à respecter la polarité
(+/–).
• Risque d'explosion en cas de remplacement incorrect des
piles! Remplacer les piles uniquement par des piles du même
type ou de type équivalent.
• N'essayez jamais de recharger des piles! Risque d'explosion !
• Veillez à ce que les piles ne soient jamais exposées à une
source de chaleur intense (p. ex. rayons du soleil, feu, etc.).
• Stockez les piles dans un endroit frais et sec. Une forte chaleur
directe peut endommager les piles. N'exposez donc jamais la
télécommande à des sources de chaleur intense.
• Ne court-circuitez pas les piles.
• Ne jetez pas les piles au feu.
• Si les piles ont coulé, sortez-les immédiatement de la télé-
commande. Nettoyez les contacts avant d'insérer de nouvelles piles. Risque de brûlure par l'acide des piles !
• Retirez les piles de la télécommande lorsqu'elles sont vides.
• Retirez aussi les piles de la télécommande si vous n'utilisez
pas l'appareil pendant une période prolongée.
DE
EN
FR
NL
DK
43
Page 45

5. Contenu de l'emballage
Veuillez vérifier si la livraison est complète et nous informer dans un délai de quinze
jours à compter de la date d'achat si ce n'est pas le cas. Avec l'appareil que vous venez d'acheter, vous recevez:
• Micro chaîne audio
• Télécommande avec 2 piles R03/LR03/AAA/Micro de 1,5 V
• Antenne fil FM
• Câble audio (connecteur jack 3,5 mm vers 2 x Cinch)
• Cordon d'alimentation
• Documentation
DANGER!
Risque de suffocation!
Les films d'emballage peuvent être avalés ou utilisés
dans un autre but que celui prévu et présentent donc
un risque de suffocation !
Conserver les emballages tels que les films ou
sachets en plastique hors de la portée des enfants.
44
Page 46

6. Vue d'ensemble de l'appareil
DE
6.1. Vue avant
1 2
15
14
USB
5V 1.5A
1) LED de minuterie
2) Capteur infrarouge pour télécommande
3) Écran
4) Bouton de réglage du volume
5)
6) – CD/USB : titre suivant, radio : recherche des stations en avant
7) – CD/USB : titre précédent, radio : recherche des stations en arrière
8) /PAIR – CD/USB : arrêter la lecture ; Bluetooth : activer le mode
9) /– CD/USB : lancer/interrompre la lecture
10) FUNCTION – sélectionner le mode
11)
12) AUDIO IN – entrée audio
13) USB 5V
14) Tiroir CD
15)
– ouvrir/fermer le tiroir CD
Couplage
– prise casque jack 3,5 mm
1.5A – port USB
– allumer/éteindre l'appareil
3 4
PAIR
5678910111213
EN
FR
NL
DK
45
Page 47

6.2. Vue arrière
345
1) SPEAKER R – prises pour le haut-parleur droit
2) SPEAKER L – prises pour le haut-parleur gauche
3) LINE IN – entrées audio Cinch L/R
4) DAB/FM – prise d'antenne 75 Ω
5) AC INPUT – prise secteur
1
2
46
Page 48

6.3. Écran
DE
1 2 3
1819
4 5
6 7 8
91011121314151617
1819
1) USB – mode USB
2) CD – mode CD
3) MP3 – mode MP3
4) RDM – lecture aléatoire activée
5) MEM – lecture programmée activée
6) – répéter tous les titres ; 1 : répéter le titre actuel
7) – lecture interrompue/démarrée
8) : station de radio réglée ;
9) RDS – affichage d'une station de radio RDS
10) PTYI – est affiché si une station diffuse une reconnaissance de type de pro-
gramme
TP – est affiché si une station propose des informations routières
TA – est affiché si une station diffuse actuellement un flash d'informations
routières
11) SLEEP – minuterie de sommeil activée
12) TOTAL – affichage de la durée totale d'un support de données
13) DISC– signale qu'un CD est inséré
14)
15) DAILY – minuterie programmée est réglée sur «quotidien»
16) TRACK – affichage du numéro du titre
17) FILE – affichage du nom du fichier
18) ALBUM – affichage du nom de l'album
19) FOLD – affichage du dossier
20) ARTIST – affichage du nom de l'artiste
21) TITLE – affichage du titre d'un morceau
22) MUTING – désactivation du son activée
23) X-BASS – amplification des graves activée
– minuterie est programmée
FM ST
: signal stéréo de la station est capté
EN
FR
NL
DK
47
Page 49

6.4. Télécommande
1) OPEN/CLOSE – ouvrir et fermer
le tiroir CD
2) AUDIO IN – sélectionner le mode
d'entrée
3) MEMORY – touche Mémoire
4) DIMMER – régler la luminosité de
22
21
l'écran
5)
– désactivation du son
6) RANDOM – régler la lecture aléa-
toire
20
/ REPEAT – régler la fonction de
répétition
7) EQ
X-BASS – activer/désactiver am-
19
plification des graves
BASS/TREBLE – régler graves/aigus
18
17
8) /PAIR – CD/USB : arrêter la lec-
ture; Bluetooth : activer le mode
16
Couplage
/ – CD/USB : lancer et interrompre la lecture
MP3 INFO – CD/USB : affichage
d'informations sur le titre
15
9) BACK – revenir dans le menu
10) ENTER – confirmer la sélection
VOL-/+ – augmenter/réduire le
14
volume
PRESET -/+ – radio : station en
mémoire précédente/suivante
11) FOLDER + – CD/USB : dossier sui-
vant
12) BLUETOOTH – activer Bluetooth
– Bluetooth : titre précédent
– Bluetooth : titre suivant
/ – Bluetooth : lancer/interrompre la lecture
13) TUNER – sélectionner le mode Radio FM
SCAN – radio FM : lancer la recherche et la mémorisation automatiques des
stations
ST./MONO – radio FM : régler le son stéréo/mono
INFO – radio FM : commuter entre nom de la station, type de programme,
radiotexte et fréquence
ON/STAND-BY
TIMER/
SLEEP AUDIO IN
CLOCK
3
2
5
4
7
6
89
RANDOM
0
USB EQ X-BASS BASS/TREBLE
PAI R
CD MP3 INFO
SCAN
TUNING
VOL
ENTER
VOL
ST./
MONO
MENU BACK
PRESET
FOLDER FOLDER
FOLDER FOLDER
BT
DAB INTROSCAN
FM
OPEN/CLOSE
MEMORY
DIMMER
REPEAT
PRESET
INFO
INFO
123
2
3
4
5
6
7
8
9
10
11
12
13
48
Page 50

14) DAB – radio DAB : sélectionner le mode Radio DAB
SCAN – radio DAB : lancer la recherche et la mémorisation automatiques
des stations
INTRO – CD : écouter les 10 premières secondes d'un titre
INFO – radio DAB : commuter entre nom de la station, type de programme,
radiotexte et fréquence
15) FOLDER - – CD/USB : dossier précédent
16) MENU –
17) / – CD/USB : retour/avance rapide
/ – CD/USB : titre précédent/suivant
TUNING / – radio : recherche des stations en arrière/avant
18) CD – passer en mode CD
19) USB – passer en mode USB
20) Touches numériques
21) SLEEP – régler la minuterie de sommeil
22) TIMER/CLOCK – régler l'heure/la minuterie
23)
/ STAND-BY – allumer l'appareil depuis le mode Veille et le remettre en
mode Veille
DE
EN
FR
NL
DK
49
Page 51

7. Préparation
7.1. Insertion des piles dans la télécommande
Insérez les deux piles R03/LR03/AAA/Micro de 1,5 V dans la télécommande.
Ouvrez le couvercle du compartiment à piles.
Insérez les piles de manière à ce que le pôle moins des piles soit en contact avec
les ressorts.
Remettez le couvercle du compartiment à piles en place.
7.2. Installation de l'appareil
• Installez l'appareil sur une surface stable et plane. Le vernis particulièrement
agressif de certains meubles peut attaquer les pieds en caoutchouc de l'appareil.
Placez éventuellement une protection sous l'appareil.
REMARQUE !
Avant de raccorder un appareil externe, débranchez le cordon d'alimentation de la micro chaîne audio!
8. Raccordements
8.1. Raccordement des haut-parleurs
1
2
3
4
Raccordez les extrémités nues des câbles de haut-parleurs aux prises de cou-
leur correspondantes signalées. SPEAKERS R (droite) correspond à la paire de
câbles du haut-parleur droit. SPEAKERS L (gauche) correspond à la paire de
câbles du haut-parleur gauche.
Raccordez les câbles comme illustré.
50
Page 52

8.2. Raccordement d'un casque
L'appareil comporte sur la façade une prise casque de 3,5 mm.
Branchez un casque doté d'un connecteur jack 3,5 mm dans cette prise.
Si un casque est branché, les haut-parleurs sont désactivés. Le volume du casque
peut être modifié avec les touches de réglage du volume.
DE
EN
FR
AVERTISSEMENT !
Risque de dommages auditifs !
L'écoute avec un casque pendant une période prolongée à un volume élevé peut provoquer des troubles auditifs.
Avant de lancer la lecture, réglez le volume sur le
niveau le plus bas.
Lancez la lecture et augmentez le volume à un ni-
veau qui vous semble agréable.
8.3. Raccordement de l'antenne
NL
DK
Pour capter la radio, raccordez un câble d'antenne à la prise d'antenne DAB/FM de
l'appareil.
• Une antenne fil est fournie avec l'appareil. Branchez cette antenne sur l'appareil
et orientez-la de manière à obtenir la meilleure réception possible.
• Vous pouvez également utiliser un câble d'antenne murale, que vous branchez
sur la prise murale correspondante.
51
Page 53

8.4. Raccordement d'un appareil externe à la prise
AUDIO IN
L'appareil comporte sur la façade une prise de 3,5 mm portant l'inscription
AUDIO IN.
Branchez le câble de connexion doté d'un connecteur jack 3,5 mm dans cette
prise.
8.5. Raccordement d'un appareil externe à la prise
LINE IN
TV
Vous pouvez raccorder un appareil externe (p. ex. un téléviseur) pour en transférer
le son sur votre micro chaîne. Vous avez pour cela besoin d'un câble de connexion
Cinch audio.
Branchez une extrémité des connecteurs Cinch sur les prises LINE IN de
gauche et de droite.
Branchez l'autre extrémité des connecteurs Cinch sur la sortie audio de l'appareil
externe. Veillez à respecter les repères de couleur des connecteurs.
52
Page 54

8.6. Raccordement au secteur
Une fois tous les autres composants raccordés, procédez au branchement du cordon d'alimentation:
Branchez l'extrémité plate du cordon d'alimentation dans la prise AC INPUT et
l'autre extrémité du cordon dans une prise de terre réglementaire et facilement
accessible de 220 V-240 V ~ 50/60 Hz.
9. Raccordement d'une clé USB
L'appareil est équipé d'un port USB sur lequel vous pouvez brancher une clé USB. Ce
qui vous permet ensuite d'écouter des morceaux stockés sur cette clé USB. Le port
USB ne supporte pas la lecture de vidéos.
Branchez la clé USB sur le port USB 5V 1.5A.
DE
EN
FR
NL
DK
53
Page 55

10. Fonctions de commande générales
10.1. Fonctions pour le son
REMARQUE !
La description s'applique à la restitution du son sur des haut-parleurs
raccordés. Si des appareils avec propres haut-parleurs sont raccordés,
vous pouvez naturellement aussi régler le son sur ces appareils.
10.1.1. Volume
Appuyez sur la touche VOL+ de la télécommande ou tournez le bouton de ré-
glage du volume de l'appareil dans le sens des aiguilles d'une montre pour augmenter le volume.
Appuyez sur la touche VOL– de la télécommande ou tournez le bouton de ré-
glage du volume de l'appareil dans le sens contraire des aiguilles d'une montre
pour réduire le volume.
10.1.2. Désactivation du son – MUTE
Appuyez sur la touche de la télécommande pour couper complètement le
son. La mention MUTING s'affiche sur l'écran.
Appuyez sur la touche de la télécommande pour rallumer le son. La mention
MUTING disparaît de l'écran.
10.1.3. Bass/Treble
Appuyez une ou plusieurs fois sur la touche BASS/TREBLE jusqu'à ce que la
fonction souhaitée BASS ou TREBLE apparaisse sur l'écran.
Avec la touche VOL -/+, réglez la fonction Bass ou Treble.
Si la fonction X-Bass est activée, les réglages Bass/Treble sont ignorés.
10.1.4. X-Bass
La fonction X-Bass vous permet d'activer ou de désactiver l'amplification des graves
avec la télécommande.
Appuyez sur la touche X-BASS de la télécommande. La mention X-BASS
s'affiche sur l'écran. La fonction est activée.
Appuyez de nouveau sur la touche pour désactiver la fonction. La mention
X-BASS disparaît de l'écran.
Si la fonction X-Bass est activée, les réglages Bass/Treble sont ignorés.
10.1.5. Égaliseur
Appuyez une ou plusieurs fois sur la touche EQ pour afficher les différents modes
sonores FLAT, CLASSIC, ROCK et POP.
54
Page 56

10.2. Heure
DE
10.2.1. Afficher l'heure
L'heure peut être affichée aussi bien lorsque l'appareil est allumé que lorsqu'il est en
mode Veille.
Appuyez sur la touche TIMER/CLOCK. L'heure s'affiche pendant plusieurs se-
condes.
10.2.2. Régler l'heure
L'heure est réglée automatiquement par la radio DAB. Mais vous pouvez aussi la régler manuellement:
L'appareil étant allumé, appuyez sur la touche TIMER/CLOCK de la télécom-
mande.
Confirmez dans les 10 secondes qui suivent avec la touche ENTER.
Pour régler le jour, appuyez sur ou et confirmez votre sélection avec
ENTER. Les jours sont affichés au format anglais :
− MON = lundi − FRI = vendredi
− TUE = mardi − SAT = samedi
− WED = mercredi − SUN = dimanche
− THU = jeudi
Sélectionnez ensuite avec ou le format 12 (12:00 AM) ou 24 (00:00)
heures et confirmez avec ENTER.
Avec ou , sélectionnez l'heure souhaitée et confirmez avec ENTER.
Réglez ensuite les minutes avec ou . Confirmez avec ENTER.
Puis appuyez de nouveau sur la touche TIMER/CLOCK pour mémoriser le ré-
glage.
EN
FR
NL
DK
10.3. Minuterie
La minuterie vous permet de faire démarrer l'appareil à une heure définie dans un
mode défini (p. ex. DAB, CD).
L'appareil vous propose deux types de minuterie :
• La minuterie unique est affichée à l'écran avec 1 et démarre l'appareil une
seule fois à l'heure programmée pour une durée définie.
• La minuterie quotidienne est affichée à l'écran avec DAILY et démarre l'appa-
reil chaque jour à la même heure pour une durée définie.
Vous pouvez régler les deux minuteries indépendamment l'une de l'autre. Les
heures sélectionnées doivent avoir au moins 1 minute d'écart.
Pour pouvoir utiliser la fonction de minuterie, vous devez avoir réglé l'heure comme
décrit plus haut.
55
Page 57

10.3.1. Régler la minuterie
Si vous voulez démarrer une minuterie en mode TUNER ou DAB, réglez tout
d'abord la station de radio souhaitée afin que l'appareil s'allume avec la bonne station.
L'appareil étant allumé, maintenez la touche TIMER/CLOCK enfoncée pen-
dant 2 secondes.
Dans les 10 secondes qui suivent, sélectionnez avec la touche ou
− une minuterie quotidienne (DAILY) ou
− unique (ONCE).
Confirmez en appuyant sur ENTER.
Sélectionnez avec la touche ou la mention TIMER SET et confirmez
avec ENTER.
Réglez maintenant quelle source doit être utilisée. Appuyez sur ou
pour sélectionner un des modes suivants :
− CD = lecteur CD − USB = port USB
− TUNER = radio FM − AUDIO IN = prise audio IN
− DAB = radio numérique DAB − LINE IN = prise LINE IN
Puis confirmez ensuite avec ENTER.
Appuyez sur ou pour sélectionner le jour. Les jours sont affichés au
format anglais :
− MON = lundi − FRI = vendredi
− TUE = mardi − SAT = samedi
− WED = mercredi − SUN = dimanche
− THU = jeudi
Confirmez avec ENTER. ON 00:00 apparaît sur l'écran et l'heure clignote.
Appuyez sur ou pour régler le chiffre des heures pour la mise en
marche automatique de l'appareil et confirmez de nouveau avec ENTER.
L'affichage des minutes clignote. Avec ou , sélectionnez le chiffre
des minutes pour la mise en marche automatique de l'appareil et appuyez sur
ENTER.
OFF 00:00 apparaît sur l'écran et les minutes clignotent. Répétez les deux
dernières étapes et indiquez maintenant le chiffre des heures et des minutes
pour l'arrêt automatique de l'appareil. Confirmez chaque étape avec ENTER.
TIMER VOL apparaît sur l'écran et le chiffre de niveau du volume clignote. Sé-
lectionnez le volume souhaité avec VOL-/+ et confirmez avec ENTER.
Mettez l'appareil en mode Veille avec ON/STAND-BY. La LED de minuterie
s'allume.
Lorsque l'heure réglée est atteinte, l'appareil se met en marche dans le mode souhaité et s'arrête à l'heure réglée. Pendant qu'une minuterie est exécutée, clignote
sur l'écran.
56
Page 58

10.3.2. Activer/supprimer la minuterie programmée
Vous pouvez activer ou supprimer une minuterie que vous avez auparavant pro-
grammée.
L'appareil étant allumé, maintenez la touche TIMER/CLOCK enfoncée pen-
dant 2 secondes.
Avec ou , sélectionnez dans les 10 secondes qui suivent l'option
ONCE (minuterie unique) ou DAILY (minuterie quotidienne), selon la minuterie que vous voulez activer/supprimer.
Puis appuyez dans les 10 secondes qui suivent sur l'option TIMER ON (acti-
ver) ou TIMER DEL (supprimer) sur l'écran et confirmez avec ENTER.
La minuterie programmée est activée ou supprimée.
10.4. Utilisation de la minuterie de sommeil
Avec la minuterie de sommeil, l'appareil allumé s'éteint automatiquement au bout
d'une durée définie.
Appuyez en cours de fonctionnement sur la touche SLEEP.
Sélectionnez dans les 5 secondes qui suivent avec les touches numériques la du-
rée en minutes devant s'écouler jusqu'à ce que l'appareil s'éteigne. SLEEP s'af-
fiche sur l'écran.
L'appareil s'arrêtera une fois la durée réglée écoulée.
Si une minuterie de sommeil est activée, vous pouvez à tout moment vous faire affi-
cher la durée restante:
Appuyez sur SLEEP. La durée restante est affichée.
Si vous voulez interrompre la minuterie de sommeil, procédez comme suit:
Appuyez sur SLEEP.
Appuyez dans les 5 secondes qui suivent deux fois sur la touche 0 jusqu'à ce
que SLEEP 00 s'affiche sur l'écran. La mention SLEEP disparaît de l'écran et
la minuterie de sommeil est alors désactivée.
DE
EN
FR
NL
DK
10.5. Sélection du mode
Pour sélectionner le mode, utilisez les touches suivantes de la télécommande ou
la touche FUNCTION de l'appareil:
− TUNER : radio
− USB: lecture d'un support de données USB ou d'une tablette
− BLUETOOTH : lecture d'un appareil externe via Bluetooth
− AUDIO IN : restitution de signaux audio d'un appareil externe sur la prise
AUDIO IN
− LINE IN: restitution de signaux audio d'un appareil externe sur la prise
LINE IN
− CD : lecture de CD
57
Page 59

11. Radio
Cette micro chaîne audio vous permet de capter aussi bien la radio FM analogique
que la radio DAB numérique.
Appuyez sur la touche FUNCTION de l'appareil une ou plusieurs fois jusqu'à ce
que FM ou DAB s'affiche sur l'écran.
Ou, en alternative :
Appuyez sur la touche FM ou DAB de la télécommande.
Si vous avez raccordé l'antenne fil, orientez-la de manière à obtenir une récep-
tion optimale.
REMARQUE
L'écran affiche toujours le nom de la station RDS et revient à cet affichage si vous changez de station. Pour voir l'état lors de la mémorisation
d'une station ou de la saisie d'une fréquence radio, appuyez plusieurs
fois sur la touche INFO au niveau FM sur la télécommande jusqu'à ce
que la fréquence radio s'affiche sur l'écran.
11.1. Réglage des stations
Appuyez sur la touche TUNING ou TUNING pour régler une station ma-
nuellement.
11.2. Recherche automatique des stations
Maintenez la touche TUNING ou TUNING enfoncée pour exécuter une
recherche automatique des stations en avant/arrière.
11.3. Mémorisation et écoute des stations
Vous disposez de 40 emplacements mémoire sous lesquels vous pouvez mémoriser
des stations.
Pour mémoriser une station réglée, appuyez sur la touche MEMORY.
Appuyez sur la touche TUNING ou TUNING et sélectionnez l'emplace-
ment mémoire souhaité.
Pour quitter la mémorisation, appuyez sur la touche ENTER.
Vous pouvez écouter les stations mémorisées en appuyant sur la touche
PRESET- ou PRESET+ et en sélectionnant ainsi l'emplacement mémoire sou-
haité.
11.4. Réception stéréo/mono (uniquement radio FM)
Si la réception stéréo est faible, le réglage mono peut éventuellement vous permettre d'améliorer la qualité de réception.
Appuyez sur la touche TUNER pour commuter entre réception stéréo et mono. La
ST
mention
58
s'affiche sur l'écran ou disparaît.
Page 60

11.5. Informations sur les stations
Certaines stations mettent à disposition des informations supplémentaires. Il peut
s'agir d'informations sur la station, de la fréquence, d'informations sur le titre/l'artiste écouté et la puissance de réception.
Appuyez une ou plusieurs fois sur la touche INFO au niveau FM ou DAB de la
télécommande pour afficher ces informations sur l'écran.
11.6. Fonction Scan
La touche SCAN au niveau FM ou DAB vous permet de rechercher automatiquement la prochaine station disponible. Appuyez de nouveau sur cette touche pour
rechercher la station suivante.
11.7. Fonction Intro (uniquement DAB)
Appuyez sur la touche INTRO pour n'écouter une station que pendant 10 secondes puis passer automatiquement à la station suivante.
12. Lecture de CD et de supports USB
Appuyez sur la touche FUNCTION de l'appareil une ou plusieurs fois jusqu'à ce
que le mode souhaité
− USB ou
− CD s'affiche sur l'écran.
Ou, en alternative :
Appuyez sur la touche USB ou CD de la télécommande.
DE
EN
FR
NL
DK
12.1. Remarques concernant les supports de stockage
Le port USB 5V 1.5A vous permet de brancher une clé USB sur votre micro
chaîne.
Veuillez tenir compte de ce qui suit:
• En raison des nombreux systèmes de fichiers et formats de fichier différents, le
fonctionnement de supports de stockage raccordés ne peut pas être garanti.
• Selon la taille du support, le système peut mettre plus longtemps à être reconnu.
• Cette micro chaîne supporte les systèmes de fichiers FAT16 et FAT32 et le format
de fichier MP3.
• Si le type de fichier correct n'est pas reconnu par l'appareil, vous voyez s'afficher
NOT SUPPORTED.
• Avec certains supports de stockage, différentes fonctions peuvent ne pas être
supportées. Avec les CD audio par exemple, vous ne pouvez ni sélectionner un
dossier ni afficher des informations sur les titres.
• Les disques durs externes ne sont pas pris en charge.
59
Page 61

12.2. Insertion d'un CD
Veillez à laisser au moins 15cm libres devant l'appareil pour que le tiroir CD puisse
s'ouvrir sans entraves.
L'appareil étant allumé, appuyez sur la touche
télécommande.
Insérez un CD, face imprimée vers le haut, dans le tiroir CD. Vérifiez que le CD est
bien au centre afin qu'il ne se mette pas de travers lorsque le tiroir se referme.
Appuyez sur la touche . Le tiroir se referme.
Au bout de quelques secondes, la lecture du CD devrait démarrer automatiquement. Si ce n'est pas le cas, appuyez sur / pour démarrer la lecture.
ou OPEN /CLOSE de la
12.3. Lancement/interruption de la lecture
Appuyez sur la touche de l'appareil ou au niveau USB ou CD de la télé-
commande pour lancer la lecture de titres. Pour interrompre la lecture, appuyez
de nouveau sur la touche. Appuyez encore une fois sur la touche pour reprendre
la lecture.
12.4. Sélection d'un titre, avance/retour rapide
Appuyez sur la touche pour revenir au début du titre en cours de lecture.
Appuyez encore une fois sur la touche pour revenir au titre précédent. Avec la
touche , vous passez directement au titre suivant.
Maintenez la touche enfoncée pour lancer un retour rapide à l'intérieur
d'un titre et sur pour une avance rapide.
12.5. Sélection directe d'un titre
Appuyez sur les touches 0-9 de la télécommande pour sélectionner directe-
ment un titre. Pour sélectionner un numéro de titre à plusieurs chiffres, appuyez
une ou plusieurs fois sur la touche +10 puis saisissez le numéro du titre.
12.6. Sélection d'un dossier
Si vous voulez écouter des fichiers MP3, il est possible qu'à des fins de clarté, ceuxci soient archivés dans différents dossiers. Vous pouvez sélectionner chacun de ces
dossiers sur l'appareil pour écouter les bons titres. Il peut alors s'agir de dossiers et
d'autres sous-dossiers. Les dossiers sont automatiquement numérotés par l'appareil.
Pour sélectionner un dossier, mettez tout d'abord l'appareil en mode Dossier.
Appuyez sur la touche FOLDER-/+ de la télécommande. FOLD et le dossier
actuellement sélectionné s'affichent sur l'écran.
Sélectionnez le dossier souhaité avec FOLDER-/+.
Avec les touches ou et , vous pouvez maintenant sélectionner et
écouter les titres comme décrit.
60
Page 62

12.7. Programmation d'un ordre de lecture
La fonction de programmation vous permet de composer votre propre programme
musical en ne sélectionnant que certains titres devant être écoutés. Vous pouvez
déterminer vous-même l'ordre de lecture des titres. Procédez pour cela comme
suit:
Appuyez sur la touche MEMORY.
Avec FOLDER-/+, sélectionnez le dossier contenant le titre souhaité.
Appuyez sur ou et sélectionnez le titre souhaité.
Mémorisez le titre avec MEMORY.
Répétez les étapes précédentes jusqu'à ce que tous les titres aient été program-
més.
Une lecture programmée est affichée sur l'écran avec MEM.
Lancez une lecture programmée avec .
Pour supprimer à nouveau une lecture programmée, appuyez sur . MEMO-
RY CLEAR s'affiche et la mémoire est supprimée.
12.8. Fonction de répétition/lecture aléatoire
Appuyez une ou plusieurs fois sur la touche REPEAT pour faire défiler les modes
de répétition. Différents modes sont soutenus :
− répéter un seul titre (REPEAT ONE/ 1 apparaît sur l'écran),
− répéter le titre actuel (REPEAT FOLDER/
l'écran),
− répéter tous les titres (REPEAT ALL/
Si un ordre de lecture est programmé (voir chapitre précédent), seul REPEAT ALL
s'affiche lorsque vous activez la fonction de répétition.
Appuyez de nouveau sur la touche REPEAT pour désactiver la fonction de répé-
tition. L'icône disparaît de l'écran.
Appuyez sur la touche RANDOM pour activer/désactiver la lecture aléatoire.
1FOLD apparaît sur
apparaît sur l'écran).
DE
EN
FR
NL
DK
12.9. Affi chage d'informations sur le titre
Appuyez sur la touche MP3 INFO de la télécommande pour vous faire afficher
des informations sur chaque titre. Nom du fichier, dossier, titre, artiste, album et numéro du titre s'affichent successivement.
61
Page 63

13. Mode Bluetooth
Via Bluetooth, vous pouvez écouter sans fil sur cette micro chaîne des titres stockés
sur des appareils externes (p. ex. lecteur MP3 ou téléphone portable avec Bluetooth).
Appuyez sur la touche FUNCTION de l'appareil une ou plusieurs fois jusqu'à
ce que BLUETOOTH s'affiche sur l'écran. Ou vous pouvez aussi appuyer sur la
touche BT de la télécommande.
13.1. Couplage d'appareils Bluetooth
Appuyez sur la touche /PAIR pour activer le mode Couplage. Activez égale-
ment la fonction Bluetooth sur votre appareil externe et procédez au couplage.
Lisez à ce sujet le mode d'emploi de votre appareil externe. Le nom de la micro
chaîne audio est «MD84597».
Si une demande de mot de passe s'affiche sur l'écran de l'appareil externe, saisis-
sez le code «8888».
Le couplage est terminé et l'appareil externe peut maintenant être utilisé sur la
micro chaîne audio.
L'écoute des titres ainsi que le réglage du volume et les fonctions spéciales peuvent
être activés aussi bien sur votre appareil externe que sur la micro chaîne. Les fonctions disponibles dépendent de votre appareil externe et des logiciels que vous utilisez.
Si vous voulez quitter le transfert via Bluetooth, désactivez la fonction Bluetooth
sur l'appareil externe ou changez de source sur la micro chaîne audio.
13.2. Commande avec la télécommande (niveau
Bluetooth)
Pour activer les fonctions de lecture des titres au moyen de la télécommande de la
micro chaîne, vous avez les possibilités suivantes:
• Appuyez sur la touche VOL-/+ pour augmenter ou réduire le volume.
• Avec la touche au niveau BT sur la télécommande, vous lancez la lecture
ou l'interrompez.
• La touche ou vous permet de revenir au titre précédent ou de passer au
titre suivant.
Veuillez noter que chaque fonction n'est pas disponible avec chaque appareil externe. Certaines fonctions peuvent éventuellement s'afficher sur l'écran de l'appareil
externe.
14. Lecture sur la prise LINE IN et AUDIO IN
Raccordez l'appareil externe comme décrit aux chapitres «8.5. Raccordement d’un
appareil externe à la prise LINE IN» à la page 52 et «8.4. Raccordement d’un appareil externe à la prise AUDIO IN» à la page 52. La commande s'effectue sur les
appareils externes.
62
Page 64

15. En cas de dysfonctionnements
En cas de problèmes, veuillez tout d'abord vérifier si vous pouvez y remédier vousmême en vous aidant du tableau ci-dessous.
DE
EN
ATTENTION !
N'essayez en aucun cas de réparer vous-même l'appareil.
Si une réparation s'avère nécessaire, veuillez vous adresser
à notre centre de service après-vente ou à un autre atelier
spécialisé.
PROBLÈME CAUSE POSSIBLE / SOLUTION
Aucune fonction • Si le fonctionnement de l'appareil est perturbé par un
orage, une accumulation de charge statique ou un autre
facteur externe, procédez comme suit: débranchez le
cordon d'alimentation et rebranchez-le.
Le CD ne démarre
pas lorsque vous
appuyez sur /
ou bien il s'arrête
aussitôt
L'appareil ne réagit pas à la télécommande
• Avez-vous bien placé la face imprimée vers le haut?
• Vérifiez que le CD n'est pas abîmé en faisant un essai
avec un autre CD. Si le CD est sale, nettoyez-le délicatement avec un chiffon doux et sec en allant du centre
vers le bord.
• Il y a peut-être de l'eau de condensation dans l'appareil :
laissez-le sécher durant une à deux heures.
• Les piles sont éventuellement usées ou mal insérées
dans la télécommande. Retirez les éventuels obstacles
entre l'émetteur infrarouge, la télécommande et le capteur de l'appareil.
• Êtes-vous éventuellement trop loin de l'appareil?
FR
NL
DK
Pas de son
Vérifiez si la fonction de désactivation du son MUTING
n'est pas activée.
63
Page 65

16. Nettoyage
Avant de nettoyer l'appareil, débranchez impérativement la fiche d'alimentation de
la prise de courant.
Pour nettoyer l'appareil, utilisez uniquement un chiffon doux et sec. N'employez ni
solvants ni détergents chimiques qui pourraient endommager la surface et/ou les
inscriptions figurant sur l'appareil.
17. Élimination
Emballage
Cet appareil se trouve dans un emballage de protection afin d'éviter
qu'il ne soit endommagé au cours du transport. Les emballages sont des
matières premières et peuvent être recyclés ou réintégrés dans le circuit
des matières premières.
Appareil
Une fois l'appareil arrivé en fin de vie, ne le jetez en aucun cas avec les
déchets domestiques. Informez-vous auprès de votre municipalité des
possibilités de recyclage écologique et adapté.
Piles
Les piles usagées ne sont pas des déchets domestiques. Elles doivent
être déposées dans un lieu de collecte des piles usagées.
64
Page 66

18. Caractéristiques techniques
Tension AC 220 - 240 V ~ 50/60 Hz
Consommation en fonctionnement 30 W
Puissance de sortie 2 x 15 W RMS
Piles de la télécommande 2 piles R03/LR03/AAA/Micro de 1,5 V
Radio FM
Stations programmables 20
Bande FM 87,5-108 MHz
Radio DAB
Stations programmables 20
Fréquence DAB+ 174-240 MHz (bande III)
Bluetooth
Version 3.0
Profils A2DP v1.2, AVRCP v1.4
Classe 2, rayon de jusqu'à 10 mètres
Fréquence de fonctionnement 2,4 GHz
Connexions
Antenne FM 75 ohms
Prise casque (façade) Connecteur jack 3,5 mm
Tension de sortie casque 150 mV max.
AUDIO IN (façade) Connecteur jack 3,5 mm
Entrée USB (façade) Version 2.0
Tension de sortie USB DC 5 V
LINE IN L/R (arrière) Entrée audio Cinch
Haut-parleurs Impédance 4 ohms
1,5 A
DE
EN
FR
NL
DK
Lecteur CD
Puissance laser Laser de classe 1
Formats compatibles CD-R, CD-RW, CD audio, CD MP3
À noter : il existe aujourd'hui de nombreux procédés d'enregistrement sur CD et de
protection anti-copie dont certains ne sont pas encore standardisés ainsi que différents types de disques vierges CD-R et CD-RW. Des erreurs ou des ralentissements
de lecture peuvent donc se produire dans certains cas. Il ne s'agit pas d'un défaut de
l'appareil.
.
65
Page 67

19. Mentions légales
Copyright © 2015
Tous droits réservés.
Le présent mode d'emploi est protégé par le copyright.
La reproduction sous forme mécanique, électronique ou sous
toute autre forme que ce soit est interdite sans l'autorisation
préalable écrite du fabricant.
Le copyright est la propriété de la société :
Medion AG
Am Zehnthof 77
45307 Essen
Allemagne
Le mode d'emploi peut être à nouveau commandé via la hotline de service et téléchargé sur le portail de service www.medionservice.fr.
Vous pouvez aussi scanner le code QR ci-dessus et charger le mode d'emploi sur
votre terminal mobile via le portail de service.
66
Page 68

Inhaltsverzeichnis
1. About these instructions ............................................................................. 3
1.1. Warning symbols and key words used in these instructions ..................3
2. Proper use .................................................................................................... 4
3. Declaration of conformity ........................................................................... 4
4. Safety instructions ....................................................................................... 5
4.1. Operating safety ...................................................................................................... 5
4.2. Installation location .............................................................................................. 5
4.3. Repairs ........................................................................................................................ 6
4.4. Ambient temperature ..........................................................................................6
4.5. Power supply ............................................................................................................ 7
4.6. CD player .................................................................................................................... 8
4.7. Batteries ..................................................................................................................... 8
5. Package contents ......................................................................................... 9
6. Overview of the device .............................................................................. 10
6.1. Front ..........................................................................................................................10
6.2. Rear ............................................................................................................................11
6.3. Display ......................................................................................................................12
6.4. Remote control ......................................................................................................13
7. Getting started ........................................................................................... 15
7.1. Inserting the batteries in the remote control .............................................15
7.2. Setting up the device ..........................................................................................15
8. Connections ............................................................................................... 15
8.1. Connecting the loudspeakers ..........................................................................15
8.2. Connecting the headphones............................................................................16
8.3. Aerial connection ..................................................................................................16
8.4. Connecting an external device to the AUDIO IN connection ...............17
8.5. Connecting an external device to the LINE IN connection ....................17
8.6. Mains connection .................................................................................................18
9. Connecting a USB memory stick............................................................... 18
10. General operating functions ..................................................................... 19
10.1. Audio functions .....................................................................................................19
10.2. Time ...........................................................................................................................20
10.3. Timer..........................................................................................................................20
10.4. Using the sleep timer ..........................................................................................22
10.5. Select operating mode .......................................................................................22
DE
EN
FR
NL
DK
67
Page 69

11. Radio ........................................................................................................... 23
11.1. Tuning .......................................................................................................................23
11.2. Search function .....................................................................................................23
11.3. Saving and selecting stations ...........................................................................23
11.4. Stereo/mono reception (only FM radio) .......................................................23
11.5. Station information ..............................................................................................24
11.6. Scan function .........................................................................................................24
11.7. Intro function (only DAB) ...................................................................................24
12. Playback from CDs and a USB stick .......................................................... 24
12.1. Notes on the media ..............................................................................................24
12.2. Inserting a disc .......................................................................................................25
12.3. Starting/stopping playback ..............................................................................25
12.4. Track selection, fast rewind/forward..............................................................25
12.5. Direct track selection ...........................................................................................25
12.6. Folder selection .....................................................................................................25
12.7. Program the playing order of tracks ..............................................................26
12.8. Repeat function/random playback ................................................................26
12.9. Display track information ...................................................................................26
13. Bluetooth mode ......................................................................................... 27
13.1. Pairing Bluetooth devices ..................................................................................27
13.2. Using the remote control (Bluetooth section) ...........................................27
14. Playback from the LINE IN and AUDIO IN connection ............................. 27
15. Troubleshooting ........................................................................................ 28
16. Cleaning ...................................................................................................... 29
17. Disposal ...................................................................................................... 29
18. Technical data ............................................................................................ 30
19. Legal information ...................................................................................... 31
68
Page 70

1. About these instructions
Read the safety instructions carefully before using the device for the first
time. Note the warnings on the device and in the operating instructions.
Always keep the operating instructions close to hand. If you sell the device or give it away, please ensure that you also pass on these instructions.
1.1. Warning symbols and key words used in these
instructions
DANGER!
Warning of immediate mortal danger!
WARNING!
Warning of possible risk of fatal injury and/or serious
irreversible injuries!
CAUTION!
Danger of possible minor or moderate injuries!
NOTICE!
Please follow the guidelines to avoid property damage!
Additional information on using the device!
DE
EN
FR
NL
DK
NOTICE!
Please follow the guidelines in the operating instructions!
69
Page 71

2. Proper use
Your device offers a number of options for usage:
The device is intended for playing sound media (CDs, MP3 data media, USB devices),
as well as for radio reception. In addition, you can wirelessly connect external devices via Bluetooth to play back audio files.
The device is intended for private use only and not for industrial/commercial use.
Please note that we shall not be liable in cases of improper use:
• Do not modify the device without our consent and do not use any auxiliary
equipment which we have not approved or supplied.
• Use only spare parts and accessories that we have supplied or approved.
• Heed all the information in these operating instructions, especially the safety information. Any other use is deemed improper and can cause personal injury or
property damage.
• Do not use the device in extreme environmental conditions.
This device is not intended for use by people (including children) with reduced
physical, sensory or mental abilities or by those without experience and/or knowledge, unless they are supervised by a person responsible for their safety or they
have been instructed in its use by that person. Children should be supervised to ensure they do not play with this device.
3. Declaration of conformity
Medion AG hereby declares that the product conforms to the following European
requirements:
• EMC Directive 2004/108/EC
• Low Voltage Directive 2006/95/EC
• RoHS Directive 2011/65/EU.
• Ecodesign Directive 2009/125/EC (regulation 1275/2008)
70
Page 72

4. Safety instructions
DE
4.1. Operating safety
• This device is not intended for use by people (including chil-
dren) with reduced physical, sensory or mental abilities or
by those without experience and/or knowledge, unless they
are supervised by a person responsible for their safety or
they have been instructed in its use by that person. Children
should be supervised to ensure they do not play with this device.
DANGER!
Risk of suffocation!
Packaging film can be swallowed or used improperly.
Therefore, there is a risk of suffocation!
Keep packaging material such as plastic film or
plastic bags away from children.
4.2. Installation location
• Keep your device and all connected devices away from mois-
ture and avoid dust, heat, direct sunlight or naked flames
(candles or similar). Non-compliance with these instructions
can lead to faults or damage to the monitor.
• Do not use the device outdoors because external elements
such as rain, snow, etc. could damage it.
• Avoid exposing the device and the mains adapter to water
droplets or spray and do not place any liquid-filled containers
(vases or similar) on or next to the device or the mains adapter. Liquids penetrating the device may impair the electrical
safety of the product.
• The slots and openings on the device are for ventilation pur-
poses. Do not cover these openings (risk of overheating, fire
hazard)!
• Position the cable so that it cannot be stepped on or tripped
over.
EN
FR
NL
DK
71
Page 73

• Make sure that there is enough clearance from the sides of
the furniture unit. Ensure a minimum clearance of 10 cm
around the device for sufficient ventilation.
• Place and operate all the components on a stable, level and
vibration-free surface in order to prevent the device from falling down.
4.3. Repairs
• Contact customer services if:
− The power cable is burnt or damaged
− Liquid has penetrated the device
− The device is not operating correctly
− The device has been dropped, or the housing is damaged.
• Repairs to your device should only be carried out by qualified
specialists.
• If a repair must be carried out, please contact only our authorised service partner.
4.4. Ambient temperature
• The device can be operated at an ambient temperature of 0°C
to +35°C with a relative humidity of < 80% (non-condensing).
• When switched off, the device may be stored at temperatures
between -20°C bis +60°C.
DANGER!
Risk of electric shock!
Major changes in temperature or fluctuations in humidity can cause moisture to build up within the product
due to condensation – this can cause an electrical short
circuit.
After transporting the device wait until it has
reached ambient temperature before switching it
on.
72
Page 74

4.5. Power supply
DE
DANGER!
Risk of electric shock!
Even when the mains switch is off, some components
of the device are live.
In order to disconnect the power to your device or
to completely isolate it from voltage sources, disconnect the mains plug from the mains socket.
• Only operate the device from an easily accessible earthed
power socket with 100 - 240 V~, 50/60 Hz that is located near
to the device.
• To disconnect the power supply from your device, disconnect
the mains plug from the mains socket.
DANGER!
Risk of electric shock!
There are live parts inside the device. There is a risk of
electric shock or fire when there is an unintentional
short circuit of these parts.
Never open the housing and do not insert any ob-
jects into the device through the slots and openings!
• To avoid damaging the cables, do not place any objects on
them.
• Keep the device at a distance of at least one metre from
sources of high-frequency or magnetic interference (televisions, loudspeakers, mobile telephones, etc.) to avoid malfunctions and data loss.
EN
FR
NL
DK
73
Page 75

4.6. CD player
The CD player is a class 1 laser product. The device has a safety system that prevents dangerous
laser rays from escaping during normal use. To
avoid eye injuries, never tamper with or damage
the safety system of the device.
4.7. Batteries
The remote control is battery-operated. Please note the following:
• Keep batteries away from children. Seek medical attention immediately if a battery is swallowed.
• Before inserting the batteries, check that the contacts in the
device and on the batteries are clean and, if necessary, clean
them.
• Only use new batteries of the same type. Never use old and
new batteries together.
• Pay attention to the polarity (+/–) when inserting the batteries.
• There is a risk of explosion if batteries are replaced incorrectly!
Replace the batteries only with the same or equivalent type.
• Never try to recharge non-rechargeable batteries. There is a
risk of explosion!
• Never expose the batteries to excessive heat (such as direct
sunlight, fire or similar).
• Store batteries in a cool, dry place. Strong direct heat can
damage batteries. Therefore, keep the product away from
strong heat sources.
• Never short-circuit batteries.
• Never throw batteries into a fire.
74
Page 76

• Remove leaking batteries from the device immediately. Clean
the contacts before inserting a new battery. There is a risk of
skin irritations from battery acid!
• Always remove flat batteries from the device.
• If the device is not going to be used for long periods, remove
the batteries.
5. Package contents
Please check your purchase to ensure that all items are included. If anything is missing, please contact us within 14 days of purchase. The following items are supplied
with your monitor:
• Micro Audio System
• Remote control incl. batteries (2 x 1.5 V batteries R03/LR03/AAA/Micro)
• FM aerial: wire aerial
• Audio cable (3.5 mm jack to 2x cinch)
• Network connection cable
• Documentation
DANGER!
Risk of suffocation!
Packaging film can be swallowed or used improperly.
Therefore, there is a risk of suffocation!
Keep packaging material such as plastic film or
plastic bags away from children.
DE
EN
FR
NL
DK
75
Page 77

6. Overview of the device
6.1. Front
1 2
3 4
15
14
USB
5V 1.5A
PAIR
5678910111213
1) Timer display
2) IR sensor for remote control
3) Display
4) Volume control
5)
6) – CD/USB: Next track, Radio: Station search forwards
7) – CD/USB: Previous track, Radio: Station search backwards
8) /PAIR – CD/USB: Stop playback; Bluetooth: Activate pairing mode
9) /– CD/USB: Start/pause playback
10) FUNCTION – Select operating mode
11)
12) AUDIO IN – Audio input
13) USB 5V
14) Disc tray
15)
– Open/close disc compartment
– Headphone connection 3.5mm jack
1.5A – USB port
– Switch device on/off
76
Page 78

6.2. Rear
DE
1
345
1) SPEAKER R – Connections for the right-hand speaker
2) SPEAKER L – Connections for the left-hand speaker
3) LINE IN – Audio cinch inputs L/R
4) DAB/FM – Aerial connection 75 Ω
5) AC INPUT – Mains connection
2
EN
FR
NL
DK
77
Page 79

6.3. Display
1 2 3
4 5
6 7 8
1819
1819
1) USB – USB operating mode
2) CD – CD operating mode
3) MP3 – MP3 operating mode
4) RDM – Random playback activated
5) MEM – Memory playback activated
6) – Repeat all tracks; 1: Repeat current track
7) – Playback paused/started
8) Radio station set;
9) RDS – RDS radio station display
10) PTYI – Is displayed when a station issues a genre identifier;
TP – Is displayed when a station provides traffic reports;
TA – Is displayed when a station is currently broadcasting a traffic report
11) SLEEP – Sleep timer activated
12) TOTAL – Displays total duration of a data medium
13) DISC– Shows a disc is inserted
14)
15) DAILY – Configured timer is set to "daily"
16) TRACK – Displays the track number
17) FILE – Displays the file name
18) ALBUM– Displays the album for a track
19) FOLD – Displays the folder
20) ARTIST – Displays the artist for a track
21) TITLE – Displays the title of a track
22) MUTING – Mute activated
23) X-BASS – X-bass activated
– Timer is set
FM ST
Stereo signal received from radio station
91011121314151617
78
Page 80

6.4. Remote control
1) OPEN/CLOSE – Open and close
CD compartment
2) AUDIO IN – Select input mode
3) MEMORY – Memory button
4) DIMMER – Setting the display
brightness
5)
– Mute
22
21
6) RANDOM – Set random playback
/ REPEAT – Set repeat function
7) EQ
20
X-BASS – Activate/deactivate
X-bass
BASS/TREBLE – Set bass/treble
8) /PAIR – CD/USB: Stop play-
back; Bluetooth: Activate pairing
mode
/ – CD/USB: Start and pause
19
18
17
playback
MP3 INFO – CD/USB: Display
16
track information
9) BACK – Go back in menu
10) ENTER – Confirm selection
VOL-/+ – Decrease/increase volume
15
PRESET -/+ – Radio: Next/previous saved station
11) FOLDER + – CD/USB: Next folder
14
12) BLUETOOTH – Activate Bluetooth
– Bluetooth: Previous track
– Bluetooth: Next track
/ – Bluetooth: Start/stop play-
back
13) TUNER – Select FM Radio operating mode
SCAN – FM Radio: Start automatic station search and store
ST./MONO – FM Radio: Set stereo/mono sound
INFO – FM Radio:Switch between station names, program type, radio text
and frequency
14) DAB – DAB Radio: Select DAB Radio operating mode
SCAN – DAB Radio: Start automatic station search and store
INTRO – CD: Play tracks for 10 seconds
INFO – DAB Radio: Switch between station names, program type, radio text
and frequency
ON/STAND-BY
TIMER/
SLEEP AUDIO IN
CLOCK
3
2
5
4
7
0
USB EQ X-BASS BASS/TREBLE
CD MP3 INFO
MENU BACK
PRESET
FOLDER FOLDER
FOLDER FOLDER
BT
DAB INTROSCAN
FM
6
89
RANDOM
PAI R
TUNING
VOL
ENTER
VOL
ST./
SCAN
MONO
OPEN/CLOSE
MEMORY
DIMMER
REPEAT
PRESET
INFO
INFO
10
11
12
13
DE
EN
123
FR
2
NL
3
DK
4
5
6
7
8
9
79
Page 81

15) FOLDER - – CD/USB: Previous folder
16) MENU –
17) / – CD/USB: Fast forward/rewind
/ – CD/USB: Previous/next track
TUNING / – Radio: Station search backwards/forwards
18) CD – Switch to CD operating mode
19) USB – Switch to USB operating mode
20) Number buttons
21) SLEEP – Set sleep timer
22) TIMER/CLOCK – Set the clock/timer
23)
/ STAND-BY – Switch on the device from standby mode and switch back
to standby mode
80
Page 82

7. Getting started
DE
7.1. Inserting the batteries in the remote control
Insert the two 1.5 V R03/LR 03/AAA/micro batteries into the remote control.
Open the battery compartment cover.
Insert the battery so that the negative pole is placed next to the springs.
Replace the battery compartment cover.
7.2. Setting up the device
• Place the device on a sturdy, level surface. Some aggressive varnishes can cor-
rode the rubber feet on the device. If necessary, place the device on a suitable
underlay.
NOTE!
Before making a connection to an external device, unplug
the device from the mains!
8. Connections
8.1. Connecting the loudspeakers
1
EN
FR
NL
DK
2
3
4
Connect the bare ends of the speaker cables to the corresponding colour-cod-
ed sockets. SPEAKERS R (right) is for the cable pair of the right loudspeaker.
SPEAKERS L (left) is for the cable pair of the left loudspeaker.
Connect the cable as shown in the diagram.
81
Page 83

8.2. Connecting the headphones
On the front of the device you will find a 3.5mm headphone socket.
Insert headphones with a 3.5mm jack plug into the headphones connection.
When headphones are connected, the loudspeaker is disabled. Volume adjustment
is still possible to alter the headphone volume.
WARNING!
Risk of damage to your hearing!
Using headphones/earphones to listen to a device at
high volumes for an extended period can damage your
hearing.
Before pressing play, set the volume to the lowest
setting.
Start playback and increase the volume to a com-
fortable level.
8.3. Aerial connection
Connect an aerial cable to the DAB/FM aerial connection on the device to enable
radio reception.
• A wire aerial is included in the delivery. Connect the wire aerial to the device and
position it to achieve the best reception.
• Alternatively, you can connect an external aerial cable to an appropriate wall
socket.
82
Page 84

8.4. Connecting an external device to the AUDIO IN
connection
A 3.5 mm socket labelled with AUDIO IN is located on the front of the device.
Insert a connection cable with a 3.5mm jack plug into the socket.
DE
EN
FR
8.5. Connecting an external device to the LINE IN
connection
TV
You can connect an external device (e.g. a television) for audio transfer to the micro
system. To do this you require an audio cinch connecting cable.
Connect the end of the cinch plug to the left and right LINE IN connections.
Connect the other end of the cinch plug to the audio output on the external de-
vice. Pay attention to the colour coding on the plugs when doing so.
NL
DK
83
Page 85

8.6. Mains connection
Once all other components are connected, connect the mains cable.
To do so, place the flat end in the AC INPUT connection and the other end of
the cable into a properly installed 220V-240V ~ 50/60Hz safety plug which is accessible at all times.
9. Connecting a USB memory stick
USB memory sticks can be connected to the USB connection. This allows music
tracks to be played from a USB memory stick. The USB connection does not support
video playback.
Connect the USB memory stick to the USB 5V 1.5A USB port.
84
Page 86

10. General operating functions
DE
10.1. Audio functions
NOTE!
The description applies to audio output on the connected speakers.
Where devices with separate speakers are connected, you can of course
adjust the sound on those devices.
10.1.1. Volume
Press the VOL+ button on the remote control or turn the volume adjuster on
the device clockwise to increase the volume.
Press the VOL– button on the remote control or turn the volume adjuster on
the device anti-clockwise to decrease the volume.
10.1.2. Switch off sound – MUTE
Press the button on the remote control to turn the sound off completely.
MUTING will appear on the display.
Press the button on the remote control to turn the sound on again. MUT-
ING disappears from the display.
10.1.3. Bass/Treble
Press the BASS/TREBLE button once or multiple times until the desired func-
tion BASS or TREBLE appears on the display.
Use VOL -/+ to set the desired bass and treble setting.
If the X-bass function has been activated, the settings for Bass/Treble will be ignored.
EN
FR
NL
DK
10.1.4. X-bass
X-bass allows you to activate or deactivate a bass boost using the remote control.
Press the X-BASS button on the remote control. X-BASS will appear on the
display. The function is activated.
Press the button again to deactivate X-bass again. X-BASS will vanish from the
display.
If the X-bass function has been activated, the settings for Bass/Treble will be ignored.
10.1.5. Equalizer
Press the EQ button once or multiple times to call up the different sound settings
FLAT, CLASSIC, ROCK and POP.
85
Page 87

10.2. Time
10.2.1. Displaying the clock time
The time is displayed both when the device is switched on and also when it is in
standby mode.
Press the TIMER/CLOCK button. The time is displayed for a number of sec-
onds.
10.2.2. Setting clock time
The time is automatically set via the DAB radio. However, you can also set the time
manually:
Press the TIMER/CLOCK button on the remote control while the device is
switched on.
Confirm by pressing the ENTER button within 10 seconds.
In order to set the day, press or and confirm your selection with
ENTER. Days are displayed in the English format:
− MON = Monday − FRI = Friday
− TUE = Tuesday − SAT = Saturday
− WED = Wednesday − SUN = Sunday.
− THU = Thursday
Now use the or buttons to select either a 12 (12:00 AM) or 24-hour
format (00:00) and confirm with ENTER.
Use or to select the desired hour and confirm with ENTER.
Set the desired minutes with or . Confirm with ENTER.
Press the TIMER/CLOCK button again to save the setting.
10.3. Timer
The timer allows you to have the device start up in a particular mode (e.g. DAB, CD)
at a particular time.
The device offers two types of timer:
• The one-off timer is shown on the display with 1 and starts the device once
only at the set time for a specific duration.
• The daily timer is shown on the display with DAILY
at the same time for a specific duration.
You can set both timers separately. There must be an interval of at least 1 minute
between the chosen times.
To use the timer function, the time must be set as described above.
86
and starts the device daily
Page 88

10.3.1. Setting the timer
If you want to start a timer in the operating modes TUNER or DAB, set the de-
sired radio station in advance so that the device switches on with the correct station.
Hold down the TIMER/CLOCK button for 2 seconds while the device is
switched on.
Press the buttons within 10 seconds to select
− a daily (DAILY) or
− a one-off (ONCE) timer
Confirm your selection by pressing ENTER.
Use the or buttons in the option TIMER SET and confirm with
ENTER.
Now set which source should be used. Press the or buttons to select
one of the following operating modes:
− CD = CD player − USB = USB port
− TUNER = FM radio − AUDIO IN = Audio IN connection
− DAB = Digital radio DAB − LINE IN = LINE IN connection
Then confirm with ENTER.
Press or to select the day. Days are displayed in the English format:
− MON = Monday − FRI = Friday
− TUE = Tuesday − SAT = Saturday
WED = Wednesday − SUN = Sunday.
−
− THU = Thursday
Confirm with ENTER. ON 00:00 appears on the display and the hour dis-
play flashes.
Press or to set the hour at which the device should be switched on
and confirm again with ENTER.
The minute display flashes. Press or to set the minutes at which the
device should be switched on and press ENTER.
OFF 00:00 appears on the display and the hour display flashes. Repeat the
last two steps and specify the hour and minutes at which the device should be
switched off. Confirm each step with ENTER.
TIMER VOL appears on the display and the number for the volume level
flashes. Select the desired volume with VOL-/+ and then confirm with ENTER.
Switch the device to standby mode with ON/STAND-BY. The LED for the tim-
er lights up.
When the set time is reached, the device switches on in the desired operating mode
and switches off again at the set time. While the timer is active, flashes on the
display.
DE
EN
FR
NL
DK
87
Page 89

10.3.2. Enabling/deleting preset timers
You can enable or disable a previously set timer.
Hold down the TIMER/CLOCK button for 2 seconds while the device is
switched on.
Use or within 10 seconds to select the entry ONCE (one-off timer) or
DAILY (daily timer) depending on which timer you want to activate/deactivate.
Press the option TIMER ON (activate) or TIMER DEL (delete) on the display
within 10 seconds and confirm with ENTER.
The set timer is turned on or off.
10.4. Using the sleep timer
With the sleep timer, the device turns off automatically after a defined period of
time.
While the device is running, press the SLEEP button.
Use the number keys within 5 seconds to select the desired period of time in
minutes until the device should be turned off. SLEEP will appear on the display.
The device will now switch off when the set period of time expires.
When a sleep timer is activated, you can query the time remaining at any time:
Press SLEEP. The time remaining is displayed.
If you wish to cancel the sleep timer, proceed as follows:
Press SLEEP.
Press the 0 button twice within 5 seconds until SLEEP 00 appears on the
display. The SLEEP symbol disappears from the display and the sleep timer is
switched off.
10.5. Select operating mode
Choose the operating mode using the following buttons on the remote control
or the FUNCTION button on the device:
− TUNER: Radio
− USB: Playback from a USB data medium or a tablet
− BLUETOOTH: Playback from an external device via Bluetooth
− AUDIO IN: Playback of audio signals from an external device connected
to the AUDIO IN connection.
− LINE IN: Playback of audio signals from an external device connected to
the LINE IN connection.
− CD: Playback of CDs
88
Page 90

11. Radio
You can receive both analogue FM radio and also digital DAB radio with this device
Press the FUNCTION button on the device once or multiple times until FM or
DAB appears on the display.
Alternatively
Press the FM or DAB buttons on the remote control.
If you have connected a wire aerial, arrange the aerial to achieve the optimum
reception.
NOTICE
The display always shows the RDS station names and returns to this display after changing stations. To see the status when saving a station or
entering a radio frequency, press the INFO button in the FM section on
the remote control several times until the radio frequency appears on
the display.
11.1. Tuning
Press the TUNING or TUNING buttons to manually tune into a station.
11.2. Search function
Hold down the TUNING or TUNING buttons for a couple of seconds to
carry out an automatic station search forwards or backwards.
11.3. Saving and selecting stations
The radio has 40 memory spaces where you can save your favourite stations.
In order to save the station that you are tuned to, press the MEMORY button
Press the TUNING or TUNING buttons and select the desired pro-
gramme memory space.
To complete the saving process, press the ENTER button.
You can call up a station using the PRESET- or PRESET+ buttons and thus se-
lect the desired memory space.
DE
EN
FR
NL
DK
11.4. Stereo/mono reception (only FM radio)
If the stereo reception is too weak, you may be able to achieve clear reception with
the mono setting.
ST
Press TUNER to switch between stereo and mono reception.
appears from the display.
appears or dis-
89
Page 91

11.5. Station information
Some stations make additional information available. Station information, the frequency and information on the current track/artists and the reception strength can
be displayed.
Press the INFO button once or multiple times in the FM or DAB section on the
remote control in order to display further information.
11.6. Scan function
You can search for the next station with the SCAN button in the FM or DAB section.
Press the button again to skip to another station.
11.7. Intro function (only DAB)
Press the INTRO button to only play a radio station for approx. 10 seconds and
then switch to the next station.
12. Playback from CDs and a USB stick
Depending on the desired operating mode, press the FUNCTION button on
the device once or multiple times until
− USB or
− CD is displayed.
Alternatively
Press the USB or CD buttons on the remote control.
12.1. Notes on the media
USB memory sticks can be connected to the USB 5V 1.5A USB connection.
Note the following:
• Due to the numerous different file systems and file formats, the operation of
connected memories cannot be guaranteed.
• Depending on the size of the data medium, it make take time for the system to
be detected.
• Supported file systems are FAT16 and FAT32; the supported file format is MP3.
• If the correct file type is not recognised by the device, NOT SUPPORTED ap-
pears on the display.
• Different functions may not be supported depending on the inserted media. For
example, no folder and no track information can be selected for an audio CD.
• External hard discs are not supported.
90
Page 92

12.2. Inserting a disc
Make sure that there is about 15 cm of space in front of the disc compartment so
that it can open without hindrance.
With the device switched on, press the
the remote control.
Insert a disc into the disc compartment with the printed side upwards. Make
sure that you place the disc in the middle of the disc holder so that it does not
get stuck when you close the compartment.
Press the button. The disc compartment closes.
Playback of the disc starts automatically after a few seconds. You may need to press
/ to start playback.
button or OPEN /CLOSE on
12.3. Starting/stopping playback
You can start playing back tracks using the button on the device or in the
USB or CD section on the remote control. To pause playback, press the button
again. Pressing the button once more resumes playback.
12.4. Track selection, fast rewind/forward
Press the button to go back to the start of a specified track. Press the but-
ton again to skip to the previous track. The button skips straight to the next
track.
Hold down the button to fast rewind within a track or the button to
fast forward.
DE
EN
FR
NL
DK
12.5. Direct track selection
Press buttons 0-9 on the remote control to select a track directly. Where the
track number is a multi-digit track number, press the +10 button once or multi-
ple times and then enter the track number.
12.6. Folder selection
When playing back MP3 files, these may be saved in various folders for a better
overview. You can select these folders on the device individually in order to play the
correct track. This may involve folders and additional sub-folders. The folders are
numbered automatically by the device.
To select a folder, first put the device into folder mode.
Press the FOLDER-/+ button on the remote control. FOLD and the currently
selected folder will appear on the display.
Use FOLDER-/+ to select the desired folder.
You can now select the track and play it back as described using the or
and buttons.
91
Page 93

12.7. Program the playing order of tracks
The program function allows you to compile your own playlist by only selecting
specific tracks for playback. You can specify the order in which the list is played
yourself. Proceed as follows:
Press the MEMORY button.
Use FOLDER-/+ to select the desired folder in which the track is located.
Press or and select the desired track.
Save the track using MEMORY.
Repeat these steps until all tracks have been programmed.
A programmed playlist is indicated on the display with MEM.
Start the programmed playlist by pressing .
You can clear a programmed playlist again by pressing . MEMORY CLEAR
is displayed and the memory is cleared.
12.8. Repeat function/random playback
Press the REPEAT button once or multiple times to scroll through the repeat
modes. A range of different modes are supported:
− Repeat single track (REPEAT ONE/ 1 appears on the display),
− Repeat the current folder (REPEAT FOLDER/
the display)
− Repeat all tracks (REPEAT ALL/
If a playback sequence has been programmed (see previous chapter), only RE-
PEAT ALL will appear when the repeat function has been activated.
Press the REPEAT button again to switch off the repeat function. The sym-
bol disappears from the display.
Press the RANDOM button to enable/disable random playback.
appears on the display).
1FOLD appears on
12.9. Display track information
The MP3 INFO button on the remote control allows you to have track information displayed for each track. The file name, folder, track title, artist, album and track
number are displayed one after another.
92
Page 94

13. Bluetooth mode
You can play back tracks on this device wirelessly via Bluetooth from external devices (e.g. an MP3 player or mobile telephone with Bluetooth).
Press the FUNCTION button on the device once or multiple times until
BLUETOOTH appears on the display. Alternatively, press the BT button on the
remote control.
13.1. Pairing Bluetooth devices
Press the /PAIR button to activate the pairing mode. Also activate the Blue-
tooth function on your external device and carry out the pairing process. Please
refer to the instructions for your device for this process. The name of the audio
system is "MD84597".
If a password is requested on the display of the external device, enter the code
number "8888".
The pairing process is now complete and the external device can now be used
from the audio system.
Playing back tracks and controlling the volume and special functions can be carried
out both on your external device and on the audio system. The functions that are
available are dependent on your external device and the software that you use.
If you want to terminate the Bluetooth connection, switch off Bluetooth on the
external device or switch the source on the audio system.
13.2. Using the remote control (Bluetooth section)
If you want to control tracks using the remote control for the audio system, you
have the following options:
• Press the VOL-/+ button to increase or decrease the volume.
• Start or pause playback on the remote control with the button in the BT
section.
• Skip to the previous or next track with the or buttons.
Please note that not every function is available for every external end device. It is
possible that some functions will be shown on the display of the external end device.
DE
EN
FR
NL
DK
14. Playback from the LINE IN and AUDIO IN
connection
Connect the external device as described in chapters “8.5. Connecting an external
device to the LINE IN connection” on page 83 and “8.4. Connecting an external
device to the AUDIO IN connection” on page 83. Control is via the external devices.
93
Page 95

15. Troubleshooting
If errors occur, check first whether you can correct the problem yourself. The following list may help you.
ATTENTION!
Never try to repair the device yourself. Contact our service
centre or another suitable specialist workshop if a repair is
necessary.
PROBLEM POSSIBLE CAUSE/REMEDY
The device does
not work
The disc does not
play even though
/ has been
pressed, or it
stops again immediately
The device does
not respond to
the remote control
No sound
,
• If the device has been affected by a storm, static charging or other external factor, try the following procedure:
Pull out the mains cable and plug it back in.
• Is the disc inserted with the title (printed) side facing upwards?
• Check whether the disc is damaged by trying another
disc. If the disc is dirty, clean it carefully, wiping it from
the centre to the edge with a soft, dry cloth.
• If condensation has formed inside the device: leave the
player for one to two hours to dry off.
• Check whether the batteries need changing and have
been inserted correctly. Remove anything which may be
blocking the signal between the infrared transmitter on
the remote control and the device's sensor.
• Is the distance between the remote control and the
player too great?
Has the sound been switched off (MUTING)?
94
Page 96

16. Cleaning
Always disconnect the device from the mains supply before cleaning it.
Only use a dry, soft cloth to clean the device. Do not use chemical solutions or
cleaning products because these may damage the device’s surface and/or inscriptions.
DE
EN
FR
17. Disposal
Packaging
The product has been packaged to protect it from damage in transit.
Packaging materials are raw materials and can therefore be reused or recycled.
Device
At the end of its service life, the device should not be disposed of with
the household rubbish. Ask your local authority about suitable environmentally friendly disposal facilities.
Batteries
Do not dispose of used batteries in the household rubbish. Take the batteries to a collection point for used batteries.
NL
DK
95
Page 97

18. Technical data
Voltage AC 220 - 240V ~ 50/60Hz
Power consumption during operation 30W
Output power 2 x 15W RMS
Batteries for remote control 2 x 1.5V R03/LR03/AAA/Micro
FM radio
Station memory 20
FM waveband 87.5 - 108MHz
DAB Radio
Station memory 20
DAB+ frequency 174 – 240MHz (Band III)
Bluetooth
Version 3.0
Profile A2DP v1.2, AVRCP v1.4
Class 2, up to 10 meter radius
Operating frequency 2.4GHz
Connections
FM antenna 75 Ohm
Connection (front) 3.5 mm jack plug
Headphone output voltage max. 150mV
AUDIO IN (Front) 3.5 mm jack plug
USB input (front) version 2.0
USB output voltage DC 5V
LINE IN L/R (rear) Cinch audio input
Loudspeaker Impedance 4 Ohms
1.5A
CD player
Laser output Class 1 laser product
Supported formats CD-R, CD-RW, audio CD, MP3 CD
Please note: These days there are many non-standard CD recording and copy pro-
tection procedures in use and a wide range of CD-R and CD-RW discs on the market.
Therefore, there may occasionally be read errors or delays. This does not mean that
the device is faulty.
.
96
Page 98

19. Legal information
Copyright © 2015
All rights reserved.
These operating instructions are protected by copyright.
Mechanical, electronic and any other form of reproduction is
prohibited without the written permission of the manufacturer.
Copyright is owned by the company:
Medion AG
Am Zehnthof 77
45307 Essen
Germany
These operating instructions can be reordered via the Service Hotline and are also
available for download from the Service web page www.medionservice.de.
You can also scan the QR code above to download the instructions onto your mobile device from the Service website.
DE
EN
FR
NL
DK
97
Page 99

98
Page 100

Inhaltsverzeichnis
1. Over deze handleiding ................................................................................ 3
1.1. In deze handleiding gebruikte waarschuwingspictogrammen en
-woorden ...................................................................................................................3
2. Gebruik voor het beoogde doel ................................................................. 4
3. Verklaring van conformiteit ........................................................................ 4
4. Veiligheidsinstructies .................................................................................. 5
4.1. Veilige werking ........................................................................................................ 5
4.2. Plaats van opstelling .............................................................................................5
4.3. Reparatie ....................................................................................................................6
4.4. Omgevingstemperatuur ......................................................................................6
4.5. Voeding ...................................................................................................................... 7
4.6. Cd-speler ....................................................................................................................8
4.7. Batterijen....................................................................................................................8
5. Inhoud verpakking ...................................................................................... 9
6. Overzicht van het toestel ..........................................................................10
6.1. Voorkant ...................................................................................................................10
6.2. Achterkant ...............................................................................................................11
6.3. Display ......................................................................................................................12
6.4. Afstandsbediening ...............................................................................................13
7. Voorbereiding ............................................................................................ 15
7.1. Batterijen in de afstandsbediening plaatsen ..............................................15
7.2. Toestel opstellen ...................................................................................................15
8. Aansluitingen ............................................................................................. 15
8.1. Luidsprekers aansluiten ......................................................................................15
8.2. Hoofdtelefoon aansluiten ..................................................................................16
8.3. Antenneaansluiting .............................................................................................16
8.4. Extern apparaat op AUDIO IN aansluiten .....................................................17
8.5. Extern apparaat op LINE IN-ingang aansluiten ..........................................17
8.6. Netaansluiting ........................................................................................................18
9. USB-geheugenstick aansluiten ................................................................ 18
10. Algemene bedieningsfuncties .................................................................. 19
10.1. Geluidsfuncties ......................................................................................................19
10.2. Tijd ..............................................................................................................................20
10.3. Timer..........................................................................................................................20
10.4. Sleeptimer gebruiken..........................................................................................22
DE
EN
FR
NL
DK
99
 Loading...