

Page 1

1
Overview of the equipment
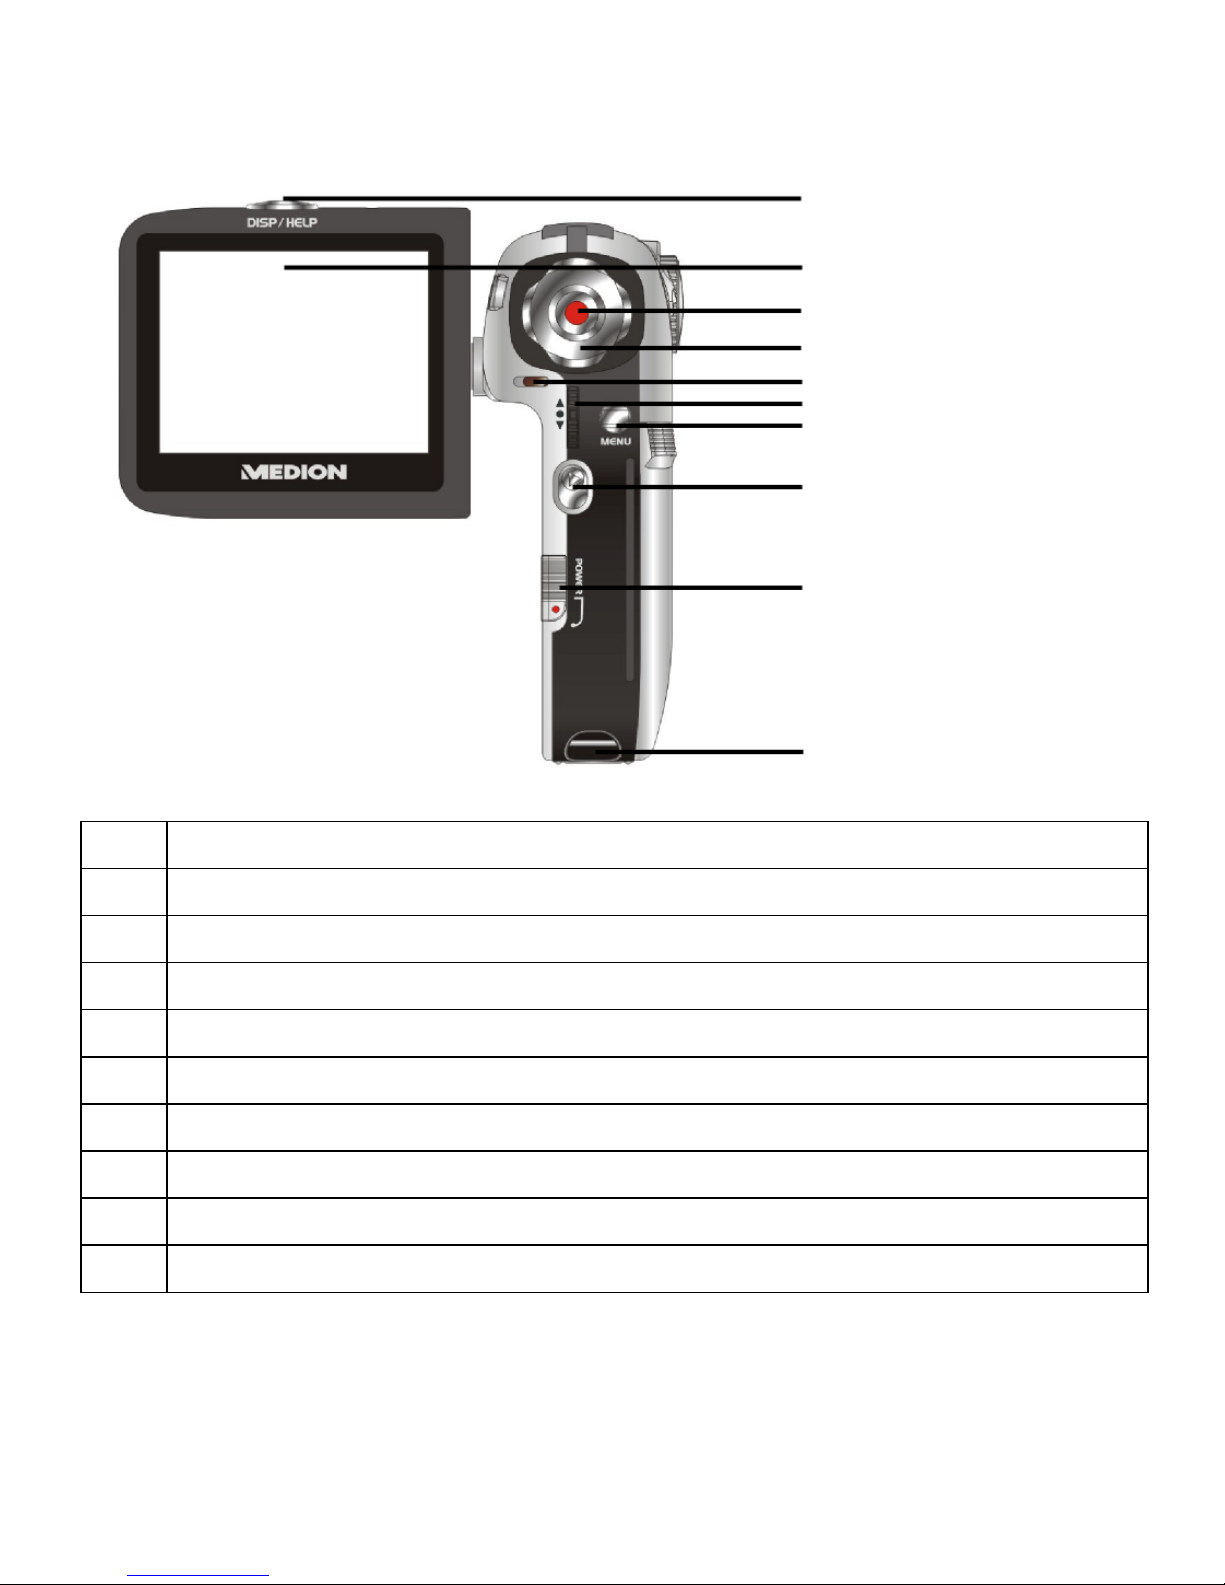
Front
1 Mode selector switch
2 Lens
3 LC display
4 Self-timer LED
5 LED
6 HDMI/USB connector casing
1
2
3
4
5
6
Page 2
2
Rear
7 Display/Help button
8 LC display
9 Shutter release
10 Navigation pad/Up/Down/Right/Left
11 Mode/Recording LED
12 Zoom/OK button
13 Menu button
14 Playback button
15 On/Off switch
16 Strap holder
7
8
9
10
11
12
13
14
15
16
Page 3

3
Upper side/underside
17 Macro switch
18 Speaker
19 Tripod socket
20 SD card compartment cover
21 Strap holder
18
19
20
21
17
Page 4

4
Contents
Overview of the equipment ...........................................................................1
Contents........................................................................................................4
Safety instructions..........................................................................................6
About these instructions.............................................................................6
Proper use ..................................................................................................6
Warnings....................................................................................................6
The Camcorder.........................................................................................10
Package contents .....................................................................................11
First steps .................................................................................................15
Adjusting the system settings ...................................................................19
Film mode ................................................................................................27
Film menu................................................................................................30
Film playback mode .................................................................................36
Film playback menu .................................................................................39
Photo mode .............................................................................................42
Photo menu .............................................................................................45
Photo playback mode...............................................................................52
Photo playback menu...............................................................................57
Audio mode .............................................................................................62
Audio playback mode...............................................................................63
Audio playback menu...............................................................................65
Underwater functions ..................................................................................68
Insert camcorder in underwater casing.....................................................68
Appliance overview in underwater casing ................................................69
Page 5

5
Installing drivers and software .....................................................................72
Technical Data .............................................................................................73
Disposal.......................................................................................................74
Page 6

6
Safety instructions
About these instructions
Read the safety instructions carefully before use. Note the
warnings on the device and in the operating instructions
Always keep the operating instructions close to hand. If you
sell the equipment or give it away, make sure you also hand
over these instructions and the guarantee card.
Proper use
The camera is intended for taking pictures in digital format. If the camera
is in the closed underwater casing, you can also take underwater
pictures.
Do not operate the camera either in extreme heat or extreme cold.
The camera is not suited to operation in extreme conditions.
The camera is for private use only and not for use in a heavy industrial
business.
Warnings
In order to avoid injury, please heed the following warnings while using
the product:
Do not trigger the flash too close to the eyes. In this case, damage can be
caused to the eyes of the person being photographed.
Keep at least 1m away from children when you are working with the
flash.
Do not place the camera strap round the neck. If the strap is placed
inadvertently around the neck there is a risk of choking.
Do not open or dismantle the camera.
Dismantling the camera constitutes a risk of high-voltage electric shock.
Page 7

7
Only expert personnel should undertake internal component tests,
modifications and repairs. Take the product to an authorised Service
Centre for testing.
If you are not going to use the camera for a period of time, remove the
batteries to prevent leakage
The camera must not be exposed to either drips or spray, unless it is in
the underwater casing. Do not place any objects filled with liquids (e.g.,
vases) on the camera.
Handling batteries
Batteries may contain combustible materials. If not properly handled,
batteries may leak, heat up intensely, ignite or even explode, which
could result in damage to your camera and your health.
Please follow the following instructions at all costs:
Keep children away from batteries.
If batteries are swallowed, consult your doctor immediately.
Never charge batteries (unless it is expressly specified).
Never empty the batteries by means of high power output.
Never short-circuit the batteries.
Never expose the batteries to excessive heat, such as from sunshine, fire
or similar.
Do not dismantle or warp the batteries.
Your hands or fingers could be injured or battery fluid could come into
contact with your eyes or skin. If this should happen, rinse the affected
parts with a large quantity of clean water and inform your doctor
immediately.
Avoid hard knocks and vibrations.
Always observe the correct polarity.
Take care to ensure that the plus (+) and minus (-) poles are correctly
inserted.
Page 8

8
Do not mix up new and old batteries or different types of battery.
This could cause your camera to malfunction. In addition, the weaker
batteries would discharge too much.
Remove used batteries from the camera immediately.
Remove the batteries from the appliance if you do not intend to use it for
a long period of time.
Immediately replace all used batteries in a camera with new batteries of
the same type.
Insulate the battery contacts with an adhesive strip, if you wish to store
or dispose of the batteries.
Safety precautions
Take the following safety precautions, in order to avoid damage to your
camera and to always keep it in perfect condition.
Store in dry conditions
The camera itself is not watertight. It may only be immersed in water if it
is inside the underwater casing supplied.
Before immersing the camera in water, ensure that the underwater
casing is tightly closed and that there is nothing jammed between the
casing cover and the rubber seal.
Keep away from damp, salt and dust.
Wipe off salt and dust with a light, damp cloth if you have been using
the camera on the beach or by the seaside. Carefully dry the camera
afterwards.
Keep away from strong magnetic fields.
Never place the camera too close to appliances which generate strong
electromagnetic fields, such as, for example, electric motors. Strong
electromagnetic fields may result in camera malfunctions or disturb the
data recording.
Avoid excessive heat
Do not use or store the camera in sunlight or at high temperatures.
Page 9

9
Stress of this kind can result in the batteries leakage or in the casing
warping.
Avoid high variations in temperature
If you take the camera from a cold environment into a warm one, or vice
versa, drops of water can form outside and inside the camera. To
prevent condensation, put the camera into the carrying case or into a
plastic bag before you subject it to a quick change of temperature.
Do not drop camera
Hard shaking caused from falling or vibrations can cause malfunctions.
Loop the carrying strap round your wrist when you carry the camera.
Do not remove batteries when data are being processed.
When image data is being recorded to memory cards or deleted,
switching off the power supply can result in data loss or damage the
internal circuit or the memory.
Treat lens and all moving parts carefully
Do not touch the lens. Be careful when handling the memory card.
These parts are not designed for high stresses.
Memory cards
Switch the power supply off, before you insert or remove the memory
card. Otherwise the memory card may become unstable. Memory cards
may become hot during use. Always remove the memory cards carefully
from the camera.
This symbol on the camera certifies that the device complies with
EU guidelines on electromagnetic interference. CE stands for
Conformité Européene (European Conformity).
Page 10

10
The Camcorder
Equipment description
The camcorder provides the following:
the functions of a digital camcorder,
of a digital camera
and of a digital device -
in one handy piece of equipment. With the enclosed underwater casing, you
can also perform the specified functions underwater, to a maximum depth of
5m.
Instead of a viewfinder, the camcorder has a high-resolution LC display,
enabling you to monitor your pictures. In addition, the LC-display is used to
show the screen menus in which you make your settings.
The Camcorder has four-times digital zoom and can take films to a maximum
resolution of HD 1280x720 and photos in 12M pixels (interpolated).
The internal memory has a usable capacity of approx. 8MB. Thus you can
also record photos or short films even if you do not have an SD card in the
camera.
The camcorder can be easily connected to a computer by USB or to a TV set
by HDMI connection.
Using an HDMI cable, connect your camcorder to a TV with a digital
connection, to watch your films recorded in HD format.
Page 11

11
Package contents
After unpacking, ensure that the following parts have been supplied:
digital HD camcorder
USB/AV cable
4 x AAA/LR03 batteries
carrying strap
carrying case
software CD
underwater casing with carrying strap
operating instructions and guarantee documents
Page 12

12
Inserting the batteries
In order to insert the four AAA/LR03 batteries supplied, you must proceed as
follows:
1. Open the battery compartment lid.
2. Insert the batteries as illustrated.
3. Close the battery compartment lid.
Always observe the correct polarity. Take care to ensure that the plus
(+) and minus (-) poles are correctly inserted, in order to avoid short
circuits.
Page 13

13
Inserting the SD/SDHC memory card
Insert the memory card as illustrated, in order to have additional available
memory space for your photos, films or audio files.
1. Open the LC-display, as shown below, and open the SD/SDHC card
compartment
2. Insert the SD/SDHC card into the card slot, as illustrated.
Make sure that the contacts are facing towards the batteries.
3. Close the card compartment as shown.
Page 14

14
DCF memory standard
The recordings on your camcorder are managed on it according to the DCF
standard (DCF= Design Rule for Camera File System). Recordings on memory
cards of other DCF camcorders can be played back on your camcorder if the
file formats on them are compatible.
Fitting carrying strap
For better handling of the camera and for safety reasons, attach the carrying
strap supplied.
While you are attaching the carrying strap, place the camera on a firm
surface, so that the camera cannot fall and be damaged.
Do not hang the camera on the carrying strap around your neck as this
could be dangerous. This particularly applies to children.
Page 15

15
First steps
Switching on the camera
Press the On/Off button, to switch the camcorder on. The ON indicator lights
up green and the display switches on.
If the camcorder does not switch on, check if the batteries are inserted
correctly.
Before you use the camcorder for the first time, you should set the desired
menu language, the current date and the current time. Both settings are
performed in Settings Mode. The following sections contain everything you
need to know regarding these procedures.
Opening the LC-display
1. Open the LC-display as shown, through 90°.
2. Now turn the display in the desired direction.
To place the camcorder into the underwater casing, rotate the LCdisplay as shown:
Page 16

16
Switching off the camera
Press the On/Off button to switch the camcorder off.
The ON indicator goes out.
The camcorder has an automatic switch-off time. The standard setting
for the switch-off time is two minutes.
If the camcorder is not used for over two minutes, it switches off. You
can increase the automatic switch-off time to five minutes or disable it
completely.
The automatic switch-off time is not enabled:
when recording audio/film clips or taking photos,
during playback,
or while the camcorder is connected to a computer.
Controls
On/Off switch Press the switch to switch the camcorder on
and off.
Menu button Press menu button to access main menu in
photo and film mode.
Mode selector
switch
Turn the mode selector switch, to switch
between photo, film or audio recording.
Navigation pad With the navigation pad, you can perform
the following settings during recording:
Set the following in photo mode:
the resolution, by pressing the
navigation pad up,
the image quality by pressing down,
the “flash” by pressing to the left or the
automatic release by pressing to the
right.
Page 17

17
Set the following in film mode:
the resolution, by pressing the
navigation pad up,
the image quality by pressing down,
the “flash” by pressing to the left or the
white balance by pressing to the right.
Select the following in playback mode:
the selected file for deletion, by
pressing the navigation pad up,
the file for blocking by pressing down
or you browse the saved files by
pressing left or right.
Shutter release Press the shutter release, to activate photo,
film or audio recording.
In photo playback mode, you can access
the miniature image view by pressing the
shutter release.
Macro switch To be able to record photos or films in close-
up, press the macro switch up
: The
macro symbol appears in the display
Playback button To enter the particular playback menu, set
the mode selector switch to the desired
mode and press the playback button.
Display/Help button Press once: all the displays are shown;
Press twice: all the displays are hidden;
Press three times: the camcorder's button
functions are performed in the particular
mode.
Page 18

18
Scroll wheel
In the film/photo mode you can “zoom
in” by scrolling up or “zoom out” by
scrolling down.
In film/speech playback mode, you can
pause playback by pressing the scroll wheel
and continue playback by pressing again.
By using “scroll up” you can raise the
volume and by using “scroll down”, you
can lower the volume.
In photo playback mode, you can zoom
into the image by using “scroll up” and
zoom out of the image by using “scroll
down”.
In setting mode, you can select the
desired menu item by scrolling up or down
and confirm by pressing the button.
Page 19

19
Switching the operating mode
Your camcorder gives you three functions in one handy device. You can
select the following modes by turning the mode selector switch:
Film mode
Photo mode
Audio mode
System settings
Adjusting the system settings
The following adjustments can be made in the system settings:
Date/time
Beep
Format
Standard setting
Memory status
Language
TV system
Auto power on
Frequency
Page 20

20
Date/time
In order to make the desired adjustments to the system settings (such as date
or time), proceed as follows:
` Switch the camcorder on.
` Turn the mode switch
to Set.
The System Settings menu (setup) appears.
` Turn the scroll wheel until the “Date/Time” entry is highlighted and
confirm by pressing the scroll wheel.
The Date/Time window appears in the top right of the display.
` Press the Right/Left navigation pad to reach the desired field
(year/month/day/hour/minute/second). Set the desired data by pressing
the Up/Down navigation pad.
` Press the scroll wheel to make the changes.
Page 21

21
Beep
To enable or disable the key tone, proceed as follows:
` Turn the scroll wheel until the “Beep” entry is highlighted and confirm by
pressing the scroll wheel.
The selection window with On/Off appears.
` By pressing the Up/Down navigation pad, select the desired setting and
confirm the change by pressing the scroll wheel.
Page 22

22
Format
To format the inserted memory card, proceed as follows:
` Turn the scroll wheel until the “Format” entry is highlighted and confirm
by pressing the scroll wheel.
The selection window with OK/Cancel appears.
` By pressing the Up/Down navigation pad, select the desired setting and
confirm the change by pressing the scroll wheel.
CAUTION!
If you format the memory, all the data saved in it is deleted.
Make sure that there is no important data left in the memory or on
the SD card.
Page 23

23
Default settings
To reset your camcorder to the factory settings, proceed as follows:
` Turn the scroll wheel until the “Standard” entry is highlighted and
confirm by pressing the scroll wheel.
The selection window with OK/Cancel appears.
` By pressing the Up/Down navigation pad, select the desired setting and
confirm the change by pressing the scroll wheel.
Memory status
To see your camcorder's memory status, proceed as follows:
` Turn the scroll wheel until the “Memory status” entry is highlighted and
confirm by pressing the scroll wheel.
The information window appears and shows you the memory space
occupied by image, photo or audio files.
` By pressing the scroll wheel, leave the memory status menu and go back
to the system settings.
Page 24

24
Language
Proceed as follows to set the desired language:
` Turn the scroll wheel until the “Language” entry is highlighted and
confirm by pressing the scroll wheel.
The selection window with the languages appears.
` By pressing the Up/Down navigation pad, select the desired setting and
confirm the change by pressing the scroll wheel.
TV system
To set your camcorder to your particular TV system, proceed as follows:
` Turn the scroll wheel until the “TV system” entry is highlighted and
confirm by pressing the scroll wheel.
The selection window with Ntsc/PAL appears.
` By pressing the Up/Down navigation pad, select the desired setting and
confirm the change by pressing the scroll wheel.
Page 25

25
Auto power off
To set your camcorder's switch-off time when it is inactive, proceed as
follows:
` Turn the scroll wheel until the “Auto power” entry is highlighted and
confirm by pressing the scroll wheel.
The selection window with off/2minutes/5 minutes appears.
` By pressing the Up/Down navigation pad, select the desired setting and
confirm the change by pressing the scroll wheel.
Page 26

26
Frequency
Proceed as follows to set the desired image frequency:
` Turn the scroll wheel until the “Frequency” entry is highlighted and
confirm by pressing the scroll wheel.
The selection window with 60Hz/50Hz appears.
` By pressing the Up/Down navigation pad, select the desired setting and
confirm the change by pressing the scroll wheel.
Page 27

27
Film mode
Proceed as follows to switch on film mode:
` Switch the camcorder on.
` Turn the mode selector switch
to film mode ( ).
Display in film mode
The following display information is shown in film mode:
1 Film mode enabled
2 Current resolution; (VGA, D1 or HD)
3 Zoom display; (0.0 – 4.0 max. digital zoom)
4 Miniature image display
5 White balance display
6
Memory status;
: Memory card inserted; : no memory card,
internalmemory in use
7 Number of films saved
8 “Flash” LED enabled.
9 Battery status
10 Macro mode enabled
Page 28

28
Recording films
To record films with your camcorder, proceed as follows:
` By turning the scroll wheel up/down, select the desired detail.
` Press the shutter release to start recording.
The operating LED lights up red.
now lights up in the display and the minutes recorded are displayed.
` Press the scroll wheel to pause recording.
` In order to stop recording, press the shutter release again.
The maximum file size per film is 4GB.
The recording length is determined by resolution and image
quality.
The higher the film's resolution and quality, the larger the file and
the less remaining memory space available.
Macro function
In order to record subjects at a distance of 15-16 cm, proceed as follows:
` Push the macro switch
to lights up in the display.
Macro mode is now enabled.
` To disable the macro switch, push it to .
Page 29

29
Quick configuration
Your camcorder provides you with the opportunity of reacting to unforeseen
events, using the “quick configuration”.
You can change the following settings during recording:
` Press the Up navigation pad, in order to switch between the VGA, D1 and
HD resolutions.
` Press the Down navigation pad, to change the image quality.
` Press the Left navigation pad, to enable the "Flash" LED.
` Press the Right navigation pad, to change the white balance.
` Firstly, press the scroll wheel down, then turn the Up/Down scroll wheel,
in order to make a correction to the lighting.
` Turn the Up scroll wheel, to enlarge the detail.
` Turn the Down scroll wheel, to reduce the detail.
If you wish to underlight your subject artificially, select a setting from the
minus range.
If you wish to overlight your subject artificially, select a setting from the plus
range.
Page 30

30
Film menu
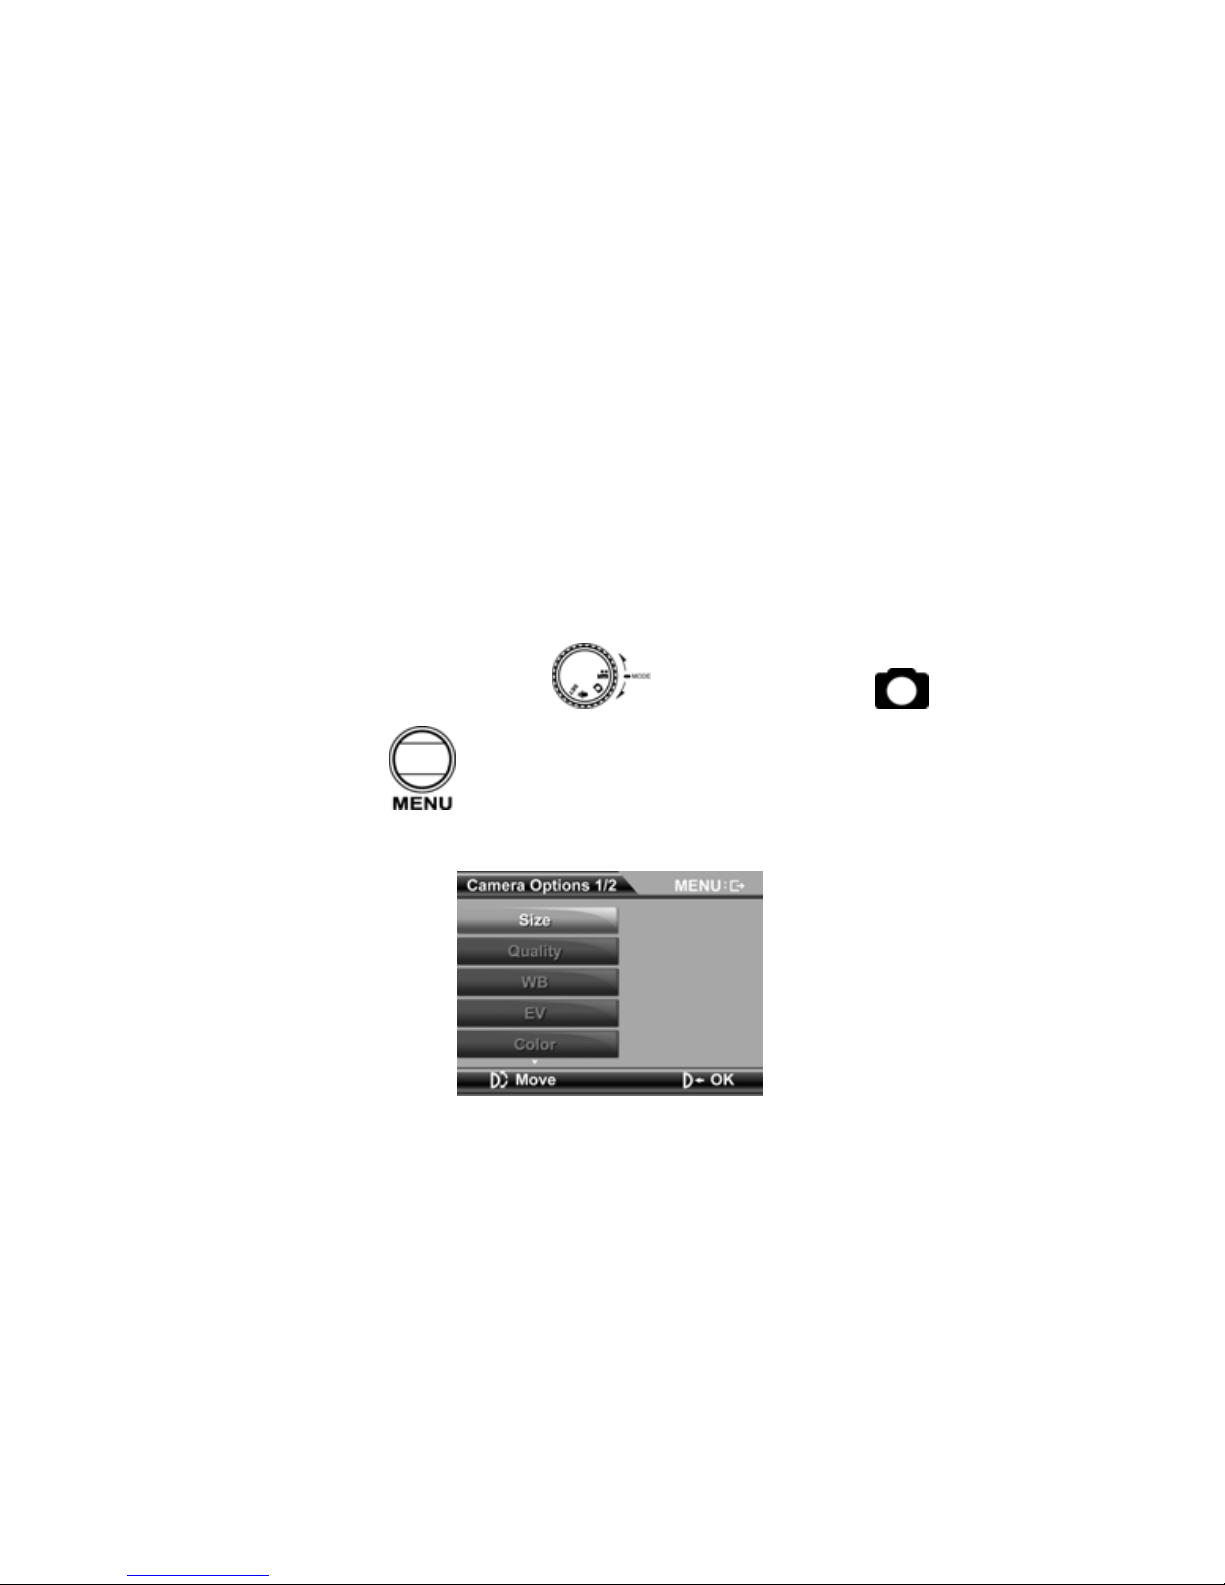
The following settings may be performed in the film menu:
Size
Quality
White balance
Exposure value
Colour
To access the film menu, please do the following:
` Switch the camcorder on.
` Turn the mode selector switch
to film mode ( ).
` Press the “MENU” button
.
To perform the desired settings before recording, proceed as follows:
Page 31

31
Size
To change the resolution of your films, proceed as follows:
` Turn the scroll wheel until the “Size” entry is highlighted and confirm by
pressing the scroll wheel.
The selection window with VGA/D1 and HD appears.
` By pressing the Up/Down navigation pad, select the desired setting and
confirm the change by pressing the scroll wheel.
Page 32

32
Quality
Proceed as follows to set the desired image frequency:
` Turn the scroll wheel until the “Quality” entry is highlighted and confirm
by pressing the scroll wheel.
The selection window with Fine/Normal appears.
` By pressing the Up/Down navigation pad, select the desired image quality
and confirm the change by pressing the scroll wheel.
Page 33

33
White balance
To change the desired white balance, please proceed as follows:
` Turn the scroll wheel until the “White balance” entry is highlighted and
confirm by pressing the scroll wheel.
The selection window with auto/sunny/cloudy/light bulb or fluorescent
appears.
` By pressing the Up/Down navigation pad, select the desired white
balance and confirm the change by pressing the scroll wheel.
Page 34

34
Lighting value/EV
To change the desired lighting value, please proceed as follows:
` Turn the scroll wheel until the “EV” entry is highlighted and confirm by
pressing the scroll wheel.
The selection window with a scale of +2 EV to – 2 EV appears.
` By pressing the Up/Down navigation pad, select the desired setting and
confirm the change by pressing the scroll wheel.
If you wish to underlight your subject artificially, select a setting from the
minus range.
If you wish to overlight your subject artificially, select a setting from the plus
range.
Page 35

35
Colour
To change the desired colour effect for the shot, proceed as follows:
` Turn the scroll wheel until the “Colour” entry is highlighted and confirm
by pressing the scroll wheel.
The selection window with the possible colour effects - normal/B/W/sepia appears.
` By pressing the Up/Down navigation pad, select the desired setting and
confirm the change by pressing the scroll wheel.
Normal No image effect
B/W The image is shown in black and white
sepia The image is shown in nostalgic brown tones.
Press the Menu button
, to quit the Film menu and return to Film
mode.
Page 36

36
Film playback mode
Proceed as follows to enable the film playback mode:
` Switch the camcorder on.
` Turn the mode selector switch
to film mode ( ).
` Press the button.
Display in film playback mode
The following display information is shown in film playback mode:
1 Playback mode enabled
2 Shows the number of the current shot and the total number of films.
3 Volume
4 Battery status
5 HOLD; file is blocked
Page 37

37
Blocking films
To protect films from being deleted accidentally, proceed as follows:
` By pressing the Right/Left navigation pad, select the film to be blocked.
` Press the Down navigation pad to block the selected film.
now appears in the display:
Unblock films
Proceed as follows to unblock individual films:
` By pressing the Right/Left navigation pad, select the blocked film.
` Press the Down navigation pad to unblock the selected film.
The block is cancelled and the film can now be deleted.
Delete photos
Proceed as follows to delete individual photos:
` By pressing the Right/Left navigation pad, select the film to be deleted.
` Press the Up navigation pad to delete the selected film.
` Answer the confirmation query by going to Delete, by pressing on the Up
navigation pad, and then confirming by pressing the scroll wheel.
If the inserted SD card is blocked, appears in the display. It is not
possible for the camcorder to delete files from a protected SD card.
If the photos to be deleted have deletion protection (blocking), you
must remove the latter before the deletion process.
Playing back films
To play back films with your camcorder, proceed as follows:
` With the Right/Left navigation pad, select the film which you want to
watch.
Page 38

38
` Press the shutter release to start playback.
` Turn the Up scroll wheel to increase the volume.
` Turn the Down scroll wheel, to lower the volume.
` Press the scroll wheel to pause playback.
` Press the shutter release to end playback.
Playing back films on an external TV
In order to view your films in HD quality on an HD Ready or Full HD TV,
proceed as follows:
` Open the HDMI/Mini-USB cover.
` Connect the small end of the supplied HDMI cable to the camcorder.
` Connect the other end of the HDMI cable to an HDMI input socket on
your television set.
` Now switch both devices on.
The camcorder LC-display is disabled and playback is via the connected
television set.
To watch your films on a conventional television set, proceed as follows:
` Open the HDMI/MINI-USB cover.
` Connect the supplied AV cable to the AV output of your camcorder.
` Connect the white and yellow plugs of your TV cable, as shown below, to
the correct sockets on your TV set.
The camcorder LC-display is disabled and playback is via the connected
television set.
Page 39

39
Film playback menu
The following settings may be performed in the film playback menu:
Delete all Invert selection
To access the film playback menu, please do the following:
` Switch the camcorder on.
` Turn the mode selector switch
to film mode ( ).
` Press the Playback button.
` Press the “MENU”
key.
Page 40

40
Delete all
To delete all the saved films, proceed as follows:
` Turn the scroll wheel until the “Delete all” entry is highlighted and
confirm by pressing the scroll wheel.
The selection window with OK and Cancel appears.
` By pressing the Up/Down navigation pad, select OK and confirm by
pressing on the scroll wheel, to delete all the blocked films.
CAUTION!
If you format the memory, all the data saved in it is deleted.
Make sure that there is no important data left in the memory or on
the SD card.
Page 41

41
Invert selection
Proceed as follows to unblock all the blocked films simultaneously:
` Turn the scroll wheel until the “Invert selection” entry is highlighted and
confirm by pressing the scroll wheel.
The selection window with OK and Cancel appears.
` By pressing the Up/Down navigation pad, select the desired setting and
confirm the change by pressing the scroll wheel.
Press the Menu
button, to quit the Film menu and return to Film
playback mode.
Page 42

42
Photo mode
Proceed as follows, to enable the photo mode:
` Switch the camcorder on.
` Turn the mode selector switch
to photo mode ( ).
Display in photo mode
The following display information is shown in photo mode:
1 Photo mode enabled
2 Current resolution; 1M, 3M, 5M and 12M
3 Zoom display; (0.0 – 4.0 max. digital zoom)
4 Miniature image display
5 White balance display
6
Memory status;
: Memory card insered, internal Memory in use
7 Number of films saved
8 “Flash” LED enabled.
9 Battery status
10 Macro mode enabled
11 Self-timer enabled
Page 43

43
Taking photos
To take photos with your camcorder, proceed as follows:
` By turning the scroll wheel up/down, select the desired detail.
` Press the shutter release to start recording.
The number of the photos taken now lights up in the display.
Macro function
In order to record subjects at a distance of 15-16 cm, proceed as follows:
` Push the macro switch
to .
lights up in the display. Macro mode is now enabled.
` To disable the macro switch, push it to .
Page 44

44
Quick configuration
Your camcorder provides you with the opportunity of reacting to unforeseen
events, using the “quick configuration”.
You can change the following settings during recording:
` Press the Up navigation pad, in order to switch between the 1M, 3M, 5M
und 12M (interpolated) resolutions.
` Press the Down navigation pad, to change the image quality.
` Press the Left navigation pad, to enable the "Flash" LED.
` Press the Right navigation pad, to switch the automatic release to 10 sec.,
20 sec. or to “Off”. Press the shutter release to start the automatic release
countdown.
` Firstly, press the scroll wheel down, then turn the Up/Down scroll wheel,
in order to make a correction to the lighting.
` Turn the Up scroll wheel, to enlarge the detail.
` Turn the Down scroll wheel, to reduce the detail.
If you wish to underlight your subject artificially, select a setting from the
minus range.
If you wish to overlight your subject artificially, select a setting from the plus
range.
Page 45
45
Photo menu
The following settings may be performed in the photo menu:
Size
Quality
White balance
Exposure value
Colour
Self-timer
Date stamp
To perform the desired settings before recording, proceed as follows:
Size
To perform the desired settings before recording, proceed as follows:
` Switch the camcorder on.
` Turn the mode selector switch
to photo mode ( ).
` Press the “MENU”
button.
The photo menu appears.
` Turn the scroll wheel until the “Size” entry is highlighted and confirm by
pressing the scroll wheel.
The selection window with 1 megapixel, 3 megapixels, 5 megapixels and 12
megapixels appears.
Page 46

46
` By pressing the Up/Down navigation pad, select the desired setting and
confirm the change by pressing the scroll wheel.
Quality
Proceed as follows to set the desired image frequency:
` Turn the scroll wheel until the “Quality” entry is highlighted and confirm
by pressing the scroll wheel.
The selection window with Fine/Normal appears.
` By pressing the Up/Down navigation pad, select the desired setting and
confirm the change by pressing the scroll wheel.
Page 47

47
White balance
To change the desired white balance, please proceed as follows:
` Turn the scroll wheel until the “White balance” entry is highlighted and
confirm by pressing the scroll wheel.
The selection window with auto/sunny/cloudy/light bulb or fluorescent
appears.
` By pressing the Up/Down navigation pad, select the desired setting and
confirm the change by pressing the scroll wheel.
Page 48

48
Lighting value/EV
To change the desired lighting value, please proceed as follows:
` Turn the scroll wheel until the “EV” entry is highlighted and confirm by
pressing the scroll wheel.
The selection window with a scale of +2 EV to – 2 EV appears.
` By pressing the Up/Down navigation pad, select the desired setting and
confirm the change by pressing the scroll wheel.
Page 49

49
Colour
To change the desired colour effect for the shot, proceed as follows:
` Turn the scroll wheel until the “Colour” entry is highlighted and confirm
by pressing the scroll wheel.
The selection window with the possible colour effects - normal/B/W/sepia appears.
` By pressing the Up/Down navigation pad, select the desired setting and
confirm the change by pressing the scroll wheel.
Normal No image effect
B/W The image is shown in black and white
sepia The image is shown in nostalgic brown tones.
Page 50

50
Self-timer
Proceed as follows to set the timer release time:
` Turn the scroll wheel until the “Self-timer” entry is highlighted and
confirm by pressing the scroll wheel.
The selection window with the possible timers - 10 seconds, 20 seconds and
“Off” -appears.
` By pressing the Up/Down navigation pad, select the desired setting and
confirm the change by pressing the scroll wheel.
To enable automatic release, quit the menu by pressing the Menu
button.
appears in the display:
` Now start the self-timer by pressing the shutter release.
Page 51

51
Date stamp
To put a date stamp on the photos during shooting, proceed as follows:
` Turn the scroll wheel until the “Date stamp” entry is highlighted and
confirm by pressing the scroll wheel.
The selection window with OK and Cancel appears.
` By pressing the Up/Down navigation pad, select the desired setting and
confirm the change by pressing the scroll wheel.
Press the Menu
button, to quit the photo menu and access photo
mode.
Page 52

52
Photo playback mode
Proceed as follows to enable photo playback mode:
` Switch the camcorder on.
` Turn the mode selector switch
to photo mode ( ).
` Press the Playback button.
Display in photo playback mode
The following display information is shown in photo playback mode:
1 Battery status
2 HOLD; file is blocked
3 Playback mode enabled
4 Shows the number of the current shot and the total number of photos.
Page 53

53
Blocking photos
To protect individual photos from being deleted accidentally, proceed as
follows:
` By pressing the Right/Left navigation pad, select the photo to be blocked.
` Press the Down navigation pad to block the selected photo.
now appears in the display:
Unblocking photos
Proceed as follows to unblock individual photos:
` By pressing the Right/Left navigation pad, select the blocked photo.
` Press the Down navigation pad to unblock the selected photo.
The block is cancelled and the film can now be deleted.
Page 54

54
Delete photos
Proceed as follows to delete individual photos:
` By pressing the Right/Left navigation pad, select the photo to be deleted.
` Press the Up navigation pad to unblock the selected photo.
` Answer the confirmation query by going to Delete, by pressing on the Up
navigation pad, and then confirming by pressing the scroll wheel.
If the inserted SD card is blocked, appears in the display. It is not
possible for the camcorder to delete files from a protected SD card.
If the films to be deleted have deletion protection (blocking), you must
remove the latter before the deletion process.
Page 55

55
Playing back photos
To play back photos with your camcorder, proceed as follows:
` By pressing the Right/Left navigation pad, select the photo.
` Turn the Up scroll wheel to enlarge a detail.
` By pressing the Up/Down/Right/Left navigation pad, you can change the
position of the detail.
` Turn the scroll wheel downwards to reduce the detail.
` Press the shutter release, to access miniature view.
Page 56

56
Playing back photos on an external TV
To look at the photos you have taken via HDMI on a television set, proceed as
follows
` Open the HDMI/Mini-USB cover.
` Connect the small end of the supplied HDMI cable to the camcorder.
` Connect the other end of the HDMI cable to an HDMI input socket on
your television set.
` Now switch both appliances on.
The camcorder LC-display is disabled and playback is via the connected
television set.
To view your photos on a conventional television set, proceed as follows:
` Open the HDMI/MINI-USB cover.
` Connect the supplied AV cable to the AV output of your camcorder.
` Connect the white and yellow plugs of your TV cable, as shown below, to
the correct sockets on your TV set.
The camcorder LC-display is disabled and playback is via the connected
television set.
Page 57

57
Photo playback menu
The following settings may be performed in the photo playback menu:
Delete all
Invert selection
Slideshow
DPOF one
DPOF all
To access the photo playback menu, please do the following:
` Switch the camcorder on.
` Turn the mode selector switch
to photo mode ( ).
` Press the Playback
button.
` Press the “MENU”
key.
Page 58

58
Delete all
To delete all the saved photos, proceed as follows:
` Turn the scroll wheel until the “Delete all” entry is highlighted and
confirm by pressing the scroll wheel.
The selection window with OK and Cancel appears.
` By pressing the Up/Down navigation pad, select OK and confirm by
pressing the scroll wheel, to delete all the unblocked photos.
CAUTION!
If you format the memory, all the data saved in it is deleted.
Make sure that there is no important data left in the memory or on
the SD card.
Page 59

59
Invert selection
Proceed as follows to unblock all the blocked photos simultaneously:
` Turn the scroll wheel until the “Selection” entry is highlighted and
confirm by pressing the scroll wheel.
The selection window with OK and Cancel appears.
` By pressing the Up/Down navigation pad, select the desired setting and
confirm this change by pressing the scroll wheel.
Slideshow
To view all the saved photos in a slideshow, proceed as follows:
` Turn the scroll wheel until the “Slideshow” entry is highlighted and
confirm by pressing the scroll wheel.
The selection window with Start and Cancel appears.
As soon as you have selected Start and confirmed it by pressing the scroll
wheel, the camcorder starts the slideshow. Press the scroll wheel, to cancel
the slideshow.
Page 60
60
DPOF one
In order to have individual photos printed by a photo studio, or on a DPOFcompatible printer, proceed as follows:
` Turn the scroll wheel until the “DPOF one” entry is highlighted and
confirm by pressing the scroll wheel.
The selection window with On and Off appears.
` By pressing the Up/Down navigation pad, select the desired setting and
confirm the change by pressing the scroll wheel.
The camcorder now goes to Photo Overview.
` By pressing the Right/Left navigation pad, select the photo to be printed.
` Press the navigation pad down once, to select the chosen photo once for
DPOF printing.
` Switch the camcorder off and remove the memory card.
` Insert the memory card in a DPOF-compatible printer or have the photos
printed at a photographic dealer's.
Page 61

61
You may highlight several photos at once.
Moreover, you can print individual photos via DPOF up to nine times.
To do this, simply keep pressing the Down navigation pad at the
desired photo until you have reached the desired number.
For the DPOF (Digital Print Order Format) function, a memory card is
essential.
DPOF all
In order to have all the photos printed by a photo studio, or on a DPOFcompatible printer, proceed as follows:
` Turn the scroll wheel until the “DPOF all” entry is highlighted and confirm
by pressing the scroll wheel.
The selection window with On and Off appears.
` By pressing the Up/Down navigation pad, select the desired setting and
confirm the change by pressing the scroll wheel.
Press the Menu
button, to quit the photo playback menu and
return to photo playback mode.
Page 62

62
Audio mode
Proceed as follows, to enable the audio mode:
` Switch the camcorder on.
` Turn the mode selector switch
to audio mode ( ).
Display in audio mode
The following display information is shown in audio mode:
1 Battery status
2 Shows the number of saved speech files
3 Recording time display
4 Speech mode
Recording audio files
To record audio files with your camcorder, proceed as follows:
` Press the shutter release to start recording.
The number of the photos taken now lights up in the display
.
Page 63

63
Audio playback mode
Proceed as follows to enable audio playback mode:
` Switch the camcorder on.
` Turn the mode selector switch
to audio mode ( ).
` Press the Playback button.
Display in audio playback mode
The following display information is shown in audio playback mode:
1 Battery status
2 Playback mode enabled
3 Shows the number of the current recording and the total number of
recording.
4 Volume
5 Playback mode
Page 64

64
Blocking audio files
To protect audio files from being deleted accidentally, proceed as follows:
` By pressing the Right/Left navigation pad, select the file to be blocked.
` Press the Down navigation pad to block the selected file.
now appears in the display:
Unblocking audio files
Proceed as follows to unblock individual files:
` By pressing the Right/Left navigation pad, select the blocked file.
` Press the Down navigation pad to unblock the selected file.
The block is cancelled and the file can now be deleted.
Delete audio files
Proceed as follows to delete individual files:
` By pressing the Right/Left navigation pad, select the file to be deleted.
` Press the Up navigation pad to delete the selected file.
` Answer the confirmation query by going to Delete, by pressing on the Up
navigation pad, and then confirming by pressing the scroll wheel.
Page 65

65
Audio playback menu
The following settings may be performed in the audio playback menu:
Delete all Invert selection
To access the audio playback menu, please do the following:
` Switch the camcorder on.
` Turn the mode selector switch
to audio mode ( ).
` Press the Playback button.
` Press the “MENU”
key.
Page 66

66
Delete all
To delete all the saved audio files, proceed as follows:
` Turn the scroll wheel until the “Delete all” entry is highlighted and
confirm by pressing the scroll wheel.
The selection window with OK and Cancel appears.
` By pressing the Up/Down navigation pad, select OK and confirm by
pressing on the scroll wheel, to delete all the audio files.
CAUTION!
If you format the memory, all the data saved in it is deleted.
Make sure that there is no important data left in the memory or on
the SD card.
Page 67

67
Invert selection
Proceed as follows to unblock all the blocked audio files simultaneously:
` Turn the scroll wheel until the “Invert selection” entry is highlighted and
confirm by pressing the scroll wheel.
The selection window with OK and Cancel appears.
` By pressing the Up/Down navigation pad, select the desired setting and
confirm the change by pressing the scroll wheel.
Press the Menu
button, to quit the photo playback menu and
return to photo playback mode.
Page 68

68
Underwater functions
Insert camcorder in underwater casing
` Push the catch of the lock upwards, as shown, and snap the lock open.
` Open the casing and lay the camcorder in the casing in “ON” mode, as
shown.
` Hitch on the lock and flip the catch down to close it.
Page 69

69
Take care to ensure that the carrying strap does not become
jammed between the yellow rubber seal and the casing lid.
This results in a leaking casing.
Lay the camcorder ready-configured (i.e. display open, camcorder
switched on and film or photo mode selected), as it is impossible to
perform any more settings on the camcorder, inside the casing.
Appliance overview in underwater casing
1 Enlarge detail
2 LED On/Off
3 Shutter release
4 Reduce detail
5 Mode switch; switch between film and photo mode
6 Playback
Page 70

70
Making films under water
Proceed as follows to make films underwater:
` Use the “T” and “W” buttons to set the desired zoom factor.
` Press the shutter release
to start recording.
The operating LED lights up red.
` In order to stop recording, press the shutter release again.
` To enable the “Flash” LED, press the LED
button.
Press the Mode Switch button, to switch smoothly between
film and photo mode.
Playing back films under water
Proceed as follows to play back films under water:
` Press the playback button.
` With the Right/Left navigation pad, select the film which you want
to watch.
` Press the shutter release
to start playback.
` Press the shutter release again to stop playback.
Page 71

71
Taking photos under water
Proceed as follows to take photos under water:
` Use the “T” and “W” buttons to set the desired zoom factor.
` Press the shutter release
to start recording.
` To enable the “Flash” LED, press the LED
button.
Press the Mode Switch button, to switch smoothly between
film and photo mode.
Playing back photos under water
Proceed as follows to play back photos under water:
` Press the playback
button.
` With the Left/Right keys , select the image you want to look at or
press the shutter release button
to access miniature image mode.
Page 72

72
Installing drivers and software
Some application programs are on the CD supplied. Insert the CD in the CDROM drive of your computer.
Usually, the CD is automatically recognised and displayed. If not, select the
CD drive in Windows Explorer > My Computer and double click on the drive
name to start the CD.
On the start page, you will see the contents of the CD.
To install the software, press the INSTALL button.
Follow the other on-screen instructions.
Files or programs on the CD:
Drivers for the camcorder
Xvid driver
QuickTime
NewSoft Filmworks
NewSoft Mr. Photo
For more detailed assistance, press the F1 key while running the
program.
Page 73

73
Technical Data
Pixels: 5 megapixels
Image sensor: 5 megapixel CMOS sensor
Focal distance: Normal: 1.5m ~ ∞
Macro: 15cm ~ 16cm
Lens: Wide-angle: F/3.2; f= 7.62 mm
Films: Format: H.264
Resolution: VGE, D1, HD(720P/30)
Photos: Formats: JPG (DPOF)
Resolution: 1M, 3M, 5M, 12M
(interpolated)
Zoom: Films: 4 times digital zoom
Photo: 4 times digital zoom
Photo playback: max. 20 times
digital zoom
Power supply 4 x AAA/LR03 batteries
Page 74

74
Disposal
Packaging
Your camcorder is packaged to protect it from transportation
damage. Packaging is raw material and can be reused or added to
the recycling system.
Appliance
At the end of its life, the appliance should not be disposed of in
household rubbish. Dispose of it in an environmentally friendly
manner via a local collection point for old devices. Ask your local
authority for the location of the collection points.
Batteries
Do not dispose of used batteries in household rubbish. Batteries
should be taken to a collection point for used batteries.
 Loading...