

Page 1
pg
1
VisionTrack™ PRO
INSTRUCTION MANUAL
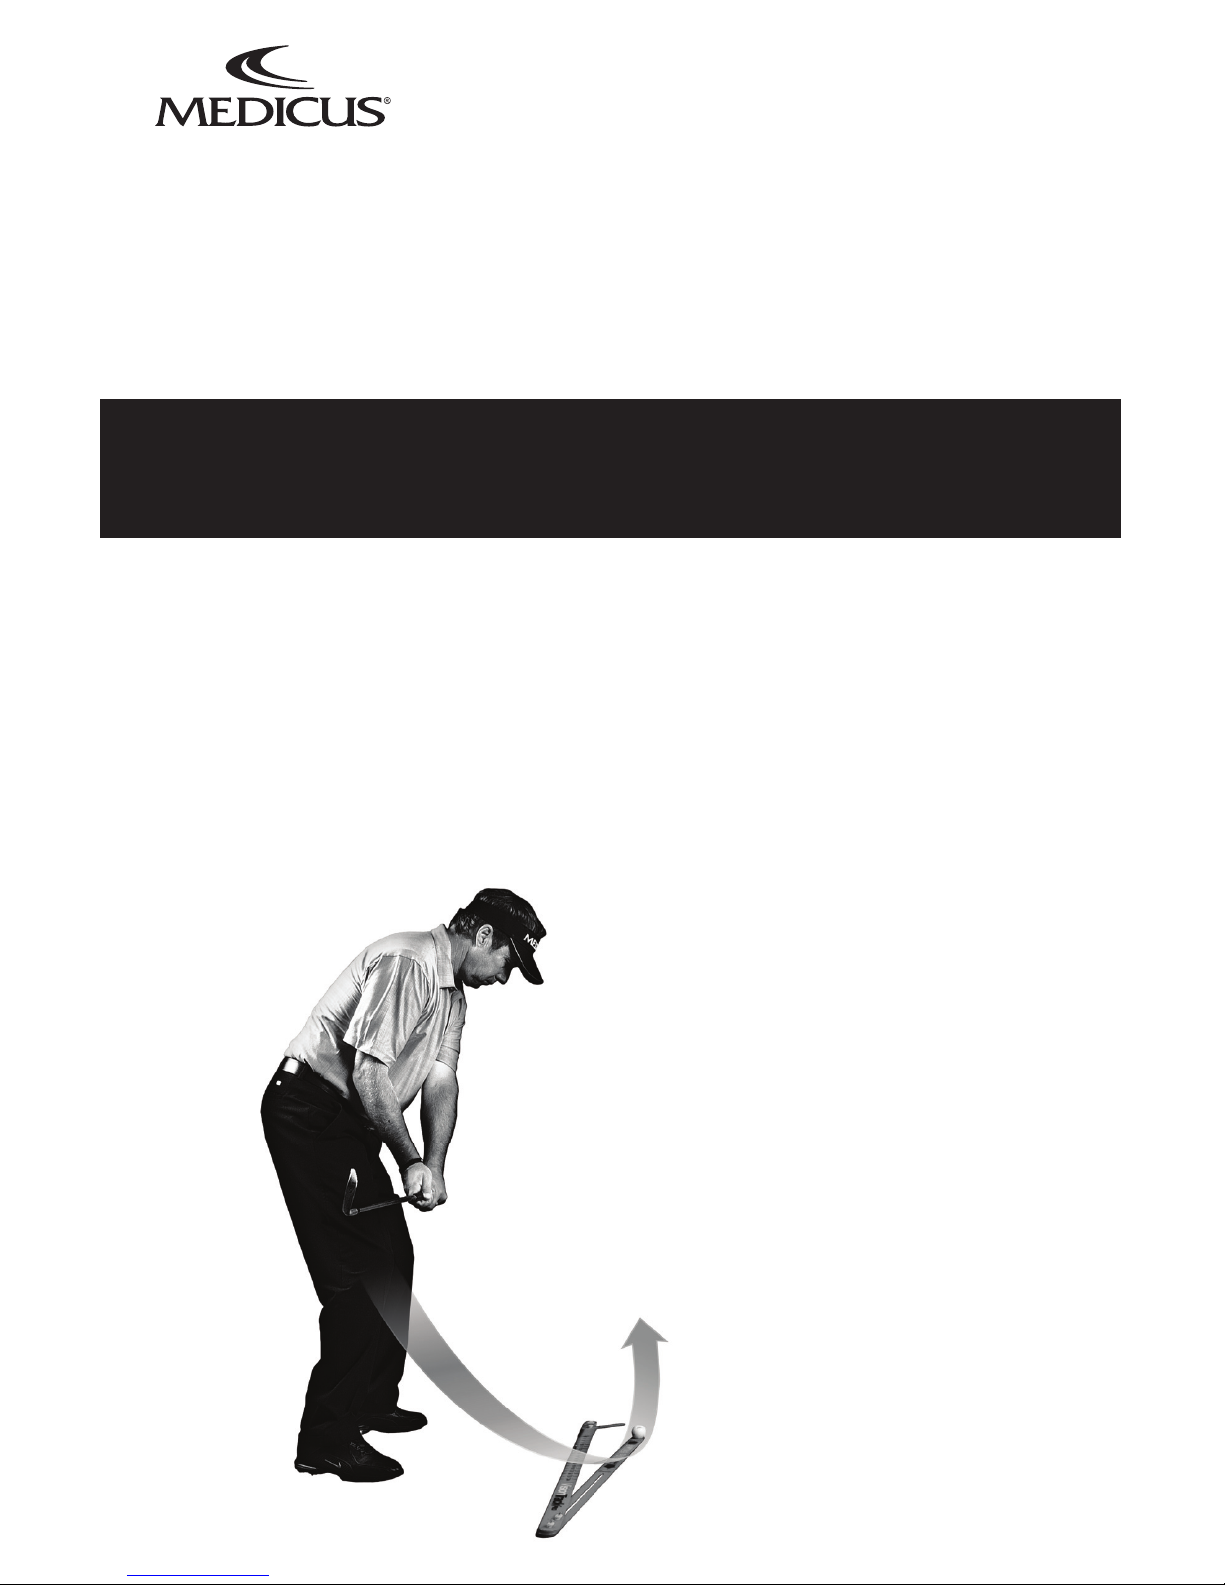
Most golfers are confused about the concept of proper Swing Path
and where the clubhead should travel throughout the swing. The VT Pro is
designed to present you with a visual reference from the golfer's point of
view showing you the proper Swing Path your clubhead should be taking
while providing you with the necessary feedback to let you know when
you're not doing it right. You'll quickly discover the ability to stay on plane
and maintain the proper Swing Path, allowing for solid ball striking every
time you swing the club.
www.medicusvisiontrack.com
VT Pro Features & Benefi ts
• Properly aligns your stance in
relation to your target.
• Shows you visually the correct
swing path for the take-away &
down-swing.
• Swing Fault Sensor provides im-
mediate feedback if your swing is
on an improper Outside-In path.
• Highly portable (
fi ts right in your
golf bag
) and easy to use.
Page 2
pg
2
FADE
DRAW
FADE
DRAW
MEDICUS GOLF
800.732.4995
TARGET
LOW POINT
RH - POINT
LEFT OF TARGET
LH - POINT
RIGHT OF TARGET
STA NCE WI DTH
RH
LH
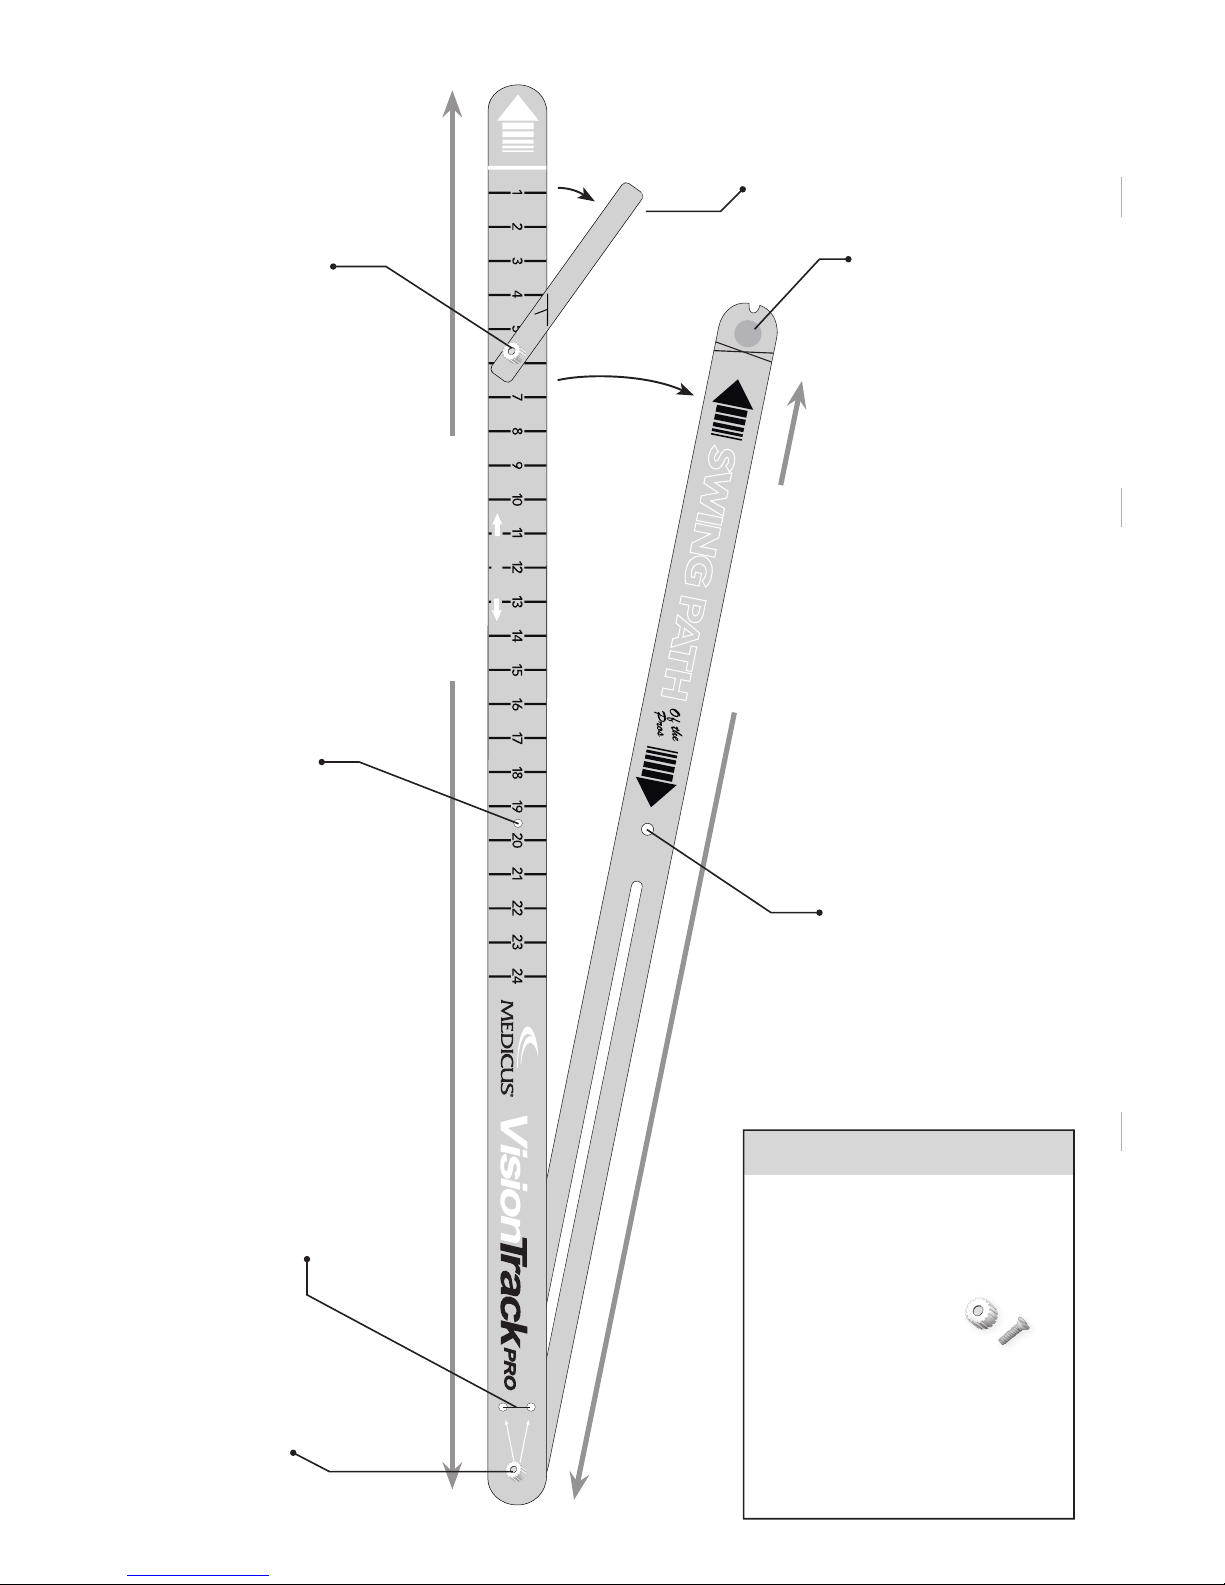
SWING FAULT SENSOR
RH
LH
(S2) Screw
(S3) Screw
Ball Area
(H1) Screw
Position
(H2) Screw
Position
Fault Sensor
(3) Screws w/caps
(1) Swing Path
(1) Stance Line
(1) Fault Sensor
INCLUDED PARTS
All parts are factory
assembled in package.
No assembly required.
No tools needed for usage
adjustments.
(RH) & (LH)
Screw Positions
Stance Line
Swing Path
Page 3
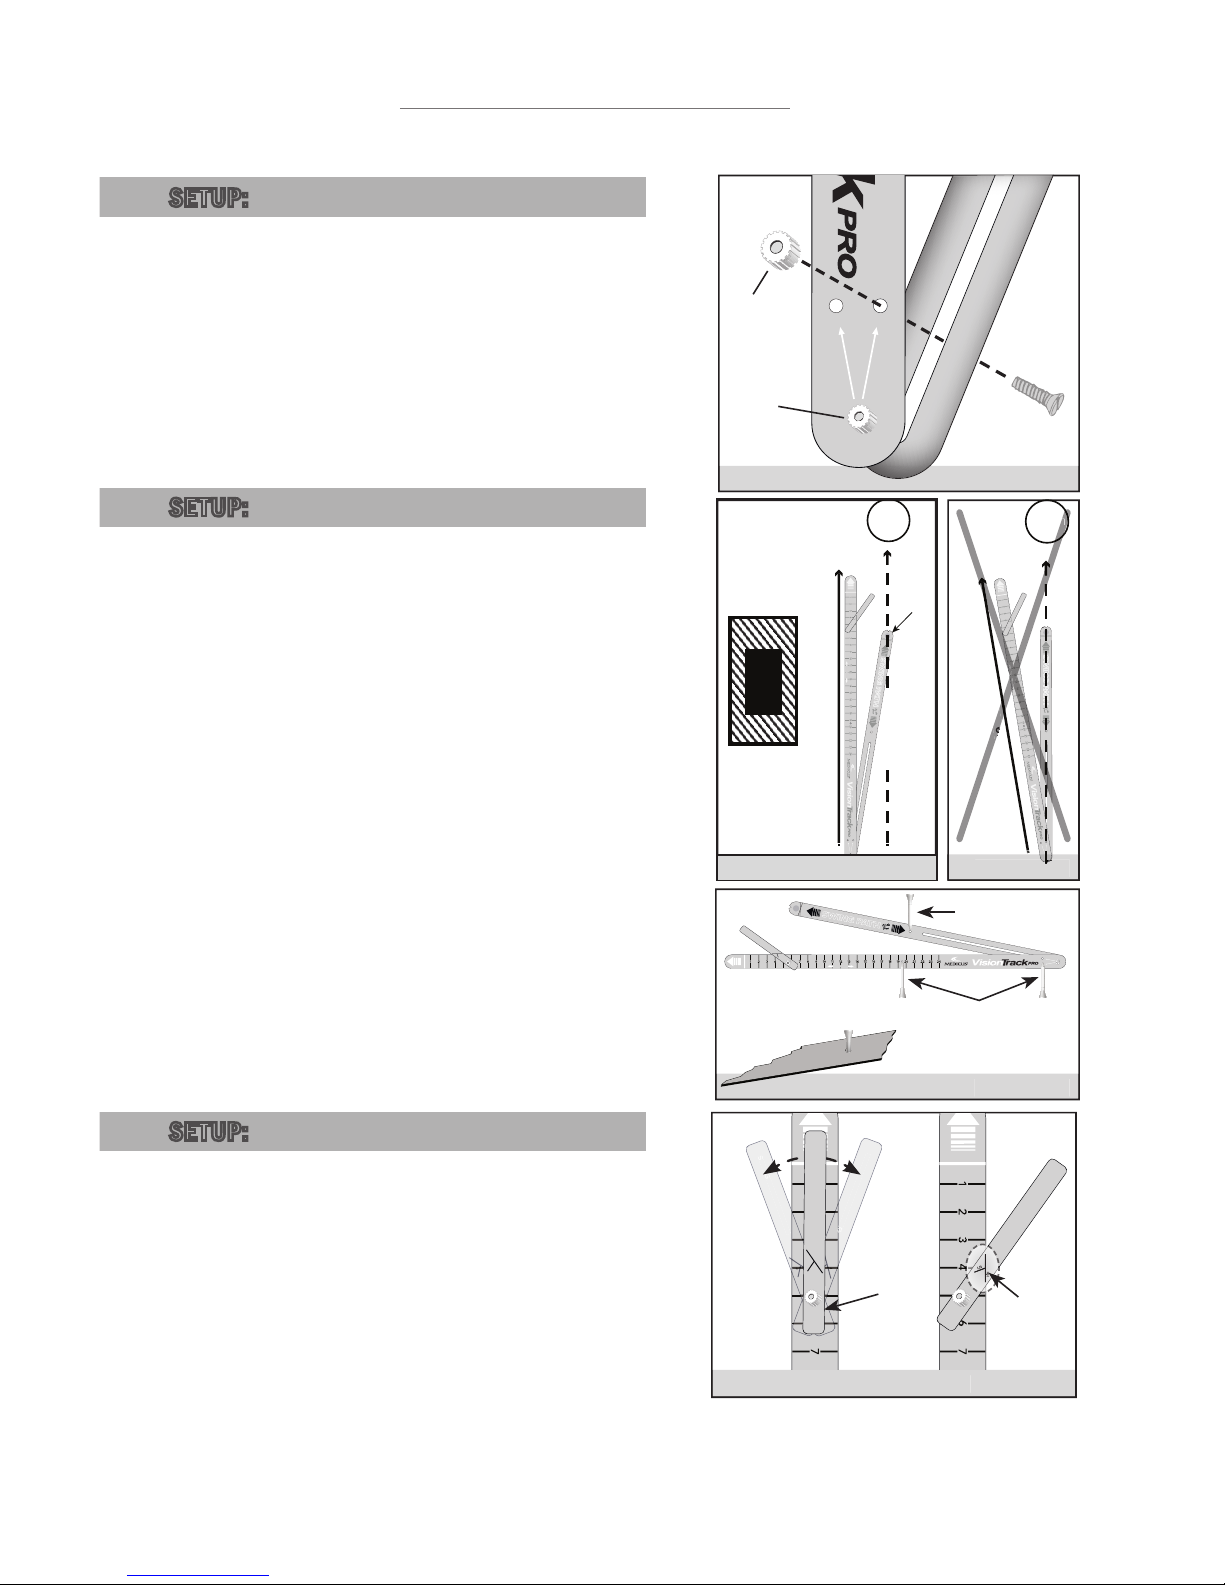
diagram 1-1
RH
LH
(S1)
(S2)
TARGET
FADE
DRAW
FADE
DRAW
MEDICUS GOLF
800.732.4995
TARGET
LOW POINT
RH - POINT
LEFT OF TARGET
LH - POINT
RIGHT OF TARGET
STANCE WIDT H
RH
LH
SWING FAULT SENSOR
Stance
Area
Target Line
Stance Line
Ball position
diagram 2-1
TARGET
FADE
DRAW
FADE
DRAW
MEDICUS GOLF
800.732.4995
TARGET
LOW POINT
RH - POINT
LEFT OF TARGET
LH - POINT
RIGHT OF TARGET
STANCE WIDT H
RH
LH
SWING FAULT SENSOR
Stance Line
diagram 2-2
STANCE WIDT H
STANCE WIDT H
diagram 2-3
FADE
DRAW
FADE
DRAW
MEDICUS GOLF
800.732.4995
TARGET
LOW POINT
RH - POINT
LEFT OF TARGET
LH - POINT
RIGHT OF TARGET
STANCE WI DTH
RH
LH
SWING FAULT SENSOR
RH
LH
Tee Placement
Tee Placements
Example
(S3)
setup
lines
diagram 3-1
TARGET
LOW POINT
RH - POINT
LEFT OF TARGET
LH - POINT
RIGHT OF TARGET
TARGET
LOW POINT
RH - POINT
LEFT OF TARGET
LH - POINT
RIGHT OF TARGET
SWING FAULT SENSOR
SWING FAULT SENSOR
SWING FAULT SENSOR
RH
RH
SWING FAULT SENSOR
RH
RH
SWING FAULT SENSOR
RH
LH
SWING FAULT SENSOR
RH
LH
RH
pg
3
VISIONTRACK PRO™ SETUP
SE TUP: SWING PATH SETUP
• Loosen Screw (S2) until the Swing Path
can swivel freely. (see diagram 1-1)
• Right Hand Players: Place Screw (S1)
into the (RH) position. Left Hand Players:
Place Screw (S1) into the (LH) position
SE TUP: AIMING & POSITIONING
• Imagine a straight line from the spot of
the ball to the target (labeled Target Line
in diagram 2-1). Next angle the Stance
Line to be parallel with the target line.
NOTE: The swing path should NOT aim at target
• Right Hand Players: The Stance Line
aims left of target. Left Hand Players:
The Stance Line aims right of target.
• Diagram 2-2 shows an example of
incorrect positioning. The Swing Path
should not aim directly at the target.
• Once in position you can stake the VT Pro™
to the ground by placing a golf tee through
unused screw holes. (see diagram 2-3)
SE TUP: FAULT SENSOR SETUP
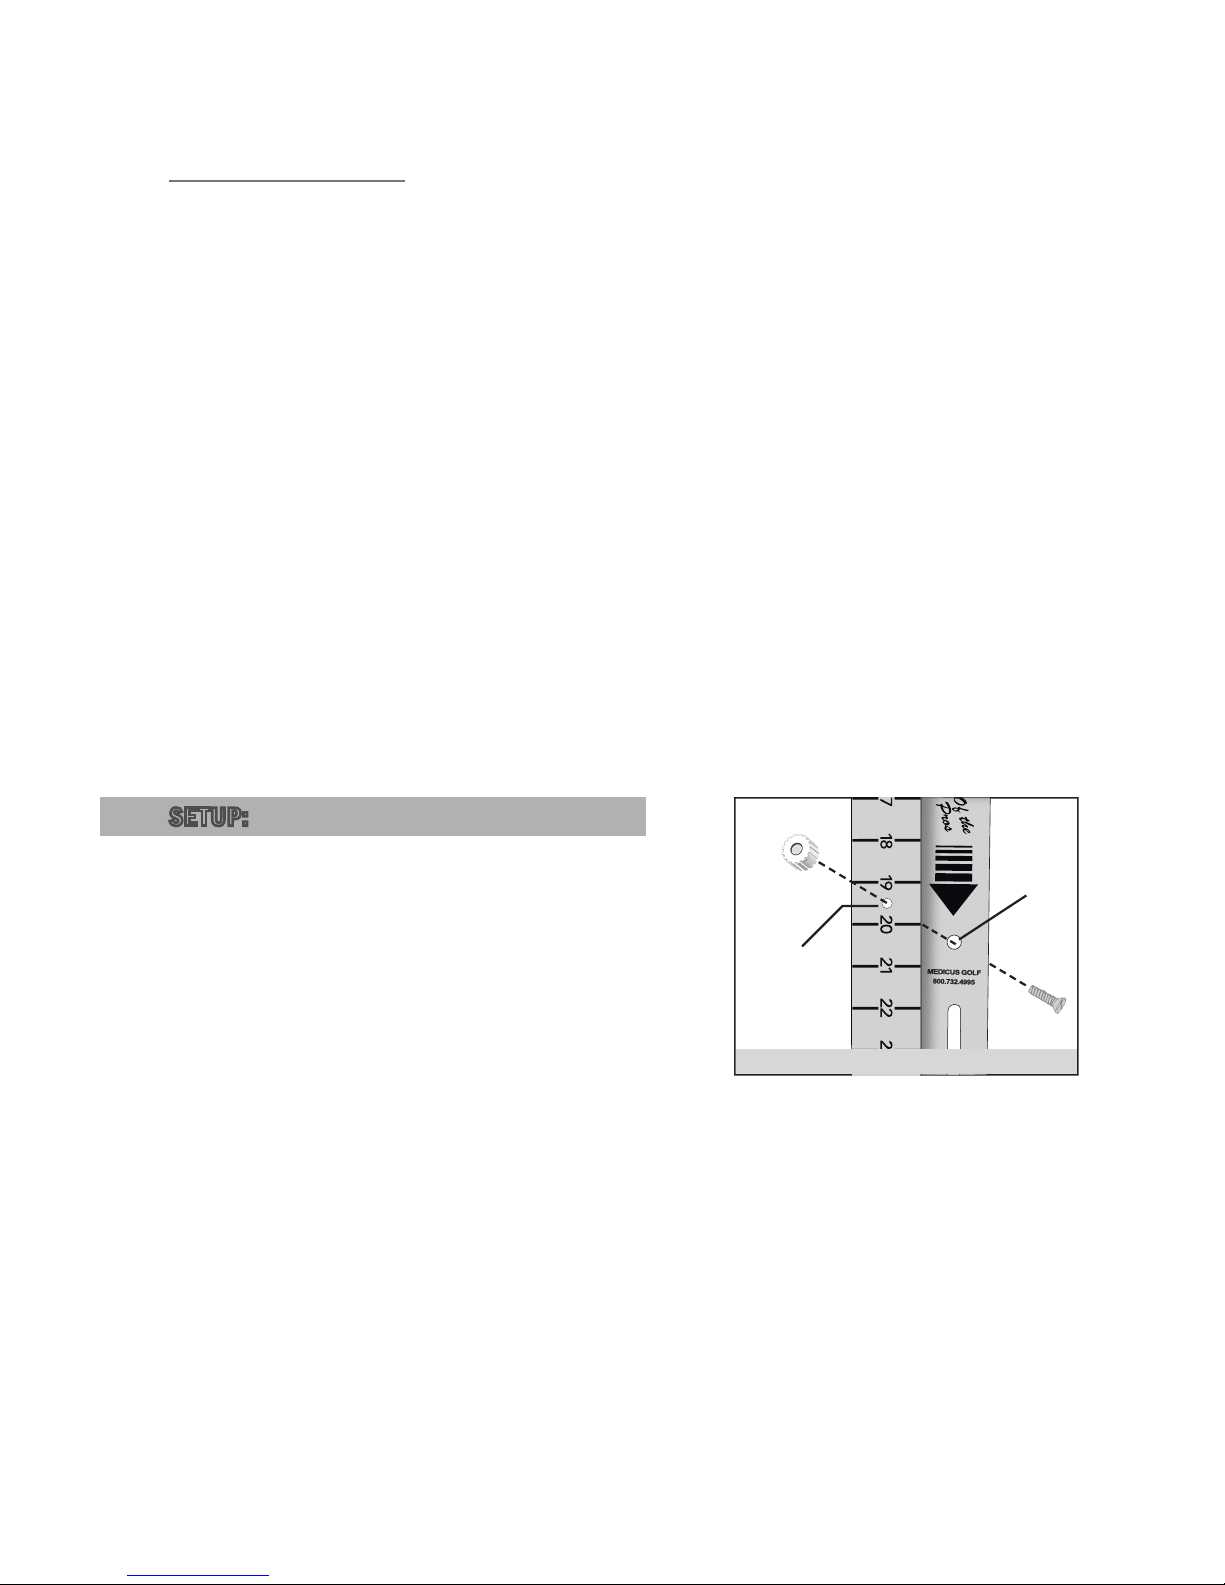
• Loosen Screw (S3) until the Fault Sensor
can swivel freely. (see diagram 3-1)
• Right Hand Players: Move the Fault Sensor until
the (RH) setup line is in-line with the edge of the
Stance Line below it. Left Hand Players: Move
until the line marked (LH) is in alignment with
the edge of the Stance Line. (see diagram 3-1)
• Once in position, fi nger tighten (S3)
until it is only slightly snug but still has
the ability to move with little effort.
Page 4
FADE
DRAW
FADE
DRAW
MEDICUS GOLF
800.732.4995
TARGET
LOW POINT
RH - POINT
LEFT OF TARGET
LH - POINT
RIGHT OF TARGET
STA NCE WI DTH
RH
LH
SWING FAULT SENSOR
Stance Area
Feet create a parallel line to the
VisionTrack Stance Line
Trace this path with club
diagram 4-1
LOW POINT
pg
4
Page 5
FADE
DRAW
DRAW
FADE
edge aligned in center
diagram 5-1
FADE
DRAW
FADE
DRAW
MEDICUS GOLF
800.732.4995
TARGETTARGET
TARGET
LOW POINTLOW POINTLOW POINT
RH - POINTRH - POINTRH - POINT
LEFT OF TARGETLEFT OF TARG ETLEFT OF TARGET
STANCE WI DTHSTANCE WI DTHSTANCE WI DTH
RHRHRH
RHRHRH
RHRHRH
SWING FAULT SENSOR
RH
LH
diagram 4-2
Swing Path slides to change ball position
Loosen both screws
and slide swing path to
desired position
FADE
DRAW
FADE
DRAW
MEDICUS GOLF
800.732.4995
RHRHRH
RHRHRH
pg
5
SE TUP: STANCE POSITION
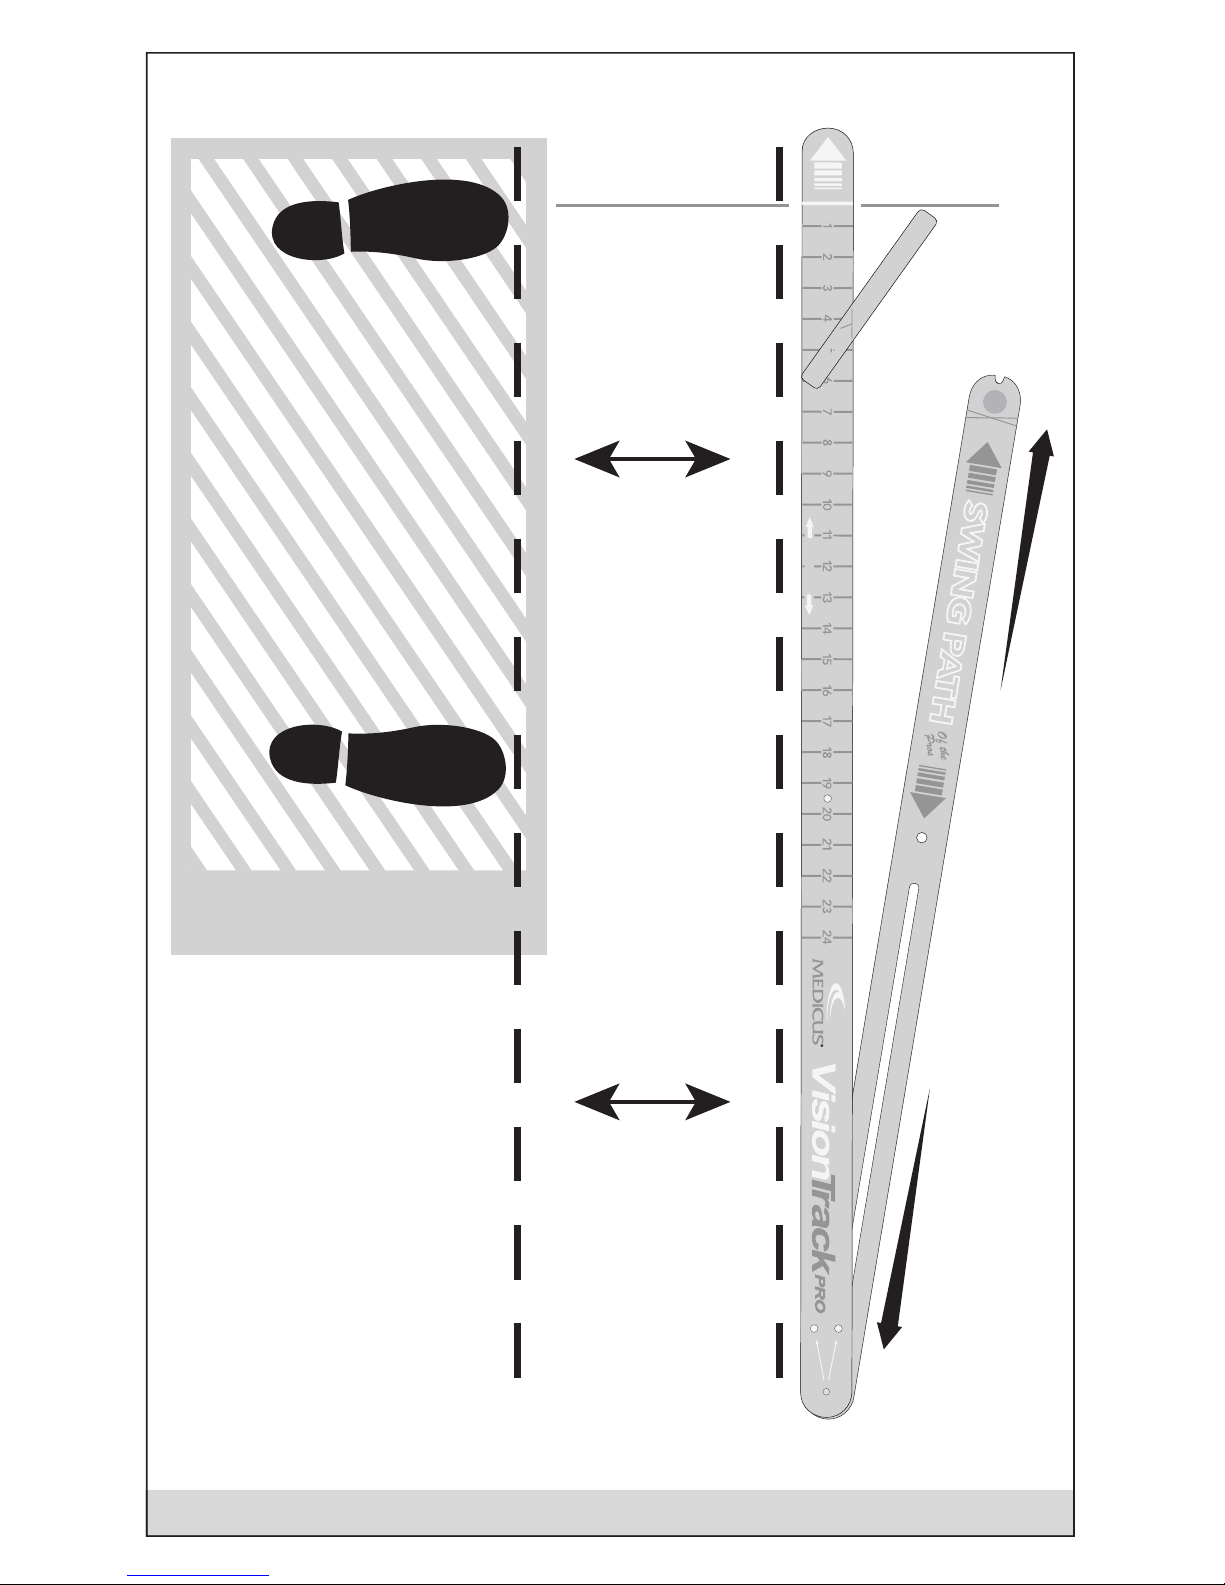
• Stand in the area shown (See diagram
4-1 on right side) with feet aligned
parallel to the Stance Line.
• Right Hand Players: Position left foot &
shoulder even with Low Point (See diagram
4-1). Left Hand Players: Position right
foot & shoulder even with Low Point.
• The VT Pro's Swing Path slides backward or
forward in order to change ball position (See
diagram 4-2). Changing your stance for different
clubs is not necessary since low point is always
at your leading shoulder. The ball position needs
to move forward or backward in the stance for
different clubs. Using this feature is important
for the purpose of the Fault Sensor. You still
must swing out past the Fault Sensor, even if
ball position is further back in your stance.
• A driver, for example should be played up
near the Low Point, while a wedge would
be positioned in the center of the chest.
Experiment with the slider to fi nd the ball
position that works best for you and allows
you to hit the type of shots you prefer.
VISIONTRACK PRO™ PRACTICE
PR ACTICE: DEVELOPING YOUR SWING PATH
• When you fi rst setup your VisionTrack PRO™
your goal is to swing the clubhead along the
track labeled Swing Path. This path will become
the foundation to building a great swing. Begin
with the iron you are most comfortable using
- if you are unsure, we suggest a 7 iron.
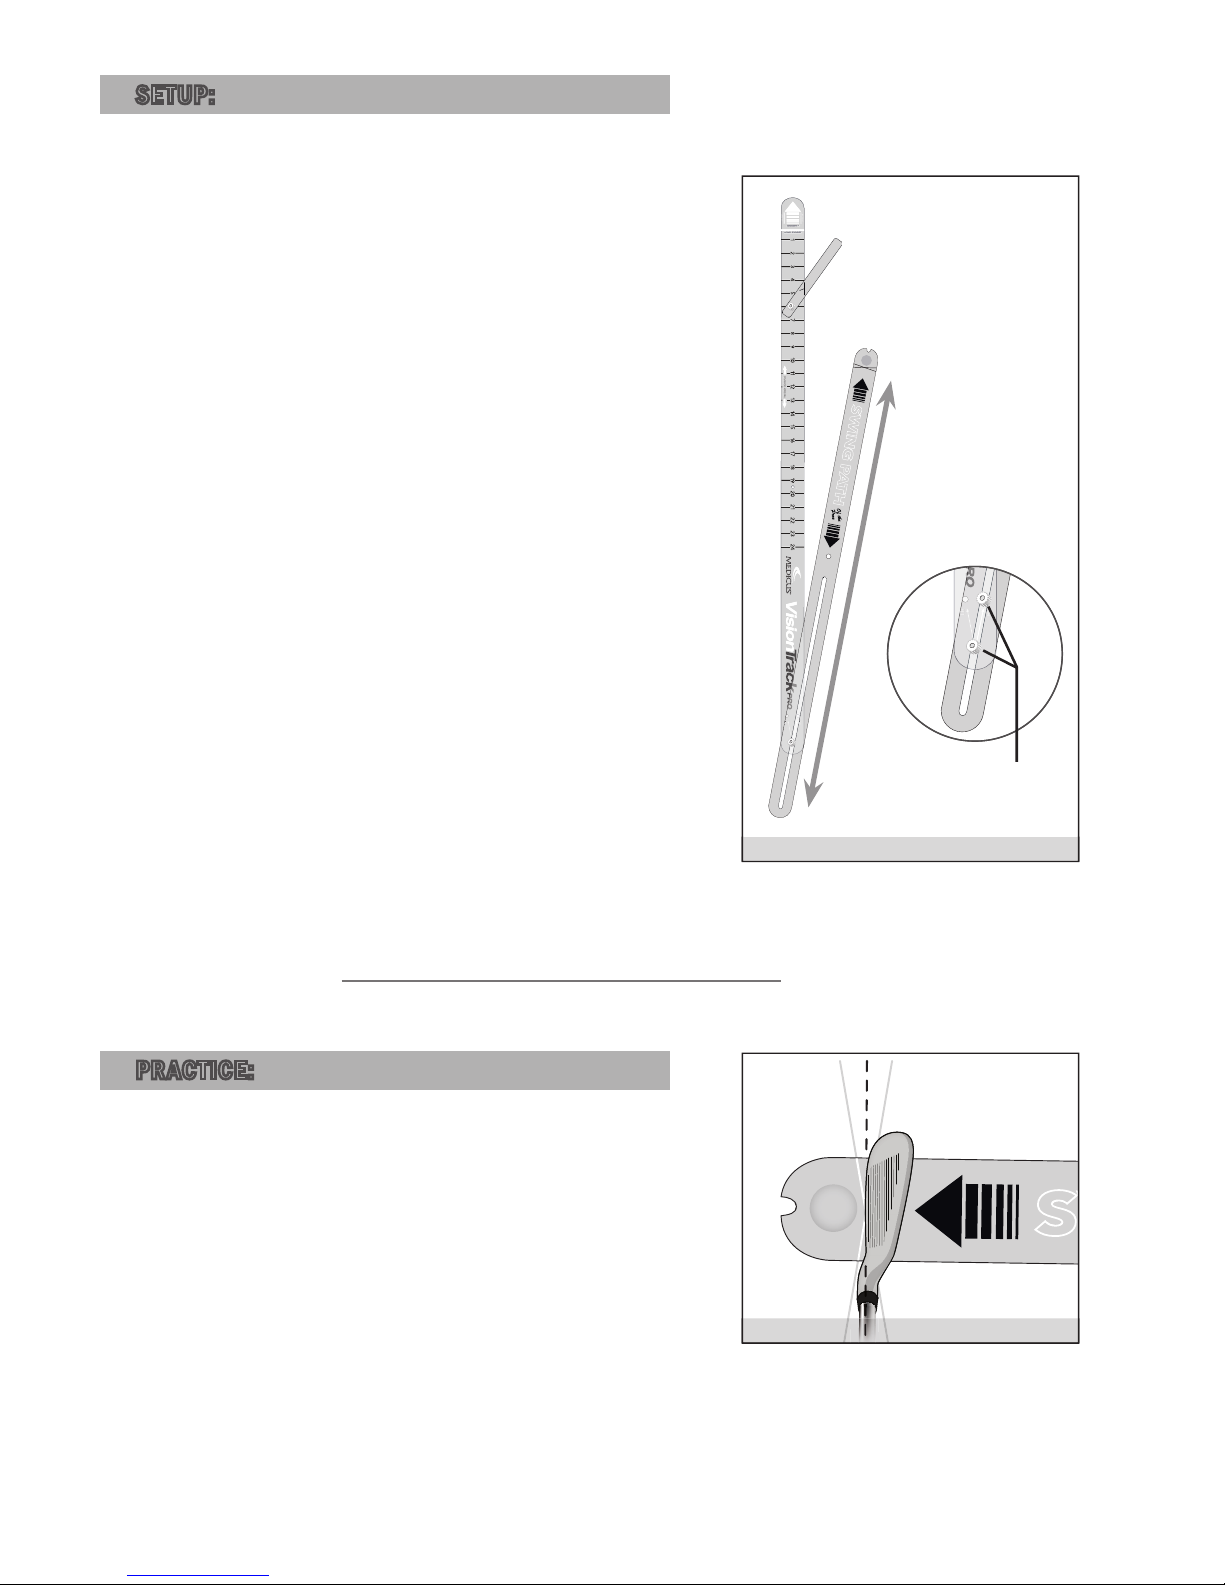
• Align the clubface halfway between the lines
marked DRAW & FADE, which are located
behind the ball position. (See diagram 5-1)
Page 6
FADE
DRAW
FADE
DRAW
diagram 5-2
Ball position without a tee
Tee position
FADE
DRAW
FADE
DRAW
MEDICUS GOLF
800.732.4995
TARGET
LOW POINT
RH - POINT
LEFT OF TARGET
LH - POINT
RIGHT OF TARGET
STANC E W IDT H
RH
LH
diagram 6 -1
pg
6
• Start with short swings - try to trace the Swing
Path with the clubhead. Waist high on the
backstroke to waist high on the follow-through
is a good stroke length to begin. Gradually
increase the length of your swing up to full
stroke. Do this without a ball until you develop
a good understanding for where the path.
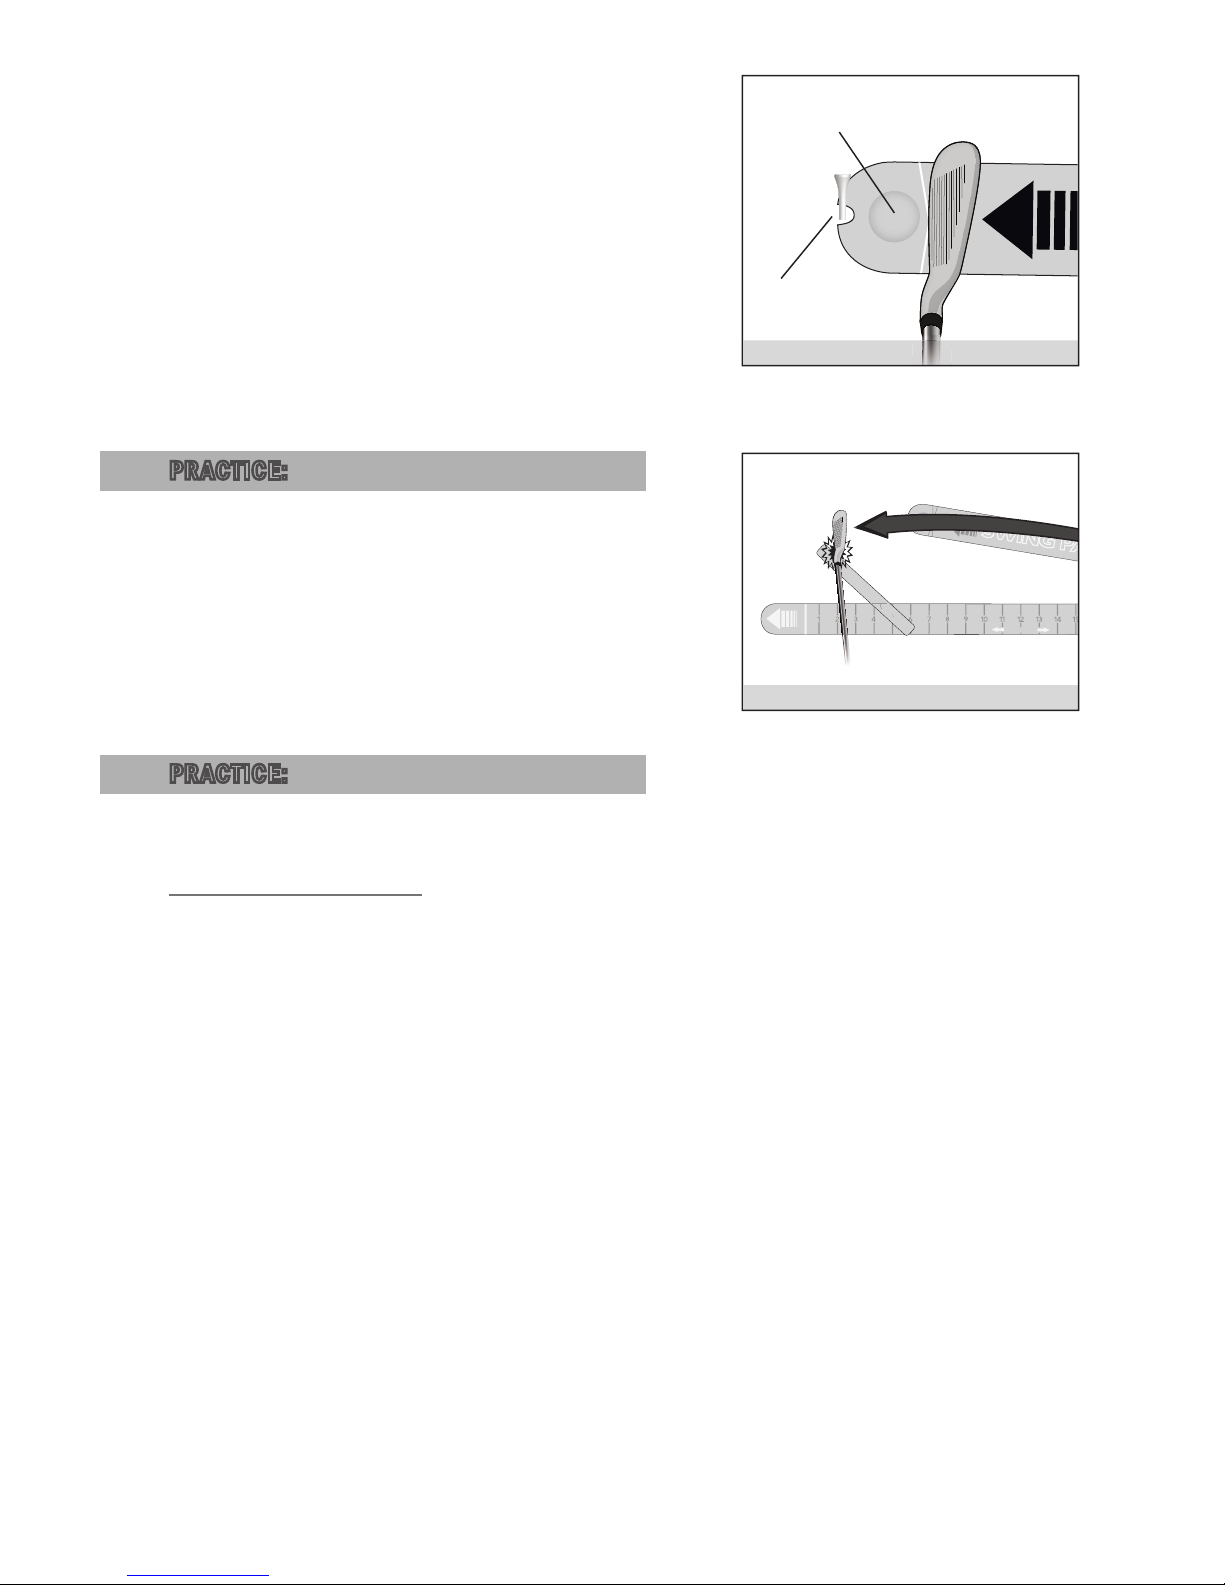
• When you are ready to hit some balls - set
the ball in the depression or tee it where
the indent is located. (see diagram 5-2)
PR ACTICE: USING THE FAULT SENSOR
• The Fault Sensor helps by indicating when
you have missed your mark. When you hit
the sensor your swing is curving inside the
Swing Path too quickly - follow the direction
of the Swing Path until the clubhead has
passed the Fault Sensor (see diagram 6-1).
PR ACTICE: ADVANCED SHOT SHAPING
HITTING A DRAW
• A Draw is a shot that starts right of
target, in the direction of the swing path,
then curves back towards target.
• Right Hand Players: Aim the VisionTrack PRO™
slightly right of target to compensate for the
ball fl ight curve (the exact amount will vary
based on the amount of Draw required to reach
your intended target). Left Hand Players: Aim
the VisionTrack PRO™ slightly left of target.
• Align your feet squarely to the VT PRO™
Stance Line. Align the leading edge of the
clubface with the line marked “DRAW.”
• Practice maintaining this clubface angle
while accurately tracing the Swing Path. This
precise clubface angle in combination with
the Swing Path you learn with the VT PRO™ is
how you achieve this shot shaping technique.
Page 7
(S1)
(H1)
(H2)
MEDICUS GOLFMEDICUS GOLFMEDICUS GOLF
800.732.4995800.732.4995800.732.4995
TARGET
LOW POINT
RH - POINT
LEFT OF TARGET
LH - POINT
RIGHT OF TARGET
STA NCE WI DTH
diagram 7-1
pg
7
HITTING A FADE
• A Fade is a shot will start left of target, in the
direction of the swing path, then curve right.
• Right Hand Players: Aim the VisionTrack PRO™
slightly left of target to compensate for ballfl ight curvature (the exact amount can vary
based on the amount of Fade required to reach
your intended target). Left Hand Players: Aim
the VisionTrack PRO™ slightly right of target.
• Align your feet squarely to the VT PRO™
stance Line. Align the leading edge of the
clubface with the line marked “FADE.”
• Practice maintaining this clubface angle
while accurately tracing the Swing Path. This
precise clubface angle in combination with
the Swing Path you learn with the VT PRO™ is
how you achieve this shot shaping technique.
SE TUP: STORAGE & TR AVEL
• Medicus recommends that you close your
VT PRO™ during storage & travel.
• Proper care will help prevent long term damage.
• Remove Screw (S1) from hole
(RH) or (LH) after use.
• Rotate the Swing Path until Holes (H1)
& (H2) are aligned with one another.
• Inserting Screw (S1) through both
holes and hand tighten until snug.
Page 8

pg
8
© Copyright 2011
Medicus Corporation
Additional information &
support for the Medicus
VisionTrack PRO™ and other
Medicus Golf products can be
found at:
www.MedicusVisionTrack.com
Be sure to check for live
webinars, videos, and other
related content.
Medicus Golf
2845 Interstate Parkway
Brunswick, OH 44212
toll free 800.732.4995
 Loading...