

Page 1

U-DRIVE UP
Your personal Driving Blackbox!
MT4045
User Manual
Page 2

EN
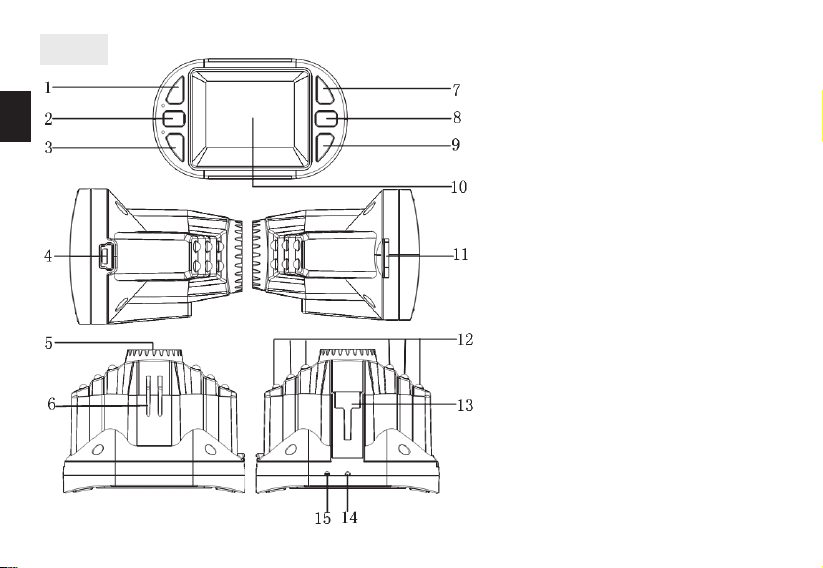
Overview
2
1. UP button
2. MENU button
3. DOWN button
4. USB socket/DC input
5. Camera lens
6. Speaker
7. OK button
8. MODE button
9. POWER button
10. LCD screen
11. microSD card slot
12. IR led
13. Mounting socket
14. Microphone
15. RESET switch
Page 3

Before rst use
Install microSD card according to icon, plug device to USB
port for a few hours to charge internal battery.
Power on/power o
Press once POWER button to power on the device. Press
and hold for 3 seconds to power o the device.
Whenever DC input is plugged in device will power on automatically, whenever DC input is plugged out device will
power o automatically.
Switching modes
Press MODE button to switch mode in following cycle:
[movie mode/still capture/playback]
Night mode
When device is working press once POWER button to enable/disable automatic IR led assistance.
Menu operating
When device is not recording press MENU button once for
context option, press again for general options. Context
menu depends on selected mode: movie/still capture/
playback.
To enter option press OK button, to exit press MENU button again, to navigate use UP/DOWN button.
General settings:
■ Set Date/Time – enter actual date and time
■ Auto Power o – select time to power o the device
during idle time [o/1min/3min]
■ Language [select menu language]
■ Light Frequency – adjust accordingly to indoor lighting
condition power supply frequency [50Hz/60Hz]
■ Screen Saver – turn LCD o [o/after 3min/after 5min/
after 10min]
■ Image Rotation [o/on]
■ Format – perform microSD card format
■ Default Setting – restore factory settings
■ Firmware version
Movie Mode settings:
■ Resolution – select resolution
■ Loop recording – recording can be split into short se-
quences [o/1min/2min/3min]
■ EV–select exposure compensation within -2EV and 2EV
■ Motion Detection [on/o ]- record whenever move-
ment is detected
■ Audio [on/o ] – record with sound
■ Date Stamp [on/o] – overlay date stamp onto record-
ed movies
■ Gsensor [o/2G/4G/8G] – select strength of shock detection for automatic security of recorded le (tag le
as “read only”)
■ Button sound [on/o ]
EN
3
Page 4
Using the device
EN
Plug input DC to power on the device and start to record
automatically. You can power on the device manually,
then press OK to start/nish recording.
If you want to protect le before deletion (if you have set
sequence time) during cycle mode press MODE button –
padlock icon will be shown in the top.
Viewing les using PC computer
Use USB cable and plug device into PC computer, then
select “Mass Storage” and click OK. Now you can copy le
from microSD card on to desktop.
Specication
• Car digital video recorder
• Video and sound recording
• Hi-res CMOS image sensor
• Motion picture resolution: up to 1080p Full HD (1920
x1080ppi) high video resolution @ 24fps (720p @ 30fps)
• 1,5” color LCD display
• Still image resolution: up to 12Mpix
• Wide angle lens: 120º
• 12x IR LEDs frontlight
• Supported media formats: AVI (MJPEG), JPG
• Motion detection
• Time stamp
• SOS function
4
• Cycle overwriting when memory is full
• Built in micro SD memory card socket (up to 32GB cards
are supported) *)
• Reliable on- glass mounting support
• Powered from car lighter socket
• Instant recording/end recording when engine started/
stopped
Built-in lithium support battery (up to 10 min recording) **)
•
• Multilingual, easy to operate user menu
• Small size: 65x40x50mm
*) Note. Device requires high speed data recording. Please
use Class 6 or higher memory card. Class 4 or lower memory
cards can be not compatible.
**) Note. Camera must be powered by car power adaptor
included in the set. Built in battery is only for short time,
emergency powering in case of disabled main power.
Due to continuous development specication and appearance
of product are subject to change without prior notice. For technical support please visit www.media-tech.eu.
Page 5
U-DRIVE UP
Kamera samochodowa
MT4045
Instrukcja obsługi
Page 6
PL
Ogólne
2
1. Przycisk UP
2. Przycisk MENU
3. Przycisk DOWN
4. Gniazdo USB/Gniazdo ładowarki
5. Obiektyw
6. Głośnik
7. Przycisk OK
8. Przycisk MODE
9. Przycisk POWER
10. Wyświetlacz LCD
11. Gniazdo microSD
12. Diody IR
13. Gniazdo uchwytu
14. Mikrofon
15. Zworka RESET
Page 7

Przed pierwszym użyciem
Włóż kartę microSD zgodnie z ikoną na obudowie, podłącz kabel USB do komputera PC lub ładowarki na kilka
godzin aby naładować urządzenie.
Włączanie/wyłączanie
Wciśnij raz przycisk POWER aby uruchomić urządzenie.
Wciśnij i przytrzymaj przycisk na 3 sekundy aby wyłączyć
urządzenie.
Gdy ładowarka jest podłączona urządzenie uruchomi się
automatycznie i zacznie nagrywać, gdy ładowarka jest
odłączona urządzenie zakończy nagrywanie i wyłączy się
automatycznie.
Przełączanie trybów
Wciśnij przycisk MODE aby zmienić tryby wg poniższego
cyklu: [kamera/aparat cyfrowy/przeglądanie]
Tryb nocny
Gdy urządzenie pracuje wciśnij raz przycisk POWER aby
włączyć/wyłączyć automatyczne podświetlenie diodami
podczerwonymi.
Korzystanie z menu
Gdy urządzenie nie nagrywa wciśnij raz przycisk MENU aby
otworzyć menu kontekstowe, wciśnij jeszcze raz aby otworzyć ustawienia ogólne. Kontekstowe menu zależy od wybranego trybu pracy: kamera/aparat cyfrowy/przeglądanie.
Aby wejść dalej w opcje wciśnij przycisk OK, aby wyjść z
opcji wciśnij ponownie przycisk MENU, aby nawigować
użyj przycisków UP/DOWN .
Ustawienia ogólne:
■ Set Date/Time – wprowadź aktualną datę i czas
■ Auto Power O – wybierz czas po jakim urządzenie
się wyłączy gdy jest w trakcie bezczynności [o/1min
/3min]
■ Language [wybierz z listy język menu]
■ Light frequency – wybierz zgodnie z parametrami sieci
elektrycznej panującej w pomieszczeniu [50Hz/60Hz]
■ Screen Saver – wyłącz ekran po czasie [o/3min/5min
/10min]
■ Image rotation - obrót ekranu [o/on]
■ Format – wykonaj formatowanie karty microSD
■ Default setting – przywróć ustawienia fabryczne
■ Firmware version – wersja rmware
Ustawienia trybu kamera:
■ Resolution – wybierz rozdzielczość nagrywanego lmu
■ Loop recording – nagrywanie ciągłe w cyklu, długość
sekwencji [o/1min/2min/3min]
■ EV – korekta ekspozycji w zakresie od -2EV do 2EV
■ Motion Detection [on/o ] – opcja nagrywania gdy wy-
kryty jest ruch w polu widzenia
■ Audio [on/o ] – nagrywanie dźwięku
■
Date Stamp [on/o] – umieszczenie daty na nagraniach
PL
3
Page 8

■ Gsensor [o/2G/4G/8G] – wybierz poziom wstrząsu,
który powoduje zabezpieczenie aktualnej sekwencji
przed skasowaniem (oznacz jako “tylko do odczytu”)
■ Button sound [on/o ] – dźwięk przycisków
PL
Korzystanie z urządzenia
Podłącz ładowarkę, urządzenie włączy się automatycznie i
zacznie nagrywać. Gdy urządzenie zostało włączone ręcznie
wciśnij przycisk OK aby rozpocząć/zakończyć nagrywanie.
Jeżeli chcesz zabezpieczyć plik przed usunięciem (jeżeli
ustawiono wcześniej nagrywanie w cyklu) wciśnij przycisk
MODE – u góry ekranu pojawi się symbol kłódki.
Przeglądanie plików za pomocą komputera PC
Za pomocą kabla USB podłącz do komputera PC, następnie wybierz “Mass Storage” i wciśnij przycisk OK. Teraz
można przekopiować pliki z karty microSD na pulpit.
Specykacja
• Kamera samochodowa
• Rejestracja obrazu i dźwięku
• Sensor CMOS o wysokiej rozdzielczości
• Rozdzielczość lmu: maks 1080p Full HD
• Szybkość obrazu: 30 fps (720p), 24fps (1080p)
• Kolorowy ekran LCD 1,5 cala
• Rozdzielczość obrazu nieruchomego do 12Mpix
• Kąt widzenia: 120 stopni
• 12 diod podczerwonych
4
• Obsługiwane formaty: AVI (MJPEG), JPG
• Detekcja ruchu
• Znacznik daty
• Funkcja SOS
• Nagrywanie cykliczne (nadpisywanie w przypadku braku
miejsca na karcie)
• Wbudowany czytnik kart pamięci micro SD (obsługa kart pamięci o pojemności do 32GB) *)
• Uchwyt do mocowania na szybie
• Zasilanie z gniazda zapalniczki samochodowej
• Rozpoczęcie/zakończenie nagrywania w momencie uruchomienia/zgaszenia silnika
• Wbudowana podtrzymująca bateria litowo-jonowa - do 10
minut nagrania awaryjnego w przypadku braku zasilania **)
• Wielojęzyczne, łatwe w obsłudze menu
• Bardzo małe rozmiary: 65x40x50mm
*) Uwaga. Urządzenie wymaga dużej szybkości nagrania na
nośniku pamięci. Zalecamy zastosowanie kart pamięci klasy
6 i wyższej. W przypadku kart pamięci klasy 4 i niższej mogą
wystąpić problemy ze zgodnością.
**) Uwaga. Kamera podczas pracy musi być zasilana z dołączonego do zestawu zasilacza. Bateria służy jedynie do podtrzymania i kontynuacji pracy kamery przez kilka najbliższych
minut w przypadku braku głównego zasilania
Ze względu na ciągły rozwój specykacja oraz wygląd urządzenia może ulec zmianie bez wcześniejszego powiadomienia.
Pomoc techniczna dostępna na www.media-tech.eu.
Page 9

U-DRIVE UP
Your personal Driving Blackbox!
MT4045
Manual del utilizador
Page 10

Descripción
ES
2
1. Botón UP
2. MENU
3. Botones
4. Toma USB/Charging
5. Lente
6. Altavoz
7. OK
8. Tecla MODE
9. Botón POWER
10. LCD
11. MicroSD ranura
12. LEDs IR
13. Jack
14. Micrófono
15. Boton de reset
Page 11

Antes del primer uso
Inserte la tarjeta microSD como un icono en el chasis, conecte el cable USB a un PC o un cargador durante unas
horas para cargar el dispositivo.
On/O
Pulse el botón POWER una vez para activar el dispositivo.
Mantenga pulsado el botón durante tres segundos para
apagar el dispositivo.
Cuando el cargador está conectado a la unidad comenzará a grabar automáticamente cuando se desconecta el
cargador de la unidad se detiene la grabación y se apaga
automáticamente.
El cambio entre los modos de
Pulse el botón MODE para cambiar el modo de acuerdo
con el siguiente ciclo: [Cámara/cámara digital/view]
Modo nocturno
Cuando la máquina está en funcionamiento, pulse el botón POWER una vez para encender/apagar la retroiluminación LED infrarrojo automático.
Uso del menú
Cuando no está grabando, pulse el botón MENU una vez
para abrir el menú contextual y, a continuación, pulse de
nuevo para abrir las Opciones generales. Menú contextual
depende del modo de funcionamiento seleccionado: La
cámara/cámara digital/reproducción.
Para tener acceso a más opciones, pulse el botón Aceptar
para salir, pulse el botón MENU otra vez para navegar con
los botones UP/DOWN.
Conguración general:
■
Ajustar Fecha/Hora - Introduzca la fecha y la hora actuales
■ Apagado automático - Seleccione el tiempo tras el cual
la unidad se apagará cuando se está en el reposo [o/
1min/3min]
■ Language [seleccionar el idioma del menú]
■ Frecuencia de la Luz - elegir de acuerdo a los paráme-
tros eléctricos existentes en la habitación [50/60Hz]
■ Protector de pantalla - apague la pantalla después de la
hora [o/3min/5min/10min]
■ Rotación de imagen - Pantalla giratoria [on/o]
■ Format - Formato de la tarjeta microSD
■
Ajustes por defecto - restaurar la conguración de fábrica
■ Versión de rmware - versión de rmware
Ajustes de la cámara:
■
Resolución - Seleccione la resolución del vídeo grabado
■ Coloque la grabación - grabación de un ciclo continuo,
la longitud de la secuencia [ o/1min/2min/3min ]
■ EV - compensación de la exposición en el rango de 2EV a 2EV
■ Detección de movimiento [on/o ] - La grabación cuando se detecta movimiento en el campo de visión
■ Sonido [on/o ] - Grabación de audio
ES
3
Page 12

■ Sello de fecha [on/o ] - la fecha de la grabación
■ Gsensor [o/2G/4G/8G] - elegir el nivel de impacto que
provoca la actual secuencia de protección contra el borrado (marca de “sólo lectura”)
■ Botón de sonido [on/o ] - Botones del sonido de
Uso de la
ES
Enchufe el cargador, el dispositivo se enciende y comienza la grabación. Cuando el dispositivo está encendido
presionar manualmente el botón OK para iniciar/detener
la grabación.
Si desea proteger el archivo sea eliminado (si el récord
establecido anteriormente en el ciclo), presione el botón
MODE - en la parte superior del símbolo de bloqueo de la
pantalla aparece.
Ver archivos de su PC
Utilice el cable USB a su PC, a continuación, seleccione
“Mass Storage” y, a continuación, pulse el botón Aceptar.
Ahora usted puede copiar los archivos desde la tarjeta microSD en el escritorio.
Specication
• Car digital video recorder
• Video and sound recording
• Hi-res CMOS image sensor
• Motion picture resolution: up to 1080p Full HD
(1920x1080ppi) high video resolution @ 24fps (720p @ 30fps)
4
• 1,5” color LCD display
• Still image resolution: up to 12Mpix
• Wide angle lens: 120°
• 12x IR LEDs frontlight
• Supported media formats: AVI (MJPEG), JPG
• Motion detection
• Time stamp
• SOS function
• Cycle overwriting when memory is full
• Built in micro SD memory card socket (up to 32GB cards are
supported) *)
• Reliable on- glass mounting support
• Powered from car lighter socket
• Instant recording/end recording when engine started/stopped
•
Built-in lithium support battery (up to 10 min recording) **)
• Multilingual, easy to operate user menu
• Small size: 65x40x50mm
*) Note. Device requires high speed data recording. Please use
Class 6 or higher memory card. Class 4 or lower memory cards
can be not compatible.
**) Note. Camera must be powered by car power adaptor included in the set. Built in battery is only for short time, emergency powering in case of disabled main power.
Debido al continuo desarrollo de las especicaciones y el aspecto están sujetos a cambios sin previo aviso. La asistencia
técnica está disponible en www.media-tech.eu.
Page 13

U-DRIVE UP
Your personal Driving Blackbox!
MT4045
Használati útmutató
Page 14

HU
Áttekintés
2
1. FEL gomb
2. MENU gomb
3. LE gomb
4. USB foglalat/DC input
5. Kamera lencse
6. Hangszóró
7. OK gomb
8. MODE gomb
9. BEKAPCSOLÁS gomb
10. LCD képernyő
11. microSD kártyahely
12. IR led
13. Rögzítő foglalat
14. Mikrofon
15. RESET kapcsoló
Page 15

Első használat előtt
Helyezze be a microSD kártyát a foglalatba, majd töltse az
eszközt USB porton keresztül néhány órán át.
Be/kikapcsolás
Nyomja mag a bekapcsolás gombot egyszer a bekapcsoláshoz. Kikapcsoláshoz nyomja meg ugyan ezt a gombot
3 másodpercig.
Üzemmódok
Nyomja meg a MODE gombot a megfelelő üzemmód kiválasztásához.:
[movie mode/still capture/playback]
Éjszakai mód
Működés közben nyomja meg a Bekapcsolás gombot
egyszer, hogy aktiválja/deaktiválja az IR ledet.
Menü
Mikor az eszköz nincsen használatban nyomja meg egyszer a MENU gombot kontextus opció eléréséhez, nyomja
meg újra az általános opciók eléréséhez. A kontextus menüben választható módok: movie/still capture/playback.
Az opció kiválasztásához nyomja meg az OK gombot,
kilépéshez nyomja meg a MENU gombot, navigáláshoz
használja a FEL/LE gombokat.
Általános beállítások:
■ Set Date/Time – írja be az aktuális dátumot és időt
■ Auto Power o – válassza meg az automata kikapcsolá-
si időt [o/1min/3min]
■ Language [válassza ki a menü nyelvét]
■ Light Frequency – válassza ki a megfelelő frekvenciát
[50Hz/60Hz]
■ Screen Saver – LCD kikapcsolás [o/ 3min után/ 5min/
után 10min után]
■ Image Rotation - képforgatás [o/on]
■ Format – microSD kártya formátum kiválasztása
■ Default Setting – gyári beállítások visszaállítása
■ Firmware verzió
Movie Mód beállítás:
■ Resolution – felbontás kiválasztás
■ Loop recording – felvétel részekre vágása [o/1min
/2min/3min]
■ EV – exponálás kompenzáció kiválasztása -2EV and 2EV
■ Motion Detection [on/o ]- Mozgásérzékelés be/kikap-
csolása
■ Audio [on/o ] – felvétel hanggal vagy hang nélkül
■ Date Stamp [on/o ] – időbélyegző feltüntetése a felvé-
telen
■ Gsensor [o/2G/4G/8G] – Automata le védelem beállítása (hány G rázkódásnál)
■ Button sound [on/o ] - hangerőszabályozó
HU
3
Page 16

Eszköz használata
Csatlakoztassa az eszközt a gépjármű DC töltőjéhez és az
eszköz megkezdi a felvételt. Manuálisan is bekapcsolhatja
az eszközt, ekkor azonban manuálisan kell a felvételt is elindítania. Ehhez nyomja meg OK gombot.
Fileok megtekintése
USB kábelen keresztül kösse össze az eszközt számítógépével majd az eszköz MASS Storage-ként megjelenik, ezután nyomjon OK-t. A leok másolhatóvá válnak az eszköz
HU
és a számítógép között.
Specication
• Car digital video recorder
• Video and sound recording
• Hi-res CMOS image sensor
• Motion picture resolution: up to 1080p Full HD (1920
x1080ppi) high video resolution @ 24fps (720p @ 30fps)
• 1,5” color LCD display
• Still image resolution: up to 12Mpix
• Wide angle lens: 120º
• 12x IR LEDs frontlight
• Supported media formats: AVI (MJPEG), JPG
• Motion detection
• Time stamp
• SOS function
• Cycle overwriting when memory is full
4
• Built in micro SD memory card socket (up to 32GB cards
are supported) *)
• Reliable on- glass mounting support
• Powered from car lighter socket
• Instant recording/end recording when engine started/
stopped
Built-in lithium support battery (up to 10 min recording) **)
•
• Multilingual, easy to operate user menu
• Small size: 65x40x50mm
*) Note. Device requires high speed data recording. Please
use Class 6 or higher memory card. Class 4 or lower memory
cards can be not compatible.
**) Note. Camera must be powered by car power adaptor
included in the set. Built in battery is only for short time,
emergency powering in case of disabled main power.
A specikáció és a termék megjelenése előzetes értesítés
nélkül változhatnak. Technikai támogatásért látogasson el
www.media-tech.eu honlapra.
Page 17

U-DRIVE UP
Your personal Driving Blackbox!
MT4045
Ръководство на
потребителя
Page 18

BG
Преглед
2
1. Бутон UP
2. Бутон MENU
3. Бутон DOWN
4. USB/DC гнездо
5. Обектив на камерата
6. Високоговорител
7. Бутон ОК
8. Бутон MODE
9. Бутон POWER
10. LCD екран
11. Слот за microSD карта
12. Инфраред (свето)диод
13. Гнездо за поставка/монтаж
14. Микрофон
15. Ключ RESET
Page 19

Преди първоначална употреба
Поставете microSD карта според диаграмата, включете
устройството към USB порт за няколко часа, за да се зареди батерията.
Включване/Изключване
Натиснете веднъж POWER бутона, за да включите устройството. Натиснете и задръжте същия бутон за 3 секунди, за да изключване.
Когато устройството e свьрзано с постоянен източник
на ток, то ще се включи автоматично, а при спиране на
захранването ще се изключи автоматично.
Превключване на режими
Натиснете бутона MODE, за да превключите режимите в
следния ред: [филмов/заснемане/възпроизвеждане]
Нощен режим
Докато устройството е включено натиснете веднъж
POWER бутона, за да включите/изключите автоматичната
инфраред светлина.
Навигация в менюто
Докато устройството не е в режим на записване натиснете MENU бутона веднъж за контекстна опция, натиснете
отново за общи настройки. Контекстното меню зависи от
избрания режим: филмов/заснемане/възпроизвеждане.
За да изберете опция натиснете OK бутона, за да излезете натиснете бутона MENU отново, използвайте бутона
UP/DOWN за навигация.
Общи настройки:
■ Set Date/Time – вьвеждане на текущата дата и час
■ Auto Power o – избиране на време за изключване на
устройството, докато е в режим на готовност [изкл./
1мин./3мин.]
■ Language [избиране език на менюто]
■ Light Frequency – коригиране [ 50Hz/60Hz ] сьобразно
осветлението на закрито
■ Screen Saver – изключване на екрана [изкл./след 3
мин./след 5 мин./след 10 мин.]
Image Rotation [o/on] - завъртане на екрана [изкл./вкл.]
■
■ Format - форматиране на microSD карта
Default Setting - възстановяване на фабричните настройки
■
■ Firmware version - версия на фърмуера
Настройки Филмов режим:
■ Resolution - избиране на резолюцията
■ Loop recording - записьт може да бъде разделен на
кратки интервали [изкл./1 мин./2 мин./3 мин.]
■ EV - изберане компенсация на експозицията между
-2EV и 2EV
■ Motion Detection [on/o] - записване, когато долови
движение [вкл./изкл.]
■ Audio [on/o ] - записване със звук [вкл./изкл.]
Date Stamp [on/o] – пос тавяне на дата при запис на филми
■
■ Gsensor [o/2G/4G/8G] - изберете силата на детекци-
ята на шок за автоматична защита на записания файл
(маркирайте файла като“read only”) [изкл./2G/4G/8G]
■ Button sound [on/o ] – бутон за звука [вкл./изкл.]
BG
3
Page 20

Използване на устройството
Включете зарядното устройство, устройството се включва и започва да записва автоматично. Може да включите
устройството ръчно, след което натиснете бутона OK, за
да започнете/прекратите записването.
Ако искате да защитите файл преди изтриване (ако сте
задали интервал от време), докато е в режим на превключване натиснете бутона MODE – икона с катинар ще
се покаже в горната част на екрана.
Преглед на файлове на компютър
Използвайте USB кабел и включете устройството кьм
компютър, след това изберете „Mass Storage“ и натисне-
BG
те OK. Сега можете да копирате файл от microSD картата
на работния плот.
Specication
• Car digital video recorder
• Video and sound recording
• Hi-res CMOS image sensor
• Motion picture resolution: up to 1080p Full HD (1920
x1080ppi) high video resolution @ 24fps (720p @ 30fps)
• 1,5” color LCD display
• Still image resolution: up to 12Mpix
• Wide angle lens: 120º
• 12x IR LEDs frontlight
• Supported media formats: AVI (MJPEG), JPG
• Motion detection
4
• Time stamp
• SOS function
• Cycle overwriting when memory is full
• Built in micro SD memory card socket (up to 32GB cards
are supported) *)
• Reliable on- glass mounting support
• Powered from car lighter socket
• Instant recording/end recording when engine started/
stopped
Built-in lithium support battery (up to 10 min recording) **)
•
• Multilingual, easy to operate user menu
• Small size: 65x40x50mm
*) Note. Device requires high speed data recording. Please
use Class 6 or higher memory card. Class 4 or lower memory
cards can be not compatible.
**) Note. Camera must be powered by car power adaptor
included in the set. Built in battery is only for short time,
emergency powering in case of disabled main power.
Поради непрекъснатото развитие спецификацията
и външния вид на продукта подлежат на промяна без
предварително известие. За техническа помощ, моля
посетете www.media-tech.eu
Page 21

Hinweis zum Umweltschutz:
D
Ab dem Zeitpunkt der Umsetzung der europäischen Richtlinie 2002/96/EU in nationales Recht gilt folgendes: Elektrische und elektronische Geräte dürfen nicht mit dem Hausmüll entsorgt werden. Der Verbraucher ist
gesetzlich verpichtet, elektrische und elektronische Geräte am Ende ihrer Lebensdauer an den dafür eingerichteten, öentlichen Sammelstellen oder an die Verkaufstelle zurückzugeben. Einzelheiten dazu regelt das
jeweilige Landesrecht. Das Symbol auf dem Produkt, der Gebrauchsanleitung oder der Verpackung weist auf diese Bestimmungen hin. Mit der Wiederverwertung, der stoichen Verwertung oder anderer Formen der
Verwertung von Altgeräten leisten Sie einen wichtigen Beitrag zum Schutz unserer Umwelt. In Deutschland gelten oben genannte Entsorgungsregeln, laut Batterieverordnung, für Batterien und Akkus entsprechend.
Note on environmental protection:
GB
After the implementation of the European Directive 2002/96/EU in the national legal system, the following applies: Electrical and electronic devices may not be disposed of with domestic waste. Consumers are obliged
by law to return electrical and electronic devices at the end of their service lives to the public collecting points set up for this purpose or point of sale. Details to this are dened by the national law of the respective
country. This symbol on the product, the instruction manual or the package indicates that a product is subject to these regulations. By recycling, reusing the materials or other forms of utilising old devices, you are
making an important contribution to protecting our environment.
Remarques concernant la protection de l'environnement:
F
Conformément à la directive européenne 2002/96/CE, et an d'atteindre un certain nombre d'objectifs en matière de protec tion de l'environnement, les règles suivantes doivent être appliquées. Elles concernent les
déchets d'équipement électriques et électroniques. Le pictogramme "picto" présent sur le produit, son manuel d'utilisation ou son emballage indique que le produit est soumis à cette réglementation. Le consommateur
doit retourner le produit usager aux points de collecte prévus à cet eet. Il peut aussi le remettre à un revendeur. En permettant enn le recyclage des produits, le consommateur contribuera à la protection de notre
environnement. C'est un acte écologique.
Nota sobre la protección medioambiental:
E
Después de la puesta en marcha de la directiva Europea 2002/96/EU en el sistema legislativo nacional, Se aplicara lo siguiente: Los aparatos eléctricos y elec trónicos, así como las pilas y las pilas recargables, no se deben
evacuar en la basura doméstica. El usuario está legalmente obligado a llevar los aparatos eléctricos y electrónicos, así como pilas y pilas recargables, al nal de su vida útil a los puntos de recogida comunales o a
devolverlos al lugar donde los adquirió. Los detalles quedaran denidos por la ley de cada país. El símbolo en el producto, en las instrucciones de uso o en el embalaje hace referencia a ello. Gracias al reciclaje, al reciclaje
del material o a otras formas de reciclaje de aparatos usados, contribuye Usted de forma importante a la protección de nuestro medio ambiente.
Informazioni per protezione ambientale:
I
Dopo l'implementazione della Direttiva Europea 2002/96/EU nel sistema legale nazionale, ci sono le seguenti applicazioni: I dispositivi elettrici ed elettronici non devono essere considerati riuti domestici. I consumatori
sono obbligati dalla legge a restituire I dispositivi elettrici ed elettronici alla ne della loro vita utile ai punti di raccolta collerici preposti per questo scopo o nei punti vendita. Dettagli di quanto riportato sono deniti
dalle leggi nazionali di ogni stato. Questo simbolo sul prodotto, sul manuale d'istruzioni o sull'imballo indicano che questo prodotto è soggetto a queste regole. Dal riciclo, e re-utilizzo del material o altre forme di utilizzo
di dispositivi obsoleti, voi renderete un importante contributo alla protezione dell'ambiente.
Notitie aangaande de bescherming van het milieu:
NL
Ten gevolge van de invoering van de Europese Richtlijn 2002/96/EU in het nationaal juridisch system, is het volgende van toepassing: Electrische en electronische toestellen mogen niet weggegooid worden tesamen met
het huishoudelijk afval. Consumenten zijn wettelijk verplicht om electrische en elctronische apparaten op het einde van gebruik in te dienen bij openbare verzamelplaatsen speciaal opgezet voor dit doeleinde of bij een
verkooppunt. Verdere specicaties aangaande dit onderwerp zijn omschreven door de nationale wet van het betreende land. Dit symbool op het product, de gebruiksaanwijzing of de verpakking duidt erop dat het
product onderworpen is aan deze richtlijnen. Door te recycleren, hergebruiken van materialen of andere vormen van hergebruiken van oude toestellen, levert u een grote bijdrage aan de bescherming van het mileu.
Anvisninger til beskyttelse af milj¢et:
DK
Efter implementeringen af det europÒiske direktiv 2002/96/EU i det nationale lovgivningssystem gÒlder f¢lgende: Elektriske og elektroniske apparater må ikke bortskaes med husholdningsaaldet. Forbrugeren er
ved afslutningen af elektriske og elektroniske apparaters levetid lovmÒssigt forpligtet til at aevere disse på de dertil indrettede oentlige indsamlingssteder eller hos sÒlgeren. Enkeltheder vedr¢rende dette fastlÒgges
af de respektive landes nationale lovgivning. Dette symbol på produktet, betjeningsvejledningen eller emballagen viser, at produktet er underlagt disse bestemmelser. Med genanvendelse, genanvendelse af materialer
eller andre former for genbrug af gamle apparater yder du et vigtigt bidrag til beskyttelse af vores milj¢.
Page 22

Nota em Protecção Ambiental:
P
Após a implementação da directiva comunitária 2002/96/EU no sistema legal nacional, o seguinte aplica-se: Todos os aparelhos eléctricos e electrónicos não podem ser despejados juntamente com o lixo doméstico
Consumidores estão obrigados por lei a colocar os aparelhos eléctricos e electrónicos sem uso em locais públicos especícos para este efeito ou no ponto de venda. Os detalhes para este processo são denidos por lei
pelos respectivos países. Este símbolo no produto, o manual de instruções ou a embalagem indicam que o produto está sujeito a estes regulamentos. Reciclando, reutilizando os materiais dos seus velhos aparelhos, esta
a fazer uma enorme contribuição para a protecção do ambiente.
Not om miljöskydd:
S
Efter implementeringen av EU direktiv 2002/96/EU i den nationella lagstiftningen, gäller följande: Elekriska och elektroniska apparater får inte avyttras med hushållsavfall.
Konsumenter är skyldiga att återlämna elektriska och elektroniska apparater vid slutet av dess livslängd till, för detta ändamål, oentliga uppsamlingsplatser. Detaljer för detta denieras via den nationella
lagstiftningen i respektive land. Denna symbol på produkten, instruktionsmanualen eller på förpackningen indikerar att produkten innefattas av denna bestämmelse. Genom återvinning och återanvändning av
material bidrar du till att skydda miljön och din omgivning.
Ympäristönsuojelua koskeva ohje:
FIN
Siitä lähtien, kun Euroopan unionin direktiivi 2002/96/EU otetaan käyttöön kansallisessa lainsäädännössä, pätevät seuraavat määräykset: Sähkö- ja elektroniikkalaitteita ei saa hävittää talousjätteen mukana.
Kuluttajalla on lain mukaan velvollisuus toimittaa sähkö- ja elektroniikkalaitteet niiden käyttöiän päätyttyä niille varattuihin julkisiin keräyspisteisiin tai palauttaa ne myyntipaikkaan. Tähän liittyvistä yksityiskohdista
säädetään kulloisenkin osavaltion laissa. Näistä määräyksistä mainitaan myös tuotteen symbolissa, käyttöohjeessa tai pakkauksessa. Uudelleenkäytöllä, materiaalien uudelleenkäytöllä tai muilla vanhojen laitteiden
uudelleenkäyttötavoilla on tärkeä vaikutus yhteisen ympäristömme suojelussa.
Informasjon om beskyttelse av milj¢et:
N
Etter implementering av EU-direktiv 2002/96/EU i det nasjonale lovverk, er f¢lgende gjort gjeldende: Elektrisk og elektronisk utstyr skal ikke kastes sammen med husholdningsavfall. Forbrukere er pålagt ved lov å
returnere elektrisk og elektronisk utstyr ved enden av levetiden til oentlige oppsamlingspunkter, oppsatt for dette formål eller til utsalgssteder for slikt utstyr. Detaljer rundt dette er denert i lovverket i det respektive
land.Dette symbolet på produktet, bruksanvisningen eller forpakningen forteller at et produkt faller inn under disse betingelsene. Ved resirkulering, gjenbruk av materialet eller på andre måter å nyttiggj¢re gammelt
utstyr bidrar du på en viktig måte til å beskytte vårt felles milj¢!
Wskazówki dotyczące ochrony środowiska:
PL
Od czasu wprowadzenia europejskiej dyrektywy 2002/96/EU do prawa narodowego obowiazują następujące ustalenia: Urzadzeń elektrycznych i elektronicznych nie należy w yrzucać wraz z innymi odpadami
domowymi. Użytkownik zobowiązany jest, zepsute lub niepotrzebne już urządzenia elektryczne i elektroniczne odnieść do specjalnego punktu, wyrzucić do specjalnego kontenera lub ewentualnie odnieść urządzenie
do sprzedawcy. Szczegółowe kwestie regulują przepisy prawne danego kraju. Informuje o tym symbol przekreślonego kosza na śmieci umieszczony na opakowaniu produktu lub w instrukcji. Segregując śmieci
przeznaczone do recyklingu pomagasz chronić środowisko naturalne. Jeżeli niniejszy produkt jest wyposażony w baterie lub akumulatory, pamiętaj, że po zużyciu należy je dostarczyć do odpowiedniego punktu
przyjmującego zużyte akumulatory i baterie. Nie wolno ich wyrzucać wraz z odpadami komunalnymi.
Környezetvédelmi tudnivalók:
H
Az európai irányelvek 2002/96/EU ajánlása szerint, a megjelölt idoponttól kezdve, minden EU-s tagállamban ér vényesek a következok: A leselejtezett elektromos és elektronikus készülékeket nem szabad a háztartási
szemétbe dobni. Az elhasznált és muködésképtelen elektromos és elektronikus készülékek gyujtésére tör vényi eloírás kötelez mindenkit, ezért azokat el kell szállítani egy kijelölt gyujto helyre vagy visszavinni a vásárlás
helyére. A termék csomagolásán feltüntetett szimbólum egyértelmu jelzést ad erre vonatkozóan a felhasználónak. A régi készülékek begyujtése, visszaváltása vagy bármilyen formában történo újra- hasznosítása közös
hozzájárulás környezetünk védelméhez.
Ochrana životního prostredí:
CZ
Evropská smernice 2002/96/EU stanovuje: Elektrické a elektronické prístroje se nesmí vhazovat do domácího odpadu. Elektrické a elektronické prístroje musí být zlikvidovány podle zákona na místech k tomu urcených.
Recyklací nebo jiným zpusobem zpracování výrazne prispíváte k ochrane našeho životního prostredí!
Ochrana životného prostredia:
SK
Európska smernica 20002/96/EU stanovuje: Elektrické a elektronické zariadenia sa nesmú vyhadzovat do domáceho odpadu. Spotrebitel je zo zákona povinný zlikvidovat elektrické a elektronické zariadenia na miesta
k tomu urcené. Symbolizuje to obrázok v návode na použitie, alebo na balení výrobku. Recykláciou, alebo inými formami využitia starých prístrojov prispievate v znacnej miere k ochrane vášho životného prostredia.
 Loading...