

Page 1

U-DRIVE GPS
To find Your Safe way...
MT5034
User Manual
Page 2
Introduction
EN
Thank you for buying this GPS navigation device. It is
equipped with built-in video camera, FM transmitter,
2x microSD card slot. Please read this manual carefully
before using the device.
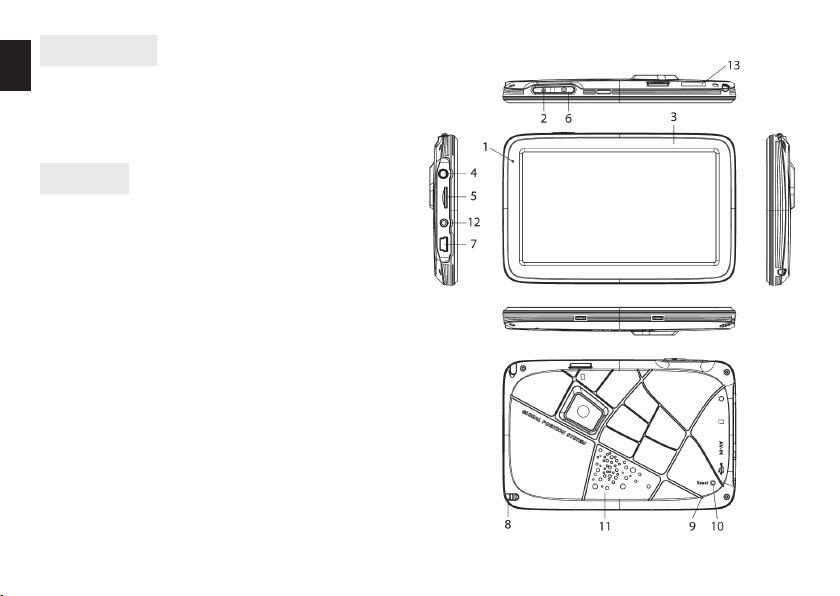
Overview
1. Power LED
2. Power/Main menu button
3. LCD touch screen
4. Headphones jack
5. MicroSD slot (for navigation software/media files)
6. Camera/Snapshot button
7. USB socket
8. Stylus
9. Microphone
10. Reset button
11. Speaker
12. AV-IN (optional)
13. MicroSD slot (for camera only)
2
Page 3
Charging
Use USB cable and plug device to PC computer or power adaptor. During charging red power LED will be on,
when charging is finished blue power LED is on.
Note! Fully charge device before first use (it takes
ca. 3 hours).
Installing MicroSD card
Make sure that device is switched off, then insert microSD card into slot according to icon on the casing.
Put inside until card is latched.
Note! Device has two slots, upper slot is for camera
purpose only, side slot is for navigation software
and user files (media files and documents).
Power button
Press and hold power button for 1 sec to power on the
device, a startup window will appear.
You can use this button to resume home screen. Press
and hold power button for 3 sec to show shutdown option (sleep or shutdown).
EN
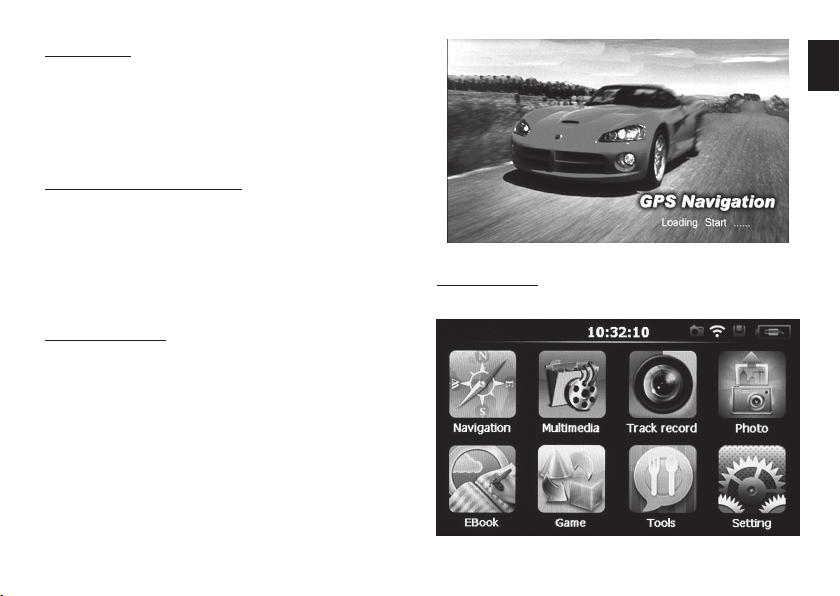
Main menu
When system is loaded you will see following screen.
3
Page 4

EN
may use other navigation software compatible with
Windows CE 6.0.
4
Navigation
Use this icon to run navigation software. Following screens are only for reference. User
Note! Refer to navigation software user manual.
Multimedia
Note! Insert microSD with user media files before
running the device – otherwise files will not be visible.
Page 5

Video
Music
Press this icon to resume home screen, music will
be played in the background.
EN
Photo
Games
Press icon to enter games
5
Page 6

EN
Setting
Here you can configure basic functions of device.
Volume – adjust system volume.
Date Time – adjust date and time setting.
Language – select menu language.
Backlight – adjust LCD brightness.
Calibration – calibrate touch screen.
System Info – show information about system.
Navi Path – click icon and select path to navigation
command file (*.exe)
Restore Set – restore factory settings.
GpsInfo – show information about GPS signal
USB – select USB mode: Mass Storage or MS ActiveSync.
Track record – setting for built-in camera.
Tools
Press icon to enter tools applications
6
Page 7

Built-in camera
Click “Track Record” icon or press “Camera/
snapshot” button to show camera preview
window
Note! Insert microSD card into appropriate slot before running this module. Recording is working in
the background, you may minimize this window
and use other application.
EN
Functions and technical specification of device are subject
to change without prior notice.
For technical support please visit www.media-tech.eu
7
Page 8

EN
8
 Loading...