

Page 1
SCANLINE COMBO
PORTABLE AUTOFEEDING COLOR SCANNER FOR A4 DOCUMENTS
Instructions Manual
MT4093
EN
Key features
¯ Color/ Mono JPEG/PDF scan selection
¯ High/Medium/Low dpi scan selection
¯ Directly save JPEG/PDF fi les to the micro SD card
¯ Support the micro SD&SDHC card up to 32GB
¯ Windows 7 / Vista / XP and Mac OS10.4 or above (directly plug-in, driver in-
stallation not required)
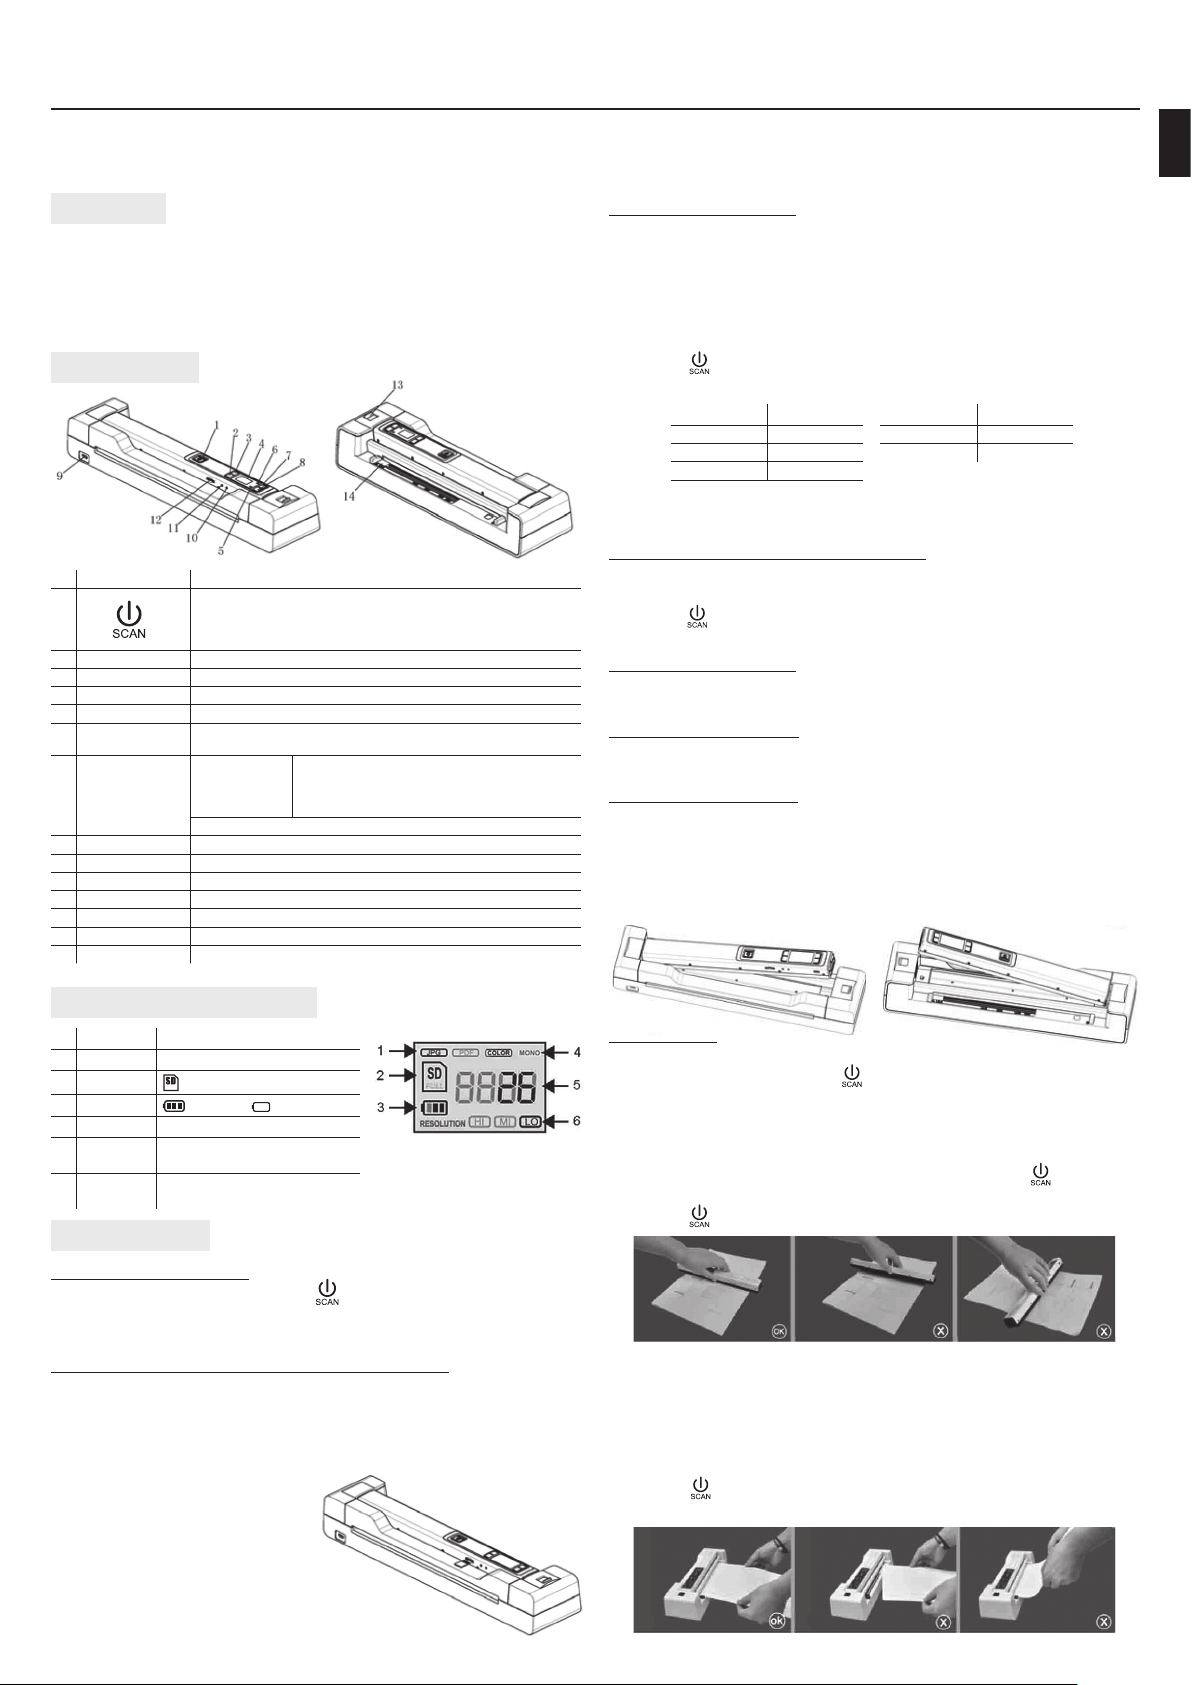
Functional parts
Part Function
1 1) For scanner without docking: Press and hold this key for 3 seconds to turn power on or off .
2 Color/Mono Select Color/Mono scan, Color/Mono mode icon will be displayed on status LCD
3 Format button Press this button to format the micro SD card.
4 LCD screen Scanning status display
5 Scan/Error LED indicator The Green LED indicates normal scanning, Red LED indicates abnormal scanning/overspeed.
6 Charge LED indicator When the Red LED keeps on, it indicates the battery is charging.
7 DPI Low resolution
8 JPEG/PDF Select JPEG/PDF scan, JPEG/PDF mode icon will be displayed on status LCD
9 USB interface Connect to a computer via USB cable provided to view and transfer fi les
10 Time Set Press to enter Time setting mode
11 Reset Press to reset the scanner (Hardware reset)
12 MicroSD card slot The micro SD card storage location
13 Fixed button Slide to put the scanner on the docking or take it out of the docking
14 Width controller Adjust to scan documents of diff erent sizes
In power on mode, press this button to start scanning, press this button again to stop.
2) For scanner with docking: Press and hold this key for 3 seconds to turn power on or off .
In power on mode, scanning will start automatically when the scanning document is detected.
When the Red LED goes out, it indicates the battery has been fully charged.
Middle resolution
High resolution
High/ Medium /Low resolution mode icon will be displayed on status LCD
300dpi
600dpi
900dpi (w/o docking)
1200dpi (w/ docking)
Time and Date setting
1. Press [TIME SET] button once to enter time setting mode by using a thin,
blunt object, such as the end of a paperclip to access the button. The LCD
status display screen will show “1 ##” (step 1) for the year. “##” is a set of
number that would be changed to correspond to the actual time/date setting. The numbers 1-5 in front of “##” indicates each step in the settings. Time
(2012.1.1~2050.12.31)
2. Press the [JPG/PDF] or [DPI] button to select the current Year.
3. Press the
4. Repeat step 2 and 3 to continue the Time and Date setting process
5. After setting the Minute, “5##”, press the [TIME SET] button again to complete
the Time and Date setting.
button once to confi rm setting.
Indicator
1## Year
2## Month
3## Day
Setting
Indicator
4## Hour
5## Minute
Setting
Formatting the micro SD memory card
1. Insert a new micro SD card into the scanner, and then turn on the scanner.
2. Press the format button into format mode. “F” will display on the LCD.
3. Press the
4. SD card indicator will blink until format is complete.
button once to format the micro SD card.
Setting the resolution
Press the [DPI] button to select High / Medium / Low resolution.
High/ Medium / Low resolution icon will be displayed on status LCD.
Setting the scan mode
Press the [JPEG/PDF] button to select JPEG/PDF mode.
JPEG/PDF icon will be displayed on status LCD.
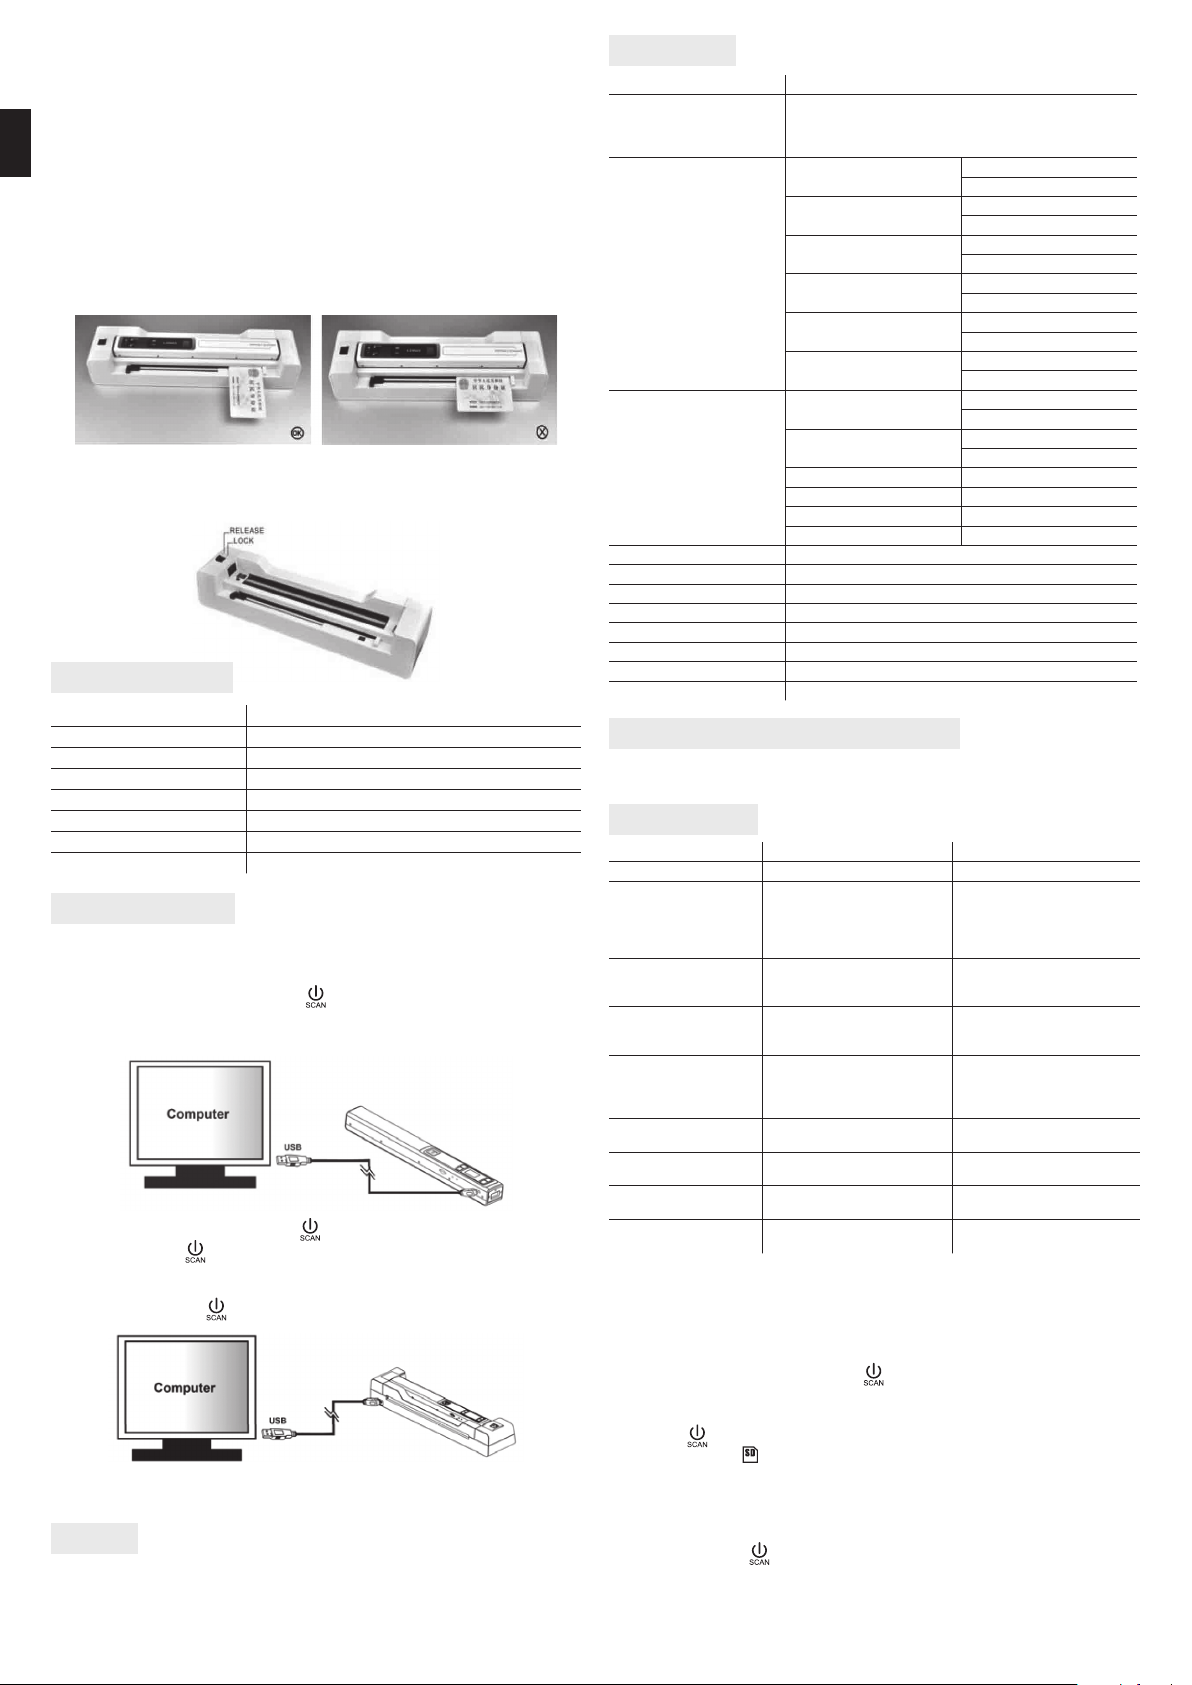
How to fi x the scanner
1. Put on the scanner
Slide the Fixed button from Lock towards Release, then put the scanner on the
docking by leaning the right side in fi rst. Use USB cable and plug it to PC computer.
2. Take out the scanner
Slide the Fixed button from Lock towards Release, then take the scanner out
from the docking by raising the left side fi rst.
Explanation of the status icons
Item Function Description
1 File Format JPEG/PDF
2 SD card indicator pliki zostaną zapisane na karcie microSD
3 Battery indicator
4 Scan Color COLOR/MONO
5 Counting
Indicator
6 Scan resolution HI:900dpi (w/o docking)/1200dpi (w/docking)
Battery is full Empty battery
Shows scanned fi les in the microSD card
MI:600dpi LO:300dpi
Using the scanner
Turn on/off the scanner
Turn on/off the scanner by pressing the button for 3 seconds.
Note: The scanner will power off automatically if no scanning action is detected
within 3 minutes.
Inserting a micro SD memory card (not included)
You must insert a micro SD Card (not supplied) to record and store your pictures.
Inserting the micro SD memory card:
1. Turn OFF the scanner.
2. Insert the micro SD card into the micro SD card slot, and gently press in until
the card is latched.
Note:
1. Do not force the card into the slot;
forcing may damage both the scanner and the micro SD memory card.
Align the micro SD card position (as
marked) and try again
2. The micro SD memory card must be
formatted before scanning. See the
following instructions.
How to scan
For scanner without docking:
a. Turn on scanner by pressing the button for 3 seconds.
b. Hold the document fi rmly with one hand on a fl at surface.
c. Place the scanner on the edge of the paper to ensure the whole document
can be scanned. Make sure to keep the scanning area in between the scanning
width indicators marked on the side of the scanner.
d. Hold the scanner fl at against the material and then press the button once.
e.
Slide the scanner slowly, keeping your hand stable to get the best quality picture.
f. Press the button again to stop scanning.
For scanner with docking:
a. Adjust the Width Controller to an appropriate gear in accordance with the size
of the document.
b. Smooth the edge of the document before scanning
c. Aim the edge of the document at the slot of the scanner. (Align to the right
side of the slot.)
d. Softly insert the paper into the slot,then the scanning will start automatically.
e. Press the button to enter into USB mode, then you can view the scanned
fi les on your computer screen.
Page 2
Notes:
1. Before scanning,make sure the micro SD card has been inserted properly and
the scanner docking has been connected to external power.
2. Once fi xed on the docking, the scanner is unable to scan black or transparent
documents.
EN
3. When the scanning document gets stuck or goes awry during the scanning
process, press Scan button to stop scanning, then take out the document and
restart scanning.
4. When scanning with docking, if no paper is detected into the scanning slot
within 4 or 5 seconds, just remove the scanning document, put it right in place
and scan again.
5. When scanning relatively thick documents such as credit card or ID, the narrow side,rather than the wide side, is suggested to be inserted into the slot to
guarantee normal scanning.
6. When the fi xed button is oriented on the “Release” side, do not touch the release perch inside the docking, since a big sound may produce from the pressing and it may hurt your fi nger.
LED light indications
LED indication Function Description
“Green” SCAN/ERROR LED ON Scan in progress.
“Green” SCAN/ERROR LED OFF Stand by/Scan is complete.
“RED” SCAN/ERROR LED ON May cause scanning error. Restart and scan again.
“RED” SCAN/ERROR LED OFF No error in scanning speed. Continue scanning process.
“RED” CHARGE LED keeps ON Battery is charging
“RED” CHARGE LED OFF Charge is over
“RED” CHARGE LED fl ashes Low power warning
Connect to computer
You may also connect your scanner to your computer and view pictures on the
computer monitor.
Without docking
Turn on your scanner by pressing the
button, connect your scanner to your
computer to enter into USB mode.”USB” symbol will display on status LCD. Click
“Open folder to view fi les” to view, import, copy, move or delete scanned fi les.
With docking:
Turn on your scanner by pressing the
button, connect your scanner to your
computer. Press the button once to enter into USB mode. Your computer will
recognize the scanner as a “Removable Disk”, ”USB” symbol will display on status LCD. Click “Open folder to view fi les” to view, import, copy, move or delete
scanned fi les. Press the button again to switch to scanning mode.
NOTE: If the Removable Device Window did not launch automatically, go to your
“My Computer” and fi nd the device under Removable Storage.
Charging
1. The scanner will keep charging when it is in connection with a computer via USB cable.
2. The scanner can also be charged via an adapter.
3. The scanner will enter into charge mode if no extra scanning action is detected
within 1 minute subsequent to each scanning.
Specifi cations
Image sensor A4 color Contact Image Sensor
Resolution High resolution: 1200dpi (w/ docking)
Minimum scanning speed
for Letter size document
Capacity (Based on 1GB microSD card.
Scan Letter size fi le, the quantity of
scans varies depending on the content
complexity)
Scan width 216mm
Scan length 300 dpi: 330cm, 600 dpi: 228cm, 900 dpi: 177cm, 1200 dpi: 127cm
File format JPEG/PDF
LCD Scanning status display
Auto Power Off 3 Minutes
USB Port USB 2.0 high speed
External memory Micro SD Card
Standard Battery 700mAH Lithium-Polymer
High resolution: 900dpi (w/o docking)
Middle resolution: 600x600 dpi
Low resolution: 300x300 dpi
Color High resolution 12 Seconds (w/o docking)
Mono High resolution 10 Seconds (w/o docking)
Color Medium resolution 8 Seconds (w/o docking)
Mono Medium resolution 6 Seconds (w/o docking)
Color Low resolution 3 Seconds (w/o docking)
Mono Low resolution 2 Seconds (w/o docking)
Color High resolution 240 Scans (Min.) (w/o docking)
Mono High resolution 250 Scans (Min.) (w/o docking)
Color Medium resolution 550 Scans (Min.)
Mono Medium resolution 600 Scans (Min.)
Color Low resolution 1580 Scans (Min.)
Mono Low resolution 1600 Scans (Min.)
12 Seconds(w/ docking)
12 Seconds(w/ docking)
10 Seconds(w/ docking)
10 Seconds(w/ docking)
8 Seconds(w/ docking)
8 Seconds(w/ docking)
150 Scans (Min.) (w/ docking)
150 Scans (Min.) (w/ docking)
Computer system minimum requirement
¯ Windows 7 / Vista / XP and Mac OS 10.4 or above (direct plug-in, driver installation not required) ¯ Pentium III or above ¯ RAM: At least 256MB ¯ USB port
Troubleshooting
Problem Cause Solution
Cannot turn on the scanner Low battery power Recharge the battery
Pictures cannot be saved
when you are scanning them
Computer does not recognize
your scanner when connected
(You cannot fi nd removable disk)
Blurry images 1. The lens of scanner is dirty.
Black Images/Black or
white vertical lines
Zebra stripes occur on the top
or bottom of scanned document
SCAN/ERROR LED is on
when scanning a document
SCAN/ERROR LED is on
after powered on
Black Image Contact Image Sensor aged. Recalibrate the scanner. Refer to the
Note: How to calibrate the scanner
Perform calibration only when white balance needs adjustment.
1. Take the scanner out of the Docking Station.
2. With the dry cleaning cloth provided, clean the scanning lens located on the
bottom of the scanner.
3. Turn on the scanner by pressing the
area of the White Balance Calibration paper provided.
4.
Press and hold the Color/Mono button. While holding the Color/Mono button,
press the
button and then release both buttons to enter into auto-calibration
mode. SD symbol
5. Do not move the scanner .Wait until the SCAN/ERROR LED turns green.
6. When the SCAN/ERROR LED is green, start scanning the white paper by sliding
the scanner across the paper until the SCAN/ERROR LED light turns off . (Slide
the scanner backwards if necessary).
7.
Press and hold the button to power off the scanner. Calibration is complete.
8. Replace the scanner onto the Docking Station..
Functions and technical specifi cation of device are subject to change without prior notice.
For technical support please visit www.media-tech.eu
1. The micro SD card has not been installed
2. Memory is full
3. The micro SD card has not been formatted
properly
Connection failure Make sure all cable connections are secured.
2. Contact Image Sensor aged.
1. Scanner senor protective glass is dirty.
2. Calibration data is off -set.
Scanning document goes awry during
scanning process
Scanning speed is too fast Press the Power/Scan button to reset and
The calibration data is destroyed Recalibrate the scanner. Refer to the
1. Install a micro SD card
2. Download the pictures from the scanner
to the computer to create storage space
3. Please refer to section: “Inserting a micro
SD memory card”
Restart the computer if necessary
1. Clean the lens with soft dry cloth.
2. The Scanner should be re-done
calibration
1. Clean the sensor’s protective glass with
clean and soft dry cloth.
2. Recalibrate scanner. Refer to the note
below.
Put scanning docunment right in place and
scan again.
scan again the document
note below
note below.
button. Place the scanner on the white
will fl ash and then stop. SCAN/ERROR LED will turn red.
 Loading...