

Page 1
SCANLINE
MT4090
Travel Mobile Scanner for A4 Documents
Key features
¯ Color/Monochrome (Mono) scan selection
¯ 600/300 dpi scan selection
¯ Direct save JPG le to MicroSD card
¯ Support MicroSD card up to 32GB
¯ Driverless under Windows XPSP2/Vista and Mac OS 10.4 or above
(direct plug-in, works on system internal drivers).
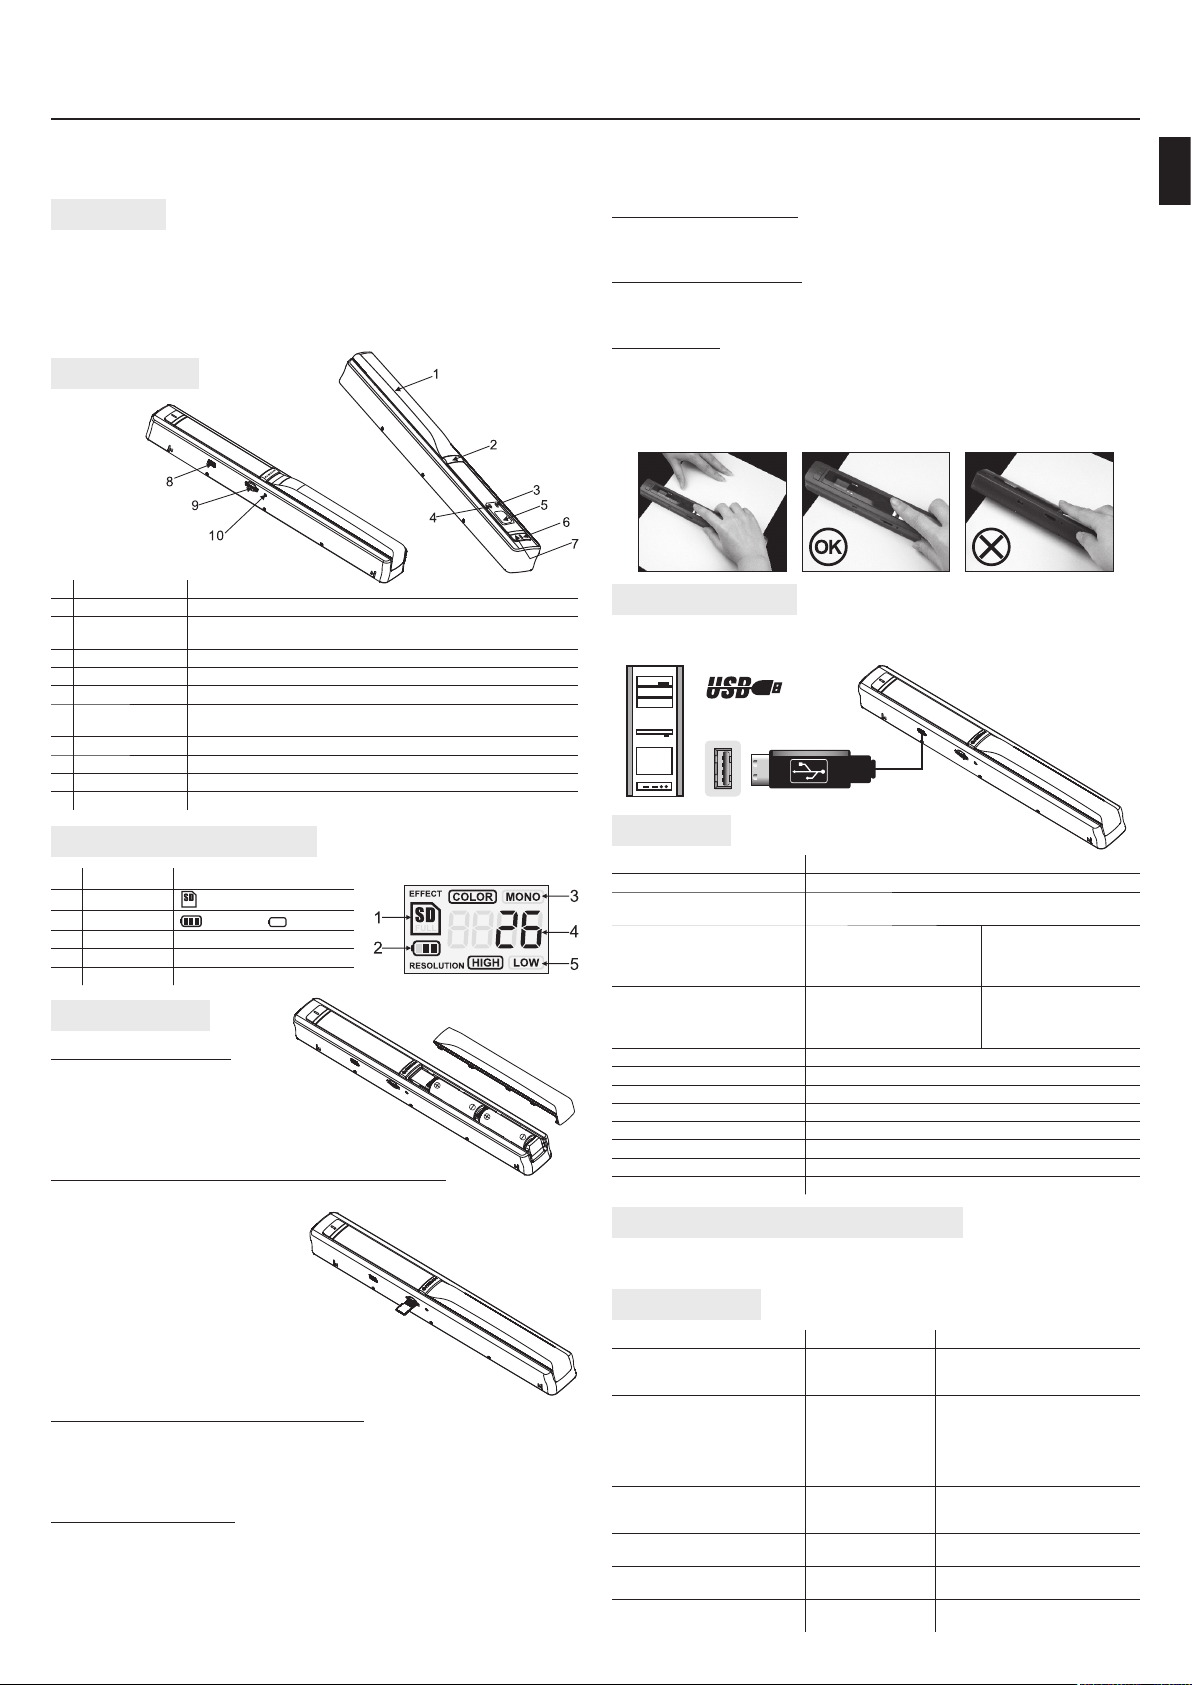
Functional parts
Part Function
1 Battery door For 2xAA alkaline batteries
2 Power/Scan Power On/O : Press and hold this key for 2 seconds to turn power on or o . In power on mode,
3 Error LED indicator Overspeed: Red LED on
4 Scan LED indicator Ready for scan; Green LED on
5 LCD screen Scanning status display
6 Resolution Select High(600dpi)/Low(300dpi) resolution; High/Low resolution mode icon will be displayed
7 C/BW Select Color/Mono scan, Color/Mono mode icon will be displayed on status LCD
8 USB interface Download scanned le to a computer via USB cable provided.
9 SD card slot MicroSD card storage location.
10 Format button Press this button to format the MicroSD card.
Explanation of the status icons
Item Function Description
1 SD card indicator
2 Battery Indicator
3 E ect indicator Color or Mono
4 Counting Indicator Show scanned les in microSD card
5 Selected resolution High: 600 dpi/Low: 300 dpi
Using the scanner
Installing the battery
1. Open the battery door.
2. Insert 2xAA alkaline batteries into
the battery compartment.
3. Turn on the scanner by pressing the [POWER]
button for 2 seconds.
Inserting a microSD memory card (not Included)
You must insert a microSD Card (not supplied) to record and store your pictures.
Inserting the microSD memory card:
1. Turn OFF the scanner.
2. Insert the microSD card into
the microSD card slot, gently press
in until card is latched.
Note: Do not force the card into the slot; forcing
may damage scanner and the microSD memory card.
Align microSD card position (as marked) and try again.
The microSD memory card must be formatted before scanning.
See the following instruction.
Formatting the microSD memory card
1. Insert a new microSD card Into the scanner, then turn on the scanner.
2. Press the format button into format mode. “F” shows on the LCD.
3. Press the Power/Scan button to start formatting the microSD card.
4. SD card indicator will blink until format is complete.
Date and time setting
1. Press TIME SET button (located next to USB socket)
2.
LCD screen will show 1 XX, use buttons C/WB and DPI to increase/decrease values.
3. Press SCAN button to con rm and set next value.
4. Date and time values are shown in the following order:
1 XX year, 2 XX month, 3 XX day, 4 XX hour, 5 XX minute
5. Once all values are entered press TIME SET button again to exit.
press this button to start scan, press this button again to stop
on status LCD
Photos will be stored in microSD card
Battery is full Empty battery
Instructions Manual
Setting the resolution
¯ Press the [DPI] button to select High/Low resolution.
High/Low resolution icon will be dlsplayed on status LCD.
Setting the scan mode
¯ Press the [C/BW] button to select Color/Mono mode,
Color/Mono icon will be displayed on status LCD.
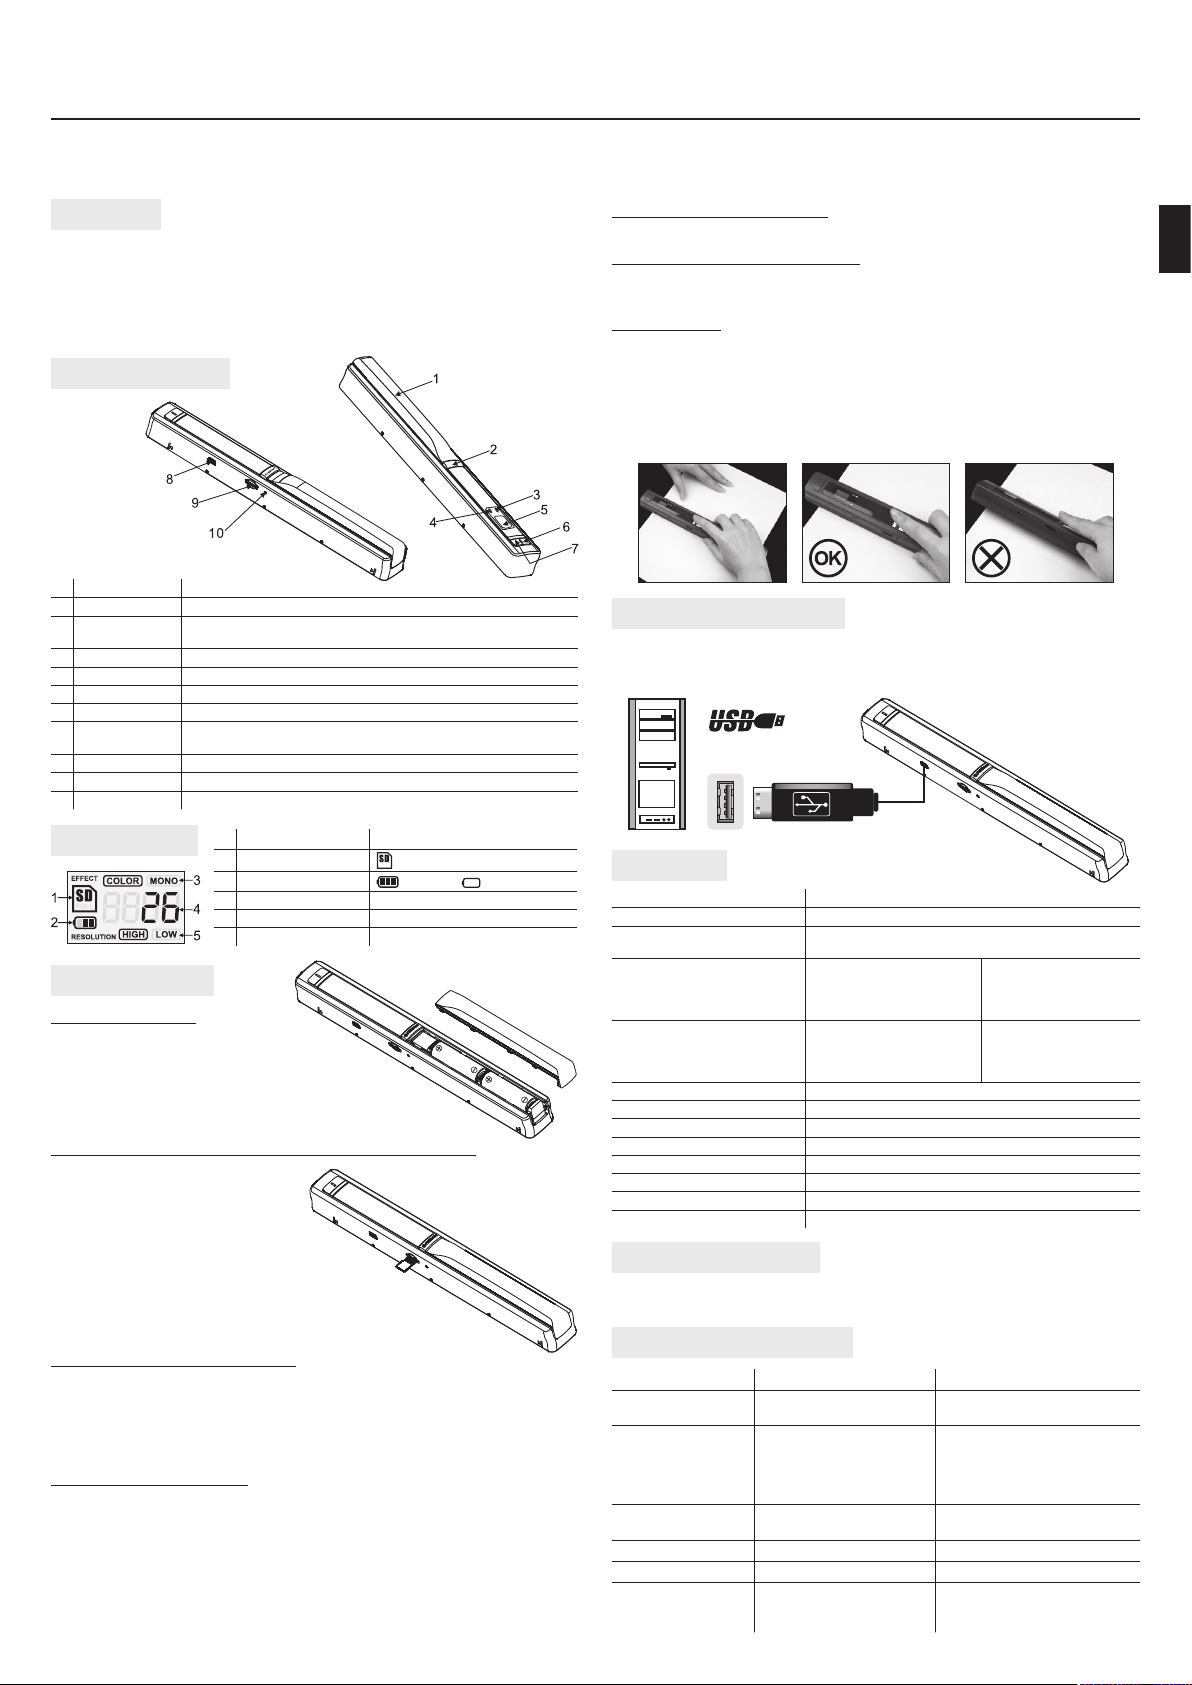
How to scan
¯ Hold the document rmly by one hand.
¯ Place the scanner on the start-scanning position.
¯ Hold the scanner tight and press the scan button once.
¯
Slide the scanner slowly and keep your hand stable to get the best quality picture.
¯ Press again to stop scanning.
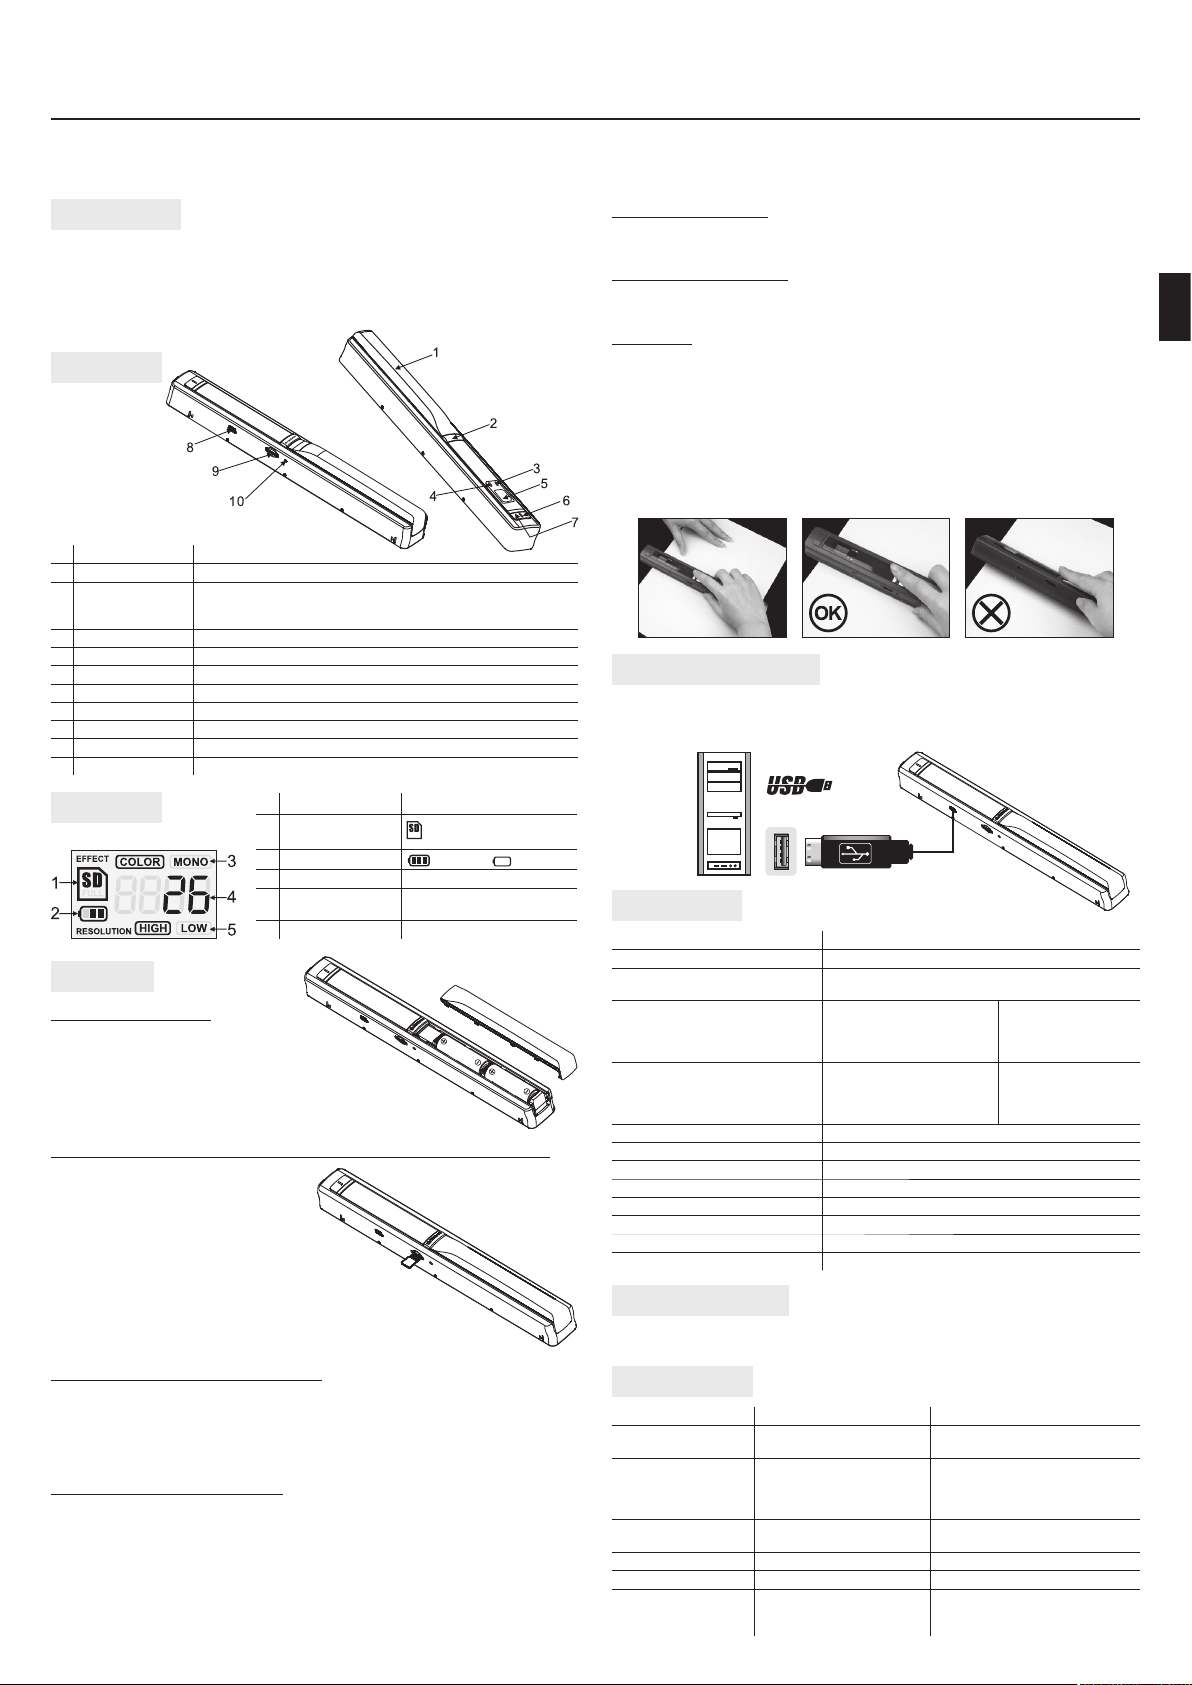
Connect to computer
You may also connect your scanner to your computer and view pictures on the
computer monitor.
Speci cation
Image sensor A4 Color Contact Image Sensor
Number of sensor 5136 dots (1st~5104 dots available)
Resolution Low resolution: 300x300 dpi (default)
Maximum scanning speed for A4
size document
Capacity (Based on 1GB microSD
card. Scan A4 size le, the quantity of scans varies depending on
the content complexity)
Scan width 8.27”
Scan length 300DPI: 50”(Max), 600DPI: 25” (Max)
File format JPEG
LCD Scanning status display
Auto Power O 3 Minutes
USB Port USB 2.0 high speed
External memory microSD Card
Standard Battery 2xAA alkaline batteries
Computer system minimum requirement
¯ Windows XP SP2/Vista and Mac OS 10.4 or above (direct plug-in, driver installation not required) ¯ Pentium II or above ¯ RAM: 64MB ¯ Interface: USB port
Troubleshooting
Problem Cause Solution
Cannot turn on the scanner 1. Low battery power
Pictures cannot be saved
when you are scanning them
Computer does not recognize
your scanner when connected.
(You cannot nd removable disk)
The battery life is very short Use wrong type of
Blurry images The lens of scanner
ERR. LED is on when scanning
a document
High resolution: 600x600 dpi
Color High resolution
Mono High resolution
Color Low resolution
Mono Low resolution
600 dpi color
600 dpi mono
300 dpi color
300 dpi mono
2. Battery not
inserted properly
1. MicroSD card has
not been installed
2. Memory is full
3. The microSD card
has not been
formatted properly
Connection failure Make sure all cable connections
battery
is dirty
Scanning speed is
too fast
13 Seconds
6.0 Seconds
3.0 Seconds
2.0 Seconds
220 Photos (Min.)
290 Photos (Min.)
780 Photos (Min.)
1280 Photos (Min.)
Replace or install the battery
correctly
1. Install microSD card
2. Download the pictures from
the scanner to the computer
to create storage space
3. Please refer to section about
formatting
are secured. Restart the
computer if necessary
Replace with new 2xAA alkaline
batteries
Clean the lens with soft dry cloth
Press the Power/Scan button to
reset and scan again the document
EN
Page 2
SCANLINE
MT4090
Travel Mobile Scanner for A4 Documents
Właściwości
¯ Wybór trybu skanowania: kolor lub monochromatyczny
¯ Wybór rozdzielczości skanowania: 300/600dpi
¯ Bezpośredni zapis do pliku JPEG na karcie MicroSD
¯ Obsługa kart MicroSD o pojemności do 32GB
¯ Nie wymaga sterownika do przesyłania danych w Windows XP SP2/Vista
oraz w systemach Mac OS 10.4 lub nowszych.
Schemat urządzenia
Element Funkcja
1 Pokry wa baterii Dla baterii alkalicznych 2xAA.
2 Power/Scan Wciśnij i przytrzymaj na 2 sek aby włączyć/wyłączyć urządzenie. Gdy urządzenie jest aktywne
3 Dioda ERR. (czerwona)
4 Dioda SCAN (zielona) Zapala się gdy urządzenie gotowe jest do skanowania.
5 Wyświetlacz LCD Wyświetla status urządzenia
6 Przycisk DPI Zmiana rozdzielczości, wciśnij aby wybrać tryb High(600dpi) lub Low(300dpi).
7 Przycisk C/BW Zmiana trybu skanowania, wciśnij aby zmienić na tryb kolorowy (color) lub monochromatyczny
8 Złącze USB Umożliwia przesyłanie skanów z karty MicroSD do komputera
9 Slot MicroSD Umożliwia instalację karty MicroSD
10 Przycisk format Włóż w otwór drucik aby uruchomić funkcję formatowania karty MicroSD
przyciśnij raz aby uruchomić funkcję skanowania, przyciśnij ponownie aby zakończyć skanowanie.
Wskazuje błąd skanowania wywołany zbyt szybkim ruchem urządzenia.
(mono).
Instrukcja obsługi
Ustawianie rozdzielczości
¯
Wciśnij przycisk DPI aby wybrać rozdzielczość 600dpi (High) lub 300dpi (Low).
Ustawianie trybu skanowania
¯ Wciśnij przycisk C/BW aby przełączyć w tryb kolorowy (kolor) lub monochro-
matyczny (mono).
Skanowanie
Przytrzymaj dokument jedną ręką na twardej powierzchni. Przenieś skaner na
położenie początkowe. Wciśnij przycisk POWER, gdy zapali się zielona dioda
SCAN przesuń jednostajnym ruchem skaner wzdłuż dokumentu. Gdy dojedziesz
do końca wciśnij ponownie przycisk POWER aby zapisać plik na karcie MicroSD.
Ważne! Skaner powinien być dociśnięty do dokumentu a skanowana część powinna znajdować się między dwoma białymi strzałkami na obudowie skanera.
Podłączanie do komputera
Uruchom skaner, podłącz kablem USB skaner do portu USB. Urządzenie zostanie
rozpoznane jako masowe urządzenie magazynujące – możesz teraz skopiować
pliki z karty MicroSD na dysk twardy komputera.
PL
Wyświetlacz LCD
Ikona Funkcja
1 Ikona obecności karty MicroSD
2 Wskaźnik baterii
3 Wskaźnik trybu Color (kolorowy) lub Mono (monochromatyczny).
4 Liczba plików Wskaźnik zapisanych plików na karcie MicroSD.
5 Rozdzielczość High 600dpi lub Low 300dpi
Skany zostaną zapisane na karcie MicroSD.
Baterie pełne, Baterie wyczerpane.
Używanie skanera
Instalacja baterii
1. Otwórz pokrywę baterii
2. Włóż dwie baterie AA alkaliczne zgodnie
ze znakami polaryzacji i zamknij pokrywę.
3. Wciśnij i przytrzymaj przez 2 sek przycisk POWER
aby uruchomić skaner.
Wkładanie karty MicroSD (zestaw nie zawiera karty)
Skaner potrzebuje karty MicroSD
do zapisu skanowanych obrazów.
1. Wyłącz urządzenie.
2. Włóż kartę MicroSD do slotu
zgodnie z ikoną na obudowie. Kartę
można włożyć tylko w sposób prawidłowy,
proszę na siłę nie wpychać karty gdyż może
ulec uszkodzeniu. Kartę należy wyjąć, obrócić
zgodnie z ikoną na obudowie i włożyć ponownie. Przed
użyciem należy kartę sformatować wg poniższej instrukcji.
Formatowanie karty MicroSD
1. Włóż nową kartę MicroSD do slotu skanera, uruchom skaner.
2. Włóż cienki drucik w dziurkę na obudowie oznaczonej jako „FORMAT”. Na
wyświetlaczu LCD pojawi się napis „F”.
3. Wciśnij przycisk POWER aby rozpocząć formatowanie.
4. Ikona karty MicroSD przestanie migać, gdy proces zakończy się.
Ustawianie daty i czasu
1. Wciśnij przycisk TIME SET (znajduje się obok gniazda USB)
2. Na wyświetlaczu LCD pojawi się napis 1 XX, za pomocą przycisków C/WB
(zmniejsz) oraz DPI (zwiększ) wprowadź żądaną wartość.
3. Przyciśnij SCAN aby zatwierdzić wartość i przejść do ustawienia kolejnej.
4. Wartości daty i czasu wyświetlane wg poniższej kolejności: 1 XX rok, 2 XX
miesiąc, 3 XX dzień, 4 XX godzina, 5 XX minuta
5. Gdy wszystkie wartości daty i czasu zostały wprowadzone wciśnij ponownie
przycisk TIME SET aby wyjść do trybu skanowania.
Specy kacja
Sensor obrazu A4 Color Contact Image Sensor
Ilość elementów światłoczułych 5136 (dostępnych 5014)
Rozdzielczość sensora Niska: 300x300 dpi (domyślna)
Max szybkość skanowania
strony A4
Orientacyjna ilość zapisanych plików dla karty MicroSD 1GB
(wielkość zależna od złożoności
skanowanych obrazów)
Max szerokość skanowania 21 cm
Max długość skanowania 127 cm (300 dpi)/63.5 cm (600 dpi)
Format pliku JPEG
Wyświetlacz LCD Informacje o ustawieniach
Funkcja Auto Power O Po 3 minutach bezczynności
Port USB Zgodny ze specy kacją USB 2.0
Zewnętrzna pamięć Karta MicroSD
Zasilanie 2xAA bateria alkaliczna
Wysoka: 600x600 dpi
600 dpi color
600 dpi mono
300 dpi color
300 dpi mono
600 dpi color
600 dpi mono
300 dpi color
300 dpi mono
13 sek
6 sek
3 sek
2 sek
220
290
780
1280
Wymagania systemowe
¯ Windows XP SP2/Vista lub Mac OS 10.4 ¯ CPU: Pentium II lub szybszy
¯ RAM: 64MB ¯ Interfejs: wolny port USB 2.0
Rozwiązywanie problemów
Problem Przyczyna Rozwiązanie
Nie można włączyć skanera Rozładowane baterie
Urządzenie nie zapisuje plików Niepoprawnie zainstalowana karta
Nierozpoznane urządzenie gdy
podłączono do komputera PC
Baterie szybko się zużywają Użycie nieodpowiedniego typu baterii Wymień na nowe baterie alkaliczne
Zamazany obraz Optyka skanera zabrudzona Użyj miękkiej szmatki i w yczyść optykę skanera.
Wskaźnik ERR zapala się
podczas skanowania
Niepoprawnie zainstalowane baterie
MicroSD
Brak wolnego miejsca na karcie
Karta MicroSD nie została poprawnie
sformatowana
Błąd połączenia Sprawdź połączenia kabli
Za duża prędkość przesuwania
po dokumencie
Wymień lub zainstaluj poprawnie baterie
Włóż kartę MicroSD
Przekopiuj pliki na inny nośnik aby uwolnić
miejsce na karcie
Wykonaj kroki opisane w pkt. dotyczącym
formatowania
Zrestartuj komputer jeżeli to konieczne
Wciśnij przycisk POWER/SCAN aby zakończyć
bieżące zadanie skanowania. Wciśnij ponownie
i zeskanuj dokument ponownie.
Page 3
SCANLINE
MT4090
Travel Mobile Scanner for A4 Documents
Eigenschaften
¯ Farbauswahl: Mehrfarbig oder einfarbig
¯ Au ösung: 300/600dpi
¯ Es werden keine zusätzlichen Treiber unter folgenden Betriebssystemen benötigt:
Windows XP SP2/Vista und Mac OS 10.4 oder neuer.
¯ Speicherort der JPEG Datei direkt auf der MicroSD Karte
¯ MicroSD Karten bis zu 32GB
Erläuterung
Element Funktion
1 Batterieabdeckung Für 2xAA Alkali-Batterien.
2 Power/Scan Über 2 Sekunden gedrückt halten, um das Gerät ein-/auszuschalten. Wenn das Gerät einge-
3 Diode ERR. (rot) Zeigt einen Fehler bei zu schnellen Bewegungen an.
4 Diode SCAN (grün) Leuchtet, sobald das Gerät Betriebsbereit ist.
5 LCD Anzeige Statusanzeige
6 DPI Taste Au ösung wählen: Hoch (600dpi) oder niedrig (300dpi).
7 C/BW Taste Mehr farbige (color) oder einfarbige (mono) Scans.
8 USB Steckplatz Datenaustausch zw. der microSD Karte und Ihrem Computer
9 Slot MicroSD Steckplatz zum einführen einer microSD Karte
10 Formatierungstaste Mit einer Stecknadel die Taste betätigen, um eine Formatierung der microSD durchzuführen.
schaltet ist, einmal kurz betätigen, um mit dem Scanvorgang zu beginnen, nochmals betätigen, um den Scanvorgang zu beenden.
Gebrauchsanleitung
Au ösung wählen
¯ Drücken Sie die DPI Tasten, um zw. zwei Au ösungen umzuschalten 600dpi (High)
oder 300dpi (Low).
Farbauswahl wählen
¯ Drücken Sie die C/BW Taste, um entweder mehrfarbige (kolor) Scans, oder einfar-
bige (mono) Scans durchzuführen.
Scannen
Halten Sie das zu scannende Dokument, mit einer Hand, auf einer ebenen Unterlage
fest. Halten Sie den Scanner über den Anfang vom Dokument und drücken Sie die
POWER Teste. Sobald die grüne LED SCAN Diode au euchtet, führen Sie den Scanner
langsam und gleichmäßig über das komplette Dokument. Sobald sie am Ende des
Dokuments angekommen sind, drücken Sie nochmals die POWER Taste, um die Datei
auf der MicroSD Karte zu speichern.
WICHTIG! Der Scanner muss am Dokument anliegen und der zu scannende Bereich muss sich zwischen den beiden, weissen Pfeilen, die auf dem Gerät markiert sind, be nden.
Anschluss am Computer
Schalten Sie den Scanner an, schließen Sie das USB Kabel an den Scanner und an
Ihren Computer an. Das Gerät wird als Massenspeicher erkannt – jetzt können Sie die
Dateien von der MicroSD Karte, auf Ihre Festplatte kopieren.
DE
LCD Anzeige
Symbol Funktion
1 Eingesteckte MicroSD Karte
2 Batterie-Anzeige
3 Farbauswahl Color (mehrfarbig) oder Mono (einfarbig)
4 Anzahl der Dateien Anzahl der gespeicherten Dateien
5 Au ösung Hoch 600dpi oder Niedrig 300dpi
Alles Scans werden auf der MicroSD
Karte gespeichert
volle Batterie leere Batterie
auf der MicroSD Karte
Benutzung
Batterien einlegen
1. Ö nen Sie bitte den Batterieschacht
2. Legen Sie zwei AA Alkali-Batterien ein
(bitte auf die +/- Markierung achten)
und schließen Sie das Batteriefach.
3. Halten Sie die POWER Taste über 2 Sekunden
gedrückt, um den Scanner einzuschalten.
MicroSD Kartei installieren (nicht im Lieferumfang enthalten)
Der Scanner benötigt eine MicroSD
Karte, um die Dateien zu speichern.
1. Gerät ausschalten.
2. Schieben Sie die MicroSD Karten
in den entsprechenden Slot ein und
achten Sie auf die Markierung. Die Karte
kann nur richtig eingeschoben werden, bitte
nicht mit Gewalt hineindrücken. Vor der
Benutzung, muss die Karte wie folgt formatiert werden:
Formatierung der MicroSD Karte
1.
Legen Sie eine MicroSD in den Slot vom Scanner ein, schalten Sie das Gerät ein.
2. Betätigen Sie, mit Hilfe eine Stecknadel, die Taste „FORMAT”. Auf der LCD Anzeige
wird Ihnen „F” angezeigt.
3. Drücken Sie die POWER, um mit der Formatierung zu beginnen.
4. Das Symbol der MicroSD Karte wird blinken, sobald der Prozess vollendet ist.
Datum- und Zeiteinstellung
1. Drücken Sie die TIME SET Taste (be ndet sich neben der USB Schnittstelle)
2. Auf der LCD Anzeige erscheint 1 XX, mit Hilfe der C/WB (kleiner) und DPI (größer)
führen Sie die gewünschten Angaben ein.
3. Drücken Sie die SCAN Taste, um die Angabe zu bestätigen und um fortzufahren
4. Die Datum- und Zeitangaben werden wie folgt angezeigt:
1 XX Jahr, 2 XX Monat, 3 XX Tag, 4 XX Uhrzeit, 5 XX Minuten
5. Nachdem alle Angaben eingeführt worden sind, drücken Sie nochmals die TIME
SET Taste um den Vorgang zu beenden.
Eigenschaften
Bildsensorensor A4 Color Contact Image Sensor
Anzahl der CCD Sensoren 5136 (verfügbar 5014)
Sensor Au ösung Niedrig: 300x300 dpi (Grundeinstellung)
Max Scangeschwindigkeit
einer A4 Seite
Ungefähre Anzahl zu speichernder
Dateien auf einer 1GB MicroSD Karte
Max Scanbreiter 21 cm
Max Scanlänge 127 cm (300 dpi)/63.5 cm (600 dpi)
Dateienformat JPEG
LCD Anzeige Einstellungsinformation
Funktion Auto Power O Nach 3 Minuten ohne Funktion
USB Schnittstelle USB 2.0 kompatibel
Externer Speicher MicroSD Karte
Strom 2xAA Alkali-Batterie
Hoch: 600x600 dpi
600 dpi color
600 dpi mono
300 dpi color
300 dpi mono
600 dpi color
600 dpi mono
300 dpi color
300 dpi mono
13 sek
6 sek
3 sek
2 sek
220
290
780
1280
Systemanforderung
¯ Windows XP SP2/Vista oder Mac OS 10.4 ¯ Pentium II oder schneller ¯ 64MB RAM
¯ Freie USB 2.0 Schnittstelle
Probleme lösen
Problem Grund Lösung
Scanner lässt sich nicht
einschalten
Dateien werden nicht
gespeichert
Das Gerät wird nicht am
Computer erkannt
Batterien entladen sich schnell Falscher Batterietyp Legen Sie neue Alkali-Batterien ein
Unscharfes Bild Linse verschmutzt Reinigen Sie die Linse mit einem weichen Tuch
Die ERR Diode leuchtet während
dem Scanvorgang
1. Leere Batterien
2. Falsch eingelegte Batterien
1. Falsch eingesetzte MicroSD Karte
2. Kein freier Speicherplatz
3. MicroSD Karte wurde falsch formatiert
Fehlerhafter Anschluss Überprüfen Sie die Verkabelung. Führen Sie einen
Den Scanner zu schnell über das
Dokument geführt
Wechseln sie die Batterien oder
legen Sie die Batterien richtig ein
1. Erneut MicroSD Karte einsetzten
2. Kopieren sie die Dateien auf einen anderen
Datenträger
3. Widerholen Sie Punkt pkt.4.3
Neustart aus.
Drücken Sie die POWER/SCAN Tasten, um den
Vorgang zu beenden. Drücken Sie die Taste erneut,
um einen neuen Scanvorgang auszulösen.
Page 4

SCANLINE
MT4090
Travel Mobile Scanner for A4 Documents
Vlastnosti
¯ Výběr skenování: barevné, nebo černobílé
¯ Výběr rozlišení: 300/600dpi
¯ Okamžitý zápis do složky JPEG na kartu MicroSD
¯ Kompatibilní MicroSD až do 32 GB
¯ Bez nutnosti instalace ovladače
Popis zařízení
Část Funkce
1 Kryt baterií Pro alkalické baterie 2xAA.
2 Power/Scan Pro zapnutí/vypnutí stiskni po dobu dvou vteřin. Pokud je zařízení aktivní, stiskni krátce pro
3 LED dioda ERR. (červená) Upozorňuje na chybu při příliš rychlém pohybu skeneru.
4 LED dioda SCAN (zelená) Svítí pokud je zařízení připraveno ke skenování.
5 LCD displej Ukazuje stav zařízení
6 Tlačítko DPI Zmněna rozlišení. High(600dpi) nebo Low(300dpi).
7 Tlačítko C/BW Výběr tipu skenování Barevný (color) černobílý (mono)
8 Konektor USB Umožňuje posílat data ze zařízení do PC
9 Slot MicroSD Umožňuje instalaci kart y MicroSD
10 Tlačítko format Naformátuje kartu MicroSD
aktivaci funkce skenování. Pro ukončení skenování stiskni opět krátce.
Návod k obsluze
Nastavení výběru skenování
¯ Stiskni tlačítko C/BW pro přepnutí na barevné (color) nebo černobílé(mono).
Skenování
Přidrž dokument jednou rukou na tvrdém povrchu. Přilož skaner na začátek dokumentu. Stiskni tlačítko POWER, až se rozsvítí zelená dioda SCAN přesuň plynulým pohybem skener po délce dokumentu. Poté znovu stiskni tlačítko POWER
pro zápis souboru na kartu MicroSD.
Pozor! Skener se musí dotýkat dokumentu který by měl ležet mezi dvěmi
bílými šipkamy, které se nachází na krytu zařízení.
Připojení k PC
Zapni skener, propoj kabelem USB skener s portem USB. Zařízení se zobrazí jako
velkokapacitní paměť – nyní můžeš kopírovat data ze skeneru na pevný disk PC.
CZ
Displej LCD
Ikona Funkce
1 Indikace MicroSD
2 Indikace baterií
3 Indikace výběru Color (barevné) lub Mono (černobílé).
4 Počet souborů Ukazuje kolik souborů je zapsáno na kartě MicroSD.
5 Rozlišení High 600dpi nebo Low 300dpi
Skenované dokumenty jsou zapsány na MicroSD.
Plná baterie Vybitá baterie.
Použití skaneru
Instalace baterií
1. Otevři kryt baterií
2. Vlož dvě alkalické baterie AA
(dodržujte správnou polaritu)
3. Podrž dvě vteřiny tlačítko POWER,
zařízení se zapne.
Vkládání karty MicroSD (balení
neobsahuje MicroSD kartu)
Skener potřebuje kartu MicroSD
pro ukládání skenovaných dat.:
1. Vypní zařízení.
2. Vlož kartu MicroSD do slotu.
Nepoužívejte při vkládání karty sílu,
pokud ji vkládáte správně není třeba tlačit.
Doporučujeme kartu před použitím naformátovat.
Formátování karty MicroSD
1. Vlož novou kartu MicroSD do slotu skeneru,zapni skener.
2. Strč tenký drátek do dírky označené FORMAT, na displeji se ukáže písmeno F
3. Stiskni tlačítko POWER pro spuštění formátování.
4. Ikona karty MicroSD bude blikat v momentě kdy skončí formátování.
Nastavení času a datumu
1. Stiskněte tlačítko TIME SET (vedle zásuvky USB)
2. Na LCD displeji se zobrazí 1 xx ,použijte tlačítka C/WB a DPI
ke zvýšení/snížení hodnoty.
3. Stiskněte tlačítko SCAN pro potvrzení a nastavení další hodnoty.
4. Hodnoty datum a čas jsou zobrazeny v tomto pořadí:
1 XX rok, 2 XXměsíc, 3 XX den, 4 XX hodina, 5 XX minuty.
5. Po zadání všech hodnot opustíte nastavení stisknutím TIME SET.
Nastavení rozlyšení
¯ Stiskni tlačítko DPI a vyber požadované rozlišení 600dpi (High) nebo 300dpi
(Low).
Specy kace
Sensor obrazu A4 Color Contact Image Sensor
Počet světelných senzorů 5136 (dostupných 5014)
Rozlyšení Nízká: 300x300 dpi (nastavená)
Max rychlost skenování strany A4 600 dpi color
Orientační počet zapsaných
souborů pro kartu MicroSD 1GB
(velikost ovlivňuje složitost
skenovaných obrazů)
Max šířka skanování 21 cm
Max délka skanování 127 cm (300 dpi)/63.5 cm (600 dpi)
Formát souboru JPEG
Displej LCD Informace o nastavení
Funkce Auto Power O Po 3 minutách nečinnosti
Port USB Kompatibilní s USB 2.0
Vnitřní paměť Karta MicroSD
Napájení 2xAA alkalická baterie (tužkové)
Vysoká: 600x600 dpi
600 dpi mono
300 dpi color
300 dpi mono
600 dpi color
600 dpi mono
300 dpi color
300 dpi mono
13 sek
6 sek
3 sek
2 sek
220
290
780
1280
Systémové požadavky
¯ Windows XP SP2/Vista nebo Mac OS 10.4 ¯ Pentium II nebo vyšší ¯ 64MB
RAM ¯ Volný port USB 2.0
Odstranění problémů
Problém Příčina Řešení
Skener nejde zapnout Vybyté baterie
Zařízení nezapisuje data Špatně zasunutá karta MicroSD
Při propojení s PC nebylo
zařízení rozpoznáno
Baterie se rychle vybíjí Zvolen špatný tip baterií Vyměň nové alkalické baterie
Rozmazaný obraz Optika skaneru je špinavá Vyčisti měkým hadříkem.
Dioda ERR svítí
v průběhu skenování
Baterie vložené proti označení +/-
Karta MicroSD je plná
Karta MicroSD nebyla
správně naformátovaná
Chyba propojení Zkontroluj zapojení kabelu. Resetuj PC pokud
Velká rychlost posunu
skeneru po dokumentu
Vyměň ,nebo správně vlož baterie
Vlož kartu MicroSD
Překopíruj data na pevný disk,aby se uvolnilo
místo na kartě MicroSD
Postupuj podle kroků popsaných v bodě.4.3
není jiná možnost.
Stlač tlačítko POWER/SCAN pro zrušení stávajícího skenování. Opakuj skenování.
Page 5

SCANLINE
MT4090
Prenosni, potovalni skener za A4 dokumente
Značilnosti
¯ Barvn/enobarvno izbiranje skeniranja
¯ 600/300 dpi izbira skeniranja
¯ Direktno shranjevanje JPG datotek na Micro SD kartico
¯ Prosti gonilniki za Windows XPSP2/Vista in Mac OS 10.4 ali boljši
(niso priloženi)
Uporabni deli
Del Funkcija
1 Vrata baterije Za 2xAA alkalni bateriji
2 Zagon/Skeniranje Zagon Vklop/Izklop. Pritisni in zadrži ta gumb za 2 sec. Za
3 LED napaka Prekoračiev hitrosti: Rdeča LED sveti
4 LED skeniranja Pripravljen za skeniranje: Zelena LED sveti
5 LCD zaslon Prikaz stanja skeniranja
6 Resolucija Izberite: visoko(600dpi)/nizko(300dpi), prikaz na LCD zaslonu
7 C/BW Izberite barvno/enobarvno skeniranje, prikaz na LCD zaslonu
8 USB vmesnik Prenesite slike na računalnik preko priloženega USB kabla
9 SD vhod Reža za Mikro SD kartico
10 Format gumb Gumb za brisanje Mikro SD kartice
Razloćitev ikon na zaslonu
Funkcija Opis
1 indikator SD kartice
2 indikator baterije
3 indikator efekta Barvno/enobarvno
4 indikator štetja Indikator ki šteje zapise
5 izbrana resolucija Visoka/nizka
Uporaba skenerja
Vstavljanje baterij
1. Odprite pokrovček baterij
2. Vstavite 2xAA alkalni bateriji
v odprtino
3. Prižgite skener s pritiskom na gumb.
Vstavljanje Mikro SD kartice
(ni priložena)
Za skeniranje potrebujete vstaviti
mikro SD kartico ki ni priložena
1. Ugasnite skener
2. Vstavite kartico v slot ki je za
njo predviden.
Nastavljanje resolucije
¯ Pritisnite (DPI) gumb za izbiro Visoke ali nizke resolucije.
Izbrana resolucija se izpiše na zaslonu.
Nastavitev načina skeniranja
¯ pritisnite (C/BW) gumb za izbiro med Barvno/enobarvno skeniranje
Izbran način skeniranja se prikaže na zaslonu.
Kako skenirati
¯ Z roko ksirajte dokument
¯ Skener postavite na začetno pozicijo
vklop ali izklop. V vklopljenem stanju pritisnite ta gumb za
začetek in konec skeniranja.
Znak se prikaže ko je kartica vstavljena
/ Prikaz stanja baterije
Navodila za uporabo
¯ Tesno držite skener in pritisnite tipko za skeniranje
¯ Zapeljite skener čez dokument z enkaomerno, počasno hitrostjo
¯ Pritisnite ponovno gumb za končanje skeniranja
Connect to computer
Vedno lahko preko USB vmesnika priklopite skener na računalnik in si ogledate
opravljene slike.
Tehnične lastnosti
Senzor slike A4 barvni senzor slike
Število senzorjev 5136 dots(1st-5104 dots vključen)
Resolucija Nizka resolucija 300dpi/Visoka 600 dpi
Makismalni čas A4 skeniranja barvna/visoka resolucija
enobarvna/visoka resolucija
barvna/nizka resoucija
enobarvna/nizka resolucija
Skenirana višina 21 cm
Skenirana dolžina 127 cm (300 dpi)/63.5 cm (600 dpi)
Format slike JPEG
LCD Izpis statusov skeniranja
Avtomatski izklop Po 3 min.
USB vhod USB 2.0 visoka hitrost
Spomin mikro SD (ni priložena)
Baterije 2xAA alkalne baterije
Minimalna zahteva računalniškega sistema
¯ Windows XP SP2/Vista in Mac OS 10.4 ali več
¯ CPU: Pentium ll ali več
¯ Ram: 64MB
¯ Vmesnik: USB
Odpravljanje težav
Problem Možnost Odpravljanje
Se ne prižge Prazna ali nevstavljena baterija Odstrani ali vstavi baterijo
Slika se ne shrani Ni micro SD ali pa je polna Vstavite micro SD oz. jo spraznite
Zamazana slika Skenirna površina ja omazana Očistite lečo s suho krpo
Rdeča LED gori Skenirna hitrost je prehitra Ponovno prižgi skener in ponovi
13 sec
6 sec
3 sec
2 sec
SL
Page 6

SCANLINE
MT4090
Мобилен скенер за документи А4
Основни характеристики
¯ Избор за цветно/чернобяло сканиране
¯ Избор за сканиране на 600/300 dpi
¯ Директен запис на JPG файл в MicroSD карта
¯ Поддържа MicroSD карта до 32GB
¯ Свободно сваляне на драйвер за Wlndows XPSP2/Vista и Mac OS 10.4 или
следваща версия (директно включване, не е необходимо инсталиране
на драйвер).
Functional parts
Част Функция
1 Място за батерии 2хАА алкални батерии
2 Включване/Сканиране Бутон Вкл./Изкл.: Натиснете и задръжте бутона две секун-
3 LED индикатор за грешка Червения светодиод свети при неправилно сканиране
LED индикатор за сканиране
4
5 LCD екран Изписва статуса на сканиране
6 Резолюция Възможност за избиране на висока (600dpi)/ Ниска
7 Цветно/чернобяло Изберете цветно/чернобяло сканиране; Иконката за ре-
8 USB интерфейс Свалете снимката на компютъра чрез USB кабела
9 Слот за SD карта Място за съхранение в MicroSD карта
10 Бутон за форматиране Натиснете този бутон за да форматирате MicroSD картата
Описание на иконите на статуса
1 Индикатор за SD карта
2 Индикатор за батерията
3 Индикатор за ефектите Цветно или чернобяло
4 Индикатор за преброяване Показва сканираните файлове в MicroSD картата
5 Избор на резолюция Висока: 600 dpi/ Ниска 300 dpi
Използване на скенера
Поставяне на батериите
1. Отворете мястото за батериите.
2. Поставете 2хАА алкални батерии
в отделението.
3. Включете скенера като натиснете
бутона [POWER] за 2 секунди.
Поставяне на MicroSD картата
(не е включена в комплекта)
Трябва да поставите MicroSD карта
(не е осигурена), на която да
записвате и съхранявате вашите снимки.
Поставяне на MicroSD картата:
1. Изключете скенера.
2. Поставете MicroSD картата в слота
и натиснете внимателно, докато се заключи.
Забележка: Не натискайте силно картата в слота; това
може да повреди скенера и MicroSD каратата. Поставете
я в правилната позиция (както е маркирано) и опитайте
отново. MicroSD каратата трябва да бъде форматираната
преди сканиране. Вижте следните инструкции.
Настройка на резолюцията
¯ Натиснете [DPI] бутона, за да изберете висока/ниска резолюция.
Иконката за висока/ниска резолюция ще се покаже на LCD дисплея.
ди, за да включите или изключите скенера. В режим на
работа натиснете бутона, за да започне сканиране, натиснете отново за спиране.
Зеленият светодиод свети при готовност за сканиране
(300dpi) резолюция; Иконката за режим с висока/ниска
резолюция се показва на LCD дисплея
жима на сканиране ще се покаже на дисплея
Снимките ще се съхраняват в MicroSD карта
Батерията е заредена Батерията е разредена
Инструкции за употреба
Настройка на режим сканиране
¯ Натиснете [C/BW] бутона, за да изберете цветно или чернобяло
сканиране. Иконката ще се покаже на LCD дисплея.
Как да сканираме
¯ Хванете документа с едната ръка.
¯ Поставете скенера на стартова позиция.
¯ Хванете скенера и натиснете веднъж бутона за сканиране.
¯ Прокарайте скенера бавно и дръжте ръката си стабилно, за да получите
снимка с най-добро качество.
¯ Натиснете бутона отново, за да спрете сканирането.
Свързване към компютър
Можете да свържете скенера към вашия компютър и да видите снимките
на монитора.
Спецификация
Имидж сензор A4 Color Contact Image Sensor
Брой сензори 5136 dots (1st~5104 dots available)
Pезолюция Ниска резолюция: 300x300 dpi (по подразбиране)
Максимална скорост за сканиране
на документ А4
Капацитет (Основно 1GB MicroSD
карта. Сканира файлове с размер
А4, качеството на сканиране зависи от съдържанието)
Ширина на сканиране 8.27”
Дължина на сканиране 300DPI: 50”(Макс.), 600DPI: 25” (Макс)
Формат на файла JPEG
LCD Показва статуса при сканиране
Автоматично изключване 3 Минути
USB порт USB 2.0 високоскоростен
Външна памет MicroSD карта
Стандартна батерия 2xAA алкални батерии
Минимални изисквания към компютърната система
¯
Windows XP SP2/Vista и Mac OS 10.4 или следваща версия (директно включване, не е необходимо инсталиране на драйвер)
или следваща версия ¯ RAM: 64MB ¯ Интерфейс: USB порт
Отстраняване на проблем
Проблем Причина Решение
Скенерът не може да
бъде включен.
Снимките не могат да
бъдат запазени, когато
сканирате.
Компютърът не разпознава скенера, когато е
свързан. (Не можете да
откриете външен диск).
Батериите се изхабяват
много бързо.
Неясни снимки. Лещите на скенера са
Индикатора за грешка
свети по време на сканиране.
Висока резолюция: 600x600 dpi
600 dpi цветно
600 dpi чернобяло
300 dpi цветно
300 dpi чернобяло
600 dpi цветно
600 dpi чернобяло
300 dpi цветно
300 dpi чернобяло
13 Секунди
6.0 Секунди
3.0 Секунди
2.0 Секунди
220
290
780
1280
¯ Процесор: Pentium II
1. Слаби батерии.
2. Батериите не са поставени правилно.
1. MicroSD картата не
е поставена.
2. Паметта е пълна.
3. MicroSD картата не е
форматирана правилно.
Няма връзка. Уверете се, че всички връзки са на-
Използвате неподходящ
тип батерии.
замърсени.
Скоростта на сканиране
е твърде висока.
Заменете батериите или ги поставете правилно.
1. Поставете MicroSD карта.
2. Свалете снимките от скенера в
компютъра, за да освободите място.
3. Моля, прочетете раздела за форматиране на картата.
правени правилно. Рестартирайте
компютъра ако е необходимо.
Заменете с нови 2хАА алкални батерии.
Почистете лещите с мека и суха кърпа.
Натиснете бутона Вкл./Изкл., да
рестартирате касетата и сканирайте
документа отново.
BG
Page 7

SCANLINE
MT4090
Переносной Сканнер Документов Формата А4 для Поездок
Основные характеристики
¯ Выбор Цветного/Черно-белого (Моно) сканирования
¯ 600/300 dpi режимы сканирования
¯ Прямое сохранение JPG файла на MicroSD
¯ Поддерживает карты MicroSD объемом до 32 гигабайт
¯ Не требует драйверов под системами Windows XPSP2/ Vista и Mac OS версии 10.4 или выше (функция пря-
мого подключения, работает с внутренними драйверами системы).
Функциональные части
Часть Функция
1 Разъем для батареек Для 2хАА алкалиновых батареек.
2 Power/Scan Включить/Выключить: Нажмите и держите эту кнопку в течении двух секунд для вы-
3 Индикатор ошибки LED Перегрузка: Загорается Красный LED
4 Индикатор Сканирования LED Готов к сканированию; LED горит Зеленым цветом.
5 Дисплей LCD Дисплей статуса сканирования
6 Разрешение Выберите Высокое (600dpi)/Низкое (300dpi) Разрешение; Индикатор Высокого/Низ-
7 C/BW Выберите Цветное/Моно сканирование, индикатор Цветного/Моно сканирования
8 Интерфейс USB Загрузите отсканированный файл на компьютер с помощью предоставленного USB
9 Разъем для SD карты Местоположение карты памяти MicroSD.
10 Кнопка Форматирования Нажмите эту кнопку для форматирования карты MicroSD.
ключения или включения. Во включенном режиме нажмите эту кнопку для начала
сканирования, нажмите ее еще раз для прекращения сканирования.
кого разрешения будет отображаться в статусе LCD дисплея.
будет отображаться в статусе LCD дисплея.
кабеля.
Пояснение к индикаторам статуса
Функция Описание
1 Индикатор карты SD Фотографии будут сохраняться на карте microSD
2 Индикатор батареи
3 Индикатор цвета Цветной или Моно
4 Индикатор подсчета Показывает отсканированные файлы на карте microSD
5 Выбранное разрешение Высокое: 600dpi/Низкое: 300dpi
Полная батарея Пустая батарея
Использование сканера
Установка батареек
1. Откройте крышку батареек
2. Вставьте 2хАА алкалиновых батарейки
в ячейку для батареек.
3. Включите сканер нажатием кнопки [POWER]
и удержанием в течении 2х секунд.
Подсоединение карты памяти microSD (не включена)
Вы должны вставить Карту microSD (не предоставляется) для записи и хранения Ваших изображений.
1. Выключите сканер
2. Вставьте карту microSD в разъем для карты
microSD, аккуратно надавите, пока карта
не зафиксируется.
Примечание: Не пытайтесь вставлять карту в разъем
прилагая силу; это может повредить сканер и карту памяти
microSD. Выведите карту памяти на правильную позицию (как
показано на рисунке) и попробуйте снова. Карта microSD должна
быть отформатирована перед сканированием.
Смотрите следующую инструкцию.
Форматирование карты памяти microSD
1. Вставьте новую карту microSD в сканер, потом включите его.
2.
Выберите режим форматирования, используя кнопку форматирования. “F” отобразится на дисплее LCD.
3. Нажмите кнопку Power/Scan для начала процесса форматирования карты microSD.
4. Индикатор карты SD будет мигать, пока не завершится форматирование.
Настройка даты и времени
1. Нажмите кнопку TIME SET (которая находится рядом с разъемом USB)
2.
На LCD дисплее отобразится 1 ХХ, используйте кнопки C/BW и DPI для увеличения/уменьшения числа.
3. Нажмите кнопку SCAN для подтверждения и устанавливайте следующее число.
4. Числа даты и времени отображаются в следующем порядке: 1 ХХ год, 2 ХХ месяц, 3 ХХ день,
4 ХХ час, 5 ХХ минута
5. Когда все числа были установлены, для выхода, нажмите снова кнопку TIME SET.
Настройка разрешения
¯ Нажмите кнопку [DPI] для выбора Высокого/Низкого разрешения. Индикатор Высокого/Низкого
разрешения будут отображаться в статусах LCD дисплея.
Настройка режима сканирования
¯ Нажмите кнопку [C/BW] для выбора Цветного/Моно режима, индикатор Цветного/Моно режима
будет отображаться в статусах LCD дисплея.
Как сканировать
¯ Крепко держите документ одной рукой.
¯ Поместите сканер на позицию для начала сканирования.
¯ Крепко держите сканер и нажмите кнопку сканирования один раз.
¯ Медленно передвигайте сканер и старайтесь держать руку спокойно, для получения наилучшего
качества изображения.
¯ Нажмите снова для прекращения сканирования.
Подключение к компьютеру
Вы также можете подключить Ваш сканер к компьютеру и просматривать изображения на мониторе
компьютера.
Технические характеристики
Датчик изображения Контактный Цветной Датчик Изображения Формата А4
Количество сенсоров 5136 точек (доступны с 1 по 5104)
Разрешение Низкое разрешение 300х300 dpi (по умолчанию)
Максимальная скорость сканирования для
документа формата А4
Объем (Основываясь на microSD карте объемом
1 гигабайт. Сканирование файла формата А4,
количество сканирований колеблется в зависимости от сложности содержимого).
Ширина области сканирования 8.27”
Длина области сканирования 300DPI: 50’’(Максимум), 600DPI: 25’’ (Максимум)
Формат файла JPEG
LCD Дисплей, отображающий состояние сканирования
Автоматическое выключение 3 Минуты
Порт USB USB 2.0 высокоскоростной
Внешняя память Карта памяти microSD
Стандартные батарейки 2х АА алкалиновых батарейки
Минимальные требования компьютерной системы
¯ Windows XP SP2/Vista и Mac OS версии 10.4 или выше (функция прямого подключения, не нуждается в установке драйверов) ¯ Pentium II или выше ¯ Оперативная память: 64 мегабайта ¯ Интер-
фейс: порт USB
Выявление неисправностей
Проблема Причина Решение
Не получается включить сканер 1. Сели батарейки
Не получается сохранить
изображения когда Вы их
сканируете.
Компьютер не опознает сканер
после подключения (Вы не можете
найти съемный диск).
Быстро садятся батарейки Использование батареек не того типа Замените на две новые алкалиновые
Расплывчатое изображение Испачканная линза сканера Протрите линзу сухой мягкой тканью
Индикатор ошибки LED загорается
во время сканирования документа.
Руководство по эксплуатации
Высокое разрешение: 600х600 dpi
Цветное Высокое разрешение
Моно Высокое разрешение
Цветное Низкое разрешение
Моно Низкое разрешение
600 dpi цветное
600 dpi цветное
300 dpi моно
300 dpi моно
2. Батарейки неправильно установлены
1. Карта microSD не была вставлена
2. Память заполнена
3. Карта microSD не была правильно
отформатирована
Неправильное подключение Удостоверьтесь, что все провода
Скорость сканирования является
слишком высокой
13 секунд
6.0 секунд
3.0 секунды
2.0 секунды
220 Фотографий (Минимум)
290 Фотографий (Минимум)
780 Фотографий (Минимум)
1280 Фотографий (Минимум)
Замените или установите правильно
батарейки
1. Установите карту памяти
2. Загрузите изображения на компьютер для создания свободного места
3. Пожалуйста, обратитесь к разделу о
форматировании
надежно подсоединены. Перезапустите
компьютер если это необходимо.
АА батарейкиbatteries
Нажмите кнопку Power/Scan для перезагрузки и повторного сканирования
документа
RU
Page 8

SCANLINE
MT4090
Travel Mobile Scanner for A4 Documents
Vlastnosti
¯ Výber skenovania: farebné, alebo čiernobiele
¯ Výber rozlíšenia: 300/600dpi
¯ Okamžitý zápis do formátu JPEG na kartu MicroSD
¯ Kompatibilné MicroSD až do 32 GB
¯ Bez nutnosti inštalácie ovladača
Popis zariadenia
Čásť Funkcia
1 Kryt batérií Pre alkalické batérie 2xAA.
2 Power/Scan Pre zapnutie/vypnutie stlač po dobu dvoch vteřin.Pokud
3 LED dióda ERR. (červená) Upozorňuje na chybu pri príliš rýchlom pohybe skenera.
4 LED dióda SCAN (zelená) Svítí ak je zariadenie pripravené na skenovanie.
5 LCD displej Ukazuje stav zariadenia.
6 Tlačidlo DPI Zmena rozlíšenia High(600dpi) alebo Low(300dpi).
7 Tlačidlo C/BW Výber typu skenovania Farebný (color) čiernobiely
8 Konektor USB Umožňuje posielať dáta zo zariadenia do PC
9 SD vh Slot MicroSD od Umožňuje inštaláciu karty MicroSD
10 Tlačidlo format Naformátuje kartu MicroSD
Displej LCD
Ikona Funkcia
1 Indikácia MicroSD
2 Indikácia batérií
3 Indikácia výberu Color (farebné) lub Mono (čiernobiele).
4 Počet súborov Ukazuje koľko súborov je zapísané na kar te MicroSD.
5 Rozlíšení High 600dpi alebo Low 300dpi
Použitie skanera
Inštalácia batérií
1. Otvor kryt batérií
2. Vlož dve alkalické batérie AA
(dodržujte správnu polaritu)
3. Podrž dve sekundy tlačidlo POWER,
zariadenie sa zapne.
Vkladanie karty MicroSD (balenie neobsahuje
MicroSD kartu)
Skener potrebuje kartu MicroSD
pre ukladanie skenovaných dát.
1. Vypni zariadenie.
2. Vlož kartu MicroSD do slotu.
Nepoužívajte pri vkladaní karty silu,
ak ju vkladáte správne nie je treba tlačiť.
Odporúčáme kartu pred použitím naformátovať.
Formátovanie karty MicroSD
1. Vlož novú kartu MicroSD do slotu skenera, zapni skener.
2.
Strč tenký drôtik do dierky označenej FORMAT, na displeji
sa ukáže písmeno F
3. Stlač tlačidlo POWER pre spustenie formátovania.
4. Ikona karty MicroSD bude blikať v momente kedy skončí formátovanie.
je zariadenie aktívne ,stlač krátko pre aktiváciu funkcie
skenovania.Pre ukončení skenovania stlač opäť krátko.
(mono)
Skenované dokumenty sú zapísané na MicroSD.
Plná batérie,
Vybitá batérie.
Návod na obsluhu
Nastavenie rozlišenia
¯ Stiskni tlačítko DPI a vyber požadované rozlišenie 600dpi (High) alebo
300dpi (Low).
Nastavenie výberu skenovania
¯ Stlač tlačidlo C/BW pre prepnutí na farebné (color) alebo čiernobiele(mono).
Skenovanie
¯ Přidrž dokument jednou rukou na tvrdom povrchu. Přilož skaner na začiatok
dokumentu. Stlač tlačidlo POWER, až sa rozsvieti zelená dióda SCAN psesuň
plynulým pohybom skener po dľžke dokumentu. Potom znovu stlač tlačidlo
POWER pre zápis súboru na kartu MicroSD.
Pozor! Skener sa musí dotýkať dokumentu ktorý by mal ležať medzi dvoma bielymi šípkamy, ktoré se nachádzají na krytu zariadení.
Pripojení k PC
Zapni skener, prepoj káblom USB skener s portom USB. Zariadenie sa zobrazí
ako veľkokapacitná pamäť – teraz môžeš kopírovať dáta zo skenera na pevný
disk PC.
Špeci kácie
Sensor obrazu A4 color Contact Image Sensor
Počet svetelných senzorov 5136 (dostupných 5014)
Rozlišenie Nízká: 300x300 dpi (nastavená)
Max rýchlosť skenovania strany A4 600 dpi color
Orientační počet zapísaných
súborov pre kartu MicroSD 1GB
(velikosť ovplyvňuje zložitosť
skenovaných obrazov)
Max šírka skanování 21 cm
Max dľžka skanování 127 cm (300 dpi)/63.5 cm (600 dpi)
Formát súborov JPEG
Displej LCD Informácie o nastavení
Funkcia Auto Power O Po 3 minútach nečinnosti
Port USB Kompatibilný s USB 2.0
Vnútorná pamäť Karta MicroSD
Napájanie 2 x AA alkalické batérie (tužkové)
Systémové požiadavky
¯ Windows XP SP2/Vista nebo Mac OS 10.4
¯ CPU: Pentium II alebo vyšší
¯ Ram: 64MB
¯ Voľný port USB 2.0
Vysoká: 600x600 dpi
600 dpi mono
300 dpi color
300 dpi mono
600 dpi color
600 dpi mono
300 dpi color
300 dpi mono
13 sek
6 sek
3 sek
2 sek
220
290
780
1280
SK
 Loading...