

Page 1

User’s Manual
D-MENTION
COMPACT 3D FULL HD 1080p VIDEO CAMERA
MT4038
Page 2

2
EN
Index
Index ������������������������������������������������������������������������������������������������������������������������2
Introducing the camcorder������������������������������������������������������������������������������3
System requirements ����������������������������������������������������������������������������������������� 3
Features�������������������������������������������������������������������������������������������������������������������3
Unpacking the camcorder �������������������������������������������������������������������������������3
About the camcorder �����������������������������������������������������������������������������������������4
Front view ��������������������������������������������������������������������������������������������������������������4
Top view ������������������������������������������������������������������������������������������������������������������ 4
Bottom view ����������������������������������������������������������������������������������������������������������4
Back view ���������������������������������������������������������������������������������������������������������������� 5
Left view �����������������������������������������������������������������������������������������������������������������5
Right view ��������������������������������������������������������������������������������������������������������������5
Operating the camcorder ��������������������������������������������������������������������������������� 7
Getting started ����������������������������������������������������������������������������������������������������� 8
Inserting an SD card �������������������������������������������������������������������������������������������8
Inserting the battery ������������������������������������������������������������������������������������������8
Charging the battery ������������������������������������������������������������������������������������������ 9
Turning on/ o the camcorder �����������������������������������������������������������������������9
Connecting to TV (AV Cable) ��������������������������������������������������������������������������� 9
Connecting to TV (HDMI Cable) ���������������������������������������������������������������������9
Connecting to PC (USB Cable) ��������������������������������������������������������������������� 10
Changing modes ���������������������������������������������������������������������������������������������� 10
Before you start ������������������������������������������������������������������������������������������������� 10
Managing the Setup mode ��������������������������������������������������������������������������� 10
Language ������������������������������������������������������������������������������������������������������������ 10
Date/Time ����������������������������������������������������������������������������������������������������������� 11
Format ������������������������������������������������������������������������������������������������������������������ 11
Default ������������������������������������������������������������������������������������������������������������������ 11
Auto Power O �������������������������������������������������������������������������������������������������� 11
Frequency ����������������������������������������������������������������������������������������������������������� 12
TV Standard �������������������������������������������������������������������������������������������������������� 12
Beep ���������������������������������������������������������������������������������������������������������������������� 12
Using the Camcorder �������������������������������������������������������������������������������������� 12
Recording Videos ���������������������������������������������������������������������������������������������� 12
The Video Recording Screen ������������������������������������������������������������������������ 13
Video Mode Menu �������������������������������������������������������������������������������������������� 14
White Balance ���������������������������������������������������������������������������������������������������� 14
Resolution ����������������������������������������������������������������������������������������������������������� 14
Eect ��������������������������������������������������������������������������������������������������������������������� 15
Night Mode��������������������������������������������������������������������������������������������������������� 15
Quality ������������������������������������������������������������������������������������������������������������������ 15
Playback Videos������������������������������������������������������������������������������������������������� 16
The Video Playback Screen ��������������������������������������������������������������������������� 16
Deleting Videos ������������������������������������������������������������������������������������������������� 17
Protecting Videos ��������������������������������������������������������������������������������������������� 18
Autoplay Videos ������������������������������������������������������������������������������������������������ 18
Video Output ����������������������������������������������������������������������������������������������������� 19
Shooting Photos ����������������������������������������������������������������������������������������������� 19
The Camera Screen ������������������������������������������������������������������������������������������ 20
Camera Mode Menu ���������������������������������������������������������������������������������������� 20
White Balance ���������������������������������������������������������������������������������������������������� 21
Resolution ����������������������������������������������������������������������������������������������������������� 21
Eect ��������������������������������������������������������������������������������������������������������������������� 22
Night Mode��������������������������������������������������������������������������������������������������������� 22
Quality ������������������������������������������������������������������������������������������������������������������ 22
Playback Photos ������������������������������������������������������������������������������������������������ 22
The Photo Playback Screen��������������������������������������������������������������������������� 23
Deleting Photos ������������������������������������������������������������������������������������������������ 23
Protecting Videos ��������������������������������������������������������������������������������������������� 24
Autoplay Photos ����������������������������������������������������������������������������������������������� 24
Image Output ���������������������������������������������������������������������������������������������������� 25
Appendix ������������������������������������������������������������������������������������������������������������� 26
Specication ������������������������������������������������������������������������������������������������������� 26
Troubleshooting ����������������������������������������������������������������������������������������������� 27
Page 3

3
EN
Introducing the camcorder
Read this section to learn about the features and functions of the camcorder� This chapter also covers system
requirements, package contents, and descriptions of
the hardware components�
System requirements
Standard system requirements
■ Windows® 7 / Vista / XP SP2 operating system
■ Intel® / AMD Dual-Core CPU or higher
■ At least 1 GB of RAM or higher
■ At least DirectX 9 video card
■ Standard USB 2�0 port
■ At least 2GB or greater available hard disk
System requirements (for 3D video playback)
■ Windows® 7 / Vista operating system
■ Intel® Core 2 Duo or AMD Athlon X2 CPU or higher
■ NVIDIA GeForce 8, 9 and 200 series
■ 3D ready monitor (120Hz)
■ 3D vision kits
Features
The camcorder oers a variety of features and functions including:
■ 3D and 2D video/image shooting and playback
■ 3�2” LCD 3D display
■ Parallax barrier auto-stereoscopic technology
■ USB mass storage
■ 3D and 2D video/image playback
■ 3D glasses not required
Unpacking the camcorder
Camcorder
Li-ion Battery
Pouch
CD Rom
Power Cable
HDMI Cable
(Optional)
User’s Manual
Charger
USB AV Cable
Page 4

4
EN
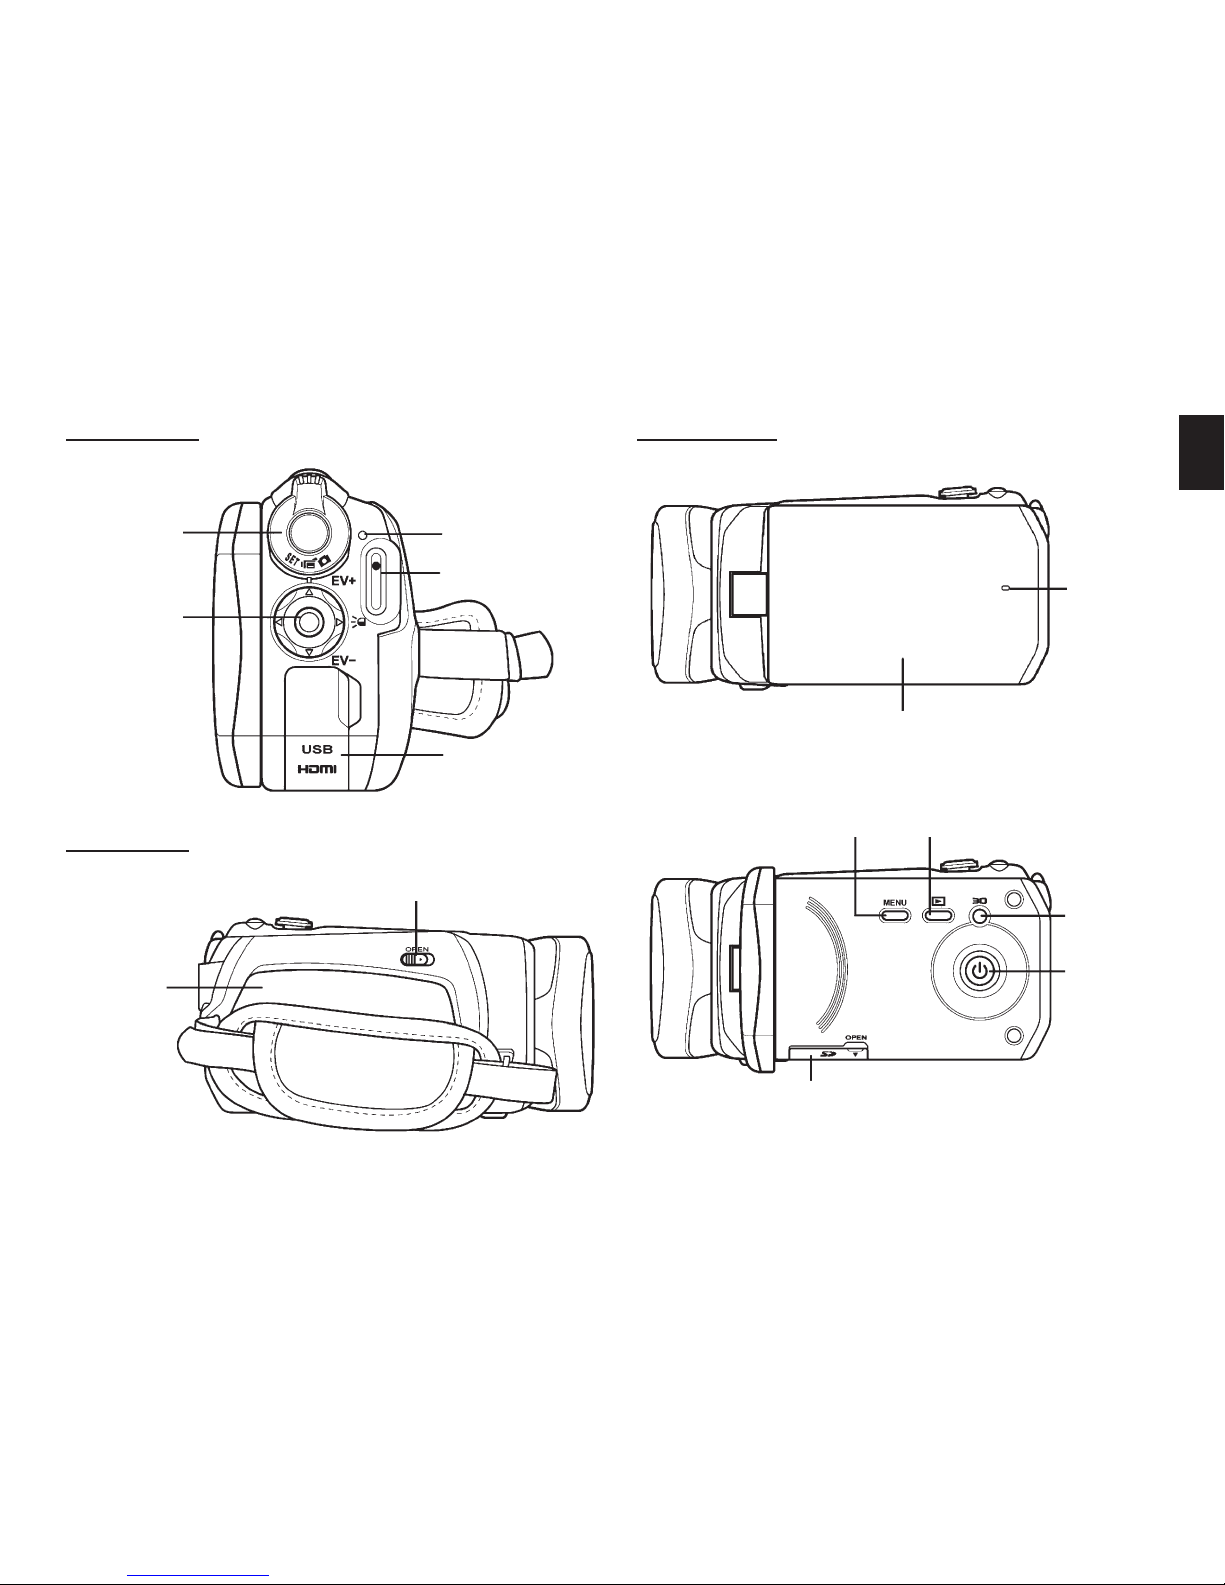
About the camcorder
Refer to the following illustrations to familiarize yourself with the buttons and controls of this camcorder�
Front view
Lens
Lens
Lens Head
Led Light
Speaker Zoom
Button
Tripod
Mount
Strap
Shutter
Button
Top view
Bottom view
Page 5
5
EN
Navigation
Button
Mode Dial
Status Led
Record Button
USB/AV Port
Back view Right view
Left view
Battery
Compartment
Battery Cover Latch
LCD Panel
SD Card Compartment
Microphone
3D Button
Playback ButtonMenu Button
Power
Button
Page 6

6
EN
Name Button Function
Power
Button
Press to turn the camcorder on
or o�
Menu
Button
Press to display the menu� Press
again to go back the previous
screen or close the menu�
Playback
Button
Press to playback recorded videos
or photos�
3D Button
Press to toggle between 3D and
2D modes�
Zoom
Button
• In Video or Camera mode, press
T to zoom in or press W to zoom
out when shooting videos or
photos�
• In Video Playback mode, press T
to increase the volume or W to
decrease the volume�
Shutter
Button
Press to take a picture�
Mode Dial
Adjust to switch to dierent
modes: Video, Camera, or Setup�
Record
Button
In Video mode, press to start
or stop recording a video�
In Video Playback mode, press to
start and pause video playback�
Name Button Function
Navigation
Button
In menu mode, use the four-way
control to select items in the
menu and press the middle button to conrm�
In Video or Camera mode:
• Press the up/down button to increase/decrease the EV settings�
• Press the left button to quickly
adjust White Balance�
• Press the right button to turn
the LED on or o�
In Video Playback mode:
• Press the middle button to start
or stop video playback�
• Press the left/right button to
scroll through the videos�
• While playing video, press the
left/right button to rewind/fastforward video playback�
• While playing video, press and
hold the left/right button increase/decrease to toggle the
rewind/ fast-forward speed (2X,
4X, or 8X)�
In Camera Playback mode:
• Press the left/right button to
scroll through the photos�
Page 7

7
EN
Operating the camcorder
To turn on the power, open the LCD panel or press the
Power Button for one second�
Rotate the LCD panel so you can view pictures and
movies�
Rotate the lens head to open the lens�
Page 8
8
EN
Getting started
Read this section to learn how to start using the camcorder� This section covers basic functions such as
switching on, inserting the battery and memory cards,
and conguring preliminary settings� See later chapters for advanced functions�
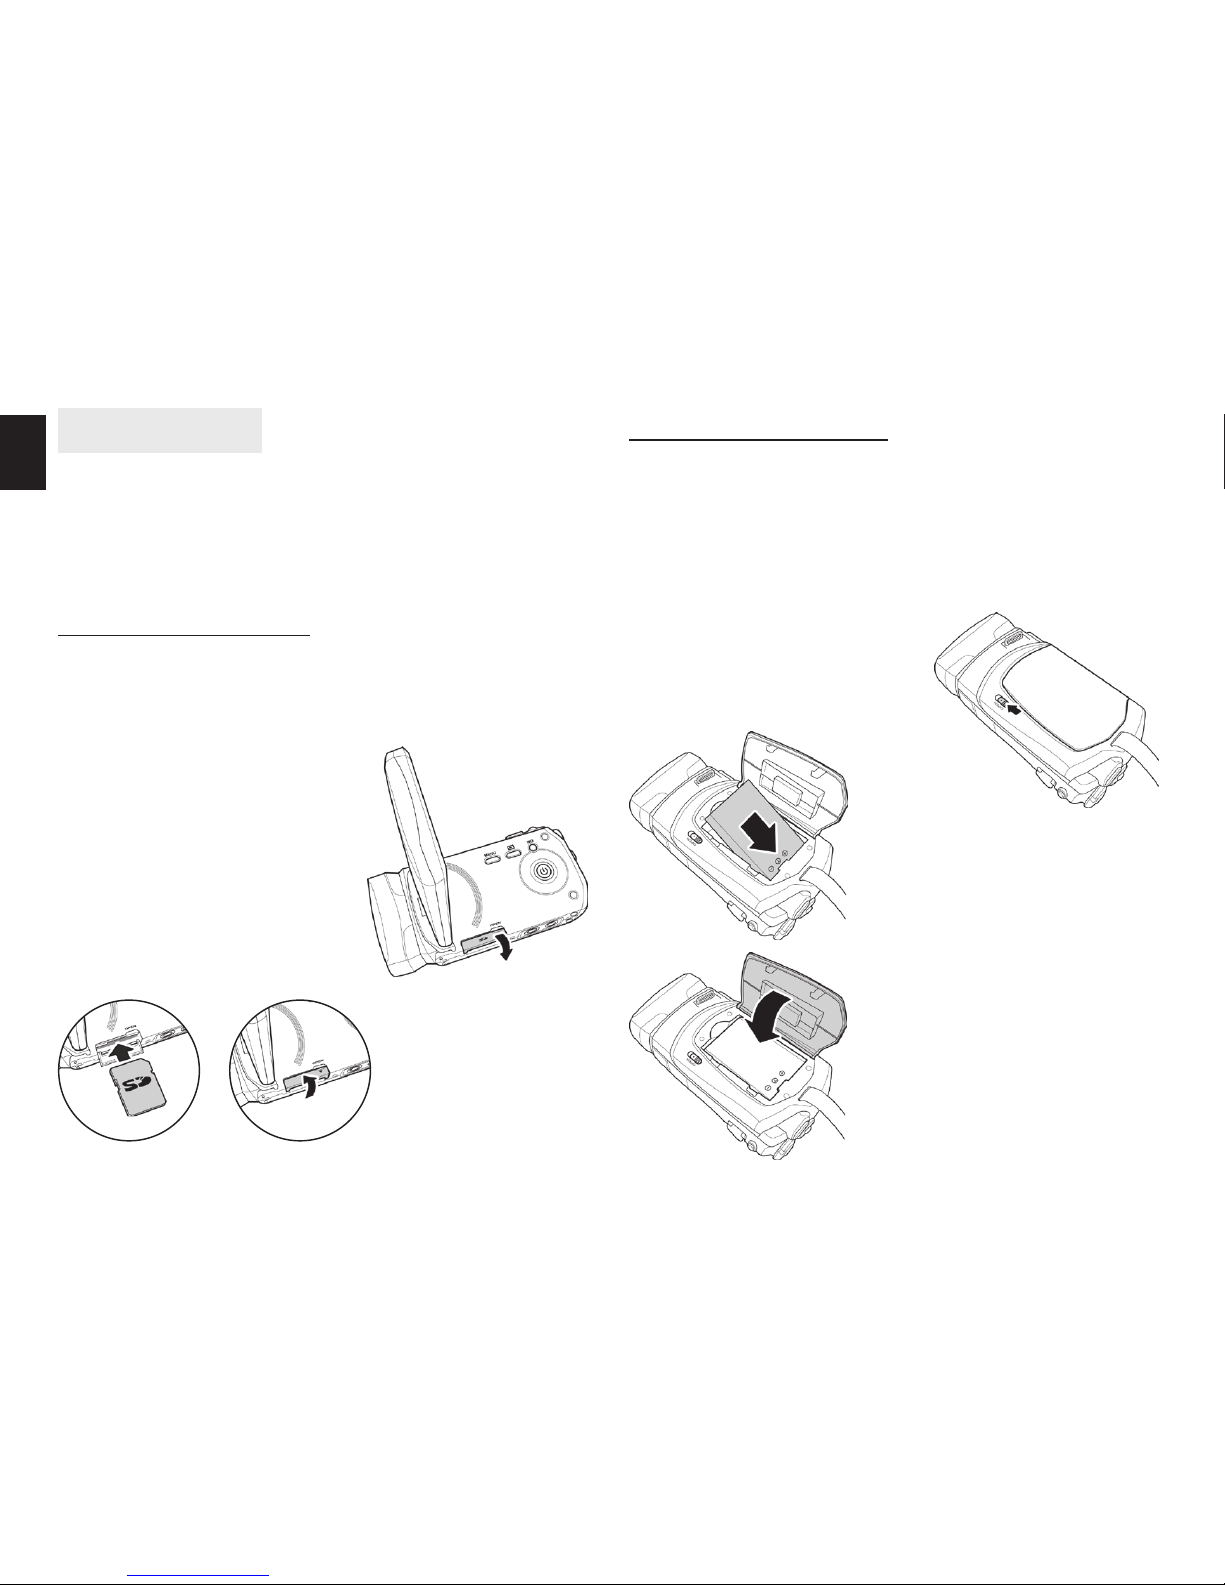
Inserting an SD card
An SD card can be installed in the camcorder to provide
additional storage space for still images, video clips, or
other les�
2� Insert the memory card� We
recommend using a memory card with a capacity
of 1 GB or higher�
1� Open the SD card door as
shown in the illustration�
3� Close the SD card door�
Inserting the battery
This camcorder is designed to use a rechargeable Li-ion
battery� Only use the batteries supplied by the manufacturer or your dealer�
Note: Install the battery exactly as described here.
Installing the battery incorrectly could cause damage to the camcorder.
2� Insert the battery� Make
sure that the + and – symbols on the battery line up
with the + and – symbols
on your camcorder�
3� Close the battery cover�
Note: Make sure that the
battery cover is tightly closed to ensure proper operation.
1� Slide the battery cover
latch to open the battery
cover�
Page 9

9
EN
Approximate charging
time is 240 minutes
with a charger and a
USB connection�
Charging the battery
You can charge the battery with the charging unit provided� Follow the steps below to charge the battery�
1� Insert the Li-ion battery into the charging bay� Con-
nect one end of the power cord to the charging unit
and then plug the other end to the wall outlet as
shown�
2� The orange LED will light up for proper charging�
3� After full charge, the LED turns to green�
4� Actual charging time depends on current battery ca-
pacity and charging conditions�
Turning on/ o the camcorder
Press and hold the Power Button to turn the camcorder
on/o�
Note: Closing and opening the LCD panel can power
on/o the camera.
Note:
For 3D video playback, you need to use a 3D HDTV.
Connecting to TV (AV Cable)
To view pictures or videos
on a TV, connect the camcorder to a TV using the
supplied AV cable as shown�
Connecting to TV (HDMI Cable)
You can also connect the
camcorder to a TV using
the HDMI cable (Optional)�
Page 10
10
EN
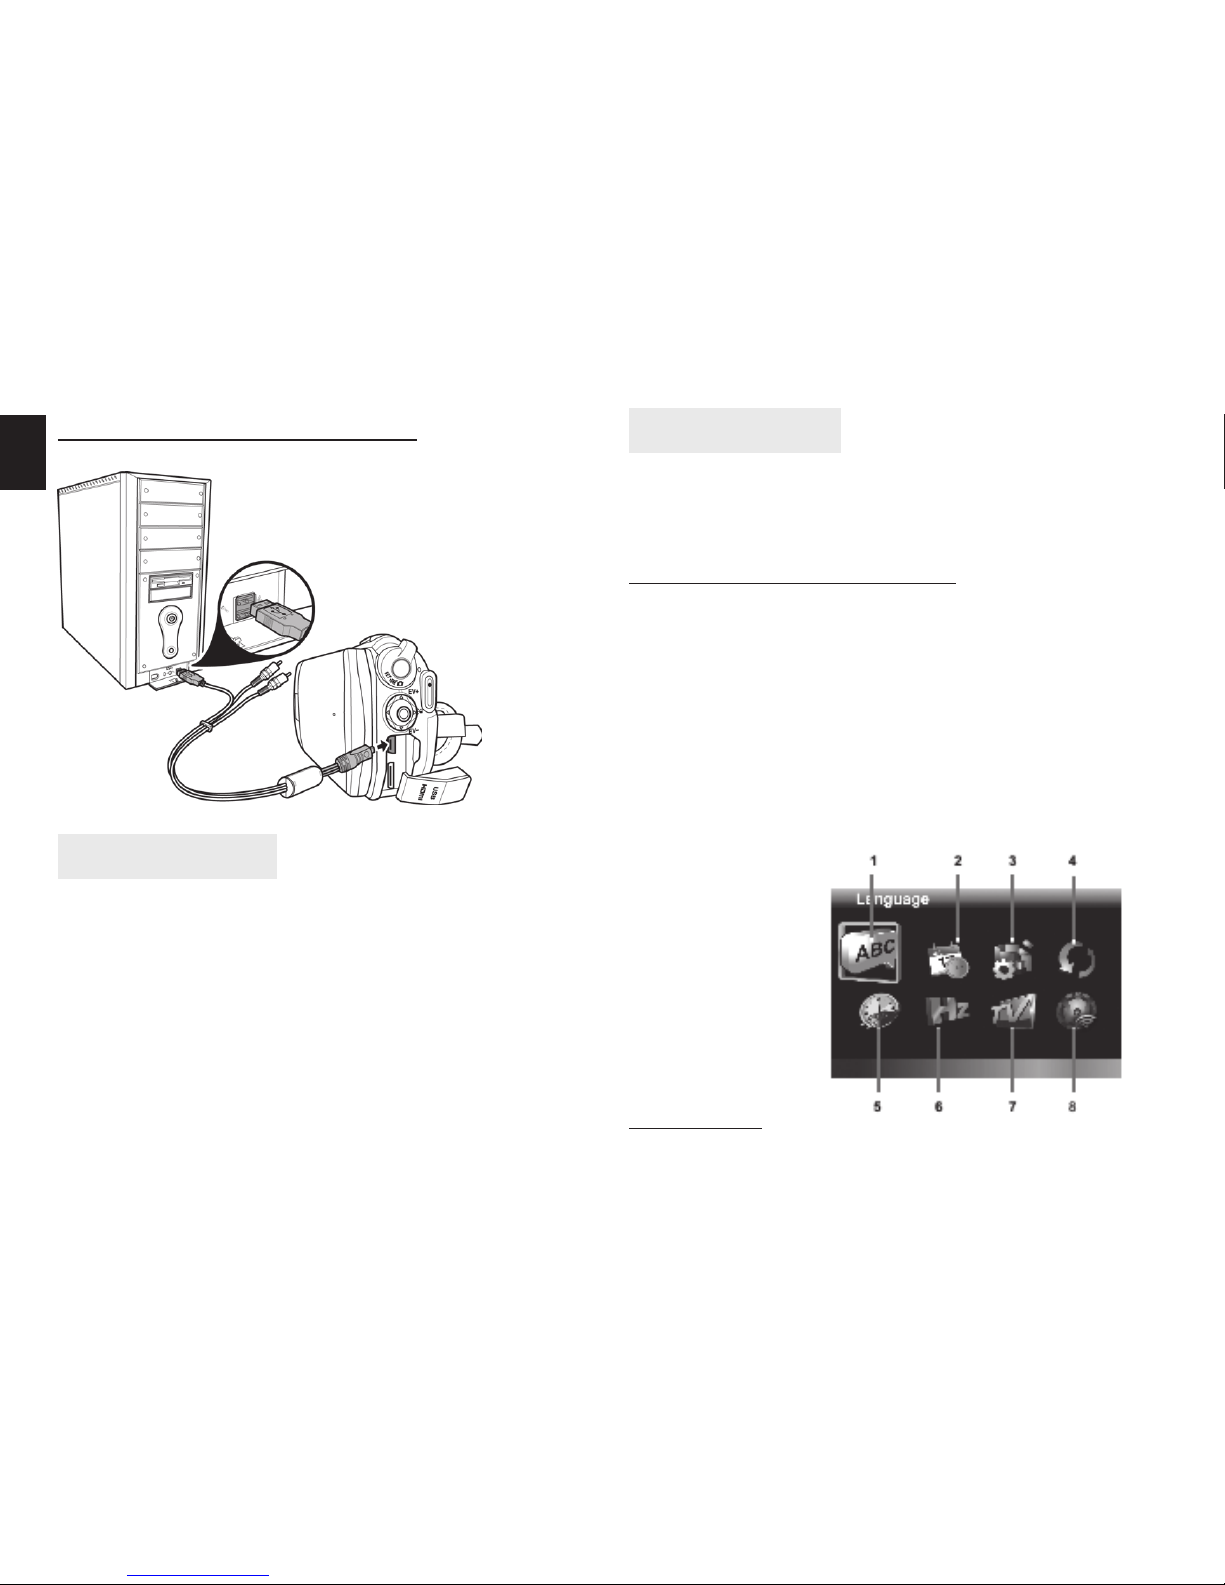
Connecting to PC (USB Cable)
Connect the camcorder to a
computer with the USB cable
provided as shown�
Changing modes
The camcorder can operate in three modes: Video,
Camera, and Setup� Adjust the Mode Dial to switch between modes�
You can also press the 3D Button to toggle between 2D
and 3D modes�
In Video or Camera modes, press the Menu Button
to enter the Video or Camera menu and adjust White
Balance, Resolution, Color, Date Stamp, or Continuous
Shooting�
Before you start
Before you start using the camcorder, some basic settings such as date and time, language, and beep function need to be congured�
Managing the Setup mode
To select a menu in the Setup mode, do the following:
1� Adjust the Mode Dial to Setup mode to display the
Setup mode screen�
2� Use the Navigation Button to scroll through the op-
tions/pages until the desired menu is highlighted�
Please see below for the available options�
3� Press the middle Navigation Button to open the
menu�
The following options are available in the Setup mode:
1� Language
2� Date/Time
3� Format
4� Default
5� Auto power o
6� Frequency
7� TV standard
8� Beep
Language
To select the language, do the following:
Page 11

11
EN
Date/Time
To adjust the Date / Time, do the following:
1� Use the left/right Na-
vigation Button to se-
lect the eld to be ad-
justed�
2� Use the up/down Na-
vigation Button to ad-
just the value�
3� Press the middle Navigation Button to conrm�
Default
The Default menu allows you to reset the
camcorder to factory defaults�
To reset the camcorder,
do the following:
1� Use the left/right Navigation Button to select �
2� Press the middle Navigation Button to conrm�
Auto Power O
The Auto Power O
menu allows you to set
an idle time after which
the camcorder automatically sets to sleep mode
to save power�
To adjust the Auto Power O, do the following:
1� Use the left/right Navigation Button to select:
X: Disable the Auto Power O function�
1 min.: Auto Power O after 1 minute�
5 min.: Auto Power O after 5 minutes��
2� Press the middle Navigation Button to conrm�
Format
The Format menu allows you to format your memory
card or the internal memory when no memory card is
inserted�
To format your memory
card or internal memory,
do the following:
1� Use the left/right
Navigation Button
to select
�
Warning: Formatting will delete everything on the
media.
2� Press the middle Navigation Button to conrm� 1� Use the left/right Navigation Button to select
the desired language�
2�
Press the middle Navigation Button to conrm�
Page 12

12
EN
Frequency
The Frequency menu allows you to set the refresh rate
of the camcorder� Increasing the refresh rate decreases
ickering, thereby reducing eyestrain�
To set the refresh rate, do the following:
1� Use the left/right Navi-
gation Button to select
60Hz or 50Hz�
2� Press the middle Navi-
gation Button to conrm�
TV Standard
The TV Standard menu allows you to select the TV
standard of the recorded videos�
To adjust the TV Standard, do the following:
1� Use the left/right Navi-
gation Button to select
NTSC or PAL�
2� Press the middle Navi-
gation Button to conrm�
Beep
The Beep menu allows you to turn the operation sound
and button sound o or on�
Using the Camcorder
Recording Videos
To record a movie, do the following:
1� Rotate the lens head and ip open the LCD panel to
turn on the camcorder�
2� Adjust the Mode Dial to Video mode�
To adjust the video, you may:
• Press the 3D Button to switch to 3D or 2D mode� 3D
mode allows you to record videos with 3D eects;
2D mode allows you to take regular 2D videos�
• Press the down Navigation Button to decrease the
EV settings�
• Press the up Navigation Button to increase the EV
settings�
• Use the Zoom Button to zoom in and out in 2D
mode�
To adjust the Beep, do the following:
1� Use the left/right Navigation Button to select:
X: Turn the operation
sound o�
: Turn the operation
sound on�
2� Press the middle Navi-
gation Button to con-
rm�
Page 13

13
EN
• Press the left Navigation Button to quickly change
the White Balance�
• Press the right Navigation Button to activate or
disable the LED lighting�
• Press the Menu Button to go to the Video mode
menu for more adjustment options�
3� Press the Record Button to start recording the video�
4� To stop movie recording, press the Record Button
again�
Notes:
1� For best results, maintain a 30-40 cm distance between your eyes
and the LCD panel when previewing 3D photos or videos�
2� The maximum le size of each video recording is approximately
3�9GB� The system will separate another le automatically and record
the video until the memory is full�
The Video Recording Screen
Icon Description
1
Indicates that the camcorder is in Video
mode�
2
Indicates the amount of zoom being
used�
3
Indicates the current White Balance
mode�
4
Indicates that night mode is enabled�
5
Indicates the amount of battery power
left�
6
Indicates the current resolution�
7
Indicates the current exposure value�
8
Indicates the memory card is inserted�
Indicates that the internal memory is
used to store les�
9
Indicates the remaining space for your
memory card/internal memory�
10
Indicates the recording time�
Page 14

14
EN
Video Mode Menu
To select a menu in the Video mode, do the following:
1� Press the Menu Button to open the Video mode
menu screen�
2� Use the Navigation Button to scroll through the op-
tions until the desired menu is highlighted� Please
see below for the available options�
3� Press the middle Navigation Button to open the
menu�
4� Press the Record Button to go back to Video mode�
White Balance
The White Balance menu allows you to set the white
balance when capturing images under specic lighting
conditions�
To set the White Balance, please do the following:
1� Use the left/right Navigation Button to select the de-
sired option:
Auto: Select this option to let the camcorder set the
white balance automatically�
Sunny: Select this option for daylight lming�
Cloudy: Select this option for lming in cloudy days�
Fluorescent: Select this option for uorescent light-
ing�
Tungsten: Select this option for normal indoor light-
ing conditions�
2� Press the middle Navigation Button to conrm�
Resolution
The Resolution menu allows you to set the resolution
before you capture an image or a video� The higher the
The following options are available in the Video mode
menu:
Note: Quality is only available when an SD card is
inserted.
1� White Balance
2� Resolution
5� Quality 3� Eect
4� Night Mode
Page 15

15
EN
Quality
The Quality menu allows you to set the recording quality� Higher quality videos contain more details and
therefore use more memory space�
To set the quality, do the following:
1� Use the left/right Navigation Button to select:
Fine: Select for higher
recording quality�
Normal: Select for nor-
mal recording quality�
2� Press the middle Navi-
gation Button to conrm�
Night Mode
To set night mode, do the following:
1� Use the left/right Navigation Button to select:
X: Turn night mode o�
: Turn night mode on�
2� Press the middle Navi-
gation Button to conrm�
Eect
The Eect menu allows you to change the recording effect� To set the Eect, do the following:
1� Use the left/right Navigation Button to select the de-
sired option:
Natural: Select it for
color photography�
Sepia: Select it for
brown color eect�
Black and white: Se-
lect it for black and
white eect�
resolution, the more memory space is required�
To select the resolution, do the following:
1� Use the left/right Navigation Button to select the de-
sired option:
1080P: Select this option for 1920 x 1080 resolution�
720P30: Select this option for 1280 x 720 resolution
at 30 fps�
720P60: Select this
option for 1280 x 720
resolution at 60 fps�
WVGA: Select this op-
tion for 848 x 480 reso-
lution�
2� Press the middle Navigation Button to conrm�
2� Press the middle Navigation Button to conrm�
Page 16

EN
Note: Videos must be recorded in 3D mode to have
3D eects.
The Video Playback Screen
Icon Description
1
Indicates that the camcorder is in Playback mode�
2
Indicates the video le number�
3
Indicates the total recorded time�
4
Indicates that the le is protected�
5
Indicates the video resolution�
Playback Videos
To playback videos, do the following:
1� Make sure you are in Video mode� Adjust the Mode
Dial to switch to Video mode if not�
2� Press the Playback Button to open the Video play-
back screen�
3� Press the left/right Navigation Button to browse the
recorded videos�
4� Press the middle Navigation Button or Record But-
ton to playback the video�
• To pause playback, press the Record Button� Press
the middle Navigation Button to stop playback�
• To adjust the volume, press the Zoom Button�
• To rewind/fast-forward, press and hold the left/
right Navigation Button to toggle dierent speeds
(2X, 4X, or 8X)� To return to the normal speed, press
the middle Navigation Button�
Page 17

17
EN
Deleting Videos
To delete a single video, do the following:
1� In Video mode, press the Playback Button to enter
the Video Playback mode�
2� Press the left /right Navigation Button to select the
video you want to delete�
3� Press the Menu Button to open the Video Playback
menu screen�
4� Use the left/right Navigation Button to select ,
then press the middle Navigation Button to conrm�
5� Press the middle Navigation Button to delete the se-
lected video�
To delete all videos, do the following:
1� Press the Playback Button to enter Video Playback
mode�
2� Press the Menu Button to open the Video Playback
menu screen�
3� Use the left/right Navigation Button to select ,
then press the middle Navigation Button to conrm�
4� Use the left/right Navigation Button to select , and
then press the middle Navigation Button to delete
all videos�
Note: Once deleted, les cannot be recovered. Ensure the les are transferred to the computer or
saved to another storage device.
Files that have been protected will not be deleted.
You have to unlock the les rst before deleting
them.
Page 18

18
EN
Protecting Videos
To protect a video from being deleted, do the following:
1� In Video mode, press the Playback Button to enter
the Video Playback mode�
2� Press the left /right Navigation Button to select the
video you want to protect/unprotect�
3� Press the Menu Button to open the Video Playback
menu screen�
4� Use the left/right Navigation Button to select ,
then press the middle Navigation Button to conrm�
5� To protect/unprotect more les, use the left/right
Navigation Button to select other les, then press
the middle Navigation Button to protect/unprotect
the le�
Autoplay Videos
The Autoplay function allows you to play each video
clip in turn�
To start autoplay, do the following:
1� In Video mode, press the Playback Button to enter
the Video Playback mode�
2� Press the Menu Button to open the Video Playback
menu screen�
3� Use the left/right Navigation Button to select ,
then press the middle Navigation Button to conrm�
4� Use the left/right Navigation Button to select , and
then press the middle Navigation Button to start autoplay�
Page 19

19
EN
Video Output
The Video Output function allows you to change the
display output in 3D format on a 3D TV�
To set video output, do the following:
1� In Video mode, press the Playback Button to enter
the Video Playback mode�
2� Press the Menu Button to open the Video Playback
menu screen�
3� Use the left/right Navigation Button to select ,
then press the middle Navigation Button to conrm�
4� Use the left/right Navigation Button to select de-
sired option:
2D: You will see 2D video clips on TV�
3D: You will see 3D video clips on TV�
5� Press the middle Navigation Button to conrm�
Note: This function is only available on videos that
have been recorded in 3D mode.
If you are viewing with a regular 2D TV, the image
will be displayed side by side.
Shooting Photos
To shoot a photo, do the following:
1� Rotate the lens head and ip open the LCD panel to
turn on the camcorder�
2� Adjust the Mode Dial to switch to Camera mode�
3� Press the Shutter Button to capture a photo�
To adjust the camera, you may:
■ Press the 3D Button to switch to 3D or 2D mode� 3D
mode allows you to take photos with 3D eects; 2D
mode allows you to take regular 2D photos�
■ Press the down Navigation Button to decrease the
EV settings�
■ Press the up Navigation Button to increase the EV
settings
■ Use the Zoom Button to zoom in and out�
■ Press the left Navigation Button to quickly change
the White Balance�
■ Press the right Navigation Button to activate or dis-
able the LED lighting�
Press the Menu Button to enter the Camera mode
menu for more adjustment options�
Page 20

20
EN
Icon Description
6
Indicates the amount of battery power
left�
7
Indicates the current resolution�
8
Indicates the current exposure value�
9
Indicates the memory card is inserted�
Indicates that the internal memory is
used to store les�
Icon Description
1
Indicates that the camcorder is in Camera mode�
2
Indicates the amount of zoom being
used�
3
Indicates the total number of pictures�
4
Indicates the current White Balance
mode�
5
Indicates that night mode is enabled�
The Camera Screen
Camera Mode Menu
To select a menu in the Camera mode, do the following:
1� Press the middle Navigation Button to open the
Camera mode menu screen�
2� Use the Navigation Button to scroll through the op-
tions until the desired menu is highlighted� Please
see below for the available options�
3� Press the middle Navigation Button to open the
menu�
4� Press the Record Button to go back to Video mode�
Page 21

21
EN
The following options are available in the Camera
mode menu:
Note: Quality is only available when an SD card is
inserted.
1� White Balance
2� Resolution
5� Quality 3� Eect
4� Night Mode
White Balance
The White Balance menu allows you to set the white
balance when capturing images under specic lighting
conditions�
To set the White Balance, please do the following:
1� Use the left/right Navigation Button to select the de-
sired option:
Auto: Select this option to let the camcorder set the
white balance automatically�
Sunny: Select this option for daylight lming�
Cloudy: Select this option for lming in cloudy days�
Fluorescent: Select this option for uorescent lighting�
Tungsten: Select this option for normal indoor light-
ing conditions�
2� Press the middle Navi-
gation Button to con-
rm�
Resolution
The Resolution menu allows you to set the resolution
before you capture an image or a video� The higher the
resolution, the more memory space is required�
To select the resolution, do the following:
1� Use the left/right Navigation Button to select the de-
sired option:
(2D mode)
2M: Select this option for 1832 x 1372 resolution�
5M: Select this option for 2592 x 1944 resolution�
8M: Select this option for 3200 x 2400 resolution�
16M: Select this option for 4608 x 3456 resolution�
(3D mode)
2M: Select this option for 1832 x 1030 resolution�
5M: Select this option for 2280 x 1242 resolution�
16M: Select this option for 4608 x 2592 resolution�
2� Press the middle Navigation Button to conrm�
Page 22

22
EN
Night Mode
To set night mode, do the following:
1� Use the left/right Navi-
gation Button to select:
X: Turn night mode o�
: Turn night mode
on�
2� Press the middle Navi-
gation Button to conrm�
Eect
The Eect menu allows you to change the camera effect�
To set the Eect, do the following:
1� Use the left/right Navigation Button to select the de-
sired option:
Color: Select this op-
tion for color photography�
Sepia: Select this op-
tion for brown color
eect�
Black and white: Select this option for black and
white eect�
3� Press the middle Navigation Button to conrm�
Quality
The Quality menu allows you to set the image quality�
Higher quality images contain more details and therefore use more memory space�
To set the quality, do the following:
1� Use the left/right Navigation Button to select:
Fine: Select for higher
image quality�
Normal: Select for
normal image quality�
2� Press the middle Navi-
gation Button to conrm�
Playback Photos
To playback photos, please do the following:
1� Make sure you are in the Camera mode� Adjust the
Mode Dial to switch to Camera mode if not�
2� Press the Playback Button to enter the Photo play-
back screen�
3� Press the left/right Navigation Button to browse the
recorded photos�
Note: Photos must be recorded in 3D mode to have
3D eects.
Page 23

23
EN
The Photo Playback Screen
Icon Description
1
Indicates that the camcorder is in Camera
Playback mode�
2
Indicates the le number of the current
photo�
3
Indicates the sequence number of the
current photo over the total number of
photos�
4
File is protected�
Deleting Photos
To delete a single photo, do the following:
1� In Camera mode, press the Playback Button to enter
the Photo Playback mode�
2� Press the left /right Navigation Button to select the
photo you want to delete�
3� Press the Menu Button to open the Photo Playback
menu screen
4� Use the left/right Navigation Button to select ,
then press the middle Navigation Button to conrm�
5� Press the middle Navigation Button to delete the se-
lected photo�
To delete all photos, do the following:
1� Press the Playback Button to enter the Photo Play-
back mode�
2� Press the Menu Button to open the Photo Playback
menu screen�
Page 24

24
EN
Protecting Videos
To protect a photo from being deleted, do the following:
1� In Camera mode, press the Playback Button to enter
the Photo Playback mode�
Autoplay Photos
The Autoplay function allows you to play the slideshow
of the photos on your camera�
To start autoplay, do the following:
3� Use the left/right Navigation Button to select ,
then press the middle Navigation Button to conrm�
4� Use the left/right Navigation Button to select , and
then press the middle Navigation Button to delete
all photos�
Note: Once deleted, les cannot be recovered. Ensure the les are transferred to the computer or
saved to another storage device.
Files that have been protected will not be deleted.
You have to unlock the les rst before deleting
them.
2� Press the left /right Navigation Button to select the
photo you want to protect/unprotect�
3� Press the Menu Button to open the Photo Playback
menu screen
4� Use the left/right Navigation Button to select
,
then press the middle Navigation Button to conrm�
5� To protect/unprotect more les, use the left/right
Navigation Button to select other les, then press
the middle Navigation Button to protect/unprotect
the le�
Page 25

25
EN
Image Output
The Image Output function allows you to change the
display output in 3D format on a 3D TV�
Note: This function is only available on photos that
have been recorded in 3D mode.
If you are viewing with a regular 2D TV, the image
will be displayed side by side.
To set image output, do the following:
1� In Camera mode, press the Playback Button to enter
the Camera Playback mode�
2� Press the Menu Button to open the Camera Playback
menu screen�
3� Use the left/right Navigation Button to select
,
then press the middle Navigation Button to conrm�
4� Use the left/right Navigation Button to select de-
sired option:
2D: You will see 2D photos on TV�
3D: You will see 3D photos on TV�
5� Press the middle Navigation Button to conrm�
1� In Camera mode, press the Playback Button to enter
the Camera Playback mode�
2� Press the Menu Button to open the Camera Playback
menu screen�
3� Use the left/right Navigation Button to select ,
then press the middle Navigation Button to conrm�
4� Use the left/right Navigation Button to select , and
then press the middle Navigation Button to start autoplay�
Page 26
26
EN
Appendix
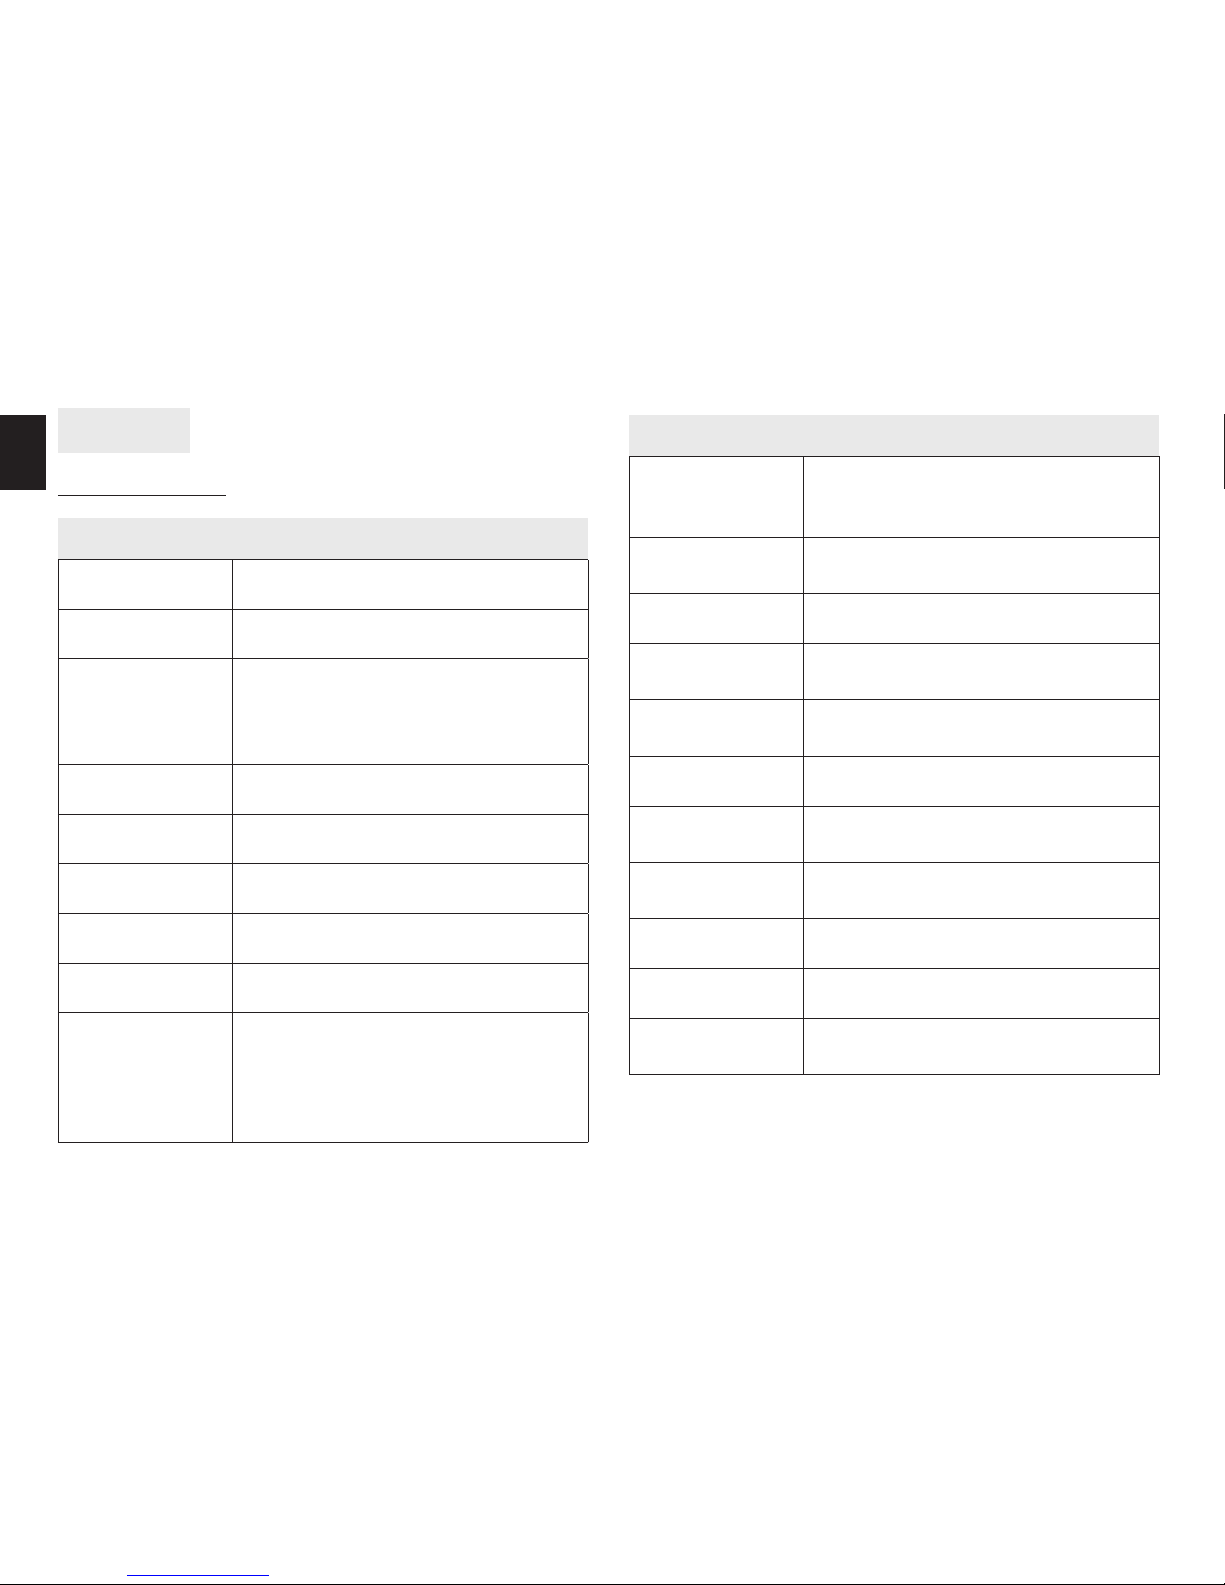
Specication
General
Imaging sensor 1/3�2” 5M CMOS Sensor x 2
Active pixels 5�0 Megapixel
Storage media Internal: Built-in 128MB Flash Memory
(Available memory for image storage
is approximately 56MB)
SD Card: (Up to SDHC 32GB Class6)
Sensitivity Auto
Exposure mode Programmed AE
Color eects Natural/B&W/Sepia
Lens F3�2, f=5�1mm
Focus range Approx� 1�2m~innity
Still image Formats: JPEG (EXIF 2�2)
3D Still image: 2M, 5M, 16M (Firmware
Interpolation)
2D Still image: 2M, 5M, 8M, 16M
(Firmware Interpolation)
General
Movie clips H�264 (AVI)
3D and 2D Movie: WVGA 848x480 60fps,
720p 30/60fps, 1080p 30fps
Zoom 3D: 6�8X
2D: 10X
LCD monitor 3�2”color LCD monitor (320x480 pixels)
LED light Eective range: < 1M
Mode: On/O
White balance Auto/Sunny/Cloudy/Tungsten/
Fluorescent
EV compensation -2�0 EV~+2�0 EV
Interface AV-out: NTSC / PAL / HDMI
MSDC: USB 2�0 (high speed)
Shutter speed Video: 1/15 ~ 1/2000 second
Still: 2 ~ 1/4000 speed
Power supply Li-ion Battery NP120
Dimension 43 (W) x 68 (H) x 135 (D) mm
Weight Approx� 232 ± 5 g
(without battery and memory card)
* Specication and appearance of product are subject to change without prior notice. Please visit www.media-tech.eu for technical support.
Page 27

27
EN
Troubleshooting
Problem Possible Cause Solution
Cannot turn on
the camcorder�
The battery is not
inserted correctly�
The batteries have
no power�
Insert the battery
correctly�
Charge the
battery�
The camcorder
suddenly turns
o�
The auto power
o function is
enabled�
The camcorder
is running out of
battery power�
Turn the power on
again�
Replace the battery�
The captured
image is not
stored in
memory�
Before the image
is saved the
power has been
cut o�
When the battery
indicator turns red,
replace the battery
immediately�
The camcorder
turns o while
taking a picture�
The camera is
running out of
battery power�
Replace the
battery�
The image is out
of focus�
The subject is
beyond focus
range�
Please take a picture
within the available
focus range
A black screen
appears on the
screen�
The EV setting
may be set too
high�
Adjust the EV
setting on the
camcorder�
Problem Possible Cause Solution
Memory card
cannot be used�
The memory card
is protected�
The memory card
contains non-DCF
images taken by
other camcorders�
Unlock the memory
card�
Format the memory
card� Before
formatting the card,
ensure you back up
the les�
All buttons are
inactive�
Short circuit
occurred when
connecting the
camera with other
devices�
Remove the
batteries from the
camera and insert
again�
 Loading...