

Page 1
BLUETOOTH
OPTICAL MOUSE
Instructions Manual
Hi-Res Wireless Optical Mouse
MT1074
EN
Package contents
■ Bluetooth Optical Mouse
■ 2 AAA alkaline batteries
■ User manual
System requirements
■ Windows ME, 2000, XP or Vista
■ Built-in Bluetooth function
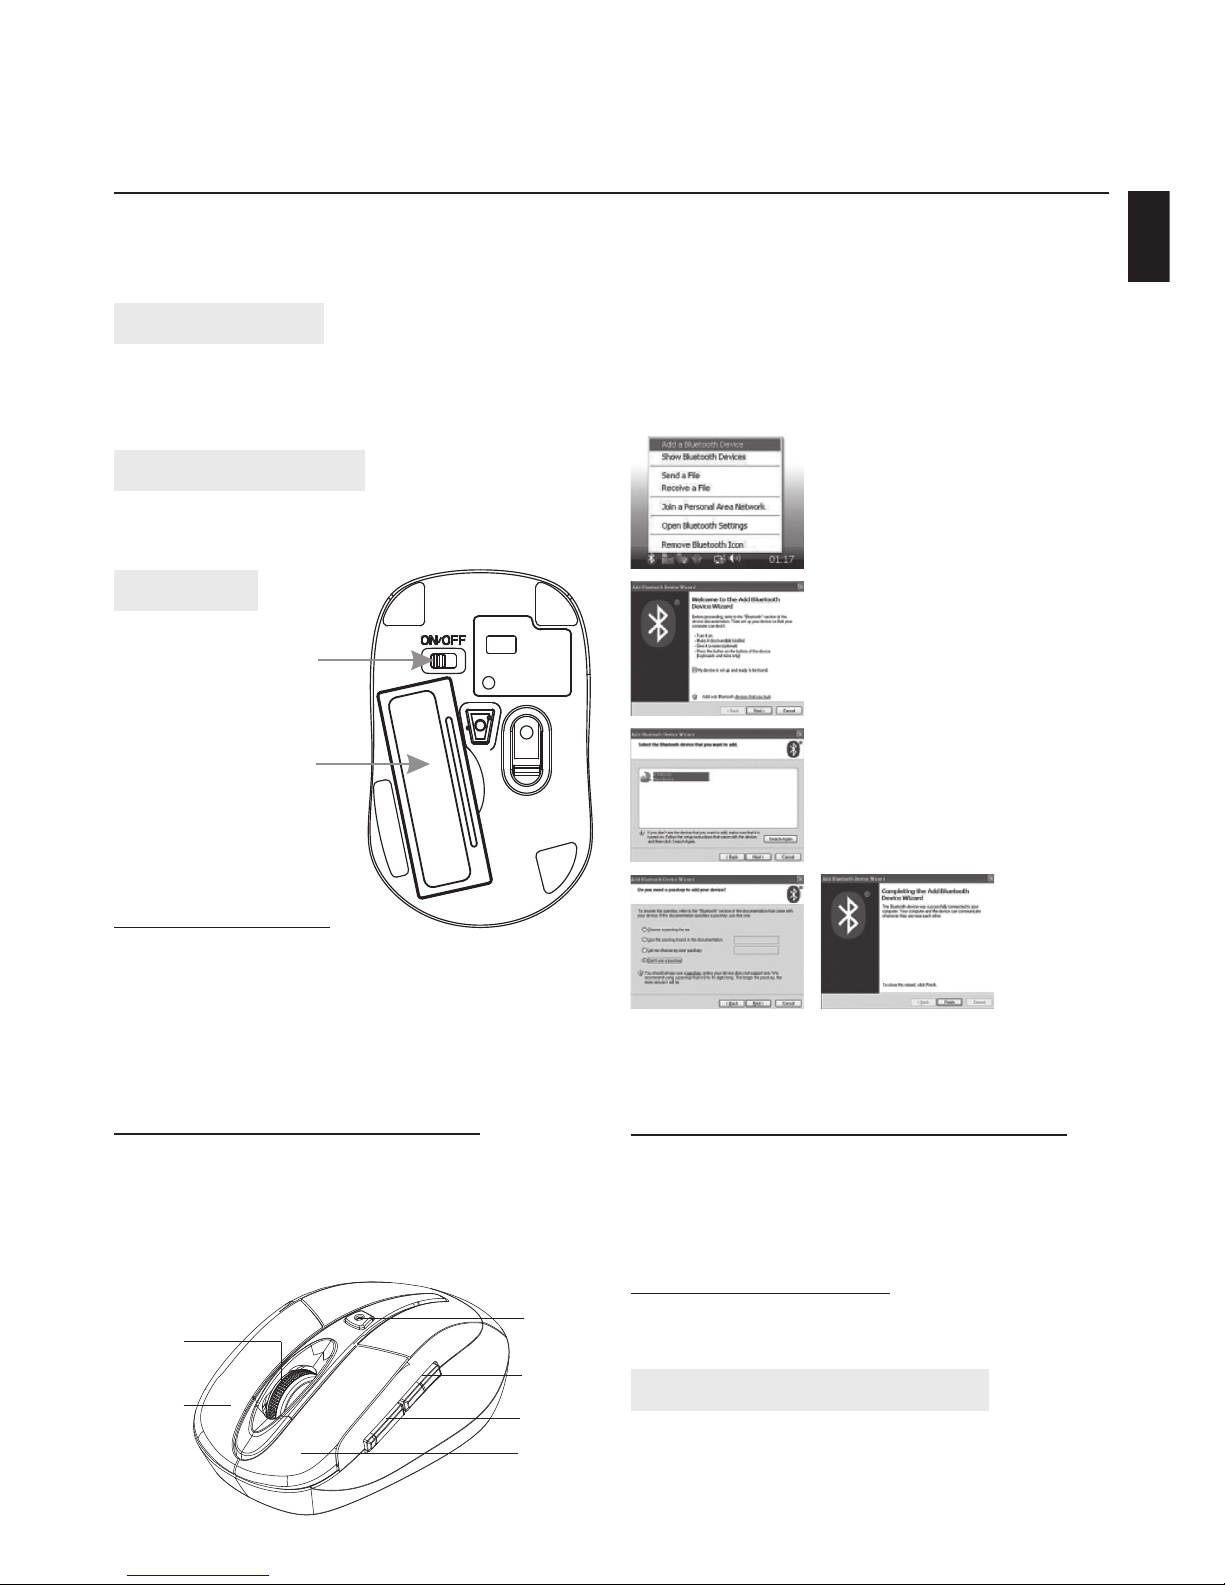
Installation
Installing batteries
1. Remove the battery cover.
2. Insert two AAA batteries into the battery compartment, make sure to properly orient the positive (+) and negative (-) ends as speci ed by the
marks in the battery compartment. Replace the
battery cover and make sure it is locked.
3. Switch on the mouse, LED light will blink
Connecting the Bluetooth mouse
Before you install the Bluetooth mouse, please make
sure that your computer supports Bluetooth function, and nished the Bluetooth software installation.
Software is available like Wincomm, IVT or the Microsoft built-in software.
1. Make sure that the Bluetooth
function has been activated.
Double click the Bluetooth
Icon on the Task Bar or in the
Control Panel, click “Add a
Bluetooth device”.
2. Select “My device is set up
and ready to be found”, click
“Next”.
3. Select Bluetooth mouse,
click “Next”.
4. Select „Don’t use a passkey”,
click „Next” and then „Finish”.
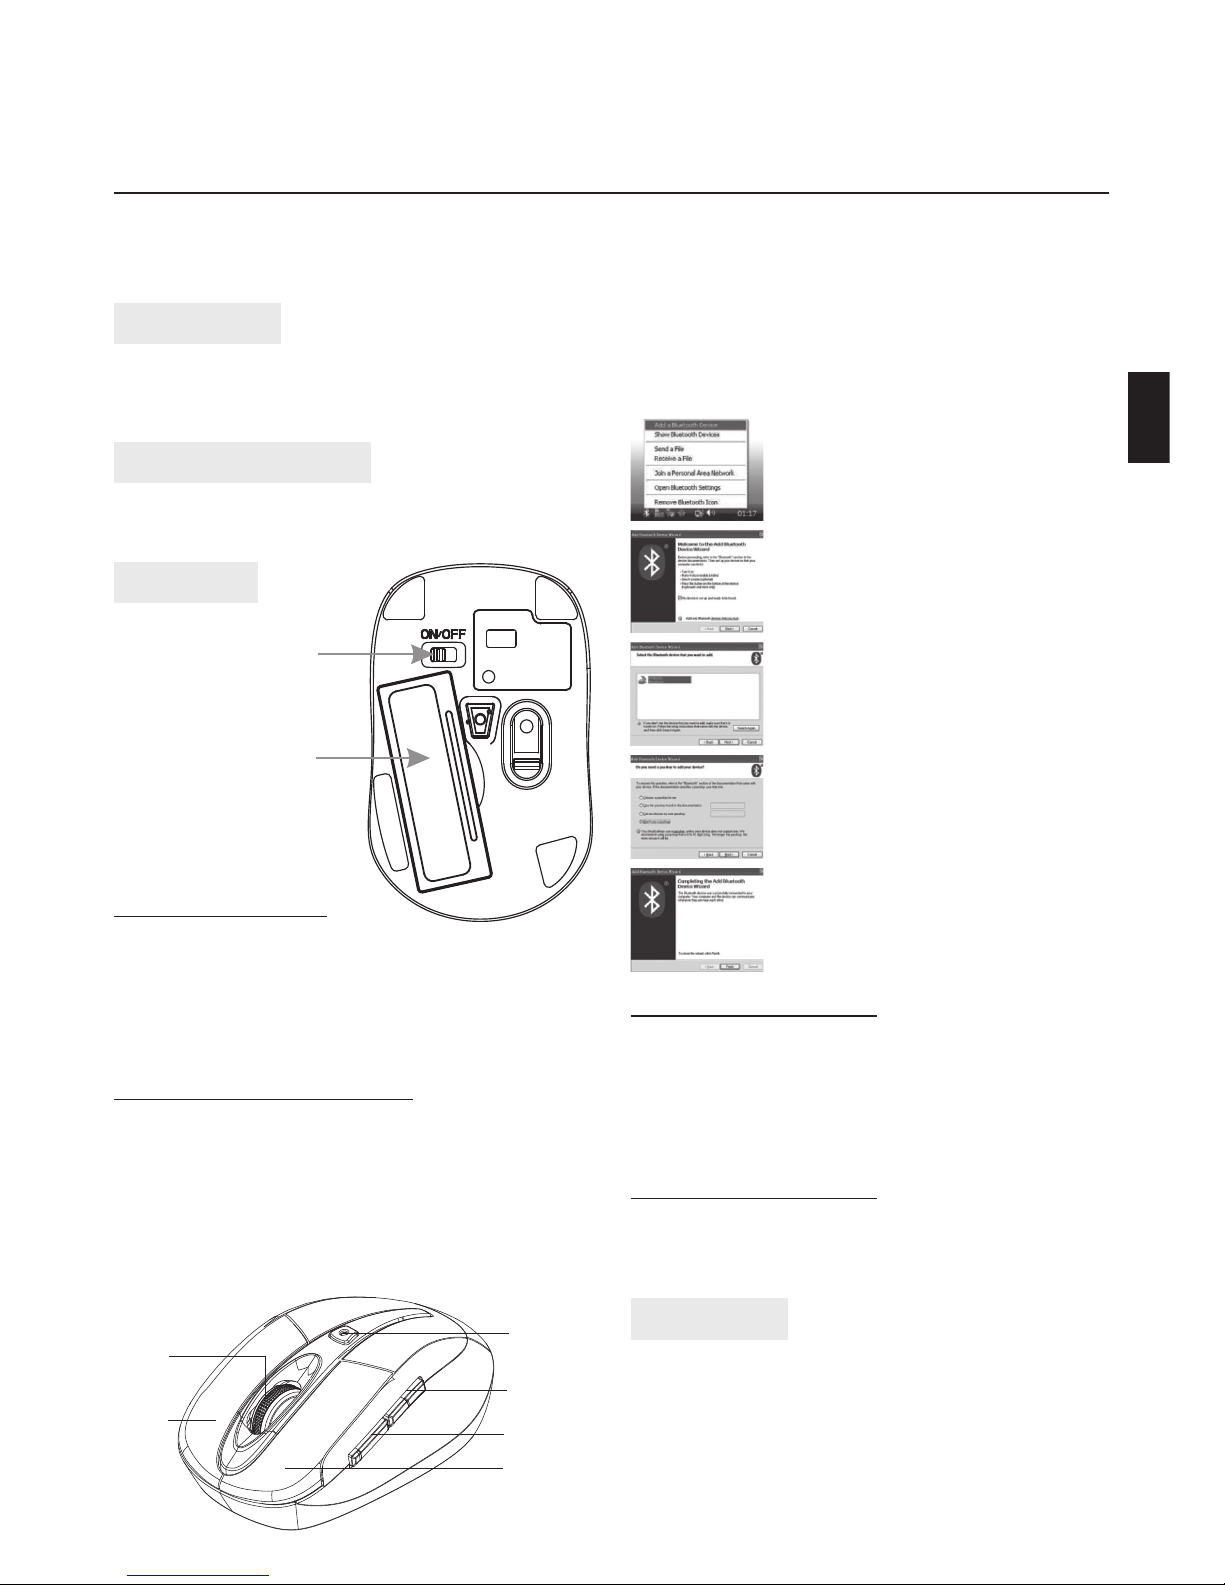
Description of keys and DPI Adjustment
Using “DPI-adjusting key”, the resolution of mouse
can be switched between 800DPI, 1000DPI and
1200DPI in turn. That LED light in “DPI-adjusting key”
blinks slowly indicates 800DPI, faster 1000DPI and
fastest 1200DPI.
Backward and Forward
Backward and Forward keys for your easily navigating forward and backward on the Internet.
Low-voltage alarming function
When batteries have been used for some time and
discover the LED light in “DPI-adjusting key” blinks
automatically, which reminds you that batteries voltage is becoming low, suggested you replace the batteries with new ones.
Note: If you use other Bluetooth software, the installing procedure may be similar. You need to try and
understand it by yourself.
Simultaneously press both Left and Right keys for
5 seconds, the LED light in “DPI-adjusting key” will
shine, it’s now searching the Bluetooth device. And
please follow the below procedures to install the
mouse.
ON/OFF switch
Battery cover
Diagram 1
Scrolling
wheel
DPI-adjusting
key
Right key
Left key
Forward
Backward
Page 2

BLUETOOTH
OPTICAL MOUSE
Instrukcja obsługi
Hi-Res Wireless Optical Mouse
MT1074
Zawartość opakowania
■ Optyczna mysz Bluetooth – 1 szt.
■ Instrukcja obsługi – 1 szt.
■ Bateria akaliczna AAA - 2 szt.
Wymagania systemowe
■ System operacyjny: Windows ME/2000/XP/Vista
■ Komputer PC z zainstalowanym interfejsem Blu-
etooth
Instalacja
Instalacja baterii
1. Otwórz pokrywę baterii.
2. Włóż dwie baterie AAA zgodnie ze znakami polaryzacji (+/-).
3. Zamknij pokrywę baterii.
4. Przesuń przełącznik zasilania w pozycję ON.
Sparowanie myszki Bluetooth
Upewnij się, że Twój komputer posiada zainstalowany i aktywny interfejs Bluetooth. Instrukcja objaśnia
sposób sparowania myszki za pomocą oprogramowania wbudowanego w system Windows. Instalacja
za pomocą innego oprogramowania może przebiegać inaczej, proszę zapoznać się z instrukcją dołączoną do tego oprogramowania.
1. W obszarze powiadomień systemowych na pasku zadań kliknij prawym przyciskiem ikonę
Bluetooth i wybierz “Add a Bluetooth device”
2. Zaznacz opcję “My device is set
up and ready to be found” i kliknij “Next”
3. Z listy odnalezionych urządzeń
wybierz “Bluetooth mouse” I
kliknij “Next”
4. Na poniższym ekranie wybierz
“Don’t use passkey” i kliknij
“Next”
5. Kliknij “Finish” aby zakończyc instalację.
Zmiana rozdzielczości
Naciśnij przycisk CPI aby zmienić rozdzielczość sensora między trybami 800, 1000 i 1200 CPI. Zmianę
sygnalizuje dioda LED pod przyciskiem CPI. Powolne
mruganie oznacza tryb 800 CPI, szybsze mruganie
oznacza tryb 1000 CPI, najszybsze oznacza pracę w
trybie 1200 CPI.
Przycisk wprzód/wstecz
Podczas korzystanie z przeglądarki WWW przyciśnij „wstecz” aby przejść do poprzedniej strony lub
„wprzód” aby przejść do następnej strony.
Oszczędzanie energii
Myszka posiada zaawansowany system oszczędzania energii. Niemniej jednak gdy nie używasz myszki
przez dłuższy czas wyłącz ją przesuwając przełącznik
zasilania w pozycję OFF.
Gdy baterie są już wyczerpane dioda pod przyciskiem CPI będzie mrugała samoczynnie. Wymień
wtedy baterie na nowe baterie alkaliczne AAA.
Wciśnij jednocześnie oba przyciski myszki (lewy i prawy) na około 5 sekund, dioda pod przyciskiem CPI zapali się sygnalizując przejście w tryb parowania.
PL
Przełącznik
zasilania
Pokrywa baterii
Rys. 1.
Mysz widok od spodu
Rys.2.
Mysz - widok z góry
Rolka
przewijania
Przycisk
CPI
Przycisk
prawy
Przycisk
lewy
Wprzód
Wstecz
Page 3
BLUETOOTH
OPTICAL MOUSE
Gebrauchsanleitung
Hi-Res Wireless Optical Mouse
MT1074
DE
Abb. 2.
Frontansicht der Maus
Lieferumfang
■ 1x optische Bluetooth Maus
■ 1x Gebrauchsanleitung
■ 2x AAA Alkali-Batterien
Systemvoraussetzung
■ Benutzersystem: Windows ME, 2000, XP, Vista
■ PC Computer mit einer Bluetooth Anbindung
Installation
1. Klicken Sie mit der rechten Maustaste in
der Tastleiste auf das Bluetooth Symbol
und wählen Sie “Add a Bluetooth device” (Bluetooth Gerät hinzufügen)
2. Wählen Sie “My device is set up and ready to be found” (Mein Gerät steht zur Benutzung bereit und kann entdeckt werden) und klicken Sie auf “Next” (Weiter)
3. Wählen Sie “Bluetooth mouse” aus der
Tre erliste und klicken Sie auf “Next”
(Weiter)
4. Auf folgendem Bildschirmhinweiss
wählen Sie „Don’t use passkey” (Kein
Sicherheitsschlüssel verwenden) und
klicken Sie auf “Next”(Weiter)
5. Klicken Sie auf “Finish” (Fertig), um mit
der Installation abzuschließen
CPI Au ösung ändern
Drücken Sie den CPI Knopf, um zwischen einer Au ösung von 800, 1000 und 1200 CPI zu wählen. Die LED
Statusanzeige unter dem CPI Knopf, wird ein paar
mal blinken – langsames blinken = 800 CPI, schnelleres blinken = 1000 CPI, am schnellsten blinkend
=1200CPI.
Vor-/Rückwärtstasten
Beim surfen im Internet, können Sie sich entsprechend die vorherige oder die nächste Seite anzeigen
lassen.
Stromsparen
Die Maus ist mit einem automatischen Stromsparmodus ausgestattet. Wir empfehlen Ihnen, bei längerer nicht Benutzung, den Schalter auf die Position
„OFF“ zu stellen.
Sobald die Batterien entladen sein sollte, wird Ihnen
dies durch eine blinkende CPI LED Statusanzeige signalisiert. Bitte ersetzen Sie die Batterien durch ein
neues paar Batterien.
Drücken Sie gleichzeitig und über 5 Sekunden die
linke und rechte Maustaste bis die LED Statusanzeige
unterhalb des CPI Knopfs leuchtet – die Maus ist zu
Verbindung bereit.
Ein-/Ausschalter
Batteriefach
Abb.1 Maus Unterseite
Batterien einlegen
1. Ö nen Sie das Batteriefach
2.
Setzen Sie die zwei AAA Batterien in das Batteriefach
ein - Achten Sie bitte auf die Polarität (+/-)
.
3. Schließen Sie das Batteriefach
4. Stellen Sie den Schalter auf ON, um die Maus einzuschalten.
Bluetooth Maus verbinden
Stellen Sie sicher, dass Ihr Computer Bluetooth-Verbindungen unterstützt und der Bluetooth-Anschluss
aktiviert ist. Die Anleitung wird Ihnen erläutern, wie
Sie per Windows Bluetooth Software die Verbindung
herstellen. Sollten Sie eine andere Software verwenden, dann kann das Schema anders aussehen – bitte
lesen Sie die Gebrauchsanleitung von der Software.
Scroll
Rad
CPI Knopf
rechte
Taste
linke Taste
Vorwärts
Rückwärts
Page 4

BLUETOOTH
OPTICAL MOUSE
Bruger manual
Hi-Res Wireless Optical Mouse
MT1074
DK
Pakken Indeholder
■ Bluetooth optisk mus – 1 stk.
■ Bruger manual – 1 stk.
■ Alkaline AAA batterier - 2 stk.
System krav
■ Operations system: Windows ME, 2000, XP, Vista
■ PC computer med Bluetooth interface installeret
Installation
1. Åbn Bluetooth-enheder i Kontrolpanel og Klik på Tilføj under fanen Enheder.
2. Marker afkrydsningsfeltet Min
enhed er installeret og er klar
til at blive tilføjet, og klik derefter på Næste.
3. Klik på det ikon, der repræsenterer Bluetooth-musen, og
klik derefter på Næste.
4. Klik på Brug ikke en adgangsnøgle og derefter på Næste.
5. Følg den resterende vejledning i guiden.
Skift DPI opløsning
Tryk DPI-knappen for at skifte mellem 800, 1000 og
1200 DPI opløsning. LED indikator under DPI knappen blinker par gange - langsomt blinkende for 800
DPI, hurtigere for 1000 DPI og hurtigste for 1200 DPI.
Frem/tilbage-knap
Når du surfer på Internettet - tryk tilbage for at få
adgang til forrige side eller trykke på frem for at få
adgang til næste side.
Strømbesparelse
Musen er forsynet med automatisk strømspare system. Hvis du ikke bruger musen i længere tid anbefales det at slukke.
Når batterierne er slidt op og skal udskiftes blinker
DPI LED automatisk. Udskift batterierne med nogle
nye.
Tryk samtidigt både venstre og højre muse knap i 5
sekunder, LED indikator under DPI-knappen vil være
på - mus er nu i parring mode.
ON/OFF knap
Batteri dæksel
Pic.1
Mus set fra bunden
Isætning af batterier
1. Åben batteri dæksel
2. Isæt to AAA batterier i batterirummet ifølge polarisering mærker (+/-).
3. Luk batteri dæksel
4. Flyt ON/OFF knap til ON position.
Parring af Bluetooth-mus
Sørg for, at computeren understøtter Bluetooth,
og Bluetooth interface er aktivt. Instruktion vil vise,
hvordan man parrer musen ved brug af Windows
indbyggede Bluetooth software. Hvis du bruger anden software kan installationen være forskellig, der
henvises til vejledningen af den software.
Pic. 2.
Mus set fra oven
Scroll hjul
DPI knap
Højre
museknap
Venstre
museknap
Frem
Tilbage
 Loading...