


E
nglish
1
1. Read these instructions.
2. Keep these instructions.
3. Heed all warnings.
4. Follow all instructions.
5. Do not use this apparatus near water.
6. Clean only with a dry cloth.
7. Do not block any ventilation openings. Install in accordance with the manufacturer’s instructions.
8. Do not install near any heat source such as radiators, stoves, or other apparatus
(including amplifiers) that produce heat.
9. Protect the power cord from being walked on or constricted particularly near the plug,
by waste bins, and at the point where it exits from the apparatus.
10. Only use attachments/accessories specified by the manufacturer.
11. Use only with the cart, stand, tripod, bracket, or table specified by the manufacturer, or sold with
the apparatus. When a cart is used, use caution when moving the cart/apparatus combination to
avoid injury from overturning.
12. Unplug this apparatus during electrical storms or when unused for long periods of time.
13. Refer all servicing to qualified service personnel. Servicing is required when the apparatus has
been damaged in any way, such as when the power-supply cord or plug is damaged, when liquid
has been spilled on it, when it does not operate normally, or has been dropped.
14. The apparatus should not be exposed to dripping or splashing of liquids, and objects filled with
liquid, such as vases, should not be placed on the apparatus.
15. Indoor use only.
(한라)TV매뉴얼32형1장_En 2006.3.29 2:12 PM 페이지1 syj_print PDF-IN 2540DPI 100LPI T

Important Safety Instruction
2
Shock Hazard Marking and Associated Graphic Symbols
Explanation of Safety Related Symbols
WARNING – To reduce the risk of fire or electric shock, do not expose this apparatus to
rain or moisture.
To prevent fire or shock hazard, do not place objects filled with liquids, such
as vases, on the apparatus.
This symbol is intended to alert the user to the presence of uninsulated
“dangerous voltage” within the product’s casing that may be of sufficient
magnitude to constitute a risk of electric shock.
RISK OF ELECTRIC SHOCK
DO NOT OPEN
CAUTION : TO REDUCE THE RISK OF ELECTRIC SHOCK, DO
NOT REMOVE COVER (OR BACK).
NO USER SERVICEABLE PARTS INSIDE.
REFER SERVICING TO QUALIFIED SERVICE PERSONNEL.
This symbol is intended to alert the user to the presence of important
operating and maintenance(servicing) instructions in the literature
accompanying the appliance.
RISK OF ELECTRIC SHOCK
DO NOT OPEN
CAUTION
CAUTION
(한라)TV매뉴얼32형1장_En 2006.3.29 2:12 PM 페이지2 syj_print PDF-IN 2540DPI 100LPI T

E
nglish
Important Safety Instruction
3
General safety precautions
Never touch the power plug with wet hands.
An electric shock may occur.
Don’t plug more than one appliance into the same power outlet.
An electric shock or fire may occur.
Insert the plug fully so that the power supply unit is connected
securely. Unsafe power connection may cause a fire.
Grasp the power plug at the base to remove it from the wall, and pull
firmly but gently. If you jerk the cord, the wire may be break, causing
ignition or heat generation.
Select a cool, dry area and protect the LCD display from extremes of
temperature, humidity, dust and smoke. Electric shock, fire or failure
may occur.
Place the apparatus at a proper distance (over 10 cm) away from the
wall for sufficient ventilation. A fire may result from an increase in
internal temperature.
Place the monitor in a well-ventilated room. A fire may result from an
increase in internal temperature.
Do not touch the antenna when it is snowing or, raining, or during
electrical storm. Electric shock may result.
There may be a danger of electric shock when installing the outdoor
antenna; please consult a specialist firm.
Electric shock may result.
(한라)TV매뉴얼32형1장_En 2006.3.29 2:12 PM 페이지3 syj_print PDF-IN 2540DPI 100LPI T

Important Safety Instruction
Position the outdoor antenna line in such a way as to prevent rain
water flowing into the parts indoors. A fire or electric shock may be
caused if rainwater is allowed to get into the LCD display.
Never disassemble and repair this apparatus yourself; use trained
repair engineers. A fire or electric shock may result. If repair or
adjustment is required, please contact the appropriate sales agency
or customer advisor.
Don’t insert metal objects (such as coins, hair pins or ironware) or
flammable items (such as paper or matches) into the apparatus. A fire
or electric shock may result.
Stop using the apparatus in case of smoke or abnormal odors.
Immediately turn off the power, pull the power cord out of the wall and
then contact your service center. Continued use in these
circumstances may cause a fire or electric shock.
Please prevent children from tampering with or swallowing a remote
control dry cell. Keep dry cells out of children’s reach. If a child
swallows one, please consult a doctor immediately.
Place on a stable and secure surface.
If the monitor falls or is dislodged, it may cause an injury.
Turn off the apparatus and disconnect all cables from the monitor
before moving the apparatus.
Do not subject the apparatus to shock when moving.
4
(한라)TV매뉴얼32형1장_En 2006.3.29 2:12 PM 페이지4 syj_print PDF-IN 2540DPI 100LPI T

E
nglish
Important Safety Instruction
If installing or moving the LCD TV after opening the LCD TV box, ensure
that two persons hold each side of the unit for moving it to the
installation site. This is to avoid potential hazards to the LCD TV as
well as to the people moving the unit. Carrying an LCD TV by only one
person places intense stress on the back, possibly resulting in back
injuries. The unit could also be dropped on the floor, which could
break the cradle or cause other injuries. When moving the product, do
not hold it by the speaker part.
Don’t put pressure on the panel or scratch the surface with your hands
or a sharp item such as a nail or pen. Damage or failure of the panel
may result.
Keep an appropriate distance from the product. If you watch the
product continually at too short a range, your eyesight may be
damaged.
When replacing dry cells, make sure to align the polarity (+, -)
correctly. Please use only designated standard products. If the polarity
is not correct, dry cells may explode or their internal liquid may leak,
causing fire, injury and contamination damage. Please discard the
battery as specified by the manufacturer.
5
(한라)TV매뉴얼32형1장_En 2006.3.29 2:12 PM 페이지5 syj_print PDF-IN 2540DPI 100LPI T

● This User Manual contains proprietary information that is protected by copyright.
All rights are reserved. No part of this User Manual may be reproduced, photocopied,
transcribed, translated or transmitted in whatsoever form without the prior permission of the
manufacturer.
● The size and appearance of this LCD display may be changed without notice for the purpose
of improvement.
● Damage caused by using unauthorized components, and non-observance of the information
and precautions in this user manual, is not covered by the warranty.
● If you have a problem with your LCD display, please check the Troubleshooting section in this
User Manual before requesting assistance from a service center.
● The information in this user manual is subject to change without notice.
● If static images are displayed on the LCD for a prolonged period, the LCD display may show
screen image retention. This is not a permanent condition and the image will fade in time.
Image retention is a condition that may occur with all LCD displays.
● The LCD consists of about 5 million pixels. One pixel incorporates 3 dots, and some of the
dots may be perceived as brighter or darker compared to others. Please note that this may
occur on all LCD displays and is not a product defect.
● This User Manual contains descriptions and instructions for both the 32-inch LCD TV models.
6
(한라)TV매뉴얼32형1장_En 2006.3.29 2:12 PM 페이지6 syj_print PDF-IN 2540DPI 100LPI T

E
nglish
After opening the box, make sure the following items are provided with the monitor. If you find
that any of these items are missing or appear to be damaged, contact your dealer immediately.
N O T E
▶
Shapes and colours of parts are subject to change without prior notice, but their functions remain
unchanged.
7
32″LCD TV
Remote Control/Batteries
(1.5V AAA type)
75Ω Antenna - extensible
Coaxial Cable
User’s Manual
Power Cable
LCD TV Main Unit
Standard Items
(한라)TV매뉴얼32형1장_En 2006.3.29 2:13 PM 페이지7 syj_print PDF-IN 2540DPI 100LPI T

8
1.1 Product Characteristics
₩₩₩₩₩₩₩₩₩₩₩₩₩₩₩₩₩₩₩₩₩₩₩₩₩₩₩₩₩₩ 1-2
1.2 LCD Display Overview
₩₩₩₩₩₩₩₩₩₩₩₩₩₩₩₩₩₩₩₩₩₩₩₩₩₩₩₩₩₩₩₩ 1-4
Front View
₩₩₩₩₩₩₩₩₩₩₩₩₩₩₩₩₩₩₩₩₩₩₩₩₩₩₩₩₩₩₩₩₩₩₩₩₩₩₩₩₩₩₩₩₩₩₩₩₩₩₩ 1-4
Rear View
₩₩₩₩₩₩₩₩₩₩₩₩₩₩₩₩₩₩₩₩₩₩₩₩₩₩₩₩₩₩₩₩₩₩₩₩₩₩₩₩₩₩₩₩₩₩₩₩₩₩₩ 1-6
1.3 Remote Controller
₩₩₩₩₩₩₩₩₩₩₩₩₩₩₩₩₩₩₩₩₩₩₩₩₩₩₩₩₩₩₩₩₩₩₩₩₩₩ 1-8
Before Using the Remote Control
₩₩₩₩₩₩₩₩₩₩₩₩₩₩₩₩₩₩₩ 1-8
Remote Controller Button Functions
₩₩₩₩₩₩₩₩₩₩₩₩₩₩₩₩ 1-10
1.4 Connecting the LCD TV and Peripheral Devices
₩₩₩₩₩₩₩₩₩₩₩₩₩₩₩₩₩₩₩₩₩₩₩₩₩₩₩₩₩₩₩₩₩₩₩₩₩₩₩₩₩₩₩₩₩₩₩₩₩₩₩₩₩₩₩₩₩₩₩₩₩₩₩₩₩ 1-14
Connecting the Aerial or Cable Television Network
₩₩ 1-14
Connecting VCR
₩₩₩₩₩₩₩₩₩₩₩₩₩₩₩₩₩₩₩₩₩₩₩₩₩₩₩₩₩₩₩₩₩₩₩₩₩₩₩₩₩₩ 1-16
Connecting a DVD Player & Set-Top Box
(Connecting to Y, Pb, Pr)
₩₩₩₩₩₩₩₩₩₩₩₩₩₩₩₩₩₩₩₩₩₩₩₩₩₩₩₩ 1-18
Connecting to a digital (AC3) amplifier
₩₩₩₩₩₩₩₩₩₩₩₩₩₩ 1-19
Connecting to HDMI
₩₩₩₩₩₩₩₩₩₩₩₩₩₩₩₩₩₩₩₩₩₩₩₩₩₩₩₩₩₩₩₩₩₩₩₩₩₩ 1-20
Connecting to a PC
₩₩₩₩₩₩₩₩₩₩₩₩₩₩₩₩₩₩₩₩₩₩₩₩₩₩₩₩₩₩₩₩₩₩₩₩₩₩₩ 1-21
LCD TV Overview and Installation
1
2.1 Watching TV
₩₩₩₩₩₩₩₩₩₩₩₩₩₩₩₩₩₩₩₩₩₩₩₩₩₩₩₩₩₩₩₩₩₩₩₩₩₩₩₩₩₩₩₩₩ 2-2
2.2 Watching Digital TV
₩₩₩₩₩₩₩₩₩₩₩₩₩₩₩₩₩₩₩₩₩₩₩₩₩₩₩₩₩₩₩₩₩₩ 2-4
To watch digital TV
₩₩₩₩₩₩₩₩₩₩₩₩₩₩₩₩₩₩₩₩₩₩₩₩₩₩₩₩₩₩₩₩₩₩₩₩₩₩₩ 2-4
To view information on the current channel
₩₩₩₩₩₩₩ 2-5
To view program guide for the digital TV
₩₩₩₩₩₩₩₩₩₩₩ 2-5
2.3 To configure the menu
₩₩₩₩₩₩₩₩₩₩₩₩₩₩₩₩₩₩₩₩₩₩₩₩₩₩₩₩₩₩₩ 2-8
Using the LCD TV
2
(한라)TV매뉴얼32형1장_En 2006.3.29 2:13 PM 페이지8 syj_print PDF-IN 2540DPI 100LPI T

E
nglish
9
Menu Settings
₩₩₩₩₩₩₩₩₩₩₩₩₩₩₩₩₩₩₩₩₩₩₩₩₩₩₩₩₩₩₩₩₩₩₩₩₩₩₩₩₩₩₩₩₩₩ 2-8
TV Menu Categories and Items
₩₩₩₩₩₩₩₩₩₩₩₩₩₩₩₩₩₩₩₩₩₩₩ 2-10
2.4 To Configure TV Channels
₩₩₩₩₩₩₩₩₩₩₩₩₩₩₩₩₩₩₩₩₩₩₩₩₩ 2-14
Saving Channels Automatically
₩₩₩₩₩₩₩₩₩₩₩₩₩₩₩₩₩₩₩₩₩₩₩ 2-14
To set digital channels
₩₩₩₩₩₩₩₩₩₩₩₩₩₩₩₩₩₩₩₩₩₩₩₩₩₩₩₩₩₩₩₩₩₩₩ 2-16
To add a channel number
₩₩₩₩₩₩₩₩₩₩₩₩₩₩₩₩₩₩₩₩₩₩₩₩₩₩₩₩₩₩ 2-17
To delete a channel number
₩₩₩₩₩₩₩₩₩₩₩₩₩₩₩₩₩₩₩₩₩₩₩₩₩₩₩ 2-17
To view the channel list
₩₩₩₩₩₩₩₩₩₩₩₩₩₩₩₩₩₩₩₩₩₩₩₩₩₩₩₩₩₩₩₩₩ 2-18
Digital signal strength
₩₩₩₩₩₩₩₩₩₩₩₩₩₩₩₩₩₩₩₩₩₩₩₩₩₩₩₩₩₩₩₩₩₩₩₩ 2-19
2.5 To Select TV/External Input
₩₩₩₩₩₩₩₩₩₩₩₩₩₩₩₩₩₩₩₩₩₩ 2-20
Selecting an External Input Device Connected to the
LCD TV for viewing
₩₩₩₩₩₩₩₩₩₩₩₩₩₩₩₩₩₩₩₩₩₩₩₩₩₩₩₩₩₩₩₩₩₩₩₩₩₩₩ 2-20
2.6 Adjusting the Picture
₩₩₩₩₩₩₩₩₩₩₩₩₩₩₩₩₩₩₩₩₩₩₩₩₩₩₩₩₩₩₩₩ 2-22
To set screen ratio
₩₩₩₩₩₩₩₩₩₩₩₩₩₩₩₩₩₩₩₩₩₩₩₩₩₩₩₩₩₩₩₩₩₩₩₩₩₩₩₩ 2-22
To set the screen colour mode
₩₩₩₩₩₩₩₩₩₩₩₩₩₩₩₩₩₩₩₩₩₩₩₩ 2-23
To set the scren mode
₩₩₩₩₩₩₩₩₩₩₩₩₩₩₩₩₩₩₩₩₩₩₩₩₩₩₩₩₩₩₩₩₩₩₩ 2-24
To eliminate screen noise
₩₩₩₩₩₩₩₩₩₩₩₩₩₩₩₩₩₩₩₩₩₩₩₩₩₩₩₩₩₩ 2-25
To set the film mode
₩₩₩₩₩₩₩₩₩₩₩₩₩₩₩₩₩₩₩₩₩₩₩₩₩₩₩₩₩₩₩₩₩₩₩₩₩ 2-26
2.7 Adjusting the Sound
₩₩₩₩₩₩₩₩₩₩₩₩₩₩₩₩₩₩₩₩₩₩₩₩₩₩₩₩₩₩₩₩₩ 2-28
To set sound mode
₩₩₩₩₩₩₩₩₩₩₩₩₩₩₩₩₩₩₩₩₩₩₩₩₩₩₩₩₩₩₩₩₩₩₩₩₩₩₩ 2-28
To adjust the sound balance
₩₩₩₩₩₩₩₩₩₩₩₩₩₩₩₩₩₩₩₩₩₩₩₩₩₩₩ 2-29
Digital Audio output
₩₩₩₩₩₩₩₩₩₩₩₩₩₩₩₩₩₩₩₩₩₩₩₩₩₩₩₩₩₩₩₩₩₩₩₩₩₩₩ 2-30
To adjust Auto volume
₩₩₩₩₩₩₩₩₩₩₩₩₩₩₩₩₩₩₩₩₩₩₩₩₩₩₩₩₩₩₩₩₩₩₩ 2-30
To set the Track
₩₩₩₩₩₩₩₩₩₩₩₩₩₩₩₩₩₩₩₩₩₩₩₩₩₩₩₩₩₩₩₩₩₩₩₩₩₩₩₩₩₩₩ 2-31
To set the Internal Speaker
₩₩₩₩₩₩₩₩₩₩₩₩₩₩₩₩₩₩₩₩₩₩₩₩₩₩₩₩ 2-32
2.8 To Configure the SET UP
₩₩₩₩₩₩₩₩₩₩₩₩₩₩₩₩₩₩₩₩₩₩₩₩₩₩₩₩ 2-34
To control the transparency of the menu screen
₩ 2-34
To set the Caption/Subtitle Language
₩₩₩₩₩₩₩₩₩₩₩₩₩₩ 2-35
To set the auto time
₩₩₩₩₩₩₩₩₩₩₩₩₩₩₩₩₩₩₩₩₩₩₩₩₩₩₩₩₩₩₩₩₩₩₩₩₩₩ 2-35
To set the Time manually
₩₩₩₩₩₩₩₩₩₩₩₩₩₩₩₩₩₩₩₩₩₩₩₩₩₩₩₩₩₩₩ 2-36
To set the On/Off Timer
₩₩₩₩₩₩₩₩₩₩₩₩₩₩₩₩₩₩₩₩₩₩₩₩₩₩₩₩₩₩₩₩₩ 2-37
To set the Sleep Timer
₩₩₩₩₩₩₩₩₩₩₩₩₩₩₩₩₩₩₩₩₩₩₩₩₩₩₩₩₩₩₩₩₩₩ 2-40
Using the Parental(V-chip)
₩₩₩₩₩₩₩₩₩₩₩₩₩₩₩₩₩₩₩₩₩₩₩₩₩₩₩₩₩ 2-40
CONTENTS
(한라)TV매뉴얼32형1장_En 2006.3.29 2:13 PM 페이지9 syj_print PDF-IN 2540DPI 100LPI T

CONTENTS
10
A.1 Appendix
₩₩₩₩₩₩₩₩₩₩₩₩₩₩₩₩₩₩₩₩₩₩₩₩₩₩₩₩₩₩₩₩₩₩₩₩₩₩₩₩₩₩₩₩₩₩₩₩₩₩₩ A-2
Specifications
₩₩₩₩₩₩₩₩₩₩₩₩₩₩₩₩₩₩₩₩₩₩₩₩₩₩₩₩₩₩₩₩₩₩₩₩₩₩₩₩₩₩₩₩₩₩ A-2
Dispaly Modes
₩₩₩₩₩₩₩₩₩₩₩₩₩₩₩₩₩₩₩₩₩₩₩₩₩₩₩₩₩₩₩₩₩₩₩₩₩₩₩₩₩₩₩₩₩ A-3
Check before calling for service
₩₩₩₩₩₩₩₩₩₩₩₩₩₩₩₩₩₩₩₩₩₩ A-4
Troubleshooting
₩₩₩₩₩₩₩₩₩₩₩₩₩₩₩₩₩₩₩₩₩₩₩₩₩₩₩₩₩₩₩₩₩₩₩₩₩₩₩₩₩₩₩ A-7
Appendix
A
3.1 Initial PC Mode Settings
₩₩₩₩₩₩₩₩₩₩₩₩₩₩₩₩₩₩₩₩₩₩₩₩₩₩₩₩₩ 3-2
3.2 PC Menu Components
₩₩₩₩₩₩₩₩₩₩₩₩₩₩₩₩₩₩₩₩₩₩₩₩₩₩₩₩₩₩₩₩ 3-4
3.3 Main Menu Settings
₩₩₩₩₩₩₩₩₩₩₩₩₩₩₩₩₩₩₩₩₩₩₩₩₩₩₩₩₩₩₩₩₩₩₩ 3-6
To set the Screen menu
₩₩₩₩₩₩₩₩₩₩₩₩₩₩₩₩₩₩₩₩₩₩₩₩₩₩₩₩₩₩₩₩ 3-6
To set the Audio menu
₩₩₩₩₩₩₩₩₩₩₩₩₩₩₩₩₩₩₩₩₩₩₩₩₩₩₩₩₩₩₩₩₩₩ 3-8
To set the Settings
₩₩₩₩₩₩₩₩₩₩₩₩₩₩₩₩₩₩₩₩₩₩₩₩₩₩₩₩₩₩₩₩₩₩₩₩₩₩₩₩ 3-10
PC Mode Environment Settings
3
(한라)TV매뉴얼32형1장_En 2006.3.29 2:13 PM 페이지10 syj_print PDF-IN 2540DPI 100LPI T

Product Characteristics
LCD Display Overview
Remote Control
Connecting the LCD TV and Peripheral Devices
(한라)TV매뉴얼32형1장_En 2006.3.29 2:13 PM 페이지1-1 syj_print PDF-IN 2540DPI 100LPI T

1-2
Product Characteristics
This product is equipped with an LCD panel to provide high-resolution
PC mode. It is a 32" LCD display that allows you to watch two highresolution video sources simultaneously.
as a TV
● All-in-one digital TV enabling you to watch HDTV even without an HDTV Set Top Box
● Vivid screen for watching TV
● LCD TV is better for your eyes than existing CRT TVs; your eyes get less tired
● Composite, S-Video, HDMI, DVD (component) input ports provided; high-definition
images and stereo sound output
● Supports Sound Status Memory (SSM) and Picture Status Memory (PSM) to enable
customized sound setting for various programs including TV dramas, music, and movies
as a Monitor
The optimal resolution is 1360x768 @ 60Hz.
N O T E S
▶▶
Supported resolution in PC mode
If your PC graphics card does not support 1360x768, use the 1024x768 @ 60Hz setting.
▶
This device can be used with 100/220V power voltage.
▶
Turning the power off with a remote control puts the device into TV Standby mode. Press the power button on
the remote again to start watching TV.
(한라)TV매뉴얼32형1장_En 2006.3.29 2:13 PM 페이지1-2 syj_print PDF-IN 2540DPI 100LPI T

E
nglish
1-3
Product Characteristics
LCD TV Overview and Installation
(한라)TV매뉴얼32형1장_En 2006.3.29 2:13 PM 페이지1-3 syj_print PDF-IN 2540DPI 100LPI T

MENU Button
Displays the main OSD menu. Exits from a sub-menu.
2
SOURCE Button
Displays a menu of all of the available input sources.
(TV, AV 1/2, S-VIDEO, COMPONENT 1/2, HDMI, PC, Exit)
3
Front View
LCD Display
Displays the current contents of the display.
1
2
1
8
7
9
3 64 5
1-4
LCD Display Overview
(한라)TV매뉴얼32형1장_En 2006.3.29 2:13 PM 페이지1-4 syj_print PDF-IN 2540DPI 100LPI T

E
nglish
LCD TV Overview and Installation
Channel (▼/▲) Buttons
Press CH (▼) or CH (▲) to change channels. Also used to select the OSD (On Screen
Display) menu.
4
Volume (◀/▶) Buttons
Press the VOL ◀(decrease) or VOL ▶ (increase) to change the volume. Also used to
increase or reduce the values in an OSD menu.
5
Power Indication Lamp
If the AC adapter is connected, then the red lamp is illuminated. If the LCD Display
power is turned on, then the green light is illuminated.
7
Remote Control Receiver
Paint the remote control towards the Power Indication Lamp to receive the function of
the radio wares emitted from the remote control.
8
Internal Speakers
Output device for LCD TV sound.
9
POWER Button
Press this button in Standby mode to turn off the LCD TV. (Use this button after pressing the
main power button on the rear panel of the LCD TV.)
6
1-5
LCD Display Overview
(한라)TV매뉴얼32형1장_En 2006.3.29 2:13 PM 페이지1-5 syj_print PDF-IN 2540DPI 100LPI T

LCD TV Overview and Installation
HDMI/DVI PC Input connector
Connects to the High Definition Multimedia Interface (HDMI)/DVI connector on
external devices.
3
PC Input RGB connector
Connects to the RGB connector (for connecting to an external monitor) on a PC.
4
Up Grade
Connect a Serial Cable to use.
1
Digital Audio Optical Output jack
Connects to digital audio devices.
5
PC Voice Input jack (PC/DVI)
Connects to the Audio jack on a PC.
2
1-6
LCD Display Overview
Rear View
11
3 4 5 76
9 10
82
1
(한라)TV매뉴얼32형1장_En 2006.3.29 2:14 PM 페이지1-6 syj_print PDF-IN 2540DPI 100LPI T

E
nglish
LCD TV Overview and Installation
AC Input connector
Connects to the power source. (110/220V)
11
Component Video Input jack (1/2)
Connects to the video input port on a DVD player (or VCR player/TV re-player).
(for both DVD and DTV)
9
Component Voice Input jack (1/2)
Connects to the audio input port on a DVD player (or DTV).
8
S-Video Input jack
Connects to the S-Video input port of a laser disk player (or S-VHS player).
(Gives better picture quality than a composite video)
6
Air/Cable/75Ω ANT connector
Connects to a cable from external antennas (VHF/UHF, cable TV, satellite, etc.)
10
Video/Audio Input 1/2 jack
For audio/video input from external sources.
7
1-7
LCD Display Overview
(한라)TV매뉴얼32형1장_En 2006.3.29 2:14 PM 페이지1-7 syj_print PDF-IN 2540DPI 100LPI T

Before Using the Remote Control
Inserting the batteries in the Remote Control
You must insert or replace the batteries
in the remote control.
❶ Open the cover.
❷ Insert batteries with the correct polarity
(+, -).
❸ Close the cover.
N O T E S
▶
Always use recommended batteries only; use of other batteries may result in battery leakage or
corrosion.
▶
Do not insert the batteries with the wrong polarity.
▶
Do not put spent batteries in a fire.
▶
Do not leave completely-used batteries in the remote control. Leaving them in place for a long time
may cause corrosion of the electrodes in the remote control.
▶
Replace the batteries with new ones, if the remote control does not work well.
1-8
Remote Control
(한라)TV매뉴얼32형1장_En 2006.3.29 2:14 PM 페이지1-8 syj_print PDF-IN 2540DPI 100LPI T

E
nglish
LCD TV Overview and Installation
Information on the Use of the Remote Control
● When using the remote control, point it towards the Power Indication Lamp of the LCD
Display .
● The operating distance should be within 23 feet.
● The receiving angle should be within 30 degrees.
N O T E S
▶
Do not subject the remote control to shock. It may get damaged.
▶
Be caregul not to let water get into the remote control. It may cause damage.
▶
Do not disassemble the remote control.
▶
Do not expose the remote control to direct sunlight or other strong light. The remote control may not
work normally.
▶
Do not keep in cold or humid places. It may cause defects.
1-9
Remote Control
(한라)TV매뉴얼32형1장_En 2006.3.29 2:14 PM 페이지1-9 syj_print PDF-IN 2540DPI 100LPI T

LCD TV Overview and Installation
Remote Control Button Functions
1
3
4
6
7
8
9
10
11
5
15
19
17
18
16
13
14
2
1-10
Remote Control
(not supported in the 32" model)
12
(한라)TV매뉴얼32형1장_En 2006.3.29 2:14 PM 페이지1-10 syj_print PDF-IN 2540DPI 100LPI T

E
nglish
LCD TV Overview and Installation
POWER Button
Turns the display On or Off.
1
SSM (Sound Status Memory) Button
Recalls your preferred sound setting. (Standard, Music, Movie, Sports, News, Manual)
5
MENU Button
Displays OSD Menu.
6
VOL ◀/▶(-/+) Buttons
Increases or decreases the volume. Also used to select the OSD main menu, to select the submenu or to change the values in sub-menus.
7
NUMBER Buttons
Direct channel select. Direct page selection during Teletext display.
2
‘-’Buttons
Set a channel on the digital TV.
3
PSM (Picture Status Memory) Button
Recalls your preferred picture setting. (Standard, Dynamic, Mild, Manual)
4
TV/AV Button
It converts to TV input mode and, if you press and hold the button, input mode will be
switched.
8
SLEEP Button
Sets the sleep timer. The TV is automatically turned off.
9
N O T E
▶
PC Mode(CSM) : Warm, Normal, Cool, Manual
1-11
Remote Control
(한라)TV매뉴얼32형1장_En 2006.3.29 2:14 PM 페이지1-11 syj_print PDF-IN 2540DPI 100LPI T
LCD TV Overview and Installation
Q.VIEW Button
It goes from the channel you are currently viewing back to the channel you were
previously watching. (Quick Search View Function)
13
OK Button
Select sub-menu or fix user setting.
14
Add/Delete Button
You can add/delete the current channel to/from the channel list.
12
CAPTION Button
Controls the caption decoder.
11
ARC (Aspect Ratio Control) Button
You can watch the LCD Display in various picture formats ; 16:9, Zoom 1, Zoom 2, 4:3.
10
<16:9>
<Zoom1>
<4:3>
<Zoom2>
1-12
Remote Control
N O T E
AV 1~2, S-Video, Component 1~2 16:9, Zoom1, Zoom2, 4:3
TV, HDMI, PC 16:9, 4:3
(한라)TV매뉴얼32형1장_En 2006.3.29 2:14 PM 페이지1-12 syj_print PDF-IN 2540DPI 100LPI T

E
nglish
LCD TV Overview and Installation
MTS Button
Press to choose stereo, mono or Separate Audio Program (SAP broadcast).
17
CH ▼/▲ Buttons
Press CH ▼ or CH ▲ to change channels. Also used to select in the OSD menu or
select the channel providing teletext service.
15
MUTE Button
Press to temporarily cut off the sound.
16
EPG(Electronic Program Guide) Button
View a program guide for the digital TV.
18
SOURCE Button
Selects the external input source.
(TV, AV 1/2, S-VIDEO, COMPONENT 1/2, HDMI, PC, Exit)
19
1-13
Remote Control
(한라)TV매뉴얼32형1장_En 2006.3.29 2:14 PM 페이지1-13 syj_print PDF-IN 2540DPI 100LPI T

1-14
Connecting the LCD TV and Peripheral Devices
Connecting the Aerial or Cable Television Network
To view television channels correctly, a signal must be received by the set from one
of following sources:
● An outdoor aerial
● An indoor aerial (not recommended)
● A cable television network
When connecting an outdoor antenna
Antenna connection is the most important factor for obtaining clean and sharp video
quality. Whenever possible, use an external antenna in areas with weak signals.
1
In the first three cases, connect the aerial or network input cable to the 75Ω coaxial
socket on the rear of the TFT LCD display.
2
Press the TV button on the remote control.
VHF Outdoor AntennaUHF Outdoor Antenna
VHF/UHF Mixer
Electronic Amplifier
75Ω Coaxial Cable (Optional)
or
300Ω Feeder Cable (Optional)
Antenna Converter
(Optional)
Use only when necessary. (Optional)
(한라)TV매뉴얼32형1장_En 2006.3.29 2:14 PM 페이지1-14 syj_print PDF-IN 2540DPI 100LPI T

E
nglish
LCD TV Overview and Installation
N O T E S
▶
You can see more clear display if you install the booster in the weak radio wave area.
▶
If you want to watch several televisions by using one antenna, please use the optional signal distributor.
1-15
Connecting the LCD TV and Peripheral Devices
N O T E S
▶▶
Connecting 300ΩΩfeeder cable to the antenna converter
▶
If the video is not clear because of weak signals, install a signal amplifier to obtain clearer video. (An
amplifier is often necessary when using an indoor antenna.)
❶
Remove the insulation from
the 300
Ω
feeder cable.
❷
Use the driver to
loosen the screw.
❸
Connect the 300Ωfeeder
cable, and secure it by
retightening the screw with
the screwdriver.
When connecting an indoor antenna (cable TV)
Check the antenna connector on the wall and then connect the antenna cable.
(한라)TV매뉴얼32형1장_En 2006.3.29 2:14 PM 페이지1-15 syj_print PDF-IN 2540DPI 100LPI T

LCD TV Overview and Installation
Connecting to a VCR
When connecting to the Compositeo connector
Different devices have different jacks at the rear.
N O T E
▶
S-video and composite video signals share the audio signals.
1-16
Connecting the LCD TV and Peripheral Devices
VCR
Composite Audio/
Video cable (Optional)
Method 1
AV1
Method 2
AV2
VCR
Composite Audio/
Video cable (Optional)
(한라)TV매뉴얼32형1장_En 2006.3.29 2:14 PM 페이지1-16 syj_print PDF-IN 2540DPI 100LPI T

E
nglish
LCD TV Overview and Installation
When connecting to the S-video connector
Different jacks on the rear panel are used for different external devices.
VCR
Audio cable (Optional)
S-Video cable (Optional)
1-17
Connecting the LCD TV and Peripheral Devices
N O T E S
▶▶
Connecting VCR (when connecting to the antenna input connector)
Different jacks on the rear panel are used for different external devices.
❶
Connect the external antenna cable to the VCR.
❷
Connect the 75Ωcoaxial cable to the VCR and TV.
❸
Set the channel selection switch on the rear panel of the VCR to channel 3 or 4, and turn on the VCR
power.
❹
Turn on the TV power and switch the channel to the same channel that was set on the VCR (3 or 4).
❺
Insert a video tape into the VCR, and press the <PLAY> button.
VCR
75Ω coaxial cable
External Antenna
(한라)TV매뉴얼32형1장_En 2006.3.29 2:14 PM 페이지1-17 syj_print PDF-IN 2540DPI 100LPI T

LCD TV Overview and Installation
Set topDVD
or
Component cable (Optional)
Audio cable (Optional)
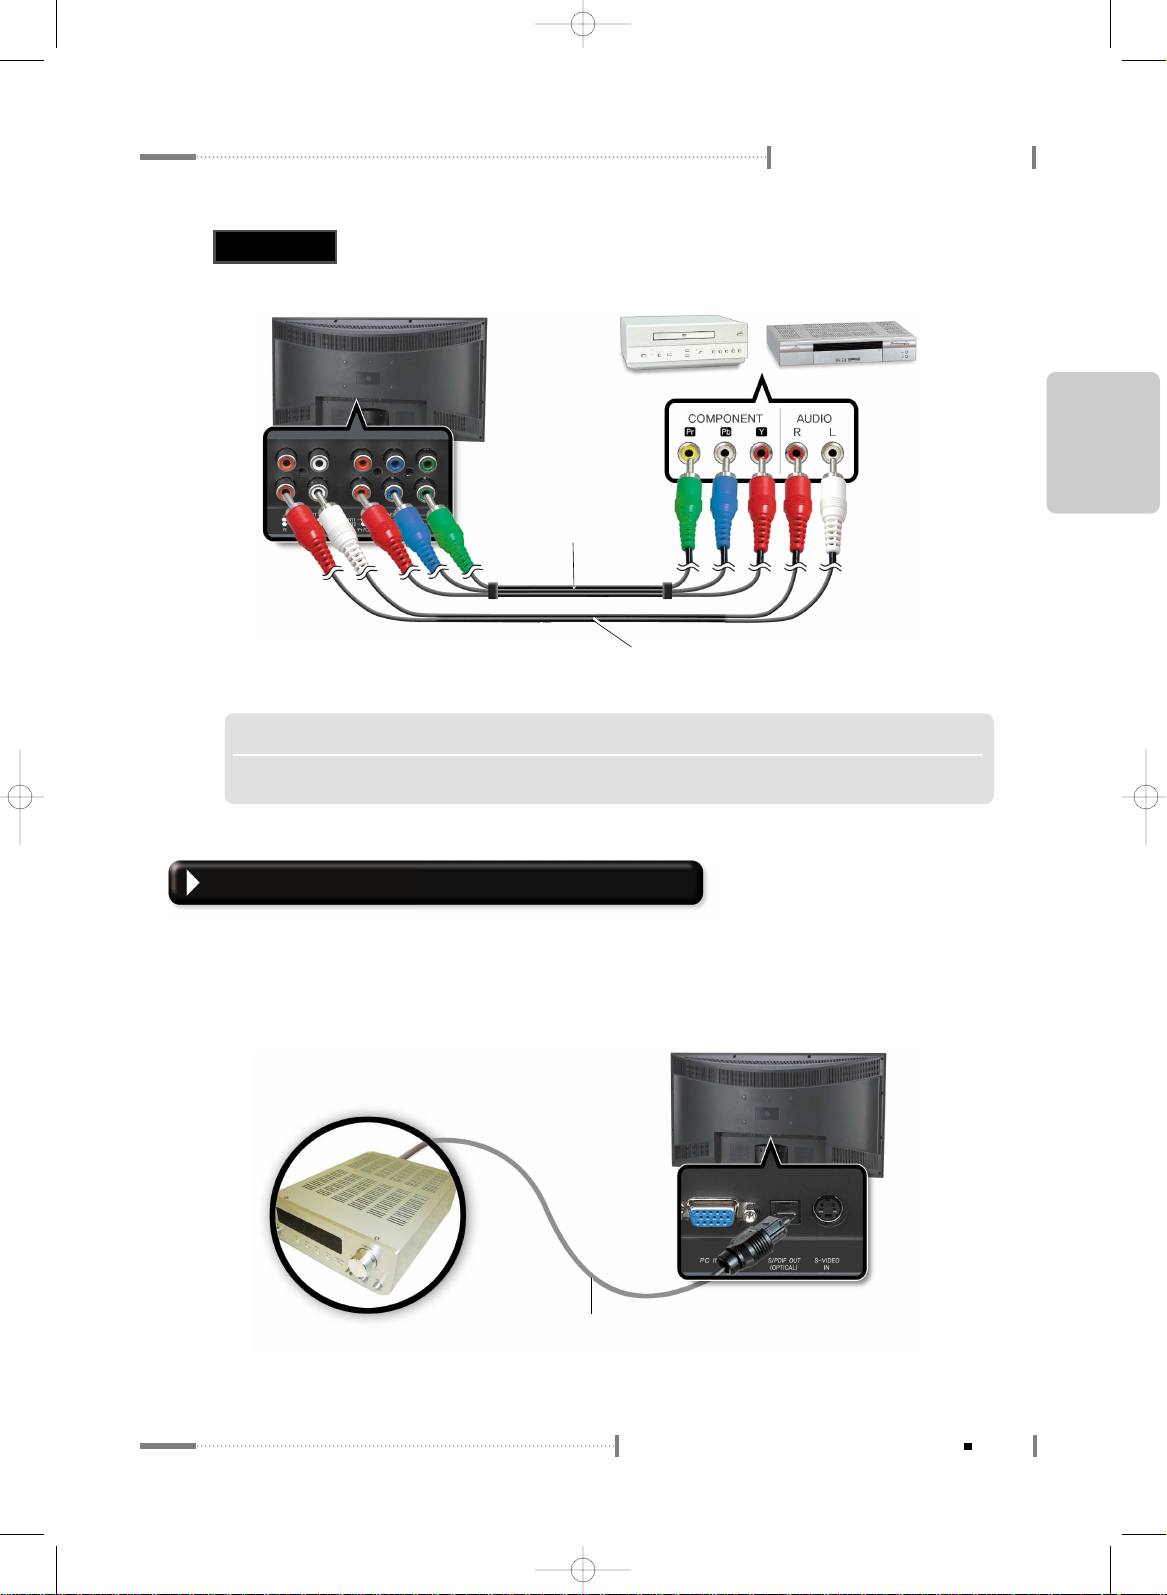
Connecting a DVD Player & Set-Top Box (Connecting to Y, Pb, Pr)
1-18
Connecting the LCD TV and Peripheral Devices
Method 1
Use the audio cable to connect the TV component audio (left/right) port to a DVD
audio output port, or to the audio output port of a Set Top Box.
1
Use the component cable to connect the TV component (Y/Pb/Pr) port to a DVD component
video output port, or to a Set Top Box video output port.
2
Turn the TV on and press the Source button on the remote to select DVD mode (component).
3
Turn the DVD player or the Set Top Box on and enjoy a high-resolution video screen.
When connecting to a DVD player or a Set Top Box, connect a component cable to the
component jack.
4
(한라)TV매뉴얼32형1장_En 2006.3.29 2:14 PM 페이지1-18 syj_print PDF-IN 2540DPI 100LPI T
E
nglish
LCD TV Overview and Installation
N O T E
▶
When connecting the DVD player or set top box, connect the component cable to the Component jack.
1-19
Connecting the LCD TV and Peripheral Devices
Set topDVD
or
Component cable (Optional)
Audio cable (Optional)
Method 2
Connecting to a digital (AC3) amplifier
"Digital" refers to surround sound technology for movie theatres used for the latest movies
and it can be used at home to obtain realistic sound effects. You can enjoy realistic sound effects
from a movie or live concert DVD disc by connecting the product to a 6-channel amplifier with
a digital converter or digital (AC3) processor.
Digital (AC3)
Amplifier with a
Converter
Optical Voice Cable (sold separately)
(한라)TV매뉴얼32형1장_En 2006.3.29 2:14 PM 페이지1-19 syj_print PDF-IN 2540DPI 100LPI T

LCD TV Overview and Installation
The ‘Internal Speaker’ option in ‘Sound
menu must be ‘Off’ in order to output
sound to external speakers.
N O T E S
▶▶
To enjoy digital (AC3) sound with the product, make sure that:
- The input signal to the product is digital (AC3).
- Connect the product to a 6-channel amplifier with five speakers and one subwoofer that has a digital
(AC3) converter or processor.
▶
Since the voice output from the product is broadband, set the volume appropriately.
Otherwise, the speakers may get damaged by sudden high pitched sounds.
▶
Make sure to turn off the amplifier before plugging or unplugging the product’s power cord.
Otherwise, the amplifier may get damaged.
1-20
Connecting the LCD TV and Peripheral Devices
Set top
HDMI Cable(Optional)
Connecting to HDMI
Please connect it to a device that supports HDMI.
(한라)TV매뉴얼32형1장_En 2006.3.29 2:14 PM 페이지1-20 syj_print PDF-IN 2540DPI 100LPI T

E
nglish
LCD TV Overview and Installation
1-21
Connecting the LCD TV and Peripheral Devices
Connecting to a PC
If you want to use this LCD TV as a monitor, set the resolution to 1360x768 @ 60Hz (WXGA) for
optimum viewing.
❶ Turn the PC and LCD TV power off.
❷ Turn on the PC and check the settings.
(Set the resolution to 1360x768 @ 60Hz(WXGA) for optimum viewing)
❸ Connect the LCD TV and the PC with an external monitor cable.
❹ Connect an audio cable to both the LCD TV and the PC.
❺ Turn on the TV and press the [PC] button on the remote to set PC input mode.
Audio cable (optional)
PC
VGA cable
Method 1
RGB
(한라)TV매뉴얼32형1장_En 2006.3.29 2:14 PM 페이지1-21 syj_print PDF-IN 2540DPI 100LPI T

LCD TV Overview and Installation
PC
Audio cable (optional)
HDMI Cable
(Optional)
1-22
Connecting the LCD TV and Peripheral Devices
Method 2
HDMI / DVI
(한라)TV매뉴얼32형1장_En 2006.3.29 2:14 PM 페이지1-22 syj_print PDF-IN 2540DPI 100LPI T

Watching TV
Watching Digital TV
To configure the menu
To Configure TV Channels
To Select TV/External Input
Adjusting the Picture
Adjusting the Sound
To Configure the SET UP
(한라)TV매뉴얼32형2장_En 2006.3.29 2:15 PM 페이지2-1 syj_print PDF-IN 2450DPI 100LPI T

2-2
Watching TV
Check the antenna connection. (For more information on connection, see section
‘1.4 Connecting the LCD TV and Peripheral Devices’.)
1
Press the [POWER] button on the remote control.
2
Press the [TV/AV] button on the remote control, and press the number button to select a
channel (For example, if selecting channel no. 99, press the 9 button twice on the
remote control).
3
Press the [ ] button to adjust the volume.
4
N O T E S
▶▶
To mute the LCD TV sound
Press the <MUTE> button on the remote control once to mute
the LCD TV sound. Press the button once again to turn the
sound back on.
▶▶
To completely turn off the LCD TV power.
❶
Press the <POWER> button on the remote control.
The LCD TV will be turned off and remain in standby mode.
❷
Remove the power plug from a wall outlet.
(한라)TV매뉴얼32형2장_En 2006.3.29 2:15 PM 페이지2-2 syj_print PDF-IN 2450DPI 100LPI T

E
nglish
2-3
Watching TV
Using the LCD TV
(한라)TV매뉴얼32형2장_En 2006.3.29 2:15 PM 페이지2-3 syj_print PDF-IN 2450DPI 100LPI T

To watch digital TV
To directly select channels by using the [Number] buttons.
Channel numbers are in the format of ‘Main Number –
Sub-Number’.
1. Press the desired channel.
2. Press the ‘-’ button.
3. Press a number button other than ‘Ø’
(‘Ø’ is the sub-number for analog broadcasts).
E.g.) To watch the digital broadcast on channel number 9,
press 9 - 1 in order. At present, the sub-number “1” is
used for digital broadcasts.
1. When using the [ ] button, if the TV does not receive
signals, check the antenna connection and then execute
automatic channel setting.
2. When selecting a channel, the indication at the upper righthand corner of the screen will show whether the channel
selected is an analog broadcast or a digital broadcast.
1
To select channels using the [Channel] button.
Repeatedly press the channel button to switch channels
in the following order.
2
7-1
Digital broadcast channel
number indication
7
analog broadcast channel
number indication
2-4
Watching Digital TV
TV Normal TV Line
DTV Normal
DTV Line
→→→→
(한라)TV매뉴얼32형2장_En 2006.3.29 2:16 PM 페이지2-4 syj_print PDF-IN 2450DPI 100LPI T

E
nglish
Using the LCD TV
To view information on the current channel
Press the [ ] button.
The information on the current channel will be displayed on the screen.
1
2-5
Watching Digital TV
To view program guide for the digital TV
Press the [ ] button.
Press this button while watching TV to see the program schedule for the current
channel.
1
(한라)TV매뉴얼32형2장_En 2006.3.29 2:16 PM 페이지2-5 syj_print PDF-IN 2450DPI 100LPI T

Using the LCD TV
2-6
Watching Digital TV
N O T E S
▶
Press the <EPG> button again to hide the display indication.
▶
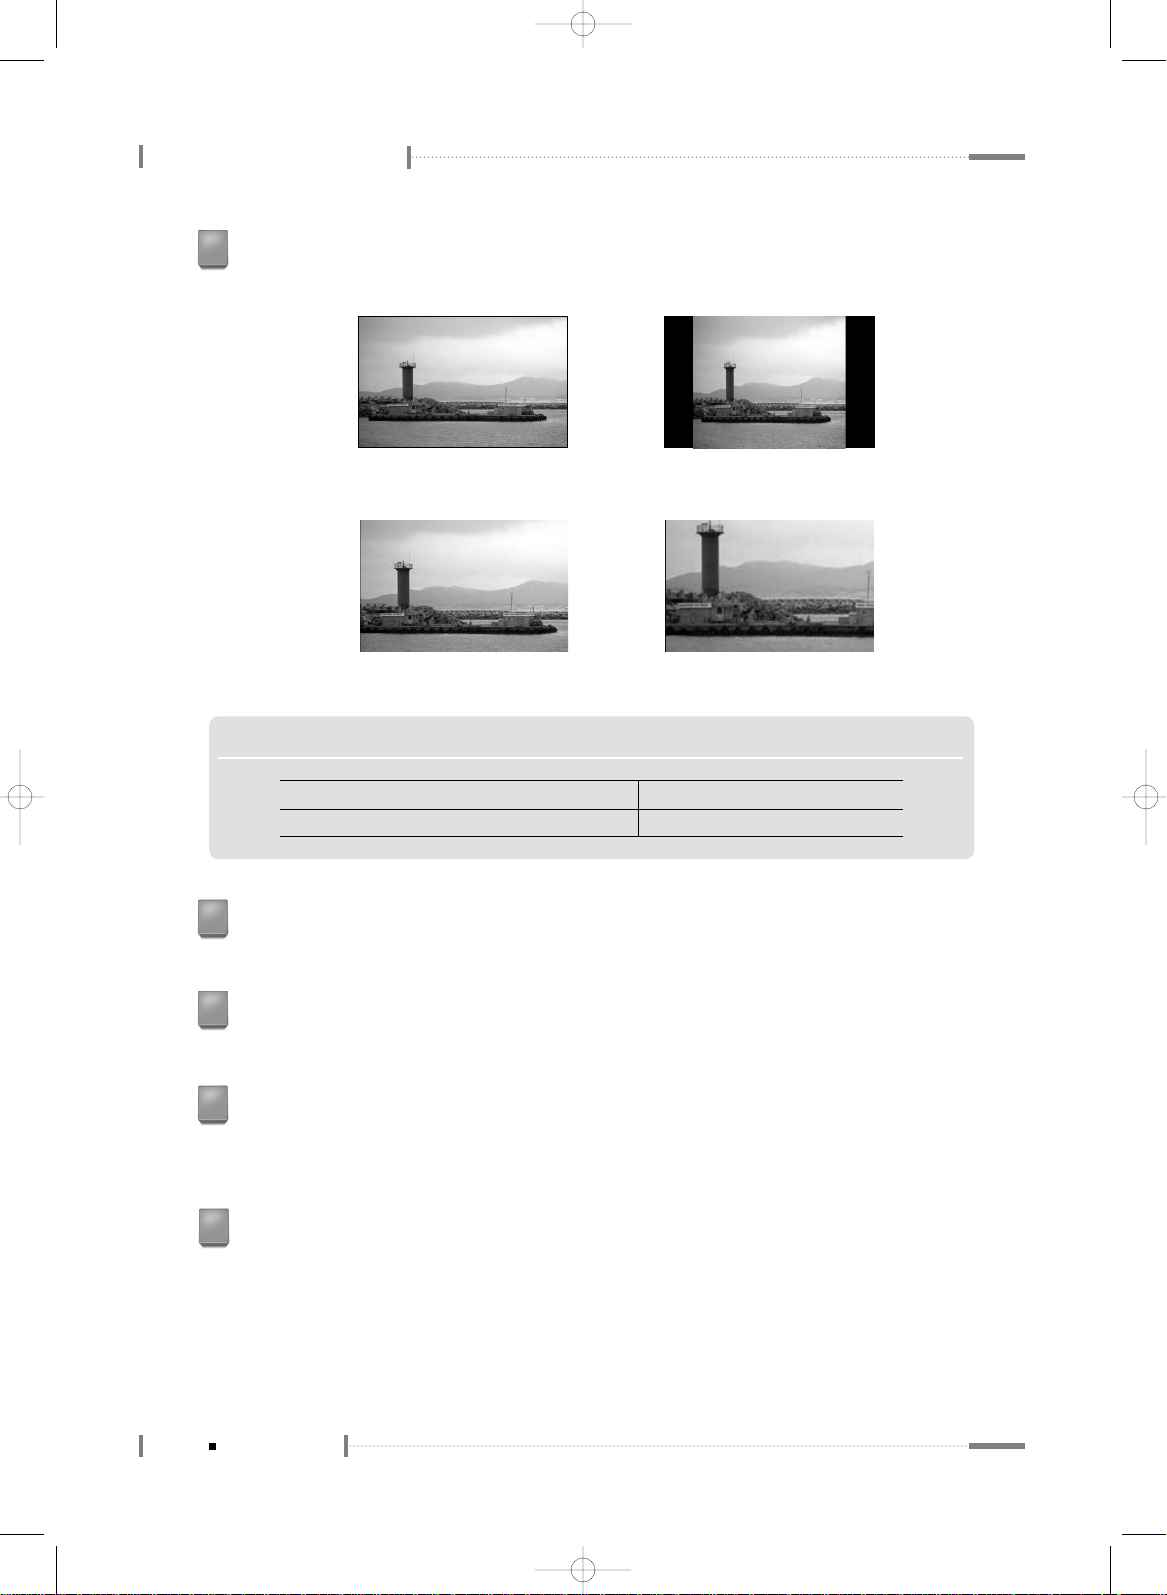
Although digital broadcasts should be broadcast as wide screen (16:9) HD, the far left and far right
portions of the screen may be cut off if programs previously produced for a normal screen (4:3) are
converted for digital signals.
▶
When the borders on the left, right, and center portions of the screen have been fixed for a prolonged
time, there may be excitations on the screen borders due to differences in brightness around the
borders. The identical phenomenon also occurs in products made by other companies.
(한라)TV매뉴얼32형2장_En 2006.3.29 2:16 PM 페이지2-6 syj_print PDF-IN 2450DPI 100LPI T

E
nglish
Using the LCD TV
2-7
Watching Digital TV
(한라)TV매뉴얼32형2장_En 2006.3.29 2:16 PM 페이지2-7 syj_print PDF-IN 2450DPI 100LPI T

To configure the LCD TV functions, press the [MENU] button. Knowing the
method for configuring the menu will make using the LCD TV much easier.
Menu Settings
Press the [POWER] button on the remote control.
1
Press the [MENU] button on the remote control.
Press the [ ] button on the remote control to navigate to different menus.
2
<PICTURE>
<SOUND> <CHANNEL>
<Caption> <SET UP>
2-8
To configure the menu
(한라)TV매뉴얼32형2장_En 2006.3.29 2:16 PM 페이지2-8 syj_print PDF-IN 2450DPI 100LPI T
E
nglish
Using the LCD TV
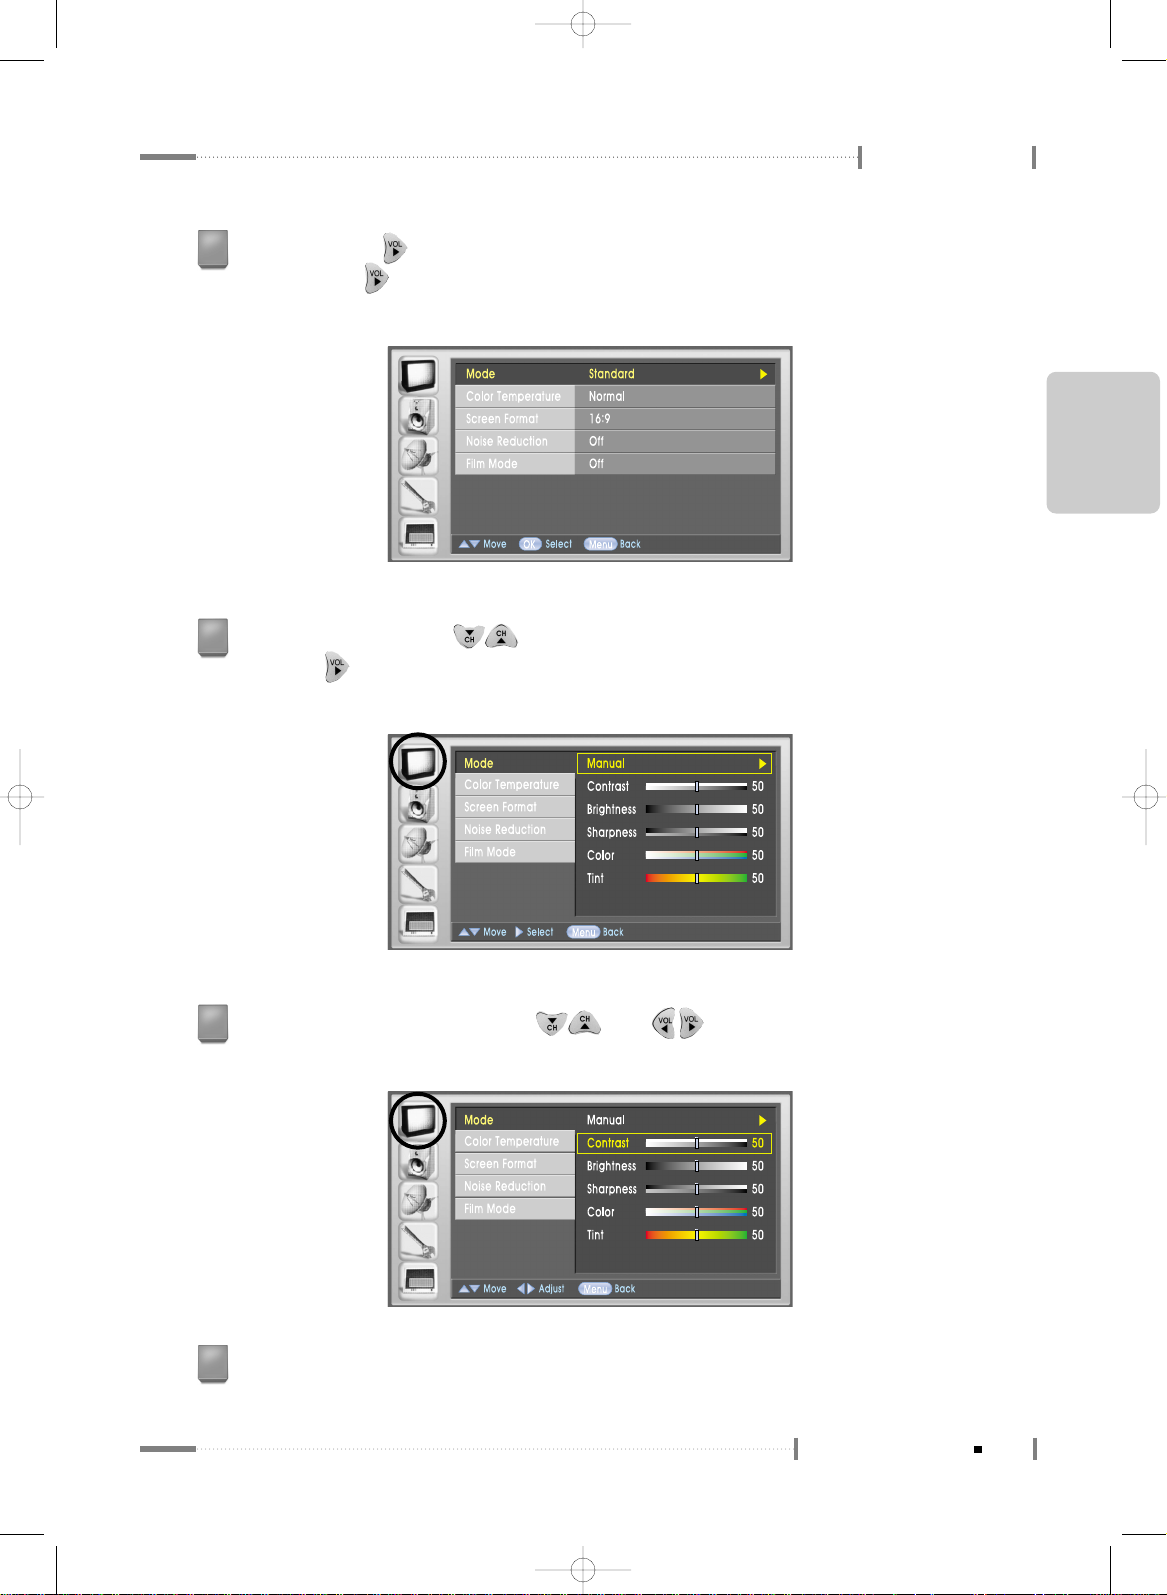
Press the [OK] or [ ] button to get to the submenus. Select a submenu and
then press the [ ] button. Standard ▶ Dynamic ▶ Mild ▶ Manual will be
selected in turn.
3
From a submenu, use the [ ] button on the remote to move to an item, and then
press the [ ] button to select the item. (At this point, select ‘Manual’ from the ‘Mode’
submenu)
4
2-9
To configure the menu
To adjust the selected item, use the [ ] and [ ] buttons on the remote.
(Use the buttons to adjust Contrast, Brightness, Sharpness, Colour, Tint, etc.)
5
Press the [Menu] button once when done to hide the control screen.
Press [Menu] again to select a different menu.
6
(한라)TV매뉴얼32형2장_En 2006.3.29 2:16 PM 페이지2-9 syj_print PDF-IN 2450DPI 100LPI T

Using the LCD TV
N O T E
▶▶
To configure the menu without using the remote control
❶
Press the <MENU> button located at the bottom of the LCD TV.
❷
Press the <CH ▲/▼> buttons to navigate to submenus.
❸
Press the <VOL <◀/ ▶> buttons to adjust each item.
❹
If ‘Menu for Local Key’ is on, the <SOURCE> button is used as the <OK> button. When adjustments
have been completed, press the <MENU> button to close the ‘Menu’ screen.
TV Menu Categories and Items
The Main Menu contains 5 categories, which in turn contain submenus and option items :
Main Menu
Mode Standard For watching general TV
Dynamic For sharper images
Mild For smoother images
Manual Contrast : controls contrast between light and dark
Brightness : controls brightness
Sharpness : controls clarity of colour
Colour : controls intensity of colour
Tint : adds a green or red tint
Color Normal, Cool, Can control ambiance of screen image
Temperature
Warm
Screen 16 : 9, Zoom1 Can set screen ratio
Format Zoom2, 4:3
Noise Reduction
On/Off Select ‘On’ to improve screen quality if dotted lines
appear or screen flickers
Film Mode On/Off To view a video, DVD, movie, etc in the original (i.e.
optimal) picture quality.
Sub Menu 1 Sub Menu 2 Description
Screen
2-10
To configure the menu
N O T E
▶
Even when film mode is enabled, the actual film mode function quality may depend on the status of the
authorised signals.
(한라)TV매뉴얼32형2장_En 2006.3.29 2:16 PM 페이지2-10 syj_print PDF-IN 2450DPI 100LPI T

E
nglish
Using the LCD TV
Main Menu
Mode Standard For general sound output
Music For musical programs
Movie For movies
Sports For sports programs
News For news programs
Manual Treble : tunes higher range sounds
Bass: tunes lower range sounds
Balance Sound output of right/left speaker can be balanced
Digital Output PCM, Dolby Digital
For digital output mode
Auto Volume On/Off Sound output differences between different channels
can be evened out by selecting ‘On’.
Multi- English For English
Track Spanish For Spanish
French For French
Internal Speaker
On/Off Select ‘On’ for output to internal speaker
Sub Menu 1 Sub Menu 2 Description
Volume
2-11
To configure the menu
Antenna Air, Cable Select according to the digital input method
Auto Memorizing
Air+Cable, Air, Cable
Can search for channels automatically
Channel List Displays current list of saved channels
Fine Tune Select ‘On’ to adjust unstable screen
Signal Strength
Displays digital TV signal strength
Time Clock Can select Auto or Manual option
Manual Clock Can set current time (i.e. time, date, month, year)
(select Manual from Clock option to set current time)
Daylight Saving Can use Summertime function
(select Auto from Clock option to set summertime)
Time Zone Select your region and then set On/Off Timer
(select Auto from Clock option to select region)
On Timer On Timer can be set by users manually
Off Timer Off Timer can be set by users manually
Auto Off Auto Off function can be turned On or Off
Menu Language
English, Espanol, France
Menu Opaque,
OSD: controls transparency of menu screen background
Transparency
Semi Opaque,
Transparent,
Semi Transparent
V-Chip Change PIN Pin number can be changed
On/Off V-Chip function can be turned On or Off
TGPG Rating TV programs can be screened according to their
ratings
(screening can be set when the V-Chip function is turned On)
MPAA Rating Movies can be selected according to their ratings
(when V-Chip function is turned On)
Can. English Rating
(when V-Chip function is turned On)
Can. French Rating
(when V-Chip function is turned On)
SET UP
Channel
(한라)TV매뉴얼32형2장_En 2006.3.29 2:16 PM 페이지2-11 syj_print PDF-IN 2450DPI 100LPI T

Using the LCD TV
2-12
To configure the menu
Main Menu Sub Menu 1 Sub Menu 2 Description
On/Off Enable or disable the caption function.
Analog Mode
CC1~4, TEXT1~4
You can watch Analog Caption.
Digital Mode
Digital Service1~8
You can watch Digital Caption.
Digital Font Option
You can set the Digital Caption font.
Caption
(한라)TV매뉴얼32형2장_En 2006.3.29 2:16 PM 페이지2-12 syj_print PDF-IN 2450DPI 100LPI T

Using the LCD TV
2-13
To configure the menu
E
nglish
(한라)TV매뉴얼32형2장_En 2006.3.29 2:16 PM 페이지2-13 syj_print PDF-IN 2450DPI 100LPI T

Press [ ] to move to the “Auto Memorizing” submenu and press [ ].
Press the [ ] button to select “Antenna Status.” (Set to Air+Cable or Cable.)
It is much more convenient to set TV channels in advance after purchasing your
LCD TV. We recommend setting TV channels during regular broadcasting hours.
Use “Auto Memorizing” to set channels automatically.
Saving channels automatically
The “Auto Memorizing” function can only save local, cable, and digital broadcasting channels.
Press the [Menu] button on the remote, and then press [ ] to move to “Channel.”
1
2-14
To Configure TV Channels
2
(한라)TV매뉴얼32형2장_En 2006.3.29 2:16 PM 페이지2-14 syj_print PDF-IN 2450DPI 100LPI T

E
nglish
Using the LCD TV
When the screen shown below appears, move to the [Yes] button and press [OK].
3
All channels searched by Auto Search will be saved and can be viewed in the “Channel
List.” Press the [Menu] button on the remote to close the “Menu” screen.
4
2-15
To Configure TV Channels
N O T E
▶‘
To stop “Auto Memorizing,” press <OK> and confirm the message, then press <OK> again.
N O T E S
▶
Verify the automatically saved channels
Press the <Channel
▼▲
> button to select the automatically saved channels.
▶
Selecting the channel number that over 100. (e.g., channel 100)
Press the numeric <1>, <0>, and <0> buttons sequentially on the remote control.
(한라)TV매뉴얼32형2장_En 2006.3.29 2:16 PM 페이지2-15 syj_print PDF-IN 2450DPI 100LPI T

Using the LCD TV
2-16
To Configure TV Channels
Press the [ ] button on the remote to select the “Antenna” submenu.
Press [ ] again.
To set digital channels
May be set to “Air” or “Cable” depending on the receiving method of the digital broadcasting
signals.
Press the [Menu] button on the remote, and then press [ ] to move to “Channel.”
1
2
When the “Select a broadcasting channel” message appears on the screen, press the
[ ] button on the remote to move either to “Air” or “Cable” and press [OK].
3
(한라)TV매뉴얼32형2장_En 2006.3.29 2:16 PM 페이지2-16 syj_print PDF-IN 2450DPI 100LPI T

E
nglish
Using the LCD TV
2-17
To Configure TV Channels
Press the [Menu] button on the remote to close the menu screen when done.
4
N O T E S
▶
Air : Digital TV broadcast by local broadcasting companies over wired antennas.
Select this option if the retransmission method is used.
▶
Cable : Select this option if receiving land-based digital TV broadcasting channels from different
broadcasters.
To add a channel number
You can enter a broadcasting channel directly and save it.
Enter a channel number by pressing the number buttons on the remote. (E.g. 7 for channel 7)
1
Press the [Add] button. Confirm the message displayed, press [Yes] to move to [OK], then
press [OK].
2
Press the [Add/Delete] button to close the screen.
3
0+7 7
or
To delete a channel number
Channels that are saved by “Auto Memorizing” or added manually by a user can be deleted.
Enter a channel number to be deleted by pressing the number buttons on the remote.
(E.g. 7 for channel 7)
1
Press the [Delete] button. Confirm the message displayed, press [Yes] to move to
[OK], then press [OK].
2
Press the [Add/Delete] button to close the screen.
3
0+7 7
or
(한라)TV매뉴얼32형2장_En 2006.3.29 2:16 PM 페이지2-17 syj_print PDF-IN 2450DPI 100LPI T

Using the LCD TV
2-18
To Configure TV Channels
“Channel List” will be displayed.
3
Press the [Menu] button on the remote to close the menu screen when done.
4
N O T E
▶
To delete a channel, select “Channel” and then press the <Delete> button.
Press the [ ] button on the remote to select the “Antenna” submenu. Press [ ]
to move to “Channel List” and then press [ ].
2
To view the channel list
Channel lists that are saved by “Auto Memorizing” or added manually by a user can be viewed.
Press the [Menu] button on the remote, and then press [ ] to move to “Channel.”
1
(한라)TV매뉴얼32형2장_En 2006.3.29 2:16 PM 페이지2-18 syj_print PDF-IN 2450DPI 100LPI T

Using the LCD TV
2-19
To Configure TV Channels
E
nglish
Press the [ ] button on the remote and then press [ ] to move to the “Signal
Strength” submenu. Press [ ] to display the current channel and its signal strength.
2
Digital signal strength
The signal strength status can be viewed if a given channel has a poorer quality image than
other channels.
Press the [Menu] button on the remote, and then press [ ] to move to “Channel.”
1
Press the [Menu] button on the remote to close the menu screen when done.
3
(한라)TV매뉴얼32형2장_En 2006.3.29 2:16 PM 페이지2-19 syj_print PDF-IN 2450DPI 100LPI T

An external input signal connected to the LCD TV can be selected for viewing.
(VCR, DVD, Camcorder, etc.)
Selecting an External Input Device Connected to the LCD TV for viewing
Press the [SOURCE] button on the remote control.
1
The ‘INPUT’ screen will be displayed.
Press the [ ] button on the remote control to
select the external device connected to the LCD TV,
and press the [OK] button.
2
LCD TV screen will be displayed when you play the
external input device.
3
N O T E
▶
Press the <SOURCE> button at the bottom of the LCD TV to open the ‘INPUT’ screen.
Use the CH
▲/▼
button to navigate to the ‘Connected External Device’ mode, and press the
<SOURCE> button to make a selection.
2-20
To Select TV/External Input
(한라)TV매뉴얼32형2장_En 2006.3.29 2:17 PM 페이지2-20 syj_print PDF-IN 2450DPI 100LPI T

E
nglish
Using the LCD TV
2-21
To Select TV/External Input
(한라)TV매뉴얼32형2장_En 2006.3.29 2:17 PM 페이지2-21 syj_print PDF-IN 2450DPI 100LPI T

Press the [Menu] button and then press [ ] to move to the “Screen” menu.
1
Press [ ] and then press [ ] to move to the “Screen Format” submenu.
Press the [ ] button.
2
Select a “Screen Format” and then press the [OK] button.
3
To set screen ratio (size)
2-22
Adjusting the Picture
● 16:9 : 16:9 ratio suitable for DVD or wide-screen broadcasts.
● Zoom1 : Increases the width of the 4:3 ratio screen, displaying the centre part.
● Zoom2 : Increases the size of the 4:3 ratio screen to display the bottom part of the image so
that the subtitles can be seen.
● 4:3 : 4:3 ratio used for videos and current broadcastings.
(한라)TV매뉴얼32형2장_En 2006.3.29 2:17 PM 페이지2-22 syj_print PDF-IN 2450DPI 100LPI T

E
nglish
Using the LCD TV
Press the [Menu] button and then press [ ] to move to the “Screen” menu.
1
Press the [ ] button on the remote and then press [ ] to move to the “Colour
Temperature” submenu. Press the [ ] button.
2
Press the [Menu] button on the remote to close the menu screen when done.
4
To set the screen colour mode
The colour mode for screen display can be set.
Select a “Colour Temperature” and then press the [OK] button.
3
2-23
Adjusting the Picture
● Norma l: for vivid images
● Cool : for gentle indigo-hued images
● Warm : for red-hued images
Press the [Menu] button on the remote to close the menu screen when done.
4
(한라)TV매뉴얼32형2장_En 2006.3.29 2:17 PM 페이지2-23 syj_print PDF-IN 2450DPI 100LPI T

Using the LCD TV
To select the “Manual” option, keep pressing the [ ] button until the “Manual” option is
displayed. Press [ ] to move to the item you want to adjust, and then press [ ]
to reset the screen so it is suitable for current viewing
● Standard : for general program viewing
● Dynamic : for playing games or viewing sport
● Mild : for smoother images
● Manual : for custom setting of contrast, brightness, vividness, colours and intensity, and
other options.
3
2-24
Adjusting the Picture
Press the [Menu] button and then press [ ] to move to the “Screen” menu.
1
Press the [ ] button on the remote to select the “Mode” submenu.
Press the [ ] button repeatedly to change the “Mode”:, select “Standard,” “Dynamic,”
“Mild,” etc; the screen will automatically be adjusted accordingly.
2
To set the screen mode
The screen image mode can be set.
(한라)TV매뉴얼32형2장_En 2006.3.29 2:17 PM 페이지2-24 syj_print PDF-IN 2450DPI 100LPI T

E
nglish
Using the LCD TV
- Contrast : controls the contrast (lightness and darkness) between the subject and the background.
- Brightness : controls brightness (brightens or darkens the whole screen).
- Sharpness : controls clarity (sharpens or dulls outlines).
- Color : controls colour intensity (lightens or deepens colours).
- Tint : adjusts the RGB (red, green, blue) of the screen colours (for more natural-looking colours).
Press the [Menu] button on the remote to close the menu screen when done.
4
2-25
Adjusting the Picture
Press the [Menu] button and then press [ ] to move to the “Screen” menu.
1
Press the [ ] button on the remote and then press [ ] to select “Noise Reduction”
submenu.
2
To eliminate screen noise
If dotted lines appear on the screen or if the screen image flickers, set the “Noise Reduction”
submenu to “On.”
Press the [ ] button and then press [ ] to move to the “On” option. Press [OK].
3
Press the [Menu] button on the remote to close the menu screen when done.
4
(한라)TV매뉴얼32형2장_En 2006.3.29 2:17 PM 페이지2-25 syj_print PDF-IN 2450DPI 100LPI T

Using the LCD TV
2-26
Adjusting the Picture
Press the [Menu] button and then press [ ] to move to the “Screen” menu.
1
Press the [ ] button on the remote and then press [ ] to select the “Film Mode”
submenu.
2
To set the film mode
Enables you to watch video or DVD movies in the optimum image quality.
Press the [ ] button and then press [ ] to move to the “On” option. Press [OK].
3
Press the [Menu] button on the remote to close the menu screen when done.
4
(한라)TV매뉴얼32형2장_En 2006.3.29 2:17 PM 페이지2-26 syj_print PDF-IN 2450DPI 100LPI T

Using the LCD TV
2-27
Adjusting the Picture
E
nglish
(한라)TV매뉴얼32형2장_En 2006.3.29 2:17 PM 페이지2-27 syj_print PDF-IN 2450DPI 100LPI T

● Standard : for general sound output. (Normal videos or movies)
● Music : for musical programs. (To appreciate the original sound)
● Movie : for movies. (To experience the feeling of size)
● Sports : for sports programs. (To feel the live action)
● News : for news programs. (To hear speech clearly)
● Manual : to custom set treble and bass.
2-28
Adjusting the Sound
Press the [Menu] button and then press [ ] to move to the “Sound” menu.
1
Press [ ] to select “Mode.” Press [ ] repeatedly to change the “Mode.”
(Standard, Music, Movie, Sports, News, Manual etc.)
2
To set sound mode
(한라)TV매뉴얼32형2장_En 2006.3.29 2:17 PM 페이지2-28 syj_print PDF-IN 2450DPI 100LPI T

E
nglish
Using the LCD TV
Press the [Menu] button on the remote to close the menu screen when done.
4
Press the [Menu] button on the remote to close the menu screen when done.
4
2-29
Adjusting the Sound
Press the [Menu] button and then press [ ] to move to the “Sound” menu.
1
Press the [ ] button on the remote and then press [ ] to move to the “Balance”
submenu.
2
To adjust the sound balance
The sound balance between the right and the left speakers can be adjusted.
To set the “Manual” mode, press [ ] repeatedly until you get to the “Manual” option.
Press [ ] to move to “Treble” and “Bass,” then press [ ] to adjust.
Press the [OK] button when done.
3
Press the [ ] button to display the balance adjuster for the two speakers.
Press [ ] to adjust. Press [OK] when done.
3
(한라)TV매뉴얼32형2장_En 2006.3.29 2:17 PM 페이지2-29 syj_print PDF-IN 2450DPI 100LPI T

Using the LCD TV
2-30
Adjusting the Sound
Press the [Menu] button and then press [ ] to move to the “Sound” menu.
1
Press the [ ] button on the remote and then press [ ] to move to the “Digital Output”
submenu.
2
Press the [ ] button and then press [ ] to move to the “PCM” or “Dolby Digital”
option. Press [OK].
3
Digital Audio output
The digital audio format can be set when the optical output (digital audio) port is connected to an
external speaker.
Press the [Menu] button and then press [ ] to move to the “Sound” menu.
1
Press the [ ] button on the remote and then press [ ] to move to the “Auto Volume”
submenu.
2
To adjust Auto Volume
If different channels have different audio output levels, set this option to “On” to smooth out the
difference.
● PCM : Use this option when connecting to a device that supports Pulse Coded
Modulation (that is, digital signals that are not compressed) format.
● Dolby Digital : Use this option when connecting to a device that supports the Dolby
digital format.
Press the [Menu] button on the remote to close the menu screen when done.
4
(한라)TV매뉴얼32형2장_En 2006.3.29 2:17 PM 페이지2-30 syj_print PDF-IN 2450DPI 100LPI T

E
nglish
Using the LCD TV
2-31
Adjusting the Sound
Press the [ ] button and then press [ ] to move to the “On” option. Press [OK].
3
Press the [Menu] button on the remote to close the menu screen when done.
4
Press the [Menu] button and then press [ ] to move to the “Sound” menu.
1
Press the [ ] button on the remote and then press [ ] to move to the “Multi-Track”
submenu.
2
To set the Track
If the broadcaster uses audio multiplex broadcasting, users can select a language from the list of
languages provided by the broadcaster.
Press the [ ] button and then press [ ] to select the voice-related option,
then press [OK]. (Mono, Stereo, SAP)
3
● Mono : for mono audio output.
● Stereo : for stereo audio output.
● SAP : to select a language if audio multiplex broadcasting is provided.
(한라)TV매뉴얼32형2장_En 2006.3.29 2:17 PM 페이지2-31 syj_print PDF-IN 2450DPI 100LPI T

Using the LCD TV
2-32
Adjusting the Sound
Press the [Menu] button and then press [ ] to move to the “Sound” menu.
1
Press the [ ] button on the remote and then press [ ] to move to the “Internal
Speaker” submenu.
2
Press the [ ] button and then press [ ] to set if the internal speaker is to be
used. Press [OK] when done. (Off, On)
3
To set the Internal Speaker
Select “On” for output to the internal speaker; select “Off” for output to an external speaker.
● On : for output to the internal speaker.
● Off : for output to an external speaker.
Press the [Menu] button on the remote to close the menu screen when done.
4
(한라)TV매뉴얼32형2장_En 2006.3.29 2:17 PM 페이지2-32 syj_print PDF-IN 2450DPI 100LPI T

Using the LCD TV
2-33
Adjusting the Sound
E
nglish
(한라)TV매뉴얼32형2장_En 2006.3.29 2:17 PM 페이지2-33 syj_print PDF-IN 2450DPI 100LPI T

To set multiple functions required for TV watching.
2-34
To Configure the SET UP
Press the [Menu] button on the remote and then press [ ] to move to the “Setup”
menu.
1
Press [ ] and then press [ ] to move to the “Menu Transparency” submenu.
Press [ ] and then press [ ] to select “Menu Transparency” options.
Press [OK] when done.
2
Press the [Menu] button on the remote to close the menu screen when done.
3
To control the transparency of the menu screen
The transparency level of the menu screen background can be set.
● Opaque : the menu background is not transparent, and nothing can be seen under it.
● Semi Opaque : the menu background is still fairly opaque, but a certain amount is
visible under it.
● Semi Trans : the menu background is almost transparent, and everything under it is
visible.
● Transparent : the menu background is very transparent, and everything under it can be
seen clearly.
(한라)TV매뉴얼32형2장_En 2006.3.29 2:17 PM 페이지2-34 syj_print PDF-IN 2450DPI 100LPI T

E
nglish
Using the LCD TV
2-35
To Configure the SET UP
Press the [Menu] button on the remote and then press [ ] to move to the “Setup”
menu.
1
Press the [ ] button on the remote and then press [ ] to move to the “Menu
Language” submenu. Press [ ] and then press [ ] to select a language.
Press [OK] when done.
2
Press the [Menu] button on the remote to close the menu screen when done.
3
To set the Caption/Subtitle Language
Captions or subtitles can be displayed if the videotape, DVD, or other video input being
played provides it.
Press the [Menu] button on the remote and then press [ ] to move to the “Setup”
menu.
1
Press the [ ] button on the remote to select the “Time” submenu.
Press [ ] again to display the “Clock” option.
2
To set the auto time
(한라)TV매뉴얼32형2장_En 2006.3.29 2:18 PM 페이지2-35 syj_print PDF-IN 2450DPI 100LPI T

Using the LCD TV
2-36
To Configure the SET UP
Press [ ] and then press [ ] to move to “Auto.” Press [OK].
3
Press the [Menu] button on the remote to close the menu screen when done.
4
Press the [Menu] button on the remote and then press [ ] to move to the “Setup”
menu.
1
Press the [ ] button on the remote to select the “Time” submenu.
Press [ ] again to display the “Clock” option.
2
Press [ ] and then press [ ] to move to “Manual.” Press [OK].
3
To set the Time manually
(한라)TV매뉴얼32형2장_En 2006.3.29 2:18 PM 페이지2-36 syj_print PDF-IN 2450DPI 100LPI T

E
nglish
● [ ] : Use this option to move between different options.
● [ ] : Use this option to adjust each item.
Using the LCD TV
2-37
To Configure the SET UP
Press the [ ] button to move to “Manual Clock” and then press [ ].
The current time setting screen will be displayed. Use the [ ] and
[ ] buttons to adjust “Yr., Mon., Day, AM/PM, Hr., Min.”
4
Press the [Menu] button to close the menu screen when all items are set.
5
Press the [Menu] button on the remote and then press [ ] to move to the “Setup”
menu.
Press the [ ] button on the remote to select the “Time” submenu.
Press [ ] again to display the “Clock” option.
To set the On/Off Timer
Press the [ ] button to move to “On Timer” and then press [ ].
After the “On Timer” setting screen is displayed, press [ ] to select
“AM/PM” and then press [ ] to set “Hr” and “Min.”
To set the On Timer
1
2
3
(한라)TV매뉴얼32형2장_En 2006.3.29 2:18 PM 페이지2-37 syj_print PDF-IN 2450DPI 100LPI T

Using the LCD TV
2-38
To Configure the SET UP
Press the [ ] button to move to the “Ch” option and then press [ ] to select the
“Channel.”
Press [ ] to move to “Repetition Number” and then press [ ] to select “Option.”
Press [Menu] when done.
● [ ] : Use this option to move between different options.
● [ ] : Use this option to adjust each item.
● Off : Use this option if you don’t want to use the “On Timer” function.
● Once : Use this option to turn it on once using the “On Timer” function.
● Daily : Use this option to turn it on daily using the “On Timer” function.
Press the [Menu] button on the remote to close the menu screen when done.
4
Press [ ] to move to “Vol” and then press [ ] to select “Volume.”
5
6
7
Press the [Menu] button on the remote and then press [ ] to move to the “Setup”
menu.
Press the [ ] button on the remote to select the “Time” submenu.
Press [ ] again to display the “Clock” option.
To set the Off Timer
1
2
(한라)TV매뉴얼32형2장_En 2006.3.29 2:18 PM 페이지2-38 syj_print PDF-IN 2450DPI 100LPI T

Using the LCD TV
2-39
To Configure the SET UP
E
nglish
Press the [ ] button to move to “Off Timer” and then press [ ].
After the “Off Timer” setting screen is displayed, press [ ] to select
“AM/PM” and then press [ ] to set “Hr” and “Min.”
3
● [ ] : Use this option to move between different options.
● [ ] : Use this option to adjust each item.
Press [ ] to move to “Repetition Number” and then press [ ] to select “Option.”
Press [Menu] when done.
● Off : Use this option if you don’t want to use the “Off Timer” function.
● Once : Use this option to turn it off once using the “Off Timer” function.
● Daily : Use this option to turn it off daily using the “Off Timer” function.
Press the [Menu] button on the remote to close the menu screen when done.
4
5
(한라)TV매뉴얼32형2장_En 2006.3.29 2:18 PM 페이지2-39 syj_print PDF-IN 2450DPI 100LPI T

Press [Sleep] repeatedly to adjust the sleep timer duration from 15-120 minutes,
or to cancel the sleep timer.
2
Using the LCD TV
2-40
To Configure the SET UP
Press the [Sleep] button on the remote to display the “Set Sleep Timer” screen.
1
To set the Sleep Timer
The TV will be turned off automatically at a preset time if the sleep timer is set.
Press the [Menu] button on the remote to close the menu screen when done.
3
Using the Parental (V-Chip)
The Parental feature automatically locks out programming that is deemed inappropriate
for children. The user must enter a PIN(Personal ID Number) before any of the Parental
restriction can be changed.
N O T E
▶
The Parental feature does not work with PC signals.
Setting Up Your PIN (Personal ID Number)
1
Press the [MENU[ button on the remote control.
2
Press the [ ] button on the remote control to navigate to the ‘SET UP’ menu and then
press the [ ] button.
(한라)TV매뉴얼32형2장_En 2006.3.29 2:18 PM 페이지2-40 syj_print PDF-IN 2450DPI 100LPI T

Press the [ ] button on the remote control to navigate to the ‘V-Chip’ submenu.
Press the [ ] button. The ‘Enter the Password : ----’ screen is displayed.
After entering a valid PIN number, the ‘V-Chip’ item screen will appear.
Press the [ ] button to select ‘Change PIN.’.
Using the LCD TV
2-41
To Configure the SET UP
E
nglish
N O T E
▶
The default PIN number for a new set is ‘1-1-1-1’.
3
4
5
Enter 4-digit PIN number.
6
8
When you have finished, press the [MENU] button to colse the ‘Menu’ screen.
7
Input the new password and input again the same password.
(한라)TV매뉴얼32형2장_En 2006.3.29 2:18 PM 페이지2-41 syj_print PDF-IN 2450DPI 100LPI T

Press the [ ] button on the remote control.
To turn On or Off the Parental feature, press the [ ] buttons to select Parental
Lock On/Off.
Using the LCD TV
2-42
To Configure the SET UP
How to On/Off the Parental(V-Chip)
1
Press the [MENU] button on the remote control.
2
Press the [ ] button on the remote control to navigate to the ‘SET UP’ menu.
3
Press the [ ] button on the remote control.
4
Press the [ ] button on the remote control to navigate to the ‘V-Chip’ submenu.
5
Press the [ ] button. The ‘Please, Enter your PIN. : ----’ screen is displayed.
6
Enter 4-digit PIN number.
7
After entering a valid PIN number, the Parental menu is displayed and the Parental
Lock will be highlighted.
8
7
When you have finished, press the [MENU] button to close the ‘Menu’ screen.
(한라)TV매뉴얼32형2장_En 2006.3.29 2:18 PM 페이지2-42 syj_print PDF-IN 2450DPI 100LPI T

Using the LCD TV
2-43
To Configure the SET UP
E
nglish
6
Enter 4-digit PIN number.
How to Setup Restriction Using the MPAA
1
Press the [MENU] button on the remote control.
2
Press the [ ] button on the remote control to navigate to the ‘SET UP’ menu.
3
Press the [ ] button on the remote control.
4
Press the [ ] button on the remote control to navigate to the ‘V-Chip’ submenu.
5
Press the [ ] button. The ‘Please, Enter your PIN. : ----’ screen is displayed.
8
Press the [ ] buttons to select particular MPAA category.
The [ ] buttons will cycle through the MPAA categories.
- G : General audience (no restrictions).
- PG : Parental guidance suggested.
- PG13 : Parents strongly cautioned.
- R : Restricted. Children under 17 should be accompanied by an adult.
- NC17 : No Children under age 17.
- X : Adults only
- NR : Not rated
7
After entering a valid PIN number, the Parental sub menu screen will appear.
Press the [ ] buttons to move to ‘MPAA Rating’ item.
9
When you have finished, press the [MENU] button to colse the ‘Menu’ screen.
(한라)TV매뉴얼32형2장_En 2006.3.29 2:18 PM 페이지2-43 syj_print PDF-IN 2450DPI 100LPI T

After entering a valid PIN number, the Parental sub menu screen will appear.
Press the [ ] buttons to select ‘TVPG Rating’.
Press the [ ] button on the remote control.
Using the LCD TV
2-44
To Configure the SET UP
N O T E
▶
The Parental will automatically block any category that is ‘More restrictive’. For example, if you block the
PG-13 category, then R, NC-17 , and X will be automatically blocked also.
How to Setup Restriction Using the TV Guidelines
6
Enter 4-digit PIN number.
1
Press the [MENU] button on the remote control.
2
Press the [ ] button on the remote control to navigate to the ‘SET UP’ menu.
3
Press the [ ] button on the remote control.
4
Press the [ ] button on the remote control to navigate to the ‘V-Chip’ submenu.
5
Press the [ ] button. The ‘Please, Enter your PIN. : ----’ screen is displayed.
7
8
Press the [ ] buttons to move to one of the six age-based categories in column
and press the [ ] buttons will cycle through the MPAA categories.
- TV-Y : Young Children
- TV-Y7 : Children 7 and Over
- TV-G : General audience
- TV-PG : Parental guidance
- TV-14 : Viewers 14 and Over
- TV-MA : Mature audience
(한라)TV매뉴얼32형2장_En 2006.3.29 2:18 PM 페이지2-44 syj_print PDF-IN 2450DPI 100LPI T

Using the LCD TV
2-45
To Configure the SET UP
E
nglish
To set the FV, D, L, S and V sub-ratings, first select one of these TV-Ratings :
TV-Y7, TV-PG, TV-14 and TV-MA (See step 7).
Next, while the TV-Ratings is selected, repeatedly press the [ ] button.
This will cycle through the available sub-ratings (FV, D, L, S or V).
Press the [OK] button to change the sub-ratings.
For example, if you block TV-Y category, then TV-Y7 will be automatically blocked.
Similarly, if you block TV-G category, then all the categories in the ‘young adult’ will be
blocked (TV-G, TV-PG, TV-14 and TV-MA). The sub-ratings (FV, V, S, L, D) work together
similarly. (See step 8)
N O T E S
▶
These categories consist of two separate groups :
TV-Y and TV-Y7(Young Children through age 7), and TV-G through TV-MA(everybody else).
▶
The restrictions for these two groups work independently :
If a household includes very young children as well as young adults, the TV guidelines must be set
separately for each group.
▶
The TV-Y7, TV-PG, TV-14 and TV-MA have additional options.
- : All
FV : Fantasy Violence
V : Violence
S : Sexual Situation
L : Adult Language
D : Sexual Suggestive Dialog
9
N O T E
▶
The Parental will automatically block certain categories that are ‘More restrictive’.
For example, if you block ‘L’ sub-rating in TV-PG, then the ‘L’ sub-rating in TV-14 and TV-MA will be
automatically blocked.
When you have finished, press the [MENU] button to colse the ‘Menu’ screen.
10
(한라)TV매뉴얼32형2장_En 2006.3.29 2:18 PM 페이지2-45 syj_print PDF-IN 2450DPI 100LPI T

Initial PC Mode Settings
PC Menu Components
Main Menu Settings
(한라)TV매뉴얼32형3장_En 2006.3.29 2:19 PM 페이지3-1 syj_print PDF-IN 2540DPI 100LPI T

3-2
Initial PC Mode Settings
To use the PC mode, set the resolution on the PC to 1280 x 768 @ 60Hz /
1360 x 768 @ 60Hz, and connect it to the LCD TV.
Connect the LCD TV and the PC, and press the [POWER] button.
1
Press the [SOURCE] button on the remote control.
The ‘INPUT’ screen will be displayed.
2
Check the type of cable that connects the LCD TV and
the PC. Press the [ ] button on the remote control to
navigate to PC, and press the [OK] button.
3
The ‘PC’ screen will be displayed.(If the screen of your PC is not displayed, please check
the connection status of the cable. When you connect the notebook PC, change the
connection mode of the external monitor to the ‘LCD+Monitor’ mode.)
4
(한라)TV매뉴얼32형3장_En 2006.3.29 2:19 PM 페이지3-2 syj_print PDF-IN 2540DPI 100LPI T

E
nglish
3-3
Initial PC Mode Settings
PC Mode Environment Settings
(한라)TV매뉴얼32형3장_En 2006.3.29 2:19 PM 페이지3-3 syj_print PDF-IN 2540DPI 100LPI T

Switch to the ‘PC’ mode and press the [MENU] button on the remote control.
The ‘MAIN MENU’ screen will be displayed.
3-4
PC Menu Components
Main Menu
Mode Standard For general PC mode
Dynamic For sports mode
Mild For smoother screen mode
Manual Contrast : controls contrast between light and dark
Brightness : controls brightness
Color Normal, Cool, Can control ambiance of screen image
Temperature Warm
Manual Controls red, green, and blue colours
Screen Format
16 : 9, 4:3 Can set screen ratio
Mode Standard For general sound output
Music For musical programs
Movie For movies
Sports For sports
News For news
Manual Treble : tunes higher range sounds
Bass : tunes lower range sounds
Balance Sound output of right/left speaker can be balanced
Auto Volume On/Off Sound output differences between different channels
can be evened out by selecting ‘On’.
Internal Speaker
On/Off Select ‘On’ for output to internal speaker
Sub Menu 1 Sub Menu 2 Description
Screen
Volume
Setup Time Clock Can select Auto or Manual option
Manual Clock Can set current time (i.e. time, date, month, year)
(select Manual from Clock option to set current time)
Daylight Saving Can use Summertime function
(select Auto from Clock option to set summertime)
Time Zone Select your region and then set On/Off Timer
(select Auto from Clock option to select region)
On Timer On Timer can be set by users manually
Off Timer Off Timer can be set by users manually
Auto Off Auto Off function can be turned On or Off
(한라)TV매뉴얼32형3장_En 2006.3.29 2:19 PM 페이지3-4 syj_print PDF-IN 2540DPI 100LPI T

E
nglish
Main Menu Sub Menu 1 Sub Menu 2 Description
PC Mode Environment Settings
3-5
PC Menu Components
PC Position Adjusts horizontal/vertical image location
Frequency Controls image quality by fine-tuning the screen
Phase Adjusts screen geometry (e.g. adjusting a screen to
eliminate noise or ghost images)
Auto Automatically sets location, frequency, geometry, etc.
Menu Language
English, Espanol, France
Menu Opaque,
OSD: controls transparency of menu screen background
Transparency
Semi Opaque,
Transparent,
Semi Transparent
V-Chip Change PIN Pin number can be changed
On/Off V-Chip function can be turned On or Off
TGPG Rating TV programs can be screened according to their
ratings (screening can be set when the V-Chip function
is turned On)
MPAA Rating Movies can be selected according to their ratings
(when V-Chip function is turned On)
Can. English Rating
(when V-Chip function is turned On)
Can. French Rating
(when V-Chip function is turned On)
(한라)TV매뉴얼32형3장_En 2006.3.29 2:19 PM 페이지3-5 syj_print PDF-IN 2540DPI 100LPI T

To set the Screen menu
3-6
Main Menu Settings
Press the [Menu] button and then press [ ] to move to the “Screen” menu.
Press the [ ] button and then press [ ] to move to the “Screen Format” submenu.
Press [ ]. Select the screen size and then press [OK].
Press the [Menu] button on the remote to close the menu screen when done.
To set the Screen Size
1
2
3
Press the [Menu] button and then press [ ] to move to the “Screen” menu.
To set the screen mode
The screen image mode can be set.
1
Press the [ ] button on the remote to select the “Mode” submenu.
Press the [ ] button repeatedly to change the “Mode”:, select “Standard,” “Dynamic,”
“Mild,” etc; the screen will automatically be adjusted accordingly.
2
(한라)TV매뉴얼32형3장_En 2006.3.29 2:19 PM 페이지3-6 syj_print PDF-IN 2540DPI 100LPI T

E
nglish
PC Mode Environment Settings
3-7
Main Menu Settings
Press the [Menu] button and then press [ ] to move to the “Screen” menu.
Press the [ ] button on the remote and then press [ ] to move to the
“Colour Temperature” submenu. Press the [ ] button.
To set the screen colour mode:
The colour mode for screen display can be set.
1
2
● Standard: for general program viewing
● Dynamic: for playing games or viewing sport
● Mild for smoother images
● Manual: for custom setting of contrast, brightness.
To select the “Manual” option, keep pressing the [ ] button until the “Manual” option is
displayed. Press [ ] to move to the item you want to adjust, and then press [ ]
to reset the screen so it is suitable for current viewing
3
● Contrast : controls the contrast (lightness and darkness) between the subject and the
background.
● Brightness : controls brightness (brightens or darkens the whole screen).
Press the [Menu] button on the remote to close the menu screen when done.
4
(한라)TV매뉴얼32형3장_En 2006.3.29 2:19 PM 페이지3-7 syj_print PDF-IN 2540DPI 100LPI T

PC Mode Environment Settings
3-8
Main Menu Settings
To set the Audio menu
Press the [Menu] button and then press [ ] to move to the “Sound” menu.
To set sound mode
1
Select “Colour Temperature” and then press [OK].
3
Press the [Menu] button on the remote to close the menu screen when done.
4
● Normal : for vivid images
● Cool : for gentle indigo-hued images
● Warm : for red-hued images
● Manual : for adjusting RGB (red, green, blue).
(한라)TV매뉴얼32형3장_En 2006.3.29 2:19 PM 페이지3-8 syj_print PDF-IN 2540DPI 100LPI T

E
nglish
PC Mode Environment Settings
3-9
Main Menu Settings
Press [ ] to select “Mode.” Press [ ] repeatedly to change the “Mode.”
(Standard, Music, Movie, Sports, News, Manual etc.)
2
● Standard : for general sound output. (Normal videos or movies)
● Music : for musical programs. (To appreciate the original sound)
● Movie : for movies. (To experience the feeling of size)
● Sports : for sports programs. (To feel the live action)
● News : for news programs. (To hear speech clearly)
● Manual : to custom set treble and bass.
To set the “Manual” mode, press [ ] repeatedly until you get to the “Manual” option.
Press [ ] to move to “Treble” and “Bass,” then press [ ] to adjust.
Press the [OK] button when done.
3
Press the [Menu] button on the remote to close the menu screen when done.
4
Press the [Menu] button and then press [ ] to move to the “Sound” menu.
To adjust the sound balance
The sound balance between the right and the left speakers can be adjusted.
1
(한라)TV매뉴얼32형3장_En 2006.3.29 2:19 PM 페이지3-9 syj_print PDF-IN 2540DPI 100LPI T

PC Mode Environment Settings
3-10
Main Menu Settings
Press the [Menu] button on the remote to close the menu screen when done.
4
Press the [ ] button on the remote and then press [ ] to move to the “Balance”
submenu.
2
Press the [ ] button to display the balance adjuster for the two speakers.
Press [ ] to adjust. Press [OK] when done.
3
Press the [ ] button and then press [ ] to move to the “On” option.
Press [OK].
Press the [Menu] button and then press [ ] to move to the “Sound” menu.
Press the [ ] button on the remote and then press [ ] to move to the “Auto Volume”
submenu.
To adjust Auto Volume
If different channels have different audio output levels, set this option to “On” to
smooth out the difference.
1
2
3
Press the [Menu] button on the remote to close the menu screen when done.
4
(한라)TV매뉴얼32형3장_En 2006.3.29 2:19 PM 페이지3-10 syj_print PDF-IN 2540DPI 100LPI T

3-11
Main Menu Settings
PC Mode Environment Settings
E
nglish
Press the [Menu] button and then press [ ] to move to the “Sound” menu.
Press the [ ] button on the remote and then press [ ] to move to the “Internal
Speaker” submenu.
To set the Internal Speaker
Select “On” for output to the internal speaker; select “Off” for output to an external
speaker.
1
2
Press the [ ] button and then press [ ] to set if the internal speaker is to be used.
Press [OK] when done. (Off, On)
Press the [Menu] button on the remote to close the menu screen when done.
4
3
● On : for output to the internal speaker.
● Off : for output to an external speaker.
To set the Settings
Press the [Menu] button and then press [ ] to move to the “Setup” menu.
Press [ ] and then press [ ] to move to the “Menu Transparency” submenu.
To control the transparency of the menu screen
1
2
(한라)TV매뉴얼32형3장_En 2006.3.29 2:19 PM 페이지3-11 syj_print PDF-IN 2540DPI 100LPI T

PC Mode Environment Settings
3-12
Main Menu Settings
Press [ ] and then press [ ] to select “Menu Transparency” options.
Press [OK] when done.
3
Press the [Menu] button on the remote to close the menu screen when done.
4
The transparency level of the menu screen background can be set.
● Opaque : the menu background is not transparent, and nothing can be seen under it.
● Semi Opaque : the menu background is still fairly opaque, but a certain amount is
visible under it.
● Semi Trans : the menu background is almost transparent, and everything under it is
visible.
● Transparent : the menu background is very transparent, and everything under it can be
seen clearly.
Press the [Menu] button and then press [ ] to move to the “Setup” menu.
Press the [ ] button on the remote and then press [ ] to move to the “PC” submenu.
To set the PC
1
2
(한라)TV매뉴얼32형3장_En 2006.3.29 2:19 PM 페이지3-12 syj_print PDF-IN 2540DPI 100LPI T

3-13
Main Menu Settings
PC Mode Environment Settings
E
nglish
Press [ ] and then press [ ] to select items. Press [OK] when done.
3
● Position : Adjusts horizontal/vertical image location
● Frequency : Controls image quality by fine-tuning the screen
● Phase : Adjusts screen geometry
(e.g. adjusting a screen to eliminate noise, or ghost images)
● Auto : Automatically sets location, frequency, geometry, etc.
(한라)TV매뉴얼32형3장_En 2006.3.29 2:19 PM 페이지3-13 syj_print PDF-IN 2540DPI 100LPI T

Appendix
(한라)TV매뉴얼32형부록_En 2006.3.29 2:20 PM 페이지A-1 syj_print PDF-IN 2540DPI 100LPI T

A-2
Appendix
Specifications
May be modified without prior notice for product enhancements.
Panel Panel Type
Display Area
Display Color
Pixel Pitch
Recommended Resolution
Contrast Ratio
Luminance white
Viewing Angle
In/Out PC
Video
Audio
RF Signal Antenna
Color System
Sound System
Stereo Type
32
″″
32″Wide TFT Colour LCD
697.685 mm×392.256 mm
(8bit) 16.7 million
0.21 mm×0.6 mm×RGB
1366×768
300(Max), 500(typical)
500 cd/m
2
Free View Angle (R/L 176, U/D 176)
Analog RGB 15 pin D-Sub Input
Composite Input
S-Video Input
Component Input
PC(analog RGB) Input
HDMI
Composite RCA L/R Input
Component RCA L/R input
SPDIF(PCM/AC-3) Output
PC/Audio Input
75Ω Coaxial cable
NTSC/ATSC
M
MTS
Others
Power Consumption
Power Save Mode
Speaker
Plug & Play
Screen Control
Weight
130 watts
Less than 3 watts
10 watts ×2
DDC 1/2 B
256 Colour On Screen Display Menu, Bit Map
Net : 20.1 kg
Gross : 24.6 kg
(한라)TV매뉴얼32형부록_En 2006.3.29 2:20 PM 페이지A-2 syj_print PDF-IN 2540DPI 100LPI T

E
nglish
A-3
Appendix
Appendix
Display Modes
Section Resolution
H
Frequency (KHz)
V
Frequency (Hz)
Pixel
Frequency(MHz)
PC
Comment
640×350
37.861 85.08 31.5
640×480
31.469 59.94 25.175
640×480
37.500 75.0 31.5
720×400
31.469 70.087
28.332
800×600
37.879 60.317 40.0
800×600
46.875 75.0 49.5
DTV
1024×768
60.030 75.029 78.75
1360×768
47.700 60.0 80.136
720×480
15.735 59.94 13.500 SDTV, DVD 480i
HDTV, 1080i
720×480
31.469 59.94 25.175 SDTV, 480p
1280×720
44.964 59.94 74.176 HDTV, 720p
1280×720
37.500 50.0 60.466 HDTV, 720p
1920×1080
33.750 60.0 74.25
HDTV, 1080i
VESA
IBM
VESA
IBM
VESA
VESA
VESA
VESA
VESA
1920×1080
28.125 50.0 70.723
1024×768
48.363 60.004 65.0
1024×768
56.476 70.069 75.0
(한라)TV매뉴얼32형부록_En 2006.3.29 2:20 PM 페이지A-3 syj_print PDF-IN 2540DPI 100LPI T

Appendix
Check before calling for service
Please check the following before asking the service center about any problems with
your LCD TV.
Something seems to be wrong with the TV
● The TV does not turn on.
● The TV is making strange noises, but
there is no video or audio.
● There is video but no audio.
● There is audio but no video.
Check the power cable connection and
press the <POWER> button on the
remote control.
The TV may be in external input mode.
Press the <TV/AV> button on the remote
control.
Try pressing the volume adjustment
< > button.
Try pressing the <MUTE> button on the
remote control.
Press the <MENU> button to adjust the
screen brightness (go to the screen
menu to adjust the settings. For more
information, see Pages 2-18~21.)
When you connect it to the external
devices, check the status of Video
terminal connection.
Symptoms What to do
● Images overlap , spots appear on the
screen, and audio is unstable.
Check the antenna cable connection.
Check whether the antenna cable is old
or damaged.
Check whether the external antenna
direction is correct. It may have been
altered by strong winds and so on.
A-4
Appendix
(한라)TV매뉴얼32형부록_En 2006.3.29 2:20 PM 페이지A-4 syj_print PDF-IN 2540DPI 100LPI T

E
nglish
Appendix
● The picture shakes, lines appear, and
audio is unstable.
● The remote controller does not work.
Check whether the TV signal is receiving
interference from other radio waves or
devices.
Check whether the TV signal is receiving
interference from automobiles, highvoltage cables, airplanes, neon
signboards and so on. Change the
antenna direction if necessary.
Check whether the batteries are dead or
installed incorrectly.
Check whether the receiver on the LCD
TV unit is masked. Ensure it is facing in
the correct direction.
Symptoms What to do
● Stereo audio is unclear or discontinuous. If the broadcasting station is too far away
or the TV is getting interference from other
radio waves, the stereo audio may not be
clear. In this case, press the <SSM>
button.
● The LCD TV is making cracking
sounds.
When the LCD TV is turned on or off,
cracking sounds may be heard. This
happens because the cabinet contracts
or expands due to environmental factors,
including humidity and temperature.
There are no adverse effects on the TV’s
performance.
● When playing VCR, there is no video. Check whether the VCR is set to a
dedicated VCR channel (3 or 4), and the
input mode for the TV is set to video
mode.
Check the video cable connection
between the VCR and TV.
A-5
Appendix
(한라)TV매뉴얼32형부록_En 2006.3.29 2:20 PM 페이지A-5 syj_print PDF-IN 2540DPI 100LPI T

Appendix
Symptoms What to do
● When playing a DVD, there is no video. Check the video cable connection
between the DVD and TV.
Check whether there is a problem with
the DVD title.
Check whether the external input signal
matches the DVD output signal.
● When playing VCR, there is noise on the
screen.
Use the screen adjustment button on the
VCR to make adjustments.
Check whether the video tape is in good
condition.
● Some channels cannot be received.
● When playing VCR, there is no sound.
Ensure that your channel selection is
correct. For more information, see
section ‘2.3 To Configure TV Channels’.
Check the audio cable connection
between the TV and VCR.
● The DVD playback screen is not clear. Check whether the DVD title surface is
clean. Check for scratches and dust.
A-6
Appendix
(한라)TV매뉴얼32형부록_En 2006.3.29 2:20 PM 페이지A-6 syj_print PDF-IN 2540DPI 100LPI T

E
nglish
Appendix
Troubleshooting
If you have a problem setting up or using your LCD TV, you may be able to solve it yourself.
Before contacting customer service, try the suggested actions that are appropriate to your
problem.
What you see...
Suggested Actions Reference
‘No Signal’ message
●
Ensure that the signal cable is firmly
connceted to the PC or video
sources.
Page 1-18 ~ 1-26
●
Ensure that the PC or video sources
are turned on.
‘Out of Range’ message
●
Check the maximum resolution and
the frequency of the video adaptor.
Page A-5
●
Compare these values with the data
in the Display Modes Timing Chart.
Page 2-20 ~ 2-21
Page 3-6 ~ 3-7
The image is too light or too dark
●
Adjust the Brightness and Contrast.
●
Auto in progress will clear it automatically.
Page 3-8
Page 3-9
Horizontal bars appear to flicker,
jitter or shimmer on the image.
●
Adjust the Clock function.
Vertical bars appear to flicker,
jitter or shimmer on the image.
●
Adjust the Phase function and then
adjust the Clock function.
●
Auto in progress will clear it automatically.
Page 3-8
Page 3-9
Image is not centered on the
screen.
●
Auto
in progress
will set the best
position automatically.
●
Adjust the horizontal and vertical
position.
Page 3-8
Page 3-9
Image is not stable and may
appear to vibrate
●
Auto in progress will clear it automatically.
●
Check that the display resolution and
frequency of your PC or video board
is an available mode for your TV.
On your computer check:
Control Panel, Display, Settings
No sound
●
Ensure that the audio cable is firmly
connected to both the audio-in jack
on your TV and the audio-out jack
on your sound card.
Connecting a PC, TV or VCR, DVD
Page 1-18 ~ 1-26
Adjust the Sound settings
Page 2-22 ~ 2-24
●
Check the volume level
●
Check the volume levelSound level is too low
●
If the volume is still too low after
turning the control to its maximum,
check the volume control on the
computer sound card or software
program.
Refer to your computer, sound card or
software documentation.
Adjusting the Sound Settings,
Page 2-22 ~ 2-24
Connecting to watch TV or VCR, DVD
Page 1-18 ~ 1-26
Sound is too high pitched or too
low pitched
●
Adjust the Treble and Bass to
appropriate level.
TV signal is not received
●
Ensure that the antenna cable is
firmly connected to the VHF/UHF
jack.
A-7
Appendix
(한라)TV매뉴얼32형부록_En 2006.3.29 2:20 PM 페이지A-7 syj_print PDF-IN 2540DPI 100LPI T
 Loading...