

Page 1
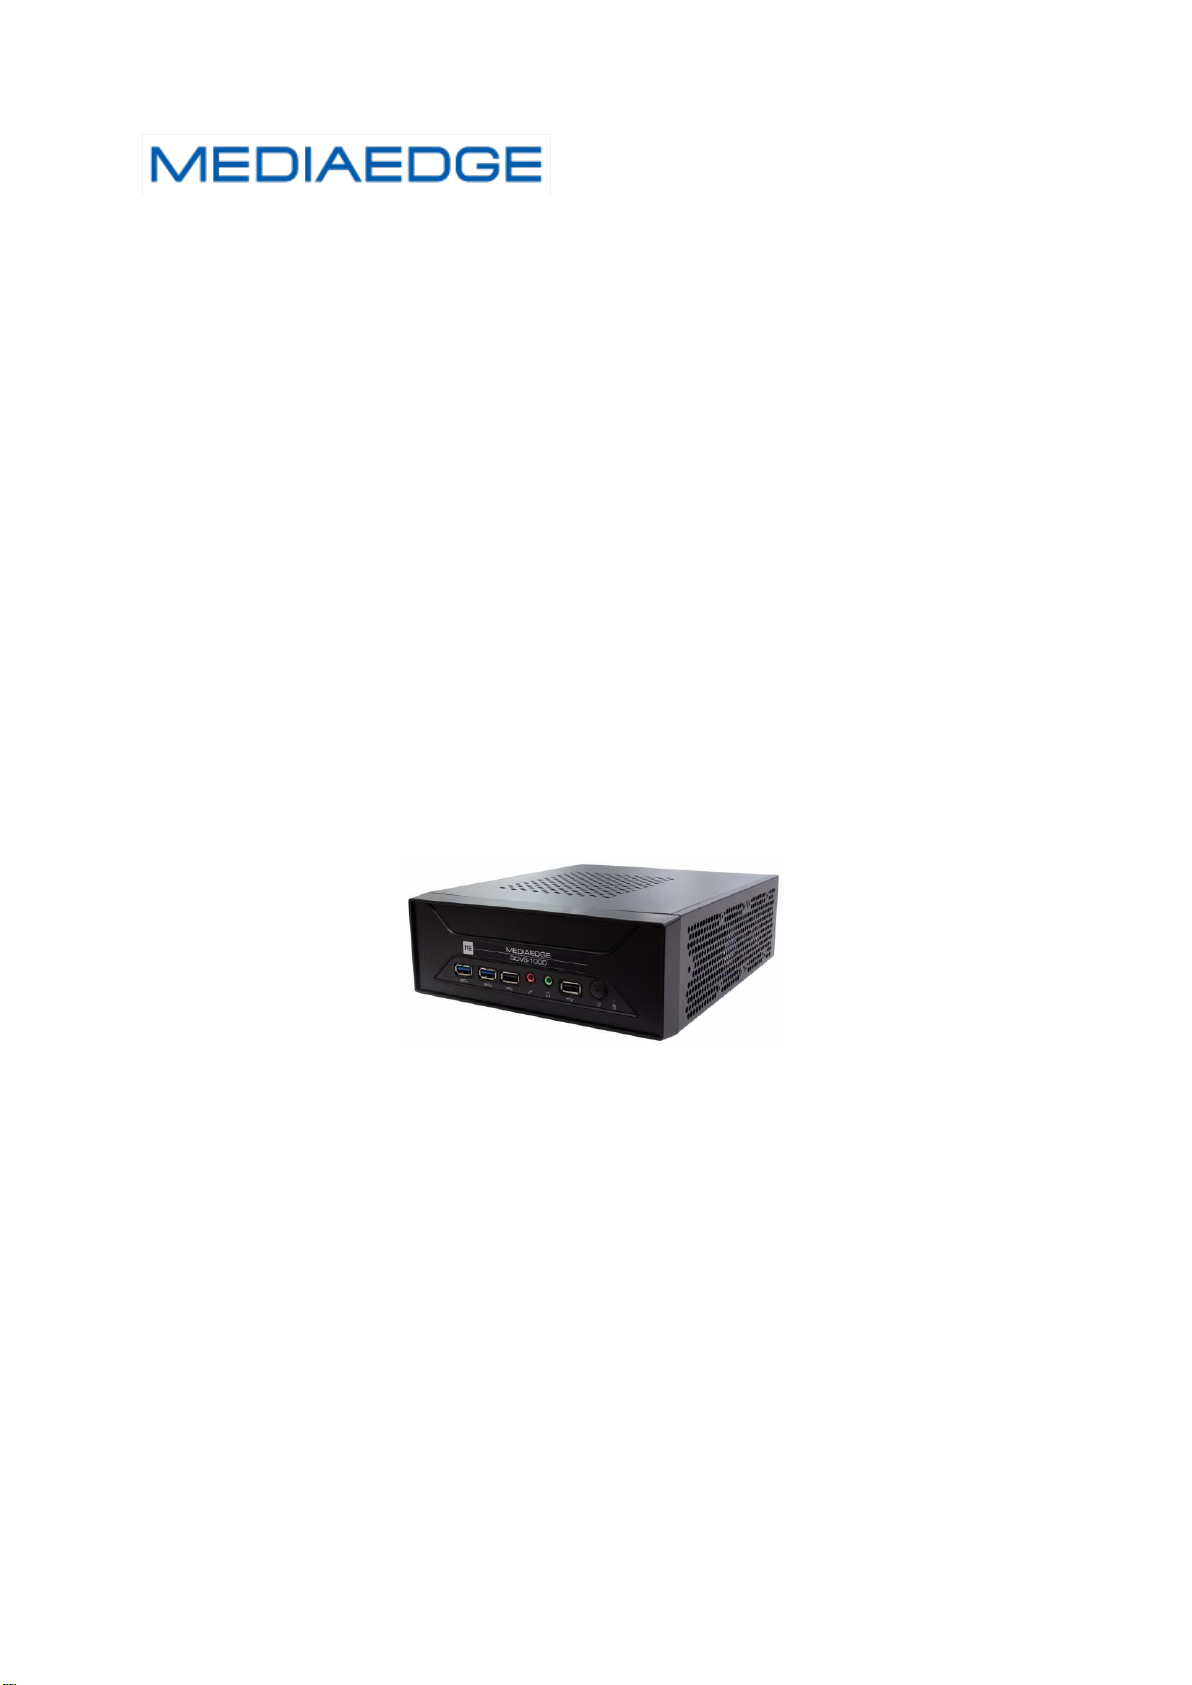
QDVS-1000
User Manual
Model number:ME-QDVS-1000
Copyright (C) 2020 MEDIAEDGE Corporation
May 29, 2020
1st Edition
All rights reserved.
Page 2
Edition
FirmWare
Date
Revision details
1.0
May/29/2020
First edition
Revision history
Page 3

Contents
I. Introduction ................................................................................................................................. 1
I-1. Notes when using this product ........................................................................................ 2
■ Notes .................................................................................................................................. 3
■ Handling Policy of personal information ....................................................................... 3
■ The trademarks ................................................................................................................ 4
■ FCC Note ............................................................................................................................ 4
I-2. Before Use ........................................................................................................................... 5
■ Verify the package content ............................................................................................. 5
■ About our homepage ....................................................................................................... 5
I-3. Notes .................................................................................................................................... 6
■ Notation ............................................................................................................................. 6
■ Attention ............................................................................................................................ 6
■ Usage Agreement ............................................................................................................. 6
II. About QDVS-1000 ..................................................................................................................... 7
II-1. Product Outline, Features, Usages ................................................................................ 8
■ II-1-1. QDVC-1000 Outline .............................................................................................. 8
■ II-1-2. QDVS-1000 Features ........................................................................................... 8
■ II-1-3. How QDVS-1000 works ....................................................................................... 9
■ II-1-4. Usages .................................................................................................................. 10
■ II-1-5. How to configure a system ................................................................................ 11
II-2. Part Names and Function .............................................................................................. 13
■ II-2-1. Front View ........................................................................................................... 13
■ II-2-2. Rear View ............................................................................................................. 14
II-3. How to connect, start and stop the system and operation flow. ........................................ 15
■ II-3-1. How to connect ................................................................................................... 15
■ II-3-2. Start the system ................................................................................................. 16
■ II-3-3. Stop the system .................................................................................................. 16
■ II-3-4. About operation Flow ......................................................................................... 17
II-4. Instractions ...................................................................................................................... 18
■ II-4-1. Setting Menu ....................................................................................................... 18
■ II-4-2. Operation screen ................................................................................................ 21
II-5. Dimensions ...................................................................................................................... 23
II-6. General Specifications .................................................................................................... 24
Page i
Page 4

Page 5
QDVS-1000
I.
Introduction
This chapter describes the matters that need to be noted before the setup and the use of QDCAM
Page 1
Page 6
User Manual
MEDIAEDGE Corporation
International Customer support
Intl. [email protected]
I-1. Notes when using this product
This section describes notes when using this
product. If you have any questions about how
touse this product and the content of this
manual please contact MEDIAEDGE
Corporation Customer Service.
Do not damage the power cord
If the power cord is damaged, it can cause
the fire and/or the electric shock. Do not
place anything heavy nor place the power
code close to any heating equipment. Also,
do not bend nor process the power cord.
When pulling out the AC adapter, hold the
plug-in part. If there is any damage in the
Do not place water or forein matter
inside
If any water or foreign matter gets inside, it
can cause the fire and the electric shock.
Should any water or foreign matter gets
inside, turn off the power, plug out the power
cord, and contact the store you purchased
the product or our customer support.
Do not use the product during the
thunderstorm.
Do not touch the body of the product and the
plug. It can cause the electric shock.
Do not touch AC adapter with wet
hands.
Do not plug in or pull out the AC adapter with
wet hands. It can cause the electric shock.
power cord, please ask our customer support
at the store you purchased for a replacement.
Do not disassenble
Opening the case or trying to remodel the
product can cause the fire and/or the electric
shock. Please ask our customer support or
the store you purchased the product for an
internal inspection and a repair
Do not use the product in duty and
humid areas.
It can lead to the short circuit and the heat
generation and cause the fire and electric
shock.
Do not place the product in the
direct sunlight.
Do not place the product in the sunlight or
close to any heating equipment. It can cause
the fire or damage the product.
Do not use the product when it is
smoking.
Do not use the product when it is smoking
or when it is giving off strange smell. It can
cause the fire or damage the product. When
abnormality occurs, turn off the power, plug
out the power cord, make sure that it stops
smoking, and then contact the store you
purchased the product or our customer
support.
Page 2
Page 7
Do not use the product in the
damaged condition.
When the product is dropped or when there
is any damage in the cover, discontinue the
use of the product. It can cause the fire or
damage the product. When the product is
damaged, turn off the power, plug out the
power cord, and then contact the store you
purchased the product or our customer
support.
Do not place the product in the
unstable location.
QDVS-1000
■ Notes
Regardless of the presence or absence of
negligence in use, our company will not be
responsible for any claim against
consequential damage and special,
incidental, or including lost profit that is
generated by operating this product.
We will not guarantee the product when the
product is not used for the originally intended
purposes and/or in the recommended
environment.
Do not place the product on the unstable
stand or tilted location. The product can fall
and hurt somebody around or damage the
product itself. Sort the power cord and AV
cable to place. It can cause the injury and
the damage to the product if you get tripped
on the cord
Turn off the power when you
clean the product.
When connecting or cleaning the product,
plug out the power cord. If not, it can cause
the electric shock or damage the product.
When cleaning the product, do not use any
volatile solvents such as thinner. When the
product is not in use for a long period of time,
leave AC adapter off the plug.
Do not cover the product with
fabric.
Do not use the product in the poorly
ventilated area or in the covered condition.
When the ventilation opening is blocked,
heat stays inside, and it can cause the fire or
damage the product.
■ Handling Policy of personal
information
As a general rule, our company will not use
customers’ personal information for any
purposes other than the ones listed below:
- To support the use of our products.
- To conduct surveys of the usage of our
products, for product improvement, for
product development, and for improvement
of our service.
* The result of the survey may be provided to
our business partner as a reference without
including the customers’ personal
information.
- To verify the legitimacy and the validity of
the bank accounts and the credit cards.
- To provide the information on the updated
version of the software and the new
products.
- To send out prizes to customers who won
prizes in the sweepstakes.
With customers’ permission, the personal
Information might be used for the other
purposes.
We manage the provided information
Page 3
Page 8
User Manual
properly and will not disclose nor provide it
to the third party without customers’
permission unless in special circumstances.
Please contact us at
http://www.mediaedge.co.jp if you have any
questions concerning to our handling of
your personal information.
■ The trademarks
(1) MEDIAEDGE is a registered trademark
for MEDIAEDGE Corporation.
(2) The other product names, related similar
names, and logos are their companies’
trademark/registered trademarks.
■ FCC Note
Note
This equipment has been tested and found
to comply with the limits for a Class A digital
device,
pursuant to part 15 of the FCC Rules. These
limits are designed to provide reasonable
protection against harmful interference
when the equipment is operated in a
commercial environment. This equipment
generates, uses, and can radiate radio
frequency energy and, if not installed and
used in accordance with the instruction
manual, may causeharmful interference to
radio communications.
Operation of this equipment in a residential
area is likely to cause harmful interference
in which case the user will be required to
■ Federal Communication Commission
FCC Notice
This device complies with Part 15 of the FCC
Rules. Operation is subject to the following
two conditions: (1) this device may not
cause harmful interference, and (2) this
device must accept any interference
received, including interference that may
cause undesired operation.
FCC Caution
- Any changes or modifications not expressly
approved by the party responsible for
compliance could void the user's authority to
operate this equipment.
- This transmitter must not be co-located or
operating in conjunction with any other
antenna or transmitter.
correct the interference at his own expense.
Declaration of Conformity
According to FCC Part 15
Responsible Party Name:
MEDIAEDGE Corporation
Address:
5-1-14,Hamabe-dori,Chuo-ku,Kobe,Hyogo,
651-0083 Japan
Telephone: +81-78-265-1552
Declares that product Model:
ME-BXC-CM100
Complies with Part 15 of the FCC Rules
Page 4
Page 9
QDVS-1000
MEDIAEDGE Corporation
International customer support
[email protected]
I-2. Before Use
■ Verify the package content
Check the QDVS-1000 package for the following parts. We try our best on packaging; however,
should there be any missing parts, please contact to your local distributor you purchased.
If you need to contact us directly, please contact us by email.
QDVS-1000 enclosed items.
● QDVS-1000 x 1
● Keyboard x 1
● Small Keyboard (for key operation) x 1
● Mouse x 1
● Simple Manual x 1
*You can download PDF User Manual(This document)from our website.
■ About our homepage
Updated information on our company and QDVS is posted on our homepage
(http://www.mediaedge.co.jp). Please access to our homepage to view our latest drivers, utilities,
the product manual, and FAQ
Page 5
Page 10
User Manual
I-3. Notes
■ Notation
Please note that should there be any difference between the instructions on this manual and
the actual method of operation, the latter will be regarded as a priority.
Illustrations for the manual might differ from the actual devices.
■ Attention
Without notice in the future, there can be some changes in the contents and the specification
of this product.
We do our best to check the contents of this product; however, should there be any questions,
error, or omission of such notice, please contact our company.
Analysis, reverse engineering, decompile, and disassembly of the software, the hardware,
the manual, and the other attachment of this product are prohibited.
■ Usage Agreement
This product uses the free software that is under the General Public License GNU
(GNU General Public License, "GPL") or GNU Lesser General Public License (GNU
Lesser General Public License, "LGPL") for a part of the software.
Please contact our customer support for the questions regarding this matter, the list
of the software that corresponds GPL/LGPL, and a request for the source code.
Please contact ou
r customer support for questions regarding this matter.
Page 6
Page 11
QDVS-1000
II.
About QDVS-1000
This chapter describes the overview and the features of each part of the QDVS-1000
Page 7
Page 12
User Manual
II-1. Product Outline, Features, Usages
■ II-1-1. QDVC-1000 Outline
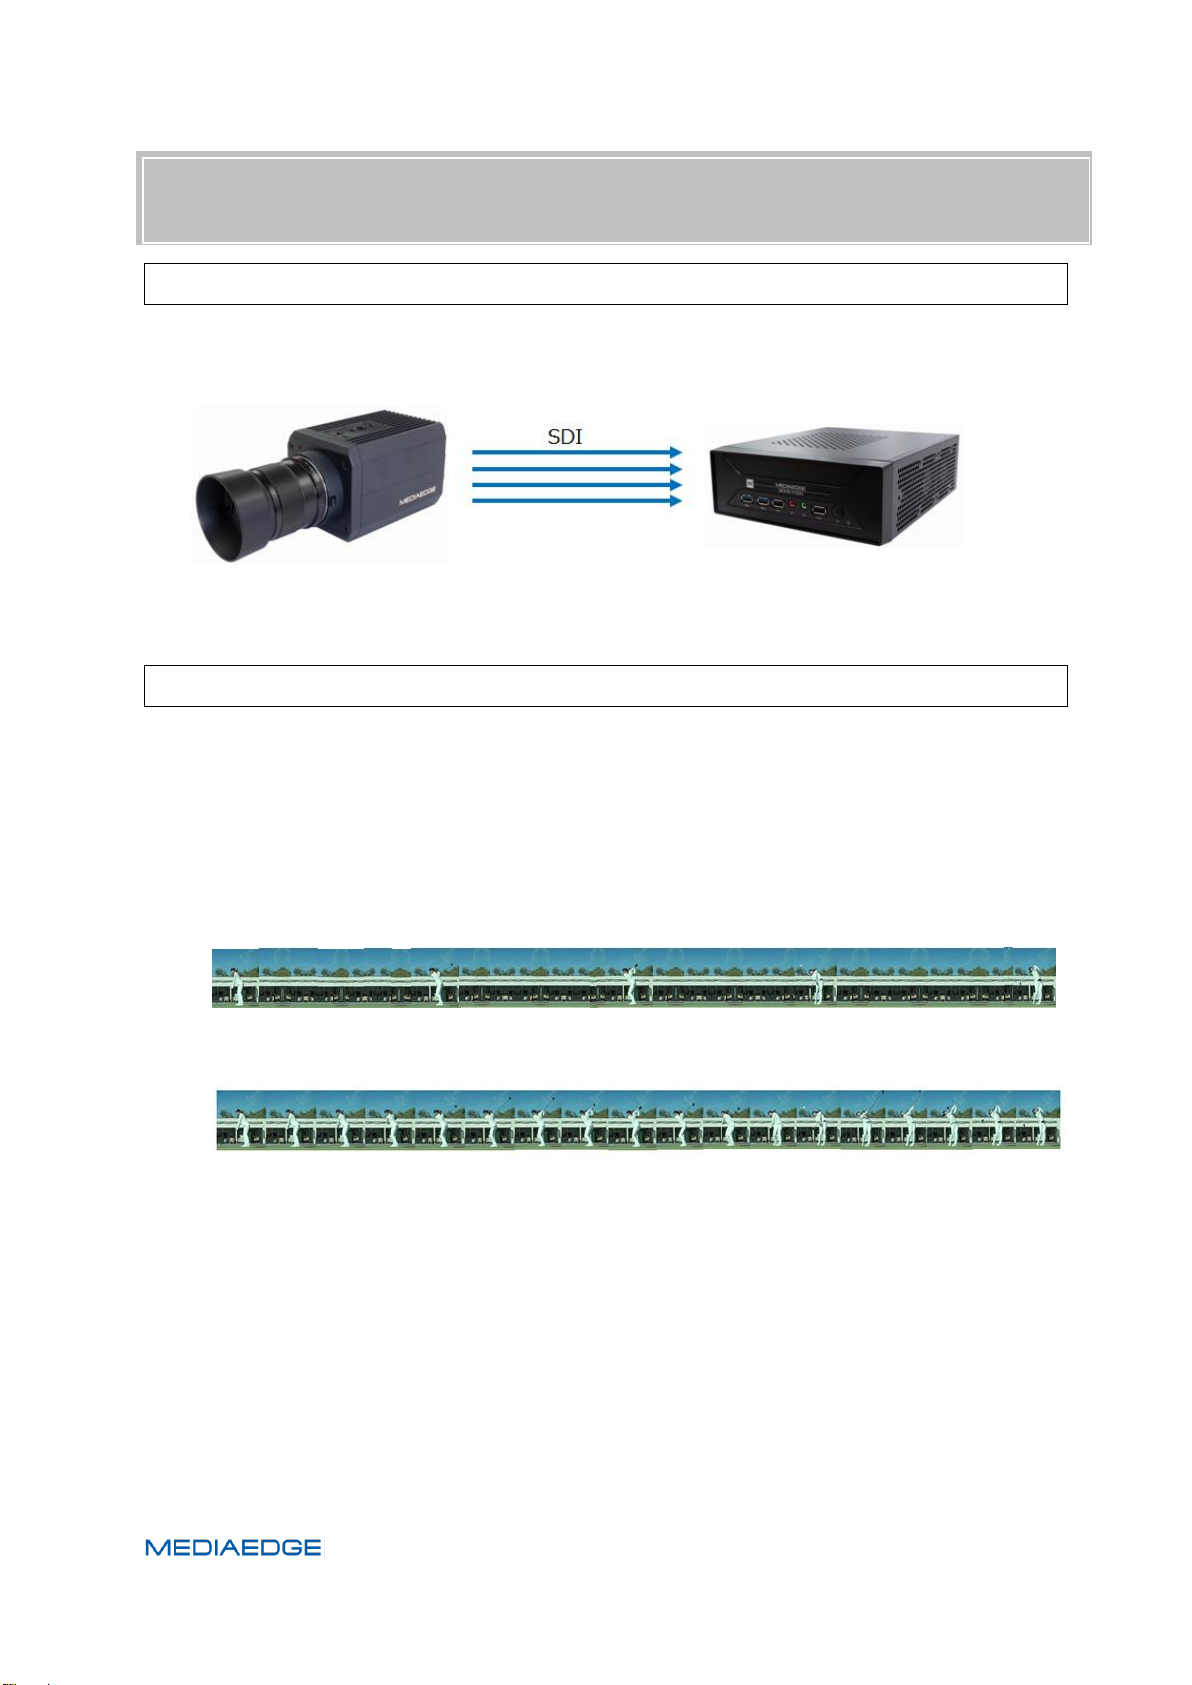
This product is a device for recording and playing the video output from QDCAM's Quad Link
(3G-SDIx4).
Shoot at 240p Record and play back video at 240P
■ II-1-2. QDVS-1000 Features
● Record and play back the video output from QDCAM.
・Loop recording of 1 to 25 seconds is possible.
・Plays back the recorded data by keyboard operation.
・The input is QUAD Link (3G-SDIx4) and playback is HDMI output.
Normal shooting
High speed shooting
● Loop recording and live display
・Uncompressed data is loop-recorded at the preset recording time.
・The display is delayed by the preset delay time.
・Recording is stopped by keyboard operation or time setting.
Page 8
Page 13

● Play back
・Recorded video is played back at 1/4 slow speed (60p).
・The playback speed can be adjusted.
・Automatic playback start, pause at the first or end frame.
・Frame feed playback by key operation (forward feed, reverse feed).
・Move the playback position to the first and end frame (jump).
● Generate recording file
MP4(H.264), ProRes422(MOV)
● Recorded file operation
・Save to NAS
・Save to USB storage
QDVS-1000
■ II-1-3. How QDVS-1000 works
● A series of actions
・Check the QDCAM video on the live screen.
・You can play the scene you want by key operation.
・The playback-confirmed video is recorded on the NAS or USB storage.
● Live screen
The video that QDCAM is shooting at 240P is displayed live at 60P.
By setting the delay, you can view the video delayed by the set time as live,
and you can check own action (for example, golf swing etc.) after completing.
● Playback screen
During live viewing, the video is recorded in memory only for the set time.
You can move to the playback screen and check the video recorded in the memory
by slowing, stepping, and playing back.
The video is recorded at 240P, so you can see more detailed movements
than viewing the video played back with a normal camera in slow motion.
(see II-1-4: Usages).
● Recording, Archiving
You can specify the IN-OUT point of the video you see on the playback screen
and record it on NAS or USB storage in H.264 or ProRes422 format.
Page 9
Page 14
User Manual
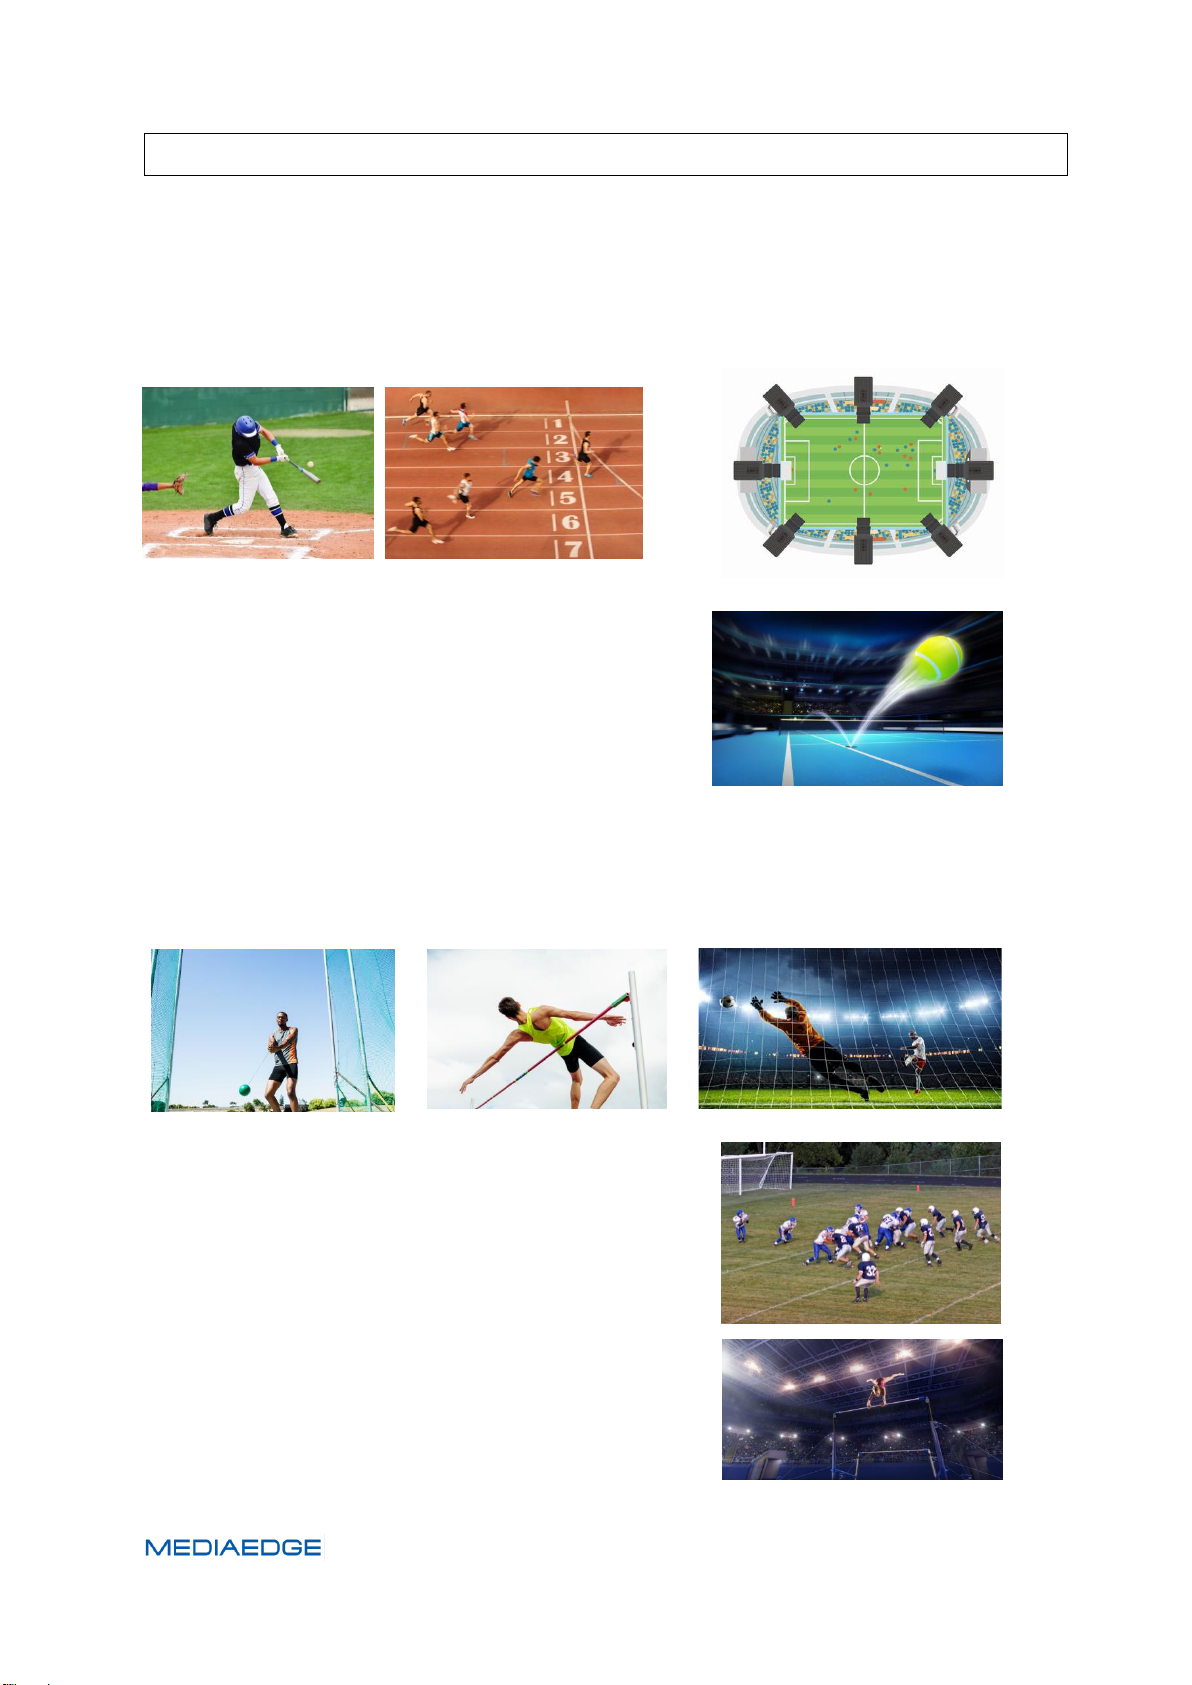
Multi-AngleView
Affordable price of camera & lens allows
to install many cameras for multi-angle
shooting.
Slow-Motion Replay
Quad link of 3G-SDI can interface
4x high speed of 1080p signal to
slow-motion recorder-player.
Video Capture Tool for Sports Coaching
High speed & high resolution image capturing
and exposure synchronization system allow
accurate calculations for sports analysis. Also,
the player’s performance can be checked
through slow-motion replay and team coach
can give the players his/her advises.
Wide Angle & Closeup Shot for Sports Broadcast
To use wide angle lens realizes exciting picture because the camera can be put near the
player.
Image Analysis for Sport Judgement System
High speed & high resolution image capturing and
exposure synchronization system allow accurate
calculations for multi-camera image processing.
■ II-1-4. Usages
Page 10
Page 15
QDVS-1000
■ II-1-5. How to configure a system
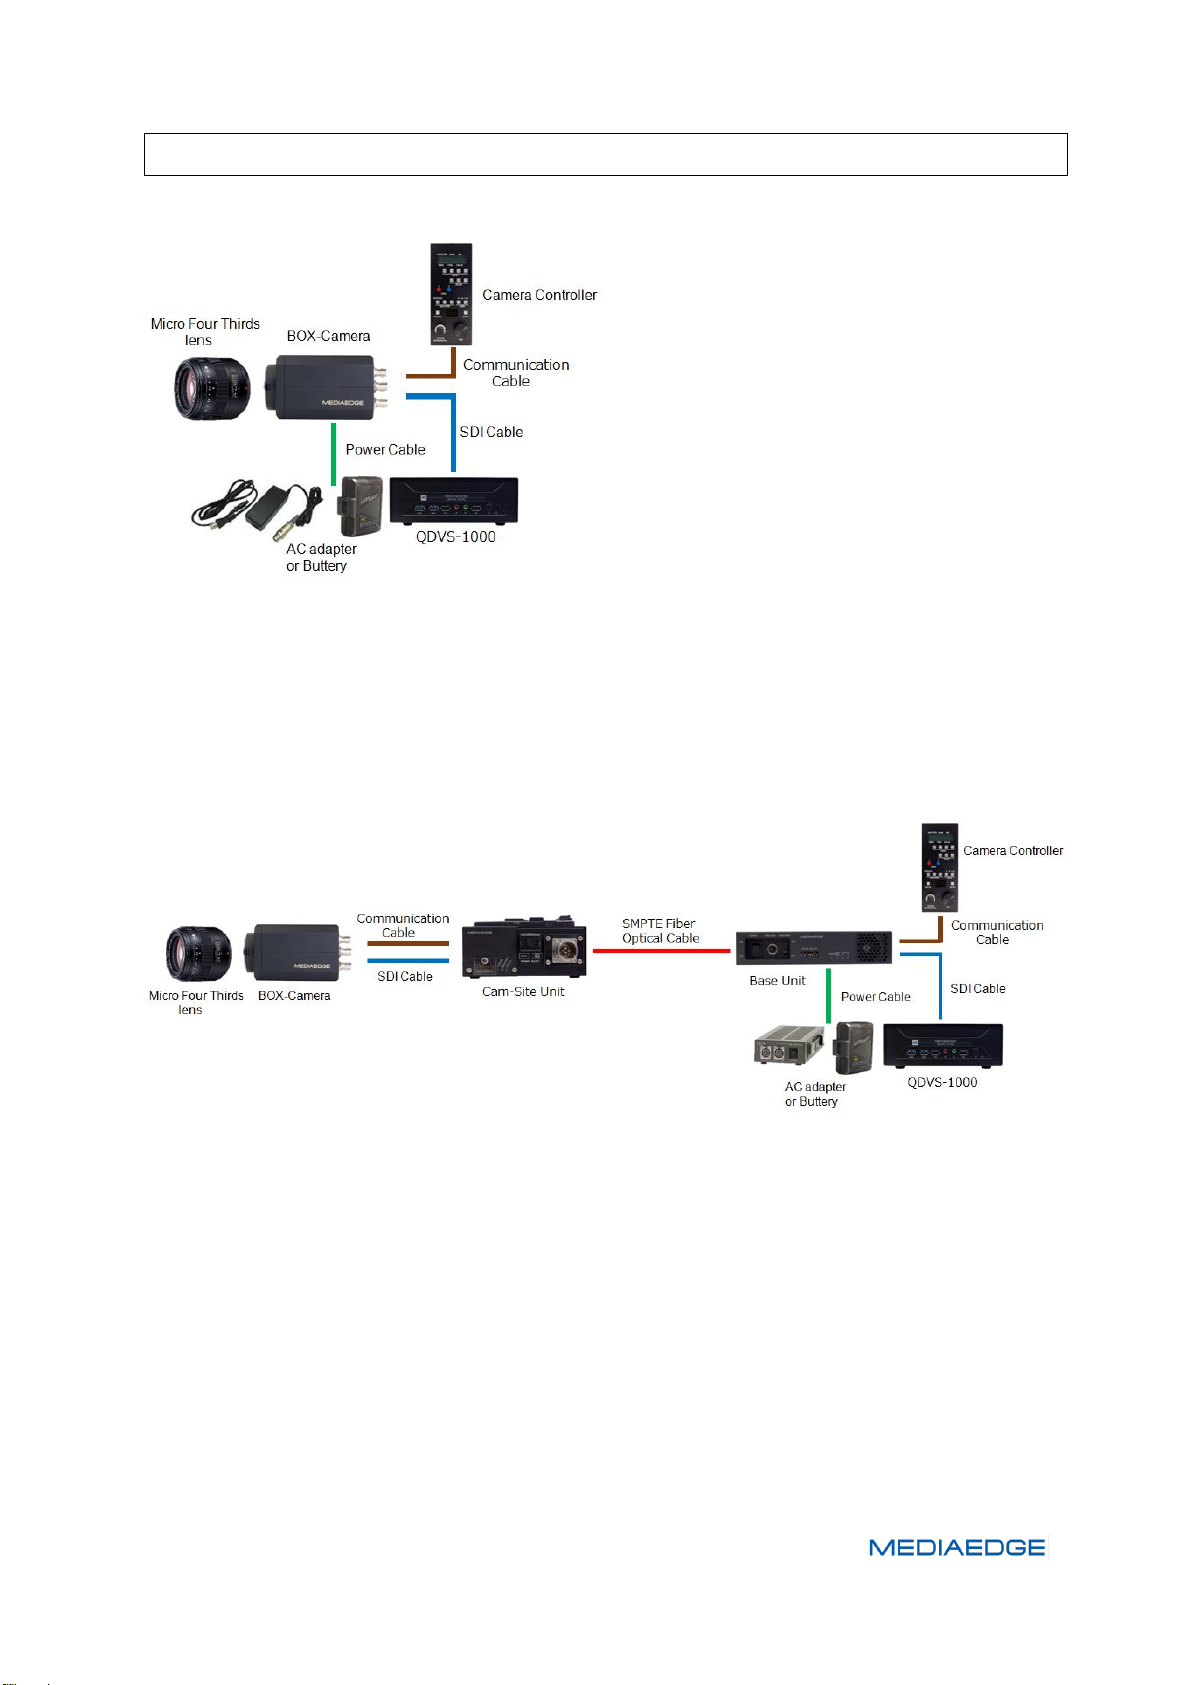
■Example1: Simple system using metallic cables
If you want to connect the SDI video output to a relatively nearby recorder, switcher, server, or
other video system, connect it directly from the camera with a coaxial cable. The camera
controller also connects directly to the camera using a communication cable.
■Example2: Medium distance transmission system for stadium or arena operation
The camera image is transmitted to a remote location using an optical camera cable. The camera
controller is also installed in a remote location and remotely controlled. The system supplies
power from the base unit to the camsite unit and camera, so there is no need to provide power on
the camera side. The optical camera cable can be up to 500 meters.
Page 11
Page 16
User Manual
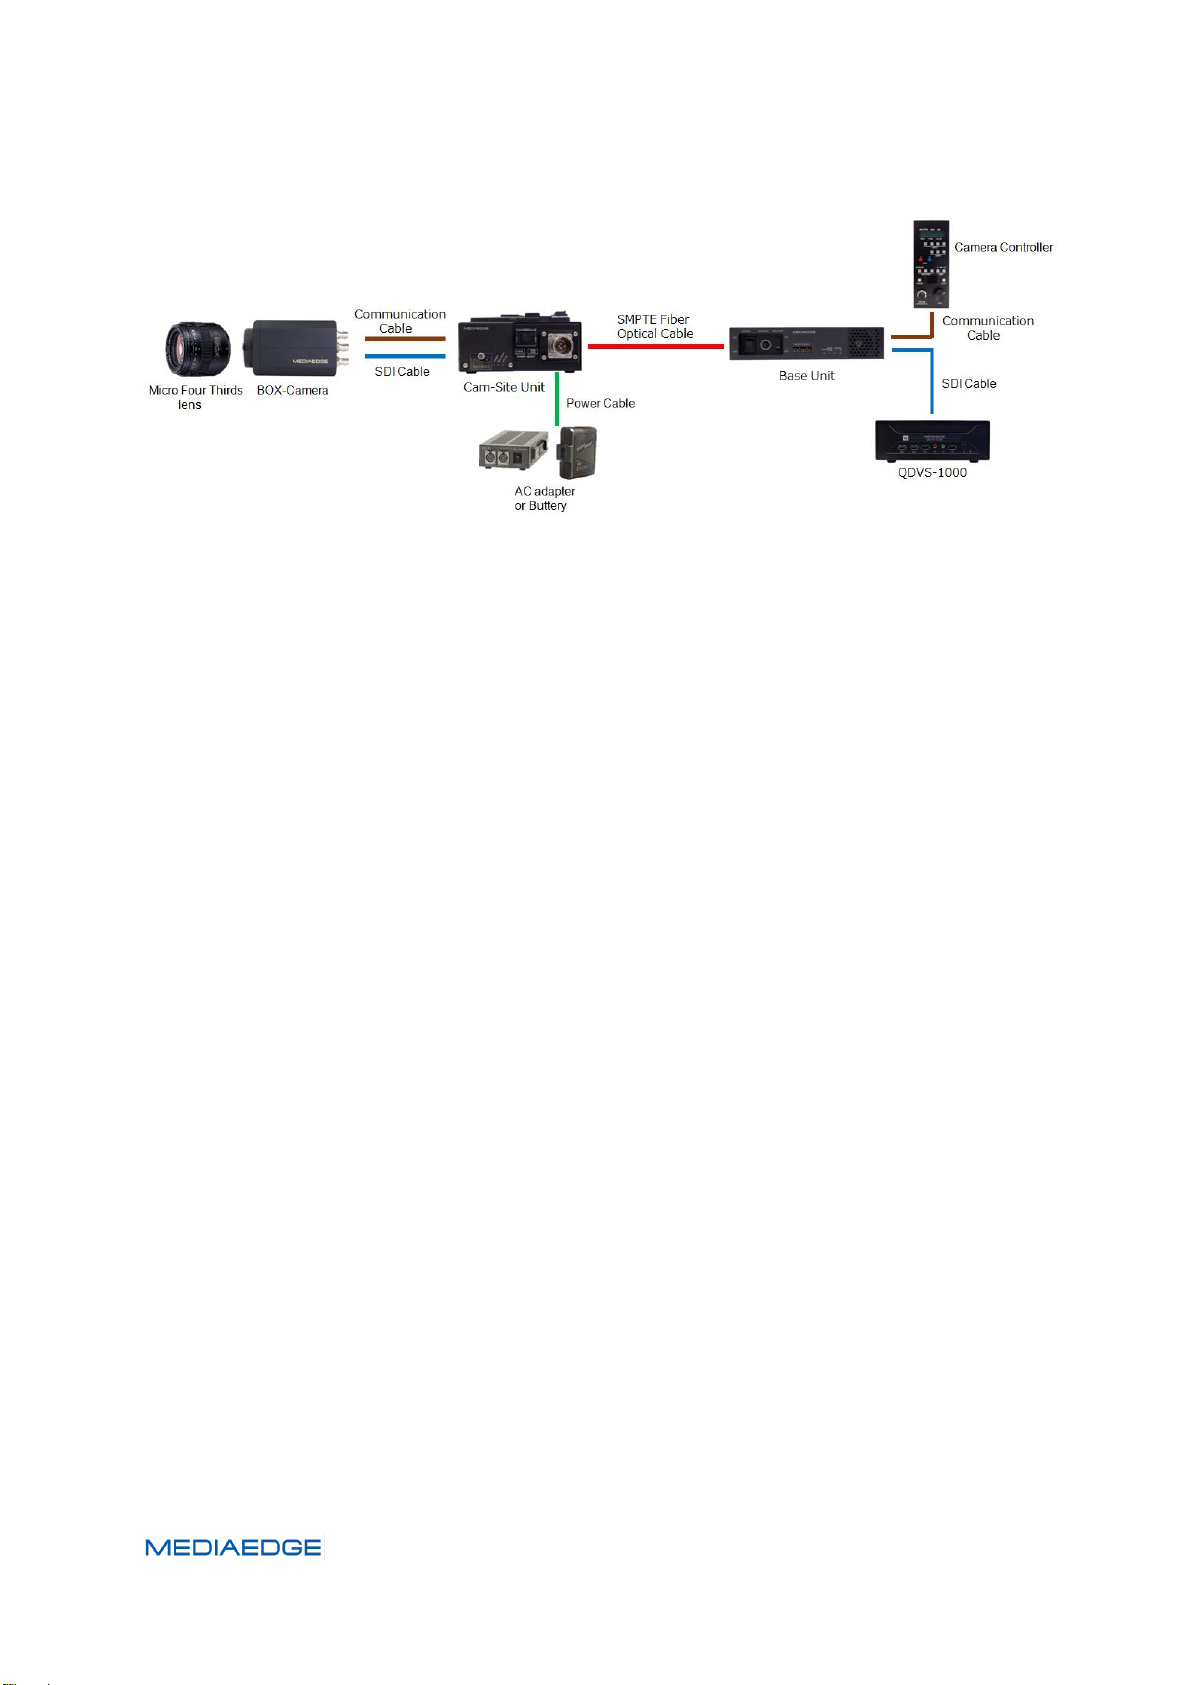
■Example3: Long distance transmission system for such as golf operation
The camera image is transmitted to a remote location using an optical camera cable. The camera
controller is also installed in a remote location and remotely controlled. The system, which
supplies power to the camsite unit, can extend the optical camera cable up to 2 km.
Page 12
Page 17
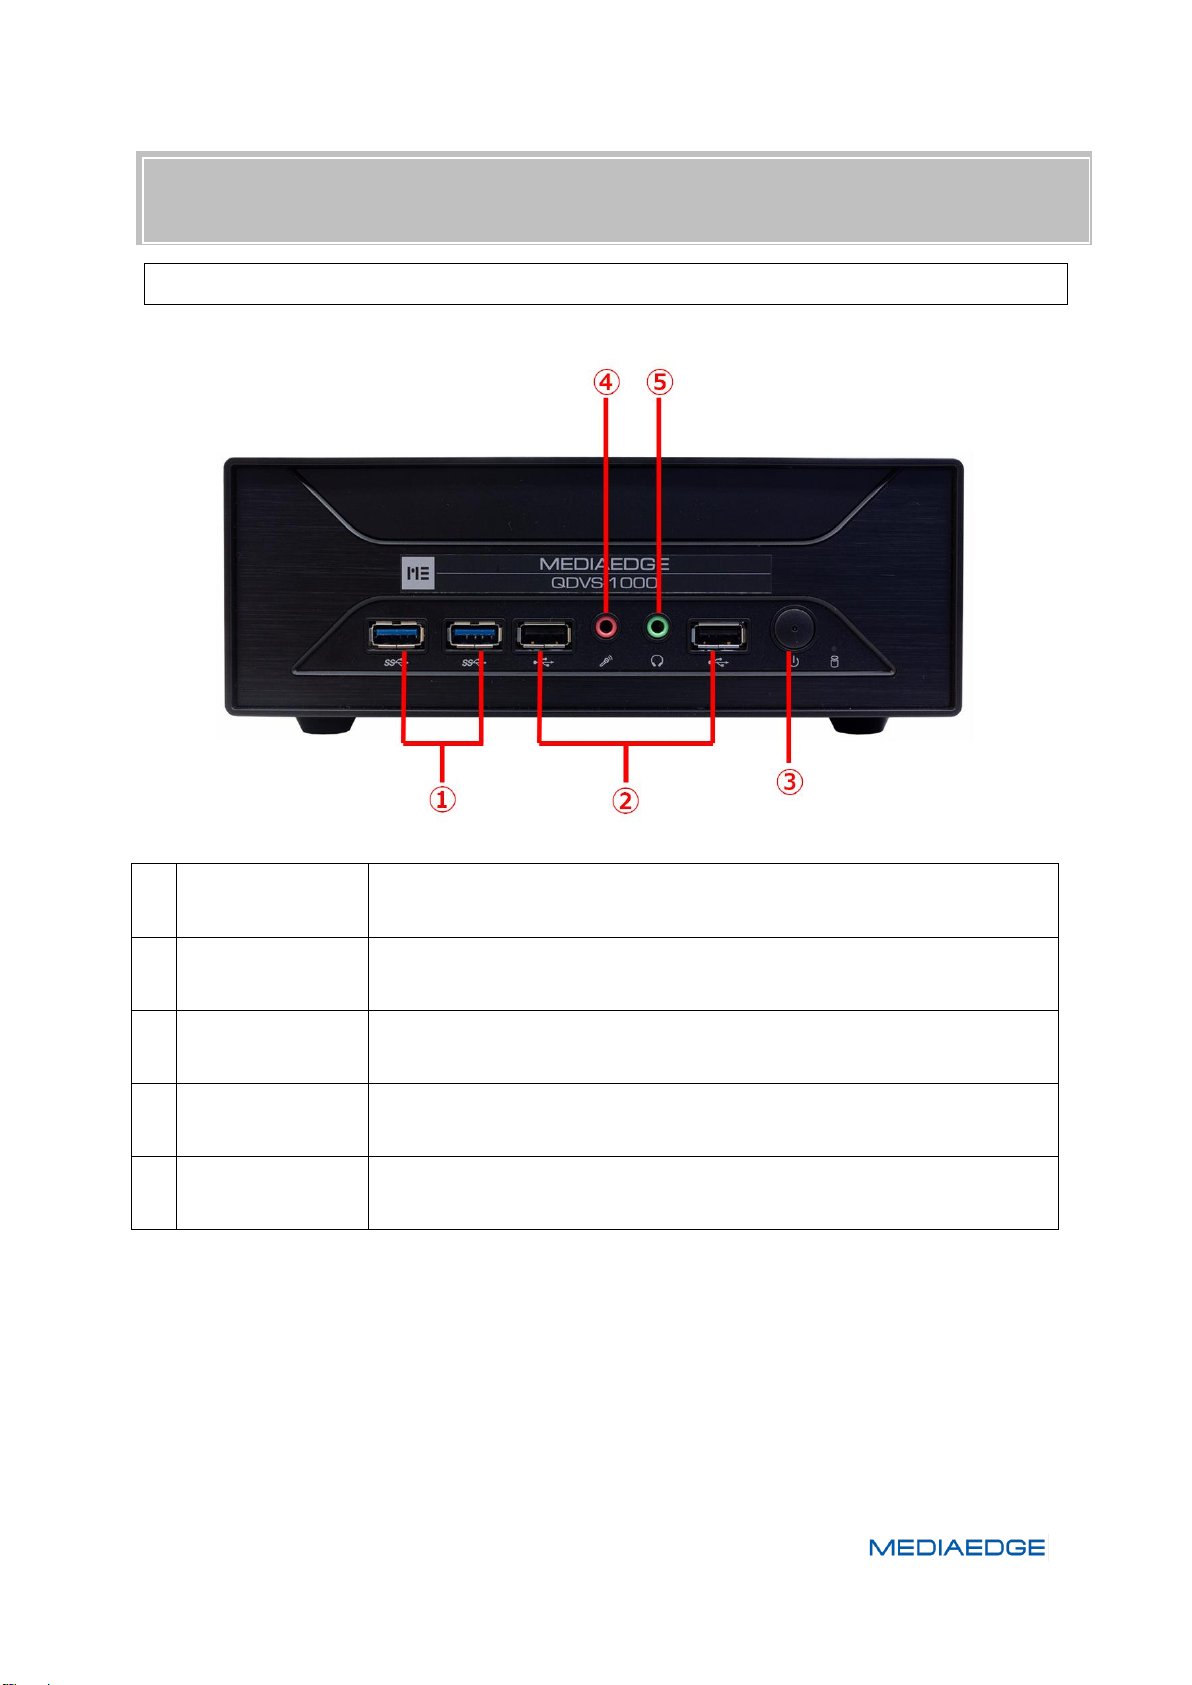
①
USB3.0 ports
Connect USB memory or USB external disk.
②
USB2.0 Ports
Connect USB peripherals such as keyboard and mouse.
③
Power switch
Power ON / OFF switch.
④
Microphone
input jack
Do not use.
⑤
Headphone jack
Do not use.
II-2. Part Names and Function
■ II-2-1. Front View
QDVS-1000
Page 13
Page 18
User Manual
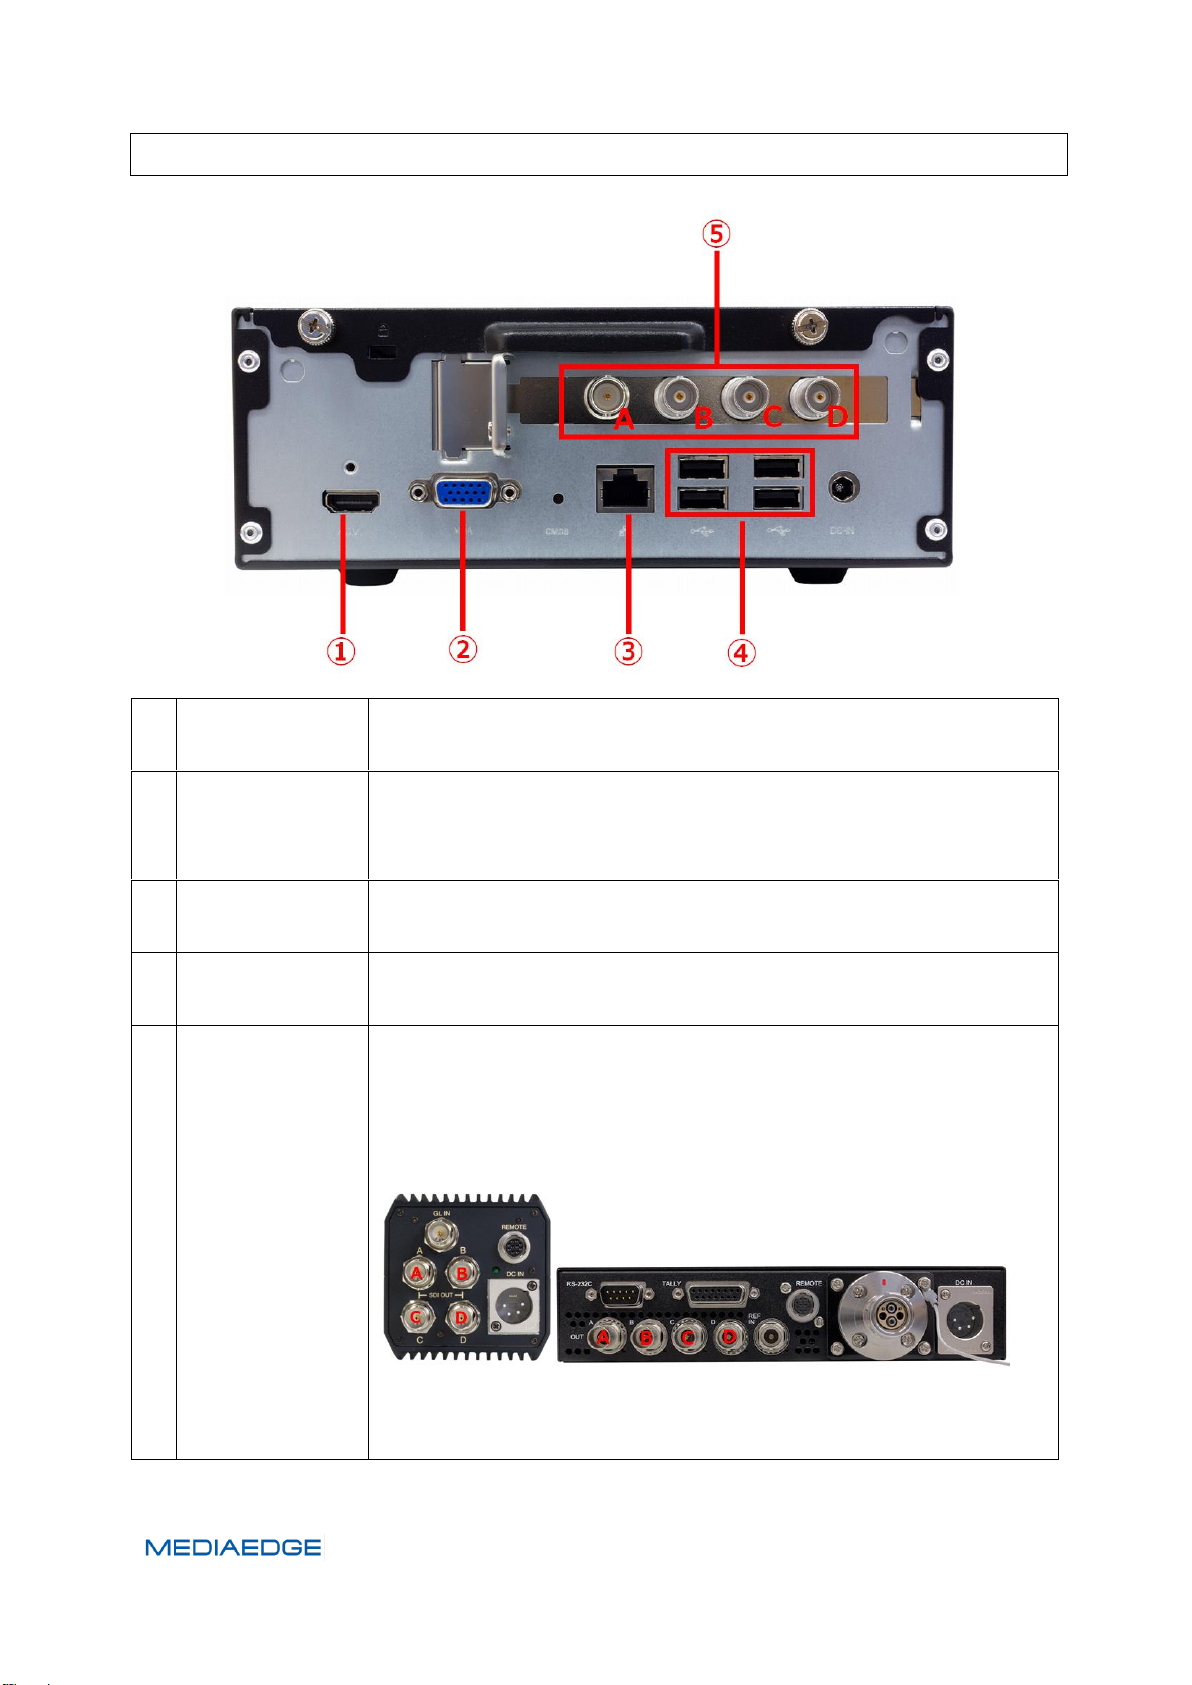
①
HDMI output
Port
HDMI port to output QDVS setting screen and playback video.
②
Analog RGB
D-Sub15
Output port
Do not use.
③
LAN port
Gigabit Ethernet port for connecting the QDVS-1000 to the network.
It is used to save the recorded video to the NAS.
④
USB2.0 Ports
Connect USB peripherals such as keyboard and mouse.
⑥
SDI Input ports
3G-SDIx4 input ports for recording QDCAM output video.
The input ports are A, B, C, D from the left.
When connecting to a QDCAM BOX camera or a QDCAM Base Unit via
SDI, connect terminals with the same symbol (A-A, B-B, C-C, D-D).
BOX Camera Base Unit
SDI output ports SDI output ports
■ II-2-2. Rear View
Page 14
Page 19
QDVS-1000
II-3. How to connect, start and stop the system and operation flow.
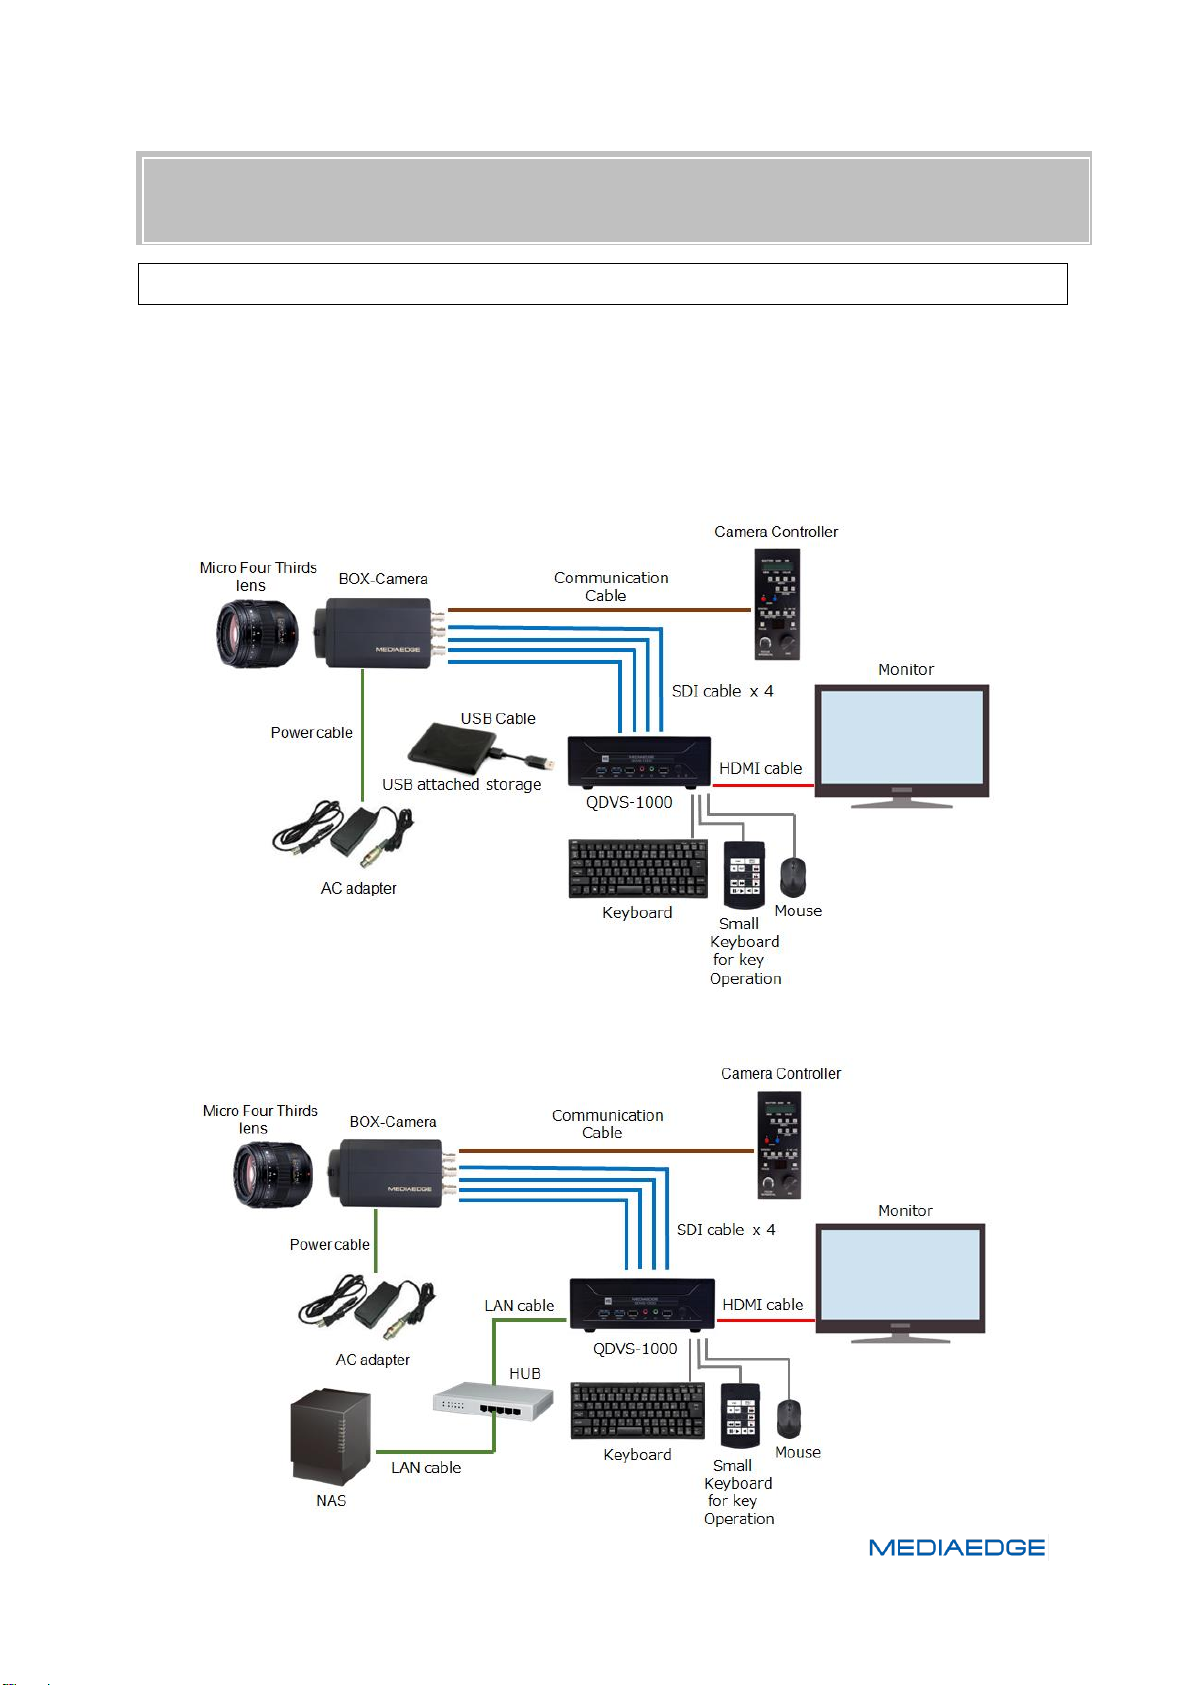
■ II-3-1. How to connect
Using the following connection examples, connect the QDCAM equipment to the QDVS-1000
according to operation.
1. In case of operation to save recorded data to USB memory or USB storage connected to the
main unit
2. In case of operation to save recorded data to NAS
Page 15
Page 20
User Manual
■ II-3-2. Start the system
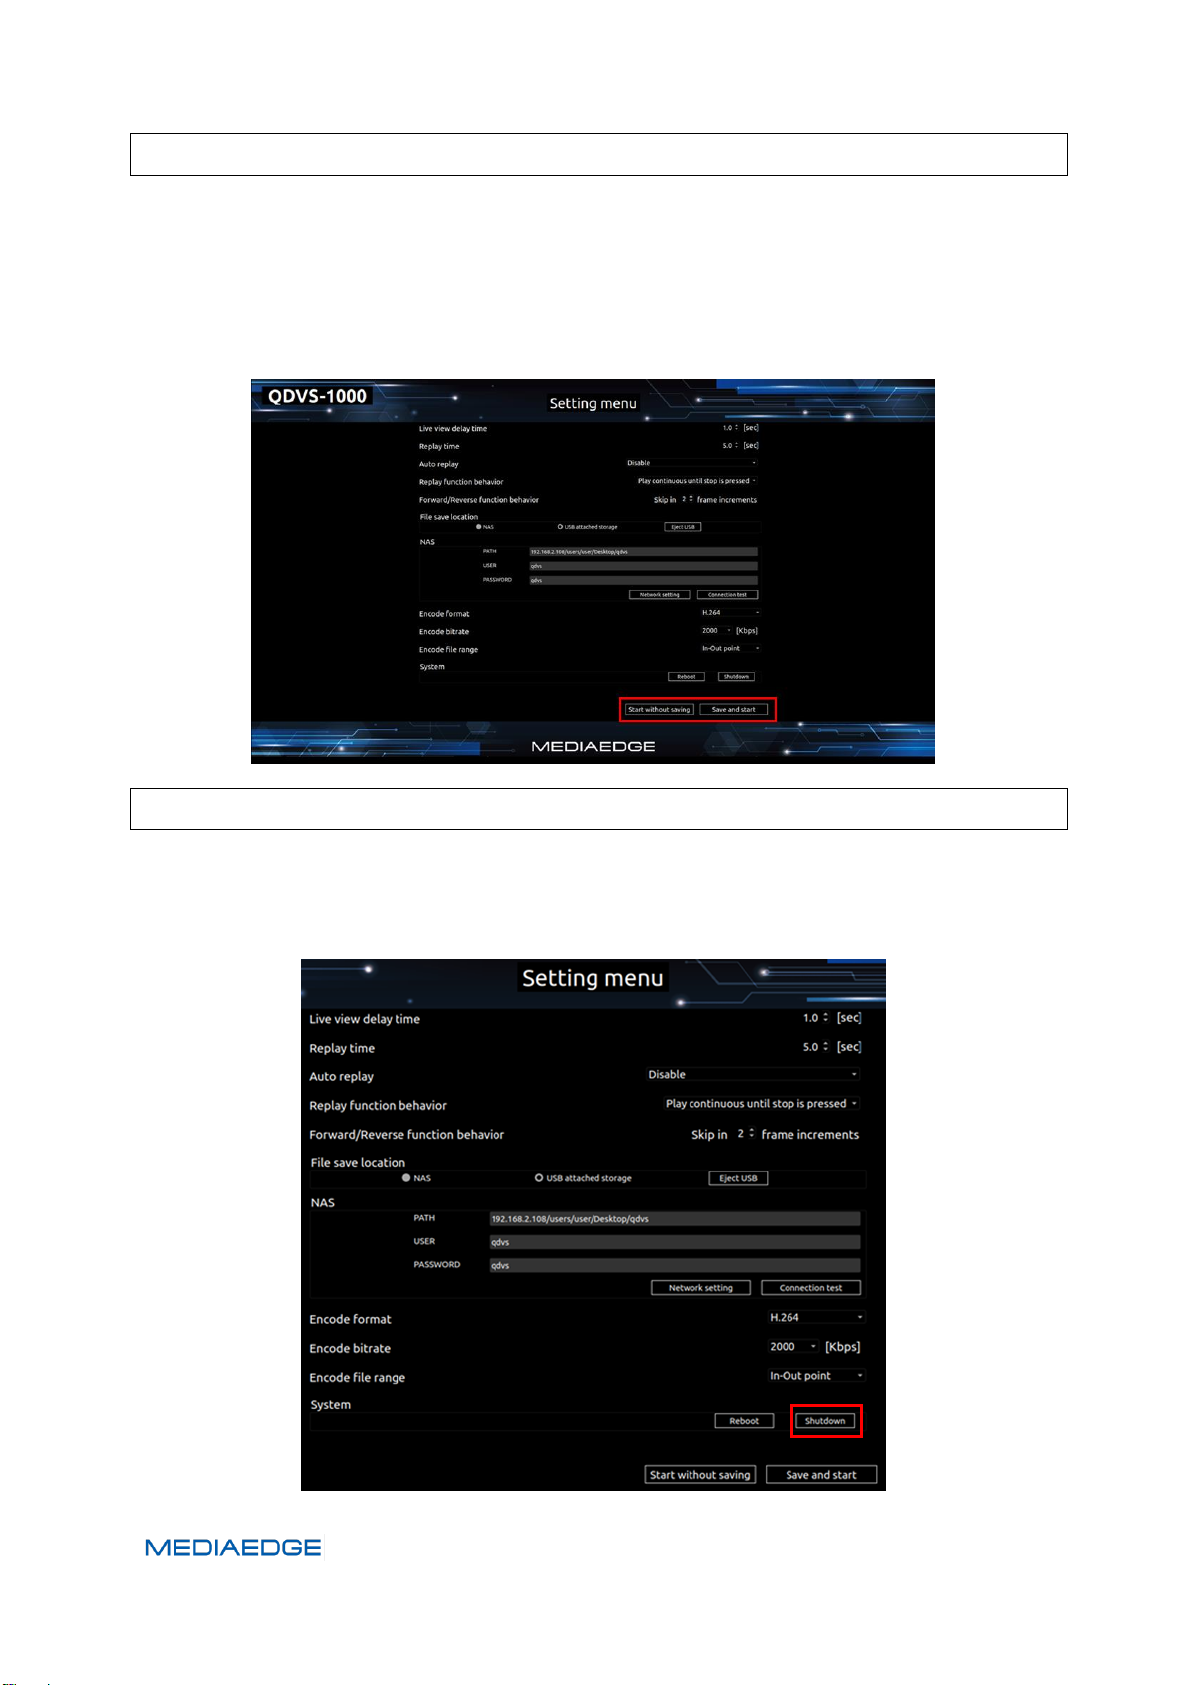
Connect the power cable to the main unit and press the power button on the front to start
the system and display the setting screen. After setting according to the operation, press the
start button (Start without saving, Save and start) at the bottom right of the screen to start the
player.
■ II-3-3. Stop the system
Press ESC while player display to return to the settings screen.
Press the "Shutdown" button at the bottom right of the settings screen.
When you press the button, a confirmation dialog is displayed, so select OK to exit.
Page 16
Page 21
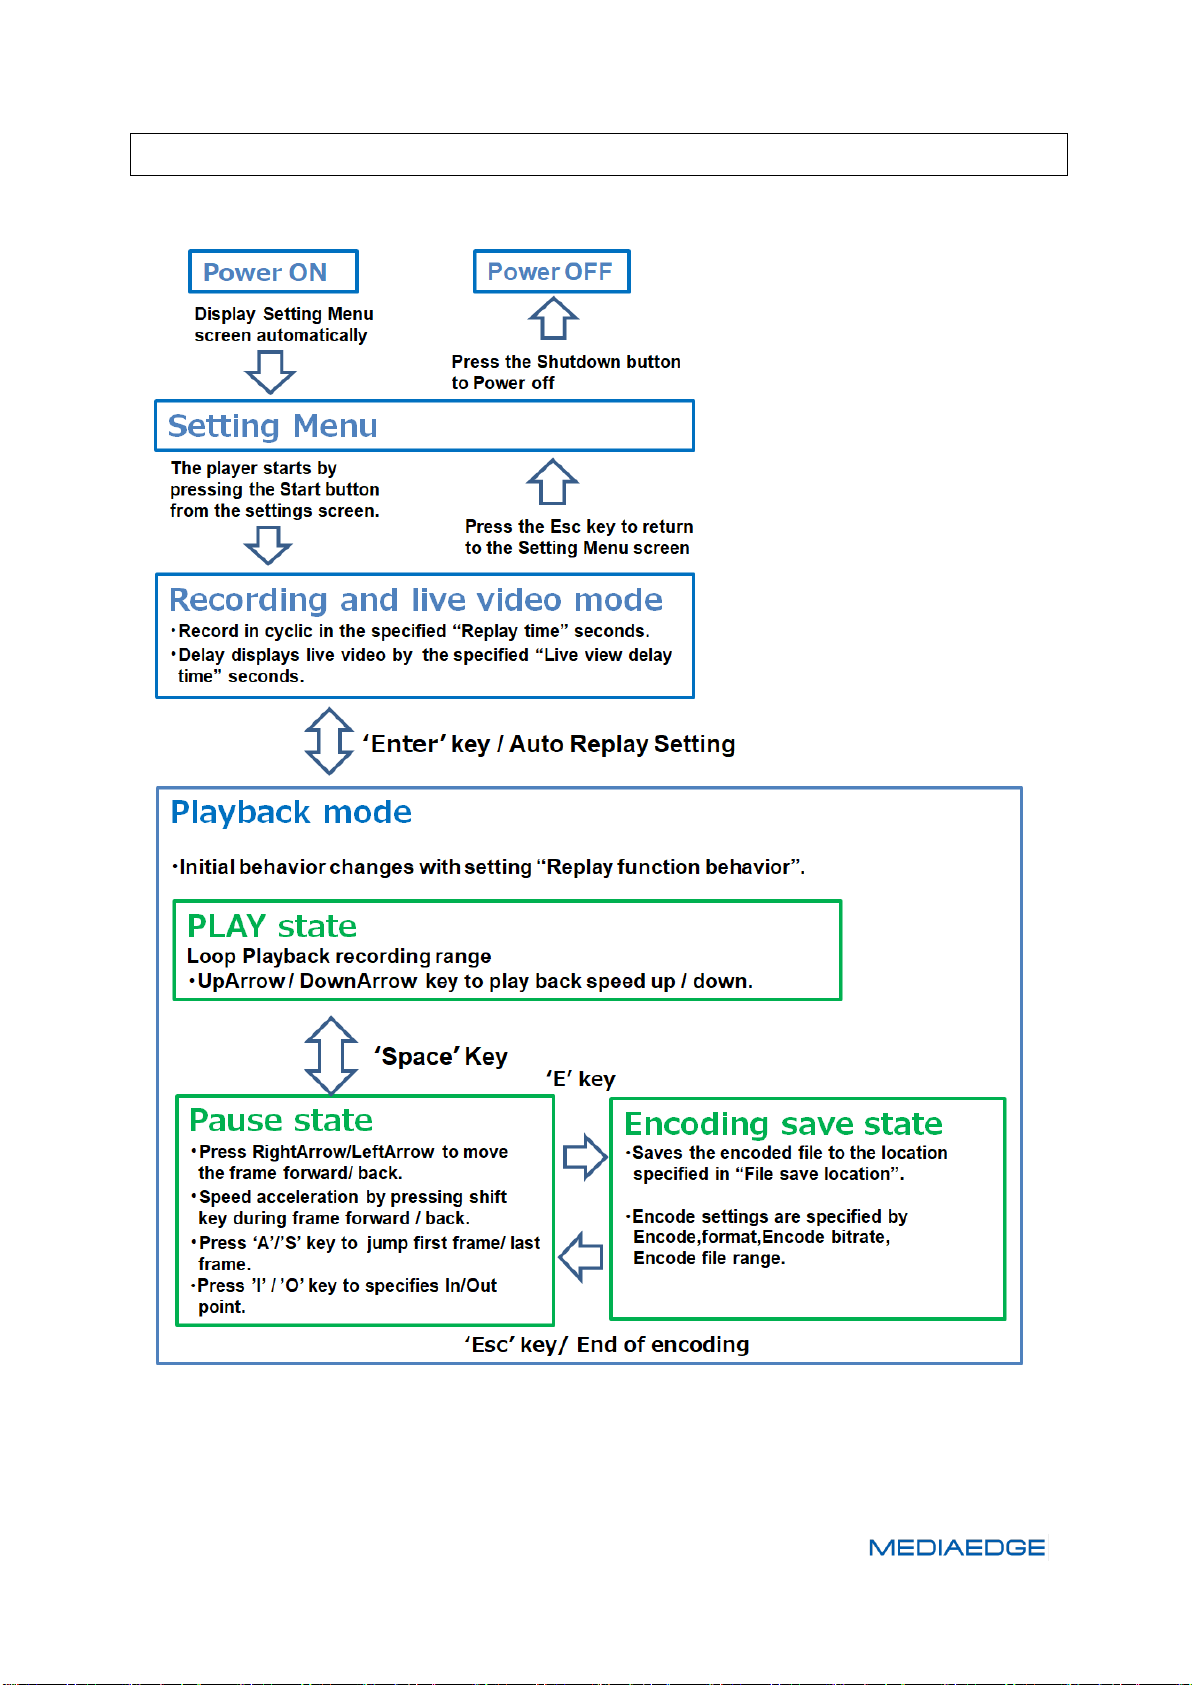
■ II-3-4. About operation Flow
The operation flow after power on is as follows.
QDVS-1000
Transition of operating mode
Page 17
Page 22
User Manual
①
Live view delay time
Sets the delay time for live video display in seconds.
②
Replay time
Sets the recording time in seconds.
③
Auto Replay
When the data for the recording time is accumulated,
set whether to automatically switch to the replay mode and set the
operation after playback.
Disable:
Do nothing
II-4. Instractions
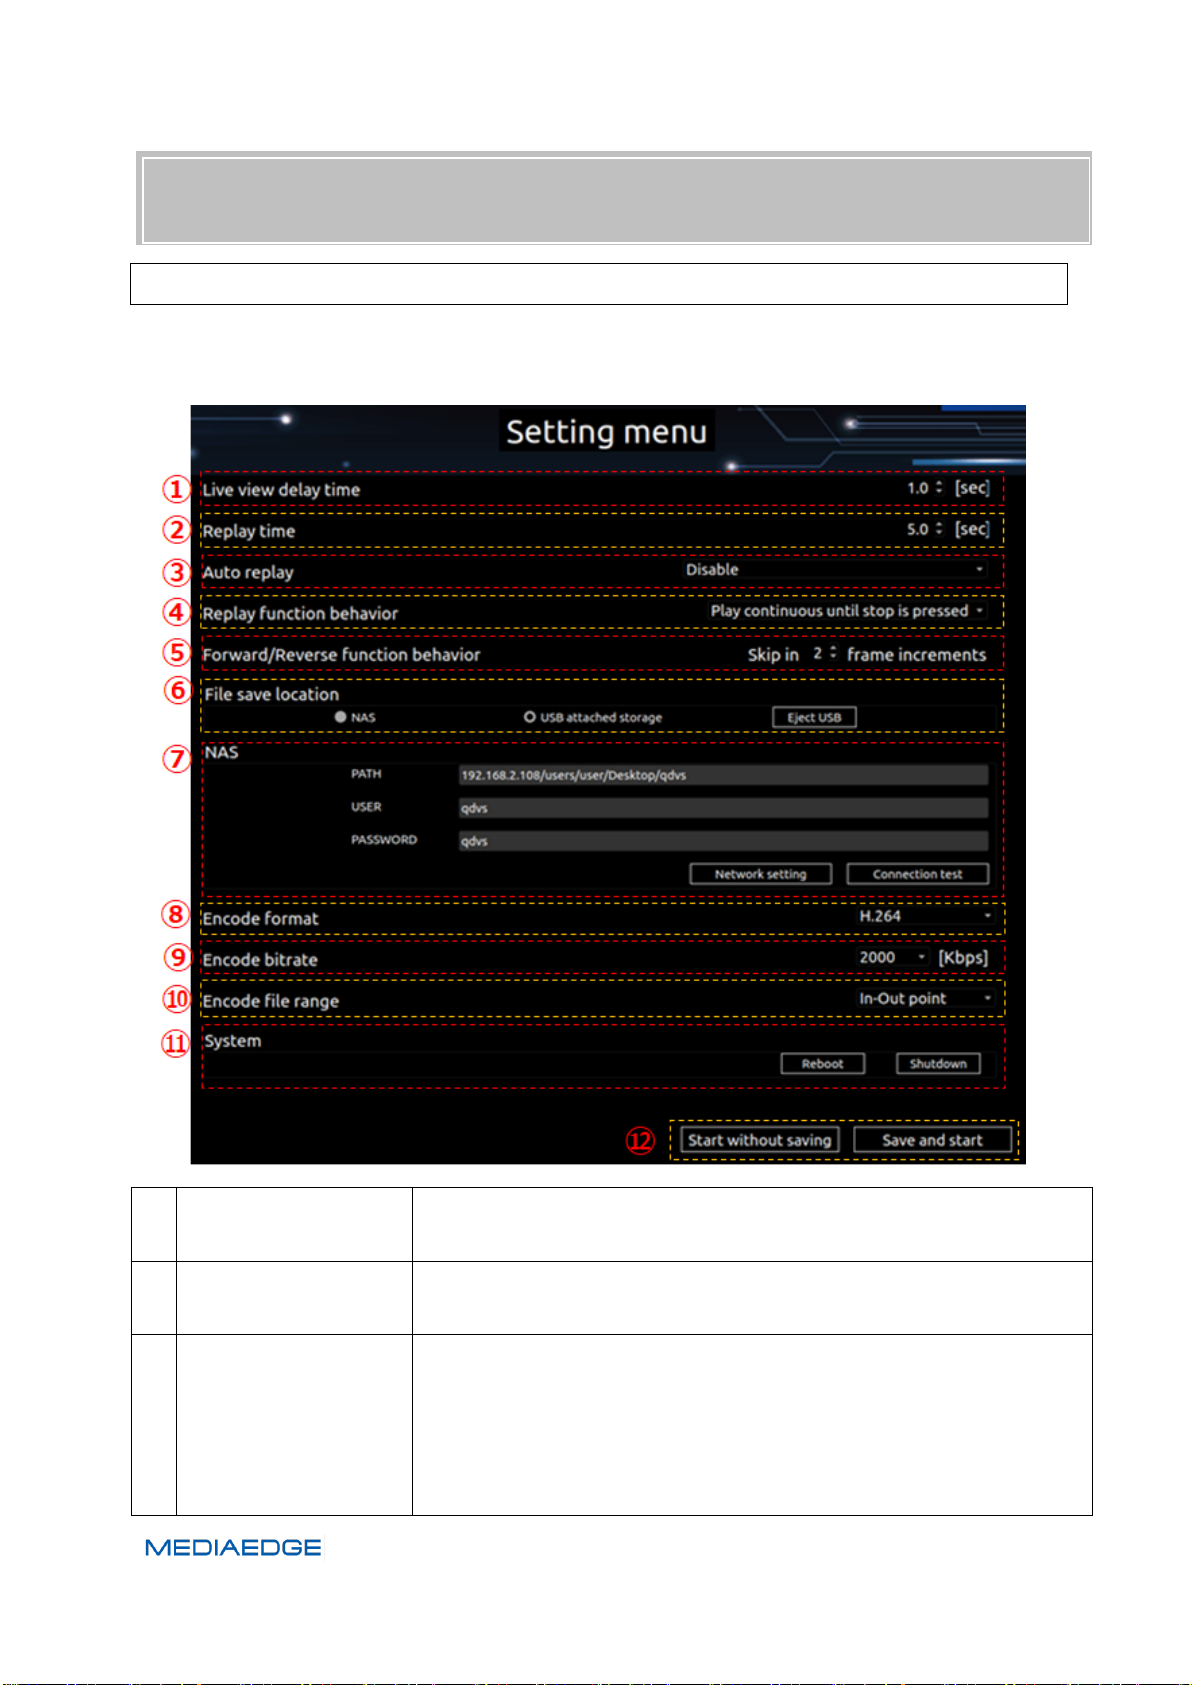
■ II-4-1. Setting Menu
When the console starts, the settings screen is automatically displayed, so make settings
according to the operation.
Page 18
Page 23
QDVS-1000
Enable - Stop at last frame after replay:
Pause at the last frame after playback.
Enable - Return to live view after replay:
Automatically returns to “recording and live video mode” after
playback.
④
Replay Function
behavior
Select the action when entering the playback mode.
Stop on last frame captured:
Stop at the last frame.
Stop on first frame captured :
Stop at the first frame.
Play continuous until stop is pressed:
Playback start automatically.
⑤
Forward/Reverse
function behavior
Set how many frames to advance with the +Shift key when sending
frames (Left and right buttons).
Only the left and right buttons go one frame at a time.
⑥
File save location
NAS/USB: USB storage eject button.
⑦ 6
NAS
Set up the NAS. PATH, USER, PASSWORD
Example of setting:
If the NAS IP address is 192.168.1.100 and the shared folder name is
video, setting as follows.
PATH 192.168.1.100/video
Network setting button:
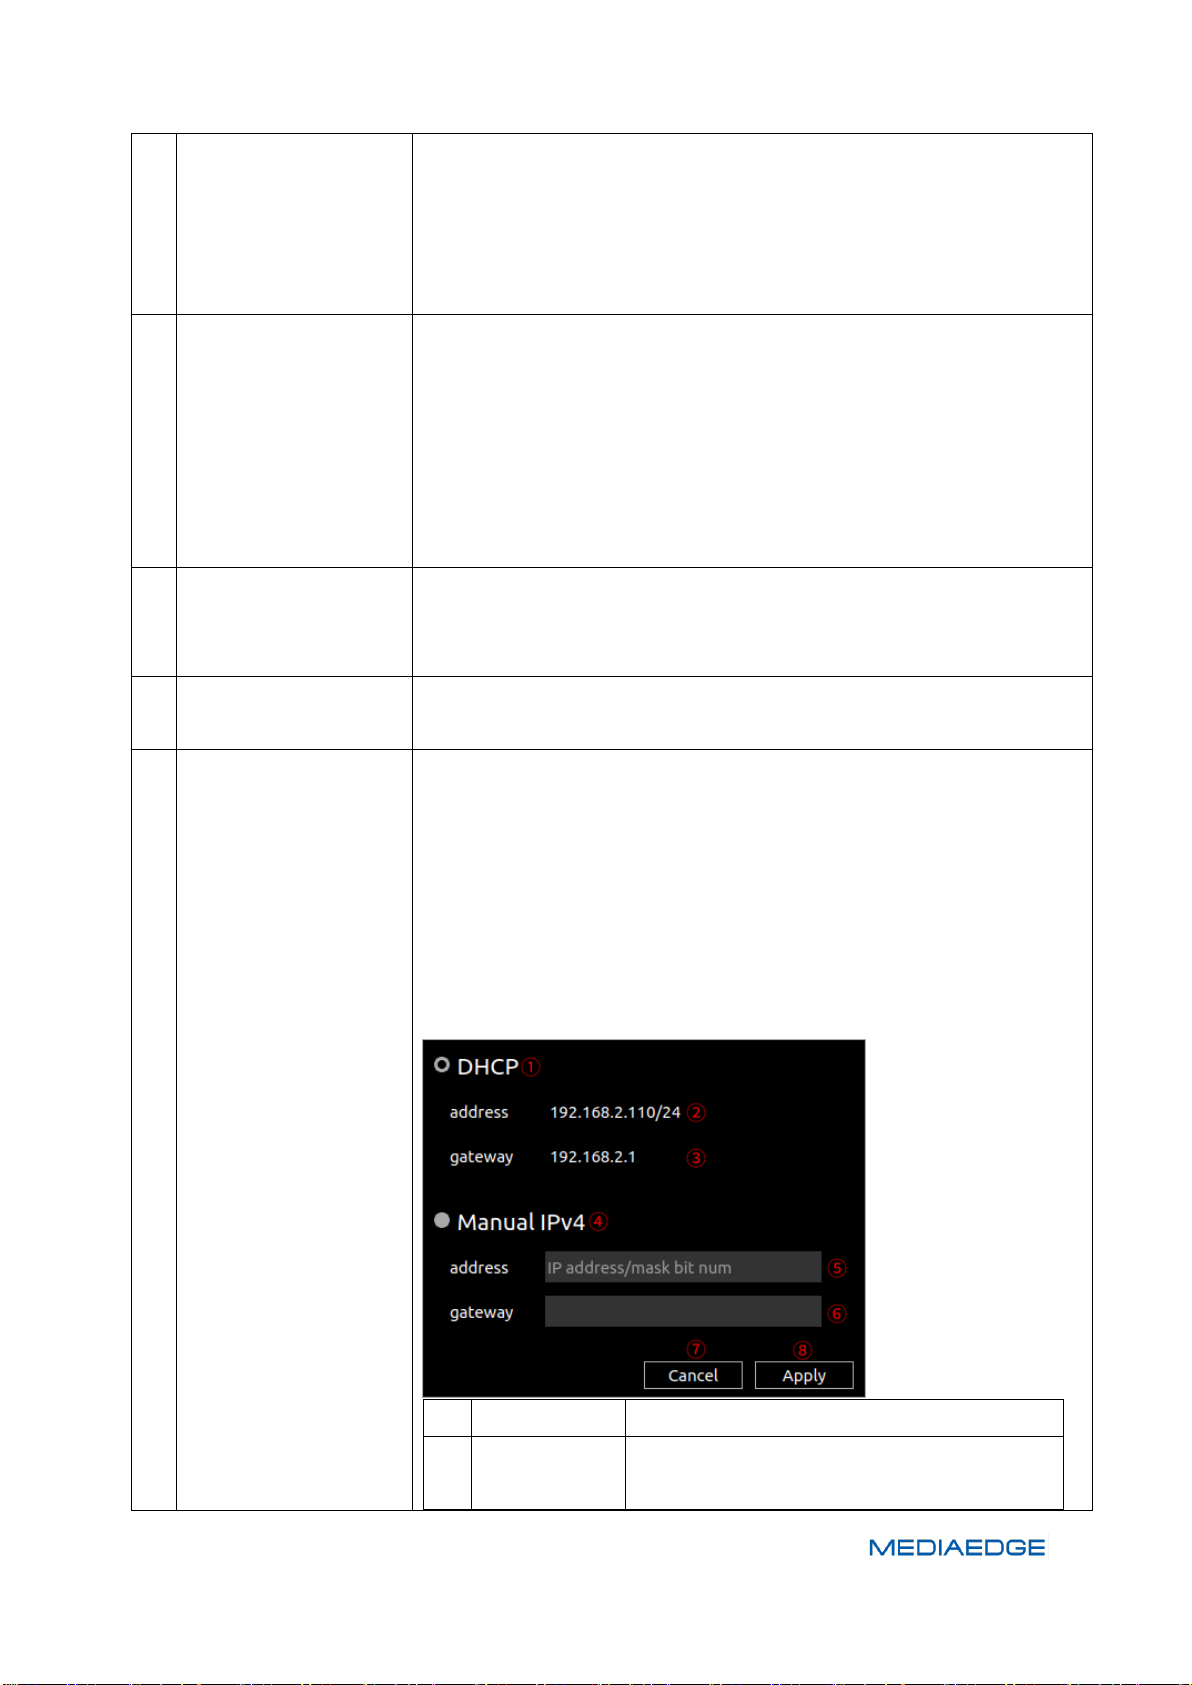
The network settings dialog opens and you can change the network
settings.
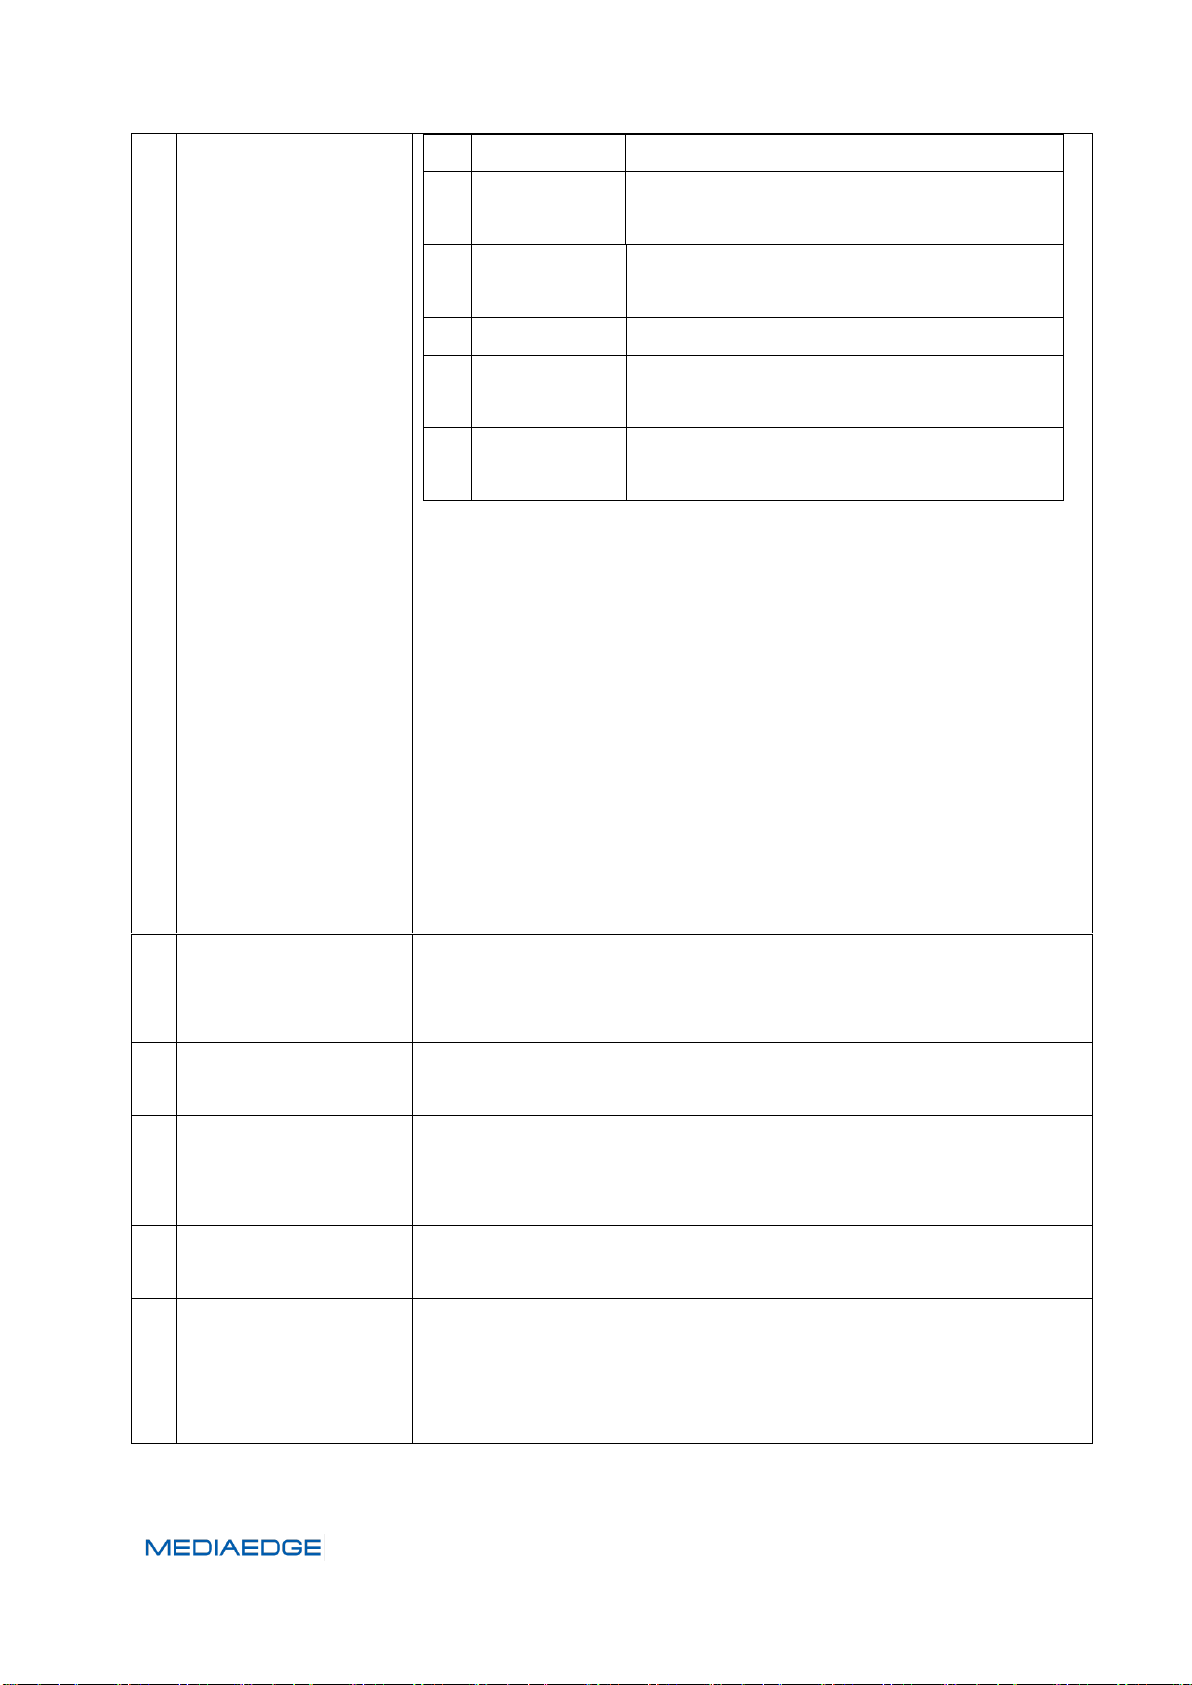
①
DHCP
Check to get the IPv4 address from DHCP.
②
address
Displays the current IPv4 address and
subnet mask in CIDR format. ※1
Page 19
Page 24
User Manual
③
gateway
Display the current IPv4 gateway.
④
Manual IPv4
Check this when manually setting the IPv4
address.
⑤
address
Set the IPv4 address and subnet mask in
CIDR format.
※
1
⑥
gateway
Set the IPv4 gateway.
⑦
Cancel button
Exit network settings without reflecting any
configuration changes.
⑧
Apply button
Exit the network settings to reflect the
configuration changes.
※1
CIDR format:
The subnet mask is expressed as a binary number, and the subnet
mask is expressed consecutively from the topmost to the number
of bits is expressed in terms of how many bits are 1, as in "/number
of bits".
255.255.0.0 -> /16
255.255.255.0 -> /24
255.255.255.128 -> /25
Connection test button:
Test connectivity in NAS settings.
⑧
Encode Format
Specify the format when saving the encoded file.
ProRes: Save in ProRes422 MOV format.
H.264: Save in H.264 MP4 format.
⑨
Encode Bitrate
Specify the bit rate for writing the encoded file. (only H.264 is valid).
⑩
Encode File range
Specify the range when writing the encoded file.
Playback frames: Entire recording file.
In-Out point: Between In/Out Points.
⑪
System
Reboot / Shutdown button.
Press the button to reboot or shut down the system.
⑫
Player start button
Save and start:
Start the player to reflect the change in the settings.
Start without saving:
Start the player without reflecting the change in the settings.
Page 20
Page 25
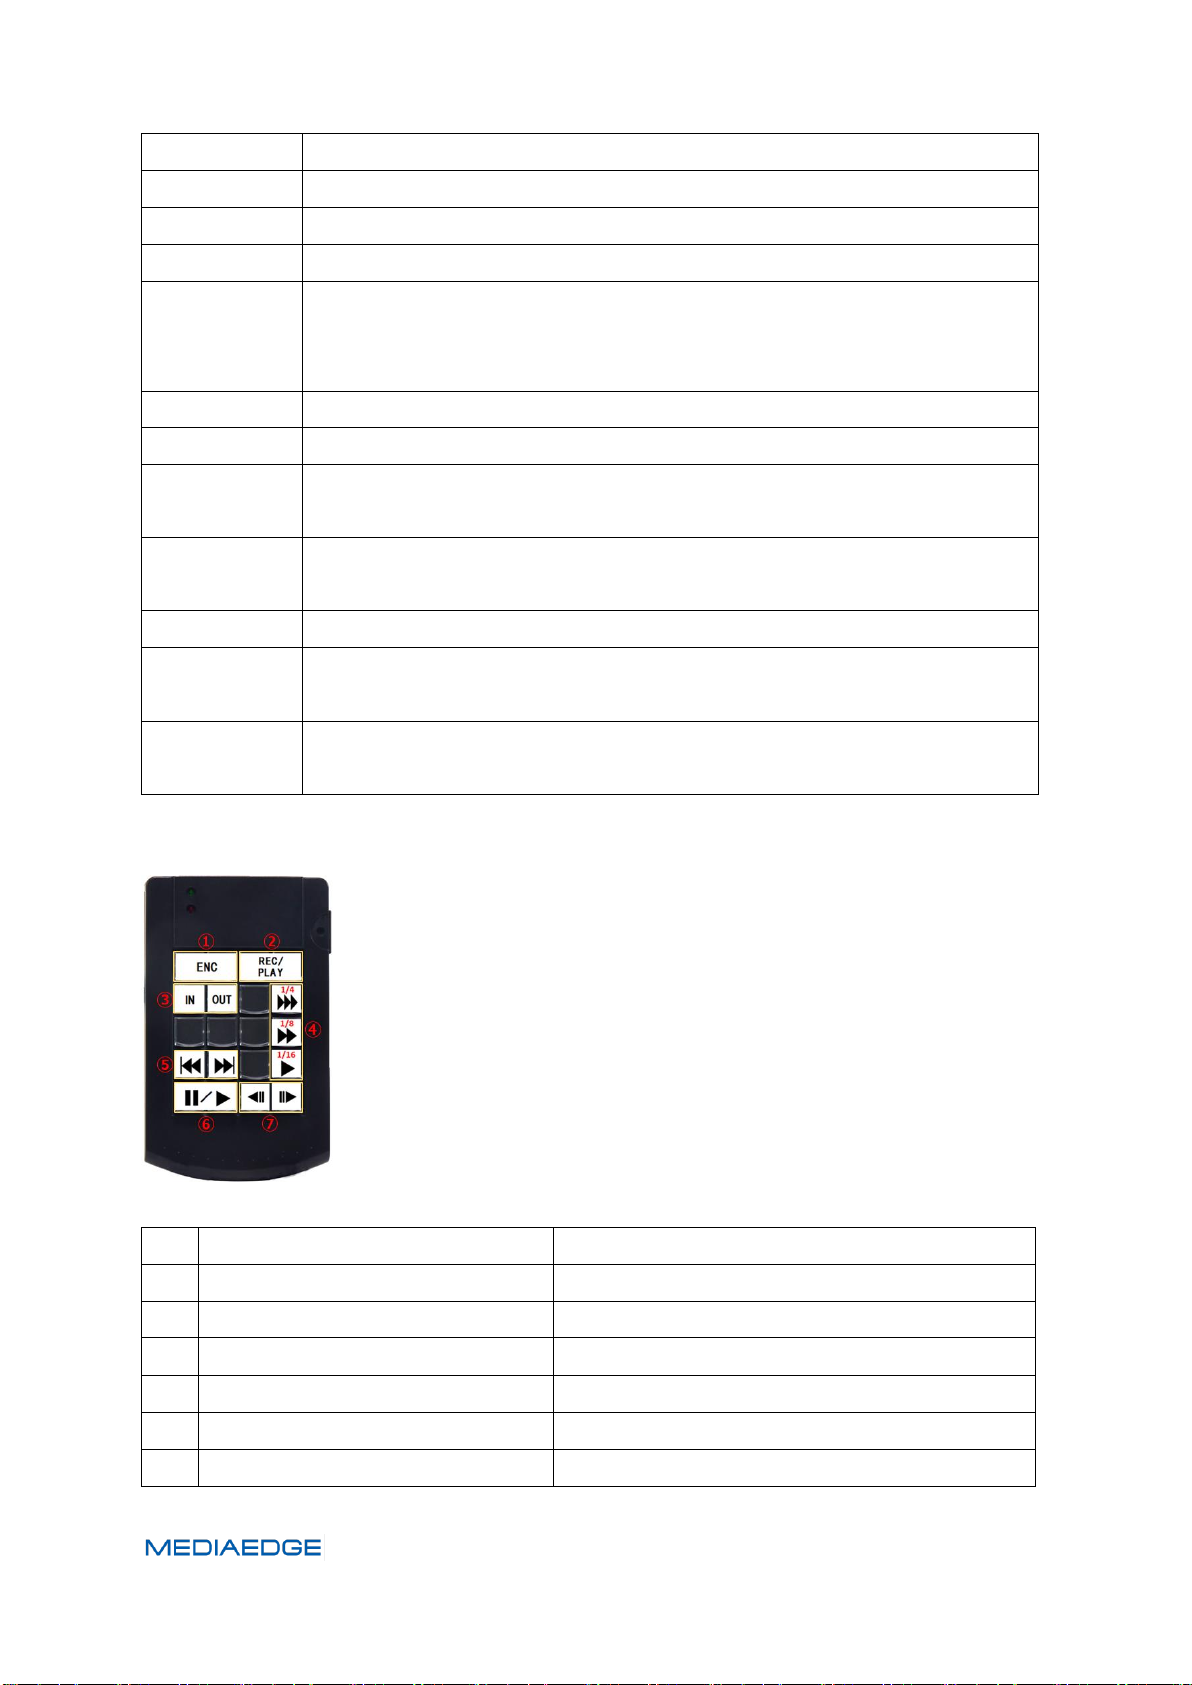
QDVS-1000
Enter
Switch between recording and live video mode and playback mode.
D
When pressed in the record and live video mode, the delay time setting is
enabled / disabled (use for adjusting camera, etc.).
Space
Switch between Play and Stop during playback mode.
E
Start encoding save while in playback mode.
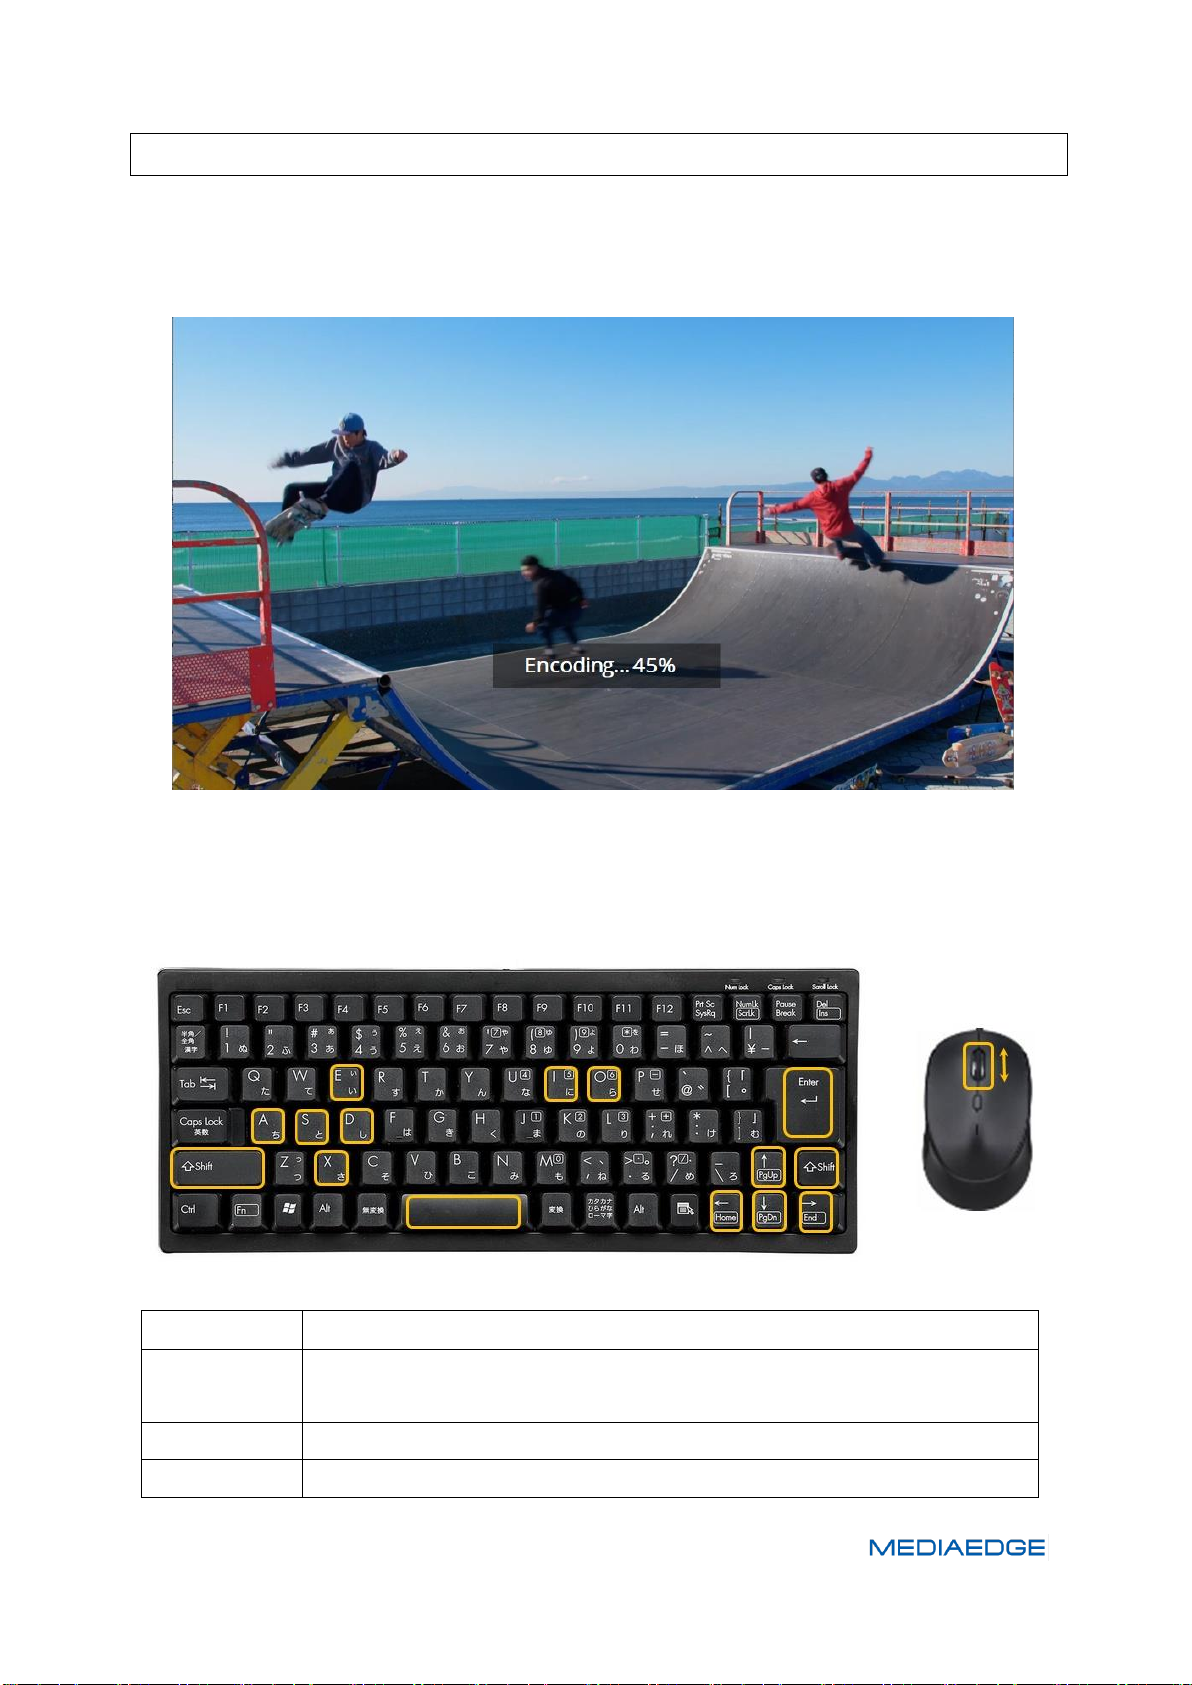
■ II-4-2. Operation screen
1. After setting on the settings screen, press the Start button to display the playback screen
according to the setting.
Example: This is the screen when encoding and saveing during playback.
(Playback screen is always displayed on the full monitor)
2. After the playback screen is displayed, use the keyboard and mouse to operate.
List of available key and mouse operations
Page 21
Page 26
User Manual
UpArrow
Playback speed up during Play in playback mode.
DownArrow
Playback speed down during play in playback mode.
RightArrow
Frame feed during stop in playback mode.
LeftArrow
Frame back during stop in playback mode.
Shift
By Pressing RightArrow or LeftArrow at the same time during stop in
playback mode will forward or reverse the set number of frames in the
Forward / Reverse function behavior.
A
Return to the first frame recording data during stop in playback mode.
S
Return to the last frame recording data during stop in playback mode.
I
Specify the In point during stop in playback mode.
(Leading position during playback mode playback and encoding save.)
O
Specify the Out point during stop in playback mode.
(End position during playback mode playback and encoding save.)
X
Resets in out points during stop in playback mode.
Mouse
WheelUp
Frame feed during stop in playback mode.
Mouse
WheelDown
Frame back during stop in playback mode.
①
ENC
Start encording.
②
REC/PLAY
Switch between recording and playback.
③
IN、OUT
Specify the IN point and the OUT point.
④
1/4▶▶▶、 1/8▶▶、 1/16▶
Play slow-motion replay (1/4, 1/8, 1/16).
⑤
❙◀◀、 ▶▶❙
Stop at the first frame or last frame.
⑥
❚❚/▶
Switch between pause and playback.
⑦
◀❙❙、 ❙❙▶
Frame forward or backward.
3. You can also operate with the dedicated small keyboard.
How the button works
Page 22
Page 27
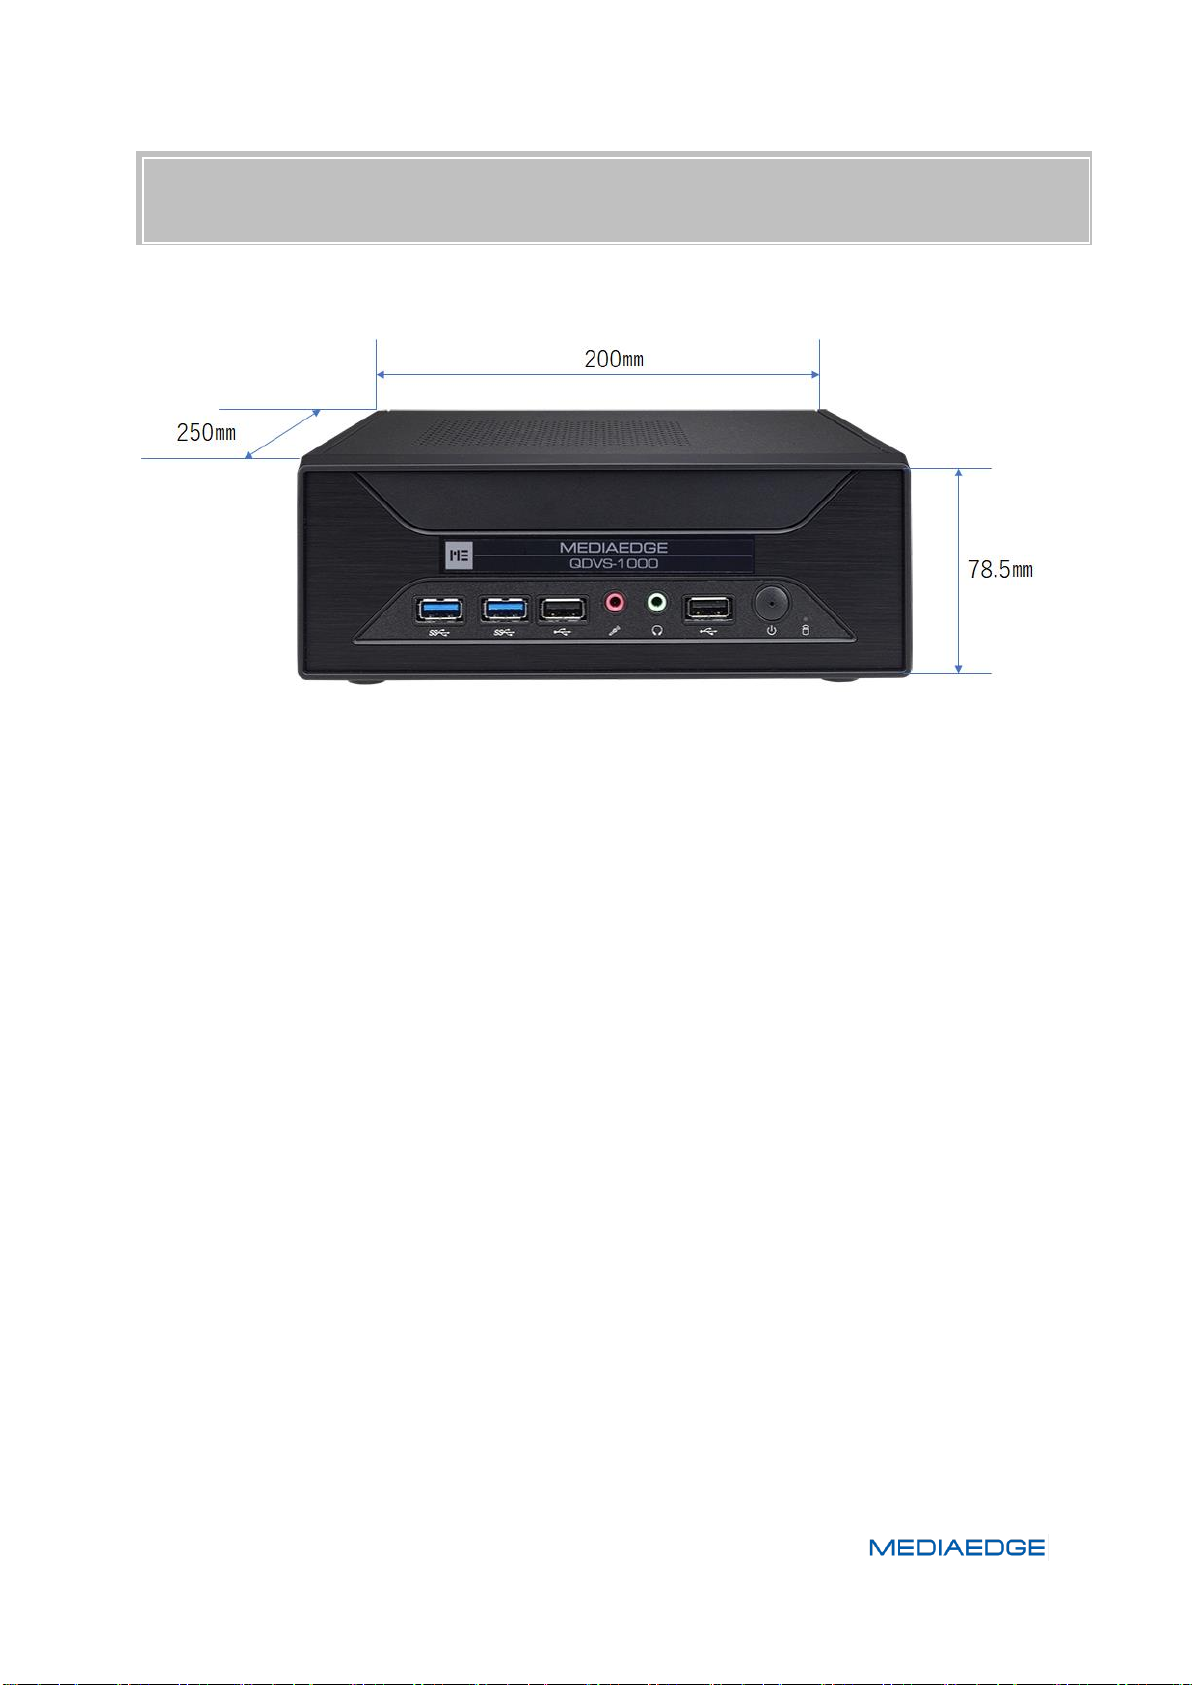
II-5. Dimensions
QDVS-1000
※ At the time of installation, in addition to the main body size,
please make space 50mm on the top surface and more than 50mm on the back.
Page 23
Page 28
User Manual
Size
Dimensions(mm)
200(W) × 250(D) × 78(H) mm ※protrusions(s) not included.
Weight
1.91kg
Rating
Power
requirements
AC adapter
INPUT:AC 100V~240V(50Hz/60Hz) 2.5A(max)
OUTPUT:DC 19.5V 9.23A
Body
INPUT:DC 19.5V 9.23A
Power consumption
Normal operation: 60W
RoHS
Compliant
Network
LAN port
Format
1000Base-TX ×1
Conforms to Ethernet/IEEE802.3 frame format
Terminal
RJ45modular connector ×1
Video audio
Video output
Format
HDMI 2,0
Audio output
Terminal
Superimposed on HDMI signal
Stereo mini jack
General-purpose input / output
USB
Format
Conforming to USB3.0 standards
Terminal
USB Type A ×2 (Front)
Format
Conforming to USB 2.0 standards
Terminal
USB Type A ×2(Front) ×4(Rear)
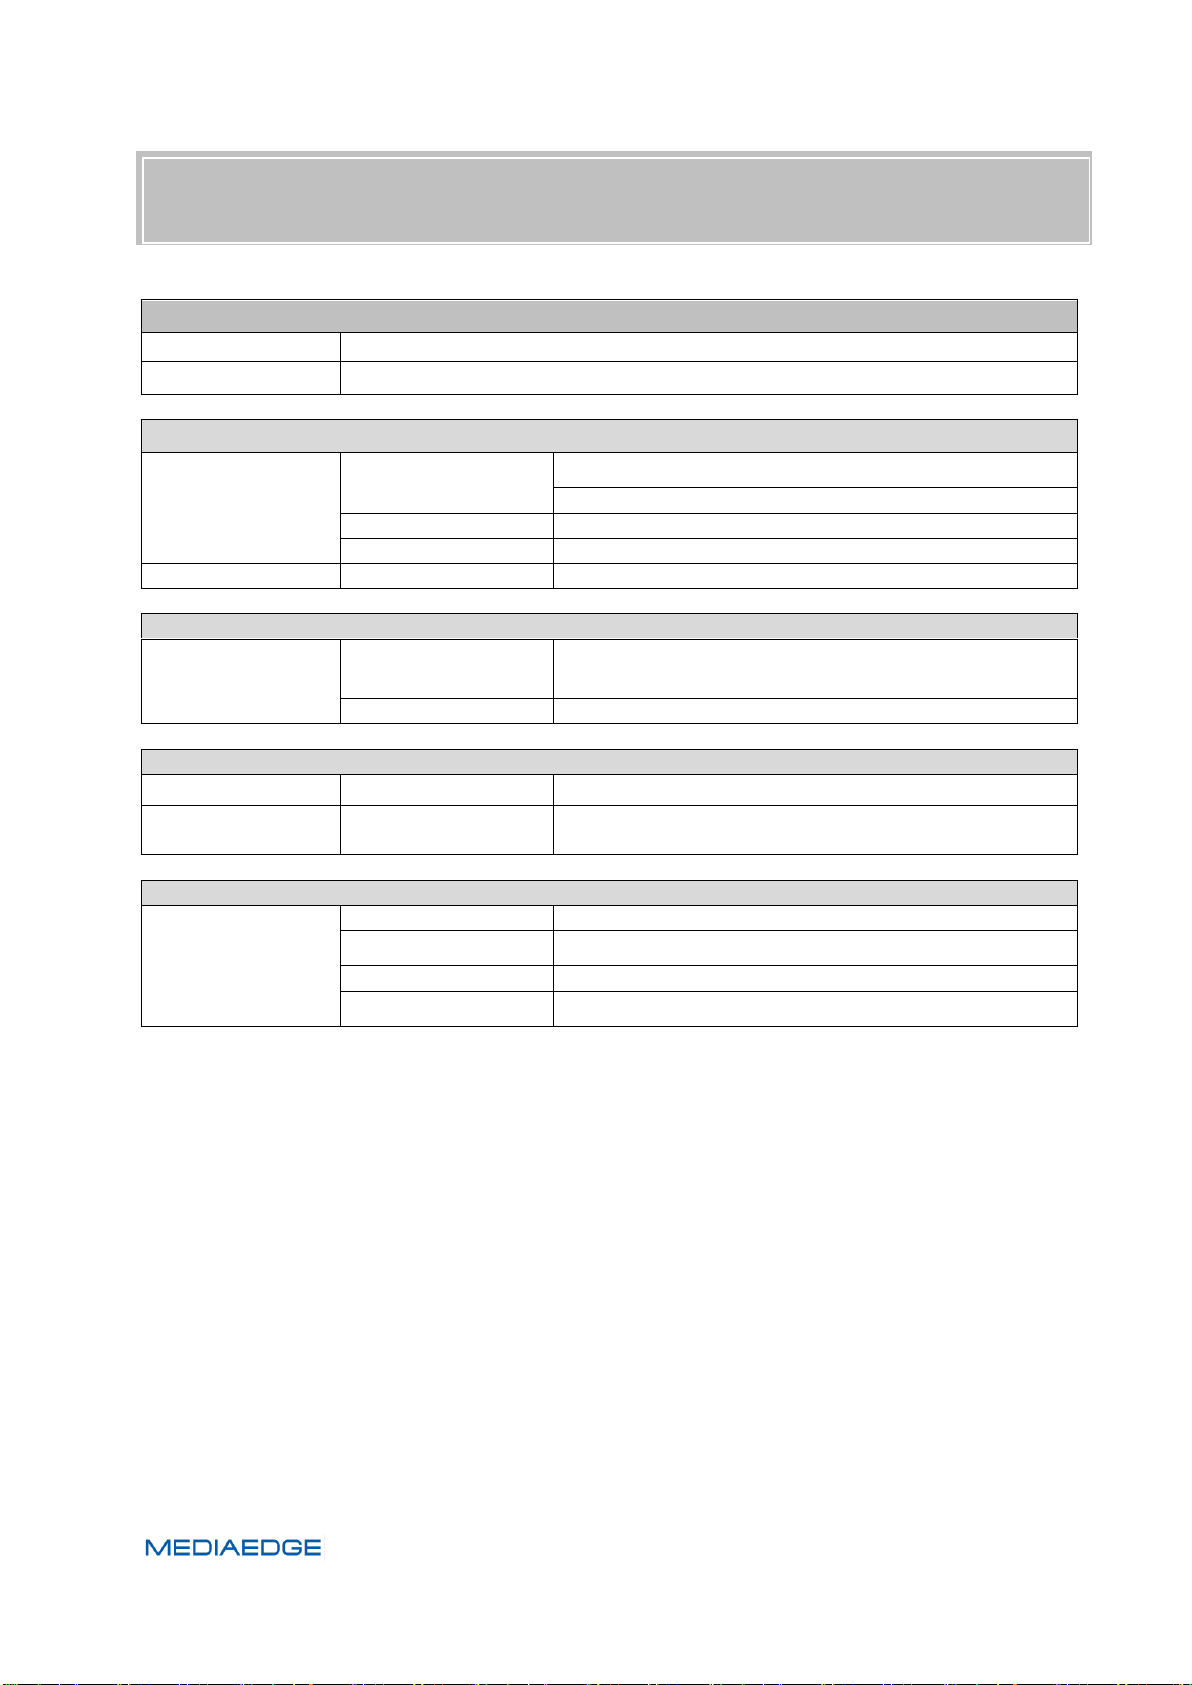
II-6. General Specifications
■Hardware Specification
Page 24
 Loading...