

Page 1

MEDIAEDGE Decoder
User Guide
MEDIAEDGE
MEDIAEDGE Decoder
User Guide
November 20, 2013
Copyright © 2013 MEDIAEDE Corporation
All rights reserved.
Page 2
Notes when using this product
Th is section de sc ri be s notes when u si ng this
product. If you have any questions about how to
use this product and the content of this manual,
please contact MEDIAEDGE Corporation Customer
Service.
MEDIAEDGE Corporation
International customer support
[email protected]
Do not damage the power cord
If the power cord is damaged, it can cause
the fire and/or the electric shock. Do not
place anything heavy nor place the power
code close to any heating equipment. Also,
do not bend nor process the power cord.
When pulling out the AC adapter, hold the
plug-in part. If there is any damage in the
power cord, please ask our customer support
at the store you purchased for a replacement.
Do not disassemble.
Opening the case or trying to remodel the
product can cause the re and/or the electric
shock. Please ask our customer support or
the store you purchased the product for an
internal inspection and a repair.
Do n ot u se t he pr oduct in dusty and
humid areas.
It can lead to the short circuit and the heat
generation and cause the fire and electric
shock.
Do n ot p la ce wa ter or fo reign matte r
inside.
If any water or foreign matter gets inside, it
can cause the fire and the electric shock.
Should any water or foreign matt er gets
inside, turn off the power, plug out the power
cord, and contact the store you purchased
the product or our customer support.
Do not use the product during the thunderstorm.
Do not touch the body of the product and the
plug. It can cause the electric shock.
Do not touch AC adapter with wet hands.
Do not plug in or pull out the AC adapter with
wet hands. It can cause the electric shock.
Do not place the product in the direct
sunlight.
Do not place the product in the sunlight or
close to any heating equipment. It can cause
the re or damage the product.
Do not use the p r o d u c t whe n it i s
smoking.
Do not use the product when it is smoking
or when it is giving off strange smell. It can
cause the re or damage the product. When
abnormality occurs, turn off the power, plug
out the power cord, make sure that it stops
smoking, and then contact the store you
pu rchased the produ ct o r ou r cu stomer
support.
Do not use the product in the damaged
condition.
When the product is dropped or when there
is any damage in the cover, discontinue the
use of the product. It can cause the re or
damage the product. When the product is
damaged, turn off the power, plug out the
power cord, and then contact the store you
pu rchased the produ ct o r ou r cu stomer
support.
Do no place the product in the unstable
location.
Do not place the product on the unstable
stand or tilted location. The product can fall
and hurt somebody around or damage the
product itself. Sort the power cord and AV
cable to place. It can cause the injury and
the damage to the product if you get tripped
on the cord.
Turn off the power when you clean the
product.
When connecting or cleaning the product,
plug out the power cord. If not, it can cause
the electric shock or damage the product.
When cleaning the product, do not use any
volatile solvents such as thinner. When the
product is not in use for a long period of time,
leave AC adapter off the plug.
Page 3
The trademarks
(1) MEDIAEDGE is a registered trademark for
MEDIAEDGE Corporation.
(2) H DMI, HDMI l ogo, and High-
D e f i n i tio n M u l t i m e d i a I n t e r f a c e a r e
trademarks/registered trademarks of HDMI
Licensing LLC.
(3) Ou r tradema rk w as m anufact ured under
license from Dolby Laboratories.
(4) Dolby and the double-D symbol are
trademarks of Dolby Laboratories.
(5) Mic r osof t and W indo w s a r e r e gist e red
trademarks of Microsoft Corporation, U.S.A.
(6) The other product name s, re lated similar
nam es, a nd logo s a re thei r com panies’
trademark/registered trademarks.
Warnings
Health Related Issue
In rare cases, strong light and flashing from the
compu ter mon itor or TV scree n might c aus e
tempo ral e pil epsy or los s of cons cio usnes s.
Even thoug h you have never experie nce such
cases, it is possible that you have such genetic
makeup. Please consult your doctor before using
the products if you or your relatives have such
experience.
About Copyright
The data such as TV broadcast and video that
captu red t he image and the voice t hat w ere
produced by the other people, regardless of video
or still image, shall not be used without permission
except for your personal use. Also, there might
be a case where copying is limited even for the
purpose of personal enjoyment. Please note that
our company will not be responsible for the use of
the captured data.
Do not use any AC adapter other than the
one included in the package.
Do not use any other products besides the
AC adapter included in the package. It can
cause the re and damage the products.
Do not cover the product with fabric.
Do n o t u s e th e produ c t in th e poor l y
ventilated area or in the covered condition.
When the ventilation opening is blocked,
heat stays inside, and it can cause the re or
damage the product.
Notes
Rega r dles s of the pr e s ence or abse n c e o f
neg lig ence i n u se, our com pan y w ill not be
responsible for any claim against consequential
damage and special, incidental, or including lost
profit that is generated by operating this product.
We will not guarantee the product when the product
is not used for the originally intended purposes and/
or in the recommended environment.
The handling of personal information
As a gene ral rul e, our com pany will n ot use
customers’ personal information for any purposes
other than the ones listed below:
- To support the use of our products.
- To c o n duct surv e y s of t h e us a ge o f ou r
products, for product improvement, for product
developm ent , and for i mpr ovement of o ur
service.
* The resu lt of the surve y may be provid ed to our
business partner as a reference without including the
customers’ personal information.
- To verify the legitimacy and the validity of the
bank accounts and the credit cards.
- To p rovide the i nf ormatio n on t he u pdated
version of the software and the new products.
- To send out prizes to customers who won prizes
in the sweepstakes.
With c u s t o mers’ per m i s s i o n, t h e per s o n a l
information might be used for the other purposes.
We manage the provided information properly and
will not disclose nor provide it to the third party
without customers’ permission unless in special
circumstances. Please contact us at http://www.
med iaed ge.c o.jp if yo u h ave an y q uest ion s
conce rni ng to our han dli ng of your pers onal
information.
Page 4

Table of Contents
I. Introduction .................................... 11
1. Before use ..............................................................12
1-1 Verify the package content .......................................................12
■ MEDIAEDGE Decoder enclosed items .................................................... 12
1-2 About our homepage ................................................................12
1-3 About rmware version .............................................................12
2. Notes ......................................................................13
2-1 Notation ....................................................................................13
2-2 Attention ...................................................................................13
2-3 Limitations ................................................................................13
2-4 Usage Agreement ....................................................................14
II. About MEDIAEDGE Decoder .......... 15
1. Overview and features............................................16
1-1 Overview of MEDIAEDGE Decoder .........................................16
1-2 Features of MEDIAEDGE Decoder ..........................................16
1-3 Playable content .......................................................................17
■ Video ........................................................................................................ 17
■ Audio ........................................................................................................ 19
■ Still image ................................................................................................. 19
■ HTML ........................................................................................................19
■ Ticker ........................................................................................................19
■ SMIL .........................................................................................................20
2. Part names and function.........................................21
2-1 Front section ............................................................................21
2-2 Rear section .............................................................................23
2-3 Remote control .........................................................................25
■ ID Setting .................................................................................................26
3. Connection and Operation of the Equipment .........27
Page 5

3-1 Connection of the Equipment ...................................................27
3-2 Startup and Shutdown ..............................................................28
■ Startup ...................................................................................................... 28
■ Shutdown .................................................................................................28
3-3 Playback Verication ................................................................29
4. Initial Setting (Default) ............................................30
4-1 Network Conguration .............................................................30
■ Setting by remote control .........................................................................30
■ Setting form the Web console .................................................................. 33
■ Verify the Setting and the Status .............................................................. 34
4-2 Display Settings .......................................................................36
4-3 Initialization of Conguration ....................................................36
4-4 Settings Wizard ........................................................................37
III. Streaming ..................................... 39
1. Summary ................................................................40
1-1 About Streaming .......................................................................40
2. Video on Demand ...................................................41
2-1 Connection to the MEDIAEDGE Server ...................................41
2-2 Connection to the MEDIAEDGE LEB .......................................41
2-3 Conguration ............................................................................42
3. Scheduled Playback ...............................................44
3-1 Conguration ............................................................................44
4. Live Streaming Video Playback ................................45
4-1 Conguration ............................................................................45
IV. Local File Playback .............................47
1. Scheduled Playback ...............................................48
1-1 About Scheduled Playback ......................................................48
1-2 DCM .........................................................................................48
1-3 Filler Play .................................................................................48
1-4 Conguration ............................................................................49
Page 6

■ Settings Wizard ........................................................................................ 49
■ Detail Settings .......................................................................................... 50
2. Playback Menu .......................................................51
2-1 Automatically Generated Menu ...............................................51
■ About Automatically Generated Menu ...................................................... 51
■ Change of Names ....................................................................................51
2-2 User Menu ................................................................................53
2-3 Screen Saver ...........................................................................53
2-4 Conguration ............................................................................53
■ In Automatically Generated Menu ............................................................ 53
■ In User Menu
.................................................................................54
3. Channel Playback...................................................56
3-1 About Channel Mode ................................................................56
3-2 Conguration ............................................................................56
V. Operating Mode .............................. 57
1. Summary ................................................................58
2. Remote Control Operation......................................59
2-1 Common Operation of Mode ....................................................59
2-2 Operation of Channel Mode .....................................................60
2-3 Operation of Menu Mode .........................................................63
■ Menu Screen ............................................................................................63
2-4 Content Playback Screen .........................................................65
VI. Functions and Operation .............. 67
1. Update of Content ..................................................68
1-1 About the Update .....................................................................68
1-2 About the Update .....................................................................68
■ Basic Settings ..........................................................................................68
■ Network .................................................................................................... 69
■ Channel Mode ..........................................................................................69
1-3 File Sharing ..............................................................................69
■ Network .................................................................................................... 69
Page 7

1-4 Content Update by SD Card and USB Storage ..........................70
1-5 Direct Writing to the Device ......................................................70
2. Network ..................................................................71
2-1 Time Setting (NTP) ...................................................................71
2-2 UPnP ........................................................................................71
2-3 Streaming .................................................................................71
3. Others .....................................................................73
3-1 Playback Information ................................................................73
3-2 Remote Serial ..........................................................................73
3-3 Log ...........................................................................................73
VII. Web Console ................................ 75
1. Access Method .......................................................76
2. Status Display.........................................................77
2-1 Status .......................................................................................78
■ Equipment Status .....................................................................................78
■ Video Output ............................................................................................80
■ Playback Status .......................................................................................81
■ Storage ..................................................................................................... 81
■ Transfer Status ......................................................................................... 82
■ Cooperation with DCM ............................................................................. 83
■ Remote serial ........................................................................................... 83
2-2 Log ...........................................................................................84
3. Settings Wizard ......................................................85
3-1 About Settings Wizard ..............................................................85
3-2 Time Zone ................................................................................86
3-3 Date/Time .................................................................................87
3-4 Network ....................................................................................88
3-5 Selection of Applications ..........................................................91
■ Scheduled playback ................................................................................. 91
■ Menu playback ......................................................................................... 92
■ Channel Viewing Playback ....................................................................... 93
Page 8

■ Live Streaming Video Playback ...............................................................94
4. Conguration ..........................................................95
4-1 About Conguration ..................................................................95
4-2 Preferences ..............................................................................95
■ Operation mode .......................................................................................95
■ Default drive ............................................................................................. 95
■ Writing Limit of Drive ................................................................................ 96
■ Time Zone ................................................................................................ 96
■ Remote Control ........................................................................................ 96
■ Clock ........................................................................................................97
■ Remote Log .............................................................................................. 98
■ Network Drive ........................................................................................... 98
■ UPS ..........................................................................................................99
4-3 Network ....................................................................................100
■ IPv6 .......................................................................................................... 100
■ Network used in preference (Wi-Fi model only) ....................................... 100
■ IPV4 .........................................................................................................100
■ Proxy ........................................................................................................ 103
■ Host name ................................................................................................104
■ NTP .......................................................................................................... 104
■ UPnP ........................................................................................................104
■ Cooperation with DCM ............................................................................. 105
■ File sharing ............................................................................................... 105
■ SNMP .......................................................................................................106
4-4 Menu mode ..............................................................................108
■ Menu Source ............................................................................................108
■ Server ....................................................................................................... 108
■ Local drive ................................................................................................108
■ Screen Saver ...........................................................................................111
4-5 Channel mode ..........................................................................112
■ Channel ....................................................................................................112
4-6 Playback ...................................................................................114
■ Digital Audio Output (Dolby Digital) .......................................................... 114
■ Volume ..................................................................................................... 114
■ Display when the Stream Stops ............................................................... 114
Page 9

■ OSD .........................................................................................................114
■ Jump time ................................................................................................. 115
■ Playback Information ................................................................................ 115
■ Error Pop-up Display ................................................................................115
■ Schedule ..................................................................................................116
■ RTSP Redirect .........................................................................................117
■ Streaming .................................................................................................117
4-7 Serial ........................................................................................119
■ Serial Port Function .................................................................................. 119
■ Remote Serial ..........................................................................................119
■ Serial Log Output .....................................................................................120
4-8 Video Output ............................................................................121
■ HDMI (HDMI model only) ......................................................................... 121
■ SDI (SDI model only) ...............................................................................122
■ Composite Display Mode .........................................................................122
5. Equipment Management ........................................123
5-1
Storage Management (internal HDD/SSD model only) ............................. 123
5-2 Restart and Shutdown ..............................................................123
5-3 Initialization ..............................................................................124
5-4 Batch Setting ............................................................................124
5-5 Date and Time Setting ..............................................................124
5-6 Firmware Update ......................................................................125
5-7 Acquisition of Information .........................................................125
5-8 User Name and Password Change ..........................................126
6. Software License Display .......................................127
6-1 Open source software list .........................................................127
VIII. Appendix .................................... 129
1. Update control script...............................................130
1-1 Summary ..................................................................................130
1-2 Format ......................................................................................130
■ add_contents ............................................................................................ 130
■ update_rm ..............................................................................................131
Page 10

■ set_cong .................................................................................................131
■ Description Example ................................................................................131
2. Update of Firmware ................................................132
2-1 Update by the Web Browser ....................................................132
2-2 Updating by SD card / USB storage .........................................132
3. Maintenance Mode .................................................133
3-1 About maintenance mode ........................................................133
3-2 Connection and Starting ...........................................................133
■ Connection ............................................................................................... 133
■ Starting the maintenance mode ...............................................................134
3-3 Operation .................................................................................134
■ Setting of the IP address (IPv4 address setup) ........................................ 134
■
Firmware update from the USB storage and the SD card (Firmware update from a USB/SD drive)
...135
■
The rmware update by the HTTP/FTP client function (Firmware download via HTTP/FTP)
... 135
■ Ping (Sending ICMP echo requests) ........................................................ 135
■
Reverting to the factory settings (Restore to factory settings) .............................. 136
■ Hardware information display (Display hardware info) ............................. 136
■ Restart of the MEDIAEDGE Decoder (Restart) .......................................136
3-4 Forced initialization ..................................................................136
3-5
Firmware update by update control script (update.inst) ...................................136
4.
SD cards conrmed for operation ............................. 137
5. About UPS ..............................................................138
■ Conrmed UPS operation ........................................................................138
■ Connecting to the UPS ............................................................................. 138
6. Specication ...........................................................139
6-1 Hardware Specication ............................................................139
■ Standard conguration ............................................................................. 139
6-2 Appearance and Size ...............................................................142
■ MEDIAEDGE Decoder body ....................................................................142
■ AC adapter ............................................................................................... 143
6-3 Connector Pin Assignment .......................................................144
■ 100Base-TX/1000Base-T Ethernet (LAN) ................................................ 144
■ RS-232C ..................................................................................................144
Page 11

MEDIAEDGE Decoder
I. Introduction
This chapter describes the matters that
need to be noted before the setup and
the use of MEDIAEDGE Decoder.
Page 12
- 12 -
MEDIAEDGE
1. Before use
1-1 Verify the package content
Check the MEDIAEDGE Decoder package for the following parts. We try our best
on packaging; however, should there be any missing parts, please contact to your
local distributor you purchased.
If you need to contact us directly, please contact us by email.
MEDIAEDGE Corporation
International customer support
[email protected]
■ MEDIAEDGE Decoder enclosed items
1. MEDIAEDGE Decoder
2. AC adapter
3. Remote Control
1-2 About our homepage
Updated information on our company and MEDIAEDGE Decoder is posted on our
homepage (http://www.mediaedge.co.jp). Please access to our homepage to view
our latest drivers, utilities, the product manual, and FAQ.
1-3 About rmware version
This document explains how to operate MEDIAEDGE Decoder in rmware version
3.0.
Page 13
- 13 -
MEDIAEDGE Decoder
2. Notes
2-1 Notation
- If there is any discrepancy between the explanation of this book and the operation
method, the actual operation method will be given the priority.
- For convenience of description, the screen photos and/or illustration may be
different from the actual product.
- In this book, internal SSD model is referred as internal HDD without distinguishing
between two.
2-2 Attention
- Without notice in the future, there can be some changes in the contents and the
specication of this product.
- We do our best to check the contents of this product; however, should there be
any questions, error, or omission of such notice, please contact our company.
- Analysis, reverse engineering, decompile, and disassembly of the software, the
hardware, the manual, and the other attachment of this product are prohibited.
2-3 Limitations
The limitations of the current emware.
- We support Internet Explorer 8 (IE8) or later version, Google Chrome and Mozilla
Firefox as a browser to be used in the initial settings. It is possible that a part or
whole function might not operate normally if it is used in the environment other
than stated above.
- It is not guaranteed that it runs ne on all of the SD cards / USB storage.
- When these drives are pulled while the content of SD card / USB storage are
being played, it may result in internal fault state. Please click the Safely Remove
button that will appear on [Status] > [Storage status] tab of the Web console
before you disconnect the drive and make sure that information light is off before
removing.
- UPnP works only in an environment of IPv4 and does not communicate with IPv6
even if IPv6 is valid.
Page 14

- 14 -
MEDIAEDGE
- It is not guaranteed that all contents of videos, audio, HTML, still image will work
without errors. Please use the content after conrming that the display and the
playback operate correctly.
- Playing video only and playing with still pictures, Television Opaque Projector,
and HTML require different level of bit rate. Please check the operation and the
playback depending on the use condition.
- The playing time length of the content may not be able to be obtained. Therefore,
the seek bar of playback information may not work properly.
- The audio noise may exist near the beginning when playing the video content.
- Wi-Fi model does not support the streaming playback using a wireless LAN.
- It may take long time for the operation of the remote control to be reected in the
playback state.
- If '#' is included in the folder name, the content in it cannot be played.
- The power of the monitor may not be able to be controlled by HDMI CEC in
some manufacturers or model years of the monitor. In addtion, depending on the
monitor, some models may have the power of the monitor automatically tuned on
when the power of the MEDIAEDGE Decoder is turned on.
2-4 Usage Agreement
This product uses the free software that is under the General Public License GNU
(GNU General Public License, "GPL") or GNU Lesser General Public License (GNU
Lesser General Public License, "LGPL") for a part of the software.
Please contact our customer support for the questions regarding this matter, the list
of the software that corresponds GPL/LGPL, and a request for the source code.
Also, this product uses the derived font of IPA font (ME font).
Based on the IPA font license v1.0, it is possible to provide the copy of the derived
font, the le that was generated in addition to the font of the development program,
and the procedure of replacing the font included in this product to the IPA font.
Please contact our customer support for questions regarding this matter.
Page 15

MEDIAEDGE Decoder
II. About MEDIAEDGE
Decoder
This chapter describes the overview
and the features of each part of the
MEDIAEDGE Decoder.
Page 16
- 16 -
MEDIAEDGE
1. Overview and features
1-1 Overview of MEDIAEDGE Decoder
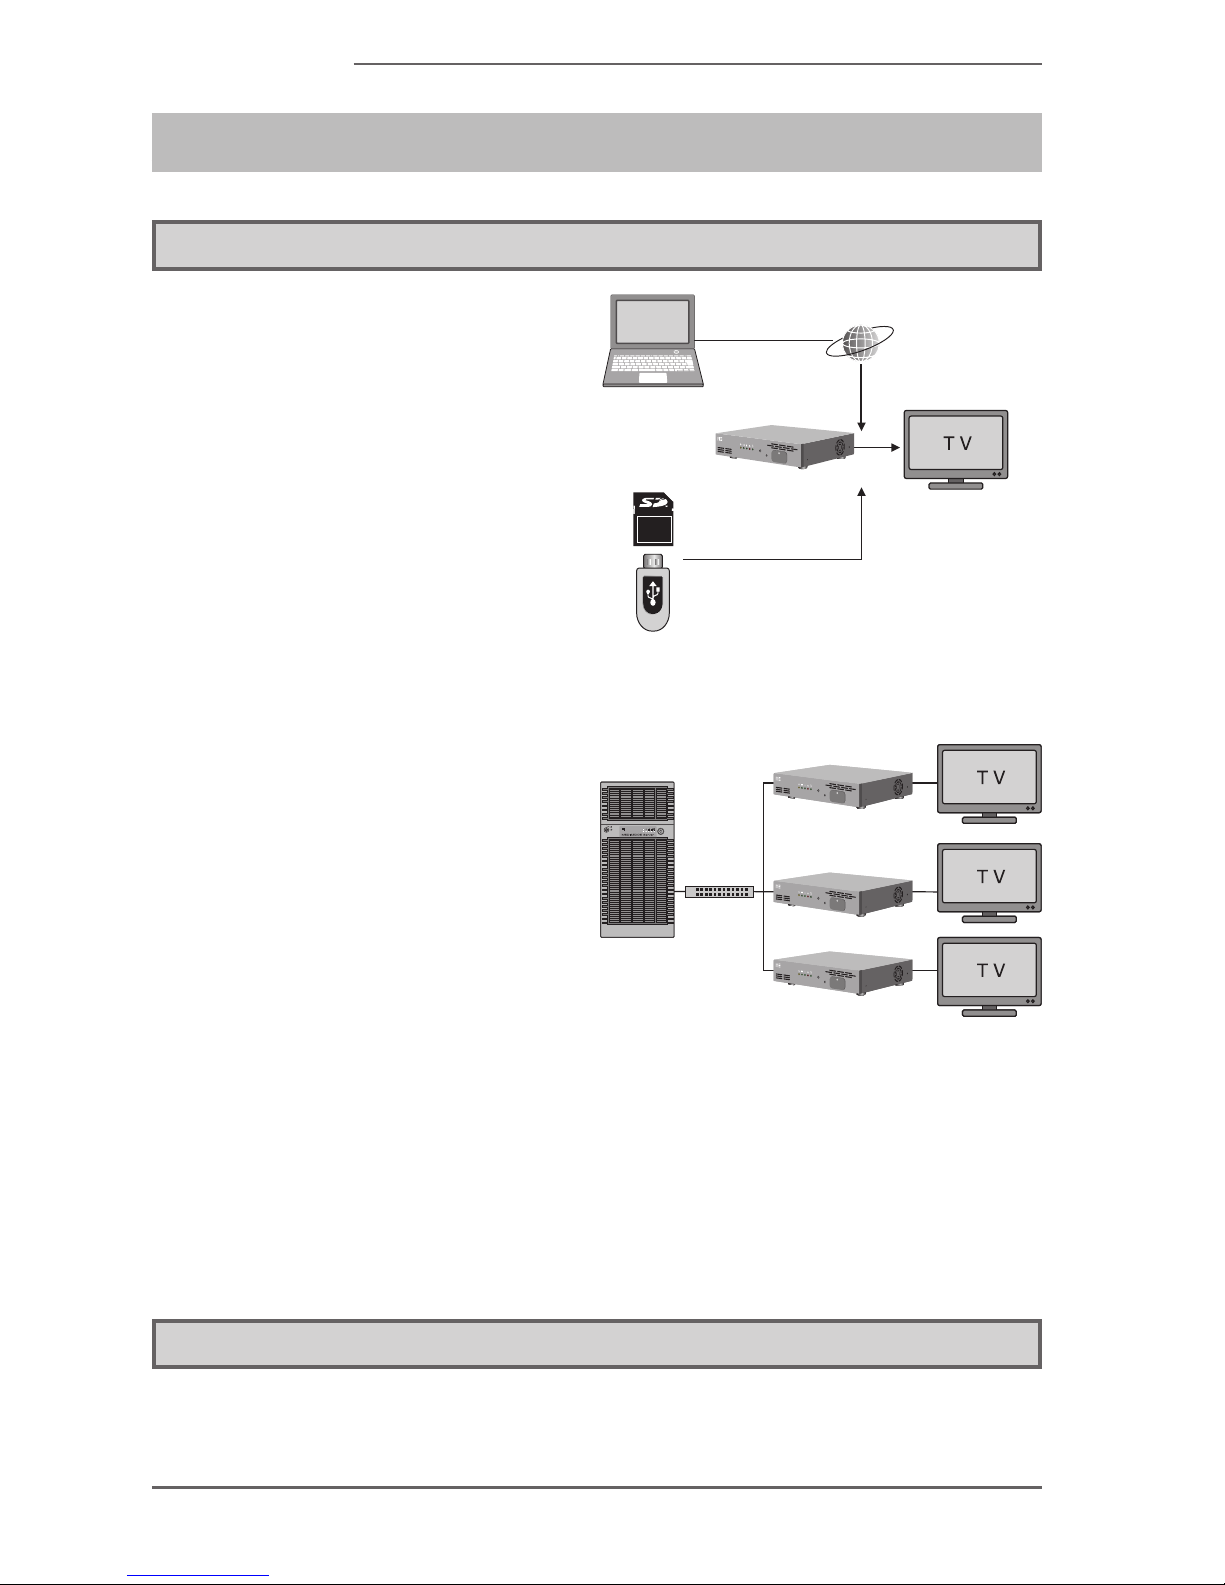
This product is a high-denition player
that plays th e content files o f the
connected storage (HDD, SSD, and
SD card, USB storage) and MPEG-2
tran sport st ream d elivere d by the
server (the data encoded in MPEG-2
or H.264). The content can be played
by selecting it from the menu with
remote control and by controlling from
the network. The update of the content
can be done by the network, SD card,
and USB storage.
The video command that plays the
streaming can be operated by pairing
with the MEDIAEDGE Server (sold
sepa rately ), sele cting th e conten t
over the server with remote control,
and receiving to play the live video
streaming from the MEDIAEDGE LEB
Pro/Express (sold separately).
In addition, when the DCM (Display Content Manager:sold separately) is used, it
will allow you to play the playlist that layout the scheduled playback, video, image,
HTML, and ticker on one screen. It is possible to manage the state monitoring and
the content updates of this product of more than one.
It can be used in combination of the playback of the streaming and the local
content, the schedule, and the menu mode freely. All functions such as controlling,
monitoring, and updating of content can be done from the network.
1-2 Features of MEDIAEDGE Decoder
- Support for streaming and playback of data recorded in the local storage.
The Decoder will support both functions as a playback device and a streaming
Network
The update of
the content is
possiblevia network
Data update by SD card
and USB storage
Decoder supports direct
playback of the content of
external drive (NTFS/FAT32).
MEDIAEDGE Decoder
MEDIAEDGE
Server
MEDIAEDGE
Server
MEDIAEDGE Decoder
Page 17
- 17 -
MEDIAEDGE Decoder
terminal, and the system construction with a high degree of freedom is possible
by switching them as desired.
- The Decoder can be applied to many applications such as scheduled automatic
playback, selection of the contents by menu, and control from outside.
- The Decoder has full support for various network functions.
> The Decoder will support IPv4,IPv6.
> The playback of the streaming (unicast and mulicast) and the access to the
shared les.
> In the environment with internet, it is possible to update, control, and mnitor the
content.
> The content in the local storage can be played without the network.
> The Decoder will support wireless LAN (Only Wi-Fi model).
- The Decoder will support to play many types of contents.
- The Decoder will switch the playback seamlessly (it will have some limitations
depending on the display mode).
- The Decoder is loaded with browsers that support HTML5.
- The Decoder supports to play the layout of multiple contents.
- The simultaneous output of HDMI or SDI and composite is possible.
> The HD monitor can be used as the main while the SD monitor is used at hand.
- The Decoder has a compact housing that does not take up space.
PLEASE NOTE
- There is a difference in the available features and operations in Internet environment and
in LAN environment.
- A network is required to set the function and mode of operation.
1-3 Playable content
■ Video
The Decoder supports the le playback and the streaming playback of the video
le up to full HD (1980x1080) that was compressed with MPEG-2 or H.264.
The playable le depends on the content that is played at the same time, the
communication status, and other conditions.
Page 18

- 18 -
MEDIAEDGE
Video
MPEG-2 (ISO/IEC 13818-2)
MP@HL, MP@H14
Resolution
1920x1080/30p, 1920x1080/60i, 1280x720/60p or less
Bit rate
35Mbps or less (*1)
*1 For the video that is played alone. When the layout is played, less than 18Mbps is
recommended.
MPEG-4 AVC / H.264 (ITU-T Rec. H.264)
Resolution
1920x1080/30p, 1920x1080/60i, 1280x720/60p or less
Bit rate
24Mbps or less (*2)
BP@L3
Resolution
720x480/30p, 720x576/25p or less
Bit rate
10Mbps or less (*2)
*2 For the video that is played alone. When the layout is played, less than 9Mbps is
recommended.
Audio
MPEG-1 Audio Layer1, Layer2 (ISO/IEC 11172-3)
Dolby Digital (AC3)
LPCM
MPEG-2/4 AAC-LC
File format
□
●
►
◦
◦
□
►
◦
◦
►
◦
◦
□
●
●
●
●
□
Page 19

- 19 -
MEDIAEDGE Decoder
MPEG-2 TS (transport stream)
TS packet length:192/188 bytes
MPEG-2 PS (program stream)
Extension
mpg, m2t, m2p, m2ts, mts
■ Audio
MPEG-1 Audio Layer3, MPEG-2 Audio Layer3
RIFF waveform Audio Format
Uncompressed, LPCM 2ch only (8kHz - 48kHz)
Extension
wav, mp3
■ Still image
The still image with maximum resolution up to 2000 x 2000 can be expanded
or reduced in any range to display.
JPEG (Exif)
PNG
GIF (not corresponding to animation GIF)
BMP
Extension
jpg, jpeg, png, gif, bmp
■ HTML
The browser that supports HTML5 is loaded (It is not guaranteed that all of the
HTML5 pages will be displayed correctly).
Extension
html, htm, asp
■ Ticker
●
►
●
●
►
●
●
►
●
►
●
●
●
●
●
►
●
►
Page 20
- 20 -
MEDIAEDGE
It is possible to display the ticker that supports multiple languages such as
Japanese, English, and Arabics. It is possible to set the color of the characters
and the background, the character size, the transparency of the background,
and the scrolling speed of the ticker.
RSS
Text (Character code is UTF-8 or Shift JIS)
Extension
text, txt, rss, xml, rdf
■ SMIL
The Decoder supports to play the play list (subset of SMIL2.0) that is made
by using “Display Content Manager” (sold separately, referred as DCM in the
followings).
Extension
smil, smi, sml
* Please refer to the manual attached to DCM for the layout playback.
- The content can be played only one type at a time.
- The video content and the audio content are used exclusively.
- Itisnotguaranteedthatallthelescanbeplayedcorrectly.
●
●
●
►
●
►
Page 21
- 21 -
MEDIAEDGE Decoder
2. Part names and function
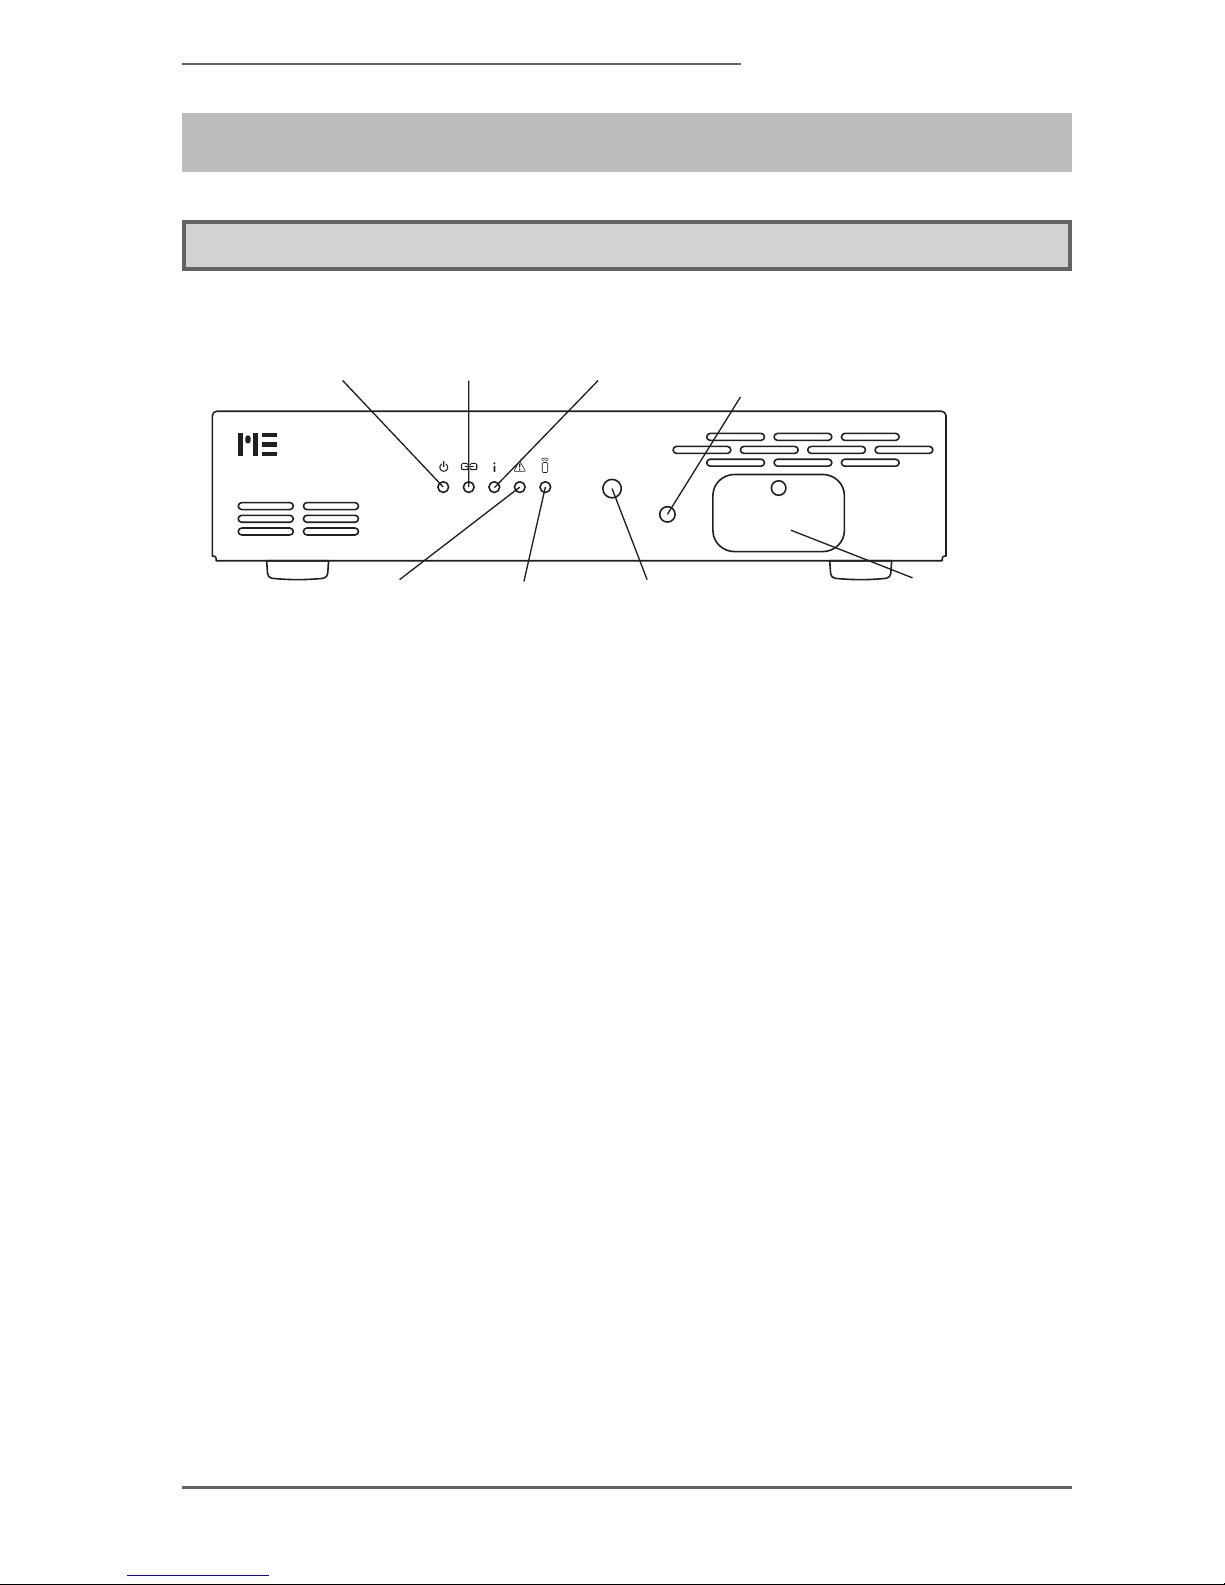
2-1 Front section
(1) Power
indicator
(4) Error
indicator
(5) Remote Control
indicator
(6) Remote Control
sensor
(8) SD card slo
t
(3) Information
indicator
(7) Reset Button
(2) LINK
indicator
(1) Power indicator (2) LINK indicator
Displays t h e s t a t e of po w e r
operation such as start-up and
standby.
i. Off
The power is not on.
ii.
Green ashing light (every 0.5 sec.)
Starting up or nishing.
iii. Green ashing light (every 2 sec.)
Starting up with maintenance
mode.
iv. Green light
Operating.
v. Orange light
The Decoder is in standby.
vi. Orange ashing light
The Decoder is updating the rmware.
The LINK indicator displays the
network status.
vii. Off
The Decoder is not connected to the
wired network equipment.
viii. Flashing
The Decoder is receiving the date
through the network.
ix. On
The Decoder is connected to the wired
network equipment.
Page 22
- 22 -
MEDIAEDGE
(3) Information indicator (5) Remote control indicator
T h e i n f o r m a t i o n i n d i c a t o r
displays the access condition of
the internal HDD/SSD and the
external storage.
x. Off
The external storage is not connected
or is write-protected.
xi. Flashing
The Decoder is writing to the internal
HDD / SSD or the external storage.
xii. On
The external storage has been
mounted in a writable state.
This indicator lights up when the
Decoder receives and recognizes
the remote control.
(4) Error indicator
The error indicator displays the
error condition due to hardware.
xiii. On or ashing
An error was detected.
xiv. Off
The Decoder is operating normally.
This indicator lights up when the
Decoder receives and recognizes
the remote control.
(6) Remote control sensor
The infrared receiver of remote
control is built in.
(7) Reset button
Use t h i s to reset i n case of
eme rgen cy. Do not use it in
normal situation.
* It w ill be switched to “m ai nt en ance
mode” when the reset button is pressed
for more than 5 seconds.
(8) SD card slot
The slot to insert the SD card.
* Only SD and SDHC memory cards are
usable.
Error indicator
Whenthefailureoftheequipmentisdetected,theerrorindicatorwilllightuporstartashing.
If this happens, please contact our customer support.
Indicator that is lit at startup
Immediately after the power-on or the restart, the indicator will be lit for around 5 seconds to
initialize the hardware.
Page 23
- 23 -
MEDIAEDGE Decoder
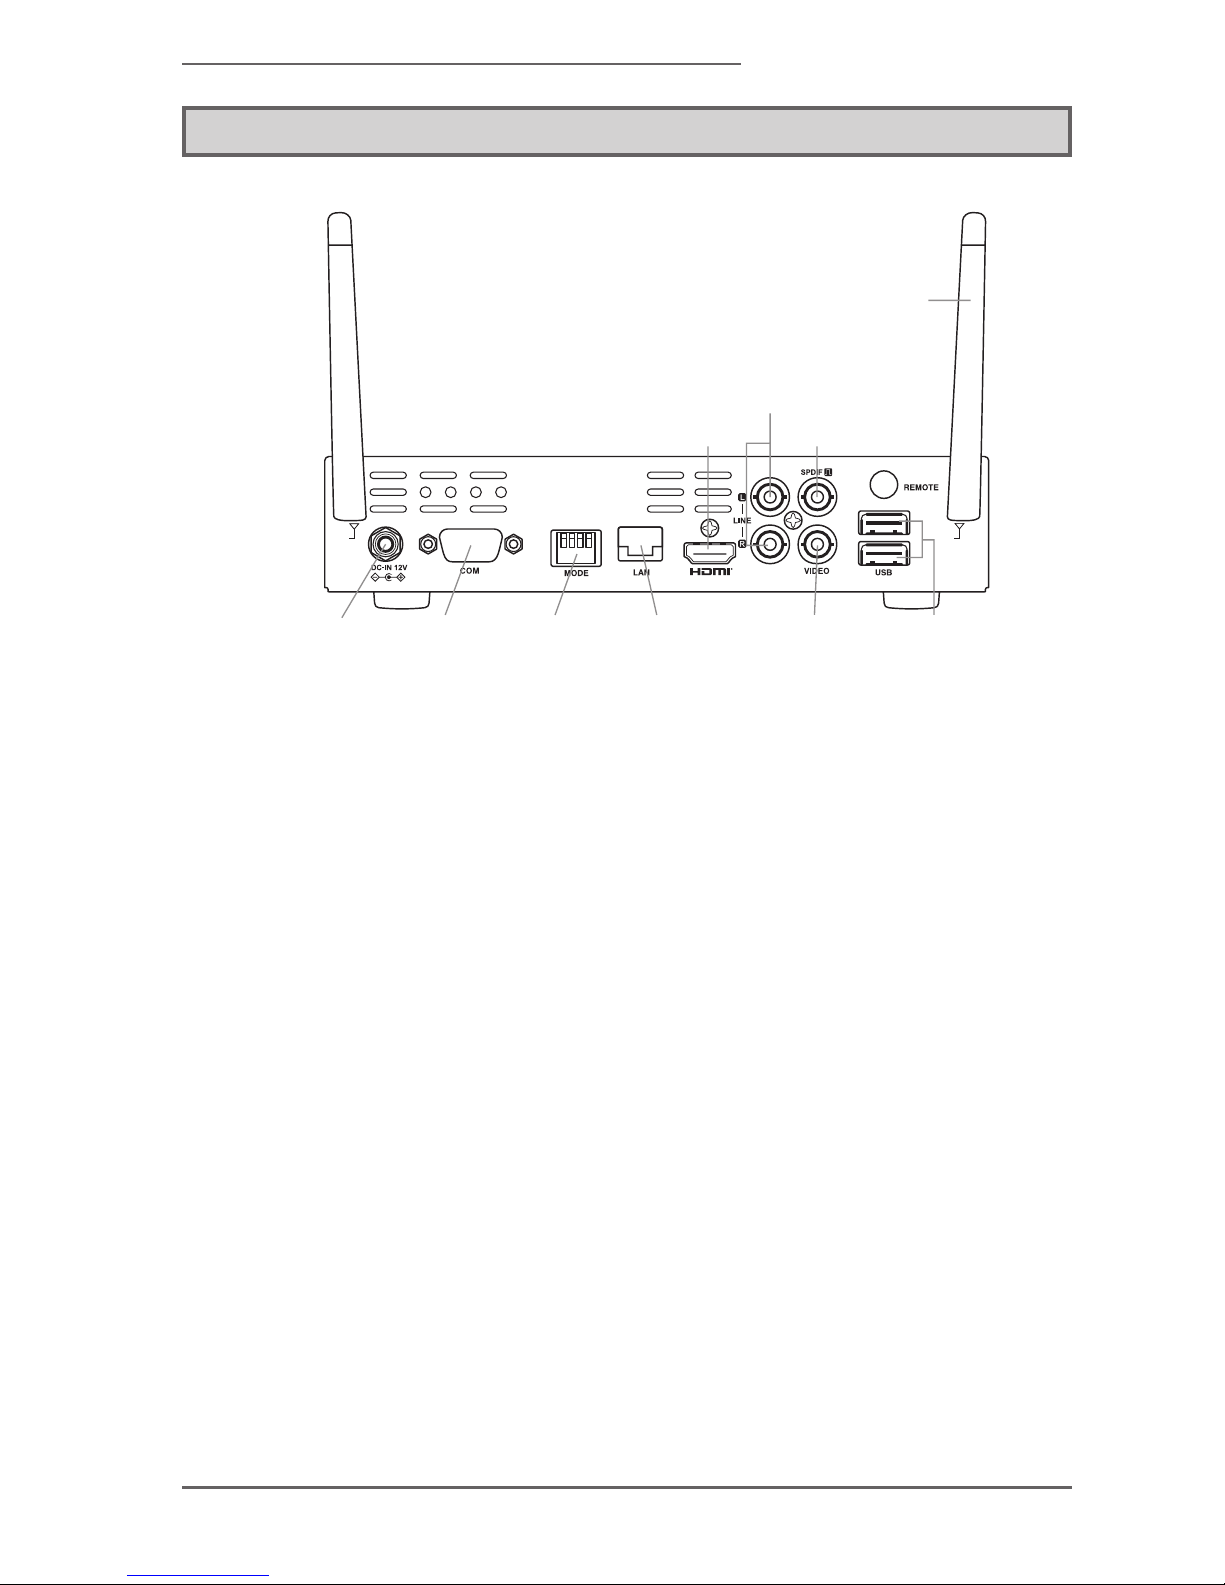
2-2 Rear section
(1) Power
connection
(2) COM
port
(3) DIP SW (4) LAN (8) VIDEO OUT
(10) Wi-Fi antenna
(6) AUDIO LINEOUT
(5) HDMI terminal
(7) SPDIF
(9) USB
terminal
(1) Power connector (6) AUDIO LINEOUT
Connect an attached AC adapter here.
* Do not use any AC adapters other than
the one attatched.
Audio output.
(2) COM port (7) SPDIF
Use this for serial connection. Coaxial digital audio output terminal.
(3) DIPSW (8) VIDEO OUT
Use this for the initialization of
the settings.
* Please always turn off all the switches.
Composite video output terminal.
(4) LAN (9) USB terminal
Connect the LAN cable here. Terminal to connect USB device.
The top is for USB1, and the
bottom is for USB2.
(5) HDMI terminal (10) Wi-Fi anntena (Option)
HDMI output terminal.
* The video and the audio will be output
simultaneously in HDMI terminal.
Anntena for Wi-Fi.
Page 24
- 24 -
MEDIAEDGE
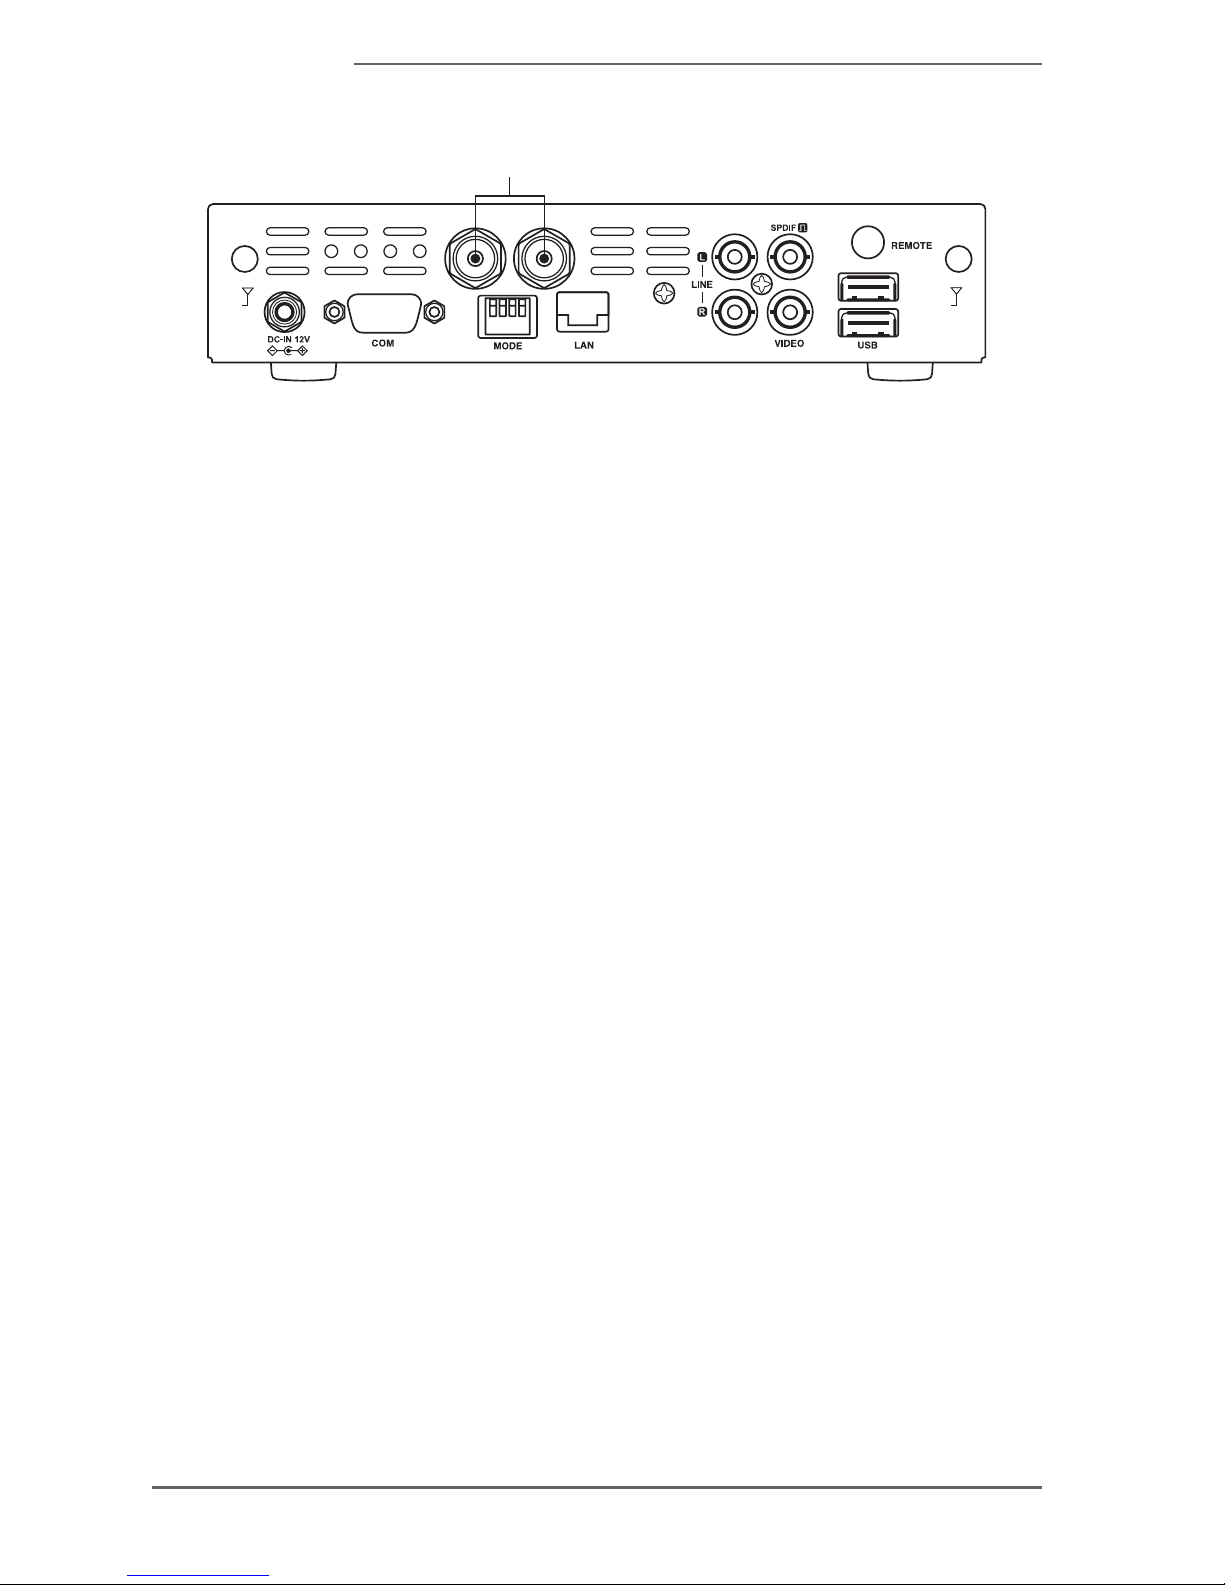
* Wi-Fi antenna is annexed to only Wi-Fi model.
(11) SDI terminal
(11) SDI terminal
3G/HD/SD-SDI output terminal.
* SDI model only. (Exclusive use with the
HDMI terminal)
Page 25
- 25 -
MEDIAEDGE Decoder
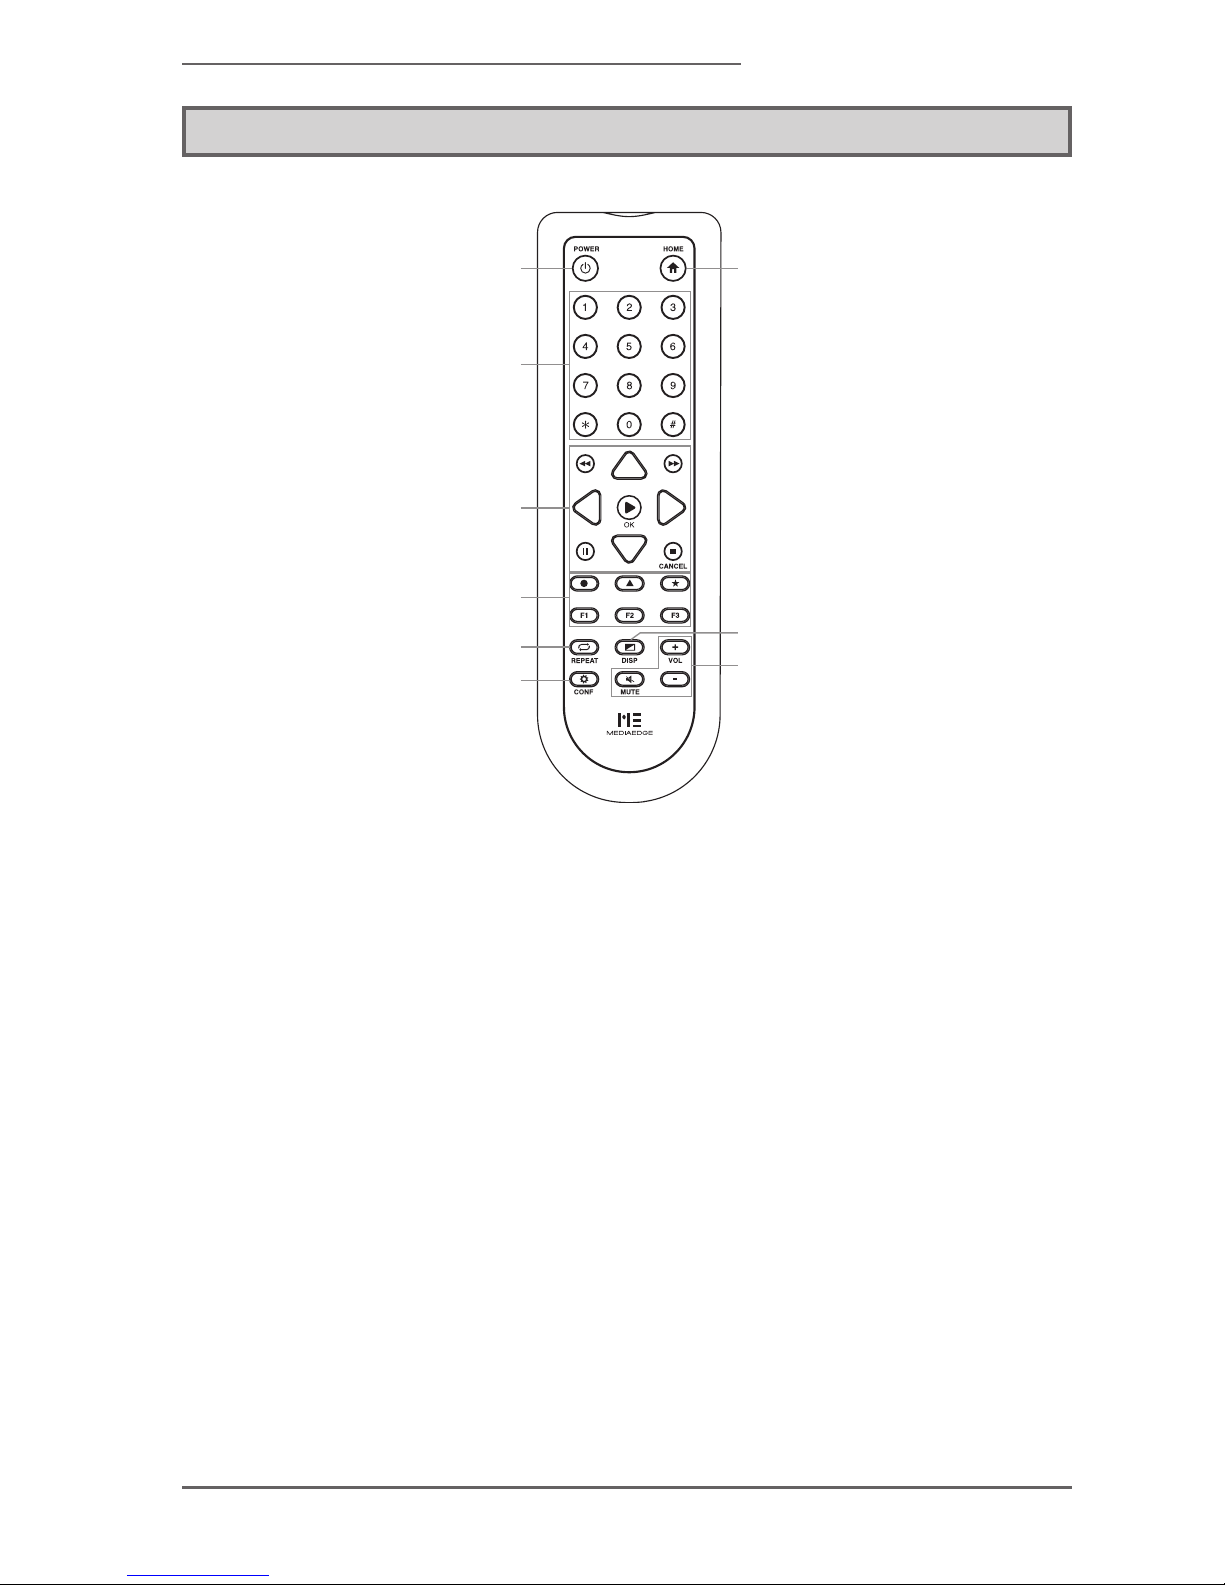
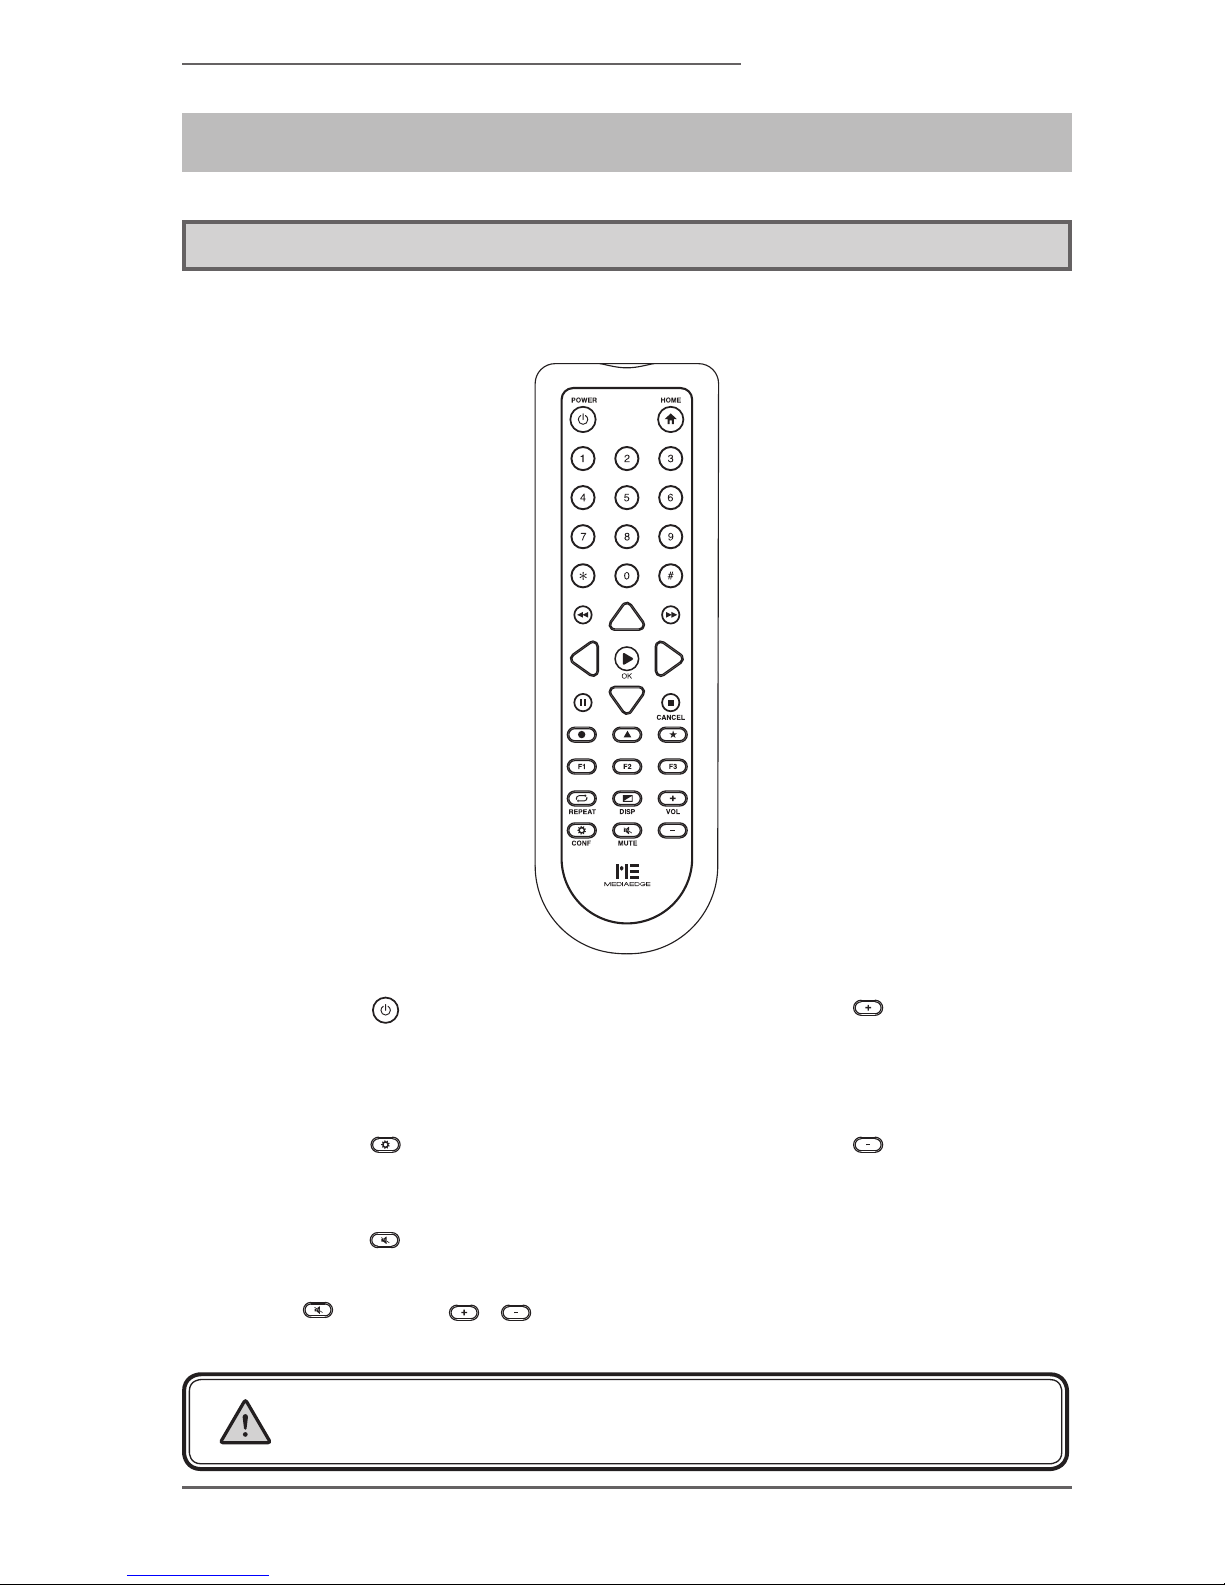
2-3 Remote control
(1) POWER button
(3) Number button
(4) Controll button
(6) REPEAT button
(8) CONF button
(2) HOME button
(7) DISP button
(9) Volume button
(5)
Special function
button
(1) POWER button (4) Controll button
To start up o r sh u t d o w n t h e
MEDIAEDGE Decoder.
To select the content and the
menu.
(2) HOME button (5) Special function button
To display the home channel when
being used in channel mode.
It will return to the home screen
when being used in menu mode.
These will not be used.
(3) Number button (6) REPEAT button
To choose the selected channel
when in channel mode.
It will display the content that was
set by the menu when in menu
mode. Use to input the numbers
where the input of the numbers is
needed according to the setting.
When the content is repeatable, it
will switch ON/OFF of the repeat
mode.
Page 26
- 26 -
MEDIAEDGE
(7) DISP button (9) Volume button
To d i s p l a y t h e p l a y b a c k
information (information about the
content that is currently playing).
To change the volume.
(8) CONF button
To display the setup menu.
You can set to enable or disable a part of the functions that can be controlled by remote control.
■ ID Setting
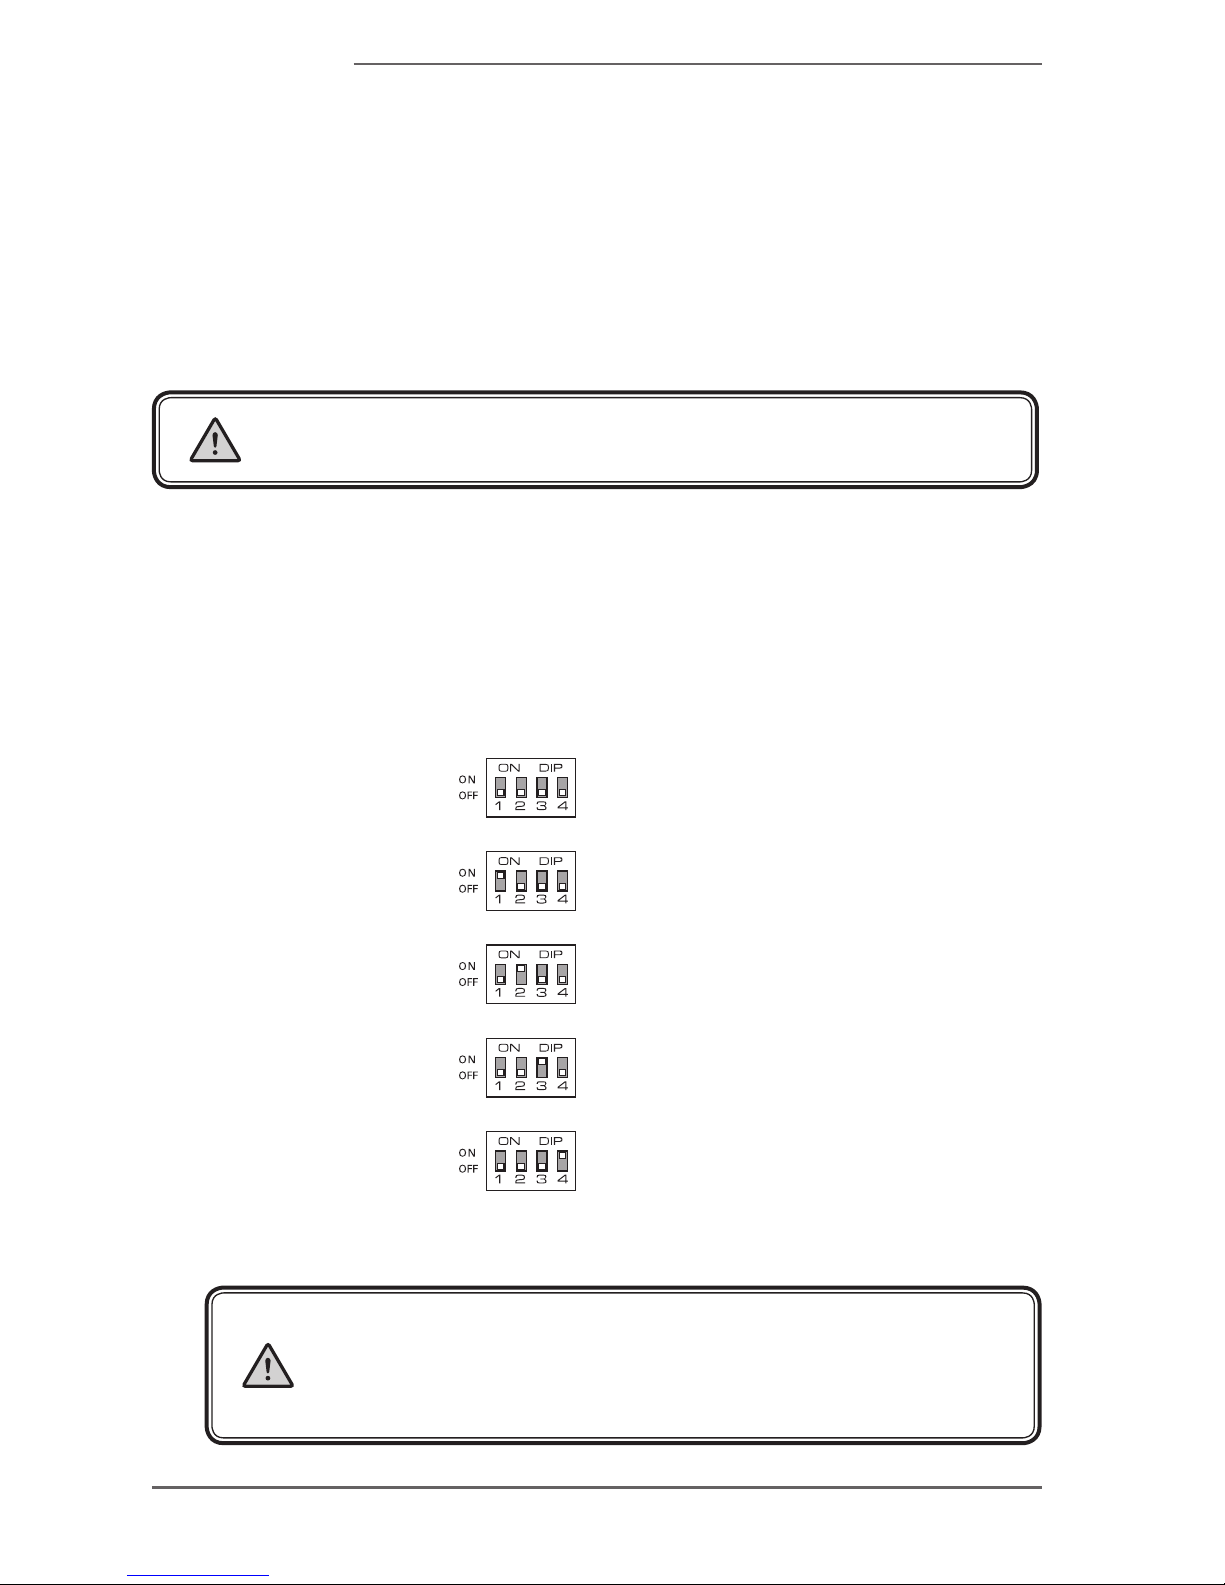
The ID of the remote control can be set with the DIPSW inside the battery
case.
When all the switches are OFF, it is ID0 (Initial state). For ID1~ID4, flip the
respective number switch to ON.
ID0 fixed(All are OFF)
ID1 fixed(only 1 is ON)
ID2 fixed(only 2 is ON)
ID3 fixed(only3 is ON)
ID4fixed(only 4 is ON)
* Please match the remote control ID with the setting on the body (refer to the setting of
the remote control).
- It will not operate when an ID on remote control and an ID on the body are
different.
- The ID will not be set correctly if multiple switches of the DIPSW are set ON at the
same time.
Page 27
- 27 -
MEDIAEDGE Decoder
3. Connection and Operation of the Equipment
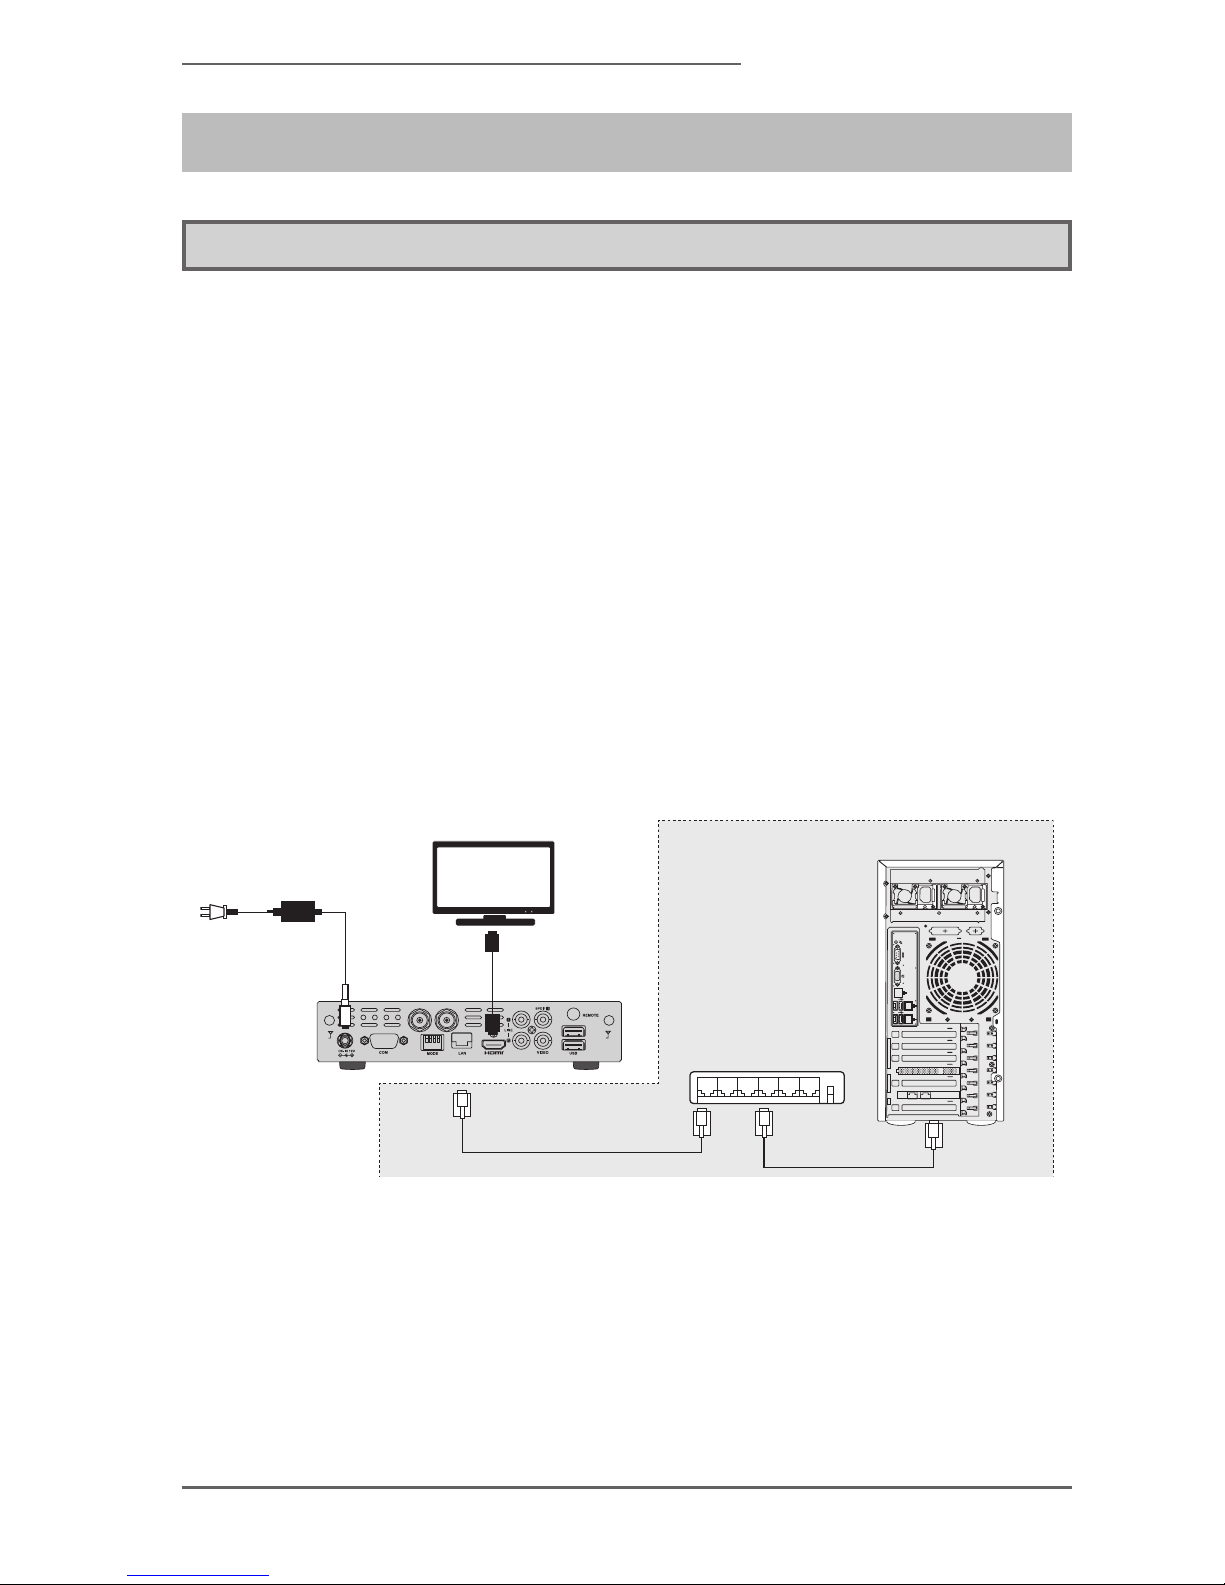
3-1 Connection of the Equipment
Please connect the MEDIAEDGE Decoder and surrounding equipment by referring
to the following example. The following explanation is for HDMI model. Please
switch HDMI to SDI for SDI model.
- Connect the MEDIAEDGE Decoder and the monitor.
HDMI is used in the connection example, but it is possible to connect by
composite and audio cable. When it is connected by HDMI, it will detect the
monitor automatically and display it in the most suitable mode.
- Connect the network cable if necessary.
It is not necessary to connect the network cable if the content is going to be
played from SD card, USB storage, and internal HDD/SSD.
When the network is used to update the content, when it is controlled through the
network, and when the settings are performed, it is necessary to have a network
connection.
Necessary only with network
PC
Ethernet cable
Ethernet cable
TV monitor (HDMI input)
To plug-in
AC adapter
(attached)
HDMI cable
- Connect the AC Adapter.
When the AC adapter is connected to the MEDIAEDGE Decoder, the power will
be turned on, and the Decoder will start.
- The MEDIAEDGE Decoder can be started or shutdown by pressing the (POWER)
key on the remote control. When it is set to limit the functions of the remote
control, there may be a time when the Decoder is not started or shutdown by
remote control.
Page 28
- 28 -
MEDIAEDGE
3-2 Startup and Shutdown
■ Startup
There are following ways to start the MEDIAEDGE Decoder.
By connecting AC adapter to the body of the Decoder.
By pressing the (POWER) key on remote control.
By pressing the reset button on the front.
By pressing the startup button from the Web console.
(Only when the MEDIAEDGE Decoder is being shutdown)
■ Shutdown
There are following ways to shutdown the MEDIAEDGE Decoder.
By pressing the (POWER) key on remote control.
By performing [Shutdown] from [Device Administration] > [Restart/
Shutdown] page of the Web console.
A part of the functions (state monitoring by the network) operates in the shutdown state.
Notes when shutting down the equipment
Pleasedonotshutdownwhileupdatingthecontentandthermware.
When unplugging the AC adapter, please shutdown the equipment and make sure that
the power indicator is off. It may cause the failure of the internal HDD/SSD and the loss
of the content.
●
●
●
●
●
●
Page 29
- 29 -
MEDIAEDGE Decoder
3-3 Playback Verication
The sample content of the MEDIAEDGE Decoder can be downloaded from our
website (www.mediaedge.co.jp). Copy the downloaded data to a SD card (or USB
storage) and insert it to the MEDIAEDGE Decoder.
In menu mode (factory setting), the menu will be updated when the (CANCEL) key
is pressed on the remote control, and the inserted SD card (or USB storage) will be
displayed on the screen. (*)
When the schedule content under inserted storage > MEDIAEDGE > _Schedule is
selected by remote control and the (OK) key is pressed, the schedule playback will
run.
* When the rst startup after factory shipping, the setup menu will be displayed. The setup menu
can be cleared with a press on the (CONF) key on the remote control.
About SD card and USB storage
- The SD card supports up to SDHC 32G bytes, and the USB storage supports up to 2T
bytes.
- ThelesystemsupportsNTFSorFAT16/FAT32.Whenthesizeofthecontentleexceeds
4Gbytes,pleaseuseNTFS.
- Please format SD card and USB storage in Windows PC.
- Whentheinformationindicatorison orashing,pleasdonotremoveSDcardandUSB
storage. Please click on the [Safely Eject Media] button that is displayed at [Status] >
[Storage status] tab of the Web console and make sure that information indicator is off
before the removal.
- When the HDD is used as a USB storage, please use the type that feeds with self-power.
Operating with USB bus power may cause a failure to operate due to power shortage.
Page 30
- 30 -
MEDIAEDGE
4. Initial Setting (Default)
4-1 Network Conguration
■ Setting by remote control
When the (CONF) key on the remote control is pressed at the startup of
MEDIAEDGE Decoder, the setup menu will be displayed on the monitor.
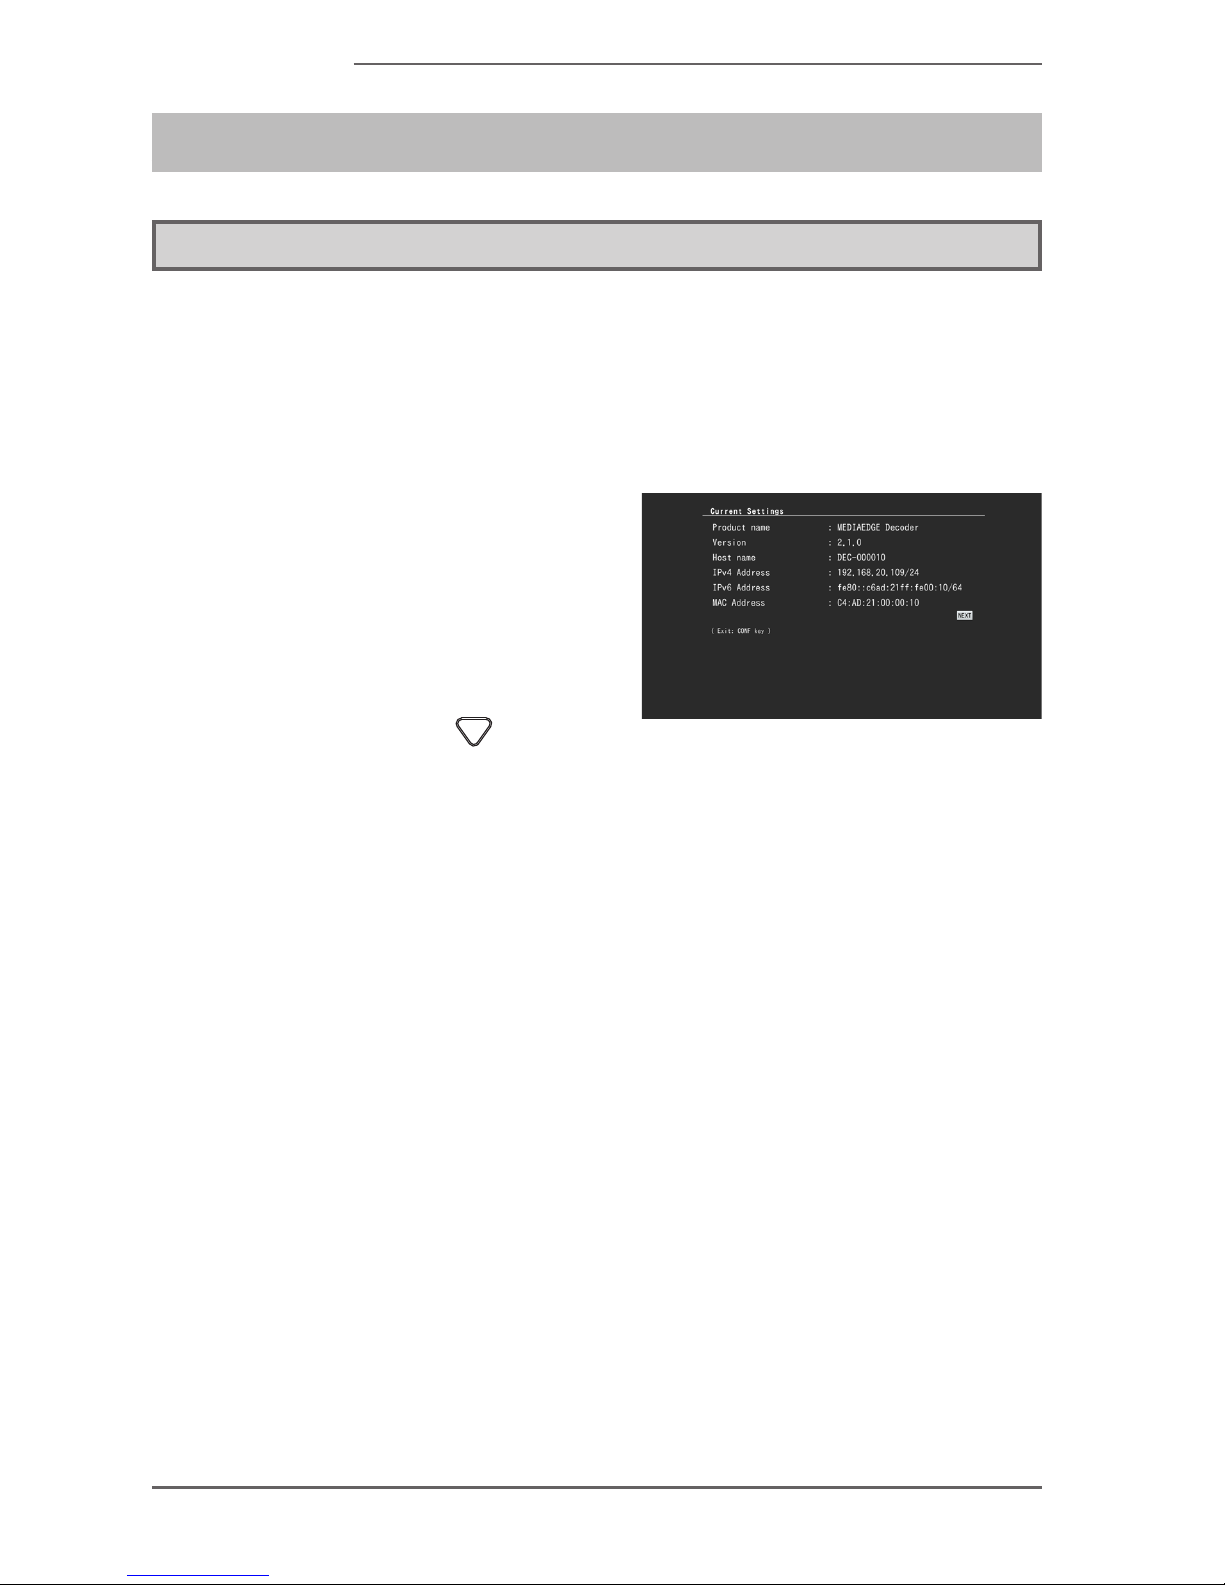
D i s p l a y of cu r r e n t s t a t u s
(Current Settings)
When the setup menu is displayed,
the current status (the setting value
or the value obtained from DHCP)
will be displayed. To change the
settings, press the key, and
move to the setup screen (Change
Setting) by selecting [NEXT].
•
Page 31
- 31 -
MEDIAEDGE Decoder
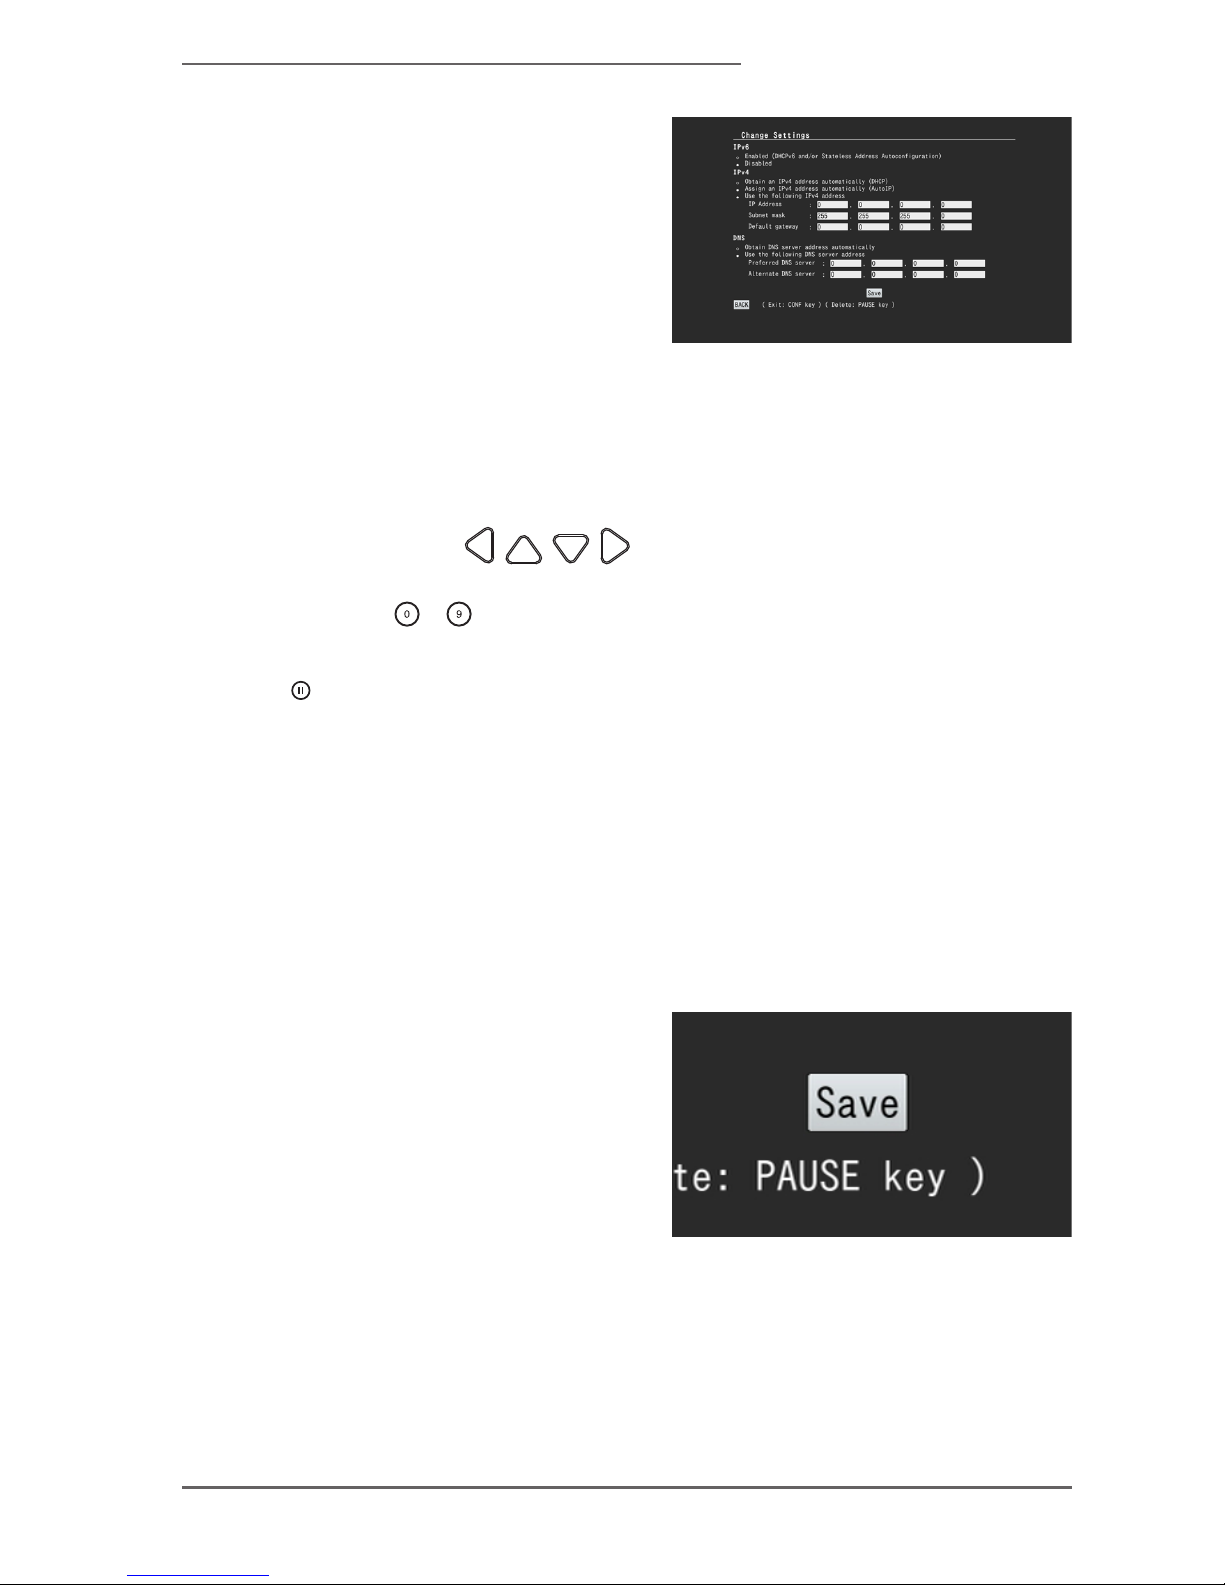
Change of the settings (Change
Settings)
Whe n IPv6 is u sed, mark a
check on [Enabled] on IPv6 by
using the remote control.
Mar k a c h e c k on [ U se the
following IPv4 address] on IPv4
by using the remote control.
Enter IP address by using the
remote control. The position of
the cursor can be moved with
the use of the
keys. Enter the correct numbers
by using - number keys.
To delete the characters, use the
key.
Mar k a c h e c k on [ U se the
following DNS server address]
by using the remote control.
Enter IP address by using the
remote control.
•
►
►
►
►
►
* When the DHCP is connected, mark a check on [Obtain an IPv4 address automatically
(DHCP)] for IPv4 and [Obtain DNS server address automatically] for DNS.
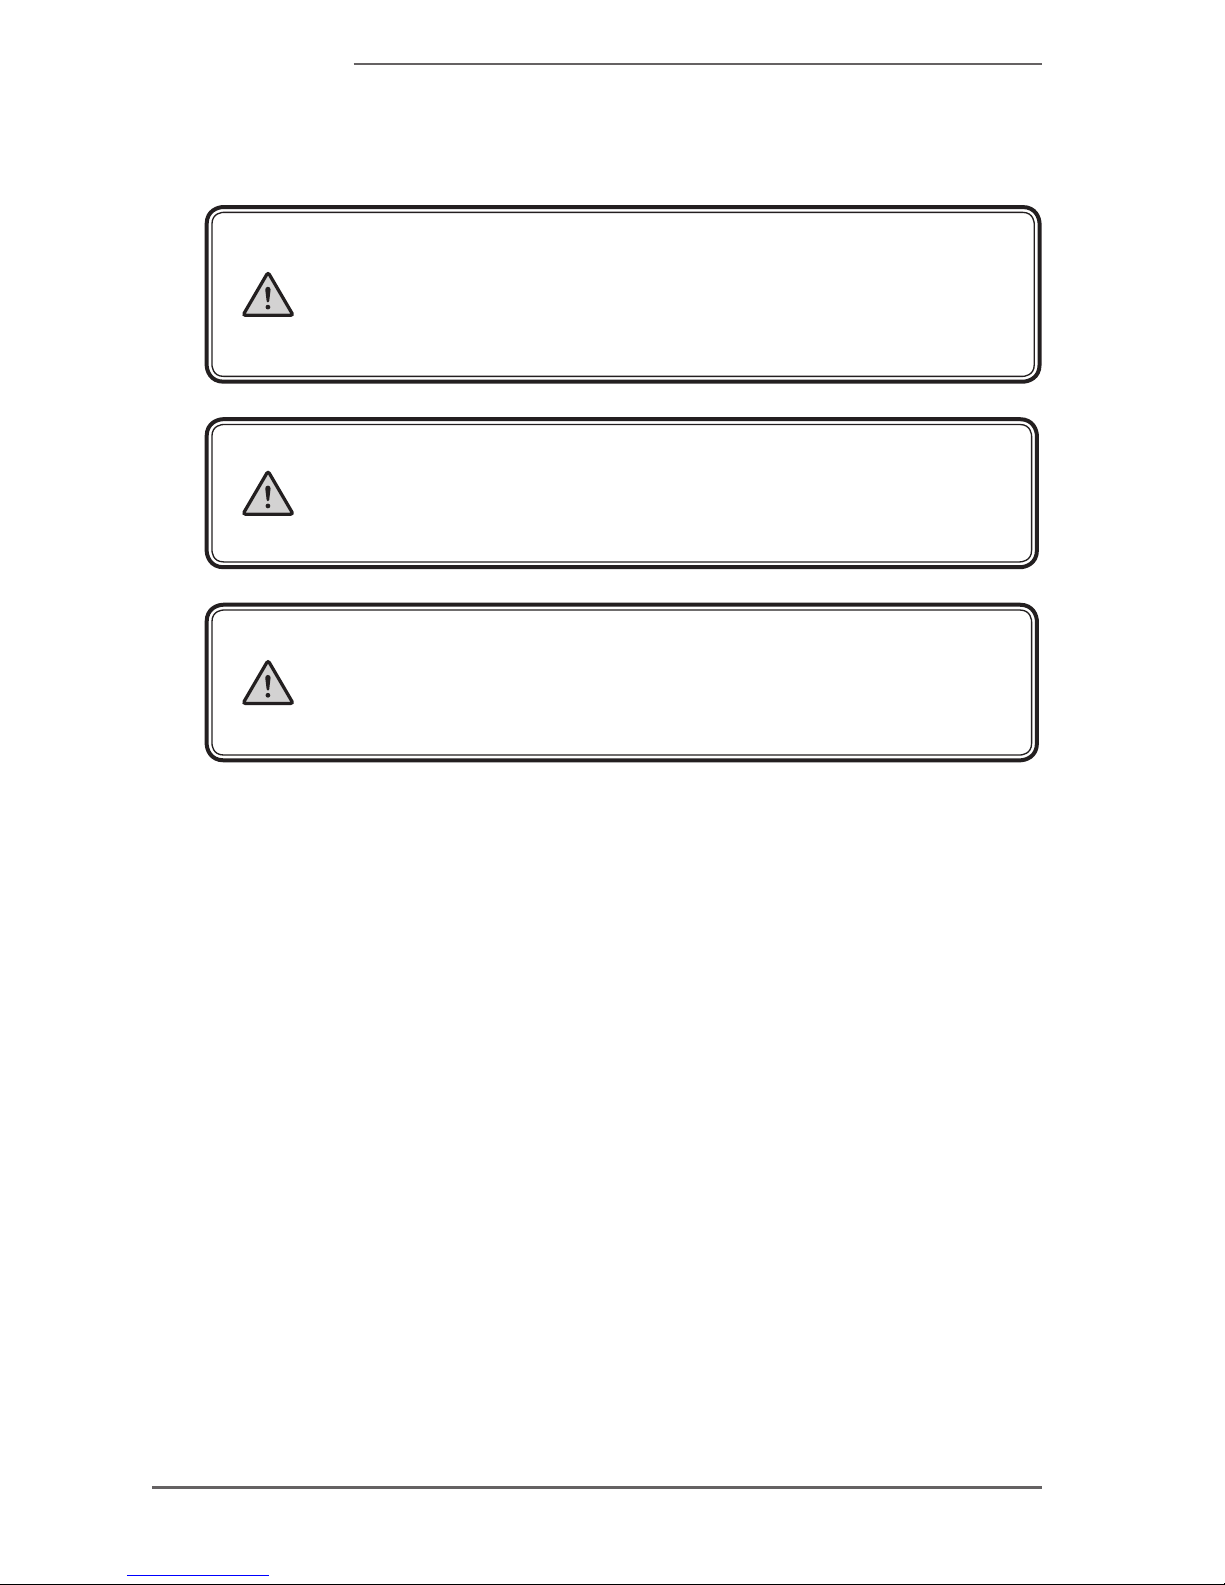
Save Settings
To save the set ting , move the
cursor to [Save] on the bottom of
the screen and press the (OK) key.
When the restart of MEDIAEDGE
Decode r is required, "Se ttings
requires rebooting the system.
P r o c e e d a n y w a y ? " w i l b e
displayed. When you select [OK],
MEDIAEDGE Decoder will restart
and the setting will be reected.
•
Page 32
- 32 -
MEDIAEDGE
Finish Setting
To erase the setup meu, press the (CONF) key on remote control.
•
When the TV monitor is connected by a composite, and if nothing is displayed when
the (CONF) on the remote control is pressed, pleaseswitchtothemonitorsignal that
is compatible with the TV monitor by pressing the (DISP) on the remote control. By
pressing the (DISP) key on the remote control while the setup menu is being diaplayed,
the monitor signal will cycle through NTSC(J)-NTSC(US)-PAL-NTSC(J). ,
At the first startup after the initial setting, the setup menu will be will be displayed
automatically. Whether the settings are changed or not, the setup menu will not be
displayedfromthesecondtime.Whennecessary,displaythescreenbyusingthe(CONF)
key on remote control.
SetupofWirelessLAN(onlyforWi-Fimodel)
The wireless LAN cannot be in the setup menu. After the wired LAN is set in the setup
menu, perform the setting of the wireless LAN from the Web console by following the
next chapter ”Setting from the Web console” over the wired network.
Page 33
- 33 -
MEDIAEDGE Decoder
■ Setting form the Web console
If the MEDIAEDGE Decoder can be connected to a network, the detailed
setting can be done from the Web console. Open the MEDIAEDGE Decoder
by Web browser (Internet Explorer 8 (or later) that runs on Windows, Google
Chrome, or Mozilla Firefox).
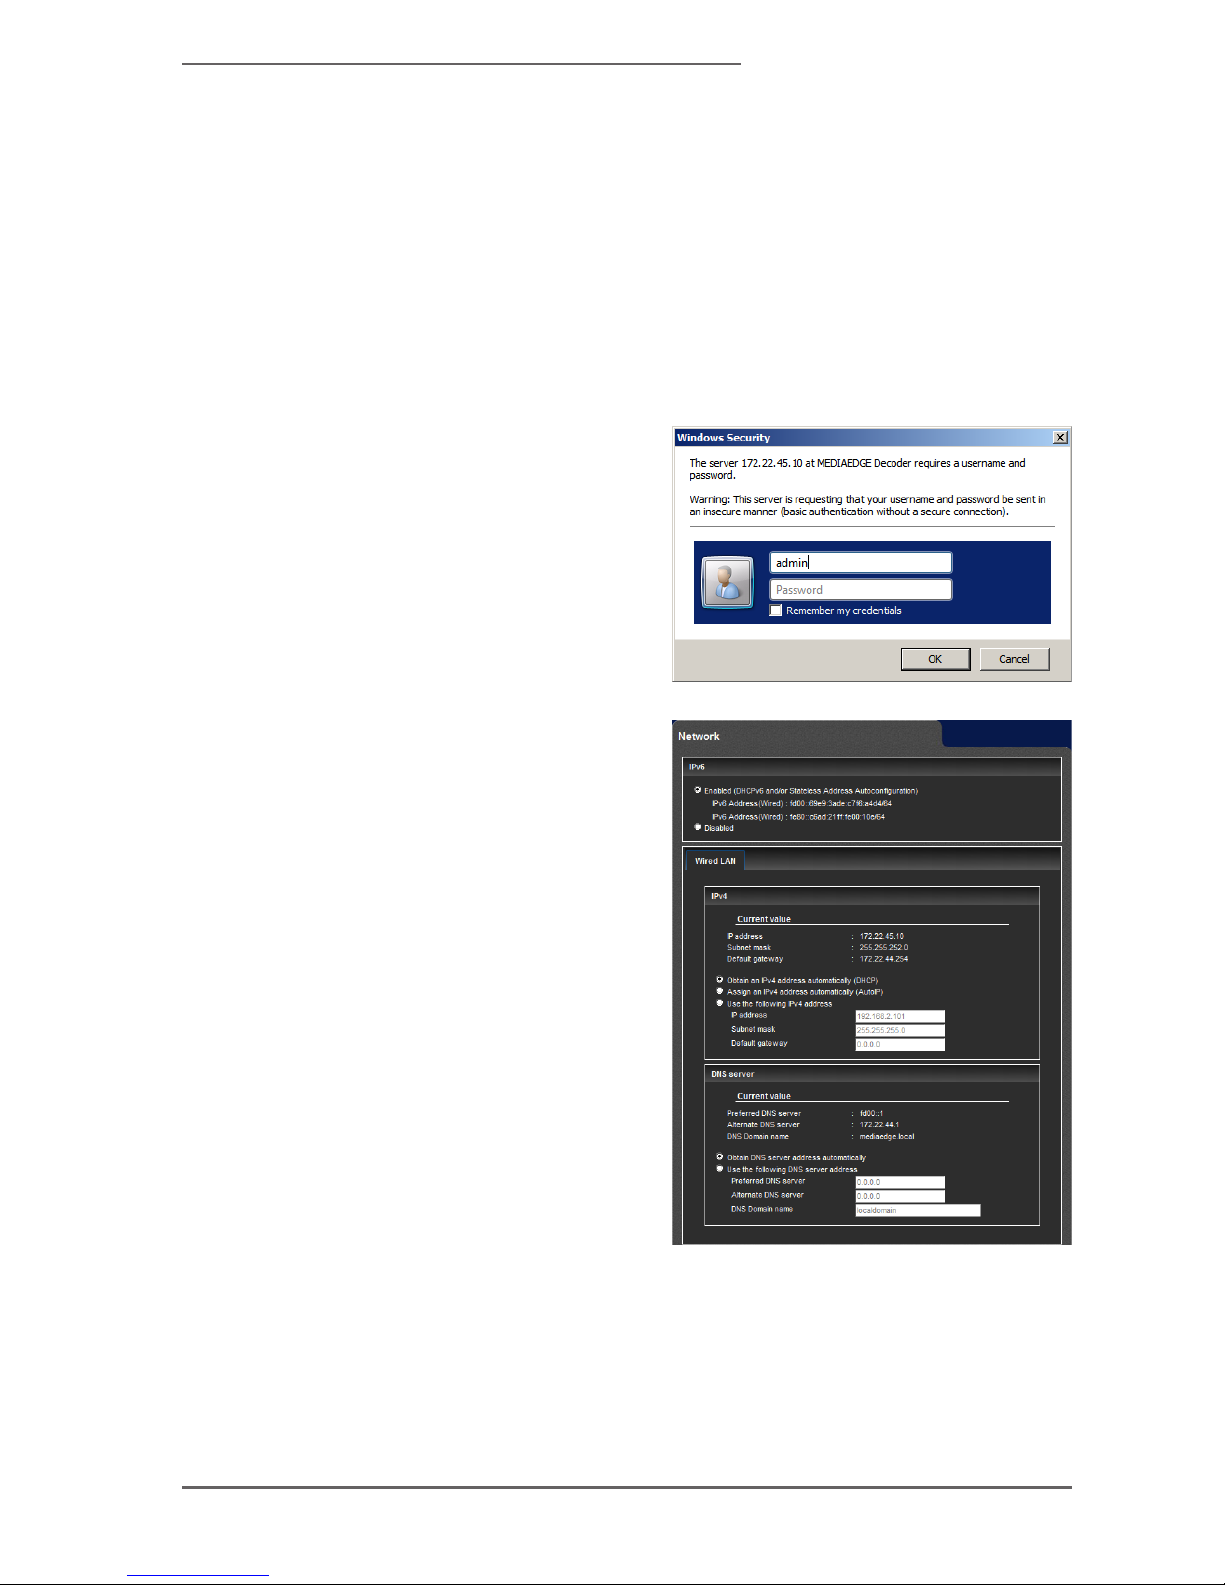
Ex.):If the IPv4 address of MEDIAEDGE Decoder is 172.22.45.10, enter URL as followed.
A screen like the one on the right
will be displayed. Enter the user
name and the password.
* In the factory setting, the user name is
admin, and there is no password. (The
password is not set.)
Open the network setting screen
from [Settings] > [Network], and
set [IPv6], [Wired LAN], [Wireless
LAN], [H o st n ame], and [NTP
server].
Page 34
- 34 -
MEDIAEDGE
■ Verify the Setting and the Status
If the MEDIAEDGE Decoder can be connected to a network, the detailed
setting can be done from the Web console. Open the MEDIAEDGE Decoder
by Web browser (Internet Explorer 8 (or later) that runs on Windows, Google
Chrome, or Mozilla Firefox).
After the startup of the MEDIAEDGE Decoder, display the setup menu
on the screen by using the (CONF) key on remote control. (It may not
be displayed depending on the settings.)
•
In Windows 7 and Windows 8, [network] > [other device] of explorer
will display the host name of the MEDIAEDGE Decoder that is
connected to the same network, and it will display the Web console
when the device is double-clicked. If the host name is not set, it will
be automatically generated from MAC address such as “DEC-xxxxxx.”
•
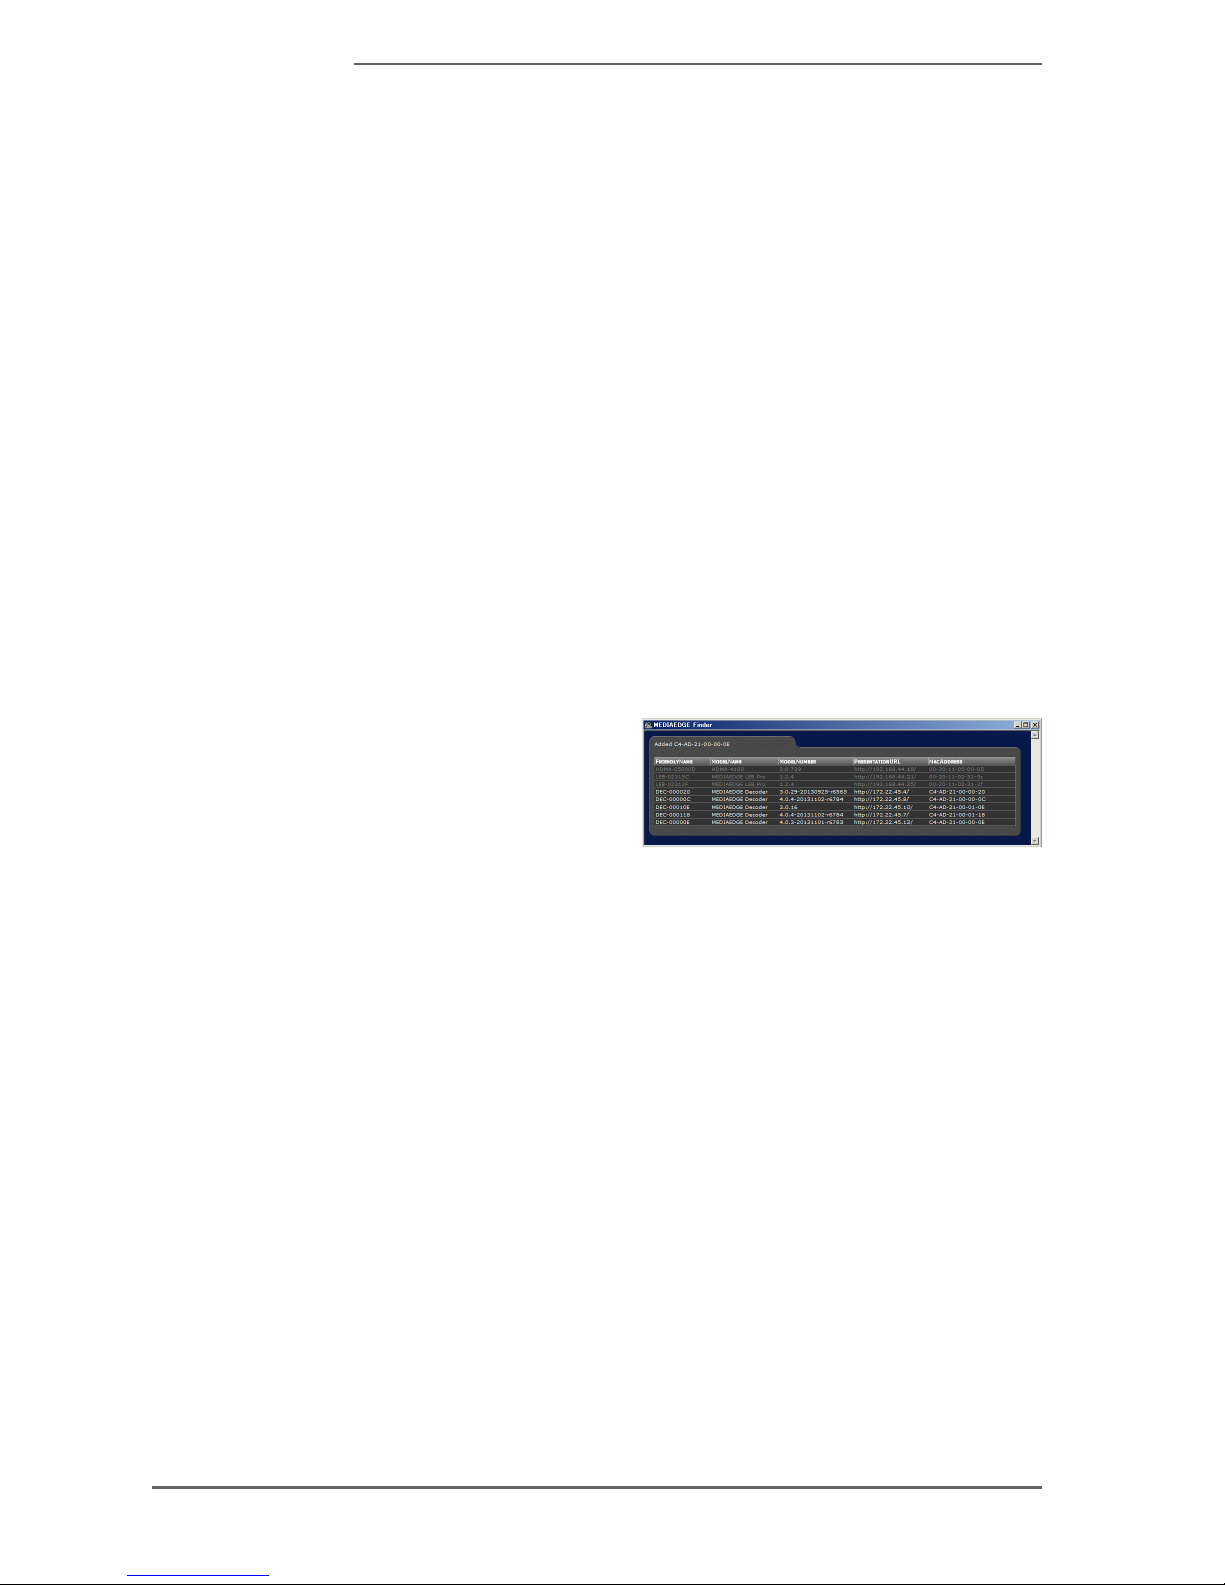
It is possible to connect the PC
and the MEDIAEDGE Decoder to
the same network and detect it
through the MEDIAEDGE Finder
that was installed in the PC.
When the detected [PRESENTATION
URL] of the MEDIAEDGE Decoder
is clicked, the Web console will be
displayed.
•
* You can download the MEDIAEDGE Finder from our home page.
* In addition to the MEDIAEDGE Decoder, HDMA-4100, MEDIAEDGE-STB4H, and MEDIAEDGE
LEB Pro/Express/Recorder will be detected.
Page 35

- 35 -
MEDIAEDGE Decoder
When DHCP or monitor is available, it is possible to perform the
setting with the following procedure.
- Set the IP address of the PC as automatic acquisition.
- Turn on DIPSW-3 of the MEDIAEDGE Decoder.
- Connect the PC and the MEDIAEDGE Decoder to the same HUB and startup.
- Startup the MEDIAEDGE Finder in the PC. After obtaining the IP address, detect
the MEDIAEDGE Decoder.
- The detected host name of the MEDIAEDGE Decoder will be displayed also in “other
divice” of Windows 7 and Windows 8.
* When the MEDIAEDGE Decoder is started while DIPSW-3 is ON, despite of the setting
status, IPv6 will be enabled and IPv4 will acquire IP automatically (AutoIP if unable to
acquire with DHCP after 20 seconds) at the startup.
* If there is possibility that UPnP is disabled, please initialize the setting value before
performing.
●
Page 36
- 36 -
MEDIAEDGE
4-2 Display Settings
Connect the MEDIAEDGE Decoder and the monitor with HDMI or SDI cable.
In HDMI model, it will display in the most appropriate resolution.
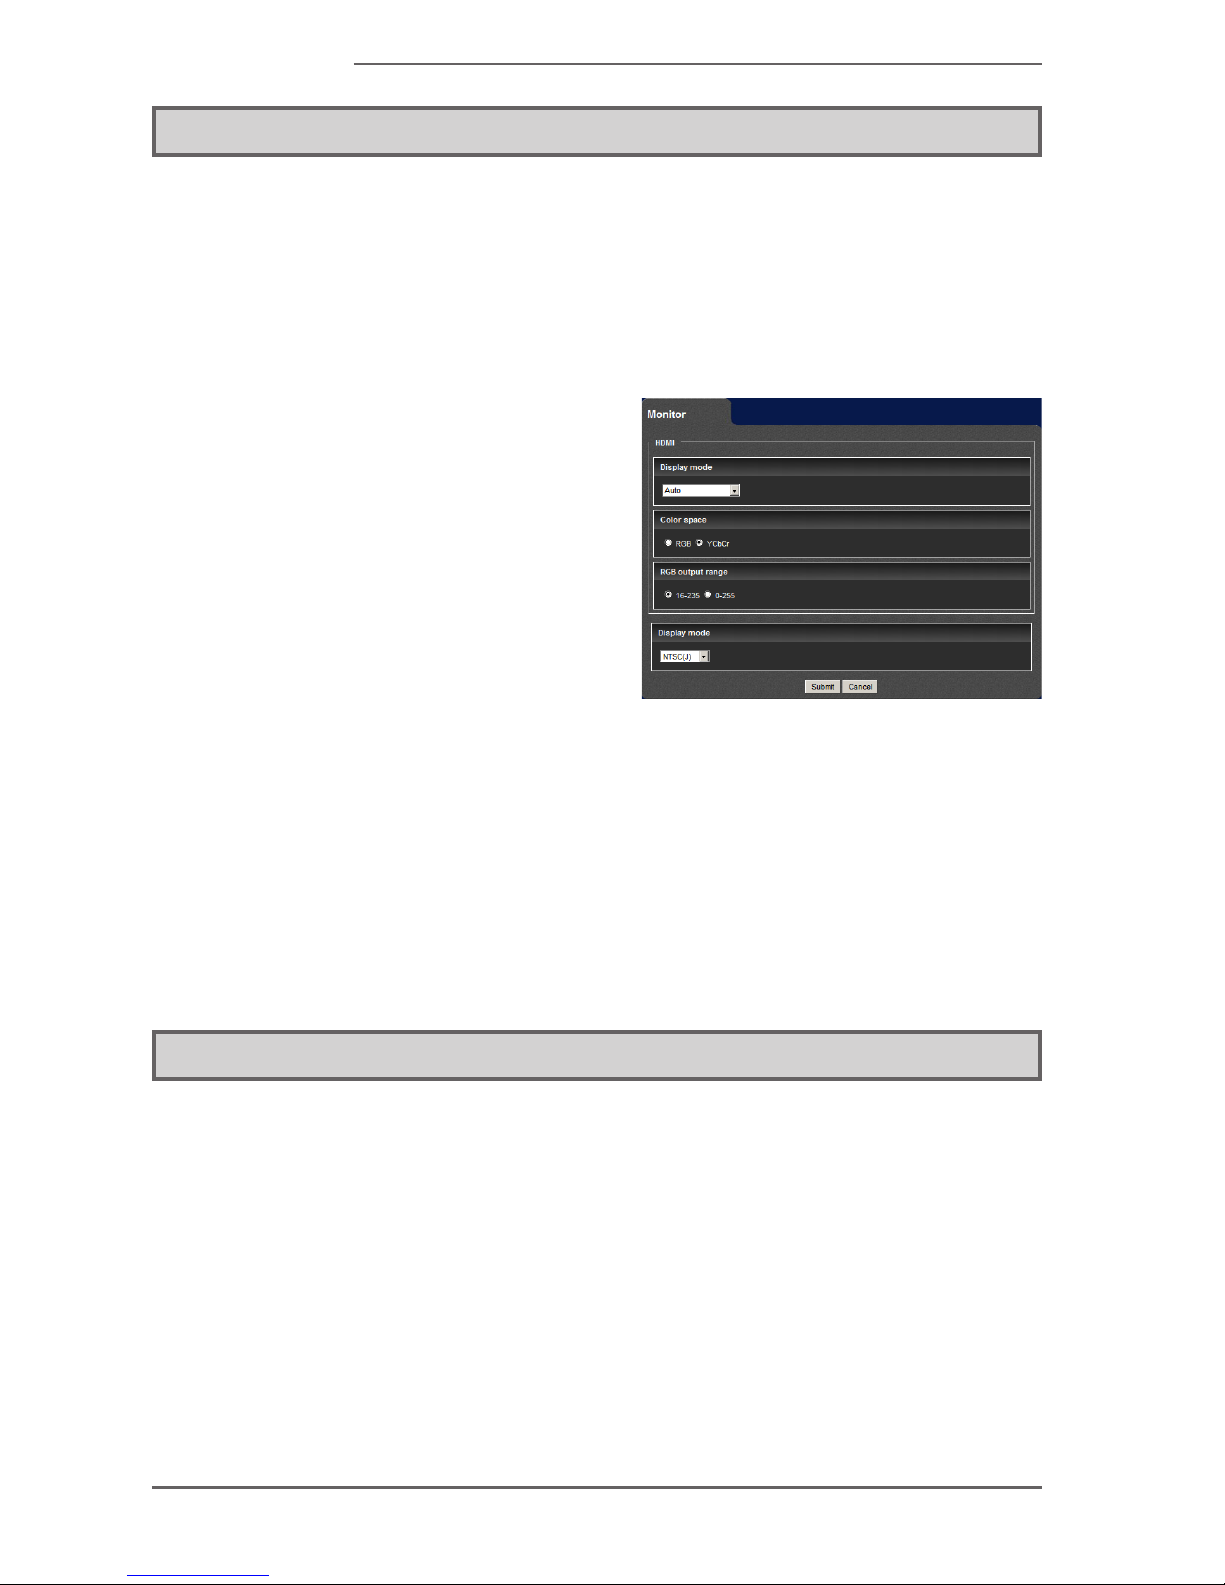
When connecting only with composite, select [Settings] > [Monitor] > [Display mode]
of the Web console from NTSC(J) (for Japan), NTSC(US) (for North America), or
PAL.
In the factory setting, “Display
mode” is set to NTSC(J) (Please
select NTSC(US) if you use the
monitor for USA).
•
When other than Auto is selected
in the display mode of HDMI,
the display will be done in the
selected mode. If the monitor that
does not support the selected
display mode is connected, it will
automatically display in the mode
that can be displayed.
•
* Please refer to the Web console for the setting method.
* The HDMI (and SDI) and the composite will perform the display at the same time. It can
be used by connecting the monitor to either one or both.
4-3 Initialization of Conguration
When the reset button is pressed for a long time (more than 5 seconds) while
DIPSW-1 is on, all the setting value will be initialized, and the MEDIAEDGE Decoder
will shutdown.
After the shutdown, turn off DIPSW-1 and the power rst before reclosing.
Page 37

- 37 -
MEDIAEDGE Decoder
4-4 Settings Wizard
For the MEDIAEDGE Decoder to be used according to the purposes, we have
provided the settings wizard to perform the minimum setting. We recommend that
the Settings Wizard is done rst and then the settings is added later.
> Settings Wizard
Page 38

- 38 -
MEDIAEDGE
Page 39

MEDIAEDGE Decoder
III. Streaming
This chapter will describe how to play
the le and the live video in streaming
by con n e c t in g the MEDI A ED G E
Decoder to the MEDIAEDGE Server
and the MEDIAEDGE LEB.
Page 40
- 40 -
MEDIAEDGE
1. Summary
1-1 About Streaming
The MEDIAEDGE Decoder supports streaming by RTSP/RTP, receives MPEG-2
transport stream that is sent from the server, and performs the playback. Streaming
supports only video les, and images and tickers are downloaded from the network
to play.
RTSP
Real Time Streaming Protocol is a protocol to deliver audio and video in real time over the
TCP/IP network.
RTP
Real-time Transport Protocol is a transmission protocol to play audio and video in streaming.
It is an UDP type protocol that does not have packet loss measure and transmission time
guarantee.
It is possible to perform playback such as video-on-demand to start playback from
the MEDIAEDGE Decoder side by remote control from the menu screen, scheduled
playback to start playback on the schedule from the server side, and live video
playback.
Notes
Wi-FimodeldoesnotsupportthestreamingplaybackthatuseswirelessLAN.
Page 41
- 41 -
MEDIAEDGE Decoder
2. Video on Demand
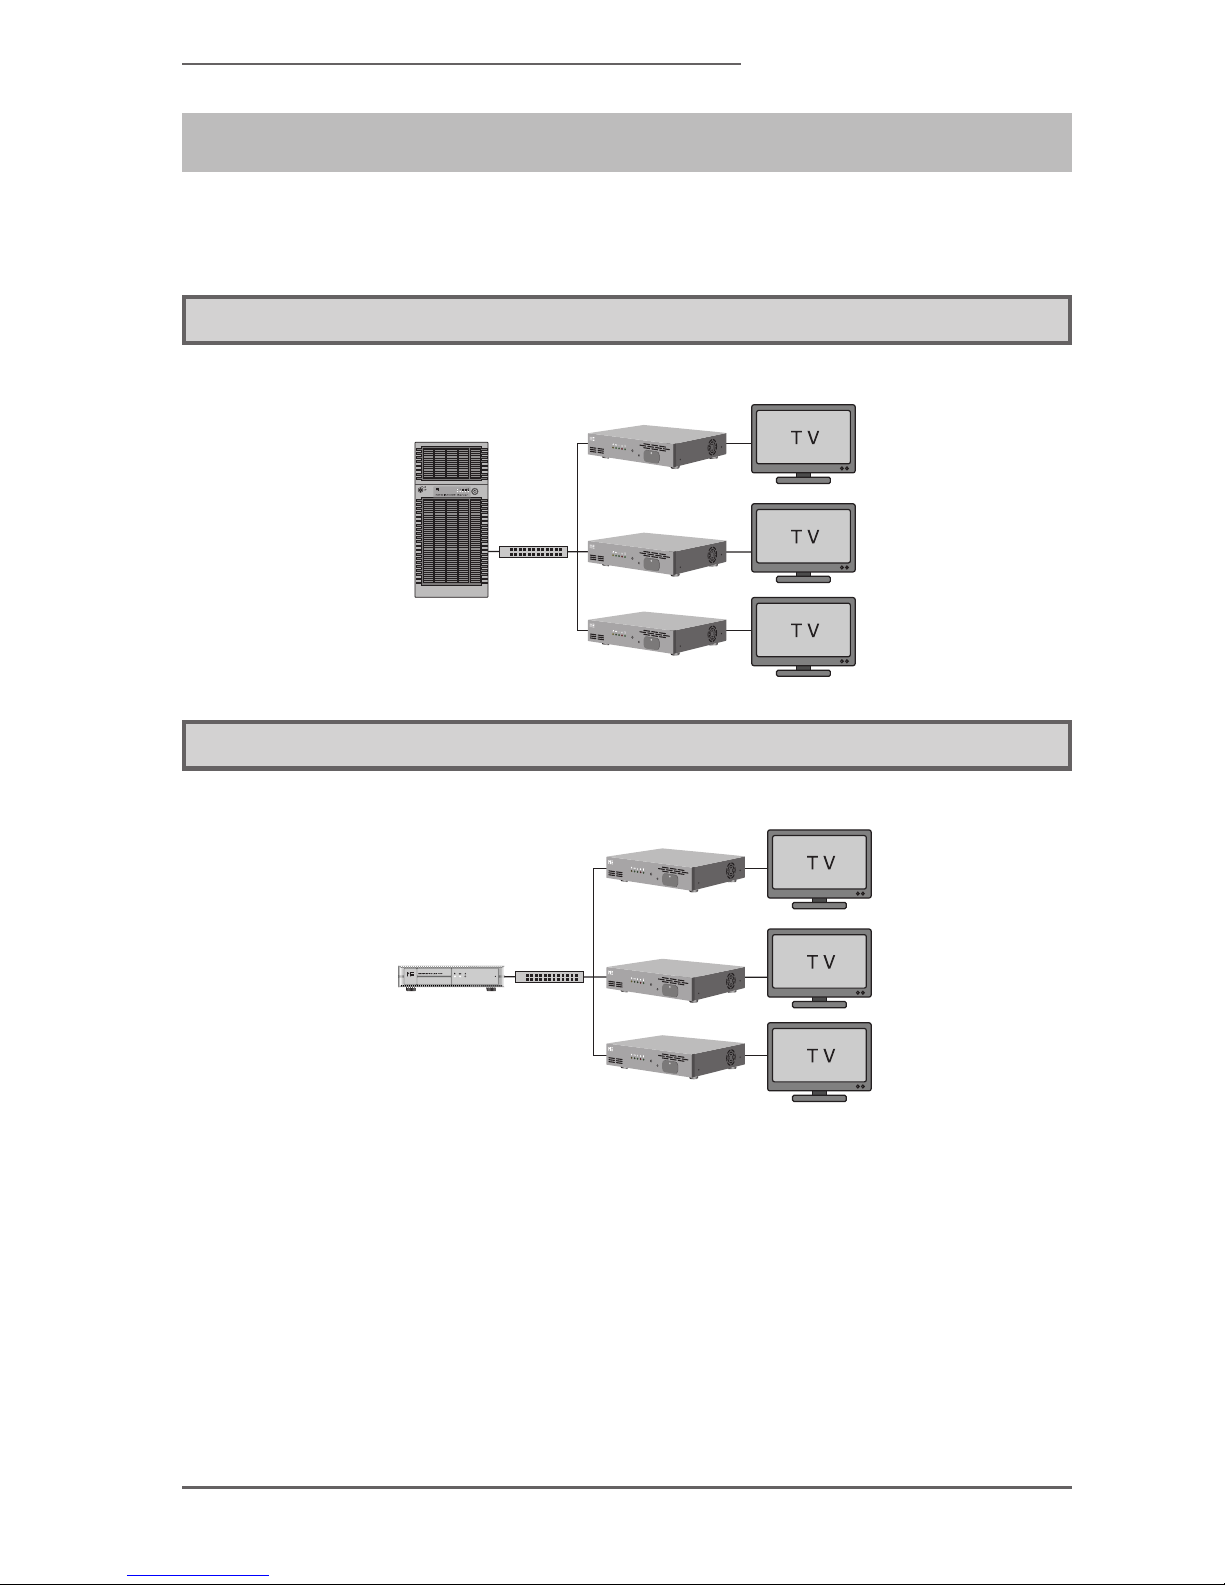
The menu page of the MEDIAEDGE Server and the MEDIAEDGE LEB will be
displayed on the screen, and the playback can be started by remote control.
2-1 Connection to the MEDIAEDGE Server
The connection to the MEDIAEDGE Server is as follows.
MEDIAEDGE Decoder
MEDIAEDGE
Server
2-2 Connection to the MEDIAEDGE LEB
The connection to the MEDIAEDGE LEB is as follows.
MEDIAEDGE LEB
MEDIAEDGE Decoder
Page 42
- 42 -
MEDIAEDGE
2-3 Conguration
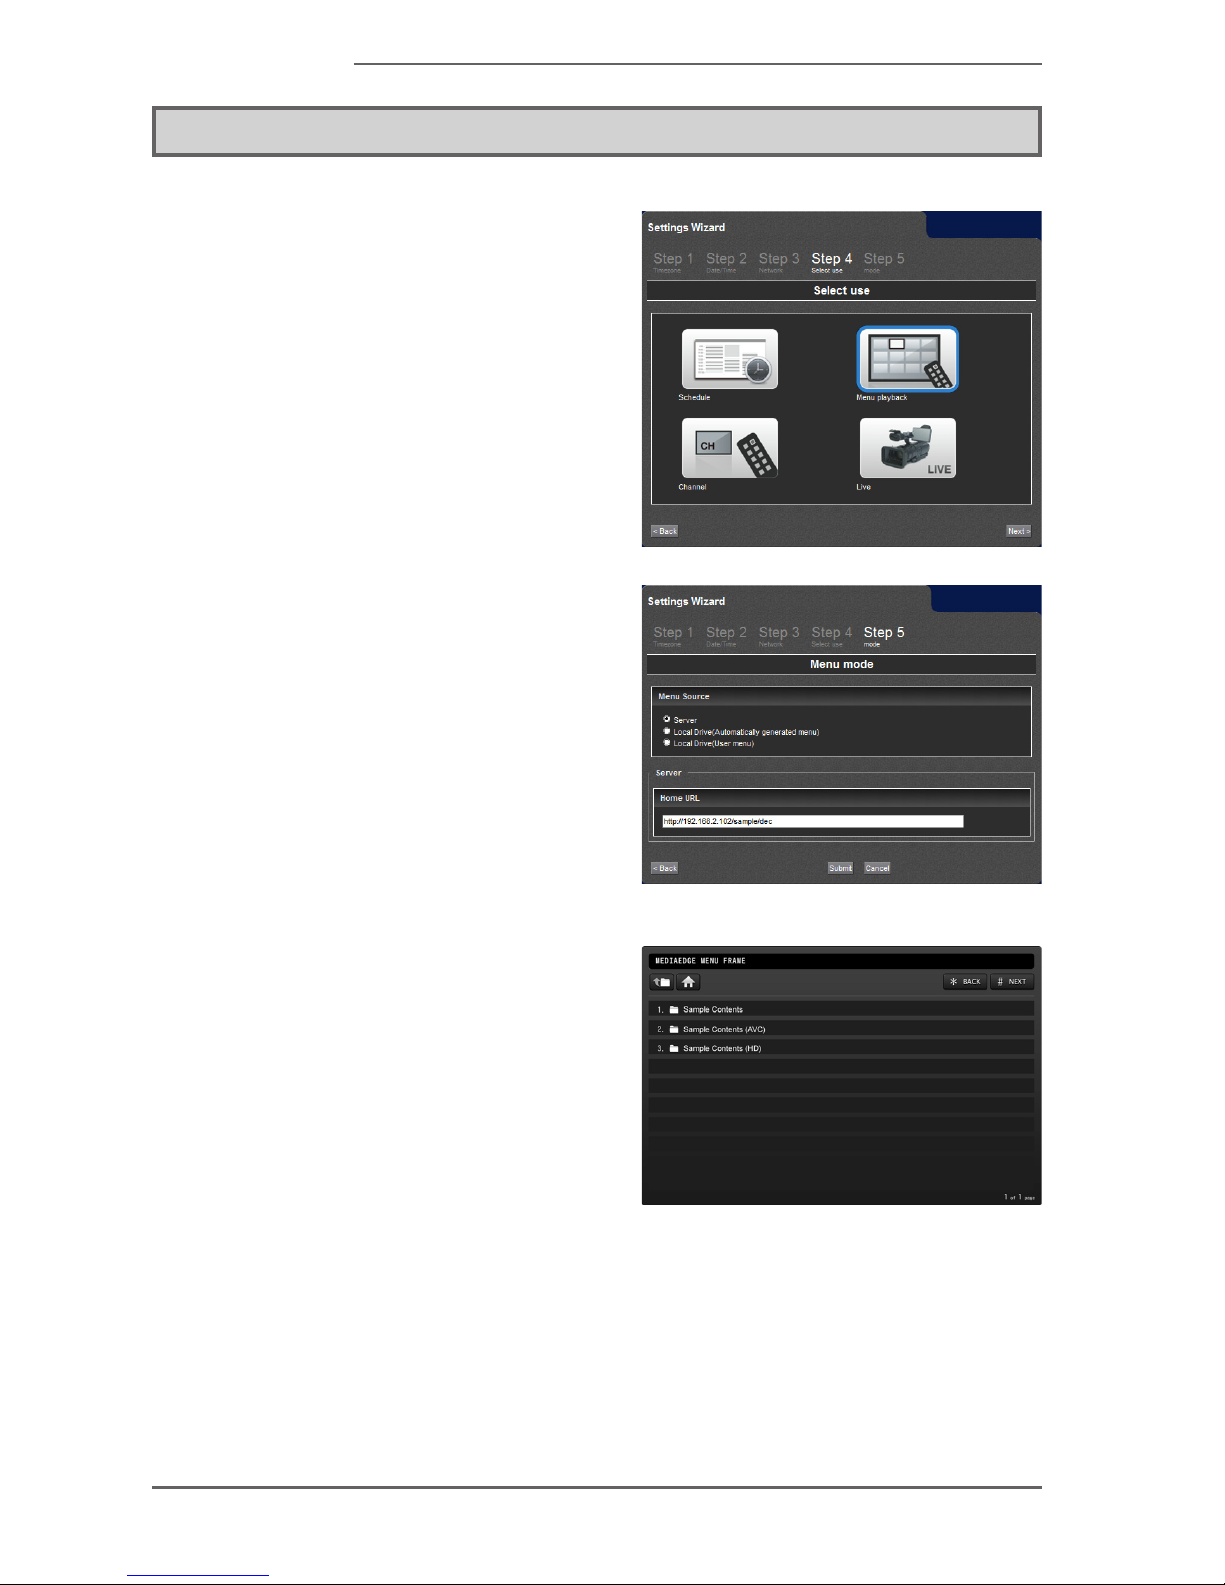
Please select [Menu playback]
on Select use screen accessing
the Web console after setting
Tim e zon e , Date / Tim e , and
Network from Settings Wizard.
•
Select [Server] in [Menu Source]
on the next screen.
Next, enter URL of menu page
on [Home URL]. To display the
sample page of the MEDIAEDGE
Server, enter as follows:
[http://(IP address or host name
of MEDIAEDGE Server)/sample/
dec/]
•
Wh e n the abov e set t i n g is
completed, the screen like the
one below will be displayed.
When the content is selected
and th e [OK] k ey on remot e
c o n t r o l i s p r e s s e d , t h e
streaming playback will start.
•
Page 43
- 43 -
MEDIAEDGE Decoder
T o d i s p l a y t h e m e n u o f
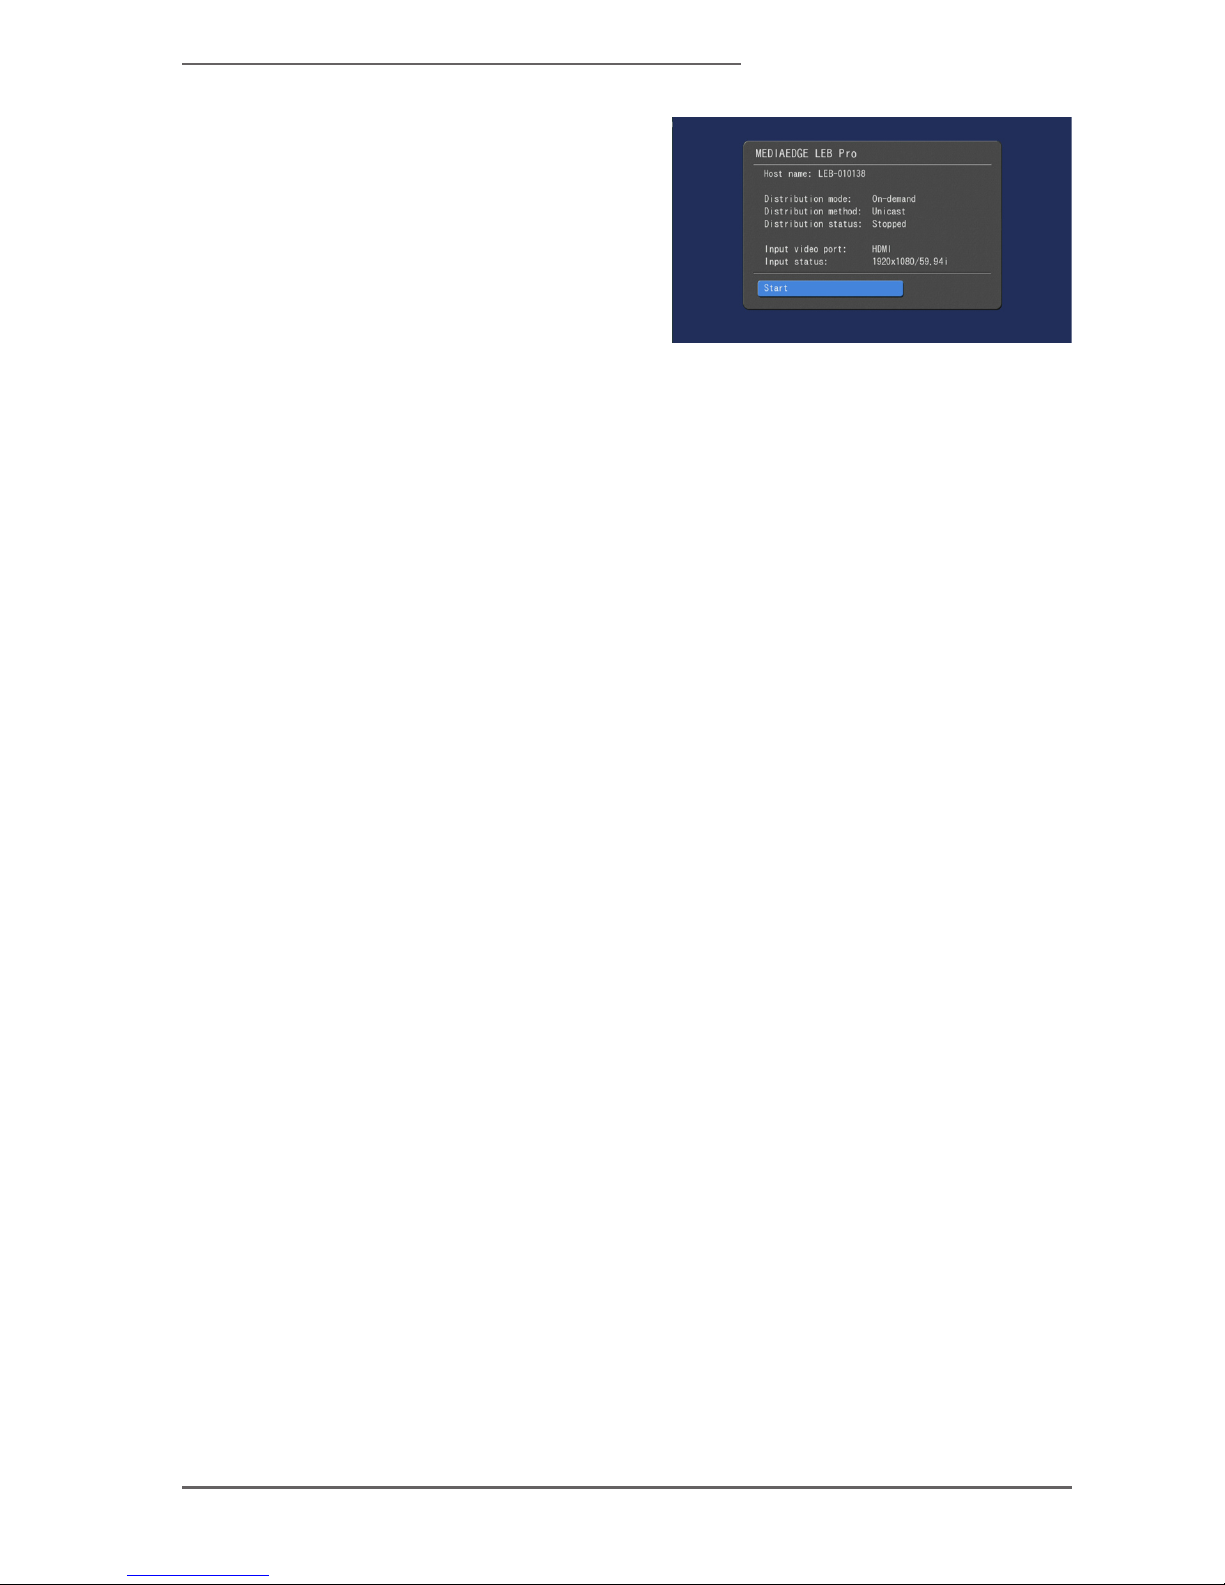
MEDIAEDGE LEB, enter as follows:
[http://(IP address or host name
of LEB)/menu]
When the setting is completed,
the screen like the one below will
be displayed. When the content
is selected and the [OK] key on
remote control is pressed, the
streaming playback will start.
•
Page 44
- 44 -
MEDIAEDGE
3. Scheduled Playback
It is possible to register the schedule in the MEDIAEDGE Server and run the
scheduled playback by streaming. Please refer to a separate user guide for
MEDIAEDGE-SVS4 to know how to create the schedule.
3-1 Conguration
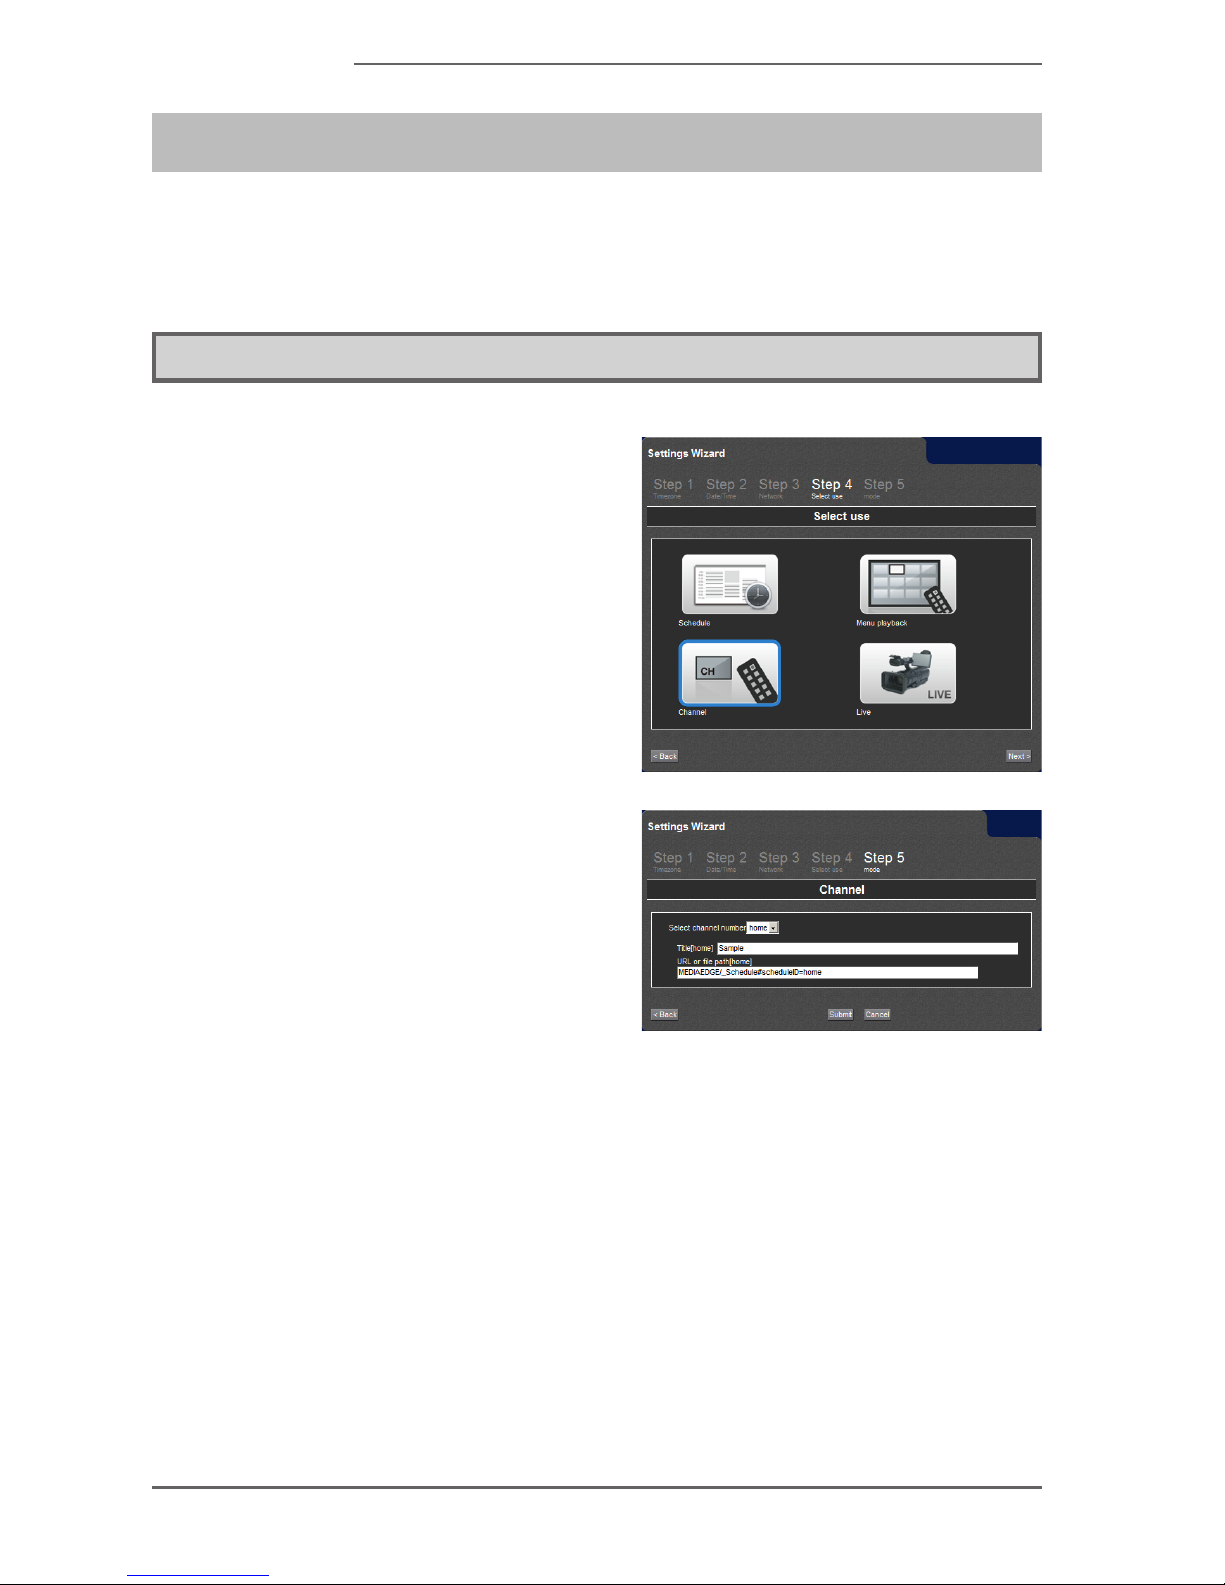
S e t t h e c h a n n e l f r o m t h e
S e t t i n g s W i z a r d . P l e a s e
select [Channel] on Select use
screen after accessing the Web
console and setting Time zone,
Date/Time, and Network from
Settings Wizard.
•
Enter URL of the channel in [URL
or file path] of any c hann el.
To specify the channel called
c h a n n e l 0 1 of ME D I A E D G E
Server, enter as follows:
[rtsp://(IP address or host name of
MEDIAEDGE Server)/channel01]
When the setting is complete,
select th e s e l ected channel
number from the remote control.
•
Page 45
- 45 -
MEDIAEDGE Decoder
4. Live Streaming Video Playback
Live streaming video of the MEDIAEDGE LEB can be received and played. Unlike
the video on demand, the live streaming of the MEDIAEDGE LEB can be played
without an instruction from the remote control.
4-1 Conguration
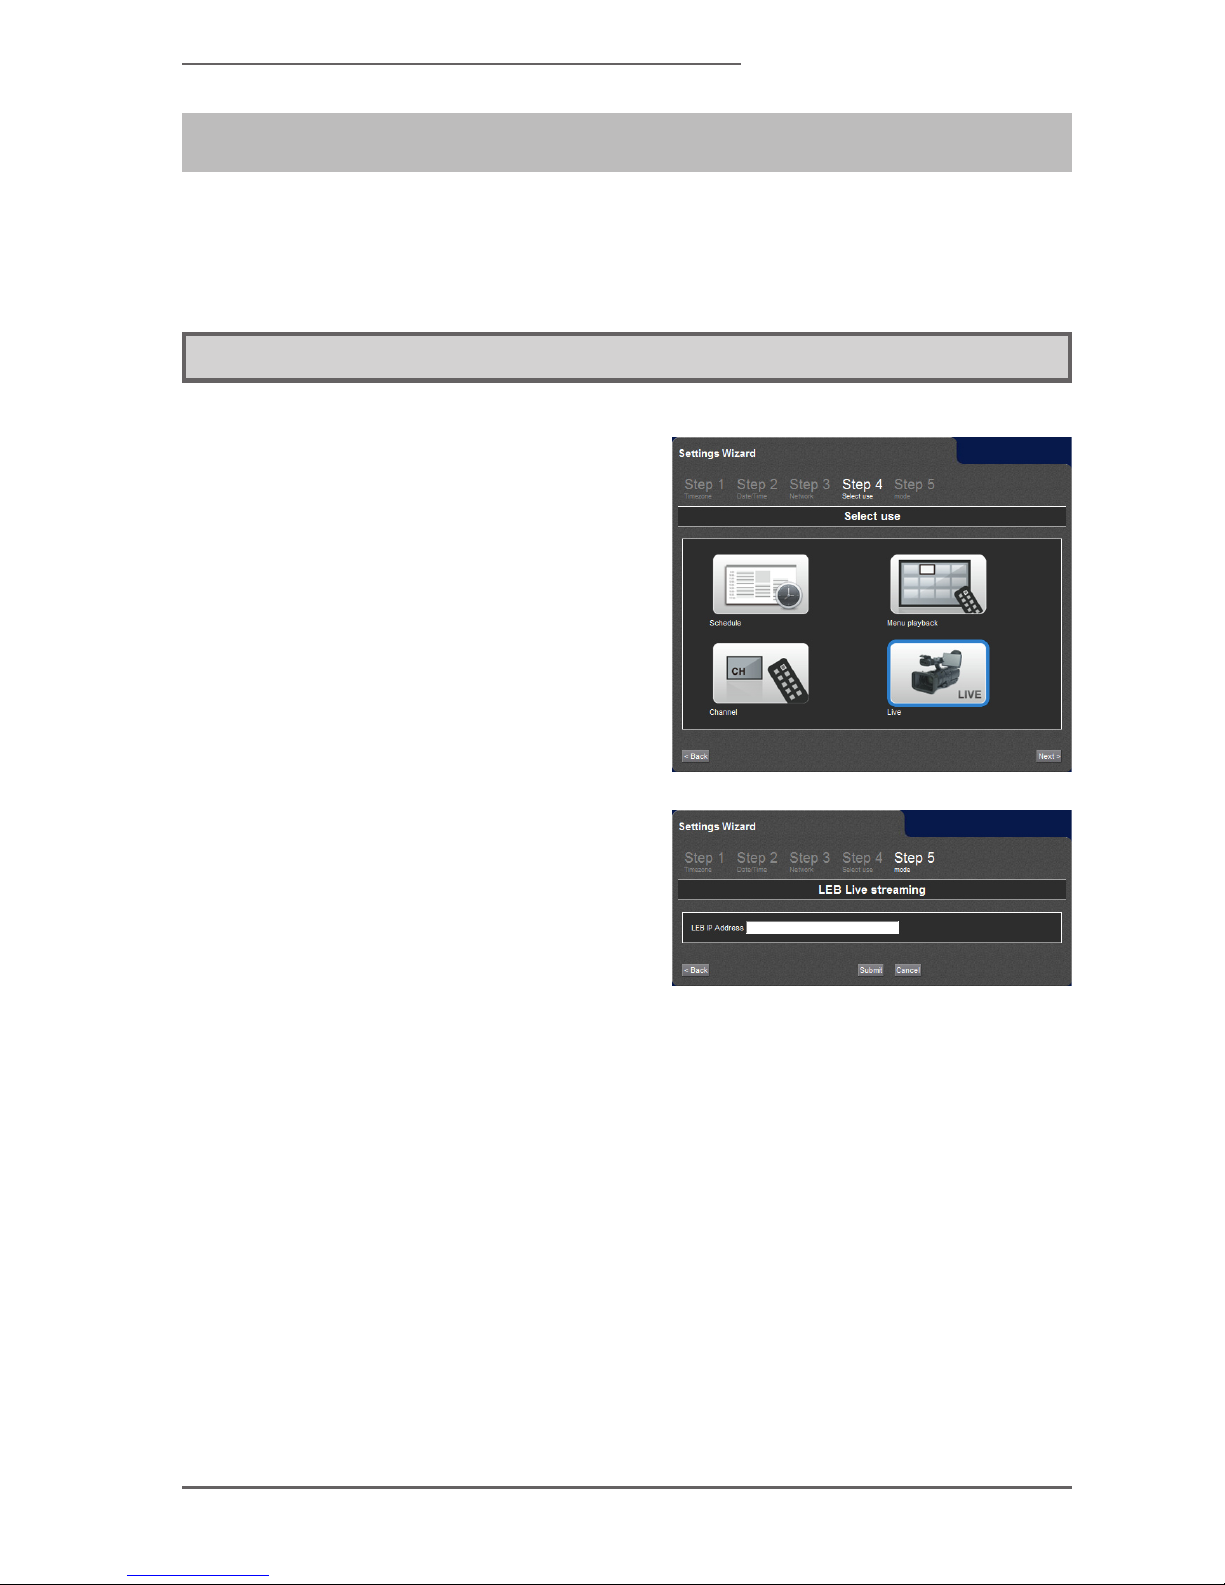
Please select [Live] on Select
use screen accessing the Web
console after setting Time zone,
Date/Time, and Network from
Settings Wizard.
•
Set up by entering IP address
or host name of LEB in [LEB IP
Address]. When setting from the
Settings Wizard, the live streaming
will be assigned in [Home] channel.
When playing the next channel,
select the [home] channel by
pressing the (HOME) key on the
remote control. To assign another
channel, enter URL in [URL or le
path] of any channel from channel
mode. Enter URL as follows:
[rtsp://(IP address or host name of
MEDIAEDGE LEB)/video]
After the s etting, the playback
will start when the previously set
channel number is selected with
the remote control.
•
Page 46

- 46 -
MEDIAEDGE
Page 47

MEDIAEDGE Decoder
IV. Local File Playback
This chapter describes how to play the
le from the storage connected to the
MEDIAEDGE Decoder.
Page 48
- 48 -
MEDIAEDGE
1. Scheduled Playback
1-1 About Scheduled Playback
With the MEDIAEDGE Decoder, it is possible to run the scheduled playback both
in menu mode and in channel mode. To startup the schedule automatically, set to
the channel mode and register the schedule to be played in [Home] channel. It is
possible to register the schedule in multiple channels and use them by switching by
the channel.
1-2 DCM
Use the DCM to create the schedule and the layout of the MEDIAEDGE Decoder.
When the DCM is used, the registration to the channel will be done automatically
if the operation mode is set to the channel mode. Concerning to the DCM, please
refer to the manual attatched to the DCM.
Notes
TheMEDIAEDGEDecodersupportstheDCM1.8orlater.
1-3 Filler Play
When an error occurs while playing the scheduled file, it is possible to play the
specic content.
This content is referred as “the ller le (or the ller content),” and playing the ller is
referred as “the ller playback”.
When the ller le is played, the playback error and the ller le playback will be
recorded in the log. When it switches to the next scheduled content, it will stop the
ller playback and return to the schedule.
Page 49
- 49 -
MEDIAEDGE Decoder
1-4 Conguration
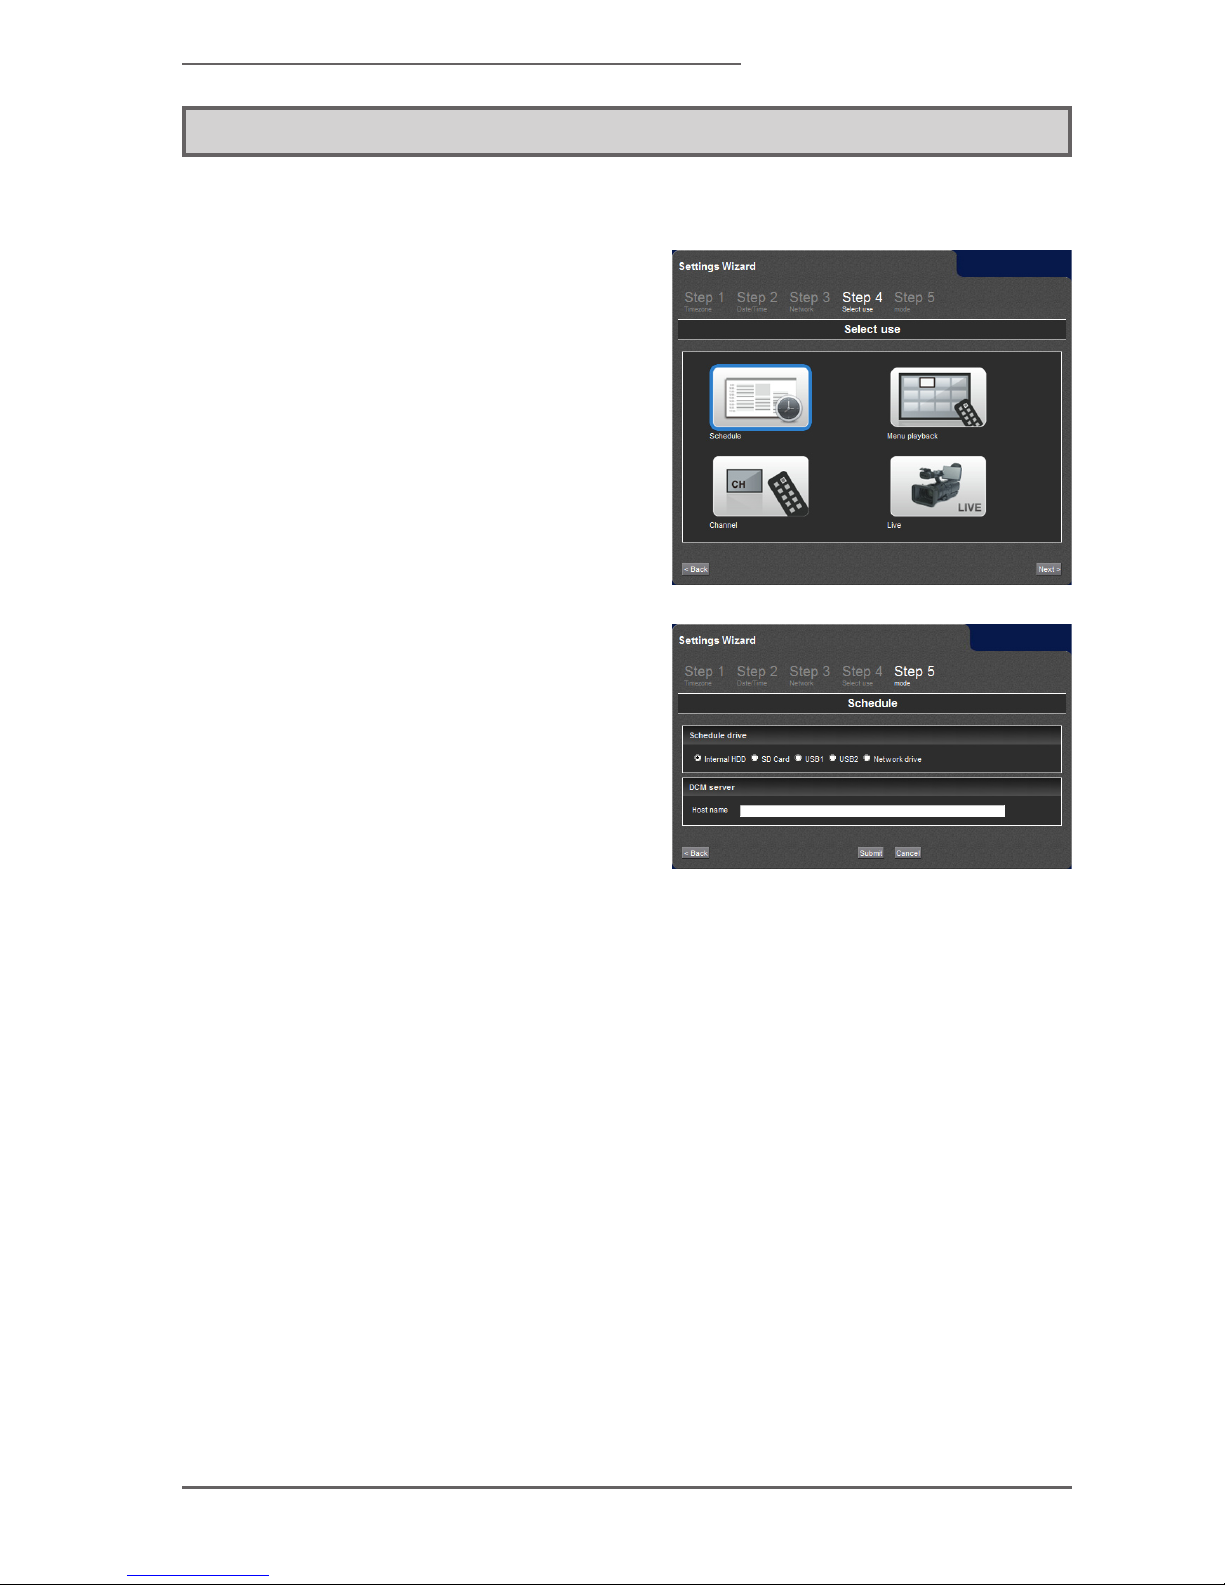
■ Settings Wizard
To create the schedule by using
DCM, please select [Scheduled
playback] on Select use screen
after accessing the Web console
and setting Time zone, Date / Time,
and Network from Setting wizard.
•
Sele ct the d rive to s ave the
content that is delivered from
DCM in [Schedule drive]. Please
make sure that there is enough
free space in the drive selected
here. Next, enter IP address
or host name of DCM serv er
in [Ho s t nam e ] . W h e n the
connection port number and the
account information of the DCM
server are changed, change the
settings from advanced setting.
Page 50

- 50 -
MEDIAEDGE
■ Detail Settings
[Basic settings] > [Note authority of the drive]
Set the drive selected in [Schedule drive] of the Settings Wizard to [Read
Write].
•
[Basic settings] > [Network drive]
When [Network drive] in [Schedule drive] of the Settings Wizard is selected,
the network drive will need to be set.
•
[Network] > [Cooperation with DCM]
When the user name and the password of authentication account in DCM
server are changed from the specied value, set a new user name and a
new password.
> The Settings of Cooperation with DCM
•
[Playback] > [Schedule]
Set wheteher or not to play the ller content when an error occurs during
playing the schedule.
> The setting of Filler Playback
•
Page 51
- 51 -
MEDIAEDGE Decoder
2. Playback Menu
2-1 Automatically Generated Menu
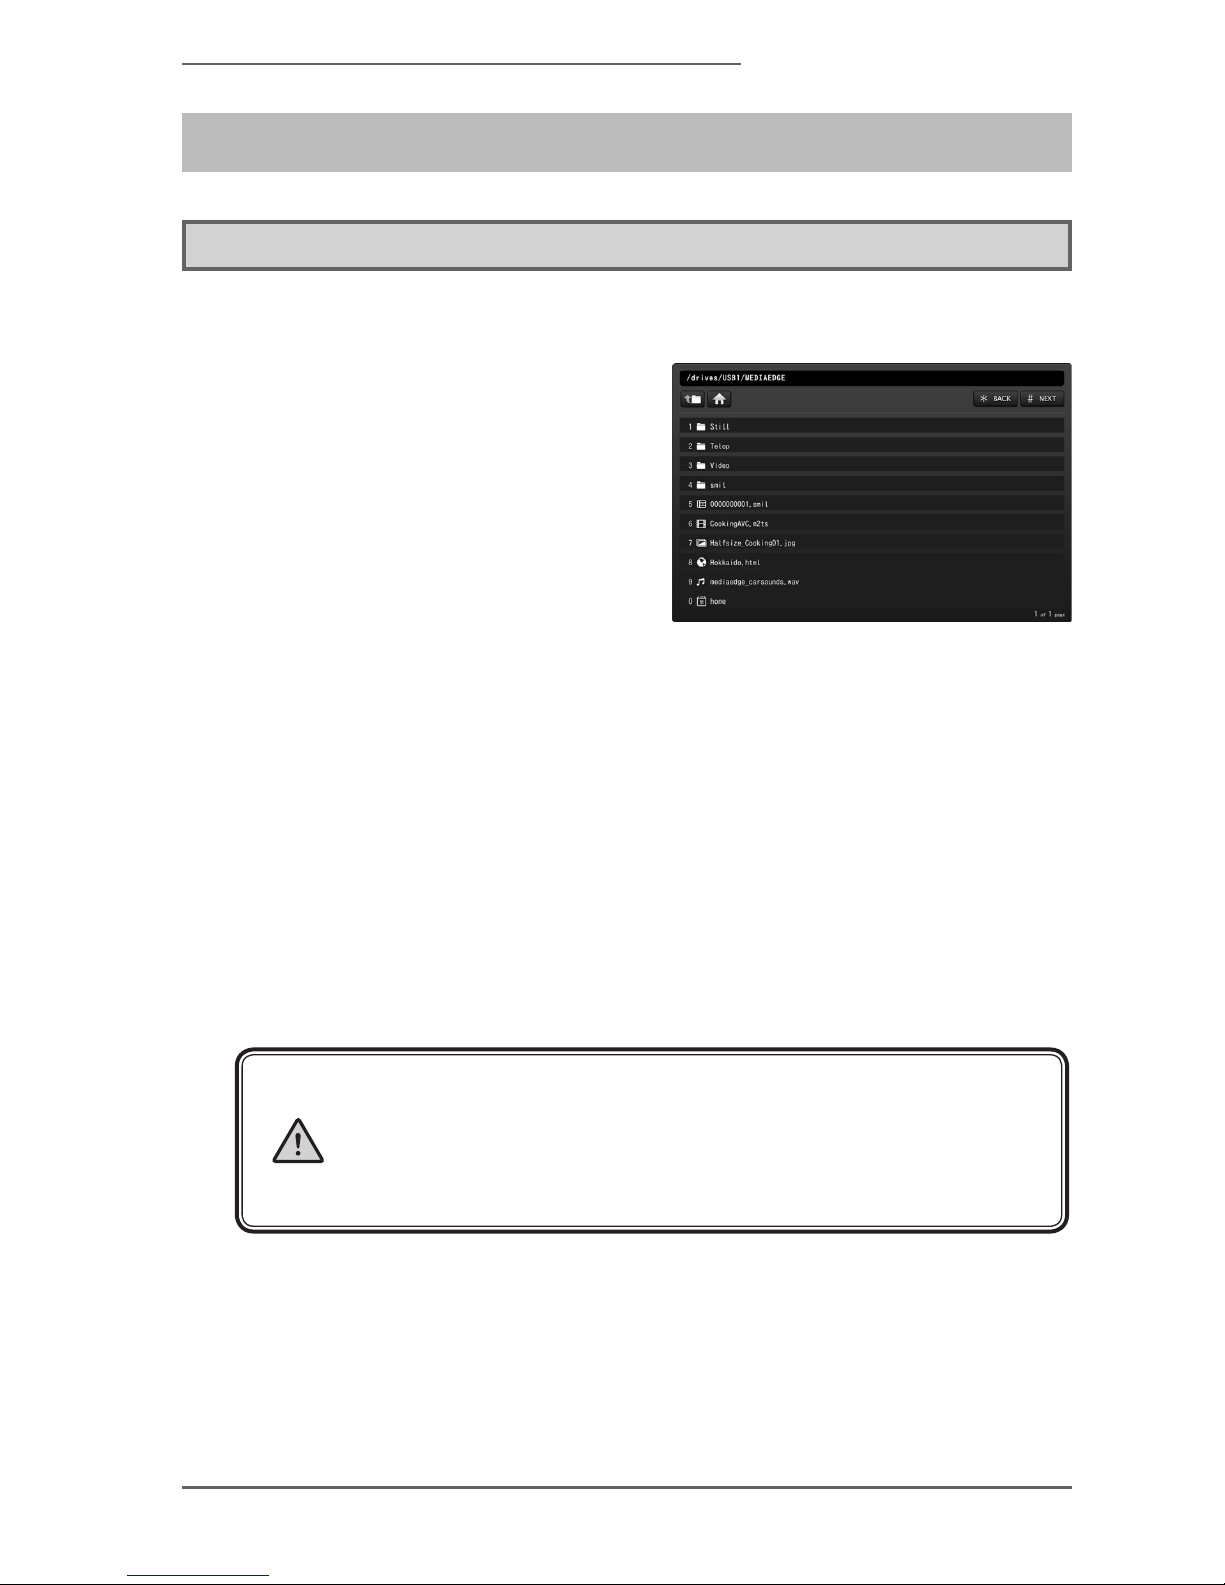
■ About Automatically Generated Menu
Based on the contents of folders
and files on the specified drive,
the menu that is layered on a
per-file basis can be created and
displayed automatically. The
hierarchy will move when the
folder is selected from the remote
control, and the playback will start
when the content is selected.
The content in USB memory and
SD card can be selected from the
remote control at once to play.
The items in the menu will be
created based on the file name,
and the display order will be by le
name or in update time order. The
folders (hierarchy) can be displayed
in preference to content les.
•
•
•
FileName
The le name isinUTF-8, and the display order will alsobe in code order of UTF-8.
Therefore, it will not be displayed in the dictionary order when Japanese is used.
Tocontrolthedisplayorder, itisrecommendedto usethe explicitprex suchas 00-le.
mpgand01-le.mpgatthebeginningofthelename.
■ Change of Names
When content.info le is put in the folder under the content le, the le name
in the menu can be changed to any names for display. Please put content.info
les in each separate folder where the content will be placed.
Page 52
- 52 -
MEDIAEDGE
Formatofcontent.info
Theformatoftheleisasfollows:
contentlename/stringofnamethatisbeingchanged
Example:
Content01.m2t/statueoiberty
Content01-HD.m2t/yukigesho
EnterlenamesandnamesbeingchangedinUTF-8.
Page 53
- 53 -
MEDIAEDGE Decoder
2-2 User Menu
The menu can be used by using the externally created menu file rather than
automatically generated menu.
2-3 Screen Saver
It is possible to display a screen saver when there is no operation in menu mode for
a certain period of time. When the remote control is operated while a screen saver
is being displayed, it will return to the menu. It is possible to specify a schedule in
addition to a video and a still image as a screen saver and to display the schedule
and operate the menu display by remote control during no-operation.
Also, when returning to the menu from the screen saver, there are options to return
to the original menu or to the home menu. This is used to return to the home screen
in case of leaving in the middle of the menu hierarchy.
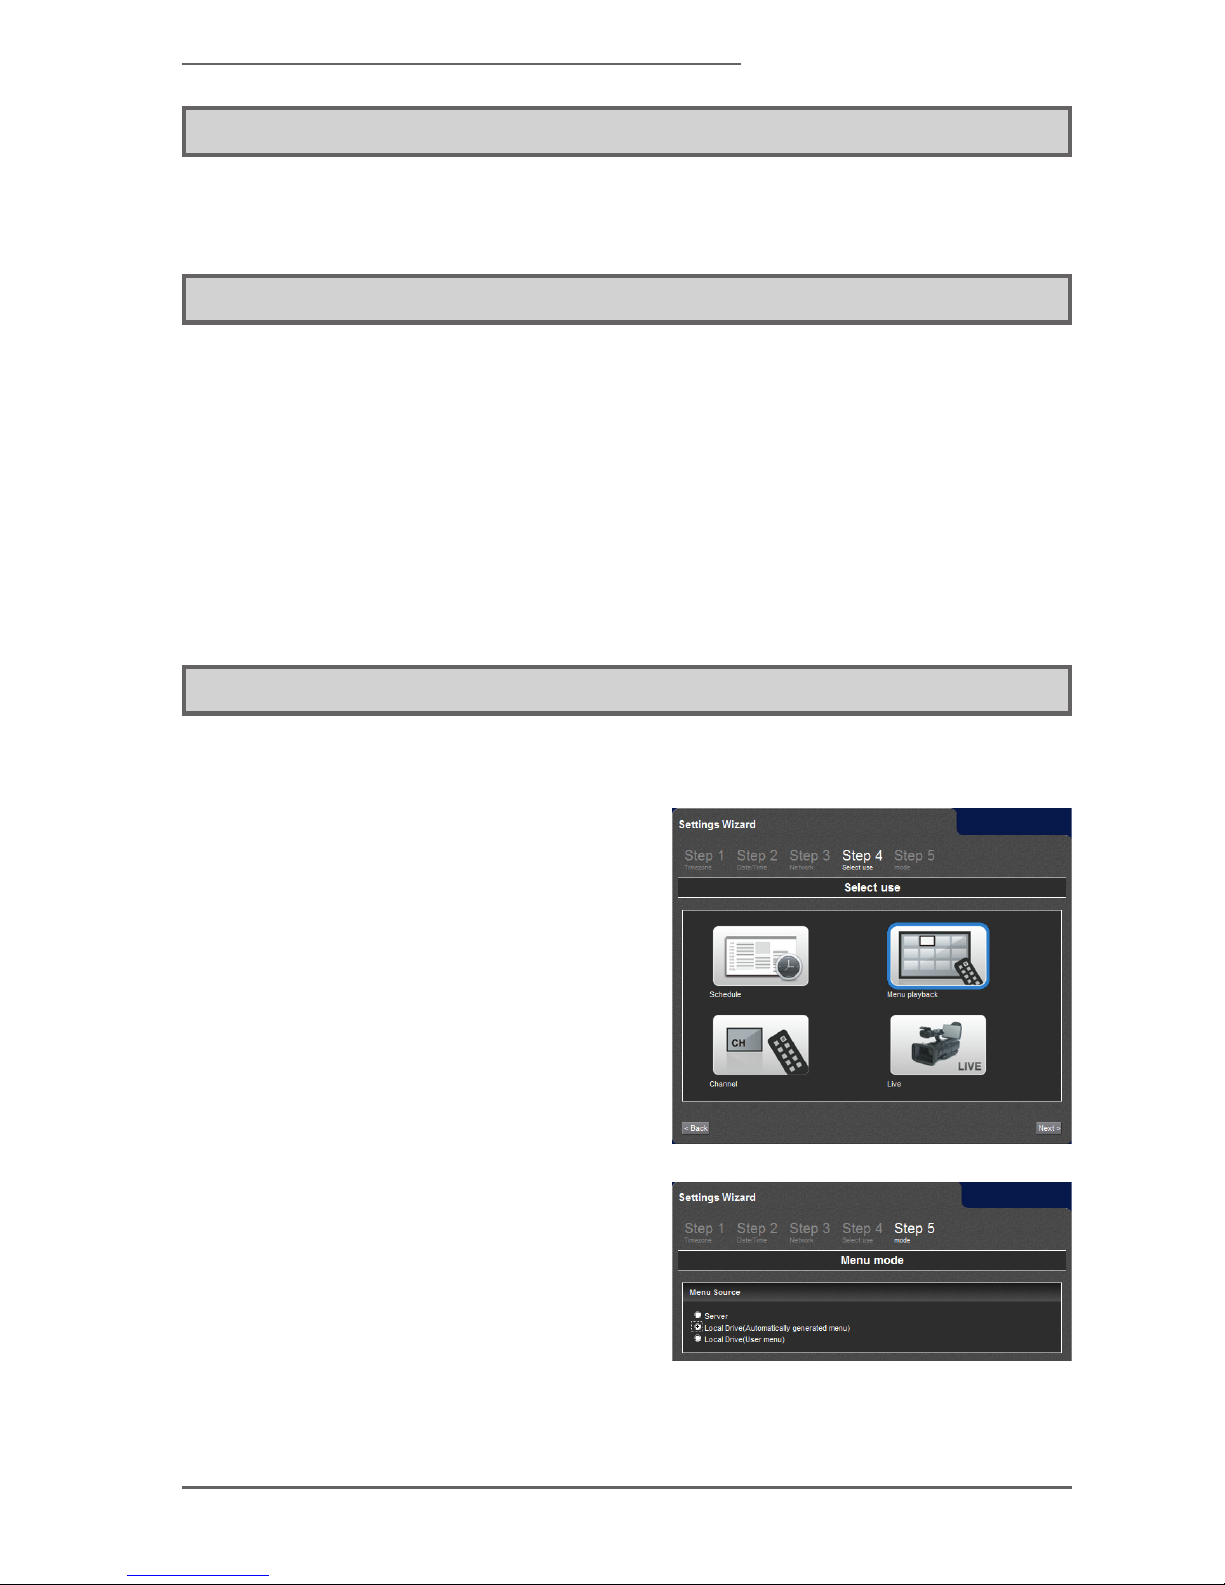
2-4 Conguration
■ In Automatically Generated Menu
To connect the drive in which
t h e c o n t e n t is s a v e d a n d
display the content to the menu
auto m aticall y, p l ease selec t
[menu playback] on Select use
screen after accessing the Web
console and setting Time zone,
Date / Time, and Network from
Settings wizard.
•
S e l e c t [ L o c a l d r i v e
(automatically generated menu)]
in [Menu source].
•
Page 54
- 54 -
MEDIAEDGE
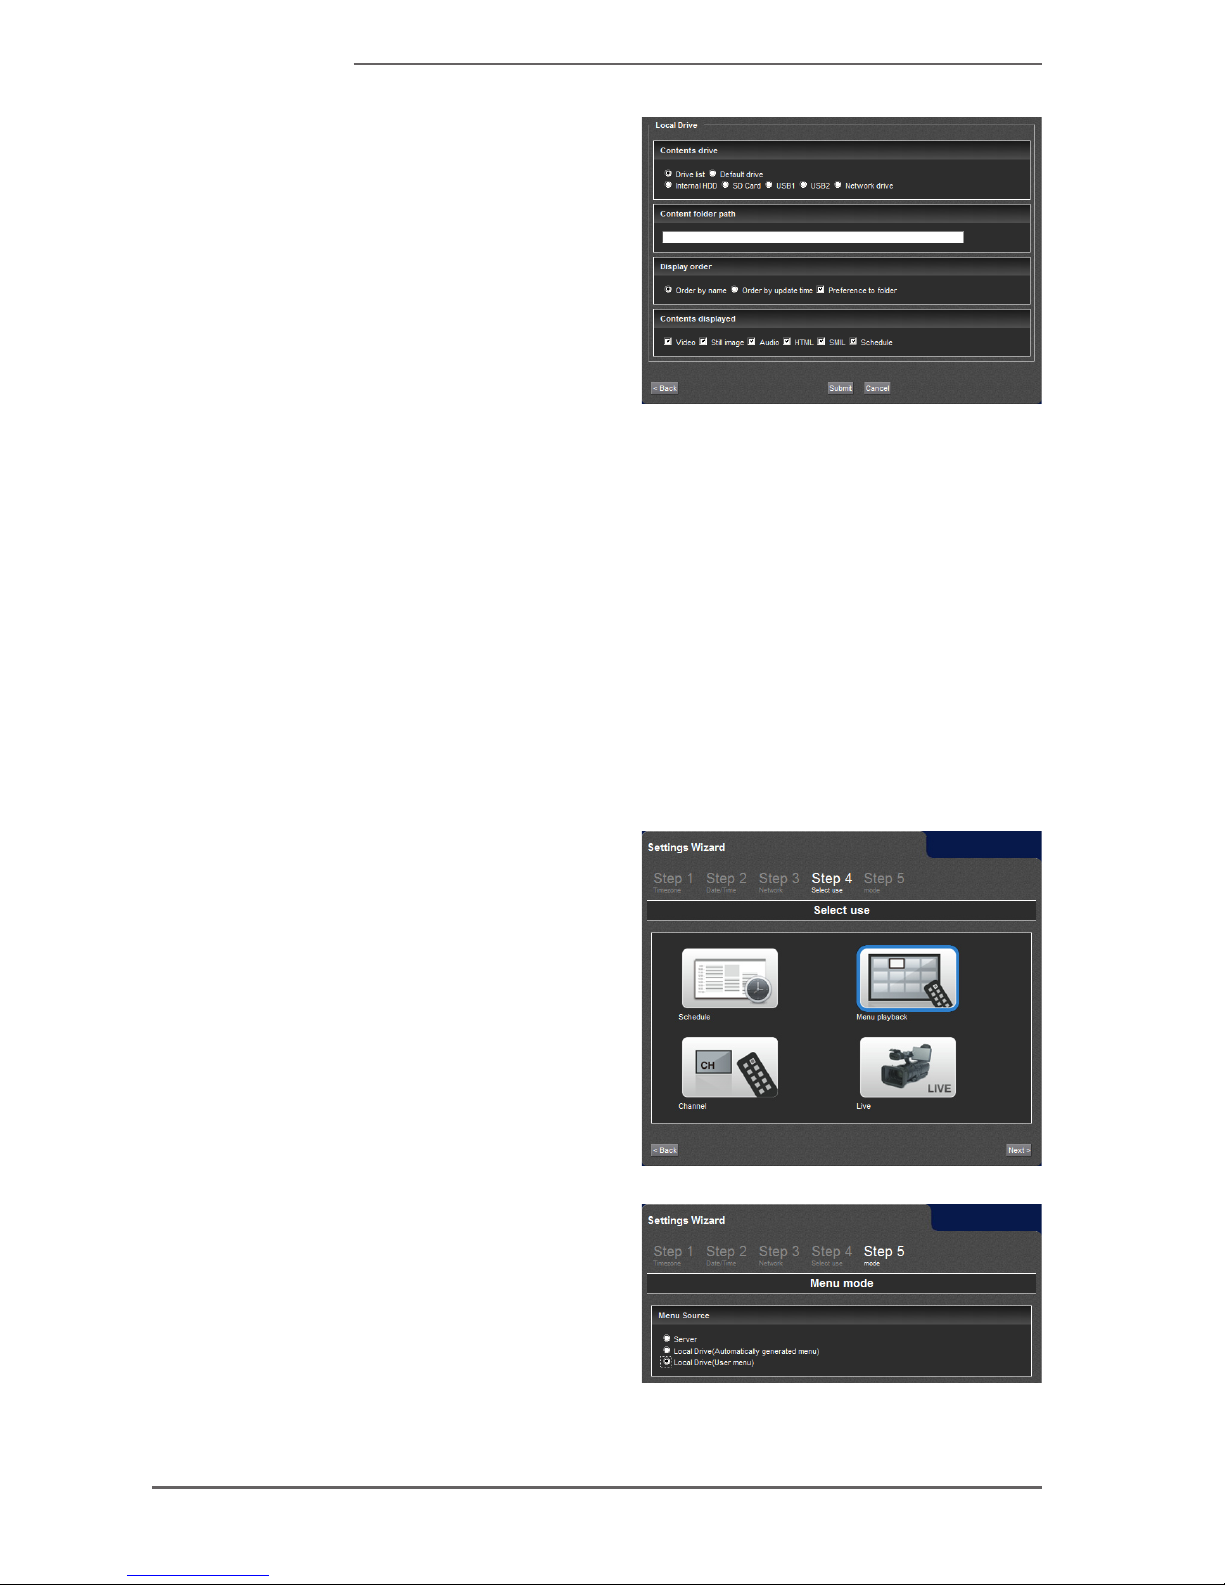
In [Content drive], select the
drive in which the content is
saved. When multiple drives are
used, please select [Drive list].
When [Default drive] is selected,
the drive that was selected in
default drive will be used. Please
set [Cont e n t f o lder path] t o
display in the menu only below a
certain folder on the drive.
Please refer to the local drive
[Content folder path] how to
write a folder path. Set [Display
order] to change the display
order and [display-content] to
change the content to display.
•
•
■ In User Menu
To us e th e c r e a t e d m e n u ,
please select [menu playback]
on Selec t use scree n afte r
accessing the Web console and
setting Time zone, Date / Time,
and Networ k from S e tti n g s
wizard.
•
Select [Local drive(user menu)]
in [Menu source].
•
Page 55
- 55 -
MEDIAEDGE Decoder
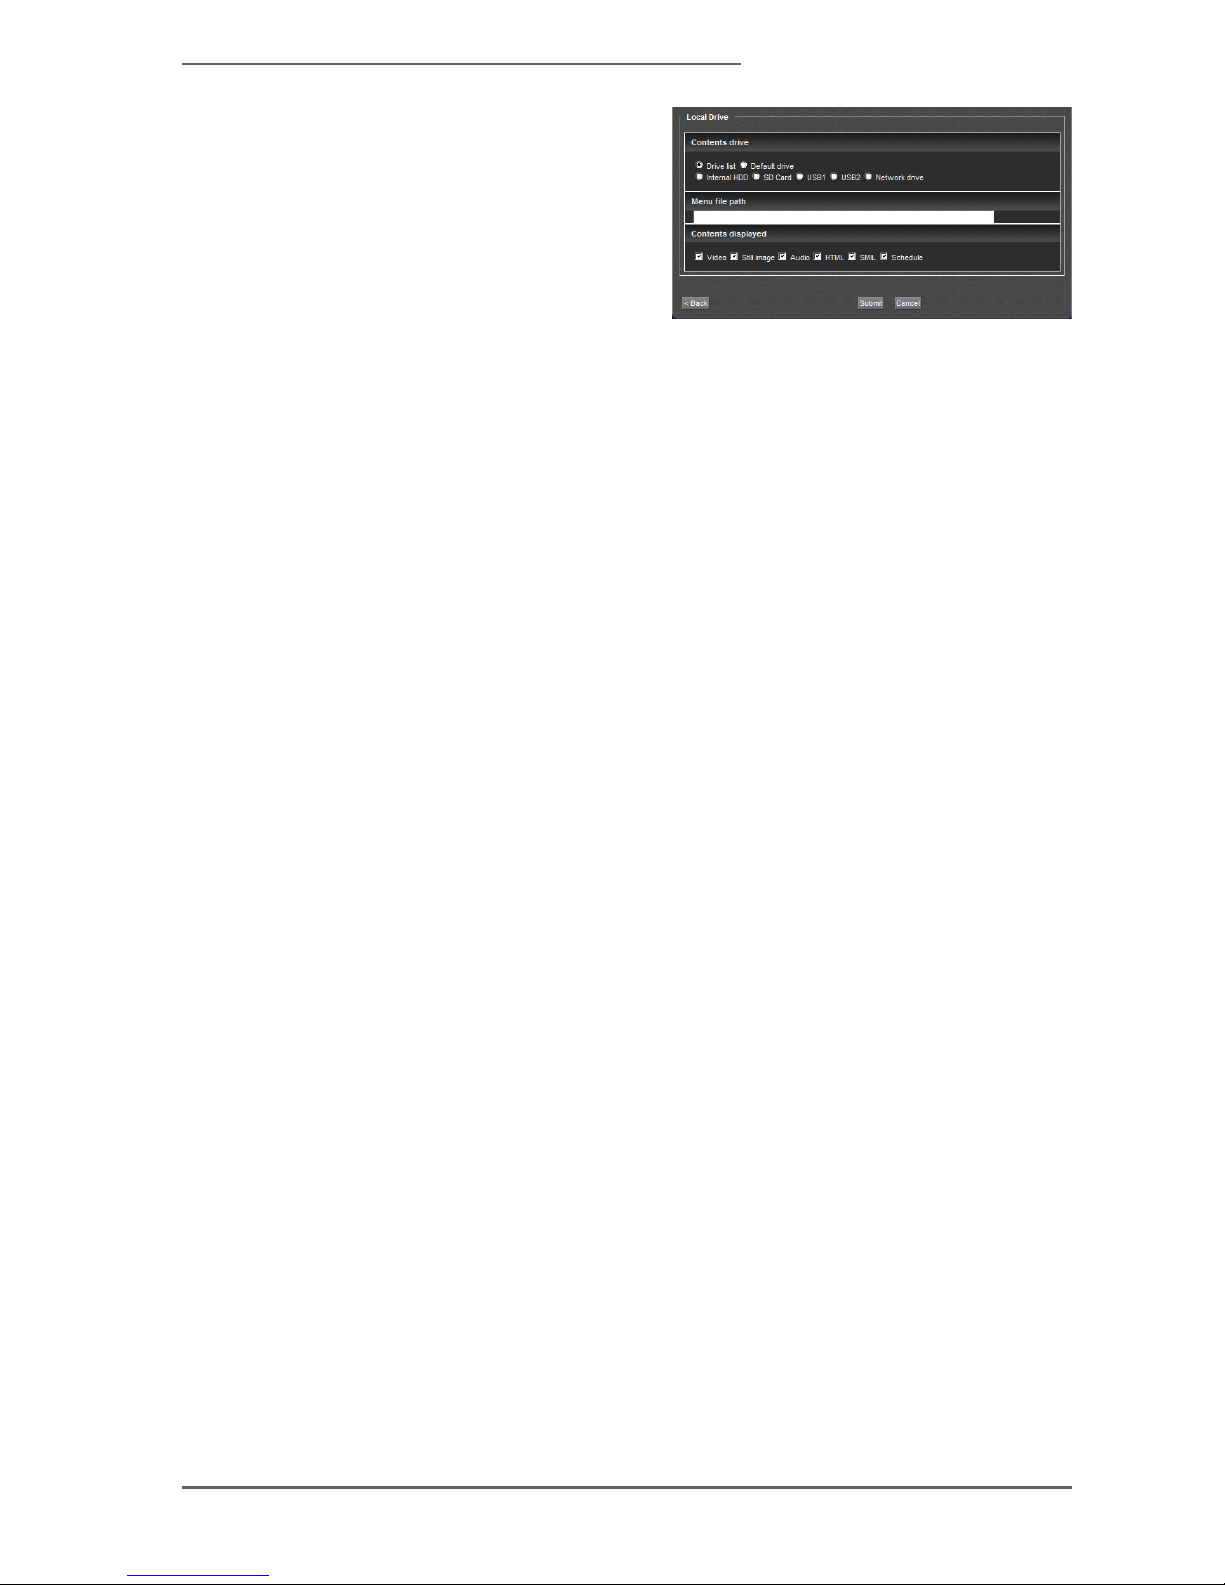
In [Content drive], select the
drive in which the menu file is
saved. When [Default drive] is
selected, the drive selected in
default drive will be used.
Set the path of the menu le in
[Menu le path]. Please refer to
[Menu le path] of local drive for
the description of the path.
•
Page 56
- 56 -
MEDIAEDGE
3. Channel Playback
3-1 About Channel Mode
The content can be registered in one-hundred channels of [home] and
[01]-[99] and be played when selected with the remote control.
The content specied to [home] of the channel will start playing after
the startup of the MEDIAEDGE Decoder. If the schedule is registered
here, it becomes the schedule playback. The black screen will be
displayed if the content is not registered.
•
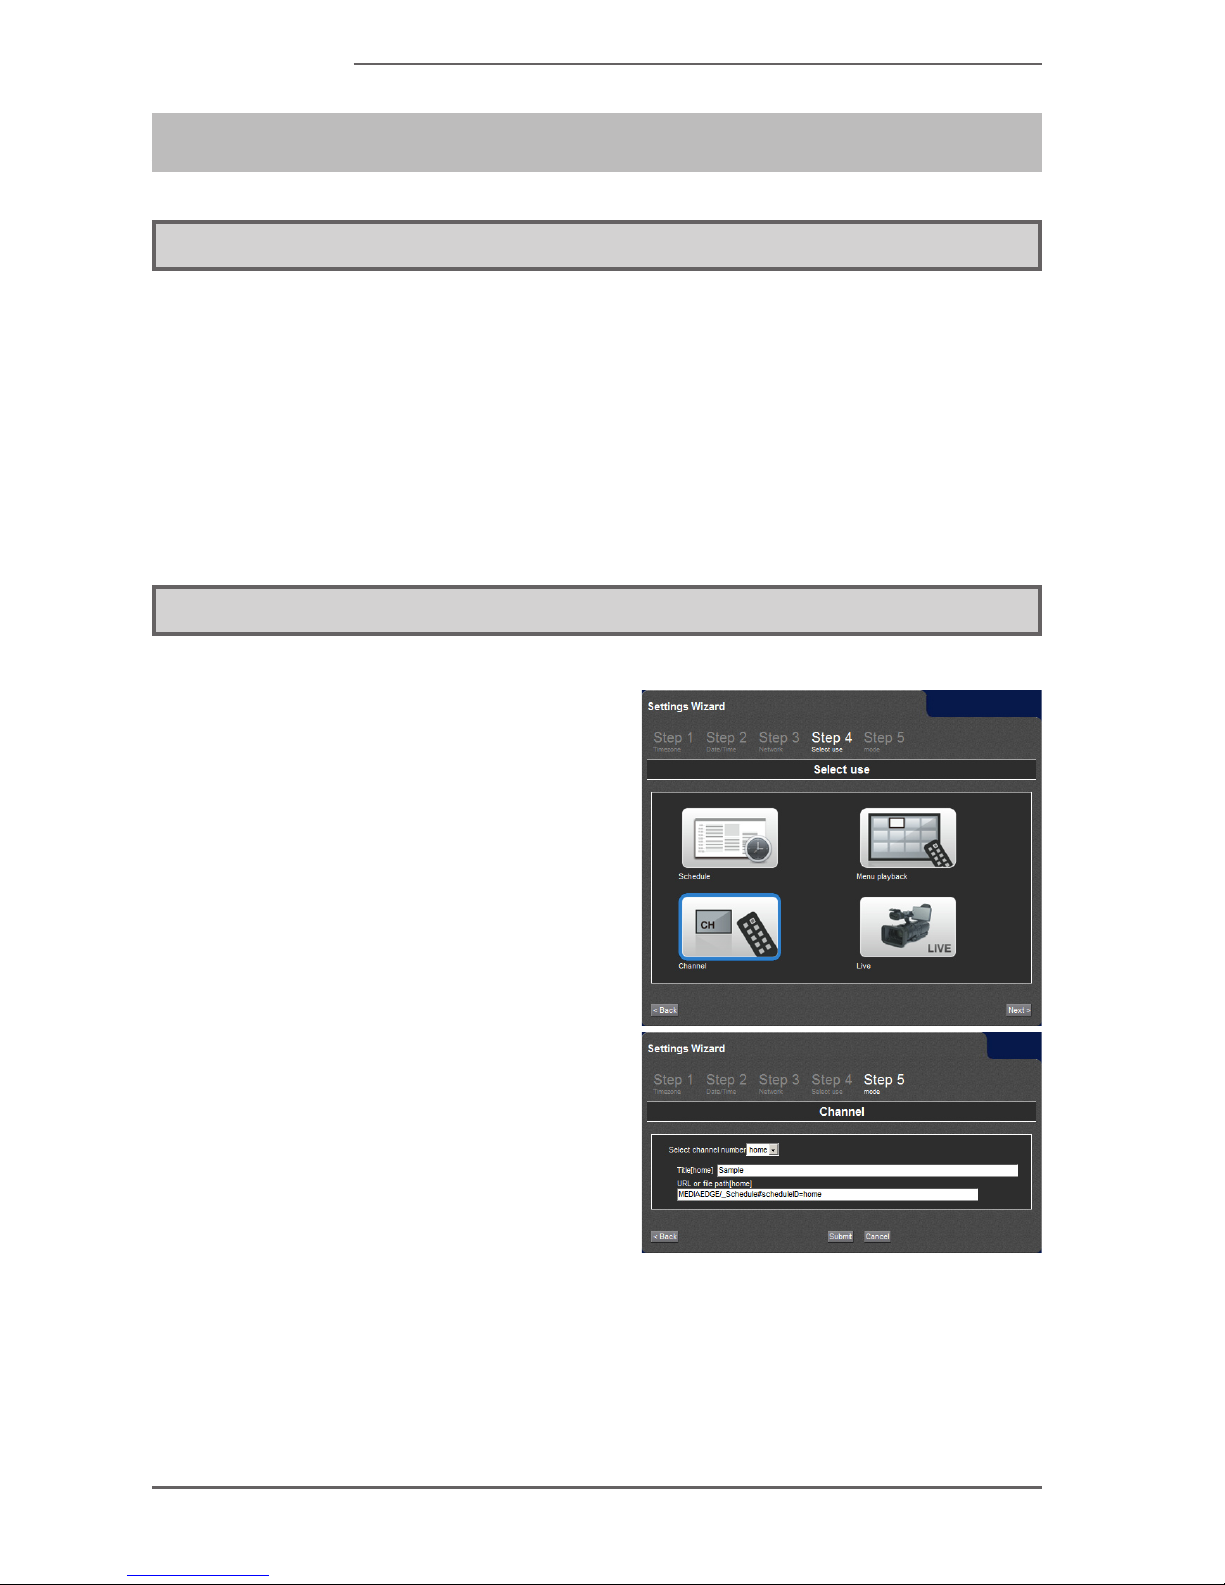
3-2 Conguration
To use the channel playback,
perform the setting of channel
viewing from the settings wizard.
Access to t h e We b con s o l e
and set it from Settings wizard.
Please select [Channel] on Select
use screen after setting Time
zone, Date / Time, and Network
from Settings wizard.
•
Page 57

MEDIAEDGE Decoder
V. Operating Mode
Thi s chapter expla i n s a b ou t th e
operation mode of the MEDIAEDGE
Decoder.
Page 58

- 58 -
MEDIAEDGE
1. Summary
The MEDIAEDGE Decoder can play the content files in internal HDD, SD card,
and USB storage and the streaming content of the MEDIAEDGE Server and the
MEDIAEDGE LEB by selecting them. A way to select and play the content will be
chosen from the following two operation modes depending on the use.
Channel Mode
The menu screen will not be displayed, and the content can be selected with
number keys as in channel switching on TV. It is possible to assign the content
to total of 100 channels (home channel and 1~99 channels). It is possible to
perform the repeat playback and the schedule playback (*) of the specified
content in each channel.
* It is necessary to have DCM to create and deliver the schedule.
Menu Mode
The content to watch can be selected and played from the menu screen. The
menu will retrieve the content from the Web page on the network such as
MEDIAEDGE Server and MEDIAEDGE LEB and the storage connected to
the MEDIAEDGE Decoder, or it will generate automatically. When the content
playback is nished, the nemu screen will be displayed again.
Regarding to the setting of the operation mode, please refer to the following
chapters:
> III. Streaming playback
> IV. Local le playback
●
●
Page 59
- 59 -
MEDIAEDGE Decoder
2. Remote Control Operation
2-1 Common Operation of Mode
The channel mode and the menu mode have a common operation.
To s t a r t u p o r s h u t d o w n
MEDIAEDGE Decoder (*1)
To increase the volume by 1.
To display the setup menu (*1)
To decrease the volume by 1.
To mute temporarily. To release,
press
again or
.
(*1) Itmaynotfunctionduetothesettings.
Page 60
- 60 -
MEDIAEDGE
2-2 Operation of Channel Mode
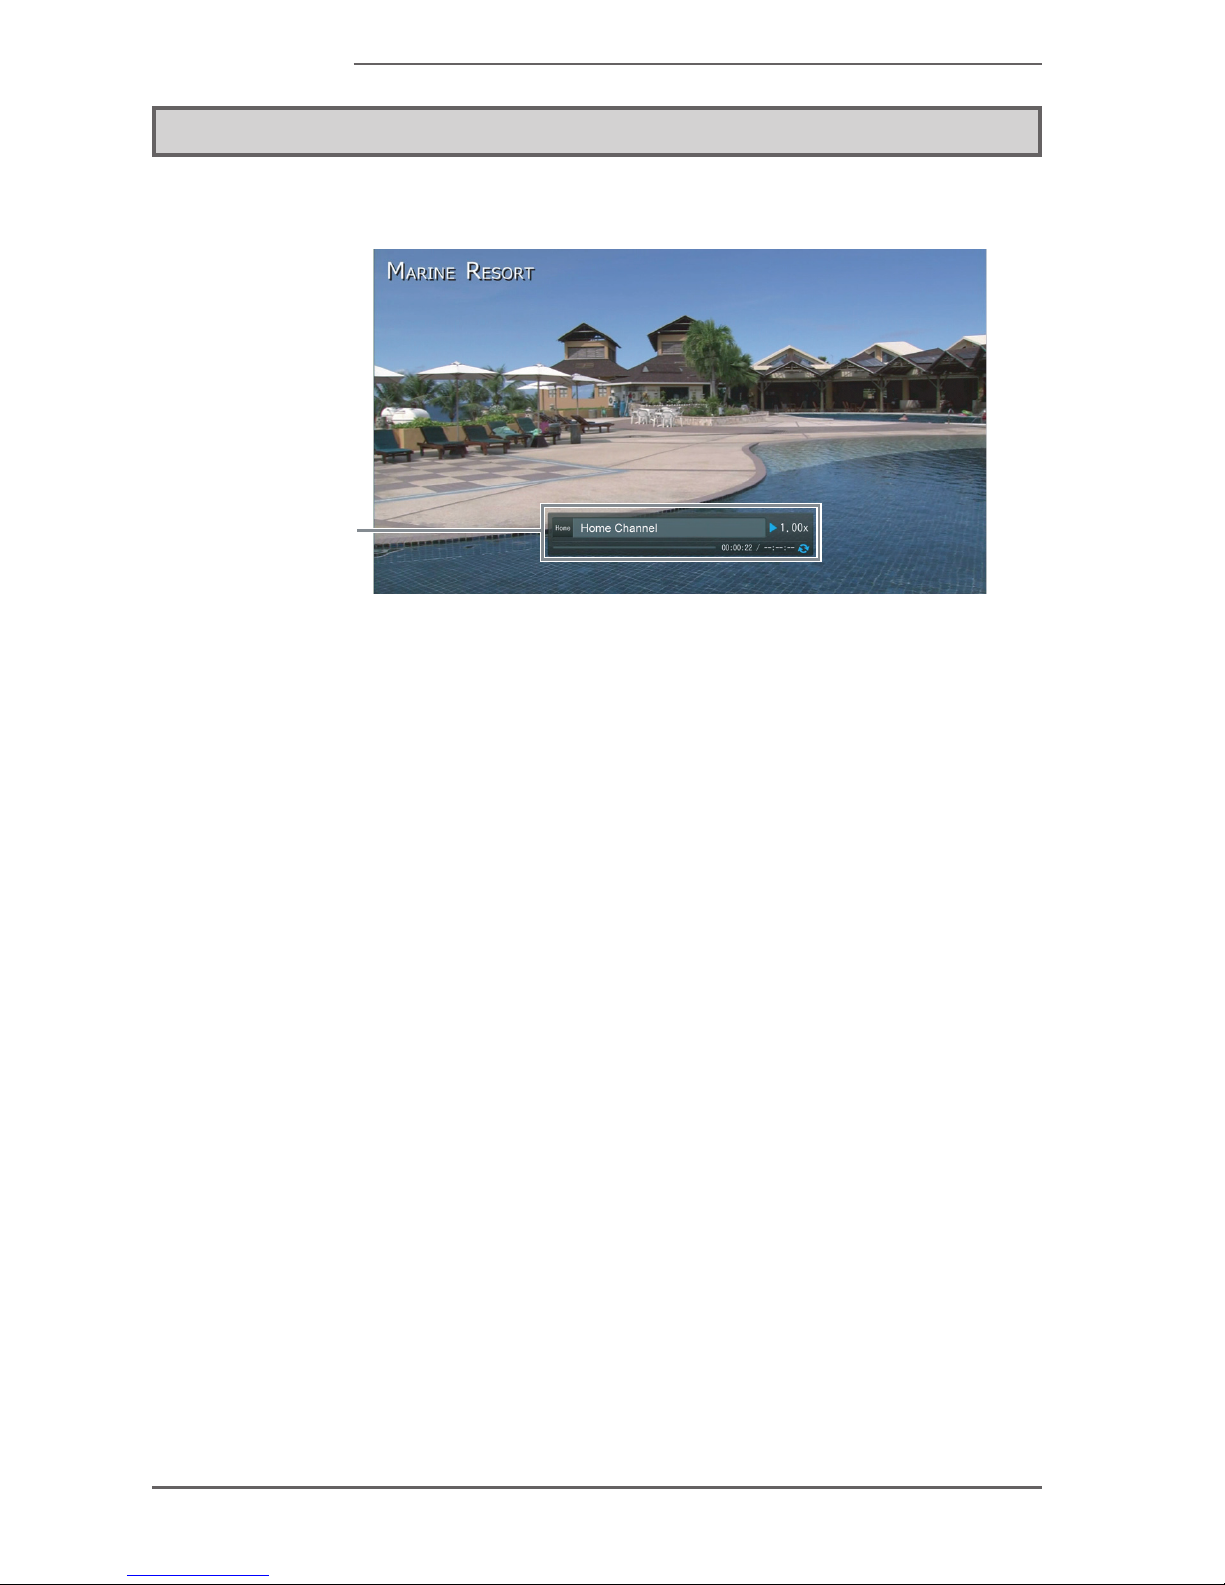
In channel mode, the playback screen will be displayed as follows:
(1) Playback
Information
(1) Playback inofrmation
The screen will be displayd for
a period of time at the start of
play and with the remote control
operation. The channel number,
the title, the display speed, the
playback time / the whole content
time, and the state of the repeat
will be displayed.
Page 61

- 61 -
MEDIAEDGE Decoder
On the playback screen, the followings can be operated:
To play home channel.
To slow down the play speed. (*1)
-
To switch channels. To play the content
that is set to 1-9 channel numbers,
press the - keys ant wait for a
while, or press the key to conrm
the channel. To play the content that is
set to 10-99 channel numbers, enter 2
digit channel numbers. When there is
no set channels, “No content” will be be
displayed.
To speed up the play speed. (*1)
To go b ac k to t he previ o u s
content. The longer it is pressed,
the wider the skipping interval will
be. (*1)
To play the channel that is +1 of
the channel number that is being
played. The channel that is not
set will be skipped.
To go forward to the next content.
The longer it is press ed, the
wider the skipping interval will be.
(*1)
To play the cahnnel that is -1 of the
channel number that is being played.
The channel that is not set will be
skipped.
To temporarily stop the content
being played. Press again or
(OK) to restart playing. (*1)
To set the repeat/ To release. (*2)
To stop the content being played. To d i s p l a y t h e p l a y b a c k
information/To hide. (*3)
Page 62
- 62 -
MEDIAEDGE
(*1) Onlyforthe video content. Thismay not workdependingonthe setting of thecontent
and the server.
(*2) Some contents may not be set or released.
(*3) Some settings may prevent this from working.
Page 63
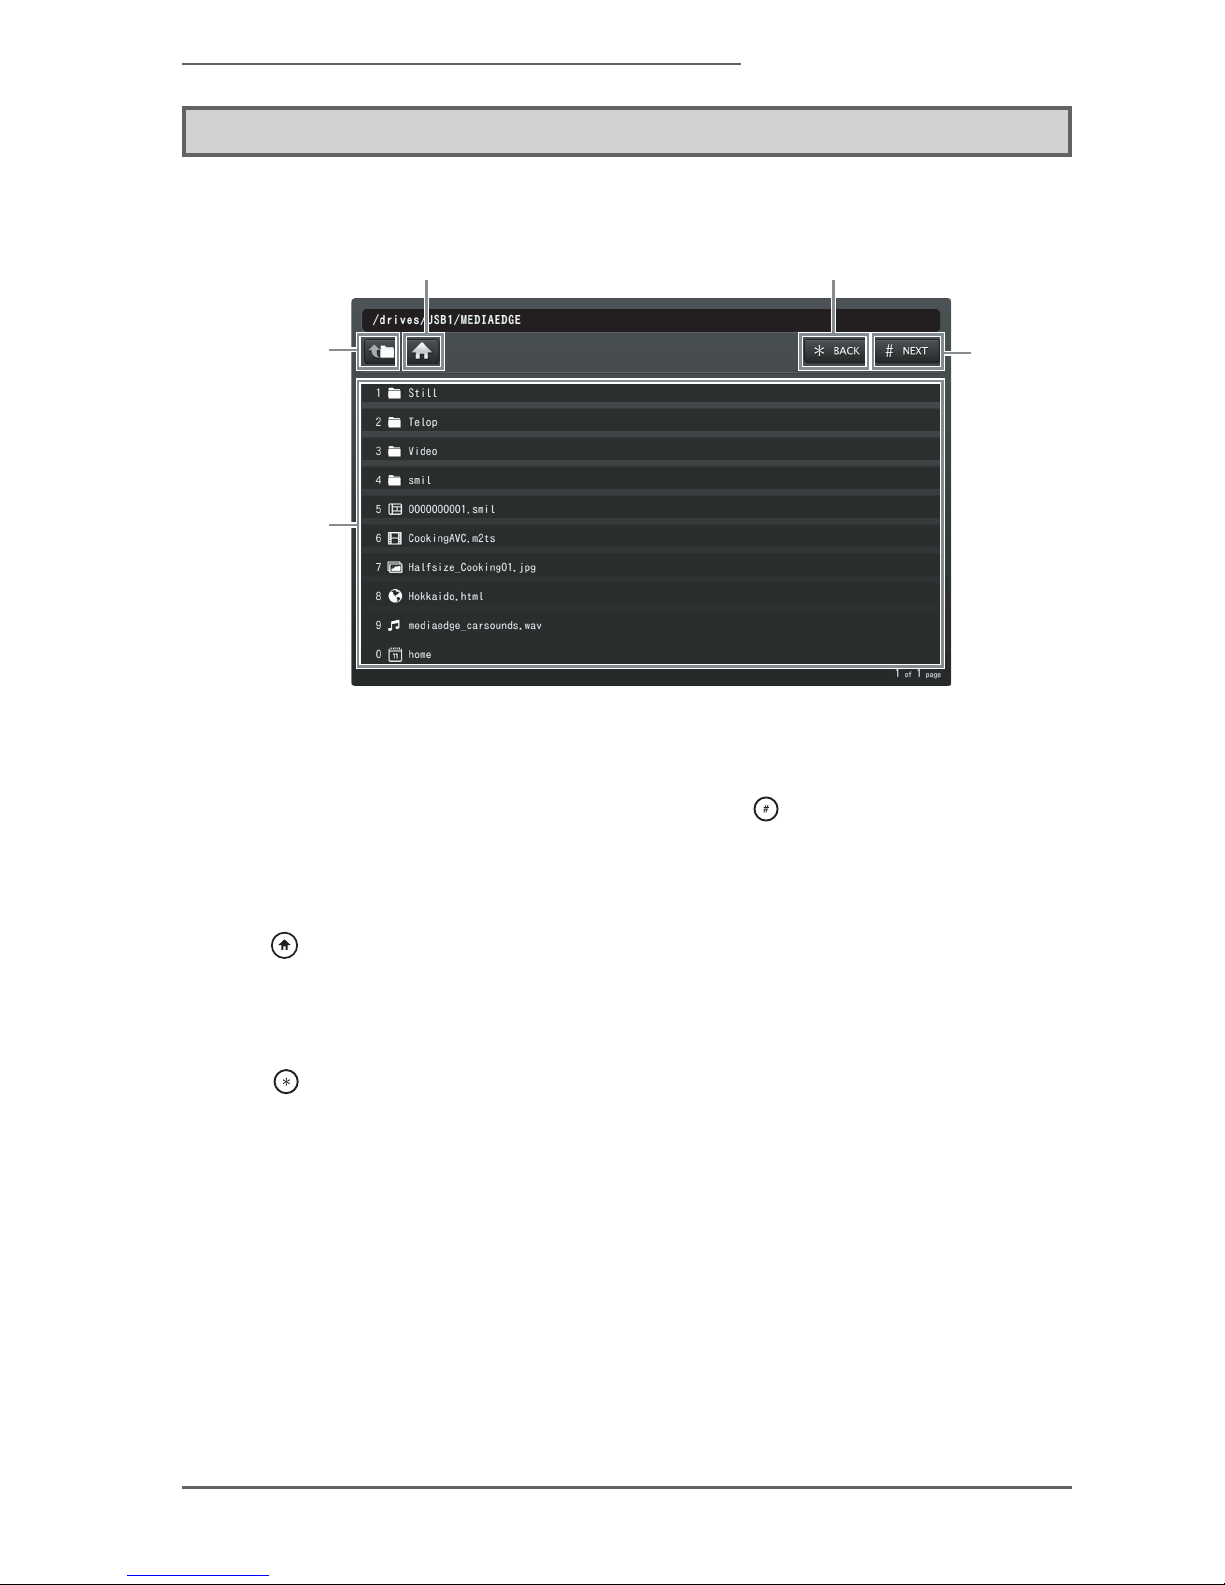
- 63 -
MEDIAEDGE Decoder
2-3 Operation of Menu Mode
■ Menu Screen
(1) Up button (4) NEXT
button
(2) Home button (3) BACK button
(5) Content
display area
(1) Up button (4) NEXT button
Use to move to the folder one
level above.
This button will work the same as
the key on the remote control.
(2) Home button (5) Content display area
This button will work the same as
the key on the remote control.
The content in the selected folder
is displayed.
(3) BACK button
This button will work the same as
the key on the remote control.
Page 64
- 64 -
MEDIAEDGE
On the menu screen, the followings can be operated.
To move to the page specified
by [Menu page URL], [Content
folder path], and [Menu le path].
When t h e key is u s e d to
return to the previous menu, this
key can be used to forward to the
next menu.
-
To p l a y t h e c o n t e n t t h a t
corresponds to menu number
0-9 . The folder will m ove to
inside the folder. The numbers
can be enetered on the menu
page with the text box.
To move the cursor.
If the content in the displayed
fo l d er canno t be f it on o n e
page, the previous page will be
displayed.
To run the movement of where
the cursor is positioned. When
is pressed while the folder
name is s electe d, inside th e
folder will be shown. When is
pressed while the content name
is selected, the content wil be
played.
If the content in the displayed
folder cannot be t on one page,
the next page will be displayed.
The characters at the cursor
position will be deleted in the
menu page with the text box.
To retu r n to the pre v i o u sl y
displayed menu.
The displayed menu screen will
be updated.
Page 65
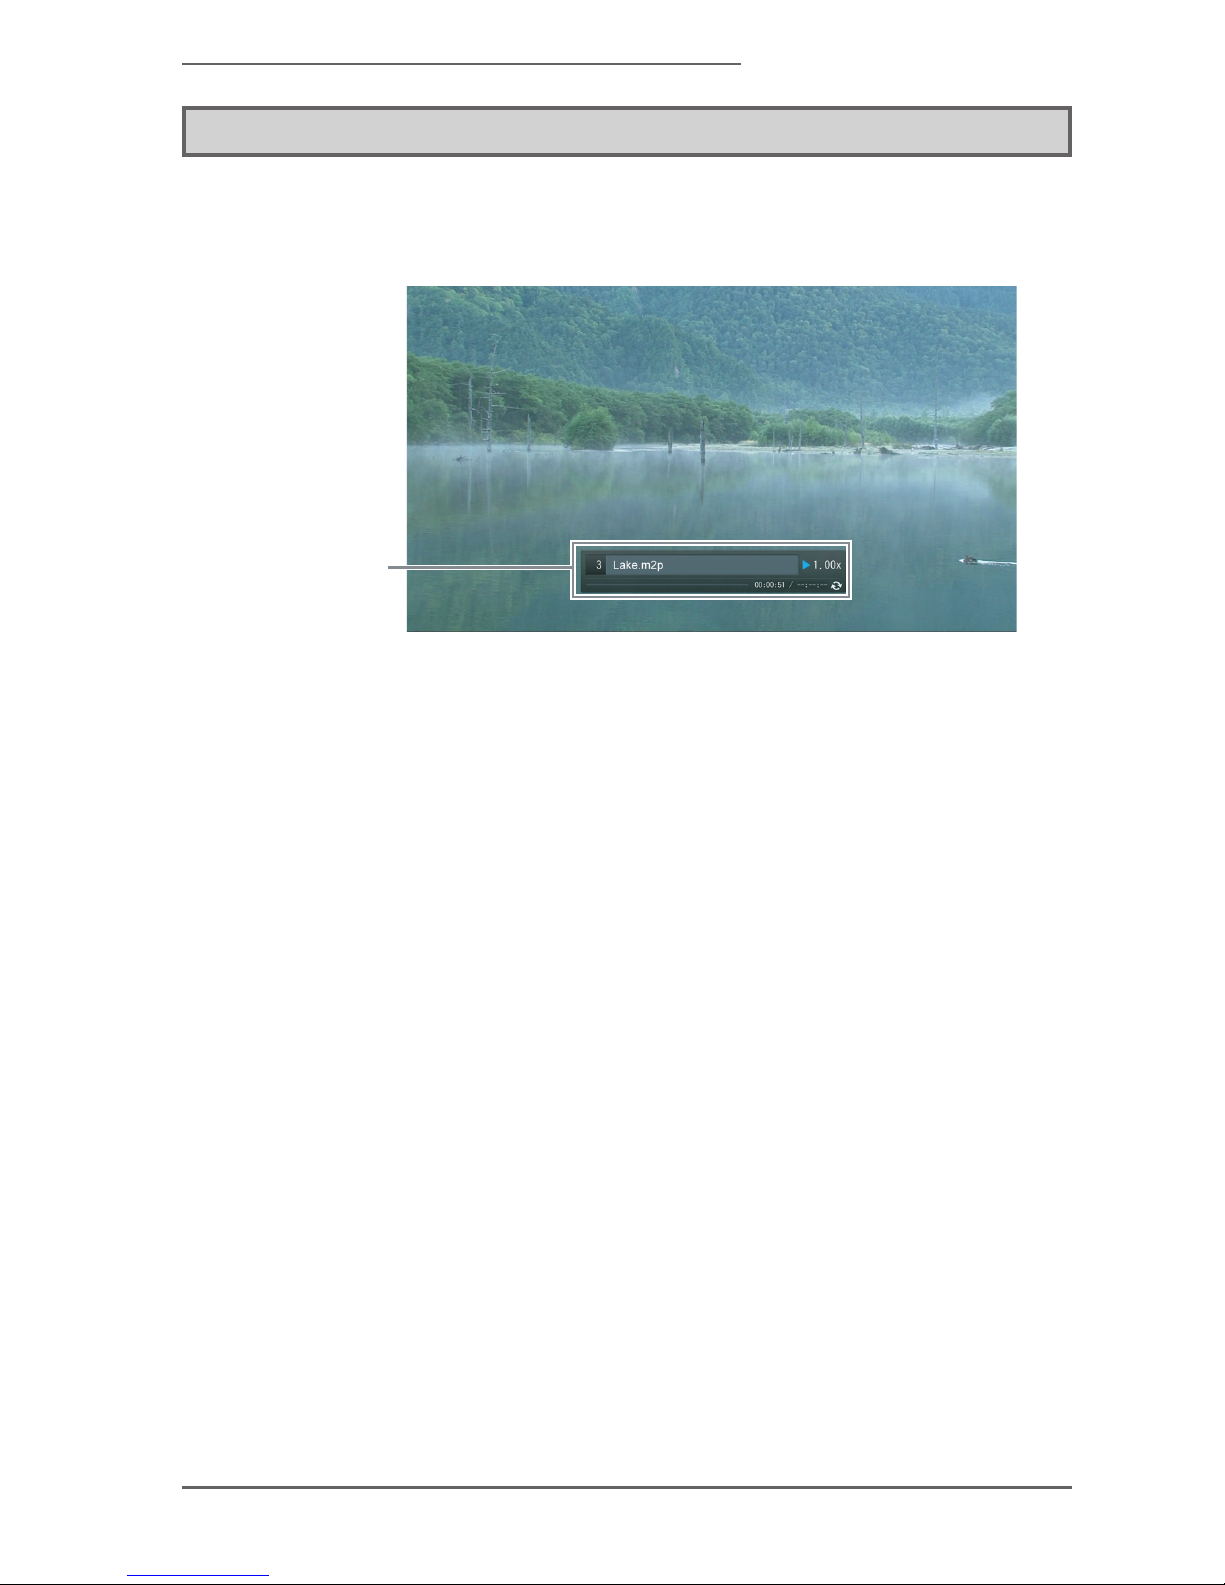
- 65 -
MEDIAEDGE Decoder
2-4 Content Playback Screen
When the content is selected from the menu screen, the playback will start as
follows:
(1) Playback
Information
(1) Playback inofrmation
The playback information will be
displayed for a period of time at
the start of playback. Number of
content on the menu, title, speed
display, playback time / whole
content time, and the state of the
repeat will be displayed.
Page 66
- 66 -
MEDIAEDGE
The following operation can be done on the playback screen.
To stop the playback and move
to the page specified in [Menu
page URL].
To speed up the play speed. (*1)
-
To switch to the content that
corresponds to the number of the
content on the menu.
To temporarily stop the content
being played. Press again or
(OK) to restart playing. (*1)
To go b ac k to t he previ o u s
content. The longer it is pressed,
the wider the skipping interval will
be. (*1)
To stop the content being played.
To go forward to the next content.
The longer it is press ed, the
wider the skipping interval will be.
(*1)
To set the repeat/To release. (*2)
To slow down the play speed. (*1) To d i s p l a y t h e p l a y b a c k
information/To hide. (*3)
(*1) Onlyforthe video content. Thismay not workdependingonthe setting of thecontent
and the server.
(*2) Some contents may not be set or released.
(*3) Some settings may prevent this from working.
Page 67

MEDIAEDGE Decoder
VI. Functions and
Operation
This chapter describes the functions
such as remot e serial and how to
update the content.
Page 68
- 68 -
MEDIAEDGE
1. Update of Content
1-1 About the Update
The contents, the schedule files, and the menu files that are necessary for the
playback in the MEDIAEDGE Decoder can be copied to the body in several ways.
Please choose the method depending on the applications. It is also possible to
use a combination of more than one way; however, please consider the integrity in
operation of each to do so.
1-2 About the Update
Cooperation with the DCM is needed when creating the DCM schedule in the DCM
and managing the content. When the DCM and the MEDIAEDGE Decoder are
properly set to cooperate, it is possible to write the content in the MEDIAEDGE
Decoder and set the schedule only by the operation of the DCM.
Pleaserefertotheusagemethodsofeachapplicationwhencreatingandoperatingscheduleles
in other softwares without using the DCM.
Please complete the following settings in the Web console of the MEDIAEDGE
Decoder.
■ Basic Settings
Default drive
Select the drive where the content le will be transferred by using the DCM.
When the SD card and the USB storage are selected, errors will occur in the
transfer of the content if the device is not currently connected.
Write access drive
Set the drive that the content is transferred to "read-write." The drive that is
not going to be used will have no problems either way.
Page 69

- 69 -
MEDIAEDGE Decoder
■ Network
For the advanced settings method, please refer to network setting. It is
necessary to set to be accessable to the DCM.
Cooperation with the DCM
Cooperation
Set up to enable.
DCM server
Set up the address of the DCM server and the port address that are
going to be used (It is necessary to adjust to the settings of the DCM).
When connecting to the external DCM server, please set the router to be
accessable.
Account
Set up the same user name and password as the ones set in the DCM.
■ Channel Mode
When the DCM is used and [Basic setting] > [Operation mode] is set in the
channel mode, the settings related to the channel will be done through the
DCM.
1-3 File Sharing
When the file sharing is enabled, it is possible to access to the drive of the
MEDIAEDGE Decoder via network. The drive set as writable will make it possible
to update the content freely. However, when the file being played is deleted or
overwritten, the playback will fail.
■ Network
Please refer to the network settings for the advanced settings method. It is
necessary to set properly so that it is accessable from Windows PC.
File Sharing
Share
Set as enable.
●
●
●
●
Page 70
- 70 -
MEDIAEDGE
Account
Set the setup value and the account that are used to connect to the shared
drive.
The account of the initial value is “mediaedge,” and the password is not set.
Shared drive authority
Set up the shared authority for each drive. When it is disabled, that drive will
not be shared.
The shared drive authority can be set up separately from the write access
drive; however, when the drive is set on “read only,” writing cannot be
possible even if “read write” is set.
1-4 Content Update by SD Card and USB Storage
The update of the content that will be used in the schedule playback or in menu
mode will be possible by putting the content file to be updated and the update
control script (update.inst) into a SD card or an USB storage and inserting it to the
MEDIAEDGE Decoder. The MEDIAEDGE Decoder recognizes the connection of
the SD card and the USB storage and updates the drive content that is set as the
default drive. When the update of the content is completed, the playback will be
started in the new content and schedule.
Please refer to the chapter update control script concerning to the update control
script.
Notes
Theinformationindicatorwillashwhileupdatingthecontent.
If the SD card and the USB storage are pulled out while updating the content, the update may
notbecompletedproperly,thelemaybreak,ortheplaybackmaynotrunnormally.
1-5 Direct Writing to the Device
When the SD card and the USB storage are used, it is possible to remove the
device from the MEDIAEDGE Decoder and write in the content directly from the PC.
The MEDIAEDGE Decoder supports NTFS and FAT16/32 as the le system.
●
●
Page 71
- 71 -
MEDIAEDGE Decoder
2. Network
2-1 Time Setting (NTP)
NTP (Network Time Protocol) is a communication protocol which synchronizes the
clock in the device connected to the network to the correct time.
It will correct the time automatically by specifying the address of the NTP server
located within the local network and the internet. Please conrm with the network
administrator concerning to the NTP server to be used.
The MEDIAEDGE Decoder will make the correction by quering the time on the NTP
server every set time that was set after the startup or in the update interval (minute).
The initial value of the update interval is 60 minutes; however, please adjust to the
precision of the time required for each operation.
2-2 UPnP
The UPnP (Universal Plug and Play) is a protocol that detects automatically and
acquires the information when the equipment is connected to the network.
The MEDIAEDGE Finder and Windows 7 / Windows 8 will use the UpnP to detect
the equipment that corresponds to the UPnP such as the MEDIAEDGE Decoder in
the same network.
At the startup and the shutdown and also in a regular interval, the UPnP sends out
the packet of recognition to the network. It is possible to stop the packet to be sent
out when the network affects the streaming packet.
2-3 Streaming
MEDIAEDGE delivers the video stream by using the streaming protocol of RTSP/
RTP.
FEC (Forward Error Correction)
The video stream will not be received since the packet of PTP is sent
by the UDP and will not be resent even if the packet loss occurs. If the
FEC is enabled, the packet loss that occuered within a certain range will
be automatically corrected. However, a large communication capacity is
required since the packet for error correction will be superimposed on the
network.
●
Page 72

- 72 -
MEDIAEDGE
When the FEC is enabled in the MEDIAEDGE Decoder, it will run the
communication that added the packet for error correction by the value set in
the MEDIAEDGE Server and the MEDIAEDGE LEB.
Keep alive
The use of the RTSP communication controls the streaming. With the keep
alive enabled, it is possible to detect and recoonect when the streaming
is stopped due to the stop and restart of the MEDIAEDGE Server and the
MEDIAEDGE LEB.
RTSP redirect
With the use of the RTSP redirect, it is possible to control the playback
content externally.
The control such as playback, stop, and pause of the content can be
done in the control command. RTSP server of this unit will only respond
REDIRECT as Method. Method of others will be ignored. Because there is
no authentication function in RTSP redirect, control will be possible from all
devices that can be connected to the network. If security is an issue, please
disable this feature and use the Web API.
Buffering time
Set the time that buffers the received stream internally in milliseconds. When
the buffering time is long, the playback will be delayed though it will make the
playback error to happen less likely due to the network issue. Even when the
setup value is 0, it continues buffering during the minimum required time for
the playback.
●
●
●
Page 73
- 73 -
MEDIAEDGE Decoder
3. Others
3-1 Playback Information
The information of the content that appears on the screen during playback will be
displayed.
3-2 Remote Serial
The remote serial is a mechanism to relay the communication from the RS-232C
that is connected to the COM port of the MEDIAEDGE Decoder via the network. It
is connected one-on-one with the relay destination on the network and cannot be
one-to-many communication with multiple relay destinations.
The interlocking connection mode is the ability to make a connection to the
streaming server when the streaming is started. If a xed destination is specied, it
will connect to that specied address. In server operation, it will wait to receive the
connection and connect with the device that comes in rst.
3-3 Log
The MEDIAEDGE Decoder will keep the log of the playback, the file transfer,
and the error in the main body and display the “status display” screen of the Web
console. Also, it is possible to read from outside by using the Web API and the
remote log output.
The log kept internally will be deleted from the old ones automatically when it
exceeds a certain amount. The holding period may become shorter if the log is
generated in large quantities due to continuous errors. It is possible to delete the
log with [Device administration] > [Initialization] > [Initialization of log] available
in the Web console. This is used to delete the log retention information for some
reasons. (It is not used in normal situation.) If a failure occurs due to some issues
in the equipment, the activity log and the internal situation can be output as a le
through [device management] > [Acquisition of information] > [Acquisition of log].
Please send the data obtained to our customer support.
Page 74

- 74 -
MEDIAEDGE
Page 75

MEDIAEDGE Decoder
VII. Web Console
Accessing the MEDIAEDGE Decoder
from the PC through Web browser
allows the setting and the operation by
the Web console.
This chapter describes the operation
and the setting of the Web console.
Page 76
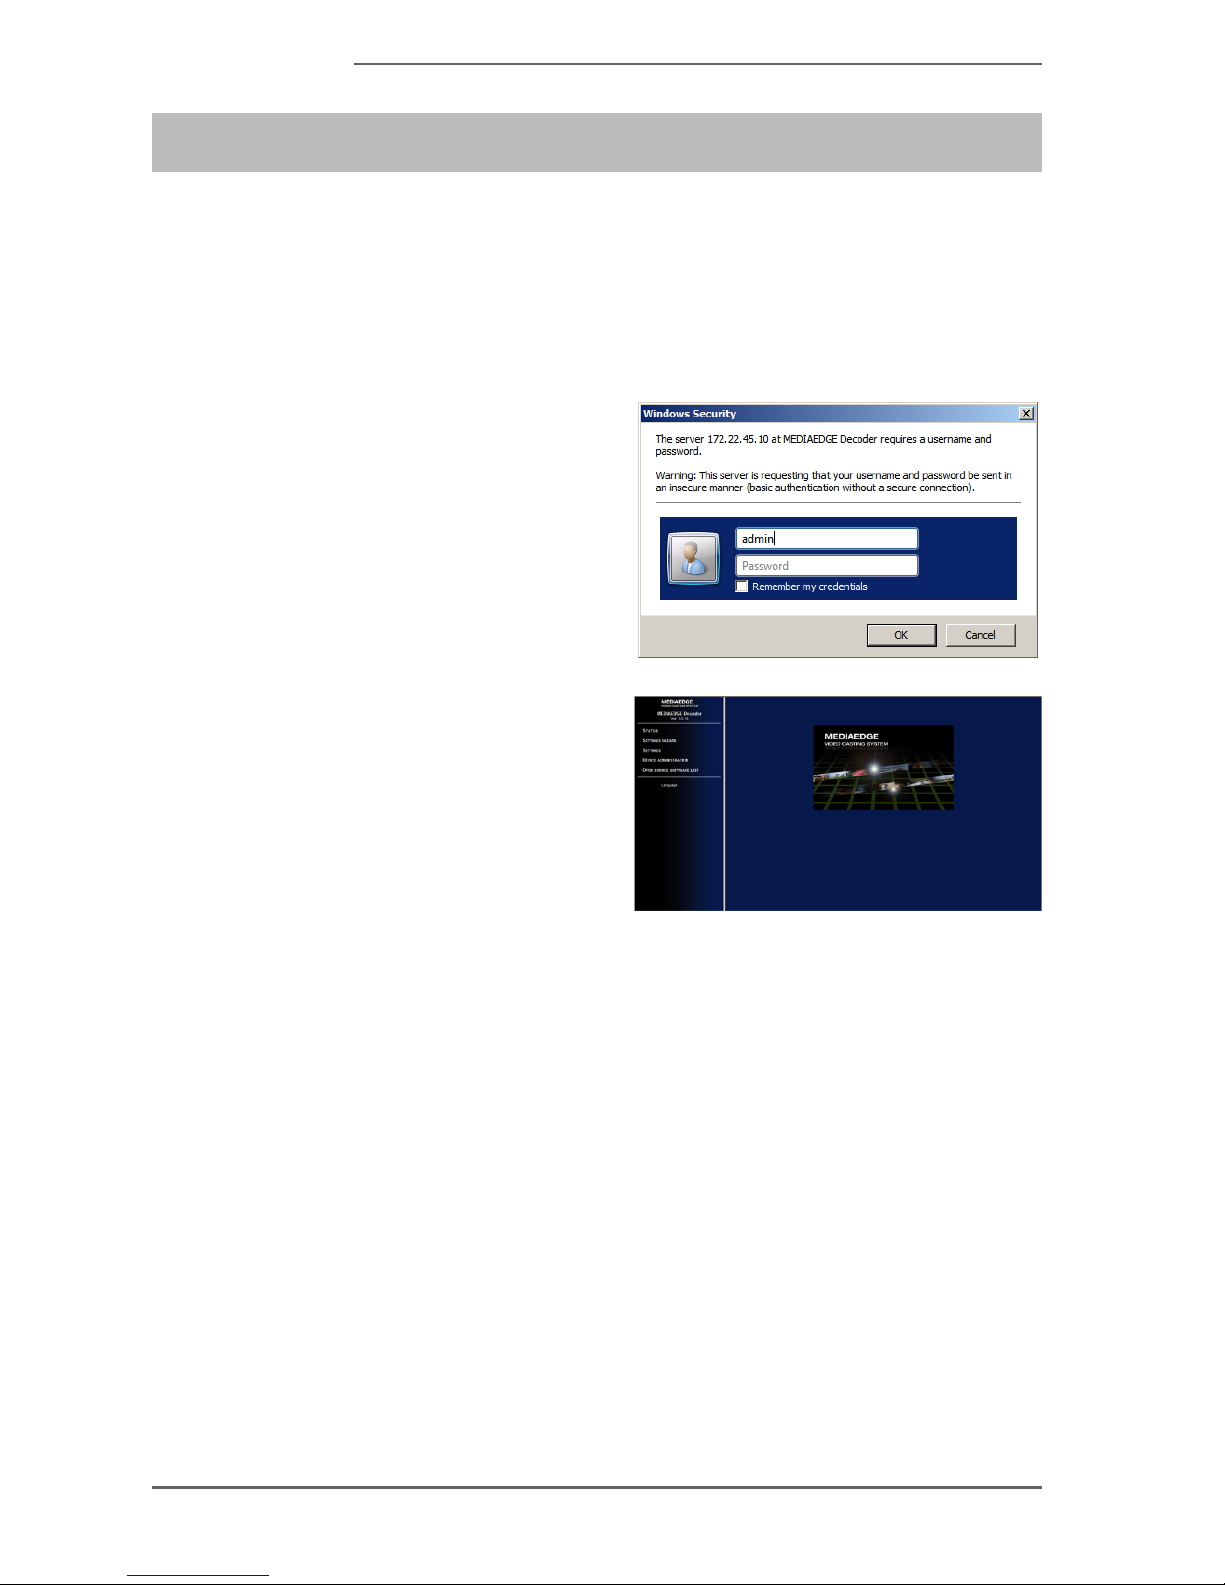
- 76 -
MEDIAEDGE
1. Access Method
Open the MEDIAEDGE Decoder in the Web browser (Internet Explorer 8 or later on
Windows, Google Chrome, or Mozilla Firefox). If the IP address of the MEDIAEDGE
Decoder is not known, please refer to network settings.
Ex.):If the IPv4 address of MEDIAEDGE Decoder is 172.22.45.10, enter URL as followed.
When the screen like the one on
the right appears, enter the user
name and the password.
* At the factory setting, the user name is
admin, and there is no password (the
password is not set)
Th e foll o w i n g scr e e n wil l be
displayed
The display language (Japanese
or English) can be selected on the
bottom of the left menu “Language.”
The next section will explain about
the menu on the left side of the
screen.
Page 77
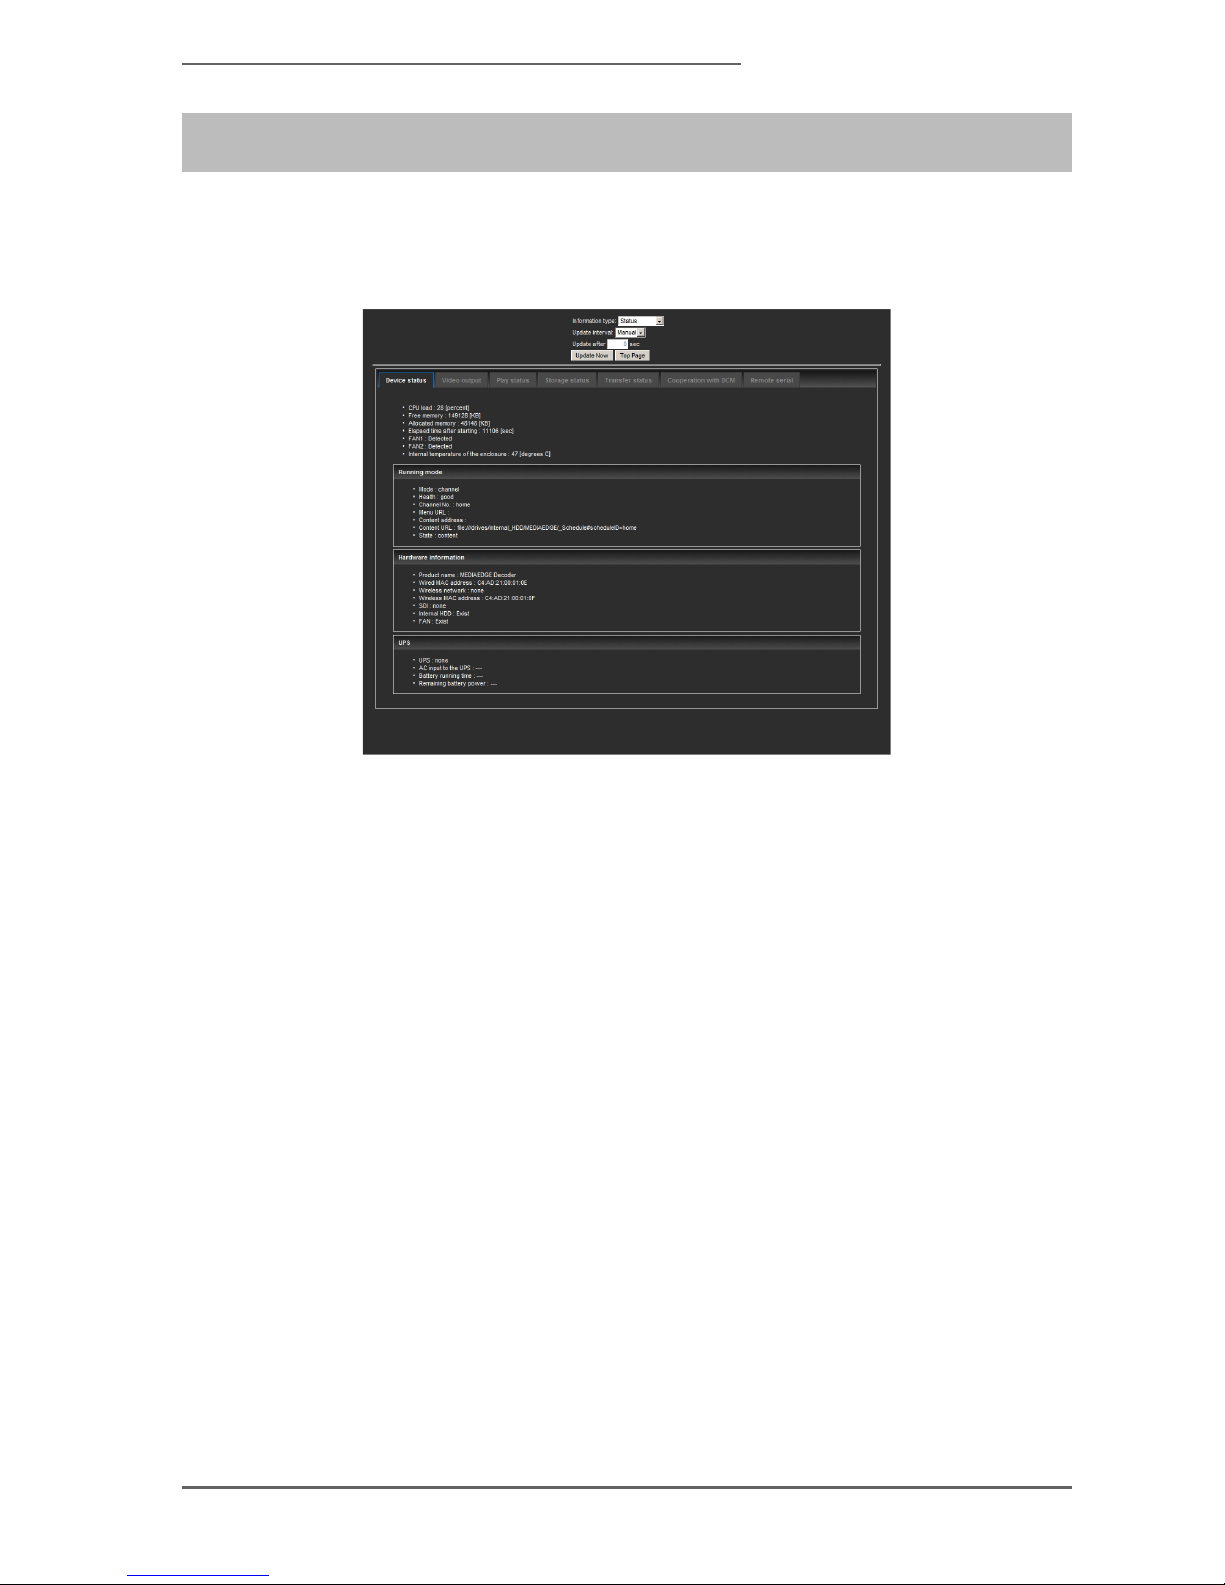
- 77 -
MEDIAEDGE Decoder
2. Status Display
The log and the state of the MEDIAEDGE Decoder can be checked on this screen.
The following screen will appear when the status display screen is opened.
The display, such as logs and status, can be switched in the select box "Display
type" at the top of the screen. Information that can be displayed is as follows.
Status
Activity log
Error log
Transfer log
This screen allows you to perform automatic updating of the display at a certain
time interval. The update interval can be selected from 15 seconds, 30 seconds, 45
seconds, and 60 seconds.
If the “Manual” is selected, the automatic update will not be run. Please update the
display with the "Update" button in that case.
●
●
●
●
Page 78

- 78 -
MEDIAEDGE
2-1 Status
The current operation status of the MEDIAEDGE Decoder will be displayed.
■ Equipment Status
CPU usage rate
The usage rate of CPU will be displayed.
Memory space
Remaining amount of available memory will be displayed.
Used memory capacity
The used memory capacity will be displayed.
Elapsed time after the startup
The elapsed time after the startup will be displayed. It will be reset at the
restart.
FAN 1/FAN 2
It will be displayed wheter the Fan 1/Fan 2 are detected. The fan may not be
loaded in some product models. In that case, this dispay will be found. When
it shows the “Error,” there are some issues with the fan. Please contact our
customer support.
Casing temperature
The temperature inside the product casing will be displayed.
Operation mode
Mode
The current operation mode will be displayed. There are “channel” and
“menu” in the operation mode. It will basically operate according to the
settings. It will become “interrupted_playback” if the insert playback is run by
the external network control.
Operation Status
The activity status of current operation mode will be displayed as “Good /
Bad.” If it shows “Bad,” please check the log.
Channel Number
When operating in channel mode, the number of the channel currently
●
●
●
Page 79

- 79 -
MEDIAEDGE Decoder
playing will be displayed.
Menu URL
When operating in menu mode, the URL or the le path of the menu page
currently displaying will be shown.
Content URL
The URL or the le path of the content currently playing will be displayed.
Display Status
The current display status will be shown. Either the menu (the menu
page), the content (content), or the screen saver (the screen saver) will be
displayed.
Hardware Information
Product name
The name of the product will be displayed.
Wired MAC address
MAC address of the wired network adapter will be displayed.
Wireless network
In Wi-Fi model, “Exist” will be displayed. In the model without Wi-Fi, “None”
will be displayed.
Wireless MAC address
MAC address of the wireless network adapter will be displayed.
SDI
In SDI model, “Exist” will be displayed. In HDMI model, “None” will be
displayed.
Internal HDD
In HDD or internal SSD model, “Exist” will be displayed. In unloaded model,
“None” will be displayed. This display wil not change even if there is some
failure in HDD or SSD. Please check the status of individual storage in
storage.
FAN
In the model with FAN, “Exist” will be displayed. In the model without FAN,
“None” wil be displayed. This display wil not change even if there is some
failure in FAN. Please check the status of individual FAN in the list of the “FAN
●
●
●
●
●
●
●
●
●
●
Page 80

- 80 -
MEDIAEDGE
1” and “FAN2” described earlier.
UPS
UPS
The detection status of uninterruptible power system (UPS) will be displayed.
Detection status:Detected, undetected status:none
AC input to UPS
The detection status of the AC input to the connected UPS will be displayed.
AC input is detected:Detected, AC input is not detected:None
Battery drive time
The elapsed time (in seconds) since UPS tuned to the battery-powered state
will be displayed.
Remaining battery capacity
The remaining battery capacity (%) of UPS will be displayed.
■ Video Output
HDMI (HDMI model only)
The information of frequency and resolution of the HDMI output current is
displayed in the "Output". The display Mode will be adjusted automatically
according to the monitor that is connected if the HDMI output is set as “Auto.”
The power state of the current monitor will be displayed as "On / Off" in
"Monitor.” The monitor needs to be compatible with the HDMI CEC in this
display. It is displayed as "Unknown" if the monitor is not connected or it is
connected to the monitor that is HDMI CEC non-compliant.
SDI (SDI model only)
The information of frequency and resolution of the current SDI output will be
displayed in the "Output."
Composite
It displays which composite output out of NTSC-J, NTSC-US, or PAL is
currently used. The composite output will run according to the video output
settings.
●
●
●
●
●
●
Page 81

- 81 -
MEDIAEDGE Decoder
■ Playback Status
This product can display multiple windows on the screen, and the status of
each display window will be displayed here.
Main Window
SMIL
Video
Audio
HTML
Still image
Ticker
Overlay HTML
Overlay image
Overlay ticker
Overlay clock
■ Storage
The status of storages that are currently connected will be displayed. The
followig storages can be connected to this product:
Internal HDD/SSD
SD card
USB1
USB2
Network drive
The next value is displayed in each of the storages. The “ --- “ will be displayed
if the storage is not connected.
File system
The type of the le system will be displayed.
Access mode
It will display in which authority, “Read only” or “Read-write,” it is connected.
●
●
●
●
●
●
●
●
●
●
●
Page 82
- 82 -
MEDIAEDGE
Storage capacity
The capacity of whole storage will be displayed.
Usage
The used capacity of the storage will be displayed.
Free space
Available storage capacity will be displayed.
For storages other than internal HDD/SSD, the “Safe removal” button will be
displayed when it is connected. When removing these storages, please press
this button before the removal.
Notes
Please do not remove the storage in the middle of accessing (playing or delivering the
content). Be suretoperform“Safe removal.” Otherwise, the contentleandthe le
system may fail, and the breakage of the storage may occur.
■ Transfer Status
The le transfer status and the transfer le state in conjunction with the DCM
will be displayed.
Progress
The progress in the whole transfer process will be displayed in percentage.
Progress will be reected in the progress bar at the top.
Transfer status
If there is a problem with the transfer process, it will be displayed as "Good /
Bad.” Please check the transfer log when it is displayed as "Bad".
Whether the transfer is in progress
It will be displayed as "Running" during the transfer. It will be displayed as
"Stopped" when transfer is completed.
File name being transferred
In the le to be transferred, the le name that is currently being transferred will
be displayed.
Size of the transferred le
The size of transferred file will be displayed in the format of "Total size of
Page 83

- 83 -
MEDIAEDGE Decoder
transferred les / Total size of les planned to be transferred."
Number of transferred les
The number of transferred les will be displayed in the format of "Number of
les transferred / Number of les planned to be transferred."
Transfer start date and time
The date and time that initiated the transfer will be displayed.
Elapsed time
Time that has elapsed since the transfer start date and time will be displayed.
End date
The date and time when the transfer is completed will be displayed.
Forecast end date
The expected date and time the transfer will be completed will be displayed. It
does not guarantee that the transfer will be completed in this exact time.
Tile to be transferred
File name that is / to be transferred will be displayed.
Transferred le
The le name that has been transferred will be displayed.
Failed le transfer
File name that failed to be transferred will be displayed.
■ Cooperation with DCM
Connection to DCM server
The connection status with the DCM will be displayed as “True / False.” When
it is “False,” please check the network settings and the status of the DCM
server.
■ Remote serial
Connection
The connection status of remote serial will be displayed as”True / False.”
Operation Status
Page 84
- 84 -
MEDIAEDGE
“Good / Bad” will show whether the remote serial connection is normal or not.
The sender peer
IP address of the sender is displayed.
Receiver peer
IP address of the recipient will be displayed.
2-2 Log
The log of the MEDIAEDGE Decoder will be displayed.
Operation log
The playback status and the operation status will be displayed.
Error log
The log of errors that occurred inside the device will be displayed.
Transfer Log
The log to transfer les in conjunction with the DCM will be displayed.
Page 85
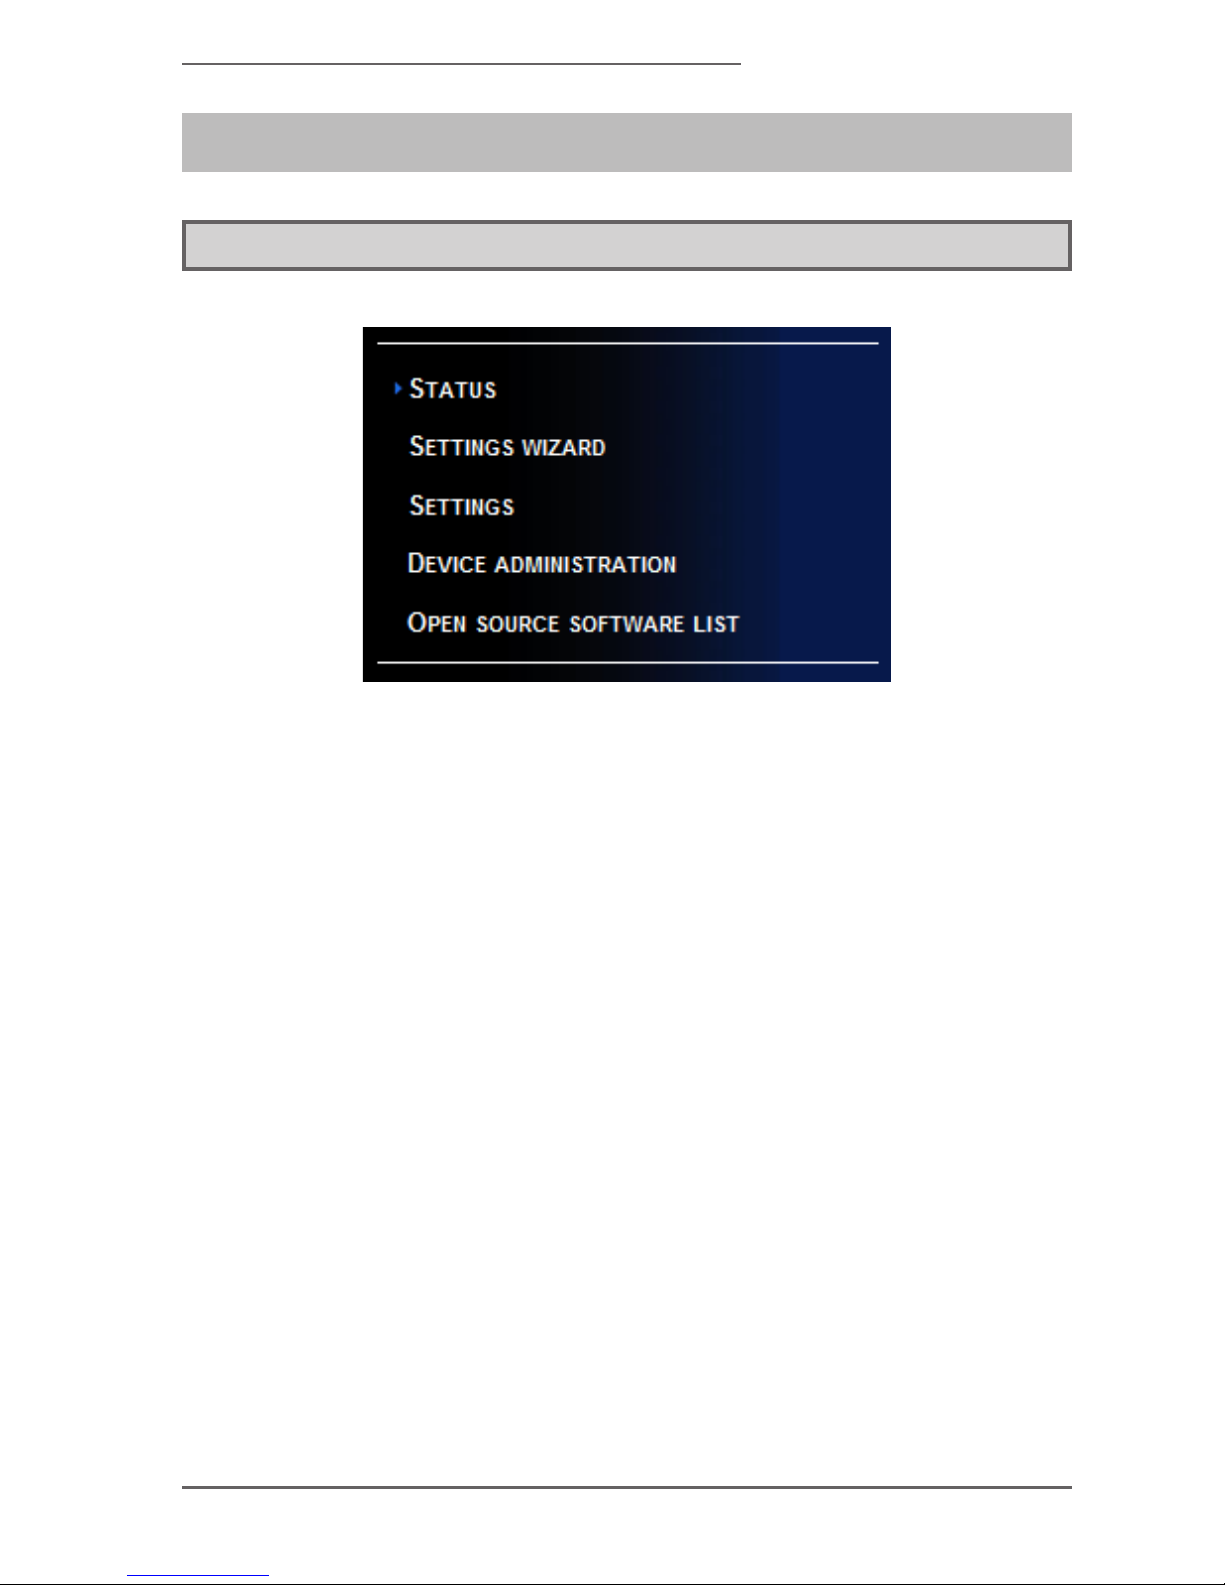
- 85 -
MEDIAEDGE Decoder
3. Settings Wizard
3-1 About Settings Wizard
The MEDIAEDGE Decoder also supports the multiple usages such as operation
by menu, playing on a schedule, channel viewing, streaming by connecting with
the server. The settings required for use in accordance with the purposes the
MEDIAEDGE Decoder will be different. By using the Settings Wizard, the minimum
settings can be done. It is recommended that you perform the Settings Wizard rst
and then add the necessary settings from the setup screen.
Page 86
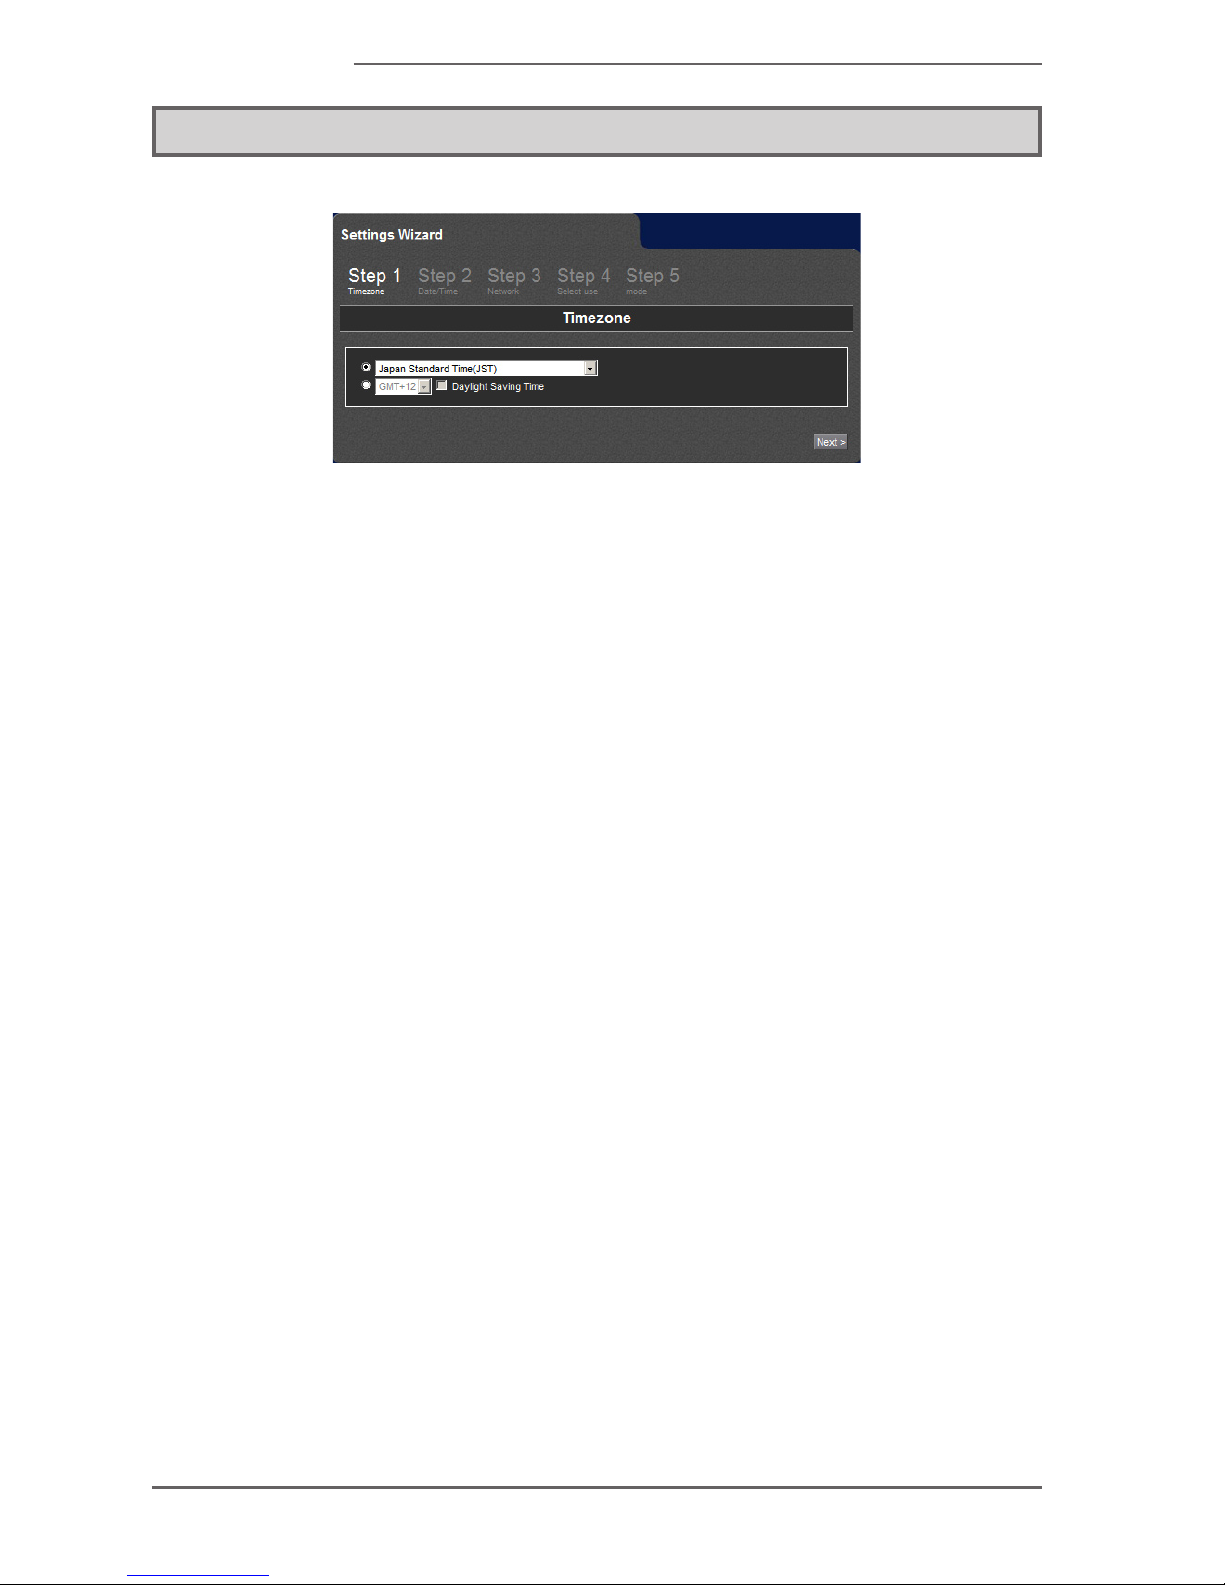
- 86 -
MEDIAEDGE
3-2 Time Zone
Please select the time zone of the region where the MEDIAEDGE Decoder will be
installed. Please check the check box of daylight saving time during the summer
time and the time difference from GMT if the region does not exist in the choice.
The time zone setting will be reected when you press the [Next] button.
Page 87
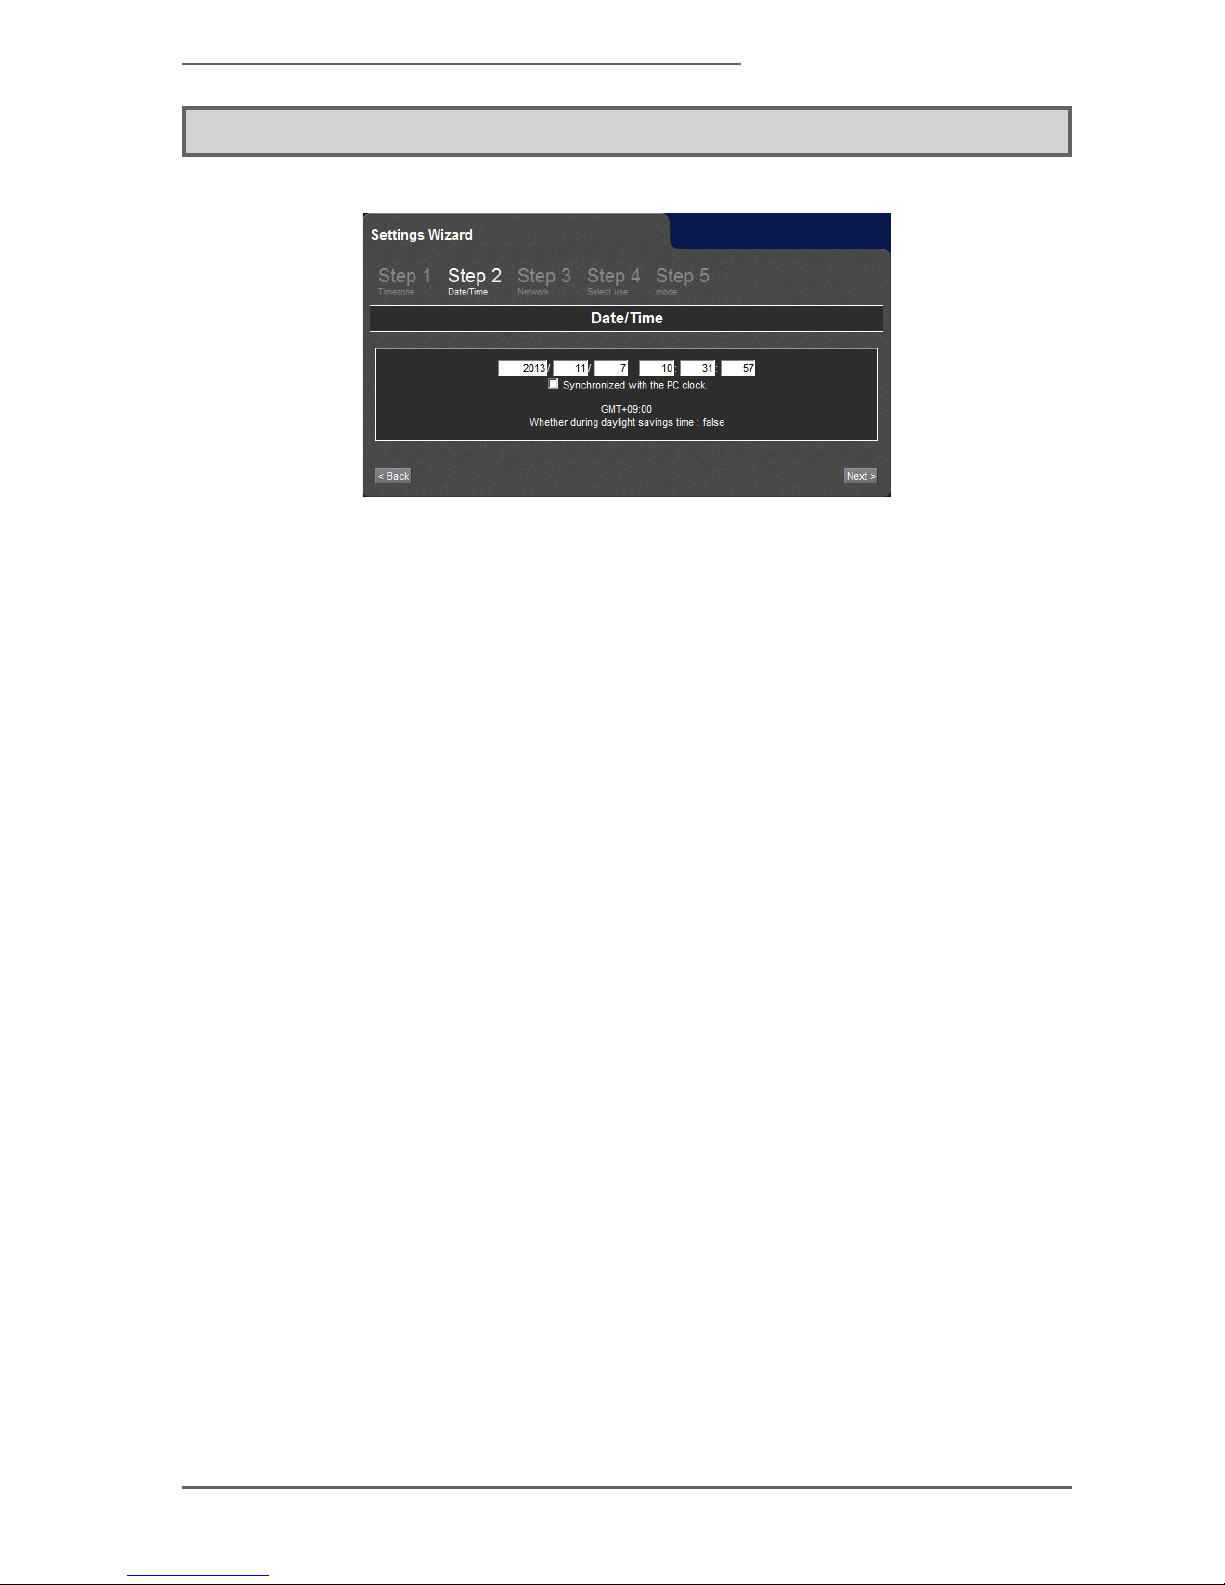
- 87 -
MEDIAEDGE Decoder
3-3 Date/Time
The local time in the region to install the MEDIAEDGE Decoder will be set. If you
check the [Synchronization with the clock of the PC], the time will be set to the same
time as the PC on which the time is set independently form the time zone setting.
The date / time setting will take effect when you press the [Next] button.
Page 88
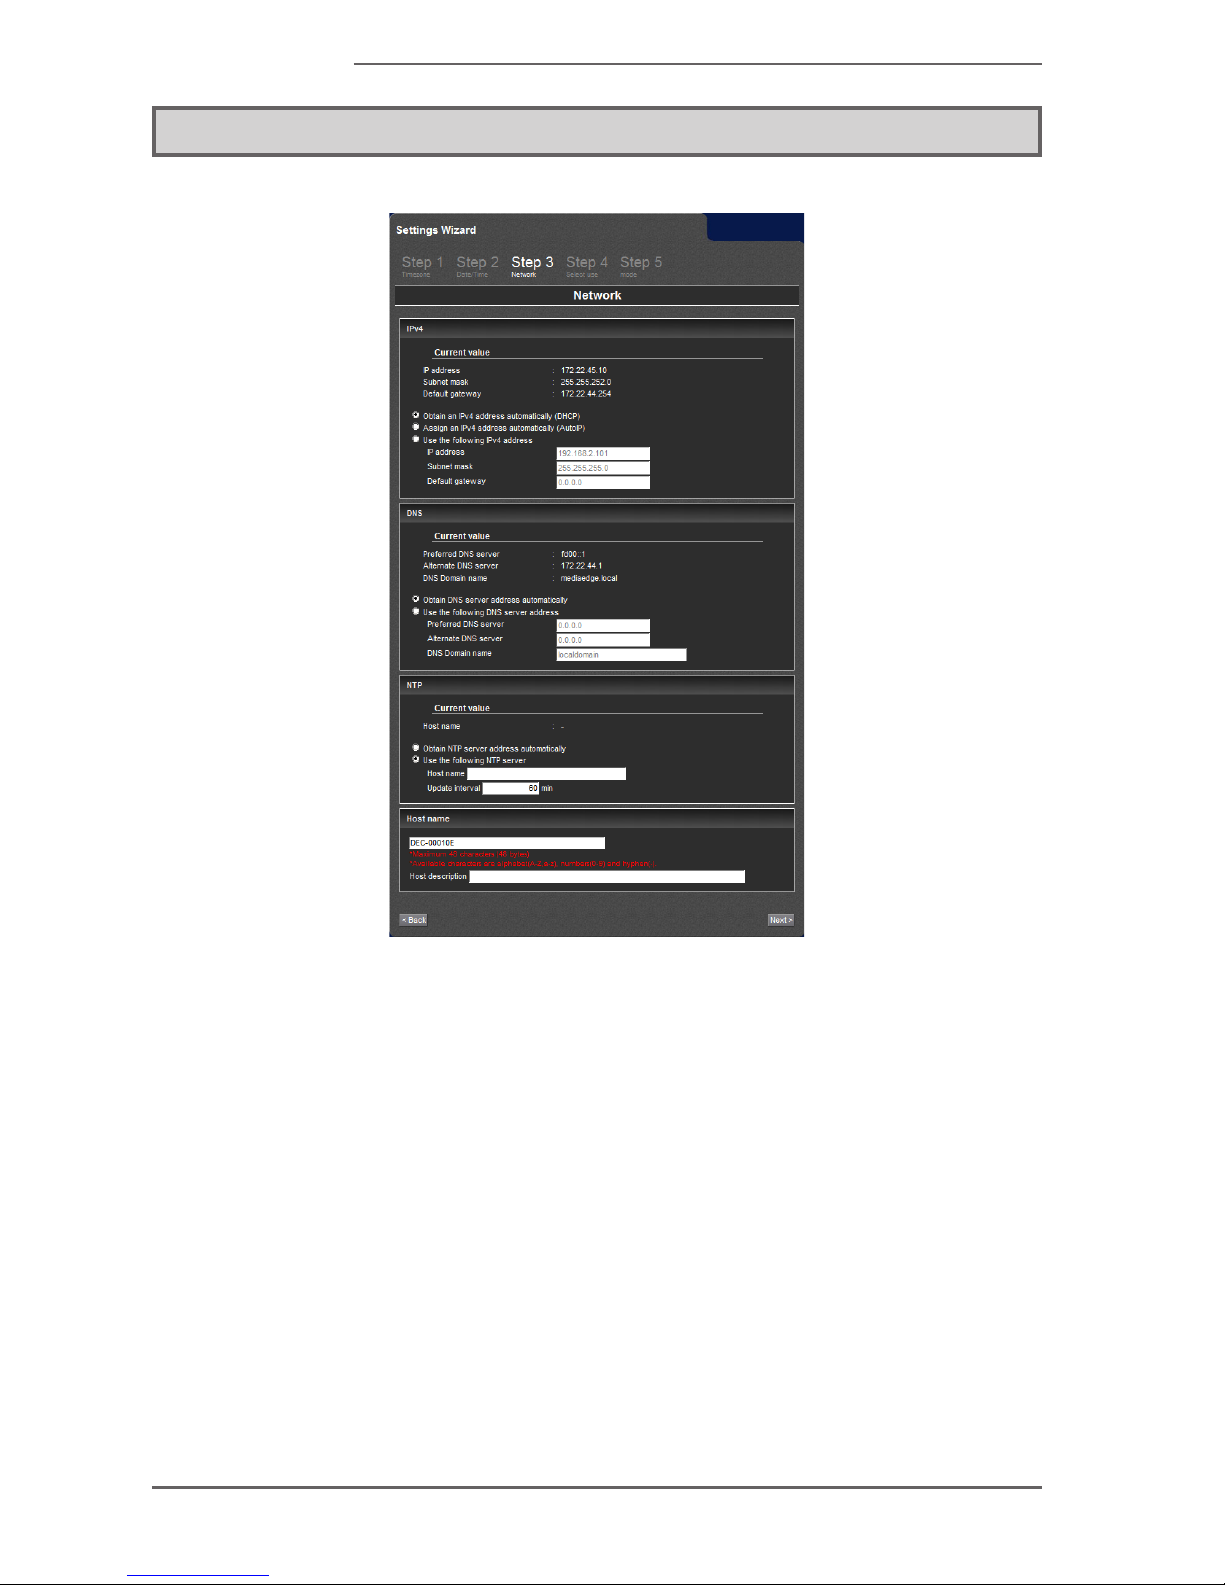
- 88 -
MEDIAEDGE
3-4 Network
The wired network-related items will be set. Since it will be only the minimum
setting, please set required items additionally in network setup after the end of the
Wizard if necessary.
IPv4
The setting on how to get IP address will be done.
Obtain IPv4 Address Automatically (DHCP) – (Initial value):
The IP address will be acquired from the DHCP server. The IP address to be
allocated depends on the conguration of the DHCP.
Obtain the IPv4 Address Automatically (AutoIP):
By using the AutoIP that obtains an IPv4 address automatically, the IP
address will automatically be allocated.
●
●
Page 89

- 89 -
MEDIAEDGE Decoder
It will be automatically generated within the AutoIP.
Use the following IP Address:
Set the IP address that will be used manually. For the setting value, please
check woth your network administrator.
DNS
The address of the DNS server will be set.
Obtaining the Address of the DNS Server Automatically:
The address of the DNS server will be automatically obtained from the DHCP
server.
Using the Address of the Next DNS Server:
Set the DNS server. For the setting value, please check with your network
administrator.
Preferred DNS server:
Specify the preferred DNS server.
Alternate DNS server:
Specify the DNS server to be used in case that a response is not returned
from the preferred DNS server.
DNS domain name:
For the setting value, please check with your network administrator.
NTP
Set the NTP server which corrects the time on the internal clock of the
MEDIAEDGE Decoder. > Time setting (NTP)
Obtain the Address of the NTP Server Automatically:
The address of the NTP server will be automatically obtained from the DHCP
server.
Use the following NTP Server:
Host name
Set the NTP server to be used. For the setting value, please check with
your network administrator.
Update interval (minute)
It will connect to the NTP server and correct the time in interval that is set
here.
●
●
●
●
●
●
●
●
●
●
Page 90

- 90 -
MEDIAEDGE
Host name
Set the host name of the MEDIAEDGE Decoder.
Only single-byte alphabet, numbers, and “ – “ can be used for the host name.
When the host name is not set, it will be automatically generated from the MAC
address.
* The “ – “ cannot be used at the beginning and the ending of the host name.
Host description:
Set the explanation that is displayed simultaneously with the host name.
●
Page 91
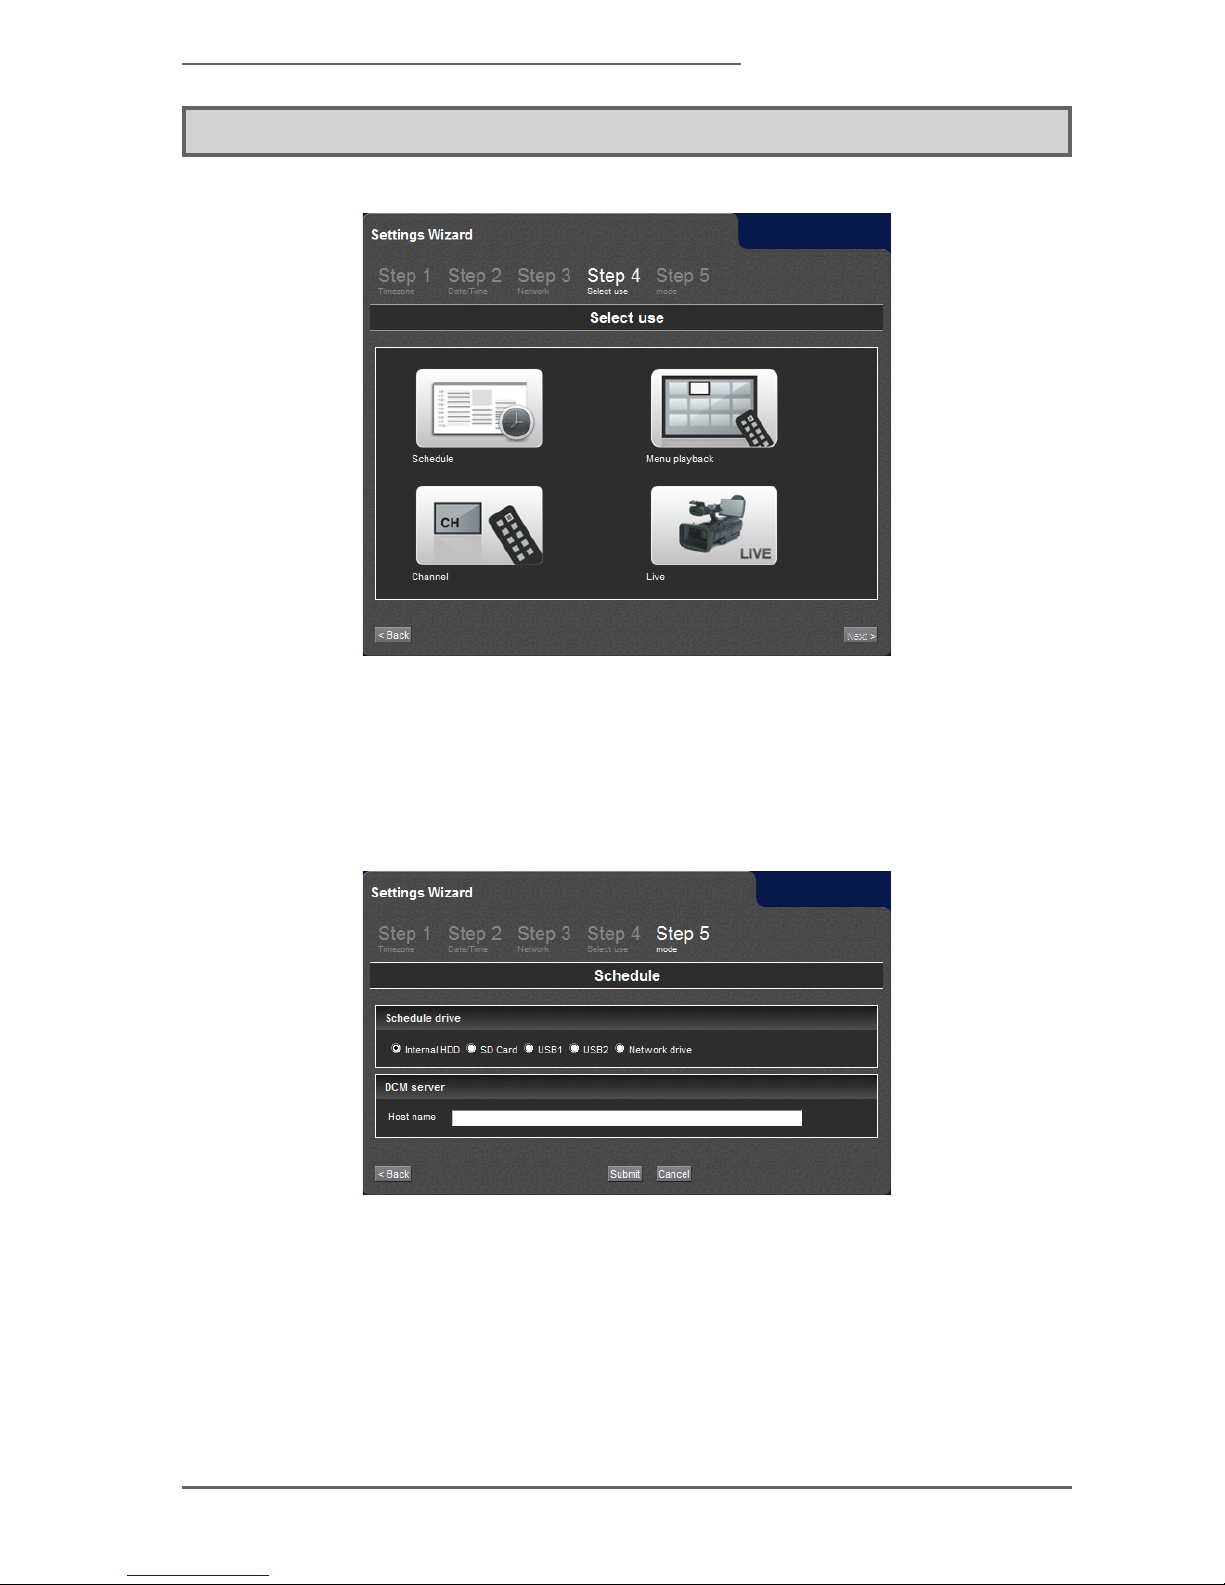
- 91 -
MEDIAEDGE Decoder
3-5 Selection of Applications
Select applications from the scheduled playback, the menu playback, the channel
viewing, and the live video playback.
■ Scheduled playback
It will play the file automatically according to the schedule that has been
delivered from the DCM.
Shcedule drive
Select the drive to save the content le. The DCM will deliver the content to the
drive selected here. Please separately set the connecting network drive from
the basic setting if the network drive was selected.
Page 92
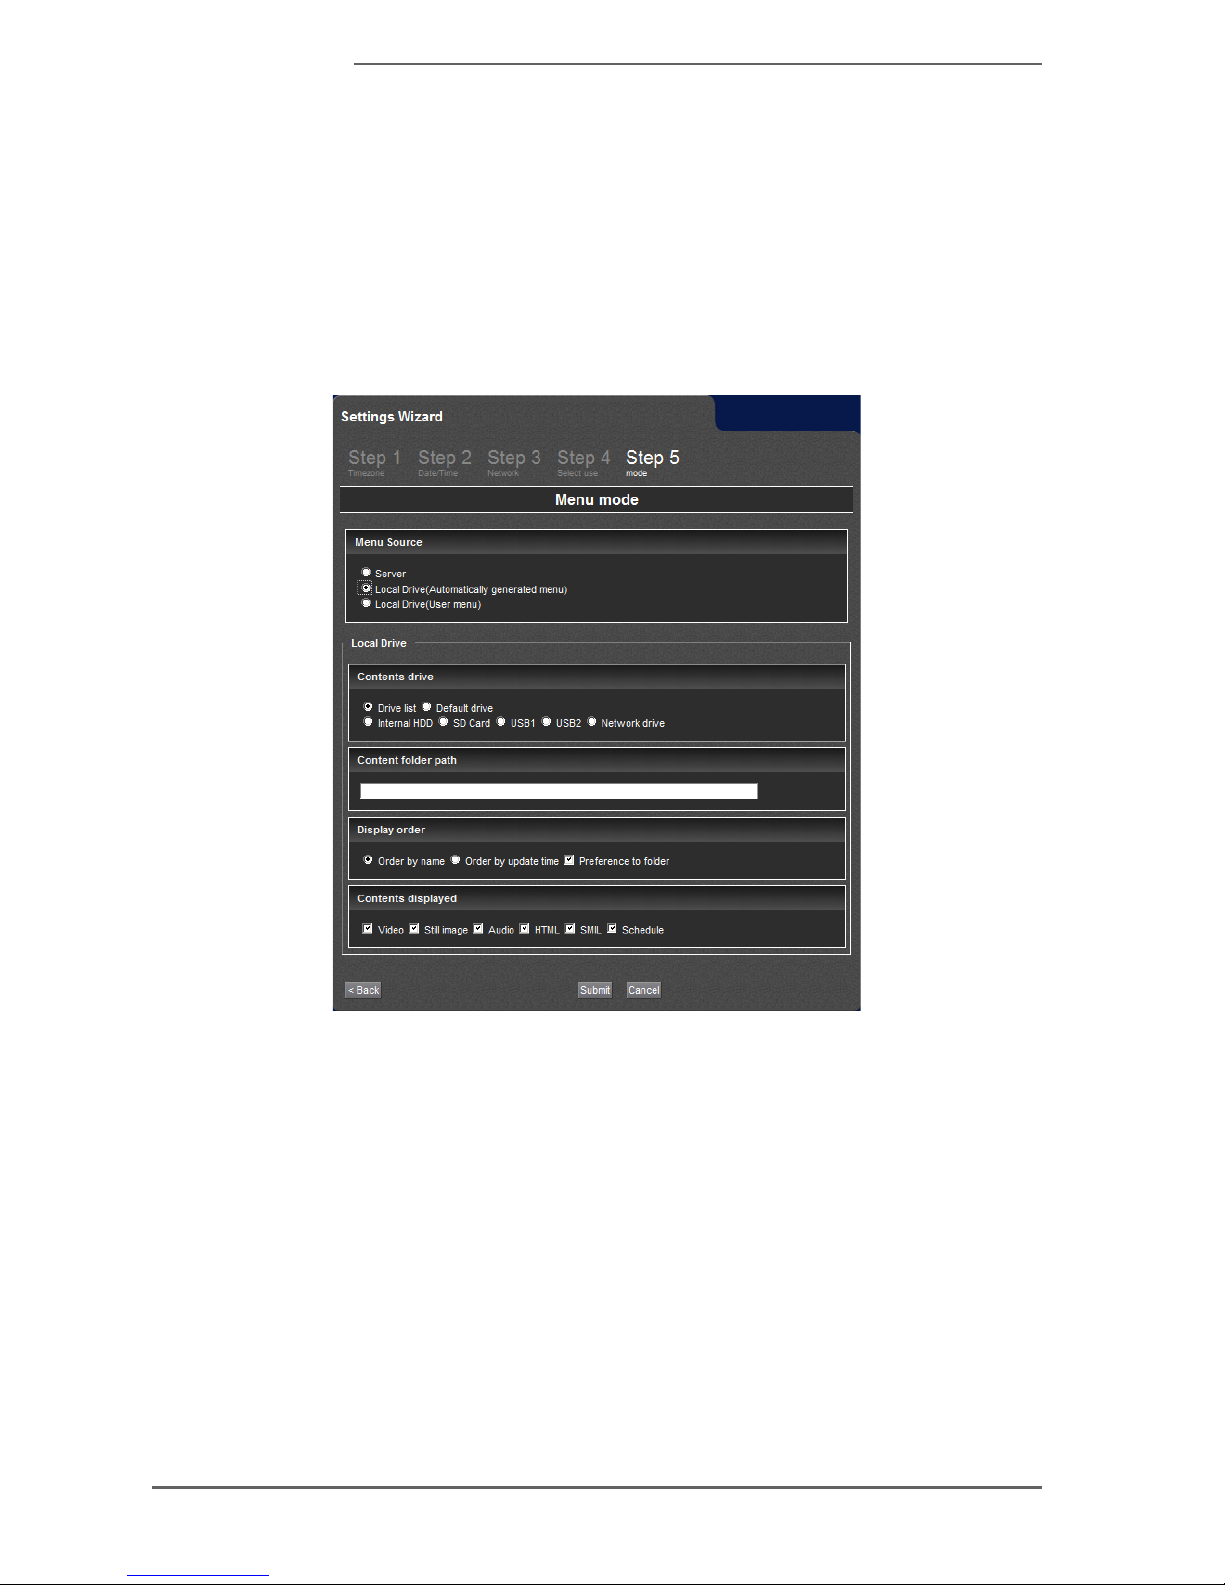
- 92 -
MEDIAEDGE
DCM server
Cooperation with the DCM will be automatically enabled. Please set the host
name of the DCM server to deliver the content and schedule. If you have
changed the account name and password for authentication of the DCM server
from the specied value, please change them in conjunction with the DCM.
■ Menu playback
The les in the local storage or the MEDIAEDGE Server will be displayed on
the menu, and the content can be played by being selected from the menu with
remote control.
Menu source
Select the menu source.
If a server is selected, the menu of the MEDIAEDGE Server will be displayed,
and the streaming will be played.
If the [Local drive (automatic menu generation)] is selected, the menu will be
automatically generated and displayed based on the content in the specied
drive. If the [Local drive (user menu)] is selected, the menu le (HTML) in the
drive that was specied in the menu le path will be displayed.
Page 93
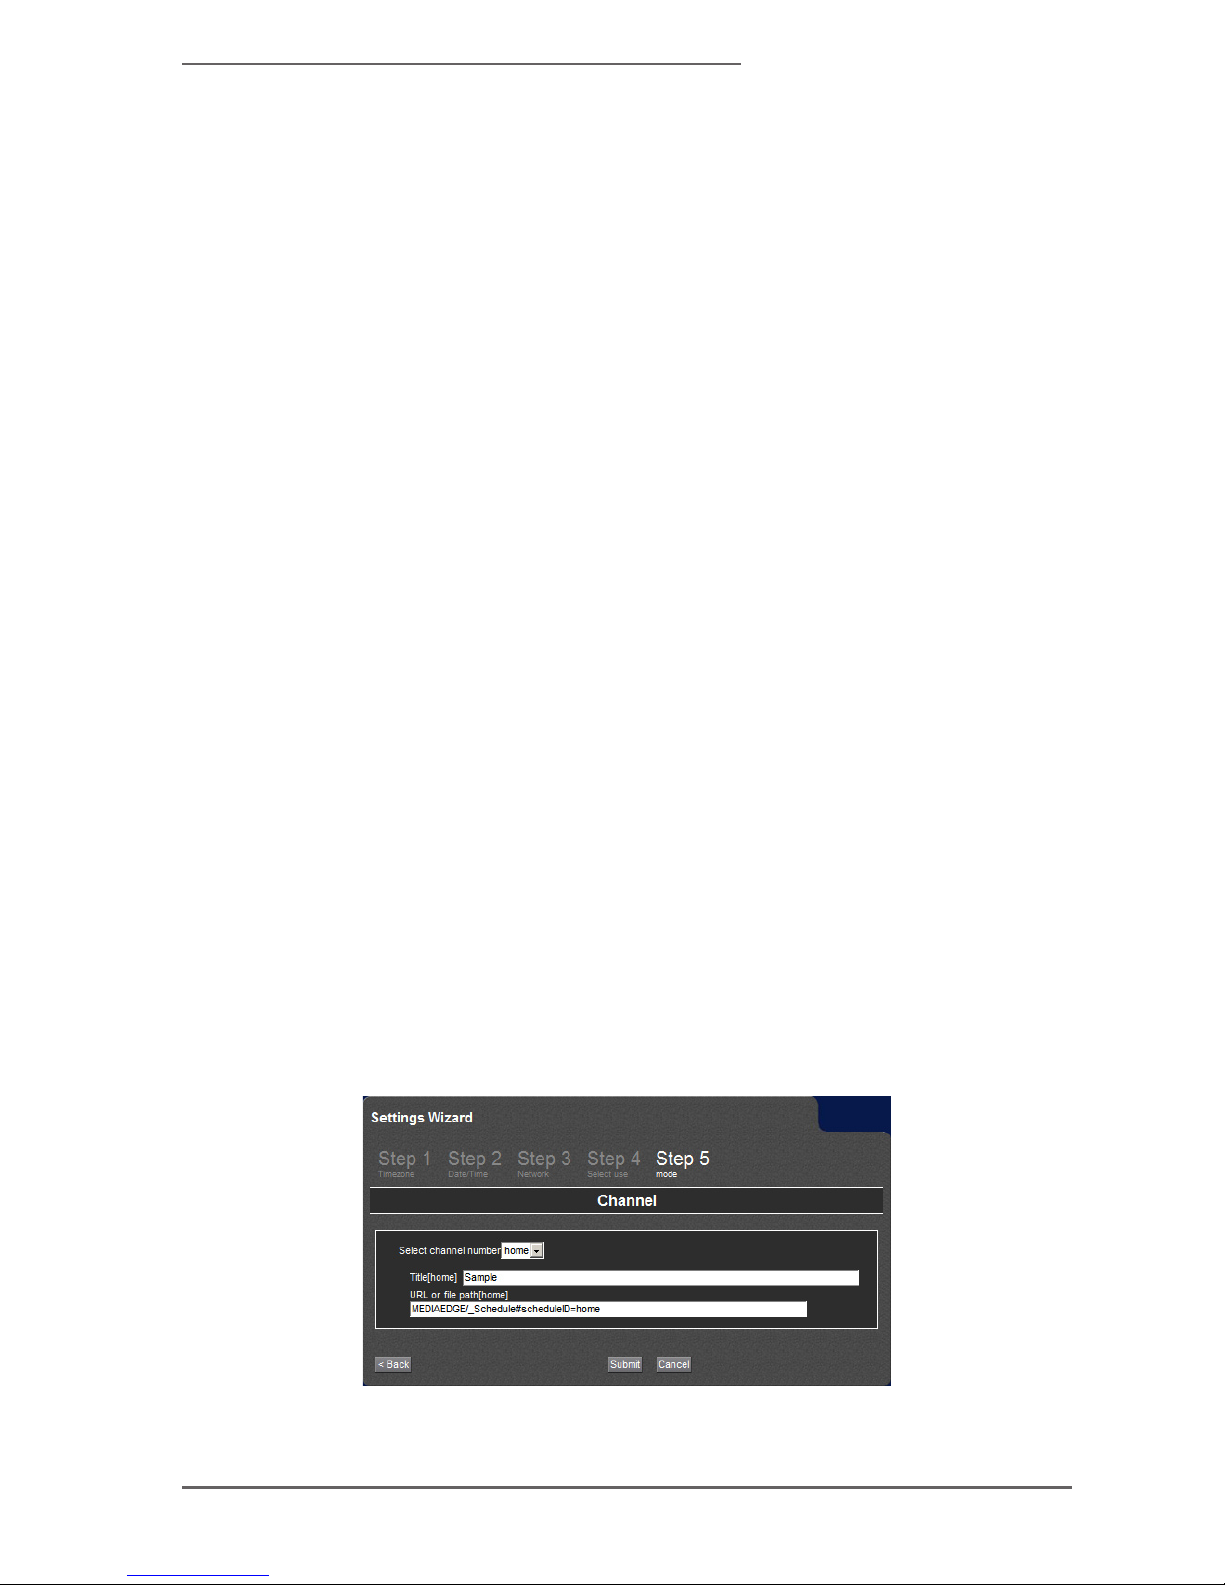
- 93 -
MEDIAEDGE Decoder
Menu page URL
It will be set when [Server] is selected in [Menu source]. Specify the URL of the
menu page of the connecting MEDIAEDGE Server.
Content drive
It will be set when [Local drive (automatic menu generation)] or [Local drive (user
menu)] is selected in [menu source].
Content folder path
It will be set when [Local drive (automatic menu generation)] is selected in the
[Menu source]. Specify the path of the folder to be used. Write a relative path
from the top hierarchy of each storage. When showing the items below the
content folder of the SD card, select the SD card in the content drive settings
and write “content.”
Display order
It will be set when [Local drive (automatic menu generation)] is selected in [Menu
source]. Specify the order of the contents that will be registered in the menu.
When the folder is set to have priority, the folder will be displayed before the le.
Contents displayed
It will be set when [Local drive (automatic menu generation)] is selected in
[Menu source]. Set the type of the content that wil be registered in the menu.
To determine the content, the extension of the le is used. Please refer to the
section of the display-content for more information.
■ Channel Viewing Playback
The content can be registered in 100 channels ([home] and [01]-[99]) and be
play by being selected with remote control. Please set the titile and the path of
Page 94
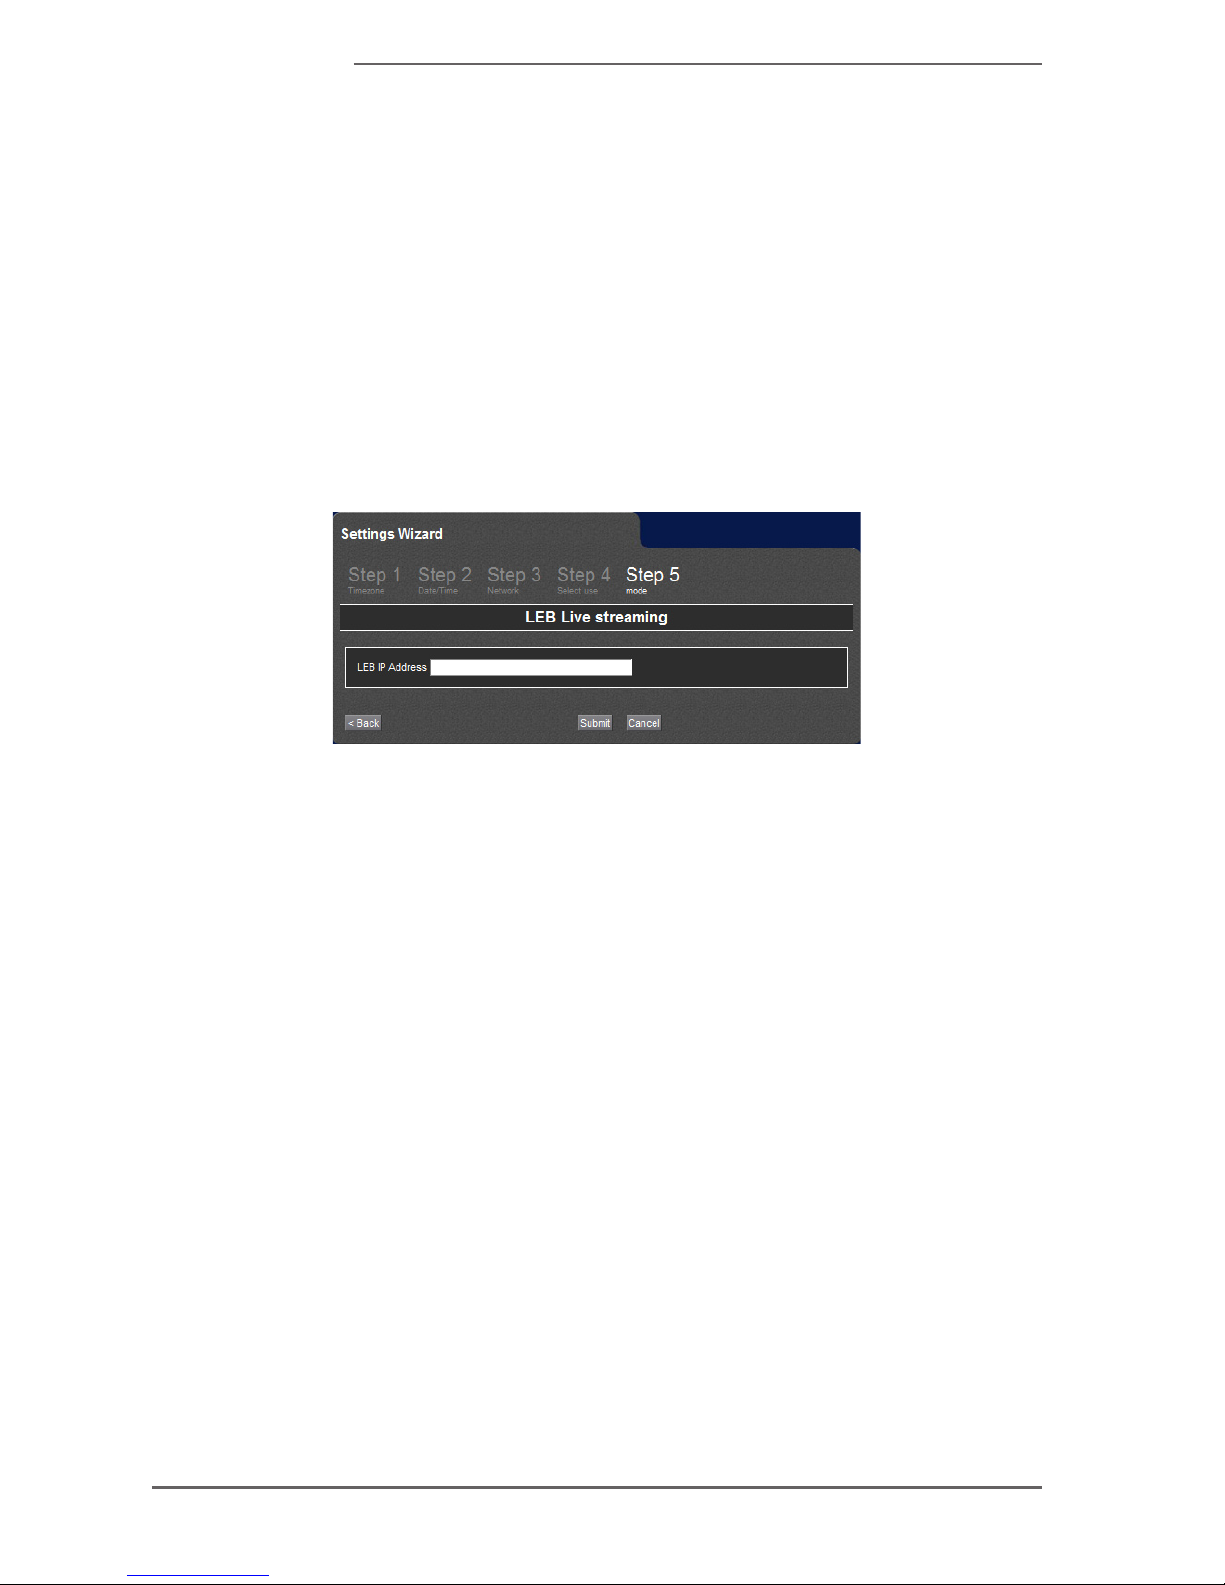
- 94 -
MEDIAEDGE
the URL of the le in channel numbers. The content that is specied in the
[Home] of the channel will be automatically played after the startup of
the MEDIAEDGE Decoder. The set title will be displayed in the playback
information that will be shown at the start of the playback and when the (DISP)
key on the remote control is pressed. When the repeat is enabled, the le will
be played repeatedly. When the repeat is disabled, it will return to the [Home]
channel after the playback of the le is nished. In the [home] channel, the
repeat will be always enabled.
■ Live Streaming Video Playback
It will receive a delivery of the MEDIAEDGE LEB Pro / Express and play it.
Please set the IP address of the MEDIAEDGE LEB Pro / Express to connect.
Page 95
- 95 -
MEDIAEDGE Decoder
4. Conguration
4-1 About Conguration
The operation of the MEDIAEDGE Decoder can be changed by the settings. When
the setting buttons on each page are clicked, it will run the actual settings and
restart if the restart after the completion of the settings is necessary. Each section
on the setup screen will display the necessary items according to the set mode.
4-2 Preferences
■ Operation mode
Set which mode will be use: the menu mode that displays and plays the menu
when the content to be played is selected, or channel mode that selects from
the registered channel numbers.
Select [Menu mode] if the content needs to be selected from the display of the
menu for the drive or server by remote control, and select [Channel mode] if
a specic content (including a schedule) needs to be automatically played at
startup.
Please set to [Channel mode] in the case of performing a scheduled playback
by using the DCM.
> Channel mode
> Menu mode - (Initial value)
■ Default drive
Select the drive to see the content files and schedule file. In the DCM, the
content will be delivered to the selected drive here.
It is necessary to set the [network drive] separately if a network drive is chosen.
> Internal HDD
> SD card
> USB1
> USB2
> Network drive
Page 96

- 96 -
MEDIAEDGE
■ Writing Limit of Drive
Set whether to enable or disable the writing to each drive. The writing will be
disabled in le delivery and all other operations if set to [Read only].
> Internal HDD/SSD
> SD card
> USB1
> USB2
> Network drive
■ Time Zone
Please select the time zone of the region where the MEDIAEDGE Decoder will
be installed. Please check the check box of [daylight saving time] during the
summer time and the time difference from GMT if the region does not exist in
the choice.
■ Remote Control
Operation of Remote Control
Enable
Initial value.
Disable
The remote control is not used.
ID
When controlling more than one MEDIAEDGE Decoders separately by remote
control, set the corresponding remote control ID. Please set to the same value
as the ID of the remote control to be used.
Power button
Enable
Initial value.
Disable
Disable only the (POWER) key by operating from the remote control.
●
●
●
●
Page 97
- 97 -
MEDIAEDGE Decoder
Setup Menu
Enable
Initial value.
Disable
The setup menu will not be displayed with the use of the (CONF) key on the
remote control.
■ Clock
Clock display
Set whether to display the clock on the screen.
Enable
Disable
Initial value.
Display format
Set the format of the date and time display. Specify by the combination of the
following notations.
The initial value is yyyy/MM/dd ddd hh:mm.
Date representation
Representation Indication
d, dd Date
ddd, dddd Day of week
M, MM Month
MMM, MMMM Name of the month
yy, yyyy Year
Time representation
Representation Indication
h, hh Hour
m, mm Minute
s, ss Second
AP, ap A.M. or P.M.
Example
Representation Indication
dd.MM.yyyy 21.05.2013
ddd MMMM d yy Tue May 21 13
●
●
●
●
●
●
●
Page 98
- 98 -
MEDIAEDGE
Representation Indication
hh:mm:ss 14:13:09
h:m:s ap 2:13:9 pm
■ Remote Log
Log Output
Set whether to send the log of the MEDIAEDGE Decoder by the UDP in the
form of IETF-syslog (RFC-5424). In order to receive a remote log, environment
for receiving Syslog is required.
Enable
Enable remote log.
Disable
Initial value.
Remote Log Transmission Destination
Set the host name or address of the network to which the log is sent. It will be
sent in IPv6 UDP format if an IPv6 address is specied.
■ Network Drive
Performs the settings to access the drive that is shared on a Windows le share. For
drives, user names, and passwords that are shared, please check with your network.
Drive Path
Sets the path of the network drive to connect in the form of \\server-name\
share.
Notes
Drivepathcanbespeciedonlyforthefolderwithsharingsettingsonthenetworkdrive
side. It is not possible to specify the path that is in lower layer than the shared folder (such
as \\server-name\share\folder for example).
User Name
Sets the user name of the network drive that has been published.
Password
Sets a password for the network drive that has been published.
●
●
Page 99

- 99 -
MEDIAEDGE Decoder
■ UPS
Monitors the AC input status of the UPS by using a USB cable to connect
Omron uninterruptible power supply (UPS). The AC input of the UPS will be
lost, and it will be possible to shut down the MEDIAEDGE Decoder due to the
battery remaining capacity or the elapsed time since it’s in battery-powered
status.
At about 1 minute after the MEDIAEDGE Decoder shuts down, the UPS unit
will shut down.
Operation mode
Sets the operating mode of the UPS monitoring.
Disabled
It will not shut down in conjunction with the UPS. (Initial value)
Battery Drive Time
Shuts down the MEDIAEDGE Decoder if the battery capacity of the UPS in
the battery-powered state falls below the set value.
Battery Drive Time till Shutdown
Species the time (in second) since UPS is in battery-powered status till the
MEDIAEDGE Decoder is shut down.
Battery Remaining Capacity till Shutdown
Species the battery remaining capacity of UPS that makes the MEDIAEDGE
Decoder shuts down.
Group Name
When supplying the power of multiple MEDIAEDGE Decoders from single
UPS, by setting the MEDIAEDGE Decoder that is not directly connected to the
UPS via a USB cable in the same group name, the simultaneous shutdown
can be done by the shutdown command via the network.
If the group name is not set (when empty), it does not send the shutdown
command over the network. (Initial value)
●
●
●
Page 100

- 100 -
MEDIAEDGE
4-3 Network
■ IPv6
Set to enable or disable IPv6. Usually set to enable. Set to disable only in the
environment where there is a problem with enabled IPv6.
Enable
Initial value. IPv6 will be used. It will set the address of IPv6 from DHCPv6
if DHCPv6 is enabled. It will set automatically if there is no DHCPv6 on the
network.
Disable
IPv6 is not used.
■ Network used in preference (Wi-Fi model only)
Set up a network to be used in preference to the settings that are obtained
from a DHCP server via wireless LAN or wired LAN (such as NTP server and
DNS server).
Wired
Initial value.
Wireless
■ IPV4
Wired LAN
IPv4 address
Set up how to obtain the IP address.
Obtaining the IPv4 address automatically (DHCP) – (Initial value)
Obtain the IP address from DHCP server. Allocated the IP address
depends on the settings of the DHCP. The IP address will not be allocated
until it is obtained from the DHCP server.
Obtaining the IPv4 address automatically (AutoIP)
The IP address will be allocated automatically by using the AutoIP.
It wil be automatically generated within a range of the AutoIP (169.254/16).
●
●
●
●
●
●
●
 Loading...