

Page 1
www.install-us.com
install-us 2007
Manual
install-us Standard
install-us Professional
Page 2

This document mustn’t be reproduced entire or in part in any kind; It mustn’t be distributed to any third
party, stored in a database system, or translated into another language without the prior written
permission of Schellhorn media-productions e.K.
Although the authors have attempted to find and correct any bugs in the software, they are not
responsible for any damage or losses of any kind caused by the use or misuse of the software. There may
also be errors in the programmcode. The authors are under no obligation to provide
service, corrections, or upgrades to SOFTWARE INSTALL-US.
install-us 2007 Documentation
Release: February 2nd 2007
© 1996-2007 schellhorn media-productions e.K.
All rights reserved.
install-us is a trademark of schellhorn media-productions e.K.; Adobe and Acrobat are trademarks of
Adobe Systems Incorporated; IBM is a registered trademark of International Business Machines
Corporation. Microsoft, Windows, Windows NT, Windows 2000, Windows XP and Windows Vista are
registered trademarks or trademarks of Microsoft Corporation in US and/or other countries. All other
product names are trademarks or registered trademarks of their owners.
Page 3

Content
Welcome to install-us 1
Introduction .........................................................................................................................1
Range of possibilities...........................................................................................................1
General 5
Latest informationen ............................................................................................................5
Version differences Standard – Professional .......................................................................5
System Requirements ..........................................................................................................6
Installation 7
Introduction .........................................................................................................................7
Instructions ..........................................................................................................................7
Working with install-us 11
Preface ...............................................................................................................................11
Programs............................................................................................................................12
CD-ROM ...............................................................................................................7
Download version..................................................................................................7
Installation assistent...............................................................................................8
install-us main module 13
Introduction into the main module.....................................................................................13
Project for beginners..........................................................................................................14
General Settings.................................................................................................................20
Directory..............................................................................................................20
Program Folder....................................................................................................20
Configurations .....................................................................................................20
Installation media ................................................................................................21
Windows version .................................................................................................23
Variables..............................................................................................................23
Overview of all variables.....................................................................................25
File source..........................................................................................................................26
Files and directories.............................................................................................27
Options ................................................................................................................29
User interface.....................................................................................................................31
Language selection and text modification ...........................................................32
Media...................................................................................................................32
Readme and message boxes ................................................................................35
System Configuration ........................................................................................................36
Software ..............................................................................................................36
Uninstall ..............................................................................................................36
Registry ...............................................................................................................37
Ini files.................................................................................................................38
Text files..............................................................................................................39
Program start .......................................................................................................39
Reboot .................................................................................................................40
install-us Manual Content
i
••••
Page 4

Registry file import..............................................................................................41
Version check ......................................................................................................41
File settings..........................................................................................................42
Backup.................................................................................................................42
Include files .........................................................................................................43
Building installation...........................................................................................................44
Compile project ...................................................................................................44
Command line usage ...........................................................................................44
Copy files to disk.................................................................................................45
Test installation..................................................................................................................46
Uninstall.............................................................................................................................47
Protecting your installation ................................................................................................48
Password protection.............................................................................................48
Expiration ............................................................................................................48
User-Registration-System (URS) ........................................................................49
Notes about Special-Copy-CD...........................................................................................51
CD-Manager 53
Introduction........................................................................................................................53
Usage .................................................................................................................................53
Creating an Autostart-CD ..................................................................................................58
Index 59
ii
Content install-us Manual
••••
Page 5

Welcome to install-us
Introduction
Install-us is an application to create professional installations for your software,
which you can distribute to your friends or customers.
Installations build with install-us can take care of nearly all tasks required for upto-date installations: Install-us can copy files and directories to the destination
system, and it can configure the system in a variety of ways, that your software
will run smoothly.
As defined in the Microsoft Windows installation guidelines, the install-us
uninstall assistant can complete remove a previous installed software from the
system of your clients.
Install-us offers a fast and efficient way of bulding installations. You can build
your own installations within five minutes. The integrated step-by-step
navigation leads you through the process of creating successful installations.
Range of possibilities
On this page you find all possibilies offered by install-us. You will see, that it is
easy to create professional installations to distribute your software:
Installations for all Windows platforms
You can create installations for all Windows platforms – 16- and 32 Bit:
The installation procedures for 32-Bit platforms steadily get adapted to the latest
Windows releases, such as Windows 95, Windows 98 (SE), Windows ME,
Windows NT4, Windows 2000 Professional, Windows XP and Windows Vista.
You can even create installations for 16-Bit Windows like Windows 3.1 and
Windows for Workgroups 3.11 - even out of one single project file.
Different distribution media open up unlimited distribution
worldwide
To distribute your software install-us offers support for 1.44 MB-Disks, 2.88
MB-Disks, harddrives, CDs, DVDs, SFX-archives (internet download) or other
storage-systems up to a size of 2 GB.
install-us Manual Welcome to install-us
1
••••
Page 6

With the help of the integrated CD-Manager you can create Autorun-CDs in the
twinkling of an eye. These CDs launch a menu program after inserting the CD,
where the user can easily select the desired product.
All installation files can be stored in one single exe-file, which is especially
useful for internet-downloads. This exe-file is one single executable, which
contains the installation program and all data files (SFX file – self-extractin
archive). The integrated Fast-Expand mechanism reduces the time for extracting.
Additional you find more than 25 dictionary files in install-us. These files can be
used to create multi-lingual installations directly within install-us.
Easy to use user interface
Install-us offers an easy to learn Click-and-Build user interface, which provides a
very quick guide in creating installations by yourself. Even beginners can create
their own running installation in five minutes. Professional users can customize
installation very detailed to fit their needs.
Your files
You can include single files or total directory trees with all nested files and
subdirectories in your installation with one click. Deleting and adding of files
and directories is possible at every time.
The integrated version checking feature ensures, that files never get overwritten
by older or outdated files. This guarantees, that there are always the latest files
installed on the user’s system.
To save disk space or to reduce the time required for tranferring files, the files
get compressed. You can even span very large file over several disks.
You can organize your files by creating directories and setup types. This makes
it easy for you and the users to have a good overview of the installed software.
The backup function can store files before the new files get copied onto the
destination system.
Install-us can update files, which are in use by the system or another application.
If necessary install-us can force a reboot of the system.
Install-us provides special interfaces to install and register new fonts, register
Shared-DLLs, Active-X-controls and new filename extensions (e.g. txt for being
opended with Notepad by default).
Customize installation
You can divide your hole installation into different setup types. Usually an
installation offers a Typical, a Minimum and a Customized setup type. The
customized setup typed can offer up to nine single options.
The options can be used within the uninstall wizward either to offer total or
partial uninstall of the different software parts.
You can define start menu entries via simple clicks. On Windows 95/98/ME and
NT4/2000/XP/Vista operation systems you can advise install-us to create
shortcuts to your files even on the desktop.
By editing entries within the Windows registry and within ini files of every kind
during installation you can pre-configure the settings of your application and
adapt it to the peculiarities of the user’s system.
You can control the installation process via different variables.
You can configure the kind, install-us should reboot.
2
Welcome to install-us install-us Manual
••••
Page 7

Via the possibility of launching special executables, which could be programs
wirtten by yourself, you can install third party plugings or make special
configurations, which cannot be handled with install-us directly. Install-us can
wait for the termination of those external programs or just start them and proceed
with the installation.
Protect your software
You can specify a single password, which locks the installation. Installation will
only be possible, if the password is known by the user.
You can set an expiration date. After this date, the user will not be able to install
the software.
Within the optional User-Registrierungs-System (URS) you can create
induvidual keys. You must supply a personalized key to the users of your
software.
Designing the user interface
Install-us offers various desiging capabilities, so that you can create a individual
design for the installation wizard of your software:
You can show or hide an installation backgroud (usually a transition from blue to
black) and show a slideshow (billboards). Alternatively you can show a hole
video (avi) or play a sound file (wav or mid).
System checking
If your software requires a special graphics mode (e.g. at least 256 colors, a
special resolution) or a minimum size of RAM, you can inform the user.
License agreements
Via showing a license agreement dialog before starting the installing of your
software you can make sure, that the user reads and accepts your license
agreement.
install-us Manual Welcome to install-us
3
••••
Page 8

Page 9

General
Latest informationen
You find the latest product information and product updates in the web on our
www.install-us.com
page
Additionally you can find a FAQ and a list with tipps and tricks there, which
gives you solutions to your problems.
Links to installation related topics are available on www.install-us.com
Version differences Standard – Professional
Standard-Version is sufficient for building simple installations. Standard version
does only offer one option for grouping files and directories. If you need
different installation types like "Typical", "Minimum" or "Custom" you need
install-us Professional.
install-us Manual General
5
••••
Page 10
System Requirements
Minimum system requirements for the install-us compiler to be able to build
installtions:
•
• 5 MB free disk space
•
• 386 DX IBM-compatible PC with > 4 MB RAM
• Mouse or similar device
Recommended system configuration for install-us compiler:
• Windows 95/98/ME, NT4, Windows 2000 Professional or
•
•
•
•
• 256 colors at 800x600 resolution or higher
• Sound card
Minimum system requirements for executing the created installations:
•
•
• 5 MB free disk space in a temprorary directory (your software may
•
Windows 95/98/ME, NT4, Windows 2000 Professional or
Windows XP/Vista
10 MB free disk space for created installations (your software
project may need much more disk space)
Windows XP/Vista
5 MB free disk space
10 MB free disk space for created installations (your software
project may need much more disk space)
486 DX IBM-compatible PC with > 8 MB RAM
Mouse or similar device
Windows 3.1 or Windows for Workgroups 3.11 (only possible for
16-Bit installations)
Windows 95/98/ME, NT4, Windows 2000 Professional or
Windows XP/Vista
require much more disk space during installation)
386 DX IBM-compatible PC with > 4 MB RAM.
6
General install-us Manual
••••
Page 11

Installation
Introduction
Please make sure, that your computer meets the "System Requirements" on page
6!
Already installed installation software of other software manufacturs, internet
settings or hardware configurations don’t get influenced with an install-us
installation.
Instructions
CD-ROM
If you have purchased install-us on CD-ROM, please follow these steps:
1. Insert the install-us CD-ROM.
2. If the setup assistant doesn’t start automatically, go to the root
directory of the CD-ROM and start the file
3. The “Installation assistent” leads you through the installation. See
next page!
setup.exe
manually.
Download version
1. Run the file
downloaded package.
2. The “Installation assistent” leads you through the installation. See
next page!
iusXXXX.exe
, which you have received within the
install-us Manual Installation
7
••••
Page 12
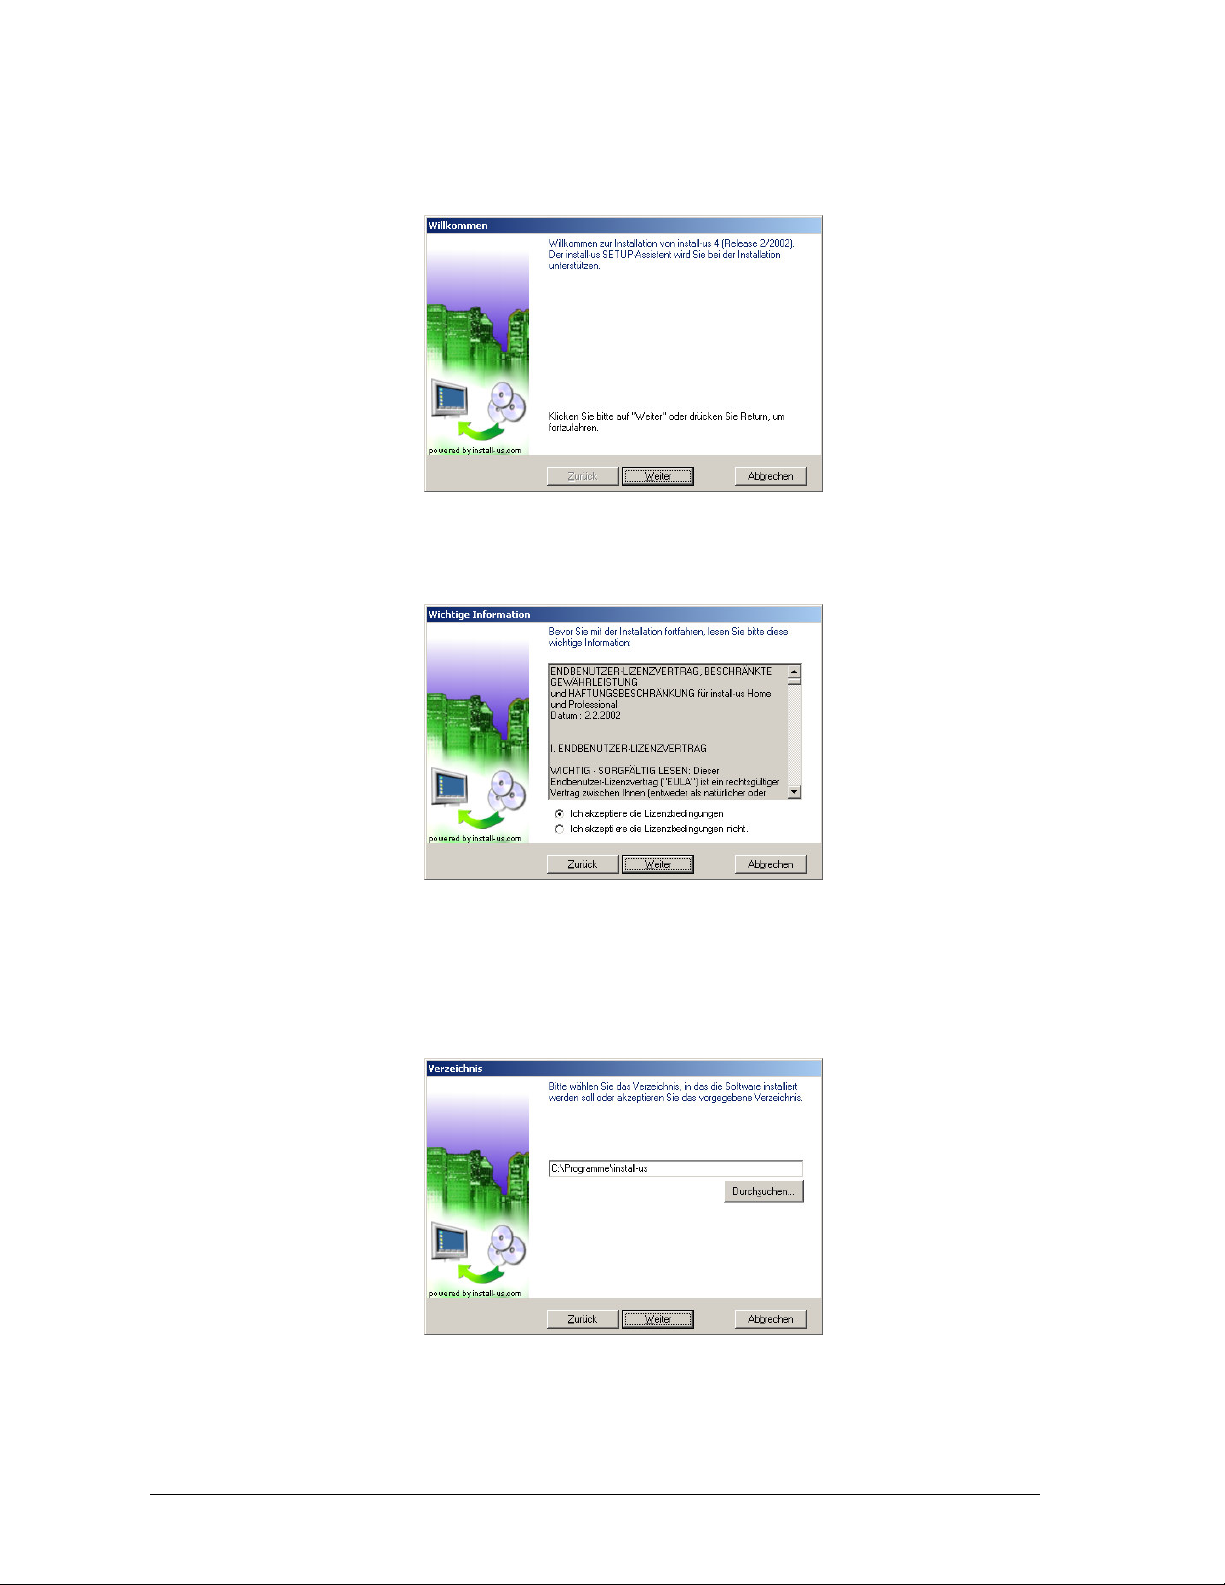
Installation assistent
Here you see the installation steps:
Welcome
In the first window of the installation assistant you get informed about the
install-us installation. Confirm with the
Next
button.
If you are not willing to
accept the license agreement,
you must completely remove
the install-us software from
your system.
License agreement
The next page shows the license agreement of install-us. If you accept the
license agreement, please activate the appropriate checkbox and click
Next
Specify directory
Choose the name of the directory, where to place install-us into or leave the
default one entered. Confirm with the Next button.
.
8
Installation install-us Manual
••••
Page 13
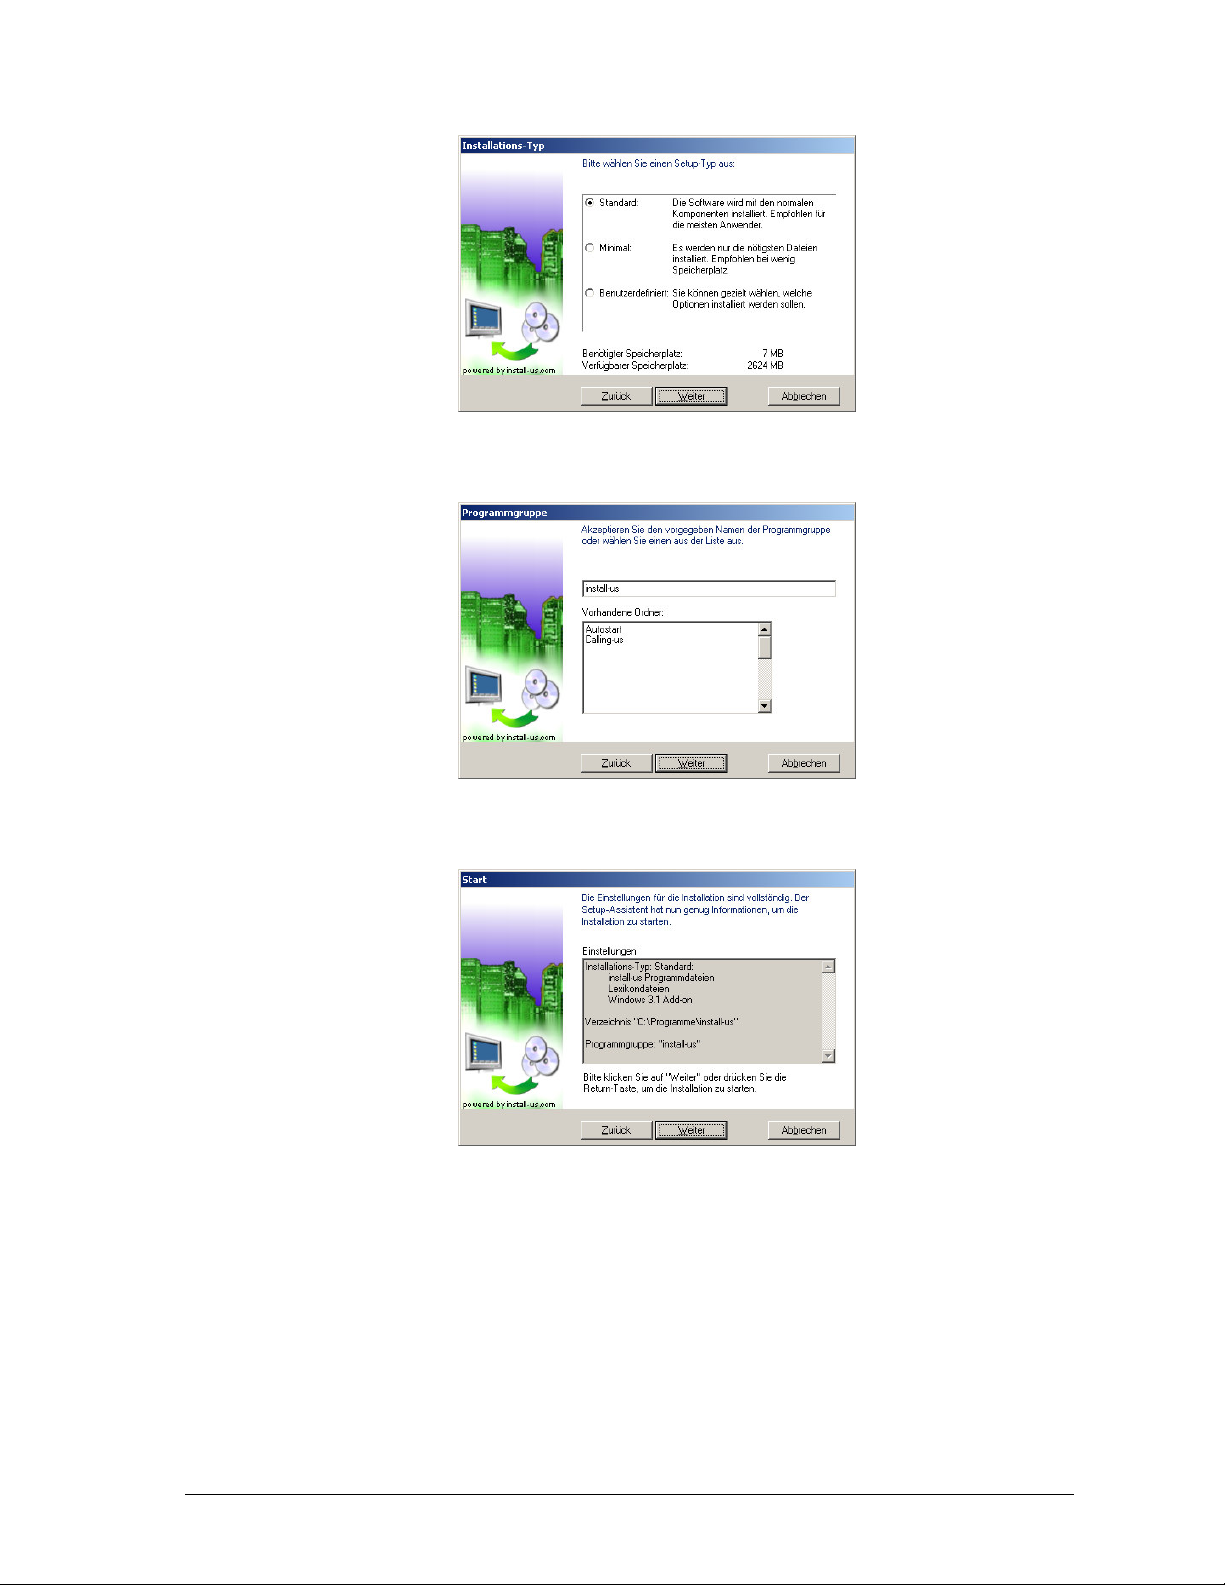
Installation type
It is recommended to install the software in its typical configuration. Click
Program group
Accept the default name of the program group and click on the button Next.
Next
.
Start
Finally the installation assistant shows a summary of all settings. You can start
the installtion via clicking onto
install-us Manual Installation
Next
.
9
••••
Page 14
Installation
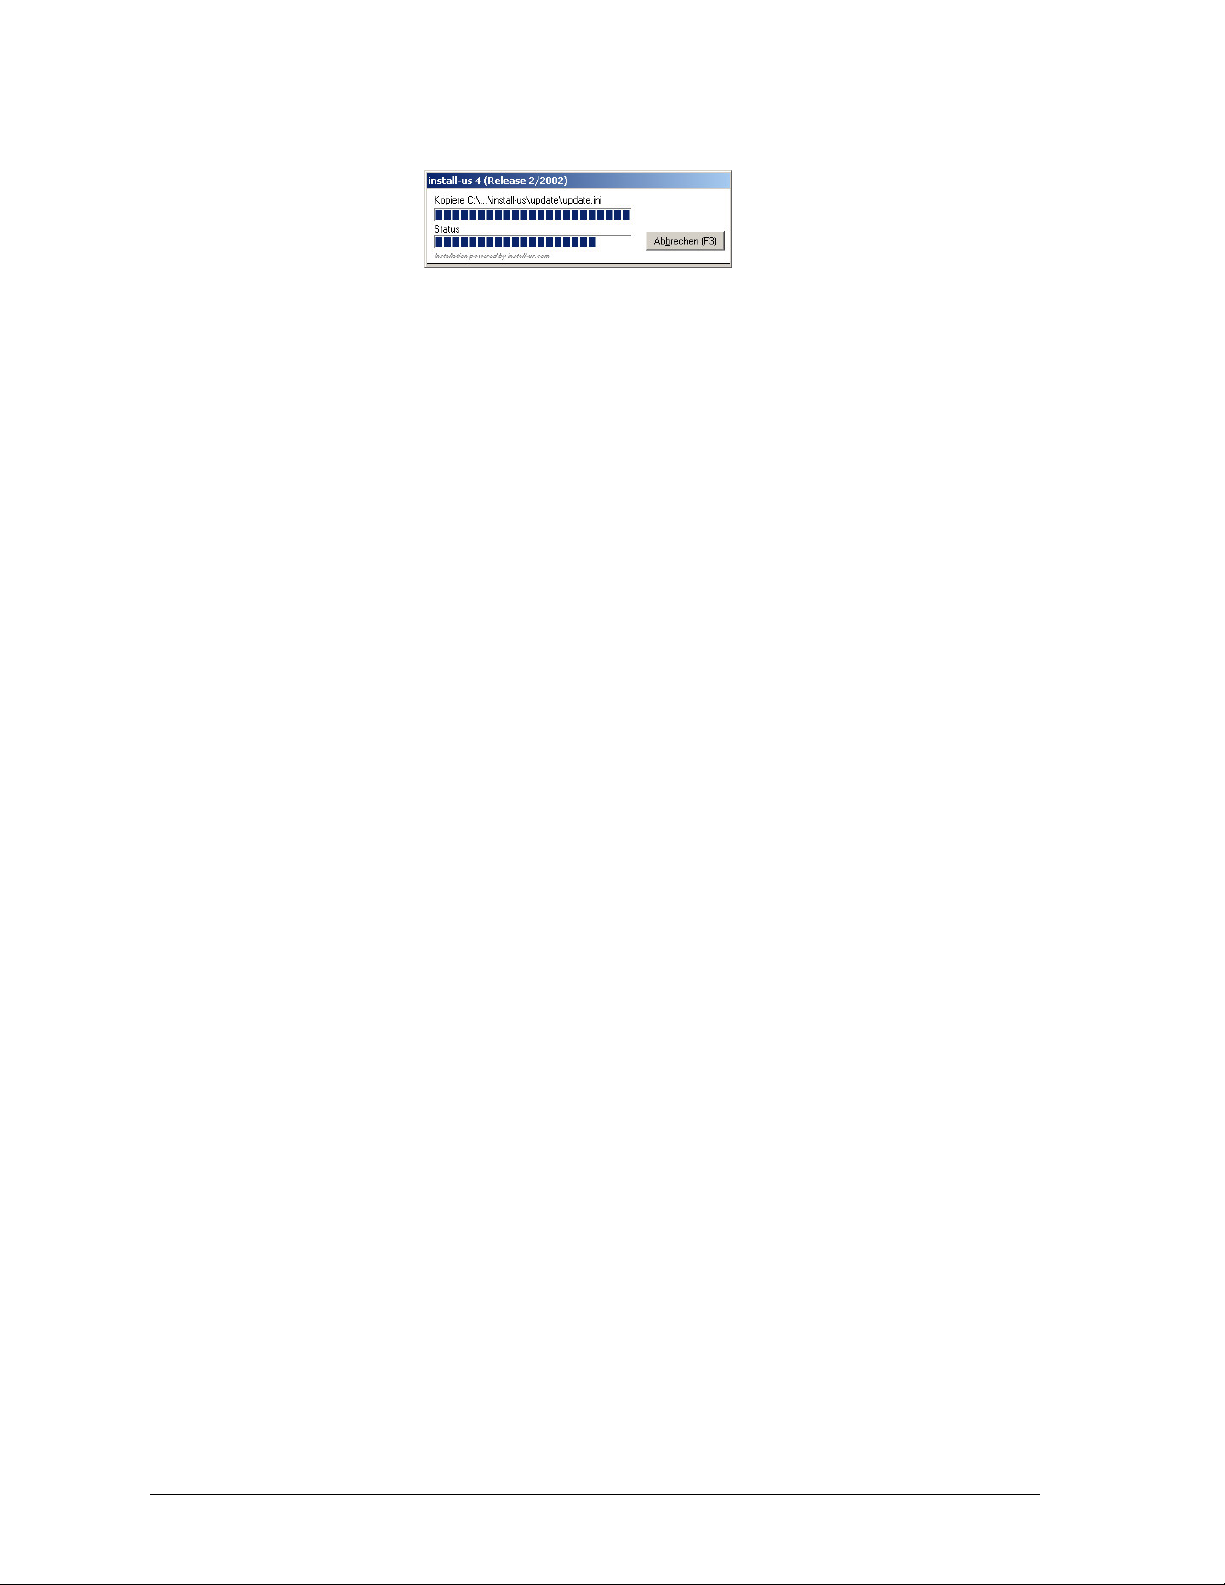
During the copying of files and the configuration of your system, the install-us
progress window is shown. The installation needs some minutes time.
At the end a messagebox reports the sucessful installation.
You will find the program group "install-us" opened at the end. There you can
select the item
install-us
to directly start the install-us main program.
10
Installation install-us Manual
••••
Page 15

Working with install-us
Preface
With install-us you create installations for the worldwide distribution of your
software. You distribute your files to the computers of your friends and/or
customers. Please make sure, that you are alloed to distribute the files you
include in install-us installations. This is especially important for system files of
your Windows installation.
Please keep in mind, that installing incompatible system files on other computers
may damage the systems completely, so that a reinstallation of Windows and all
program files may become necessary.
The best way to avoid such problems would be to just include self programmed
and edited files into your installations and put those files into your own
instalation dictionary, where they cannot overwrite other third party or system
files.
install-us Manual Working with install-us
11
••••
Page 16
Programs
Install-us consists of the main module (install-us) and the CD-Manager and
various help and documentation files.
With install-us you create one installation for each software project you have to
manage. The settings of an installation and the names of the files necessary for it
are stored in a data files, which is called install-us project file. The filename
extension of those files is .ius.
install-us project
Within an install-us project file the kind of installation media, the offered
installation options and setup types, the operation and the look of the installation
assistant, the name of required files and directories gets stored. Install-us does
not save complete external files within the project files. It always saves
references to the files required by a project. Therefore you must copy the ius file
and all referenced files to the other system, when you want to build the
installation on this system.
The install-us CD-Manager offers a simple method of creating Autorun-CDs
with a special menu. The user can decide what to do after inserting the CD. He
can install the application, you included onto the CD, or he can open special
documents provided with the CD-ROM.
12
Working with install-us install-us Manual
••••
Page 17

install-us main module
Introduction into the main module
With install-us you create one installation for each software project you have to
manage. The settings of an installation and the names of the files necessary for it
are stored in a data files, which is called install-us project file. The filename
extension of those files is .ius.
Within an install-us project file the kind of installation media, the offered
installation options and setup types, the operation and the look of the installation
assistant, the name of required files and directories gets stored. Install-us does
not save complete external files within the project files. It always saves
references to the files required by a project. Therefore you must copy the ius file
and all referenced files to the other system, when you want to build the
installation on this system.
install-us Manual install-us main module
13
••••
Page 18
Project for beginners
After taking part in this project for beginners you are able to create your own
first installations for Windows.
1. Preparing a new project
When install-us is already running, choose the item
Otherwise start install-us.
New
in the
File
menu.
install-us project
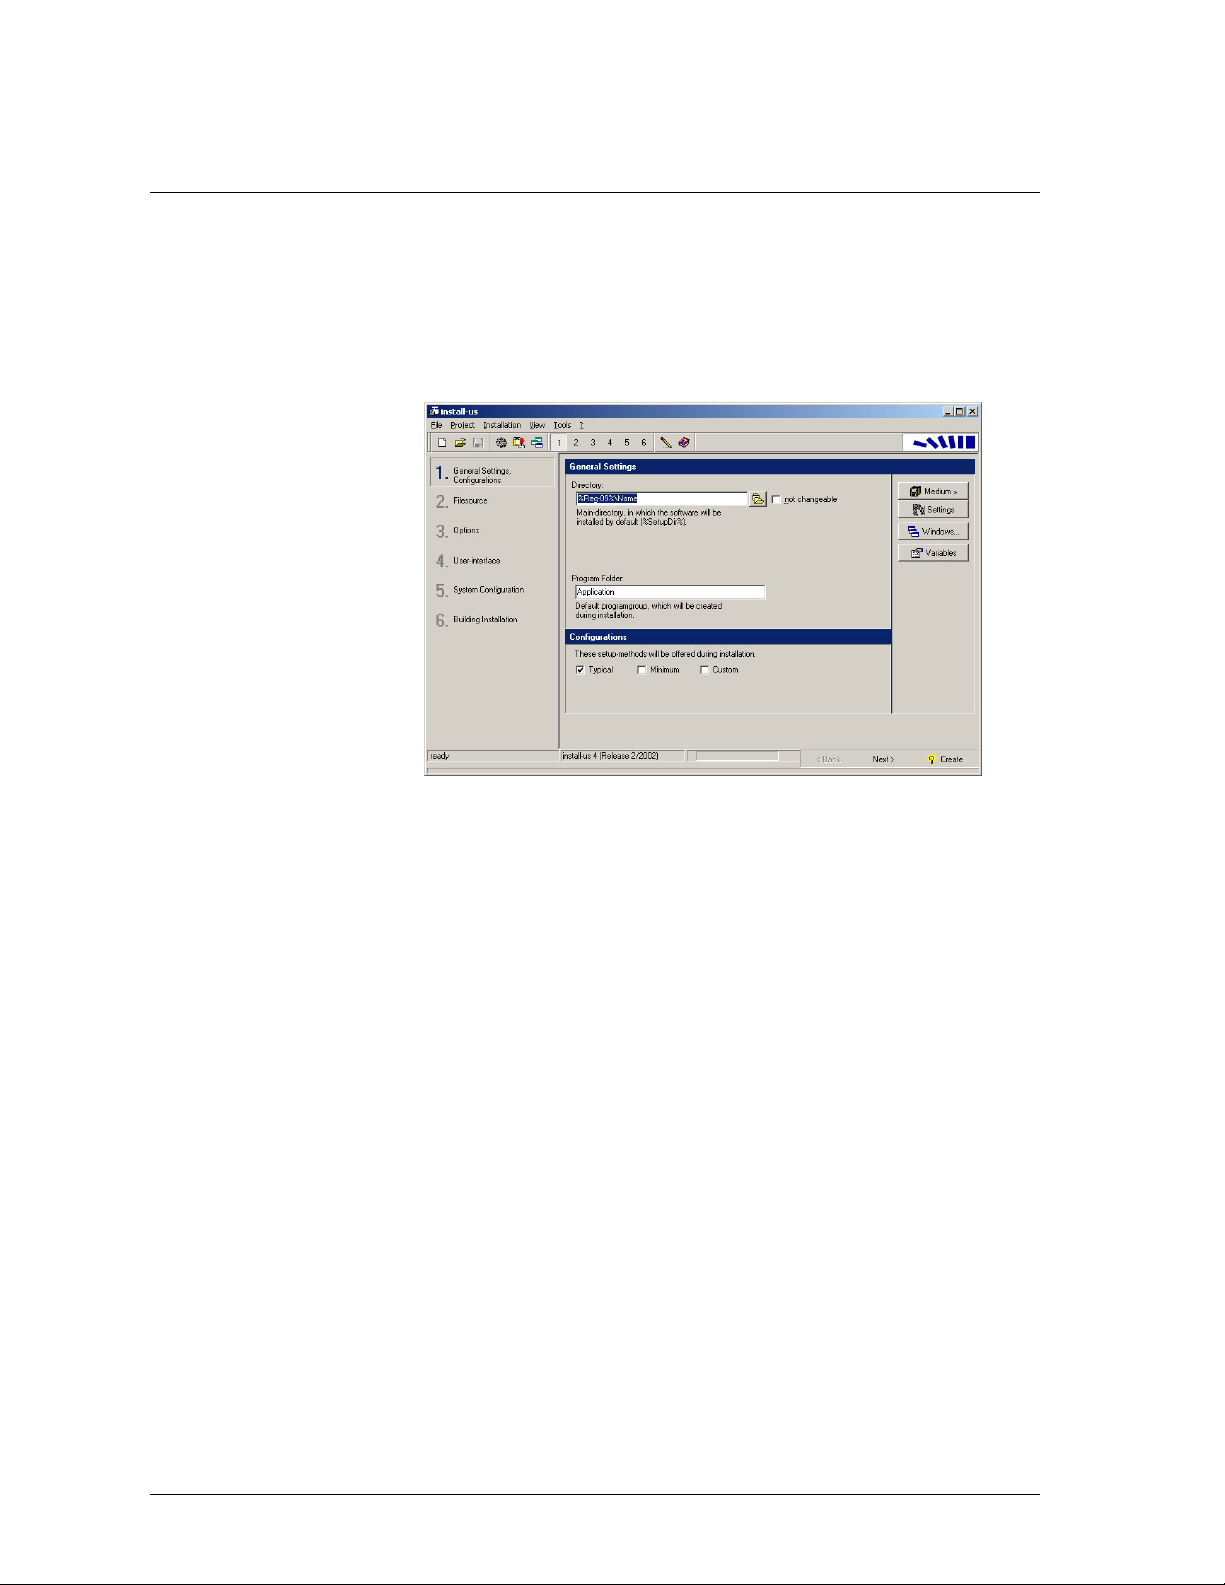
You see the first setting dialog in the workspace of install-us. The left side panel
is a kind of assistant, which leads you through the entire process of creating an
installation. It always displays the currently active section, where you are
currently working, with a highlighted number.
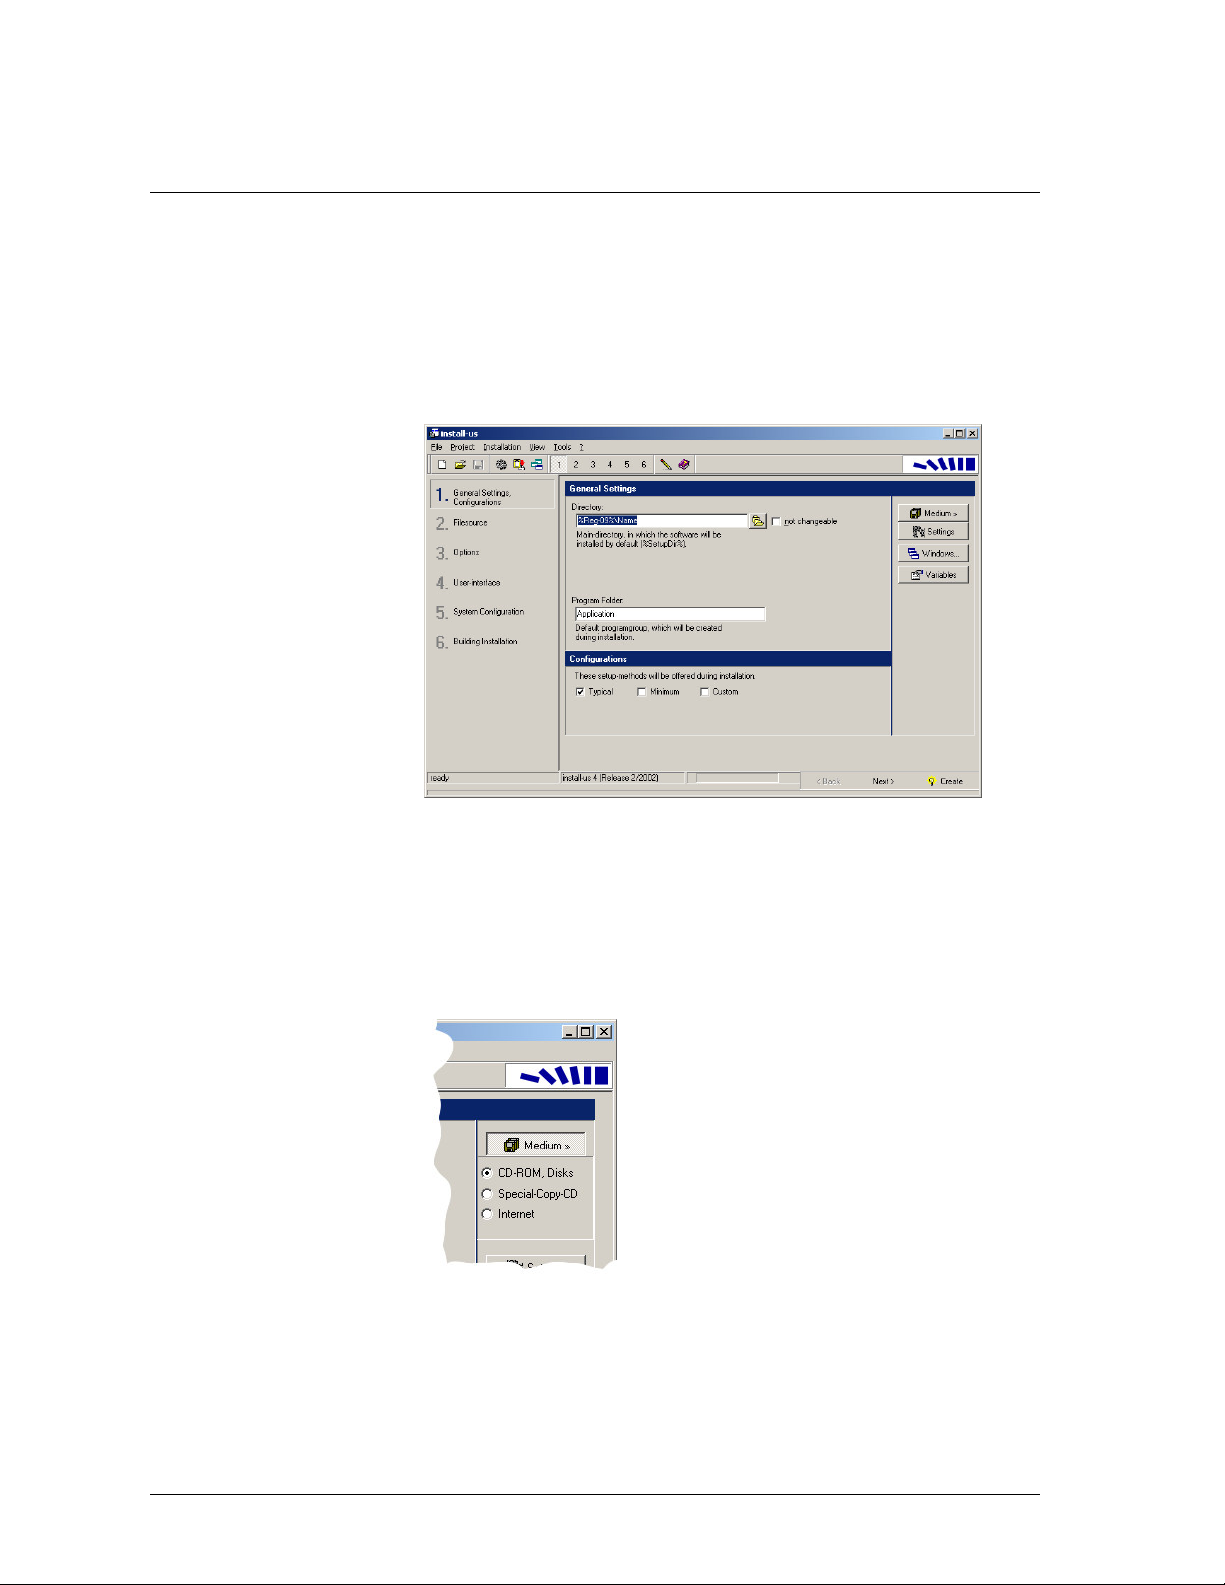
Select the radiobutton
Choosing the installation medium
Wir befinden uns im Abschnitt ”Allgemeine Einstellungen”:
CD-ROM, Disks
behind the button
Medium
:
2. General Settings, Configurations
14
install-us main module install-us Manual
••••
Page 19
You are in section
General Settings, Configuration
.
Make sure, that the text “%Reg-09%\My directory” is entered into the edit box
Directory
.
This expression symbolizes the root destination directory, where your files will
be installed to. %Reg-09% is a variable, wich will be replaced via the name of
the default application directory of the user’s system (e.g. „C:\Program Files\My
directory“). We will discuss variables later in this manual.
install-us project
Please enter ”My program group“ into the appropriate field.
3. Selecting files
Now you have to click onto
2. Filesource
in the assistant panel on the left.
Filesource
install-us Manual install-us main module
15
••••
Page 20
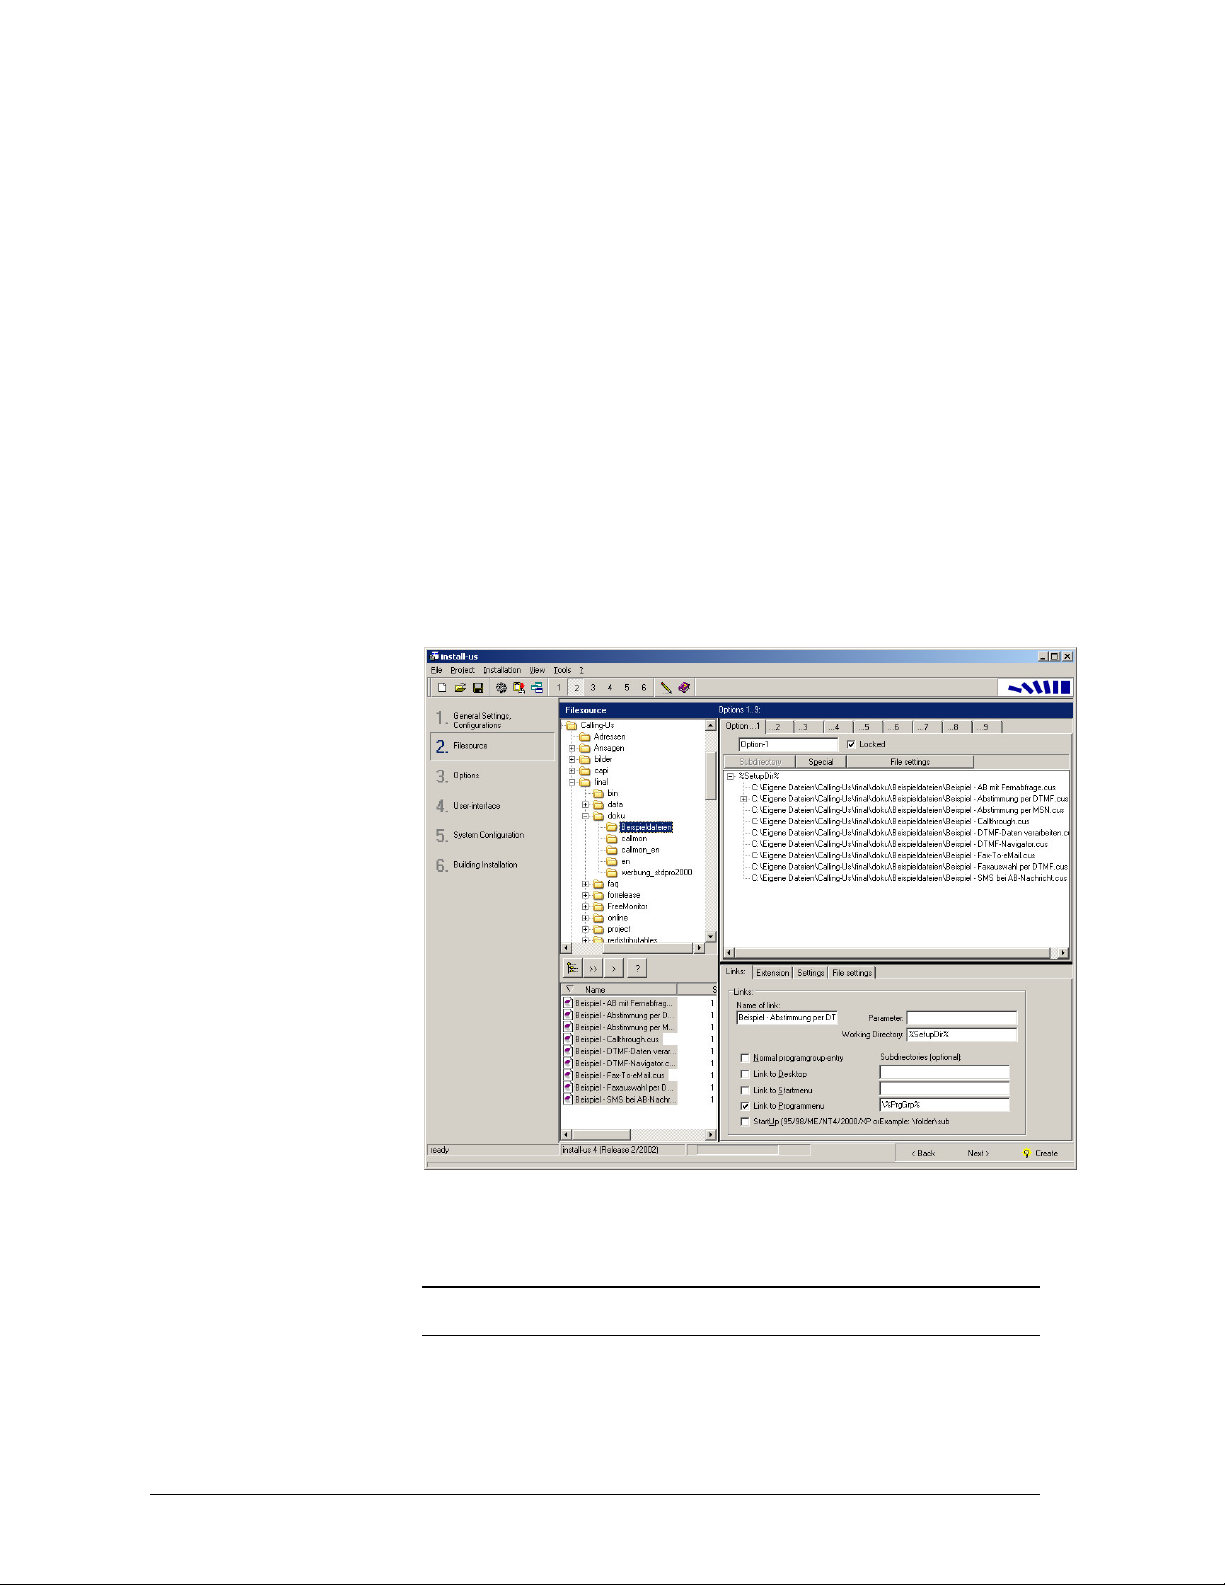
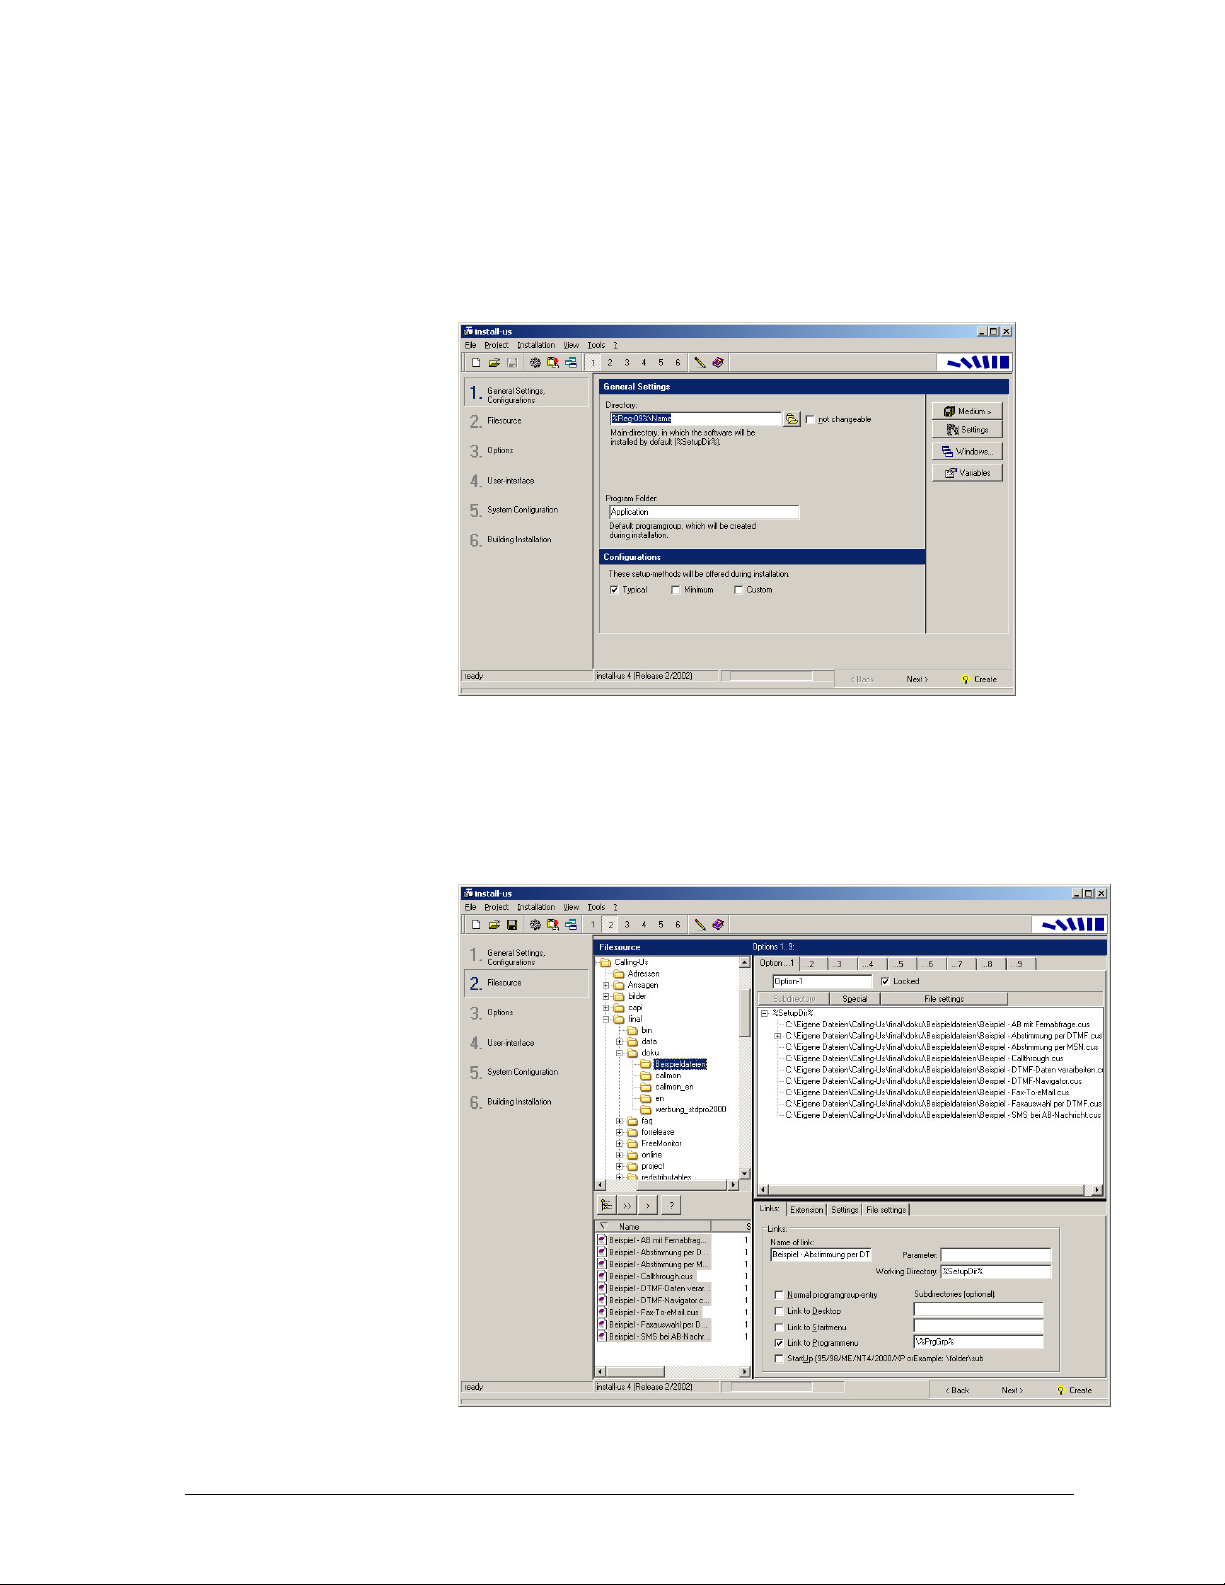
On the left side you can see the
Filesource
directory- and file-listview. You
can select single files or entire directories including their sub directories. On the
right side you see the detination treeview, where all directories and file
references will be listed.
To take one single file into the project, select the file in the file listview and click
at the button >. The button >> takes all files into our project, which are in the
current selected directory.
By clicking on the button symbolizing a directory structure all files and
subdirectories will be inserted in the destination treeview of our project.
Please note, that you can organize your files in up to nine options. You switch
between those options by just selecting the desired page (
Option…1 to 9
) of
the destination treeview pagecontrol.
In this example project you can set the name of
Option..1
to “Typical
configuration”.
Now you select some files, which you want to include in your installation.
4. Creating links
To create a link to one of the files you have included in the destination treeview
already just select the desired file in the treeview.
Filesource
In the blank workspace under the destination treeview a pagecontrol will apear,
which hase the pages
Note:
If you doubleclick on the file the dialog “File settings” appears, which
Links, Extension, Settings
File settings
and
offers some additional settings.
Now please enter a name in the edit box
Name of link
and select the checkbox
Link to Programmenu. Make sure to not select the checkbox Normal
programgroup-entry
16
install-us main module install-us Manual
••••
.
.
Page 21
Note:
If the selected file has the extension .exe a link to this file will be created
automatically. You can avoid this automate process in the options dialog of
install-us.
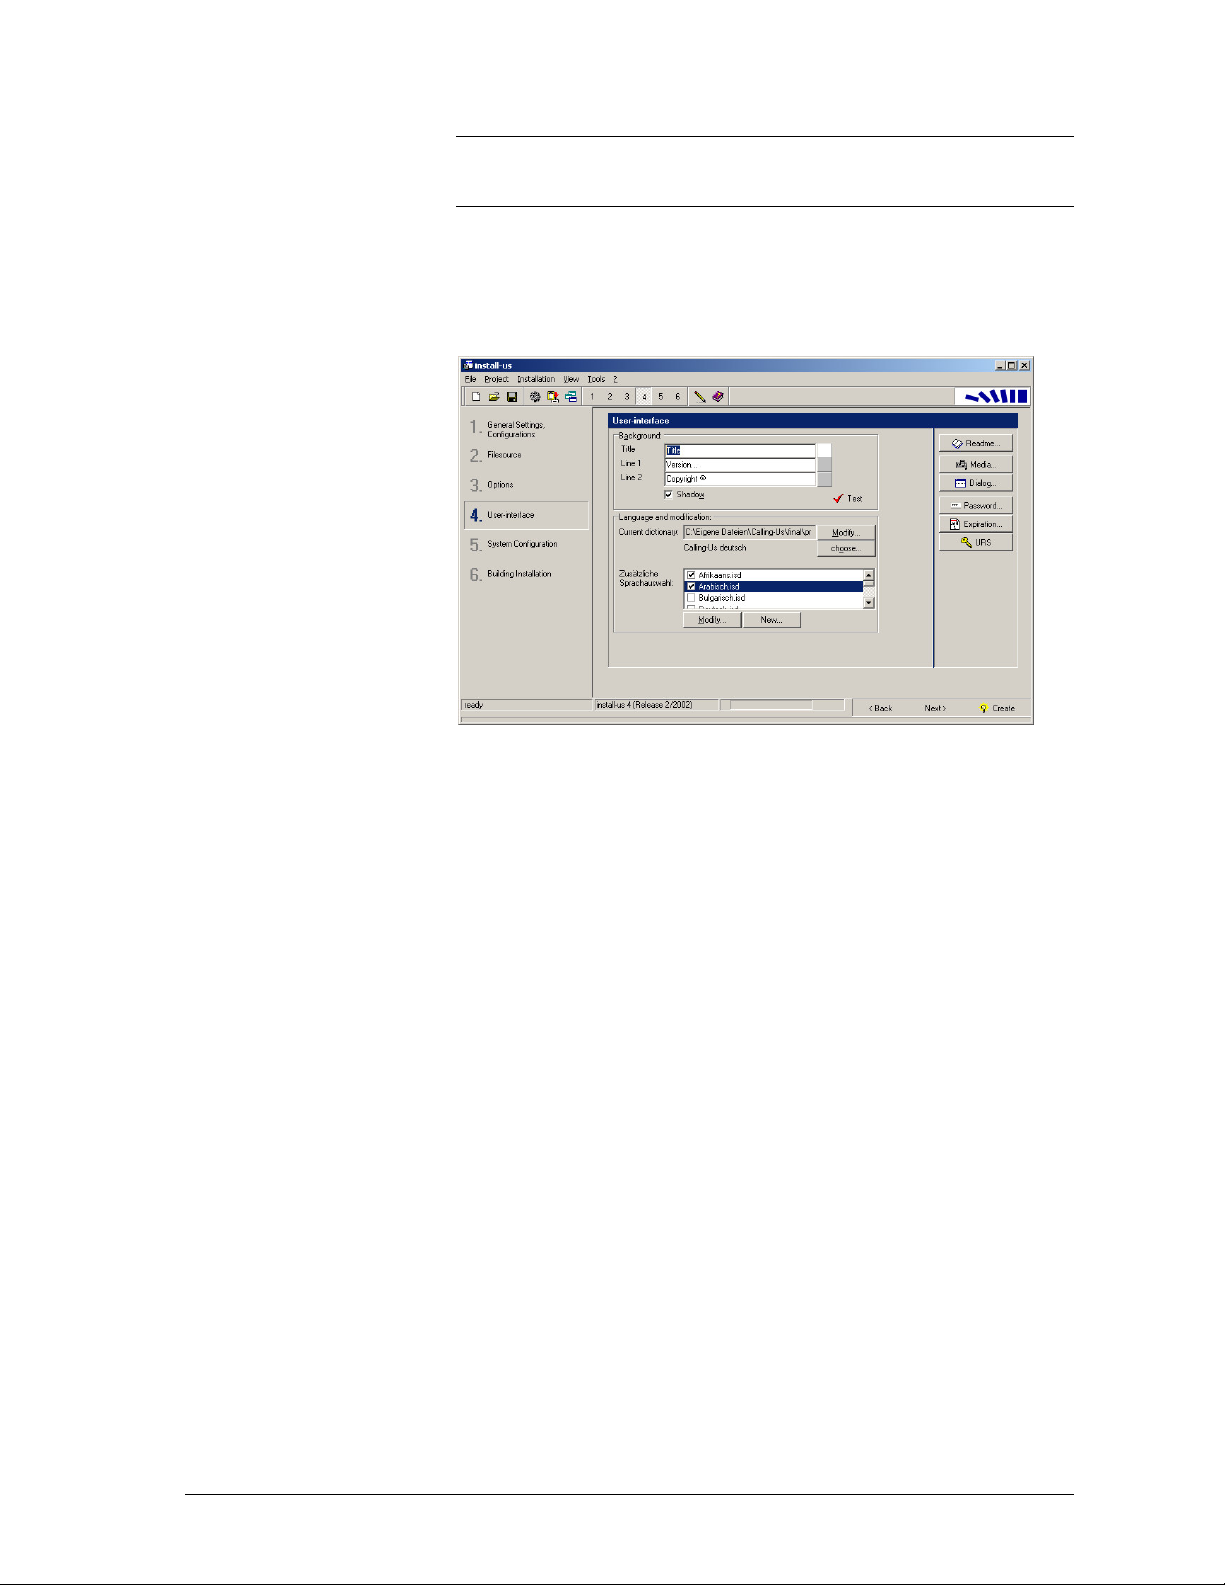
5. User interface
Click onto the button
4. User interface
to display the next step of the
installation creating wizard:
User interface
Enter the
title
“My first installation” and some subtitles (
displayed at the
background
of your installation.
Line 1+2
) to be
install-us Manual install-us main module
17
••••
Page 22
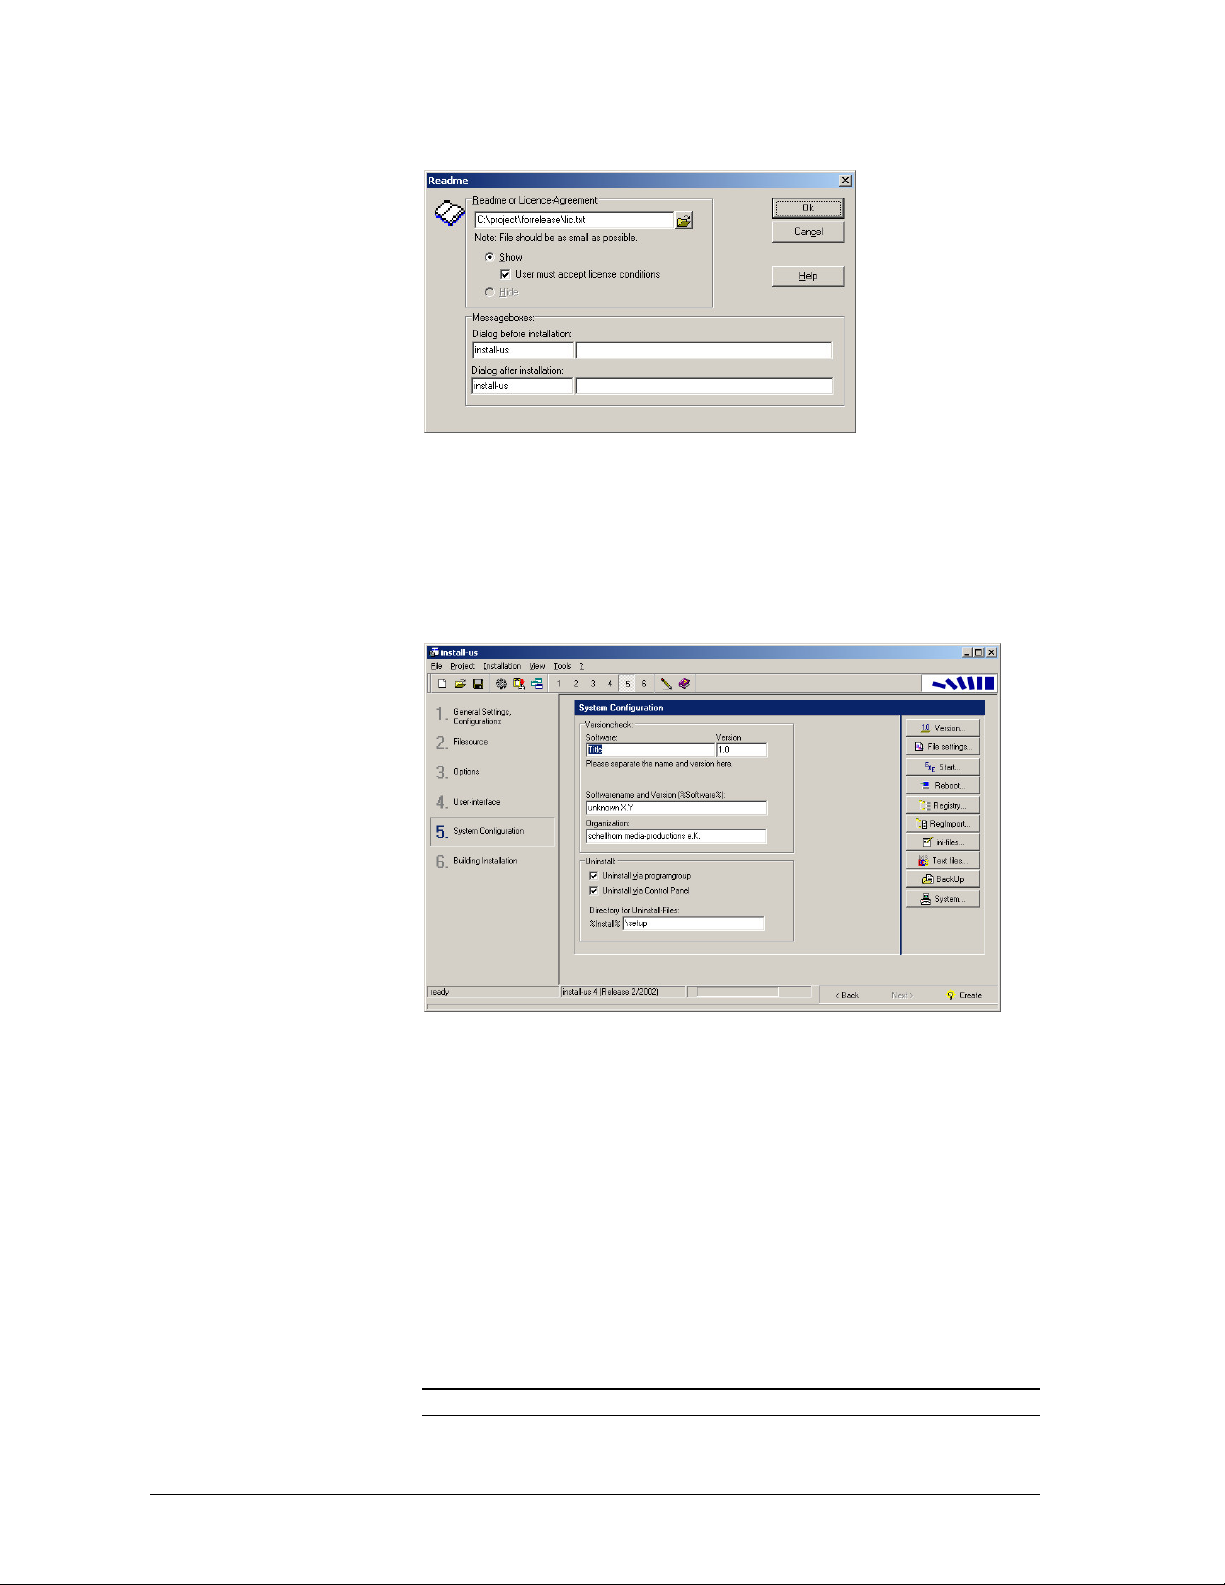
Click onto the button
Readme
at the right side.
Readme
In this dialog you enter the text „Hello world“ into the right edit box Dialog
before isnatllation. Confirm your changes with Ok.
6. Name of your software
Click onto the button
5. System Configuration
:
System Configuration
Enter „test“ into the edit box Software. You can set Version to ”1.0”, which is
already the default setting.
Now we have done some basic settings in our projectfile. It is a good time for
saving it. Click at the disk symbol in the top bar and save your project in the
main folder of install-us: “MyFirstTest.ius”.
7. Compiling installation
Click onto the button
6. Building installation
in the assistant panel.
You can specify a directory, where all the files necessary for installation will be
created.
Example: “C:\Projects\MyFirstProject”.
Note:
that all files in this directory will be deleted!
18
install-us main module install-us Manual
••••
Page 23
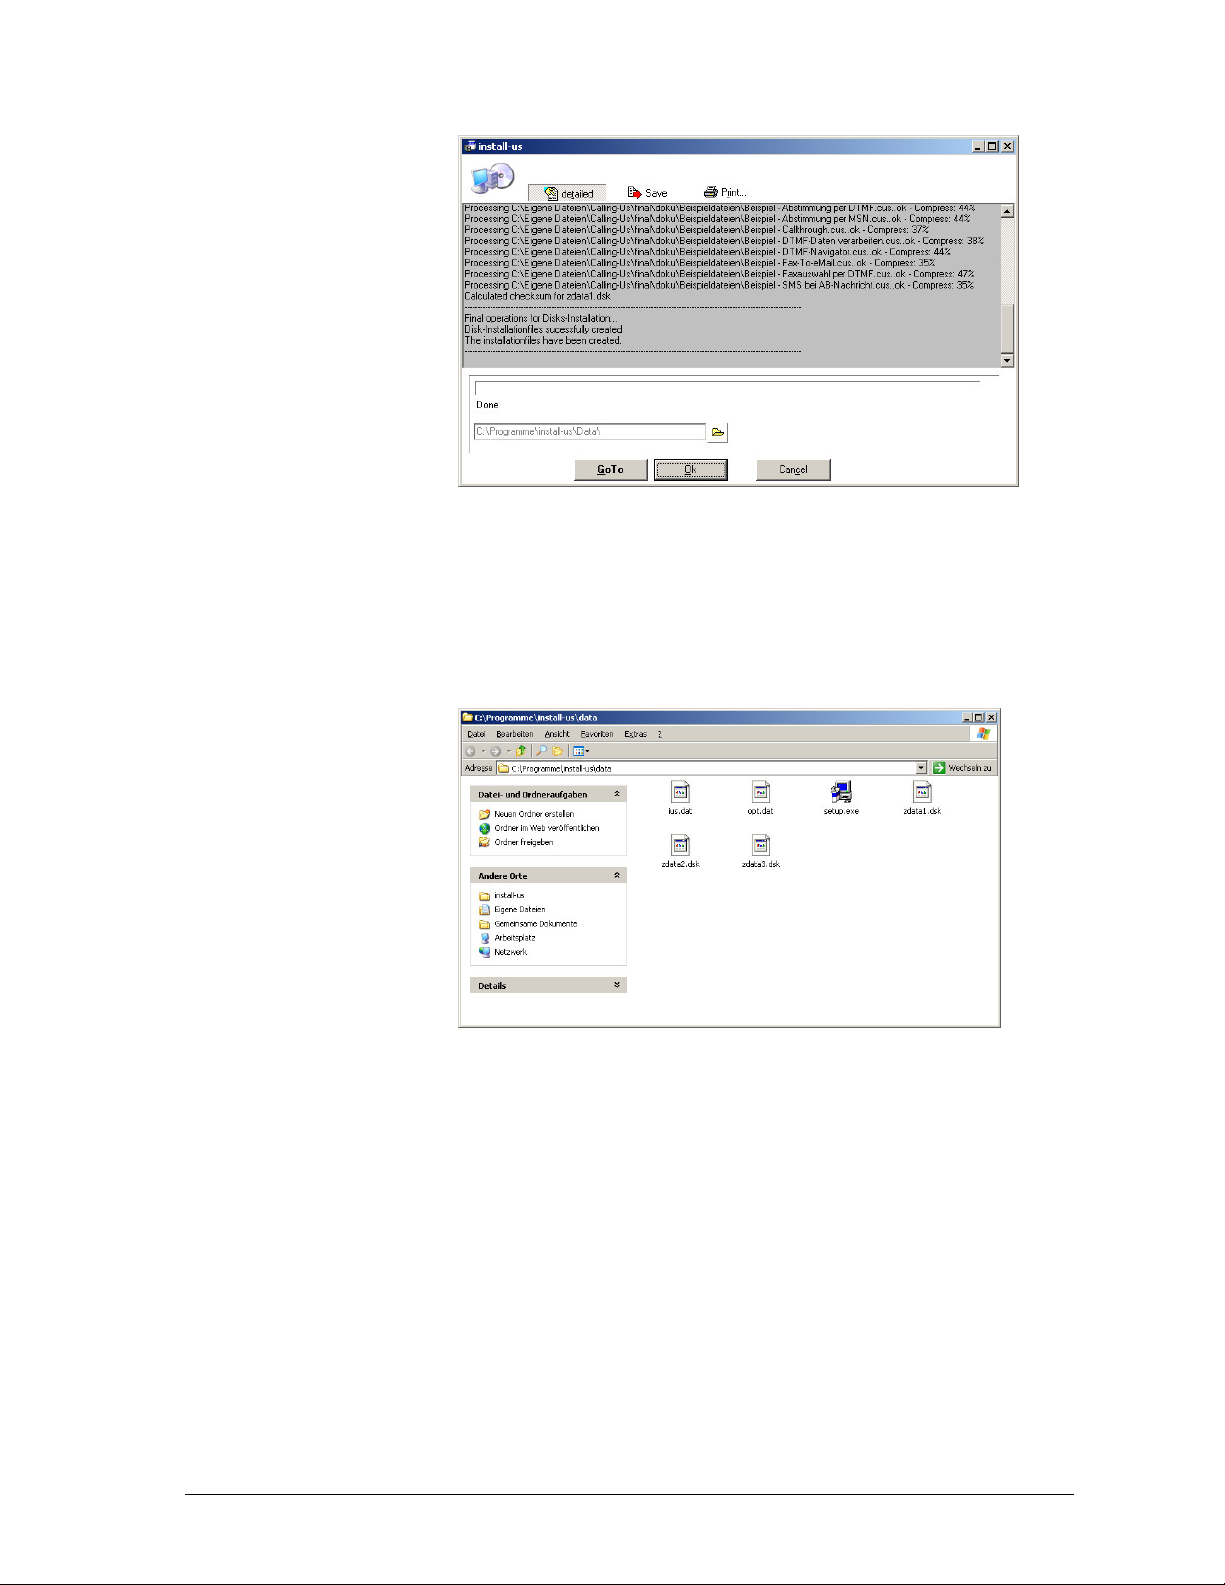
Compiling the installation
Click onto the button
GoTo
. Install-us starts creating the installation files. The
progress of the compilation work is displayed in a progress bar. After finishing
install-us starts the Explorer (this is, what GoTo means). You can then execute
the file setup.exe.
8. Copy files to distribution media
Result
After testing your installation you can decide, whether it does fit your needs. If
so, you can copy the installation files to the desired distribution medium.
Now you have learnt the basical concept of how to create installations with
install-us.
install-us Manual install-us main module
19
••••
Page 24
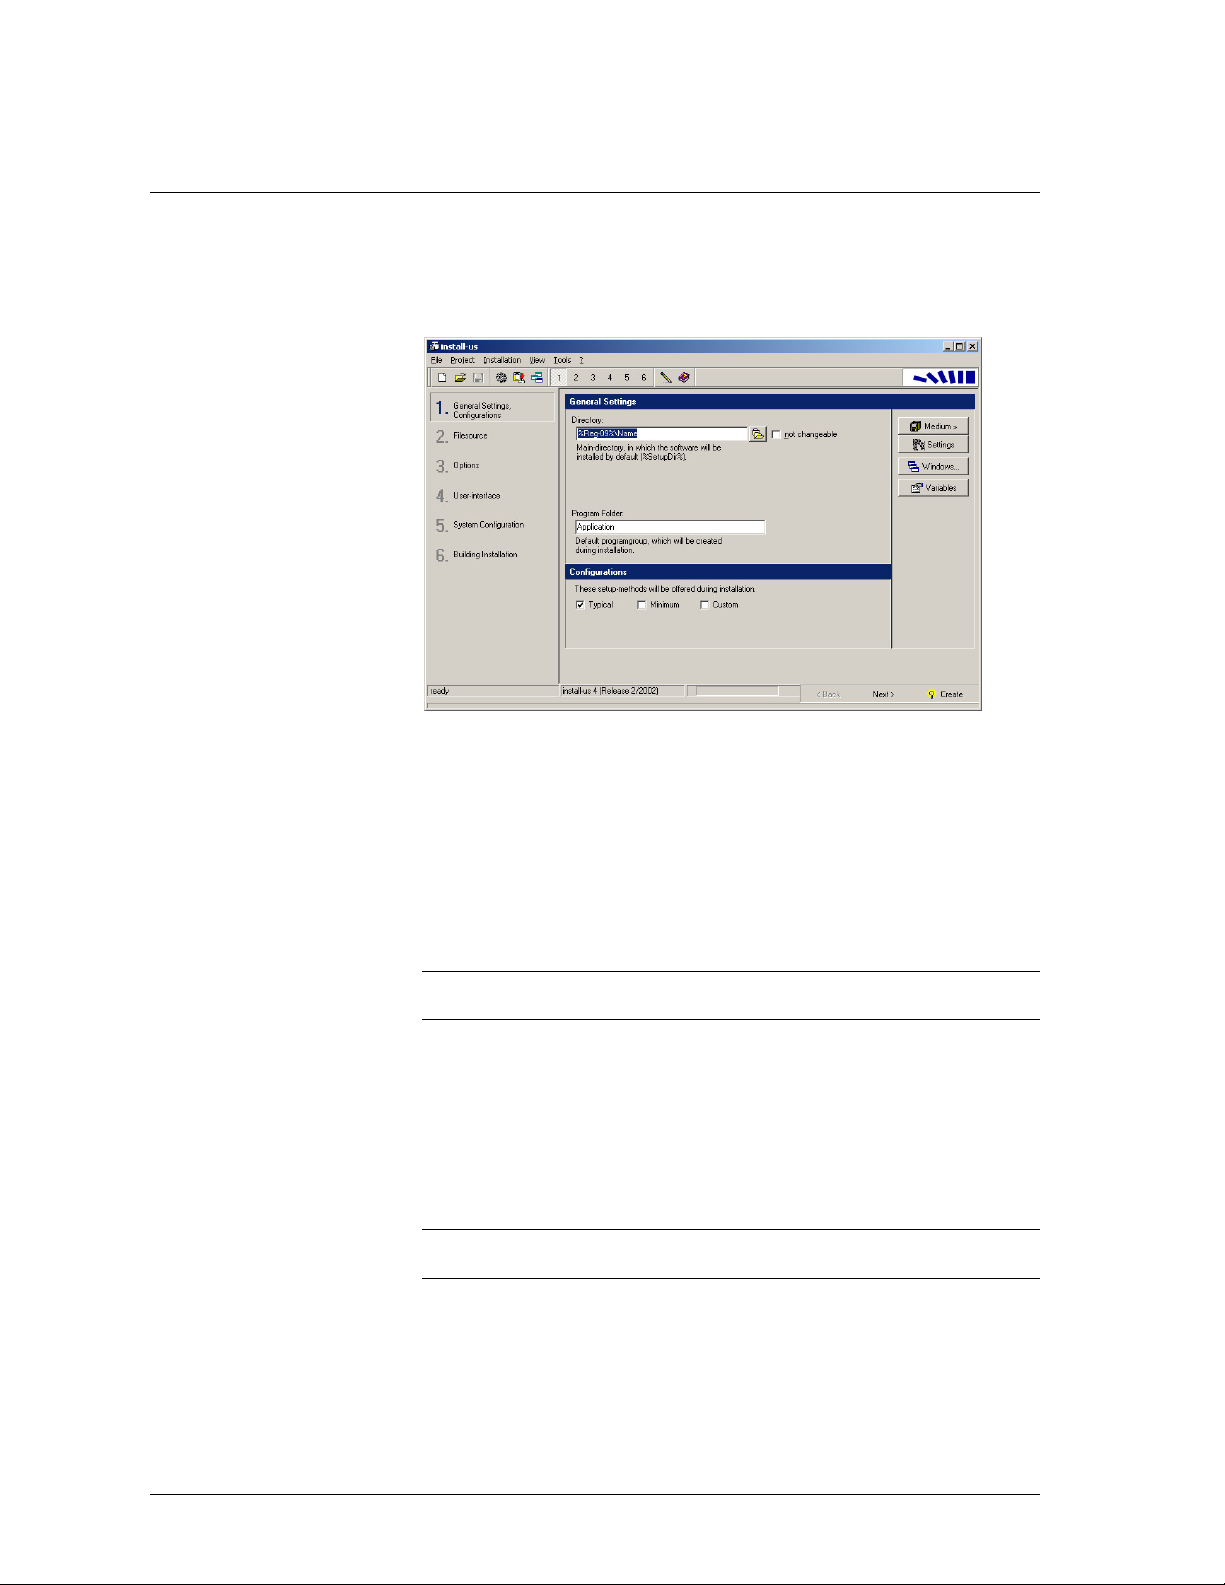
General Settings
In the section „General Settings“ you specify some global settings of your
current installation project:
install-us project
Directory
After starting an installation the user has in most cases the chance to specify an
installation directory or to select the suggested one. The
“General Settings” will be the default or initial directory for installation.
If you don’t want the user to be able to change thie directory during installation,
you can set it to be not changeable.
Important:
nearly all other dialogs of install-us.
This directory will be accessible via the variable %SetupDir% in
directory
you enter in
Program Folder
The user can define a name of the program folder, where the shortcuts and links
to your files will reside. You find the programs by clicking on the Windows
START button and the choosing the menu Programs.
The user is able to change the pre-defined name of the
Note:
The name of the program group cannot contain on of these characters: * ?
- / ( ) ; : , | " < >.
Program folder
.
Configurations
In section „Configurations“ you can choose, which setup types will be offered to
the user.
20
install-us main module install-us Manual
••••
Page 25
Small software projects don’t require Minimum or Custom installation types. In
those cases checking the Standard checkbox lasts.
Software projects with a larger number of files usually can be installed with few
or all options (e.g. example projects, pictures, …). In those cases it is
recommended to activate the checkbox
The assignement of the different files to the different setup-types or options is
done in a later section (3. Options).
Minimum
and
Custom
.
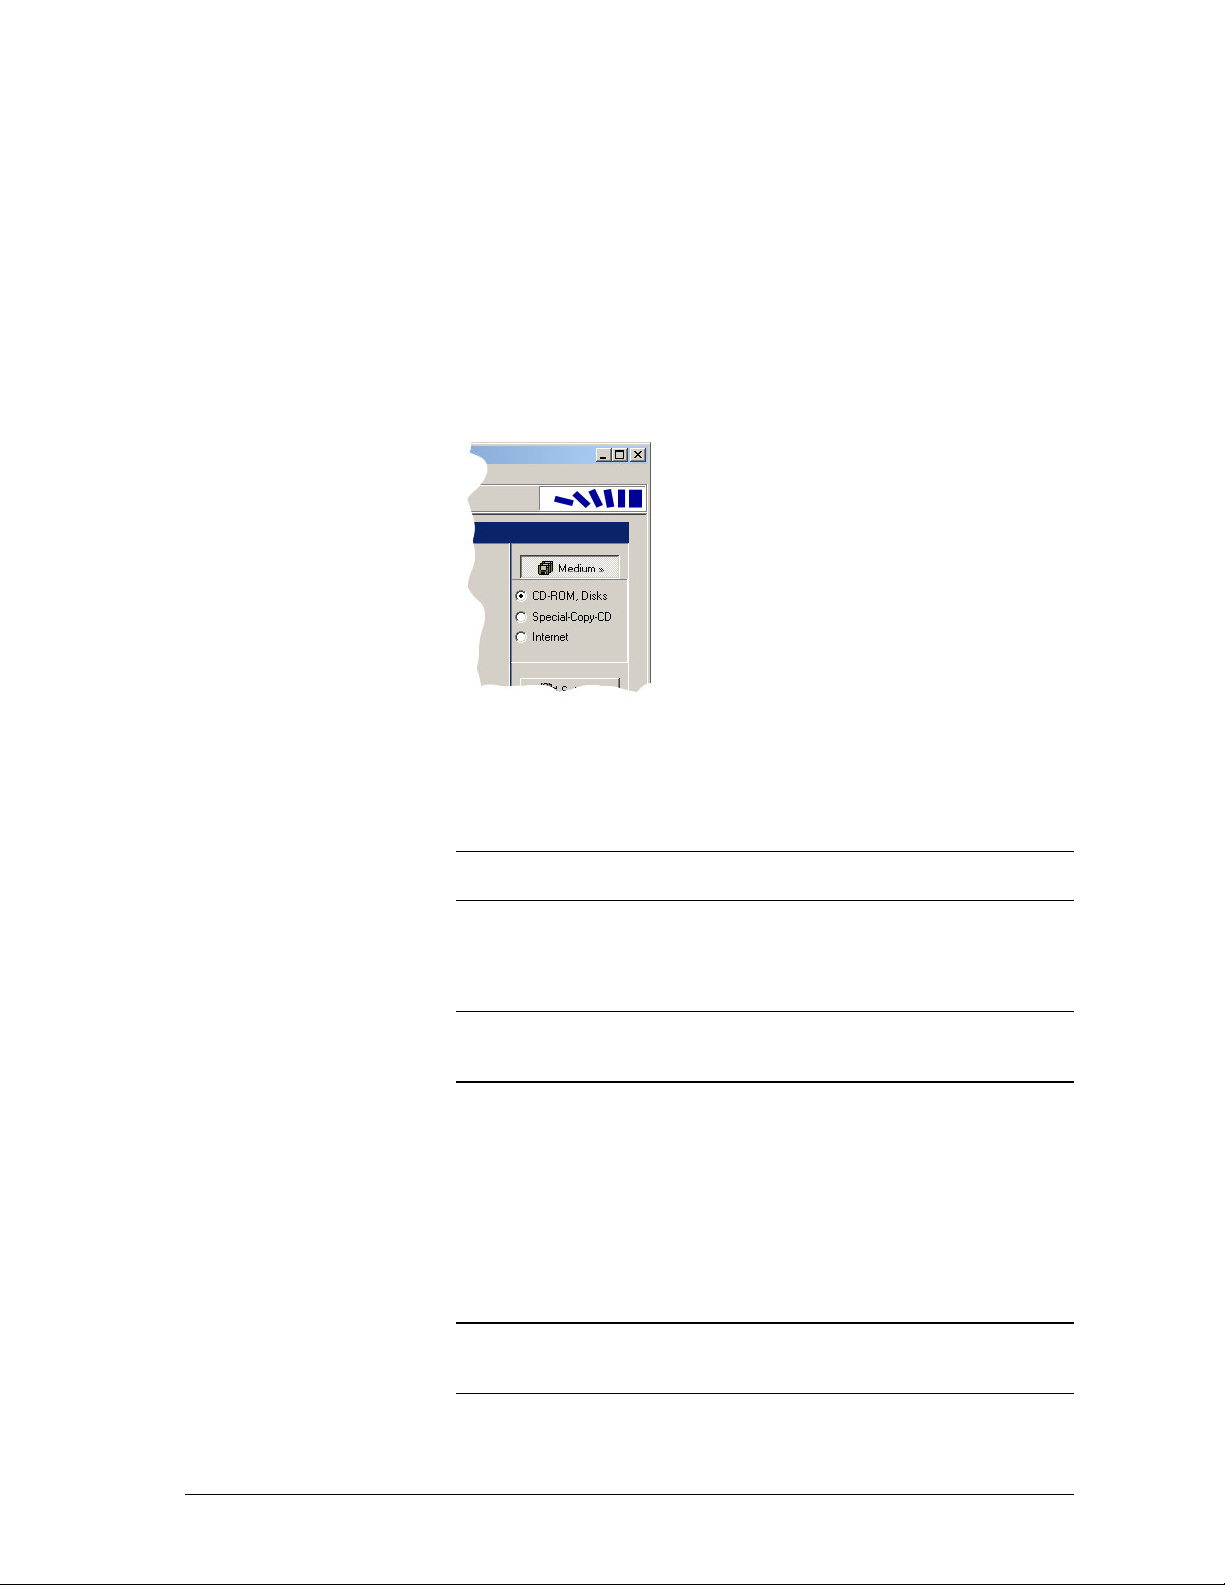
Installation media
Possible media for installation are diskettes, CDs, DVDs and Self-extracting
archives, which are especially useful for internet distribution:
Choosing the installation medium
Disks, CD-ROM
The installationfiles will be split over several disks, if the space available on the
single diskettes is not enough.
Note: Files needed for the installation user interface (like bitmaps, audio- or
videofiles) must fit onto the first disk.
If you want to create installations for disks, just select this option either and
make sure to set the disk-size
2.000.000.000.
Note:
If the available space is not used fully or is not enough on disk number
one, you can specify a special value for the size at disk-1: Menu
Special - Adjust Disk-1-Space
Special-Copy-CD
If all files, which should be installed onto the user’s system, are accessable on
the CD in uncompressed form, you can use this method. It is very good, because
it avoids duplicate files (in original and compressed form) on the CD-ROM.
Additionally the copying of very much files will be much faster, because the
installation-program just copies the files from CD to the destination-directories
on the user's system.
Note:
This method is a little bit harder to understand and to handle. If you don’t
require to save disk space or don’t need very fast running installations, you
should use another method.
Size
in the dialog “Settings” to a value of about
Installation -
.
install-us Manual install-us main module
21
••••
Page 26
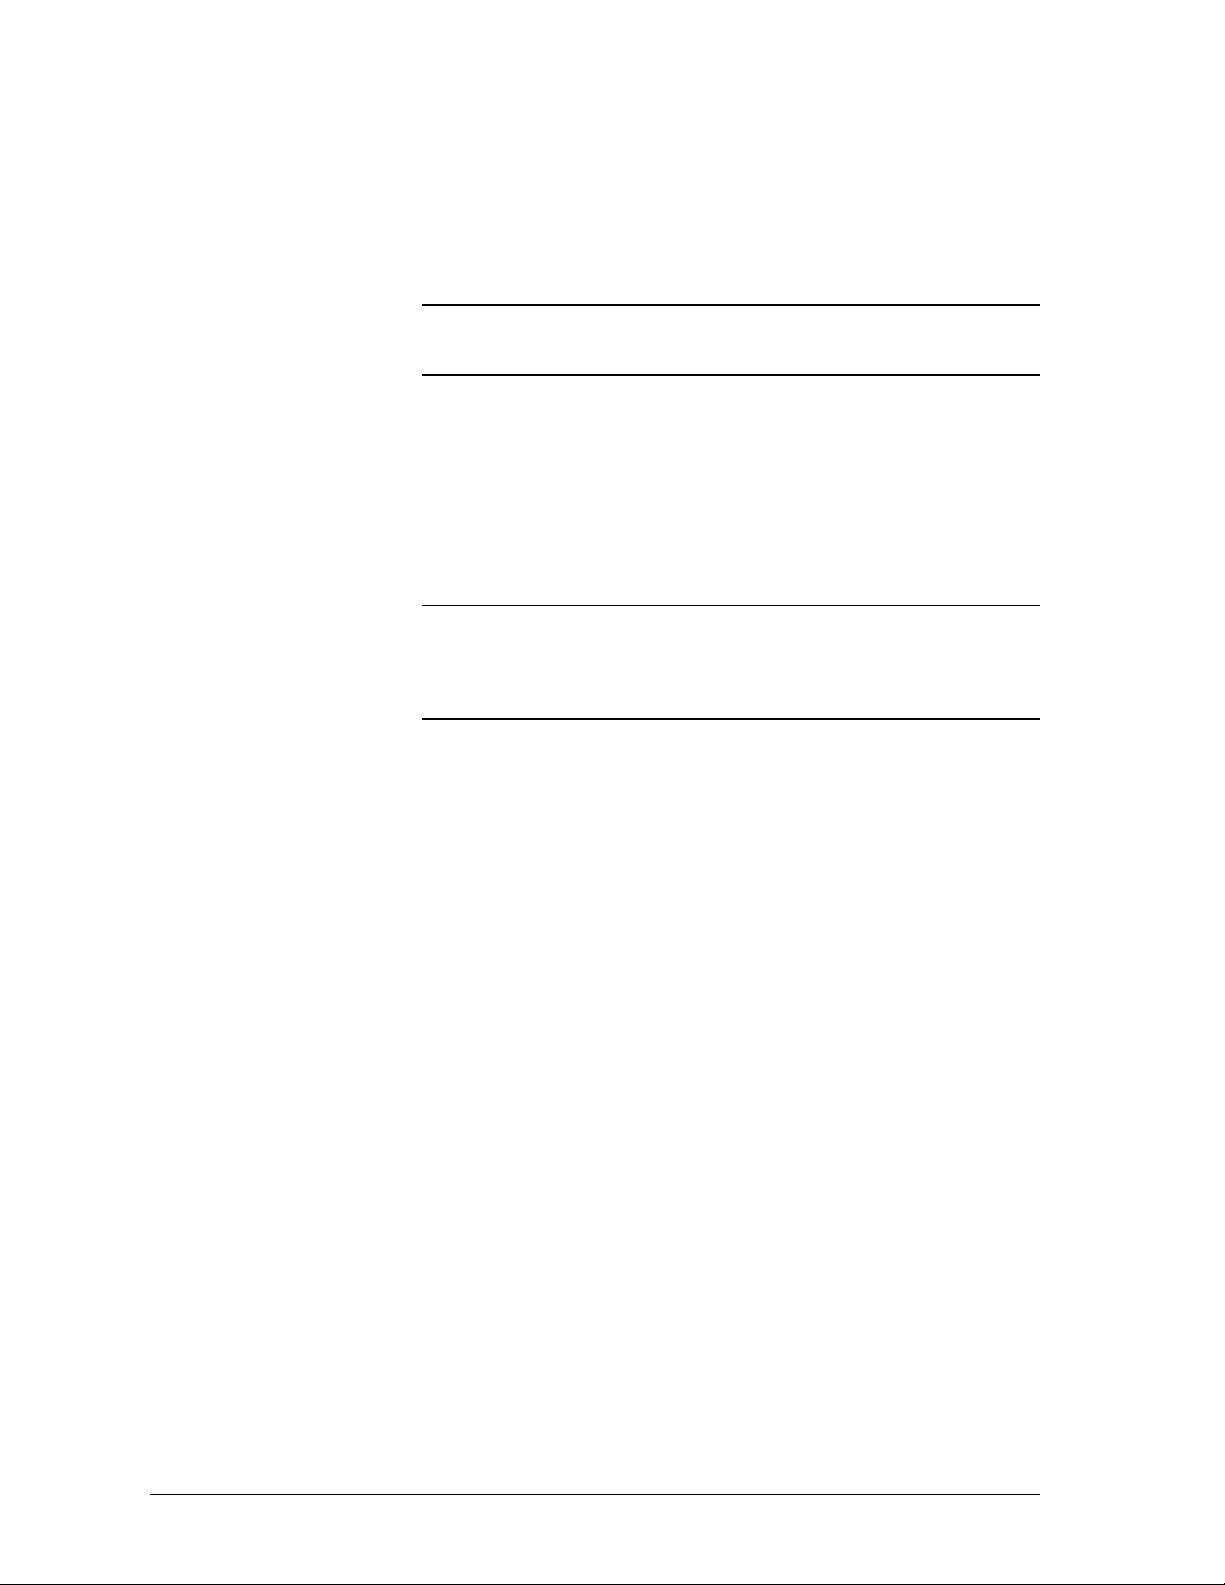
If you have chosen CD as medium for installation, you must pay attention before
selecting the files:
The installationfiles must be in one single parent folder (Subdirectories are
allowed) - The directory can be on your harddrive or already on the installationCD. Example: “D:\”.
This proceeding is necessary, that install-us can find the files on the CD again.
Note:
You can test CD-Installations on hard-drive first. But this makes it
necessary, that all files are in the same directory, in which they can be found on
the CD later.
Internet
You can pack all installation-files into one single setup.exe-file. So the user
needn’t know anything about decompression-utilities like WinZip.
Creating a installation in the One-EXE-Format is as simple as creating a disk /
CD-ROM installation. There is no difference except that you will only get on
setup.exe as the result of a compilation, which contains all files.
Note:
To offer a One-EXE-Installation you have to upload it on a internet server
for example. Some browsers in conjunction with some servers do not recognise
that the exe file has to be downloaded and show it in the browser window as text
file. To avoid disoriented users you should first test this issue with the most
popular browsers.
22
install-us main module install-us Manual
••••
Page 27
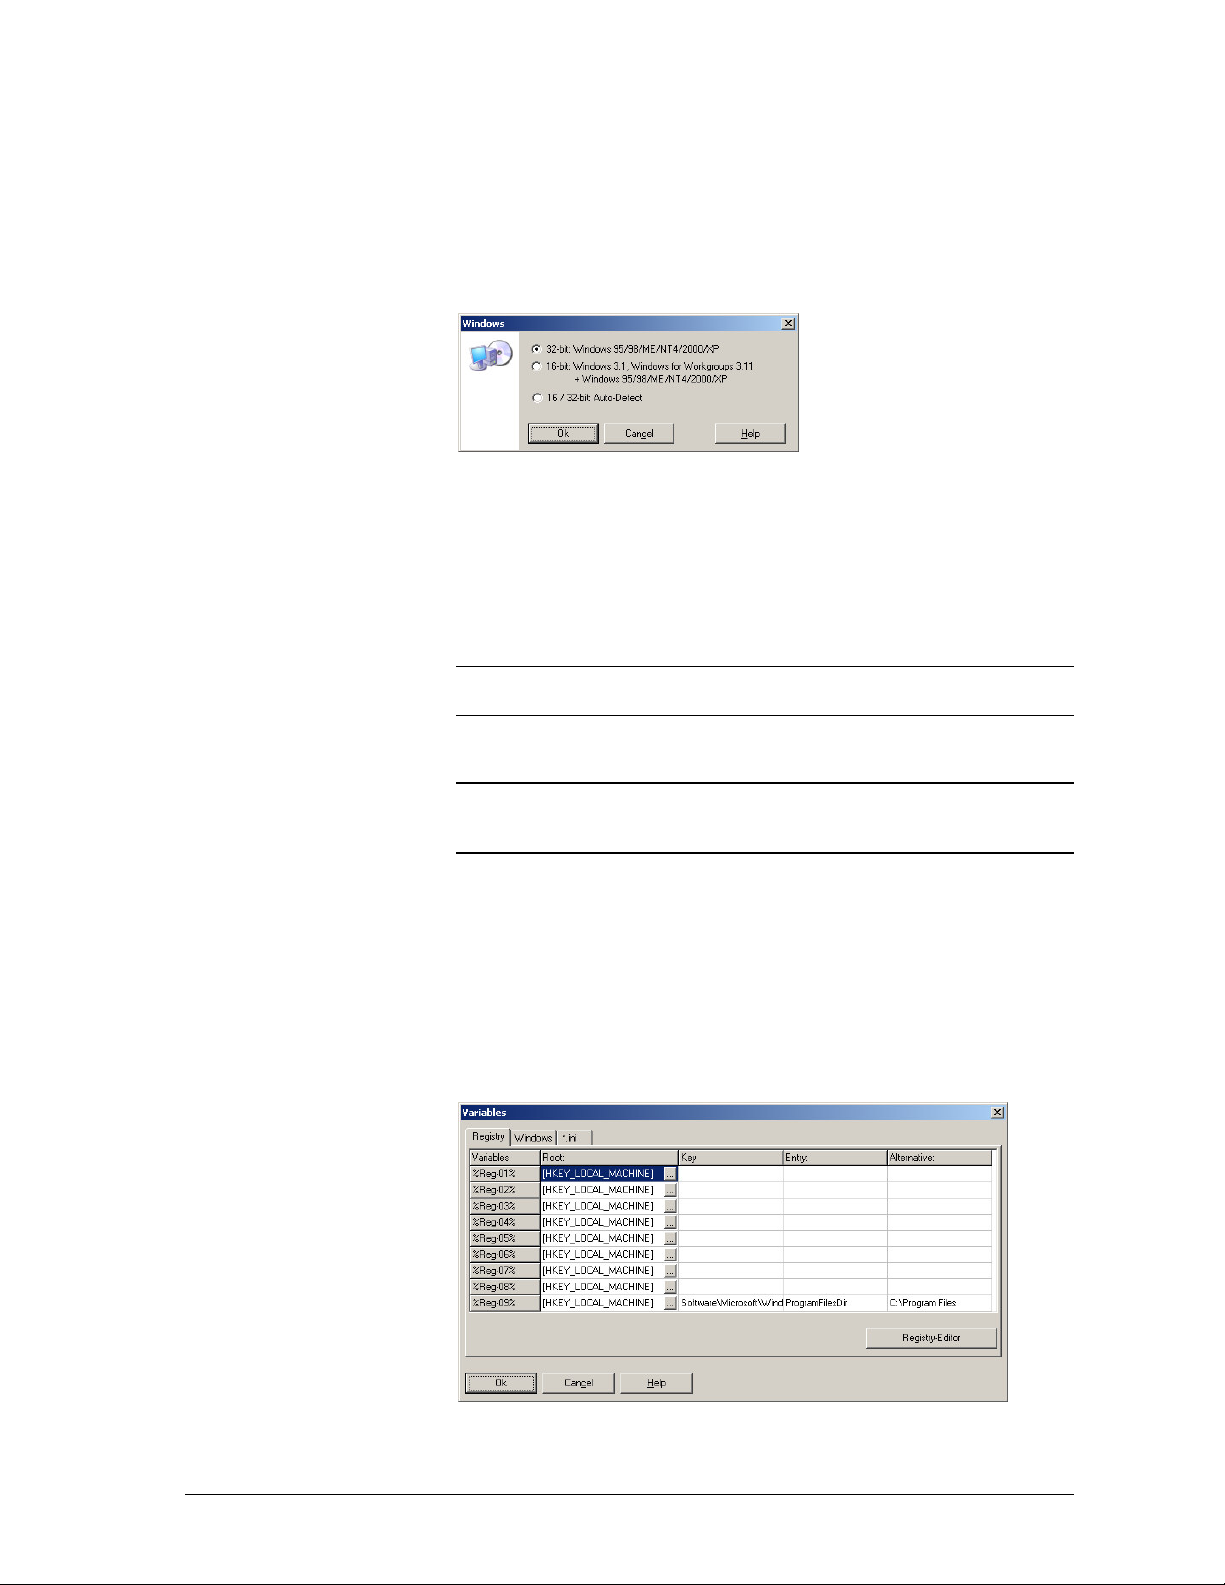
Windows version
Install-us can build installations for Windows 3.1, Windows for Workgroups
3.11, Windows 95/98/ME, Windows NT, Windows 2000 Professional and
Windows XP/Vista.
You can specify the target Windows platform via menu
Windows
Windows version
If the software runs only on 16- or only on 32-bit-Systems, the installation
should be defined in the same way.
If the software runs on both Windows 16- and 32-bit, the 16-bit-installations is
enough for most needs, because it runs on 32-bit-systems as well. But if it is
necessary, that registry-entries or other 32-bit typical tasks will be done during
installation, you must choose Option
Note: The option 16/32-bit: Auto-Detect needs more diskspace, because the
installation programs for both 16- and 32-bit-Version must be available.
.
16/32-bit: Auto-Detect
Installation –
.
Note for 16-bit installation:
because Windows 3.1 and Windows for Workgroups 3.11 allow only eight
characters in filenames.
Please check all directory and filenames,
Variables
Variables give you the possibility to create very complex installations, which can
react according to the configuration of the end-user's system.
Registry variables
Registry variables
install-us Manual install-us main module
23
••••
Page 28
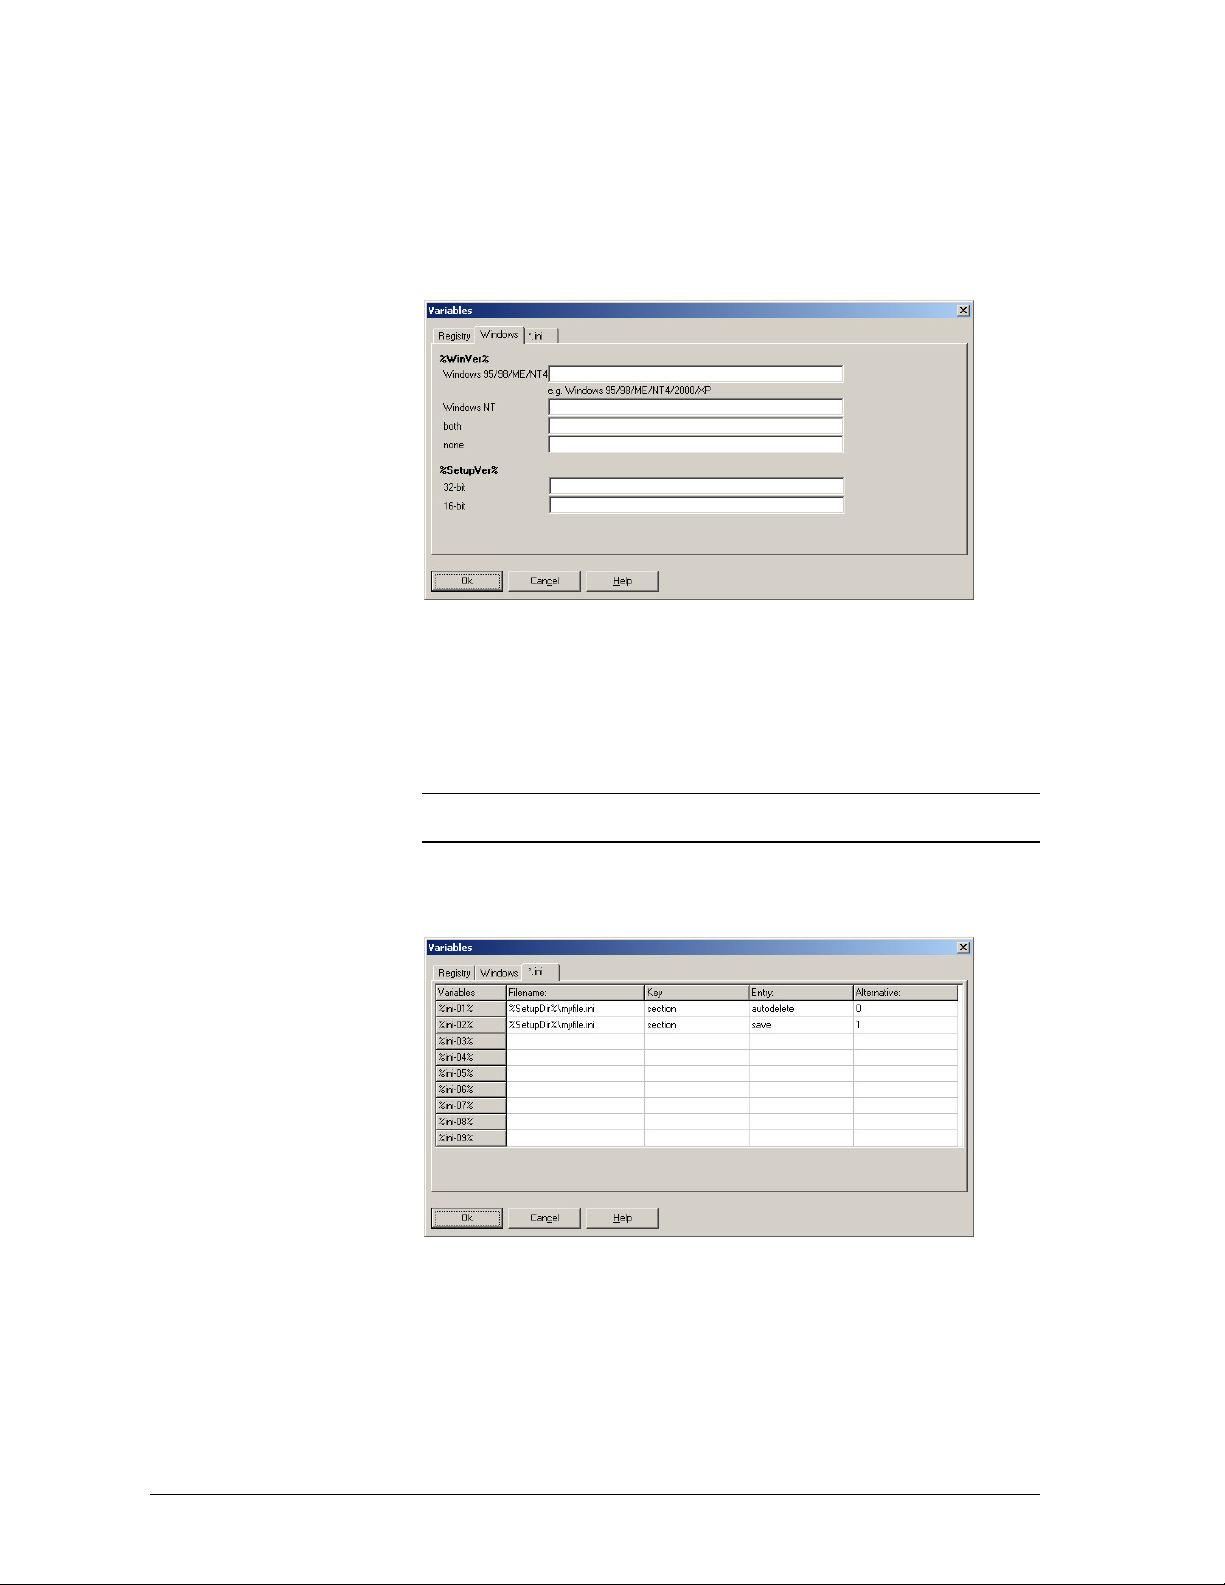
You can set the variables “%Reg-0X%” to the values, which are stored in the
user’s registry. Just click the ...-Buttons to select a root. Then you have to define
key
the
and the
the default value (
entry
. If the given value is not accessible in the user’s registry,
Alternative
) will be taken.
Windows version related variables
Windows variables
The value of the variable %WinVer% will be one of the texts in the edit-fields.
Example: If the software will be installed on a Windows NT/Window 2000
Professional/Windows XP systems, the variable will turn into the value, which is
entered into the edit box
Windows NT
. The variable %SetupVer% will become
the value of 16-Bit or 32-Bit.
Note:
It could be useful to specify one variable in another one. The return-value
of the first variable could be used for the second one.
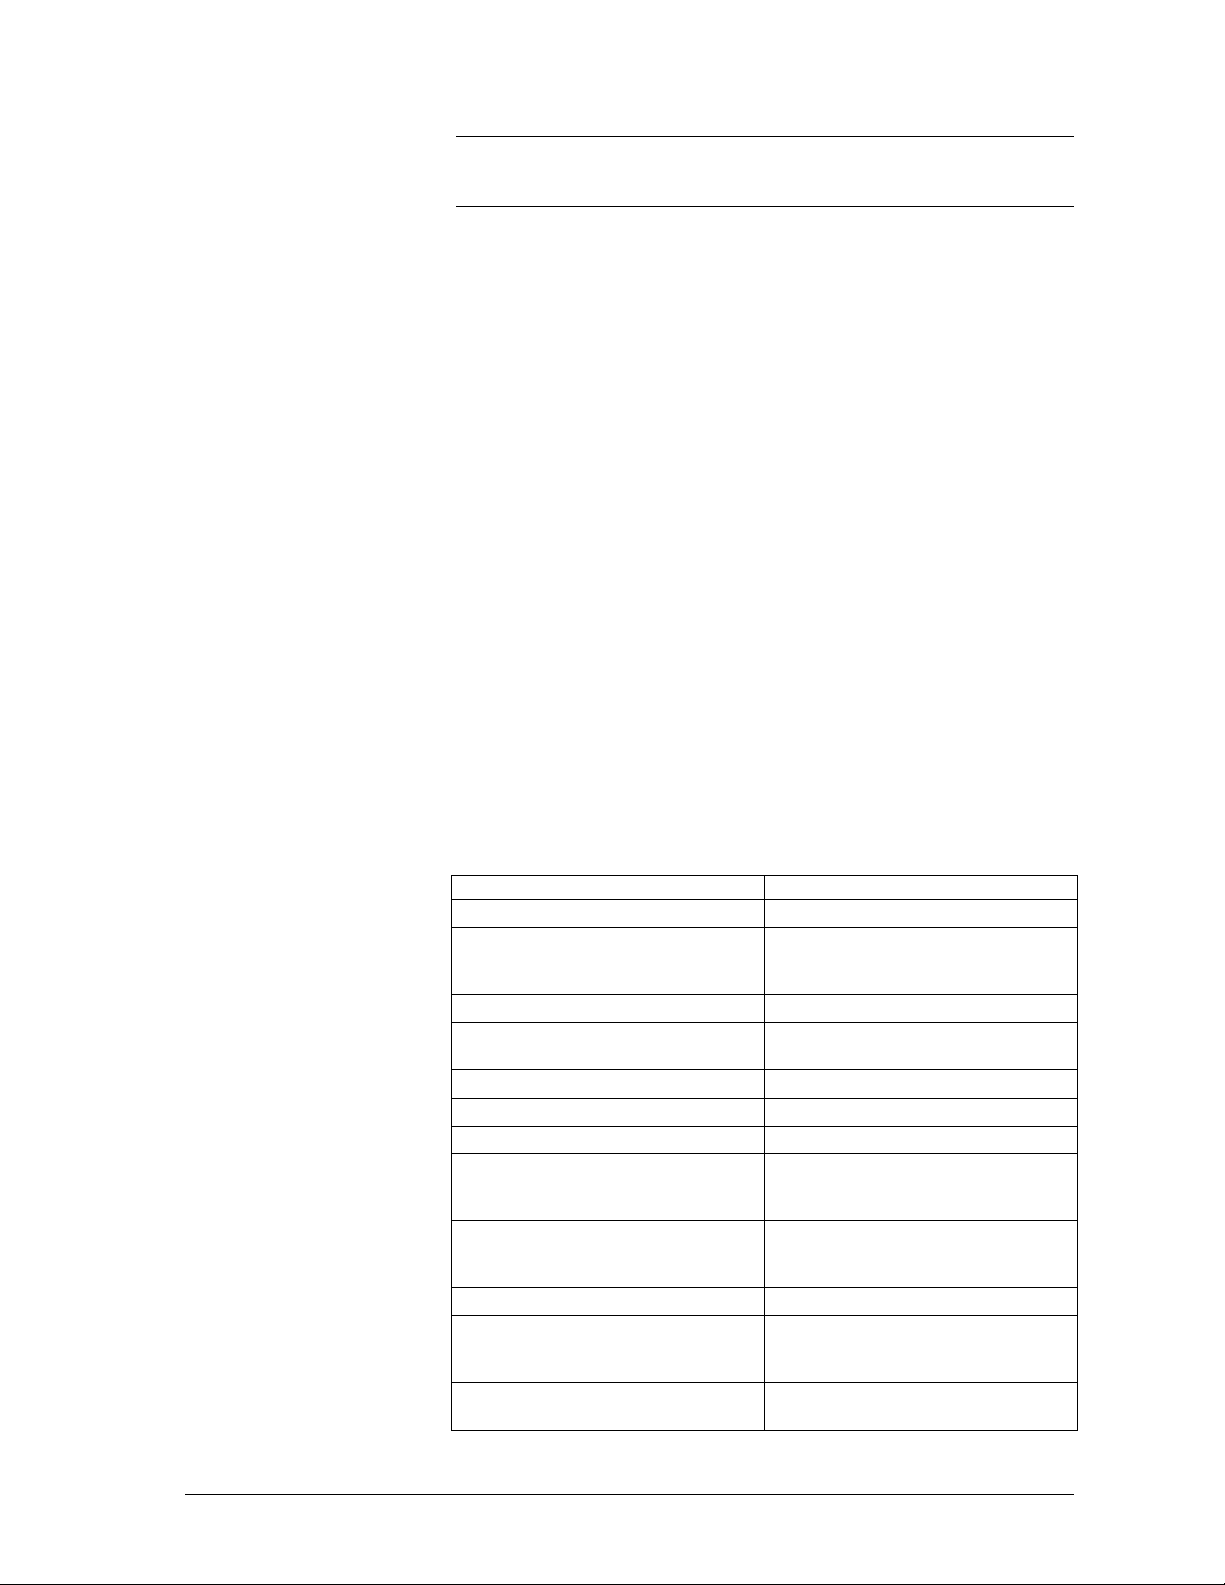
Ini-file variables
ini file variables
To the variables %ini-0X% the values from existing ini-files will be assignes.
The filename contains the name of the file (you can use variables here), while
key
the
defines the name of the ini file section, where the
entry
resides.
If install-us cannot find the ini file or the specified section/entry the default value
Alternative
will be used.
24
install-us main module install-us Manual
••••
Page 29
Note for professionals:
You can assign the return value of a variable to
another variable (recursion). But please be aware of endless loops (stack
overflow).
Example 1:
You can use Variables to read information from the registry during installationtime. This information can be the names of directories, which lets you set the
installation-directory.
Example 2:
You can display these information to the user.
Example 3:
You can install some files into directories, which are different from the main
directory.
Example 4:
You can store the name of the user into the Registry or into an ini- or textfile.
Example 5:
You can create program group entries with Variables as parameters.
Overview of all variables
%SetupDir% Main installation directory
%ShortSetupDir%
%SetupDrive% Drive name of %SetupDir%
%LaunchDir%
%LaunchDrive% Drive name of %LaunchDir%
%Windows% Windows directory
%System%
%Reg-01% to %Reg-09% Values from the registry
%ini-01% to %ini-09% Values from ini files
%Fonts% Font directory
%WinVer%
%UserName% Username (or other input) specified by
Short version of %SetuopDir%
(8.3 notation for Windows 3.1
compatibility)
Directory, where "setup.exe" is started
from
Windows system directory
Specify in "1. General settings >
Variables"
Specify in "1. General settings >
Variables"
Windows system related variable
Specify in "1. General settings >
Variables"
the user during installation
install-us Manual install-us main module
25
••••
Page 30
%UserReg% Registration number (or other input)
%SetupVer% Depending on the running installation
%Software%
%#13% Line feed
%Date% Date at installation
%Time% Time at installation
%DateTime%
%LangID% Language index of chosen lanuage
%Language% Name of chosen language
specified by the user during installation
(16/32-bit)
Specify in "1. General settings >
Variables"
Name of software
Date – time combination
Other variables:
These variables should not be used any more:
File source
%Install% This variable is identical with
%oldSetupDir% This variable contains the value of the
%SetupDrive% Drive letter of installation directory
%CDDir% Source directory for CD installations
%Dir-01% <not vaild any more>
%SetupDir% (backwards compatibility)
variable, which was avaiable in the
variable %SetupDir% until version 3.56
In the file source you tell install-us, what files should be included in your
installation. You specify, which file should be installed to which directory
(folder) during installation. Additionally you can tell install-us, which links and
shortcuts should be created. Each single file can have its own file atributes,
which handle the overwriting, the registration as Active-X or SharedDLL.
You can choose between these ddestination directories:
• Main installation directory %SetupDir%,
•
Windows directory %Windows%,
•
Windows system directory %System%,
• Font directory %Fonts%,
• Directories with contant names,
•
Directories with variable names (e.g. name comes from registry or
from configuration files).
Note:
Fonts, which are installed in the %Fonts% directory automatically get
registered in the system.
26
install-us main module install-us Manual
••••
Page 31
Files and directories
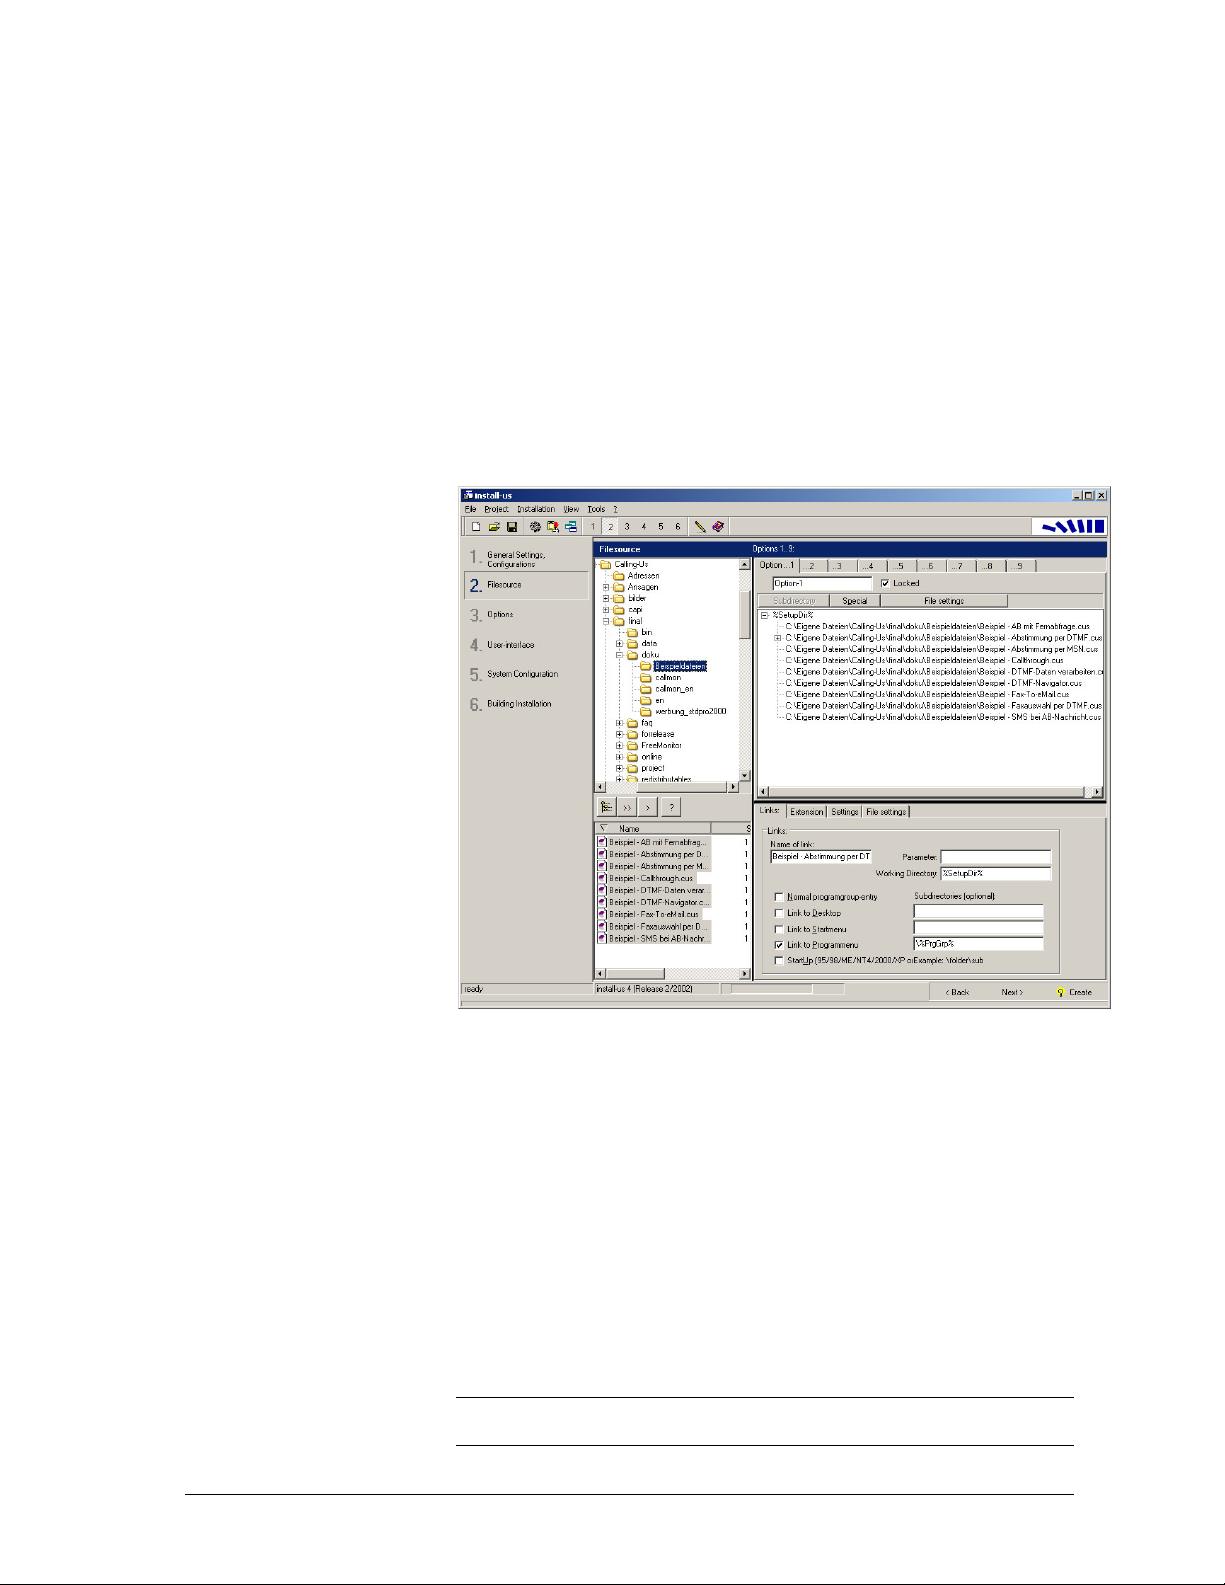
On the left side you can see the Filesource directory- and file-listview. You
can select single files or entire directories including their sub directories. On the
right side you see the detination treeview, where all directories and file
references will be listed.
To take one single file into the project, select the file in the file listview and click
at the button >. The button >> takes all files into our project, which are in the
current selected directory.
By clicking on the button symbolizing a directory structure all files and
subdirectories will be inserted in the treeview of our project.
Please note, that you can organize your files in up to nine options. You switch
between those options by just selecting the desired page (
the destination treeview pagecontrol.
Option…1 to 9
) of
Filesource
The expression %SetupDir% within the destination-treeview represents the main
installation-directory, which can be changed during setup by the user.
To create a subdirectory just click at
“%SetupDir%\dirname” will be added. To change its name doubleclick onto the
entry and the rename dialog appears.
If you want to install some files into a directory different from the maindirectory %SetupDir% click
another directory.
Program group entries, links and shortcuts
Install-us is able to create links in a ordinary program group or shortcuts on the
Desktop or in the Start-Menu.
Note:
The programm group will only be created, if there is at least one entry to
make.
install-us Manual install-us main module
Special
Subdirectory
. Within the next dialog you can select
. A subdirectory named
27
••••
Page 32
Specify a name for the link in
Name of link
. Then just specify the kind of link
(or shortcut) you want to be created during installation. If you do want create an
addtional folder, which contains the links, you can specify its name in the edit
Subdirectories (optional)
fields
.
You can add parameters, which can be used by your application when called.
You can prompt them in the field
Parameter
.
Some examples: “Test” or “%SetupDir%”.
Additional programgroup entries
Choose menu
Installation - Additional Programgroup-Entries
.
In the following dialog you can specify the name of the links and the links
themselves. Within the section
Configuration
you can choose the
configuration, when to create the links.
Example: %SetupDir%\program.exe would create a link to the file program.exe
in the main-directory of the drive, from which the software is installed.
Filename-extensions
If the user doubleclicks on a datafile in the explorer, a program is started, which
automatically opens the calling datafile. If your software includes a program,
which can open specific datafiles, you must specify this program and the
extension in install-us to register it automatically in the explorer during
installation.
Example: If the user clicks on a *.txt-file within the Explorer or the file-manager
the standard-editor notepad starts and opens the textfile.
Please choose the program-file in the destination-tree, which you have put into it
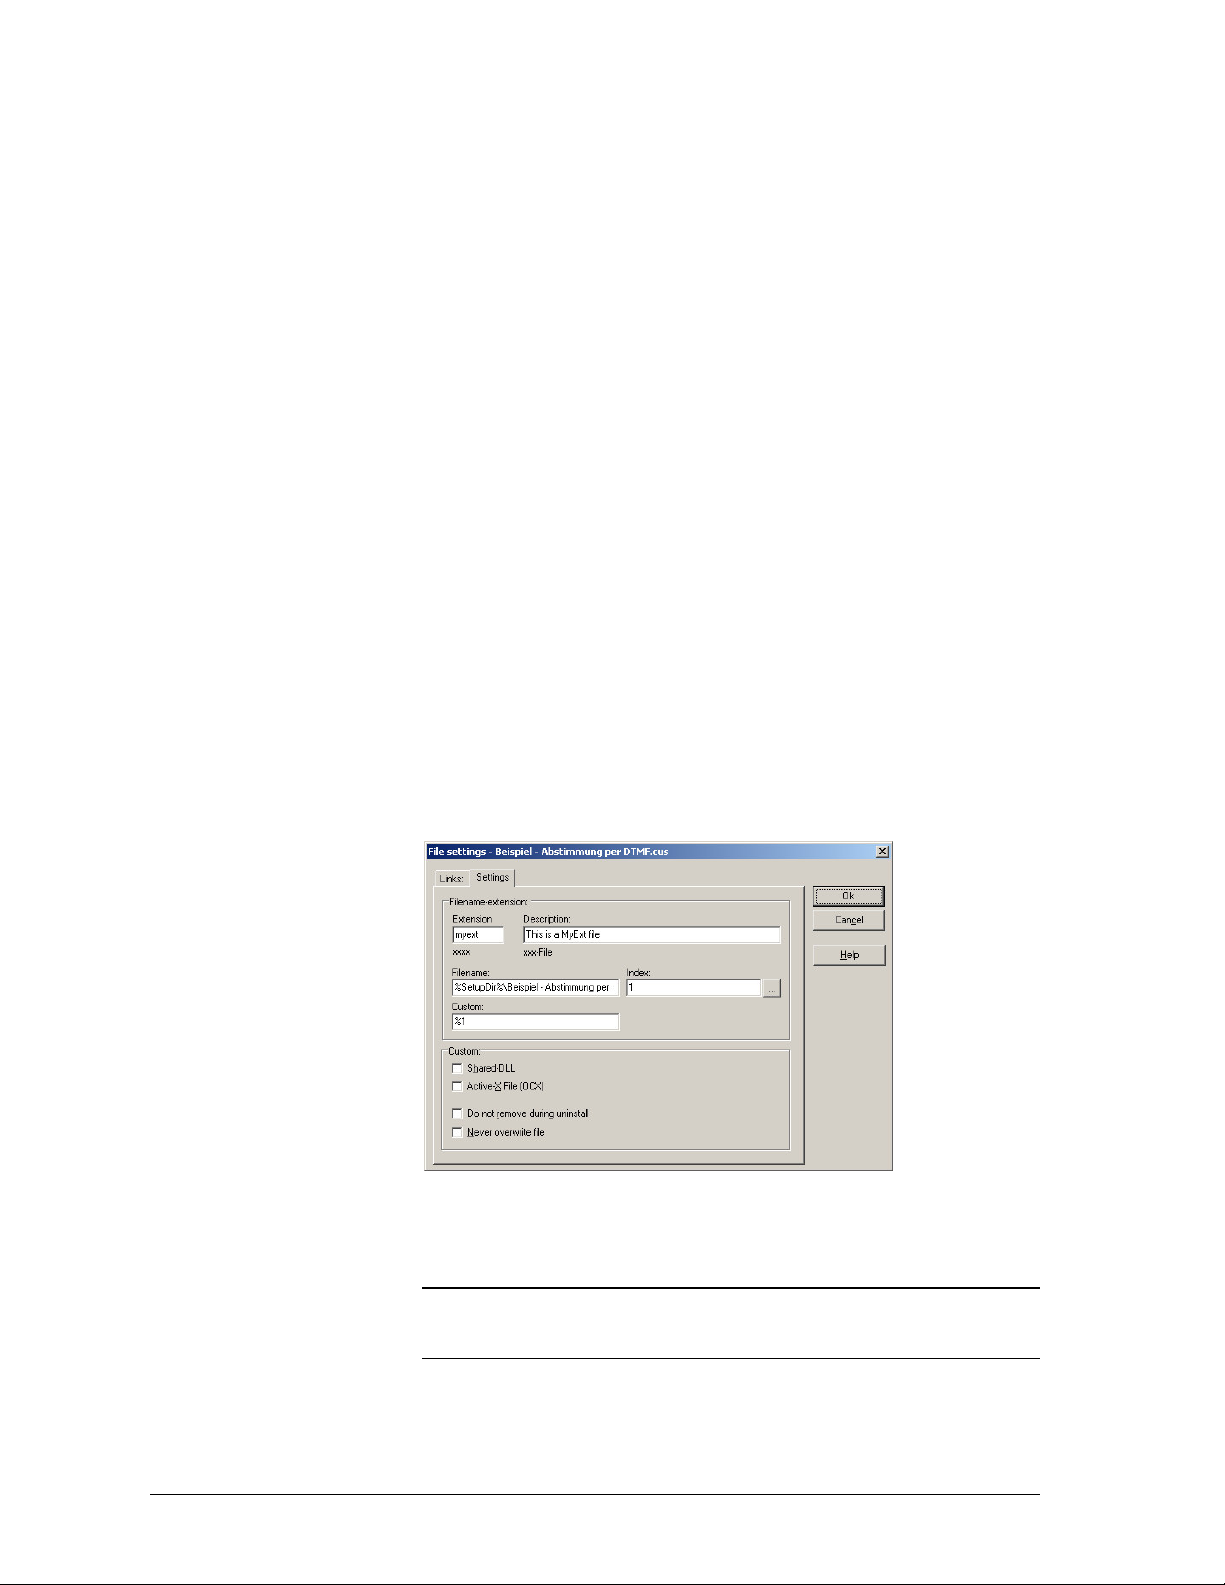
already, and doubleclick onto it. The dialog “File-Settings appears”:
Settings
Then go to the page Settings and enter you can promt the extension (e.g.
xyz) and give it a suitable
Note:
If a file calls the program, this program should open the calling file, as it
description
(e.g. XYZ-Project-File)
is usual for windows-applications. The name of the calling file is included as a
parameter: ParamStr[1].
Select the program-file or another file within the destination-treeview, to which
an entry should be created. Doubleclick at the selected item.
28
install-us main module install-us Manual
••••
Page 33
ActiveX
To register a file as OCX / ActiveX server, go to section "2. File source" and
doubleclick on the file in the destination treeview on the right.
Settings
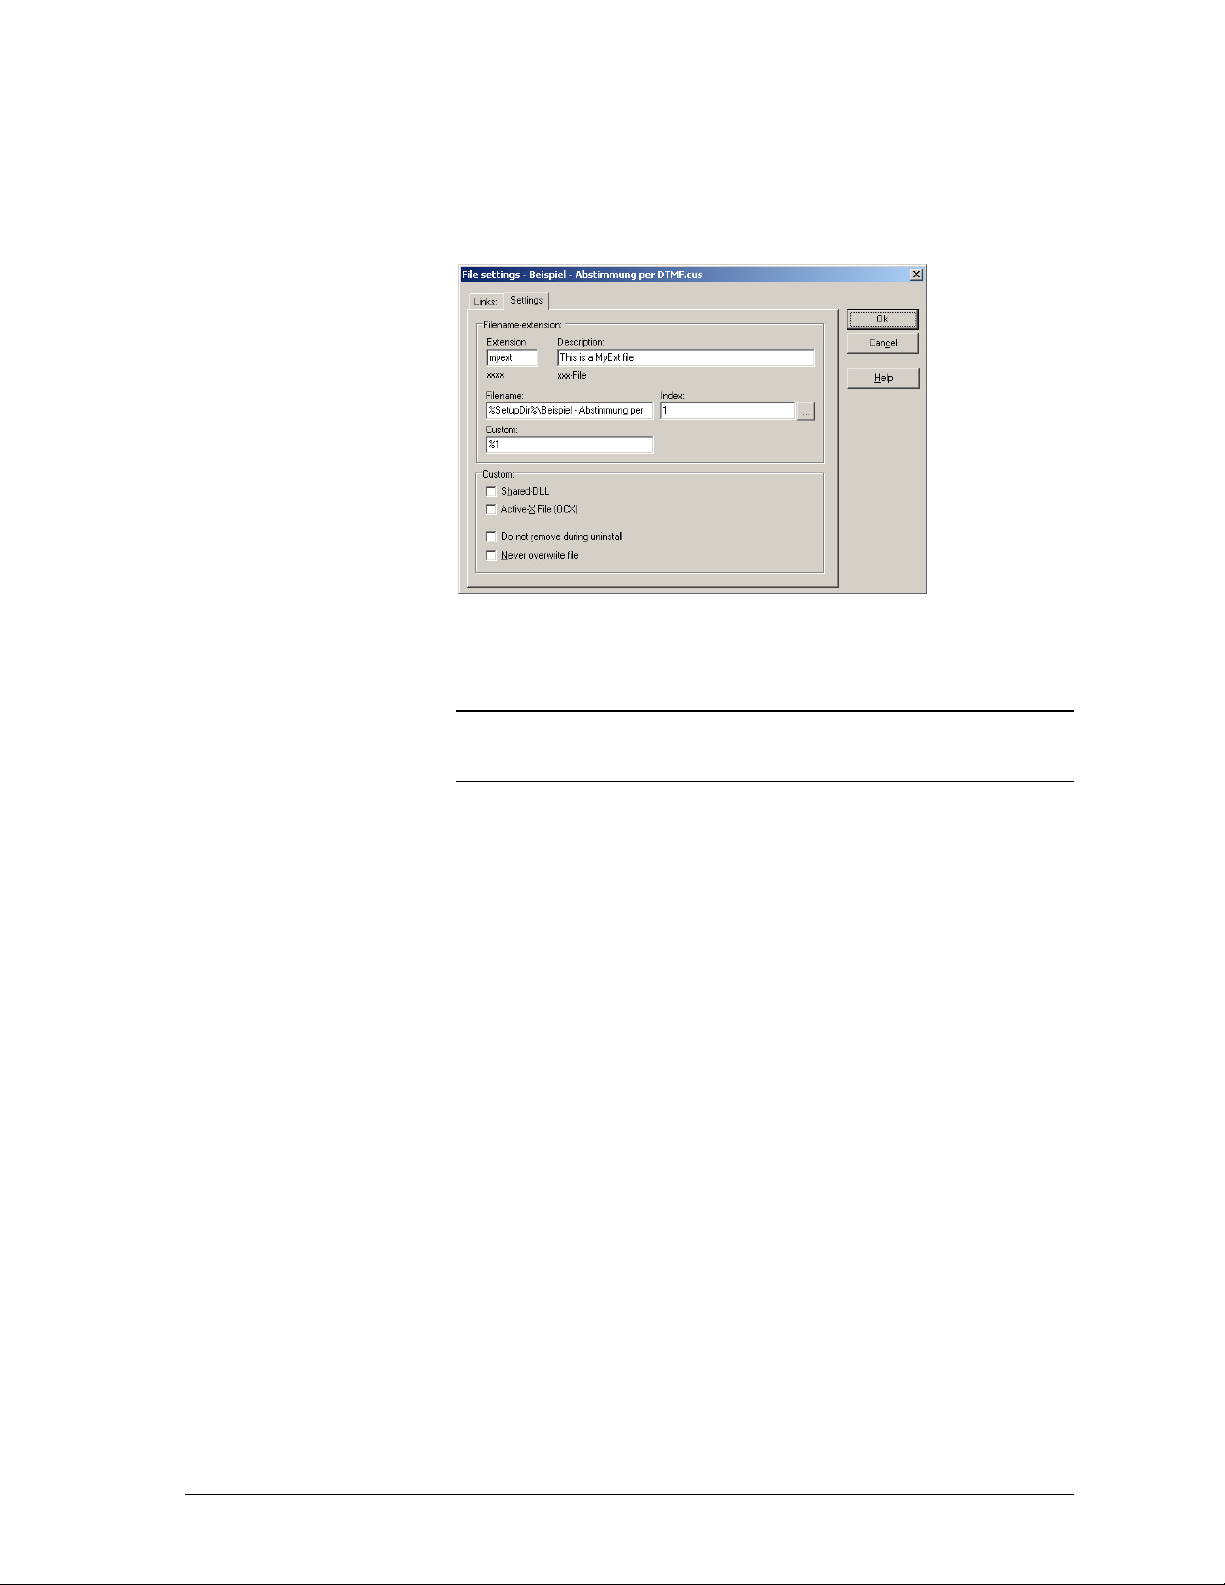
In the dialog “File Settings” go to the page
Active-X file (OCX)
Note:
Some ActiveX files need other ActiveX files to be registered before
registering themselves. You need to have a look at the documentation of
ActiveX controls.
Shared DLL
Windows 95/98/ME, NT4, 2000 Professional and Windows XP/Vista offer the
possibility to register DLLs (and other files) as SharedDLLs. Each
application,which uses a shared file, must increment a counter at its installation
and decrement it at ist deinstallation. If the number of referenced files is equal
zero, the uninstall application can delete the file.
.
Settings
and select the checkbox
Options
The user can choose between the configurations (setup-type), which you select in
install-us. These configurations are possible:
Typical-, Minimum- and Custom Configuration.
Choosing the Custom-Configuration, the user can specify the single options,
which he wants to be installed. Please make sure to take suitable names for the
single options!
You can offer up to nine single options to the user in a Custom configuration.
The user can choose his own options, which should be installed.
If you want to ensure that one option will be installed in every installation, you
can set option-1 as locked.
install-us Manual install-us main module
29
••••
Page 34
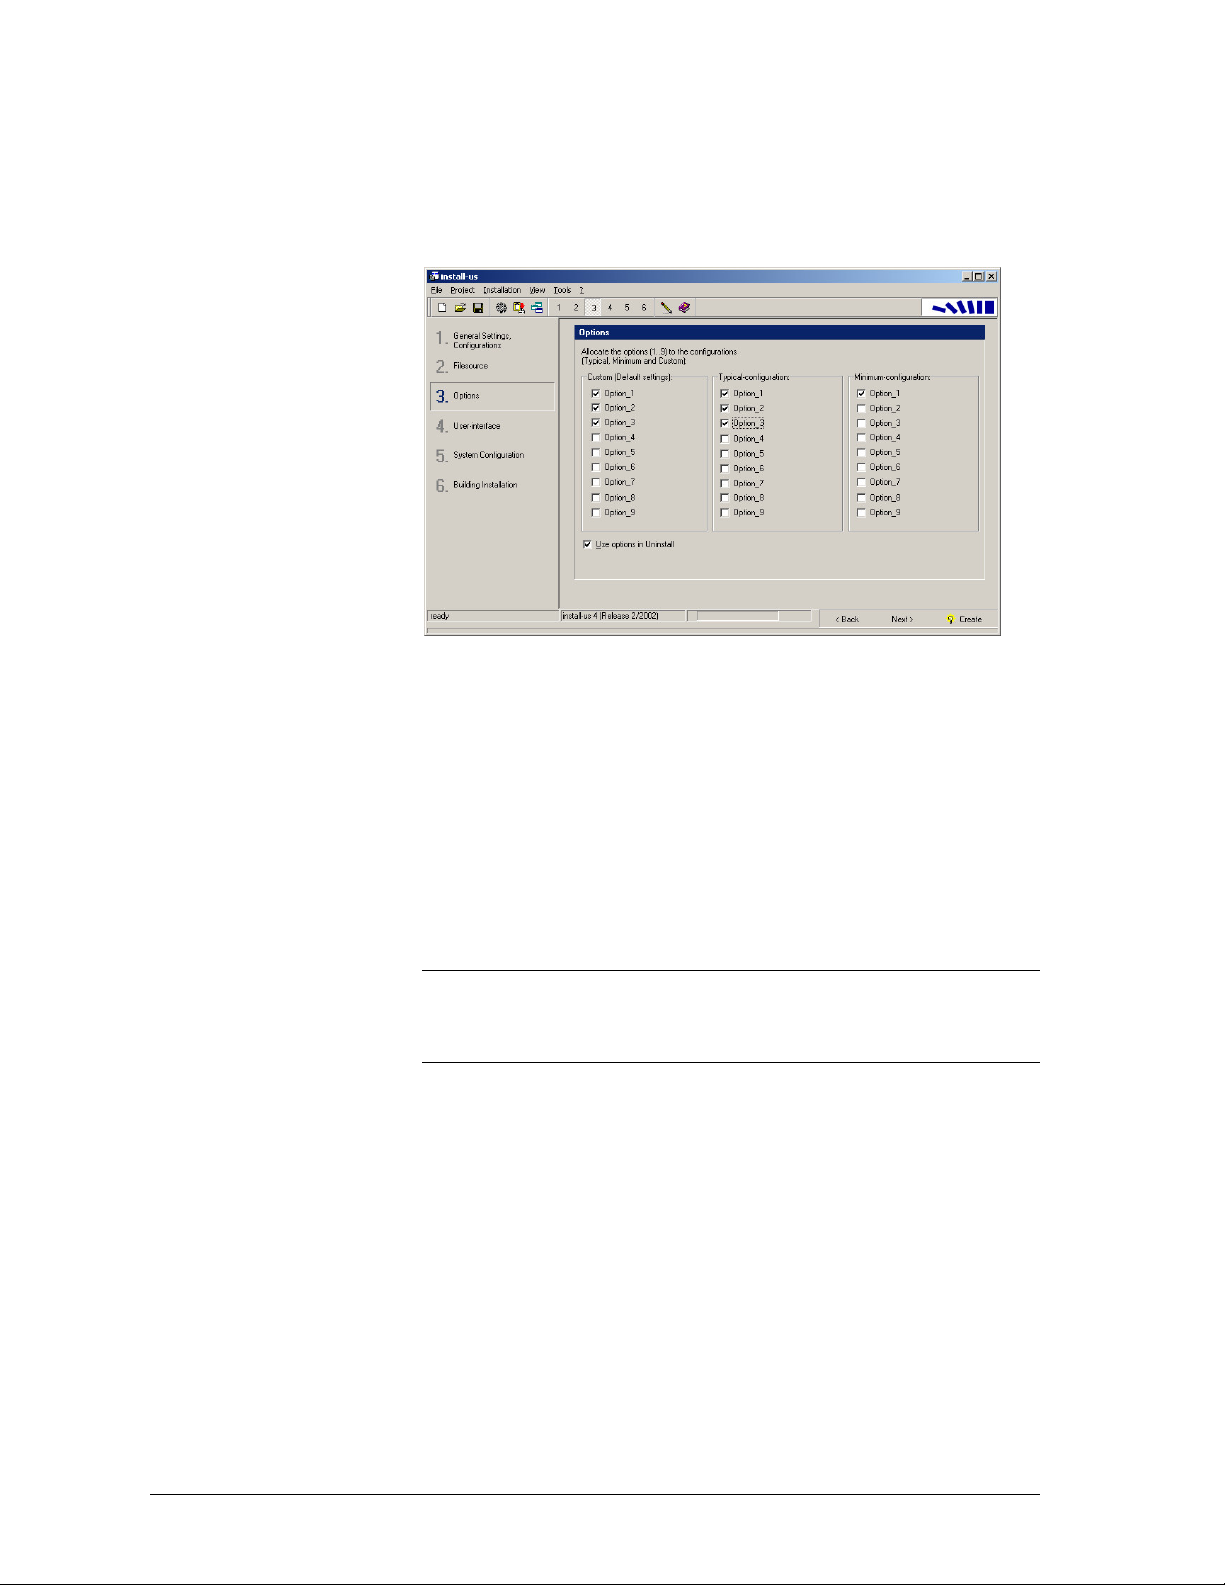
To be able to use options especially for custom configurations, please ensure that
the Custom-checkbox is activated in section “1. General Settings,
Configurations”.
To assign the different options to different setup types (configurations), please
go to section “3. Options”:
Options
See section
Custom (Default setting)
and activate the items, which should be
installed by default, if the user chooses Custom-Configuration. The user can
select other options in his installation.
In the other configurations please activate the options, which should be installed,
if the user chooses the specific configuration. The user cannot change these
settings later.
If you want to offer Uninstall with options, just activate the checkbox “Use
options in Uninstall”.
Note:
You can change the descriptions of the different setup types (Standard,
Minimum, Custom) to make your own spaial installations (e.g. you can rename
the descriptions to Network installation, Client/Server installation, etc.)You must
go to “4. User interface” and edit the current dictionary file.
30
install-us main module install-us Manual
••••
Page 35
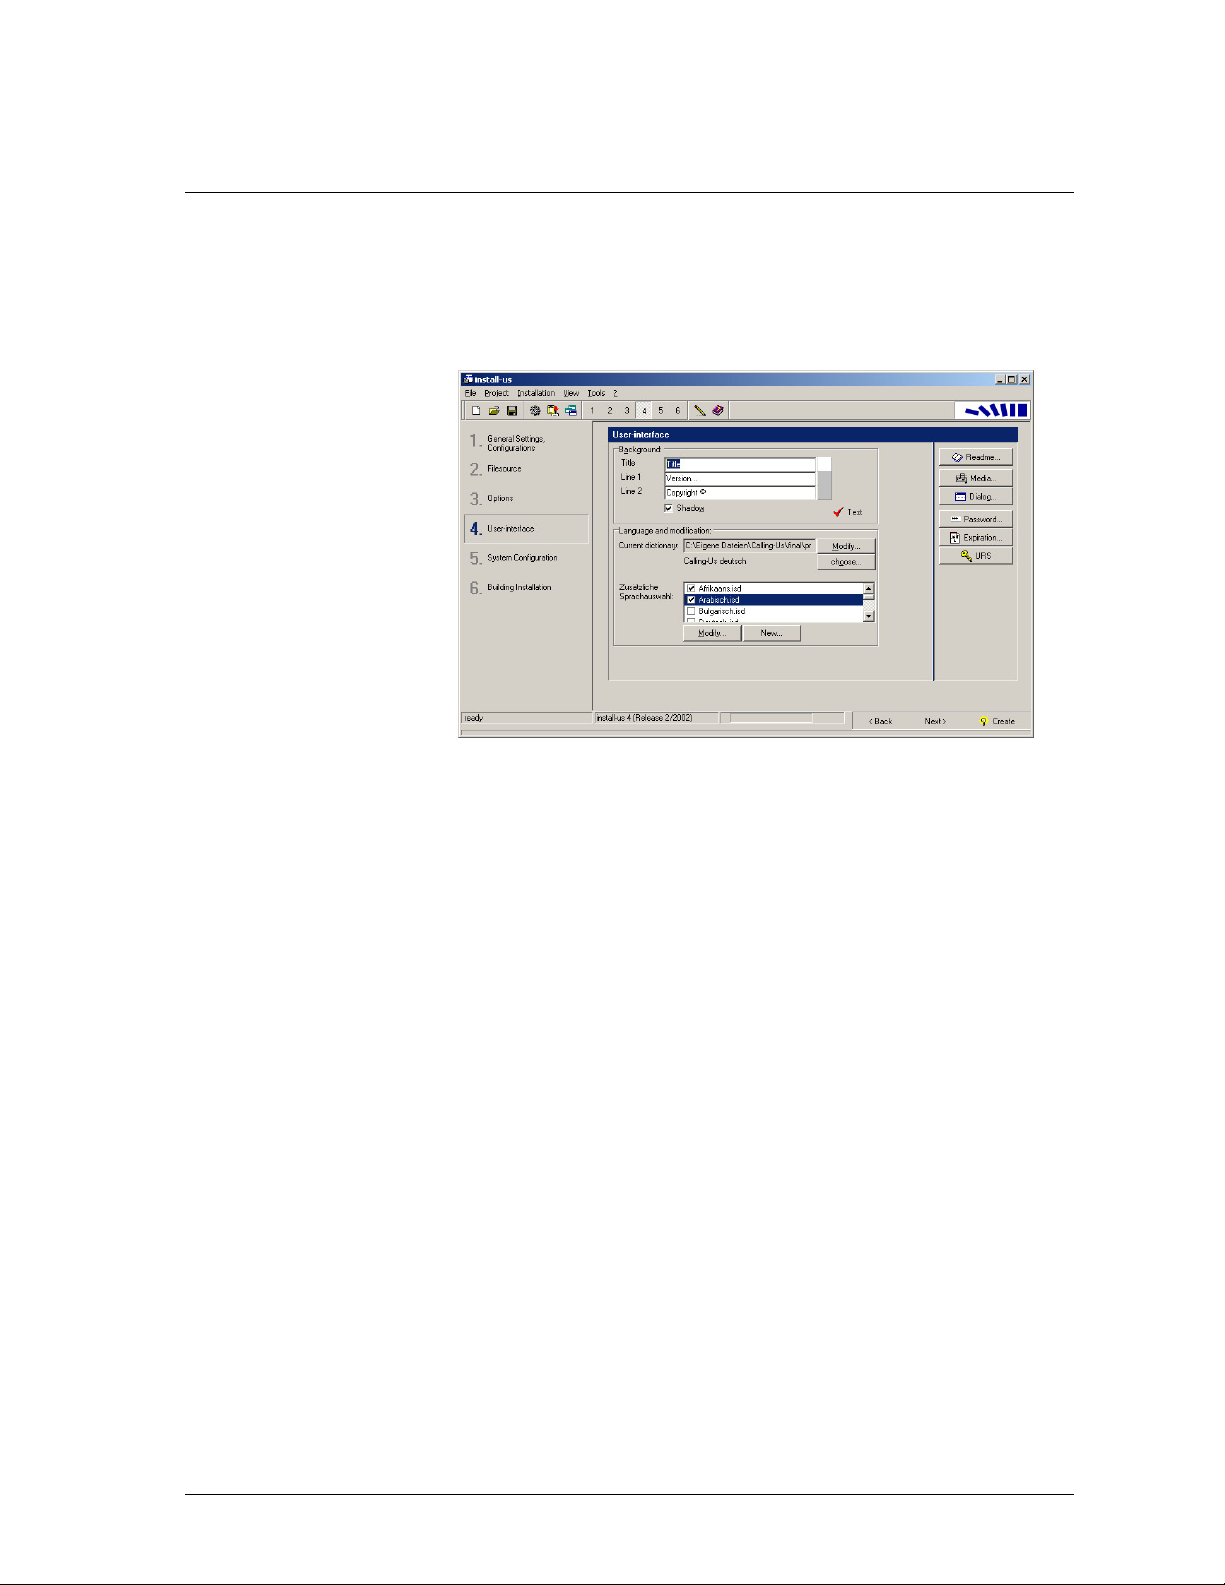
User interface
Install-us offers a wide range of possibilities to make a positive first impression
to the user of your software. The first impression is very important!
You can add titles, text, bitmaps, Video and Audio.
To do this, please go to section “4. User interface”:
User interface
In the section
in a color of your choice. To change the colors just click at the small buttons at
the end of the edit-boxes.
Background
you can place headlines as title of the setup-wizard
install-us Manual install-us main module
31
••••
Page 36
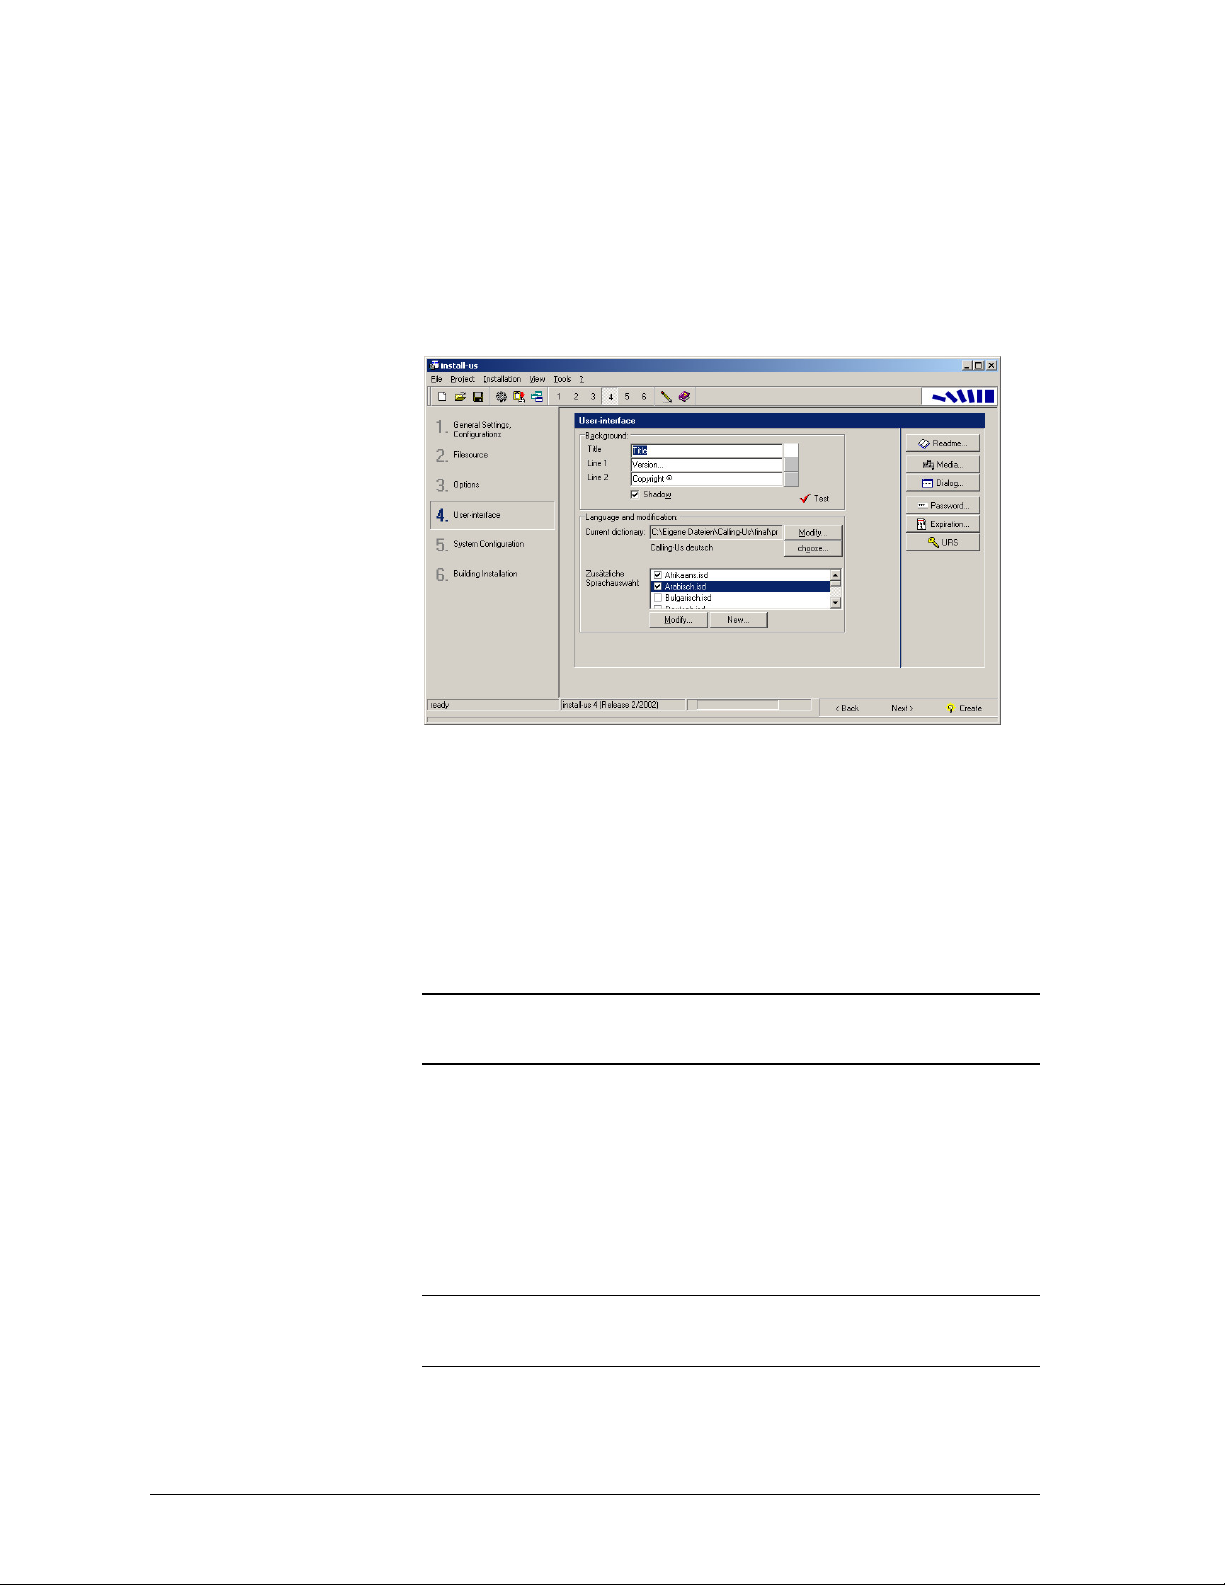
Language selection and text modification
The installation assistant can run with different language dialogs.
These are available at the moment: Afrikaan, Danish, Dutch, English (AE, BE),
German, Italian, Polish, Portuguese, Norwegian, Spanish, Swedish, Russian,
Turkish and more...
All texts shown during installation can be modified to fit your needs:
User interface
In the groupbox Language and modification you can modify all texts shown
to the user during installations.
Click onto the button choose.
In the following dialog you can select the desired dictionary file (*.isd).
Click onto the button
dictionry files.
Click at
Remark:
needs. These expressions are shown to the user of your installation-routine
during installation.
If you want to use your modifications in other project-files, just save them to
another dictionary file and click Save as.
New
and produce your own dictionary..
You can modify all “Standard-expressions” that they exactly fit your
Modify
to create new dictionary files or to edit existing
Media
Install-us enables you to give the installation-process a professional look by
playing Audio- and Videofiles during the installation-process or showing a
sequence of up to ten bitmaps (billboards).
Note:
If there is no suitable soundcard or no Video-Codec installed on the
system of the user, there will be no error-message and the installation will
proceed without interruptions.
To include media into installation, please press F7 and click onto
32
install-us main module install-us Manual
••••
Media
.
Page 37
Note:
Note for installations from floppy-disk:All created files, which contain
media-files, must be as small, that they fit onto the first installation disk. The
installation-program expands all media-files to a temporary directory on the
user’s system to play them.
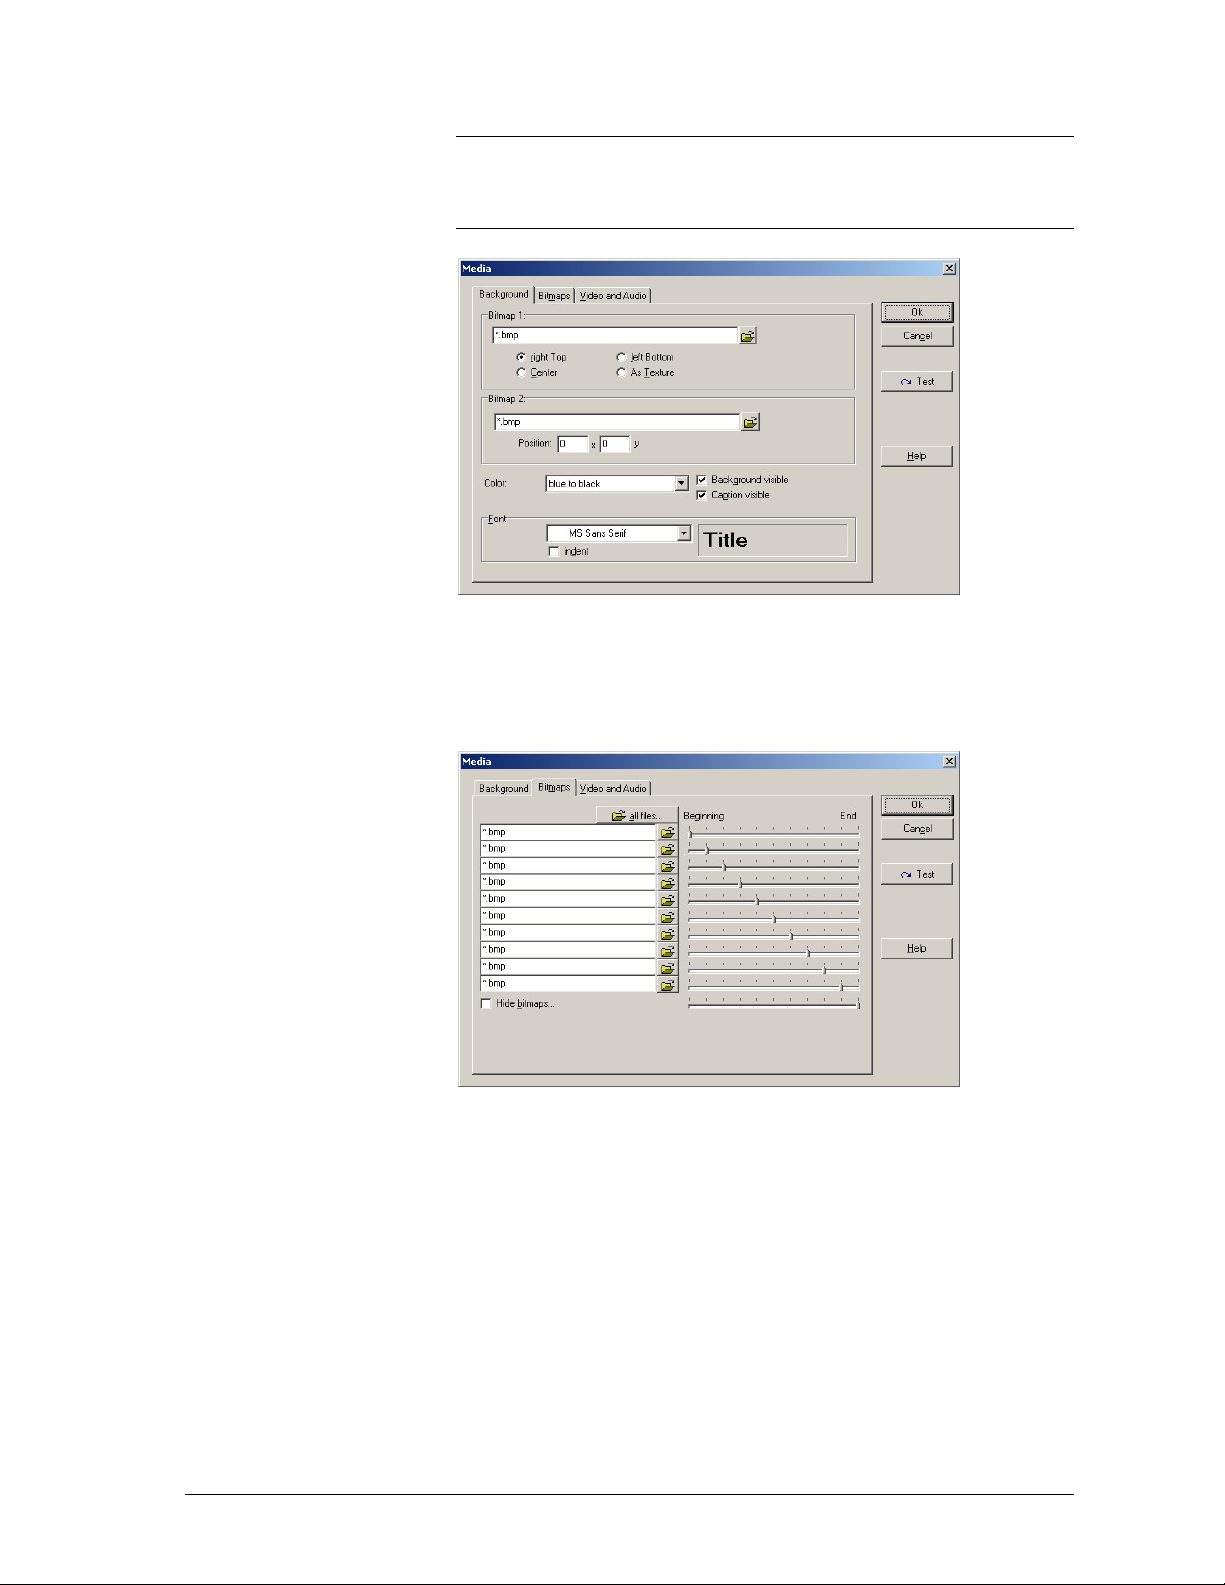
Media - Background
On the page
Setup-Assistant. You can place
disk space you can set Bitmap 1
coordinates just use
Background
Bitmap 2
you can define the look of the backround of the
Bitmap 1
as texture
in the center of the screen. To save
. To set a picture to absolute
.
Media - Bitmaps
If you want to show a slide-show during the installation-process go to page
Bitmaps
. The frame-rate depends from the installation-process directly.
install-us Manual install-us main module
33
••••
Page 38
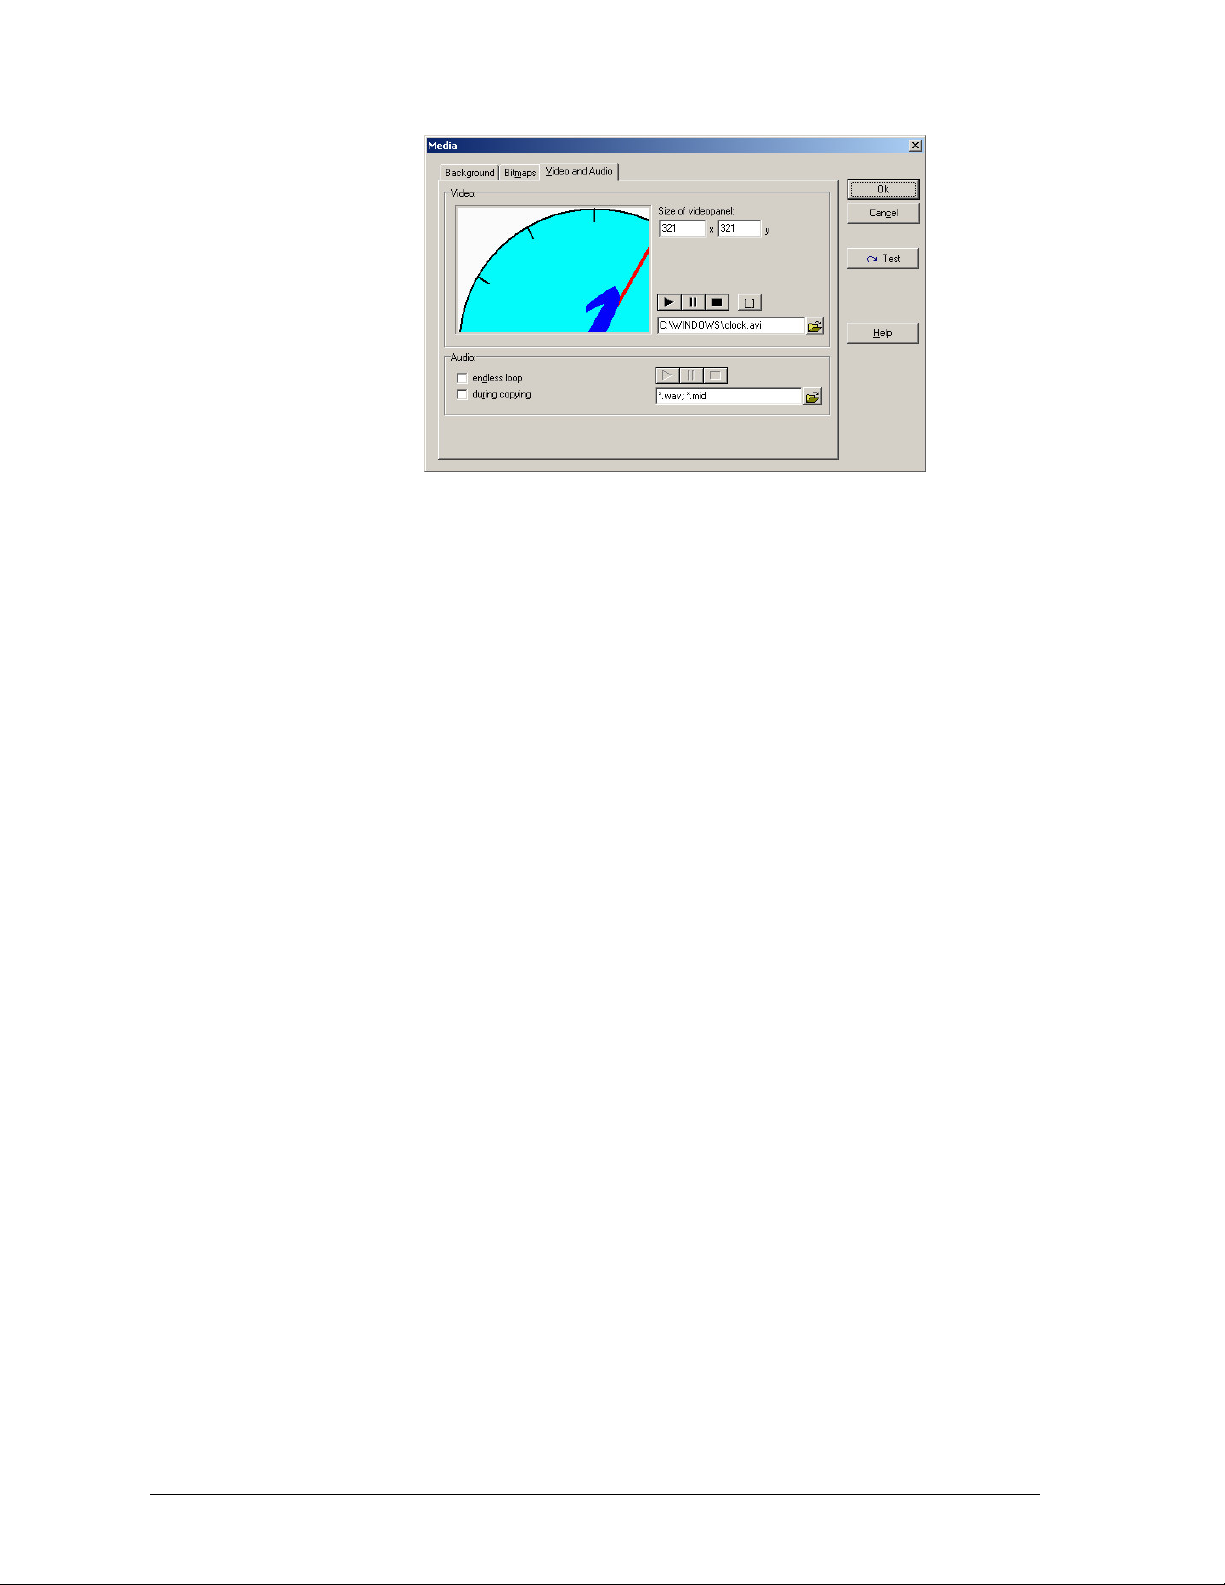
Media –Video and Audio
For showing a video it is recommended that you type in the required x and yvalues of the windowpanel (
Size of video panel
).
34
install-us main module install-us Manual
••••
Page 39
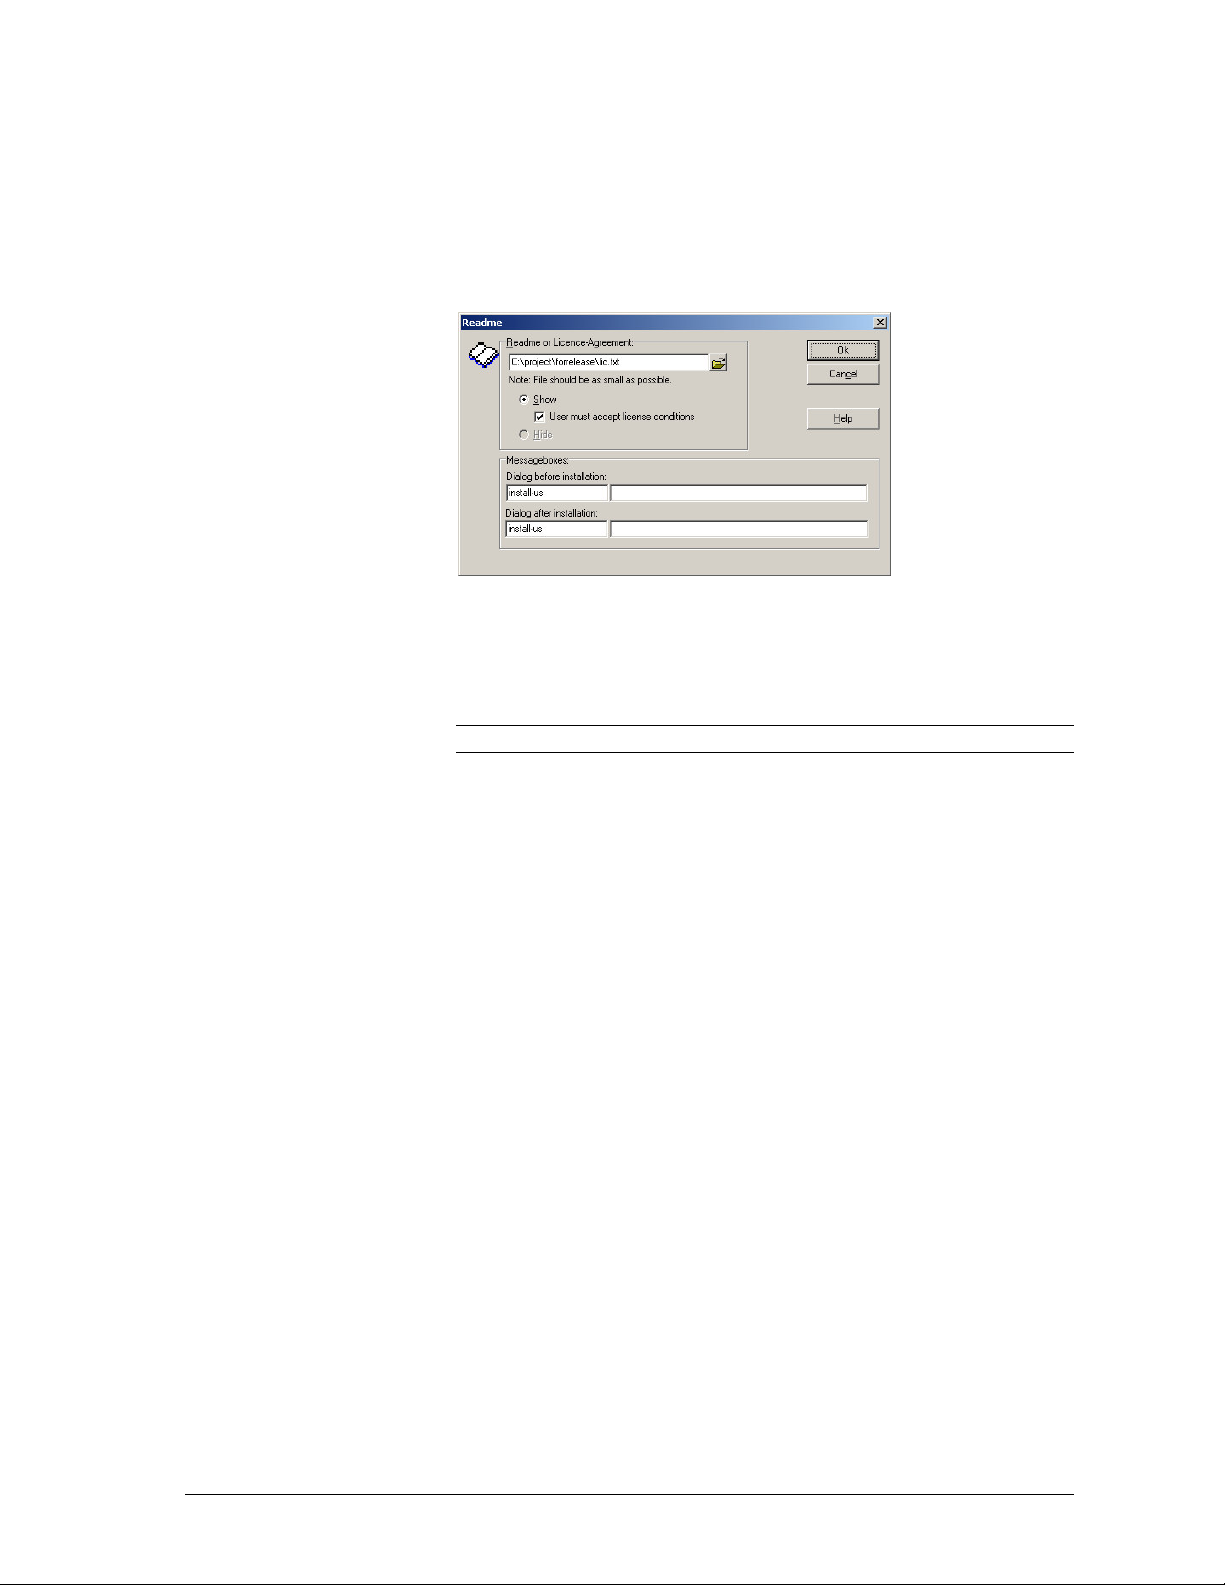
Readme and message boxes
To add a readme or licensefile to the installation, specify this file in install-us.
The text will be shown in the installation-Wizard before installation starts. You
can show message boxes before or after installation to give the user instructions
or just to welcome him.
Press F7 and click onto the button
Readme
Readme
:
Specify the name of the textfile in
To show messageboxes during the installtion, enter the message into the
adequate fields at
Note:
The readme-file will be shown in notepad.exe in 16-bit-installations.
If you want the user to accept the license agreement, you can activate the
checkbox
User must accept license agreement
Dialog before
Readme or License-Agreement
Dialog after installat
or
ion.
.
.
install-us Manual install-us main module
35
••••
Page 40
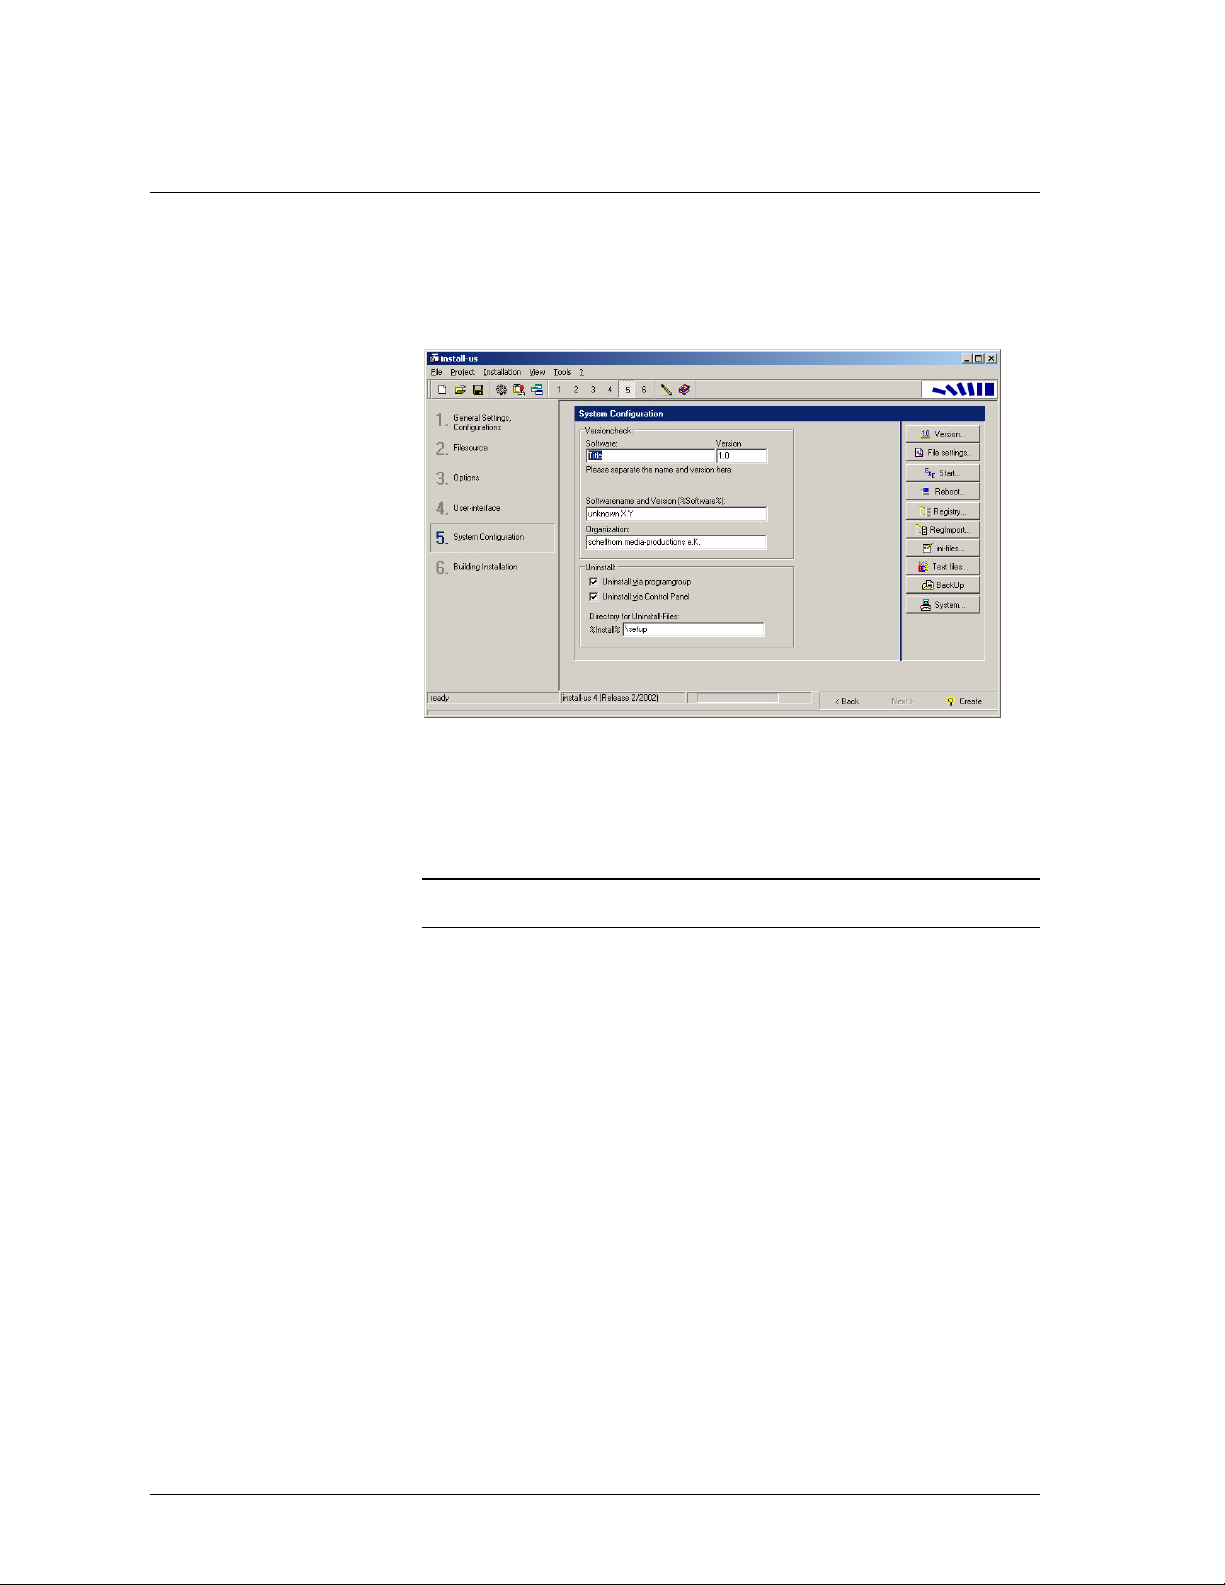
System Configuration
Software
Press key F8 to see section “System Configuration”.
System Configuration
In the groupbox
software. In the edit box Softwarename and version you enter the text,
which will be shown to the user and is available via the variable %Software%
during installation.
Note: Please make sure to separate the name of the software and the version
in both of the fields
Versioncheck
software
and
you specify the name and
version
.
version
of your
Uninstall
You can offer Uninstall via Program group-entry or via Control Panel. If you
want to save diskspace, you can deactivate Uninstall totally.
36
install-us main module install-us Manual
••••
Page 41
System Configuration
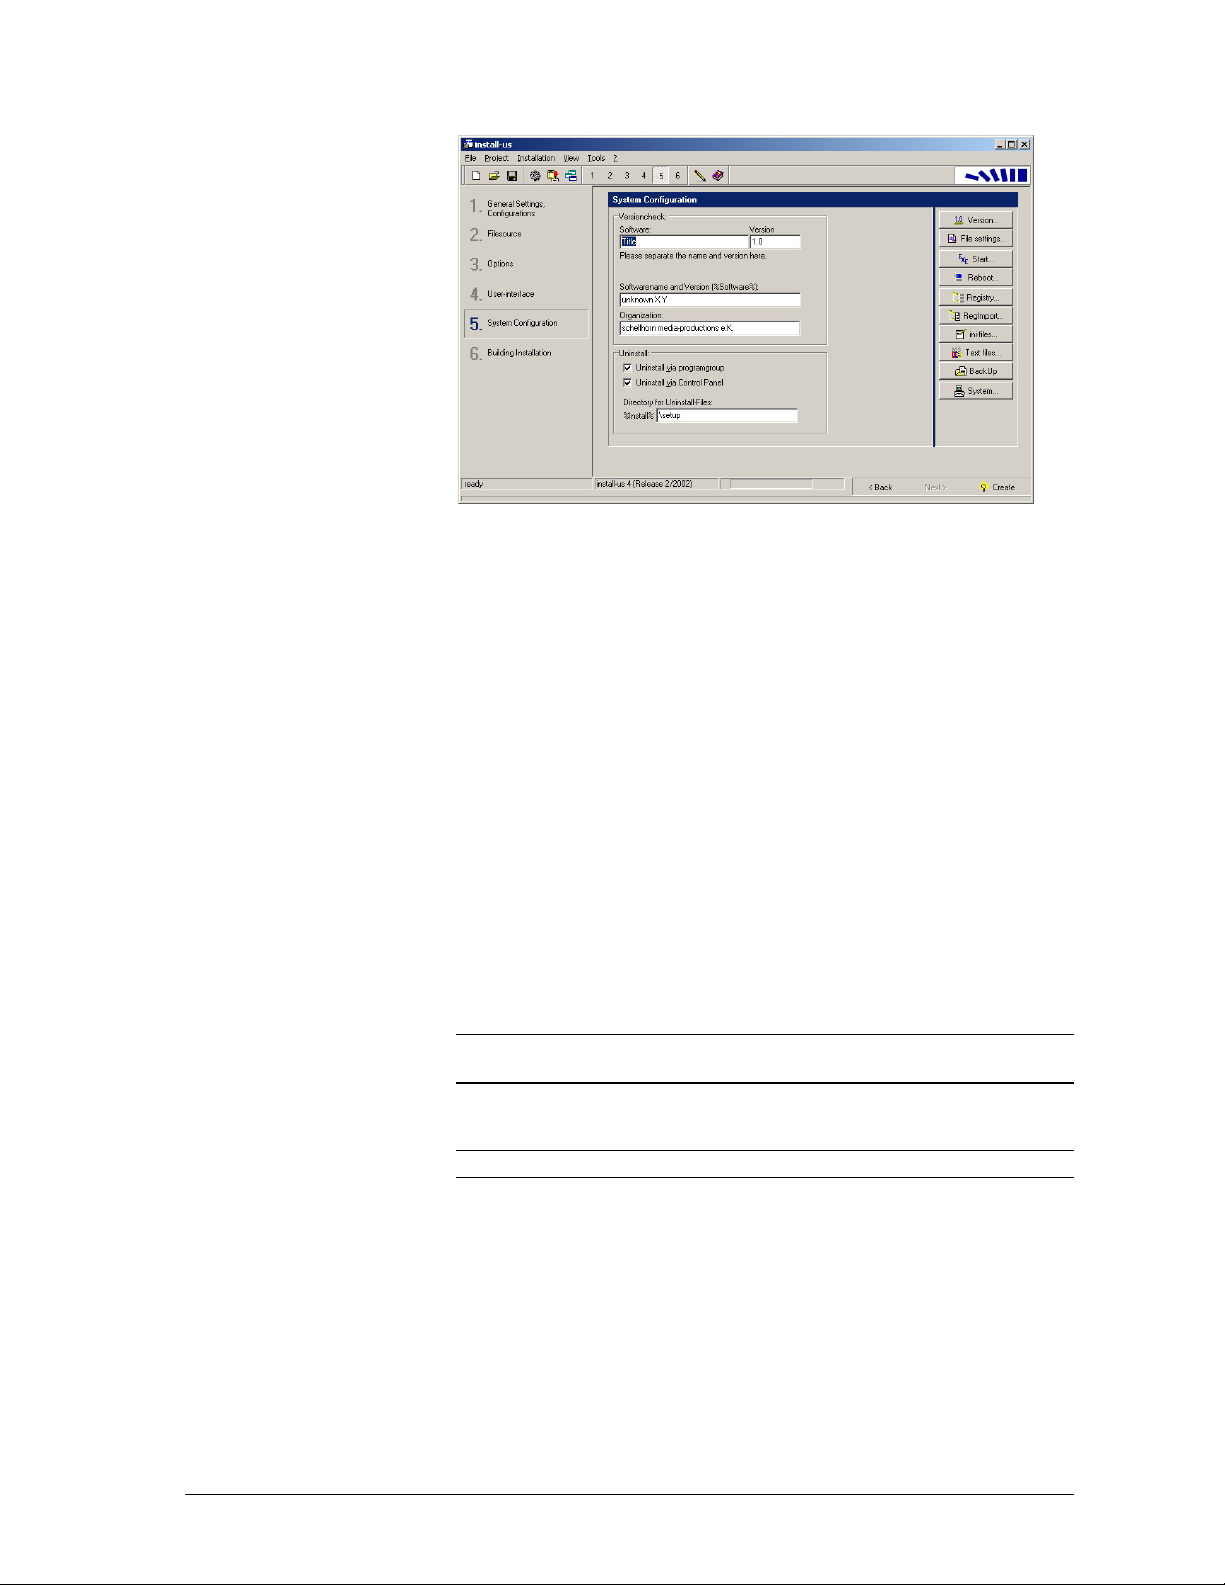
Press key F8 to see section “System Configuration”.
In the goupbox
available. Deactivating both options disables uninstall completely.
In the editbox
directory, into which all Uninstall-files will be copied to. Deleteting the text will
copy the files directly to the main installation-directory %SetupDir%.
Uninstall
Directory for Uninstall files
you can set the way on which Uninstall should be
you can specify the name of the
Registry
Install-us enables you to add or modify entries in the registry of Windows
95/98/ME, Windows NT 4.0, Windows 2000 Professional and Windows
XP/Vista.
It’s possible, that you store settings in the registry, which are needed by your
application. These settings can be queried every time.
It is common that your application stores data in the HKEY_CURRENT_USER
or the HKEY_LOCAL_MACHINE root unter the key
“Software\YourCompany\YourSoftware”.
Note: Please make sure not to change data of other application without knowing
what you do. It could result in a total system-breakdown.
Note for Windows 3.1: You can use ini-files to store settings instead.
Choose menu
install-us Manual install-us main module
Installation -
Registry.
37
••••
Page 42
Registry
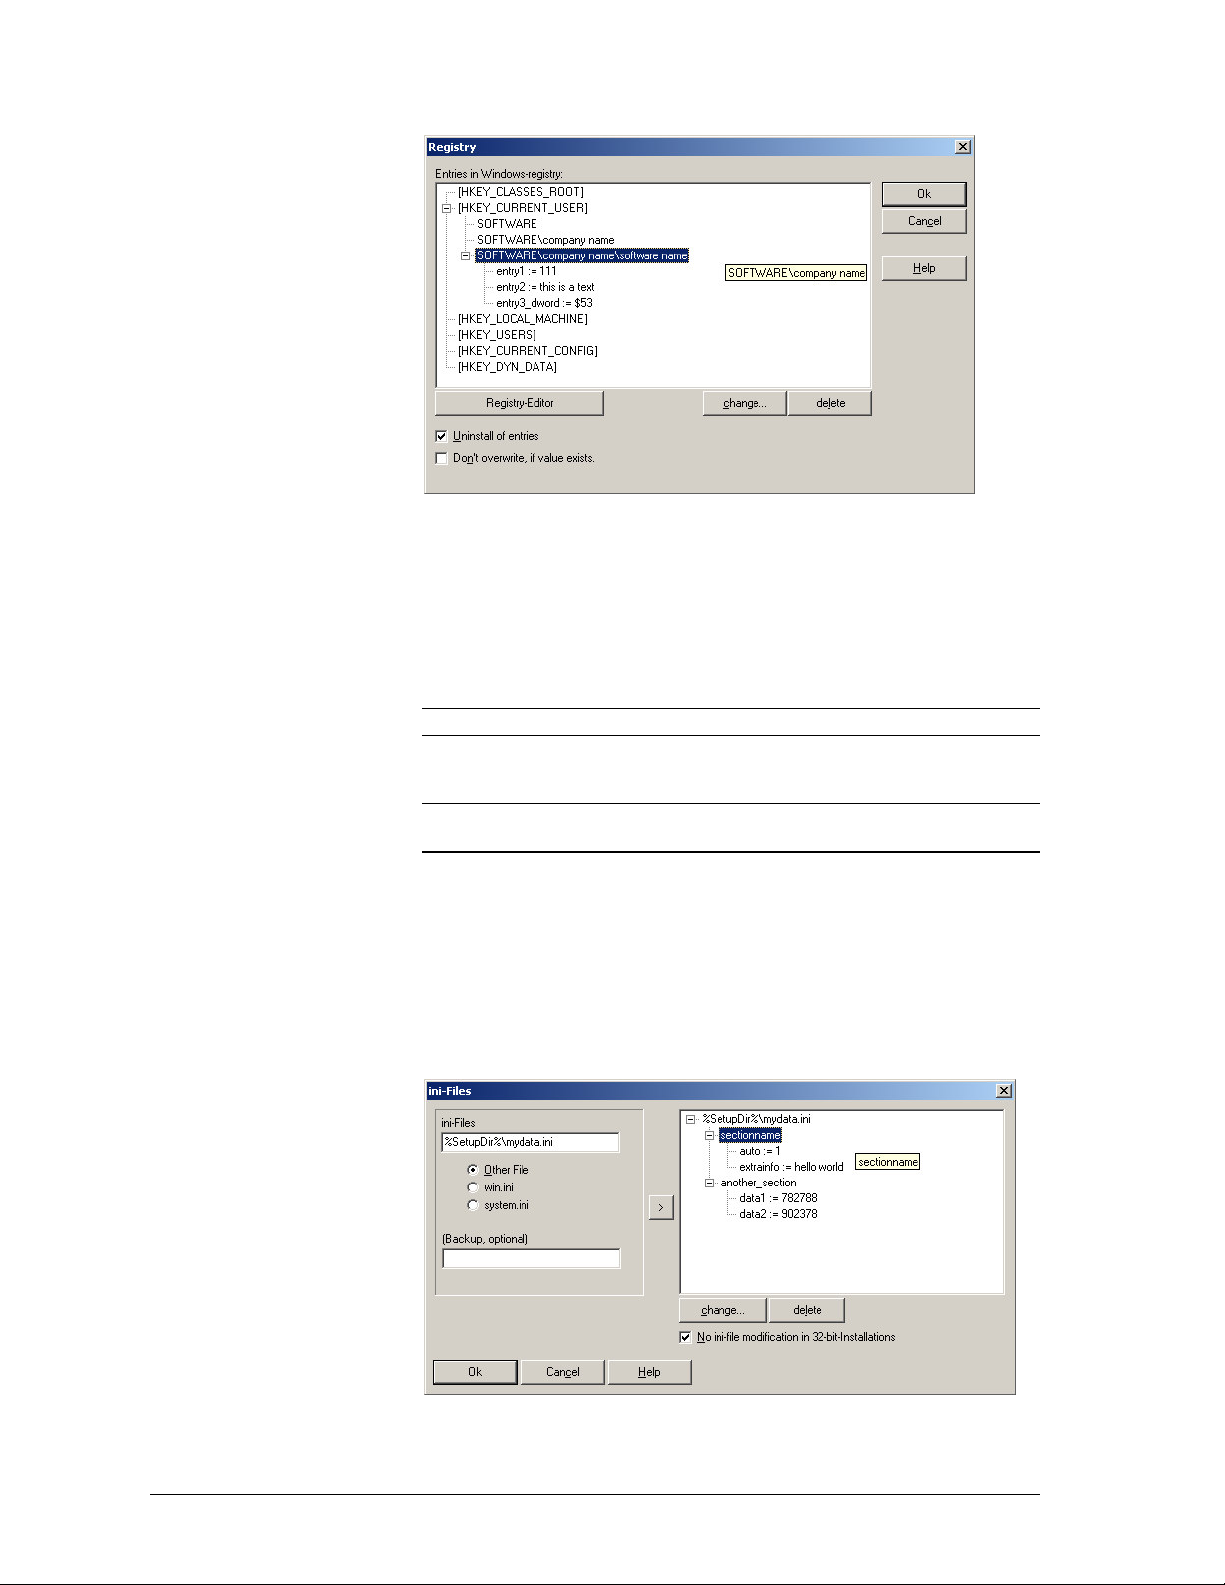
The entries, which you make here, are added to the user’s registry. The changes
can be undone by uninstalling your software.
Doubleclick at the root to which you want to add entries.
In the next dialog you can specify the keys:
Example: Software\YourCompany\YourSoftware
Important: DWORD values can be specified by a leading $. Example: $FFFF
Note:
You can have a look at the registry of your system by clicking on
“Registry-Editor”.
Ini files
You can insert or modify entries in ini-files, which are typical for Windows
systems, during installation. You can change ini-files in the main-directory or in
the Windowsdirectory (win.ini, system.ini or others).
Please press F8 to go to “System Configuration”. Then click onto the button
files:
ini-
ini files
38
install-us main module install-us Manual
••••
Page 43
Specify the name of the
win.ini or system.ini to choose these files. You can specify the name of an
optional
the right treeview. Doubleclick onto the new added item.
Within the following dialog you can specify the the name of the section to
change and the entries to make.
backup-file
ini-files
. To take the setting click at >. The file will be taken into
, which should be changed. Or just click at
Text files
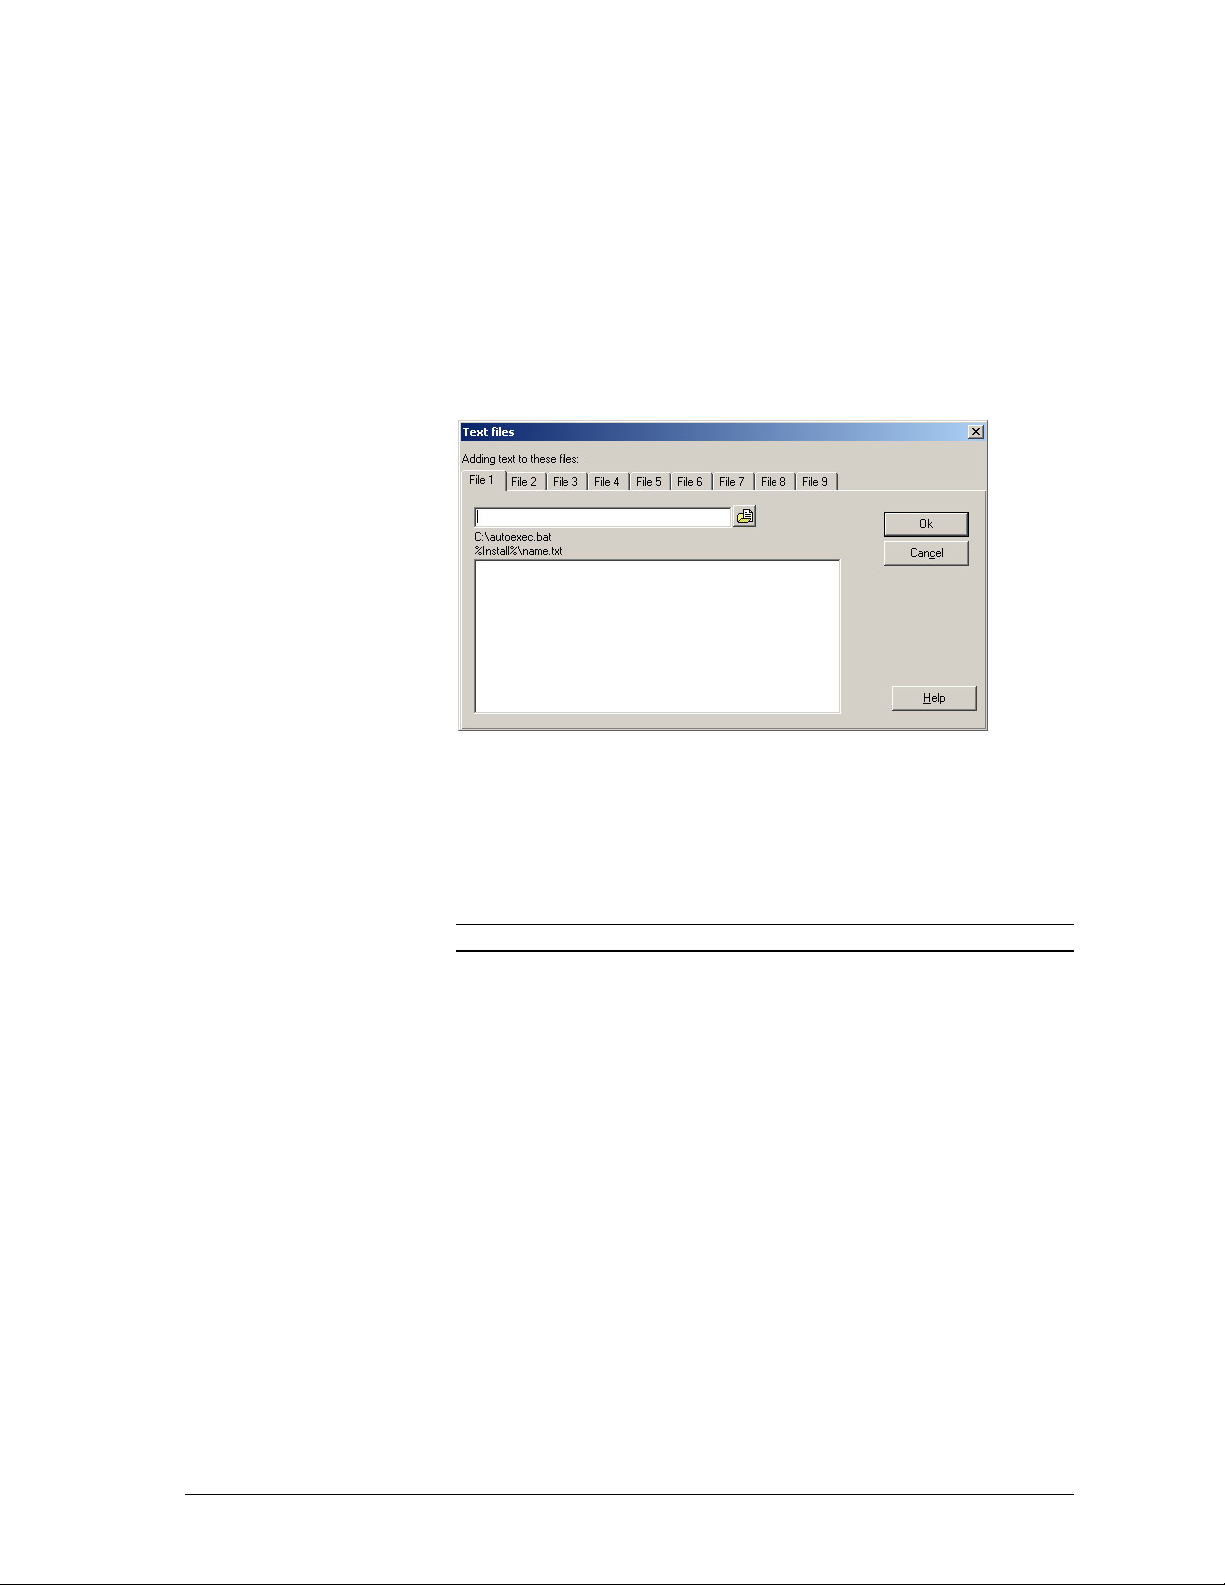
You can add some text to existing textfiles, like autoexec.bat or config.sys.
Text files
Specify the name of the textfile in the top-editfield.
The text typed into the memo will be added to the file during installation.
You can modify up to nine files at maximum.
Note:
Install-us does not undo changes made to textfilesduring uninstall.
Program start
After successfully installing the software, the installation-routine can start a
program automatically. This is very useful to make special systemconfigurations, which are not implemented in install-us, or to start the installed
application of the new software. You can even specify parameters, which are
given to the called application.
Choose menu
Installation - Run program/Program start
.
install-us Manual install-us main module
39
••••
Page 44
Starting program
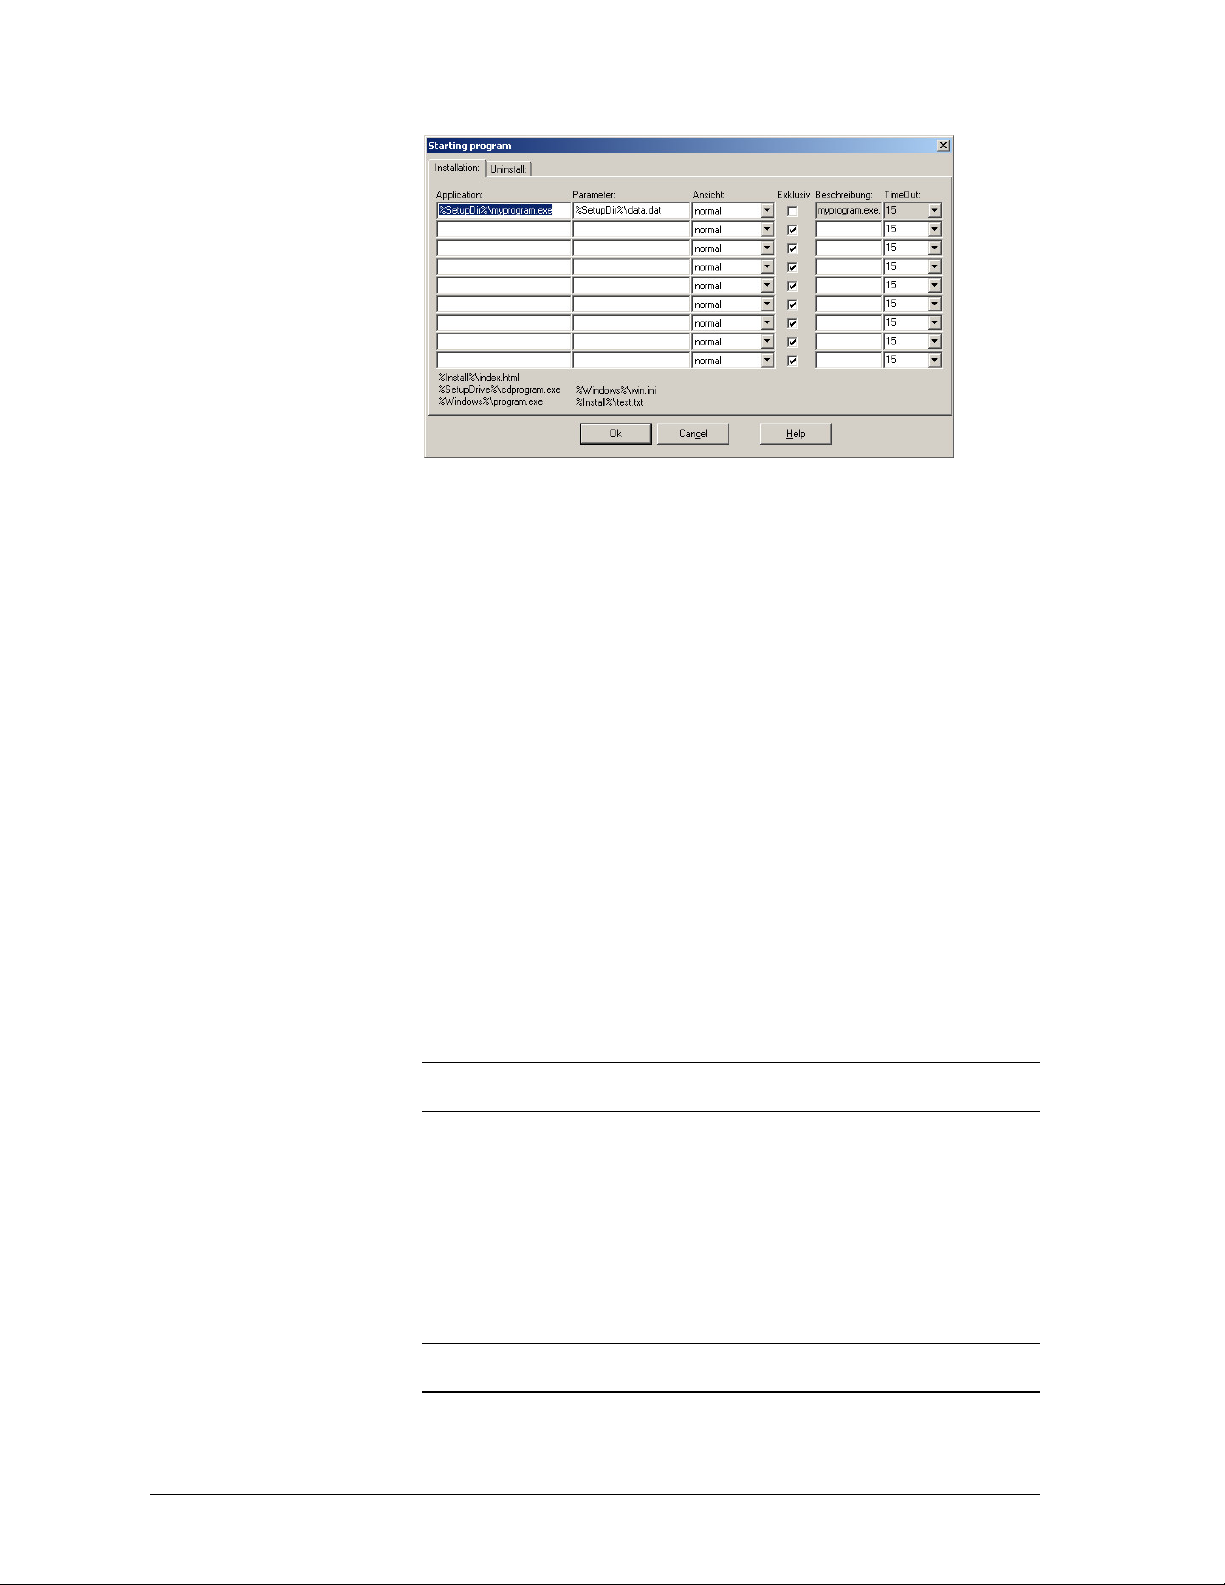
Please enter the filename of an executable (program with EXE, COM) or of a
datafile to be opened in the associated application (DOC, TXT, HTML). Make
sure to use a variable, that install-us is able to find the file on the customers
computer as well.
Please specify the name of the directory and the name of the program to be
started. Enter this filename into Application. Remember, that you can use
variables in the filename (e.g. %SetupDir%\myapp.exe).
The parameter takes only effect in conjunction with EXE or COM files. You
can pass optional parameters to the program (e.g. the name of the installation
directory %SetupDir% or other data like %UserName% or %RegNr%)
Have a look at the example:
Application: “%Windows%\notepad.exe”
Parameter: “%SetupDir%\text.txt”
This line starts the standard texteditor of notepad. Notepad then opens the file
text.txt, which was installed into the main-installationdirectory.
Via View you can tell install-us how to show the selected programs after
program start (only EXE).
If you switch on the checkbox Exclusive install-us will wait for the termination
of the specified program, until it proceeds with installation.
The Timeout specifies the time after which install-us will proceed with the
other tasks, when the called program doesn't return.
Please note:
executables.
Description
The
During the installation a small windows appears with the description inside, hile
the associated program is executed.
The "Exclusive" feature does not work together with all
will only be shown, when the
Exclusive
option is checked.
Reboot
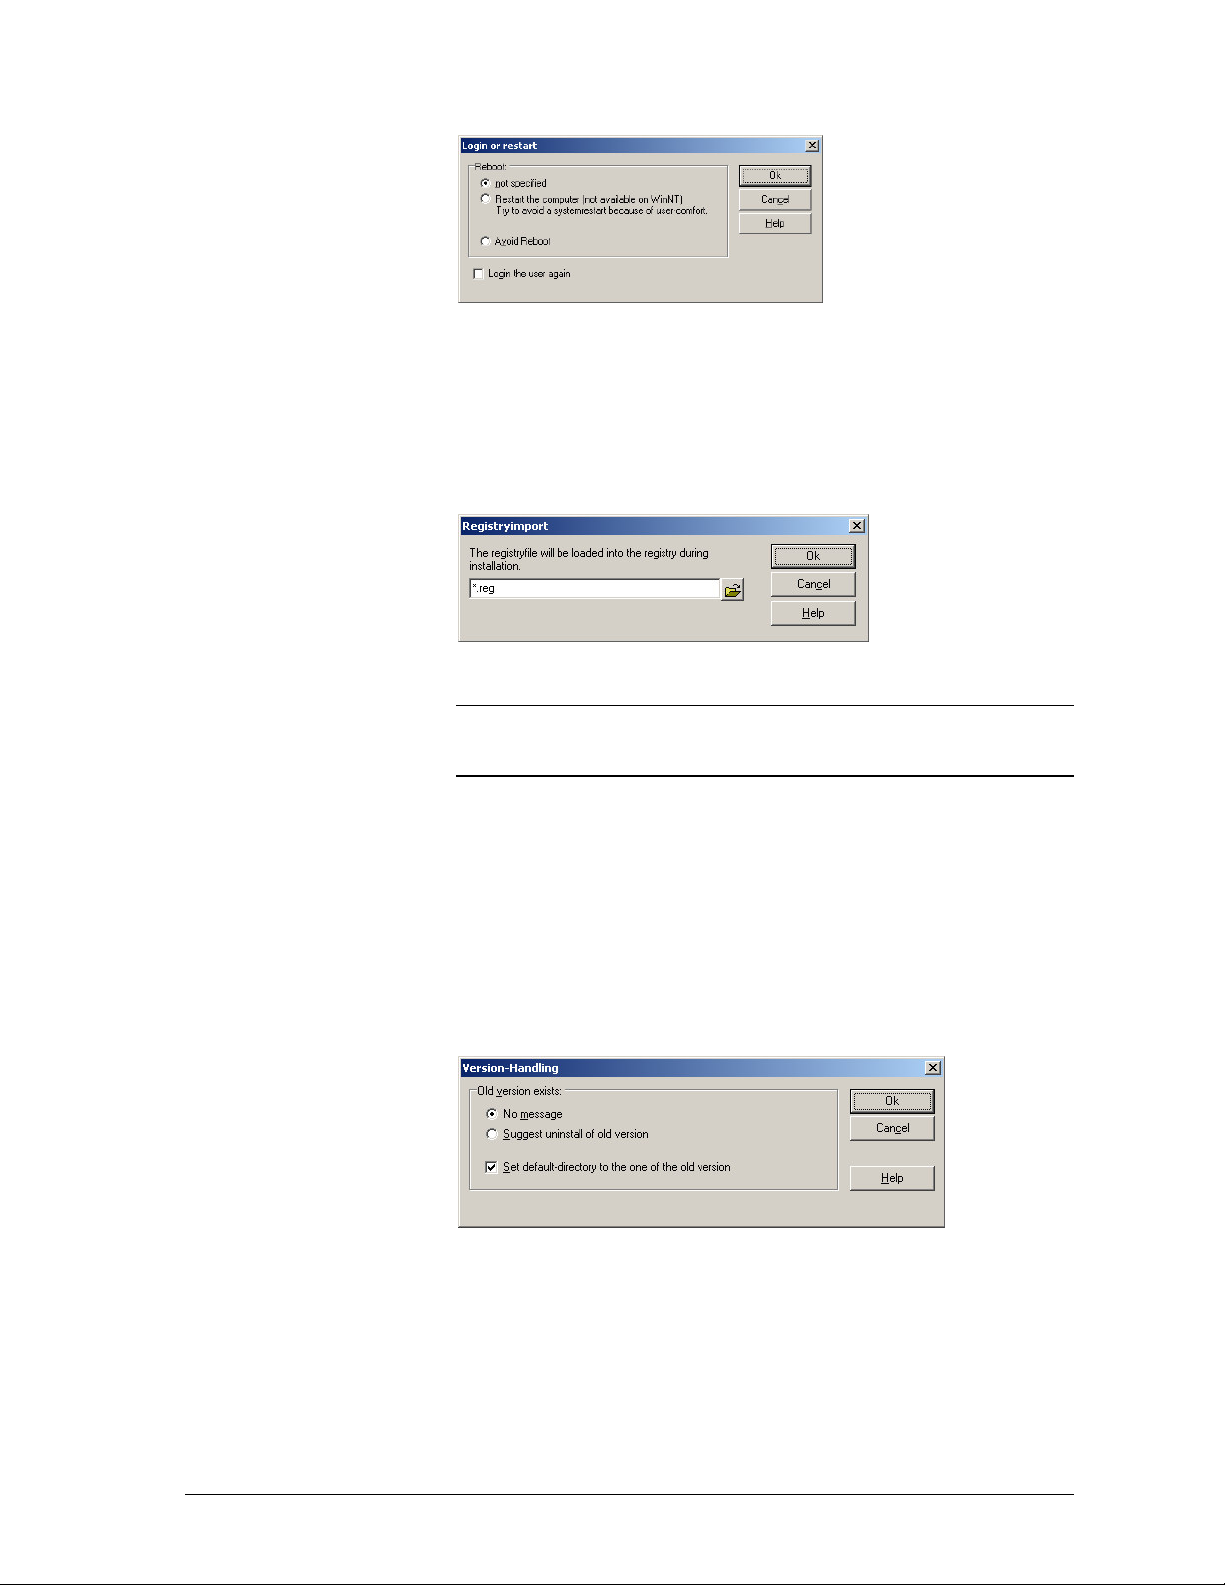
Some installations may require, that the computer is shut down after installation
or that the user is relogged in.
Note:
If the restart is not allowed by the user or the system, a message appears,
which advices the user to restart the system manually.
Select menu Installation - Restart or Reboot.
40
install-us main module install-us Manual
••••
Page 45
Reboot
Just activate the option you need.
Registry file import
Choose a registry import-file, which you have exported from your registry. The
settings of this file will be loaded into the registry during installation.
Registry import
Note:
Entries made by loading this file into the registry cannot be undone by
uninstall automatically. To create entries, which will be undone, you should
specify them in the dialog “
Registry”
.
Version check
If install-us comes across already installed files with the same name and
directory, install-us can act differently. It can overwrite files, if the new file has a
higher version-information, or not install the file.
Install-us uses the internal versioninfo of the files (e.g. exe and DLL files). If
there is no version-information available in the file, install-us can compare the
dates of the files.
Choose menu
Version Handling
Versioncheck allows to
installing the new one.
This function requires, that the name of the software hasen’t changed from
version to version. Specify the name under section “5. System Configuration” -
Versioncheck - Software.
Installation - Versioncheck
suggest the uninstall of an old version
.
before
install-us Manual install-us main module
41
••••
Page 46
File settings
File settings
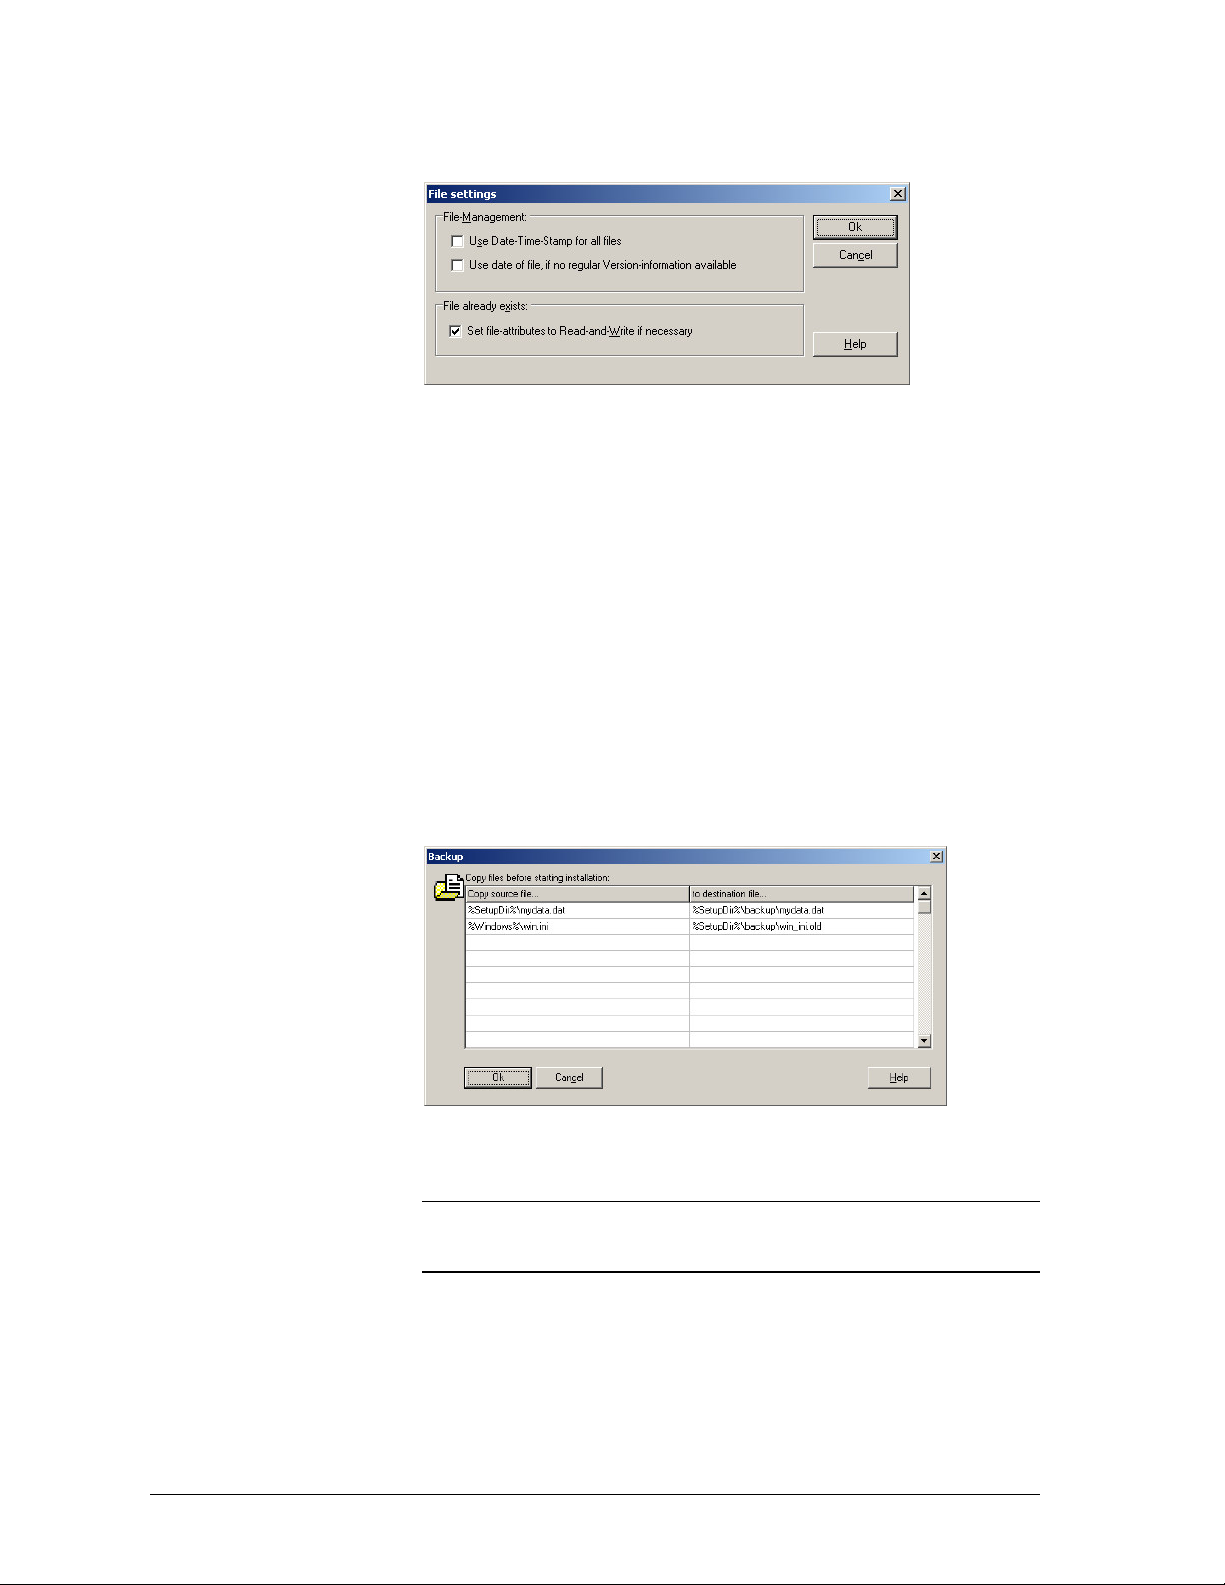
In the dialog
what to do, when it should overwrite an existing file: If both files (the new and
the existing one) don’t have a version information, install-us can
of file
stay after the installation. Otherwise install-us will overwrite the existing file.
If the checkbox
checked install-us will replace existing files even if the existing file is write
protected. I fyou do not want install-us to overwrite protected files, you must
uncheck this option.
File settings
information of the files. The file with the latest date-time information will
Set file-attributes to Read-and-Write if necessary
(“5. System Configuration“) you can tell install-us,
use the date
is
Backup
This feature makes it easy to copy files before the installation process. You can
choose constant or variable path as source- and destination directory.
Go to section “5 - System Configuration”:
Backup
Specify the
Note:
there is no error message and install-us will proceed with the other installation
steps.
42
install-us main module install-us Manual
••••
source-
When the file does not exist or it cannot be copied because of full disk,
destination
and
filenames In the dialog “Backup”.
Page 47
Include files
Include
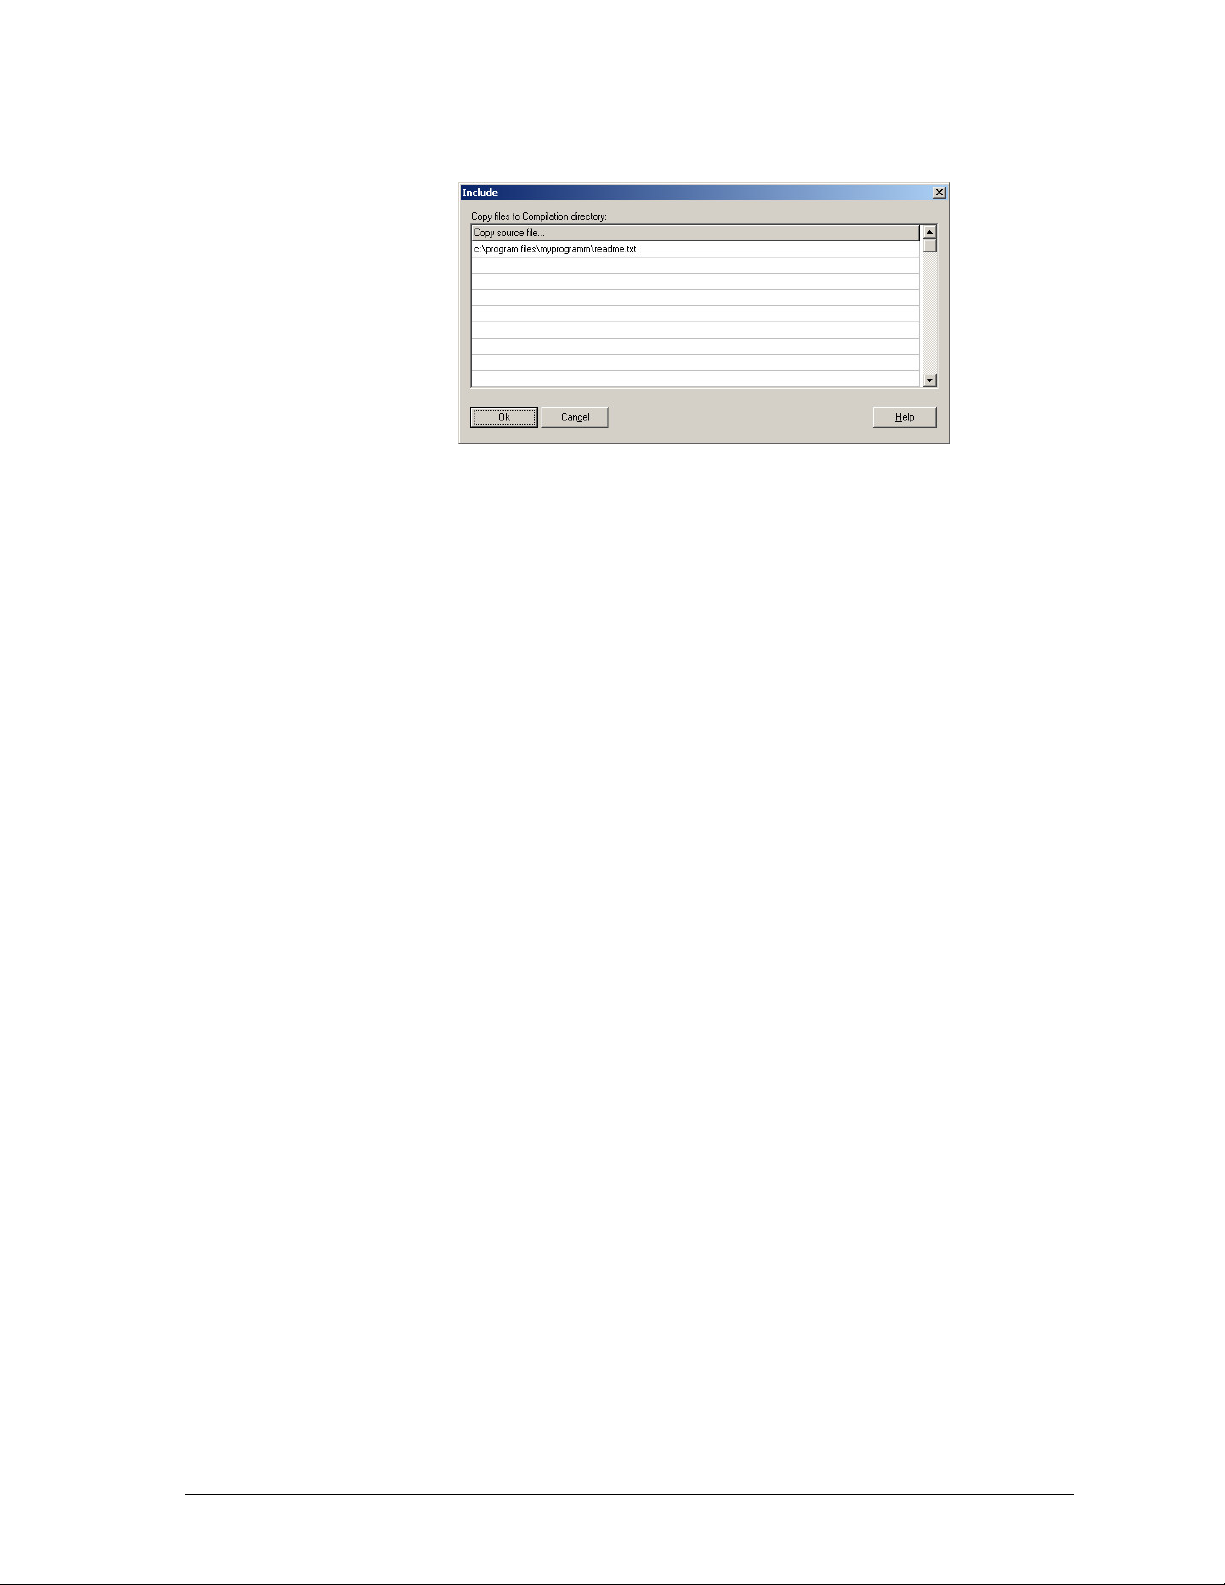
This feature includes files into the compilation directory.
As you probably may have noticed, install-us always deletes the files in the
compilation directory before creating the installtion files. Therefore you can
copy some files, which you define in this dialog, into this directory every time
an installation set was compiled.
Select menu Installation - Include uncompressed files to go to this dialog.
Specify the names of files to be copied to the compilation directory after every
single compilation. Make sure to specify the total path. Variables are not
allowed.
install-us Manual install-us main module
43
••••
Page 48
Building installation
Compile project
You can build the installation you are currently working on at every time. Just
click at “6. Building installation”.
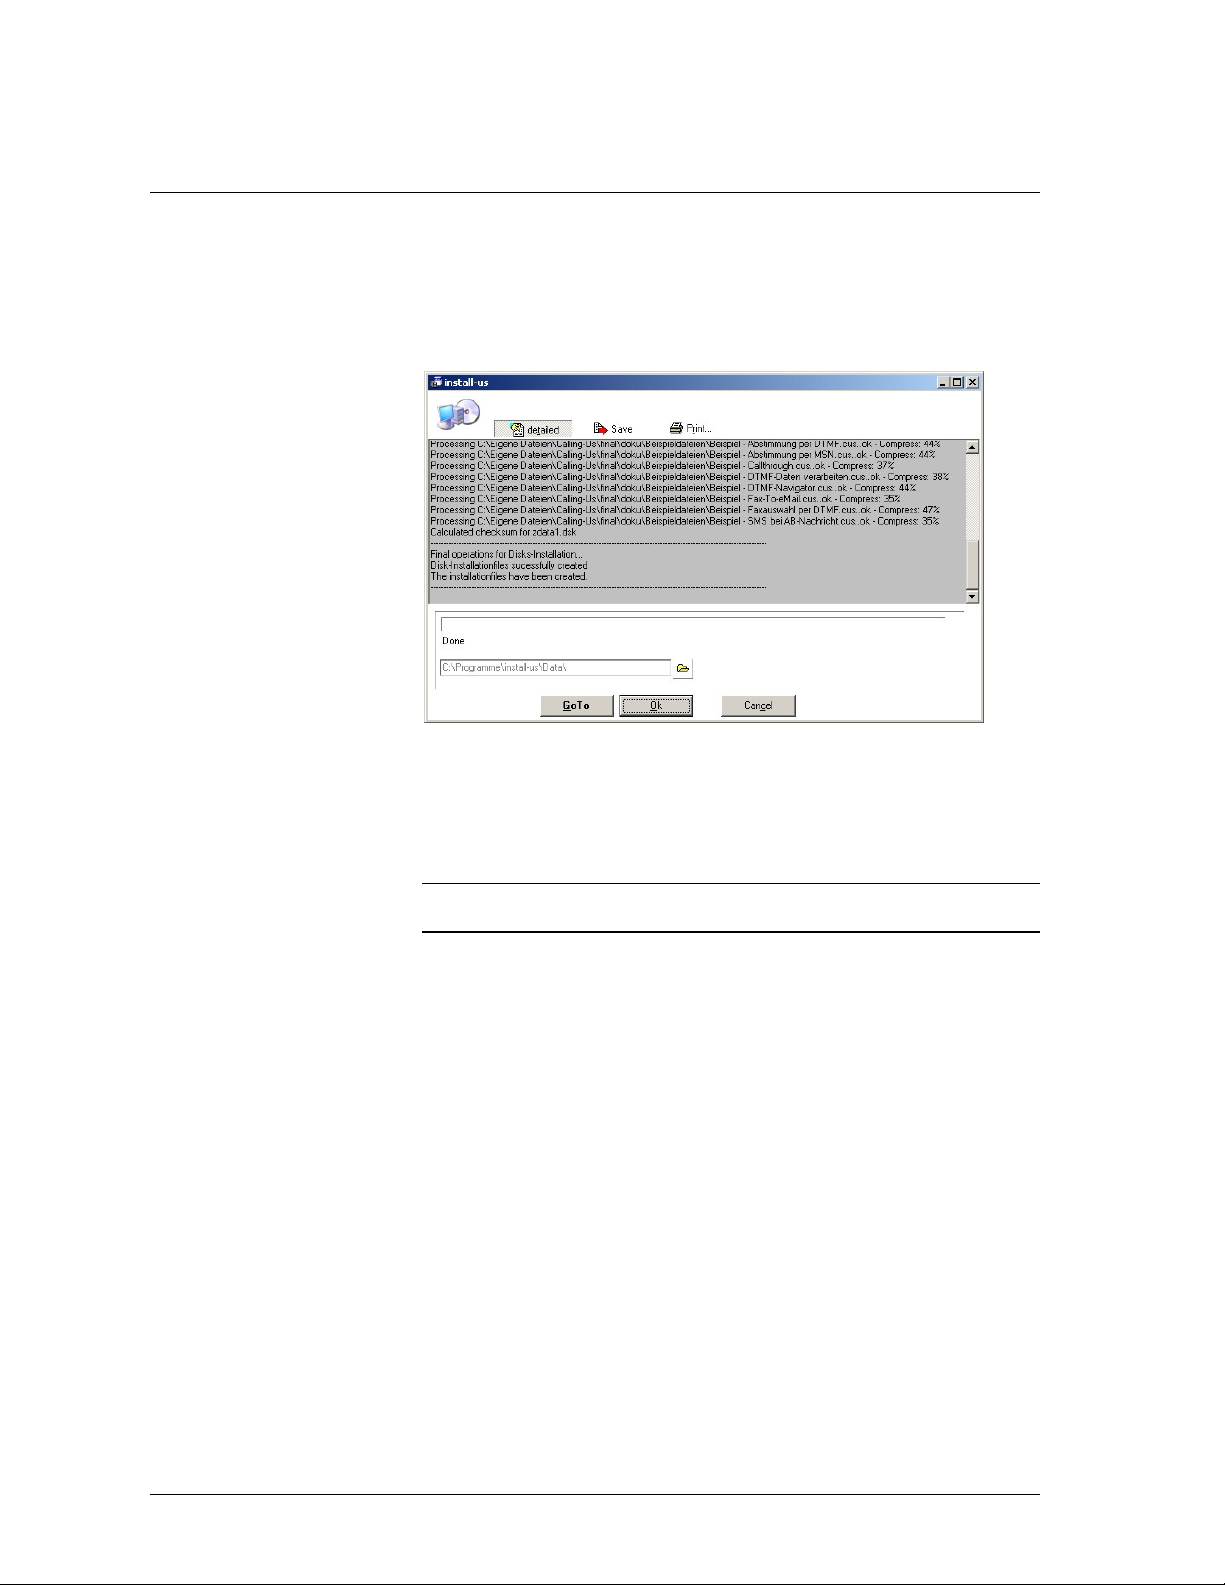
Compiling the installation
Click onto the button
progress of the compilation work is displayed in a progress bar. After finishing
install-us starts the Explorer (this is, what GoTo means). You can then execute
the file setup.exe.
Remark: To guarantee an error-free installation, you should test the installation
on more systems before distributing your software finally.
To see all details, which can be shown during the creation of the files, click at
“>”. You can even save or print this report for future documentation.
GoTo
. Install-us starts creating the installation files. The
Command line usage
To include the creating of installation files into an automatic installation building
process install-us offers commandline run. You can create installations
automatically on the bais of an install-us project file.
Use these options for command line in the dos box or a batch file:
ius.exe /silent <project file> <destination directory> <optional: /cd or /internet>
Examples:
ius.exe /silent "C:\Projects\projekt.ius" C:\temp
ius.exe /silent "C:\Projects\projekt.ius" C:\temp /internet
44
install-us main module install-us Manual
••••
Page 49
Copy files to disk
All installationfiles, which are necessary to install your software at the user’s
system, are created in one diretory on your harddrive. With
disk(s)
Specify the name of the directory, in which the files have been created, in the
text-field at the top. This directory is the same as mentioned in the dialog
“Create”. Then just simply choose the floppy-drive with the right size.
Click at
Note:
you get the final disks for distribution very simple:
Start
to copy the files to the disks.
All files on the disks will be deleted before copying starts.
Copy files to
install-us Manual install-us main module
45
••••
Page 50
Test installation
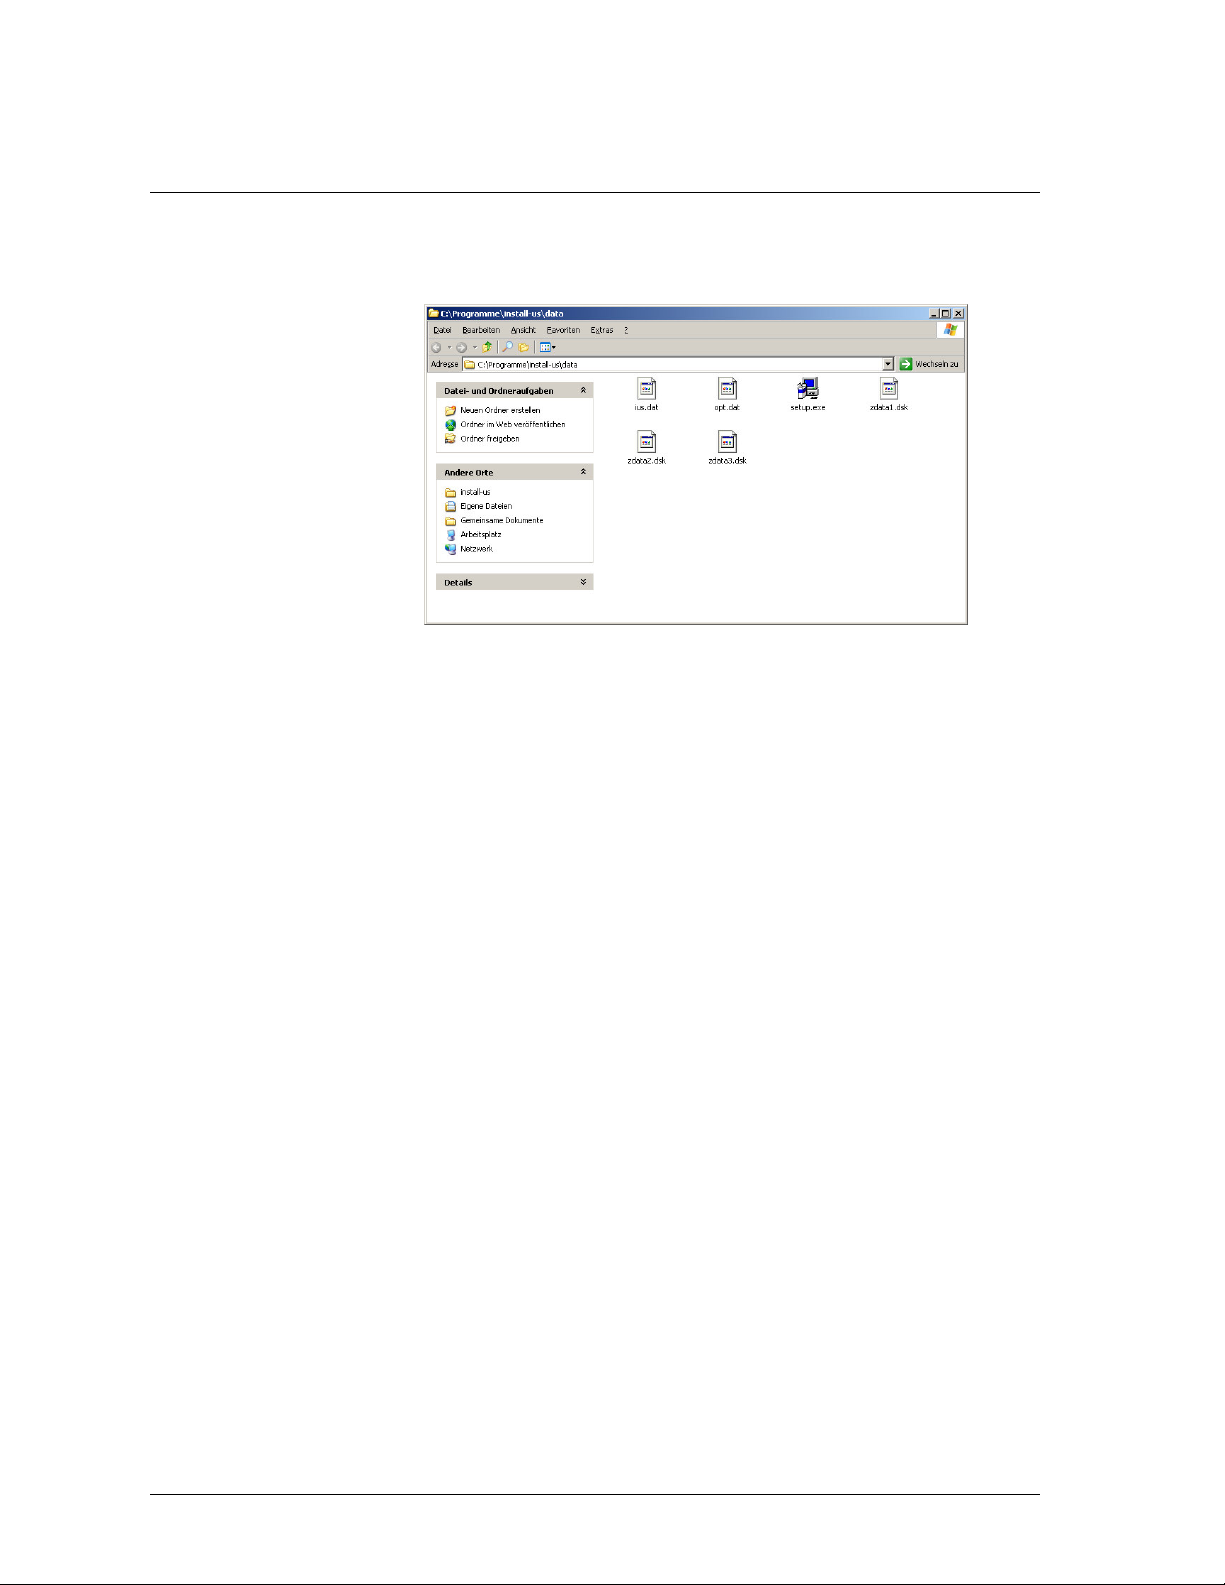
You can start the installation in the Windows Explorer. By default the file
setup.exe is created:
Result
46
install-us main module install-us Manual
••••
Page 51
Uninstall
Install-us supports Uninstall of software, which was installed with install-us
before. On Windows 95/98/ME, Windows NT 4.0, Windows 2000 Professional
and Windows XP and Windows Vista uninstall is accessible via Contol Panel
(item “Software”) or via an program group-entry.
You can switch of uninstall-support by deselecting
group and Uninstall via Control Panel in section “5. System
Configuration”.
Uninstall includes:
1. Deleting all files in the main-directory, which have been created during the
last installation. If the user or the system has put some files into this directory,
these files are not deleted.
2. All directories are removed, if there are no files in them, which were created
by the user or the system.
3. The registry-entries are removed. Important: Entries made by a importfile
cannot be removed!
4. Removing program groupentries and group if empty
5. Removing the uninstall-files
Uninstall does not support:
Entries made in ini- or textfiles cannot be made undone.
Uninstall via program
install-us Manual install-us main module
47
••••
Page 52
Protecting your installation
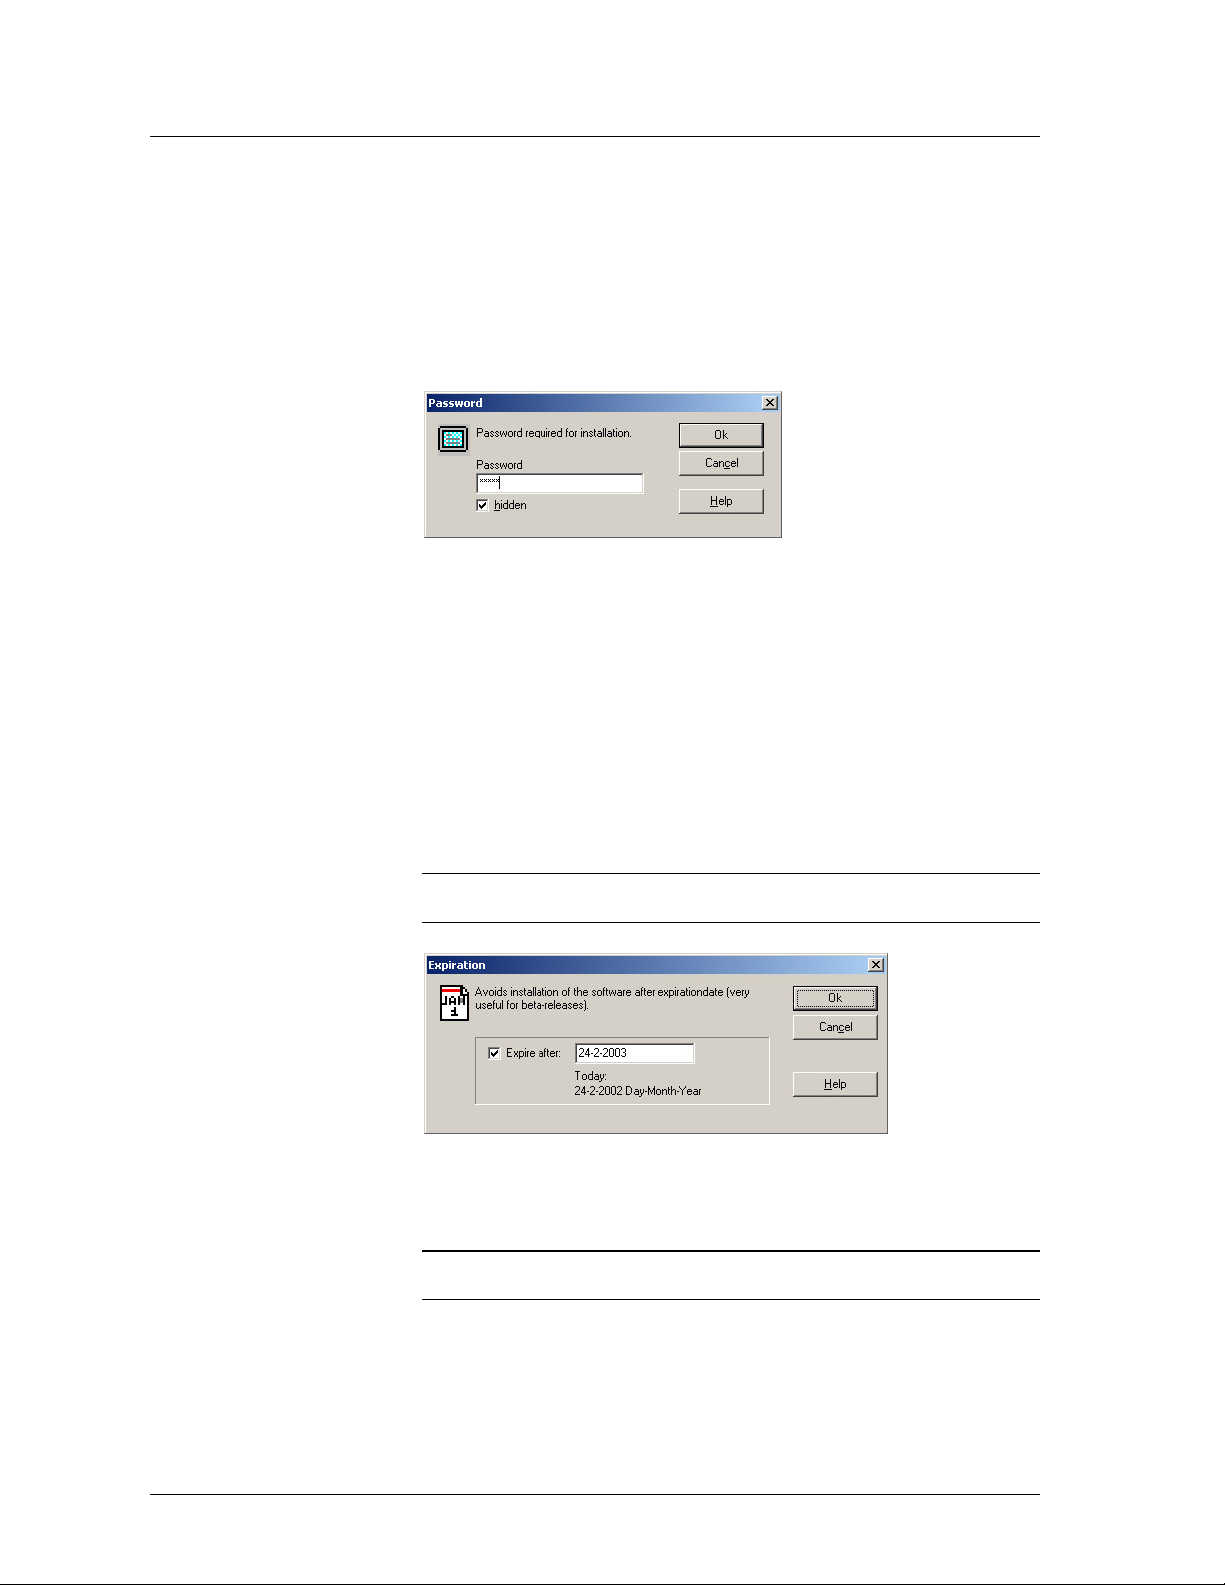
You can protect your software from being installed by unauthorized persons by
using these methods:
Password protection
The user must know the correct password to be able to start installation. Without
knowing the password the user cannot proceed with the installation after starting.
The password is case-sensitive.
Password
Just type in a
The password is case-sensitive.
Deactivate the checkbox
has no influence to the final installation.
password
of your choice.
hidden
to be able to read the password. This setting
Expiration
You can disable installations after a specific date. Choose menu
Expiration
Note:
user’s system.
Expiration
.
This function only runs correctly, if the date is set correct on the end-
Installation -
Activate the checkbox
installation should have expired.
Note: This function only runs correctly, if the date is set correct on the enduser’s system.
48
install-us main module install-us Manual
••••
Expire after
. Specify the date, after which the
Page 53
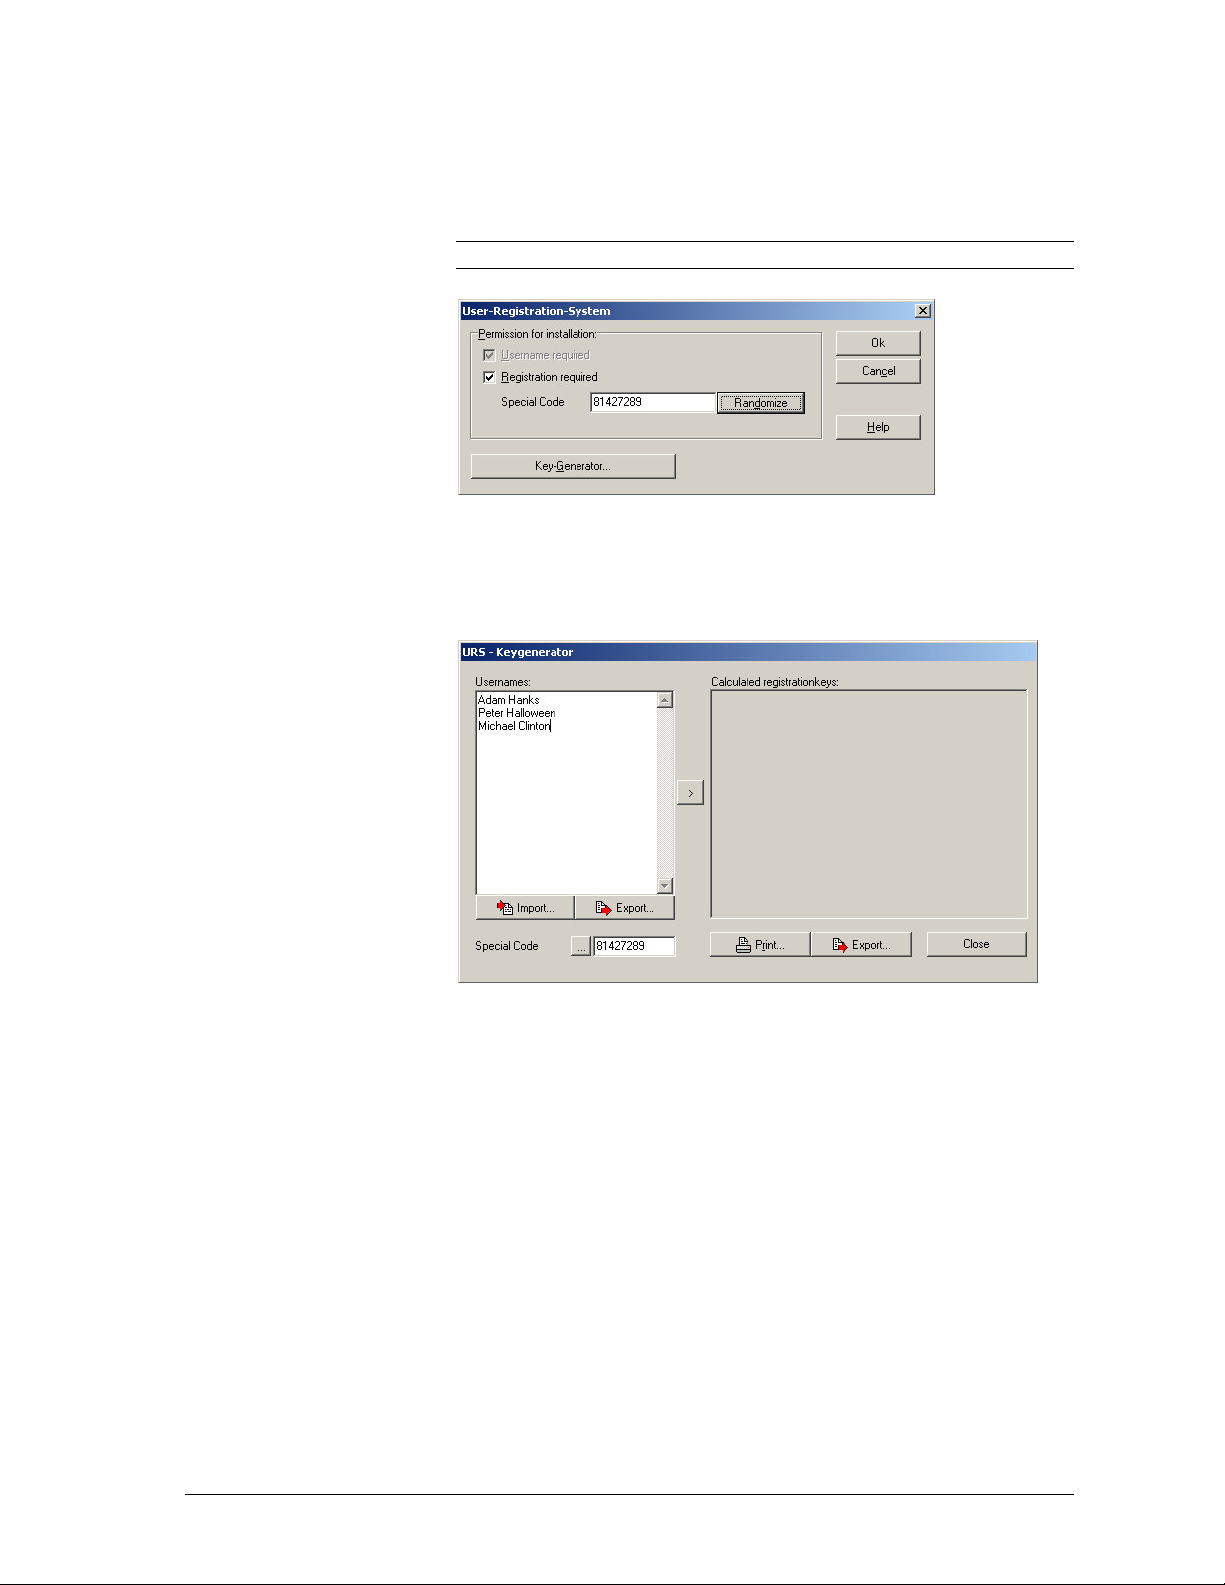
User-Registration-System (URS)
The user has to identify himself through his username and a valid registrationnumber. Press key F7 and choose item
Note:
The safety of these functions cannot be guaranteed.
URS
URS
.
Activate the checkbox
the field
Special Code
Click onto the button
URS-Keygenerator
Specify the
usernames
Registration required
. Specify a random number in
.
Key-Generator
to create the keys for your customers.
in the listbox. Confirm every name through pressing
Enter.
The calculation of the registration-keys starts clicking the >-button.
install-us Manual install-us main module
49
••••
Page 54
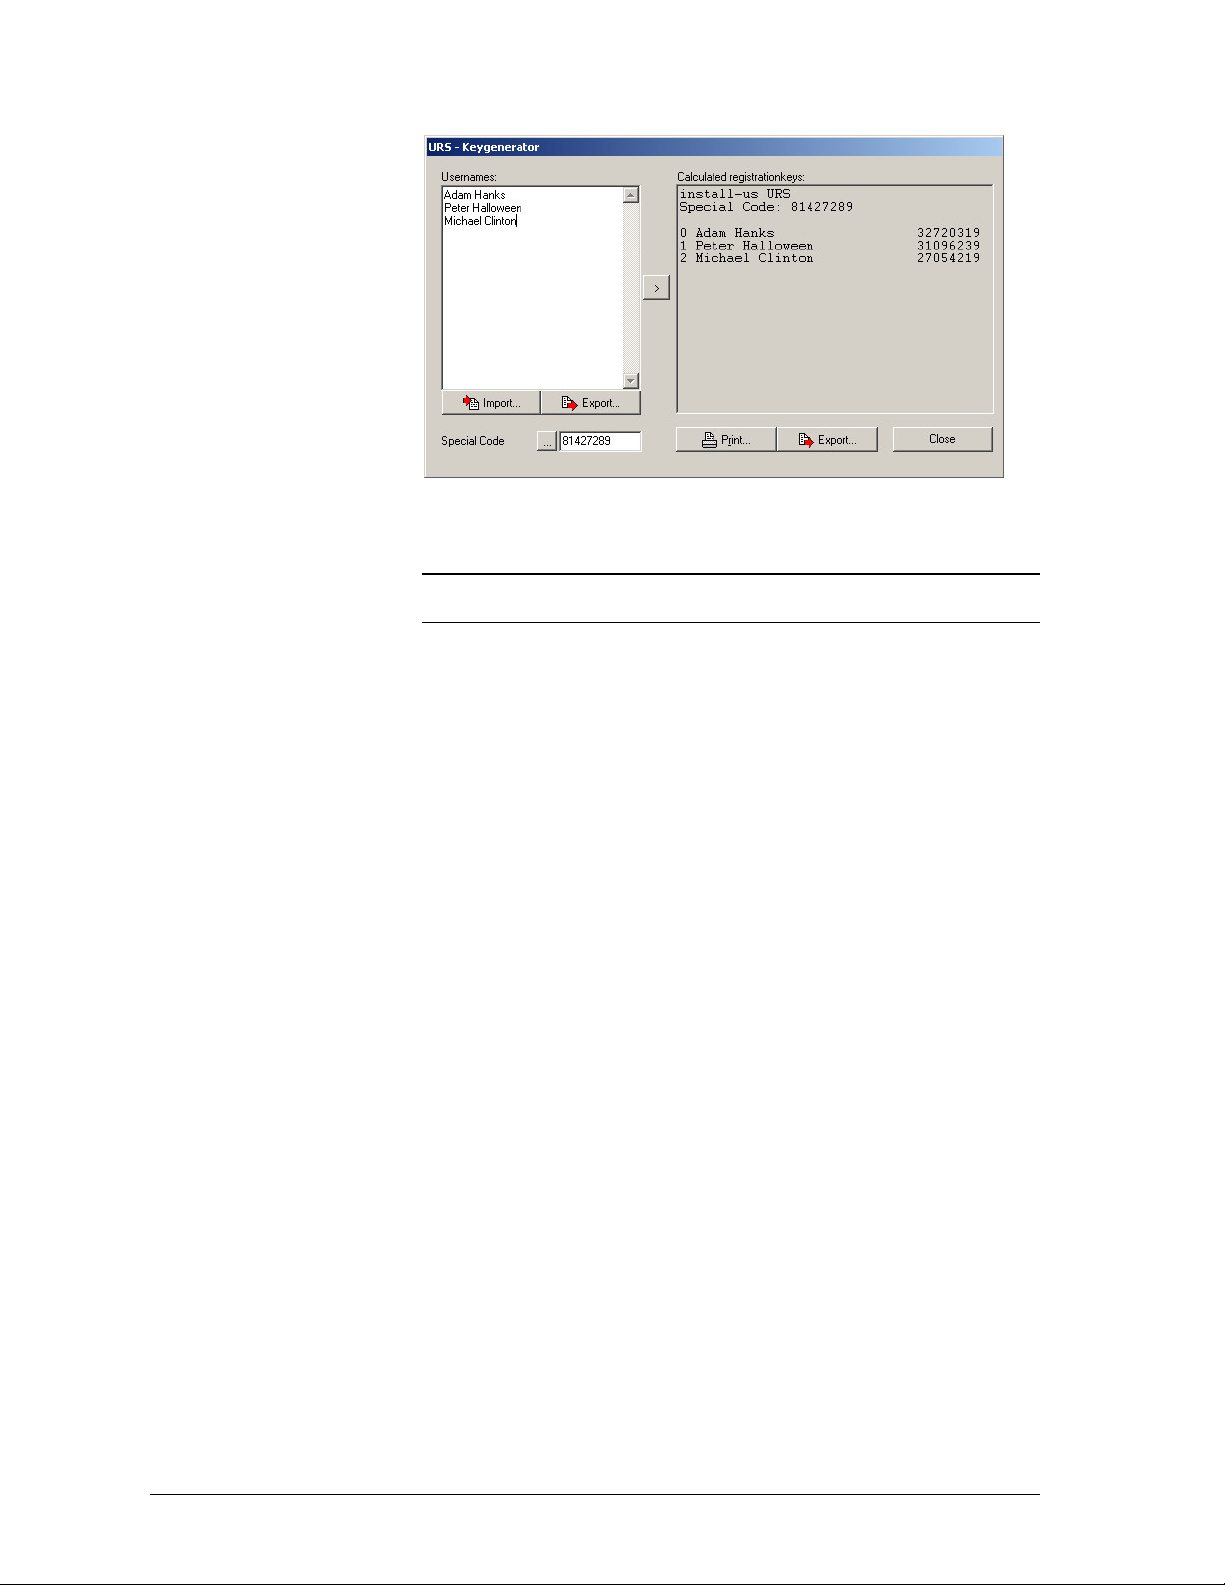
URS-Keygenerator
Notes:
The special-code must be the same as the one specified in the field
mentioned above. The usernames must have at least eight characters!
50
install-us main module install-us Manual
••••
Page 55
Notes about Special-Copy-CD
If all files, which have to be installed on the user’s system, are already present on
the CD-Rom in unpacked form, it is of course not logical to create an
installation, so that all files are present on the CD-Rom for a second time in
compressed form.
Why could the uncompressed files be necessary to be present on a CD-Rom?
Because some software applications can run from CD directly. This makes
sense, if the user does not have enough space available on his harddrives.
As a consequence install-us offers a special feature, which enables you to make
an installation, which uses the uncompressed files on a CD-Rom for installation.
They will just be copied to the specific directories on the harddrive after version
check,...
Preparation:
The files should all be stored in one directory (which can have multible
subdirectories). It is also possible to include the files, if they are already on the
CD-Rom.
Example:
The following three files are all stored on drive C: with the common directory
“\cd-files”:
C:\cd-files\Program.exe
C:\cd-files\Texts\Information.txt
C:\cd-files\Texts\Information2.txt
On the final CD-Rom these files are located in the directory CD:\install
Example (CD symbolizes the CD-Rom drive):
CD:\install\Program.exe
CD:\install\Texts\Information.txt
CD:\install\Texts\Information2.txt
Next steps to complete CD settings:
Start install-us and go to section “1 – General Settings”. Choose
Copy-CD as medium for installation and go to the Settings dialog. The dialog
with the CD directories to set appears.
Referring to our example we specify the directory during compilation time like
this: “C:\cd-files”, while the directory during installation time has to be set to
“\install”. Exit the dialog with Ok.
Goto section “2 - Filesource” in the assistant. Doubleclick on the directory
“C:\cd-files” and click on the take directory button, which is symbolized by a
directory structure. The files and directories will be taken in the project.
Create the installation.
If you have chosen detailed in the Create dialog, the install-us compiler
generates a list, where you can see the paths of every single file, where the
setup.exe will be searching for the files.
Special-
install-us Manual install-us main module
51
••••
Page 56

In our example the list should look similar to this list:
Processing C:\cd-files\Program.exe
...ok Root:\install\Program.exe
Processing C:\cd-files\Texts\Information.txt
...ok Root:\install\Texts\Information.txt
Processing C:\cd-files\Texts\important2.txt
...ok Root:\install\Texts\information2.txt
Note:
“Root:” represents the letter of the CD-Rom drive, which will be
available on the user’s system.
Now you can create the CD-Rom with the installation files. Make sure to copy
the files to the directories specified in the “Settings”-dialog!
52
install-us main module install-us Manual
••••
Page 57
CD-Manager
Introduction
The install-us CD-Manager offers a simple method of creating Autorun-CDs
with a special menu. The user can decide what to do after inserting the CD. He
can install the application, you included onto the CD, or he can open special
documents provided with the CD-ROM.
The CD-Manager enables you to list all available installations/ applications on a
CD-Rom in one single list. In this list the user can inform himself about the
single options and run the installation/ application directly.
Usage
Go to menu
from the install-us Program folder. The Wizard interface leads you though the
configuration very easily.
install-us Manual CD-Manager
Tools
and select
CD-Manager
or start the CD-Manager directly
53
••••
Page 58
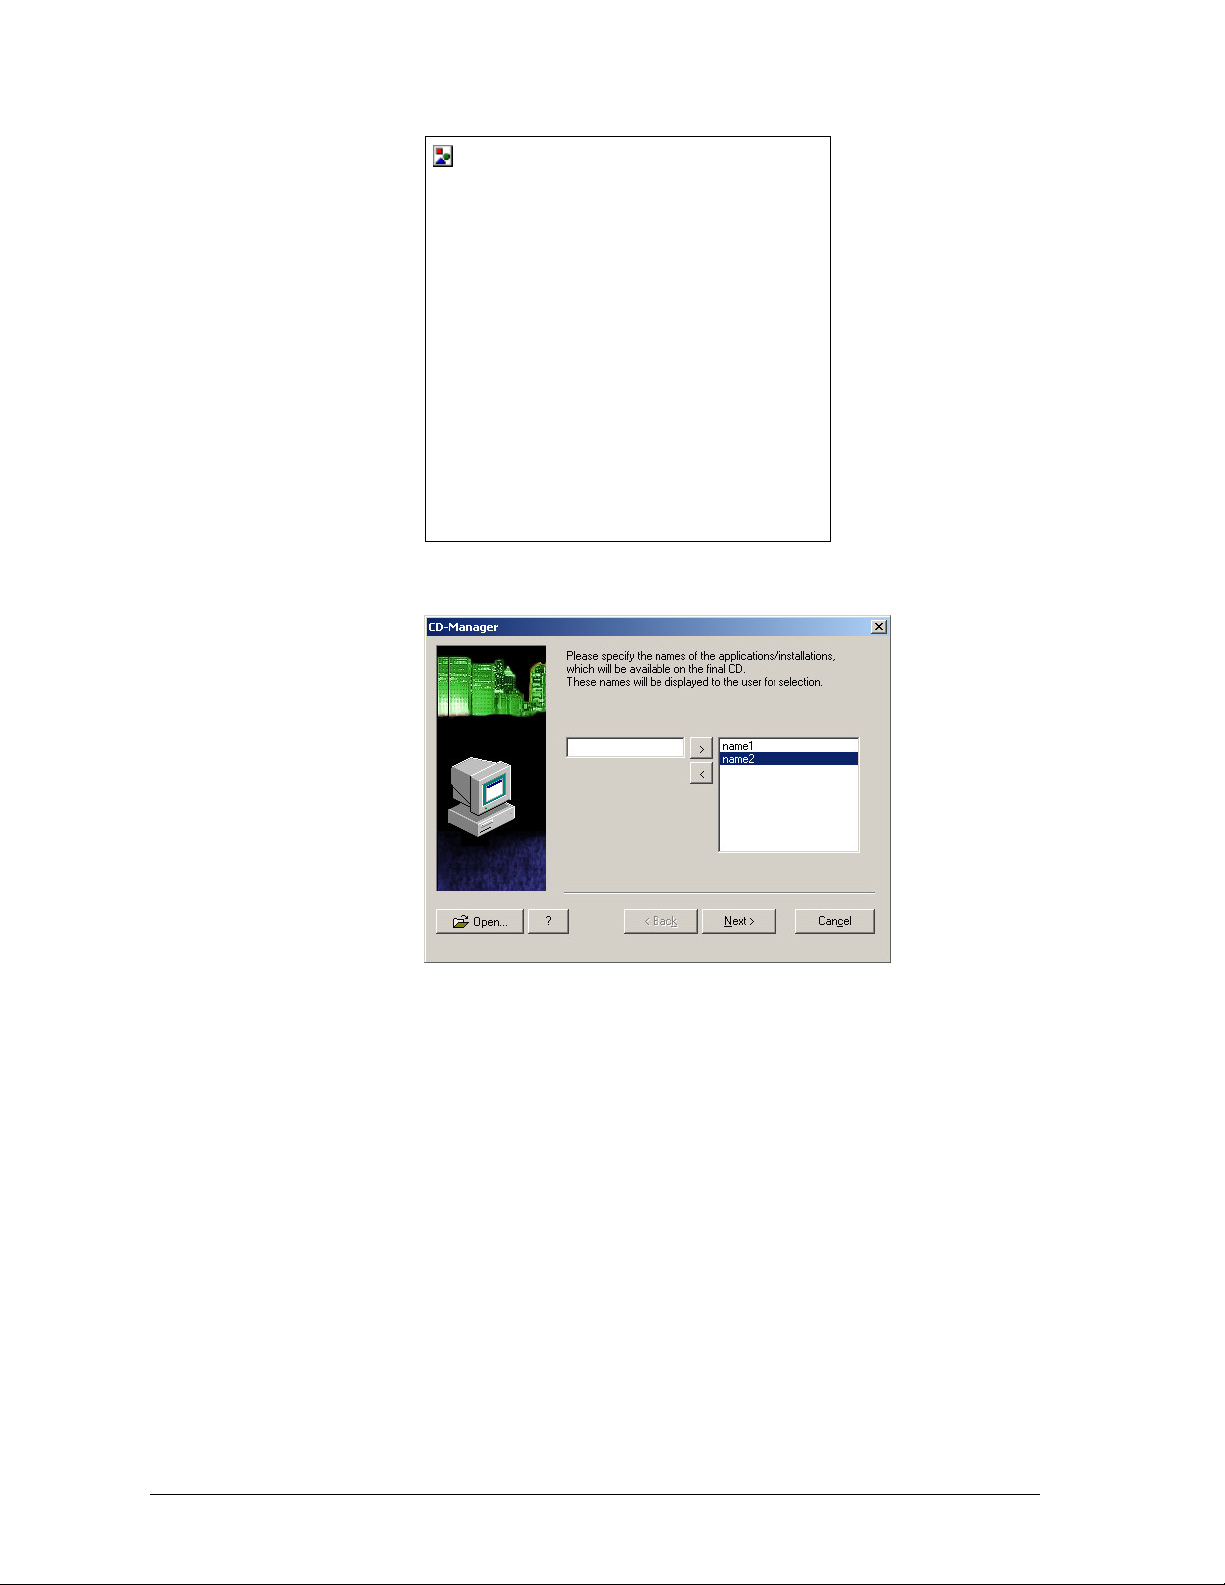
In the first screen of CD-Manager you have to specify the names of all
applications, which you want to be startable from the final CD-Manager:
CD-Manager
Confirm every single name by clicking >. The names will appear in the right
listbox. To remove a single item again, click at <.
Go to the next screen by clicking onto the button
Next
.
54
CD-Manager install-us Manual
••••
Page 59
CD-Manager
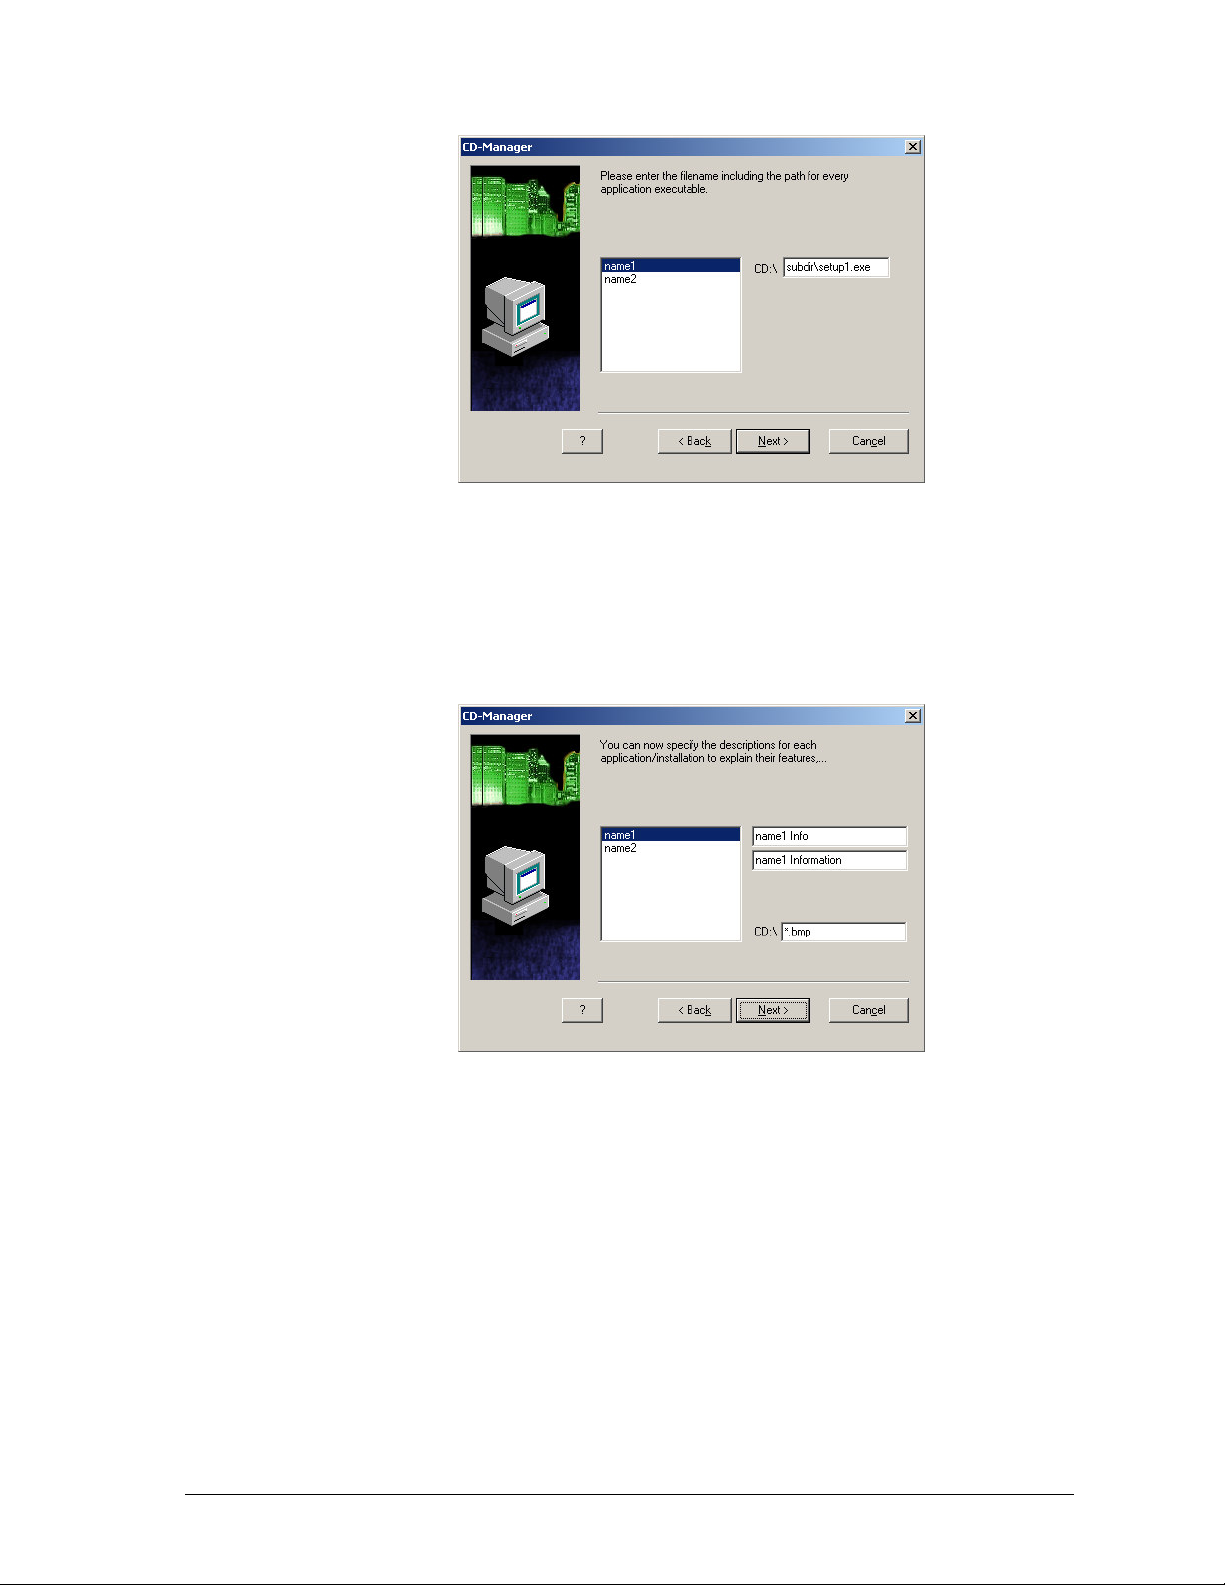
Select the first entry in the listbox on the left. Then you have to specify, where
CD-Manager can find the executable. Example: If the exe-file is located in
D:\install\setup.exe on your CD-drive you have to put in "install\setup.exe". The
final CD-Manager will automatically add the appropriate drive letter.
Go through the list and enter the appropriate paths for all other applications.
Go to the next screen by clicking onto the button
Next
.
CD-Manager
In this screen you have to put some general informations in the fields, which will
be displayed to the user. Select the first entry again and specify the information
texts. The first text (Info) has to be a short description, while the information text
may be longer.
Optionally you can specify a bitmap file, which will be displayed in the layer at
the bottom of the text. You have to specify the path and the filename in the same
way as the filename of the exe-files. Example: "install\setup.bmp"
Go to the next screen by clicking onto the button
install-us Manual CD-Manager
Next
.
55
••••
Page 60
CD-Manager
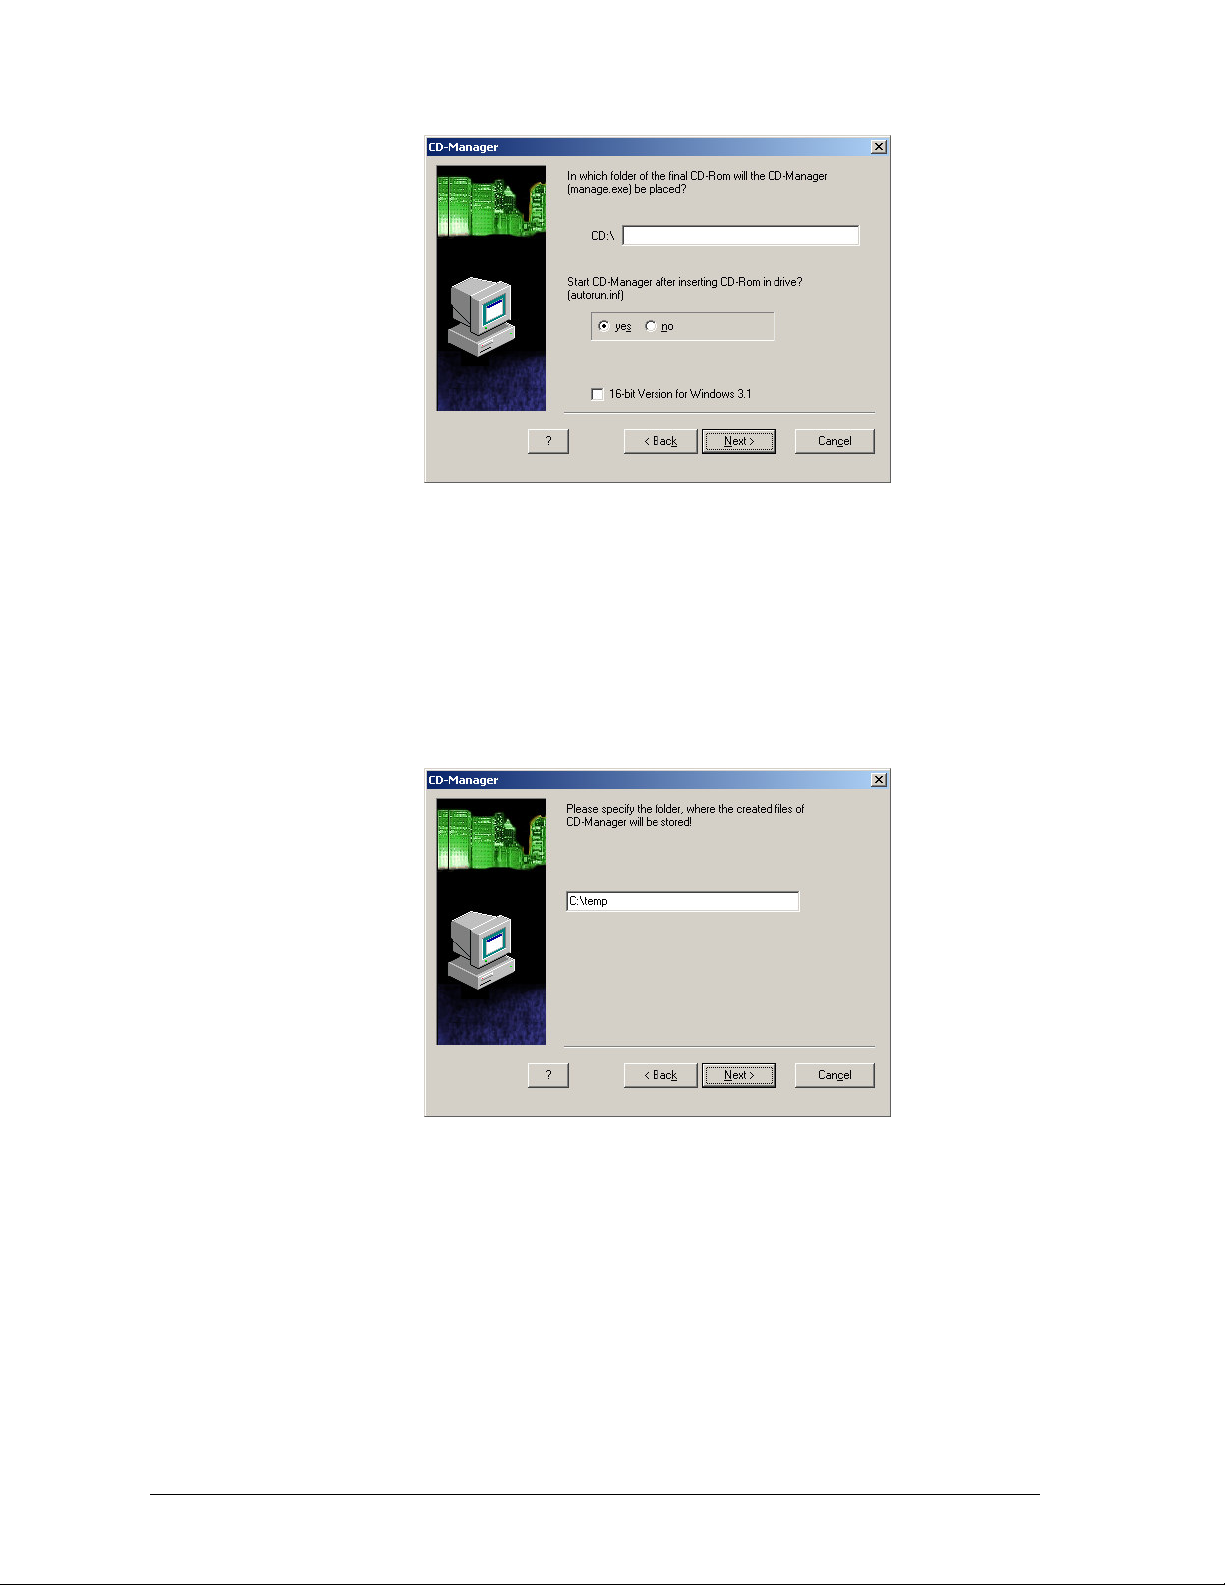
Now you have to specify, where the final CD-Manager (the file manage.exe) will
be located on the CD. This is necessary, because the CD-Manager has to convert
your directory names into relative ones: Example: If you want to place
manage.exe in D:\manage.exe you have to specify the path like this: "" (empty).
If you want to put it in D:\install\manage.exe you have to set it to "install".
In the same screen you can select, whether to create a autorun.inf, which starts
the CD-Manager automatically after inserting the CD-Rom. You have to put this
file in the main directory of the CD.
Additionally you can offer a 16-bit version (manage16.exe).
CD-Manager
In the next screen, you have to set the directory, where CD-Manager Compiler
will create the files. You finally have to copy the created files to the directories
on the CD, which you have specified before.
56
CD-Manager install-us Manual
••••
Page 61
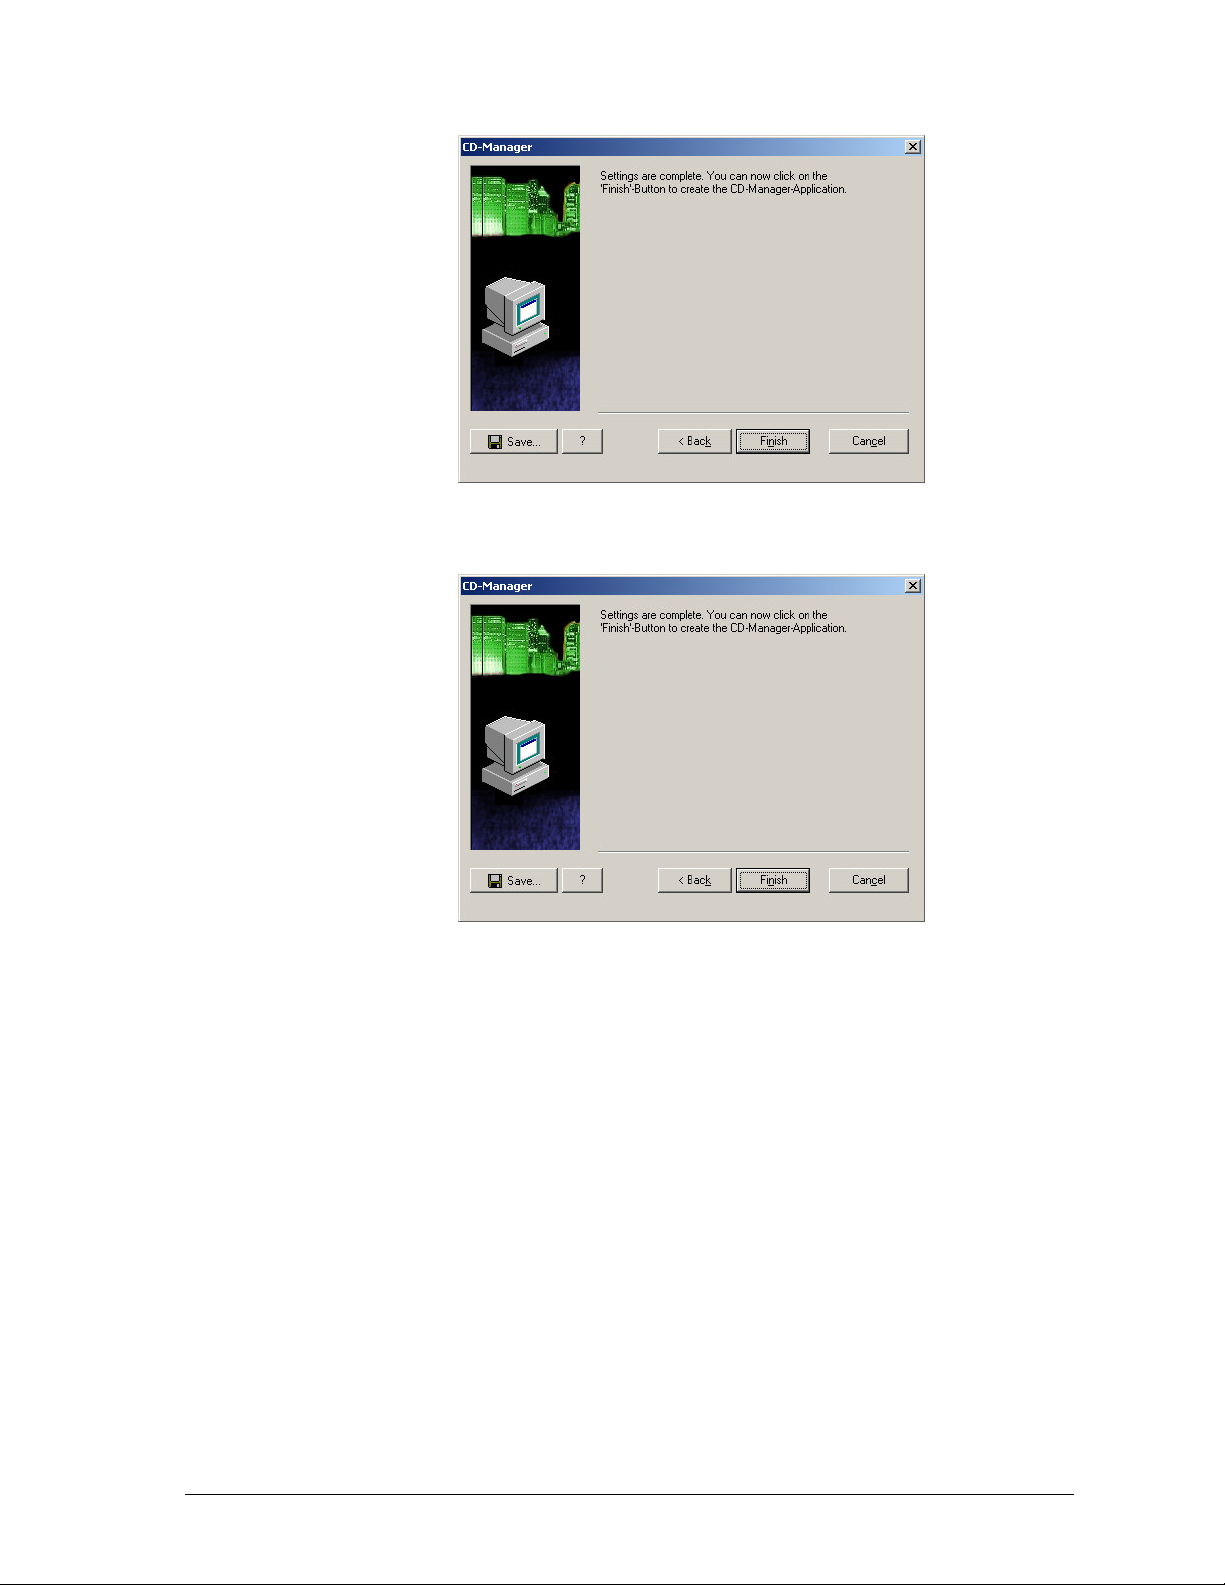
CD-Manager
In the next screen you can modify the user information.
CD-Manager
Finally you have to click at
recommended to save your settings via
Finish
, which will create the files.It is
Save
, that you can modify your settings
later.
install-us Manual CD-Manager
57
••••
Page 62

Creating an Autostart-CD
Windows 95/98/ME, NT 4.0, 2000 Professional and Windows XP allow to start
a program on a CD-Rom after inserting automatically. A special file has to be
copied into the root of this CD, which contains a link to the program on the CD.
You can create this file by using theAutorun-CD feature in install-us. Select
Tools - Autorun-CD
menu
Choose the directory and the filename, which has to be started after inserting.
There is no drive-letter necessary.
Example: Programs\Program.exe
Note:
The created file (autorun.inf) has to be copied in the root directory of the
CD-Rom and the linked programfile to the directory. This option is only
available for CD-Roms.
.
58
CD-Manager install-us Manual
••••
Page 63

E
Exclusive 40
EXE 2, 7, 17, 55
Expiration 3, 48
Index
1
16/32-bit
Auto-Detect 23
A
ActiveX 29
Active-X 2, 26
Additional programgroup entries 28
Adjust Disk-1-Space 21
Audio 21
Autorun-CD 58
avi 3
B
Background 17
Backup 2, 39
Bitmaps 21
bmp 55
browser 22
Building installation 18
F
FAQ 5
Fast-Expand 2
File settings 16
File source 26
Filename-extensions 28
Files and directories 2, 12, 13
G
General Settings 14
H
harddrives 1, 51
hardware 7
HTML 40
I
Include files 43
Include uncompressed files 43
Ini files 2
Ini-file variables 24
Installation media 12, 13
Internet 1, 7, 21
L
Language selection and text modification 32
Licence agreements 3
links 5, 16
C
CD-Manager 2, 12, 53
CD-ROMs 58
CDs 1, 12, 21, 53
color 31
Command line usage 44
Compile project 44
Configurations 3, 7, 14
copy files 1, 19
Copy files to disk 45
Customized 2
M
Media 1, 12, 13
message boxes 35
mid 3
Minimum 2, 6, 21
N
Name of link 16
Navigation 1
O
D
Description 28, 55
Desktop 2, 27
dictionary 2, 11, 30
Directory 2, 6–7, 15, 56
Distribution 1, 11, 19
DVDs 1, 21
install-us Manual Index
One-EXE 22
Options 2, 12, 13, 53
P
Password protection 48
Program Folder 20, 53
59
••••
Page 64

Program start 39
projectfile 18
Protecting your installation 48
R
Readme 18
Reboot 2, 40
Registry 2, 23
Registry file import 41
Registry variables 23
Restart 40
S
Server 22
setup types 2, 12, 13
SetupDir 20
SFX 1
SharedDLL 26
Shared-DLLs 2
Shortcut 28
shortcuts 2, 20
Slideshow 3
Software 1, 6–7, 11, 13
Special-Copy-CD 21
Standard 21
Start 2, 7, 14, 53
System 1, 6–7, 6–7, 11, 13
System Configuration 6, 18
system requirements 6–7, 6–7
system.ini 38
Windows 2000 1, 6, 23
Windows 3.1 1, 6, 23
Windows 95 1, 6, 23, 58
Windows for Workgroups 3.11 1, 6, 23
Windows ME 1
Windows NT4 1
Windows version 23
Windows XP 1, 6, 23, 58
Wizard 3, 17, 53
X
XP 1, 6, 23, 58
T
Test installation 46
Text files 39
Timeout 40
titles 31
Typical 2, 9, 16
U
uncompressed 21
Uninstall 1, 29
URS 3, 49
User interface 2, 17
User-Registrierungs-System 3
V
Variable 15
Variables 2, 15
Version 2, 7, 18, 56
Versioncheck 36
Video 3, 31
W
wav 3
win.ini 38
60
Index install-us Manual
••••
 Loading...