

Page 1
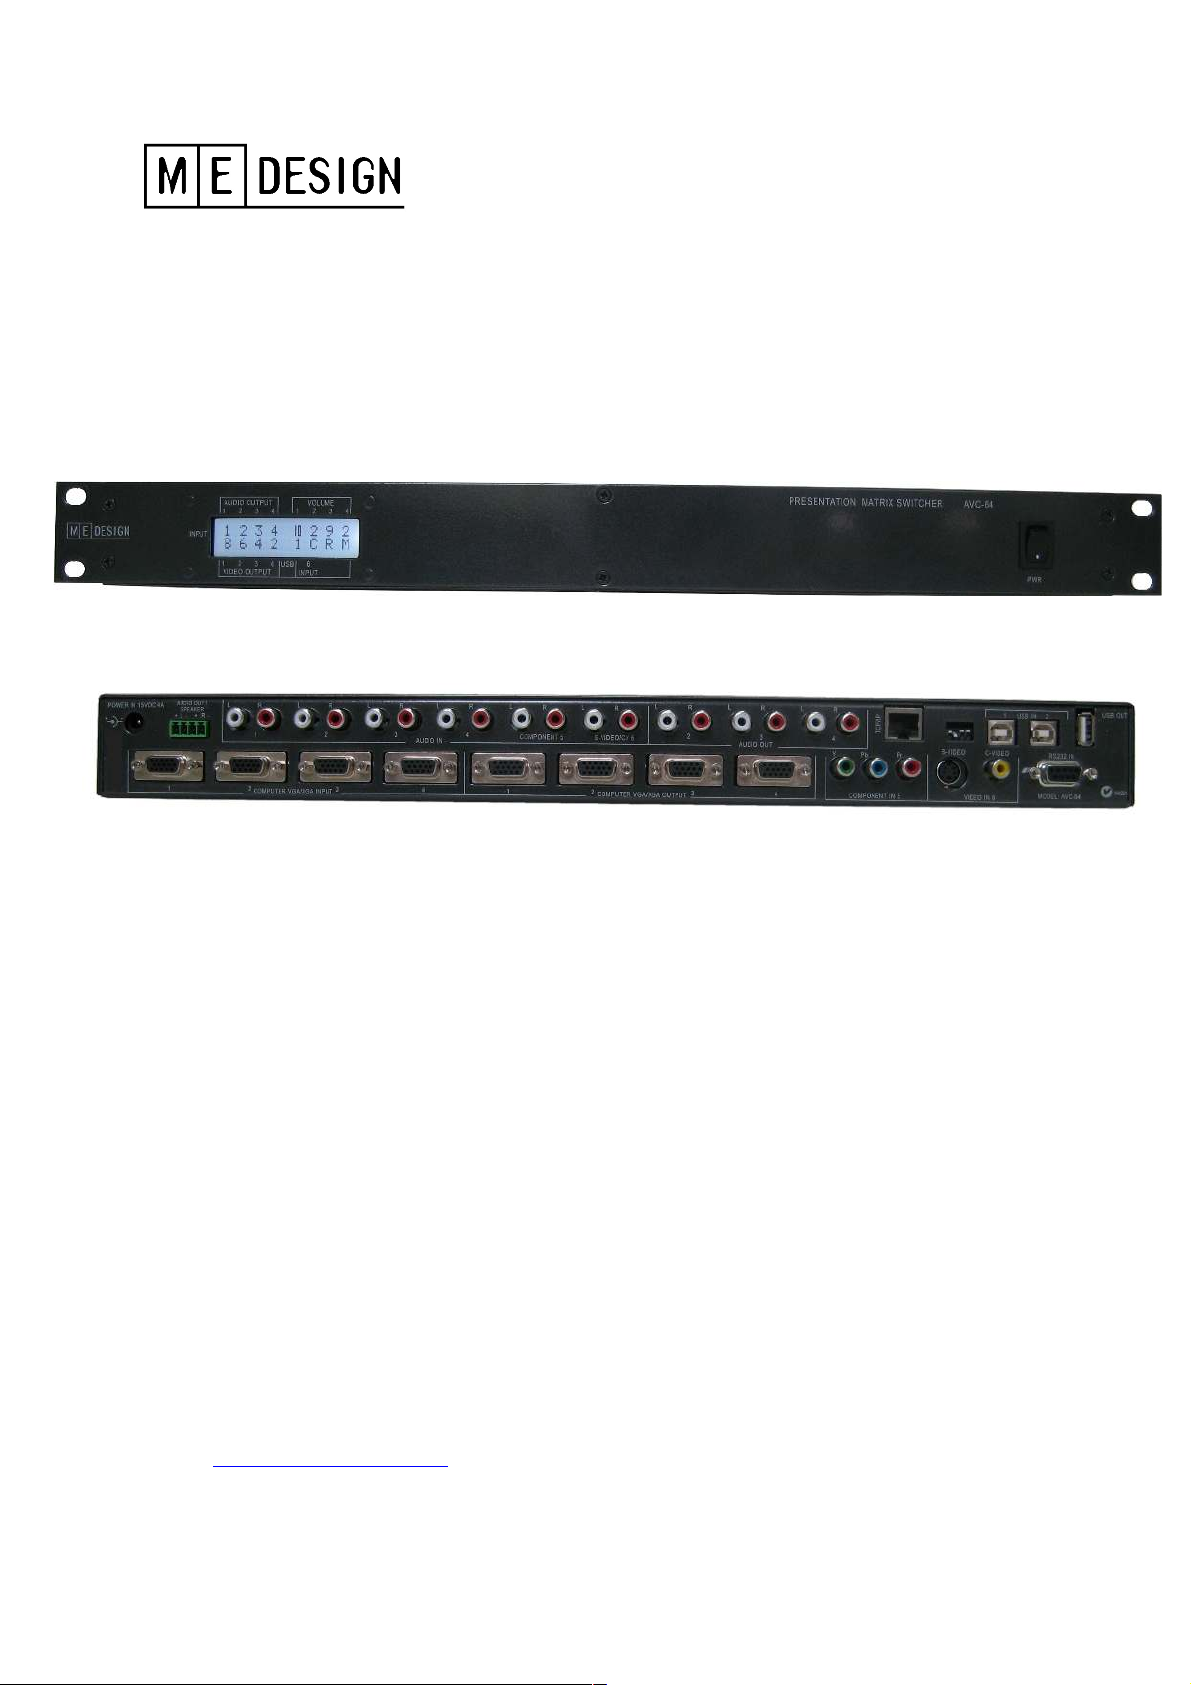
AVC-64
Presentation Matrix Switcher
USER MANUAL
Designed and Manufactured in Australia by M.E. Design (Aust) Pty Ltd
Email: [email protected]
www.medesign.com.au
ABN 19 321 212 948
1
Page 2
M.E. Design (Aust) Pty Ltd
Copyright
© 2011 M.E. Design (Aust). All rights reserved.
Trademarks
All trademarks mentioned in this guide are the properties of their respective owners.
2
TO PREVENT THE RISK OF ELECTRIC SHOCK DO NOT REMOVE COVER (OR BACK). NO
USER SERVICABLE PARTS INSIDE. REFER SERVICING TO QUALIFIED SERVICE PERSONNEL.
Information to User
Alteration or modification carried out without appropriate authorisation may invalidate the
user’s right to operate the equipment.
WARNING
This equipment is not waterproof. To prevent a fire or shock hazard, do not place any
container filled with liquid near this equipment (such as a vase or flower pot) or expose it to
dripping, splashing, rain or moisture.
The exclamation point within an equilateral triangle is intended to alert the user to the
presence of important operating and maintenance instructions in the literature
accompanying the product.
Page 3

M.E. Design (Aust) Pty Ltd
TABLE OF CONTENTS
INTRODUCTION
4
COMPONENT LIST
5
FEATURES
6
FRONT PANEL DESCRIPTION
7
REAR PANEL DESCRIPTION
8
PROTOCOL SET UP AND INSTRUCTION SET
9
TCP/IP COMMUNICATION
11
HEXADECIMAL-DB ATTENUATION CHART
13
BLOCK DIAGRAM
14
TYPICAL CONNECTION DIAGRAM
15
SPECIFICATIONS
16
3
Page 4

M.E. Design (Aust) Pty Ltd
INTRODUCTION
The AVC-64 is a high quality multimedia Presentation Matrix Switcher, incorporating a 6 x 4
video switcher, 6 x 4 stereo audio switcher, 2 x 1 USB switcher and an audio amplifier housed in
a tough and compact 1RU rack mountable metal enclosure. With its unique feature set the AVC-
64 has been specifically designed for the classroom, where an ‘all-in-one box’ might be desired.
An example of a typical set up may include inputs from several computers, as well as composite
and s-video connections from DVD and VHS players, all being routed to several monitors, a
projector and stereo speakers
At the heart of the unit is a 4 x 4 VGA/XGA matrix switcher suitable for switching laptops,
monitor outputs and video devices. However, the AVC-64 offers the ability for an additional
(two-stage selectable) component/composite/s-video input to be routed to any one of the
switchers 4 outputs; effectively making the unit a 6 x 4 matrix switcher with support for a
projector. No need to worry about the input format, as the switcher transcodes the signal to be
projector-friendly. The two-stage selectable control stated above refers to first selecting the input
and then selecting the output format; either component or RGsB (selected via DIP switch – See
page 8 for details). This extra set of inputs is extremely useful for the classroom, as it allows any
industry-standard video projector to be connected to a range of sources, allowing complete
flexibility for the demonstrator.
In addition to the above video switching capabilities offered, the unit also features a 6 x 4 stereo
audio matrix switcher and a 2 x 1 USB switcher that functions independently from the video
switcher. The stereo audio switcher features both line level and speaker level outputs, utilising a
15 Watt stereo speaker amplifier for the latter. Connected via twin RCA for the three line level
outputs, and 4 pin detachable connector for the amplified output (so that it may be connected
straight to a set of front speakers), the AVC-64 unit is very capable at managing your audio
needs. The USB switcher is software selectable and is suitable for classroom whiteboards and
other peripheral devices.
The AVC-64 can be controlled via serial RS-232 connection or via TCP/IP with minimal
configuration. TCP/IP Configuration allows the AVC-64 to be plugged into an existing network,
allowing it to be easily controlled from remote locations. The unit also offers a test pattern
diagnostic function on the s-video/composite video input to aid in installation and
troubleshooting. These functions can be enabled/disabled via DIP switch settings on rear panel.
For precise control of audio, the AVC-64 provides independent audio channel attenuation
adjustment in 0.5dB steps for all audio outputs.
4
Page 5
M.E. Design (Aust) Pty Ltd
COMPONENTS INCLUDED
1 x AVC-64 Switcher
1 x 15VDC 4.0Amp Power supply
1 x Figure 8 Power lead
1 x Support Manual (this document)
5
Use included power supply
only. Power supplies should
only be replaced or repaired
by qualified service
personnel.
Page 6

M.E. Design (Aust) Pty Ltd
FEATURES
3-in-1 switcher with inbuilt audio speaker amplifier: VGA switcher, transcodes composite
and s-video signals to either component video or RGsB video for video projection, and a 2
x 1 USB switcher
Video Inputs and Outputs: 6 x 4 video matrix switcher comprised of 4 VGA (or derivatives
such as SVGA, UXGA, RGBS, RGsB, and RGBHV) inputs and 4 outputs via 15-pin HD
female connectors (VGA/XGA, RGB 50Hz or Component), 1 component video (Y Pb Pr)
input, and 1 S-Video (PAL, NTSC, or SECAM) input/1 Composite video (PAL, NTSC, or
SECAM) input
VGA/XGA Bandwidth: 350Mhz
S-Video and Composite Video Bandwidth: 100Mhz
Main Audio Inputs and Outputs: 6 x 4 audio matrix switcher. 6 stereo audio inputs (RCA),
1 stereo speaker output (RCA) via inbuilt 15W Stereo amp, 3 stereo audio line outputs
(RCA)
Volume control: 4 (independent) channel volume controls; 3 for line audio outputs, 1 for
speaker audio output
USB Inputs and Outputs: 2 x 1 USB switcher with DIP switch selectable AUTO/MANUAL
mode. AUTO mode ensures input 1 is routed to the output by default, however if a signal
is detected on input 2 it will override this and input 2 will be routed to the output instead.
MANUAL mode allows for complete control
Control: software controlled via serial RS232 or TCP/IP (cat5) with a DIP switch selectable
baud rate (9600 / 38400). TCP/IP MAC addressable
Test pattern program available on s-video / composite video inputs, enable / disable via
DIP switch
DIP Switch selectable component Component Y,Pb,Pr or RgsB
Metal enclosure 1RU
6
Page 7
M.E. Design (Aust) Pty Ltd
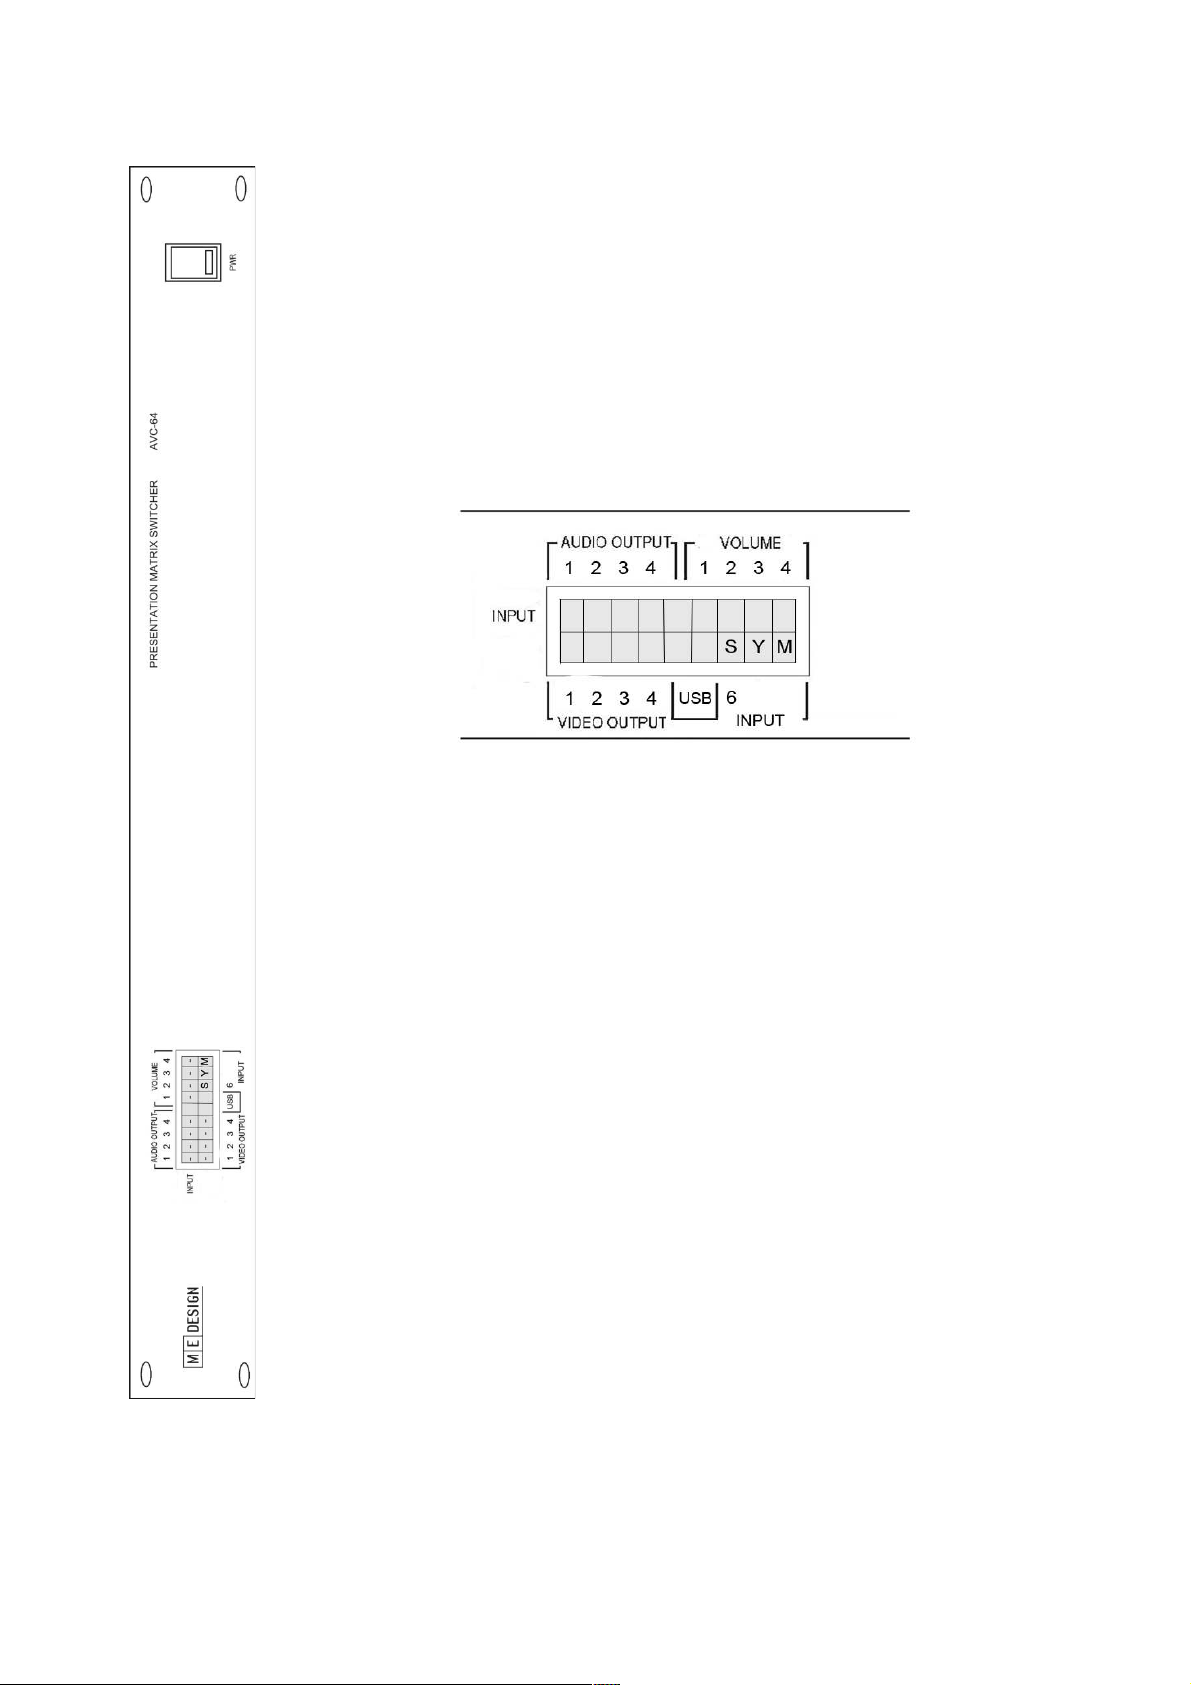
FRONT PANEL
7
PWR
This controls the units power.
POWER ON SEQUENCE
At power on, the DIP Switch settings are loaded into the microprocessor. These
settings, along with the Software version, are displayed momentarily on the
LCD display for confirmation and ease of programming. After this, the standard
display is shown.
DISPLAY
The primary function of the LCD display is to inform the user of which input is
being routed to the listed output channel. It also displays information about
transcoding, input 6 source selection and USB mode. The legend for this is as
follows:
S, C or Y: S-Video, Composite or Component Video currently being transcoded
Y or R: The transcoder is outputting Component or RgsB format
M or A: The USB mode is set to Manual/Auto
‘Video output’ and 'Audio Output' sections displays the number
corresponding to input number (1-6 ) above the video/audio output channel.
‘Volume’ section displays the volume level of all audio outputs (1 - 4), in 0.5dB
steps
‘USB’ displays the input number (1 or 2) currently being routed to the output.
Page 8
M.E. Design (Aust) Pty Ltd
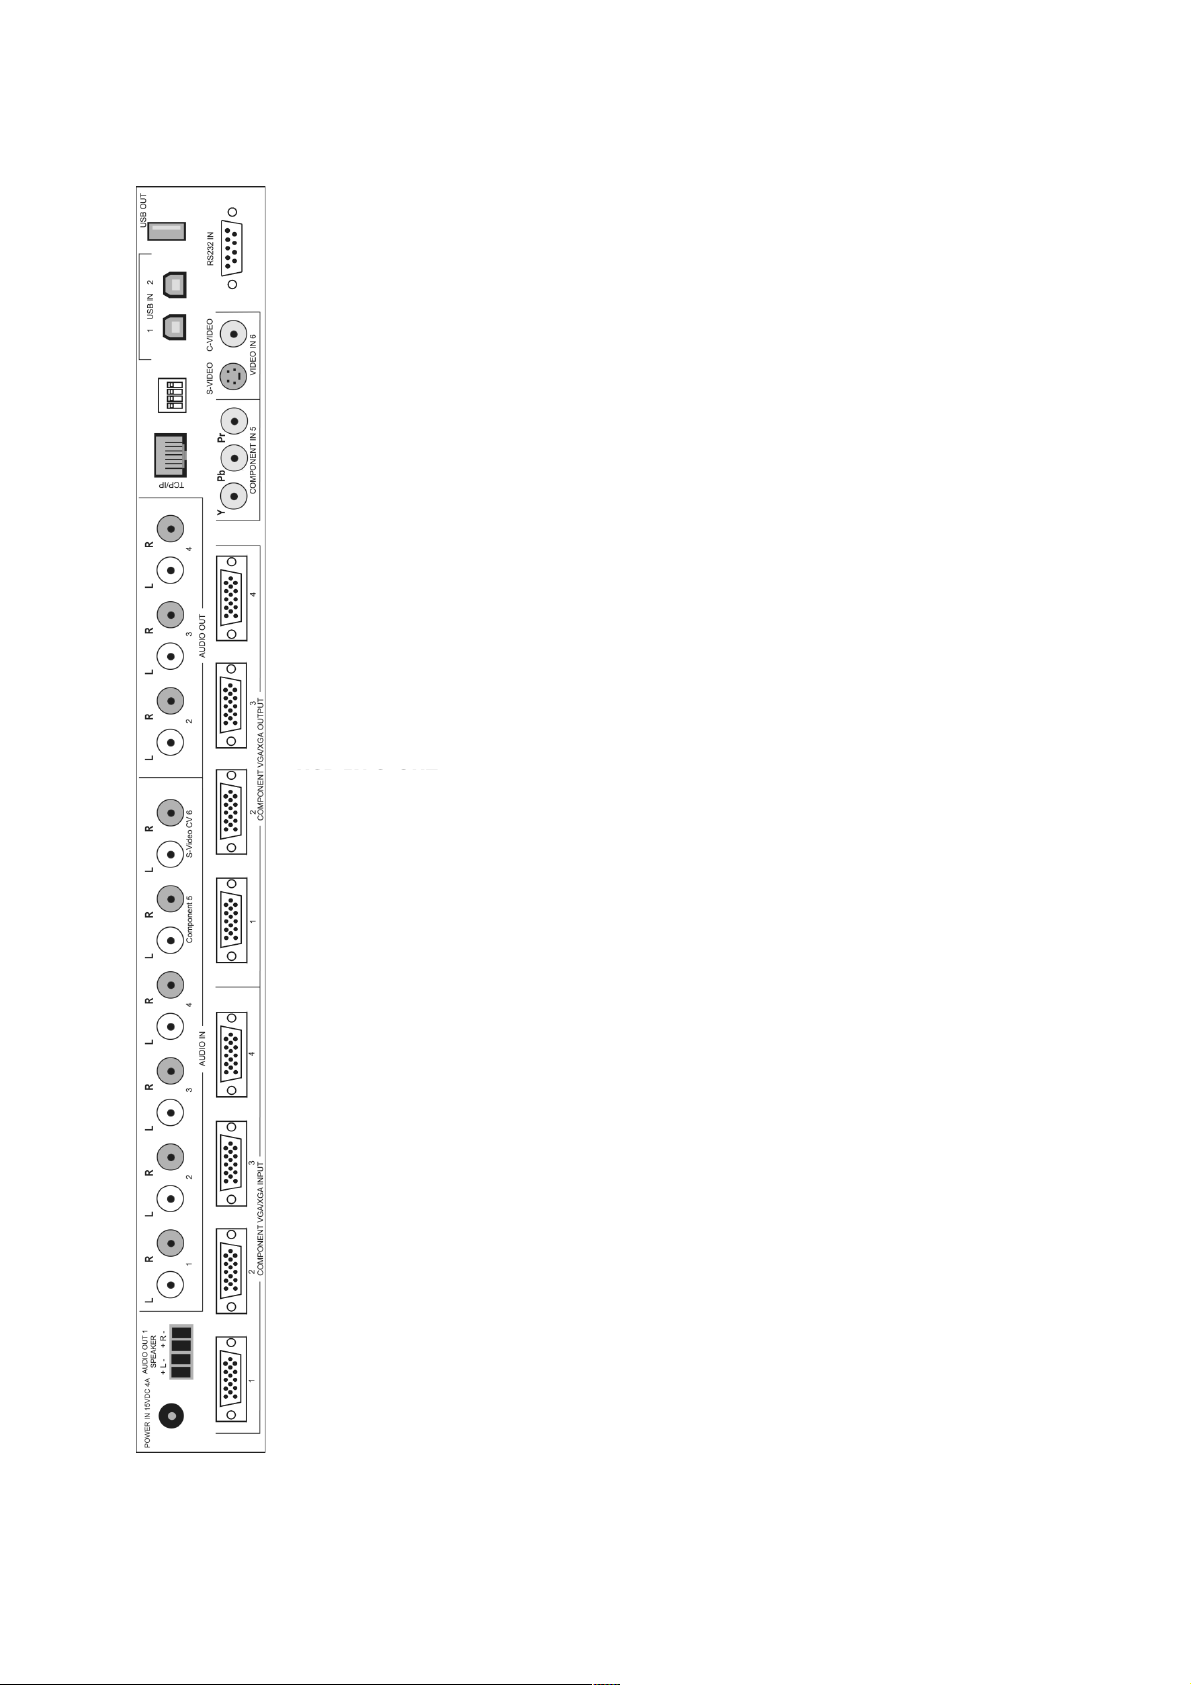
REAR PANEL
8
POWER IN
Input: 15VDC, 4.0A External plug pack supplied
AUDIO IN
6 channel audio input is supplied via 6x twin female RCA connectors. Standard
1V RMS and 47kΩ input impedance.
AUDIO OUT
The AVC-64 features an inbuilt 15W stereo audio amplifier. To utilise the
amplifier, connect speakers directly to audio output 1(located next to the power
input).
The remaining 3 outputs are line-out via RCA connectors (audio out 2, 3 and 4)
TCP/IP
The AVC-64 features control via TCP/IP. To utilise this function, connect the
AVC-64 into the control system via the female RJ45 connector.
USB IN & OUT
4-PIN DIP SWITCH
The AVC-64 features a 2 x 1 USB switcher. The inputs are available via female USB type
(UP/DOWN)
B connectors. The output is via a USB type A connector.
1 – Test Pattern OFF/ON
2 – Y,Pb,Pr / RGsB
RS232 INPUT
RS232 Input is to be connected to
control unit, via female DB9
connector.
3 – Manual/Auto
4 – Baud Rate 9600/38400
VIDEO INPUT
The AVC-64 allows for up to 4 component VGA/XGA inputs to be connected via
female DB15. Along with this it can take a fifth component video input via RCA
connectors (Y,Pr,Pb) and a (switch-able) composite video input via an S-Video
or RCA connector, shown as the sixth and seventh numbered inputs.
The AVC-64 provides the option to transcode video input from inputs 5, 6 or 7
to either component or RGsB , enabling support for standard projectors. Note
that only one of these inputs can undergo transcoding at a time.
VIDEO OUTPUT
Video outputs are provided via 4 x DB15 connectors, and supplies output in
either VGA/XGA, (RGsB 50HZ) or component depending on programmed
operation.
Page 9

M.E. Design (Aust) Pty Ltd
PROTOCOL SETUP
8 bits, 1 stop bit, No Parity
The AVC-64 instruction set is as follows:
{ xx a1 a2 v1 v2 } Audio and Video switching
{ xx U u1 } USB switching
{ 00I } Query signal present VGA
input 4
{ xx V h1 h2 h3 h4 } Volume level change
NOTE: No spacing in instructions
Where-: { Start byte in ASCII character {
xx Address 00 in ASCII default
a1 ASCII character for audio output
Output 0, 1, 2, 3, 4 where 0 = off
a2 ASCII character audio input
Input source 1, 2, 3, 4, 5, 6
NOTE: When switching Audio, the previous Video must be sent
v1 ASCII character for video output
Input source 0, 1, 2, 3, 4 where 0 = off
v2 ASCII character for video input
Input source 1, 2, 3, 4, 5, 6, 7, 8
1, 2, 3, 4 VGA inputs
5 Component input
6 Component through video transcoder
7 S-video
8 Composite video
NOTE: When switching Video, the previous Audio must be sent
U USB switching
u1 ASCII character for USB input
0, 1 or 2 where 0 = off
I Query present VGA input 4
V Volume change V
h1 h2 h3 h4 Hexadecimal value for attenuation for channels 1, 2, 3 and 4 (refer to
table for hex values)
} End byte in ASCII character }
Instructions relating to audio and video switching, USB switching, and query on VGA input 4
cause the AVC-64 to return an acknowledgement ACK string. For volume adjustment instruction
the AVC-64 returns the new volume level as a string.
9
Page 10

M.E. Design (Aust) Pty Ltd
EXAMPLES
Example, Audio Video switching
{001243} Audio output 1 from audio input 2
Video output 4 from video input 3
Example, USB Switching
{00U2} USB output from input 2
Example, Query VGA input 4 for signal present
{00I} Returns {0} for no signal or {1} for signal present
Example, Volume level change
{00V7FFF40FF} Audio output 1 @ -31.5dB 7F Hex
Audio output 2 @ -95.5dB (mute) FF Hex
Audio output 3 @ 0.05dB 40 Hex
Audio output 4 @ -31.5dB (mute) 7F Hex
See Table next page
return string:
{00V7FFF40FF}
Example, Status request for Audio Video
{00?}
return string:
{14223248} Audio output 1 from input 1
Video output 1 from input 4
Audio output 2 from input 2
Video output 2 from input 2
Audio output 3 from input 3
Video output 3 from input 2
Audio output 4 from input 4
Video output 4 from input 8
10
Page 11

M.E. Design (Aust) Pty Ltd
TCP/IP COMMUNICATION
The AVC-64 features a TCP/IP Serial-Ethernet adapter (Netburner SBL2e), enabling it to
communicate on an Ethernet network. The adapter features DHCP and static IP addressing.
PC CONFIGURATION (Windows)
To configure the device to work with windows over a direct Ethernet connection, watch the video
below.
(http://www.netburner.com/video/pc_configuration.html)
INITIAL SETUP
Setup and configuration of the SBL2e requires the IPSetup.exe Windows PC utility, available on
the included CD or alternatively via the Netburner website
(http://www.netburner.com/support/public_downloads.html ). Ensure the device is connected to
the network prior to completing the steps below
1. Run IPSetup.exe (by double clicking its icon).
2. Locate your SBL2e in the "Select a Unit" pane by matching its MAC address. The MAC
address is located on the side of the AVC-64. If the SBL2e adapter does not appear in the list
box, verify the power, speed, and link LEDs are illuminated, and click the Search Again button. If
you are still unable to see the SBL2e adapter, remove power, correct any cabling errors, reapply
power, and click the Search Again button. Note: IP Setup uses a UDP broadcast protocol and will
not operate through a router.
FIREWALLS: IPSetup uses UDP and TCP port number 20034. If your computer’s firewall is
blocking this port number you will need to either disable the firewall, or add a rule to the firewall
to allow communication on this port number.
3. If your network supports DHCP (factory default): The assigned IP Address will appear in
the "Select a Unit" pane. Write down this address. If your network does not support DHCP,
configure the IP Address and Network Mask fields with your static IP address information. After
you have entered all of your values, click the Set button in the center of the IP Setup window to
configure the SBL2e adapter with its new parameters. Note: If you do not click the Set button,
your values will not be saved. If you have multiple devices, make sure you selected the correct
SBL2e adapter in the "Select a Unit" pane before you input your information.
Reference: SBL2e Users Manual by, NetBurner Inc
11
Page 12
M.E. Design (Aust) Pty Ltd
OPERATIONAL SETUP
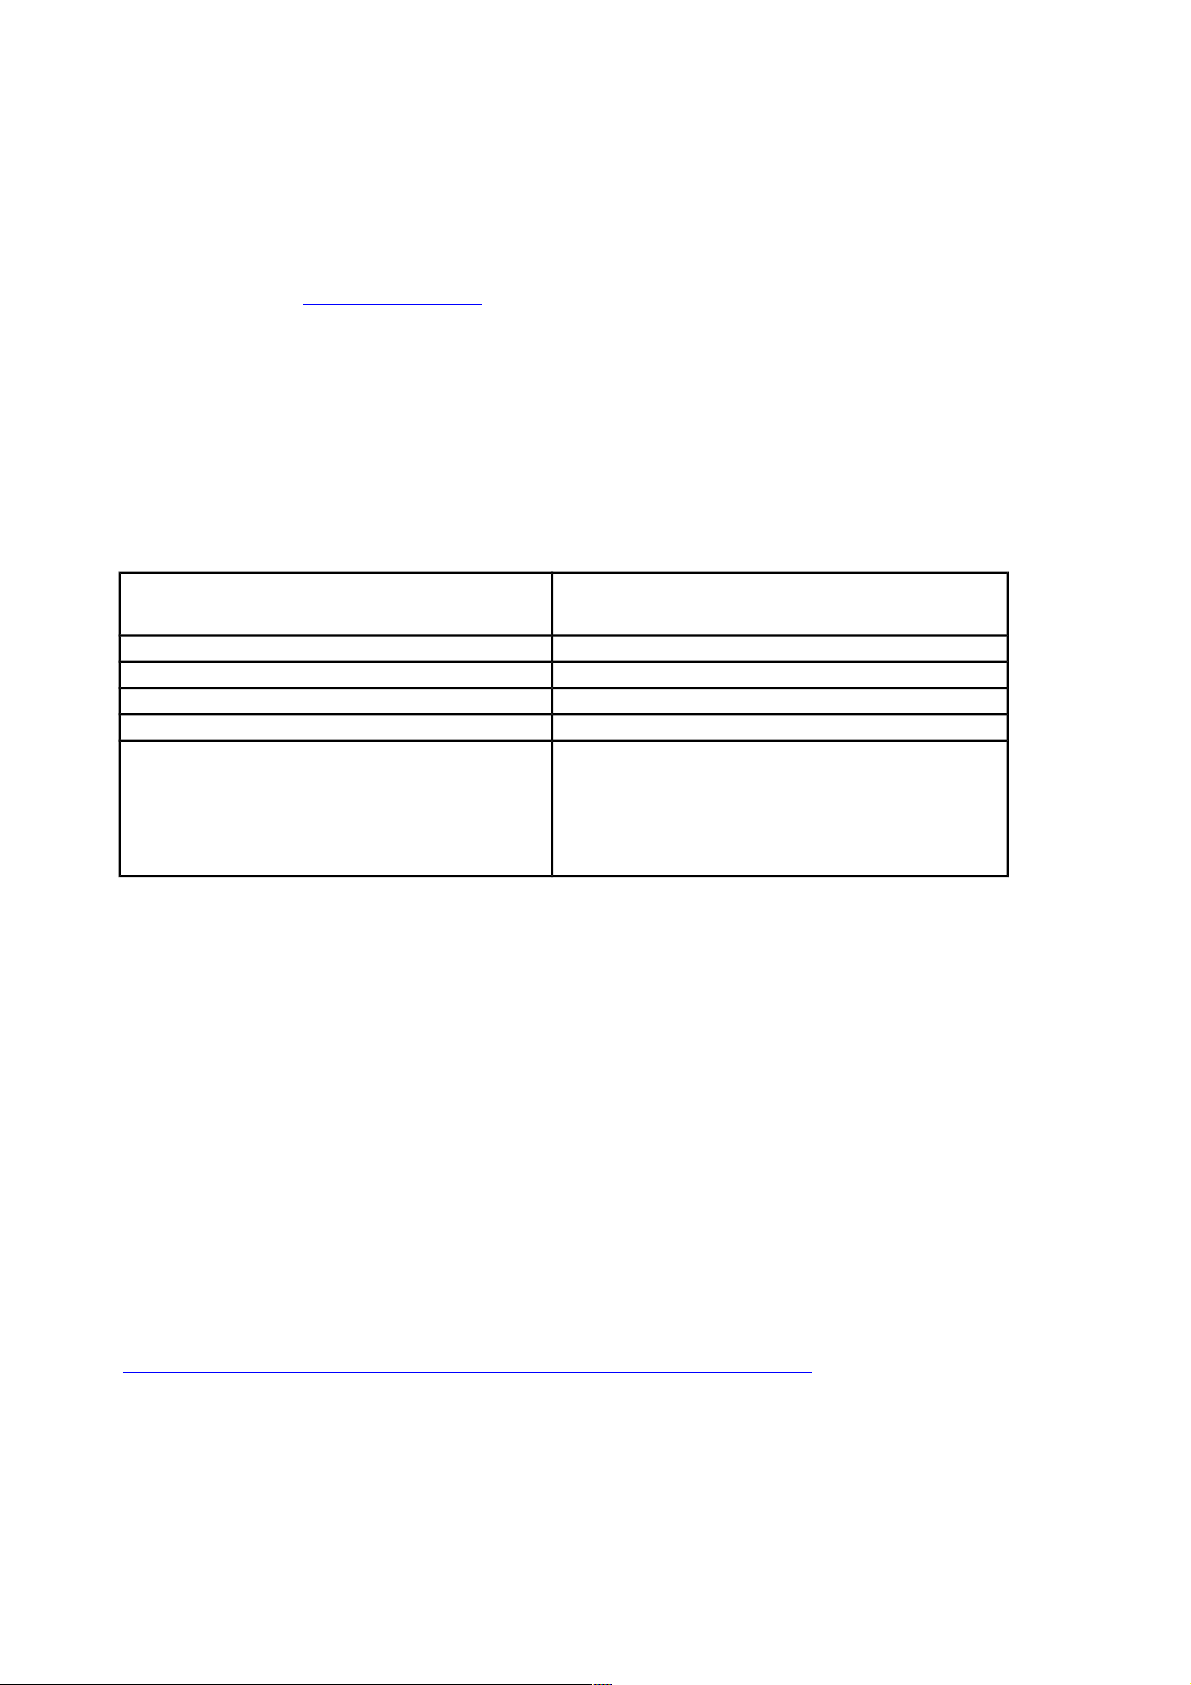
Once the network parameters are configured, you can use the web server interface or serial AT
commands to modify the settings of the adapter. To access the web page, click on the Launch
Webpage button in IP Setup, or open your web browser and enter the numeric IP Address in the
address field (e.g. http://10.1.1.110).
To set up the serial configuration of the adapter, navigate to the serial tab. A brief description of
each section is shown below.
For the VC12-8 to communicate correctly, set 8 data bits, 1 stop bit and No Parity
(Refer to protocol setup for more information).
Data Port Settings (If both are DEBUG,
defaults to Port 0)
Select serial mode RS-232 or DEBUG.
Data Baud Rate Set serial baud rate
Data bits Serial data bits
Data parity Serial parity
Stop bits Number of stop bits
Flow control Set to None for no flow control. If using
RS-232 or TTL valid selections are None,
Xon/Xoff software flow control, or
RTS/CTS hardware flow control.
Many other settings can be adjusted from the web interface. For more information on this and
more detailed configuration information, refer to the SBL2e user guide
(http://www.netburner.com/downloads/sbl2e/SBL2eUsersManual.pdf)
12
Page 13
M.E. Design (Aust) Pty Ltd
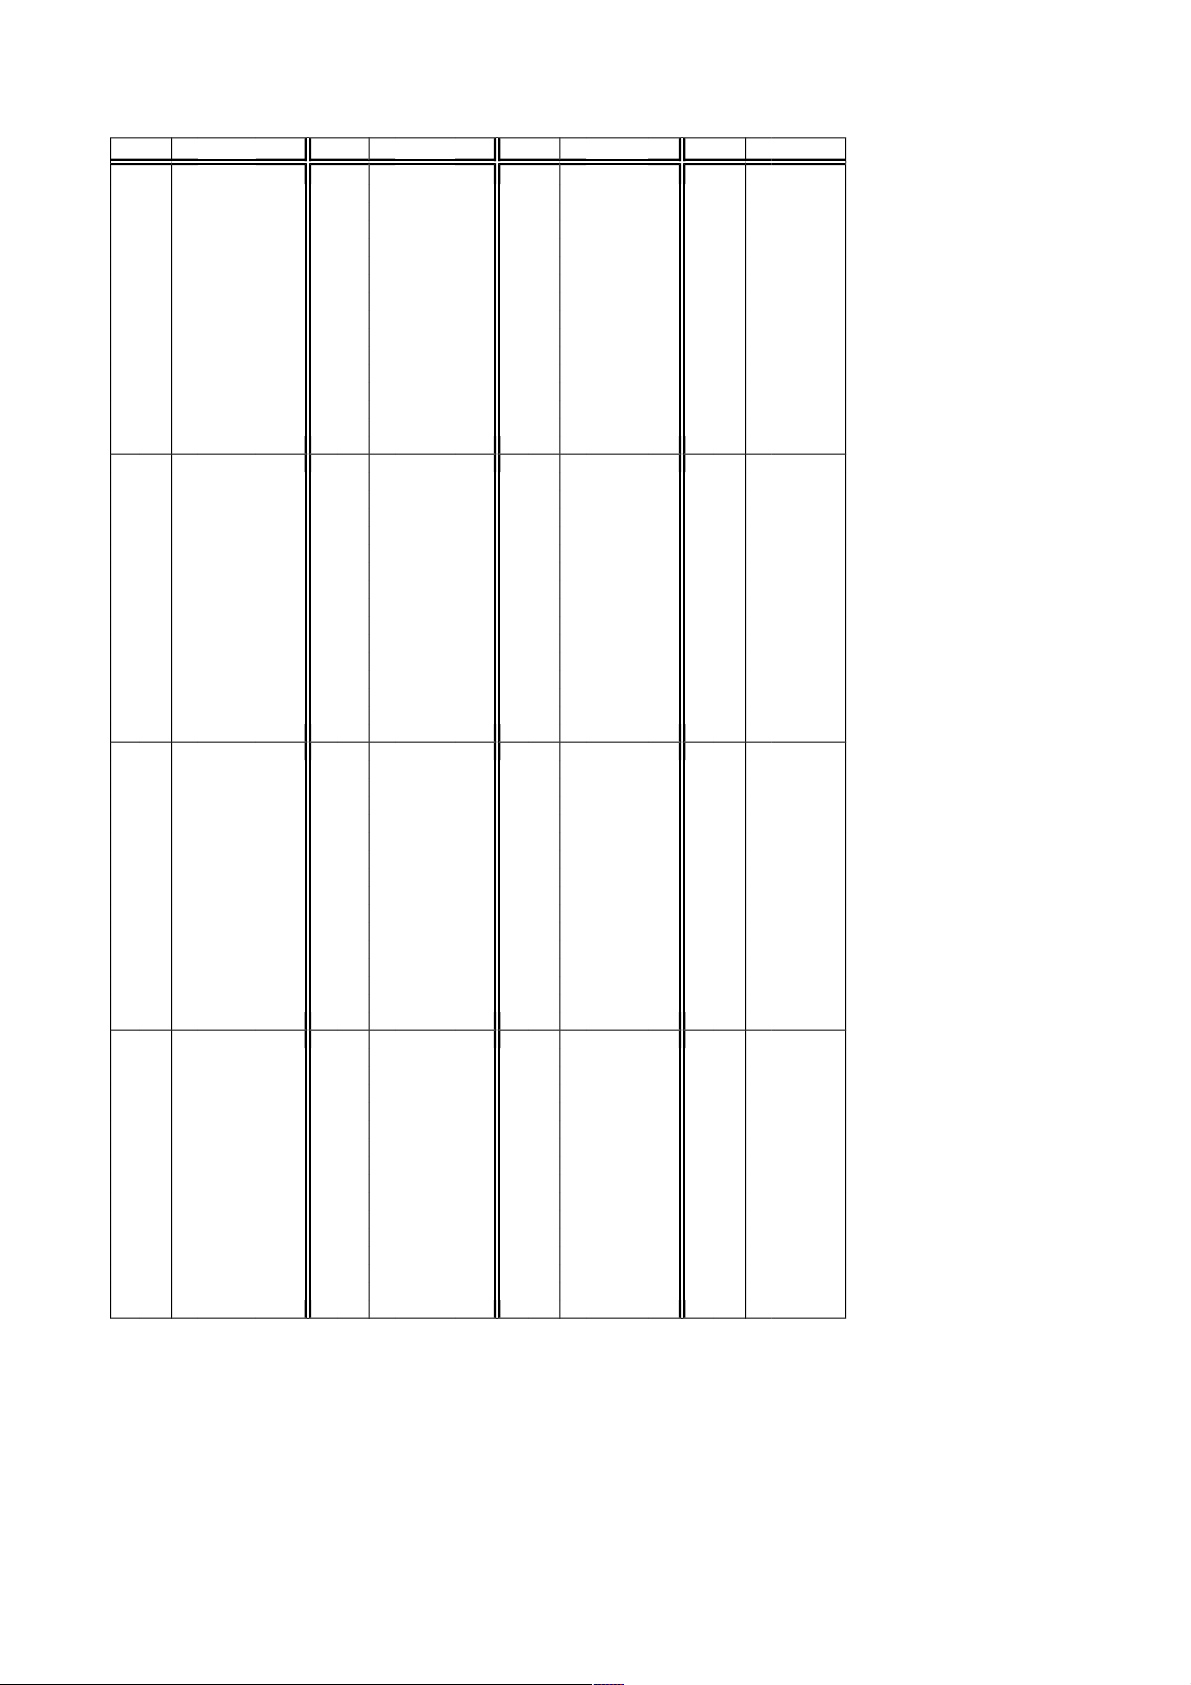
Gain in dB vs. Input Code in Hexadecimal format
Hex dB Hex dB Hex dB Hex dB
0 0 4 0 0.0 8 0 -32.0 C 0 -64.0
0 1 31.5 4 1 -0.5 8 1 -32.5 C 1 -64.5
0 2 31.0 4 2 -1.0 8 2 -33.0 C 2 -65.0
0 3 30.5 4 3 -1.5 8 3 -33.5 C 3 -65.5
0 4 30.0 4 4 -2.0 8 4 -34.0 C 4 -66.0
0 5 29.5 4 5 -2.5 8 5 -34.5 C 5 -66.5
0 6 29.0 4 6 -3.0 8 6 -35.0 C 6 -67.0
0 7 28.5 4 7 -3.5 8 7 -35.5 C 7 -67.5
0 8 28.0 4 8 -4.0 8 8 -36.0 C 8 -68.0
0 9 27.5 4 9 -4.5 8 9 -36.5 C 9 -68.5
0 A 27.0 4 A -5.0 8 A -37.0 C A -69.0
0 B 26.5 4 B -5.5 8 B -37.5 C B -69.5
0 C 26.0 4 C -6.0 8 C -38.0 C C -70.0
0 D 25.5 4 D -6.5 8 D -38.5 C D -70.5
0 E 25.0 4 E -7.0 8 E -39.0 C E -71.0
0 F 24.5 4 F -7.5 8 F -39.5 C F -71.5
1 0 24.0 5 0 -8.0 9 0 -40.0 D 0 -72.0
1 1 23.5 5 1 -8.5 9 1 -40.5 D 1 -72.5
1 2 23.0 5 2 -9.0 9 2 -41.0 D 2 -73.0
1 3 22.5 5 3 -9.5 9 3 -41.5 D 3 -73.5
1 4 22.0 5 4 -10.0 9 4 -42.0 D 4 -74.0
1 5 21.5 5 5 -10.5 9 5 -42.5 D 5 -74.5
1 6 21.0 5 6 -11.0 9 6 -43.0 D 6 -75.0
1 7 20.5 5 7 -11.5 9 7 -43.5 D 7 -75.5
1 8 20.0 5 8 -12.0 9 8 -44.0 D 8 -76.0
1 9 19.5 5 9 -12.5 9 9 -44.5 D 9 -76.5
1 A 19.0 5 A -13.0 9 A -45.0 D A -77.0
1 B 18.5 5 B -13.5 9 B -45.5 D B -77.5
1 C 18.0 5 C -14.0 9 C -46.0 D C -78.0
1 D 17.5 5 D -14.5 9 D -46.5 D D -78.5
1 E 17.0 5 E -15.0 9 E -47.0 D E -79.0
1 F 16.5 5 F -15.5 9 F -47.5 D F -79.5
2 0 16.0 6 0 -16.0 A 0 -48.0 E 0 -80.0
2 1 15.5 6 1 -16.5 A 1 -48.5 E 1 -80.5
2 2 15.0 6 2 -17.0 A 2 -49.0 E 2 -81.0
2 3 14.5 6 3 -17.5 A 3 -49.5 E 3 -81.5
2 4 14.0 6 4 -18.0 A 4 -50.0 E 4 -82.0
2 5 13.5 6 5 -18.5 A 5 -50.5 E 5 -82.5
2 6 13.0 6 6 -19.0 A 6 -51.0 E 6 -83.0
2 7 12.5 6 7 -19.5 A 7 -51.5 E 7 -83.5
2 8 12.0 6 8 -20.0 A 8 -52.0 E 8 -84.0
2 9 11.5 6 9 -20.5 A 9 -52.5 E 9 -84.5
2 A 11.0 6 A -21.0 A A -53.0 E A -85.0
2 B 10.5 6 B -21.5 A B -53.5 E B -85.5
2 C 10.0 6 C -22.0 A C -54.0 E C -86.0
2 D 9.5 6 D -22.5 A D -54.5 E D -86.5
2 E 9.0 6 E -23.0 A E -55.0 E E -87.0
2 F 8.5 6 F -23.5 A F -55.5 E F -87.5
3 0 8.0 7 0 -24.0 B 0 -56.0 F 0 -88.0
3 1 7.5 7 1 -24.5 B 1 -56.5 F 1 -88.5
3 2 7.0 7 2 -25.0 B 2 -57.0 F 2 -89.0
3 3 6.5 7 3 -25.5 B 3 -57.5 F 3 -89.5
3 4 6.0 7 4 -26.0 B 4 -58.0 F 4 -90.0
3 5 5.5 7 5 -26.5 B 5 -58.5 F 5 -90.5
3 6 5.0 7 6 -27.0 B 6 -59.0 F 6 -91.0
3 7 4.5 7 7 -27.5 B 7 -59.5 F 7 -91.5
3 8 4.0 7 8 -28.0 B 8 -60.0 F 8 -92.0
3 9 3.5 7 9 -28.5 B 9 -60.5 F 9 -92.5
3 A 3.0 7 A -29.0 B A -61.0 F A -93.0
3 B 2.5 7 B -29.5 B B -61.5 F B -93.5
3 C 2.0 7 C -30.0 B C -62.0 F C -94.0
3 D 1.5 7 D -30.5 B D -62.5 F D -94.5
3 E 1.0 7 E -31.0 B E -63.0 F E -95.0
3 F 0.5 7 F -31.5 B F -63.5 F F -95.5
13
Page 14
M.E. Design (Aust) Pty Ltd
14
Page 15
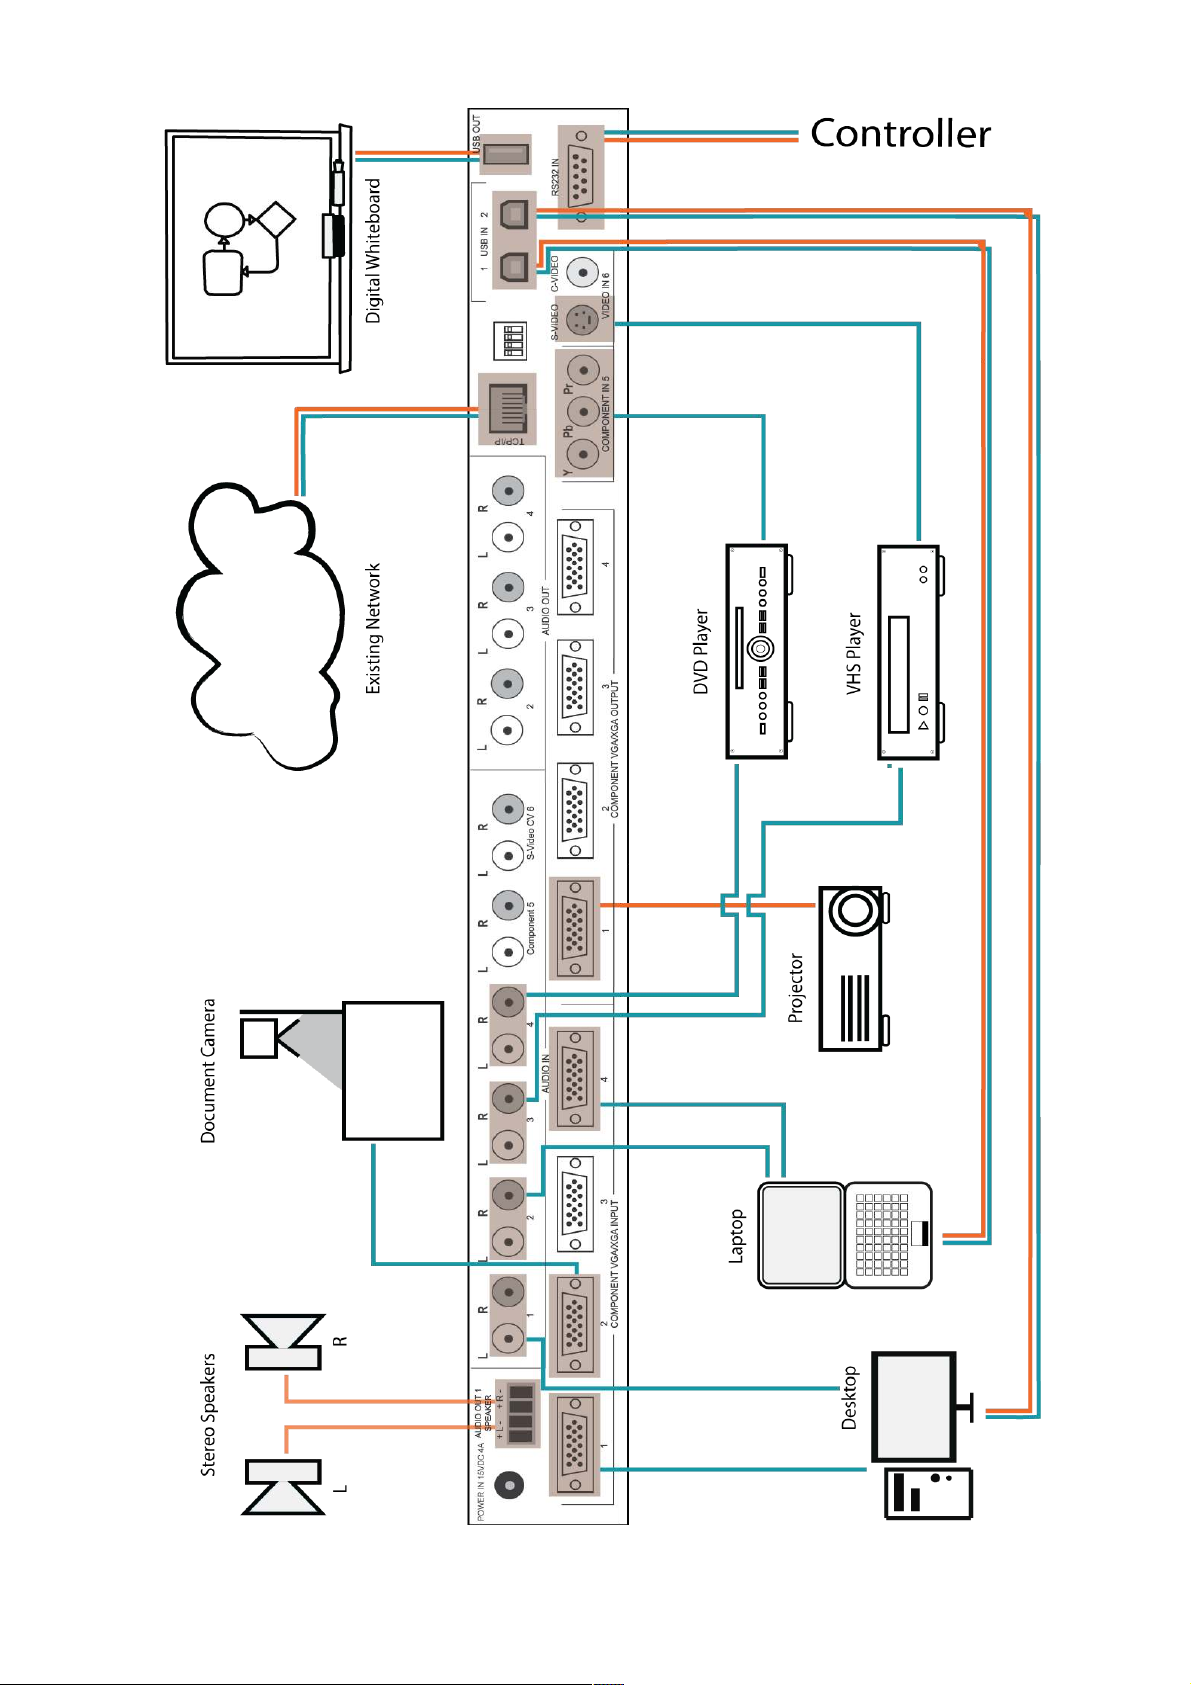
M.E. Design (Aust) Pty Ltd
S
15
Page 16

M.E. Design (Aust) Pty Ltd
SPECIFICATIONS
VIDEO
Gain : Unity
Bandwidth (VGA/XGA) : 400MHz (-3dB)
Bandwidth (Composite S-Video) : 10Mhz
Switching time : <1ms
Component video connections (VGA/XGA) : 4 inputs via DB15 / 1 input via 3 x RCA / 4 outputs
via DB15
Composite video connections : 1 input via 1 x RCA
S video connections : 4 pin mini-din
Nominal level (input/output) : 1V p-p/1V p-p
Impedance (input/output) : 75Ω
AUDIO
Gain : -95dB to +31.5dB
Frequency Response : 20Hz to 20kHz, +/- 0.05dB
Stereo Audio-
Input connections : 6 via twin RCA
Input Impedance : 47kΩ 1V RMS
Output Connections : 1 speaker via 4 pin connector, 3 via RCA stereo
AUDIO AMPLIFIER
Output : 15 Watts / Channel
Frequency Response : 20Hz to 20kHz
Output Connections : Speakers via 4 pin removable connector
USB
Type A : 1
Type B : 2
GENERAL
Control port : RS-232 via DB9 / TCP-IP via RJ45
Baud rate and protocol : 9600/38400bps, 8 bits, 1 stop bit, no parity
Power : 15V DC 4.0 AMP
Enclosure : Rack mountable, 1RU, metal and powder coated
Weight and Dimensions : 2.1kg, 44mm (H) x 482mm (W) x 190mm (D)
Warranty : 3 years parts and labour
NOTE: Specifications are subject to change without notice.
16
 Loading...