

Page 1
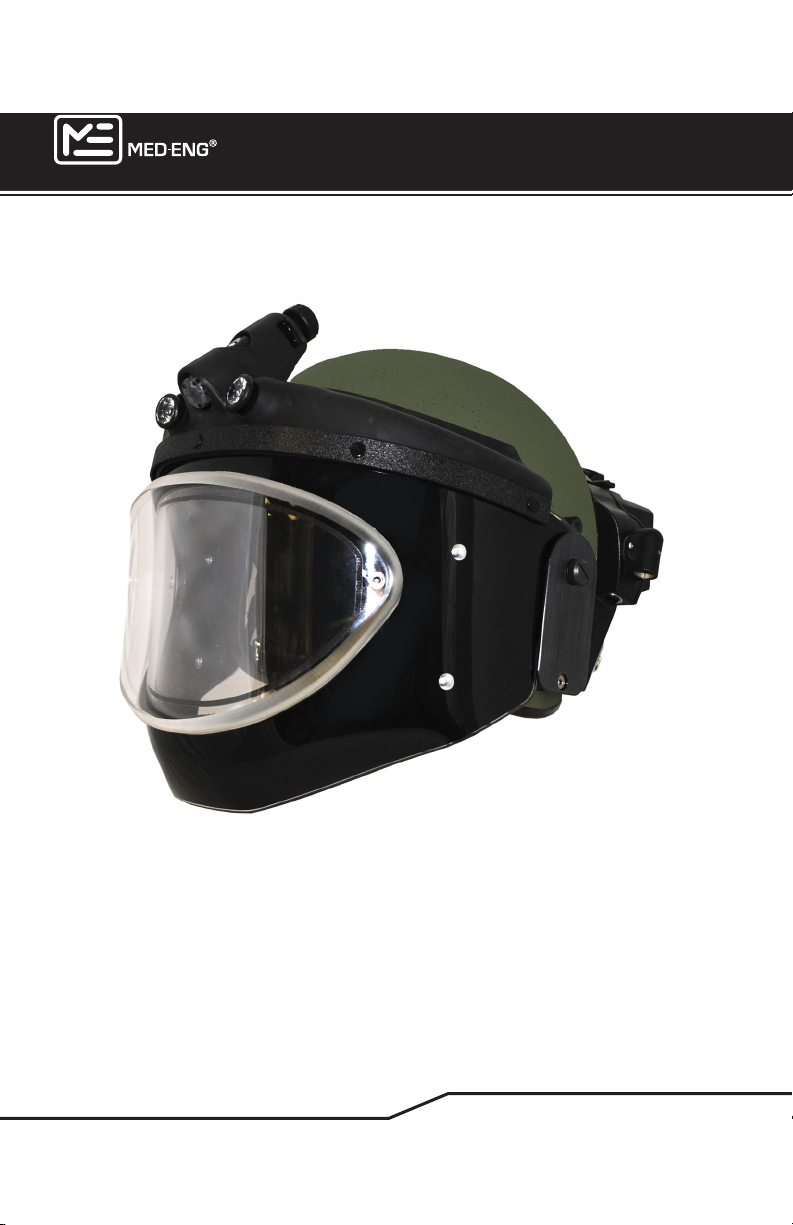
EOD® HELMET CAMCORDER
USER GUIDE
4977841 Rev B
©2013 Med-Eng. Company Proprietary and Confidential
Page 2

Page 3

USER GUIDE
Proprietary Statement
© 2014 Med-Eng
This document and the information contained herein is the property of Med-Eng. This document is not for distribution other than as authorized by Med-Eng, and the data disclosed
herein or herewith are not to be reproduced, used or disclosed for purposes other than
which it has been supplied, without the permission of Med-Eng.
ME Med-Eng in Box Design, and ME in Box Design are trade marks of Med-Eng. All other
trademarks listed herein are the property of their respective owners.
4977841 Rev B
©2014 Med-Eng. Company Proprietary and Confidential
Page 4

EOD® HELMET CAMCORDER
USER GUIDE
WARNING AND LIMITATION OF LIABILITY
THIS PRODUCT SHALL NOT BE USED BEFORE CAREFULLY READING ALL PRECAUTIONS, DIRECTIONS FOR USE, CARE INSTRUCTIONS, LIMITED WARRANTY AND
LIMITATIONS OF LIABILITY.
DO NOT USE THIS PRODUCT IF IT IS DAMAGED OR IF THERE ARE OTHER SIGNS
OF WEAR AND TEAR.
EXPLOSIVE ORDNANCE DISPOSAL (EOD) IS A HIGH RISK ACTIVITY AND SHOULD
ONLY BE PERFORMED BY HIGHLY TRAINED PROFESSIONALS. THIS PRODUCT IS
USED SOLELY AT THE RISK AND LIABILITY OF THE PERSON(S) WHO USES IT. USE
OF THIS PRODUCT DOES NOT GUARANTEE PROTECTION FROM INJURY, DEATH,
DISMEMBERMENT AND/OR DISABILITY AND WILL NOT ELIMINATE DAMAGE TO, OR
THE DESTRUCTION OF PROPERTY.
PERSONNEL SHALL NOT USE THIS PRODUCT UNTIL THEY ARE FULLY TRAINED
AND AWARE OF THE OPERATIONAL CHARACTERISTICS OF THIS PRODUCT.
CONTINUED USE OF THIS PRODUCT WITH FAILURE TO FOLLOW INSTRUCTIONS
FOR USE AND CARE MAY ALSO CONTRIBUTE TO THE CAUSE OF INJURY, DEATH,
DISMEMBERMENT AND/OR DISABILITY, AND MAY CONTRIBUTE TO THE CAUSE OF
DAMAGE TO, AND/OR THE DESTRUCTION OF PROPERTY.
Under no circumstances shall Med-Eng, nor any of its afliates, Directors, Ofcers,
employees and/or contractors be liable for any bodily injury to personnel, including death,
dismemberment and/or disability; nor for damage to or the destruction of property; nor any
other repercussion stemming from the use of the product within its intended environment.
Med-Eng, and all its afliates, Directors, Ofcers, employees and/or contractors shall not be
liable for, and any and all claims against Med-Eng are waived for, special, indirect, incidental, or consequential damages or expense of any nature, including, but not limited to injury,
death, dismemberment, disability, loss of prots or income.
Med-Eng offers this product, and the Buyer and User accept it, subject to Med-Eng
Standard Conditions of Sale, and the limitation of warranty, liability and remedies provided
therein, including but not limited to this product and warning label.
Translation of this document into any language other than English is intended solely for the convenience
of the non-English reading recipient and is non-binding. The ofcial version of this document is the
English version. In the event of any discrepancy between the English version and the translated version
of this document, the English version shall prevail. Med-Eng and its afliates make no warranty, express
or implied, as to accuracy, reliability or completeness of any information translated and shall not be
liable for any damages or loss from reliance on the translation. Any person or entity who relies on the
translated version of this document does so at his or her own risk. Any citations must refer to the English
version of this document.
The information and data contained in this document is subject to change without notice.
4
©2014 Med-Eng. Company Proprietary and Confidential
4977841 Rev B
Page 5

EOD® HELMET CAMCORDER
USER GUIDE
Contents
Introduction �������������������������������������������������������������������������������� 6
Important ������������������������������������������������������������������������������������ 6
Features �������������������������������������������������������������������������������������� 6
Components ������������������������������������������������������������������������������� 7
Camera LEDs ������������������������������������������������������������������������������ 7
Procedures ��������������������������������������������������������������������������������� 8
Charging the EOD Helmet Camcorder �������������������������������������� 8
Installing the microSD Card ������������������������������������������������������ 9
Setting the Time/Date ����������������������������������������������������������������� 9
Formatting the microSD Card �������������������������������������������������� 10
Mounting the Camcorder to the Helmet ���������������������������������� 11
Removing the Camcorder from the Helmet ���������������������������� 12
Video Recording ����������������������������������������������������������������������� 13
Video Playback ������������������������������������������������������������������������� 13
Specifications ��������������������������������������������������������������������������� 14
4977841 Rev B
©2014 Med-Eng. Company Proprietary and Confidential
5
Page 6

EOD® HELMET CAMCORDER
USER GUIDE
Introduction
The EOD Helmet Camcorder is a weather-proof, bullet-style camera system that
has been fitted onto a specifically-designed EOD 9 Helmet Visor. The camcorder
gives Bomb Technicians the ability to record video of Render Safe Procedures
(RSP) and Training Scenarios. Video can be recorded for up to two hours on the
supplied 8 GB microSD card.
Important
The EOD Helmet Camcorder records video on a continuous loop in 5 minute
segments. The Camcorder should be turned off immediately if a significant incident has been recorded. Failure to turn off the Camcorder may result in the loss
of potentially valuable intelligence or forensic evidence.
The supplied 8 GB microSD card will record approximately 2 hours of video before it begins to loop. It is advisable to have backup cards available for recording
longer duration missions.
Format the memory card frequently. Formatting is simple and is explained in
detail in this User Manual. When a memory card is formatted is it less likely to
fragment digital files. The digital filing system will be restored and the EOD Helmet Camcorder will be less likely to malfunction.
Features
The EOD Helmet Camcorder has the following features:
(1) 720p HD video
(2) Optional audio (with installed audio end cap)
(3) Wide angled 135 degree lens
(4) Weather resistant design
(5) Loop recording
(6) Time/date stamp
(7) One button operation
(8) Internal battery (1.5 to 2 hours)
6
©2014 Med-Eng. Company Proprietary and Confidential
4977841 Rev B
Page 7
EOD® HELMET CAMCORDER
USER GUIDE
Components
The following components are included in the kit for the camcorder:
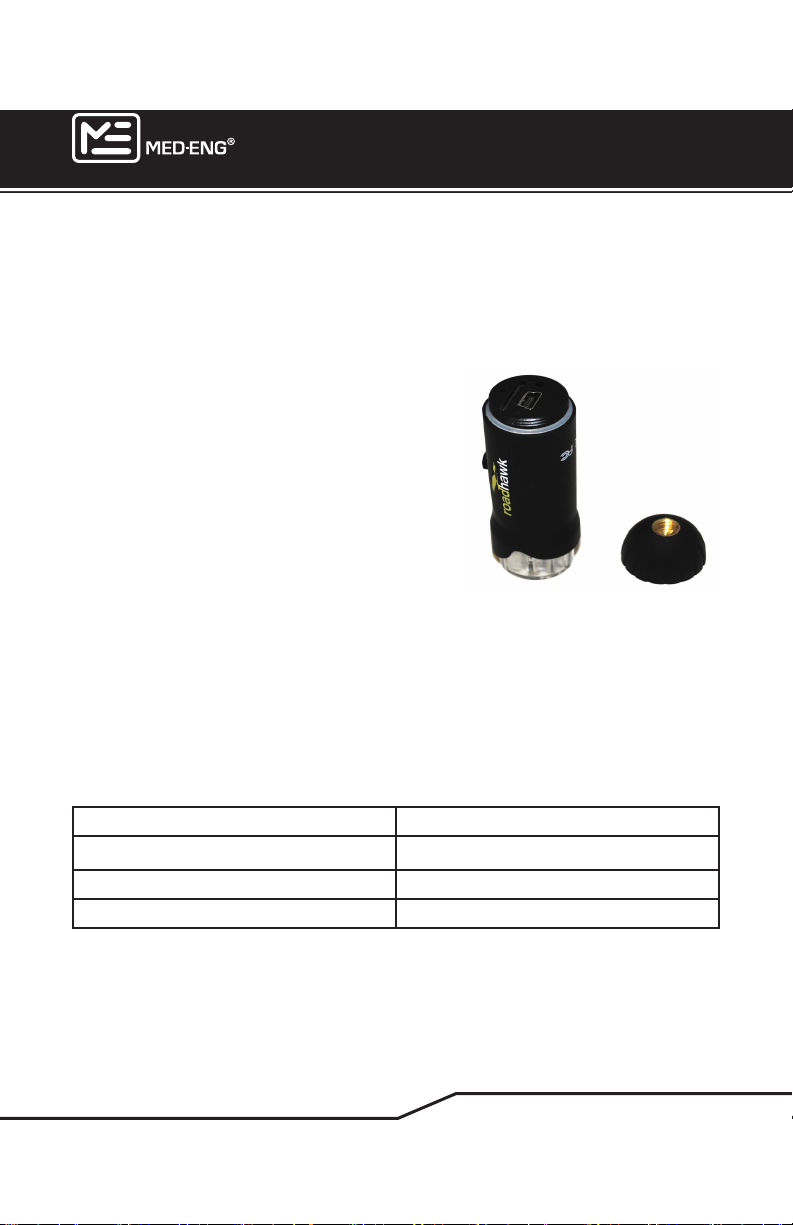
(1) Visor assembly with EOD Helmet Camcorder and weather-
resistant end cap/thumbscrew
(2) 8 GB Class 4 microSD card and adapter
(3) Mini USB cable
(4) User Manual
(5) Spare O-rings
(6) Rear audio cap
(7) Car charging adapter
Camera LEDs
Three (3) small LEDs at the front of the EOD Helmet Camcorder inside the lens
housing provide the user with required feedback for camera functions. These
lights cannot be seen by the user when the camcorder is mounted and the
Helmet is worn.
Red Charging internal battery
Green Internal battery fully charged
Green/Blue Flash Camera is recording video
Red/Blue/Green Fast Flash microSD card error
When the Camcorder flashes RED/BLUE/GREEN momentarily and then stops,
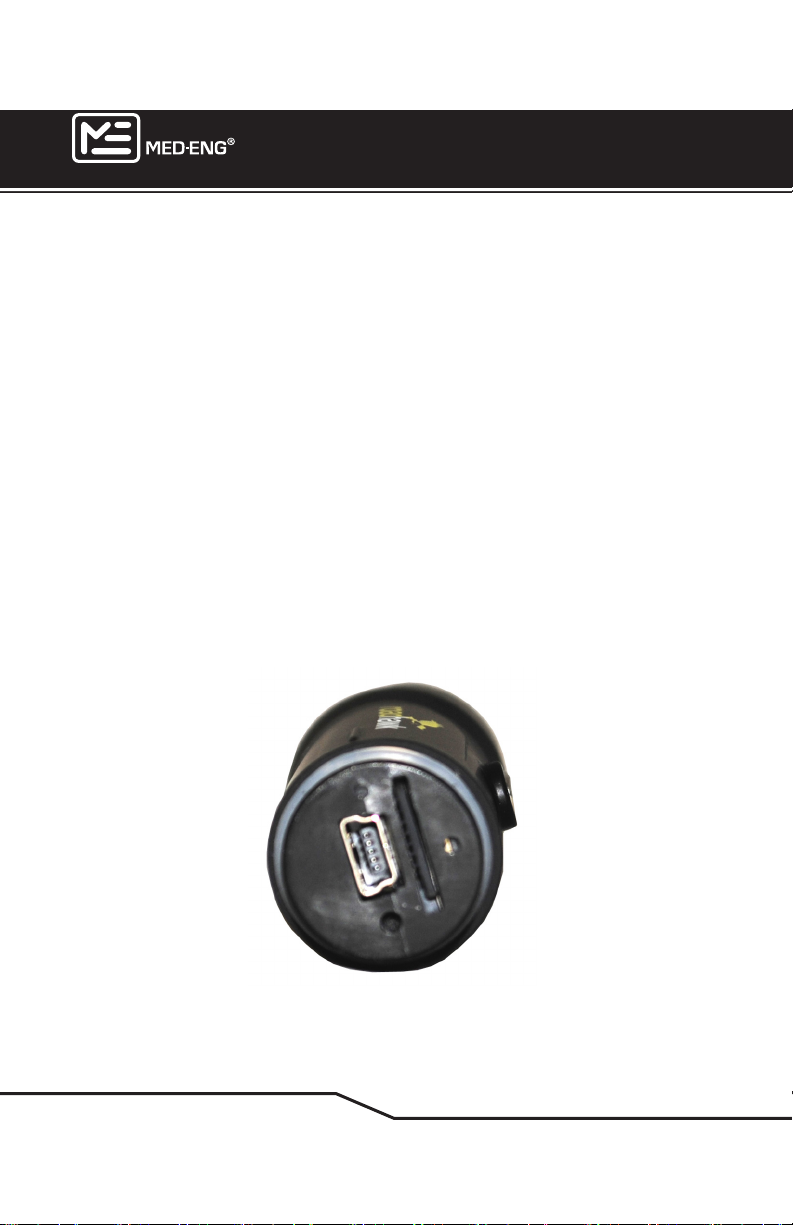
make sure that the microSD card is fully inserted by removing the Rear Cap and
observing the microSD slot located above the USB port. If the problem persists,
confirm that the microSD card has been formatted.
For a microSD error - press and hold the power button for 1 second to fix the
error.
4977841 Rev B
©2014 Med-Eng. Company Proprietary and Confidential
7
Page 8
EOD® HELMET CAMCORDER
USER GUIDE
Procedures
Charging the EOD Helmet Camcorder
The EOD Helmet Camcorder can be connected to any USB sourced power
supply, e.g. external power supply, computer, USB mains charger or vehicle 12
volt accessory socket. The EOD Camcorder will begin to charge immediately
after being plugged in. The RED light indicates charging and the GREEN light
indicates a fully charged battery.
A full charge will normally take 2 to 3 hours. It is not possible to overcharge the
battery on the EOD Camcorder.
When the Camcorder is connected to external power it will turn on and start to
record. The Camcorder will recharge faster if it is turned off and not recording.
To stop recording press and hold the silver power button on top of the Camcorder. When the Camcorder is connected to a computer it will begin to recharge
immediately but will not record.
8
©2014 Med-Eng. Company Proprietary and Confidential
4977841 Rev B
Page 9

EOD® HELMET CAMCORDER
USER GUIDE
Installing the microSD Card
The EOD Helmet Camcorder is equipped with an 8 GB Class 4 microSD Card. It
is possible to change cards to avoid losing video data on missions over 2 hours.
The Camcorder will accept microSD cards up to 32 GB and Class 6. To change
the microSD card, use the following steps:
1. Orient the Camcorder with the microSD card slot to the top and USB port to
the bottom.
2. Insert the microSD card into the card slot with the writing facing up and the
electrical contacts facing down.
3. Do not force the card into position. It should click into place with onlyenough force provided by the end of a fingernail.
4. The microSD card will be flush with the end of the Camcorder body when it
is fully seated.
Setting the Time/Date
The EOD Helmet Camcorder will embed the time and date on any video being
recorded. In order to set the time and date on your Camcorder, a text file must
be created on the microSD card, as follows:
1. Create a file on the microSD card called “Time.txt”
2. Write text to this file in the following format: YYYY MM DD HH MM SS.
Example, 2013 05 16 06 16 10 will be 16 May 2013 at 6:16:10 am.
3. Insert the microSD card into the EOD Camcorder.
4. Turn on the EOD Camcorder immediately.
Any text editor, for example, Windows Notepad, can be used to write to this file.
When the EOD Camcorder is turned on, it will instantly recognize the text file and
set the internal clock. It is recommended to complete the time set procedure
as quickly as possible to reduce time synching errors. The “Time.txt” is deleted
automatically after the time is set.
Once the time/date stamp has been set on the Camcorder it will not be possible
to remove it from the video. This is important to note because this information
may be used for forensic video evidence. The Camcorder can be linked to a
computer using the supplied USB cable or the microSD adapter.
4977841 Rev B
©2014 Med-Eng. Company Proprietary and Confidential
9
Page 10

EOD® HELMET CAMCORDER
USER GUIDE
Formatting the microSD Card
The use of a high quality microSD card of at least Class 4 is recommended. A
Class 6 microSD card may provide increased video performance.
Formatting the microSD card is an important step in maintaining the serviceability of the Camcorder.
Video stored on the microSD card can become fragmented over time and affect performance. Any inefficiency in the microSD card can cause lags in video
recording and playback due to the non- continuous storage of information.
Deleting data from the microSD card does not remove it. It simply marks it as being deleted. This is useful if there is ever a requirement to recover deleted data
from a microSD card. All of this deleted data remains on the card until the card is
properly formatted and the file structure is rebuilt. The only method of removing
information entirely from a digital storage device is to format it.
If this Camcorder is being used on a daily basis, it is recommended to format the
card once per week.
A microSD card may be formatted with a computer using the following steps: (1)
Windows OS:
(a) Click the START button and select COMPUTER
(b) Right click on the removable disk and select FORMAT
(c) When the FORMAT window appears select the QUICK FOR
MAT option and choose the file allocation size of 32 kilobytes
MAC OS:
(a) Open the DISK UTILITIES app
(b) Select the microSD card from the menu on the left
(c) Select ERASE and follow the on screen instructions
WARNING: ENSURE THAT YOU HAVE CHOSEN THE CORRECT DISK
BEFORE SELECTING THE FORMAT OPTION� IT WILL BE IMPOSSIBLE TO
FORMAT YOUR HARD DRIVE WHILE YOU’RE USING IT, BUT ANY OTHER
REMOVABLE OR EXTERNAL STORAGE SYSTEMS ARE NOT PROTECTED
AND CAN BE EASILY FORMATTED IN ERROR�
10
©2014 Med-Eng. Company Proprietary and Confidential
4977841 Rev B
Page 11
EOD® HELMET CAMCORDER
USER GUIDE
Mounting the Camcorder to the Helmet
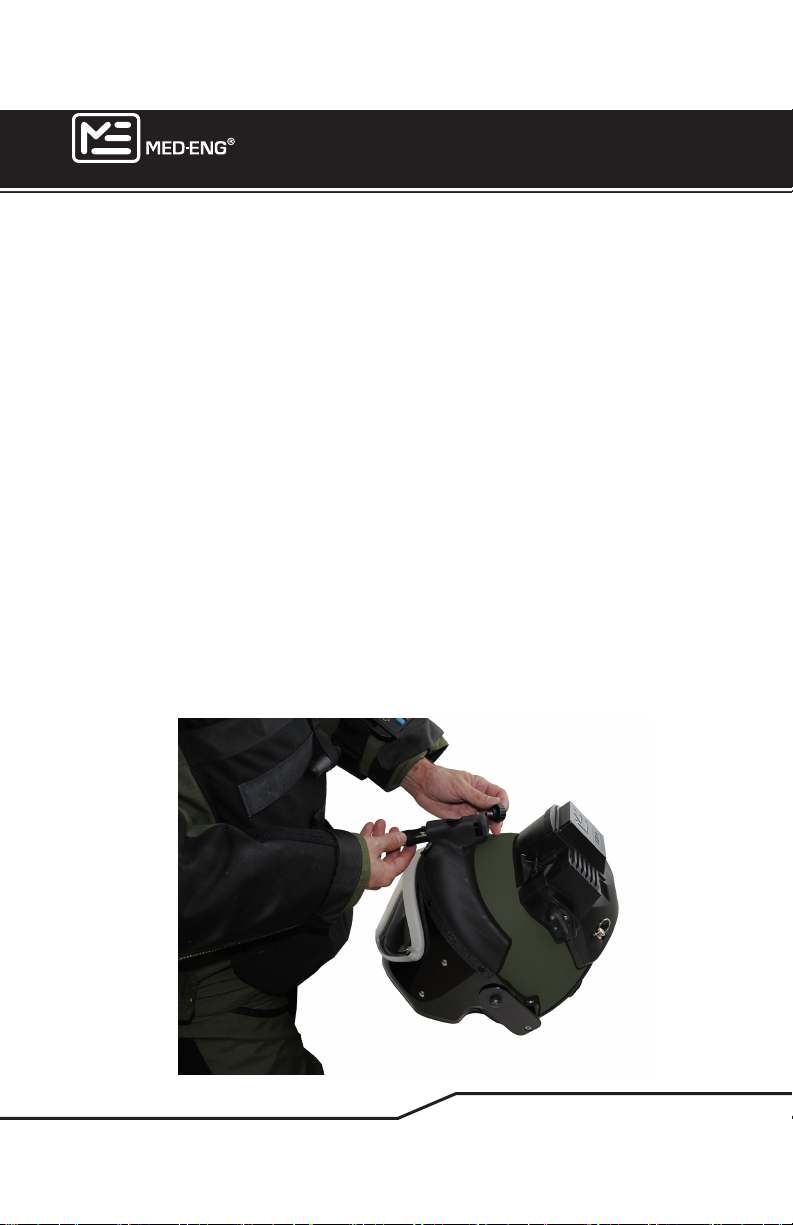
The visor that is supplied with the Camcorder has been designed to fit the Camcorder in a mounting bracket between the two lights. If changing visors on the
EOD 9/9A Helmet, follow the directions in the EOD 9/9A Helmet User Manual.
To mount the EOD Camcorder to the visor, use the following steps:
1. Locate and/or remove the thumbscrew from the threaded hole in the
Rear Cap and place it on a clean surface to prevent fouling of the threads.
2. The kit is supplied with two types of caps. The Rear Audio Cap has
holes in it to allow the integrated microphone to record sounds. The second
cap is the Weather Resistant Rear Cap. Mount the required Rear Cap on the
Camcorder depending on the mission.
3. Insert the EOD Helmet Camcorder into the front of the visor mount. The lens
will be facing forward of the visor and the silver on/off button shall be facing
up. The silver on/off button will glide effortlessly into the provided slot on
top of the helmet mount. It may be beneficial to support the Camcorder in
place by holding onto the lens face of the Camcorder.
4. Replace the thumb screw by inserting it into the provided hole in the back
of the visor mount. The thumbscrew only needs to be finger tight.
5. Perform a function test on the Camcorder by pressing and holding the silver
button for 3 seconds until the RED/BLUE lights flash.
4977841 Rev B
©2014 Med-Eng. Company Proprietary and Confidential
11
Page 12

EOD® HELMET CAMCORDER
USER GUIDE
Removing the Camcorder from the Helmet
To remove the EOD Helmet Camcorder from the visor, use the following steps:
1. Twist the thumbscrew in a counter-clockwise fashion to remove it from the
rear screw hole. Place the thumbscrew in a clean location to avoid fouling of
the screw threads.
2. The Camcorder should glide effortlessly from the mount towards the front of
the visor. If it requires assistance, use your thumb to push against the back
of the Camcorder.
3. Replace the thumbscrew into the rear threaded hole to prevent fouling
from the introduction of dirt or water.
12
©2014 Med-Eng. Company Proprietary and Confidential
4977841 Rev B
Page 13

EOD® HELMET CAMCORDER
USER GUIDE
Video Recording
To record video on the EOD Helmet Camcorder, press and hold the silver power
button for 3 seconds. To stop recording, press and hold the silver power button
for 3 seconds.
Video Playback
The EOD Helmet Camcorder records video in MPEG-4 (MP4) format. These files
can be played on any personal computer or laptop that runs Windows OS using
Microsoft Windows Media Player.
For MAC OS, VLC Media Player should be used. VLC can be downloaded for
free from www.videolan.org.
To play videos recorded by the Camcorder, use the following steps:
1. Remove the Camcorder from the visor.
2. Connect the USB cable to the back of the Camcorder.
3. Connect the other end of the cable to a computer’s USB port.
4. Turn the Camcorder on by pressing and hold the silver button for 3 seconds.
5. The Camcorder will appear as a removable disk. View any of the video files
in the DCIM folder by double-clicking on the file.
Files can be transferred from this folder to the computer by dragging and dropping. It is possible to delete files from the Camcorder but not necessary as
these files will be overwritten by the normal operation. For file removal from the
Camcorder, it is recommended to format the microSD card.
4977841 Rev B
©2014 Med-Eng. Company Proprietary and Confidential
13
Page 14
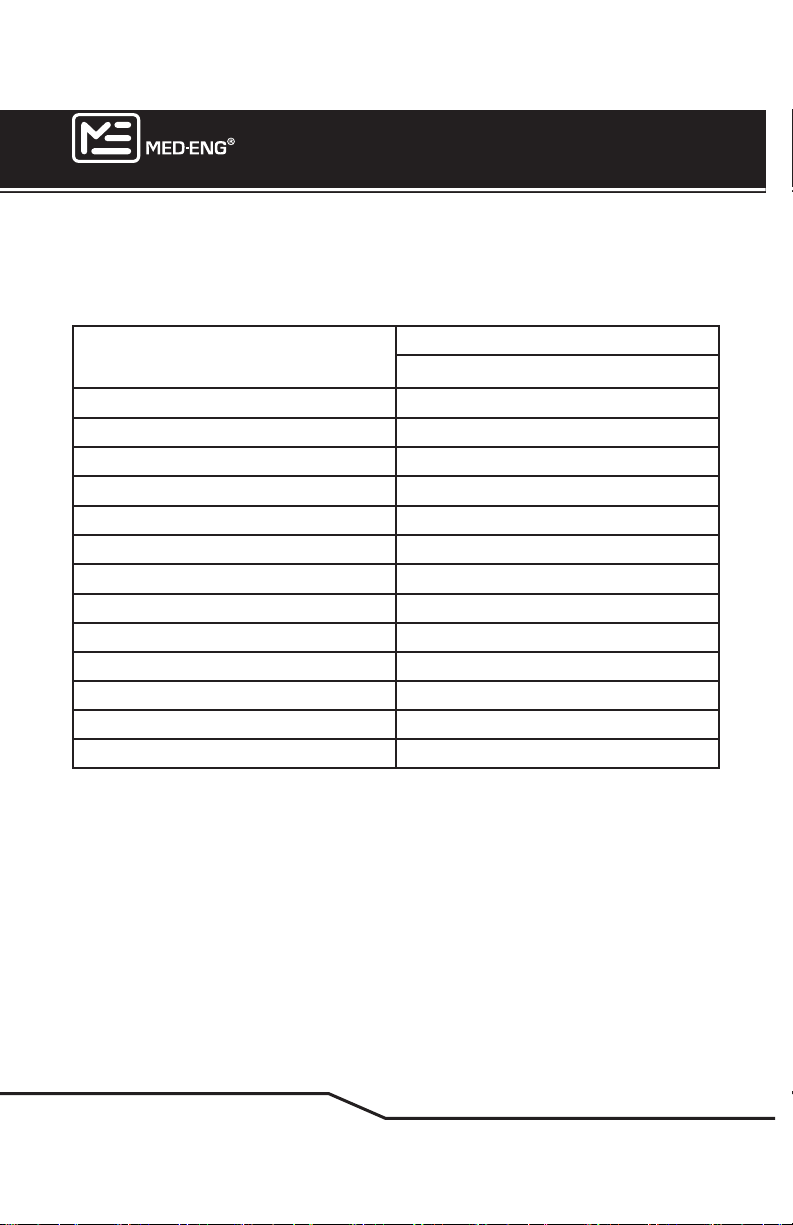
Specifications
Camera size Diameter: 22 mm (0.87”)
Camera Weight 32 g (0.07 lb)
Resolution 1280 x 720p
USB 2.0
Video Format H.264
Power Duration 1.5 to 2 hrs
Frame Rate 30 fps
Sensor 3 MP
Battery 500mAh LiPo
Memory Up to 32 GB microSD
Working Temperature -5 to 40ºC (23 to 104ºF)
Storage Temperature -20 to 80ºC (-4 to 176ºF)
Power Consumption < 1 W
Lens 135º
EOD® HELMET CAMCORDER
USER GUIDE
Length: 78 mm (3.07”)
14
©2014 Med-Eng. Company Proprietary and Confidential
4977841 Rev B
Page 15

Page 16

EOD® HELMET CAMCORDER
Med-Eng| A BRAND OF THE SAFARILAND GROUP
2400 St. Laurent Blvd.
Ottawa, ON K1G 6C4
Canada
T 1.613.482.8835
1.855.633.3649 (US and Canada)
F 1.613.482.4991
USER GUIDE
www.med-eng.com
 Loading...