

Page 1
SUCTION PUMP
EN
Patient Instructions for use
DE
Gebrauchsanweisung für Patienten
FR
Mode d’emploi
IT
Istruzioni per l’uso per i pazienti
NL
Gebruiksaanwijzing voor patiënten
SV
Patientbruksanvisning
FI
Käyttöohjeet potilaalle
NO
Pasientbruksanvisning
ES
Instrucciones de uso para el paciente
PT
Instruções de utilização para o paciente
Page 2

2
Assistance
Read the entire instruction manual before trying to
operate the device.
If you have any questions about your Clario Toni suction
pump, please contact your healthcare provider /
physician at the number below:
Keep this Patient Instructions for use booklet in an
easily accessible location.
HEALTHCARE PROVIDER/PHYSICIAN CONTACT
INFORMATION:
Page 3

3
EN
Table of contents
Warnings and safety instructions �����������������������������������������������������������������������������������4
Description of the device
���������������������������������������������������������������������������������������������������������������9
Set up instructions
�������������������������������������������������������������������������������������������������������������������������������� 13
Preparation for use
��������������������������������������������������������������������������������������������������������������������������������14
Operating instructions
��������������������������������������������������������������������������������������������������������������������� 18
Emptying the canister
���������������������������������������������������������������������������������������������������������������������22
Replacing the valve discs
��������������������������������������������������������������������������������������������������������23
Replacing the rechargeable battery
��������������������������������������������������������������������� 24
Battery data and test
����������������������������������������������������������������������������������������������������������������������� 25
Battery calibration
����������������������������������������������������������������������������������������������������������������������������������� 27
Troubleshooting
������������������������������������������������������������������������������������������������������������������������������������������ 28
Cleaning guidelines
������������������������������������������������������������������������������������������������������������������������������ 30
Signs and symbols
������������������������������������������������������������������������������������������������������������������������������� 32
Warranty and servicing
����������������������������������������������������������������������������������������������������������������� 34
Disposal
��������������������������������������������������������������������������������������������������������������������������������������������������������������������� 35
Technical specifications
��������������������������������������������������������������������������������������������������������������� 36
Page 4

4
Warnings and safety instructions
The Clario Toni is approved exclusively for the use as
described in these Patient Instructions for use� Medela
can only warranty the safe functioning of the system
when the Clario Toni is used in combination with the
original Medela accessories�
Please read and observe these warning and safety
instructions before operation. These Patient
Instructions for use must be kept with the device for
later reference.
Please note that these instructions for use are a general
guide for the use of the product� Medical matters must
be addressed by a physician�
WARNINGS
The individual responsible for operating this device
on a daily basis (patient, caregiver) must be able
to read, understand and follow directions provided
in this instructions for use and by the healthcare
professional� The individual must be able to hear
and respond to auditory signal�
Only use the Clario Toni suction pump on the person for whom it was ordered and only for its
intended use�
Do not perform the therapy without your healthcare
provider’s supervision�
Page 5

5
EN
– If you are dependent on the device for airway suction-
ing and a breakdown can lead to a critical situation,
you must have a replacement device at hand�
– The connecting tubing delivered with the device
must always be connected to a sterile catheter as
prescribed by your physician�
– Do not modify the equipment�
– Clario Toni is EMC-tested in conformity with the
requirements of IEC 60601-1-2:2007 and IEC 60601-
1-2:2014 4th Edition according to clause 7 and 8�9�
Clario Toni is suitable for use in home and clinical
environments�
– Wireless communications equipment such as wireless
home network devices, mobile phones, cordless tele-
phones and their base stations, walkie-talkies can
affect the Clario Toni and should be kept at least a
distance 1ft (30 cm) away from the equipment�
Page 6

6
General safety at home
– Clario Toni should not be used adjacent to or stacked
with other equipment� If adjacent or stacked use is
necessary, Clario Toni should be observed to verify
normal operation in the configuration in which it will
be used�
– Keep the power supply cord away from hot surfaces�
– Keep the mains plug and the on / off switch away
from moisture�
– Never pull the mains plug out of the fixed mains
socket by pulling on the power supply cord!
– Never leave the device unattended when it is
switched on�
– The pump must stand upright during use�
– Never use the device at high room temperatures,
while bathing or showering or if you are very tired�
– Do not use extension cords with Clario Toni pump�
– Keep the power supply cord where you will not fall or
trip over it�
– Never place the power supply cord around your neck�
– Keep the Clario Toni pump clean and dry�
– Never place the pump in water or liquids�
Page 7

7
EN
– If the pump gets wet, rub with dry towel� Do not dry
in a microwave�
– Keep the pump away from children and pets�
– Keep the pump protected from direct sunlight�
– Prevent the pump from falling to the floor during sleep�
– Do not touch the pump when it has fallen into water�
Unplug device immediately from electrical outlet�
– The power supply may be damaged through electro-
static discharge (ESD) events at the DC port of 15 kV�
Page 8

8
When you leave the house
– Make sure the LED indicator is not blinking when you
leave the house�
– For your convenience put the pump into the optional
carrying bag and store the tubing safely in the tubing
bag�
– Don’t forget to take a spare jar / tubing and the power
supply with you�
These instructions for use must be kept for later reference�
Page 9

9
EN
Description of the device
Introduction
Your physician has prescribed the Clario Toni for airway
suctioning� This suction pump from Medela is a highquality suction pump that combines easy handling and
cleaning with safety features to ensure optimal operation�
Intended use
The Clario Toni suction pumps are indicated for
aspiration and removal of secretions, bodily fluids and
foreign objects from a patient’s airway or respiratory
support system in the nasal, pharyngeal and tracheal
areas of pediatric and adult patients� The suction
pump is suitable for use at home, in the hospital, in the
car or outdoors�
Indications
The Clario Toni suction pump is indicated to clear
the airways either through the nose, mouth or
tracheostomy tube�
Contraindications
The device is not suitable for use for prolonged
suctioning�
Page 10

10
Intended user
The Clario Toni should only be operated by properly
instructed users�
Expected service life
The expected service life of the device is seven years�
CAUTION: U�S� Federal law restricts this device to sale
by or on the order of a physician�
Subject to change�
Page 11

11
EN
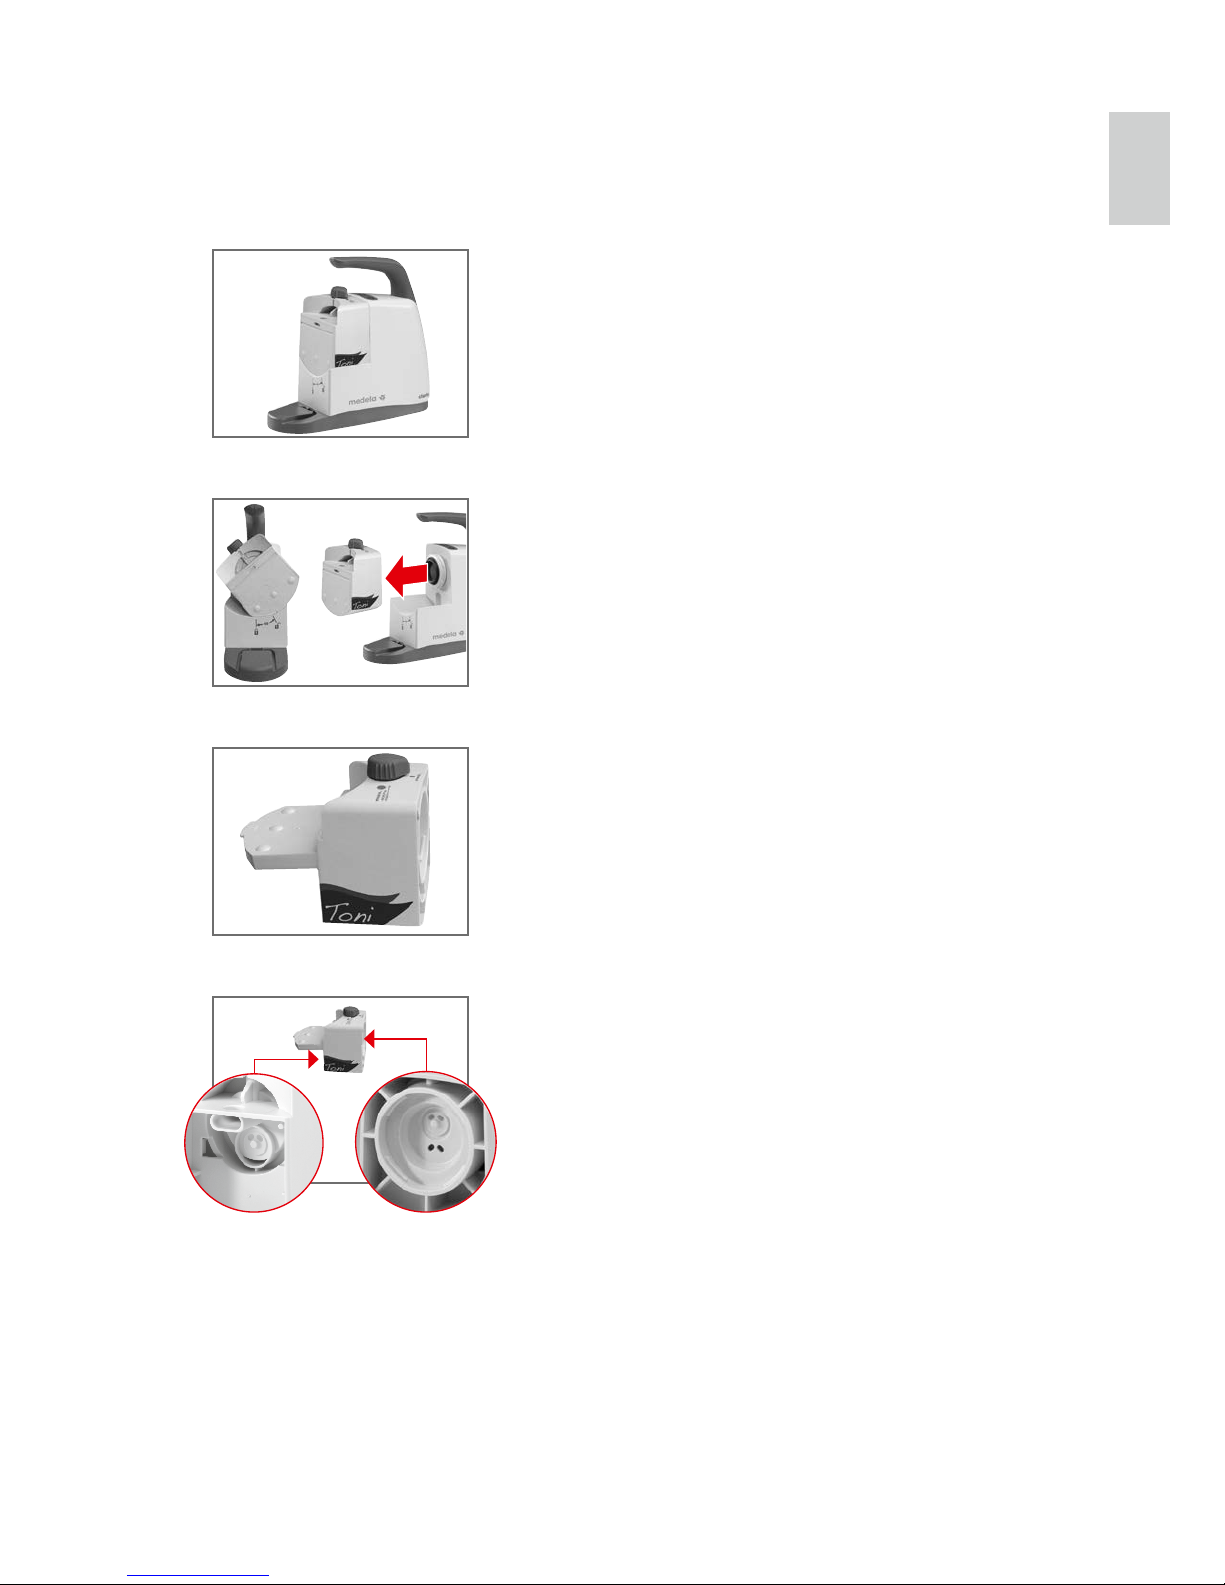
Versions of the pump
Front of the pump
Clario Toni AC/DC
Handle
On / off button
SafetyChamber
Motor unit
Mains socket
Specification plate
Battery compartment
Canister
Power cord
Plugs for
closing
Floater
Suction port
LED
Vacuum regulator
Page 12
12
Position of the membrane
Valve discs in the SafetyChamber
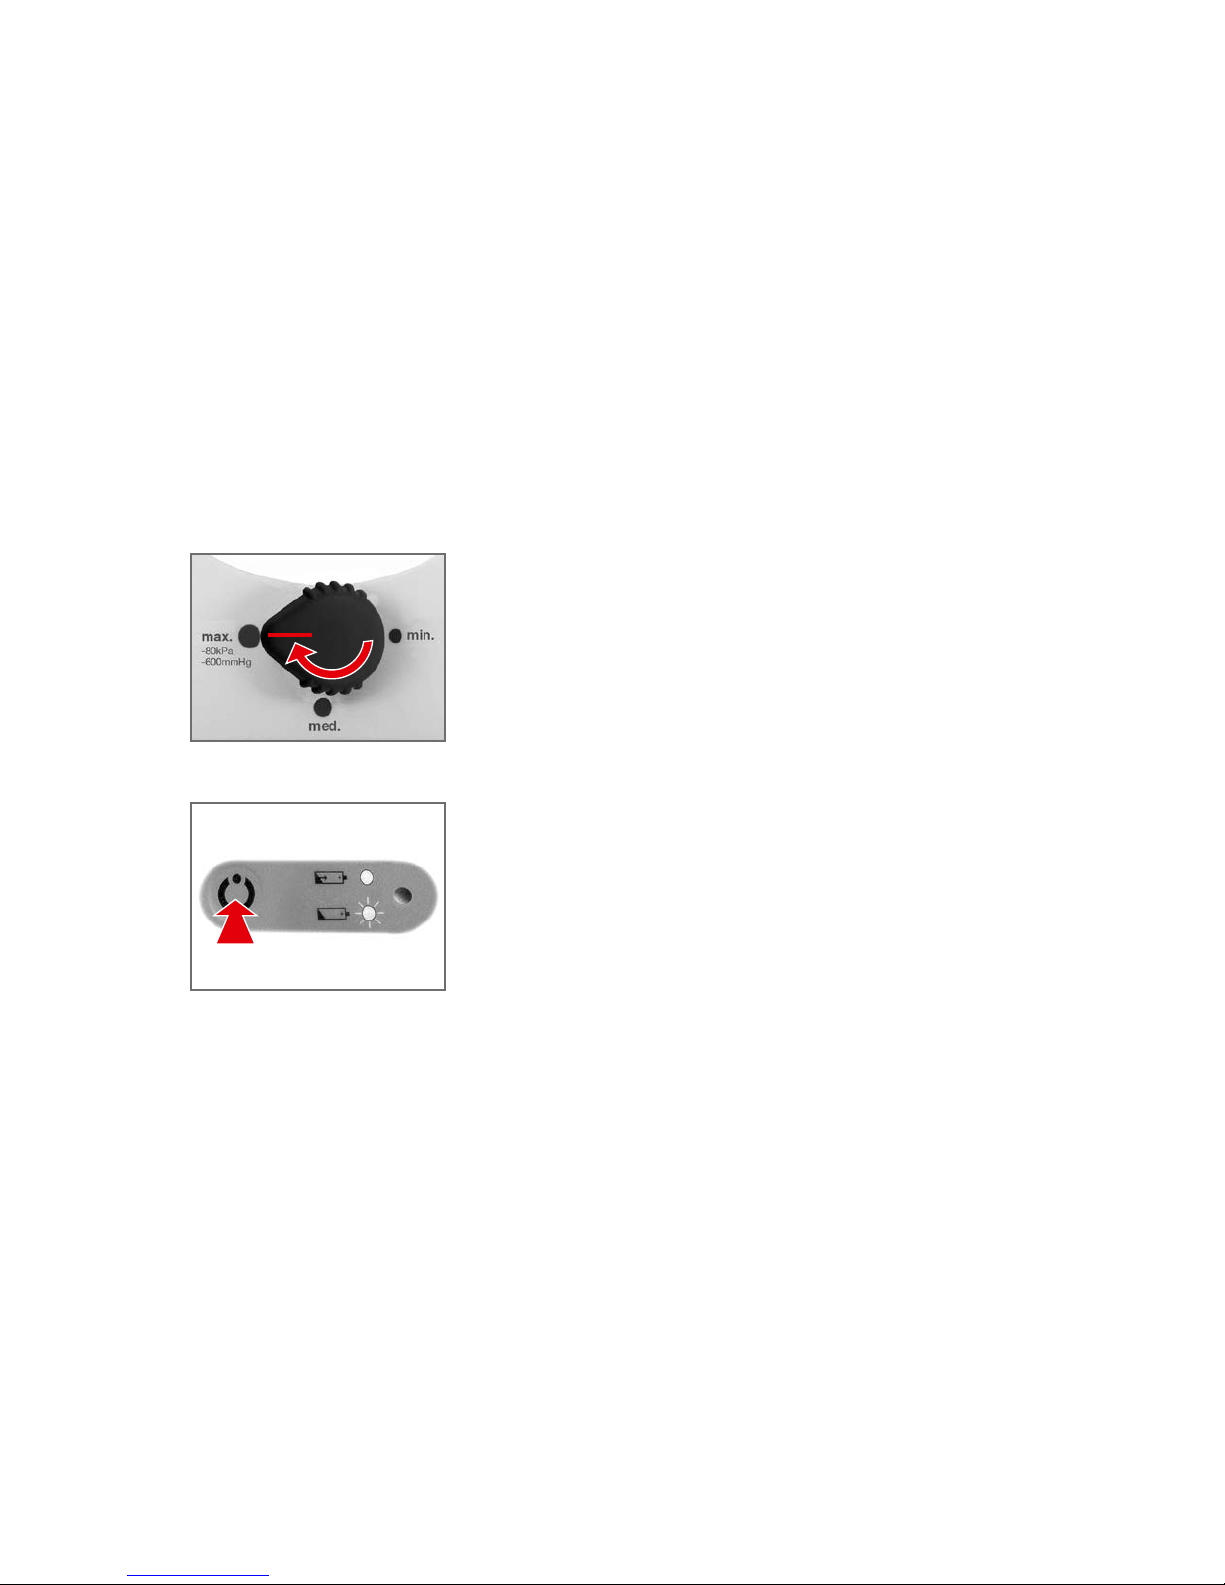
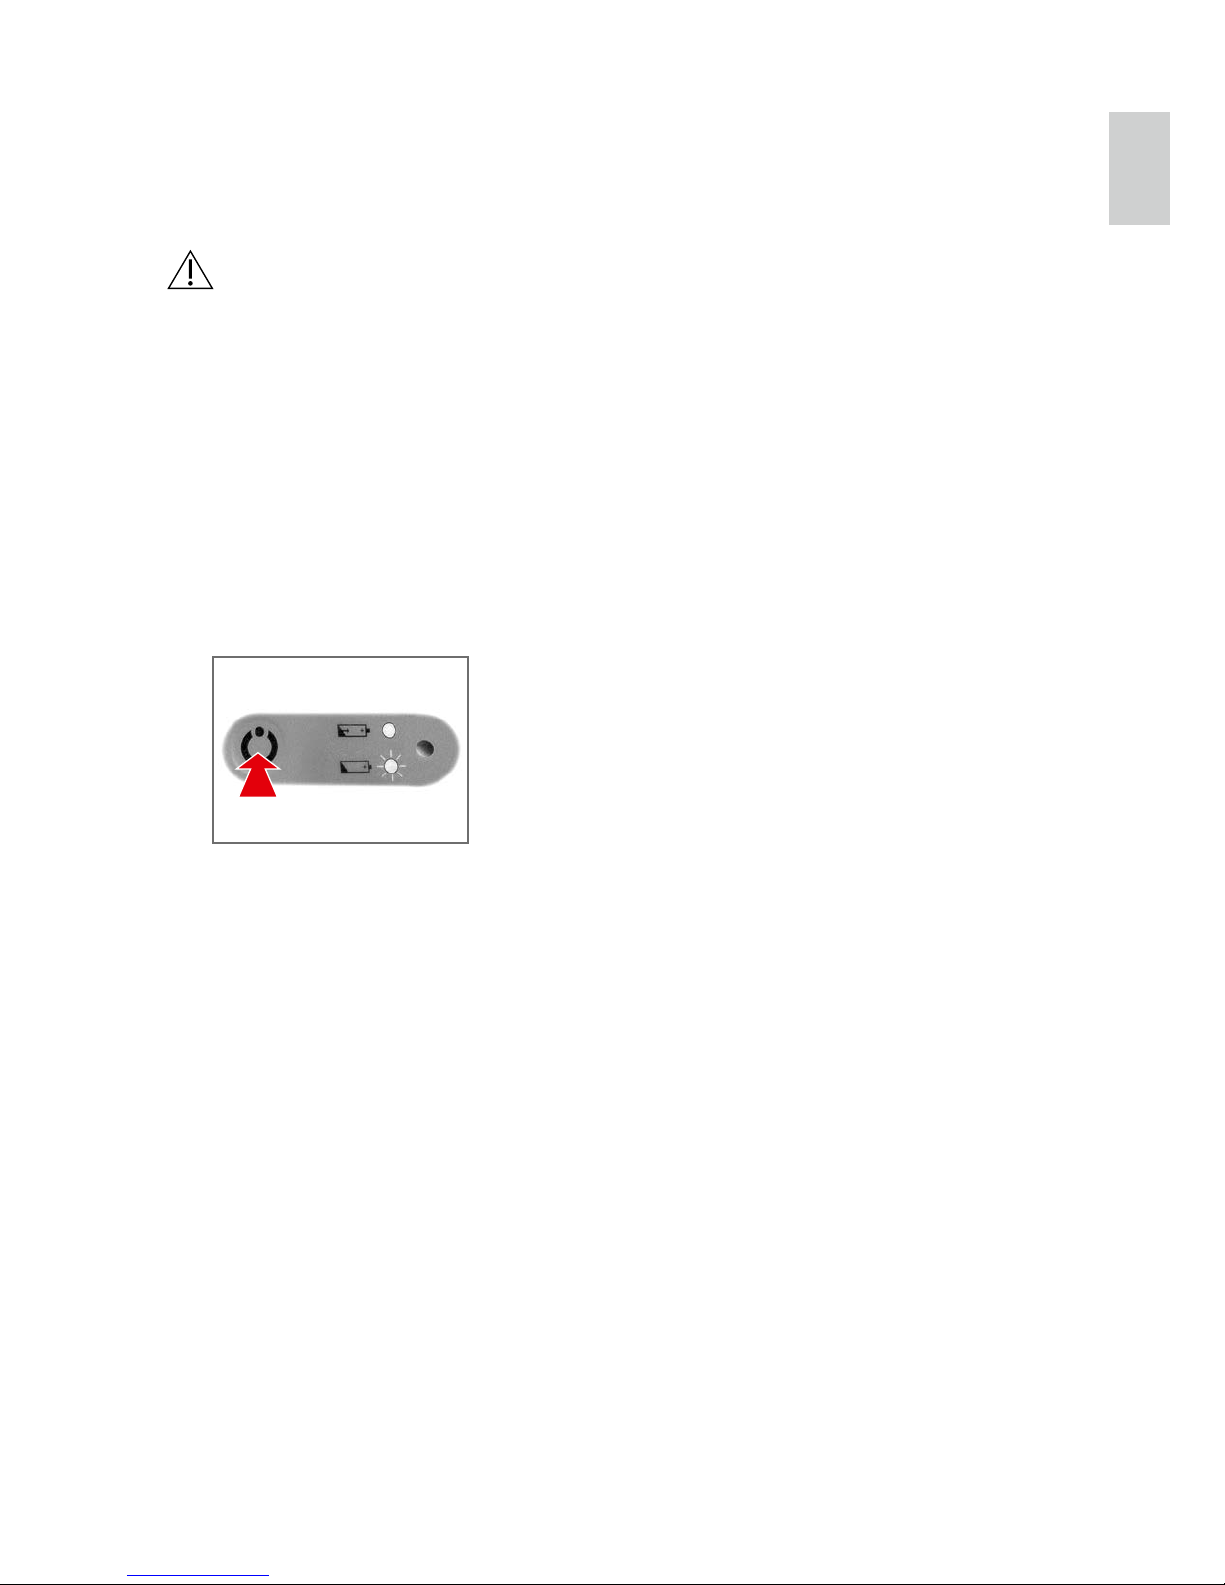
Operating elements and battery status
Vacuum regulator
not lit Battery is fully charged
lit up
blinks slowly Battery is soon empty
blinks rapidly Battery is defective
– Battery is being charged
– Pump is plugged in
Membrane
Rechargeable battery LED
On / off button
Page 13
13
EN
Check initial delivery
Check the delivery package of the Clario Toni for
completeness and general condition�
Set up instructions
Accessories
Please ask your healthcare provider / physician in case
of missing parts or for additional accessories�
1 x Instructions for use
1 x Power adapter
1 x Disposable fingertip tubing
1 x Clario Toni suction pump
WARNING
The connecting tubing supplied with the device
must never come into direct contact with the suction
area� A sterile suction catheter must always be used
(risk of infection)�
Page 14

14
Preparation for use
Checks before use
– Check the Clario Toni system before use for dam-
age of the power cord or plug, obvious device
damage or safety defects and proper functioning
of the device.
– Make sure that the rechargeable battery
is calibrated according to chapter "Battery
calibration".
– Check all accessories prior to use:
– Canister and lid for cracks, brittle and flawed
spots. Replace if necessary.
– Tubing for cracks, brittle areas and that connec-
tors are firmly attached. Replace if necessary.
WARNINGS
For use only by persons who have been adequately
trained in the use of suction pumps for airway
suctioning by their healthcare provider / physician�
CAUTIONS
– The Clario Toni must remain in an upright position
during use�
– Sterile accessories must be checked on the
integrity of the packaging before use�
– Non sterile and reusable accessories must be
cleaned and disinfected before use�
Page 15
15
EN
Assembly of the canister
1� Attach the floater to the canister�
2� Attach the lid to the canister� Mind
the markings on the front of the
canister and the lid�
Page 16
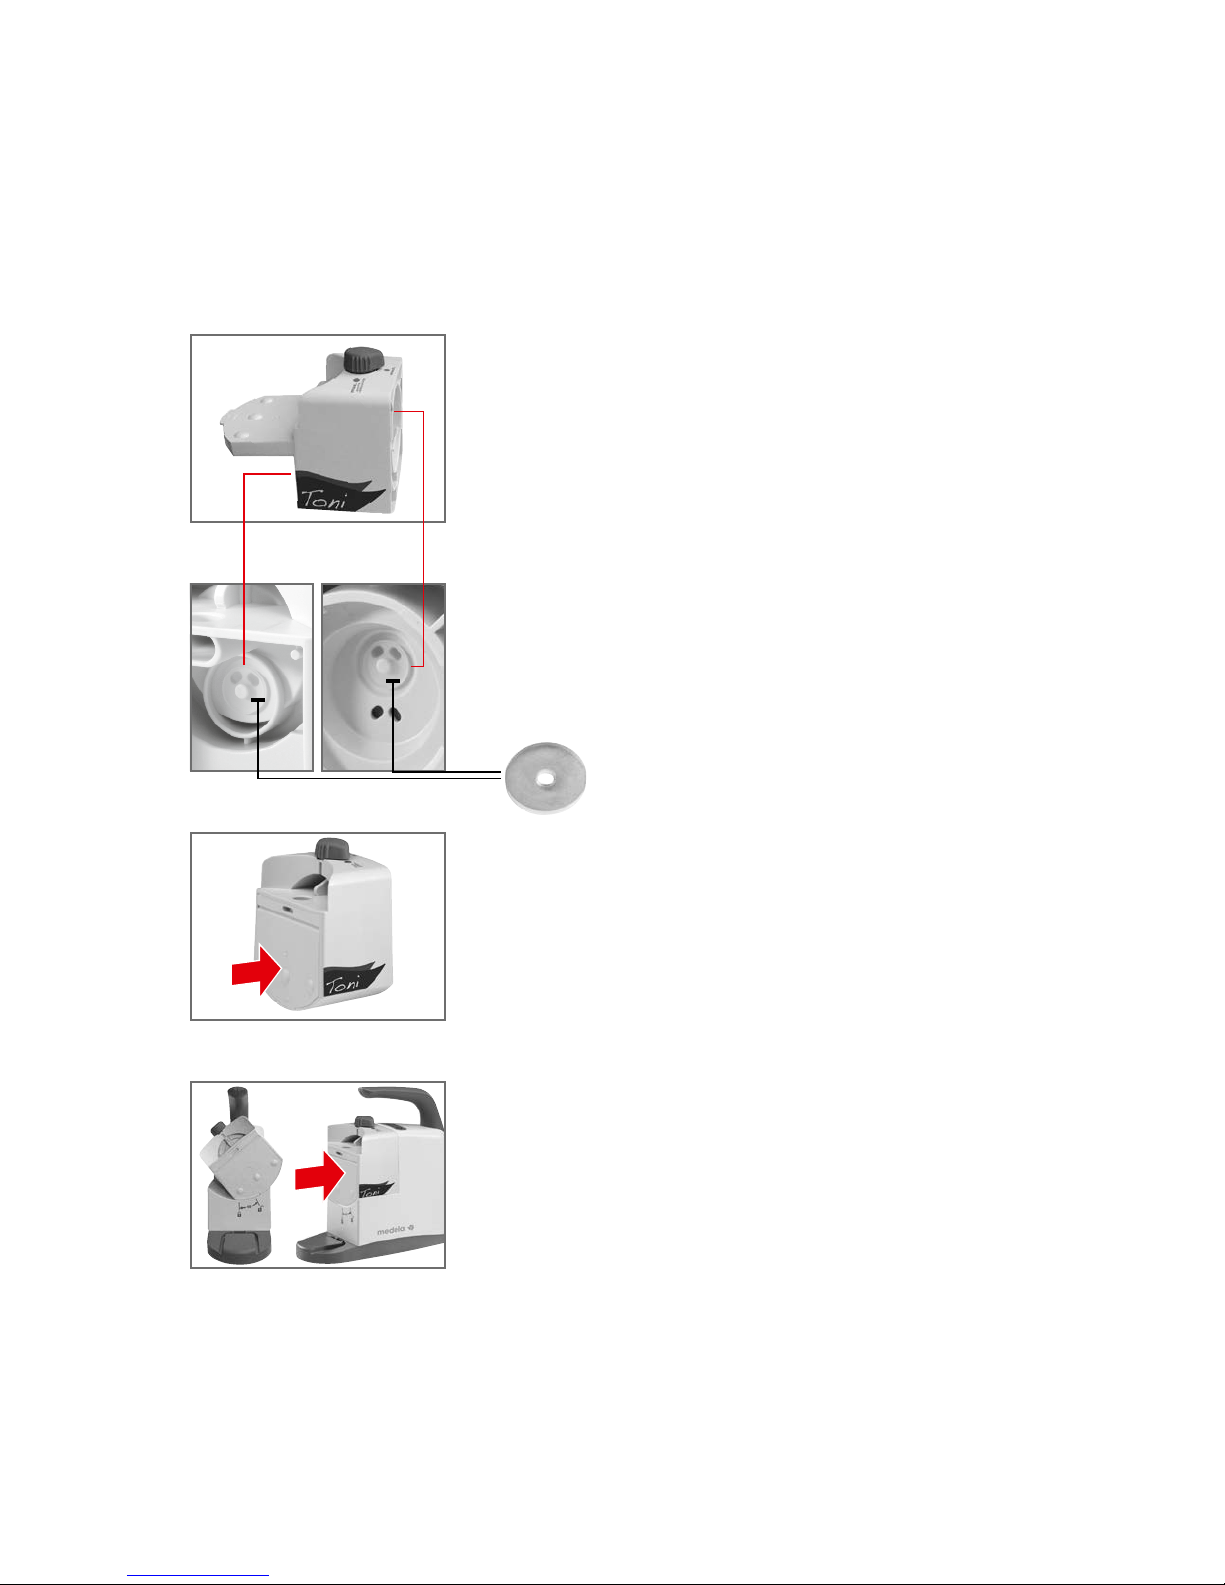
16
Make sure that both valves (silicone
discs) are attached to the
SafetyChamber�
2�
Assembly of the SafetyChamber
1� Open the lid of the SafetyChamber�
3� Make sure that the lid of the
SafetyChamber is closed well�
4� a) Hold the SafetyChamber and tilt
45 ° to the left to attach it to the
motor unit�
b) Turn the SafetyChamber to an
upright position until you hear a
click�
Page 17

17
EN
CAUTION
Do not use tubing or other sterile accessories if the
sterile packaging is damaged� Do not reuse single
use or sterile products�
Attaching the canister to the pump
1� Attach the canister to the pump�
Press firmly�
2� Attach the disposable fingertip
tubing to the suction port�
Page 18

18
Operating instructions
CAUTIONS
The Clario Toni is to be set up in such a way, that
a separation from the mains supply can be easily
managed� Calibrate the rechargeable battery
before the first use�
Connect Clario Toni to mains power
Check the pump before use following the instruction in
chapter "Preparation for use"�
1�
2� All versions: Plug in the mains plug of the power
cord to a fixed mains socket�
If the pump is
operated using
the optional
car connection
cable:
Connect the optional 12 V DC
connection cable to the socket on
the side of the pump and connect
it to the 12 V DC power source
(cigarette lighter in the car)�
or
If the pump is
operated with
the recharge-
able battery:
No connection to a power source is
needed� Make sure that the battery
was charged for five hours�
or
Page 19
19
EN
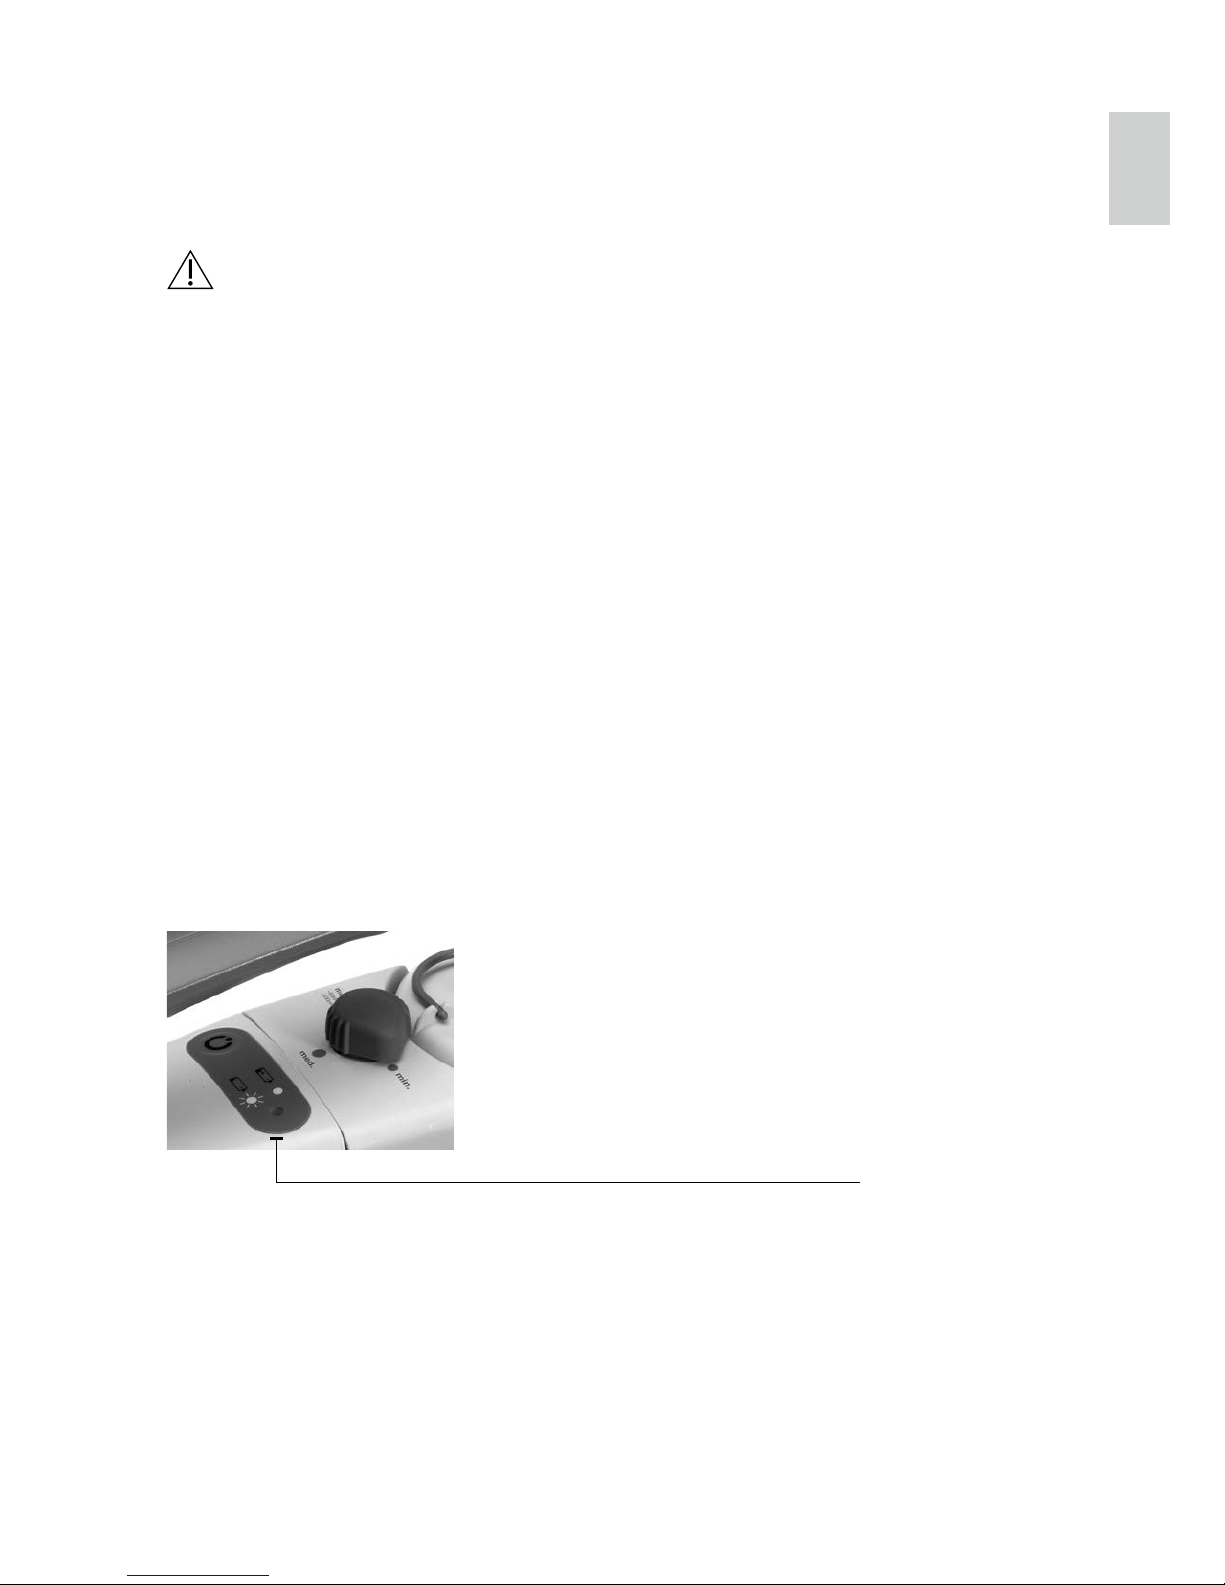
Functional check with water
1� Press the On / off button to switch
on the pump�
2� Set vacuum regulator to position
"max�"�
3� a) Attach the fingertip tubing�
b) Plug fingertip port�
4� Place fingertip into water and check
if there is suction�
If there is suction, proceed with step 6� If not, see
chapter "Troubleshooting"�
5�
6� Use catheter and vacuum setting as prescribed by a
physician�
Page 20

20
WARNING
For use only by medically trained persons who have
been adequately trained in suction procedures and in
the use of aspirators� Wear gloves for all operations�
Changing vacuum level
1� Set vacuum regulator to the
necessary position�
Page 21
21
EN
Placing out of operation after use
3� Clean and desinfect the Clario Toni�
See chapter "Cleaning guidelines"�
2� If the pump is
connected to
a fixed mains
socket:
Disconnect the mains plug from the
fixed mains socket�
If the pump is
connected to
a 12 V DC
power source:
Disconnect the 12 V DC plug from
the 12 V DC power source�
or
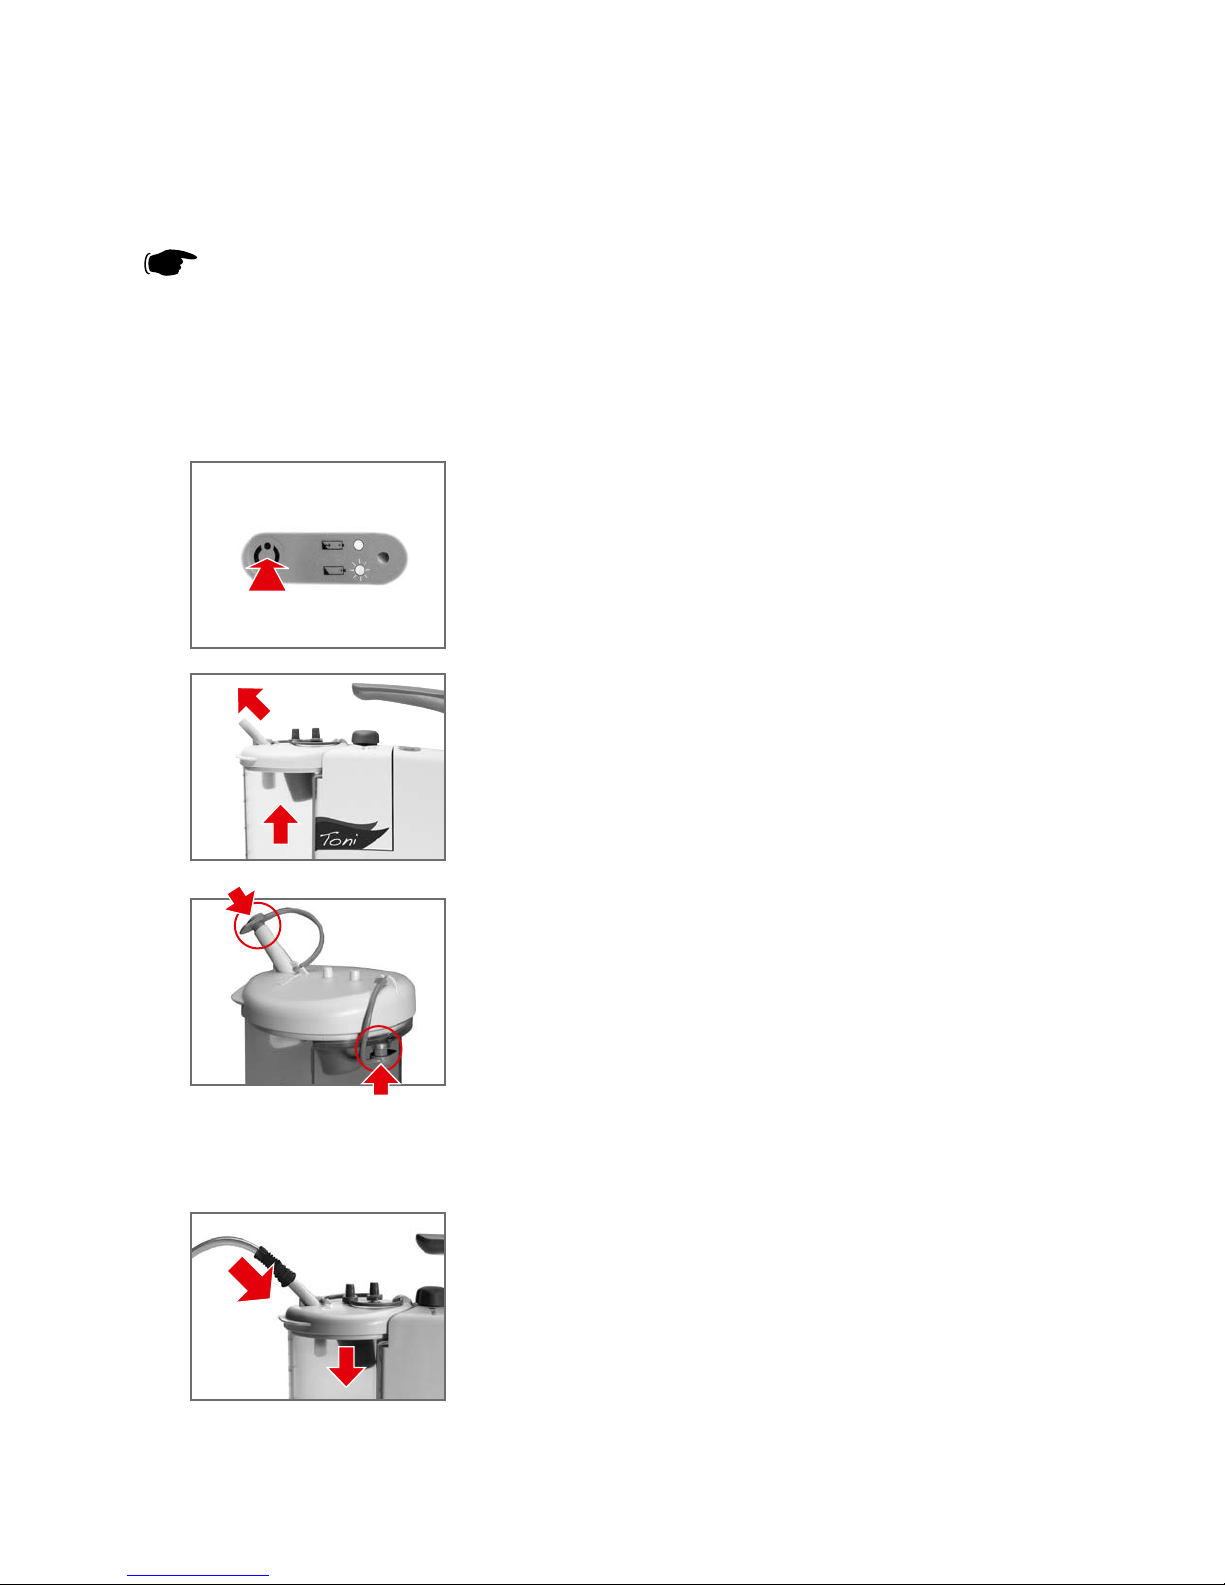
1� Press the On / off button to switch off
the pump�
Page 22
22
Emptying the canister
Safety related tip
On a daily basis or latest when the fluid level
reaches 550 ml and the floater stops suction into
the canister the canister should be emptied�
4�
Empty canister and dispose of fingertip tubing in accor-
dance with local guidelines and inhouse guidelines�
6� Switch on the pump and set the vacuum as
prescribed by a physician�
1� Press the On / off button to switch off
the pump�
2� a) Disconnect the disposable finger-
tip tubing from the suction port�
b) Remove canister from the pump�
5� a) Attach a clean canister�
b) Attach a new disposable fingertip
tubing to the suction port�
3� For transportation always seal the
canister with the plugs�
Page 23
23
EN
Replacing the valve discs
Attach the SafetyChamber to the pump as described
in chapter "Preparation for use"�
5�
1� Remove the canister�
2� a) Turn SafetyChamber 45 ° to the
left�
b) Remove SafetyChamber by pulling
it off the pump�
3� Open the SafetyChamber�
Replace defective valve discs� Make
sure that the new valve discs are
attached correctly�
4�
Page 24
24
Replacing the rechargeable battery
WARNINGS
Before replacing the rechargeable battery, switch off
the Clario Toni and pull the mains plug from Clario Toni
out of the fixed mains socket�
Calibrate and test the rechargeable battery (see
chapters Battery data and test/Battery calibration)�
7�
1� Open the lid of the battery
compartment on the bottom of
the Clario Toni�
5� Reattach the battery cable by
plugging in the plug�
6� Close the lid of the battery compartment� Make sure
that the lid is closed well and that the battery cable is
not clamped or pinched�
2� Detach the battery cable by
pulling the plug�
3� Remove the old rechargeable battery�
4� Insert the new rechargeable battery�
Page 25
25
EN
Battery data and test
Duration of pumping
If the battery is fully charged, the operating time at
maximum vacuum is approximately > 50 minutes�
Charging time (charged up to 100 %)
Approx� 5 hours
Battery status
CAUTIONS
Only charge the rechargeable battery when the
charging indicator blinks slowly�
not lit Battery is fully charged
lit up
blinks slowly Battery is soon empty
blinks rapidly Battery is defective
– Battery is being charged
– Pump is plugged in
Page 26
26
Pull out the mains plug from the fixed mains socket�2�
Testing the rechargeable battery
5� Measure the time until the pump comes to a stop�
The battery is ok, when the running time is
> 50 minutes� If the running time is < 50 minutes,
repeat test or calibrate the battery (see next page)�
4� Switch on the Clario Toni�
The pump will start running�
3� Set vacuum regulator to position
"max�"�
Make sure that the rechargeable battery is fully
charged�
1�
Page 27
27
EN
Battery calibration
CAUTIONS
Calibrate the rechargeable battery before first use
and after storage duration > 2 months� Replace
battery if the calibration is not successful�
Calibrating NiMH rechargeable battery
Pull out the mains plug from the fixed mains socket�2�
Connect the Clario Toni to a fixed mains socket�
The rechargeable battery is being charged�
5�
Wait until the charging indicator goes out�6�
Repeat step 1 to 6� The Clario Toni AC / DC is then
ready to use�
7�
Let the pump run until the rechargeable battery is
empty and the pump comes to a stop�
4�
3� Switch on the Clario Toni�
The pump will start running�
Make sure that the rechargeable battery is fully charged�1�
Storage of the rechargeable battery
In order to keep the self-discharge at a minimum, store
the Clario Toni and the removed replacement rechargeable batteries at temperatures below 25 °C (77 °F)�
Repeat the calibration process every 60–90 days�
Page 28

28
Troubleshooting
If the motor is not running
Check if:
– the Clario Toni is switched on�
– the mains voltage is correct and if the mains plug is
inserted correctly into the wall socket�
– the internal battery is charged (only under battery
operation)�
If the pump does not suction strongly enough
Check if:
– the vacuum regulator is set to the correct and
prescribed suction level�
– the tubings are not defective or broken� If necessary,
replace�
– all plug-in connections are tight�
– the suction canister / lid have no cracks, brittle areas,
discolouration� If necessary, replace�
– the seal of the valve discs inside the SafetyChamber
is tight�
– the membrane is clean and has no tears�
If the pump is too loud
Check the position and seal of the valve discs inside the
SafetyChamber� If necessary reposition according to
chapter "Replacing the valve discs"�
Page 29
29
EN
Running time from battery insufficient
Calibrate the rechargeable battery (see chapter
"Battery calibration")�
CAUTIONS
If the fault cannot be rectified, please contact your
healthcare provider�
The rechargeable battery is
fully charged�
No LED lit
– The rechargeable battery is being
charged�
– The pump is connected to the
mains�
LED lit up
The rechargeable battery is
soon empty� The battery power
is sufficient for about 10 minutes
of pumping�
LED blinks
slowly
The rechargeable battery is
defective, please contact your
healthcare provider�
LED blinks
rapidly
Page 30
30
Cleaning guidelines
General notes
– Follow the cleaning instructions given by your
healthcare provider�
– Wear protective gloves for cleaning / disinfection�
– Dispose of fluids such as blood and secretions and
the parts contaminated with them according to your
healthcare provider’s instructions�
Water
Use only the purest quality of water for cleaning� Water
hardness is a serious consideration since deposits left
on medical products may not be properly decontaminated� Use deionised water in order to reduce this problem�
Disposable products
These are single use products not intended to be
reused� Reuse could cause loss of mechanical,
chemical and / or biological characteristics� Reuse could
cause cross contamination�
Disassembly
Separate all individual parts before cleaning and disinfecting�
WARNINGS
Before cleaning the device, pull the mains plug out
of the wall socket�
Page 31

31
EN
Cleaning canister and lid
Clean components in hot water (60–70 °C) containing a
detergent with a pH range between 6�0 and 8�0 only, in
order to avoid damaging the instruments and containment devices�
1� Soak all parts thoroughly with warm, soapy water
(60–70 °C) or in enzymatic detergent for 1–5 minutes�
2� Remove visible dirt with a cleaning tool – general
purpose cleaning brushes, such as pipe cleaners or
non-abrasive lint cloths� Rinse thoroughly in clear
water� Allow to dry�
3� Check the parts for visible dirt and repeat these steps
if necessary� Alternatively the canister / lid can be
placed in a dishwasher for cleaning�
Cleaning pump housing, mains cable and plastic
accessories
Wipe with detergent recommended by your healthcare
provider� Use clean cloth to dry�
Page 32

32
Signs and symbols
This Symbol indicates
a type BF applied
part�
This symbol indicates
a class Il device�
This symbol indicates
to consult instructions
for use�
This symbol indicates
the date of manufacture (four digits for the
year and two digits
for the month)�
This symbol indicates
the manufacturer�
This symbol indicates
safety related tip�
This symbol indicates
to follow instructions
for use�
This symbol indicates the compliance with additional
USA and Canada
safety requirements
for medical electrical
equipment�
This symbol indicates
the humidity limitation
for operation, transport and storage�
This symbol
indicates the
compliance with
the essential
requirements
of the Council
Directive 93/42/
EEC of 14 June
1993 concerning
medical devices�
This symbol indicates
that interferences may
occur in the vicinity
of equipment marked
with this symbol�
This symbol indicates
the class of the pump�
This symbol indicates
the legal specifications of the pump�
This symbol indicates a CAUTION or
WARNING associated
with the device�
This symbol
indicates the
device is
sterilized using
ethylene oxide�
This symbol indicates
manufacturer’s
catalogue number�
This symbol indicates
manufacturer’s serial
number�
This symbol indicates
manufacturer’s batch
code�
This symbol indicates
that the device should
not be used after the
end of the year and
month shown�
This symbol indicates
a single use device�
Do not reuse the
device�
This symbol indicates
the temperature limitation for operation,
transport and storage�
This symbol indicates
the protection against
harmful effects due to
ingress of solid foreign
objects and against
harmful effects due to
the ingress of water�
IP21
This symbol indicates
MR UNSAFE�
MR
Page 33

33
EN
This symbol indicates
alternating current�
This symbol indicates
a carton package�
This symbol indicates
that the material is
part of a recovery/
recycling process�
This symbol indicates
the number of items
n that the content is
sufficient for�
∑
This symbol indicates
the atmospheric pressure limitation for
operation, transport
and storage�
This symbol indicates
the dimensions
(h x w x d) of the pump�
This symbol indicates
the maximum vacuum
level of the pump�
This symbol indicates
the flow levels of the
pump�
This symbol indicates
the weight of the
pump�
AC
This symbol indicates
the electrical specifications of the pump�
This symbol indicates
do not dispose the
device together with
unsorted municipal
waste (for EU only)�
This symbol indicates
do not use the
device if package is
damaged�
This symbol indicates
to keep the device
dry�
This symbol indicates
to handle the fragile
device with care�
This symbol indicates
to keep the device
away from sunlight�
This symbol indicates
direct current�
This symbol indicates
number of items�
pcs
This symbol indicates
a Prescription Device�
CAUTION: U�S� Federal
law restricts this device
to sale by or on the
order physician (for US
only)�
Page 34

34
Warranty and servicing
Warranty
Warranty period is for 2 years (6 months for the
rechargeable battery) after date of delivery� The manufacturer is not liable for any damage orconsequential
damage caused by incorrect operation, inappropriate
usage as well as use by unauthorized persons�
Servicing
The Clario Toni pump should not require maintenance�
If a Clario Toni pump fails within the warranty period
due to a manufacturing defect, it will be replaced� The
original pump will need to be returned to the supplier�
Page 35

35
EN
Disposal
Ask your healthcare provider how to dispose of used
tubings�
Page 36

36
Technical specications
Transport/Storage conditions
The Clario Toni pump and accessories must remain in
the packaging for storage and stored at a temperature
range from –4 °F to +122 °F (–20 °C to +50 °C)�
Rechargeable battery +41 °F to + 77 °F (+5 °C to +25 °C)
Operating conditions
The Clario Toni pump and accessories must be operated within a temperature range of +41 °F and +104 °F
(+5 °C and +40 °C)� Do not operate the products in
extreme cold or heat� Avoid high humidity (15 – 93 % is
permissable)�
Protection class IP21
The Clario Toni pump is protected against ingress of
dripping water�
CAUTIONS
Do not operate the Clario Toni pump above 9,842 ft
above sea level (3,000 m above sea level)�
Page 37

37
EN
h x w x d
223 x 255 x 95 mm
8�8 x 8�9 x 3�7 inches
15 liter/minute (+/– 10 %)
2�0 kg / 4�4 lbs
Without jar
min� vacuum, – 60 mmHg / – 8 kPa (+/– 15 %)
med� vacuum, –100 mmHg / – 13 kPa (+/– 15 %)
max� vacuum, – 600 mmHg / – 80 kPa (– 15 %)
Calculated at 0 meter, atmospheric pressure:
1013 hPa� Please note: vacuum levels may vary
depending on location (meters above sea level,
atmospheric pressure and temperature)�
100–240 Volt, 50–60 Hz
12 V, 3�4 A, NiMH
Power adapter
UE48-120340SPA1
Page 38

38
Hilfe
Bitte lesen Sie die ganze Gebrauchsanweisung durch,
bevor Sie das Gerät in Betrieb nehmen�
Falls Sie Fragen zur Clario Toni Absaugpumpe haben,
kontaktieren Sie bitte Ihre Pflegefachkraft/Ihren Arzt
unter der unten stehenden Nummer:
Bewahren Sie diese Gebrauchsanweisung für
Patienten an einem gut zugänglichen Ort auf.
KONTAKTINFORMATIONEN PFLEGEFACHKRAFT/
AR Z T:
Page 39

39
DE
Inhaltsverzeichnis
Warn- und Sicherheitshinweise ������������������������������������������������������������������������������������40
Beschreibung des Geräts
��������������������������������������������������������������������������������������������������������45
Montageanleitung
�����������������������������������������������������������������������������������������������������������������������������������49
Anwendung vorbereiten
�������������������������������������������������������������������������������������������������������������� 50
Betriebsanweisungen
�����������������������������������������������������������������������������������������������������������������������54
Behälter leeren
����������������������������������������������������������������������������������������������������������������������������������������������58
Ventilscheiben ersetzen
��������������������������������������������������������������������������������������������������������������� 59
Akku ersetzen
������������������������������������������������������������������������������������������������������������������������������������������������60
Akku-Daten und Test
����������������������������������������������������������������������������������������������������������������������� 61
Akku kalibrieren
������������������������������������������������������������������������������������������������������������������������������������������63
Problembehebung
���������������������������������������������������������������������������������������������������������������������������������64
Richtlinien für die Reinigung
������������������������������������������������������������������������������������������������66
Zeichen und Symbole
���������������������������������������������������������������������������������������������������������������������68
Garantie und Wartung
�������������������������������������������������������������������������������������������������������������������� 70
Entsorgung
���������������������������������������������������������������������������������������������������������������������������������������������������������� 71
Technische Daten
����������������������������������������������������������������������������������������������������������������������������������� 72
Page 40

40
Warn- und Sicherheitshinweise
Die Clario Toni ist ausschließlich zur in dieser
Gebrauchs anweisung für Patienten beschriebenen
Verwendung zugelassen� Medela kann die sichere
Funktion des Systems nur gewährleisten, wenn die
Clario Toni in Kombination mit dem Medela OriginalZubehör verwendet wird�
Vor Inbetriebnahme bitte diese Warn- und
Sicherheits hinweise lesen und beachten.
Diese Gebrauchsanweisung für Patienten muss
für den späteren Gebrauch aufbewahrt werden.
Bitte beachten Sie, dass diese Gebrauchsanweisung
allgemeine Angaben zur Verwendung des Produktes
enthält� Zur Klärung medizinischer Fragen wenden Sie
sich bitte an einen Arzt�
ACHTUNG
Die Person, die für den täglichen Betrieb dieses
Geräts verantwortlich ist (Patient, Pflegeperson),
muss in der Lage sein, die Anweisungen dieser
Gebrauchsanweisung und diejenigen der Pflegefachkraft zu verstehen und zu befolgen�
Die Person muss über ein normales Hörvermögen
verfügen und auf Tonsignale reagieren können�
Die Clario Toni Absaugpumpe darf nur an der Person angewendet werden, für die sie bestellt wurde
und ausschließlich für den vorgesehenen Zweck�
Führen Sie die Behandlung nur unter Aufsicht durch
Ihre Pflegefachkraft durch�
Page 41

41
DE
– Falls Sie zur Absaugung der Atemwege auf das Gerät
angewiesen sind und ein Ausfall des Gerätes zu
einer kritischen Situation führen kann, müssen Sie ein
Ersatzgerät bereithalten�
– Der mit dem Gerät mitgelieferte Verbindungsschlauch
muss immer gemäß den Anweisungen Ihres Arztes
mit einem sterilen Katheter verbunden sein�
– Verändern Sie die Einstellungen am Gerät nicht�
– Clario Toni ist entsprechend den Anforderungen von
IEC 60601-1-2:2007 und IEC 60601-1-2:2014 4�
Fassung gemäß Abschnitt 7 und 8�9 EMV-geprüft�
Clario Toni eignet sich für die Anwendung zu Hause
und in der klinischen Praxis�
– Drahtlose Kommunikationsgeräte wie drahtlose Heim-
netzwerke, Mobiltelefone, schnurlose Telefone und
deren Basisstationen sowie Sprechfunkgeräte können
die Funktionsweise der Clario Toni beeinträchtigen
und sollten mit einem Mindestabstand von 30 cm
(1 Fuß) vom Gerät ferngehalten werden�
Page 42

42
Allgemeine Sicherheit zu Hause
– Clario Toni sollte nicht unmittelbar neben oder mit
anderen Geräten gestapelt verwendet werden� Wenn
der Betrieb nahe oder mit anderen Geräten gestapelt
erforderlich ist, dann sollte Clario Toni beobachtet
werden, um ihren ordnungsgemäßen Betrieb in dieser
Konstellation sicherzustellen�
– Stromkabel nicht mit heißen Flächen in Berührung
bringen�
– Stecker und Ein-/Aus-Schalter dürfen nicht mit
Feuchtigkeit in Berührung kommen�
– Den Stecker niemals durch Ziehen am Stromkabel
aus der Steckdose ziehen�
– Eingeschaltetes Gerät nie unbeaufsichtigt lassen�
– Während des Gebrauches muss die Pumpe
aufrecht stehen�
– Das Gerät nie in Gebrauch nehmen bei hohen
Zimmertemperaturen, beim Baden, beim Duschen
oder wenn Sie sehr müde sind�
– Verwenden Sie keine Verlängerungskabel mit der
Clario Toni Pumpe�
– Das Stromkabel so legen, dass Sie nicht darüber
stolpern�
– Legen Sie das Stromkabel nie um Ihren Hals�
– Halten Sie die Clario Toni Pumpe sauber und trocken�
– Die Pumpe nie in Wasser oder andere Flüssigkeiten
stellen�
Page 43

43
DE
– Falls die Pumpe nass wird, mit einem Tuch
trocken reiben� Nicht in der Mikrowelle trocknen�
– Die Pumpe außer Reichweite von Kindern und
Haustieren aufbewahren�
– Die Pumpe vor direktem Sonnenlicht schützen�
– Verhindern Sie, dass die Pumpe, während Sie
schlafen, auf den Boden fällt�
– Berühren Sie die Pumpe nicht, wenn sie ins Wasser
gefallen ist� Ziehen Sie den Stecker sofort aus
der Steckdose�
– Das Netzteil kann bei elektrostatischen Entladungen
(ESD) von 15 kV am DC Anschluss beschädigt
werden�
Page 44

44
Wenn Sie das Haus verlassen
– Stellen Sie sicher, dass die LED-Anzeige nicht blinkt,
wenn Sie aus dem Haus gehen�
– Stecken Sie die Pumpe in die optionale Tragetasche
und verstauen Sie den Schlauch im Schlauchbeutel,
damit er nirgends hängen bleibt�
– Vergessen Sie nicht, das Ladegerät und ein Behälter/
Schlauch-Set als Ersatz mitzunehmen�
Diese Gebrauchsanweisung muss für den späteren
Gebrauch aufbewahrt werden�
Page 45

45
DE
Beschreibung des Geräts
Einleitung
Ihr Arzt hat Ihnen die Clario Toni für die Absaugung der
Atemwege verschrieben� Diese Absaugpumpe von
Medela ist ein qualitativ hochwertiges Gerät, das
einfache Handhabung und Reinigung mit besonderen
Sicherheitsmerkmalen verbindet, um einen optimalen
Betrieb sicherzustellen�
Verwendungszweck
Die Clario Toni Absaugpumpen sind zum Absaugen und
Entfernen von Sekreten, Körperflüssigkeiten und
Fremdkörpern aus den Atemwegen oder aus den nasalen, pharyngalen und trachealen Bereichen eines
Patienten (Kinder und Erwachsene) geeignet� Diese
Absaugpumpe ist geeignet für die Verwendung zu
Hause, im Krankenhaus, im Auto oder im Freien�
Indikationen
Die Clario Toni Absaugpumpe ist dazu geeignet, die
Atemwege durch die Nase, den Mund oder eine
Tracheostomiekanüle von Sekreten zu befreien�
Kontraindikationen
Das Gerät ist nicht geeignet zum Dauerabsaugen�
Page 46

46
Benutzer
Die Clario Toni sollte nur von entsprechend ausgebildeten Benutzern betrieben werden�
Erwartete Betriebsdauer
Die erwartete Betriebsdauer des Geräts beträgt sieben
Jahre�
VORSICHT: Nach US-Bundesgesetz darf dieses Gerät
nur von Ärzten oder auf deren Anweisung verkauft
werden�
Änderungen vorbehalten�
Page 47

47
DE
Versionen der Pumpe
Vorderseite der Pumpe
Handgriff
Ein-/Aus-Knopf
Sicherheits-
kammer
Motoreinheit
Stromanschluss
Typenschild
Akku-Fach
Behälter
Stromkabel
Stöpsel, um Deckel
zu verschließen
Schwimmer
Schlauchanschluss
LED
Vakuumregler
Clario Toni AC/DC
Page 48

48
Position der Membran
Ventilscheiben in der Sicherheitskammer
Bedienelemente und Ladezustand des Akkus
Vakuumregler
leuchtet nicht Akku ist vollständig geladen
leuchtet ständig
blinkt langsam Akku ist fast leer
blinkt schnell Akku ist defekt
– Akku wird geladen
– Pumpe ist eingesteckt
Membran
Akku-LED
Ein-/Aus-Knopf
Page 49

49
DE
Lieferumfang überprüfen
Lieferumfang der Clario Toni auf Vollständigkeit und
allgemeinen Zustand prüfen�
Montageanleitung
Zubehör
Bitte fragen Sie Ihre Pflegefachkraft/Ihren Arzt, falls
etwas fehlt oder Sie weiteres Zubehör benötigen�
1 x Gebrauchsanweisung
1 x Netzteil
1 x Einweg-Fingertipschlauch
1 x Clario Toni Absaugpumpe
ACHTUNG
Der mit dem Gerät gelieferte Anschlussschlauch
darf niemals mit dem Absaugbereich in direkten
Kontakt kommen� Es muss immer ein steriler
Saugkatheter verwendet werden (Infektionsrisiko)�
Page 50

50
Anwendung vorbereiten
Tests vor Gebrauch
– Überprüfen Sie das Clario Toni System vor Inbe-
triebnahme auf Beschädigungen des Stromkabels
und Steckers, Schäden am Gerät, Sicherheitsdefekte und das korrekte Funktionieren des Geräts.
– Stellen Sie sicher, dass der Akku gemäß Kapitel
„Akku kalibrieren“ kalibriert wurde.
– Prüfen Sie sämtliches Zubehör vor Gebrauch:
– Behälter und Deckel auf Risse, spröde und feh-
lerhafte Stellen untersuchen. Falls nötig ersetzen.
– Schläuche auf Risse bzw. spröde Stellen unter-
suchen und sicherstellen, dass die Verbindungsstücke korrekt eingesteckt sind. Falls nötig
ersetzen.
ACHTUNG
Nur zur Anwendung durch Personen, die im Einsatz
von Pumpen für das Absaugen der Atemwege
durch ihre Pflegefachkraft/ihren Arzt ausreichend
geschult worden sind�
VORSICHT
– Während des Gebrauchs muss die Clario Toni auf-
recht stehen�
– Die Verpackung von sterilem Zubehör muss vor
der Verwendung auf Unversehrtheit geprüft werden�
– Nicht-steriles und wiederverwendbares Zubehör
muss vor der Verwendung gereinigt und desinfiziert werden�
Page 51

51
DE
Montage des Behälters
1� Den Schwimmer am Behälter
befestigen�
2� Den Deckel am Behälter befestigen�
Markierungen an Vorderseite von
Behälter und Deckel beachten�
Page 52

52
Sicherstellen, dass beide
Ventile (Silikonscheiben) an der
Sicherheitskammer angebracht sind�
2�
Montage der Sicherheitskammer
1� Deckel der Sicherheitskammer öffnen�
3� Deckel der Sicherheitskammer
gut verschließen�
4� a) Die Sicherheitskammer um 45 °
nach links neigen, um sie an der
Motoreinheit zu befestigen�
b) Die Sicherheitskammer in aufrechte
Stellung drehen, bis ein Klicken
hörbar ist�
Page 53

53
DE
VORSICHT
Verwenden Sie keine Schläuche oder anderes
steriles Zubehör, dessen sterile Verpackung
beschädigt wurde� Einweg-Produkte oder sterile
Produkte nicht wiederverwenden�
Behälter an der Pumpe anbringen
1� Den Behälter an der Pumpe
anbringen� Fest andrücken�
2� Den Einweg-Fingertipschlauch
am Schlauchanschluss anbringen�
Page 54

54
Betriebsanweisungen
VORSICHT
Die Clario Toni muss so aufgestellt werden, dass sie
auf einfache Weise vom Stromnetz getrennt werden
kann� Der Akku ist vor dem ersten Einsatz zu kalibrieren�
Die Clario Toni mit dem Stromnetz verbinden.
Überprüfen Sie die Pumpe vor dem Gebrauch
entsprechend der Anleitung in Kapitel „Anwendung
vorbereiten“�
1�
2� Alle Versionen: Den Netzstecker in eine Steckdose
einstecken�
Betrieb der
Pumpe mit
dem optio-
nalen Auto-
Verbindungs-
kabel:
Das optionale 12 V-Gleichstromkabel
mit dem Anschluss auf der Seite
der Pumpe verbinden und
in die 12 V-Gleichstromquelle
(Zigarettenanzünder im Auto)
einstecken�
oder
Wenn die
Pumpe mit
einem Akku
betrieben wird:
Es ist keine Verbindung zu
einer Stromquelle ist erforderlich�
Sicherstellen, dass der Akku
während fünf Stunden geladen wurde�
oder
Page 55

55
DE
Funktionstest mit Wasser
1� Ein-/Aus-Knopf an der
Pumpe drücken�
2� Vakuumregler auf die Position
„max�“ drehen�
3� a) Fingertipschlauch befestigen�
b) Fingertip-Anschluss mit Stöpsel
verschließen�
4� Fingertip ins Wasser halten und
kontrollieren, ob Sog vorhanden�
Wenn Sog vorhanden, weiter mit Schritt 6�
Wenn nicht, siehe Kapitel „Problembehebung“�
5�
6� Vom Arzt vorgeschriebene Katheter und
Vakuumeinstellungen verwenden�
Page 56

56
ACHTUNG
Nur zur Anwendung durch medizinisch geschultes
Personal, das in der Durchführung von Absaugtechniken und im Einsatz von Absauggeräten
ausreichend geschult ist� Bei allen Anwendungen
Handschuhe tragen�
Vakuumstärke ändern
1� Vakuumregler auf benötigte
Position drehen�
Page 57

57
DE
Außerbetriebnahme nach Gebrauch
3� Die Clario Toni reinigen und desinfizieren�
Siehe Kapitel „Richtlinien für die Reinigung“�
2� Wenn die
Pumpe mit
dem
Stromnetz
verbunden ist:
Den Netzstecker aus der
Steckdose ziehen�
Wenn die
Pumpe mit
einer
12 V-Gleichstromquelle
verbunden ist:
Den 12 V-Stecker aus der
12 V-Stromquelle ziehen�
oder
1� Ein-/Aus-Knopf drücken, um die
Pumpe auszuschalten�
Page 58

58
Behälter leeren
Sicherheitshinweis
Einmal täglich oder spätestens, wenn der Flüssigkeitsspiegel 550 ml erreicht und der Schwimmer das
Absaugen unterbricht, sollte der Behälter geleert
werden�
4� Behälter leeren und Fingertipschlauch entsorgen
gemäß den lokalen und betriebsinternen Vorschriften�
6� Pumpe einschalten und Vakuum entsprechend den
Anweisungen des Arztes einstellen�
1� Ein-/Aus-Knopf drücken, um die
Pumpe auszuschalten�
2� a) Den Einweg-Fingertipschlauch
vom Schlauchanschluss entfernen�
b) Den Behälter von der Pumpe
entfernen�
5� a) Einen sauberen Behälter
anbringen�
b) Einen neuen Einweg-
Fingertipschlauch am
Schlauchanschluss anbringen�
3� Während des Transports den
Behälter immer mit den Stöpseln
verschlossen halten�
Page 59

59
DE
Ventilscheiben ersetzen
Sicherheitskammer an der Pumpe anbringen, wie in
Kapitel „Anwendung vorbereiten“ beschrieben�
5�
1� Behälter entfernen�
2� a) Sicherheitskammer 45 ° nach
links drehen�
b) Sicherheitskammer von der
Pumpe wegziehen�
3� Sicherheitskammer öffnen�
Defekte Ventilscheiben ersetzen�
Sicherstellen, dass die neuen
Ventilscheiben korrekt angebracht
sind�
4�
Page 60

60
Akku ersetzen
ACHTUNG
Vor dem Auswechseln des Akkus ist die Clario Toni
abzuschalten und der Netzstecker aus der
Steckdose zu ziehen�
Den Akku kalibrieren und testen (siehe Kapitel Akku-
Daten und Test/Akku kalibrieren)�
7�
1� Klappe des Akku-Fachs auf der
Unterseite der Clario Toni öffnen�
5� Das Akku-Kabel wieder einstecken�
6� Die Klappe des Akku-Fachs schließen� Sicherstellen,
dass die Klappe gut geschlossen ist und das Kabel
nicht eingeklemmt wurde�
2� Stecker des Akku-Kabels aus der
Dose ziehen�
3� Alten Akku entfernen�
4� Neuen Akku einsetzen�
Page 61

61
DE
Akku-Daten und Test
Dauer des Absaugens
Bei voller Akkuladung beträgt die Betriebsdauer bei
maximaler Vakuumleistung etwas mehr als 50 Minuten�
Ladezeit (bis 100 % geladen)
Ca� 5 Stunden
Akku-Ladezustand
VORSICHT
Den Akku nur laden, wenn die Ladeanzeige
langsam blinkt�
leuchtet nicht Akku ist vollständig geladen
leuchtet ständig
blinkt langsam Akku ist fast leer
blinkt schnell Akku ist defekt
– Akku wird geladen
– Die Pumpe ist eingesteckt
Page 62

62
Den Netzstecker aus der Steckdose ziehen�2�
Akku testen
5� Die Zeit messen, bis die Pumpe anhält� Der Akku ist in
Ordnung, wenn die Betriebszeit über 50 Minuten
beträgt� Wenn die Betriebszeit weniger als 50 Minuten
beträgt, den Test wiederholen oder den Akku kalibrieren
(siehe nächste Seite)�
4� Die Clario Toni einschalten�
Die Pumpe beginnt zu laufen�
3� Vakuumregler auf die Position
„max�“ drehen�
Sicherstellen, dass der Akku vollständig
aufgeladen wurde�
1�
Page 63

63
DE
Akku kalibrieren
VORSICHT
Der Akku ist vor dem ersten Einsatz und nach
längerer Lagerung (über 2 Monate) zu kalibrieren�
Falls die Kalibrierung nicht erfolgreich verläuft, muss
der Akku ersetzt werden�
NiMH-Akku kalibrieren
Den Netzstecker aus der Steckdose ziehen�2�
Die Clario Toni in die Steckdose einstecken� Der Akku
wird geladen�
5�
Warten bis Ladeanzeige erlischt�6�
Schritt 1 bis 6 wiederholen� Die Clario Toni AC/DC ist
nun betriebsbereit�
7�
Die Pumpe laufen lassen, bis der Akku leer ist und die
Pumpe anhält�
4�
3� Die Clario Toni einschalten�
Die Pumpe beginnt zu laufen�
Sicherstellen, dass der Akku vollständig
aufgeladen wurde�
1�
Lagerung des Akkus
Um die Selbstentladung auf ein Minimum zu beschränken, sollten die Clario Toni und die entfernten Ersatzakkus bei einer Temperatur unter 25 °C gelagert werden�
Wiederholen Sie die Kalibrierung alle 60 – 90 Tage�
Page 64

64
Problembehebung
Motor läuft nicht
Prüfen Sie, ob:
– die Clario Toni eingeschaltet ist�
– die Netzspannung die richtige ist und ob der
Netzstecker korrekt in der Steckdose eingesteckt ist�
– der Akku geladen ist (nur im Akku-Betrieb)�
Pumpe zu laut
Überprüfen Sie die Position und die Abdichtung der
Ventilscheiben in der Sicherheitskammer� Falls nötig
gemäß Kapitel „Ventilscheiben ersetzen“ korrigieren�
Pumpe saugt nicht genug stark
Prüfen Sie, ob:
– der Vakuumregler auf die richtige, vorgeschriebene
Einstellung eingestellt ist�
– die Schläuche schadhaft oder undicht sind�
Falls nötig ersetzen�
– alle Steckverbindungen dicht sind�
– die Sekretbehälter und Deckel spröde Stellen, Risse
oder Verfärbungen aufweisen� Falls nötig ersetzen�
– die Ventilscheiben in der Sicherheitskammer
gut abdichten�
– die Membran sauber ist und keine Risse hat�
Page 65

65
DE
Ungenügende Laufzeit mit Akku
Den Akku kalibrieren (siehe Kapitel „Akku kalibrieren“)�
VORSICHT
Kann die Störung nicht behoben werden,
kontaktieren Sie bitte Ihre Pflegefachkraft�
Der Akku ist vollständig geladen�LED leuchtet
nicht
– Der Akku wird geladen�
– Die Pumpe ist eingesteckt�
LED leuchtet
ständig
Akku ist bald leer� Die Akkuleistung
reicht noch für rund 10 Minuten
Pumpzeit�
LED blinkt
langsam
Akku ist defekt� Bitte setzen
Sie sich mit Ihrer Pflegefachkraft
in Verbindung�
LED blinkt
schnell
Page 66

66
Richtlinien für die Reinigung
Allgemeine Hinweise
– Befolgen Sie die Reinigungsanweisungen,
die Sie von Ihrer Pflegefachkraft erhalten haben�
– Für die Reinigung/Desinfektion geeignete
Schutzhandschuhe tragen�
– Flüssigkeiten wie Blut und Sekrete und damit
kontaminierte Teile gemäß den Anweisungen
Ihrer Pflegefachkraft entsorgen�
Wasser
Benutzen Sie nur Wasser der reinsten Qualität für die
Reinigung� Die Wasserhärte stellt ein ernstes Problem
dar, da Rückstände auf medizinischen Produkten eine
wirksame Reinigung beeinträchtigen können� Verwenden
Sie entionisiertes Wasser, um dieses Problem zu vermeiden�
Einweg-Artikel
Dies sind Einweg-Produkte, die nicht für die
Wiederverwendung vorgesehen sind� Eine erneute
Verwendung könnte zum Verlust der mechanischen,
chemischen und/oder biologischen Eigenschaften führen�
Wiederverwendung kann zu einer Kreuzkontamination
führen�
Demontage
Gerät vor dem Reinigen und Desinfizieren in seine
Bestandteile zerlegen�
ACHTUNG
Vor der Reinigung des Geräts ist der Netzstecker
aus der Steckdose zu ziehen�
Page 67

67
DE
Reinigung von Behälter und Deckel
Ein Reinigungsmittel in heißes Wasser (60 – 70 °C) geben
und Einzelteile darin reinigen� Der pH-Wert des
Reinigungsmittels muss zwischen 6,0 und 8,0 liegen,
um Schäden an Instrumenten und Reinigungsbehälter
zu vermeiden�
1� Alle Einzelteile in warmem Seifenwasser (60 – 70 °C)
oder in Enzymreiniger für 1 – 5 Minuten gründlich
einweichen lassen�
2� Sichtbare Verschmutzung mit einem Reinigungs-
werkzeug entfernen; geeignet sind normale
Reinigungsbürsten, Rohrputzer oder nichtscheuernde,
fusselfreie Tücher� Gründlich mit sauberem Wasser
abspülen� Trocknen lassen�
3� Überprüfen Sie die Teile auf sichtbaren Schmutz und
wiederholen Sie diese Schritte falls nötig� Es ist auch
möglich, Behälter und Deckel in einer Geschirrspülmaschine zu reinigen�
Reinigung von Pumpengehäuse, Netzkabel
und Plastikzubehör
Mit dem Reinigungsmittel abwischen, das Ihre
Pflegefachkraft empfohlen hat� Mit einem sauberen
Tuch trocken reiben�
Page 68

68
Dieses Symbol
zeigt das
Herstellungsdatum
(vier Ziffern für das
Jahr und zwei Ziffern
für den Monat) an�
Dieses Symbol zeigt
den Hersteller an�
Dieses Symbol
zeigt einen
Sicherheitshinweis an�
Dieses Symbol
zeigt an, dass die
Gebrauchsanweisung
zu befolgen ist�
Dieses Symbol zeigt
die Übereinstimmung
mit zusätzlichen
US-amerikanischen
und kanadischen
Sicherheitsvorschriften
für medizinische
elektrische Geräte an�
Dieses Symbol
zeigt die
Übereinstimmung
mit wesentlichen
Anforderungen
der Richtlinie
93/42/EWG des
Rates vom 14�
Juni 1993 über
Medizinprodukte
an�
Dieses Symbol
zeigt an, dass in
der Umgebung von
Geräten mit diesem
Symbol Interferenzen
möglich sind�
Dieses Symbol zeigt
die Klasse der Pumpe
an�
Dieses Symbol zeigt
die gesetzlichen
Vorgaben der Pumpe
an�
Dieses Symbol
zeigt einen Hinweis
(VORSICHT oder
ACHTUNG) zum
Gerät an�
Dieses Symbol
zeigt an, dass
das Gerät mit
Ethylenoxid
sterilisiert wurde�
Dieses Symbol zeigt
die Katalognummer
des Herstellers an�
Dieses Symbol zeigt
die Seriennummer des
Herstellers an�
Dieses Symbol zeigt
die Chargennummer
des Herstellers an�
Dieses Symbol zeigt
an, dass das Gerät
nicht nach Ende
des angegebenen
Jahres und Monats
verwendet werden
sollte�
Dieses Symbol zeigt ein
Einweggerät an� Nicht
wiederverwenden�
Dieses Symbol zeigt
den Schutz gegen
das Eindringen von
Fremdkörpern und
gegen schädliche
Auswirkungen infolge
des Eindringens von
Wasser an�
Dieses Symbol zeigt
an, dass das Gerät für
Magnetresonanz (MR)
nicht geeignet ist�
MR
Dieses Symbol
zeigt die Feuchtebegrenzung für
Betrieb, Transport
und Lagerung an�
Zeichen und Symbole
Dieses Symbol
zeigt ein Gerät der
Klasse II an�
Dieses Symbol zeigt
an, dass in der
Gebrauchsanweisung
nachzuschlagen ist�
Dieses Symbol zeigt
die Temperaturbeschränkung für
Betrieb, Transport
und Lagerung an
Page 69

69
DE
Dieses Symbol
bedeutet
Kartonverpackung�
Dieses Symbol zeigt
an, dass das Material
der Rückgewinnung
von Ressourcen/dem
Recycling zugeführt
wird�
Dieses Symbol zeigt
an, für wie viele
Artikel „n“ der Inhalt
ausreicht�
∑
Dieses Symbol zeigt
die Begrenzung des
atmosphärischen
Drucks für Betrieb,
Transport und
Lagerung an�
Dieses Symbol zeigt
die Abmessungen
(H x B x T) der Pumpe
an�
Dieses Symbol
zeigt die höchste
Vakuumstufe der
Pumpe an�
Dieses Symbol zeigt
die Saugleistung der
Pumpe an�
Dieses Symbol zeigt
das Gewicht der
Pumpe an�
AC
Dieses Symbol zeigt
die elektrischen
Spezifikationen der
Pumpe an�
Dieses Symbol zeigt
an, dass das Gerät
nicht zusammen
mit unsortierten
Siedlungsabfällen
entsorgt werden darf
(gilt nur in der EU)�
Dieses Symbol zeigt an,
dass das Gerät nicht
verwendet werden
darf, falls die Packung
beschädigt ist�
Dieses Symbol zeigt
an, dass das Gerät
trocken zu halten ist�
Dieses Symbol zeigt
an, dass das zerbrechliche Gerät mit
Vorsicht zu behandeln
ist�
Dieses Symbol zeigt
an, dass das Gerät
vor Sonnenlicht zu
schützen ist�
Dieses Symbol zeigt
die Stückzahl an�
pcs
Dieses Symbol zeigt ein
rezeptpflichtiges Gerät
an� VORSICHT: Nach
US-Bundesgesetz darf
dieses Gerät nur von
Ärzten oder auf deren
Anweisung verkauft
werden (gilt nur für
die USA)�
Dieses Symbol zeigt
Wechselstrom an�
Dieses Symbol zeigt
Gleichstrom an�
Page 70

70
Garantie und Wartung
Garantie
2 Jahre Garantie ab Lieferdatum (6 Monate für den
Akku)� Für Schäden/Folgeschäden infolge fehlerhafter
Bedienung, unsachgemäßer Verwendung sowie bei
Handhabung durch nicht autorisierte Personen besteht
keine Haftung durch den Hersteller�
Wartung
Die Clario Toni Pumpe sollte keine Wartung erfordern�
Wenn die Clario Toni Pumpe innerhalb der Garantiezeit
wegen eines Fabrikationsdefekts versagt, wird sie
ersetzt� Die defekte Pumpe muss an den Hersteller
zurückgeschickt werden�
Page 71

71
DE
Entsorgung
Fragen Sie Ihre Pflegefachkraft, wie benutzte Schläuche
und anderes Material zu entsorgen sind�
Page 72

72
Technische Daten
Transport/Lagerung
Die Clario Toni Pumpe und ihr Zubehör müssen in der
Verpackung aufbewahrt und bei einer Temperatur
zwischen –20 °C und +50 °C (–4 °F bis +122 °F)
gelagert werden� Akku +5 °C bis +25 °C (+41 °F bis
+77 °F)�
Betriebsbedingungen
Die Clario Toni Pumpe und ihr Zubehör müssen bei einer
Temperatur von +5 °C bis +40 °C (+41 °F bis +104 °F)
betrieben werden� Benutzen Sie die Produkte nicht bei
extremer Hitze oder Kälte� Vermeiden Sie hohe
Luftfeuchtigkeit (15–93 % sind zulässig )�
Schutzklasse IP21
Die Clario Toni Pumpe ist gegen das Eindringen von
Tropfwasser geschützt�
VORSICHT
Verwenden Sie die Clario Toni Pumpe nicht auf einer
Höhe von mehr als 3000m (9842 Fuß) über
dem Meeresspiegel�
Page 73

73
DE
H x B x T
223 x 255 x 95 mm
8,8 x 8,9 x 3,7 Zoll
15 Liter/Minute (+/– 10 %)
2,0 kg / 4,4 lbs
Ohne Behälter
min� Vakuum, –60 mmHg / –8 kPa (+/– 15 %)
med� Vakuum, –100 mmHg / –13 kPa (+/– 15 %)
max� Vakuum, –600 mmHg / –80 kPa (+/– 15 %)
Berechnet bei 0 m, atmosphärischer Druck:
1013 hPa� Hinweis: Vakuumstärke kann je nach
Lage (Meter über Meeresspiegel, atmosphärischer
Druck und Temperatur) variieren�
100–240 Volt, 50–60 Hz
12 V, 3,4 A, NiMH
Netzteil
UE48-120340SPA1
Page 74

74
Assistance
Lire l’intégralité du manuel d’instruction avant d’essayer
d’utiliser le dispositif�
Pour toute question sur votre aspirateur médical Clario
Toni, veuillez contacter votre fournisseur en soins de
santé/votre médecin au numéro ci-dessous:
Garder ce mode d’emploi destiné aux patients dans
un endroit facilement accessible.
COORDONNÉES DU MÉDECIN/FOURNISSEUR
DE SOINS DE SANTÉ:
Page 75

75
FR
Table des matières
Instructions de sécurité ���������������������������������������������������������������������������������������������������������������� 76
Description de l’appareil
������������������������������������������������������������������������������������������������������������� 81
Instructions de montage
������������������������������������������������������������������������������������������������������������ 85
Préparation pour l’utilisation
������������������������������������������������������������������������������������������������86
Mode d’emploi
����������������������������������������������������������������������������������������������������������������������������������������������90
Vider le bocal
��������������������������������������������������������������������������������������������������������������������������������������������������94
Remplacer les membranes
��������������������������������������������������������������������������������������������������95
Changement de la batterie
���������������������������������������������������������������������������������������������������96
Informations de la batterie et test
����������������������������������������������������������������������������� 97
Calibrage de la batterie
���������������������������������������������������������������������������������������������������������������� 99
Pannes et solutions
�������������������������������������������������������������������������������������������������������������������������100
Consignes de nettoyage
��������������������������������������������������������������������������������������������������������102
Signes et symboles
�������������������������������������������������������������������������������������������������������������������������104
Garantie et maintenance
�������������������������������������������������������������������������������������������������������106
Élimination
��������������������������������������������������������������������������������������������������������������������������������������������������������� 107
Spécifications techniques
����������������������������������������������������������������������������������������������������108
Page 76

76
Instructions de sécurité
Le Clario Toni est exclusivement indiqué pour l’utilisation
décrite dans ce mode d’emploi destiné au patient�
Medela ne peut garantir la sécurité de fonctionnement
du système que si le Clario Toni est utilisé en association
avec les accessoires originaux de Medela�
Veuillez lire et respecter les mises en garde et
consignes de sécurité avant toute utilisation.
Ce mode d’emploi doit être conservé avec
l’appareil pour les utilisations futures.
Ce mode d’emploi sert de directive générale pour l’utilisation du produit� Les questions médicales doivent être
traitées par un médecin�
AVERTISSEMENTS
La personne responsable de l’utilisation quotidienne
de cet appareil (patient, personnel soignant) doit
pouvoir lire, comprendre et suivre les instructions
fournies dans ce manuel d’utilisation et par les
professionnels des soins de santé� Cette personne
doit être capable d’entendre et de réagir à tout
signal sonore�
Utiliser uniquement l’aspirateur médical Clario Toni
pour la personne pour laquelle il a été prescrit et
uniquement pour son usage prévu�
Ne pas faire ce traitement en dehors de la surveillance de votre fournisseur de soins de santé�
Page 77

77
FR
– Si vous êtes dépendant de cet appareil pour une
aspiration ORL et qu’une panne peut engendrer
une situation critique, vous devez avoir un appareil
de remplacement à disposition�
– La tubulure de raccordement fournie avec l’appareil
doit toujours être reliée au cathéter stérile, tel que
prescrit par votre médecin�
– Ne pas modifier l’équipement�
– Le dispositif médical Clario Toni a fait l’objet d’une
évaluation de la compatibilité électromagnétique en
conformité avec les normes CEI 60601-1-2:2007 et
CEI 60601-1-2:2014 4e édition selon les clauses 7 et
8�9� Le dispositif Clario Toni est conçu pour être utilisé
au domicile et en milieu clinique�
– Les dispositifs de communication sans fil tels que
les dispositifs domestiques sans fil en réseau, les
téléphones portables, les téléphones sans fil et leurs
bases, les talkies-walkies peuvent perturber le dispositif médical Clario Toni et doivent se trouver à au
moins 30 cm de l’appareil�
Page 78

78
Sécurité générale à la maison
– Le dispositif Clario Toni ne doit pas être utilisé ou
entreposé avec d’autres appareils� S’il est impossible
de faire autrement, il convient de surveiller le dispositif
Clario Toni afin de s’assurer qu’il fonctionne correcte-
ment dans la configuration choisie�
– Éloigner le cordon d’alimentation des surfaces chaudes�
– Eloignez la prise et l’interrupteur on/off de l’humidité�
– Ne jamais débrancher le connecteur de la prise
de courant en tirant sur le câble d’alimentation!
– Ne jamais laisser le dispositif sans surveillance quand
il est mis en marche�
– Pendant son utilisation, l’aspirateur doit être en
position verticale�
– Ne jamais faire fonctionner l’appareil dans des pièces
à températures élevées, pendant le bain ou sous
la douche ou en cas de grande fatigue�
– Ne pas utiliser de rallonges avec l’aspirateur Clario Toni�
– Laisser le cordon d’alimentation là où il ne vous fera pas
tomber ou trébucher�
– Ne jamais placer le cordon d’alimentation autour de
votre cou�
– Maintenir l’aspirateur Clario Toni propre et sec�
– Ne jamais placer l’aspirateur dans l’eau ou d’autres
liquides�
Page 79

79
FR
– Si l’aspirateur est mouillé, le frotter avec une serviette
sèche� Ne pas le sécher au micro-onde�
– Tenir les enfants et les animaux domestiques éloignés
de l’aspirateur�
– Tenir l’aspirateur éloigné de la lumière directe du soleil�
– Prévenir la chute de l’aspirateur pendant le sommeil�
– Ne pas toucher l’aspirateur quand il est tombé dans
l’eau� Débrancher immédiatement l’appareil de la prise
de courant�
– Il peut arriver qu’une décharge électrostatique (ESD) au
port CC de 15 kV endommage l’alimentation électrique�
Page 80

80
Lorsque vous quittez votre domicile
– Veillez à ce que le voyant LED ne clignote pas lorsque
vous quittez votre domicile�
– Pour votre confort, mettez l’aspirateur dans le sac de
transport en option et entreposez le tuyau dans le sac
prévu à cet effet�
– N’oubliez pas d’emporter un bocal/un tuyau de
rechange et le cordon d’alimentation�
Conservez ces consignes d’utilisation pour une utilisation
ultérieure�
Page 81

81
FR
Description de l’appareil
Introduction
Votre médecin vous a prescrit le Clario Toni pour une
aspiration ORL� Cet aspirateur médical de Medela est un
aspirateur de grande qualité qui associe facilité
d’utilisation et de nettoyage à des caractéristiques de
sécurité pour assurer un fonctionnement optimal�
Usage prévu
Les aspirateurs médicaux Clario Toni sont recommandés
pour l’aspiration et l’élimination de sécrétions, fluides
corporels et corps étrangers situés dans les cavités
nasales, pharyngées et trachéales chez l’enfant et
l’adulte� Cet aspirateur médical convient pour un usage à
domicile, à l’hôpital, en voiture ou hors de chez soi�
Indications
L’aspirateur médical Clario Toni est indiqué pour dégager
les voies ORL�
Contre-indications
Cet appareil ne convient pas pour une aspiration
prolongée�
Page 82

82
Utilisateur
Le Clario Toni doit exclusivement être manipulé par des
utilisateurs correctement formés�
Estimation de durée de vie opérationnelle
Le dispositif a une durée de vie estimée de sept ans�
ATTENTION : La loi fédérale américaine limite la vente
de ce dispositif à un médecin ou sur ordonnance
d’un médecin�
Sous réserve de modifications�
Page 83

83
FR
Versions de l’aspirateur
Face avant de l’aspirateur
Poignée
Bouton
Marche/Arrêt
Chambre de
sécurité
Unité moteur
Prise secteur
Plaque du
constructeur
Compartiment de la batterie
Bocal
Câble d’alimentation
Bouchons de fermeture des couvercles
Clapet antidébordement
Embout d’aspiration
Voyant LED
Régulateur de vide
Clario Toni CA/CC
Page 84

84
Position de la membrane
Membrane dans la chambre de sécurité
Éléments et état de charge de la batterie
Régulateur de vide
éteint Batterie pleine
allumé
clignote lentement La batterie est bientôt vide
clignote rapidement La batterie est défectueuse
– La batterie est alors en charge
– L’aspirateur est branché
Membrane
Batterie LED rechargeable
Bouton Marche/Arrêt
Page 85

85
FR
Contrôler l’appareil dès livraison
Vérifier que le contenu du paquet du Clario Toni est
complet et qu’il est en bon état�
Instructions de montage
Accessoires
Veuillez contacter votre médecin/fournisseur de soins
de santé en cas de pièces manquantes ou pour tout
accessoire supplémentaire�
1x mode d’emploi
1x adaptateur secteur
1x tuyau à usage unique avec
possibilité de réglage fin au doigt
1x aspirateur médical Clario Toni
AVERTISSEMENT
Le tuyau de raccordement fourni avec le dispositif
ne doit jamais entrer en contact direct avec la zone
d’aspiration� Un drain d’aspiration stérile doit
toujours être utilisé (risque d’infection)�
Page 86

86
Préparation pour l’utilisation
Vérifications avant l’utilisation
– Avant d’utiliser le Clario Toni, vérifier que le cor-
don d’alimentation et la prise n’ont pas été
endommagés, qu’il n’y a aucun dommage ou
défaut de sécurité évident et que le dispositif est
en bon état de marche.
– Veiller à ce que la batterie soit calibrée conformé-
ment au chapitre « Calibrage de la batterie ».
– Vérifier tous les accessoires avant leur utilisation:
– S’assurer que le bocal et le couvercle ne pré-
sentent aucune fissure, craquelure ou défaut.
Remplacer si nécessaire.
– S’assurer que les tuyaux ne présentent aucune fis-
sure ou craquelure et que les connecteurs soient
fermement attachés. Remplacer si nécessaire.
AVERTISSEMENTS
Le dispositif ne doit être utilisé que par du personnel
formé correctement aux aspirateurs médicaux ORL
par leur médecin/fournisseur de soins de santé�
MISE EN GARDE
– Pendant son utilisation, le Clario Toni doit être en
position verticale�
– L’intégrité de l’emballage des accessoires stériles
doit être vérifiée avant leur utilisation�
– Les accessoires non stériles et réutilisables doit
être nettoyés et désinfectés avant leur utilisation�
Page 87

87
FR
Assemblage du bocal
1� Fixer le flotteur au bocal�
2� Fixer le couvercle au bocal�
Faire attention aux repères sur
le devant du bocal et du couvercle�
Page 88

88
S’assurer que les deux valves
(disques en silicone) sont attachées
à la chambre de sécurité�
2�
Assemblage de la chambre de sécurité
1� Ouvrir le couvercle de la chambre
de sécurité�
3� S’assurer que le couvercle de la
chambre de sécurité est bien fermé�
4� a) Maintenir la chambre de sécurité
et l’incliner à 45° sur la gauche
pour la fixer à l’unité moteur�
b) Tourner la chambre de sécurité
en position verticale jusqu’à ce
que vous entendiez un clic�
Page 89

89
FR
MISE EN GARDE
Ne pas utiliser de tuyaux ou d’accessoires stériles
dont l’emballage a été endommagé� Ne pas réutiliser
de produits stériles ou à usage unique�
Fixer le bocal à l’aspirateur
1� Fixer le bocal à l’aspirateur�
Appuyer fermement�
2� Attacher le tuyau à usage unique
avec réglage au doigt à l’embout
d’aspiration�
Page 90

90
Mode d’emploi
MISE EN GARDE
Le Clario Toni doit être assemblé de manière à pou-
voir gérer facilement une séparation entre l’aspira-
teur et les accessoires� Calibrer la batterie avant
la première utilisation�
Brancher Clario Toni au secteur
Vérifier l’aspirateur avant utilisation conformément
aux instructions du chapitre «Préparation pour
l’utilisation».
1�
2� Toutes les
versions:
Brancher la prise d’alimentation
au secteur�
Si l’aspirateur
est utilisé
avec le câble
allume-cigare
en option :
Brancher le câble allume-cigare
de 12V CC à la prise située sur
le côté de l’aspirateur, puis le brancher à une source d’alimentation
de 12V CC (allume-cigare dans
la voiture)�
ou
Si l’aspirateur
fonctionne
sur batterie:
Une connexion à une source d’alimentation n’est pas nécessaire�
Veiller à ce que la batterie ait été
chargée 5heures.
ou
Page 91

91
FR
Contrôle des fonctions avec de l’eau
1� Appuyer sur le bouton Marche/Arrêt
pour allumer l’aspirateur�
2� Mettre le régulateur de vide
sur la position «max.».
3� a) Fixer le tuyau avec réglage
au doigt�
b) Brancher l’embout avec réglage
fin au doigt�
4� Placer l’embout avec réglage
fin au doigt dans de l’eau et
contrôler l’aspiration�
S’il y a une aspiration, passer à l’étape 6� Sinon,
voir chapitre «Pannes et solutions».
5�
6� Utiliser le cathéter et le réglage du vide, conformément
à la prescription médicale�
Page 92

92
AVERTISSEMENT
Le dispositif ne doit être utilisé que par du personnel
spécialement formé aux méthodes d’aspiration et
dans l’utilisation d’aspirateurs� Porter des gants lors
de chaque utilisation�
Modifier le niveau de vide
1� Mettre le régulateur de vide dans
la position adéquate�
Page 93

93
FR
Mettre hors tension après utilisation
3� Nettoyer et désinfecter le Clario Toni�
Voir chapitre «Consignes de nettoyage».
2� Si l’aspirateur
est relié au
secteur :
Débrancher la prise d’alimentation
du secteur�
Si l’aspirateur
est relié à
une source
d’alimentation
de 12V CC:
Débrancher la prise de 12V CC de
la source d’alimentation de 12V CC.
ou
1� Appuyer sur le bouton Marche/Arrêt
pour éteindre l’aspirateur�
Page 94

94
Vider le bocal
Conseils de sécurité
Le bocal doit être vidé tous les jours ou lorsque
le niveau du fluide atteint 550ml et que le clapet
anti-débordement empêche d’aspirer du liquide
dans le bocal�
4� Vider le bocal et jeter le tuyau avec réglage fin au doigt
conformément aux consignes locales et internes�
6� Allumer l’aspirateur et régler le vide conformément
à la prescription médicale�
1� Appuyer sur le bouton Marche/Arrêt
pour éteindre l’aspirateur�
2� a) Débrancher le tuyau à usage
unique avec réglage fin au doigt
à l’embout d’aspiration�
b) Retirer le bocal de l’aspirateur�
5� a) Fixer un bocal propre�
b) Fixer un nouveau tuyau à usage
unique avec réglage fin au doigt
à l’embout d’aspiration�
3� Lors du transport, fermer le bocal
avec les bouchons�
Page 95

95
FR
Remplacer les membranes
Fixer la chambre de sécurité à l’aspirateur, comme
décrit dans le chapitre «Préparation pour l’utilisation».
5�
1� Retirer le bocal�
2� a) Tourner la chambre de sécurité
de 45° sur la gauche�
b) Retirer la chambre de sécurité
en la tirant de l’aspirateur�
3� Ouvrir la chambre de sécurité�
Remplacer les disques de valve
défectueux� Veiller à la fixation
correcte des nouveaux disques
de valve�
4�
Page 96

96
Changement de la batterie
AVERTISSEMENTS
Avant de remplacer la batterie, éteindre le Clario Toni
et débrancher-le du secteur�
Calibrer et tester la batterie (voir chapitres Informations
de la batterie et test/Calibrage de la batterie)�
7�
1� Ouvrir le couvercle du compartiment
de la batterie, situé à la base du
Clario Toni�
5� Rattacher le câble de la batterie en
le branchant à la prise�
6� Fermer le couvercle du compartiment de la batterie�
Veiller à ce que le couvercle soit bien fermé et que
le câble de la batterie ne soit pas serré ou coincé�
2� Détacher le câble de la batterie en
tirant sur la prise�
3� Retirer l’ancienne batterie�
4� Insérer la nouvelle batterie�
Page 97

97
FR
Informations de la batterie et test
Durée d’aspiration
Si la batterie est pleine, le temps de fonctionnement
au vide maximal est >50minutes en moyenne.
Durée de charge (jusqu’à 100%)
Environ 5heures
État de la batterie
MISE EN GARDE
Ne recharger la batterie que lorsque l’indicateur de
charge clignote lentement�
éteint Batterie pleine
allumé
clignote lentement La batterie est bientôt vide
clignote rapidement La batterie est défectueuse
– La batterie est alors en charge
– L’aspirateur est branché
Page 98

98
Débrancher la prise d’alimentation du secteur�2�
Test de la batterie
5� Déterminer le temps nécessaire à l’arrêt de l’aspirateur�
La batterie est bonne, lorsque l’autonomie est
>50minutes. Si l’autonomie est <50minutes, refaire
le test ou calibrer la batterie (voir page suivante)�
4� Allumer Clario Toni�
L’aspirateur se met en route�
3� Mettre le régulateur de vide
en position «max.».
Veiller à ce que la batterie soit complètement rechargée�1�
Page 99

99
FR
Calibrage de la batterie
MISE EN GARDE
Calibrer la batterie avant la première utilisation et
après une durée d’entreposage >2mois. Changer
la batterie si le calibrage n’a pas fonctionné�
Vérification de l’état de la batterie NiMH
Débrancher la prise d’alimentation du secteur�2�
Brancher Clario Toni sur le secteur� La batterie est en
charge�
5�
Attendre jusqu’à ce que le voyant s’éteigne�
6�
Refaire les étapes 1 à 6� Le Clario Toni CA/CC est
alors prêt à l’usage�
7�
Laisser l’aspirateur fonctionner jusqu’à ce que la batterie
soit complètement déchargée et que l’aspirateur s’arrête�
4�
3� Allumer Clario Toni�
L’aspirateur se met en route�
Veiller à ce que la batterie soit complètement rechargée�1�
Entreposage de la batterie
Afin d’éviter au maximum que les batteries ne se
déchargent, conserver le dispositif médical Clario Toni et
les batteries de remplacement à part, à une température
inférieure à 25 °C� Refaire le procédé de calibrage tous
les 60–90 jours�
Page 100

100
Pannes et solutions
Si le moteur ne fonctionne pas
Vérifier si:
– le Clario Toni est allumé ;
– la tension secteur est correcte et si la prise secteur
est bien raccordée à la prise murale ;
– la batterie interne est chargée (uniquement en
fonctionnement sur batterie)�
Si la pompe est trop bruyante
Contrôlez la position et l’étanchéité des 2 membranes
dans la chambre de sécurité Repositionner le cas
échéant selon les instructions du chapitre
«Remplacer les membranes».
Si l’aspirateur n’aspire pas suffisamment
Vérifier si:
– le régulateur de vide est réglé selon le niveau correct
d’aspiration prescrit ;
– les tuyaux ne sont ni défectueux, ni cassés�
Remplacer si nécessaire;
– toutes les connexions sont bien insérées;
– le bocal d’aspiration et le couvercle ne sont ni fissurés,
ni fragilisés, ni décolorés. Remplacer si nécessaire;
– le joint de la membrane dans la chambre de sécurité
est étanche ;
– la membrane est propre, sans fissure�
 Loading...