

Page 1
Instruction Manual
Manual de instrucciones
Mode d’emploi
BabyWeigh™ II Scale
Part Number: 0407020
Part Number: 0407023 (grams only)
Número de pieza: 0407020
Número de pieza: 0407023 (en gramos solamente)
Numéro de pièce : 0407020
Numéro de pièce : 0407023 (grammes seulement)
Page 2

Table of Contents
Important Safeguards
. . . . . . . . . . . . . . . . . . . . . . . . 2-6
Use and Storage Conditions
. . . . . . . . . . . . . . . . . . . .7
Power Requirements. . . . . . . . . . . . . . . . . . . . . . . . . .
7
Explanation of Terminology . . . . . . . . . . . . . . . . . . . .
8
Baby Tray Attachment & Removal . . . . . . . . . . . . .
9-12
Part Identication . . . . . . . . . . . . . . . . . . . . . . . . . . .
13
Operator Interface . . . . . . . . . . . . . . . . . . . . . . . . .
14-16
Scale Setup . . . . . . . . . . . . . . . . . . . . . . . . . . . . . .
17-19
Instructions for Weighing . . . . . . . . . . . . . . . . . . .
20-23
Calibration Procedure . . . . . . . . . . . . . . . . . . . . . .
24-25
Scale Settings Adjustment . . . . . . . . . . . . . . . . . .
26-27
Troubleshooting. . . . . . . . . . . . . . . . . . . . . . . . . . . . .
28
Data Output Format . . . . . . . . . . . . . . . . . . . . . . .
29-32
Replacement Parts . . . . . . . . . . . . . . . . . . . . . . . . . .
33
Warranty Information. . . . . . . . . . . . . . . . . . . . . . . . .
34
Technical Specications . . . . . . . . . . . . . . . . . . . . . .
35
References. . . . . . . . . . . . . . . . . . . . . . . . . . . . . . . . .
36
Accurately measuring infant milk intake during breastfeeding is
important in the management of hospitalized infants, as well as in
addressing breastfeeding concerns with healthy infants at home.
In the hospital, knowledge of milk intake improves clinical diagnosis
of feeding problems while providing essential information for precise
supplementation of infants at risk for under or over consumption
1,2,3
.
In the home, knowledge of milk intake ensures feeding adequacy and
enhances maternal satisfaction
4,5
.
Clinical indices of milk intake during breastfeeding, such as duration of
sucking, audible swallowing, and presence of maternal milk ejection,
are not accurate replacements for the evidence based practice of
test weighing before and after feeding. Using test weights may also
increase maternal satisfaction when compared to using clinical indices
to ensure adequate feeding
5
.
Page 3

2
Índice
Medidas preventivas importantes
. . . . . . . . . . . . . . . . .38-40
Condiciones de uso y guardado
. . . . . . . . . . . . . . . . . . . . . 41
Requisitos eléctricos. . . . . . . . . . . . . . . . . . . . . . . . . . . . . . .
41
Explicación de los términos utilizados. . . . . . . . . . . . . . . . .
42
Cómo colocar y extraer la bandeja de pesaje . . . . . . .
43-46
Identicación de las piezas . . . . . . . . . . . . . . . . . . . . . . . . .
47
Interfaz del operador. . . . . . . . . . . . . . . . . . . . . . . . . . . .
48-50
Armado de la báscula. . . . . . . . . . . . . . . . . . . . . . . . . . .
51-53
Instrucciones para el pesaje. . . . . . . . . . . . . . . . . . . . . .
54-57
Procedimiento de calibración. . . . . . . . . . . . . . . . . . . . .
58-59
Cómo ajustar las conguraciones de la báscula . . . . .
60-61
Solución de problemas. . . . . . . . . . . . . . . . . . . . . . . . . . . . .
62
Formato de salida de datos . . . . . . . . . . . . . . . . . . . . . .
63-66
Piezas de reemplazo. . . . . . . . . . . . . . . . . . . . . . . . . . . . . . .
67
Información sobre la garantía. . . . . . . . . . . . . . . . . . . . . . . .
68
Especicaciones técnicas . . . . . . . . . . . . . . . . . . . . . . . . . .
69
Referencias . . . . . . . . . . . . . . . . . . . . . . . . . . . . . . . . . . . . . .
70
Determinar con exactitud la cantidad de leche que consume un
lactante durante el amamantamiento es importante no solo para
controlar a los bebés que están hospitalizados sino también para
abordar los problemas vinculados con la lactancia materna que tienen
los bebés sanos que se encuentran en el hogar.
En el hospital, saber cuál es el consumo de leche ayuda a obtener un
mejor diagnóstico clínico de los problemas de alimentación, además
de proporcionar información esencial para poder proveer el suplemento
alimenticio apropiado a los bebés que corren el riesgo de tener un
consumo por debajo o por encima del óptimo
1, 2, 3
.
En el hogar, saber cuál es el consumo de leche garantiza una
alimentación adecuada y aumenta la satisfacción de la madre
4, 5
.
Los índices clínicos respecto del consumo de leche durante el
amamantamiento, tales como el tiempo de succión, el ruido que el
bebé hace al tragar y la eyección de leche materna, no reemplazan
la exactitud empírica que implica controlar el peso del bebé antes y
después de alimentarlo. Además, es posible que este tipo de control
de peso aumente la satisfacción materna en comparación con el uso
de índices clínicos para garantizar una buena alimentación
5
.
Page 4

3
Table des matières
Consignes de sécurité importantes
. . . . . . . . . . . 72-74
Conditions d’utilisation et de rangement
. . . . . . . . .75
Alimentation. . . . . . . . . . . . . . . . . . . . . . . . . . . . . . . . 7
5
Glossaire . . . . . . . . . . . . . . . . . . . . . . . . . . . . . . . . . . 7
6
Mise en place et dépose du plateau pour bébé
77-80
Nomenclature des pièces. . . . . . . . . . . . . . . . . . . . .
81
Interface opérateur . . . . . . . . . . . . . . . . . . . . . . . .
82-84
Préparation de la balance . . . . . . . . . . . . . . . . . .
85-87
Instructions pour la pesée . . . . . . . . . . . . . . . . . .
88-91
Étalonnage. . . . . . . . . . . . . . . . . . . . . . . . . . . . . . .
92-93
Réglages de la balance . . . . . . . . . . . . . . . . . . . .
94-95
Dépannage . . . . . . . . . . . . . . . . . . . . . . . . . . . . . . . .
96
Format de sortie des données . . . . . . . . . . . . .
97-100
Pièces de rechange . . . . . . . . . . . . . . . . . . . . . . . .
101
Informations sur la garantie . . . . . . . . . . . . . . . . . .
102
Caractéristiques techniques . . . . . . . . . . . . . . . . .
103
Références. . . . . . . . . . . . . . . . . . . . . . . . . . . . . . . .
104
La mesure précise de l’ingestion de lait maternel par le bébé pendant
l’allaitement est importante pour le traitement des nouveau-nés
hospitalisés, ainsi que pour répondre aux questions sur l’allaitement
dans le cas de nouveau-nés en bonne santé à la maison.
À l’hôpital, connaître la quantité de lait ingéré favorise un meilleur
diagnostic clinique des problèmes d’allaitement, et fournit également
des renseignements précieux pour supplémenter avec précision les
nouveau-nés à risque (sous-alimentés ou suralimentés)
1,2,3
.
À la maison, connaître la quantité de lait ingéré garantit un allaitement
adéquat : le contentement de la maman n’en sera que plus grand
4,5
.
Les indices cliniques d’ingestion de lait pendant l’allaitement, comme
la durée pendant laquelle le bébé suce, avale de manière audible,
et la présence d’éjection de lait maternel ne peuvent remplacer de
manière exacte la pratique fondée sur le pesage d’essai pendant et
après l’allaitement. Ces pesages augmentent également la satisfaction
maternelle, comparativement aux indices cliniques en vue de garantir
un allaitement adéquat
5
.
Page 5
4
IMPORTANT
SAFEGUARDS
When using electrical devices, basic safety precautions should
always be followed, including the following:
READ ALL INSTRUCTIONS BEFORE USE
WARNING/CAUTION SYMBOLS
For optimum performance and safety, please familiarize yourself with the Caution
Symbols below. These symbols are designed to alert the user to potential hazards
when using this equipment. Ignoring these Caution Symbols may result in serious
injury to the patient or damage to the product. Please be sure to review before
proceeding with the INSTRUCTION MANUAL.
WARNING:
1. To reduce the risk of electric shock or product damage, never insert or remove
the AC adapter with wet hands.
2. Do not under any circumstances dismantle or alter the device, as this could
result in electric shock or injury as well as adversely affect the precision of
measurements.
3. To prevent fire hazard, use only a correctly wired outlet, and do not use a
multiple outlet extension cable.
WARNING – This symbol indicates the possibility of serious
injury if the product is mishandled or instructions are
ignored.
CAUTION – This symbol indicates the possibility of physical
injury or equipment damage if instructions are ignored.
This symbol indicates general precautions that should be
taken when using this product.
Page 6

5
4. Ensure the baby is lying down in the tray with minimal movement. Excessive
movement could result in a fall, potentially causing serious injury.
5. The baby tray is not designed to accommodate individuals weighing more than
20 kg (44 lbs).
6. Infants must not be left unattended on the baby tray.
CAUTION:
1. When connecting the BabyWeigh™ II to a computer, ensure that the computer
conforms to IEC60950.
2. To help prevent the spread of infections, always clean the equipment after use.
Clean the tray and the housing as required with Cavicide® or commercially
available disinfectant.
3. Ensure the equipment is placed on a level and stable surface.
4. Always take the utmost care when placing a baby in the baby tray. Ensure that
there is no risk of the equipment tipping over.
5. Only use the adapter supplied with this equipment (PN 9207053).
6. When changing batteries, ensure that the new batteries are inserted with the
correct polarity, + and -. If the polarity is incorrect, then the batteries may leak
and damage the equipment.
7. When carrying the equipment, unplug the AC adapter from the wall and hold
the main body firmly, using handles provided.
8. To avoid any risk of injury or malfunction, keep your fingers and other objects
away from the space between the inner-plate and the scale.
Page 7

6
Care & Maintenance
This is a precision manufactured and accurately calibrated product. Please
observe the following instructions.
1. Do not dismantle the scale housing. The baby tray may be removed by
following the instructions on page 9-12.
2. When not in use for a long time, unplug the AC adapter from the wall socket.
3. Remove the batteries before storing the equipment for long periods of time.
4. Do not wipe the equipment with corrosive chemicals. Use a neutral detergent
to clean the equipment. Do not spill water or chemical liquid on or in the unit.
The baby tray should be cleaned using Cavicide
®
or commercially available
disinfectant.
5. Avoid subjecting the equipment to excessive shocks or vibrations.
6. If an unauthorized person attempts to disassemble or repair any part of the
unit, the warranty will become invalid. If the unit malfunctions, please consult
your Medela sales consultant or customer service toll-free at 1-800-435-8316.
7. When disposing of this unit, please do so in accordance with local standards
for industrial waste.
Please observe the following instructions for accurate measurement.
1. Measurement may not be possible on a surface that is strongly vibrating. In
such cases transfer the equipment to a stable surface with little or no vibration.
2. If the scale is moved, and the new location has a temperature difference of
more than 20 °C (36 °F) please allow at least 2 hours before using.
3. While taking measurements, do not use mobile phones, microwave therapy
equipment or other types of transmitters near the scale as they may cause
interference.
4. Avoid scale placement near heating/cooling vents, heating appliances, areas of
high airflow or direct sunlight.
SAVE THESE INSTRUCTIONS
Page 8

7
Usage Conditions
Temperature Range for Use: +5 ºC to +35 ºC
(+41 ºF to +95 ºF)
Relative Humidity: 30% - 80% (non-condensing)
Storage Conditions
Temperature Range of Environment: -10 ºC to +50 ºC
(+14 ºF to +122 ºF)
Range of Relative Humidity: 10% - 90%
(non-condensing)
To avoid malfunctions, avoid storing the equipment where
there is direct sunlight, significant temperature changes,
the risk of dampness, a large amount of dust, in the vicinity
of fires, or where there is the risk of receiving vibrations or
shocks. When in storage do not put anything on the tray.
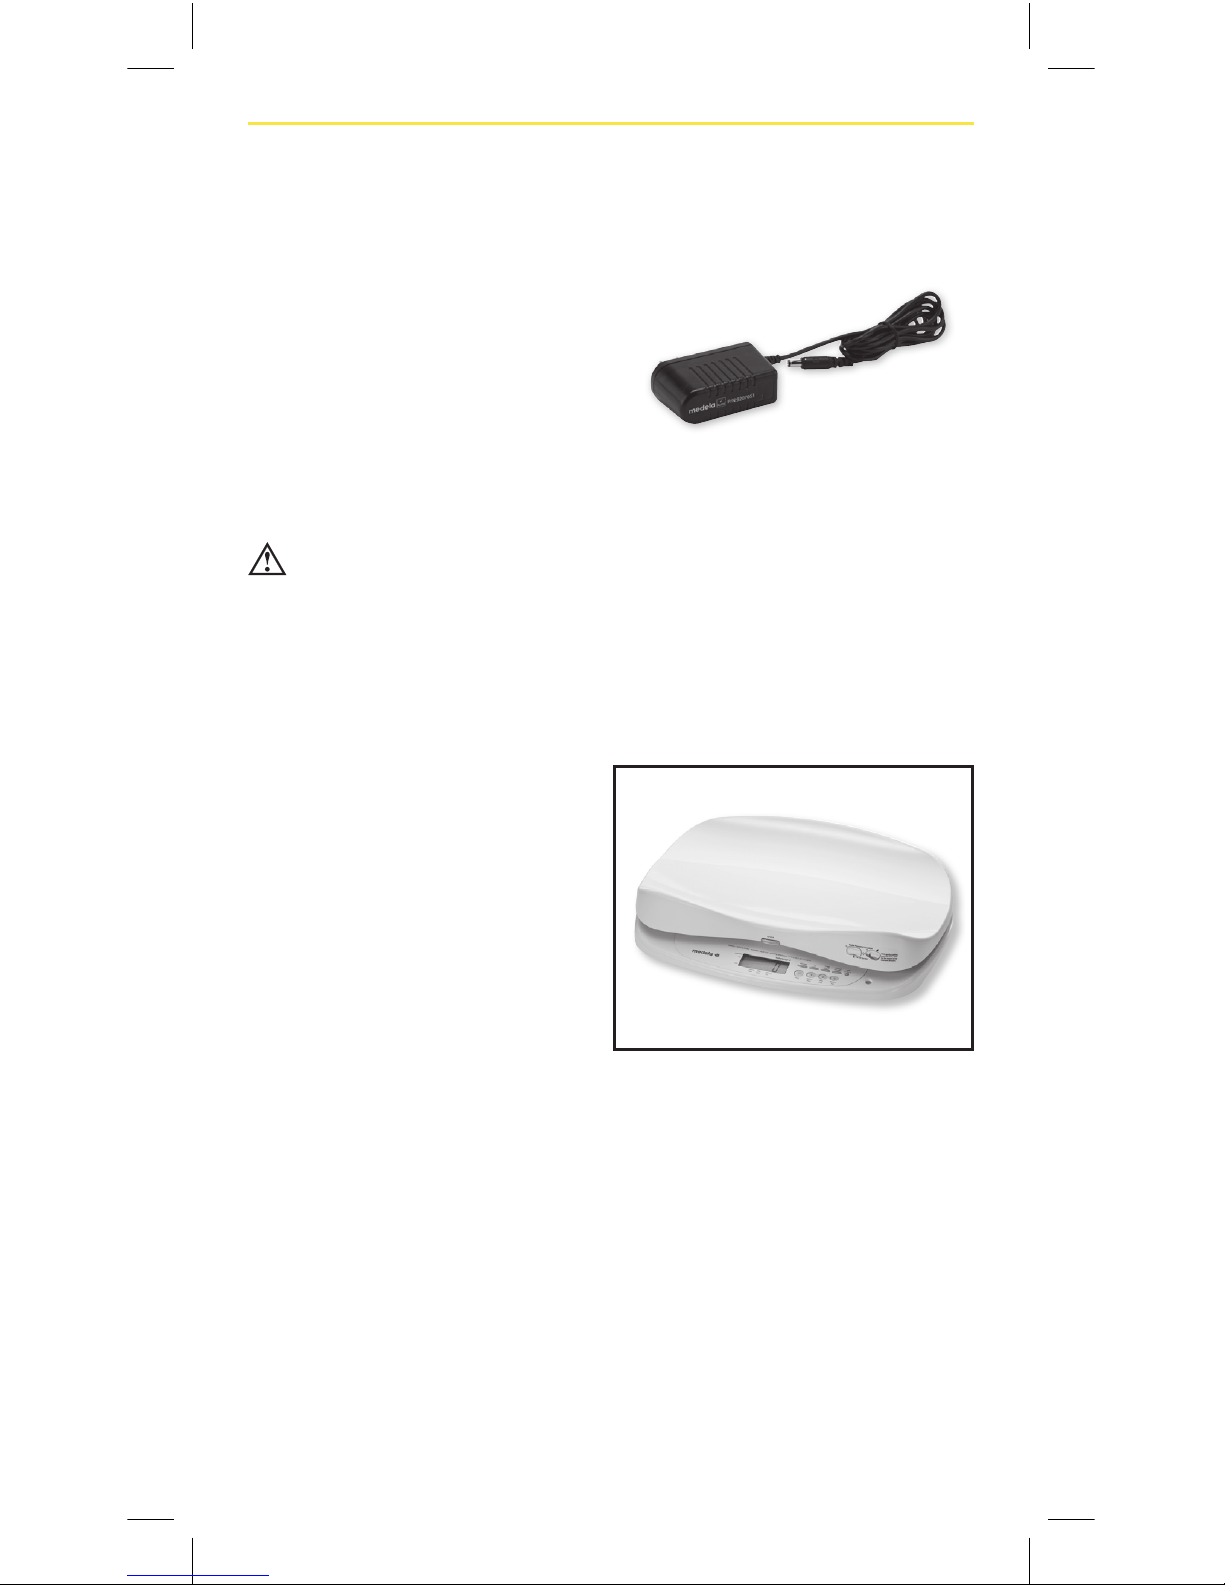
Power Requirements
AC Adapter
Model BWII
Input Voltage 100 – 240 VAC 50-60 Hz/200 mA
Output Voltage 9 VDC ± 0.45 VDC
Rated Current 800 mA
Consumption Current 38 mA
Power Consumption 0.35 W max
Batteries
Model Batteries (AA x 4)
Consumption Current 20 mA
Power Consumption 0.12 W max
Page 9

8
Explanation of Terminology
• Capacity (Maximum Capacity): This shows the
maximum weight that can be measured by the scale.
• Increment (Minimum Graduation): This shows the
interval of the numeric value change on the digital
display.
• Tare: The towel, blanket, etc., used when measuring
the infant weight is called “tare”. Measuring the infant
weight after subtracting the weight of the blanket is
called “tare weighing.”
• Pre-feed: Before feed or prior to feed.
• Post-feed: After feed or following feed.
Page 10
9
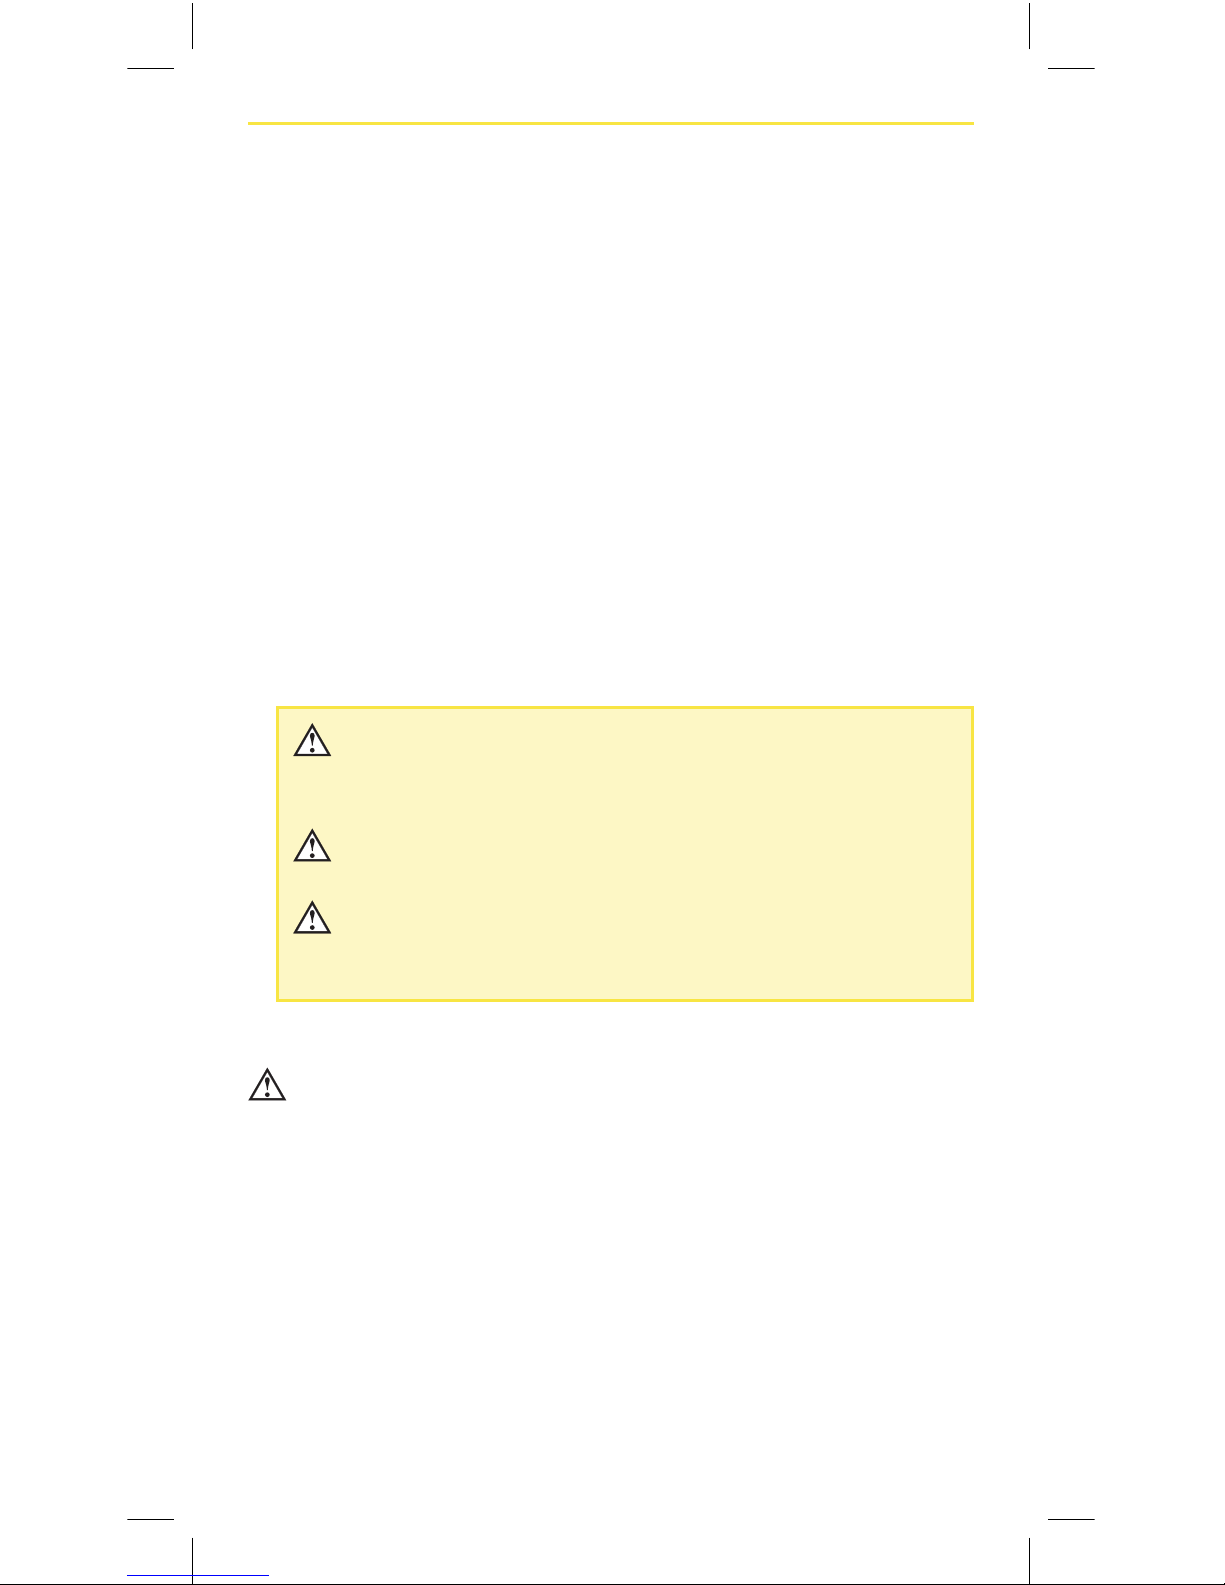
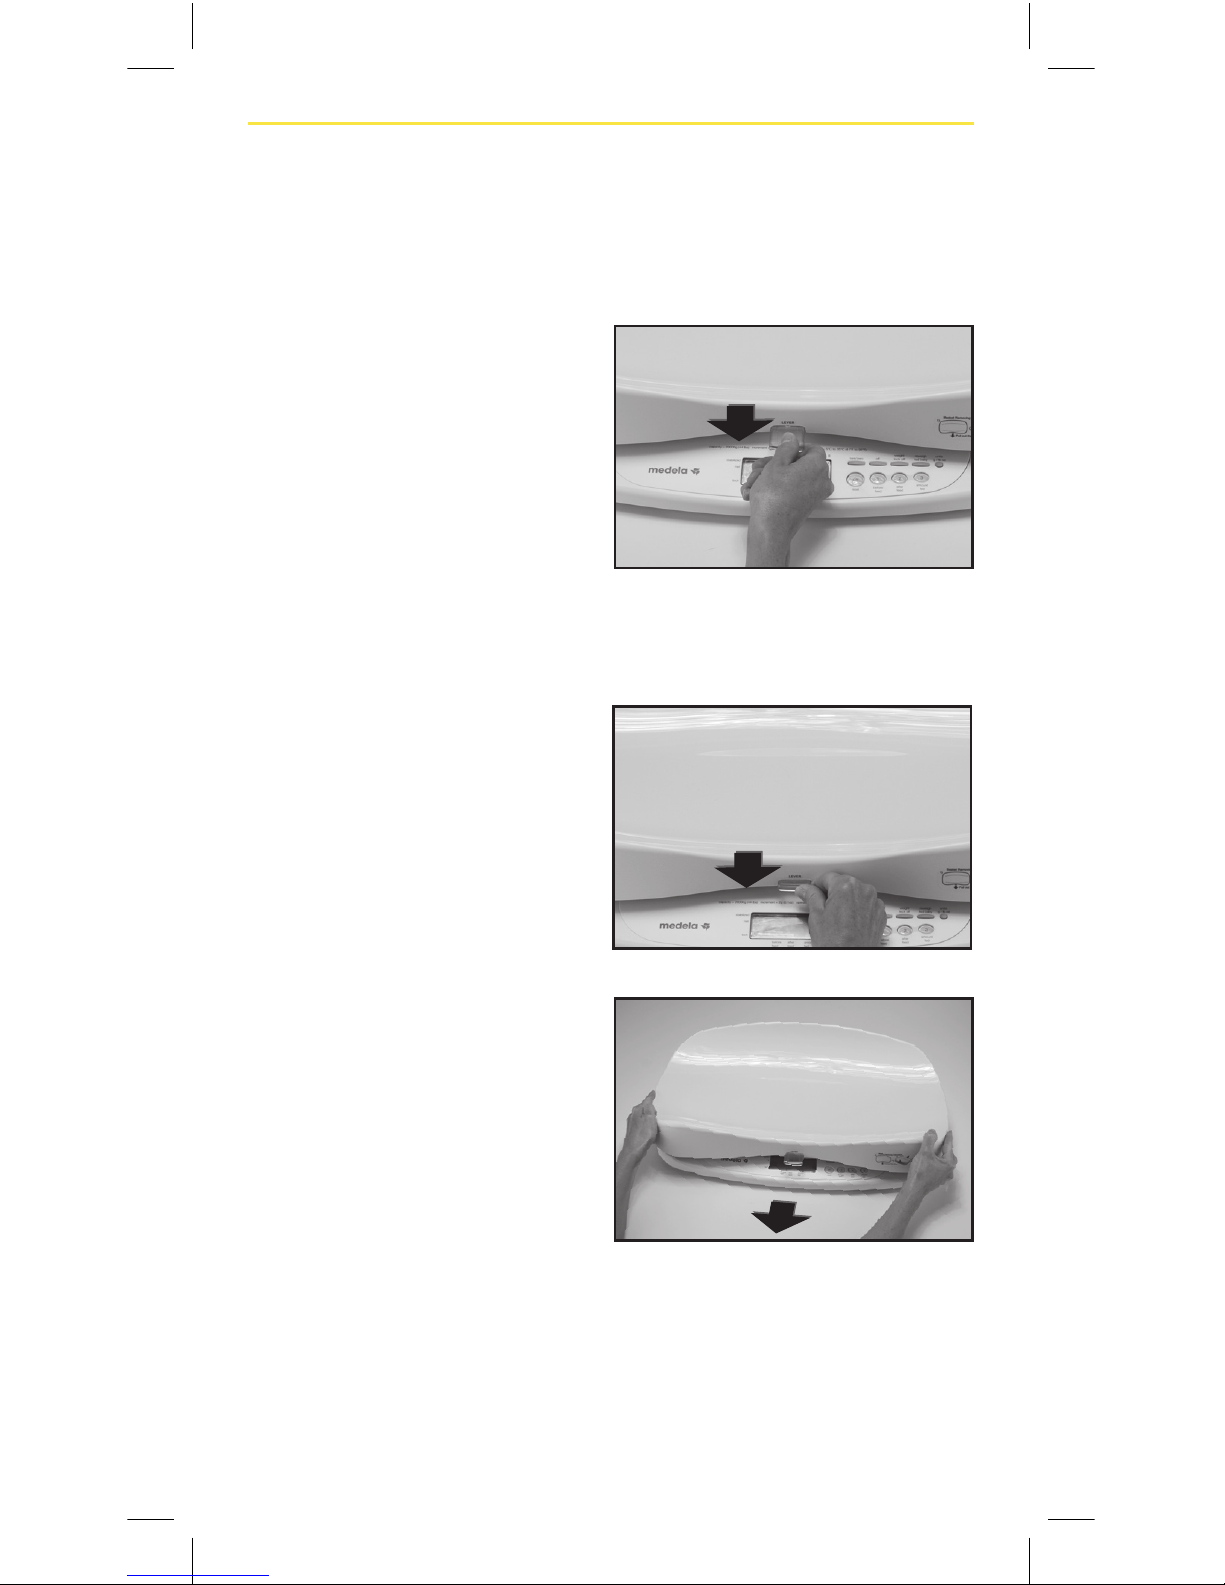
Baby Tray Attachment & Removal
A. Attachment
The baby tray is not attached to the main unit when unpacked.
1. Pull the lever out.
2. Align the far edge of the
tray with the stickered line.
Line
Page 11
10
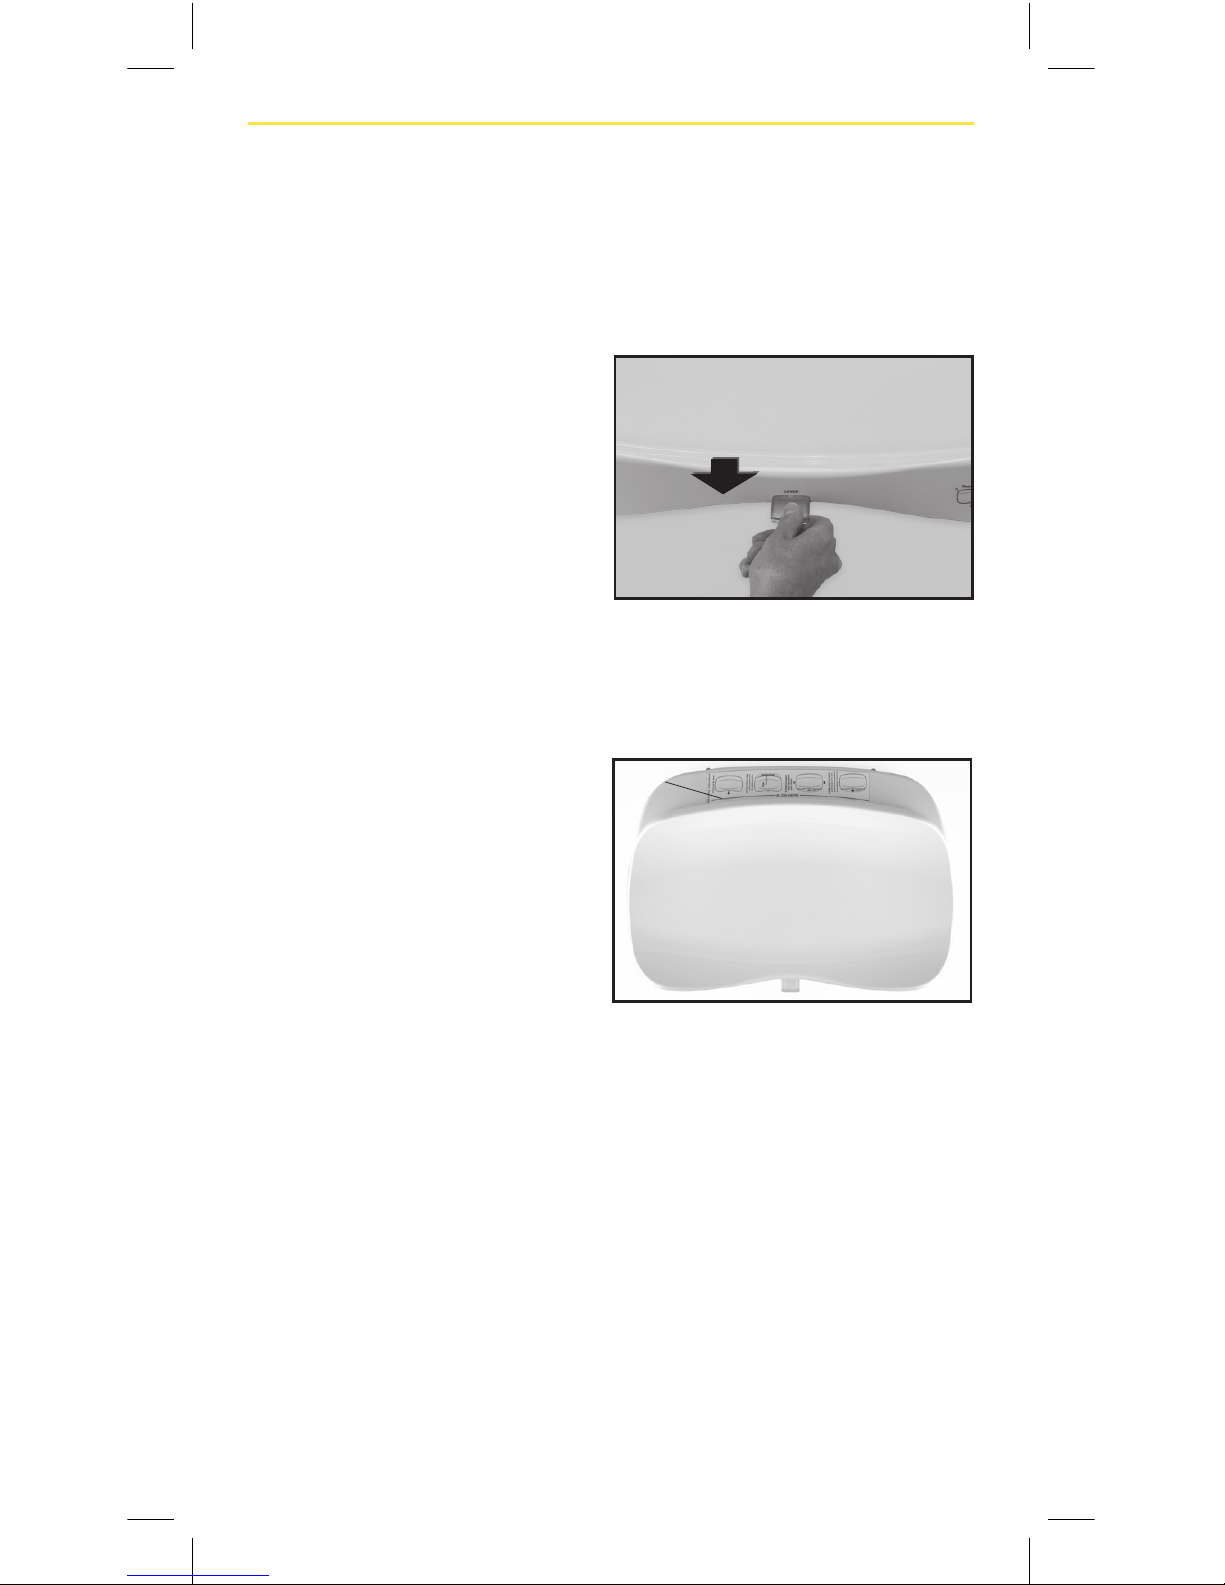
Baby Tray Attachment & Removal (cont.)
3. Slide the tray over the
platform until it stops and
you hear a “click.”
4. Make sure the tray is firmly
secured and then fix it to
the platform by pushing in
the lever until you hear a
“click.”
Page 12
11
Baby Tray Attachment & Removal (cont.)
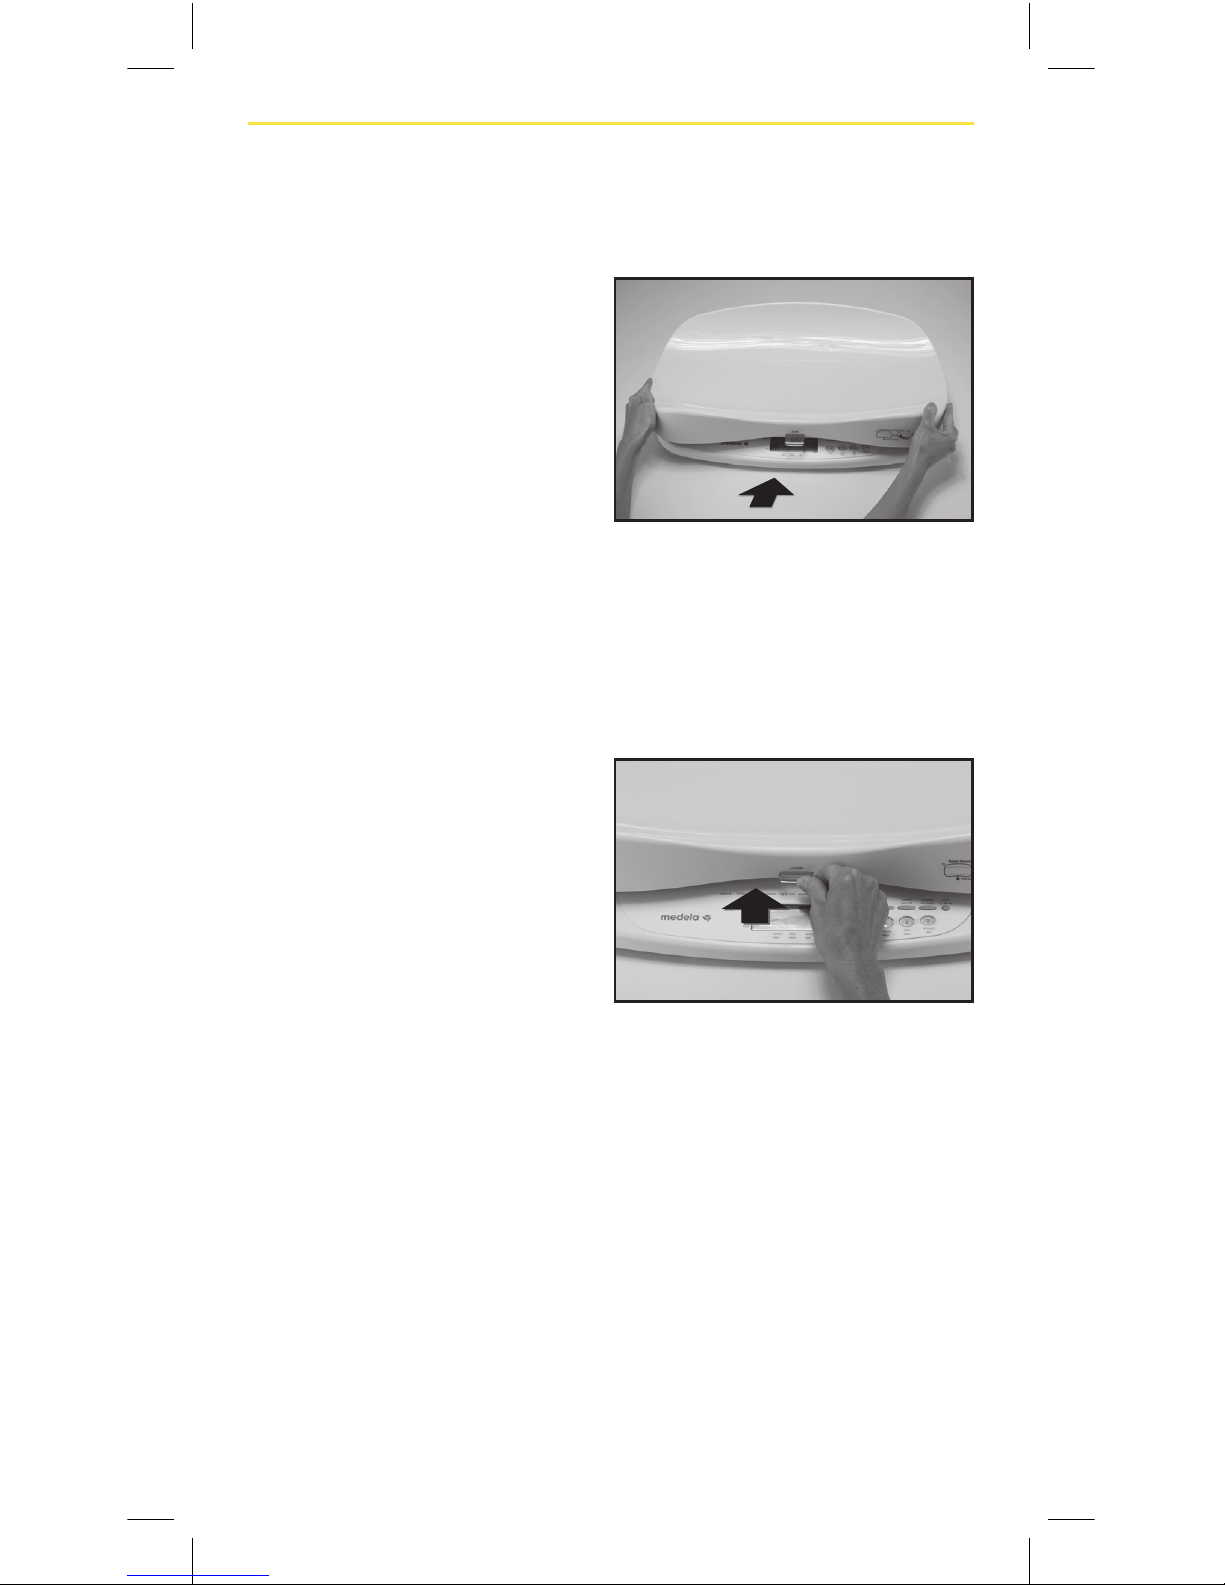
B. Removal
The baby tray can be removed and washed.
1. Pull out the lever
2. While gently pushing
down the lever, slide out
the tray in the displayed
direction.
Page 13
12
Baby Tray Attachment & Removal (cont.)
3. Remove the tray once its
far edge is aligned with the
stickered line.
CAUTION: Once the tray is removed, take care not
to insert a finger or drop anything into the
exposed opening.
Line
Page 14

13
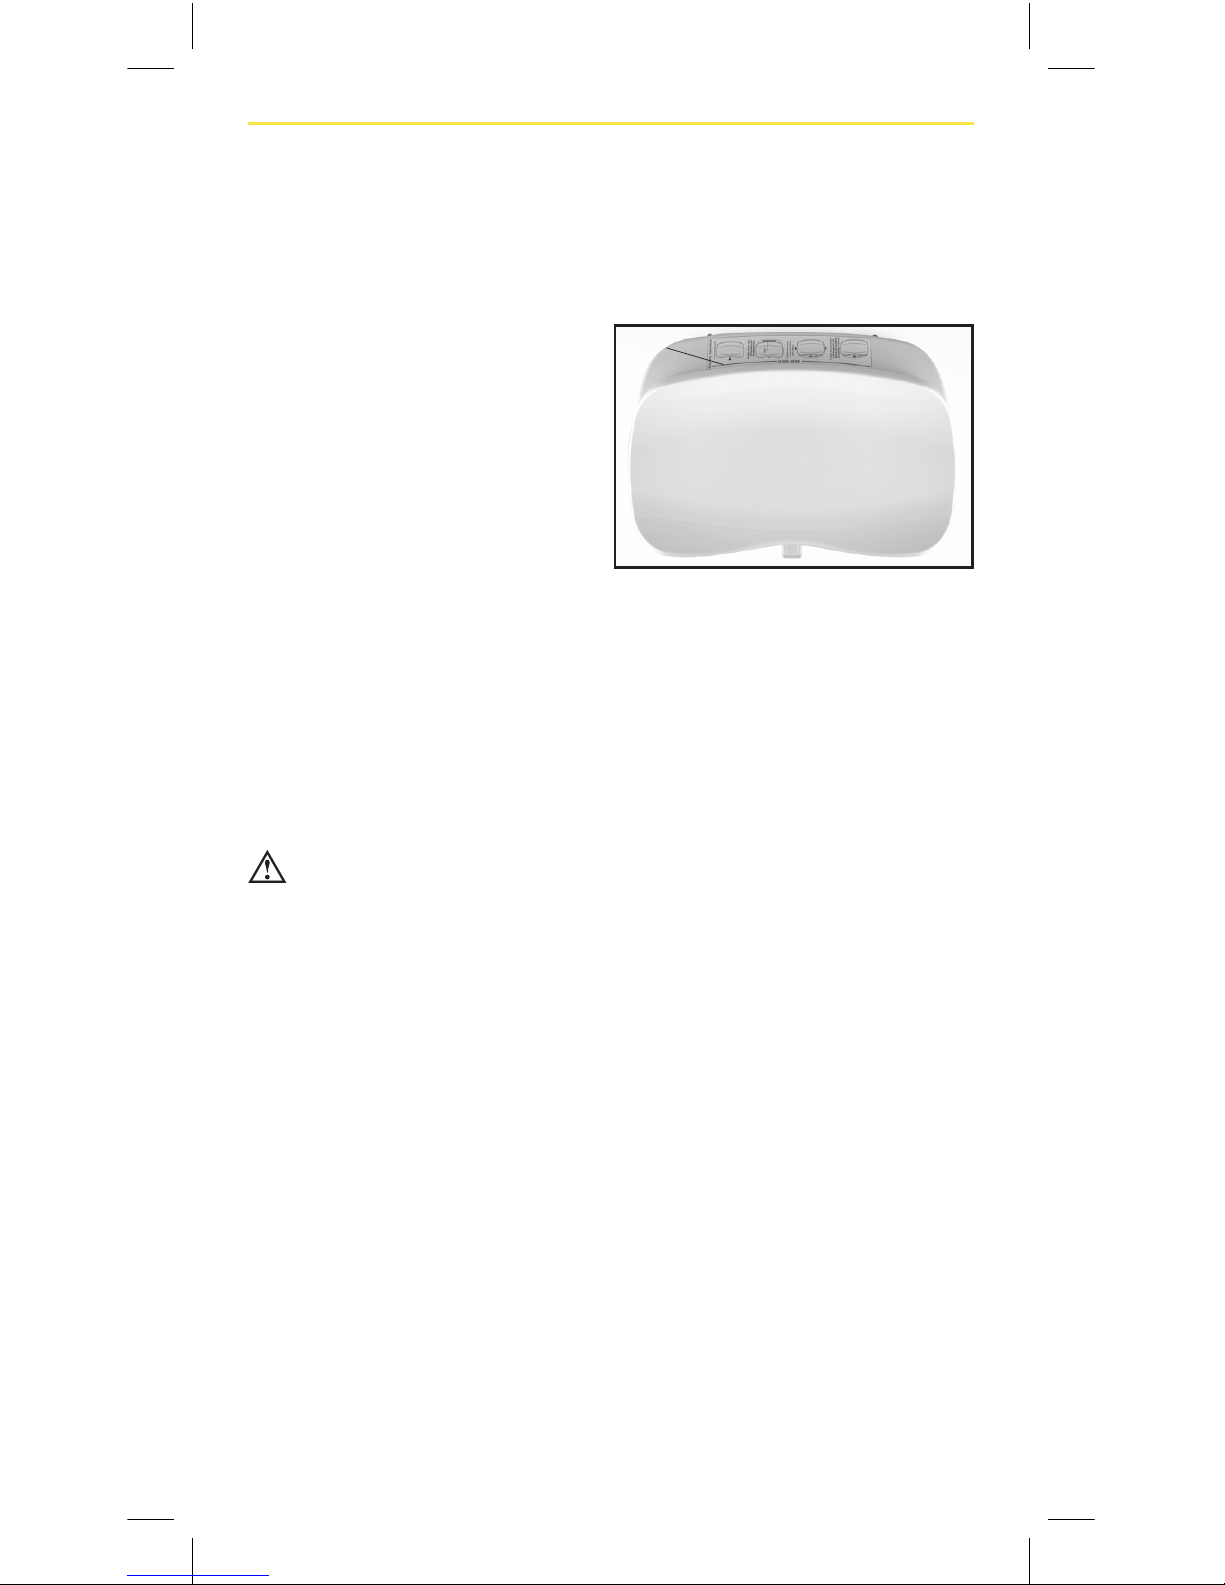
Part Identification
Top
Bottom
Adjusters (4)
Baby Tray
(for infant)
Tray Locking
Lever
Level Gauge
Operation Keys
Display Panel
Battery Cover
AC Adapter
Inlet
RS-232C
Connector
Page 15
14
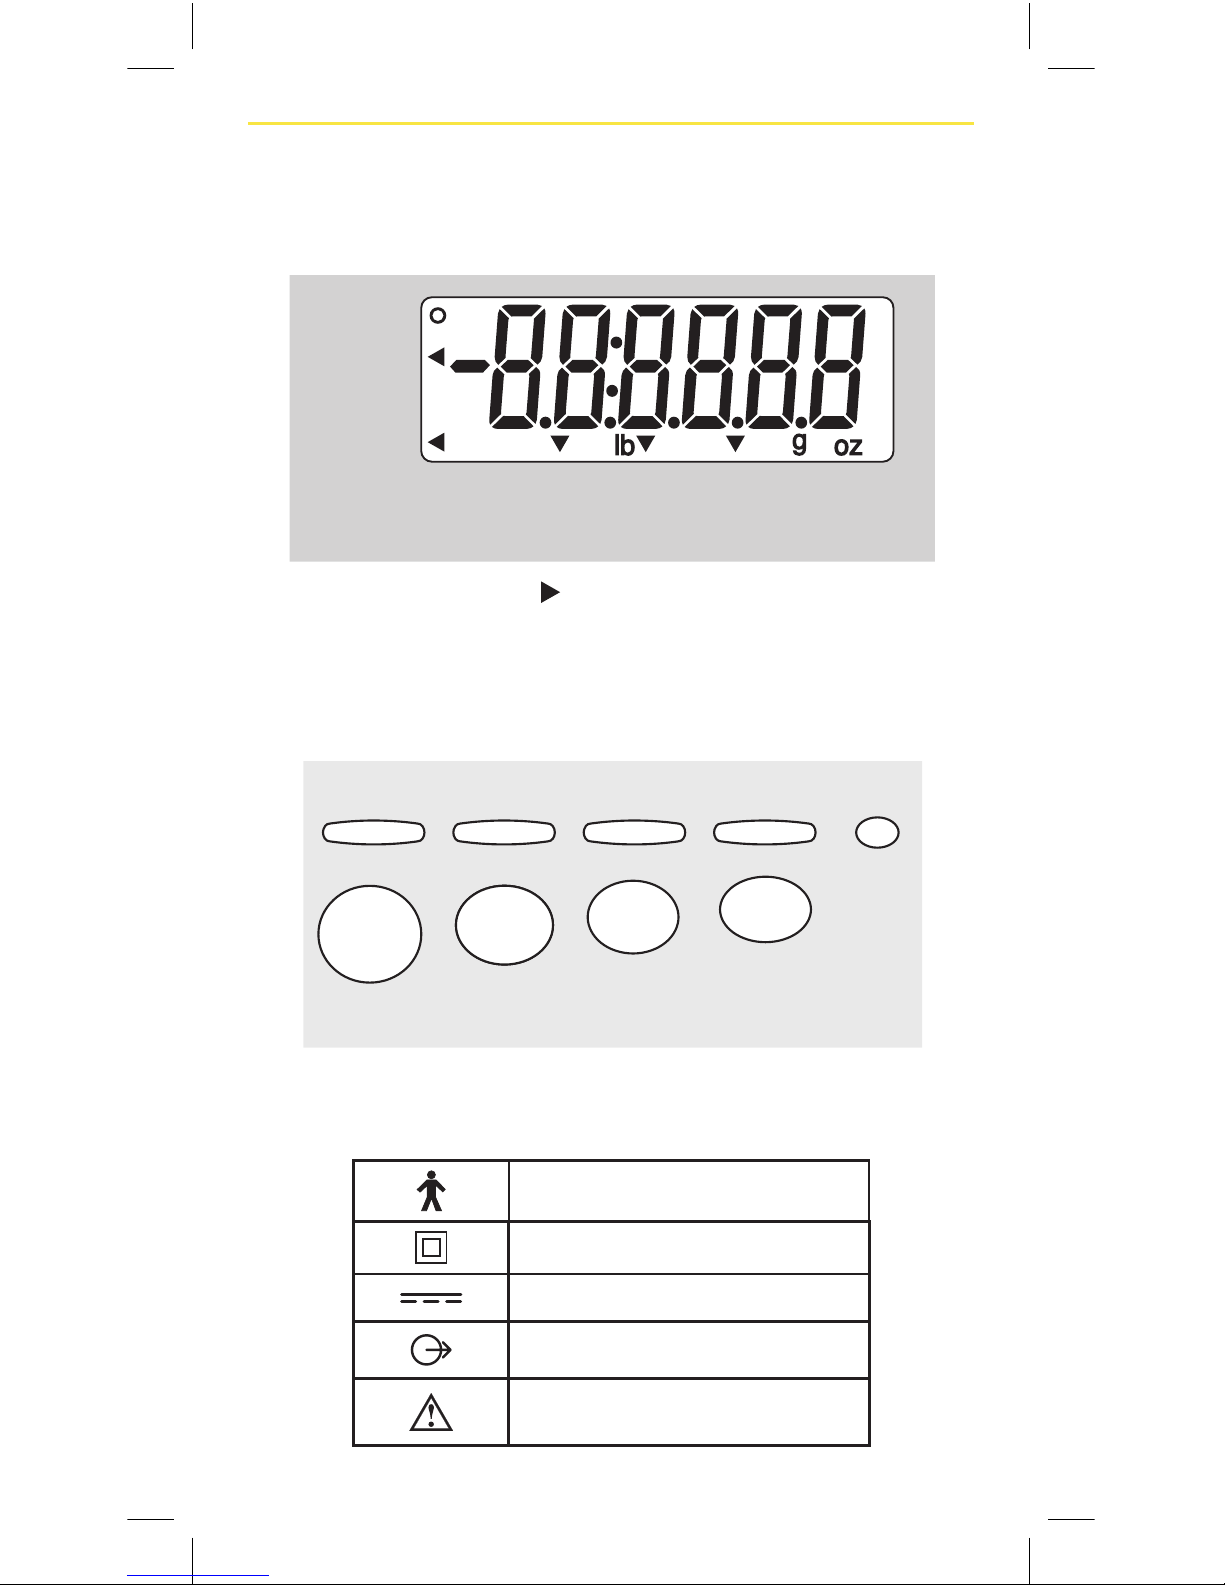
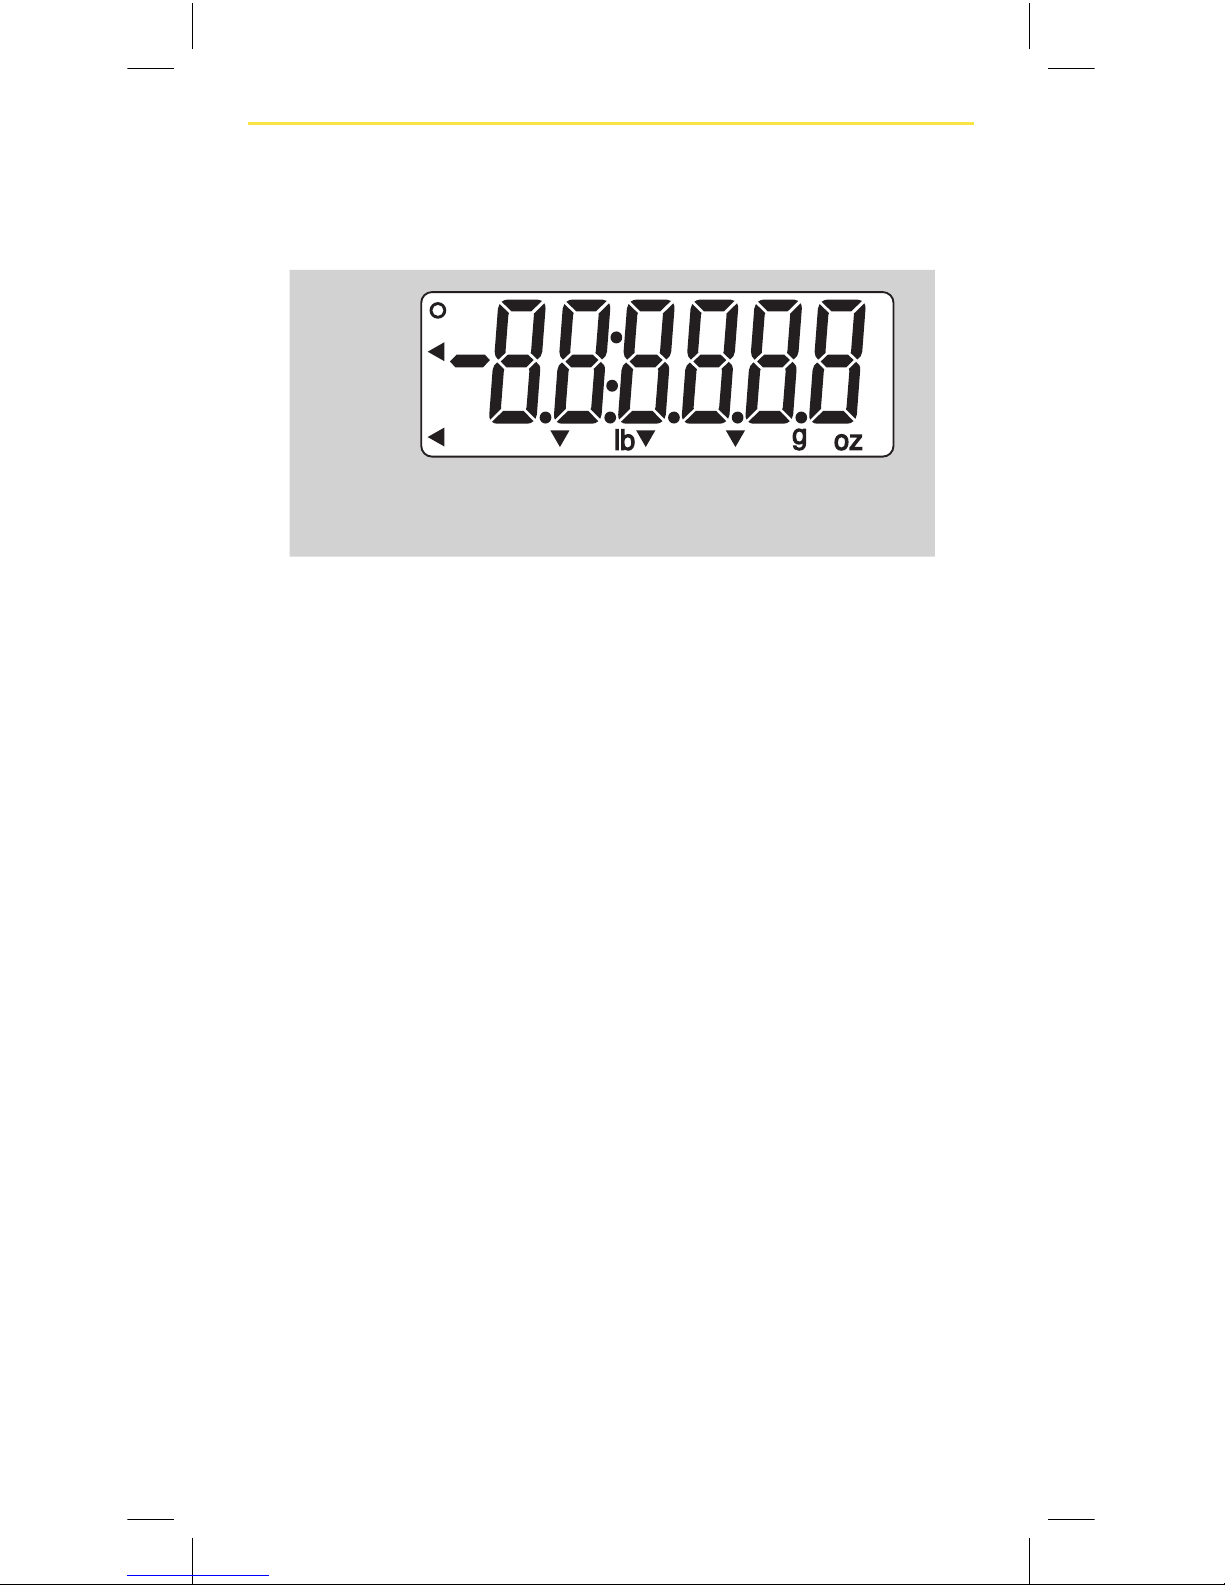
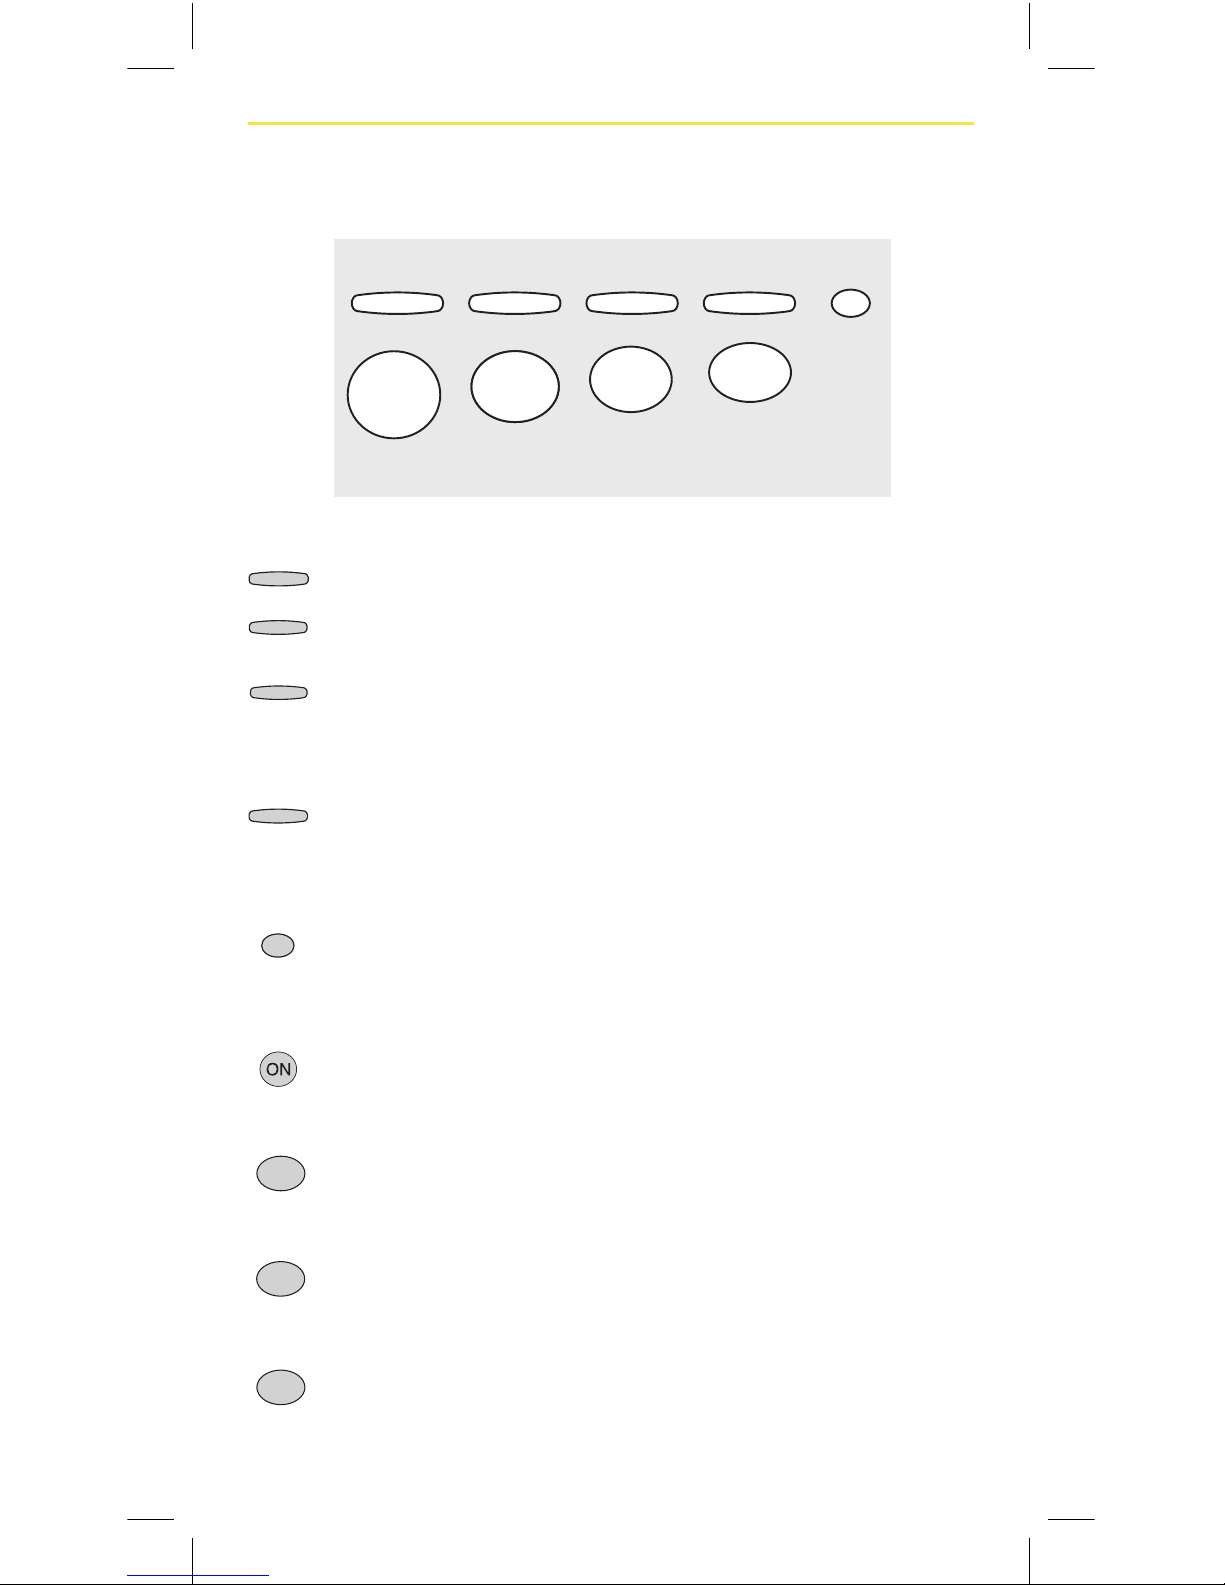
Operator Interface
Display panel
• The pointers ( the mark ) indicate active items.
• The backlight is on only when the AC adapter is used.
Operation keys
Symbols and their meaning
before
feed
after
feed
stabilized
net
lock
amount
fed
tare/zero off
weight
lock off
reweigh
fed baby
reset
before
feed
after
feed
amount
fed
ON
1
2
3
tare/zero off
weight
lock off
reweigh
fed baby
units
g / lb. oz
reset
before
feed
after
feed
amount
fed
ON
1
2
3
Type B applied part
Class II Equipment
Direct Current
Output
Caution. Refer to the attached
Important Safeguards.
* In gram only version (PN 0407023) of scale this button is disabled.
*
Page 16
15
Operator Interface (cont.)
Display panel
Display panel descriptions:
Stabilized – The weight measurement has settled.
Net – A tare weight is subtracted from current weight.
Lock – Holding the stabilized weight.
Before feed – Before feed weight displayed.
After feed – After feed weight displayed.
Amount fed – Weight of amount fed displayed.
before
feed
after
feed
stabilized
net
lock
amount
fed
tare/zero off
weight
lock off
reweigh
fed baby
reset
before
feed
after
feed
amount
fed
ON
1
2
3
Page 17
16
Operator Interface (cont.)
Operation keys
Operation key functions:
tare/zero
Tare/zero – Sets the tare weight to zero.
off
Off – Turns off the scale.
weight
lock off
Weight lock off – Turns off weight lock mode until
weight is removed from scale.
Weight lock automatically turns on
again when scale displays zero.
reweigh
fed baby
Reweigh fed baby – Redo post-feed weight. Clears
post feed weight and amount fed
allowing entry of new post feed
weight and milk intake calculation.
units
g / lb. oz
Units g/lb-oz – Switches between grams and
pounds-ounces. *In gram only
version (PN 0407023) of scale this
button is disabled.
Reset – Turns on scale. Releases weight
lock and sets display to zero
(Stored weights remain in memory).
1
Before feed – Stores before feed weight in
memory 1. Displays before-feed
weight once it has been stored.
2
After feed – Stores after feed weight in memory
2. Displays after-feed weight once
it has been stored.
3
Amount fed – Stores amount fed weight in
memory 3. Displays the calculated
feed amount once the post-feed
weight has been stored.
tare/zero off
weight
lock off
reweigh
fed baby
units
g / lb. oz
reset
before
feed
after
feed
amount
fed
ON
1
2
3
Page 18

17
Scale Setup
Power supply/battery
1. Turn the scale upside-
down, and turn the nger
screw on the battery
cover counterclockwise
(as indicated) to release
the screw.
2. Lift off the battery cover.
• When the batteries start to run low, “Lo” appears on
display panel as a warning. All (4 AA) batteries should be
immediately replaced with new ones.
NOTE: Rechargeable batteries are NOT recommended.
• A set of standard batteries should last about one year
(assuming four readings a day).
Page 19
18
Scale Setup (cont.)
Using the AC adapter
1. Insert the AC adapter jack
into the AC adapter inlet on
the right side of the main unit.
2. Plug the AC adapter into the
power outlet.
CAUTION: This equipment must be used with the
included AC adapter or 4 AA batteries.
How to set up
Use the scale on a rm, at and stable location.
• Do not position scale
anywhere that is subject
to direct sunlight, near
heating equipment, or
directly in the path of an
air conditioner outlet,
or other source of high
air ow.
• Do not use scale anywhere
that is subject to signi cant temperature change.
• Do not position scale anywhere that is either damp or
subject to high humidity.
• After positioning the scale and before use, pick up the baby
tray from both sides to con rm that the tray is secure, and
not easily removed.
• Ensure that the tray locking lever is pushed in.
Page 20
19
Scale Setup (cont.)
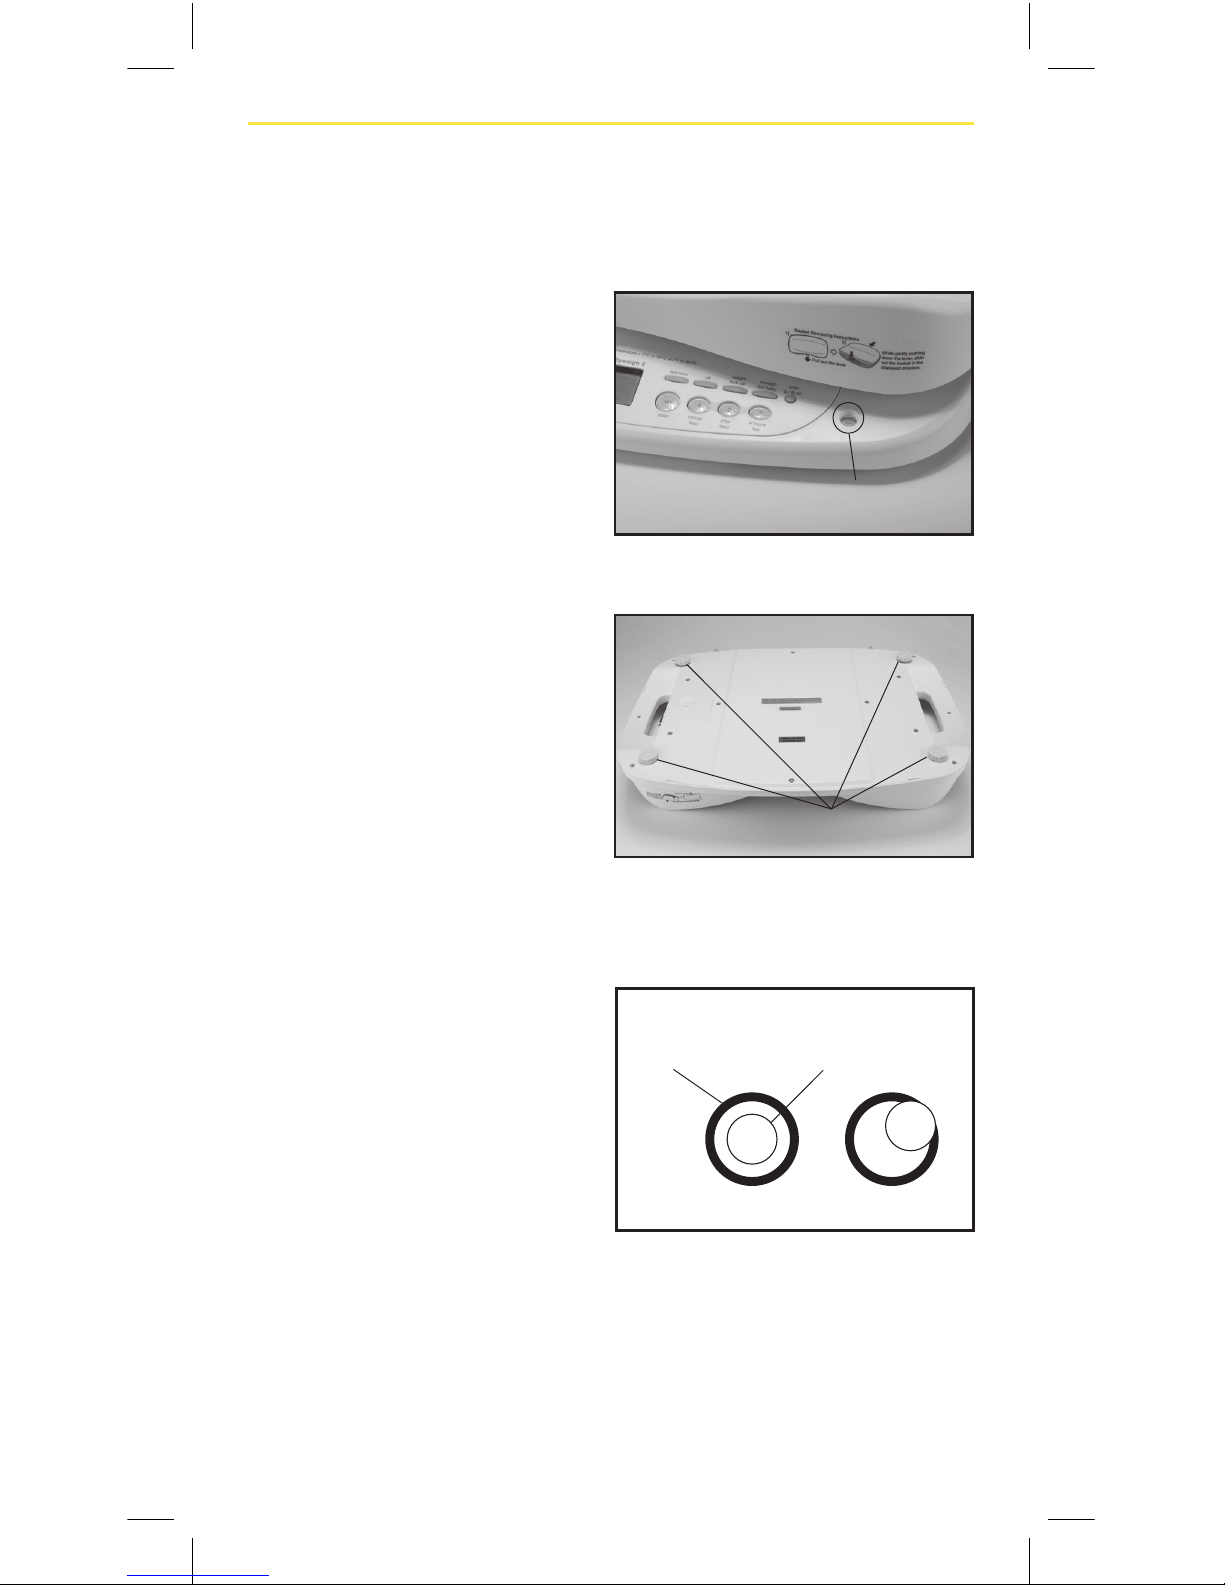
Level gauge check
1. Place the scale on a
at surface to ensure
accurate measurement.
2. Turn the four adjusters
such that the air bubble
in the level guide is
positioned in the center
of the circle. Conrm
that all four adjusters
are in contact with the
surface.
Level gauge
Adjusters (4)
View from above
Red Air bubble
Correct Incorrect
Page 21

20
Instructions for Weighing
Considerations to follow prior to test-weighing:
• Diaper should not be changed between the “before”
and “after” weights.
• Baby should wear the same clothing for “before” and
“after” weights.
• Use a bib, but do NOT include it in “before” and “after”
weights.
• To improve accuracy, bundle active infants and verify
that all blankets, clothing, and extremities are inside the
basket and not touching the side of the scale.
• Record weights in grams only.*
*Note – Grams is closely equivalent to milliliters (mL) or cubic centimeters (cc). Meier PP, et al.
A New Scale for in-Home Test-Weighing for Mothers of Preterm and High Risk Infants.
Journal of Human Lactation, 1994;10(3); 163-168.
BabyWeigh II Operation Overview
Once you have set up the scale (pg. 19) operation is easy.
Here is an overview.
1. Perform before-feed weight (pg. 21). To store weight in
memory press the
1
button.
2. Perform after-feed weight (pg. 21-22).To store weight
in memory press
2
button.
3. Calculate amount fed (pg 22).
To calculate press
3
button.
Page 22
21
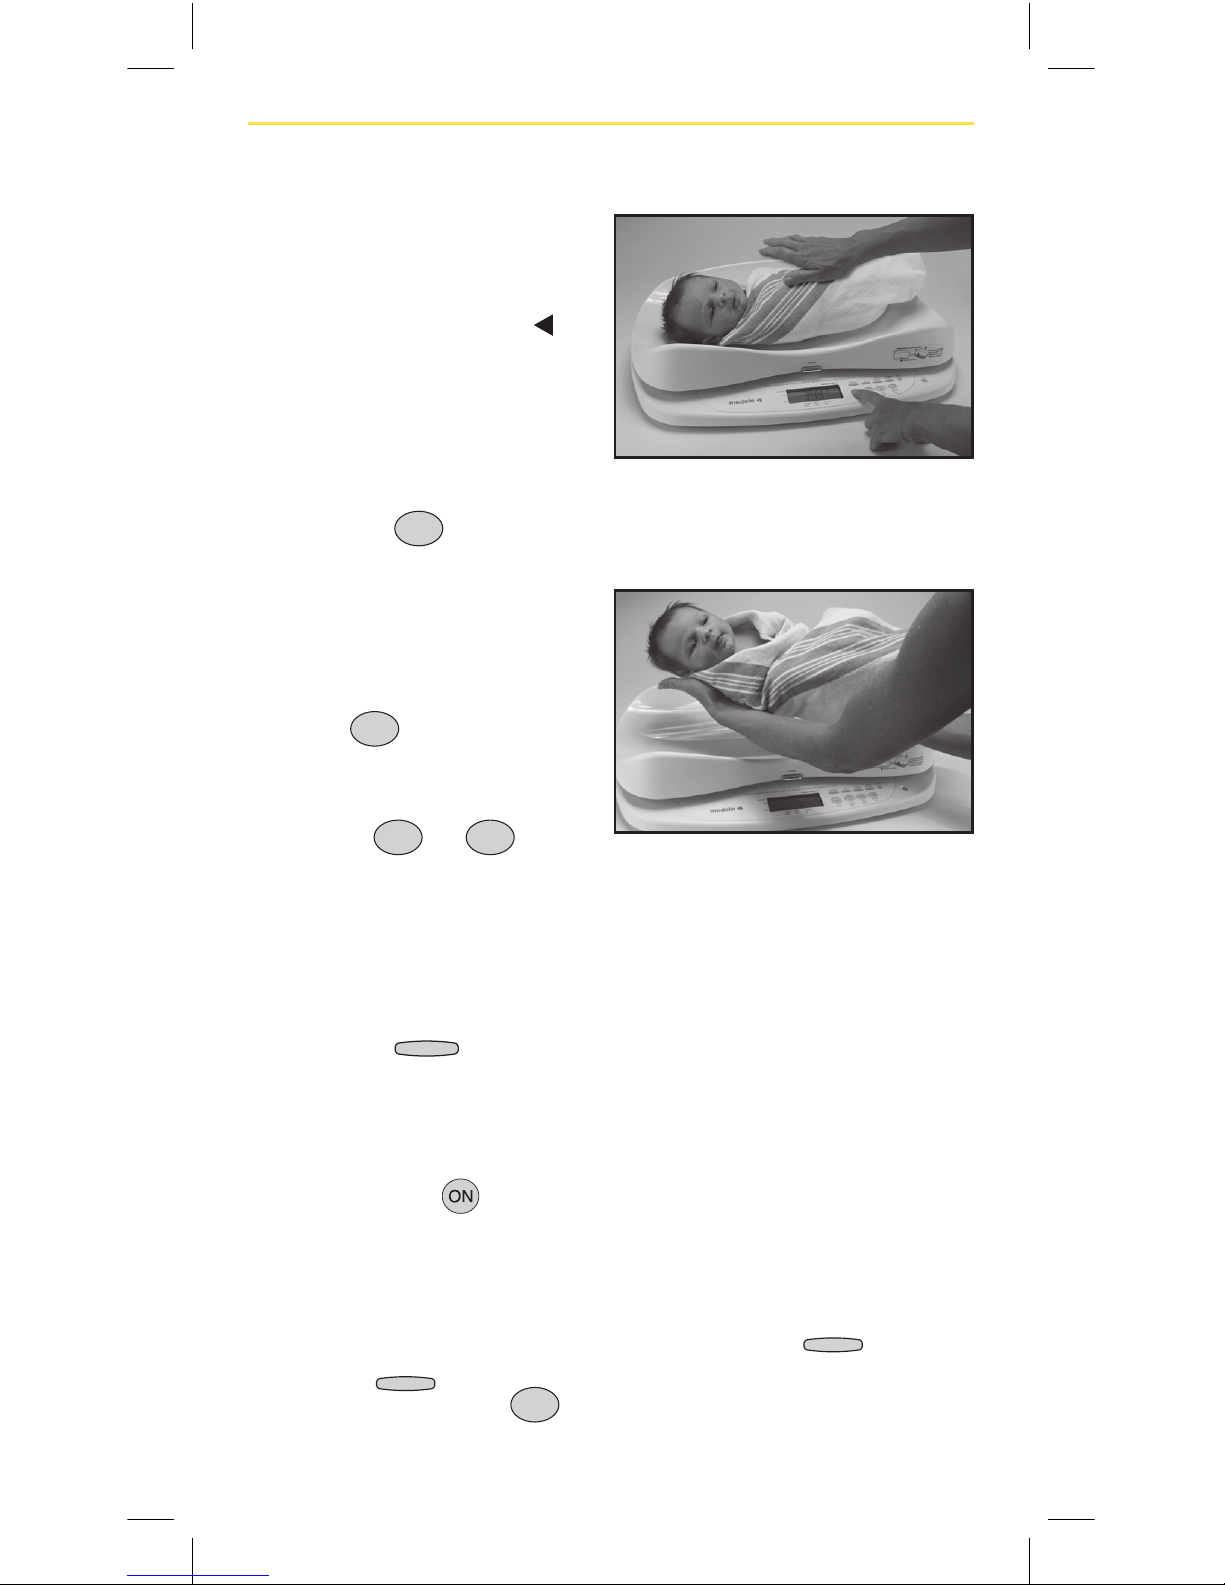
Instructions for Weighing (cont.)
Instructions for Weighing
Setup:
1. Attach the tray and level the scale prior to weighing.
2. Press the
button and wait until a ‘0’ appears in the
display. If using a blanket or pad on the scale, press
tare/zero
button to zero out the excess weight. Net
will
be indicated.
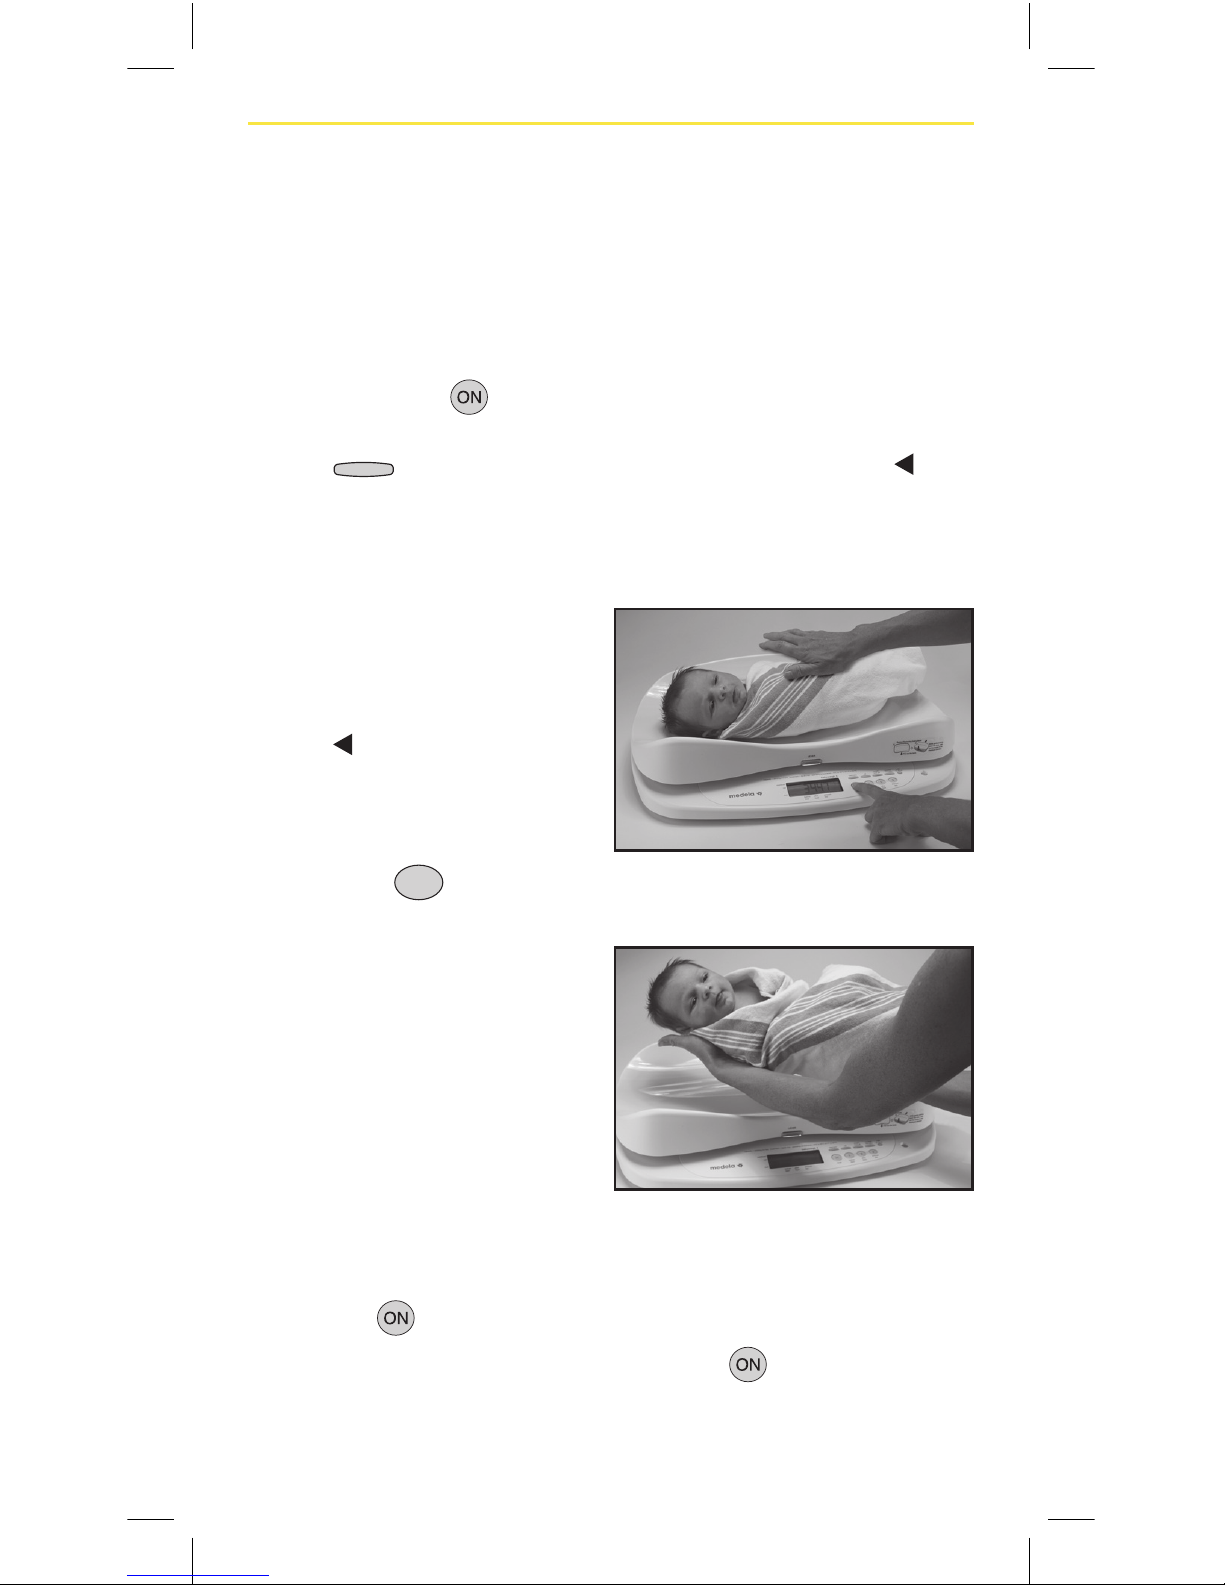
Before-feed Weight (pre-weight):
1. Place baby on the scale,
holding one hand just
above baby. Wait until the
display indicates
lock
(Beep sound). The
value that appears is the
pre-weight.
2. Press the
1
button to
store the pre-weight.
3. Remove baby from the
scale, place baby in a safe
location and then record
pre-weight.
Feed baby. Leave scale on
during feeding.
After-feed Weight (post-weight):
NOTE: Ensure the display has reset to ‘0’. If it has not, press
the
button to zero out the display.
1. If the scale has powered off, press the
button and wait
until a ‘0’ appears in the display. The pre-weight is saved in
memory, even if the scale is powered off.
Page 23
22
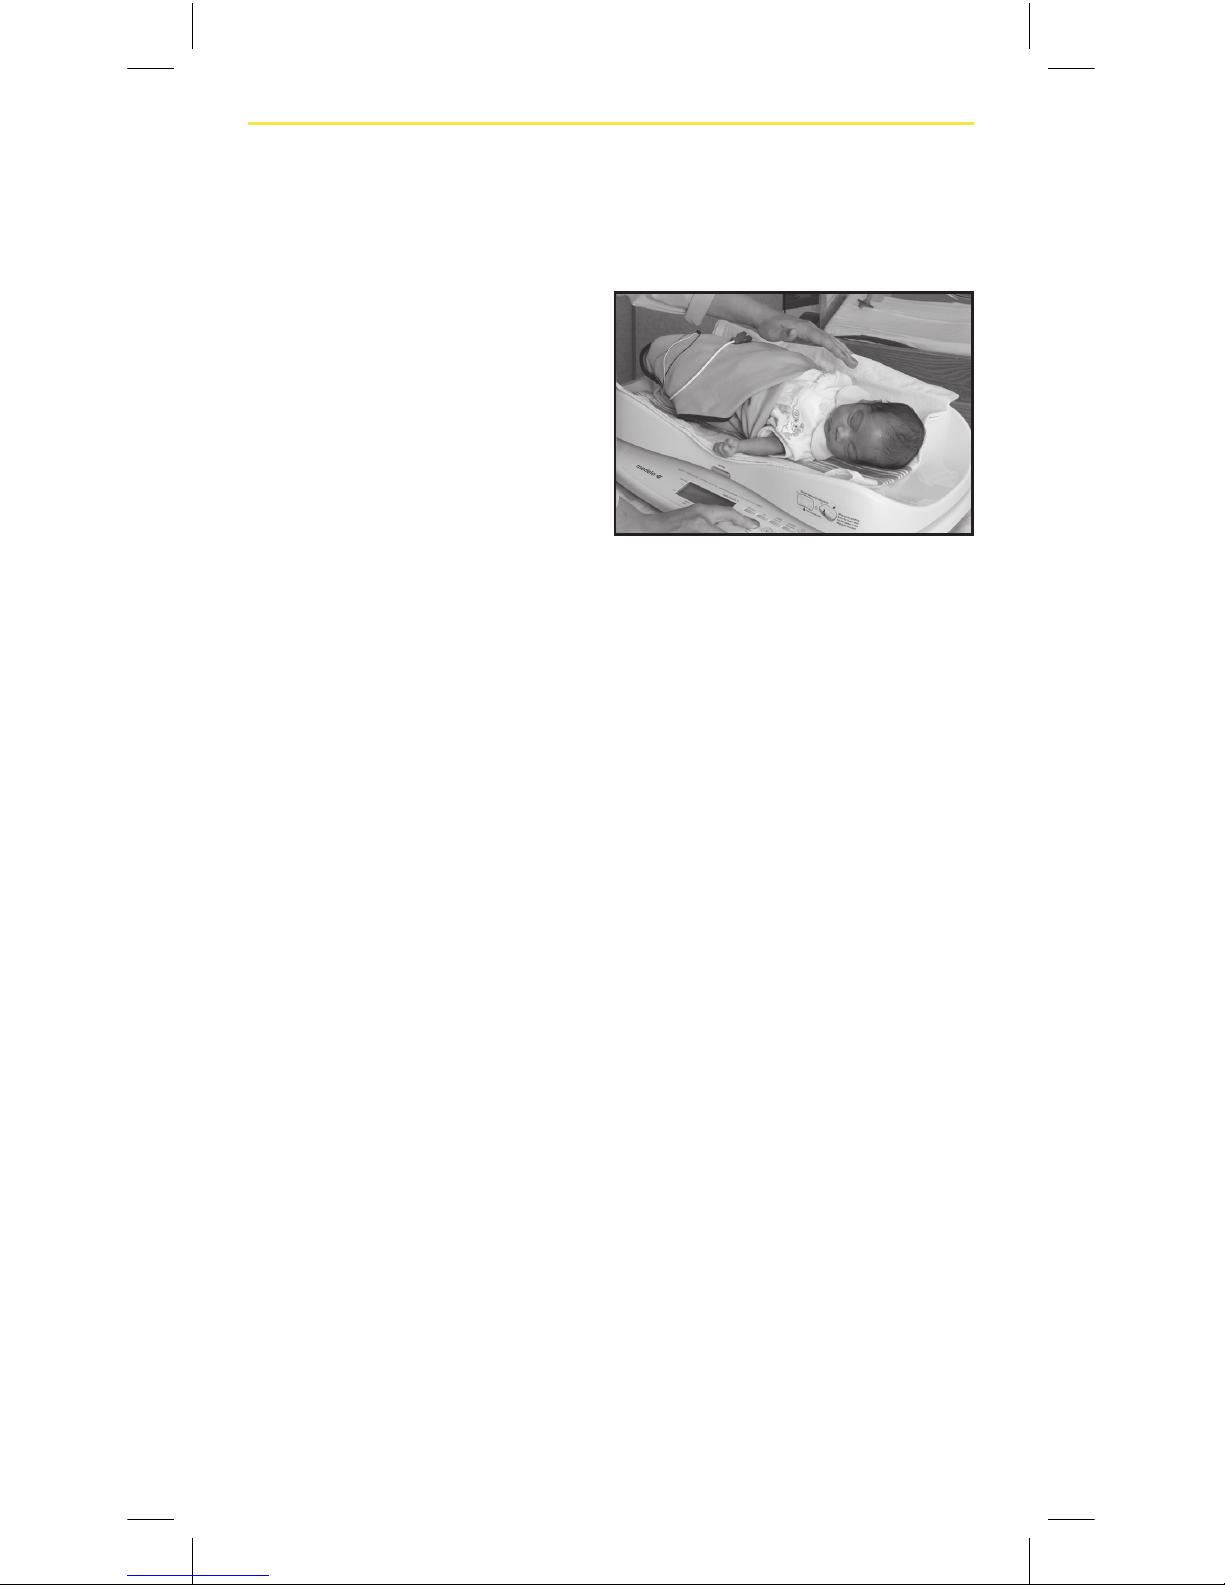
Instructions for Weighing (cont.)
2. Place baby on the scale,
holding one hand just
above baby. Wait until the
display indicates lock
(Beep sound). The value
that appears is the postweight.
3. Press the
2
button to store the post-weight.
4. Remove the baby from the
scale and place baby in a
safe location.
5. Press
3
button to
display the calculated
breastmilk intake. Press
buttons
1
or
2
to
recall the pre-weight or
post-weight respectively.
6. Record the post-weight and the calculated amount fed.
7. Press the
off
button to turn off the scale. The last set of
weights will remain in memory.
Additional Considerations:
• Press the
button at any time to reset the scale. This
will not delete weights in memory.
• If it should become necessary to reweigh the after-feed
weight after it has been saved, press the
reweigh
fed baby
button.
The
reweigh
fed baby
button clears the current post-weight on the
memory button
2
to prepare the scale for a new
post-weight.
Page 24
23
Instructions for Weighing (cont.)
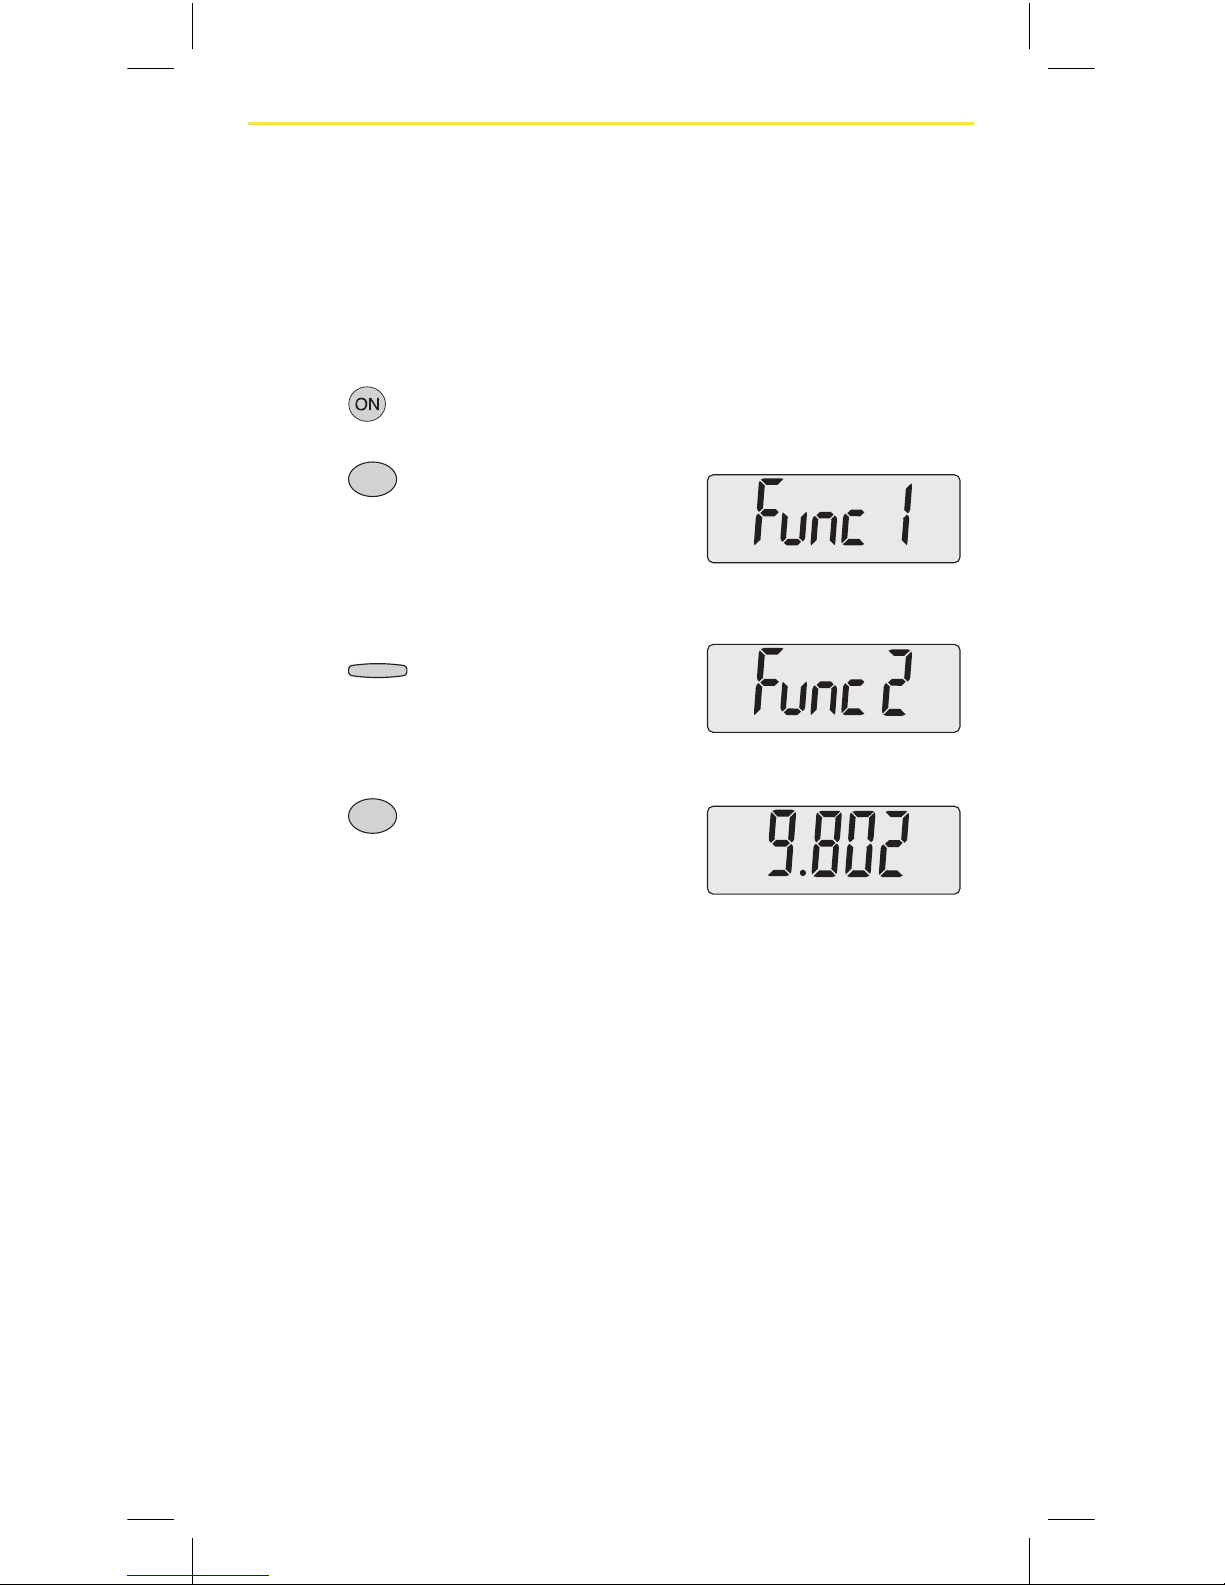
Considerations for weighing infant with Leads:
• If possible, disconnect
leads and or tubings
from monitor and place
on top of bundled
infant.
• Suspend monitoring/
alarm during test
weight procedure.
• Prior to feeding the baby reconnect leads if
disconnected.
Accurate test weights for preterm infants with leads attached can
be achieved by properly training NICU personnel and following
an evidence based protocol. Refer to the following publication for
more information:
Haase B, Barreira J, Murphy PK, Mueller M, Rhodes J. The
development of an accurate test weighing technique for preterm
and high-risk hospitalized infants. Breastfeed Med. 2009
Sep;4(3):151-6.
Page 25
24
Calibration Procedure
NOTE: This procedure should be performed in the same
geographic area as the measurements for infant
weights. Procedure requires two certified 10 kg
Class F test weights.
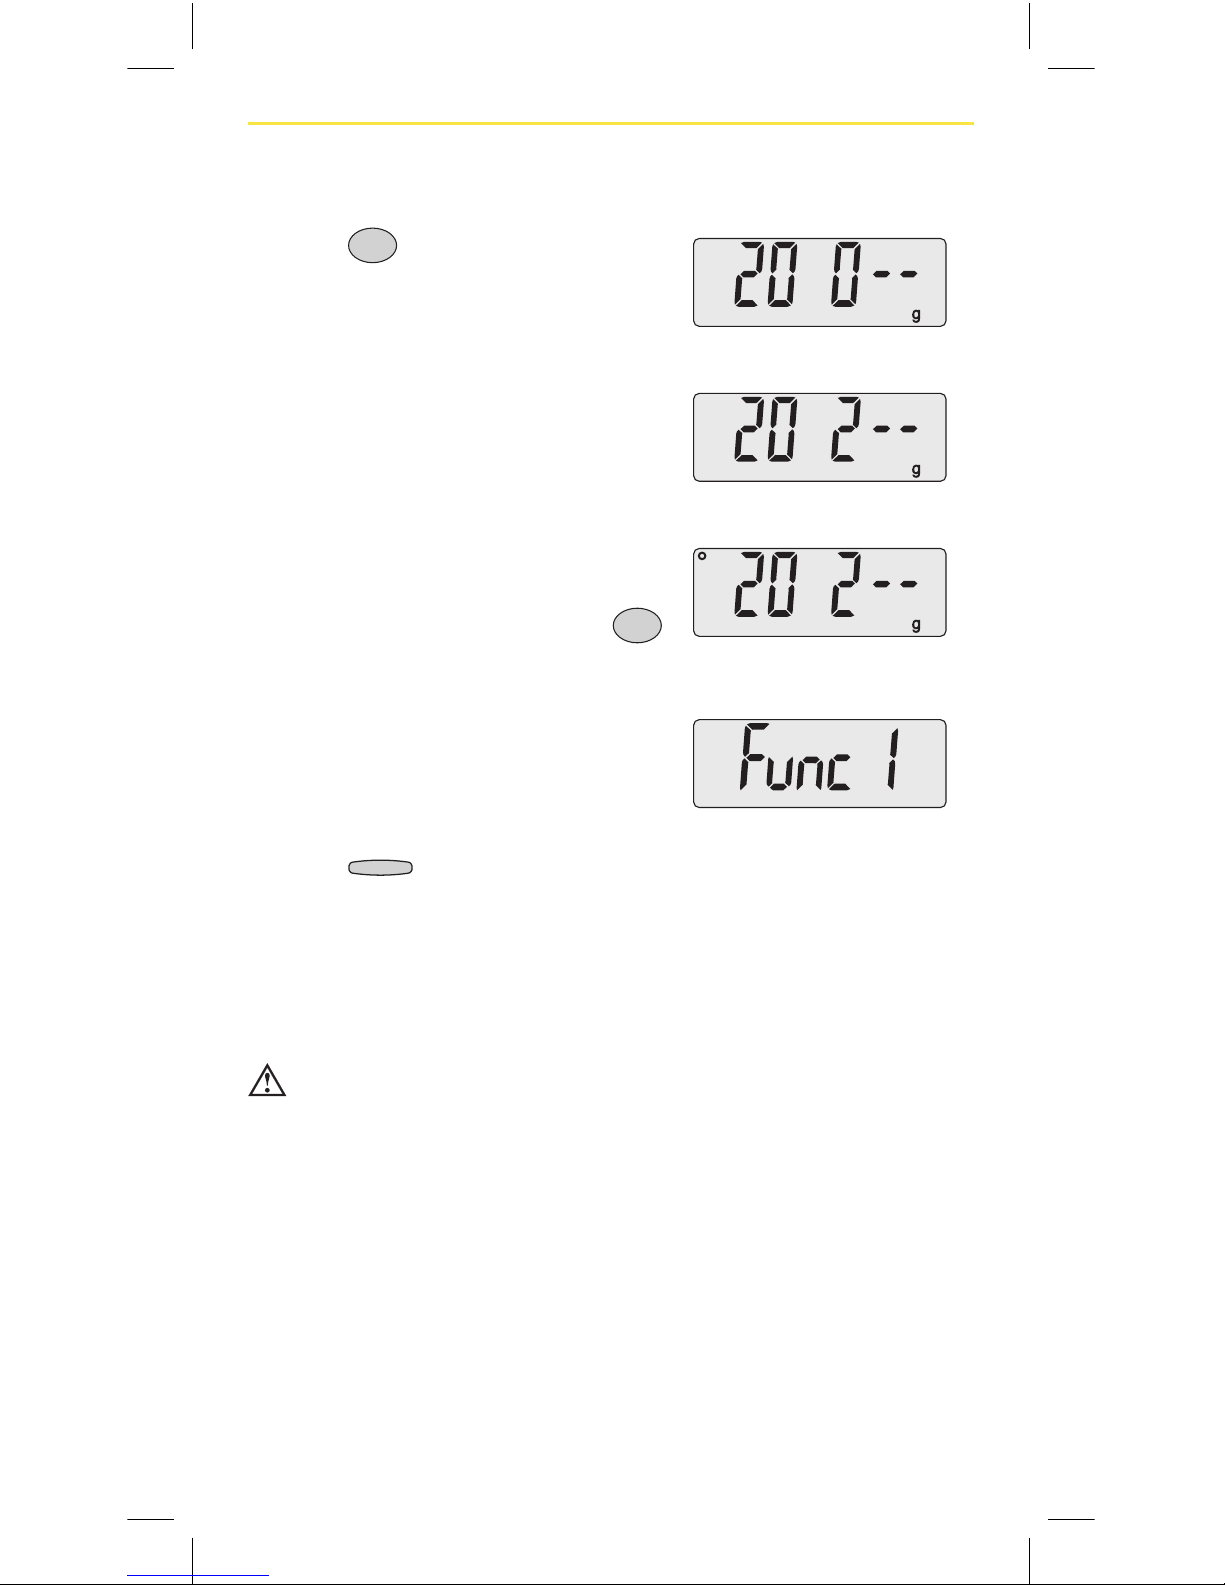
1. Press
button while the scale is off.
2. Press
1
button while the display
is flashing all segments --> Display
shows “Func 1”.
3. Press
reweigh
fed baby
button --> Display
shows “Func 2”.
4. Press
3
button --> Display
shows “9.XXX” (For example, 9.802
will be displayed).
NOTE: The gravity setting will update automatically upon
completing the calibration procedure.
Page 26
25
Calibration Procedure (cont.)
5. Press
3
button again -->
Display shows “20 0--” and “g”.
Wait for display to show “20 2--”.
6. Place two 10 kg weights on the
platform after the display shows
“20 2--”.
7. Wait for the display to show
“stabilized” mark (circle in the top
of left corner), then Press the
3
button to complete calibration.
8. Wait for display to show “func 1”
then remove the 20 kg weight.
9. Press
off
button to turn off the scale.
NOTE: If the following error messages are displayed, “Er0065”
or “Er0066”, recalibration must be performed.
CAUTION: Do not leave the calibration weights on the scale
for prolonged periods of time (more than a few
minutes)
Page 27
26
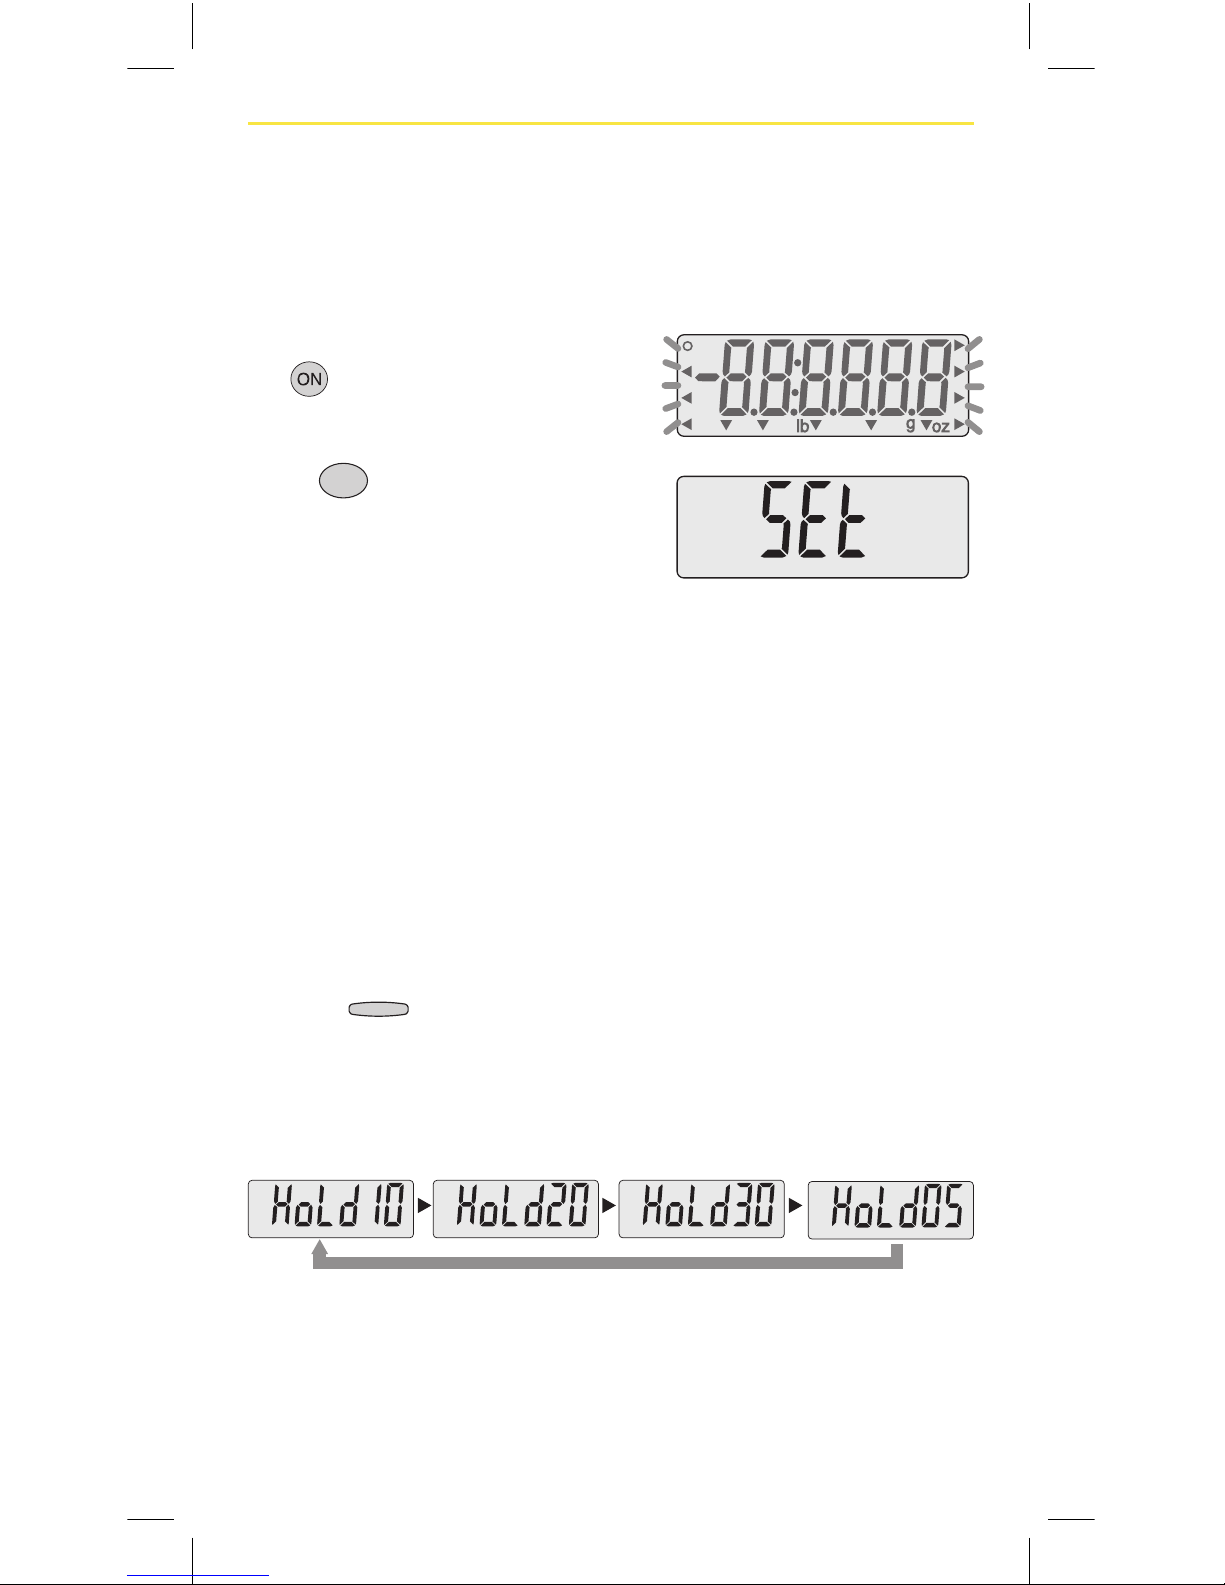
Scale Settings Adjustment
To adjust settings for Display Hold Time and Auto Power Off
Time complete the following steps:
Enter the setting menu by pressing
the
key.
(Beep sound)
Press
3
button while the screen
is ashing (Beep sound). The LCD
screen will show SEt.
Depending on which setting you wish to adjust follow next
steps under instructions for each setting.
Display Hold Time
The “Display Hold Time” setting holds the display for a
specied length of time. This setting determines how long
the weight displays after the baby has been removed from
the scale. It also controls the length of time the weight is
displayed when recalling pre-feed, post-feed and amount fed
values.
1. Press
tare/zero
key.
(Beep sound)
The hold time is shown (the default is 10 seconds), and the
value is changed by pressing this key.
* The hold times that can be set are 5 seconds, 10 seconds, 20 seconds or 30 seconds.
Page 28
27
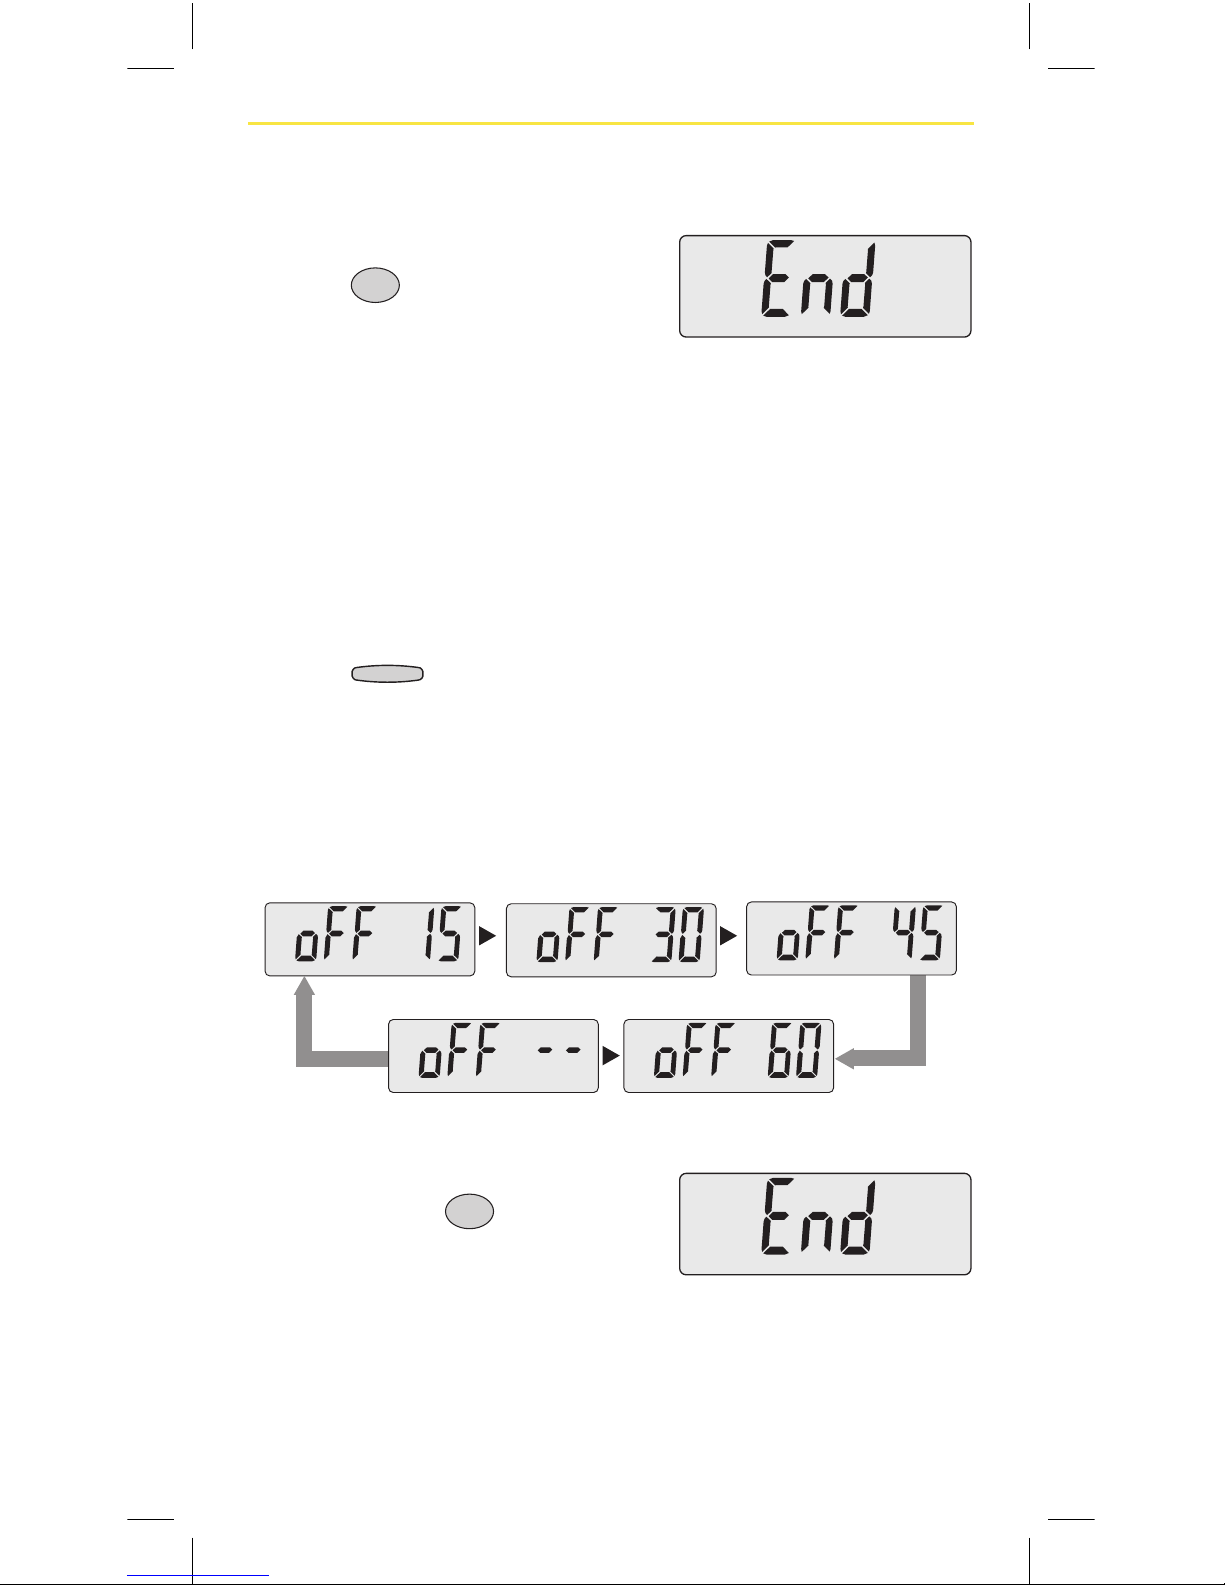
Display Hold Time (cont.)
2. To save the hold time setting,
Press
3
again.
(Beep sound)
Auto Power Off Time
The “Auto Power Off Time” setting automatically turns off the
power when the scale is unused for the specied length of
time. To enter the settings menu.
1. Press
weight
lock off
key. (Beep sound)
The auto power off time is shown (the default is none), and
changed by pressing this key.
* The auto power off times that can be set are 15 minutes, 30 minutes, 45 minutes, 60
minutes, or -- (None). --(None) means that the auto power off function is deactivated.
2. To save the Auto Power Off Time
setting, Press
3
again.
(Beep sound)
Page 29
28
Troubleshooting
If you are concerned that the scale may not be
functioning correctly please check the following points
before requesting repairs.
Problem Check Points
Scale will not ‘Power On.’ - Have the batteries been
removed, or has the AC adapter
been unplugged?
- Are the batteries running low?
- Is anything stuck to the terminals
of the batteries?
‘Lo’ is displayed. - The batteries are running out.
Please replace them immediately
or use the AC adapter.
------------- is shown during
measurement.
- The maximum measurable weight
capacity for the scale is 20 kg
and has been exceeded.
Page 30
29
BWII Data Output Format
Explanation for RS-232C-compliant output.
Specifications
NOTE: Commas (,) are used to separate data.
Terminator (end of data) is CR (ASCII code: 0DH), LF
(ASCII code: 0AH).
Communication standard EIA RS-232C
Communication method Asynchronous
Signal speed 9,600bps
Data bit length 8bit
Parity None
Stop bit 1bit
Terminator CR + LF
Flow control None
Page 31

30
BWII Data Output Format (cont.)
Signal line name and connection method.
Connection example
Please be sure to use a straight cable when the equipment is
connected to an external computer.
BWII
PC, etc.
Terminal no. Signal name
1
2
TXD
3
4
5
GND
6
7
8
9
Page 32

31
BWII Data Output Format (cont.)
Transmission data is output immediately after measurement
regardless of the receiving device status. The receiving
device must always be ready to receive data before any
measurements are taken.
1. Grams (g) mode
◆ When the display locks on a weight.
Item Header Output data (ASCII code) Details
Control data {0 Fixed at 16
Control data ~0 Fixed at 1
Model No. MO “xxxxxx” 6 byte fixed length
(“BWII”)
Body weight Wg xxxxx 3~5 bytes variable
length (unit: g)
Ex.) {0,16,~0,1,MO,”BWII”,Wg,5260
◆When the Before Feed key
1
is pressed to store weight.
Item Header Output data (ASCII code) Details
Before
Feeding
Rg xxxxx 3~5 bytes variable
length (unit: g)
Ex.) Rg,5260
◆When the After Feeding key
2
is pressed to store weight.
Item Header Output data (ASCII code) Details
Before
Feeding
Rg xxxxx 3~5 bytes variable
length (unit: g)
After Feeding Pg xxxxx 3~5 bytes variable
length (unit: g)
Amount Fed Gg xxxxxx 1~6 bytes variable
length (unit: g)
Ex.) Rg,5260,Pg,5366,Gg,106
Page 33

32
BWII Data Output Format (cont.)
2. lb-oz mode
NOTE: Commas (,) are used to separate data.
Terminator (end of data) is CR (ASCII code: 0DH), LF
(ASCII code: 0AH).
◆ When the display locks on a weight.
Item Header Output data (ASCII code) Details
Control data {0 Fixed at 16
Control data ~0 Fixed at 1
Model No. MO “xxxxxx” 6 byte fixed length
(“BWII”)
Body weight Wo xx.xx.x 5~7 bytes variable
length (unit: lb.oz)
Ex.) {0,16,~0,1,MO,”BWII”,Wo,11.14.2
◆When the Before Feeding key
1
is pressed to store weight.
Item Header Output data (ASCII code) Details
Before
Feeding
Ro xx.xx.x 5~7 bytes variable
length (unit: lb.oz)
Ex.) Ro,11.14.2
◆When the After Feeding key
2
is pressed to store weight.
Item Header Output data (ASCII code) Details
Before
Feeding
Ro xx.xx.x 5~7 bytes variable
length (unit: lb.oz)
After Feeding Po xx.xx.x 5~7 bytes variable
length (unit: lb.oz)
Amount Fed Go xxx.xx.x 5~8 bytes variable
length (unit: lb.oz)
Ex.) Ro, 11.14.2, Po, 12.2.1, Go, 0.3.9
Page 34

33
Replacement Parts
Item Part No.
Power Adapter . . . . . . . . . . . . . . . . . . . . . . . . . . . . . . . 9207053
Baby Tray Assembly . . . . . . . . . . . . . . . . . . . . . . . . . . 8097012
Battery Cover . . . . . . . . . . . . . . . . . . . . . . . . . . . . . . . . 8107232
Instruction Manual . . . . . . . . . . . . . . . . . . . . . . . . . . . . 1908156
Accessories (not included)
Item Part No.
Soft Case . . . . . . . . . . . . . . . . . . . . . . . . . . . . . . . . . . . 3007357
Page 35

34
Warranty Information
This product is warranted by Medela, Inc., to the original purchaser
to be free from defects in material and workmanship for the period
of one (1) year from the date of purchase. In the event of a defect or
failure to conform to this warranty, Medela will, at Medela’s option,
repair or replace this product without charge for such replacement,
on parts or labor, at the Medela ofce listed below. The Purchaser
shall bear all responsibility and expense for returning this product
to Medela, including risk of loss prior to receipt by Medela, and
shipping, packing, and insurance costs.
Medela will have no obligation under this warranty to repair any
malfunction or damage arising from any misuse, abuse, or alteration
of this product. Without limiting the generality of the foregoing,
bending , or dropping of this product or its components, visible
cracking of the equipment housing will be presumed to be defects
resulting from misuse or abuse. Accessories that are not expressly
manufactured or recommended by Medela and subsequently
attached to the equipment will immediately void this warranty.
ANY AND ALL IMPLIED WARRANTIES ARE LIMITED TO THE
DURATION OF ONE YEAR FROM DATE OF PURCHASE. SOME
STATES DO NOT ALLOW LIMITATIONS ON HOW LONG AN IMPLIED
WARRANTY LASTS, SO THE ABOVE LIMITATIONS MAY NOT APPLY
TO YOU.
THE LIABILITY OF MEDELA FOR BREACH OF ANY WRITTEN OR
IMPLIED WARRANTY IS LIMITED TO REPAIR OR REPLACEMENT
OF THIS PRODUCT, AND MEDELA WILL HAVE NO LIABILITY
UNDER ANY CIRCUMSTANCES FOR ANY INCIDENTAL OR
CONSEQUENTIAL DAMAGES. SOME STATES DO NOT ALLOW THE
EXCLUSION OR LIMITATION OF INCIDENTAL OR CONSEQUENTIAL
DAMAGES, SO THE ABOVE LIMITATIONS OR EXCLUSIONS MAY
NOT APPLY TO YOU.
THIS WARRANTY GIVES YOU SPECIFIC LEGAL RIGHTS AND YOU
MAY ALSO HAVE OTHER RIGHTS WHICH VARY FROM STATE TO
STATE.
If you wish to make a claim under this warranty, you must return
this product to Medela Inc. at 1101 Corporate Drive, McHenry, IL
60050-0660. You must contact Medela Customer Service Department
and obtain a Return to Merchant Authorization (RMA) Number and
reference the number on your return package. The original Invoice
Number or Purchase Order Number must be referenced on the RMA.
Medela’s customer service toll free number is 1-800-435-8316.
Page 36

35
Technical Specifications
This product meets the following requirements.
Safety Standard: IEC60601-1:1988,+A1:1991+A2:1995
EMC Standard: IEC60601-1-2:2001,+A1:2004
Model BabyWeigh™ II
Protection against
electrical shock
On AC adapter: Class II
On battery: Internally powered
equipment
Capacity 44 lb (20000 g)
D (division) 0.1 oz (0-44 lb)
2 g (0-20000 g)
Display panel Backlit LCD (Backlight is on only
when the AC adapter is used)
External Interface RS-232C (D-sub 9-pin female
connector), unidirectional output
Regular voltage DC 6 V (using the batteries)
DC 9 V (using the AC adapter)
Power consumption 0.12 W or less (using the batteries)
0.35 W or less (using the AC
adapter)
Consumption current 20 mA (using the batteries)
38 mA (using the AC adapter)
Operating temperature
41
ºF to 95 ºF (5 ºC to 35 ºC)
Storage temperature
14
ºF to 122 ºF (-10 ºC to 50 ºC)
Overall dimensions D16.1xW23.6xH6.2in (D409x-
W600xH157mm)
Main unit mass Approx. 10.1 lb (4.6 kg)
Main material ABS resin
Made in Japan
Page 37

36
References
1) Hurst NM, Meier PP, Engstrom JL, et al. Mothers performing in-home
measurement of milk intake during breastfeeding of their preterm infants:
Maternal reactions and feeding outcomes. J Hum Lact20(2), 178-178, 2004
2) Meier PP, Engstrom JL, Test weighing for term and premature infants is an
accurate procedure, Arch Dis Child Fetal Neonatal Ed. 2007 March; 92(2):
F155-F156.
3) Meier PP, Engstrom JL, Fleming BA, et al. Estimating milk intake of hospitalized
preterm infants who breastfeed. J Hum Lact 12(1), 21-26, 1996.
4) Meier PP, Engstrom JL, Crichton CL, et al. A new scale for in-home test
weighing for mothers of preterm and high risk infants. J Hum Lact 10(3), 163168, 1994.
5) Ahmed A, Sands LP. Effect of Pre- and Postdischarge Interventions on
Breastfeeding Outcomes and Weight Gain Among Premature Infants. JOGNN,
39, 53-63; 2010.
Page 38

Page 39

38
MEDIDAS PREVENTIVAS
IMPORTANTES
Al utilizar dispositivos eléctricos, siempre deben tomarse
precauciones básicas, incluidas las siguientes:
LEA TODAS LAS INSTRUCCIONES ANTES DE
USAR LA BÁSCULA
SÍMBOLOS DE ADVERTENCIA Y PRECAUCIÓN
Para optimizar el rendimiento y contribuir a la seguridad, familiarícese con los
símbolos de precaución que aparecen abajo. La finalidad de dichos símbolos es
alertar al usuario sobre posibles peligros durante el uso de este equipo. Ignorarlos
podría provocarle lesiones graves al bebé o dañar el producto. Asegúrese de leer
esta sección antes de seguir adelante con el MANUAL DE INSTRUCCIONES.
ADVERTENCIA:
1. Para reducir el riesgo de sufrir una descarga eléctrica o dañar el producto,
nunca enchufe ni desenchufe el adaptador de corriente alterna (AC, por sus
siglas en inglés) con las manos húmedas.
2. No desarme ni modifique la unidad en ninguna circunstancia, ya que esto
podría provocar una descarga eléctrica o una lesión, además de alterar la
precisión del pesaje.
3. Para evitar el riesgo de incendio, utilice únicamente tomacorrientes cuyos
cables estén correctamente instalados; no use alargadores con varios
enchufes.
ADVERTENCIA: Este símbolo indica que pueden producirse
lesiones graves si el producto no se utiliza correctamente o
si no se respetan las instrucciones.
PRECAUCIÓN: Este símbolo indica que pueden producirse
lesiones físicas o daños en el equipo si no se respetan las
instrucciones.
Este símbolo indica que deben tomarse precauciones
generales al utilizar este producto.
Page 40

39
4. Asegúrese de que el bebé esté acostado en la bandeja de pesaje y se mueva
lo menos posible. Si se mueve mucho, podría caerse y posiblemente sufrir
lesiones graves.
5. La bandeja de pesaje no está preparada para personas que pesen más de
20 kg (44 lb).
6. Nunca deje solo al bebé en la bandeja de pesaje.
PRECAUCIÓN:
1. Cuando conecte la báscula BabyWeighTM II a una computadora, asegúrese
de que esta última cumpla con la norma de la Comisión Electrotécnica
Internacional IEC 60950.
2. Para ayudar a evitar la propagación de infecciones, limpie siempre el equipo
después de usarlo. Limpie la bandeja de pesaje y la carcasa del modo
indicado, usando Cavicide® u otro desinfectante disponible en el mercado.
3. Asegúrese de que el equipo esté sobre una superficie plana y estable.
4. Sea siempre extremadamente cuidadoso al colocar al bebé sobre la bandeja
de pesaje. Asegúrese de que no exista riesgo alguno de que el equipo se
caiga.
5. Utilice únicamente el adaptador suministrado con el equipo (PN 9207053).
6. Al cambiar las pilas, asegúrese de colocar las nuevas respetando la polaridad
correcta (+ y -). Si la polaridad es incorrecta, las pilas pueden derramarse y
dañar el equipo.
7. Para trasladar el equipo, desenchufe el adaptador de AC del tomacorriente de
la pared y sostenga la unidad con firmeza utilizando las manijas provistas.
8. Para evitar riesgo de lesiones o mal funcionamiento, mantenga los dedos y
demás objetos lejos del espacio entre la placa interna y la báscula.
Page 41

40
Cuidado y mantenimiento
Este es un producto fabricado y calibrado con precisión y exactitud. Por favor,
siga las siguientes instrucciones:
1. No desarme la carcasa de la báscula. La bandeja de pesaje se puede extraer
siguiendo las instrucciones que figuran en las páginas 43 a 46.
2. Cuando no utilice la báscula por mucho tiempo, desenchufe el adaptador de
AC del tomacorriente de la pared.
3. Quite las pilas antes de guardar el equipo por mucho tiempo.
4. No limpie el equipo con sustancias químicas corrosivas; utilice detergente
neutro. No derrame agua ni sustancias químicas sobre la unidad o dentro
de ella. La bandeja de pesaje debe limpiarse con Cavicide
®
o con otro
desinfectante disponible en el mercado.
5. Evite someter el equipo a descargas eléctricas o vibraciones excesivas.
6. Si una persona no autorizada intenta desarmar o reparar alguna parte de la
unidad, se anulará la garantía. En caso de mal funcionamiento, comuníquese
con su asesor comercial o con el servicio al cliente de Medela, llamando sin
cargo al 1-800-435-8316.
7. Cuando se deshaga de la unidad, respete las normas locales sobre desechos
industriales.
Por favor, siga las siguientes instrucciones para que el pesaje sea preciso.
1. No es posible controlar el peso sobre una superficie que vibre demasiado. En
ese caso, traslade el equipo a una superficie estable con poca vibración o sin
vibración alguna.
2. Si cambia la báscula de lugar y la diferencia de temperatura entre los dos
lugares es de más de 20 °C (36 °F), espere como mínimo dos horas antes de
utilizarla.
3. Mientras controla el peso, no utilice teléfonos móviles, equipos para terapia de
microondas ni otro tipo de transmisores cerca de la báscula, ya que podrían
provocar interferencia.
4. Evite colocar la báscula cerca de entradas de calor, conductos de ventilación,
equipos de calefacción, zonas donde haya mucha circulación de aire o luz
solar directa.
CONSERVE ESTAS INSTRUCCIONES
Page 42

41
Condiciones de uso
Rango de temperatura de uso: de +5 °C a +35 °C
(de +41 ºF a +95 ºF)
Rango de humedad relativa: 30% - 80% (sin condensación)
Condiciones de guardado
Rango de temperatura ambiental: de -10 ºC a +50 ºC
(de +14 ºF a +122 ºF)
Rango de humedad relativa: 10% - 90%
(sin condensación)
Para evitar el mal funcionamiento, no guarde el equipo
en lugares donde haya luz solar directa, cambios de
temperatura significativos, riesgo de humedad, exceso de
polvo, proximidad con el fuego o riesgo de vibraciones o
descargas eléctricas. Cuando guarde la báscula, no coloque
nada sobre la bandeja de pesaje.
Requisitos eléctricos
Adaptador de corriente alterna
Modelo BWII
Voltaje de entrada 100 – 240 VAC (voltios de AC)
50-60 Hz/200 mA
Voltaje de salida 9 VDC (voltios de corriente
continua, DC, por sus siglas en
inglés) ± 0.45 VDC
Corriente nominal 800 mA
Corriente de consumo 38 mA
Consumo de energía 0.35 W (máximo)
Pilas
Model 4 pilas AA
Corriente de consumo 20 mA
Consumo de energía 0.12 W (máximo)
Page 43

42
Explicación de los términos utilizados
• Capacidad (capacidad máxima): Indica la cantidad
máxima que puede pesarse en la báscula.
• Aumento (graduación mínima): Indica el intervalo del
cambio de valor numérico en la pantalla digital.
• Tara: Peso de la toalla, la manta, etc. utilizadas cuando
se pesa al bebé. Cuando el peso de la toalla o la manta
se resta del peso del bebé, se obtiene el “peso neto”.
• Antes de la alimentación: Antes de alimentar al bebé.
• Después de la alimentación: Después de alimentar al
bebé.
Page 44

43
Cómo colocar y extraer la bandeja de
pesaje
A. Colocación
Al desembalar la báscula, la bandeja de pesaje no viene
colocada en la unidad principal.
1. Tire de la palanca.
2. Alinee el extremo de la
bandeja con la etiqueta
autoadhesiva.
Etiqueta
Page 45

44
Cómo colocar y extraer la bandeja de
pesaje (continuación)
3. Deslice la bandeja sobre
la plataforma hasta que se
detenga y escuche un “clic”.
4. Asegúrese de que
la bandeja esté bien
colocada y luego fíjela a
la plataforma presionando
la palanca hasta que
escuche un “clic”.
Page 46

45
Cómo colocar y extraer la bandeja de
pesaje (continuación)
B. Extracción
La bandeja de pesaje se puede extraer y lavar.
1. Tire de la palanca.
2. Presione la palanca
levemente hacia abajo
y retire la bandeja de
pesaje deslizándola en
la dirección que indica la
imagen.
Page 47

46
Cómo colocar y extraer la bandeja de
pesaje (continuación)
3. Retire la bandeja cuando el
extremo esté alineado con
la etiqueta autoadhesiva.
PRECAUCIÓN: Una vez que extraiga la bandeja de
pesaje, tenga cuidado de no colocar un
dedo ni de que se le caiga nada en la
abertura que ahora está descubierta.
Etiqueta
Page 48

47
Identificación de las piezas
Parte superior
Parte inferior
Pies ajustables
(4)
Bandeja de pesaje
(para bebés)
Palanca de bloqueo de la
bandeja de pesaje
Indicador de
nivel
Teclas de
funcionamiento
Pantalla de
visualización
Tapa del
compartimento
de las pilas
Entrada del
adaptador de AC
Conector
RS-232C
Page 49

48
Interfaz del operador
Pantalla de visualización
• Los punteros (la marca ) indican los elementos
activos.
• La luz trasera está prendida solamente cuando se
utiliza el adaptador de AC.
Teclas de funcionamiento
Los símbolos y su significado
before
feed
after
feed
stabilized
net
lock
amount
fed
tare/zero off
weight
lock off
reweigh
fed baby
reset
before
feed
after
feed
amount
fed
ON
1
2
3
tare/zero off
weight
lock off
reweigh
fed baby
units
g / lb. oz
reset
before
feed
after
feed
amount
fed
ON
1
2
3
Parte aplicada tipo B
Equipo de clase II
Corriente continua
Salida
Advertencia. Lea las Medidas
preventivas importantes adjuntas.
*En la báscula que pesa únicamente en gramos (PN 0407023) este botón
está desactivado.
*
Page 50

49
Interfaz del operador (continuación)
Pantalla de visualización
Descripción de la pantalla de visualización:
Stabilized (estabilizado): Se ha determinado el peso.
Net (neto): Se resta la tara del peso obtenido
Lock (bloqueo): Se mantiene el peso estabilizado.
Before feed (antes de alimentar al bebé): Muestra el peso del
bebé antes de alimentarlo.
After feed (después de alimentar al bebé): Muestra el peso del
bebé después de alimentarlo.
Amount fed (cantidad ingerida): Muestra el peso de la cantidad
ingerida.
before
feed
after
feed
stabilized
net
lock
amount
fed
tare/zero off
weight
lock off
reweigh
fed baby
reset
before
feed
after
feed
amount
fed
ON
1
2
3
Page 51

50
Interfaz del operador (continuación)
Teclas de funcionamiento
Función de las teclas de funcionamiento:
tare/zero
Tare/zero (tara/cero): Fija la tara en cero.
off
Off (apagado): Apaga la báscula.
weight
lock off
Weight lock off (bloqueo de peso desactivado):
Desactiva el modo bloqueo de peso hasta que se quite el peso
de la báscula. El bloqueo de peso vuelve a activarse en forma
automática cuando en la báscula aparece el cero.
reweigh
fed baby
Reweigh fed baby (volver a pesar al bebé alimentado):
Pesa nuevamente al bebé después de la alimentación. Borra el
peso posterior a la alimentación y la cantidad ingerida, y permite
controlar nuevamente el peso después de alimentar al bebé y
calcular el consumo de leche.
units
g / lb. oz
Units g/lb-oz (unidades g/lb-oz):
Alterna entre gramos y libras-onzas. *En la báscula que pesa
únicamente en gramos (PN 0407023) este botón está desactivado.
Reset (reiniciar):
Enciende la báscula. Desactiva el bloqueo de peso y pone la
pantalla en cero. (Los pesos guardados quedan en la memoria).
1
Before feed (antes de alimentar al bebé):
Guarda en la memoria 1 el peso antes de alimentar al bebé. Una
vez guardado, muestra dicho peso.
2
After feed (después de alimentar al bebé):
Guarda en la memoria 2 el peso después de alimentar al bebé.
Una vez guardado, muestra dicho peso.
3
Amount fed (cantidad ingerida):
Guarda en la memoria 3 el peso de la cantidad ingerida. Una vez
guardado el peso del bebé después de ser alimentado, muestra la
cantidad ingerida calculada.
tare/zero off
weight
lock off
reweigh
fed baby
units
g / lb. oz
reset
before
feed
after
feed
amount
fed
ON
1
2
3
Page 52

51
Armado de la báscula
Suministro de energía/pilas
1. Voltee la báscula y gire
con el dedo y en sentido
antihorario el tornillo que
se encuentra en la tapa
del compartimento de las
pilas (como se indica),
hasta quitarlo.
2. Levante y quite la tapa
del compartimento de las
pilas.
• Cuando las pilas se estén gastando, aparecerá en la
pantalla la palabra “Lo” (del término en inglés “low”,
que significa “bajo”) a modo de advertencia. Reemplace
inmediatamente todas las pilas por nuevas (4 pilas AA).
NOTA: NO se recomienda el uso de pilas recargables.
• Un juego de pilas estándar debería durar alrededor de
un año (si se realizan cuatro controles de peso por día).
Page 53

52
Armado de la báscula (cont.)
Cómo utilizar el adaptador de corriente alterna
1. Inserte el enchufe hembra del
adaptador de AC en la entrada
que hay en el lado derecho de
la unidad principal.
2. Enchufe el adaptador de AC
en el tomacorriente.
PRECAUCIÓN: Este equipo debe ser utilizado con el
adaptador de AC incluido o con 4 pilas AA.
Cómo proceder al armado
Use la báscula sobre una super cie rme, plana y estable.
• No coloque la báscula
en ningún lugar donde
reciba luz solar directa,
esté cerca de equipos
de calefacción, ni esté
directamente expuesta
a la salida de un aire
acondicionado u otra
fuente de circulación de
aire.
• No utilice la báscula
en ningún lugar donde esté expuesta a cambios de
temperatura signi cativos.
• No coloque la báscula en lugares mojados o con mucha
humedad.
• Una vez que haya ubicado correctamente la báscula, pero
antes de utilizarla, levante la bandeja de pesaje de ambos
lados para veri car que esté bien colocada y que no pueda
extraerse con facilidad.
• Asegúrese de que la palanca de bloqueo de la bandeja de
pesaje no esté hacia afuera.
Page 54

53
Armado de la báscula (cont.)
Verificación del indicador de nivel
1. Coloque la báscula sobre
una supercie plana para
asegurarse de obtener un
peso exacto.
2. Gire los cuatro pies
ajustables de modo tal
que la burbuja de aire
que se encuentra en el
indicador de nivel quede
ubicada en el centro
del círculo. Asegúrese
de que los cuatro pies
ajustables estén en
contacto con la supercie.
Indicador de nivel
Pies ajustables (4)
Vista desde arriba
Rojo Burbuja de aire
Correcto Incorrecto
Page 55

54
Instrucciones para el pesaje
Consideraciones que deben tenerse en cuenta antes de
controlar el peso:
• No cambie el pañal del bebé entre el pesaje anterior y
posterior a la alimentación.
• No cambie la ropa del bebé entre el pesaje anterior y
posterior a la alimentación.
• Póngale un babero al bebé cuando coma, pero
SÁQUESELO durante los pesajes.
• Para una mayor precisión, si el bebé se mueve mucho,
envuélvalo en las mantas y asegúrese de que las
mantas, la ropa y las extremidades del bebé estén
dentro de la bandeja y no toquen los bordes de la
báscula.
• Los pesos se registran en gramos únicamente.*
*Nota: Los gramos son prácticamente equivalentes a los mililitros (ml) o a los centímetros cúbicos
(cc). Meier P. P. y otros: “A New Scale for in-Home Test-Weighing for Mothers of Preterm
and High Risk Infants” [Nueva báscula para que las madres de bebés prematuros y de alto
riesgo puedan controlar en el hogar el peso de sus bebés], Journal of Human Lactation
[Publicación sobre lactancia humana], 1994, 10(3), 163-168.
Información general sobre el uso de la báscula
BabyWeigh II
Una vez que armó la báscula (pág. 53), es fácil usarla. Se
incluye a continuación información general sobre el uso.
1. Pese al bebé antes de alimentarlo (pág. 55). Para
guardar el peso en la memoria, presione el botón
1
.
2. Pese al bebé después de alimentarlo (págs. 55 y 56).
Para guardar el peso en la memoria, presione el botón
2
.
3. Calcule la cantidad ingerida (pág. 56). Para hacerlo,
presione el botón
3
.
Page 56

55
Instrucciones para el pesaje (continuación)
Instrucciones para el pesaje
Armado:
1. Coloque la bandeja de pesaje y nivele la báscula antes
de controlar el peso.
2. Presione el botón
y espere hasta que aparezca
un “0” en la pantalla. Si coloca una manta o una
almohadilla sobre la báscula, presione el botón
tare/zero
para eliminar el peso de más. El puntero
señalará la
palabra “net”.
Peso antes de alimentar al bebé (peso anterior):
1. Coloque al bebé en la
báscula y ponga la mano
sobre él. Espere a que el
puntero de la pantalla
señale la palabra “lock”
(escuchará un sonido). El
valor que aparece es el
peso anterior.
2. Presione el botón
1
para guardar el peso
anterior
.
3. Saque al bebé de la
báscula, colóquelo en
un lugar seguro y luego
registre el peso anterior.
Alimente al bebé. Mientras lo
hace, mantenga la báscula
encendida.
Peso después de alimentar
al bebé (peso posterior):
NOTA: Asegúrese de que la pantalla haya vuelto a ‘0’. De
lo contrario, presione el botón
(Encendido) para
ponerla en cero.
1. Si la báscula se apagó, presione el botón
y espere
hasta que aparezca un “0” en la pantalla. El peso anterior
queda guardado en la memoria, incluso cuando la báscula
se apaga.
Page 57

56
Instrucciones para el pesaje (continuación)
2. Coloque al bebé en la
báscula y ponga la mano
sobre él. Espere a que el
puntero de la pantalla
señale la palabra “lock”
(escuchará un sonido). El
valor que aparece es el
peso posterior.
3. Presione el botón
2
para guardar el peso posterior.
4. Saque al bebé de la
báscula y colóquelo en un
lugar seguro.
5. Presione el botón
3
para ver en la pantalla
la cantidad calculada de
leche materna ingerida.
Presione los botones
1
o
2
para ver el peso anterior
o posterior respectivamente.
6. Registre el peso posterior y la cantidad ingerida calculada.
7. Presione el botón
off
para apagar la báscula. Los últimos
pesos quedarán guardados en la memoria
.
Otras consideraciones:
• Presione el botón
en cualquier momento para
reiniciar la báscula. No se borrarán los pesos
guardados en la memoria.
• En caso de que hubiera guardado en la memoria el
peso del bebé después de alimentarlo y tuviera que
volver a controlarlo, presione el botón
reweigh
fed baby
. Dicho
botón elimina el peso posterior guardado en la memoria
2
y prepara la báscula para un nuevo pesaje.
Page 58

57
Instrucciones para el pesaje (continuación)
Consideraciones que deben tenerse en cuenta al controlar
el peso de bebés con sondas:
• De ser posible,
desconecte las sondas
o los tubos del monitor
y colóquelos encima
del bebé (envuelto en
mantas).
• Detenga el sistema de
monitoreo o alarma durante el control de peso.
• Antes de alimentar al bebé, vuelva a conectar las
sondas que correspondan.
En el caso de bebés prematuros que tienen sondas, es posible
obtener pesos exactos si el control es realizado por personal
altamente capacitado de la Unidad Neonatal de Cuidados
Intensivos (NICU, por sus siglas en inglés) y si se respeta un
protocolo empírico. Para obtener más información, consulte la
siguiente publicación:
Haase B., Barreira J., Murphy P. K., Mueller M., Rhodes J.: “The
development of an accurate test weighing technique for preterm
and high-risk hospitalized infants” [Creación de una técnica
precisa para el control de peso de bebés hospitalizados de alto
riesgo y prematuros]. Breastfeed Med. [Publicación médica sobre
lactancia materna], septiembre del 2009, 4(3): 151-6.
Page 59

58
Procedimiento de calibración
NOTA: Este procedimiento debe realizarse en el mismo
espacio geográfico en que se realicen los pesajes
a los bebés; asimismo, deben utilizarse dos pesas
patrón certificadas de 10 kg de clase F.
1. Presione el botón
con la báscula apagada.
2. Presione el botón
1
mientras
parpadean todos los segmentos
de la pantalla --> En la pantalla,
aparecerá la leyenda “Func 1”.
3. Presione el botón
reweigh
fed baby
--> En la
pantalla, aparecerá la leyenda
“Func 2”.
4. Presione el botón
3
--> En
la pantalla, aparecerá el número
“9.XXX” (por ejemplo: 9.802).
NOTA: La configuración de gravedad se actualizará en forma
automática al completar el procedimiento de calibración.
Page 60

59
Procedimiento de calibración (continuación)
5. Presione nuevamente el botón
3
--> En la pantalla, aparecerá
el número “20 0--” y la letra
“g”. Espere a que en la pantalla
aparezca el número “20 2--”.
6. Después de que en la pantalla
aparezca el número “20 2--”,
coloque dos pesas de 10 kg sobre
la plataforma.
7. Espere a que en la pantalla
aparezca la marca de “stabilized”
(un círculo en el extremo superior
izquierdo) y luego presione el
botón
3
para completar la calibración.
8. Espere a que en la pantalla
aparezca la leyenda “Func 1” y
después retire las dos pesas.
9. Presione el botón
off
para apagar la báscula.
NOTA: Vuelva a realizar la calibración si aparecen los siguientes
mensajes de error: “Er0065” o “Er0066”.
PRECAUCIÓN: No deje las pesas de calibración durante
mucho tiempo sobre la báscula (solo unos
pocos minutos).
Page 61

60
Cómo ajustar las configuraciones de la
báscula
Para congurar el tiempo de espera de la pantalla y el tiempo
de apagado automático, siga los siguientes pasos:
Ingrese al menú de
conguraciones presionando la
tecla
(escuchará un sonido).
Presione el botón
3
mientras la pantalla parpadea (escuchará un sonido). En la pantalla
de cristal líquido (LCD, por sus siglas en inglés), aparecerá la palabra
“SEt”.
Según la función que desee congurar, siga los pasos
correspondientes que se incluyen a continuación.
Tiempo de espera de la pantalla
La función “Tiempo de espera de la pantalla” mantiene
los valores en pantalla durante un período determinado.
Esta función permite establecer el tiempo durante el cual
aparecerá el peso del bebé en la pantalla una vez que lo
haya sacado de la báscula. Además, permite determinar el
tiempo que los valores permanecerán en la pantalla cuando
quiera ver nuevamente el peso anterior, el peso posterior y la
cantidad ingerida.
1. Presione la tecla
tare/zero
(escuchará un sonido).
Aparecerá el tiempo de espera (por defecto, son 10
segundos), el cual podrá cambiar presionando la tecla
mencionada.
* El tiempo de espera (hold) puede ser de 5 segundos, 10 segundos, 20 segundos o
30 segundos.
Page 62

61
Tiempo de espera de la pantalla
(continuación)
2. Para guardar la configuración
del tiempo de espera, vuelva a
presionar el botón
3
(escuchará un sonido).
Tiempo de apagado automático
La función “Tiempo de apagado automático” apaga la
báscula en forma automática cuando no ha sido utilizada
por un período determinado. Para ingresar al menú de
conguraciones:
1. Presione la tecla
weight
lock off
(escuchará un sonido).
Aparecerá el tiempo de apagado automático (por defecto,
no hay un tiempo de apagado), el cual podrá cambiar
presionando la tecla mencionada.
* El tiempo de apagado automático (off) puede ser de 15 minutos, 30 minutos, 45 minu-
tos, 60 minutos o -- (nada). La opción “-- (nada)” significa que la función de apagado
automático está desactivada.
2. Para guardar la conguración
del tiempo de apagado
automático, vuelva a presionar
el botón
3
(escuchará un
sonido).
Page 63

62
Solución de problemas
Si cree que la báscula no funciona correctamente, lea los
siguientes puntos antes de solicitar reparación.
Problema Lo que debe verificar
La báscula no enciende. - ¿Están puestas las pilas?¿Está
enchufado el adaptador de AC?
- ¿Están gastadas las pilas?
- ¿Hay algo pegado en los
terminales de las pilas?
Aparece “Lo” en la pantalla. - Las pilas se están agotando.
Cámbielas de inmediato o utilice
el adaptador de AC.
Aparece “--------------”
durante el pesaje.
- Se ha excedido la capacidad
máxima de la báscula, que es
de 20 kg.
Page 64

63
Formato de salida de datos de la báscula
BWII
Explicación sobre la salida que cumple con la norma
RS-232C.
Especificaciones
NOTA: Se utilizan comas (,) para separar los datos.
El terminador (fin de datos) es CR (código ASCII: 0DH), LF
(código ASCII: 0AH).
Norma de comunicación EIA RS-232C
Método de comunicación Asincrónico
Velocidad de la señal 9,600 bits por segundo
Extensión de bits de datos 8 bits
Paridad Ninguna
Bit de parada 1bit
Terminador CR + LF
Control de flujo Ninguno
Page 65

64
Formato de salida de datos de la báscula
BWII (cont.)
Nombre de la línea de señal y método de conexión.
Ejemplo de conexión
Asegúrese de utilizar un cable recto cuando conecte el
equipo a una computadora externa.
BWII
computadora
personal, etc.
N.° de terminal Nombre de la señal
1
2
TXD
3
4
5
GND
6
7
8
9
Page 66

65
Formato de salida de datos de la báscula
BWII (cont.)
Los datos de transmisión se suministran inmediatamente
después del control del peso, independientemente del
estado del dispositivo receptor. El dispositivo receptor debe
estar siempre preparado para recibir datos antes de que se
controle cualquier peso.
1. Modo de pesaje en gramos (g)
◆ Cuando la pantalla se bloquea en un peso.
Elemento Cabecera Datos de salida (código
ASCII)
Información detallada
Datos de control {0 Fijado en 16
Datos de control ~0 Fijado en 1
N.° de modelo MO “xxxxxx” Extensión fija de 6 bytes
(“BWII”)
Peso del cuerpo Wg xxxxx Extensión variable de
3 a 5 bytes (unidad: g)
Ej.: {0,16,~0,1,MO,“BWII”,Wg,5260
◆ Cuando se presiona la tecla
1
(Antes de alimentar al bebé) para guardar el peso.
Elemento Cabecera Datos de salida (código
ASCII)
Información
detallada
Antes de
alimentar al
bebé
Rg xxxxx Extensión variable
de 3 a 5 bytes
(unidad: g)
Ej.: Rg,5260
◆ Cuando se presiona la tecla
2
(Después de alimentar al bebé) para guardar el peso.
Elemento Cabecera Datos de salida (código
ASCII)
Información
detallada
Antes de
alimentar al bebé
Rg xxxxx Extensión variable de
3 a 5 bytes (unidad: g)
Después de
alimentar al bebé
Pg xxxxx Extensión variable de
3 a 5 bytes (unidad: g)
Cantidad ingerida Gg xxxxxx Extensión variable de
1 a 6 bytes (unidad: g)
Ej.: Rg,5260,Pg,5366,Gg,106
Page 67

66
Formato de salida de datos de la báscula
BWII (cont.)
2. Modo de pesaje en libras-onzas (lb-oz)
NOTA: Se utilizan comas (,) para separar los datos. El
terminador (fin de datos) es CR (código ASCII: 0DH),
LF (código ASCII: 0AH).
◆ Cuando la pantalla se bloquea en un peso.
Elemento Cabecera Datos de salida
(código ASCII)
Información detallada
Datos de control {0 Fijado en 16
Datos de control ~0 Fijado en 1
N.° de modelo MO “xxxxxx” Extensión fija de
6 bytes (“BWII”)
Peso del cuerpo Wo xx.xx.x Extensión variable de 5 a
7 bytes (unidad: lb-oz)
Ej.: {0,16,-0,1,MO,”BWII”,Wo,11.14.2
◆ Cuando se presiona la tecla
1
(Antes de alimentar al bebé) para guardar el peso.
Elemento Cabecera Datos de salida
(código ASCII)
Información detallada
Antes de
alimentar al bebé
Ro xx.xx.x Extensión variable de 5 a
7 bytes (unidad: lb-oz)
Ej.: Ro, 11.14.2
◆ Cuando se presiona la tecla
2
(Después de alimentar al bebé) para guardar el peso.
Elemento Cabecera Datos de salida
(código ASCII)
Información detallada
Antes de
alimentar al bebé
Ro xx.xx.x Extensión variable de 5
a 7 bytes (unidad: lb-oz)
Después de
alimentar al bebé
Po xx.xx.x Extensión variable de 5
a 7 bytes (unidad: lb-oz)
Cantidad ingerida Go xxx.xx.x Extensión variable de 5
a 8 bytes (unidad: lb-oz)
Ej.: Ro, 11.14.2, Po, 12.2.1, Go, 0.3.9
Page 68

67
Piezas de reemplazo
Pieza N.° de pieza
Adaptador de corriente . . . . . . . . . . . . . . . . . . . . . . . . 9207053
Componentes de la bandeja de pesaje . . . . . . . . . . . 8097012
Tapa del compartimento de las pilas . . . . . . . . . . . . . 8107232
Manual de instrucciones . . . . . . . . . . . . . . . . . . . . . . 1908156
Accesorios (no incluidos)
Pieza N.° de pieza
Estuche blando . . . . . . . . . . . . . . . . . . . . . . . . . . . . . . 3007357
Page 69

68
Información sobre la garantía
Medela, Inc. le garantiza al comprador original que, durante un (1) año a
partir de la fecha de compra, este producto no tendrá ningún defecto de
material ni de fabricación. En caso de defecto o incumplimiento de esta
garantía, Medela, a su propia discreción, reparará o reemplazará el producto
sin cobrar por el reemplazo, las piezas o la mano de obra, en la ocina
de Medela que se indica a continuación. El comprador será enteramente
responsable y correrá con todos los gastos en que incurra por devolver este
producto a Medela, incluido el riesgo de pérdida antes de que Medela lo
reciba, así como el envío, el embalaje y los costos de seguro.
Esta garantía no obliga a Medela a reparar ningún mal funcionamiento o
daño que surja del uso incorrecto, el uso en exceso o la alteración de este
producto. Sin perjuicio de lo mencionado anteriormente, si este producto
o sus componentes se encontraran doblados o hubieran sufrido una
caída o si la carcasa del equipo se encontrara visiblemente quebrada, se
presumirá que son defectos originados por un uso incorrecto o excesivo.
Los accesorios que no son fabricados ni recomendados expresamente
por Medela y que sean utilizados en el equipo anularán esta garantía de
inmediato.
TODAS Y CADA UNA DE LAS GARANTÍAS IMPLÍCITAS ESTÁN LIMITADAS
A UNA DURACIÓN DE UN AÑO A PARTIR DE LA FECHA DE COMPRA. ES
POSIBLE QUE USTED NO SE VEA AFECTADO POR LAS LIMITACIONES
MENCIONADAS ANTERIORMENTE, YA QUE ALGUNOS ESTADOS
PROHÍBEN QUE SE LIMITE LA DURACIÓN DE UNA GARANTÍA IMPLÍCITA.
LA RESPONSABILIDAD DE MEDELA RESPECTO DEL INCUMPLIMIENTO
DE CUALQUIER GARANTÍA EXPLÍCITA O IMPLÍCITA ESTÁ LIMITADA A LA
REPARACIÓN O EL REEMPLAZO DE ESTE PRODUCTO Y, EN NINGÚN
CASO, SERÁ MEDELA RESPONSABLE DE DAÑOS INCIDENTALES O
CONSECUENTES. ES POSIBLE QUE USTED NO SE VEA AFECTADO POR
LAS LIMITACIONES O EXCLUSIONES MENCIONADAS ANTERIORMENTE,
YA QUE ALGUNOS ESTADOS PROHÍBEN LA EXCLUSIÓN O LIMITACIÓN
DE LOS DAÑOS INCIDENTALES O CONSECUENTES.
ESTA GARANTÍA LE OTORGA DERECHOS LEGALES ESPECÍFICOS;
ASIMISMO, ES POSIBLE QUE TENGA OTROS DERECHOS SEGÚN EL
ESTADO QUE A USTED LE CORRESPONDE.
Si desea presentar un reclamo conforme a esta garantía, debe devolver este
producto a: Medela Inc., 1101 Corporate Drive, McHenry, IL 60050-0660.
Comuníquese con el Departamento de Servicio al Cliente de Medela para
obtener el Número de Autorización para Devoluciones de Mercadería (RMA,
por sus siglas en inglés) que deberá incluir en el paquete que envíe con el
producto. También deberá incluir el número de factura o el número de orden
de compra original. El número gratuito de servicio al cliente de Medela es
1-800-435-8316.
Page 70

69
Especificaciones técnicas
Este producto cumple con los siguientes requisitos:
Norma de seguridad: IEC60601-1: 1988, +A1: 1991 +A2:
1995 Norma de compatibilidad electromagnética (EMC, por
sus siglas en inglés): IEC60601-1-2: 2001, +A1: 2004
Modelo Báscula BabyWeigh™ II
Protección contra
descarga eléctrica
En el adaptador de AC: Clase II
En las pilas: Equipo con generación
de energía interna
Capacidad 44 lb (20000 g)
D (división) 0.1 oz (0-44 lb)
2 g (0-20000 g)
Pantalla de visualización Pantalla LCD con luz trasera (la luz
trasera está prendida solamente
cuando se utiliza el adaptador de AC)
Interfaz externa RS-232C (conector hembra D-sub
con 9 pines), salida unidireccional
Voltaje normal DC 6 V (con las pilas)
DC 9 V (con el adaptador de AC)
Consumo de energía 0.12 W o menos (con las pilas)
0.35 W o menos (con el adaptador
de AC)
Corriente de consumo 20 mA (con las pilas)
38 mA (con el adaptador de AC)
Temperatura de uso 41 ºF a 95 ºF (5 ºC a 35 ºC)
Temperatura de guardado 14 ºF a 122 ºF (-10 ºC a 50 ºC)
Dimensiones totales D16.1 x W23.6 x H6.2 in (409 mm de
profundidad x 600 mm de ancho x
157 mm de alto)
Masa de la unidad
principal
Aproximadamente 10.1 lb (4.6 kg)
Material principal Resina ABS
Fabricado en Japón
Page 71

70
Referencias
1) Hurst N. M., Meier P. P., Engstrom J. L. y otros: “Mothers performing in-home
measurement of milk intake during breastfeeding of their preterm infants: Maternal
reactions and feeding outcomes” [Madres que controlan el consumo de leche
materna de sus bebés prematuros en el hogar durante el amamantamiento:
Reacciones maternas y resultados en la alimentación]. J Hum Lact [Publicación
sobre lactancia humana], 20(2), 178-178, 2004.
2) Meier P. P., Engstrom J. L.: “Test weighing for term and premature infants is an
accurate procedure” [El control del peso de bebés nacidos a término y prematuros
es un procedimiento preciso]. Arch Dis Child Fetal Neonatal Ed. [Edición fetal y
neonatal de la publicación sobre enfermedades infantiles], marzo del 2007, 92(2):
F155-F156.
3) Meier P. P., Engstrom J. L., Fleming B. A. y otros: “Estimating milk intake of
hospitalized preterm infants who breastfeed” [Cómo calcular el consumo de leche
de los bebés prematuros hospitalizados que maman]. J Hum Lact [Publicación
sobre lactancia humana], 12(1), 21-26, 1996.
4) Meier P. P., Engstrom J. L., Crichton C. L. y otros: “A new scale for in-home test
weighing for mothers of preterm and high risk infants” [Nueva báscula para que las
madres de bebés prematuros y de alto riesgo puedan controlar en el hogar el peso
de sus bebés]. J Hum Lact [Publicación sobre lactancia humana], 10(3), 163-168,
1994.
5) Ahmed A., Sands L. P.: “Effect of Pre- and Postdischarge Interventions on
Breastfeeding Outcomes and Weight Gain Among Premature Infants” [Efecto
de las intervenciones antes y después del alta sobre los resultados del
amamantamiento y el aumento de peso entre bebés prematuros]. JOGNN
[Publicación sobre obstetricia, ginecología y enfermería neonatal], 39, 53-63; 2010.
Page 72

Page 73

72
CONSIGNES DE SÉCURITÉ
IMPORTANTES
Lorsque vous utilisez des appareils électriques, vous devez toujours
prendre des précautions élémentaires, dont celles qui suivent :
LISEZ TOUTES LES INSTRUCTIONS AVANT
UTILISATION
SYMBOLES D’ALERTES
Pour une performance et une sécurité optimales, veuillez étudier les symboles
d’alertes ci-dessous. Ils sont destinés à avertir les utilisateurs de dangers potentiels
lors de l’utilisation de cet équipement. Négliger ces alertes peut entraîner des
blessures graves pour les patients ou endommager le produit. Veillez à prendre
connaissance de ces symboles avant de poursuivre la lecture du MODE D’EMPLOI.
AVERTISSEMENT
1. Pour réduire le risque de décharge électrique ou d’endommagement du
produit, n’insérez et ne retirez jamais l’adaptateur CA avec les mains mouillées
2. Ne désassemblez et ne modifiez sous aucun prétexte l’appareil (risques de
décharge électrique ou de blessures, et d’une précision compromise des
mesures).
3. Pour éviter les risques d’incendie, utilisez seulement une prise câblée
correctement, et n’utilisez pas de rallonge à prises multiples.
AVERTISSEMENT – Ce symbole indique la possibilité de
blessures graves si le produit est manipulé incorrectement
ou si les instructions ne sont pas respectées.
ATTENTION – Ce symbole indique la possibilité de blessures
corporelles ou d’endommagement de l’équipement si les
instructions ne sont pas respectées.
Ce symbole vous invite à prendre des précautions générales
lors de l’utilisation de ce produit.
Page 74

73
4. Assurez-vous que le bébé est couché sur le plateau et qu’il ne bouge pas
trop. Des mouvements excessifs pourraient causer une chute et des blessures
graves.
5. Le plateau pour bébé n’est pas conçu pour s’adapter à des enfants de plus de
20 kg (44 lb).
6. Les nouveau-nés ne doivent pas être laissés sans surveillance sur le plateau
pour bébé.
ATTENTION
1. Lorsque vous connectez la balance BabyWeighTM II à un ordinateur, assurez-
vous que celui-ci est conforme à la norme CEI60950.
2. Pour éviter les infections, désinfectez toujours l’équipement après utilisation.
Nettoyez le plateau et le boîtier avec du Cavicide® ou un désinfectant vendu
dans le commerce.
3. L’équipement doit être placé sur une surface de niveau et stable.
4. Procédez toujours avec le plus grand soin lorsque vous placez un bébé sur le
plateau pour bébé. Assurez-vous qu’il n’y aucun risque de basculement de
l’équipement.
5. Utilisez uniquement l’adaptateur fourni avec cet équipement (N° de pièce
9207053).
6. Lorsque vous changez de piles, assurez-vous que les piles neuves sont
insérées avec la polarité correcte, + et -. Si la polarité est inversée, les piles
risquent de fuir et d’endommager l’équipement.
7. Lorsque vous portez l’équipement, débranchez l’adaptateur CA du mur et
saisissez le corps principal fermement par les poignées.
8. Pour éviter tout risque de blessures ou de mauvais fonctionnement, gardez à
distance les doigts et les objets de l’espace compris entre la plaque intérieure
et la balance.
Page 75

74
Entretien et maintenance
Cette balance sensible a été fabriquée et étalonnée avec précision. Veuillez
observer les instructions suivantes.
1. Ne désassemblez pas le boîtier de la balance. Le plateau pour bébé peut être
retiré en suivant les instructions des pages 77 à 80.
2. Lorsque la balance n’est pas utilisée pendant longtemps, débranchez
l’adaptateur CA de la prise murale.
3. Retirez les piles avant le rangement à long terme de l’équipement.
4. N’essuyez pas l’équipement avec des produits chimiques corrosifs. Nettoyez
plutôt avec un détergent neutre. Ne renversez pas d’eau ou de liquide
chimique sur ou dans l’appareil. Le plateau pour bébé doit être nettoyé avec du
Cavicide
®
ou un désinfectant vendu dans le commerce.
5. Évitez de faire subir des vibrations ou des chocs excessifs à l’appareil.
6. La garantie est annulée si une personne non autorisée tente de désassembler
ou de réparer une partie quelconque de l’appareil. En cas de mauvais
fonctionnement, veuillez consulter votre représentant commercial ou le service
à la clientèle de Medela en composant le 1-800-435-8316.
7. Lors de la mise au rebut de cet appareil, veuillez respecter les réglementations
locales en vigueur pour les déchets industriels.
Veuillez observer les instructions suivantes pour garantir des mesures exactes.
1. Il n’est pas possible d’effectuer une mesure sur une surface qui subit de fortes
vibrations. Dans de tels cas, transférez l’équipement sur une surface stable,
ayant peu ou pas de vibrations.
2. Si la balance est déplacée à un endroit où la différence de température
est supérieure à 20 °C (36 °F), veuillez attendre 2 heures au moins avant
d’utiliser l’appareil.
3. Lorsque vous prenez des mesures, n’utilisez pas de téléphones mobiles,
d’équipement de traitement à micro-ondes ou d’autres types d’émetteurs à
proximité de la balance, ces appareils risquant de créer un brouillage sonore.
4. Évitez de placer la balance à proximité de grilles de chauffage/d’aération,
d’appareils de chauffage, de zones à débit d’air élevé, ou en plein soleil.
CONSERVEZ CES INSTRUCTIONS
Page 76

75
Conditions d’utilisation
Plage de température pour utilisation : +5 ºC à +35 ºC
(+41 ºF à +95 ºF)
Humidité relative : 30% à 80% (sans condensation)
Conditions de rangement
Plage de température de l’environnement : -10 ºC à +50 ºC
(+14 ºF à +122 ºF)
Plage d’humidité relative : 10 à 90 %
(sans condensation)
Pour éviter tout risque de mauvais fonctionnement, évitez de
ranger l’équipement dans des zones exposées à la lumière
directe du soleil, des endroits avec variations importantes de
température, avec risque d’humidité, très poussiéreux, ou à
proximité de feux, ou encore dans les endroits susceptibles de
subir des vibrations ou des chocs. Ne posez rien sur le plateau
lorsque la balance est rangée.
Puissance nécessaire
Adaptateur CA
Modèle BWII
Tension d’entrée 100 – 240 V c.a. 50-60 Hz/
200 mA
Tension de sortie 9 V c.c. ± 0,45 V c.c.
Courant nominal 800 mA
Courant de consommation 38 mA
Consommation d’énergie 0,35 W max
Piles
Model Piles (AA x 4)
Courant de consommation 20 mA
Consommation d’énergie 0,12 W max
Page 77

76
Glossaire
• Capacité (capacité maximale) : indique le poids
maximum pouvant être mesuré par la balance.
• Incrément (graduation minimale) : indique l’intervalle
du changement de valeur numérique sur l’affichage
numérique.
• Tare : la serviette, la couverture, etc., utilisées lors de
la mesure du poids du nouveau-né sont dénommées
« tare ». La mesure du poids du nouveau-né après
soustraction du poids de la couverture est dénommée
« poids sans tare ».
• Avant allaitement : avant l’allaitement ou avant de
nourrir le bébé.
• Après allaitement : après l’allaitement ou après avoir
nourri le bébé.
Page 78

77
Mise en place et dépose du plateau pour
bébé
A. Mise en place
Le plateau pour bébé n’est pas attaché au corps principal de
l’appareil lorsque vous le déballez.
1. Tirez le levier.
2. Alignez le bord le plus
éloigné du plateau sur la
ligne avec autocollant.
Ligne
Page 79

78
Mise en place et dépose du plateau pour
bébé (suite)
3. Faites glisser le plateau
par-dessus la plateforme,
jusqu’à ce qu’il s’enclenche.
4. Vérifiez que le plateau
est solidement en place,
puis encliquetez-le sur la
plateforme en enfonçant le
levier.
Page 80

79
Mise en place et dépose du plateau pour
bébé (suite)
B. Dépose
Le plateau pour bébé est amovible pour pouvoir être nettoyé.
1. Tirez le levier.
2. Tout en appuyant
doucement sur le levier,
faites glisser le plateau
pour le sortir dans la
direction indiquée.
Page 81

80
Mise en place et dépose du plateau pour
bébé (suite)
3. Retirez le plateau lorsque
son bord distal est
aligné avec la ligne avec
autocollant.
ATTENTION - Lorsque le plateau est retiré, veillez à ne
pas introduire un doigt ou à faire tomber un
objet dans l’ouverture.
Ligne
Page 82

81
Nomenclature des pièces
Dessus
Dessous
Régleurs (4)
Plateau pour bébé
(nouveau-né)
Levier de verrouillage
du plateau
Indicateur
de niveau
Touches de
fonctionnement
Afcheur
Couvercle des piles
Entrée de
l’adaptateur CA
Connecteur
RS-232C
Page 83

82
Interface opérateur
Afficheur
• Les pointeurs ( le symbole ) indiquent des éléments
activés.
• Le rétroéclairage s’allume uniquement lorsque
l’adaptateur CA est utilisé.
Touches de fonctionnement
Symboles et leur signification
before
feed
after
feed
stabilized
net
lock
amount
fed
tare/zero off
weight
lock off
reweigh
fed baby
reset
before
feed
after
feed
amount
fed
ON
1
2
3
tare/zero off
weight
lock off
reweigh
fed baby
units
g / lb. oz
reset
before
feed
after
feed
amount
fed
ON
1
2
3
Pièce appliquée de type B
Équipement de classe II
Courant continu
Sortie
Attention. Consultez les consignes de
sécurité importantes ci-jointes.
* Dans la version grammes seulement (Pièce n° 0407023) de la balance, ce
bouton est désactivé.
*
Page 84

83
Interface opérateur (suite)
Afficheur
Explication de l’afficheur
Stabilized (Stabilisé) – La mesure du poids est prise.
Net – Un poids de tare est soustrait au poids actuel.
Lock (Verrouillé) – Maintien du poids stabilisé.
Before feed (Avant allaitement) – Avant la quantité ingérée
affichée.
After feed (Après allaitement) – Après le poids ingéré affiché.
Amount fed (Quantité ingérée) – Poids de la quantité ingérée
affichée.
before
feed
after
feed
stabilized
net
lock
amount
fed
tare/zero off
weight
lock off
reweigh
fed baby
reset
before
feed
after
feed
amount
fed
ON
1
2
3
Page 85

84
Interface opérateur (suite)
Touches de fonctionnement
Fonctions des touches de fonctionnement :
tare/zero
Tare/zero (Tare/zéro) – Règle le poids de la tare à zéro.
off
Off (Arrêt) – Éteint la balance.
weight
lock off
Weight lock off (Verrou poids désactivé) –
Désactive le mode de verrouillage de poids jusqu’à ce que le
poids soit retiré de la balance. Le verrouillage du poids se réactive
automatiquement lorsque la balance affiche zéro.
reweigh
fed baby
Reweigh fed baby (Repeser bébé nourri) –
Reprendre le poids après allaitement. Efface le poids après
allaitement et la quantité ingérée, en permettant l’entrée d’un
nouveau poids après allaitement ainsi que le calcul de la quantité
de lait ingérée.
units
g / lb. oz
Units g/lb-oz (Unités g/lb-oz) – Bascule entre les grammes et
les livres-onces. *Ce bouton est désactivé dans la version en
grammes seulement (N° de pièce 0407023) de la balance.
Reset (Réinitialiser) – Met la balance en marche. Dégage le
verrouillage du poids et règle l’affichage à zéro (les poids stockés
restent en mémoire).
1
Before feed (Avant allaitement) – Stocke le poids avant
allaitement dans la mémoire 1. Affiche le poids avant allaitement
lorsque celui-ci a été stocké.
2
After feed (Après allaitement) – Stocke le poids après allaitement
dans la mémoire 2. Affiche le poids après allaitement lorsque celuici a été stocké.
3
Amount fed (Quantité ingérée) – Stocke le poids ingéré dans la
mémoire 3. Affiche la quantité ingérée qui a été calculée lorsque le
poids après allaitement a été stocké.
tare/zero off
weight
lock off
reweigh
fed baby
units
g / lb. oz
reset
before
feed
after
feed
amount
fed
ON
1
2
3
Page 86

85
Configuration de la balance
Alimentation/piles
1. Retournez la balance et
tournez la vis à doigt du
couvercle des piles dans
le sens contraire des
aiguilles d’une montre (tel
qu’indiqué) pour libérer
la vis.
2. Levez le couvercle
des piles.
• Lorsque les piles sont faibles, la mention « Lo » apparaît
sur le panneau d’affichage pour vous avertir. Les quatre
piles (4 AA) doivent immédiatement être remplacées par
des piles neuves.
REMARQUE - L’utilisation de piles rechargeables n’est PAS
recommandée.
• Un jeu de piles ordinaires durera environ un an (soit
quatre relevés par jour).
Page 87

86
Configuration de la balance (suite)
Utilisation de l’adaptateur CA
1. Insérez la prise de l’adaptateur
CA dans l’entrée de
l’adaptateur CA, sur le côté
droit de l’unité principale.
2. Branchez l’adaptateur CA sur
la prise murale.
ATTENTION – Cet équipement doit être utilisé avec
l’adaptateur CA inclus ou 4 piles AA.
Comment procéder
Utilisez la balance sur une surface ferme, plate et stable.
• Ne placez pas la balance
là où elle risque d’être
exposée à la lumière
directe du soleil, ni à
proximité d’appareils de
chauffage ou directement
dans le souf e d’une
bouche de climatiseur
ou d’une autre source de
débit d’air élevé.
• N’utilisez pas la balance
dans un endroit susceptible de subir des variations
importantes de température.
• Ne placez pas la balance dans un endroit humide ou
susceptible de subir une forte humidité.
• Après la mise en place de la balance et avant son
utilisation, saisissez le plateau pour bébé des deux côtés et
assurez-vous qu’il est xé solidement en place et qu’il ne
peut être retiré facilement.
• Regardez si le levier de verrouillage du plateau est bien
enfoncé.
Page 88

87
Configuration de la balance (suite)
Vérification de l’indicateur de niveau
1. Placez la balance sur
une surface plate an
d’assurer des mesures
exactes.
2. Tournez les quatre
régleurs jusqu’à ce que
les bulles d’air dans
le guide de niveau se
trouvent au centre du
cercle. Vériez que les
quatre régleurs reposent
sur la surface.
Indicateur de
niveau
Régleurs (4)
Vue du dessus
Rouge Bulle d’air
Correct Incorrect
Page 89

88
Instructions pour la pesée
Éléments à considérer avant d’effectuer une pesée d’essai :
• Ne changez pas les couches avant les poids « avant »
et « après ».
• Le bébé doit porter les mêmes vêtements pour les
poids « avant » et « après ».
• Utilisez une bavette, mais ne l’incluez PAS dans les
poids « avant » et « après ».
• Pour augmenter la précision, emmaillotez les
nouveau-nés actifs et vérifiez que toutes les
couvertures, tous les vêtements et toutes les extrémités
se trouvent à l’intérieur du panier et qu’ils ne touchent
pas le côté de la balance.
• Enregistrez les poids en grammes seulement.*
* Remarque – Les grammes sont presque équivalents aux millimètres (mL) ou aux centimètres
cubes (cc). Meier PP, et al. A New Scale for in-Home Test-Weighing for Mothers of Preterm and
High Risk Infants. Journal of Human Lactation, 1994;10(3); 163-168.
Vue d’ensemble du fonctionnement de la balance
BabyWeigh II
Une fois que la balance a été mise en place (p. 87), celle-ci
sera facile à utiliser. Voici un exposé sommaire.
1. Effectuez la pesée avant allaitement (p. 89). Appuyez
sur le bouton
1
pour stocker le poids dans la
mémoire.
2. Effectuez la pesée après allaitement (p. 89-90).
Appuyez sur le bouton
2
pour stocker le poids
après allaitement.
3. Calculez la quantité ingérée (p. 90). Appuyez sur le
bouton
3
pour faire le calcul.
Page 90

89
Instructions pour la pesée (suite)
Instructions pour la pesée
Mise en place :
1. Attachez le plateau, puis mettez la balance à niveau avant
d’effectuer la pesée.
2. Appuyez sur le bouton
(Marche) et attendez que
le chiffre ‘0’ apparaisse à l’écran. Si vous utilisez une
couverture ou un coussinet sur la balance, appuyez sur le
bouton
tare/zero
pour soustraire le poids excessif. La valeur
Net
sera indiquée.
Poids avant allaitement :
1. Placez le bébé sur la
balance, une main juste
au-dessus du bébé. Attendez
que l’écran indique lock
(verrouillé) (bip sonore).
La valeur qui s’afche
est le poids initial, avant
allaitement.
2. Appuyez sur le bouton
1
pour mémoriser le poids initial.
3. Retirez le bébé de la balance,
posez-le dans un endroit
sûr, puis consignez le poids
initial.
Allaitez le bébé. Laissez la
balance en marche pendant
que vous nourrissez le bébé.
Poids après allaitement :
REMARQUE : Assurez-vous que l’affichage s’est réinitialisé
à “0”. Si non, appuyez sur le bouton
pour
effacer l’affichage.
1. Si la balance s’est éteinte, appuyez sur le bouton
(Marche)
et attendez que le chiffre ‘0’ apparaisse à l’écran. Le poids avant
allaitement est mémorisé, même si la balance est éteinte.
Page 91

90
Instructions pour la pesée (suite)
2. Placez le bébé sur la
balance, une main juste
au-dessus du bébé. Attendez
que l’écran indique lock
(verrouillé) (bip sonore). La
valeur qui apparaît est la
valeur après allaitement.
3. Appuyez sur le bouton
2
pour mémoriser le poids
après allaitement.
4. Retirez le bébé de la balance
et placez-le dans un endroit
sûr.
5. Appuyez sur le bouton
3
pour afficher la quantité de
lait maternel ingérée qui a
été calculée. Appuyez sur les
boutons
1
ou
2
pour
voir les poids avant et après
allaitement, respectivement.
6. Consignez le poids après allaitement et la quantité de lait
ingérée qui a été calculée.
7. Appuyez sur le bouton
off
(arrêt) pour éteindre la balance.
Le dernier ensemble de poids restera en mémoire.
Éléments supplémentaires à considérer :
• Appuyez sur le bouton
(Marche) chaque fois qu’il est
nécessaire de réinitialiser la balance. Ceci ne supprime
pas les poids mis en mémoire.
• S’il est nécessaire de peser le bébé une nouvelle fois pour
obtenir le poids après allaitement, alors que ce poids a
déjà été mis en mémoire, appuyez sur le bouton
reweigh
fed baby
(repeser le bébé nourri). Le bouton
reweigh
fed baby
efface le poids
après allaitement actuel sur le bouton
2
de mise en
mémoire, afin de préparer la balance pour un nouveau
poids après allaitement.
Page 92

91
Instructions pour la pesée (suite)
Éléments à considérer pour la pesée de nouveau-nés ayant
des fils de connexion :
• Si possible,
débranchez les fils ou
la tubulure et placezles sur le dessus de
l’enfant emmailloté.
• Arrêtez l’alarme/la
surveillance pendant la
procédure de pesée d’essai.
• Rebranchez les fils avant de nourrir le bébé, si ceux-ci
ont été déconnectés.
Des poids d’essai précis, avec fils, pour les nouveau-nés
prématurés, peuvent être obtenus en formant le personnel
de l’unité néonatale de soins intensifs de manière adéquate
et en suivant le protocole fondé sur les résultats. Consultez
la documentation suivante pour obtenir des informations
supplémentaires :
Haase B, Barreira J, Murphy PK, Mueller M, Rhodes J. The
development of an accurate test weighing technique for preterm
and high-risk hospitalized infants. Breastfeed Med. 2009
Sep;4(3):151-6
Page 93

92
Étalonnage
REMARQUE – L’étalonnage doit être réalisé dans la même
région géographique de l’unité de mesure
pour les poids de nouveau-nés. La procédure
nécessite deux poids étalons certifiés de 10 kg
de classe F.
1. Appuyez sur le bouton
(Marche) alors que la balance est
éteinte.
2. Appuyez sur le bouton
1
pendant que l’écran fait clignoter
tous les segments --> L’écran
affiche « Func 1 ».
3. Appuyez sur le bouton
reweigh
fed baby
-->
(Repeser bébé nourri). L’écran
affiche « Func 2 ».
4. Appuyez sur le bouton
3
-->
L’écran affiche « 9.XXX » (le chiffre
9.802 sera par exemple affiché).
REMARQUE – Le réglage de la pesanteur se met
automatiquement à jour lors de l’étalonnage.
Page 94

93
Étalonnage (suite)
5. Appuyez de nouveau sur le bouton
3
--> L’écran indique « 20 0-- »
et « g ». Attendez qu’il indique
« 20 2-- ».
6. Placez deux poids de 10 kg sur la
plateforme lorsquel’écran affiche
« 20 2-- ».
7. Attendez que l’écran affiche le
signe « stabilisé » (cercle dans
le coin supérieur gauche), puis
appuyez sur le bouton
3
pour terminer l’étalonnage.
8. Attendez que l’écran affiche
« func 1 », puis enlevez les poids.
9. Appuyez sur le bouton
off
pour éteindre la balance.
REMARQUE – Si les messages d’erreur « Er0065 » ou
« Er0066 » s’affichent, il faudra alors faire un
nouvel étalonnage.
ATTENTION – Ne laissez pas les poids étalons sur la
balance pendant trop longtemps (plus de
quelques minutes).
Page 95

94
Réglages de la balance
Pour régler les fonctions Durée de maintien de l’afchage
et Temps de désactivation automatique, suivez les étapes
ci-dessous :
Passez au menu des réglages
en appuyant sur la touche
(Marche) (Bip sonore).
Appuyez sur le bouton
3
pendant que l’écran clignote (Bip
sonore). L’écran ACL affiche SEt.
Selon le réglage que vous souhaitez faire, suivez les instructions pertinentes suivantes.
Durée de maintien de l’affichage
Le réglage de la « Durée de maintien de l’afchage »
maintient l’afchage pendant une durée précise. Ce
réglage détermine la durée pendant laquelle le poids est
afché lorsque le bébé a été retiré de la balance. Il contrôle
également la durée pendant laquelle le poids est afché lors
du rappel des valeurs avant allaitement, après allaitement et
de la quantité ingérée.
1. Appuyez sur la touche
tare/zero
(Bip sonore).
La valeur « hold » (maintien) est affichée (la valeur par défaut
est 10 secondes); modifiez la valeur en appuyant sur cette
touche.
* Les durées hold peuvent être définies à 5 secondes, 10 secondes, 20 secondes ou
30 secondes.
Page 96

95
Durée de maintien de l’affichage (suite)
2. Pour enregistrer le réglage de la
durée de maintien, appuyez de
nouveau sur la touche
3
(Bip sonore).
Temps de désactivation automatique
Le réglage « Temps de désactivation automatique » met automatiquement la balance hors tension lorsque celle-ci n’est
pas utilisée pendant une durée précise. Procédez ainsi pour
passer au menu de réglage :
1. Appuyez sur la touche
weight
lock off
(verrou poids désactivé)
(Bip sonore).
Le temps de désactivation automatique est indiqué (la valeur
par défaut est nulle); il peut être modié en appuyant sur
cette touche.
* La désactivation automatique peut être réglée à 15 minutes, 30 minutes, 45 minutes,
60 minutes ou -- (Nulle). --(Nulle) signifie aucune désactivation automatique.
2. Appuyez de nouveau sur la
touche
3
pour enregistrer
le réglage du temps de
désactivation automatique (Bip
sonore).
Page 97

96
Dépannage
Si vous avez des doutes quant au bon fonctionnement
de la balance, veuillez vérifier les éléments suivants avant
d’appeler pour une réparation.
Anomalie Éléments à vérifier
La balance ne se met pas
en marche.
- Les piles ont-elles été retirées,
ou l’adaptateur CA a-t-il été
débranché?
- Les piles sont-elles faibles?
- Est-ce que quelque chose est
coincé entre les bornes des
piles?
L’écran indique ‘Lo’ - Les piles sont faibles. Veuillez
les remplacer immédiatement ou
utilisez l’adaptateur CA.
L’écran indique -------------
pendant les mesures.
- La capacité de poids maximum
mesurable de la balance, 20 kg,
a été dépassé.
Page 98

97
Formats de sortie des données BWII
Explication pour la sortie conforme RS-232C.
Caractéristiques
REMARQUE – Des virgules (,) sont utilisées pour séparer les
données. Le terminateur (fin des données) est CR (code
ASCII : 0DH), LF (code ASCII : 0AH).
Norme de communication EIA RS-232C
Méthode de communication Asynchrone
Vitesse de signal 9 600 bps
Longueur de bit
d’information
8 bit
Parité Aucune
Bit d’arrêt 1 bit
Terminateur CR + LF
Contrôle de flux Aucun
Page 99

98
Formats de sortie des données BWII (suite)
Nom de la ligne de signal et méthode de connexion.
Exemple de connexion
Veillez à utiliser un câble droit lorsque l’équipement est
connecté à un ordinateur externe.
BWII
PC, etc.
N° de borne Nom de signal
1
2
TXD (TD)
3
4
5
GND (Terre)
6
7
8
9
Page 100

99
Formats de sortie des données BWII (suite)
La transmission des données (TD) est immédiate après les
mesures, quel que soit l’état du dispositif de réception. Ce
dispositif doit être toujours prêt à recevoir des données
avant toute prise de mesure.
1. Mode Grammes (g)
◆ Lorsque l’écran se verrouille sur un poids.
Article En-tête Données de sortie (code
ASCII)
Détails
Donnée de contrôle {0 Fixée à 16
Donnée de contrôle ~0 Fixée à 1
N° de modèle MO “xxxxxx” Longueur fixe de
6 octets (« BWII »)
Poids du corps Wg xxxxx Longueur variable de
3~5 octets (unité : g)
Ex.) {0,16,~0,1,MO,« BWII »,Wg,5260
◆ Lorsque l’on appuie sur la touche
1
Avant allaitement pour stocker le poids.
Article En-tête Données de sortie (code
ASCII)
Détails
Avant allaitement Rg xxxxx Longueur variable de
3~5 octets (unité : g)
Ex.) Rg,5260
◆ Lorsque l'on appuie sur la touche
2
Après allaitement pour stocker le poids.
Article En-tête Données de sortie (code
ASCII)
Détails
Avant allaitement Rg xxxxx Longueur variable de
3~5 octets (unité : g)
Après allaitement Pg xxxxx Longueur variable de
3~5 octets (unité : g)
Quantité ingérée Gg xxxxxx Longueur variable
de1~6 octets
(unité : g)
Ex.) Rg,5260,Pg,5366,Gg,106
 Loading...