


SONNET2
CI and EAS Audio Processor
Quick Guide
AW37283_1.0 (English)

Table of Contents
Rechargeable Batteries .................2
Disposable Batteries ...................6
DL-Coil .............................8
Earhook ........................... 10
Microphone Cover .....................11
WaterWear .........................12
BabyWear ..........................13
ActiveWear .........................16
FineTuner Echo ......................20
The SONNET 2 Quick Guide contains easy-to-use instructions to get you started
with your SONNET 2. For detailed information on the intended use, indications,
contraindications, warnings and precautions of the SONNET 2 audio processor,
please refer to the instructions for use.
AudioKey ..........................22
AudioLink ..........................23
Wireless Microphone System ............24
Flight Mode ........................25
Battery Overview ....................26
Processor Indicator Light ..............27
DL-Coil Indicator Light .................30
Care and Maintenance ................32
Troubleshooting .....................34

SONNET 2 CI and EAS Audio Processor
Processor Indicator Light
1
Earhook
Pin
EAS
Earhook
Battery Pack
Cover Lock
CI
Earhook
Microphones
Microphone Cover
Battery Pack
DL-Coil Cable
Air Inlets
Control Unit
DL-Coil
DL-Coil
Indicator Light

SONNET 2
2
Assembling SONNET 2
With Rechargeable Batteries
Click!
To remove, press
the tip of the
release lever.
Attach the rechargeable battery
1
adapter to the control unit.
Note the mechanism that secures
the rechargeable battery adapter
to the control unit.

Click!
3
Insert the rechargeable
2
battery at an angle. The side
with the higher lip should be
facing towards the earhook.
Gently press the rechargeable
3
battery back into the adapter
until it clicks into place.

4
4
Plug the coil cable
into the control unit.
Note the correct
orientation of the
coil cable socket.
Make sure that the battery
5
pack cover lock is in the
unlocked position. Slide
the battery pack cover over
the rechargeable battery
adapter. Your SONNET 2 is
now switched on.
Battery Pack
Cover Lock
Unlocked
Locked
Be careful not to use too much
force when turning the lock.

Detaching
5
To remove the rechargeable battery, simply
reverse steps 3 and 2. The rechargeable
battery adapter does not need to be removed
when changing the rechargeable battery.
To see which batteries you can
use with your SONNET 2, see the
Battery Overview on page 25.

SONNET 2
6
Assembling SONNET 2
With Disposable Batteries
Note the mechanism that secures
the control unit to the frame.
Click!
Attach the battery pack frame
1
to the control unit.
To remove, press
the tip of the
release lever.

Plug the coil cable into
2
the control unit.
Note the correct
orientation of the
coil cable socket.
Insert the batteries with the
3
positive (+) poles facing out.
Make sure the battery pack
cover lock is in the unlocked
position. Slide the battery
pack cover over the battery
pack frame. Your SONNET 2 is
now switched on.
Battery Pack
Cover Lock
Unlocked
Locked
7

8
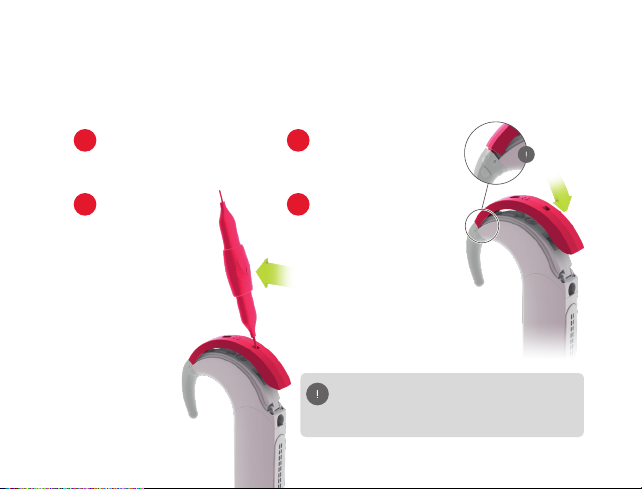
SONNET 2
Changing the Coil Cover
DL-Coil Cover
DL-Coil Magnet
DL-Coil
Indicator
Light
DL-Coil Base
DL-Coil Cable

9
Insert your ngernail or the plastic
1
screwdriver into the front of the
DL-Coil cover, and slide around the
base to gently detach it.
Note the orientation of the plug.
The logo and arrow should face up.
Insert the coil cable into
2
the base.
Place the new cover over
3
the base, and gently press
together until they snap
into place.

SONNET 2
10
Changing the Earhook
Click!
Pin
Remove the earhook pin by pushing it
1
out with the supplied pin removal tool.
Remove the earhook by gently
2
pushing it down.
Pin
Removal
Too l
Attach new earhook, and lock
3
into place with the earhook pin.
If you have a SONNET 2 EAS, a
hearing professional will t your
earhook with an earmould.
SONNET 2
Changing the Microphone Cover
11
Insert the screwdriver into
1
the groove at the bottom
of the microphone cover.
Gently lever the
2
cover away from
the control unit.
Place the new cover over
3
the control unit.
Starting at the earhook
4
end, press down until the
cover snaps into place.
The cover should be changed every three
months to maintain best possible hearing
with SONNET 2.

12
SONNET 2
Attaching WaterWear
Make your SONNET 2 waterproof with WaterWear,
and enjoy the water activities you love.
– WaterWear makes your processor
completely waterproof.
– Can be used in fresh-, salt-, and
chlorinated water.
– The WaterWear covers are reusable.
For more details, and instructions for how to attach WaterWear,
check out our online support at www.medel.com/WaterWear
SONNET 2
Attaching BabyWear
13
28 cm DL-Coil Cable
Earhook Cover
Attachment Clip

14
Slide the silicone ring of
1
the attachment clip over
the battery pack cover
with the small cable ring
to the back.
Slide the end of the 28 cm
2
coil cable through the ring
in the attachment clip.
All steps must be followed to
ensure BabyWear is tamperproof.
Plug the coil cable
3
into SONNET 2.

15
Slide the battery pack cover over
4
the battery pack. Lock into place
by turning the lock with the
plastic screwdriver.
Replace the earhook with the
5
earhook cover (see page 10).

SONNET 2
16
Attaching ActiveWear
ActiveWear Connector
Cover Lock
ActiveWear Connector Cover
ActiveWear Battery
Pack Connector
Attachment Clip

Unlocked
Locked
17
Attach the ActiveWear
1
connector to the control unit.
Slide the cover over the
2
connector and lock into place.

18
Unlocked
Locked
Attach any SONNET 2 battery
3
option to the ActiveWear battery
pack connector.
Slide the regular battery pack
4
cover over the battery pack, and
lock into place.

Slide the silicone ring of the
5
attachment clip over the
battery pack cover. The hole
in the attachment clip should
snap onto the button on
the battery pack connector.
Attach the clip to clothing.
19

SONNET 2
20
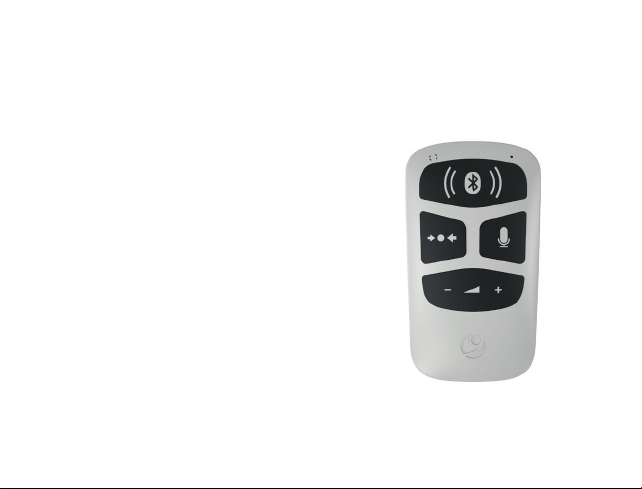
FineTuner Echo
1
4
5
8
Volume
1
Increase or decrease volume
Sensitivity
2
Increase or decrease audio sensitivity
Programme Selection
3
Choose a programme
Default
4
Set volume and audio sensitivity to default
3
2
7
6
setting as determined by your audiologist
Input Selection
5
Select input from microphone, telecoil or
a mix of microphone and telecoil
AudioLink
6
Activate or deactivate connection with AudioLink
Keypad Lock
7
Press for several seconds to lock or unlock the keypad
Processor Selection
8
Select left, right, or both audio processors

21
Pairing the FineTuner Echo
1. Switch off SONNET 2. Place the coil on
the back of the FineTuner Echo.
2. Switch on SONNET 2. It will pair
automatically with the FineTuner Echo.
3. Once it is successfully paired, the
symbol will be displayed on the screen.
Changing the Battery
1. Using a coin, turn the battery
compartment cover until it points to
the symbol.
2. Carefully remove the cover, making
sure the black silicone ring does not
fall out.
3. Insert a CR2032 battery, with the +
facing upwards.
4. Place the cover over the battery
compartment, pointing towards the
symbol. Using a coin, turn the
cover until it points to the symbol.

22
SONNET 2
Using AudioKey
The AudioKey app can be used to control your SONNET 2
from your phone, and has several other useful features.
– Control the volume, audio sensitivity, and
other settings straight from your phone.
– Find your lost SONNET 2 with the
“Find My Processor” function.
– Support other users, such as a child,
with their SONNET 2.
– Keep track of your usage by checking the
statistics of your SONNET 2.
Scan the QR code to download AudioKey now:
Download
for iPhone
Download
for Android
SONNET 2
Connecting via AudioLink
AudioLink is a pocket-sized universal connectivity
device that can be used to wirelessly stream phone
calls, audio, and music to your SONNET 2.
– Make phone calls from your Android,
iPhone or any other smartphone.
– Listen to music from your phone or
music device.
– Stream sound from your TV.
– Use AudioLink as a remote microphone for
better hearing in challenging environments.
For more details, and instructions for how to connect,
check out our online support at medel.com/support/AudioLink.
23

SONNET 2
24
Wireless Microphone System
Roger™ 21 from Phonak
Replace standard battery pack
1
cover with Roger 21.
Connect to wireless microphone
2
following instructions for that
specic device.
Refer to the user manual for your wireless
microphone system for instructions on
changing settings.
Other Connectivity Options: SONNET 2 makes it easy to connect, wherever you are. For more
details about Bluetooth
see our SONNET 2 online support section at medel.com/support/SONNET 2.
®
neckloops, digital wireless systems, telecoils, and direct audio input,

SONNET 2
Activating the Flight Mode
Activate the ight mode whenever you board a ight or enter an
environment where RF transmissions are prohibited.
Switch off the audio processor
1
and wait 2seconds.
Switch on the audio processor
2
and wait 2seconds.
Repeat steps 1 and 2 three
3
more times. A brief red blinking
of the indicator light conrms
successful activation.
Deactivating the Flight Mode
1. Switch off the audio processor and wait 2seconds.
2. Switch on the audio processor.
2 s
25
2 s

26
SONNET 2
Battery Overview
SONNET 2 comes with exible battery options. The table below gives you an overview
of all the battery types that can be used with SONNET 2.
Maximum
battery life
675 Zinc-Air Batteries 60 hours No
SONNET Standard
Rechargeable Battery
SONNET Micro
Rechargeable Battery
675 Silver-Oxide Batteries 10 hours Yes
675 Alkaline Batteries 8 hours Ye s
AAA Battery via
Mini Battery Pack
10 hours Yes
7 hours No
37 hours No
Compatible
with WaterWear

SONNET 2
Processor Indicator Light
Conrmation Status
FineTuner Echo command has been successfully received.
27
Programme Change
Status
0 1 2 3
Scale in seconds
Programme 1 is selected.
Programme 2 is selected.
Programme 3 is selected.
Programme 4 is selected.
If the optional status light has been activated: SONNET 2 is
initialised and working.

28
Error Pattern Problem Solution
Temporary error or
electronic malfunction
The setting you selected has not
yet been programmed, or there
has been a programming failure.
Temporary error or
electronic malfunction
Electronic malfunction or
programming failure
Temporary error or
electronic malfunction
0 1 2 3
Scale in seconds
1. Switch SONNET 2 off.
2. Switch SONNET 2 on.
Select another setting.
1. Switch SONNET 2 off.
2. Switch SONNET 2 on.
1. Switch SONNET 2 off.
2. Switch SONNET 2 on.
1. Switch SONNET 2 off.
2. Switch SONNET 2 on.

Warning Status Solution
Batteries are empty. Change the batteries.
Either minimum or maximum volume
or audio sensitivity has been reached
Adjust volume or
sensitivity if necessary.
Flight Mode Conrmation Pattern
Flight mode successfully activated
0 1 2 3
Scale in seconds
29

SONNET 2
30
DL-Coil Indicator Light
Conrmation
The DL-Coil, DL-Coil cable, and SONNET 2 are working; your SONNET 2 and
implant are successfully connected (applicable to SYNCHRONY, CONCERTO,
SONATA, and PULSAR implants).
The DL-Coil, DL-Coil Cable, and SONNET 2 are working
(applicable to C40+ and C40 implants).
No Light Signal Problem Solution
Your audio processor
is not working.
The indicator light has
been deactivated by
your audiologist.
1. Change the batteries. If that does not solve the
problem, go to 2.
2. Replace the DL-Coil cable. If that does not solve
the problem, contact your CIcentre for assistance
Contact your audiologist.

Warning Problem Solution
0 1 2 3 s 5 min
0 10 s
Random signals
The DL-Coil and implant are
disconnected.
SONNET 2 is in microphone
monitoring mode.
The DL-Coil is positioned
over the wrong implant.
The DL-Coil cable is defective.
If the DL-Coil cable fails, the
DL-Coil will automatically
power off after 5 minutes.
The DL-Coil has powered off. 1. Reposition the DL-Coil over the implant.
The DL-Coil cable is defective. Replace the DL-Coil cable.
Position the DL-Coil over the implant.
Switch SONNET 2 off and on again.
Position the DL-Coil over
the correct implant.
1. Replace the DL-Coil cable.
2. Reposition the DL-Coil over the implant.
3. Switch your SONNET 2 off.
4. Switch your SONNET 2 back on.
2. Switch your SONNET 2 off.
3. Switch your SONNET 2 back on.
31

32
SONNET 2
Care and Maintenance
Follow these basic and important care instructions to help improve
the functioning of your SONNET 2 and extend its life.
General Cleaning
Clean SONNET 2 regularly by wiping it with a soft, damp
cloth. Do not use cleaning solutions. Use extra care when
cleaning small parts such as the battery contacts and
microphone covers.
Battery Contacts
Inspect the battery contacts regularly; clean and dry them
as necessary. To clean them, use a cotton swab and a small
amount of rubbing alcohol. Gently wipe them dry. Avoid
touching the battery contacts.
Microphone Cover
If the microphone cover gets wet, wipe it dry or replace it.
Replace the microphone cover every three months, or sooner
if it appears dirty or if sound quality has worsened.
Drying
Use the drying kit every night to allow SONNET 2 to dry out
completely. Disposable batteries may remain in the battery
pack frame but you should remove the battery pack cover.
Do not put rechargeable batteries into the drying kit.
Moisture
Protect SONNET 2 from excessive or unnecessary exposure
to water. If your audio processor gets wet, gently wipe it dry
with a soft absorbent cloth.
Sunlight
Do not leave SONNET 2 in direct sunlight, especially inside
a vehicle. Do not expose your audio processor to extreme
temperatures.
Refer to your user manual for more
information about care and maintenance.
33

34
SONNET 2
Troubleshooting
In case you encounter any minor technical problems, such as an
interruption in sound, carefully follow these steps to identify possible
causes and solutions:
1. Change the batteries of your SONNET 2. If that does not solve
the problem, go to 2.
2. Disassemble your SONNET 2 into ve parts: control unit, battery
pack frame, battery pack cover, DL-Coil cable, and DL-Coil.
Do not disassemble the DL-Coil.
3. Check each part for dirt or signs of damage. Gently clean any
audio processor parts that are dirty and wipe dry any parts
that are wet (see instructions on page 31). If any parts appear
damaged, contact your CI centre for assistance.
4. Reassemble SONNET 2. If your audio processor is still not
working, go to 5.

5. Place the DL-Coil on the back of the FineTuner Echo.
6. Speak into the audio processor microphones. The green light
on the FineTuner Echo should icker in the rhythm of your
voice. If it does not icker, go to 7.
7. Adjust the volume setting on your FineTuner Echo. If the green
light still does not icker, go to 8.
8. Replace the DL-Coil cable with a new one, and try again.
9. If your SONNET 2 is still not working correctly, contact your
CIcentre for assistance.
35

Notes36


MED-EL Elektromedizinische Geräte GmbH
MED-EL Elektromedizinische Geräte GmbH
Fürstenweg 77a, 6020 Innsbruck, Austria
Fürstenweg 77a, 6020 Innsbruck, Austria
of ce@medel.com
of ce@medel.com
medel.com
medel.com
 Loading...