

Page 1
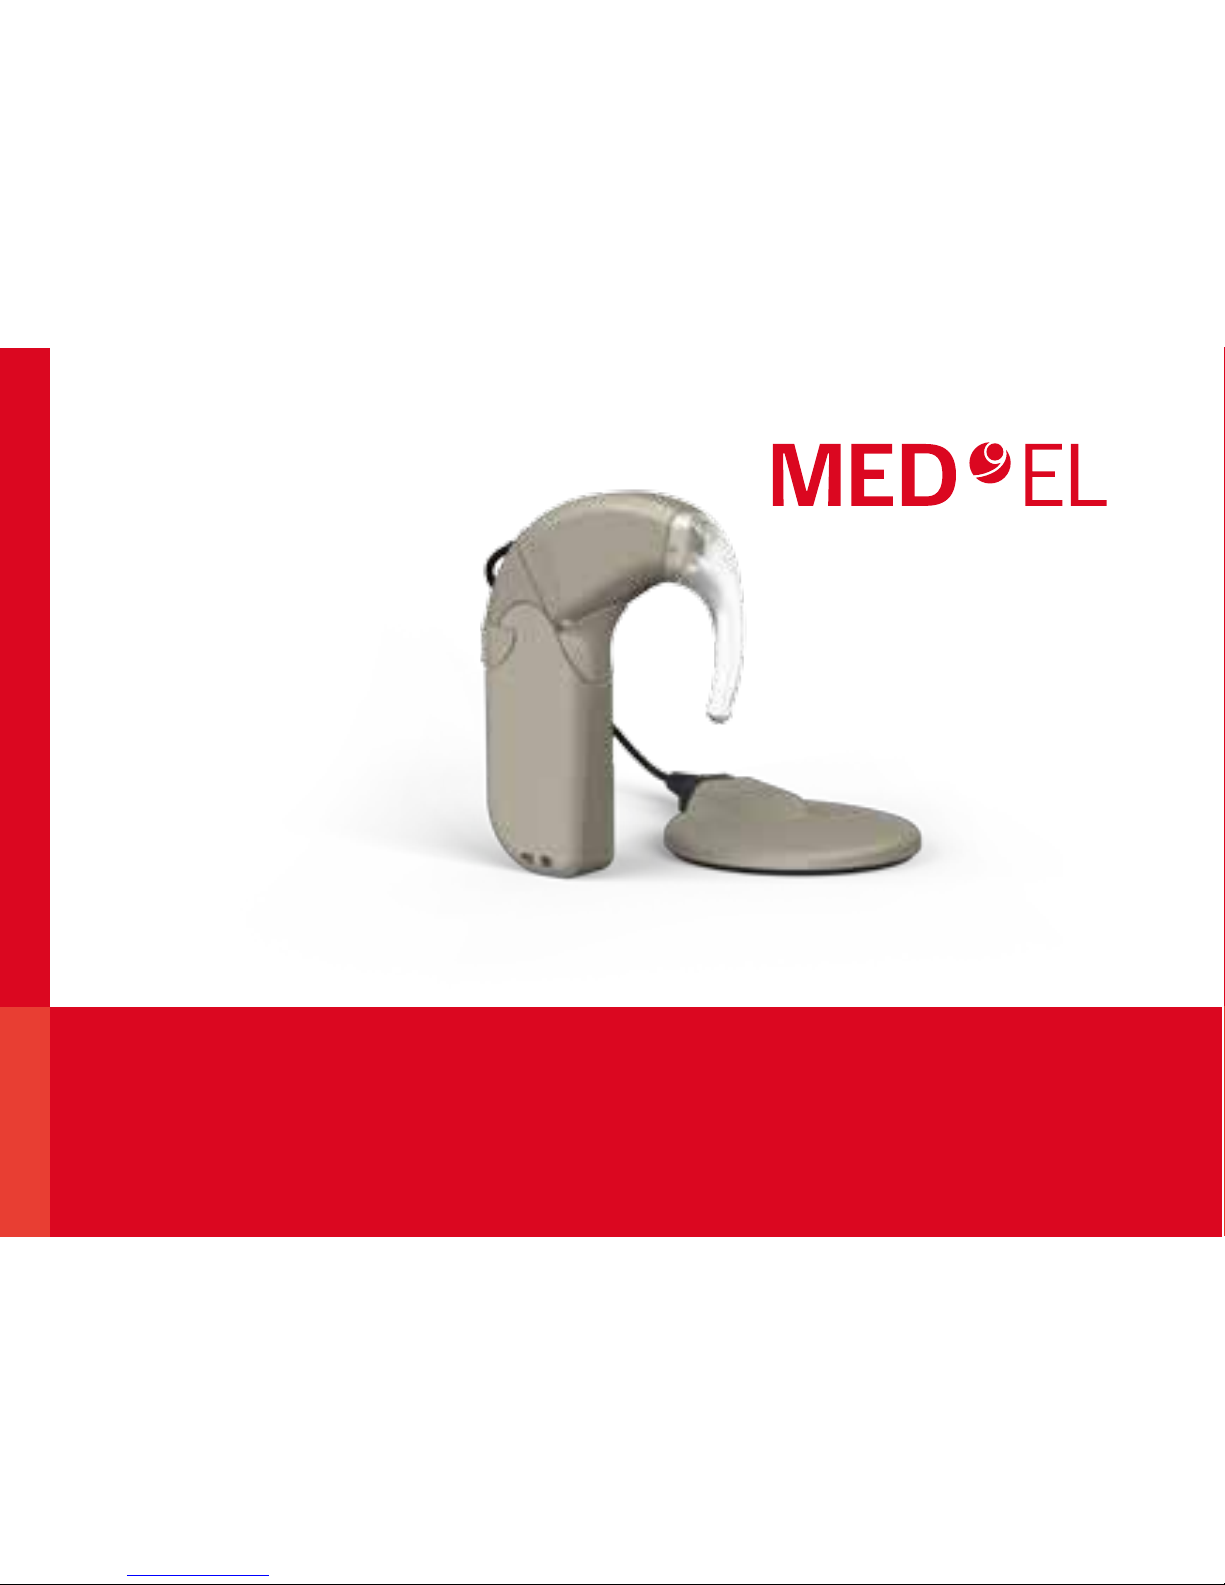
OPUS® 2
Audio Processor
Quick Guide
Page 2

OPUS® 2 Audio Processor
Microphone
Control Unit
Battery
Pack
ON/OFF Switch
and Battery
Pack Cover
Lock
Earhook
Connecting Piece
Coil Cable
Indicator Light
D Coil
Table of Contents
Basic Assembly ........................... 2
D Coil .................................. 3
Earhook ................................ 4
Battery Options .......................... 5
Indicator Light ........................... 6
FineTuner ............................... 8
FineTuner Light Patterns ................... 10
Batteries ............................... 11
Telecoil Accessories ....................... 12
FM Battery Pack ......................... 14
BabyBTE/ActiveWear ...................... 16
Children’s Battery Pack .................... 18
Mini Battery Pack ........................ 20
Safety Features ......................... 24
Basic Care and Maintenance ................ 26
Troubleshooting ......................... 28
1
Page 3
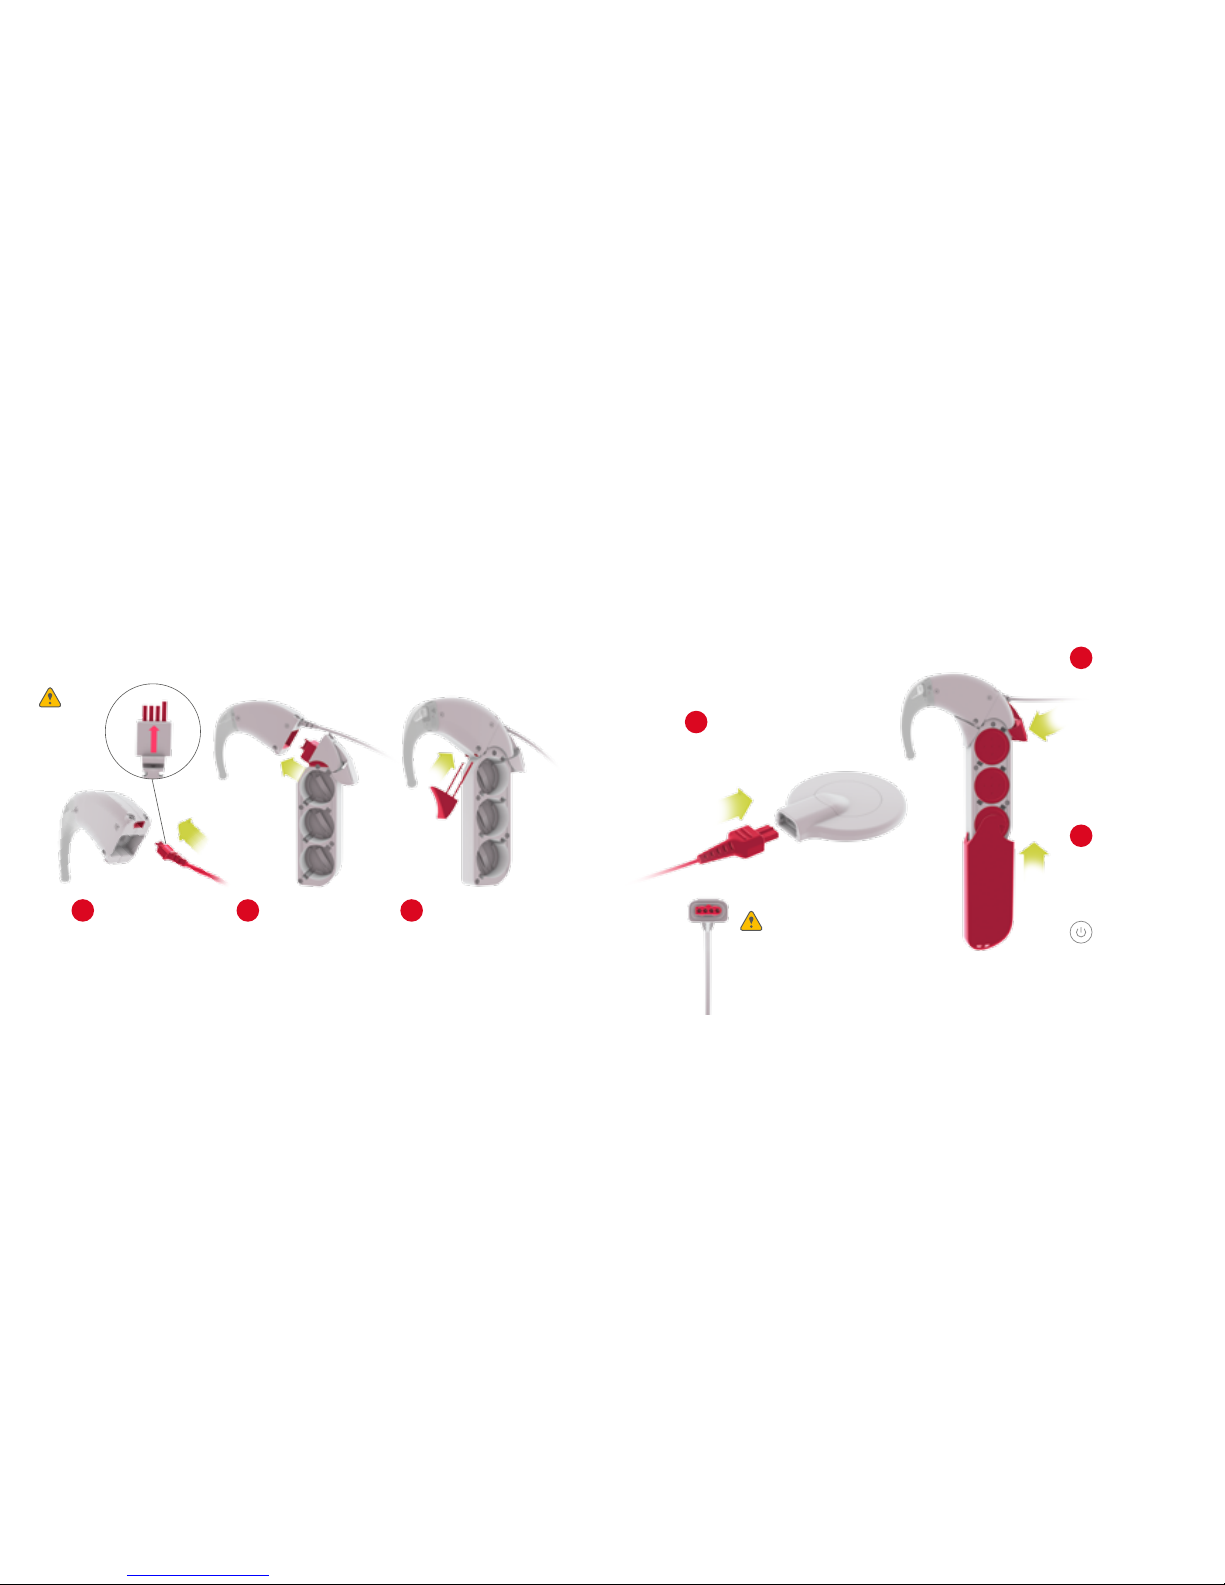
Basic Assembly
Plug the coil cable
into the control unit.
1
Lock the battery pack
frame using the
connecting piece.
3
Attach the battery
pack frame to the
control unit.
2
Insert the
batteries with
positive (+)
poles facing out.
5
OPUS 2
Ensure
the arrow
is on top.
Connect the coil cable
to the D Coil.
4
Ensure the centre
ridge is on top.
Slide on the
battery pack
cover. Close the
battery pack
cover lock.
Your OPUS 2 is
now turned on.
6
2 3
Page 4

Detaching XS Battery Pack DaCapo Rechargeable
Battery Pack
Earhook Battery Options
OPUS 2 OPUS 2
Remove the earhook by
gently pushing it down.
2
Remove the earhook pin
by pushing it out with the
supplied pin removal tool.
1
Pin
Pin
Removal
Too l
Click!
To Attach
Note the mechanism
that secures the earhook.
To lock the earhook, attach the
earhook and insert the earhook pin.
Alternate the
daily usage of
your DaCapo
batteries for
best results.
Attach the DaCapo Rechargeable Battery Pack or the XS Battery Pack in the same way you
attach the standard battery pack cover. (See Basic Assembly instructions on pages 2–3.)
4 5
Page 5

Status
Batteries are empty.
Either minimum or maximum volume
has been reached, or audio sensitivity
has been reached.
Warning
Problem
Temporary error or electronic
malfunction.
The setting you selected has not
yet been programed, or there has
been a program malfunction.
Temporary error or electronic
malfunction.
Programming failure, temporary
error, or electronic malfunction.
Error Pattern Solution
1. Turn processor off.
2. Turn processor back on.
Select another setting.
1. Turn processor off.
2. Turn processor back on.
1. Turn processor off.
2. Turn processor back on.
Solution
Change the batteries.
Adjust volume or sensitivity
if necessary.
Scale in Seconds
10 2 3
Status
FineTuner command has been successfully received.
Program 1 is selected.
Program 2 is selected.
Program 3 is selected.
Program 4 is selected.
Conrmation
If the optional status light has been activated:
OPUS 2 is initialised and working.
Status
Program Change
Scale in Seconds
10 2 3
Indicator Light
OPUS 26 7
Page 6
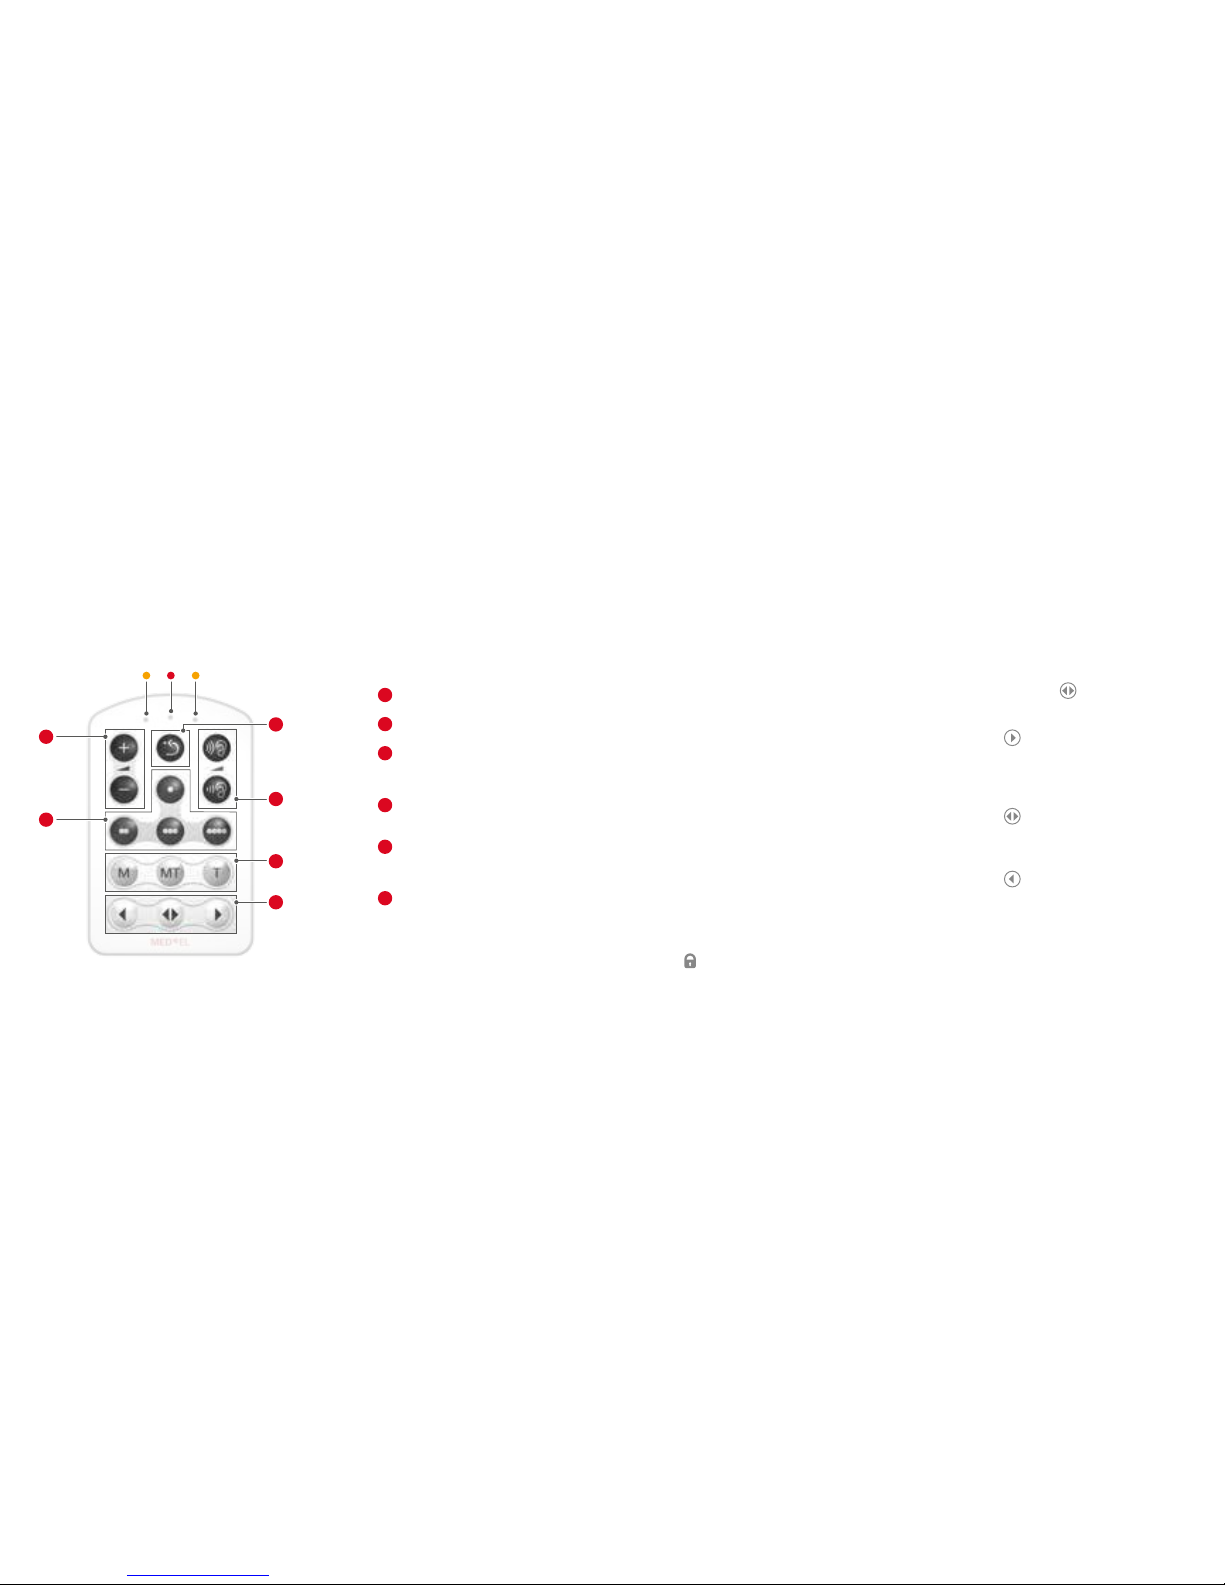
Volume
Increase or decrease the volume
Program Selection
Choose a program
Default Volume and Sensitivity
Set volume and audio sensitivity
to default setting as determined
by your audiologist
Sensitivity
Increase or decrease the
audio sensitivity
Input Selection
M: Selects microphone
MT: Selects microphone and telecoil
T: Selects telecoil
Processor Selection
(For Bilateral Users)
Select the left processor, both
processors, or the right processor;
Activates and deactivates the
Keypad Lock
1
2
3
4
5
6
FineTuner
OPUS 2
Sensitivity
Input Selection
Processor Selection
(For Bilateral Users)
and Keypad Lock
Feature
Volume
Program
Selection
Indicator Lights
Default Volume
and Sensitivity
1
2
3
4
5
6
FineTuner Keypad Lock
To prevent accidental setting changes,
you can activate the FineTuner
Keypad Lock. If any key is pressed
while the keypad is locked, the red
LED light on the FineTuner will blink.
Temporarily Unlocking the Keypad
You can make a selection even when
the keypad is locked by pressing any
given key twice. The rst click
temporarily unlocks the keypad, and
the second click sends the command.
When the Keypad Lock is temporarily
deactivated, the keypad will relock
after 10 seconds of inactivity.
Activating the Keypad Lock
1. Press and hold the ( ) key for
5 seconds, or until the red and
amber lights blink alternately.
2. Press the (
) key. When the
keypad has been locked successfully,
the amber lights will blink.
Deactivating the Keypad Lock
1. Press the ( ) key twice. The
second time, press and hold for at
least 5 seconds, or until the red
and amber lights blink alternately.
2. Press the (
) key. The amber
lights will blink to indicate that
your FineTuner is unlocked.
Any FineTuner key can be deactivated by your
clinician to prevent accidental setting changes.
8 9
Page 7

+ 5 seconds
Meaning
Keypad is locked
Information is
being transmitted
Input side change
Programming mode
Batteries are low
Conguration has
been successful
Explanation
If you press any key while the FineTuner is locked,
the red indicator lights will turn on.
The indicator lights blink when signals are being
transmitted. The left light blinks if the left side is
activated. The right light blinks if the right side is
activated. Both blink if both sides (for bilateral users)
are activated.
Press the left key to send commands to the left side.
Press the right key to send commands to the right side.
The corresponding amber light will turn on. To send
commands to both sides (for bilateral users), press the
centre key. Both amber lights will turn on.
Press for more than 5 seconds to activate programming
mode. The 3 indicator lights will ash alternately.
If batteries are low, the red indicator light in the centre
will blink three times repeatedly.
If conguration of your FineTuner has been successful or
if the automatic keyboard lock feature has been either
activated or deactivated, both amber lights will turn on
for one second.
Light Pattern
Light Patterns
FineTuner
Batteries
Use only type 675 batteries to power your OPUS 2. We recommend using
high-power zinc-air batteries that are designed especially for cochlear implant
systems. When you use OPUS 2 with the WaterWear accessory, however, you
must substitute zinc-air batteries with one of the other types.
XS
Battery Pack
Standard
Battery Pack
DaCapo
Battery Pack
Zinc-Air
Batteries
Zinc-Air
Batteries
Silver-Oxide
Batteries
Alkaline
Batteries
Rechargeable
Maximum
battery life
60 hours 90 hours 10 hours 8 hours 16 hours
Requires
oxygen supply
Yes Yes No No No
Compatible
with WaterWear
No No Yes Yes Yes
OPUS 210 11
Page 8
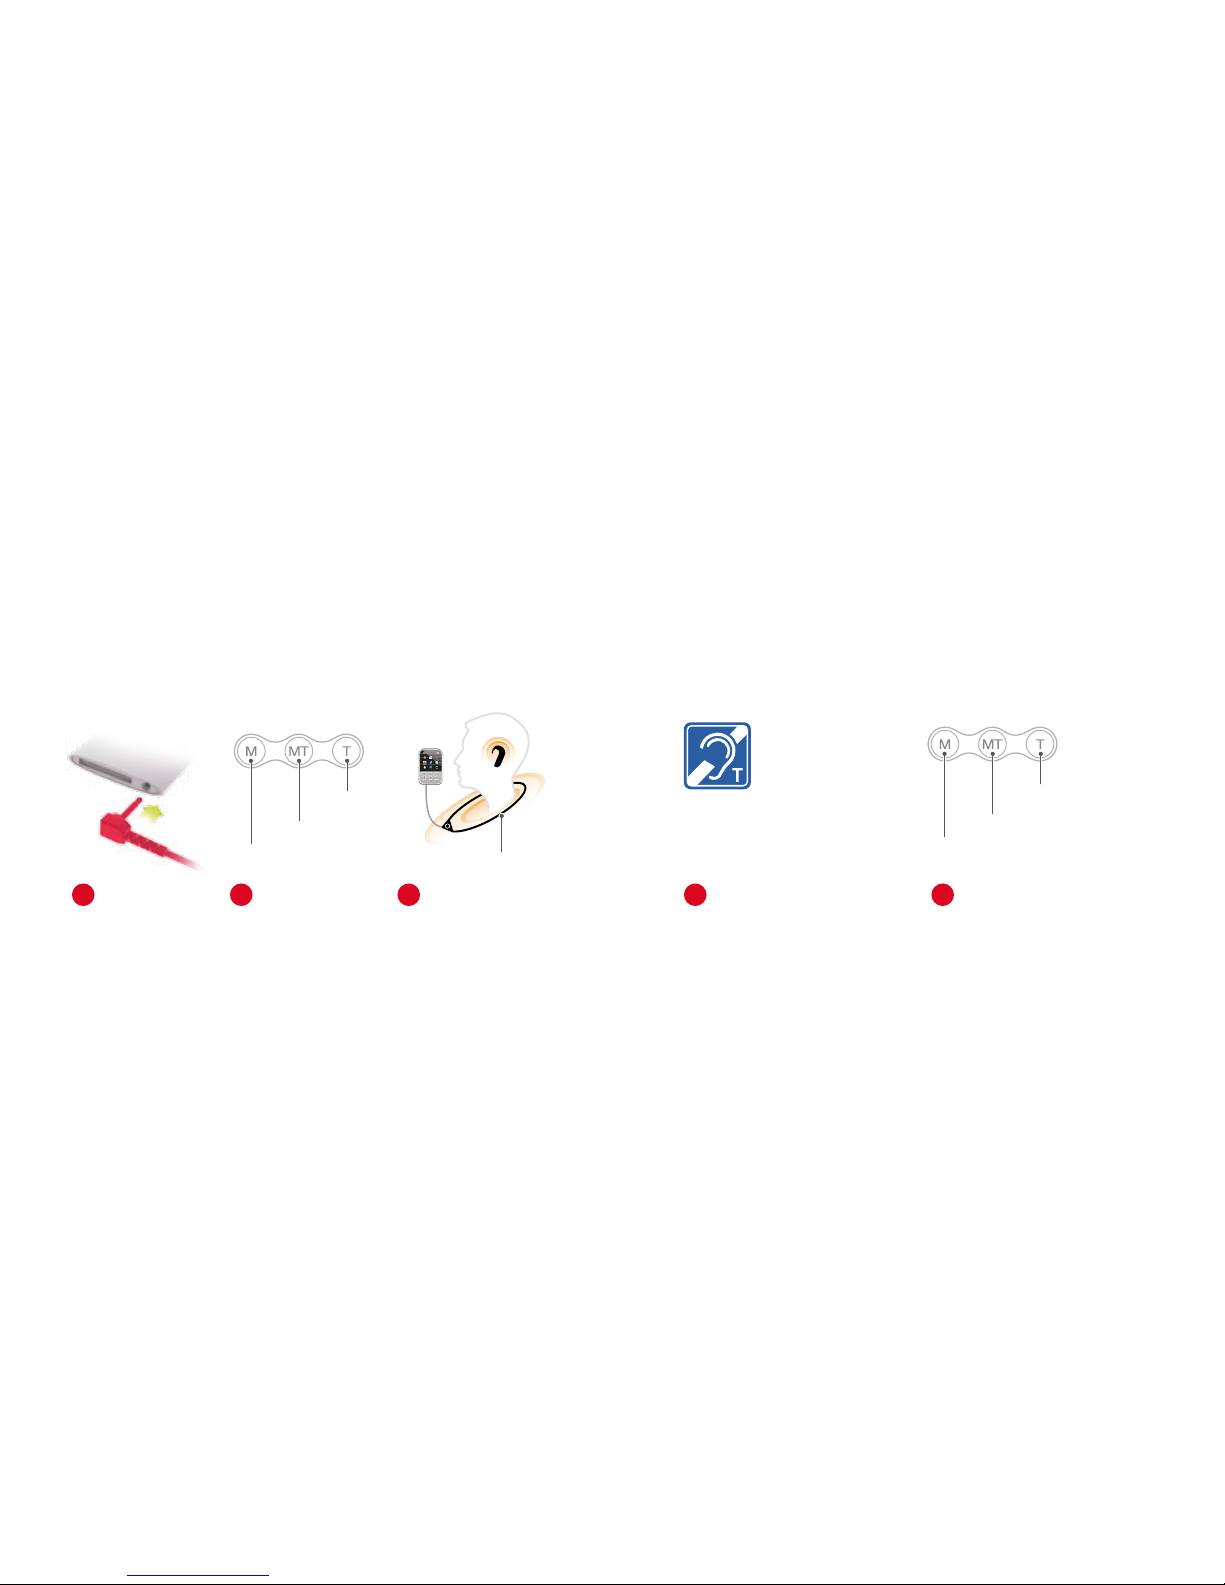
Look for the symbol that
identies the use of an induction
loop system at venues.
For Neckloops and Silhouettes For Induction Loop Systems
Neckloop
Accessory
Microphone
with Telecoil
Microphone
with Telecoil
Telecoil
Only
Telecoil
Only
Microphone Only
Microphone Only
FineTuner Input Selection Keys
FineTuner Input Selection Keys
Telecoil Accessories
OPUS 2 − Assistive Listening Devices
Insert the 3.5 mm
plug of the telecoil
accessory into the
headphone jack of
the audio device.
1
Find the listening area of
the induction loop system
and stay within it.
1
Press the MT or T
button on your
FineTuner to activate
the telecoil and
select the input type.
2
Press the MT or T button on
your FineTuner to activate the
telecoil function and select the
input type.
2
Place the telecoil
accessory around
your neck if you’re
using a neckloop or
on your ear if you’re
using a silhouette.
3
12 13
Page 9
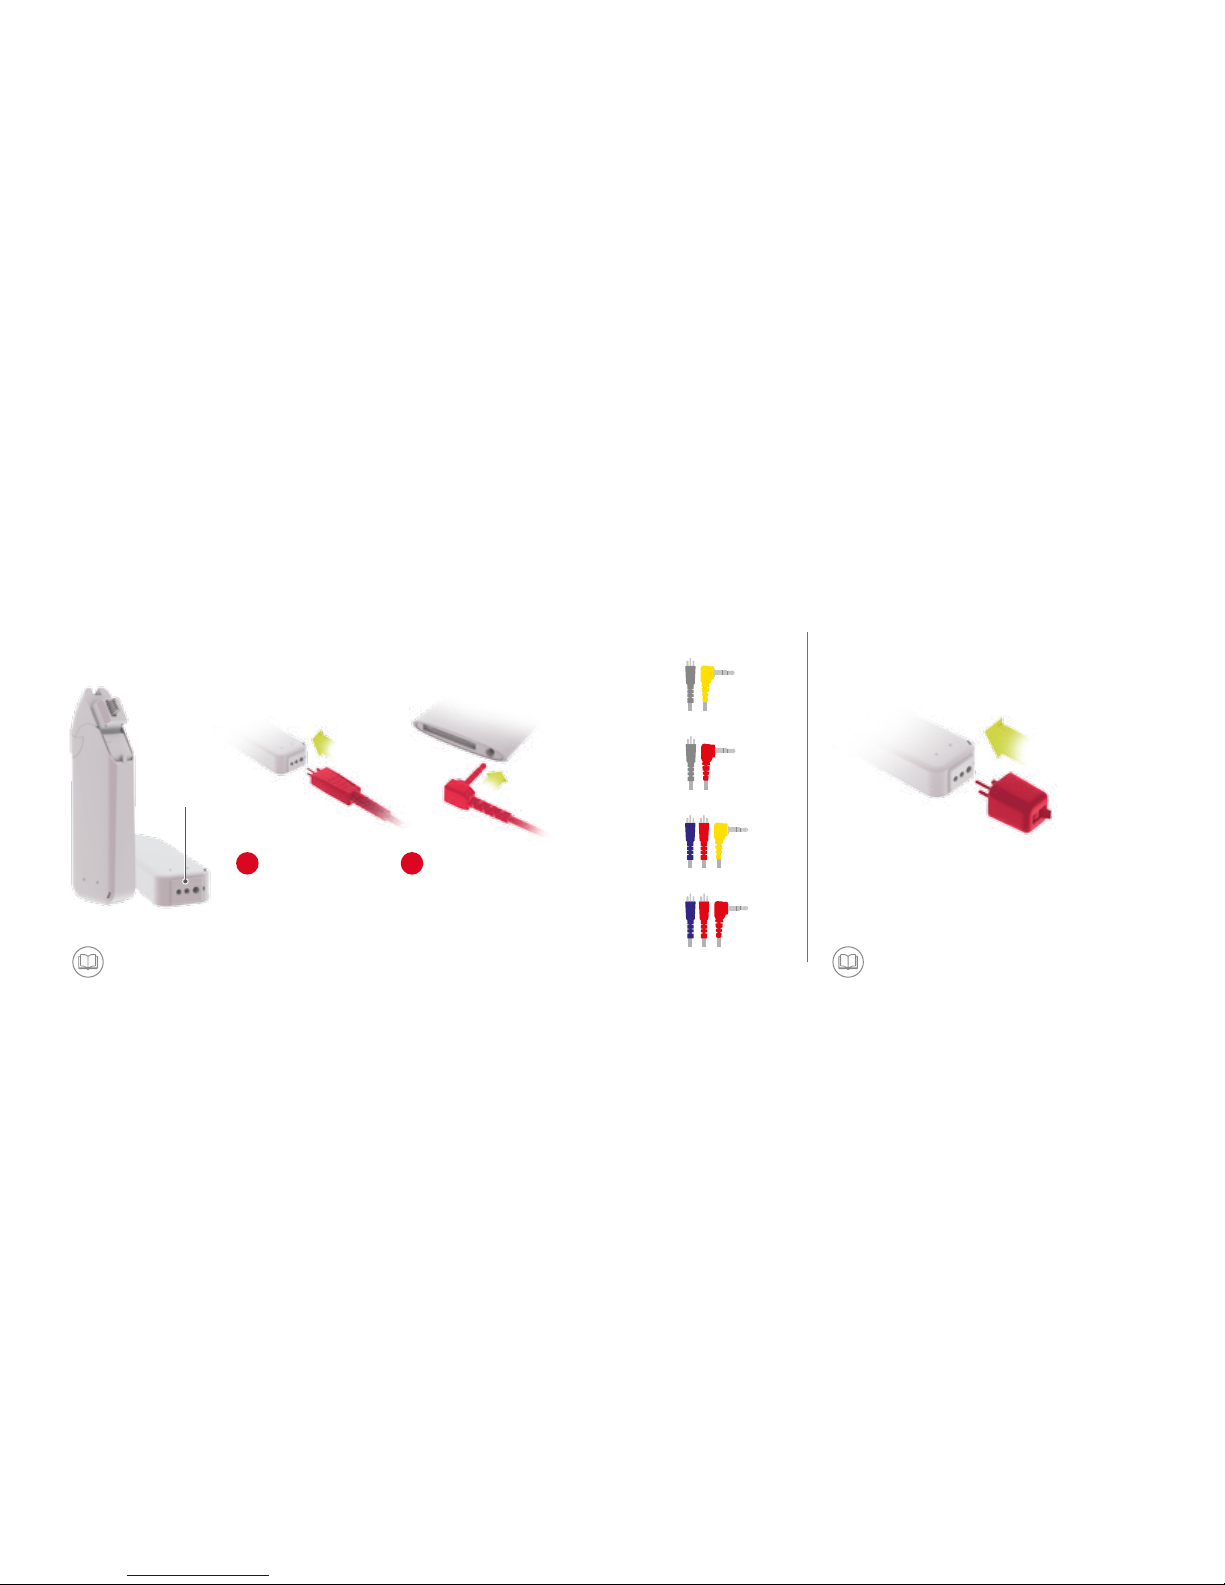
With Direct Audio Input With FM Receiver
FM Battery Pack
OPUS 2 − Assistive Listening Devices
Insert the 3-pin
plug of the audio
adapter cable into
the FM port.
1
Insert the FM receiver into the FM port.
OPUS 2 will automatically detect sound signals
as soon as the FM system is activated.
Insert the 3.5 mm
plug of the audio
adapter cable into
the headphone port
of the audio device.
2
Unilateral Mix
Audio Adapter
Cables
Unilateral Ext.
Bilateral Mix
Bilateral Ext.
3-Pin
FM Port
Attach the FM Battery Pack in the same way you attach the standard battery pack cover.
(See Basic Assembly instructions on pages 2–3 of this guide.)
Refer to the user manual for your FM system
for instructions on changing FM settings.
14 15
Page 10
Click!
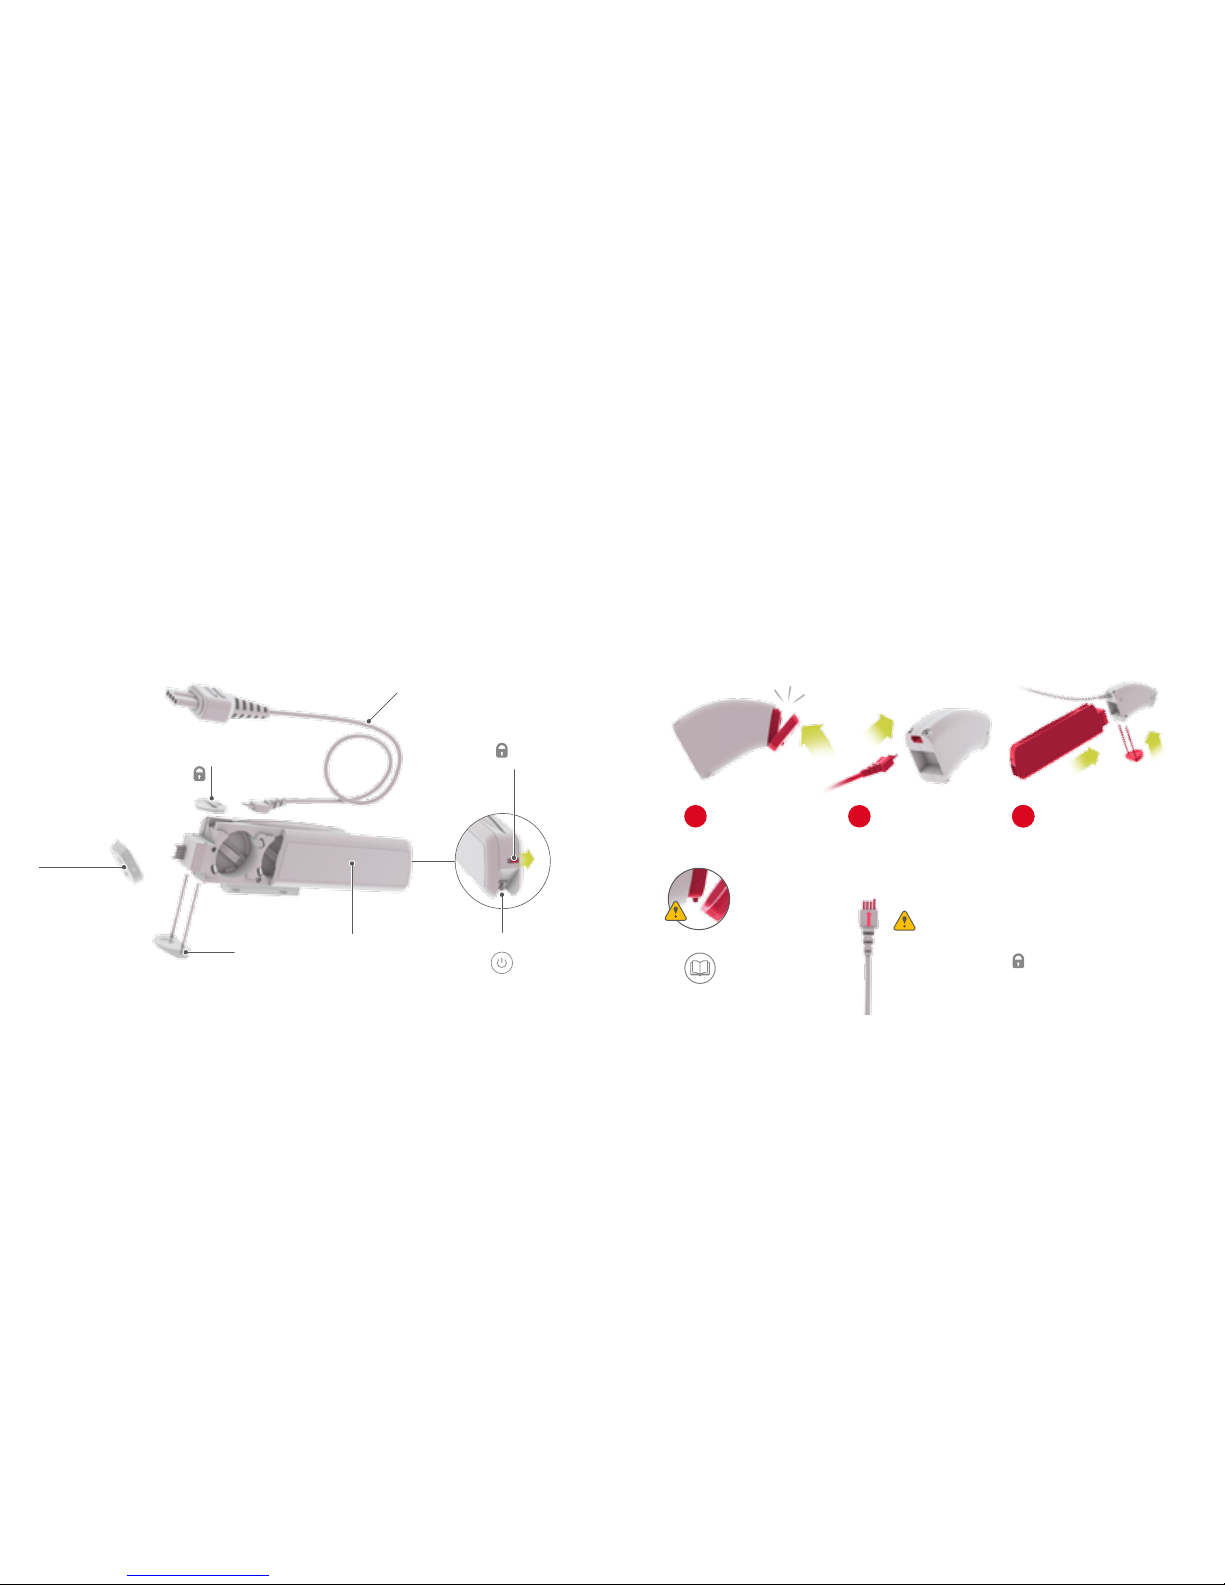
BabyBTE/ActiveWear
OPUS 2
Basic Assembly
OPUS 2 − BabyBTE/ActiveWear
Plug the coil cable
into the control
unit.
2
Attach the battery pack
frame to the control
unit and secure both
components using the
connecting piece.
33
Carefully snap the
microphone cover
onto the control unit.
1
Note the
mechanism that
secures the
microphone cover.
Battery
Compartment
Battery
Compartment
Lock
Coil Cable
Connecting Piece
Microphone
Cover
Safety Lock
(Optional)
ON/OFF
Ensure the
arrow is on top.
Refer to page 4 for
earhook removal.
The connecting piece is also
available with a safety lock.
See page 24 for details.
16 17
Page 11
Ensure the
arrow is on top.
Battery
Compartment
Lock
ON/OFF
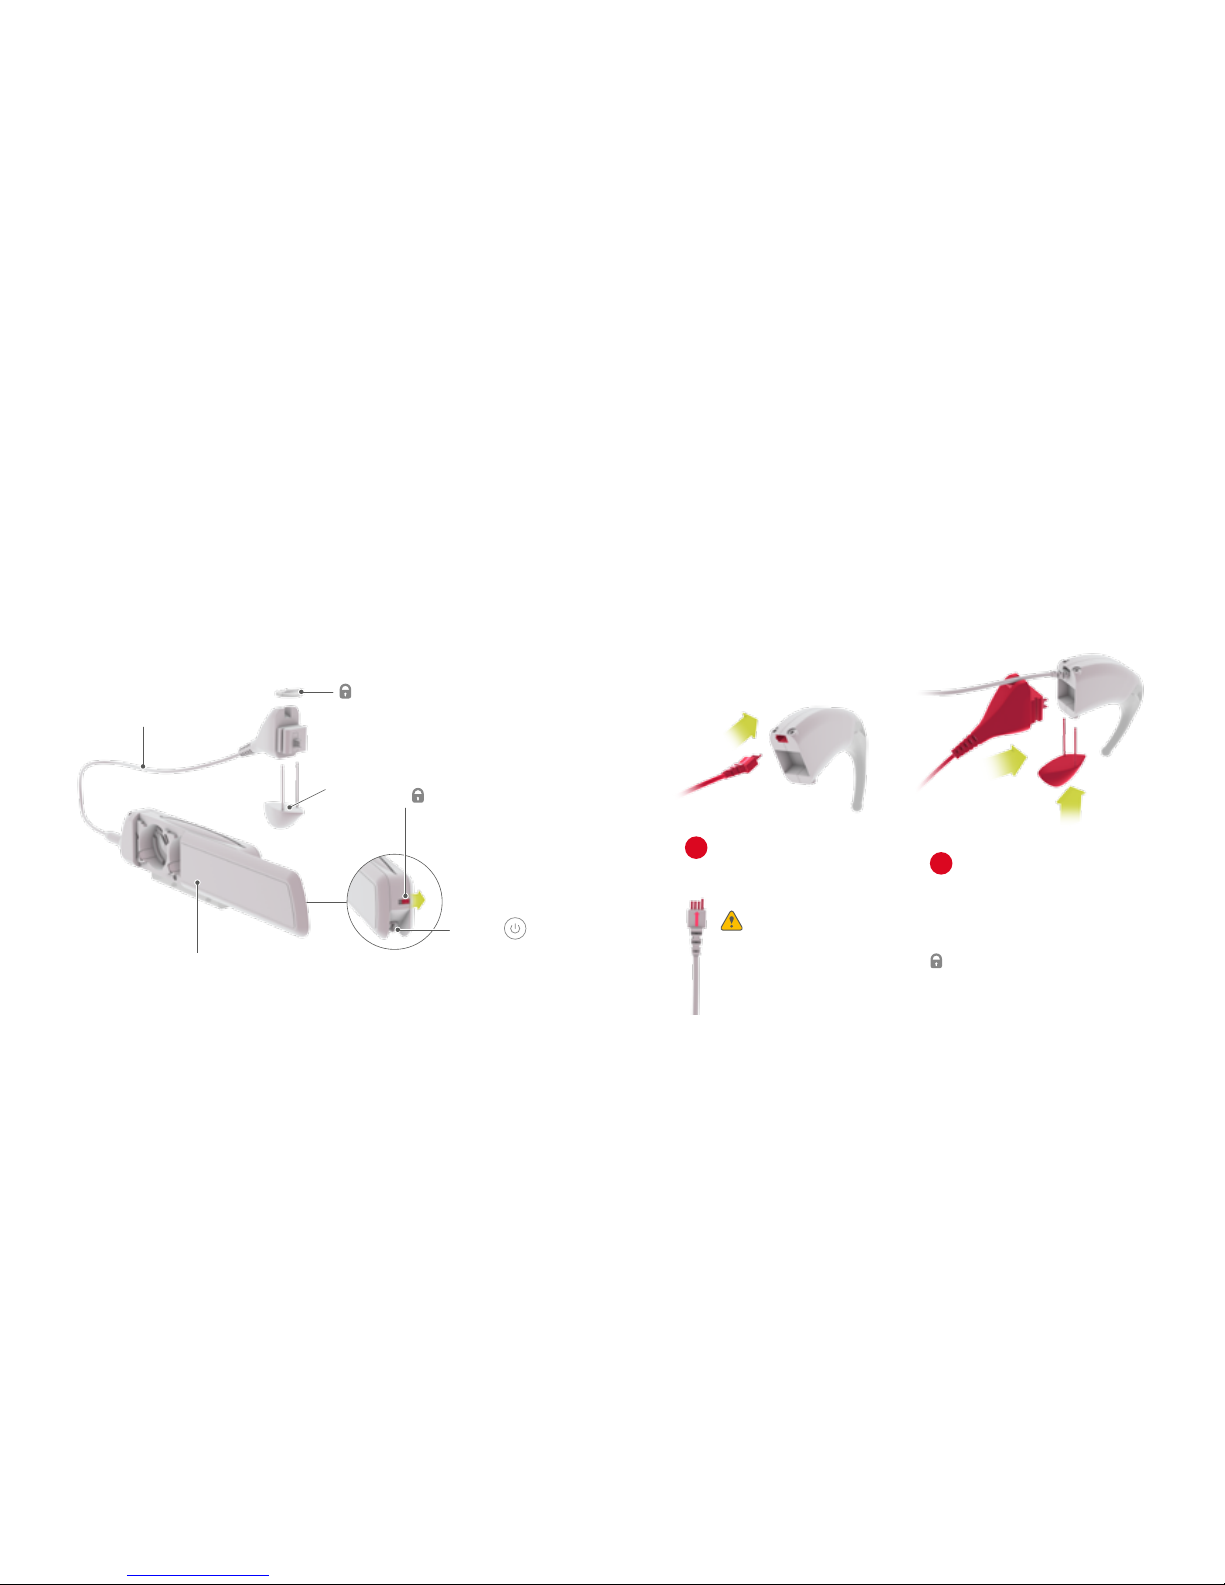
Children’s Battery Pack
OPUS 2
Attach the connector to the
control unit and secure both
components using the
connecting pin.
2
Plug the coil cable into
the control unit.
1
Basic Assembly
OPUS 2 − Children’s Battery Pack
The connecting piece is also available
with a safety lock for additional security.
See page 24 for details.
Battery
Compartment
Safety Lock
(Optional)
Connecting
Piece
Coil Cable
18 19
Page 12
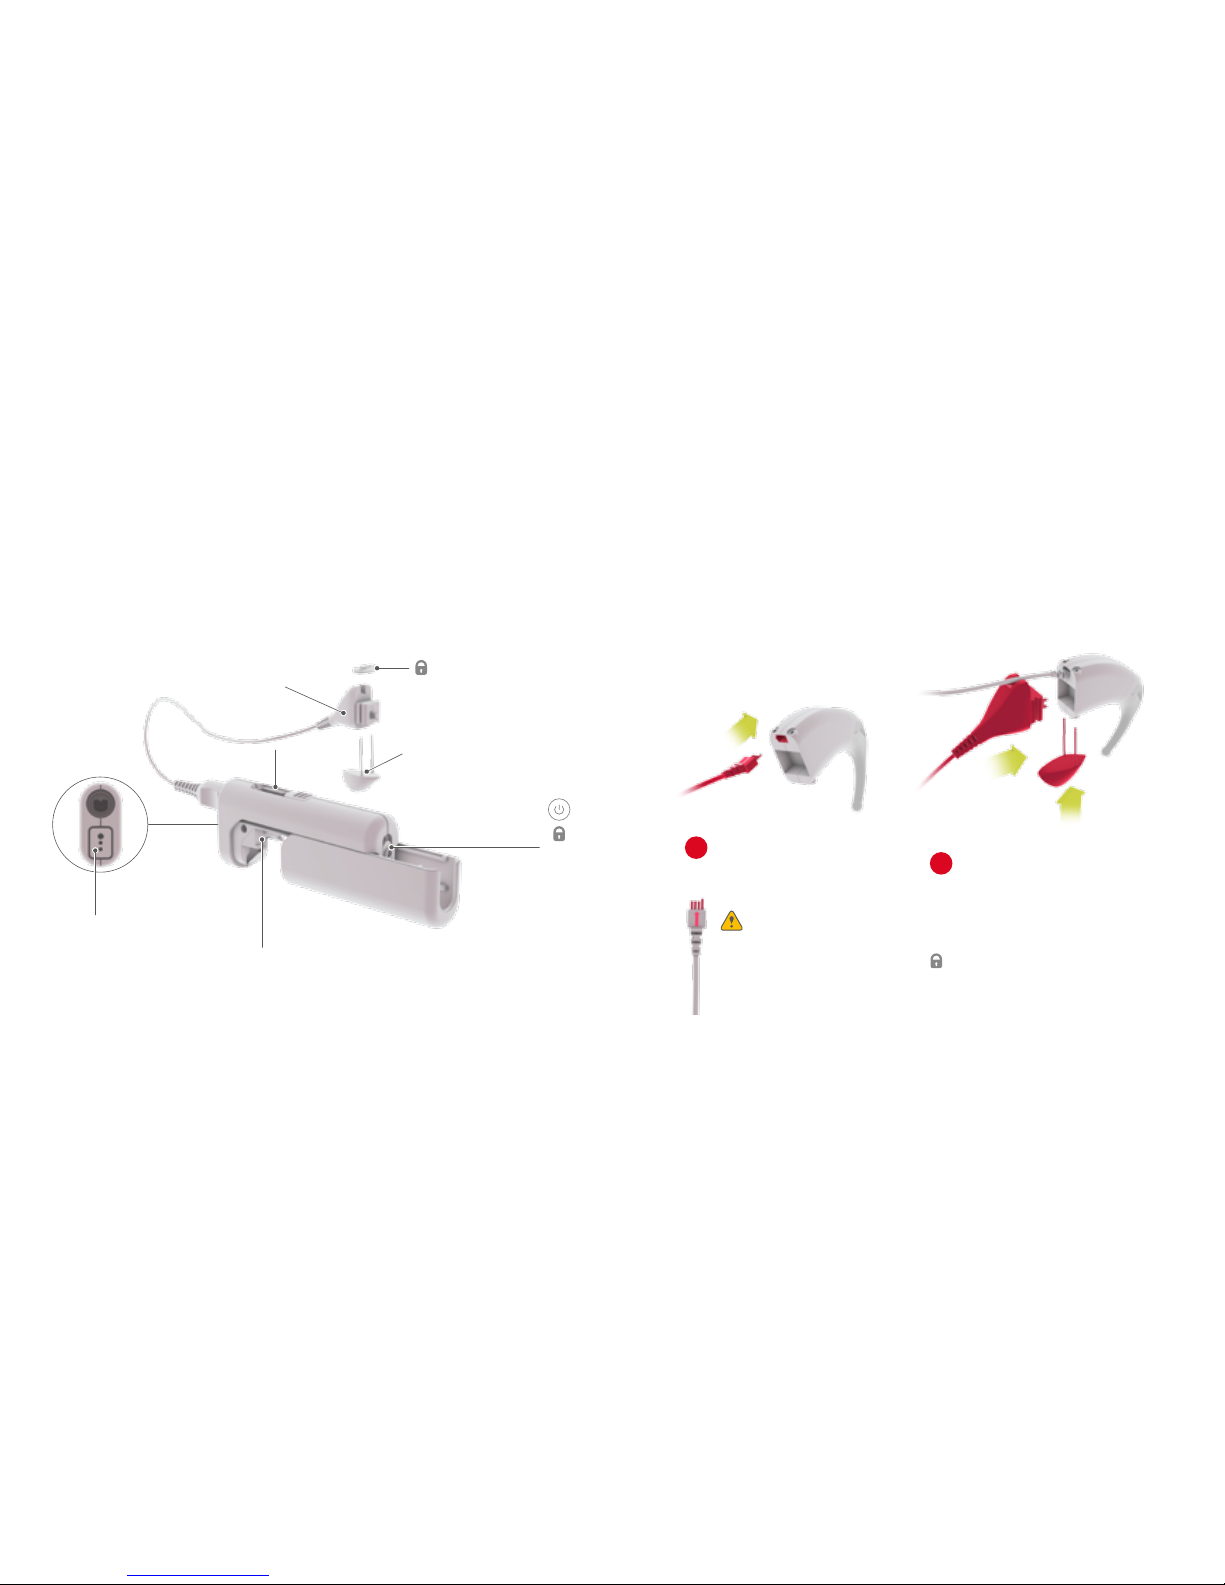
Mini Battery Pack
OPUS 2
Battery Compartment
for DaCapo PowePack
or AAA Battery
3-Pin
FM Port
ON/OFF Switch
and Battery
Compartment Lock
Basic Assembly
OPUS 2 − Mini Battery Pack
Microphone Test
Device Port (CS 44)
Safety Lock
(Optional)
Connecting Piece
Connector
Ensure the
arrow is on top.
Attach the connector to the
control unit and secure both
components using the
connecting pin.
2
Plug the coil cable into
the control unit.
1
The connecting piece is also available
with a safety lock for additional security.
See page 24 for details.
20 21
Page 13
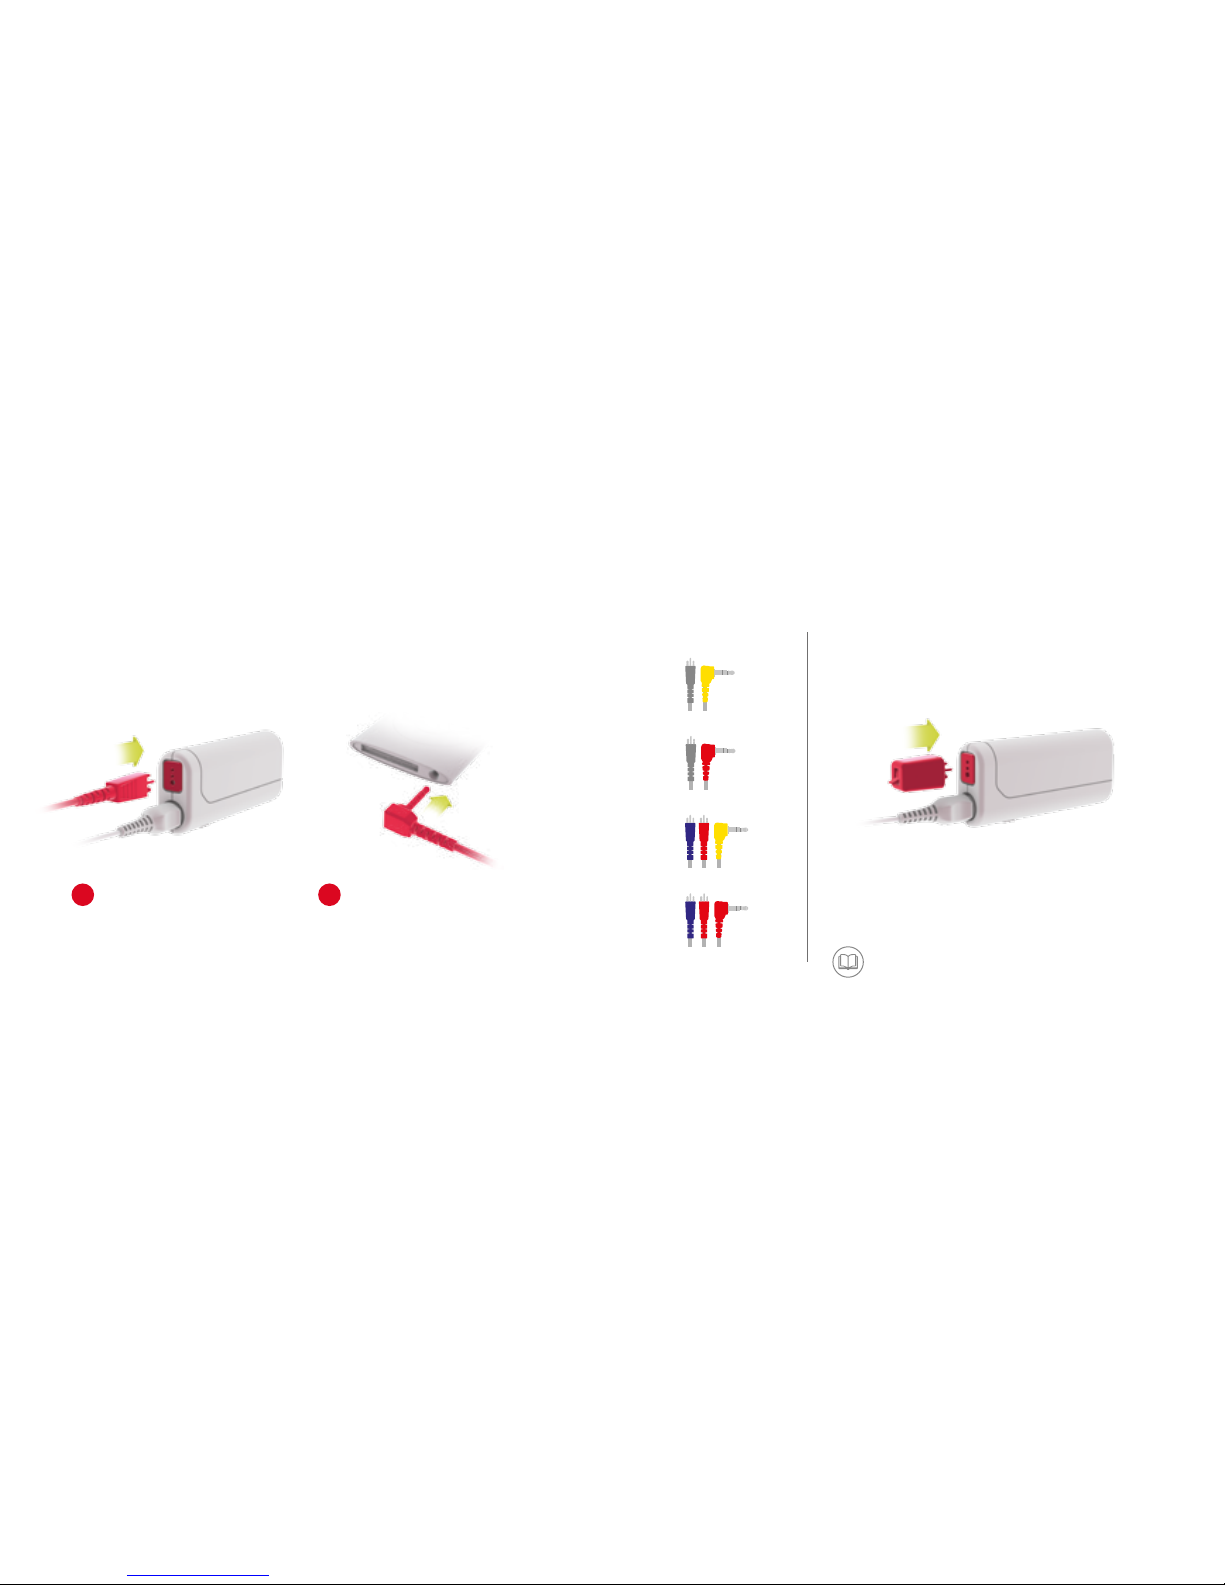
Direct Audio Input FM Receiver
Assistive Listening Devices
OPUS 2 − Mini Battery Pack
Insert the 3-pin plug of the
audio adapter cable into the
FM port.
1
Insert the FM receiver into the FM port.
OPUS 2 will automatically detect sound signals
as soon as the FM system is activated. Insert the 3.5 mm plug
of the audio adapter cable
into the headphone port of
the audio device.
2
Unilateral Mix
Audio Adapter
Cables
Unilateral Ext.
Bilateral Mix
Bilateral Ext.
Refer to the user manual of your FM system
for instructions on changing FM settings.
22 23
Page 14

Locked
Position
Safety Features
FineTuner Deactivation
You can deactivate certain FineTuner keys or programs
to prevent accidental changes to settings. For more
information about this feature or for instructions for
FineTuner deactivation, please contact your CI centre.
Lockable Earhook
The earhook locks securely in place to prevent accidental
removal. To lock the earhook, insert the earhook pin after
you attach the earhook to the control unit. If OPUS 2
belongs to a child, always insert the earhook pin before
you place the audio processor on the child’s ear.
OPUS 2
Battery Pack Cover Lock
The battery pack cover can be locked
to prevent tampering or disassembly.
If OPUS 2 belongs to a child, always
lock the battery pack cover before
you place the audio processor on the
child’s ear.
Insert the long-pinned connecting
piece and place the safety lock onto
the pins. The coil cable plug should
rest in the cutout section.
Slide the lever to the left with a
pointed object (e.g. ballpoint pen) to
secure the safety lock.
To open the safety lock, move the
lever in the opposite direction.
1
2
3
24 25
Page 15

Basic Care and Maintenance
Follow these basic and important care instructions to help improve
the functioning of your OPUS 2 and extend its life.
General Cleaning
Clean OPUS 2 regularly by wiping it with a soft, damp cloth.
Don’t use cleaning solutions. Use extra care when cleaning
small parts such as the battery contacts.
Battery Contacts
Inspect the battery contacts regularly; clean and dry them
as necessary. To clean them, use a cotton swab and a small
amount of rubbing alcohol. Gently wipe them dry. Avoid
touching the battery contacts.
Moisture
Protect OPUS 2 from exposure to water. If your audio processor
gets wet, gently wipe it dry with a soft absorbent cloth.
Sunlight
Don’t leave OPUS 2 in direct sunlight, especially inside
of a vehicle. Don’t expose your audio processor to
extreme temperatures.
Drying
Use the drying kit every night to allow OPUS 2 to dry out
completely. Remove the battery pack cover before putting it
into the drying kit with your audio processor. Disposable
batteries can be left in the frame and put into the drying kit.
OPUS 2
Don’t put rechargeable batteries into the drying kit.
Refer to your user manual for more
information about care and maintenance.
26 27
Page 16

In case you encounter any minor technical problems, such as an
interruption in sound, carefully follow these steps to identify possible
causes and solutions:
1. Remove your OPUS 2 and change the batteries.
If that doesn’t solve the problem, go to 2.
2. Disassemble your OPUS 2 into ve parts: control unit, battery pack frame,
battery pack cover, coil cable, and D Coil. (For guidance, see pages 2–3.)
3. Check each part for dirt or signs of damage.
Gently clean any processor parts that are dirty and
wipe dry any parts that are wet. (See instructions on pages 26–27.)
If any parts appear damaged, contact your CI centre for assistance.
4. Reassemble OPUS 2. (See instructions on pages 2–3.)
If your processor still isn’t working, go to 5.
5. Use the Speec h Processor Test Device to troubleshoot your audio processor.
Speech Processor Test Device
The Speech Processor Test Device (SPTD) is a troubleshooting tool for
detecting the most common audio processor problems. To troubleshoot
with the SPTD, follow these steps:
1. Switch on your OPUS 2.
2. Place the at side of the D Coil under the Speech Processor Test Device.
3. Speak into the OPUS 2 microphone. The indicator light should icker to
the rhythm of your voice. If it doesn’t, go to 4.
4. Adjust the volume and speak into the microphone.
If the indicator light doesn’t icker, go to 5.
5. Change the batteries and speak into the microphone.
If the indicator light doesn’t icker, go to 6.
6. Replace the coil cable.
If your OPUS 2 still isn’t working or for immediate assistance, please contact
your CI centre. For complete troubleshooting instructions, visit medel.com.
OPUS 2
Troubleshooting
28 29
Page 17

Notes Notes30 31
Page 18

Notes32
Page 19

MED-EL Medical Electronics
Fürstenweg 77a | 6020 Innsbruck, Austria
of[email protected]
medel.com
25224 r1.0
 Loading...