

Page 1
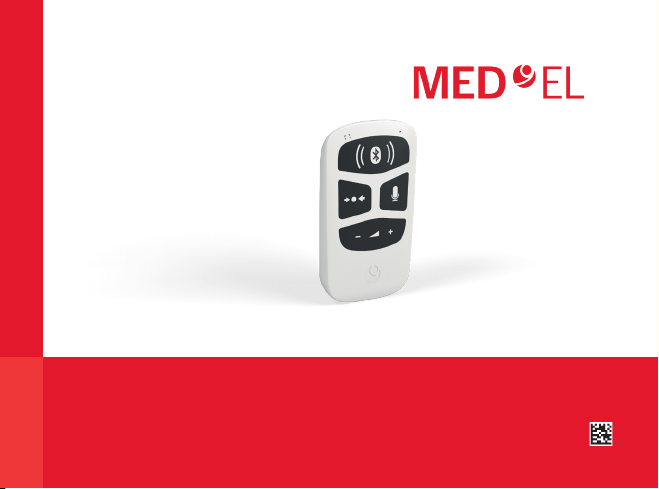
AudioLink
Quick Guide
AW37282_1.0 (English)
Page 2

Table of Contents
Assembling AudioLink ................. 2
Disassembling AudioLink ............... 3
Charging AudioLink ................... 4
Switching On/Off AudioLink ............ 5
Pairing with your Audio Processor ........ 6
Pairing with your BluetoothDevice ....... 8
Using AudioLink .....................11
Talking on the Phone .................12
The AudioLink Quick Guide is intended as an easy-to-use reference when handling
your connectivity device. For detailed information on the intended use, indications,
contraindications, warnings and precautions of AudioLink, or the complete information
on the docking station and other accessories, please refer to the AudioLink user manual.
Listening to Music ....................14
Watching TV ........................15
Using the Remote Microphone ..........16
Using AudioLink with AudioKey ..........17
Indicator Light ......................18
Care and Maintenance ................21
Troubleshooting .....................22
Page 3
AudioLink
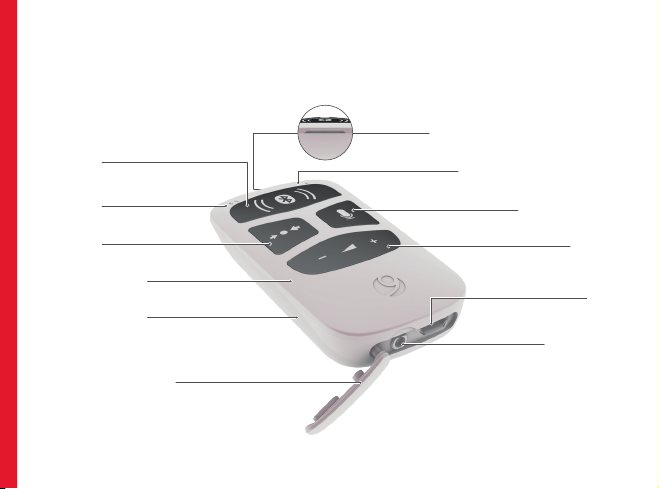
Main Button
1
Groove
Status Light
Microphone
Mix Button
Main Unit
Battery Unit
Rubber Socket
Cover
Mic Button
Volume Button
Micro USB Socket
Audio Socket
Page 4
AudioLink
2
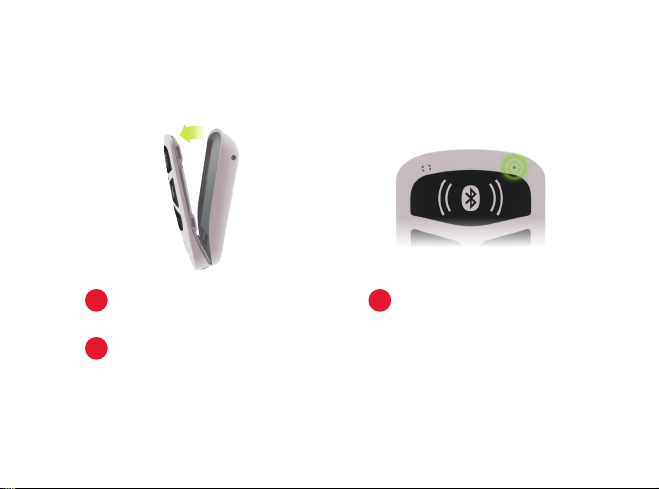
Assembling AudioLink
Attach the battery unit and the main
1
unit, starting at the bottom.
Press the two parts together until the
2
battery unit fully snaps into the main unit.
The status light will start pulsing to
3
show that your AudioLink is ready
to use.
Page 5
AudioLink
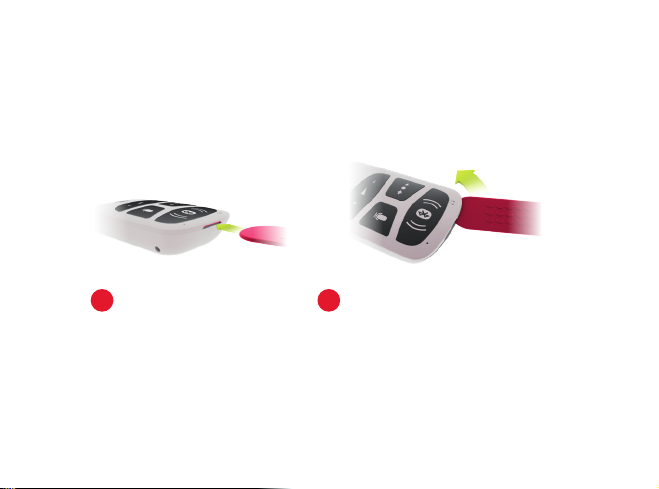
Disassembling AudioLink
3
Insert the opening tool into
1
the groove.
Slide the opening tool around AudioLink
2
until the main unit and the battery unit
detach from each other.
Page 6
AudioLink
4
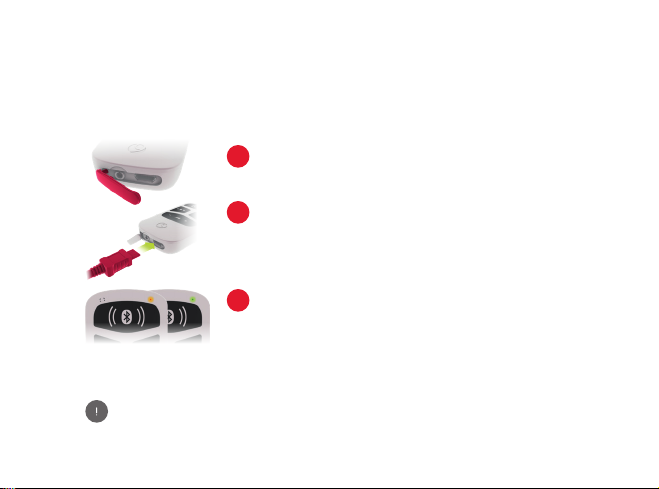
Charging AudioLink
Open the rubber socket cover.
1
Plug the micro USB cable into the socket,
2
or place AudioLink in the docking station.
Plug the USB power adapter or docking
station into a power outlet.
The status light will be orange while
3
charging. When the status light turns
green, AudioLink is fully charged.
AudioLink is delivered with the battery only partly charged. We
recommend that you fully charge the battery before using AudioLink.
Page 7
AudioLink
Switching On/Off AudioLink
5
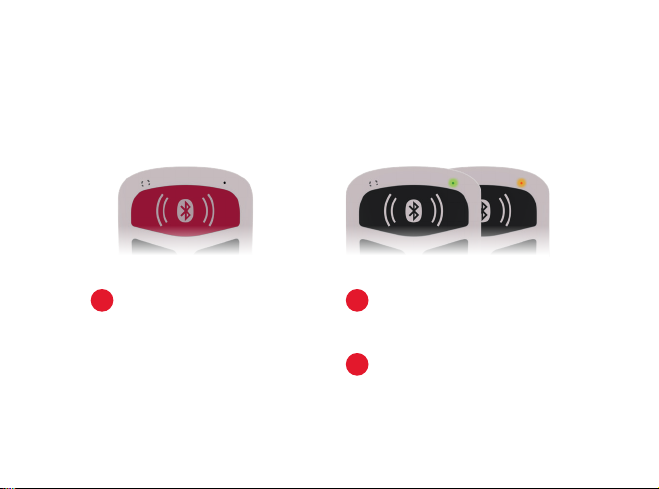
To switch on AudioLink, press the
1
main button for 2seconds.
The status light will illuminate in
2
green or orange, to show that
AudioLink is switched on.
Press the main button again for
3
2seconds to switch off AudioLink.
Page 8

AudioLink
6
Pairing with your Audio Processor
Switch off the audio processor.
1
If you are a bilateral user, your audiologist should ensure that your
audio processors are correctly programmed for the right and left sides.
Switch on AudioLink and make
2
sure it is in standby mode. Only
the status light should be active.
Page 9
7
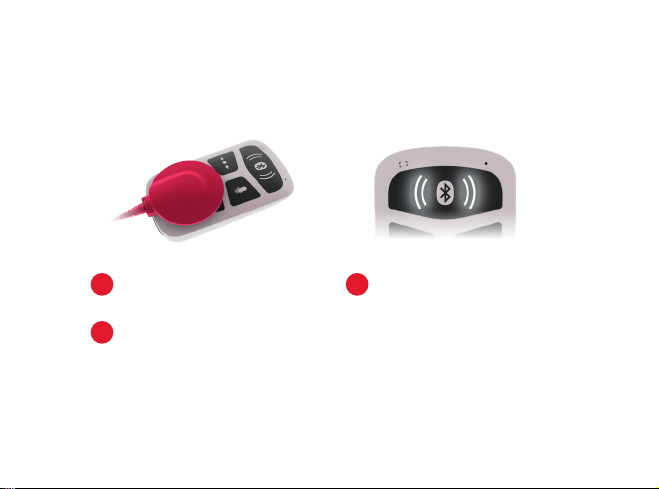
Place the coil over the
3
volume button.
Switch on the audio processor.
4
When the audio processor is
5
successfully paired, the left and right
connection symbols will light up
simultaneously. Your audio processors
will now receive sound from
AudioLink.
Page 10
AudioLink
8
Pairing with your
Bluetooth®Device
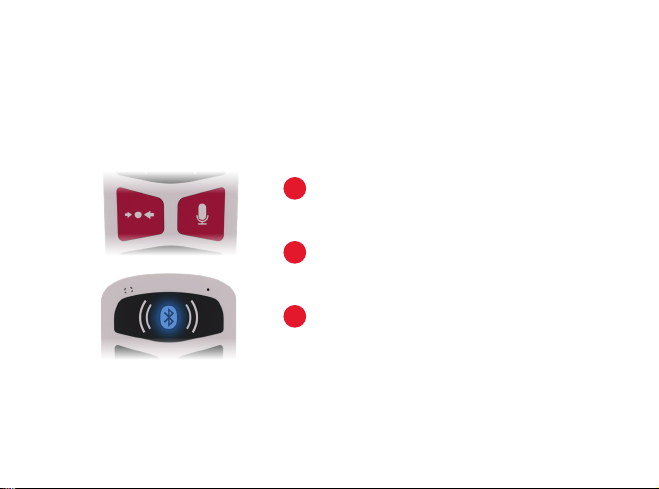
Switch on AudioLink and make sure it is
1
in standby mode. Only the status light
should be active.
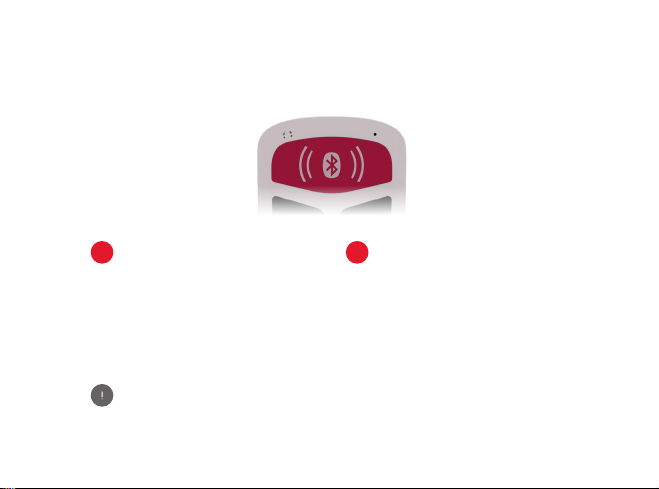
To switch on Bluetooth® pairing mode,
2
press the mix button and the mic button
together for 2seconds.
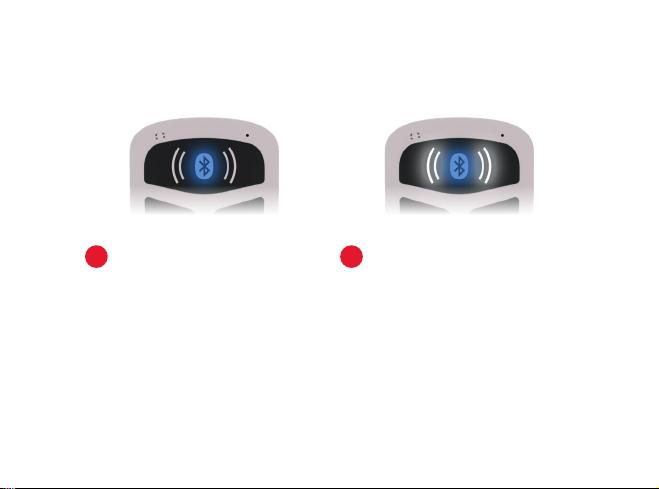
The Bluetooth® symbol will blink to show
3
that AudioLink is ready to be paired.
Page 11
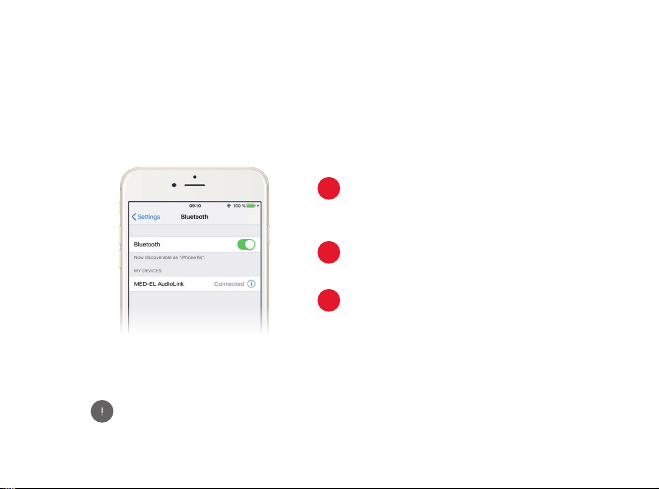
Make sure Bluetooth® is activated on
4
your device, and search for available
Bluetooth devices.
Select “MED-EL AudioLink” and
5
start pairing.
If you are asked for a security key,
6
enter “0000”
9
If no device is paired within 60seconds, AudioLink
will no longer be in Bluetooth
®
pairing mode.
Page 12
10
When AudioLink and your
7
®
Bluetooth
paired, the Bluetooth
device are successfully
stop blinking and pulse slowly.
®
symbol will
Once AudioLink starts streaming to
8
your audio processor, the left and/or
right connection symbols on the main
button will pulse slowly, to show that
sound is being streamed to your left
processor, right processor, or both
processors.
Page 13
AudioLink
Using AudioLink
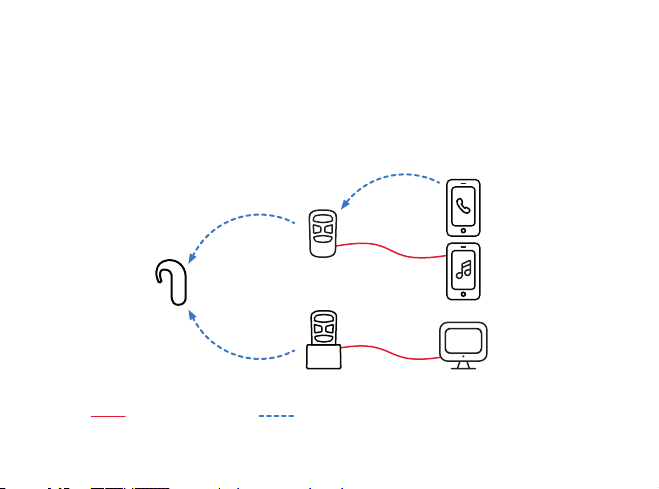
Phones, TVs, tablets—you can connect AudioLink to almost any device! The next few
pages show you how to connect, and make the most of your hearing in any situation.
Cable Connection Wireless Connection
11
Page 14
AudioLink
12
Talking on the Phone
AudioLink can be used for conventional phone calls, and
also for VoIP services such as Skype or FaceTime.
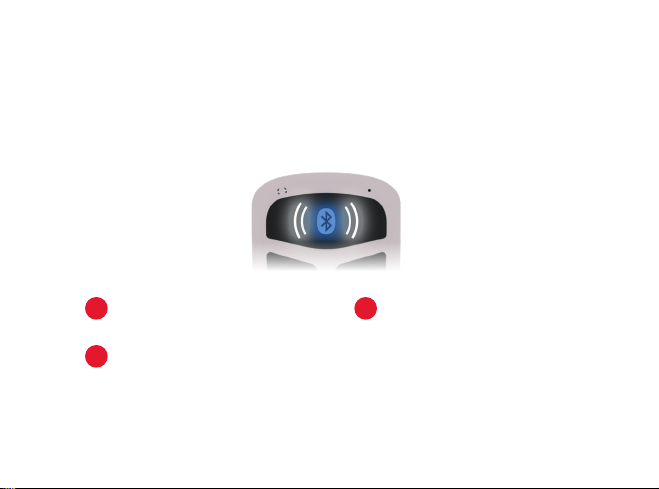
Make sure AudioLink is paired with
1
your phone or other Bluetooth
Use the attachment clip or lanyard to
2
position AudioLink close to your mouth.
®
device.
To make a call, select the number or
3
contact on your phone as normal.
The audio from your phone will then
be streamed to your audio processor.
Page 15
13
If you receive a call, the ring tone
4
will be streamed to your audio
processor. Press the main button
once to accept the call. To reject
the call, press and hold the main
button for 2seconds.
By default, your audio input is a mix of the AudioLink signal
and the audio processor microphones. You can change the
setting by pressing the mix button.
To hang up on an active phone call,
5
press the main button once.
Page 16
AudioLink
14
Listening to Music
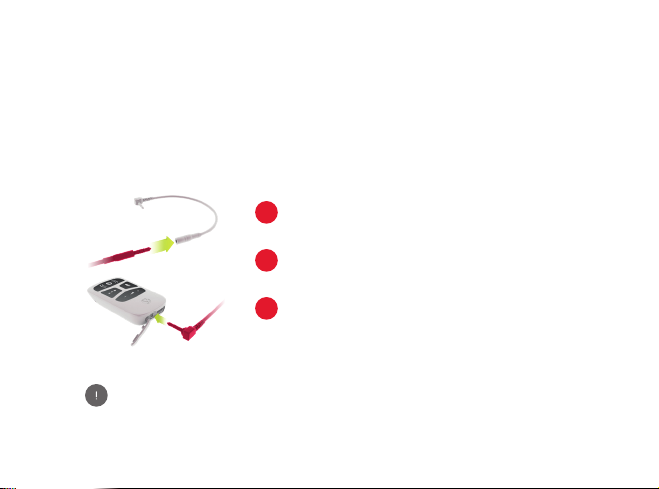
Connect your phone or other music device to AudioLink, and stream music wirelessly
to your audio processor. For more ways to connect to your music device, check out
our support section at go.medel.com/audiolink-music
Connect your phone or other device to
1
AudioLink using the provided cables.
Select the music you would like to listen
2
to, and press play.
The music will start streaming to your
3
audio processor.
By default, your audio input is a mix of the audio source signal
and the audio processor microphone signal. You can change the
setting by pressing the mix button.
Page 17
AudioLink
Watching TV
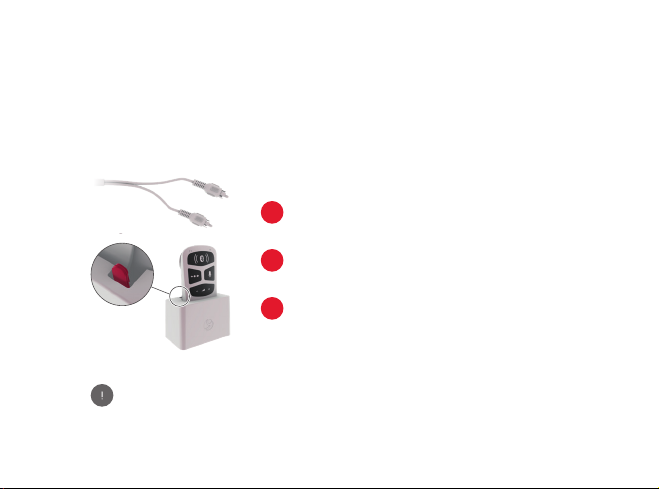
You can use AudioLink together with the docking station
to hear the TV more clearly from across the room.
Connect the docking station to your TV
1
using the provided RCA (or cinch) cable.
Open the rubber socket cover and place
2
AudioLink into the docking station.
Switch on your TV to start streaming.
3
By default, your audio input is a mix of the TV signal and
the audio processor microphone signal. You can change
the setting by pressing the mix button.
15
Page 18
AudioLink
16
Using the Remote Microphone
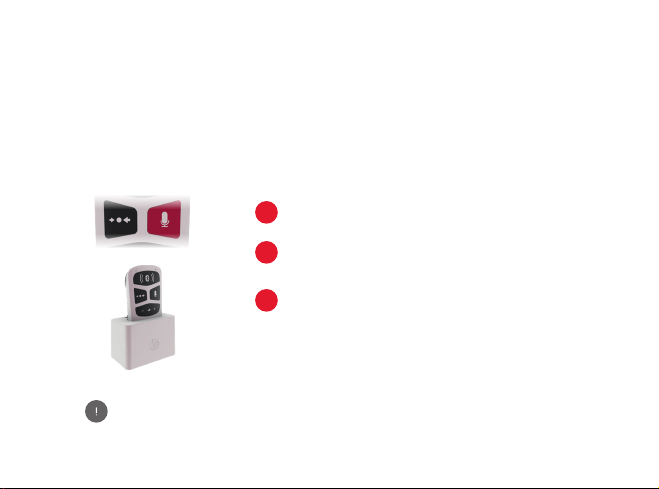
AudioLink can be used as a remote microphone, streaming sound from
your environment straight to your audio processor. It can be used in
group situations and one-to-one conversations.
Press the mic button to start streaming.
1
The mic button will light up to show that
2
the remote mic is activated.
To position the remote mic effectively
3
for group conversations, you can place
AudioLink in the docking station.
By default, your audio input is only from the AudioLink remote microphone.
You can change the setting by pressing the mix button.
Page 19

AudioLink
Using AudioLink with AudioKey
The AudioKey app allows you to control your audio processor directly from your phone.
Some audio processors connect to AudioKey via AudioLink. To nd out if your audio
processor is compatible, please visit go.medel.com/audiokey-compatibility
If you do not already have the
1
AudioKey app on your phone, visit
your app store and download it.
Make sure AudioLink is paired with
2
your phone.
Open AudioKey. You should now be
3
able to change the settings of your
audio processor from your phone.
For a detailed description of the app and its additional
functions, please refer to the AudioKey user manual.
17
Page 20
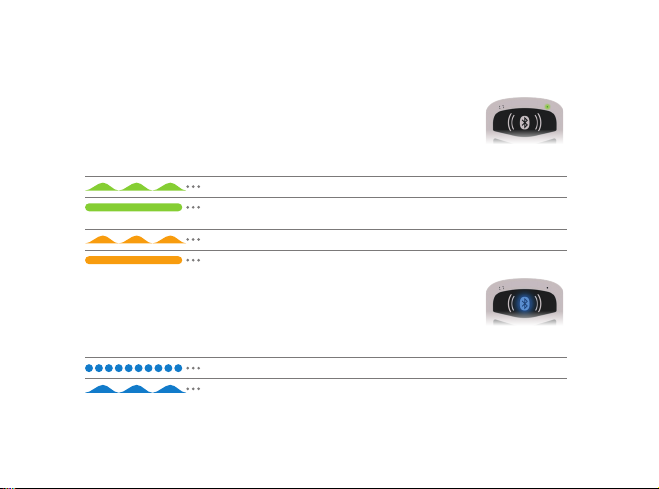
AudioLink
18
Indicator Light
Status Light
Light Pattern Meaning Required Action
AudioLink active None
Charger connected and
charging process nished
AudioLink active and battery level low Charge the battery
Charger connected and battery charging None
Bluetooth Symbol
Light Pattern Meaning Required Action
AudioLink is in Bluetooth pairing mode None
Active Bluetooth wireless connection None
Remove AudioLink from
the power outlet.
Page 21
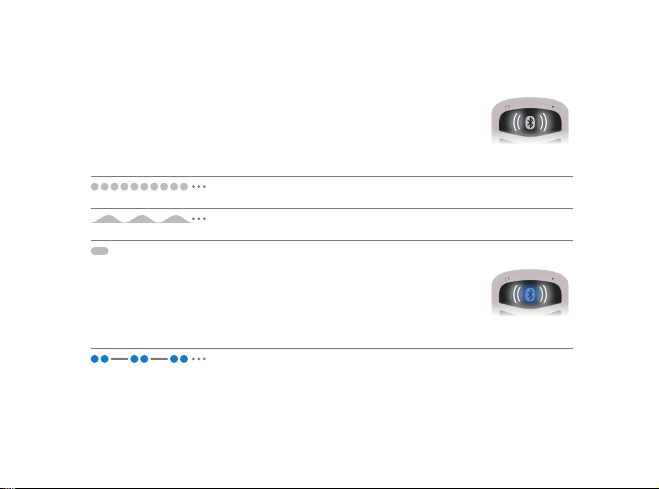
Left/Right Connection Symbol
Light Pattern Meaning Required Action
AudioLink is synchronising to
corresponding audio processor
AudioLink is streaming to
corresponding audio processor
Audio processor pairing successful None
None
None
Bluetooth and Connection Symbols
Light Pattern Meaning Required Action
Incoming phone call Accept or reject phone call
19
Page 22
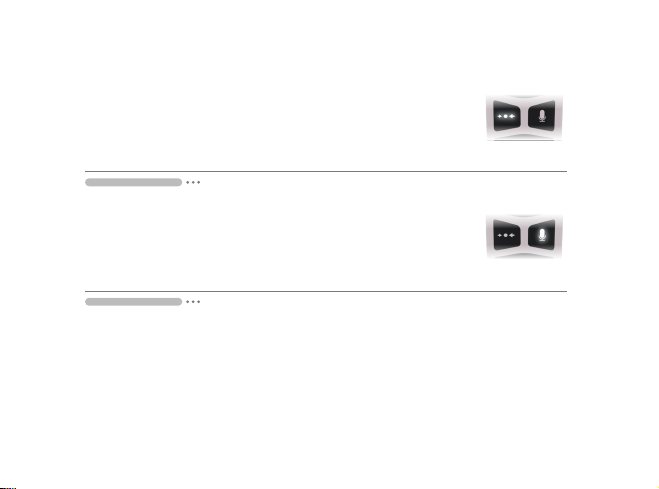
20
Mix Button
Light Pattern Meaning Required Action
Audio input is a mix of AudioLink signal
and the audio processor microphones
None
Mic Button
Light Pattern Meaning Required Action
Remote microphone active None
Page 23

AudioLink
Care and Maintenance
AudioLink is designed for durability and reliability. When handled with
sufcient care, it will function for a long time.
1. Do not drop the device.
2. Do not try to repair electronic parts of your AudioLink. Do not open,
except to detach the battery, or alter any system component as this
may damage the system and voids warranty claims.
3. Store AudioLink in a safe place when not in use.
4. Protect AudioLink from liquids, dust and excessive temperatures.
5. Do not clean AudioLink in, or under, water. Use a damp cloth to gently
clean AudioLink. Never use household cleaning products or alcohol.
6. Do not use a microwave or any other heating devices to dry AudioLink.
If necessary, wipe it off with a dry tissue.
7. Do not use tools with sharp edges, such as a screwdriver or knife,
to detach the battery from the control unit. Only use the provided
opening tool.
21
Page 24

22
AudioLink
Troubleshooting
Problem Possible Cause Recommended Action
Audio streaming does
not start. Right and/or
left connection symbols
on the main button do
not blink
No sound during audio
streaming although
the right and/or left
connection symbols
are blinking
Distorted sound during
audio streaming
Audio processor is not
paired with AudioLink
Audio processor
is out of range or
switched off
Device is not within
range, or there is
interference from
other devices
– Pair your audio processor with
AudioLink
– Ensure audio processor is
switched on
– Replace audio processor battery
– Move AudioLink closer to audio
processor
– Move AudioLink closer to audio
processor
– Remove other devices which
could interfere with the wireless
frequency, for example internet
routers or PCs
Page 25

Problem Possible Cause Recommended Action
No sound, or
sound too quiet
Sound too loud,
or distorted
Streaming with the
docking station or
audio cables does not
work, although the right
and/or left indicator
lights are blinking
AudioLink frozen AudioLink has an
Volume too low – Increase volume on device,
Volume too high – Decrease volume on AudioLink,
Audio cable is not
connected properly
unexpected problem
then on AudioLink
then on device
– C heck that all cables are properly
connected, and/or that AudioLink
is placed correctly in the docking
station
– Switch AudioLink off and on again
– Disassemble the AudioLink
main unit from the battery,
and reassemble. Switch
AudioLink back on.
23
Page 26

Notes24
Page 27

Notes 25
Page 28

MED-EL Elektromedizinische Geräte GmbH
MED-EL Elektromedizinische Geräte GmbH
Fürstenweg 77a, 6020 Innsbruck, Austria
medel.com
medel.com
 Loading...