

Page 1
Page 2

X
Nuclear Radiation Monitor
Operating Manual
Page 3

© 1996, 2005, 2013 International Medcom, Inc.
All rights reserved.
Page 4

Contents
1 Introduction ..........................................................................1
How the Radalert 100X Detects Radiation ..............................1
Precautions ............................................................................2
2 Features ................................................................................3
The Display ............................................................................4
The Switches .........................................................................5
The Detector .........................................................................6
The Input/Output Ports ..........................................................6
3 Operation ..............................................................................7
Units of Measurement ...........................................................7
Starting the Radalert 100X .....................................................7
Operating in the Dose and Count Rate Modes .......................7
Operating in Total/Timer Mode ..............................................8
Operating Ranges and Response Times ................................10
Using the Alert ....................................................................11
The Utility Menu ..................................................................12
Interfacing to an External Device ..........................................13
4 Common Procedures ...........................................................14
Establishing the Background Count .....................................14
Environmental Area Monitoring ...........................................15
Checking an Object .............................................................15
5 Maintenance .......................................................................16
Calibration ..........................................................................16
Troubleshooting and Service ................................................19
6 Basics of Radiation and Its Measurement .............................21
Ionizing Radiation ................................................................21
Measuring Radiation ............................................................23
Radiation Measurement Units ..............................................24
Higher Than Normal Readings .............................................24
Appendix: Technical Specifications ...........................................26
Limited Warranty .....................................................................28
Page 5

1 Introduction
The Radalert 100X is a health and safety instrument that measures
alpha,
beta, gamma, and X-ray radiation. Its applications include:
• Monitoring possible radiation exposure while working with
radionuclides
• Ensuring compliance with regulatory standards
• Checking for leakage from X-ray machines and other sources
• Alerting you with an audible alarm if the radiation goes above an alert
level that you set
• Screening for environmental contamination or environmental sources
of radioactivity
• Connecting to a computer or data logger to record and tabulate your
data
How the Radalert 100X Detects Radiation
The Radalert 100X uses a Geiger-Mueller tube to detect radiation.
The
Geiger tube generates a pulse of electrical current each time
radiation
is electron100X displays the
per hour (µSv/hr),
second (CPS), or total
per hour (mR/hr) and
The number of counts detected by the Radalert 100X varies from
readreading is
the average is
information, see
passes through the tube and causes ionization. Each pulse
ically detected and registers as a count. The Radalert
counts in the mode you choose: microsieverts
either counts per minute (CPM) or counts per
counts. In conventional units, milliroentgens
CPM are used.
ing to reading due to the random nature of radioactivity. A
expressed more accurately as an average over time, and
more accurate over a longer time period. For more
“Operating in Total/Timer Mode” in Chapter 3.
Radalert 100X
1
Page 6

Precautions
To keep the Radalert 100X in good condition, handle it with care
and
observe the following precautions:
•
Do not contaminate the Radalert 100X by touching it to radioactive
surfaces or materials.
• Do not leave the Radalert 100X in temperatures over 122° F (50° C) or
in direct sunlight for extended periods of time.
• Do not get the Radalert 100X wet. Water can damage the circuitry and
the coating of the mica surface of the Geiger tube.
• Do not put the Radalert 100X in a microwave oven. It cannot measure
microwaves, and you may damage it or the oven.
• If you expect to not use the Radalert 100X for longer than one month,
remove the battery to avoid damage from battery corrosion.
• Change the battery promptly when the battery indicator appears on
the display.
2
Radalert 100X
Page 7
2 Features
The Radalert 100X measures alpha, beta, gamma, and X-ray radiation.
This chapter briefly describes the Radalert 100X’s functions. For more
information on how to use the Radalert 100X, see Chapter 3,
“Operation.”
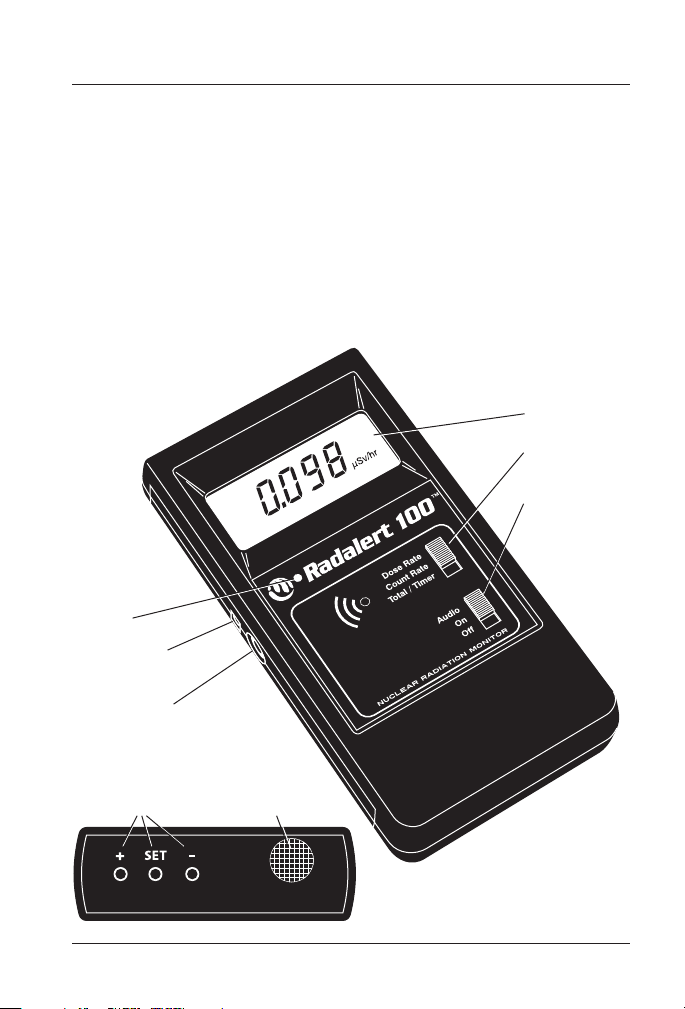
The Radalert 100X counts ionizing events and displays the results on
the
liquid crystal
measurement
Whenever the Radalert 100X is operating, the red count light (1)
each time a count (an ionizing event) is detected.
flashes
1 Count
Light
display (LCD) (4). You control which unit of
is shown by using the mode switch.
4 LCD
5 Mode
Switch
6 On/Off/
Audio
Switch
2 Calibration
Input Port
3 Output Port
End Panel
7 +, –, and
Set Buttons
Radalert 100X
8 Alpha
Window
3
Page 8
The Display
1 Count
Light
2 Calibration
Input Port
3 Output Port
4 LCD
5 Mode
Switch
6 On/Off/
Audio
Switch
End Panel
7 +, –, and
Set Buttons
8 Alpha
Window
or Calibration
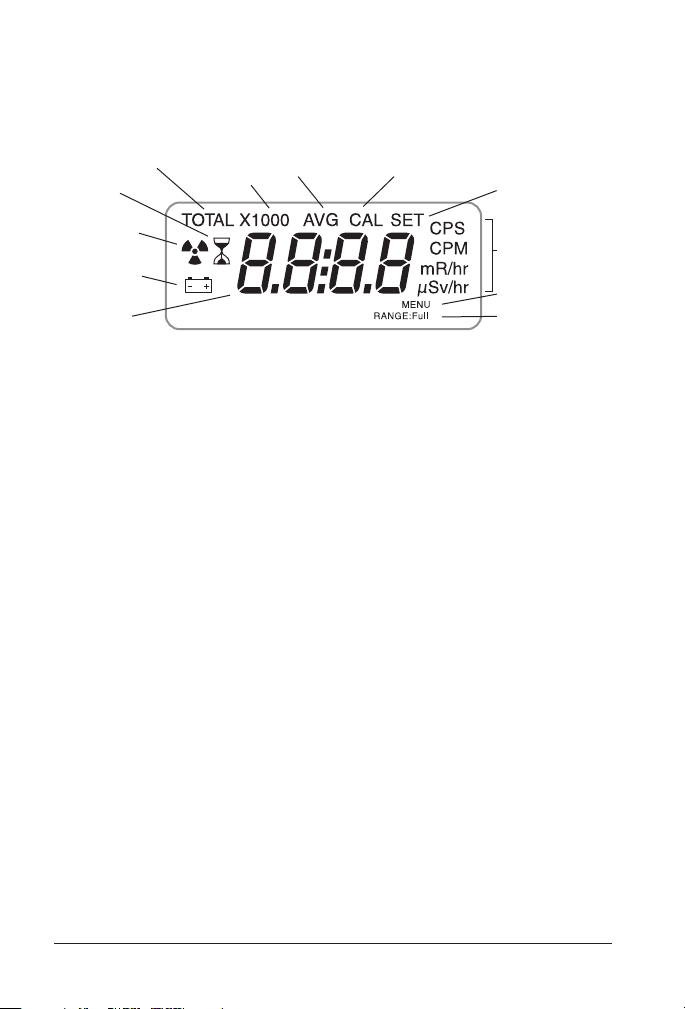
Several indicators on the LCD show information about the mode setting,
the current function, and the battery condition.
E Total Mode
D Timer
C Alert Mode
Indicator
B Low Battery
Indicator
A Numeric
Display
F X1000
Mode
G Average
H Calibration
Mode
• e numeric display (A) shows the current radiation level in the unit
specied by the mode switch setting.
• A small battery (B) appears to the le of the numeric display to indicate
low battery voltage.
• A radiation symbol (C) appears when the Alert feature is on.
• An hourglass (D) appears during a timed count.
• TOTAL (E) appears when the Radalert 100X is in Total/Timer mode.
• X1000 (F) appears when the radiation level is displayed in X1000
mode.
•
AVG (G) appears when the Radalert 100X is showing the average reading
for a timed count.
• CAL (H) appears while you are calibrating the Radalert 100X.
• SET (I) appears when you are setting the Timer, the Alert level, or the
calibration factor, or working in the Utility Menu (the numeric display
shows the setting being adjusted instead of the current radiation level).
• e current unit of measurement (J)—CPM, CPS, mR/hr, or µSv/hr—is
displayed to the right of the numeric display.
• MENU (K) appears when you are in the Utility Menu.
• RANGE:Full (L) appears when the radiation level goes beyond the
range that can be displayed.
I Timer, Alert,
Set Mode
J Units of
Measurement
K Menu
L Range Full
4
Radalert 100X
Page 9

The Switches
The Radalert 100X has two switches on the front and three buttons on
the
end panel. Each switch has three settings, which are described
below.
Mode Switch (5)
Dose Rate. e numeric display shows the current radiation level
in the selected unit of measurement. In SI units it shows the current
radiation level in microsieverts per hour, from .000 to 1100. In conventional units, it shows milliroentgens per hour from .000 to 110.
Count Rate. e display shows the current radiation level in counts
per minute from 0 to 350,000 or in counts per second from 0 to
3500. When X1000 is shown, multiply the numeric reading by 1,000
to get the complete reading.
Total/Timer. e display shows the accumulated total of counts
starting when the switch is turned to this position, from 0 to
9,999,000. When X1000 is shown, multiply the numeric reading
by 1,000 to get the complete reading.
On/Off/Audio Switch (6)
Audio. The Radalert 100X is on, and it makes a clicking sound
for
each radiation event detected.
On. The Radalert 100X is operating, but audio is off.
Off. The Radalert 100X is not operating.
+, –, and SET Buttons (7)
ese buttons are used for setting the alert level and the timer. ey
are also used for calibration and for using the Utility Menu. For
more information, see “Taking a Timed Count,” “Using the Alert,”
and “e Utility Menu” in Chapter 3 and “Calibration” in Chapter 5.
Radalert 100X
5
Page 10

The Detector
The Radalert 100X uses a Geiger tube to detect radiation. Alpha
radiation
a thin disk
The screened opening at the top of the Radalert 100X is called the
alpha window (8). It allows alpha and low-energy beta and gamma
radiation to penetrate the mica end of the tube.
does not penetrate most solid materials, so this Geiger tube has
of mica, which alpha radiation can penetrate, on its end.
CAUTION: The mica end surface of the Geiger tube is fragile. Be
careful not to let anything penetrate the screen.
The Input/Output Ports
There are two ports on the left side of the Radalert 100X.
e calibration input port (2) is used for calibrating electronically using
a pulse generator. For more information, see “Calibrating Electronically”
in Chapter 5.
The output port (3) below the calibration input port allows you
to
interface the Radalert 100X to a computer, data logger,
earphones, or
information, see
other device using a 3.5 mm stereo plug. For more
“Interfacing to an External Device” in Chapter 3.
6
Radalert 100X
Page 11

3 Operation
The guidelines in this chapter describe how to use the Radalert 100X.
Units of Measurement
The Radalert 100X is designed both for users of SI units
(microsieverts
and for users of
counts per minute).
per minute. To switch
Menu. See “The Utility
Starting the Radalert 100X
Be sure that a standard 9-volt alkaline battery is installed in the
battery
Note: When installing the battery, place the battery wires along the side
of the battery and not under it.
To start the Radalert 100X, set the top switch to the mode you want,
and
set the bottom switch to On or Audio. The Radalert 100X then
does a
brief system check, displaying all the indicators and numbers.
After the system check, the radiation level is displayed in the
selected
short beep
ensure statis-
When using the Radalert 100X, always be sure there is no obstruction
be-
tween the detector window and the source you are surveying or
monitoring.
Operating in the Dose and Count Rate Modes
When the mode switch is set to Dose Rate or Count Rate, the numeric
display is updated every three seconds. At low count rates, signicant
changes in the radiation level displayed can take up to 90 seconds to
stabilize. See “Operating Ranges and Response Times” in this chapter
for more information.
Count Rate (CPM or CPS) and timed total counts are the most direct
methods of measurement; Dose Rate (µSv/hr or mR/hr) measurements
per hour and counts per second or counts per minute)
conventional units (milliroentgens per hour and
The default is microsieverts per hour and counts
between units of measurement, use the Utility
Menu” in this chapter.
compartment in the lower rear of the Radalert 100X.
mode. Ninety seconds after you start the Radalert 100X, a
indicates that enough information has been collected to
tical validity.
Radalert 100X
7
Page 12

are calculated using a conversion factor optimized for Cesium-137, so this
mode is less accurate for other radionuclides unless you have calibrated
the instrument for a specic radionuclide using an appropriate source.
It is more a
Rate than using Dose Rate. Conversion for alpha and beta emitters
is
calculated differently, and the Radalert 100X’s Dose Rate reading
may
e most immediate indicators of the radiation level are the count light,
the audio beep, and the alert. It takes three seconds before an increase
is shown on the numeric display in Dose Rate mode.
ppropriate to measure alpha and beta activity using Count
not be accurate.
Operating in Total/Timer Mode
When the mode switch is set to Total/Timer, the Radalert 100X
starts
totaling the counts it registers, and the numeric display is
updated every
Taking a Timed Count
A timed total count is useful for determining the average counts per
minute
Radalert 100X
of radioactivity.
count per minute
significant.
Taking an average allows you to detect low-level contamination or differences in background radiation due to altitude or soil mineral content,
and can be useful for educational purposes. For example, if one 10-minute
average is one count higher than another 10-minute average, the increase
may be due to normal variation. But over 12 hours, a one count increase
over the 12-hour background average is statistically signicant.
The Radalert 100X can give you a total count for a timed period of
from one minute to 40 hours. Follow these steps:
1.
With the Radalert 100X operating, set the Mode switch to Total/
Timer. The display shows TOTAL.
2.
Press the Set button twice in quick succession. e display shows SET,
the hourglass, and the most recent timing period used. e rst time
you use the timer, the setting is 24:00, which means 24 hours.
second.
over a period of time. The number of counts detected by the
varies from minute to minute due to the random nature
When a
count is taken over a longer period, the average
is more accurate, and any small increase is more
8
Radalert 100X
Page 13

3. Use the + and – buttons to set the timing period. e timed period can be
for 1 to 10 minutes in one-minute increments, for 10 minutes to 2 hours
in ten-minute increments, or for 2 to 40 hours in one-hour increments.
4.
Press the Set button again to start the timed count. The Radalert
100X beeps three times and starts counting. The hourglass indicator
flashes
during the timed period.
During the counting period, if you want to see how much time remains, press and hold down the Set button. e display counts down
in hours and minutes to zero. For example, if the display says 00:21,
21 minutes remain.
5.
At the end of the timed period, the Radalert 100X beeps three
times and repeats the beeping several times. The number
displayed is the
6. To display the average count and dose rates for the timed period, press
and hold the Set button. e display alternates between the average
count rate and the average dose rate every 3 seconds, and shows AVG
above the numeric display.
7. Press the Set button twice to return to normal operation.
Aer you start a timed count, the timer mode is active in the background
even when the Mode switch is set to Dose Rate or Count Rate. For
example, during and aer the timed period, you can switch back and
forth between Total/Timer and Dose Rate; when the timed period is
over, the total is displayed whenever you switch back to Total/Timer.
e hourglass indicator is shown on the display in any mode setting; it
is blinking while the timer is totaling counts.
Taking a Total Count
e timer can take timed counts of up to 40 hours. In certain situations,
you may want to take a total count without the timer; for example, taking
a count for longer than 40 hours. Follow these steps:
1.
Place the Radalert 100X in the location where you plan to take the count.
2. Note the time.
3. Immediately when you note the time, set the mode switch to Total/
Timer.
total count.
Radalert 100X
9
Page 14

4. At the end of the time period, note the time and the total on the
numeric display.
5. Subtract the starting time from the ending time to determine the
exact number of minutes in the timing period.
6. To get the average count, divide the total reading by the number of
minutes in the timing period.
Operating Ranges and Response Times
In some modes, when radiation levels increase over certain preset levels,
e Radalert 100X uses autoranging, automatically changing to the X1000
th
scale. Whenever X1000 is shown above the numeric display, multiply the
displayed reading by 1000 to determine the radiation level. The following
table shows the radiation levels the Radalert 100X measures in each mode
and how they are displayed.
Mode Regular Range x1000 Range
μSv/hr .000–1100 N/A
mR/hr .000–110 N/A
CPM 0–9999
CPS 0–3500 N/A
Total/Timer 0–9999
(displayed as 10.00–350 with x1000 indicator)
(displayed as 10.00–9999 with x1000 indicator)
10,000–350,000
10,000–9,999,000
Maximum Level
When the maximum level for the current mode is reached, the Radalert
100X
beeps for three seconds, pauses for three seconds, and repeats that
pattern.
Range Full
The display shows RANGE:Full. The beeping pattern and the
continue until the level decreases or the Radalert 100X is
icon
turned off.
Display Update and Response Time
In Total/Timer mode, the numeric display is updated each second. In the dose
and count rate modes, the numeric display is updated every three seconds.
When the radiation level is less than 1,000 CPM, the reading in the dose
and count rate modes is based on the radiation detected in the immediately
previous 90 seconds. In order to give a quicker response to changes, when
10
Radalert 100X
Page 15
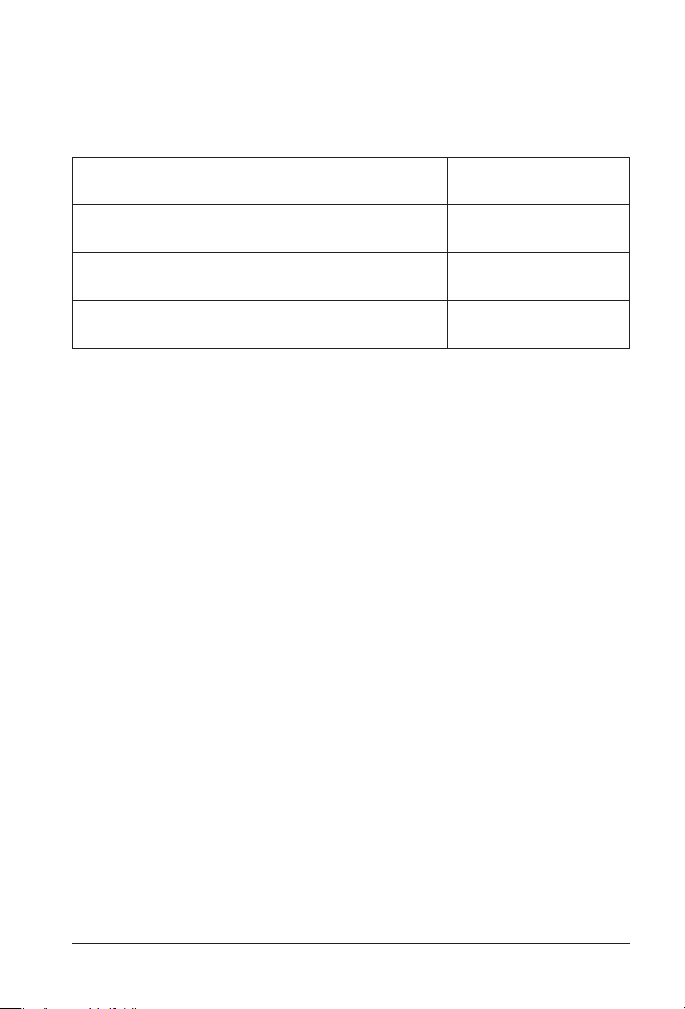
the radiation level exceeds 1,000 CPM in any 90-second period, the reading
is based on the previous 6 seconds, and when it exceeds 6,000 CPM, the
reading is based on the previous 3 seconds, as shown in the following table.
is automatic change in response time is called auto averaging.
Radiation Level
<1000 CPM or <8.3 μSv/hr or <.83 mR/hr
(<17 CPS)
1000–6000 CPM or 8.3–50 μSv/hr or .83–5 mR/hr
(17–100 CPS)
>6000 CPM or >50 μSv/hr or >5 mR/hr
(>100 CPS)
Basis for Reading
(after first 90 seconds)
90 seconds
6 seconds
3 seconds
Note: You can set the response time to 3 seconds at all radiation levels
using the Utility Menu; see “e Utility Menu” in this chapter.
Using the Alert
The Radalert 100X can sound an audible alert whenever the radiation
reading reaches a certain level. The +, –, and Set buttons on the end of
Radalert
100X allow you to turn Alert mode on and off and to set the
levels. You can set the alert level when the Mode switch is set to
Rate or Count Rate. Follow these steps:
1. Press the Set button on the end panel twice in quick succession. e
display shows the current alert level in µSv/hr, mR/hr, CPM, or CPS,
depending on the current setting. e radiation symbol and SET icon
are also displayed.
2. To change the displayed alert level, use the + and – buttons to adjust
the level up or down.
3. When the desired alert level is displayed, press the Set button once
to save the new level and to continue in Alert mode. The radiation
mbol is displayed to show that the Radalert 100X is in Alert mode.
sy
4. To reset the alert level while you are in Alert mode, press the Set
button four times (twice for O, and twice more for Set), then repeat
steps 2 and 3.
5. To turn o Alert mode, press the Set button twice.
the
alert
Dose
Radalert 100X
11
Page 16

When Alert mode is started, the Radalert 100X restarts counting,
and
When you first start the Radalert 100X, the alert levels are preset at 1 µSv/
and the equivalent values in the other units: .1 mR/hr, 120 CPM, and
CPS.
modes are automatically updated to the equivalent values (the conversion may not be exact due to rounding). When you change the units of
measurement, the alert level is reset to the defaults.
e best alert level is one that rarely gives a false alarm, yet warns you
when the radiation is higher than normal.
after 90 seconds to show that the reading is statistically valid.
beeps
If you set the alert level in one mode, the settings for the other
hr
The Utility Menu
The Utility Menu allows you to change the default settings for several
operating
after the Radalert 100X is turned off and until you change it again.
• To activate the Utility Menu, hold down the + button on the end panel
while y
bottom right of the numeric display, and the display shows 1 for menu
option 1.
• To scroll through the menu, push the plus (+) and minus (–) buttons.
• To select an option, push the Set button.
• Once an option is selected, use the + and – buttons to scroll among
the settings.
• Aer you choose the setting you want, select option 0 to exit the Utility
Menu.
e options are:
0 Resume normal operation.
1 Auto Averaging. on (the default) selects Auto averaging; oFF selects
2 Units of measurement. CPM µSv/hr (the default) selects counts per
parameters. When a setting is changed, it remains in effect
ou turn on the Radalert 100X. The word MENU appears at the
3-second (fast response) averaging at all radiation levels.
minute and microsieverts per hour; CPM mR/hr selects counts
per minute and milliroentgens per hour; CPS µSv/hr selects counts per
second and microsieverts per hour.
2
12
Radalert 100X
Page 17

3 Cal 100 Reset. Automatically resets the calibration factor to 100.
4, 5, 6 Reserved for future options.
7 Cal Factor Adjust. Displays the current calibration factor, which
you can then adjust to the new factor you want. See “Calibration” in
Chapter 5.
8 Factory Default Reset. Automatically resets items 1, 2, and 3 to Auto
averaging, CPM and µSv/hr, and 100, and resets the Alert level to
1.000 µSv/hr.
9 Revision #. Displays the soware version number.
Interfacing to an External Device
The lower output jack on the left side of the Radalert 100X is a dual miniature jack that provides a data output that can be used to drive external
devices. You can use it to record the counts on a computer, data logger, or
accumulating counter. Use a 3.5 mm stereo plug to access this port.
e outputs provide a positive pulse (9 volt peak, 1 kOhm impedance)
each time the Geiger tube detects a count. At the ring of the plug, the
pulse is approximately 1 millisecond wide and is well suited for chart recorders and audio input. e tip signal is approximately 80 microseconds
wide and is suitable for high-speed counting and RS-232 interfacing.
Computer cables for USB or serial ports and accompanying soware for
Windows are available from International Medcom, Inc.
For 4.5V logic compatible output, externally connect a 1 kOhm resistor
from the output to ground. A standard stereo or mono headphone can
be plugged directly into the jack. For some types of headphones, external
volume control may be needed.
Radalert 100X
13
Page 18

4 Common Procedures
e following sections give guidelines for several commonly-used pro
cedures. With any procedure, the user must determine the suitability
of the instrument or procedure for that application.
Establishing the Background Count
Normal background radiation levels vary at different locations, according
to altitude and other factors, such as types of minerals in the ground.
Levels vary at different distances from the ground, and may differ even
different areas of the same room. To accurately interpret the readings
get on the Radalert 100X, it is a good idea to establish the normal background radiation level for each area you plan to monitor. You can do this
with a timed count. Use the following steps to get a ten-minute average.
1.
With the Radalert 100X operating, set the Mode switch to Total/Timer.
2. Press the Set button twice in quick succession.
3. e display shows the current timer period and SET. Unless you have
previously changed it, the display reads 24:00, which means 24 hours.
Use the + and – buttons to change the timer period to ten minutes.
4. Press the Set button on the end panel. The Radalert 100X beeps
three times and starts counting.
During the timed count, if you want to see how much of the ten
minutes remains, hold down the Set button. e display counts down
from ten minutes to zero. For example, if the display says 00:03, seven
minutes have elapsed and three minutes remain.
5.
At the end of the ten minutes, the Radalert 100X beeps three times,
and repeats the beeping several times. Note the total reading.
6. To nd the average count and dose rates, hold down the Set button.
A ten-minute average is moderately accurate. You can repeat it several
times to nd how close the averages are. To establish a more accurate
average, take a one-hour timed count. In some locations, you may want
to take a longer count (for example, 12 hours). If you need to determine
whether there is prior contamination, take averages in several locations
and compare the averages.
in
you
-
14
Radalert 100X
Page 19
For more information on using the timer, see “Taking a Timed Count”
Alpha
in Chapter 3.
Environmental Area Monitoring
You can keep the Radalert 100X in Dose Rate or Count Rate mode whenever you want to monitor the ambient radiation, and look at it from time
to
time to check for elevated readings. You can also use Alert mode to warn
u if the radiation increases above the alert level.
yo
If you suspect an increase in ambient radiation, use the timer to take a
ten-minute count, and compare the average to your average background
count. If you suspect an increase that is too small to detect with a short
timed reading, you can take a longer count (for example 6, 12, or 24 hours).
Checking an Object
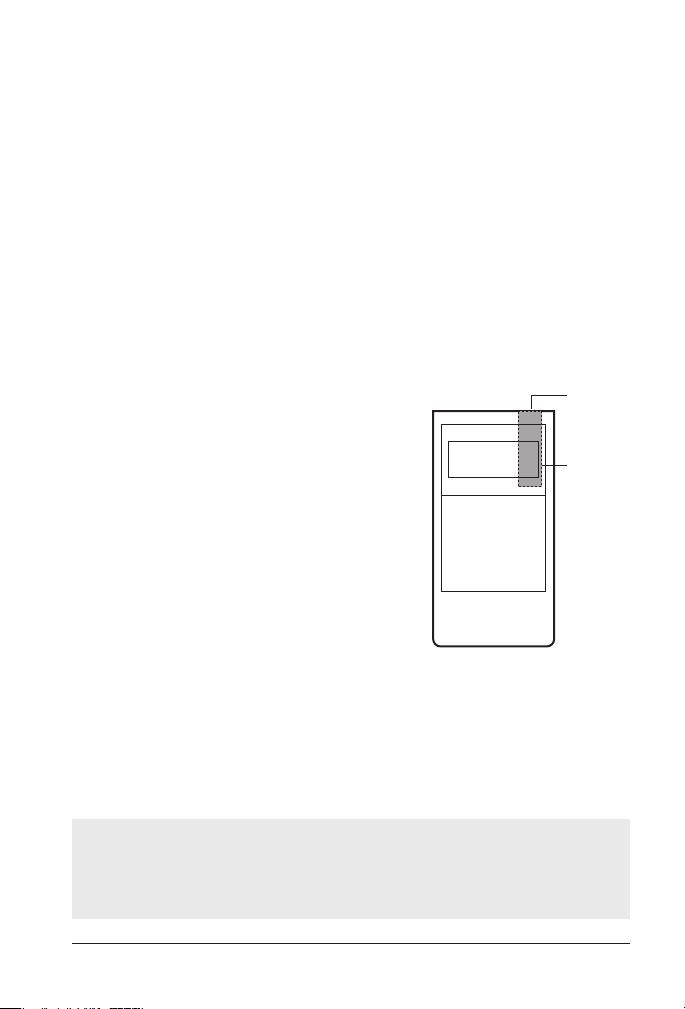
To check an object, place the Radalert 100X
next
to it with the end window facing and
near the
and lowan object
Radalert 100X
count over an ap-
object; otherwise you may miss alpha
level beta radiation. To determine if
is slightly radioactive, place the
next to it and take a timed
propriate period of time.
When not using the end window, hold the
Radalert 100X so that the side wall of the tube
is as close as possible to the object. The best
position is with
back of the Radalert 100X closest to the object
To measure as
Radalert 100X as close as you can without touching the object. The
the top right corner of the
Position of Geiger Tube
much as possible of the radioactivity of an object, place
radiation level for gamma radiation from a localized source decreases
according to the inverse square law. If you move to twice the distance
from the object, the radiation drops by a factor of four.
Window
Geiger
Tube
the
UTION: Never touch the Radalert 100X to an object that may be
CA
contaminated. You may contaminate the instrument. A contaminated
instrument will not be accepted for repair or servicing.
Radalert 100X
15
Page 20

5 Maintenance
The Radalert 100X should be handled with care and can be calibrated as
necessary to comply with regulations. Use the following guidelines to
maintain the Radalert 100X properly.
Calibration
The Radalert 100X’s readings typically remain stable for many years of
use. Specific industries, such as diagnostic laboratories, radiography, and
public safety, operate under standards or regulations that require routine
calibrations. In most regulated environments, an annual calibration meets
these standards. Some standards require more frequent calibrations, and
some also require the occasional use of a check source to make sure the
instrument is working properly. For a list of recommended laboratories
instrument calibration, see the International Medcom, Inc. website
medcom.com. Check sources are available from various licensed
sources. Any radioactive source should be handled with caution and
shielded properly during storage.
e standard radionuclide for calibration is Cesium-137. To calibrate to
another radionuclide, use a calibrated source for that radionuclide or determine the appropriate conversion factor referenced to Cs-137. A certied test
range should be used. Depending on the facility, calibrations are typically
done at about two-thirds of the maximum reading, or 660 μSv/hr (66 mR/
hr). Some labs can do a three-point calibration check at, for example, 250,
500, and 660 μSv/hr (25, 50, and 66 mR/hr). Calibration should not be
done at levels below 10 μSv/hr (1mR/hr) or above 900 μSv/hr (90 mR/hr).
If no source is available, and the Geiger tube is functioning normally,
an electronic calibration can be performed using a calibrated pulse
generator. is conrms that the instrument is counting accurately, but
does not conrm the Geiger tube sensitivity.
Calibrating Using a Source
Most certified calibration laboratories utilize robotics to minimize or
eliminate radiation exposure to the calibration personnel. The
100X’s calibration procedure is designed to further minimize exposure.
for
at
Radalert
16
Radalert 100X
Page 21

Before you calibrate the Radalert 100X, make sure the distance between
the Radalert 100X and the source is correct to produce the appropriate
dose rate. Follow these steps:
1.
Start with the Radalert 100X turned off and the Mode switch set to
se Rate.
Do
2. Hold down the – button on the end panel while you turn the On/
O/Audio switch to On. (Don’t use the Audio setting.)
The display shows CAL, and the Radalert 100X counts down for 15
seconds, beeping each second. This delay gives you a chance to move
the field and then expose the source. At the end of the 15 sec-onds,
of
the Radalert 100X beeps several times.
3.The Radalert 100X collects data for 90 seconds, beeping as it does so,
with CAL and the hourglass indicator flashing. At the end of the 90
seconds, it beeps several times. The display shows CAL and SET. You
can now seal or close the source.
4. Press the + and – buttons to adjust the reading to what it should be.
When the reading is correct, press the Set button. e new calibration
factor is automatically calculated from the adjustment you make.
5.The new calibration factor is displayed for several seconds, then the
Radalert 100X beeps and resumes regular operation.
The calibration factor is set to 100 (percent) at the factory. If you change
the reading, for example, to 20% higher than the factory reading, the
calibration
during the system check when the Radalert 100X is first turned on.
Calibrating Electronically
You can calibrate the Radalert 100X electronically using a pulse or function
generator. Electronic calibration requires a cable with a 2.5 mm plug,
h the tip carrying the signal. Follow these steps:
wit
1. Set the signal height to 3.3 volts (positive pulse).
2. Plug the cable into the upper jack.
factor would be 120. The current calibration factor is dis-
out
new
played
Radalert 100X
17
Page 22
3.
Start with the Radalert 100X turned off and the Mode switch set to
Dose Rate. Hold down the – button on the end panel while you turn
/Off/Audio switch to On. (Don’t use the Audio setting.)
On
The display shows CAL, and the Radalert 100X counts down for 15
seconds, chirping each second. At the end of the 15 seconds, the
Radalert 1
4.
The Radalert 100X collects data
00X beeps several times.
for 90 seconds, beeping as it does so,
with CAL and the hourglass indicator ashing. At the end of the 90
seconds, it beeps several times. e display shows CAL and SET.
5.
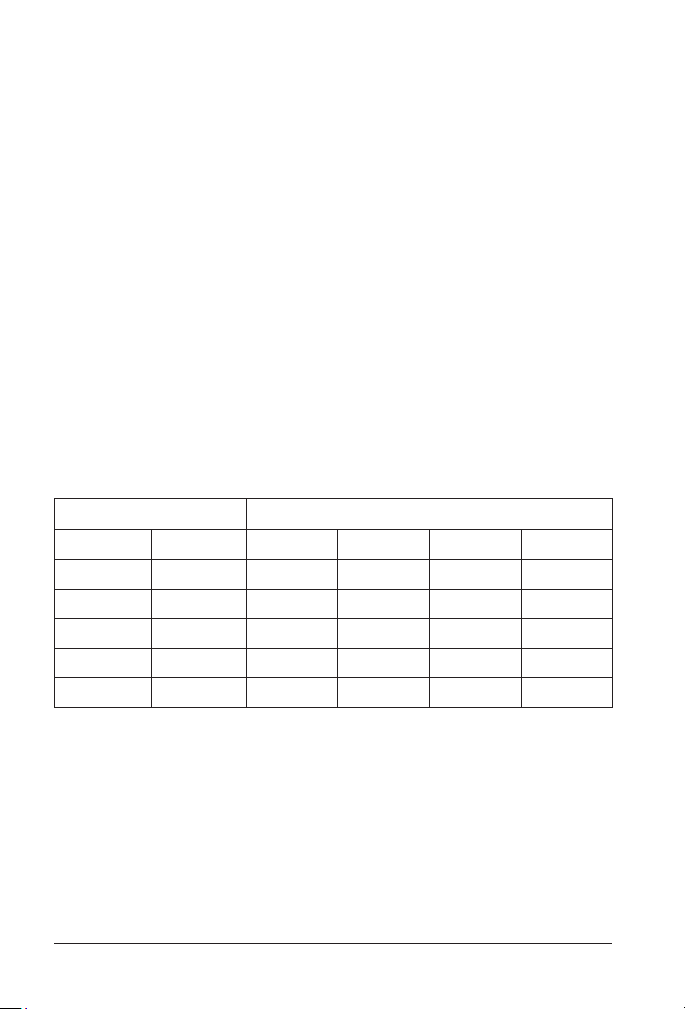
Use the following table to check the Radalert 100X’s accuracy. The table
shows appropriate pulse generator count rates to calibrate for Cs-137.
the accuracy is not within desired limits, follow step 6. Note that
Radalert 100X automatically compensates for lost counts due to
tube dead time. Thus, the display reading in CPM mode does not
the input frequency. You can display uncompensated counts
in CP
mode by continuously holding down the – (minus) button; the reading
now corresponds to the input frequency.
Pulse Generator Input Display
Hz Pulse/min CPM μSv/hr mR/hr CPS
162.97 9778
318.88
748.50 44910
1128.67 67720
1358.70 81522
19133
12,000 100 10 200
24,000 200 20 400
60,000 500 50 1,000
96,000 800 80 1,600
120,000 1,000 100 2,000
the
If
the
GM
equal
M
6. Press the + and – buttons to adjust the reading to what it should be.
When the reading is correct, press the Set button. e new calibration
factor is automatically calculated from the adjustment you make.
7. e new calibration factor is displayed for several seconds, then the
Radalert 100X beeps and resumes regular operation.
18
Radalert 100X
Page 23

Troubleshooting and Service
The Radalert 100X is a highly reliable instrument. If it does not seem
to be working properly, look through the following chart to see if you
can identify the problem.
Problem Possible Cause What to Check
Display is blank Battery: dead, missing,
Display works,
but no counts
are registered
Reading is high,
but another
instrument has
a normal reading in the same
location
or poor connection
Damaged LCD If count light and audio work, the
Damaged Geiger tube If the mica surface of the tube has
Contamination
Moisture The circuit board may be wet; dry the
Photosensitivity Remove from direct sunlight and
Continuous discharge The Geiger tube needs to be replaced
Electromagnetic
interference
Install and firmly connect a new
9-volt alkaline battery
LCD may need to be replaced
visible breaks or wrinkles, it needs to
be replaced
Scan the Radalert 100X with another
instrument; clean the instrument with
a damp cloth and mild detergent
instrument in a warm dry place; if it
still has a problem, it requires factory
service
ultraviolet sources; if the high count
drops, the mica coating on the Geiger tube may be damaged and the
tube needs to be replaced
Move the instrument away from
sources of extremely high-energy
non-ionizing radiation, e.g., electromagnetic or microwave
Radalert 100X
19
Page 24

If the Radalert 100X requires servicing, please contact your distributor
International Medcom, Inc. for instructions on where to ship the
instrument. You can contact International Medcom, Inc. at 707-823-
36 or at [email protected].
03
Do not attempt to repair the Radalert 100X; it contains no user-serviceable
parts and you co
CAUTION: Do not send a contaminated instrument for repair
under any circumstances.
uld void your warranty.
or
20
Radalert 100X
Page 25

6 Basics of Radiation and Its Measurement
This chapter briefly tells what radiation is and how it is measured.
This
information is provided for users who are not already familiar
with the
works and in interpreting your readings.
Ionizing Radiation
Ionizing radiation is radiation that changes the structure of individual
atoms by ionizing them. e ions produced in turn ionize more atoms.
Substances that produce ionizing radiation are called radioactive.
Radioactivity is a natural phenomenon. Nuclear reactions take place
continuously on the sun and all other stars. e emitted radiation travels
through space, and a small fraction reaches the Earth. Natural sources of
ionizing radiation also exist in the ground. e most common of these
are uranium and its decay products.
Ionizing radiation detected by the Radalert 100X can be categorized
into
X-rays are usually man-made radiation produced by bombarding a
metallic target with electrons at a high speed in a vacuum. X-rays are
electromagnetic radiation of the same nature as light waves and radio
waves, but at extremely short wavelength, less than 0.1 billionth of a
centimeter. ey are also called photons. e energy of X-rays is millions
of times greater than that of light and radio waves. Because of this high
energy level, X-rays penetrate a variety of materials, including body tissue.
Gamma rays occur in nature and are almost identical to X-rays, but
generally have a shorter wavelength than X-rays. Gamma rays are very
penetrating; thick lead shielding is generally required to stop them.
Beta radiation. A beta particle consists of an electron emitted from an
atom. It has more mass and less energy than a gamma ray, so it doesn’t
penetrate matter as deeply as gamma and X-rays.
subject. It is helpful in understanding how the Radalert 100X
four types:
Radalert 100X
21
Page 26
Alpha radiation. An alpha particle consists of two protons and two
neutrons, the same as the nucleus of a helium atom. It generally can
travel no more than 1 to 3 inches in air before stopping, and can be
stopped by a piece of paper.
When an atom emits an alpha or beta particle or a gamma ray, it
becomes a dierent type of atom. Radioactive substances may go
through several stages of decay before they change into a stable, or
non-radioactive, form.
An element may have several forms, or isotopes. A radioactive form of
an element is called a radioisotope or radionuclide. Each radionuclide
has a half-life, which is the time required for half of a quantity of the
material to decay.
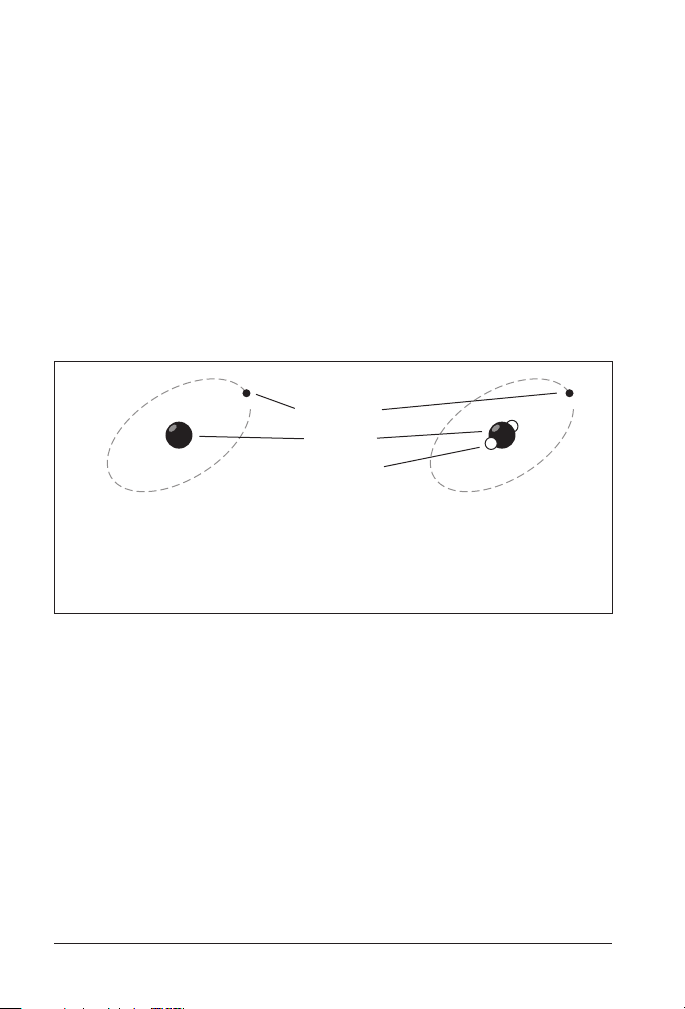
Electron
Proton
Neutron
Hydrogen Tritium
A hydrogen atom has one electron and
one proton. The most common isotope
has no neutrons and is stable.
Tritium is a radioactive isotope of
hydrogen. It has two neutrons in
its nucleus.
e chart on the following page shows the complete decay chain for
Uranium 238, which ends with a stable isotope of lead. Notice that the
half-life of the radionuclides in the chain range from 164 microseconds
to 4.5 billion years.
22
Radalert 100X
Page 27
Isotope Emits Half-life Product
Alpha
Cathode
U-238 alpha 4.5 billion years Th-234 Thorium
Th-234 beta 24.1 days Pa-234 Proactinium
Pa-234 beta 1.17 minutes U-234 Uranium
U-234 alpha 250,000 years Th-230 Thorium
Th-230 alpha 80,000 years Ra-226 Radium
Ra-226 alpha 1,602 years Rn-222 Radon
Rn-222 alpha 3.8 days Po-218 Polonium
Po-218 alpha 3 minutes Pb-214 Lead
Pb-214 beta 26.8 minutes Bi-214 Bismuth
Bi-214 beta 19.7 minutes Po-214 Polonium
Po-214 alpha 164 microseconds Pb-210 Lead
Pb-210 beta 21 years Bi-210 Bismuth
Bi-210 beta 5 days Po-210 Polonium
Po-210 alpha 138 days Pb-206 Lead
Measuring Radiation
Alpha, beta, gamma, and X-rays ionize material they strike or pass
through. e amount of radiation is generally determined by measuring
the resulting ionization.
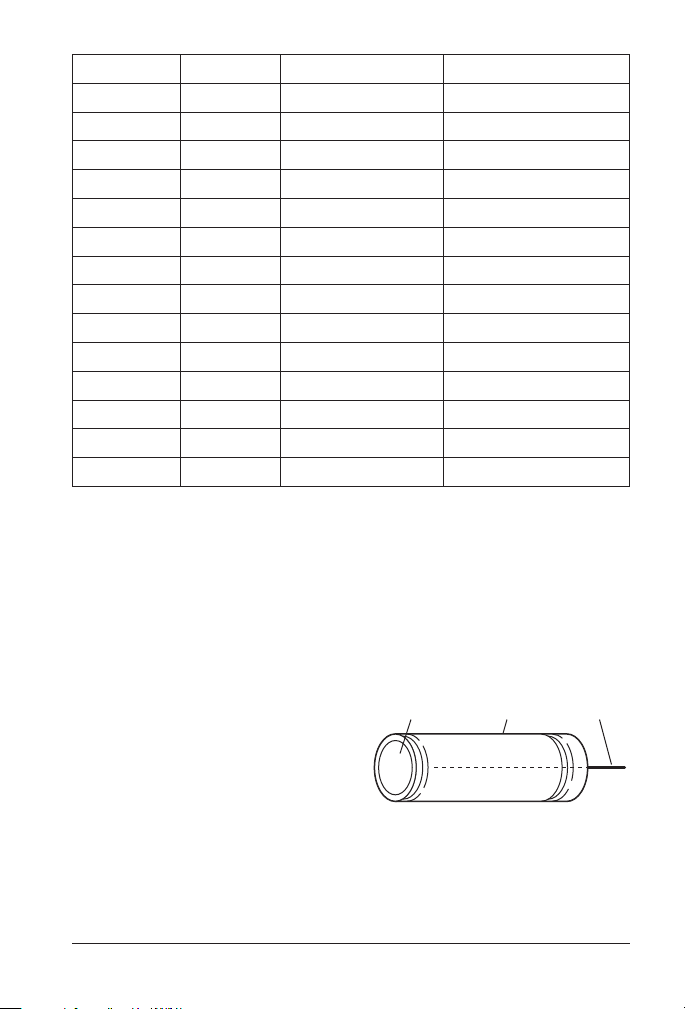
The Geiger tube used in the Radalert 100X consists of an anode (positive
electrode) positioned in the center of a tubular cathode (negative electrode) filled with a mixture of argon,
neon, and either chlorine or bromine
gases. e cathode is a thin-walled
metallic cylinder sealed at each end
with an insulating disk to contain the
gas. e anode is a wire that extends
into the cylinder. A high voltage is
applied to the electrodes to create an electrical field within the chamWhen radiation passes through the chamber and ionizes the gas, it
generates a pulse of current. The Radalert 100X electronically processes
these pulses to display the radiation level.
Window
(Side Wall)
Anode
ber.
Radalert 100X
23
Page 28

Radiation Measurement Units
Several dierent units are used to measure radiation, exposure to radiation, and dosage.
A roentgen is the amount of X-radiation or gamma radiation that produces one electrostatic unit of charge in one cc of dry air at 0° C and
760 mm of mercury atmospheric pressure. The Radalert 100X displays
readings in milliroentgens per hour (mR/hr). A milliroentgen is one
one-thousandth of a roentgen.
A rad is the unit of exposure to ionizing radiation equal to an energy
of 100 ergs per gram of irradiated material. is is approximately equal
to 1.07 roentgen.
A rem is the dosage received from exposure to a rad. It is the number
of rads multiplied by the quality factor of the particular source of radiation. e rem and millirem (one one-thousandth of a rem) are the
most commonly-used measurement units of radiation dose in the U.S.
One rem is generally considered to equal one rad.
A sievert is the standard international measurement of dose. One sievert
is equivalent to one hundred rems. A microsievert (µSv) is one millionth
of a sievert.
A curie is the amount of radioactive material that decays at the rate of
37 billion disintegrations per second, approximately the decay rate of
one gram of radium. Microcuries (millionths of a curie) and picocuries
(trillionths of a curie) are also oen used as units of measurement.
A becquerel (Bq) is equivalent to one disintegration per second.
Higher Than Normal Readings
Due to the random nature of radioactivity, the Radalert 100X reading
varies from minute to minute. In one location with only background
radiation, the reading in µSv/hr might vary from .007 to .180 in ten
minutes and from .004 to .210 in an hour. Averages for both periods
would be very close.
Normal radiation levels in dierent locations can vary greatly due to
soil composition, altitude, and other factors. For example, normal background at 10,000 feet might be double that at sea level. On an airplane,
24
Radalert 100X
Page 29

the radiation at 35,000 to 40,000 feet may be as much as 30 to 50 times
the normal level on the ground.
When monitoring radiation levels in one location, it is useful to determine the highest reading you can normally expect to see in that
location. If you use Alert mode, you want to set the alert level to one
that rarely gives a false alarm, yet sounds the alert when the radiation
is higher than normal.
A single alert may occur occasionally and is not signicant unless there is
also an elevation in the average count. If you suspect an elevation and you
have previously taken an average background count in the same location,
you can take a total count to get the current average count for 30 minutes
or another time period. You can then compare the current average to the
previous average to see whether there is an elevation. (See “Operating in
Total/Timer Mode” in Chapter 3 for more information.)
Radalert 100X
25
Page 30
Appendix: Technical Specifications
Detector:
Display:
Operating Range:
Calibration:
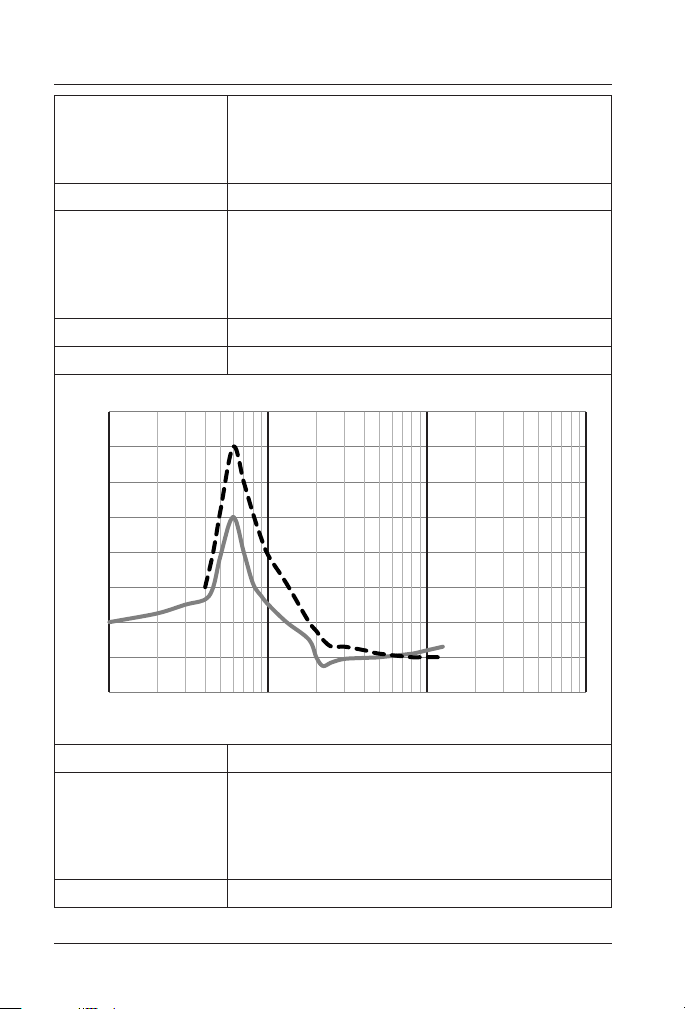
Gamma Sensitivity:
8
7
6
5
4
3
Relative Response
2
Window
1
0
1.00E+01 1.00E+02 1.00E+03 1.00E+04
Halogen-quenched Geiger-Mueller detector (LND 712)
Mica end window density is 1.5–2.0 mg/cm
Side wall is 0.012" #446 stainless steel
Detects Alpha, Beta, Gamma, and X-radiation
4-digit liquid crystal display with mode indicators
µSv/hr: .000 to 1,100
mR/hr: .000 to 110
CPM: 0 to 350,000
CPS: 0 to 3,500
Total: 0 to 9,999,000 counts
Cesium-137 (gamma)
1,000 CPM/mR/hr referenced to Cs-137
ENERGY RESPONSE CURVE
Side
Energy (KeV)
2
Accuracy:
Alert Range:
Timer:
26
±10% typical; ±15% maximum
µSv/hr: .001 to 500
mR/hr: .001 to 50
CPM: 1 to 60,000
CPS: 1 to 1,000
Beeper sounds the alert
Can set sampling periods of 1 minute to 40 hours
Radalert 100X
Page 31
Averaging Periods:
Count Light:
Audio:
Ports:
Anti-Saturation:
Temperature Range:
Power:
Size:
Weight:
Options:
Certifications:
Specications subject to change without notice.
Display updates every 3 seconds, showing the
average for the past 90-second time period at normal levels. e averaging period decreases as the
radiation level increases.
Red LED ashes with each count
Beeper chirps for each count (can be muted)
• Output: Stereo 3.5 mm jack sends counts to computers, data loggers, other CMOS-compatible devices,
earphones, and educational data collection systems.
0–9 V, 1 kOhm impedance.
• Input: 2.5 mm mono jack provides calibration input.
0–3.3 V, > 5 µs width, rising edge triggered.
Readout holds at full scale in elds up to 100 times
the maximum reading
-20° to +50° C , -4° to +122° F
One 9-volt alkaline battery; battery life 2,000
hours typical, 700 hours minimum at normal
background radiation levels at sea level. Battery life
decreases as radiation level rises.
150 x 80 x 30 mm (5.9" x 3.2" x 1.2")
225 grams (8 oz) including battery
Computer soware and cable available
Certied:
Emissions: EN 55011:2009 +A1:2010 (Class B
emissions limits); EN 61326-1:2006 (Class B) RF
Emissions
Immunity: EN 61326-1:2006 (Annex C) Portable
Test and Measurement Equipment; EN 61000-42:1995 (ESD); EN 61000-4-3:1997 (EM)
RoHS Compliant
Meets WEEE standards
Radalert 100X
27
Page 32

Limited Warranty
is product is warranted to the original owner to be free from
defects in materials and workmanship for two years from the
date of purchase with the exception of the Geiger-Mueller tube,
which is warranted for one year. e battery is not included
in this warranty. International Medcom, Inc. will, at its own
discretion, repair or replace this instrument if it fails to operate
properly within this warranty period provided that it has not
been subjected to misuse, abuse, or neglect. Modication or
repair of this instrument by anyone other than International
Medcom, Inc. voids this warranty.
Contamination of this instrument with radioactive materials
voids this warranty. Contaminated instruments will not be
accepted for servicing at our repair facility.
e user is responsible for determining the suitability of this
product for the intended application. e user assumes all risk
and liability connected with such use. International Medcom,
Inc. is not responsible for incidental or consequential damages
arising from the use of this instrument.
e terms of this warranty are subject to change without notice.
International Medcom, Inc.
103 Morris Street, Suite A-5
Sebastopol, CA 95472
Phone Toll Free: (877) 378-1010
(707) 823-0336
Fax: (707) 823-7207
28
Radalert 100X
 Loading...