

Page 1
Û Use and maintenance manual
02150343 Manuale d‘uso e man. starlight uno
Rev. 02 del 11-05-2017
Reseller - Rivenditore - Wiederverkäufer - Revendeur - Revendedor
manufacturer:
Mectron S.p.A.
Via Loreto 15/A
16042 Carasco (Ge) Italy
Tel. +39 0185 35361
Fax +39 0185 351374
www.mectron.com
e-mail: [email protected]
STARLIGHT UNO
STARLIGHT UNO
EN
Page 2

Summary
00.0 Introduction ......................................................................................................................33
00.1 Foreword ................................................................................................................33
00.2 Description of the equipment ..................................................................................33
00.3 Intended use ...........................................................................................................34
00.4 Safety requirements ...............................................................................................34
01.0 Identication data ............................................................................................................36
01.1 Identication data ...................................................................................................36
01.2 Identication plate of the charging unit ...................................................................36
01.3 Identication data of the starlight uno handpiece .................................................36
01.4 starlight uno battery module identication data ...............................................37
02.0 Testing .............................................................................................................................37
02.1 Testing of the equipment ........................................................................................37
03.0 Delivery............................................................................................................................37
03.1 Delivery of the equipment .......................................................................................37
03.2 List of material included in the standard supply ......................................................38
04.0 Installation .......................................................................................................................39
04.1 Safety requirements at the time of installation ........................................................39
04.2 Connecting the equipment ......................................................................................40
04.3 Description of the controls and signalling lamps ....................................................41
05.0 Battery .............................................................................................................................42
05.1 New battery - rst charging .....................................................................................42
05.2 Battery low signal ...................................................................................................42
05.3 Battery dead signal .................................................................................................42
05.4 Battery failed signal ................................................................................................43
05.5 Replacing the battery ..............................................................................................43
05.6 Safety requirements relating to the battery .............................................................43
06.0 Use ..................................................................................................................................44
06.1 Connecting the accessories ...................................................................................44
06.2 Safety requirements during use ..............................................................................45
06.3 Instructions for use .................................................................................................45
06.4 Measuring the light intensity ...................................................................................46
06.5 Safety protection .....................................................................................................46
07.0 Cleaning, disinfection and sterilisation ............................................................................47
07.1 Cleaning and disinfection of the handpiece and the charging unit .........................47
07.2 Cleaning and sterilisation of the optical protection .................................................48
07.2.1 Manual cleaning ............................................................................................ 48
07.2.2 Check cleaning .............................................................................................. 49
07.2.3 Drying .......................................................................................................... 49
07.2.4 Sterilisation ................................................................................................... 49
08.0 Disposal procedures and precautions .............................................................................50
09.0 Symbols ...........................................................................................................................51
10.0 Problem-solving ..............................................................................................................52
11.0 Technical specications ...................................................................................................53
11.1 Electromagnetic compatibility IEC/EN 60601-1-2 ...................................................54
12.0 Warranty ..........................................................................................................................60
32
starlight uno - manual of use and maintenance
Page 3

00.0 Introduction
00.1 Foreword
Before proceeding with the installation, use, maintenance or any other activities on the
equipment please read this manual carefully.
Always keep this manual within easy reach.
Important: To avoid causing personal injuries or damage to property, read all the points concerning
“Safety requirements” contained in this manual with particular attention.
Depending on the level of risk involved, safety requirements are classed under the following
indications:
WARNING (always referred to personal injury)
CAUTION (referred to possible damage to property)
The purpose of this manual is to ensure that operators are aware of the safety requirements, of the
installation procedures and of the instructions for correct use and maintenance of the equipment.
The user is not authorised to tamper with the equipment under any circumstances.
If any problems are encountered, please contact a Mectron Service Centre.
Any attempts on the part of the user or any unauthorised personnel to tamper with or alter the
equipment will invalidate the warranty and release the Manufacturers from any liability in respect of
any harm or damage to persons or property.
The information and illustrations contained in this manual are updated as of the date of publication
indicated on the last page.
MECTRON are committed to continuous up-dating of their products, which may entail changes to
components of the equipment. If there are any discrepancies between the descriptions contained
in this manual and your equipment, please contact your dealer or the MECTRON After-Sale service
for explanations.
Using this manual for purposes other than those relating to the installation, use and maintenance of
the equipment is strictly prohibited.
EN
00.2 Description of the equipment
The starlight uno is an equipment for polymerising photo-hardening composites. The light source
used is a very high-efciency monochromatic LED.
Unlike traditional halogen lamps, therefore, all the light being emitted by the starlight uno is used
to activate the camphorquinone photoinitiator. This means that it is possible to achieve excellent
polymerisation performance levels using decidedly less power and without emitting heat.
The device consists of an induction charging unit with a brightness meter and a handpiece powered
by a rechargeable lithium-ion battery that can be removed and replaced directly by the user.
The starlight uno can be used to operate in either of two emission modes:
- Constant intensity of emission - FAST (cycle lasting 10 seconds);
- Gradual intensity of emission - SLOW RISE (cycle lasting 20 seconds).
starlight uno - manual of use and maintenance
33
Page 4

00.3 Intended use
Polymerisation of photo-hardening dental materials with a photoinitiator that can be activated in the
wavelength band comprised between 440 and 480 nm with a narrow peak at 460 nm.
Although most composite materials are activated within this wavelength range, in case of
uncertainty consult the specications of the composite material.
This equipment may be used only in a dentist’s surgery or out-patient’s department where there are
no inammable gases (anaesthetic mixtures, oxygen, etc.).
00.4 Safety requirements
Mectron will not accept any liability for direct or incidental personal injury or damage to property in
the following cases:
1 If the equipment is used for purposes other than that for which it is intended.
2 If the equipment is not used in accordance with all the instructions and requirements described
in this manual.
3 If the wiring system in the room where the equipment is used does not comply with the
applicable standards and appropriate requirements.
4 If any assembly operations, extensions, settings, alterations or repairs have been carried out
by personnel not authorised by Mectron.
5 If the environmental conditions in which the device is kept and stored do not comply with the
requirements indicated in the chapter on technical specications.
CAUTION: No alterations to this device are permitted.
CAUTION: The wiring system of the premises on which this device is used must comply with
the applicable standards and requirements.
WARNING: Qualied and specialised personnel.
The device must be used exclusively by specialized personnel with proper medical culture; no
training activities are foreseen for the use of the device. The use of the device does not cause side
effects if it is used correctly.
WARNING: Intended use.
Use the equipment solely for the purpose for which it is intended (see point “00.3”). Failure to
comply with this requirement could lead to serious harm to the patient and/or to the operator and/or
damage to/failure of the equipment.
WARNING: Contraindications.
Do not use this equipment on patients tted with pace-makers or any other implantable electronic
devices. This requirement applies equally to the operator.
WARNING: Point the beam of light directly at the material to be polymerised.
Do not use the beam of light on the gums or other soft tissues (if necessary these parts should
be suitably shielded). The effect of the light should be limited to that part of the oral cavity to be
clinically treated.
WARNING: Never point the beam of light towards the eyes.
The effect of the light should be limited to that part of the oral cavity to be clinically treated.
WARNING: Contraindications.
Do not use this equipment for patients who have a case history of positive reaction to stimulation by
light e.g. urticaria solaris and/or porphyria, etc. or who are receiving treatment with photosensitising
drugs. In all cases of possible risk consult a specialised physician.
34
starlight uno - manual of use and maintenance
Page 5
WARNING: Contraindications.
Adopt strict safety measures for patients who have undergone cataract surgery and who are
therefore particularly sensitive to light (e.g. protective goggles able to lter out blue light).
WARNING: Contraindications.
Patients who have a case history of diseases of the retina should consult their optician beforehand
and be specically authorised to receive treatment with the starlight uno.
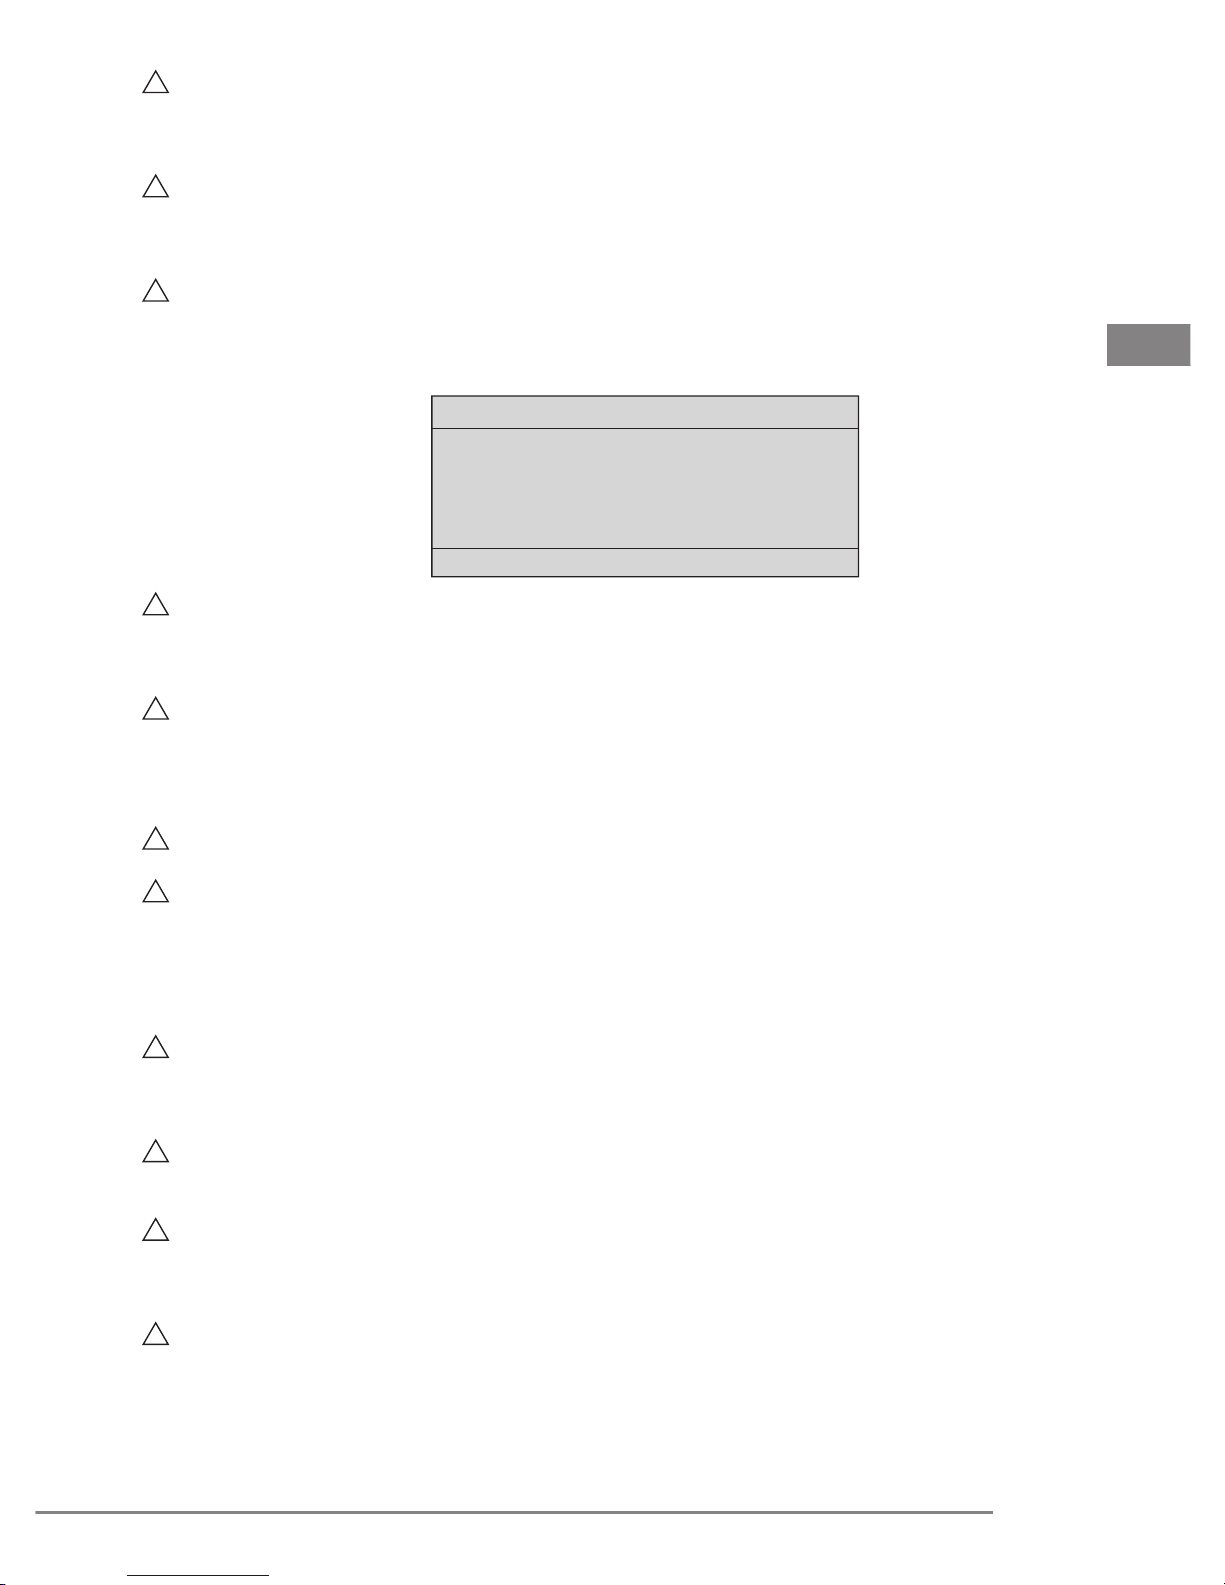
CAUTION: Photobiological safety of the curing lights and lamp systems IEC 62471.
According to the Standard IEC 62471, the device results in risk class 2 (moderate risk) concerning
a retinal risk from blue light or thermal retinal risk.
The following CAUTION indications are applied to the device package.
Risk Group 2
CAUTION. Possibly hazardous optical
radiation emitted from this product.
Do not stare at operating lamp. May
be harmful to the eye
Product tested against IEC62471
WARNING: Cleaning, disinfection and sterilisation of new or repaired products.
Before treatment, all new or repaired products should be cleaned and disinfected and, if suitable for
this treatment, autoclave sterilised following the instructions provided under point “07.0” strictly.
EN
WARNING: Infection control.
For maximum safety of the patient and of the operator, before each treatment, clean and disinfect
the charging unit and the handpiece, cleane and sterilise the optical protection and replace the
protective sheath. Carefully follow the instructions provided in chapter “07.0”.
WARNING: Use only original Mectron accessories and spare parts.
WARNING: Checking the condition of the device before treatment.
Before each treatment always check that the equipment is in proper working order and that the
accessories are efcient. Do not carry out the treatment if any problems are encountered in
operating the equipment. If the problems concern the equipment contact an authorised technical
service centre.
WARNING: Risk of explosions.
The equipment cannot operate in environments where there are saturated atmospheres of
ammable gases (anaesthetic mixtures, oxygen, etc.).
WARNING: Do not use the charging unit to recharge other types of batteries or other
equipment with rechargeable batteries.
CAUTION: Recharge the battery only with the Mectron charging unit (Fig.3 - Ref.A). Do
not attempt to recharge the battery using a generic battery charger. This entails a risk of
explosion and re.
CAUTION: In the case that the end user, when operating in his or her own dental facility or
clinic, must subject the electro-medical equipment and systems to periodical inspections in order
to adhere to imposed requirements, test procedures that must be applied to electro-medical
equipment and systems to evaluate safety must be performed in conformance with standard EN
62353 ‘Electro-medical devices - Periodical inspections and tests to be performed after repair
interventions on electro-medical devices’.
starlight uno - manual of use and maintenance
35
Page 6
01.0 Identication data
01.1 Identication data
An exact description of the model including the serial number of the equipment will make it easier
for our After-Sale Service to respond quickly and efciently to your queries.
Always provide the above information whenever you contact a Mectron Service Centre.
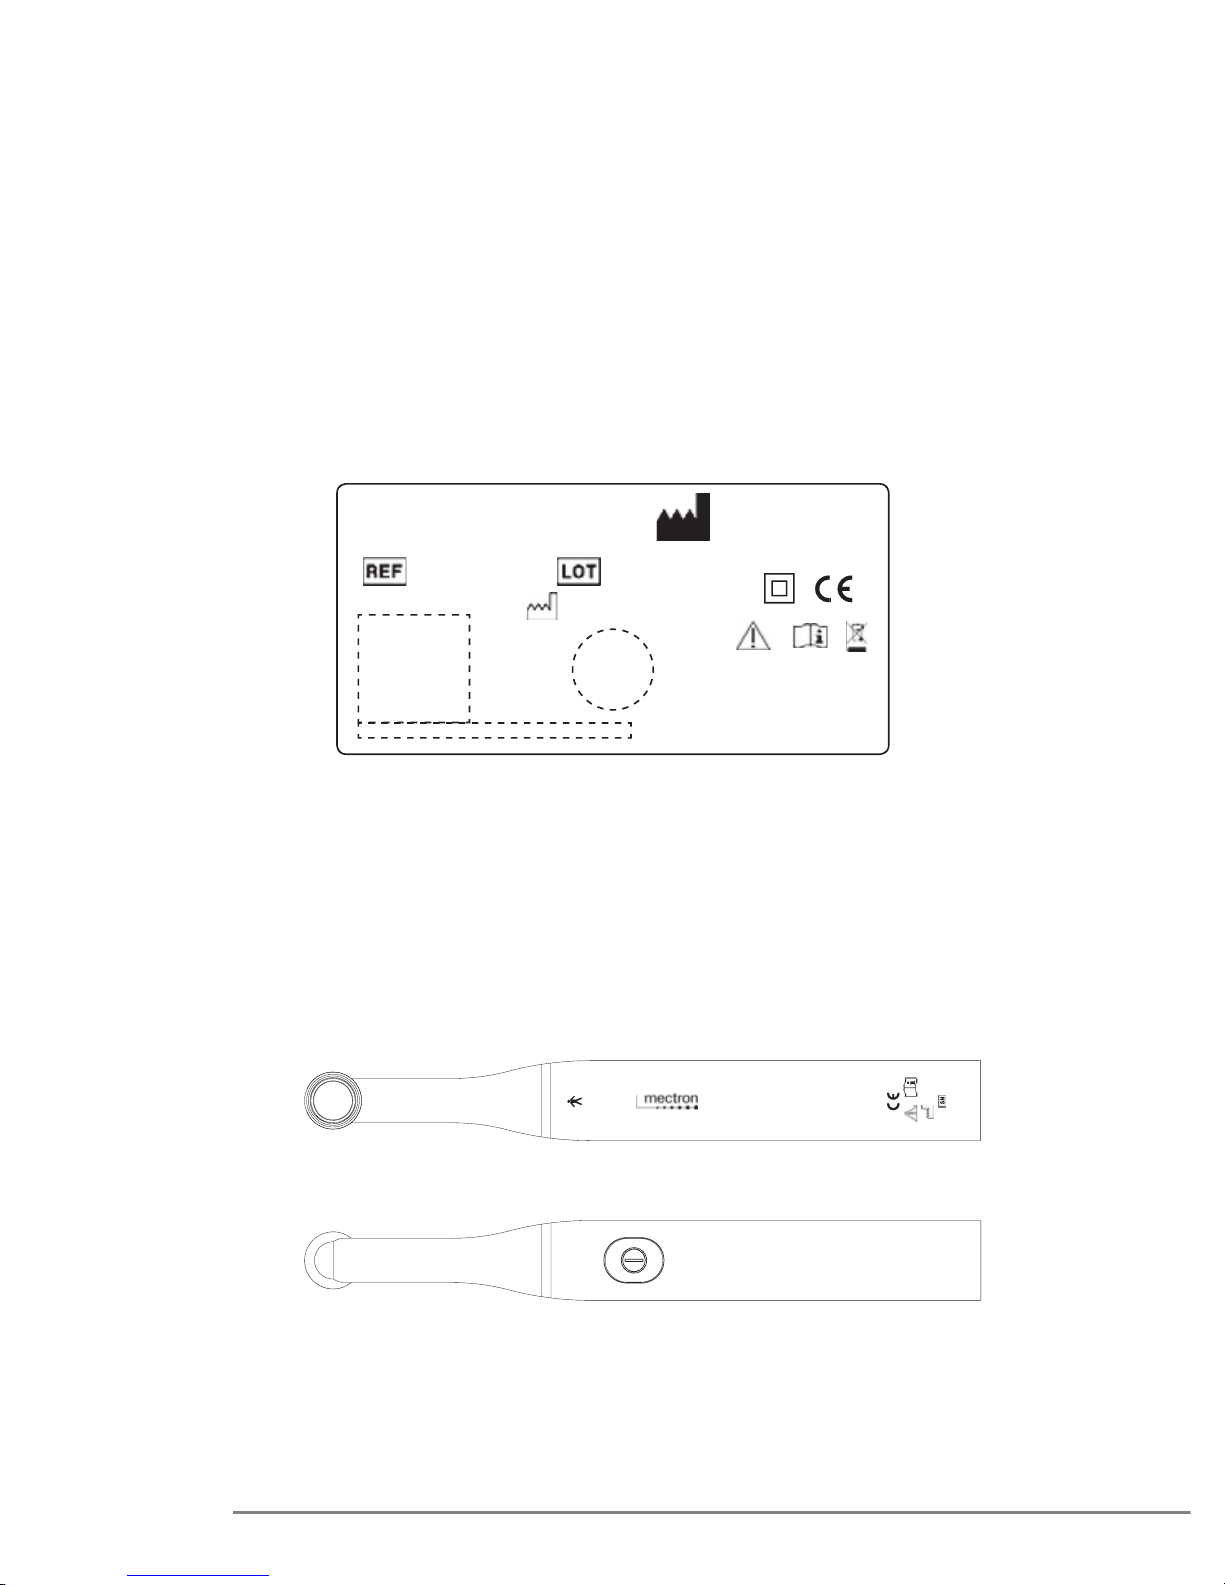
01.2 Identication plate of the charging unit
Each charging unit has an identication plate (Fig.1) on which the technical specications and the
lot number are indicated. The identication plate is xed to the underside of the equipment. The
remaining data are contained in this manual (see point “11.0”).
STARLIGHT UNO
-CHARGER100-240 V - 50/60Hz. 15 VA
~
000000000
00000000
YYYY - MM - DD
manufacturer
Mectron S.p.A.
Via Loreto 15/A
16042 Carasco - GE - Italy
Rx only
made in Italy
Fig. 1
01.3 Identication data of the starlight uno handpiece
The serial number and some symbols are marked on each starlight uno handpiece (Fig.2).
36
YYYY
328R0 0000
starlight uno
Fig. 2
starlight uno - manual of use and maintenance
Page 7
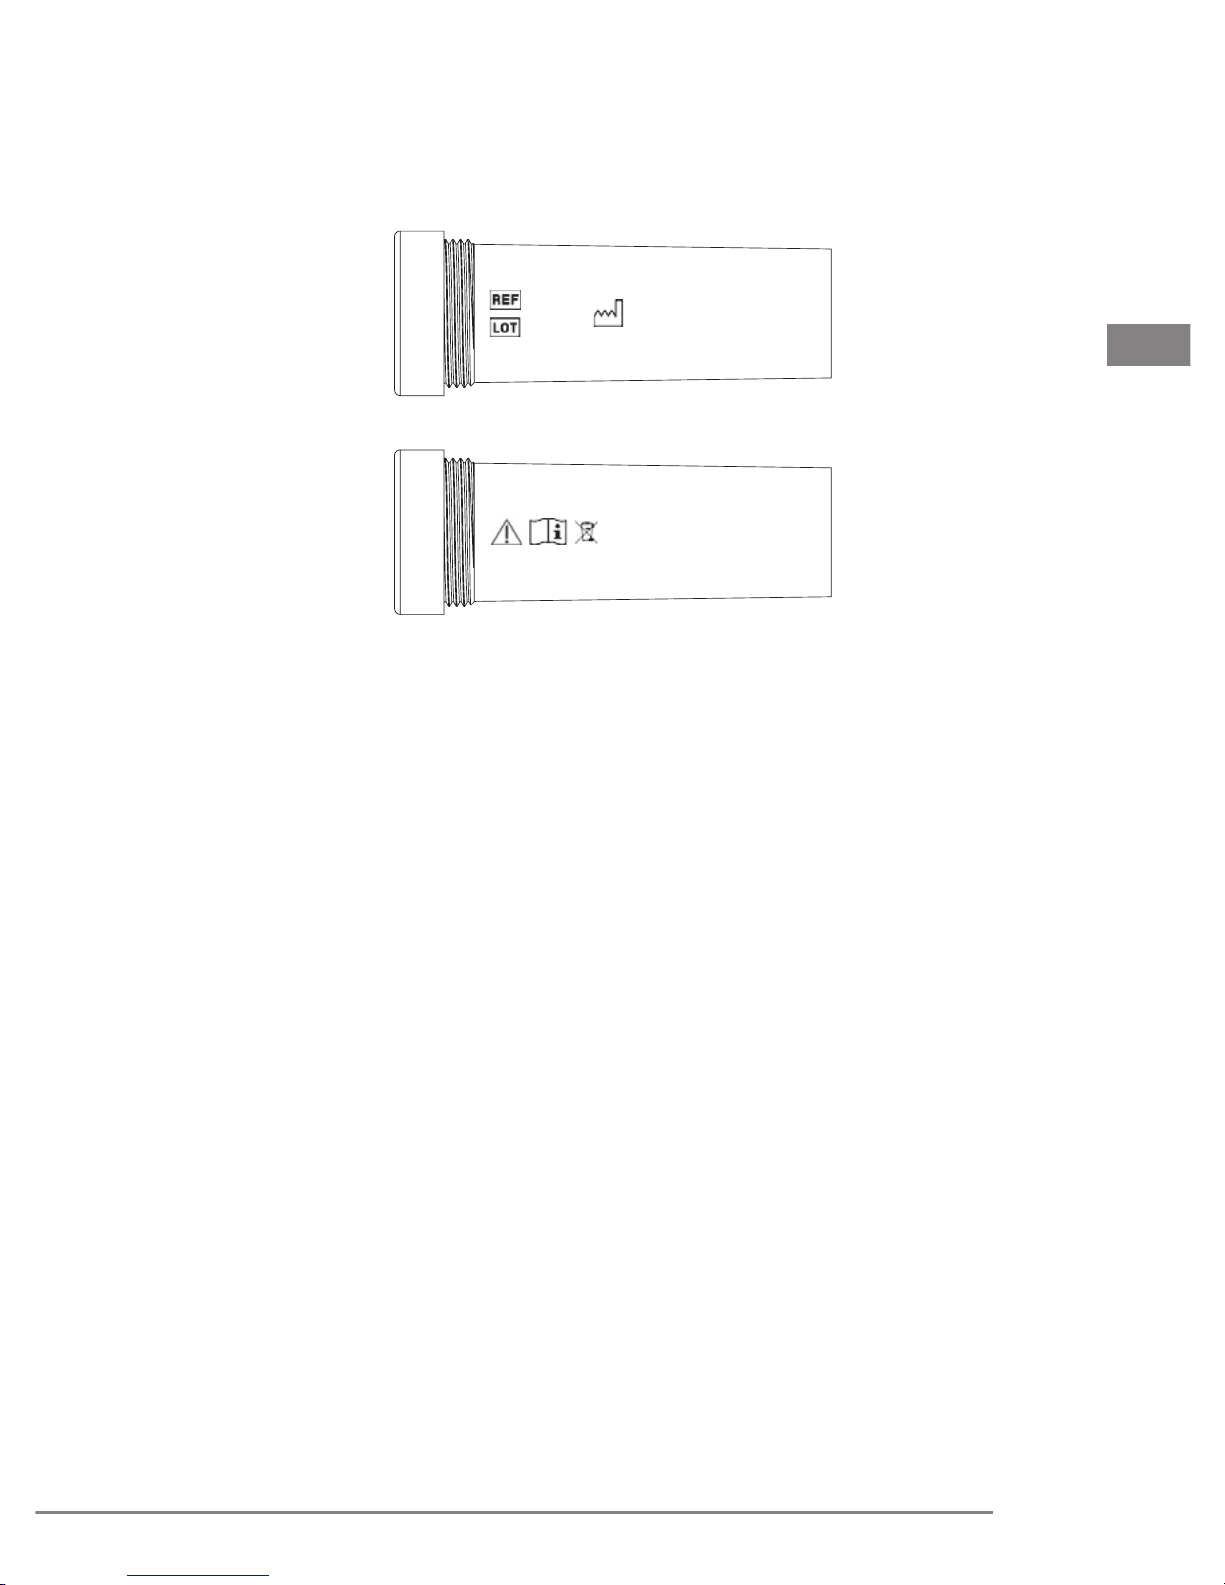
01.4 starlight uno battery module identication data
The batch number and the technical specications are marked on each starlight uno battery
module the batch number and the technical specications (Fig.3).
02.1 Testing of the equipment
00000000
00000000
YYYY-MM-DD
EN
Li-Ion Battery 3,6V 0,8Ah
Fig. 3
02.0 Testing
All equipment manufactured by MECTRON is thoroughly checked and tested, including all
components.
During the testing procedure the components are subjected to a number of work cycles.
The tests highlight any malfunctioning due to faulty components.
This procedure ensures proper functioning and reliability of all components.
03.0 Delivery
03.1 Delivery of the equipment
The equipment contains electronic components that may be damaged by impacts even inside the
packaging. Special care must therefore be taken for both transport and storage.
All material shipped by MECTRON is checked at the time of shipment.
The equipment is delivered properly protected and packaged.
At the time of receipt of the equipment check it for possible transport damage. If any damage is
found, make a complaint to the carrier.
starlight uno - manual of use and maintenance
37
Page 8
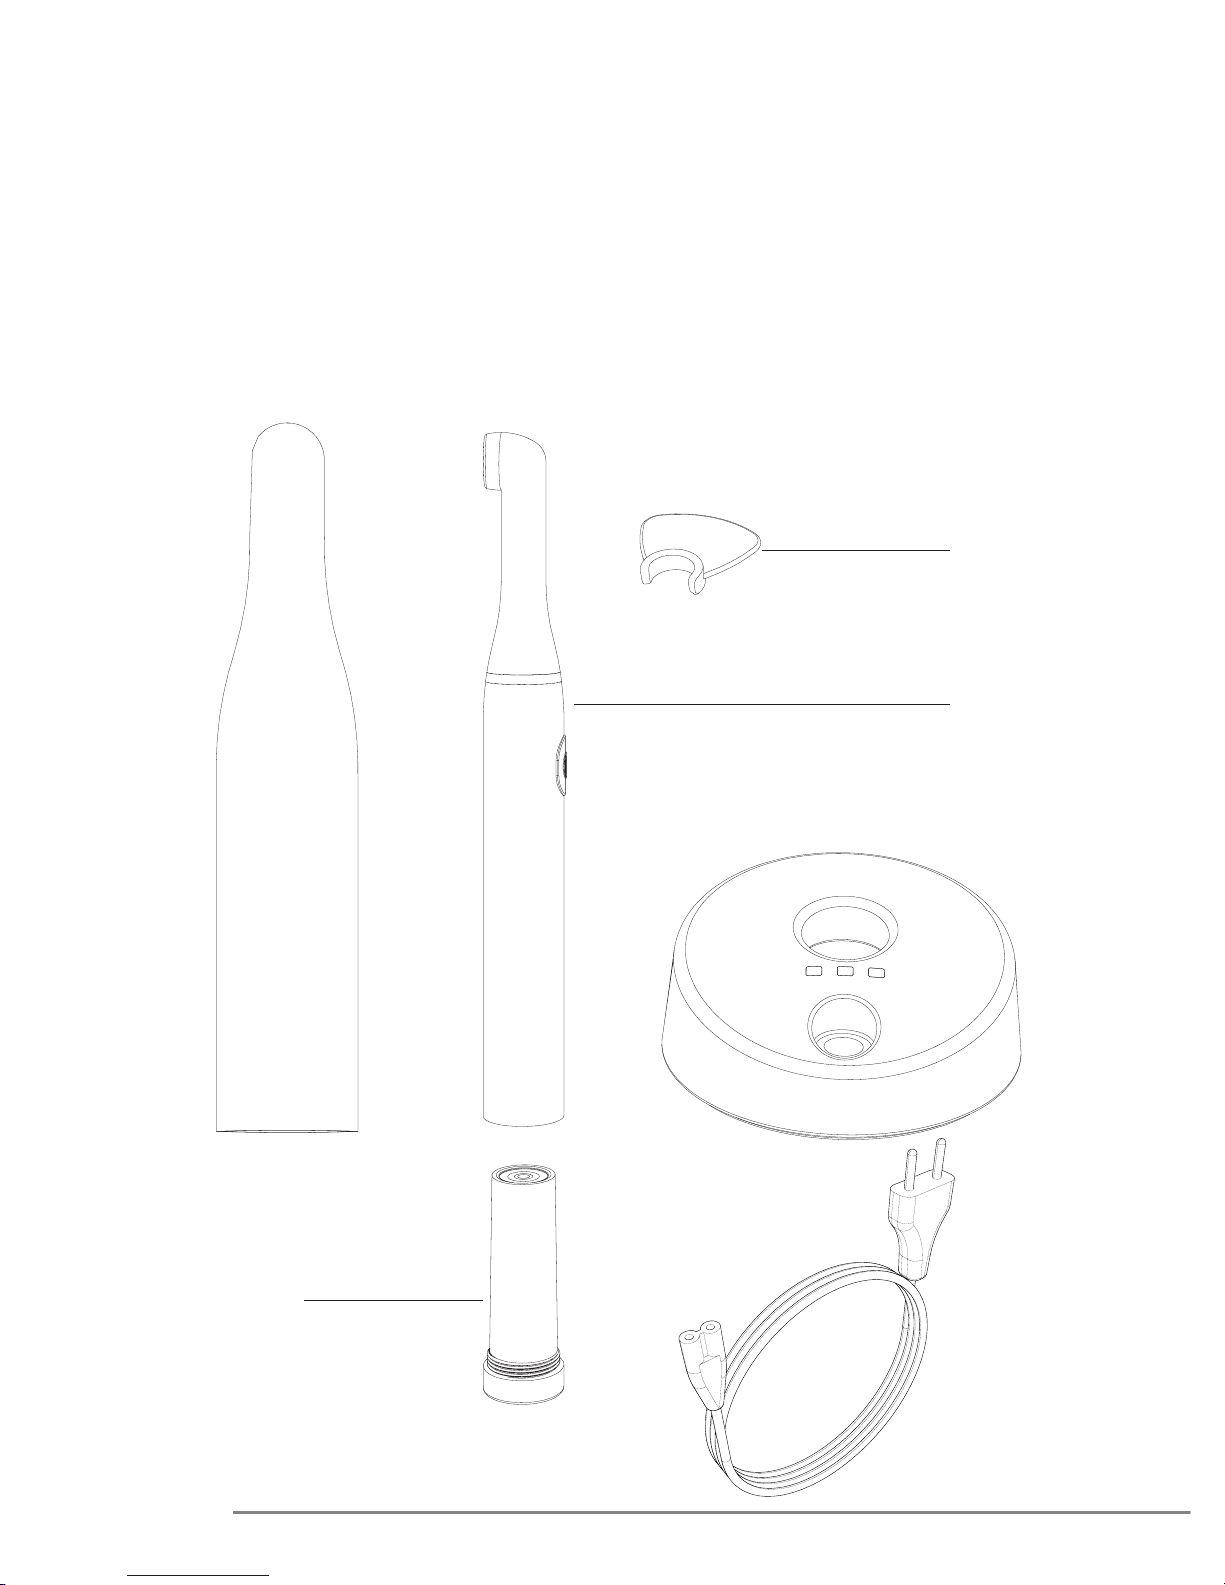
03.2 List of material included in the standard supply
1 starlight uno charging unit (Fig.4 - Ref.A).
1 starlight uno handpiece (Fig.4 - Ref.B).
1 Rechargeable lithium-ion battery module (Fig.4 - Ref.C).
1 Optical protection (Fig.4 - Ref.D).
50 Single use protective sheaths (Fig.4 - Ref.E).
1 Power supply cable for the charging unit (Fig.4 - Ref.F).
This equipment may vary at the time of promotional campaigns.
D
B
A
E
F
C
38
Fig. 4
starlight uno - manual of use and maintenance
Page 9
04.0 Installation
04.1 Safety requirements at the time of installation
WARNING: The wiring system of the premises where the equipment is installed and used must
comply with the applicable standards and the relevant electrical safety requirements.
WARNING: Risk of explosion. The equipment cannot operate in environments where there
are saturated atmospheres of ammable gases (anaesthetic mixtures, oxygen, etc.).
WARNING: Install the equipment in a place where it will be protected from shocks and from
accidental sprays of water or other liquids.
WARNING: Do not install the equipment above or in the vicinity of sources of heat. Make sure
that there is sufcient air circulating around the equipment.
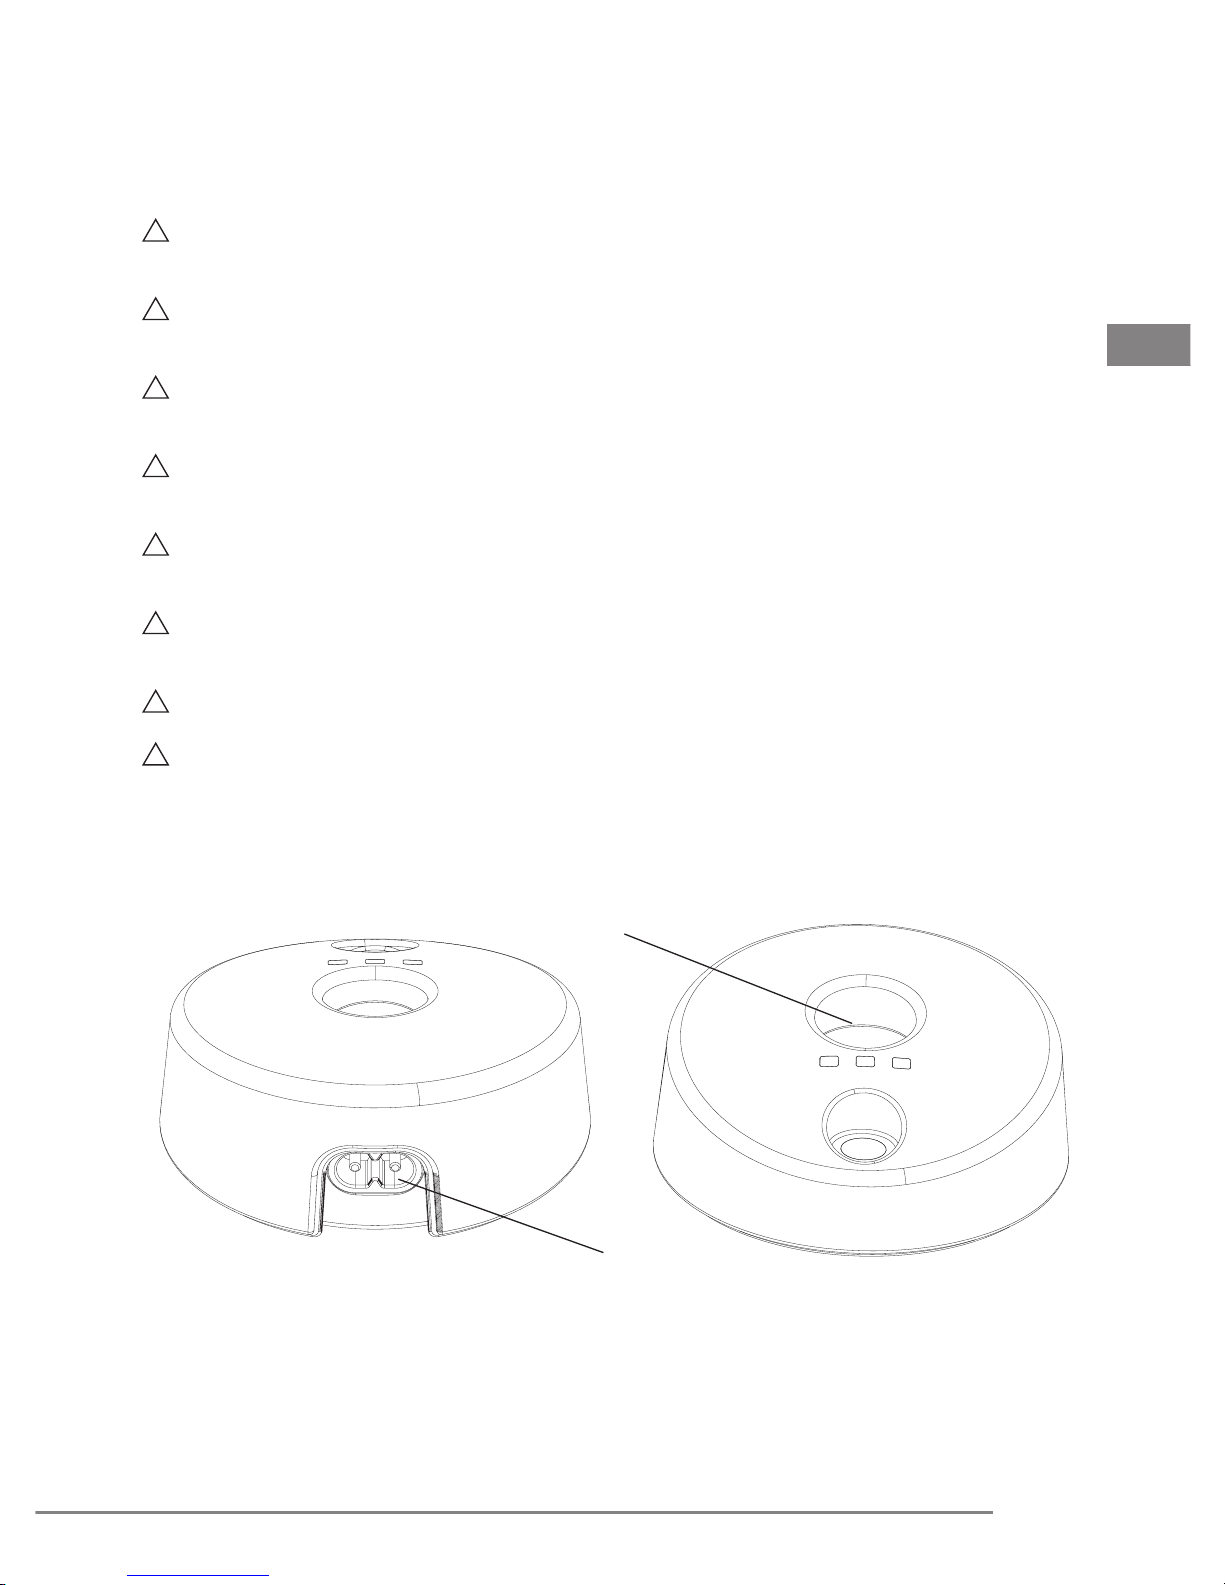
WARNING: Do not insert metal objects into the handpiece of the charging unit (Fig.5 - Ref.B)
when the device is on.
CAUTION: The equipment is transportable, however it must be handled with care when it is
moved.
EN
CAUTION: Do not expose the equipment to direct sunlight or to sources of UV light.
CAUTION: Always position the device in a way that the power plug is easily accessible at all
times; this is considered a insulation means.
B
A
starlight uno - manual of use and maintenance
Fig. 5
39
Page 10
04.2 Connecting the equipment
In order to make the equipment operational it is necessary to proceed as follows:
1 Place the charging unit on a at surface.
2 Plug the power cable (Fig.4 - Ref.D) into the connector on the rear of the equipment (Fig.5 -
Ref.A) and then into the power outlet. The green power LED should light up (Fig.7 - Ref.A).
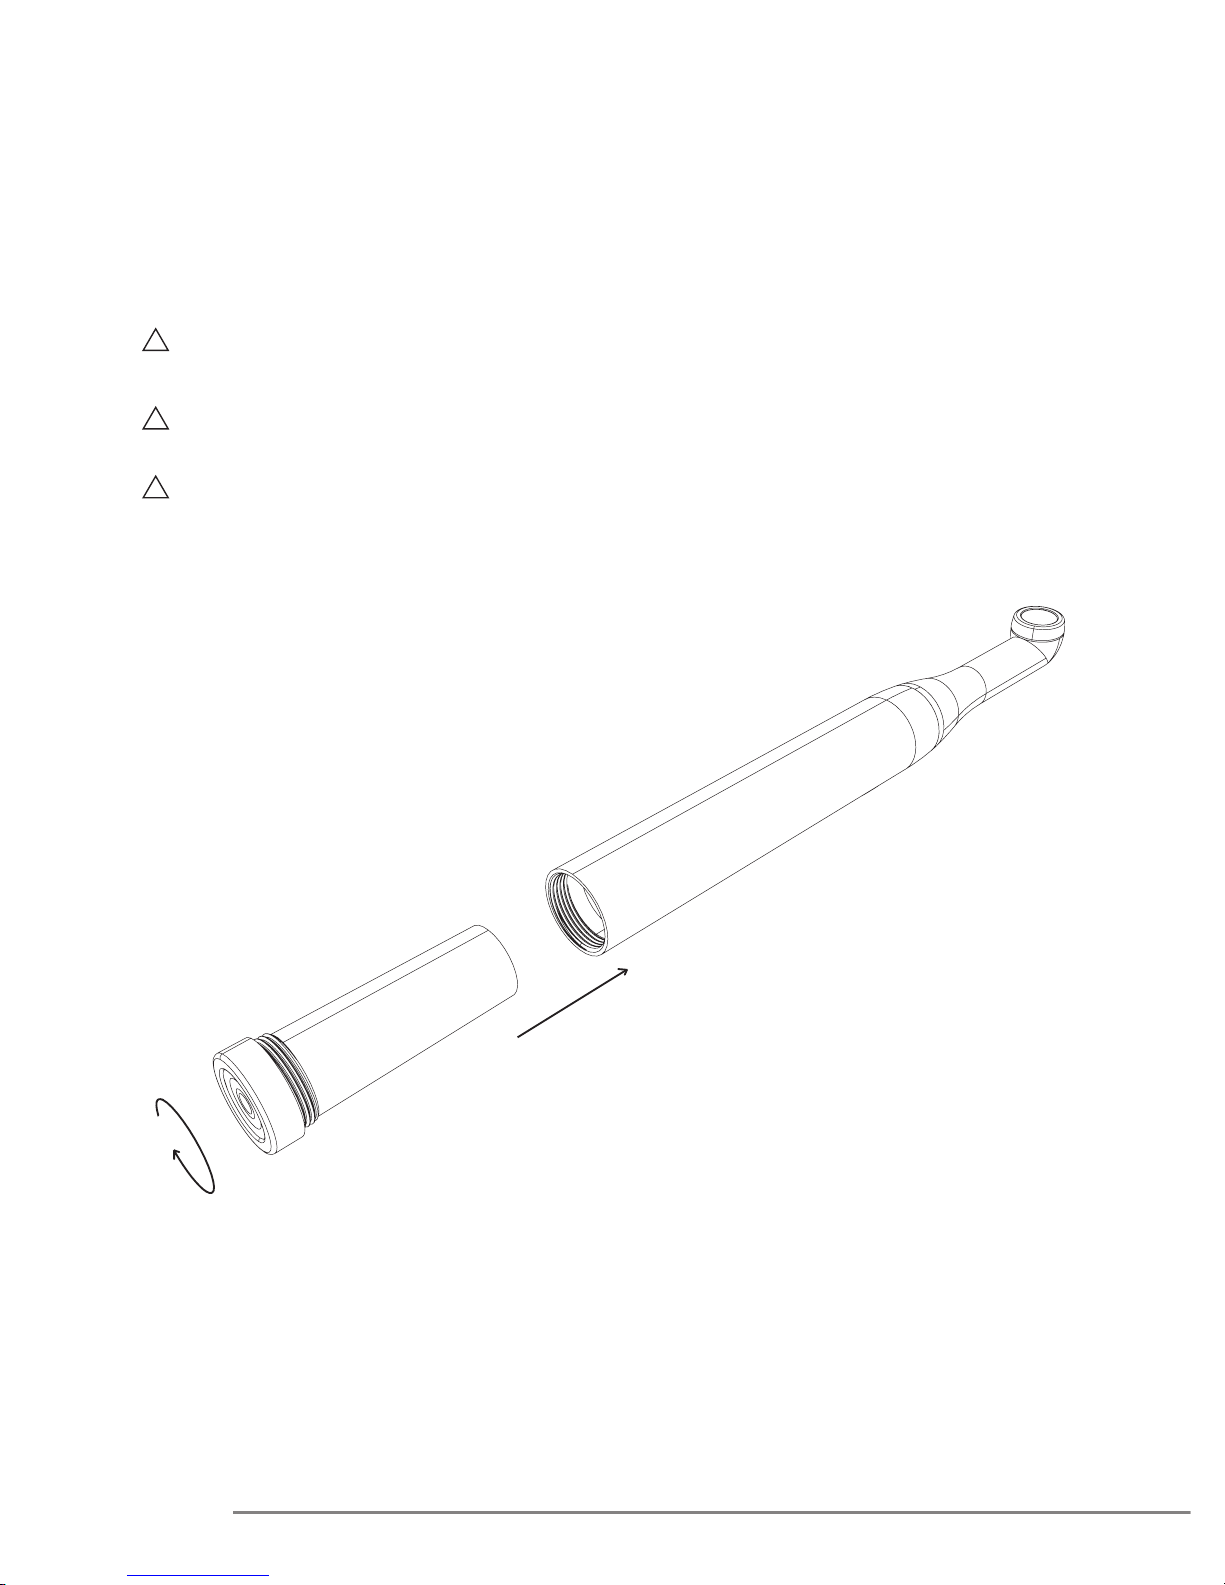
3 Connect the battery module to the handpiece by tightening the nut of the battery module to the
handpiece as shown in Fig.6.
CAUTION: Make sure that the voltage and frequency of the power-supply line match the values
indicated on the identication label under the charging unit.
WARNING: Check the condition of the power cable regularly. If it is found to be damaged,
replace it with an original Mectron spare parts.
CAUTION: Always position the device in a way that the power plug is easily accessible at all
times; this is considered a insulation means.
40
Fig. 6
starlight uno - manual of use and maintenance
Page 11
04.3 Description of the controls and
signalling lamps
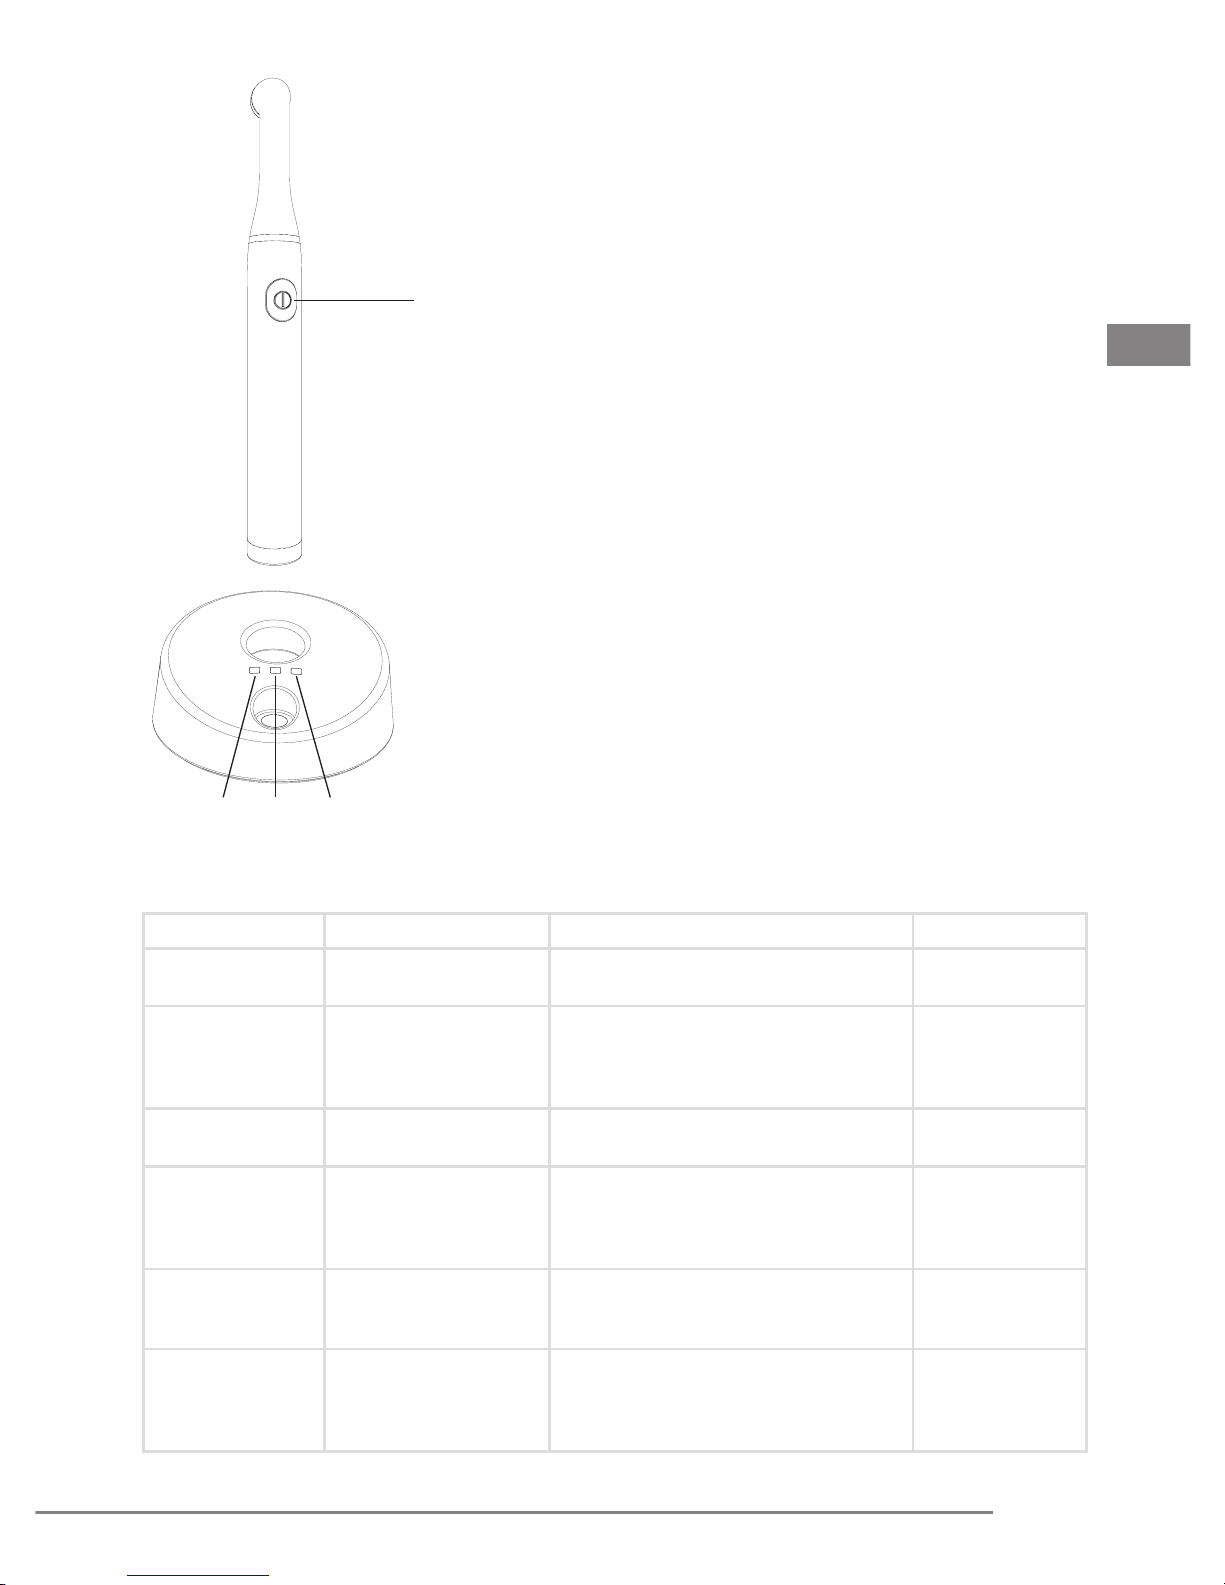
Description of the controls (Fig. 4):
Ref. A - Green power LED.
Function: This indicates that the charging unit is
D
powered up.
Ref. B - Green battery LED.
Function This indicate that the starlight uno battery is
being charged.
Ref. C - test LED.
Function Green: Indicates that the light intensity is
suitable for effective therapy.
Yellow: Indicates that the light intensity is
insufcient.
Ref. D - on/off button
Function: This starts or stops a polymerisation cycle.
C
BA
Fig. 7
Description of the acoustic and light signals of the handpiece (Table 1):
EN
Function Button control Acoustic signal Light signal
FAST
polymerisation
SLOW RISE
polymerisation
Interruption of
exposure cycle
Battery low signal.
The residual
charge is sufcient
for 6 cycles.
Battery dead
signal
Thermal protection
signal
Brief pressure of on/off
button
Pressure of on/off
button for at least 2
seconds
Brief pressure of on/off
button during exposure
Pressure of on/off button for FAST or SLOW
RISE polymerisation
1 beep on starting exposure
1 beep on completing exposure 10 sec.
1 beep when starting and 1 beep after
2 sec.
1 beep after 10 sec. of exposure
1 beep on completing exposure 20 sec.
1 beep
2 beeps on completing the exposure
cycle
2 beeps - No light emission
3 beeps at the end of FAST exposure
cycle or in the middle of SLOW RISE
exposure cycle and functioning
interruption
Green LED
steady on
Yellow LED
steady on
Green and yellow
LEDs ashing
Green and yellow
LEDs ashing
starlight uno - manual of use and maintenance
41
Page 12

Description of light signals of the charging unit (Table 2):
Position of
Power LED Battery LED Test LED
ON OFF Not in place Charging unit powered
ON ON In place Battery being recharged
the handpiece in the
charging unit
Function
ON OFF In place
ON OFF OFF Not in place Luminous ux absent.
ON OFF Yellow ON Not in place Luminous ux insufcient.
ON OFF Green ON Not in place
Recharging completed.
Battery charged.
Luminous ux suitable for ef-
fective treatment.
05.0 Battery
The starlight uno is powered by a rechargeable lithium-ion battery already contained inside the
handpiece, with no memory effect.
The starlight uno is equipped with two microprocessors that check the battery continuously and
maintain the optimum battery charging parameters. The handpiece may therefore be placed back
into the charging unit at the end of each treatment and left there, regardless of the charge of the
battery.
05.1 New battery - rst charging
NOTE: The battery of the starlight uno is supplied in a partly charged condition.
To charge the battery completely:
1 Insert the handpiece into its housing in the charging unit (Fig.5 - Ref.B). The green battery LED
will light up (Fig.7 - Ref.B).
2 The charging phase has been completed when the green battery LED extinguishes.
05.2 Battery low signal
When the charge of the battery becomes low, after frequent use of the starlight uno, the
microprocessor will allow 6 more exposures to be carried out (FAST or SLOW RISE) without any
need to recharge the battery.
A battery low state is signalled at the end of each of these 6 cycles by means of 2 beeps.
Once the 6 cycles have been completed, the handpiece enters a battery dead state (see point
“05.3”).
Place the starlight uno back into the charging unit.
05.3 Battery dead signal
The battery of the starlight uno is dead if no light is emitted when the on/off button is pressed and
at the same time an acoustic signal is heard (2 beeps). Recharge the battery:
1 Place the handpiece in its housing in the charging unit (Fig.5 - Ref.B). The green battery LED
will light up (Fig.7 - Ref.B).
2 When the green battery LED extinguishes the recharging phase has been completed.
42
starlight uno - manual of use and maintenance
Page 13
05.4 Battery failed signal
When the low battery handpiece is placed in the charging unit and the battery green LED on the
charging unit remains off this means that there is a fault with the battery (Fig.7 - Ref.B).
NOTE: This failure condition disables operation of the charging unit. To restore proper working
conditions proceed as follows:
1 Remove the handpiece from the charging unit.
2 Cut off the power supply to the charging unit for a few seconds (disconnect the power cable) -
All the LEDs will extinguish.
3 Reconnect the cable of the charging unit. The green power LED will light up.
05.5 Replacing the battery
To replace the faulty battery, unscrew the nut of the battery module, remove it and replace it with a
new one (Fig.6).
05.6 Safety requirements relating to the battery
The battery can cause damage to property and/or personal injuries such as burns if conducting
materials such as jewellery, keys or beaded necklaces come into contact with the exposed
terminals. The conducting material could close an electrical circuit (short circuit) and become very
hot. Make a habit of handling the device with care, particularly if it is placed inside a pocket, bag or
other container in which there are metal objects.
In the case of contact of the terminals with metal objects and consequent short circuit, the lamp
stops and it is necessary to reposition it on the battery charger to resume its operation.
EN
WARNING: Do not insert metal objects into the handpiece of the charging unit (Fig.5 -
Ref.B) when the device is on.
WARNING: Keep the battery out of the reach of children.
CAUTION: Use only original Mectron batteries.
CAUTION: Recharge the battery only with the Mectron charging unit (Fig.3 - Ref.A). Do
not attempt to recharge the battery using a generic battery charger. This entails a risk of
explosion and re.
CAUTION: The battery should be recycled or disposed of in the appropriate manner in
accordance with the law. The battery should not be thrown away with normal waste. The
user will be liable for any damages caused by improper disposal of the battery.
CAUTION: Do not use the battery for purposes other than those for which it is intended.
CAUTION: Do not open, pierce or crush the battery. It contains toxic substances.
CAUTION: Do not burn the battery or expose it to a high temperature. There is a risk of
explosion.
CAUTION: Do not short-circuit the battery terminals. This could cause burns and re.
starlight uno - manual of use and maintenance
43
Page 14
06.0 Use
06.1 Connecting the accessories
WARNING: Check the condition of the device before the treatment.
Before each treatment, always make sure that the equipment is working properly and check
the efciency of the accessories. If any improper functioning is noted, do not proceed with the
treatment. If the problem concerns the equipment contact an authorised technical assistance
centre.
WARNING: Infections control.
For maximum safety of the patient and of the operator, before each treatment, clean and disinfect
the charging unit and the handpiece, cleanse and sterilise the optical protection and replace the
protective sheath. Carefully follow the instructions provided in chapter “07.0”.
WARNING: The protective sheaths are single use. Each protective sheath must be used for
one application only on a single patient.
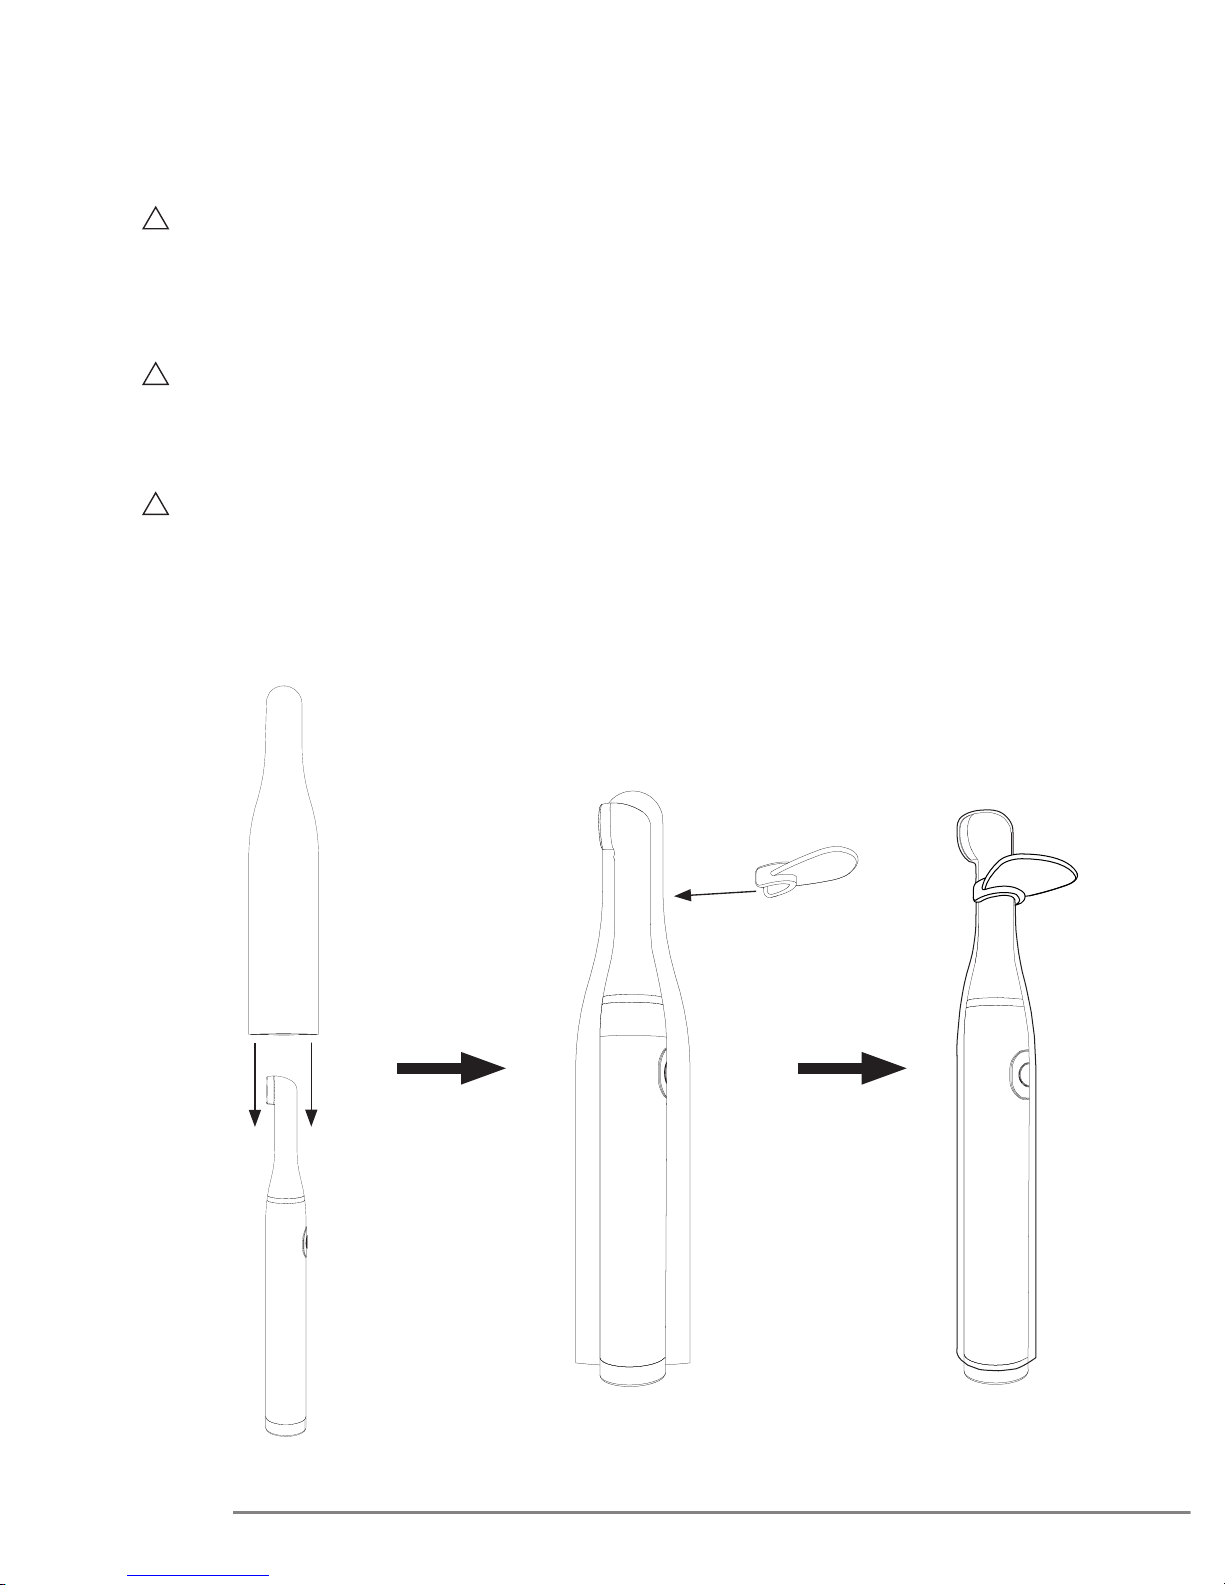
Before using the starlight uno, the following are necessary:
1 Ensure the battery module is correctly connected to the handpiece;
2 Insert the single use protective sheath onto the handpiece (Fig.8 - Ref.A);
3 Fix the optical protection onto the handpiece (Fig.8 - Ref.B).
A
44
B
Fig. 8
starlight uno - manual of use and maintenance
Page 15

06.2 Safety requirements during use
WARNING: Never point the beam of light in the direction of the eyes.
WARNING: Before each cycle of exposure always make sure that the optical protection
has been tted onto the handpiece.
WARNING: Point the beam of light directly onto the material to be polymerised.
Do not subject the gum or other soft tissues to the beam of light (shield these parts suitably if
necessary). The effect of the light should be limited to the oral cavity and in particular to the sector
requiring clinical treatment.
WARNING: Do not insert metal objects into the handpiece of the charging unit (Fig.5 - Ref.B)
when the device is on.
CAUTION: During the rst few seconds of exposure avoid contact of the tip with the
material to be polymerised.
Deposits of composite material adhering to and polymerised to the tip terminal surface lower the
amount of light transmitted and will therefore prejudice subsequent polymerisation operations.
06.3 Instructions for use
The starlight uno can be used in two different modes:
- FAST: exposure time of 10 seconds at the maximum light intensity.
- SLOW RISE: exposure time 20 seconds with a gradual increase of the light intensity during the
rst 3 seconds up to the maximum intensity.
EN
Selecting the FAST exposure mode.
- To start the FAST exposure cycle press the on/off button on the handpiece briey (Fig.7 -
Ref.D). An acoustic signal will be heard (1 beep) and the green LED on the handpiece will light
up.
- After 10 seconds an acoustic signal will be heard (1 beep) and the green LED on the
handpiece will go out. The FAST cycle has been completed.
Selecting the SLOW RISE exposure mode.
- To start the SLOW RISE exposure cycle hold the on/off button on the handpiece down for
2 seconds (Fig.7 - Ref.D). At the start an acoustic signal will be heard and after 2 seconds
another acoustic signal to conrm the SLOW RISE cycle beginning. The yellow LED on the
handpiece will light up.
- After 10 seconds an acoustic signal will be heard (1 beep).
- After 20 seconds an acoustic signal will be heard (1 beep) ) and the yellow LED on the
handpiece will go out. The SLOW RISE cycle has been completed.
After the end of the treatment, remove the protective sheath used and place the starlight uno
handpiece back into the charging unit (Fig.5 - Ref.B).
NOTE: Interrupting the cycle.
Both in the FAST and in the SLOW RISE mode, the exposure cycle can be broken off at any time
by pressing the on/off button on the handpiece (Fig.7 - Ref.D).
NOTE: Additional exposure cycles.
At the end of any exposure cycle, it is possible to carry out one or more additional cycles by
pressing the on/off button on the handpiece again each time (Fig.7 - Ref.D).
For a quick guide to the signalling, see Tables 1 and 2.
starlight uno - manual of use and maintenance
45
Page 16

06.4 Measuring the light intensity
To determine whether the light intensity is sufcient:
1 Place the tip (Fig.7 - Ref.A) at on the surface of the light-intensity sensor without pressing it
(Fig.7 - Ref.B);
2 Press the on/off button (Fig.7 - Ref.C) to switch on the lamp.
The test LED (Fig.7 - Ref.D) will indicate the working luminous ux measured:
- Green = luminous ux suitable for effective treatment;
- Yellow = luminous ux insufcient.
CAUTION: If the working luminous ux is not sufcient, do not proceed with the treatment on
the patient and carry out the following checks:
1 Check that the tip is not dirty;
2 Clean the tip (see point 7.1 - Cleaning and disinfecting the handpiece and the charging unit);
If these measures do not lead to improved performance, place the device out of commission (by
disconnecting it from the mains) and make sure that it cannot be started by unauthorised persons.
Any repair work on the device should be carried out by an authorised Mectron service centre.
06.5 Safety protection
In the event of extremely heady duty use, with long and repeated exposure cycles, a thermal
protection device is triggered automatically. An acoustic signal (3 beeps) will be heard. This
protection device will temporarily prevent use of the lamp for a few minutes. The yellow and green
LEDs ash.
46
starlight uno - manual of use and maintenance
Page 17
07.0 Cleaning, disinfection and sterilisation
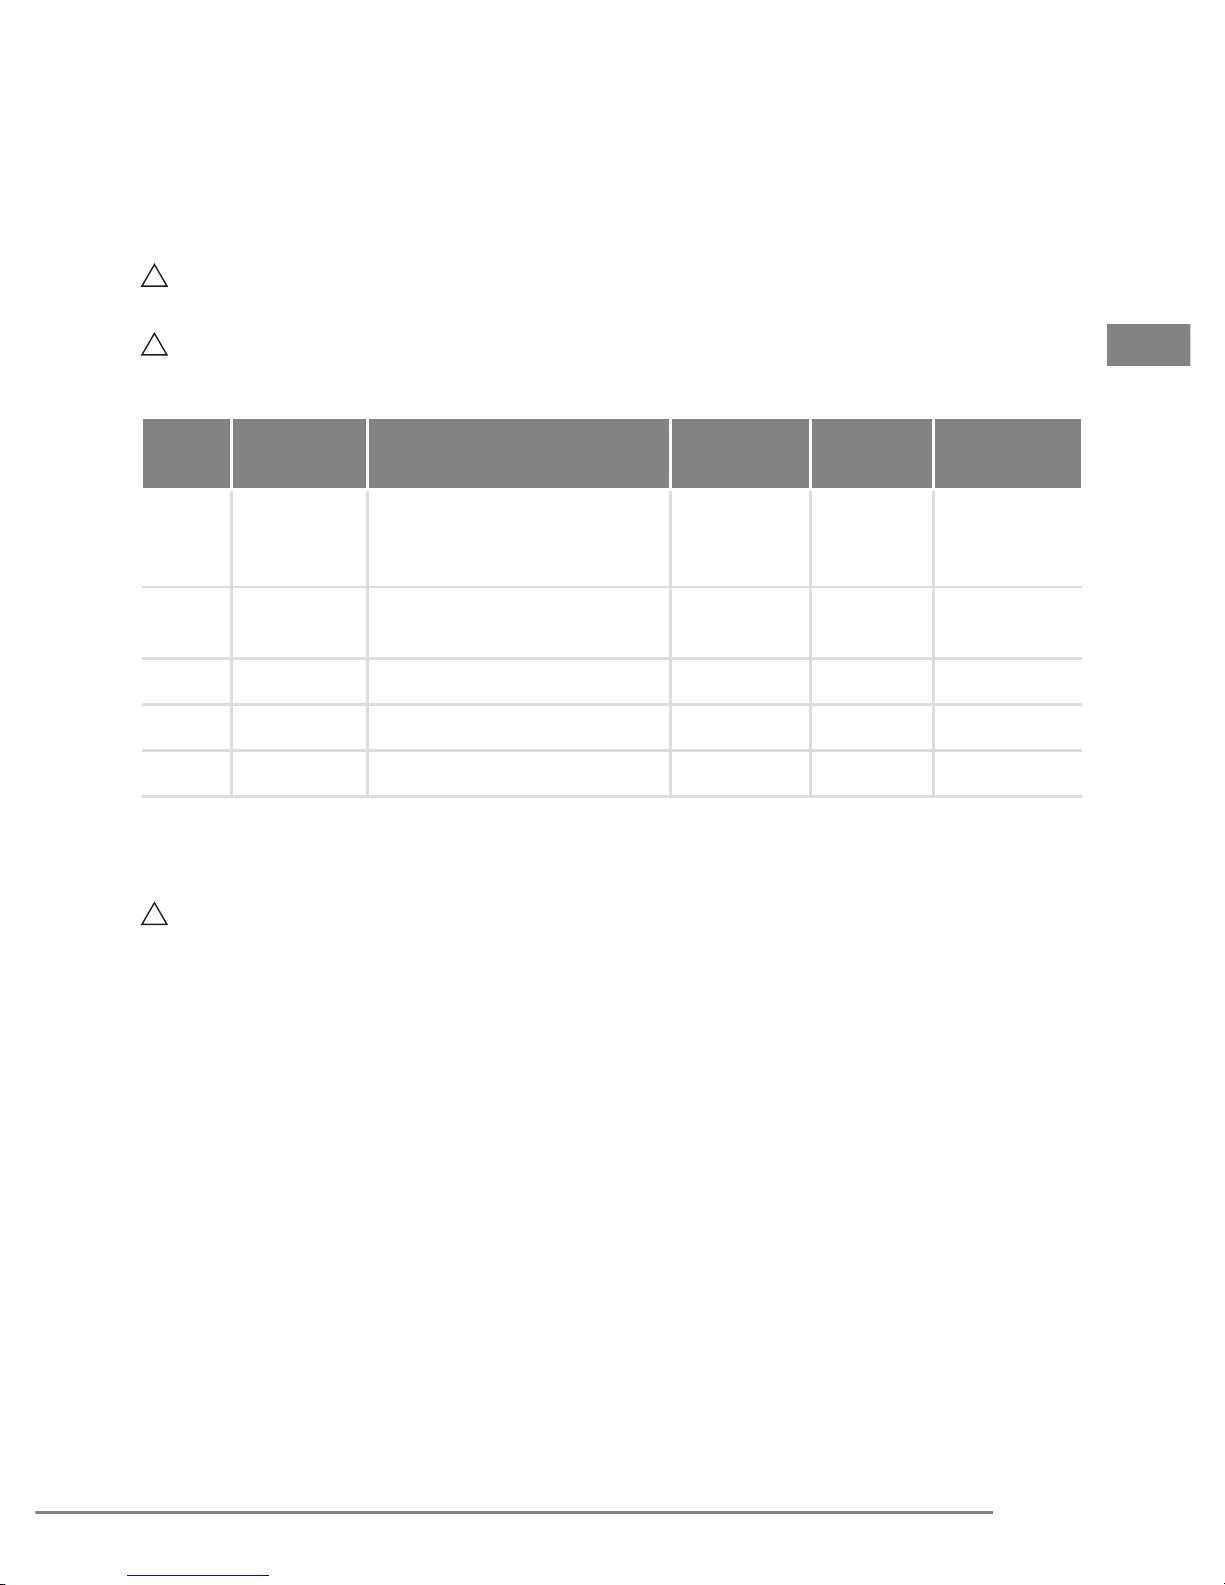
This table is purely indicative.
For the complete cleaning, disinfecting and sterilization procedures of the individual parts, refer to
the paragraphs indicated in the table.
CAUTION: All the phases indicated in the following table must be performed, avoiding using
methods not referred to in that table.
WARNING: The protective sheaths are single use. Each protective sheath must be used for
one application only on a single patient.
EN
Phase Paragraph Procedure Handpiece
Manual cleaning with
I 07.1
II 07.2.1
III 07.2.2 Check cleaning X
IV 07.2.3 Drying X
V 07.2.4 Sterilisation X
detergent solution and
disinfecting agent
Immersion into enzymatic
detergent
X X
Charging
unit
Optical
protection
X
07.1 Cleaning and disinfection of the handpiece and the charging unit
WARNING: Switch off the charging unit.
Before carrying out any cleaning and disinfection, disconnect the charging unit from the mains
power supply.
PREPARATION
- Remove the handpiece from the charging unit;
- Remove the optical protection from the handpiece;
- Remove the protective sheath from the handpiece.
MATERIALS NECESSARY
- Clean, soft cloths with low ber-release;
- Detergent solution (pH 6-9);
- Demineralised water;
- Disinfectant agent (Glutaraldehyde, Ghlorhexidine gluconate or Isopropyl alcohol 70%).
CLEANING METHOD
1 Clean the surface of the charging unit and the handpiece with a clean, soft and low bre
release cloth, dampened with a cleaning solution (pH 6-9) prepared according to the
manufacturer’s instructions;
2 Clean the surface of the charging unit and the handpiece with a clean, soft and low bre
release cloth, dampened with demineralised water to remove all residues of the cleaning
solution;
starlight uno - manual of use and maintenance
47
Page 18
3 Dry the surface of the charging unit and the handpiece with a clean, soft and low bre release
cloth;
4 If you intend to disinfect, spray the disinfecting agent onto a clean, soft and low bre release
cloth and clean the surface of the charging unit and of the handpiece.
CAUTION: Do not use as disinfecting agents:
• Very alkaline products (pH > 9);
• Products containing sodium hypochlorite;
• Products containing hydrogen peroxide;
• Products containing abrasive substances;
• Acetone;
• Methylethylketone.
as they can discolour and/or damage the plastic materials.
CAUTION: Contact of liquid with the lamp terminals can cause damage and therefore voids the
warranty.
CAUTION: Contact of liquid with the LED causes damage and therefore voids the warranty.
CAUTION: Do not spray liquid directly onto the surface of the charging unit and/or of the
handpiece.
CAUTION: The casing of the charging unit and/or the handpiece are not protected against the
entry of liquids.
CAUTION: The charging unit and the handpiece should not be sterilised.
07.2 Cleaning and sterilisation of the optical protection
07.2.1 Manual cleaning
CAUTION: The only part of the device that can be sterilised is the optical protection.
MATERIALS NECESSARY
- Clean, soft cloths with low ber-release;
- Enzymatic detergent at pH 6-9;
- Water;
- Container for immersion in the enzymatic liquid;
- Brush with soft nylon bristles.
CAUTION: Do not use sharp-edged objects to clean the optical protection.
CLEANING METHOD
1 Prepare an enzymatic detergent solution with pH 6-9, as per the instructions of the
manufacturer;
CAUTION: Once used, dispose of the enzymatic detergent correctly, do not recycle it.
2 Place the optical protection horizontally in a clean container and add enzymatic detergent
solution until the optical protection is covered completely;
3 Let the optical protection soak for 10 minutes at 40°C ±2°C;
4 During immersion in the enzymatic solution, delicately brush the surface of the optical
protection using the brush with soft nylon bristles to eliminate all traces of visible dirt;
5 Delicately brush the surface of the optical protection under running water using the brush with
soft nylon bristles;
48
starlight uno - manual of use and maintenance
Page 19
CAUTION: Do not use as disinfecting agents:
• Very alkaline products (pH > 9);
• Products containing sodium hypochlorite;
• Products containing hydrogen peroxide;
• Products containing abrasive substances;
• Acetone;
• Methylethylketone.
as they can discolour and/or damage the plastic materials
07.2.2 Check cleaning
Once the cleaning operations have been completed, visually inspect the optical protection under an
adequate source of light, if necessary using a magnifying glass 2.5X, paying attention to the details
that could conceal dirt residue (threading, cavities, grooves) and, if necessary, repeat the cleaning
cycle if dirt is still visible. Finally, check the integrity of those parts and those elements that could
have deteriorated during use.
07.2.3 Drying
Thoroughly dry all parts of the optical protection with a soft low bre release cloth, possibly blowing
with compressed air.
EN
07.2.4 Sterilisation
CAUTION: Carry out sterilisation only in a steam autoclave. Do not use any other
sterilisation procedures (dry heat, radiation, ethylene oxide, gas, low-temperature plasma, etc.).
CAUTION: The optical protections are made from materials able to withstand a maximum
temperature of 135°C for a maximum period of 20 minutes.
WARNING: Infections control - Sterilisable parts.
To avoid infection by bacteria or viruses, carefully remove any remaining organic dirt prior to
sterilisation.
STERILISATION PROCEDURE
Seal the optical protection individually in a disposable bag for sterilisation and proceed with the
process of sterilisation in a steam autoclave.
The sterilization process, in a steam autoclave, guarantees SAL 10
indicated below:
- Type of cycle: 3 times Pre-vacum (pressione min. 60 mBar).
- Minimum sterilisation temperature: 132 °C (interval 0 °C ÷ +3 °C).
- Minimum sterilisation time: 4 minutes.
- Minimum drying time: 10 minutes.
All the stages of sterilisation must be carried out by the operator in accordance with UNI EN ISO
17665-1:2007, UNI EN ISO 556-1:2002 and ANSI/AAMI ST 46:2002.
-6
by setting the parameters
starlight uno - manual of use and maintenance
49
Page 20

08.0 Disposal procedures and precautions
-
- This equipment must be disposed of and treated as waste requiring separate collection;
- At the end of the life-cycle of this equipment, the purchaser is entitled to return the equipment
- Failure to comply with the foregoing points may entail punishment in accordance with Directive
Treat the following items as hospital waste:
- Optical protection, when worn or broken;
- Protective sheath, at the end of each application.
CAUTION: This device contains a LITHIUM-ION battery. The battery must be disposed
of and treated as waste requiring separate collection;
to the dealer supplying new equipment. Instructions for disposal are available from Mectron
S.p.A.;
about waste of electrical and electronic equipment WEEE.
WARNING: Hospital waste.
50
starlight uno - manual of use and maintenance
Page 21
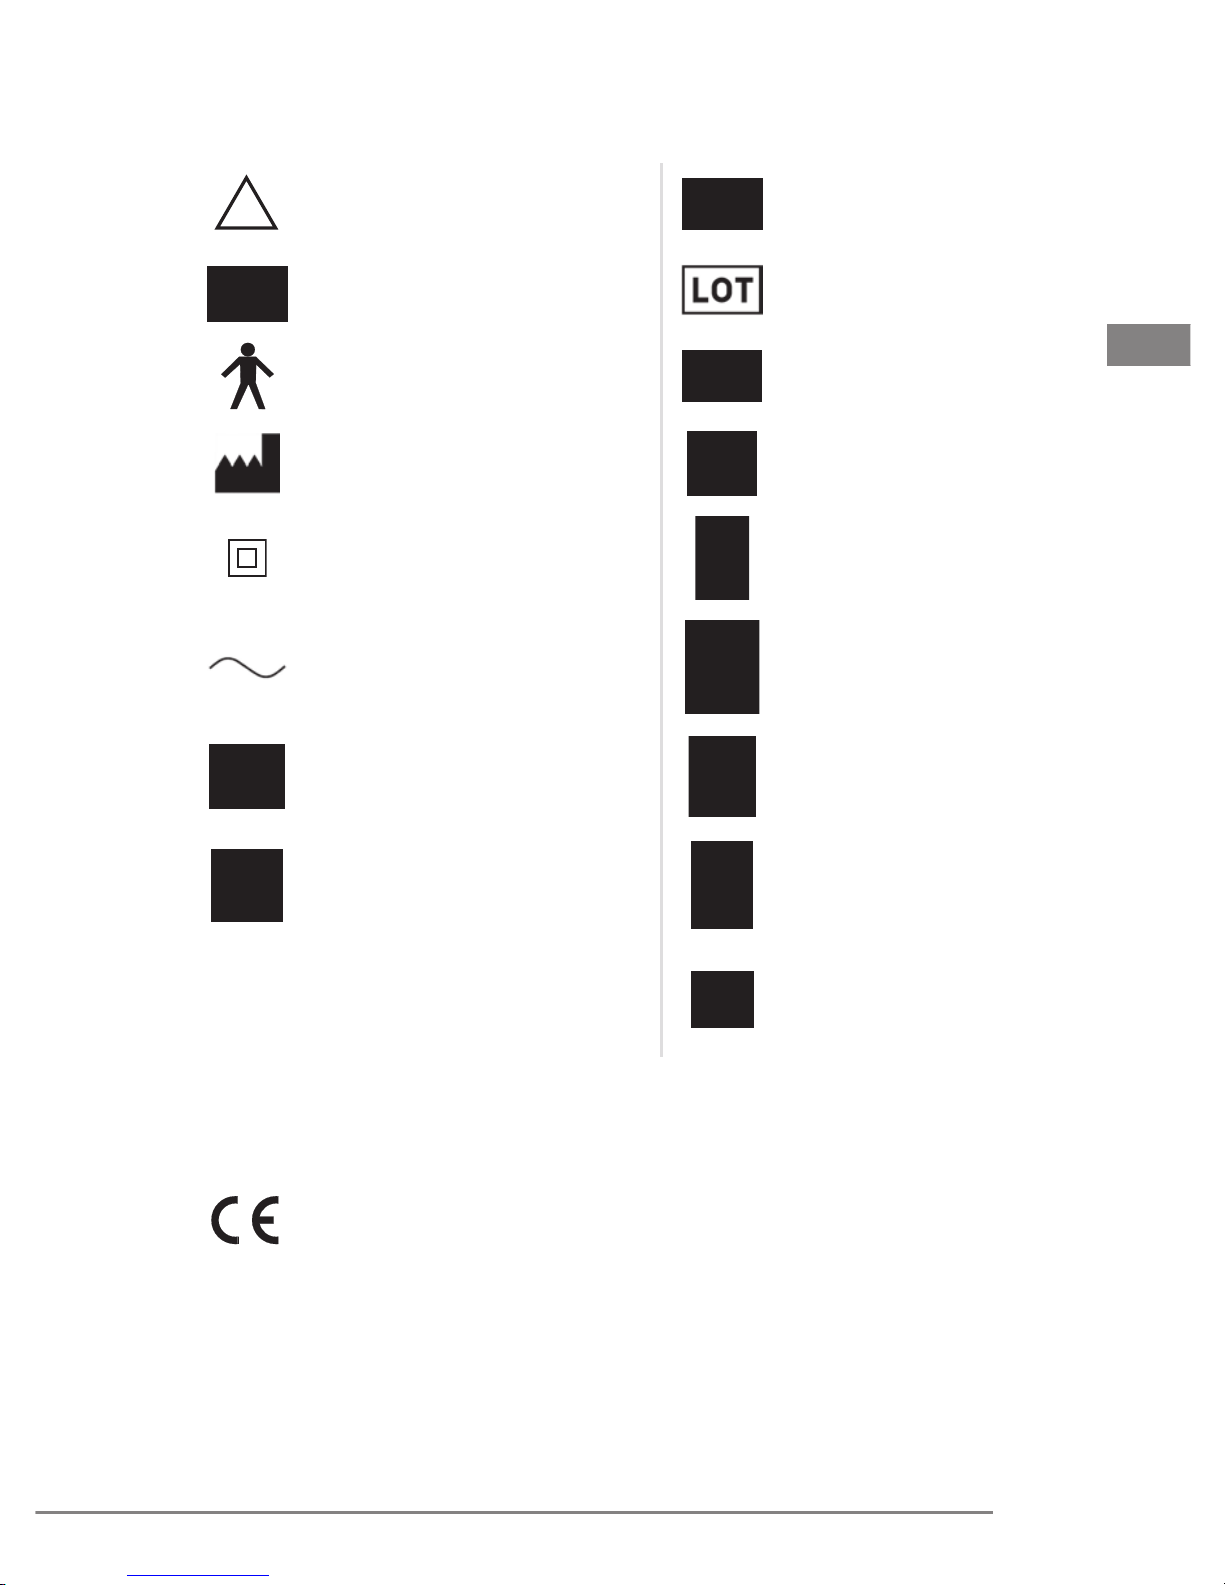
09.0 Symbols
CAUTION, See instructions for
use
Consult operating instructions Lot number
Type “B” applied part in conformity
with technical norm IEC/EN
60601-1
Manufacturer Date of manufacture
Class II apparatus
Alternate current
Non sterile
Serial number
EN
Catalogue number
Temperature limitation - transport
and storage conditions
Humidity limitation - transport and
storage conditions
Atmospheric pressure
limitation - transport and
storage conditions
Can be sterilised in autoclave
up to a maximum temperature of
135 °C
Symbol ISO 7010-W001
Generic CAUTION symbol
The device and its accessories
must not be disposed of or
treated as solid urban waste
Do not re-use
Nemko Mark
Conformity to norms UL - CSA
Device manufactured in conformity with directive 93/42/EEC
including technical norms EN 60601-1 and EN 60601-1-2.
starlight uno - manual of use and maintenance
51
Page 22

10.0 Problem-solving
If the equipment appears not to be working correctly, read the instructions again and then check the
following table.
PROBLEM POSSIBLE CAUSE SOLUTION
The charging unit does not
switch on (none of the LEDs
will light up).
There is no beam of light
when the on/off button of the
starlight uno is pressed and
an acoustic signal is heard (2
beeps).
An acoustic signal is heard ad
the end of the exposure cycle
(2 beeps).
An acoustic signal (3 beeps)
is heard during the exposure
cycle and at the end of the
cycle starlight uno will not
enable any further treatment
to be carried out.
The power cable is not
connected correctly.
The power cable is faulty.
The charging unit is out of
order.
Battery dead.
Battery low.
The thermal protection has
been activated.
Connect the cable both to the
charging unit and to the wall
socket.
Replace the power cable.
Contact an authorised
MECTRON technical
assistance centre.
Recharge the battery. See
point “05.3”.
Recharge the battery. See
point “05.2”.
It will be possible to use the
equipment only after it has
cooled down.
The polymerisation is
insufcient.
An acoustic signal is heard (4
beeps) and there is no beam
of light.
52
The terminal surface of the tip
is soiled.
Hardware failure. Contact an authorised
starlight uno - manual of use and maintenance
See point “07.5”.
MECTRON technical
assistance centre.
Page 23

11.0 Technical specications
This equipment complies with Directive 93/42/EEC: Class I
Class according to IEC/EN 60601-1: II
Applied part type B (Tip)
IP 20 (Charging unit)
IP 20 (Handpiece)
Essential performances: According to Standard IEC 80601-2-60 the device
does not have essential performances
Charging station: Model starlight uno -CHARGER-
Charging station power supply requirements: 100-240 V~ 50/60 Hz 15 VA
Power supply of starlight uno handpiece: Rechargeable Lithium-ion battery.
Manufacturer: Panasonic. Model: UR-14500.
Nominal Voltage: 3.6 V
Nominal capacity (Typical): 840 mAh
Handpiece for intermittent operation: 60” ON 60” OFF Max 3 times running
Source of light: High luminosity LED with opti.
Dominant wave length: 440 - 465 nm LED in class
2 (IEC 62471) retinal risk from blue light or thermal
retinal risk.
Esposure: FAST: Exposure time 10 seconds
- Acoustic signals indicating start and end of
exposure.
SLOW RISE: Exposure time 20 seconds
- Acoustic signal at the start, after 10 seconds and
at the end of the 20 seconds.
The cycles can be stopped or repeated at any
time.
EN
Time required to recharge a dead battery: About 4 hours.
Ch: CC-CV 200mA ±10% 4,20V ±1%
Operating conditions: from 10 °C to 35 °C
Relative Humidity from 45% to 85%
Air pressure P: 800 hPa/1060 hPa
Transport and storage conditions: from -20 °C to 40 °C
Relative Humidity from 45% to 85%
Air pressure P: 500 hPa/1060 hPa
Weights and dimensions: Charging unit: Weight 108 g
93 x 93 x 40 mm
starlight uno handpiece: Weight 77 g
L 190 mm Max. Ø 21 mm
starlight uno - manual of use and maintenance
53
Page 24
11.1 Electromagnetic compatibility IEC/EN 60601-1-2
WARNING: The device requires specic EMC precautions and must be installed and started up
in accordance with the EMC information given in this paragraph.
WARNING: Portable and mobile radio communication appliances may affect the correct
functioning of the device.
Guidance and manufacturer’s declaration - Electromagnetic emissions
The starlight uno is intended for use in the electromagnetic environment specied below.
The customer or the user of the starlight uno should assure that it is used in such an environment.
Emissions test Compliance Electromagnetic environment - Guidance
RF emissions
CISPR 11
RF emissions
CISPR 11
Harmonic emissions
IEC 61000-3-2
Voltage uctuations / icker
emissions
IEC 61000-3-3
Group 1 The starlight uno uses RF energy only for its internal
function. Therefore, its RF emissions are very low and are not
likely to cause any interference in nearby electronic equipment.
Class B The starlight uno is suitable for use in all establishments, includ-
ing domestic establishments and those directly connected to the
Class A
Complies
public low-voltage power supply network that supplies buildings
used for domestic purposes.
54
starlight uno - manual of use and maintenance
Page 25
Guidance and manufacturer’s declaration - Elettromagnetic immunity
Enclosure port
The starlight uno device is designed to work in the electromagnetic environment specied below.
The client or user of the starlight uno device should always make sure that it is used only in such
environment.
Phenomenon
Electrostatic
discharge (ESD)
Basic EMC
standard or test
Immunity test levels
method
IEC 61000-4-2 ±8 kV contact
±2 kV, ±4 kV, ±8 kV,
±15 kV air
Floors must be wood,
concrete or ceramic. If the
oor is lined with synthetic
Electromagnetic
environment - Guidance
materials, the relative
humidity should be at least
30 %
Radiated RF EM
a)
elds
IEC 61000-4-3 3 V/m
80 MHz - 2,7 GHz
80 % AM at 1 kHz
f)
b)
c)
Portable or mobile RF
communication device must
not be used in close proximity
of the product, including its
cables, except when these
respect the distances of
separation recommended and
calculated from the equation
applicable to the frequency of
the transmitter.
Rated power
frequency
magnetic elds
IEC 61000-4-8 30 A/m
50 Hz or 60 Hz
d) e)
g)
Grid frequency magnetic
elds should have levels
characteristic of a typical
commercial or hospital
environment.
a)
The interface between the PATIENT physiological signal simulation, if used, and the starlight uno shall be located within 0, 1 m of
the vertical plane of the uniform eld area in one orientation of the starlight uno.
b)
starlight uno that intentionally receive RF electromagnetic energy for the purpose of their operation shall be tested at the
frequency of reception. Testing may be performed at other modulation frequencies identied by the RISK MANAGEMENT
PROCESS. This test assesses the BASIC SAFETY and ESSENTIAL PERFORMANCE of an intentional receiver when an ambient
signal is in the passband. It is understood that the receiver might not achieve normal reception during the test.
c)
Testing may be performed at other modulation frequencies identied by the RISK MANAGEMENT PROCESS.
d)
Applies only to starlight uno with magnetically sensitive components or circuitry.
e)
During the test, the starlight uno may be powered at any NOMINAL input voltage, but with the same frequency as the test
signal.
f)
Before modulation is applied.
g)
This test level assumes a minimum distance between the starlight uno and sources of power frequency magnetic eld of at least
15 cm. If the RISK ANALYSIS shows that the starlight uno will be used close than 15 cm to sources of power frequency magnetic
eld, the IMMUNITY TEST LEVEL shall be adjusted as appropriate for the minimum expected distance.
EN
starlight uno - manual of use and maintenance
55
Page 26

Guidance and manufacturer’s declaration - Elettromagnetic immunity
Input a.c. power port
The starlight uno device is designed to work in the electromagnetic environment specied below.
The client or user of the starlight uno device should always make sure that it is used only in such
environment.
Phenomenon
Electrical fast
transients / bursts
a) l) o)
Basic EMC standard
or test method
Immunity test levels
IEC 61000-4-4 ±2 kV contact
100 KHz repetition
frequency
The quality of the power
supply should be that of a
typical commercial or hospital
Electromagnetic
environment - Guidance
environment.
Surges
Line-to-line
a) b) j) o)
IEC 61000-4-5 ± 0,5 kV, ± 1 kV The quality of the power
supply should be that of a
typical commercial or hospital
environment.
Surges
Line-to-ground
b) j) k) o)
IEC 61000-4-5 ± 0,5 kV, ± 1 kV, ± 2kV The quality of the power
a)
supply should be that of a
typical commercial or hospital
environment.
Conducted
disturbances induce
by RF elds
c) d) o)
IEC 61000-4-6 3 V
m)
0,15 MHz - 80 MHz
m)
6 V
in ISM bands between
0,15 MHz and 80 MHz
80 % AM at 1 KHz
e)
Portable or mobile RF
communication device must not
be used in close proximity of
n)
the product, including its cables,
except when these respect
the distances of separation
recommended and calculated
from the equation applicable to
the frequency of the transmitter.
Voltage dips
f) p) r)
IEC 61000-4-11 0% UT; 0,5 cycle
At 0°, 45°, 90°, 135°, 180°,
225°, 270° and 315°
; 1 cycle
0 % U
T
g)
The quality of the power
supply should be that of a
typical commercial or hospital
environment.
and
70 % UT; 25/30 cycles
h)
Single phase: at 0°
Voltage
interruptions
f) i) o) r)
IEC 61000-4-11 0% UT; 250/300 cycle
h)
The quality of the power
supply should be that of a
typical commercial or hospital
environment.
a)
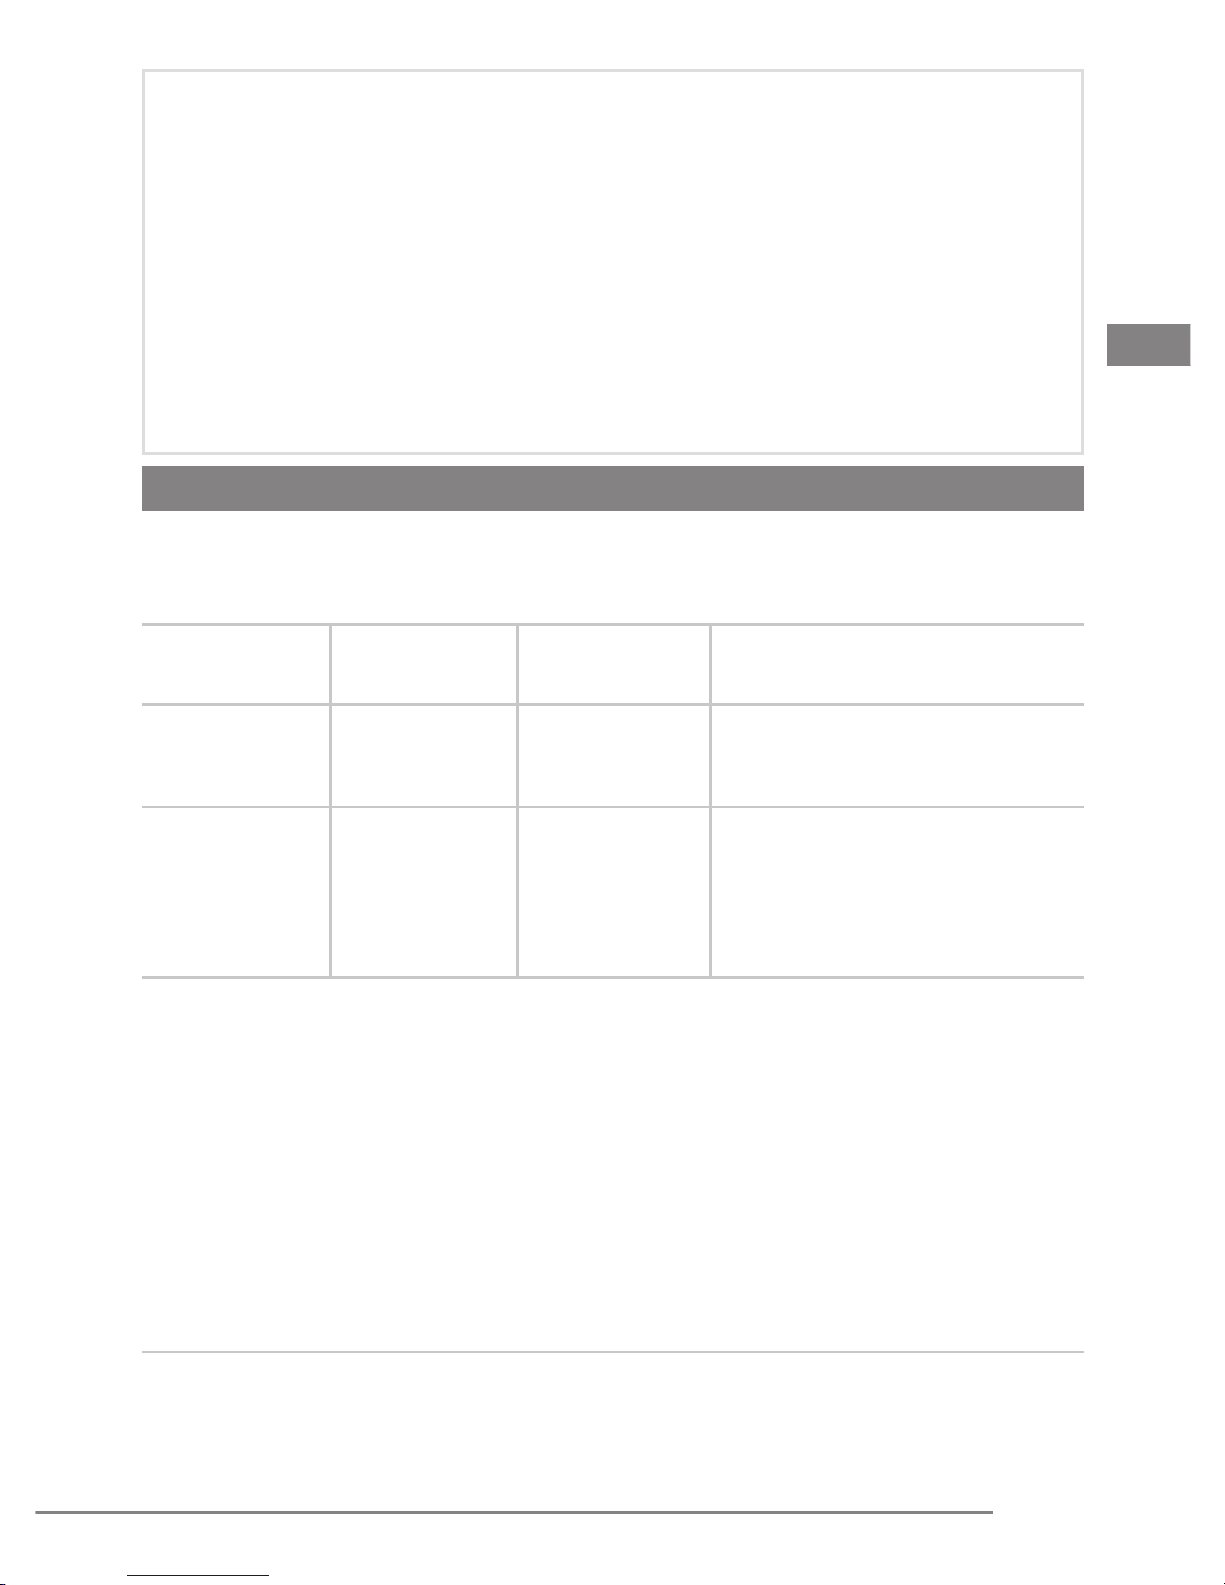
The test may be performed at any one power input voltage within the starlight uno RATED voltage range. If the starlight uno is
tested at one power input voltage, it is not necessary to re-test at additional voltages.
b)
All starlight uno cables are attached during the test.
c)
Calibration for current injection clamps shall be performed in a 150 Ω system.
d)
If the frequency stepping skips over an ISM or amateur band, as applicable, an additional test frequency shall be used in the ISM
or amateur radio band. This applies to each ISM and amateur radio band within the specied frequency range.
e)
Testing may be performed at other modulation frequencies identied by the RISK MANAGEMENT PROCESS.
f)
starlight uno with a d.c. power input intended for use with a.c.-to-d.c. converters shall be tested using a converter that meets the
specications of the MANUFACTURER of the starlight uno. The IMMUNITY TEST LEVELS are applied to the a.c. power input of
the converter .
g)
Applicable only to starlight uno connected to single-phase a.c. mains.
h)
E.g. 10/12 means 10 periods at 50 Hz or 12 periods at 60 Hz.
i)
starlight uno with RATED input current greater than 16 A / phase shall be interrupted once for 250/300 cycles at any angle and at
all phases at the same time (if applicable). starlight uno with battery backup shall resume line power operation after the test. For
starlight uno with RATED input current not exceeding 16 A, all phases shall be interrupted simultaneously.
56
starlight uno - manual of use and maintenance
Page 27
j)
starlight uno that do not have a surge protection device in the primary power circuit may be tested only at ± 2 kV line(s) to earth
and ± 1 kV line(s) to line(s).
k)
Not applicable to CLASS II starlight uno.
l)
Direct coupling shall be used.
m)
r.m .s. , before modulation is applied.
n)
The ISM (industrial scientic and medical) bands between 0,15 MHz and 80 MHz are 6,765 MHz to 6,795 MHz; 13,553 MHz to
13,567 MHz; 26,957 MHz to 27,283 MHz; and 40,66 MHz to 40,70 MHz. The amateur radio bands between 0, 15 MHz and 80
MHz are 1,8 MHz to 2,0 MHz, 3,5 MHz to 4,0 MHz, 5,3 MHz to 5,4 MHz, 7 MHz to 7,3 MHz, 10,1 MHz to 10,15 MHz, 14 MHz to
14,2 MHz, 18,07 MHz to 18,17 MHz, 21,0 MHz to 21,4 MHz, 24,89 MHz to 24,99 MHz, 28,0 MHz to 29,7 MHz and 50,0 MHz to
54,0 MHz.
o)
Applicable to starlight uno with RATED input current less than or equal to 16 A / phase and starlight uno with RATED input
current greater than 16 A / phase.
p)
Applicable to starlight uno with RATED input current less than or equal to 16 A / phase.
q)
At some phase angles, applying this test to starlight uno with transformer mains power input might cause an overcurrent
protection device to open. This can occur due to magnetic ux saturation of the transformer core after the voltage dip. If this
occurs, the starlight uno shall provide BASIC SAFETY during and after the test.
r)
For starlight uno that have multiple voltage settings or auto ranging voltage capability, the test shall be performed at the
minimum and maximum RATED input voltage. starlight uno with a RATED input voltage range of less than 25 % of the highest
RATED input voltage shall be tested at one RATED input voltage within the range.
Guidance and manufacturer’s declaration - Elettromagnetic immunity
Patient coupling port
The starlight uno device is designed to work in the electromagnetic environment specied below.
The client or user of the starlight uno device should always make sure that it is used only in such
environment.
EN
Phenomenon
Electrostatic
discharge (ESD)
Basic EMC
standard or test
method
IEC 61000-4-2 ±8 kV contact
c)
Immunity test
levels
±2 kV, ±4 kV, ±8 kV,
±15 kV air
Electromagnetic
environment - Guidance
Floors must be wood,
concrete or ceramic. If the oor is lined
with synthetic materials, the relative
humidity should be at least 30 %
Conducted
disturbances induce
by RF elds
a)
IEC 61000-4-6 3 V
b)
0,15 MHz - 80 MHz
b)
6 V
in ISM bands
between 0,15 MHz
and 80 MHz
80 % AM at 1 KHz
Portable or mobile RF communication
device must not be used in close proximity
of the product, including its cables, except
when these respect the distances of
separation recommended and calculated
from the equation applicable to the
frequency of the transmitter.
a)
The following apply:
- All PATIENT-COUPLED cables shall be tested, either individually or bundled
- PATIENT-COUPLED cables shall be tested using a current clamp unless a current clamp is not suitable. In cases where a current
clamp is not suitable, an EM clamp shall be used.
- No intentional decoupling device shall be used between the injection point and the PATIENT COUPLING POINT in any case.
- Testing may be performed at other modulation frequencies identied by the RISK MANAGEMENT PROCESS.
- Tubes that are intentionally lled with conductive liquids and intended to be connected to a PATIENT shall be considered to be
PATIENT-COUPLED cables.
- If the frequency stepping skips over an ISM or amateur radio band, as applicable, an additional test frequency shall be used in
the ISM or amateur radio band. This applies to each ISM and amateur radio band within the specied frequency range.
- The ISM (industrial, scientic and medical) bands between 0,15 MHz and 80 MHz are 6,765 MHz to 6,795 MHz; 13,553 MHz to
13,567 MHz; 26,957 MHz to 27,283 MHz; and 40,66 MHz to 40,70 MHz. The amateur radio bands between 0, 15 MHz and 80
MHz are 1,8 MHz to 2,0 MHz, 3,5 MHz to 4,0 MHz, 5,3 MHz to 5,4 MHz, 7 MHz to 7,3 MHz, 10,1 MHz to 10,15 MHz, 14 MHz to
14,2 MHz, 18,07 MHz to 18, 17 MHz, 21,0 MHz to 21,4 MHz, 24,89 MHz to 24,99 MHz, 28,0 MHz to 29, 7 MHz and 50,0 MHz to
54,0 MHz.
b)
r.m.s., before modulation is applied
c)
Discharges shall be applied with no connection to an articial hand and no connection to PATIENT simulation. PATIENT
simulation may be connected after the test as needed in order to verify BASIC SAFETY and ESSENTIAL PERFORMANCE.
starlight uno - manual of use and maintenance
57
Page 28

Guidance and manufacturer’s declaration - Elettromagnetic immunity
Signal input / output parts port
The starlight uno device is designed to work in the electromagnetic environment specied below.
The client or user of the starlight uno device should always make sure that it is used only in such
environment.
Phenomenon
Electrostatic
discharge (ESD)
Basic EMC
standard or test
Immunity test levels
method
IEC 61000-4-2 ±8 kV contact
e)
±2 kV, ±4 kV, ±8 kV, ±15
kV air
Electromagnetic
environment - Guidance
Floors must be wood,
concrete or ceramic. If the
oor is lined with synthetic
materials, the relative
humidity should be at least
30 %
Electrical fast
transients /
bursts
b) f)
IEC 61000-4-4 ±1 kV contact
100 KHz repetition
frequency
The quality of the power
supply should be that of
a typical commercial or
hospital environment.
Surges
Line-to-ground
IEC 61000-4-5 ± 2kV The quality of the power
a)
supply should be that of
a typical commercial or
hospital environment.
Conducted
disturbances
induce by RF
b) d) g)
elds
IEC 61000-4-6 3 V
h)
0,15 MHz - 80 MHz
h)
6 V
in ISM bands
between 0,15 MHz and
80 MHz
80 % AM at 1 KHz
i)
c)
Portable or mobile RF
communication device
must not be used in close
proximity of the product,
including its cables, except
when these respect the
distances of separation
recommended and
calculated from the equation
applicable to the frequency
of the transmitter.
a)
This test applies only to output lines intended to connect directly to outdoor cables.
b)
SIP/SOPS whose maximum cable length is less than 3 m in length are excluded.
c)
Testing may be performed at other modulation frequencies identied by the RISK MANAGEMENT PROCESS.
d)
Calibration for current injection clamps shall be performed in a 150 Ω system.
e)
Connectors shall be tested per 8.3.2 and Table 4 of IEC 61000-4-2:2008. For insulated connector shells, perform air discharge
testing to the connector shell and the pins using the rounded tip nger of the ESD generator, with the exception that the only
connector pins that are tested are those that can be contacted or touched, under conditions of INTENDED USE, by the standard
test nger shown in Figure 6 of the general standard, applied in a bent or straight position.
f)
Capacitive coupling shall be used.
g)
If the frequency stepping skips over an ISM or amateur radio band, as applicable, an additional test frequency shall be used in
the ISM or amateur radio band. This applies to each ISM and amateur radio band within the specied frequency range.
h)
r.m.s., before modulation is applied.
i)
The ISM (industrial, scientic and medical) bands between 150 kHz and 80 MHz are 6, 765 MHz to 6,795 MHz; 13,553 MHz to
13,567 MHz; 26,957 MHz to 27,283 MHz; and 40,66 MHz to 40,70 MHz. The amateur radio bands between 0, 15 MHz and 80
MHz are 1,8 MHz to 2,0 MHz, 3,5 MHz to 4,0 MHz, 5,3 MHz to 5,4 MHz, 7 MHz to 7,3 MHz, 10,1 MHz to 10,15 MHz, 14 MHz to
14,2 MHz, 18,07 MHz to 18,17 MHz, 21,0 MHz to 21,4 MHz, 24,89 MHz to 24,99 MHz, 28,0 MHz to 29,7 MHz and 50,0 MHz to
54,0 MHz.
58
starlight uno - manual of use and maintenance
Page 29
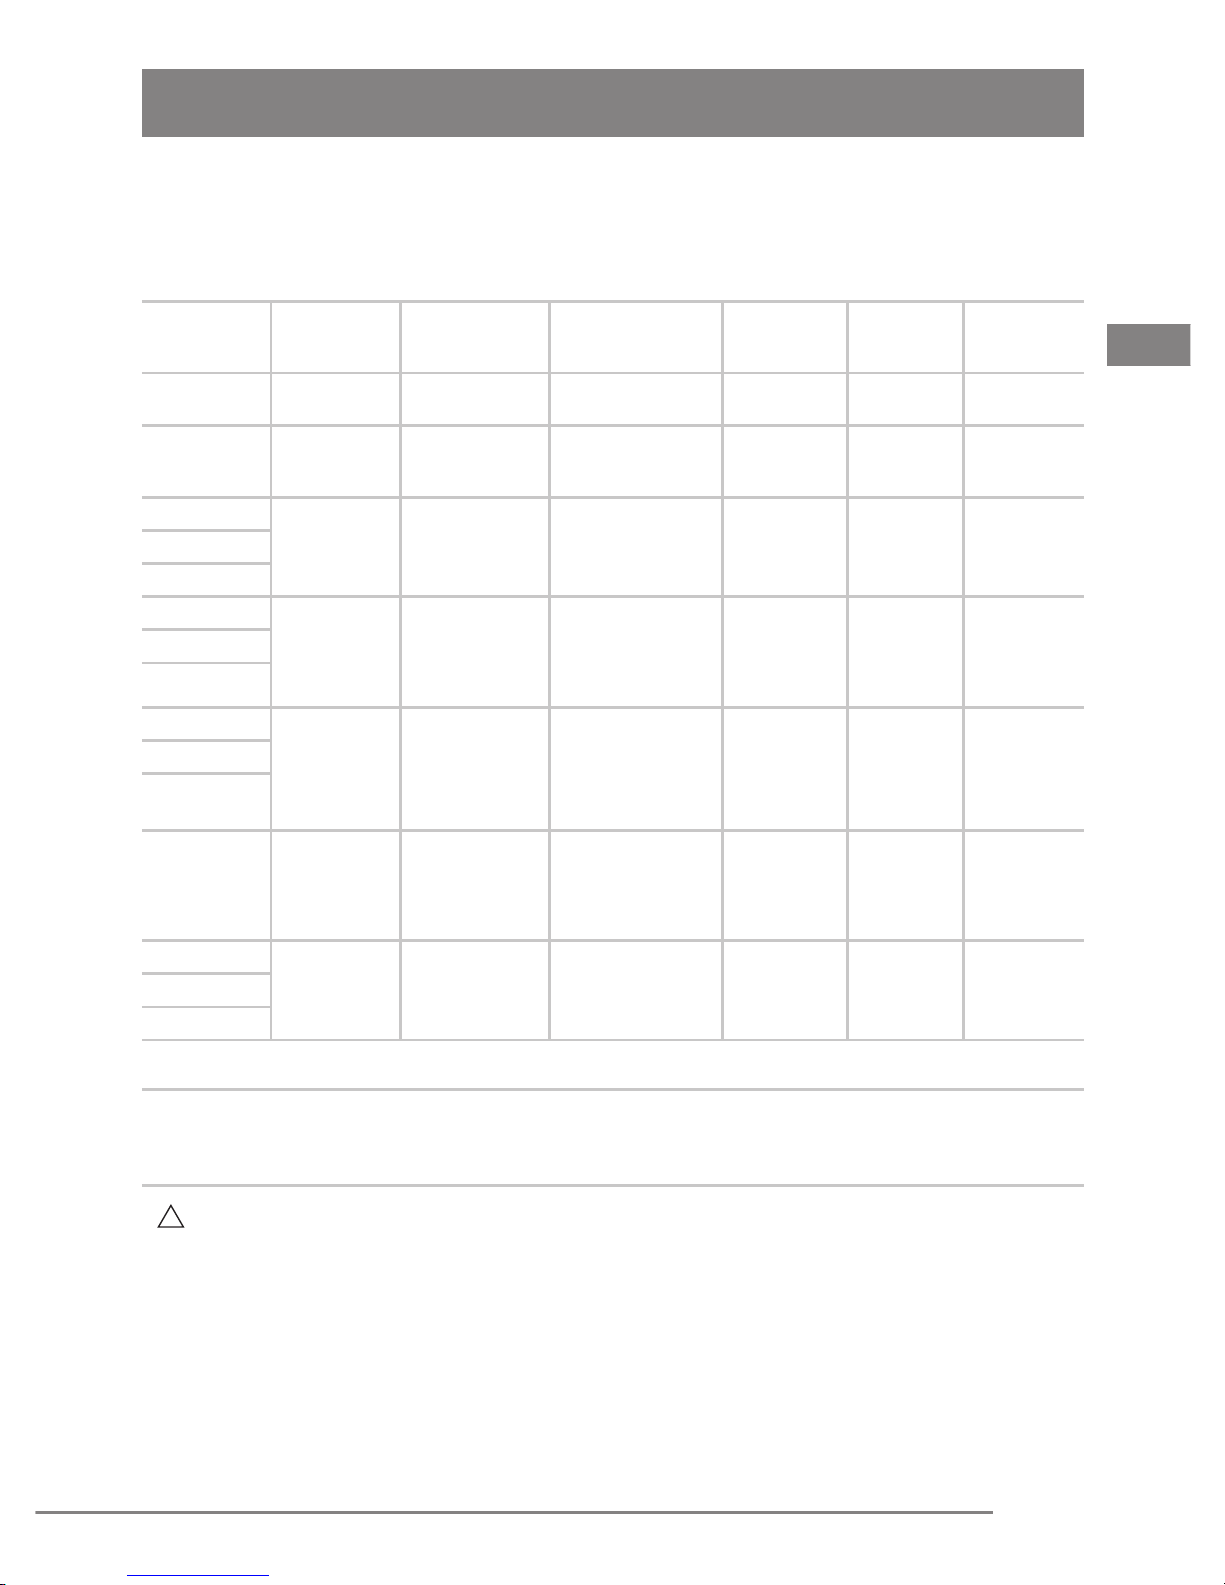
Test specifications for enclosure port immunity to RF wireless communications
equipment
The starlight uno device is designed to work in an electromagnetic environment in which RF
radiated disturbances are kept under control. The purchaser or user of the starlight uno device
can contribute to prevent electromagnetic interference by ensuring a minimum distance between
the RF mobile and cordless communication device (transmitters) and the starlight uno device,
as recommended below, in relation to the maximum output power of the radio-communication
devices.
Test
frequency
(MHz)
385 380 - 390
450 430 - 470
710
780
810
870
930
a)
Band
(MHz)
TETRA 400
GMRS 460, FRS
704 - 787 LTE Band 13, 17
GSM 800/900,
800 - 960
TETRA 800, iDEN
820, CDMA 850,
LTE Band 5
Service
460
a)
FM
b)
c)
Modulation
Pulse modulation
18 Hz
± 5 kHz deviation
1 kHz sine
Pulse modulation
217 Hz
Pulse modulation
18 Hz
b)
b)
b)
Maximum
power
(W)
1,8 0,3 27
2 0,3 28
0,2 0,3 9745
2 0,3 28
Distance
(m)
Immunity
test level
(V/m)
EN
1720
1845
1970
2450 2400 - 2570
5420
5785
NOTE If necessary to achieve the IMMUNITY TEST LEVEL, the distance between the transmitting antenna and the
starlight uno may be reduced to 1 m. The 1 m test distance is permitted by IEC 61000-4-3.
a)
For some services, only the uplink frequencies are included.
b)
The carrier shall be modulated using a 50 % duty cycle square wave signal.
c)
As an alternative to FM modulation, 50 % pulse modulation at 18 Hz may be used because while it does not represent actual
modulation, it would be worst case.
WARNING: Portable RF communications equipment (including peripherals such as antenna
1700 - 1990
5100 - 5800 WLAN 802.11 a/n
GSM 1800; CDMA
1900; GSM 1900;
DECT; LTE Band 1,
3, 4, 25; UMTS
Bluetooth, WLAN,
802.11 b/g/n,
RFID 2450, LTE
Band 7
Pulse modulation
217 Hz
Pulse modulation
217 Hz
Pulse modulation
217 Hz
b)
b)
b)
2 0,3 28
2 0,3 28
0,2 0,3 95500
cables and external antennas) should be used no closer than 30 cm ( 12 inches) to any part of
the starlight uno device, including cables specied by the manufacturer. Otherwise, degradation
of the performance of this equipment could result.
starlight uno - manual of use and maintenance
59
Page 30

12.0 Warranty
Before being placed on the market, all Mectron equipment undergoes a thorough nal check to
ensure that it is are in proper working order.
Mectron warrant their products, purchased brand-new from authorised Mectron dealers or
importers, free from material or manufacturing defects for a period of 3 (THREE) years for the
handpiece and 1 (ONE) years for the battery module from the date of purchase.
Throughout the warranty period, Mectron undertake to repair (or, at their sole discretion, to replace)
free of charge any parts that, in their opinion, are faulty.
Complete replacement of Mectron products is excluded.
Mectron cannot accept any liability for direct or incidental damage or personal injury in the following
cases:
- If the equipment is used for purposes other than that for which it is intended.
- If the equipment is not used in accordance with all the instructions and requirements described
in this manual.
- If the wiring system in the room where the equipment is used does not comply with the
applicable standards and appropriate requirements.
- If the wiring system in the room where the equipment is used does not comply with the
applicable standards and appropriate requirements.
- If any assembly operations, extensions, settings, alterations or repairs have been carried out
by personnel not authorised by Mectron.
- If the environmental conditions in which the device is kept and stored do not comply with the
requirements indicated in the chapter on technical specications.
Accidental damages due to transport, incorrect use or carelessness or to connection to power
supplies other than as envisaged and damage to the signalling lamps, handpieces and all
accessories are excluded from the warranty.
The warranty will no longer apply if the equipment has been tampered with or repaired by
unauthorised personnel.
CAUTION
The warranty is valid only if the warranty slip enclosed with the product has been completed in
full and returned to us or, if appropriate, to your Mectron dealer or importer within 20 (TWENTY)
DAYS from the date of purchase, as proven by the consignment note/invoice issued by the dealer/
importer.
In order to benet from the warranty service, the customer must return the equipment to be
repaired to the Mectron dealer/importer from which it was purchased, at his own expense.
The equipment should be returned suitably packed (possibly in its original packing material),
accompanied by all the accessories and by the following information:
a) Owner’s details, including his telephone number.
b) Details of the dealer/importer.
c) Photocopy of the consignment note/purchase invoice of the equipment issued to the owner and
indicating, in addition to the date, also the name of the equipment and its serial number.
d) A description of the problem.
Transport and any damages caused during transport are not covered by the warranty.
In the event of failures due to accidents or improper use, or if the warranty has lapsed, repairs to
Mectron products will be charged on the basis of the actual cost of the materials and labour
required for such repairs.
60
starlight uno - manual of use and maintenance
Page 31

EN
The indications that appear in this publication are not binding and can be modied without fore-notice.
The Italian version of this manual is the original document from which its translations have been obtained. In case of any discrepancy,
the Italian version will have pertinence.
Texts, images, and graphics of this manual are property of Mectron S.p.A., Carasco, Italy. All rights reserved.
The contents cannot be copied, distributed, changed, or made available to third parties without the written approval of Mectron
S.p.A.
starlight uno - manual of use and maintenance
61
 Loading...