

Page 1
Use and maintenance manual
EN
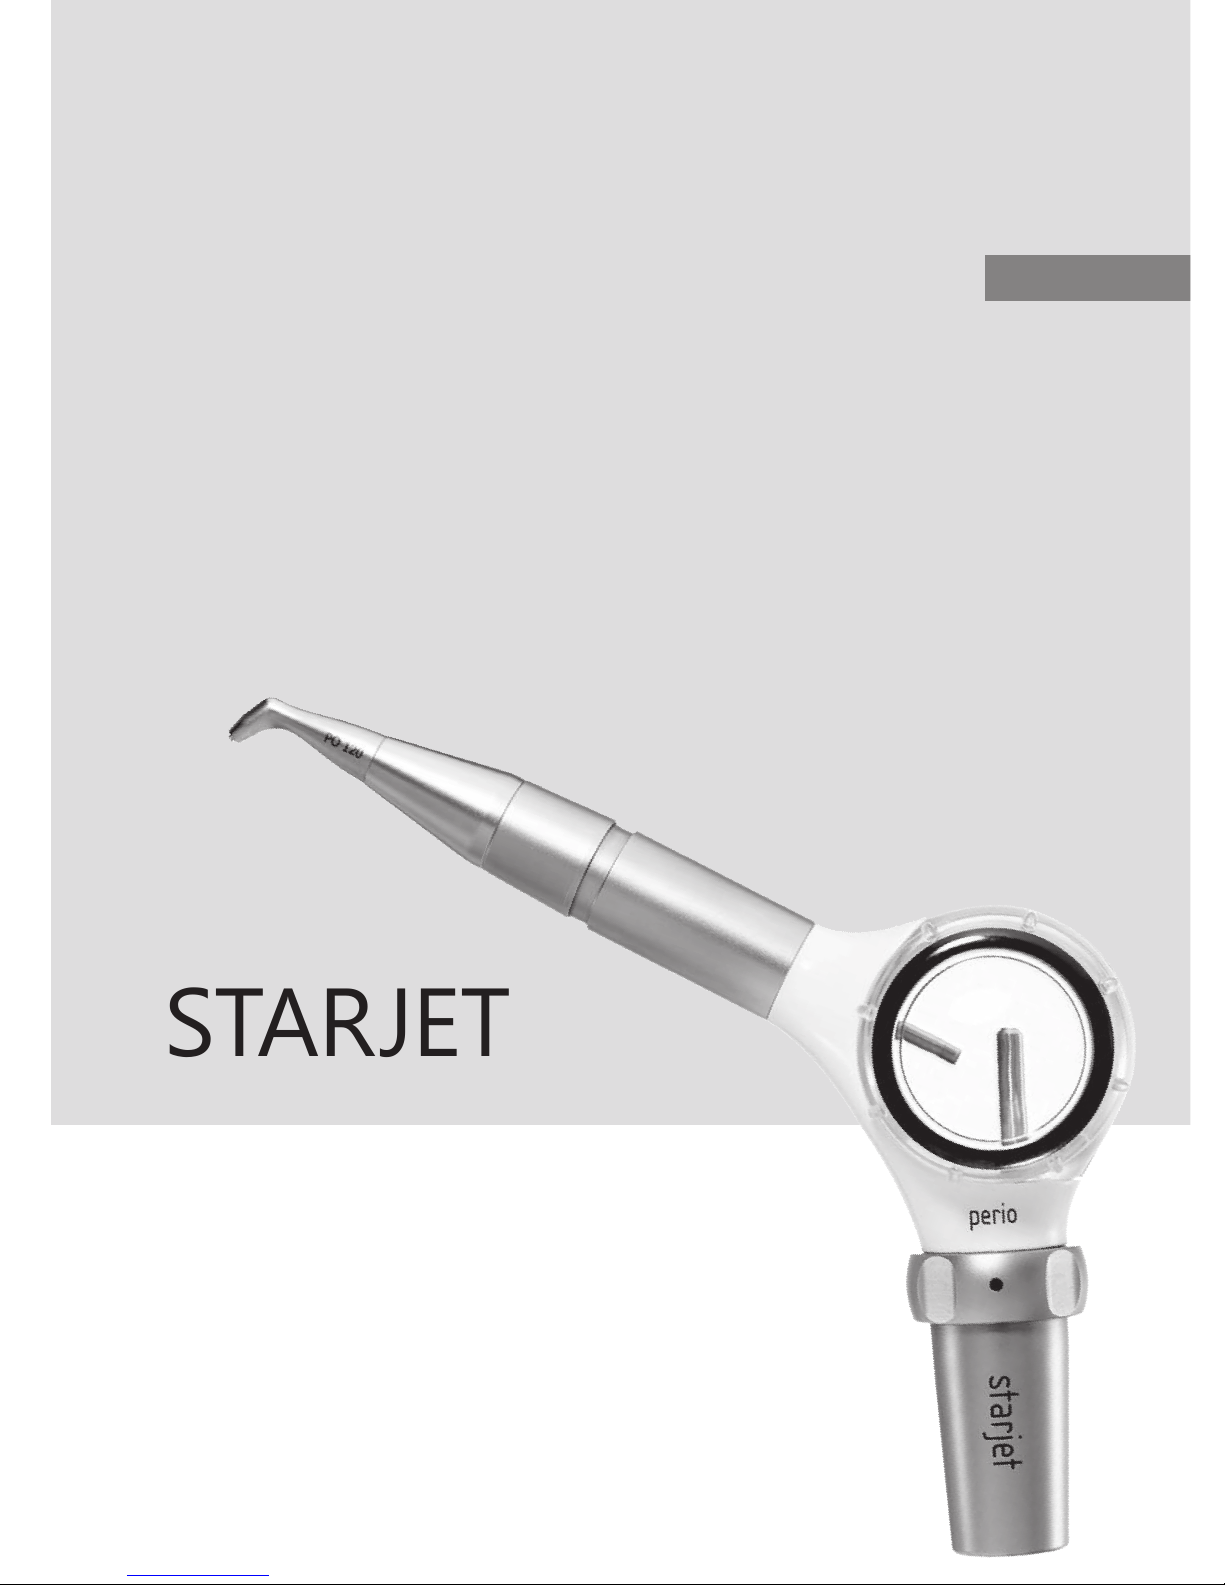
STARJET
Page 2
EN
SUMMARY
01 INTRODUCTION ..........................................................................................4
01.1 Intended use ........................................................................................................................ 4
01.2 Description of the device ................................................................................................. 4
01.3 Responsibility waiver ........................................................................................................ 5
01.4 Safety precautions ............................................................................................................. 5
01.5 Symbols ................................................................................................................................ 7
02 IDENTIFICATION DATA ............................................................................. 8
02.1 Device identicaTion data ............................................................................................... 8
02.2 Polisher tip identication data ....................................................................................... 8
03 DELIVERY ....................................................................................................... 9
03.1 List of components ............................................................................................................ 9
04 INSTALLATION ........................................................................................... 10
04.1 First installation .................................................................................................................10
04.2 Safety precautions during installation ........................................................................10
05 USE .................................................................................................................. 11
05.1 Safety precautions before and during use ..................................................................12
05.2 Instructions for use ..........................................................................................................13
05.3 Cleaning the powder container.....................................................................................16
06 CLEANING, DISINFECTION AND STERILISATION .......................... 18
06.1 Preparation .........................................................................................................................19
06.2 Cleaning and disinfecting Starjet device ................................................................... 20
06.3 Cleaning accessories that can be sterilised ...............................................................22
06.3.1 Manual cleaning ............................................................................................................. 22
06.3.2 Combined manual/automatic cleaning .................................................................29
06.3.2.1 Manual pre-wash ...........................................................................................................................................29
06.3.2.2 Mechanical cleaning .....................................................................................................................................32
06.3.3 Automatic cleaning ........................................................................................................ 33
06.4 Cleaning verication .......................................................................................................34
06.5 Drying .................................................................................................................................34
06.6 Sterilisation........................................................................................................................35
07 MAINTENANCE ..........................................................................................36
07.1 Check Starjet front terminal graft ................................................................................36
07.2 Check turbine fast graft ................................................................................................. 36
Page 3

08 DISPOSAL MODES AND PRECAUTIONS ...........................................37
09 TECNICHAL DATA .....................................................................................37
10 TROUBLESHOOTING ................................................................................38
10.1 Quick solution to problems ............................................................................................ 38
10.2 Sending the device to an authorised Mectron service center ..............................39
11 WARRANTY ..................................................................................................40
EN
Unix® - Unix L
Multiex® - Multiex lux
Sirona® R - Sirona® B is a registered trademark of SIRONA company
Roto Quick
FlexiQuik
®
is a registered trademark of Bien-Air company
®
is a registered trademark of KaVo company
®
- Roto Quick Lux
®
is a registered trademark of NSK company
®
is a registered trademark of W&H company
Page 4
01 INTRODUCTION
EN
EN
Carefully read this manual before proceeding
with the installation, use, maintenance, or
other operations on the device. Always keep
this manual within reach.
IMPORTANT: To prevent harm to persons
or damages to objects, read all the “Safety
precautions” present in the manual with
special care. Depending on their degree
of seriousness, the safety precautions are
classied with the following indications:
WARNING
(always refers to personal injury)
CAUTION
(refers to possible damage to property)
The purpose of this manual is for the
operator knowledge regarding the safety
precautions, the installation procedures,
and the instructions for correct use and
maintenance of the device and its accessories.
Use of this manual for purposes other than
those strictly tied to the installation, use and
maintenance of the device is forbidden.
The information and illustrations in this
manual are updated as of the date of issue
reported on the last page.
Mectron is committed to continually updating
its products with possible modications to
device components. In the event you uncover
discrepancies between what is described
in this manual and the device in your
possession, contact your Retailer or the After-
Sales Service of Mectron for clarications and
support.
01.1 INTENDED USE
The air polisher is intended for specic use depending on the type of powder being used
(whether it be bicarbonate or glycine based).
Bicarbonate powder Jet polisher. Indications:
- Removal of bacterial plaque;
- Removal of stains from the tooth
surface, due to tobacco, coffee, tea and
chlorhexidine;
- Cavity preparation for a better adhesion
between enamel and lling material;
- Polishing of the enamel’s surface;
Glycine powder Jet Polisher. Indications:
- Removal of bacterial plaque above and
below the gums;
- Removal of the Biolm in the prevention of
Perimplantitis;
- Prolaxis on patients in ortodontics
therapy.
01.2 DESCRIPTION OF THE DEVICE
The Starjet is a Bicarbonate based or Glycine
based powder compact whitening system
with a quick-t connection to the turbine.
The Starjet has all the main advantages of the
best-known table-top devices:
• a steady and efcient stream of powder
• simplicity of use and reliability.
The operating principle of the Starjet is based
on the mechanical action obtained with a jet
of crystals of powder accelerated by a stream
of compressed air.
The kinetic energy impressed in this way on
the particles is almost entirely dissipated as
they strike the surface of the enamel, giving
rise to a gentle but effective cleansing effect.
This action is completed by a jet of water that
exploits the depression created around the
nozzle to form a bell shape around the main
stream, producing two effects: it prevents
to a great extent the cloud of powder from
splashing and spilling out and performs
continuous rinsing of the treated area.
4
Page 5
Starjet
01.3 RESPONSIBILITY WAIVER
Mectron will not accept any liability for direct or incidental personal injury or damage to
property in the following cases:
1 If the equipment is used for purposes other than those for which it is intended.
2 If the equipment is not used in accordance with all the instructions and requirements
described in this manual.
3 If the wiring system in the room where the equipment is used does not comply with the
applicable standards and appropriate requirements.
4 If any assembly operations, extensions, settings, alterations or repairs have been carried out
by personnel not authorised by Mectron.
5 If the environmental conditions in which the device is kept and stored do not comply with
the requirements indicated in the chapter on technical specications.
01.4 SAFETY PRECAUTIONS
EN
EN
WARNING: No alterations to this
device are permitted.
WARNING: The device must be used
in a dental practice or ambulatory facility.
WARNING: Qualied and specialized
personnel. The device must be used
exclusively by specialized personnel with
proper medical education; no particular
training activities are intended for the use
of the device. The use of the device does
not cause side effects if applied correctly.
Improper use may injure soft tissues and
emphysema tissues.
WARNING: Use the device solely for
the purpose for which it is intended (see
paragraph 01.1 and 01.2).
Failure to comply with this requirement
could lead to serious harm to the patient
and/or to the operator and/or damage to/
failure of the equipment.
WARNING: Contraindications.
Patients wearing contact lenses should
remove them prior to receiving treatment
with the jet polisher.
WARNING: Contraindications.
Patients that are on a low sodium diet
or who suffer from serious respiratory
problems, such as chronic bronchitis,
asthma, emphysema, etc. must not
undergo the prophylaxis treatment, until
they have consulted with their doctor.
WARNING: Controindications.
Do not direct the stream of air/powder/
water in towards eyes.
Failure to observe this requirement can
cause serious eye damage. It is advisable
for everyone involved (patient, dentist
and dental personnel) to wear protective
goggles).
WARNING: Controindications.
Do not direct the stream of air/Prophylaxis
powder/water onto composites, llings
or bridges. Failure to observe this
requirement may cause them to be
damaged.
WARNING: Contraindications.
Do not aim the jet of air/Prophylaxis
powder/water onto soft tissues or inside
the gingival sulcus. Failure to comply with
this direction can cause gingival tissue
emphysema (emphysema of the mucosa
and/or subcutaneous). Use only Glycine
based powder for this kind of treatments.
5
Page 6
EN
EN
WARNING: Controindications.
Dentists and other dental personnel are
advised to use protective masks in order
to limit inhalation of the powder.
WARNING: Cleaning, disinfection
and sterilisation of new or repaired
accessories.
All new and repaired accessories are
supplied in non-sterile conditions. Before
use, and after each treatment, they
must be cleaned and sterilized in strict
compliance with the instructions given
in the Chapter 06 - Cleaning, disinfection
and sterilisation.
WARNING: Infection control.
To ensure maximum safety of patient and
operator, before using all the reusable
parts and accessories, they should rst
be cleaned and sterilized, following the
instructions in Chapter 06 - Cleaning,
disinfection and sterilisation.
CAUTION: Controindications. After
sterilizing the cleaner terminals and any
other accessory that can be sterilized
in the autoclave, allow to cool down
completely before reuse.
WARNING: Check the condition of
the device before treatment.
Before each treatment always check that
the equipment is in proper working order
and that the accessories are efcient.
Do not carry out the treatment if any
problems are encountered in operating
the device. If the problems concern
the equipment contact an authorised
technical service centre.
WARNING: Use authentic Mectron
accessories only.
6
Page 7
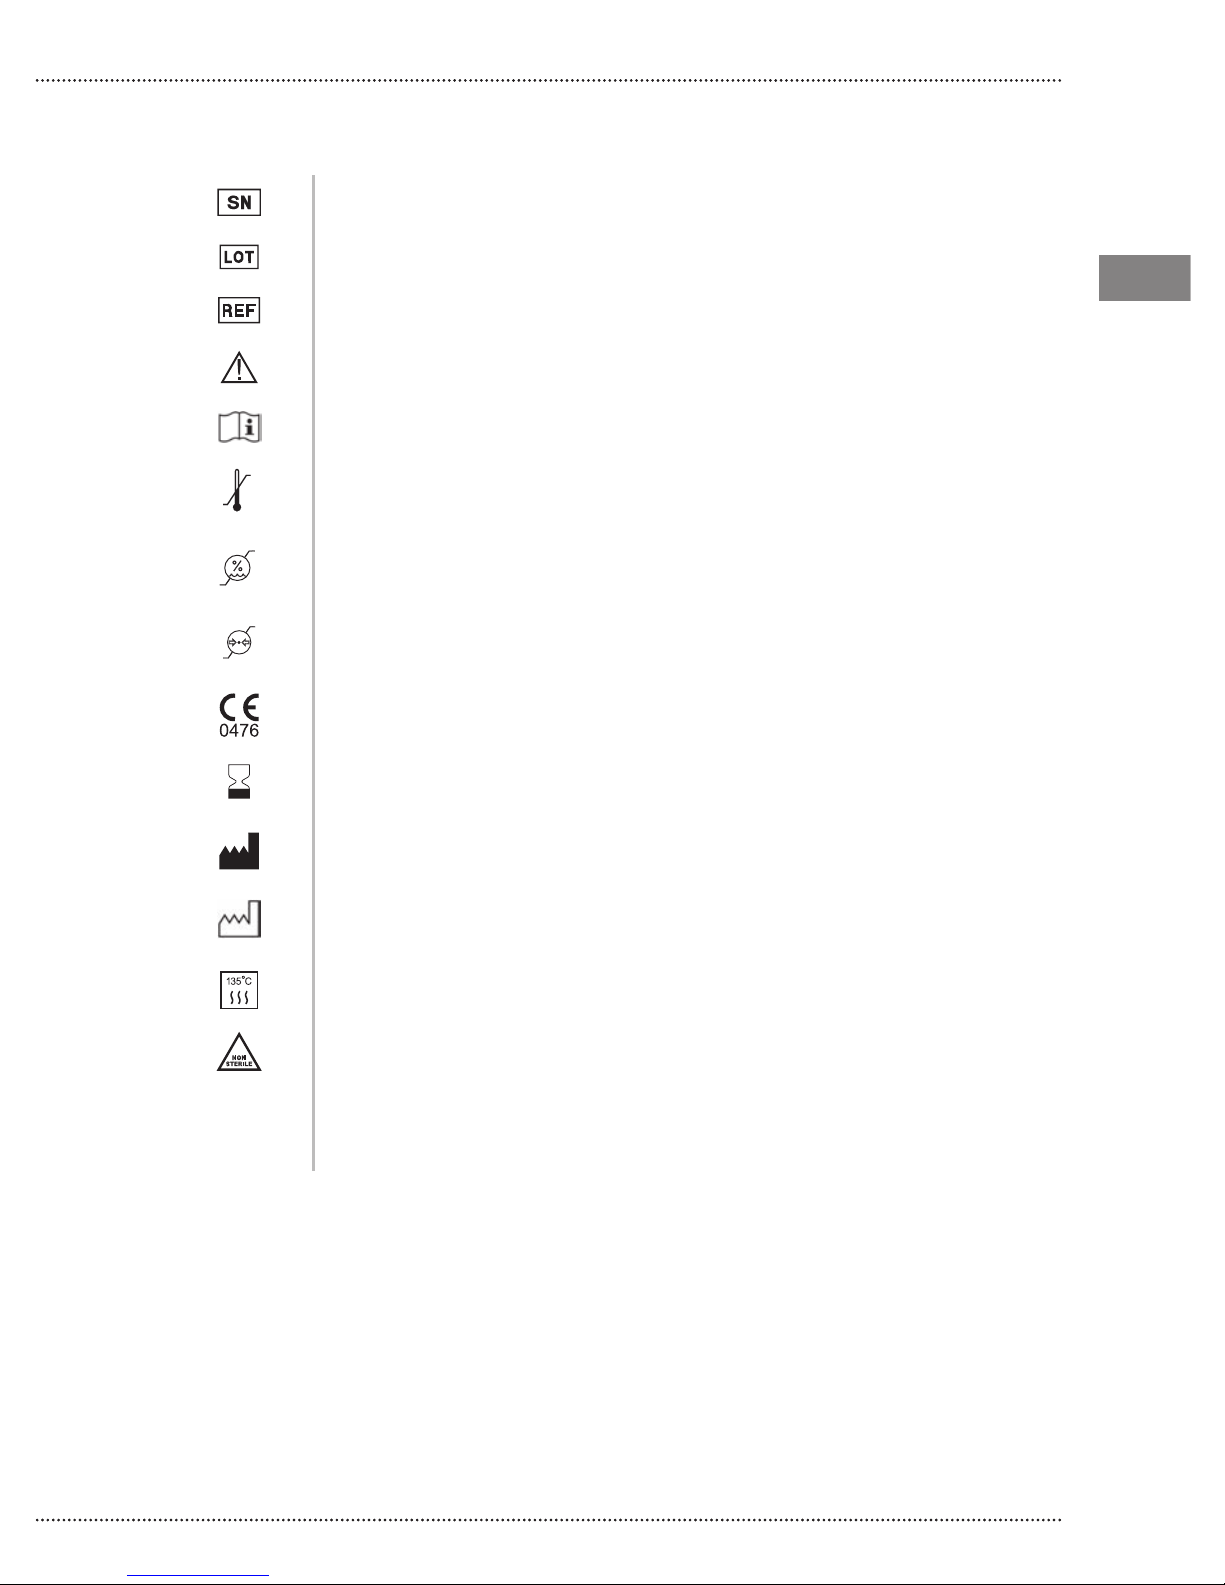
01.5 SYMBOLS
Serial number
Lot number
Product code
Warning: read the instructions for use
Operating instructions
35 °C
-10 °C
70 %
10 %
1060 hPa
500 hPa
Temperature limitation - transport and storage conditions
Humidity limitation - transport and storage conditions
Atmospheric pressure limitation - transport and storage conditions
Starjet
EN
EN
Rx only
It indicates compliance with the CE 93/42 CEE. Notied body: KIWA CERMET
ITALIA
Use-by date
Manufacturer
Date of manufacture
Can be sterilized in autoclave up to a maximum temperature of 135° C
Non-sterile
For US market only
CAUTION US Federal law restricts this device to sale by or on the order of a
dentist
7
Page 8
EN
EN
02 IDENTIFICATION DATA
An exact description of the model and serial number of the device will enable our After-Sales
Service to provide fast and efcient support.
Always provide this information whenever you contact an Authorized Mectron Service Center.
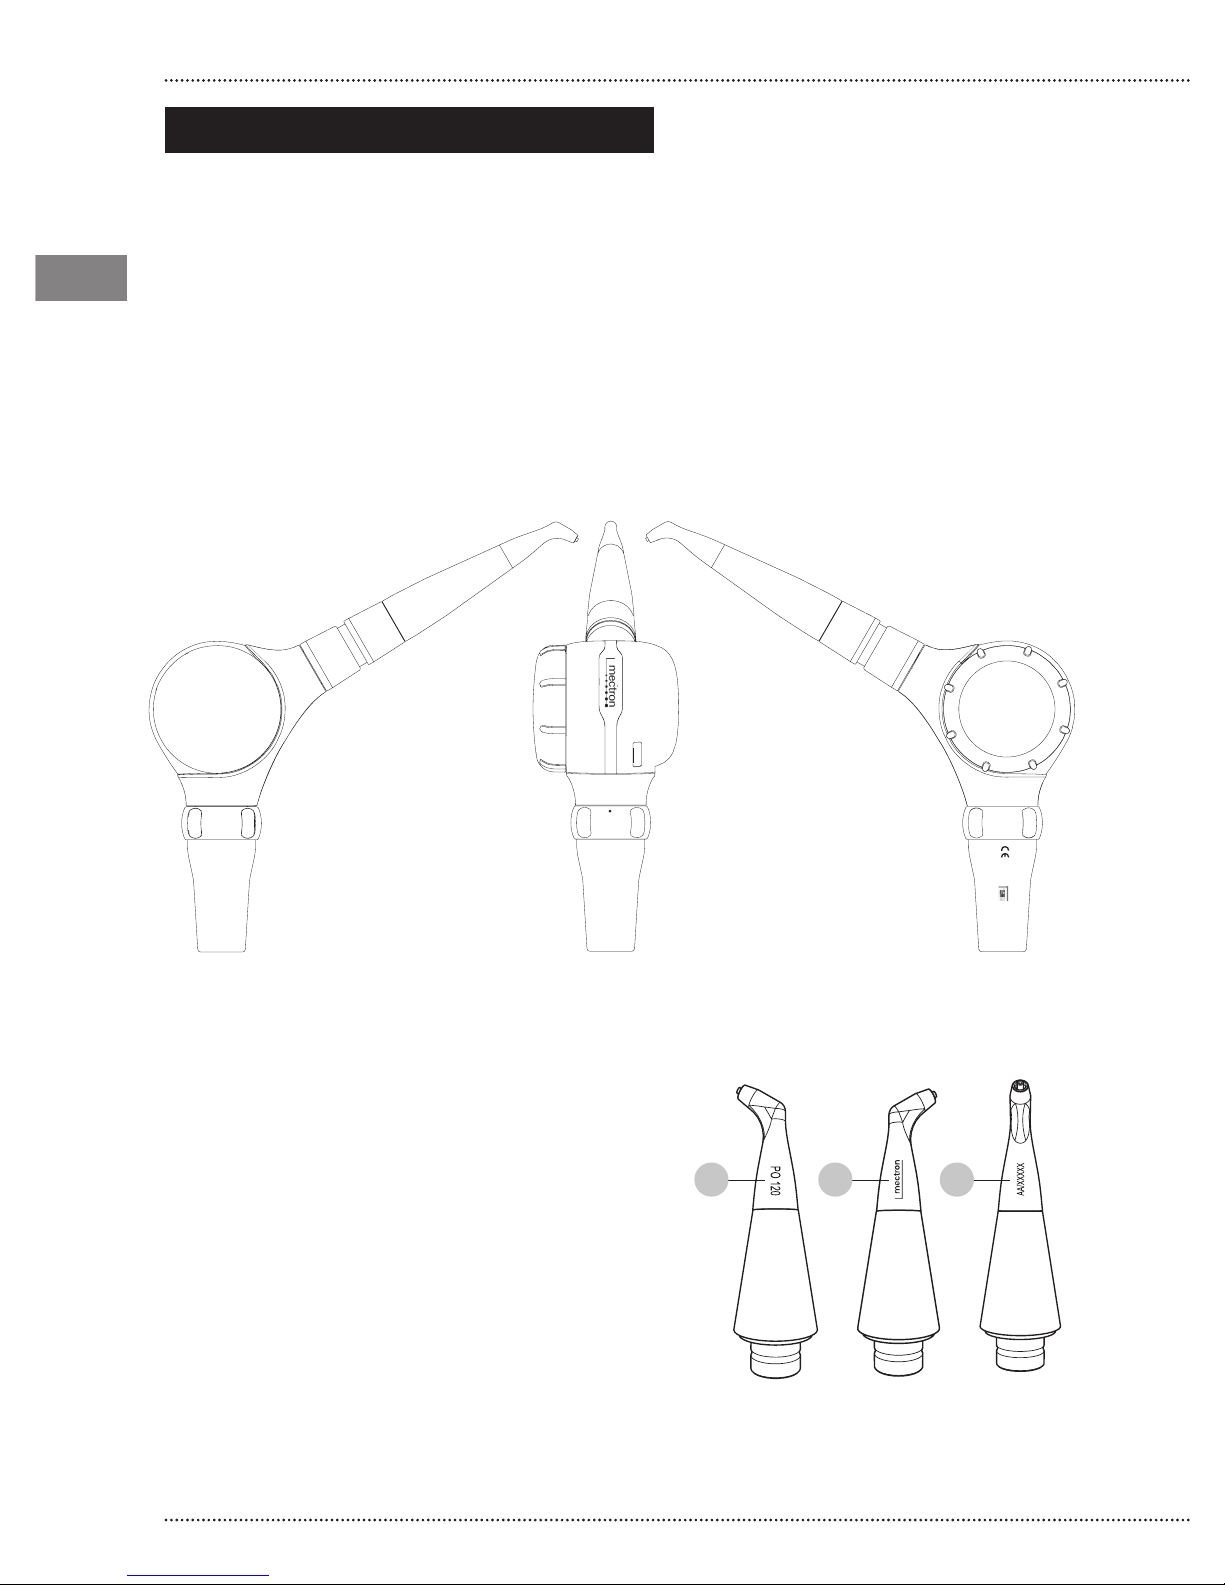
02.1 DEVICE IDENTIFICATION DATA
The device name, serial number and other
relevant information is laser marked on the
device. The remaining data is included in this
manual (See Chapter 09 - TECHNICAL DATA).
perio
perio
prophy
starjet
02.2 POLISHER TIP IDENTIFICATION DATA
The following data are laser-marked on each
insert: the name of the polisher tip (ref. 1), the
Mectron logo (ref. 2) and the lot number to
which the polisher tip belongs (ref. 3).
1 2 3
0476
207000000
8
Page 9
03 DELIVERY
03.1 LIST OF COMPONENTS
See inside cover
Starjet
The Starjet consists of:
A Starjet device
B Ø 0,8 mm needle
C Ø 0,4 mm needle
D 3 polisher tips: 90° (PO 90) / 120° (PO 120) / PERIO
E K9 wrench
F subgingival perio tip
G packet of “Glycine powder“ (for European market only)
H packet of “Prophylaxis powder“
I use and maintenance manual
L brush
Starjet has accessories available that can be
ordered separately.
The quantity and type of accessories supplied
with the device you have purchased can vary
according to promotional campaigns and to
the country where the unit is sold.
The package of the device is sensitive
to strong collisions therefore, special
precautions must be taken for transport and
storage.
All the materials shipped by Mectron have
been inspected upon their delivery.
The device is delivered duly protected and
packed.
When receiving the device, check for the
possible presence of damages incurred
during the transport and, should that be the
case, le a complaint with the transporter.
Preserve the package in the event that you
need to send the device to an Authorized
Mectron Service Center and for sto-ring the
device during prolonged periods of non-use.
EN
EN
9
Page 10
04 INSTALLATION
04.1 FIRST INSTALLATION
EN
EN
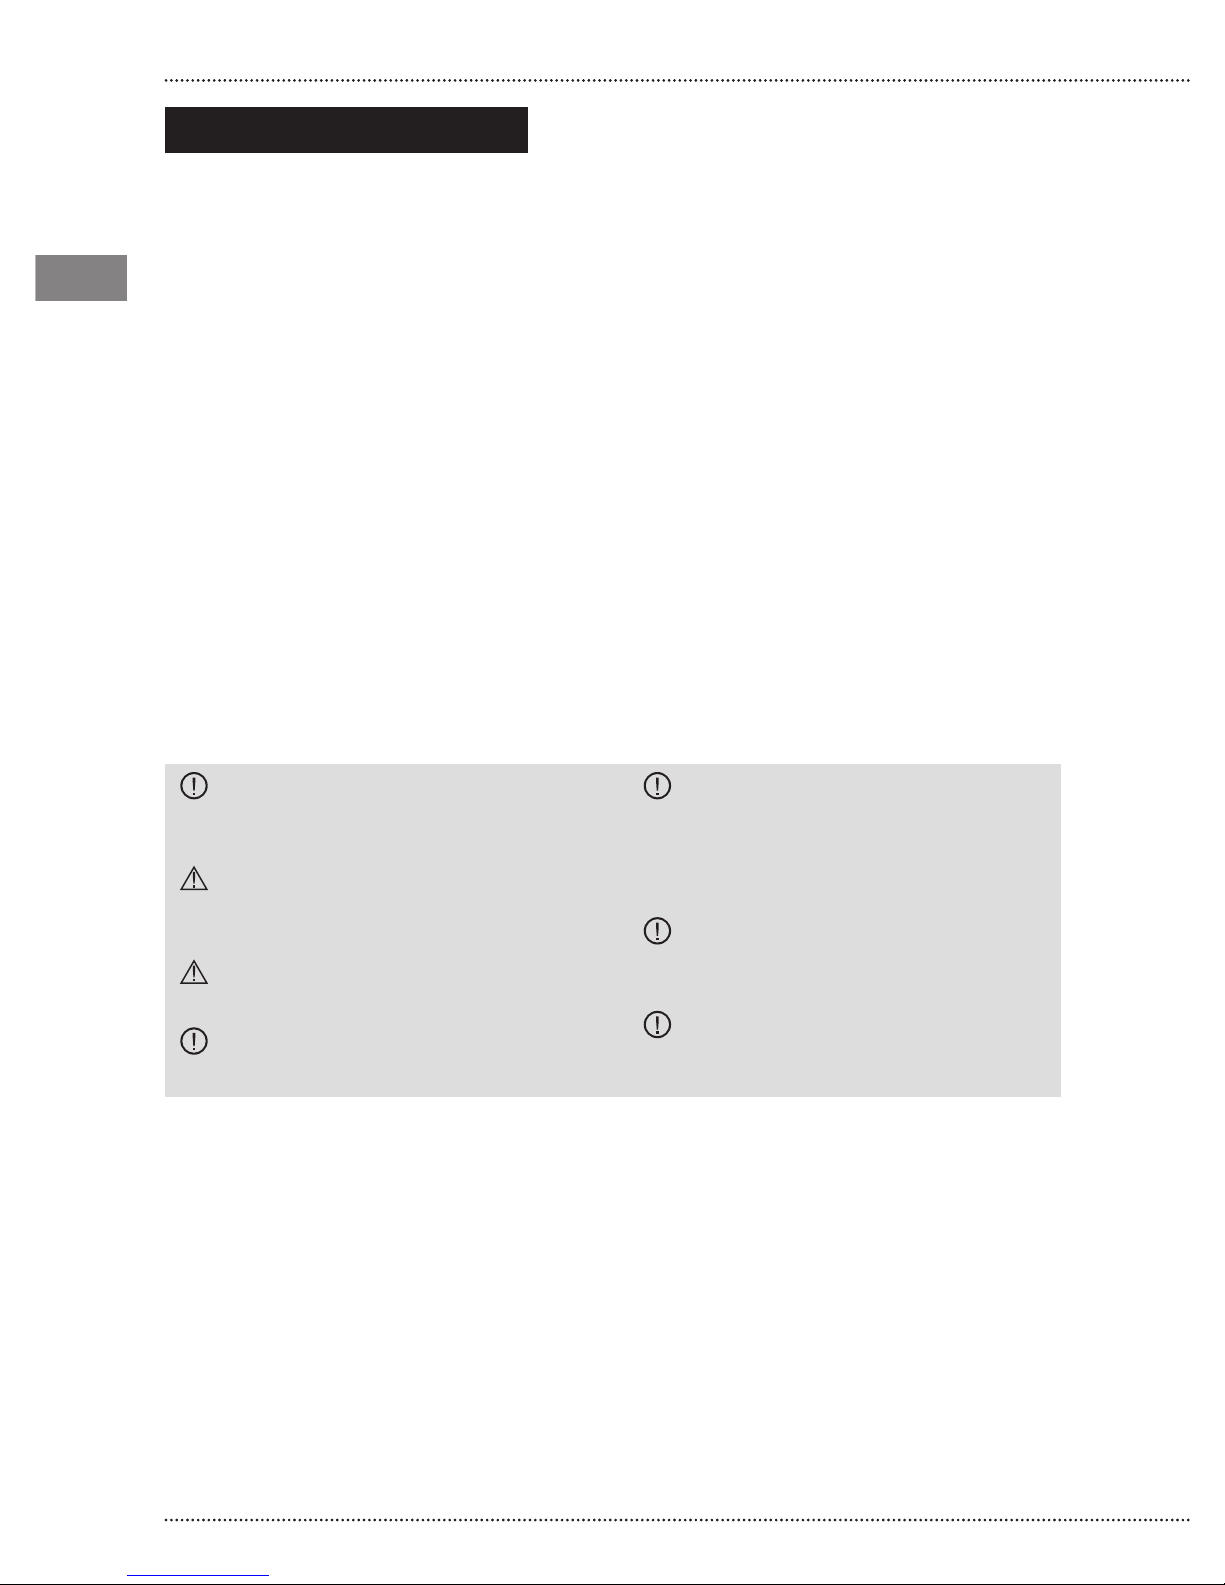
The device must be installed in a comfortable
and suitable place for its use.
To ensure that the device is in working order,
it is necessary to check the following:
1 Supply of water to the turbine spray;
2 Supply of air to the turbine;
3 Presence of powder;
Standard supplies from the dental unit for a
turbine:
- water from 1 to 3 bars (from 1000 hPa to
3000 hPa), max. 40°C;
- air 2.0 – 3.0 bars (2000 hPa - 3000 hPa).
The Starjet is supplied with a specic adaptor
corresponding to the tting of the turbine on
your dental unit. Use the Starjet only for the
tting on your own turbine. Fitting the Starjet
to a different connector could damage it.
Use Starjet only with the possessed adaptor
of the turbine.
Connect Starjet to another connector could
damage it.
04.2 SAFETY PRECAUTIONS DURING INSTALLATION
CAUTION: Check that the connector
of the turbine is clean and that the o-ring
on it are in good conditions.
WARNING: Do not press the
turbine control pedal while checking the
connector.
WARNING: Do not press thr turbine
control pedal while connecting Starjet.
CAUTION: If your turbine has a light,
turn the light off.
CAUTION: The front polisher terminal
and the tting of the turbine must be
perfectly dry. The presence of moisture
could cause clogging of the channels in
which the air/powder circulate.
CAUTION: Do not expose the
apparatus to direct sunlight or to UV light
sources.
CAUTION: The apparatus is
transportable, however it must be handled
with care when it is moved.
10
Page 11
05 USE
Starjet
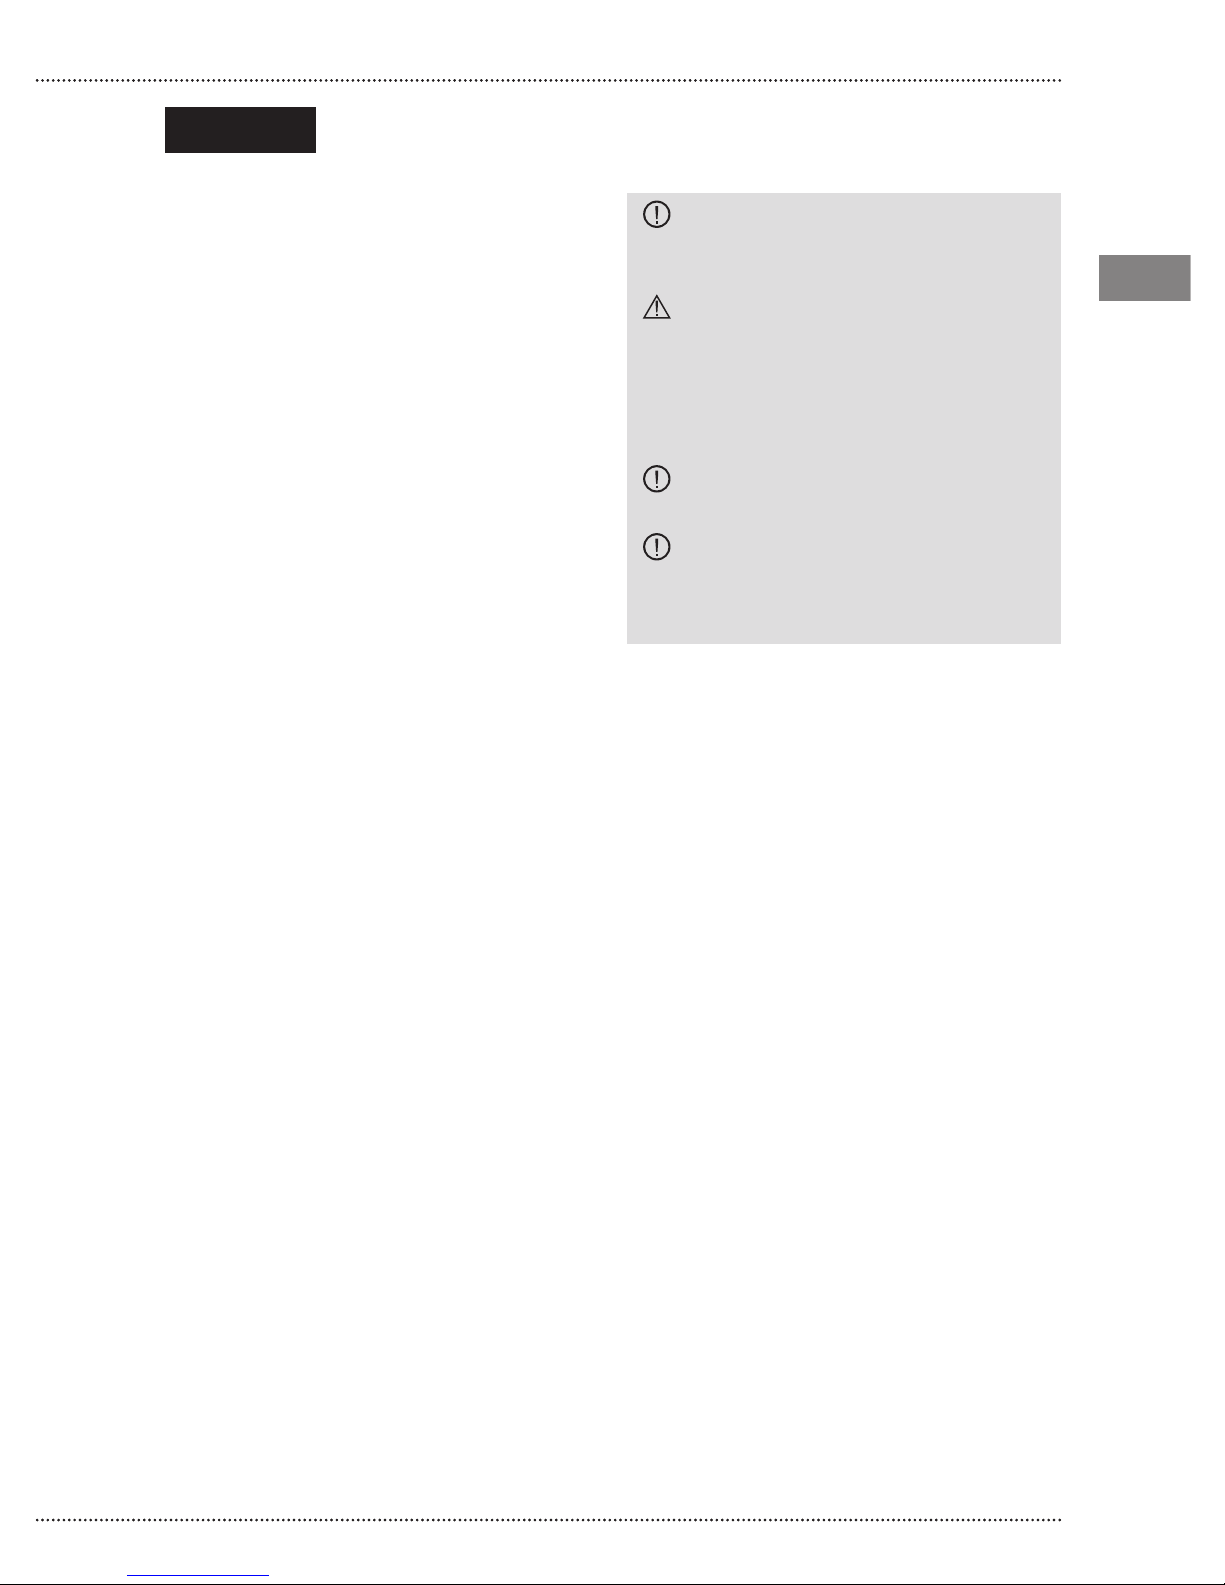
Depending on the type of application
required you need to choose the powder and
the specic cleaner terminals.
1 For applications using bicarbonate-based
powder you must:
- Set the adjusting ring on Prophy;
- Fill the powder container with Prophylaxis
powder;
- Insert one of the two available cleaner
terminals for this type of applications (PO
90° and 120°) in the handpiece
2 For applications using glycine-based
powder you must:
- Set the adjusting ring on Perio;
- Fill the powder container with glycinebased powder;
- Insert the cleaner terminal required (PO
90°, PO 120° o PERIO) in the handpiece;
- Should you wish to carry out a
subgingival application, and as a result the
PERIO cleaner terminal was inserted, you
must insert the subgingival perio terminal
on it.
CAUTION: The subgingival perio tip
can only be used with the PERIO polisher
tip.
WARNING: The subgingival perio
tips are sterile disposable.
The subgingival perio tips are supplied
sterile and disposable. They must be
used on a single patient during a single
application and must then be eliminated.
CAUTION: Use only Glycine-based
powder with the PERIO polisher tip.
CAUTION: Before lling the powder
container with the chosen powder
make sure it is clean and free of powder
residues.
EN
EN
11
Page 12
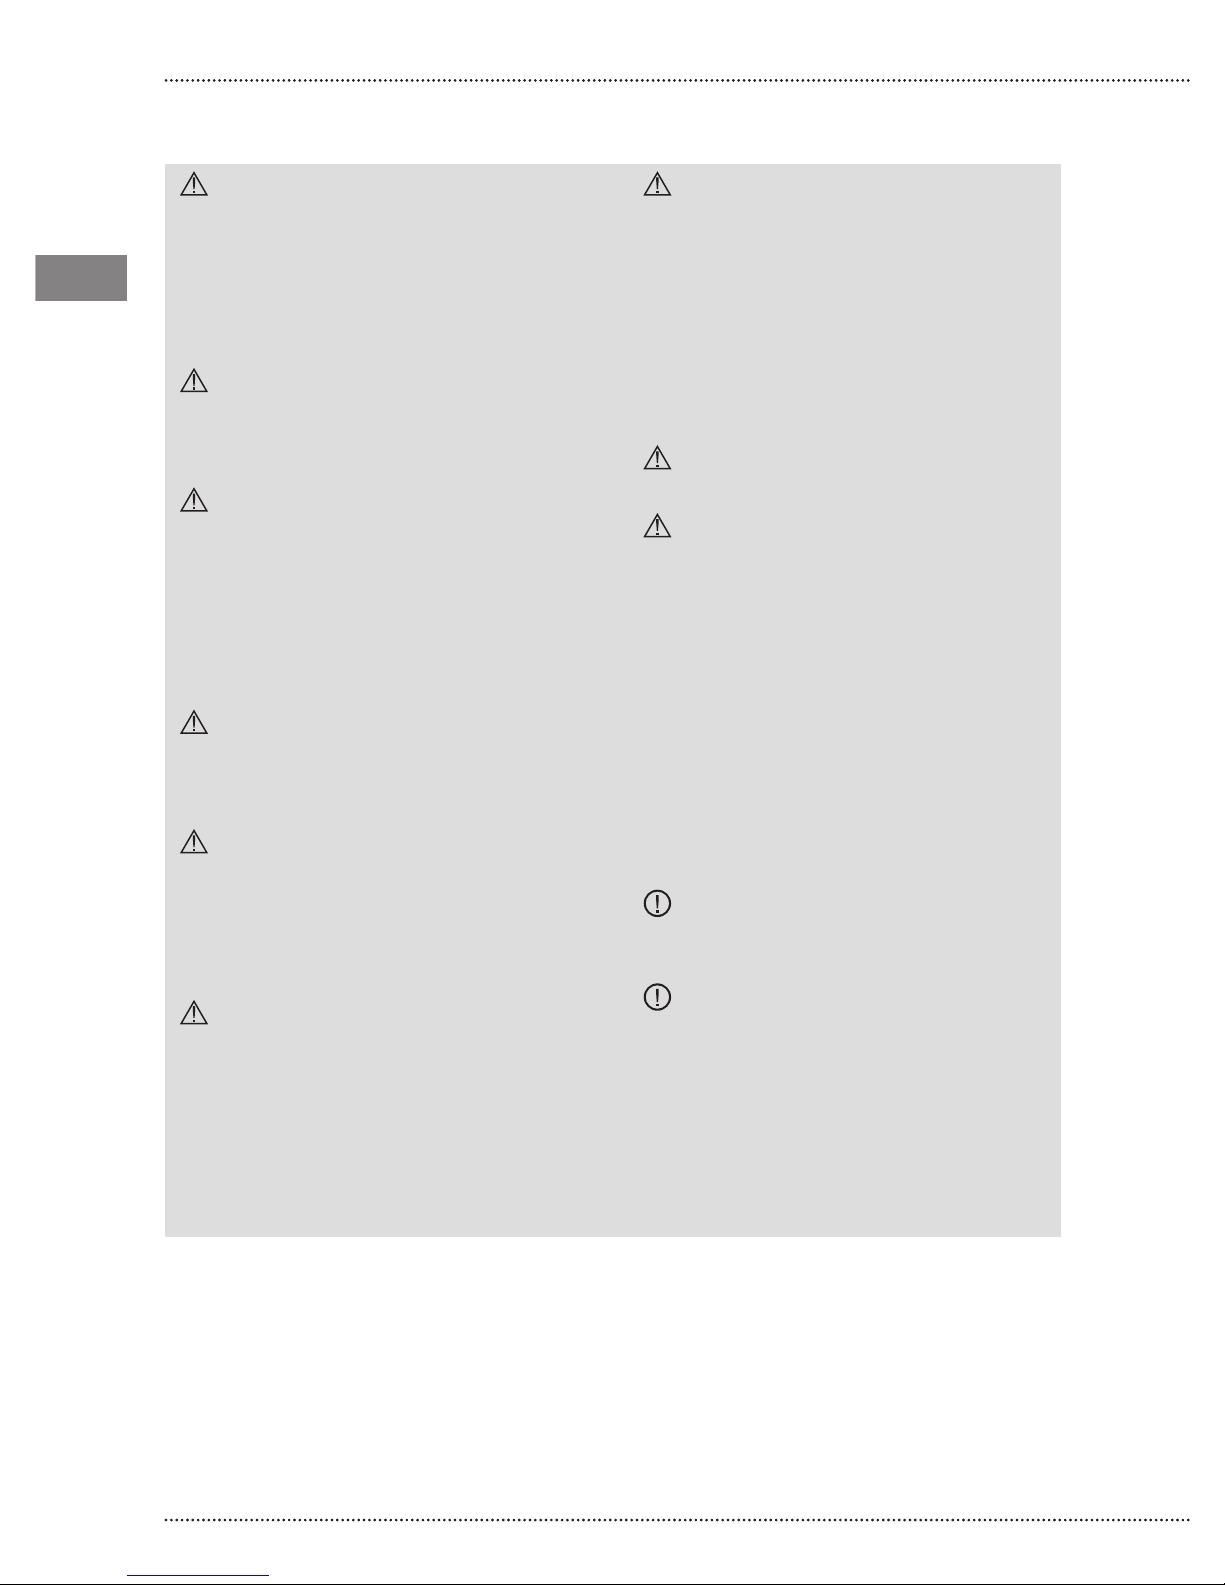
05.1 SAFETY PRECAUTIONS BEFORE AND DURING USE
EN
EN
WARNING: Contraindications.
Patients that are on a low sodium diet
or who suffer from serious respiratory
problems, such as chronic bronchitis,
asthma, emphysema, etc. must not
undergo the prophylaxis treatment, until
they have consulted with their doctor.
WARNING: Contraindications.
Patients wearing contact lenses should
remove them prior to receiving treatment
with the jet polisher.
WARNING: Controindications.
Do not direct the stream of air/powder/
water in towards eyes.
Failure to observe this requirement can
cause serious eye damage. It is advisable
for everyone involved (patient, dentist
and dental personnel) to wear protective
goggles).
WARNING: Controindications.
Dentists and other dental personnel are
advised to use protective masks in order
to limit inhalation of the powder.
WARNING: Controindications.
Do not direct the stream of air/Prophylaxis
powder/water onto composites, llings
or bridges. Failure to observe this
requirement may cause them to be
damaged.
WARNING: Contraindications.
Do not aim the jet of air/Prophylaxis
powder/water onto soft tissues or inside
the gingival sulcus. Failure to comply with
this direction can cause gingival tissue
emphysema (emphysema of the mucosa
and/or subcutaneous). Use only Glycine
based powder for this kind of treatments.
WARNING: Check the condition of
the device before treatment.
Before each treatment always check that
the equipment is in proper working order
and that the accessories are efcient.
Do not carry out the treatment if any
problems are encountered in operating
the device. If the problems concern
the equipment contact an authorised
technical service centre.
WARNING: Use authentic Mectron
accessories only.
WARNING: Infection control and
cleaning of the water and air circuits.
First use: All new and repaired accessories
are supplied in NON STERILE conditions.
Before use, and after each treatment, they
must be cleaned and sterilized in strict
compliance with the instructions provided
in Chapter 06 - Cleaning, disinfection and
sterilization.
Subsequent uses: After every treatment,
clean, disinfect and sterilize all the
reusable parts and accessories, following
the instructions provided in Chapter 06 Cleaning, disinfection and sterilization.
CAUTION: Do not attempt to unscrew
the cap of the powder container when it is
under pressure.
CAUTION: Make sure that the powder
tank is perfectly dry.
The presence of moisture could case
clogging of the channels.
12
Page 13
05.2 INSTRUCTIONS FOR USE
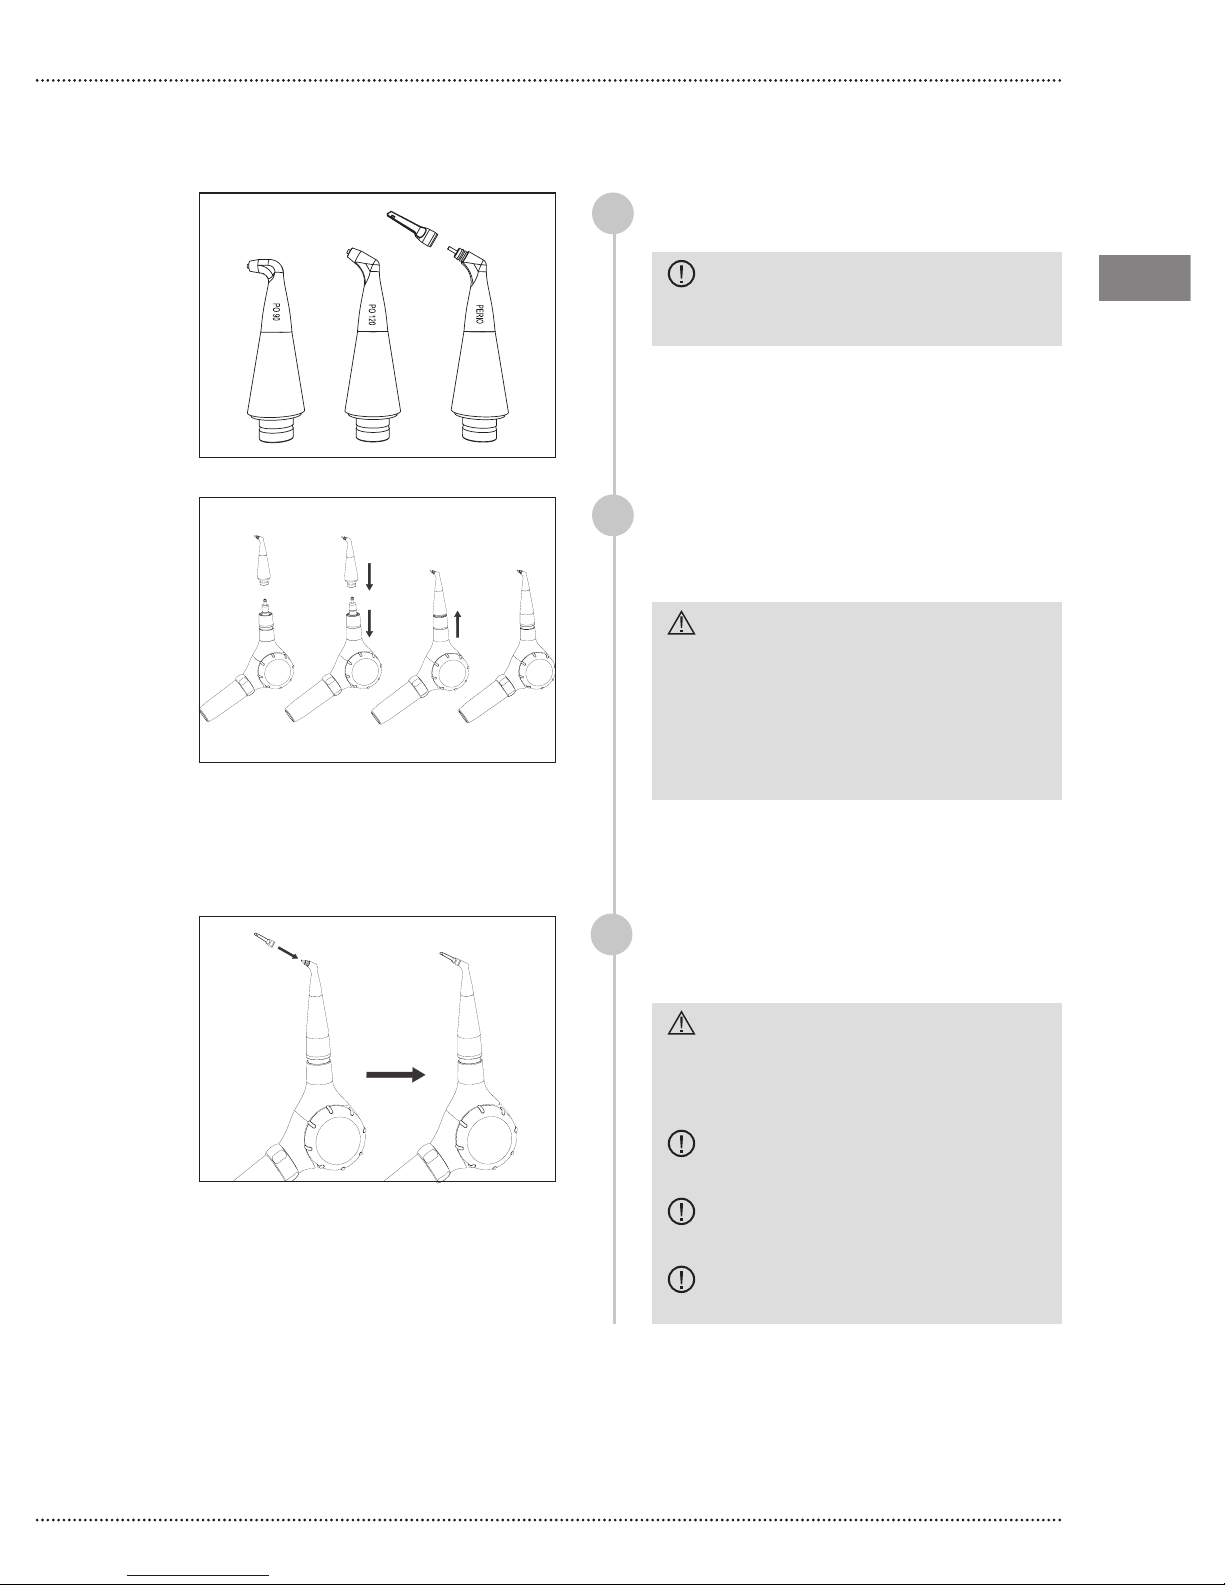
Select the type of polisher tip on the basis
1
of the operation to be performed;
Starjet
CAUTION: The subgingival perio tip
can only be used with the perio polisher
tip.
Take the Starjet, run the ferrule and
2
maintain it in this position, insert the
polisher tip fully to the home position and
then release the handpiece ferrule;
WARNING: Before proceeding with
successive operations, make sure that
the polisher tip is inserted correctly,
fully to the home position on the Starjet
(the Starjet ferrule and the polisher tip
must be in contact) and that the ferrule
has returned to its initial position.
EN
EN
If the PERIO polisher tip has been chosen
3
insert the subgingival perio tip in the
front, pushing it until it stops.
WARNING: Make sure that the
subgingival perio tip is correctly
inserted fully home on the polisher tip;
the two pieces must be in contact.
WARNING: Use authentic Mectron
accessories only.
CAUTION: Handle the front
subgingival tip with care.
CAUTION: Use only Glycine-based
powder with the PERIO polisher tip.
13
Page 14
EN
EN
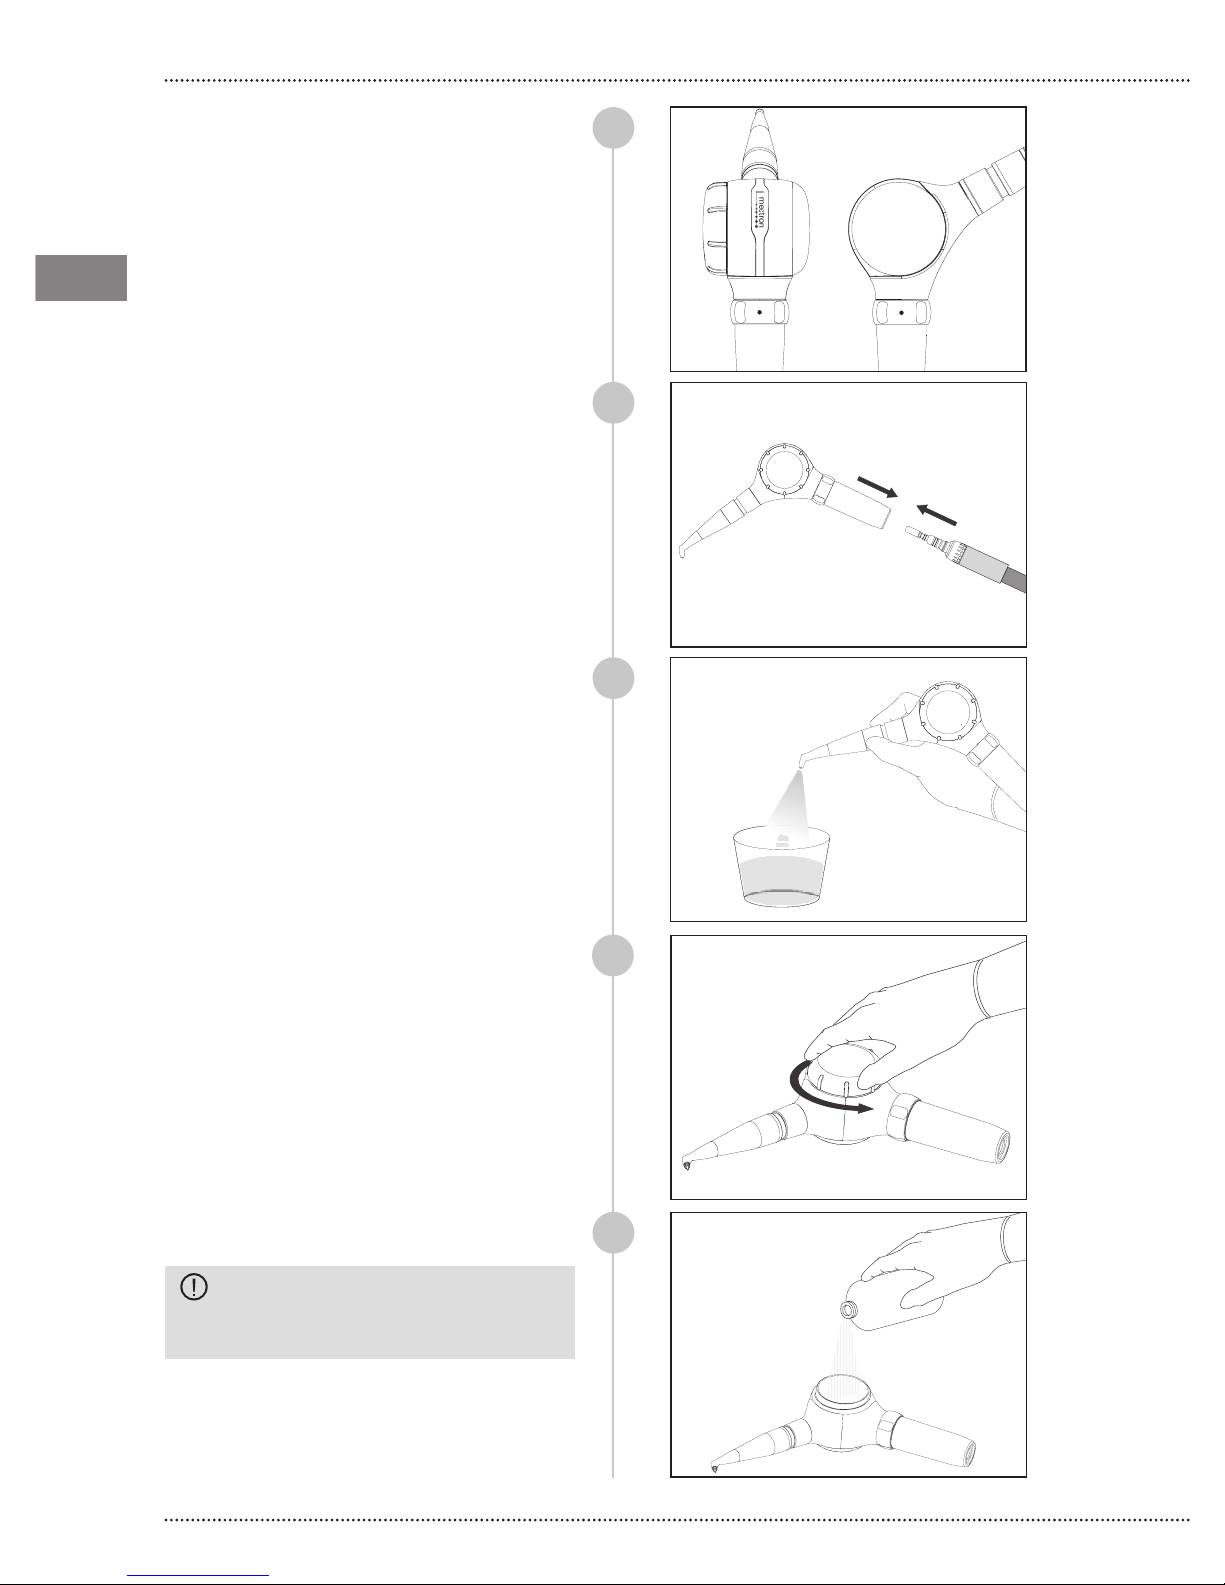
Select the desired “prophy” or “perio”
function by turning the Starjet adjustment
ring.
“Prophy” function: use Mectron
Prophylaxis Powder;
“Perio” function: use specic glycine
based powder.
4
prophy
perio
Connect Starjet to the turbine of the dental
unit;
Adjust the water ow rate on your dental
unit in order to obtain a steady stream of
water. It is easier to adjust the ow rate
without powder;
Unscrew the cap of the powder container;
5
6
7
Pour the powder chosen for the particular
application into the powder container.
CAUTION: Do not use bicarbonate-
based powder if the adjustment ring
has been set to “perio“.
14
8
Page 15
perio
prophy
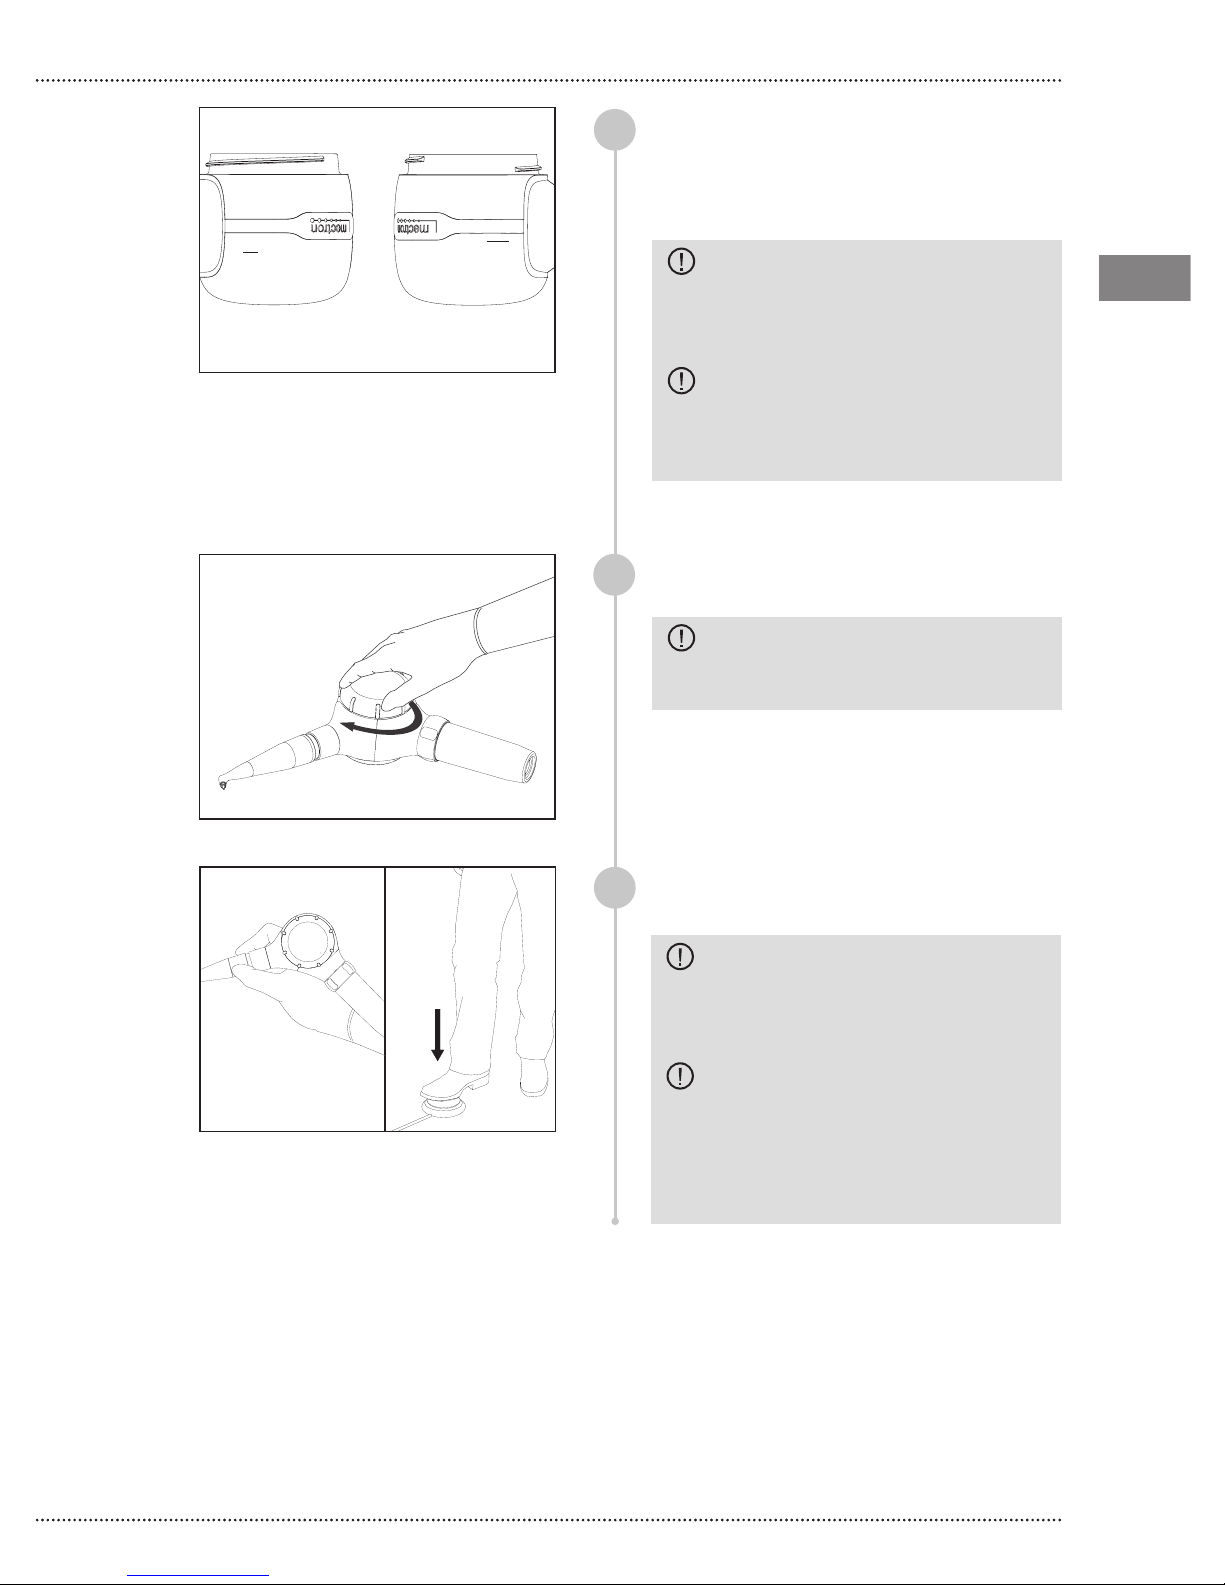
There are two maximum levels of powder
9
shown on the powder container: one for
the bicarbonate-based powder (prophy)
and the other for the glycine-based
powder (perio).
CAUTION: When lling the powder
container with a bicarbonate-based
powder do not exceed the “prophy”
level indicated on the powder container.
CAUTION: When lling the
powder container with a glycine-based
powder do not exceed the “perio” level
indicated on the powder container.
Screw the cap of the powder container
10
back on;
CAUTION: Remove any residues
of powder from the thread of the cap
before screwing it on.
Starjet
EN
EN
Press the turbine pedal to carry out the
11
treatment;
CAUTION: During the treatment
use the suction cannula to evacuate the
mixture of air/powder/water and water
from the patient’s mouth.
CAUTION: The stream of air/
powder/water will continue for several
seconds after removing your foot from
the control pedal. Take these few extra
seconds into account when nishing the
treatment.
15
Page 16
EN
EN
05.3 CLEANING THE POWDER CONTAINER
CAUTION: The instructions
described in this paragraph must be
carried out every time the powder is
changed from bicarbonate to glycine
and before the cleaning, disinfection
and sterilization procedures.
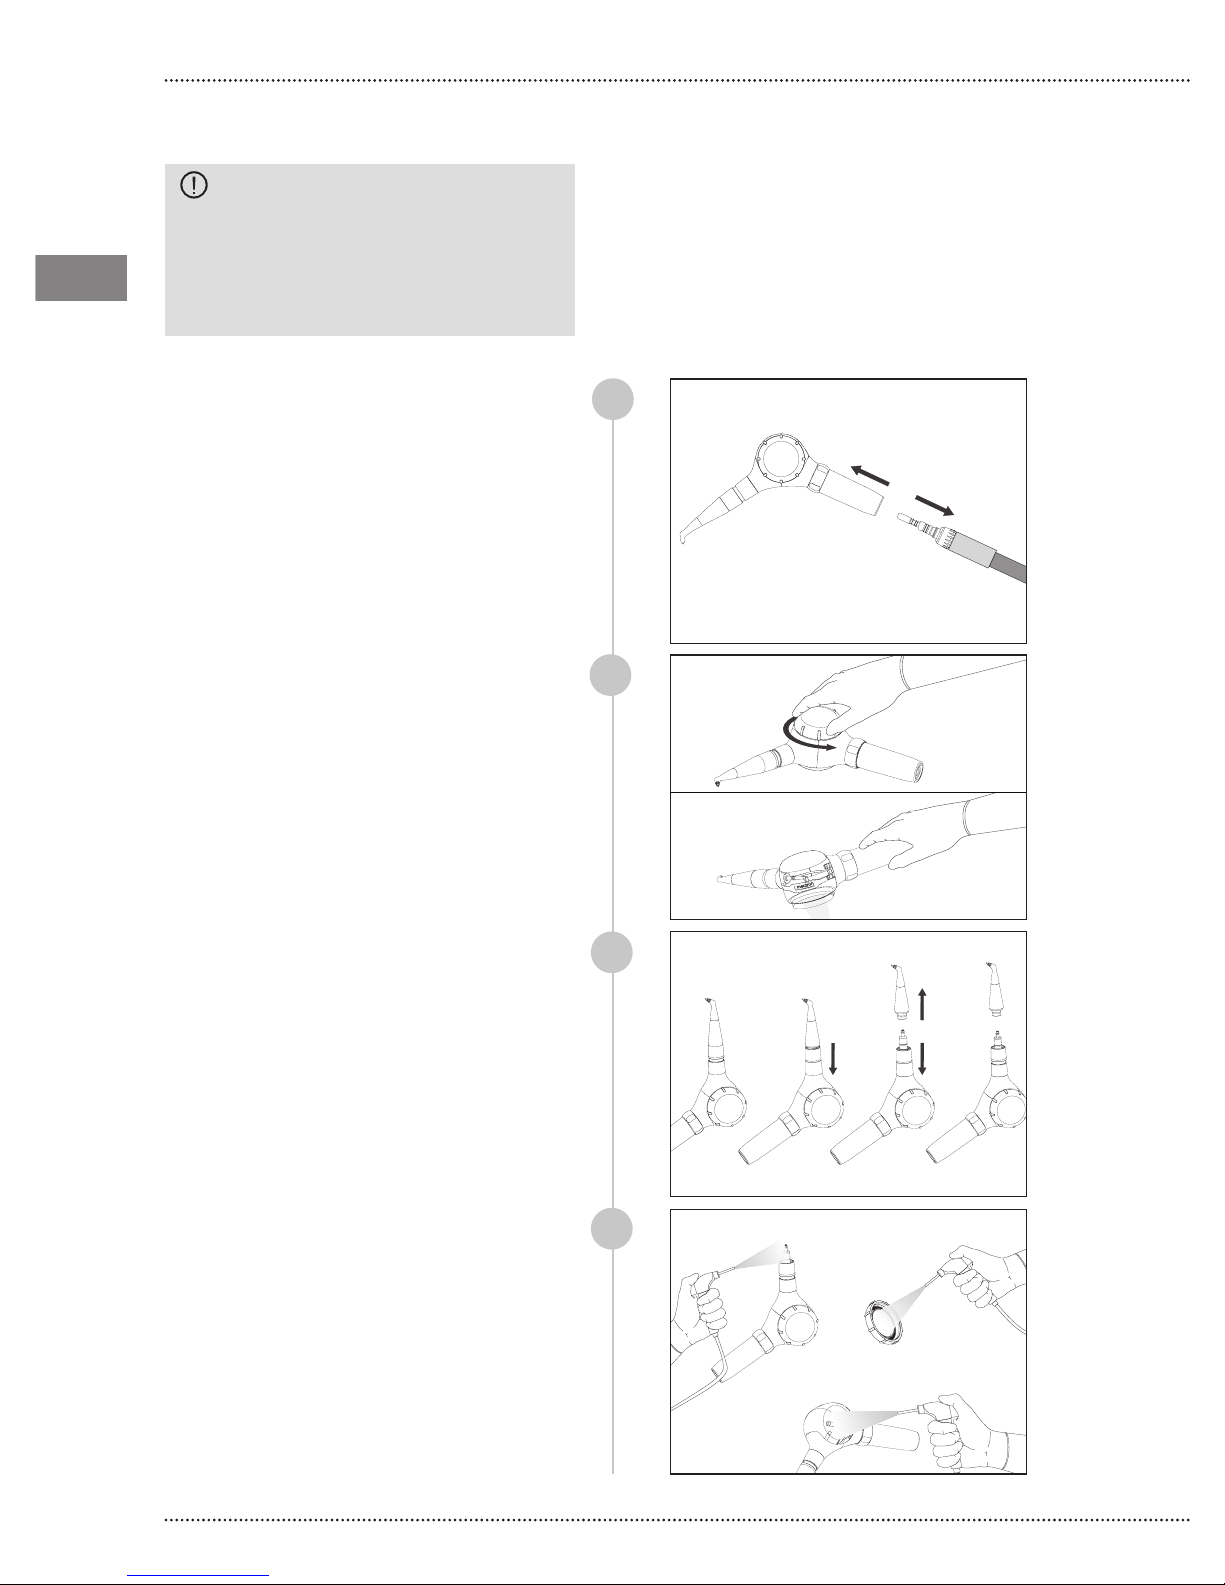
Disconnect Starjet from the turbine of the
dental unit;
Unscrew the cap of the powder container
and empty the powder container;
Take the Starjet, slide the ferrule and
maintain it in this position, extract the
polisher tip and then release the Starjet
ferrule;
1
2
3
Blow compressed air into the powder
container, on the cap and the handpiece
connector cavity, so as to remove all
powder residues;
16
4
Page 17
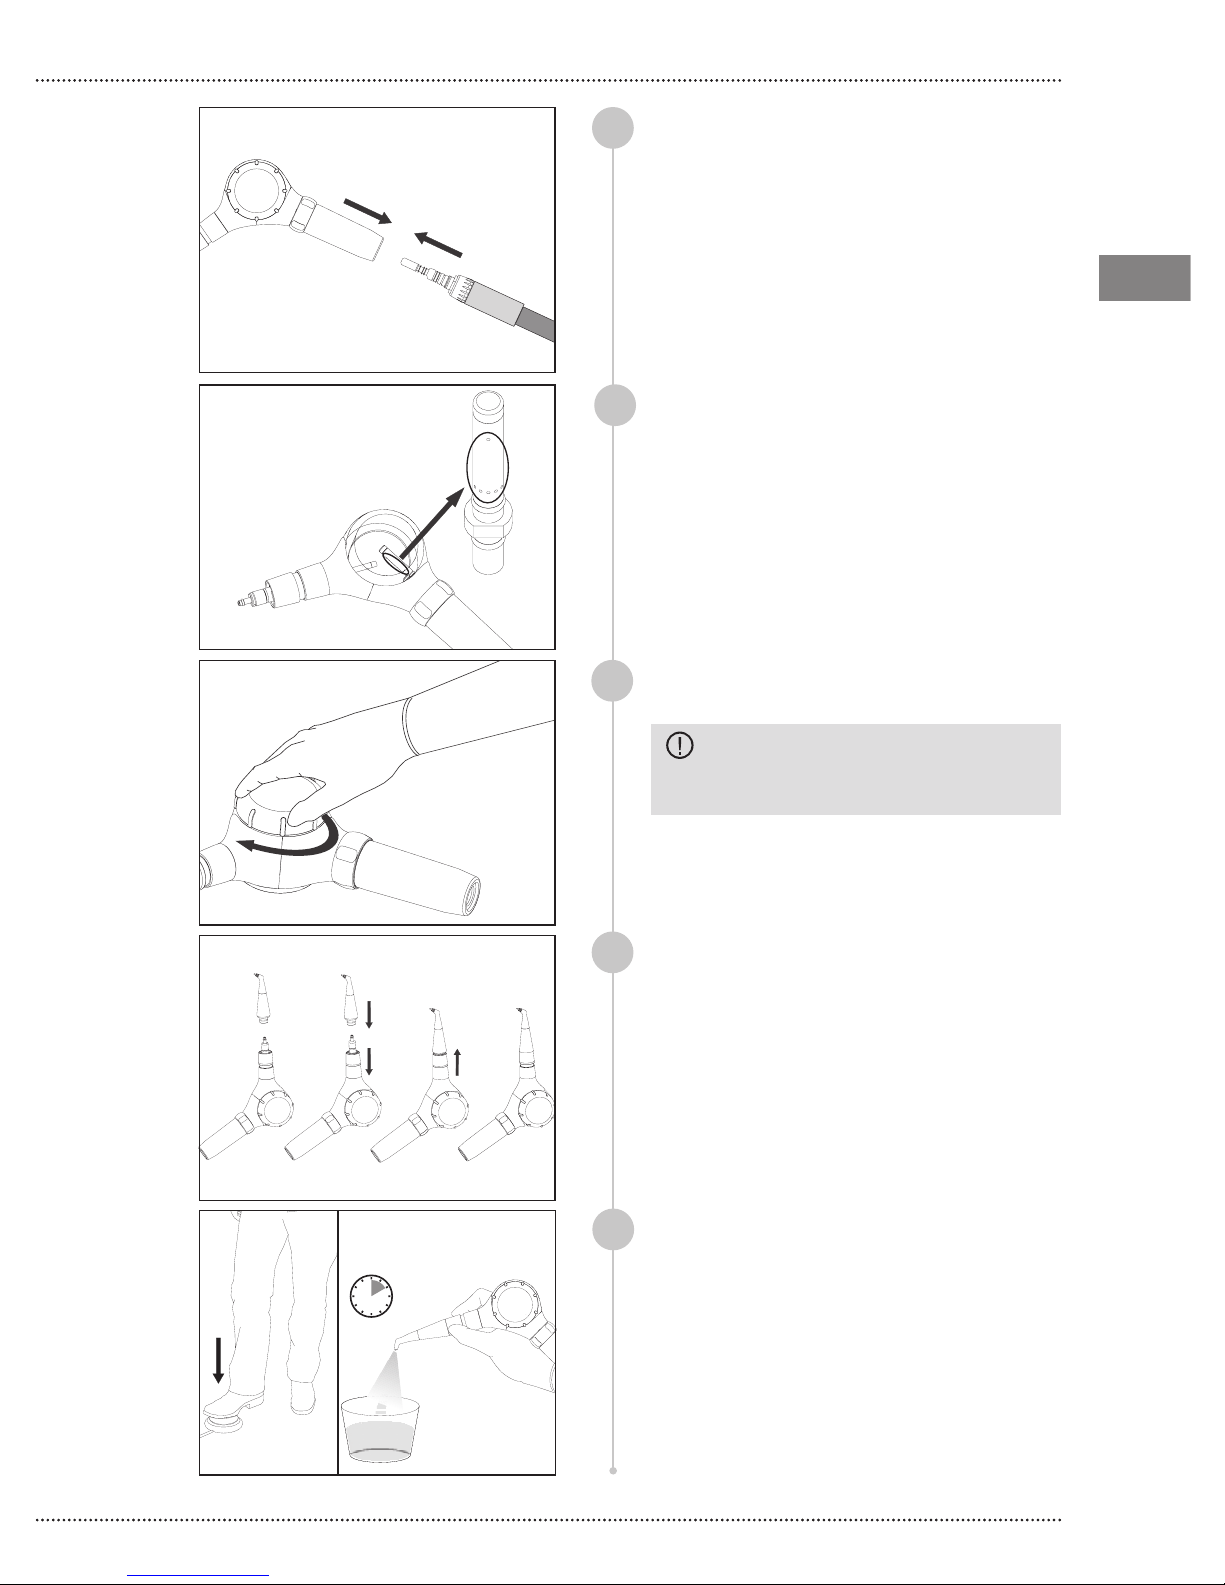
Connect Starjet to the turbine of the dental
5
unit;
By using the brush supplied and while
6
keeping the footpedal pressed, brush
the 6 holes on the diffuser in the powder
container.
NOTE: Pay attention to the water coming
out of the Starjet.
Starjet
EN
EN
8-10 sec
Screw the cap of the powder container
7
back on;
CAUTION: Remove any residues
of powder from the thread of the cap
before screwing it on.
Take the Starjet, run the ferrule and
8
maintain it in this position, insert the
polisher tip fully to the home position and
then release the handpiece ferrule;
Activate the pedal for 8-10 seconds so as
9
to remove possible powder residues from
the handpiece;
17
Page 18
EN
EN
06 CLEANING, DISINFECTION AND
STERILISATION
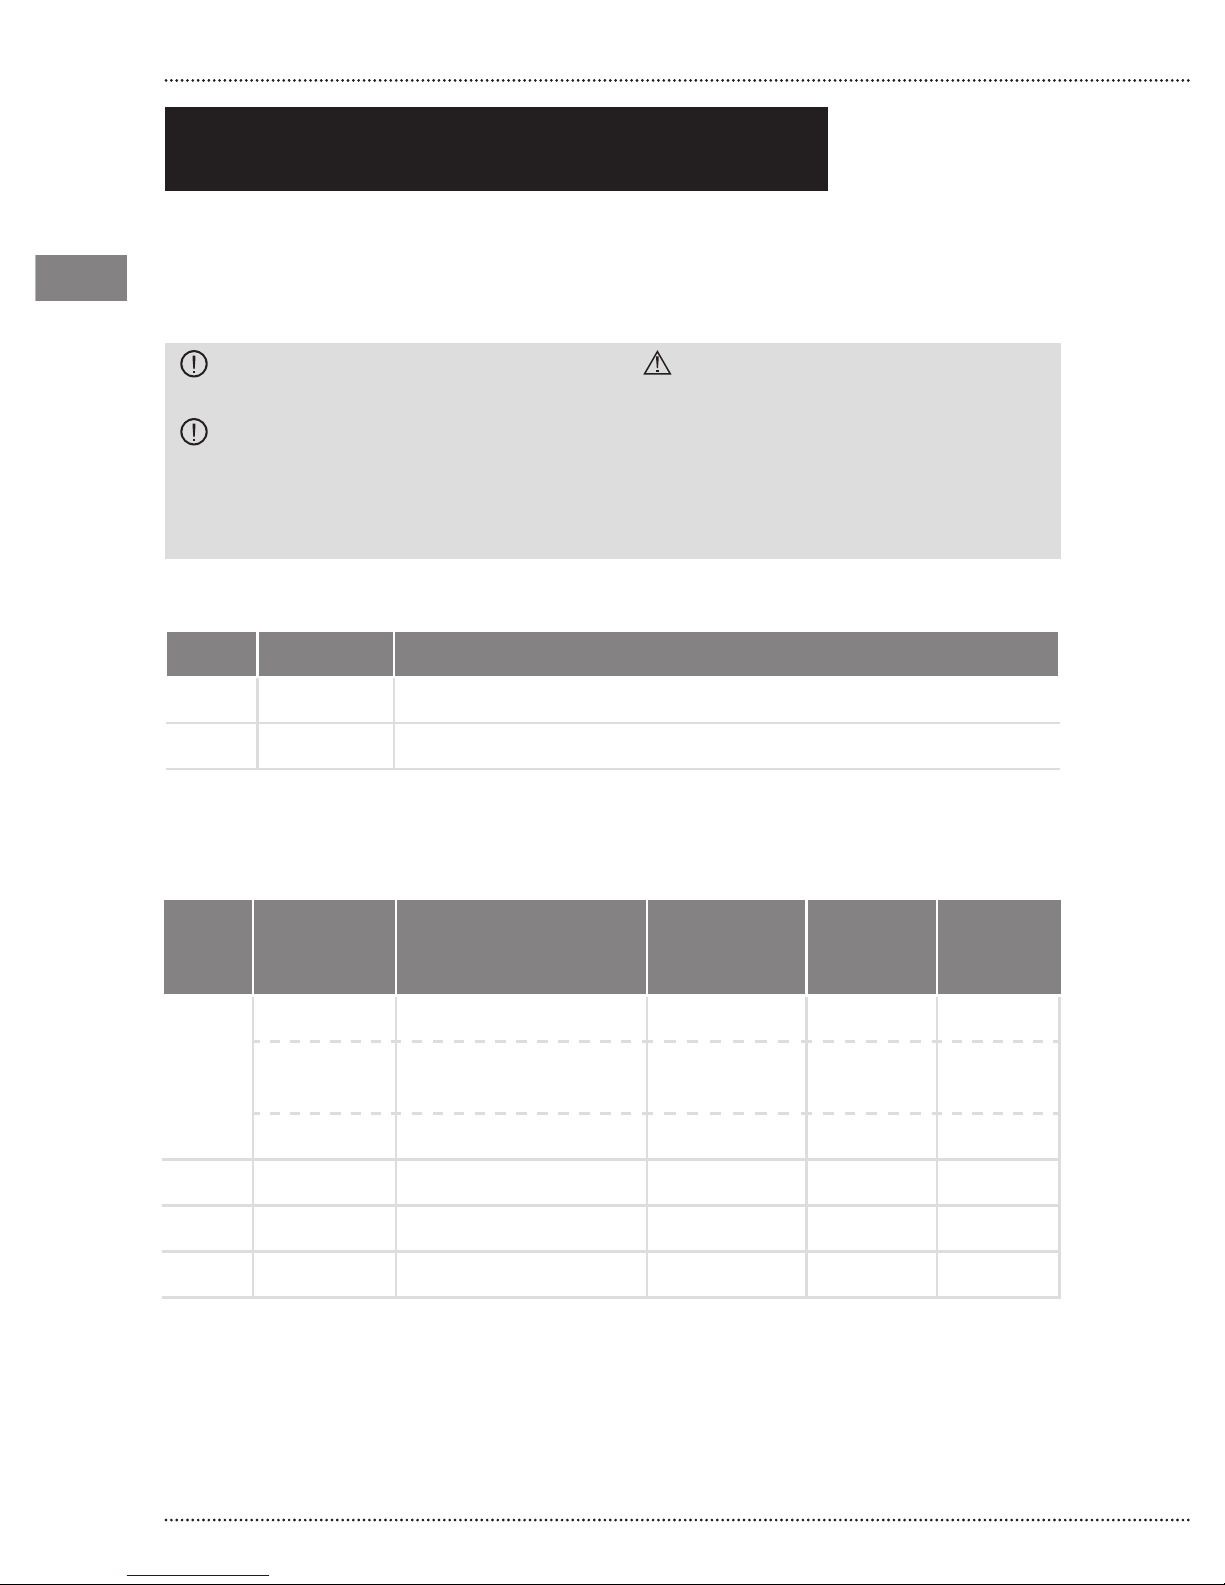
This table is purely indicative.
For the complete cleaning, disinfection and
sterilization procedures of the individual
parts, refer to the paragraphs indicated in the
table.
CAUTION: Methods not included in
the table below must not be used.
CAUTION: The cleaning, disinfection
and sterilization procedures described
in the following paragraphs are to be
carried out after the rst usage and all
subsequent usages.
WARNING:The subgingival perio
tips are sterile disposable.
The subgingival perio tips are supplied
sterile and disposable. They must be
used on a single patient during a single
application and must then be eliminated.
Starjet device
Phase Paragraph Procedure
I 08.1 Preparation
II 08.2 Manual cleaning with detergent solution and disinfecting
Accessories (Polisher tips, K9 wrench, needle for cleaning)
Phase Paragraph Procedure Polisher tips
K9
wrench
Needle
for
cleaning
08.4.1 Manual cleaning X X X
IV
V 08.5 Check cleaning X X X
VI 08.6 Drying X X X
VII 08.7 Sterilisation X X X
Particular information: Sterilization parameters, in steam autoclave, used in Great Britain: temperature: 134° C , time: 3 minutes
08.4.2
08.4.3 Automatic cleaning X X
18
Combined cleaning
manual/automatic
X X
Page 19
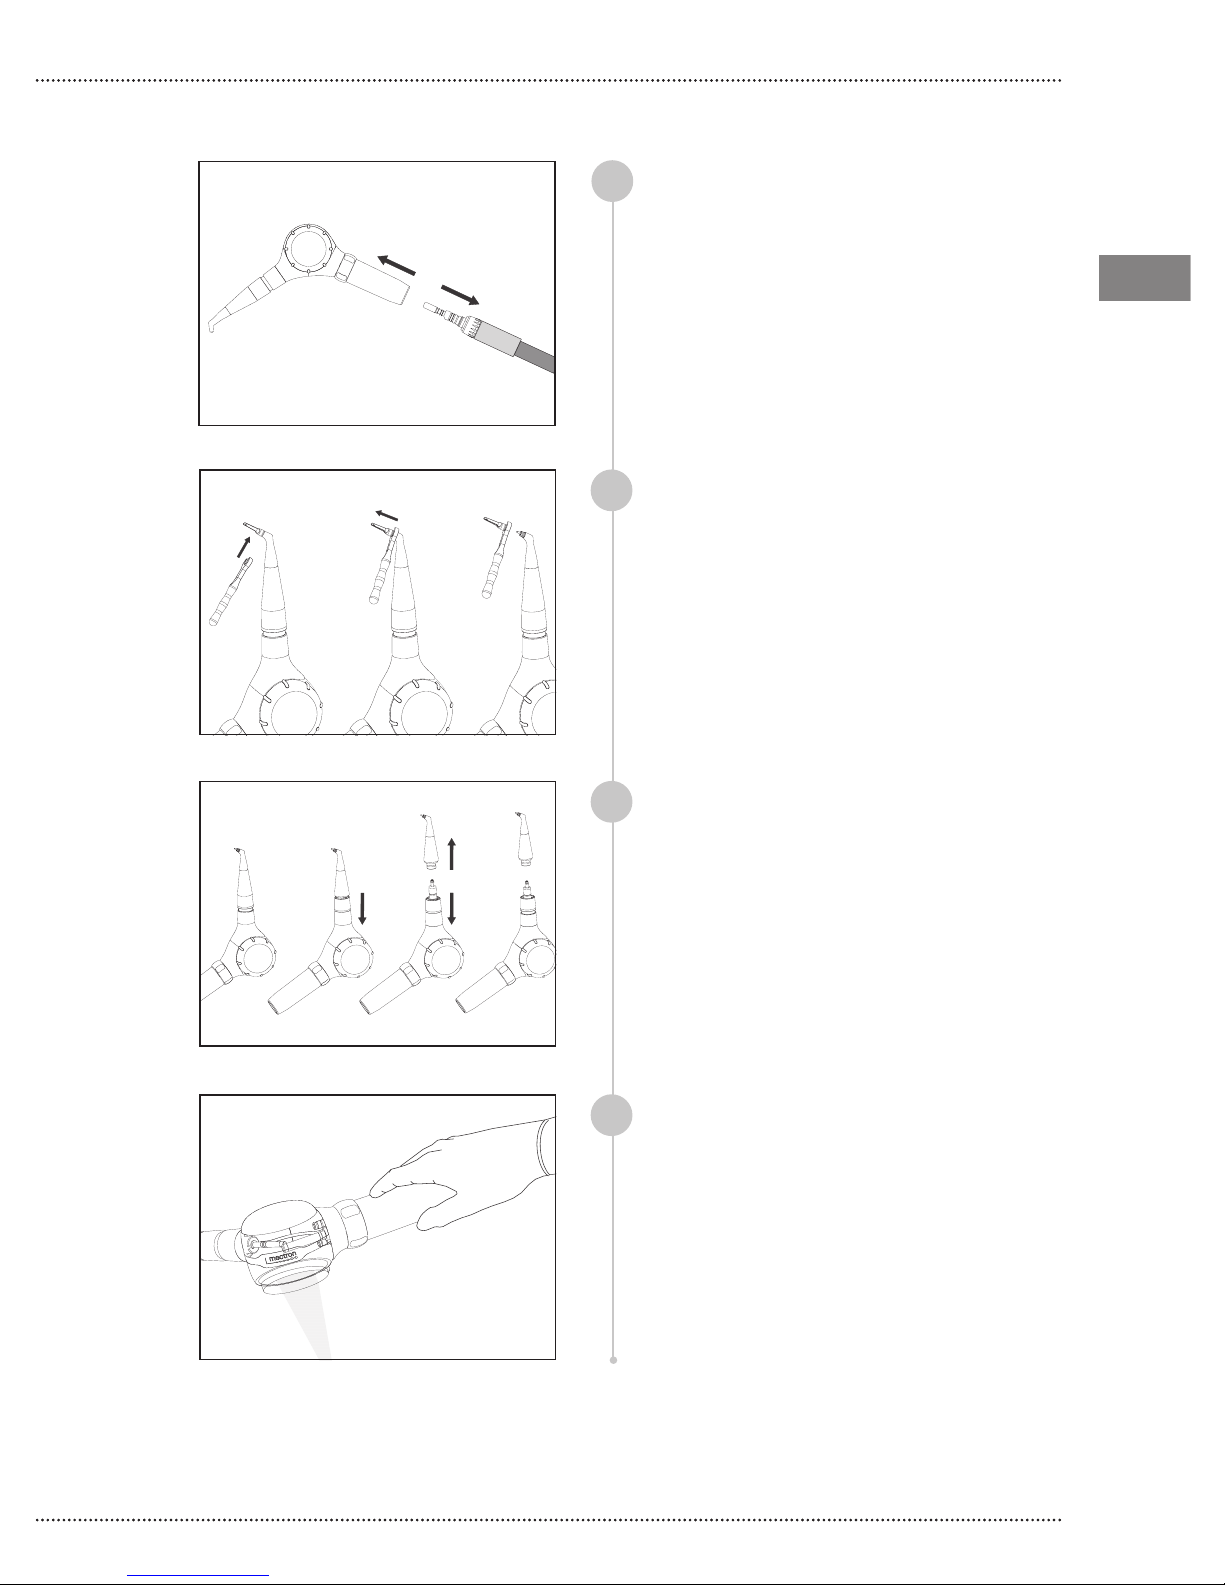
06.1 PREPARATION
Disconnect Starjet from the turbine of the
1
dental unit
Where the PERIO cleaner terminal has
2
been used, remove the perio subgingival
terminal using the K9 wrench supplied and
then proceed to dismantling (Chapter 08);
NOTE: Introduce the K9 wrench exactly
into the position indicated in the gure.
Starjet
EN
EN
Take the Starjet, slide the ferrule and
3
maintain it in this position, extract the
polisher tip and then release the Starjet
ferrule;
Empty the Starjet device powder container
4
by following the instructions provided in
paragraph 05.3.
19
Page 20
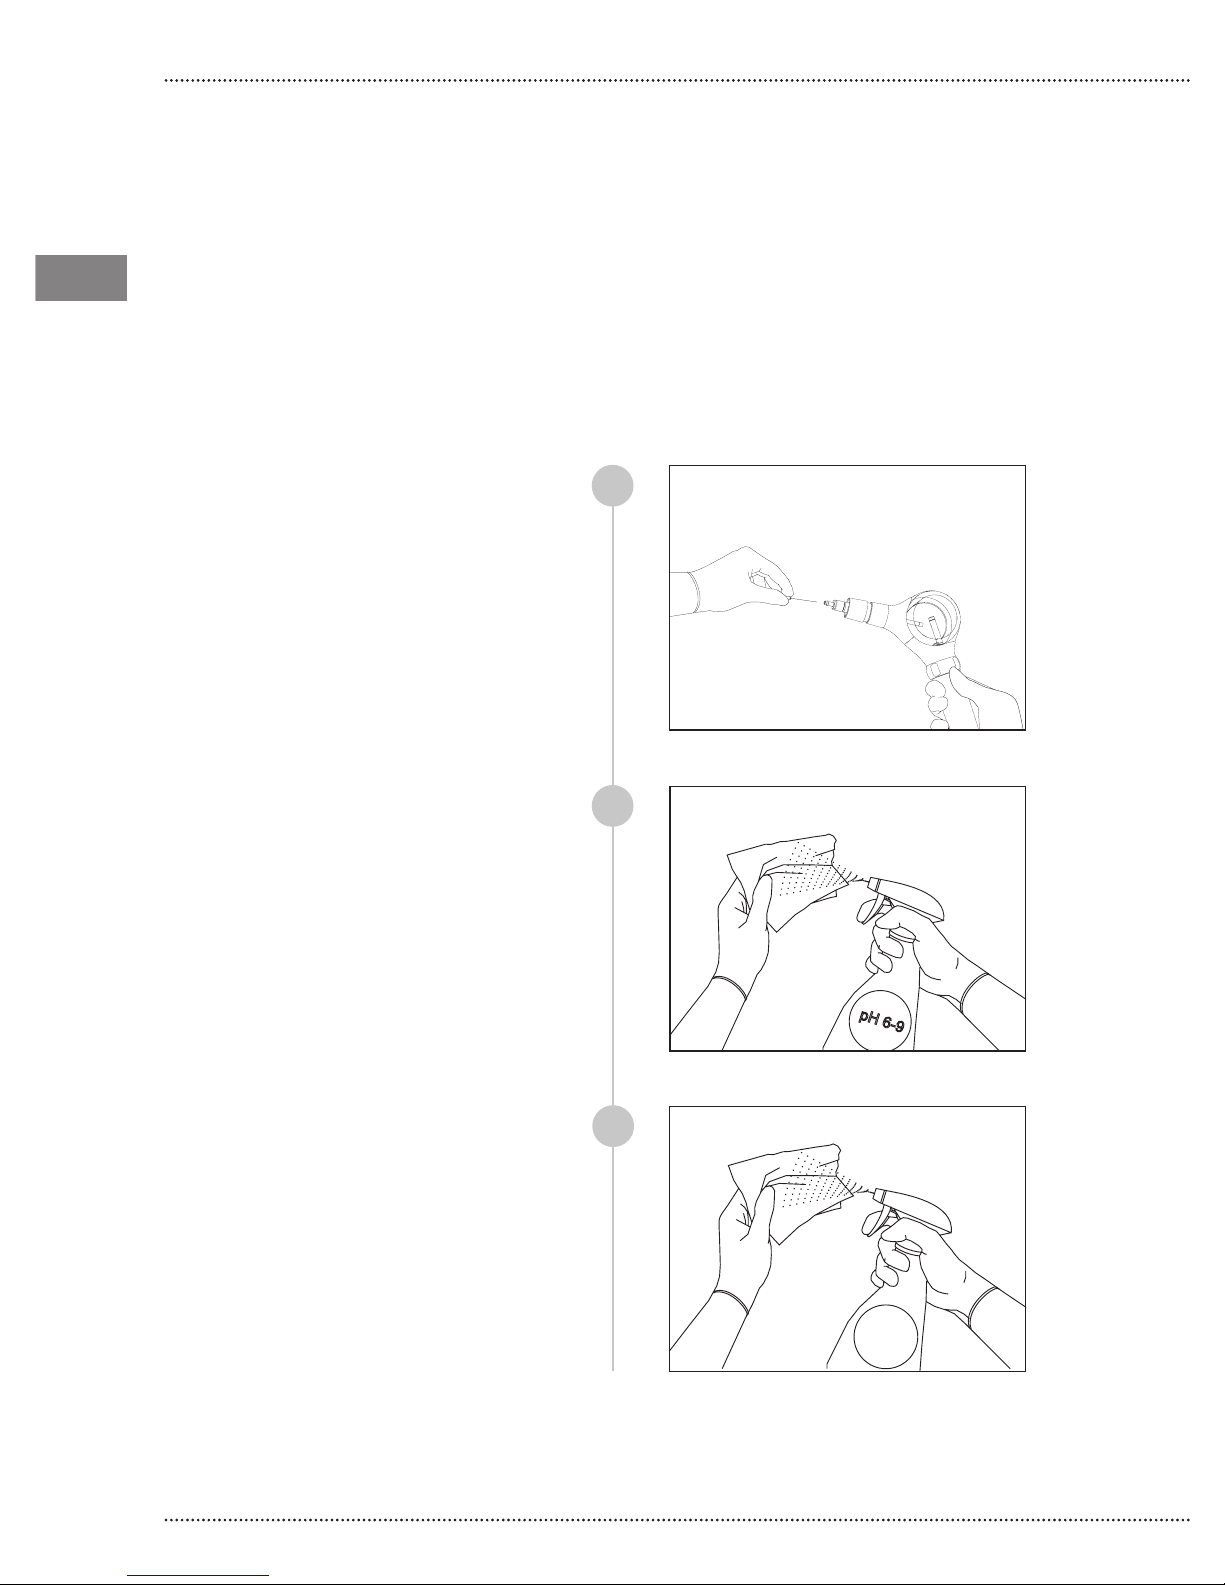
06.2 CLEANING AND DISINFECTING STARJET DEVICE
The following procedure must be carried out on the Starjet device.
MATERIALS NECESSARY
EN
EN
- Clean, soft cloths with low ber-release;
- Detergent solution (pH 6-9);
- Demineralised water;
- Disinfectant agent (peracetic acid 2%).
CLEANING METHOD
Free the channel of the Starjet from any
powder residual by using the cleaning
needle Ø 0,4 mm supplied.
Clean the surface of the Starjet device
with a clean, soft and low bre release
cloth, dampened with a cleaning solution
(pH 6-9) prepared according to the
manufacturer’s instructions;
1
2
Clean the surface of the Starjet device
with a clean, soft and low bre release
cloth, dampened with demineralised water
to remove all residues of the cleaning
solution;
20
pH 6-9
3
Deminarilsed
6-9
water
Page 21
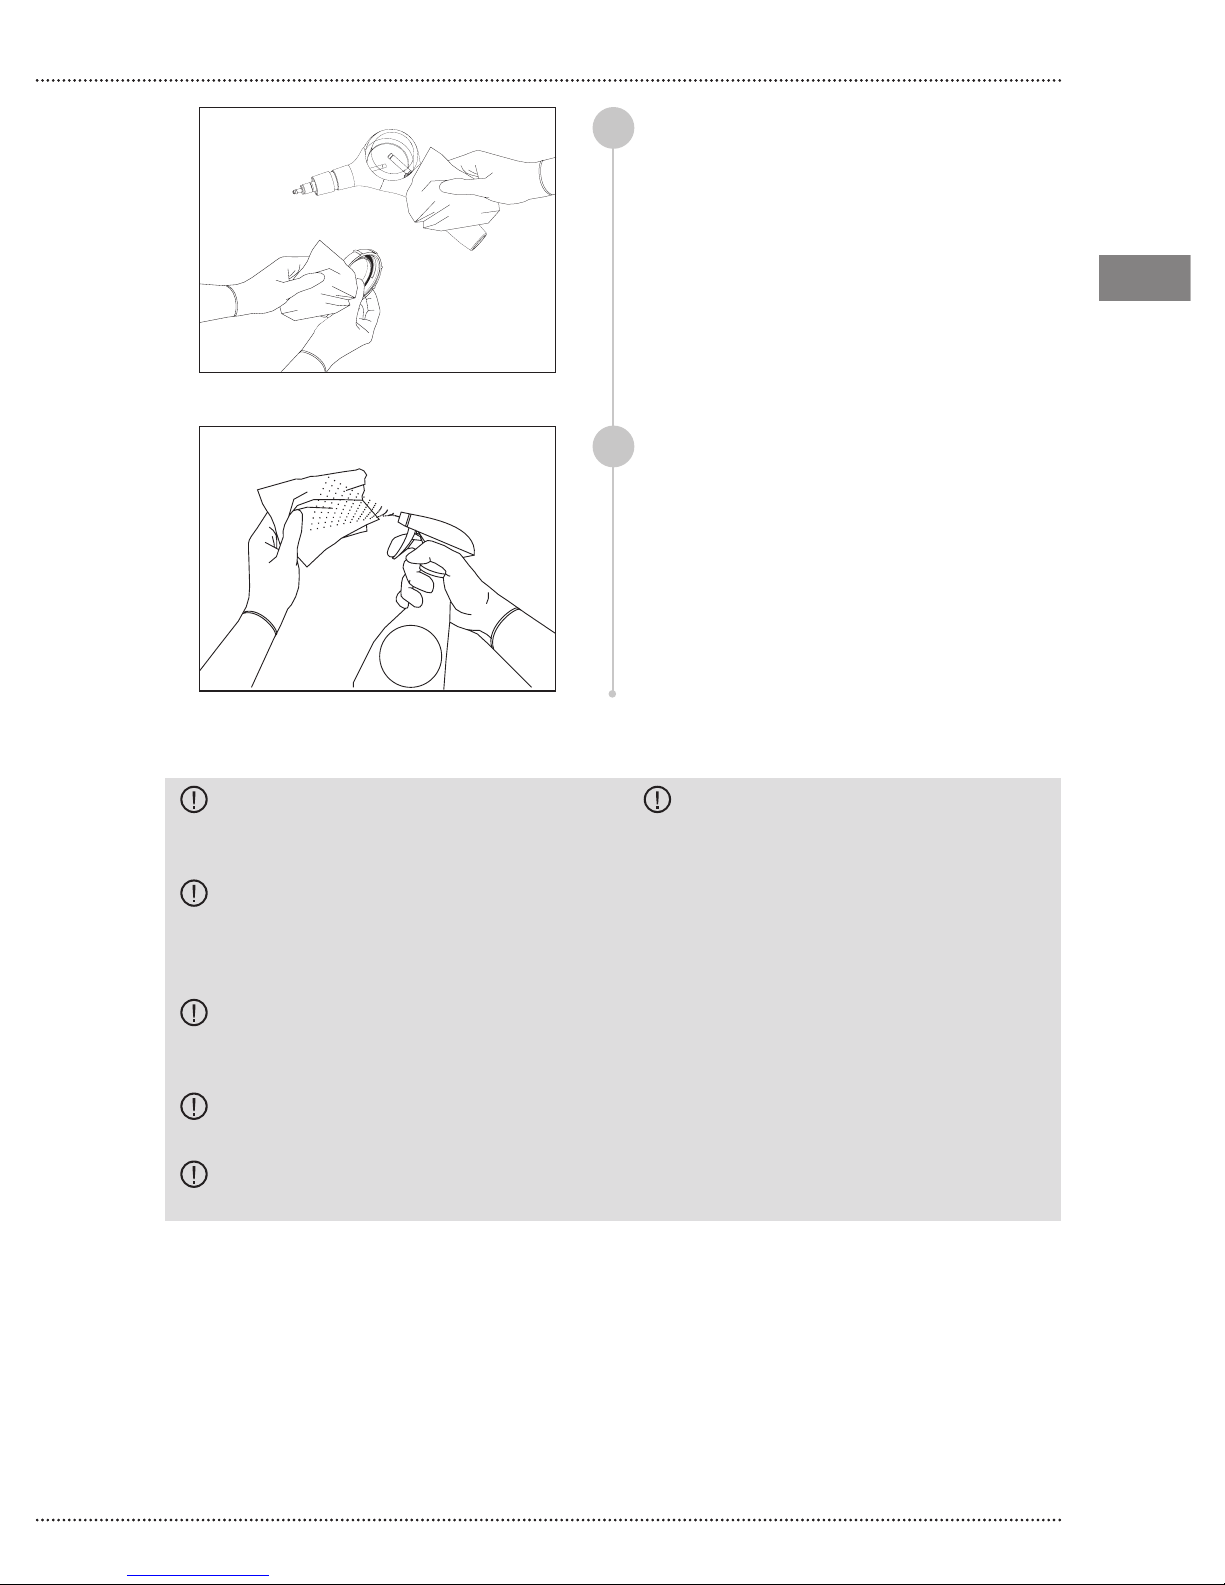
Dry the surface of the Starjet device with a
4
clean, soft and low bre release cloth;
If you wish to disinfect the device, vaporize
5
the disinfectant agent (prepared according
to the manufacturer’s instructions) on a
clean and soft cloth with low ber release
and clean the surface of the Starjet device.
Starjet
EN
EN
Disinfecting
6-9
agent
CAUTION: Do not sterilize the
Starjet device. It may stop working and
cause damage to people and/or property.
CAUTION: The Starjet device is not
protected against the penetration of
liquids. Do not spray liquids directly on
the surface of the Starjet device.
CAUTION: Do not immerse the Starjet
device in liquids and/or various kinds of
solutions as it could be damaged.
CAUTION: Do not immerse the
handpiece in an ultrasonic basin.
CAUTION: Do not use running water
to clean the Starjet device.
CAUTION: Do not use as disinfecting
agents:
- Very alkaline products (pH > 9);
- Products containing sodium
hypochlorite;
- Products containing hydrogen peroxide;
- Products containing abrasive substances;
- Alcohol-based products;
- Products containing aldehyde, amines
and/or phenols;
- Acetone;
- Methylethylketone.
as they can discolour and/or damage the
plastic materials.
21
Page 22
06.3 CLEANING ACCESSORIES THAT CAN BE STERILISED
EN
EN
PREPARATION
The following parts of the device can be
sterilized:
• Polisher tips;
• K9 wrench;
• Cleaning needle.
Before verifying the cleaning (paragraph
06.4), drying (paragraph 06.5) and then
sterilization (paragraph 06.6), depending
on requirements, one of the three possible
cleaning methods must be selected, which
are explained in-depth in the following subparagraphs.
06.3.1 MANUAL CLEANING
CAUTION: The instructions provided
below have been validated by the
manufacturer of the medical device as
ABLE to prepare a medical device for
re-use. The person in charge of the
process is responsible for ensuring that
the processes repeated are effectively
performed using the equipment, materials
and staff in the reprocessing structure
in order to obtain the desired result.
This generally requires the validation
and systematic monito-ring of the
process. Similarly, all deviations from
the instructions provided by the process
manager must be adequately assessed
to judge their efciency and potential
undesired consequences.
MATERIALS NECESSARY
- Enzymatic detergent at pH 6-9;
- Water;
- Container for immersion in the enzymatic
liquid;
- Ultrasonic tank;
- Clean, soft cloths with low bre release;
- Brush with soft nylon bristles;
- 25 ml syringe;
- Demineralised water.
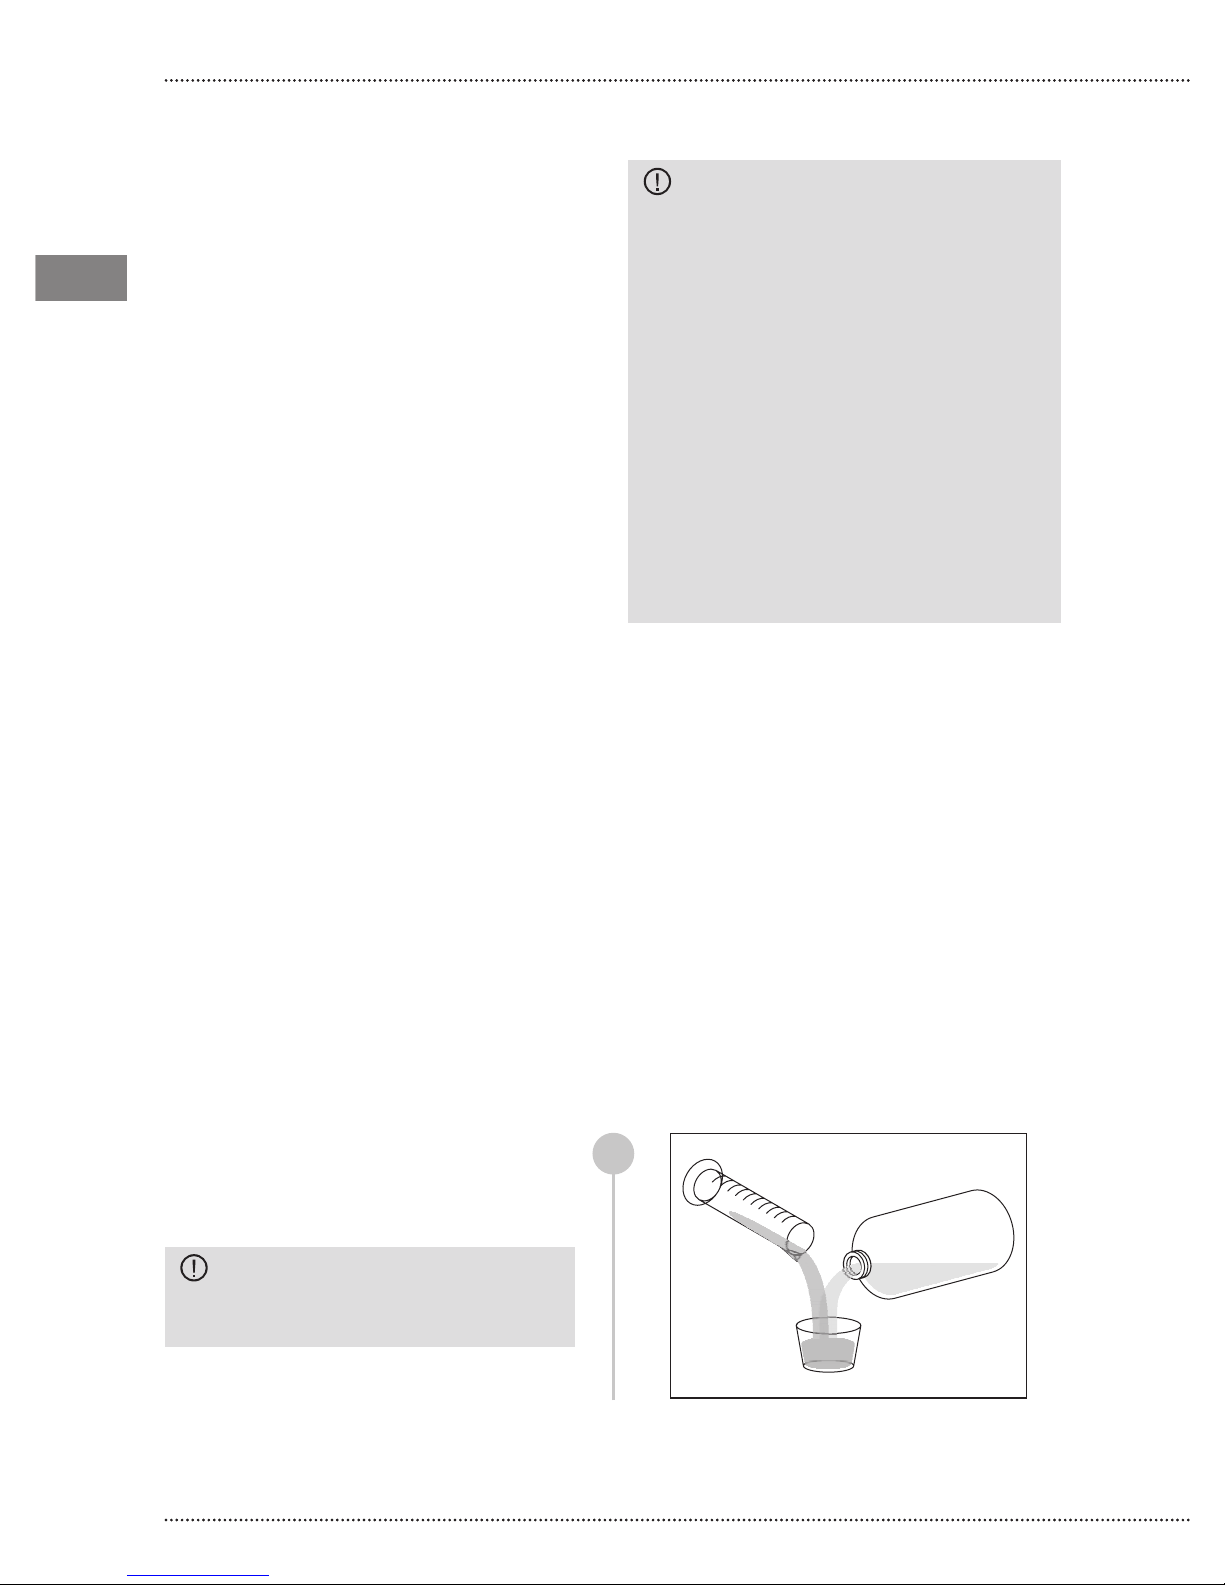
Prepare an enzymatic detergent solution*
with pH 6-9, as per the instructions of the
manufacturer;
CAUTION: Once used, dispose of
the enzymatic detergent correctly, do
not recycle it.
1
22
Page 23
POLISHER TIP
Free the polisher tip channel from any
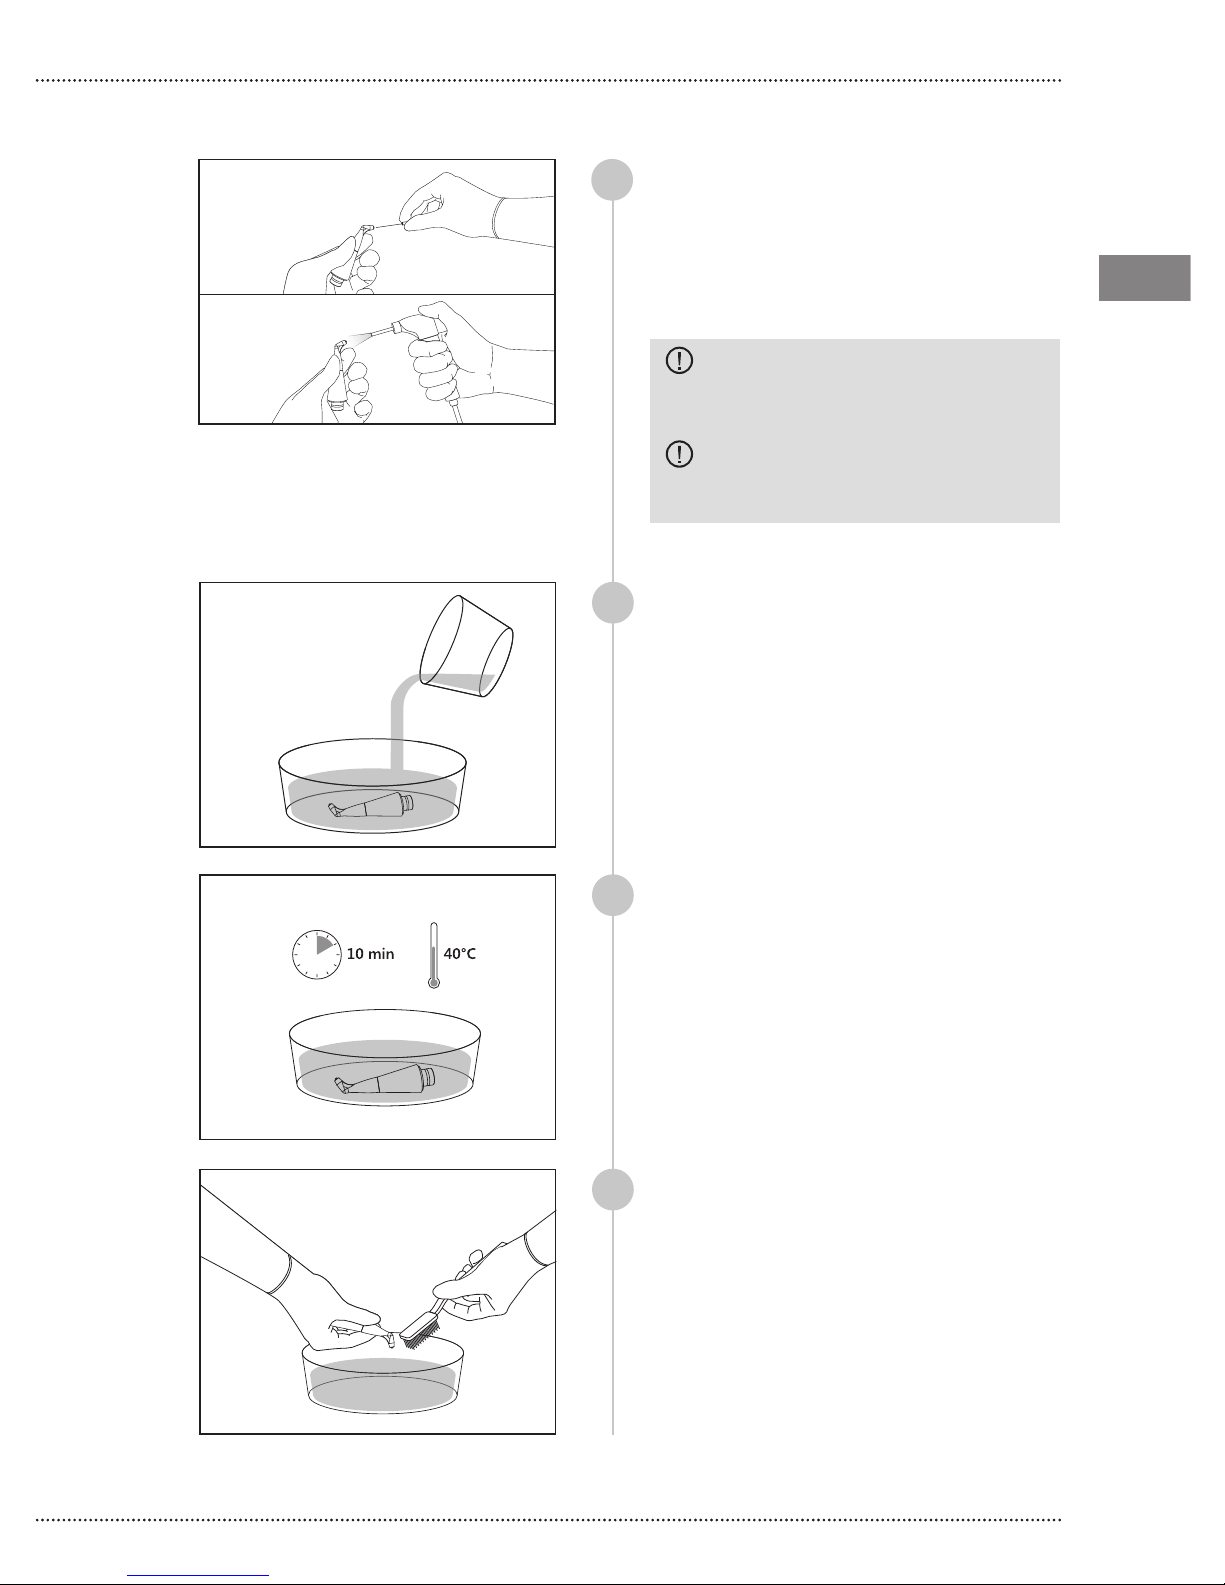
2
powder residual by using the supplied
cleaning needle Ø 0,4mm for the front
side and the supplied cleaning needle Ø
0,8mm for the rear side
Blow compressed air into the central hole
of the tip, from both ends;
channel exclusively using the cleaning
needle supplied with the device.
tip is present on the polisher tip,
remove it and dispose of it.
Place the polisher tip horizontally in a clean
3
container and add enzymatic detergent
solution until the polisher tip is covered
completely;
Starjet
CAUTION: Clean the polisher tip
CAUTION: If the subgingival perio
EN
EN
Let the polisher tip soak for 10 minutes
4
at 40°C ±2°C. This procedure reduces the
amount of blood, protein and mucous
present on the polisher tip;
During immersion in the enzymatic
5
solution, delicately brush the surface of the
polisher tip using the brush with soft nylon
bristles to eliminate all traces of visible dirt.
Thoroughly clean the difcult areas such as
sharp edges;
23
Page 24
EN
EN
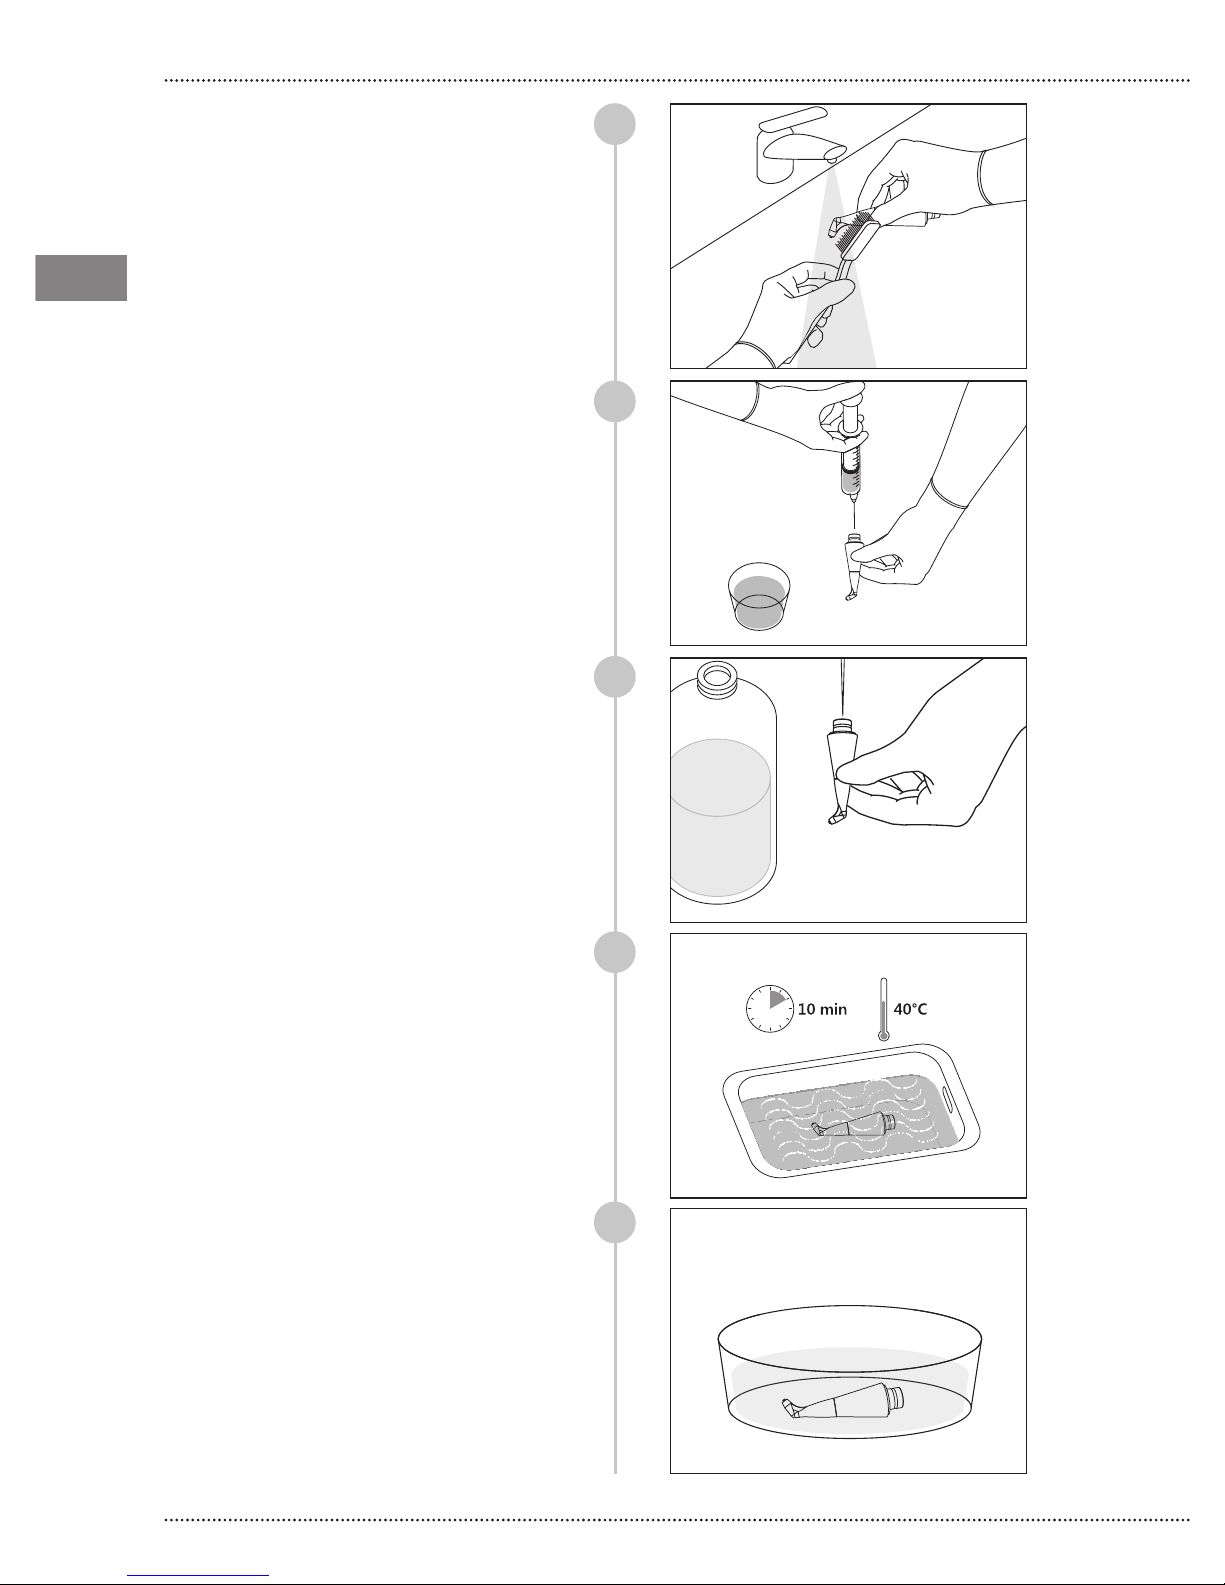
Delicately brush the surface of the polisher
tip under running water using the brush
with soft nylon bristles;
6
Using a syringe, inject the enzymatic
detergent solution 3 times inside the cavity
of the polisher tip to effectively remove the
residues from the internal surface;
Using a disposable syringe (25 ml vol.)
inject the demineralized water into the
polisher tip cavity for at least 5 times in
order to eliminate any detergent residue;
Place the polisher tip in the ultrasound
tank submerged by the enzymatic
detergent solution at 40°C ±2°C, for at
least 10 minutes;
7
8
9
Remove the polisher tip from the ultrasonic
tank and rinse with demineralised water;
24
10
Page 25
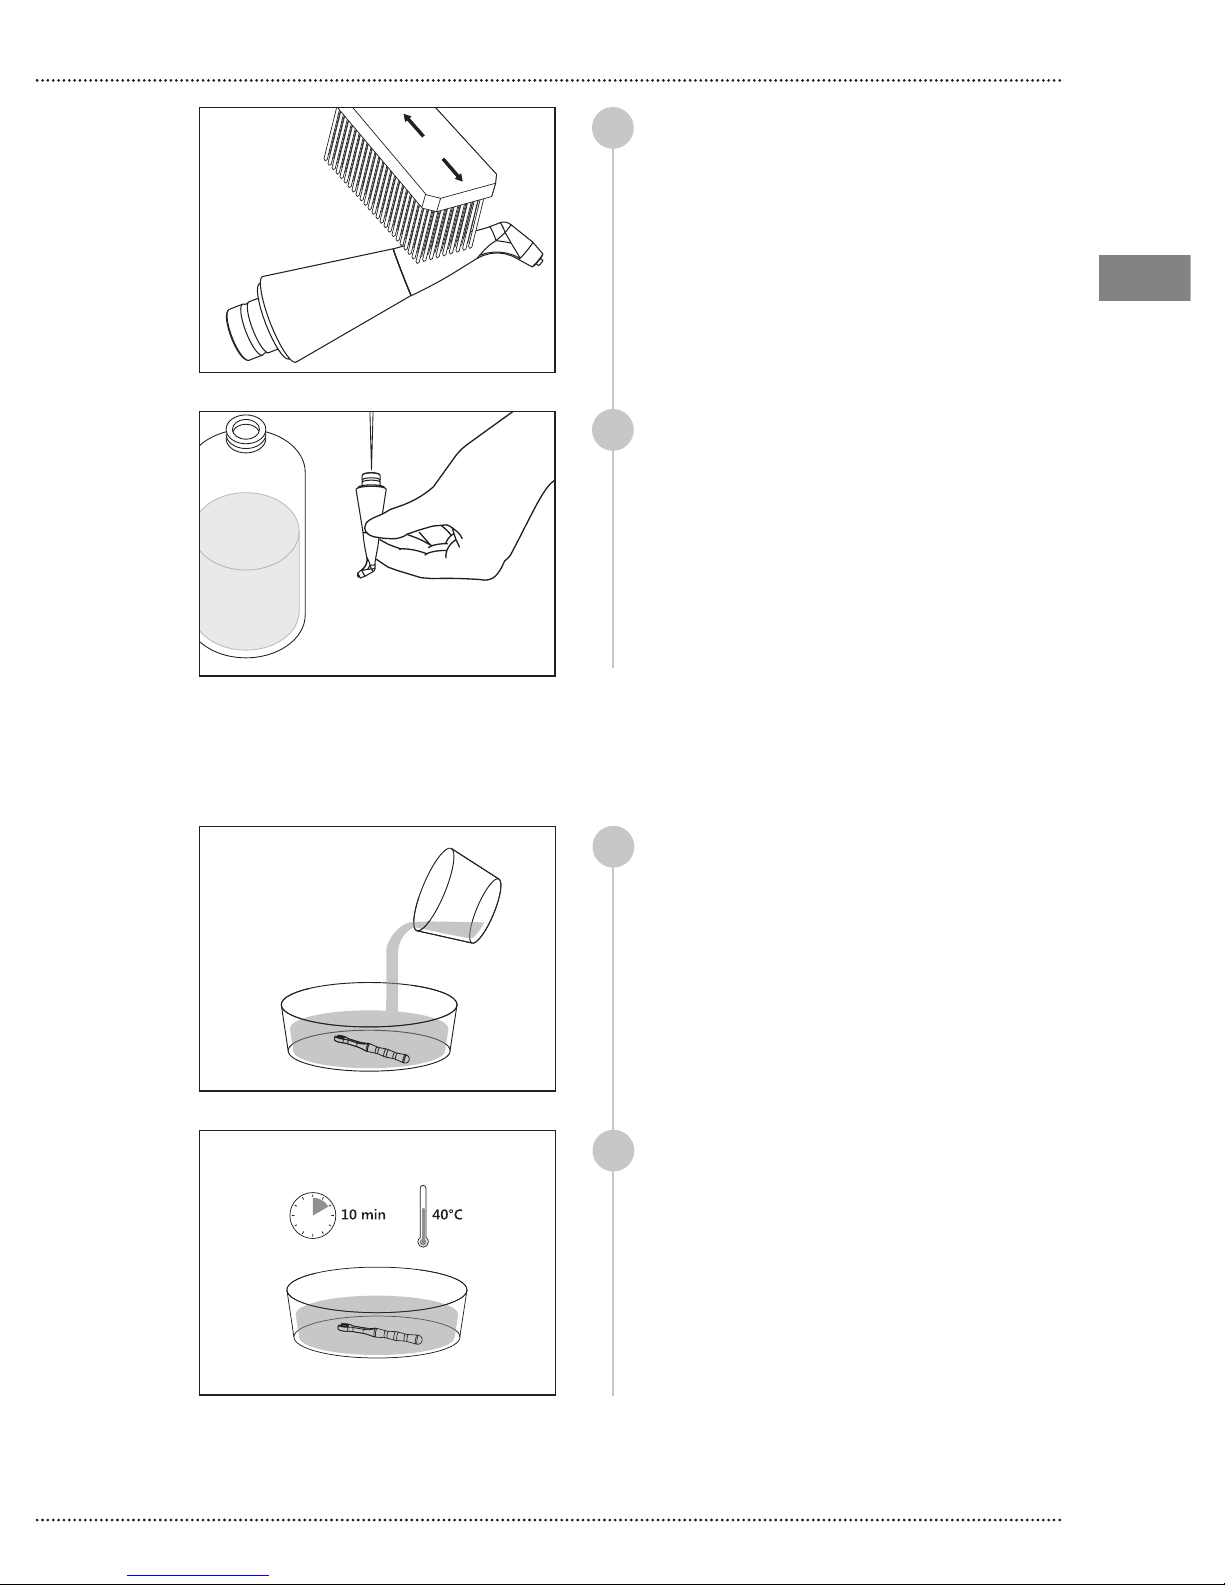
Delicately brush the surface of the polisher
11
tip again using the brush with soft nylon
bristles;
Using a disposable syringe (25 ml vol.)
12
inject the demineralized water into the
polisher tip cavity for at least 5 times in
order to eliminate any detergent residue;
Starjet
EN
EN
Process validated by independent bodies with enzymatic
detergent.
K9 WRENCH
Place the K9 wrench horizontally in a clean
13
container and add enzymatic detergent
solution until the K9 wrench is covered
completely;
Let the K9 wrench soak for 10 minutes at
14
40°C ±2°C. This procedure reduces the
amount of blood, protein and mucous
present on the K9 wrench;
25
Page 26
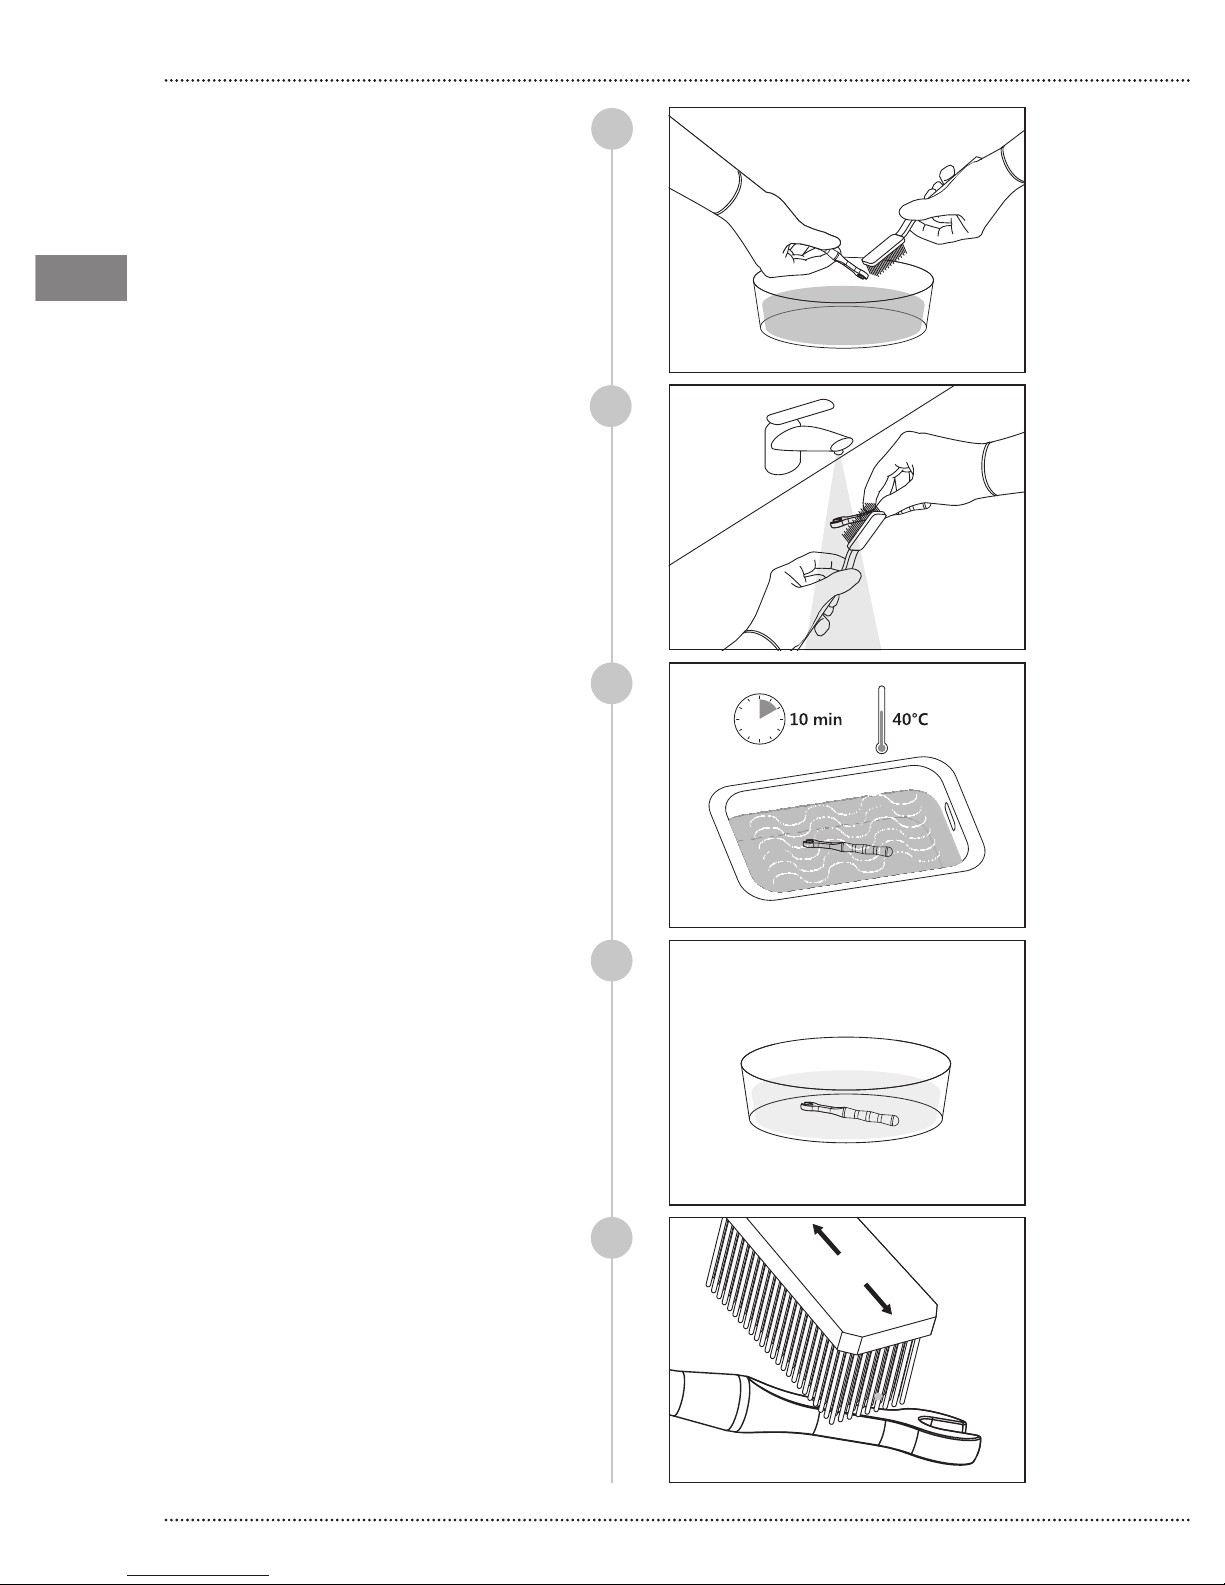
EN
EN
During immersion in the enzymatic
solution, delicately brush the surface of the
K9 wrench using the brush with soft nylon
bristles to eliminate all traces of visible dirt.
Thoroughly clean the difcult areas;
15
Delicately brush the surface of the K9
wrench under running water using the
brush with soft nylon bristles;
Place the K9 wrench in the ultrasound tank
submerged by the enzymatic detergent
solution at 40°C ±2°C, for at least 10
minutes;
Remove the K9 wrench from the ultrasonic
tank and rinse with demineralised water;
16
17
18
Delicately brush the surface of the K9
wrench again using the brush with soft
nylon bristles;
26
19
Page 27
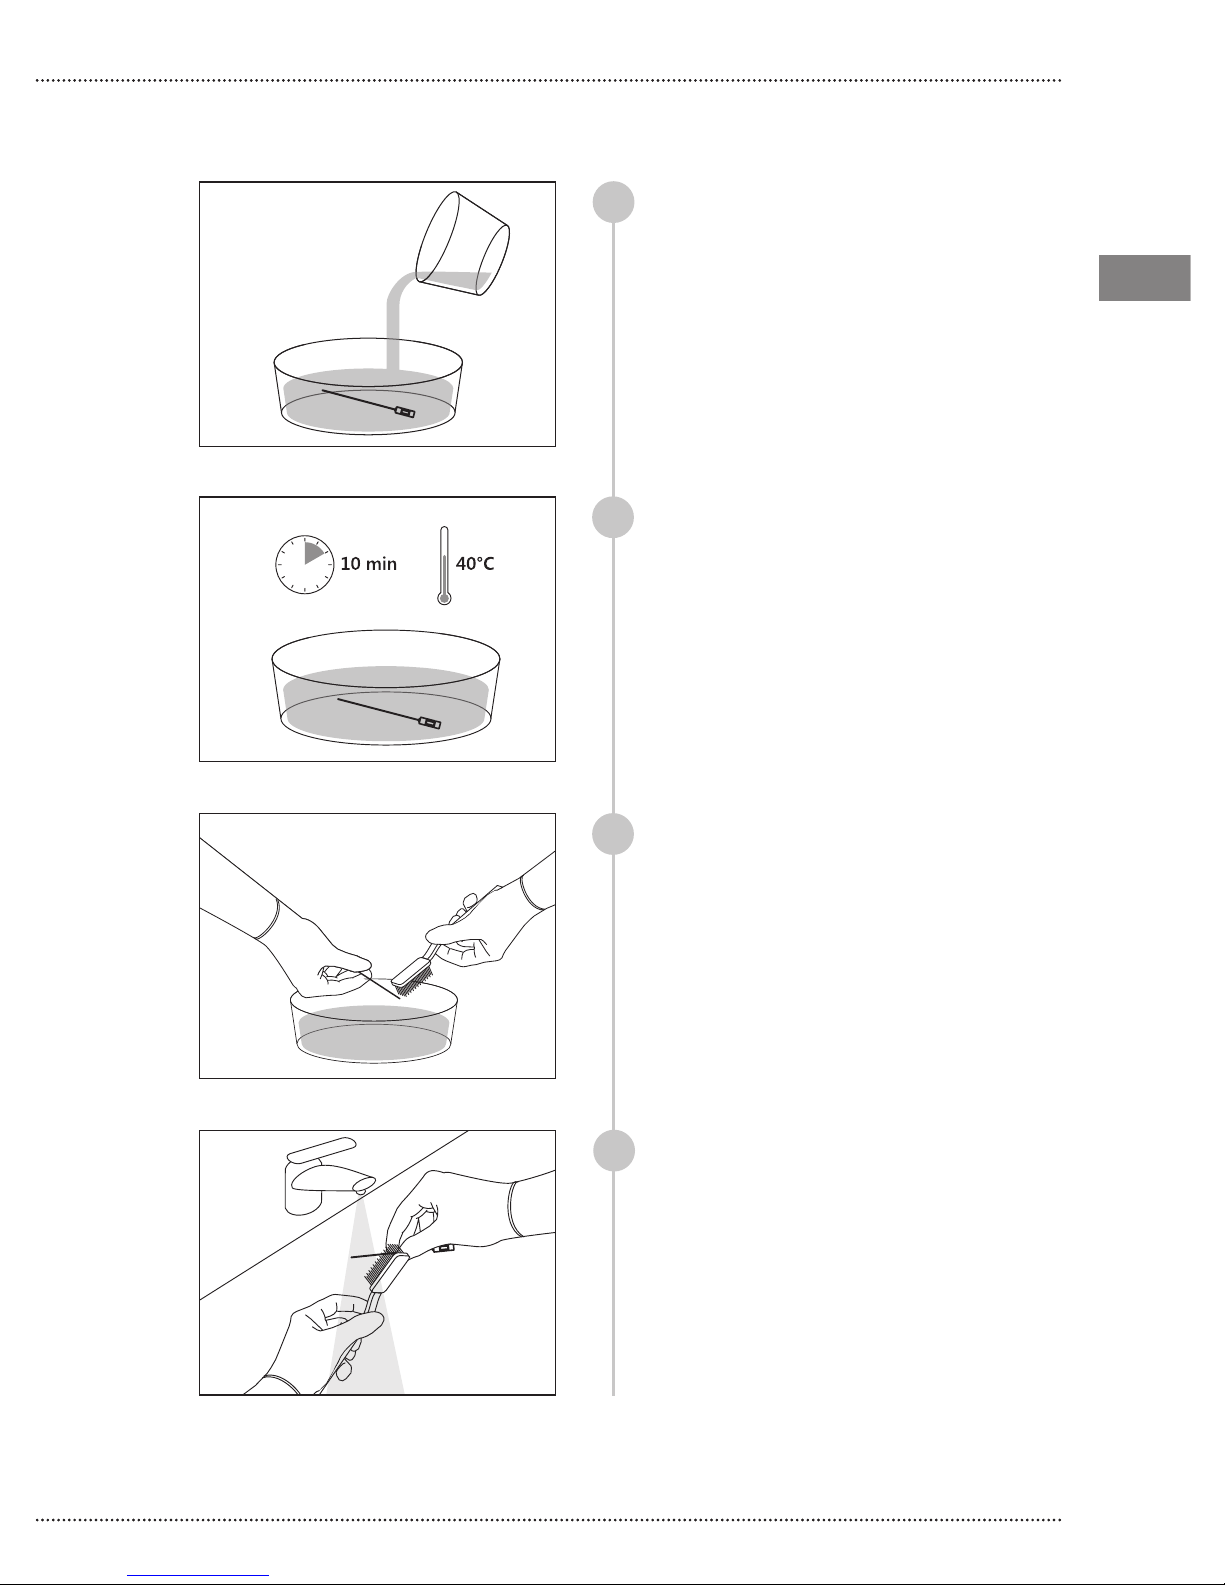
CLEANING NEEDLES
Place the cleaning needle horizontally
20
in a clean container and add enzymatic
detergent solution until the cleaning
needle is covered completely;
Let the cleaning needle soak for 10
21
minutes at 40°C ±2°C. This procedure
reduces the amount of blood, protein and
mucous present on the cleaning needle;
Starjet
EN
EN
During immersion in the enzymatic
22
solution, delicately brush the surface of
the cleaning needle using the brush with
soft nylon bristles to eliminate all traces of
visible dirt. Thoroughly clean the difcult
areas;
Delicately brush the surface of the cleaning
23
needle under running water using the
brush with soft nylon bristles;
27
Page 28
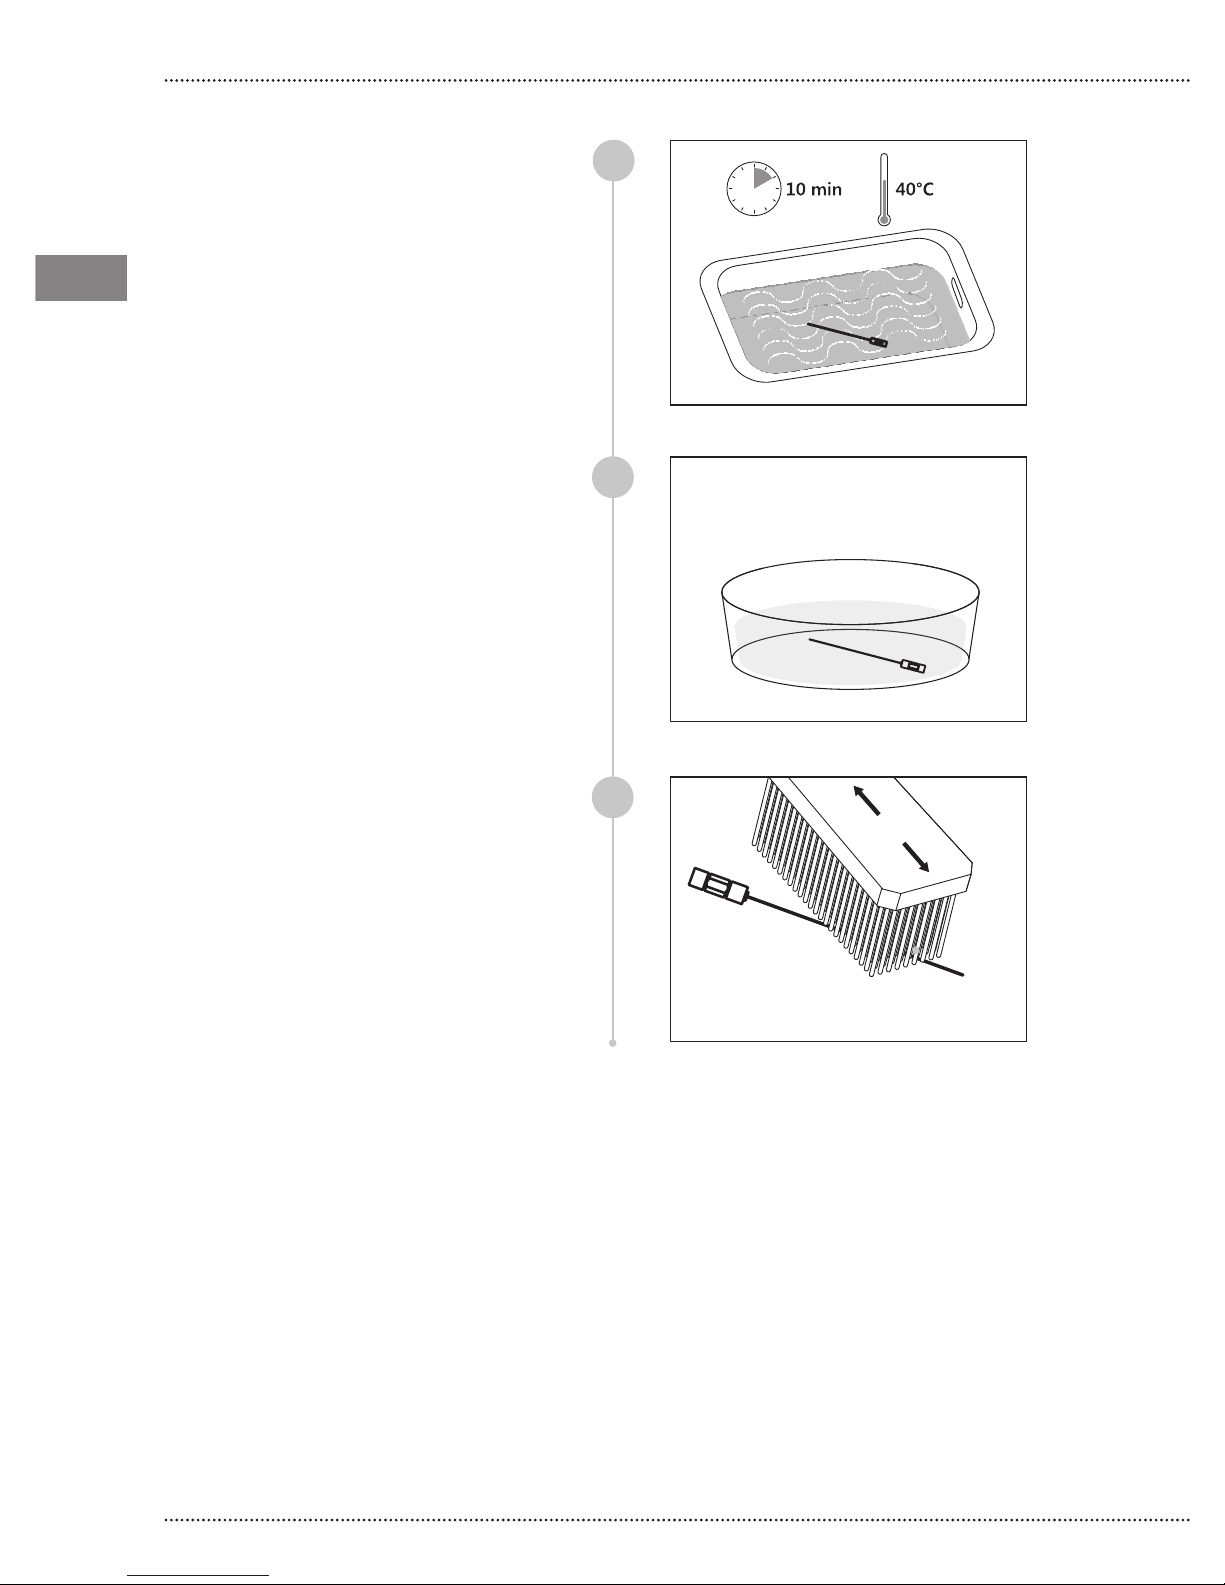
EN
EN
Place the cleaning needle in the ultrasound
tank submerged by the enzymatic
detergent solution at 40°C ±2°C, for at
least 10 minutes;
24
Remove the cleaning needle from
the ultrasonic tank and rinse with
demineralised water;
Delicately brush the surface of the cleaning
needle again using the brush with soft
nylon bristles;
25
26
28
Page 29
06.3.2 COMBINED MANUAL/AUTOMATIC CLEANING
MATERIALS NECESSARY
- Enzymatic detergent
(Mectron ENZYMEC, 0.8% v/v);
- Water;
- Container for immersion in the enzymatic
liquid;
- Brush with soft nylon bristles;
- Disposable syringe 25 ml;
- Demineralised water;
- Alkaline detergent: neodisher® FA
(0.2 % v/v);
- Neutralising liquid: neodisher® FA
(0.1 % v/v);
- Metal basket;
- Thermal disinfector.
Starjet
EN
EN
06.3.2.1 MANUAL PRE-WASH
POLISHER TIP
Prepare an enzymatic detergent solution*
1
with pH 6-9, as per the instructions of the
manufacturer;
CAUTION: Once used, dispose of
the enzymatic detergent correctly, do
not recycle it.
Free the polisher tip channel from any
2
powder residual by using the supplied
cleaning needle Ø 0,4mm for the front
side and the supplied cleaning needle Ø
0,8mm for the rear side
Blow compressed air into the central hole
of the tip, from both ends;
CAUTION: Clean the polisher tip
channel exclusively using the cleaning
needle supplied with the device.
CAUTION: If the subgingival perio
tip is present on the polisher tip,
remove it and dispose of it.
29
Page 30
EN
EN
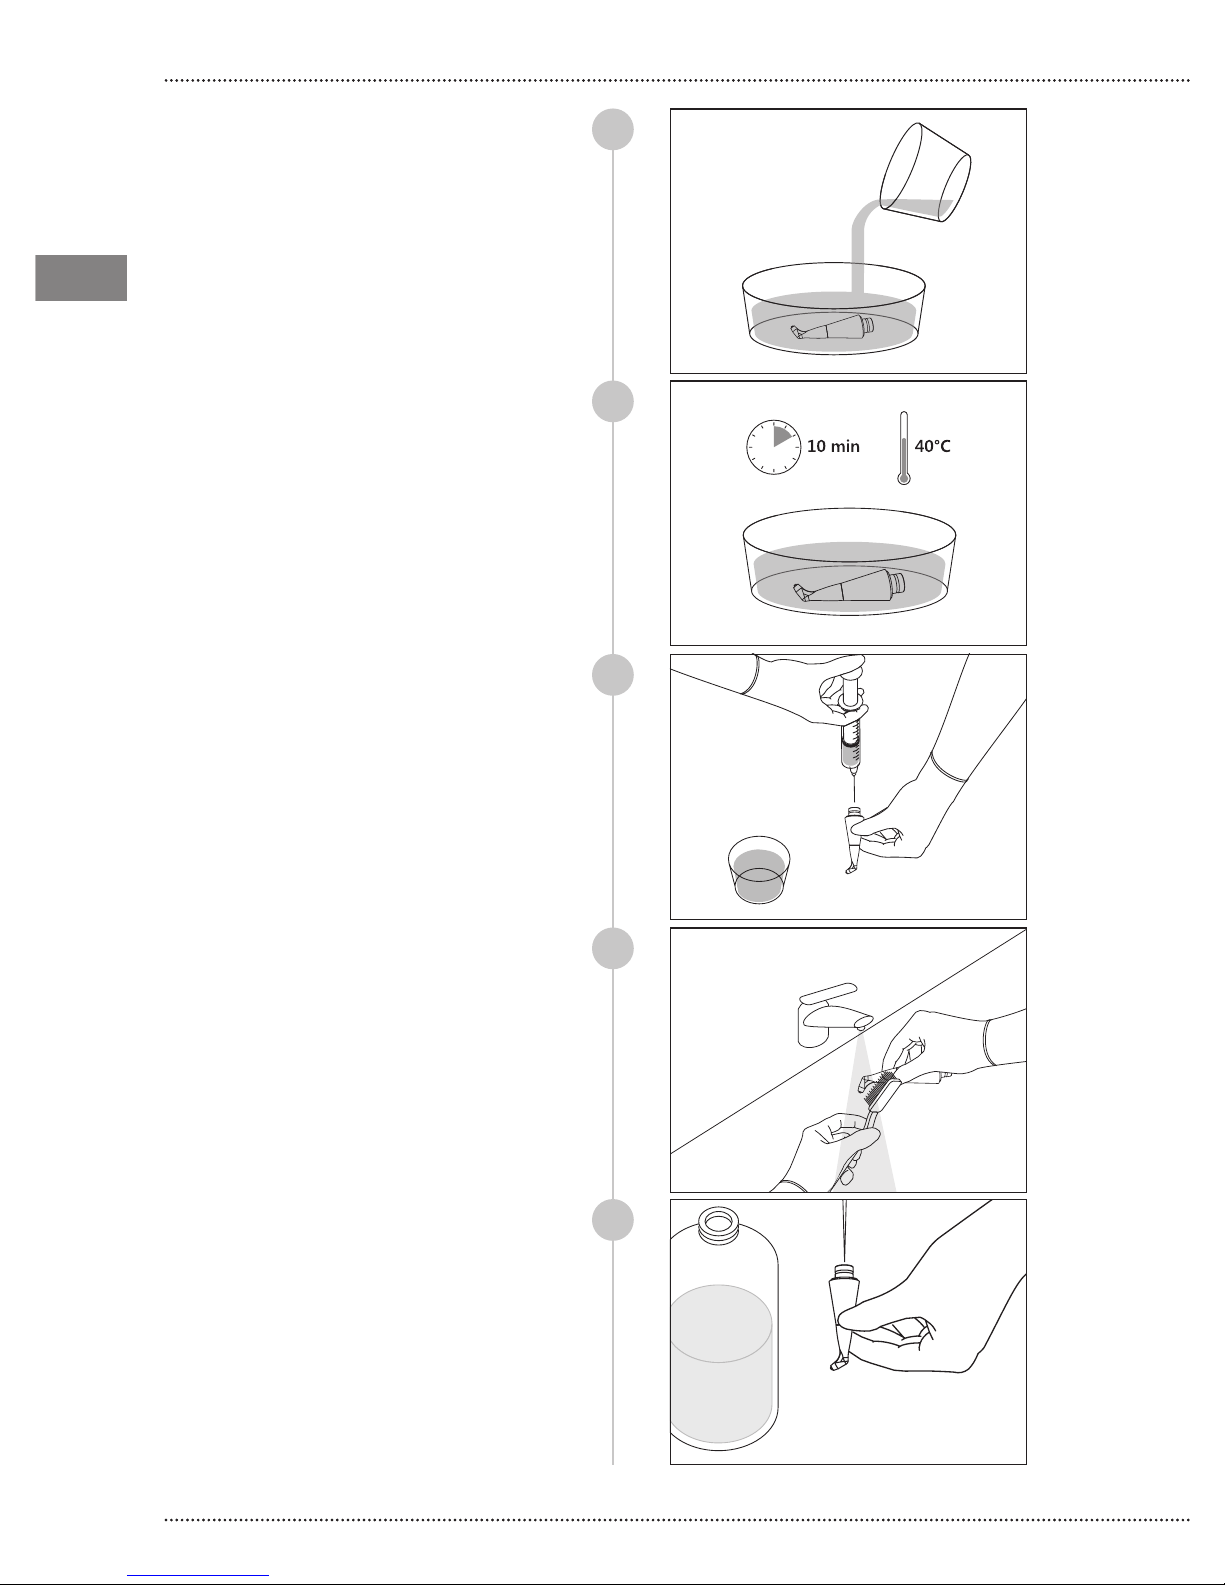
Place the polisher tip horizontally in a clean
container and add enzymatic detergent
solution until the polisher tip is covered
completely;
3
Let the polisher tip soak for 10 minutes
at 40°C ±2°C. This procedure reduces the
amount of blood, protein and mucous
present on the polisher tip
Using a disposable syringe (25 ml vol.)
inject the enzymatic detergent solution
into the polisher tip cavity for at least 5
times;
Delicately brush the surface of the polisher
tip under running water (drinking water,
temperature 20°C+/- 2°C), in particular the
parts that are difcult to access (cavities,
structured surfaces, etc.) using a brush with
soft nylon bristles;
The polisher tip must be brushed until no
residues can be seen (at least 30 seconds);
4
5
6
Using a disposable syringe (25 ml vol.)
inject the cold demineralized water into the
polisher tip cavity for at least 5 times;
Process validated by independent bodies with enzymatic
detergent Enzymec (Mectron).
30
7
Page 31
K9 WRENCH
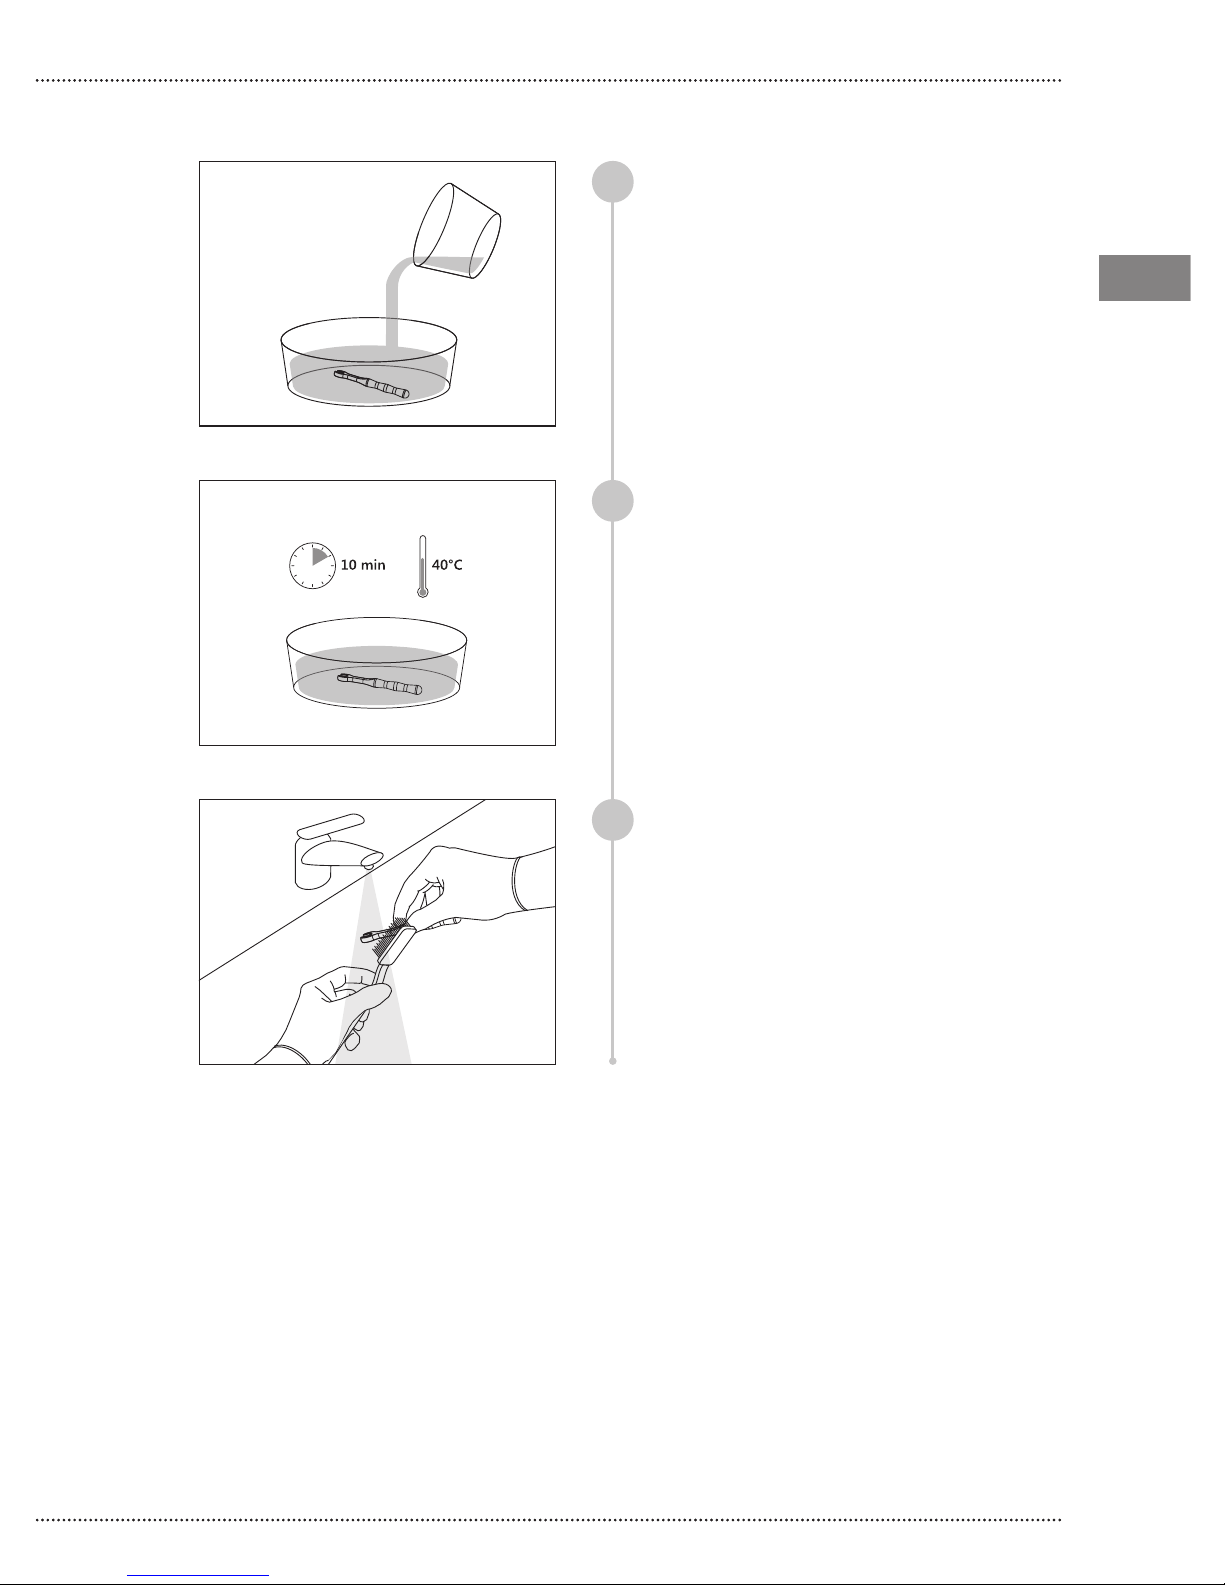
Place the K9 wrench horizontally in a clean
20
container and add enzymatic detergent
solution until the K9 wrench is covered
completely;
Let the K9 wrench soak for 10 minutes at
21
40°C ±2°C. This procedure reduces the
amount of blood, protein and mucous
present on the K9 wrench;
Starjet
EN
EN
Delicately brush the surface of the K9
22
wrench under running water (drinking
water, temperature 20°C+/- 2°C), in
particular the parts that are difcult to
access ( joint) using a brush with soft nylon
bristles;
The K9 wrench must be brushed until no
residues can be seen (at least 30 seconds);
31
Page 32
06.3.2.2 MECHANICAL CLEANING
EN
EN
CAUTION: The following mechanical
cycle must always be preceded by the prewashing phase with enzymatic detergent.
CAUTION: Avoid overloading
the thermal disinfector as this could
compromise cleaning effectiveness.
CAUTION: Do not place the Starjet
device in a thermal disinfector.
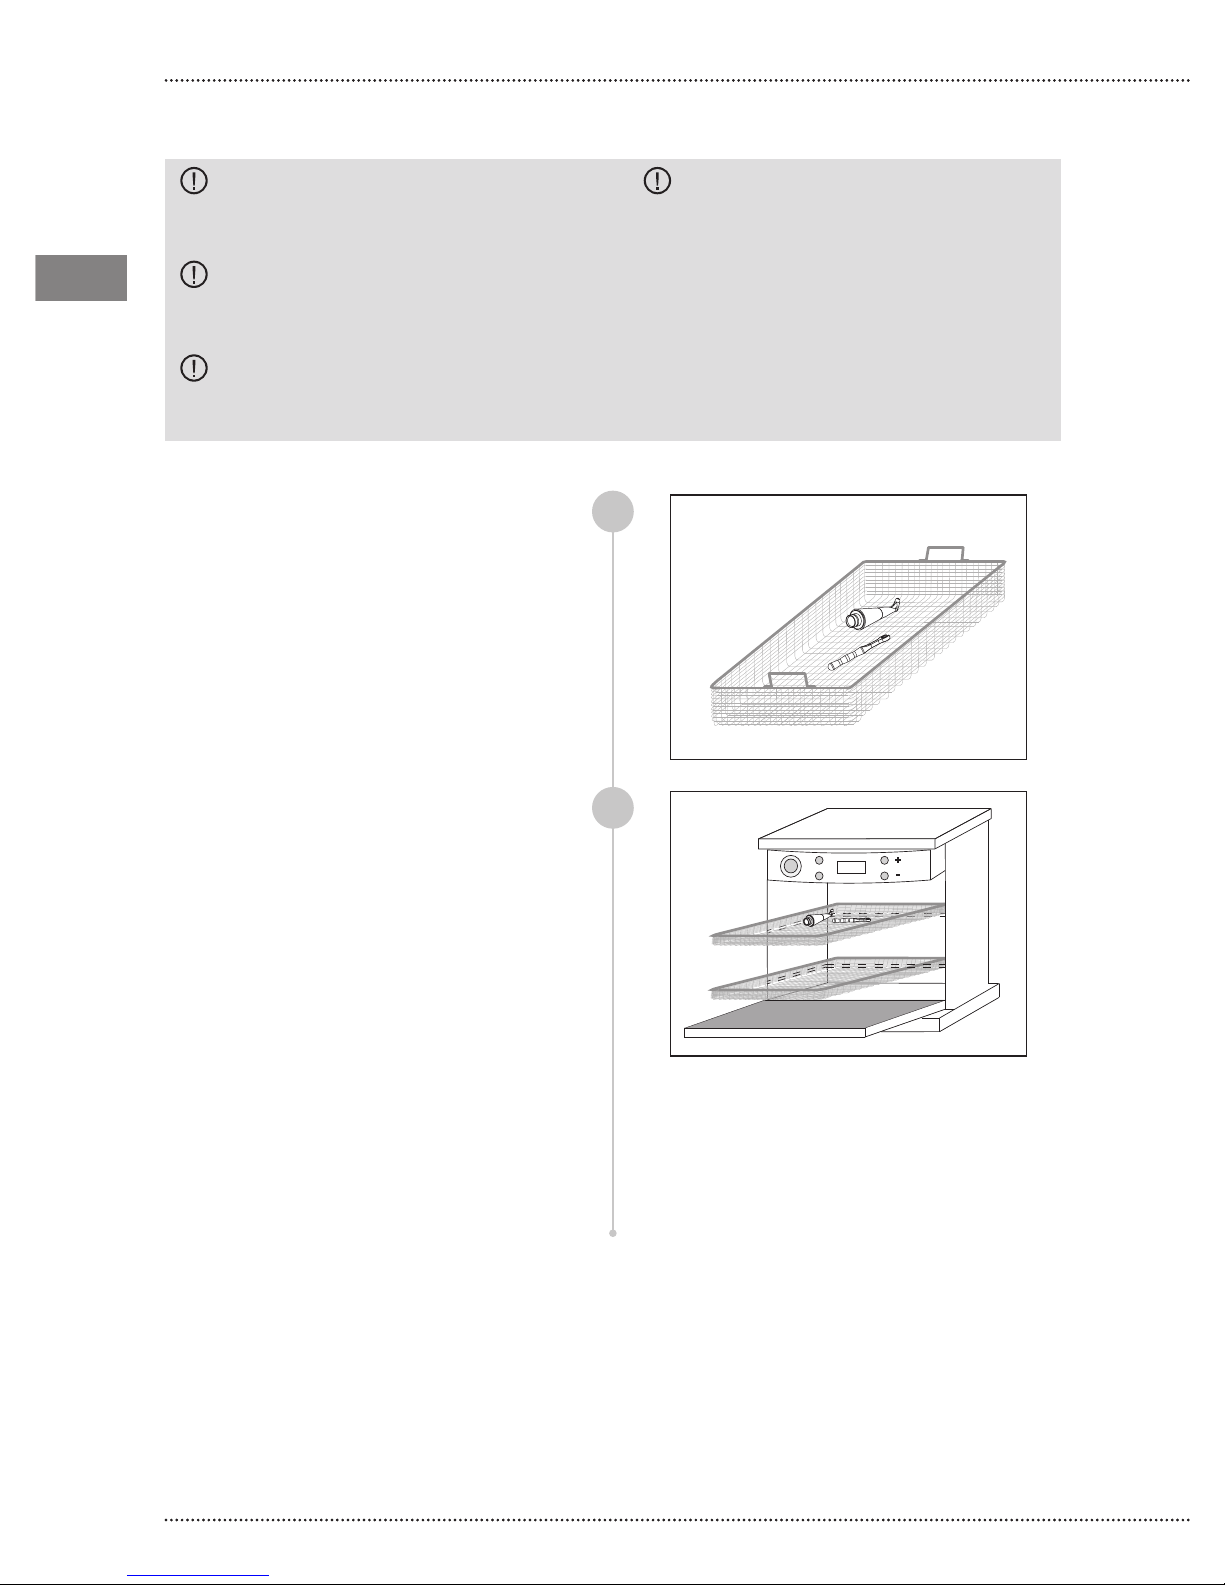
Place the accessories in a metal basket and
place the basket in the thermal disinfector;
CAUTION: Do not place the cleaning
needle in a thermal disinfector.
NOTE: Make sure that the accessories
are appropriately blocked in the basket
and cannot move during washing. Any
movement during washing could damage
them. Position the instruments in a way
that the water can ow through all the
surfaces, even internally.
1
Sequence and parameters applicable to
the cycle:
- 1 min, rinse with cold water;
- 5 min, wash with alkaline detergent
at 55°C ±2°C;
- 2 min, neutralisation with suitable
solution (1/3 cold water, 2/3 hot water);
- 1 min, rinse with water (1/3 cold water,
2/3 hot water);
- 5 min, thermal disinfection at 93°C with
demineralised water.
Thermal disinfection has not been tested
experimentally. In compliance with ISO
15883-1, Table B.1 [4] thermal disinfection
at a temperature of 90°C for 5 min
determines a value A0 3000.
2
+
_ _
-
Procedure validated with Miele PG8535 instrument
washer/disinfector.
Miele DES-VAR-TD program.
Alkaline detergent: neodisher® FA (0.2 % v/v);
Neutralising liquid: neodisher® Z (0.1 % v/v)
32
Page 33
06.3.3 AUTOMATIC CLEANING
MATERIALS NECESSARY
- Alkaline detergent: neodisher® FA
(0.2 % v/v);
- Neutralising liquid: neodisher® FA
(0.1 % v/v);
- Water;
- Metal basket;
- Adaptors;
- Thermal disinfector.
Starjet
CAUTION: Before starting to clean
the thermal disinfector, assess the entity
of dirt and, if necessary, perform a
pre-wash (paragraph 6.3.2.1) to avoid
repeating the entire cleaning cycle.
EN
EN
CAUTION: Do not place the Starjet
device in a thermal disinfector.
CAUTION: Do not place the cleaning
needle in a thermal disinfector.
CAUTION: Avoid overloading
the thermal disinfector as this could
compromise cleaning effectiveness.
+
_ _
-
Procedure validated with Miele PG8535 instrument
washer/disinfector.
Miele DES-VAR-TD program.
Alkaline detergent: neodisher® FA (0.2 % v/v);
Neutralising liquid: neodisher® Z (0.1 % v/v)
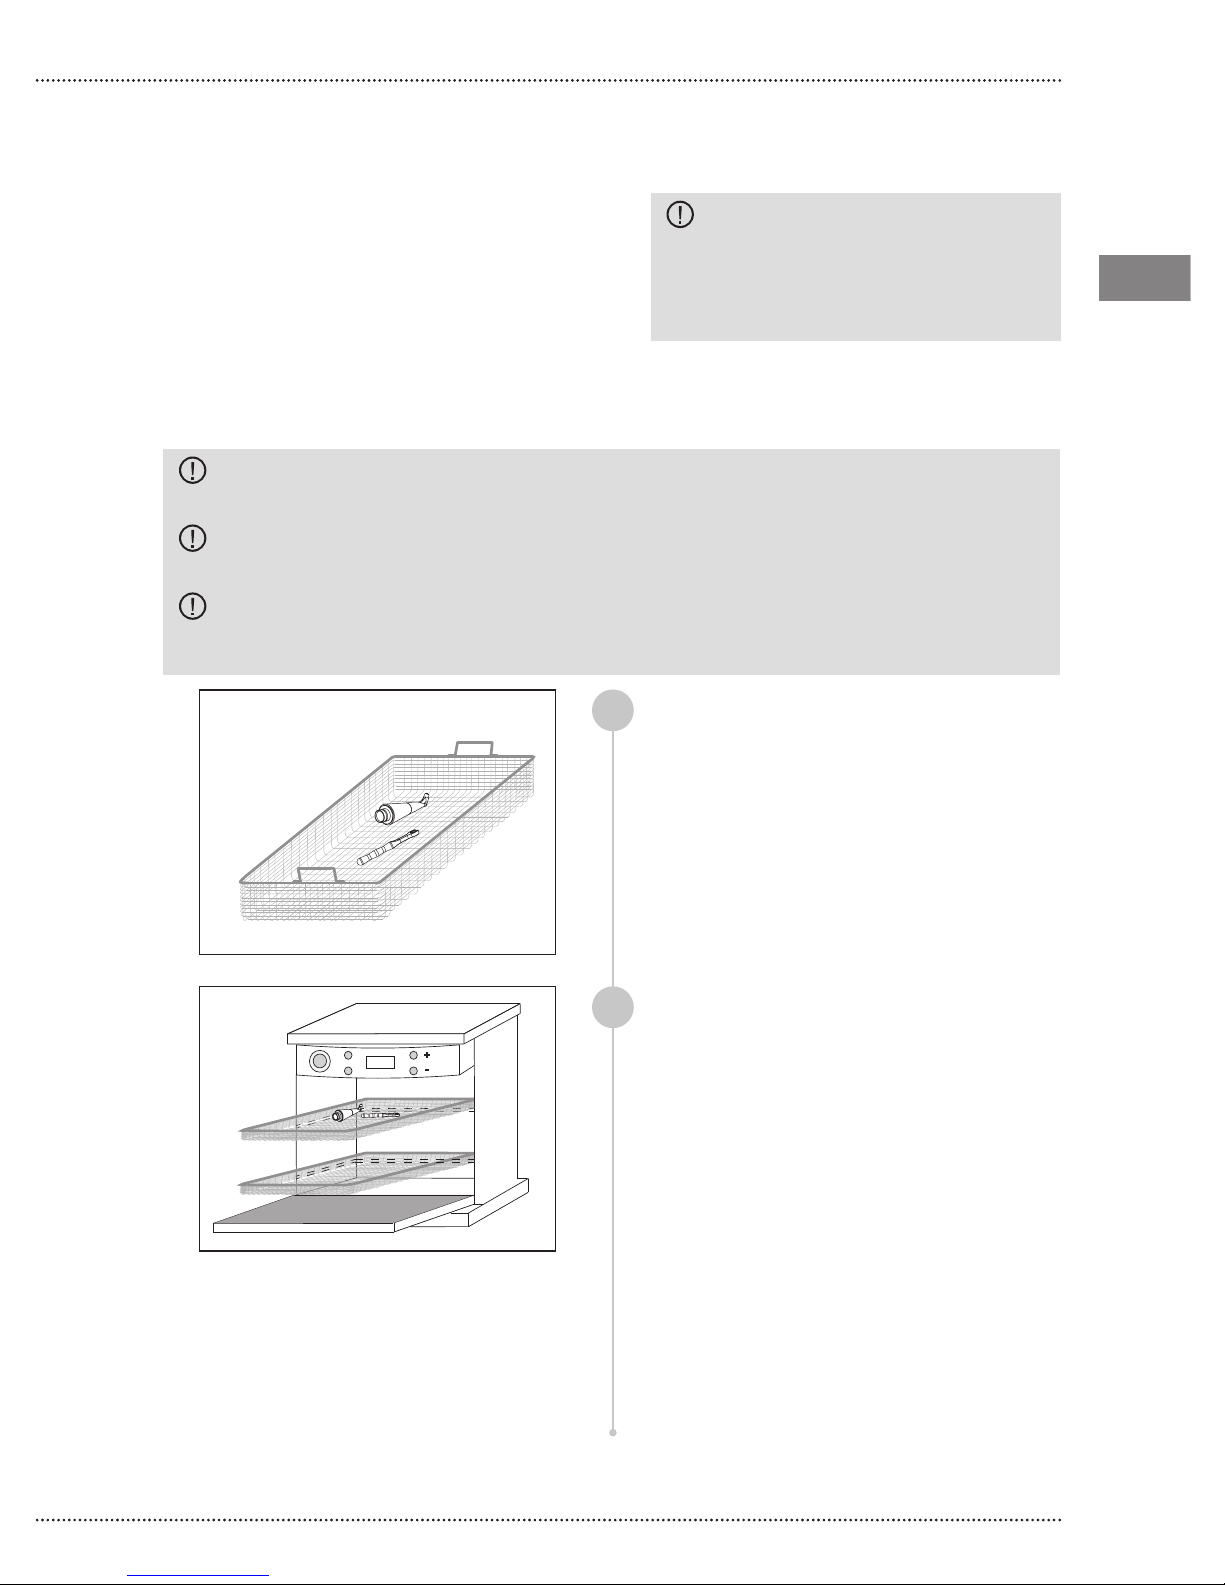
NOTE: Make sure that the accessories
are appropriately blocked in the basket
and cannot move during washing. Any
movement during washing could damage
them. Position the instruments in a way
that the water can ow through all the
surfaces, even internally.
Place the accessories in a metal basket and
1
place the basket in the thermal disinfector;
Sequence and parameters applicable to
2
the cycle:
- 1 min, rinse with cold water;
- 5 min, wash with alkaline detergent
at 55°C ±2°C;
- 1 min, neutralisation with suitable
solution (1/3 cold water, 2/3 hot water);
- 1 min, rinse with water (1/3 cold water,
2/3 hot water);
- 5 min, thermal disinfection at 93°C with
demineralised water.
Thermal disinfection has not been tested
experimentally. In compliance with ISO
15883-1, Table B.1 [4] thermal disinfection
at a temperature of 90°C for 5 min
determines a value A0 3000.
33
Page 34
EN
EN
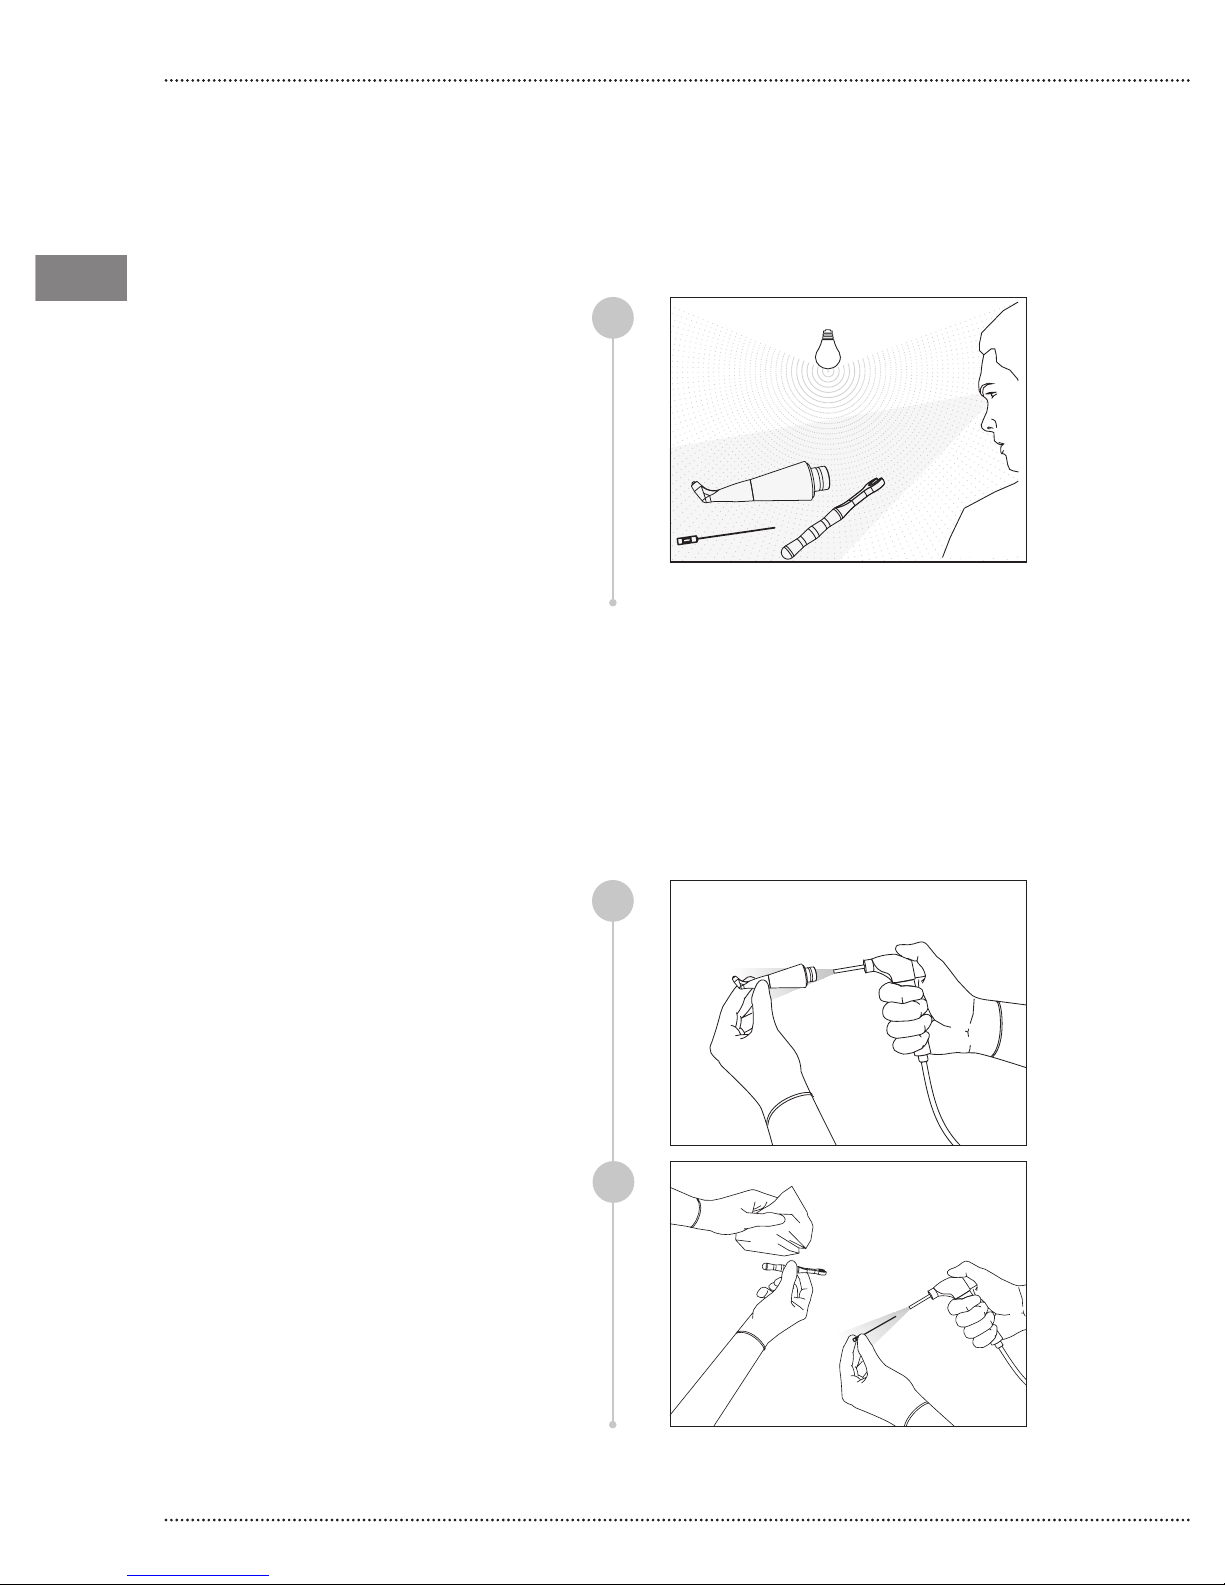
06.4 CLEANING VERIFICATION
MATERIALS NECESSARY
- Light source;
- Magnifying glass 2.5X.
Once the cleaning operations have been
completed, visually inspect the polisher
tips, the K9 wrench and the cleaning
needle under an adequate source of light,
if necessary using a magnifying glass 2.5X,
paying attention to the details that could
conceal dirt residue (threading, cavities,
grooves) and,
if necessary, repeat the cleaning cycle if dirt
is still visible; Finally, check the integrity of
those parts and those elements that could
have deteriorated during use.
1
06.5 DRYING
MATERIALS NECESSARY
- Compressed air;
- Soft cloth with low bre release.
Thoroughly dry all the polisher tip parts,
both internally and externally. To do this,
blow compressed air both externally and
through the internal passage holes. This
will prevent the appearance of stains,
streaks on the surface or oxidation inside
the polisher tip;
Dry the K9 wrench using a soft cloth with
low ber release.
Thoroughly dry all the cleaning needle
parts by blowing compressed air on it.
1
2
34
Page 35
06.6 STERILISATION
PREPARATION
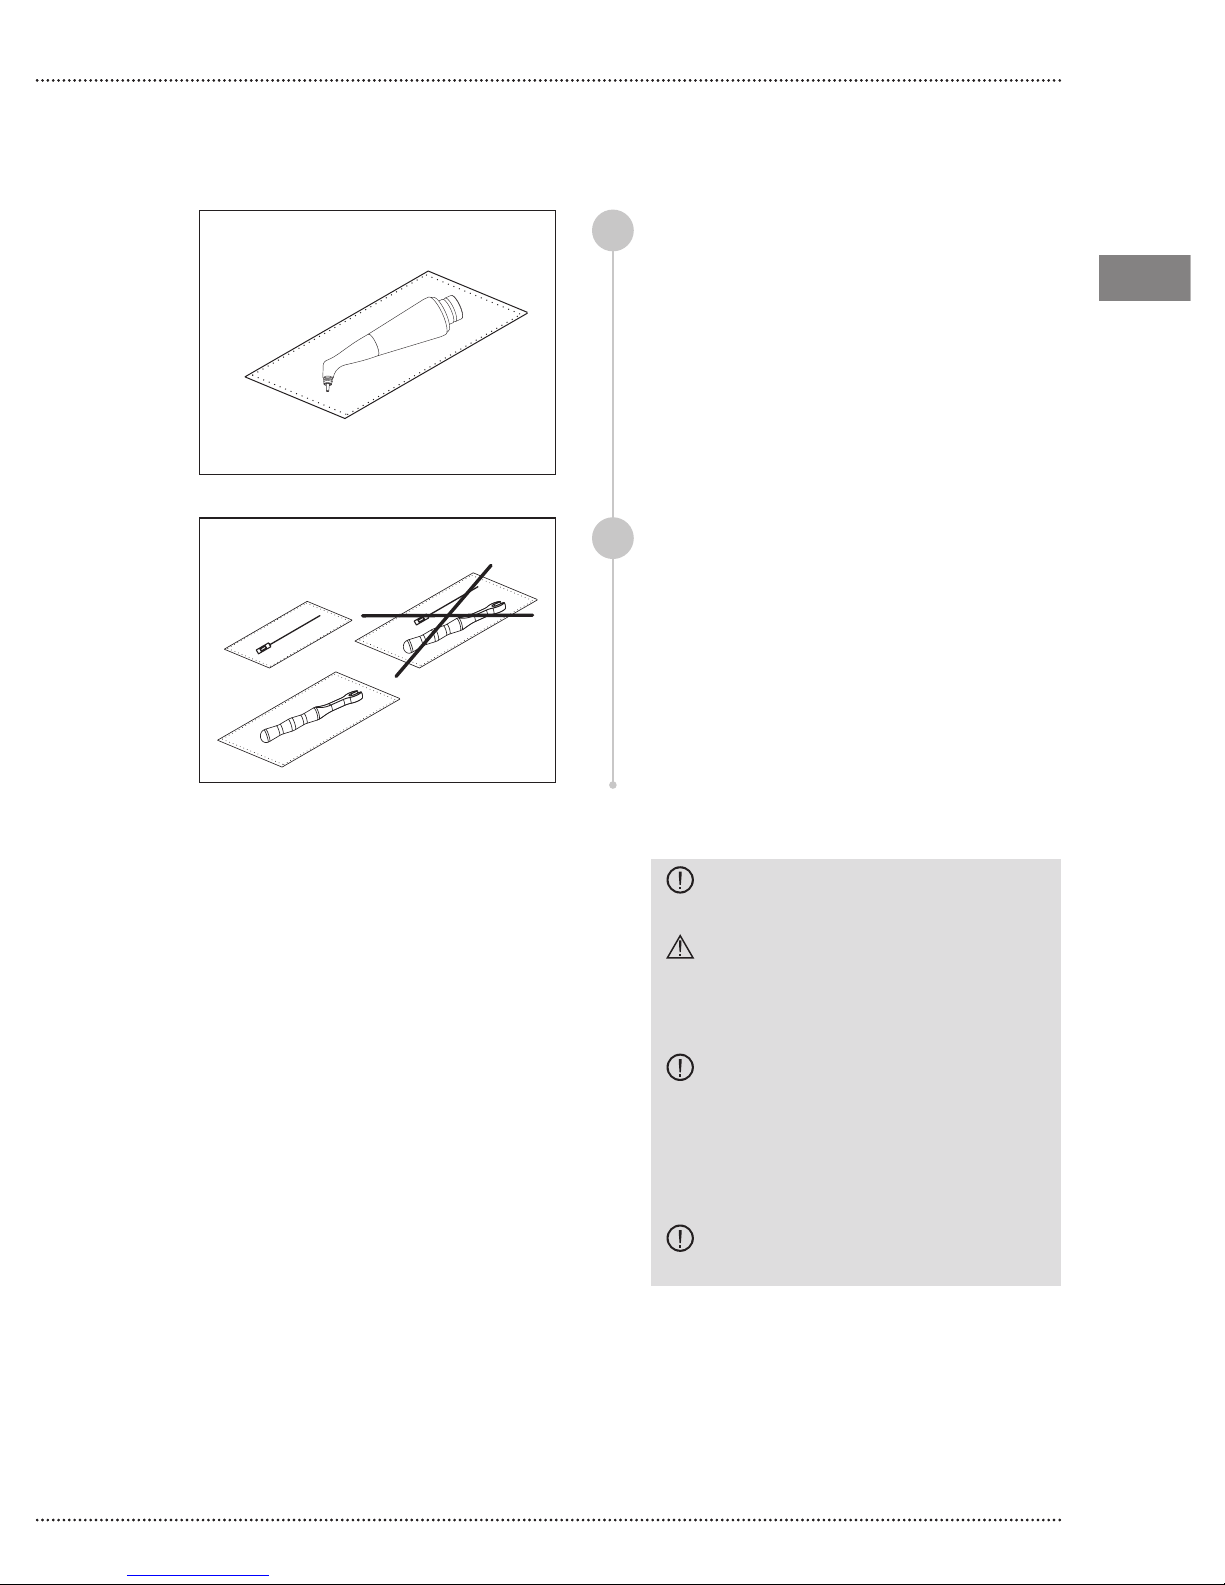
Seal the polisher tips individually,
1
separately in disposable sterilization bags.
Seal the the K9 wrench and the cleaning
2
needle individually, separately in
disposable sterilization bags.
Starjet
EN
EN
STERILISATION METHOD
The parts that can be sterilized are
made with material that can resist up to
a maximum of 135°C for maximum 20
minutes.
Once the parts that can be sterilized
are individually wrapped, carry out the
sterilization process in a steam autoclave.
The sterilization process validated by
Mectron S.p.A., in a steam autoclave,
guarantees SAL 10-6 by setting the
parameters indicated below:
Type of cycle: 3 times Pre-vacuum
(min. pressure 60 mBar).
Minimum sterilization temperature:
132°C (interval 0°C÷ +3°C).
Minimum sterilization time:
4 minutes.
Minimum drying time: 10 minutes.
All of the stages of sterilization must be
performed by the operator in compliance
with ISO 17665-1:2007, ISO 556-1:2002
and ANSI/AAMI ST 46:2002.
CAUTION: Do not sterilize the
Starjet device.
WARNING: Infection control -
Parts that can be sterilized - Diligently
remove all residues of organic dirt
before the sterilization.
CAUTION: Perform the sterilization
using a water steam autoclave only.
Do not use any other sterilization
procedure (dry heat, irradiation,
ethylene oxide, gas, low temperature
plasma, etc.).
CAUTION: Do not exceed the
allowed load of the steam steriliser.
35
Page 36
07 MAINTENANCE
EN
EN
1 If the air passage in the front terminal
gets clogged, it is sufcient to switch on
the device for a few seconds and to use
the needles included in the supply (Fig.
5) to free the channel from any resides of
powder.
2 If the front terminal gets clogged
due to the excessively hard water, it is
recommended to dip it in a 2 % solution of
hydrochloric acid for a few minutes.
3 To avoid clogging, it is advisable to empty
the powder container of the Starjet at least
once a day.
4 Whenever the front terminal is removed,
it is necessary to blow compressed air
with the syringe, both into the cavity of
the handpiece connector and into the rear
central hole of the front terminal, so as
to avoid the accumulation of residues of
powder.
5 If the airway passage of the Starjet device
gets clogged, use the cleaning needle
supplied to clear the duct of powder
residue.
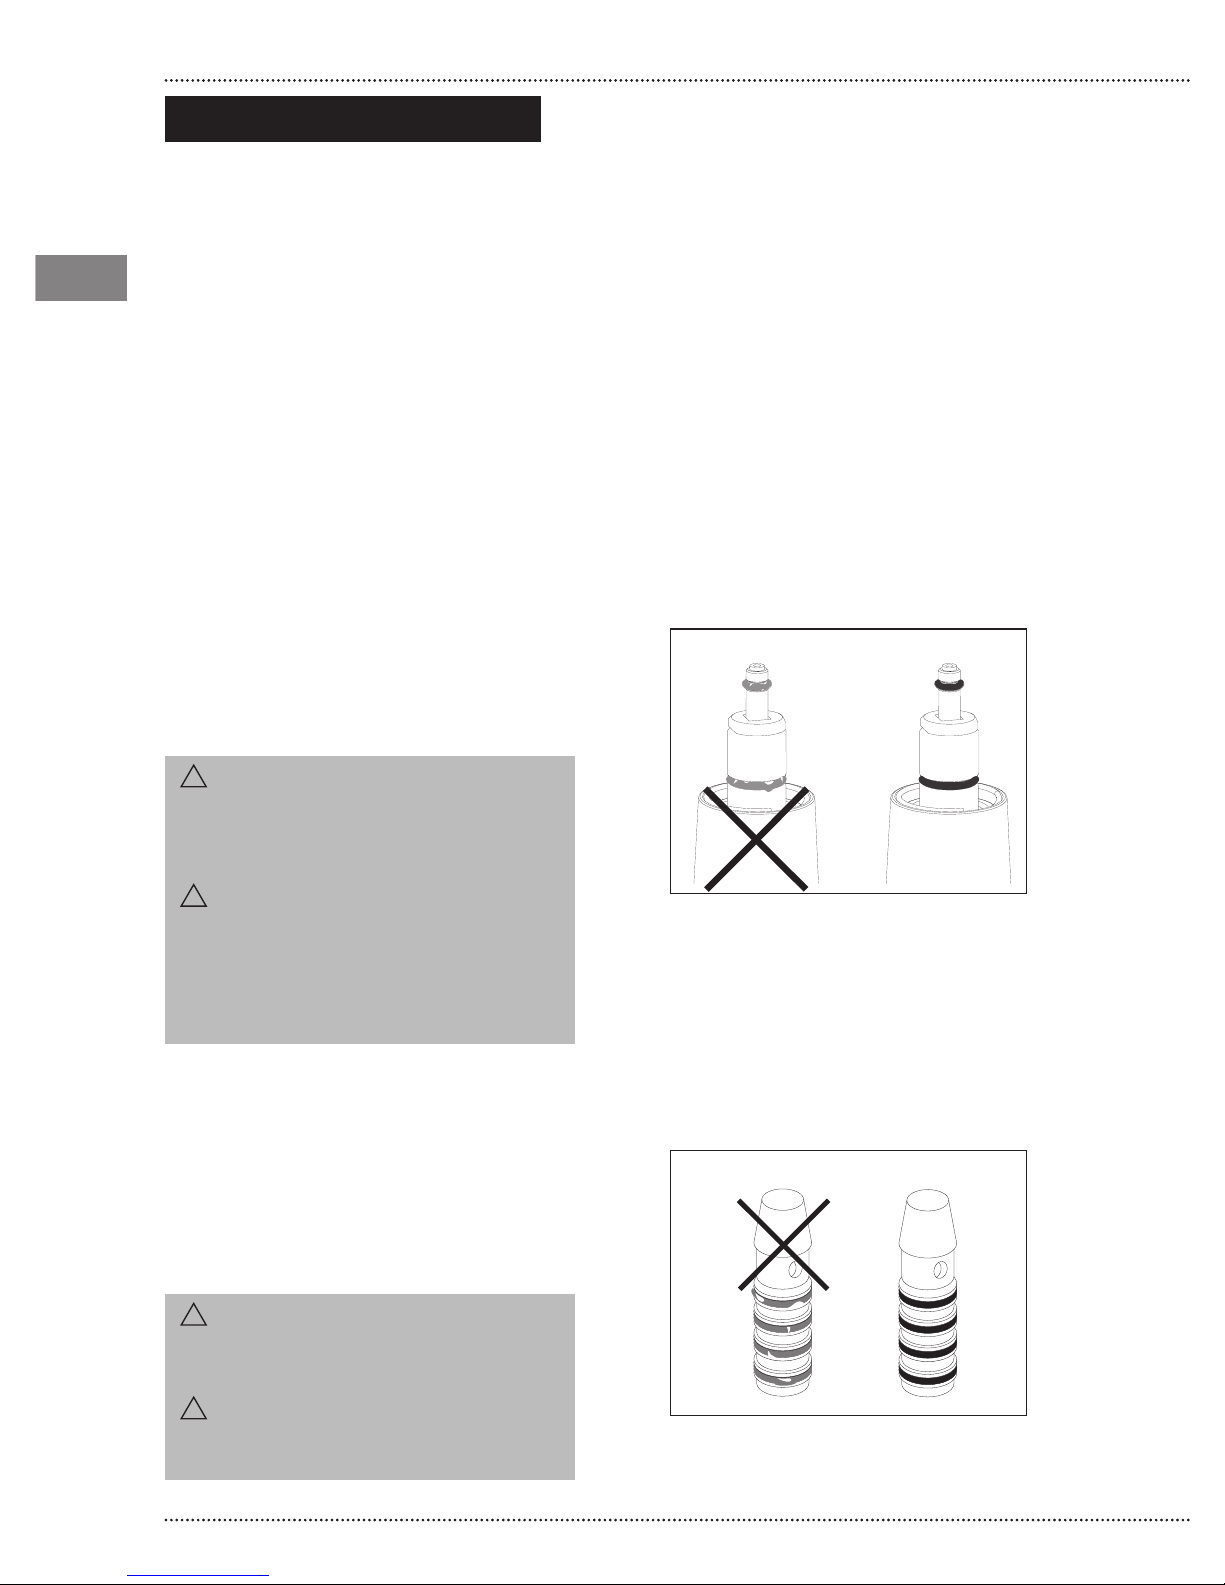
07.1 CHECK STARJET FRONT TERMINAL GRAFT
Periodically check o-rings’ conditions on
the front terminal graft.
O-rings are useful to keep separate
the outsourcings of powder and water
separate.
O-rings must always be in good conditions
without the presence of residues of powder
or cuts.
WARNING: Controindications.
The front terminal can clog in case
of broken, worn o-rings or powder
residues.
WARNING: Exclusively use
Mectron original accessories and
spare parts.
In case of o-rings’ usury or breakage,
exclusively use the kit supplied by
Mectron.
07.2 CHECK TURBINE FAST GRAFT
Periodically check o-rings’ conditions on
the turbine fast graft.
O-rings are useful to keep separate
the outsourcings of powder and water
separate.
O-rings must always be in good conditions
without the presence of soil or cuts.
WARNING: Contraindications.
Starjet can clog in case of broken, worn
o-rings or powder residues.
WARNING: Exclusively use original
accessories and spare parts supplied by
turbine’s manufacturer.
36
Page 37
08 DISPOSAL MODES AND PRECAUTIONS
Starjet
WARNING: Hospital wastes.
Treat the following items as hospital
waste:
- Polisher tips, when they are worn out or
broken;
- Subgingival perio tip at the end of each
treatment.
09 TECNICHAL DATA
Apparatus in accordance with EEC Directive
93/42:
The use and disposal of materials, and
materials that entail a biological risk, must
be disposed of in accordance to the local
regulations in force concerning hospital
wastes.
The Starjet must be disposed of and treated
as a waste for separate collection.
It is up to the purchaser to hand over the
device for its disposal to the retailer who
supplies them with new equipment; the
instructions for proper disposal are available
from Mectron.
Class IIa
EN
EN
Apparatus for intermittent operation: 60 sec. ON - 10 sec. OFF
Standard water pressure provided by the
dental unit for a turbine:
Standard air pressure provided by the
dental unit for a turbine:
Operating conditions:
Transport and storage conditions:
Weights and sizes:
from 1 to 3 bar (from 1000 hPa to 3000
hPa) max 40°C.
2,0 - 3,0 bar (2000 hPa - 3000 hPa).
From +10°C to +35°C
Relative humidity from 30% to 75%
Air pressure P: 800hPa/1060hPa
from -10°C to +35°C
Relative humidity from 10% to 70%
Air pressure P: 500hPa/1060hPa
~ 155 g
L - l - h ~ 200 x 90 x 50 mm
Weight and sizes may vary depending on
the various congurations
37
Page 38
EN
EN
10 TROUBLESHOOTING
10.1 QUICK SOLUTION TO PROBLEMS
If the device doesn’t appear to functioning properly, read the instructions once again and then
check the following users guide table in order to identify and solve the relevant malfunction.
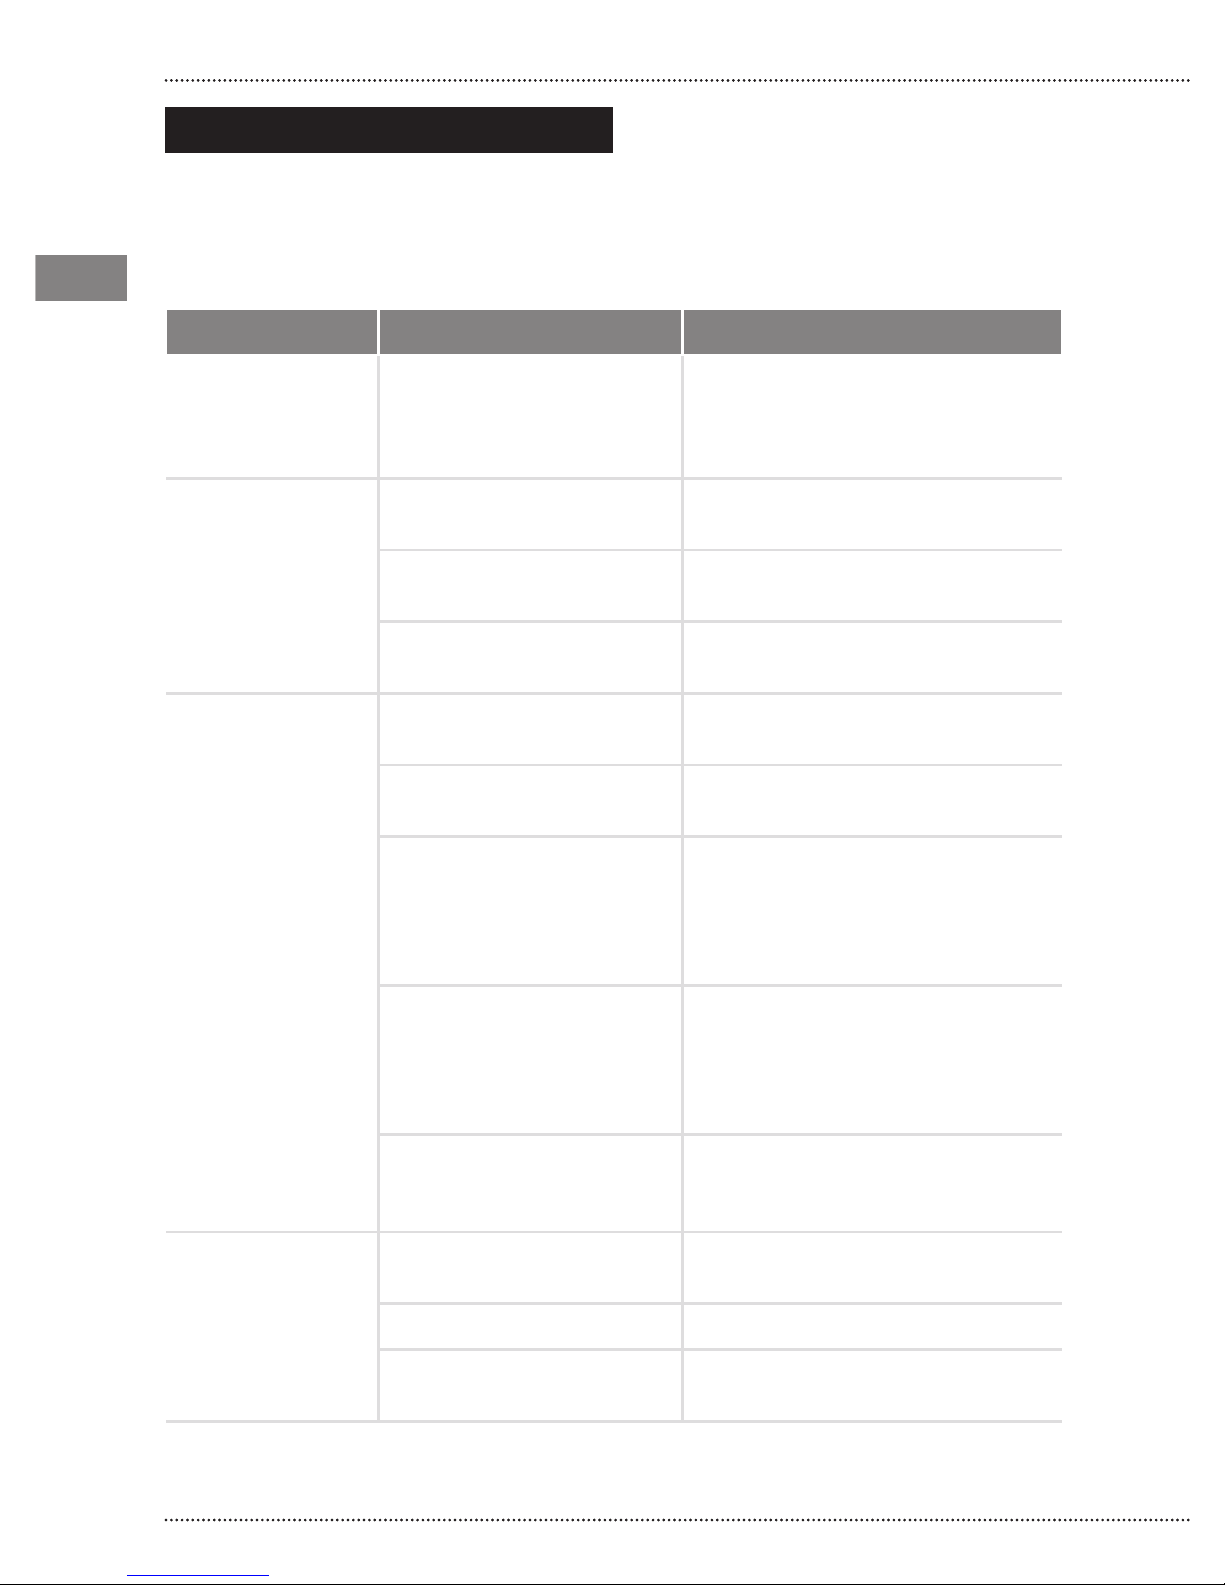
Problem Possible cause Solution
The cap of the
powder container
cannot be
unscrewed
Leakage of
powder from
the cap of the
container
No powder comes
out of the front
terminal of the
polisher during
operation
The Starjet is connected to
the turbine and the powder
container is pressurised
Cap not correctly screwed
in place
The cap seal is not properly
positioned in its place
Residues of powder in the
thread
Dental unit not connected to
the air circuit
The tank of the Starjet is
empty
Front terminal polisher
clogged due to excessive
moisture in the powder or
insufcient
cleaning/maintenance
The Starjet device duct is
clogged due to an excessive
amount of humidity in
the powder or insufcient
cleaning/maintenance
Disconnect the Starjet from the
turbine so as to depressurise the
internal circuit
Screw the cap on correctly
Check the positioning of the cap seal
Read point “06.1”
Check the connection between the
dental unit and the air circuit
Read point “05.2”
Read point “05.3“ “06.1”, “06.3”, and
“07.0”.
Remove the powder from the
container and clean it with a dry
cloth.
Read paragraph “07“
The level of powder inside
the container is higher than
permitted
Dental unit not connected to
No water comes
out of the front
terminal of the
polisher during
operation
the water circuit
Water too hard Read point “06.3 - 07.0”
Water lter of dental unit
clogged
38
Restore the correct level of powder
in the container (see point “05.2”)
Check the connection between the
dental unit and the water circuit
Check the connection to the water
circuit of the dental unit
Page 39
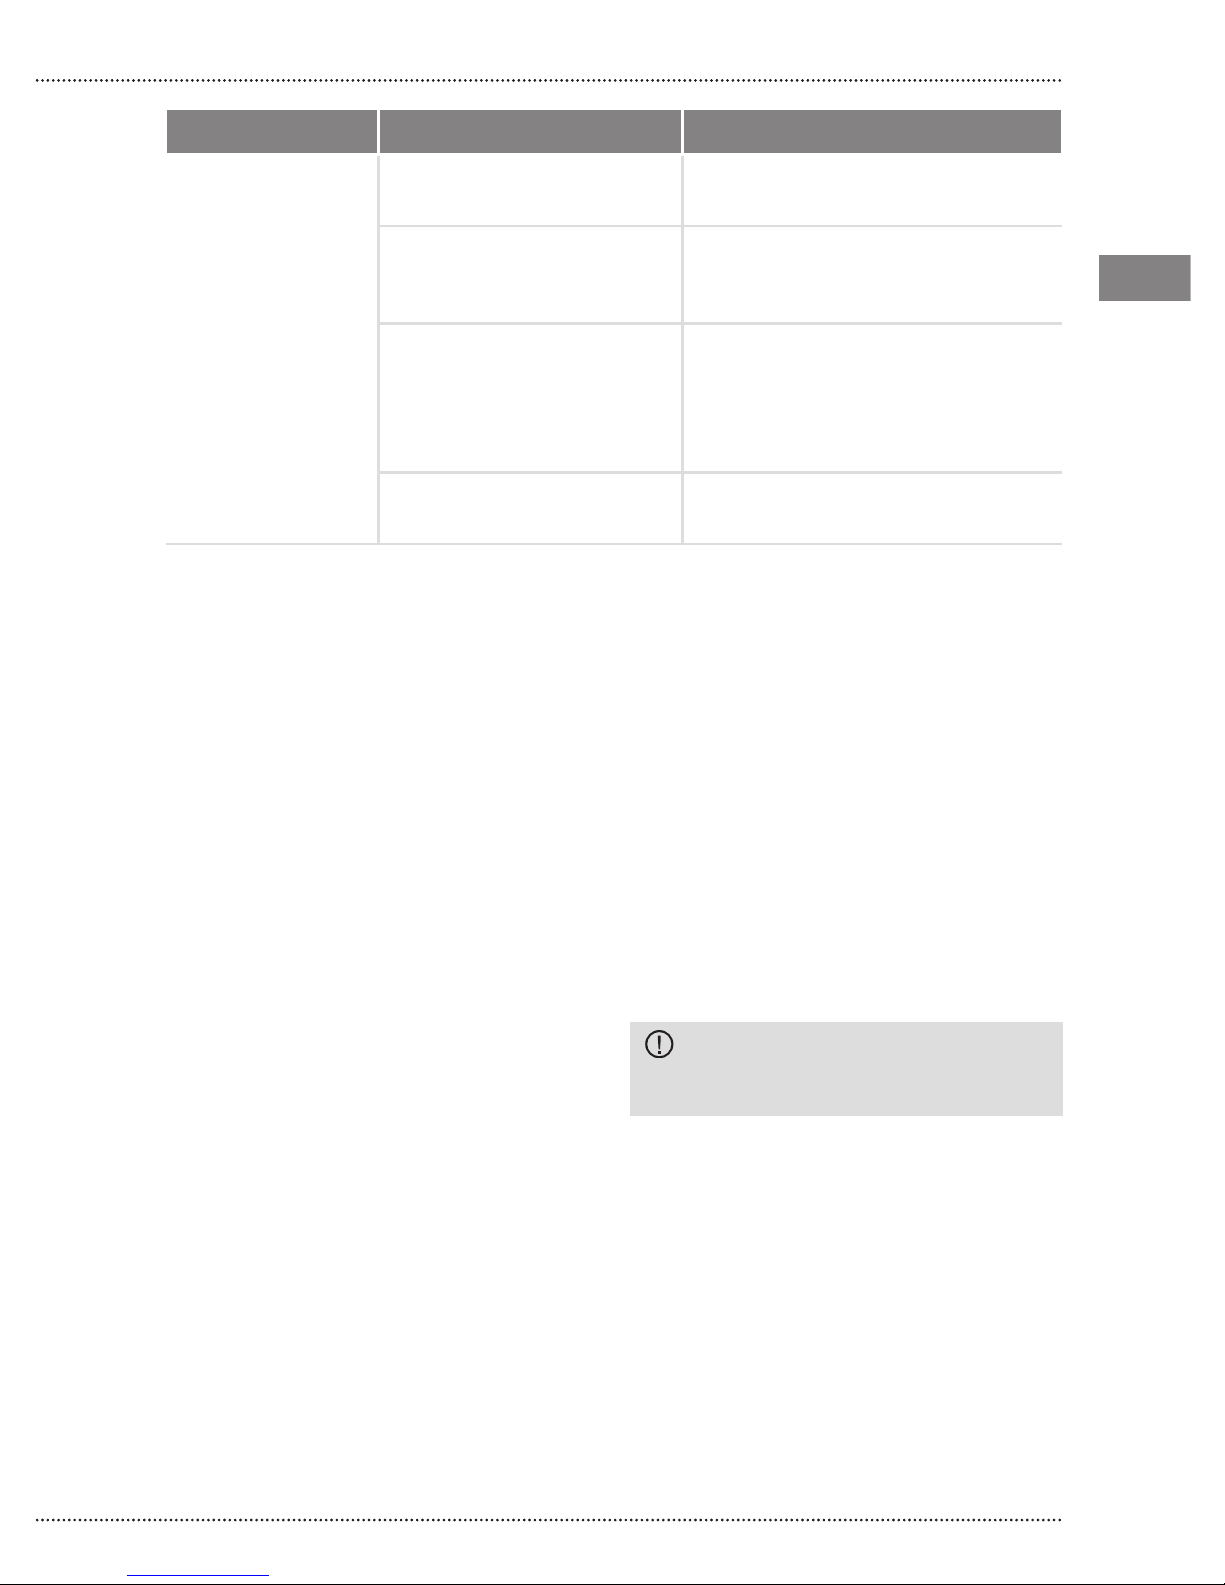
Problem Possible cause Solution
Starjet
Treatment
ineffective
Insufcient pressure of the
air-supply circuit
Level of powder inside the
container too low or too
high
Front terminal of the
polisher clogged by too
much moister in the powder
or insufcient
cleaning/maintenance
Water/powder ow is
irregular and/or intermittent
Check the pressure in the air circuit
of the dental unit
Restore the correct level of the
powder inside the container (see
point “05.2”)
Read point “05.3“ “06.1”, “06.3”, and
“07.0”.
Remove the powder from the
container and clean it with a dry
cloth.
Check the o-ring terminal cleaner
insert (see paragraph 07.1)
10.2 SENDING THE DEVICE TO AN AUTHORISED MECTRON
SERVICE CENTER
In the event that technical assistance is
needed on the device, contact one of the
Authorized Mectron Service Centers or your
Retailer. Do not attempt to repair or modify
the device and its accessories.
Clean and sterilize all the parts that need to
be sent to an Authorized Mectron Service
Center, following the instructions provided in
the Chapter 06 - Cleaning, disinfection and
sterilisation.
Return all parts in sterilization pouches to
provide evidence that the sterilization process
has been performed.
The cleaning and sterilization requirements
are in line with those in force concerning
the safeguarding of health and safety in the
workplace, as per Law Decree 626/94 and
DLgs 81/08 and its subsequent amendments,
both laws of the Italian State.
In the event that customer does not fulll
the requirements, Mectron reserves the right
to charge him or her for the cleaning and
sterilization expenses, or to reject the goods
received in unsuitable conditions, returning
them to the customer, at the customer’s
expense, for them to be correctly cleaned and
sterilized.
The device must be returned properly
packaged, accompanied by all the
accessories, and by a document including:
• Owner information including complete
address and telephone number
• Product name
• Serial number and/or lot number
• Reason for goods returned / description of
the malfunction
• Photocopy of packing list or purchase
invoice of the device
CAUTION: Package
Pack the device in its original packaging to
prevent damages during transport.
Once the material has been received by
the Authorized Mectron Service Center,
qualied technical personnel will provide an
evaluation based on the given circumstances.
The repair work will be performed only upon
the prior acceptance by the customer. For
further details, contact the closest Authorized
Mectron Service Center or your retailer.
Unauthorized repair works may damage the
system and make the warranty void, and
will absolve Mectron of any responsibility
for direct or indirect harm to persons or
damages to anything else..
EN
EN
39
Page 40
11 WARRANTY
EN
EN
All Mectron devices are subjected to an
accurate end inspection that ascertains their
full functionality before they are placed on
the market.
Mectron provides a warranty on all new
Starjet purchased from a retailer or a Mectron
importer to cover material or manufacturing
defects for 1 YEAR (ONE) from the date of
purchase.
The accessories are not included in the
warranty.
During the period in which the warranty is
valid, Mectron commits itself to repair (or at
its own free choice, replace) those product
parts that were to proved defective according
to its judgment, free of charge.
Entire replacement of the Mectron products
is excluded.
The warranty of the manufacturer and the
certication of the device are not valid in the
following cases:
- The device is not used in accordance to its
intended use.
- The device is not used in compliance with
all of the instructions and precautions
described and outlined in this manual.
- The electrical system in which the device
is used is not compliant to electrical code
compliance standards and to the relative
precautions.
- The assembly operations, extensions,
adjustments, updates, and repair works are
performed by personnel not authorized by
Mectron.
- The environmental conditions for the
preservation and storage of the device are
not compliant to the precautions indicated
in the Chapter 09 - TECHNICAL DATA.
- Use of non-authentic Mectron inserts,
accessories, and spare parts that can
compromise correct device operation and
cause harm to the patient.
- Accidental breakage due to transport
- Damages due to incorrect use or
negligence, or to connection to a power
voltage other than the one required
- Warranty expiration
NOTE: The warranty is valid only if the
warranty sheet annexed to the product has
been lled out in all its parts, and sent to our
ofces or possibly to the retailer or Mectron
importer within 20 (twenty) days from the
date of purchase, which is the date that
appears on the packing list/purchase invoice
issued by the retailer/importer.
To benet from the warranty service, the
customer must return, at its own expense, the
device to be repaired to the retailer/Mectron
importer from whom the customer purchased
the product.
See paragraph 10.2 for the details relative
to the procedure to send the device to an
Authorized Mectron Service Center.
The indications that appear in this publication are not binding and can be modied without fore-notice.
The Italian version of this manual is the original document from which its translations have been obtained. In case of any
discrepancy, the Italian version will have pertinence.
Texts, images, and graphics of this manual are property of Mectron S.p.A., Carasco, Italy. All rights reserved.
The contents cannot be copied, distributed, changed, or made available to third parties without the written approval of
Mectron S.p.A.
40
 Loading...