

Page 1
EN
COMPACT PIEZO LED
Û Use and maintenance manual
Page 2

EN
2
TABLE OF CONTENTS
01
Û
INTRODUCTION .................................................. 3
01.1 Intended use of compact piezo LED .............................. 3
01.2 Description of the device ........................................ 4
01.3 Responsibility waiver ........................................... 4
01.4 Safety precautions .............................................. 4
01.5 Symbols ........................................................6
02
Û
IDENTIFICATION DATA ........................................... 7
02.1 Identification data of the handpiece ............................. 7
02.2 Identification data of the inserts. . . . . . . . . . . . . . . . . . . . . . . . . . . . . . . . . 7
03
Û
DELIVERY .......................................................... 7
03.1 List of the components of the compact piezo LED ................. 7
04 Û USE ................................................................ 8
04.1 Controls ........................................................ 8
04.2 Switching the device on and off ................................. 8
04.3 Safety precautions before and during use ........................ 8
04.4 Instructions for use ............................................ 10
04.5 Important information on the inserts ........................... 11
05
Û
DISASSEMBLY OF PARTS FOR CLEANING AND
STERILIZATION
................................................... 12
06 Û CLEANING AND STERILIZATION. . . . . . . . . . . . . . . . . . . . . . . . . . . . . . . . 13
06.1 Cleaning and sterilization of the handpiece ...................... 13
06.2 Cleaning and sterilization of the inserts ......................... 16
06.3 Cleaning and sterilization of the torque wrench ................. 18
07
Û
MAINTENANCE .................................................. 21
08
Û
DISPOSAL MODES AND PRECAUTIONS ....................... 21
09 Û TECHNICAL DATA. . . . . . . . . . . . . . . . . . . . . . . . . . . . . . . . . . . . . . . . . . . . . . . . 21
09.1 Electromagnetic compatibility EN 60601-1-2 ..................... 22
10
Û
TROUBLESHOOTING ............................................ 26
10.1 Quick solution to problems .....................................26
10.2 Sending the device to an Authorized Mectron Service Service .... 27
11
Û
WARRANTY ...................................................... 28
Page 3

EN
3
01 Û INTRODUCTION
01.1 Û INTENDED USE OF THE COMPACT PIEZO LED
Read this manual and follow its instructions
carefully before proceeding with the use,
maintenance, or other operations on the
device. Always keep this manual within easy
reach.
IMPORTANT: to prevent harm to persons
or damages to objects, read all the “Safety
precautions”present in the manual with
special care. Depending on their degree
of seriousness, the safety precautions are
classified with the following indications:
WARNING
(always refers to personal injury)
CAUTION
(refers to possible damage to property)
The purpose of this manual is to make
the operator knowledgeable of the safety
precautions and the instructions for a correct
use and maintenance of the device and its
accessories.
Use of this manual for purposes other than
those strictly tied to the use and maintenance
of the device is forbidden.
The information and illustrations in this
manual are updated as of the date of issue
reported on the last page.
Mectron is committed to continuously
update its products with possible
modifications to device components. In case
you uncover discrepancies between what
is described in this manual and the device
in your possession, contact your Retailer
or the After-Sales Service of Mectron for
clarifications and support.
WARNING: The device must be used
in a dental practice or ambulatory. The
device cannot operate in environments
where anesthetic or flammable mixtures
are present.
WARNING: Qualified and specialized
personnel. The device must be used
exclusively by specialized and appropriately
trained personnel completely familiar with
the required techniques and
instructions for use of the equipment.
The use of the device does not cause side
effects if it is used correctly. An improper
use might cause tissues heating.
WARNING: Use the device only for the
intended use.
Failure to observe this precaution may
cause serious injuries to the patient, the
operator, and damages/breakdowns to the
device.
By means of the appropriate inserts, the
following dental applications can be
performed:
- scaling: all the procedures for the removal
of bacterial plaque deposits and supragingival, sub-gingival, and interdental
calculi, and for the removal of stains;
- periodontology: periodontal treatment for
the scaling and root-planing/debridement
including cleaning and irrigation of the
periodontal pocket;
- cleaning of the implant site surfaces;
- endodontics: all treatments for root canals
preparation, irrigation, filling, condensation
of the gutta-percha, endodontic revision and
retrograde preparation;
- restoration and prosthesis: cavity
preparation and removal of carious tissues,
removal of denture and of excess restoration
material, condensation of the amalgam,
finishing of the cervical margin.
01 Û INTRODUCTION
Page 4

EN
4
COMPACT PIEZO LED
01.2 Û DESCRIPTION OF THE DEVICE
01.3 Û RESPONSIBILITY WAIVER
The compact piezo LED is a multifunctional
ultrasonic piezoelectric scaler. It has been
designed in order to offer a product with
innovative design and exclusive technical
characteristics to the operator, and maximum
comfort during the treatment to the patient
thanks to a wide range of possible power
settings.
The device has an automatic sync circuit
which optimizes frequency and power
for each available insert, so that the best
performance is always assured. The handpiece
has a LED light 360° adjustable and can be
autoclaved at 135 °C.
The manufacturer Mectron disclaim any
liability, expressed or implied, and shall have
no responsibility for any direct, indirect or
other damages and personal injury arising
out in connection with any errors in the
use of the device and its accessories.
The manufacturer Mectron shall be under no
liability, expressed or implied, with respect to
any damages (personal injury and/or damage
to property) which might arise or be caused,
whether by the customer or by any of the
users of the product and its accessories, as
result of:
1 Use or procedures different than those
specified in the intended use of the
product;
2 The environmental conditions for the
preservation and storage of the device
are not compliant to the precautions
indicated in the Chapter 09 - TECHNICAL
DATA;
3 The device is not used in compliance
with all the instructions and precautions
described in this manual;
4 The electrical system in the premises in
which the device is used is not compliant
to the norms in force and to the relative
precautions;
5 The assembly operations, extensions,
adjustments, updates, and repairs on the
device are performed by personnel not
authorized by Mectron;
6 Improper use, mistreatments, and/or
incorrect interventions;
7 Any and all attempts to tamper with or
modify the device, under any circumstance;
8 Use of non-original Mectron inserts that
entail a finite damage to the threading of
the handpeice, thus compromising correct
operation and causing risk of harm to the
patient;
9 Use of non-original Mectron inserts, used
in accordance to designed and tested
settings of Mectron original inserts. The
correct use of the settings is guaranteed
only with original Mectron inserts;
10 Lack of stock materials (handpiece, inserts,
wrenches) to be used in the event of device
stop due to fault or of inconveniences.
01.4 Û SAFETY PRECAUTIONS
WARNING: Contraindications. Do not
use the multipiezo pro on patients who
carry heart stimulators (Pace-makers) or
other implantable electronic devices. This
precaution also applies to the operator.
CAUTION: Contraindications. Ultrasonic
scaler. Do not perform treatments on
prosthetic artifacts made of metal or
ceramics. The ultrasonic vibrations could
lead to the de-cementing of the artifacts.
WARNING: Contraindications. Do not
perform scaling treatments without water
spray in order to avoid the insert overheating which may cause damages to the
tooth.
Treatments with no water spray can be
carried out only with “Dry Work” inserts
which do not have the water passage.
Page 5
EN
5
01 Û INTRODUCTION
WARNING: Contraindications.
Interference with other equipment.
Though compliant to the standard
IEC 60601-1-2, the multipiezo pro may
nonetheless interfere with other devices
nearby. The multipiezo pro must not
be used near to or stacked on other
devices. However, if this were to prove
necessary, you must check and monitor
correct operation of the device in that
configuration.
WARNING: Contraindications.
Interference from other equipment. An
electrical scalpel or other electro-surgical
units near the multipiezo pro device may
interfere with its correct operation.
WARNING: Do not use the device in
places where there is a risk of explosion.
The device cannot operate in environments
where anesthetic or flammable mixtures
are present.
CAUTION: In the case that the end
user, when operating in his or her own
medical study or clinic, must subject the
electro-medical equipment and systems to
periodical inspections in order to adhere to
imposed requirements, the test procedures
that must be applied to electro-medical
equipment and systems to evaluate safety
must be performed in line with norm EN
62353 ‘Electro-medical devices - Periodical
inspections and tests to be performed after
repair interventions on electro-medical
devices’.
WARNING: Checking device status
before the treatment. Always check that
there is no water underneath the device.
Before every treatment, always check
that the device works perfectly and that
the accessories are efficient. In case you
uncover operating abnormalities, do
not perform the treatment. Contact an
Authorized Mectron Service Center if the
abnormalities concern the device.
WARNING: Infections control.
To ensure maximum safety of the patient
and the operator, before using all the
reusable parts and accessories, make sure
you have first cleaned and sterilized them,
following the instructions of the Chapter
08 - CLEANING AND STERILIZATION.
WARNING: All the accessories of the
new or repaired devices are not sterile. All
new and repaired accessories are supplied
in non-sterile conditions. Before use, and
after each treatment, they must be cleaned
and sterilised in strict compliance with
the instructions given in the Chapter 08 CLEANING AND STERILIZATION.
CAUTION: Contraindications. After
having sterilized the handpiece, the
inserts, the torque wrench, and any other
accessory that can be sterilized in autoclave,
wait for them to completely cool down to
room temperature prior to reusing them.
WARNING: Breakage and wear-out of
the inserts. High frequency oscillations and
wear-out may, in rare circumstances, lead
to the breakage of the insert.
Deformed or otherwise damaged inserts
are susceptible to breakage during their
use. These inserts must never be used.
If an insert breaks, check that none of its
fragments remain in the treated part and,
at the same time, apply effective suction to
remove them.
The patient must be instructed to breathe
through his nose during the treatment,
or a dental dam must be used to prevent
the patient from ingesting fragments of
broken inserts.
When the nitride coating wears out, the
cutting efficiency decreases; re-sharpening
the insert damages it and is therefore
forbidden. Check that the insert is not
worn out.
During the intervention, frequently check
that the insert is intact, especially in its
apical part.
During the intervention, avoid prolonged
contact with retractors or with metallic
instrumentation in use. Do not exert
excessive pressure on the inserts during
their use.
WARNING: Only use original Mectron
inserts, accessories, and spare parts.
Page 6
EN
6
COMPACT PIEZO LED
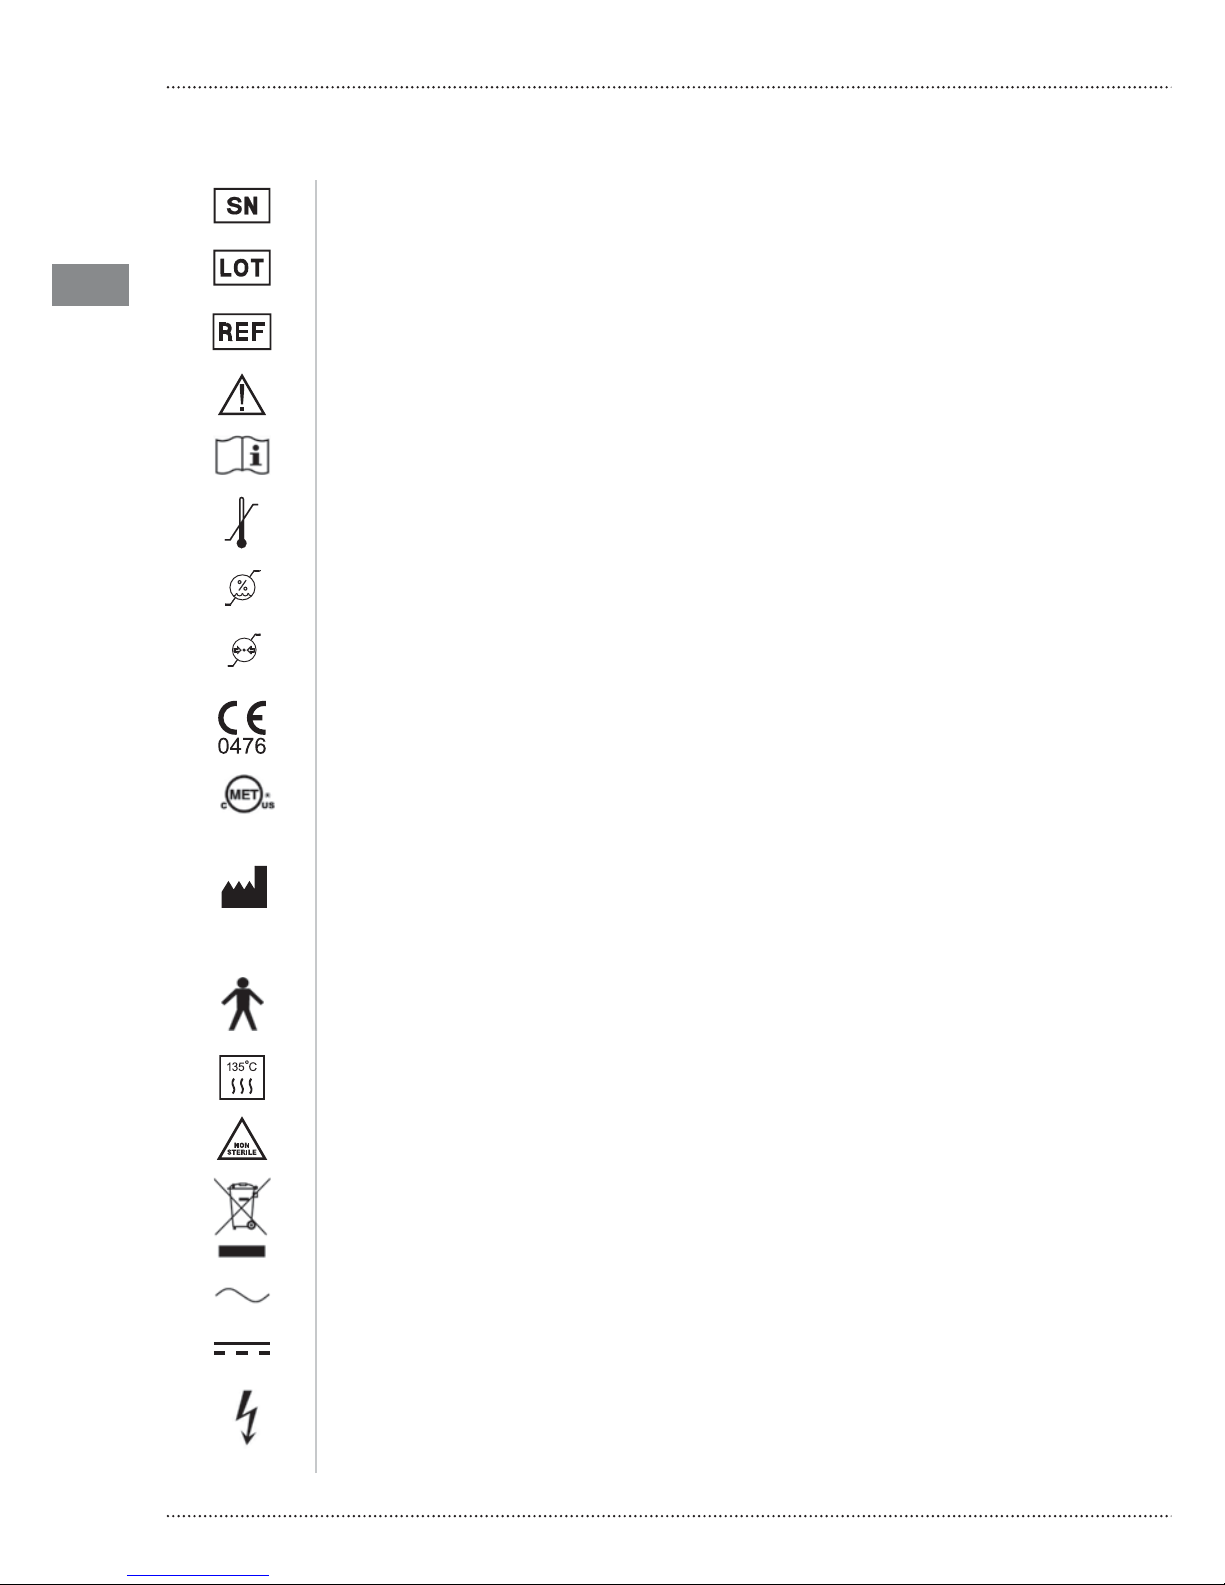
Serial number
Lot number
Product code
CAUTION: read the instructions for use
Operating instructions
Temperature limitation - transport and storage conditions
Humidity limitation - transport and storage conditions
Atmospheric pressure limitation - transport and storage conditions
It indicates compliance with the CE 93/42 CEE EN 60601-1 and EN 60601-1-2.
Notified body: CERMET.
MET Mark
UL CSA conformity
Manufacturer
QTY.1 Quantity of parts in the pack = 1
Applied part of type “B” as per norm EN 60601-1
Can be sterilized in autoclave up to a maximum temperature of 135° C
Non-sterile
The device and its accessories must not be disposed
of or treated as solid urban wastes
Alternating current
Direct current
Dangerous voltage
01.5 Û SYMBOLS
UL 60601-1 CSA C22.2
No. 601-1 - E113015
-10 °C
70 °C
10 %
90 %
1060 hPa
500 hPa
Page 7
EN
7
02 Û IDENTIFICATION DATA
02 Û IDENTIFICATION DATA
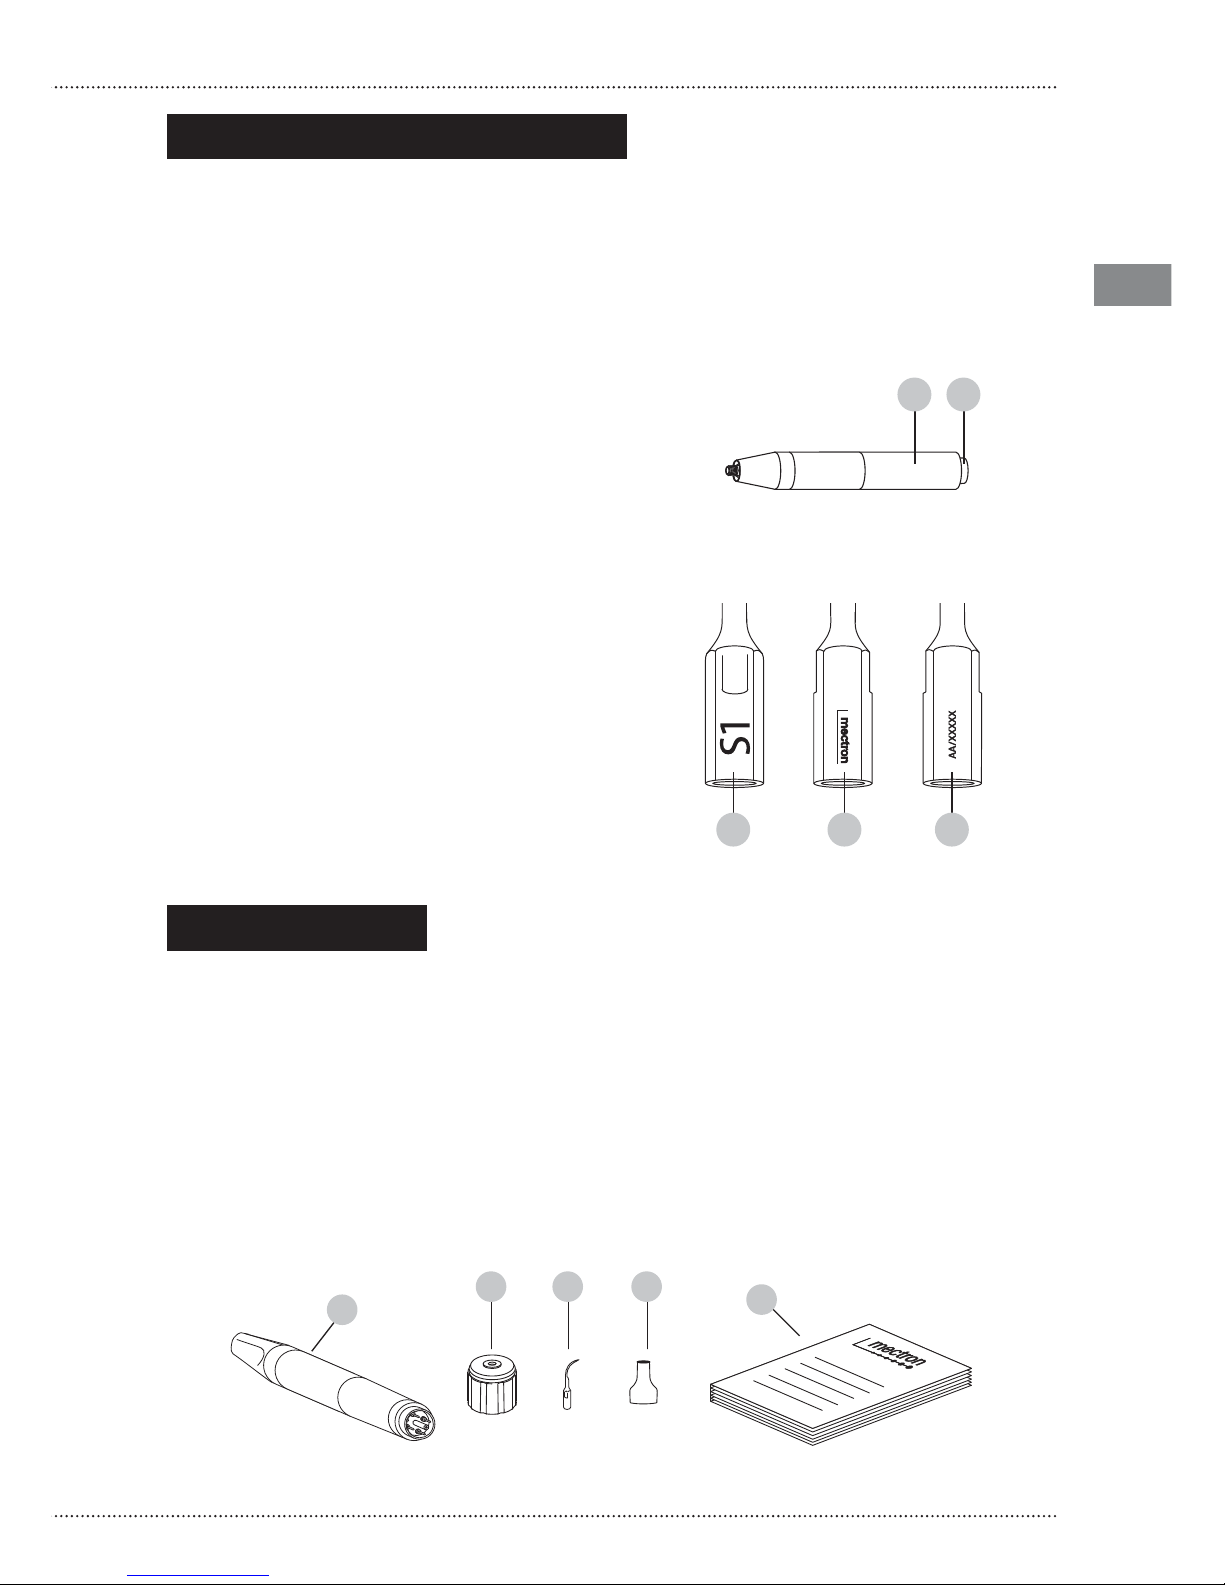
Each handpiece is laser-marked with the
Mectron logo (ref. 1), and the handpiece serial
number (ref. 2).
The following data are laser-marked on each
insert: the name of the insert (ref. 3), the
Mectron logo (ref. 4) and the lot number to
which the insert belongs (ref. 5).
02.1 Û IDENTIFICATION DATA OF THE HANDPIECE
02.2 Û IDENTIFICATION DATA OF THE INSERTS
21
An exact description of the model and of the serial number of the device will enable our AfterSales Service to provide fast and efficient support.
Always refer these data whenever you contact an Authorized Mectron Service Center.
03 Û DELIVERY
03.1 Û LIST OF THE COMPONENTS OF THE COMPACT PIEZO LED
The compact piezo LED consists of:
A scaler handpiece complete with LED light front cone
B Mectron torque wrench
C inserts/insert kits
D metal front cone without light
E manual of use and maintenance
3 4 5
E
A
B C D
Page 8

EN
8
COMPACT PIEZO LED
The compact piezo LED consists of accessories
that can be ordered separately. Refer to the
“Packing List” included in your package, so
that you may exactly know the quantity and
type of the accessories supplied with the
device you have purchased.
The package of the device is sensitive
to strong collisions, because it contains
electronic components.
Therefore, special precautions must be taken
for transport and storage.
All the materials shipped by Mectron have
been inspected upon their delivery.
The device is delivered duly protected and
packed.
When receiving the device, check for the
possible presence of damages incurred during
the transport and, should that be the case, file
a complaint with the transporter.
Preserve the package in the event that you
need to send the device to an Authorized
Mectron Service Center and so that you can
place it back inside during prolonged periods
of disuse.
WARNING: Before starting to operate
with the device, make sure that you
have stock material (handpiece, inserts,
wrenches) available to use in case
the device stops due to a fault or of
inconveniences.
04 Û USE
04.1 Û CONTROLS
The compact piezo LED offers a wide range
of power settings: from a sub-gengival perio
treatment in soft mode to a more aggressive
scaling. Read the manual of use of the
dental chair on which the compact piezo
LED is intalled in order to have the complete
description of the power settings at your
disposal.
04.2 SWITCHING THE DEVICE ON AND OFF
Read the manual of use of the dental chair
on which the compact piezo LED is intalled
in order to know how to switch the device on
and off, and how to control the LED light on
the front end of the handpiece.
04.3 Û SAFETY PRECAUTIONS BEFORE AND DURING USE
WARNING: Before starting to
operate with the device, make sure that
you have stock material (handpiece,
inserts, wrenches) available to use in
case the device stops due to a fault or of
inconveniences.
WARNING: Only use original Mectron
inserts, accessories, and spare parts.
WARNING: Use of non-original
Mectron inserts: this use entails finite
damage to the handpiece threading, thus
compromising correct operation and
risking to cause harm to the patient.
WARNING: Contraindications. Do not
use the compact piezo LED on patients who
carry heart stimulators (Pace-makers) or
other implantable electronic devices. This
precaution also applies to the operator.
CAUTION: Contraindications. Ultrasonic
scaler. Do not perform treatments on
metal or ceramic/porcelain prosthetic
artifacts. The ultrasonic vibration could
cause decementation/loosening of such
artifacts.
CAUTION: Only use inserts with water
passage when performing treatments that
require irrigation.
Page 9
EN
9
04 Û USE
WARNING: Contraindications. Do not
perform scaling treatments without water
spray in order to avoid the insert over-heating which may cause damages to the tooth.
Treatments with no water spray can be carried out only with “Dry Work” inserts which
do not have the water passage.
WARNING: Treatments that require
irrigation. Always check operation of the
irrigation before and during use. Make sure
the fluid outflows from the insert.
Do not use the device if the irrigation does
not work or if the pump is defective.
WARNING: Checking device status
before the treatment. Always check that
there is no water underneath the device.
Before every treatment, always check that
the device works perfectly and that the
accessories are efficient. DO NOT use the
device and its accessories if damage is
apparent. Contact an Authorized Mectron
Service Center if the abnormalities concern
the device.
CAUTION: Do not activate the
handpiece while the insert is in contact
with the part to be treated. Doing so, will
not allow the electronic control circuit
of the device to recognize the best point
of resonance of the insert, required for
efficient and optimum performance.
WARNING: Before every treatment,
make sure that the insert appropriate for
the treatment is inserted on the handpiece.
Exclusively use the original Mectron
torque wrench to fasten the insert to the
handpiece.
WARNING: Do not change the insert
with handpiece running, to prevent
causing wounds to the operator.
WARNING: Control of infections.
First Use The reusable accessories (brand
new or returned by service) are delivered
in NON-STERILE conditions and must
be prepared prior to use by applying
the procedures given in Chapter 06 CLEANING AND STERILIZATION.
Every use Once used, each reusable
accessory must be thoroughly reprocessed
prior to reuse, according to the procedures
given in Chapter 06 - CLEANING AND
STERILIZATION.
CAUTION: Contraindications. Allow
reusable, autoclavable items (the
handpiece, the inserts, the torque wrench,
and any other accessory that can be
sterilized ) to gradually return to room
temperature after steam sterilization and
prior to usage. The cooling process must
not be accelerated.
CAUTION: The electrical contacts inside
the cord and handpiece connectors must
be dry. Before connecting the handpiece
to the cord, make sure that the electrical
contacts of both connectors are perfectly
dry, especially after the sterilization cycle
in autoclave. If need be, dry the contacts by
blowing compressed air onto them.
WARNING: Breakage and wear-out of
the inserts. High frequency oscillations and
wear-out may, in rare circumstances, lead
to the breakage of the insert.
Do not bend, change shape of, or resharpen an insert in any way.
Bending an insert or applying leverage on
it can lead to its breakage.
Deformed or otherwise damaged inserts
are susceptible to breakage during their
use. These inserts must never be used.
Excessive pressure applied to insert during
its use can cause insert fracture.
Should an insert fracture during use, check
that none of its fragments remain in the
treated part and, at the same time, apply
effective suction to remove them.
The patient must be instructed to breathe
through his nose during the treatment,
or a dental dam must be used to prevent
the patient from ingesting fragments of
broken inserts.
When the nitride coating wears out, the
cutting efficiency decreases; re-sharpening
the insert damages it and is therefore
forbidden. Prior to each use check that the
insert is not worn out.
During the intervention, frequently
check that the insert is intact, especially
its top.
During the intervention, avoid prolonged
contact with retractors or with metallic
instrumentation in use.
Page 10
EN
10
COMPACT PIEZO LED
click!
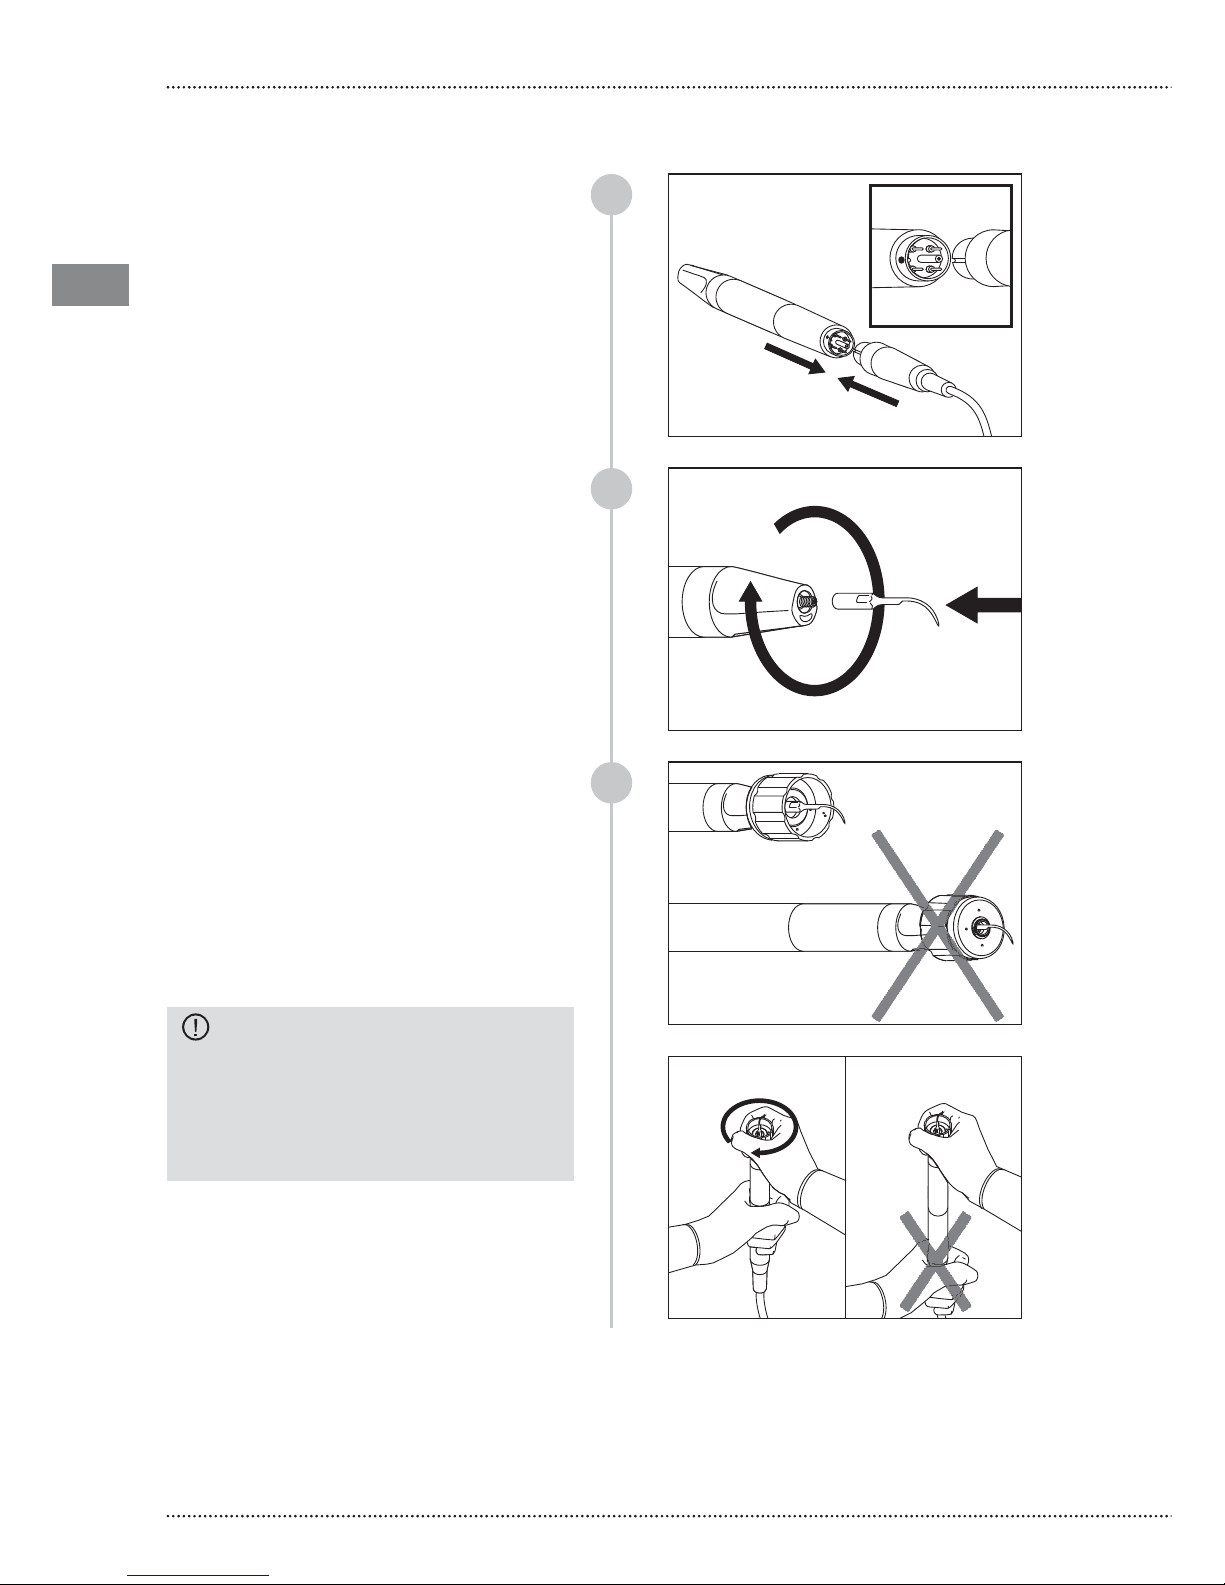
04.4 INSTRUCTIONS FOR USE
Correctly connect the handpiece on its
cord making sure to match the dot on the
handpiece connector with the groove on
the cord connector.
Make sure that the electrical contacts of
both connectors are perfectly dry, if need
be, dry them by blowing compressed air;
1
2
3
Screw the chosen insert onto the compact
piezo LED handpiece, until it reaches the
limit stop;
Tighten the insert by using the Mectron
torque wrench.
To correctly use the Mectron torque wrench,
operate as follows:
put the insert inside the wrench as shown;
firmly hold the central body of the
handpiece;
CAUTION:The handpiece must not be
grabbed by its terminal part and/or cord,
but only by its central body.
The handpiece must not be rotated, but
must be grasped firmly, and you must
only rotate the wrench.
rotate the wrench clockwise until the
friction snaps (the external body of the
wrench rotates compared to the handpiece,
emitting mechanical “CLICK” sounds).
The insert is now perfectly tightened.
CORRECT
NOT CORRECT
Page 11
EN
11
04 Û USE
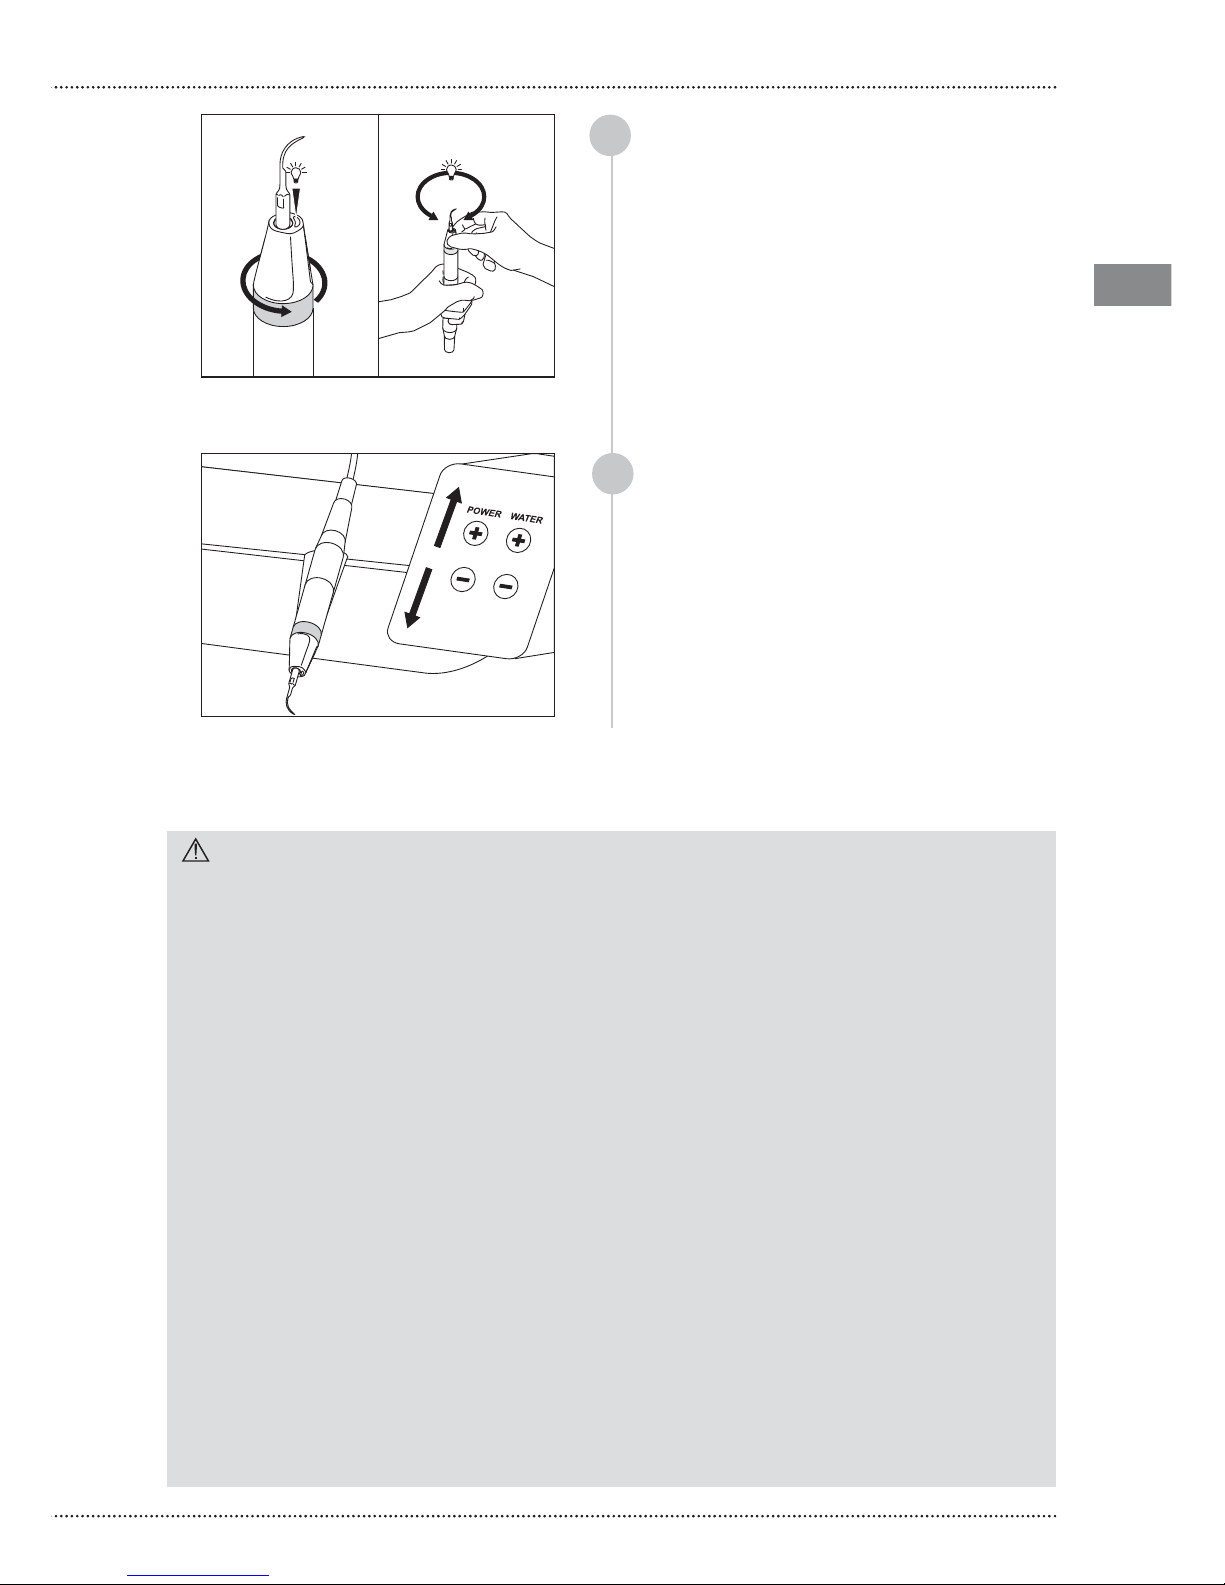
The position of the LED light on the front
terminal of the handpiece can be adjusted
in the following way:
• Hold the body of the handpiece and lightly
unscrew the metal ring nut located at
the base of the front terminal, rotating it
counter-clockwise.
• Rotate the front terminal so that the LED
light goes into the desired and necessary
position.
To fasten it into position, screw the metal
ring nut, rotating it clockwise.
4
5
Select the desired power and irrigation
levels according to the instructions given by
the chair manufacturer.
NOTE: activate the WATER function if you
need to perform a treatment that forsees
the use of water spray, otherwise switch
the WATER function to OFF.
Activate the compact piezo LED.
At the end of the treatment always put the
scaler handpiece back into its seat.
WARNING:
- When the titanium nitride coating is
visibly worn out, the insert must be
replaced. Use of an overly worn out insert
reduces its efficiency.
- Diamond-coated inserts: the diamond
inserts must be replaced when the
titanium nitride coating is visibly worn
out and, at any rate, after a maximum of
10 treatments.
- Do not activate the handpiece while
the insert is in contact with the part to
be treated. Doing so, will not allow the
electronic control circuit of the device to
recognize the best point of resonance
of the insert, required for efficient and
optimum performance.
- Check the condition of wear of the
insert and that it is intact before and
during every use. If a damage or drop in
performance is noted replace it with a
new one.
- Use original Mectron inserts only. Use of
non-original inserts, in addition to
voiding the warranty, damages the
threading of the compact piezo LED
handpiece, with the risk of no longer
being able to screw the original inserts
correctly during subsequent use.
Moreover, the device settings are tested
and guaranteed to operate correctly only
when original Mectron inserts are used.
- Do not change the shape of the insert in
any way by either bending or filing it. This
could cause it to break.
- Do not use an insert that has suffered
any type of deformation.
- Do not attempt to sharpen the insert
used.
- Always check that the threaded parts
of the insert and of the handpiece
are perfectly clean – see Chapter 06 CLEANING AND STERILIZATION.
- If excessive pressure is applied on the
insert, it can cause the insert to break
and possibly harm the patient.
04.5 Û IMPORTANT INFORMATION ON THE INSERTS
Page 12
EN
12
COMPACT PIEZO LED
WARNING: Make sure that the device
is not active. Always make sure that the
footswitch is not pressed during the
disassembling of parts before cleaning
and sterilization interventions
Before moving on to the cleaning procedures
described in Chapter 06 - CLEANING AND
STERILIZATION, disconnect all the accessories
and components of the compact piezo LED.
05
Û
DISASSEMBLY OF PARTS FOR CLEANING
AND STERILIZATION
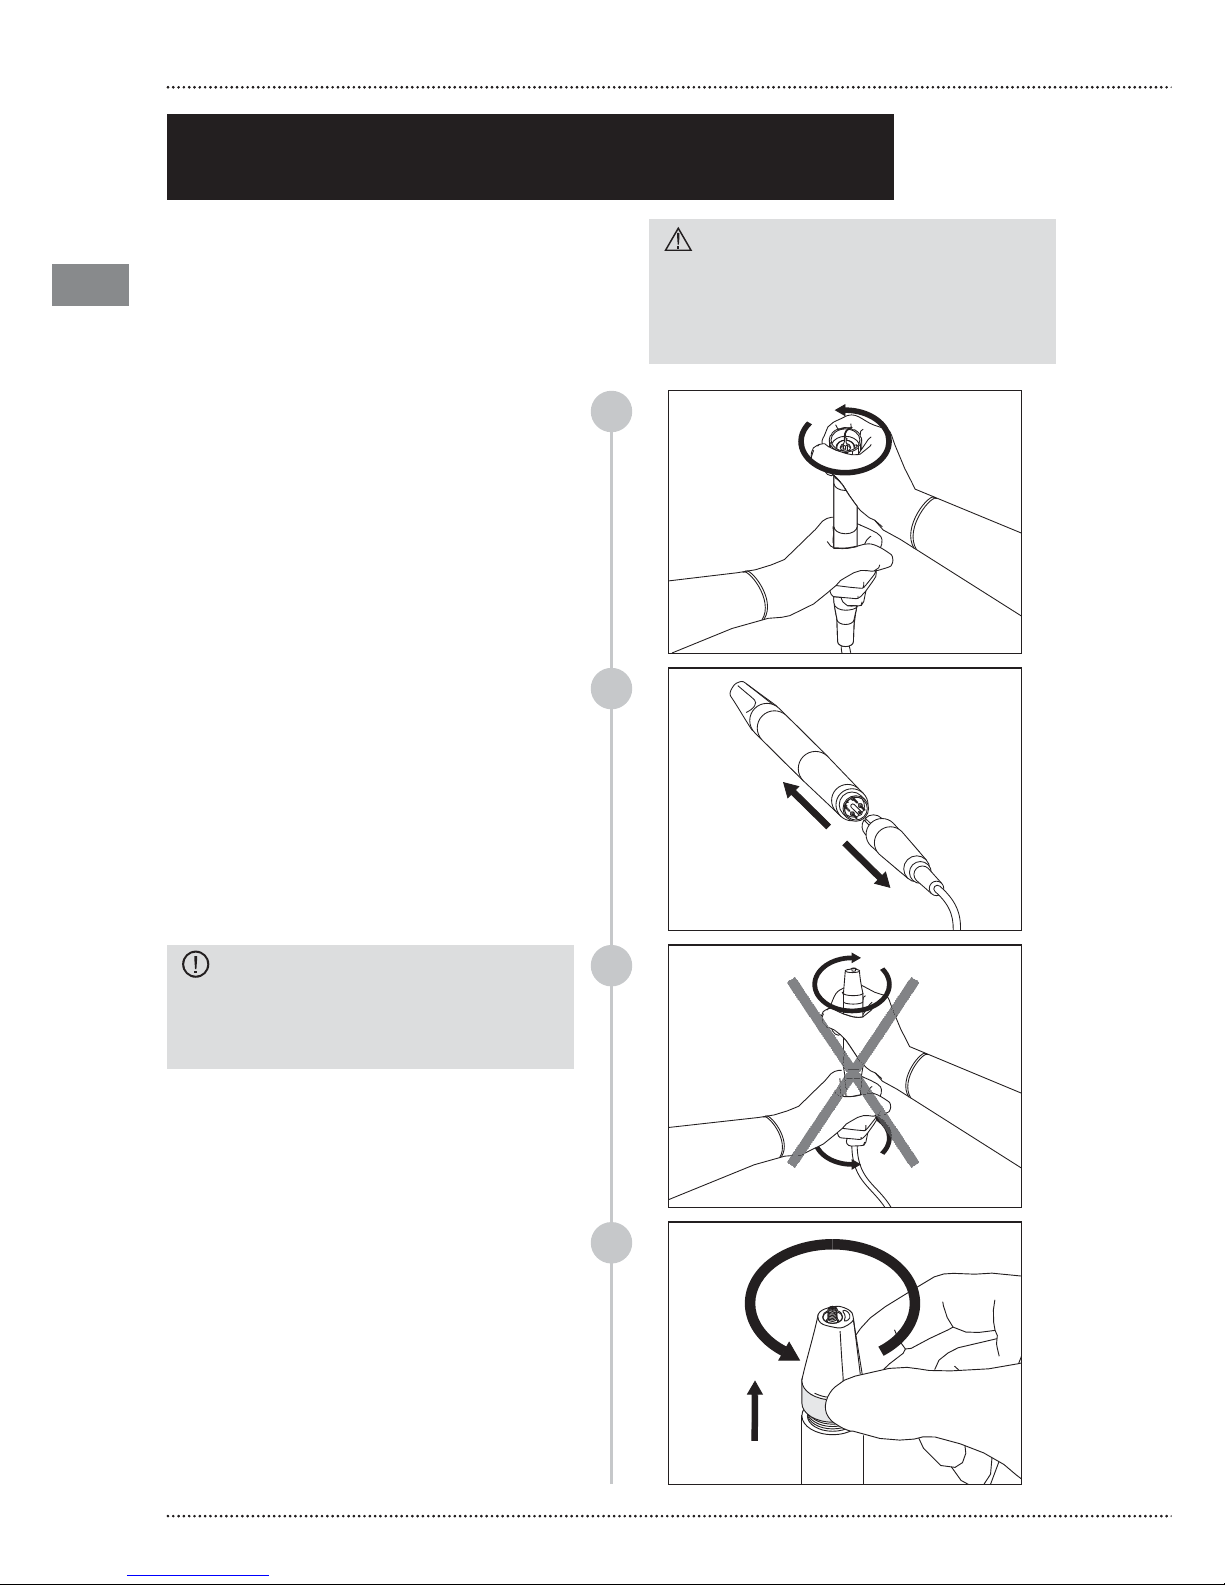
1
3
4
Unscrew the front terminal from the
handpiece;
NOTE: on the LED front cone the metal ring
cannot be separated from the plastic cone.
CAUTION: Do not attempt to
unscrew or turn the connector when
disconnecting the handpiece.
The connector could get damaged.
Disconnect the handpiece from its cord;
2
If present, unscrew the insert from the
handpiece by using the torque wrench;
Page 13
EN
13
06 Û CLEANING AND STERILIZATION
06 Û CLEANING AND STERILIZATION
PREPARATION
- Disconnect the handpiece from the cord of
the dental chair (see Chapter 05);
- If present, disconnect the insert from the
handpiece with the torque wrench (see
Chapter 05);
- Unscrew the front terminal (see Chapter 05).
CAUTION: Do not attempt to unscrew
or turn the connector when disconnecting
the handpiece. The connector could get
damaged.
CAUTION: Do not immerge the
handpiece in disinfectant solutions or other
liquids, because it could get damaged.
CAUTION: Do not immerge the
handpiece in an ultrasonic tank.
CLEANING AND DISINFECTION METHOD - Handpiece
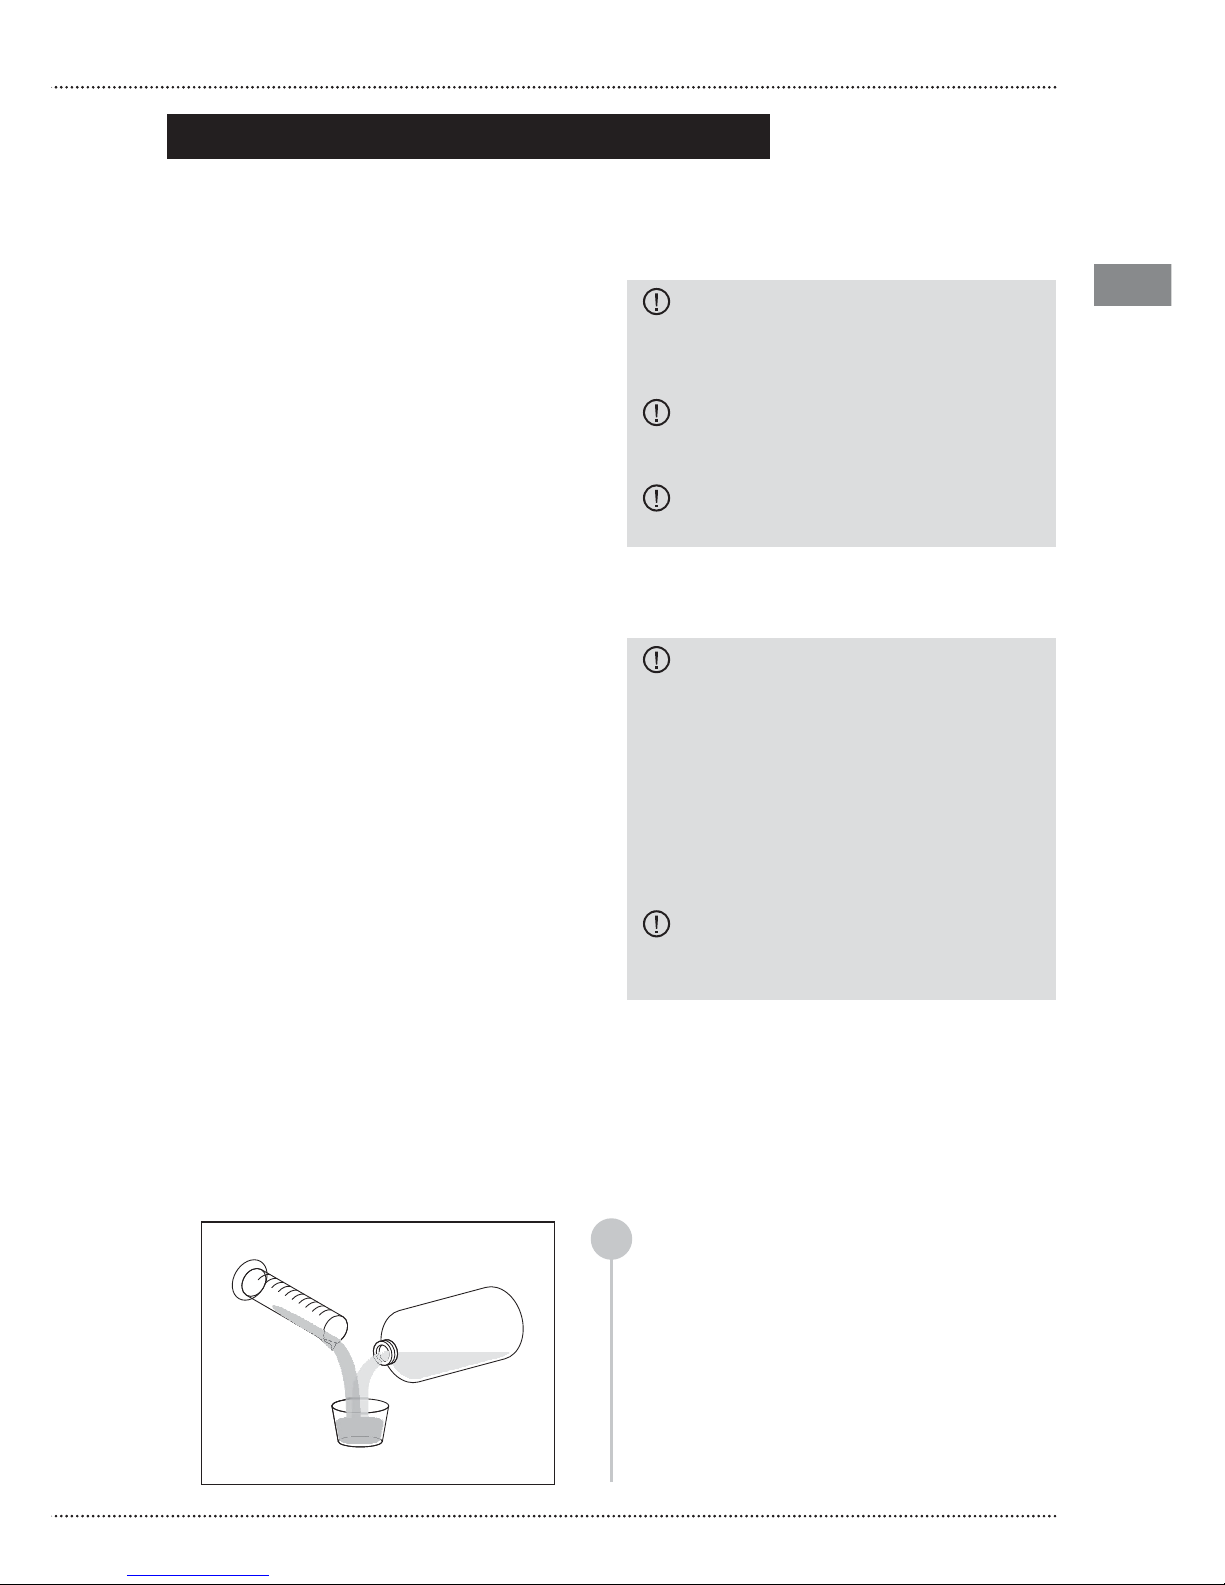
Prepare an enzymatic detergent solution
with pH 6-9, as per the instructions of the
manufacturer;
06.1 Û CLEANING AND STERILIZATION OF THE HANDPIECE
1
MATERIALS NECESSARY
- Enzymatic detergent with pH 6-9
- Water
- Container for solution with enzymatic
liquid
- If need be, non-aggressive disinfectant
solution with neutral pH (pH7)
- Clean and soft cloth with low fiber-release
- Brush with soft nylon bristles
- Distilled water
- Compressed air
- Single-use sterilization packets
- Steam sterilization
CAUTION: If you intend to disinfect,
we recommend that you use water-based
disinfectant solutions with a neutral pH
(pH7). Alcohol-based disinfectant solutions
and hydrogen peroxide are contraindicated, because they can fade the color
and/or damage the plastic materials. This
also holds true for chemical products such
as acetone and alcohol. Always rinse with
sterile water to preserve the disinfection.
CAUTION: Once used, correctly dispose
of the enzymatic detergent solution, do
not recycle.
Page 14
EN
14
COMPACT PIEZO LED
2
3
4
5
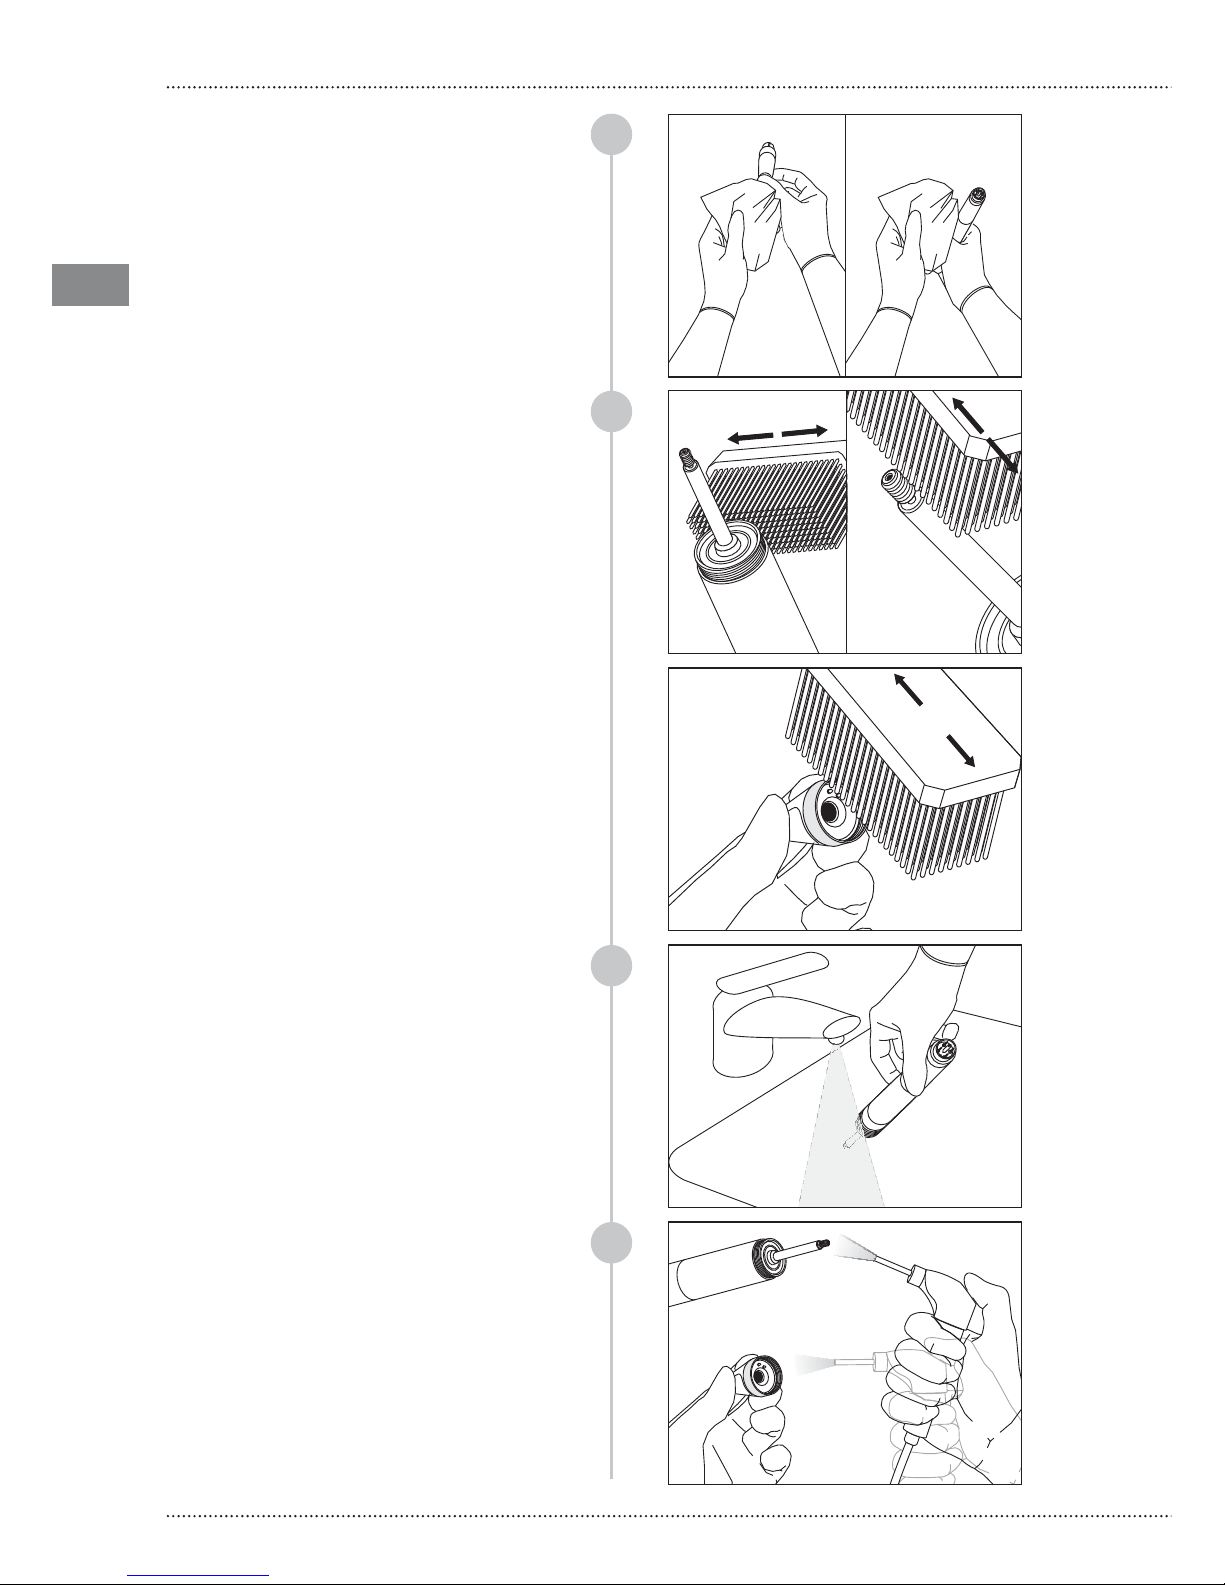
Delicately clean the surface of the
handpiece using the enzymatic detergent
solution with the aid of a brush with soft
nylon bristles, placing special care to the
following areas:
- threading of the handpiece
- titanium stem
- front terminal in its external and internal
parts
Accurately rinse with tap water to eliminate
any detergent residues and perform the last
rinse with distilled water;
Thoroughly dry all the parts, especially
the electrical contacts, blowing on them
with compressed air;
Clean the surface of the handpiece and
of its connector with a clean, soft cloth
with low fiber-release, dampened with
a detergent solution (pH 6-9) and, if
need be, disinfect with a non-aggressive
disinfectant solution with neutral pH (pH7),
following the instructions provided by the
manufacturer of the solution;
Page 15
EN
15
06 Û CLEANING AND STERILIZATION
7
6
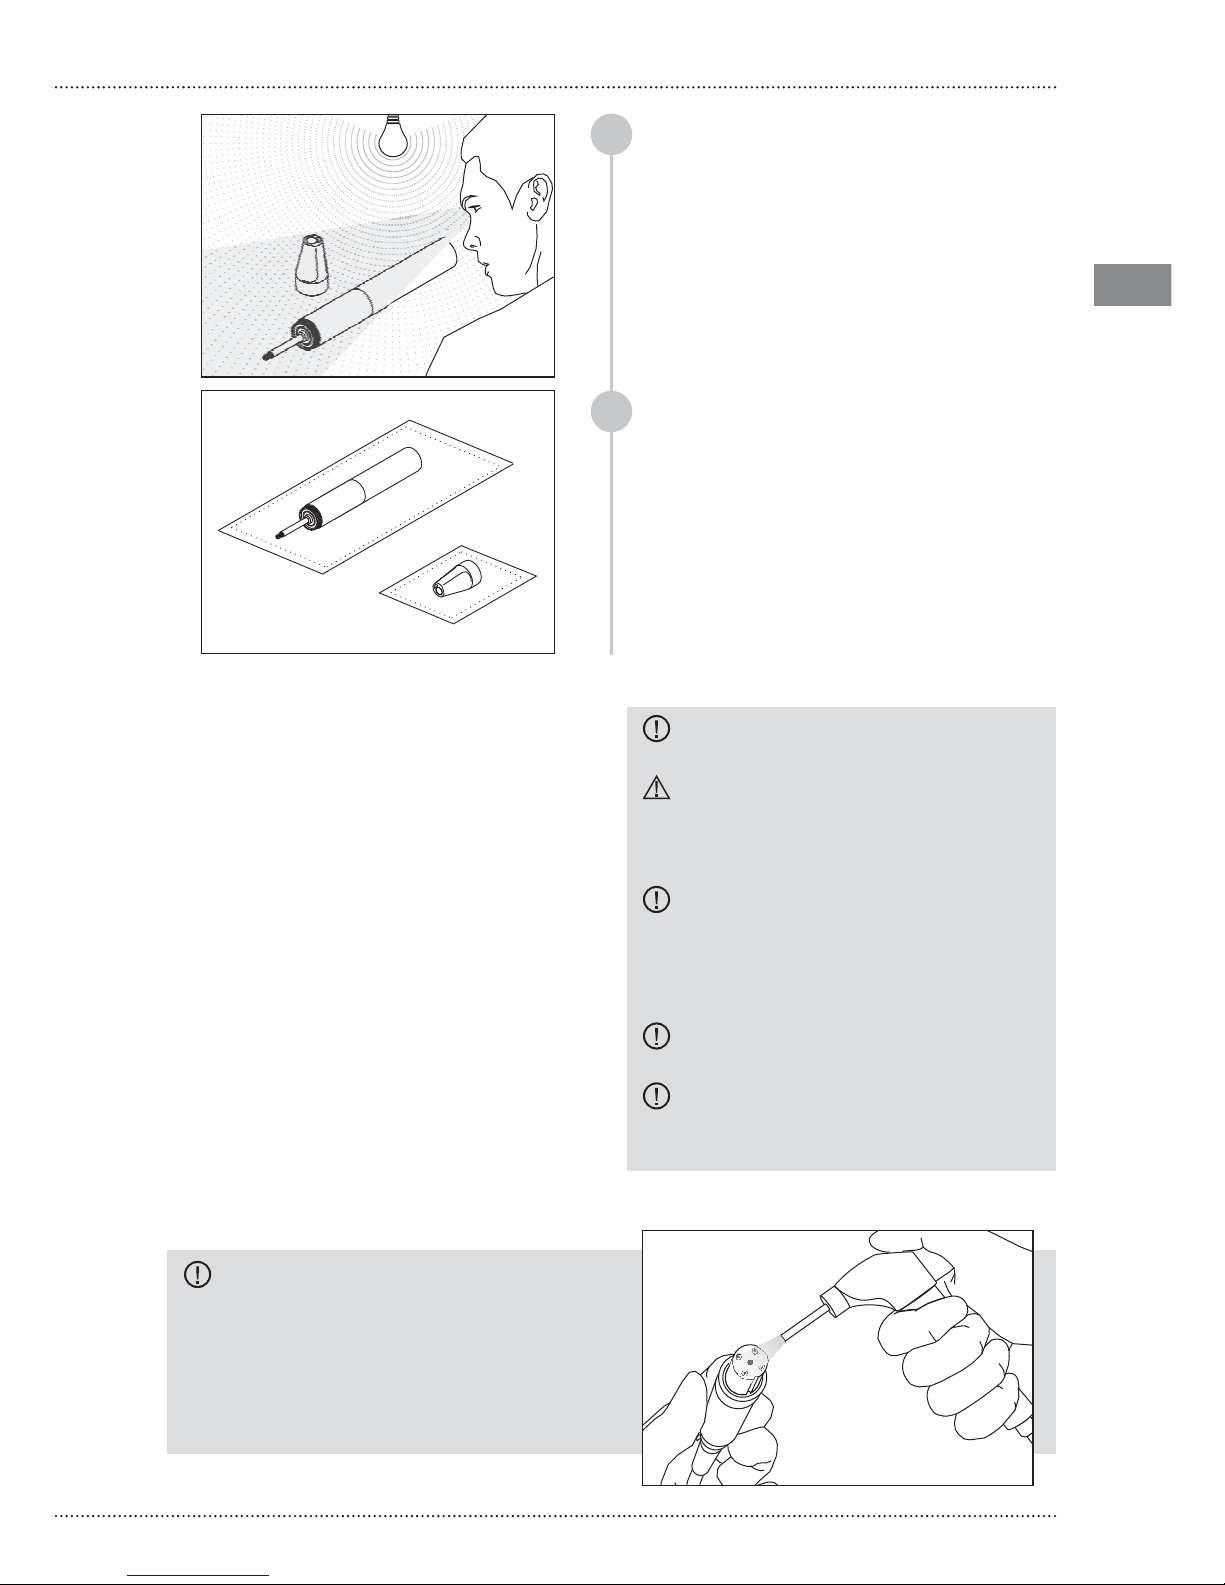
Once you’ve finished the cleaning
operations, check all the objects under an
adequate source of light, paying attention
to the details that could conceal dirt
residues (threading, cavities, grooves) and,
if need be, repeat the cleaning cycle. Finally,
check the integrity of those parts and
elements that may have worn out during
their use;
Individually seal the handpiece (without
inserts) and the front terminal in single-use
packets for separate sterilization cycles.
Proceed with the sterilization.
STERILIZATION METHOD - Handpiece
CAUTION:The electrical contacts of the
cord connector must be dry.
At the end of the sterilization cycle and
before connecting the handpiece to the cord,
make sure that the electrical contacts and
the connector are perfectly dry; if need be,
dry them by blowing compressed air.
The handpiece is built with materials that
resist to a maximum temperature of 135°C for
a maximum time of 20 minutes.
The sterilization process in steam autoclave
must be performed setting the parameters
indicated below, which are validated by
Mectron and reach the sterilization safety
levels (SAL 10
-6
):
- 3 times Pre-vacuum
(minimum pressure 60 mBar).
- Sterilization temperature 132°C
(interval 0°C ÷ +3°C).
- Sterilization time 4 minutes.
- Minimum drying time 20 minutes.
All the sterilization phases must be performed
by the operator in compliance to the norms
UNI EN ISO 17665-1:2007, UNI EN ISO
556-1:2002 e ANSI/AAMI ST46:2002.
CAUTION: Do not sterilize the
handpiece with the insert screwed onto it.
WARNING: Checking infections - Parts
that can be sterilized - Diligently remove
all residues of organic dirt before the
sterilization.
CAUTION: Perform the sterilization
using a water steam autoclave only. Do not
use any other sterilization procedure (dry
heat, irradiation, ethylene oxide, gas, low
temperature plasma, etc.).
CAUTION: Do not exceed the allowed
load of the steam sterilizer.
CAUTION: At the end of the steriliza-
tion cycle, let the handpiece cool down
completely prior to using it.
Page 16
EN
16
COMPACT PIEZO LED
06.2 Û CLEANING AND STERILIZATION OF THE INSERTS
PREPARATION
- Disconnect the insert from the handpiece
with the torque wrench (see Chapter 05).
CAUTION: Always disconnect the insert
from the handpiece before proceeding to
its cleaning and sterilization.
MATERIALS NECESSARY
- Enzymatic detergent with pH 6-9
- Water
- Ultrasound tank
- Brush with soft nylon bristles
- Compressed air
- Distilled water
- Single-use sterilization packets
- Steam sterilization
- Syringe
CAUTION: Do not use hydrogen
peroxide. If you intend to disinfect the
inserts, do not use hydrogen peroxide, but
only disinfectants with neutral pH (pH7);
always rinse with sterile water to preserve
the disinfection.
CAUTION: Once used, correctly dispose
of the enzymatic detergent solution, do
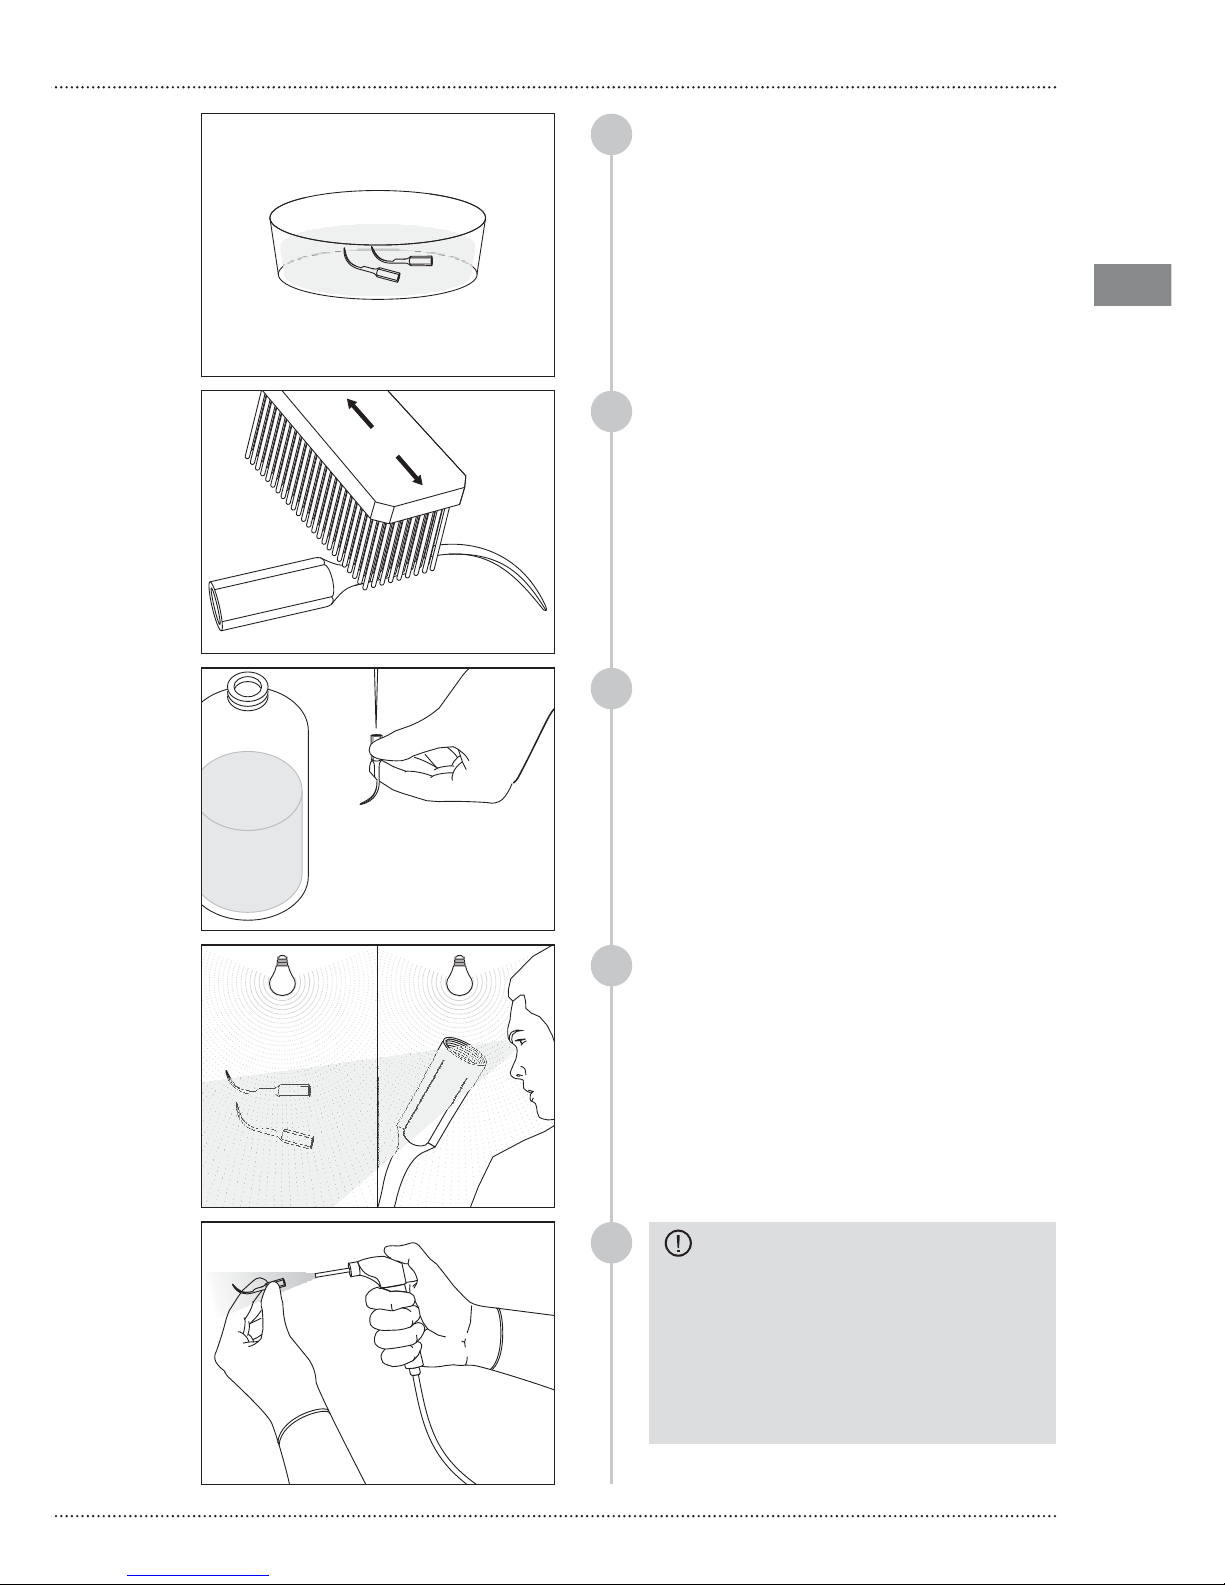
not recycle.
1
2
CLEANING AND DISINFECTION METHOD - Inserts
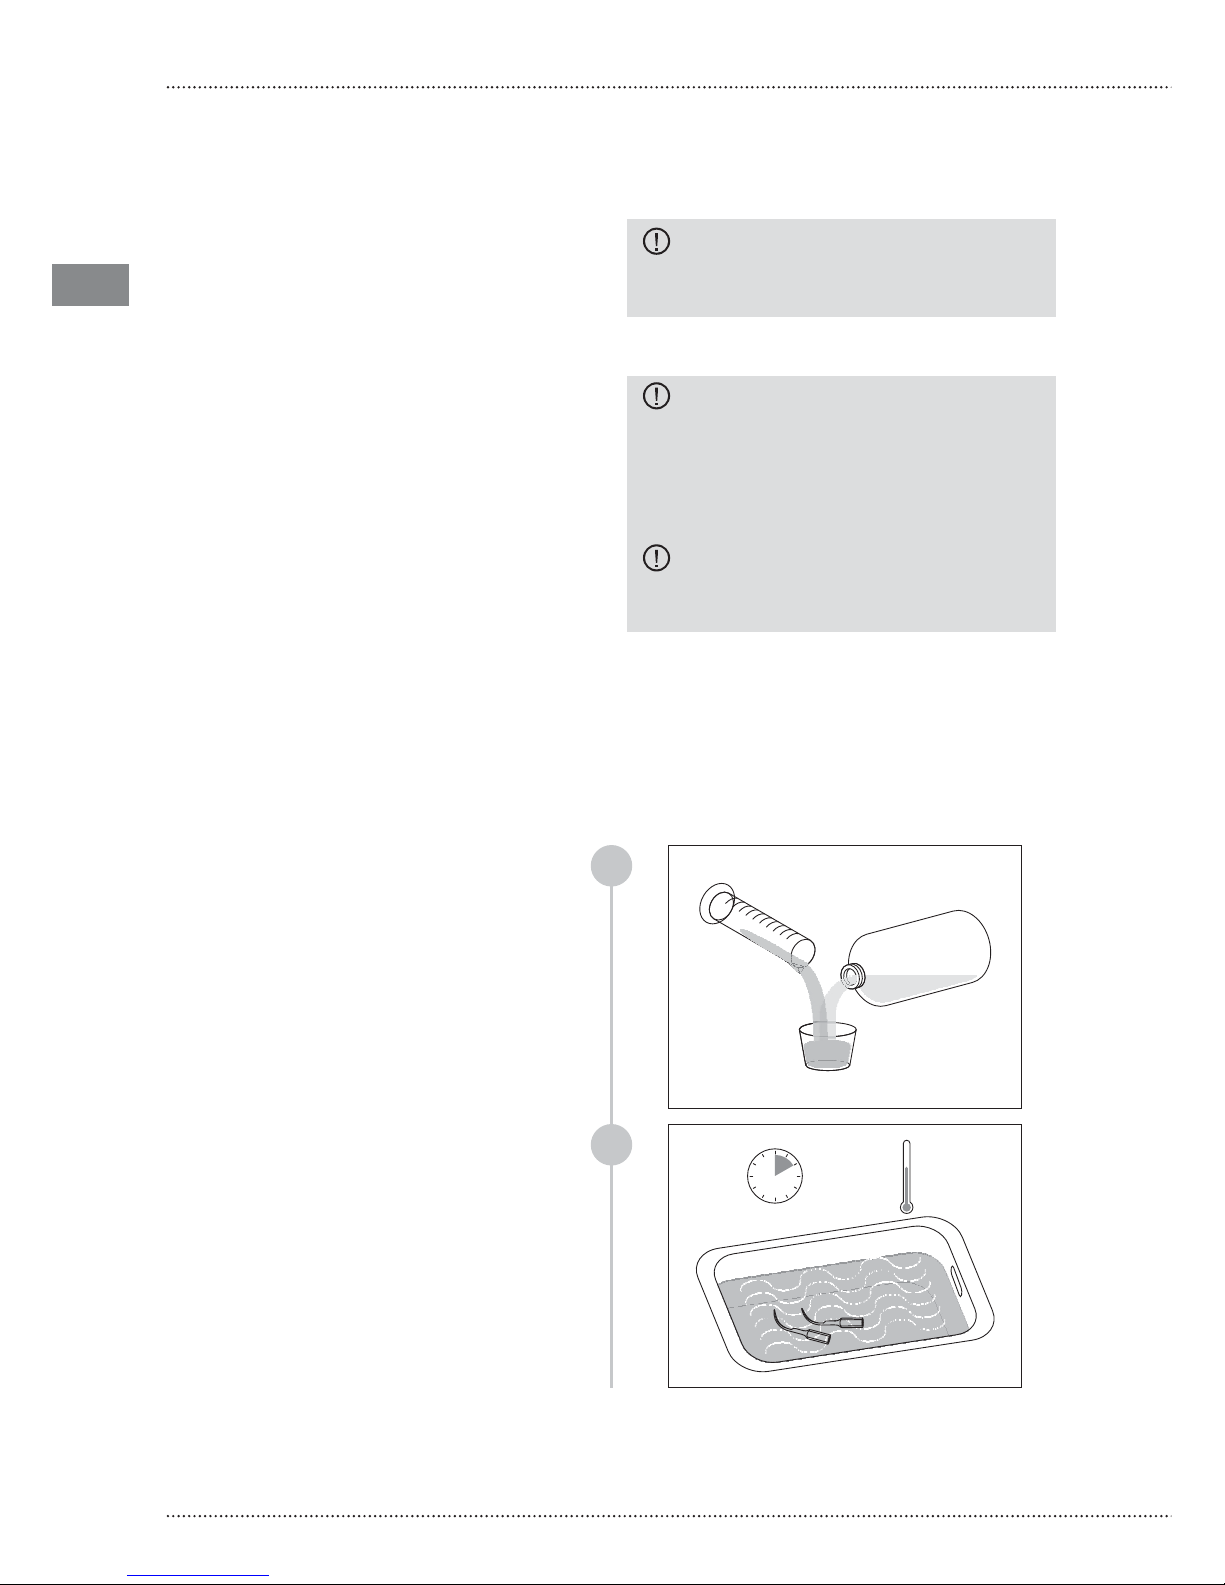
Prepare an enzymatic detergent solution
with pH 6-9, as per the instructions of the
manufacturer;
Place the insert in the ultrasound tank
submerged by the enzymatic detergent
solution at 40°C, for at least 10 minutes;
10 min 40°C
Page 17
EN
17
06 Û CLEANING AND STERILIZATION
3
5
4
6
7
Delicately brush the surface of the insert
with the brush with soft nylon bristles;
Remove the insert from the ultrasonic tank
and rinse with distilled water;
Rinse the internal canal of the insert
with distilled water injected under pressure
(3,8 bar) for at least 10 seconds to eliminate
all residues;
Once you’ve finished the cleaning
operations, check all the inserts under an
adequate source of light, paying attention
to the details that could conceal dirt
residues (threading, cavities, grooves) and,
if need be, repeat the cleaning cycle;
CAUTION: Before starting the
sterilization cycle, make sure that the
insert is thoroughly dry, both externally
and internally. For this purpose, blow
compressed air both externally and
through the internal thru hole; this will
prevent the onset of stains and haloes
on the surface or rust inside the insert.
10 sec
3,8 bar
Page 18
EN
18
COMPACT PIEZO LED
8
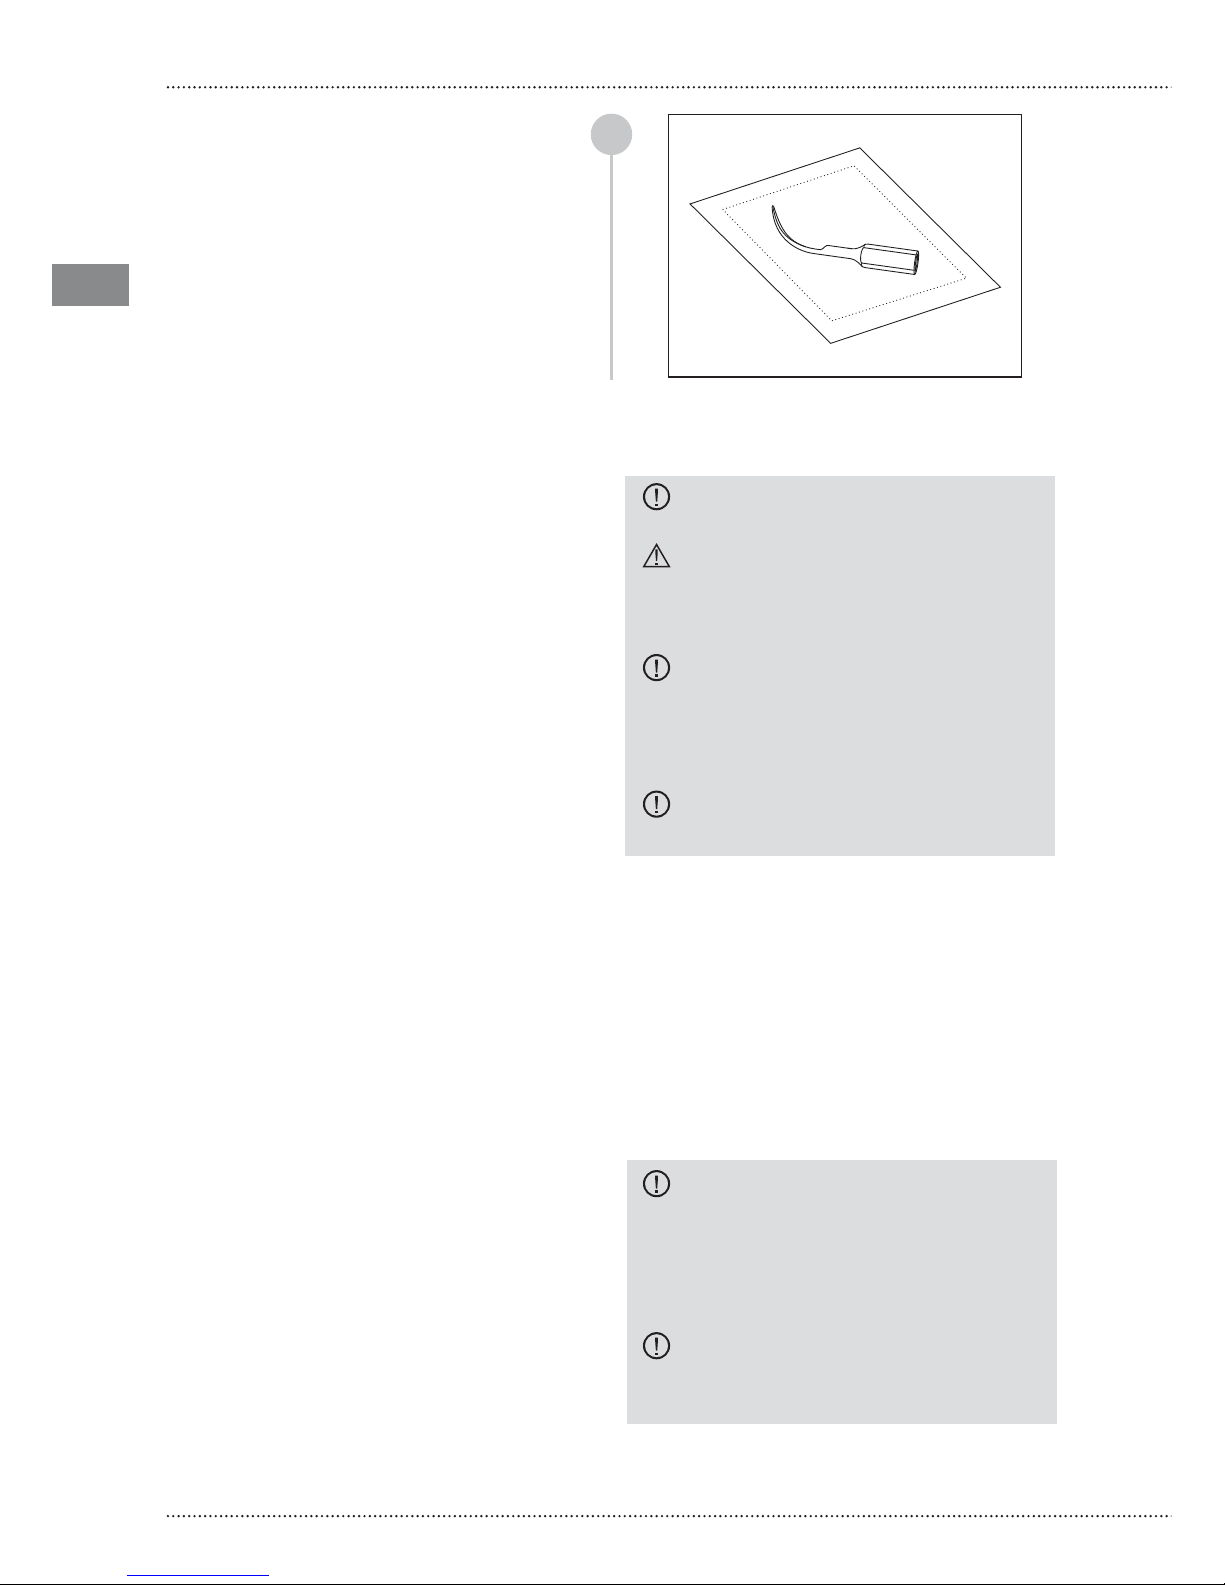
Individually seal the inserts in single-use
sterilization packets.
Sterilize the inserts in a steam autoclave.
STERILIZATION METHOD - Inserts
The sterilization process in steam autoclave
must be performed setting the parameters
indicated below, which are validated by
Mectron and reach the sterilization safety
levels (SAL 10
-6
):
- 3 times Pre-vacuum
(minimum pressure 60 mBar).
- Sterilization temperature 132°C
(interval 0°C ÷ +3°C).
- Sterilization time 4 minutes.
- Minimum drying time 20 minutes.
All the sterilization phases must be performed
by the operator in compliance to the norms
UNI EN ISO 17665-1:2007, UNI EN ISO
556-1:2002 e ANSI/AAMI ST46:2002.
CAUTION: Do not sterilize the insert
screwed onto the handpiece.
WARNING: Checking infections - Parts
that can be sterilized - Diligently remove
all residues of organic dirt before the
sterilization.
CAUTION: Perform the sterilization
using a water steam autoclave only. Do not
use any other sterilization procedure (dry
heat, irradiation, ethylene oxide, gas, low
temperature plasma, etc.).
CAUTION: Do not exceed the allowed
load of the steam sterilizer.
06.3 Û CLEANING AND STERILIZATION OF THE TORQUE WRENCH
PREPARATION
- Take the wrench.
MATERIALS NECESSARY
- Enzymatic detergent with pH 6-9
- Water
- Ultrasound tank
- Brush with soft nylon bristles
- Distilled water
- Clean and soft cloth with low fiber-release
- Medical degree lubricant
- Single-use sterilization packets
- Steam sterilization
CAUTION: Do not use hydrogen
peroxide. If you intend to disinfect the
wrench, do not use hydrogen peroxide, but
only disinfectants with neutral pH (pH7);
always rinse with sterile water to preserve
the disinfection.
CAUTION: Once used, correctly dispose
of the enzymatic detergent solution, do
not recycle.
Page 19
EN
19
06 Û CLEANING AND STERILIZATION
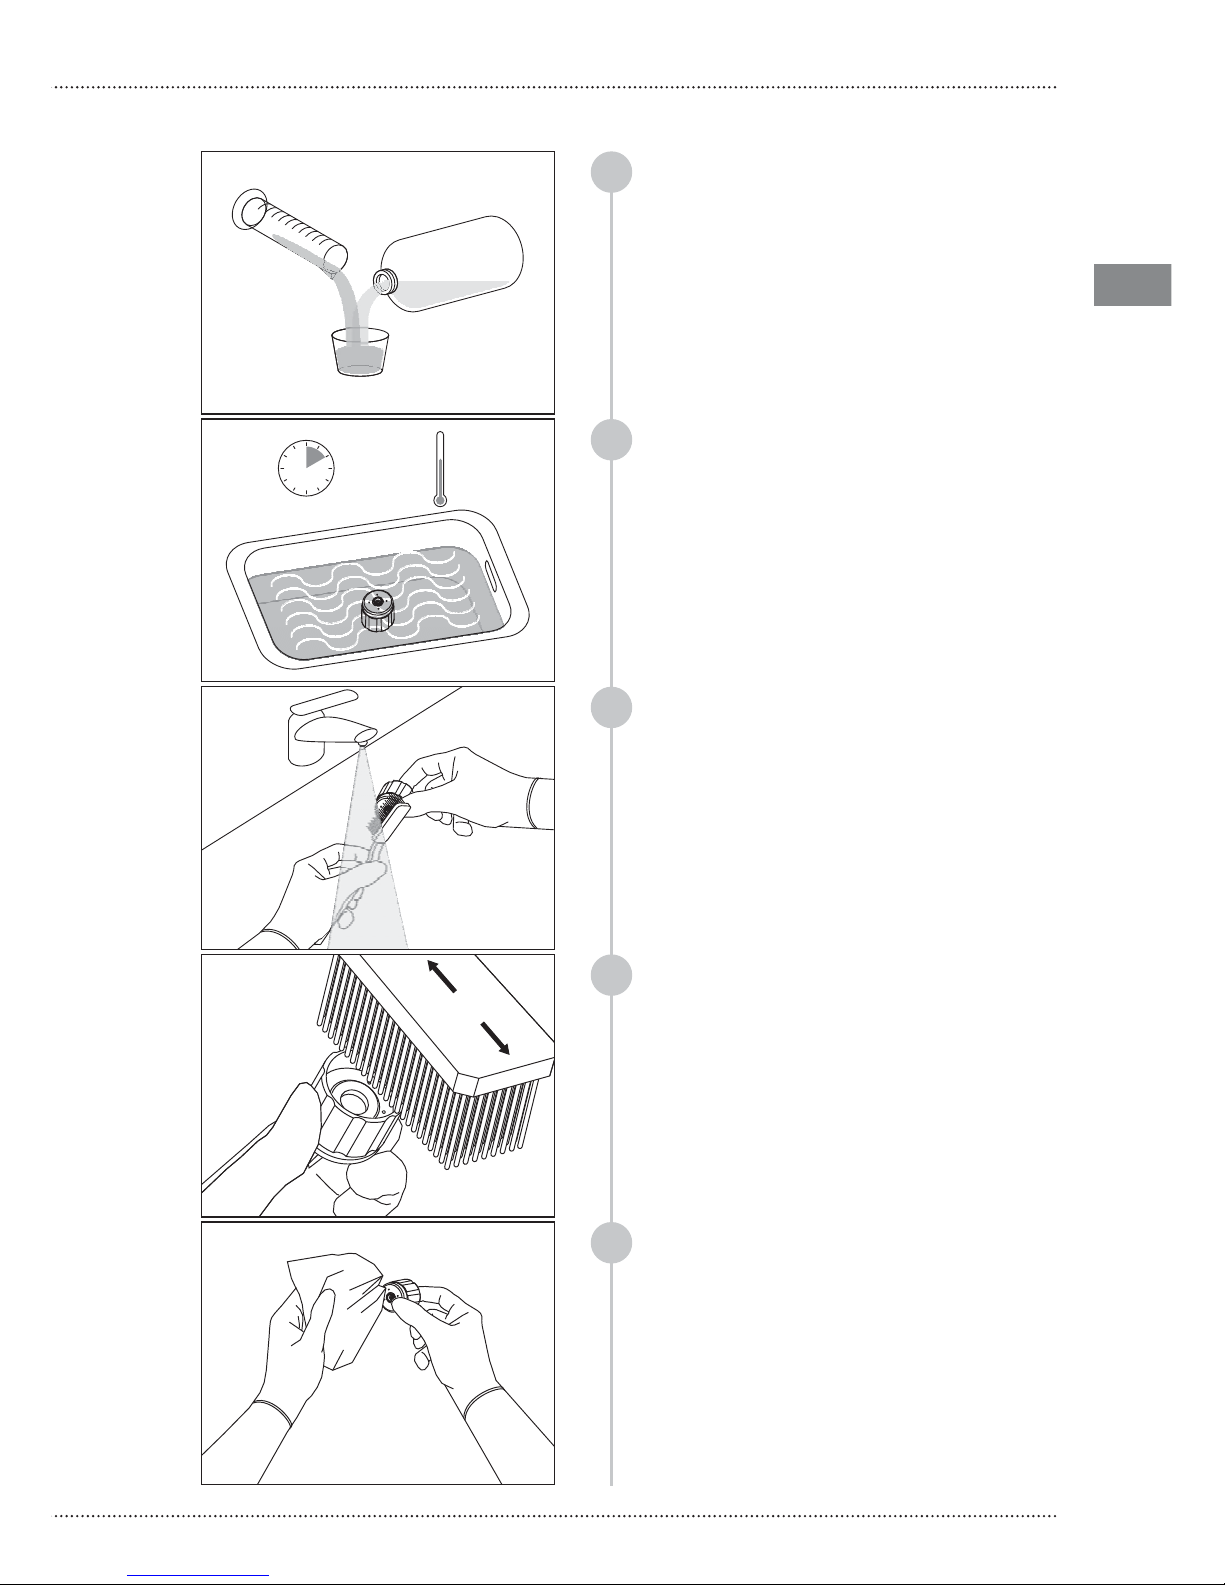
1
2
CLEANING AND DISINFECTION METHOD - Torque wrench
Prepare an enzymatic detergent solution
with pH 6-9, as per the instructions of the
manufacturer;
3
4
5
Place the insert in the ultrasound tank
submerged by the enzymatic detergent
solution at 40°C, for at least 10 minutes;
Rinse with tap water to eliminate all
residues;
Delicately brush the surface of the wrench
with a brush with soft nylon bristles using
distilled water;
Dry the wrench with a clean, soft cloth
with low fiber-release;
10 min 40°C
Page 20
EN
20
COMPACT PIEZO LED
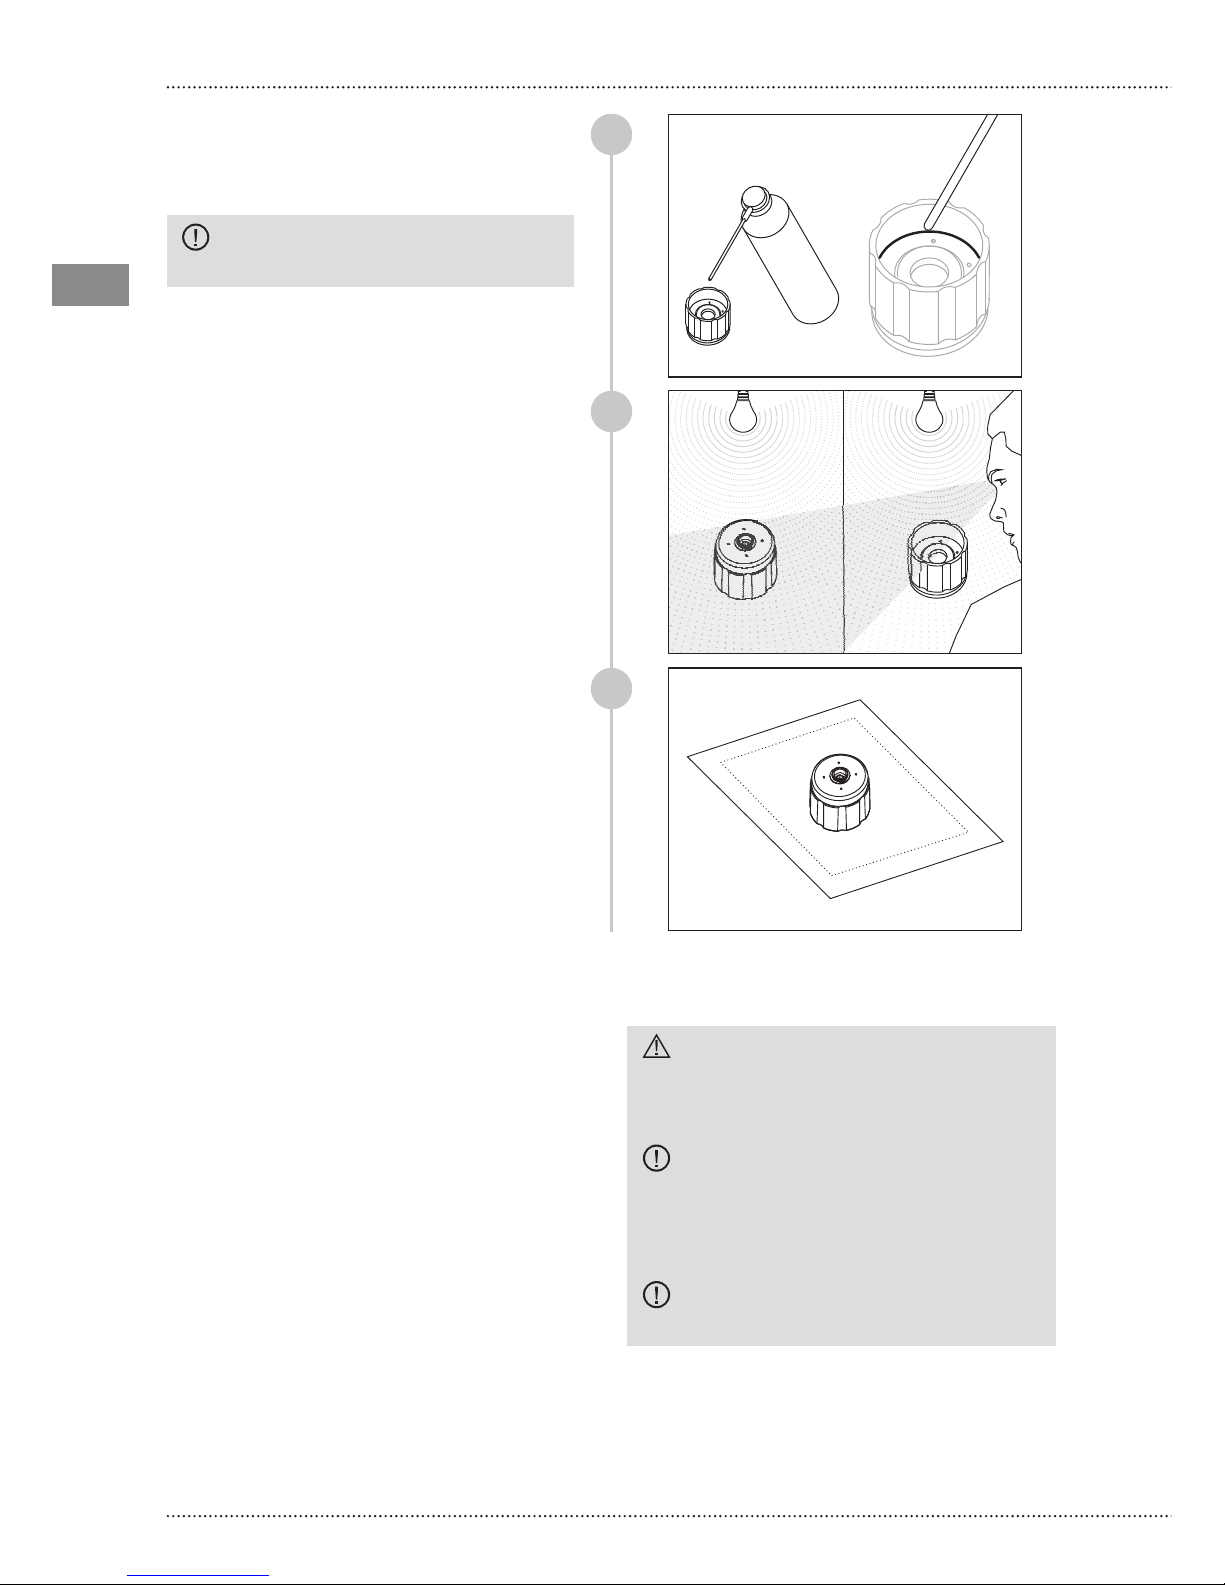
6
8
7
Lubricate with medical degree lubricant in
the indicated point;
Once you’ve finished the cleaning
operations, check the wrench under an
adequate source of light, paying attention
to the details that could conceal dirt
residues (cavities, grooves) and, if need be,
repeat the cleaning cycle.;
Seal the wrench individually in a single-use
sterilization packet.
Sterilize the wrench in a steam autoclave.
CAUTION: do not use lubricants
based on oil or silicon.
STERILIZATION METHOD - Torque wrench
The sterilization process in steam autoclave
must be performed setting the parameters
indicated below, which are validated by
Mectron and reach the sterilization safety
levels (SAL 10-6):
- 3 times Pre-vacuum
(minimum pressure 60 mBar).
- Sterilization temperature 132°C
(interval 0°C ÷ +3°C).
- Sterilization time 4 minutes.
- Minimum drying time 10 minutes.
All the sterilization phases must be performed
by the operator in compliance to the norms
UNI EN ISO 17665-1:2007, UNI EN ISO
556-1:2002 e ANSI/AAMI ST46:2002.
WARNING: Checking infections - Parts
that can be sterilized - Diligently remove
all residues of organic dirt before the
sterilization.
CAUTION: Perform the sterilization
using a water steam autoclave only. Do not
use any other sterilization procedure (dry
heat, irradiation, ethylene oxide, gas, low
temperature plasma, etc.).
CAUTION: do not exceed the allowed
load of the steam sterilizer.
Page 21
EN
21
07 Û MAINTENANCE
07
Û MAINTENANCE
If the device is not used for prolonged time,
observe the following recommendations:
1 Before carrying on any kind of maintenace
activity make sure that the device is not
active;
2 Prior to using the device again, clean and
sterilize the handpiece, the inserts and
the wrench following the instructions
provided in Chapter 06 - CLEANING AND
STERILIZATION;
3 Check that the inserts are not worn out,
deformed, or broken, placing special
attention to the integrity of their tip
WARNING: Periodically check that
the scaler cord is intact; if it is damaged,
contact the dental chair manufacturer in
order to replace it with an original Mectron
spare part.
08 Û
DISPOSAL MODES AND PRECAUTIONS
WARNING: Hospital wastes.
Hospital wastes. Treat the following items
as hospital waste:
- Inserts: when they are worn out or
broken;
- Torque wrench for inserts: when worn
out or broken.
The use and throw-away materials and
materials that entail a biological risk must
be disposed of in accordance to the norms in
force locally concerning hospital wastes.
compact piezo LED must be disposed of and
treated as a waste for separate collection.
Disregard of the previous points may entail a
fine, pursuant to Directive 2002/96/CE.
It is up to the purchaser to hand over the
device for its disposal to the retailer who
supplies him new equipment; the instructions
for proper disposal are available from Mectron.
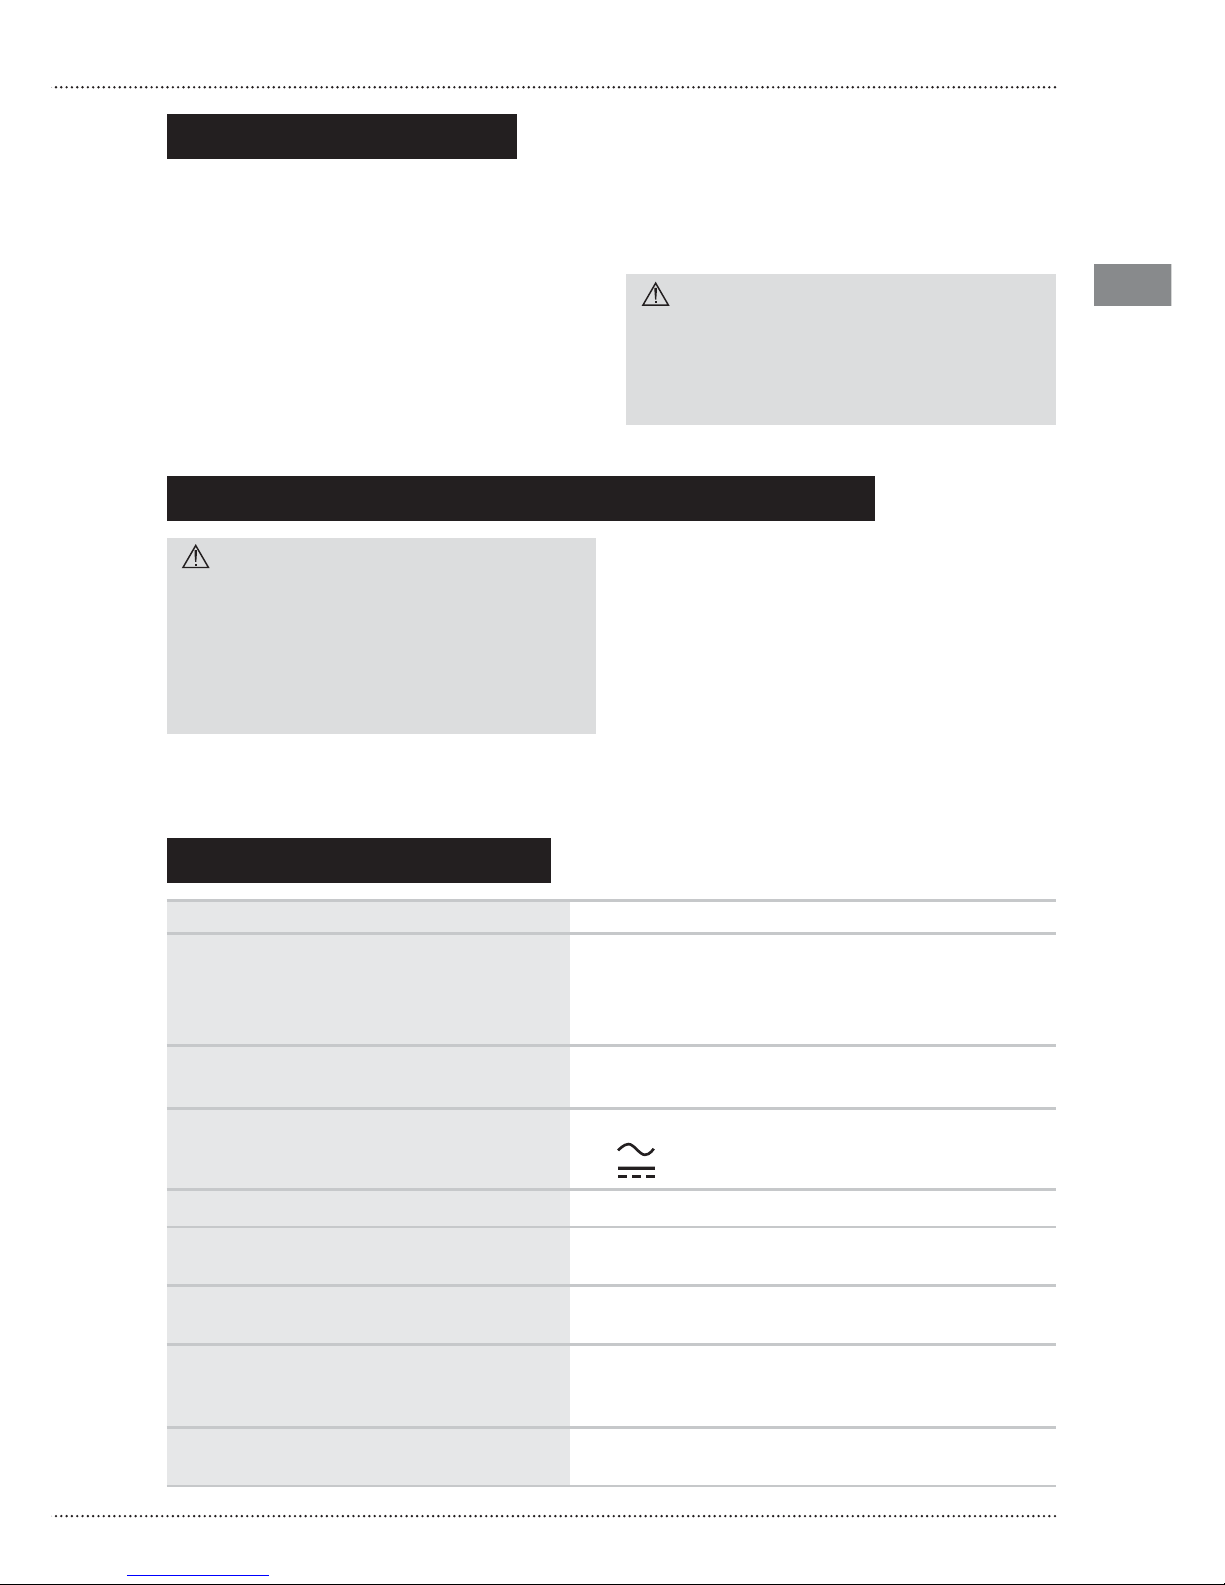
09 Û TECHNICAL DATA
Device compliant to Dir. 93/42/CEE: Class IIa
Classification as per EN 60601-1: The class definition is delegated to the dental chair
manufacturer using the compact piezo LED in its unit
Applied part type “B” (handpiece, insert)
IP According to the dental chair manufacturer
Device for intermittent operation: 60sec. ON - 30sec. OFF with irrigation
30sec. ON - 120sec. OFF without irrigation
Power supply voltage: Power supply compliant to IEC/EN 60601-1:
24V 50/60 Hz, or
32V
Max. power absorbed: 40 VA
Operating frequency: Automatic scan
From 24 KHz a 36 KHz
Power types: Adjustable according to the instructions given by the
dental chair manufacturer
Water supply: Adjustable according to the instructions given by the
dental chair manufacturer
Operating pressure from 1 to 6 bar
LED system of the handpiece: Adjustable according to the instructions given by the
dental chair manufacturer
Page 22
EN
22
COMPACT PIEZO LED
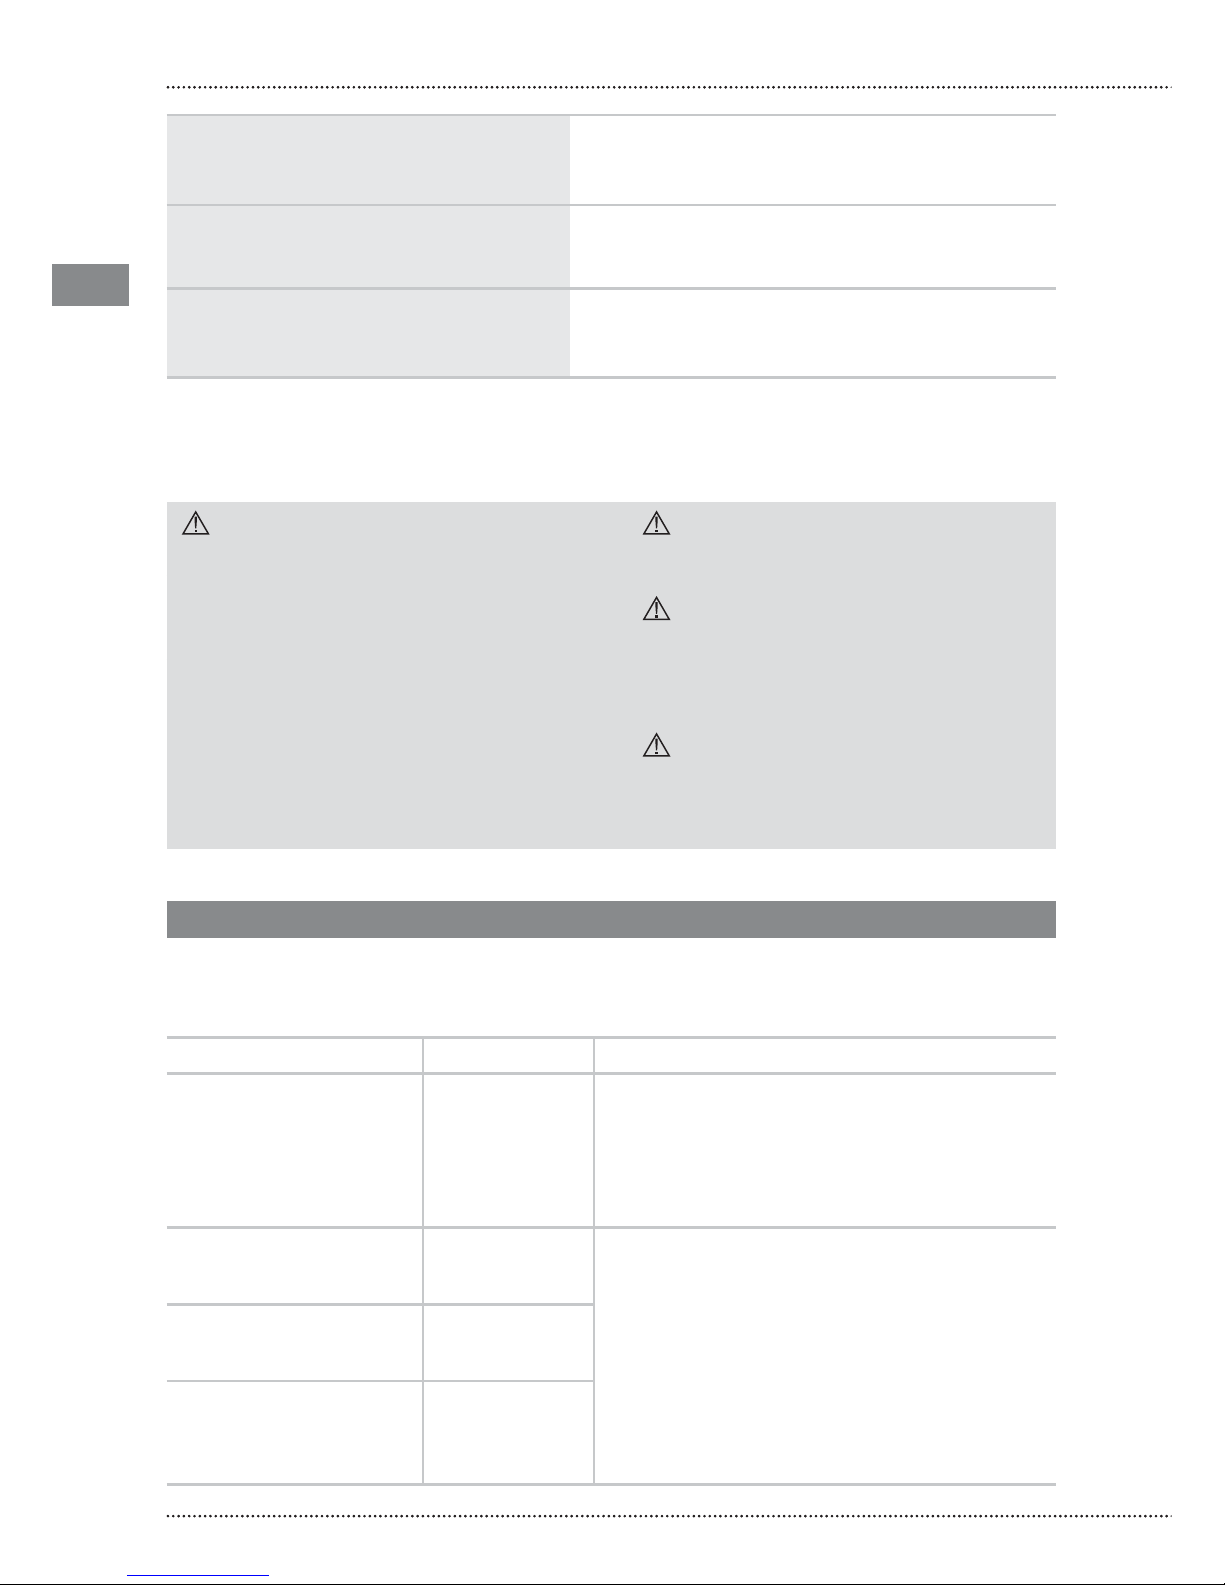
Protections of the APC circuit: No handpiece detected
Cord interruption
Insert not tightened correctly or broken
Operating conditions: from +10°C to +40°C
Relative humidity from 30% to 75%
Pressure of air P: 800hPa/1060hPa
Transport and storage conditions: from -10°C to +70°C
Relative humidity from 10% to 90%
Pressure of air P: 500hPa/1060hPa
09.1 Û ELECTROMAGNETIC COMPATIBILITY EN 60601-1-2
WARNING: Interference with other
equipment. Though compliant with the
standard IEC 60601-1-2, the compact piezo
LED may nonetheless interfere with other
devices nearby.
The compact piezo LED must not be used
near to or stacked on other devices. If
adjacent or stacked use is necessary, the
compact piezo LED and the other devices
must be observed and checked to verify
normal operation in the configuration in
which they will be used.
WARNING: Portable and mobile radio
communication appliances may affect the
correct functioning of the device.
WARNING: Interference from other
equipment. The use of an electrical scalpel
or other electro-surgical unit/s near the
compact piezo LED may interfere with its
correct functioning.
WARNING: The device requires specific
EMC precautions and must be installed
and activated in accordance with the EMC
information given in this paragraph.
Guidance and manufacturer’s declaration - Electromagnetic emissions
The compact piezo LED is intended for use in the electromagnetic environment specified
below. The customer or user of the compact piezo LED should ensure that it is used in such an
environment.
Emissions test
RF emissions
CISPR 11
RF emissions
CISPR 11
Harmonic emissions
IEC 61000-3-2
Voltage fluctuations /
flicker emissions
IEC 61000-3-3
Compliance
Group 1
Class B
Class A
Complies
Electromagnetic environment – Guidance
The compact piezo LED only uses RF energy for
internal function. Therefore, its FR emissions
are very low and are not likely to cause any
interference with nearby electronic
equipment.
The compact piezo LED is suitable for use
in all establishments, including domestic
establishments and those directly connected to
the public low-voltage power supply network
that supplies buildings used for domestic
purposes.
Page 23

EN
23
09 Û TECHNICAL DATA
Guidance and manufacturer’s declaration - Electromagnetic immunity
The compact piezo LED is intended for use in the electromagnetic environment specified
below. The customer or user of the compact piezo LED should ensure that it is used in such an
environment.
Immunity
test
Electrostatic
discharge (ESD)
IEC 61000-4-2
Electrical fast
transient/burst
IEC 61000-4-4
Power frequency
(50/60 Hz)
magnetic field
IEC 61000-4-8
N.B.: UT is the AC mains voltage prior to application of the test level.
Surge
IEC 61000-4-5
Voltage dips, short
interruptions and
voltage variations
on power supply
input lines
IEC 61000-4-11
Test level
IEC 60601
±6 kV contact
±8 kV air
±2 kV for power supply
lines
±1 kV for input/output
lines
3 A/m
±1 kV differential
mode
±2 kV common mode
<5 % U
T (>95 % dip
in UT) for 0,5 cycles
40 % UT (60 % dip
in U
T) for 5 cycles
70 % UT (30 % dip
in UT) for 25 cycles
<5 % U
T
(>95 % dip in UT)
for 5 s
Electromagnetic
environment - Guidance
Floors should be wood,
concrete or ceramic tile.
If floors are covered with
synthetic material, the
relative humidity should
be at least 30%.
Mains power quality
should be that of a
typical commercial or
hospital environment.
Power frequency
magnetic fields should
be at levels characteristic
of a typical location in a
commercial or hospital
environment.
Mains power quality
should be that of a
typical commercial or
hospital environment.
Mains power quality
should be that of a
typical commercial or
hospital environment.
Compliance
level
The device continues
to work regularly and
in safety
The device continues
to work regularly and
in safety
The device continues
to work regularly and
in safety
The device continues
to work regularly and
in safety
The device can vary
from the required
levels of immunity
with a duration of
<5% / >95% / 5 s as
long as the device
remains in safety, no
malfunctions have
been dected and can
be restored to
pre-test status with
the intervention of
the operator
Page 24
EN
24
COMPACT PIEZO LED
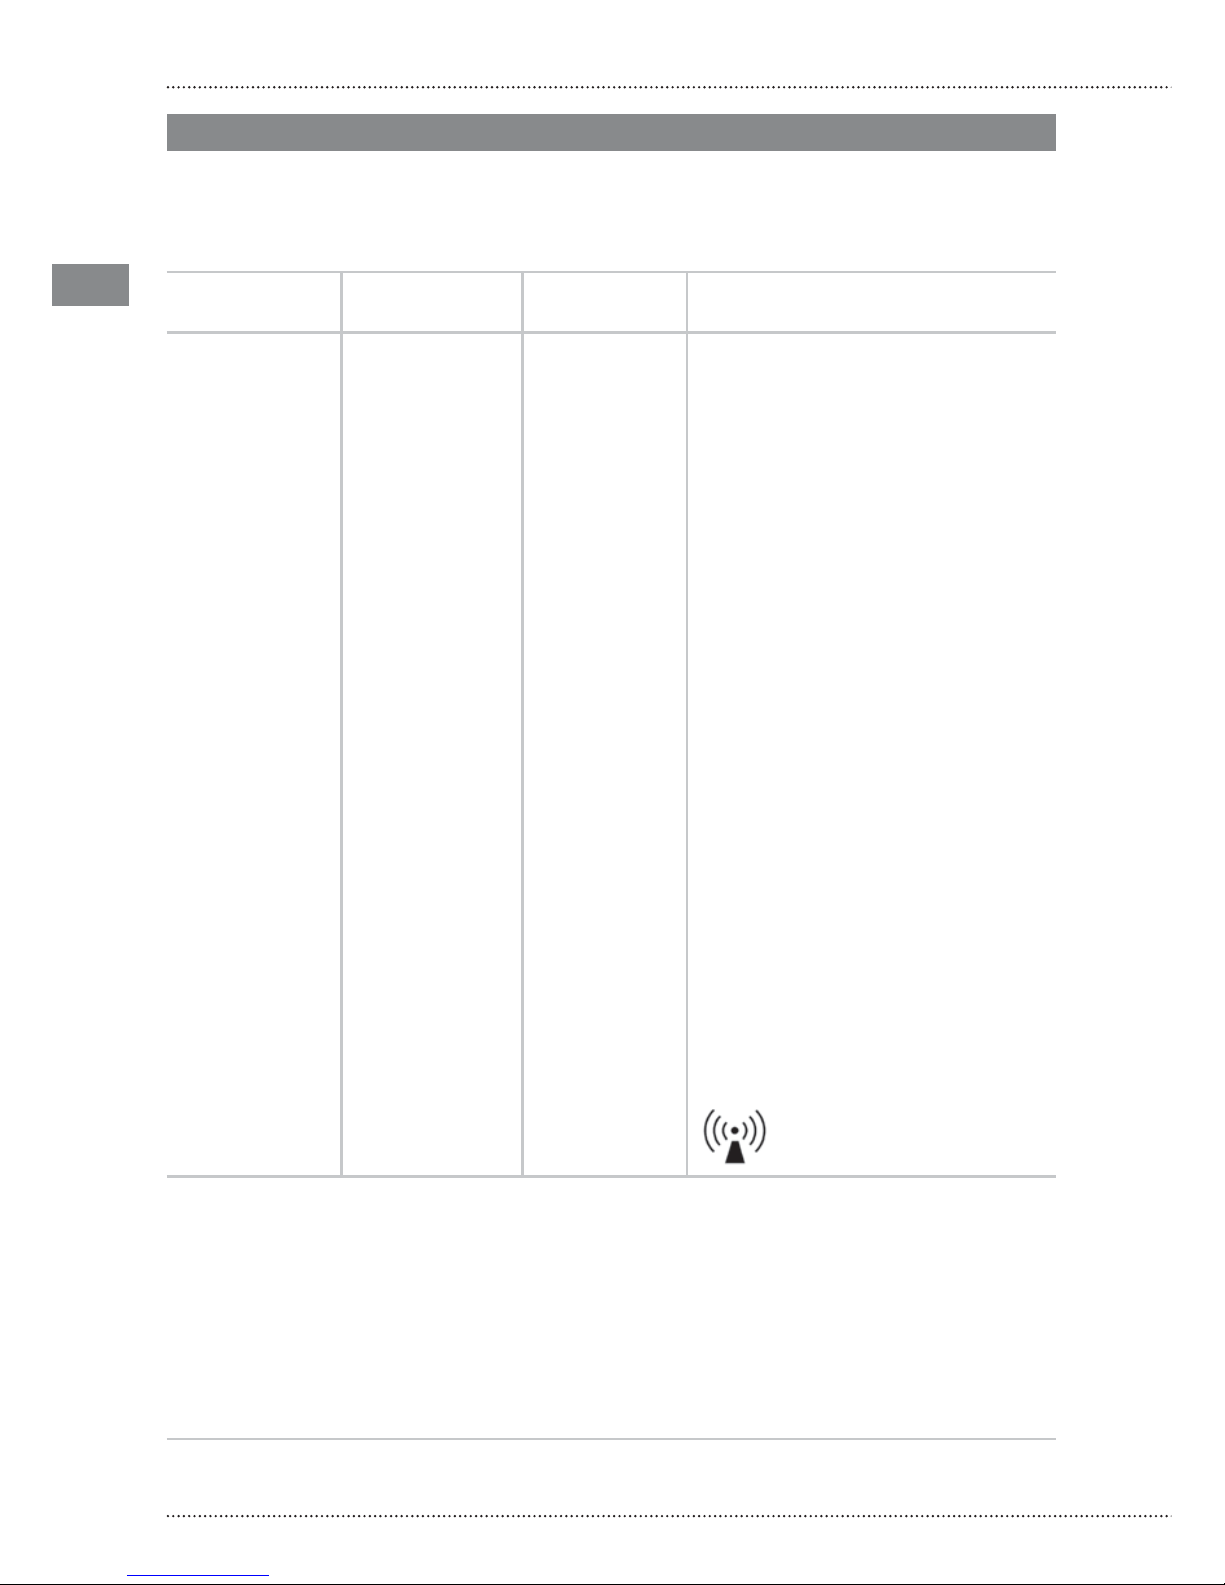
Guidance and manufacturer’s declaration - Electromagnetic immunity
The compact piezo LED is intended for use in the electromagnetic environment specified
below.
The customer or user of the compact piezo LED should ensure that it is used in such an
environment.
Immunity
test
Conducted RF
IEC 61000-4-6
Radiated RF
IEC 61000-4-3
N.B.:
(1) at 80 MHz and 800 MHz, the higher frequency range applies.
(2) These guidelines may not apply in all situations. Electromagnetic propagation is affected by absorption and
reflection from structures, objects and people.
a Field strengths from fixed transmitters, such as base stations for radio (cellular/cordless) telephones and land
mobile radios, amateur radio, AM and FM radio broadcast and TV broadcast cannot be predicted theoretically
with any reasonable accuracy. To assess the electromagnetic environment due to fixed RF transmitters, an
electromagnetic site survey should be considered. If the measured field strength in the location in which the
compact piezo LED is used exceeds the applicable RF compliance level given above, the compact piezo LED should
be observed to verify normal operation. If abnormal performance is observed, additional measures may be
necessary, such as re-orienting or relocating the compact piezo LED.
b Over the frequency range from 150 kHz to 80 MHz, field strengths should be less than 3 V/m.
Test level
IEC 60601
3 Veff
from 150 kHz
to 80 MHz
3 V/m
from 80 MHz
to 2,5 GHz
Electromagnetic environment
Guidance
Portable and mobile RF
communications equipment should
be used no closer to any part of the
device including cables, than the
recommended separation distance
calculated from the equation
applicable to the frequency of the
transmitter.
Recommended separation distance
d = 1,2 √P
d = 1,2 √P from 80 MHz to 800 MHz
d = 2,3 √P from 800 MHz to 2,5 GHz
where P is the maximum output
power rating of the transmitter
in watts (W) according to the
transmitter manufacturer and d
is the recommended separation
distance in metres (m).
Field strengths from fixed RF
transmitters, as determined by an
electromagnetic site survey
a
, may be
less than the compliance level in each
frequency rangeb.
Interference may occur in the vicinity
of equipment marked with the
following symbol:
Compliance
level
The device
continues to
work regularly
and in safety
Page 25

EN
25
09 Û TECHNICAL DATA
Recommended separation distances between portable and mobile RF
communications equipment and the compact piezo LED
The compact piezo LED is intended for use in an electromagnetic environment in which
radiated RF disturbances are controlled. The customer or user of the compact piezo LED can
help prevent electromagnetic interference by maintaining a minimum distance between
portable and mobile FR communications equipment (transmitters) and the compact
piezo LED as recommended below, according to the maximum output power of the
communications equipment.
Rated maximum
output power
of transmitter
‘W’
0,01 0,12 0,12 0,23
0,1 0,38 0,38 0,73
1 1,2 1,2 2,3
10 3,8 3,8 7,3
100 12 12 23
For transmitters rated at a maximum output power not listed above, the recommended
separation distance d in metres (m) can be calculated using the equation applicable to the
frequency of the transmitter, where P is the maximum output power rating of the transmitter
in watts (W) according to the transmitter manufacturer.
N.B.:
(1) at 80 MHz and 800 MHz, the higher frequency range applies.
(2) These guidelines may not apply in all situations. Electromagnetic propagation is affected by absorption and
reflection from structures, objects and people.
from 150 kHz to 80 MHz
d = 1,2 √P
from 800 MHz to 2,5 GHz
d = 2,3 √P
Separation distance according to the frequency of transmitter ‘m’
from 80 MHz to 800 MHz
d = 1,2 √P
Page 26

EN
26
COMPACT PIEZO LED
10 Û TROUBLESHOOTING
10.1 Û QUICK SOLUTION TO PROBLEMS
Problem Possible cause Solution
Turn on the water function on
the dental chair
The device is on
but not working
(intervention of the APC
protection circuit)
The Water function is off
No liquid outflows
from the insert during
operation
Handpiece not connected to
the cord
Connect the handpiece to the
cord
Interruption of a cord wire
Handpiece defective
Contact an Authorized Mectron
Service Center
Sync circuit malfunction
Contact an Authorized Mectron
Service Center
Contact an Authorized Mectron
Service Center
A slight whistling sound
coming from the compact
piezo LED handpiece is
heard during operation.
The insert type does not foresee
liquid passage
Use an insert type with liquid
passage
The insert is obstructed
The handpiece is obstructed
Unscrew the insert from the
handpiece and free the insert
water passage by blowing
compressed through it.
If the problem persists, replace
the insert with a new one
Contact an Authorized Mectron
Service Center
The insert is not correctly
tightened on the handpiece
Unscrew and correctly screw the
insert again with the Mectron
torque wrench
(see paragraph 04.4)
Insert broken, worn-out, or
deformed
Replace the insert with a new
one
Handpiece or cord connector
contacts wet
Thoroughly dry the contacts with
compressed air
The irrigation circuit has not
been completely filled
Fill the irrigation circuit
The insert is not correctly
tightened on the handpiece
Unscrew and correctly screw the
insert again with the Mectron
torque wrench
(see paragraph 04.4)
Page 27

EN
27
10 Û TROUBLESHOOTING
Problem Possible cause Solution
The insert is not correctly
maintained
Clean and maintain the insert
correctly (see paragraph 06.2)
10.2 Û SENDING THE DEVICE TO AN AUTHORISED
MECTRON SERVICE CENTRE
In the event that technical assistance is
needed on the device, contact one of the
Authorized Mectron Service Centers or your
Retailer. Do not attempt to repair or modify
the device and its accessories.
Clean and sterilize all the parts that need to be
sent to an Authorized Mectron Service Center,
following the instructions provided in Chapter
06 - CLEANING AND STERILIZATION.
Leave the sterilized parts in the packet,
procedure that confirms the sterilization
process has been performed.
The cleaning and sterilization requirements
are in line with those in force concerning the
safeguarding of health and safety on the
workplace, as per Law Decree 626/94 and
DLgs 81/08 and its subsequent amendments,
both laws of the Italian State.
In the case that the customer does not fulfill
the requirements, Mectron reserves the
right to charge him or her the cleaning and
sterilization expenses, or to reject the goods
received in unsuitable conditions, returning
them to the customer, at his or her expense,
for them to be correctly cleaned and sterilized.
The device must be returned properly
packaged, accompanied by all the accessories
and by a sheet bearing the:
• Data of the owner with telephone number
• Product name
• Serial number and/or lot number
• Reason for goods returned / description of
the malfunction
• Photocopy of delivery note or purchase
invoice of the device
CAUTION: Package
Pack the device in its original package to
prevent damages during transport.
Once the material has been received by
the Authorized Mectron Service Center,
qualified technical personnel will provide its
evaluation to the given circumstance. The
repair works will be performed only upon their
prior acceptance by the end customer. For
further details, contact the closest Authorized
Mectron Service Center or your retailer.
Unauthorized repair works may damage the
system and make the warranty void, and
absolve Mectron of any responsibility for
direct or indirect harm to persons or damages
to things.
The insert is not correctly
tightened on the handpiece
Insert broken, worn-out, or
deformed
Unscrew and correctly screw the
insert again with the Mectron
torque wrench (see paragraph
04.4)
Replace the insert with a new
one
Insufficient
performance
Page 28

EN
28
COMPACT PIEZO LED
11 Û WARRANTY
All the Mectron devices are subjected to an
accurate end inspection that ascertains their
full functionality before they are placed on the
market.
Mectron provides warranty on the compact
piezo LED purchased new from a retailer
or a Mectron importer to cover material or
manufacturing defects for:
- 2 YEARS (TWO) on the device from the date
of purchase;
- 1 YEAR (ONE) on the handpiece complete
with cord from the date of purchase.
The accessories are not included in the
warranty.
During the period in which the warranty is
valid, Mectron commits itself to repair (or at
its own free choice, replace) those product
parts that were to prove defective according
to its judgment, free of charge.
Entire replacement of the Mectron products is
excluded.
The warranty of the manufacturer and the
homologation of the device are not valid in
the following cases:
- The device is not used in accordance to the
intended use foreseen for it;
- The device is not used in compliance to all
the instructions and precautions described
in this manual;
- The electrical system in the premises in
which the device is used is not compliant
to the norms in force and to the relative
precautions;
- The assembly operations, extensions,
adjustments, updates, and repair works are
performed by personnel not authorized by
Mectron;
- The environmental conditions for the
preservation and storage of the device are
not compliant to the precautions indicated
in the Chapter 09 - TECHNICAL DATA;
- Use of non-original Mectron inserts,
accessories, and spare parts that can
compromise correct device operation and
cause harm to the patient;
- Accidental breakage due to transport;
- Damages due to incorrect use or negligence,
or to connection to a power voltage other
than the one foreseen;
- Warranty expiry.
PLEASE NOTE The warranty is valid only if the
warranty sheet annexed to the product has
been filled out in all its parts, and sent to our
offices or possibly to the retailer or Mectron
importer within 20 (twenty) days from the
date of purchase, which is the date that
appears on the delivery note/purchase invoice
issued by the retailer/importer.
To benefit of the warranty service, the
customer must return, at his own expense, the
device to be repaired to the retailer/Mectron
importer from whom he has purchased the
product.
See paragraph 10.2 for the details relative
to the procedure to send the device to an
Authorized Mectron Service Center.
The indications that appear in this publication are not binding and can be modified without fore-notice.
The Italian version of this manual is the original document from which its translations have been obtained. In case of any
discrepancy, the Italian version will have pertinence.
Texts, images, and graphics of this manual are property of Mectron S.p.A., Carasco, Italy. All rights reserved.
The contents cannot be copied, distributed, changed, or made available to third parties without the written approval of
Mectron S.p.A.
Page 29

Manuale d’uso e manutenzione Compact Piezo Led
02150238 - Rev. 01 22-09-2012
Reseller - Rivenditore - Wiederverkäufer - Revendeur - Revendedor
Mectron S.p.A.
Via Loreto 15/A
16042 Carasco (Ge) Italy
Tel. +39 0185 35361
Fax +39 0185 351374
www.mectron.com
e-mail: [email protected]
 Loading...