

Page 1
Page 2

Warnings and Safety Notes
Plea se read thi s s ectio n v ery care full y. Fa ilure to ob serve th e
precautions set out in this section could result in permanent damage
to th e robot, damage to proper ty, personal injury or voidin g of the
warranty
General precautions for using and operating your robot
Beforeusingthe robot,readthis userguidein full,payingspecic
attention to the section on using the Lithium Polymer (LiPo) battery
and its cha rger a nd bein g sure to o bserve the in formation and
recommendations stated there.
This robot is not suitable for children under fourteen years of age.
This robot system contains small parts which could be swallowed. It
is therefore important to keep the robot out of the reach of small
children.
When the robot is powered up it is possible that the servos, or any
attached peripheral, connected to it could move unexpectedly. For
this reason:
Make sure that the robot is operated in an area where
there is plenty of space for it to move unobstructed.
Make sure that there are no open liquid containe rs in
the area where the robot is being operated.
Mak e s ure th at othe r peop le are awa re tha t y ou
are ope ratin g th e r obot and tha t it sh ould not be
approached.
Keep animals and pets away from the area in which the
robot is being operated.
Imm ediat ely swi tch the rob ot off if some body or
something enters the area in which the robot is being
operated.
Operate the robot with the greatest of care. Keep your
distance when servos are moving to avo id the risk of
your ngers being trapped or squashed.
Thi s p roduc t shoul d o nly be ope rate d u nder th e
constant supervision of a responsible adult.
If a servo becomes mechanically stalled (i.e. it is trying
to move but is be ing obstructed in such a way that i t
cannot), or e mits a loud b uzzing n oise, im mediately
switch the robot off to avoid permanent damage to the
servo.
Use the robot only in dry conditions. Protec t the robot from dust,
damp, humid ity, ra in, h eat, direct sunshi ne, e xtreme cold and
vibration.
Assemb le an d oper ate th e robo t in exact accord ance with t he
instructions given in this user guide. Failure to do so may result
in perm anent damage to the robot a nd its components an d may
invalidate your warranty.
To avoid injury, never touch the robot while it is moving.
Never attem pt to oper ate t he ro bot on an uneven or unstab le
surface. Should the robot fall, there is a risk of injury and damage
to the robot or property.
The robot is int ended f or ind oor use only. Use o utdoors would
expose the robot to en vironmenta l haza rds wh ich co uld cau se
malfunction of the robot, personal injury and damage to the robot
and property.
Do not operate the robot in any environment where combustible or
explosivedusts,gasesoruidsarepresent.
“Left” and “Right” are always referenced as seen from the point of
view of the robot.
Upgrading and servicing your robot
The robot’s “Control Module” does not contain any user serviceable
part s. Di sassem bling the “Con trol Module ” wi ll i nvalid ate the
product warranty.
The “R emot e Cont rol Han dset ” d oes no t c onta in any us er
serviceable parts. Disassembling the “Remote Control Handset” will
invalidate the product warranty.
The robot’s servo s do not contain any user service able p arts.
Disassembling the servos will invalidate the product warranty.
Never touch t he connec tions on the “Control Module” with you r
fing ers o r me tallic obj ects, as short- circui ts a nd e lectro static
discharge may cause permanent damage to the unit.
Disconnect and remove the battery from the robot when connecting
or disconnecting components (mechanical or electrical) to it.
Take grea t ca re to o bserv e t he p olari ty of c onnec tors when
atta ching any elect ronic comp onents to the robo t. P ay c lose
attention to the orientation of connectors when att aching cables.
Incorrect connection could cause permanent damage to the robot’s
electronic systems as the robot’s systems are not protected against
such circumstances.
Check the robot regular ly for damag e to the mechanic al par ts
and cables caused by eithe r wear and tear or incorr ect usa ge.
Components that are damaged or have become wet must not be
re-used (even after they have been dried).
When maintaini ng and upgradi ng your robot, use only genuine
components and accessories manufactured by MechRC or those
thatareofciallylicensedbyMechRC.
Never pull on the wires when undoing connections!
Whenxingcables ensurethatthey willnotsubject tomechanical
strain when the robot is in any position, and that they are not kinked
or liable to be squashed when the robot moves as this can cause
damage to the wire’s i nsulation. For this reason all cables should
be fastened in such a way that they cannot become entangled in
any of the robot’s moving parts.
It is not perm issible to carry out modification s of an y kind to the
components.
Remember that all tools c an be dangerous if not us ed correctly.
If you are uncertain how to use a tool safely, seek advice from an
expert.
The exposed plastic parts of the robot (only) may be cleaned using
a lightly damped cloth. Never clean the mechanical parts, electronic
compon ents etc. u sing cleaning agent s, li ghter fluid or si milar
agents.
Do not exceed the recom mended opera ting voltag e of t he robot
as this is likely to cause permanent damage to the robot and could
resultinre.
Important Information
Please take the time to read this section carefully and in full before operating your robot.
It is of the utmost importance that you read, understand and observe the following Warnings and Safety Notes and that you operate the robot in accordance
with the operating instructions detailed in this user guide. If any information contained in this documentation is unclear, then please contact MechRC support
(contact details can be found on the back cover of this book) before attempting to operate the robot. This user guide should be stored in a safe place as it
contains important safety information and MUST be passed to the new owner should you ever part with the robot.
If you operate the robot with any of the optional MechRC expansion packs, please ensure that you also take the time to read, understand and observe the
Warnings and Safety Notes included in the user guide supplied with them.
Page 3

Never connect an external power supply to the robot as this is likely
tocausepermanentdamagetotherobotandcouldresultinre.
Battery safety information
The remote control handset uses 4 x AAA (1.5V) batteries. Please read and
observe the battery safety information below:
Battery installation and replacement should only be performed by a
responsible adult.
Switch off the remote control han dset before opening the battery
compartment.
Ensure that the battery polarity is correct, observing the (+) and (-)
marks on the battery and the handset.
Only use batteries of the type recommended (or equivalent).
Do not mix old and new batteries.
Do not mix alkaline, s tandard (carbon-zinc), or rechargeable (e.g.
nickel-cadmium) batteries.
Remove used batteries immediately.
Remove batteries if the handset will not be used for an extended
period of time to avoid battery leakage.
Do not short circuit the battery terminals.
Dispose o f batteries safely. Do not dispose of batteries in fire as
batteries may leak or explode.
Perio dicall y ex amine the hands et fo r si gns of da mage to the
electrical parts. If found, do not use the handset until the damage
has been assessed by your MechRC dealer.
Recha rgeable bat teries shou ld be rem oved from the handset
before attempting to charge them.
Never attempt to recharge non-rechargeable batteries.
Rec harg eabl e b atte ries sh ould o nly be cha rged u nder th e
supervision of a responsible adult.
Lithium Polymer (LiPo) battery information
WARNING: The MechRC System is suppli ed with a Lithium Pol ymer
(LiPo) battery pack. You must read and understand the informa tion
below before charging or using your lithium polymer battery. Failure
to read and follow the instructions below may result in re, personal
injury and d amage to propert y if charged or used imprope rly. The
Mech RC assum es n o l iabil ity for failu res to compl y w ith these
warn ings and safe ty g uideli nes. If you do not agree wit h th ese
conditions, return the lithium polymer battery immediately and before
any use.
You must read and understand these safety instructions and warnings
before u sing or charging the lithium po lymer battery pack supp lied
with the MechRC System
Lithium Polymer (LiPo) batteries a re volatile. Failure to read and
followtheinstructions belowmayresult inre,personal injuryand
damage to property if charged or used improperly.
The MechRC Group, its distributors or retailers assume no liability
for failures to comply with these warnings and safety guidelines.
By purchasing this battery, the buyer assumes all risks associated
with lithi um po lymer batter ies. If y ou do not agree wit h the se
conditions, return the battery immediately before use.
General Guidelines and Warnings:
Warnin g: Ch anges or m odifica tions to t his u nit n ot ex pressly
approved by the party responsib le for c ompliance could void the
user’s authority to operate the equipment.
NOTE: This equi pment has been tested and found to comply
with the li mits for a Class B digit al d evice , pu rsuan t to Par t
15 of the FCC Rules . Thes e li mits are desi gned to provi de
reasonable protection against harmful interference in a residential
installation. This equipment generates, uses and can radiate radio
freque ncy ene rgy an d, if not installed and used in ac cordance
with the instruc tions, may cause harmful inte rference to radio
communications.
However, there is no guarant ee that interfe rence wi ll not occur
in a particular installatio n. If this equipm ent does cause h armful
int erfe rence t o r adio or te levi sion re cepti on, whi ch can be
dete rmined by turn ing the equip ment off and on, the user is
encouraged to try to correct the interference by one or more of the
following measures:
Reorient or relocate the receiving antenna.
Increase the separation between the equipment and receiver.
Connect the equipment into an outlet on a circu it different from
that to which the receiver is connected.
Con sult the dealer or an experien ced radi o/TV tech nician f or
help.
Note: The serial cabl e with ferr ite bead at tached is d esigned
for exclusive use with this product. Don't use others for this
product.
Shi elde d c able s m ust be us ed with th is unit to en sure
compliance with the Class B FCC limits.
This device complies with Part 15 of the FCC Rules. Operation
is subject to the followi ng two cond itions: (1) this devic e
may not cause harmful interfe rence, and (2) this device must
accept a ny interference received, including interfe rence that
may cause undesired operation.
Use only genuine MechRC battery packs in the robot.
The MechRC battery pack is not a toy.
The MechRC battery pack charger is not a toy.
Disconnect the battery from your robot if it is not to be used for a
long period.
Only use the Lithium Polymer charger supplied with the MechRC
System. Do not use a NiMH or NiCd charge r. Failure to use the
correctcharger maycausere, andcouldresult inpersonalinjury
and damage to property.
Never charge batteries unattended. When charging LiPo batteries
you should always re main in con stant observation to monitor the
charging process and react to potential problems that may occur.
SomeLiPochargersonthemarketmayhavetechnicaldeciencies
that may cause it to charge the L iPo batteries incorrectly or at an
improp er rat e. Onl y use the Lithium Polym er cha rger s upplied
with the MechRC system. Always monitor the charging process to
assure batteries are being charged properly. Failure to do so may
resultinre.
If a t any time yo u see a batt ery star ting to expand or swe ll up,
disco ntinue the chargin g proc ess i mmediate ly, dis connect the
battery,andplaceitinasafeplaceincaseoftheeventofre.
It is best to observe the battery for approximately 15 minu tes as
a safe ty precauti on since delayed b attery leaka ge and chemical
reactioncanoccurandcausere.Batteryobservationshouldoccur
in a safe area outside of any building or vehicle and away from any
combustible material.
Creating a short -circuit ca n cause fire! If you ac cidentally short-
circuit the w ires tog ether for even a very brief time, the batte ry
must be placed in a safe, open, area that is away from combustible
materials for observation for approximately 15 minutes. Additionally,
if a short-circuit is made by metal such as jewellery, this may result
in severe injury.
A battery can still ignite even10 minutes after the incident.
In the event of damage to the robot, you must remove the battery
for observa tion a nd pl ace in a safe open area a way f rom an y
combustible material for approximately 15 minutes.
Never cut the wire s, as a short-circuit of the battery could cause
re.
Never store or charg e a battery pack in extreme temperatu res,
sinceextremetemperaturecouldcausere.
Charging Process:
The charger is designed to be connected directly to a 230V/50Hz or 110V/60Hz
mains socket, and is intended solely for charging the MechRC battery. Please
read all of these instructions before attempting to operate the charger.
Never leave a charging battery pack unattended.
The battery pack must only be charged under the supervision of a
responsible adult.
Only use the Lithium Polymer charger supplied with the MechRC
system. Do not use a NiMH or NiCd charger. Failu re to use the
correctchargermaycause re,whichmayresultin personalinjury
and property damage.
Let the battery cool down to room temperature before charging.
Do not charge battery packs in series. Charge each battery pack
individually. Failure to do so may result in incorrect charging which
maycausere.
Protect the charg er from dust, damp , rain, heat, dire ct sunshine
Page 4

and vibration. It should only be operated in dry indoor conditions.
Provide good ventilation to the charger and battery. Do not cover.
Set up the unit with space all aro und it so that c ooling air can
circulate unhindered.
The charger and the battery to be charged should be set up on a
heat-resistant, non-ammableand non-conductive surfacebefore
use.Keepallinammableandvolatilematerialswellawayfromthe
charging area.
Disc onnect the cha rger from the mai ns p ower suppl y be fore
connecting or disconnecting the battery.
Thechargeleadsmust notbemodied,andmustnot becoiledup
when the charger is in use. Check the unit regularly for damage to
cables, connectors, case etc. If the charger is damaged, it must not
be used.
Do not open the charger case.
Never attempt to recharge faulty, damaged, already charged or hot
batteries, or a pack which is not fully discharged.
Only use the charger to recharge original MechRC batteries.
Never use a damaged charge lead or battery. Take great care to
maintain correct polarity.
If the battery or charger becomes hot to the touch, disconnect them
from the power supply immediately.
Avoid short-circuits between the positive and negative terminals.
Clean th e charger by rubbing it lightly with a damp clot h when i t
is not plugged into eit her the battery or mains supply. Do not use
cleaning agents.
Storage & Transportation:
Store th e battery at a t emperature betw een 4°C and 27°C (40°F
and 80°F).
Do not expose the batt ery pack to d irect sunl ight or h eat for
extended periods.
Whe n t rans por ting or te mpor ari ly stor ing in a veh icle , the
temperature range must be greater than -7°C (20°F) but no more
than 65°C (150°F).
Storing the battery at temperatures greater than 71°C ( 160°F) for
extended periods of time (more than 2 hours) may cause damage
tothebatteryandpossiblyre.
Caring For Your Lithium Polymer Battery:
Only use the Lithium Polymer charger supplied with the MechRC
System. A poor quality charger can be dangerous.
Do no t discharg e the battery t o a l evel below 3V p er cell under
load. Deep d ischarge below 3V per cell ca n deteri orate ba ttery
performance.
Use caution to avoid puncturing the cell. Puncturing the cells may
causere.
Operating Temperature:
Charge:
0°C to 45°C (32°F to 113°F)
Let battery cool down to room temperature before charging.
Discharge:
0°C to 60°C (32°F to 140°F)
During discharge and handling of batteries, do not exceed
71°C (160°F).
Battery Life:
Batteries that loose 20% of their capacity must be removed
from service and disposed of properly.
Construction and components
All products supplied and manufactured by MechRC are subject to ongoing
qualit y cont rol an d comp liance checks of all ma terials and producti on
processes. We are sure that you wi ll be satisfied wit h all a spects of the
MechRC system. Howeve r, should yo u encounter any proble ms or h ave
queriesregardingtheoperation oftherobot,pleaserstattempt tondthe
answer by reading throug h this user guide. If you still cannot resolve the
problem, please consult the “Frequent ly Asked Questi ons” section of the
MechRC website at www.mechrc.com/support and the MechRC forum at
www.pimpmybot.com
Mec hRC ar e cons tan tly see kin g t o impr ove th e engi nee ring a nd
performance of our product range as well as the production methods used
at manufacture. For this reason we reserve the right to make changes to the
system in terms of dimensions, design, technology, materials, components,
software and fixings at an y time and without prior n otification . For this
reason MechRC will not entertain claims based on illustrations, stated information and descriptions contained on the packaging or in this user guide.
MechRC only endorse the use of software, componen ts and access ories
which have been t ested a nd app roved b y MechR C for their suitabil ity,
function, quality and safety. The company acce pts product liability if you
obser ve th is a dvice. MechR C do es no t acc ept liabili ty if unap proved
software, parts or accessories made by other manufacturers or third parties
are use d as M echRC are not in a position to ass ess these for their suitability and safety.
Appropriate usage
The MechRC Enterta inment Robot System has been d eveloped to be
used as an entertainment platform, an experimental platform for the study
of r obotic principle s, and as a mediu m for testing newly created robot
programs within a physical system. The rob ot can be progra mmed with
the a ccompanying software (MechRC Commander) to pe rform diff erent
motion sequences supplied with the robot or created by other users. We do
not approve the use of the robot in any manner othe r than that described
in th is manua l. The robot is NOT designed for indus trial or commerci al
applications.
Liability exclusion
The MechRC Entertainment Robot System consists of a fully working robot
which can be upgraded with suitable accessories. MechRC recognises that,
as the manufacturer, MechRC has no control over the way in which the user
might modify, maintain and operate their robot, nor how they install, operate
and mainta in an y ass ociated compo nent or up grade. For this reason
MechRC are obliged to deny any and all liability for loss, damage or costs
which are incurred due to the incompetent or incorrect use and operation
of ANY MechRC product, or which are conne cted with such operation in
any way. Unless otherwi se presc ribed b y bindin g law, the obl igation of
MechRC to pay compensation, regardless of the legal argument employed,
is e xcluded. This in cludes p ersonal injury, dea th, dam age to buildings ,
damage to personal property, damage due to loss of business or turnover,
interru ption o f busin ess or other direct or in direct consequent damage
whose root cause was the operation of the robot.
The total liability in all cases is limited to the amount paid for the MechRC
Entertainment Robot System.
Thi s rob ot is op era ted an d upg rade d at th e s ole a nd exp res s
responsibility of the user. The only way to avoid injury to persons and
damage to property is to handle and operate the robot with the greatest
of care and considerati on at all times and in strict accordance with the
instructions and safety guidelines set out in this user guide.
Before you oper ate the MechRC Entertainment Robot System for the
rsttime itisimportant tocheckwhether yourprivate thirdpartyliability
insurance policy covers you for operating models of this type. If you are
not sure, take out a special policy designed to cover the inherent risks of
hobby robotics.
This user guide should be stored in a safe place as it contains important
safety in formation and MUST be passed to the new owner should you
ever part with the robot.
The sole purpose of this user guide is to provide information. MechRC
reservethe rightto altertheinformation withoutprior notication,and it
must not be viewe d as an obligation on the part of MechRC. MechRC
accepts no responsibility or liability for errors or inaccuracies which may
occur in the information section of this manual.
Environmental Protection Notes
The presence of this symbol on a product or its packaging, or in
the instructions, means that you must not dispose of that item, or
the electronic components contain ed withi n it, in the ordinary
domestic waste when the product comes to the end of its useful life. The
correct metho d of disposal is to take it to your local collection po int for
recycling electrical and electronic equipment.
Individual markings indicate which materials can be recycled and re-used.
You can make an important contribution to th e protection of our shared
environment by re-using the product, recycling the basic materials or reprocessing redundant equipment in other ways.
Batteries must be removed from the device and taken separately to your
local battery disposal centre. If you do not know the location of you r
nearestrecyclingcentre,pleaseenquireatyourlocalcouncilofce.
Page 5

MechRC accepts no liability for problems and damage which are caused
by improper use of the MechRC Commander software on your computer
system.
It is never possi ble to excl ude t he po ssibilit y of malfu nctions with
software products.
Av oid pro gram ming se quen ces whi ch inv olve ve ry fast , v iole nt
movements, as they are very hard on servos and mechanical systems. The
result may be premature wear of these components.
The programs supplied could ca use damage to y our robot if i t is n ot
maintained or adjusted correctly.
End-User License Agreement
THIS A GREEMENT (the “A greement”) is he reby en tered in to betw een
MechRC Limited, a limited liability company (the “Licensor”) and the party
obtaining the righ t to u se the Licensed Pr oduct (“you ”) on the followin g
terms and conditions:
1. Lice nsed Prod uct. Th is licens e a llows you to use Mec hRC
Commanderversion1.0,the accompanyingDocumentationandanyxes,
releases, upgrades, new versions or enhancements that may subsequently
be issued to you (the “Licensed Product”) according to the terms set forth
in this Agreement.
2. Delivery & Installation. The Licensed Product is distributed to you
by electronic download from authorised web site(s) or on physical media
(e.g., CD-ROM). You will need to install the Licensed Product on properly
conguredan dcompatible computerequipment according tothesys tem
requirementsspecied intheDocu mentation.Ifyou areloading datainto
the L icensed Pro duct, you will also need to ens ure that your da ta is in
proper format. I f the Licensed Pr oduct is to inte roperate an d exchange
data with other program(s), you will ensure the Licensed Product and other
program(s)areproperlyconguredandtested.
3. Perm itted Use of the Lic ensed Pro duct. Ope ratin g Li cense:
Subjec t to payment of the Li cense Fee, yo u may instal l the Licens ed
Product on one (1) computer which meets the system require ments and
you may use the Licensed Product during the Term to perform your work
and process your own data.
4. Reservation of Rights. The Licensed Product is licensed, not sold
to you. The intellectual property rights in the Licensed Product shall at all
times re main the exclusive prop erty of Licensor or other owner identified
in th e Document ation. You agree to use t he License d Product strictly in
accord ance w ith th is Agree ment. You will not loan, rent, sublicens e or
distribute any part of the Licensed Product to persons not licensed und er
this A greement through public networks or o therwise. You agree not to
disassemble, decompile or reverse engineer the Licensed Product. You will
ensure t hat all m arks, notices or legends pertaining to the origin, identity
or o wnership of the License d Produ ct remai n intac t and clearly legible.
You may transfer all your rights under this Agreement to another person,
provided you delete all copies and cease further use.
5. No Product Support Plan. The Licensor may make available certain
helples,patchesandadditionaluserDocumentationonitswebsite.Atthis
time, however, Licensor does not provide a Product Support plan or provide
updates or new versions of the License d Product on a subscription basis.
You are encoura ged to obtain new versions of the Licensed Product from
time to time as they are made generally available, through legitimate means.
Licensor may change its Product Support policy from time to time.
6. No Undocum ented Featur es. The Licen sed P roduct does not
contain any software locks or undocumented features, oth er than r outine
security features descr ibed in the Documentati on. The Li censor reserves
the right to change this policy with respect to any updates or new versions
of the Licensed Product released in the future.
7. Acade mic Copies . The Licens or do es n ot c urrentl y of fer a ny
special discount on the Licensed Product for academic users (i.e., college,
univers ity, publ ic or privat e schoo l). The Licen sor res erves the rig ht to
change this policy in the future.
8. Warranties.
(a) Gener ally. In the event that the Lice nsee discove rs a
material error which substantially affects the Licensee’s Use of the same and
notiesLicensoroftheerror within30daysfromthedateof paymentofthe
Licence Fee (the “warranty period”) Licensor shall at its discretion correct by
patch or new release (at its option) that part of the software which does not
so comp ly PROVIDED THAT such n on-compliance h as not been caused
byany modication,variation oradditionto thesoftware notperformedby
Licensor or caused by its incorrect use, abuse or corruption of the software
or by use of the software with other software or on equipment with which
it is incompatible.
(b) No O ther Warra nty. The License e acknowl edges th at
software in g eneral i s not error-free and a grees th at the existence of
such error s shall no t constitute a breach of this Li cence. The L icensed
Product itself and any P roduct Suppo rt are provided st rictly on an “as
is” and “as availa ble” ba sis wit hout an y expre ss or implied warrant y,
guarantee or other assurance of quality, conformit y with sp ecifications,
rel iabi lity o r f unct iona lit y. You a ccep t a ll ris k f or the su itab ili ty,
performanc e or nonperformance of th e License d Product. LICENSOR
MAKES NO WA RRANTY, EXPR ESS OR IMPLIE D, WITH RESPE CT
TO THIS LICENSE D PRODUCT OR ANY SERVICES AND DISCLAIMS
ALL I MPL IED WA RRA NTI ES OF TI TLE , INT ERO PERA BIL ITY,
IN TE GRA TI ON, MER CH AN TAB IL ITY A ND F IT NE SS F OR A
PARTICULAR PURP OSE. THIS AGRE EMENT GIVES YOU SPECIFIC
LEGA L RIG HTS. YOU MAY HAV E OT HER R IGHTS WHIC H VARY
BET WEEN JUR ISDIC TION S. Licen sor does no t w arra nt that the
functions mentioned in the softwar e will me et the L icensee‘s individ ual
requirements.
9. Not Fault Tolerant. THE LICENSED PRODUCT IS NOT FAULT
TOLERANT AND IS NOT DESIGNED, MANUFACTURED OR INTENDED
FOR USE IN HA ZARDO US ENVIR ONME NTS REQU IRING FAI LSAFE PERFORMANCE, SUCH AS IN THE OPERATION OF NUCLEAR
FACILITIES, IN WHICH THE FAILURE OF THE LICENSED PRODUCT
COULD LEAD TO D EATH, PE RSONAL INJURY OR P HYSICAL OR
ENVIRONMENTAL DAMAGE.
10. Limitation of Remedies & Liabilities. The following provisions are
amaterialconditionofthisAgreementandreectafairallocationofrisk:
(a) Rem edie s. If Li cens or brea ches an y p rovi sion of
this Agreeme nt, y our s ole an d exc lusive remedy will be to o btain a
refund of unamortised License Fees paid by you (using 1 year straightline amortisa tion). You also agree that legal remedies alone provid e
inadequ ate pr otection of Li censor’s intelle ctual p roperty rights in th e
Licensed Product and that, in addition to other relief, Licensor may obtain
temporary and permanent injunctions to enforce those rights.
(b) Liabilities. In no event shall Licensor, ITS DIRECTORS,
EMPLOYEES, RESE LLERS OR DISTRI BUTORS be liable, WHETHER
MechRC Commander Software
Epilepsy warning
Please read through this information before you use the software, or allow
a child to operate it.
When subj ected to p articu lar f lashing lig hts o r lig hting effect s, m any
peoplemaybe susceptibletoepileptictsor othermentalupsets,and itis
possible that such individuals may be affected when using computer programs. E ven persons whose histo ry of il lness does not include epilepsy,
andwhohave neversufferedat, maybeaffectedby thisproblem.Ifyou
or a family member has ever noticed symptoms which might be connected
with epi lepsy (suc h as men tal upset s or fit s) u nder the influ ence of
flashing l ights, please seek medical advice before you use this software.
As a bas ic rul e, pa rents should always super vise their children when
they are using computer programs. If you or your child should encounter
symptoms such as dizziness, vision problems, eye or muscle twitches, loss
of conscio usness, disorientatio n, or any kind of involuntary m ovement or
cramp when you are using a comp uter program , switch the machin e off
immediately and c onsult your doctor before y ou resume working on the
computer.
Cautionary measures when using the software:
Do not stand or sit too close to the computer screen.
Useaicker-freescreenasthecomputerdisplay.
Do not carry out programming when you are tired, or if you are short of
sleep.
Ensure that the room in which you carry out programming is always well
ventilated.
Whenusinganycomputerprogram,takeabreakofat leasttentofteen
minutes every hour.
General Information
Th ese in structi ons c annot and d o not cove r pro blems and q ueries
specictotheuser’scomputeroritsoperatingsystem.
Page 6

the j urisdiction of the English Courts. YOU WI LL BRING A NY ACTION
AGAINST LICENS OR ARISI NG OUT OF TH IS AGREE MENT WI THIN
ONE (1) YEAR AFTER THE CLAIM ARISE S, O R BE BARR ED. You
irrevocably agree that any claim will be brought and maintained by you on
an individ ual basis ( and not con solidated with similar cases). If Licensor
is required to enforce this Agreement or its rig hts, you irre vocably agree
to receive legal notices and papers by electronic mail at your last known
email address (we would also attempt to se nd you a b ackup c opy by
regular mail or regular service).
13. Severability. In the event that any of these terms and conditions or
provisions shall be det ermined by a ny competent authority to be invalid,
unlawful or unenforceable to any extent, such terms, condition or provision
shall to that extent be severed from the remaini ng terms, condit ions and
provisions which shall continue to be valid to the fullest extent permitted by
law.
14. Miscellaneous. This document constitutes the entire and exclusive
agreement betwe en the parties with respect to the subject matter hereof
and su persedes all other communications, whether w ritten or oral. This
document and evidence of its acceptance procedu re shall be considered
an original docu ment a dmissibl e int o evi dence unless the documen t’
s a uthentic ity i s gen uinely placed in questio n. No thing in t his c lause
shall relieve either party of liability for fraudulen t misrepresentations and
neither party shall be en titled to any remedy for e ither any negligent or
any innoce nt misrepresentation except to the extent (if any) that a court
or arbitrator may allow reliance as the same as being fair and reasonable.
This Agreemen t may be modifie d or amend ed onl y by writi ng sig ned
by a n author ised rep resentative of Li censor. It is agreed th at resel lers
and d istributors of the Licensed Product have n o authori ty to alter th is
Agreement. Any notice required to be give n under these conditions shall
be i n writin g and shall be sent to t he addre ss of Licensor ’s regist ered
office. Waiver of any provision hereo f in one instance shal l not prec lude
enforcement of it on future occasions. Headings are for reference purposes
only and have no substantive effect.
Copyright Notice:
© 2008 MechRC Ltd. All rights reserved.
MechRC, Shadow Stalker and MechRC Commander are registered trademarks of MechRC Ltd.
All other product and company names listed are trademarks or trade names of their respective companies.
IN CO NTRACT, TORT, NEGLIG ENCE, stat utory duty OR OT HERWISE,
to the Licensee for any loss or da mage whatsoever or howsoever caused
arising directly or indirectly in connection with this Licence, the software,
its use or otherwise, EVEN IF LICENSOR IS NOTIFIED IN ADVANCE OF
SUCH POSSIBILITY, except to the extent set out in this License or to the
extent that such liability may not be lawfully excluded. The Licensee agrees
that the maximum aggregate liability of LICENSOR whether in contract, tort,
negligence, s tatutory duty or otherwise, for any loss or damage whatever
arising from or in any way connected with any liability not excluded by this
Agreement shall not EXCEED THE LICENSE FEES ACTUALLY PAID BY
YOU. Th is limit shall al so apply in the event t hat any exclusion or other
provision conta ined in this Agreement is held to be invalid for any reason
and LIC ENSOR becomes liable for loss or damage that c ould otherwise
have been limited. LICEN SOR ex pressly exclude s liab ility for in direct,
special, incident al or consequent ial loss or d amage wh ich may arise in
respect of the software, its use, or in respect of other equipment or property,
or f or loss of pr ofit, bus iness, r evenue, g oodwill or antici pated sa vings.
THIS LIMITATION PROT ECTS LICENSOR AND ANY DISTRIBUTOR OR
RESELLER FROM WHOM YOU OBTAINED THE LICENSED PRODUCT.
THIS LIABILITY LIMIT IS INDEPENDENT OF THE EXCLUSIVE REMEDY.
11. Term & Termination.
(a) Generally. Your license w ill continue in perpetuity unless
term inated ear lier in a ccorda nce with this or anoth er S ection of this
Agreeme nt. Your license will terminate automati cally i f you breach any
provision of this A greement. You ma y terminate your lice nse at a ny time
at y our ele ction b y perma nently d eleting the Li censed Product from al l
computers, destroying all copies and Documentation and ceasing all further
use.
(b) Effe ct o f Term inatio n. Termin ation of this Agr eement
will terminate your rig ht to possess or Use the Lic ensed Prod uct. Upon
termination for any reason, you agree to destroy the original and all copies
of the Licensed Product ( including Doc umentation) and cease all furth er
Use of it. Termination will have no effect on Section 8 (“Warranties”), Section
9 (“Not Fault Tolerant”), Section 10 (“Limitation of Remedies & Liabilities”) or
Section 12 (“Disputes, Choice of Law”).
12. Disputes, Choice of Law. This Agreement will be governed by and
construed in accordance with the laws of England and shall be subject to
Page 7
1
contents
welcome to mechrc----------- --------------------- -------------------- ---------------4
how to use this guide------------------------ ---------------------------------------6
system component s--------------- --------------- --------------- ---------------- -----8
key product features----------------- ----------------------- ----------------------- 9
anatomy of mechrc (servo l ayout)------------------------------------------10
anatomy of mechrc (component layout)----------------------------------11
part i: getting started
charging the mechrc battery------------------------ ------------------14
installing the mechrc battery---------------- ------------------------15
preparing the handset for use---------------------------------------16
Changing the Infrared channel----------------------------------------17
turning on the robot & handset------------------------------------18
pre-flight check------------------------------- --------------------------------19
using the handset---------------------------------------------- --------------20
handset layout-----------------------------------------------------------------21
default handset functions----------------------------------------------22
part ii: mechrc commander software
introduction to mechrc commander--------------------------------26
installing mechrc commander------------------------------------------27
installing the usb-serial adapter-----------------------------------29
main window l ayout----------------------------------------------------------30
connecting to the robot--------------------------------------------------31
motion editing--------------------------------------------------------------------34
creating a motion file--------------------------------------------------------36
Page 8
2
3
further editing tools----------- ----------------------------------------------40
Advanced controls--------------------------------------------------------------48
audio file preparation------------------------ --------------------------------53
downloading an audio pl ay list-----------------------------------------54
creating a controller configuration---------------------------------57
part iii: advanced features
Setting the robot's trim data----------------------------------------------62
Setting the robot's home position---------------------------------------66
Renaming and adding extra joints--------------------------------------69
Input and output settings---------------------------------------------------72
Appendix A: Decal application
Decal application guide-------------------------------------------------------78
Page 9
4
5
welcome to mechrc
a message from the mechrc team:
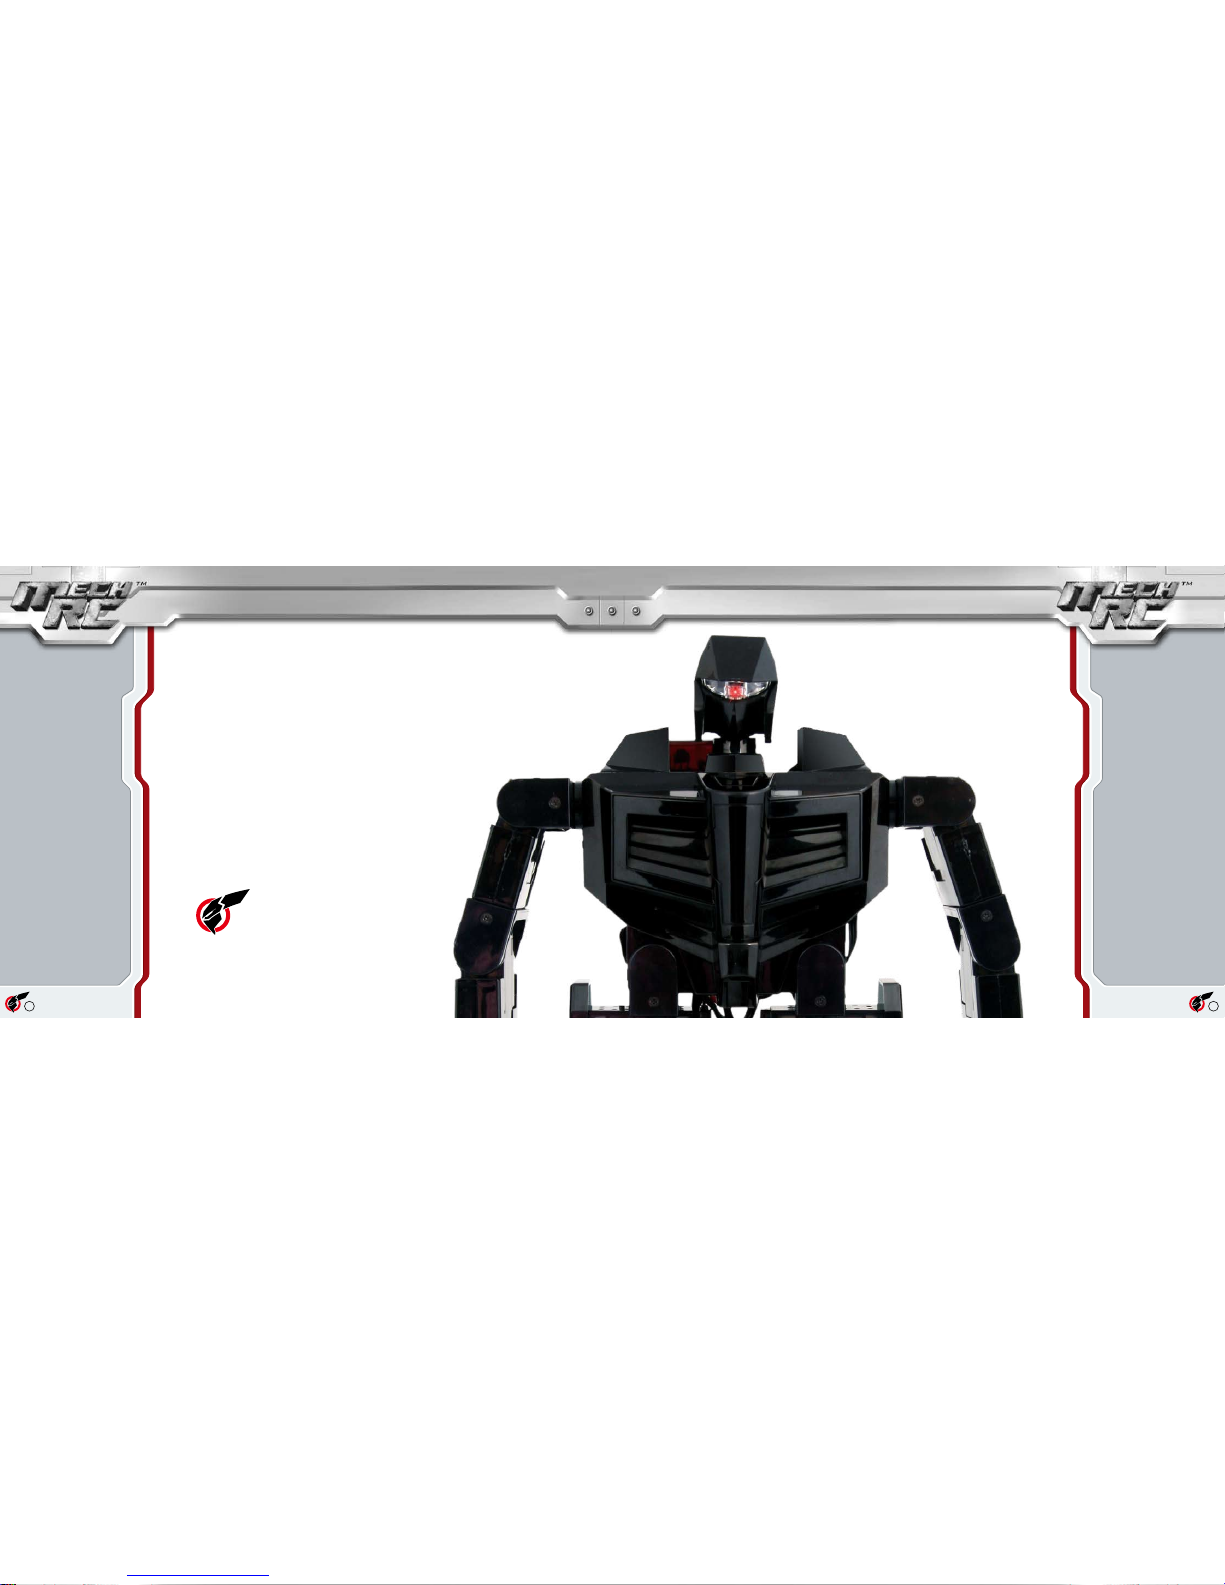
Tha nk y ou fo r pu rch asi ng t he M ech RC 1 .0 Hu ma noi d Rob ot
Entertainment System. We believe that you have chosen the nest, most
user-friendly humanoid robot system on the market today.
The MechRC desi gn te am c onsists of some of the most respec ted
cybernetic and robotic researchers, designers, manufacturers and artists
from around the world to bring you this revolutionary new product. Every
aspect of the MechRC system has been meticulously designed with you,
the user, in mind to ensure that we provide you with the most rewarding
experience that we can.
The M echRC s ystem wi ll appe al to robotics novices and enthusiast s
alike, delivering exciting functionality out of the box as well as a host of
expansion options to keep you enthralled by this electrifying hobby.
We could spend an eternity telling you how great the MechRC system
is but the best way to nd out is to try it for yourself. So let's get started
and enter the remarkable world of MechRC.
Have fun!
The MechRC Team
Page 10
6
7
This guide includes a Fast Track path that takes you through the
minimum number of steps necessary to get your robot up and
running in the shortest time possible. If you are already familiar
Fast Track
Caution!
Checklist
Top Tip!
Need to
Know
Cross
Reference
Precautions should be taken to avoid serious damage to the robot
Hints and ti ps f rom our robot exp erts to make your Mec hRC
experience as rewarding as possible
Check o ff compon ents and tasks as you go along to make sure
that you haven't missed anything
The f ield of robotic s can appear dauntin g at first, but fe ar not,
'Need to Know' boxes provide you with all the information you need
to become a robotics guru
Provides useful links to other parts of this guide
Throughout this guide you will encounter boxes of text in the side panels of the pages. These boxes contain important
information on using your robot as well as additional f acts and tips that will enable you to get the most from your
MechRC experience. Each text box is characterised by one of the icons shown below to alert you to the signicance of
its contents:
This guide is intended to provide you with everything you need to know to get the most out of your MechRC robot, taking you from
robotics novice to MechRC guru in a series of easy to follow steps. The guide comprises of 3 sections, each one building on the
last to provide you with a comprehensive understanding of the MechRC system:
how to use this guide
Getting Started: Get your MechRC up and running
MechRC Commande r Software: Bu ild custom mot ions and acti on sequences
for your MechRC
Advanced Features: Tune, maintain and customise your MechRC robot
Stop!
Immediate precautions should be taken to avoid serious damage
to the robot or personal injury
with humanoid robotic systems you will nd this route helpful and fast.
However, we would still recommend that you take the time to read through the rest of
this guide to nd out about important safety, maintenance, and tuning procedures as
well as the host of customising and expansion opportunities that the MechRC system
has to offer.
Head to page 14 to get started...
Page 11
8
9
7
6
10
9
8
1
2
3
4
5
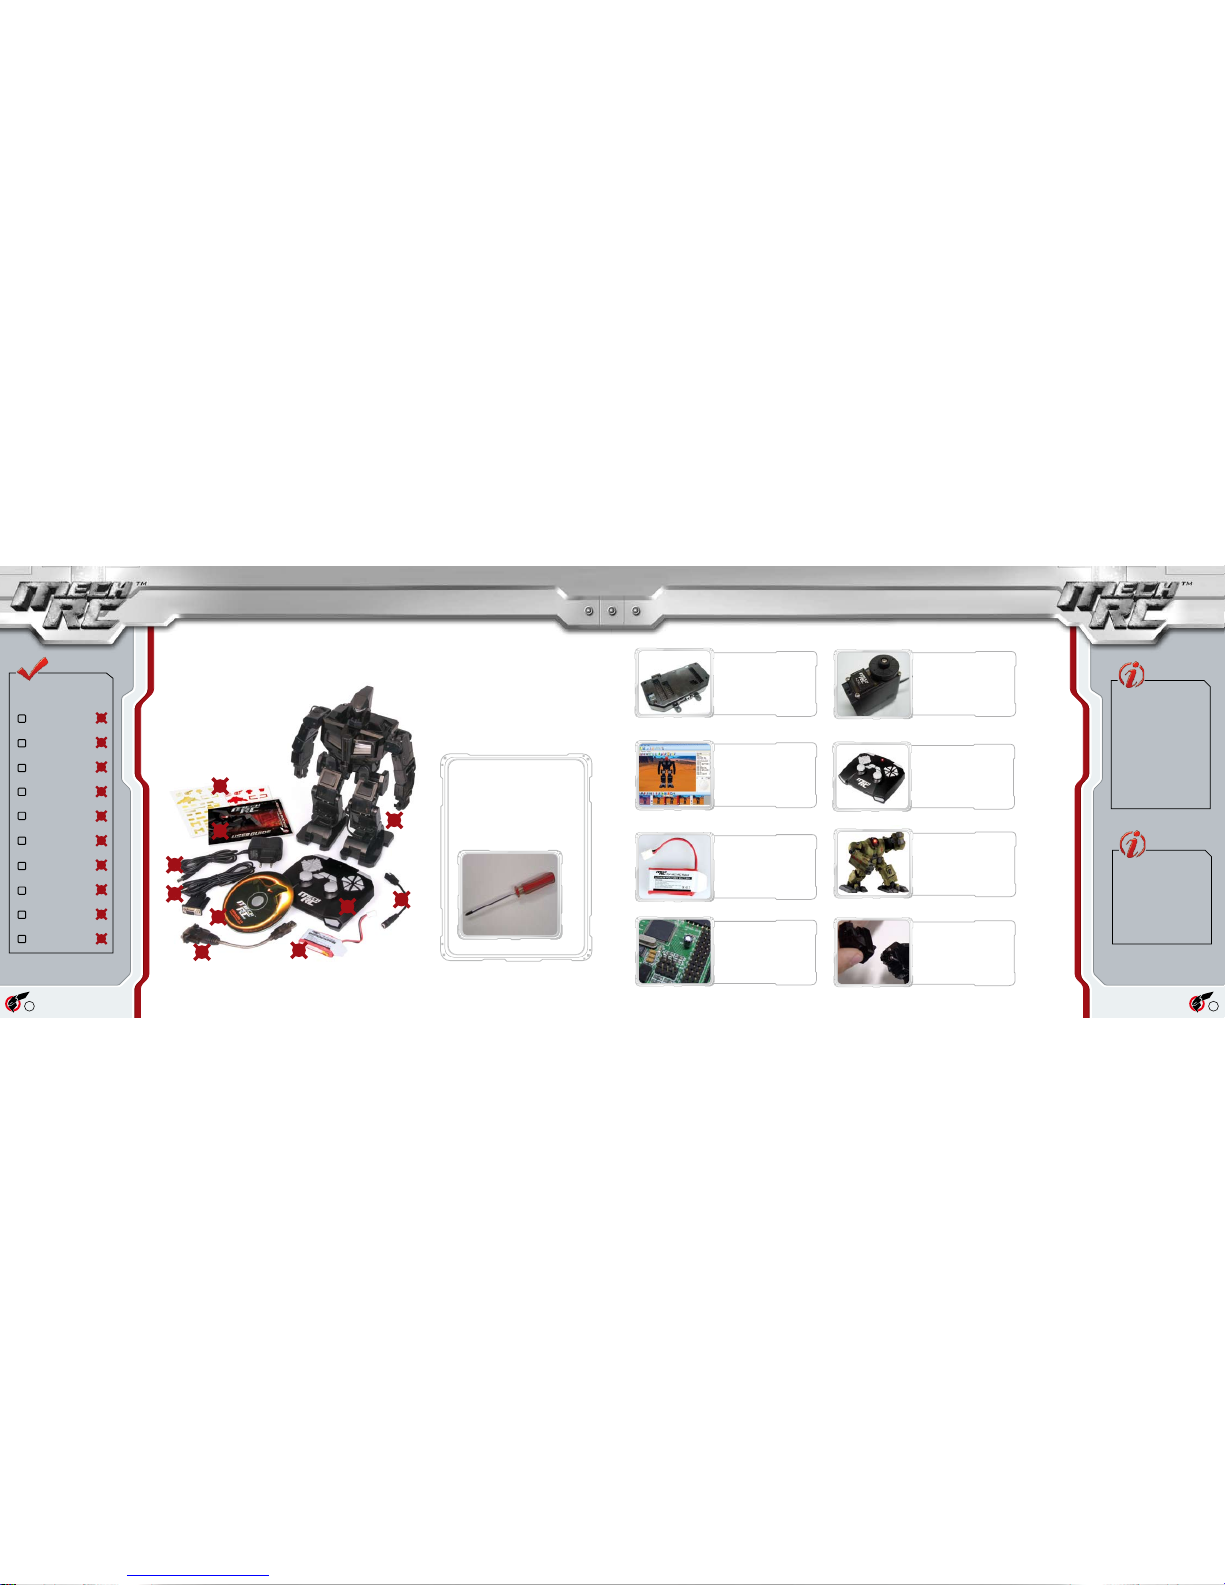
MechRC Robot
Handset
Battery
Battery Charger
Charger Adapter
CD-ROM
Serial Cable
USB Serial Adapter
User Guide
Decal Sheet
Official MechRC Website
Please take the tim e to visit
the offici al Me chRC website
to g et yo ur h an ds on the
latest s oftware and firmwar e
up da te s fo r th e M ec hR C
system as we ll as additio nal
in for mat io n on u si ng th e
Me chR C sy ste m, M ech RC
sponsored ev ents an d other
products in the MechRC range.
www.mechrc.com
pimpmybot.com
Jo i n t h e c o mm un i ty o f
MechRC u sers on the of ficial
Me c h R C f o r um . S h ar e
ideas, video, knowledg e and
programs with other members
or just drop in for a chat!
www.pimpmybot.com
For Sec tions 1 and 2 of t his guid e,
the only tool that you will req uire
is a small to medium sized Philli ps
(“crosshead ”) screw driver for opening the battery compartments of the
remote control handset
You'll Also Need...
system components
key product features
1
2
3
4
5
6
7
8
9
10
All of th e spe cialist items you will need to ge t
your robot up and running are incl uded in t he
MechRC system. P lease tak e the time to check
the contents of the MechRC package against the
image below and the checklist in the side panel.
MechRC Commander:
Th e eas y- to- us e Me chR C
Command er Sof tware gives
you com plet e c ontro l over
your robot's actions.
Electronic Expansion:
The Mec hRC control module
allows use rs t o exp erimen t
and build their own electronic
peripherals.
Mechanical Expansion:
The modu lar desig n o f th e
robot's chassi s allows you to
easily add add itional servos
and mechanical components.
Lithium Polymer Battery:
LiPo batte ries serve as the
ulti mate po wer sou rce for
your robot, deli vering up to
45 minutes of running time.
MechRC Custom Servos:
Spec ially de sign ed robot ic
se rv os d el iv er op tim um
pe rf or ma nce in a sm al l
package.
MechRC control module:
The control module contains
a 16 - b i t h ig h s p e ed
co nt ro ll e r th a t ca n b e
upgraded to provide extended
functionality.
Body Kits:
A range of hi ghly de tail ed
body kits, designed by leading
robot artists, are available to
give your robot a whole new
look.
Remote Control:
The gamepad style controller
provides an intuitive means
by w hic h to c on tro l you r
robot. Just like you would in a
video game.
The MechRC system
consists of the following
components:
Page 12
10
11
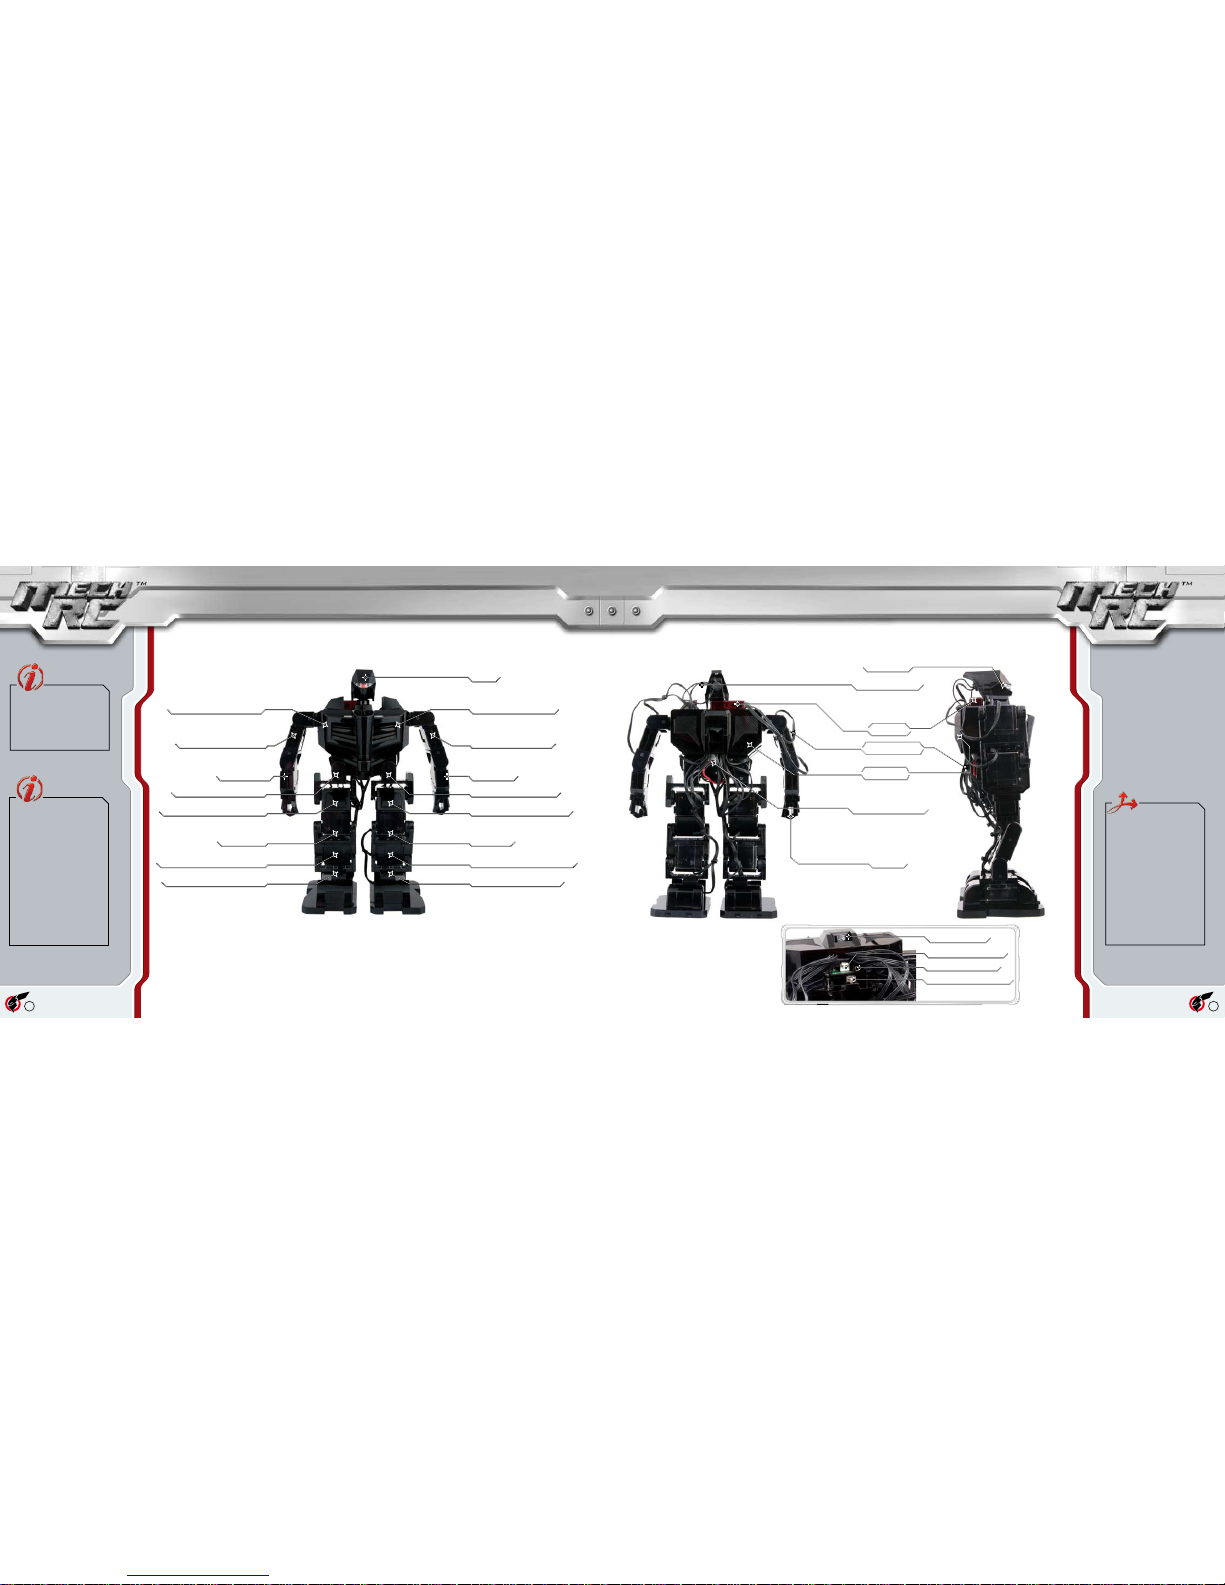
Eye Lights
IR Cover
Backpack
Hands
Servo Cables
Eye Light Cable
Battery (Internal)
Servo Trims
Eac h of the jo int s on you r
MechRC robot has been tuned
by our robot engineer s at the
fact ory to del iver op timu m
perf orman ce of t he syste m
out of th e box. However, af ter
extensive use or modication,
you m ay fin d it nec ess ary
to a dj ust the tri ms ( ze ro
po si tio ns ) o f th e ro bo t' s
joints. To nd out more ab out
this process , ple ase r efer to
Section 3 of this guide
anatomy of mechrc (servo layout)
anatomy of mechrc (component layout)
Head
Left Shoulder (body)
Left Hip (Side to Side)
Left Shoulder (arm)
Left Elbow
Left Hip (Forward/Back)
Left Knee
Left Foot (Forward/Back)
Left Foot (Side to Side)
Right Shoulder (body)
Right Hip (Side to Side)
Right Shoulder (arm)
Right Elbow
Right Hip (Forward/Back)
Right Knee
Right Foot (Forward/Back)
Right Foot (Side to Side)
Power Switch
RS232 Connection
Battery Cover Screw
Battery Connection
Your left or mine?
Throughout this guide an d in
the s oftware we w ill re fer to
left and right from the point of
view of the robot.
What is a servo?
A servo is a pre cision electromechanical feedback system
consisting of a motor, gearbox
and c ontr oll er. A si gna l is
sent to t he co ntroller tell ing
it w ha t po si ti on t o d riv e
th e ou tp ut sh af t to . Th e
posit ion of th e ou tput shaf t
is conti nuou sly fed back to
the c ontroller which ensur es
that t he spe cifi ed posi tion
is m ai nt ai ne d, eve n i f a
reason able externa l for ce is
applied.
Page 13
12
13
Part I: Getting Started
Page 14
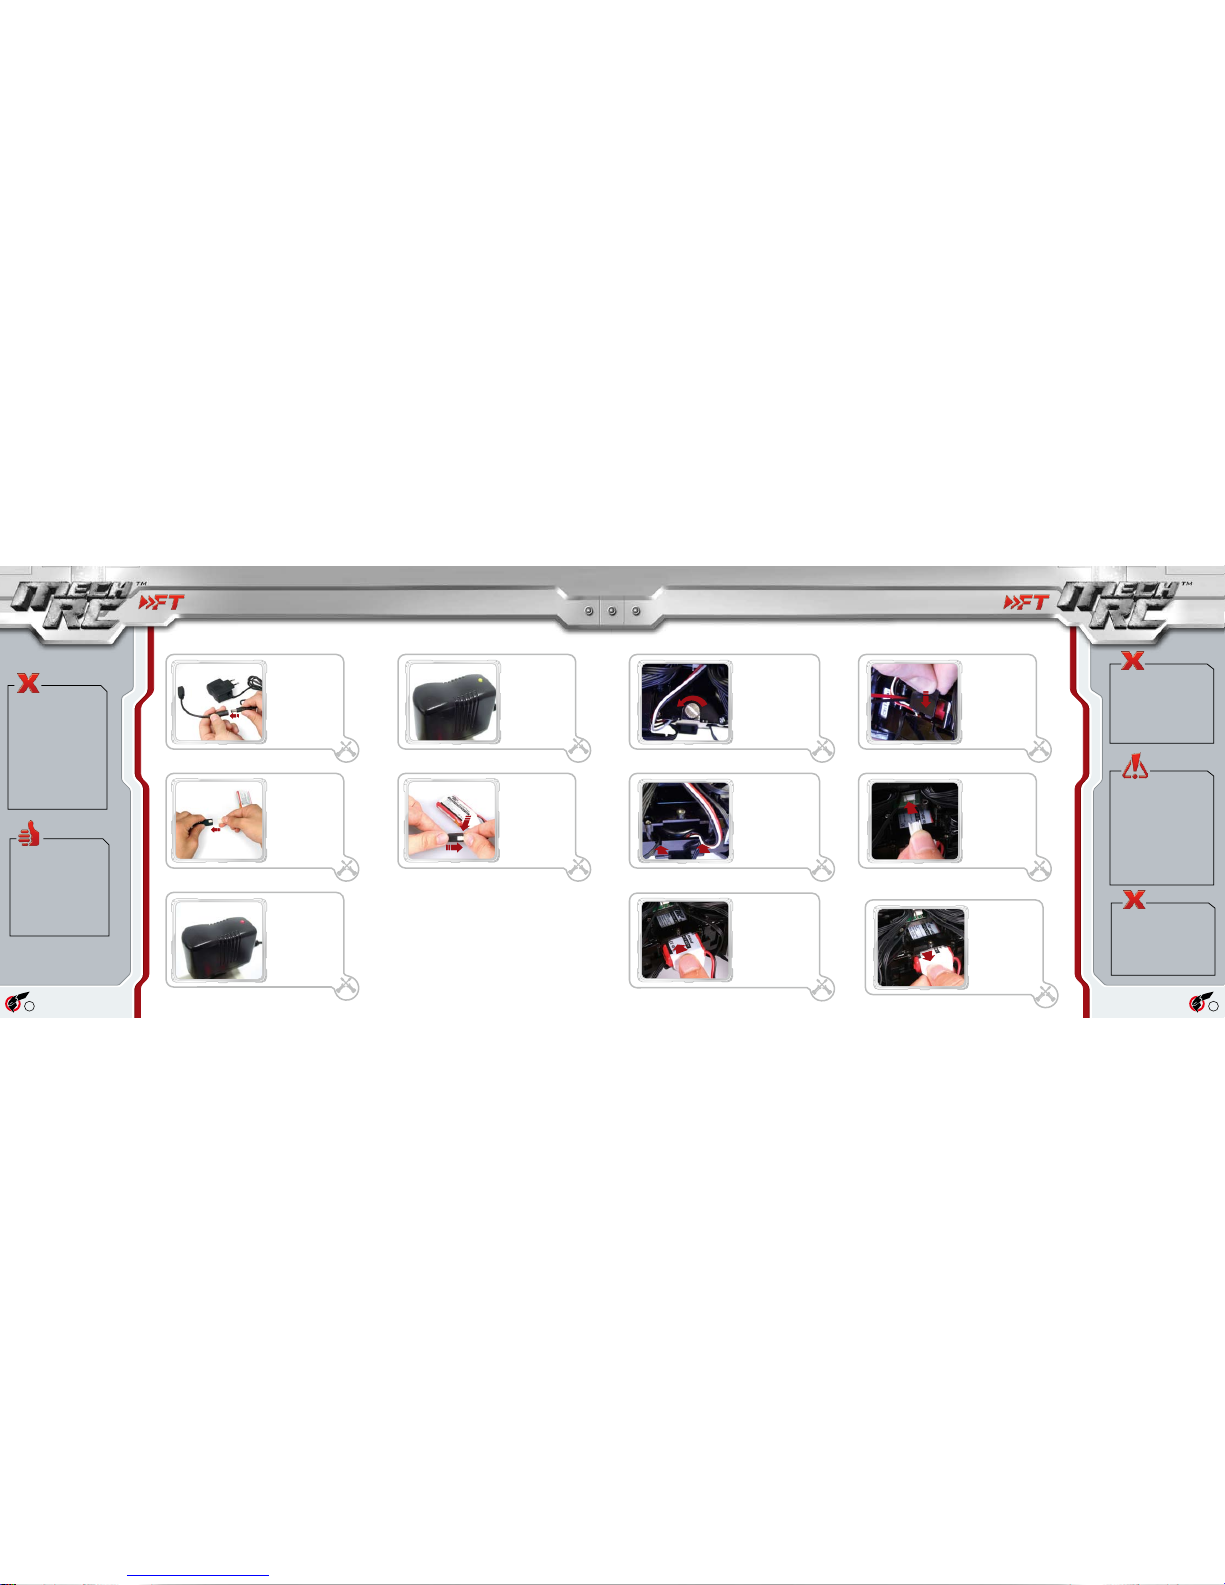
14
15
charging the mechrc battery
installing the mechrc battery
Warning!
Never attempt to power t he
robot d irectly f rom the charger unit. Doing so could irrecoverably damage your robot
and t he ch arge r and m ay
cause re.
Caution!
If y ou me et wi th r esistan ce
when in serti ng the batt ery
pack into the robot or w hen
replac ing t he ba ttery cover,
check that no wires are o bstructing the battery compartment op enin g. Forci ng the
battery or cover into the battery compartment may cause
damage to the cables.
Warning!
The M echR C robo t uses a
lithi um polyme r ( LiPo) battery pack as its power source.
This type of battery pack can
be volatile if used or handled
incorr ectly. Please take the
time to read the battery safety g uideline s at the start of
this guide to ensure your own
safety and the safety of your
robot and property.
Warning!
Never attempt to remove the
battery by pulling on its wires.
This c ould cau se damag e to
the batter y p ack and c ould
even result in re.
Di s co n n ec t th e
ba tte ry f ro m th e
charger by p ushing
down on the battery
r e l e a s e c a t c h
an d pu ll i ng th e
con nect ors ap art ,
taki ng care not to
pull on th e c ables
themselves.
5
1
2
Connect the MechRC
batt ery ada pter to
the out put jac k of
the charger unit.
1
Mat e t he ba tter y
connector with the
cha rger 's batt ery
adapter.
2
Wh en th e ba tte ry
has nished charging
the g reen l igh t on
th e ch ar g er wi l l
ill umin ate. U nplu g
the charger unit from
the mains power.
4
Undo the battery cover
scr ew lo cate d on th e
ba c k o f t h e r ob o t
be twe en t he l eg s. I t
sho uld be po ssib le to
undo with your fi ngers,
but if the screw is tight
you m ay nee d to us e
a m edium , f lat-b laded
screwdriver.
1
Re mo ve t he b at te ry
cover an d e nsure th at
al l ca bl es e me rg in g
f r om t he b a t t e r y
c om p a r t m en t a r e
located in the cable slots
to t he l eft and r ight of
the compartment.
2
Ca re fu l ly in se rt th e
batter y in to the bat tery
com pa rtm en t, t aki ng
special care not to t rap
or pinch any cables.
3
Replace t he battery
compartme nt cover
and x in place with
th e co ve r s cr ew.
tig hte n the s crew
finger tigh t so that
it c an be und one
without the need of
a screwdriv er in t he
future.
4
Plug the connec tor
of th e batte ry pa ck
in t o t he p o w er
socket of the control
module.
Plu g th e cha rge r
uni t i nto a mai ns
p o w er o u t l et .
Th e re d li gh t on
th e ch ar ge r w il l
illuminate when the
battery is charging.
3
5
When re moving the
bat te ry, o nly pul l
on the plas tic tab,
and ensure that you
ha ve n ot h oo ked
any w ir es ar oun d
the batter y. NEV ER
pull on the batte ry
wires to remove the
battery.
6
If you find tha t th e r ed
li gh t on th e ch ar ge r
does not illuminate when
yo u con ne ct t he b attery, che ck a ll t he wire
co nne cti on s bet we en
the charger and battery
pac k. It co uld al so be
that the battery is already
charged.
Page 15
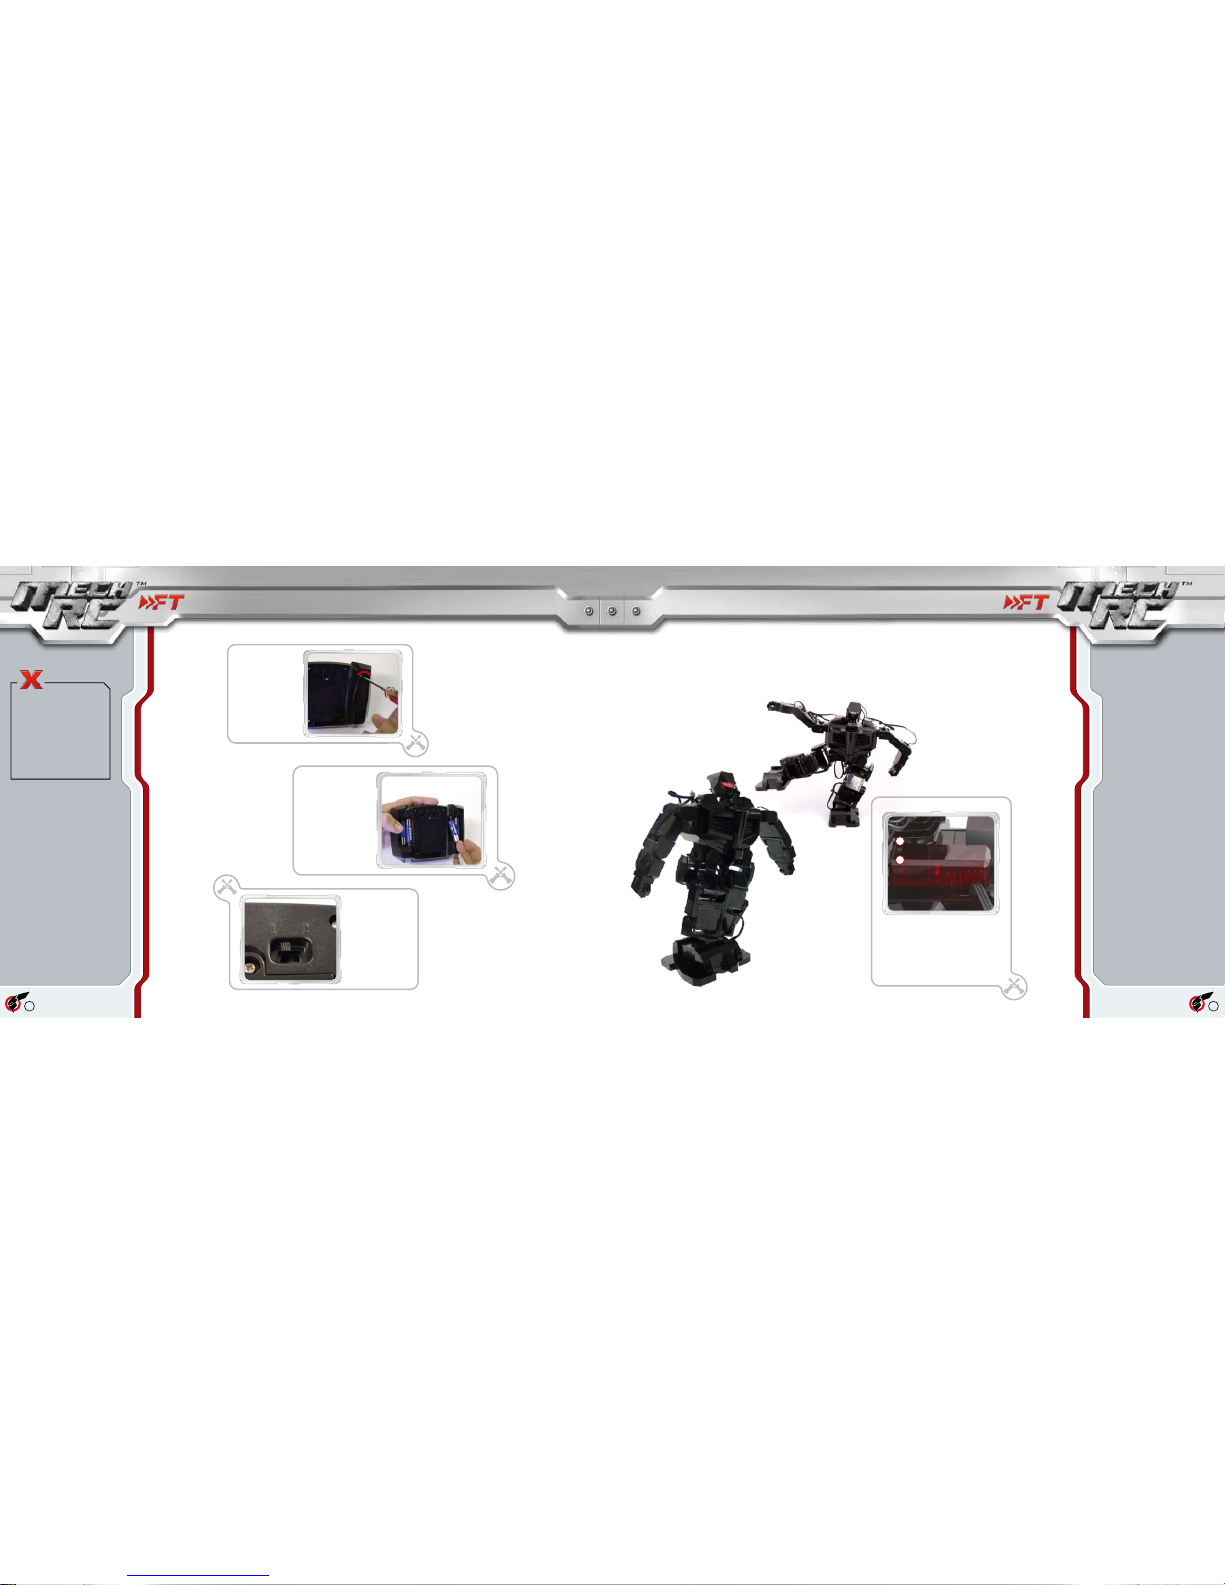
16
17
preparing the handset for use
changing the infrared channel
Us i ng a sm a ll t o
m e d i u m s i z e d
screwdriver, undo the
screws holding the two
battery covers in place
on the und ersi de of
the r emo te co ntr ol
handset.
1
Insert batteries into the
battery compartment s,
p a y i n g s p e c i a l
attention to the polarity
shown on the diagr am
lo ca te d i ns id e t he
compartment. Replace
th e b at te ry co ve rs
and tighten the fixin g
screws.
2
The c hannel setting
f or t h e r e mo t e
c on t r o l c an b e
cha ng ed be twe en
Cha nne ls 1 an d 2
wi th t he s el ect or
swi tch l oca ted o n
the underside of the
handset.
3
Warning!
Please pay care ful atten tion
to the battery warning notices
prin ted at the sta rt of this
guide. Incorrect installation of
batteries could cause permanent damage to th e remo te
control handset and may re-
sult in re.
The factory default channel setting for both the robot and the handset is Channel 1. If you need to change the channel on
which the robot operates (for example, if you are using two robots at the same time) then you can do so by following these
simple instructions.
Set the chan nel sele ctor switc h t o
the desired position according to the
image shown here. You may nd this
is made easier by using the ni b of a
ball point pen.
2
1
Page 16
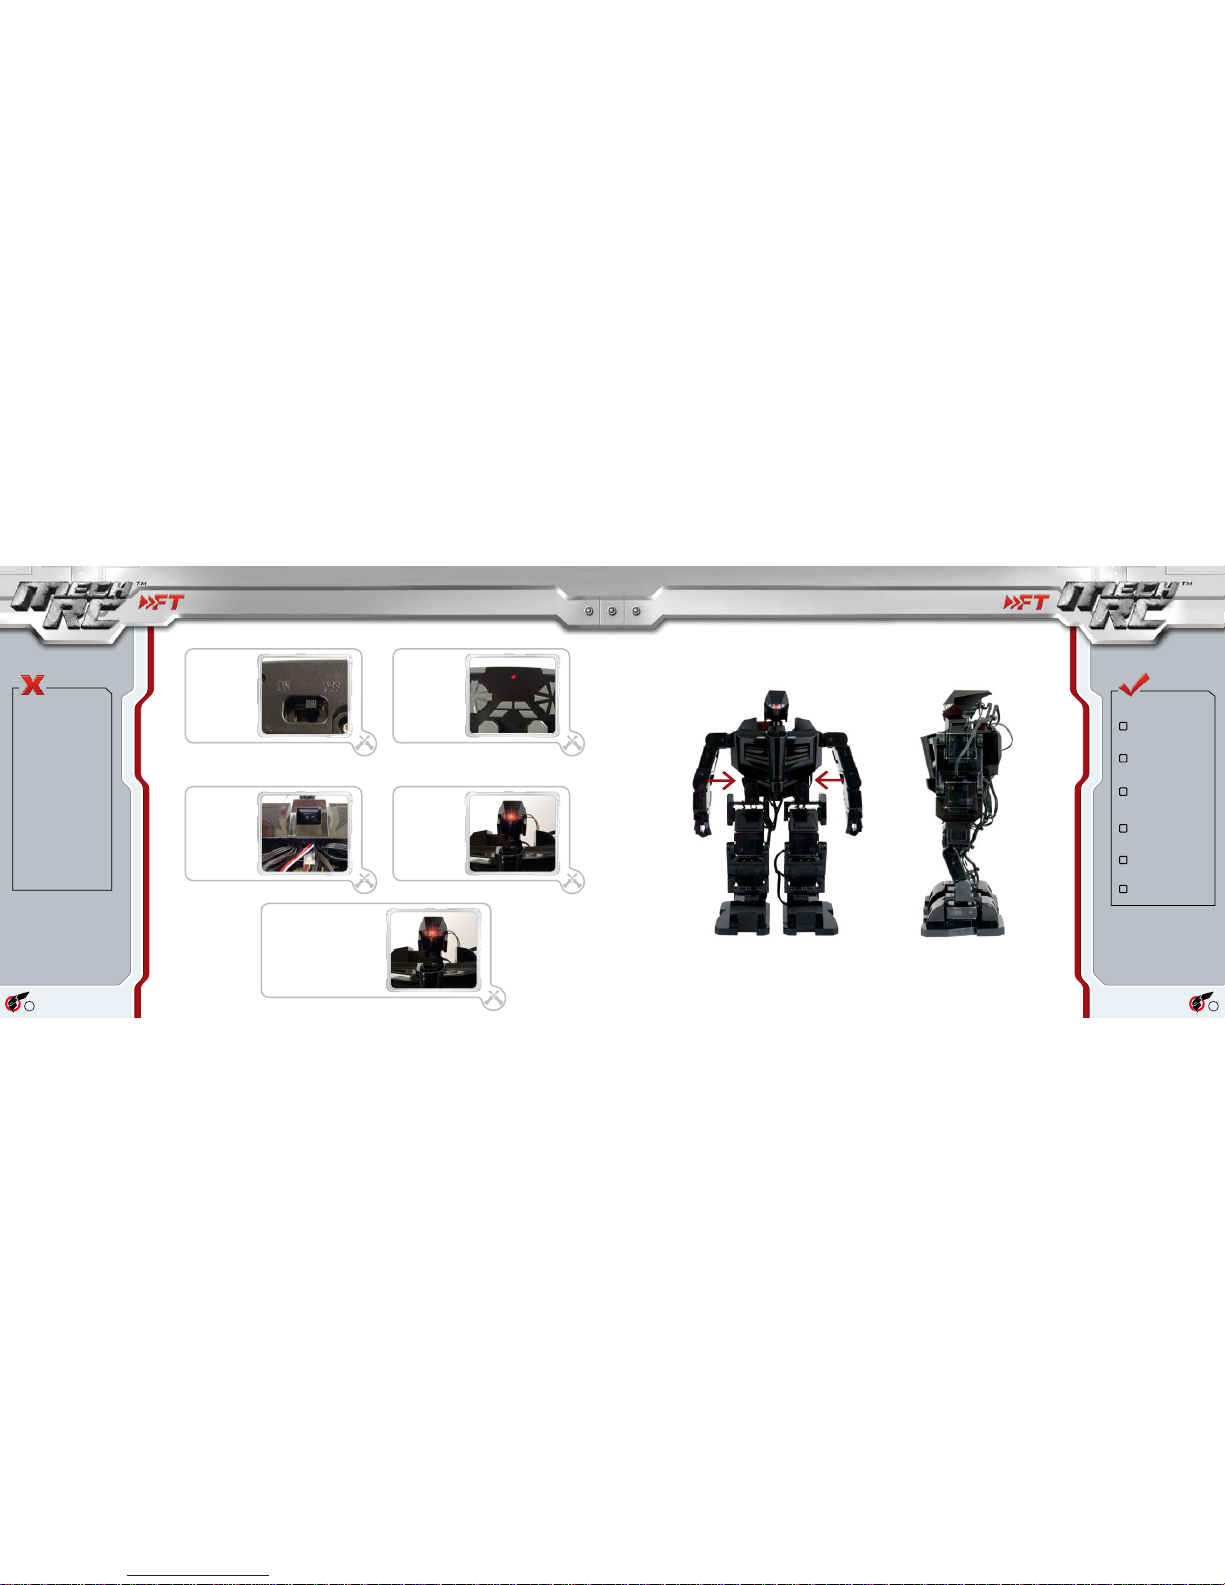
18
19
turning on the robot & handset
pre-flight check
Each t ime you power up the robot, please review the six -point
chec k p rinte d i n t he pane l t o t he side of thi s p age befo re
commencing operation.
S w it c h o n t h e
handset by moving
the power switch on
the underside of the
handset to the "ON"
position.
1
W he n p o we r e d
up , th e re d li ght
on t he ha n ds e t
will be illumin ated
constantly.
2
Switch on the robot
b y m o v i ng t h e
power switch on the
robot's backpack to
the "I" position.
3
Th e r o bo t' s e y e
light will flash for a
mome nt and the n
rema in const antl y
il lu mi na te d. I t' s
jo i nt s w i ll th e n
move to their home
positions (shown on
the facing page).
4
Warning!
Whi lst it is r ecom mend ed
that yo u hold onto the robot
du rin g t he p ow er u p se quence to avoid it falling over
and causing damage to itself,
pay careful attention for sud den movements of the joints
which cou ld cause fingers to
be trapped or crushed.
The sa fest pla ce to hold th e
robot during power up is on
the side of the body below the
chest (indicated by the arrows
on the illust ration on the facing page).
For further safety instructions
on operating the robot, please
refer to the guidelines printed
at the front of this guide.
The robot is standing
upright in the “home”
position shown in the
illustration.
The eye light is illuminated solidly
All cables are able to
move freely and are not
hooked up on the frame
of the robot
All decorative plastic
parts are rmly attached
The robot’s servos are
not making any excessive noise
None of the joints are
limp
Low Battery Warning
When the robot's batter y ch arge
bec omes to o l ow for th e robo t
to func tion at full capacity, it will
cease all move ment and outpu t
activity (includi ng audi o) and will
ash its eye light constantly.
Page 17
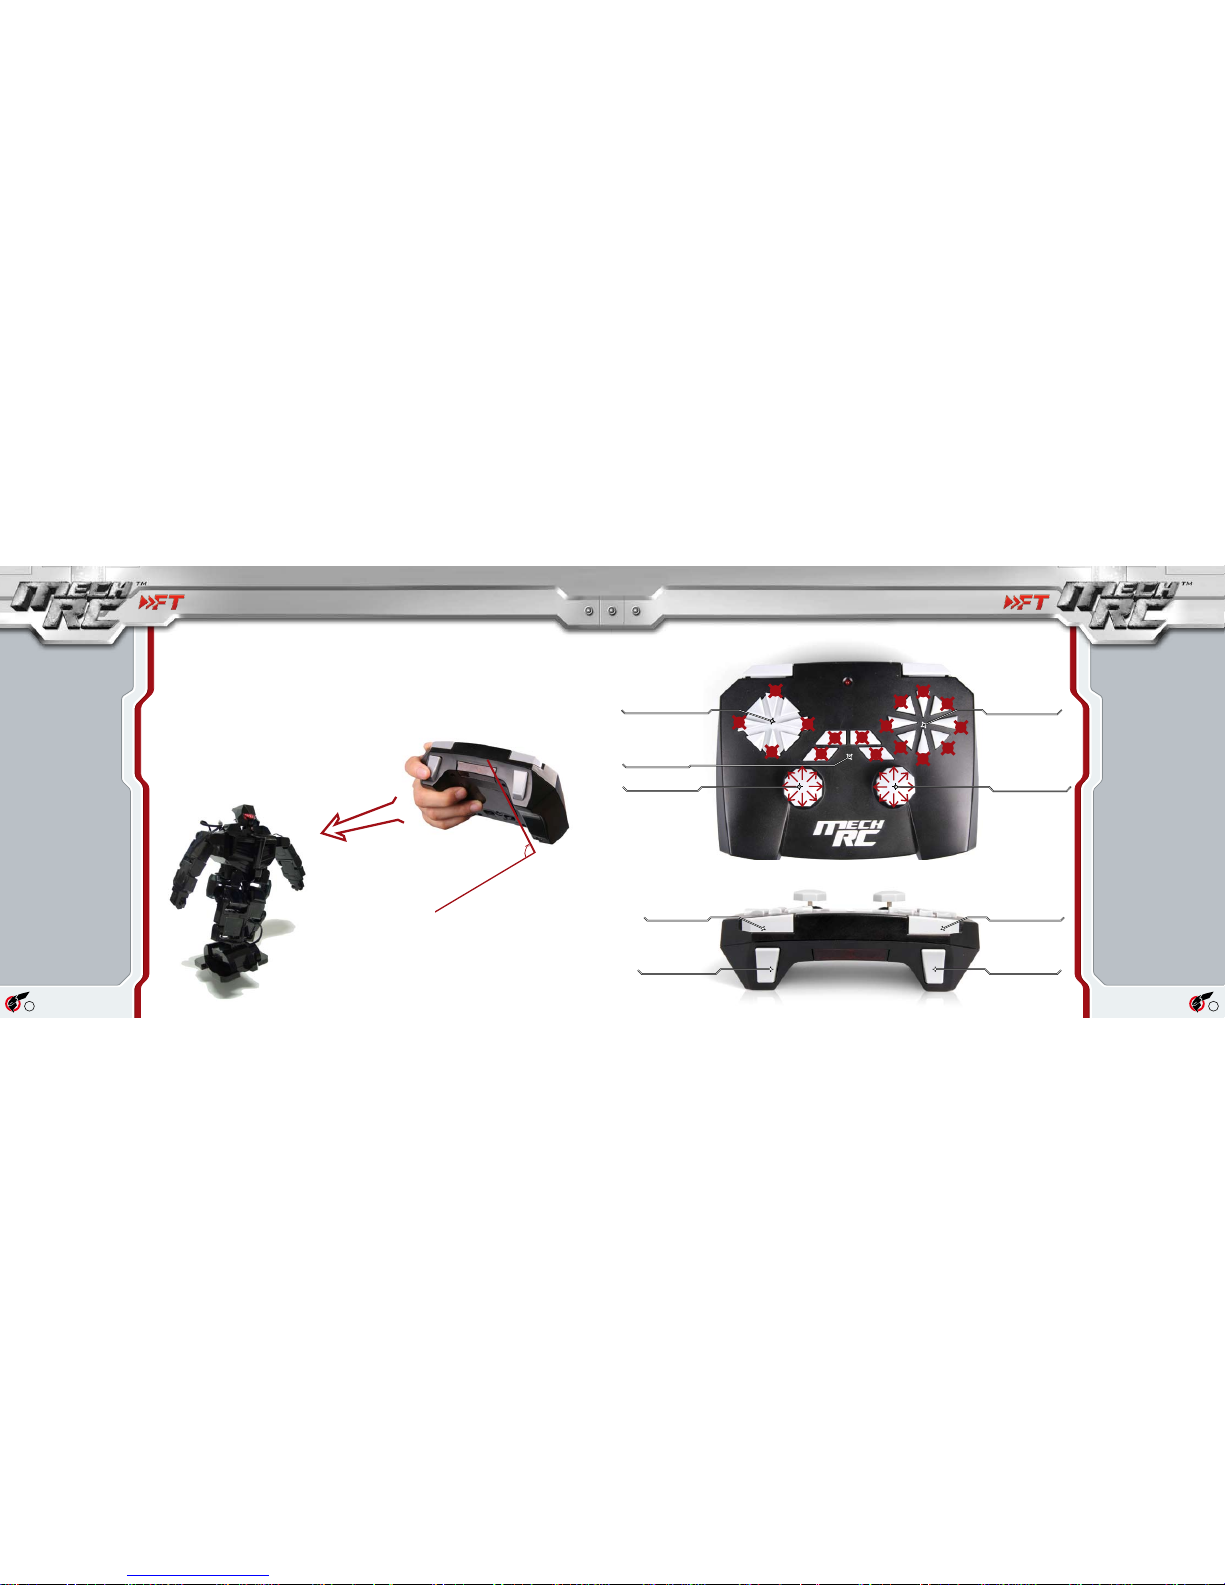
20
21
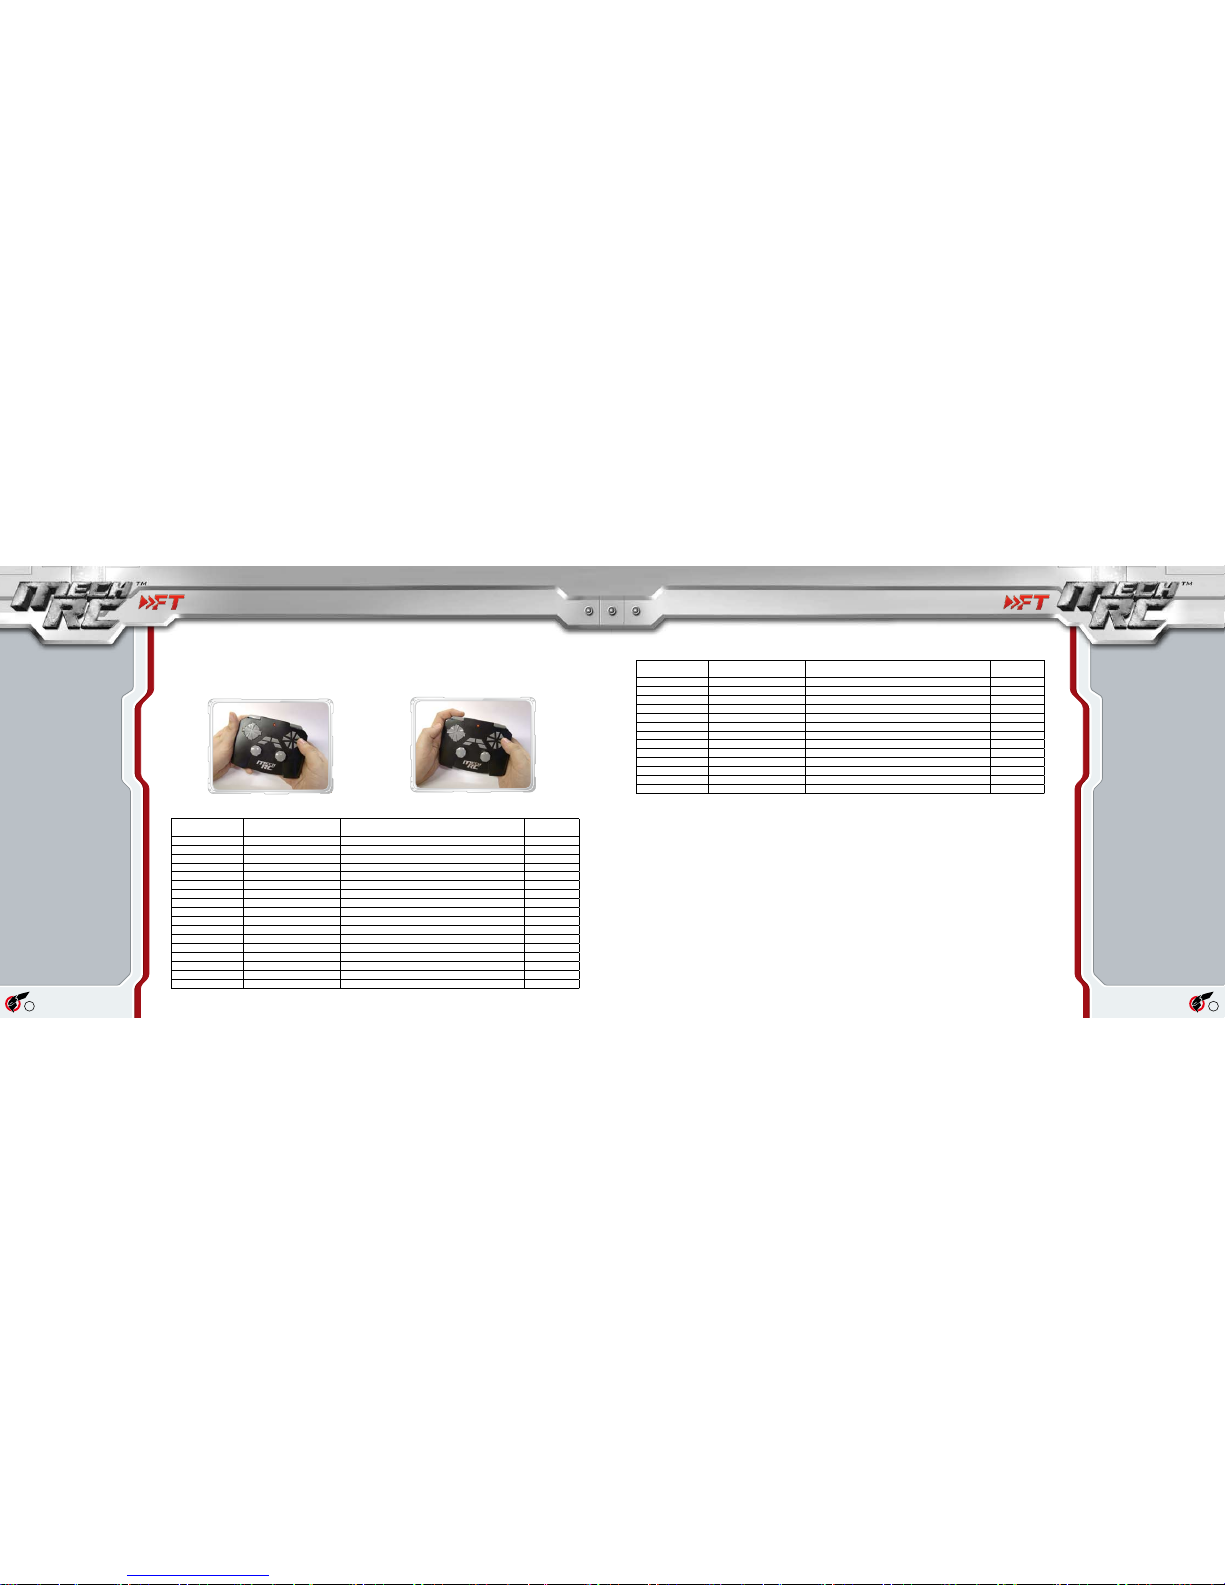
handset layout
IMPORTANT:
The infrared transmitter i n the remo te control ha ndset points down at
approximately a 45 degree angle in order to provide a more comfortable
operati ng ang le wh en con trolling the robot. For maximum range of
communica tion b etween t he hand set and robot, please obser ve the
illustration below when operating the robot.
Ri gh t D ir ec ti on
Pad (RD)
Left Direction Pad (LD)
Right Joystick (RJ)
Function Pad (F)
Right Joystick (LJ)
Ri gh t S ho ul der
Button (RS)
Right Trigger (RT)
L ef t S ho u ld e r
Button (LS)
Left Trigger(LT)
using the handset
1
2
3
4
5
6
7
8
1
2
3
4
1
2
3
4
45
O
Page 18
22
23
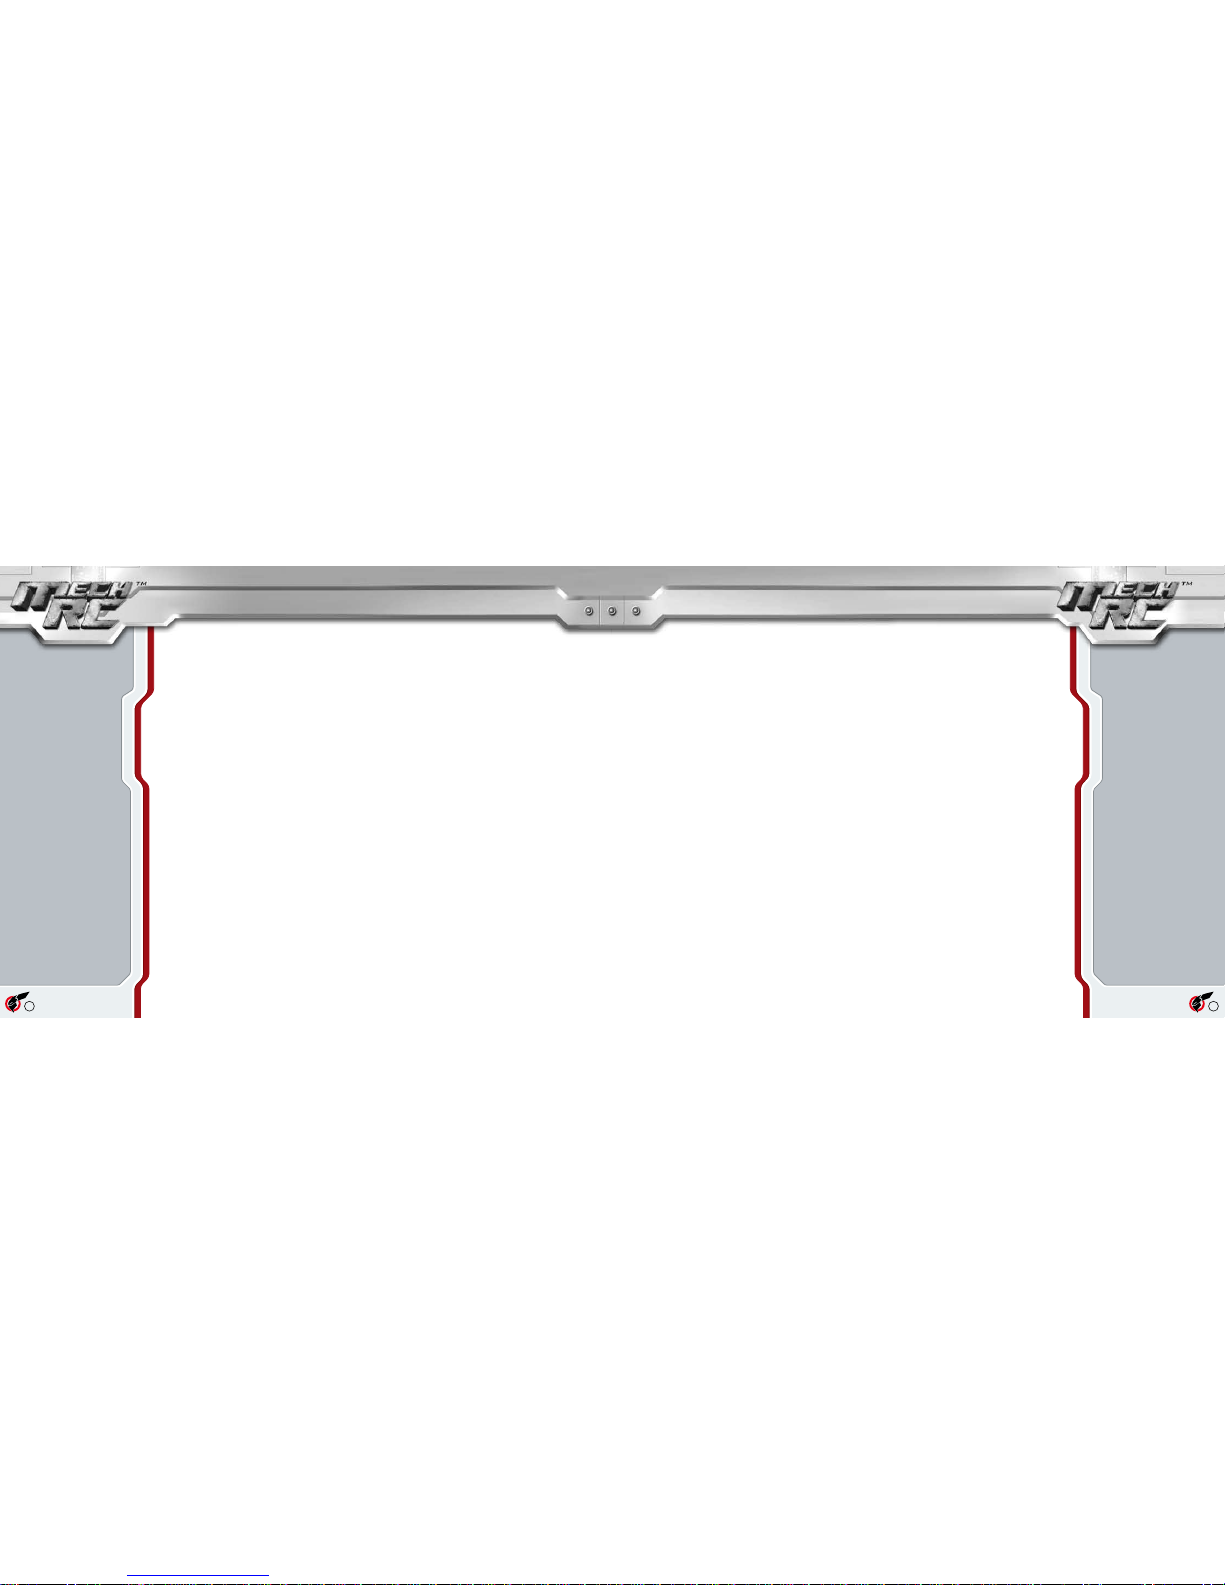
Default Handset Functions
Single button press
Combo-button press
Button Combination M e ch R C Co m ma n de r
Motion File
Motion Description Looping
Motion?
RJ Up Walk Forward Loop.MRCmot Robot walks forward Yes
RJ Down Walk Backwards Loop.MRCmot Robot walks backwards Yes
RJ Left Step Left.MRCmot Robot steps to the left No
RJ Right Step Right.MRCmot Robot steps to the right No
LJ Up Get Up From Front.MRCmot Robot gets up from lying on its front No
LJ Down Get Up From Back.MRCmot Robot gets up from lying on its back No
LJ Left Left Ball Kick.MRCmot Robot kicks with its left foot No
LJ Right Right Ball Kick.MRCmot Robot kicks with its right foot No
F1 Audio 1.MRCmot Robot plays audio le stored in memory location 1 No
F2 Audio 2.MRCmot Robot plays audio le stored in memory location 2 No
F3 Audio 3.MRCmot Robot plays audio le stored in memory location 3 No
F4 Audio 4.MRCmot Robot plays audio le stored in memory location 4 No
RD1 Salute.MRCmot Robot salutes No
RD2 Bow.MRCmot Robot bows No
RD3 Celebrate.MRCmot Robot pumps the air Yes
RD4 Wave.MRCmot Robot waves Yes
RD5 Handstand.MRCmot Robot performs a handstand No
Button Combination M e ch R C Co m ma n de r
Motion File
Motion Description Looping
Motion?
RD6 Matrixed.MRCmot Robot prepares for battle No
RD7 Karate.MRCmot Robot performs the "crane" move No
LS + RD1 Bounce.MRCmot Robot bounces up and down No
LS + RD2 Flapper Right.MRCmot Robot stands on left leg and aps arms No
LS + RD3 Sink and Swim Robot does a dance from the 60's No
LS + RD4 Pirouette Right.MRCmot Robot stands on left leg and stretches No
LS + RD5 Russian.MRCmot Robot performs a Russian dance No
LS + RD6 Pirouette Left.MRCmot Robot stands on right leg and stretches No
LS + RD7 Break Dance Robot does a dance from the 80's No
LS + RD8 Flapper Left.MRCmot Robot stands on right leg and aps arms No
LT Turn Left 30 Degrees.MRCmot Robot turns 30 degrees to the left No
RT Turn Right 30 Degrees.MRCmot Robot turns 30 degrees to the right No
LS + F1 Dance Routine The ultimate demo! No
The remote control handset is designed to operate in a similar way to a video game controller, allowing the user to use mu ltiple
button presses in order to trigger robot actions. This means that the robot is less limited in the number of accessible motions that
it can perform. The robot also features "looping" motions which will play the middle section of a motion repeatedly all the while a
button (or combination of buttons) is held down. This eliminates the need for the robot to return to the home position at the end of
each motion, thereby making motions such as walking more seamless.
Page 19
24
25
Part II: MechRC Commander Software
Page 20
26
27
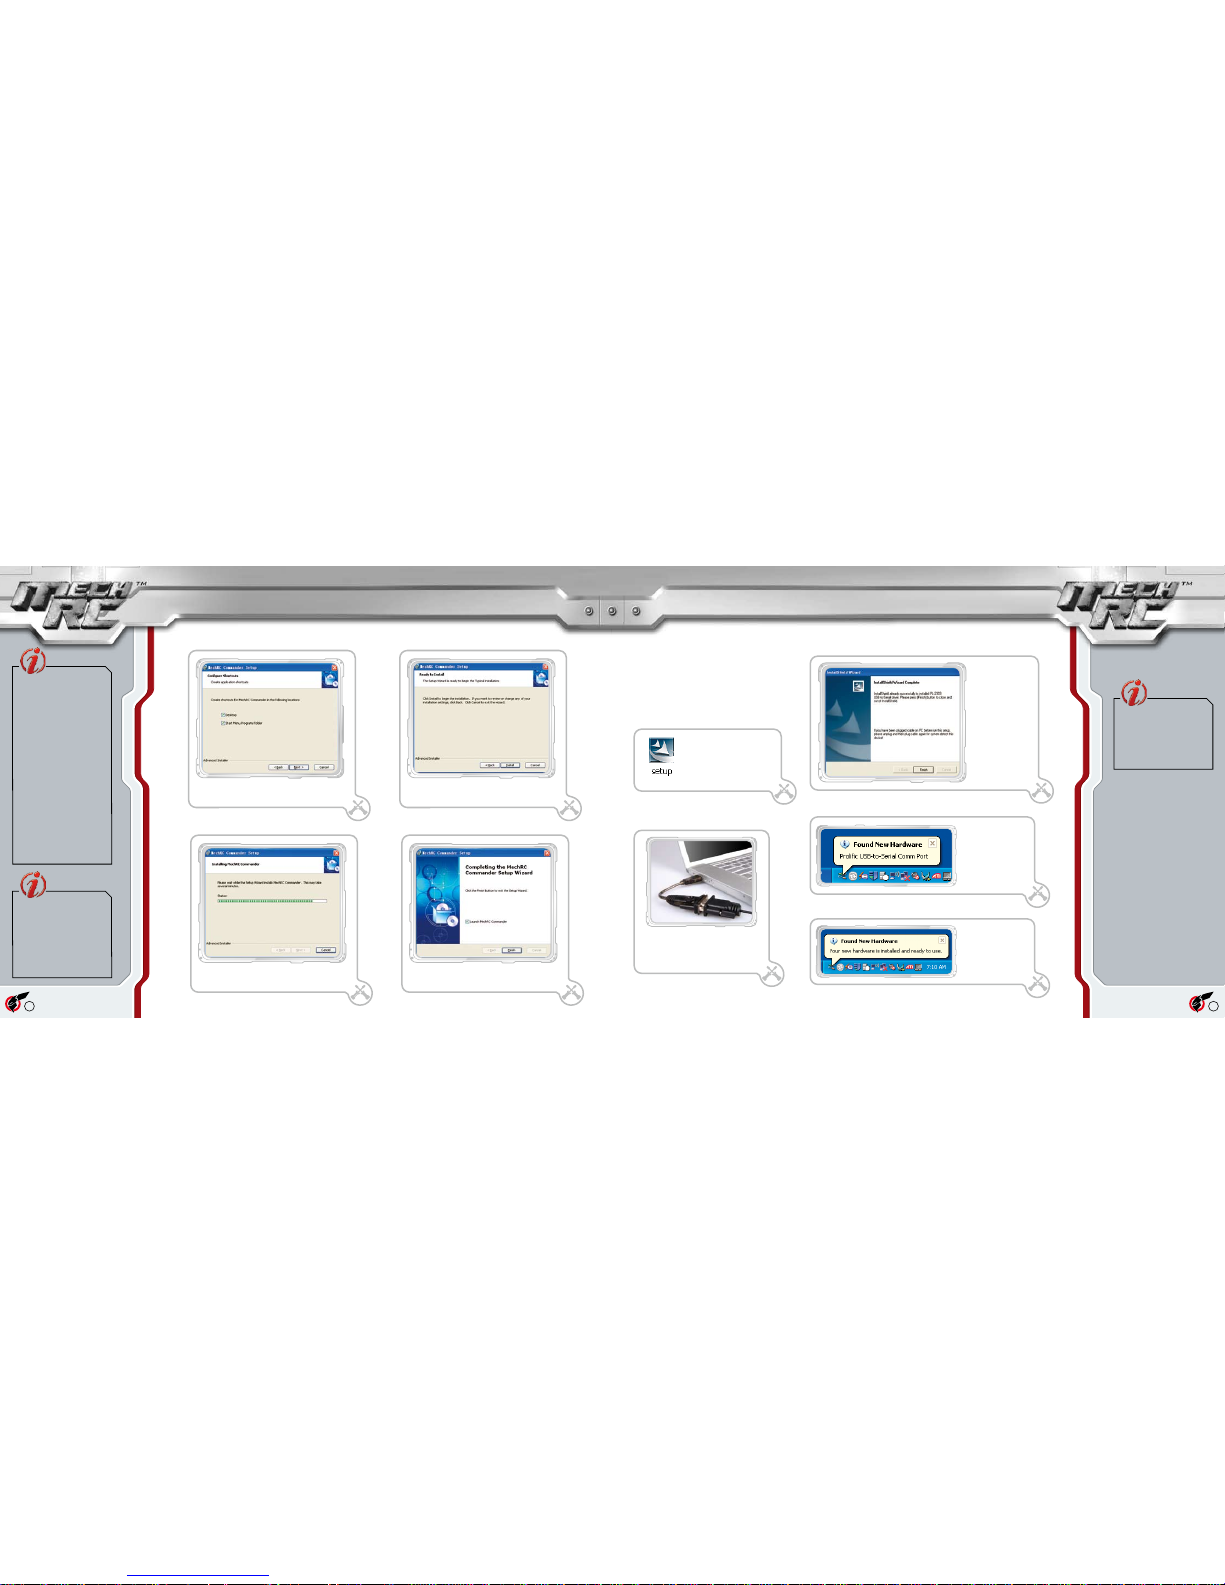
Conrm the installation directory and then click
the "Next" button.
4
Just like the MechRC hardware, the MechRC Commander software supplied on the CD-ROM has been designed to be
intuitive and easy to use whilst still providing advanced users with the exibility they need to develop complex action
sequences and, later, to interface to peripheral devices. This section will guide you through installing and using the
MechRC Commander software and all of its functions.
introduction to mechrc commander
installing mechrc commander
Run "Setup.exe" in the
"MechRC Commander"
dir ect ory of t he CD -
ROM. Note that you will
requir e Adm inistra tor
privi leges in ord er t o
install the software.
1
W h e n t h e
i n s t a l l a t i o n
program runs, click
the "Next " bu tton
to p rec ee d wi th
th e in st al la tio n
process.
2
If you agree to the terms and conditions set out
in t he E nd Us er Li cense Agree ment, select 'I
accept' and click on the "Next" button.
3
If you wan t t o e xpand yo ur
kno wled ge of th e Mec hRC
Commander s oftware beyond
the i nformation given in this
guide , l og o n to the of ficial
Mec hRC we bsi te for v ide o
tutorials and sample les:
www.mechrc.com
Alt erna tive ly log o n to the
comm unit y s ite to fin d o ut
what oth er user s ar e d oing
with their robots:
www.pimpmybot.com
Minimum System Requirements:
Operating System: Windows XP (Service Pack 2)/
Windows Vista (Service Pack 1)
Processor: Intel Pentium processor (or compatible), 1 GHz
Memory: 512MB RAM
Hard-disk space: 400MB
Interface: 1 x RS 232 serial port or 1 x USB 1.1
Video:
DirectX 9 compatible XGA (1024x768) display card
Other: CD-ROM drive
setup
Page 21
28
29
5
Once Windows has
installed the drivers,
the USB adapter is
available for use.
Run "Setup.exe" in the "USB
to RS23 2" directo ry of the
CD- RO M. N ote t hat you
will requi re A dminist rator
privileges in order to install
the software.
1
After the installation
has completed, click
the "Finish" button.
2
Conne ct t he U SB t o RS 232 adapte r
into a free USB port.
3
4
installing the usb-serial adapter
To conrm the installation click the "Install" button.
The installation will proceed.
7
Cli ck the " Fini sh" b utto n t o comp let e t he
installation.
8
Windows will
automatically detect
the USB adapter and
install the required
drivers.
The robot can b e con nected direct ly to a f ree
9-pin RS2 32 se rial port on your PC, howev er
many computers no longer have such ports and
will require the use of the supplied USB to RS232
adapter. To install the adapter, please follow the
instructions on this page.
Windows Vista Users
Windo ws V ista inclu des the
required drive rs as standa rd
and wil l automatic ally inst all
the required drivers when the
adapter is plugged in.
Sel ect t he sh ort cut i con s you wi sh to b e
installed.
5
6
Additional components
that may be installed on
your computer
Du ri n g t he in st al la t io n
p ro c e ss t h e i ns t a l le r
wi ll in st all the f ol low in g
prerequis ite comp onents on
your computer if they are not
already present:
- V i s u a l C + + 2 0 0 8
Redistributable
- DirectX 9.0
- Net Framework 2.0
If t he s e p a ck a ge s ar e
ins tal led b y t he in sta lle r,
you will see a pr ogress bar
ap pe ar on yo ur sc re en .
Thes e i nstal lati ons can be
cancel led, b ut th is wi ll al so
terminate the in stallation of
MechRC Commander.
Windows Vista Users
Win dows V ist a user s may
encounte r the messag e "An
unident ified program wants
acc ess to y our co mpu ter"
during the installation.In this
case it is saf e to cl ick the
"Allow" button.
Page 22
30
31
main window layout
connecting to the robot
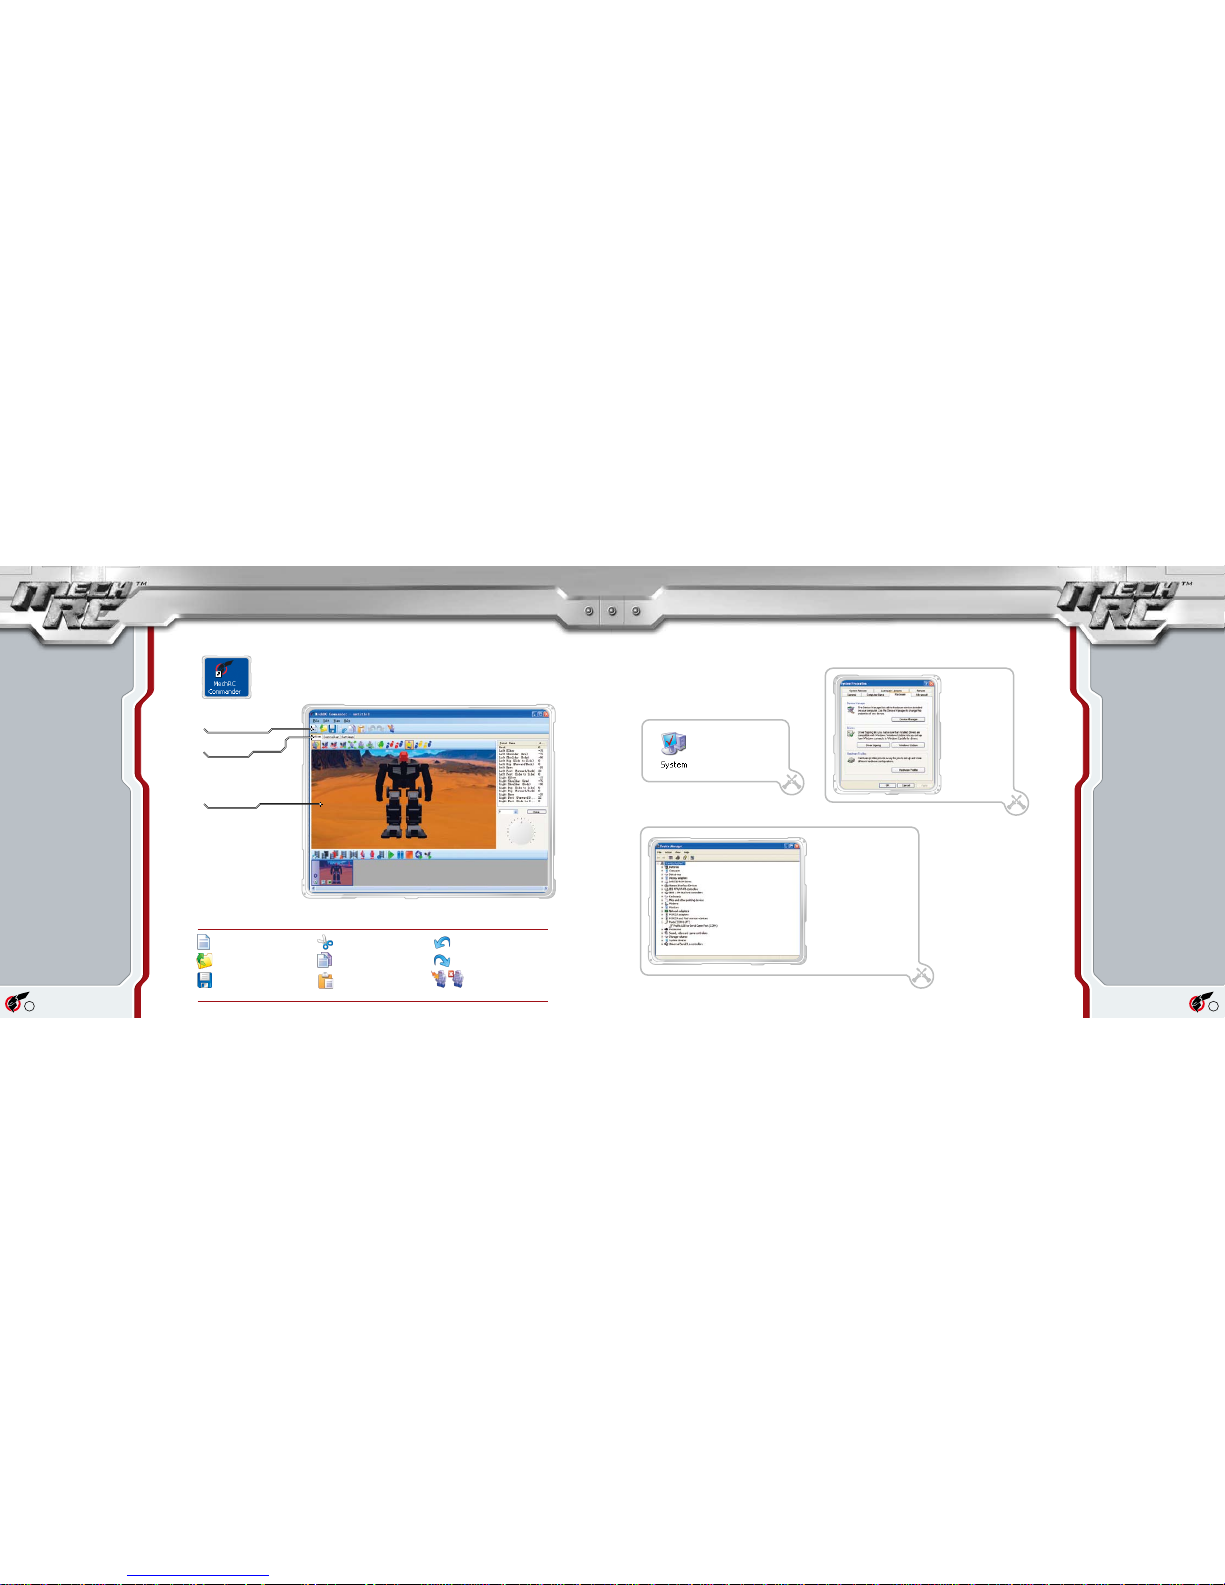
To run MechRC Comma nder, do uble c lick on the program icon on y our des ktop or run the
software from th e Start menu. The sof tware may take a few s econds to appear - pleas e be
patient! When the software loa ds, you will see the main program screen. This screen c ontains
items that are common to all software views (detailed below):
New File
Open File
Save File
Cut
Copy
Paste
Undo
Redo
Connect/Disconnect from robot
(Th e ic on di spl aye d wi ll be
dependent on the curr ent state
of the connection)
Double-click on the System
icon in the Control Panel or
right click on My Computer
and select "Properties".
1
Select the
"Hardware" tab and
then click "Device
Manager" to view
your hardware
conguration.
2
Locate the "Ports (COM & LPT)"
entr y in th e ha rdware li st t o
see wha t physical serial ports
your P C has (if y our PC has a
9-pin serial connection it will be
listed here) or which CO M port
the USB ad apter i s prov iding.
This por t w ill be deno ted by
"Proli fic USB-to- Serial Com m
Port (CO MX), whe re X i s th e
number of the COM port.
3
Before connecting to the robot you will need to identify
which serial (COM) port of the PC it is connected to. If
you will be using the USB to RS232 adapter to link to
the robot and have not already done so, connect it to
the PC.
Icon Key:
Tab Select
Tab Window
Universal Tools
Page 23
32
33
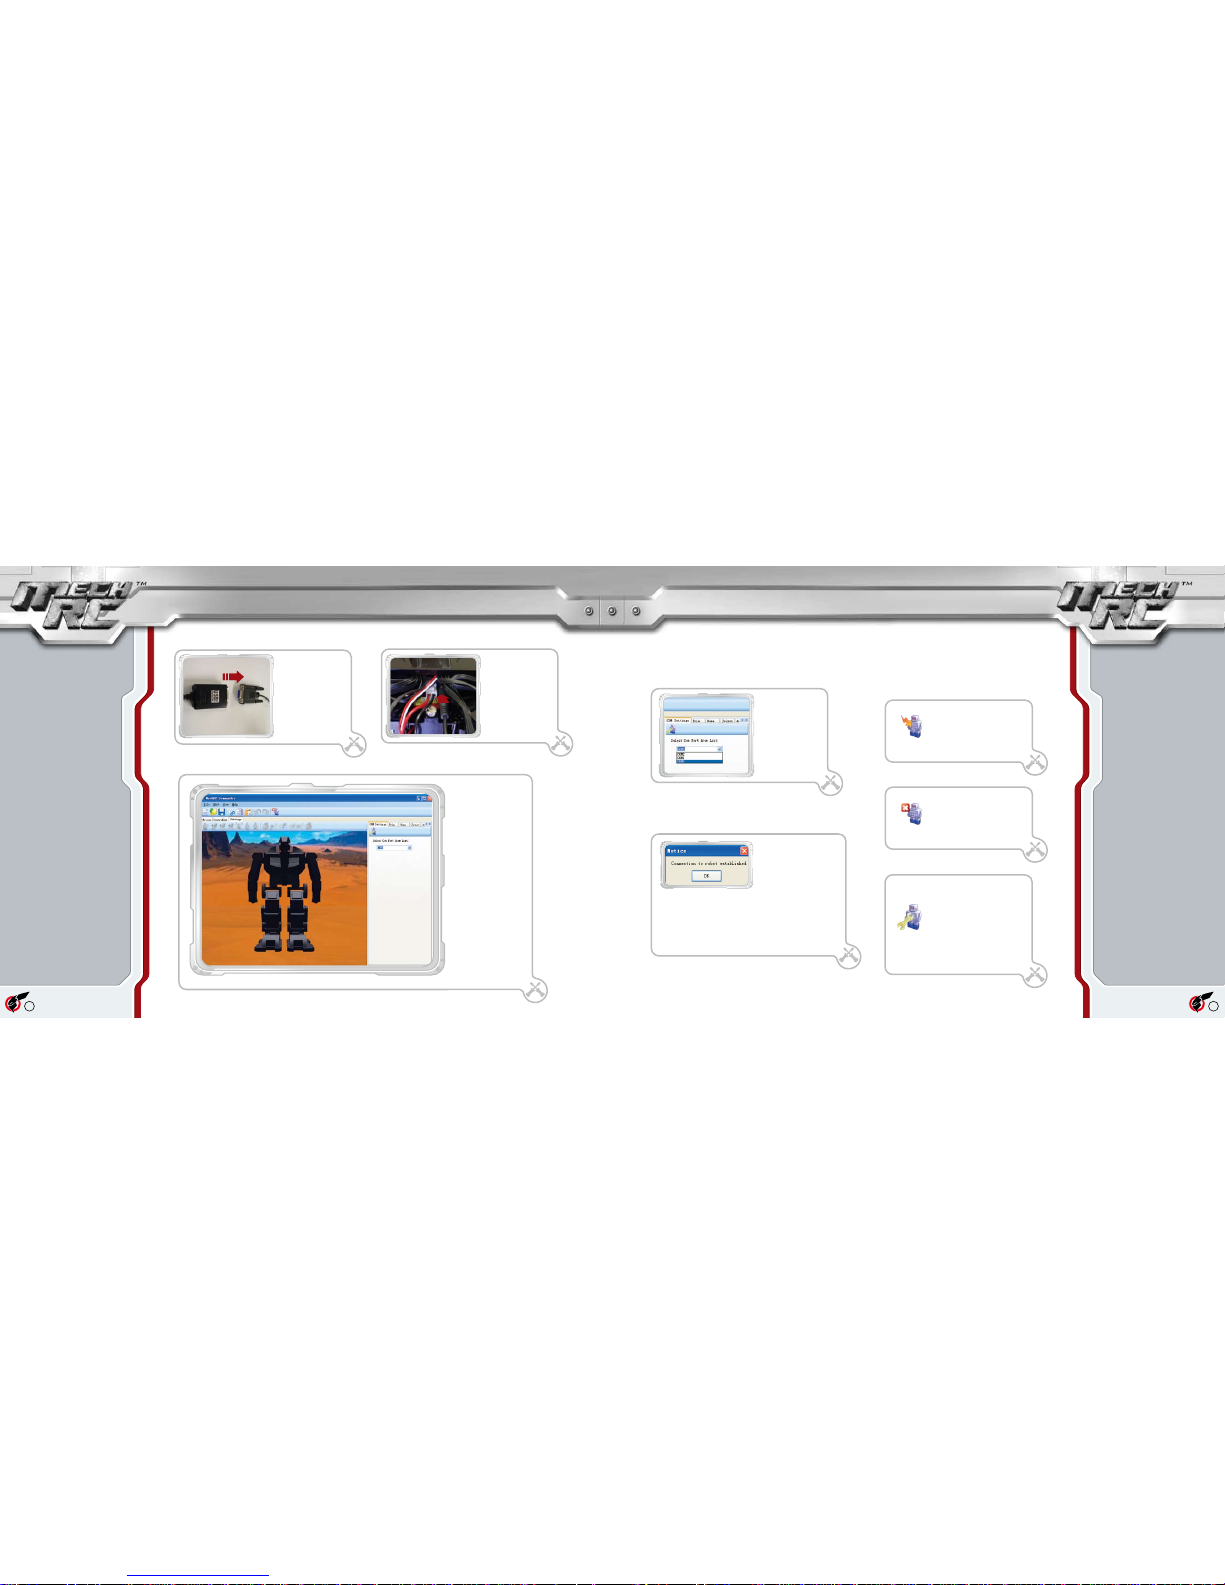
Se l ec t t he C OM
port you ident ified
in Step 3 as bein g
con nec te d to th e
robot.
7
If t h e c o nn e c ti o n i s
su cc es sf ul a di alo gu e
box w ill ap pear i nforming
you t hat c ommunica tions
with the robot have been
established.
9
Conne ct t he serial
progr amming lea d
to th e 9-pin socket
o n t h e U S B t o
RS23 2 a dapte r o r
PC.
4
5
Ins ert th e 3 .5mm
jack p lug into t he
ser ial p ort o f the
co n tr o l m o du l e
(l o ca te d o n t h e
un der si de o f the
robot's backpack).
C l i c k o n t h e
"S ett ing s" t ab i n
the main pr ogram
win dow a nd th en
se le ct t he "C OM
Settings" tab on the
righ t h and side of
the screen.
6
Power up the robot and click
on the Connect to Robot icon
on the universal tool bar.
8
To disconnect from the robot,
click on the Disconnect from
Robot ico n on t he univers al
tool bar.
10
If the connection fails, check the physical connections to the
robot and double check the COM port settings in the device
manager. N ote that if you are co nnecting to a se rial port
built into the PC there may be more than 1 por t available.
Try conn ecting to a dif ferent C OM number from the drop
down menu.
If at a ny t ime you wish to
check tha t th e co nnectio n
to the robot is establishe d,
you can r eturn to th e COM
tab in Settings a nd click on
the Test R obot Connect ion
button. If the connec tion is
made the n the "Connection
to r ob o t e st a bl i sh e d"
dial ogue box (se e St ep 9)
will be displayed.
11
Page 24
34
35
motion editing
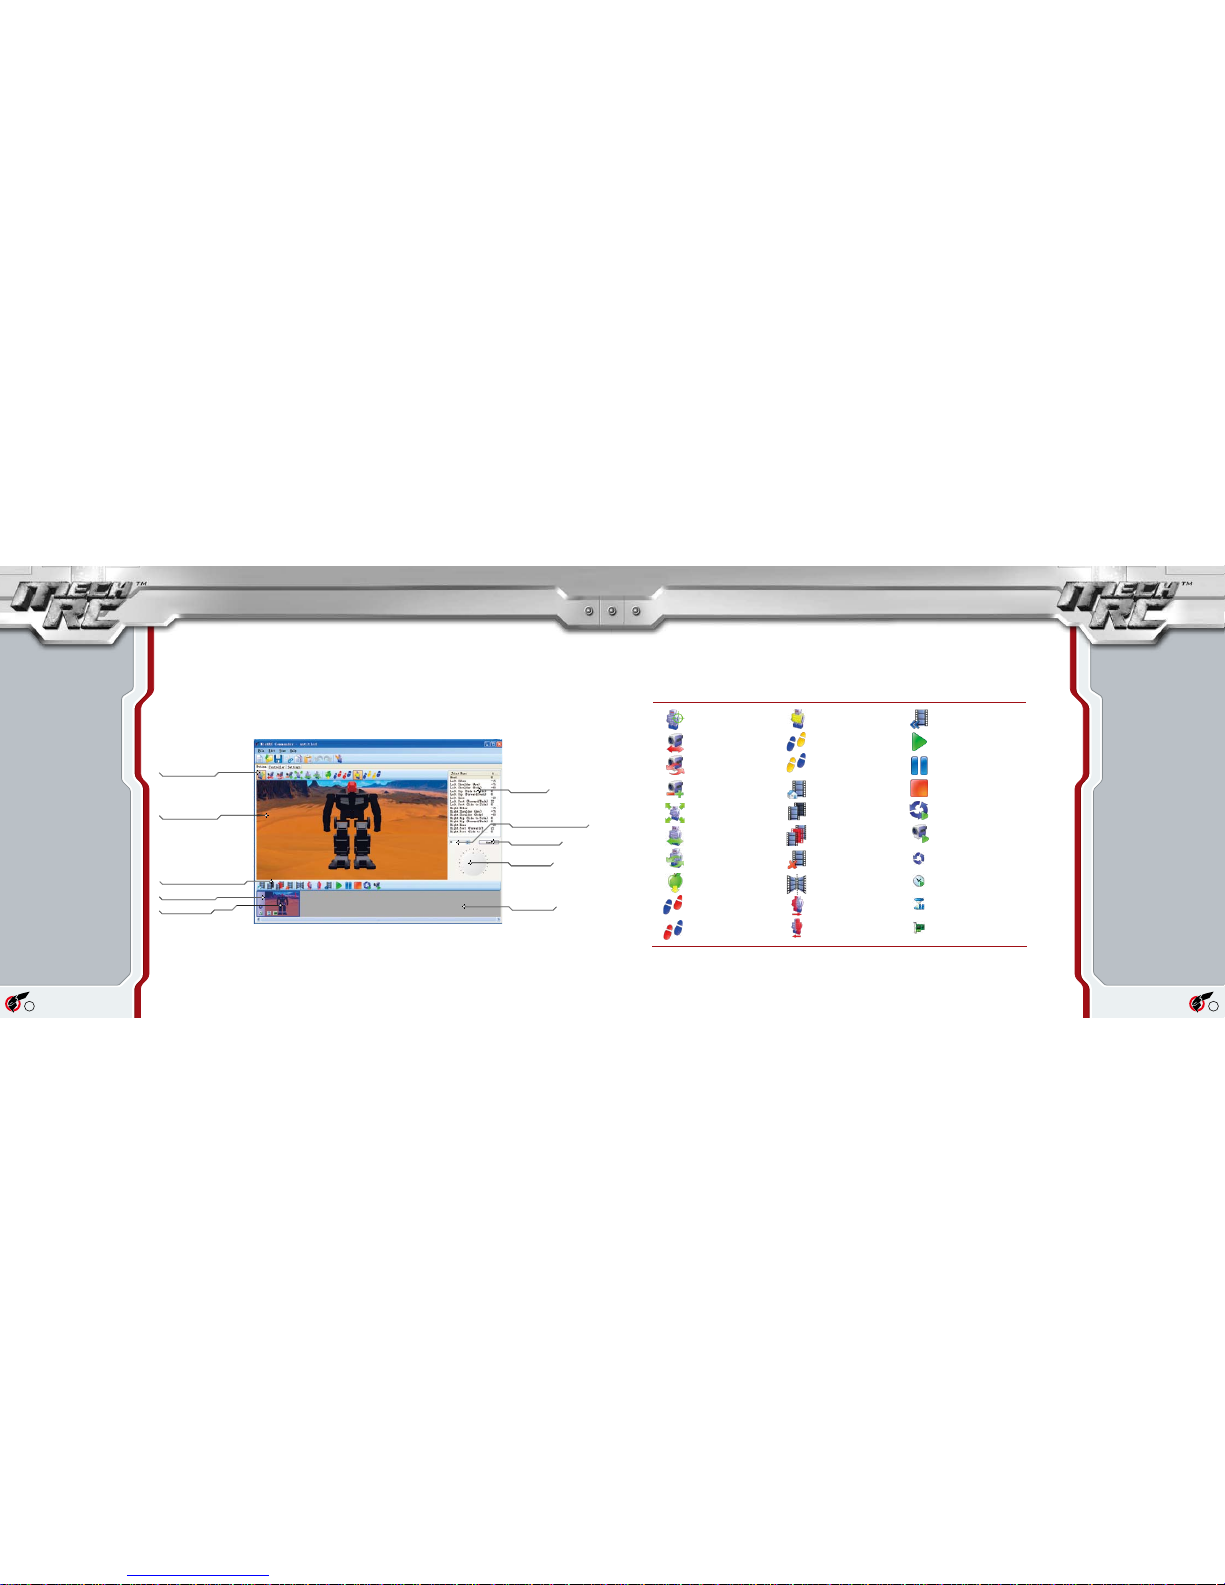
Joint List
Current Joint Angle
Home Button
Servo Dial
Edit & Playback Tools
Pose Frame
Frame Viewer
Viewer Tools
Film Strip
MechRC Commander makes creating motion les for your robot a piece of cake. The process of creating an action sequence
in the motion editor is much like that of creating a stop motion animation with clay models. Each pose frame in the lm
strip represents a position that the robot must move to. The transition bars between each frame specify the time it takes for
the robot to move from the previous frame to the next. By stringing together a number of these frames, complex motions
can be sequenced. Motions are edited under the Motion tab in the main program window, the layout of which is shown
below:
Joint Selection Tool
Pan Camera
Rotate Camera
Zoom Camera In/Out
Fit Robot to Screen
Apply Loop to Frame
Set Frame Transition Time
Set Frame Delay Time
Set Frame I/O
Insert Home Frame
Insert Duplicate Frame
Insert Tween Frame
Delete Selection
Mirror Selection
Copy Right to Left
Copy Left to Right
Reference to Chest
Reference to Left Foot
Reference to Right Foot
Icon Key:
Transition Bar
Pan Robot
Rotate Robot
Gravity Snap
Plant Left Foot
Plant Right Foot
Reverse Selection
Play Motion
Pause Playback
Stop Playback
Loop Playback
Toggle Animation of Camera
Page 25
36
37
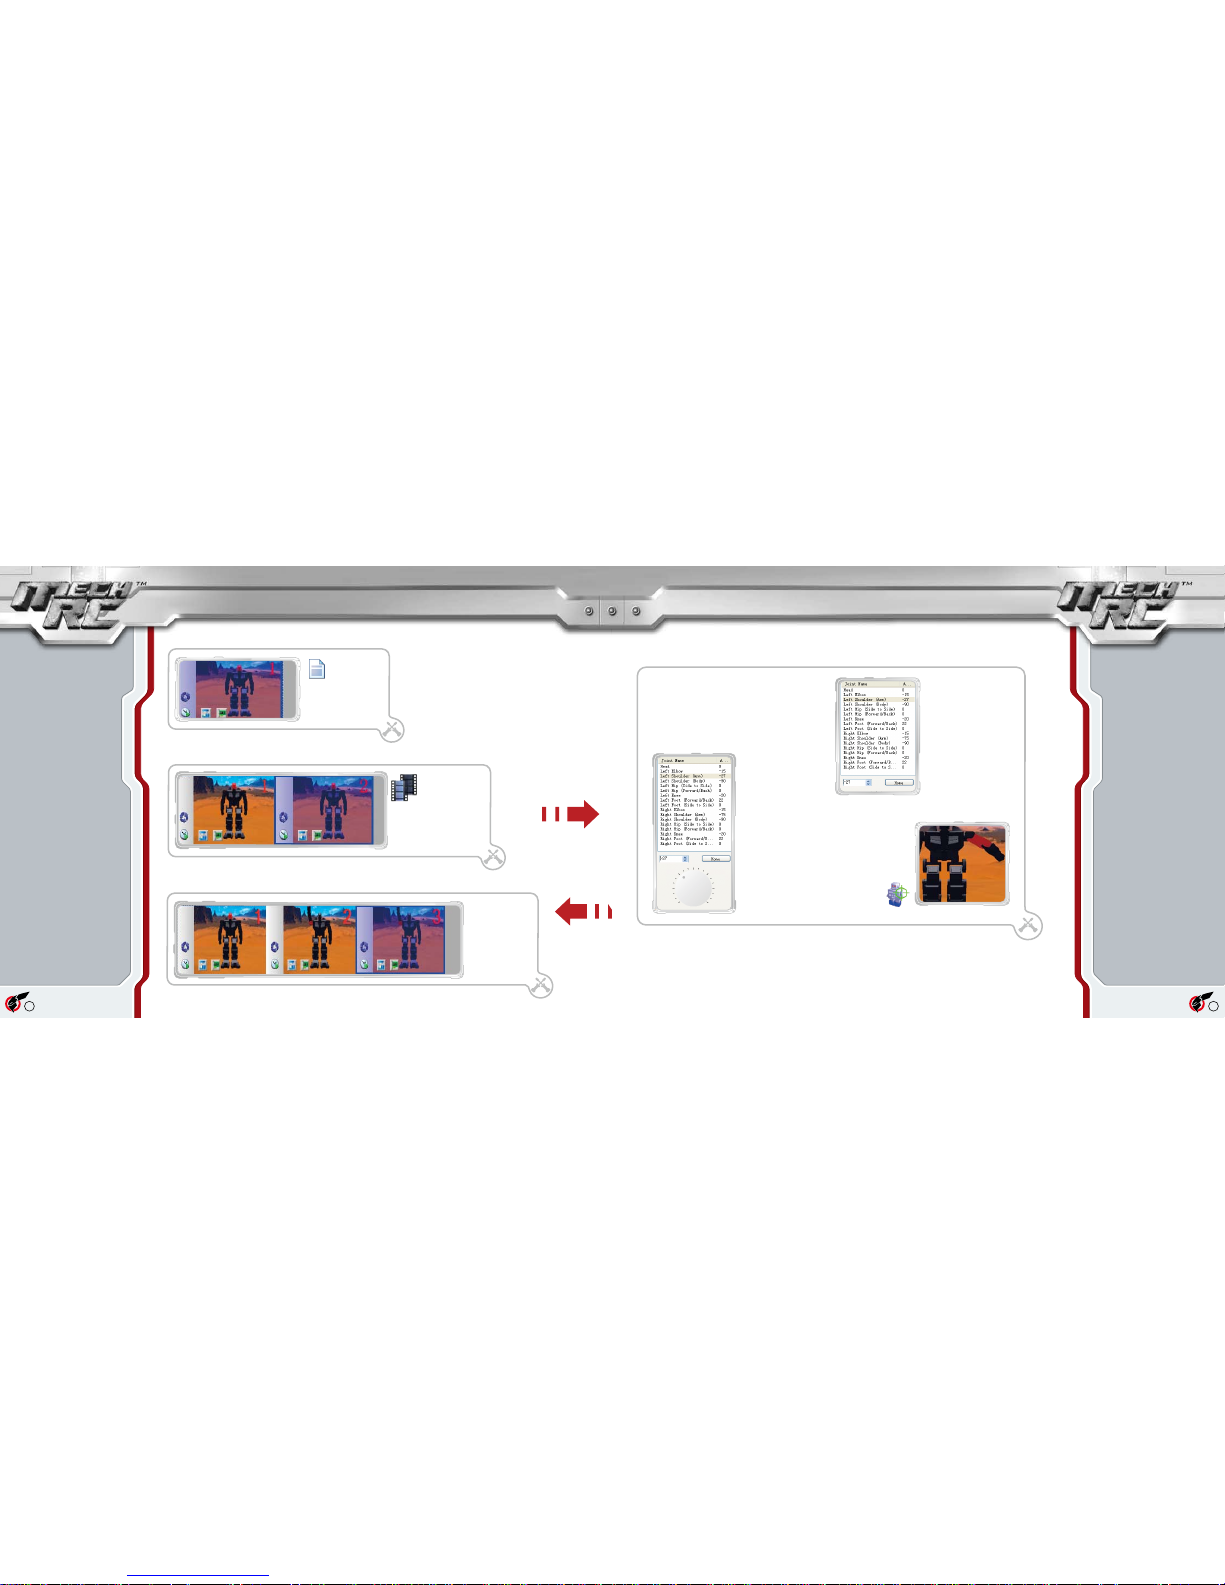
Method C: Select the joint selec tion t ool a nd
then click on the joint o f the ro bot you w ish to
move in the frame viewer (the selected joint will
then b ecome h ighlighted in re d). To move the
joint click and hold the left mouse button whilst
dragging the mouse left and right.
3
Method A: Select a joint to
move fro m th e j oints lis t
(the selected joint will then
become highlighted in r ed
on th e robo t imag e in the
fram e viewe r) and mo ve
the jog dial with the mouse
pointer to the desired angle.
Method B: Select a joint to
mov e from t he jo int s list
(the selected joint will then
become highlighted in red on
the robot image in the frame
viewe r) and edit the ang le
in the jo int angle eld to the
desired value (you may al so
use the u p/down arrows to
the left of the fiel d to fin e
tune the value).
Next you will need to move the joints of the robot to give
the pos e that you want for the first step in the mot ion.
Most join ts can be moved to any position bet ween +90
and -90 degrees (although the arc of travel for some joints
may be limited by the frame of the robot). This ca n be
done in one of the three ways described here. Note that
if a co nnection to the robot is established, the ro bot will
move simultaneously with the robot on screen.
creating a motion file
Clic k on th e " New File"
icon on the universal tool
bar. The rst frame in the
lm strip will be set to the
home position by default.
1
Cre ate a dup lica te
fr am e t o ed it . I n
mo s t c as es i t i s
advised to keep t he
first and last f rames
in a motion as home
fr a me s to m ak e
trans ition from one
mot ion t o anot her
appear seamless.
2
Add further frames
to t h e m o ti o n
sequence with the
Dup lic ate F ram e
tool.
4
Page 26
38
39
Remember to end your motion sequence on a home frame by selecting the nal frame and clicking on
the Insert Home Frame button.
7
5
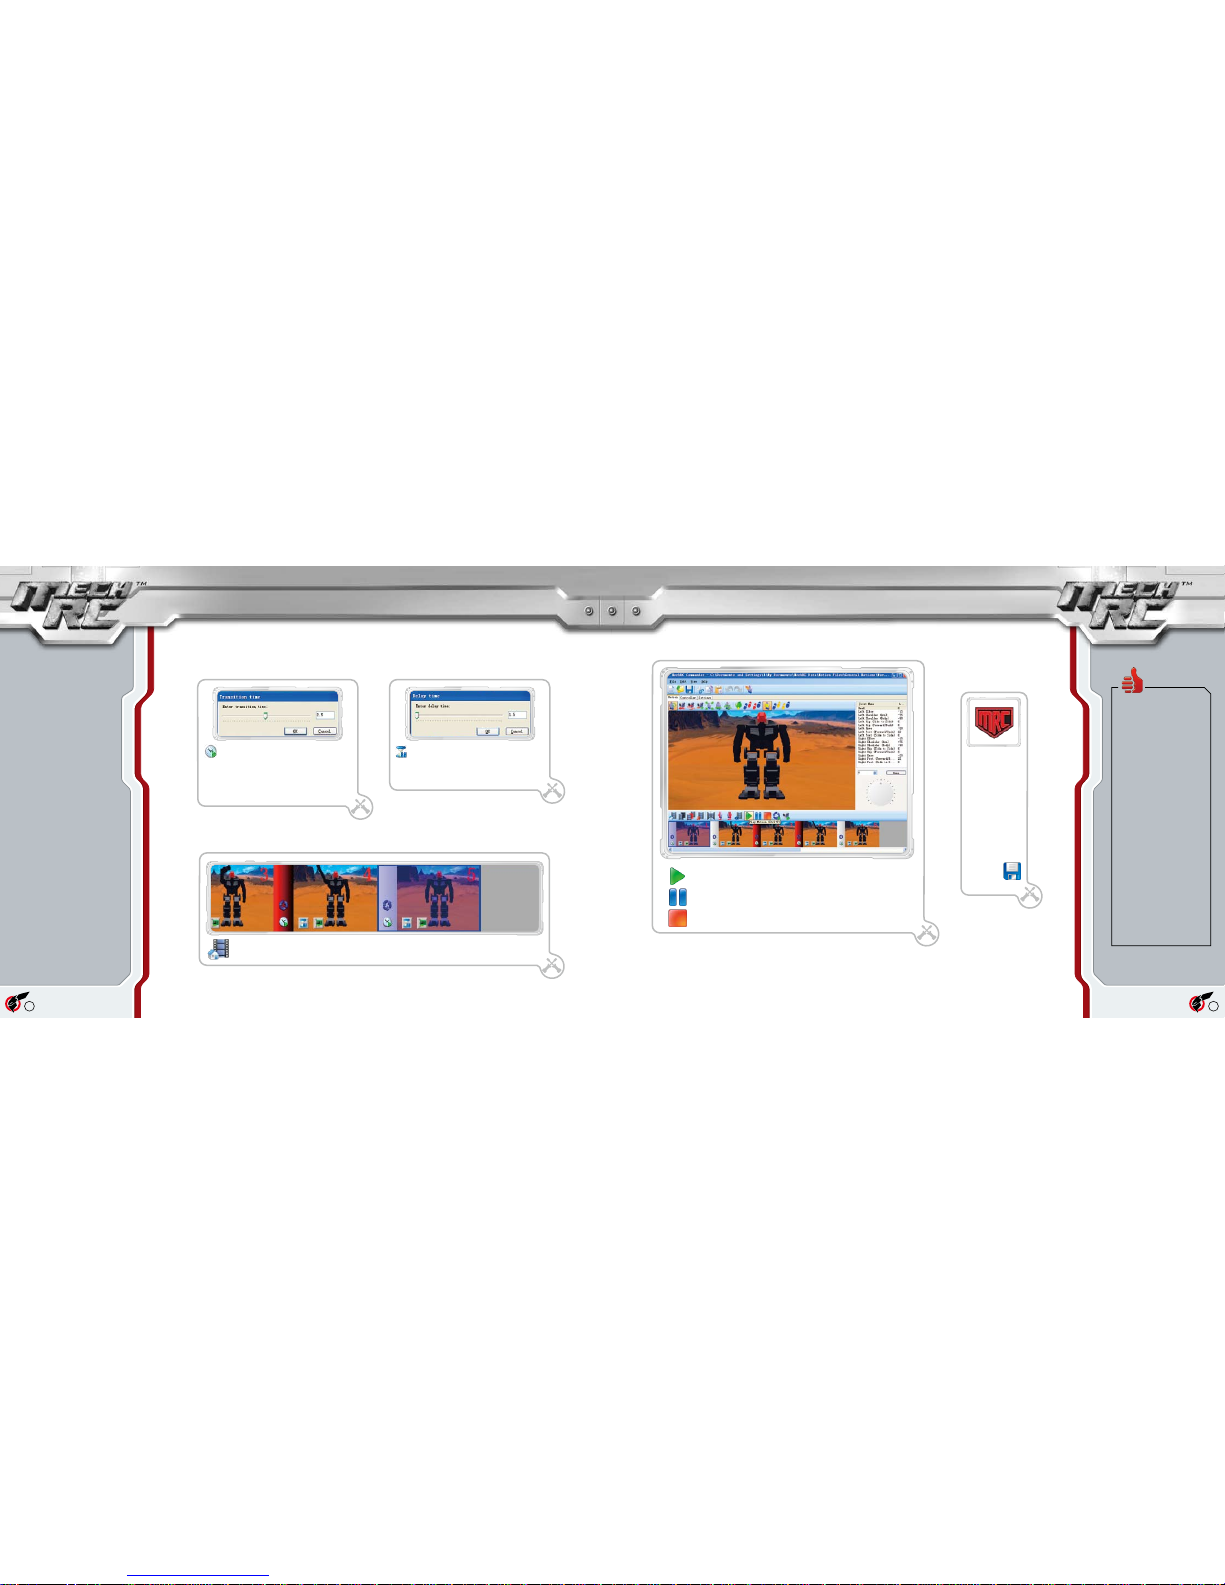
Click on the Transi tion time icon on the
transit ion ba r betwe en po se fra mes. You
can now se t t he time it ta kes to move
between the two frames either side of the
transition bar (between 0.1 and 5 seconds).
Repeat this process for all pose frames in
the motion sequence.
6
Click on the Delay icon in the pose frame
to set a pe riod of time (between 0 and 5
seconds) that the robot will wait for before
movin g du ring playb ack of t he s electe d
frame.
You can ch eck the p erformance of the motion file by clicking the play
button on the Edit/Pl ayback to ol bar. This will play the motion from
the currently selected frame in the lm strip to the end. You may also
pause, restart or stop the motion at any time during p layback. Note
that if a connecti on to the r obot is estab lished, the ro bot wil l move
simultaneously with the robot on screen.
8
Re m em b er t o
save your motion
fil e by c li cki ng
on th e Save icon
on the unive rsal
tool bar. The f ile
will be save d as
a .M RCm ot fi le
in t he M ec hR C
Da ta\ Mo tio ns \
Sha dow Sta lke r
f o ld e r i n M y
Documents.
9
First transition time in a
motion file
New frames (not those copied
from elsew here) are alway s
cre ated wi th a 2.5 se cond
tra nsit ion ti me ass ocia ted
with the m. As a re sult, you
may wish to re duce the time
on the rst frame of a motion
file to a lower value (su ch as
0.1 of a second).
The reason for this is that you
are likely to have set the rst
frame as a home frame. If the
robot is alrea dy in the ho me
position be fore you p ress the
play button o r the button on
the hands et, then it will take
2.5 sec onds to tr avel fr om
the ho me pos iti on of th e
robot to the pos ition in the
first frame of the motion . If
these positions are the same,
then it will result in the r obot
remaini ng sta tionary for the
fir st 2.5 s eco nds wh ich i s
likely to be undesirable.
Page 27
40
41
1
1
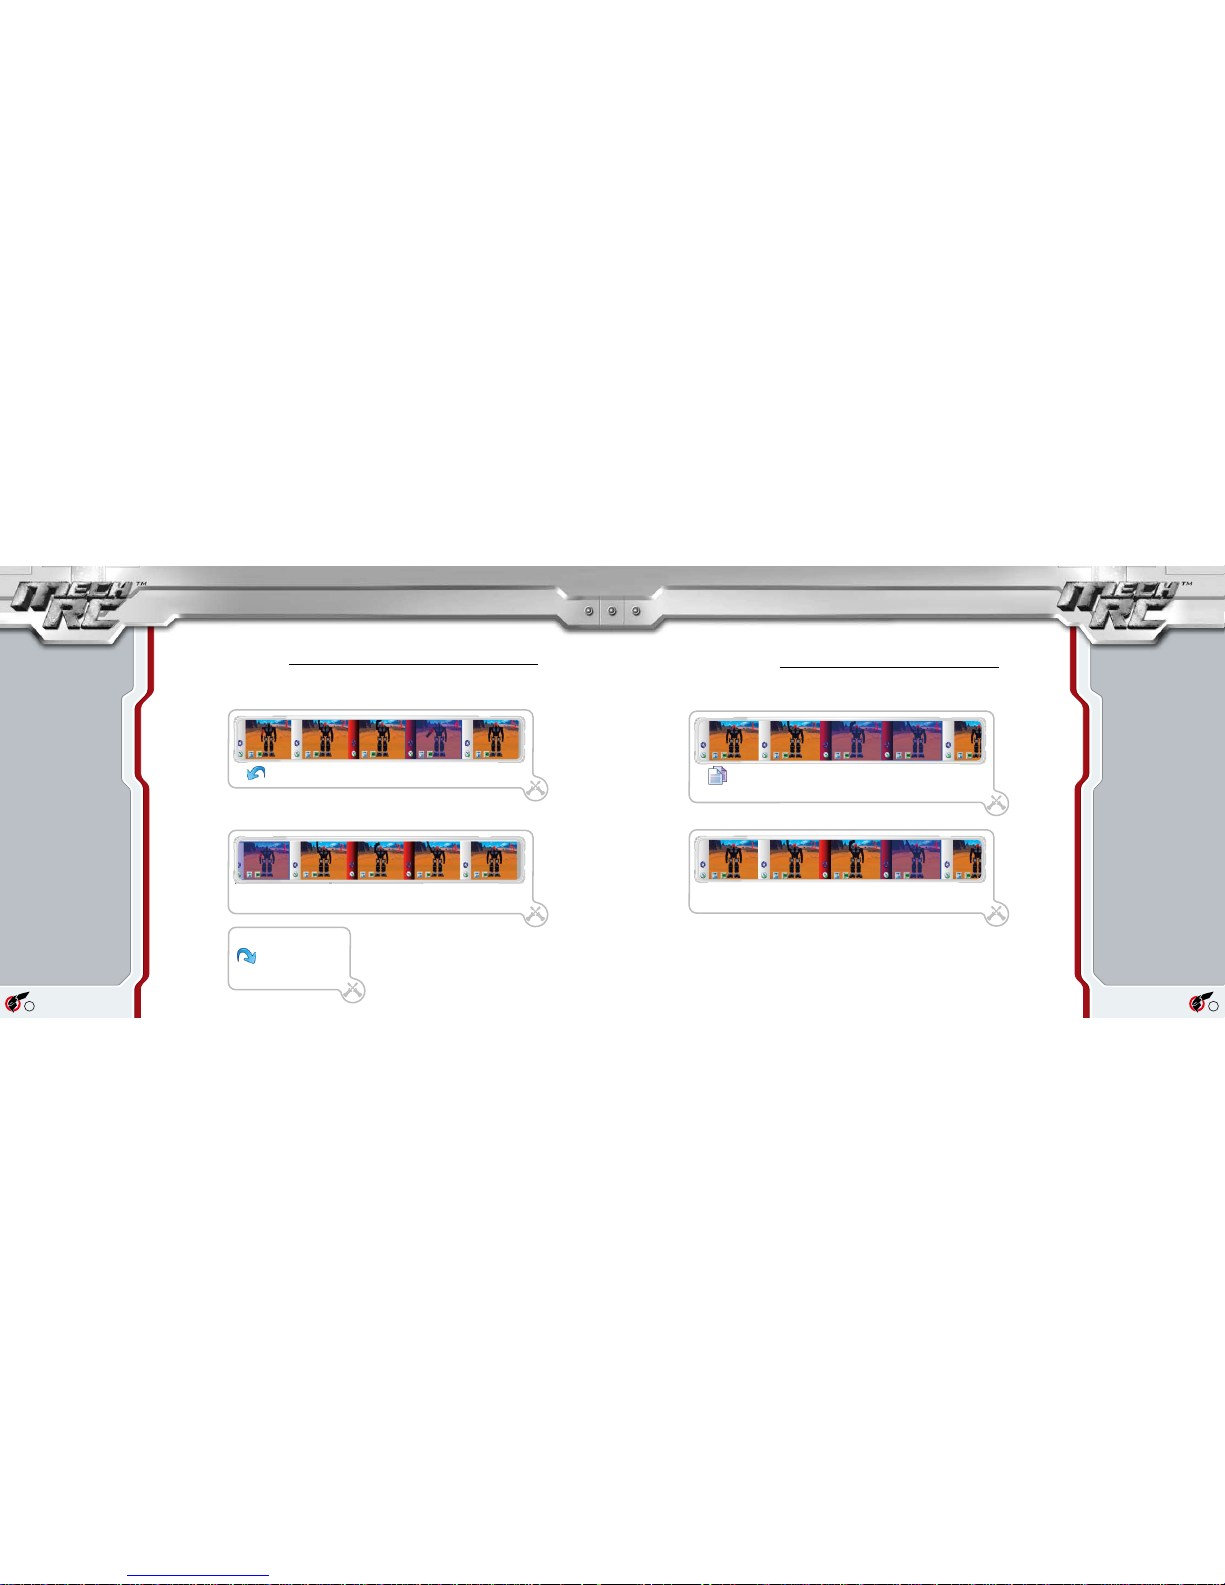
Select the frame you wish to copy by lef t-clicking on it. You can select multi ple
frames by clicking on the rst frame you wish to select, holding down the Shift key
and clicking on the last frame you require. To copy the frames click on the copy
icon from the universal tool bar.
further editing tools
Cut, Copy, Paste, Delete:
The MechRC Commander software includes these standard editing facilities for manipulating frames
in the lm strip.
Select the frame immediately before the location you wish to insert the copied frame.
2
At any point while editing a motion le, a controller le or settings you may click
the Undo button to cancel the last action performed.
Undo and Redo:
The MechRC Commander software includes these standard editing facilities to help you to recover
from accidental changes made to your work. You can undo or redo u p to ve levels of changes in
your work history
Once the Undo button has been pressed, you will be returned to th e first frame in the
motion sequence.
2
Sh o u l d y o u wi s h to
reinstate an action in your
work history that has been
undone , si mply click the
Redo button.
3
 Loading...