


USB-231
User's Guide
Analog and Digital I/O
January 2019. Rev 4
© Measurement Computing Corporation

HM USB-231.docx
Trademark and Copyright Information
Measurement Computing Corporation, InstaCal, Universal Library, and the Measurement Computing logo are
either trademarks or registered trademarks of Measurement Computing Corporation. Refer to the Copyrights &
Trademarks section on mccdaq.com/legal
for more information about Measurement Computing trademarks.
Other product and company names mentioned herein are trademarks or trade names of their respective
companies.
© 2019 Measurement Computing Corporation. All rights reserved. No part of this publication may be
reproduced, stored in a retrieval system, or transmitted, in any form by any means, electronic, mechanical, by
photocopying, recording, or otherwise without the prior written permission of Measurement Computing
Corporation.
Notice
Measurement Computing Corporation does not authorize any Measurement Computing Corporation product for
use in life support systems and/or devices without prior written consent from Measurement Computing
Corporation. Life support devices/systems are devices or systems that, a) are intended for surgical implantation
into the body, or b) support or sustain life and whose failure to perform can be reasonably expected to result in
injury. Measurement Computing Corporation products are not designed with the components required, and are
not subject to the testing required to ensure a level of reliability suitable for the treatment and diagnosis of
people.
2

Table of Contents
Preface
About this User's Guide ....................................................................................................................... 5
What you will learn from this user's guide ......................................................................................................... 5
Conventions in this user's guide ......................................................................................................................... 5
Where to find more information ......................................................................................................................... 5
Chapter 1
Introducing the USB-231 ...................................................................................................................... 6
Device features ................................................................................................................................................... 6
Functional block diagram ................................................................................................................................... 7
Chapter 2
Installing the USB-231 .......................................................................................................................... 8
Unpacking........................................................................................................................................................... 8
Installing the software ........................................................................................................................................ 8
Installing the hardware ....................................................................................................................................... 8
Calibrating the hardware..................................................................................................................................... 9
Chapter 3
Functional Details ............................................................................................................................... 10
Analog input acquisition modes ....................................................................................................................... 10
Software paced mode .......................................................................................................................................................10
Hardware paced mode......................................................................................................................................................10
External components ........................................................................................................................................ 11
Screw terminals................................................................................................................................................................11
USB connector .................................................................................................................................................................13
LED indicator ..................................................................................................................................................................13
Signal connections ............................................................................................................................................ 14
Analog input ....................................................................................................................................................................14
Analog output ..................................................................................................................................................................16
Digital I/O ........................................................................................................................................................................18
Trigger input .................................................................................................................................................................... 19
Counter input ...................................................................................................................................................................19
+VO power source ...........................................................................................................................................................19
Ground .............................................................................................................................................................................20
Mechanical drawings ........................................................................................................................................ 21
Chapter 4
Specifications ...................................................................................................................................... 22
Analog input ..................................................................................................................................................... 22
Absolute accuracy (analog input DC voltage measurement accuracy) ............................................................................22
Analog output ................................................................................................................................................... 23
Timebase........................................................................................................................................................... 23
Digital input/output........................................................................................................................................... 23
Digital input .....................................................................................................................................................................24
Digital output ...................................................................................................................................................................24
External digital trigger ...................................................................................................................................... 24
Counter ............................................................................................................................................................. 24
Memory ............................................................................................................................................................ 25
Power requirements .......................................................................................................................................... 25
Power output ..................................................................................................................................................... 25
USB specifications ........................................................................................................................................... 25
3

USB-231 User's Guide
Environmental .................................................................................................................................................. 26
Mechanical ....................................................................................................................................................... 26
Screw terminal connector ................................................................................................................................. 26
Screw terminal pinout ....................................................................................................................................... 27
Differential mode pinout ..................................................................................................................................................27
Single-ended mode pinout ...............................................................................................................................................27
Declaration of Conformity .................................................................................................................. 28
4

About this User's Guide
What you will learn from this user's guide
This user's guide describes the Measurement Computing USB-231 data acquisition device and lists device
specifications.
Conventions in this user's guide
For more information
Text presented in a box signifies additional information related to the subject matter.
Caution! Shaded caution statements present information to help you avoid injuring yourself and others,
damaging your hardware, or losing your data.
bold text Bold text is used for the names of objects on a screen, such as buttons, text boxes, and check boxes.
italic text Italic text is used for the names of manuals and help topic titles, and to emphasize a word or phrase.
Preface
Where to find more information
Additional information about USB-231 hardware is available on our website at www.mccdaq.com. You can
also contact Measurement Computing Corporation with specific questions.
Knowledgebase: kb.mccdaq.com
Tech support form: www.mccdaq.com/support/support_form.aspx
Email: techsupport@mccdaq.com
Phone: 508-946-5100 and follow the instructions for reaching Tech Support
For international customers, contact your local distributor. Refer to the International Distributors section on our
website at www.mccdaq.com/International
.
5

Chapter 1
Introducing the USB-231
The USB-231 is a high-speed data acquisition USB board supported under the Windows® operating system.
The USB-231 is a USB 2.0 high speed device that is compatible with USB 3.0 ports. The device is also
compatible with USB 1.1 ports, but use with this older hardware is not recommended due to longer initialization
times that can occur when the USB-231 is connected through USB 1.1 ports or hubs.
Device features
The USB-231 provides the following features:
Eight single-ended (SE) or four differential (DIFF) 16-bit analog inputs
50 kS/s maximum sample rate
Two analog outputs with 5 kS/s simultaneous update rate per channel maximum
Eight individually configurable digital I/O channels
32-bit counter
Digital trigger input
User voltage output
Two detachable screw terminals for field wiring connections
The USB-231 is powered by the +5 V USB supply from your computer; no external power is required.
6

USB-231 User's Guide Introducing the USB-231
Functional block diagram
Device functions are illustrated in the block diagram shown here.
Figure 1. USB-231 functional block diagram
7

Chapter 2
Installing the USB-231
Unpacking
As with any electronic device, you should take care while handling to avoid damage from static
electricity. Before removing the device from its packaging, ground yourself using a wrist strap or by simply
touching the computer chassis or other grounded object to eliminate any stored static charge.
If any components are missing or damaged, contact us immediately using one of the following methods:
Knowledgebase: kb.mccdaq.com
Phone: 508-946-5100 and follow the instructions for reaching Tech Support
Fax: 508-946-9500 to the attention of Tech Support
Email: techsupport@mccdaq.com
For international customers, contact your local distributor. Refer to the International Distributors section on our
website at www.mccdaq.com/International
.
Installing the software
Refer to the USB-231 product page on the Measurement Computing website for information about how to
install the supported software.
Install the software before you install the hardware
The driver needed to run the device is installed when you install the software. Therefore, you need to install the
software package you plan to use before you install the hardware.
Installing the hardware
Caution! To ensure the specified EMC performance, the length of any wire or cable connected to the screw
terminal connector must be no longer than 0.5 m (20 in.).
The USB-231ships with one detachable screw terminal connector for analog signals and one detachable screw
terminal connector for digital signals. Complete the following steps to set up the device:
1. Insert the screw terminal connector plugs into the connector jacks on the device. Refer to Figure 2
on page 9.
2. Plug the smaller end of the Micro-USB cable into the device, and plug the larger connector into the USB
port on the computer. No external power is required.
8

USB-231 User's Guide Installing the USB-231
1
Screw terminal connector plugs
2
Hi-Speed Micro -USB cable
Figure 2. Setting up a USB-231
When connected for the first time, a Found New Hardware dialog box opens when the operating system detects
the device. When the dialog closes, the installation is complete. The LED turns on after the device is
successfully installed.
If the LED turns off or blinks
If the LED turns off, the device is either not fully connected or is in suspend mode.
If the LED blinks, the device has encountered an error. Wait 10 seconds to allow the device to attempt to
recover from the error. If the LED continues blinking, disconnect and reconnect the device. Contact
Measurement Computing if the error persists.
Calibrating the hardware
The Measurement Computing Manufacturing Test department performs the initial factory calibration. Return
the device to Measurement Computing Corporation when calibration is required. The recommended calibration
interval is one year.
9
1
50 2 25 3 16.67
4
12.5
6
8.33
7
7.14
8
6.25
Chapter 3
Functional Details
Analog input acquisition modes
The USB-231 can acquire analog input data in two different modes – software paced and hardware paced.
Software paced mode
You can acquire one analog sample at a time in software paced mode. You initiate the A/D conversion with a
software command. The analog value is converted to digital and returned to the computer. You can repeat this
procedure until you have the total number of samples that you want.
The maximum throughput sample rate in software paced mode is system-dependent.
Hardware paced mode
You can acquire data from up to eight channels in hardware paced mode. The analog data is continuously
acquired and converted to digital values until you stop the scan. Data is transferred in blocks of samples from
the device to the memory buffer on your computer. The block size varies depending on the sample rate.
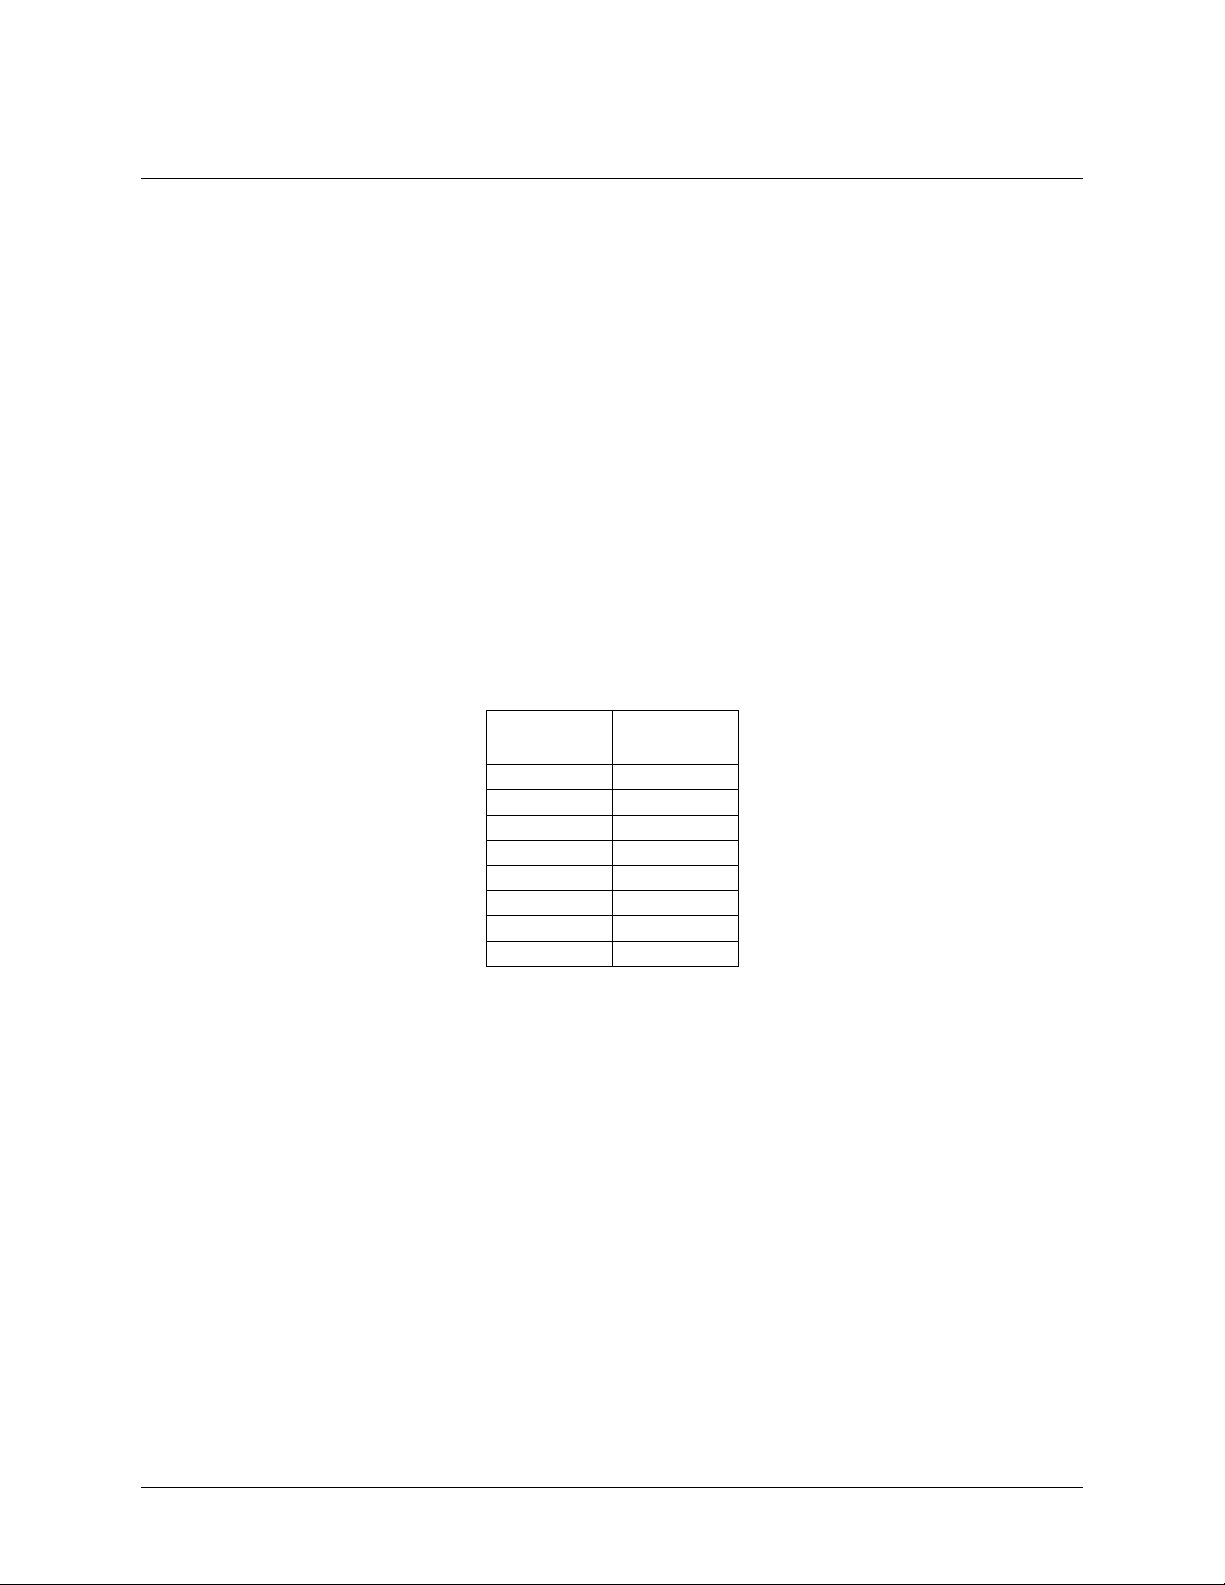
The maximum continuous scan rate is an aggregate rate. The total acquisition rate for all channels cannot
exceed 50 kS/s. The following table lists the scan rate when scanning from one to eight channels.
Maximum continuous scan rate
# channels
scanned
5 10
You can start a hardware paced continuous scan with either a software command or with an external hardware
trigger event.
Sample rate
(kS/s)
10
USB-231 User's Guide Functional Details
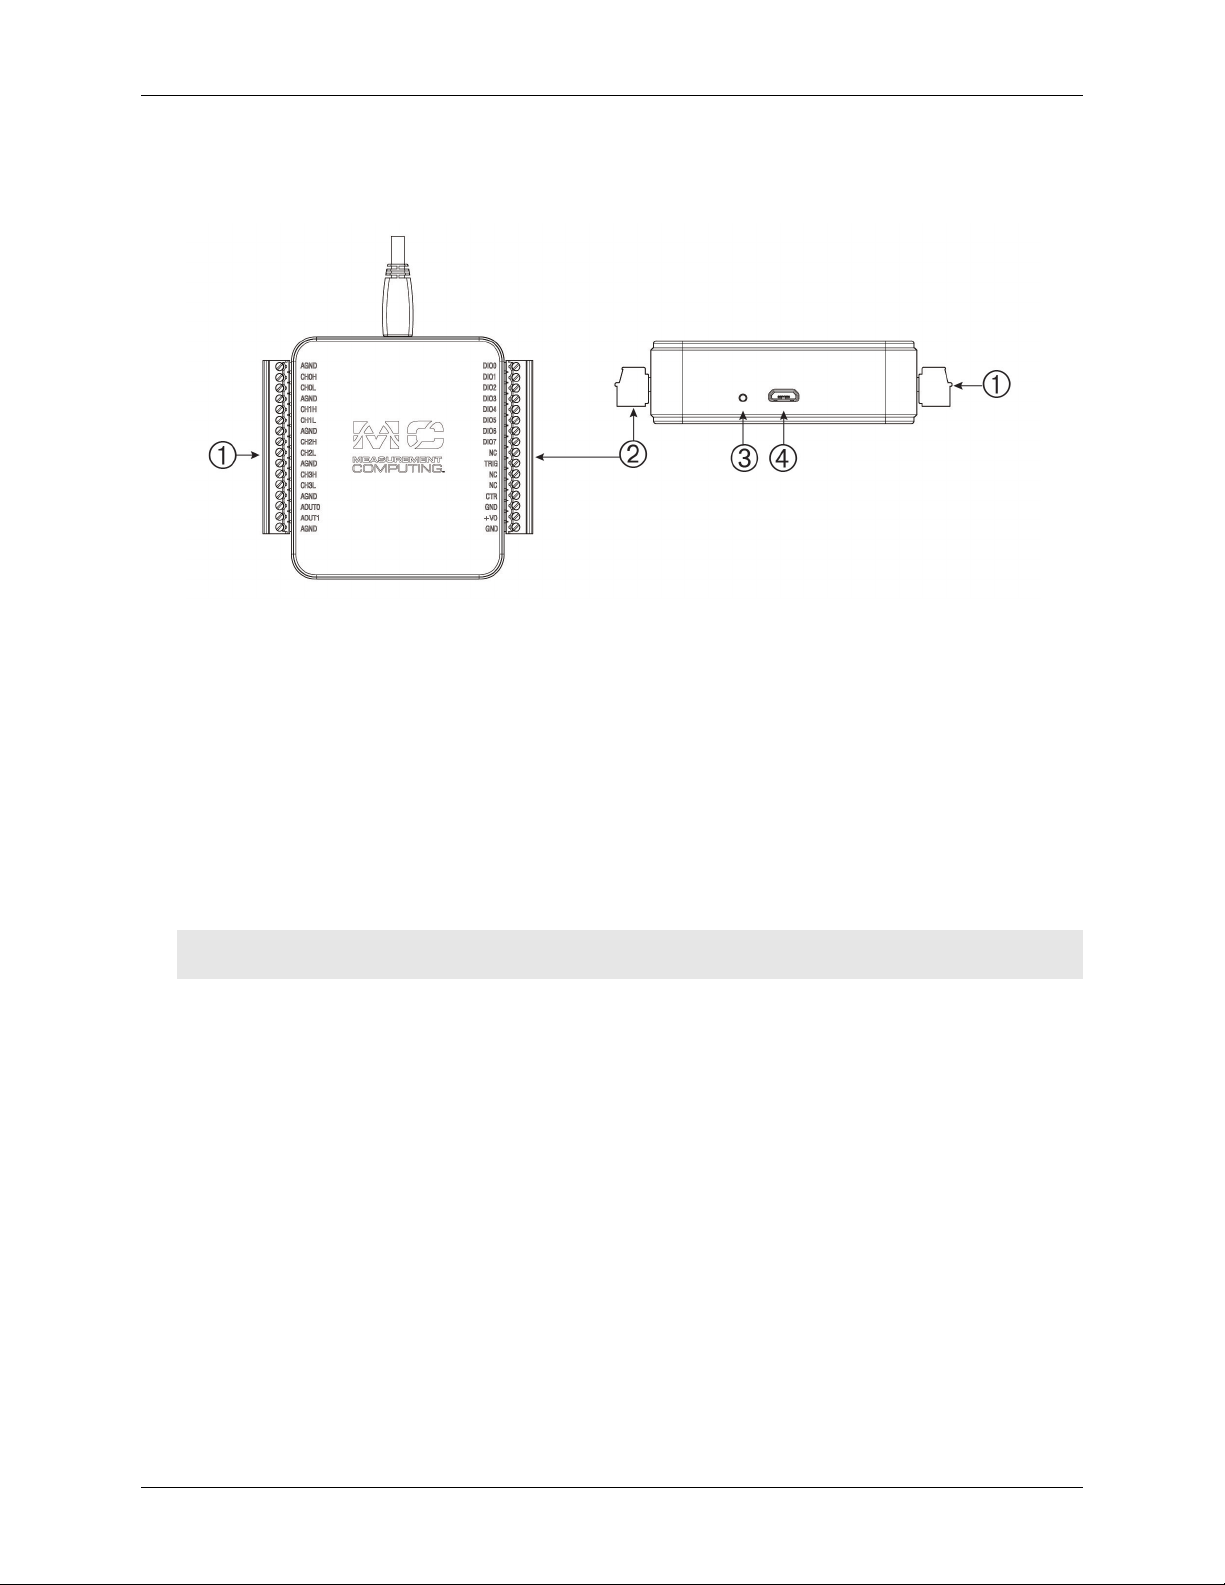
1
Screw terminal pins 1 to 16
3
LED Indicator
2
Screw terminal pins 17 to 32
4
USB connector
External components
The external components on the USB-231 are shown in Figure 3.
Figure 3. USB-231 external components
Screw terminals
The screw terminals provide the following connections (refer to Figure 4 and Figure 5 for pinout diagrams):
Eight single-ended/four differential analog inputs (
Two analog outputs (
Digital trigger input (
Counter input (
User voltage output
Analog ground reference (
AOUT0 and AOUT1)
TRIG)
CTR)
(+VO)
AGND) and digital ground reference (GND)
Caution! To ensure the specified EMC performance, the length of any wire or cable connected to the screw
terminal connector must be no longer than 0.5 m (20 in.).
CH0H/CH0L to CH3H/CH3L)
11
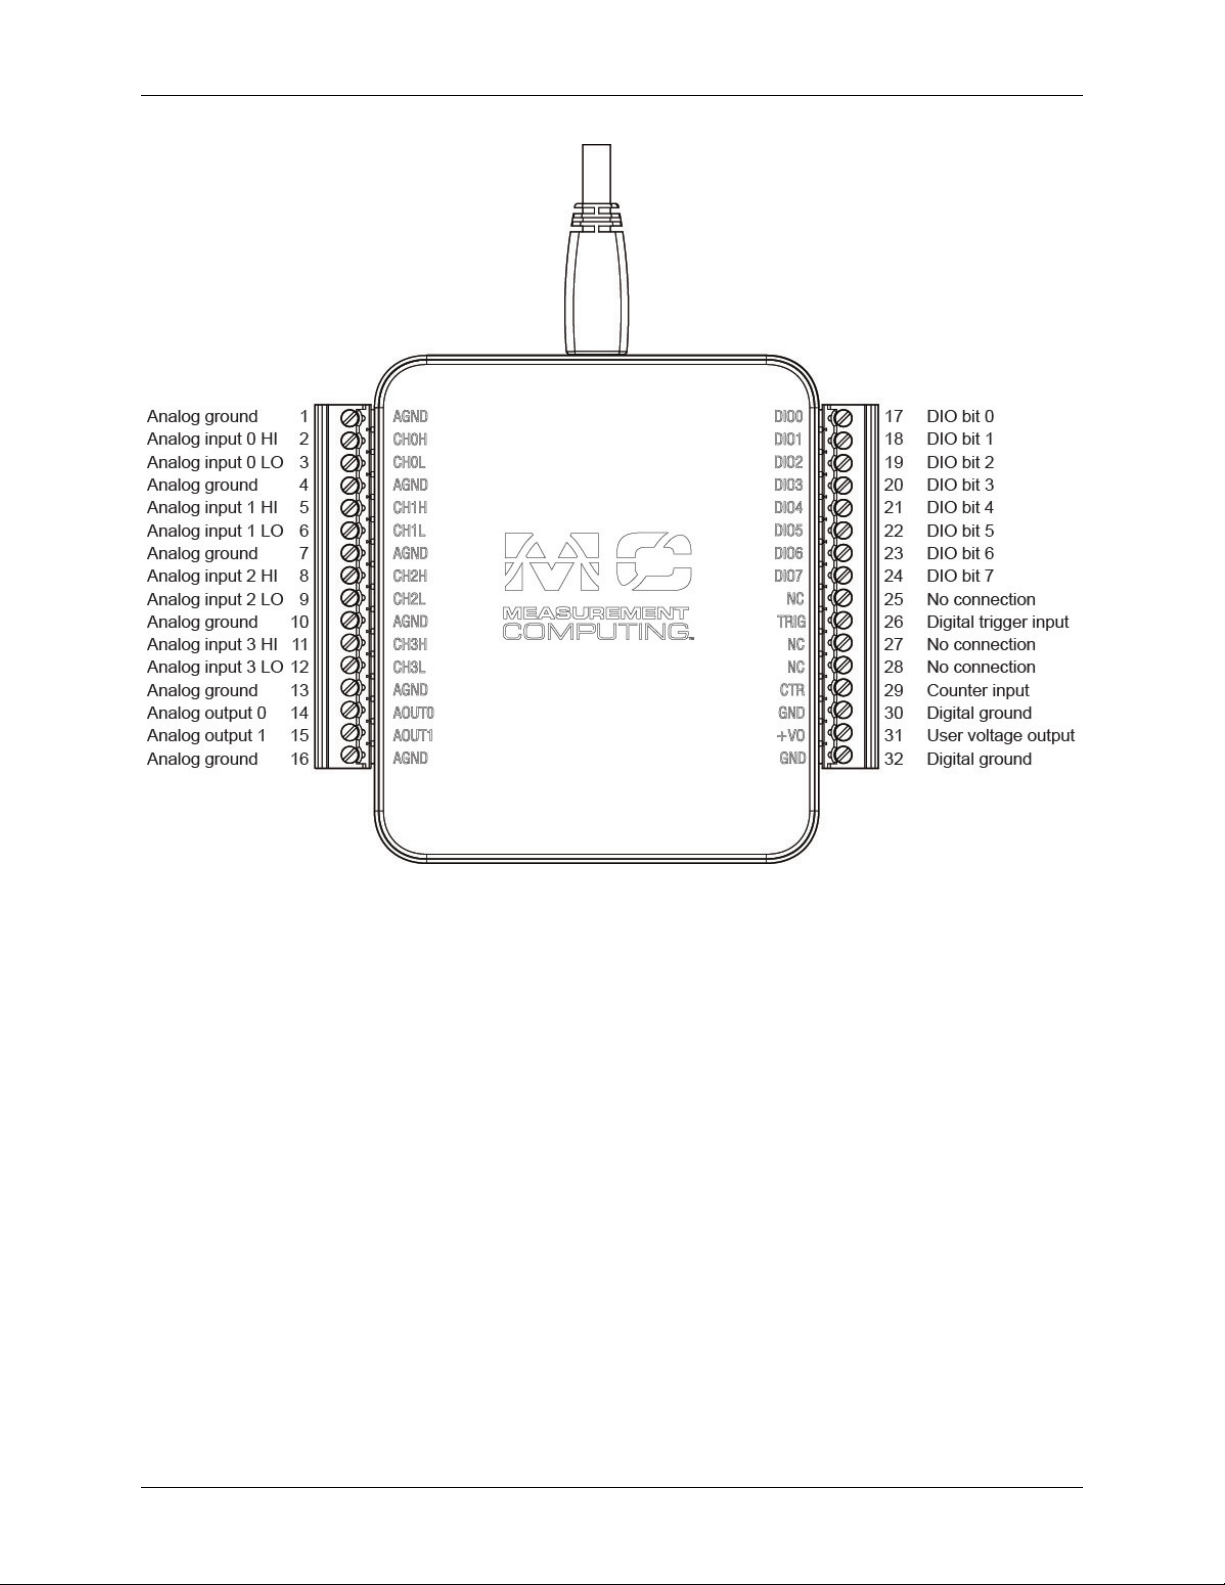
USB-231 User's Guide Functional Details
Figure 4. USB-231 differential pinout
12
USB-231 User's Guide Functional Details
Off
Device is not connected or is in suspend mode.
On, not blinking
Device is connected and functioning normally.
Blinking
Device has encountered an error: wait 10 seconds to allow the device to attempt to recover
Measurement Computing if the error persists.
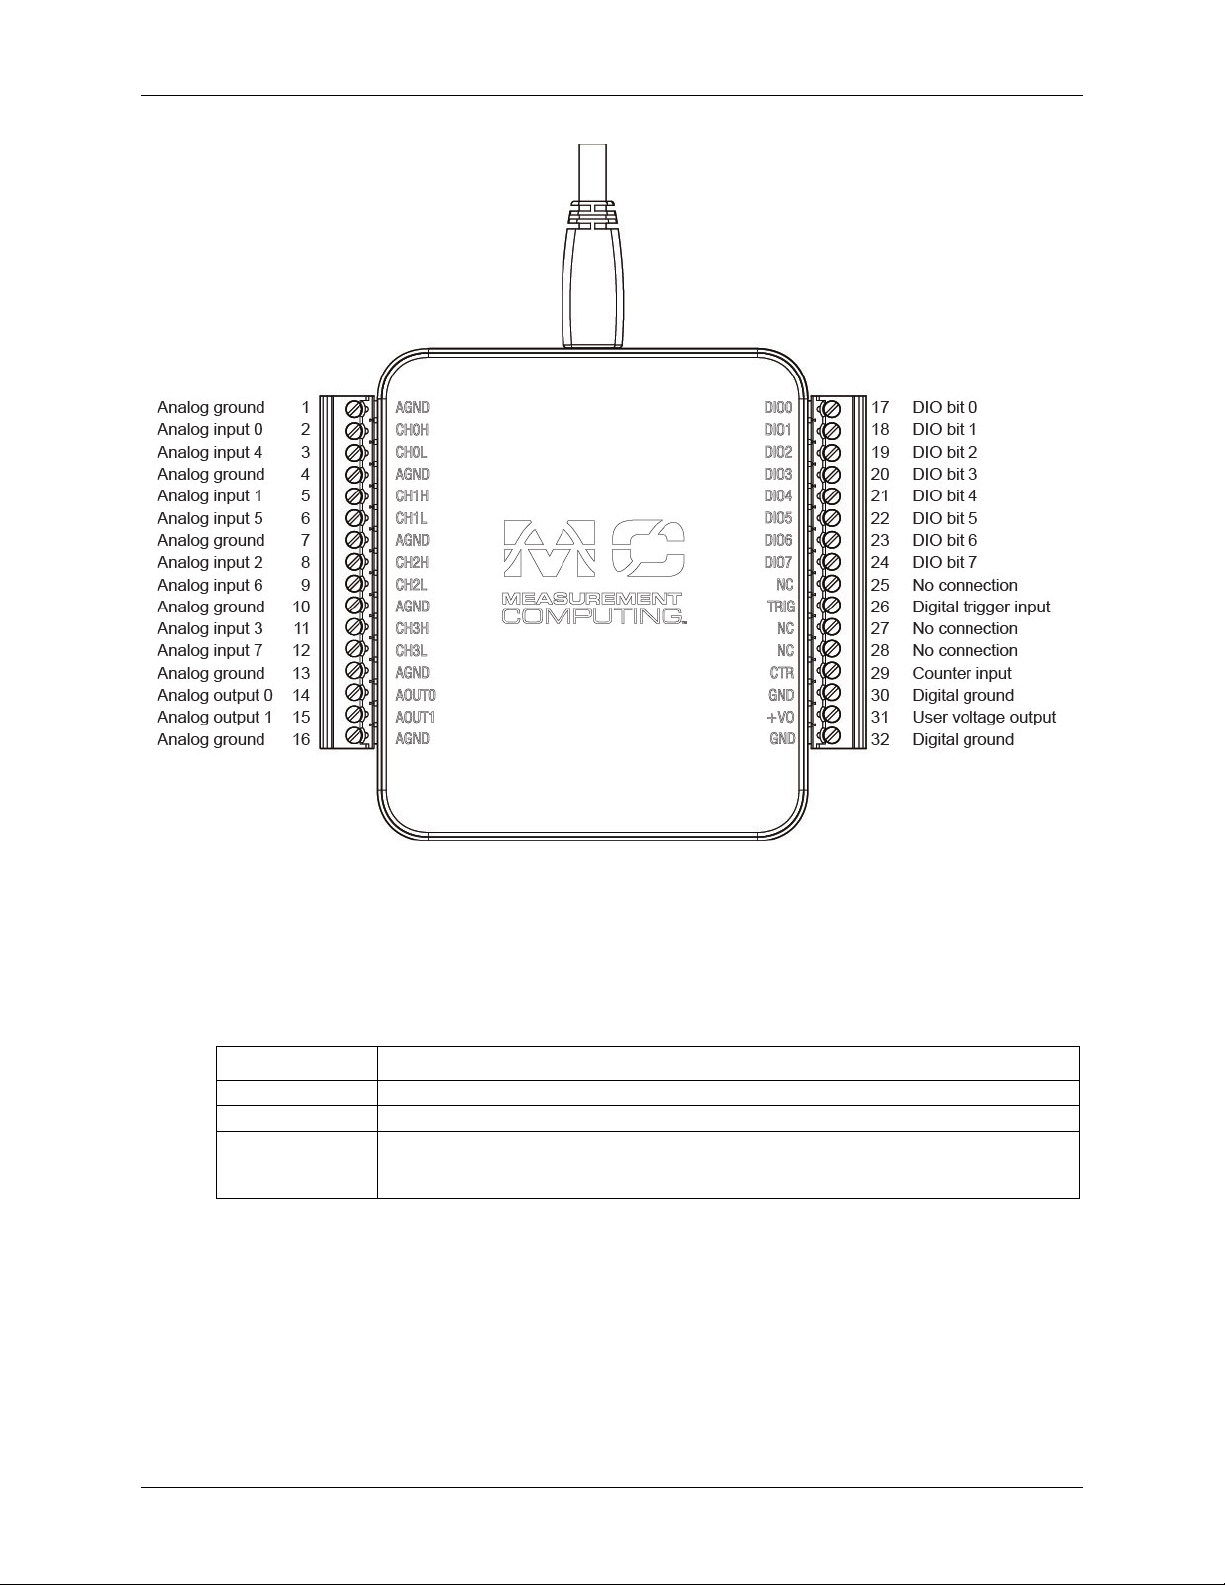
Figure 5. USB-231 single-ended pinout
USB connector
The Micro-USB connector provides +5 V power and communication. No external power supply is required.
LED indicator
The table below lists the device status indicated by the LED:
LED State Device Status
from the error. If the LED continues blinking, disconnect and reconnect the device. Contact
Refer to Figure 3 on page 11 for the location of the LED.
13

USB-231 User's Guide Functional Details
Signal connections
Analog input
You can connect up to eight single-ended inputs or up to four differential inputs to screw terminals CH0H/CH0L
through
CH3H/CH3L. The input voltage range is ±10 V. Figure 6 shows the USB-231 analog input circuitry.
Figure 6. USB-231 analog input circuitry
The main analog input circuitry blocks are as follows:
MUX—The multiplexer (MUX) routes one AI channel at a time to the mode selector multiplexer
(DIFF/SE MUX).
DIFF/SE MUX—The mode selector MUX selects between DIFF mode and SE measurement mode.
IA— The instrumentation amplifier (IA) removes the common mode signal and buffers the analog input
signal before it is sampled by the analog-to-digital converter (ADC).
ADC—The ADC digitizes the AI signal by converting the analog voltage into digital code.
AI FIFO—The DAQ device can perform both single and multiple analog-to-digital conversions of a fixed or
infinite number of samples. A first-in-first-out (FIFO) buffer holds data during AI acquisitions to ensure no
data is lost.
ADC Control—The ADC control circuitry sets the conversion rate of the ADC, sets the input
configuration, drives the scanning sequence, and starts acquisitions synchronous with the TRIG or CTR
signal
Single-ended configuration
When configured for SE input mode, the input signal is referenced to analog ground (
AGND) and delivered
through two wires:
Connect the wire carrying the signal to be measured (
Connect the second wire to
AGND.
CHxH or CHxL).
The input range for single-ended mode is ±10 V. The single-ended mode pinout is shown in Figure 5 on page
13.
14
USB-231 User's Guide Functional Details
Differential configuration
When configured for differential input mode, the input signal is measured with respect to the low input and
delivered through three wires:
Connect the wire carrying the signal to be measured to
Connect the wire carrying the reference signal to
Connect the third wire to
AGND.
CHxH
CHxL
The differential mode pinout is shown in Figure 4 on page 12.
Note: To perform a single-ended measurement using differential channels, connect the signal to CHxH and
ground the associated
CHxL input.
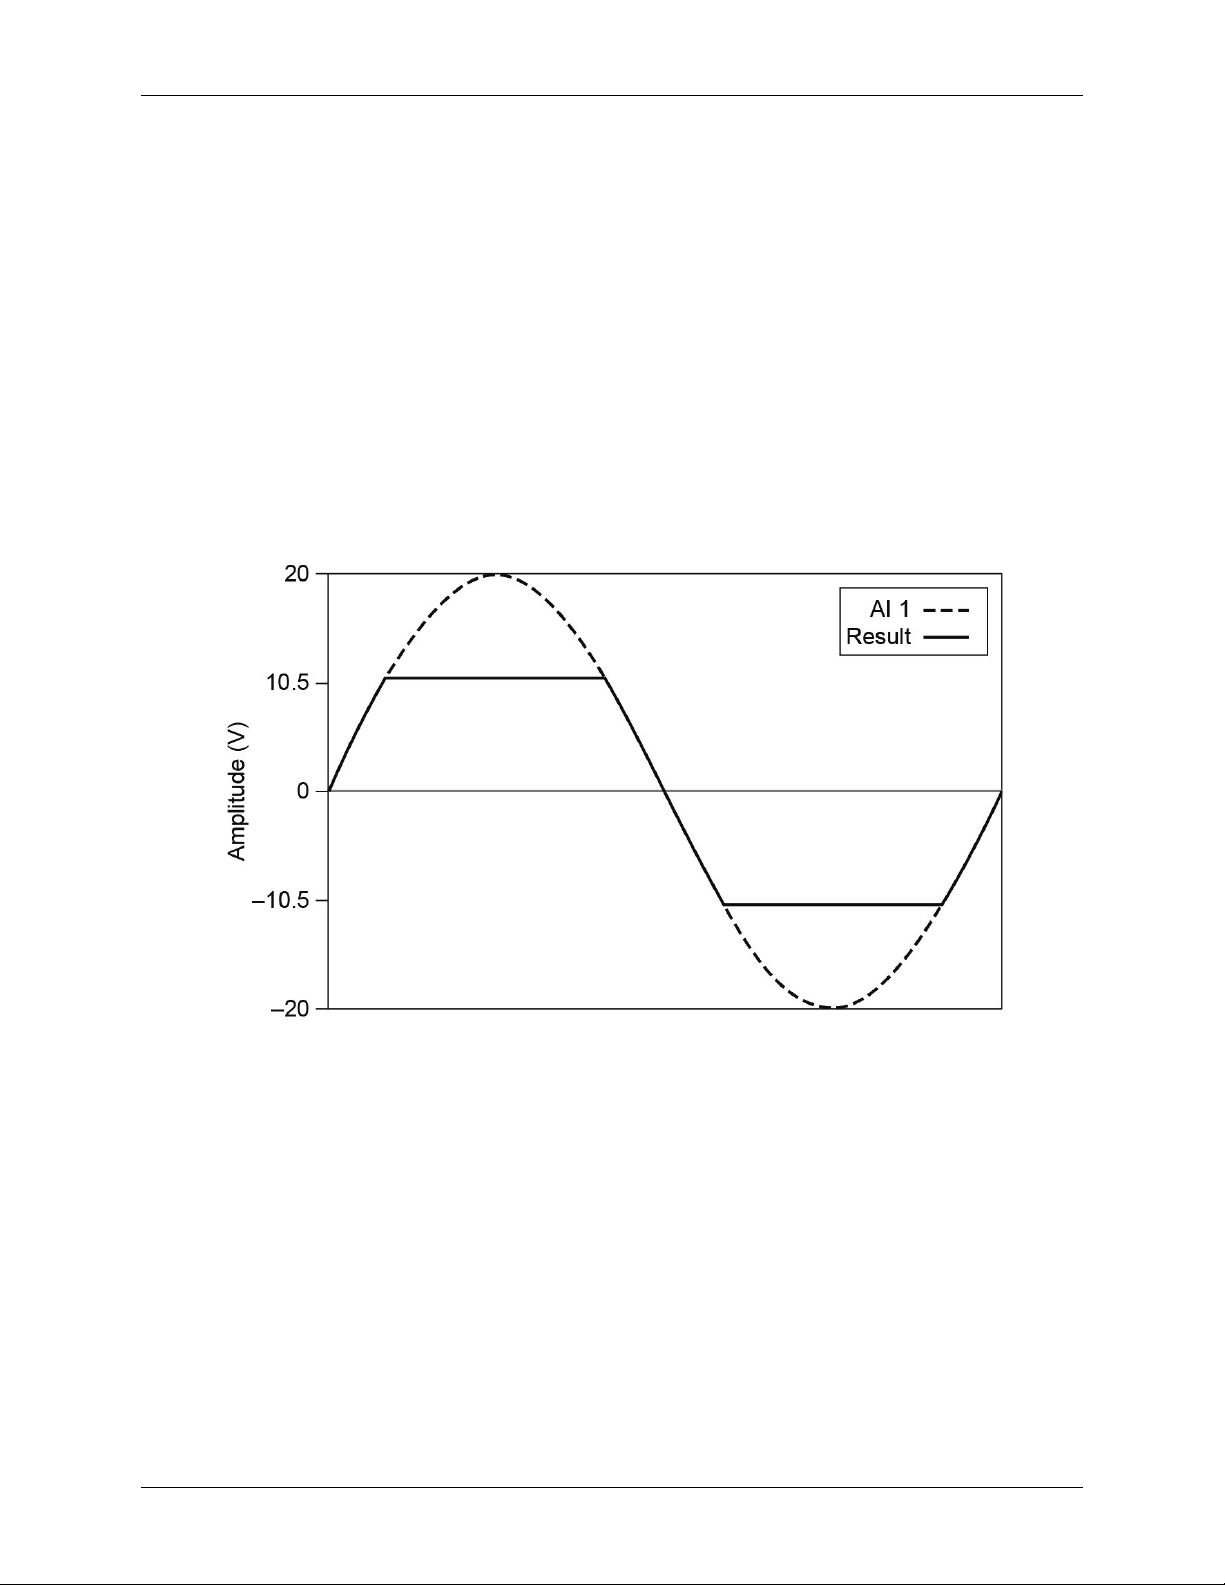
Input range
The USB-231 has an input range of ±10 V. For DIFF mode, each AI should stay within ±10 V with respect to
AGND, and the voltage between positive and negative inputs should be lower or equal to ±10 V. For SE mode,
signals of ±10 V at any analog input terminal with respect to AGND are accurately measured.
Beyond ±10 V, the input signal begins clipping as shown in Figure 7. Typically, this clipping begins at ±10.5 V.
Figure 7. Analog input exceeding ±10 V returning clipped results
Multichannel scanning
The USB-231 can scan multiple channels at high rates and digitize the signals accurately. However, you should
consider several issues when designing your measurement system to ensure the high accuracy of your
measurements:
Use low impedance sources – To ensure fast settling times, your signal sources should have an
impedance of <1 kΩ. Large source impedances increase the settling time of the DAQ device and decrease
the accuracy at fast scanning rates.
Use short high-quality cabling – Using short high-quality cables can minimize several effects that
degrade accuracy including crosstalk, transmission line effects, and noise. The capacitance of the cable also
can increase the settling time.
To ensure the specified EMC performance, operate this product only with shielded cables and accessories.
The length of any wire or cable connected to the screw terminal connector must be no longer than 0.5 m
(20 in.).
Avoid scanning faster than necessary – Design your system to scan at slower speeds to give the DAQ
device more time to settle to a more accurate level when switching between channels.
15

USB-231 User's Guide Functional Details
Analog output
Figure 8 shows the USB-231 analog output circuitry.
Figure 8. USB-231 analog output circuitry
The main analog output circuitry blocks are as follows:
Protection – The protection circuit prevents damage of the buffers in case of a short circuit or an
overvoltage condition.
Buffer – The buffer amplifies the analog signal to the ±10 V range and ensures the driving capability for
the external load.
DAC 0 and DAC 1 – The digital-to-analog converters (DAC) convert the digital signals into low-level
analog signals.
AO FIFO – The AO FIFO (first-in-first out) ensures that data is transferred to the DACs in a timely manner
without being affected by USB latencies.
DAC Control – The DAC control sets the DAC data rate and the startup condition, which could be
triggered by the
TRIG signal.
Analog output signals are referenced to AGND. Connect the loads between AOUT0 or AOUT1 and AGND as
shown in Figure 9.
16

USB-231 User's Guide Functional Details
Figure 9. USB-231 analog output connection diagram
Power-on state
The AO circuitry exhibits a short glitch when the device is powered on and when the DAQ device exits suspend
mode. After power-up, the AO circuitry is reset to 0 V.
AO range
The AO range is ± 10 V.
Minimizing glitches on the output signal
When using a DAC to generate a waveform, you may observe glitches on the output signal. These glitches are
normal; when a DAC switches from one voltage to another, it produces glitches due to released charges. The
largest glitches occur when the most significant bit of the DAC code changes. You can build a low-pass
deglitching filter to remove some of these glitches, depending on the frequency and nature of the output signal.
Generating analog output data
The USB-231 can generate analog output data in two different modes – software paced and hardware paced.
Software paced – Software controls the rate at which data is generated. Software sends a separate
command to the hardware to initiate each DAQ conversion. Software-paced generations are also referred to
as immediate or static operations. They are typically used for writing a single value out, such as a constant
DC voltage.
Hardware paced – A digital hardware signal controls the generation rate. This signal is generated
internally on your device. Hardware-paced generations have advantages over software-timed acquisitions,
such as the time between samples can be much shorter, and the timing between samples can be
deterministic (data is sampled at regular intervals).
Hardware-timed operations are buffered. During hardware-paced AO generation, data is moved from a PC
buffer to the onboard FIFO on the DAQ device using USB signal streams before it is written to the DACs one
sample at a time. Buffered generations allow for fast transfer rates because data is moved in large blocks rather
than one point at a time.
The sample mode can be either finite or continuous in a buffered I/O operation:
In finite sample mode, a specified number of samples are generated, and then the generation stops.
In continuous mode, an unspecified number of samples are generated until you stop the generation.
17

USB-231 User's Guide Functional Details
1
DIO0 configured as an open drain digital output driving a LED
2
DIO4 configured as a digital input receiving a TTL signal from a gated inverter
3
DIO7 configured as an digital input receiving a 0 V or 5 V signal from a switch
Digital I/O
You can connect up to eight digital I/O lines to DIO0 through DIO7. GND is the ground-reference signal for
digital I/O. Each digital I/O line is bit-configurable as input or output. Digital input voltage ranges from 0 V to
5 V are permitted, with thresholds of 0.8 V (low) and 2.3 V (high). Each DIO channel can sink up to 4 mA for
direct drive applications when used as an output. All digital I/O updates and samples are software-paced.
Figure 10 below shows
DIO0 through DIO7connected to signals configured as digital inputs and digital outputs.
Figure 10. Example of connecting a load
Caution! Exceeding the maximum input voltage ratings or maximum output ratings – listed in the
Specification chapter – can damage the device and the computer. Measurement Computing is not
liable for any damage resulting from such signal connections.
Power-on states
At system startup and reset, the USB-231 sets all DIO lines to high-impedance inputs. The device does not drive
the signal high or low. Each line has a weak pull-down resistor connected to it.
DIO protection
To protect the DAQ device against overvoltage, undervoltage, and overcurrent conditions, as well as ESD
events, avoid these fault conditions by using the following guidelines:
If you configure a DIO line as an output, do not connect it to any external signal source, ground signal, or
power supply.
If you configure a DIO line as an output, understand the current requirements of the load connected to these
signals. Do not exceed the specified current output limits of the DAQ device. Measurement Computing has
several signal conditioning solutions for digital applications requiring high-current drive.
If you configure a DIO line as an input, do not drive the line with voltages outside of its normal operating
range. The DIO lines have a smaller operating range than the AI signals.
Treat the DAQ device as you would treat any static-sensitive device. Always properly ground yourself and
the equipment when handling the DAQ device or connecting to it.
18

USB-231 User's Guide Functional Details
Trigger input
The TRIG terminal is an external digital trigger input that supports rising edge or falling edge detection.
Counter input
The CTR terminal is a 32-bit counter that can count rising edges. Edges can only be counted up from 0.
Counting down is not supported – you cannot set the initial count to 100 and count down to 99, 98, 97.
+VO power source
Figure 11 shows the +VO power source circuitry of the USB-231.
Figure 11. +VO power source circuitry
The main blocks featured in the +VO power source circuitry are as follows:
+5 V Source—Regulated 5 V supply.
+5 V Protection—Circuit for overvoltage, over current, and short circuit protection.
The +5 V source is limited at 200 mA typically. In case of hard short circuit to ground, this limit is further
reduced to avoid excessive power dissipation.
Connecting the load
The return terminal for the +5 V source is the
+VO terminal and GND. The current delivered by the USB-231 at the +VO terminal is sourced from the USB
connector. To meet the USB specifications, a maximum of 150 mA can be used from the
GND terminal. The +5 V load should be connected between the
+VO terminal.
19

USB-231 User's Guide Functional Details
Figure 12. Connecting the +VO power source load
The + 5 V power is always enabled and the voltage is present at the +VO terminal when the device is in active
mode. The +5 V power source is not available for about one second after the device is first connected to the
USB connector or when the device is in suspend mode.
Ground
The analog ground (AGND) terminals provide a common ground for all analog channels. The digital ground
DND) terminals provide a common ground for the digital, counter, and power terminal.
(
For more information about signal connections
For more information about analog and digital signal connections, refer to the Guide to DAQ Signal
Connections on our website at www.mccdaq.com/support/DAQ-Signal-Connections.aspx.
20

USB-231 User's Guide Functional Details
Mechanical drawings
Figure 13. Circuit board (top) and housing dimensions
21

A/D converter type
Successive approximation
Working voltage
±10 V
Power on
±30 V max
Power off
±20 V max
INL ±1.8 LSB
DNL
16 bits no missing codes
Input bandwidth
300 kHz
Trigger sources
Software, TRIG
±10 V
6 mV
26 mV
0.4 mV
Specifications
All specifications are subject to change without notice.
Typical for 25 °C unless otherwise specified.
Specifications in italic text are guaranteed by design.
Analog input
Table 1. Analog input specifications
Parameter Condition Specification
ADC resolution 16 bits
Sampling rate Maximum aggregate 50 kS/s
Number of channels 8 single-ended or 4 differential; software-selectable
Input voltage range ±10 V
Chapter 4
Overvoltage protection
Input impedance
Input bias current
CMRR 56 dB (DC to 5 kHz)
>1 GΩ
±200 pA, typ
Absolute accuracy (analog input DC voltage measurement accuracy)
Table 2. Absolute accuracy (no load)
Range
At full scale (typical at 25 °C) At full scale (maximum over temperature)
System noise
rms
22

USB-231 User's Guide Specifications
Resolution
16 bits, 1 in 65,536
Output range
±10 V
Number of channels
2 Update rate
Hardware paced
5 kS/s simultaneous per channel max, hardware-paced
Trigger sources
Software, TRIG
Short circuit current
11 mA
Slew rate
3 V/µs
Output impedance
0.2 Ω
Typical at full scale
8.6 mV
full scale
INL ±4 LSB
DNL
16 bits no missing codes
Power-on state
0 V
Startup glitch
–7 V for 10 µs
Timebase frequency
80 MHz
Timebase accuracy
100 ppm
Timing resolution
12.5 ns
Compatibility
LVTTL, 3.3 V LVCMOS
Number of channels
8 (DIO0 through DIO7)
Configuration
Each bit can be configured as input (power on default) or output
Pull-down resistor
47.5 kΩ to digital ground (GND).
Absolute maximum voltage
range
–0.3 V to 5 V with respect to digital ground (GND)
Analog output
Table 3. Analog output specifications
Parameter Condition Specification
Output current drive
Absolute accuracy (no load)
Maximum over temperature,
±5 mA
±
32 mV
Timebase
The following specifications apply to hardware-paced analog input and analog output sampling accuracy.
Parameter Specification
±
Digital input/output
Table 4. Digital I/O specifications
Parameter Specification
23

USB-231 User's Guide Specifications
Input voltage range
Power on
0 V to 5 V
Power off
0 V to 3.3 V (Note 1)
Input voltage protection
lines for all ports) for up to 24 hours
Input low voltage
0.8 V max
Input leakage current
At 3.3 V
0.8 mA max
At 5 V
4.5 mA max
Output low voltage
4 mA
0.7 V max
1 mA
0.2 V max
Output high voltage
4 mA
2.1 V min
1 mA
2.8 V min
3.6 V max
Maximum output current per
line
Trigger source
TRIG input
Trigger mode
Software configurable for rising or falling edge. Power on default is rising edge.
Input high voltage
2.3 V min
Input low voltage
0.8 V max
Pin name
CTR
Number of counters
1
Resolution
32 bits
Counter type
Edge counter (rising)
Counter direction
Count up
Counter source
CTR
Input frequency
5 MHz max
High pulse width
100 ns min
Low pulse width
100 ns min
Digital input
Table 5. Digital input specifications
Parameter Condition Specification
±20 V on two lines per port (maximum of five
Input high voltage 2.3 V min
Note 1: Do not leave a voltage above 3.3 V connected on the DIO line when the device is not powered. This can cause
long-term reliability issues.
Digital output
Table 6. Digital output specifications
Parameter Condition Specification
External digital trigger
Table 6. External digital trigger specifications
Parameter Specification
Counter
Parameter Specification
±4 mA
Table 7. Counter specifications
24

USB-231 User's Guide Specifications
Data FIFO
2,047 samples (4096 bytes)
2 kB microcontroller integrated EEPROM)
Idle USB current
165 mA
Output voltage
Maximum current
150 mA
Overcurrent protection
200 mA
Short circuit current
50 mA
Overvoltage protection
Device type
USB 2.0 full speed (12 Mb/s)
Device compatibility
USB 1.1, USB 2.0
Connector type
USB micro-B receptacle
AB)
USB cable length
3 m (9.84 ft) max
Memory
Table 8 Memory specifications
Parameter Specification
Non-volatile memory Up to 256 kB microcontroller integrated Flash
Power requirements
Table 9. Power specifications
Parameter Specification
From USB 4.50 to 5.25 VDC (Note 2)
Maximum load USB current <500 mA (Note 3)
Note 2: A typical bus-powered hub provides 100 mA on its USB lines. The USB-231 does not work on a bus-powered
hub.
Note 3: The maximum power draw from all output terminals should be kept under 0.9 W to avoid overloading the USB
port
Power output
Parameter Specification
5 V, ±3%
±20 V
USB specifications
Parameter Specification
USB cable type
A-micro-B cable, UL type AWM 2725 or equivalent (28 AWG × 2C + 28 AWG × 2C +
Table 10. External voltage specifications
Table 11. USB specifications
25
USB-231 User's Guide Specifications
Operating temperature range
0 °C to 45 C
Storage temperature range
–40 °C to 85 °C
Operating humidity range
5% to 95% RH, non-condensing
Storage humidity range
5% to 90% RH, non-condensing
Pollution degree (IEC 60664)
2
Maximum altitude
2,000 m
Without screw terminals
(2.97 ×3.40 × 0.93 in.)
Weight
With screw terminal connector plugs
105 g (3.70 oz)
Without screw terminals
83 g (2.93 oz)
Connector type
16-position screw terminal plugs
Wire gauge range
16 AWG to 28 AWG (1.31 to 0.08 mm2)
Torque for screw terminals
Environmental
Table 12. Environmental specifications (Indoor use only)
Parameter Specification
Mechanical
Table 13. Mechanical specifications
Parameter Conditions Specification
Dimensions (L × W × H) With screw terminal connector plugs
93.2 × 86.2 × 23.6 mm
(3.67 ×3.40 × 0.93 in.)
75.4 × 86.2 × 23.6 mm
Screw terminal connector
Table 14. Screw terminal connector specifications
Parameter Specification
0.22 - 0.25 N · m (2.0 - 2.2 lb. · in.)
26
USB-231 User's Guide Specifications
Pin
Signal name
Pin description
Pin
Signal name
Pin description
1
AGND
Analog ground
17
DIO0
DIO bit 0
2
CH0H
Analog input 0 HI
18
DIO1
DIO bit 1
3
CH0L
Analog input 0 LO
19
DIO2
DIO bit 2
4
AGND
Analog ground
20
DIO3
DIO bit 3
5
CH1H
Analog input 1 HI
21
DIO4
DIO bit 4
6
CH1L
Analog input 1 LO
22
DIO5
DIO bit 5
7
AGND
Analog ground
23
DIO6
DIO bit 6
9
CH2L
Analog input 2 LO
25
NC
No connection
10
AGND
Analog ground
26
TRIG
Digital trigger input
11
CH3H
Analog input 3 HI
27
NC
No connection
12
CH3L
Analog input 3 LO
28
NC
No connection
13
AGND
Analog ground
29
CTR
Counter input
14
AOUT0
Analog output 0
30
GND
Digital ground
15
AOUT1
Analog output 1
31
+ VO
User voltage output
16
AGND
Analog ground
32
GND
Digital ground
Signal
name
1
AGND
Analog ground
17
DIO0
DIO bit 0
2
CH0H
Analog input 0
18
DIO1
DIO bit 1
3
CH0L
Analog input 4
19
DIO2
DIO bit 2
4
AGND
Analog ground
20
DIO3
DIO bit 3
5
CH1H
Analog input 1
21
DIO4
DIO bit 4
6
CH1L
Analog input 5
22
DIO5
DIO bit 5
7
AGND
Analog ground
23
DIO6
DIO bit 6
8
CH2H
Analog input 2
24
DIO7
DIO bit 7
9
CH2L
Analog input 6
25
NC
No connection
10
AGND
Analog ground
26
TRIG
Digital trigger input
11
CH3H
Analog input 3
27
NC
No connection
12
CH3L
Analog input 7
28
NC
No connection
13
AGND
Analog ground
29
CTR
Counter input
14
AOUT0
Analog output 0
30
GND
Digital ground
15
AOUT1
Analog output 1
31
+ VO
User voltage output
16
AGND
Analog ground
32
GND
Digital ground
Screw terminal pinout
Differential mode pinout
Do not connect to terminal block pins labeled NC.
Table 15. Screw terminal pinout
8 CH2H Analog input 2 HI 24 DIO7 DIO bit 7
Single-ended mode pinout
Do not connect to terminal block pins labeled NC.
Table 16. Screw terminal pinout
Pin Signal name Pin description Pin
Pin description
27
Declaration of Conformity
Manufacturer: Measurement Computing Corporation
Address: 10 Commerce Way
Suite 1008
Norton, MA 02766
USA
Category: Electrical equipment for measurement, control and laboratory use.
Date of Issue: June 27, 2014
Measurement Computing Corporation declares under sole responsibility that the product
USB-231
to which this declaration relates is in conformity with the relevant provisions of the following standards or other
documents:
EC EMC Directive 2004/108/EC: General Requirements, EN 61326-1:2006 (IEC 61326-1:2005).
Emissions:
EN 55011 (2010) / CISPR 11(2010): Radiated emissions: Group 1, Class A
EN 55011 (2010) / CISPR 11(2010): Conducted emissions: Group 1, Class A
Immunity: EN 61326-1:2006, Table 1.
IEC 61000-4-2 (2001): Electrostatic Discharge immunity.
IEC 61000-4-3 (2002): Radiated Electromagnetic Field immunity.
IEC 61000-4-4 (2004): Electric Fast Transient Burst Immunity.
IEC 61000-4-5 (2001): Surge Immunity.
IEC 61000-4-6 (2007): Radio Frequency Common Mode Immunity.
IEC 61000-4-11 (2004): Voltage Interruptions.
To maintain compliance to the standards of this declaration, the following conditions must be met.
The host computer, peripheral equipment, power sources, and expansion hardware must be CE compliant.
All I/O cables must be shielded, with the shields connected to ground.
I/O cables must be less than 0.5 meter (20 in.) in length.
The host computer must be properly grounded.
Declaration of Conformity based on tests conducted by National Instruments Corporation, 11500 North MoPac
Expressway, Austin, Texas 78759, USA in March, 2014. Test records are outlined in National Instruments Test
Report #20140610-1451-SF.
We hereby declare that the equipment specified conforms to the above Directives and Standards.
Carl Haapaoja, Director of Quality Assurance

Measurement Computing Corporation NI Hungary Kft
10 Commerce Way H-4031 Debrecen, Hátar út 1/A, Hungary
Norton, Massachusetts 02766 Phone: +36 (52) 515400
(508) 946-5100 Fax: +36 (52) 515414
Fax: (508) 946-9500 http://hungary.ni.com/debrecen
E-mail: info@mccdaq.com
www.mccdaq.com
 Loading...