

Page 1

WEB-TEMP
Document Revision 5
March 2013
© Copyright 2013
User's Guide
Web-Enabled Sensor Measurement
Page 2

HM WEB-TEMP.docx
Your new Measurement Computing product comes with a fantastic extra —
Management committed to your satisfaction!
Thank you for choosing a Measurement Computing product—and congratulations! You own the finest, and you can now enjoy
the protection of the most comprehensive warranties and unmatched phone tech support. It’s the embodiment of our mission:
To provide data acquisition hardware and software that will save time and save money.
Simple installations minimize the time between setting up your system and actually making measurements. We offer quick and
simple access to outstanding live FREE technical support to help integrate MCC products into a DAQ system.
Limited Lifetime Warranty: Most MCC products are covered by a limited lifetime warranty against defects in materials or
workmanship for the life of the product, to the original purchaser, unless otherwise noted. Any products found to be defective in
material or workmanship will be repaired, replaced with same or similar device, or refunded at MCC’s discretion. For specific
information, please refer to the terms and conditions of sale.
Harsh Environment Program: Any Measurement Computing product that is damaged due to misuse, or any reason, may be
eligible for replacement with the same or similar device for 50% of the current list price. I/O boards face some harsh
environments, some harsher than the boards are designed to withstand. Contact MCC to determine your product’s eligibility for
this program.
30 Day Money-Back Guarantee: Any Measurement Computing Corporation product may be returned within 30 days of
purchase for a full refund of the price paid for the product being returned. If you are not satisfied, or chose the wrong product by
mistake, you do not have to keep it.
These warranties are in lieu of all other warranties, expressed or implied, including any implied warranty of merchantability or
fitness for a particular application. The remedies provided herein are the buyer’s sole and exclusive remedies. Neither
Measurement Computing Corporation, nor its employees shall be liable for any direct or indirect, special, incidental or
consequential damage arising from the use of its products, even if Measurement Computing Corporation has been notified in
advance of the possibility of such damages.
Trademark and Copyright Information
Measurement Computing Corporation, InstaCal, Universal Library, and the Measurement Computing logo are either trademarks
or registered trademarks of Measurement Computing Corporation. Refer to the Copyrights & Trademarks section on
mccdaq.com/legal for more information about Measurement Computing trademarks. Other product and company names
mentioned herein are trademarks or trade names of their respective companies.
© 2013 Measurement Computing Corporation. All rights reserved. No part of this publication may be reproduced, stored in a
retrieval system, or transmitted, in any form by any means, electronic, mechanical, by photocopying, recording, or otherwise
without the prior written permission of Measurement Computing Corporation.
Notice
Measurement Computing Corporation does not authorize any Measurement Computing Corporation product for use
in life support systems and/or devices without prior written consent from Measurement Computing Corporation.
Life support devices/systems are devices or systems that, a) are intended for surgical implantation into the body, or
b) support or sustain life and whose failure to perform can be reasonably expected to result in injury. Measurement
Computing Corporation products are not designed with the components required, and are not subject to the testing
required to ensure a level of reliability suitable for the treatment and diagnosis of people.
2
Page 3

Table of Contents
Preface
About this User’s Guide ....................................................................................................................... 6
What you will learn from this user's guide ......................................................................................................... 6
Conventions in this user's guide ......................................................................................................................... 6
Where to find more information ......................................................................................................................... 6
Chapter 1
Introducing the WEB-TEMP ................................................................................................................. 7
Web interface ...................................................................................................................................................... 7
TCP/IP connection ............................................................................................................................................................ 7
Browser requirement ......................................................................................................................................................... 7
WEB-TEMP features .......................................................................................................................................... 7
Temperature channels ....................................................................................................................................................... 7
Alarms .............................................................................................................................................................................. 8
Digital I/O channels .......................................................................................................................................................... 8
WEB-TEMP block diagram ............................................................................................................................... 8
Chapter 2
Installing the WEB-TEMP ..................................................................................................................... 9
What comes with your shipment? ....................................................................................................................... 9
Hardware .......................................................................................................................................................................... 9
Documentation .................................................................................................................................................................. 9
Unpacking........................................................................................................................................................... 9
Installing the software ........................................................................................................................................ 9
Connecting the AC power adapter ...................................................................................................................... 9
Connecting the WEB-TEMP ............................................................................................................................ 10
Connecting to a LAN for communication within a network ............................................................................................10
Connecting to a LAN for communication across networks .............................................................................................10
Connecting the WEB-TEMP directly to a computer ........................................................................................................11
Using the web interface .................................................................................................................................... 12
Logging in to a device......................................................................................................................................................13
Configuring the WEB-TEMP using InstaCal ................................................................................................... 13
Setting network parameters ..............................................................................................................................................13
Calibrating the Hardware .................................................................................................................................. 14
Warm-up period ................................................................................................................................................ 14
Chapter 3
Signal Connections ............................................................................................................................. 15
Screw terminal pinout ....................................................................................................................................... 15
Sensor inputs ....................................................................................................................................................................15
Current excitation outputs ................................................................................................................................................16
Four-wire, two sensor common .......................................................................................................................................16
Four-wire, two sensor common .......................................................................................................................................16
CJC sensors ......................................................................................................................................................................16
Digital I/O ........................................................................................................................................................................16
Pull-up/down configuration .............................................................................................................................................16
Analog and digital ground ...............................................................................................................................................16
Power output ....................................................................................................................................................................16
Thermocouple connections ............................................................................................................................... 17
Wiring configuration ........................................................................................................................................................17
RTD and thermistor connections ...................................................................................................................... 17
Two-wire configuration ...................................................................................................................................................18
Three-wire configuration .................................................................................................................................................19
Four-wire configuration ...................................................................................................................................................19
3
Page 4

WEB-TEMP User's Guide
Semiconductor sensor measurements ............................................................................................................... 20
Wiring configuration ........................................................................................................................................................20
Digital I/O connections ..................................................................................................................................... 21
Configuring the DIO channels to generate alarms ...........................................................................................................21
Chapter 4
Functional Details ............................................................................................................................... 22
Thermocouple measurements ........................................................................................................................... 22
Cold junction compensation (CJC) ..................................................................................................................................22
Data linearization .............................................................................................................................................................22
Open-thermocouple detection (OTD) ..............................................................................................................................22
RTD and thermistor measurements .................................................................................................................. 22
Data linearization .............................................................................................................................................................23
External components ........................................................................................................................................ 23
Screw terminals................................................................................................................................................................23
Ethernet port ....................................................................................................................................................................23
External power connector ................................................................................................................................................23
POWER/COMM LED .....................................................................................................................................................24
LINK/ACTIVITY LED ...................................................................................................................................................24
Digital logic voltage switch .............................................................................................................................................24
Factory default reset button..............................................................................................................................................24
Chapter 5
Ethernet Troubleshooting .................................................................................................................. 25
Check the WEB-TEMP status LEDs ................................................................ ................................................ 25
Check the network settings on the computer .................................................................................................... 26
Check whether DHCP is enabled on the network server ..................................................................................................26
Verify that the computer is connected to the network ...................................................................................... 26
Verify the network path to the WEB-TEMP .................................................................................................... 27
Verify the network path to a remote WEB-TEMP ........................................................................................... 28
Check cached information ................................................................................................................................ 28
Deleting a NetBIOS table entry .......................................................................................................................................28
Deleting an ARP table .....................................................................................................................................................28
Getting help ...................................................................................................................................................... 28
Chapter 6
Specifications ...................................................................................................................................... 29
Analog input ................................................................................................ ..................................................... 29
Channel configurations ..................................................................................................................................... 30
Compatible sensors ........................................................................................................................................... 30
Accuracy ........................................................................................................................................................... 31
Thermocouple measurement accuracy .............................................................................................................................31
Semiconductor sensor measurement accuracy .................................................................................................................31
RTD measurement accuracy ............................................................................................................................................32
Thermistor measurement accuracy ..................................................................................................................................32
Throughput rate ................................................................................................................................................ 33
Digital input/output........................................................................................................................................... 34
Temperature alarms .......................................................................................................................................... 34
Memory ............................................................................................................................................................ 34
Microcontroller ................................ ................................................................................................................. 35
Power ................................................................................................................................................................ 35
Network ............................................................................................................................................................ 35
Ethernet compliance ........................................................................................................................................................35
Ethernet connection .........................................................................................................................................................35
Network factory default settings ......................................................................................................................................36
Network protocols ............................................................................................................................................................36
4
Page 5

WEB-TEMP User's Guide
Network security ..............................................................................................................................................................36
LED displays and the factory reset button ........................................................................................................ 37
Current excitation outputs (Ix+) ....................................................................................................................... 37
Environmental .................................................................................................................................................. 37
Mechanical ....................................................................................................................................................... 37
Screw terminal connector ................................................................................................................................. 38
Declaration of Conformity .................................................................................................................. 39
5
Page 6

About this User’s Guide
What you will learn from this user's guide
This user's guide describes the Measurement Computing WEB-TEMP data acquisition device and lists device
specifications.
Conventions in this user's guide
For more information
Text presented in a box signifies additional information related to the subject matter.
Caution! Shaded caution statements present information to help you avoid injuring yourself and others,
damaging your hardware, or losing your data.
bold text Bold text is used for the names of objects on a screen, such as buttons, text boxes, and check boxes.
italic text Italic text is used for the names of manuals and help topic titles, and to emphasize a word or phrase.
Where to find more information
Preface
Additional information about WEB-TEMP hardware is available on our website at www.mccdaq.com. You can
also contact Measurement Computing Corporation with specific questions.
Knowledgebase: kb.mccdaq.com
Phone: 508-946-5100 and follow the instructions for reaching Tech Support
Fax: 508-946-9500 to the attention of Tech Support
Email: techsupport@mccdaq.com
6
Page 7

Chapter 1
Introducing the WEB-TEMP
The WEB-TEMP is a temperature measurement device with a built-in web server. You can connect the device
to an Ethernet port or hub, start up your browser, and view current data.
The WEB-TEMP is fully supported by the Universal Library and TracerDAQ. These software programs are
included on the Measurement Computing Data Acquisition Software CD.
Web interface
The WEB-TEMP embedded web interface provides access to current data and configuration settings using a
standard web browser.
Browse to the device home page by entering the URL that is printed on the device into the browser. View
current sensor measurements, channel data, and configure hardware options from the device's web pages. Only
one user can change configuration options on the device at a time.
The web interface is built into the device's firmware, and does not need to be installed on a computer. No
external software is required other than a web browser and a TCP/IP connection.
TCP/IP connection
A TCP/IP connection is required to access the web interface. Connect the device's 10Base-T Ethernet port to a
local or wide area network using the supplied Ethernet cable, to a single computer through a hub using the
supplied Ethernet cable, or directly to a computer using a standard CAT-5 crossover cable.
Browser requirement
The web browser used to access the WEB-TEMP web interface must support JavaScript. The web interface was
tested with the following browsers for compatibility:
Mozilla Firefox™ 2.x
Microsoft Internet Explorer® 6.x
Microsoft Internet Explorer® 7.x
WEB-TEMP features
The WEB-TEMP provides eight temperature channels and eight digital I/O channels. An external supply
shipped with the device provides power. On-board LEDs display the status of communication and external
power.
All hardware configurable options are selectable with the web browser or InstaCal. Network configurable
options are settable with InstaCal. When using InstaCal, if the login settings have been changed from the
default, a login name and password are required to change configuration settings.
Temperature channels
The WEB-TEMP provides eight differential input channels that accept temperature sensor type inputs. A 24-bit
analog-to-digital (A/D) converter is provided for each pair of analog inputs. Each pair of inputs constitutes a
channel pair. Measurements are available from four sensor categories:
Thermocouple – types J, K, R, S, T, N, E, and B
Resistance temperature detectors (RTDs) – 2, 3, or 4-wire measurements of 100 Ω platinum RTDs
Thermistors – 2, 3, or 4-wire measurements
Semiconductor temperature sensors – LM35, TMP35 or equivalent
The sensor category is software programmable for each channel pair. Each channel pair can connect to a
different category of sensor. The sensor category between the channels that constitute a channel pair cannot be
mixed. However, thermocouple types within a channel pair can be mixed.
7
Page 8

WEB-TEMP User's Guide Introducing the WEB-TEMP
The WEB-TEMP provides four integrated cold junction compensation (CJC) sensors for thermocouple
measurements, and built-in current excitation sources for resistive sensor measurements. Each CJC sensor is
dedicated to one of the four channel pairs. An open thermocouple detection feature lets you detect a broken
thermocouple. An on-board microprocessor automatically linearizes the measurement data according to the
sensor category.
Alarms
The WEB-TEMP features eight independent temperature alarms. Each alarm controls an associated digital I/O
channel as an alarm output. The input to each alarm is one of the temperature input channels. The output of each
alarm is software configurable as active high or low. The user-configurable threshold conditions activate each
alarm. When an alarm is activated, the associated DIO channel is driven to the active output state selected.
Digital I/O channels
Eight digital I/O channels are provided to communicate with external devices and to generate alarms. The
digital bits are software programmable for input or output. The digital output voltage is switch-selectable for
3.3 V or 5 V logic. A screw terminal is provided for pull-up or pull-down configuration.
The digital I/O channels power up in input mode unless the bit is configured for an alarm. When a digital bit is
configured as an alarm, that bit is configured as an output and assumes the state defined by the alarm
configuration.
If you need to log data or display data graphically
The WEB-TEMP displays current data read from the device, and does not log or store historical data. For
logging or trending needs, use the TracerDAQ software included on the Measurement Computing Data
Acquisition Software CD.
WEB-TEMP block diagram
WEB-TEMP functions are illustrated in the block diagram shown here.
Figure 1. Functional block diagram
8
Page 9

Installing the WEB-TEMP
What comes with your shipment?
The following items are shipped with the WEB-TEMP.
Hardware
WEB-TEMP
Ethernet cable (standard)
You can optionally purchase a crossover cable (CAT-5 or higher) to connect the WEB-TEMP to an
Ethernet card installed in a computer.
External power supply and cord – 10 watt AC power adapter. MCC part number PS-5V2AEPS.
Software
MCC DAQ Software CD
Documentation
Quick Start Guide
This booklet provides an overview of the MCC DAQ software you received with the device, and includes
information about installing the software. Please read this booklet completely before installing any software
or hardware.
Setup Options
An overview of installation options is provided in the WEB-TEMP setup options that ships with the device.
Chapter 2
Unpacking
As with any electronic device, you should take care while handling to avoid damage from static
electricity. Before removing the WEB-TEMP from its packaging, ground yourself using a wrist strap or by
simply touching the computer chassis or other grounded object to eliminate any stored static charge.
If any components are missing or damaged, contact us immediately using one of the following methods:
Knowledgebase: kb.mccdaq.com
Phone: 508-946-5100 and follow the instructions for reaching Tech Support
Fax: 508-946-9500 to the attention of Tech Support
Email: techsupport@mccdaq.com
For international customers, contact your local distributor. Refer to the International Distributors section on our
website at www.mccdaq.com/International.
Installing the software
Refer to the Quick Start Guide for instructions on installing the software on the MCC DAQ CD. This booklet is
available in PDF at www.mccdaq.com/PDFmanuals/DAQ-Software-Quick-Start.pdf.
Connecting the AC power adapter
Power to the WEB-TEMP is provided with the 10 watt AC power adapter (PS-5V2AEPS). Connect the adapter
cord to the power connector on the WEB-TEMP device, and plug the AC adapter into an electrical outlet.
The POWER/COMM LED illuminates when +5 V power is supplied to the WEB-TEMP. If the voltage supply is
less than +4.75 V or more than +5.25 V, the POWER/COMM LED will not light.
Refer to Figure 11 on page 23 for the location of the POWER/COMM LED.
9
Page 10

WEB-TEMP User's Guide Installing the WEB-TEMP
Connecting the WEB-TEMP
A TCP/IP connection between the WEB-TEMP and the network or computer is required to access the web
interface. A 10Base-T compatible Ethernet port, hub, or switch is required.
You can connect the WEB-TEMP using the following configurations:
Connect to your Local Area Network (LAN) for communication within a private network/intranet; refer to
the procedure below.
Connect to your LAN for communication across networks (communicate over the internet, for example);
refer to the procedure below.
Connect directly to a computer's Ethernet port for local access (requires a crossover cable (not provided) or
network hub); refer to the procedure on page 11.
Use the standard Ethernet cable provided to connect the WEB-TEMP to a TCP/IP-based local or wide area
network or to connect to a single PC through a hub or switch. Use a CAT-5 or higher crossover cable (not
provided) to connect the WEB-TEMP to an Ethernet card installed in a computer.
How you access the web interface once a TCP/IP connection is established depends on your configuration:
When the WEB-TEMP is connected to the same network as the computer browser, enter the URL that is
printed on the device to open the device's home page.
When the WEB-TEMP is connected to a different network as the computer browser, enter the public IP
address set for the device to open the device's home page. Refer to "Connecting to a LAN for
communication across networks" below for more information.
Connecting to a LAN for communication within a network
Use this procedure to connect the WEB-TEMP to a local area network (LAN). When connected, all computers
installed on the same network can access the WEB-TEMP web interface.
Note: This procedure assumes the network server is equipped with DHCP (dynamic host configuration
protocol), and will automatically assign an IP address to the WEB-TEMP when it is connected to the network.
1. Connect the WEB-TEMP to the network using the Ethernet cable provided.
The Link/Activity LED will illuminate steady green to indicate that you have established a valid Ethernet
connection.
2. Open your web browser, and enter the URL that is printed on the device label.
The WEB-TEMP Measurements page opens. You can view current measurement data from this page. A log in
name (default is "webtemp") and password (default is "mccdaq") are required to change configuration settings.
If the WEB-TEMP is not recognized by the network
If the WEB-TEMP Measurements page does not open, the server may not have DHCP, or DHCP may be
disabled on the server. In either situation, assign a static IP address to the WEB-TEMP before connecting to the
network. Refer to "Connecting the WEB-TEMP directly to a computer" on page 11 for instructions. After you
assign the static IP address, connect to the network using the standard Ethernet cable shipped with the device,
open the browser, and enter the static IP address.
Configuring the WEB-TEMP
All hardware options are configurable with InstaCal or the web interface. InstaCal must be used if any of the
network parameters need to be changed, such as the IP address of your device. Configuration settings are stored
in non-volatile memory in EEPROM, and are loaded on power up.
Refer to the sections "Using the web interface" on page 12 and "Configuring the WEB-TEMP using InstaCal "
on page 13 for detailed information.
Connecting to a LAN for communication across networks
In order to communicate with the WEB-TEMP from a computer connected to a different network, such as over
the internet, you must change the network configuration of the network router.
10
Page 11

WEB-TEMP User's Guide Installing the WEB-TEMP
In the following procedure, the WEB-TEMP is installed at the "host" LAN, and the computer is installed at the
"client" LAN.
Caution! This procedure should only be performed by a network administrator or computer professional.
Incorrect settings can significantly disrupt a network.
1. Connect the WEB-TEMP to a LAN (host) that has access to the Internet using the cable provided.
The Link/Activity LED will illuminate steady green to indicate that you have established a valid Ethernet
connection.
2. Configure the WEB-TEMP at the host LAN to access the web page:
o Assign a fixed "private" static IP address to the WEB-TEMP.
o Configure the firewall/router to map a static "public" IP address to the "private" IP address assigned
above. Record this address for use in step 3.
o Configure the firewall/router to forward incoming traffic from the public IP address to the HTTP port
("port 80") of the private static IP address.
Note: If your network has an HTTP server already running, network address translation (NAT) allows
different ports to redirect to the WEB-TEMP on port 80. Contact your network administrator or
computer professional for more information.
Note: To access the WEB-TEMP using InstaCal and the Universal Library, configure the firewall to
allow incoming traffic to the UDP port ("port 54211" by default).
3. At the client LAN, open your web browser, and enter the "public" IP address recorded in step 2 above.
Note: To access the WEB-TEMP by name, a DNS entry must be assigned.
The WEB-TEMP Measurements page opens. You can view current measurement data from this page. A log in
name and password are required to change configuration settings.
Accessing the WEB-TEMP using InstaCal and the Universal Library
InstaCal cannot automatically detect a WEB-TEMP that is installed on a different subnet. To change
configuration settings with InstaCal or communicate with a WEB-TEMP using programs written with the
Universal Library, manually add the public IP address to InstaCal. InstaCal can then search the public address
provided for the WEB-TEMP. We recommend that the port number be set to 54211 for use with InstaCal and
the Universal Library. Port 80 is used for the web interface. For information on port configuration, contact your
network administrator or computer professional.
Configuring the WEB-TEMP
All hardware options are configurable with InstaCal or the web interface. InstaCal must be used if any of the
network parameters need to be changed, such as the IP address of your device. Configuration settings are stored
in non-volatile memory in EEPROM, and are loaded on power up.
Refer to the sections "Using the web interface" on page 12 and "Configuring the WEB-TEMP using InstaCal "
on page 13 for detailed information.
Connecting the WEB-TEMP directly to a computer
Use this procedure to connect the WEB-TEMP directly to a computer. This scenario provides local access only,
and requires that you set up your computer to use a static IP address for communication with the WEB-TEMP.
If you are not using a network hub, a CAT-5 (or higher) crossover cable is required to connect to the computer's
Ethernet port. If you are connecting to your computer through a network hub or switch, the Ethernet cable
provided with your device can be used.
Knowledge of network configuration is required
If you are not familiar with network configurations and have questions regarding your network settings, consult
your network administrator or a computer professional.
1. Select Start » Control Panel > Network Connections.
2. Double-click on Local Area Connection.
11
Page 12
WEB-TEMP User's Guide Installing the WEB-TEMP
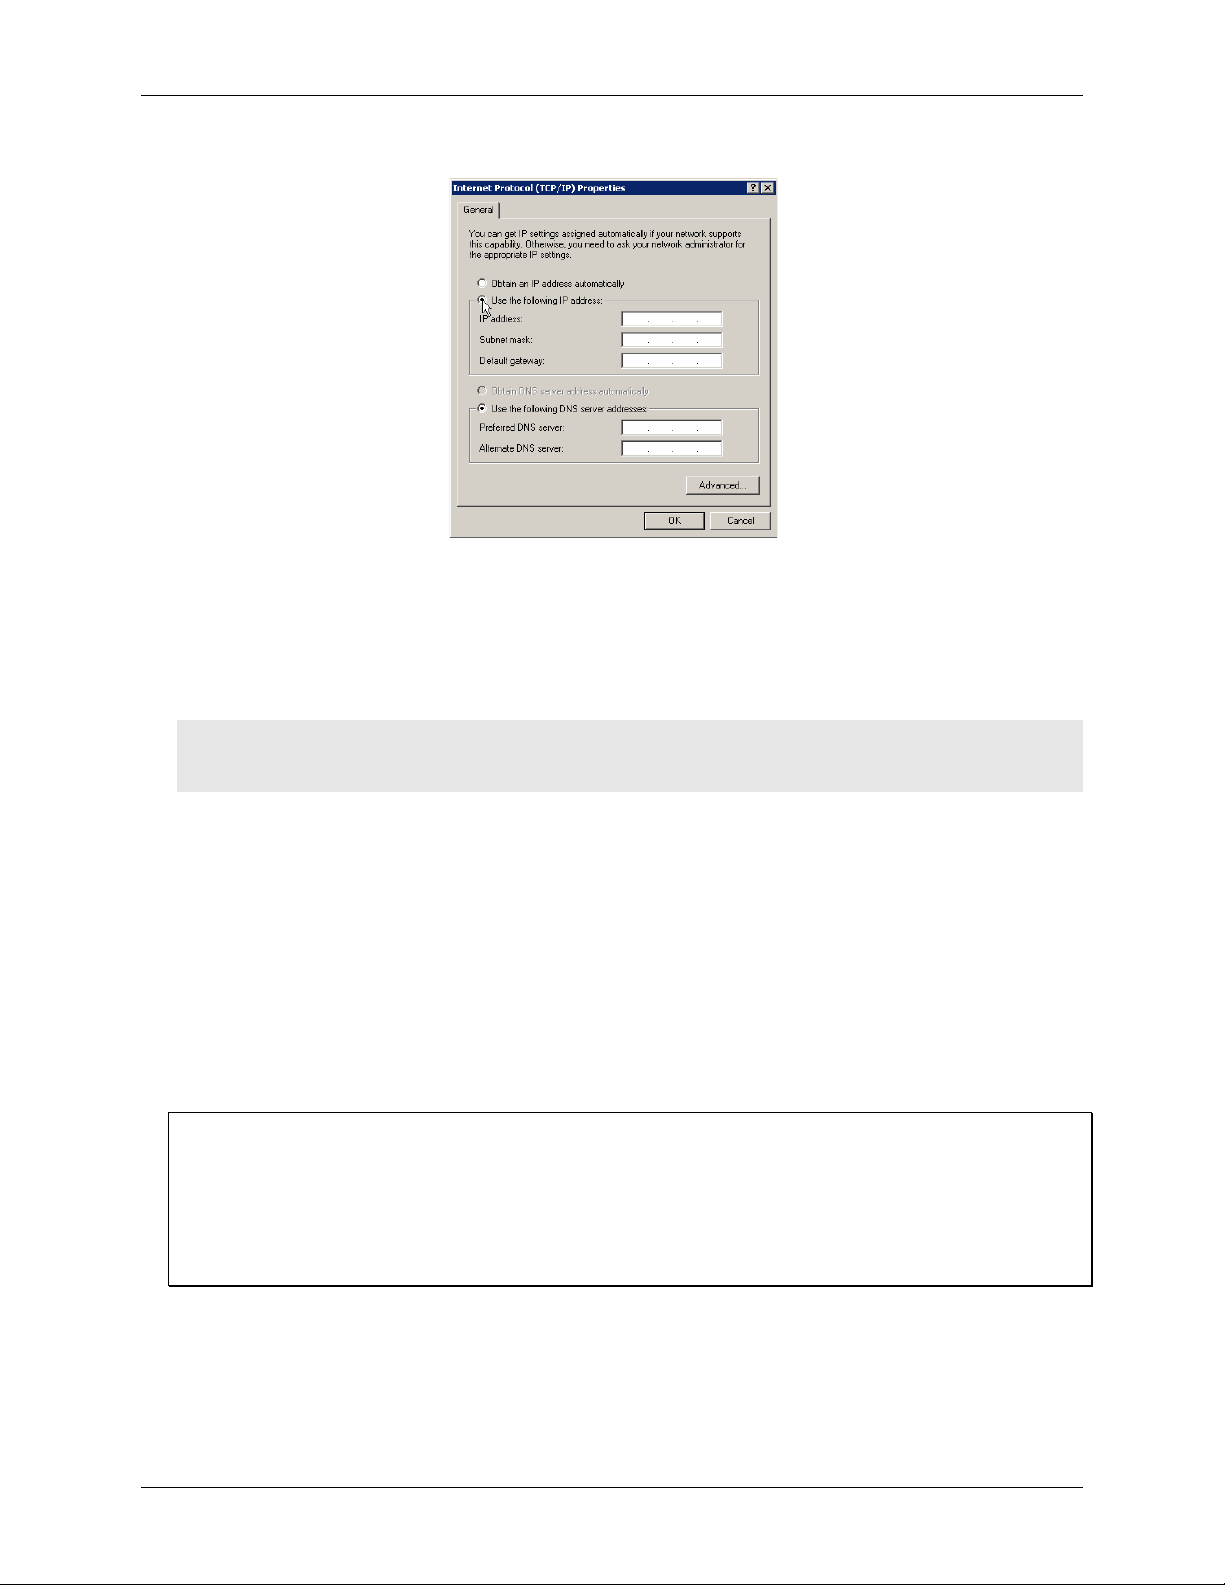
3. Select Internet Protocol (TCP/IP) and click Properties.
4. Select Use the following IP address option and enter the following:
o IP address: Enter 192.168.0.102. Note that the last three digits of this number can be any number
between 11 and 254, inclusive, but must be different from the IP address assigned to the device. The
default IP address set for the WEB-TEMP is 192.168.0.101.
o Subnet mask: Enter 255.255.255.0.
o Default gateway: Enter 192.168.0.1.
Caution! Assigning an arbitrary IP address could result in duplicate IP addresses on the network. This
condition can cause a communication failure that affects both devices. Make sure when
configuring static IP addresses that you set different addresses for each device.
5. Click OK.
6. Connect the WEB-TEMP Ethernet port to your Ethernet hub using the supplied cable, or to your computer's
Ethernet port using a CAT-5 or higher crossover cable.
Note: If you connect to an Ethernet hub, you can use the Ethernet cable shipped with the device. If you
have multiple WEB-TEMP devices, configure each device separately and assign a unique IP address to
each device. You’ll need to run InstaCal to change the IP address from the default 192.168.0.101.
When connected, the Link/Activity LED illuminates steady green to indicate that you have established a
valid Ethernet connection, and blinks indicating network traffic. Refer to Figure 11 on page 23 for the
location of the Link/Activity LED.
7. Open your browser and enter the URL address that is printed on the device label.
The WEB-TEMP Measurements page opens. You can view current measurement data from this page.
Configuring the WEB-TEMP
All hardware options are configurable with InstaCal or the web interface. InstaCal must be used if any of the
network parameters need to be changed, such as the IP address of your device. Configuration settings are stored
in non-volatile memory in EEPROM, and are loaded on power up.
Refer to the sections "Using the web interface" below and "Configuring the WEB-TEMP using InstaCal " on
page 13 for detailed information.
Using the web interface
You can view current measurements and configure hardware options from the device's web interface. The web
interface provides four tabs. Each tab represents an HTML page that is stored on the device.
Measurements tab (home page) – lists the temperature measurements, digital values, and alarm status read
from each channel on the WEB-TEMP.
12
Page 13

WEB-TEMP User's Guide Installing the WEB-TEMP
System Info tab – summarizes the current network settings set for the WEB-TEMP, and provides a button
that when pressed flashes the POWER/COMM LED on the device. Settings on this tab are not configurable
via the web interface; use InstaCal to configure network settings.
Configuration tab – provides separate menu options for configuring your temperature, digital, and alarm
options. To change configuration settings, enter the user name (default is "webtemp") and password
(default is "mccdaq") set for the device and click the Log In button. The user name and password cannot be
changed from the web interface – you must use InstaCal to change them.
o Temperature menu option– Use the options on this page to set the sensor category and connection type
for each temperature channel pair.
The factory default configuration is Disabled. The Disabled mode disconnects the analog inputs from
the terminal blocks and internally grounds all of the A/D inputs. This mode also disables each of the
current excitation sources. Any channel you don’t intend to use should be left disabled.
o DIO menu option – Use the options on this page to set the direction of each digital I/O channel and
value of each digital I/O channel configured for Output.
o Alarm menu option – Use the options on this page to set up the temperature conditions to activate an
alarm, and the output state of the channel (active high or low) when activated. You can configure up to
eight independent alarms.
The configuration options are enabled on these pages when you are logged in. The device is calibrated to
the selected settings each time the "Submit" or "Calibrate" button is pressed.
Help – summarizes the options on each web page, and includes step-by-step procedures for setting up your
temperature channels, digital channels, and alarms.
Logging in to a device
Configurable options are disabled until you log in with the user name and password set for the device. Only one
user can be logged in at a time. By default, the user name is set to webtemp, and the password is set to mccdaq.
You can change these values with InstaCal.
Base64 encryption is used to encrypt the login name and password. JavaScript must be enabled on the browser
to encrypt login information. If JavaScript is disabled on your browser when you log in, the user name and
password values are transmitted as plain text with no encryption applied.
Configuring the WEB-TEMP using InstaCal
All hardware and network options are configurable with InstaCal. When the device is using its default
configuration, InstaCal has access to all functions on the device. Login is done in the background if the default
user name and password are assigned to the device.
By default, the user name is set to webtemp, and the password is set to mccdaq. You can change these values
with InstaCal. If the user name and password have been changed, configurable options are disabled until you
log in with the user name and password set for the device. Only one user can be logged in at a time.
It is recommended that you change the user name and password from the default
To prevent unauthorized changes to your device configuration, make sure you change the user name and
password values from the default. In the event that you forget your settings, they can be reset to the default
values using the reset button on the device. Pressing and holding the reset button for three seconds sets all
network settings back to default including the user name and password.
Note: For security purposes, do not change the log in information to the name and password used to access
secure accounts, such as a credit card or bank account.
Setting network parameters
Use InstaCal to change configurable network settings set on the WEB-TEMP. The network parameters are not
accessible via the web interface. The device is shipped configured with the following default settings.
13
Page 14

WEB-TEMP User's Guide Installing the WEB-TEMP
Network setting
Default value
Identifier
not set, optional
DHCP setting
Enabled
IP address
192.168.0.101
Subnet mask
255.255.255.000
Gateway
192.168.0.1
Server
Enabled
User name
webtemp
Password
mccdaq
MAC address
00:12:71:Cx:xx:xx, where xxxxx is the device’s serial number (read-only)
Default network settings
The following default network parameters are programmable with InstaCal.
Identifier: Text that identifies the WEB Series device. This value is optional, and is not set by default. Up
to 48 alpha-numeric characters can be entered.
DHCP: Enables configuration by a DHCP (Dynamic Host Configuration Protocol) Server. DHCP is a
service that automatically assigns IP addresses to clients supporting the protocol. If the connected network
has a DHCP server, the WEB-TEMP should be assigned an IP address shortly after it is powered up and
attached to the network. InstaCal will display the IP address assigned to the WEB-TEMP.
The default DHCP setting for the WEB-TEMP is Enabled. Disable this setting when the server is not
DHCP-enabled, or when entering a "static" IP address. Unless there is a reason to disable DHCP (such as
the network server is not DHCP-enabled), we recommend that you leave DHCP enabled.
IP: The Internet Protocol (IP) address that is stored on the device. Use this address when a DHCP server is
not available or when DHCP is disabled.
Subnet: The Subnet Mask that is stored on the device. The Subnet Mask is the part of the IP address that
denotes the local Subnet. Use this address when a DHCP server is not available or when DHCP is disabled.
Gateway: The Gateway IP address that is stored on the device. Use this address when a DHCP server is not
available or when DHCP is disabled. A gateway is the IP address of the device that bridges subnets within
a network.
Server: Enables or disables the device's web page server. Enable this value to view the device's web page
with a browser. Disable access to the web page when you want to restrict access to the device to InstaCal or
the Universal Library API.
User Name and Password: The user name and password used to log in to a device session. Log in is
required only when changing configurable options on the device. Default values can be changed with
InstaCal.
A unique 64-bit physical (MAC) address is also assigned to the device. This address is set at the factory and is
not user-configurable.
Restoring factory default network settings
To restore network settings to factory default values, press and hold the device's reset button for three seconds.
If InstaCal is open when default settings are restored, click the Refresh Boards button on InstaCal's tool bar to
reflect the changes.
Calibrating the Hardware
The WEB-TEMP is calibrated to the selected device settings each time a Submit or Calibrate button is pressed
on a web interface configuration page, or the OK button is pressed on an InstaCal board configuration page.
Warm-up period
After you configure the hardware options, allow the WEB-TEMP to warm up for 30 minutes before taking
measurements. This warm up time minimizes thermal drift and achieves the specified rated accuracy of
measurements. For analog, RTD or thermistor measurements, this warm-up time is also required to stabilize the
internal current reference.
14
Page 15

Signal Connections
Screw terminal pinout
The WEB-TEMP has four rows of screw terminals. There are 26 connections on each side. Signals are
identified in Figure 2.
Chapter 3
Figure 2. Screw terminal pinout
Do not make connections to the terminals labeled NC. Use 16 AWG to 30 AWG wire for your signal
connections.
Tighten screw terminal connections
When making connections to the screw terminals, be sure to tighten the screw until tight. Simply touching the
top of the screw terminal is not sufficient to make a proper connection.
Sensor inputs
The WEB-TEMP supports the following temperature sensor types:
Thermocouple – types J, K, R, S, T, N, E, and B
Resistance temperature detectors (RTDs) – 2, 3, or 4-wire measurement modes of 100 Ω platinum RTDs.
Thermistors – 2, 3, or 4-wire measurement modes.
Semiconductor temperature sensors – LM35, TMP35 or equivalent
Sensor selection
The type of sensor you select will depend on your application needs. Review the temperature ranges and
accuracies of each sensor type to determine which is best suited for your application.
You can connect up to eight temperature sensors to the differential sensor inputs (C0H/C0L to C7H/C7L).
Supported sensor categories include thermocouples, RTDs, thermistors, or semiconductor sensors.
Do not mix sensor categories within channel pairs. You can, however, mix thermocouple types (J, K, R, S, T, N,
E, and B) within channel pairs.
15
Page 16

WEB-TEMP User's Guide Signal Connections
Do not connect two different sensor categories to the same channel pair
The WEB-TEMP provides a 24-bit A/D converter for each channel pair. Each channel pair can monitor one
sensor category. To monitor a sensor from a different category, connect the sensor to a different channel pair.
Current excitation outputs
The WEB-TEMP has four dedicated pairs of current excitation output terminals (±IA to ±ID). These terminals
have a built-in precision current source to provide excitation for the resistive sensors used for RTD and
thermistor measurements.
Each current excitation terminal is dedicated to one pair of sensor input channels:
IA+ is the current excitation source for channel 0 and channel 1
IB+ is the current excitation source for channel 2 and channel 3
IC+ is the current excitation source for channel 4 and channel 5
ID+ is the current excitation source for channel 6 and channel 7
Four-wire, two sensor common
Terminals 4W01, 4W23, 4W45, and 4W67 are the common connection for four-wire configurations with two
RTD or thermistor sensors.
Four-wire, two sensor common
Terminals IC01, IC23, IC45, and IC67 are used as the common connection for four-wire configurations with two
RTD or thermistor sensors.
CJC sensors
The WEB-TEMP has four built in high-resolution temperature sensors for thermocouple measurements. Each
CJC sensor is dedicated to one of the four channel pairs, and is located behind the associated channel's screw
terminal. These sensors measure the ambient temperature at the terminal block so that the cold junction voltage
can be calculated.
Digital I/O
You can connect up to eight digital I/O lines to the screw terminals labeled DIO0 to DIO7. Each terminal is
software configurable for input or output. A PU/D terminal is provided for pull-up/down configuration.
If a digital bit is set up as an alarm, the bit is configured for output and assumes the state defined by the alarm
configuration.
Pull-up/down configuration
All digital I/O lines are connected through 47 kΩ to the PU/D pin, which is floating by default. For a pull-up
configuration, connect the PU/D pin to the +5V pin. For a pull-down configuration, connect the PU/D pin to the
GND pin.
Analog and digital ground
The analog ground (AGND) terminals provide a common ground for the sensor input channels. AGND pins are
isolated from the GND pin and from earth ground. Thermocouple sensors can connect to voltages that are
referenced to earth ground, as long the isolation between the AGND pins and earth ground is maintained.
The ground (GND) terminal provides a common ground for the digital I/O channels. The GND pin is isolated
from the AGND pins and from earth ground.
Power output
The +5V output terminal is isolated (500 VDC) from the analog input terminals.
Caution! The +5V terminal is an output. Do not connect an external power supply to this terminal or you
may damage the WEB-TEMP and possibly the computer.
16
Page 17

WEB-TEMP User's Guide Signal Connections
Thermocouple connections
A thermocouple consists of two dissimilar metals that are joined together at one end. When the junction of the
metals is heated or cooled, a voltage is produced that correlates to temperature.
The WEB-TEMP makes fully differential thermocouple measurements without requiring ground-referencing
resistors. A 32-bit floating point value in either a voltage or temperature format is returned by software. Open
thermocouple detection (OTD) is available for each thermocouple input. OTD automatically detects an open or
broken thermocouple.
Use the web browser or InstaCal to select the thermocouple type (J, K, R, S, T, N, E, and B) and one or more
input channels to connect the thermocouple.
Wiring configuration
Connect the thermocouple to the WEB-TEMP using a differential configuration, as shown in Figure 3.
Figure 3. Typical thermocouple connection
Note: There are two high/low channel pairs on each terminal. The # indicates the channel number. Do not make
connections to pin marked "NC".
Connect thermocouples to the WEB-TEMP such that they are floating with respect to AGND. The AGND pins
are isolated from earth ground, so connecting thermocouple sensors to voltages referenced to earth ground is
permissible as long as the isolation between the AGND pins and earth ground is maintained.
When thermocouples are attached to conductive surfaces, the voltage differential between multiple
thermocouples must remain within ±1.4 V. For best results, we recommend the use of insulated or ungrounded
thermocouples when possible.
Maximum input voltage between analog input and ground
The absolute maximum input voltage between an analog input and the isolated AGND pins is ±25 VDC when
the WEB-TEMP is powered on, and ±40 VDC when the WEB-TEMP is powered off.
If you need to increase the length of your thermocouple, use the same type of thermocouple wires to minimize
the error introduced by thermal EMFs.
RTD and thermistor connections
A resistance temperature detector (RTD) measures temperature by correlating the resistance of the RTD
element with temperature. A thermistor is a thermally-sensitive resistor that is similar to an RTD in that its
resistance changes with temperature — thermistors show a large change in resistance that is proportional to a
small change in temperature. The main difference between RTD and thermistor measurements is the method
used to linearize the sensor data.
RTDs and thermistors are resistive devices that require an excitation current to produce a voltage drop that can
be measured differentially across the sensor. The WEB-TEMP features four pairs of current excitation sources
(±IA to ±ID) for measuring resistive type sensors. Each current excitation terminal is dedicated to one pair of
sensor input channels:
IA+ is the current excitation source for channel 0 and channel 1
IB+ is the current excitation source for channel 2 and channel 3
17
Page 18

WEB-TEMP User's Guide Signal Connections
IC+ is the current excitation source for channel 4 and channel 5
ID+ is the current excitation source for channel 6 and channel 7
The WEB-TEMP makes two, three, and four-wire measurements of RTDs (100 Ω platinum type) and
thermistors.
Use InstaCal or the web interface to select the sensor type and the wiring configuration. Once the resistance
value is calculated, the value is linearized in order to convert it to a temperature value. A 32-bit floating point
value in either temperature or resistance is returned by software.
RTD maximum resistance
Resistance values greater than 660 Ω cannot be measured by the WEB-TEMP in the RTD mode. The 660 Ω
resistance limit includes the total resistance across the current excitation (±Ix) pins, which is the sum of the
RTD resistance and the lead resistances.
Thermistor maximum resistance
Resistance values greater than 180 kΩ cannot be measured by the WEB-TEMP in the thermistor mode. The
180 kΩ resistance limit includes the total resistance across the current excitation (±Ix) pins, which is the sum of
the thermistor resistance and the lead resistance.
Two-wire configuration
The easiest way to connect an RTD sensor or thermistor to the WEB-TEMP is with a two-wire configuration,
since it requires the fewest connections to the sensor. With this method, the two wires that provide the RTD
sensor with its excitation current also measure the voltage across the sensor.
Since RTDs exhibit a low nominal resistance, measurement accuracy can be affected due to the lead wire
resistance. For example, connecting lead wires that have a resistance of 1 Ω (0.5 Ω each lead) to a 100 Ω
platinum RTD will result in a 1% measurement error.
With a two-wire configuration, you can connect either one sensor per channel pair, or two sensors per channel
pair.
Two-wire, single-sensor
A two-wire single-sensor measurement configuration is shown in Figure 4. Note: There are two high/low
channel pairs on each terminal. The # indicates the channel number. Do not make connections to pin marked
"NC".
Figure 4. Two-wire, single RTD or thermistor sensor measurement configuration
When you select a two-wire single sensor configuration, connections to C#H and C#L are made internally.
Two-wire, two sensor
A two-wire, two-sensor measurement configuration is shown in Figure 5. Note: There are two high/low channel
pairs on each terminal. The # indicates the channel number. Do not make connections to pin marked "NC".
18
Page 19

WEB-TEMP User's Guide Signal Connections
Figure 5. Two-wire, two RTD or thermistor sensors measurement configuration
When you select a two-wire, two sensor configuration, connections to C#H (first sensor) and C#H/C#L (second
sensor) are made internally.
When configured for two-wire mode, both sensors must be connected to obtain proper measurements.
Three-wire configuration
A three-wire configuration compensates for lead-wire resistance by using a single voltage sense connection.
With a three-wire configuration, you can connect only one sensor per channel pair.
A three-wire measurement configuration is shown in Figure 6. Note: There are two high/low channel pairs on
each terminal. The # indicates the channel number. Do not make connections to pin marked "NC".
Figure 6. Three-wire RTD or thermistor sensor measurement configuration
When you select a three-wire sensor configuration, the WEB-TEMP measures the lead resistance on the first
channel (between Ix+ and C#L) and measures the sensor itself using the second channel (between C#L and Ix-).
This configuration compensates for any lead-wire resistance and temperature change in lead-wire resistance.
Connections to C#H for the first channel and C#H/C#L of the second channel are made internally.
Three-wire compensation
For accurate three wire compensation, the individual lead resistances connected to the ±I# pins must be of equal
resistance value.
Four-wire configuration
With a four-wire configuration, connect two sets of sense/excitation wires at each end of the RTD or thermistor
sensor. This configuration completely compensates for any lead-wire resistance and temperature change in
lead-wire resistance.
Connect your sensor with a four-wire configuration when your application requires very high accuracy
measurements.
Examples of a four-wire single-sensor measurement configuration are shown in Figure 7 and Figure 8. You can
configure the WEB-TEMP with either a single sensor per channel or two sensors per channel pair.
19
Page 20

WEB-TEMP User's Guide Signal Connections
Four-wire, single-sensor
A four-wire measurement configuration is shown in Figure 7. The diagram on the left shows the sensor
connected to the first channel in the channel pair. The diagram on the right shows the sensor connected to the
second channel in the channel pair. The # indicates the channel number. Do not make connections to pin
marked "NC".
Figure 7. Four-wire, single RTD or thermistor sensor measurement configuration
Four-wire, two-sensor
A four-wire, two-sensor measurement configuration is shown in Figure 8. The # indicates the channel number.
Do not make connections to pin marked "NC".
Figure 8. Four-wire, two RTD or thermistor sensors measurement configuration
When configured for four-wire, two sensor mode, both sensors must be connected to obtain proper
measurements.
Semiconductor sensor measurements
Semiconductor sensors are suitable over a range of approximately -40 C to 125 C, where an accuracy of
±2 C is adequate. The temperature measurement range of a semiconductor sensor is small when compared to
thermocouples and RTDs. However, semiconductor sensors can be accurate, inexpensive and easy to interface
with other electronics for display and control.
The WEB-TEMP makes high-resolution measurements of semiconductor sensors and returns a 32-bit floating
point value in either a voltage or temperature.
Use InstaCal or the web interface to select the sensor type (LM35, TMP35 or equivalent) and the sensor input
channel to connect the sensor.
Wiring configuration
Connect a semiconductor sensor using a single-ended configuration, as shown in Figure 9. The # indicates the
channel number. Do not make connections to pins marked "NC". The WEB-TEMP also provides +5V and GND
pins for powering the sensor, but use of this power source requires overriding the isolation between analog and
power ground by connecting AGND to GND.
20
Page 21

WEB-TEMP User's Guide Signal Connections
Figure 9. Semiconductor sensor measurement configuration
Digital I/O connections
Connect up to eight digital I/O lines to the screw terminals labeled DIO0 to DIO7. Configure each digital bit for
either input or output. All digital I/O lines are connected through 47k to the PU/D pin, which is floating by
default. For a pull-up configuration, connect the PU/D terminal to the +5V terminal. For a pull-down
configuration, connect the PU/D terminal to the GND terminal.
When configuring the digital bits for input, the digital I/O terminals can detect the state of a TTL-compatible
device. The ground (GND) terminal (pin 48) provides a common ground for the digital I/O channels. Refer to
the schematic shown in Figure 10. If the switch is set to the +5V input, DIO0 reads TRUE (1). If the switch is
moved to GND, DIO0 reads FALSE (0).
Figure 10. Schematic showing switch detection by digital channel DIO0
When configuring the digital bits, use the switch on the side of the device to set the voltage to either 5 V or
3.3 V (see page 24 for more information). Refer to the digital I/O specification on page 34 for the maximum and
minimum threshold levels for each setting.
If a digital bit is set up as an alarm, that bit is configured for output and assumes the state defined by the alarm
configuration.
Caution! The ground pin labeled GND (pin 48) is isolated from the AGND pins and from earth ground. If a
connection is made to earth ground and AGND, the thermocouples are no longer isolated. In this
case, thermocouples must not be connected to any conductive surfaces that may be referenced to
earth ground.
For general information regarding digital signal connections and digital I/O techniques, refer to the Guide to
DAQ Signal Connections (available on our web site at www.mccdaq.com/signals/signals.pdf).
Configuring the DIO channels to generate alarms
The WEB-TEMP features eight independent temperature alarms. All alarm options are configurable using the
web browser or InstaCal.
When a digital bit is configured as an alarm, that bit will be configured as an output and assume the state
defined by the alarm configuration.
Each alarm controls an associated digital I/O channel as an alarm output. The input to each alarm is one of the
temperature input channels. You set up the temperature conditions to activate an alarm, and the output state of
the channel (active high or low) when activated. When an alarm is enabled, its associated I/O line is set to
output and driven to the appropriate state determined by the alarm options and input temperature. Alarm
configuration settings are stored in non-volatile memory and are loaded on power up.
21
Page 22

Chapter 4
Functional Details
Thermocouple measurements
The WEB-TEMP hardware level-shifts the thermocouple’s output voltage into the A/D’s common mode input
range by applying +2.5 V to the thermocouple’s low side at the C#L input. Always connect thermocouple
sensors to the WEB-TEMP in a floating fashion. Do not attempt to connect the thermocouple low side C#L to
GND or to a ground referencing resistor.
Cold junction compensation (CJC)
When connecting the thermocouple sensor leads to the sensor input channel, the dissimilar metals at the WEBTEMP terminal blocks produce two additional thermocouple junctions. This junction creates a small voltage
error term which must be removed from the overall sensor measurement using a cold junction compensation
technique. The measured voltage includes both the thermocouple voltage and the cold junction voltage. To
compensate for the additional cold junction voltage, the WEB-TEMP subtracts the cold junction voltage from
the thermocouple voltage.
The WEB-TEMP has four high-resolution CJC temperature sensors integrated into the design. The CJC sensors
are configured as one sensor for each channel pair. CJC sensors measure the average temperature at the terminal
block so that the cold junction voltage can be calculated. A software algorithm automatically corrects for the
additional thermocouples created at the terminal blocks by subtracting the calculated cold junction voltage from
the analog input's thermocouple voltage measurement.
Increasing the thermocouple length
If you need to increase the length of your thermocouple, use the same type of thermocouple wires to minimize
the error introduced by thermal EMFs.
Data linearization
After the CJC correction is performed on the measurement data, an on-board microcontroller automatically
linearizes the thermocouple measurement data using National Institute of Standards and Technology (NIST)
linearization coefficients for the selected thermocouple type. The measurement data is then output as a 32-bit
floating point value in the configured format (voltage or temperature).
Open-thermocouple detection (OTD)
The WEB-TEMP is equipped with open-thermocouple detection for each analog input channel. OTD is
automatically enabled when the channel pair is configured for thermocouple sensors.
With OTD, any open-circuit or short-circuit condition at the thermocouple sensor is detected by the software.
An open channel is detected by driving the input voltage to a negative value outside the range of any
thermocouple output. The software recognizes this as an invalid reading and flags the appropriate channel. The
firmware continues to sample all channels when OTD is detected.
RTD and thermistor measurements
RTDs and thermistors are resistive devices that require an excitation current to produce a voltage drop that can
be measured differentially across the sensor. The WEB-TEMP measures the sensor resistance by forcing a
known excitation current through the sensor and then measuring (differentially) the voltage across the sensor to
determine its resistance.
After the voltage measurement is made, the resistance of the RTD is calculated using Ohms law – the sensor
resistance is calculated by dividing the measured voltage by the current excitation level (±Ix) source. The value
of the ±Ix source is stored in local memory.
Once the resistance value is calculated, the value is linearized in order to convert it to a temperature value. The
measurement is returned by software as a 32-bit floating point value in a resistance or temperature format.
22
Page 23

WEB-TEMP User's Guide Functional Details
1
Screw terminal pins 1 to 26
5
LEDs: POWER/COMM (top) and
LINK/ACTIVITY (bottom)
2
Screw terminal pins 27 to 52
6
Digital output voltage switch
3
Power connector
7
Ethernet port
4
Factory default reset button
Data linearization
An on-board microcontroller automatically performs linearization on RTD and thermistor measurements.
RTD measurements are linearized using a Callendar-Van Dusen coefficients algorithm (you select DIN,
SAMA, or ITS-90).
Thermistor measurements are linearized using a Steinhart-Hart linearization algorithm (coefficients
provided by the sensor manufacturer's data sheet).
External components
The WEB-TEMP has the following external components, as shown in Figure 11.
Screw terminals
Ethernet port
External power connector
Status LEDs (POWER/COMM and LINK/ACTIVITY)
Digital output voltage switch
Factory default reset button
Figure 11. WEB-TEMP component locations
Screw terminals
The screw terminals provide connections for sensors, digital channels, power, and ground. Detailed information
is provided in Chapter 3, Signal Connections, beginning on page 15.
Ethernet port
The WEB-TEMP has one 10BASE-T communication port. The port connector is an eight-position RJ-45
connector. Use the Ethernet cable provided to connect the device to a local or wide area network or to a hub
attached to a single computer. Use a CAT-5 (or higher) shielded or unshielded twisted pair crossover cable to
connect directly to a computer. The maximum communication distance without using a repeater is 100 meters.
Data can transmit up to 100 meters at speeds of up to 100 Mbps using only one crossover Ethernet cable
connected to your computer.
External power connector
Use the supplied external power supply (MCC p/n PS-5V2AEPS) to power the WEB-TEMP.
23
Page 24

WEB-TEMP User's Guide Functional Details
LED
Indication
On
4.75 V to 5.25 V external power is supplied to the WEB-TEMP.
Off
Check the following:
External power is not supplied; verify that the supply is connected to the external power connector.
A power fault has occurred. A power fault occurs when the input power falls outside of the specified
voltage range of the external supply (4.75 V to 5.25 V).
LED
Indication
Blinking
Data is being transmitted or received over the Ethernet connection.
On
The Ethernet is idle.
Your network traffic has reached its maximum limit, and no communication is possible. Check with
your Network Administrator.
Off
The Ethernet cable is not connected to the WEB-TEMP.
The Ethernet cable is not connected to the network.
The Ethernet cable is damaged.
The Ethernet cable is not the correct type (a crossover cable is required for a direct connection.)
POWER/COMM LED
The POWER/COMM LED (upper LED) is on when external power is supplied. The WEB-TEMP has an
on-board voltage supervisory circuit that monitors the 5 V external power supply. The table below explains the
function of the POWER/COMM LED.
LINK/ACTIVITY LED
The LINK/ACTIVITY LED (lower LED) blinks green when a data packet is sent or received over the Ethernet
connection. The table below explains the function of the LINK/ACTIVITY LED.
Digital logic voltage switch
The digital logic voltage switch lets you set the voltage to either 3.3 V or 5 V (default setting).
To interface with 3.3 V logic, use the 3.3 V setting. To interface with 5 V logic, use the 5 V setting. Refer to the
digital I/O specification on page 34 for the maximum and minimum threshold levels for each setting.
Figure 12. Output voltage switch positions
To change the logic voltage, slide the switch left or right with a screwdriver.
Factory default reset button
Press and hold this button for three seconds to restore the factory default network settings on the WEB-TEMP.
When held for 3 seconds, the POWER LED will turn off for a short time, indicating a reset is in process. When
the POWER LED turns back on, reset is complete and the factory default network settings have been restored.
24
Page 25

Chapter 5
Ethernet Troubleshooting
There are typically only two reasons why you would be unable to communicate with the WEB-TEMP and
access the web interface:
The WEB-TEMP is configured incorrectly, or is operating incorrectly.
The network is configured incorrectly. Though the WEB-TEMP is functioning normally, you are unable to
communicate with it over the network.
Though a detailed treatment of debugging the network is beyond the scope of this manual, there are a few things
to try to determine if the problem experienced is a problem with the WEB-TEMP or with the network
configuration.
Perform the procedures below to verify the physical and network connections.
Contact your network administrator for issues with your network configuration
Measurement Computing provides technical support for WEB-TEMP connectivity and operation only. For
networking issues, contact your network administrator or computer professional.
Check the WEB-TEMP status LEDs
1. Verify the external power connection. When external power is supplied to the WEB-TEMP, the
POWER/COMM LED illuminates steady green.
o If the POWER/COMM LED is off, check the power cable and the socket that the cable is plugged into.
If the cable is good, plugged in, and the power to the socket is on, then the WEB-TEMP is not
powering up correctly. Contact MCC technical support. Refer to Getting help on page 28 for contact
information.
2. Verify the Ethernet connection. The LINK/ACTIVITY LED illuminates steady green when the WEB-TEMP
is connected to an active Ethernet hub or switch.
o If the LINK/ACTIVITY LED is off, verify that the Ethernet cable is the correct type, that it is not
damaged , and that it is connected correctly between the WEB-TEMP and a known functional
server/hub/switch (or connected to your computer if you are connected directly).
o If the Ethernet cable is plugged into a wall socket, check with your Network Administrator or
computer professional that the wall socket is active, and that it is connected to an active Ethernet hub
or switch.
If you are properly connected to an active server/hub/switch and the LED is still off, there is a problem
with the WEB-TEMP. Contact MCC technical support. Refer to Getting help on page 28 for contact
information.
3. Verify the network connection:
When the WEB-TEMP is connected to a network, the LINK/ACTIVITY LED flashes when there is activity
on the network.
o If the LINK/ACTIVITY LED is solid green, your network’s traffic is at its maximum limit and no
communication is possible, or the network traffic is idle. Check with your network administrator.
o If the LINK/ACTIVITY LED is not illuminated, there are two possibilities:
You are not connected to the network, even though the WEB-TEMP is connected to an active
server/hub/switch. An average network has at least some traffic that causes the LED to blink. Perform
the procedure listed in Checking your TCP/IP settings on page 26.
The WEB-TEMP is not receiving data, and the network connection is verified by a network
administrator. Contact MCC technical support. Refer to Getting help on page 28 for contact
information.
When the WEB-TEMP is directly connected to a computer via a crossover cable or a single hub/switch, the
LINK/ACTIVITY LED flashes when data is transmitted or received over the Ethernet connection.
25
Page 26

WEB-TEMP User's Guide Ethernet Troubleshooting
o If the LINK/ACTIVITY LED is not flashing, there are two possibilities:
Your computer is not transmitting — verify that your TCP/IP settings are correct, and that you are
using a valid IP address for both your computer and WEB-TEMP. Perform the procedure listed in
Check the network settings on the computer TCP/IP settings below.
The WEB-TEMP is not receiving — contact MCC technical support. Refer to Getting help on page 28
for contact information.
Check the network settings on the computer
If the LINK/ACTIVITY LED is not flashing, verify that your TCP/IP settings are correct, and that you are using a
valid IP address for both your computer and the WEB-TEMP. Use the ipconfig utility to return the TCP/IP
settings on your computer.
1. Open a DOS Command Prompt window from your computer.
2. Enter ipconfig and press the Return key. Your computer will display all TCP/IP network configuration
values currently set on the computer. An example is shown here.
o If the IP Address or Subnet Mask information are all 0’s, or if the first three sets (octets) of numbers in
either the IP address or Subnet Mask do not match the device's network settings, then the computer
will be unable to communicate with the WEB-TEMP. Contact your network administrator or computer
professional.
Check whether DHCP is enabled on the network server
You can determine whether DHCP is enabled on the network server — open a DOS Command Prompt and
enter ipconfig /all. Your computer will display additional TCP/IP information, including the status of
DHCP on the network server.
Contact your network administrator regarding network settings
Changes to network configuration should only be performed by your network administrator or computer
professional.
Verify that the computer is connected to the network
You can ping (Packet InterNet Groper) the computer to verify that it is connecting to your network. Ping is a
diagnostic utility used to send a request to a device. The device then returns a response.
Enter ping followed by the IP address of the computer. Using the address returned in the example above
with ipconfig, enter ping 127.0.0.01 and press the Return key.
This address tells the computer to test its network setup.
If your computer is connected to the network, a message similar to the one shown here is returned.
26
Page 27

WEB-TEMP User's Guide Ethernet Troubleshooting
If your computer is not connected to the network, a "Request timed out" error or a "Destination
host unreachable" message is returned. Check with your network administrator.
Verify the network path to the WEB-TEMP
You can ping the WEB-TEMP to verify that the network path from the computer to the device is set up
correctly.
Enter ping followed by the IP address of the WEB-TEMP.
For example, enter ping 192.168.0.10 and press the Return key. If you can successfully communicate
with the WEB-TEMP, a message similar to the one below is returned.
If a "Request timed out" error or a "Destination host unreachable" message is returned, the network
settings may not be set correctly. Press the RESET button on the WEB-TEMP to reset the network
configuration settings to factory default values. If DHCP is enabled, an IP address is automatically assigned to
the device. If DHCP is not enabled, assign the device a unique static IP address and re-establish communication
with the WEB-TEMP. Refer to "Connecting the WEB-TEMP directly to a computer" on page 14 for
information on how to assign a static IP address.
If the RESET button does not restore the network settings, the microcontroller on the WEB-TEMP may not be
working. Contact MCC technical support. Refer to Getting help on page 28 for contact information.
Contact your network administrator regarding network settings
Changes to network configuration should only be performed by your network administrator or computer
professional.
27
Page 28

WEB-TEMP User's Guide Ethernet Troubleshooting
Verify the network path to a remote WEB-TEMP
You can ping the network where the WEB-TEMP is installed to verify that the network path from the computer
to a device installed on a different network is set up correctly.
Enter ping followed by the public IP address of the network where the WEB-TEMP is installed.
If a "Request timed out" error or a "Destination host unreachable" message is returned, verify
that you have the correct public address for the network where the WEB-TEMP is installed.
If you get a response from the ping of the public network but still cannot communicate with the WEB-TEMP,
check the following:
A unique, fixed "static" IP address has been assigned to the WEB-TEMP.
The firewall is configured to allow incoming traffic to the HTTP port ("port 80") for access to the web
page.
The firewall is configured to allow incoming traffic to the UDP port ("port 54211" by default) for access
through InstaCal and the Universal Library.
The network at the public IP address is configured to access the fixed address assigned to the WEB-TEMP.
Contact your network administrator regarding firewall settings
Changes to network configuration should only be performed by your network administrator or computer
professional.
Check cached information
When your network configuration changes - for example, when you change the static address on one of your
devices - you may have obsolete information on PCs that have previously accessed your device. You may be
able to update this information simply by disconnecting the network cable from the PC on which the problem
exists and reconnecting it. After a short time, the cached information should update. If this doesn’t work, the
following procedures may help.
Deleting a NetBIOS table entry
If NetBIOS is enabled, "nbtstat –c" will provide a list of names and IP addresses. If the webtc name is listed,
check the associated IP address. If it is different, try typing "nbtstat –R" to purge the NetBIOS cache.
Deleting an ARP table
If you suspect that two devices on a network are assigned the same IP address, you can delete the ARP table
(Address Resolution Protocol). Do the following:
1. Open a Command Prompt (DOS) window.
2. Enter arp –d followed by the address found in step 2 (192.168.0.102 for example) and press Enter.
The ARP table will update with the current IP addresses assigned to devices on the network.
Getting help
If you are unable to communicate with the WEB-TEMP, first contact your network administrator or computer
professional to verify that you are using the correct TCP/IP network settings, and that your network
configuration is working.
If the network configuration and settings are properly set but you still cannot communicate with the WEBTEMP, the problem may be with the WEB-TEMP. For hardware related issues, contact Measurement
Computing Corporation technical support by phone, fax, or email.
Phone: 508-946-5100 and follow the instructions for reaching Tech Support
Fax: 508-946-9500 to the attention of Tech Support
Email: techsupport@mccdaq.com
For international customers, contact your local distributor where you purchased the WEB-TEMP. Click on this
link www.measurementcomputing.com/sales.asp to locate your distributor.
28
Page 29

Parameter
Condition
Specification
A/D converters
Four dual 24-bit, Sigma-Delta type
Number of channels
8 differential
Input isolation
500 VDC minimum between field wiring and
power supply input.
Channel configuration
Software programmable to match sensor type
Differential input voltage range
Thermocouple
±0.080 V
RTD
0 V to 0.5 V
Thermistor
0 V to 2 V
Semiconductor sensor
0 V to 2.5 V
Absolute maximum input
voltage
±C0x through ±C7x relative to
AGND
±25 V (power on)
±40 V (power off)
Input impedance
5 GΩ (power on)
1 MΩ (power off)
Input leakage current
Open thermocouple detect disabled
30 nA max
Open thermocouple detect enabled
105 nA max
Common mode rejection ratio
fIN = 60 Hz
100 dB min
ADC resolution
24 bits
ADC No missing codes
24 bits
Input coupling
DC
Warm-up time
30 minutes min
Open thermocouple detect
Automatically enabled when the channel pair is
configured for thermocouple sensor.
The maximum open detection time is 3 seconds.
CJC sensor accuracy
15 °C to 35 °C
–0.75 °C to 0.5 °C max
0 °C to 55 °C
–1.5 °C to 1.25 °C max
Specifications
All specifications are subject to change without notice.
Typical for 25 °C unless otherwise specified.
Specifications in italic text are guaranteed by design.
Analog input
Table 1. Generic analog input specifications
Chapter 6
29
Page 30

WEB-TEMP User's Guide Specifications
Sensor Category
Condition
Max number of
sensors (all channels
configured alike)
Disabled
All temperature input channels are disconnected from screw
terminals and internally connected to AGND.
See Note 3
Thermocouple (Note 1)
8 differential channels
Semiconductor sensor
(Note 1)
8 differential channels
RTD and Thermistor
(Note 1)
2-wire input configuration with a single sensor per channel pair
4 differential channels
2-wire input configuration with two sensors per channel pair
8 differential channels
3-wire configuration with a single sensor per channel pair
4 differential channels
4-wire input configuration with a single sensor per channel pair
4 differential channels
4-wire input configuration with two sensors per channel pair
8 differential channels
Parameter
Specification
Thermocouple
J: –210 °C to 1200 °C
K: –270 °C to 1372 °C
R: –50 °C to 1768 °C
S: –50 °C to 1768 °C
T: –270 °C to 400 °C
N: –270 °C to 1300 °C
E: –270 °C to 1000 °C
B: 0 °C to 1820 °C
RTD
100 Ω PT (DIN 43760: 0.00385 ohms/ohm/°C)
100 Ω PT (SAMA: 0.003911 ohms/ohm/°C)
100 Ω PT (ITS-90/IEC751:0.0038505 ohms/ohm/°C)
Thermistor
Standard 2,252 Ω through 30,000 Ω
Semiconductor / IC
LM35, TMP35 or equivalent
Channel configurations
Table 2. Channel configuration specifications
Note 1: Internally, the WEB-TEMP has four, dual-channel, fully differential A/Ds providing a total of eight
differential channels. The analog input channels are therefore configured in four channel pairs with
CH0/CH1 sensor inputs, CH2/CH3 sensor inputs, CH4/CH5 sensor inputs, and CH6/CH7 sensor
inputs paired together. This "channel-pairing" requires the analog input channel pairs be configured to
monitor the same category of temperature sensor. Mixing different sensor types of the same category is
permissible, such as a type J thermocouple on channel 0 and a type T thermocouple on channel 1.
Note 2: Channel configuration information is stored on a EEPROM external to the isolated microcontroller by
the firmware whenever any item is modified. Modification is performed by commands issued over
Ethernet from an external application, and the configuration is made non-volatile through the use of the
EEPROM.
Note 3: The factory default configuration is Disabled. The Disabled mode disconnects the analog inputs from
the terminal blocks and internally grounds (AGND) all of the A/D inputs. This mode also disables each
of the current excitation sources.
Compatible sensors
Table 3. Compatible sensor type specifications
30
Page 31

WEB-TEMP User's Guide Specifications
Sensor
Type
Sensor temperature
(°C)
Accuracy error
maximum (°C)
Accuracy error typical (°C)
Tempco (°C/°C)
J
–210
3.098
1.762
0.040
0
1.282
0.724
1200
1.178
0.684
K
–210
3.318
1.843
0.045
0
1.292
0.730
1372
1.495
0.799
S
–50
1.892
1.058
0.027
250
0.853
0.479
1768
0.734
0.416
R
–50
2.010
1.124
0.025
250
0.844
0.475
1768
0.612
0.347
B
250
2.199
2.192
0.004
700
0.824
0.821
1820
0.471
0.469
E
–200
3.050
1.708
0.038
0
1.465
0.826
1000
1.010
0.564
T
–200
3.226
1.797
0.045
0
1.334
0.754
400
0.856
0.496
N
–200
3.406
1.897
0.035
0
1.300
0.735
1300
0.978
0.571
Sensor Type
Temperature Range (°C)
Maximum Accuracy Error (°C)
LM35, TMP35 or equivalent
–40 to 150
±0.50
Accuracy
Thermocouple measurement accuracy
Table 4. Thermocouple accuracy specifications, including CJC measurement error. All specifications are (±).
Note 4: Thermocouple measurement accuracy specifications include polynomial linearization, cold-junction
compensation and system noise. These specs are for one year, or 3000 operating hours, whichever
comes first, and for operation of the WEB-TEMP between 15 °C and 35 °C after 30 minute warm-up.
The tempco should be applied to the accuracy specifications for operation at an ambient temperature
outside of the 15 °C and 35 °C range. There are total of four CJC sensors, two per side of the module.
Each CJC sensor is dedicated to one of the four channel pairs. The accuracy listed above assumes the
screw terminals are at the same temperature as the CJC sensor. Errors shown do not include inherent
thermocouple error. Contact your thermocouple supplier for details on the actual thermocouple
accuracy error.
Note 5: Thermocouples must be connected to the WEB-TEMP such that they are floating with respect to
AGND. The AGND pins are isolated from earth ground. You can connect thermocouple sensors to
voltages referenced to earth ground as long as the isolation between the AGND pins and earth ground
is maintained.
Note 6: When thermocouples are attached to conductive surfaces, the voltage differential between multiple
thermocouples must remain within ±1.4V. For best results, we recommend using insulated or
ungrounded thermocouples when possible.
Semiconductor sensor measurement accuracy
Table 5. Semiconductor sensor accuracy specifications
31
Page 32

WEB-TEMP User's Guide Specifications
RTD
Sensor temperature
(°C)
Accuracy error (°C)
maximum
Accuracy error (°C)
typical
Tempco (°C/°C)
PT100, DIN,
US or ITS-90
–200
2.913
2.784
0.001
–150
1.201
1.070
0.001
–100
0.482
0.349
0.001
0
0.261
0.124
0.001
100
0.269
0.127
0.001
300
0.287
0.136
0.001
600
0.318
0.150
0.001
Thermistor
Sensor
temperature (°C)
Accuracy error
maximum (°C)
Accuracy error
typical (°C)
Tempco (°C/°C)
2252 Ω
–40
0.001
0.0007
0.001
0
0.021
0.008
0.001
50
0.263
0.130
0.001
120
3.473
1.750
0.001
5000 Ω
–35
0.001
0.0006
0.001
0
0.009
0.004
0.001
50
0.115
0.049
0.001
120
1.535
0.658
0.001
10000 Ω
–25
0.001
0.0005
0.001
0
0.005
0.002
0.001
50
0.060
0.028
0.001
120
0.771
0.328
0.001
30000 Ω
–10
0.001
0.0005
0.001
0
0.002
0.001
0.001
50
0.019
0.009
0.001
120
0.267
0.128
0.001
Note 7: Error shown does not include errors of the sensor itself. These specs are for one year while operation
of the WEB-TEMP unit is between 15 °C and 35 °C. Contact your sensor supplier for details on the
actual sensor error limitations.
RTD measurement accuracy
Table 6. RTD measurement accuracy specifications
Note 8: Error shown does not include errors of the sensor itself. The sensor linearization is performed using a
Callendar-Van Dusen linearization algorithm. These specs are for one year while operation of the
device is between 15 °C and 35 °C. The accuracy and tempco specifications include the accuracy of
the Callendar-Van Dusen linearization algorithm. The specification does not include lead resistance
errors for 2-wire RTD connections. Contact your sensor supplier for details on the actual sensor error
limitations.
Note 9: Resistance values greater than 660 Ω cannot be measured by the WEB-TEMP in the RTD mode. The
660 Ω resistance limit includes the total resistance across the current excitation (±Ix) pins, which is the
sum of the RTD resistance and the lead resistances.
Note 10: For accurate three wire compensation, the individual lead resistances connected to the ±Ix pins
must be of equal ohmic value. To ensure this, use connection leads of equal lengths.
Thermistor measurement accuracy
Table 7. Thermistor measurement accuracy specifications
32
Page 33

WEB-TEMP User's Guide Specifications
Temp (°C)
2252 Ω
thermistor
3000 Ω
thermistor
5 kΩ
thermistor
10 kΩ
thermistor
30 kΩ
thermistor
–40
76 kΩ
101 kΩ
168 kΩ
240 kΩ (Note 12)
885 kΩ (Note 12)
–35
55 kΩ
73 kΩ
121 kΩ
179 kΩ
649 kΩ (Note 12)
–30
40 kΩ
53 kΩ
88 kΩ
135 kΩ
481 kΩ (Note 12)
–25
29 kΩ
39 kΩ
65 kΩ
103 kΩ
360 kΩ (Note 12)
–20
22 kΩ
29 kΩ
49 kΩ
79 kΩ
271 kΩ (Note 12)
–15
16 kΩ
22 kΩ
36 kΩ
61 kΩ
206 kΩ (Note 12)
–10
12 kΩ
17 kΩ
28 kΩ
48 kΩ
158 kΩ
–5
9.5 kΩ
13 kΩ
21 kΩ
37 kΩ
122 kΩ
0
7.4 kΩ
9.8 kΩ
16 kΩ
29 kΩ
95 kΩ
Number of input channels
Maximum throughput
1
2 S/s
2
2 S/s on each channel, 4 S/s total
3
2 S/s on each channel, 6 S/s total
4
2 S/s on each channel, 8 S/s total
5
2 S/s on each channel, 10 S/s total
6
2 S/s on each channel, 12 S/s total
7
2 S/s on each channel, 14 S/s total
8
2 S/s on each channel, 16 S/s total
Note 11: Error shown does not include errors of the sensor itself. The sensor linearization is performed
using a Steinhart-Hart linearization algorithm. The accuracy and tempco specifications include the
accuracy of the Callendar-Van Dusen linearization algorithm. These specifications are for one year
while operation of the device is between 15 °C and 35 °C. The specification does not include lead
resistance errors for 2-wire thermistor connections. Contact your sensor supplier for details on the
actual sensor error limitations. Total thermistor resistance on any given channel pair must not exceed
180 kΩ. Typical resistance values at various temperatures for supported thermistors are shown in Table
8.
Table 8. Typical thermistor resistance specifications
Note 12: Resistance values greater than 180 kΩ cannot be measured by the WEB-TEMP in the thermistor
mode. The 180 kΩ resistance limit includes the total resistance across the current excitation (±Ix) pins,
which is the sum of the thermistor resistance and the lead resistances.
Note 13: For accurate three wire compensation, the individual lead resistances connected to the ±Ix pins
must be of equal ohmic value. To ensure this, use connection leads of equal lengths.
Throughput rate
Table 9. Throughput rate specifications
Note 14: The analog inputs are configured to run continuously. Each channel is sampled twice per second.
The maximum latency between when a sample is acquired and the temperature data is provided by the
Ethernet unit is approximately 0.5 seconds.
33
Page 34

WEB-TEMP User's Guide Specifications
Parameter
Specification
Digital type
CMOS
Number of I/O
8 (DIO0 through DIO7)
Configuration
Independently configured for input or output.
Switch selectable output voltages: +5 V and +3.3 V
Power on conditions
Power on reset is Input mode except when bits are configured to operate as
alarms.
Pull-up/pull-down configuration
All pins are connected to 47 kΩ resistors that share a common point accessible
at Pin 22 of the device (PU/D). This pin is floating by default and is userconfigurable via external connection. For pull-up mode, connect this pin to pin
21 (+5V). For pull-down mode, connect this pin to Pin 48 (GND).
Digital I/O transfer rate (software paced)
Digital input: 50 port reads or single bit reads per second, typ.
Digital output: 100 port writes or single bit writes per second, typ.
Input high voltage (+5 V mode)
4 V min, 5.5 V absolute max
Input high voltage (+3.3 V mode)
2.64 V min, 5.5 V absolute max
Input low voltage (+5 V mode)
1 V max, –0.3 V absolute min
Input low voltage (+3.3 V mode)
0.66 V max, –0.3 V absolute min
Output low voltage (IOL = 2.5 mA)
0.6 V max
Output high voltage (IOH = –2.5 mA)
4.3 V min (+5 V mode), 2.7 V (+3.3 V mode)
Parameter
Specification
Number of alarms
8 (one per digital I/O line)
Alarm functionality
Each alarm controls its associated digital I/O line as an alarm output. The input to each
alarm may be any of the analog temperature input channels. When an alarm is enabled, its
associated I/O line is set to output and driven to the appropriate state determined by the
alarm options and input temperature. The alarm configurations are stored in non-volatile
memory and are loaded at power on.
Alarm input modes
Alarm when input temperature > T1
Alarm when input temperature > T1, reset alarm when input temperature goes below T2
Alarm when input temperature < T1
Alarm when input temperature < T1, reset alarm when input temperature goes above T2
Alarm when input temperature is < T1 or > T2
T1 and T2 may be independently set for each alarm.
Alarm output modes
Disabled, digital I/O line may be used for normal operation
Enabled, active high output. The DIO line goes high when an alarm condition is met.
Enabled, active low output. The DIO line goes low when an alarm condition is met.
Alarm update rate
1 second
Parameter
Specification
EEPROM
512 bytes for sensor configuration
FLASH
2 MB for device configuration and website storage
Digital input/output
Table 10. Digital input/output specifications
Note 15: Ground pins on the device labeled GND are isolated from AGND pins and from earth ground.
Temperature alarms
Table 11. Temperature alarm specifications
Memory
Table 12. Memory specifications
34
Page 35

WEB-TEMP User's Guide Specifications
Parameter
Specification
Type
One high-performance 8-bit RISC microcontroller (isolated)
One high-performance 16-bit RISC microcontroller (non-isolated)
Parameter
Condition
Specification
Supply current (Note 17)
Continuous mode
440 mA max
External power input
(Note 16)
+5 VDC ± 5%
(+5 VDC power supply provided)
External power supply
(included)
MCC p/n PS-5V2AEPS
+5VDC, 10 W, 5% regulation
Voltage supervisor limits
4.75 V > V
ext
or V
ext
> 5.25 V
PWR LED = Off (power fault)
4.75 V < V
ext
< 5.25 V
PWR LED = On
User output voltage range
Available at +5V screw terminal
4.65 V min, 5.25 V max
User output current
available
Available at +5V screw terminal
10 mA max
Parameter
Specification
Device type
IEEE 802.3 Ethernet 10Base-T
Device compatibility
IEEE 802.3-2003 10 Mpbs Media Access Control
Parameter
Specification
Ethernet type
10Base-T
Connector
RJ-45, 8 position
Cable
CAT-5 shielded, unshielded twisted pair
Length
100 meters max
MAC address
00:12:71:Cx:xx:xx, where xxxxx is the device serial number
Microcontroller
Table 13. Microcontroller specifications
Power
Table 14. Power specifications
Note 16: Voltage specification applies at barrel plug power input. The power supply provided with the
board meets this specification at the rated total power supply current. If a different power supply is
used, small line resistances could cause significant voltage drop between the power supply and the
barrel plug input.
Note 17: This is the total current requirement for the WEB-TEMP which includes up to 20 mA for the
LEDs and 10 mA for the user voltage output.
Network
Ethernet compliance
Table 15. Ethernet compliance specifications
Ethernet connection
Table 16. Ethernet connection specifications
35
Page 36

WEB-TEMP User's Guide Specifications
Parameter
Specification
Factory default IP address
192.168.0.101
Factory default subnet mask
255.255.255.0
Factory default Gateway
192.168.0.1
Factory default DHCP setting
Enabled
Factory default user name
"webtemp"
Factory default password
"mccdaq"
Web server
Enabled
Parameter
Specification
Protocols implemented
IP, ARP, ICMP, DHCP, UDP, TCP, NBNS, HTTP
Protocols using UDP or TCP for transport communicate on their IETF assigned
ports, for example HTTP on TCP port 80.
UDP messaging protocol
UDP port 54211
TCP downloading protocol
TCP port 54267
HTTP 1.0 alternate port
TCP port 49152-65535 (not including 54267)
Network name
"webtemp_xxxxx", where xxxxx is the device serial number
Network name publication
Via NBNS (responds to b-node broadcasts, therefore only available on the local
subnet)
Max number of simultaneous HTTP
connections
3
Max number of non-HTTP TCP
sockets
5
Parameter
Specification
Security implementation
IP address based session manager with user-name/password login for
configuration and control transactions (data is not secured.)
Session timeout
5 minutes with no activity
User-name/password encryption
Base64
The default web page does not support encryption if Javascript is disabled in the
web browser.
Vulnerabilities
Denial of service attacks, user-name/password spoofing, script probing and simple
decryption
Network factory default settings
Table 17. Factory default specifications
Network protocols
Table 18. Factory default specifications
Network security
Table 19. Factory default specifications
36
Page 37

WEB-TEMP User's Guide Specifications
Parameter
Specification
POWER/COMM LED (top)
4.75 V < V
ext
< 5.25 V On
V
ext
< 4.75 V, V
ext
> 5.25 V Off (power fault)
Blinks during microcontroller communications.
LINK/ACTTIVITY LED (bottom)
On when a valid Ethernet connection is established.
Blinks when an Ethernet packet is sent or received.
Factory reset button
Press for 3 seconds to restore the factory default network settings.
When pressed for 3 seconds, the POWER LED turns off for a short time,
indicating that a reset is in process. When the POWER LED turns back on, the
reset is complete and the factory default network settings are restored.
Parameter
Specification
Configuration
4 dedicated pairs:
±IA: CH0/CH1
±IB: CH2/CH3
±IC: CH4/CH5
±ID: CH6/CH7
Current excitation output ranges
Thermistor: 10 µA typ
RTD: 210 µA typ
Tolerance
±5% typ
Drift
200 ppm/°C
Line regulation
2.1 ppm/V max
Load regulation
0.3 ppm/V typ
Output compliance voltage
(relative to AGND pins)
3.90 V max
–0.03 V min
Parameter
Specification
Operating temperature range
0 to 55 ° C
Storage temperature range
–40 to 85 ° C
Humidity
0 to 90% non-condensing
Parameter
Specification
Dimensions (L × W × H)
128.52 x 88.39 × 35.56 mm (5.06 × 3.48 × 1.43 ft)
LED displays and the factory reset button
Table 20. LED and button configurations
Current excitation outputs (Ix+)
Table 21. Current excitation output specifications
Note 18: The WEB-TEMP has four current excitation outputs, with ±IA dedicated to the CH0/CH1 analog
inputs, ±IB dedicated to CH2/CH3, ±IC dedicated to CH4/CH5, and ±ID dedicated to CH6/CH7. The
excitation output currents should always be used in this dedicated configuration.
Note 19: The current excitation outputs are automatically configured based on the sensor selected
(thermistor or RTD).
Environmental
Table 22. Environmental specifications
Mechanical
Table 23. Mechanical specifications
37
Page 38

WEB-TEMP User's Guide Specifications
Parameter
Specification
Connector type
Screw terminal
Wire gauge range
16 AWG to 30 AWG
Pin
Signal Name
Pin Description
Pin
Signal Name
Pin Description
1
IA+
CH0/CH1 current excitation source
27
ID–
CH6/CH7 current excitation return
2
NC
No connection
28
AGND
Analog ground
3
C0H
CH0 sensor input (+)
29
C7L
CH7 sensor input (–)
4
C0L
CH0 sensor input (–)
30
C7H
CH7 sensor input (+)
5
4W01
CH0/CH1 4-wire, 2 sensor common
31
IC67
CH6/CH7 2 sensor common
6
IC01
CH0/CH1 2-sensor common
32
4W67
CH6/CH7 4-wire, 2 sensor common
7
C1H
CH1 sensor input (+)
33
C6L
CH6 sensor input (–)
8
C1L
CH1 sensor input (–)
34
C6H
CH6 sensor input (+)
9
AGND
Analog ground
35
NC
No connection
10
IA–
CH0/CH1 current excitation return
36
ID+
CH6/CH7 current excitation source
11
IB+
CH2/CH3 current excitation source
37
IC–
CH4/CH5 current excitation return
12
NC
No connection
38
AGND
Analog ground
13
C2H
CH2 sensor input (+)
39
C5L
CH5 sensor input (–)
14
C2L
CH2 sensor input (–)
40
C5H
CH5 sensor input (+)
15
4W23
CH2/CH3 4-wire, 2 sensor common
41
IC45
CH4/CH5 2 sensor common
16
IC23
CH2/CH3 2 sensor common
42
4W45
CH4/CH5 4-wire, 2 sensor common
17
C3H
CH3 sensor input (+)
43
C4L
CH4 sensor input (–)
18
C3L
CH3 sensor input (–)
44
C4H
CH4 sensor input (+)
19
AGND
Analog ground
45
NC
No connection
20
IB–
CH2/CH3 current excitation return
46
IC+
CH4/CH5 current excitation source
21
+5V
+5V output
47
NC
No connection
22
PU/D
Pull-up/down for digital outputs
48
GND
Digital ground
23
DIO0
DIO channel 0
49
DIO7
DIO channel 7
24
DIO1
DIO channel 1
50
DIO6
DIO channel 6
25
DIO2
DIO channel 2
51
DIO5
DIO channel 5
26
DIO3
DIO channel 3
52
DIO4
DIO channel 4
Screw terminal connector
Table 24. Screw terminal connector specifications
Table 25. Screw terminal pinout
38
Page 39

Declaration of Conformity
Manufacturer: Measurement Computing Corporation
Address: 10 Commerce Way
Suite 1008
Norton, MA 02766
USA
Category: Electrical equipment for measurement, control and laboratory use.
Measurement Computing Corporation declares under sole responsibility that the product
WEB-TEMP
EU EMC Directive 89/336/EEC: Electromagnetic Compatibility, EN 61326 (1997) Amendment 1 (1998)
Emissions: Group 1, Class A
EN 55011 (1990)/CISPR 11: Radiated and Conducted emissions.
Immunity: EN61326, Annex A
IEC 61000-4-2 (1995): Electrostatic Discharge immunity, Criteria B.
IEC 61000-4-3 (1995): Radiated Electromagnetic Field immunity Criteria B.
IEC 61000-4-4 (1995): Electric fast transient burst immunity Criteria B.
IEC 61000-4-5 (1995): Surge immunity Criteria A.
IEC 61000-4-6 (1996): Radio frequency common mode immunity Criteria B.
IEC 61000-4-8 (1994): Power frequency magnetic field immunity Criteria A.
IEC 61000-4-11 (1994): Interrupt immunity Criteria A.
Declaration of Conformity based on tests conducted by Chomerics Test Services, Woburn, MA 01801, USA in
August, 2007. Test records are outlined in Chomerics Test Report #EMI4891A.07.
We hereby declare that the equipment specified conforms to the above Directives and Standards.
Carl Haapaoja, Director of Quality Assurance
Page 40

Measurement Computing Corporation
10 Commerce Way
Suite 1008
Norton, Massachusetts 02766
(508) 946-5100
Fax: (508) 946-9500
E-mail: info@mccdaq.com
www.mccdaq.com
 Loading...